Tag Archives: X.509 certificate

Connect your on-premises Kubernetes cluster to AWS APIs using IAM Roles Anywhere

Post Syndicated from Varun Sharma original https://aws.amazon.com/blogs/security/connect-your-on-premises-kubernetes-cluster-to-aws-apis-using-iam-roles-anywhere/

Many customers want to seamlessly integrate their on-premises Kubernetes workloads with AWS services, implement hybrid workloads, or migrate to AWS. Previously, a common approach involved creating long-term access keys, which posed security risks and is no longer recommended. While solutions such as Kubernetes secrets vault and third-party options exist, they fail to address the underlying issue effectively.

One option to connect your on-premises Kubernetes workloads to AWS APIs is to use the service account issuer discovery feature. This allows the Kubernetes API server to act as an OpenID Connect (OIDC) identity provider and be federated with AWS Identity and Access Management (IAM). However, this approach requires public internet access to the Kubernetes API server, which might not be desirable for some customers.

To help eliminate the need for long-term access keys or exposing the Kubernetes API server to the public internet, AWS has introduced AWS IAM Roles Anywhere. This feature enables secure, seamless integration of on-premises Kubernetes workloads with AWS services, promoting robust security practices and minimizing potential risks associated with long-term credentials or public exposure.

IAM Roles Anywhere enables workloads outside of AWS to access AWS resources by exchanging X.509 bound identities for temporary AWS credentials. With IAM Roles Anywhere, you can use the same IAM roles and policies as your AWS workloads to access AWS resources, promoting consistency.

IAM Roles Anywhere can be combined with a standard public key infrastructure solution. In this blog post, we use AWS Private Certificate Authority, which has several advantages over using a self-signed certificate authority (CA). First, it reduces operational and management overhead, because AWS manages the CA for you. Second, the cryptographic key material can be stored in hardware security modules or at least vaulted, which helps you protect your private CA against key compromises. Additionally, certificates can be short-lived, which aligns with dynamic Kubernetes environments where pod lifetimes are typically shorter than traditional servers.

We also demonstrate how to integrate IAM Roles Anywhere without modifying your existing workload Docker files, and how to automate the X.509 certificate lifecycle with cert-manager and an AWS Private CA backend in short-lived certificate mode. By using these capabilities, you can seamlessly integrate your on-premises Kubernetes workloads with AWS services, promoting robust security practices, minimizing risks associated with long-term credentials, and helping to ensure a streamlined, consistent access management experience.

This post is for customers who run their own Kubernetes cluster outside of AWS without using Amazon EKS Anywhere. If you’re using Amazon Elastic Kubernetes Service (Amazon EKS), use IAM roles for service accounts or Amazon EKS Pod Identity instead.

Background

“Why should I prefer X.509 certificates over IAM access keys?” Access keys are long-term credentials that must be rotated regularly to minimize the risk of unauthorized access. They need to be securely deployed onto servers hosting applications that use them, requiring procedures for secure transfer and deletion of transient copies. As the number of applications and access keys grows, tracking and managing them becomes operationally challenging.

In contrast, X.509 certificates use public key infrastructure (PKI). The private key is generated directly on the application server and doesn’t leave it. Only a certificate signing request, which doesn’t contain secrets, is sent to the CA for signing and returning the certificate. This alleviates the need for securely transmitting secret keys.

However, you can argue that X.509 certificates are also long-lived credentials. This concern is valid, but not necessarily true. As demonstrated by projects such as Let’s Encrypt, it’s possible to reduce certificate lifetimes from years to months by implementing automation for certificate renewal. After such a mechanism is in place, certificate lifetimes can be further limited to days or even hours.

In this post, we introduce mutually authenticated Transport Layer Security (mTLS), which uses certificates for high-assurance bidirectional authentication. Certificates are used to establish trust between the client and server, making sure that both parties are authenticated and authorized to communicate securely. By implementing mTLS, you can achieve a higher level of security and trust in your communication channels, mitigating potential risks associated with unauthorized access or man-in-the-middle attacks. Here, we implement ephemeral certificates that are tied to the lifecycle of pods. When a pod is started, a certificate is automatically created, and it expires after a short period of time unless it’s actively in use by the pod, in which case it’s automatically renewed by the cert-manager. This approach verifies that certificates are only valid for the duration of the pod’s lifetime, minimizing the potential risk associated with long-lived credentials. Additionally, IAM Roles Anywhere supports certificate revocation list (CRL) checks, allowing you to perform explicit revocation of certificates if required. This feature provides an additional layer of security, enabling you to revoke access promptly in case of compromised credentials or other security concerns.

Throughout this post, we assume that you have a basic understanding of IAM Roles Anywhere. For more information you can see this blog post. Furthermore, we assume that you are familiar with Kubernetes, kubectl, Helm, and cert-manager.

Solution overview

This solution assumes that you have an existing Kubernetes cluster running outside of AWS.

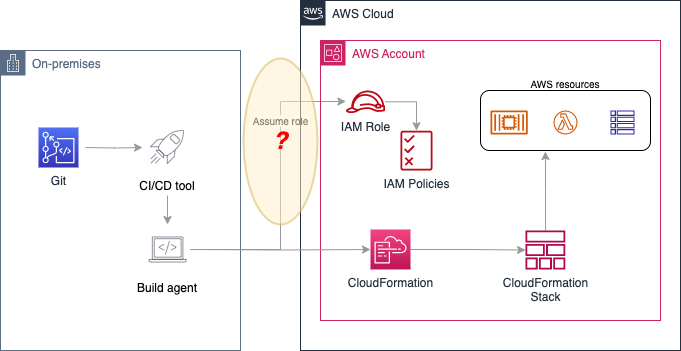
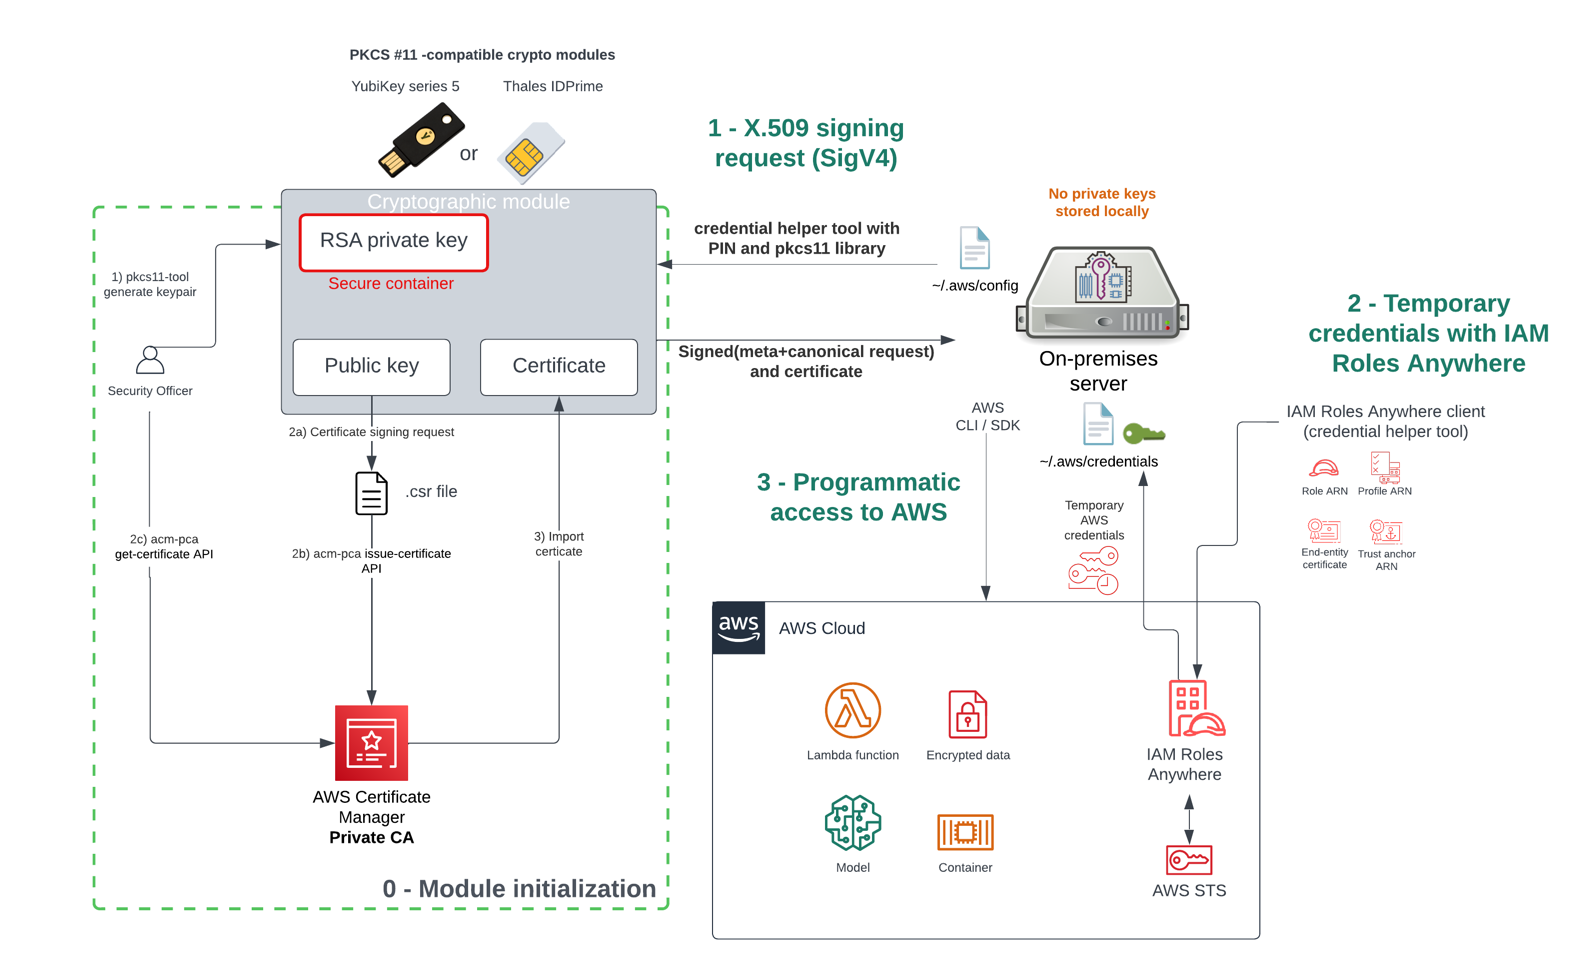
Figure 1 shows the high-level architecture of our solution. An on-premises Kubernetes cluster accessing AWS APIs using IAM Roles Anywhere with X.509 certificates issued by AWS Private CA in short-lived-certificate mode.

Figure 1: High level architecture of on-premises Kubernetes accessing AWS APIs

Figure 1: High level architecture of on-premises Kubernetes accessing AWS APIs

Here’s how the solution works, as shown in Figure 1:

  1. An AWS Private CA in short-lived certificate mode issues X.509 certificates for your pods.
  2. When you set up your AWS Private CA as a trusted source and establish a specific profile, IAM Roles Anywhere will validate and accept authentication requests that use certificates issued by your AWS Private CA.
  3. cert-manager, deployed into your Kubernetes cluster, orchestrates the issuance of AWS Private CA certificates to authorized pods.
  4. Each pod uses IAM Roles Anywhere to create an AWS session using its private key and X.509 certificate obtained from cert-manager.

Let’s explore the different parts of the architecture in more detail.

AWS Private CA short lived credentials

AWS Private CA offers a short-lived certificate, where the validity period is limited to 7 days or fewer. You can see this AWS Blog to learn how to use AWS Private CA short-lived certificates. This new mode can be used to issue certificates for your Kubernetes pods and benefit from lower costs of operations. By synchronizing the certificate lifecycle with the lifecycle of the pod, you can minimize the operational overhead for this solution. To help meet requirements for auditability and transparency, you can use the audit report feature to list the issued certificates in a machine readable format.

IAM Roles Anywhere

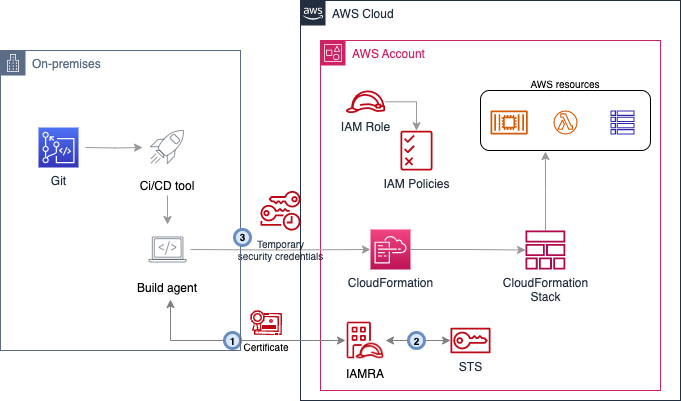
Figure 2 shows a detailed overview of the components involved in authentication with IAM Roles Anywhere.

Figure 2: Components of IAM Roles Anywhere

Figure 2: Components of IAM Roles Anywhere

IAM Roles Anywhere allows you to obtain temporary security credentials for workloads that run outside of AWS. Your workloads must use a certificate issued by a trusted PKI CA to authenticate with IAM Roles Anywhere. You establish trust between IAM Roles Anywhere and your CA by creating a trust anchor that points to the root of the CA.

cert-manager

Figure 3 shows a detailed overview of the cert-manager setup used in this post, including the aws-privateca-issuer add-on for the integration of AWS Private CA.

Figure 3: Detailed overview of cert-manager setup

Figure 3: Detailed overview of cert-manager setup

cert-manager is a tool for managing X.509 certificates in Kubernetes. As shown in Figure 3, cert-manager will make sure that certificates are valid and up-to-date and attempt to renew them before they expire. By using add-ons, you can configure different backends for issuing X.509 certificates. In this post, we explore how to integrate cert-manager with AWS Private CA using the aws-privateca-issuer add-on. The aws-privateca-issuer add-on defines two custom resources, AWSPCAIssuer and AWSPCAClusterIssuer, which are used to configure the link to AWS Private CA. They are similar to the Issuer and ClusterIssuer resources that come with cert-manager, but specific to aws-privateca-issuer.

After the AWSPCAIssuer or AWSPCAClusterIssuer is available, aws-privateca-issuer authenticates towards AWS APIs using temporary security credentials obtained from IAM Roles Anywhere. cert-manager watches for the certificate resource, which references to an AWSPCAIssuer, which in turn references to AWS Private CA. aws-privatca-issuer requests a certificate from AWS Private CA. The auto-generated private key and the signed certificate are stored in Kubernetes secrets.

Using certificates and secrets

cert-manager supports multiple ways of integrating into your Kubernetes workloads. You can use certificate resources, which represent a human-readable definition of a certificate signing request (CSR) and contain information on certificate lifespan and renewal time. When using a certificate, the auto-generated private key and the signed certificate are stored in Kubernetes secrets.

With this option, an X.509 certificate is issued manually and saved as a secret. After a PKI is configured as an issuer, a certificate resource is created to automate the renewal of the certificate. With the certificate resource, the lifecycle of certificates is decoupled from the lifecycle of the pods that use them. This allows you to bootstrap the X.509 certificate even before the trusted PKI is deployed.

Using the CSI driver

Another way of integrating cert-manager is by using a CSI driver. In this case, the certificate lifecycle is bound to the lifecycle of the pod. An X.509 certificate and private key are mounted into a predefined folder where your workloads can read them. On pod creation, cert-manager automatically creates a private key and requests a certificate for the configured trusted PKI. When the pod is deleted, the private key and certificate are also deleted and become invalid because they aren’t renewed by cert-manager.

In this post, we use the CSI driver approach for workloads to create ephemeral certificates for IAM Roles Anywhere.

Workload configuration

Figure 4 shows a detailed view of how pods can be configured to use IAM Roles Anywhere without needing to change the underlying Docker images by using a sidecar that provides an IMDSv2 endpoint that mimics the behavior in the Amazon Elastic Compute Cloud (Amazon EC2) instance metadata endpoint.

Figure 4: Pod configuration using a sidecar

Figure 4: Pod configuration using a sidecar

As shown in Figure 4, when using a certificate resource, the auto-generated private key and the signed certificate are stored in Kubernetes secrets and mounted into the pod. When using the CSI driver, a private key is generated locally (for the pod), a certificate is requested from cert-manager based on the given attributes and is issued by AWSPCAIssuer, and the certificates are mounted directly into the pod with no intermediate secret being created.

IAM Roles Anywhere uses the CreateSession API to authenticate requests with a SigV4a signature using the private key and its associated X.509 certificate. This exchange provides a IAM role session credential, as if you had assumed the IAM role. The aws_signing_helper binary is provided to call the CreateSession API from the command line. In this post, a sidecar container that provides an IMDSv2 endpoint to the workload container is used. This container uses the aws_signing_helper binary and uses its serve command.

This way, applications using AWS SDKs can use the AWS_EC2_METADATA_SERVICE_ENDPOINT environment variable to set the instance metadata endpoint to the correct port on the localhost interface. The X.509 certificate and private key are provided as files to the sidecar container.

Solution deployment

In this section, we show the steps needed to deploy the solution in your AWS account.

Prerequisites

To deploy the solution in this post, make sure that you have the following in place:

  • AWS Command Line Interface (AWS CLI) v2
  • An AWS account and IAM permissions for IAM, IAM Roles Anywhere, and AWS Private CA
  • Latest stable Kubernetes
  • kubectl (matching your Kubernetes version)
  • Helm 3
  • jq

Note: As an alternative to using the AWS CLI, you can use the AWS Controllers for Kubernetes (ACK) service controller for AWS Private CA for creating and managing CertificateAuthority, Certificate, and CertificateAuthorityActivation resources directly within your Kubernetes cluster. After establishing your CA hierarchy using the ACK controller, you can proceed with the subsequent steps involving IAM Roles Anywhere integration, aws-privateca-issuer, and cert-manager as described in this post.

Step 1 – AWS Private CA

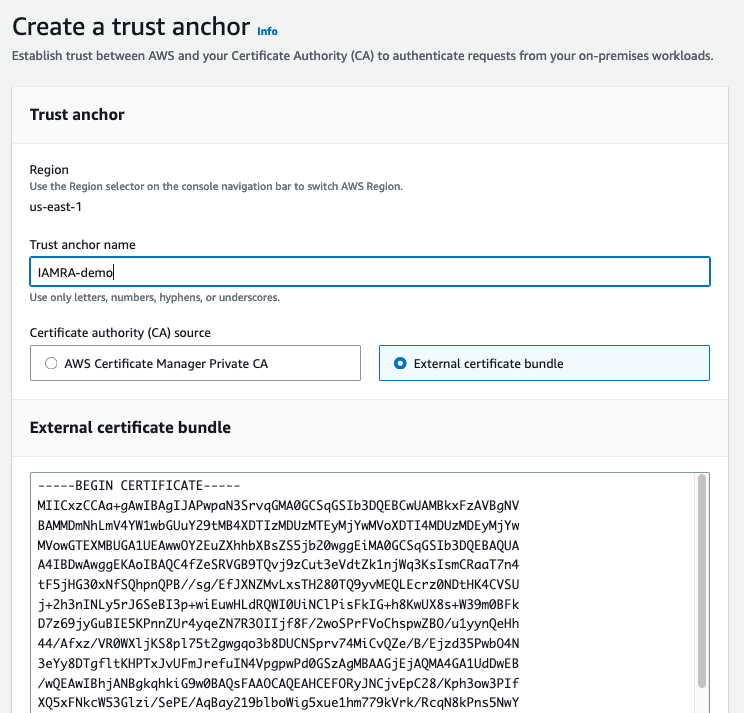
  1. Set up a root CA in AWS Private CA, which will issue short lived certificates for your pods. In this example you use only one CA; for production environments, you should check the considerations for designing CA hierarchies. Start by using the AWS CLI to create a configuration.
    cat <<EOF > ca-config.json
    {
       "KeyAlgorithm":"RSA_2048",
       "SigningAlgorithm":"SHA256WITHRSA",
       "Subject":{
          "Country":"DE",
          "Organization":"Example Corp",
          "OrganizationalUnit":"SREs",
          "State":"HE",
          "Locality":"FRANKFURT",
          "CommonName":"Blogpost CA"
       }
    }
    EOF

  2. Create the CA in AWS Private CA with short-lived certificates mode.
    aws acm-pca create-certificate-authority \
      --certificate-authority-configuration file://ca-config.json \
      --certificate-authority-type "ROOT" \
      --usage-mode SHORT_LIVED_CERTIFICATE

  3. The command will return a CertificateAuthorityArn, which you will need for further commands, so export it for later use. Replace <region> with your AWS Region.
    export PCA_ARN=arn:aws:acm-pca:<region>:012345678912:certificate-authority/8213159d-cad0-481c-bf14-a0ced4d6d479

  4. After creating the root CA, the CA is in a pending state. You need to create a CSR.
    aws acm-pca get-certificate-authority-csr \
         --certificate-authority-arn ${PCA_ARN} \
         --output text > ca.csr

  5. Now, the CSR needs to be signed by the root CA.
    aws acm-pca issue-certificate \
         --certificate-authority-arn ${PCA_ARN} \
         --csr fileb://ca.csr \
         --signing-algorithm SHA256WITHRSA \
         --template-arn arn:aws:acm-pca:::template/RootCACertificate/V1 \
         --validity Value=365,Type=DAYS

  6. This command returns a CertificateArn which you will need later. Export it.
    export ROOT_CA_CERTIFICATE_ARN=arn:aws:acm-pca:<region>:012345678912:certificate-authority/8213159d-cad0-481c-bf14-a0ced4d6d479/certificate/5830e475088eee553bd409b7f4964613

  7. Download the root CA certificate and upload it to your AWS Private CA.
    aws acm-pca get-certificate \
        --certificate-authority-arn ${PCA_ARN} \
        --certificate-arn ${ROOT_CA_CERTIFICATE_ARN} \
        --output text > cert.pem
    
    aws acm-pca import-certificate-authority-certificate \
         --certificate-authority-arn ${PCA_ARN} \
         --certificate fileb://cert.pem

  8. Verify the status of the PCA, it should be ACTIVE.
    aws acm-pca describe-certificate-authority \
        --certificate-authority-arn ${PCA_ARN} \
        --output json

Step 2 – IAM Roles Anywhere

At this point your root CA is set up and ready to use. The next step is to configure IAM Roles Anywhere.

  1. Start by defining a trust anchor that will refer to your newly created AWS Private CA and export the
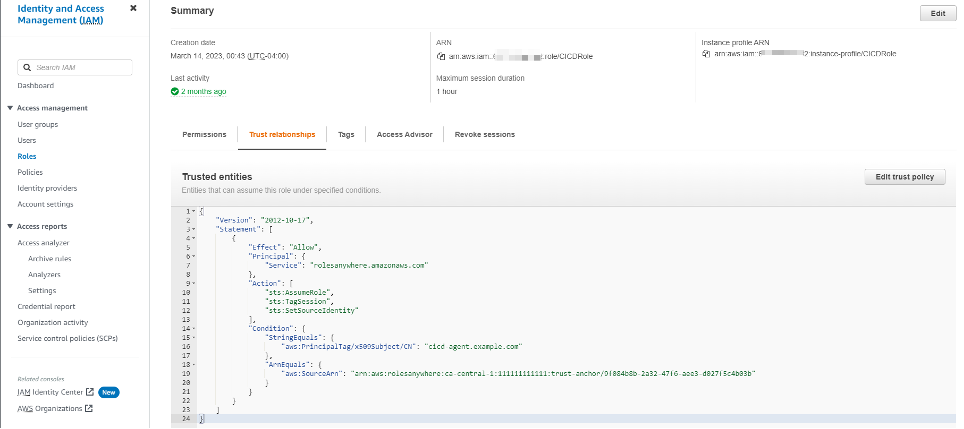
 trustAnchorArn. Replace <value-of-trustAnchorArn> with the Amazon Resource Name (ARN) value of your IAM Roles Anywhere trust anchor.
    aws rolesanywhere create-trust-anchor \
    --name onprem-k8s-issuer \
    --enabled \
    --source sourceType=AWS_ACM_PCA,sourceData={acmPcaArn=${PCA_ARN}}
    
    export TRUST_ANCHOR_ARN=<value-of-trustAnchorArn>

  2. Create an IAM role to be used by the aws-privateca-issuer cert-manager plugin. This role needs to include the actions sts:AssumeRole, sts:SetSourceIdentity and sts:TagSession, which are required by IAMRA. Replace <TA_ID> with your trust anchor.

    Note: You should specify a PrincipalTag with the CN. Furthermore, it should be scoped to the IAMRA service principal. This further restricts authorization based on attributes that are extracted from the X.509 certificate and provides an additional layer of security by helping to ensure that even if an unauthorized party gains access to a valid certificate, they cannot assume the role unless the certificate’s CN matches the specified value.

    cat <<EOF > trust-policy.json
    {
        "Version": "2012-10-17",
        "Statement": [{
            "Sid": "Statement1",
            "Effect": "Allow",
            "Principal": {
                "Service": "rolesanywhere.amazonaws.com"
            },
            "Action": [
                "sts:AssumeRole",
                "sts:SetSourceIdentity",
                "sts:TagSession"
            ],
            "Condition": {
                "StringEquals": {
                    "aws:PrincipalTag/x509Subject/CN": "iamra-issuer"
                },
                "ArnEquals": {
                    "aws:SourceArn": [
                        "arn:aws:rolesanywhere:<region>:012345678912:trust-anchor/<TA_ID>"
                    ]
                }
    
            }
        }]
    }
    EOF

    • Use the following to create the iamra-issuer role:
      aws iam create-role --role-name iamra-issuer \
        --assume-role-policy-document file://trust-policy.json

  3. The command will return a JSON document containing information about the newly created role. Export the ARN for later use.
    export IAMRA_ISSUER_ROLE=arn:aws:iam::012345678912:role/iamra-issuer

  4. Attach an inline policy that allows the role request certificates from your PCA and retrieve these. Note that there is a condition limiting the AWS Private CA templates to only allow EndEntityCertificate.
    cat <<EOF > inline-policy.json
    {
      "Version": "2012-10-17",
      "Statement": [
        {
          "Sid": "awspcaissuerread",
          "Action": [
            "acm-pca:DescribeCertificateAuthority",
            "acm-pca:GetCertificate"
          ],
          "Effect": "Allow",
          "Resource": "$PCA_ARN"
        },
        {
          "Sid": "awspcaissuerwrite",
          "Action": [
            "acm-pca:IssueCertificate"
          ],
          "Effect": "Allow",
          "Resource": "$PCA_ARN",
          "Condition":{
            "StringEquals":{
              "acm-pca:TemplateArn":"arn:aws:acm-pca:::template/EndEntityCertificate/V1"
            }
          }
        }
      ]
    }
    EOF

    • Use the following to associate the inline policy (created in the preceding step) with the iamra-issuer role.
      aws iam put-role-policy --role-name iamra-issuer \
        --policy-name iamra-issuer \
        --policy-document file://inline-policy.json

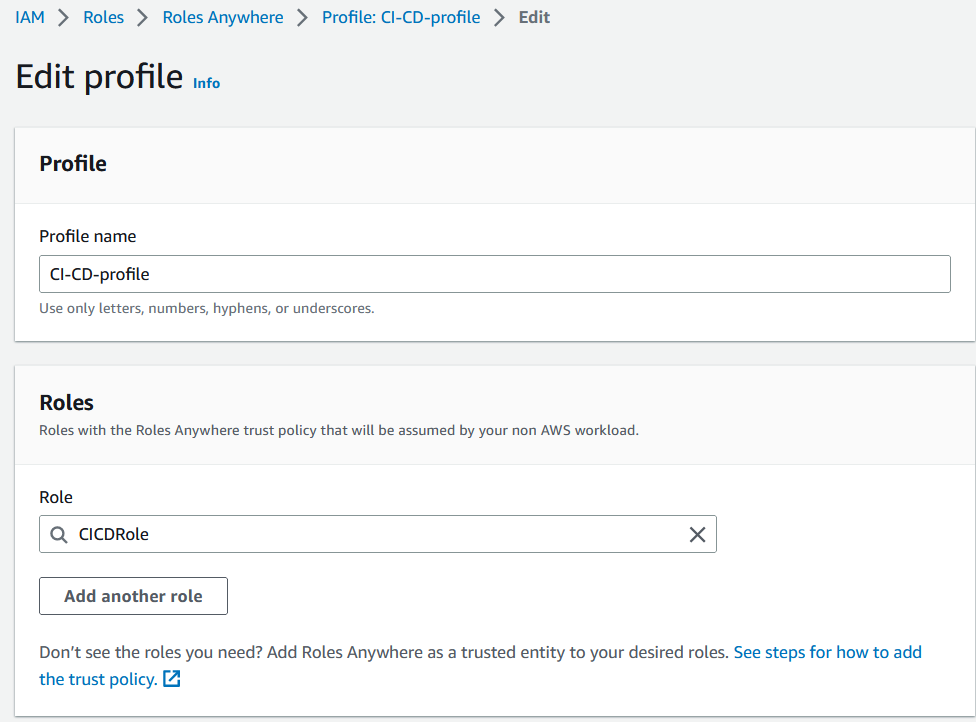
  5. To finish, create a profile that defines which IAM roles can be assumed and then export the returned ARN.
    aws rolesanywhere create-profile --name iamra-issuer \
      --role-arns ${IAMRA_ISSUER_ROLE} \
      --enabled

    • Export the returned ARN:
      export IAMRA_PROFILE_ARN=arn:aws:rolesanywhere:<region>:012345678912:profile/<Profile_ID>

The created role iamra-issuer will only be used by the aws-privateca-issuer to integrate with AWS Private CA. You should repeat the process of creating IAM roles and IAMRA profiles for your workloads. it’s recommended to create a separate IAM role for each workload and limit its use with condition statements in the trust policy, checking for the workload identity and trust anchor (for example, matching the common name). Furthermore, it’s important that you add IAMRA to the trust policy and allow the aforementioned actions. Best practice with IAM roles is to apply least-privilege permissions.

Step 3 – Create the init container

To integrate IAM Roles Anywhere within your Kubernetes environment, you need to provide an IMDSv2 endpoint to your application containers by running the aws_signing_helper binary as a sidecar. You also need to configure your applications using an environment variable to use the new instance metadata endpoint. To do so, build a Docker image that works as a sidecar.

In this step, create a basic image that fulfills the preceding requirements. In your environment, you might want to adapt this example to use your own base image and implement your image hardening processes.

Copy the following script and save it as init.sh.

#!/bin/sh

if [[ -z "$TRUST_ANCHOR_ARN" ]]; then
  echo "Must provide TRUST_ANCHOR_ARN environment variable." 1>&2
  exit 1
fi

if [[ -z "$PROFILE_ARN" ]]; then
  echo "Must provide PROFILE_ARN environment variable." 1>&2
  exit 1
fi

if [[ -z "$ROLE_ARN" ]]; then
  echo "Must provide ROLE_ARN environment variable." 1>&2
  exit 1
fi

echo "starting IMDSv2 endpoint with aws_signing_helper ..."
/aws_signing_helper serve \
  --certificate /iamra/tls.crt         \
  --private-key /iamra/tls.key         \
  --trust-anchor-arn $TRUST_ANCHOR_ARN \
  --profile-arn $PROFILE_ARN           \
  --role-arn $ROLE_ARN

This script is the entry point of the sidecar container. It expects the environment variables TRUST_ANCHOR_ARN, PROFILE_ARN, and ROLE_ARN, which are required by aws_signing_helper. It also expects an X.509 certificate and its private key in the folder /iamra, which will be mounted in a later stage during pod initialization. Finally, it invokes the aws_signing_helper with the serve directive which creates an IMDSv2 endpoint listening on 9911 by default. This can be customized using the --port parameter.

Now let’s inspect the Docker file.

Note: At the time of writing, we used the alpine3.17.0 image. Use a hardened base image that’s designed to be secure and aligns with the requirements of your environment.

FROM alpine:3.17.0

COPY init.sh .
RUN apk add --no-cache libc6-compat libgcc wget
RUN wget https://rolesanywhere.amazonaws.com/releases/1.3.0/X86_64/Linux/aws_signing_helper
RUN chmod +x /aws_signing_helper /init.sh 
RUN ln -s /lib/libc.musl-x86_64.so.1 /lib/libresolv.so.2
ENTRYPOINT ["/bin/sh", "-c", "/init.sh"]

This Docker file copies the init.sh and downloads the aws_signing_helper binary. The init.sh script is defined as an entry point to the container. Dynamic libraries required by aws_signing_helper are installed using Alpine Linux package manager (Apk).

Now build the docker image, sign in to it, and push it for later use. For the following commands replace <my-docker-registry> with the hostname of your local registry or use an ECR Repository.

docker build . -t <my-docker-registry>/iamra-sidecar
docker login <my-docker-registry>
docker push <my-docker-registry>/iamra-sidecar

Step 4 – Install cert-manager

In this step, install cert-manager into your cluster and configure aws-privateca-issuer using a manually bootstrapped certificate. cert-manager-approver-policy is used to control which certificates can be requested by the workloads. Then, set up the cert-manager CSI driver to automatically provision X.509 certificates for your workload pods.

Start with the cert-manager setup:

  1. Add the cert-manager repository to Helm and install the chart.

    Note: At the time of writing, we used cert-manager version 1.16.2. Check for the latest stable version.

    helm repo add jetstack https://charts.jetstack.io
    helm repo update
    helm install \
      cert-manager jetstack/cert-manager \
      --namespace cert-manager \
      --create-namespace \
      --version v1.16.2 \
      --set installCRDs=true \
      --set extraArgs={--controllers='*\,-certificaterequests-approver'}
      
    helm install \
      cert-manager-approver-policy jetstack/cert-manager-approver-policy \
      --namespace cert-manager \
      --wait \
        --set app.approveSignerNames="{\
    issuers.cert-manager.io/*,clusterissuers.cert-manager.io/*,\
    awspcaclusterissuers.awspca.cert-manager.io/*,awspcaissuers.awspca.cert-manager.io/*\
    }"
    
    
    #make modifications in cert-manager-approver-policy and add below permissions
    
    kubectl edit  Clusterrole cert-manager-approver-policy -n cert-manager -o yaml
    
    - apiGroups:
      - awspca.cert-manager.io
      resources:
      - awspcaissuers
      - awspcaclusterissuers
      verbs:
      - get
      - list
      - watch
    - apiGroups:
      - cert-manager.io
      - awspca.cert-manager.io
      resources:
      - signers
      verbs:
      - approve

    Now, install the cert-manager aws-privateca-issuer plugin. This integration connects cert-manager with AWS Private CA and lets you issue short-lived certificates automatically. Currently, aws-privateca-issuer Helm chart doesn’t support IAMRA natively. So, you’re going to use the same init-container to set up IAMRA as for the workload pods.

    You need to issue the first X.509 certificate for aws-privateca-issuer IAMRA manually. Later, cert-manager will renew it automatically.

  2. Create the bootstrap certificate. When asked for a common name, enter iamra-issuer.
    openssl req -out iamra.csr -new -newkey rsa:2048 \
    -nodes -keyout iamra.key
    

    The previous command will create an RSA private key named iamra.key and a certificate signing request name iamra.csr. Now you need to call AWS Private CA to issue the bootstrap certificate.

  3. Set the validity period of the certificate to 1 day so that cert-manager will replace it after it’s set up. The IAM role that’s performing this action must have permissions to AWS Certificate Manager (ACM), IAM, and IAM Roles Anywhere to complete the setup.
    aws acm-pca issue-certificate \
          --certificate-authority-arn ${PCA_ARN} \
          --csr fileb://iamra.csr \
          --signing-algorithm "SHA256WITHRSA" \
          --validity Value=1,Type="DAYS"

  4. The command will return a CertificateArn for your iamra-issuer certificate. Export it and save the certificate to a file.
    export IAMRA_ISSUER_CERT_ARN=arn:aws:acm-pca:<region>:012345678912:certificate-authority/8213159d-cad0-481c-bf14-a0ced4d6d479/certificate/afc47911ed2ded9c2664fa597a33b9fb
    aws acm-pca get-certificate \
          --certificate-authority-arn ${PCA_ARN} \
          --certificate-arn ${IAMRA_ISSUER_CERT_ARN} | \
          jq -r .'Certificate' > iamra-cert.pem

  5. Create a Kubernetes secret that contains the certificate and private key.
    kubectl create secret tls -n cert-manager iamra-issuer \
      --cert=iamra-cert.pem \
      --key=iamra.key

    You’re ready to install the aws-privateca-issuer. You need to modify the Helm chart because it doesn’t currently support IAMRA. You will render the Helm chart into YAML manifests, which are then adapted for IAMRA.

  6. Install the Helm repository and render the charts into a file.
    helm repo add awspca https://cert-manager.github.io/aws-privateca-issuer
     helm template --release-name iamra --include-crds awspca/aws-privateca-issuer \
       -n cert-manager > privateca-issuer.yaml

  7. Add your previously built image as a sidecar and replace the environment variables with your exported values. Search for the deployment definition and add the following section:
    # Source: aws-privateca-issuer/templates/deployment.yaml
    apiVersion: apps/v1
    kind: Deployment
    metadata:
      name: iamra-aws-privateca-issuer
      namespace: cert-manager
      labels:
        helm.sh/chart: aws-privateca-issuer-v1.4.0
        app.kubernetes.io/name: aws-privateca-issuer
        app.kubernetes.io/instance: iamra
        app.kubernetes.io/version: "v1.4.0"
        app.kubernetes.io/managed-by: Helm
    spec:
      replicas: 1
      revisionHistoryLimit: 10
      selector:
        matchLabels:
          app.kubernetes.io/name: aws-privateca-issuer
          app.kubernetes.io/instance: iamra
      template:
        metadata:
          labels:
            app.kubernetes.io/name: aws-privateca-issuer
            app.kubernetes.io/instance: iamra
        spec:
          serviceAccountName: iamra-aws-privateca-issuer
          securityContext:
            runAsUser: 65532
          volumes:
            - name: "iamra-secret"
              projected:
                sources:
                  - secret:
                      name: iamra-issuer
          containers:
            - name: iamra-sidecar
              image: 012345678912.dkr.ecr.us-east-2.amazonaws.com/<replace-with-iamra-sidecar-repository>
              imagePullPolicy: Always
              env:
                - name: "TRUST_ANCHOR_ARN"
                  value: "arn:aws:rolesanywhere:us-east-2:012345678912:trust-anchor/05d183f8-a34e-4f0c-ad2a-de6f803"
                - name: "PROFILE_ARN"
                  value: "arn:aws:rolesanywhere:us-east-2:012345678912:profile/7b45f9a9-73fa-47f8-a20f-88aacbf57"
                - name: "ROLE_ARN"
                  value: "arn:aws:iam::012345678912:role/iamra-issuer"
              volumeMounts:
                - name: iamra-secret
                  mountPath: "/iamra"
                  readOnly: true
            - name: aws-privateca-issuer
              securityContext:
                allowPrivilegeEscalation: false
              image: "public.ecr.aws/k1n1h4h4/cert-manager-aws-privateca-issuer:latest"
              env:
               - name: "AWS_EC2_METADATA_SERVICE_ENDPOINT"
                 value: "http://localhost:9911/"
              imagePullPolicy: IfNotPresent
              command:
                - /manager
              args:
                - --leader-elect
              ports:
                - containerPort: 8080
                  name: http
              livenessProbe:
                httpGet:
                  path: /healthz
                  port: 8081
                initialDelaySeconds: 15
                periodSeconds: 20
              readinessProbe:
                httpGet:
                  path: /healthz
                  port: 8081
                initialDelaySeconds: 5
                periodSeconds: 10
          terminationGracePeriodSeconds: 10

  8. Apply your modified manifest to install aws-privateca-issuer and verify the deployment you have modified. It should show that one pod is ready and available.
    kubectl apply -f privateca-issuer.yaml
    
    kubectl get deployment -n cert-manager -l app.kubernetes.io/name=aws-privateca-issuer
    
    NAME                         READY   UP-TO-DATE   AVAILABLE   AGE
    iamra-aws-privateca-issuer   1/1     1            1           4d10h

  9. Define an AWSPCAIssuer, which will be used for renewal of the manually bootstrapped certificate for the aws-privateca-issuer add-on.

    Note: At the time of writing, we used awspca cert-manager API version v1beta1. Check for the latest stable version.

    export AWS_REGION=<region>
    cat <<EOF | kubectl apply -f -
    apiVersion: awspca.cert-manager.io/v1beta1
    kind: AWSPCAIssuer
    metadata:
      name: iamra-cm-issuer
      namespace: cert-manager
    spec:
      arn: ${PCA_ARN}
      region: ${AWS_REGION}
    EOF

  10. After at least one AWSPCAIssuer or AWSPCAClusterIssuer is available, aws-privateca-issuer is going to authenticate towards AWS APIs by calling sts.get-caller-identity and verify the authentication method. You can verify this using its log files. It should print the assumed role.
    kubectl logs -n cert-manager -l app.kubernetes.io/name=aws-privateca-issuer -c aws-privateca-issuer | grep -i getcalleridentity
    
    Defaulted container "aws-privateca-issuer" out of: aws-privateca-issuer, iamra-init (init)
    {"level":"info","ts":1669240040.2704494,"logger":"controllers.GenericIssuer","msg":"sts.GetCallerIdentity","genericissuer":"cert-manager/iamra-cm-issuer","arn":"arn:aws:sts::012345678912:assumed-role/iamra-issuer/5bafffcfb691969f0616a9b1a68032ec","account":"012345678912","user_id":"AROA2EIPPI5BVJ6SKBYOY:5bafffcfb691969f0616a9b1a68032ec"}

    Now, you can create a cert-manager Certificate resource that represents a desired certificate that should be issued by the referenced cert-manager Issuer. It combines information of a CSR with details on the validity period and renewal.

  11. Create the certificate object:
    cat <<EOF | kubectl apply -f - 
      apiVersion: cert-manager.io/v1
      kind: Certificate
      metadata:
        name: iamra-privateca-issuer-cert
        namespace: cert-manager
      spec:
        secretName: iamra-issuer
        duration: 168h # 7d
        renewBefore: 24h # 15d
        subject:
          organizations:
            - "Example Corp."
          organizationalUnits:
            - "Admin"
        commonName: "iamra-issuer"
        isCA: false
        usages:
          - "client auth"
          - "server auth"
        issuerRef:
          group: awspca.cert-manager.io
          kind: AWSPCAIssuer
          name: iamra-cm-issuer
      EOF
      helm upgrade -i -n cert-manager cert-manager-csi-driver jetstack/cert-manager-csi-driver --wait
      -- > install policies:
      policy + role + role binding to allow service account to accept certs.
      cat <<EOF | kubectl apply -f - 
      apiVersion: policy.cert-manager.io/v1alpha1
      kind: CertificateRequestPolicy
      metadata:
        name: iamra-issuer-policy
      spec:
        allowed:
          commonName:
            required: true
            value: "iamra-issuer"
          subject:
            organizations:
              values: ["Example Corp."]
              required: true
            organizationalUnits:
              values: ["Admin"]
              required: true
          usages:
          - "server auth"
          - "client auth"
        selector:
          issuerRef:
            group: awspca.cert-manager.io
            kind: AWSPCAIssuer
            name: iamra-cm-issuer
      ---
      apiVersion: rbac.authorization.k8s.io/v1
      kind: ClusterRole
      metadata:
        name: cert-manager-policy:iamra-issuer-policy
      rules:
        - apiGroups: ["policy.cert-manager.io"]
          resources: ["certificaterequestpolicies"]
          verbs: ["use"]
          resourceNames: ["iamra-issuer-policy"]
      ---
      apiVersion: rbac.authorization.k8s.io/v1
      kind: ClusterRoleBinding
      metadata:
        name: cert-manager-policy:iamra-issuer-policy
      roleRef:
        apiGroup: rbac.authorization.k8s.io
        kind: ClusterRole
        name: cert-manager-policy:iamra-issuer-policy
      subjects:
      - kind: ServiceAccount
        name: cert-manager
        namespace: cert-manager
      EOF

Step 5 – Deploy your workload

In Step 4, sub-step 9, you created an AWSPCAIssuer named iamra-cm-issuer. You then used this AWSPCAIssuer to renew the manually bootstrapped certificate for the aws-privateca-issuer.

In Step 4, sub-step 11, you created the certificate iamra-privateca-issuer-cert, which is used by the aws-privateca-issuer.

In this step, you will deploy the sample workload. When deploying the sample workload, make sure to repeat the process of creating IAM roles and IAMRA profiles (from Step 2), the AWSPCAIssuer (Step 4, sub-step 9), and the CertificateRequestPolicy (Step 4, sub-step 11) for the certificate request.

For more information on certificate request policies, see the cert-manager documentation on approval policies.

Use the following code to deploy the workload.

cat <<EOF | kubectl apply -f -
  
apiVersion: v1
kind: Pod
metadata:
   creationTimestamp: null
   labels:
     run: acmpca-csi-test
   name: acmpca-csi-test
spec:
  containers:
      - name: iamra-sidecar
        image: 056930860237.dkr.ecr.us-east-2.amazonaws.com/aws_sighning:latest
        imagePullPolicy: Always
        env:
          - name: "TRUST_ANCHOR_ARN"
            value: "arn:aws:rolesanywhere:us-east-2:012345678912:trust-anchor/05d183f8-a34e-4f0c-ad2a-de6f803ac172"
          - name: "PROFILE_ARN"
            value: "arn:aws:rolesanywhere:us-east-2:012345678912:profile/7b45f9a9-73fa-47f8-a20f-88aacbf579d2"
          - name: "ROLE_ARN"
            value: "arn:aws:iam::012345678912:role/iam-roles-anywhere-s3-full-access"
        volumeMounts:
          - name: "iamra-csi"
            mountPath: "/iamra"
            readOnly: true
      - name: aws-cli
        image: amazon/aws-cli:latest
        env:
        - name: "AWS_EC2_METADATA_SERVICE_ENDPOINT"
          value: "http://127.0.0.1:9911/"
        command:
          - sleep
          - "3600"
  dnsPolicy: ClusterFirst
  restartPolicy: Never
  volumes:
    - name: "iamra-csi"
      csi:
        readOnly: true
        driver: csi.cert-manager.io
        volumeAttributes:
            csi.cert-manager.io/issuer-name: my-pca
            csi.cert-manager.io/issuer-group: awspca.cert-manager.io
            csi.cert-manager.io/issuer-kind: AWSPCAIssuer
            csi.cert-manager.io/common-name: "${SERVICE_ACCOUNT_NAME}.${POD_NAMESPACE}"
            csi.cert-manager.io/duration: 168h
            csi.cert-manager.io/renew-before: 24h
            csi.cert-manager.io/is-ca: "false"
            csi.cert-manager.io/key-usages: "client auth, server auth"
  EOF

Step 6 – Test your deployment

To test the deployment, you can use kubectl exec to access the iamra-sidecar container. Navigate to the iamra directory and check if the certificate and key are mounted.

Command:
kubectl exec -it acmpca-csi-test  – sh
ls | grep iamra

Output: iamra

Command:
cd iamra
/iamra# ls

Output: ca.crt   tls.crt  tls.key

You can also exec into the aws-cli container and verify the caller identity and make API calls to Amazon Simple Storage Service (Amazon S3):

Command:
kubectl exec -it acmpca-csi-test -c aws-cli  – sh
$aws sts get-caller-identity

Output: You should see iam-roles-anywhere-s3-full-access in caller-identity.

Command:
$aws s3 ls

Output: You should be able to list the S3 bucket based on the permissions associated with the assumed role.

Summary

In this post, you learned about a solution for securely connecting on-premises Kubernetes workloads to AWS services using IAM Roles Anywhere. The approach alleviates the need for long-term access keys or public internet exposure of the Kubernetes API server. By using this solution for containerized and full stack applications, you can benefit from:

  • Enhanced security: Use short-lived X.509 certificates instead of long-term credentials.
  • Simplified management: Automate the certificate lifecycle with cert-manager and AWS Private CA.
  • Seamless integration: No modifications are required to existing workload Docker files.
  • Consistent policies: Use the same IAM roles and policies across AWS and on premises.

 
If you have feedback about this post, submit comments in the Comments section below. If you have questions about this post, contact AWS Support.
 

Varun Sharma
Varun Sharma

Varun is a Senior AWS Cloud Security Engineer who wears his security cape proudly. Varun is a go-to subject matter expert for Amazon Cognito and IAM. When he’s not busy securing the cloud, you’ll find him in the world of security penetration testing. Outside of work, Varun switches gears to capture the beauty of nature through the lens of his camera.
Nishant Mainro
Nishant Mainro

Nishant is a Senior Security Consultant in the AWS Professional Services team and is based in Atlanta, Georgia. He is a technical and passionate Amazonian with over 16 years of professional experience with a specialization in security, risk, and compliance. His specializes developing and enabling security controls at scale to empower customers to achieve the required security goals for their workloads.
Roshini Jagarapu
Roshini Jagarapu

Roshini is an Amazon EKS subject matter expert and an AWS Cloud Support Engineer based in India. She works with services such as Amazon EKS and Amazon ECS, helping customers run at scale. Her day-to-day work involves troubleshooting issues related to container technologies. Roshini conducts learning sessions to educate customers and is passionate about cloud-native solutions.

Enable external pipeline deployments to AWS Cloud by using IAM Roles Anywhere

Post Syndicated from Olivier Gaumond original https://aws.amazon.com/blogs/security/enable-external-pipeline-deployments-to-aws-cloud-by-using-iam-roles-anywhere/

Continuous integration and continuous delivery (CI/CD) services help customers automate deployments of infrastructure as code and software within the cloud. Common native Amazon Web Services (AWS) CI/CD services include AWS CodePipeline, AWS CodeBuild, and AWS CodeDeploy. You can also use third-party CI/CD services hosted outside the AWS Cloud, such as Jenkins, GitLab, and Azure DevOps, to deploy code within the AWS Cloud through temporary security credentials use.

Security credentials allow identities (for example, IAM role or IAM user) to verify who they are and the permissions they have to interact with another resource. The AWS Identity and Access Management (IAM) service authentication and authorization process requires identities to present valid security credentials to interact with another AWS resource.

According to AWS security best practices, where possible, we recommend relying on temporary credentials instead of creating long-term credentials such as access keys. Temporary security credentials, also referred to as short-term credentials, can help limit the impact of inadvertently exposed credentials because they have a limited lifespan and don’t require periodic rotation or revocation. After temporary security credentials expire, AWS will no longer approve authentication and authorization requests made with these credentials.

In this blog post, we’ll walk you through the steps on how to obtain AWS temporary credentials for your external CI/CD pipelines by using IAM Roles Anywhere and an on-premises hosted server running Azure DevOps Services.

Deploy securely on AWS using IAM Roles Anywhere

When you run code on AWS compute services, such as AWS Lambda, AWS provides temporary credentials to your workloads. In hybrid information technology environments, when you want to authenticate with AWS services from outside of the cloud, your external services need AWS credentials.

IAM Roles Anywhere provides a secure way for your workloads — such as servers, containers, and applications running outside of AWS — to request and obtain temporary AWS credentials by using private certificates. You can use IAM Roles Anywhere to enable your applications that run outside of AWS to obtain temporary AWS credentials, helping you eliminate the need to manage long-term credentials or complex temporary credential solutions for workloads running outside of AWS.

To use IAM Roles Anywhere, your workloads require an X.509 certificate, issued by your private certificate authority (CA), to request temporary security credentials from the AWS Cloud.

IAM Roles Anywhere can work with your existing client or server certificates that you issue to your workloads today. In this blog post, our objective is to show how you can use X.509 certificates issued by your public key infrastructure (PKI) solution to gain access to AWS resources by using IAM Roles Anywhere. Here we don’t cover PKI solutions options, and we assume that you have your own PKI solution for certificate generation. In this post, we demonstrate the IAM Roles Anywhere setup with a self-signed certificate for the purpose of the demo running in a test environment.

External CI/CD pipeline deployments in AWS

CI/CD services are typically composed of a control plane and user interface. They are used to automate the configuration, orchestration, and deployment of infrastructure code or software. The code build steps are handled by a build agent that can be hosted on a virtual machine or container running on-premises or in the cloud. Build agents are responsible for completing the jobs defined by a CI/CD pipeline.

For this use case, you have an on-premises CI/CD pipeline that uses AWS CloudFormation to deploy resources within a target AWS account. The CloudFormation template, the pipeline definition, and other files are hosted in a Git repository. The on-premises build agent requires permissions to deploy code through AWS CloudFormation within an AWS account. To make calls to AWS APIs, the build agent needs to obtain AWS credentials from an IAM role. The solution architecture is shown in Figure 1.

Figure 1: Using external CI/CD tool with AWS

Figure 1: Using external CI/CD tool with AWS

To make this deployment securely, the main objective is to use short-term credentials and avoid the need to generate and store long-term credentials for your pipelines. This post walks through how to use IAM Roles Anywhere and certificate-based authentication with Azure DevOps build agents. The walkthrough will use Azure DevOps Services with Microsoft-hosted agents. This approach can be used with a self-hosted agent or Azure DevOps Server.

IAM Roles Anywhere and certificate-based authentication

IAM Roles Anywhere uses a private certificate authority (CA) for the temporary security credential issuance process. Your private CA is registered with IAM Roles Anywhere through a service-to-service trust. Once the trust is established, you create an IAM role with an IAM policy that can be assumed by your services running outside of AWS. The external service uses a private CA issued X.509 certificate to request temporary AWS credentials from IAM Roles Anywhere and then assumes the IAM role with permission to finish the authentication process, as shown in Figure 2.

Figure 2: Certificate-based authentication for external CI/CD tool using IAM Roles Anywhere

Figure 2: Certificate-based authentication for external CI/CD tool using IAM Roles Anywhere

The workflow in Figure 2 is as follows:

  1. The external service uses its certificate to sign and issue a request to IAM Roles Anywhere.
  2. IAM Roles Anywhere validates the incoming signature and checks that the certificate was issued by a certificate authority configured as a trust anchor in the account.
  3. Temporary credentials are returned to the external service, which can then be used for other authenticated calls to the AWS APIs.

Walkthrough

In this walkthrough, you accomplish the following steps:

  1. Deploy IAM roles in your workload accounts.
  2. Create a root certificate to simulate your certificate authority. Then request and sign a leaf certificate to distribute to your build agent.
  3. Configure an IAM Roles Anywhere trust anchor in your workload accounts.
  4. Configure your pipelines to use certificate-based authentication with a working example using Azure DevOps pipelines.

Preparation

You can find the sample code for this post in our GitHub repository. We recommend that you locally clone a copy of this repository. This repository includes the following files:

  • DynamoDB_Table.template: This template creates an Amazon DynamoDB table.
  • iamra-trust-policy.json: This trust policy allows the IAM Roles Anywhere service to assume the role and defines the permissions to be granted.
  • parameters.json: This passes parameters when launching the CloudFormation template.
  • pipeline-iamra.yml: The definition of the pipeline that deploys the CloudFormation template using IAM Roles Anywhere authentication.
  • pipeline-iamra-multi.yml: The definition of the pipeline that deploys the CloudFormation template using IAM Roles Anywhere authentication in multi-account environment.

The first step is creating an IAM role in your AWS accounts with the necessary permissions to deploy your resources. For this, you create a role using the AWSCloudFormationFullAccess and AmazonDynamoDBFullAccess managed policies.

When you define the permissions for your actual applications and workloads, make sure to adjust the permissions to meet your specific needs based on the principle of least privilege.

Run the following command to create the CICDRole in the Dev and Prod AWS accounts.

aws iam create-role --role-name CICDRole --assume-role-policy-document file://iamra-trust-policy.json
aws iam attach-role-policy --role-name CICDRole --policy-arn arn:aws:iam::aws:policy/AmazonDynamoDBFullAccess
aws iam attach-role-policy --role-name CICDRole --policy-arn arn:aws:iam::aws:policy/AWSCloudFormationFullAccess

As part of the role creation, you need to apply the trust policy provided in iamra-trust-policy.json. This trust policy allows the IAM Roles Anywhere service to assume the role with the condition that the Subject Common Name (CN) of the certificate is cicdagent.example.com. In a later step you will update this trust policy with the Amazon Resource Name (ARN) of your trust anchor to further restrict how the role can be assumed.

{
    "Version": "2012-10-17",
    "Statement": [
        {
            "Effect": "Allow",
            "Principal": {
                "Service": "rolesanywhere.amazonaws.com"
            },
            "Action": [
                "sts:AssumeRole",
                "sts:TagSession",
                "sts:SetSourceIdentity"
            ],
            "Condition": {
                "StringEquals": {
                    "aws:PrincipalTag/x509Subject/CN": "cicd-agent.example.com"
                }
            }
        }
    ]
}

Issue and sign a self-signed certificate

Use OpenSSL to generate and sign the certificate. Run the following commands to generate a root and leaf certificate.

Note: The following procedure has been tested with OpenSSL 1.1.1 and OpenSSL 3.0.8.

# generate key for CA certificate
openssl genrsa -out ca.key 2048

# generate CA certificate
openssl req -new -x509 -days 1826 -key ca.key -subj /CN=ca.example.com \
    -addext 'keyUsage=critical,keyCertSign,cRLSign,digitalSignature' \
    -addext 'basicConstraints=critical,CA:TRUE' -out ca.crt 

#generate key for leaf certificate
openssl genrsa -out private.key 2048

#request leaf certificate
cat > extensions.cnf <<EOF
[v3_ca]
keyUsage = digitalSignature, nonRepudiation, keyEncipherment, dataEncipherment
EOF

openssl req -new -key private.key -subj /CN=cicd-agent.example.com -out iamra-cert.csr

#sign leaf certificate with CA
openssl x509 -req -days 7 -in iamra-cert.csr -CA ca.crt -CAkey ca.key -set_serial 01 -extfile extensions.cnf -extensions v3_ca -out certificate.crt

The following files are needed in further steps: ca.crt, certificate.crt, private.key.

Configure the IAM Roles Anywhere trust anchor and profile in your workload accounts

In this step, you configure the IAM Roles Anywhere trust anchor, the profile, and the role with the associated IAM policy to define the permissions to be granted to your build agents. Make sure to set the permissions specified in the policy to the least privileged access.

To configure the IAM Role Anywhere trust anchor

  1. Open the IAM console and go to Roles Anywhere.
  2. Choose Create a trust anchor.
  3. Choose External certificate bundle and paste the content of your CA public certificate in the certificate bundle box (the content of the ca.crt file from the previous step). The configuration looks as follows:
Figure 3: IAM Roles Anywhere trust anchor

Figure 3: IAM Roles Anywhere trust anchor

To follow security best practices by applying least privilege access, add a condition statement in the IAM role’s trust policy to match the created trust anchor to make sure that only certificates that you want to assume a role through IAM Roles Anywhere can do so.

To update the trust policy of the created CICDRole

  1. Open the IAM console, select Roles, then search for CICDRole.
  2. Open CICDRole to update its configuration, and then select Trust relationships.
  3. Replace the existing policy with the following updated policy that includes an additional condition to match on the trust anchor. Replace the ARN ID in the policy with the ARN of the trust anchor created in your account.
Figure 4: IAM Roles Anywhere updated trust policy

Figure 4: IAM Roles Anywhere updated trust policy

{
    "Version": "2012-10-17",
    "Statement": [
        {
            "Effect": "Allow",
            "Principal": {
                "Service": "rolesanywhere.amazonaws.com"
            },
            "Action": [
                "sts:AssumeRole",
                "sts:TagSession",
                "sts:SetSourceIdentity"
            ],
            "Condition": {
                "StringEquals": {
                    "aws:PrincipalTag/x509Subject/CN": "cicd-agent.example.com"
                },
                "ArnEquals": {
                    "aws:SourceArn": "arn:aws:rolesanywhere:ca-central-1:111111111111:trust-anchor/9f084b8b-2a32-47f6-aee3-d027f5c4b03b"
                }
            }
        }
    ]
}

To create an IAM Role Anywhere profile and link the profile to CICDRole

  1. Open the IAM console and go to Roles Anywhere.
  2. Choose Create a profile.
  3. In the Profile section, enter a name.
  4. In the Roles section, select CICDRole.
  5. Keep the other options set to default.
Figure 5: IAM Roles Anywhere profile

Figure 5: IAM Roles Anywhere profile

Configure the Azure DevOps pipeline to use certificate-based authentication

Now that you’ve completed the necessary setup in AWS, you move to the configuration of your pipeline in Azure DevOps. You need to have access to an Azure DevOps organization to complete these steps.

Have the following values ready. They’re needed for the Azure DevOps Pipeline configuration. You need this set of information for every AWS account you want to deploy to.

  • Trust anchor ARN – Resource identifier for the trust anchor created when you configured IAM Roles Anywhere.
  • Profile ARN – The identifier of the IAM Roles Anywhere profile you created.
  • Role ARN – The ARN of the role to assume. This role needs to be configured in the profile.
  • Certificate – The certificate tied to the profile (in other words, the issued certificate: file certificate.crt).
  • Private key – The private key of the certificate (private.key).

Azure DevOps configuration steps

The following steps walk you through configuring Azure DevOps.

  1. Create a new project in Azure DevOps.
  2. Add the following files from the sample repository that you previously cloned to the Git Azure repo that was created as part of the project. (The simplest way to do this is to add a new remote to your local Git repository and push the files.)
    • DynamoDB_Table.template – The sample CloudFormation template you will deploy
    • parameters.json – This passes parameters when launching the CloudFormation template
    • pipeline-iamra.yml – The definition of the pipeline that deploys the CloudFormation template using IAM RA authentication
  3. Create a new pipeline:
    1. Select Azure Repos Git as your source.
    2. Select your current repository.
    3. Choose Existing Azure Pipelines YAML file.
    4. For the path, enter pipeline-iamra.yml.
    5. Select Save (don’t run the pipeline yet).
  4. In Azure DevOps, choose Pipelines, and then choose Library.
  5. Create a new variable group called aws-dev that will store the configuration values to deploy to your AWS Dev environment.
  6. Add variables corresponding to the values of the trust anchor profile and role to use for authentication.
    Figure 6: Azure DevOps configuration steps: Adding IAM Roles Anywhere variables

    Figure 6: Azure DevOps configuration steps: Adding IAM Roles Anywhere variables

  7. Save the group.
  8. Update the permissions to allow your pipeline to use the variable group.
    Figure 7: Azure DevOps configuration steps: Pipeline permissions

    Figure 7: Azure DevOps configuration steps: Pipeline permissions

  9. In the Library, choose the Secure files tab to upload the certificate and private key files that you generated previously.
    Figure 8: Azure DevOps configuration steps: Upload certificate and private key

    Figure 8: Azure DevOps configuration steps: Upload certificate and private key

  10. For each file, update the Pipeline permissions to provide access to the pipeline created previously.
    Figure 9: Azure DevOps configuration steps: Pipeline permissions for each file

    Figure 9: Azure DevOps configuration steps: Pipeline permissions for each file

  11. Run the pipeline and validate successful completion. In your AWS account, you should see a stack named my-stack-name that deployed a DynamoDB table.
    Figure 10: Verify CloudFormation stack deployment in your account

    Figure 10: Verify CloudFormation stack deployment in your account

Explanation of the pipeline-iamra.yml

Here are the different steps of the pipeline:

  1. The first step downloads and installs the credential helper tool that allows you to obtain temporary credentials from IAM Roles Anywhere.
    - bash: wget https://rolesanywhere.amazonaws.com/releases/1.0.3/X86_64/Linux/aws_signing_helper; chmod +x aws_signing_helper;
      displayName: Install AWS Signer

  2. The second step uses the DownloadSecureFile built-in task to retrieve the certificate and private key that you stored in the Azure DevOps secure storage.
    - task: DownloadSecureFile@1
      name: Certificate
      displayName: 'Download certificate'
      inputs:
        secureFile: 'certificate.crt'
    
    - task: DownloadSecureFile@1
      name: Privatekey
      displayName: 'Download private key'
      inputs:
        secureFile: 'private.key'

    The credential helper is configured to obtain temporary credentials by providing the certificate and private key as well as the role to assume and an IAM AWS Roles Anywhere profile to use. Every time the AWS CLI or AWS SDK needs to authenticate to AWS, they use this credential helper to obtain temporary credentials.

    bash: |
        aws configure set credential_process "./aws_signing_helper credential-process --certificate $(Certificate.secureFilePath) --private-key $(Privatekey.secureFilePath) --trust-anchor-arn $(TRUSTANCHORARN) --profile-arn $(PROFILEARN) --role-arn $(ROLEARN)" --profile default
        echo "##vso[task.setvariable variable=AWS_SDK_LOAD_CONFIG;]1"
      displayName: Obtain AWS Credentials

  3. The next step is for troubleshooting purposes. The AWS CLI is used to confirm the current assumed identity in your target AWS account.
    task: AWSCLI@1
      displayName: Check AWS identity
      inputs:
        regionName: 'ca-central-1'
        awsCommand: 'sts'
        awsSubCommand: 'get-caller-identity'

  4. The final step uses the CloudFormationCreateOrUpdateStack task from the AWS Toolkit for Azure DevOps to deploy the Cloud Formation stack. Usually, the awsCredentials parameter is used to point the task to the Service Connection with the AWS access keys and secrets. If you omit this parameter, the task looks instead for the credentials in the standard credential provider chain.
    task: CloudFormationCreateOrUpdateStack@1
      displayName: 'Create/Update Stack: Staging-Deployment'
      inputs:
        regionName:     'ca-central-1'
        stackName:      'my-stack-name'
        useChangeSet:   true
        changeSetName:  'my-stack-name-changeset'
        templateFile:   'DynamoDB_Table.template'
        templateParametersFile: 'parameters.json'
        captureStackOutputs: asVariables
        captureAsSecuredVars: false

Multi-account deployments

In this example, the pipeline deploys to a single AWS account. You can quickly extend it to support deployment to multiple accounts by following these steps:

  1. Repeat the Configure IAM Roles Anywhere Trust Anchor for each account.
  2. In Azure DevOps, create a variable group with the configuration specific to the additional account.
  3. In the pipeline definition, add a stage that uses this variable group.

The pipeline-iamra-multi.yml file in the sample repository contains such an example.

Cleanup

To clean up the AWS resources created in this article, follow these steps:

  1. Delete the deployed CloudFormation stack in your workload accounts.
  2. Remove the IAM trust anchor and profile from the workload accounts.
  3. Delete the CICDRole IAM role.

Alternative options available to obtain temporary credentials in AWS for CI/CD pipelines

In addition to the IAM Roles Anywhere option presented in this blog, there are two other options to issue temporary security credentials for the external build agent:

  • Option 1 – Re-host the build agent on an Amazon Elastic Compute Cloud (Amazon EC2) instance in the AWS account and assign an IAM role. (See IAM roles for Amazon EC2). This option resolves the issue of using long-term IAM access keys to deploy self-hosted build agents on an AWS compute service (such as Amazon EC2, AWS Fargate, or Amazon Elastic Kubernetes Service (Amazon EKS)) instead of using fully-managed or on-premises agents, but it would still require using multiple agents for pipelines that need different permissions.
  • Option 2 – Some DevOps tools support the use of OpenID Connect (OIDC). OIDC is an authentication layer based on open standards that makes it simpler for a client and an identity provider to exchange information. CI/CD tools such as GitHub, GitLab, and Bitbucket provide support for OIDC, which helps you to integrate with AWS for secure deployments and resources access without having to store credentials as long-lived secrets. However, not all CI/CD pipeline tools supports OIDC.

Conclusion

In this post, we showed you how to combine IAM Roles Anywhere and an existing public key infrastructure (PKI) to authenticate external build agents to AWS by using short-lived certificates to obtain AWS temporary credentials. We presented the use of Azure Pipelines for the demonstration, but you can adapt the same steps to other CI/CD tools running on premises or in other cloud platforms. For simplicity, the certificate was manually configured in Azure DevOps to be provided to the agents. We encourage you to automate the distribution of short-lived certificates based on an integration with your PKI.

For demonstration purposes, we included the steps of generating a root certificate and manually signing the leaf certificate. For production workloads, you should have access to a private certificate authority to generate certificates for use by your external build agent. If you do not have an existing private certificate authority, consider using AWS Private Certificate Authority.

If you have feedback about this post, submit comments in the Comments section below. If you have questions about this post, start a new thread on the AWS Security, Identity, & Compliance re:Post or contact AWS Support.

Want more AWS Security news? Follow us on Twitter.

Olivier Gaumond

Olivier Gaumond

Olivier is a Senior Solutions Architect supporting public sector customers from Quebec City. His varied experience in consulting, application development, and platform implementation allow him to bring a new perspective to projects. DevSecOps, containers, and cloud native development are among his topics of interest.

Manal Taki

Manal Taki

Manal is a solutions Architect at AWS, based in Toronto. She works with public sector customers to solve business challenges to drive their mission goals by using Amazon Web Services (AWS). She’s passionate about security, and works with customers to enable security best practices to build secure environments and workloads in the cloud.

How to implement cryptographic modules to secure private keys used with IAM Roles Anywhere

Post Syndicated from Edouard Kachelmann original https://aws.amazon.com/blogs/security/how-to-implement-cryptographic-modules-to-secure-private-keys-used-with-iam-roles-anywhere/

AWS Identity and Access Management (IAM) Roles Anywhere enables workloads that run outside of Amazon Web Services (AWS), such as servers, containers, and applications, to use X.509 digital certificates to obtain temporary AWS credentials and access AWS resources, the same way that you use IAM roles for workloads on AWS. Now, IAM Roles Anywhere allows you to use PKCS #11–compatible cryptographic modules to help you securely store private keys associated with your end-entity X.509 certificates.

Cryptographic modules allow you to generate non-exportable asymmetric keys in the module hardware. The cryptographic module exposes high-level functions, such as encrypt, decrypt, and sign, through an interface such as PKCS #11. Using a cryptographic module with IAM Roles Anywhere helps to ensure that the private keys associated with your end-identity X.509 certificates remain in the module and cannot be accessed or copied to the system.

In this post, I will show how you can use PKCS #11–compatible cryptographic modules, such as YubiKey 5 Series and Thales ID smart cards, with your on-premises servers to securely store private keys. I’ll also show how to use those private keys and certificates to obtain temporary credentials for the AWS Command Line Interface (AWS CLI) and AWS SDKs.

Cryptographic modules use cases

IAM Roles Anywhere reduces the need to manage long-term AWS credentials for workloads running outside of AWS, to help improve your security posture. Now IAM Roles Anywhere has added support for compatible PKCS #11 cryptographic modules to the credential helper tool so that organizations that are currently using these (such as defense, government, or large enterprises) can benefit from storing their private keys on their security devices. This mitigates the risk of storing the private keys as files on servers where they can be accessed or copied by unauthorized users.

Note: If your organization does not implement PKCS #11–compatible modules, IAM Roles Anywhere credential helper supports OS certificate stores (Keychain Access for macOS and Cryptography API: Next Generation (CNG) for Windows) to help protect your certificates and private keys.

Solution overview

This authentication flow is shown in Figure 1 and is described in the following sections.

Figure 1: Authentication flow using crypto modules with IAM Roles Anywhere

Figure 1: Authentication flow using crypto modules with IAM Roles Anywhere

How it works

As a prerequisite, you must first create a trust anchor and profile within IAM Roles Anywhere. The trust anchor will establish trust between your public key infrastructure (PKI) and IAM Roles Anywhere, and the profile allows you to specify which roles IAM Roles Anywhere assumes and what your workloads can do with the temporary credentials. You establish trust between IAM Roles Anywhere and your certificate authority (CA) by creating a trust anchor. A trust anchor is a reference to either AWS Private Certificate Authority (AWS Private CA) or an external CA certificate. For this walkthrough, you will use the AWS Private CA.

The one-time initialization process (step “0 – Module initialization” in Figure 1) works as follows:

  1. You first generate the non-exportable private key within the secure container of the cryptographic module.
  2. You then create the X.509 certificate that will bind an identity to a public key:
    1. Create a certificate signing request (CSR).
    2. Submit the CSR to the AWS Private CA.
    3. Obtain the certificate signed by the CA in order to establish trust.
  3. The certificate is then imported into the cryptographic module for mobility purposes, to make it available and simple to locate when the module is connected to the server.

After initialization is done, the module is connected to the server, which can then interact with the AWS CLI and AWS SDK without long-term credentials stored on a disk.

To obtain temporary security credentials from IAM Roles Anywhere:

  1. The server will use the credential helper tool that IAM Roles Anywhere provides. The credential helper works with the credential_process feature of the AWS CLI to provide credentials that can be used by the CLI and the language SDKs. The helper manages the process of creating a signature with the private key.
  2. The credential helper tool calls the IAM Roles Anywhere endpoint to obtain temporary credentials that are issued in a standard JSON format to IAM Roles Anywhere clients via the API method CreateSession action.
  3. The server uses the temporary credentials for programmatic access to AWS services.

Alternatively, you can use the update or serve commands instead of credential-process. The update command will be used as a long-running process that will renew the temporary credentials 5 minutes before the expiration time and replace them in the AWS credentials file. The serve command will be used to vend temporary credentials through an endpoint running on the local host using the same URIs and request headers as IMDSv2 (Instance Metadata Service Version 2).

Supported modules

The credential helper tool for IAM Roles Anywhere supports most devices that are compatible with PKCS #11. The PKCS #11 standard specifies an API for devices that hold cryptographic information and perform cryptographic functions such as signature and encryption.

I will showcase how to use a YubiKey 5 Series device that is a multi-protocol security key that supports Personal Identity Verification (PIV) through PKCS #11. I am using YubiKey 5 Series for the purpose of demonstration, as it is commonly accessible (you can purchase it at the Yubico store or Amazon.com) and is used by some of the world’s largest companies as a means of providing a one-time password (OTP), Fast IDentity Online (FIDO) and PIV for smart card interface for multi-factor authentication. For a production server, we recommend using server-specific PKCS #11–compatible hardware security modules (HSMs) such as the YubiHSM 2, Luna PCIe HSM, or Trusted Platform Modules (TPMs) available on your servers.

Note: The implementation might differ with other modules, because some of these come with their own proprietary tools and drivers.

Implement the solution: Module initialization

You need to have the following prerequisites in order to initialize the module:

Following are the high-level steps for initializing the YubiKey device and generating the certificate that is signed by AWS Private Certificate Authority (AWS Private CA). Note that you could also use your own public key infrastructure (PKI) and register it with IAM Roles Anywhere.

To initialize the module and generate a certificate

  1. Verify that the YubiKey PIV interface is enabled, because some organizations might disable interfaces that are not being used. To do so, run the YubiKey Manager CLI, as follows:
    ykman info

    The output should look like the following, with the PIV interface enabled for USB.

    Figure 2:YubiKey Manager CLI showing that the PIV interface is enabled

    Figure 2:YubiKey Manager CLI showing that the PIV interface is enabled

  2. Use the YubiKey Manager CLI to generate a new RSA2048 private key on the security module in slot 9a and store the associated public key in a file. Different slots are available on YubiKey, and we will use the slot 9a that is for PIV authentication purpose. Use the following command to generate an asymmetric key pair. The private key is generated on the YubiKey, and the generated public key is saved as a file. Enter the YubiKey management key to proceed:
    ykman ‐‐device 123456 piv keys generate 9a pub-yubi.key

  3. Create a certificate request (CSR) based on the public key and specify the subject that will identify your server. Enter the user PIN code when prompted.
    ykman --device 123456 piv certificates request 9a --subject 'CN=server1-demo,O=Example,L=Boston,ST=MA,C=US' pub-yubi.key csr.pem

  4. Submit the certificate request to AWS Private CA to obtain the certificate signed by the CA.
    aws acm-pca issue-certificate \
    --certificate-authority-arn arn:aws:acm-pca:<region>:<accountID>:certificate-authority/<ca-id> \
    --csr fileb://csr.pem \
    --signing-algorithm "SHA256WITHRSA" \
    --validity Value=365,Type="DAYS"

  5. Copy the certificate Amazon Resource Number (ARN), which should look as follows in your clipboard:
    {
    "CertificateArn": "arn:aws:acm-pca:<region>:<accountID>:certificate-authority/<ca-id>/certificate/<certificate-id>"
    }

  6. Export the new certificate from AWS Private CA in a certificate.pem file.
    aws acm-pca get-certificate \
    --certificate-arn arn:aws:acm-pca:<region>:<accountID>:certificate-authority/<ca-id>/certificate/<certificate-id> \
    --certificate-authority-arn arn:aws:acm-pca: <region>:<accountID>:certificate-authority/<ca-id> \
    --query Certificate \
    --output text > certificate.pem

  7. Import the certificate file on the module by using the YubiKey Manager CLI or through the YubiKey Manager UI. Enter the YubiKey management key to proceed.
    ykman --device 123456 piv certificates import 9a certificate.pem

The security module is now initialized and can be plugged into the server.

Configuration to use the security module for programmatic access

The following steps will demonstrate how to configure the server to interact with the AWS CLI and AWS SDKs by using the private key stored on the YubiKey or PKCS #11–compatible device.

To use the YubiKey module with credential helper

  1. Download the credential helper tool for IAM Roles Anywhere for your operating system.
  2. Install the p11-kit package. Most providers (including opensc) will ship with a p11-kit “module” file that makes them discoverable. Users shouldn’t need to specify the PKCS #11 “provider” library when using the credential helper, because we use p11-kit by default.

    If your device library is not supported by p11-kit, you can install that library separately.

  3. Verify the content of the YubiKey by using the following command:
    ykman --device 123456 piv info

    The output should look like the following.

    Figure 3: YubiKey Manager CLI output for the PIV information

    Figure 3: YubiKey Manager CLI output for the PIV information

    This command provides the general status of the PIV application and content in the different slots such as the certificates installed.

  4. Use the credential helper command with the security module. The command will require at least:
    • The ARN of the trust anchor
    • The ARN of the target role to assume
    • The ARN of the profile to pull policies from
    • The certificate and/or key identifiers in the form of a PKCS #11 URI

You can use the certificate flag to search which slot on the security module contains the private key associated with the user certificate.

To specify an object stored in a cryptographic module, you should use the PKCS #11 URI that is defined in RFC7512. The attributes in the identifier string are a set of search criteria used to filter a set of objects. See a recommended method of locating objects in PKCS #11.

In the following example, we search for an object of type certificate, with the object label as “Certificate for Digital Signature”, in slot 1. The pin-value attribute allows you to directly use the pin to log into the cryptographic device.

pkcs11:type=cert;object=Certificate%20for%20Digital%20Signature;id=%01?pin-value=123456

From the folder where you have installed the credential helper tool, use the following command. Because we only have one certificate on the device, we can limit the filter to the certificate type in our PKCS #11 URI.

./aws_signing_helper credential-process
--profile-arn arn:aws:rolesanywhere:<region>:<accountID>:profile/<profileID>
--role-arn arn:aws:iam::<accountID>:role/<assumedRole> 
--trust-anchor-arn arn:aws:rolesanywhere:<region>:<accountID>:trust-anchor/<trustanchorID>
--certificate pkcs11:type=cert?pin-value=<PIN>

If everything is configured correctly, the credential helper tool will return a JSON that contains the credentials, as follows. The PIN code will be requested if you haven’t specified it in the command.

Please enter your user PIN:
  			{
                    "Version":1,
                    "AccessKeyId": <String>,
                    "SecretAccessKey": <String>,
                    "SessionToken": <String>,
                    "Expiration": <Timestamp>
                 }

To use temporary security credentials with AWS SDKs and the AWS CLI, you can configure the credential helper tool as a credential process. For more information, see Source credentials with an external process. The following example shows a config file (usually in ~/.aws/config) that sets the helper tool as the credential process.

[profile server1-demo]
credential_process = ./aws_signing_helper credential-process --profile-arn <arn-for-iam-roles-anywhere-profile> --role-arn <arn-for-iam-role-to-assume> --trust-anchor-arn <arn-for-roles-anywhere-trust-anchor> --certificate pkcs11:type=cert?pin-value=<PIN> 

You can provide the PIN as part of the credential command with the option pin-value=<PIN> so that the user input is not required.

If you prefer not to store your PIN in the config file, you can remove the attribute pin-value. In that case, you will be prompted to enter the PIN for every CLI command.

You can use the serve and update commands of the credential helper mentioned in the solution overview to manage credential rotation for unattended workloads. After the successful use of the PIN, the credential helper will store it in memory for the duration of the process and not ask for it anymore.

Auditability and fine-grained access

You can audit the activity of servers that are assuming roles through IAM Roles Anywhere. IAM Roles Anywhere is integrated with AWS CloudTrail, a service that provides a record of actions taken by a user, role, or an AWS service in IAM Roles Anywhere.

To view IAM Roles Anywhere activity in CloudTrail

  1. In the AWS CloudTrail console, in the left navigation menu, choose Event history.
  2. For Lookup attributes, filter by Event source and enter rolesanywhere.amazonaws.com in the textbox. You will find all the API calls that relate to IAM Roles Anywhere, including the CreateSession API call that returns temporary security credentials for workloads that have been authenticated with IAM Roles Anywhere to access AWS resources.
    Figure 4: CloudTrail Events filtered on the “IAM Roles Anywhere” event source

    Figure 4: CloudTrail Events filtered on the “IAM Roles Anywhere” event source

  3. When you review the CreateSession event record details, you can find the assumed role ID in the form of <PrincipalID>:<serverCertificateSerial>, as in the following example:
    Figure 5: Details of the CreateSession event in the CloudTrail console showing which role is being assumed

    Figure 5: Details of the CreateSession event in the CloudTrail console showing which role is being assumed

  4. If you want to identify API calls made by a server, for Lookup attributes, filter by User name, and enter the serverCertificateSerial value from the previous step in the textbox.
    Figure 6: CloudTrail console events filtered by the username associated to our certificate on the security module

    Figure 6: CloudTrail console events filtered by the username associated to our certificate on the security module

    The API calls to AWS services made with the temporary credentials acquired through IAM Roles Anywhere will contain the identity of the server that made the call in the SourceIdentity field. For example, the EC2 DescribeInstances API call provides the following details:

    Figure 7: The event record in the CloudTrail console for the EC2 describe instances call, with details on the assumed role and certificate CN.

    Figure 7: The event record in the CloudTrail console for the EC2 describe instances call, with details on the assumed role and certificate CN.

Additionally, you can include conditions in the identity policy for the IAM role to apply fine-grained access control. This will allow you to apply a fine-grained access control filter to specify which server in the group of servers can perform the action.

To apply access control per server within the same IAM Roles Anywhere profile

  1. In the IAM Roles Anywhere console, select the profile used by the group of servers, then select one of the roles that is being assumed.
  2. Apply the following policy, which will allow only the server with CN=server1-demo to list all buckets by using the condition on aws:SourceIdentity.
    {
      "Version":"2012-10-17",
      "Statement":[
        {
                "Sid": "VisualEditor0",
                "Effect": "Allow",
                "Action": "s3:ListBuckets",
                "Resource": "*",
                "Condition": {
                    "StringEquals": {
                        "aws:SourceIdentity": "CN=server1-demo"
                    }
                }
            }
      ]
    }

Conclusion

In this blog post, I’ve demonstrated how you can use the YubiKey 5 Series (or any PKCS #11 cryptographic module) to securely store the private keys for the X.509 certificates used with IAM Roles Anywhere. I’ve also highlighted how you can use AWS CloudTrail to audit API actions performed by the roles assumed by the servers.

To learn more about IAM Roles Anywhere, see the IAM Roles Anywhere and Credential Helper tool documentation. For configuration with Thales IDPrime smart card, review the credential helper for IAM Roles Anywhere GitHub page.

If you have feedback about this post, submit comments in the Comments section below. If you have questions about this post, start a new thread on the AWS Identity and Access Management re:Post or contact AWS Support.

Want more AWS Security news? Follow us on Twitter.

Author

Edouard Kachelmann

Edouard is an Enterprise Senior Solutions Architect at Amazon Web Services. Based in Boston, he is a passionate technology enthusiast who enjoys working with customers and helping them build innovative solutions to deliver measurable business outcomes. Prior to his work at AWS, Edouard worked for the French National Cybersecurity Agency, sharing his security expertise and assisting government departments and operators of vital importance. In his free time, Edouard likes to explore new places to eat, try new French recipes, and play with his kids.

Extend AWS IAM roles to workloads outside of AWS with IAM Roles Anywhere

Post Syndicated from Faraz Angabini original https://aws.amazon.com/blogs/security/extend-aws-iam-roles-to-workloads-outside-of-aws-with-iam-roles-anywhere/

AWS Identity and Access Management (IAM) has now made it easier for you to use IAM roles for your workloads that are running outside of AWS, with the release of IAM Roles Anywhere. This feature extends the capabilities of IAM roles to workloads outside of AWS. You can use IAM Roles Anywhere to provide a secure way for on-premises servers, containers, or applications to obtain temporary AWS credentials and remove the need for creating and managing long-term AWS credentials.

In this post, I will briefly discuss how IAM Roles Anywhere works. I’ll mention some of the common use cases for IAM Roles Anywhere. And finally, I’ll walk you through an example scenario to demonstrate how the implementation works.

Background

To enable your applications to access AWS services and resources, you need to provide the application with valid AWS credentials for making AWS API requests. For workloads running on AWS, you do this by associating an IAM role with Amazon Elastic Compute Cloud (Amazon EC2), Amazon Elastic Container Service (Amazon ECS), Amazon Elastic Kubernetes Service (Amazon EKS), or AWS Lambda resources, depending on the compute platform hosting your application. This is secure and convenient, because you don’t have to distribute and manage AWS credentials for applications running on AWS. Instead, the IAM role supplies temporary credentials that applications can use when they make AWS API calls.

IAM Roles Anywhere enables you to use IAM roles for your applications outside of AWS to access AWS APIs securely, the same way that you use IAM roles for workloads on AWS. With IAM Roles Anywhere, you can deliver short-term credentials to your on-premises servers, containers, or other compute platforms. When you use IAM Roles Anywhere to vend short-term credentials you can remove the need for long-term AWS access keys and secrets, which can help improve security, and remove the operational overhead of managing and rotating the long-term credentials. You can also use IAM Roles Anywhere to provide a consistent experience for managing credentials across hybrid workloads.

In this post, I assume that you have a foundational knowledge of IAM, so I won’t go into the details here about IAM roles. For more information on IAM roles, see the IAM documentation.

How does IAM Roles Anywhere work?

IAM Roles Anywhere relies on public key infrastructure (PKI) to establish trust between your AWS account and certificate authority (CA) that issues certificates to your on-premises workloads. Your workloads outside of AWS use IAM Roles Anywhere to exchange X.509 certificates for temporary AWS credentials. The certificates are issued by a CA that you register as a trust anchor (root of trust) in IAM Roles Anywhere. The CA can be part of your existing PKI system, or can be a CA that you created with AWS Certificate Manager Private Certificate Authority (ACM PCA).

Your application makes an authentication request to IAM Roles Anywhere, sending along its public key (encoded in a certificate) and a signature signed by the corresponding private key. Your application also specifies the role to assume in the request. When IAM Roles Anywhere receives the request, it first validates the signature with the public key, then it validates that the certificate was issued by a trust anchor previously configured in the account. For more details, see the signature validation documentation.

After both validations succeed, your application is now authenticated and IAM Roles Anywhere will create a new role session for the role specified in the request by calling AWS Security Token Service (AWS STS). The effective permissions for this role session are the intersection of the target role’s identity-based policies and the session policies, if specified, in the profile you create in IAM Roles Anywhere. Like any other IAM role session, it is also subject to other policy types that you might have in place, such as permissions boundaries and service control policies (SCPs).

There are typically three main tasks, performed by different personas, that are involved in setting up and using IAM Roles Anywhere:

  • Initial configuration of IAM Roles Anywhere – This task involves creating a trust anchor, configuring the trust policy of the role that IAM Roles Anywhere is going to assume, and defining the role profile. These activities are performed by the AWS account administrator and can be limited by IAM policies.
  • Provisioning of certificates to workloads outside AWS – This task involves ensuring that the X.509 certificate, signed by the CA, is installed and available on the server, container, or application outside of AWS that needs to authenticate. This is performed in your on-premises environment by an infrastructure admin or provisioning actor, typically by using existing automation and configuration management tools.
  • Using IAM Roles Anywhere – This task involves configuring the credential provider chain to use the IAM Roles Anywhere credential helper tool to exchange the certificate for session credentials. This is typically performed by the developer of the application that interacts with AWS APIs.

I’ll go into the details of each task when I walk through the example scenario later in this post.

Common use cases for IAM Roles Anywhere

You can use IAM Roles Anywhere for any workload running in your data center, or in other cloud providers, that requires credentials to access AWS APIs. Here are some of the use cases we think will be interesting to customers based on the conversations and patterns we have seen:

Example scenario and walkthrough

To demonstrate how IAM Roles Anywhere works in action, let’s walk through a simple scenario where you want to call S3 APIs to upload some data from a server in your data center.

Prerequisites

Before you set up IAM Roles Anywhere, you need to have the following requirements in place:

  • The certificate bundle of your own CA, or an active ACM PCA CA in the same AWS Region as IAM Roles Anywhere
  • An end-entity certificate and associated private key available on the on-premises server
  • Administrator permissions for IAM roles and IAM Roles Anywhere

Setup

Here I demonstrate how to perform the setup process by using the IAM Roles Anywhere console. Alternatively, you can use the AWS API or Command Line Interface (CLI) to perform these actions. There are three main activities here:

  • Create a trust anchor
  • Create and configure a role that trusts IAM Roles Anywhere
  • Create a profile

To create a trust anchor

  1. Navigate to the IAM Roles Anywhere console.
  2. Under Trust anchors, choose Create a trust anchor.
  3. On the Create a trust anchor page, enter a name for your trust anchor and select the existing AWS Certificate Manager Private CA from the list. Alternatively, if you want to use your own external CA, choose External certificate bundle and provide the certificate bundle.
Figure 1: Create a trust anchor in IAM Roles Anywhere

Figure 1: Create a trust anchor in IAM Roles Anywhere

To create and configure a role that trusts IAM Roles Anywhere

  1. Using the AWS Command Line Interface (AWS CLI), you are going to create an IAM role with appropriate permissions that you want your on-premises server to assume after authenticating to IAM Roles Anywhere. Save the following trust policy as rolesanywhere-trust-policy.json on your computer.
    {
        "Version": "2012-10-17",
        "Statement": [
            {
                "Effect": "Allow",
                "Principal": {
                    "Service": "rolesanywhere.amazonaws.com"
                },
                "Action": [
                    "sts:AssumeRole",
                    "sts:SetSourceIdentity",
                    "sts:TagSession"
                ]
            }
        ]
    }

  2. Save the following identity-based policy as onpremsrv-permissions-policy.json. This grants the role permissions to write objects into the specified S3 bucket.
    {
        "Version": "2012-10-17",
        "Statement": [
            {
                "Effect": "Allow",
                "Action": "s3:PutObject",
                "Resource": "arn:aws:s3:::<DOC-EXAMPLE-BUCKET>/*"
            }
        ]
    }

  3. Run the following two AWS CLI commands to create the role and attach the permissions policy.
    aws iam create-role \
    --role-name ExampleS3WriteRole \
    --assume-role-policy-document file://<path>/rolesanywhere-trust-policy.json


    aws iam put-role-policy \
    --role-name ExampleS3WriteRole \
    --policy-name onpremsrv-inline-policy \
    --policy-document file://<path>/onpremsrv-permissions-policy.json

You can optionally use condition statements based on the attributes extracted from the X.509 certificate to further restrict the trust policy to control the on-premises resources that can obtain credentials from IAM Roles Anywhere. IAM Roles Anywhere sets the SourceIdentity value to the CN of the subject (onpremsrv01 in my example). It also sets individual session tags (PrincipalTag/) with the derived attributes from the certificate. So, you can use the principal tags in the Condition clause in the trust policy as additional authorization constraints.

For example, the Subject for the certificate I use in this post is as follows.

Subject: … O = Example Corp., OU = SecOps, CN = onpremsrv01

So, I can add condition statements like the following into the trust policy (rolesanywhere-trust-policy.json):

...
    "Condition": {
        "StringEquals": {
            "aws:PrincipalTag/x509Subject/CN": "onpremsrv01",
            "aws:PrincipalTag/x509Subject/OU": "SecOps"
        }
    }
...

To learn more, see the trust policy for IAM Roles Anywhere documentation.

To create a profile

  1. Navigate to the Roles Anywhere console.
  2. Under Profiles, choose Create a profile.
  3. On the Create a profile page, enter a name for the profile.
  4. For Roles, select the role that you created in the previous step (ExampleS3WriteRole).
  5. 5. Optionally, you can define session policies to further scope down the sessions delivered by IAM Roles Anywhere. This is particularly useful when you configure the profile with multiple roles and want to restrict permissions across all the roles. You can add the desired session polices as managed policies or inline policy. Here, for demonstration purpose, I add an inline policy to only allow requests coming from my specified IP address.
Figure 2: Create a profile in IAM Roles Anywhere

Figure 2: Create a profile in IAM Roles Anywhere

At this point, IAM Roles Anywhere setup is complete and you can start using it.

Use IAM Roles Anywhere

IAM Roles Anywhere provides a credential helper tool that can be used with the process credentials functionality that all current AWS SDKs support. This simplifies the signing process for the applications. See the IAM Roles Anywhere documentation to learn how to get the credential helper tool.

To test the functionality first, run the credential helper tool (aws_signing_helper) manually from the on-premises server, as follows.

./aws_signing_helper credential-process \
    --certificate /path/to/certificate.pem \
    --private-key /path/to/private-key.pem \
    --trust-anchor-arn <TA_ARN> \
    --profile-arn <PROFILE_ARN> \
    --role-arn <ExampleS3WriteRole_ARN>
Figure 3: Running the credential helper tool manually

Figure 3: Running the credential helper tool manually

You should successfully receive session credentials from IAM Roles Anywhere, similar to the example in Figure 3. Once you’ve confirmed that the setup works, update or create the ~/.aws/config file and add the signing helper as a credential_process. This will enable unattended access for the on-premises server. To learn more about the AWS CLI configuration file, see Configuration and credential file settings.

# ~/.aws/config content
[default]
 credential_process = ./aws_signing_helper credential-process
    --certificate /path/to/certificate.pem
    --private-key /path/to/private-key.pem
    --trust-anchor-arn <TA_ARN>
    --profile-arn <PROFILE_ARN>
    --role-arn <ExampleS3WriteRole_ARN>

To verify that the config works as expected, call the aws sts get-caller-identity AWS CLI command and confirm that the assumed role is what you configured in IAM Roles Anywhere. You should also see that the role session name contains the Serial Number of the certificate that was used to authenticate (cc:c3:…:85:37 in this example). Finally, you should be able to copy a file to the S3 bucket, as shown in Figure 4.

Figure 4: Verify the assumed role

Figure 4: Verify the assumed role

Audit

As with other AWS services, AWS CloudTrail captures API calls for IAM Roles Anywhere. Let’s look at the corresponding CloudTrail log entries for the activities we performed earlier.

The first log entry I’m interested in is CreateSession, when the on-premises server called IAM Roles Anywhere through the credential helper tool and received session credentials back.

{
    ...
    "eventSource": "rolesanywhere.amazonaws.com",
    "eventName": "CreateSession",
    ...
    "requestParameters": {
        "cert": "MIICiTCCAfICCQD6...mvw3rrszlaEXAMPLE",
        "profileArn": "arn:aws:rolesanywhere:us-west-2:111122223333:profile/PROFILE_ID",
        "roleArn": "arn:aws:iam::111122223333:role/ExampleS3WriteRole",
        ...
    },
    "responseElements": {
        "credentialSet": [
        {
            "assumedRoleUser": {
                "arn": "arn:aws:sts::111122223333:assumed-role/ExampleS3WriteRole/00ccc3a2432f8c5fec93f0fc574f118537",
            },
            "credentials": {
                ...
            },
            ...
            "sourceIdentity": "CN=onpremsrv01"
        }
      ],
    },
    ...
}

You can see that the cert, along with other parameters, is sent to IAM Roles Anywhere and a role session along with temporary credentials is sent back to the server.

The next log entry we want to look at is the one for the s3:PutObject call we made from our on-premises server.

{
    ...
    "eventSource": "s3.amazonaws.com",
    "eventName": "PutObject",
    "userIdentity":{
        "type": "AssumedRole",
        "arn": "arn:aws:sts::111122223333:assumed-role/ExampleS3WriteRole/00ccc3a2432f8c5fec93f0fc574f118537",
        ...
        "sessionContext":
        {
            ...
            "sourceIdentity": "CN=onpremsrv01"
        },
    },
    ...
}

In addition to the CloudTrail logs, there are several metrics and events available for you to use for monitoring purposes. To learn more, see Monitoring IAM Roles Anywhere.

Additional notes

You can disable the trust anchor in IAM Roles Anywhere to immediately stop new sessions being issued to your resources outside of AWS. Certificate revocation is supported through the use of imported certificate revocation lists (CRLs). You can upload a CRL that is generated from your CA, and certificates used for authentication will be checked for their revocation status. IAM Roles Anywhere does not support callbacks to CRL Distribution Points (CDPs) or Online Certificate Status Protocol (OCSP) endpoints.

Another consideration, not specific to IAM Roles Anywhere, is to ensure that you have securely stored the private keys on your server with appropriate file system permissions.

Conclusion

In this post, I discussed how the new IAM Roles Anywhere service helps you enable workloads outside of AWS to interact with AWS APIs securely and conveniently. When you extend the capabilities of IAM roles to your servers, containers, or applications running outside of AWS you can remove the need for long-term AWS credentials, which means no more distribution, storing, and rotation overheads.

I mentioned some of the common use cases for IAM Roles Anywhere. You also learned about the setup process and how to use IAM Roles Anywhere to obtain short-term credentials.

 
If you have any questions, you can start a new thread on AWS re:Post or reach out to AWS Support.

Faraz Angabini

Faraz Angabini

Faraz is a senior security specialist at AWS. He helps AWS strategic customers in their cloud journey. His interests include security, identity and access management, encryption, networking, and infrastructure.