Post Syndicated from Edouard Kachelmann original https://aws.amazon.com/blogs/security/how-to-implement-cryptographic-modules-to-secure-private-keys-used-with-iam-roles-anywhere/
AWS Identity and Access Management (IAM) Roles Anywhere enables workloads that run outside of Amazon Web Services (AWS), such as servers, containers, and applications, to use X.509 digital certificates to obtain temporary AWS credentials and access AWS resources, the same way that you use IAM roles for workloads on AWS. Now, IAM Roles Anywhere allows you to use PKCS #11–compatible cryptographic modules to help you securely store private keys associated with your end-entity X.509 certificates.
Cryptographic modules allow you to generate non-exportable asymmetric keys in the module hardware. The cryptographic module exposes high-level functions, such as encrypt, decrypt, and sign, through an interface such as PKCS #11. Using a cryptographic module with IAM Roles Anywhere helps to ensure that the private keys associated with your end-identity X.509 certificates remain in the module and cannot be accessed or copied to the system.
In this post, I will show how you can use PKCS #11–compatible cryptographic modules, such as YubiKey 5 Series and Thales ID smart cards, with your on-premises servers to securely store private keys. I’ll also show how to use those private keys and certificates to obtain temporary credentials for the AWS Command Line Interface (AWS CLI) and AWS SDKs.
Cryptographic modules use cases
IAM Roles Anywhere reduces the need to manage long-term AWS credentials for workloads running outside of AWS, to help improve your security posture. Now IAM Roles Anywhere has added support for compatible PKCS #11 cryptographic modules to the credential helper tool so that organizations that are currently using these (such as defense, government, or large enterprises) can benefit from storing their private keys on their security devices. This mitigates the risk of storing the private keys as files on servers where they can be accessed or copied by unauthorized users.
Note: If your organization does not implement PKCS #11–compatible modules, IAM Roles Anywhere credential helper supports OS certificate stores (Keychain Access for macOS and Cryptography API: Next Generation (CNG) for Windows) to help protect your certificates and private keys.
Solution overview
This authentication flow is shown in Figure 1 and is described in the following sections.
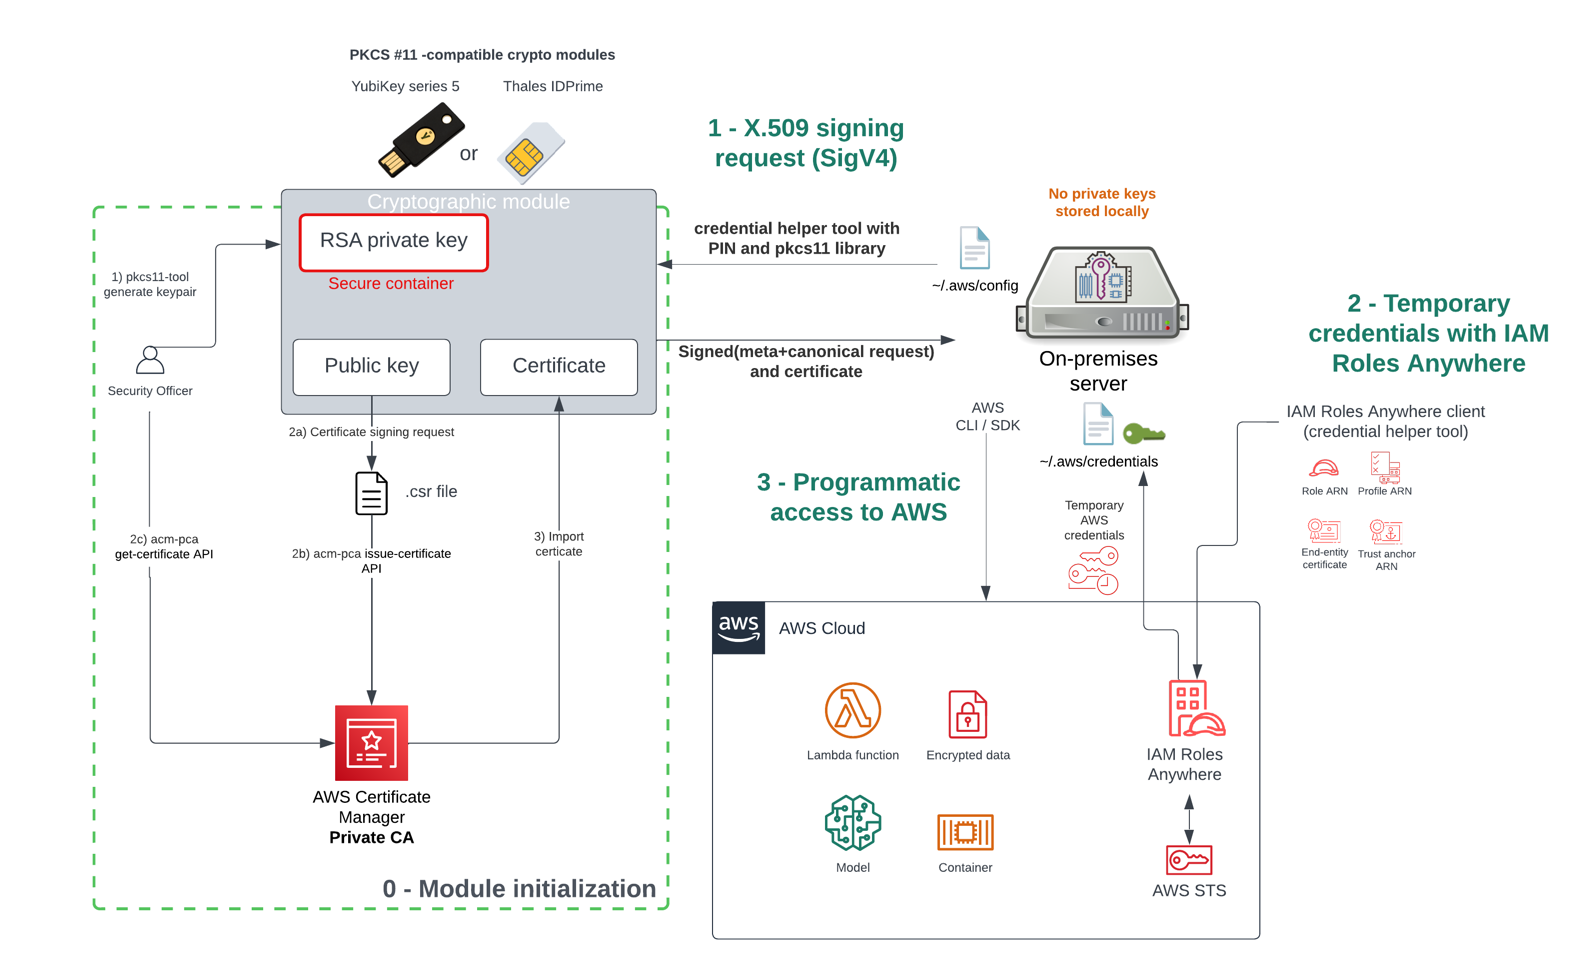
Figure 1: Authentication flow using crypto modules with IAM Roles Anywhere
How it works
As a prerequisite, you must first create a trust anchor and profile within IAM Roles Anywhere. The trust anchor will establish trust between your public key infrastructure (PKI) and IAM Roles Anywhere, and the profile allows you to specify which roles IAM Roles Anywhere assumes and what your workloads can do with the temporary credentials. You establish trust between IAM Roles Anywhere and your certificate authority (CA) by creating a trust anchor. A trust anchor is a reference to either AWS Private Certificate Authority (AWS Private CA) or an external CA certificate. For this walkthrough, you will use the AWS Private CA.
The one-time initialization process (step “0 – Module initialization” in Figure 1) works as follows:
- You first generate the non-exportable private key within the secure container of the cryptographic module.
- You then create the X.509 certificate that will bind an identity to a public key:
- Create a certificate signing request (CSR).
- Submit the CSR to the AWS Private CA.
- Obtain the certificate signed by the CA in order to establish trust.
- The certificate is then imported into the cryptographic module for mobility purposes, to make it available and simple to locate when the module is connected to the server.
After initialization is done, the module is connected to the server, which can then interact with the AWS CLI and AWS SDK without long-term credentials stored on a disk.
To obtain temporary security credentials from IAM Roles Anywhere:
- The server will use the credential helper tool that IAM Roles Anywhere provides. The credential helper works with the credential_process feature of the AWS CLI to provide credentials that can be used by the CLI and the language SDKs. The helper manages the process of creating a signature with the private key.
- The credential helper tool calls the IAM Roles Anywhere endpoint to obtain temporary credentials that are issued in a standard JSON format to IAM Roles Anywhere clients via the API method CreateSession action.
- The server uses the temporary credentials for programmatic access to AWS services.
Alternatively, you can use the update or serve commands instead of credential-process. The update command will be used as a long-running process that will renew the temporary credentials 5 minutes before the expiration time and replace them in the AWS credentials file. The serve command will be used to vend temporary credentials through an endpoint running on the local host using the same URIs and request headers as IMDSv2 (Instance Metadata Service Version 2).
Supported modules
The credential helper tool for IAM Roles Anywhere supports most devices that are compatible with PKCS #11. The PKCS #11 standard specifies an API for devices that hold cryptographic information and perform cryptographic functions such as signature and encryption.
I will showcase how to use a YubiKey 5 Series device that is a multi-protocol security key that supports Personal Identity Verification (PIV) through PKCS #11. I am using YubiKey 5 Series for the purpose of demonstration, as it is commonly accessible (you can purchase it at the Yubico store or Amazon.com) and is used by some of the world’s largest companies as a means of providing a one-time password (OTP), Fast IDentity Online (FIDO) and PIV for smart card interface for multi-factor authentication. For a production server, we recommend using server-specific PKCS #11–compatible hardware security modules (HSMs) such as the YubiHSM 2, Luna PCIe HSM, or Trusted Platform Modules (TPMs) available on your servers.
Note: The implementation might differ with other modules, because some of these come with their own proprietary tools and drivers.
Implement the solution: Module initialization
You need to have the following prerequisites in order to initialize the module:
- A PIV-enabled YubiKey, such as YubiKey 5 series with PIN code and management key configured
- The YubiKey Manager CLI (and optionally the YubiKey Manager UI)
- The Open source smart card (OpenSC) library (compatible with a large set of security modules)
- A trust anchor and profile in IAM Roles Anywhere, by following these steps
- An IAM role that trusts the IAM Roles Anywhere service principal
- The Security Officer (SO) should have permissions to use the AWS Private CA service
Following are the high-level steps for initializing the YubiKey device and generating the certificate that is signed by AWS Private Certificate Authority (AWS Private CA). Note that you could also use your own public key infrastructure (PKI) and register it with IAM Roles Anywhere.
To initialize the module and generate a certificate
- Verify that the YubiKey PIV interface is enabled, because some organizations might disable interfaces that are not being used. To do so, run the YubiKey Manager CLI, as follows:
The output should look like the following, with the PIV interface enabled for USB.

Figure 2:YubiKey Manager CLI showing that the PIV interface is enabled
- Use the YubiKey Manager CLI to generate a new RSA2048 private key on the security module in slot 9a and store the associated public key in a file. Different slots are available on YubiKey, and we will use the slot 9a that is for PIV authentication purpose. Use the following command to generate an asymmetric key pair. The private key is generated on the YubiKey, and the generated public key is saved as a file. Enter the YubiKey management key to proceed:
- Create a certificate request (CSR) based on the public key and specify the subject that will identify your server. Enter the user PIN code when prompted.
- Submit the certificate request to AWS Private CA to obtain the certificate signed by the CA.
- Copy the certificate Amazon Resource Number (ARN), which should look as follows in your clipboard:
- Export the new certificate from AWS Private CA in a certificate.pem file.
- Import the certificate file on the module by using the YubiKey Manager CLI or through the YubiKey Manager UI. Enter the YubiKey management key to proceed.

The security module is now initialized and can be plugged into the server.
Configuration to use the security module for programmatic access
The following steps will demonstrate how to configure the server to interact with the AWS CLI and AWS SDKs by using the private key stored on the YubiKey or PKCS #11–compatible device.
To use the YubiKey module with credential helper
- Download the credential helper tool for IAM Roles Anywhere for your operating system.
- Install the p11-kit package. Most providers (including opensc) will ship with a p11-kit “module” file that makes them discoverable. Users shouldn’t need to specify the PKCS #11 “provider” library when using the credential helper, because we use p11-kit by default.
If your device library is not supported by p11-kit, you can install that library separately.
- Verify the content of the YubiKey by using the following command:
The output should look like the following.

Figure 3: YubiKey Manager CLI output for the PIV information
This command provides the general status of the PIV application and content in the different slots such as the certificates installed.
- Use the credential helper command with the security module. The command will require at least:
- The ARN of the trust anchor
- The ARN of the target role to assume
- The ARN of the profile to pull policies from
- The certificate and/or key identifiers in the form of a PKCS #11 URI

You can use the certificate flag to search which slot on the security module contains the private key associated with the user certificate.
To specify an object stored in a cryptographic module, you should use the PKCS #11 URI that is defined in RFC7512. The attributes in the identifier string are a set of search criteria used to filter a set of objects. See a recommended method of locating objects in PKCS #11.
In the following example, we search for an object of type certificate, with the object label as “Certificate for Digital Signature”, in slot 1. The pin-value attribute allows you to directly use the pin to log into the cryptographic device.
From the folder where you have installed the credential helper tool, use the following command. Because we only have one certificate on the device, we can limit the filter to the certificate type in our PKCS #11 URI.
If everything is configured correctly, the credential helper tool will return a JSON that contains the credentials, as follows. The PIN code will be requested if you haven’t specified it in the command.
To use temporary security credentials with AWS SDKs and the AWS CLI, you can configure the credential helper tool as a credential process. For more information, see Source credentials with an external process. The following example shows a config file (usually in ~/.aws/config) that sets the helper tool as the credential process.
You can provide the PIN as part of the credential command with the option pin-value=<PIN> so that the user input is not required.
If you prefer not to store your PIN in the config file, you can remove the attribute pin-value. In that case, you will be prompted to enter the PIN for every CLI command.
You can use the serve and update commands of the credential helper mentioned in the solution overview to manage credential rotation for unattended workloads. After the successful use of the PIN, the credential helper will store it in memory for the duration of the process and not ask for it anymore.
Auditability and fine-grained access
You can audit the activity of servers that are assuming roles through IAM Roles Anywhere. IAM Roles Anywhere is integrated with AWS CloudTrail, a service that provides a record of actions taken by a user, role, or an AWS service in IAM Roles Anywhere.
To view IAM Roles Anywhere activity in CloudTrail
- In the AWS CloudTrail console, in the left navigation menu, choose Event history.
- For Lookup attributes, filter by Event source and enter rolesanywhere.amazonaws.com in the textbox. You will find all the API calls that relate to IAM Roles Anywhere, including the CreateSession API call that returns temporary security credentials for workloads that have been authenticated with IAM Roles Anywhere to access AWS resources.
Figure 4: CloudTrail Events filtered on the “IAM Roles Anywhere” event source
- When you review the CreateSession event record details, you can find the assumed role ID in the form of <PrincipalID>:<serverCertificateSerial>, as in the following example:
Figure 5: Details of the CreateSession event in the CloudTrail console showing which role is being assumed
- If you want to identify API calls made by a server, for Lookup attributes, filter by User name, and enter the serverCertificateSerial value from the previous step in the textbox.
Figure 6: CloudTrail console events filtered by the username associated to our certificate on the security module
The API calls to AWS services made with the temporary credentials acquired through IAM Roles Anywhere will contain the identity of the server that made the call in the SourceIdentity field. For example, the EC2 DescribeInstances API call provides the following details:
Figure 7: The event record in the CloudTrail console for the EC2 describe instances call, with details on the assumed role and certificate CN.


Additionally, you can include conditions in the identity policy for the IAM role to apply fine-grained access control. This will allow you to apply a fine-grained access control filter to specify which server in the group of servers can perform the action.
To apply access control per server within the same IAM Roles Anywhere profile
- In the IAM Roles Anywhere console, select the profile used by the group of servers, then select one of the roles that is being assumed.
- Apply the following policy, which will allow only the server with CN=server1-demo to list all buckets by using the condition on aws:SourceIdentity.
Conclusion
In this blog post, I’ve demonstrated how you can use the YubiKey 5 Series (or any PKCS #11 cryptographic module) to securely store the private keys for the X.509 certificates used with IAM Roles Anywhere. I’ve also highlighted how you can use AWS CloudTrail to audit API actions performed by the roles assumed by the servers.
To learn more about IAM Roles Anywhere, see the IAM Roles Anywhere and Credential Helper tool documentation. For configuration with Thales IDPrime smart card, review the credential helper for IAM Roles Anywhere GitHub page.
If you have feedback about this post, submit comments in the Comments section below. If you have questions about this post, start a new thread on the AWS Identity and Access Management re:Post or contact AWS Support.
Want more AWS Security news? Follow us on Twitter.