All posts by Marcia Villalba

Amazon Location Service Is Now Generally Available with New Routing and Satellite Imagery Capabilities

Post Syndicated from Marcia Villalba original https://aws.amazon.com/blogs/aws/amazon-location-service-is-now-generally-available-with-new-routing-and-satellite-imagery-capabilities/

In December of 2020, we made Amazon Location Service available in preview form for you to start building web and mobile applications with location-based features. Today I’m pleased to announce that we are making Amazon Location generally available along with two new features: routing and satellite imagery.

I have been a full-stack developer for over 15 years. On multiple occasions, I was tasked with creating location-based applications. The biggest challenges I faced when I worked with location providers were integrating the applications into the existing application backend and frontend and keeping the data shared with the location provider secure. When Amazon Location was made available in preview last year, I was so excited. This service makes it possible to build location-based applications with a native integration with AWS services. It uses trusted location providers like Esri and HERE and customers remain in control of their data.

Amazon Location includes the following features:

  • Maps to visualize location information.
  • Places to enable your application to offer point-of-interest search functionality, convert addresses into geographic coordinates in latitude and longitude (geocoding), and convert a coordinate into a street address (reverse geocoding).
  • Routes to use driving distance, directions, and estimated arrival time in your application.
  • Trackers to allow you to retrieve the current and historical location of the devices running your tracking-enabled application.
  • Geofences to give your application the ability to detect and act when a tracked device enters or exits a geographical boundary you define as a geofence. When a breach of the geofence is detected, Amazon Location will send an event to Amazon EventBridge, which can trigger a downstream set of actions, like invoking an AWS Lambda function or sending a notification using Amazon Simple Notification Service (SNS). This level of integration with AWS services is one of the most powerful features of Amazon Location. It will help shorten your application’s time to production.

In the preview announcement blog post, Jeff introduced the service functionality in a lot of detail. In this blog post, I want to focus on the new two features: satellite imagery and routing.

Satellite Imagery

You can use satellite imagery to pack your maps with information and provide more context to the map users. It helps the map users answer questions like “Is there a swamp in that area?” or “What does that building look like?”

To get started with satellite imagery maps, go to the Amazon Location console. On Create a new map, choose Esri Imagery. 

Creating a new map with satellite imagery

Routing
With Amazon Location Routes, your application can request the travel time, distance, and all directions between two locations. This makes it possible for your application users to obtain accurate travel-time estimates based on live road and traffic information.

If you provide these extra attributes when you use the route feature, you can get very tailored information including:

  • Waypoints: You can provide a list of ordered intermediate positions to be reached on the route. You can have up to 25 stopover points including the departure and destination.
  • Departure time: When you specify the departure time for this route, you will receive a result optimized for the traffic conditions at that time.
  • Travel mode: The mode of travel you specify affects the speed and the road compatibility. Not all vehicles can travel on all roads. The available travel modes are car, truck and walking. Depending on which travel mode you select, there are parameters that you can tune. For example, for car and truck, you can specify if you want a route without ferries or tolls. But the most interesting results are when you choose the truck travel mode. You can define the truck dimensions and weight and then get a route that is optimized for these parameters. No more trucks stuck under bridges!

Amazon Location Service and its features can be used for interesting use cases with low effort. For example, delivery companies using Amazon Location can optimize the order of the deliveries, monitor the position of the delivery vehicles, and inform the customers when the vehicle is arriving. Amazon Location can be also used to route medical vehicles to optimize the routing of patients or medical supplies. Logistic companies can use the service to optimize their supply chain by monitoring all the delivery vehicles.

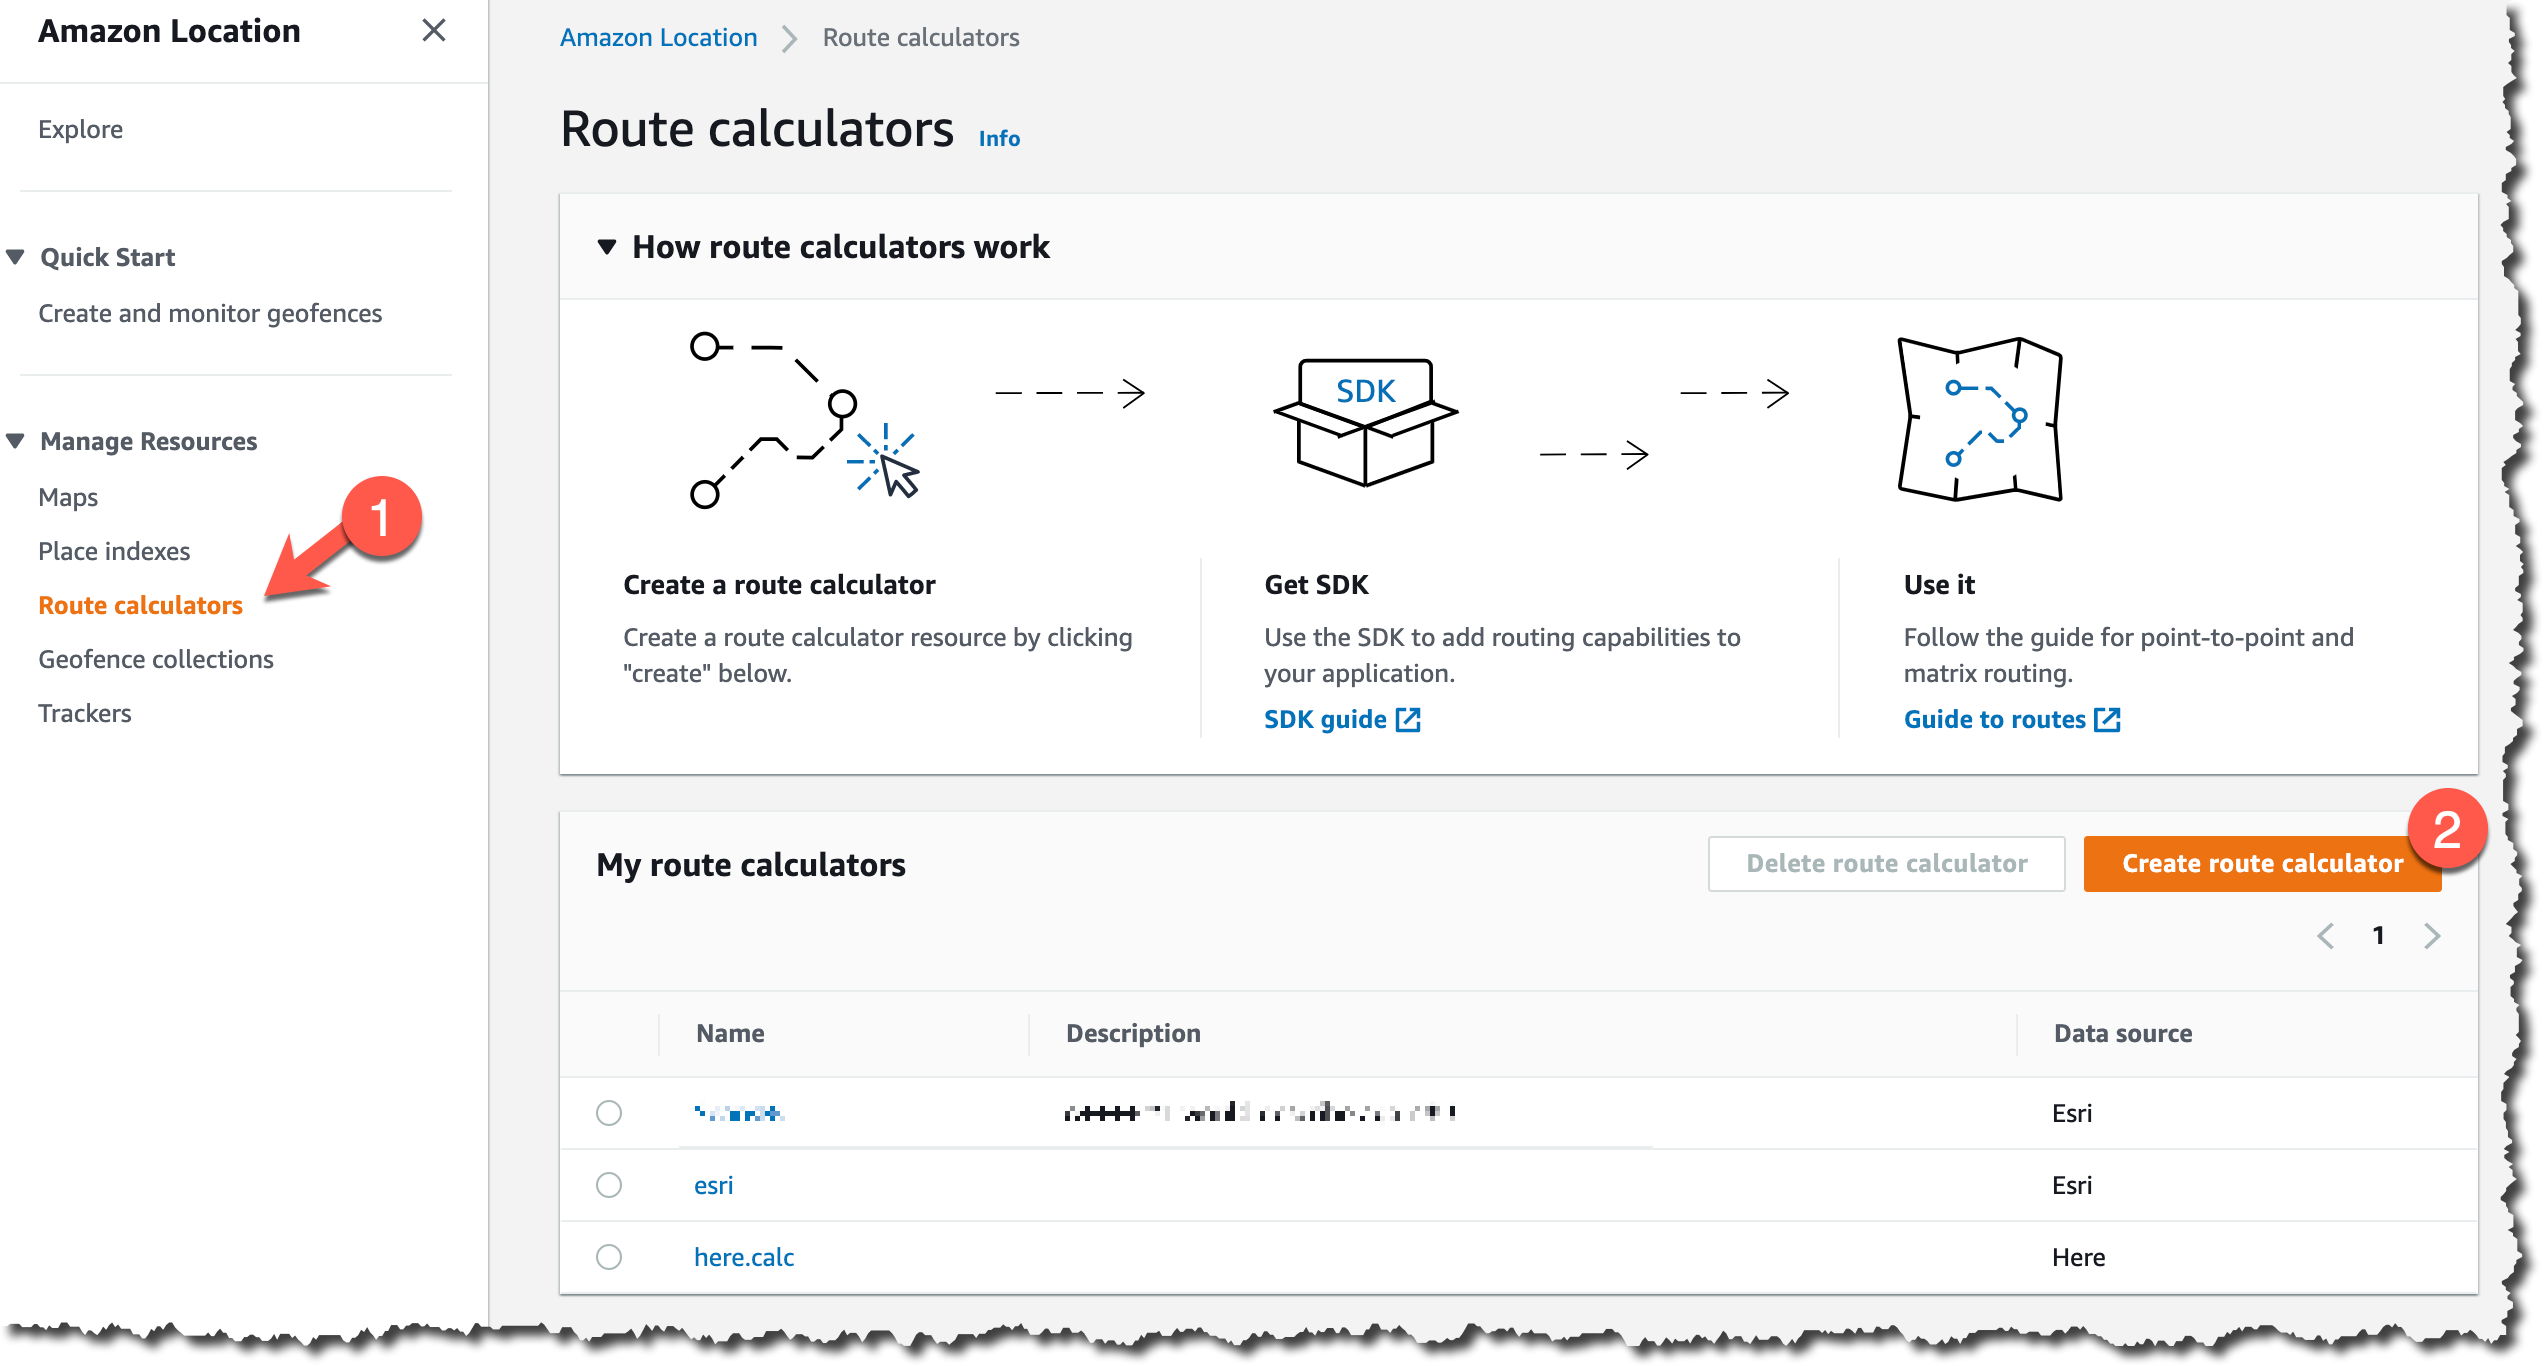
To use the route feature, start by creating a route calculator. In the Amazon Location console, choose Route calculators. For the provider of the route information, choose Esri or HERE.

Screenshot of create a new routing calculator

You can use the route calculator from the AWS SDKs, AWS Command Line Interface (CLI) or the Amazon Location HTTP API.

For example, to calculate a simple route between departure and destination positions using the CLI, you can write something like this:

aws location \
    calculate-route \
        --calculator-name MyExampleCalculator \
        --departure-position -123.1376951951309 49.234371474778385 \
        --destination-position -122.83301379875074 49.235860182576886

The departure-position and destination-positions are defined as longitude, latitude.

This calculation returns a lot of information. Because you didn’t define the travel mode, the service assumes that you are using a car. You can see the total distance of the route (in this case, 29 kilometers). You can change the distance unit when you do the calculation. The service also returns the duration of the trip (in this case, 29 minutes). Because you didn’t define when to depart, Amazon Location will assume that you want to travel when there is the least amount of traffic.

{
    "Legs": [{
        "Distance": 26.549,
        "DurationSeconds": 1711,
        "StartPosition":[-123.1377012, 49.2342994],
        "EndPosition": [-122.833014,49.23592],
        "Steps": [{
            "Distance":0.7,
            "DurationSeconds":52,
            "EndPosition":[-123.1281,49.23395],
            "GeometryOffset":0,
            "StartPosition":[-123.137701,49.234299]},
            ...
        ]
    }],
    "Summary": {
        "DataSource": "Esri",
        "Distance": 29.915115551209176,
        "DistanceUnit": "Kilometers",
        "DurationSeconds": 2275.5813682980006,
        "RouteBBox": [
            -123.13769762299995,
            49.23068000000006,
            -122.83301399999999,
            49.258440000000064
        ]
    }
}

It will return an array of steps, which form the directions to get from departure to destination. The steps are represented by a starting position and end position. In this example, there are 11 steps and the travel mode is a car.

Screenshot of route drawn in map

The result changes depending on the travel mode you selected. For example, if you do the calculation for the same departure and destination positions but choose a travel mode of walking, you will get a series of steps that draw the map as shown below. The travel time and distance are different: 24.1 kilometers and 6 hours and 43 minutes.

Map of route when walking

Available Now
Amazon Location Service is now available in the US East (N. Virginia), US East (Ohio), US West (Oregon), Europe (Frankfurt), Europe (Ireland), Europe (Stockholm), Asia Pacific (Singapore), Asia Pacific (Sydney), and Asia Pacific (Tokyo) Regions.

Learn about the pricing models of Amazon Location Service. For more about the service, see Amazon Location Service

Marcia

AWS DeepRacer League’s 2021 Season Launches With New Open and Pro Divisions

Post Syndicated from Marcia Villalba original https://aws.amazon.com/blogs/aws/aws-deepracer-leagues-2021-season-launches-with-new-open-and-pro-divisions/

AWS DeepRacer League LogoAs a developer, I have been hearing a lot of stories lately about how companies have solved their business problems using machine learning (ML), so one of my goals for 2021 is to learn more about it.

For the last few years I have been using artificial intelligence (AI) services such as, Amazon Rekognition, Amazon Comprehend, and others extensively. AI services provide a simple API to solve common ML problems such as image recognition, text to speech, and analysis of sentiment in a text. When using these high-level APIs, you don’t need to understand how the underlying ML model works, nor do you have to train it, or maintain it in any way.

Even though those services are great and I can solve most of my business cases with them, I want to understand how ML algorithms work, and that is how I started tinkering with AWS DeepRacer.

AWS DeepRacer, a service that helps you learn reinforcement learning (RL), has been around since 2018. RL is an advanced ML technique that takes a very different approach to training models than other ML methods. Basically, it can learn very complex behavior without requiring any labeled training data, and it can make short-term decisions while optimizing for a long-term goal.

AWS DeepRacer is an autonomous 1/18th scale race car designed to test RL models by racing virtually in the AWS DeepRacer console or physically on a track at AWS and customer events. AWS DeepRacer is for developers of all skill levels, even if you don’t have any ML experience. When learning RL using AWS DeepRacer, you can take part in the AWS DeepRacer League where you get experience with machine learning in a fun and competitive environment.

Over the past year, the AWS DeepRacer League’s races have gone completely virtual and participants have competed for different kinds of prizes. However, the competition has become dominated by experts and newcomers haven’t had much of a chance to win.

The 2021 season introduces new skill-based Open and Pro racing divisions, where racers of all skill levels have five times more opportunities to win rewards than in previous seasons.

Image of the leagues in the console

How the New AWS DeepRacer Racing Divisions Work

The 2021 AWS DeepRacer league runs from March 1 through the end of October. When it kicks off, all participants will enter the Open division, a place to have fun and develop your RL knowledge with other community members.

At the end of every month, the top 10% of the Open division leaderboard will advance to the Pro division for the remainder of the season; they’ll also receive a Pro Welcome kit full of AWS DeepRacer swag. Pro division racers can win DeepRacer Evo cars and AWS DeepRacer merchandise such as hats and T-shirts.

At the end of every month, the top 16 racers in the Pro division will compete against each other in a live race console. That race will determine who will advance that month to the 2021 Championship Cup at re:Invent 2021.

The monthly Pro division winner gets an expenses-paid trip to re:Invent 2021 and participates in the Championship Cup to get a chance to win a Machine Learning education sponsorship worth $20k.

In both divisions, you can collect digital rewards, including vehicle customizations and accessories which will be released to participants once the winners are announced each month. 

You can start racing in the Open division any time during the 2021 season. Get started here!

Image of my racer profileNew Racer Profiles Increase the Fun

At the end of March, you will be able to create a new racer profile with an avatar and show the world which country you are representing.

I hope to see you in the new AWS DeepRacer season, where I’ll start in the Open division as MaVi.

Start racing today and train your first model for free! 

Marcia

Announcing Amazon Managed Service for Grafana (in Preview)

Post Syndicated from Marcia Villalba original https://aws.amazon.com/blogs/aws/announcing-amazon-managed-grafana-service-in-preview/

Today, in partnership with Grafana Labs, we are excited to announce in preview, Amazon Managed Service for Grafana (AMG), a fully managed service that makes it easy to create on-demand, scalable, and secure Grafana workspaces to visualize and analyze your data from multiple sources.

Grafana is one of the most popular open source technologies used to create observability dashboards for your applications. It has a pluggable data source model and support for different kinds of time series databases and cloud monitoring vendors. Grafana centralizes your application data from multiple open-source, cloud, and third-party data sources.

Many of our customers love Grafana, but don’t want the burden of self-hosting and managing it. AMG manages the provisioning, setup, scaling, version upgrades and security patching of Grafana, eliminating the need for customers to do it themselves. AMG automatically scales to support thousands of users with high availability.

With AMG, you will get a fully managed and secure data visualization service where you can query, correlate, and visualize operational metrics, logs and traces across multiple data sources including cloud services such as AWS, Google, and Microsoft. AMG is integrated with AWS data sources, such as Amazon CloudWatch, Amazon Elasticsearch Service, AWS X-Ray, AWS IoT SiteWise, Amazon Timestream, and others to collect operational data in a simple way. Additionally, AMG also provides plug-ins to connect to popular third-party data sources, such as Datadog, Splunk, ServiceNow, and New Relic by upgrading to Grafana Enterprise directly from the AWS Console.

Screenshot for creating and configuring a managed Grafana workspace

AMG integrates directly into your AWS Organizations. You can define a AMG workspace in one AWS account that allows you to discover and access datasources in all your accounts and regions across your AWS organization. Creating dashboards in Grafana is easy as all these different datasources are discoverable in one place.

Customers really like Grafana for the ease of creating dashboards, it comes with many built-in dashboards to use when you add a new data source, or you can take advantage of its broad community of pre-built dashboards. For example, you can see in the following image a really nice dashboard that AMG created for me from one of my AWS Lambda function.

Screenshot of an automatic dashboard for Lambda function

One of my favorite things from AMG is the built-in security features. You can easily enable single sign-on using AWS Single Sign-On, restrict access to data sources and dashboards to the right users, and access audit logs via AWS CloudTrail for your hosted Grafana workspace. With AWS Single Sign-On you can leverage your existing corporate directories to enforce authentication and authorization permissions.

Another powerful feature that AMG has is support for Alerts. AMG integrates with Amazon Simple Notification Service (SNS) so customers can send Grafana alerts to SNS as a notification destination. It also has support for four other alert destinations including PagerDuty, Slack, VictorOps and OpsGenie.

There are no up-front investments required to use AMG, and you only pay a monthly active user license fee. This means that you can provision many users to access to your Grafana workspace, but will only be billed for active users that log in and use the workspace that month. Users granted access but that do not log in, will not be billed that month. You can also upgrade to Grafana Enterprise using AWS Marketplace, to get access to enterprise plugins, support, and training content directly from Grafana Labs.

Availability

This service is available in US East (N. Virginia) and Europe (Ireland) regions. To learn more visit the AMG service page, and be sure to join our re:Invent session tomorrow 12/16 from 8:00am – 8:30am PST for a demo!

AMG is now available in preview; to get access to this service fill out the registration form here.

Marcia

AWS Marketplace Now Offers Professional Services

Post Syndicated from Marcia Villalba original https://aws.amazon.com/blogs/aws/aws-marketplace-now-offers-professional-services/

Now with AWS Marketplace, customers can not only find and buy third-party software but also the professional services needed to support the full lifecycle of those products, including planning, deployment and support. This simplifies the software supply chain including tasks like managing provider relationships and procurement processes and also consolidates billing and invoices in one place.

Until today, customers have used AWS Marketplace for buying software and then used a separate process for contracting professional services. Many customers need extra professional services when they purchase third-party software, like premium support, implementation, or training. The additional effort to support different procurement processes impacts customers’ project timelines and adds a lot complexity to the customer’s organization.

Last year we announced AWS IQ, a service that helps you engage with AWS Certified third-party experts for AWS project work. This year we want to go one step further and help you find professional services for all those third-party software solutions you currently buy from AWS Marketplace.

For the Buyers
Buyers can now discover professional services using AWS Marketplace from multiple trusted sellers, manage the invoices and payments from software and services together and reduce procurement time, accelerating the process from months to days.

This new feature allow buyers to choose from a selection of professional services such as assessments, implementation, premium support, and managed services and training from consulting partners, managed service providers and independent software vendors.

To get started finding and buying professional services, first you need to find the right service for you. If you are looking for a professional service associated with a particular piece of software, using the search tool in AWS Marketplace, you can search for the software and the related professional services will appear in the search results. Use the delivery method to filter the results to just include professional services.

Screenshot of searching for professional services

After you find the service you are looking for, you can visit the service details page and learn more information about the listing. If you want to buy the service, just click continue.

Screenshot of service page

That will open the request service form where you can connect to the seller and request the service. The seller will receive a notification and then they can contact you to agree on the scope of the work including deliverables, milestones, pricing, payment schedules, and service terms.

Screenshot of request service form

Once you agree with the seller on all the specific details of the contract, the seller sends you a private offer. Now the offer page will show the private offer details instead of a request for service form. You can review the pricing, payment schedule, and contract terms and create the contract.

Screenshot of private offer

The service subscription starts after you review and accept the private offer on AWS Marketplace. Also, you will receive an invoice from AWS Marketplace and you can track your subscriptions in the buyers management console. The purchases of the services are itemized on your AWS invoice, simplifying payments and cost management.

For the Sellers
This new feature of AWS Marketplace enables you, the seller, to grow your business and reach new customers by listing your professional service offerings. You can list professional services offerings as individual products or alongside existing software products in AWS Marketplace using pricing, payment schedule, and service terms that are independent from the software.

In AWS Marketplace you will create your seller page, where all your information as a seller will be displayed to the potential buyers.

Public professional service listings are discoverable by search and visible in your seller profile. You will receive customer requests for each of the services listed. Agree with the customer on the details of the service contract and then send a private offer to them.

Screenshot for creating a professional service

AWS Marketplace will invoice and collect the payments from the customers and distribute the funds to your bank account after the customers pay. AWS Marketplace also offers you seller reports that are updated daily to understand how your business is doing.

Availability
To learn more about buying and selling professional services in AWS Marketplace, visit the AWS Marketplace service page

Marcia

New – Amazon S3 Replication Adds Support for Multiple Destination Buckets

Post Syndicated from Marcia Villalba original https://aws.amazon.com/blogs/aws/new-amazon-s3-replication-adds-support-for-multiple-destination-buckets/

Amazon Simple Storage Service (S3) supports many types of replication, including S3 Same-Region Replication (SRR), which launched in 2019 and S3 Cross-Region Replication (CRR), which has been around since 2015. Today, we are happy to announce S3 Replication support for multiple destination buckets. S3 Replication now gives you the ability to replicate data from one source bucket to multiple destination buckets. With S3 Replication (multi-destination) you can replicate data in the same AWS Regions using S3 SRR or across different AWS Regions by using S3 CRR, or a combination of both.

Before this launch, if you needed to have multiple copies of your data in different S3 buckets, you had to build your own S3 replication service by monitoring S3 events, identifying created objects, and using AWS Lambda functions to copy objects to each destination bucket.

This launch removes the need for you to develop your own solutions to replicate the data across multiple destinations. You can use the flexibility of S3 Replication (multi-destination) to store multiple copies of your data in different storage classes, with different encryption types, or across different accounts depending on its intended use. Additionally, when replicating to multiple destinations, you can use CloudWatch metrics to track replication progress for each region pair.

S3 Replication (multi-destination) is an extension to S3 Replication, and it supports all existing S3 Replication features like Replication Time Control (RTC) and delete marker replication. If you need a predictable replication time backed by a Service Level Agreement, you can use RTC to replicate objects in less than 15 minutes.

How to Get Started With S3 Replication (multi-destination)
In order to get S3 Replication working, all the buckets involved in the replication (source and destinations) must have bucket versioning enabled.

To setup S3 Replication (multi-destination), you need to define replication rules. You can create a new rule in the bucket Management page, under Replication Rules.

Screenshot of adding a rule

When creating a new replication rule, one very important step is to set up permissions for replication, as S3 will need to replicate objects on your behalf. To do that, you can follow the instructions available in the S3 documentation page.

To create the replication rule, just follow the steps in the console. You can specify to which objects of the bucket this rule applies, the destination bucket, if you want to change the storage class of the replicated objects and many other preferences for your replicated objects.

Screenshot configuring the replication rule

One thing to have in mind when activating a rule is that the replication will start for all new objects added to the bucket from that moment. Objects uploaded to the bucket before the rule was created need to be copied using one time operations like S3 batch operations or S3 copy.

If you want to monitor the progress of your replication using CloudWatch metrics, don’t forget to click the Replication metrics and notifications checkbox.

Screenshot of configuring replication rules metrics

Now that we support multiple destinations for replication, rule priorities are used when there are two or more rules with the same destination. When that happens, the rule with the highest priority will be applied. For the same destination bucket, a lower priority rule will not be applied when the replication configuration has two or more rules with overlapping scope. If there are two or more rules with the same scope and different destinations, both rules will be applied.

You can see a summary of all your rules in the Replication rules listing under the bucket Management page.

Screenshot of replication rules listing

Monitoring Replication
When you have all the rules configured, you can start uploading objects to the source bucket and monitor how they get replicated in all the different destinations.

To know the replication status of an object in the source bucket, you can see the Replication status in the object Details. The status types are:

  • COMPLETED: The replication was successful in all the destinations.
  • PENDING: The replication is still in progress.
  • FAILED: The replication failed to replicate in at least one of the destinations. When there is a failure in replication, the only way to fix it is by uploading the object again.

screenshot of object metadata

For replicated objects, you will see the REPLICA status under the Replication status.

You can also use CloudWatch metrics to monitor the replication. First, you need to enable metrics for each of the rules. And then in the bucket Metrics, you can choose which rules you want to see the metrics of and see the charts for each of them; the metrics are also available in the CloudWatch console.

Screenshot of replication metrics

Availability
S3 Replication (multi-destination) is available today in all AWS Regions. To get started, you can use the AWS Management Console, SDKs, S3 API, or AWS CloudFormation to create replication rules from one source bucket to multiple destination buckets.

Pricing for S3 Replication (multi-destination) applies for each rule. For pricing information, please visit the Amazon S3 pricing page.

For more information about this new feature visit the S3 Replication page.

Marcia


New AWS Amplify Admin UI Helps You Develop App Backends, No Cloud Experience Required

Post Syndicated from Marcia Villalba original https://aws.amazon.com/blogs/aws/aws-amplify-admin-ui-helps-you-develop-app-backends-no-cloud-experience-required/

Today AWS Amplify announces new Admin UI to configure an application backend, and manage app users and content outside the AWS console. This new feature makes it easier to use AWS services and accelerates the development and management of full-stack web and mobile apps.

We launched AWS Amplify in November 2018, and since then it has been helping front-end web and mobile developers to quickly develop and deploy cloud-connected web and mobile applications. In order to stay ahead of the curve and deliver innovation to customers, businesses need to ship features fast. However, developers and non-developers who are unfamiliar with AWS fundamentals require training, which slows the entire process down.

AWS Amplify today launches a new Admin UI that enables team members to interface with AWS without requiring an AWS account (only the first deployment requires an AWS account).

The Admin UI provides simple yet powerful tools to model database tables, add authentication and authorization, and manage app content, users, and groups. It also offers the ability to manage the application users and content. The AWS Amplify Admin UI focuses on data types rather than backend infrastructure. All the backend resources generate infrastructure as code (IaC) templates that can be committed in the team repository and integrated with AWS Amplify continuous deployment workflow to manage the different environments.

Let’s Look at an Example Using the New AWS Amplify Admin UI
Imagine that you are a front-end web developer creating a website for a local restaurant. The restaurant owner wants to have a website where they can show their daily menu, and wants a simple way to update the content of the page every day.

There are many ways to solve this problem. You can spin up a server and install a CMS for the restaurant owner to manage the menu. For this particular use case, having a server exclusively to do this is just over-provisioning resources. Or, you can create the CMS yourself using serverless tools; however, this adds a lot of complexity and extra time to the development cycle.

Another option is to use the new AWS Amplify Admin UI that allows you to take advantage of many AWS managed services to create the backend quickly and also provides the ability to manage the application users and content.

The first thing you need to do is to create a new AWS Amplify app backend in the AWS Console. AWS Amplify will create a backend environment called staging. When, your app backend is ready, open the new Admin UI. If you would like to get another developer working on this application who doesn’t have experience with AWS, nor access to the AWS account, now you can grant access to them so they can continue the work on the UI. But for now, let’s imagine that you are going to do all the development.

Screenshot of opening the admin ui

The Admin UI contains all the tools that application developers need to configure the application backend and that content managers need to update the application content.

In the sidebar of the Admin UI (as shown in the following illustration), you can find all the different options for setting up your application.

To get started with the restaurant website, you need a menu data model. For that, first go to Data (1), then create a new data model call Menu (2), add the necessary fields and Save and deploy (3) the model. Saving and deploying the model will create all the needed AWS resources in the backend, like an AWS AppSync API and a Amazon DynamoDB table to host the menu items. Deploying takes a few minutes.

Screenshot for data modeling

After your model is deployed, you can start working on your website. For this example I will be using React, one of the web frameworks supported by AWS Amplify, but you can do the same example with any of the supported frameworks.

First, you need to install the AWS Amplify CLI:

npm install -g @aws-amplify/cli

Then create a new React application:

npx create-react-app react-amplified
cd react-amplified

When your application is created, you can configure it with the AWS Amplify application we just created. For that, go back to the Admin UI and select Local setup instructions (1), and execute the amplify command (2) in the directory where the web application is stored in your computer.

Screenshot of pulling amplify configuration

When you execute that command, a browser window will open that asks you if you are sure that you want to log in to the AWS Amplify Admin UI. Selecting yes will grant the AWS Amplify CLI access to deploy updates to the backend directly from your local desktop. The CLI will prompt you with a few questions about your local environment, and finally will ask if you plan to modify this backend locally. Choose yes.

When that process ends, you will notice some changes in your web application directory: a couple of new directories were created (amplify and src/models) and also a new file (aws-exports.js). These files and directories hold all the configuration for your AWS Amplify application.

Now it’s time to develop your application. To access the menu data model you created in the first steps, you will use the DataStore library from AWS Amplify. DataStore allows you to connect to your deployed database and perform CRUD, sort and filter operations from your UI to manipulate backend data. In the Admin UI, you can see some examples on how to create, update, delete and query the model.

Screenshot of using the data model

When the website is ready, it’s time to add some content. The restaurant owner is the one adding the menu items. In order for them to be able to add items, they need to have permissions to access the Admin UI for this application.

To do this, you need to create a new Admin UI account for the restaurant owner with the correct permissions. Go to the AWS Amplify console for your application and then to the Admin UI management and invite users.

When adding new users to the Admin UI you can define their permission scope. If you want to grant them full access, they will be able to configure and manage the application backend environment, and if you want them just to be able to edit the content, you can give them the manage only access scope. For the restaurant owner grant manage only permissions.

Screenshot for inviting new users to the AdminUI

After sending the invite, the restaurant owner will receive an email with a link to access the Admin UI and a username and password to log in. When they log in, they can go to the Content tab (1) and start adding items in their menu (2) and they can see the items available in the table in the screen (3).

Screenshot adding new content

From this screen, the restaurant owner can add, delete and edit items in their menu whenever they want to. These changes are reflected in the website immediately after they save.

The use cases for Admin UI are endless, such as blogs, e-commerce sites, planning apps, etc. Developers can build complex and feature-rich apps by focusing on their domain-specific data model instead of spending hours deploying and stitching together cloud infrastructure. AWS Amplify gives front-end developers the fastest and easiest way to develop mobile and web apps. And all accessible to developers that are not familiar with the cloud and without the need to give AWS access to everybody in the team.

Availability
AWS Amplify Admin UI is available at launch in: US East (N. Virginia), US East (Ohio), US West (Oregon), Asia Pacific (Mumbai), Asia Pacific (Seoul), Asia Pacific (Singapore), Asia Pacific (Sydney), Asia Pacific (Tokyo), Canada (Central), Europe (Frankfurt), Europe (Ireland), and Europe (London).

For more information, visit the Amplify service page. Get started building a data model without an AWS account in the sandbox experience.

Marcia

Amazon Lookout for Vision – New ML Service Simplifies Defect Detection for Manufacturing

Post Syndicated from Marcia Villalba original https://aws.amazon.com/blogs/aws/amazon-lookout-for-vision-new-machine-learning-service-that-simplifies-defect-detection-for-manufacturing/

Today, I’m excited to announce Amazon Lookout for Vision, a new machine learning (ML) service that helps customers in industrial environments to detect visual defects on production units and equipment in an easy and cost-effective way.

Can you spot the circuit board with the defect in these images?

Image of 3 circuit boards - one is faulty

Maybe you can if you are familiar with circuit boards, but I have to say that it took me a while to discover the error. Humans, when properly trained and are well rested, are great at finding anomalies in a set of objects. However, when they are tired or not properly trained – like me in this example – they can be slow, prone to errors and inconsistent.

That’s why many companies use machine vision technologies to detect anomalies. However, these technologies need to be calibrated with controlled lighting and camera viewpoints. In addition, you need to specify hard-coded rules that define what is a defect and what is not, making the technologies very specialized and complex to build.

Lookout for Vision is a new machine learning service that helps increase industrial product quality and reduce operational costs by automating visual inspection of product defects across production processes. Lookout for Vision uses deep learning models to replace hard-coded rules and handles the differences in camera angle, lighting and other challenges that arise from the operational environment. With Lookout for Vision, you can reduce the need for carefully controlled environments.

Using Lookout for Vision, you can detect damages to manufactured parts, identify missing components or parts, and uncover underlying process-related issues in your manufacturing lines.

How to Get Started With Lookout for Vision
The first thing I want to mention is that to use Lookout for Vision, you don’t need to be a machine learning expert. Lookout for Vision is a fully managed service and comes with anomaly detection models that can be optimized for your use case and your data.

There are several steps for using Lookout for Vision. The first is preparing the dataset, which includes creating a dataset of images and adding labels to the images. Then, Lookout for Vision uses this dataset to automatically train the ML model that learns to detect anomalies in your product. The final part is using the model in production. You can keep evaluating the performance of your trained model and improve it at any time using tools that Lookout for Vision provides.

Service console tutorial for getting started

Preparing the Data
To get started with the model, you first need a set of images of your product. For better results, include images with normal (no defects) and anomalous content (includes defects). To get started with training, you will need at least 20 normal images and 10 anomalous images.

There are many ways of importing images into Lookout for Vision from the AWS Management Console: You can provide manifests for annotated images using the Amazon SageMaker Ground Truth service, provide images from an S3 bucket or upload directly from your computer.

Different ways to import your images.

After you upload the images, you need to add labels to classify the images in your dataset as normal or anomalous. Labeling is a very important step, as this is the key information that Lookout for Vision uses to train the model for your use case.

For this demo, I import the images from an S3 bucket. If you’ve organized the images in your S3 bucket by folder name (/anomaly/01.jpeg), Lookout for Vision will automatically import the folder structure into corresponding labels.

Training the Model
When our dataset is ready, we need to train our model with it. The training button is enabled once you have the minimum number of labeled images: 20 normal and 10 anomalous.

Depending on the size of the dataset, training may take a while to complete: for me, it took around an hour to train the model with 100 images. Note that you will begin incurring costs when Lookout for Vision starts to actually train the model. After training is complete, your model is ready to detect anomalies in new images.

Screenshot of a model in training.

Evaluating the Model
There are a couple of ways to evaluate whether your model is ready to be deployed to production. The first is to review the performance metrics of the model and the second is to run some productionlike tests that will help you to verify if the model is ready to be deployed.

There are three main performance metrics: precision, recall and the F1 score. Precision measures the percentage of times the model prediction is correct and recall measures the percentage of true defects the model identified. F1 score is used to determine the model performance metric.

Screenshot of model performance metrics

If you want to run some production-like tests to verify if your model is ready, use the run trial detection feature. This will enable you to run your Lookout for Vision model and predict anomalies on new images. You can further improve the model by manually verifying the results and adding new training images.

Create a new job to predict anomalies.

I used the three images that appear at the beginning of this post for my trial detection. The trial detection job ran for 15-20 minutes, and after that Lookout for Vision used the trained model to classify the images into “Normal” and “Anomaly.” When Lookout for Vision finalizes the trial detection job, you can verify the results as correct or incorrect, and add this images to the dataset.

Screenshot verifying the results of the trial

Using the Model in Production
To use Lookout for Vision, you need to integrate the AWS SDKs or CLI in the systems that are processing the images of the products in the manufacturing line, and internet connectivity is required for this to work. The first thing you need to do is to start the model. When using Lookout for Vision, you are billed for the time your model is running and making inferences. For example, if you start your model at 8 a.m. and stop it at 5 p.m., you will be billed for 9 hours.

# Example CLI
aws lookoutvision start-model 
--project-name circuitBoard 
--model-version 1
--additional-output-config "Bucket=<OUTPUT_BUCKET>,Prefix=<PREFIX_KEY>" 
--min-anomaly-detection-units 10 

# Example response
{ "status" : "STARTING_HOSTING" }

When your model is ready, you can call the detect-anomalies API from Lookout for Vision.

# Example CLI
aws lookoutvision detect-anomalies 
--project-name circuitBoard 
--model-version 1 

And this API will return a JSON response that shows if the image is an anomaly or not, along with the confidence level of that prediction.

{
    "DetectAnomalyResult": {
        "Source": {
            "Type": "direct"
        },
        "IsAnomalous": true,
        "Confidence": 0.97
    }
}

When you are done with detecting anomalies for the day, use the stop-model API. In the Lookout for Vision service console you can find code snippets on how to use these APIs.

When you are using Lookout for Vision in production, you’ll find a dashboard that helps you to sort and track the production lines by most defective line, line with the most recent defects, and the line with the highest anomaly ratio.

Available Today
Lookout for Vision is available in all AWS Regions.

To get started with Amazon Lookout for Vision, visit the service page today.

Marcia

S3 Intelligent-Tiering Adds Archive Access Tiers

Post Syndicated from Marcia Villalba original https://aws.amazon.com/blogs/aws/s3-intelligent-tiering-adds-archive-access-tiers/

We launched S3 Intelligent-Tiering two years ago, which added the capability to take advantage of S3 without needing to have a deep understanding of your data access patterns. Today we are launching two new optimizations for S3 Intelligent-Tiering that will automatically archive objects that are rarely accessed. These new optimizations will reduce the amount of […]