All posts by Marcia Villalba

Now Open–AWS Region in the United Arab Emirates (UAE)

Post Syndicated from Marcia Villalba original https://aws.amazon.com/blogs/aws/now-open-aws-region-in-the-united-arab-emirates-uae/

View of Abu Dhabi in the United Arab EmiratesThe AWS Region in the United Arab Emirates is now open. The official name is Middle East (UAE), and the API name is me-central-1. You can start using it today to deploy workloads and store your data in the United Arab Emirates. The AWS Middle East (UAE) Region is the second Region in the Middle East, joining the AWS Middle East (Bahrain) Region.

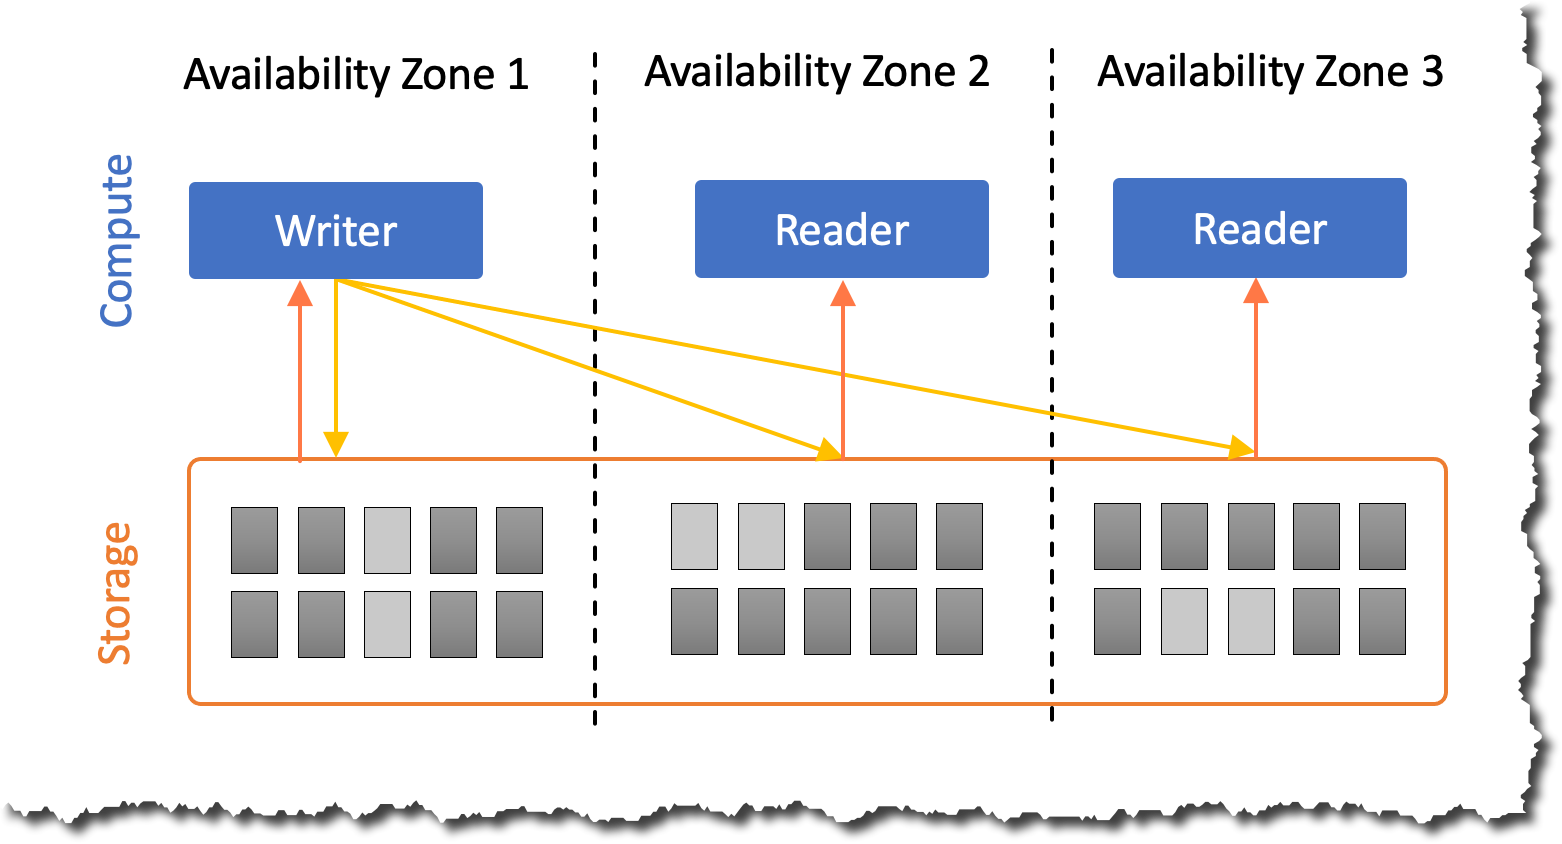
The Middle East (UAE) Region has three Availability Zones that you can use to reliably spread your applications across multiple data centers. Each Availability Zone is a fully isolated partition of AWS infrastructure that contains one or more data centers.

Availability Zones are in separate and distinct geographic locations with enough distance to reduce the risk of a single event affecting the availability of the Region but near enough for business continuity for applications that require rapid failover and synchronous replication. This gives you the ability to operate production applications that are more highly available, more fault-tolerant, and more scalable than would be possible from a single data center.

Instances and Services
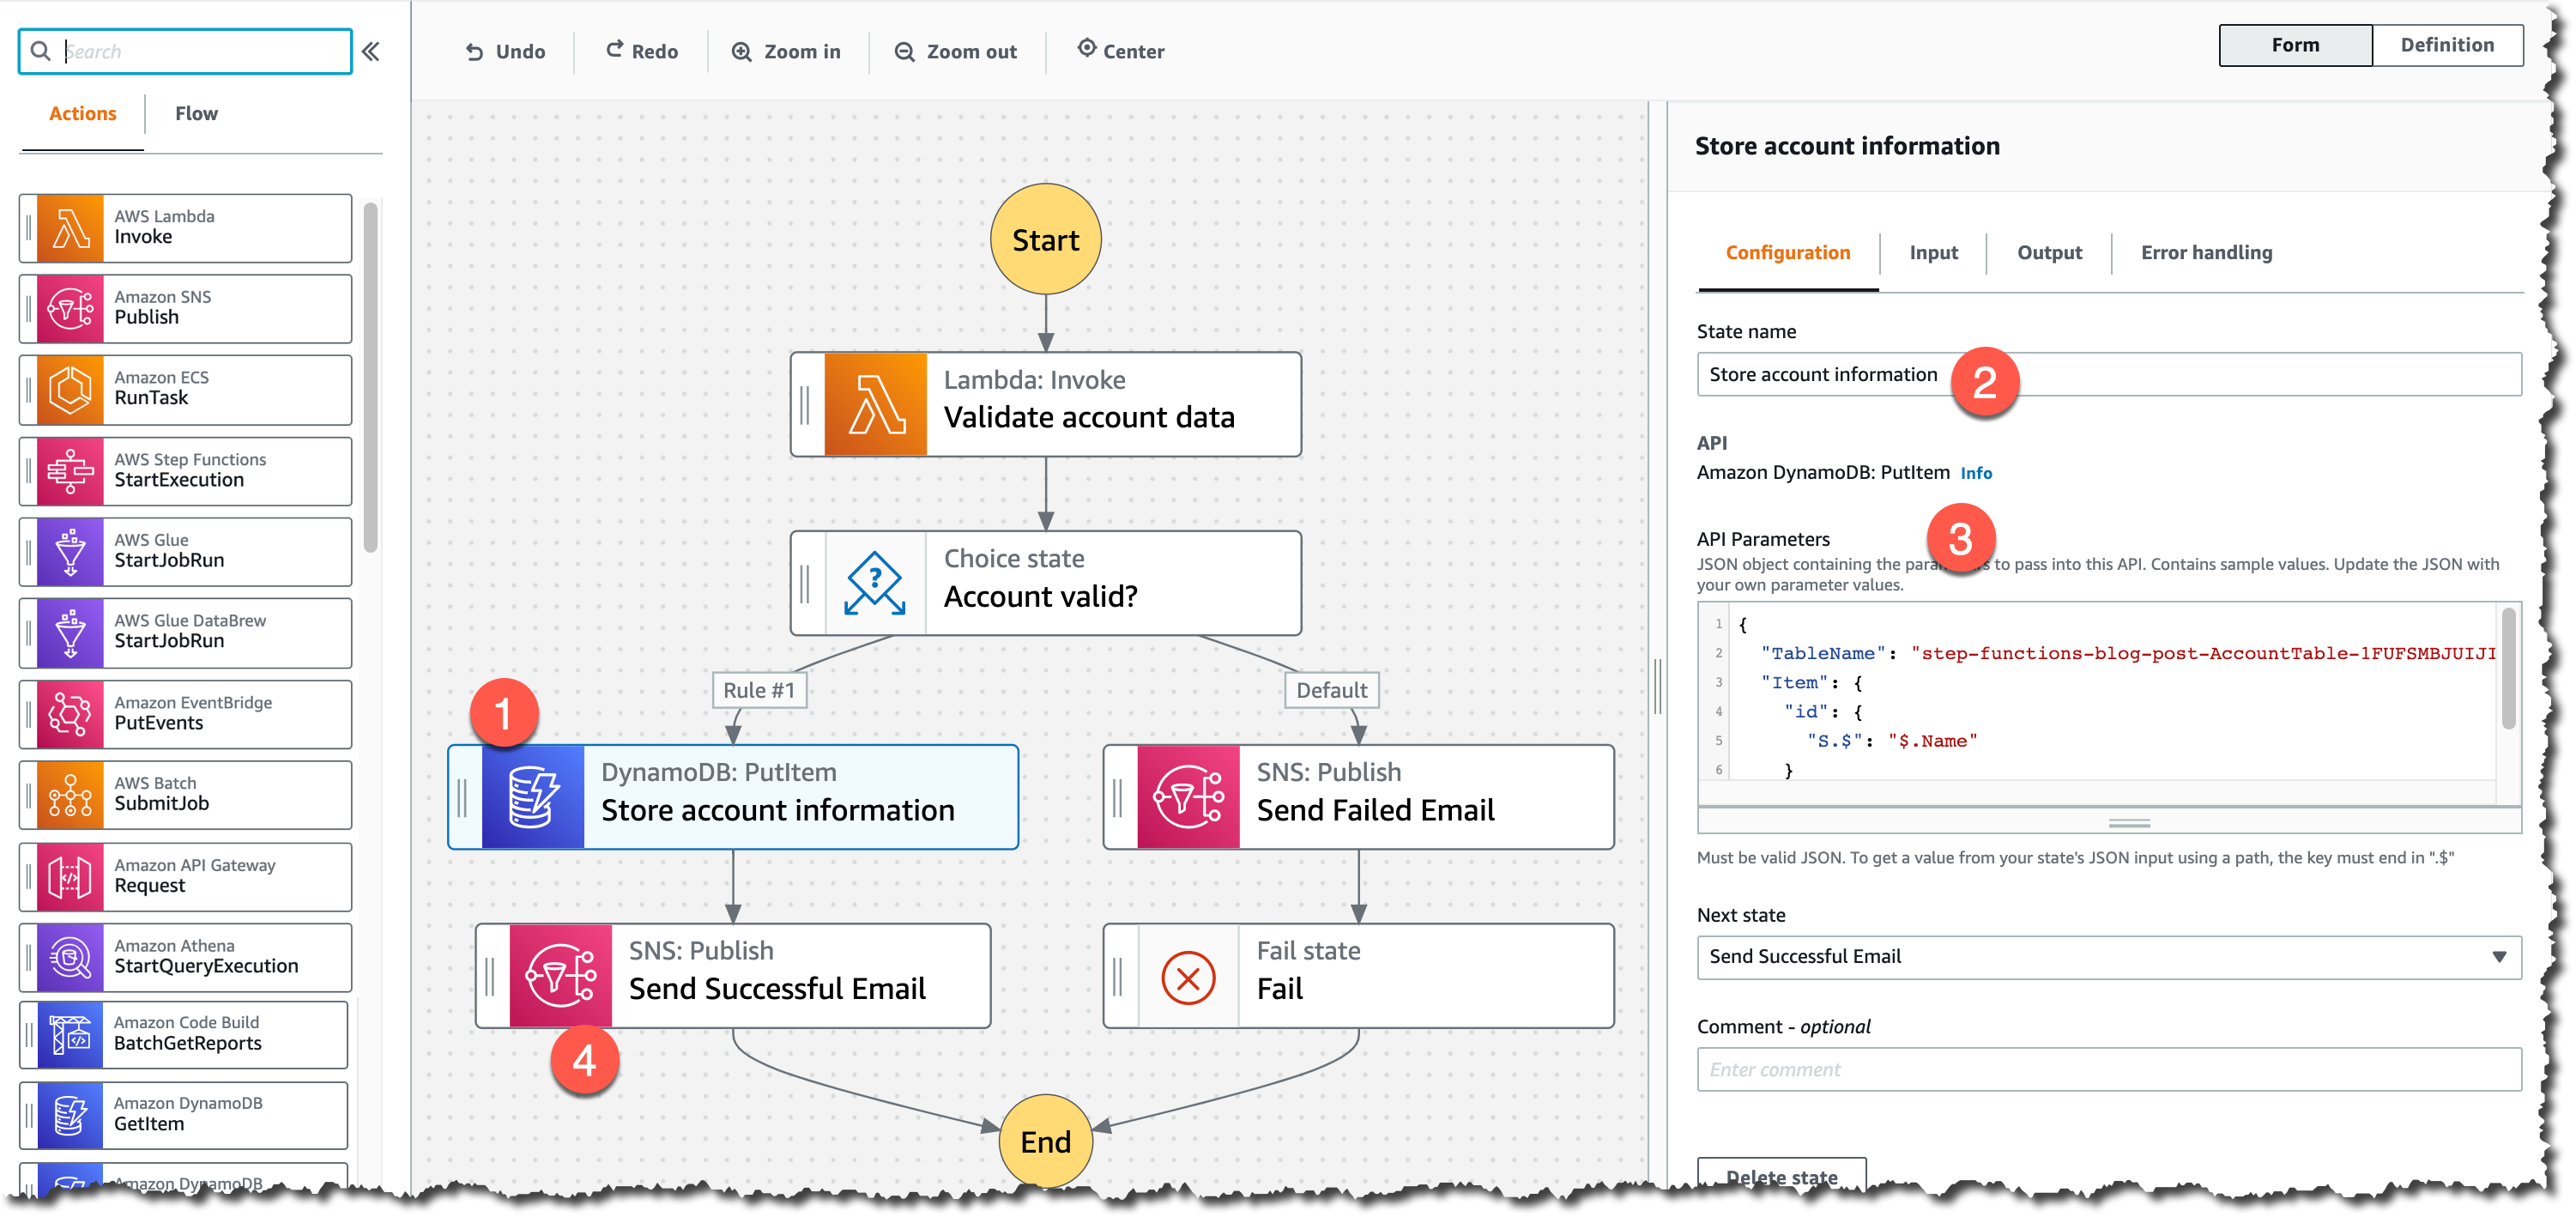
Applications running in this three-AZ Region can use C5, C5d, C6g, M5, M5d, M6g, M6gd, R5, R5d, R6g, I3, I3en, T3, and T4g instances, and can use a long list of AWS services including: Amazon API Gateway, Amazon Aurora, AWS AppConfig, Amazon CloudWatch, Amazon CloudWatch Logs, Amazon DynamoDB, Amazon EC2 Auto Scaling, Amazon ElastiCache, Amazon Elastic Block Store (Amazon EBS), Elastic Load Balancing, Amazon Elastic Compute Cloud (Amazon EC2), Amazon Elastic Container Registry (Amazon ECR), Amazon Elastic Container Service (Amazon ECS), Amazon EMR, Amazon OpenSearch Service, Amazon EventBridge, Amazon Kinesis Data Streams, Amazon Redshift, Amazon Relational Database Service (Amazon RDS), Amazon Route 53, Amazon Simple Notification Service (Amazon SNS), Amazon Simple Queue Service (Amazon SQS), Amazon Simple Storage Service (Amazon S3), Amazon Simple Workflow Service (Amazon SWF), Amazon Virtual Private Cloud (Amazon VPC), AWS Application Auto Scaling, AWS Certificate Manager, AWS CloudFormation, AWS CloudTrail, AWS CodeDeploy, AWS Config, AWS Database Migration Service, AWS Direct Connect, AWS Identity and Access Management (IAM), AWS Key Management Service (AWS KMS), AWS Lambda, AWS Marketplace, AWS Health Dashboard, AWS Secrets Manager, AWS Step Functions, AWS Support API, AWS Systems Manager, AWS Trusted Advisor, VM Import/Export, AWS VPN, and AWS X-Ray.

AWS in the Middle East
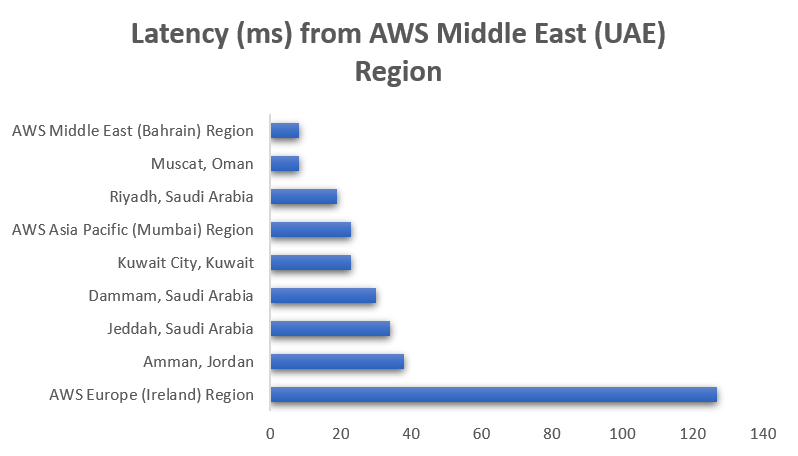
In addition to the two Regions—Bahrain and UAE—the Middle East has two AWS Direct Connect locations, allowing customers to establish private connectivity between AWS and their data centers and offices, as well as two Amazon CloudFront edge locations, one in Dubai and another in Fujairah. The UAE Region also offers low-latency connections to other AWS Regions in the area, as shown in the following chart:

Chart showing Latency (ms) from AWS Middle East UAE Region. To AWS Europe (Ireland) Region 127 ms. To Amman, Jordan 38 ms. To Jeddah, Saudi Arabia 34 ms. To Dammam, Saudi Arabia 30 ms. To Kuwait City, Kuwait 23 ms. To AWS Asia Pacific (Mumbai) Region 23 ms. To Riyadh, Saudi Arabia 19 ms. To Muscat, Oman 8 ms. To AWS Middle East (Bahrain) Region 8 ms.

Since 2017, AWS has established offices in Dubai and Bahrain along with a broad network of partners. We continue to build our teams in the Middle East by adding account managers, solutions architects, business developers, and professional services consultants to help customers of all sizes build or move their workloads to the cloud. Visit the Amazon career page to check out the roles we are hiring for.

In addition to Infrastructure, AWS continues to make investments in education initiatives, training, and start-up enablement to support UAE’s digital transformation and economic development plans.

  • AWS Activate – This global program provides start-ups with credits, training, and support so they can build their business on AWS.
  • AWS Training and Certification – This program helps developers build cloud skills using digital or classroom training and to validate those skills by earning an industry-recognized credential.
  • AWS Educate and AWS Academy – These programs provide higher education institutions, educators, and students with cloud computing courses and certifications.

AWS Customers in the Middle East
We have many amazing customers in the Middle East that are doing incredible things with AWS, for example:

The Ministry of Health and Prevention (MoHAP) implements the health care policy in the UAE. MoHAP is working with AWS to modernize their patient experience. With AWS, MoHAP can connect 100 percent of care providers—public and private—to further enhance their data strategy to support predictive and population health programs.

GEMS Education is one of the largest private K–12 operators in the world. Using AWS services like artificial intelligence and machine learning, GEMS developed an all-in-one integrated ED Tech platform called LearnOS. This platform supports teachers and creates personalized learning experiences. For example, with the use of Amazon Rekognition, they reduced 93 percent of the time spent in marking attendance. They also developed an automated quiz generation and assessment platform using Amazon EC2 and Amazon SageMaker. In addition, the algorithms can predict student year-end performance with up to 95 percent accuracy and recommend personalized reading materials.

YAP is a fast-growing regional financial super app that focuses on improving the digital banking experience. It functions as an independent app with no physical branches, making it the first of its kind in the UAE. AWS has helped fuel YAP’s growth and enabled them to scale to become a leading regional FinTech, giving them the elasticity to control costs as their user base has grown to over 130,000 users. With AWS, YAP can scale fast as they launch new markets, reducing the time to build and deploy complete infrastructure from months to weeks.

Available Now
The new Middle East (UAE) Region is ready to support your business. You can find a detailed list of the services available in this Region on the AWS Regional Service List.

With this launch, AWS now spans 87 Availability Zones within 27 geographic Regions around the world. We also have announced plans for 21 more Availability Zones and seven more AWS Regions in Australia, Canada, India, Israel, New Zealand, Spain, and Switzerland.

For more information on our global infrastructure, upcoming Regions, and the custom hardware we use, visit the Global Infrastructure page.

Marcia

AWS Week in Review – August 22, 2022

Post Syndicated from Marcia Villalba original https://aws.amazon.com/blogs/aws/aws-week-in-review-august-22-2022/

This post is part of our Week in Review series. Check back each week for a quick roundup of interesting news and announcements from AWS!

I’m back from my summer holidays and ready to get up to date with the latest AWS news from last week!

Last Week’s Launches
Here are some launches that got my attention during the previous week.

Amazon CloudFront now supports HTTP/3 requests over QUIC. The main benefits of HTTP/3 are faster connection times and fewer round trips in the handshake process. HTTP/3 is available in all 410+ CloudFront edge locations worldwide, and there is no additional charge for using this feature. Read Channy’s blog post about this launch to learn more about it and how to enable it in your applications.

Using QUIC in HTTP3 vs HTTP2

Amazon Chime has announced a couple of really cool features for their SDK. Now you can compose video by concatenating video with multiple attendees, including audio, content and transcriptions. Also, Amazon Chime SDK launched the live connector pipelines that send real-time video from your applications to streaming platforms such as Amazon Interactive Video Service (IVS) or AWS Elemental MediaLive. Now building real-time streaming applications becomes easier.

AWS Cost Anomaly Detection has launched a simplified interface for anomaly exploration. Now it is easier to monitor spending patterns to detect and alert anomalous spend.

Amazon DynamoDB now supports bulk imports from Amazon S3 to a new table. This new launch makes it easier to migrate and load data into a new DynamoDB table. This is a great use for migrations, to load test data into your applications, thereby simplifying disaster recovery, among other things.

Amazon MSK Serverless, a new capability from Amazon MSK launched in the spring of this year, now has support for AWS CloudFormation and Terraform. This allows you to describe and provision Amazon MSK Serverless clusters using code.

For a full list of AWS announcements, be sure to keep an eye on the What’s New at AWS page.

Other AWS News
Some other updates and news that you may have missed:

This week there were a couple of stories that caught my eye. The first one is about Grillo, a social impact enterprise focused on seismology, and how they used AWS to build a low-cost earthquake early warning system. The second one is from the AWS Localization team about how they use Amazon Translate to scale their localization in order to remove language barriers and make AWS content more accessible.

Podcast Charlas Técnicas de AWS – If you understand Spanish, this podcast is for you. Podcast Charlas Técnicas is one of the official AWS podcasts in Spanish, and every other week there is a new episode. The podcast is meant for builders, and it shares stories about how customers implemented and learned to use AWS services, how to architect applications, and how to use new services. You can listen to all the episodes directly from your favorite podcast app or at AWS Podcast en español.

Upcoming AWS Events
Check your calendars and sign up for these AWS events:

AWS Summits – Registration is open for upcoming in-person AWS Summits. Find the one closest to you: Chicago (August 28), Canberra (August 31), Ottawa (September 8), New Delhi (September 9), Mexico City (September 21–22), Bogota (October 4), and Singapore (October 6).

GOTO EDA Day 2022 – Registration is open for the in-person event about Event Driven Architectures (EDA) hosted in London on September 1. There will be a great line of speakers talking about the best practices for building EDA with serverless services.

AWS Virtual Workshop – Registration is open for the free virtual workshop about Amazon DocumentDB: Getting Started and Business Continuity Planning on August 24.

AWS .NET Enterprise Developer Days 2022Registration for this free event is now open. This is a 2-day, in-person event on September 7-8 at the Palmer Events Center in Austin, Texas, and a 2-day virtual event on September 13-14.

That’s all for this week. Check back next Monday for another Week in Review!

— Marcia

How Grillo Built a Low-Cost Earthquake Early Warning System on AWS

Post Syndicated from Marcia Villalba original https://aws.amazon.com/blogs/aws/how-grillo-built-a-low-cost-earthquake-early-warning-system-on-aws/

It is estimated that 50 percent of the injuries caused when a high magnitude earthquake affects an area are because of falls or falling hazards. This means that most of these injuries could have been prevented if the population had a few seconds of warning to take cover. Grillo, a social impact enterprise focused on seismology, created a low-cost solution using AWS that senses earthquakes and alerts the population in real time about the dangers in the area.

Earthquakes can happen at any time, and there are two actions cities can take to mitigate the damages. First is structural refitting, that is, building structures that can resist earthquakes. This solution doesn’t apply to many areas because they require big investments. The second solution is to send an alert to the affected population before the shaking reaches them. Ten to sixty seconds can be enough time for people to take action by getting out of a building, taking cover, or turning off a dangerous machine.

Earthquake Early Warning (EEW) systems provide rapid detection of earthquakes and alert people at risk. However, because of the hardware, infrastructure, and technology involved, traditional EEW systems can cost hundreds of millions of US dollars to deploy—a cost too high for most countries.

Andrés Meira was living in Haiti during the 2010 earthquake that claimed over 100,000 human lives and left many people homeless and injured. It is estimated that the earthquake affected three million people. He later moved to Mexico, where in 2017, he experienced another high-magnitude earthquake. As a result, Andrés founded Grillo to develop an accessible EEW system, and its solution has been operating successfully in Mexico since 2017.

Grillo developed a low-cost EEW system using sensors and cloud computing. This system uses off-the-shelf sensors that are placed in buildings near seismically active zones. Grillo sensors cost approximately $300 USD, compared to the traditional seismometers that cost around $10,000 USD. Because of these inexpensive sensors, Grillo can offer a higher density of sensors, which reduces the time needed to issue an alert and gives people more time for action. This benefits the population because higher density increases the accuracy of the location detection, reduces false positives, and reduces times to alert.

How sensors are placed

How Grillo sensors are placed

Grillo’s sensors transmit data to the cloud as the shaking is happening. The cloud platform Grillo built on AWS uses machine learning models that can determine and alert in almost real time, with an average latency of 2 to 3 seconds if an earthquake is happening, depending on the data sent by the different sensors. When the cloud platform detects earthquake risk, it sends alerts to nearby populations via a native phone application, IoT loudspeakers placed in populated areas, or by SMS.

Grillo data flow

How data flows from the shaking to the end users

OpenEEW
In addition, Grillo founded the OpenEEW initiative to enable EEW systems for millions of people who live in areas with earthquake risks. This features the sensor hardware schematics, firmware, dashboard, and other elements of the system as open source, with a permissive license for anyone to use freely.

In this initiative, they also share on the Registry of Open Data on AWS all the data produced from the sensors deployed in Mexico, Chile, Puerto Rico, and Costa Rica for different organizations to learn from it and also to train machine learning models.

Low cost sensor

Low-cost sensor

Grillo in Haiti
Haiti ranks among the countries with the highest seismic risk in the world. Large magnitude earthquakes hit Haiti in 2020 and 2021. Currently, Grillo is working to establish their low-cost EEW system in southern Haiti, where most of the large seismic events in the past decade have occurred. This area is home to over three million people.

Over the course of 2021, Grillo installed over 100 sensors in Puerto Rico. And during 2022, they have focused on deploying sensors in the nationwide cell tower network of Haiti. Also during this year, they will calibrate the machine learning models with data from the new sensors in order to correctly predict when there is earthquake risk. Finally, they will develop an SMS alert system with Digicel, a local telecommunication company. Grillo plans to complete the deployment of the south Haiti EEW system by the end of 2022.

School in southern Haiti where alarm systems are placed

School in southern Haiti where alarm systems are placed

Learn more
Grillo partnered with the AWS Disaster Response team to achieve their goals. AWS helped Grillo to migrate their initial system to AWS and provided expert technical assistance on how to use Amazon SageMaker and AWS IoT services. AWS also provided credits to run the system and financial help to build the sensors.

Check the AWS Disaster Response page to learn more about the projects they are currently working on. And visit the Grillo home page to learn more about their EEW system.

Marcia

AWS Week in Review – July 4, 2022

Post Syndicated from Marcia Villalba original https://aws.amazon.com/blogs/aws/aws-week-in-review-july-04-2022/

This post is part of our Week in Review series. Check back each week for a quick roundup of interesting news and announcements from AWS!

Summer has arrived in Finland, and these last few days have been hotter than in the Canary Islands! Today in the US it is Independence Day. I hope that if you are celebrating, you’re having a great time. This week I’m very excited about some developer experience and artificial intelligence launches.

Last Week’s Launches
Here are some launches that got my attention during the previous week:

AWS SAM Accelerate is now generally available – SAM Accelerate is a new capability of the AWS Serverless Application Model CLI, which makes it easier for serverless developers to test code changes against the cloud. You can do a hot swap of code directly in the cloud when making a change in your local development environment. This allows you to develop applications faster. Learn more about this launch in the What’s New post.

Amplify UI for React is generally available – Amplify UI is an open-source UI library that helps developers build cloud-native applications. Amplify UI for React comes with over 35 components that you can use, an authentication component that allows you to connect to your backend with no extra configuration, theming for your components. You can also build your UI using Figma. Check the Amplify UI for React site to learn more about all the capabilities offered.

Amazon Connect has new announcements – First, Amazon Connect added support to personalize the flows of the customer experience using Amazon Lex sentiment analysis. It also added support to branch out the flows depending on Amazon Lex confidence scores. Lastly, it added confidence scores to Amazon Connect Customer Profiles to help companies merge duplicate customer records.

Amazon QuickSight – QuickSight authors can now learn and experience Q before signing up. Authors can choose from six different sample topics and explore different visualizations. In addition, QuickSight now supports Level Aware Calculations (LAC) and rolling date functionality. These two new features bring flexibility and simplification to customers to build advanced calculation and dashboards.

Amazon SageMaker – RStudio on SageMaker now allows you to bring your own development environment in a custom image. RStudio on SageMaker is a fully managed RStudio Workbench in the cloud. In addition, SageMaker added four new tabular data modeling algorithms: LightGBM, CatBoost, AutoGluon-Tabular, and TabTransformer to the existing set of built-in algorithms, pre-trained models and pre-built solution templates it provides.

For a full list of AWS announcements, be sure to keep an eye on the What’s New at AWS page.

Other AWS News
Some other updates and news that you may have missed:

AWS Support announced an improved experience when creating a case – There is a new interface for creating support cases in the AWS Support Center console. Now you can create a case with a simplified three-step process that guides you through the flow. Learn more about this new process in the What’s new post.

New AWS Step Functions workflows collection on Serverless Land – The Step Functions workflows collection is a new experience that makes it easier to discover, deploy, and share AWS Step Functions workflows. In this collection, you can find opinionated templates that implement the best practices to build using Step Functions. Learn more about this new collection in Ben’s blog post.

Podcast Charlas Técnicas de AWS – If you understand Spanish, this podcast is for you. Podcast Charlas Técnicas is one of the official AWS Podcasts in Spanish, which shares a new episode ever other week. The podcast is meant for builders, and it shares stories about how customers implement and learn AWS, how to architect applications, and how to use new services. You can listen to all the episodes directly from your favorite podcast app or from the AWS Podcasts en español website.

AWS open-source news and updates – A newsletter curated by my colleague Ricardo brings you the latest open-source projects, posts, events, and more.

Upcoming AWS Events
Check your calendars and sign up for these AWS events:

AWS Summit New York – Join us on July 12 for the in-person AWS Summit. You can register on the AWS Summit page for free.

AWS re:Inforce – This is an in-person learning conference with a focus on security, compliance, identity, and privacy. You can register now to access hundreds of technical sessions, and other content. It will take place July 26 and 27 in Boston, MA.

That’s all for this week. Check back next Monday for another Week in Review!

— Marcia

AWS Week in Review – May 16, 2022

Post Syndicated from Marcia Villalba original https://aws.amazon.com/blogs/aws/aws-week-in-review-may-16-2022/

This post is part of our Week in Review series. Check back each week for a quick roundup of interesting news and announcements from AWS!

I had been on the road for the last five weeks and attended many of the AWS Summits in Europe. It was great to talk to so many of you in person. The Serverless Developer Advocates are going around many of the AWS Summits with the Serverlesspresso booth. If you attend an event that has the booth, say “Hi 👋” to my colleagues, and have a coffee while asking all your serverless questions. You can find all the upcoming AWS Summits in the events section at the end of this post.

Last week’s launches
Here are some launches that got my attention during the previous week.

AWS Step Functions announced a new console experience to debug your state machine executions – Now you can opt-in to the new console experience of Step Functions, which makes it easier to analyze, debug, and optimize Standard Workflows. The new page allows you to inspect executions using three different views: graph, table, and event view, and add many new features to enhance the navigation and analysis of the executions. To learn about all the features and how to use them, read Ben’s blog post.

Example on how the Graph View looks

Example on how the Graph View looks

AWS Lambda now supports Node.js 16.x runtime – Now you can start using the Node.js 16 runtime when you create a new function or update your existing functions to use it. You can also use the new container image base that supports this runtime. To learn more about this launch, check Dan’s blog post.

AWS Amplify announces its Android library designed for Kotlin – The Amplify Android library has been rewritten for Kotlin, and now it is available in preview. This new library provides better debugging capacities and visibility into underlying state management. And it is also using the new AWS SDK for Kotlin that was released last year in preview. Read the What’s New post for more information.

Three new APIs for batch data retrieval in AWS IoT SiteWise – With this new launch AWS IoT SiteWise now supports batch data retrieval from multiple asset properties. The new APIs allow you to retrieve current values, historical values, and aggregated values. Read the What’s New post to learn how you can start using the new APIs.

AWS Secrets Manager now publishes secret usage metrics to Amazon CloudWatch – This launch is very useful to see the number of secrets in your account and set alarms for any unexpected increase or decrease in the number of secrets. Read the documentation on Monitoring Secrets Manager with Amazon CloudWatch for more information.

For a full list of AWS announcements, be sure to keep an eye on the What’s New at AWS page.

Other AWS News
Some other launches and news that you may have missed:

IBM signed a deal with AWS to offer its software portfolio as a service on AWS. This allows customers using AWS to access IBM software for automation, data and artificial intelligence, and security that is built on Red Hat OpenShift Service on AWS.

Podcast Charlas Técnicas de AWS – If you understand Spanish, this podcast is for you. Podcast Charlas Técnicas is one of the official AWS podcasts in Spanish. This week’s episode introduces you to Amazon DynamoDB and shares stories on how different customers use this database service. You can listen to all the episodes directly from your favorite podcast app or the podcast web page.

AWS Open Source News and Updates – Ricardo Sueiras, my colleague from the AWS Developer Relation team, runs this newsletter. It brings you all the latest open-source projects, posts, and more. Read edition #112 here.

Upcoming AWS Events
It’s AWS Summits season and here are some virtual and in-person events that might be close to you:

You can register for re:MARS to get fresh ideas on topics such as machine learning, automation, robotics, and space. The conference will be in person in Las Vegas, June 21–24.

That’s all for this week. Check back next Monday for another Week in Review!

— Marcia

Amazon MSK Serverless Now Generally Available–No More Capacity Planning for Your Managed Kafka Clusters

Post Syndicated from Marcia Villalba original https://aws.amazon.com/blogs/aws/amazon-msk-serverless-now-generally-available-no-more-capacity-planning-for-your-managed-kafka-clusters/

Today we are making Amazon MSK Serverless generally available to help you reduce even more the operational overhead of managing an Apache Kafka cluster by offloading the capacity planning and scaling to AWS.

In May 2019, we launched Amazon Managed Streaming for Apache Kafka to help our customers stream data using Apache Kafka. Apache Kafka is an open-source platform that enables customers to capture streaming data like clickstream events, transactions, and IoT events. Apache Kafka is a common solution for decoupling applications that produce streaming data (producers) from those consuming the data (consumers). Amazon MSK makes it easy to ingest and process streaming data in real time with fully managed Apache Kafka clusters.

Amazon MSK reduces the work needed to set up, scale, and manage Apache Kafka in production. With Amazon MSK, you can create a cluster in minutes and start sending data. Apache Kafka runs as a cluster on one or more brokers. Brokers are instances with a given compute and storage capacity distributed in multiple AWS Availability Zones to create high availability. Apache Kafka stores records on topics for a user-defined period of time, partitions those topics, and then replicates these partitions across multiple brokers. Data producers write records to topics, and consumers read records from them.

When creating a new Amazon MSK cluster, you need to decide the number of brokers, the size of the instances, and the storage that each broker has available. The performance of an MSK cluster depends on these parameters. These settings can be easy to provide if you already know the workload. But how will you configure an Amazon MSK cluster for a new workload? Or for an application that has variable or unpredictable data traffic?

Amazon MSK Serverless
Amazon MSK Serverless automatically provisions and manages the required resources to provide on-demand streaming capacity and storage for your applications. It is the perfect solution to get started with a new Apache Kafka workload where you don’t know how much capacity you will need or if your applications produce unpredictable or highly variable throughput and you don’t want to pay for idle capacity. Also, it is great if you want to avoid provisioning, scaling, and managing resource utilization of your clusters.

Amazon MSK Serverless comes with a lot of secure features out of the box, such as private connectivity. This means that the traffic doesn’t leave the AWS backbone, AWS Identity and Access Management (IAM) access control, and encryption of your data at rest and in transit, which keeps it secure.

An Amazon MSK Serverless cluster scales capacity up and down instantly based on the application requirements. When Apache Kafka clusters are scaled horizontally (that is, more brokers are added), you also need to move partitions to these new brokers to make use of the added capacity. With Amazon MSK Serverless, you don’t need to scale brokers or do partition movement.

Each Amazon MSK Serverless cluster provides up to 200 MBps of write-throughput and 400 MBps of read-throughput. It also allocates up to 5 MBps of write-throughput and 10 MBps of read-throughput per partition.

Amazon MSK Serverless pricing is based on throughput. You can learn more on the MSK’s pricing page.

Let’s see it in action
Imagine that you are the architect of a mobile game studio, and you are about to launch a new game. You invested in the game’s marketing, and you expect it will have a lot of new players. Your games send clickstream data to your backend application. The data is analyzed in real time to produce predictions on your players’ behaviors. With these predictions, your games make real-time offers that suit the current player’s behavior, encouraging them to stay in the game longer.

Your games send clickstream data to an Apache Kafka cluster. As you are using an Amazon MSK Serverless cluster, you don’t need to worry about scaling the cluster when the new game launches, as it will adjust its capacity to the throughput.

In the following image, you can see a graph of the day of the launch of the new game. It shows in orange the metric MessagesInPerSec that the cluster is consuming. And you can see that the number of messages per second is increasing first from 100, which is our base number before the launch. Then it increases to 300, 600, and 1,000 messages per second, as our game is getting downloaded and played by more and more players. You can feel confident that the volume of records can keep increasing. Amazon MSK Serverless is capable of ingesting all the records as long as your application throughput stays within the service limits.

Graph of messages in per second to the cluser

How to get started with Amazon MSK Serverless
Creating an Amazon MSK Serverless cluster is very simple, as you don’t need to provide any capacity configuration to the service. You can create a new cluster on the Amazon MSK console page.

Choose the Quick create cluster creation method. This method will provide you with the best-practice settings to create a starter cluster and input a name for your cluster.

Create a cluster

Then, in the General cluster properties, choose the cluster type. Choose the Serverless option to create an Amazon MSK Serverless cluster.

General cluster properties

Finally, it shows all the cluster settings that it will configure by default. You cannot change most of these settings after the cluster is created. If you need different values for these settings, you might need to create the cluster using the Custom create method. If the default settings work for you, then create the cluster.

Cluster settings page

Creating the cluster will take you a few minutes, and after that, you see the Active status on the Cluster summary page.

Cluster information page

Now that you have the cluster, you can start sending and receiving records using an Amazon Elastic Compute Cloud (Amazon EC2) instance. For doing that, the first step is to create a new IAM policy and IAM role. The instances need to authenticate using IAM in order to access the cluster from the instances.

Amazon MSK Serverless integrates with IAM to provide fine-grained access control to your Apache Kafka workloads. You can use IAM policies to grant least privileged access to your Apache Kafka clients.

Create the IAM policy
Create a new IAM policy with the following JSON. This policy will give permissions to connect to the cluster, create a topic, send data, and consume data from the topic.

{
    "Version": "2012-10-17",
    "Statement": [
        {
            "Effect": "Allow",
            "Action": [
                "kafka-cluster:Connect"
            ],
            "Resource": "arn:aws:kafka:<REGION>:<ACCOUNTID>:cluster/msk-serverless-tutorial/cfeffa15-431c-4af4-8725-42636fab9937-s3"
        },
        {
            "Effect": "Allow",
            "Action": [
                "kafka-cluster:DescribeTopic",
                "kafka-cluster:CreateTopic",
                "kafka-cluster:WriteData",
                "kafka-cluster:ReadData"
            ],
            "Resource": "arn:aws:kafka:<REGION>:<ACCOUNTID>:topic/msk-serverless-tutorial/cfeffa15-431c-4af4-8725-42636fab9937-s3/msk-serverless-tutorial"
        },
        {
            "Effect": "Allow",
            "Action": [
                "kafka-cluster:AlterGroup",
                "kafka-cluster:DescribeGroup"
            ],
            "Resource": "arn:aws:kafka:<REGION>:<ACCOUNTID>:group/msk-serverless-tutorial/cfeffa15-431c-4af4-8725-42636fab9937-s3/*"
        }
    ]
}

Make sure that you replace the Region and account ID with your own. Also, you need to replace the cluster, topic, and group ARN. To get these ARNs, you can go to the cluster summary page and get the cluster ARN. The topic ARN and the group ARN are based on the cluster ARN. Here, the cluster and the topic are named msk-serverless-tutorial.

"arn:aws:kafka:<REGION>:<ACCOUNTID>:cluster/msk-serverless-tutorial/cfeffa15-431c-4af4-8725-42636fab9937-s3"
"arn:aws:kafka:<REGION>:<ACCOUNTID>:topic/msk-serverless-tutorial/cfeffa15-431c-4af4-8725-42636fab9937-s3/msk-serverless-tutorial"
"arn:aws:kafka:<REGION>:<ACCOUNTID>:group/msk-serverless-tutorial/cfeffa15-431c-4af4-8725-42636fab9937-s3/*"

Then create a new role with the use case EC2 and attach this policy to the role.

Create a new role

Create a new EC2 instance
Now that you have the cluster and the role, create a new Amazon EC2 instance. Add the instance to the same VPC, subnet, and security group as the cluster. You can find that information on your cluster properties page in the networking settings. Also, when configuring the instance, attach the role that you just created in the previous step.

Cluster networking configuration

When you are ready, launch the instance. You are going to use the same instance to produce and consume messages. To do that, you need to set up Apache Kafka client tools in the instance. You can follow the Amazon MSK developer guide to get your instance ready.

Producing and consuming records
Now that you have everything configured, you can start sending and receiving records using Amazon MSK Serverless. The first thing you need to do is to create a topic. From your EC2 instance, go to the directory where you installed the Apache Kafka tools and export the bootstrap server endpoint.

cd kafka_2.13-3.1.0/bin/
export BS=boot-abc1234.c3.kafka-serverless.us-east-2.amazonaws.com:9098

As you are using Amazon MSK Serverless, there is only one address for this server, and you can find it in the client information on your cluster page.

Viewing client information

Run the following command to create a topic with the name msk-serverless-tutorial.

./kafka-topics.sh --bootstrap-server $BS \
--command-config client.properties \
--create --topic msk-serverless-tutorial --partitions 6

Now you can start sending records. If you want to see the service work under a high throughput, you can use the Apache Kafka producer performance test tool. This tool allows you to send many messages at the same time to the MSK cluster with a defined throughput and specific size. Experiment with this performance test tool, change the number of messages per second and the record size and see how the cluster behaves and adapts its capacity.

./kafka-topics.sh --bootstrap-server $BS \
--command-config client.properties \
--create --topic msk-serverless-tutorial --partitions 6

Finally, if you want to receive the messages, open a new terminal, connect to the same EC2 instance, and use the Apache Kafka consumer tool to receive the messages.

cd kafka_2.13-3.1.0/bin/
export BS=boot-abc1234.c3.kafka-serverless.us-east-2.amazonaws.com:9098
./kafka-console-consumer.sh \
--bootstrap-server $BS \
--consumer.config client.properties \
--topic msk-serverless-tutorial --from-beginning

You can see how the cluster is doing on the monitoring page of the Amazon MSK Serverless cluster.

Cluster metrics page

Availability
Amazon MSK Serverless is available in US East (Ohio), US East (N. Virginia), US West (Oregon), Europe (Frankfurt), Europe (Ireland), Europe (Stockholm), Asia Pacific (Singapore), Asia Pacific (Sydney), and Asia Pacific (Tokyo).
Learn more about this service and its pricing on the Amazon MSK Serverless feature page.

Marcia

Build a custom Java runtime for AWS Lambda

Post Syndicated from Marcia Villalba original https://aws.amazon.com/blogs/compute/build-a-custom-java-runtime-for-aws-lambda/

This post is written by Christian Müller, Principal AWS Solutions Architect and Maximilian Schellhorn, AWS Solutions Architect

When running applications on AWS Lambda, you have the option to use either one of the managed runtime versions that AWS provides or bring your own custom runtime. The following blog post provides a walkthrough of how you can create and optimize a custom runtime for Java based Lambda functions.

Builders might rely on customized or experimental runtime behavior when creating solutions in the cloud. The Java ecosystem fosters innovation and encourages experiments with the current six-month release schedule for the latest runtime versions.

However, Lambda focuses on providing stable long-term support (LTS) versions. The official Lambda runtimes are built around a combination of operating system, programming language, and software libraries that are subject to maintenance and security updates. For example, the Lambda runtime for Java supports the LTS versions Java 8 Corretto and Java 11 Corretto as of April 2022. The Java 17 Corretto version is pending. In addition, there is no provided runtime for non LTS versions like Java 15 Corretto, Java 16 Corretto, or Java 18 Corretto.

To use other language versions, Lambda allows you to create custom runtimes. Custom runtimes allow builders to provide and configure their own runtimes for running their application code. To enable communication between your custom runtime and Lambda, you can use the runtime interface client library in Java.

With the introduction of modular runtime images in Java 9 (JEP 220), it is possible to include only the Java runtime modules that your application depends on. This reduces the overall runtime size and increases performance, especially during cold-starts. In addition, there are other techniques in Java, like class data sharing and tiered compilation, which allow you to reduce the startup time of your application even further.

To combine those capabilities, this blog post provides an overview for creating and deploying a minified Java runtime on Lambda by using Java 18 Corretto. For step-by-step instructions and prerequisites, refer to the official GitHub example.

Overview of the example

In the following example, you build a custom runtime for a basic Java application that writes request headers to Amazon DynamoDB and is fronted by Amazon API Gateway.

Application architecture

The following diagram summarizes the steps to create the application and the custom runtime:

Steps to create the application custom runtime

  1. Download the preferred Java version and take advantage of jdeps, jlink and class data sharing to create a minified and optimized Java runtime based on the application code (function.jar).
  2. Create a bootstrap file with optimized starting instructions for the application.
  3. Package the application code, the optimized Java runtime, and the bootstrap file as a zip file.
  4. Deploy the runtime, including the app, to Lambda. For example, using the AWS Cloud Development Kit (CDK)

Steps 1–3 are automated and abstracted via Docker. The following section provides a high-level walkthrough of the build and deployment process. For the full version, see the Dockerfile in the GitHub example.

Creating the optimized Java runtime

1. Download the desired Java version and copy the local application code to the Docker environment and build it with Maven:

FROM amazonlinux:2

...

# Update packages and install Amazon Corretto 18, Maven and Zip
RUN yum -y update
RUN yum install -y java-18-amazon-corretto-devel maven zip

...

# Copy the software folder to the image and build the function
COPY software software
WORKDIR /software/example-function
RUN mvn clean package

2. This step results in an uber-jar (function.jar) that you can use as an input argument for jdeps. The output is a file containing all the Java modules that the function depends on:

RUN jdeps -q \
    --ignore-missing-deps \
    --multi-release 18 \
    --print-module-deps \
    target/function.jar > jre-deps.info

3. Create an optimized Java runtime based on those application modules with jlink. Remove unnecessary information from the runtime, for example header files or man-pages:

RUN jlink --verbose \
    --compress 2 \
    --strip-java-debug-attributes \
    --no-header-files \
    --no-man-pages \
    --output /jre18-slim \
    --add-modules $(cat jre-deps.info)

4. This creates your own custom Java 18 runtime in the /jre18-slim folder. You can apply additional optimization techniques such as Class-Data-Sharing (CDS) to generate a classes.jsa file to accelerate the class loading time of the JVM.

RUN /jre18-slim/bin/java -Xshare:dump

Adding optimized starting instructions

You must tell the Lambda execution environment how to start the application. You can achieve that with a bootstrap file that includes the necessary instructions. In addition, you can define parameters to improve the performance further. For example, you could use tiered compilation and SerialGC.

The following snippet represents an example of a bootstrap file:

#!/bin/sh

$LAMBDA_TASK_ROOT/jre18-slim/bin/java \
    --add-opens java.base/java.util=ALL-UNNAMED \
    -XX:+TieredCompilation \
    -XX:TieredStopAtLevel=1 \
    -XX:+UseSerialGC \
    -jar function.jar "$_HANDLER"

Packaging the components

Combine the bootstrap file, the custom Java runtime, and the application code in a zip file for later use as the deployment package:

RUN zip -r runtime.zip \
    bootstrap \
    function.jar \
    /jre18-slim

The GitHub example provides a build.sh script to run the above-mentioned process via Docker. This results in a runtime.zip that you can then use as a deployment package.

Deploying the application with the custom runtime

To deploy the custom runtime, use AWS CDK. This allows you to define the needed infrastructure as code more easily in your favorite programming language.

The following code snippet shows how to create a Lambda function from a custom runtime:

Function customJava18Function = new Function(this, "LambdaCustomRuntimeJava18", FunctionProps.builder()
        .functionName("custom-runtime-java-18")
.handler("com.amazon.aws.example.ExampleDynamoDbHandler::handleRequest")
        .runtime(Runtime.PROVIDED_AL2)
        .code(Code.fromAsset("../runtime.zip"))
        .memorySize(512)
        .environment(Map.of("TABLE_NAME", exampleTable.getTableName()))
        .timeout(Duration.seconds(20))
        .logRetention(RetentionDays.ONE_WEEK)
        .build());

To deploy the application and output the necessary API Gateway URL to invoke the Lambda function, use the following command or use the provided provision_infrastructure.sh script:

cdk deploy --outputs-file target/outputs.json

Testing the application and validating the example results

After deployment, you can load test the application with the open-source software project Artillery.

The following command creates 120 concurrent invocations of the Lambda function for a duration of 60 seconds. It uses the API Gateway URL that is exported after the AWS CDK successfully deployed the application:

artillery run -t $(cat infrastructure/target/outputs.json | jq -r '.LambdaCustomRuntimeMinimalJRE18InfrastructureStack.apiendpoint') -v '{ "url": "/custom-runtime" }' infrastructure/loadtest.yml

Use CloudWatch Log Insights to query the Lambda logs and gather information about the cold start (initDuration) and duration percentiles:

filter @type = "REPORT"
    | parse @log /\d+:\/aws\/lambda\/(?<function>.*)/
    | stats
    count(*) as invocations,
    pct(@duration+coalesce(@initDuration,0), 0) as p0,
    pct(@duration+coalesce(@initDuration,0), 25) as p25,
    pct(@duration+coalesce(@initDuration,0), 50) as p50,
    pct(@duration+coalesce(@initDuration,0), 75) as p75,
    pct(@duration+coalesce(@initDuration,0), 90) as p90,
    pct(@duration+coalesce(@initDuration,0), 95) as p95,
    pct(@duration+coalesce(@initDuration,0), 99) as p99,
    pct(@duration+coalesce(@initDuration,0), 100) as p100
    group by function, ispresent(@initDuration) as coldstart
    | sort by coldstart, function

The results provide an indication of how your application performs with the custom runtime. This is especially helpful when comparing different versions.

  • Invocation time (@duration) for both cold and warm starts plus function initialization time (@initDuration) if it is a cold start:

Invocation time

  • Function initialization time (@initDuration) only:

Function initialisation time

Conclusion

In this blog post, you learn how to create your own optimized Java runtime for AWS Lambda by using a variety of Java optimization techniques. This allows you to tailor your Java runtime to your application needs.

See the full example on GitHub and make use of your own preferred Java version. Add additional optimization steps in the Dockerfile or tune the parameters in the bootstrap file to optimize the start of the Java virtual machine.

In case you want to re-use your custom runtime in multiple Lambda functions, you can also distribute it via a Lambda layer.

For more serverless learning resources, visit Serverless Land.

Amazon Aurora Serverless v2 is Generally Available: Instant Scaling for Demanding Workloads

Post Syndicated from Marcia Villalba original https://aws.amazon.com/blogs/aws/amazon-aurora-serverless-v2-is-generally-available-instant-scaling-for-demanding-workloads/

Today we are very excited to announce that Amazon Aurora Serverless v2 is generally available for both Aurora PostgreSQL and MySQL. Aurora Serverless is an on-demand, auto-scaling configuration for Amazon Aurora that allows your database to scale capacity up or down based on your application’s needs.

Amazon Aurora is a MySQL- and PostgreSQL-compatible relational database built for the cloud. It is fully managed by Amazon Relational Database Service (RDS), which automates time-consuming administrative tasks, such as hardware provisioning, database setup, patches, and backups.

One of the key features of Amazon Aurora is the separation of compute and storage. As a result, they scale independently. Amazon Aurora storage automatically scales as the amount of data in your database increases. For example, you can store lots of data, and if one day you decide to drop most of the data, the storage provisioned adjusts.

How Amazon Aurora works - compute and storage separation
However, many customers said that they need the same flexibility in the compute layer of Amazon Aurora since most database workloads don’t need a constant amount of compute. Workloads can be spiky, infrequent, or have predictable spikes over a period of time.

To serve these kinds of workloads, you need to provision for the peak capacity you expect your database will need. However, this approach is expensive as database workloads rarely run at peak capacity. To provision the right amount of compute, you need to continuously monitor the database capacity consumption and scale up resources if consumption is high. However, this requires expertise and often incurs downtime.

To solve this problem, in 2018, we launched the first version of Amazon Aurora Serverless. Since its launch, thousands of customers have used Amazon Aurora Serverless as a cost-effective option for infrequent, intermittent, and unpredictable workloads.

Today, we are making the next version of Amazon Aurora Serverless generally available, which enables customers to run even the most demanding workload on serverless with instant and nondisruptive scaling, fine-grained capacity adjustments, and additional functionality, including read replicas, Multi-AZ deployments, and Amazon Aurora Global Database.

Aurora Serverless v2 is launching with the latest major versions available on Amazon Aurora. Versions supported: Aurora PostgreSQL-compatible edition with PostgreSQL 13 and Aurora MySQL-compatible edition with MySQL 8.0.

Main features of Aurora Serverless v2
Aurora Serverless v2 enables you to scale your database to hundreds of thousands of transactions per second and cost-effectively manage the most demanding workloads. It scales database capacity in fine-grained increments to closely match the needs of your workload without disrupting connections or transactions. In addition, you pay only for the exact capacity you consume, and you can save up to 90 percent compared to provisioning for peak load.

If you have an existing Amazon Aurora cluster, you can create an Aurora Serverless v2 instance within the same cluster. This way, you’ll have a mixed configuration cluster where both provisioned and Aurora Serverless v2 instances can coexist within the same cluster.

It supports the full breadth of Amazon Aurora features. For example, you can create up to 15 Amazon Aurora read replicas deployed across multiple Availability Zones. Any number of these read replicas can be Aurora Serverless v2 instances and can be used as failover targets for high availability or for scaling read operations.

Similarly, with Global Database, you can assign any of the instances to be Aurora Serverless v2 and only pay for minimum capacity when idling. These instances in secondary Regions can also scale independently to support varying workloads across different Regions. Check out the Amazon Aurora user guide for a comprehensive list of features.

Aurora Serverless compute and storage scaling

How Aurora Serverless v2 scaling works
Aurora Serverless v2 scales instantly and nondisruptively by growing the capacity of the underlying instance in place by adding more CPU and memory resources. This technique allows for the underlying instance to increase and decrease capacity in place without failing over to a new instance for scaling.

For scaling down, Aurora Serverless v2 takes a more conservative approach. It scales down in steps until it reaches the required capacity needed for the workload. Scaling down too quickly can prematurely evict cached pages and decrease the buffer pool, which may affect the performance.

Aurora Serverless capacity is measured in Aurora capacity units (ACUs). Each ACU is a combination of approximately 2 gibibytes (GiB) of memory, corresponding CPU, and networking. With Aurora Serverless v2, your starting capacity can be as small as 0.5 ACU, and the maximum capacity supported is 128 ACU. In addition, it supports fine-grained increments as small as 0.5 ACU which allows your database capacity to closely match the workload needs.

Aurora Serverless v2 scaling in action
To show Aurora Serverless v2 in action, we are going to simulate a flash sale. Imagine that you run an e-commerce site. You run a marketing campaign where customers can purchase items 50 percent off for a limited amount of time. You are expecting a spike in traffic on your site for the duration of the sale.

When you use a traditional database, if you run those marketing campaigns regularly, you need to provision for the peak load you expect. Or, if you run them now and then, you need to reconfigure your database for the expected peak of traffic during the sale. In both cases, you are limited to your assumption of the capacity you need. What happens if you have more sales than you expected? If your database cannot keep up with the demand, it may cause service degradation. Or when your marketing campaign doesn’t produce the sales you expected? You are unnecessarily paying for capacity you don’t need.

For this demo, we use Aurora Serverless v2 as the transactional database. An AWS Lambda function is used to call the database and process orders during the sale event for the e-commerce site. The Lambda function and the database are in the same Amazon Virtual Private Cloud (VPC), and the function connects directly to the database to perform all the operations.

To simulate the traffic of a flash sale, we will use an open-source load testing framework called Artillery. It will allow us to generate varying load by invoking multiple Lambda functions. For example, we can start with a small load and then increase it rapidly to observe how the database capacity adjusts based on the workload. This Artillery load test runs on an Amazon Elastic Compute Cloud (Amazon EC2) instance inside the same VPC.

Architecture diagram
The following Amazon CloudWatch dashboard shows how the database capacity behaves when the order count increases. The dashboard shows the orders placed in blue and the current database capacity in orange.

At the beginning of the sale, the Aurora Serverless v2 database starts with a capacity of 5 ACUs, which was the minimum database capacity configured. For the first few minutes, the orders increase, but the database capacity doesn’t increase right away. The database can handle the load with the starting provisioned capacity.

However, around the time 15:55, the number of orders spikes to 12,000. As a result, the database increases the capacity to 14 ACUs. The database capacity increases in milliseconds, adjusting exactly to the load.

The number of orders placed stays up for some seconds, and then it goes dramatically down by 15:58. However, the database capacity doesn’t adjust exactly to the drop in traffic. Instead, it decreases in steps until it reaches 5 ACUs. The scaling down is done more conservatively to avoid prematurely evicting cached pages and affecting performance. This is done to prevent any unnecessary latency to spiky workloads, and also so the caches and buffer pools are not aggressively purged.

Cloudwatch dashboard

Get started with Aurora Serverless v2 with an existing Amazon Aurora cluster
If you already have an Amazon Aurora cluster and you want to try Aurora Serverless v2, the fastest way to get started is by using mixed configuration clusters that contain both serverless and provisioned instances. Start by adding a new reader into the existing cluster. Configure the reader instance to be of the type Serverless v2.

Adding a serverless reader

Test the new serverless instance with your workload. Once you have confirmation that it works as expected, you can start a failover to the serverless instance, which will take less than 30 seconds to finish. This option provides a minimal downtime experience to get started with Aurora Serverless v2.

Failover to the serverless instance

How to create a new Aurora Serverless v2 database
To get started with Aurora Serverless v2, create a new database from the RDS console. The first step is to pick the engine type: Amazon Aurora. Then, pick which database engine you want it to be compatible with: MySQL or PostgreSQL. Open the filters under Engine version and select the filter Show versions that support Serverless v2. Then, you see that the Available versions dropdown list only shows options that are supported by Aurora Serverless v2.

Engine options
Next, you need to set up the database. Specify credential settings with a username and password for the administrator of the database.

Database settings
Then, configure the instance for the database. You need to select what kind of instance class you want. This allocates the computational, network, and memory capacity for the database instance. Select Serverless.

Then, you need to define the capacity range. Aurora Serverless v2 capacity scales up and down within the minimum and maximum configuration. Here you can specify the minimum and maximum database capacity for your workload. The minimum capacity you can specify is 0.5 ACUs, and the maximum is 128 ACUs. For more information on Aurora Serverless v2 capacity units, see the Instant autoscaling documentation.

Capacity configuration
Next, configure connectivity by creating a new VPC and security group or use the default. Finally, select Create database.

Connectivity configuration

Creating the database takes a couple of minutes. You know your database is ready when the status switches to Available.

Database list

You will find the connection details for the database on the database page. The endpoint and the port, combined with the user name and password for the administrator, are all you need to connect to your new Aurora Serverless v2 database.

Database details page

Available Now!
Aurora Serverless v2 is available now in US East (Ohio), US East (N. Virginia), US West (N. California), US West (Oregon), Asia Pacific (Hong Kong), Asia Pacific (Mumbai), Asia Pacific (Seoul), Asia Pacific (Singapore), Asia Pacific (Sydney), Asia Pacific (Tokyo), Canada (Central), Europe (Frankfurt), Europe (Ireland), Europe (London), Europe (Paris), Europe (Stockholm), and South America (São Paulo).

Visit the Amazon Aurora Serverless v2 page for more information about this launch.

Marcia

Automatically Detect Operational Issues in Lambda Functions with Amazon DevOps Guru for Serverless

Post Syndicated from Marcia Villalba original https://aws.amazon.com/blogs/aws/automatically-detect-operational-issues-in-lambda-functions-with-amazon-devops-guru-for-serverless/

Today we are announcing Amazon DevOps Guru for Serverless, a new capability for Amazon DevOps Guru. It allows developers to improve the operational performance and availability of serverless applications.

AWS pioneered the serverless computing space with the launch of AWS Lambda in 2014. Today, hundreds of thousands of customers are using AWS Lambda. Lambda allows you to configure many parameters for your functions, like memory allocation, provisioned concurrency, and timeouts. For many customers, finding the right balance between all those parameters to optimize the performance and availability of their functions is challenging.

In December 2020, we announced DevOps Guru, a fully managed AIOps (Artificial Intelligence for IT operations) service that automatically detects and alerts customers about application issues and helps them to improve their applications’ availability. Today, we are announcing DevOps Guru for Serverless, a new capability for DevOps Guru, to help developers using Lambda automatically detect anomalous behavior at the function level and use ML-powered recommendations to remediate any issues that were detected.

DevOps Guru for Serverless uses ML to automatically identify and analyze a wide range of performance and availability-related issues for Lambda functions, such as low provisioned concurrency or underutilization of memory. To use this capability, you don’t need to be a serverless or ML expert.

The reactive insights of this capability help you troubleshoot ongoing issues affecting serverless applications efficiently with actionable recommendations that help you identify and fix the root cause in the shortest time possible.

DevOps Guru for Serverless also provides proactive insights that help you identify a wider range of operational anomalies long before your serverless application performance is affected. It also gives you recommendations on how to resolve the root cause of the issues.

When an issue is detected, DevOps Guru for Serverless displays the finding in the DevOps Guru console and sends notifications using Amazon EventBridge or Amazon Simple Notification Service (Amazon SNS). This allows developers to automatically manage and take real-time action on the discovered issues.

DevOps Guru for Serverless Proactive Insights
DevOps Guru for Serverless enables developers to proactively detect application issues before an event that affects the customer occurs. For example, if provision concurrency is set too low for a Lambda function and traffic for this application is growing, DevOps Guru will detect the growing traffic and the application latency degradation and generate a proactive insight showing the issue.

ML algorithms create these insights from operational data and application metrics. An insight provides high-level information, severity, status, and a recommendation for how to solve this issue.

Nowadays, DevOps Guru for Serverless provides proactive insights for Lambda and Amazon DynamoDB. These are the operational issues and the proactive insights available today:

  • Lambda concurrent executions reaching account limit – Triggered when concurrent executions reach an account limit for a continuous period.
  • Lambda Provisioned Concurrency function limit breached – Triggered when the reserved amount of provisioned concurrency is not enough over a period.
  • Lambda timeout high compared to SQS’s visibility timeout – Triggered when the duration of the lambda function exceeds the visibility timeout for the event source Amazon Simple Queue Service (Amazon SQS).
  • ­Lambda­ Provisioned Concurrency usage is lower than expected – Triggered when the utilization of the provisioned concurrency is too low.
  • Account read/write capacity for DynamoDB consumption reaching account limit – Triggered when the account consumed capacity is approaching account-level limits during a period of time.
  • DynamoDB table read/write consumed capacity reaching table limit – Triggered when the writes or reads in a table are reaching the ProvisionedWriteCapacityUnits or ProvisionedReadCapacityUnits limits for the table over a period.
  • DynamoDB table consumed capacity reaching AutoScaling Max parameter limit – Triggered when table consumed capacity is reaching AutoScaling Max parameters limit over a period.
  • DynamoDB read/write consumption lower than expected – Triggered when the value for ProvisionedWriteCapacityUnits or ProvisionedReadCapacityUnits is far from what is being consumed during a period of time.

Get started with DevOps Guru for Serverless
To get started, navigate to the DevOps Guru console to enable the service for your Lambda-based applications, other supported resources, or your entire account.

Configuring DevOps Guru

For this demo, create a new Lambda function with provisioned concurrency of 1. You can do this from the AWS console or programmatically. After you create it, you can check on the function overview page that the provisioned concurrency is set to 1.

Configuring Lambda provisioned concurrency

Add to the Lambda function a CloudWatch Event that triggers the function every minute. You can do that from the AWS console or programmatically. You can follow this tutorial to learn how to do it. Repeat that process five more times. Now the function will get triggered six times every minute from different events.

To trigger the proactive insight, you need to have six concurrent invocations of this Lambda function. To accomplish that, you need to ensure that the duration of each invocation is long enough. For this demo, you can make your function sleep for 30 seconds.

'use strict';

exports.handler = async (event) => {
  
    console.log('Sleep for 30 seconds')
    await new Promise(r => setTimeout(r, 30000));
    console.log('finish sleeping')

    return;
};

This configuration will trigger the proactive insight Lambda Provisioned Concurrency function limit breached for this function. You should see the insight in the console in three hours or less after the issue starts.

How to Check an Insight From the DevOps Guru Console
After a few hours, you can visit your DevOps Guru console, and you can verify that the proactive insight was triggered by exceeding the provisioned concurrency.

List of proactive insights

Select the Ongoing insight to see more details. The insight page opens, and it displays information relevant to the insight, metrics, events, and recommended actions for this issue.

Let’s examine this page in more detail. At the top of the page is the insight overview, with a description of what the insight is about and the severity of the issue. This is a proactive insight, so the user experience is not compromised by this issue. You also learn if the issue is ongoing and when it started. If the issue is not happening anymore, you can learn the end date for that insight. If you select the link for the affected applications, you can confirm all the Lambda functions that are affected by this insight.

Insight description information box

The next information box contains information about the CloudWatch metrics related to the proactive insight. This graph shows the metric ProvisionedConcurrecySpilloverInvocations with the summary of all the invocations in the last hours that the provisioned concurrency spilled.

Information about metrics

Relevant events are the next information box available on the page. These are AWS CloudTrail events that DevOps Guru uses combined with CloudWatch metrics and operational data to identify anomalous behavior that created the insight.

Relevant info about the insight

And finally on the page is the Recommendations information box, where DevOps Guru will output all the generated recommendations to help you address the issue. You can use the recommendations to learn the immediate steps you can take to remediate the issue.

Recommendations for the insights

In this proactive insight, DevOps Guru recommends you tune the provision concurrency of your Lambda function. It tells you to which value to set it, based on the past utilization of your function. You can also find the reasoning on why DevOps Guru recommends this insight.

Pricing and Availability
DevOps Guru for Serverless is offered to customers at no additional charge.

DevOps Guru for Serverless is available in all AWS Regions where DevOps Guru is available, US East (Ohio), US East (N. Virginia), US West (Oregon), Asia Pacific (Singapore), Asia Pacific (Sydney), Asia Pacific (Tokyo), Europe (Frankfurt), Europe (Ireland), and Europe (Stockholm).

Learn more about DevOps Guru for Serverless and register for the hands-on workshop on May 10 to learn more about this new launch.

Marcia

AWS Week in Review – March 28, 2022

Post Syndicated from Marcia Villalba original https://aws.amazon.com/blogs/aws/aws-week-in-review-march-28-2022/

This post is part of our Week in Review series. Check back each week for a quick round up of interesting news and announcements from AWS!

Welcome to another round up of the most significant AWS launches from the previous week. Among the most relevant news, we have improvements done in AWS Lambda, a new service for game developers, and we are back with the AWS Summits all around the world.

Last Week’s Launches
Here are some launches that got my attention during the previous week.

AWS Lambda Now Supports Up to 10 GB Ephemeral Storage – This new launch allows you to configure the temporary file system capacity (/tmp) of Lambda up to 10 GB! This is very useful for customers that are trying to use Lambda for ETL jobs, ML inference or other data-intensive workloads. Check Channy’s launch blog post to learn more about how to get started.

Amazon GameSparks – Last week we announced the launch of Amazon GameSparks in preview. Amazon GameSparks is a new serverless service that makes it easy for developers to create, test, and tune custom game features without thinking about the underlying servers or infrastructure. It comes with out-of-the-box features ideal for game backends and it is pre-integrated with the Unity game engine. Learn more in Tabitha’s blog post.

Amazon Connect Forecasting, Capacity Planning, and Scheduling – This set of ML-powered capabilities makes it easier for contact center managers to predict customer service workloads, determine ideal staffing levels, and schedule agents accordingly. These features are available in preview and you can learn more in Sajith’s blog post.

AWS Proton Support for Terraform Open Source Last November we announced the preview for this feature, and now it is generally available in all the AWS Regions where Proton is available. Platform teams can now define Proton templates using Terraform modules. Read the What’s New post for more information.

Amazon Polly Now Offers Neural TTS Voices in Catalan and Mexican Spanish Polly is a service that turns your text into lifelike speech. It has support for Neural TTS voices in many languages, and last week they added two more, in Mexican Spanish and in Catalan. You can read more in the What’s New post and listen to the Mexican voice in this audio.


For a full list of AWS announcements, be sure to keep an eye on the What’s New at AWS page.

Other AWS News

Podcast Charlas Técnicas de AWS – If you understand Spanish, this podcast is for you. Podcast Charlas Técnicas is one of the official AWS podcasts in Spanish. It has episodes every other week. The podcast is meant for builders, and it shares stories on how customers implemented and learned AWS and how to architect applications using AWS services. You can listen to all the episodes directly from your favorite podcast app or the podcast web page.

AWS Open Source News and Updates Ricardo Sueiras, my colleague from the AWS Developer Relation team, runs this newsletter. It brings you all the latest open-source projects, posts and more. This week he shares the latest open source project, tools and also AWS and community blog posts related to open-source. Read edition #106 here.

Upcoming AWS Events
Check your calendars and sign up for these AWS events:

Building a Tech-Enabled Biotech with Celsius Therapeutics on Tuesday March 29 at 10 PM UTC – My colleague Mark Birch hosts regular Clubhouse events, in which he talks with different startups. These companies share their journey and experience using AWS. Join the live event here.

The AWS Summits Are Back – Don’t forget to register for the AWS Summits in Brussels (on March 31), Paris (on April 12), San Francisco (on April 20-21), and London (on April 27). More summits are coming in the next weeks, and we’ll let you know in these weekly posts.

That’s all for this week. Check back next Monday for another Week in Review!

— Marcia

NEW – Replicate Existing Objects with Amazon S3 Batch Replication

Post Syndicated from Marcia Villalba original https://aws.amazon.com/blogs/aws/new-replicate-existing-objects-with-amazon-s3-batch-replication/

Starting today, you can replicate existing Amazon Simple Storage Service (Amazon S3) objects and synchronize your buckets using the new Amazon S3 Batch Replication feature.

Amazon S3 Replication supports several customer use cases. For example, you can use it to minimize latency by maintaining copies of your data in AWS Regions geographically closer to your users, to meet compliance and data sovereignty requirements, and to create additional resiliency for disaster recovery planning. S3 Replication is a fully managed, low-cost feature that replicates newly uploaded objects between buckets. The buckets can belong to the same or different accounts. Objects may be replicated to a single destination bucket or to multiple destination buckets. Destination buckets can be in different AWS Regions (Cross-Region Replication) or within the same Region as the source bucket (Same-Region Replication).

Replication flow

But until today, S3 Replication could not replicate existing objects; now you can do it with S3 Batch Replication.

There are many reasons why customers will want to replicate existing objects. For example, customers might want to copy their data to a new AWS Region for a disaster recovery setup. To do that, they will need to populate the new destination bucket with existing data. Another reason to copy existing data comes from organizations that are expanding around the world. For example, imagine a US-based animation company now opens a new studio in Singapore. To reduce latency for their employees, they will need to replicate all the internal files and in-progress media files to the Asia Pacific (Singapore) Region. One other common use case we see is customers going through mergers and acquisitions where they need to transfer ownership of existing data from one AWS account to another.

To replicate existing objects between buckets, customers end up creating complex processes. In addition, copying objects between buckets does not preserve the metadata of objects such as version ID and object creation time.

Today we are happy to launch S3 Batch Replication, a new capability offered through S3 Batch Operations that removes the need for customers to develop their own solutions for copying existing objects between buckets. It provides a simple way to replicate existing data from a source bucket to one or more destinations. With this capability, you can replicate any number of objects with a single job.

When to Use Amazon S3 Batch Replication
S3 Batch Replication can be used to:

  • Replicate existing objects – use S3 Batch Replication to replicate objects that were added to the bucket before the replication rules were configured.
  • Replicate objects that previously failed to replicate – retry replicating objects that failed to replicate previously with the S3 Replication rules due to insufficient permissions or other reasons.
  • Replicate objects that were already replicated to another destination – you might need to store multiple copies of your data in separate AWS accounts or Regions. S3 Batch Replication can replicate objects that were already replicated to new destinations.
  • Replicate replicas of objects that were created from a replication rule – S3 Replication creates replicas of objects in destination buckets. Replicas of objects cannot be replicated again with live replication. These replica objects can only be replicated with S3 Batch Replication.

Get started with S3 Batch Replication
There are many ways to get started with S3 Batch Replication from the S3 console. You can create a job from the Replication configuration page or the Batch Operations create job page. You will also get prompted to replicate existing objects when you create a new replication rule or add a new destination bucket.

For this demo, imagine that you are creating a replication rule in a bucket that has existing objects. When you finish creating the rule, you will get prompted with a message asking you if you want to replicate existing objects.

Prompt asking if you want to replicate existing objects

If you answer yes, then you will be directed to a simplified Create Batch Operations job page. If you want this job to execute automatically after the job is ready, you can leave the default option. If you want to review the manifest or the job details before running the job, select Wait to run the job when it’s ready.

This method of creating the job automatically generates the manifest of objects to replicate. A manifest is a list of objects in a given source bucket to apply the replication rules. The generated manifest report has the same format as an Amazon S3 Inventory Report.

Create a Batch Operations job view

S3 Batch Replication creates a Completion report, similar to other Batch Operations jobs, with information on the results of the replication job. It is highly recommended to select this option and to specify a bucket to store this report.

Completion report configuration

The final step is to configure permissions for creating this batch job. If you keep the default settings, Amazon S3 will create a new AWS Identity and Access Management (IAM) role for you.

Permissions configurations

After you save this job, check the status of the job on the Batch Operations page. You will see the job changing status as it progresses, the percentage of files that have been replicated, and the total number of files that have failed the replication.

Keep in mind that existing objects can take longer to replicate than new objects, and the replication speed largely depends on the AWS Regions, size of data, object count, and encryption type.

Job status page

When the Batch Replication job completes, you can navigate to the bucket where you saved the completion report to check the status of object replication. The reports have the same format as an Amazon S3 Inventory Report.

Finding the report and manifest

Pricing and availability
When using this feature, you will be charged replication fees for request and data transfer for cross Region, for the
batch operations, and a manifest generation fee if you opted for it.

Additionally, you will be charged the storage cost of storing the replicated data in the destination bucket and AWS KMS charges if your objects are replicated with AWS KMS. Check the Replication tab on the S3 pricing page to learn all the details.

S3 Batch Replication is available in all AWS Regions, including the AWS GovCloud Regions, the AWS China (Beijing) Region, operated by Sinnet, and the AWS China (Ningxia) Region, operated by NWCD. And you can get started using the Amazon S3 console, CLI, S3 API, or AWS SDKs client.

To learn more about S3 Batch Replication, check out the Amazon S3 User Guide.

Marcia

New DynamoDB Table Class – Save Up To 60% in Your DynamoDB Costs

Post Syndicated from Marcia Villalba original https://aws.amazon.com/blogs/aws/new-dynamodb-table-class-save-up-to-60-in-your-dynamodb-costs/

Today we are announcing Amazon DynamoDB Standard-Infrequent Access (DynamoDB Standard-IA). A new table class for DynamoDB that reduces storage costs by 60 percent compared to existing DynamoDB Standard tables, and that delivers the same performance, durability, and scaling.

Nowadays, many customers are moving their infrequently accessed data between DynamoDB and Amazon Simple Storage Service (Amazon S3). This means that customers are developing a process to migrate the data and build complex applications that must support two different APIs—one for DynamoDB and another for Amazon S3.

DynamoDB Standard-IA table class is designed for customers who want a cost-optimized solution for storing infrequently accessed data in DynamoDB without changing any application code. Using this new table class, you get the single-digit millisecond read and write performance from DynamoDB and use all of the same APIs.

When you use DynamoDB Standard-IA table class, you will save up to 60 percent in storage costs as compared to using the DynamoDB Standard table class. However, DynamoDB reads and writes for this new table class are priced higher than the Standard tables. Therefore, it is important to understand your use cases before applying this new table class to your tables.

DynamoDB Standard-IA is a great solution if you must store terabytes of data for several years where the data must be highly available, but it is not frequently accessed. An example is social media applications where end users rarely access their old posts. However, these posts remain stored, because if someone scrolls on a profile to see an old photo from 2009, they should be able to retrieve it as fast as if it was a newer post.

E-commerce sites are another good use case. These sites might have a lot of products that are not frequently accessed, but administrators of the site still want to have them available in their store just in case someone wants to buy them. Furthermore, this is a good solution for storing a customer’s previous orders. DynamoDB Standard-IA table offers the ability to retain historical orders at a lower cost.

Get started using DynamoDB Standard-IA
Get started using DynamoDB Standard-IA by evaluating the best class for your existing tables.

Go to the table page and select Update the table class in the Actions dropdown to change the table class. Then, choose the new table class and save the changes. You can change the table class for an existing table to be Standard-IA or Standard twice every 30-days with no impact on performance or availability. All of the features of DynamoDB are available when using a table in the Standard-IA table class.

Moreover, you can also create a new table with the DynamoDB Standard-IA table class.

Update table class

Availability and Pricing
DynamoDB Standard-IA is available in all of the AWS Regions, except the China Regions and AWS GovCloud.

For example, DynamoDB Standard-IA storage pricing in US East (N. Virginia) is now $0.10 per GB (60 percent less than DynamoDB Standard), while reads and writes are 25 percent higher.

For more information about this feature and its pricing, see the DynamoDB Standard-IA Feature page and the DynamoDB pricing page.

Marcia

New – Amazon DevOps Guru for RDS to Detect, Diagnose, and Resolve Amazon Aurora-Related Issues using ML

Post Syndicated from Marcia Villalba original https://aws.amazon.com/blogs/aws/new-amazon-devops-guru-for-rds-to-detect-diagnose-and-resolve-amazon-aurora-related-issues-using-ml/

Today we are announcing Amazon DevOps Guru for RDS, a new capability for Amazon DevOps Guru. It allows developers to easily detect, diagnose, and resolve performance and operational issues in Amazon Aurora.

Hundreds of thousands of customers nowadays are using Amazon Aurora because it is highly available, scalable, and durable. But as applications grow in size and complexity, it becomes more challenging for these customers to detect and resolve operational and performance issues quickly.

During last year’s re:Invent, we announced DevOps Guru, a service that uses machine learning (ML) to automatically detect and alert customers of application issues, including database problems. Today we are announcing DevOps Guru for RDS to help developers using Amazon Aurora databases to detect, diagnose, and resolve database performance issues fast and at scale. Now developers will have enough information to determine the exact cause for a database performance issue. This launch will save developers and engineers many hours of work trying to uncover and remediate the performance-related database issues.

DevOps Guru for RDS uses ML to automatically identify and analyze a wide range of performance-related database issues, such as over-utilization of host resources, database bottlenecks, or misbehavior of SQL queries. It also recommends solutions to remediate the issues it finds. To use this capability, you don’t need to be a database or ML expert.

When an issue is detected, DevOps Guru for RDS displays the finding in the DevOps Guru console and sends notifications using Amazon EventBridge or Amazon Simple Notification Service (SNS). This allows developers to automatically manage and take real-time action on the issues.

How DevOps Guru for RDS Works
DevOps Guru for RDS uses anomaly detection on the database load (DB load) performance metric to detect issues. DB load is measured in units of Average Active Sessions (AAS). DB load measures the level of activity in your database, making it a great metric to understand the health of your database. If the DB load is high, this can result in performance issues. This metric can be compared to the number of virtual CPUs (vCPUs), and if the DB load is higher than that number, issues can arise.

The most useful dimensions for this metric are the wait events and the top SQL. The wait event describes what the system conditions that are currently running SQLs are waiting on. The most common reasons why a statement is waiting is that it is waiting for the CPU, waiting for a read or write, or waiting for a locked resource. The top SQL dimension shows which queries are contributing the most to DB load.

The following image is an example of a finding that DevOps Guru for RDS reported. The graph shows that from the AAS, most of them were waiting for access to a table or for CPU.

Example of anomaly detection
If you continue scrolling on the DevOps Guru for RDS analysis page, you can discover the cause for the problem and some recommendations to fix it. In this particular example, two problems were detected: high-load wait events and CPU capacity exceeded.

DevOps Guru for RDS looks more in-depth into these problems. First, it looks at the high-load wait events, where there were 27 AAS for the IO and CPU wait types, which is 99 percent of the total DB load.

Second, it tells us that the running tasks exceeded six processes. This database only has two vCPUs, and the recommended number of running processes should be a maximum of four (2x vCPUs). DevOps Guru for RDS also makes recommendations to fix these issues.

Recommendations

In another anomaly, the graph shows that there was a high load of wait events, and one SQL query was found to require further investigation. You can even see the exact SQL query if you click on the SQL digest IDs. The insight’s analysis and recommendation section is full of information on how to investigate further and fix the issue. You can get a lot of detailed information by clicking on the wait event, for example, on the wait event wait/io/table/sql/handler or in the View troubleshooting doc link.

Analysis and recommendations

Get started with DevOps Guru for RDS
To get started with this new capability of DevOps Guru, make sure that Performance Insights is enabled for your Amazon Aurora DB instances. It supports Amazon Aurora with MySQL- and PostgreSQL-compatibility. For instructions on how to enable Performance Insights, see Enabling and disabling Performance Insights.

The next step is to enable DevOps Guru to start monitoring your AWS resources. You can specify the resources you want to be covered by DevOps Guru.

If you are already using DevOps Guru, whenever there is a new insight for an Amazon Aurora database resource, you will see it in the console.

To see the detailed database analysis, navigate to the Insight page and select the new View analysis button under the DB load aggregated metric. That button will take you to the detailed analysis by DevOps Guru for RDS.

View analysis

Pricing and Availability
DevOps Guru for RDS is offered to customers at no additional charge, as part of the existing price that DevOps Guru charges customers for RDS resources.

DevOps Guru for RDS is available in all Regions where DevOps Guru is available, US East (Ohio), US East (N. Virginia), US West (Oregon), Asia Pacific (Singapore), Asia Pacific (Sydney), Asia Pacific (Tokyo), Europe (Frankfurt), Europe (Ireland), and Europe (Stockholm).

Learn more about DevOps Guru for RDS and check out the talk at AWS re:Invent “Automatically detect and resolve performance issues with Amazon DevOps Guru for RDS” (Session Id 15877).

Marcia

Amazon S3 Glacier is the Best Place to Archive Your Data – Introducing the S3 Glacier Instant Retrieval Storage Class

Post Syndicated from Marcia Villalba original https://aws.amazon.com/blogs/aws/amazon-s3-glacier-is-the-best-place-to-archive-your-data-introducing-the-s3-glacier-instant-retrieval-storage-class/

Today we are announcing the Amazon S3 Glacier Instant Retrieval storage class. This new archive storage class delivers the lowest cost storage for long-lived data that is rarely accessed and requires millisecond retrieval.

We are also excited to announce that S3 Intelligent-Tiering now automatically optimizes storage costs for rarely accessed data that needs immediate retrieval with the new Archive Instant Access tier, which is ideal for data with unknown or changing access patterns. For existing customers, this will provide an immediate savings of 68 percent for data that hasn’t been accessed for more than 90 days, with no action needed. The Frequent, Infrequent, and now Archive Instant Access tiers are designed for the same milliseconds access time and high-throughput performance.

In addition, we are announcing the new name for the existing Amazon S3 Glacier storage class and several price reductions.

Amazon S3 Glacier Instant Retrieval
The Amazon S3 Glacier storage classes are extremely low-cost and built for data archiving. They are secure and durable, and they are designed to provide the lowest cost for data that does not require immediate access, with retrieval options from minutes to hours.

Many customers need to store rarely accessed data for several years. However the data must be highly available and immediately accessible. Today, these customers use the S3 Standard-Infrequent Access (S3 Standard-IA) storage class. This storage class offers low cost for storage and allows customers to retrieve their data instantly.

S3 Glacier Instant Retrieval is a new storage class that delivers the fastest access to archive storage, with the same low latency and high-throughput performance as the S3 Standard and S3 Standard-IA storage classes. You can save up to 68 percent on storage costs as compared with using the S3 Standard-IA storage class when you use the S3 Glacier Instant Retrieval storage class and pay a low price to retrieve data. For example, in the US East (N. Virginia) Region, S3 Glacier Instant Retrieval storage pricing is $0.004 per GB-month and data retrieval is $0.03 per GB. Learn more about pricing for your Region.

Media archives, medical images, or user-generated content are just a few examples of ideal use cases for S3 Glacier Instant Retrieval. Once created, this content is rarely accessed, but when it is needed it must be available in milliseconds.

To get started using the new storage class from the Amazon S3 console, upload an object as you would normally, and select the S3 Glacier Instant Retrieval storage class.

Upload object with the new storage class

This feature is available programmatically from AWS SDKs, AWS Command Line Interface (CLI), and AWS CloudFormation.

In my opinion, the easiest way to store data in S3 Glacier Instant Retrieval is to use the S3 PUT API using the CLI. When using this API, set the storage class to GLACIER_IR.

aws s3api put-object --bucket <bucket-name> --key <object-key> --body <name-file> --storage-class GLACIER_IR

When the object is uploaded to Amazon S3, verify the storage class in the list of objects or on the object details page.

Storage classes

For data that already exists in Amazon S3, you can use S3 Lifecycle to transition data from the S3 Standard and S3 Standard-IA storage classes into S3 Glacier Instant Retrieval.

New Archive Instant Access Tier in S3 Intelligent-Tiering
S3 Intelligent-Tiering is a storage class that automatically moves objects between access tiers to optimize costs. This is the recommended storage class for data with unpredictable or changing access patterns, such as in data lakes, analytics, or user-generated content.

Until today, there were two low latency access tiers optimized for frequent and infrequent access, and two optional archive access tiers designed for asynchronous access optimized for rare access at a low cost.

Beginning today, the Archive Instant Access tier is added as a new access tier in the S3 Intelligent-Tiering storage class. You will start seeing automatic costs savings for your storage in S3 Intelligent-Tiering for rarely accessed objects.

The Archive Instant Access tier joins the group of low latency access tiers. This new tier is optimized for data that is not accessed for months at a time but, when it is needed, is available within milliseconds.

S3 Intelligent-Tiering automatically stores objects in three access tiers that deliver the same performance as the S3 Standard storage class:

  • Frequent Access tier
  • Infrequent Access tier
  • Archive Instant Access (new)

For a small monitoring and automation charge, S3 Intelligent-Tiering monitors access patterns and moves objects between the different access tiers. Objects that have not been accessed for 30 consecutive days are moved from the Frequent Access tier to the Infrequent Access tier for savings of 40 percent. When an object hasn’t been accessed for 90 consecutive days, S3 Intelligent-Tiering will move the object from the Infrequent Access tier to the Archive Instant Access tier, with a savings of 68 percent. If the data is accessed later, it is automatically moved back to the Frequent Access tier. No tiering charges apply when objects are moved between access tiers within the S3 Intelligent-Tiering storage class.

S3 Intelligent-Tiering access tiers

To get started with this new access tier, select Intelligent-Tiering as the storage class for an object when uploading an object using the S3 console. After 90 days of inactivity (30 days in Frequent Access tier and 60 days in Infrequent Access tier), S3 Intelligent-Tiering will automatically move the object to the Archive Instant Access tier. The introduction of the new Archive Instant Access tier has no impact on performance when you retrieve objects.

New name for the Amazon S3 Glacier storage class – S3 Glacier Flexible Retrieval
The existing Amazon S3 Glacier storage class is now named S3 Glacier Flexible Retrieval. This storage class now has free bulk retrievals in 5 to 12 hours, and the storage price has been reduced by 10 percent in all Regions, effective December 1, 2021. S3 Glacier Flexible Retrieval is now even more cost-effective, and the free bulk retrievals make it ideal for retrieving large data volumes.

These are the Amazon S3 archive storage classes:

  • S3 Glacier Instant Retrieval: The newest storage class is optimized for long-lived data that is rarely accessed (typically once per quarter). However when data is needed, it is available within milliseconds. For example, medical images and news media assets are perfect for this storage class.
  • S3 Glacier Flexible Retrieval: This newly renamed storage class is optimized for archiving data that can be retrieved in minutes or with free bulk retrievals in 5 to 12 hours. This storage class is ideal for backups and disaster recovery use cases, where you have large amounts of long-term, rarely accessed data, and you don’t want to worry about retrieval costs when you need the data.
  • S3 Glacier Deep Archive: This storage class is the lowest-cost storage in the cloud and is optimized for archiving data that can be restored in at least 12 hours. It’s great for storing your compliance archives or for digital media preservation.

Amazon S3 has reduced storage prices!
We are excited to announce that Amazon S3 has reduced storage prices of up to 31 percent in the S3 Standard-IA and S3 One Zone-IA storage classes across 9 AWS Regions: US West (N. California), Asia Pacific (Hong Kong), Asia Pacific (Mumbai), Asia Pacific (Osaka), Asia Pacific (Seoul), Asia Pacific (Singapore), Asia Pacific (Sydney), Asia Pacific (Tokyo), and South America (São Paulo). These price reductions are effective December 1, 2021.

Learn more about price reduction details.

Available Now
The new storage class, S3 Glacier Instant Retrieval, and the new Archive Instant Access tier in S3 Intelligent-Tiering are available today (November 30, 2021) in all AWS Regions.

The price cut for S3 Glacier and free bulk retrievals in all AWS Regions, and the S3 Standard-Infrequent Access/One Zone-Infrequent storage class in nine Regions will be effective on December 1, 2021.

Learn more about the storage classes changes and all the storage classes.

Marcia

New – Simplify Access Management for Data Stored in Amazon S3

Post Syndicated from Marcia Villalba original https://aws.amazon.com/blogs/aws/new-simplify-access-management-for-data-stored-in-amazon-s3/

Today, we are introducing a couple new features that simplify access management for data stored in Amazon Simple Storage Service (Amazon S3). First, we are introducing a new Amazon S3 Object Ownership setting that lets you disable access control lists (ACLs) to simplify access management for data stored in Amazon S3. Second, the Amazon S3 console policy editor now reports security warnings, errors, and suggestions powered by IAM Access Analyzer as you author your S3 policies.

Since launching 15 years ago, Amazon S3 buckets have been private by default. At first, the only way to grant access to objects was using ACLs. In 2011, AWS Identity and Access Management (IAM) was announced, which allowed the use of policies to define permissions and control access to buckets and objects in Amazon S3. Nowadays, you have several ways to control access to your data in Amazon S3, including IAM policies, S3 bucket policies, S3 Access Points policies, S3 Block Public Access, and ACLs.

ACLs are an access control mechanism in which each bucket and object has an ACL attached to it. ACLs define which AWS accounts or groups are granted access as well as the type of access. When an object is created, the ownership of it belongs to the creator.  This ownership information is embedded in the object ACL. When you upload an object to a bucket owned by another AWS account, and you want the bucket owner to access the object, then permissions need to be granted in the ACL. In many cases, ACLs and other kinds of policies are used within the same bucket.

The new Amazon S3 Object Ownership setting, Bucket owner enforced, lets you disable all of the ACLs associated with a bucket and the objects in it. When you apply this bucket-level setting, all of the objects in the bucket become owned by the AWS account that created the bucket, and ACLs are no longer used to grant access. Once applied, ownership changes automatically, and applications that write data to the bucket no longer need to specify any ACL. As a result, access to your data is based on policies. This simplifies access management for data stored in Amazon S3.

With this launch, when creating a new bucket in the Amazon S3 console, you can choose whether ACLs are enabled or disabled. In the Amazon S3 console, when you create a bucket, the default selection is that ACLs are disabled. If you wish to keep ACLs enabled, you can choose other configurations for Object Ownership, specifically:

  • Bucket owner preferred: All new objects written to this bucket with the bucket-owner-full-controlled canned ACL will be owned by the bucket owner. ACLs are still used for access control.
  • Object writer: The object writer remains the object owner. ACLs are still used for access control.

Options for object ownership

For existing buckets, you can view and manage this setting in the Permissions tab.

Before enabling the Bucket owner enforced setting for Object Ownership on an existing bucket, you must migrate access granted to other AWS accounts from the bucket ACL to the bucket policy. Otherwise, you will receive an error when enabling the setting. This helps you ensure applications writing data to your bucket are uninterrupted. Make sure to test your applications after you migrate the access.

Policy validation in the Amazon S3 console
We are also introducing policy validation in the Amazon S3 console to help you out when writing resource-based policies for Amazon S3. This simplifies authoring access control policies for Amazon S3 buckets and access points with over 100 actionable policy checks powered by IAM Access Analyzer.

To access policy validation in the Amazon S3 console, first go to the detail page for a bucket. Then, go to the Permissions tab and edit the bucket policy.

Accessing the IAM Policy Validation in S3 consoleWhen you start writing your policy, you see that, as you type, different findings appear at the bottom of the screen. Policy checks from IAM Access Analyzer are designed to validate your policies and report security warnings, errors, and suggestions as findings based on their impact to help you make your policy more secure.

You can also perform these checks and validations using the IAM Access Analyzer’s ValidatePolicy API.

Example of policy suggestion

Availability
Amazon S3 Object Ownership is available at no additional cost in all AWS Regions, excluding the AWS China Regions and AWS GovCloud Regions. IAM Access Analyzer policy validation in the Amazon S3 console is available at no additional cost in all AWS Regions, including the AWS China Regions and AWS GovCloud Regions.

Get started with Amazon S3 Object Ownership through the Amazon S3 console, AWS Command Line Interface (CLI), Amazon S3 REST API, AWS SDKs, or AWS CloudFormation. Learn more about this feature on the documentation page.

And to learn more and get started with policy validation in the Amazon S3 console, see the Access Analyzer policy validation documentation.

Marcia

Amazon Kinesis Data Streams On-Demand – Stream Data at Scale Without Managing Capacity

Post Syndicated from Marcia Villalba original https://aws.amazon.com/blogs/aws/amazon-kinesis-data-streams-on-demand-stream-data-at-scale-without-managing-capacity/

Today we are launching Amazon Kinesis Data Streams On-demand, a new capacity mode. This capacity mode eliminates capacity provisioning and management for streaming workloads.

Kinesis Data Streams is a fully-managed, serverless service for real-time processing of streamed data at a massive scale. Kinesis Data Streams can take any amount of data, from any number of sources, and scale up and down as needed. Creating a new data stream is easy, since we announced Kinesis Data Streams in November 2013. To get started, you only need to specify the number of shards with which you must provision your stream.

Shards are the way to define capacity in Kinesis Data Streams. Each shard can ingest 1 MB/s and 1,000 records/second and egress up to 2 MB/s. You can add or remove shards of the stream using Kinesis Data Streams APIs to adjust the stream capacity according to the throughout needs of their workloads. This lets you make sure that producer and consumer applications don’t experience any throttling.

As customers adopt data streaming broadly, workloads with data traffic that can increase by millions of events in a few minutes are becoming more common. For these volatile traffic patterns, customers carefully plan capacity, monitor throughput, and in some cases develop processes that automatically change the Kinesis Data Streams stream capacity.

Kinesis Data Streams On-Demand Mode
That is why today we are announcing Kinesis Data Streams On-demand. This new capacity mode eliminates the need for provisioning and managing the capacity for streaming data. Using Kinesis Data Streams On-demand automatically scales the capacity in response to varying data traffic. Customers are charged per gigabyte of data written, read, and stored in the stream, in a pay-per-throughput fashion.

Data streams in the on-demand mode have the same high durability, high availability, low latency, security, and deep AWS integrations that Kinesis Data Streams already provides. Moreover, there are no new APIs to write or read data. All existing Kinesis Data Streams integrations work in the on-demand mode.

Kinesis Data Streams uses the partition key to distribute data across shards. That is why when using Kinesis Data Streams On-demand, you still must specify a partition key for each record to write data into a data stream, as you do today in Kinesis Data Streams using the provisioned mode. In Kinesis Data Streams On-demand, the data stream automatically adapts to handle uneven data distribution patterns. But you must be careful that no partition key exceeds a shard’s limits. If this happens, then you will receive write throttles, and then you can retry these requests.

When a new data stream is created using Kinesis Data Streams On-demand, it gets created with the default capacity of 4 MB/s and 4,000 records per second for writes. Kinesis Data Streams On-demand can automatically scale up to 200 MB/s and 200,000 records per second for writes.

Kinesis Data Streams On-demand accommodates up to double its previous peak write throughput observed in the last 30 days. As your data stream’s write throughput hits a new peak, Kinesis Data Streams automatically scales the stream’s capacity.

For example, if your data stream has a write throughput that varies between 10 MB/s and 40 MB/s, Kinesis Data Streams will make sure that you can easily burst to double the peak—80 MB/s. And, if later on that same data stream reaches a new peak of 50 MB/s, then Kinesis Data Streams will make sure that there is enough capacity to ingest 100 MB/s. However, write throttling can occur if your traffic grows more than double the previous peak in less than 15 minutes.

When to Use Kinesis Data Streams On-demand
On-demand mode is great for customers that have an unknown or variable workload, or who simply don’t want to deal with capacity management. On-demand mode works best for workloads that have even partition key distribution. For example, you run a mobile game that has variable traffic through the week or day, as customers play mostly on nights or weekends. Or, you run a streaming platform that hosts live shows, and you see a sudden increase in demand depending on the guests you have.

In addition, you can switch between on-demand and provision mode twice a day. For example, you run an e-commerce site with predictable traffic. But, starting next month, there will be many marketing campaigns launched globally. You don’t know the impact that those will have on the site traffic. Switch your Kinesis Data Streams to on-demand mode, and now you can enjoy the automated capacity planning and management for your data streams.

Get Started with Kinesis Data Streams On-demand
Create a new data stream with Kinesis Data Streams On-demand from the AWS console, AWS SDKs, AWS Command Line Interface (CLI), and AWS CloudFormation.

To create one from the console, visit the Kinesis console and Create data stream. When selecting the capacity mode, select On-demand.

Creating a data stream

At the end of the page, all of the settings for the new data stream are presented. These settings can be changed after the data stream has been created.

Data stream settings

Let’s See This in Action!
For this demo, I want to show you how the new Kinesis Data Streams capability works. This situation is best described if you at look at the following Amazon CloudWatch graphs. The green line represents the bytes ingested successfully into the stream, and the red line shows the percentage of traffic that is throttled.

First, we will start with a stream provisioned with five shards. For the first three minutes, we are sending a load of 4 MB/s. You can see that the stream can handle the load.

At the time stamp 21:19, we increase the load to 12 MB/s. Now the stream cannot handle the load, and the throttles start (the red line starts climbing up to 60 percent of request being throttled).

Increase the load on a provisioned stream

At the time stamp 21:23, we change the stream capacity from provisioned to on-demand. You can do that on-the-fly without affecting the stream. See that it takes a very short time for the stream to handle the load when converting from one capacity mode to the other.

In a few minutes (time stamp 21:24) the throttles start to drop as the stream starts scaling up. The stream capacity doubles to 10 shards first (time stamp 21:26), and the stream keeps scaling up until each shard has a load of less than 0.5 MB/s. In this way, if the stream suddenly receives double the amount of load, then it has the capacity ready to handle it.

Change to on-demand mode

At the time stamp 21:26, the load in the stream is increased to 18 MB/s. You can see the green line climbing to 350,000 records – there are no throttles, and the stream ends this demo with 40 open shards. This means that if suddenly the stream receives a load of 40 MB/s, then it could handle it with no problem.

Increase the load

Available Now!
The Amazon Kinesis Data Streams On-demand is available globally in all commercial Regions.

You can learn more about the capacity modes in the Amazon Kinesis Data Streams Developer Guide.

Marcia

New – AWS Proton Supports Terraform and Git Repositories to Manage Templates

Post Syndicated from Marcia Villalba original https://aws.amazon.com/blogs/aws/new-aws-proton-supports-terraform-and-git-repositories-to-manage-templates/

Today we are announcing the launch of two features for AWS Proton. First, the most requested one in the AWS Proton open roadmap, to define and provision infrastructure using Terraform. Second, the capability to manage AWS Proton templates directly from Git repositories.

AWS Proton is a fully managed application delivery service for containers and serverless applications, announced during reinvent 2020. AWS Proton aims to help infrastructure teams automate and manage their infrastructure without impacting developer productivity. It allows developers to get the templates they need to deliver their applications without the need to involve the platform team.

When using AWS Proton, the infrastructure team needs to define the environment and the service templates. Learn more about the templates.

Template Sync
This new feature in AWS Proton enables the platform team to push, update, and publish templates directly from their Git repositories. Now when you create a new service or environment template, you can specify a remote Git repository containing the templates. AWS Proton will automatically sync those templates and make them available for use. When there are changes to the Git repository, AWS Proton will take care of the updates.

Create enviroment template

One important advantage of using repositories and syncing the templates is that it simplifies the process of the administrators for uploading, updating, and registering the templates. This process, when done manually, can be error-prone and inconvenient. Now you can automate the process of authoring and updating the templates. Also, you can add more validations using pull requests and track the changes to the templates.

Template sync allows collaboration between the platform team and the developers. By having all the templates in a Git repository, all the collaboration tooling available in platforms like GitHub becomes available to everybody. Now developers can see all the templates, and when they want to improve them, they can just create a pull request with the changes. In addition, tools like bug trackers and features requests can be used to manage the templates.

Configuring the Repository Link
To get started using template sync, you need to give AWS Proton permissions to access your repositories. For that, you need to create a link between AWS Proton and your repository.

To do this, first create a new source connection for your GitHub account. Then you need to create a new repository link from the AWS Proton. Go to the Repositories option in the side bar. Then in the Link new repository screen, use the GitHub connection that you just created and specify a repository name.

Create new link repository

AWS Proton supports Terraform
Until now, AWS CloudFormation was the only infrastructure as code (IaC) engine available in AWS Proton. Now you can define service and environment templates based on infrastructure defined using Terraform and through a pull-request-based mechanism, use Terraform to provision and keep your infrastructure updated.

Platforms teams author their IaC templates in HCL, the Terraform language, and then provision the infrastructure using Terraform Open Source. AWS Proton renders the ready-to-provision Terraform module and makes a pull request to your infrastructure repository, from where you can plan and apply the changes.

This operation is asynchronous, as AWS Proton is not the one managing the provision of infrastructure. Therefore it is important that in the process of provisioning the infrastructure, there is a step that notifies AWS Proton of the status of the deployment.

I want to show you a demo on how you can set up an environment using Terraform. For that, you will use GitHub actions to provision the Terraform infrastructure in your AWS account.

To get started with Terraform templates, first, configure the repository link as it was described before. Then you need to create a new role to give permissions to GitHub actions to perform some activities in your AWS account. You can find the AWS CloudFormation template for this role here.

Create an empty GitHub repository and create a folder .github/workflows/. Create a file called terraform.yml. In that file, you need to define the GitHub actions to plan and apply the infrastructure changes. Copy the template from the terraform example file.

This template configures your AWS credentials, configures Terraform, plans the whole infrastructure, and applies the changes in the infrastructure using Terraform, and then notifies AWS Proton on the status of this process.

In addition, you need to modify the file env_config.json, which is located inside that folder. In that file, you need to add the configuration for the environment you plan to create. You can append new environments to the JSON file. In the example, the environment is called tf-test. The role is the role you created previously, and the region is the region where you want to deploy this infrastructure. Look at the example file.

{
    “tf-test”: {
        “role”: “arn:aws:iam::123456789:role/TerraformGitHubActionsRole”,
        “region”: “us-west-2”
    }
}

For this example, you upload the Terraform project to Amazon S3. See an example of a Terraform project.

Now it is time to create a new environment template in AWS Proton. You can follow the instructions in the console.

When your environment template is ready, create a new environment using the template you just created. When configuring the environment, select Provision through pull request and then configure the repository with the correct parameters.

Configure new enviromentNow, in the Environment details, you can see the Deployment status to be In progress. This will stay like this until the GitHub action finishes.

Environment details

If you go to your repository, you should see a new pull request. Next to the pull request name, you will see a red cross, yellow dot, or green check. That icon depends on the status of the GitHub action. If you have a yellow dot, wait for it to turn red or green. If there is an error, you need to see what is going on inside the logs of the GitHub action.

If you see a green check on the pull request, it means that the GitHub actions has completed, and the pull request can be merged. After the pull request is merged, the infrastructure is provisioned. Go back to the Environment Details page. After a while, and once your infrastructure is provisioned, which can take some minutes depending on your template, you should see that the Deployment Status is Successful.

Github pull request

By the end of this demo, you have provisioned your infrastructure using AWS Proton to handle the environment templates and GitHub actions, and Terraform Open Source to provision the infrastructure in your AWS account.

Availability
Terraform support is available in public preview mode.

These new features are available in the regions where AWS Proton is available: US East (Ohio), US East (N. Virginia), US West (Oregon), Asia Pacific (Tokyo), and Europe (Ireland).

To learn more about these features, visit the AWS Proton service page.

Marcia

Now — AWS Step Functions Supports 200 AWS Services To Enable Easier Workflow Automation

Post Syndicated from Marcia Villalba original https://aws.amazon.com/blogs/aws/now-aws-step-functions-supports-200-aws-services-to-enable-easier-workflow-automation/

Today AWS Step Functions expands the number of supported AWS services from 17 to over 200 and AWS API Actions from 46 to over 9,000 with its new capability AWS SDK Service Integrations.

When developers build distributed architectures, one of the patterns they use is the workflow-based orchestration pattern. This pattern is helpful for workflow automation inside a service to perform distributed transactions. An example of a distributed transaction is all the tasks required to handle an order and keep track of the transaction status at all times.

Step Functions is a low-code visual workflow service used for workflow automation, to orchestrate services, and help you to apply this pattern. Developers use Step Functions with managed services such as Artificial Intelligence services, Amazon Simple Storage Service (Amazon S3), and Amazon DynamoDB.

Introducing Step Functions AWS SDK Service Integrations
Until today, when developers were building workflows that integrate with AWS services, they had to choose from the 46 supported services integrations that Step Functions provided. If the service integration was not available, they had to code the integration in an AWS Lambda function. This is not ideal as it added more complexity and costs to the application.

Now with Step Functions AWS SDK Service Integrations, developers can integrate their state machines directly to AWS service that has AWS SDK support.

You can create state machines that use AWS SDK Service Integrations with Amazon States Language (ASL), AWS Cloud Development Kit (AWS CDK), or visually using AWS Step Function Workflow Studio. To get started, create a new Task state. Then call AWS SDK services directly from the ASL in the resource field of a task state. To do this, use the following syntax.

arn:aws:states:::aws-sdk:serviceName:apiAction.[serviceIntegrationPattern]

Let me show you how to get started with a demo.

Demo
In this demo, you are building an application that, when given a video file stored in S3, transcribes it and translates from English to Spanish.

Let’s build this demo with Step Functions. The state machine, with the service integrations, integrates directly to S3, Amazon Transcribe, and Amazon Translate. The API for transcribing is asynchronous. To verify that the transcribing job is completed, you need a polling loop, which waits for it to be ready.

State machine we are going to build

Create the state machine
To follow this demo along, you need to complete these prerequisites:

  • An S3 bucket where you will put the original file that you want to process
  • A video or audio file in English stored in that bucket
  • An S3 bucket where you want the processing to happen

I will show you how to do this demo using the AWS Management Console. If you want to deploy this demo as infrastructure as code, deploy the AWS CloudFormation template for this project.

To get started with this demo, create a new standard state machine. Choose the option Write your workflow in code to build the state machine using ASL. Create a name for the state machine and create a new role.

Creating a state machine

Start a transcription job
To get started working on the state machine definition, you can Edit the state machine.

Edit the state machine definition

The following piece of ASL code is a state machine with two tasks that are using the new AWS SDK Service Integrations capability. The first task is copying the file from one S3 bucket to another, and the second task is starting the transcription job by directly calling Amazon Transcribe.

For using this new capability from Step Functions, the state type needs to be a Task. You need to specify the service name and API action using this syntax: “arn:aws:states:::aws-sdk:serviceName:apiAction.<serviceIntegrationPattern>”. Use camelCase for apiAction names in the Resource field, such as “copyObject”, and use PascalCase for parameter names in the Parameters field, such as “CopySource”.

For the parameters, find the name and required parameters in the AWS API documentation for this service and API action.

{
  "Comment": "A State Machine that process a video file",
  "StartAt": "GetSampleVideo",
  "States": {
    "GetSampleVideo": {
      "Type": "Task",
      "Resource": "arn:aws:states:::aws-sdk:s3:copyObject",
      "Parameters": {
        "Bucket.$": "$.S3BucketName",
        "Key.$": "$.SampleDataInputKey",
        "CopySource.$": "States.Format('{}/{}',$.SampleDataBucketName,$.SampleDataInputKey)"
      },
      "ResultPath": null,
      "Next": "StartTranscriptionJob"
    },
    "StartTranscriptionJob": {
      "Type": "Task",
      "Resource": "arn:aws:states:::aws-sdk:transcribe:startTranscriptionJob",
      "Parameters": {
        "Media": {
          "MediaFileUri.$": "States.Format('s3://{}/{}',$.S3BucketName,$.SampleDataInputKey)"
        },
        "TranscriptionJobName.$": "$$.Execution.Name",
        "LanguageCode": "en-US",
        "OutputBucketName.$": "$.S3BucketName",
        "OutputKey": "transcribe.json"
      },
      "ResultPath": "$.transcription",
      "End": true
    }
  }
}

In the previous piece of code, you can see an interesting use case of the intrinsic functions that ASL provides. You can construct a string using different parameters. Using intrinsic functions in combination with AWS SDK Service Integrations allows you to manipulate data without the needing a Lambda function. For example, this line:

"MediaFileUri.$": "States.Format('s3://{}/{}',$.S3BucketName,$.SampleDataInputKey)"

Give permissions to the state machine
If you start the execution of the state machine now, it will fail. This state machine doesn’t have permissions to access the S3 buckets or use Amazon Transcribe. Step Functions can’t autogenerate IAM policies for most AWS SDK Service Integrations, so you need to add those to the role manually.

Add those permissions to the IAM role that was created for this state machine. You can find a quick link to the role in the state machine details. Attach the “AmazonTranscribeFullAccess” and the “AmazonS3FullAccess” policies to the role.

Link of the IAM role

Running the state machine for the first time
Now that the permissions are in place, you can run this state machine. This state machine takes as an input the S3 bucket name where the original video is uploaded, the name for the file and the name of the S3 bucket where you want to store this file and do all the processing.

For this to work, this file needs to be a video or audio file and it needs to be in English. When the transcription job is done, it saves the result in the bucket you specify in the input with the name transcribe.json.

 {
  "SampleDataBucketName": "<name of the bucket where the original file is>",
  "SampleDataInputKey": "<name of the original file>",
  "S3BucketName": "<name of the bucket where the processing will happen>"
}

As StartTranscriptionJob is an asynchronous call, you won’t see the results right away. The state machine is only calling the API, and then it completes. You need to wait until the transcription job is ready and then see the results in the output bucket in the file transcribe.json.

Adding a polling loop
Because you want to translate the text using your transcriptions results, your state machine needs to wait for the transcription job to complete. For building an API poller in a state machine, you can use a Task, Wait, and Choice state.

  • Task state gets the job status. In your case, it is calling the service Amazon Transcribe and the API getTranscriptionJob.
  • Wait state waits for 20 seconds, as the transcription job’s length depends on the size of the input file.
  • Choice state moves to the right step based on the result of the job status. If the job is completed, it moves to the next step in the machine, and if not, it keeps on waiting.

States of a polling loop

Wait state
The first of the states you are going to add is the Wait state. This is a simple state that waits for 20 seconds.

"Wait20Seconds": {
        "Type": "Wait",
        "Seconds": 20,
        "Next": "CheckIfTranscriptionDone"
      },

Task state
The next state to add is the Task state, which calls the API getTranscriptionJob. For calling this API, you need to pass the transcription job name. This state returns the job status that is the input of the Choice state.

"CheckIfTranscriptionDone": {
        "Type": "Task",
        "Resource": "arn:aws:states:::aws-sdk:transcribe:getTranscriptionJob",
        "Parameters": {
          "TranscriptionJobName.$": "$.transcription.TranscriptionJob.TranscriptionJobName"
        },
        "ResultPath": "$.transcription",
        "Next": "IsTranscriptionDone?"
      },

Choice state
The Choice state has one rule that checks if the transcription job status is completed. If that rule is true, then it goes to the next state. If not, it goes to the Wait state.

 "IsTranscriptionDone?": {
        "Type": "Choice",
        "Choices": [
          {
            "Variable": "$.transcription.TranscriptionJob.TranscriptionJobStatus",
            "StringEquals": "COMPLETED",
            "Next": "GetTranscriptionText"
          }
        ],
        "Default": "Wait20Seconds"
      },

Getting the transcription text
In this step you are extracting only the transcription text from the output file returned by the transcription job. You need only the transcribed text, as the result file has a lot of metadata that makes the file too long and confusing to translate.

This is a step that you would generally do with a Lambda function. But you can do it directly from the state machine using ASL.

First you need to create a state using AWS SDK Service Integration that gets the result file from S3. Then use another ASL intrinsic function to convert the file text from a String to JSON.

In the next state you can process the file as a JSON object. This state is a Pass state, which cleans the output from the previous state to get only the transcribed text.

 "GetTranscriptionText": {
        "Type": "Task",
        "Resource": "arn:aws:states:::aws-sdk:s3:getObject",
        "Parameters": {
          "Bucket.$": "$.S3BucketName",
          "Key": "transcribe.json"
        },
        "ResultSelector": {
          "filecontent.$": "States.StringToJson($.Body)"
        },
        "ResultPath": "$.transcription",
        "Next": "PrepareTranscriptTest"
      },
  
      "PrepareTranscriptTest" : {
        "Type": "Pass",
        "Parameters": {
          "transcript.$": "$.transcription.filecontent.results.transcripts[0].transcript"
        },
        "Next": "TranslateText"
      },

Translating the text
After preparing the transcribed text, you can translate it. For that you will use Amazon Translate API translateText directly from the state machine. This will be the last state for the state machine and it will return the translated text in the output of this state.

"TranslateText": {
        "Type": "Task",
        "Resource": "arn:aws:states:::aws-sdk:translate:translateText",
        "Parameters": {
          "SourceLanguageCode": "en",
          "TargetLanguageCode": "es",
          "Text.$": "$.transcript"
         },
         "ResultPath": "$.translate",
        "End": true
      }

Add the permissions to the state machine to call the Translate API, by attaching the managed policy “TranslateReadOnly”.

Now with all these in place, you can run your state machine. When the state machine finishes running, you will see the translated text in the output of the last state.

Final state machine

Important things to know
Here are some things that will help you to use AWS SDK Service Integration:

  • Call AWS SDK services directly from the ASL in the resource field of a task state. To do this, use the following syntax: arn:aws:states:::aws-sdk:serviceName:apiAction.[serviceIntegrationPattern]
  • Use camelCase for apiAction names in the Resource field, such as “copyObject”, and use PascalCase for parameter names in the Parameters field, such as “CopySource”.
  • Step Functions can’t autogenerate IAM policies for most AWS SDK Service Integrations, so you need to add those to the IAM role of the state machine manually.
  • Take advantage of ASL intrinsic functions, as those allow you to manipulate the data and avoid using Lambda functions for simple transformations.

Get started today!
AWS SDK Service Integration is generally available in the following regions: US East (N. Virginia), US East (Ohio), US West (Oregon), Canada (Central), Europe (Ireland), Europe (Milan), Africa (Cape Town) and Asia Pacific (Tokyo). It will be generally available in all other commercial regions where Step Functions is available in the coming days.

Learn more about this new capability by reading its documentation.

Marcia

Welcome to AWS Storage Day 2021

Post Syndicated from Marcia Villalba original https://aws.amazon.com/blogs/aws/welcome-to-aws-storage-day-2021/

Welcome to the third annual AWS Storage Day 2021! During Storage Day 2020 and the first-ever Storage Day 2019 we made many impactful announcements for our customers and this year will be no different. The one-day, free AWS Storage Day 2021 virtual event will be hosted on the AWS channel on Twitch. You’ll hear from experts about announcements, leadership insights, and educational content related to AWS Storage services.

AWS Storage DayThe first part of the day is the leadership track. Wayne Duso, VP of Storage, Edge, and Data Governance, will be presenting a live keynote. He’ll share information about what’s new in AWS Cloud Storage and how these services can help businesses increase agility and accelerate innovation. The keynote will be followed by live interviews with the AWS Storage leadership team, including Mai-Lan Tomsen Bukovec, VP of AWS Block and Object Storage.

The second part of the day is a technical track in which you’ll learn more about Amazon Simple Storage Service (Amazon S3), Amazon Elastic Block Store (EBS), Amazon Elastic File System (Amazon EFS), AWS Backup, Cloud Data Migration, AWS Transfer Family and Amazon FSx.

To register for the event, visit the AWS Storage Day 2021 event page.

Now as Jeff Barr likes to say, let’s get into the announcements.

Amazon FSx for NetApp ONTAP
Today, we are pleased to announce Amazon FSx for NetApp ONTAP, a new storage service that allows you to launch and run fully managed NetApp ONTAP file systems in the cloud. Amazon FSx for NetApp ONTAP joins Amazon FSx for Lustre and Amazon FSx for Windows File Server as the newest file system offered by Amazon FSx.

Amazon FSx for NetApp ONTAP provides the full ONTAP experience with capabilities and APIs that make it easy to run applications that rely on NetApp or network-attached storage (NAS) appliances on AWS without changing your application code or how you manage your data. To learn more, read New – Amazon FSx for NetApp ONTAP.

Amazon S3
Amazon S3 Multi-Region Access Points is a new S3 feature that allows you to define global endpoints that span buckets in multiple AWS Regions. Using this feature, you can now build multi-region applications without adding complexity to your applications, with the same system architecture as if you were using a single AWS Region.

S3 Multi-Region Access Points is built on top of AWS Global Accelerator and routes S3 requests over the global AWS network. S3 Multi-Region Access Points dynamically routes your requests to the lowest latency copy of your data, so the upload and download performance can increase by 60 percent. It’s a great solution for applications that rely on reading files from S3 and also for applications like autonomous vehicles that need to write a lot of data to S3. To learn more about this new launch, read How to Accelerate Performance and Availability of Multi-Region Applications with Amazon S3 Multi-Region Access Points.

Creating a multi-region access point

There’s also great news about the Amazon S3 Intelligent-Tiering storage class! The conditions of usage have been updated. There is no longer a minimum storage duration for all objects stored in S3 Intelligent-Tiering, and monitoring and automation charges for objects smaller than 128 KB have been removed. Smaller objects (128 KB or less) are not eligible for auto-tiering when stored in S3 Intelligent-Tiering. Now that there is no monitoring and automation charge for small objects and no minimum storage duration, you can use the S3 Intelligent-Tiering storage class by default for all your workloads with unknown or changing access patterns. To learn more about this announcement, read Amazon S3 Intelligent-Tiering – Improved Cost Optimizations for Short-Lived and Small Objects.

Amazon EFS
Amazon EFS Intelligent Tiering is a new capability that makes it easier to optimize costs for shared file storage when access patterns change. When you enable Amazon EFS Intelligent-Tiering, it will store the files in the appropriate storage class at the right time. For example, if you have a file that is not used for a period of time, EFS Intelligent-Tiering will move the file to the Infrequent Access (IA) storage class. If the file is accessed again, Intelligent-Tiering will automatically move it back to the Standard storage class.

To get started with Intelligent-Tiering, enable lifecycle management in a new or existing file system and choose a lifecycle policy to automatically transition files between different storage classes. Amazon EFS Intelligent-Tiering is perfect for workloads with changing or unknown access patterns, such as machine learning inference and training, analytics, content management and media assets. To learn more about this launch, read Amazon EFS Intelligent-Tiering Optimizes Costs for Workloads with Changing Access Patterns.

AWS Backup
AWS Backup Audit Manager allows you to simplify data governance and compliance management of your backups across supported AWS services. It provides customizable controls and parameters, like backup frequency or retention period. You can also audit your backups to see if they satisfy your organizational and regulatory requirements. If one of your monitored backups drifts from your predefined parameters, AWS Backup Audit Manager will let you know so you can take corrective action. This new feature also enables you to generate reports to share with auditors and regulators. To learn more, read How to Monitor, Evaluate, and Demonstrate Backup Compliance with AWS Backup Audit Manager.

Amazon EBS
Amazon EBS direct APIs now support creating 64 TB EBS Snapshots directly from any block storage data, including on-premises. This was increased from 16 TB to 64 TB, allowing customers to create the largest snapshots and recover them to Amazon EBS io2 Block Express Volumes. To learn more, read Amazon EBS direct API documentation.

AWS Transfer Family
AWS Transfer Family Managed Workflows is a new feature that allows you to reduce the manual tasks of preprocessing your data. Managed Workflows does a lot of the heavy lifting for you, like setting up the infrastructure to run your code upon file arrival, continuously monitoring for errors, and verifying that all the changes to the data are logged. Managed Workflows helps you handle error scenarios so that failsafe modes trigger when needed.

AWS Transfer Family Managed Workflows allows you to configure all the necessary tasks at once so that tasks can automatically run in the background. Managed Workflows is available today in the AWS Transfer Family Management Console. To learn more, read Transfer Family FAQ.

Storage Day 2021 Join us online for more!
Don’t forget to register and join us for the AWS Storage Day 2021 virtual event. The event will be live at 8:30 AM Pacific Time (11:30 AM Eastern Time) on September 2. The event will immediately re-stream for the Asia-Pacific audience with live Q&A moderators on Friday, September 3, at 8:30 AM Singapore Time. All sessions will be available on demand next week.

We look forward to seeing you there!

Marcia

New – AWS Step Functions Workflow Studio – A Low-Code Visual Tool for Building State Machines

Post Syndicated from Marcia Villalba original https://aws.amazon.com/blogs/aws/new-aws-step-functions-workflow-studio-a-low-code-visual-tool-for-building-state-machines/

AWS Step Functions allow you to build scalable, distributed applications using state machines. Until today, building workflows on Step Functions required you to learn and understand Amazon State Language (ASL). Today, we are launching Workflow Studio, a low-code visual tool that helps you learn Step Functions through a guided interactive interface and allows you to prototype and build workflows faster.

In December 2016, when Step Functions was launched, I was in the middle of a migration to serverless. My team moved all the business logic from applications that were built for a traditional environment to a serverless architecture. Although we tried to have functions that did one thing and one thing only, when we put all the state management from our applications into the functions, they became very complex. When I saw that Step Functions was launched, I realized they would reduce the complexity of the serverless application we were building. The downside was that I spent a lot of time learning and writing state machines using ASL, learning how to invoke different AWS services, and performing the flow operations the state machine required. It took weeks of work and lots of testing to get it right.

Step Functions is amazing for visualizing the processes inside your distributed applications, but developing those state machines is not a visual process. Workflow Studio makes it easy for developers to build serverless workflows. It empowers developers to focus on their high-value business logic while reducing the time spent writing configuration code for workflow definitions and building data transformations.

Workflow Studio is great for developers who are new to Step Functions, because it reduces the time to build their first workflow and provides an accelerated learning path where developers learn by doing. Workflow Studio is also useful for developers who are experienced in building workflows, because they can now develop them faster using a visual tool. For example, you can use Workflow Studio to do prototypes of the workflows and share them with your stakeholders quickly. Or you can use Workflow Studio to design the boilerplate of your state machine. When you use Workflow Studio, you don’t need to have all the resources deployed in your AWS account. You can build the state machines and start completing them with the different actions as they get ready.

Workflow Studio simplifies the building of enterprise applications such as ecommerce platforms, financial transaction processing systems, or e-health services. It abstracts away the complexities of building fault-tolerant, scalable applications by assembling AWS services into workflows. Because Workflow Studio exposes many of the capabilities of AWS services in a visual workflow, it’s easy to sequence and configure calls to AWS services and APIs and transform the data flowing through a workflow.

Build a workflow using Workflow Studio
Imagine that you need to build a system that validates data when an account is created. If the input data is correct, the system saves the record in persistent storage and an email is sent to the administrator to confirm the account was created successfully. If the account cannot be created due to a validation error, the data is not stored and an email is sent to notify the administrator that there was a problem with the creation of the account.

There are many ways to solve this problem, but if you want to make the application with the least amount of code, and take advantage of all the managed services that AWS provides, you should use Workflow Studio to design the state machine and build the integrations with all the managed services.

Architectural diagram of what we are building

Let me show you how easy is to create a state machine using Workflow Studio. To get started, go to the Step Functions console and create a state machine. You will see an option to start designing the new state machine visually with Workflow Studio.

Creating a new state machine

You can start creating state machines in Workflow Studio. In the left pane, the States Browser, you can view and search the available actions and flow states. Actions are operations you can perform using AWS services, like invoking an AWS Lambda function, making a request with Amazon API Gateway, and sending a message to an Amazon Simple Notification Service (SNS) topic. Flows are the state types you can use to make a workflow appropriate for your use case.

Here are some of the available flow states:

  • Choice: Adds if-then-else logic.
  • Parallel: Adds parallel branches.
  • Map: Adds a for-each loop.
  • Wait: Delays for a specific time.

In the center of the page, you can see the state machine you are currently working on.

Screenshot of Studio workflow first view

To build the account validator workflow, you need:

  • One task that invokes a Lambda function that validates the data provided to create the account.
  • One task that puts an item into a DynamoDB table.
  • Two tasks that put a message to an SNS topic.
  • One choice flow state, to decide which action to take, depending on the results of a Lambda function.

When creating the workflow, you don’t need to have all the AWS resources in advance to start working on the state machine. You can build the state machine and then you can add the definitions to the resources later. Or, as we are going to do in this blog post, you can have all your AWS resources deployed in your AWS account before you start working on your state machine. You can deploy the required resources into your AWS account from this Serverless Application Model template. After you create and deploy those resources, you can continue with the other steps in this post.

Configure the Lambda function
The first step in your workflow is the Lambda function. To add it to your state machine, just drag an Invoke action from the Actions list into the center of Workflow Studio, as shown in step 1. You can edit the configuration of your function in the right pane. For example, you can change the name (as shown in step 2). You can also edit which Lambda function should be invoked from the list of functions deployed in this account, as shown in step 3. When you’re done, you can edit the output for this task, as shown in step 4.

Steps for adding a new Lambda function to the state machine

Configuring the output of the task is very important, because these values will be passed to the next state as input. We will construct a result object with just the information we need (in this case, if the account is valid). First, clear Filter output with OutputPath, as shown in step 1. Then you can select Transform result with Result Selector, and add the JSON shown in step 2. Then, to combine the input of this current state with the output, and send it to the next state as input, select Combine input and result with ResultPath, as shown in step 3. We need the input of this state, because the input is the account information. If the validation is successful, we need to store that data in a DynamoDB table.

If need help understanding what each of the transformations does, choose the Info links in each of the transformations.

Screenshot of configuration for the Lambda output

Configure the choice state
After you configure the Lambda function, you need to add a choice state. A choice will validate the input using choice rules. Based on the result of applying those rules, the state machine will direct the execution to a different path.

The following figure shows the workflow for adding a choice state. In step 1, you drag it from the flow menu. In step 2, you enter a name for it. In step 3, you can define the rules. For this use case, you will have one rule with a specific condition.

Screenshot of configuring a choice state

The condition for this rule compares the results of the output of the previous state against a boolean constant. If the previous state operation returns a value of true, the rule is executed. This is your happy path. In this example, you want to validate the result of the Lambda function. If the function validates the input data, it returns validated is equals to true, as shown here.

Configuring the rule

If the rule doesn’t apply, the choice state makes the default branch run. This is your error path.

Configure the error path
When there is an error, you want to send an email to let the administrator know that the account couldn’t be created. You should have created an SNS topic earlier in the post. Make sure that the email address you configured in the SNS topic accepts the email subscription for this topic.

To add the SNS task of publishing a message, first search for SNS:Publish task as shown in step 1, and then drag it to the state machine, as shown in step 2. Drag a Fail state flow to the state machine, as shown in step 3, so that when this branch of execution is complete, the state machine is in a fail state.

One nice feature of Workflow Studio is that you can drag the different states around in the state machine and place them in different parts of the worklow.

Now you can configure the SNS task for publishing a message. First, change the state name, as shown in step 4. Choose the topic from the ones deployed in your AWS account, as shown in step 5. Finally, change the message that will be sent in the email to something appropriate for your use case, as shown in step 6.

Steps for configuring the error path

Configure the happy path
For the happy path, you want to store the account information in a DynamoDB table and then send an email using the SNS topic you deployed earlier. To do that, add the DynamoDB:PutItem task, as shown in step 1, and the SNS:Publish task, as shown in step 2, into the state machine. You configure the SNS:Publish task in a similar way to the error path. You just send a different message. For that, you can duplicate the state from the error path, drag it to the right place, and just modify it with the new message.

The DynamoDB:PutItem task puts an item into a DynamoDB table. This is a very handy task because we don’t need to execute this operation inside a Lambda function. To configure this task, you first change its name, as shown in step 3. Then, you need to configure the API parameters, as shown in step 4, to put the right data into the DynamoDB table.

Steps for configuring the happy path

These are the API parameters to use for this particular item (an account):

{
  "TableName": "<THE NAME OF YOUR TABLE>",
  "Item": {
    "id": {
      "S.$": "$.Name"
    },
    "mail": {
      "S.$": "$.Mail"
    },
    "work": {
      "S.$": "$.Work"
    }
  }
}

Save and execute the state machine
Workflow Studio created the ASL definition of the state machine for you, but you can always edit the ASL definition and return to the visual editor whenever you want to edit the state machine.

Now that your state machine is ready, you can run the first execution. Save it and start a new execution. When you start a new execution, a message will be displayed, asking for the input event to the state machine. Make sure that the attributes for this event are named Name, Mail and Work, because the execution of the state machine depends on those.

Starting the execution After you run your state machine, you see a visualization for the execution. It shows you all the steps that the execution ran. In each step, you see the step input and step output. This is very useful for debugging and fine-tuning the state machine.

Execution results

Available Now

There are a lot of great features on our roadmap for Workflow Studio. Although the details may change, we are currently working to give you the power to visually create, run, and even debug workflow executions. Stay tuned for more information, and please feel free to send us feedback.

Workflow Studio is available now in all the AWS Regions where Step Functions is available.

Try it and learn more.

Marcia