Post Syndicated from Michael Hamilton original https://aws.amazon.com/blogs/big-data/detect-mask-and-redact-pii-data-using-aws-glue-before-loading-into-amazon-opensearch-service/
Many organizations, small and large, are working to migrate and modernize their analytics workloads on Amazon Web Services (AWS). There are many reasons for customers to migrate to AWS, but one of the main reasons is the ability to use fully managed services rather than spending time maintaining infrastructure, patching, monitoring, backups, and more. Leadership and development teams can spend more time optimizing current solutions and even experimenting with new use cases, rather than maintaining the current infrastructure.
With the ability to move fast on AWS, you also need to be responsible with the data you’re receiving and processing as you continue to scale. These responsibilities include being compliant with data privacy laws and regulations and not storing or exposing sensitive data like personally identifiable information (PII) or protected health information (PHI) from upstream sources.
In this post, we walk through a high-level architecture and a specific use case that demonstrates how you can continue to scale your organization’s data platform without needing to spend large amounts of development time to address data privacy concerns. We use AWS Glue to detect, mask, and redact PII data before loading it into Amazon OpenSearch Service.
Solution overview
The following diagram illustrates the high-level solution architecture. We have defined all layers and components of our design in line with the AWS Well-Architected Framework Data Analytics Lens.

The architecture is comprised of a number of components:
Source data
Data may be coming from many tens to hundreds of sources, including databases, file transfers, logs, software as a service (SaaS) applications, and more. Organizations may not always have control over what data comes through these channels and into their downstream storage and applications.
Ingestion: Data lake batch, micro-batch, and streaming
Many organizations land their source data into their data lake in various ways, including batch, micro-batch, and streaming jobs. For example, Amazon EMR, AWS Glue, and AWS Database Migration Service (AWS DMS) can all be used to perform batch and or streaming operations that sink to a data lake on Amazon Simple Storage Service (Amazon S3). Amazon AppFlow can be used to transfer data from different SaaS applications to a data lake. AWS DataSync and AWS Transfer Family can help with moving files to and from a data lake over a number of different protocols. Amazon Kinesis and Amazon MSK also have capabilities to stream data directly to a data lake on Amazon S3.
S3 data lake
Using Amazon S3 for your data lake is in line with the modern data strategy. It provides low-cost storage without sacrificing performance, reliability, or availability. With this approach, you can bring compute to your data as needed and only pay for capacity it needs to run.
In this architecture, raw data can come from a variety of sources (internal and external), which may contain sensitive data.
Using AWS Glue crawlers, we can discover and catalog the data, which will build the table schemas for us, and ultimately make it straightforward to use AWS Glue ETL with the PII transform to detect and mask or and redact any sensitive data that may have landed in the data lake.
Business context and datasets
To demonstrate the value of our approach, let’s imagine you’re part of a data engineering team for a financial services organization. Your requirements are to detect and mask sensitive data as it is ingested into your organization’s cloud environment. The data will be consumed by downstream analytical processes. In the future, your users will be able to safely search historical payment transactions based on data streams collected from internal banking systems. Search results from operation teams, customers, and interfacing applications must be masked in sensitive fields.
The following table shows the data structure used for the solution. For clarity, we have mapped raw to curated column names. You’ll notice that multiple fields within this schema are considered sensitive data, such as first name, last name, Social Security number (SSN), address, credit card number, phone number, email, and IPv4 address.
| Raw Column Name | Curated Column Name | Type |
| c0 | first_name | string |
| c1 | last_name | string |
| c2 | ssn | string |
| c3 | address | string |
| c4 | postcode | string |
| c5 | country | string |
| c6 | purchase_site | string |
| c7 | credit_card_number | string |
| c8 | credit_card_provider | string |
| c9 | currency | string |
| c10 | purchase_value | integer |
| c11 | transaction_date | date |
| c12 | phone_number | string |
| c13 | string | |
| c14 | ipv4 | string |
Use case: PII batch detection before loading to OpenSearch Service
Customers who implement the following architecture have built their data lake on Amazon S3 to run different types of analytics at scale. This solution is suitable for customers who don’t require real-time ingestion to OpenSearch Service and plan to use data integration tools that run on a schedule or are triggered through events.

Before data records land on Amazon S3, we implement an ingestion layer to bring all data streams reliably and securely to the data lake. Kinesis Data Streams is deployed as an ingestion layer for accelerated intake of structured and semi-structured data streams. Examples of these are relational database changes, applications, system logs, or clickstreams. For change data capture (CDC) use cases, you can use Kinesis Data Streams as a target for AWS DMS. Applications or systems generating streams containing sensitive data are sent to the Kinesis data stream via one of the three supported methods: the Amazon Kinesis Agent, the AWS SDK for Java, or the Kinesis Producer Library. As a last step, Amazon Kinesis Data Firehose helps us reliably load near-real-time batches of data into our S3 data lake destination.
The following screenshot shows how data flows through Kinesis Data Streams via the Data Viewer and retrieves sample data that lands on the raw S3 prefix. For this architecture, we followed the data lifecycle for S3 prefixes as recommended in Data lake foundation.

As you can see from the details of the first record in the following screenshot, the JSON payload follows the same schema as in the previous section. You can see the unredacted data flowing into the Kinesis data stream, which will be obfuscated later in subsequent stages.

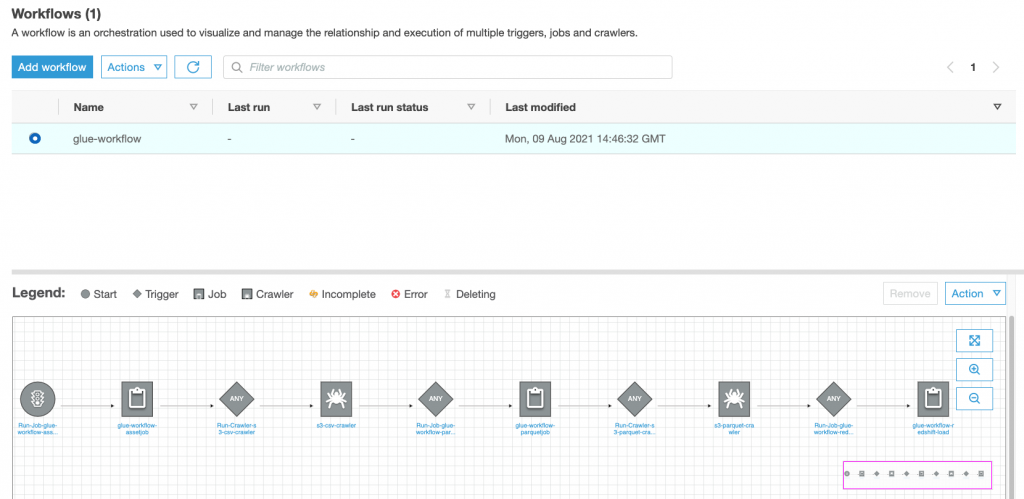
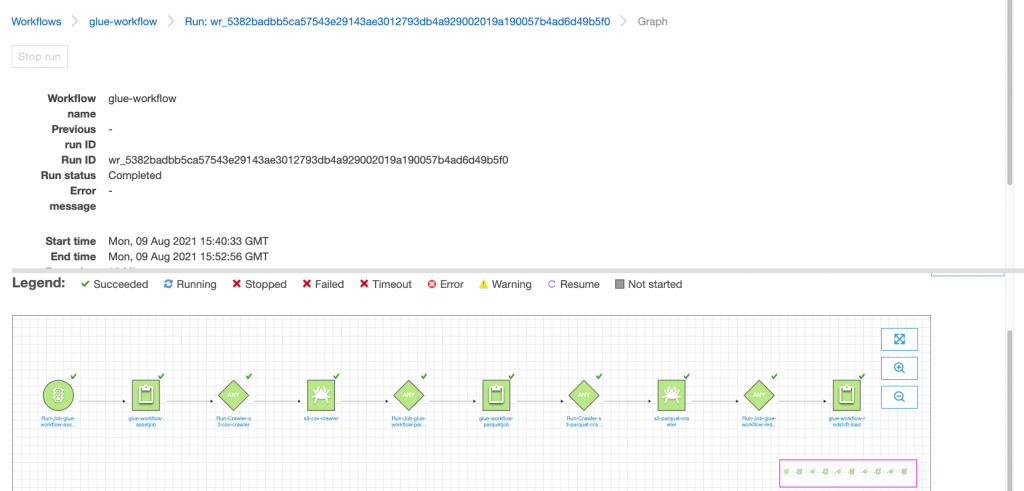
After the data is collected and ingested into Kinesis Data Streams and delivered to the S3 bucket using Kinesis Data Firehose, the processing layer of the architecture takes over. We use the AWS Glue PII transform to automate detection and masking of sensitive data in our pipeline. As shown in the following workflow diagram, we took a no-code, visual ETL approach to implement our transformation job in AWS Glue Studio.

First, we access the source Data Catalog table raw from the pii_data_db database. The table has the schema structure presented in the previous section. To keep track of the raw processed data, we used job bookmarks.

We use the AWS Glue DataBrew recipes in the AWS Glue Studio visual ETL job to transform two date attributes to be compatible with OpenSearch expected formats. This allows us to have a full no-code experience.

We use the Detect PII action to identify sensitive columns. We let AWS Glue determine this based on selected patterns, detection threshold, and sample portion of rows from the dataset. In our example, we used patterns that apply specifically to the United States (such as SSNs) and may not detect sensitive data from other countries. You may look for available categories and locations applicable to your use case or use regular expressions (regex) in AWS Glue to create detection entities for sensitive data from other countries.
It’s important to select the correct sampling method that AWS Glue offers. In this example, it’s known that the data coming in from the stream has sensitive data in every row, so it’s not necessary to sample 100% of the rows in the dataset. If you have a requirement where no sensitive data is allowed to downstream sources, consider sampling 100% of the data for the patterns you chose, or scan the entire dataset and act on each individual cell to ensure all sensitive data is detected. The benefit you get from sampling is reduced costs because you don’t have to scan as much data.

The Detect PII action allows you to select a default string when masking sensitive data. In our example, we use the string **********.

We use the apply mapping operation to rename and remove unnecessary columns such as ingestion_year, ingestion_month, and ingestion_day. This step also allows us to change the data type of one of the columns (purchase_value) from string to integer.

From this point on, the job splits into two output destinations: OpenSearch Service and Amazon S3.
Our provisioned OpenSearch Service cluster is connected via the OpenSearch built-in connector for Glue. We specify the OpenSearch Index we’d like to write to and the connector handles the credentials, domain and port. In the screen shot below, we write to the specified index index_os_pii.

We store the masked dataset in the curated S3 prefix. There, we have data normalized to a specific use case and safe consumption by data scientists or for ad hoc reporting needs.

For unified governance, access control, and audit trails of all datasets and Data Catalog tables, you can use AWS Lake Formation. This helps you restrict access to the AWS Glue Data Catalog tables and underlying data to only those users and roles who have been granted necessary permissions to do so.
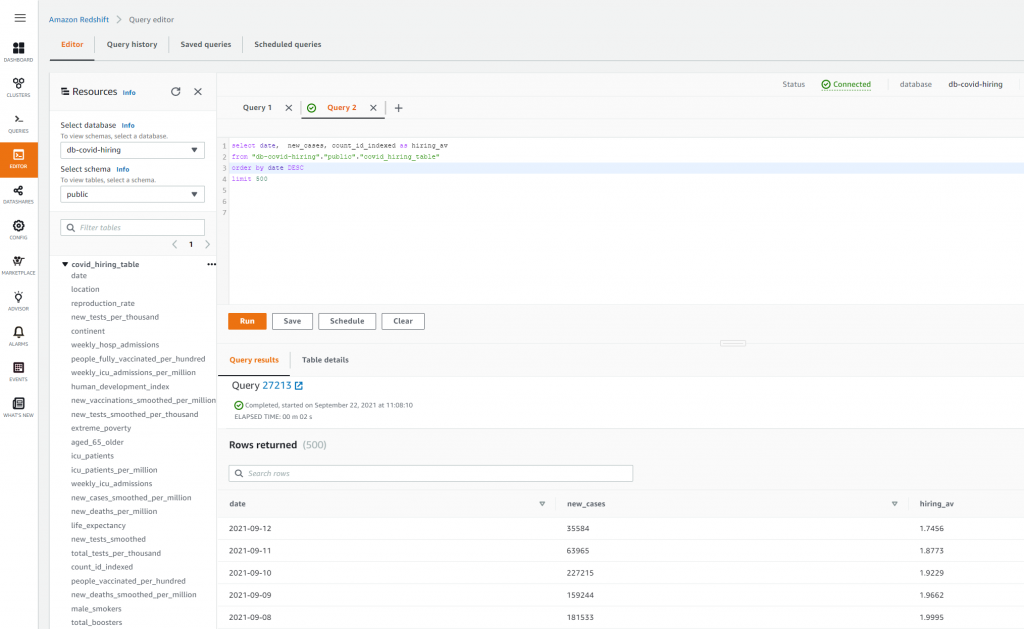
After the batch job runs successfully, you can use OpenSearch Service to run search queries or reports. As shown in the following screenshot, the pipeline masked sensitive fields automatically with no code development efforts.

You can identify trends from the operational data, such as the amount of transactions per day filtered by credit card provider, as shown in the preceding screenshot. You can also determine the locations and domains where users make purchases. The transaction_date attribute helps us see these trends over time. The following screenshot shows a record with all of the transaction’s information redacted appropriately.

For alternate methods on how to load data into Amazon OpenSearch, refer to Loading streaming data into Amazon OpenSearch Service.
Furthermore, sensitive data can also be discovered and masked using other AWS solutions. For example, you could use Amazon Macie to detect sensitive data inside an S3 bucket, and then use Amazon Comprehend to redact the sensitive data that was detected. For more information, refer to Common techniques to detect PHI and PII data using AWS Services.
Conclusion
This post discussed the importance of handling sensitive data within your environment and various methods and architectures to remain compliant while also allowing your organization to scale quickly. You should now have a good understanding of how to detect, mask, or redact and load your data into Amazon OpenSearch Service.
About the authors
 Michael Hamilton is a Sr Analytics Solutions Architect focusing on helping enterprise customers modernize and simplify their analytics workloads on AWS. He enjoys mountain biking and spending time with his wife and three children when not working.
 Daniel Rozo is a Senior Solutions Architect with AWS supporting customers in the Netherlands. His passion is engineering simple data and analytics solutions and helping customers move to modern data architectures. Outside of work, he enjoys playing tennis and biking.


 Michael Hamilton is a Sr Analytics Solutions Architect focusing on helping enterprise customers in the south east modernize and simplify their analytics workloads on AWS. He enjoys mountain biking and spending time with his wife and three children when not working.
 Cody Penta is a Solutions Architect at Amazon Web Services and is based out of Charlotte, NC. He has a focus in security and CDK, and enjoys solving the really difficult problems in the technology world. Off the clock, he loves relaxing in the mountains, coding personal projects, and gaming.
 Angus Ferguson is a Solutions Architect at AWS who is passionate about meeting customers across the world, helping them solve their technical challenges. Angus specializes in Data & Analytics with a focus on customers in the financial services industry.

 Michael Hamilton is a Sr Analytics Solutions Architect focusing on helping enterprise customers in the south east modernize and simplify their analytics workloads on AWS. He enjoys mountain biking and spending time with his wife and three children when not working.
 Angus Ferguson is a Solutions Architect at AWS who is passionate about meeting customers across the world, helping them solve their technical challenges. Angus specializes in Data & Analytics with a focus on customers in the financial services industry.