Post Syndicated from Sandeep Adwankar original https://aws.amazon.com/blogs/big-data/the-amazon-sagemaker-lakehouse-architecture-now-supports-tag-based-access-control-for-federated-catalogs/
The Amazon SageMaker lakehouse architecture has expanded its tag-based access control (TBAC) capabilities to include federated catalogs. This enhancement extends beyond the default AWS Glue Data Catalog resources to encompass Amazon S3 Tables, Amazon Redshift data warehouses. TBAC is also supported on federated catalogs from data sources Amazon DynamoDB, MySQL, PostgreSQL, SQL Server, Oracle, Amazon DocumentDB, Google BigQuery, and Snowflake. TBAC provides you a sophisticated permission management that uses tags to create logical groupings of catalog resources, enabling administrators to implement fine-grained access controls across their entire data landscape without managing individual resource-level permissions.
Traditional data access management often requires manual assignment of permissions at the resource level, creating significant administrative overhead. TBAC solves this by introducing an automated, inheritance-based permission model. When administrators apply tags to data resources, access permissions are automatically inherited, eliminating the need for manual policy modifications when new tables are added. This streamlined approach not only reduces administrative burden but also enhances security consistency across the data ecosystem.
TBAC can be set up through the AWS Lake Formation console, and accessible using Amazon Redshift, Amazon Athena, Amazon EMR, AWS Glue, and Amazon SageMaker Unified Studio. This makes it valuable for organizations managing complex data landscapes with multiple data sources and large datasets. TBAC is especially beneficial for enterprises implementing data mesh architectures, maintaining regulatory compliance, or scaling their data operations across multiple departments. Furthermore, TBAC enables efficient data sharing across different accounts, making it easier to maintain secure collaboration.
In this post, we illustrate how to get started with fine-grained access control of S3 Tables and Redshift tables in the lakehouse using TBAC. We also show how to access these lakehouse tables using your choice of analytics services, such as Athena, Redshift, and Apache Spark in Amazon EMR Serverless in Amazon SageMaker Unified Studio.
Solution overview
For illustration, we consider a fictional company called Example Retail Corp, as covered in the blog post Accelerate your analytics with Amazon S3 Tables and Amazon SageMaker Lakehouse. Example Retail’s leadership has decided to use the SageMaker lakehouse architecture to unify data across S3 Tables and their Redshift data warehouse. With this lakehouse architecture, they can now conduct analyses across their data to identify at-risk customers, understand the impact of personalized marketing campaigns on customer churn, and develop targeted retention and sales strategies.
Alice is a data administrator with the AWS Identity and Access Management (IAM) role LHAdmin in Example Retail Corp, and she wants to implement tag-based access control to scale permissions across their data lake and data warehouse resources. She is using S3 Tables with Iceberg transactional capability to achieve scalability as updates are streamed across billions of customer interactions, while providing the same durability, availability, and performance characteristics that S3 is known for. She already has a Redshift namespace, which contains historical and current data about sales, customers prospects, and churn information. Alice supports an extended team of developers, engineers, and data scientists who require access to the data environment to develop business insights, dashboards, ML models, and knowledge bases. This team includes:
- Bob, a data steward with IAM role
DataSteward, is the domain owner and manages access to the S3 Tables and warehouse data. He enables other teams who build reports to be shared with leadership. - Charlie, a data analyst with IAM role
DataAnalyst, builds ML forecasting models for sales growth using the pipeline or customer conversion across multiple touchpoints, and makes those available to finance and planning teams. - Doug, a BI engineer with IAM role
BIEngineer, builds interactive dashboards to funnel customer prospects and their conversions across multiple touchpoints, and makes those available to thousands of sales team members.
Alice decides to use the SageMaker lakehouse architecture to unify data across S3 Tables and Redshift data warehouse. Bob can now bring his domain data into one place and manage access to multiple teams requesting access to his data. Charlie can quickly build Amazon QuickSight dashboards and use his Redshift and Athena expertise to provide quick query results. Doug can build Spark-based processing with AWS Glue or Amazon EMR to build ML forecasting models.
Alice’s goal is to use TBAC to make fine-grained access much more scalable, because they can grant permissions on many resources at once and permissions are updated accordingly when tags for resources are added, changed, or removed.The following diagram illustrates the solution architecture.
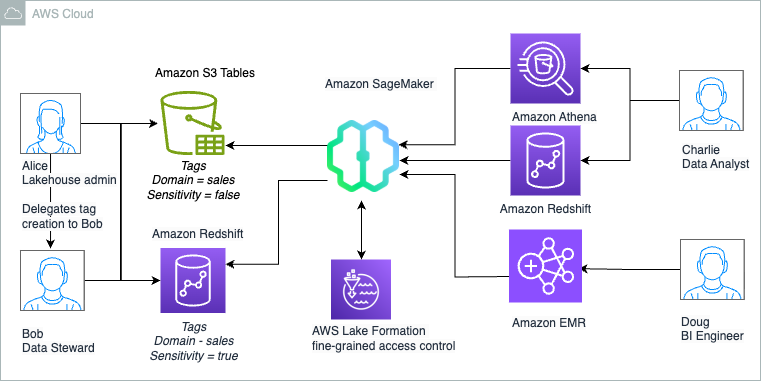
Alice as Lakehouse admin and Bob as Data Steward determines that following high-level steps are needed to deploy the solution:
- Create an S3 Tables bucket and enable integration with the Data Catalog. This will make the resources available under the federated catalog
s3tablescatalogin the lakehouse architecture with Lake Formation for access control. Create a namespace and a table under the table bucket where the data will be stored. - Create a Redshift cluster with tables, publish your data warehouse to the Data Catalog, and create a catalog registering the namespace. This will make the resources available under a federated catalog in the lakehouse architecture with Lake Formation for access control.
- Delegate permissions to create tags and grant permissions on Data Catalog resources to
DataSteward. - As
DataSteward, define tag ontology based on the use case and create Tags. Assign these LF-Tags to the resources (database or table) to logically group lakehouse resources for sharing based on access patterns. - Share the S3 Tables catalog table and Redshift table using tag-based access control to
DataAnalyst, who uses Athena for analysis and Redshift Spectrum for generating the report. - Share the S3 Tables catalog table and Redshift table using tag-based access control to
BIEngineer, who uses Spark in EMR Serverless to further process the datasets.
Data steward defines the tags and assignment to resources as shown:
| Tags | Data Resources |
|
Domain = sales Sensitivity = false |
S3 Table: customer( c_salutation, c_preferred_cust_flag,c_first_sales_date_sk, |
|
Domain = sales Sensitivity = true |
S3 Table: customer( c_first_name, c_last_name, c_email_address, c_birth_year) |
|
Domain = sales Sensitivity = false |
Redshift Table: sales.store_sales |
The following table summarizes the tag expression that is granted to roles for resource access:
| User | Persona | Permission Granted | Access |
| Bob | DataSteward | SUPER_USER on catalogs | Admin access on customer and store_sales. |
| Charlie | DataAnalyst |
Domain = sales Sensitivity = false |
Access to non -sensitive data that is aligned to sales domain: customer(non-sensitive columns) and store_sales. |
| Doug | BIEngineer | Domain = sales | Access to all datasets that is aligned to sales domain: customer and store_sales. |
Prerequisites
To follow along with this post, complete the following prerequisite steps:
- Have an AWS account and admin user with access to the following AWS services:
- Athena
- Amazon EMR
- IAM
- Lake Formation and the Data Catalog
- Amazon Redshift
- Amazon S3
- IAM Identity Center
- Amazon SageMaker Unified Studio
- Create a data lake admin (
LHAdmin). For instructions, see Create a data lake administrator. - Create an IAM role named
DataStewardand attach permissions for AWS Glue and Lake Formation access. For instructions, refer to Data lake administrator permissions. - Create an IAM role named
DataAnalystand attach permissions for Amazon Redshift and Athena access. For instructions, refer to Data analyst permissions. - Create an IAM role named
BIEngineerand attach permissions for Amazon EMR access. This is also the EMR runtime role that the Spark job will use to access the tables. For instructions on the role permissions, refer to Job runtime roles for EMR serverless. - Create an IAM role named
RedshiftS3DataTransferRolefollowing the instructions in Prerequisites for managing Amazon Redshift namespaces in the AWS Glue Data Catalog. - Create an EMR Studio and attach an EMR Serverless namespace in a private subnet to it, following the instructions in Run interactive workloads on Amazon EMR Serverless from Amazon EMR Studio.
Create data lake tables using an S3 Tables bucket and integrate with the lakehouse architecture
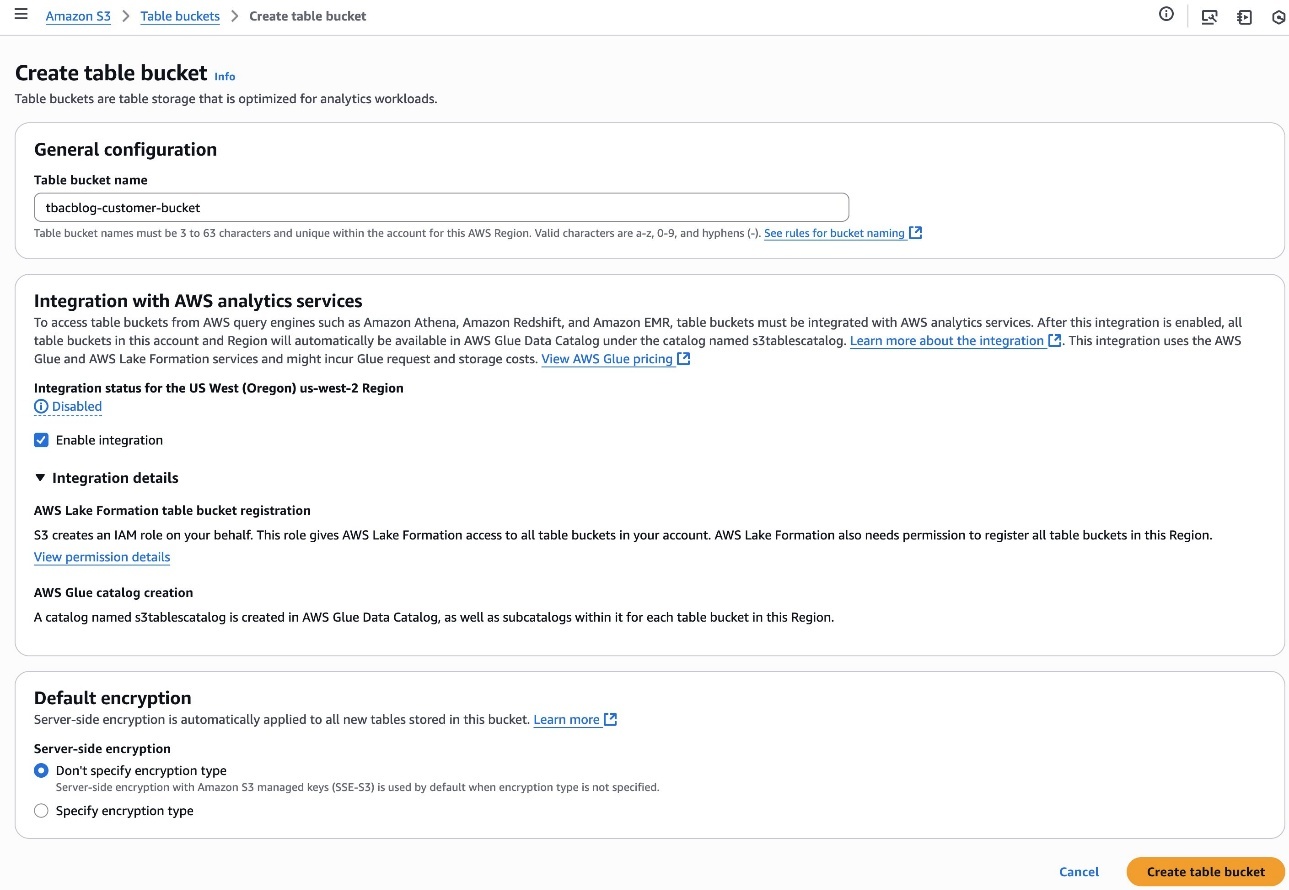
Alice completes the following steps to create a table bucket and enable integration with analytics services:
- Sign in to the Amazon S3 console as
LHAdmin. - Choose Table buckets in the navigation pane and create a table bucket.
- For Table bucket name, enter a name, such as
tbacblog-customer-bucket. - For Integration with AWS analytics services, choose Enable integration.
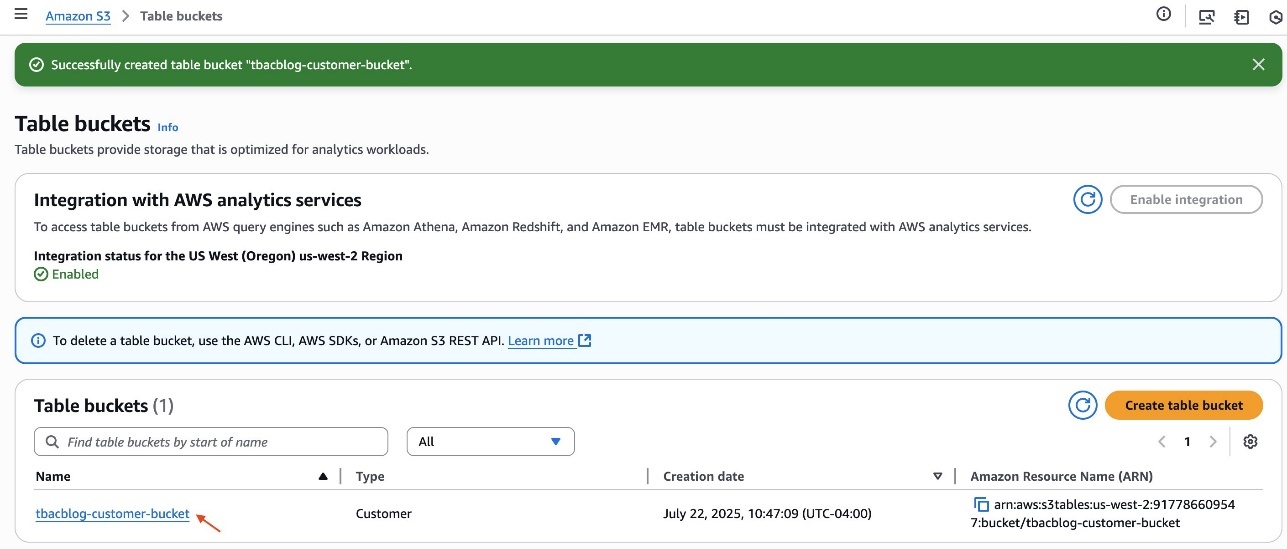
- Choose Create table bucket.

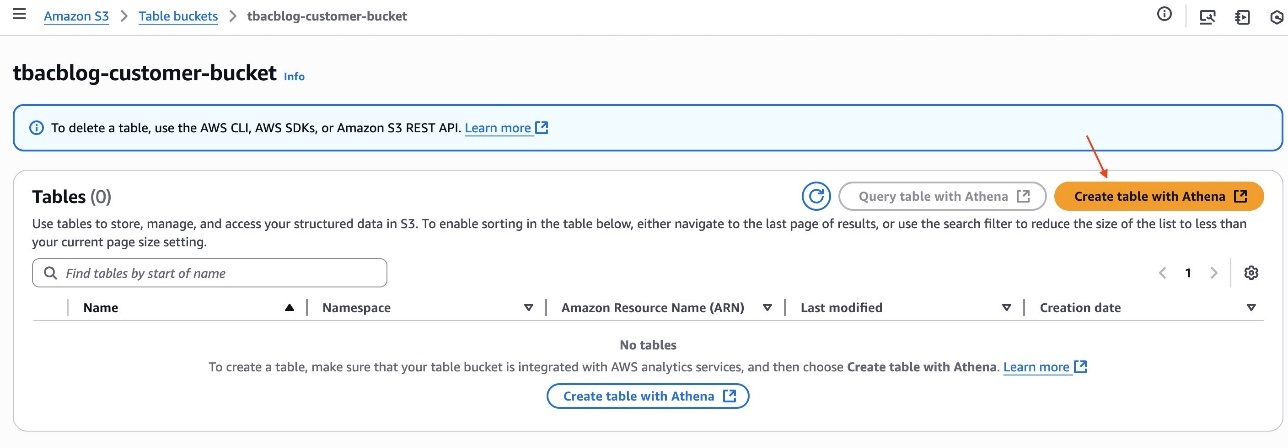
- After you create the table, click the hyperlink of the table bucket name.

- Choose Create table with Athena.

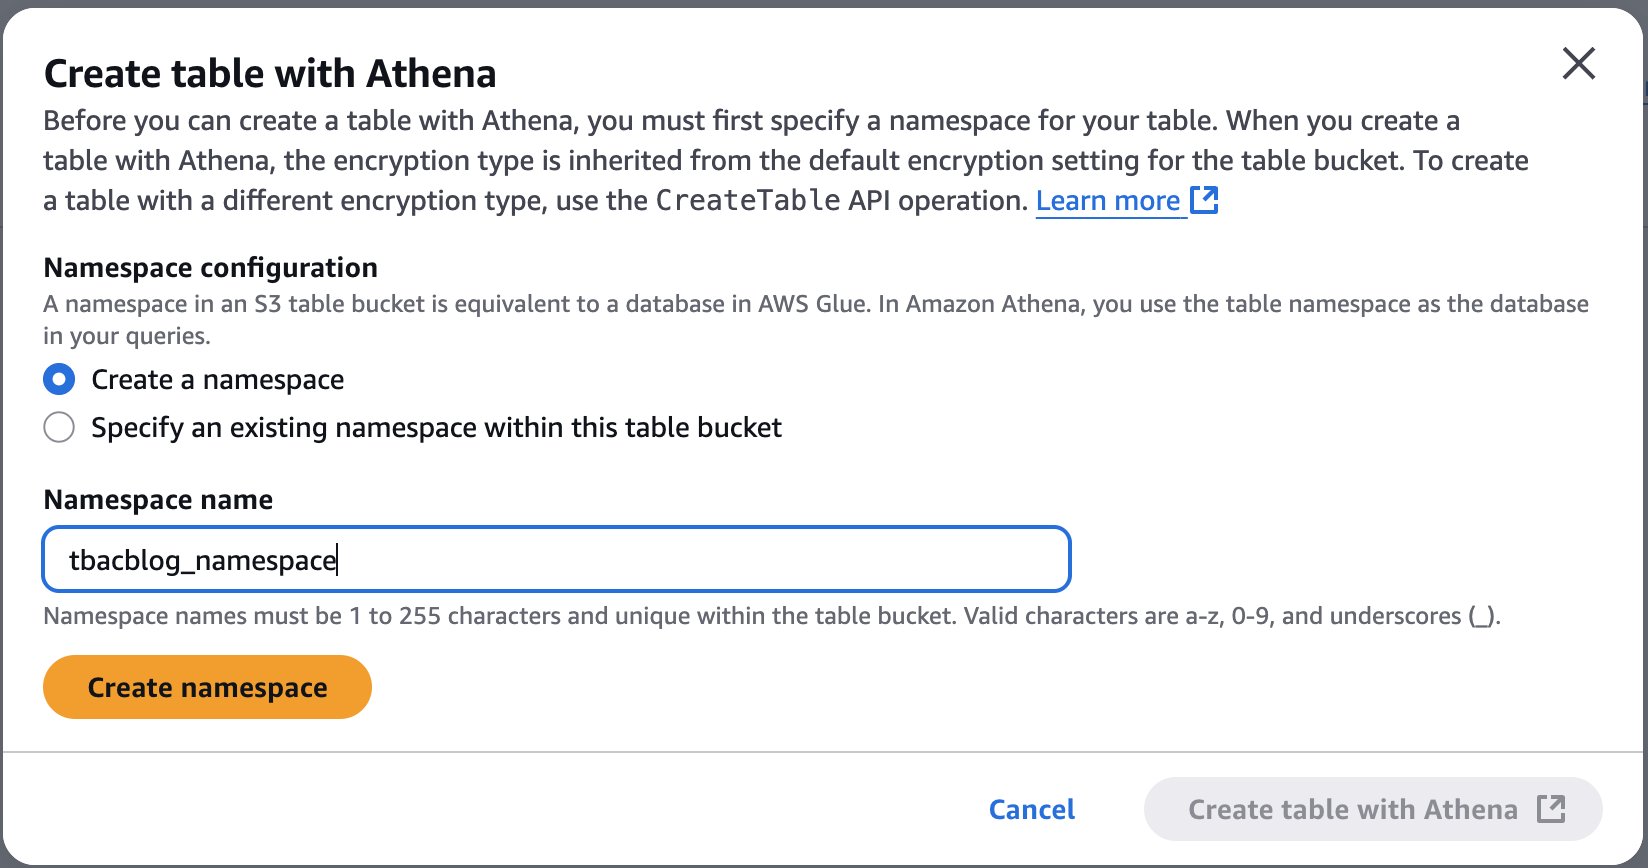
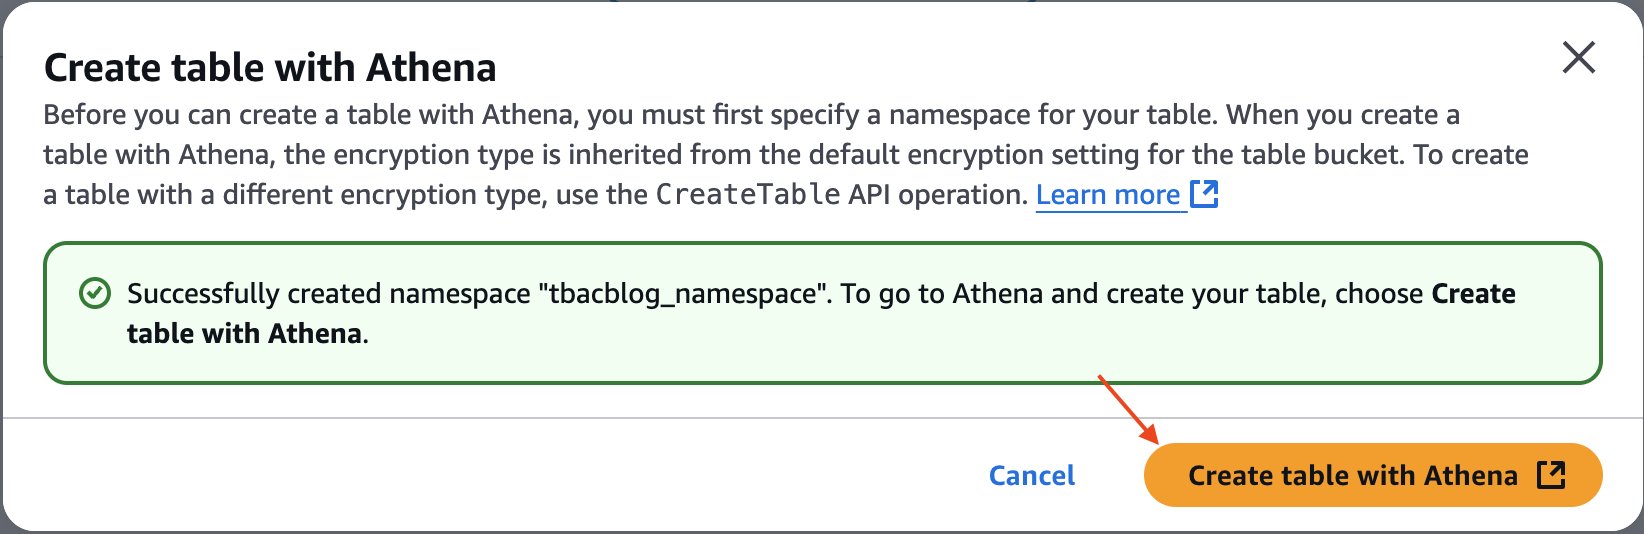
- Create a namespace and provide a namespace name. For example,
tbacblog_namespace. - Choose Create namespace.

- Now proceed to creating table schema and populating it by choosing Create table with Athena.

- On the Athena console, run the following SQL script to create a table:
You have now created the S3 Tables table customer, populated it with data, and integrated it with the lakehouse architecture.
Set up data warehouse tables using Amazon Redshift and integrate them with the lakehouse architecture
In this section, Alice sets up data warehouse tables using Amazon Redshift and integrates them with the lakehouse architecture.
Create a Redshift cluster and publish it to the Data Catalog
Alice completes the following steps to create a Redshift cluster and publish it to the Data Catalog:
- Create a Redshift Serverless namespace called
salescluster. For instructions, refer to Get started with Amazon Redshift Serverless data warehouses. - Sign in to the Redshift endpoint
salesclusteras an admin user. - Run the following script to create a table under the
devdatabase under thepublicschema:
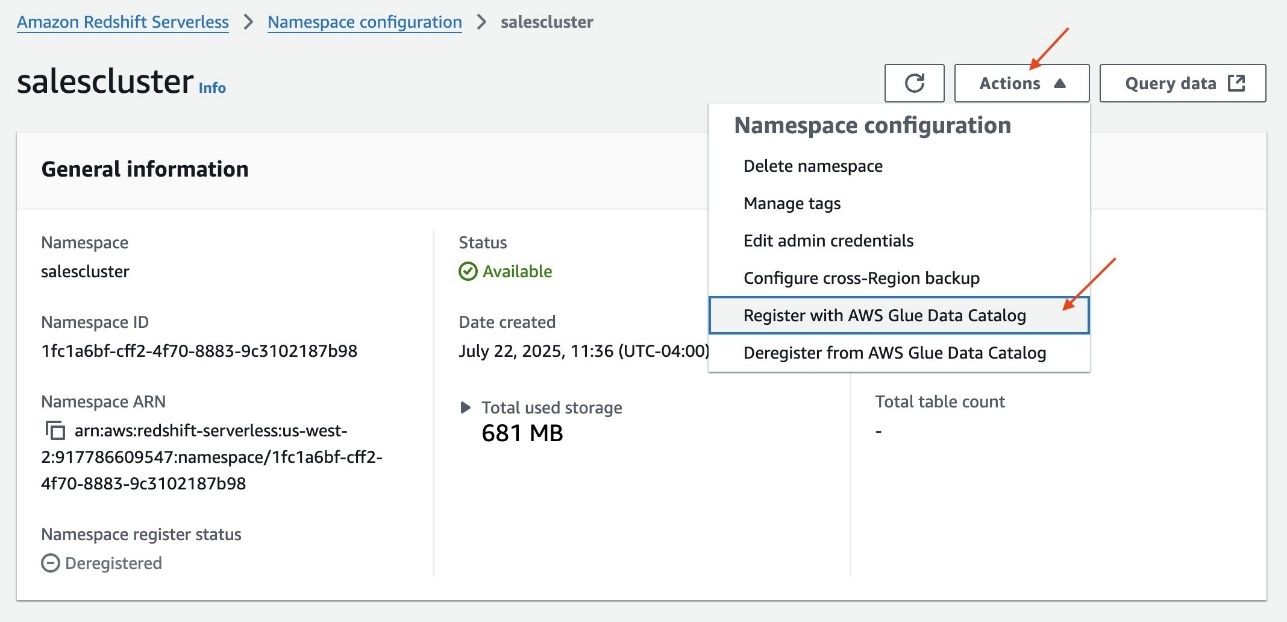
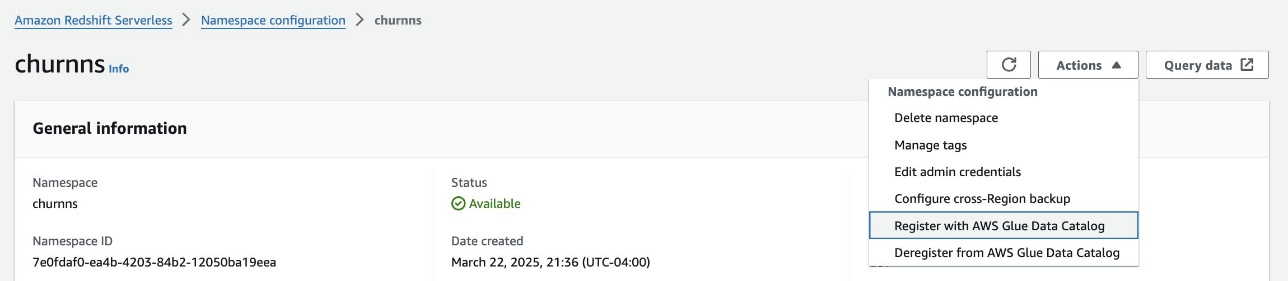
- On the Redshift Serverless console, open the namespace.
- On the Actions dropdown menu, choose Register with AWS Glue Data Catalog to integrate with the lakehouse architecture.
- Select the same AWS account and choose Register.

Create a catalog for Amazon Redshift
Alice completes the following steps to create a catalog for Amazon Redshift:
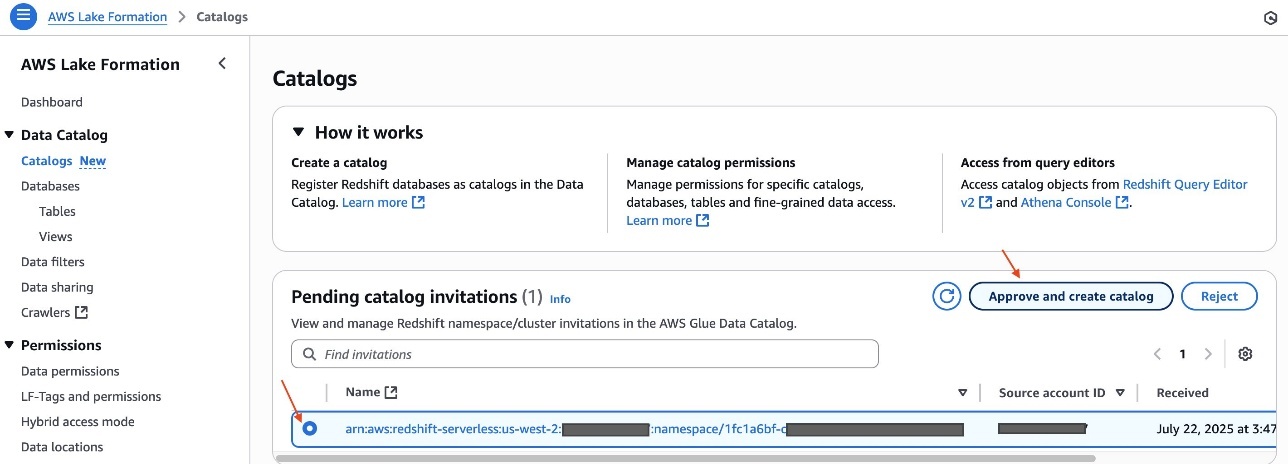
- Sign in to the Lake Formation console as the data lake administrator
LHAdmin. - In the navigation pane, under Data Catalog, choose Catalogs.
Under Pending catalog invitations, you will see the invitation initiated from the Redshift Serverless namespacesalescluster. - Select the pending invitation and choose Approve and create catalog.

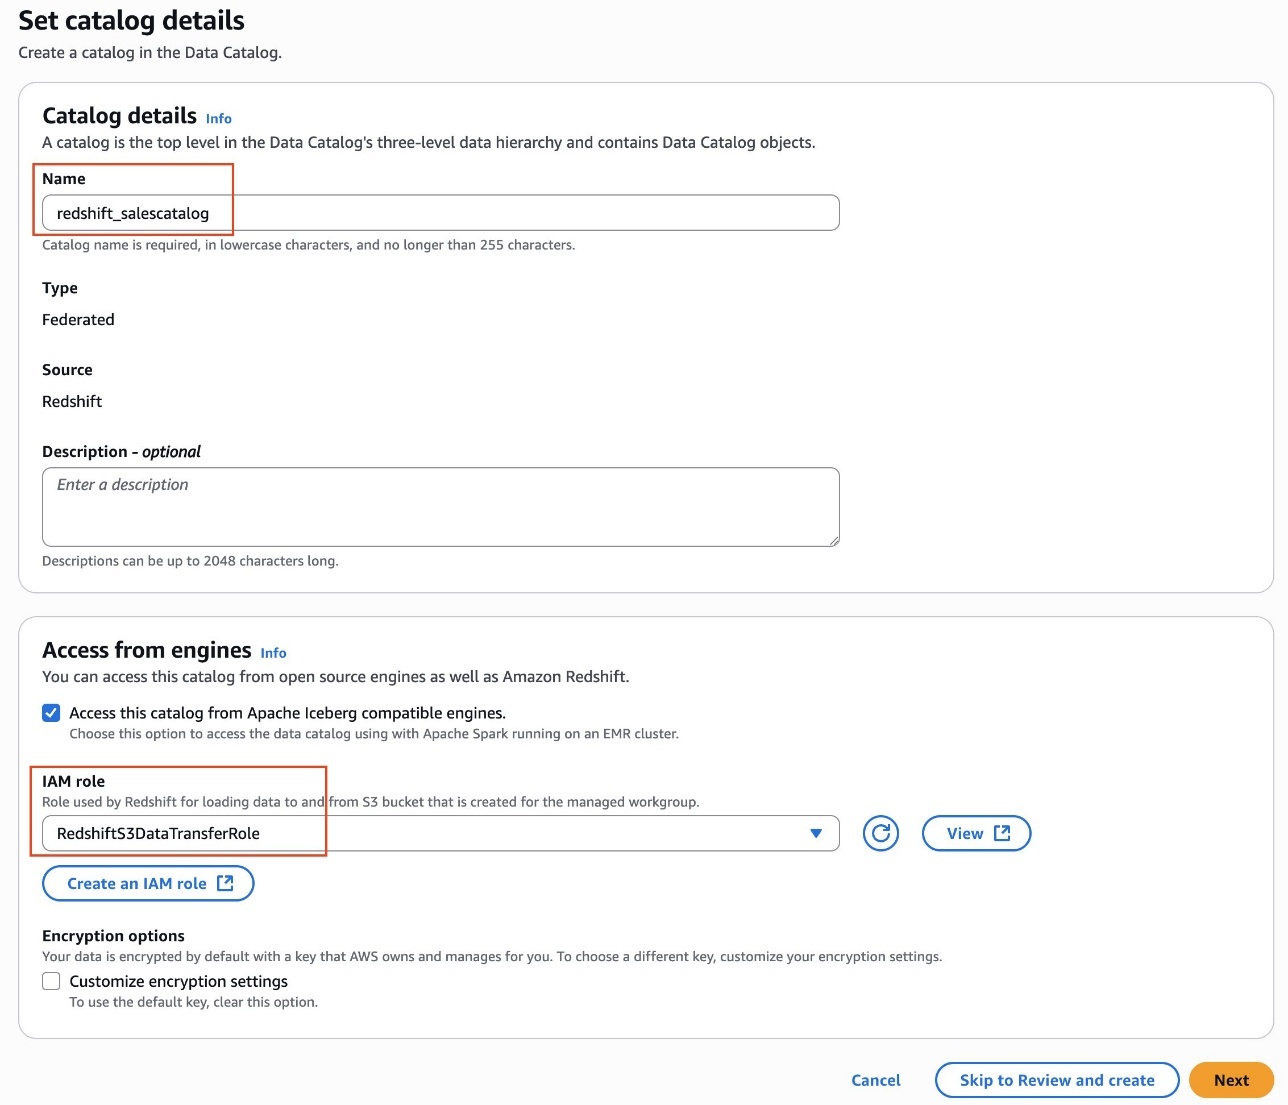
- Provide a name for the catalog. For example,
redshift_salescatalog. - Under Access from engines, select Access this catalog from Iceberg-compatible engines and choose
RedshiftS3DataTransferRolefor IAM role. - Choose Next.

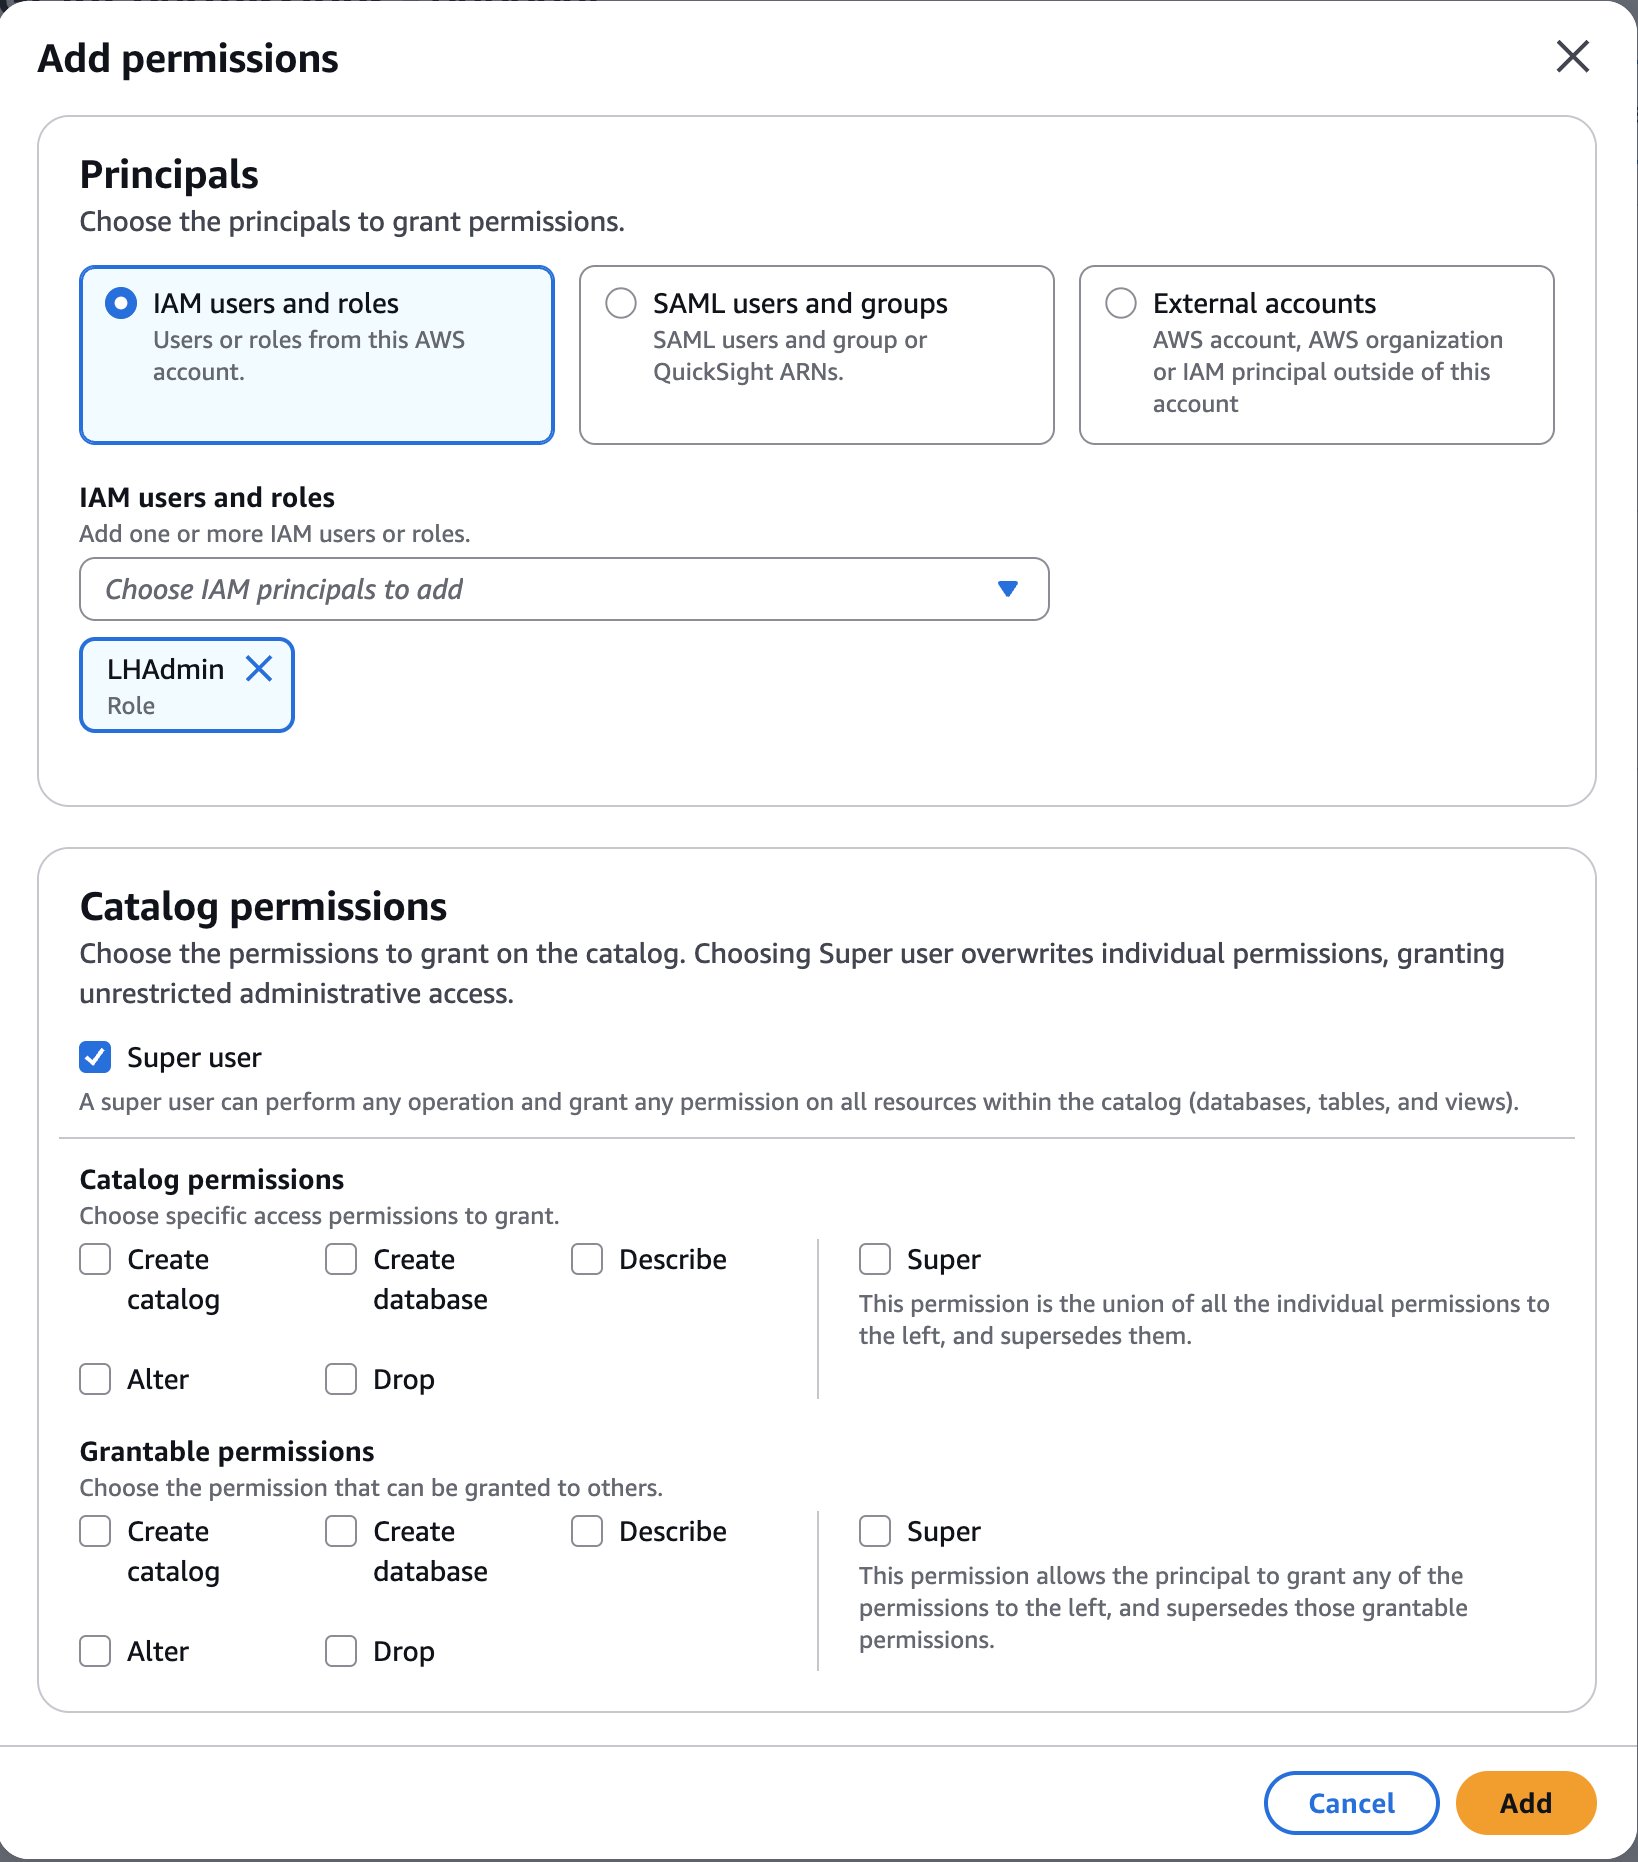
- Choose Add permissions.
- Under Principals, choose the
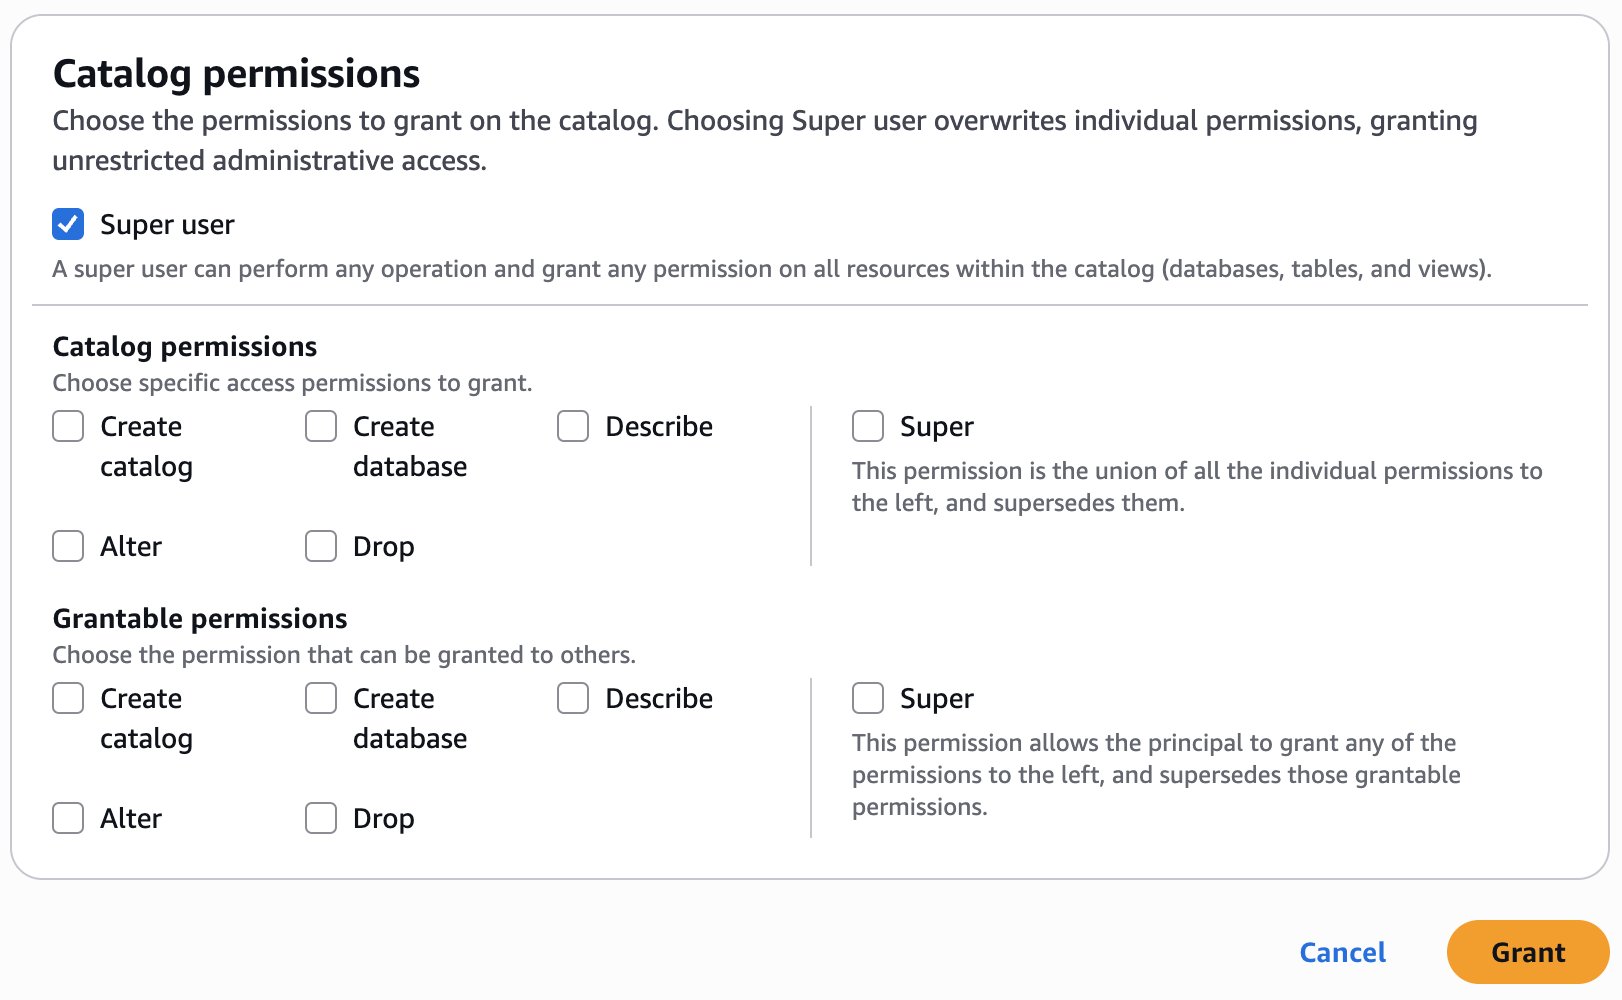
LHAdminrole for IAM users and roles, choose Super user for Catalog permissions, and choose Add.

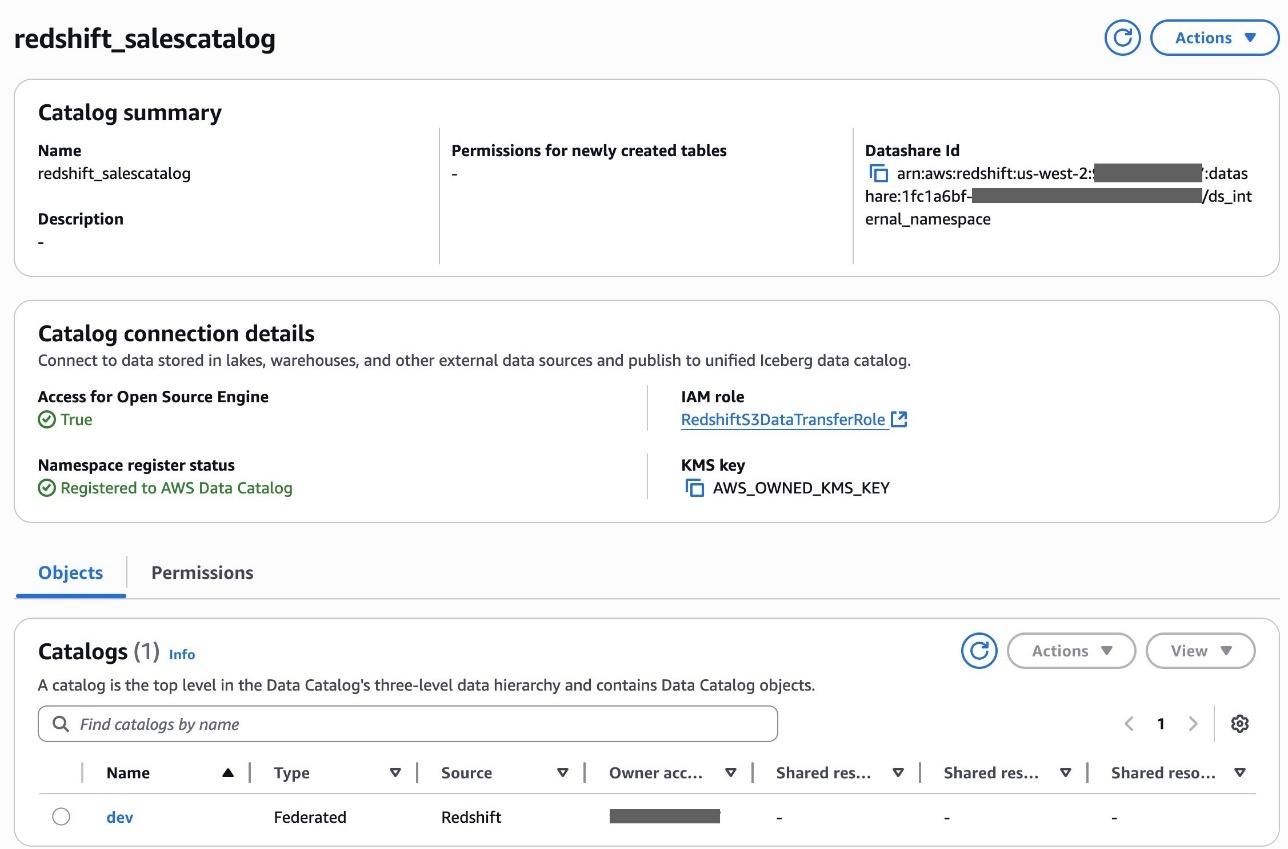
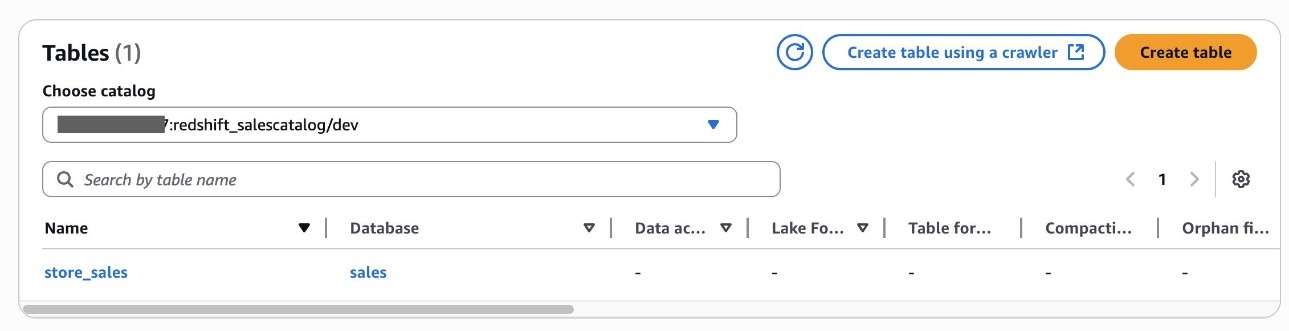
- Choose Create catalog.After you create the catalog
redshift_salescatalog, you can inspect the sub-catalogdev, namespace and databasesales, and tablestore_salesunderneath it.


Alice has now completed creating an S3table catalog table and Redshift federated catalog table in the Data Catalog.
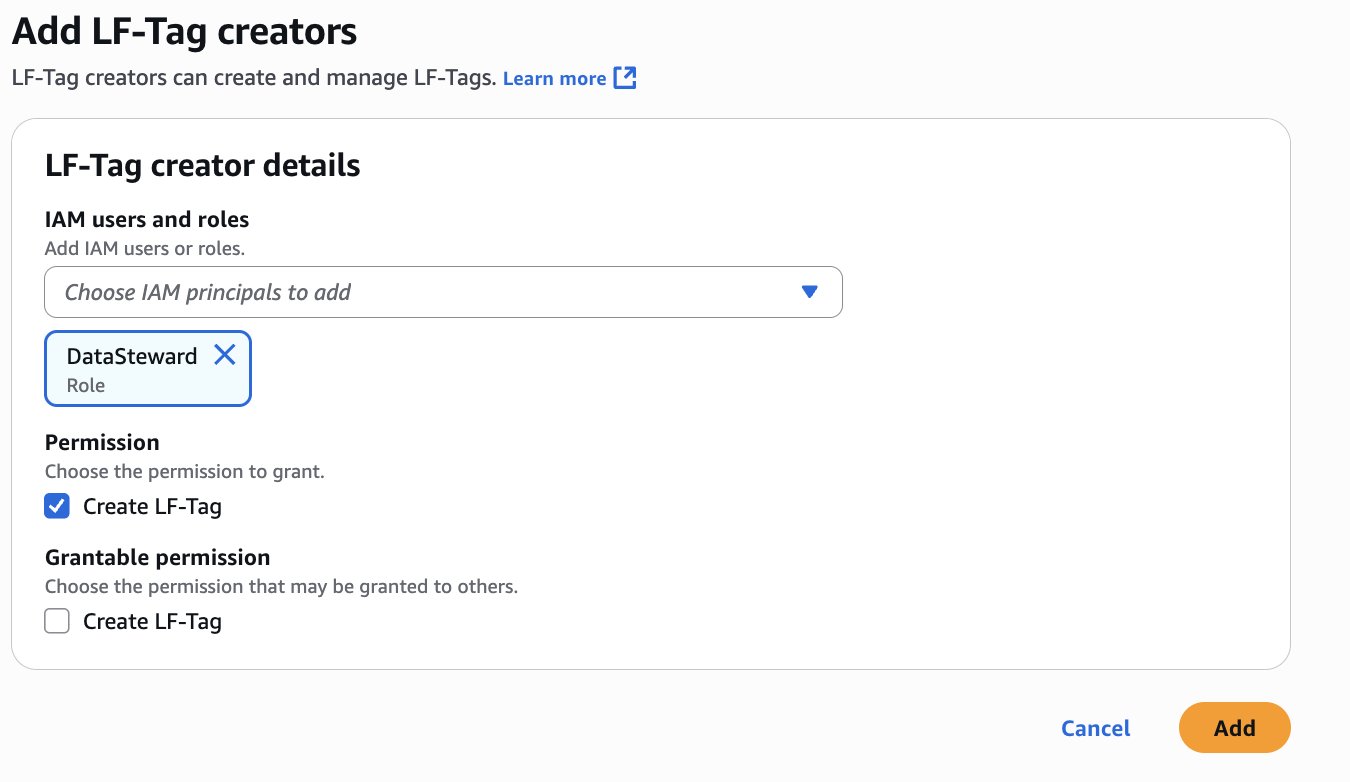
Delegate LF-Tags creation and resource permission to the DataSteward role
Alice completes the following steps to delegate LF-Tags creation and resource permission to Bob as DataSteward:
- Sign in to the Lake Formation console as the data lake administrator
LHAdmin. - In the navigation pane, choose LF Tags and permissions, then choose the LF-Tag creators tab.
- Choose Add LF-Tag creators.
- Choose DataSteward for IAM users and roles.
- Under Permission, select Create LF-Tag and choose Add.

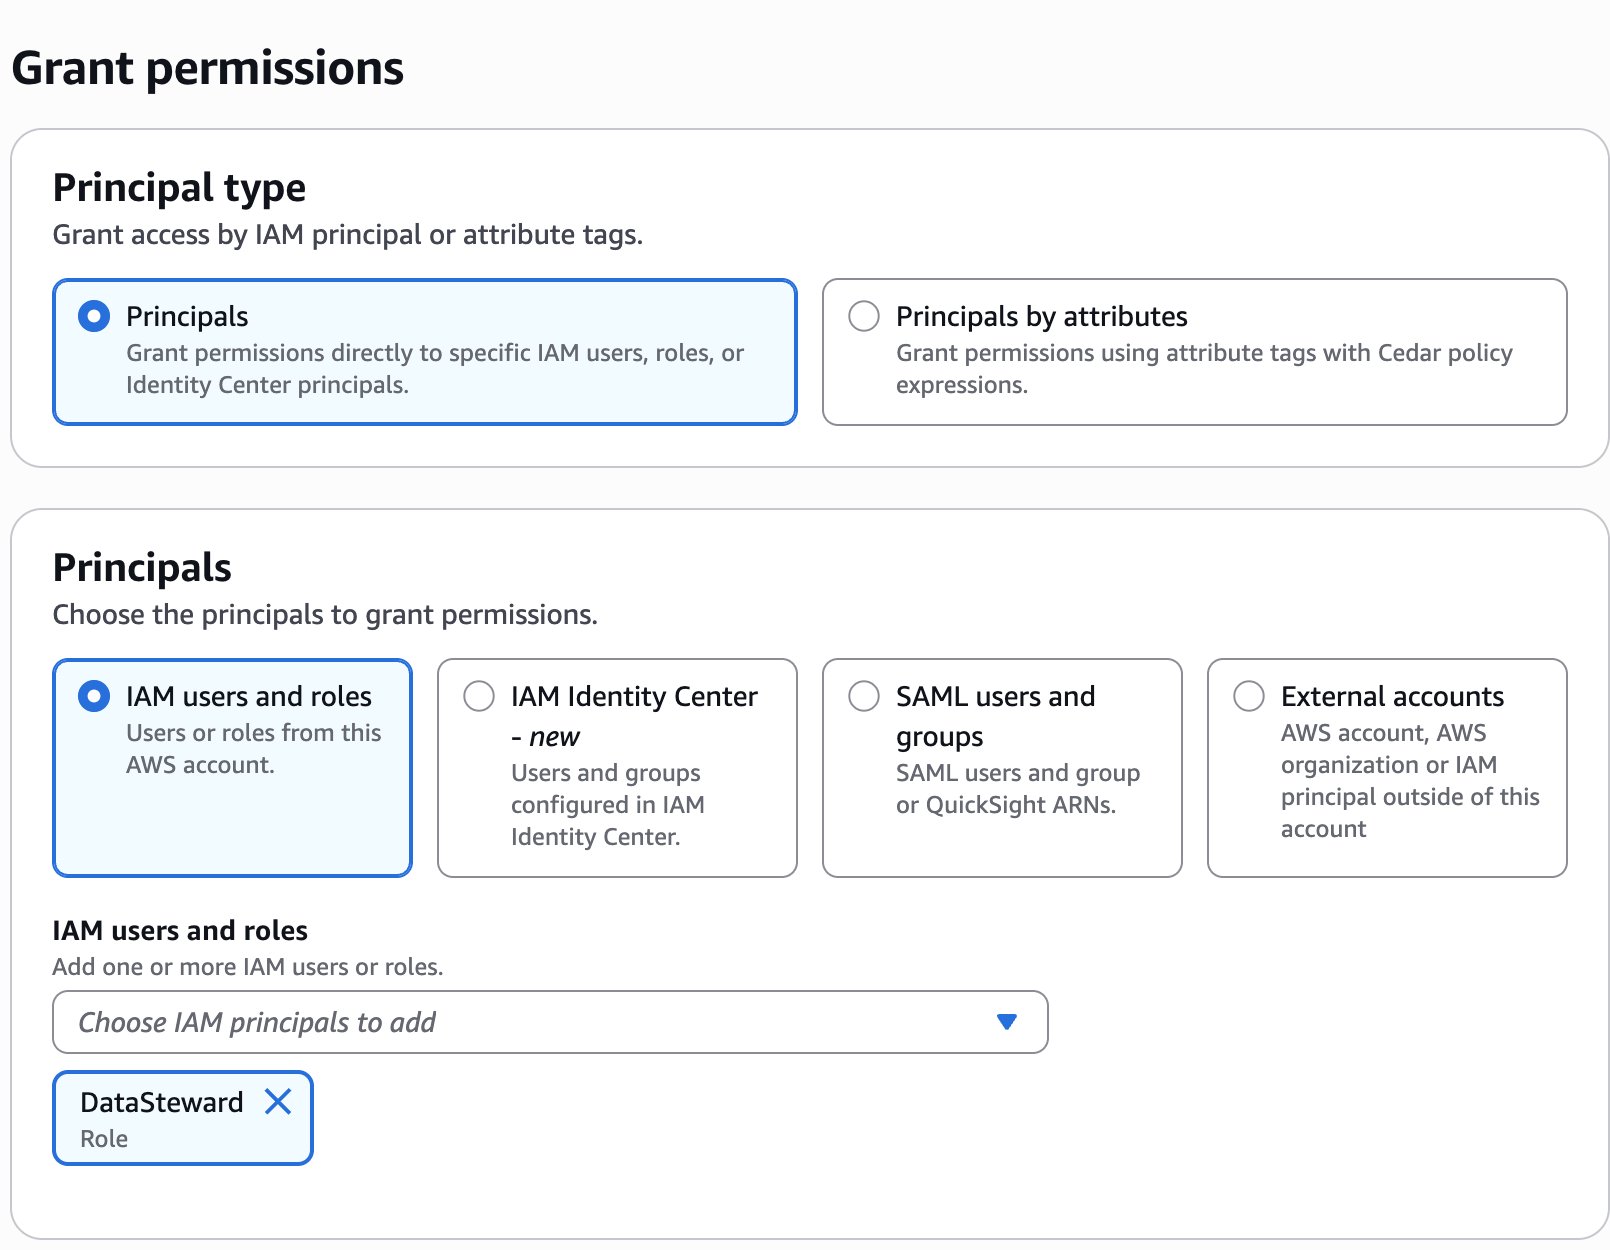
- In the navigation pane, choose Data permissions, then choose Grant.
- In the Principals section, for IAM users and roles, choose the
DataStewardrole.

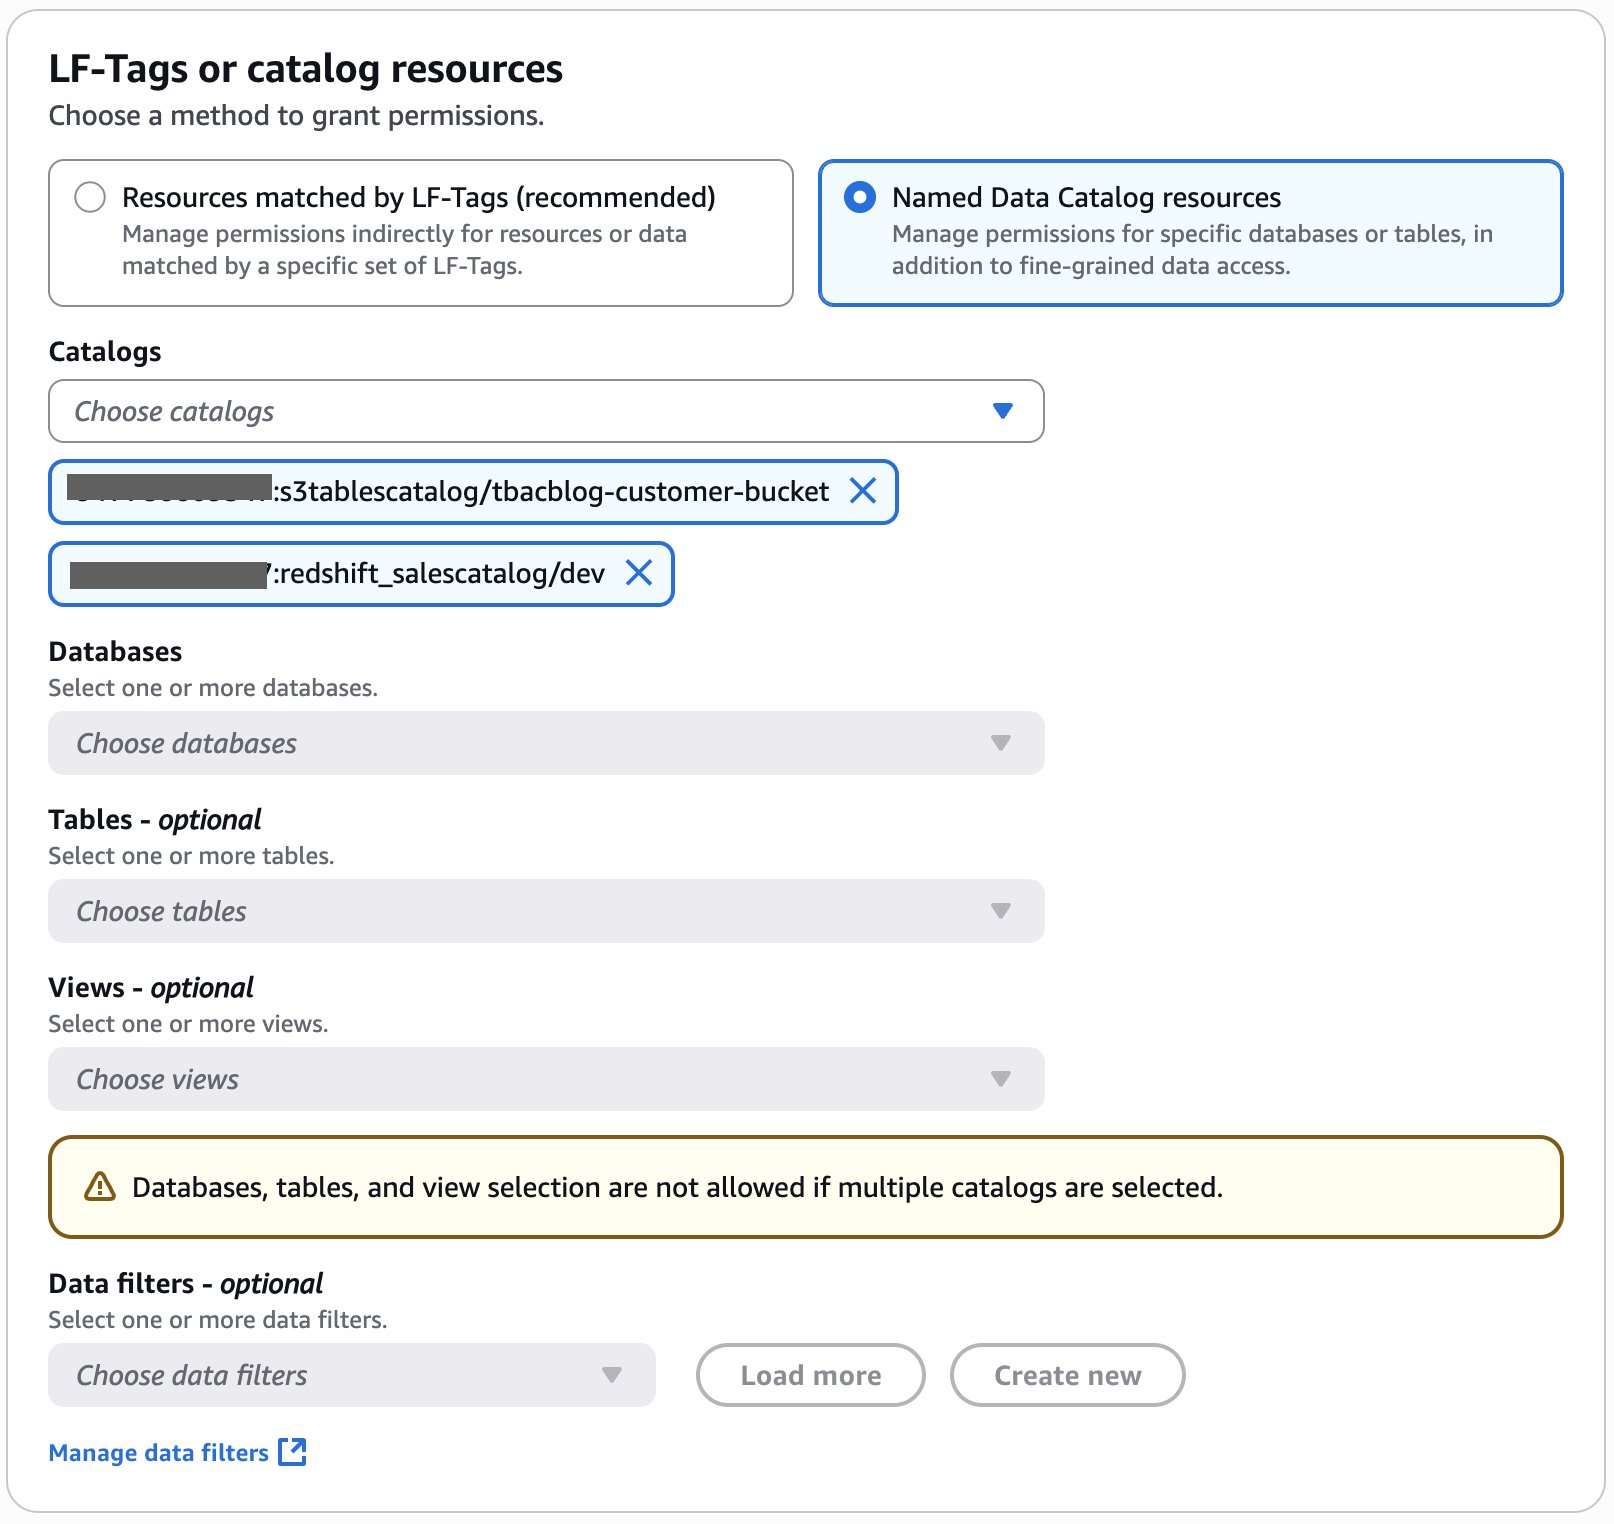
- In the LF-Tags or catalog resources section, select Named Data Catalog resources.
- Choose
<account_id>:s3tablescatalog/tbacblog-customer-bucketand<account_id>:redshift_salescatalog/devfor Catalogs.

- In the Catalog permissions section, select Super user for permissions.
- Choose Grant.

You can verify permissions for DataSteward on the Data permissions page.
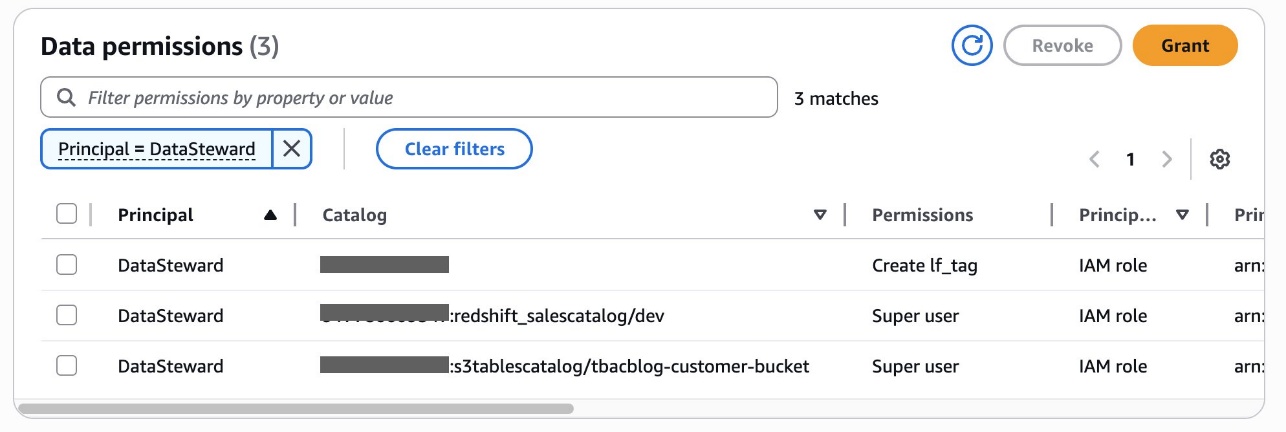
Alice has now completed delegating LF-tags creation and assignment permissions to Bob, the DataSteward. She had also granted catalog level permissions to Bob.
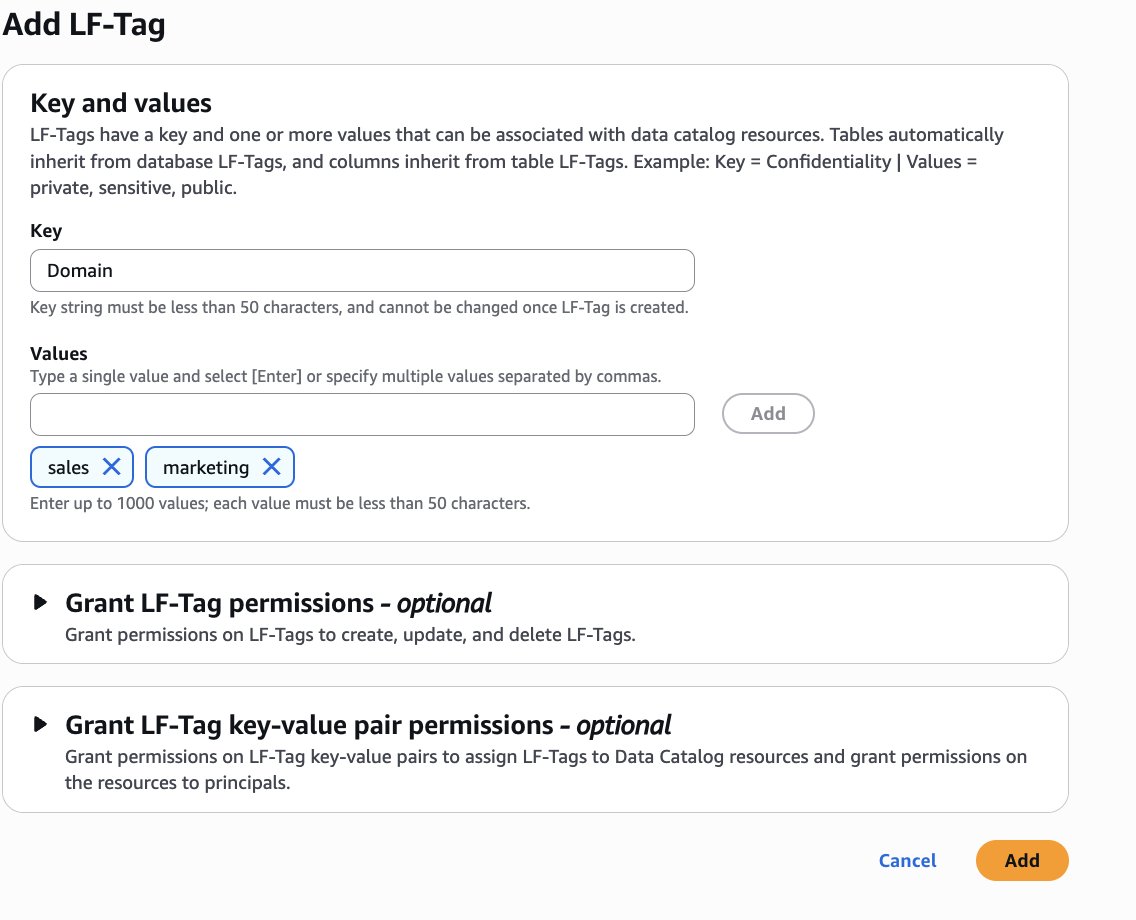
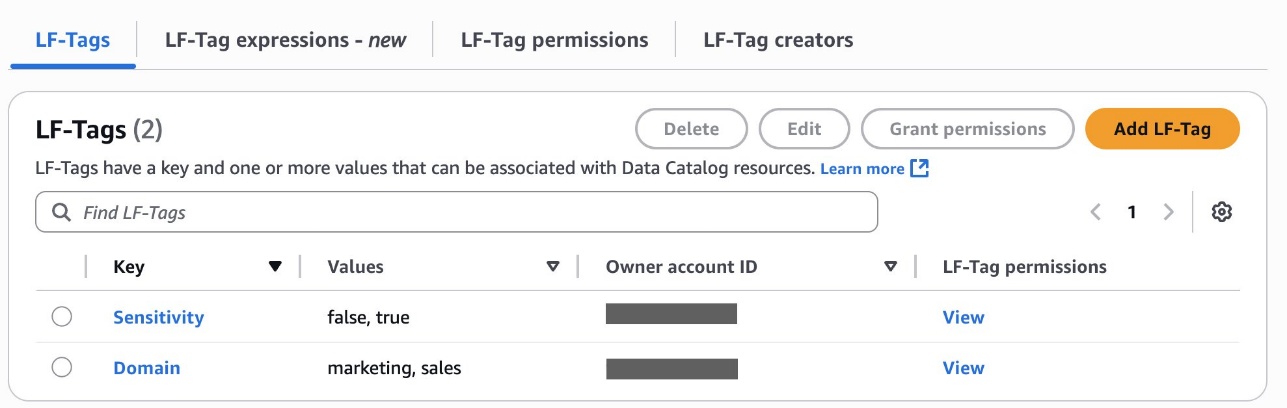
Create LF-Tags
Bob as DataSteward completes the following steps to create LF-Tags:
- Sign in to the Lake Formation console as
DataSteward. - In the navigation pane, choose LF Tags and permissions, then choose the LF-tags tab.
- Choose Add-LF-Tag.
- Create LF tags as follows:
- Key:
Domainand Values:sales,marketing - Key:
Sensitivityand Values:true,false
- Key:
Assign LF-Tags to the S3 Tables database and table
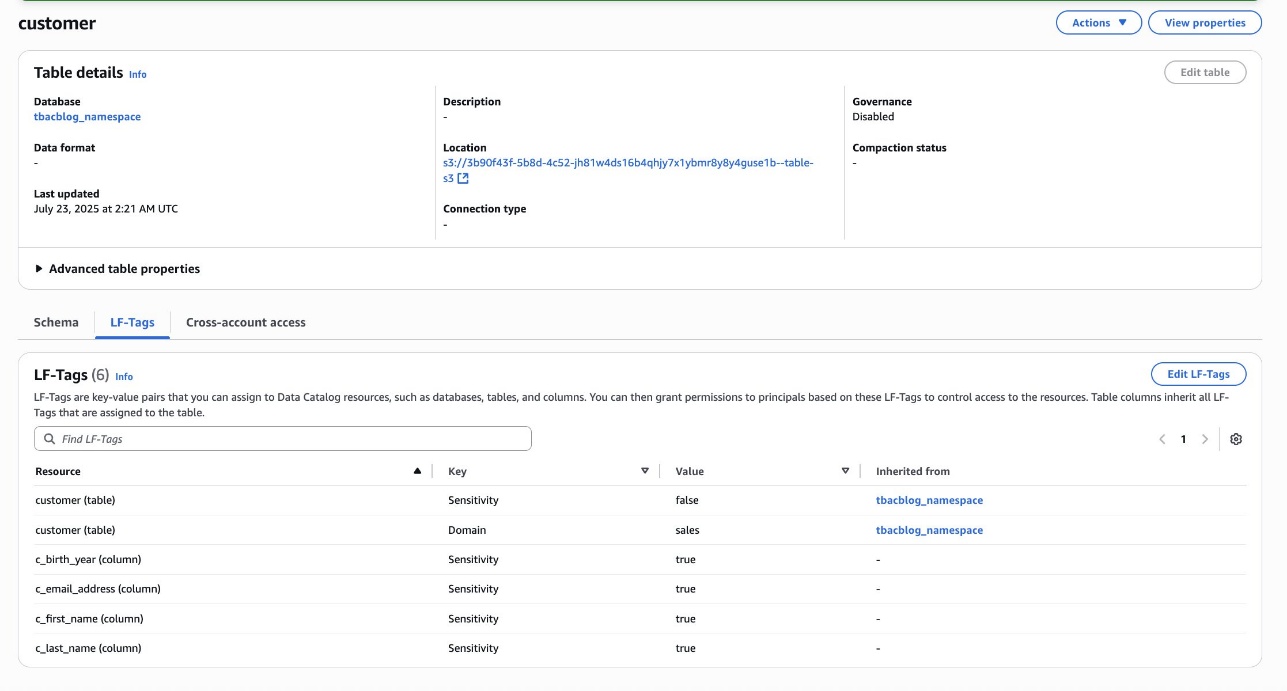
Bob as DataSteward completes the following steps to assign LF-Tags to the S3 Tables database and table:
- In the navigation pane, choose Catalogs and choose
s3tablescatalog. - Choose
tbacblog-customer-bucketand choosetbacblog_namespace. - Choose Edit LF-Tags.
- Assign the following tags:
- Key: Domain and Value: sales
- Key: Sensitivity and Value: false
- Choose Save.

- On the View dropdown menu, choose Tables.
- Choose the customer table and choose the Schema tab.
- Choose Edit schema and select the columns
c_first_name,c_last_name,c_email_address, andc_birth_year. - Choose Edit LF-Tags and modify the tag value:
- Key:
Sensitivityand Value:true
- Key:
- Choose Save.


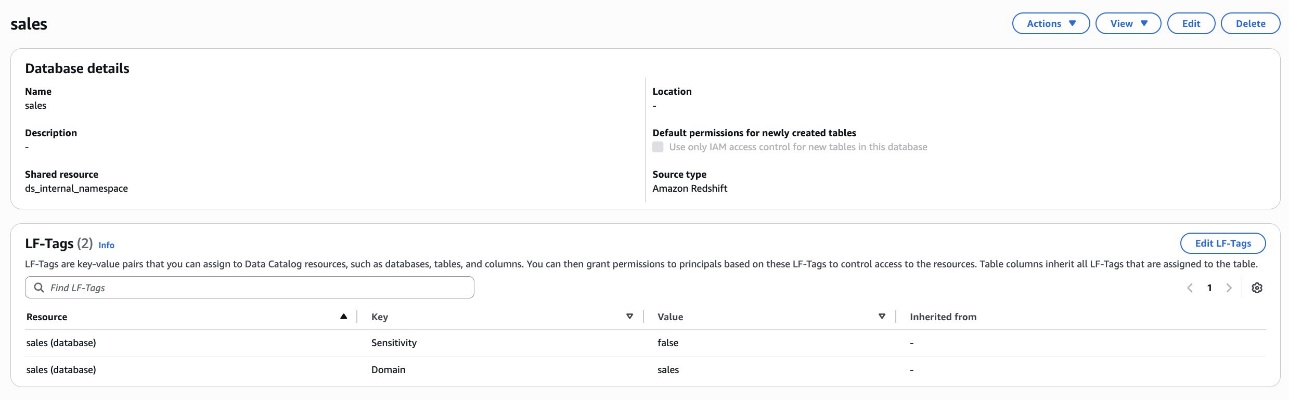
Assign LF-Tags to the Redshift database and table
Bob as DataSteward completes the following steps to assign LF-Tags to the Redshift database and table:
- In the navigation pane, choose Catalogs and choose
salescatalog. - Choose
devand selectsales. - Choose Edit LF-Tags and assign the following tags:
- Key:
Domainand Value:sales - Key:
Sensitivityand Value:false
- Key:
- Choose Save.

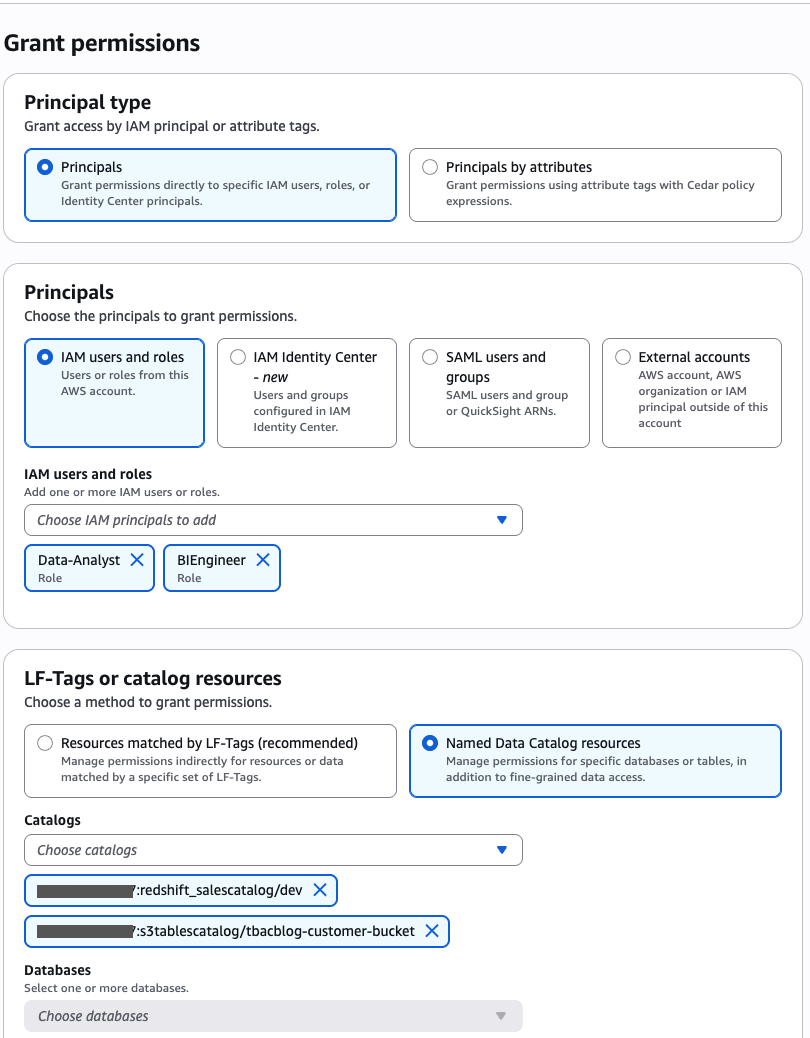
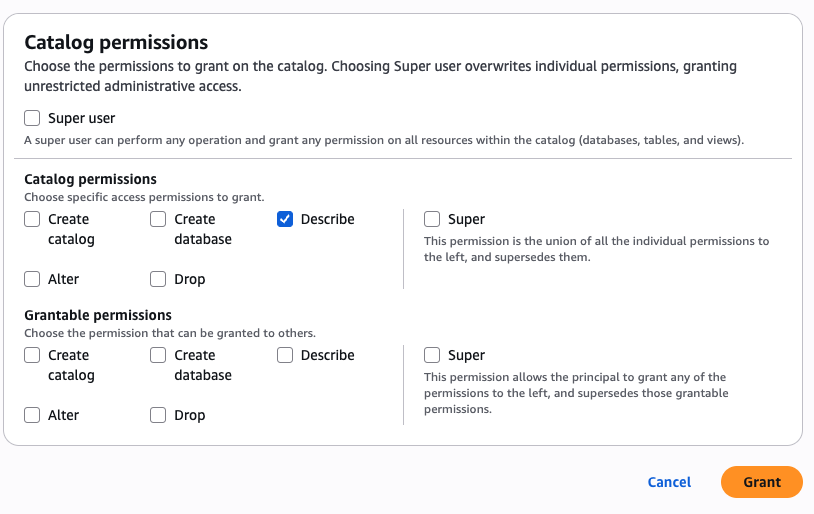
Grant catalog permission to the DataAnalyst and BIEngineer roles
Bob as DataSteward completes the following steps to grant catalog permission to the DataAnalyst and BIEngineer roles (Charlie and Doug, respectively):
- In the navigation pane, choose Datalake permissions, then choose Grant.
- In the Principals section, for IAM users and roles, choose the
DataAnalystandBIEngineerroles. - In the LF-Tags or catalog resources section, select Named Data Catalog resources.
- For Catalogs, choose
<account_id>:s3tablescatalog/tbacblog-customer-bucketand<account_id>:salescatalog/dev.

- In the Catalog permissions section, choose Describe for permissions.
- Choose Grant.

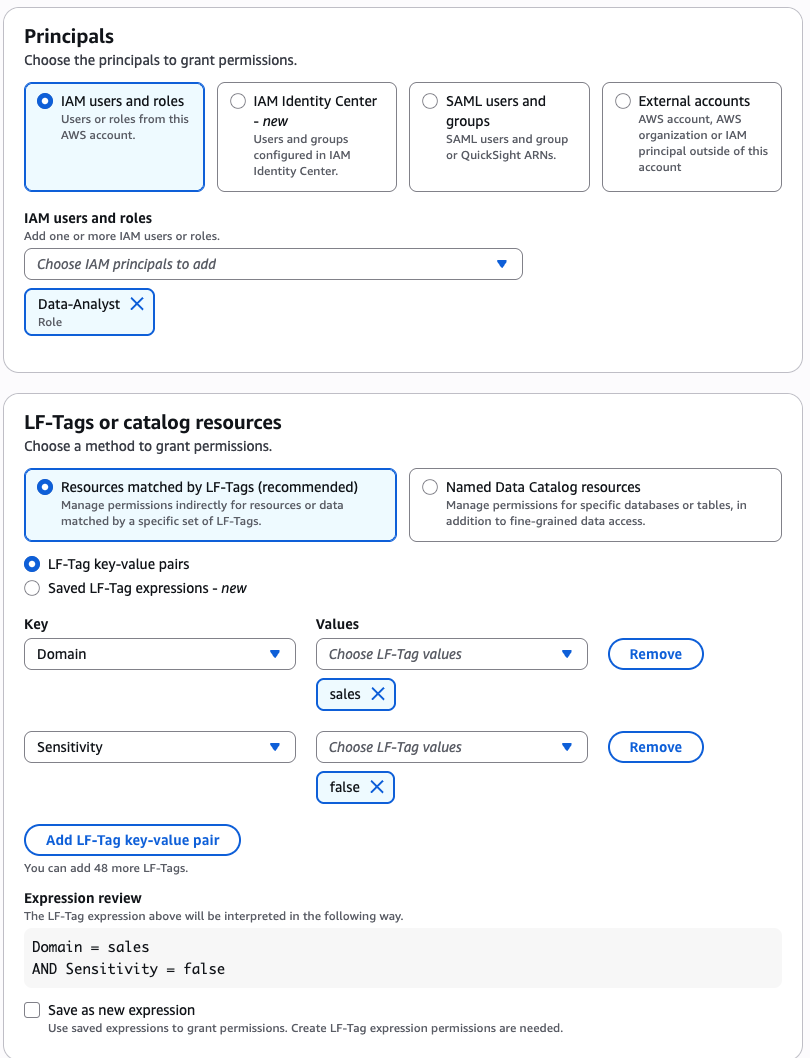
Grant permission to the DataAnalyst role for the sales domain and non-sensitive data
Bob as DataSteward completes the following steps to grant permission to the DataAnalyst role (Charlie) for the sales domain for non-sensitive data:
- In the navigation pane, choose Datalake permissions, then choose Grant.
- In the Principals section, for IAM users and roles, choose the
DataAnalystrole. - In the LF-Tags or catalog resources section, select Resources matched by LF-Tags and provide the following values:
- Key:
Domainand Value:sales - Key:
Sensitivityand Value:false

- Key:
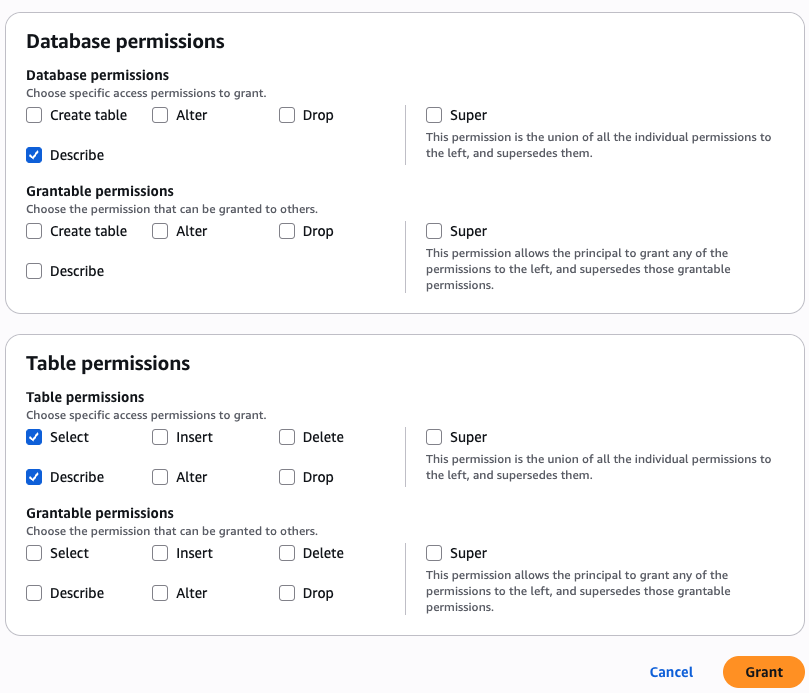
- In the Database permissions section, choose Describe for permissions.
- In the Table permissions section, select Select and Describe for permissions.
- Choose Grant.


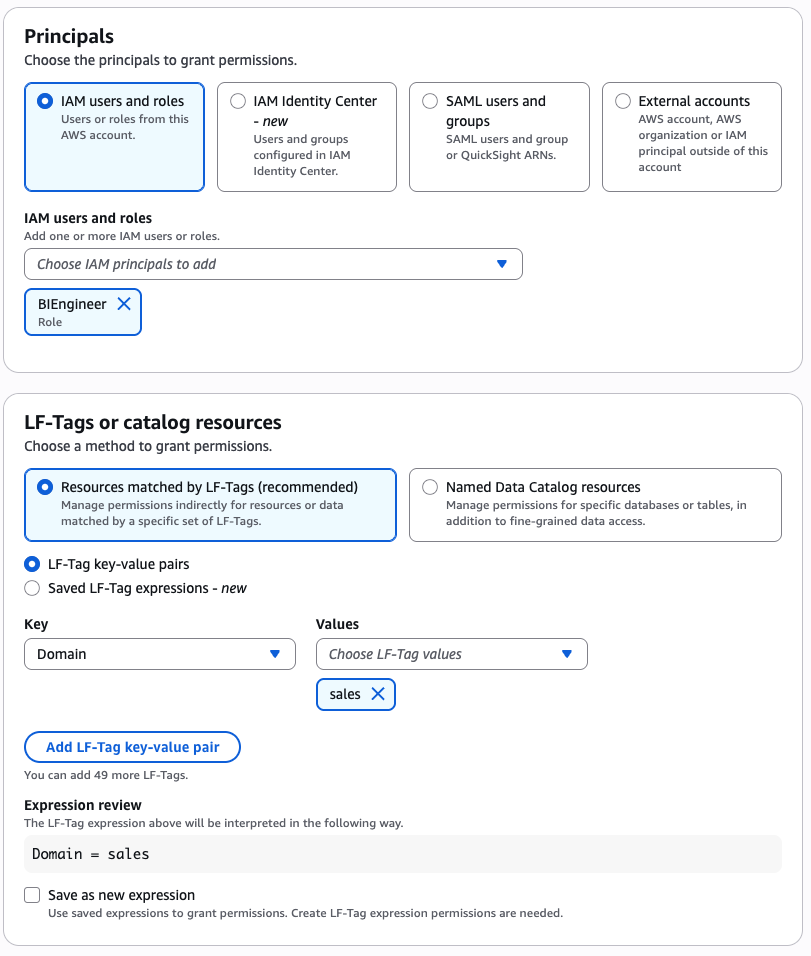
Grant permission to the BIEngineer role for sales domain data
Bob as DataSteward completes the following steps to grant permission to the BIEngineer role (Doug) for all sales domain data:
- In the navigation pane, choose Datalake permissions, then choose Grant.
- In the Principals section, for IAM users and roles, choose the
BIEngineerrole. - In the LF-Tags or catalog resources section, select Resources matched by LF-Tags and provide the following values:
- Key:
Domainand Value:sales
- Key:
- In the Database permissions section, choose Describe for permissions.
- In the Table permissions section, select Select and Describe for permissions.
- Choose Grant.
This completes the steps to grant S3 Tables and Redshift federated tables permissions to various data personas using LF-TBAC.
Verify data access
In this step, we log in as individual data personas and query the lakehouse tables that are available to each persona.
Use Athena to analyze customer information as the DataAnalyst role
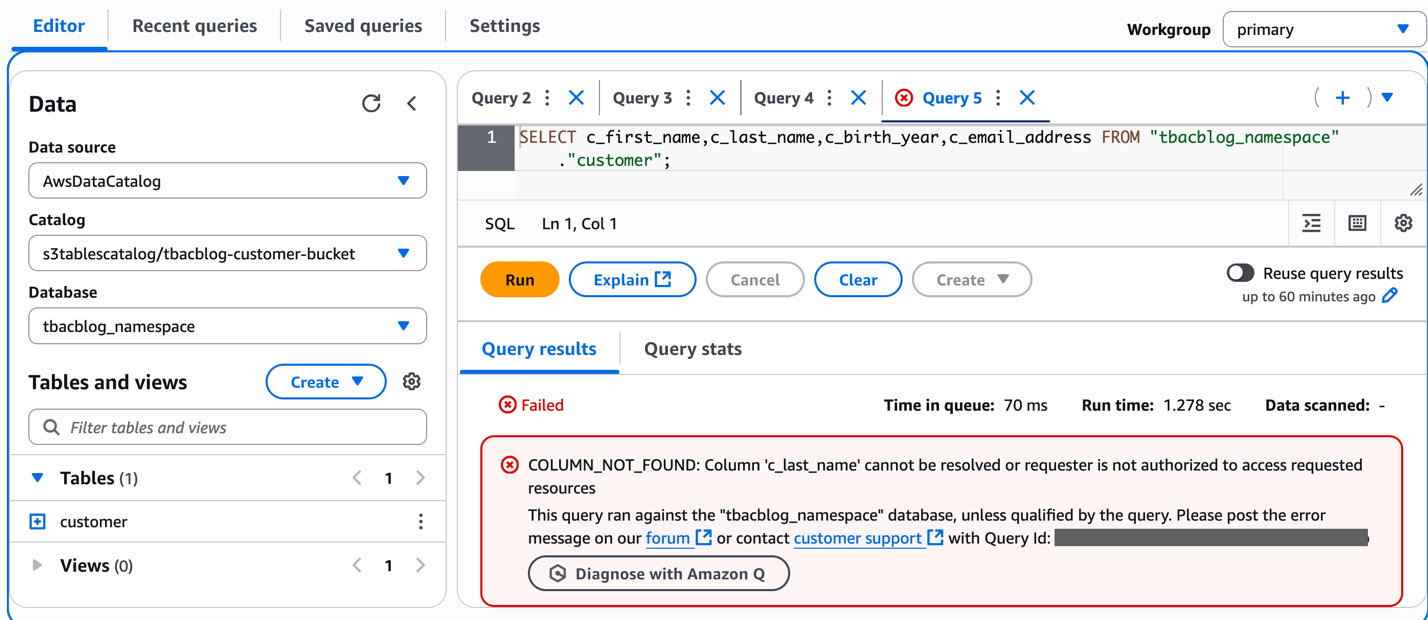
Charlie signs in to the Athena console as the DataAnalyst role. He runs the following sample SQL query:
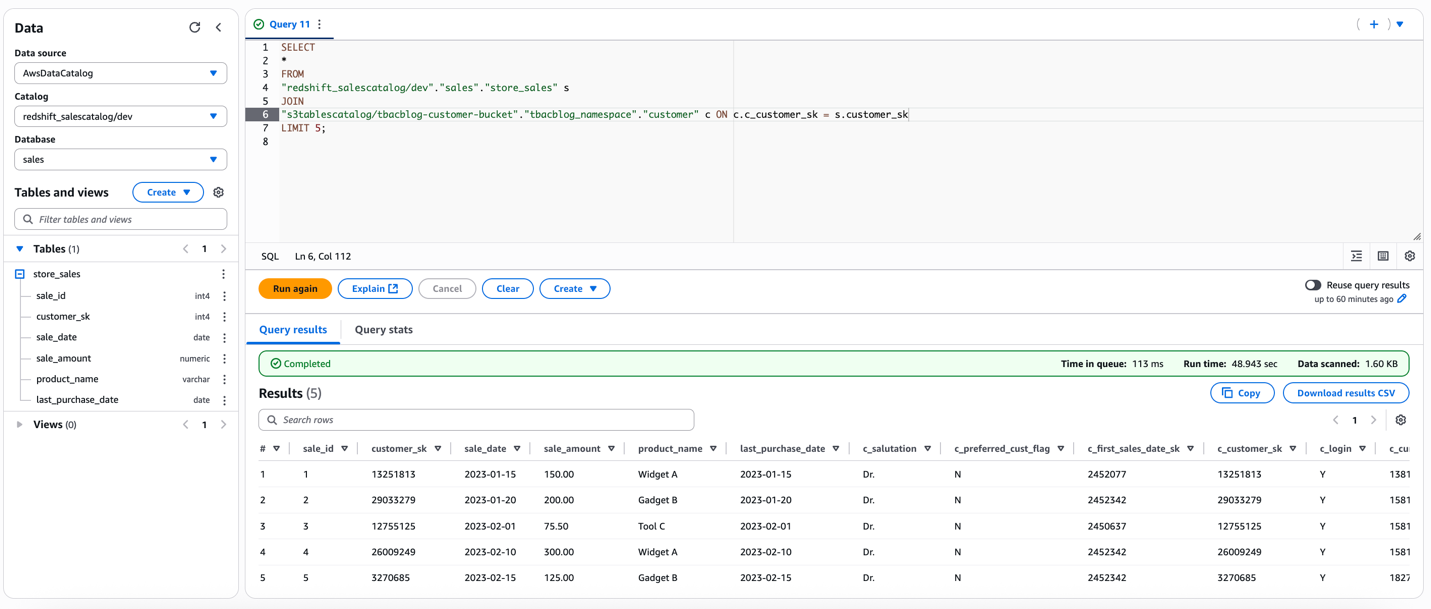
Run a sample query to access the 4 columns in the S3table customer that DataAnalyst does not have access to. You should receive an error as shown in the screenshot. This verifies column level fine grained access using LF-tags on the lakehouse tables.
Use the Redshift query editor to analyze customer data as the DataAnalyst role
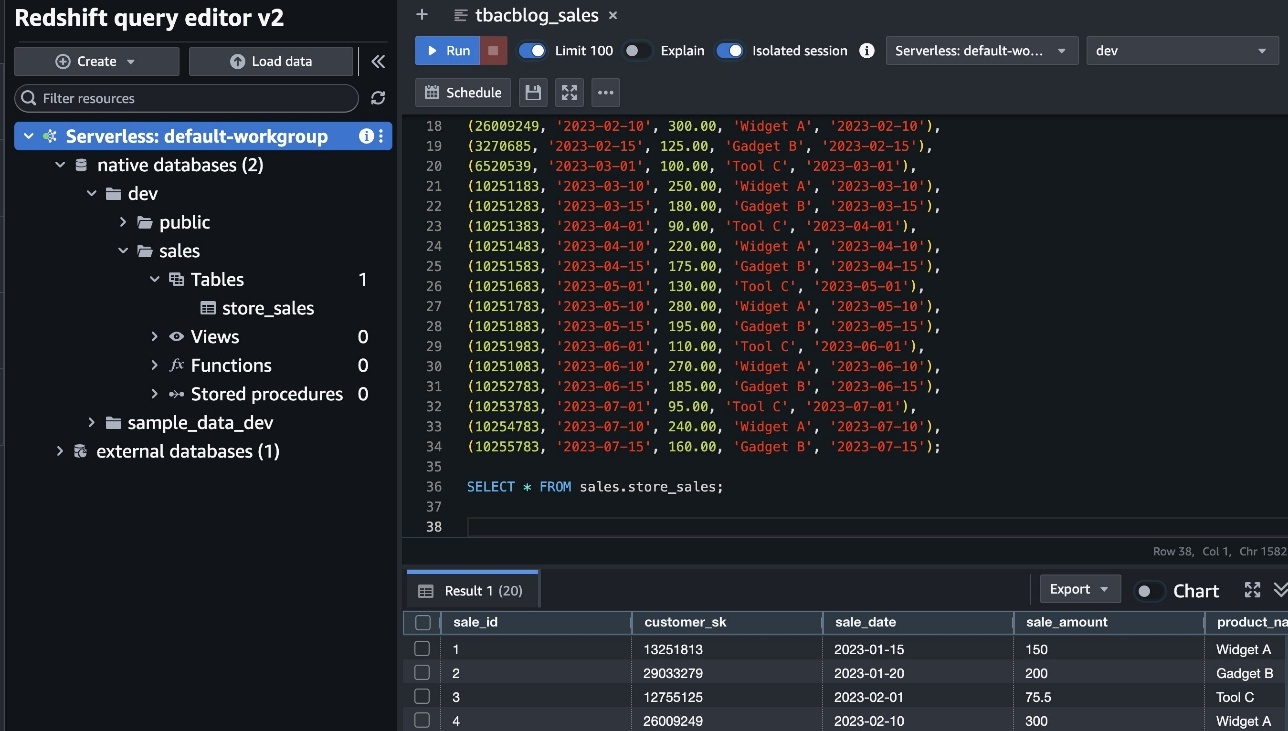
Charlie signs in to the Redshift query editor v2 as the DataAnalyst role and runs the following sample SQL query:
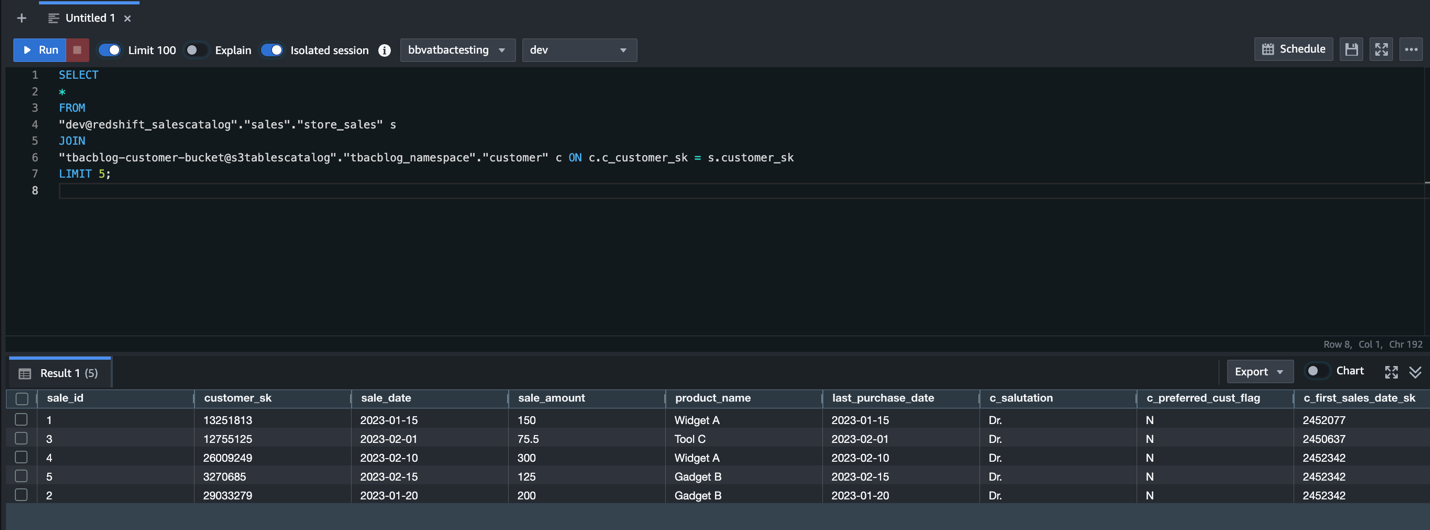
This verifies the DataAnalyst access to the lakehouse tables with LF-tags based permissions, using Redshift Spectrum
Use Amazon EMR to process customer data as the BIEngineer role
Doug uses Amazon EMR to process customer data with the BIEngineer role:
- Sign-in to the EMR Studio as Doug, with
BIEngineerrole. Ensure EMR Serverless application is attached to the workspace withBIEngineeras the EMR runtime role.
Download the PySpark notebook tbacblog_emrs.ipynb. Upload to your studio environment. - Change the account id, AWS Region and resource names as per your setup. Restart kernel and clear output.
- Once your pySpark kernel is ready, run the cells and verify access.This verifies access using LF-tags to the lakehouse tables as the EMR runtime role. For demonstration, we are also providing the pySpark script tbacblog_sparkscript.py that you can run as EMR batch job and Glue 5.0 ETL.
Doug has also set up Amazon SageMaker Unified Studio as covered in the blog post Accelerate your analytics with Amazon S3 Tables and Amazon SageMaker Lakehouse. Doug logs in to SageMaker Unified Studio and select previously created project to perform his analysis. He navigates to the Build options and choose JupyterLab under IDE & Applications. He uses the downloaded pyspark notebook and updates it as per his Spark query requirements. He then runs the cells by selecting compute as project.spark.fineGrained.
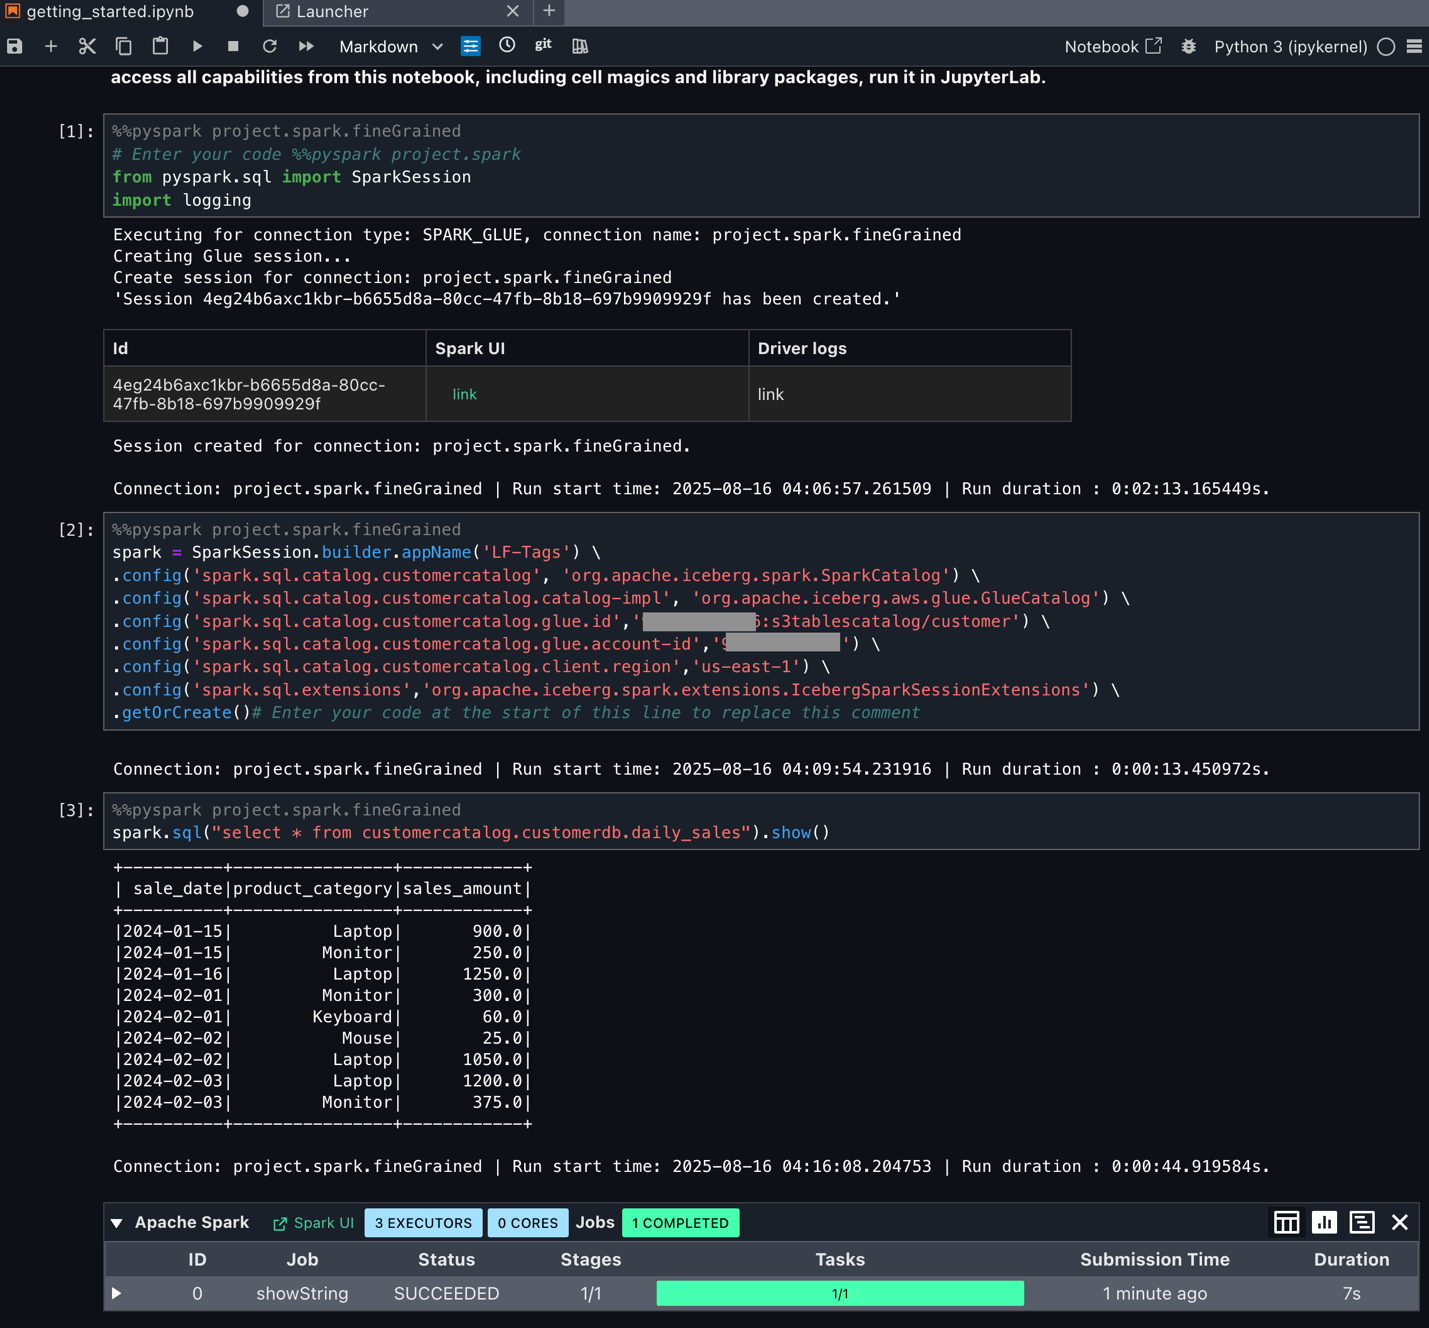
Doug can now start using Spark SQL and start processing data as per fine grained access controlled by the Tags.
Clean up
Complete the following steps to delete the resources you created to avoid unexpected costs:
- Delete the Redshift Serverless workgroups.
- Delete the Redshift Serverless associated namespace.
- Delete the EMR Studio and EMR Serverless instance.
- Delete the AWS Glue catalogs, databases, and tables and Lake Formation permissions.
- Delete the S3 Tables bucket.
- Empty and delete the S3 bucket.
- Delete the IAM roles created for this post.
Conclusion
In this post, we demonstrated how you can use Lake Formation tag-based access control with the SageMaker lakehouse architecture to achieve unified and scalable permissions to your data warehouse and data lake. Now administrators can add access permissions to federated catalogs using attributes and tags, creating automated policy enforcement that scales naturally as new assets are added to the system. This eliminates the operational overhead of manual policy updates. You can use this model for sharing resources across accounts and Regions to facilitate data sharing within and across enterprises.
We encourage AWS data lake customers to try this feature and share your feedback in the comments. To learn more about tag-based access control, visit the Lake Formation documentation.
Acknowledgment: A special thanks to everyone who contributed to the development and launch of TBAC: Joey Ghirardelli, Xinchi Li, Keshav Murthy Ramachandra, Noella Jiang, Purvaja Narayanaswamy, Sandya Krishnanand.
About the Authors
 Sandeep Adwankar is a Senior Product Manager with Amazon SageMaker Lakehouse . Based in the California Bay Area, he works with customers around the globe to translate business and technical requirements into products that help customers improve how they manage, secure, and access data.
 Srividya Parthasarathy is a Senior Big Data Architect with Amazon SageMaker Lakehouse. She works with the product team and customers to build robust features and solutions for their analytical data platform. She enjoys building data mesh solutions and sharing them with the community.
 Aarthi Srinivasan is a Senior Big Data Architect with Amazon SageMaker Lakehouse. She works with AWS customers and partners to architect lakehouse solutions, enhance product features, and establish best practices for data governance.


 Sandeep Adwankar is a Senior Product Manager at AWS. Based in the California Bay Area, he works with customers around the globe to translate business and technical requirements into products that enable customers to improve how they manage, secure, and access data.
 Srividya Parthasarathy is a Senior Big Data Architect on the AWS Lake Formation team. She enjoys building data mesh solutions and sharing them with the community.
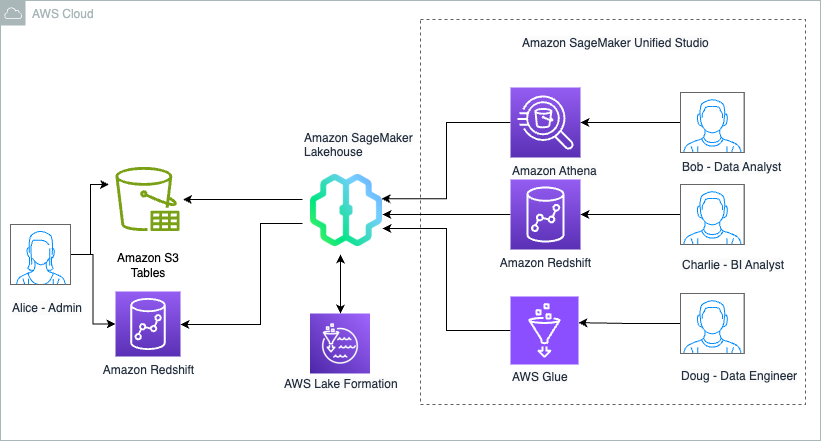


 Charlie can now further update the SQL query and use it to power QuickSight dashboards that can be shared with Sales team members.
 Sandeep Adwankar is a Senior Technical Product Manager at AWS. Based in the California Bay Area, he works with customers around the globe to translate business and technical requirements into products that enable customers to improve how they manage, secure, and access data.
 Srividya Parthasarathy is a Senior Big Data Architect on the AWS Lake Formation team. She works with the product team and customers to build robust features and solutions for their analytical data platform. She enjoys building data mesh solutions and sharing them with the community.


 Sandeep Adwankar is a Senior Product Manager at AWS. Based in the California Bay Area, he works with customers around the globe to translate business and technical requirements into products that enable customers to improve how they manage, secure, and access data.
 Praveen Kumar is a Principal Analytics Solution Architect at AWS with expertise in designing, building, and implementing modern data and analytics platforms using cloud-centered services. His areas of interests are serverless technology, modern cloud data warehouses, streaming, and generative AI applications.
 Stuti Deshpande is a Big Data Specialist Solutions Architect at AWS. She works with customers around the globe, providing them strategic and architectural guidance on implementing analytics solutions using AWS. She has extensive experience in big data, ETL, and analytics. In her free time, Stuti likes to travel, learn new dance forms, and enjoy quality time with family and friends.
 Noritaka Sekiyama is a Principal Big Data Architect on the AWS Glue team. He is responsible for building software artifacts to help customers. In his spare time, he enjoys cycling with his road bike.
 Scott Rigney is a Senior Technical Product Manager with AWS and has expertise in analytics, data science, and machine learning. He is passionate about building software products that enable enterprises to make data-driven decisions and drive innovation.


 Sandeep Adwankar is a Senior Product Manager at AWS. Based in the California Bay Area, he works with customers around the globe to translate business and technical requirements into products that enable customers to improve how they manage, secure, and access data.
 Paul Villena is a Senior Analytics Solutions Architect in AWS with expertise in building modern data and analytics solutions to drive business value. He works with customers to help them harness the power of the cloud. His areas of interests are infrastructure as code, serverless technologies, and coding in Python.


 Navnit Shukla serves as an AWS Specialist Solution Architect with a focus on Analytics. He possesses a strong enthusiasm for assisting clients in discovering valuable insights from their data. Through his expertise, he constructs innovative solutions that empower businesses to arrive at informed, data-driven choices. Notably, Navnit Shukla is the accomplished author of the book titled Data Wrangling on AWS. He can be reached via


 Srividya Parthasarathy is a Senior Big Data Architect on the AWS Lake Formation team. She enjoys building data mesh solutions and sharing them with the community.
 Mahesh Mishra is a Principal Product Manager with AWS Lake Formation team. He works with many of AWS largest customers on emerging technology needs, and leads several data and analytics initiatives within AWS including strong support for Transactional Data Lakes.


 Alternatively, you can also use the AWS CLI to grant data location permission on bucket registered in central account to the crawler role using below command:


 Piyali Kamra is a seasoned enterprise architect and a hands-on technologist who believes that building large scale enterprise systems is not an exact science but more like an art, in which tools and technologies must be carefully selected based on the team’s culture , strengths , weaknesses and risks , in tandem with having a futuristic vision as to how you want to shape your product a few years down the road.


