As bots and agents start cryptographically signing their requests, there is a growing need for website operators to learn public keys as they are setting up their service. I might be able to find the public key material for well-known fetchers and crawlers, but what about the next 1,000 or next 1,000,000? And how do I find their public key material in order to verify that they are who they say they are? This problem is called discovery.
We share this problem with Amazon Bedrock AgentCore, a comprehensive agentic platform to build, deploy and operate highly capable agents at scale, and their AgentCore Browser, a fast, secure, cloud-based browser runtime to enable AI agents to interact with websites at scale. The AgentCore team wants to make it easy for each of their customers to sign their own requests, so that Cloudflare and other operators of CDN infrastructure see agent signatures from individual agents rather than AgentCore as a monolith. (Note: this method does not identify individual users.) In order to do this, Cloudflare needed a way to ingest and register the public keys of AgentCore’s customers at scale.
In this blog post, we propose a registry of bots and agents as a way to easily discover them on the Internet. We also outline how Web Bot Auth can be expanded with a registry format. Similar to IP lists that can be authored by anyone and easily imported, the registry format is a list of URLs at which to retrieve agent keys and can be authored and imported easily.
We believe such registries should foster and strengthen an open ecosystem of curators that website operators can trust.
A need for more trustworthy authentication
In May, we introduced a protocol proposal called Web Bot Auth, which describes how bot and agent developers can cryptographically sign requests coming from their infrastructure.
There have now been multiple implementations of the proposed protocol, from Vercel to Shopify to Visa. It has been actively discussed and contributions have been made. Web Bot Auth marks a first step towards moving from brittle identification, like IPs and user agents, to more trustworthy cryptographic authentication. However, like IP addresses, cryptographic keys are a pseudonymous form of identity. If you operate a website without the scale and reach of large CDNs, how do you discover the public key of known crawlers?
The first protocol proposal suggested one approach: bot operators would provide a newly-defined HTTP header Signature-Agent that refers to an HTTP endpoint hosting their keys. Similar to IP addresses, the default is to allow all, but if a particular operator is making too many requests, you can start taking actions: increase their rate limit, contact the operator, etc.
With all that in mind, we come to the following problem. How can Cloudflare ensure customers have control over the traffic they want to allow, with sensible defaults, while fostering an open curation ecosystem that doesn’t lock in customers or small origins?
Such an ecosystem exists for lists of IP addresses (e.g. avestel-bots-ip-lists) and robots.txt (e.g. ai-robots-txt). For both, you can find canonical lists on the Internet to easily configure your website to allow or disallow traffic from those IPs. They provide direct configuration for your nginx or haproxy, and you can use it to configure your Cloudflare account. For instance, I could import the robots.txt below:
User-agent: MyBadBot
Disallow: /
This is where the registry format comes in, providing a list of URLs pointing to Signature Agent keys:
# AI Crawler
https://chatgpt.com/.well-known/http-message-signatures-directory
https://autorag.ai.cloudflare.com/.well-known/http-message-signatures-directory

# Test signature agent card
https://http-message-signatures-example.research.cloudflare.com/.well-known/http-message-signatures-directory
And that’s it. A registry could contain a list of all known signature agents, a curated list for academic research agents, for search agents, etc.
Anyone can maintain and host these lists. Similar to IP or robots.txt list, you can host such a registry on any public file system. This means you can have a repository on GitHub, put the file on Cloudflare R2, or send it as an email attachment. Cloudflare intends to provide one of the first instances of this registry, so that others can contribute to it or reference it when building their own.
Learn more about an incoming request
Knowing the Signature-Agent is great, but not sufficient. For instance, to be a verified bot, Cloudflare requires a contact method, in case requests from that infrastructure suddenly fail or change format in a way that causes unexpected errors upstream. In fact, there is a lot of information an origin might want to know: a name for the operator, a contact method, a logo, the expected crawl rate, etc.
Therefore, to complement the registry format, we have proposed a signature-agent card format that extends the JWKS directory (RFC 7517) with additional metadata. Similar to an old-fashioned contact card, it includes all the important information someone might want to know about your agent or crawler.
We provide an example below for illustration. Note that the fields may change: introducing jwks-uri, logo being more descriptive, etc.
Amazon Bedrock AgentCore, an agentic platform for building and deploying AI agents at scale, adopted Web Bot Auth for its AgentCore Browser service (learn more in their post). AgentCore Browser intends to transition from a service signing key that is currently available in their public preview, to customer-specific keys, once the protocol matures. Cloudflare and other operators of origin protection service will be able to see and validate signatures from individual AgentCore customers rather than AgentCore as a whole.
Cloudflare also offers a registry for bots and agents it trusts, provided through Radar. It uses the registry format to allow for the consumption of bots trusted by Cloudflare on your server.
You can use these registries today – we’ve provided a demo in Go for Caddy server that would allow us to import keys from multiple registries. It’s on cloudflare/web-bot-auth. The configuration looks like this:
:8080 {
    route {
        # httpsig middleware is used here
        httpsig {
            registry "http://localhost:8787/test-registry.txt"
            # You can specify multiple registries. All tags will be checked independantly
            registry "http://example.test/another-registry.txt"
        }

        # Responds if signature is valid
        handle {
            respond "Signature verification succeeded!" 200
        }
    }
}
There are several reasons why you might want to operate and curate a registry leveraging the Signature Agent Card format:
Monitor incoming Signature-Agents. This should allow you to collect signature-agent cards of agents reaching out to your domain.
Import them from existing registries, and categorize them yourself. There could be a general registry constructed from the monitoring step above, but registries might be more useful with more categories.
Establish direct relationships with agents. Cloudflare does this for itsbot registry for instance, or you might use a public GitHub repository where people can open issues.
Learn from your users. If you offer a security service, allowing your customers to specify the registries/signature-agents they want to let through allows you to gain valuable insight.
Moving forward
As cryptographic authentication for bots and agents grows, the need for discovery increases.
With the introduction of a lightweight format and specification to attach metadata to Signature-Agent, and curate them in the form of registries, we begin to address this need. The HTTP Message Signature directory format is being expanded to include some self-certified metadata, and the registry maintains a curation ecosystem.
Down the line, we predict that clients and origins will choose the signature-agent they trust, use a common format to migrate their configuration between CDN providers, and rely on a third-party registry for curation. We are working towards integrating these capabilities into our bot management and rule engines.
The way we interact with the Internet is changing. Not long ago, ordering a pizza meant visiting a website, clicking through menus, and entering your payment details. Soon, you might just ask your phone to order a pizza that matches your preferences. A program on your device or on a remote server, which we call an AI agent, would visit the website and orchestrate the necessary steps on your behalf.
Of course, agents can do much more than order pizza. Soon we might use them to buy concert tickets, plan vacations, or even write, review, and merge pull requests. While some of these tasks will eventually run locally, for now, most are powered by massive AI models running in the biggest datacenters in the world. As agentic AI increases in popularity, we expect to see a large increase in traffic from these AI platforms and a corresponding drop in traffic from more conventional sources (like your phone).
This shift in traffic patterns has prompted us to assess how to keep our customers online and secure in the AI era. On one hand, the nature of requests are changing: Websites optimized for human visitors will have to cope with faster, and potentially greedier, agents. On the other hand, AI platforms may soon become a significant source of attacks, originating from malicious users of the platforms themselves.
Unfortunately, existing tools for managing such (mis)behavior are likely too coarse-grained to manage this transition. For example, when Cloudflare detects that a request is part of a known attack pattern, the best course of action often is to block all subsequent requests from the same source. When the source is an AI agent platform, this could mean inadvertently blocking all users of the same platform, even honest ones who just want to order pizza. We started addressing this problem earlier this year. But as agentic AI grows in popularity, we think the Internet will need more fine-grained mechanisms of managing agents without impacting honest users.
At the same time, we firmly believe that any such security mechanism must be designed with user privacy at its core. In this post, we’ll describe how to use anonymous credentials (AC) to build these tools. Anonymous credentials help website operators to enforce a wide range of security policies, like rate-limiting users or blocking a specific malicious user, without ever having to identify any user or track them across requests.
Anonymous credentials are under development at IETF in order to provide a standard that can work across websites, browsers, platforms. It’s still in its early stages, but we believe this work will play a critical role in keeping the Internet secure and private in the AI era. We will be contributing to this process as we work towards real-world deployment. This is still early days. If you work in this space, we hope you will follow along and contribute as well.
Let’s build a small agent
To help us discuss how AI agents are affecting web servers, let’s build an agent ourselves. Our goal is to have an agent that can order a pizza from a nearby pizzeria. Without an agent, you would open your browser, figure out which pizzeria is nearby, view the menu and make selections, add any extras (double pepperoni), and proceed to checkout with your credit card. With an agent, it’s the same flow —except the agent is opening and orchestrating the browser on your behalf.
In the traditional flow, there’s a human all along the way, and each step has a clear intent: list all pizzerias within 3 Km of my current location; pick a pizza from the menu; enter my credit card; and so on. An agent, on the other hand, has to infer each of these actions from the prompt “order me a pizza.”
In this section, we’ll build a simple program that takes a prompt and can make outgoing requests. Here’s an example of a simple Worker that takes a specific prompt and generates an answer accordingly. You can find the code on GitHub:
export default {
   async fetch(request: Request, env: Env, ctx: ExecutionContext): Promise<Response> {
       const out = await env.AI.run("@cf/meta/llama-3.1-8b-instruct-fp8", {
           prompt: `I'd like to order a pepperoni pizza with extra cheese.
                    Please deliver it to Cloudflare Austin office.
                    Price should not be more than $20.`,
       });


       return new Response(out.response);
   },
} satisfies ExportedHandler<Env>;
In this context, the LLM provides its best answer. It gives us a plan and instruction, but does not perform the action on our behalf. You and I are able to take a list of instructions and act upon it because we have agency and can affect the world. To allow our agent to interact with more of the world, we’re going to give it control over a web browser.
Cloudflare offers a Browser Rendering service that can bind directly into our Worker. Let’s do that. The following code uses Stagehand, an automation framework that makes it simple to control the browser. We pass it an instance of Cloudflare remote browser, as well as a client for Workers AI.
import { Stagehand } from "@browserbasehq/stagehand";
import { endpointURLString } from "@cloudflare/playwright";
import { WorkersAIClient } from "./workersAIClient"; // wrapper to convert cloudflare AI


export default {
   async fetch(request: Request, env: Env, ctx: ExecutionContext): Promise<Response> {
       const stagehand = new Stagehand({
           env: "LOCAL",
           localBrowserLaunchOptions: { cdpUrl: endpointURLString(env.BROWSER) },
           llmClient: new WorkersAIClient(env.AI),
           verbose: 1,
       });
       await stagehand.init();


       const page = stagehand.page;
       await page.goto("https://mini-ai-agent.cloudflareresearch.com/llm");


       const { extraction } = await page.extract("what are the pizza available on the menu?");
       return new Response(extraction);
   },
} satisfies ExportedHandler<Env>;
Using the screenshot API of browser rendering, we can also inspect what the agent is doing. Here’s how the browser renders the page in the example above:
Stagehand allows us to identify components on the page, such as page.act(“Click on pepperoni pizza”) and page.act(“Click on Pay now”). This eases interaction between the developer and the browser.
To go further, and instruct the agent to perform the whole flow autonomously, we have to use the appropriately named agent mode of Stagehand. This feature is not yet supported by Cloudflare Workers, but is provided below for completeness.
import { Stagehand } from "@browserbasehq/stagehand";
import { endpointURLString } from "@cloudflare/playwright";
import { WorkersAIClient } from "./workersAIClient";


export default {
   async fetch(request: Request, env: Env, ctx: ExecutionContext): Promise<Response> {
       const stagehand = new Stagehand({
           env: "LOCAL",
           localBrowserLaunchOptions: { cdpUrl: endpointURLString(env.BROWSER) },
           llmClient: new WorkersAIClient(env.AI),
           verbose: 1,
       });
       await stagehand.init();

       const agent = stagehand.agent();
       const result = await agent.execute(`I'd like to order a pepperoni pizza with extra cheese.
                                           Please deliver it to Cloudflare Austin office.
                                           Price should not be more than $20.`);


       return new Response(result.message);
   },
} satisfies ExportedHandler<Env>;
We can see that instead of adding step-by-step instructions, the agent is provided control. To actually pay, it would need access to a payment method such as a virtual credit card.
The prompt had some subtlety in that we’ve scoped the location to Cloudflare’s Austin office. This is because while the agent responds to us, it needs to understand our context. In this case, the agent operates out of Cloudflare edge, a location remote to us. This implies we are unlikely to pick up a pizza from this data center if it was ever delivered.
The more capabilities we provide to the agent, the more it has the ability to create some disruption. Instead of someone having to make 5 clicks at a slow rate of 1 request per 10 seconds, they’d have a program running in a data center possibly making all 5 requests in a second.
This agent is simple, but now imagine many thousands of these — some benign, some not — running at datacenter speeds. This is the challenge origins will face.
Protecting origins
For humans to interact with the online world, they need a web browser and some peripherals with which to direct the behavior of that browser. Agents are another way of directing a browser, so it may be tempting to think that not much is actually changing from the origin’s point of view. Indeed, the most obvious change from the origin’s point of view is merely where traffic comes from:
The reason this change is significant has to do with the tools the server has to manage traffic. Websites generally try to be as permissive as possible, but they also need to manage finite resources (bandwidth, CPU, memory, storage, and so on). There are a few basic ways to do this:
Global security policy: A server may opt to slow down, CAPTCHA, or even temporarily block requests from all users. This policy may be applied to an entire site, a specific resource, or to requests classified as being part of a known or likely attack pattern. Such mechanisms may be deployed in reaction to an observed spike in traffic, as in a DDoS attack, or in anticipation of a spike in legitimate traffic, as in Waiting Room.
Incentives: Servers sometimes try to incentivize users to use the site when more resources are available. For instance, a server price may be lower depending on the location or request time. This could be implemented with a Cloudflare Snippet.
While both tools can be effective, they also sometimes cause significant collateral damage. For example, while rate limiting a website’s login endpoint can help prevent credential stuffing attacks, it also degrades the user experience for non-attackers. Before resorting to such measures, servers will first try to apply the security policy (whether a rate limit, a CAPTCHA, or an outright block) to individual users or groups of users.
However, in order to apply a security policy to individuals, the server needs some way of identifying them. Historically, this has been done via some combination of IP addresses, User-Agent, an account tied to the user identity (if available), and other fingerprints. Like most cloud service providers, Cloudflare has a dedicated offering for per-user rate limits based on such heuristics.
Likewise, agentic AI only exacerbates the limitations of fingerprinting. Not only will more traffic be concentrated on a smaller source IP range, the agents themselves will run the same software and hardware platform, making it harder to distinguish honest from malicious users.
Something that could help is Web Bot Auth, which would allow agents to identify to the origin which platform they’re operated by. However, we wouldn’t want to extend this mechanism — intended for identifying the platform itself — to identifying individual users of the platforms, as this would create an unacceptable privacy risk for these users.
We need some way of implementing security controls for individual users without identifying them. But how? The Privacy Pass protocol provides a partial solution.
Privacy Pass and its limitations
Today, one of the most prominent use cases for Privacy Pass is to rate limit requests from a user to an origin, as we have discussed before. The protocol works roughly as follows. The client is issued a number of tokens. Each time it wants to make a request, it redeems one of its tokens to the origin; the origin allows the request through only if the token is fresh, i.e., has never been observed before by the origin.
In order to use Privacy Pass for per-user rate-limiting, it’s necessary to limit the number of tokens issued to each user (e.g., 100 tokens per user per hour). To rate limit an AI agent, this role would be fulfilled by the AI platform. To obtain tokens, the user would log in with the platform, and said platform would allow the user to get tokens from the issuer. The AI platform fulfills the attester role in Privacy Pass parlance. The attester is the party guaranteeing the per-user property of the rate limit. The AI platform, as an attester, is incentivized to enforce this token distribution as it stakes its reputation: Should it allow for too many tokens to be issued, the issuer could distrust them.
The issuance and redemption protocols are designed to have two properties:
Tokens are unforgeable: only the issuer can issue valid tokens.
Tokens are unlinkable: no party, including the issuer, attester, or origin, can tell which user a token was issued to.
These properties can be achieved using a cryptographic primitive called a blind signaturescheme. In a conventional signature scheme, the signer uses its private key to produce a signature for a message. Later on, a verifier can use the signer’s public key to verify the signature. Blind signature schemes work in the same way, except that the message to be signed is blinded such that the signer doesn’t know the message it’s signing. The client “blinds” the message to be signed and sends it to the server, which then computes a blinded signature over the blinded message. The client obtains the final signature by unblinding the signature.
This is exactly how the standardised Privacy Pass issuance protocols are defined by RFC 9578:
Issuance: The user generates a random message $k$
which we call the nullifier. Concretely, this is just a random, 32-byte string. It then blinds the nullifier and sends it to the issuer. The issuer replies with a blind signature. Finally, the user unblinds the signature to get $\sigma$,
a signature for the nullifier $k$. The token is the pair $(k, \sigma)$.
Redemption: When the user presents $(k, \sigma)$,
the origin checks that $\sigma$
is a valid signature for the nullifier $k$
and that $k$
is fresh. If both conditions hold, then it accepts and lets the request through.
Blind signatures are simple, cheap, and perfectly suited for many applications. However, they have some limitations that make them unsuitable for our use case.
First, the communication cost of the issuance protocol is too high. For each token issued, the user sends a 256-byte, blinded nullifier and the issuer replies with a 256-byte blind signature (assuming RSA-2048 is used). That’s 0.5KB of additional communication per request, or 500KB for every 1,000 requests. This is manageable as we’ve seen in a previous experiment for Privacy Pass, but not ideal. Ideally, the bandwidth would be sublinear in the rate limit we want to enforce. An alternative to blind signatures with lower compute time are Oblivious Pseudorandom Functions (VOPRF), but the bandwidth is still asymptotically linear. We’ve discussed them in the past, as they served as the basis for early deployments of Privacy Pass.
Second, blind signatures can’t be used to rate-limit on a per-origin basis. Ideally, when issuing $N$ tokens to the client, the client would be able to redeem at most $N$ tokens at any origin server that can verify the token’s validity. However, the client can’t safely redeem the same token at more than one server because it would be possible for the servers to link those redemptions to the same client. What’s needed is some mechanism for what we’ll call late origin-binding: transforming a token for redemption at a particular origin in a way that’s unlinkable to other redemptions of the same token.
Third, once a token is issued, it can’t be revoked: it remains valid as long as the issuer’s public key is valid. This makes it impossible for an origin to block a specific user if it detects an attack, or if its tokens are compromised. The origin can block the offending request, but the user can continue to make requests using its remaining token budget.
Anonymous credentials and the future of Privacy Pass
As noted by Chaum in 1985, an anonymous credential system allows users to obtain a credential from an issuer, and later prove possession of this credential, in an unlinkable way, without revealing any additional information. Also, it is possible to demonstrate that some attributes are attached to the credential.
One way to think of an anonymous credential is as a kind of blind signature with some additional capabilities: late-binding (link a token to an origin after issuance), multi-show (generate multiple tokens from a single issuer response), and expiration distinct from key rotation (token validity decoupled of the issuer cryptographic key validity). In the redemption flow for Privacy Pass, the client presents the unblinded message and signature to the server. To accept the redemption, the server needs to verify the signature. In an AC system, the client only presents a part of the message. In order for the server to accept the request, the client needs to prove to the server that it knows a valid signature for the entire message without revealing the whole thing.
The flow we described above would therefore include this additional presentation step.
Note that the tokens generated through blind signatures or VOPRFs can only be used once, so they can be regarded as single-use tokens. However, there exists a type of anonymous credentials that allows tokens to be used multiple times. For this to work, the issuer grants a credential to the user, who can later derive at most N many single-use tokens for redemption. Therefore, the user can send multiple requests, at the expense of a single issuance session.
The table below describes how blind signatures and anonymous credentials provide features of interest to rate limiting.
Feature
Blind Signature
Anonymous Credential
Issuing Cost
Linear complexity: issuing 10 signatures is 10x as expensive as issuing one signature
Sublinear complexity: signing 10 attributes is cheaper than 10 individual signatures
Proof Capability
Only prove that a message has been signed
Allow efficient proving of partial statements (i.e., attributes)
State Management
Stateless
Stateful
Attributes
No attributes
Public (e.g. expiry time) and private state
Let’s see how a simple anonymous credential scheme works. The client’s message consists of the pair $(k, C)$,
where $k$
is a nullifier and $C$
is a counter representing the remaining number of times the client can access a resource. The value of the counter is controlled by the server: when the client redeems its credential, it presents both the nullifier and the counter. In response, the server checks that signature of the message is valid and that the nullifier is fresh, as before. Additionally, the server also
checks that the counter is greater than zero; and
decrements the counter issuing a new credential for the updated counter and a fresh nullifier.
A blind signature could be used to meet this functionality. However, whereas the nullifier can be blinded as before, it would be necessary to handle the counter in plaintext so that the server can check that the counter is valid (Step 1) and update it (Step 2). This creates an obvious privacy risk since the server, which is in control of the counter, can use it to link multiple presentations by the same client. For example, when you reach out to buy a pepperoni pizza, the origin could assign you a special counter value, which eases fingerprinting when you present it a second time. Fortunately, there exist anonymous credentials designed to close this kind of privacy gap.
The scheme above is a simplified version of Anonymous Credit Tokens (ACT), one of the anonymous credential schemes being considered for adoption by the Privacy Pass working group at IETF. The key feature of ACT is its statefulness: upon successful redemption, the server re-issues a new credential with updated nullifier and counter values. This creates a feedback loop between the client and server that can be used to express a variety of security policies.
By design, it’s not possible to present ACT credentials multiple times simultaneously: the first presentation must be completed so that the re-issued credential can be presented in the next request. Parallelism is the key feature of Anonymous Rate-limited Credential (ARC), another scheme under discussion at the Privacy Pass working group. ARCs can be presented across multiple requests in parallel up to the presentation limit determined during issuance.
Another important feature of ARC is its support for late origin-binding: when a client is issued an ARC with presentation limit $N$, it can safely use its credential to present up to $N$ times to any origin that can verify the credential.
These are just examples of relevant features of some anonymous credentials. Some applications may benefit from a subset of them; others may need additional features. Fortunately, both ACT and ARC can be constructed from a small set of cryptographic primitives that can be easily adapted for other purposes.
Building blocks for anonymous credentials
ARC and ACT share two primitives in common: algebraic MACs, which provide for limited computations on the blinded message; and zero-knowledge proofs (ZKP) for proving validity of the part of the message not revealed to the server. Let’s take a closer look at each.
Algebraic MACs
A Message Authenticated Code (MAC) is a cryptographic tag used to verify a message’s authenticity (that it comes from the claimed sender) and integrity (that it has not been altered). Algebraic MACs are built from mathematical structures like group actions. The algebraic structure gives them some additional functionality, one of them being a homomorphism that we can blind easily to conceal the actual value of the MAC. Adding a random value on an algebraic MAC blinds the value.
Unlike blind signatures, both ACT and ARC are only privately verifiable, meaning the issuer and the origin must both have the issuer’s private key. Taking Cloudflare as an example, this means that a credential issued by Cloudflare can only be redeemed by an origin behind Cloudflare. Publicly verifiable variants of both are possible, but at an additional cost.
Zero-Knowledge Proofs for linear relations
Zero knowledge proofs (ZKP) allow us to prove a statement is true without revealing the exact value that makes the statement true. The ZKP is constructed by a prover in such a way that it can only be generated by someone who actually possesses the secret. The verifier can then run a quick mathematical check on this proof. If the check passes, the verifier is convinced that the prover’s initial statement is valid. The crucial property is that the proof itself is just data that confirms the statement; it contains no other information that could be used to reconstruct the original secret.
For ARC and ACT, we want to prove linear relations of secrets. In ARC, a user needs to prove that different tokens are linked to the same original secret credential. For example, a user can generate a proof showing that a request token was derived from a valid issued credential. The system can verify this proof to confirm the tokens are legitimately connected, all without ever learning the underlying secret credential that ties them together. This allows the system to validate user actions while guaranteeing their privacy.
Proving simple linear relations can be extended to prove a number of powerful statements, for example that a number is in range. For example, this is useful to prove that you have a positive balance on your account. To prove your balance is positive, you prove that you can encode your balance in binary. Let’s say you can at most have 1024 credits in your account. To prove your balance is non-zero when it is, for example, 12, you prove two things simultaneously: first, that you have a set of binary bits, in this case 12=(1100)2, and second, that a linear equation using these bits (8*1 + 4*1 + 2*0 + 1*0) correctly adds up to your total committed balance. This convinces the verifier that the number is validly constructed without them learning the exact value. This is how it works for powers of two, but it can easily be extended to arbitrary ranges.
The mathematical structure of algebraic MACs allows easy blinding and evaluation. The structure also allows for an easy proof that a MAC has been evaluated with the private key without revealing the MAC. In addition, ARC could use ZKPs to prove that a nonce has not been spent before. In contrast, ACT uses ZKPs to prove we have enough of a balance left on our token. The balance is subtracted homomorphically using more group structure.
How much does this all cost?
Anonymous credentials allow for more flexibility, and have the potential to reduce the communication cost, compared to blind signatures in certain applications. To identify such applications, we need to measure the concrete communication cost of these new protocols. In addition, we need to understand how their CPU usage compares to blind signatures and oblivious pseudorandom functions.
We measure the time that each participant spends at each stage of some AC schemes. We also report the size of messages transmitted across the network. For ARC, ACT, and VOPRF, we’ll use ristretto255 as the prime group and SHAKE128 for hashing. For Blind RSA, we’ll use a 2048-bit modulus and SHA-384 for hashing.
Each algorithm was implemented in Go, on top of the CIRCL library. We plan to open source the code once the specifications of ARC and ACT begin to stabilize.
Let’s take a look at the most widely used deployment in Privacy Pass: Blind RSA. Redemption time is low, and most of the cost lies with the server at issuance time. Communication cost is mostly constant and in the order of 256 bytes.
When looking at VOPRF, verification time on the server is slightly higher than for Blind RSA, but communication cost and issuance are much faster. Evaluation time on the server is 10x faster for 1 token, and more than 25x faster when using amortized token issuance. Communication cost per token is also more appealing, with a message size at least 3x lower.
This makes VOPRF tokens appealing for applications requiring a lot of tokens that can accept a slightly higher redemption cost, and that don’t need private verifiability.
Now, let’s take a look at the figures for ARC and ACT anonymous credential schemes. For both schemes we measure the time to issue a credential that can be presented at most $N=1000$ times.
Issuance Credential Generation
ARC
ACT
Time
Message Size
Time
Message Size
Client (Request)
323 µs
224 B
64 µs
141 B
Server (Response)
1349 µs
448 B
251 µs
176 B
Client (Finalize)
1293 µs
128 B
204 µs
176 B
Redemption Credential Presentation
ARC
ACT
Time
Message Size
Time
Message Size
Client (Present)
735 µs
288 B
1740 µs
1867 B
Server (Verify/Refund)
740 µs
–
1785 µs
141 B
Client (Update)
–
–
508 µs
176 B
As we would hope, the communication cost and the server’s runtime is much lower than a batched issuance with either Blind RSA or VOPRF. For example, a VOPRF issuance of 1000 tokens takes 99 ms (99 µs per token) vs 1.35 ms for issuing one ARC credential that allows for 1000 presentations. This is about 70x faster. The trade-off is that presentation is more expensive, both for the client and server.
How about ACT? Like ARC, we would expect the communication cost of issuance grows much slower with respect to the credits issued. Our implementation bears this out. However, there are some interesting performance differences between ARC and ACT: issuance is much cheaper for ACT than it is for ARC, but redemption is the opposite.
What’s going on? The answer has largely to do with what each party needs to prove with ZKPs at each step. For example, during ACT redemption, the client proves to the server (in zero-knowledge) that its counter $C$ is in the desired range, i.e., $0 \leq C \leq N$. The proof size is on the order of $\log_{2} N$, which accounts for the larger message size. In the current version, ARC redemption does not involve range proofs, but a range proof may be added in a future version. Meanwhile, the statements the client and server need to prove during ARC issuance are a bit more complicated than for ARC presentation, which accounts for the difference in runtime there.
The advantage of anonymous credentials, as discussed in the previous sections, is that issuance only has to be performed once. When a server evaluates its cost, it takes into account the cost of all issuances and the cost of all verifications. At present, only accounting for credentials costs, it’s cheaper for a server to issue and verify tokens than verify an anonymous credential presentation.
The advantage of multiple-use anonymous credentials is that instead of the issuer generating $N$ tokens, the bulk of computation is offloaded to the clients. This is more scoped. Late origin binding allows them to work for multiple origins/namespace, range proof to decorrelate expiration from key rotation, and refund to provide a dynamic rate limit. Their current applications are dictated by the limitation of single-use token based schemes, more than by the added efficiency they provide. This seems to be an exciting area to explore, and see if closing the gap is possible.
Managing agents with anonymous credentials
Managing agents will likely require features from both ARC and ACT.
ARC already has much of the functionality we need: it supports rate limiting, is communication-efficient, and it supports late origin-binding. Its main downside is that, once an ARC credential is issued, it can’t be revoked. A malicious user can always make up to N requests to any origin it wants.
We can allow for a limited form of revocation by pairing ARC with blind signatures (or VOPRF). Each presentation of the ARC credential is accompanied by a Privacy Pass token: upon successful presentation, the client is issued another Privacy Pass token it can use during the next presentation. To revoke a credential, the server would simply not re-issue the token:
This scheme is already quite useful. However, it has some important limitations:
Parallel presentation across origins is not possible: the client must wait for the request to one origin to succeed before it can initiate a request to a second origin.
Revocation is global rather than per-origin, meaning the credential is not only revoked for the origin to whom it was presented, but for every origin it can be presented to. We suspect this will be undesirable in some cases. For example, an origin may want to revoke if a request violates its robots.txt policy; but the same request may have been accepted by other origins.
A more fundamental limitation of this design is that the decision to revoke can only be made on the basis of a single request — the one in which the credential was presented. It may be risky to decide to block a user on the basis of a single request; in practice, attack patterns may only emerge across many requests. ACT’s statefulness enables at least a rudimentary form of this kind of defense. Consider the following scheme:
Issuance: The client is issued an ARC with presentation limit $N=1$.
Presentation:
When the client presents its ARC credential to an origin for the first time, the server issues an ACT credential with a valid initial state.
When the client presents an ACT with valid state (e.g., credit counter greater than 0), the origin either:
refuses to issue a new ACT, thereby revoking the credential. It would only do so if it had high confidence that the request was part of an attack; or
issues a new ACT with state updated to reduce the ACT credit by the amount of resources consumed while processing the request.
Benign requests wouldn’t change the state by much (if at all), but suspicious requests might impact the state in a way that gets the user closer to their rate limit much faster.
Demo
To see how this idea works in practice, let’s look at a working example that uses the Model Context Protocol. The demo below is built usingMCP Tools. Tools are extensions the AI agent can call to extend its capabilities. They don’t need to be integrated at release time within the MCP client. This provides a nice and easy prototyping avenue for anonymous credentials.
Tools are offered by the server via an MCP compatible interface. You can see details on how to build such MCP servers in a previous blog.
In our pizza context, this could look like a pizzeria that offers you a voucher. Each voucher gets you 3 pizza slices. Mocking a design, an integration within a chat application could look as follows:
The first panel presents all tools exposed by the MCP server. The second one showcases an interaction performed by the agent calling these tools.
To look into how such a flow would be implemented, let’s write the MCP tools, offer them in an MCP server, and manually orchestrate the calls with the MCP Inspector.
The MCP server should provide two tools:
act-issue which issues an ACT credential valid for 3 requests. The code used here is an earlier version of the IETF draft which has some limitations.
act-redeem makes a presentation of the local credential, and fetches our pizza menu.
First, we run act-issue. At this stage, we could ask the agent to run anOAuth flow, fetch an internal authentication endpoint, or to compute a proof of work.
This gives us 3 credits to spend against an origin. Then, we run act-redeem
Et voilà. If we run act-redeem once more, we see we have one fewer credit.
You can test it yourself, here are the source codes available. The MCP server is written inRust to integrate with the ACT rust library. The browser-based client works similarly, check it out.
Moving further
In this post, we’ve presented a concrete approach to rate limit agent traffic. It is in full control of the client, and is built to protect the user’s privacy. It uses emerging standards for anonymous credentials, integrates with MCP, and can be readily deployed on Cloudflare Workers.
We’re on the right track, but there are still questions that remain. As we touched on before, a notable limitation of both ARC and ACT is that they are only privately verifiable. This means that the issuer and origin need to share a private key, for issuing and verifying the credential respectively. There are likely to be deployment scenarios for which this isn’t possible. Fortunately, there may be a path forward for these cases using pairing-based cryptography, as in the BBS signature specification making its way through IETF. We’re also exploring post-quantum implications in a concurrent post.
If you are an agent platform, an agent developer, or a browser, all our code is available on GitHub for you to experiment. Cloudflare is actively working on vetting this approach for real-world use cases.
The specification and discussion are happening within the IETF and W3C. This ensures the protocols are built in the open, and receive participation from experts. Improvements are still to be made to clarify the right performance-to-privacy tradeoff, or even the story to deploy on the open web.
With the rise of traffic from AI agents, what’s considered a bot is no longer clear-cut. There are some clearly malicious bots, like ones that DoS your site or do credential stuffing, and ones that most site owners do want to interact with their site, like the bot that indexes your site for a search engine, or ones that fetch RSS feeds.
Historically, Cloudflare has relied on two main signals to verify legitimate web crawlers from other types of automated traffic: user agent headers and IP addresses. The User-Agent header allows bot developers to identify themselves, i.e. MyBotCrawler/1.1. However, user agent headers alone are easily spoofed and are therefore insufficient for reliable identification. To address this, user agent checks are often supplemented with IP address validation, the inspection of published IP address ranges to confirm a crawler’s authenticity. However, the logic around IP address ranges representing a product or group of users is brittle – connections from the crawling service might be shared by multiple users, such as in the case of privacy proxies and VPNs, and these ranges, often maintained by cloud providers, change over time.
Cloudflare will always try to block malicious bots, but we think our role here is to also provide an affirmative mechanism to authenticate desirable bot traffic. By using well-established cryptography techniques, we’re proposing a better mechanism for legitimate agents and bots to declare who they are, and provide a clearer signal for site owners to decide what traffic to permit.
Today, we’re introducing two proposals – HTTP message signatures and request mTLS – for friendly bots to authenticate themselves, and for customer origins to identify them. In this blog post, we’ll share how these authentication mechanisms work, how we implemented them, and how you can participate in our closed beta.
Existing bot verification mechanisms are broken
Historically, if you’ve worked on ChatGPT, Claude, Gemini, or any other agent, you’ve had several options to identify your HTTP traffic to other services:
You define a user agent, an HTTP header described in RFC 9110. The problem here is that this header is easily spoofable and there’s not a clear way for agents to identify themselves as semi-automated browsers — agents often use the Chrome user agent for this very reason, which is discouraged. The RFC states: “If a user agent masquerades as a different user agent, recipients can assume that the user intentionally desires to see responses tailored for that identified user agent, even if they might not work as well for the actual user agent being used.”
You publish your IP address range(s). This has limitations because the same IP address might be shared by multiple users or multiple services within the same company, or even by multiple companies when hosting infrastructure is shared (like Cloudflare Workers, for example). In addition, IP addresses are prone to change as underlying infrastructure changes, leading services to use ad-hoc sharing mechanisms like CIDR lists.
You go to every website and share a secret, like a Bearer token. This is impractical at scale because it requires developers to maintain separate tokens for each website their bot will visit.
We can do better! Instead of these arduous methods, we’re proposing that developers of bots and agents cryptographically sign requests originating from their service. When protecting origins, reverse proxies such as Cloudflare can then validate those signatures to confidently identify the request source on behalf of site owners, allowing them to take action as they see fit.
A typical system has three actors:
User: the entity that wants to perform some actions on the web. This may be a human, an automated program, or anything taking action to retrieve information from the web.
Agent: an orchestrated browser or software program. For example, Chrome on your computer, or OpenAI’s Operator with ChatGPT. Agents can interact with the web according to web standards (HTML rendering, JavaScript, subrequests, etc.).
Origin: the website hosting a resource. The user wants to access it through the browser. This is Cloudflare when your website is using our services, and it’s your own server(s) when exposed directly to the Internet.
In the next section, we’ll dive into HTTP Message Signatures and request mTLS, two mechanisms a browser agent may implement to sign outgoing requests, with different levels of ease for an origin to adopt.
Introducing HTTP Message Signatures
HTTP Message Signatures is a standard that defines the cryptographic authentication of a request sender. It’s essentially a cryptographically sound way to say, “hey, it’s me!”. It’s not the only way that developers can sign requests from their infrastructure — for example, AWS has used Signature v4, and Stripe has a framework for authenticating webhooks — but Message Signatures is a published standard, and the cleanest, most developer-friendly way to sign requests.
We’re working closely with the wider industry to support these standards-based approaches. For example, OpenAI has started to sign their requests. In their own words:
“Ensuring the authenticity of Operator traffic is paramount. With HTTP Message Signatures (RFC 9421), OpenAI signs all Operator requests so site owners can verify they genuinely originate from Operator and haven’t been tampered with” – Eugenio, Engineer, OpenAI
Without further delay, let’s dive in how HTTP Messages Signatures work to identify bot traffic.
Scoping standards to bot authentication
Generating a message signature works like this: before sending a request, the agent signs the target origin with a public key. When fetching https://example.com/path/to/resource, it signs example.com. This public key is known to the origin, either because the agent is well known, because it has previously registered, or any other method. Then, the agent writes a Signature-Input header with the following parameters:
A validity window (created and expires timestamps)
A Key ID that uniquely identifies the key used in the signature. This is a JSON Web Key Thumbprint.
A tag that shows websites the signature’s purpose and validation method, i.e. web-bot-auth for bot authentication.
In addition, the Signature-Agent header indicates where the origin can find the public keys the agent used when signing the request, such as in a directory hosted by signer.example.com. This header is part of the signed content as well.
For those building bots, we propose signing the authority of the target URI, i.e. crawler.search.google.com for Google Search, operator.openai.com for OpenAI Operator, workers.dev for Cloudflare Workers, and a way to retrieve the bot public key in the form of signature-agent, if present.
The User-Agent from the example above indicates that the software making the request is Chrome, because it is an agent that uses an orchestrated Chrome to browse the web. You should note that MyBotCrawler/1.1 is still present. The User-Agent header can actually contain multiple products, in decreasing order of importance. If our agent is making requests via Chrome, that’s the most important product and therefore comes first.
At Internet-level scale, these signatures may add a notable amount of overhead to request processing. However, with the right cryptographic suite, and compared to the cost of existing bot mitigation, both technical and social, this seems to be a straightforward tradeoff. This is a metric we will monitor closely, and report on as adoption grows.
Generating request signatures
We’re making several examples for generating Message Signatures for bots and agents available on Github (though we encourage other implementations!), all of which are standards-compliant, to maximize interoperability.
Imagine you’re building an agent using a managed Chromium browser, and want to sign all outgoing requests. To achieve this, the webextensions standard provides chrome.webRequest.onBeforeSendHeaders, where you can modify HTTP headers before they are sent by the browser. The event is triggered before sending any HTTP data, and when headers are available.
Here’s what that code would look like:
chrome.webRequest.onBeforeSendHeaders.addListener(
  function (details) {
	// Signature and header assignment logic goes here
      // <CODE>
  },
  { urls: ["<all_urls>"] },
  ["blocking", "requestHeaders"] // requires "installation_mode": "force_installed"
);
Cloudflare provides a web-bot-auth helper package on npm that helps you generate request signatures with the correct parameters. onBeforeSendHeaders is a Chrome extension hook that needs to be implemented synchronously. To do so, we import {signatureHeadersSync} from “web-bot-auth”. Once the signature completes, both Signature and Signature-Input headers are assigned. The request flow can then continue.
const request = new URL(details.url);
const created = new Date();
const expired = new Date(created.getTime() + 300_000)


// Perform request signature
const headers = signatureHeadersSync(
  request,
  new Ed25519Signer(jwk),
  { created, expires }
);
// `headers` object now contains `Signature` and `Signature-Input` headers that can be used
Using our debug server, we can now inspect and validate our request signatures from the perspective of the website we’d be visiting. We should now see the Signature and Signature-Input headers:
In this example, the homepage of the debugging server validates the signature from the RFC 9421 Ed25519 verifying key, which the extension uses for signing.
The above demo and code walkthrough has been fully written in TypeScript: the verification website is on Cloudflare Workers, and the client is a Chrome browser extension. We are cognisant that this does not suit all clients and servers on the web. To demonstrate the proposal works in more environments, we have also implemented bot signature validation in Go with a plugin for Caddy server.
Experimentation with request mTLS
HTTP is not the only way to convey signatures. For instance, one mechanism that has been used in the past to authenticate automated traffic against secured endpoints is mTLS, the “mutual” presentation of TLS certificates. As described in our knowledge base:
Mutual TLS, or mTLS for short, is a method formutual authentication. mTLS ensures that the parties at each end of a network connection are who they claim to be by verifying that they both have the correct privatekey. The information within their respectiveTLS certificates provides additional verification.
While mTLS seems like a good fit for bot authentication on the web, it has limitations. If a user is asked for authentication via the mTLS protocol but does not have a certificate to provide, they would get an inscrutable and unskippable error. Origin sites need a way to conditionally signal to clients that they accept or require mTLS authentication, so that only mTLS-enabled clients use it.
A TLS flag for bot authentication
TLS flags are an efficient way to describe whether a feature, like mTLS, is supported by origin sites. Within the IETF, we have proposed a new TLS flag called req mTLS to be sent by the client during the establishment of a connection that signals support for authentication via a client certificate.
This proposal leverages the tls-flags proposal under discussion in the IETF. The TLS Flags draft allows clients and servers to send an array of one bit flags to each other, rather than creating a new extension (with its associated overhead) for each piece of information they want to share. This is one of the first uses of this extension, and we hope that by using it here we can help drive adoption.
When a client sends the req mTLS flag to the server, they signal to the server that they are able to respond with a certificate if requested. The server can then safely request a certificate without risk of blocking ordinary user traffic, because ordinary users will never set this flag.
Let’s take a look at what an example of such a req mTLS would look like in Wireshark, a network protocol analyser. You can follow along in the packet capture here.
The extension number is 65025, or 0xfe01. This corresponds to an unassigned block of TLS extensions that can be used to experiment with TLS Flags. Once the standard is adopted and published by the IETF, the number would be fixed. To use the req mTLS flag the client needs to set the 80th bit to true, so with our block length of 12 bytes, it should contain the data 0b0000000000000000000001, which is the case here. The server then responds with a certificate request, and the request follows its course.
This example library allows you to configure Go to send req mTLS 0xfe01 bytes in the TLS Flags extension. If you’d like to test your implementation out, you can prompt your client for certificates against req-mtls.research.cloudflare.com using the Cloudflare Research client cloudflareresearch/req-mtls. For clients, once they set the TLS Flags associated with req mTLS, they are done. The code section taking care of normal mTLS will take over at that point, with no need to implement something new.
Two approaches, one goal
We believe that developers of agents and bots should have a public, standard way to authenticate themselves to CDNs and website hosting platforms, regardless of the technology they use or provider they choose. At a high level, both HTTP Message Signatures and request mTLS achieve a similar goal: they allow the owner of a service to authentically identify themselves to a website. That’s why we’re participating in the standardizing effort for both of these protocols at the IETF, where many other authentication mechanisms we’ve discussed here — from TLS to OAuth Bearer tokens –— been developed by diverse sets of stakeholders and standardized as RFCs.
Evaluating both proposals against each other, we’re prioritizing HTTP Message Signatures for Bots because it relies on the previously adopted RFC 9421 with several reference implementations, and works at the HTTP layer, making adoption simpler. request mTLS may be a better fit for site owners with concerns about the additional bandwidth, but TLS Flags has fewer implementations, is still waiting for IETF adoption, and upgrading the TLS stack has proven to be more challenging than with HTTP. Both approaches share similar discovery and key management concerns, as highlighted in a glossary draft at the IETF. We’re actively exploring both options, and would love to hear from both site owners and bot developers about how you’re evaluating their respective tradeoffs.
The bigger picture
In conclusion, we think request signatures and mTLS are promising mechanisms for bot owners and developers of AI agents to authenticate themselves in a tamper-proof manner, forging a path forward that doesn’t rely on ever-changing IP address ranges or spoofable headers such as User-Agent. This authentication can be consumed by Cloudflare when acting as a reverse proxy, or directly by site owners on their own infrastructure. This means that as a bot owner, you can now go to content creators and discuss crawling agreements, with as much granularity as the number of bots you have. You can start implementing these solutions today and test them against the research websites we’ve provided in this post.
Bot authentication also empowers site owners small and large to have more control over the traffic they allow, empowering them to continue to serve content on the public Internet while monitoring automated requests. Longer term, we will integrate these authentication mechanisms into our AI Audit and Bot Management products, to provide better visibility into the bots and agents that are willing to identify themselves.
Being able to solve problems for both origins and clients is key to helping build a better Internet, and we think identification of automated traffic is a step towards that. If you want us to start verifying your message signatures or client certificates, have a compelling use case you’d like us to consider, or any questions, please reach out.
HTTP caching is conceptually simple: if the response to a request is in the cache, serve it, and if not, pull it from your origin, put it in the cache, and return it. When the response is old, you repeat the process. If you are worried about too many requests going to your origin at once, you protect it with a cache lock: a small program, possibly distinct from your cache, that indicates if a request is already going to your origin. This is called cache revalidation.
In this blog post, we dive into how cache revalidation works, and present a new approach based on probability. For every request going to the origin, we simulate a die roll. If it’s 6, the request can go to the origin. Otherwise, it stays stale to protect our origin from being overloaded. To see how this is built and optimised, read on.
Background
Let’s take the example of an online image library. When a client requests an image, the service first checks its cache to see if the resource is present. If it is, it returns it. If it is not, the image server processes the request, places the response into the cache for a day, and returns it. When the cache expires, the process is repeated.
Figure 1: Uncached request goes to the origin
Figure 2: Cached request stops at the cache
And this is where things get complex. The image of a cat might be quite popular. Let’s say it’s requested 10 times per second. Let’s also assume the image server cannot handle more than 1 request per second. After a day, the cache expires. 10 requests hit the service. Given there are no up-to-date items in cache, these 10 requests are going to go directly to the image server. This problem is known as cache stampede. When the image server sees these 10 requests all happening at the same time, it gets overloaded.
Figure 3: Image server overloaded upon cache expiration. This can happen to one or multiple users, across locations.
This all stops if the cache gets populated, as it can handle a lot more requests than the origin.
Figure 4: Cache is populated and can handle the load. The image server is healthy again.
In the following sections, we build this image service, see how it can prevent cache stampede with a cache lock, then dive into probabilistic cache revalidation, and its optimisation.
Setup
Let’s write this image service. We need an image, a server, and a cache. For the image we’re going to use a picture of my cat, Cloudflare Workers for the server, and the Cloudflare Cache API for caching.
Note to the reader: On purpose, we aren’t using Cloudflare KV or Cloudflare CDN Cache, because they already solve our cache validation problem by using a cache lock.
let cache = caches.default
const CACHE_KEY = new Request('https://cache.local/')
const CACHE_AGE_IN_S = 86_400 // 1 day

function cacheExpirationDate() {
  return new Date(Date.now() + 1000*CACHE_AGE_IN_S)
}

function fetchAndCache(ctx) {
  let response = await fetch('https://files.research.cloudflare.com/images/cat.jpg')
  response = new Response(
	await response.arrayBuffer(),
	{
  	  headers: {
  	    'Content-Type': response.headers.get('Content-Type'),
  	    'Expires': cacheExpirationDate().toUTCString(),
  	  },
	},
  )
  ctx.waitUntil(cache.put(CACHE_KEY, response.clone()))
  return response
}

export default {
  async fetch(request, env, ctx) {
	let cachedResponse = await cache.match(CACHE_KEY)
	if (cachedResponse) {
  	  return cachedResponse
	}
	return fetchAndCache(ctx)
  }
}
Codeblock 1: Image server with a non-collapsing cache
Expectation about cache revalidation
The image service is receiving 10 requests per second, and it caches images for a day. It’s reasonable to assume we would like to start revalidating the cache 5 minutes before it expires. The code evolves as follows:
let cache = caches.default
const CACHE_KEY = new Request('https://cache.local/')
const CACHE_AGE_IN_S = 86_400 // 1 day
const CACHE_REVALIDATION_INTERVAL_IN_S = 300

function cacheExpirationDate() {
  // Date constructor in workers takes Unix time in milliseconds
  // Date.now() returns time in milliseconds as well
  return new Date(Date.now() + 1000*CACHE_AGE_IN_S)
}

async function fetchAndCache(ctx) {
  let response = await fetch('https://files.research.cloudflare.com/images/cat.jpg')
  response = new Response(
	await response.arrayBuffer(),
	{
  	  headers: {
  	    'Content-Type': response.headers.get('Content-Type'),
  	    'Expires': cacheExpirationDate().toUTCString(),
  	  },
	},
  )
  ctx.waitUntil(cache.put(CACHE_KEY, response.clone()))
  return response
}

// Revalidation function added here
// This is were we are going to focus our effort: should the request be revalidated ?
function shouldRevalidate(expirationDate) {
  let remainingCacheTimeInS = (expirationDate.getTime() - Date.now()) / 1000

  return remainingCacheTimeInS <= CACHE_REVALIDATION_INTERVAL_IN_S
}

export default {
  async fetch(request, env, ctx) {
	let cachedResponse = await cache.match(CACHE_KEY)
	if (cachedResponse) {
       // revalidation happens only if the request was cached. Otherwise, the resource is fetched anyway
  	  if (shouldRevalidate()) {
    	    ctx.waitUntil(fetchAndCache(ctx))
  	  }
  	  return cachedResponse
	}
	return fetchAndCache(ctx)
  }
}
Codeblock 2: Image server with early-revalidation and a non-collapsing cache
That code works, and we can now revalidate 5 minutes in advance of cache expiration. However, instead of fetching the image from the origin server at expiration time, all requests are going to be made 5 minutes in advance, and that does not solve our cache stampede problem. This happens no matter if requests are coming to a single location or not, given the code above does not collapse requests.
To solve our cache stampede problem, we need the revalidation process to not send too many requests at the same time. Ideally, we would like only one request to be sent between expiration - 5min and expiration.
The usual solution: a cache lock
To make sure there is only one request at a time going to the origin server, the solution that’s usually deployed is a cache lock. The idea is that for a specific item, a cat picture in our case, requests to the origin try to obtain a lock. The request obtaining the lock can go to the origin, the others will serve stale content.
The lock has two methods: try_lock() and unlock.
* try_lock if the lock is free, take it and return true. If not, return false.
* unlock releases the lock.
import { WorkerEntrypoint } from 'cloudflare:workers'

class Lock extends WorkerEntryPoint {
  async try_lock(key) {
	let value = await this.ctx.storage.get(key)
	if (!value) {
  	  await this.ctx.storage.put(key, true)
  	  return true
	}
	return false
  }

  unlock() {
	return this.ctx.storage.delete(key)
  }
}
Codeblock 3: Lock service implemented with a Durable Object
That service can then be used as a cache lock.
// CACHE_LOCK is an instantiation of the above binding
// Assuming the above is deployed as a worker with name `lock`
// It can be bound in wrangler.toml as follows
// services = [ { binding = "CACHE_LOCK", service = "lock" } ]

const LOCK_KEY = "cat_image_service"

async function fetchAndCache(env, ctx) {
  let response = await fetch('...')
  ctx.waitUntil(env.CACHE_LOCK.unlock(LOCK_KEY))
  ...
}

function shouldRevalidate(env, expirationDate) {
  let remainingCacheTimeInS = (expirationDate.getTime() - Date.now()) / 1000

  // check if the expiry window is now, and then if the revalidation lock is available. if it is, take it
  return remainingCacheTimeInS <= CACHE_REVALIDATION_INTERVAL_IN_S && env.CACHE_LOCK.try_lock(LOCK_KEY)
}
Codeblock 4: Image server with early-revalidation and a cache using a cache-lock
Now you might say “Et voilà. No need for probabilities and mathematics. Peak engineering has triumphed.” And you might be right, in most cases. That’s why cache locks are so predominant: they are conceptually simple, deterministic for the same key, and scale well with predictable resource usage.
On the other hand, cache locks add latency and fallibility. To take ownership of a lock, cache revalidation has to contact the lock service. This service is shared across different processes, possibly different machines in different locations. Requests therefore take time. In addition, this service might be unavailable. Probabilistic cache revalidation does not suffer from these, given it does not reach out to an external service but rolls a die with the local randomness generator. It does so at the cost of not guaranteeing the number of requests going to the origin server: maybe zero for an extended period, maybe more than one. On average, this is going to be fine. But there can be border cases, similar to how one can roll a die 10 times and get 10 sixes. It’s unlikely, but not unrealistic, and certain services need that certainty. In the following sections, we dissect this approach.
First dive into probabilities given a stable request rate
A first approach is to reduce the number of requests going to the origin server. Instead of always sending a request to revalidate, we are going to send 1 out of 10. This means that instead of sending 10 requests per second when the cache is invalidated, we send 1 per second.
Because we don’t have a lock, we do that with probabilities. We set the probability of sending a request to the origin to be $p=\frac{1}{10}$. With a rate of 10 requests per second, after 1 second, the expectancy of a request being sent to the origin is $1-(1-p)^10=65\%$. We draw the evolution of the function $E(r, t)=1-(1-p)^{r \times t}$ representing the expectancy of a request being sent to the server over time. $r = 10$ and is the request rate.
Figure 5: Revalidation time $E(t)$ with $r=10$ and $p=\frac{1}{10}$. At time $t$, $E(t)$ is the probability that an early revalidation occurred.
The graph moves very quickly towards $1$. This means we might still have space to reduce the number of requests going to our origin server. We can set a lower probability, such as $p_2=\frac{1}{500}$ (1 request every 5 seconds on average). The graph looks as follows:
Figure 6: Revalidation time $E(t)$ with $r=10$ and $p=\frac{1}{500}$.
This looks great. Let’s implement it.
const CACHE_REVALIDATION_INTERVAL_IN_S = 300
const CACHE_REVALIDATION_PROBABILITY = 1/500

function shouldRevalidate(expirationDate) {
  let remainingCacheTimeInS = (expirationDate.getTime() - Date.now()) / 1000

  if (remainingCacheTimeInS > CACHE_REVALIDATION_INTERVAL_IN_S) {
	return false
  }
  if (remainingCacheTimeInS <= 0) {
	return true
  }
  return Math.random() < CACHE_REVALIDATION_PROBABILITY
}
Codeblock 5: Image server with early-revalidation and a probabilistic cache using uniform distribution
That’s it. If the cache is not close to expiration, we don’t revalidate. If the cache is expired, we revalidate. Otherwise, we revalidate based on a probability.
Adaptive cache revalidation
Until now, we assumed the picture of the cat received a stable request rate. However, for a real service, this does not necessarily hold. For instance, if instead of 10 requests per second, imagine the service receives only 1. The expectancy function does not look as good. After 5 minutes (300s), $E(r=1, t=300)=45\%$. On the other hand, if the image service is receiving 10,000 requests per second, $E(r=10000, t = 300) \approx 100\%$, but our server receives on average $10000 \times \frac{1}{500} = 20$ requests per second. It would be ideal to design a probability function that would adapt to the request rate.
That function would return a low probability when expiration time is far in the future, and increase over time such that the cache is revalidated before it expires. It would cap the request rate going to the origin server.
Let’s design the variation of probability $p$ over 5 minutes. When far from the expiration, the probability to revalidate should be low. This should help match the high request rate. For example, with a request rate of 10k requests per second, we would like the revalidation probability $p$ to be $\frac{1}{100000}$. This ensures the request rates seen by our server are going to be low on average, at about 1 request every 10 seconds. As time passes, we increase this probability to allow for revalidation even at a lower request rate.
Time to expiration $t$ (in s)
Revalidation probability $p$
Target request rate $r$ (in rps)
300
1/100000
10000
240
1/10000
1000
180
1/1000
100
120
1/100
10
60
1/10
1
0
1
–
Table 1: Variation of revalidation probability over time
For each of these intervals, there is a high likelihood that a request rate $r$ will trigger a cache revalidation, and low likelihood that a lower request rate will trigger it. If it does, it’s ok.
We can update our revalidation function as follows:
const CACHE_REVALIDATION_INTERVAL_IN_S = 300
const CACHE_REVALIDATION_PROBABILITY_PER_MIN = [1/100_000, 1/10_000, 1/1000, 1/100, 1/10, 1]

function shouldRevalidate(expirationDate) {
  let remainingCacheTimeInS = (expirationDate.getTime() - Date.now()) / 1000

  if (remainingCacheTimeInS > CACHE_REVALIDATION_INTERVAL_IN_S) {
	return false
  }
  if (remainingCacheTimeInS <= 0) {
	return true
  }
  let currentMinute = Math.floor(remainingCacheTimeInS/60)
  return Math.random() < CACHE_REVALIDATION_PROBABILITY_PER_MIN[currentMinute]
}
Codeblock 6: Image server with early-revalidation and a probabilistic cache using piecewise uniform distribution
Optimal cache stampede solution
There seems to be a lot of decisions going on here. To solve this, we can reference an academic paper written by A Vattani, T Chierichetti, and K Lowenstein in 2015 called Optimal Probabilistic Cache Stampede Prevention. If you read it, you’ll recognise that what we have been discussing until now is close to what the paper presents. For instance, both the cache revalidation algorithm structure and the early revalidation function look similar.
Figure 7: Probabilistic early expiration of a cache item as defined by Figure 2 of Optimal Probabilistic Cache Stampede Prevention paper. In our case, $\mathcal{D}=300$
One takeaway from the paper is that instead of discretization, with a probability from 0 to 60s, then from 60s to 120s, …, the probability function can be continuous. Instead of a fixed $p$, there is a function $p(t)$ of time $t$.
$p(t)=e^{-\lambda (expiry-t)}, \text{ with } expiry=300, \text{ and } t \in [0, 300]$
We call $\lambda$ the steepness parameter, and set it to $\frac{1}{300}$, $300$ being our early expiration gap.
The expectancy over time is $E(r, t)=1-e^{-rλt}$. This leads to the expectancy below for various request rates. You can note that when $r=1$, there is not a $100%$ chance that the request will be revalidated before expiry.
Figure 8: Revalidation time $E(t)$ for multiple $r$ with an exponential distribution.
This leads to the final code snippet:
const CACHE_REVALIDATION_INTERVAL_IN_S = 300
const REVALIDATION_STEEPNESS = 1/300

function shouldRevalidate(expirationDate) {
  let remainingCacheTimeInS = (expirationDate.getTime() - Date.now()) / 1000

  if (remainingCacheTimeInS > CACHE_REVALIDATION_INTERVAL_IN_S) {
	return false
  }
  if (remainingCacheTimeInS <= 0) {
	return true
  }
  // p(t) is evaluated here
  return Math.random() < Math.exp(-REVALIDATION_STEEPNESS*(CACHE_REVALIDATION_INTERVAL_IN_S-remainingCacheTimeInS)
}
Codeblock 7: Image server with early-revalidation and a probabilistic cache using exponential distribution
And that’s it. Given Date.now() has a granularity, and is not continuous, it would also be possible to discretise these functions, even though the gains are minimal. This is what we have done in a production worker implementation, where the number of requests is important. It is a service that benefits from caching for performance consideration, and that cannot use built-in stale-while-revalidate from within Cloudflare workers. Probabilistic cache stampede prevention is well-suited here, as no new component has to be built, and it performs well at different request rates.
Conclusion
We have seen how to solve cache stampede without a lock, its implementation, and why it is optimal. In the real world, you likely will not encounter this issue: either because it’s good enough to optimize your origin service to serve more requests, or because you can leverage a CDN cache. In fact, most HTTP caches provide an API that follows Cache Control, and likely have all the tools you need. This primitive is also built into certain products, such as Cloudflare KV.
If you have not done so, you can go and experiment with all the code snippets presented in this blog on the Cloudflare Workers Playground at cloudflareworkers.com.
Chances are good that today you’ve sent a message through an end-to-end encrypted (E2EE) messaging app such as WhatsApp, Signal, or iMessage. While we often take the privacy of these conversations for granted, they in fact rely on decades of research, testing, and standardization efforts, the foundation of which is a public-private key exchange. There is, however, an oft-overlooked implicit trust inherent in this model: that the messaging app infrastructure is distributing the public keys of all of its users correctly.
Here’s an example: if Joe and Alice are messaging each other on WhatsApp, Joe uses Alice’s phone number to retrieve Alice’s public key from the WhatsApp database, and Alice receives Joe’s public key. Their messages are then encrypted using this key exchange, so that no one — even WhatsApp — can see the contents of their messages besides Alice and Joe themselves. However, in the unlikely situation where an attacker, Bob, manages to register a different public key in WhatsApp’s database, Joe would try to message Alice but unknowingly be messaging Bob instead. And while this threat is most salient for journalists, activists, and those most vulnerable to cyber attacks, we believe that protecting the privacy and integrity of end-to-end encrypted conversations is for everyone.
There are several methods that end-to-end encrypted messaging apps have deployed thus far to protect the integrity of public key distribution, the most common of which is to do an in-person verification of the QR code fingerprint of your public key (WhatsApp and Signal both have a version of this). As you can imagine, this experience is inconvenient and unwieldy, especially as your number of contacts and group chats increase.
Over the past few years, there have been significant developments in this area of cryptography, and WhatsApp has paved the way with their Key Transparency announcement. But as an independent third party, Cloudflare can provide stronger reassurance: that’s why we’re excited to announce that we’re now verifying WhatsApp’s Key Transparency audit proofs.
Auditing: the next frontier of encryption
We didn’t build this in a vacuum: similar to how the web and messaging apps became encrypted over time, we see auditing public key infrastructure as the next logical step in securing Internet infrastructure. This solution builds upon learnings from Certificate Transparency and Binary Transparency, which share some of the underlying data structure and cryptographic techniques, and we’re excited about the formation of a working group at the IETF to make multi-party operation of Key Transparency-like systems tractable for a broader set of use cases.
We see our role here as a pioneer of a real world deployment of this auditing infrastructure, working through and sharing the operational challenges of operating a system that is critical for a messaging app used by billions of people around the world.
We’ve also done this before — in 2022, Cloudflare announced Code Verify, a partnership in which we verify that the code delivered in the browser for WhatsApp Web has not been tampered with. When users run WhatsApp in their browser, the WhatsApp Code Verify extension compares a hash of the code that is executing in the browser with the hash that Cloudflare has of the codebase, enabling WhatsApp web users to easily see whether the code that is executing is the code that was publicly committed to.
In Code Verify, Cloudflare builds a non-mutable chain associating the WhatsApp version with the hash of its code.
Cloudflare’s role in Key Transparency is similar in that we are checking that a tree-based directory of public keys (more on this later) has been constructed correctly, and has been done so consistently over time.
How Key Transparency works
The architectural foundation of Key Transparency is the Auditable Key Directory (AKD): a tree-shaped data structure, constructed and maintained by WhatsApp, in which the nodes contain hashed contact details of each user. We’ll explain the basics here but if you’re interested in learning more, check out the SEEMless and Parakeet papers.
The AKD tree is constructed by building a binary tree, each parent node of which is a hash of each of its left and right child nodes:
Each child node on the tree contains contact and public key details for a user (shown here for illustrative purposes). In reality, Cloudflare only sees a hash of each node rather than Alice and Bob’s contact info in plaintext.
An epoch describes a specific version of the tree at a given moment in time, identified by its root node. Using a structure similar to Code Verify, the WhatsApp Log stores each root node hash as part of an append-only time structure of updates.
What kind of changes are valid to be included in a given epoch? When a new person, Brian, joins WhatsApp, WhatsApp inserts a new “B” node in the AKD tree, and a new epoch. If Alice loses her phone and rotates her key, her “version” is updated to v1 in the next update.
How we built the Auditor on Cloudflare Workers
The role of the Auditor is to provide two main guarantees: that epochs are globally unique, and that they are valid. They are, however, quite different: global uniqueness requires consistency on whether an epoch and its associated root hash has been seen, while validity is a matter of computation — is the transition from the previous epoch to the current one a correct tree transformation?
Timestamping service
Timestamping service architecture (Cloudflare Workers in Rust, using a Durable Object for storage)
At regular intervals, the WhatsApp Log puts all new updates into the tree, and cuts a new epoch in the format “{counter}/{previous}/{current}”. The counter is a number, whereby “previous” is a hexadecimal encoded hash of the previous tree root, and “current” is a hexadecimal encoded hash for the new tree root. As a shorthand, epochs can be referred to by their counter only.
Once an epoch is constructed, the WhatsApp Log sends it to the Auditor for cross-signing, to ensure it has only been seen once. The Auditor adds a timestamp as to when this new epoch has been seen. Cloudflare’s Auditor uses a Durable Object for every epoch to create their timestamp. This guarantees the global uniqueness of an epoch, and the possibility of replay in the event the WhatsApp Log experiences an outage or is distributed across multiple locations. WhatsApp’s Log is expected to produce new epochs at regular intervals, given this constrains the propagation of public key updates seen by their users. Therefore, Cloudflare Auditor does not have to keep the durable object state forever. Once replay and consistency have been accounted for, this state is cleared. This is done after a month, thanks to durable object alarms.
Additional checks are performed by the service, such as checking that the epochs are consecutive, or that their digest is unique. This enforces a chain of epochs and their associated digests, provided by the WhatsApp Log and signed by the Auditor, providing a consistent view for all to see.
We decided to write this service in Rust because Workers rely on cloudflare/workers-rs bindings, and the auditable key directory library is also in Rust (facebook/akd).
Tree validation service
With the timestamping service above, WhatsApp users (as well as their Log) have assurance that epochs are transparent. WhatsApp’s directory can be audited at any point in time, and if it were to be tampered with by WhatsApp or an intermediary, the WhatsApp Log can be held accountable for it.
Epochs and their digests are only representations of their underlying key directory. To fully audit the directory, the transition from the previous digest to a current digest has to be validated. To perform validation, we need to run the epoch validation method. Specifically, we want to run verify_consecutive_append_only on every epoch constructed by the Log. The size of an epoch varies with the number of updates it contains, and therefore the number of associated nodes in the tree to construct as well. While Workers are able to run such validation for a small number of updates, this is a compute-intensive task. Therefore, still leveraging the same Rust codebase, the Auditor leverages a container that only performs the tree construction and validation. The Auditor retrieves the updates for a given epoch, copies them into its own R2 bucket, and delegates the validation to a container running on Cloudflare. Once validated, the epoch is marked as verified.
Architecture for Cloudflare’s Plexi Auditor. The proof verification and signatures stored do not contain personally identifiable information such as your phone number, public key, or other metadata tied to your WhatsApp account.
This decouples global uniqueness requirements and epoch validation, which happens at two distinct times. It allows the validation to take more time, and not be latency sensitive.
How can I verify Cloudflare has signed an epoch?
Anyone can perform audit proof verification — the proofs are publicly available — but Cloudflare will be doing so automatically and publicly to make the results accessible to all. Verify that Cloudflare’s signature matches WhatsApp’s by visiting our Key Transparency website, or via our command line tool.
To use our command line tool, you’ll need to download the plexi client. It helps construct data structures which are used for signatures, and requires you to have git and cargo installed.
cargo install plexi
With the client installed, let’s now check the audit proofs for WhatsApp namespace: whatsapp.key-transparency.v1. Plexi Auditor is represented by one public key, which can verify and vouch for multiple Logs with their own dedicated “namespace.” To validate an epoch, such as epoch 458298 (the epoch at which the log decided to start sharing data), you can run the following command:
Interested in having Cloudflare audit your public key infrastructure?
At the end of the day, security threats shouldn’t become usability problems — everyday messaging app users shouldn’t have to worry about whether the public keys of the people they’re talking to have been compromised. In the same way that certificate transparency is now built into the issuance and use of digital certificates to encrypt web traffic, we think that public key transparency and auditing should be built into end-to-end encrypted systems by default, so that users never have to do manual QR code verification again.
We built our auditing service to be general purpose, reliable, and fast, and WhatsApp’s Key Transparency is just the first of several use cases it will be used for – Cloudflare is interested in helping audit the delivery of code binaries and integrity of all types of end-to-end encrypted infrastructure. If your company or organization is interested in working with us, you can reach out to us here.
Four years ago, Cloudflare went Interplanetary by offering a gateway to the IPFS network. This meant that if you hosted content on IPFS, we offered to make it available to every user of the Internet through HTTPS and with Cloudflare protection. IPFS allows you to choose a storage provider you are comfortable with, while providing a standard interface for Cloudflare to serve this data.
Since then, businesses have new tools to streamline web development. Cloudflare Workers, Pages, and R2 are enabling developers to bring services online in a matter of minutes, with built-in scaling, security, and analytics.
Today, we’re announcing we’re bridging the two. We will make it possible for our customers to serve their sites on the IPFS network.
In this post, we’ll learn how you will be able to build your website with Cloudflare Pages, and leverage the IPFS integration to make your content accessible and available across multiple providers.
A primer on IPFS
The InterPlanetary FileSystem (IPFS) is a peer-to-peer network for storing content on a distributed file system. It is composed of a set of computers called nodes that store and relay content using a common addressing system. In short, a set of participants agree to maintain a shared index of content the network can provide, and where to find it.
Let’s take two random participants in the network: Alice, a cat person, and Bob, a dog person.
As a participant in the network, Alice keeps connections with a subset of participants, referred to as her peers. When Alice is making her content 🐱 available on IPFS, it means she announces to her peers she has content 🐱, and these peers stored in their routing table 🐱 is provided by Alice’s node.
Each node has a routing table, and a datastore. The routing table retains a mapping of content to peers, and the datastore retains the content a given node stores. In the above case, only Alice has content, a 🐱.
When Bob wants to retrieve 🐱, he tells his peers they want 🐱. These peers point him to Alice. Alice then provides 🐱 to Bob. Bob can verify 🐱 is the content they were looking for, because the content identifier he requested is derived from the 🐱 content itself, using a secure, cryptographic hash function.
Even better, if Bob becomes a cat person, they can announce to their peers they are also providing a cat. Bob’s love for cats could be genuine, or because they have interest in providing the content, such as a contract with Alice. IPFS provides a common ground to share content, without being opinionated on how this content has to be stored and its guarantees.
How Pages websites are made available on IPFS
Content is made available as follows.
The components are:
Pages storage: Storage solution for Cloudflare Pages.
IPFS Index Proxy: Service maintaining a map between IPFS CID and location of the data. This is operated on Cloudflare Workers and using Workers KV to store the mapping.
IPFS node: Cloudflare-hosted IPFS node serving Pages content. It has an in-house datastore module, able to communicate with the IPFS Index Proxy.
IPFS network: The rest of the IPFS network.
When you opt in serving your Cloudflare Page on IPFS, a call is made to the IPFS index proxy. This call first fetches your Pages content, transforms it into a CID, then both populates IndexDB to associate the CID with the content and reaches out to Cloudflare IPFS node to tell them they are able to provide the CID.
For example, imagine your website structure is as follows:
/
index.html
static/
cats.txt
beautiful_cats.txt
To provide this website on IPFS, Cloudflare has to compute a CID for /. CIDs are built recursively. To compute the CID for a given folder /, one needs to have the CID of index.html and static/. index.html CID is derived from its binary representation, and static/ from cats.txt and beautiful_cats.txt.
This works similarly to a Merkle tree, except nodes can reference each other as long as they still form a Directed Acyclic Graph (DAG). This structure is therefore referred to as a MerkleDAG.
In our example, it’s not unlikely for cats.txt and beautiful_cats.txt to have data in common. In this case, Cloudflare can be smart in the way it builds the MerkleDAG.
This reduces the storage and bandwidth requirement when accessing the website on IPFS.
If you want to learn more about how you can model a file system on IPFS, you can check the UnixFS specification.
Cloudflare stores every CID and the content it references in IndexDB. This allows Cloudflare IPFS nodes to serve Cloudflare Pages assets when requested.
Let’s put this together
Let’s take an example: pages-on-ipfs.com is hosted on IPFS. It is built using Hugo, a static site generator, and Cloudflare Pages with the public documentation template. Its source is available on GitHub. If you have an IPFS compatible client, you can access it at ipns://pages-on-ipfs.com as well.
1. Read Cloudflare Pages deployment documentation
For the purpose of this blog, I want to create a simple Cloudflare page website. I have experience with Hugo, so I choose it as my framework for the project.
This is where I use Hugo, and your configuration might differ. In short, I use hugo new site pages-on-ipfs, create an index and two static resources, et voilà. The result is available on the source GitHub for this project.
3. Deploy using Cloudflare Pages
On the Cloudflare Dashboard, I go to Account Home > Pages > Create a project. I select the GitHub repository I created, and configure the build tool to build Hugo website. Basically, I follow what’s written on Cloudflare Pages documentation.
Upon clicking Save and Deploy, my website is deployed on pages-on-ipfs.pages.dev. I also configure it to be available at pages-on-ipfs.com
4. Serve my content on IPFS
First, I opt in my zone on Cloudflare Pages integration with IPFS. This feature is not available yet for everyone to try out.
This allows Cloudflare to index the content of my website. Once indexed, I get the CID for my deployment baf…1. I can check that my content is available at this hash on IPFS using an IPFS gateway https://baf…1.ipfs.cf-ipfs.com/.
5. Make my IPFS website available at pages-on-ipfs.com
Having one domain name to access both Cloudflare Pages and IPFS version, depending on if the client supports IPFS or not is ideal. Fortunately, the IPFS ecosystem supports such a feature via DNSLink. DNSLink is a way to specify the IPFS content a domain is associated with.
For pages-on-ipfs.com, I create a TXT record on _dnslink.pages-on-ipfs.com with value dnslink=/ipfs/baf…1. Et voilà. I can now access ipns://pages-on-ipfs.com via an IPFS client.
6. (Optional) Replicate my website
The content of my website can now easily be replicated and pinned by other IPFS nodes. This can either be done at home via an IPFS client or using a pinning service such as Pinata.
What’s next
We’ll make this service available later this year as it is being refined. We are committed to make information move freely and help build a better Internet. Cloudflare Pages work of solving developer problems continues, as developers are now able to make their site accessible to more users.
Over the years, IPFS has been used by more and more people. While Cloudflare started by making IPFS content available to web users through an HTTP interface, we now think it’s time to give back. Allowing Cloudflare assets to be served over a public distributed network extends developers and users capability on an open web.
Common questions
I am already hosting my website on IPFS. Can I pin it using Cloudflare?
No. This project aims at serving Cloudflare hosted content via IPFS. We are still investigating how to best replicate and re-provide already-existing IPFS content via Cloudflare infrastructure.
Does this make IPFS more centralized?
No. Cloudflare does not have the authority to decide who can be a node operator nor what content they provide.
Are there guarantees the content is going to be available?
Yes. As long as you choose Cloudflare to host your website on IPFS, it will be available on IPFS. Should you move to another provider, it would be your responsibility to make sure the content remains available. IPFS allows for this transition to be smooth using a pinning service.
Is IPFS private?
It depends. Generally, no. IPFS is a p2p protocol. The nodes you peer with and request content from would know the content you are looking for. The privacy depends on the trust you have in your peers to not snoop on the data you request.
Can users verify the integrity of my website?
Yes. They need to access your website through an IPFS compatible client. Ideally, IPFS content integrity is turned into a web standard, similar to subresource integrity.
By reading this, you are a participant of the web. It’s amazing that we can write this blog and have it appear to you without operating a server or writing a line of code. In general, the web of today empowers us to participate more than we could at any point in the past.
Last year, we mentioned the next phase of the Internet would be always on, always secure, always private. Today, we dig into a similar trend for the web, referred to as Web3. In this blog we’ll start to explain Web3 in the context of the web’s evolution, and how Cloudflare might help to support it.
Going from Web 1.0 to Web 2.0
When Sir Tim Berners-Lee wrote his seminal 1989 document “Information Management: A Proposal”, he outlined a vision of the “web” as a network of information systems interconnected via hypertext links. It is often assimilated to the Internet, which is the computer network it operates on. Key practical requirements for this web included being able to access the network in a decentralized manner through remote machines and allowing systems to be linked together without requiring any central control or coordination.
The original proposal for what we know as the web, fitting in one diagram – Source: w3
This vision materialized into an initial version of the web that was composed of interconnected static resources delivered via a distributed network of servers and accessed primarily on a read-only basis from the client side — “Web 1.0”. Usage of the web soared with the number of websites growing well over 1,000% in the ~2 years following the introduction of the Mosaic graphical browser in 1993, based on data from the World Wide Web Wanderer.
The early 2000s marked an inflection point in the growth of the web and a key period of its development, as technology companies that survived the dot-com crash evolved to deliver value to customers in new ways amidst heightened skepticism around the web:
Desktop browsers like Netscape became commoditized and paved the way for native web services for discovering content like search engines.
Network effects that were initially driven by hyperlinks in web directories like Yahoo! were hyperscaled by platforms that enabled user engagement and harnessed collective intelligence like review sites.
The massive volume of data generated by Internet activity and the growing realization of its competitive value forced companies to become experts at database management.
O’Reilly Media coined the concept of Web 2.0 in an attempt to capture such shifts in design principles, which were transformative to the usability and interactiveness of the web and continue to be core building blocks for Internet companies nearly two decades later.
However, in the midst of the web 2.0 transformation, the web fell out of touch with one of its initial core tenets — decentralization.
Decentralization: No permission is needed from a central authority to post anything on the web, there is no central controlling node, and so no single point of failure … and no “kill switch”! — History of the web by Web Foundation
A new paradigm for the Internet
This is where Web3 comes in. The last two decades have proven that building a scalable system that decentralizes content is a challenge. While the technology to build such systems exists, no content platform achieves decentralization at scale.
There is one notable exception: Bitcoin. Bitcoin was conceptualized in a 2008 whitepaper by Satoshi Nakamoto as a type of distributed ledger known as a blockchain designed so that a peer-to-peer (P2P) network could transact in a public, consistent, and tamper-proof manner.
That’s a lot said in one sentence. Let’s break it down by term:
A peer-to-peer network is a network architecture. It consists of a set of computers, called nodes, that store and relay information. Each node is equally privileged, preventing one node from becoming a single point of failure. In the Bitcoin case, nodes can send, receive, and process Bitcoin transactions.
A ledger is a collection of accounts in which transactions are recorded. For Bitcoin, the ledger records Bitcoin transactions.
A distributed ledger is a ledger that is shared and synchronized among multiple computers. This happens through a consensus, so each computer holds a similar replica of the ledger. With Bitcoin, the consensus process is performed over a P2P network, the Bitcoin network.
A blockchain is a type of distributed ledger that stores data in “blocks” that are cryptographically linked together into an immutable chain that preserves their chronological order. Bitcoin leverages blockchain technology to establish a shared, single source of truth of transactions and the sequence in which they occurred, thereby mitigating the double-spending problem.
Bitcoin — which currently has over 40,000 nodes in its network and processes over $30B in transactions each day — demonstrates that an application can be run in a distributed manner at scale, without compromising security. It inspired the development of other blockchain projects such as Ethereum which, in addition to transactions, allows participants to deploy code that can verifiably run on each of its nodes.
Today, these programmable blockchains are seen as ideal open and trustless platforms to serve as the infrastructure of a distributed Internet. They are home to a rich and growing ecosystem of nearly 7,000 decentralized applications (“Dapps”) that do not rely on any single entity to be available. This provides them with greater flexibility on how to best serve their users in all jurisdictions.
The web is for the end user
Distributed systems are inherently different from centralized systems. They should not be thought about in the same way. Distributed systems enable the data and its processing to not be held by a single party. This is useful for companies to provide resilience, but it’s also useful for P2P-based networks where data can stay in the hands of the participants.
For instance, if you were to host a blog the old-fashioned way, you would put up a server, expose it to the Internet (via Cloudflare 😀), et voilà. Nowadays, your blog would be hosted on a platform like WordPress, Ghost, Notions, or even Twitter. If these companies were to have an outage, this affects a lot more people. In a distributed fashion, via IPFS for instance, your blog content can be hosted and served from multiple locations operated by different entities.
Web 1.0Web 2.0Web3
Each participant in the network can choose what they host/provide and can be home to different content. Similar to your home network, you are in control of what you share, and you don’t share everything.
This is a core tenet of decentralized identity. The same cryptographic principles underpinning cryptocurrencies like Bitcoin and Ethereum are being leveraged by applications to provide secure, cross-platform identity services. This is fundamentally different from other authentication systems such as OAuth 2.0, where a trusted party has to be reached to assess one’s identity. This materializes in the form of “Login with <Big Cloud provider>” buttons. These cloud providers are the only ones with enough data, resources, and technical expertise.
In a decentralised web, each participant holds a secret key. They can then use it to identify each other. You can learn about this cryptographic system in a previous blog. In a Web3 setting where web participants own their data, they can selectively share these data with applications they interact with. Participants can also leverage this system to prove interactions they had with one another. For example, if a college issues you a Decentralized Identifier (DID), you can later prove you have been registered at this college without reaching out to the college again. Decentralized Identities can also serve as a placeholder for a public profile, where participants agree to use a blockchain as a source of trust. This is what projects such as ENS or Unlock aim to provide: a way to verify your identity online based on your control over a public key.
This trend of proving ownership via a shared source of trust is key to the NFT craze. We have discussed NFTs before on this blog. Blockchain-based NFTs are a medium of conveying ownership. Blockchain enables this information to be publicly verified and updated. If the blockchain states a public key I control is the owner of an NFT, I can refer to it on other platforms to prove ownership of it. For instance, if my profile picture on social media is a cat, I can prove the said cat is associated with my public key. What this means depends on what I want to prove, especially with the proliferation of NFT contracts. If you want to understand how an NFT contract works, you can build your own.
How does Cloudflare fit in Web3?
Decentralization and privacy are challenges we are tackling at Cloudflare as part of our mission to help build a better Internet.
In a previous post, Nick Sullivan described Cloudflare’s contributions to enabling privacy on the web. We launched initiatives to fix information leaks in HTTPS through Encrypted Client Hello (ECH), make DNS even more private by supporting Oblivious DNS-over-HTTPS (ODoH), and develop OPAQUE which makes password breaches less likely to occur. We have also released our data localization suite to help businesses navigate the ever evolving regulatory landscape by giving them control over where their data is stored without compromising performance and security. We’ve even built a privacy-preserving attestation that is based on the same zero-knowledge proof techniques that are core to distributed systems such as ZCash and Filecoin.
It’s exciting to think that there are already ways we can change the web to improve the experience for its users. However, there are some limitations to build on top of the exciting infrastructure. This is why projects such as Ethereum and IPFS build on their own architecture. They are still relying on the Internet but do not operate with the web as we know it. To ease the transition, Cloudflare operates distributed web gateways. These gateways provide an HTTP interface to Web3 protocols: Ethereum and IPFS. Since HTTP is core to the web we know today, distributed content can be accessed securely and easily without requiring the user to operate experimental software.
Where do we go next?
The journey to a different web is long but exciting. The infrastructure built over the last two decades is truly stunning. The Internet and the web are now part of 4.6 billion people’s lives. At the same time, the top 35 websites had more visits than all others (circa 2014). Users have less control over their data and are even more reliant on a few players.
The early Web was static. Then Web 2.0 came to provide interactiveness and service we use daily at the cost of centralisation. Web3 is a trend that tries to challenge this. With distributed networks built on open protocols, users of the web are empowered to participate.
At Cloudflare, we are embracing this distributed future. Applying the knowledge and experience we have gained from running one of the largest edge networks, we are making it easier for users and businesses to benefit from Web3. This includes operating a distributed web product suite, contributing to open standards, and moving privacy forward.
If you would like to help build a better web with us, we are hiring.
Cloudflare’s journey with IPFS started in 2018 when we announced a public gateway for the distributed web. Since then, the number of infrastructure providers for the InterPlanetary FileSystem (IPFS) has grown and matured substantially. This is a huge benefit for users and application developers as they have the ability to choose their infrastructure providers.
Today, we’re excited to announce new secure filtering capabilities in IPFS. The Cloudflare IPFS module is a tool to protect users from threats like phishing and ransomware. We believe that other participants in the network should have the same ability. We are releasing that software as open source, for the benefit of the entire community.
Before we get to understand how IPFS filtering works, we need to dive a little deeper into the operation of an IPFS node.
The InterPlanetary FileSystem (IPFS) is a peer-to-peer network for storing content on a distributed file system. It is composed of a set of computers called nodes that store and relay content using a common addressing system.
Nodes communicate with each other over the Internet using a Peer-to-Peer (P2P) architecture, preventing one node from becoming a single point of failure. This is even more true given that anyone can operate a node with limited resources. This can be light hardware such as a Raspberry Pi, a server at a cloud provider, or even your web browser.
This creates a challenge since not all nodes may support the same protocols, and networks may block some types of connections. For instance, your web browser does not expose a TCP API and your home router likely doesn’t allow inbound connections. This is where libp2p comes to help.
libp2p is a modular system of protocols, specifications, and libraries that enable the development of peer-to-peer network applications – libp2p documentation
That’s exactly what four IPFS nodes need to connect to the IPFS network. From a node point of view, the architecture is the following:
Any node that we maintain a connection with is a peer. A peer that does not have 🐱 content can ask their peers, including you, they WANT🐱. If you do have it, you will provide the 🐱 to them. If you don’t have it, you can give them information about the network to help them find someone who might have it. As each node chooses the resources they store, it means some might be stored on a limited number of nodes.
For instance, everyone likes 🐱, so many nodes will dedicate resources to store it. However, 🐶 is less popular. Therefore, only a few nodes will provide it.
This assumption does not hold for public gateways like Cloudflare. A gateway is an HTTP interface to an IPFS node. On our gateway, we allow a user of the Internet to retrieve arbitrary content from IPFS. If a user asks for 🐱, we provide 🐱. If they ask for 🐶, we’ll find 🐶 for them.
Cloudflare’s IPFS gateway is simply a cache in front of IPFS. Cloudflare does not have the ability to modify or remove content from the IPFS network. However, IPFS is a decentralized and open network, so there is the possibility of users sharing threats like phishing or malware. This is content we do not want to provide to the P2P network or to our HTTP users.
In the next section, we describe how an IPFS node can protect its users from such threats.
If you would like to learn more about the inner workings of libp2p, you can go to ProtoSchool which has a great tutorial about it.
How IPFS filtering works
As we described earlier, an IPFS node provides content in two ways: to its peers through the IPFS P2P network and to its users via an HTTP gateway.
Filtering content of the HTTP interface is no different from the current protection Cloudflare already has in place. If 🐶 is considered malicious and is available at cloudflare-ipfs.com/ipfs/🐶, we can filter these requests, so the end user is kept safe.
The P2P layer is different. We cannot filter URLs because that’s not how the content is requested. IPFS is content-addressed. This means that instead of asking for a specific location such as cloudflare-ipfs.com/ipfs/🐶, peers request the content directly using its Content IDentifiers (CID), 🐶.
More precisely, 🐶 is an abstraction of the content address. A CID looks like QmXnnyufdzAWL5CqZ2RnSNgPbvCc1ALT73s6epPrRnZ1Xy (QmXnnyufdzAWL5CqZ2RnSNgPbvCc1ALT73s6epPrRnZ1Xy happens to be the hash of a .txt file containing the string “I’m trying out IPFS”). CID is a convenient way to refer to content in a cryptographically verifiable manner.
This is great, because it means that when peers ask for malicious 🐶 content, we can prevent our node from serving it. This includes both the P2P layer and the HTTP gateway.
In addition, the working of IPFS makes it, so content can easily be reused. On directories for instance, the address is a CID based on the CID of its files. This way, a file can be shared across multiple directories, and still be referred to by the same CID. It allows IPFS nodes to efficiently store content without duplicating it. This can be used to share docker container layers for example.
In the filtering use case, it means that if 🐶 content is included in other IPFS content, our node can also prevent content linking to malicious 🐶 content from being served. This results in 😿, a mix of valid and malicious content.
By now, you should have an understanding of how an IPFS node retrieves and provides content, as well as how we can protect peers and users from shared nodes accessing threats. Using this knowledge, Cloudflare went on to implement IPFS Safemode, a node protection layer on top of go-ipfs. It is up to every node operator to build their own list of threats to be blocked based on their policy.
Et voilà. You are ready to use your IPFS node, with safemode capabilities.
# alias ipfs command to make it easier to use
alias ipfs=’./cmd/ipfs/ipfs’
# run an ipfs daemon
ipfs daemon &
# understand how to use IPFS safemode
ipfs safemode --help
USAGE
ipfs safemode - Interact with IPFS Safemode to prevent certain CIDs from being provided.
...
Going further
IPFS nodes are running in a diverse set of environments and operated by parties at various scales. The same software has to accommodate configuration in which it is accessed by a single-user, and others where it is shared by thousands of participants.
At Cloudflare, we believe that decentralization is going to be the next major step for content networks, but there is still work to be done to get these technologies in the hands of everyone. Content filtering is part of this story. If the community aims at embedding a P2P node in every computer, there needs to be ways to prevent nodes from serving harmful content. Users need to be able to give consent on the content they are willing to serve, and the one they aren’t.
By providing an IPFS safemode tool, we hope to make this protection more widely available.
The Domain Name System (DNS) matches names to resources. Instead of typing 104.18.26.46 to access the Cloudflare Blog, you type blog.cloudflare.com and, using DNS, the domain name resolves to 104.18.26.46, the Cloudflare Blog IP address.
Similarly, distributed systems such as Ethereum and IPFS rely on a naming system to be usable. DNS could be used, but its resolvers’ attributes run contrary to properties valued in distributed Web (dWeb) systems. Namely, dWeb resolvers ideally provide (i) locally verifiable data, (ii) built-in history, and (iii) have no single trust anchor.
At Cloudflare Research, we have been exploring alternative ways to resolve queries to responses that align with these attributes. We are proud to announce a new resolver for the Distributed Web, where IPFS content indexed by the Ethereum Name Service (ENS) can be accessed.
To discover how it has been built, and how you can use it today, read on.
Welcome to the Distributed Web
IPFS and its addressing system
The InterPlanetary FileSystem (IPFS) is a peer-to-peer network for storing content on a distributed file system. It is composed of a set of computers called nodes that store and relay content using a common addressing system.
This addressing system relies on the use of Content IDentifiers (CID). CIDs are self-describing identifiers, because the identifier is derived from the content itself. For example, QmXoypizjW3WknFiJnKLwHCnL72vedxjQkDDP1mXWo6uco is the CID version 0 (CIDv0) of the wikipedia-on ipfs homepage.
To understand why a CID is defined as self-describing, we can look at its binary representation. For QmXoypizjW3WknFiJnKLwHCnL72vedxjQkDDP1mXWo6uco, the CID looks like the following:
The first is the algorithm used to generate the CID (sha2-256 in this case); then comes the length of the encoded content (32 for a sha2-256 hash), and finally the content itself. When referring to the multicodec table, it is possible to understand how the content is encoded.
Name
Code (in hexadecimal)
identity
0x00
sha1
0x11
sha2-256
0x12 = 00010010
keccak-256
0x1b
This encoding mechanism is useful, because it creates a unique and upgradable content-addressing system across multiple protocols.
Ethereum is an account-based blockchain with smart contract capabilities. Being account-based, each account is associated with addresses and these can be modified by operations grouped in blocks and sealed by Ethereum’s consensus algorithm, Proof-of-Work.
There are two categories of accounts: user accounts and contract accounts. User accounts are controlled by a private key, which is used to sign transactions from the account. Contract accounts hold bytecode, which is executed by the network when a transaction is sent to their account. A transaction can include both funds and data, allowing for rich interaction between accounts.
When a transaction is created, it gets verified by each node on the network. For a transaction between two user accounts, the verification consists of checking the origin account signature. When the transaction is between a user and a smart contract, every node runs the smart contract bytecode on the Ethereum Virtual Machine (EVM). Therefore, all nodes perform the same suite of operations and end up in the same state. If one actor is malicious, nodes will not add its contribution. Since nodes have diverse ownership, they have an incentive to not cheat.
How to access IPFS content
As you may have noticed, while a CID describes a piece of content, it doesn’t describe where to find it. In fact, the CID describes the content, but not its location on the network. The location of the file would be retrieved by a query made to an IPFS node.
An IPFS URL (Unified Resource Locator) looks like this: ipfs://QmXoypizjW3WknFiJnKLwHCnL72vedxjQkDDP1mXWo6uco. Accessing this URL means retrieving QmXoypizjW3WknFiJnKLwHCnL72vedxjQkDDP1mXWo6uco using the IPFS protocol, denoted by ipfs://. However, typing such a URL is quite error-prone. Also, these URLs are not very human-friendly, because there is no good way to remember such long strings. To get around this issue, you can use DNSLink. DNSLink is a way of specifying IPFS CIDs within a DNS TXT record. For instance, wikipedia on ipfs has the following TXT record
In addition, its A record points to an IPFS gateway. This means that, when you access en.wikipedia-on-ipfs.org, your request is directed to an IPFS HTTP Gateway, which then looks out for the CID using your domain TXT record, and returns the content associated to this CID using the IPFS network.
This is trading ease-of-access against security. The web browser of the user doesn’t verify the integrity of the content served. This could be because the browser does not implement IPFS or because it has no way of validating domain signature — DNSSEC. We wrote about this issue in our previous blog post on End-to-End Integrity.
Human readable identifiers
DNS simplifies referring to IP addresses, in the same way that postal addresses are a way of referring to geolocation data, and contacts in your mobile phone abstract phone numbers. All these systems provide a human-readable format and reduce the error rate of an operation.
To verify these data, the trusted anchors, or “sources of truth”, are:
The government registry for postal addresses. In the UK, addresses are handled by cities, boroughs and local councils.
When it comes to your contacts, you are the trust anchor.
Ethereum Name Service, an index for the Distributed Web
An account is identified by its address. An address starts with “0x” and is followed by 20 bytes (ref 4.1 Ethereum yellow paper), for example: 0xf10326c1c6884b094e03d616cc8c7b920e3f73e0. This is not very readable, and can be pretty scary when transactions are not reversible and one can easily mistype a single character.
A first mitigation strategy was to introduce a new notation to capitalise some letters based on the hash of the address 0xF10326C1c6884b094E03d616Cc8c7b920E3F73E0. This can help detect mistype, but it is still not readable. If I have to send a transaction to a friend, I have no way of confirming she hasn’t mistyped the address.
The Ethereum Name Service (ENS) was created to tackle this issue. It is a system capable of turning human-readable names, referred to as domains, to blockchain addresses. For instance, the domain privacy-pass.eth points to the Ethereum address 0xF10326C1c6884b094E03d616Cc8c7b920E3F73E0.
To achieve this, the system is organised in two components, registries and resolvers.
A registry is a smart contract that maintains a list of domains and some information about each domain: the domain owner and the domain resolver. The owner is the account allowed to manage the domain. They can create subdomains and change ownership of their domain, as well as modify the resolver associated with their domain.
Resolvers are responsible for keeping records. For instance, Public Resolver is a smart contract capable of associating not only a name to blockchain addresses, but also a name to an IPFS content identifier. The resolver address is stored in a registry. Users then contact the registry to retrieve the resolver associated with the name.
Consider a user, Alice, who has direct access to the Ethereum state. The flow goes as follows: Alice would like to get Privacy Pass’s Ethereum address, for which the domain is privacy-pass.eth. She looks for privacy-pass.eth in the ENS Registry and figures out the resolver for privacy-pass.eth is at 0x1234… . She now looks for the address of privacy-pass.eth at the resolver address, which turns out to be 0xf10326c….
Accessing the IPFS content identifier for privacy-pass.eth works in a similar way. The resolver is the same, only the accessed data is different — Alice calls a different method from the smart contract.
Cloudflare Distributed Web Resolver
The goal was to be able to use this new way of indexing IPFS content directly from your web browser. However, accessing the ENS registry requires access to the Ethereum state. To get access to IPFS, you would also need to access the IPFS network.
To tackle this, we are going to use Cloudflare’s Distributed Web Gateway. Cloudflare operates both an Ethereum Gateway and an IPFS Gateway, respectively available at cloudflare-eth.com and cloudflare-ipfs.com.
EthLink
The first version of EthLink was built by Jim McDonald and is operated by True Name LTD at eth.link. Starting from next week, eth.link will transition to use the Cloudflare Distributed Web Resolver. To that end, we have built EthLink on top of Cloudflare Workers. This is a proxy to IPFS. It proxies all ENS registered domains when .link is appended. For instance, privacy-pass.eth should render the Privacy Pass homepage. From your web browser, https://privacy-pass.eth.link does it.
The resolution is done at the Cloudflare edge using a Cloudflare Worker. Cloudflare Workers allows JavaScript code to be run on Cloudflare infrastructure, eliminating the need to maintain a server and increasing the reliability of the service. In addition, it follows Service Workers API, so results returned from the resolver can be checked by end users if needed.
To do this, we setup a wildcard DNS record for *.eth.link to be proxied through Cloudflare and handled by a Cloudflare Worker. When a user Alice accesses privacy-pass.eth.link, the worker first gets the CID of the CID to be retrieved from Ethereum. Then, it requests the content matching this CID to IPFS, and returns it to Alice.
All parts can be run locally. The worker can be run in a service Worker, and the Ethereum Gateway can point to both a local Ethereum node and the IPFS gateway provided by IPFS Companion. It means that while Cloudflare provides resolution-as-a-service, none of the components has to be trusted.
Final notes
So are we distributed yet? No, but we are getting closer, building bridges between emerging technologies and current web infrastructure. By providing a gateway dedicated to the distributed web, we hope to make these services more accessible to everyone.
We thank the ENS team for their support of a new resolver on expanding the distributed web. The ENS team has been running a similar service at https://eth.link. On January 18th, they will switch https://eth.link to using our new service.
These services benefit from the added speed and security of the Cloudflare Worker platform, while paving the way to run distributed protocols in browsers.
The collective thoughts of the interwebz
Manage Consent
To provide the best experiences, we use technologies like cookies to store and/or access device information. Consenting to these technologies will allow us to process data such as browsing behavior or unique IDs on this site. Not consenting or withdrawing consent, may adversely affect certain features and functions.
Functional
Always active
The technical storage or access is strictly necessary for the legitimate purpose of enabling the use of a specific service explicitly requested by the subscriber or user, or for the sole purpose of carrying out the transmission of a communication over an electronic communications network.
Preferences
The technical storage or access is necessary for the legitimate purpose of storing preferences that are not requested by the subscriber or user.
Statistics
The technical storage or access that is used exclusively for statistical purposes.The technical storage or access that is used exclusively for anonymous statistical purposes. Without a subpoena, voluntary compliance on the part of your Internet Service Provider, or additional records from a third party, information stored or retrieved for this purpose alone cannot usually be used to identify you.
Marketing
The technical storage or access is required to create user profiles to send advertising, or to track the user on a website or across several websites for similar marketing purposes.


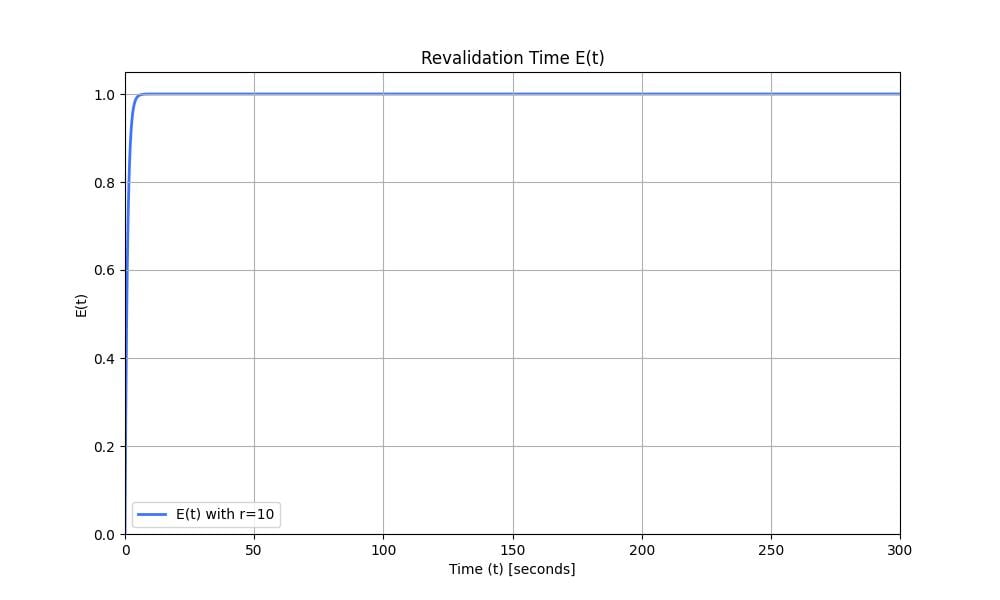
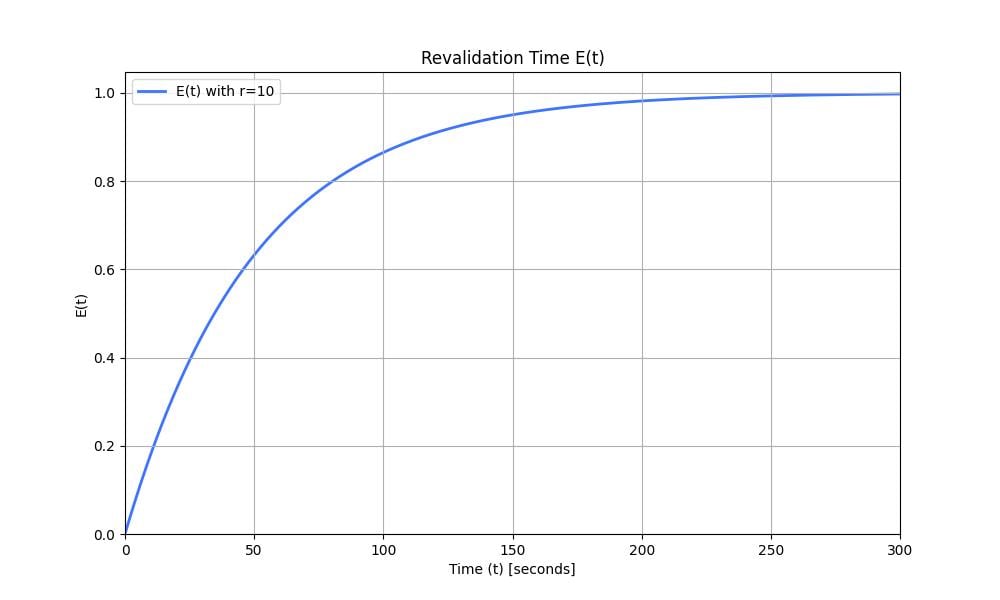
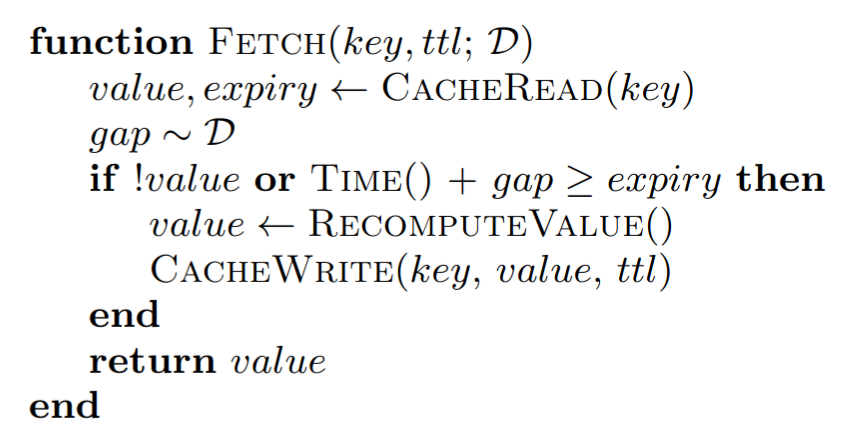
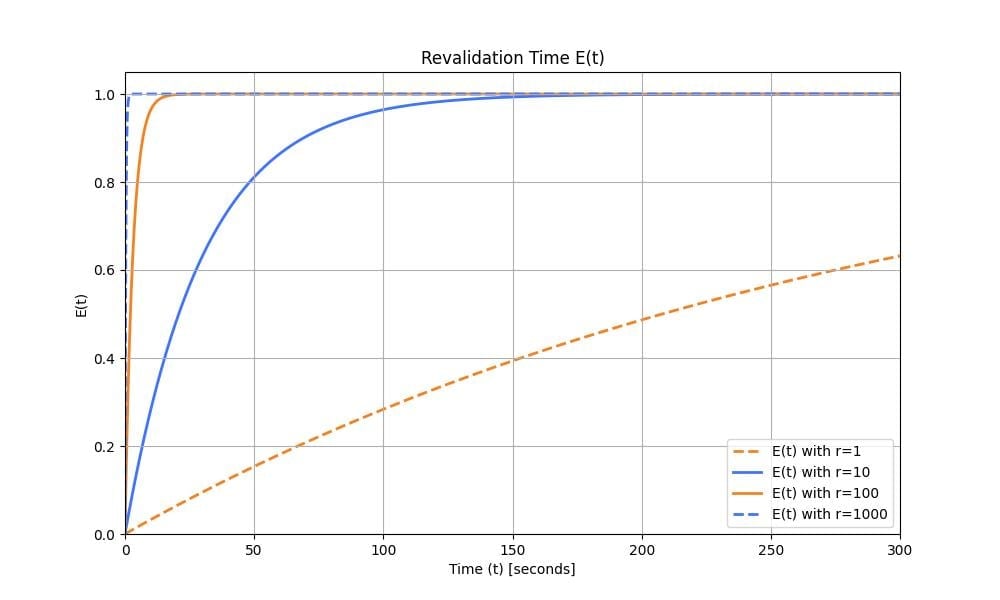
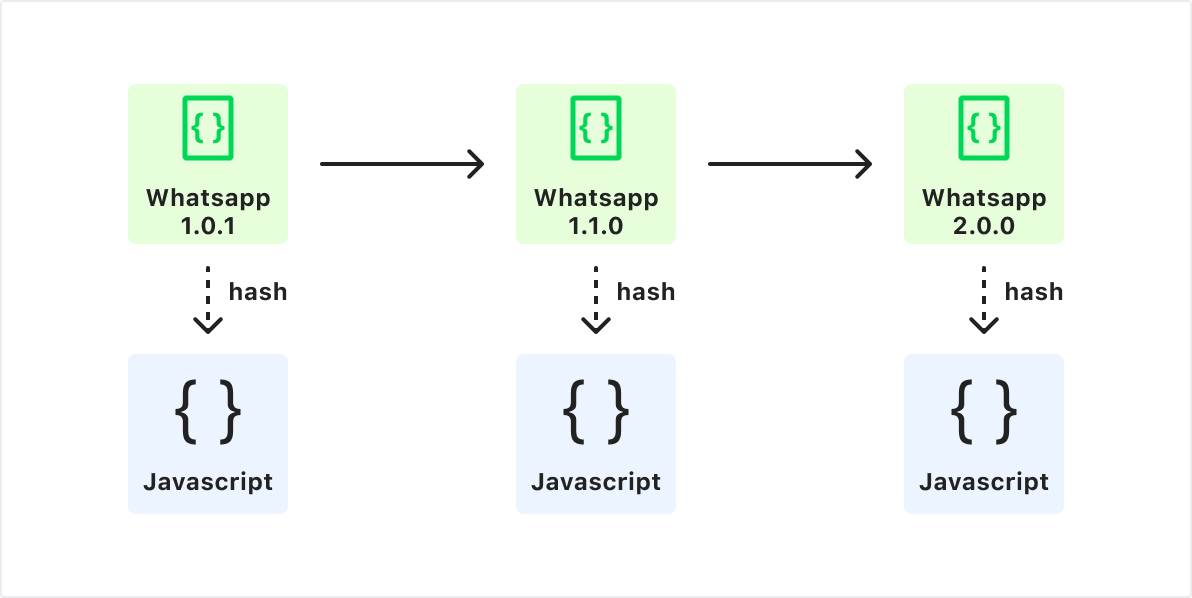
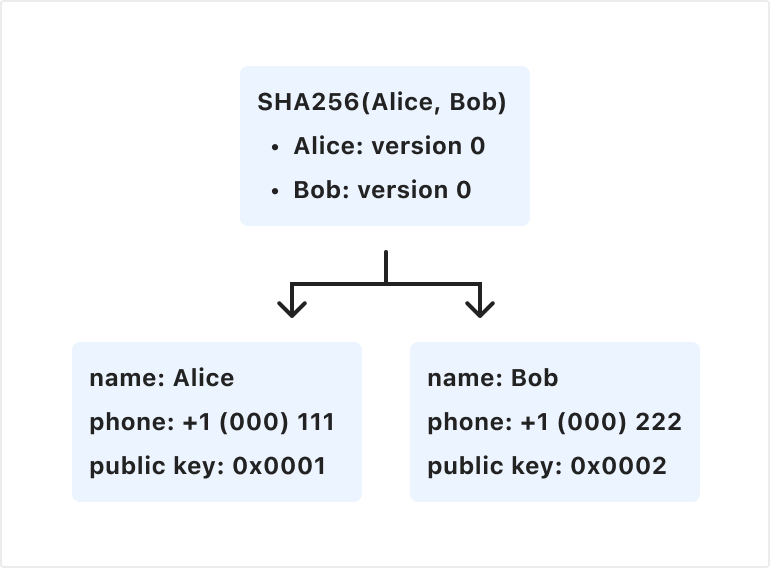


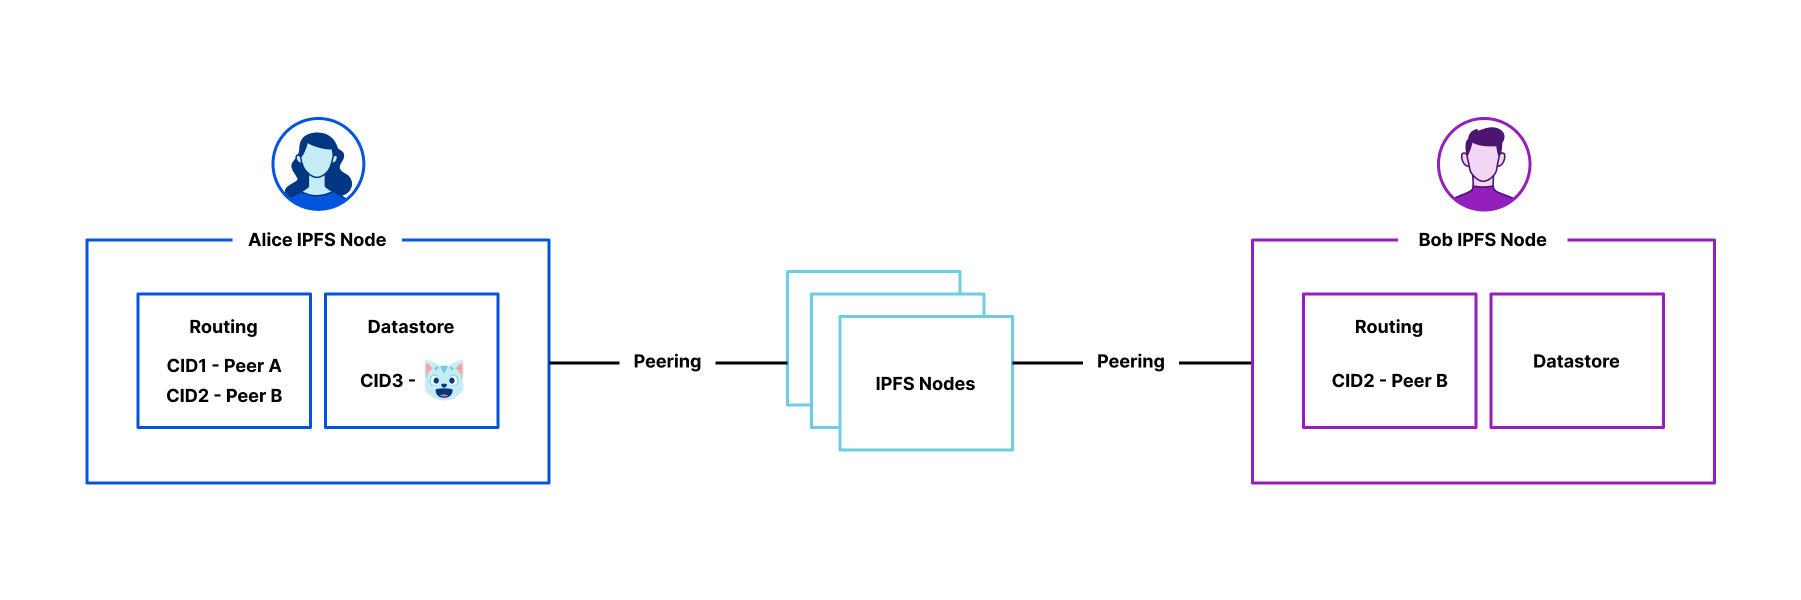
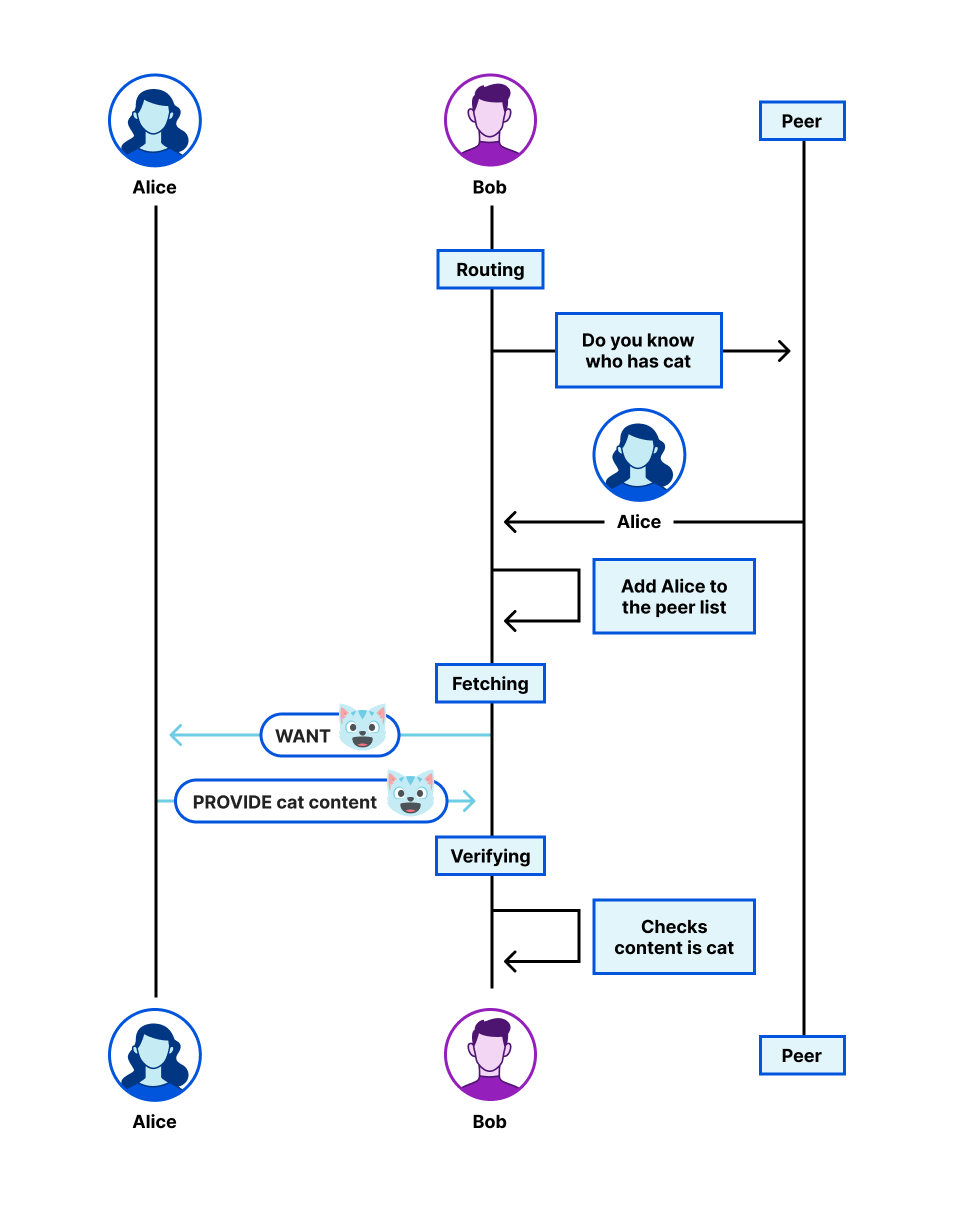
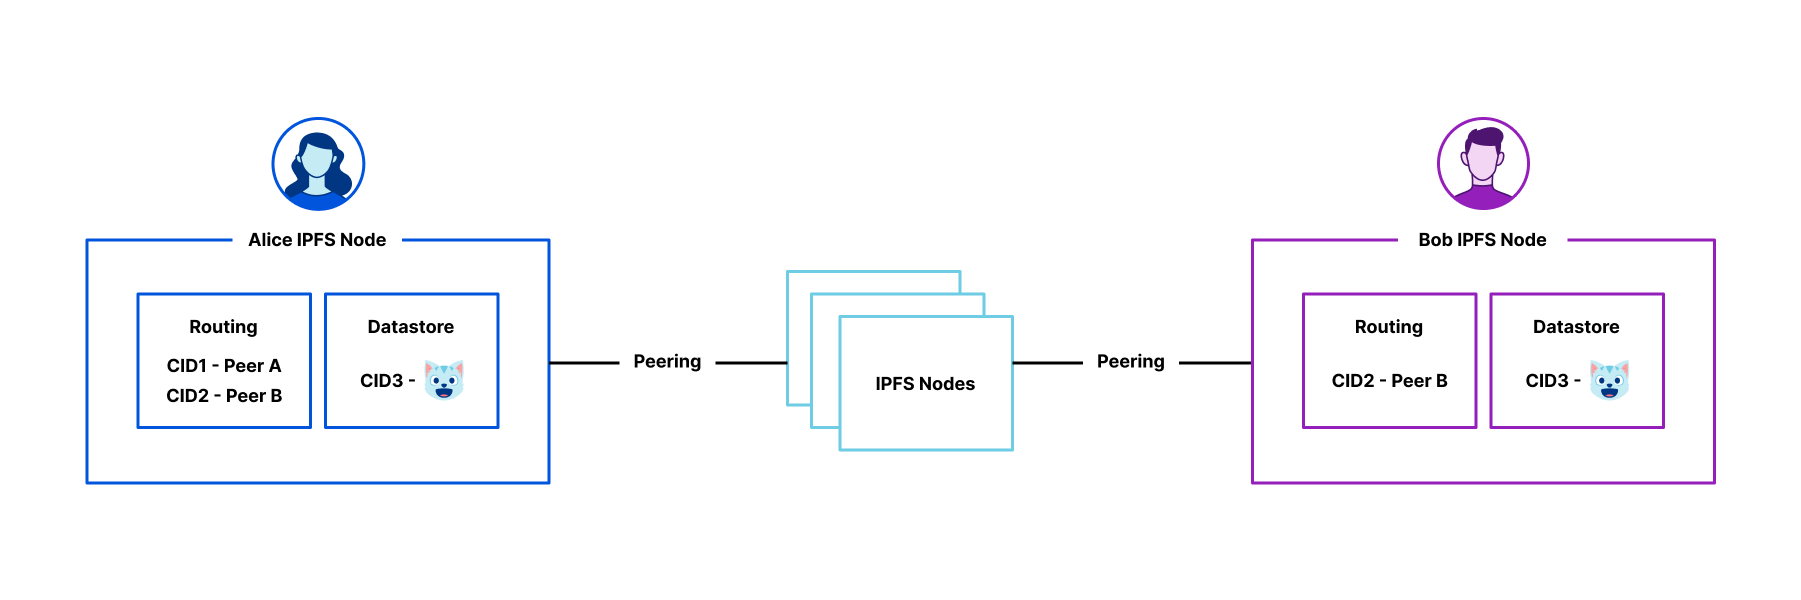
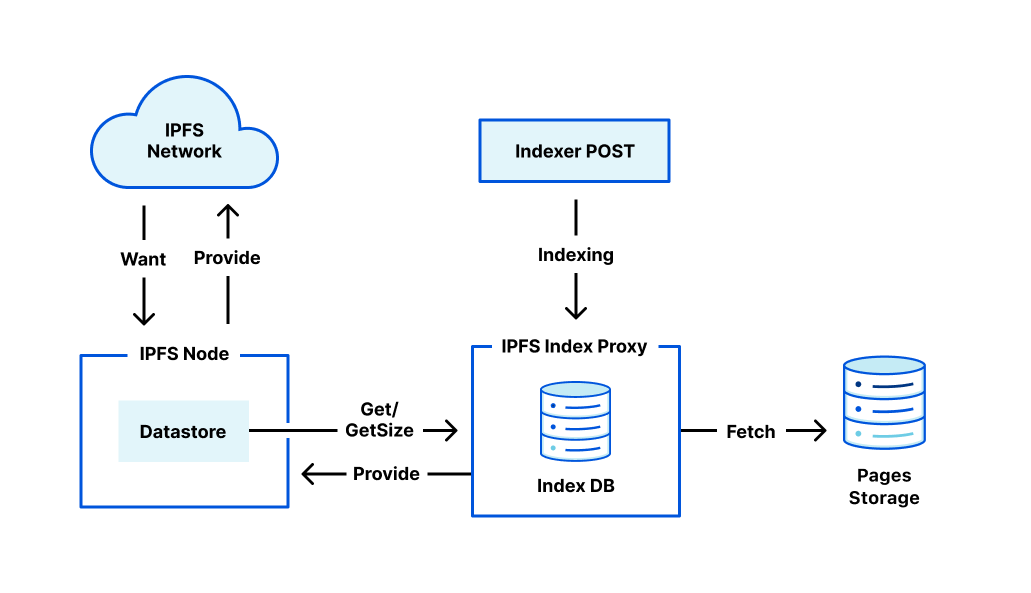

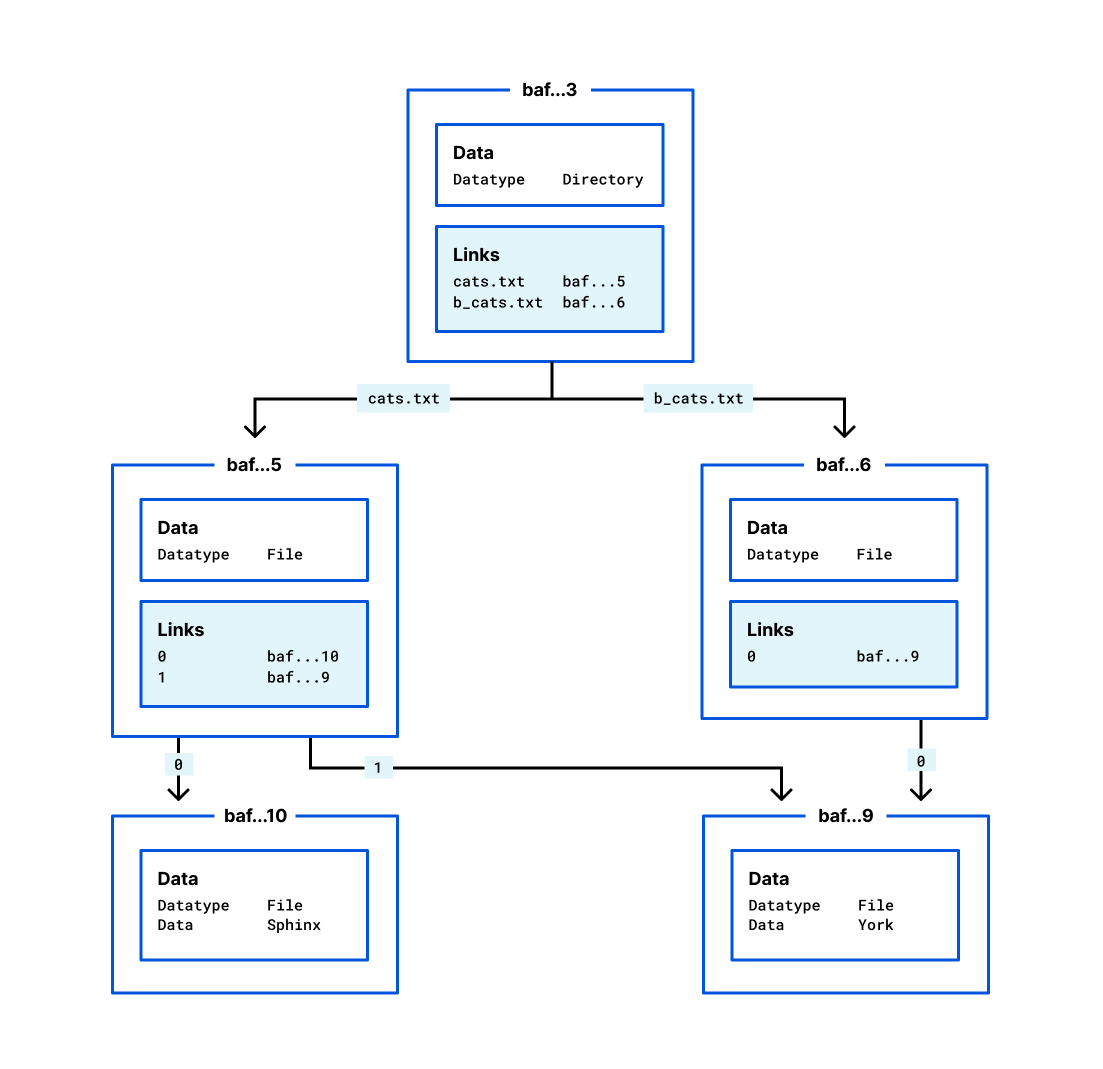


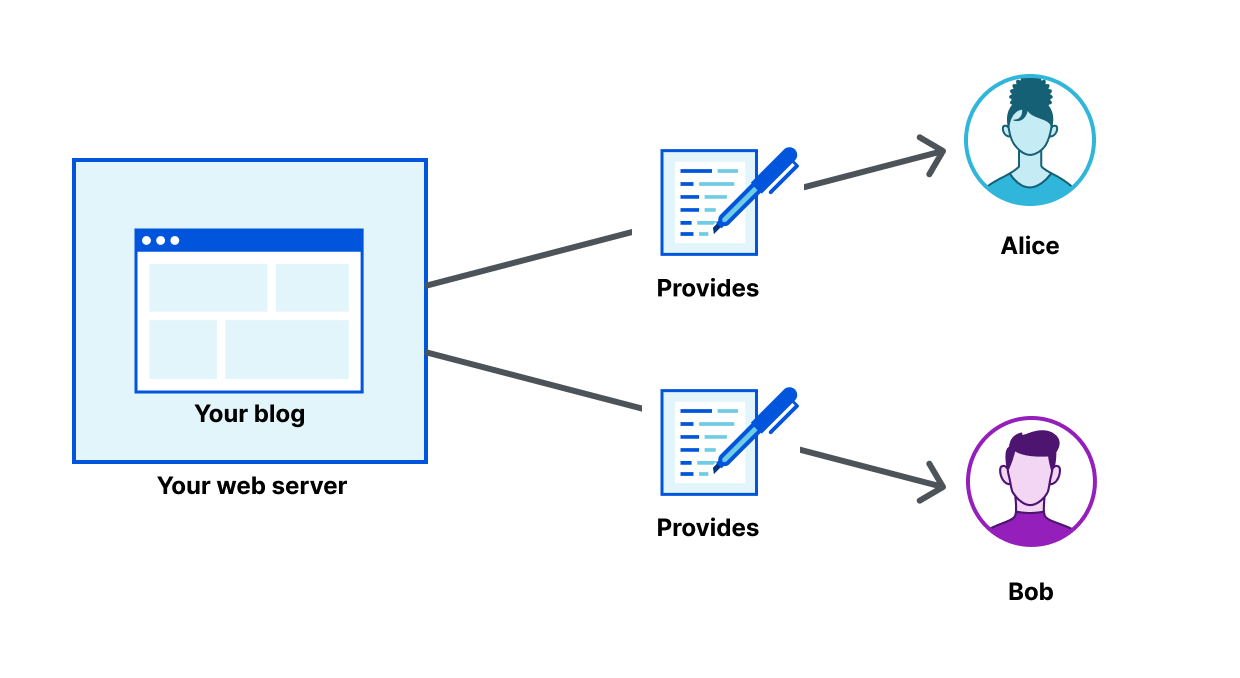
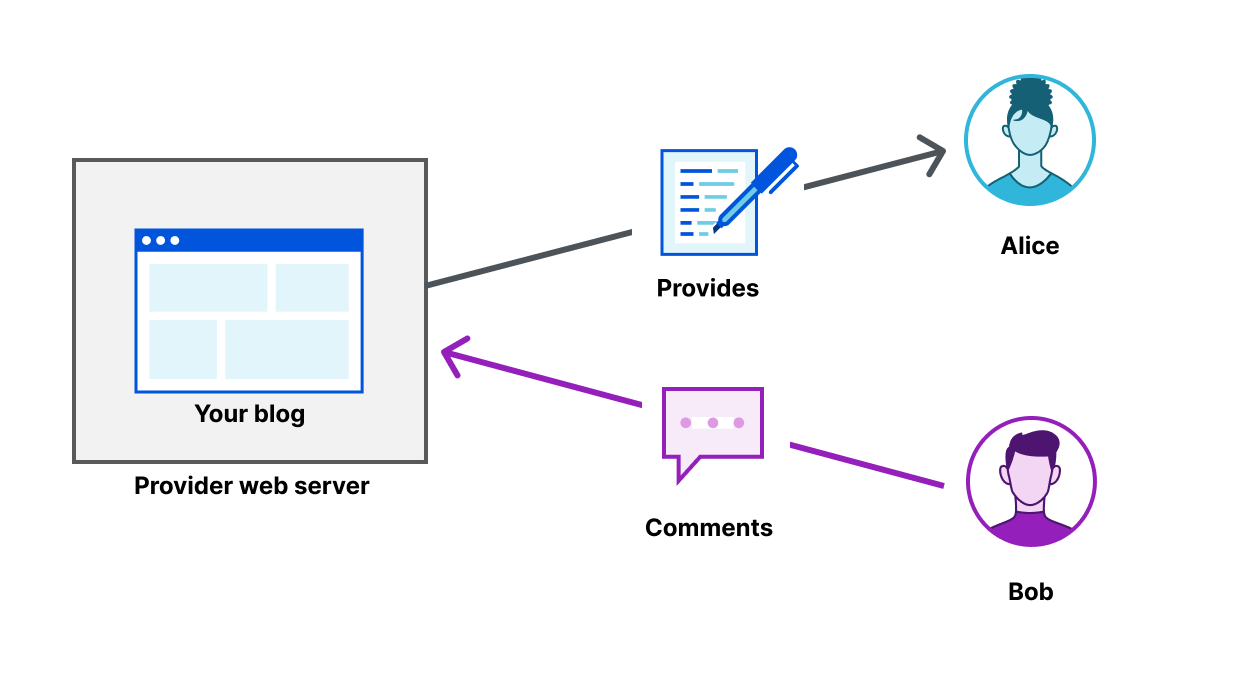
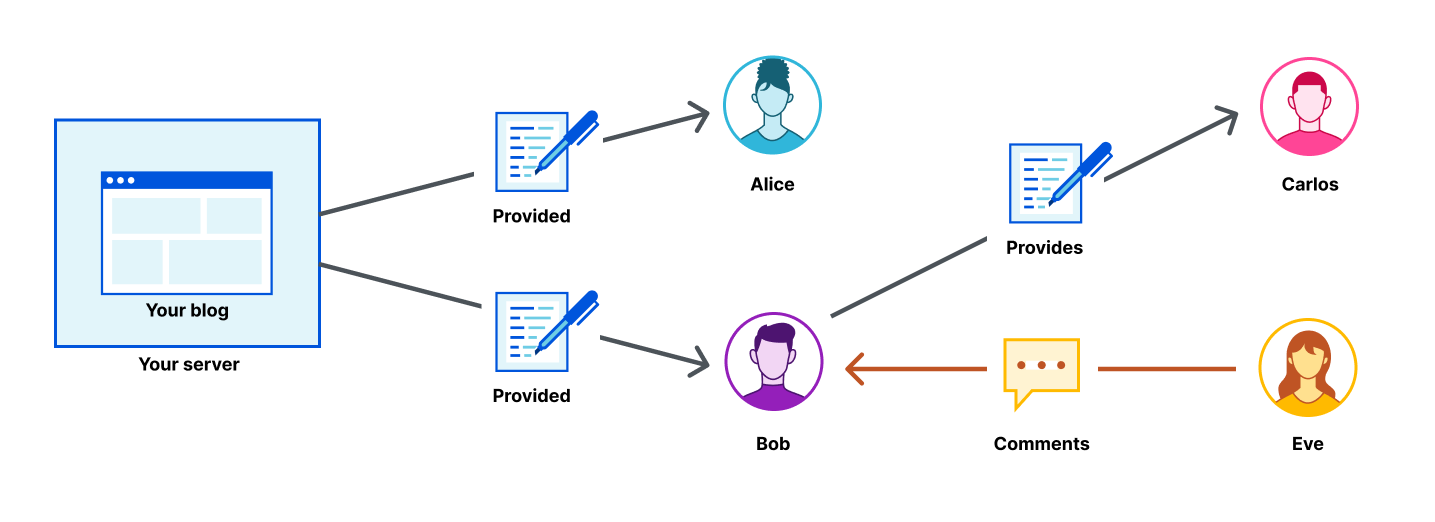
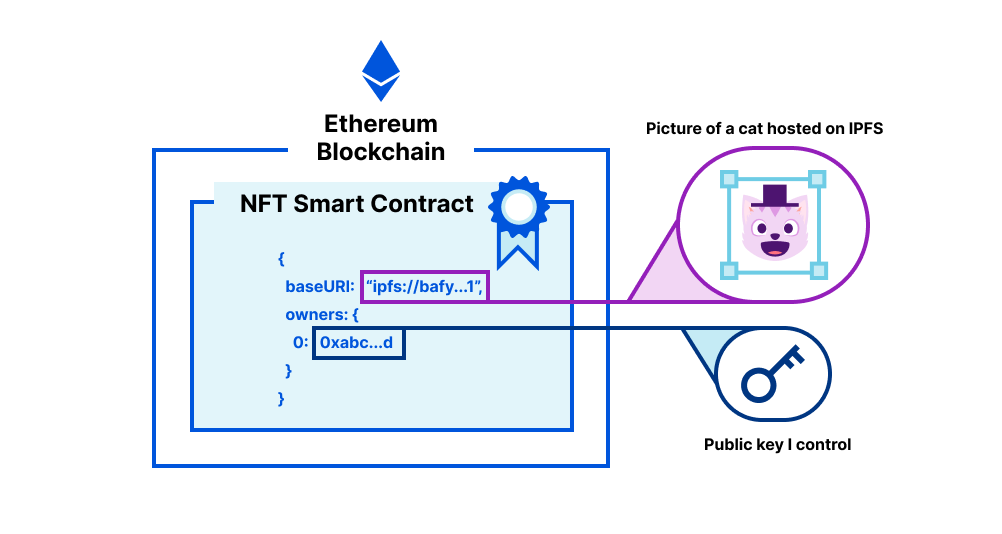

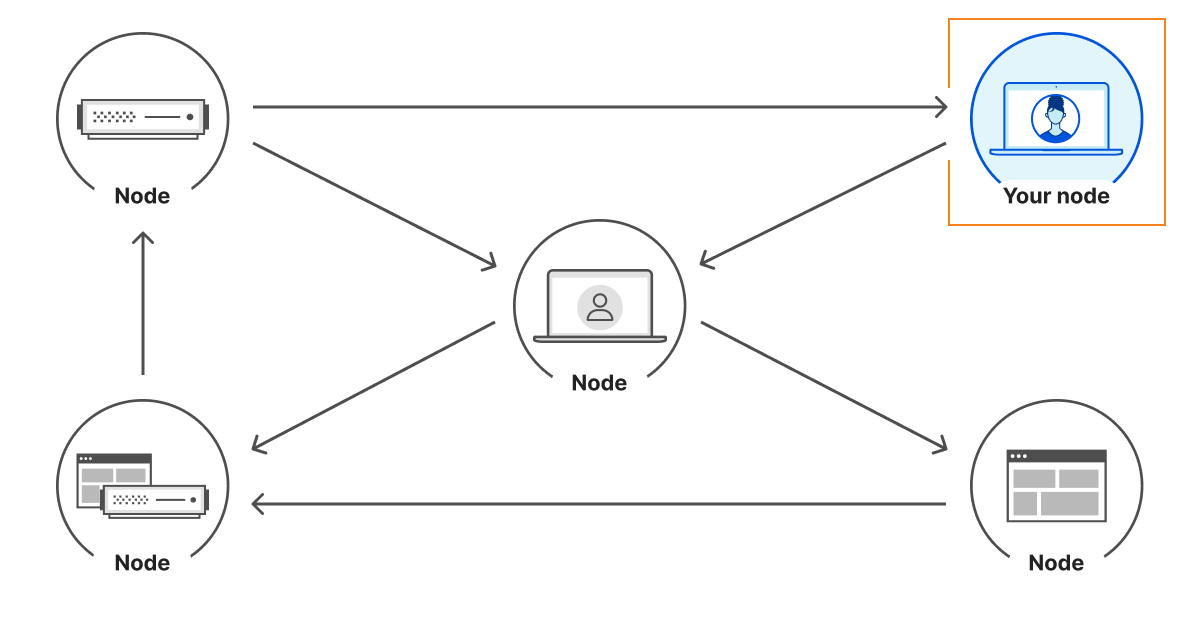
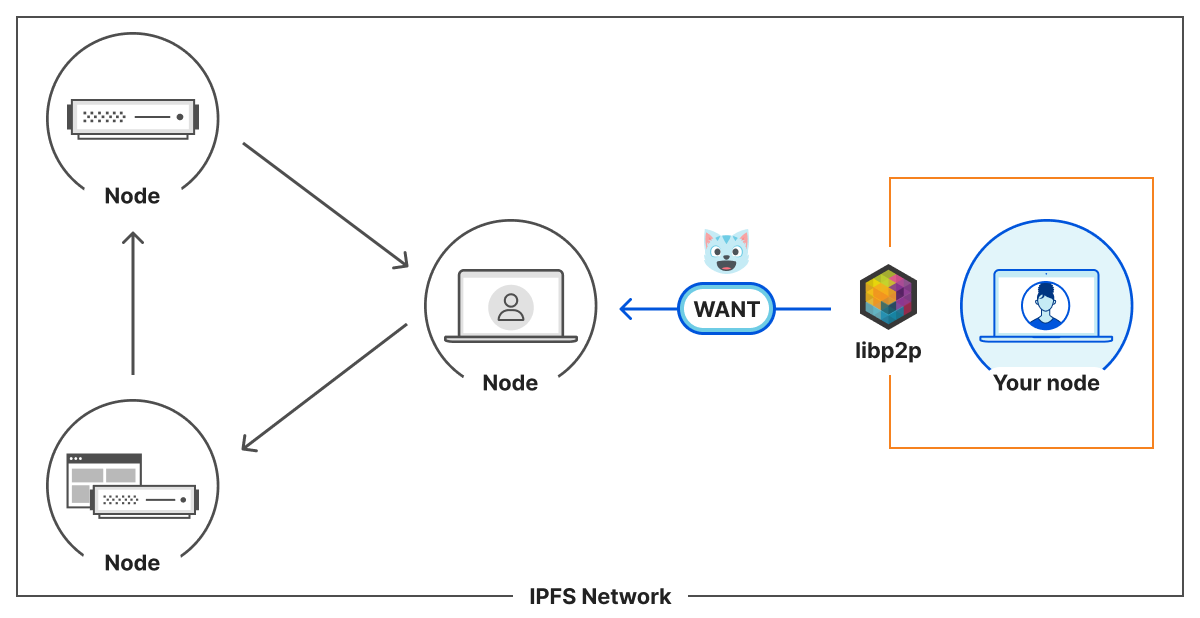
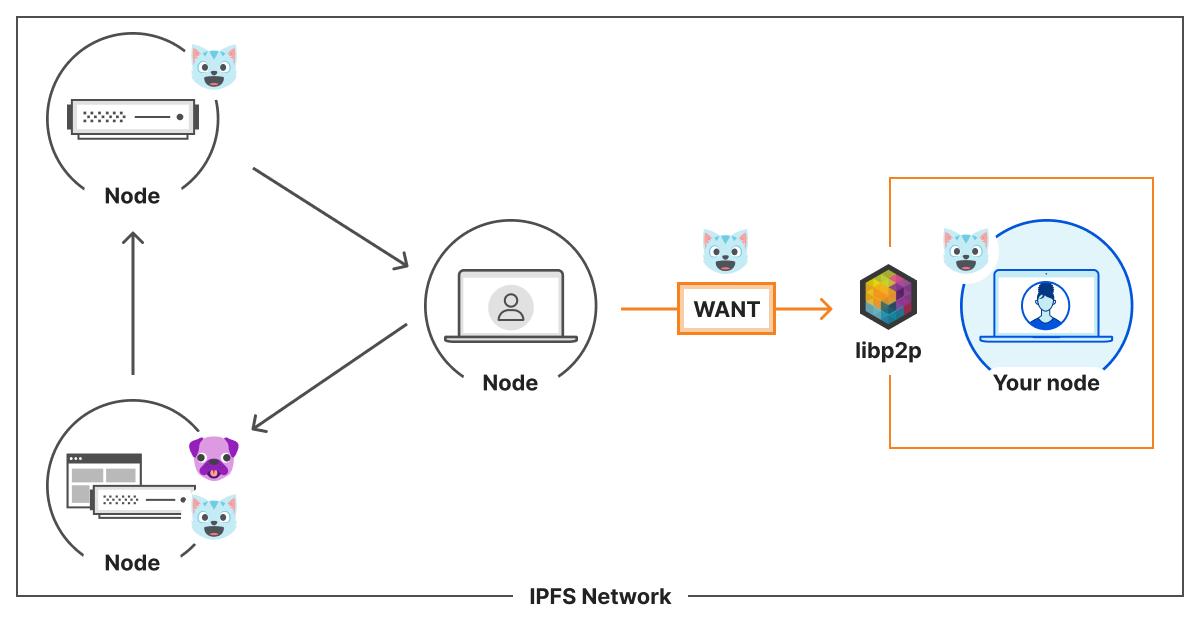
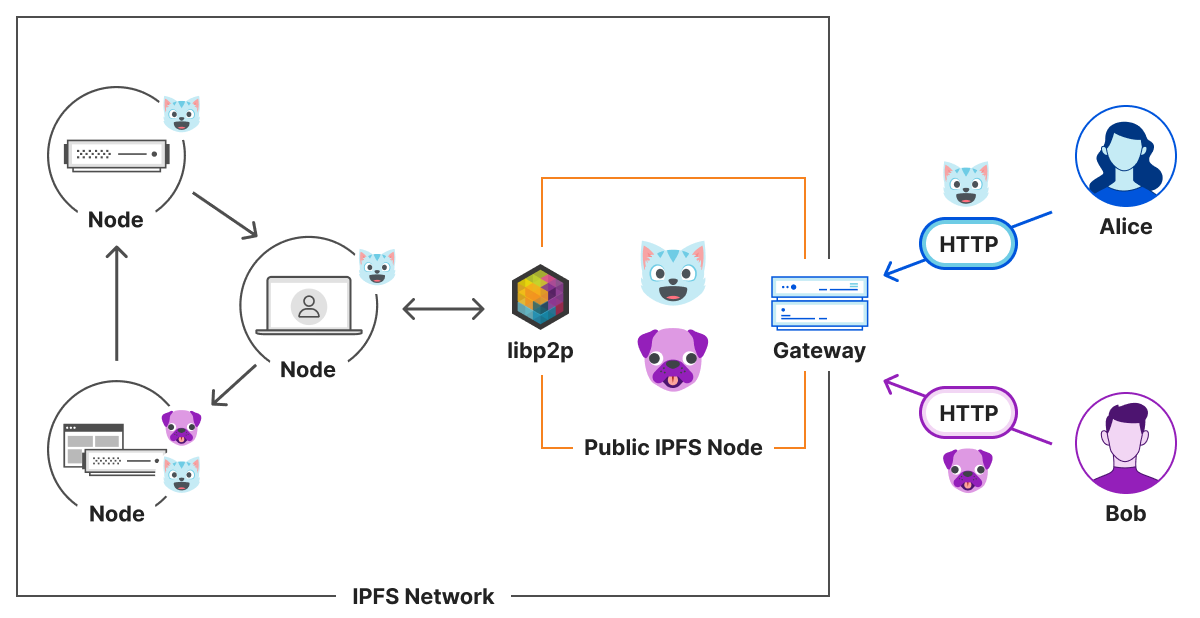
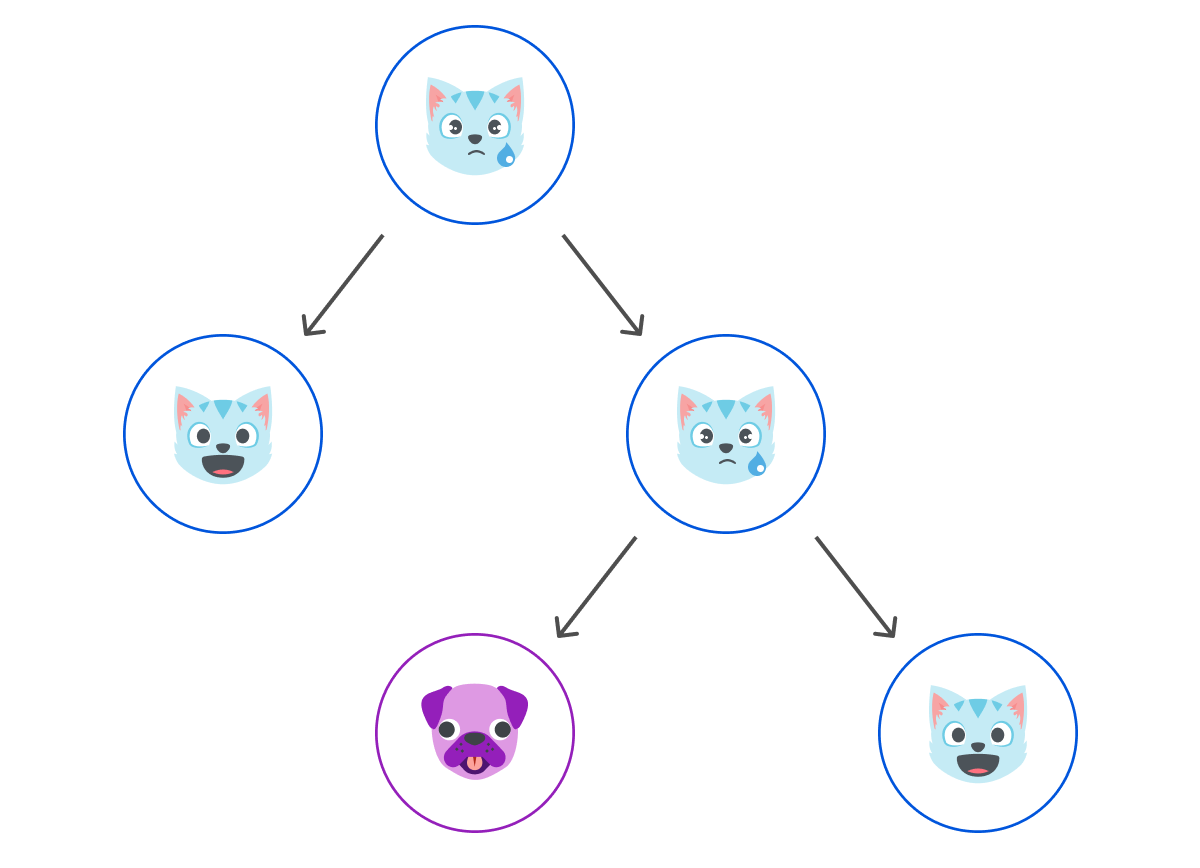

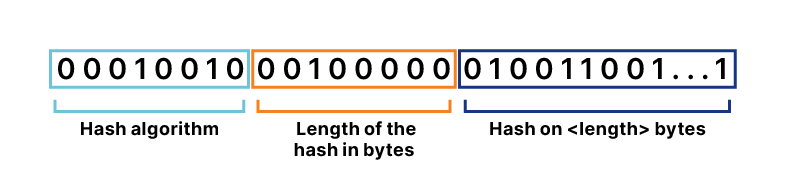
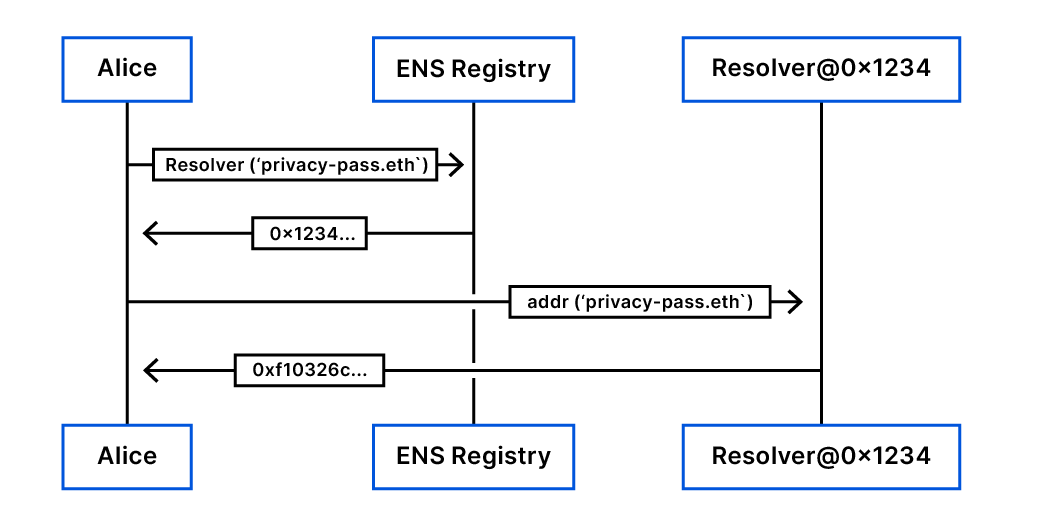
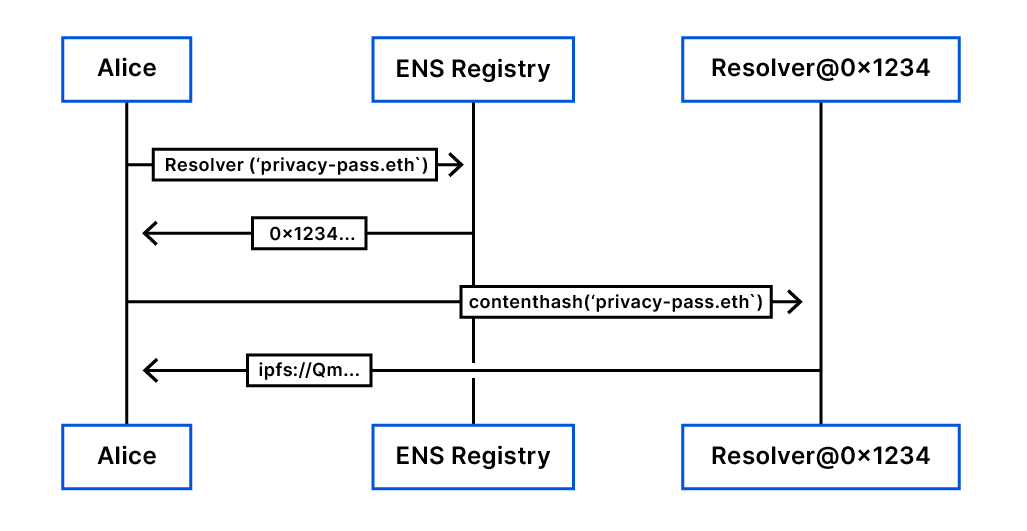
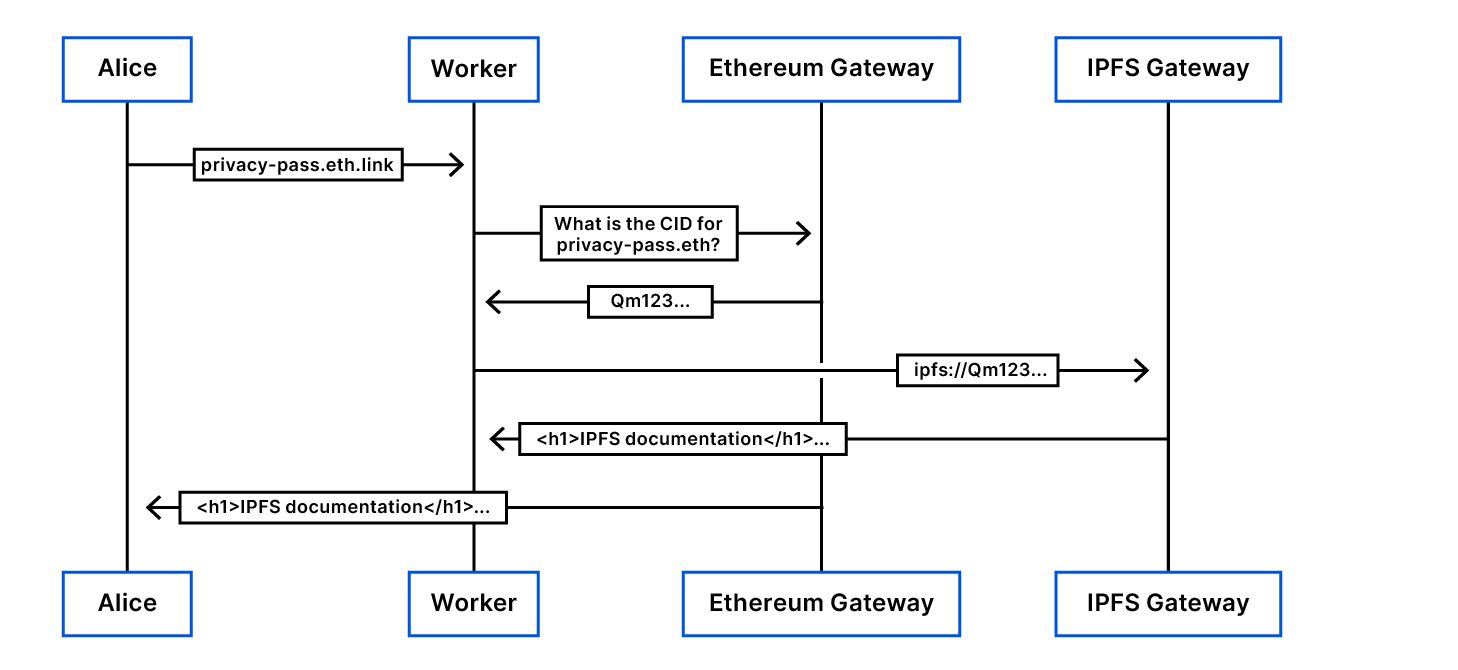