Post Syndicated from Tibor Volanszki original https://blog.zabbix.com/aruba-central-api-monitoring-with-zabbix/31370/

Aruba Central is a SaaS solution that allows you to manage your Enterprise Aruba network environment. Due to the increasing number of cloud migrations, we can expect that more and more Aruba customers will move their on-premise environment to it, which will also mean a change in their monitoring environment. In this article, I will show you how to switch to API- based monitoring using Aruba Central and Zabbix. All custom resources mentioned can be found in my repository.
Aruba Central’s API
Oauth 2.0 is used, so you can forget the simple token management. At the end it is great, but for monitoring purposes it is overkill. There is pretty good documentation (referred to later) regarding how you can generate your access token, but after two hours it expires so you need to continually refresh it. To do this, you must use a refresh token, which can help you to get a new access token AND a new refresh token.
Within two hours, use the latest refresh token to repeat this action again. At this point you can imagine that this is not something you can implement easily by using the Zabbix GUI only. Well, maybe with some javascript magic, but otherwise there is no native support for this logic at this point of time. So how can we do this? In short:
- Generate your client credentials
- Generate your first token
- Schedule the token refresh for every two hours
- Update your host macro via Zabbix API
- Use the token in Zabbix HTTP agent checks
- Monitor your environment based on JSONPath pre-processing
Initial steps within Aruba Central
To manage your API access, you need to launch your “HPE Aruba Networking Central” application, so do NOT look into your workspace modules – the “Personal API clients” menu is NOT what we are looking for. Turn off the “New Central” view – at this point the early access version is not so useful (hopefully it will change soon).
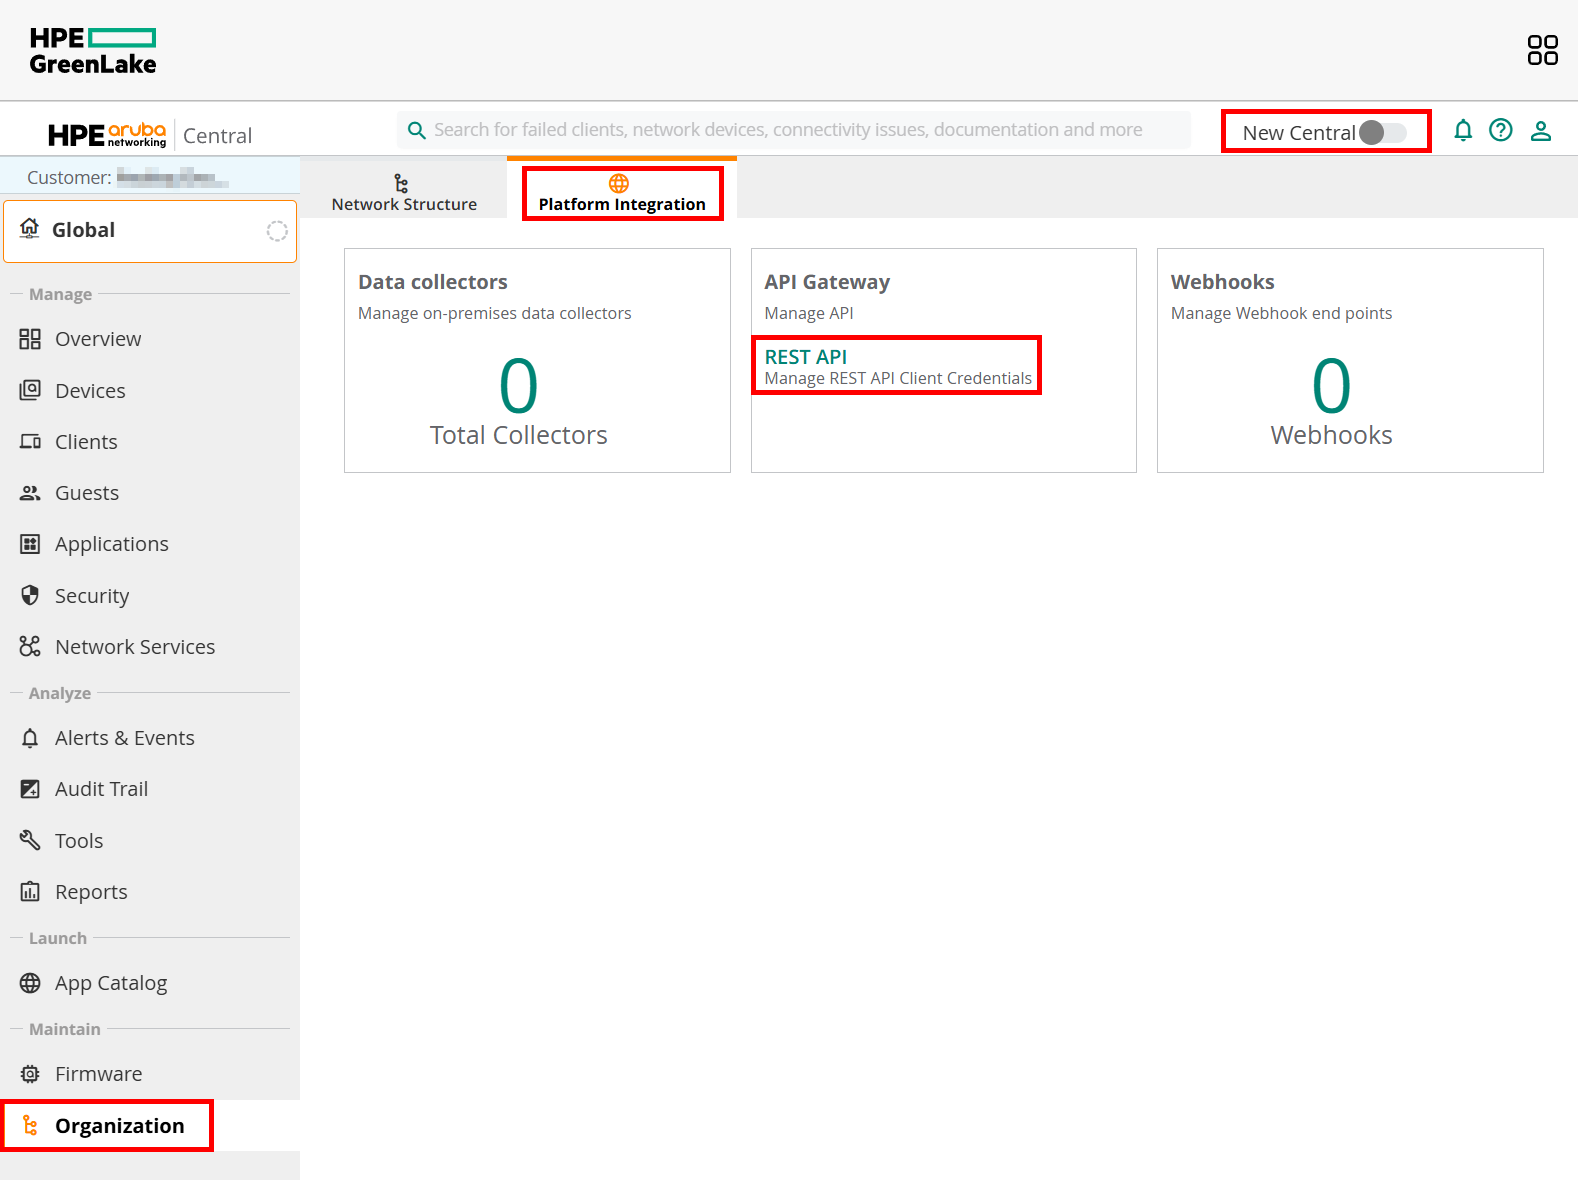
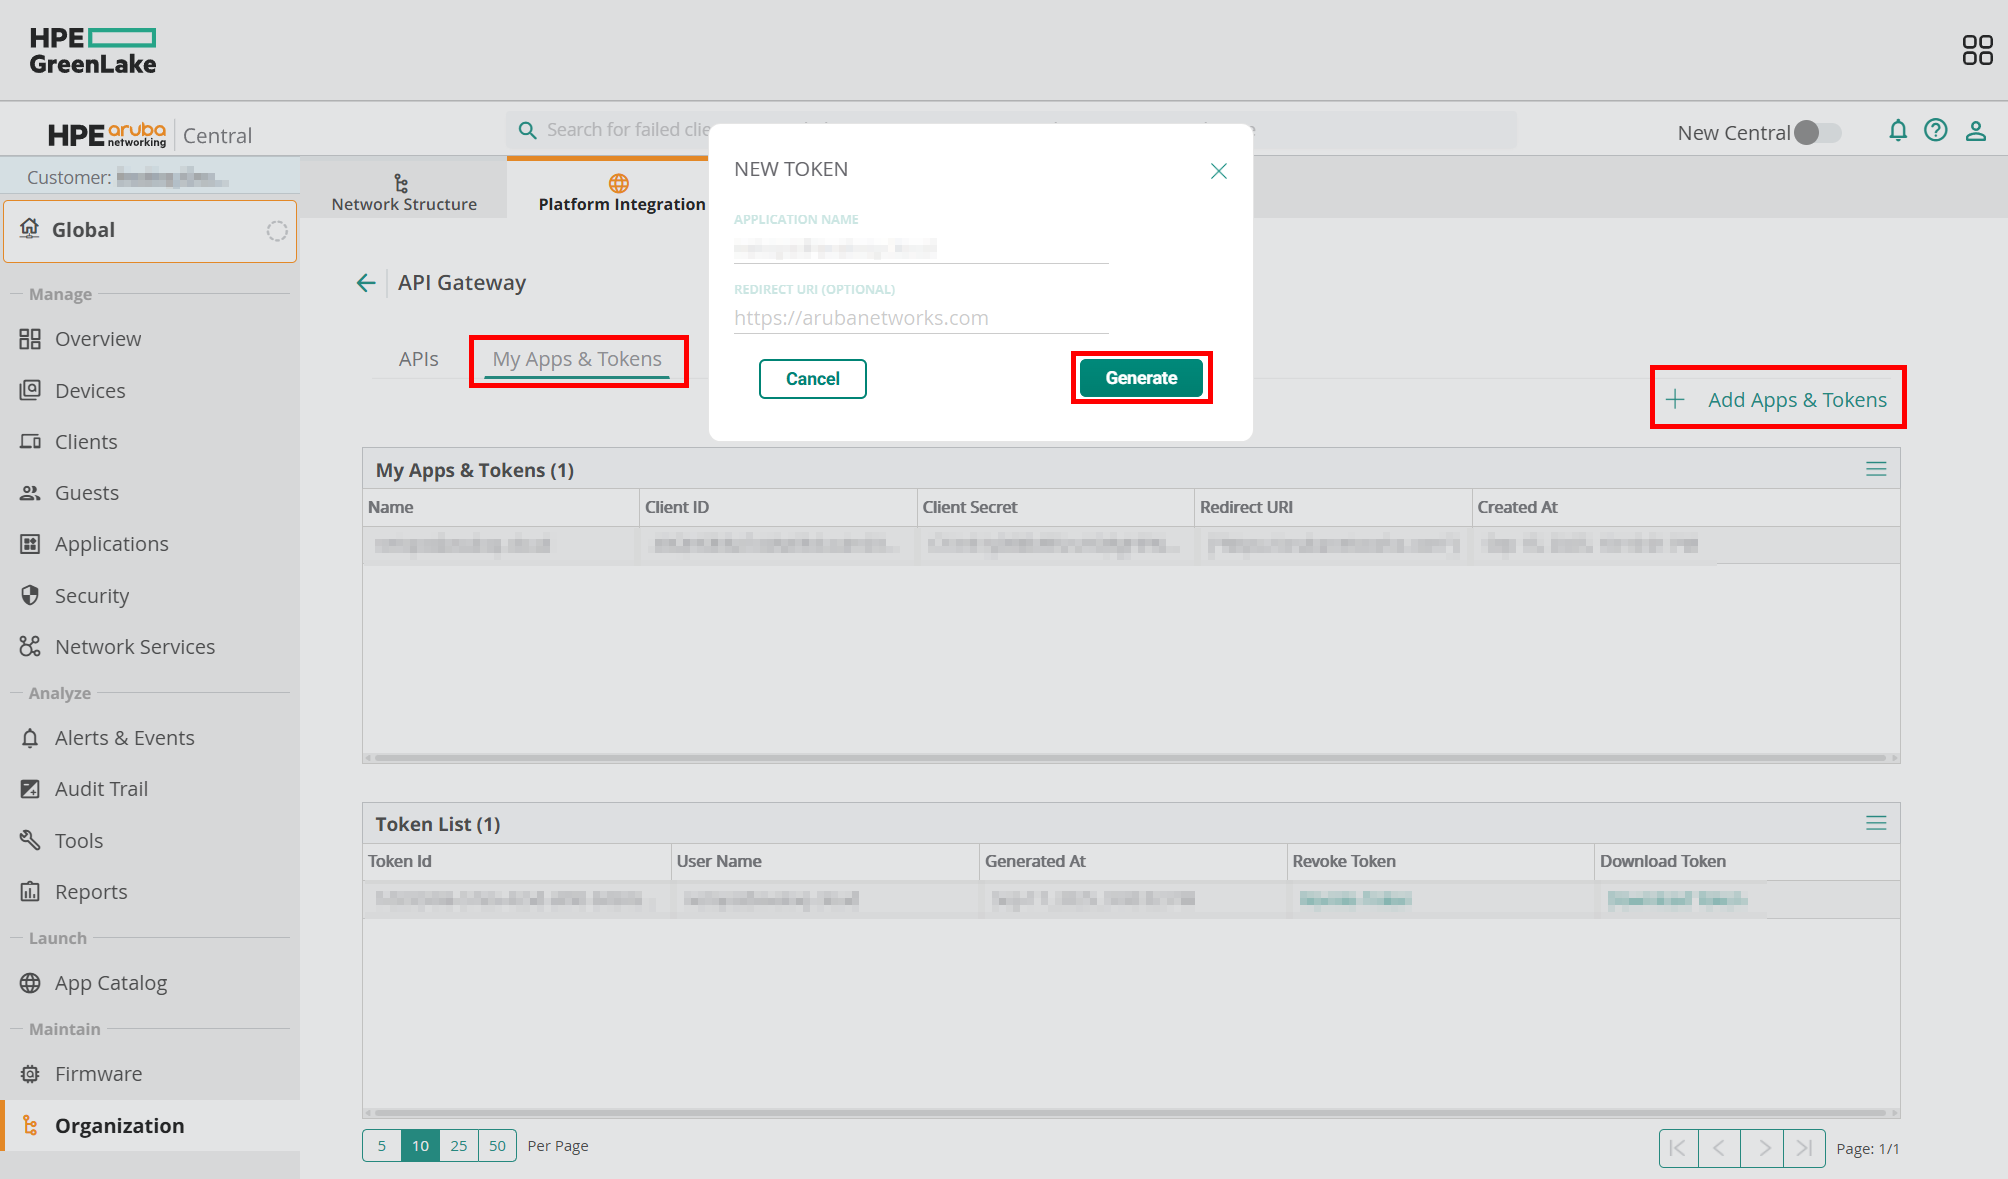
The first time you get there, you will not see any items, but under the “My Apps & Tokens” tab you can click the “Add Apps & Tokens” button and generate it. Technically, this is already enough to start to monitoring your network infrastructure, but within two hours it would stop. So the relevant data for us are the “Client ID” and “Client Secret.” Feel free to revoke the recently created token at the bottom area as we do not need it.
Record your credentials
For this article, I am using a simple file to store all the credentials, which will be sourced into a bash script. Please keep in mind that storing your sensitive credentials in a single file is a BAD practice! Your SECO/CISO would probably have a few words with you about it, so please consider a better approach. A more secure way would be to use some Key Vault solution (like Azure, AWS, Google, or Hashicorp). Anyway, let’s continue with this unsecure example:
#!/bin/bash

### ZABBIX VARS ###

# URL of your zabbix instance (assuming you do not use the "/zabbix" ending, if yes, then add it to the end)
zabbix_url="https://your.zabbix.instance.net"
# Your Zabbix API token. If you do not know how to get it, check the documentation.
zabbix_api_token="1234_your_zabbix_api_key_5678"
# Create a host with a macro, remain at the "Macros" tab, turn on debug mode, look for "[hostmacroid] =>"
zabbix_macro_id="12345"

### ARUBA VARS ###
# To find yours, go here and check "Table: Domain URLs for API Gateway Access"
base_url="YOUR_ARUBA_CENTRAL_BASE_URL"
# Click on your profile in the Central app and you will find it there: 32 char long hexa string
client_id="YOUR_CLIENT_ID"
# provided in the previous step
client_secret="YOUR_CLIENT_ID"
# provided in the previous step
customer_id="YOUR_CUSTOMER_ID"
# your login credential
account_username="YOUR_CENTRAL_LOGIN_USERNAME"
# your login credential
account_password="YOUR_CENTRAL_LOGIN_PASSWORD"
# to be populated later
csrftoken=""
session=""
auth_code=""
Get or refresh your token and update the Zabbix host macro
The next steps are based on the official Aruba documentation, which you can find here. Please remember that there are many ways to achieve our target – this is just one example and probably not the most optimal one. Feel free to change / improve it with your code in your preferred scripting language.
The below script assumes that the file containing the credentials (previous step) is named as “variables” and located in the folder named “central.”
Filename: aruba_central_token_new.sh
Purpose: To be used for first time token generation. Later, you only have to refresh your token with the script after this one.
Remarks: Aruba is limiting this API query set, so you can run it only ONCE every 30 minutes! If you made a typo somewhere, wait 30 minutes before your next attempt or tweak the result files.
#!/bin/bash

basedir=central
source $basedir/variables

curl -s --noproxy '*' -v --cookie-jar $basedir/cookie --location --request POST "$base_url/oauth2/authorize/central/api/login?client_id=$client_id" \
--header "Content-Type: application/json" \
--data-raw "{
    \"username\": \"$account_username\",
    \"password\": \"$account_password\"
}" > $basedir/result1.raw 2>&1

grep 'Added cookie' $basedir/result1.raw > $basedir/result1.filtered

csrftoken=$(grep csrftoken $basedir/result1.filtered | awk -F '"' '{print $2}')
session=$(grep session $basedir/result1.filtered | awk -F '"' '{print $2}')

curl -s --noproxy '*' --request POST "$base_url/oauth2/authorize/central/api?client_id=$client_id&response_type=code&scope=all" \
--header "Content-Type: application/json" \
--header "Cookie: session=$session" \
--header "X-CSRF-Token: $csrftoken" \
--data-raw "{
\"customer_id\": \"$customer_id\"
}" > $basedir/result2.raw

auth_code=$(cat $basedir/result2.raw | jq -r .auth_code)

curl -s --noproxy '*' --request POST "$base_url/oauth2/token" \
--header "Content-Type: application/json" \
--data "{
    \"client_id\": \"${client_id}\",
    \"client_secret\": \"${client_secret}\",
    \"grant_type\": \"authorization_code\",
    \"code\": \"${auth_code}\"
}" > $basedir/result3.raw

refresh_token=$(cat $basedir/result3.raw | jq -r .refresh_token)
access_token=$(cat $basedir/result3.raw | jq -r .access_token)

if [ "$refresh_token" == "null" ]; then
    echo "something went wrong... exiting now"
    exit 1
fi

echo $access_token > $basedir/token_access.latest
echo $refresh_token > $basedir/token_refresh.latest

echo "access_token: $access_token"
echo "refresh_token: $refresh_token"

curl -s --request POST \
--url "$zabbix_url/api_jsonrpc.php" \
--header "Authorization: Bearer $zabbix_api_token" \
--header "Content-Type: application/json-rpc" \
--data "{\"jsonrpc\": \"2.0\",\"method\": \"usermacro.update\",\"params\": {\"hostmacroid\": \"${zabbix_macro_id}\",\"value\": \"${access_token_new}\"},\"id\": 1}"

rm -f $basedir/cookie
Filename: aruba_central_token_refresh.sh
Purpose: To refresh your existing token. It is expecting an existing refresh token in the “token_refresh.latest” file, so better to run the previous script one time before this.
Remarks: You can run this script as many times you want, but it will result in new tokens only once per every two hours (when the current one expires). Therefore, refreshing too frequently is pointless.
#!/bin/bash

basedir=central
source $basedir/variables

refresh_token_current=$(cat $basedir/token_refresh.latest | tr -d '\n')
refresh_token_new=""

curl -s --noproxy '*' --request POST "$base_url/oauth2/token?client_id=$client_id&client_secret=$client_secret&grant_type=refresh_token&refresh_token=$refresh_token_current" > $basedir/result4.raw

refresh_token_new=$(cat $basedir/result4.raw | jq -r .refresh_token)
access_token_new=$(cat $basedir/result4.raw | jq -r .access_token)
expires_in=$(cat $basedir/result4.raw | jq -r .expires_in)

if [ "$refresh_token_new" == "null" ]; then
    echo "something went wrong... exiting now"
    exit 1
fi

echo $access_token_new > $basedir/token_access.latest
echo $refresh_token_new > $basedir/token_refresh.latest

echo "access_token: $access_token_new"
echo "refresh_token: $refresh_token_new"
echo "expires_in: $expires_in"

curl -s --request POST \
--url "$zabbix_url/api_jsonrpc.php" \
--header "Authorization: Bearer $zabbix_api_token" \
--header "Content-Type: application/json-rpc" \
--data "{\"jsonrpc\": \"2.0\",\"method\": \"usermacro.update\",\"params\": {\"hostmacroid\": \"${zabbix_macro_id}\",\"value\": \"${access_token_new}\"},\"id\": 1}"
In my case, both the scripts and variables files are in the same “central” folder, which is in a git repository. Each time I call one of the scripts, it will record the new tokens in files, which are committed and pushed to the repo. In my own implementation, this is how I call the refresh script and sync the result with my repo:
git checkout master

basedir=central
source $basedir/variables
bash $basedir/aruba_central_token_refresh.sh

git add .
git commit -m "save the new tokens"
git push origin master
Schedule your token management
You must run your refresh script at least once per every two hours. To make this happen you have many options, including:
- cron (old-school, outdated way)
- systemctl timer (a better way, but only if it is monitored)
- Jenkins / Github Actions/etc.
- Zabbix itself, by calling your bash script
In my case, Jenkins does the scheduling and execution and the job is monitored via Zabbix.
Monitor your network infrastructure
When everything is in place, then the monitoring part is pretty simple. The usual JSONPath based logic can be used. API call documentation can be found here. The template contains only the wireless components, since I do not have my switches in Central. Implementing the switching part should not be difficult – just have a look at the “Switch” section, then clone and adjust one of your “get” items.
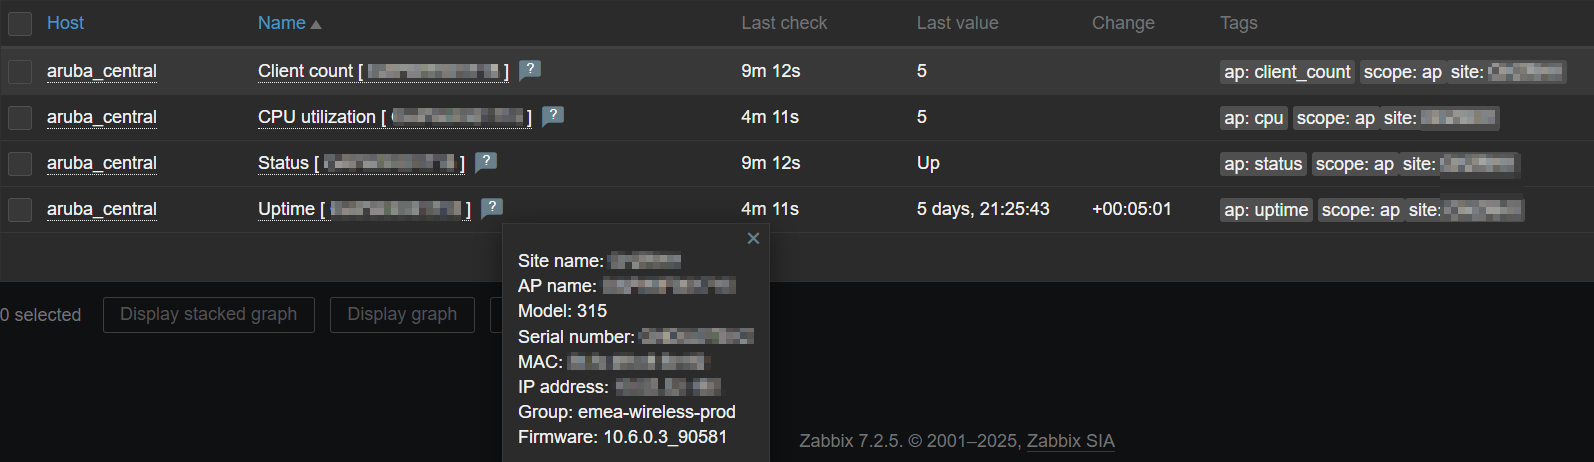
Screenshots
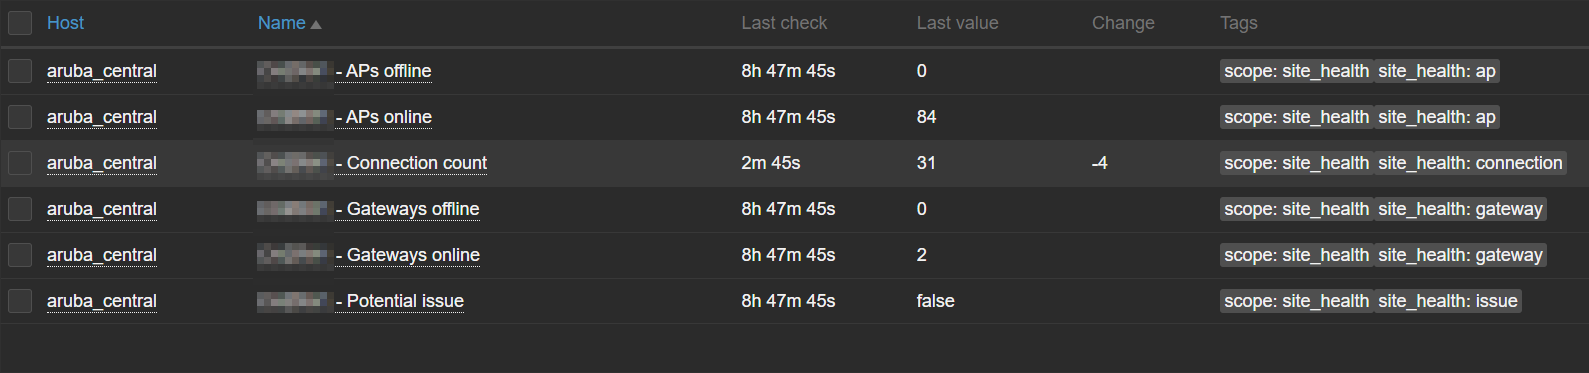
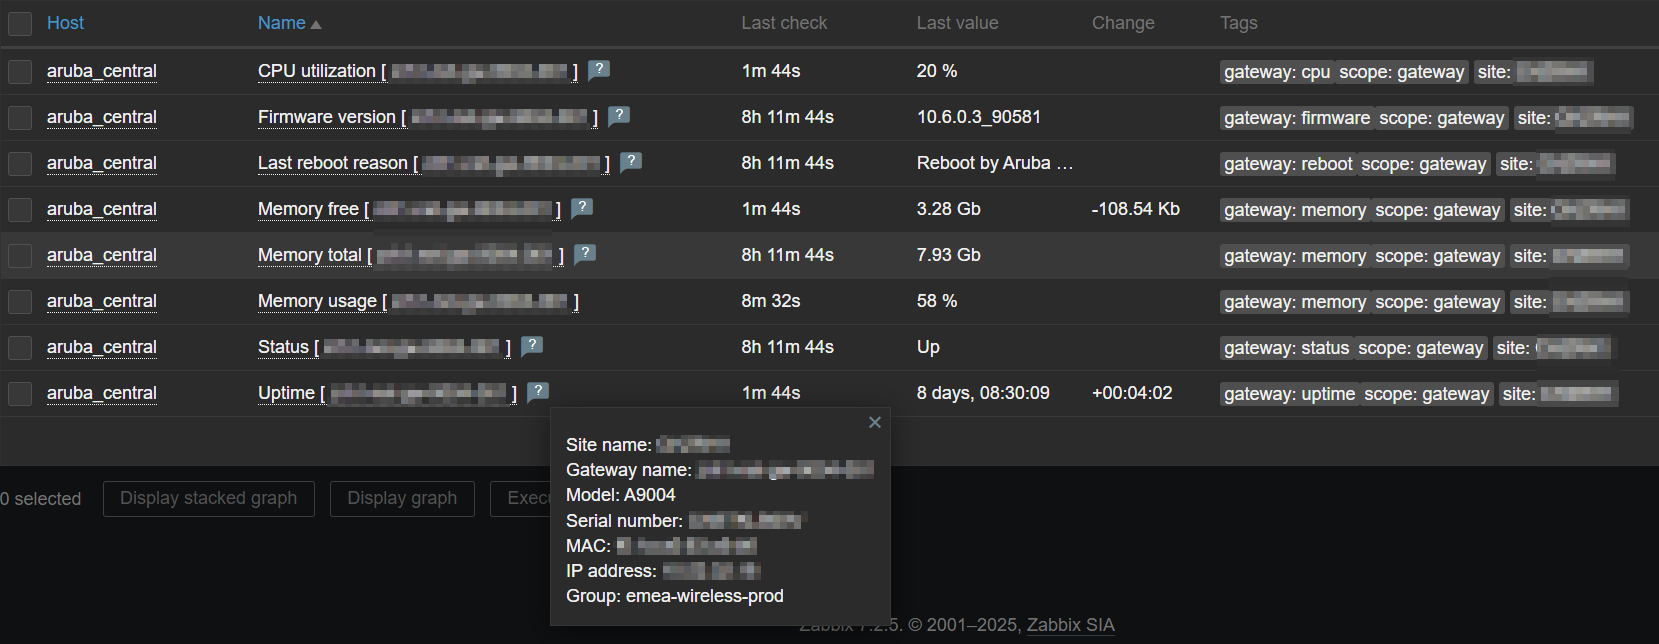
Latest data – tag based filtering:

Latest data – Site health
Latest data – Gateway info
Latest data – AP info
Triggers:
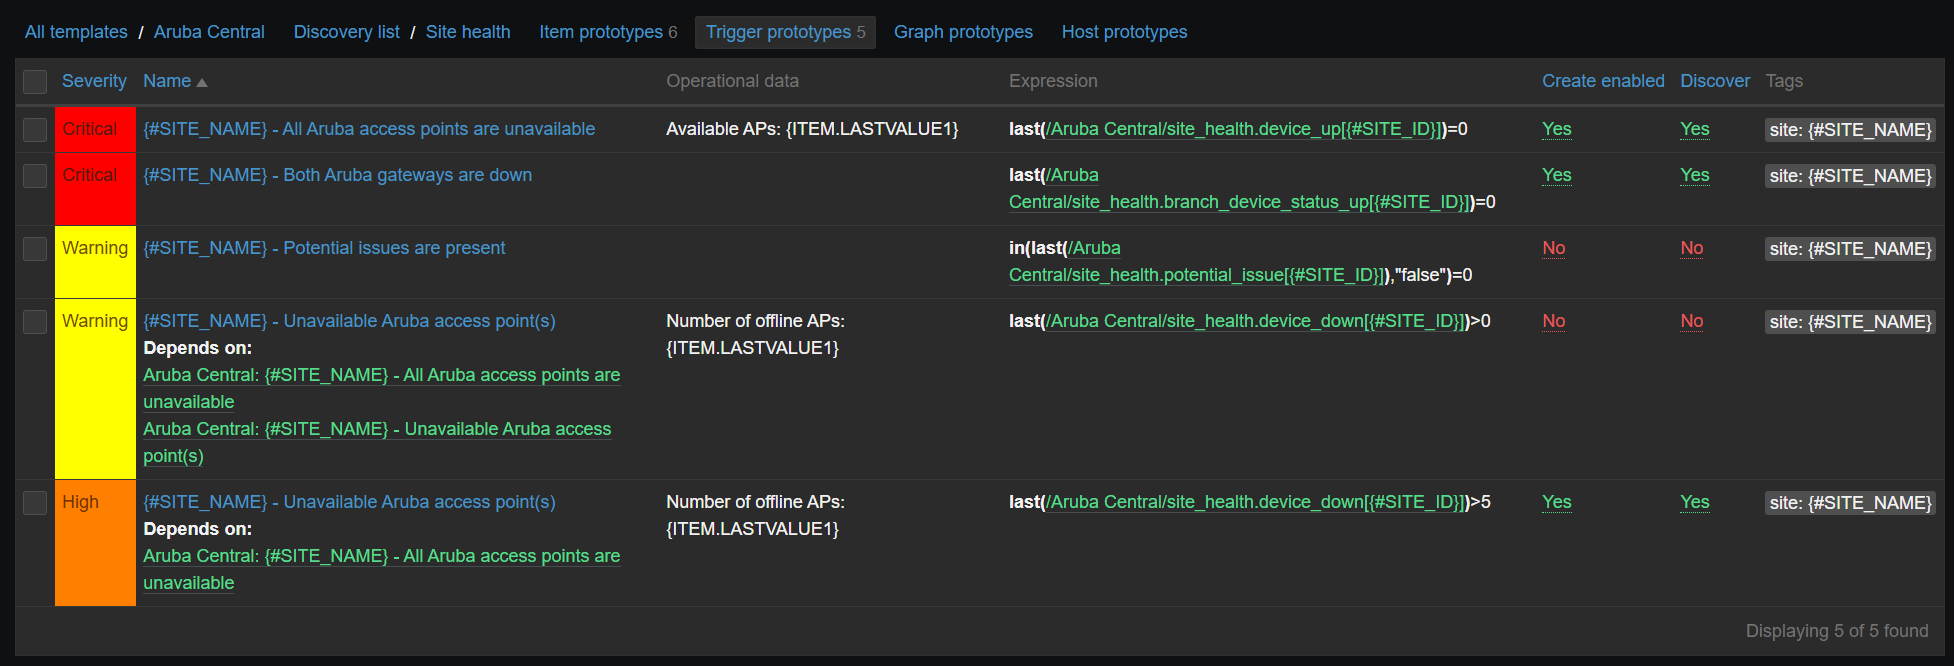
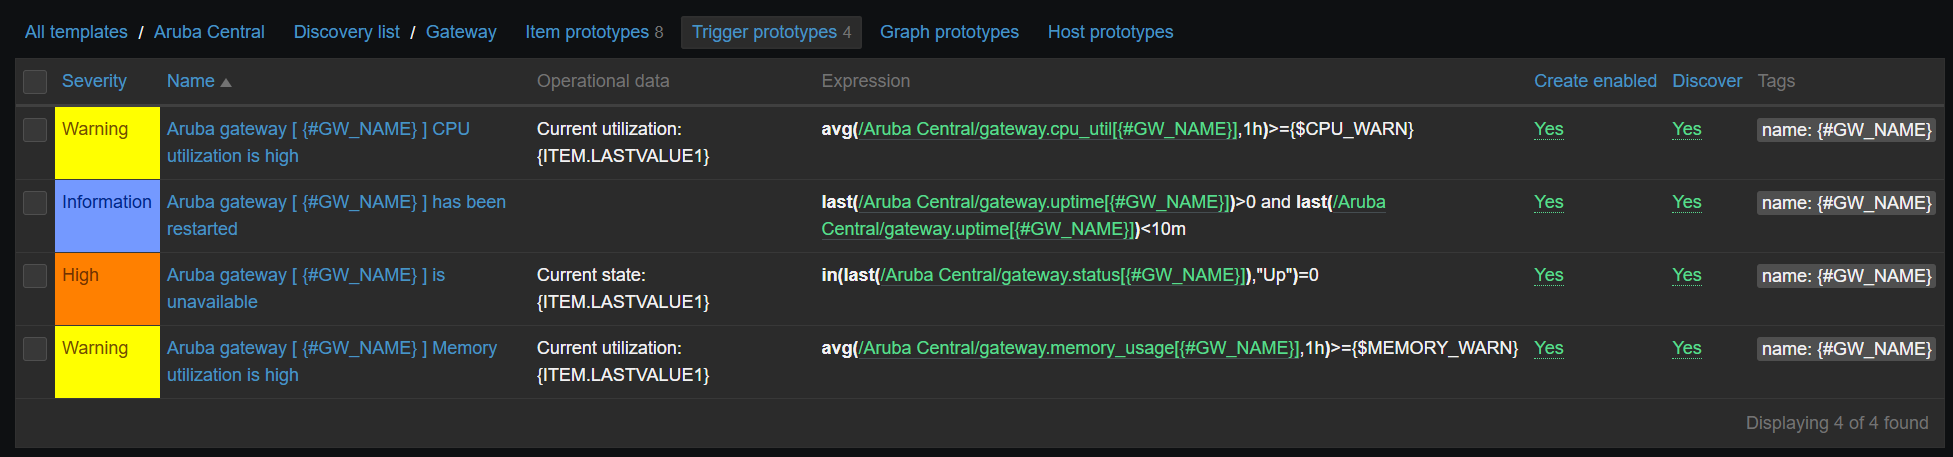

Some triggers are intentionally disabled, because they are a bit redundant. However, I wanted to cover all options. Sometimes less alerting is better if you have a ticketing system integration, otherwise your monitoring system will turn into a ticket factory.
Known issues and limitations
Since we are not querying the devices directly, some delay can be expected. Based on my recent testing, the delay compared to real time is between 3-10 minutes. In my test I disconnected my test environment and then started to do manual updates frequently. Some items got the real state earlier, some only later.
If your refresh script will malfunction for whatever reason (normally it should not), then you may have to run the other script once to generate a new token, or you can go to the GUI and check the last refresh token, with which you can override the content of the “token_refresh.latest” file.
Aruba is limiting the number of API queries to 5,000 per day. This could seem annoying, but it is way more than what you need (you should expect less than 1,000 in normal conditions, depending on your update frequency).
Zabbix API will not authorize your call unless you insert a line into your apache vhost configuration. This is a more generic Zabbix API issue that is not related to Aruba Central.
SetEnvIf Authorization "(.*)" HTTP_AUTHORIZATION=$1
If Aruba Central has a maintenance activity, then the token refreshing way could break. Running the token request script once should address the issue.
Summary
Aruba Central’s API is pretty decent, but if you start from zero it could take a while to get to the end of it. With this guide, my intention was to speed you up, but please do not consider my scripts and the shown example as the only or best possible way – I’m just hoping it can give you a good base for your own solution. Have fun!
The post Aruba Central API Monitoring with Zabbix appeared first on Zabbix Blog.


 For testing you can keep both and then later remove the unnecessary one as well as the number suffix.


