Tag Archives: powershell

ICYMI: Serverless Q2 2022

Post Syndicated from dboyne original https://aws.amazon.com/blogs/compute/icymi-serverless-q2-2022/

Welcome to the 18th edition of the AWS Serverless ICYMI (in case you missed it) quarterly recap. Every quarter, we share all the most recent product launches, feature enhancements, blog posts, webinars, Twitch live streams, and other interesting things that you might have missed!

In case you missed our last ICYMI, check out what happened last quarter here.

AWS Lambda

For Node.js developers, AWS Lambda now supports the Node.js 16.x runtime version. This offers new features, including the Stable timers promises API and RegExp match indices. There is also new documentation for TypeScript with Lambda.

Customers are rapidly adopting the new runtime version by updating to Node.js 16.x. To help keep Lambda functions secure, AWS continually updates Node.js 16 with all minor updates released by the Node.js community when using the zip archive format. Read the release blog post to learn more about building Lambda functions with Node.js 16.x.

A new Lambda custom runtime is now available for PowerShell. It makes it even easier to run Lambda functions written in PowerShell. Although Lambda has supported PowerShell since 2018, this new version simplifies the process and reduces the additional steps required during the development process.

To get started, see the GitHub repository which contains the code, examples and installation instructions.

PowerShell code in Lambda console

PowerShell code in Lambda console

AWS Lambda Powertools is an open-source library to help customers discover and incorporate serverless best practices more easily. Powertools for Python went GA in July 2020, followed by Java in 2021, TypeScript in 2022, and .NET is coming soon. AWS Lambda Powertools crossed the 10M download milestone and TypeScript support has now moved from beta to a release candidate.

When building with Lambda, it’s important to develop solutions to handle retries and failures when the same event may be received more than once. Lambda Powertools provide a utility to handle idempotency within your functions.

To learn more:

AWS Step Functions

AWS Step Functions launched a new opt-in console experience to help builders analyze, debug, and optimize Step Functions Standard Workflows. This allows you to debug workflow executions and analyze the payload as it passes through each state. To opt in to the new console experience and get started, follow these detailed instructions.

Events Tab in Step Functions Workflow

Events tab in Step Functions workflow

Amazon EventBridge

Amazon EventBridge released support for global endpoints in April 2022. Global endpoints provide a reliable way for you to improve availability and reliability of event-driven applications. Using global endpoints, you can fail over event ingestion automatically to another Region during service disruptions.

The new IngestionToInvocationStartLatency metric exposes the time to process events from the point at which they are ingested by EventBridge to the point of the first invocation. Amazon Route 53 uses this information to failover event ingestion automatically to a secondary Region if the metric exceeds a configured threshold of 30 seconds, consecutively for 5 minutes.

To learn more:

Amazon EventBridge Architecture for Global Endpoints

Amazon EventBridge global endpoints architecture diagram

Serverless Blog Posts

April

Apr 6 – Getting Started with Event-Driven Architecture

Apr 7 – Introducing global endpoints for Amazon EventBridge

Apr 11 – Building an event-driven application with Amazon EventBridge

Apr 12 – Orchestrating high performance computing with AWS Step Functions and AWS Batch

Apr 14 – Working with events and the Amazon EventBridge schema registry

Apr 20 – Handling Lambda functions idempotency with AWS Lambda Powertools

Apr 26 – Build a custom Java runtime for AWS Lambda

May

May 05 – Amazon EC2 DL1 instances Deep Dive

May 05 – Orchestrating Amazon S3 Glacier Deep Archive object retrieval using AWS Step Functions

May 09 – Benefits of migrating to event-driven architecture

May 09 – Debugging AWS Step Functions executions with the new console experience

May 12 – Node.js 16.x runtime now available in AWS Lambda

May 25 – Introducing the PowerShell custom runtime for AWS Lambda

June

Jun 01 – Testing Amazon EventBridge events using AWS Step Functions

Jun 02 – Optimizing your AWS Lambda costs – Part 1

Jun 02 – Optimizing your AWS Lambda costs – Part 2

Jun 02 – Extending PowerShell on AWS Lambda with other services

Jun 02 – Running AWS Lambda functions on AWS Outposts using AWS IoT Greengrass

Jun 14 – Combining Amazon AppFlow with AWS Step Functions to maximize application integration benefits

Jun 14 – Capturing GPU Telemetry on the Amazon EC2 Accelerated Computing Instances

Serverlesspresso goes global

Serverlesspresso in five countries

Serverlesspresso is a serverless event-driven application that allows you to order coffee from your phone.

Since building Serverlesspresso for reinvent 2021, the Developer Advocate team have put in approximately 100 additional development hours to improve the application to make it a multi-tenant event-driven serverless app.

This allowed us to run Serverlesspresso concurrently at five separate events across Europe on a single day in June, serving over 5,000 coffees. Each order is orchestrated by a single Step Functions workflow. To read more about how this application is built:

AWS Heroes EMEA Summit in Milan, Italy

AWS Heros in Milan, Italy 2022

AWS Heroes EMEA Summit in Milan, Italy

The AWS Heroes program recognizes talented experts whose enthusiasm for knowledge-sharing has a real impact within the community. The EMEA-based Heroes gathered for a Summit on June 28 to share their thoughts, providing valuable feedback on topics such as containers, serverless and machine learning.

Serverless workflow collection added to Serverless Land

Serverless Land is a website that is maintained by the Serverless Developer Advocate team to help you learn with workshops, patterns, blogs and videos.

The Developer Advocate team have extended Serverless Land and introduced the new AWS Step Functions workflows collection.

Using the new collection you can explore common patterns built with Step Functions and use the 1-click deploy button to deploy straight into your AWS account.

Serverless Workflows Collection on Serverless Land

Serverless Workflows Collection on Serverless Land

Videos

Serverless Office Hours – Tues 10AM PT

ServerlessLand YouTube Channel

ServerlessLand YouTube Channel

Weekly live virtual office hours. In each session we talk about a specific topic or technology related to serverless and open it up to helping you with your real serverless challenges and issues. Ask us anything you want about serverless technologies and applications.

YouTube: youtube.com/serverlessland
Twitch: twitch.tv/aws

April

May

June

FooBar Serverless YouTube channel

FooBar Serverless YouTube Header

FooBar Serverless Channel

Marcia Villalba frequently publishes new videos on her popular serverless YouTube channel. You can view all of Marcia’s videos at https://www.youtube.com/c/FooBar_codes.

April

May

June

Still looking for more?

The Serverless landing page has more information. The Lambda resources page contains case studies, webinars, whitepapers, customer stories, reference architectures, and even more Getting Started tutorials.

You can also follow the Serverless Developer Advocacy team on Twitter to see the latest news, follow conversations, and interact with the team.

JSON is your friend – Certificate monitoring on Microsoft CA server

Post Syndicated from Tibor Volanszki original https://blog.zabbix.com/json-is-your-friend-certificate-monitoring-on-microsoft-ca-server/20697/

Introduction

By transforming our data into JSON we can achieve great results with Zabbix without the need to have a complex external script logic. The article will provide an example of obtaining a set of master data with a single PowerShell script and then using the Zabbix native functionality to configure low-level discovery and collect the required metrics from the master JSON data set.

In this example, we will implement certificate monitoring by using a Microsoft Windows Certificate Authority server. The goal is to see how many days we have before our internally signed certificates will expire. As an extra, we will be able to filter the monitored items by requestors and template names.

  • Target system version: MS Windows Server 2019 (also tested on 2012)
  • Zabbix server & agent version: 6.0.3 (Other Zabbix versions should be supported too with no or minimal changes)

Core logic

The below diagram shows the concept itself and you will find a detailed guide to implement this step by step in the next sections.

Core workflow


Sample output of Latest Data:

Prerequisites

To start, you will need to deploy Zabbix agent 2 on your target system – confirm that the Zabbix agent can communicate with your Zabbix server.  For the calculated item, we will require local time monitoring. The easiest way is to use the key “system.localtime”, which is already provided by the default Windows OS monitoring template. This item is intentionally not included within the certificate monitoring template to avoid key conflicts.

Below you can find the Powershell script which you have to implement: (name: “certmon_get_certs.ps1″) :

To import module PSPKI you may have to install the module first: https://pkisolutions.com/tools/pspki/

Import-Module PSPKI
$ca_hostname=$args[0]
$start = (Get-Date).AddDays(-7)
Get-IssuedRequest -CertificationAuthority $ca_hostname -Filter "NotAfter -ge $start" | Select-Object -Property RequestID,Request.RequesterName,CommonName,NotAfter,CertificateTemplateOid | ConvertTo-Json -Compress

*for Windows 2012 systems use CertificateTemplate instead of CertificateTemplateOid within this script.

This script expects one parameter, which is your CA server’s FQDN. That name will be loaded into variable “$ca_hostname”, so for testing purposes, you can just replace it with a static entry. Based on your needs you can adjust the “AddDays” parameter. Essentially this means to track back certificates, which are already expired for up to 7 days. Consider a situation, when you miss one just before a long weekend.

Script output

Let’s check the first part of the main command without further piping:

Simple script output without additional properties

As you can see, we are getting some basic information about the certificate. We do not need all the returned lines for the next steps, so it is better to filter the output down. Before we do that, we will use the option called “-Property”, and if you use it with a wildcard character, then it will list all the available parameters for a certificate. If you need more than the basic output, then you can list the extra parameters by using this option. Please be aware, that this will add extra lines compared to the basic output, but it will not do any filtering (the common lines will always remain visible).

Output with “-Property *”

Compare this with the output after using “Select-Object -Property RequestID,Request.RequesterName,CommonName,NotAfter,CertificateTemplateOid”

Output after using property filters

This looks good for us, but it is still not machine-readable. Let’s add the JSON output conversion, but without the “-Compress” option first:

JSON converted compressed output

What is especially great in this conversion, is that the “CertificateTemplateOid” part got 2 child entries, so later we can target the “FriendlyName” entry for discovery. Lastly, adding the “-Compress” option will help us to use less space by removing the white spaces and newlines from the output.

Depending on the amount of issued and valid certificates the output can be huge, especially without any filtering and compression (even megabytes in size). The current Zabbix server version (6.0.3) supports only 512KB as item output, this is why the output reduction is crucial. In my example the text data of one certificate takes approx 300 bytes, so 512KB will result in a limit of 1747 certificates. In case you are expecting more than this amount of ACTIVE certs within your CA, then I recommend cloning the PS script and adding some extra filtering to each variant (filter for template name / requestor / OU) and adjusting the template accordingly. Another approach would be to monitor the certificates, which will expire in the coming N days in case you have too many entries.

Agent configuration

To run the defined script, you have to allow it within the Zabbix Agent configuration file. You can either modify the main config or just define the extra lines within an additional file under zabbix_agent2.d folder. Below you can find the additional Zabbix agent configuration lines:

AllowKey=system.run[powershell -NoProfile -ExecutionPolicy bypass -File "C:\Program Files\Zabbix Agent 2\scripts\certmon_get_certs.ps1" *]
Timeout=20

The wildcard character at the end is needed to specify any hostname, which is expected by the script. The default timeout is 3 seconds, which is unfortunately insufficient. Importing Module PSPKI alone takes a few seconds, so the overall execution time is somewhere between 5 and 10 seconds. My assumption is that more certificates will not increase this significantly, but some extra seconds can be expected. 20 seconds sounds like a safe bet.

We are done with the pre-requisites, now we can start the real work!

Template

Let’s create our template from scratch.

  • Name: “Microsoft Certificate Authority – Certificate monitoring”
  • Host group: any group will do
Master item

We need only the following item:

  • Name: “Get certificate data”
  • Type: “Zabbix agent / Zabbix agent (active)” – for testing I recommend the passive mode
  • Key: system.run[powershell -NoProfile -ExecutionPolicy bypass -File “C:\Program Files\Zabbix Agent 2\scripts\certmon_get_certs.ps1″ {HOST.DNS}]”
  • Type of information: Text”
  • Update interval: 6h”
  • History: 1d”
Item configuration example

Assign the template to a CA server and you can test the item already. The result should be a big block of data in JSON format. To review the output I recommend the following external websites:

The latter one is especially helpful to find the correct JSON path, which we will require in the upcoming steps.

Item output sample
Measuring the script execution time

To measure the execution time, you can test it by using Zabbix get, which can connect to your Zabbix agent and request the item value over a CLI:

time zabbix_get -s [CA_SERVER_FQDN] --tls-connect psk --tls-psk-identity [PSK_IDEN] --tls-psk-file [PSK_FILE] -k 'system.run[powershell -NoProfile -ExecutionPolicy bypass -File "C:\Program Files\Zabbix Agent 2\scripts\certmon_get_certs.ps1" [CA_SERVER_FQDN]]'

This will give you the normal output and the execution time info:

real   0m5.771s
user   0m0.003s
sys    0m0.005s

To test the size of the output, redirect your command output to any file and measure it by “du -sk” to get it in kilobytes.

zabbix_get -s [CA_SERVER_FQDN] --tls-connect psk --tls-psk-identity [PSK_IDEN] --tls-psk-file [PSK_FILE] -k 'system.run[powershell -NoProfile -ExecutionPolicy bypass -File "C:\Program Files\Zabbix Agent 2\scripts\certmon_get_certs.ps1" [CA_SERVER_FQDN]]' > output.test
du -sk output.test
Low-level discovery rule definition

If the above part works just fine, then proceed with defining the low-level discovery rule as per the below example:

  • Name: Certificate discovery”
  • Type: Dependent item”
  • Key: certificate.discovery”
  • Master item: select our previously created item
  • Keep lost resources period: “6h”
Discovery rule configuration example

Then switch to LLD macros and define the below lines:

  • “{#COMMON_NAME}”: $.CommonName”
  • “{#REQUESTOR_NAME}”: $.[“Request.RequesterName”]”
  • “{#REQUEST_ID}”: $.RequestID”
  • “{#TEMPLATE_NAME1}”: “$.CertificateTemplate”
  • “{#TEMPLATE_NAME2}”: $.CertificateTemplateOid.FriendlyName”
Discovery rule LLD macro definitions

Some explanation:
The first LLD macro is self-explanatory – it obtains the certificate’s common name. The second one is also trivial, except the special marking, which is required due to the dot character in the middle. The third one is also simple, but the last 2 lines are somewhat special. If you have a fresh OS version, then most probably you will need only the 5th line without the 4th. In case you have a Windows server 2012 system, then you will need only the 4th line without the 5th. Why? Because of Windows 🙂 For testing you can keep both and then later remove the unnecessary one as well as the number suffix.

Now you are ready to create your item prototypes and this is where the real magic starts.

Certificate expiration date item prototype – Dependent item

Define the new item prototype as follows:

  • Name: Certificate [ ID #{#REQUEST_ID} ] {#COMMON_NAME} – Expiration date”
  • Type: Dependent item”
  • Key: certificate.expiration_date[{#REQUEST_ID}]”
  • Type of information: “Numeric (unsigned)”
  • Master item: pick the previously created master item
  • Units: unixtime”
  • History: 1d”
Item prototype example

Tags

  • cert_requestor“:  “{{#REQUESTOR_NAME}.regsub(“\\(\w+)”, “\1″)}”
  • cert_template1“: {#TEMPLATE_NAME1}”
  • cert_template2“: “{#TEMPLATE_NAME2}”
  • “scope”: certifcate / expiration date”
Item prototype tag definitions

As mentioned previously, it makes sense to keep only one template tag later, but for now, such an approach is fine.

The first line requires some explanation:
The requestor name starts with a domain prefix followed by 2 backslashes. If you are submitting CSRs from different domains to this CA server, then you can remove the extra formatting, but in a simple setup, we do not need the domain prefix, since it will be the same for all requestors.
Example: “DOMAIN\\someuser → someuser”

Preprocessing

  • JSONPath: $[?(@.RequestID == {#REQUEST_ID})].NotAfter”
  • Regular expression: (\d+) \1″
  • Custom multiplier: 0.001″
  • Discard unchanged with heartbeat: 1d”
Item prototype preprocessing step definitions

Explanation:
Since this item is a dependent item, it will point back to our master item, which returns a data block in JSON. Due to the nature of the discovery definitions, we are running a while loop, which is already loaded with our variables (the LLD macros). Therefore the “{#REQUEST_ID}” already has a numerical value within each cycle. With this number, we can go back to the original item and target that exact certificate, which has the same ID. Then we are interested in the NotAfter value considering the selected certificate.

You can find many other examples within Zabbix documentation: jsonpath functionality
At this point, we have the extracted value of the expiration date, but it is quite raw at the moment:

\/Date(1673594922000)\/

In the next step, we are taking the numerical part and then we have to apply a multiplier of 0.001 since by default the time is given in milliseconds. After this, we have an integer, which can be converted to a human-readable form by using the unit unixtime”. The last line is just a standard discard unchanged entry.

Since our discovery object is also a dependent item, you have to execute our master item to run the low-level discovery rule. The first execution will result in the creation of your certificate items and only the second execution of the master item will execute them all at once. After this point, you should have N certificate objects created and each should have a valid expiration date. This is already something, for which you could define a trigger, but personally, I prefer to see the remaining days and not the exact date itself.

Days to expire item prototype – Calculated item

Let’s define yet another item prototype as follows:

  • Name: Certificate [ ID #{#REQUEST_ID} ] {#COMMON_NAME} – Days to expire”
  • Type: Calculated”
  • Key: certificate.remaining_days[{#REQUEST_ID}]”
  • Type of information: Numeric (float)”
  • Formula: (last(//certificate.expiration_date[{#REQUEST_ID}])-last(//system.localtime))/86400″
  • Update interval: 6h”
  • History: 1d”
Remaining days to expiration item prototype example

Please do not forget, that you require an existing local time item, which is not provided by this template (but available within Windows by Zabbix agent*” template).

Tags:

Copy the same tags from the first prototype and only change the last tag to scope: certificate / remaining days

Remaining days to expiration item prototype tag definitions

Preprocessing:

  • Regular expression: ^(-?\d+)”: “\1”
  • Discard unchanged with heartbeat: 1d”
Remaining days to expiration item prototype preprocessing steps

As a result, this will give you a simple number with the remaining days to the expiration date. Then you can decide which item to use in the trigger to implement proper alerting based on your needs.

Certificate expiration trigger prototype

In my case I am just using a simple trigger expression for the remaining days:

  • Name:Certificate will expire within 30 days – {#COMMON_NAME}”
  • Operational data:Expires in {ITEM.LASTVALUE1} days”
  • Severity: up to you
  • Expression:last(/Microsoft Certificate Authority – Certificate monitoring/certificate.remaining_days[{#REQUEST_ID}])<=30″
Trigger prototype example

Tags:

  • cert_cn: “{#COMMON_NAME}”
  • cert_id“:{#REQUEST_ID}”
Trigger prototype tag definitions

When you check the relevant certificates in the Latest data section, then you can do the filtering by the item-based tags. Since we are adding the cert CN and ID only to the trigger, these will appear only in case of alerts. Based on your needs you can implement additional tags, you just have to adjust the PS script to show more properties. When you extend the input data, please always consider the 512KB limit or the configured timeout.

The logic defined in this example can be applied to any JSON formatted data.

Enjoy!

The post JSON is your friend – Certificate monitoring on Microsoft CA server appeared first on Zabbix Blog.

Extending PowerShell on AWS Lambda with other services

Post Syndicated from Julian Wood original https://aws.amazon.com/blogs/compute/extending-powershell-on-aws-lambda-with-other-services/

This post expands on the functionality introduced with the PowerShell custom runtime for AWS Lambda. The previous blog explains how the custom runtime approach makes it easier to run Lambda functions written in PowerShell.

You can add additional functionality to your PowerShell serverless applications by importing PowerShell modules, which are shareable packages of code. Build your own modules or import from the wide variety of existing vendor modules to manage your infrastructure and applications.

You can also take advantage of the event-driven nature of Lambda, which allows you to run Lambda functions in response to events. Events can include an object being uploaded to Amazon S3, a message placed on an Amazon SQS queue, a scheduled task using Amazon EventBridge, or an HTTP request from Amazon API Gateway. Lambda functions support event triggers from over 200 AWS services and software as a service (SaaS) applications.

Adding PowerShell modules

You can add PowerShell modules from a number of locations. These can include modules from the AWS Tools for PowerShell, from the PowerShell Gallery, or your own custom modules. Lambda functions access these PowerShell modules within specific folders within the Lambda runtime environment.

You can include PowerShell modules via Lambda layers, within your function code package, or container image. When using .zip archive functions, you can use layers to package and share modules to use with your functions. Layers reduce the size of uploaded deployment archives and can make it faster to deploy your code. You can attach up to five layers to your function, one of which must be the PowerShell custom runtime layer. You can include multiple modules per layer.

The custom runtime configures PowerShell’s PSModulePath environment variable, which contains the list of folder locations to search to find modules. The runtime searches the folders in the following order:

1. User supplied modules as part of function package

You can include PowerShell modules inside the published Lambda function package in a /modules subfolder.

2. User supplied modules as part of Lambda layers

You can publish Lambda layers that include PowerShell modules in a /modules subfolder. This allows you to share modules across functions and accounts. Lambda extracts layers to /opt within the Lambda runtime environment so the modules are located in /opt/modules. This is the preferred solution to use modules with multiple functions.

3. Default/user supplied modules supplied with PowerShell

You can also include additional default modules and add them within a /modules folder within the PowerShell custom runtime layer.

For example, the following function includes four Lambda layers. One layer includes the custom runtime. Three additional layers include further PowerShell modules; the AWS Tools for PowerShell, your own custom modules, and third-party modules. You can also include additional modules with your function code.

Lambda layers

Lambda layers

Within your PowerShell code, you can load modules during the function initialization (init) phase. This initializes the modules before the handler function runs, which speeds up subsequent warm-start invocations.

Adding modules from the AWS Tools for PowerShell

This post shows how to use the AWS Tools for PowerShell to manage your AWS services and resources. The tools are packaged as a set of PowerShell modules that are built on the functionality exposed by the AWS SDK for .NET. You can follow similar packaging steps to add other modules to your functions.

The AWS Tools for PowerShell are available as three distinct packages:

The AWS.Tools package is the preferred modularized version, which allows you to load only the modules for the services you want to use. This reduces package size and function memory usage. The AWS.Tools cmdlets support auto-importing modules without having to call Import-Module first. However, specifically importing the modules during the function init phase is more efficient and can reduce subsequent invoke duration. The AWS.Tools.Common module is required and provides cmdlets for configuration and authentication that are not service specific.

The accompanying GitHub repository contains the code for the custom runtime, along with a number of example applications. There are also module build instructions for adding a number of common PowerShell modules as Lambda layers, including AWS.Tools.

Building an event-driven PowerShell function

The repository contains an example of an event-driven demo application that you can build using serverless services.

A clothing printing company must manage its t-shirt size and color inventory. The printers store t-shirt orders for each day in a CSV file. The inventory service is one service that must receive the CSV file. It parses the file and, for each order, records the details to manage stock deliveries.

The stores upload the files to S3. This automatically invokes a PowerShell Lambda function, which is configured to respond to the S3 ObjectCreated event. The Lambda function receives the S3 object location as part of the $LambdaInput event object. It uses the AWS Tools for PowerShell to download the file from S3. It parses the contents and, for each line in the CSV file, sends the individual order details as an event to an EventBridge event bus.

In this example, there is a single rule to log the event to Amazon CloudWatch Logs to show the received event. However, you could route each order, depending on the order details, to different targets. For example, you can send different color combinations to SQS queues, which the dyeing service can use to order dyes. You could send particular size combinations to another Lambda function that manages cloth orders.

Example event-driven application

Example event-driven application

The previous blog post shows how to use the AWS Serverless Application Model (AWS SAM) to build a Lambda layer, which includes only the AWS.Tools.Common module to run Get-AWSRegion. To build a PowerShell application to process objects from S3 and send events to EventBridge, you can extend this functionality by also including the AWS.Tools.S3 and AWS.Tools.EventBridge modules in a Lambda layer.

Lambda layers, including S3 and EventBridge

Lambda layers, including S3 and EventBridge

Building the AWS Tools for PowerShell layer

You could choose to add these modules and rebuild the existing layer. However, the example in this post creates a new Lambda layer to show how you can have different layers for different module combinations of AWS.Tools. The example also adds the Lambda layer Amazon Resource Name (ARN) to AWS Systems Manager Parameter Store to track deployed layers. This allows you to reference them more easily in infrastructure as code tools.

The repository includes build scripts for both Windows and non-Windows developers. Windows does not natively support Makefiles. When using Windows, you can use either Windows Subsystem for Linux (WSL)Docker Desktop, or native PowerShell.

When using Linux, macOS, WSL, or Docker, the Makefile builds the Lambda layers. After downloading the modules, it also extracts the additional AWS.Tools.S3 and AWS.Tools.EventBridge modules.

# Download AWSToolsLayer module binaries
curl -L -o $(ARTIFACTS_DIR)/AWS.Tools.zip https://sdk-for-net.amazonwebservices.com/ps/v4/latest/AWS.Tools.zip
mkdir -p $(ARTIFACTS_DIR)/modules

# Extract select AWS.Tools modules (AWS.Tools.Common required)
unzip $(ARTIFACTS_DIR)/AWS.Tools.zip 'AWS.Tools.Common/**/*' -d $(ARTIFACTS_DIR)/modules/
unzip $(ARTIFACTS_DIR)/AWS.Tools.zip 'AWS.Tools.S3/**/*' -d $(ARTIFACTS_DIR)/modules/
unzip $(ARTIFACTS_DIR)/AWS.Tools.zip 'AWS.Tools.EventBridge/**/*' -d $(ARTIFACTS_DIR)/modules/

When using native PowerShell on Windows to build the layer, the build-AWSToolsLayer.ps1 script performs the same file copy functionality as the Makefile. You can use this option for Windows without WSL or Docker.

### Extract entire AWS.Tools modules to stage area but only move over select modules
…
Move-Item "$PSScriptRoot\stage\AWS.Tools.Common" "$PSScriptRoot\modules\" -Force
Move-Item "$PSScriptRoot\stage\AWS.Tools.S3" "$PSScriptRoot\modules\" -Force
Move-Item "$PSScriptRoot\stage\AWS.Tools.EventBridge" "$PSScriptRoot\modules\" -Force

The Lambda function code imports the required modules in the function init phase.

Import-Module "AWS.Tools.Common"
Import-Module "AWS.Tools.S3"
Import-Module "AWS.Tools.EventBridge"

For other combinations of AWS.Tools, amend the example build-AWSToolsLayer.ps1 scripts to add the modules you require. You can use a similar download and copy process, or PowerShell’s Save-Module to build layers for modules from other locations.

Building and deploying the event-driven serverless application

Follow the instructions in the GitHub repository to build and deploy the application.

The demo application uses AWS SAM to deploy the following resources:

  1. PowerShell custom runtime.
  2. Additional Lambda layer containing the AWS.Tools.Common, AWS.Tools.S3, and AWS.Tools.EventBridge modules from AWS Tools for PowerShell. The layer ARN is stored in Parameter Store.
  3. S3 bucket to store CSV files.
  4. Lambda function triggered by S3 upload.
  5. Custom EventBridge event bus and rule to send events to CloudWatch Logs.

Testing the event-driven application

Use the AWS CLI or AWS Tools for PowerShell to copy the sample CSV file to S3. Replace BUCKET_NAME with your S3 SourceBucket Name from the AWS SAM outputs.

AWS CLI

aws s3 cp .\test.csv s3://BUCKET_NAME

AWS Tools for PowerShell

Write-S3Object -BucketName BUCKET_NAME -File .\test.csv

The S3 file copy action generates an S3 notification event. This invokes the PowerShell Lambda function, passing the S3 file location details as part of the function $LambdaInput event object.

The function downloads the S3 CSV file, parses the contents, and sends the individual lines to EventBridge, which logs the events to CloudWatch Logs.

Navigate to the CloudWatch Logs group /aws/events/demo-s3-lambda-eventbridge.

You can see the individual orders logged from the CSV file.

EventBridge logs showing CSV lines

EventBridge logs showing CSV lines

Conclusion

You can extend PowerShell Lambda applications to provide additional functionality.

This post shows how to import your own or vendor PowerShell modules and explains how to build Lambda layers for the AWS Tools for PowerShell.

You can also take advantage of the event-driven nature of Lambda to run Lambda functions in response to events. The demo application shows how a clothing printing company builds a PowerShell serverless application to manage its t-shirt size and color inventory.

See the accompanying GitHub repository, which contains the code for the custom runtime, along with additional installation options and additional examples.

Start running PowerShell on Lambda today.

For more serverless learning resources, visit Serverless Land.

Introducing the PowerShell custom runtime for AWS Lambda

Post Syndicated from Julian Wood original https://aws.amazon.com/blogs/compute/introducing-the-powershell-custom-runtime-for-aws-lambda/

The new PowerShell custom runtime for AWS Lambda makes it even easier to run Lambda functions written in PowerShell to process events. Using this runtime, you can run native PowerShell code in Lambda without having to compile code, which simplifies deployment and testing. You can also now view PowerShell code in the AWS Management Console, and have more control over function output and logging.

Lambda has supported running PowerShell since 2018. However, the existing solution uses the .NET Core runtime implementation for PowerShell. It uses the additional AWSLambdaPSCore modules for deployment and publishing, which require compiling the PowerShell code into C# binaries to run on .NET. This adds additional steps to the development process.

This blog post explains the benefits of using a custom runtime and information about the runtime options. You can deploy and run an example native PowerShell function in Lambda.

PowerShell custom runtime benefits

The new custom runtime for PowerShell uses native PowerShell, instead of compiling PowerShell and hosting it on the .NET runtime. Using native PowerShell means the function runtime environment matches a standard PowerShell session, which simplifies the development and testing process.

You can now also view and edit PowerShell code within the Lambda console’s built-in code editor. You can embed PowerShell code within an AWS CloudFormation template, or other infrastructure as code tools.

PowerShell code in Lambda console

PowerShell code in Lambda console

This custom runtime returns everything placed on the pipeline as the function output, including the output of Write-Output. This gives you more control over the function output, error messages, and logging. With the previous .NET runtime implementation, your function returns only the last output from the PowerShell pipeline.

Building and packaging the custom runtime

The custom runtime is based on Lambda’s provided.al2 runtime, which runs in an Amazon Linux environment. This includes AWS credentials from an AWS Identity and Access Management (IAM) role that you manage. You can build and package the runtime as a Lambda layer, or include it in a container image. When packaging as a layer, you can add it to multiple functions, which can simplify deployment.

The runtime is based on the cross-platform PowerShell Core. This means that you can develop Lambda functions for PowerShell on Windows, Linux, or macOS.

You can build the custom runtime using a number of tools, including the AWS Command Line Interface (AWS CLI), AWS Tools for PowerShell, or with infrastructure as code tools such as AWS CloudFormation, AWS Serverless Application Model (AWS SAM), Serverless Framework, and AWS Cloud Development Kit (AWS CDK).

Showing the PowerShell custom runtime in action

In the following demo, you learn how to deploy the runtime and explore how it works with a PowerShell function.

The accompanying GitHub repository contains the code for the custom runtime, along with additional installation options and a number of examples.

This demo application uses AWS SAM to deploy the following resources:

  1. PowerShell custom runtime based on provided.al2 as a Lambda layer.
  2. Additional Lambda layer containing the AWS.Tools.Common module from AWS Tools for PowerShell.
  3. Both layers store their Amazon Resource Names (ARNs) as parameters in AWS Systems Manager Parameter Store which can be referenced in other templates.
  4. Lambda function with three different handler options.

To build the custom runtime and the AWS Tools for PowerShell layer for this example, AWS SAM uses a Makefile. This downloads the specified version of PowerShell from GitHub and the AWSTools.

Windows does not natively support Makefiles. When using Windows, you can use either Windows Subsystem for Linux (WSL), Docker Desktop, or native PowerShell.

Pre-requisites:

Clone the repository and change into the example directory

git clone https://github.com/awslabs/aws-lambda-powershell-runtime
cd examples/demo-runtime-layer-function

Use one of the following Build options, A, B, C, depending on your operating system and tools.

A) Build using Linux or WSL

Build the custom runtime, Lambda layer, and function packages using native Linux or WSL.

sam build --parallel

sam build –parallel

B) Build using Docker

You can build the custom runtime, Lambda layer, and function packages using Docker. This uses a Linux-based Lambda-like Docker container to build the packages. Use this option for Windows without WSL or as an isolated Mac/Linux build environment.

sam build --parallel --use-container

sam build –parallel –use-container

C) Build using PowerShell for Windows

You can use native PowerShell for Windows to download and extract the custom runtime and Lambda layer files. This performs the same file copy functionality as the Makefile. It adds the files to the source folders rather than a build location for subsequent deployment with AWS SAM. Use this option for Windows without WSL or Docker.

.\build-layers.ps1
Build layers using PowerShell

Build layers using PowerShell

Test the function locally

Once the build process is complete, you can use AWS SAM to test the function locally.

sam local invoke

This uses a Lambda-like environment to run the function locally and returns the function response, which is the result of Get-AWSRegion.

sam local invoke

sam local invoke

Deploying to the AWS Cloud

Use AWS SAM to deploy the resources to your AWS account. Run a guided deployment to set the default parameters for the first deploy.

sam deploy -g

For subsequent deployments you can use sam deploy.

Enter a Stack Name and accept the remaining initial defaults.

AWS SAM deploy --g

AWS SAM deploy –g

AWS SAM deploys the infrastructure and outputs the details of the resources.

AWS SAM resources

AWS SAM resources

View, edit, and invoke the function in the AWS Management Console

You can view, edit code, and invoke the Lambda function in the Lambda Console.

Navigate to the Functions page and choose the function specified in the sam deploy Outputs.

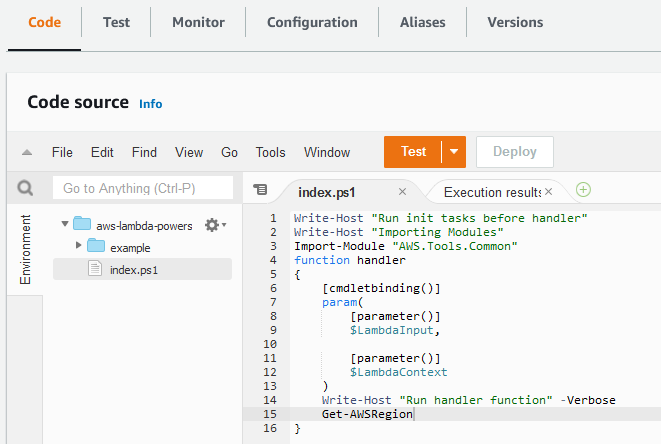
Using the built-in code editor, you can view the function code.

This function imports the AWS.Tools.Common module during the init process. The function handler runs and returns the output of Get-AWSRegion.

To invoke the function, select the Test button and create a test event. For more information on invoking a function with a test event, see the documentation.

You can see the results in the Execution result pane.

Lambda console test

Lambda console test

You can also view a snippet of the generated Function Logs below the Response. View the full logs in Amazon CloudWatch Logs. You can navigate directly via the Monitor tab.

Invoke the function using the AWS CLI

From a command prompt invoke the function. Amend the --function-name and --region values for your function. This should return "StatusCode": 200 for a successful invoke.

aws lambda invoke --function-name "aws-lambda-powershell-runtime-Function-6W3bn1znmW8G" --region us-east-1 invoke-result

View the function results which are outputted to invoke-result.

cat invoke-result
cat invoke result

cat invoke result

Invoke the function using the AWS Tools for PowerShell

You can invoke the Lambda function using the AWS Tools for PowerShell and capture the response in a variable. The response is available in the Payload property of the $Response object, which can be read using the .NET StreamReader class.

$Response = Invoke-LMFunction -FunctionName aws-lambda-powershell-runtime-PowerShellFunction-HHdKLkXxnkUn -LogType Tail
[System.IO.StreamReader]::new($Response.Payload).ReadToEnd()

This outputs the result of AWS-GetRegion.

Cleanup

Use AWS SAM to delete the AWS resources created by this template.

sam delete

PowerShell runtime information

Variables

The runtime defines the following variables which are made available to the Lambda function.

  1. $LambdaInput: A PSObject that contains the Lambda function input event data.
  2. $LambdaContext: An object that provides methods and properties with information about the invocation, function, and runtime environment. For more information, see the GitHub repository.

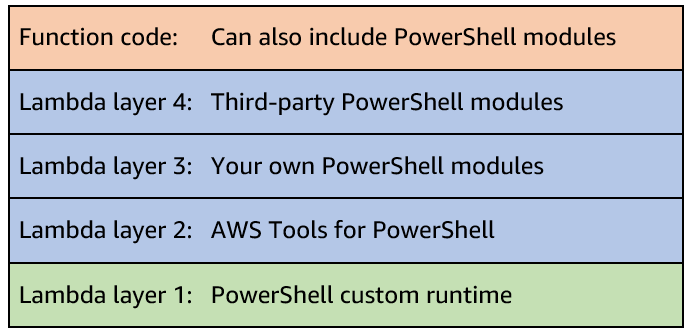
PowerShell module support

You can include additional PowerShell modules either via a Lambda Layer, or within your function code package, or container image. Using Lambda layers provides a convenient way to package and share modules that you can use with your Lambda functions. Layers reduce the size of uploaded deployment archives and make it faster to deploy your code.

The PSModulePath environment variable contains a list of folder locations that are searched to find user-supplied modules. This is configured during the runtime initialization. Folders are specified in the following order:

  1. Modules as part of function package in a /modules subfolder.
  2. Modules as part of Lambda layers in a /modules subfolder.
  3. Modules as part of the PowerShell custom runtime layer in a /modules subfolder.

Lambda handler options

There are three different Lambda handler formats supported with this runtime.

<script.ps1>

You provide a PowerShell script that is the handler. Lambda runs the entire script on each invoke.

<script.ps1>::<function_name>

You provide a PowerShell script that includes a PowerShell function name. The PowerShell function name is the handler. The PowerShell runtime dot-sources the specified <script.ps1>. This allows you to run PowerShell code during the function initialization cold start process. Lambda then invokes the PowerShell handler function <function_name>. On subsequent invokes using the same runtime environment, Lambda invokes only the handler function <function_name>.

Module::<module_name>::<function_name>

You provide a PowerShell module. You include a PowerShell function as the handler within the module. Add the PowerShell module using a Lambda Layer or by including the module in the Lambda function code package. The PowerShell runtime imports the specified <module_name>. This allows you to run PowerShell code during the module initialization cold start process. Lambda then invokes the PowerShell handler function <function_name> in a similar way to the <script.ps1>::<function_name> handler method.

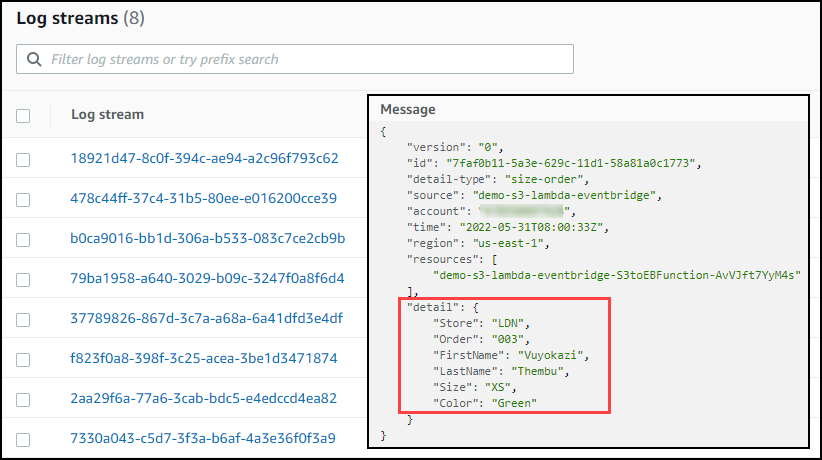
Function logging and metrics

Lambda automatically monitors Lambda functions on your behalf and sends function metrics to Amazon CloudWatch. Your Lambda function comes with a CloudWatch Logs log group and a log stream for each instance of your function. The Lambda runtime environment sends details about each invocation to the log stream, and relays logs and other output from your function’s code. For more information, see the documentation.

Output from Write-Host, Write-Verbose, Write-Warning, and Write-Error is written to the function log stream. The output from Write-Output is added to the pipeline, which you can use with your function response.

Error handling

The runtime can terminate your function because it ran out of time, detected a syntax error, or failed to marshal the response object into JSON.

Your function code can throw an exception or return an error object. Lambda writes the error to CloudWatch Logs and, for synchronous invocations, also returns the error in the function response output.

See the documentation on how to view Lambda function invocation errors for the PowerShell runtime using the Lambda console and the AWS CLI.

Conclusion

The PowerShell custom runtime for Lambda makes it even easier to run Lambda functions written in PowerShell.

The custom runtime runs native PowerShell. You can view, and edit your code within the Lambda console. The runtime supports a number of different handler options, and you can include additional PowerShell modules.

See the accompanying GitHub repository which contains the code for the custom runtime, along with installation options and a number of examples. Start running PowerShell on Lambda today.

For more serverless learning resources, visit Serverless Land.

Acknowledgements

This custom runtime builds on the work of Norm Johanson, Kevin Marquette, Andrew Pearce, Jonathan Nunn, and Afroz Mohammed.