Post Syndicated from Explosm.net original https://explosm.net/comics/dont-wash
New Cyanide and Happiness Comic
Post Syndicated from Explosm.net original https://explosm.net/comics/dont-wash
New Cyanide and Happiness Comic
Post Syndicated from Brian Beach original https://aws.amazon.com/blogs/devops/watch-the-recordings-from-aws-developer-day-2025/
Software development is undergoing a seismic shift, driven by the transformative impact of generative AI. This powerful technology is redefining how developers work, what they build, and who can become a developer. At the AWS Developer Day 2025, we discussed how AWS is empowering developers to embrace this evolution through their generative AI developer tools. Developers got a first-hand look at exciting product launches, updates, and insights from AWS leaders on the future of software development. See the session list below.

This free, virtual event inspired developers of all backgrounds about the possibilities of generative AI for their work. Through use case demos, leadership insights, and community spotlights, attendees learned how AWS is making it faster and easier to build and scale quality software in the cloud.
If you could not attend AWS Developer Day 2025, you can still watch the recordings on YouTube:
The AWS Developer Day 2025 showcased the transformative power of generative AI for software development. Developers learned how AWS is empowering them to embrace this evolution through their generative AI developer tools, making it faster and easier to build and scale quality software in the cloud. From boosting productivity across the SDLC to accelerating application modernization, the event highlighted the exciting possibilities that generative AI offers for the future of software development. As the industry continues to evolve, AWS is committed to equipping developers with the tools and insights they need to thrive in this changing landscape.
Post Syndicated from Cliff Robinson original https://www.servethehome.com/kioxia-lc9-is-the-122-88tb-pcie-gen5-nvme-ssd/
The Kioxia LC9 offers 122.88TB of PCIe Gen5 NVMe storage in a 2.5″ form factor for high-density and high-performance AI storage arrays
The post Kioxia LC9 is the 122.88TB PCIe Gen5 NVMe SSD appeared first on ServeTheHome.
Post Syndicated from original https://www.toest.bg/chuzhdoezikovoto-obuchenie-v-uchilishte-maksimalno-neefektivno-za-da-e-udobno-na-vsichki/

Има една обществена тайна, която се обсъжда главно от родители на потърпевши ученици, но за съжаление, е стигнала до изключително малко учебни институции. И това – при положение че засегнатите от нея не са единични случаи. Става въпрос за чуждоезиковото обучение в цели три години от средношколския път на учениците в България – от 5. до 7. клас. Училищата като главни изпълнители на образователната услуга услужливо мълчат, въпреки че никоя наредба не забранява изрично да действат адекватно.
В стотици училища в страната изучаването на чужд език започва във втори клас с 64 учебни часа за цялата учебна година – така както е предвидено в Рамковия учебен план. В трети клас часовете стават 96, в четвърти – 102. Общо за трите първи години изучаване на чужд език учениците разполагат с 262 учебни часа по първия си чужд език.
В 5. и 6. клас часовете по чужд език на година остават по 102, в 7. клас са 108. Общо за трите години учебните часове са 312. Това е абсолютният минимум, предвиден в учебните планове, без да смятаме всички възможности, които предлага обучението по факултативен учебен предмет и избирателен учебен предмет, които най-често се използват за допълнителни часове по профилиращ предмет и чужд език.
Оставяме настрани факта, че този пръв чужд език най-често не може да бъде избран свободно – все пак образованието не е концерт по желание и това ще ви бъде напомняно от почти всяко общинско училище, с което ви събере животът. Концентрираме се върху тези общо 574 учебни часа, или 22 960 минути.
Да приемем, че първият чужд език на детето ви в училище е английски. Не сте имали възможността да го избирате, но и няма нищо лошо в това – това е съвременният универсален световен език.
В края на 7. клас се очаква учениците да са достигнали ниво А2. Общият брой на часовете през годините, разделен на 120 (колкото е нормативът за изучаване на материала за едно ниво), надвишава сумата от продължителността на общо 4 нива, но да приемем, че грубо отговаря на нея. Да обобщим: в програмата, заложена от Министерството на образованието и науката (МОН) се приема, че са нужни 6 учебни години за 4 нива (А 1.1., А 1.2., А 2.1. и А 2.2.). Това обхваща приблизително възрастта от 8 до 14 години.
Покриването на ниво А2, разделено по четирите компетенции, които са заложени и в учебната програма на МОН, означава следното:
Въпреки че съвременните изследвания разширяват успешния период за научаване на чужд език до около 17-годишна възраст, те затвърждават тезата, че за да се достигне най-високото ниво на владеене, е препоръчително човек да започне преди десетата си година. Тогава дяловете от мозъка, които са основна движеща сила за езиковите ни умения, преминават през пиковия си период на продуктивност. През началния етап на образованието способностите на децата в познавателните процеси, творчеството, дивергентното мислене са в оптимално състояние.
Множество изследвания доказват, че е възможно да има първични явления, например промяна на произношение или синтаксис от езици (език 1 към език 2 и обратно), но те са само временни и не влошават владеенето на първия език. По-важното е доказателството, че владеенето на повече от един език подобрява не само езиковите, но и когнитивните способности. Така двуезичните хора показват по-добри изпълнителски умения (executive functions) – това е когнитивният процес, който организира мислите и дейностите. Тези хора са по-способни да работят в многозадачен режим, имат по-добро внимание и концентрация, по-успешно филтрират информация. Установено е и че владеенето на повече от един език в по-напреднала възраст забавя или спира когнитивния упадък.
Накратко, от биологична гледна точка в периода от 6 до 13 години е най-ползотворно да се въведе чужд език.
Децата в този период могат да разбират чуждия език наравно с родния си в петте основни умения – четене, писане, слушане, говорене и мултимодално учене (филми, видеа и извличане на информация от тях). Едно прелюбопитно изследване дава отговор на въпроса коя е най-подходящата възраст да се започне изучаването на английски език като чужд, за да се достигне до ниво на майчин език: най-късно на 10.
Освен силната биологична обусловеност на ученето на чужд език съществува и социална – заради технологии, музика, игри, пътувания, изобщо всичко, което ни заобикаля в света. Много от децата на 80-те и 90-те години на миналия век си спомнят комичното прохождане в английския език с ваденето на текстове на песни, сублимирали в изпълнението на небезизвестната песен на Марая Кери – „Кен лий“.
В днешно време достъпът до автентичния съвременен английски език е буквално навсякъде – социални мрежи, недублирани телевизионни канали, приложения за телефони и таблети. Светът е съвсем различен и децата (често и абсолютно неконтролирано) проговарят едновременно на майчиния си език и на поне още един, най-често именно английски. Добавяме и възможностите за пътуване, за живеене на различно от родното място, смесените бракове, многоезичната семейна среда – все повече деца са билингви от раждането си. И не на последно място, ранното чуждоезиково обучение е една от първите грижи на почти всички родители. За справка може да се огледате колко широка палитра от услуги се предлагат в частния сектор, когато става въпрос за чуждоезиково обучение. Именно защото това е бъдещето. Но то още не е влязло в държавната образователна система.
Училищното образование в България е задължително и безплатно. Това обаче някак автоматично започна да означава, че ползвателят му няма право на претенции за качеството. Ако имате късмет, ще попаднете на учители, които си обичат работата. Може обаче да нямате този късмет и трябва да слушате как образованието „не е концерт по желание“ и ако искате нещо различно, „отидете в частно училище“. Не знам дали директори и учители си дават сметка за собственото си омаловажаване, когато предлагат този единствен според тях изход.
Харизаният кон всъщност чисто регулационно (закони, наредби, програми и всички мерки, посочвани винаги като ограничителни) е много гъвкав. И това го доказват десетките частни училища, които са задължени да спазват същите тези регулации, но предлагат много по-качествена услуга.
Ако влезете в произволен 5., 6. или 7. клас, ще установите, че една представителна част от класа владее чуждия език на по-високо ниво от това, което изисква годишната учебна програма от него. Децата, които са минали през езикови школи от малки, гледат вече филми без дублаж или субтитри, четат и общуват свободно на английски език, са длъжни да минават отново през материал (граматика и лексика), който владеят добре отдавна. Детето няма право да бъде освободено от този час. Може единствено да се надявате учителят да прояви разбиране и да се споразумеете ученикът да участва във всяко писмено и устно изпитване, но в регулярните часове да си носи работни листове от извънучилищното си обучение и кротко да се упражнява по тях, вместо да повтаря това, което вече знае. Тоест да използва разумно огромното количество часове.
Ако това изключително рядко щастие не ви се усмихне, то ще преминете цялата йерархия до директора, за да ви бъде обяснено, че има програма, има наредба и вие сте никой да искате специално отношение.
Ако позволим на един, ще дойдат и други, които ще поискат същото.
Уви, никой не си задава въпроса, ако дойдат повече от петима с едно и също питане, проблемът в тях ли е, или е извън тях? Естествено, образователната система не вижда проблема в себе си. Най-често отношенията между по-напреднали езиково ученици и преподавателите им ескалират в междуличностни конфликти и наказателни оценки, за да „се вземе в ръце“ многознайкото. Не помагат дори доказателства като външно оценяване на олимпиада или на официален езиков тест (IELTS, TOEFL, Cambridge Certificate).
Така повечето родители са се научили да не се намесват и да не търсят варианти за регулиране на тези чисто пропуснати шансове предвид броя на часовете, а децата се научават да си мълчат и да изпълняват безсмислени упражнения, които не водят до напредък.
МОН всъщност залага един минимум знания в учебните си програми и никъде не пише, че той не може да бъде прекрачван, напротив. Никой обаче не може да ви отговори на въпроса, ако има проверка и тя установи, че 1/3 от класа всъщност е на по-високо ниво, какво ще последва. А като родители, плащащи за неефективността на образователния модел (защото този пропуск бива наваксван с частни уроци и школи), бихме имали пълно право да пожелаем качествена услуга.
Не съществува наредба или каквато и да било административна пречка, която да забранява разделянето на класове и събирането на ученици от различни класове в отделни групи според етапа на уменията им. Така както се прави в много гимназии междувременно, в които още в началото на 8. клас децата преминават през тест за установяване на актуалното ниво на владеене и класовете биват разделени на групи за часовете по чужд език.
Вместо входно ниво в началото на учебната година, на учениците се прави тест за нивото на знания. Всеки учител по английски език би могъл да назове поне няколко такива теста, които са общовалидни и определят кое ниво е подходящо за конкретния обучаван. В даден випуск, състоящ се от повече паралелки, един учител е недостатъчен, винаги са най-малко двама, които си разделят класовете. Ако приемем, че говорим за средношколски етап, от 5. до 7. клас, то тези учители са с нужната квалификация, за да могат да преподават на различните нива.
Представете си как тези Х на брой паралелки започват да имат нещо повече от съседските взаимоотношения на засичане по коридорите – децата разширяват социалния си кръг, опознават се по-отблизо, работят в различни групи. Естествено, за учебната програма ще е по-лесно, а за учениците ще е много по-полезно, ако езиковите часове станат блокови – най-малко по два учебни часа. Така пък и учителите ще имат спокойствието да разгънат преподаване, затвърждаване и упражнение в един учебен ден. На кого би навредило това?
Ако още във 2. клас сте наясно, че знаете повече от другите и няма нужда да учите по предмет Х, за да изкарвате похвали и добри оценки – честито! Вие още на 8 години започвате да заучавате грешно поведение при учене. Няма какво да ви мотивира, нищо не ви предизвиква, всичко, което ви преподават, е вече чувано и виждано – нищо ново. В голяма степен е вероятно да запазите тази самоувереност дори когато тя няма да отговаря на истината.
А децата, които не са учили до този момент чужд език? Не познават буквите, не знаят нито една дума. Те по всяка вероятност ще са малцинство и ще трябва да се учат в среда, в която повечето им съученици въздишат с досада. Ако си представим света от тяхна гледна точка, то има вероятност той да изглежда така: „Всички знаят всичко, само аз съм глупав и не мога нищо.“ Излиза, че сме създали всички предпоставки едно дете да намрази цял предмет, а защо не и генерално всички чужди езици – чували сте „не е моето“ и „на мен не ми вървят езиците“, нали?
Не му липсват наредби на българското образование. Липсва му желание. Човешко отношение. Внимание. Комуникация без назидание.
И ще му гледаме зъбите на коня – няма как, дали сме му най-ценното си. Дори и да ни захапе, пак ще търсим начин да го погалим и да му кажем, че не е лош той, просто не са му показали, че може и с добро.
Светът се променя с бясна скорост. Професиите, в които ще се развиват поколенията, започващи днес образователния си път, все още не са измислени. Подготвена ли е нашата образователна система, за да отговори на тези предизвикателства? Какво може и трябва да се промени? А как? Веднъж месечно в рубриката „Възможното образование“ на Донка Дойчева-Попова ще говорим за промяната – такава, каквато искаме да я видим, за добрите примери и за посоките, в които може би е добре да обърне поглед българската образователна система.
Post Syndicated from The Atlantic original https://www.youtube.com/watch?v=gQKlXoNOmJA
Post Syndicated from corbet original https://lwn.net/Articles/1013184/
Inside this week’s LWN.net Weekly Edition:
Post Syndicated from The History Guy: History Deserves to Be Remembered original https://www.youtube.com/watch?v=jTJPAWSmtd4
Post Syndicated from Patrick Kennedy original https://www.servethehome.com/lip-bu-tan-takes-over-as-intel-ceo/
In a big announcement today, Intel announced that Lip-Bu Tan will be taking over as CEO starting March 18, 2025
The post Lip-Bu Tan Takes Over as Intel CEO appeared first on ServeTheHome.
Post Syndicated from jake original https://lwn.net/Articles/1012954/
On February 25, the Python
Software Foundation (PSF), which runs the Python Package Index (PyPI), announced
new terms
of service (ToS) for the repository. That has led to some questions
about the new ToS, and the process of coming up with them. For one thing, the previous terms
of use for the service were shorter and simpler, but there are other
concerns with specific wording in the new agreement.
Post Syndicated from jzb original https://lwn.net/Articles/1013876/
Damien Neil has written an article for the Go Blog about path
traversal vulnerabilities and the os.Root API added in Go 1.24 to help prevent
them.
Root permits relative path components and symlinks that do not escape
the root. For example, root.Open("a/../b") is permitted. Filenames are
resolved using the semantics of the local platform: On Unix systems,
this will follow any symlink in “a” (so long as that link does not
escape the root); while on Windows systems this will open “b” (even if
“a” does not exist).
Post Syndicated from LastWeekTonight original https://www.youtube.com/watch?v=RVqm-L6QAME
Post Syndicated from daroc original https://lwn.net/Articles/1012809/
The Zig project has
announced the release of the 0.14 version of the language,
including changes from more than 250 contributors. Zig is a low-level,
memory-unsafe programming language that aims to compete with C instead of
depending on it. Even though the language has not yet had a stable release,
there are a number of projects using it as an alternative to C with better
metaprogramming.
While the project’s release
schedule has been a bit inconsistent, with the release of version 0.14 being
delayed
several times, the release contains a number of new convenience features,
broader architecture support, and the next steps toward removing Zig’s
dependency on LLVM.
Post Syndicated from jzb original https://lwn.net/Articles/1013842/
The SUSE Security Team blog has a post with a
detailed analysis of a vulnerability (CVE-2025-27591)
in the below
tool for recording and displaying system data.
In January 2025, Below was packaged and submitted to openSUSE
Tumbleweed. Below runs as a systemd service with root privileges. The
SUSE security team monitors additions and changes to systemd service
unit files in openSUSE Tumbleweed, and through this we noticed
problematic log directory permissions applied in Below’s code.
Post Syndicated from daroc original https://lwn.net/Articles/1013844/
The LLVM project’s Fortran compiler, which has for many years gone by the name “flang-new”, will now simply be “flang”, starting from LLVM’s 20.1.0 release on March 4. The
announcement, which includes details about the history of flang, comes after a long period of development and discussion. The community has considered renaming flang several times before now, but has always held off out of a feeling that the compiler was not yet ready. Now, the members of the project believe that flang has become stable and complete enough to earn its name.
We are almost 10 years from the first announcement of what would
become LLVM Flang. In the LLVM monorepo alone there have been close
to 10,000 commits from around 400 different contributors. Undoubtedly
more in Classic Flang before that.
Post Syndicated from jzb original https://lwn.net/Articles/1013840/
Version
1.26.0 of the GStreamer cross-platform multimedia framework has
been released. Notable changes in this release include support for the
H.266
Versatile Video Coding (VVC) codec, Low Complexity Enhancement
Video Coding (LCEVC) support, closed caption improvements, and JPEG XS image codec
support.
Post Syndicated from Subramanya Vajiraya original https://aws.amazon.com/blogs/big-data/develop-and-test-aws-glue-5-0-jobs-locally-using-a-docker-container/
AWS Glue is a serverless data integration service that allows you to process and integrate data coming through different data sources at scale. AWS Glue 5.0, the latest version of AWS Glue for Apache Spark jobs, provides a performance-optimized Apache Spark 3.5 runtime experience for batch and stream processing. With AWS Glue 5.0, you get improved performance, enhanced security, support for the next generation of Amazon SageMaker, and more. AWS Glue 5.0 enables you to develop, run, and scale your data integration workloads and get insights faster.
AWS Glue accommodates various development preferences through multiple job creation approaches. For developers who prefer direct coding, Python or Scala development is available using the AWS Glue ETL library.
Building production-ready data platforms requires robust development processes and continuous integration and delivery (CI/CD) pipelines. To support diverse development needs—whether on local machines, Docker containers on Amazon Elastic Compute Cloud (Amazon EC2), or other environments—AWS provides an official AWS Glue Docker image through the Amazon ECR Public Gallery. The image enables developers to work efficiently in their preferred environment while using the AWS Glue ETL library.
In this post, we show how to develop and test AWS Glue 5.0 jobs locally using a Docker container. This post is an updated version of the post Develop and test AWS Glue version 3.0 and 4.0 jobs locally using a Docker container, and uses AWS Glue 5.0 .
The following Docker images are available for the Amazon ECR Public Gallery:
ecr.aws/glue/aws-glue-libs:5AWS Glue Docker images are compatible with both x86_64 and arm64.
In this post, we use public.ecr.aws/glue/aws-glue-libs:5 and run the container on a local machine (Mac, Windows, or Linux). This container image has been tested for AWS Glue 5.0 Spark jobs. The image contains the following:
To set up your container, you pull the image from the ECR Public Gallery and then run the container. We demonstrate how to run your container with the following methods, depending on your requirements:
spark-submitpyspark)pytestBefore you start, make sure that Docker is installed and the Docker daemon is running. For installation instructions, see the Docker documentation for Mac, Windows, or Linux. Also make sure that you have at least 7 GB of disk space for the image on the host running Docker.
To enable AWS API calls from the container, set up your AWS credentials with the following steps:
In the following sections, we use this AWS named profile.
If you’re running Docker on Windows, choose the Docker icon (right-click) and choose Switch to Linux containers before pulling the image.
Run the following command to pull the image from the ECR Public Gallery:
Now you can run a container using this image. You can choose any of following methods based on your requirements.
You can run an AWS Glue job script by running the spark-submit command on the container.
Write your job script (sample.py in the following example) and save it under the /local_path_to_workspace/src/ directory using the following commands:
These variables are used in the following docker run command. The sample code (sample.py) used in the spark-submit command is included in the appendix at the end of this post.
Run the following command to run the spark-submit command on the container to submit a new Spark application:
You can run a REPL (read-eval-print loop) shell for interactive development. Run the following command to run the pyspark command on the container to start the REPL shell:
You will see following output:
With this REPL shell, you can code and test interactively.
For unit testing, you can use pytest for AWS Glue Spark job scripts.
Run the following commands for preparation:
Now let’s invoke pytest using docker run:
When pytest finishes executing unit tests, your output will look something like the following:
To set up the container with Visual Studio Code, complete the following steps:
Preferences: Open Workspace Settings (JSON).Now you’re ready to set up the container.
ecr.aws/glue/aws-glue-libs:5 (right-click) and choose Attach in Current Window.

/home/hadoop/workspace/.
You should see the successful run on the AWS Glue PySpark script.

The following are major changes between the AWS Glue 4.0 and Glue 5.0 Docker image:
DATALAKE_FORMATS is no longer needed. Until AWS Glue 4.0, the environment variable DATALAKE_FORMATS was used to specify whether the specific table format is loaded.The preceding list is specific to the Docker image. To learn more about AWS Glue 5.0 updates, see Introducing AWS Glue 5.0 for Apache Spark and Migrating AWS Glue for Spark jobs to AWS Glue version 5.0.
Keep in mind that the following features are not supported when using the AWS Glue container image to develop job scripts locally:
In this post, we explored how the AWS Glue 5.0 Docker images provide a flexible foundation for developing and testing AWS Glue job scripts in your preferred environment. These images, readily available in the Amazon ECR Public Gallery, streamline the development process by offering a consistent, portable environment for AWS Glue development.
To learn more about how to build end-to-end development pipeline, see End-to-end development lifecycle for data engineers to build a data integration pipeline using AWS Glue. We encourage you to explore these capabilities and share your experiences with the AWS community.
This appendix introduces three different scripts as AWS Glue job sample codes for testing purposes. You can use any of them in the tutorial.
The following sample.py code uses the AWS Glue ETL library with an Amazon Simple Storage Service (Amazon S3) API call. The code requires Amazon S3 permissions in AWS Identity and Access Management (IAM). You need to grant the IAM-managed policy arn:aws:iam::aws:policy/AmazonS3ReadOnlyAccess or IAM custom policy that allows you to make ListBucket and GetObject API calls for the S3 path.
The following test_sample.py code is a sample for a unit test of sample.py:
To add a JDBC driver not currently available in the container, you can create a new directory under your workspace with the JAR files you need and mount the directory to /opt/spark/jars/ in the docker run command. JAR files found under /opt/spark/jars/ within the container are automatically added to Spark Classpath and will be available for use during the job run.
For example, you can use the following docker run command to add JDBC driver jars to a PySpark REPL shell:
As highlighted earlier, the customJdbcDriverS3Path connection option can’t be used to import a custom JDBC driver from Amazon S3 in AWS Glue container images.
The AWS Glue 5.0 container image doesn’t have Livy installed by default. You can create a new container image extending the AWS Glue 5.0 container image as the base. The following Dockerfile demonstrates how you can extend the Docker image to include additional components you need to enhance your development and testing experience.
To get started, create a directory on your workstation and place the Dockerfile.livy_jupyter file in the directory:
The following code is Dockerfile.livy_jupyter:
Run the docker build command to build the image:
When the image build is complete, you can use the following docker run command to start the newly built image:

In this section, we discuss adding extra Python libraries and installing Python packages using
To add local Python libraries, place them under a directory and assign the path to $EXTRA_PYTHON_PACKAGE_LOCATION:
To validate that the path has been added to PYTHONPATH, you can check for its existence in sys.path:
To install packages from PyPI (or any other artifact repository) using pip, you can use the following approach:
 Subramanya Vajiraya is a Sr. Cloud Engineer (ETL) at AWS Sydney specialized in AWS Glue. He is passionate about helping customers solve issues related to their ETL workload and implementing scalable data processing and analytics pipelines on AWS. Outside of work, he enjoys going on bike rides and taking long walks with his dog Ollie.
 Noritaka Sekiyama is a Principal Big Data Architect on the AWS Glue team. He works based in Tokyo, Japan. He is responsible for building software artifacts to help customers. In his spare time, he enjoys cycling with his road bike.
Post Syndicated from jzb original https://lwn.net/Articles/1013838/
Security updates have been issued by Debian (libmodbus), Fedora (thunderbird and vyper), Mageia (firefox, nss, python-django, python-jinja2, and thunderbird, thunderbird-l10n), Oracle (bind, kernel, rsync, and tigervnc), Red Hat (.NET 8.0, .NET 9.0, and libxml2), SUSE (iniparser and kernel), and Ubuntu (dotnet8, dotnet9, freerdp2, jinja2, libreoffice, linux, linux-hwe, linux-aws, linux-aws-hwe, linux-gcp, linux-gcp-4.15, linux-kvm, linux-oracle, linux-kvm, and opensc).
Post Syndicated from Ed Montgomery original https://blog.rapid7.com/2025/03/12/explaining-external-network-assessment-with-vector-command/

Learn how external network assessment works within Vector Command, Rapid7’s continuous red team managed service.
Let’s start by providing some context around where Vector Command fits into a security program and more specifically Continuous Threat Exposure Management (CTEM). Threat exposure management involves identifying, assessing, and mitigating exposures within an organization’s digital environment CTEM has emerged as a dynamic program designed to address this expanding footprint and help organizations achieve a consistent and actionable security posture.
According to Gartner, some of the different technologies that can support a wider CTEM program can be organized into three distinct pillars:
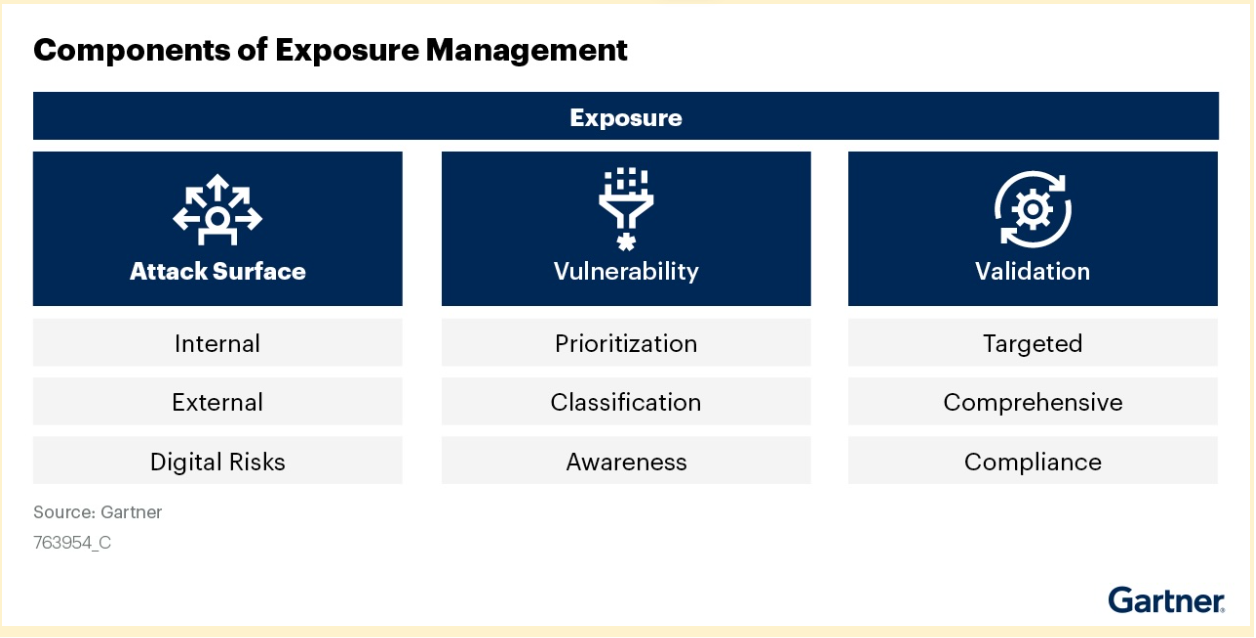
Vector Command sits within the validation pillar, your ‘always on’ red team – validating results from technologies or services as well as validating that the controls in place are working as anticipated.
An “external network assessment” refers to evaluating the security posture of an organization’s publicly accessible network perimeter. This essentially simulates a hacker’s perspective to identify vulnerabilities on systems and services directly reachable from the internet. This will include web servers, email servers, and exposed ports, to assess potential risks and weaknesses that could be exploited by malicious actors.
Goals of an external network assessment:
Our Vector Command red team experts conduct comprehensive security assessments using a multi-faceted approach:
We begin by leveraging EASM-discovered assets and IVM scan results to map your approved attack surface. Our experts validate IVM findings and conduct service discovery to ensure complete coverage.
Our team searches for common web misconfigurations through directory testing, reviews exposed administrative functions, and checks for unauthenticated access to sensitive areas. We also conduct limited, non-intrusive password testing against services like email, IAM, and VPNs using information gathered during EASM scanning.
As an always-on managed service, we:
Throughout this process, we build comprehensive documentation of your attack landscape to inform future security assessments.
Rapid7 strengthens your organization’s security strategy through Vector Command, delivering comprehensive CTEM alongside our other exposure management solutions.
With Vector Command, customers can now have a team of experts continuously assess their external attack surface. This includes identifying any security gaps, and receiving remediation guidance on an ongoing basis.
Our series of Vector Command blog posts will continue and next up we will cover the TTP Post-Compromise Breach Simulation.
If you would like to hear more about the world of red teaming from one of our experts behind Vector Command, Rapid7 is running a virtual session at our 2025 Take Command Summit, find out more about it here.
Post Syndicated from Brian Beach original https://aws.amazon.com/blogs/devops/announcing-support-for-upgrades-to-java-21-in-amazon-q-developer/
On February 14, Amazon Q Developer announced support for upgrades to Java 21. As a Java developer, I’m excited about this new capability, which will make it easier for me to keep my applications up-to-date and take advantage of the latest language features and performance improvements. In addition, the latest version of Amazon Q Developer includes improved summarization and recommendations that simplify the upgrade process and increase confidence in the results.
Amazon Q Developer is a generative AI-powered assistant that helps accelerate the modernization of enterprise applications. It can perform complex tasks like analyzing legacy code, mapping dependencies, and executing migration and modernization workflows. Amazon Q Developer frees up your team to focus on more strategic initiatives rather than getting bogged down in the undifferentiated heavy lifting of upgrading Java applications.
Staying current on Java versions is crucial, as each new release brings important security fixes, performance enhancements, and support for emerging frameworks and libraries. However, the effort required to manually migrate large Java codebases can be daunting. That’s where Amazon Q Developer has been invaluable. By offloading the tedious, labor-intensive parts of the upgrade process, your team can deliver important updates to users much faster while minimizing disruption.
With the addition of Java 21 upgrade capabilities, Amazon Q Developer now supports upgrading applications from Java 8, 11, and 17 to Java 17 or 21. Some of the key benefits of Java 21 that I’m looking forward to include:
Virtual Threads: Virtual Threads are a new concurrency primitive introduced in Java 19 that reduce the effort of writing, maintaining, and debugging high-throughput concurrent applications. This unlocks significant performance improvements for your applications.
Improved Performance: Java 21 includes a variety of other language enhancements like Sequenced Collections, Record Patterns, and Pattern Matching that deliver tangible speed and efficiency gains.
Better Memory Management: Enhancements to the Z Garbage Collector in Java 21 result in more predictable garbage collection pauses and reduced memory footprint, leading to more stable and responsive applications.
Upgrading your team’s Java applications to Java 21 with Amazon Q Developer is a game-changer. It saves countless hours of manual effort that would otherwise be required to migrate all of your Java components.
Upgrading Java applications to Java 21 with Amazon Q Developer is easy. After configuring your project and ensuring it meets the prerequisites, you can simply invoke the /transform command in the Amazon Q Developer chat window of your integrated development environment (IDE). The following screenshot is from VS Code; however, Q Developer also supports JetBrain’s IDEs including IntelliJ IDEA and the qct command line.

Amazon Q Developer will then analyze your codebase, determine the necessary changes to upgrade to Java 21, and provide a detailed diff so you can review and accept the transformations. This not only saves you time, but also helps ensure a consistent, high-quality upgrade across all of your Java applications.
In addition to adding support for upgrading to Java 21, the latest version of Amazon Q Developer also enhances the summarization and recommendations it provides after completing the transformation. Once the upgrade to Java 21 is complete, Q Developer generates a detailed summary of the changes made, such as deprecated APIs removed and code refactored to leverage new Java features. It also includes tailored recommendations to further improve the application, taking advantage of the capabilities introduced in Java 21. For example, Q Developer suggested upgrading the logging framework and implementing pattern matching to make the code more concise. These summary and recommendation capabilities help ensure a smooth and comprehensive upgrade process.

Finally, Q includes recommendations to further improve the application beyond the upgrade to Java 21. For example, Q provided the following recommendations.

The summary and recommendation capabilities help ensure a smooth and comprehensive upgrade experience. Developers can review the detailed changes, understand the rationale behind them, and then selectively apply the suggested optimizations to fully unlock the benefits of Java 21. This level of transparency and guidance from Q Developer greatly simplifies the upgrade process and increases confidence in the resulting codebase.
In summary, the new Amazon Q Developer transformation capabilities for upgrades to Java 21 offload the labor-intensive task of keeping your Java applications up-to-date. The detailed summaries and tailored recommendations provided by Q Developer ensure a smooth and comprehensive upgrade process, and significantly streamline the upgrade process. I’m excited to start rolling this out and freeing up the team’s time to focus on higher-value work. If you’re a fellow Java developer, I’d highly encourage you to try out Amazon Q Developer for yourself. To get started, visit the Amazon Q Developer getting started page.
Post Syndicated from The History Guy: History Deserves to Be Remembered original https://www.youtube.com/watch?v=DPUs04iRKf0