On February 14, Amazon Q Developer announced support for upgrades to Java 21. As a Java developer, I’m excited about this new capability, which will make it easier for me to keep my applications up-to-date and take advantage of the latest language features and performance improvements. In addition, the latest version of Amazon Q Developer includes improved summarization and recommendations that simplify the upgrade process and increase confidence in the results.
Amazon Q Developer is a generative AI-powered assistant that helps accelerate the modernization of enterprise applications. It can perform complex tasks like analyzing legacy code, mapping dependencies, and executing migration and modernization workflows. Amazon Q Developer frees up your team to focus on more strategic initiatives rather than getting bogged down in the undifferentiated heavy lifting of upgrading Java applications.
Staying current on Java versions is crucial, as each new release brings important security fixes, performance enhancements, and support for emerging frameworks and libraries. However, the effort required to manually migrate large Java codebases can be daunting. That’s where Amazon Q Developer has been invaluable. By offloading the tedious, labor-intensive parts of the upgrade process, your team can deliver important updates to users much faster while minimizing disruption.
The Benefits of Java 21
With the addition of Java 21 upgrade capabilities, Amazon Q Developer now supports upgrading applications from Java 8, 11, and 17 to Java 17 or 21. Some of the key benefits of Java 21 that I’m looking forward to include:
Virtual Threads:Virtual Threads are a new concurrency primitive introduced in Java 19 that reduce the effort of writing, maintaining, and debugging high-throughput concurrent applications. This unlocks significant performance improvements for your applications.
Better Memory Management: Enhancements to the Z Garbage Collector in Java 21 result in more predictable garbage collection pauses and reduced memory footprint, leading to more stable and responsive applications.
Upgrading your team’s Java applications to Java 21 with Amazon Q Developer is a game-changer. It saves countless hours of manual effort that would otherwise be required to migrate all of your Java components.
Simplifying the Upgrade Process with Amazon Q Developer
Upgrading Java applications to Java 21 with Amazon Q Developer is easy. After configuring your project and ensuring it meets the prerequisites, you can simply invoke the /transform command in the Amazon Q Developer chat window of your integrated development environment (IDE). The following screenshot is from VS Code; however, Q Developer also supports JetBrain’s IDEs including IntelliJ IDEA and the qct command line.
Amazon Q Developer will then analyze your codebase, determine the necessary changes to upgrade to Java 21, and provide a detailed diff so you can review and accept the transformations. This not only saves you time, but also helps ensure a consistent, high-quality upgrade across all of your Java applications.
In addition to adding support for upgrading to Java 21, the latest version of Amazon Q Developer also enhances the summarization and recommendations it provides after completing the transformation. Once the upgrade to Java 21 is complete, Q Developer generates a detailed summary of the changes made, such as deprecated APIs removed and code refactored to leverage new Java features. It also includes tailored recommendations to further improve the application, taking advantage of the capabilities introduced in Java 21. For example, Q Developer suggested upgrading the logging framework and implementing pattern matching to make the code more concise. These summary and recommendation capabilities help ensure a smooth and comprehensive upgrade process.
Finally, Q includes recommendations to further improve the application beyond the upgrade to Java 21. For example, Q provided the following recommendations.
The summary and recommendation capabilities help ensure a smooth and comprehensive upgrade experience. Developers can review the detailed changes, understand the rationale behind them, and then selectively apply the suggested optimizations to fully unlock the benefits of Java 21. This level of transparency and guidance from Q Developer greatly simplifies the upgrade process and increases confidence in the resulting codebase.
Conclusion
In summary, the new Amazon Q Developer transformation capabilities for upgrades to Java 21 offload the labor-intensive task of keeping your Java applications up-to-date. The detailed summaries and tailored recommendations provided by Q Developer ensure a smooth and comprehensive upgrade process, and significantly streamline the upgrade process. I’m excited to start rolling this out and freeing up the team’s time to focus on higher-value work. If you’re a fellow Java developer, I’d highly encourage you to try out Amazon Q Developer for yourself. To get started, visit the Amazon Q Developer getting started page.
We will be highlighting Projen’s powerful features that cater to various aspects of project management and development. We’ll examine how Projen enhances polyglot programming within Amazon Web Services (AWS) Cloud Development Kit constructs. We’ll also touch on its built-in support for common development tools and practices.
In our previous blog, we introduced you to the basics of getting started with Projen. Projen is a powerful project generator that simplifies the management of complex software configurations. In our prior blog, we discussed developing a new AWS cloud development kit (CDK) construct library project. For consistency, we will continue using this construct library project as our example while exploring linting, dependency management, and test coverage. It’s important to note that these practices are equally applicable to CDK applications and other project types.
AWS CDK Polyglot Construct Library
The AWS Cloud Development Kit (AWS CDK) is an open-source software development framework that allows developers to define cloud infrastructure using familiar programming languages. In a CDK application, constructs serve as the foundational elements, allowing developers to represent either a single AWS resource or a complex combination of resources. These constructs are not only reusable but can be incorporated into other AWS CDK projects, promoting efficient and scalable development practices.
Projen and Polyglot Programming
Projen leverages the power of the JSII library, enabling developers to write constructs once and generate equivalent constructs across multiple programming languages. This feature streamlines the development process, especially when working with teams that have expertise in different languages.
Automated Publishing with Projen
With its publisher module, Projen automates the distribution of c ructs to various package managers. This process can be integrated into a GitHub workflow, such as a build job, which triggers the publication of the library to the designated package managers.
Starting with Projen
Initiating an AWS CDK construct library project is straightforward through the Projen command npx projen new <project_type>. By executing the command npx projen new awscdk-construct, you initialize a new project complete with a projenrc file. This file contains the essential configuration for a CDK construct library, setting the stage for further customization and development.
import { awscdk } from 'projen';
const project = new awscdk.AwsCdkConstructLibrary({
  author: 'github username',
  authorAddress: 'github email',
  cdkVersion: '2.1.0',
  defaultReleaseBranch: 'main',
  jsiiVersion: '~5.0.0',
  name: 'cdkconstruct',
  projenrcTs: true,
  repositoryUrl: 'https://github.com/*****/cdkconstruct.git',

  // deps: [],                /* Runtime dependencies of this module. */
  // description: undefined,  /* The description is just a string that helps people understand the purpose of the package. */
  // devDeps: [],             /* Build dependencies for this module. */
  // packageName: undefined,  /* The "name" in package.json. */
});
project.synth();
A release.yml file is generated by projen under the github>workflow directory. This file has the details of the public registry where the construct needs to be published. By default, it will add the details for npm.
release_npm:
    name: Publish to npm
The construct can be developed in typescript under src/main.ts, our previous blog shows how to create one. If the construct needs to be published to other public registries (such as Maven for java, Pypi for python), then a projenrc file can be updated to synthesize a new release.yml file.
For example, to publish a construct developed in typescript to Maven (so that it can be used in a java application) add publishToMaven API to the projenrc file.
This way the construct is built once and published to multiple registries with different programming languages.
Figure 1: High-level Architecture showing publication to multiple public registries
Linting, Dependency Management & Test Coverage
Projen streamlines the setup process by generating a comprehensive package.json file. This file includes pre-configured dependencies for ESLint and Jest, enabling developers to maintain coding standards and ensure robust test coverage right from the start. ESLint, a widely adopted static code analysis utility, empowers developers to enforce consistent coding practices by analyzing the source code and identifying potential errors, bugs, and stylistic issues. Additionally, Jest equips developers with a comprehensive suite of tools for writing and executing unit tests, facilitating comprehensive test coverage for their codebase. While Projen provides Jest as the default testing framework, it offers developers the flexibility to incorporate alternative testing frameworks based on their project requirements.
Following with the awscdk-construct from the previous section, under test>main.test.ts a default test file is created, which can be updated for writing test cases. A default package.json is generated in the root directory.
Projen can be extensively configured. For example, if you need to configure webpack as a module bundler, then you need to add a webpack.config.js file and update the projenrc file project.
The other dependencies can be updated in package.json by adding deps in the projenrc.ts file.
Run npx projen build to synthesize a package.json.
Continuous Integration and Continuous Delivery (CI/CD)
When you create a project using Projen, it comes equipped with an automated build process that triggers upon the submission of a pull request. This is one of the key, “out-of-the-box” features that streamlines development workflows.
Projen orchestrates this process through GitHub Actions, utilizing a sequence of tasks predefined in the project’s base ‘Project’ class.
When a build is initiated, it systematically carries out several sub-tasks:
Synthesis: It starts by synthesizing all the project files, ensuring they are up-to-date and correctly configured.
Bundling: Next, it bundles the necessary assets for the project.
Compilation: The project’s code is then compiled.
Testing: Following compilation, Projen runs the suite of tests defined for the project.
Packaging: Finally, it packages everything together, preparing it for deployment or distribution.
Projen manages these steps by auto-generating a build.yml file, which it places within the workflow directory of your project’s structure. This YAML file contains all the instructions for the GitHub Actions to execute the build process.
For instance, when you run the command npx projen new awscdk-app-ts, Projen sets up a TypeScript application for AWS CDK. It automatically creates a ‘build.yml’ file through the default projenrc file, which can be found in the github/workflow folder of your project repository. This automated process is designed to save time and reduce manual errors, making it an essential feature for efficient project management.
 .github
   workflow
    build.yml
A Projen build is self-mutating because files generated by Projen are part of the source directory. To ensure that a pull request branch always represents the final state of the repository, you can enable the mutableBuild option in your project configuration (currently only supported for projects derived from NodeProject).
The build process can be customized by adding any task in the project class, which can execute a shell command.
const buildproject = project.addTask('build');
buildproject.exec('npm run build');
The Task also supports the condition option that determines if the condition is true before running the task.
const hello = project.addTask('hello', {
  condition: '[ -n "$CI" ]', // only execute if the CI environment variable is defined
  exec: 'echo running in a CI environment'
});
Releases and Versioning
Projen uses Conventional Commits to generate semantic versioning of the releases automatically. This means that based on the commit message format, it can create the release version automatically.
Initially, the project is released under version 0.0.0. Anything may change at any time and public APIs should not be considered stable. Commits marked as a breaking change will increase the minor version. All other commits will increase the patch version.
You need to manually promote the major version to 1 once your project is considered stable. For major versions 1 and above, if a release includes fix commits only, it will increase the patch version. If a release includes any feat commits, then the new version will be a minor version.
One of the nice, out-of-the-box features that comes with Projen for AWS CDK constructs is the creation of API documentation for your constructs. By leveraging jsii-docgen, Projen’s build step will generate API documentation (API.md) from the comments in your code.
This feature is powerful for several reasons. Firstly, it ensures that documentation is kept up-to-date with the codebase, as the API documentation is generated directly from the source code comments. This reduces the risk of discrepancies between the code and its documentation, which can lead to misunderstandings and errors in usage.
Secondly, it streamlines the development process by automating a task that is often tedious and time-consuming. Developers can focus more on writing code and less on updating documentation manually.
Thirdly, it promotes better coding practices, as developers are encouraged to write clear and detailed comments in their code. This not only benefits the generation of documentation, but also helps any new developers who may work on the codebase in the future to understand the code more quickly and thoroughly.
Moreover, having readily available and accurate documentation can significantly enhance the developer experience. It makes it more straightforward for users of the CDK constructs to understand the functionality, parameters, return types, and the structure of the code they are working with.
In the context of team collaboration and open-source projects, this feature is especially beneficial. It ensures that anyone who contributes to the codebase is able to generate and view the latest documentation without any additional setup or configuration, facilitating smoother collaboration and integration processes.
Let’s recap all of the features that Projen can introduce into your project right out of the box:
Projen’s automation for linting and testing to maintain high code quality from the beginning.
Automated API documentation feature to keep your project’s documentation synchronized with the latest code changes.
Polyglot capabilities to cater to a diverse development team, ensuring flexibility in language preference.
The publisher module to streamline the release process across multiple package managers, saving time and reducing the scope for human error.
As we wrap up our deep dive into some of the advanced features of Projen within AWS CDK, it’s clear that Projen helps alleviate a lot of the pain points of a new greenfield project. By leveraging Projen, developers can navigate the complexities of polyglot programming, automate the mundane tasks of publishing and documentation, and ensure consistent code quality through linting and testing. Projen elevates the development workflow to a level where efficiency and scalability are the norms, not the exception.
What’s more compelling is Projen’s commitment to developer empowerment. Through its automated systems, it encourages developers to adhere to best practices without the overhead of manual enforcement. Its ability to seamlessly integrate with various package managers and generate detailed API documentation from inline comments signifies a leap in developer tooling.
Contact an AWS Representative to know how we can help accelerate your business.
Amazon Q Developer is a generative artificial intelligence (AI) powered conversational assistant that can help you understand, build, extend, and operate AWS applications. You can ask questions about AWS architecture, your AWS resources, best practices, documentation, support, and more.
With Amazon Q Developer in your IDE, you can write a comment in natural language that outlines a specific task, such as, “Upload a file with server-side encryption.” Based on this information, Amazon Q Developer recommends one or more code snippets directly in the IDE that can accomplish the task. You can quickly and easily accept the top suggestions (tab key), view more suggestions (arrow keys), or continue writing your own code.
However, Amazon Q Developer in the IDE is more than just a code completion plugin. Amazon Q Developer is a generative AI (GenAI) powered assistant for software development that can be used to have a conversation about your code, get code suggestions, or ask questions about building software. This provides the benefits of collaborative paired programming, powered by GenAI models that have been trained on billions of lines of code, from the Amazon internal code-base and publicly available sources.
The challenge
At the 2024 AWS Summit in Sydney, an exhilarating code challenge took center stage, pitting a Blue Team against a Red Team, with approximately 10 to 15 challengers in each team, in a battle of coding prowess. The challenge consisted of 20 tasks, starting with basic math and string manipulation, and progressively escalating in difficulty to include complex algorithms and intricate ciphers.
The Blue Team had a distinct advantage, leveraging the powerful capabilities of Amazon Q Developer, the most capable generative AI-powered assistant for software development. With Q Developer’s guidance, the Blue Team navigated increasingly complex tasks with ease, tapping into Q Developer’s vast knowledge base and problem-solving abilities. In contrast, the Red Team competed without assistance, relying solely on their own coding expertise and problem-solving skills to tackle daunting challenges.
As the competition unfolded, the two teams battled it out, each striving to outperform the other. The Blue Team’s efficient use of Amazon Q Developer proved to be a game-changer, allowing them to tackle the most challenging tasks with remarkable speed and accuracy. However, the Red Team’s sheer determination and technical prowess kept them in the running, showcasing their ability to think outside the box and devise innovative solutions.
The culmination of the code challenge was a thrilling finale, with both teams pushing the boundaries of their skills and ultimately leaving the audience in a state of admiration for their remarkable achievements.
The graph shows the average completion time in which Team Blue “Q Developer” completed more questions across the board in less time than Team Red “Solo Coder”. Within the 1-hour time limit, Team Blue got all the way to Question 19, whereas Team Red only got to Question 16.
There are some assumptions and validations. People who consider themselves very experienced programmers were encouraged to choose team Red and not use AI, to test themselves against team Blue, those using AI. The code challenges were designed to test the output of applying logic. They were specifically designed to be passable without the use of Amazon Q Developer, to test the optimization of writing logical code with Amazon Q Developer. As a result, the code tasks worked well with Amazon Q Developer due to the nature of and underlying training of Amazon Q Developer models. Many people who attended the event were not Python Programmers (we constrained the challenge to Python only), and walked away impressed at how much of the challenge they could complete.
As an example of one of the more complex questions competitors were given to solve was:
Implement the rail fence cipher.
In the Rail Fence cipher, the message is written downwards on successive "rails" of an imaginary fence, then moving up when we get to the bottom (like a zig-zag). Finally the message is then read off in rows.

For example, using three "rails" and the message "WE ARE DISCOVERED FLEE AT ONCE", the cipherer writes out:

W . . . E . . . C . . . R . . . L . . . T . . . E
. E . R . D . S . O . E . E . F . E . A . O . C .
. . A . . . I . . . V . . . D . . . E . . . N . .

Then reads off: WECRLTEERDSOEEFEAOCAIVDEN

Given variable a. Use a three-rail fence cipher so that result is equal to the decoded message of variable a.
The questions were both algorithmic and logical in nature, which made them great for testing conversational natural language capability to solve questions using Amazon Q Developer, or by applying one’s own logic to write code to solve the question.
Top scoring individual per team:
Total Questions Complete
individual time (min)
With Q Developer (Blue Team)
19
30.46
Solo Coder (Red Team)
16
58.06
By comparing the top two competitors, and considering the solo coder was a highly experienced programmer versus the top Q Developer coder, who was a relatively new programmer not familiar with Python, you can see the efficiency gain when using Q Developer as an AI peer programmer. It took the entire 60 minutes for the solo coder to complete 16 questions, whereas the Q Developer coder got to the final question (Question 20, incomplete) in half of the time.
Summary
Integrating advanced IDE features and adopting paired programming have significantly improved coding efficiency and quality. However, the introduction of Amazon Q Developer has taken this evolution to new heights. By tapping into Q Developer’s vast knowledge base and problem-solving capabilities, the Blue Team was able to navigate complex coding challenges with remarkable speed and accuracy, outperforming the unassisted Red Team. This highlights the transformative impact of leveraging generative AI as a collaborative pair programmer in modern software development, delivering greater efficiency, problem-solving, and, ultimately, higher-quality code. Get started with Amazon Q Developer for your IDE by installing the plugin and enabling your builder ID today.
In the modern world of cloud computing, Infrastructure as Code (IaC) has become a vital practice for deploying and managing cloud resources. AWS Cloud Development Kit (AWS CDK) is a popular open-source framework that allows developers to define cloud resources using familiar programming languages. A related open source tool called Projen is a powerful project generator that simplifies the management of complex software configurations. In this post, we’ll explore how to get started with Projen and AWS CDK, and discuss the pros and cons of using Projen.
What is Projen?
Building modern and high quality software requires a large number of tools and configuration files to handle tasks like linting, testing, and automating releases. Each tool has its own configuration interface, such as JSON or YAML, and a unique syntax, increasing maintenance complexity.
When starting a new project, you rarely start from scratch, but more often use a scaffolding tool (for instance, create-react-app) to generate a new project structure. A large amount of configuration is created on your behalf, and you get the ownership of those files. Moreover, there is a high number of project generation tools, with new ones created almost everyday.
Projen is a project generator that helps developers to efficiently manage project configuration files and build high quality software. It allows you to define your project structure and configuration in code, making it easier to maintain and share across different environments and projects.
Out of the box, Projen supports multiple project types like AWS CDK construct libraries, react applications, Java projects, and Python projects. New project types can be added by contributors, and projects can be developed in multiple languages. Projen uses the jsii library, which allows us to write APIs once and generate libraries in several languages. Moreover, Projen provides a single interface, the projenrc file, to manage the configuration of your entire project!
The diagram below provides an overview of the deployment process of AWS cloud resources using Projen:
In this example, Projen can be used to generate a new project, for instance, a new CDK Typescript application.
Developers define their infrastructure and application code using AWS CDK resources. To modify the project configuration, developers use the projenrc file instead of directly editing files like package.json.
The project is synthesized to produce an AWS CloudFormation template.
The CloudFormation template is deployed in a AWS account, and provisions AWS cloud resources.
Diagram 1 – Projen packaged features: Projen helps gets your project started and allows you to focus on coding instead of worrying about the other project variables. It comes out of the box with linting, unit test and code coverage, and a number of Github actions for release and versioning and dependency management.
Pros and Cons of using Projen
Pros
Consistency: Projen ensures consistency across different projects by allowing you to define standard project templates. You don’t need to use different project generators, only Projen.
Version Control: Since project configuration is defined in code, it can be version-controlled, making it easier to track changes and collaborate with others.
Extensibility: Projen supports various plugins and extensions, allowing you to customize the project configuration to fit your specific needs.
Integration with AWS CDK: Projen provides seamless integration with AWS CDK, simplifying the process of defining and deploying cloud resources.
Polyglot CDK constructs library: Build once, run in multiple runtimes. Projen can convert and publish a CDK Construct developed in TypeScript to Java (Maven) and Python (PYPI) with JSII support.
API Documentation : Generate API documentation from the comments, if you are building a CDK construct
Deploying stacks with the AWS CDK requires dedicated Amazon S3 buckets and other containers to be available to AWS CloudFormation during deployment (More information).
Note: Projen doesn’t need to be installed globally. You will be using npx to run Projen which takes care of all required setup steps. npx is a tool for running npm packages that:
You can create a new Projen project using the following command:
mkdir test_project && cd test_project npx projen new awscdk-app-ts
This command creates a new TypeScript project with AWS CDK support. The exhaustive list of supported project types is available through the official documentation: Projen.io, or by running the npx projen new command without a project type. It also supports npx projen new awscdk-construct to create a reusable construct which can then be published to other package managers.
The created project structure should be as follows:
Initialization of an empty git repository, with the associated GitHub workflow files to build and upgrade the project. The release workflow can be customized with projen tasks.
.projenrc.js is the main configuration file for project
tasks.json file for integration with Visual Studio Code
src folder containing an empty CDK stack
License and README files
A projen configuration file: projenrc.js
package.json contains functional metadata about the project like name, versions and dependencies.
.gitignore, .gitattributes file to manage your files with git.
.eslintrc identifying and reporting patterns on javascript.
.npmignore to keep files out of package manager.
.mergify.yml for managing the pull requests.
tsconfig.json configure the compiler options
Most of the generated files include a disclaimer:
# ~~ Generated by projen. To modify, edit .projenrc.js and run "npx projen".
Projen’s power lies in its single configuration file, .projenrc.js. By editing this file, you can manage your project’s lint rules, dependencies, .gitignore, and more. Projen will propagate your changes across all generated files, simplifying and unifying dependency management across your projects.
Projen generated files are considered implementation details and are not meant to be edited manually. If you do make manual changes, they will be overwritten the next time you run npx projen.
To edit your project configuration, simply edit .projenrc.js and then run npx projen to synthesize again. For more information on the Projen API, please see the documentation: http://projen.io/api/API.html.
Projen uses the projenrc.js file’s configuration to instantiate a new AwsCdkTypeScriptApp with some basic metadata: the project name, CDK version and the default release branch. Additional APIs are available for this project type to customize it (for instance, add runtime dependencies).
Let’s try to modify a property and see how Projen reacts. As an example, let’s update the project name in projenrc.js :
name: 'test_project_2',
and then run the npx projen command:
npx projen
Once done, you can see that the project name was updated in the package.json file.
Step 3: Define AWS CDK Resources
Inside your Projen project, you can define AWS CDK resources using familiar programming languages like TypeScript. Here’s an example of defining an Amazon Simple Storage Service (Amazon S3) bucket:
1. Navigate to your main.ts file in the src/ directory 2. Modify the imports at the top of the file as follow:
import { App, CfnOutput, Stack, StackProps } from 'aws-cdk-lib'; import * as s3 from 'aws-cdk-lib/aws-s3'; import { Construct } from 'constructs';
1. Replace line 9 “// define resources here…” with the code below:
const bucket = new s3.Bucket(this, 'MyBucket', {
  versioned: true,
});

new CfnOutput(this, 'TestBucket', { value: bucket.bucketArn });
Once you’ve defined your resources, you can synthesize a cloud assembly, which includes a CloudFormation template (or many depending on the application) using:
$ npx projen build
npx projen build will perform several actions:
Build the application
Synthesize the CloudFormation template
Run tests and linter
The synth() method of Projen performs the actual synthesizing (and updating) of all configuration files managed by Projen. This is achieved by deleting all Projen-managed files (if there are any), and then re-synthesizing them based on the latest configuration specified by the user.
You can find an exhaustive list of the available npx projen commands in .projen/tasks.json. You can also use the projen API project.addTask to add a new task to perform any custom action you need ! Tasks are a project-level feature to define a project command system backed by shell scripts.
Deploy the CDK application:
$ npx projen deploy
Projen will use the cdk deploy command to deploy the CloudFormation stack in the configured AWS account by creating and executing a change set based on the template generated by CDK synthesis. The output of the step above should look as follow:
deploy | cdk deploy
✨ Synthesis time: 3.28s
toto-dev: start: Building 387a3a724050aec67aa083b74c69485b08a876f038078ec7ea1018c7131f4605:263905523351-us-east-1 toto-dev: success: Built 387a3a724050aec67aa083b74c69485b08a876f038078ec7ea1018c7131f4605:263905523351-us-east-1 toto-dev: start: Publishing 387a3a724050aec67aa083b74c69485b08a876f038078ec7ea1018c7131f4605:263905523351-us-east-1 toto-dev: success: Published 387a3a724050aec67aa083b74c69485b08a876f038078ec7ea1018c7131f4605:263905523351-us-east-1 toto-dev: deploying... [1/1] toto-dev: creating CloudFormation changeset...
The application was successfully deployed in the configured AWS account! Also, the Amazon Resource Name (ARN) of the S3 bucket created is available through the CloudFormation stack Outputs tab, and displayed in your terminal under the ‘Outputs’ section.
Clean up
Delete CloudFormation Stack
To clean up the resources created in this section of the workshop, navigate to the CloudFormation console and delete the stack created. You can also perform the same task programmatically:
$ npx projen destroy
Which should produce the following output:
destroy | cdk destroy Are you sure you want to delete: testproject-dev (y/n)? y testproject-dev: destroying... [1/1]
testproject-dev: destroyed
Delete S3 Buckets
The S3 bucket will not be deleted since its retention policy was set to RETAIN. Navigate to the S3 console and delete the created bucket. If you added files to that bucket, you will need to empty it before deletion. See the Deleting a bucket documentation for more information.
Conclusion
Projen and AWS CDK together provide a powerful combination for managing cloud resources and project configuration. By leveraging Projen, you can ensure consistency, version control, and extensibility across your projects. The integration with AWS CDK allows you to define and deploy cloud resources using familiar programming languages, making the entire process more developer-friendly.
Whether you’re a seasoned cloud developer or just getting started, Projen and AWS CDK offer a streamlined approach to cloud resource management. Give it a try and experience the benefits of Infrastructure as Code with the flexibility and power of modern development tools.
Today, accelerating application development while shifting security and assurance left in the development lifecycle is essential. One of the most critical components of application security is access control. While traditional access control mechanisms such as role-based access control (RBAC) and access control lists (ACLs) are still prevalent, policy-based access control (PBAC) is gaining momentum. PBAC is a more powerful and flexible access control model, allowing developers to apply any combination of coarse-, medium-, and fine-grained access control over resources and data within an application. In this article, we will explore PBAC and how it can be used in application development using Amazon Verified Permissions and how you can define permissions as policies using Cedar, an expressive and analyzable open-source policy language. We will briefly describe here how developers and admins can define policy-based access controls using roles and attributes for fine-grained access.
What is Policy-Based Access Control?
PBAC is an access control model that uses permissions expressed as policies to determine who can access what within an application. Administrators and developers can define application access statically as admin-time authorization where the access is based on users and groups defined by roles and responsibilities. On the other hand, developers set up run-time or dynamic authorization at any time to apply access controls at the time when a user attempts to access a particular application resource. Run-time authorization takes in attributes of application resources, such as contextual elements like time or location, to determine what access should be granted or denied. This combination of policy types makes policy-based access control a more powerful authorization engine.
A central policy store and policy engine evaluates these policies continuously, in real-time to determine access to resources. PBAC is a more dynamic access control model as it allows developers and administrators to create and modify policies according to their needs, such as defining custom roles within an application or enabling secure, delegated authorization. Developers can use PBAC to apply role- and attributed-based access controls across many different types of applications, such as customer-facing web applications, internal workforce applications, multi-tenant software-as-a-service (SaaS) applications, edge device access, and more. PBAC brings together RBAC and attribute-based access control (ABAC), which have been the two most widely used access control models for the past couple decades (See the figure below).
Figure 1: Overview of policy-based access control (PBAC)
Before we try and understand how to modernize permissions, let’s understand how developers implement it in a traditional development process. We typically see developers hardcode access control into each and every application. This creates four primary challenges.
First, you need to update code every time to update access control policies. This is time-consuming for a developer and done at the expense of working on the business logic of the application.
Second, you need to implement these permissions in each and every application you build.
Third, application audits are challenging, you need to run a battery of tests or dig through thousands of lines of code spread across multiple files to demonstrate who has access to application resources. For example, providing evidence to audits that only authorized users can access a patient’s health record.
Finally, developing hardcoded application access control is often time consuming and error prone.
Amazon Verified Permissions simplifies this process by externalizing access control rules from the application code to a central policy store within the service. Now, when a user tries to take an action in your application, you call Verified Permissions to check if it is authorized. Policy admins can respond faster to changing business requirements, as they no longer need to depend on the development team when updating access controls. They can use a central policy store to make updates to authorization policies. This means that developers can focus on the core application logic, and access control policies can be created, customized, and managed separately or collectively across applications. Developers can use PBAC to define authorization rules for users, user groups, or attributes based on the entity type accessing the application. Restricting access to data and resources using PBAC protects against unintended access to application resources and data.
For example, a developer can define a role-based and attribute-based access control policy that allows only certain users or roles to access a particular API. Imagine a group of users within a Marketing department that can only view specific photos within a photo sharing application. The policy might look something like the following using Cedar.
permit(
principal in Role::"expo-speakers",
action == Action::"view",
resource == Photo::"expoPhoto94.jpg"
)
when {
principal.department == “Marketing”
}
;
How do I get started using PBAC in my applications?
PBAC can be integrated into the application development process in several ways when using Amazon Verified Permissions. Developers begin by defining an authorization model for their application and use this to describe the scope of authorization requests made by the application and the basis for evaluating the requests. Think of this as a narrative or structure to authorization requests. Developers then write a schema which documents the form of the authorization model in a machine-readable syntax. This schema document describes each entity type, including principal types, actions, resource types, and conditions. Developers can then craft policies, as statements, that permit or forbid a principal to one or more actions on a resource.
Next, you define a set of application policies which define the overall framework and guardrails for access controls in your application. For example, a guardrail policy might be that only the owner can access photos that are marked ‘private’. These policies are applicable to a large set of users or resources, and are not user or resource specific. You create these policies in the code of your applications, and instantiate them in your CI/CD pipeline, using CloudFormation, and tested in beta stages before being deployed to production.
Lastly, you define the shape of your end-user policies using policy templates. These end-user policies are specific to a user (or user group). For example, a policy that states “Alice” can view “expoPhoto94.jpg”. Policy templates simplify managing end-user policies as a group. Now, every time a user in your application tries to take an action, you call Verified Permissions to confirm that the action is authorized.
Benefits of using Amazon Verified Permissions policies in application development
Amazon Verified Permissions offers several benefits when it comes to application development.
One of the most significant benefits is the flexibility in using the PBAC model. Amazon Verified Permissions allows application administrators or developers to create and modify policies at any time without going into application code, making it easier to respond to changing security needs.
Secondly, it simplifies the application development process by externalizing access control rules from the application code. Developers can reuse PBAC controls for newly built or acquired applications. This allows developers to focus on the core application logic and mitigates security risks within applications by applying fine-grained access controls.
Lastly, developers can add secure delegated authorization using PBAC and Amazon Verified Permissions. This enables developers to enable a group, role, or resource owner the ability to manage data sharing within application resources or between services. This has exciting implications for developers wanting to add privacy and consent capabilities for end users while still enforcing guardrails defined within a centralized policy store.
In Summary
PBAC is a more flexible access control model that enables fine-grained control over access to resources in an application. By externalizing access control rules from the application code, PBAC simplifies the application development process and reduces the risks of security vulnerabilities in the application. PBAC also offers flexibility, aligns with compliance mandates for access control, and developers and administrators benefit from centralized permissions across various stages of the DevOps process. By adopting PBAC in application development, organizations can improve their application security and better align with industry regulations.
Amazon Verified Permissions is a scalable permissions management and fine-grained authorization service for applications developers build. The service helps developers to build secure applications faster by externalizing authorization and centralizing policy management and administration. Developers can align their application access with Zero Trust principles by implementing least privilege and continuous verification within applications. Security and audit teams can better analyze and audit who has access to what within applications.
We announce the general availability of license-included Visual Studio software on Amazon Elastic Cloud Compute (Amazon EC2) instances. You can now purchase fully compliant AWS-provided licenses of Visual Studio with a per-user subscription fee. Amazon EC2 provides preconfigured Amazon Machine Images (AMIs) of Visual Studio Enterprise 2022 and Visual Studio Professional 2022. You can launch on-demand Windows instances including Visual Studio and Windows Server licenses without long-term licensing commitments.
Amazon EC2 provides a broad choice of instances, and customers not only have the flexibility of paying for what their end users use but can also provide the capacity and right hardware to their end users. You can simply launch EC2 instances using license-included AMIs, and multiple authorized users can connect to these EC2 instances by using Remote Desktop software. Your administrator can authorize users centrally using AWS License Manager and AWS Managed Microsoft Active Directory (AD).
Configure Visual Studio License with AWS License Manager As a prerequisite, your administrator needs to create an instance of AWS Managed Microsoft AD and allow AWS License Manager to onboard to it by accepting permission. To set up authorized users, see AWS Managed Microsoft AD documentation.
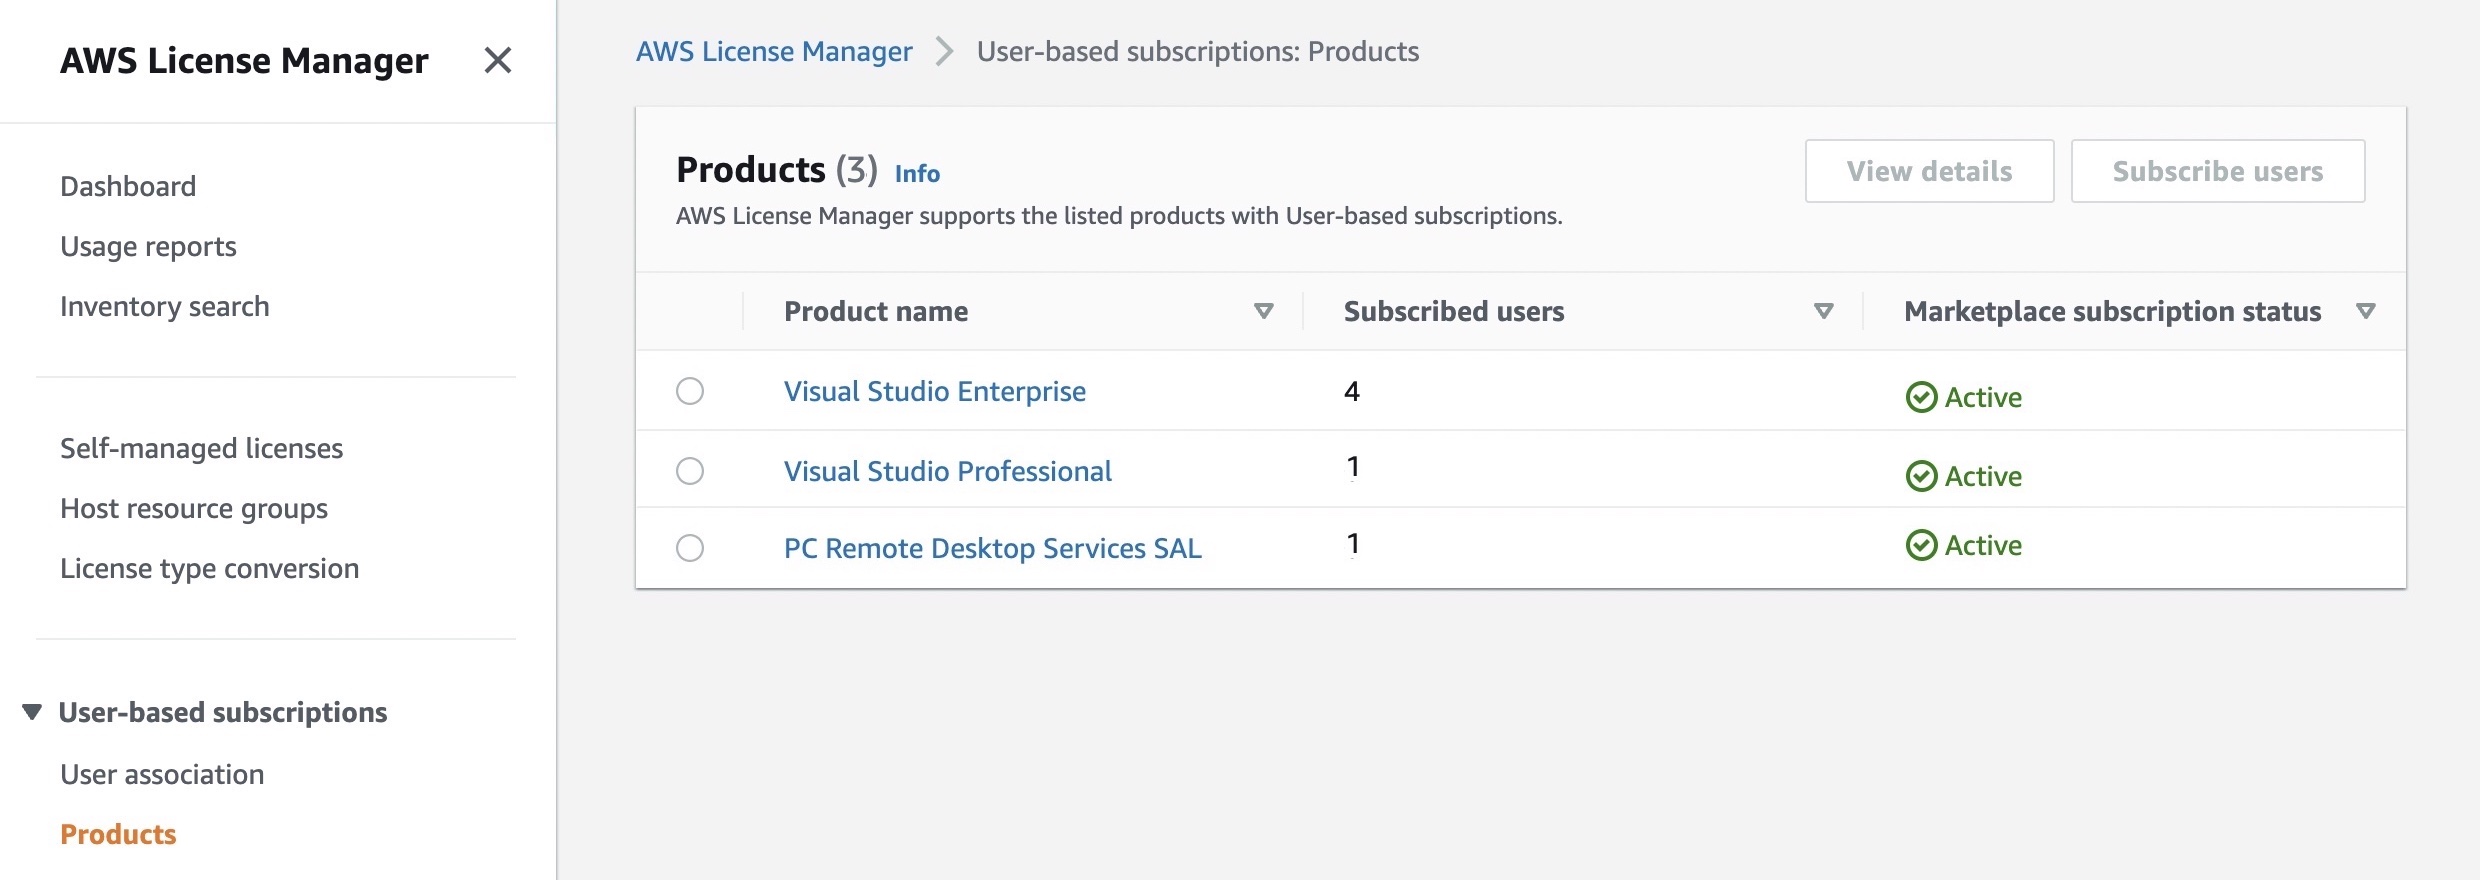
AWS License Manager makes it easier to manage your software licenses from vendors such as Microsoft, SAP, Oracle, and IBM across AWS and on-premises environments. To display a list of available Visual Studio software licenses, select User-based subscriptions in the AWS Licence Manager console.
You can see listed products to support user-based subscriptions. Each product has a descriptive name, a count of the subscribed users to utilize the product, and whether the subscription has been activated for use with a directory. Also, you are required to purchase Remote Desktop Services SAL licenses in the same way as Visual Studio by authorizing users for those licenses.
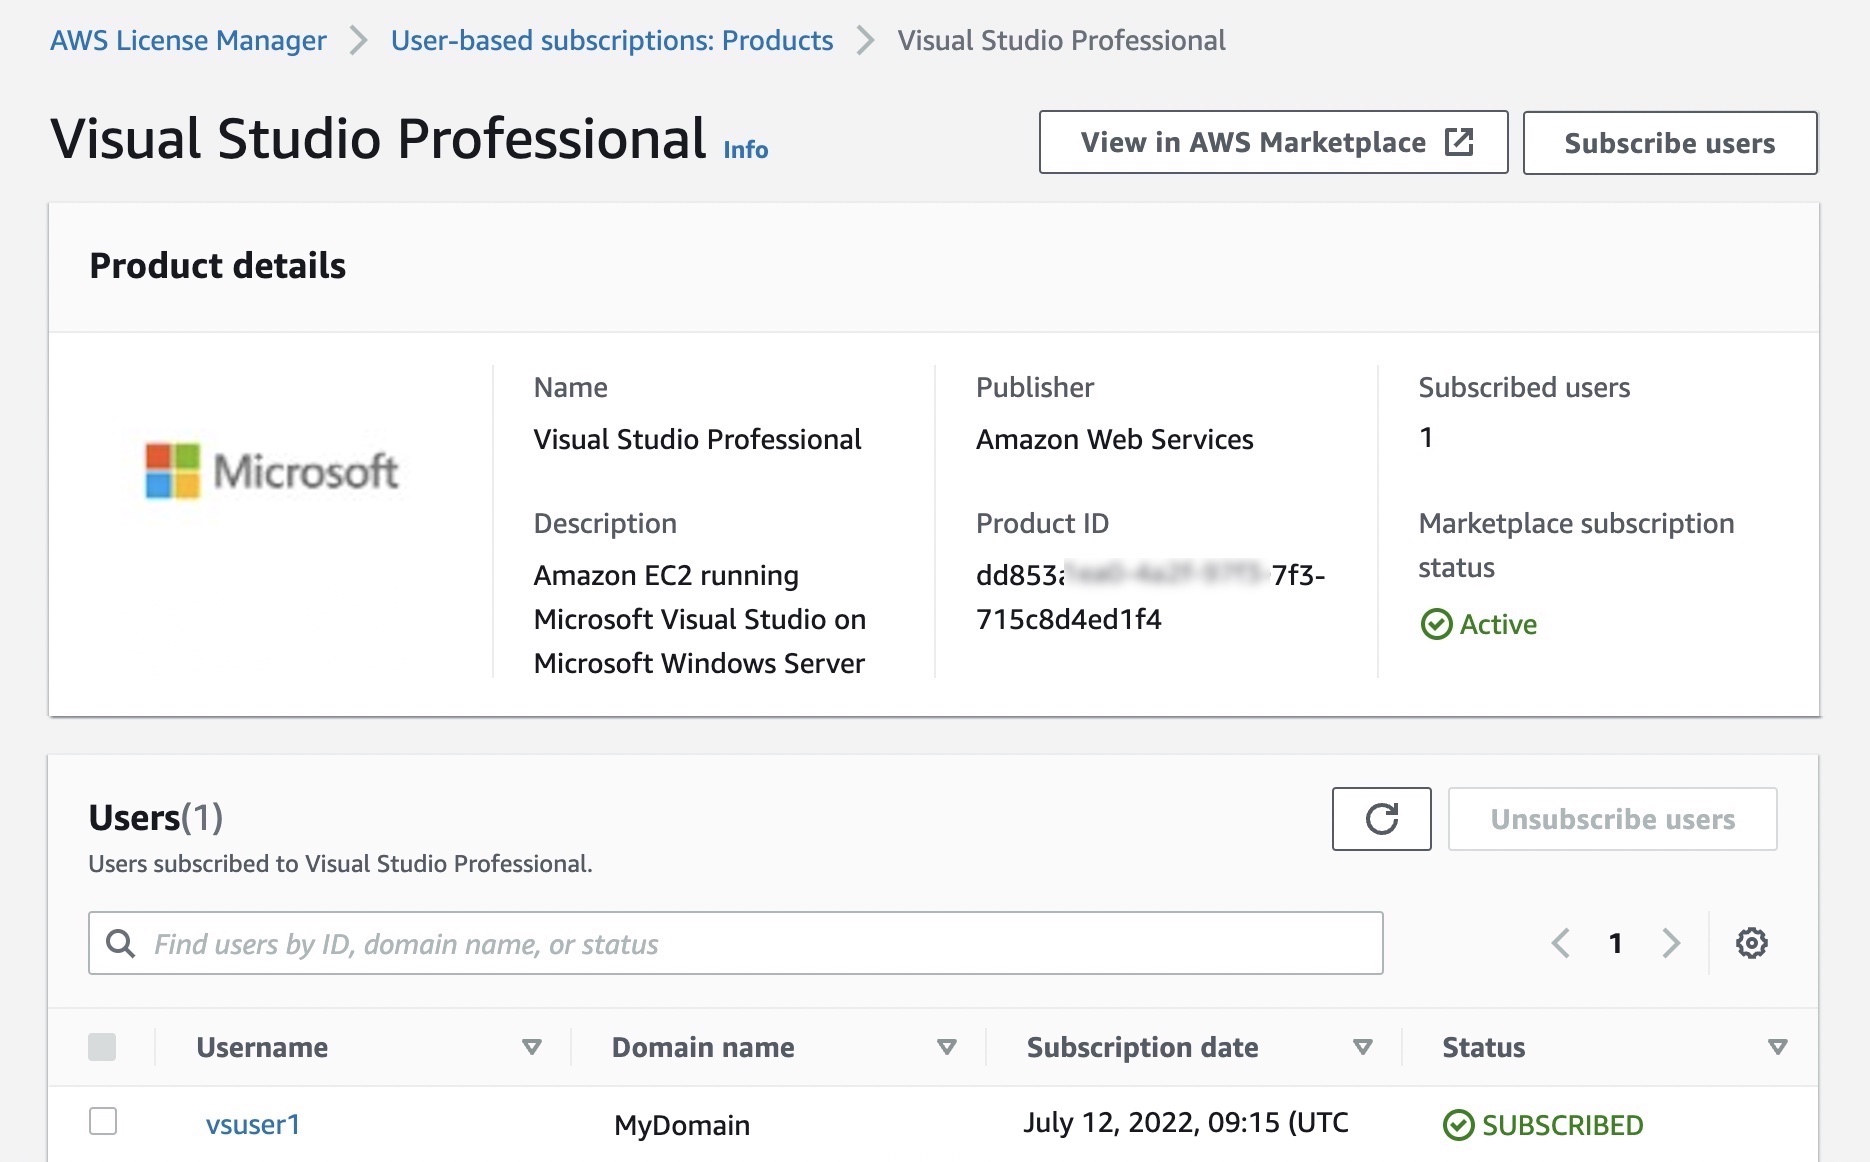
When you select Visual Studio Professional, you can see product details and subscribed users. By selecting Subscribe users, you can add authorized users to the license of Visual Studio Professional software.
You can perform the administrative tasks using the AWS Command Line Interface (CLI) tools via AWS License Manager APIs. For example, you can subscribe a user to the product in your Active Directory.
To launch a Windows instance with preconfigured Visual Studio software, go to the EC2 console and select Launch instances. In the Application and OS Images (Amazon Machine Image), search for “Visual Studio on EC2,” and you can find AMIs under the Quickstart AMIs and AWS Marketplace AMIs tabs.
After launching your Windows instance, your administrator associates a user to the product in the Instances screen of the License Manager console. You can see the listed instances were launched using an AMI to provide the specified product to users who can then be associated.
These steps will be performed by the administrators who are responsible for managing users, instances, and costs across the organization. To learn more about administrative tasks, see User-based subscriptions in AWS License Manager.
Run Visual Studio Software on EC2 Instances Once administrators authorize end users and launch the instances, you can remotely connect to Visual Studio instances using your AD account information shared by your administrator via Remote Desktop software. That’s all!
Now Available License-included Visual Studio on Amazon EC2 is now available in all AWS commercial and public Regions. You are billed per user for licenses of Visual Studio through a monthly subscription and per vCPU for license-included Windows Server instances on EC2. You can use On-Demand Instances, Reserved Instances, and Savings Plan pricing models like you do today for EC2 instances.
This blog post was written by Syl Taylor, Professional Services Consultant.
In March 2022, the highly anticipated Go 1.18 was released. Go 1.18 brings to the language some long-awaited features and additions, such as generics. It also brings significant performance improvements for Arm’s 64-bit architecture used in AWS Graviton server processors. In this post, we show how migrating Go workloads from Go 1.17.8 to Go 1.18 can help you run your applications up to 20% faster and more cost-effectively. To achieve this goal, we selected a series of realistic and relatable workloads to showcase how they perform when compiled with Go 1.18.
Overview
Go is an open-source programming language which can be used to create a wide range of applications. It’s developer-friendly and suitable for designing production-grade workloads in areas such as web development, distributed systems, and cloud-native software.
AWS Graviton2 processors are custom-built by AWS using 64-bit Arm Neoverse cores to deliver the best price-performance for your cloud workloads running in Amazon Elastic Compute Cloud (Amazon EC2). They provide up to 40% better price/performance over comparable x86-based instances for a wide variety of workloads and they can run numerous applications, including those written in Go.
Web service throughput
For web applications, the number of HTTP requests that a server can process in a window of time is an important measurement to determine scalability needs and reduce costs.
To demonstrate the performance improvements for a Go-based web service, we selected the popular Caddy web server. To perform the load testing, we selected the hey application, which was also written in Go. We deployed these packages in a client/server scenario on m6g Graviton instances.
The Caddy web server compiled with Go 1.18 brings a 7-8% throughput improvement as compared with the variant compiled with Go 1.17.8.
We conducted a second test where the client downloads a dynamic page on which the request handler performs some additional processing to write the HTTP response content. The performance gains were also noticeable at 10-11%.
Regular expression searches
Searching through large amounts of text is where regular expression patterns excel. They can be used for many use cases, such as:
Checking if a string has a valid format (e.g., email address, domain name, IP address),
Finding all of the occurrences of a string (e.g., date) in a text document,
Identifying a string and replacing it with another.
However, despite their efficiency in search engines, text editors, or log parsers, regular expression evaluation is an expensive operation to run. We recommend identifying optimizations to reduce search time and compute costs.
The following example uses the Go regexp package to compile a pattern and search for the presence of a standard date format in a large generated string. We observed a 13.5% increase in completed executions with a 12% reduction in execution time.
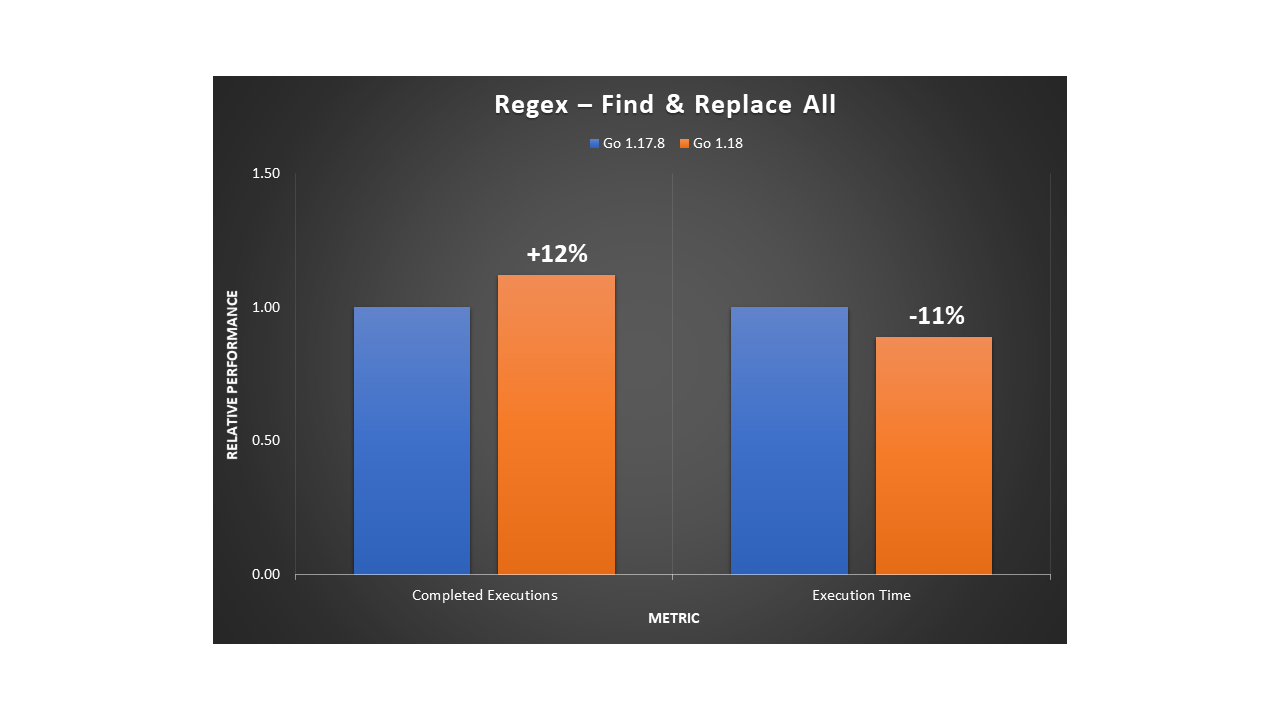
In a second example, we used the Go regexp package to find all of the occurrences of a pattern for character sequences in a string, and then replace them with a single character. We observed a 12% increase in evaluation rate with an 11% reduction in execution time.
As with most workloads, the improvements will vary depending on the input data, the hardware selected, and the software stack installed. Furthermore, with this use case, the regular expression usage will have an impact on the overall performance. Given the importance of regex patterns in modern applications, as well as the scale at which they’re used, we recommend upgrading to Go 1.18 for any software that relies heavily on regular expression operations.
Database storage engines
Many database storage engines use a key-value store design to benefit from simplicity of use, faster speed, and improved horizontal scalability. Two implementations commonly used are B-trees and LSM (log-structured merge) trees. In the age of cloud technology, building distributed applications that leverage a suitable database service is important to make sure that you maximize your business outcomes.
B-trees are seen in many database management systems (DBMS), and they’re used to efficiently perform queries using indexes. When we tested a sample program for inserting and deleting in a large B-tree structure, we observed a 10.5% throughput increase with a 10% reduction in execution time.
On the other hand, LSM trees can achieve high rates of write throughput, thus making them useful for big data or time series events, such as metrics and real-time analytics. They’re used in modern applications due to their ability to handle large write workloads in a time of rapid data growth. The following are examples of databases that use LSM trees:
InfluxDB is a powerful database used for high-speed read and writes on time series data. It’s written in Go and its storage engine uses a variation of LSM called the Time-Structured Merge Tree (TSM).
CockroachDB is a popular distributed SQL database written in Go with its own LSM tree implementation.
Badger is written in Go and is the engine behind Dgraph, a graph database. Its design leverages LSM trees.
When we tested an LSM tree sample program, we observed a 13.5% throughput increase with a 9.5% reduction in execution time.
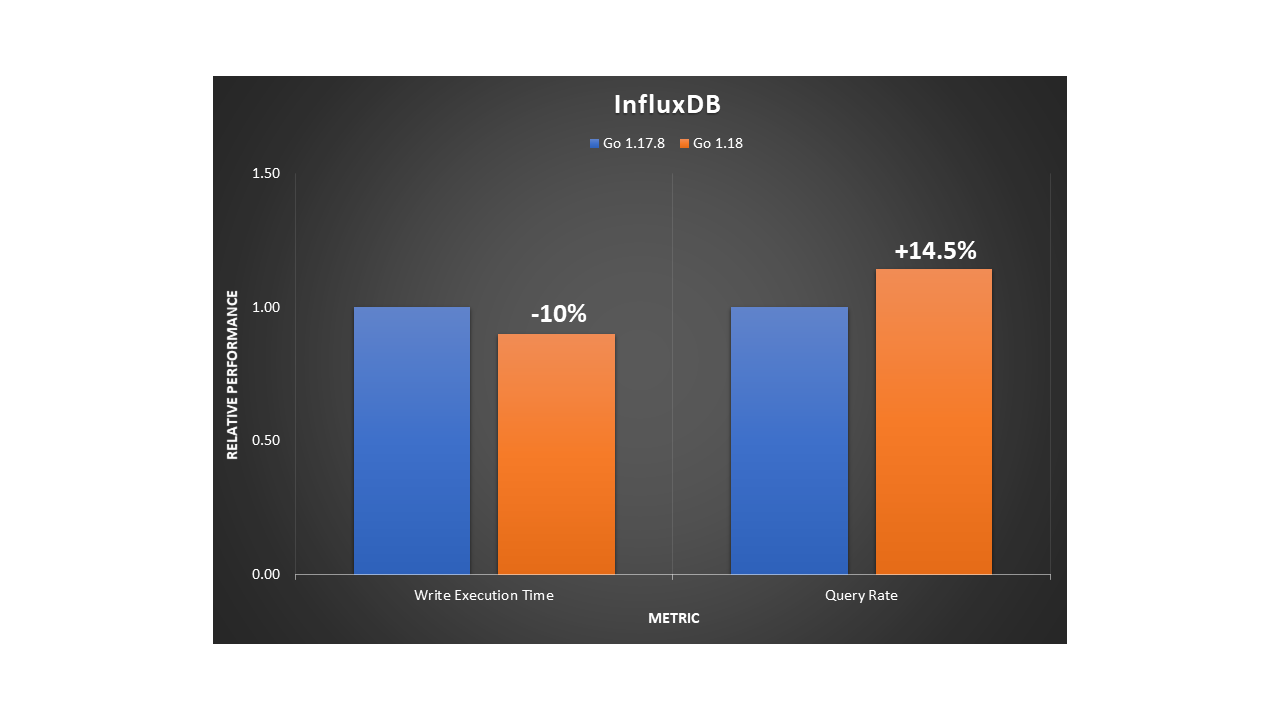
We also tested InfluxDB using comparison benchmarks to analyze writes and reads to the database server. On the load stress test, we saw a 10% increase of insertion throughput and a 14.5% faster rate when querying at a large scale.
In summary, for databases with an engine written in Go, you’ll likely observe better performance when upgrading to a version that has been compiled with Go 1.18.
Machine learning training
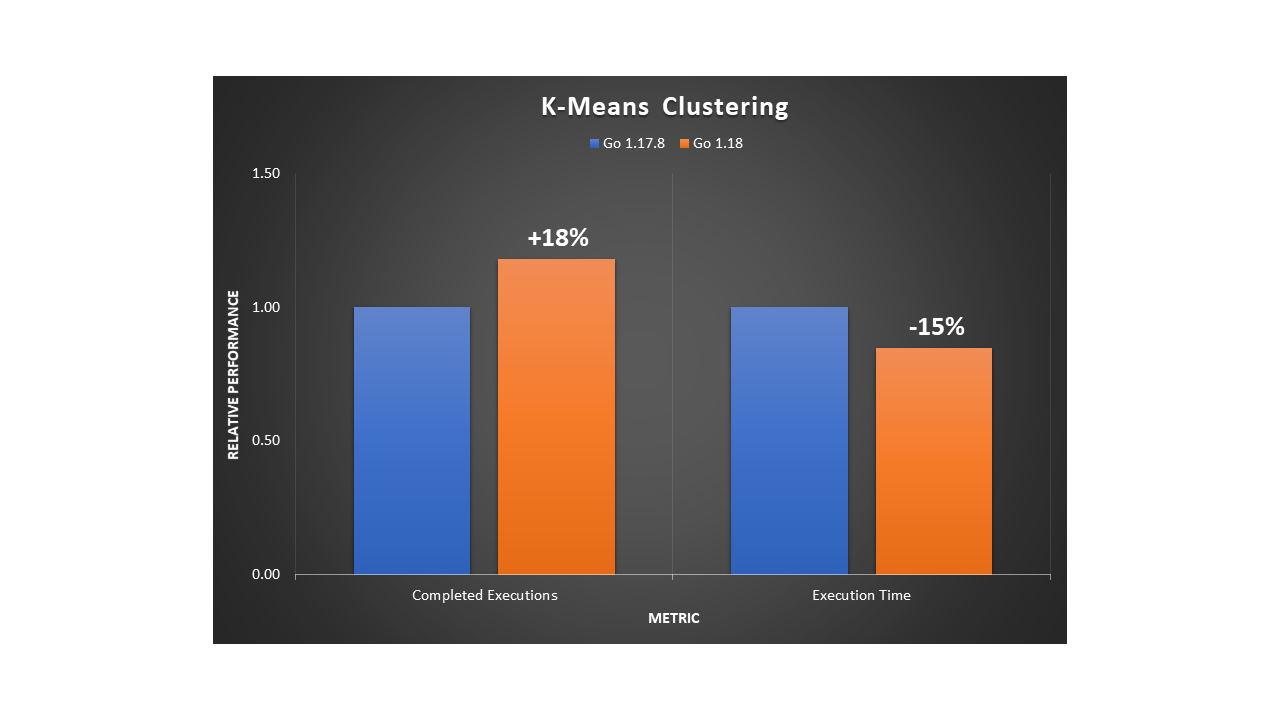
A popular unsupervised machine learning (ML) algorithm is K-Means clustering. It aims to group similar data points into k clusters. We used a dataset of 2D coordinates to train K-Means and obtain the cluster distribution in a deterministic manner. The example program uses an OOP design. We noticed an 18% improvement in execution throughput and a 15% reduction in execution time.
A widely-used and supervised ML algorithm for both classification and regression is Random Forest. It’s composed of numerous individual decision trees, and it uses a voting mechanism to determine which prediction to use. It’s a powerful method for optimizing ML models.
We ran a deterministic example to train a dense Random Forest. The program uses an OOP design and we noted a 20% improvement in execution throughput and a 15% reduction in execution time.
Recursion
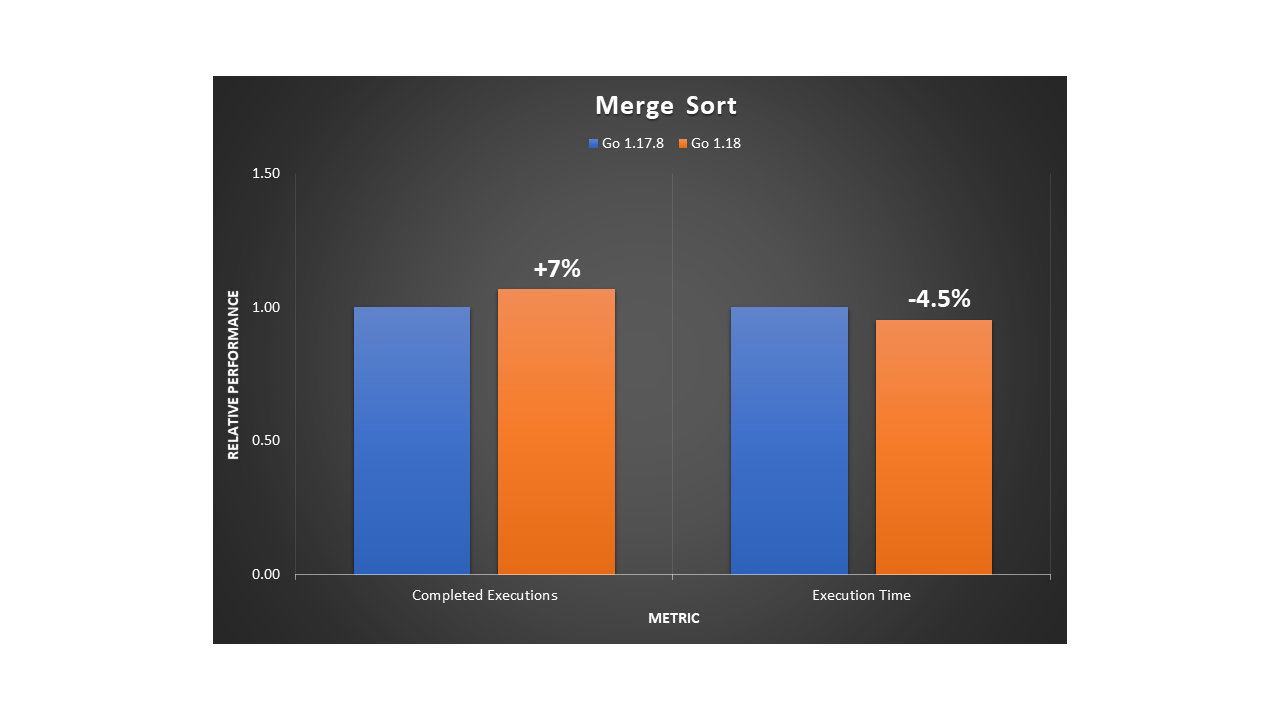
An efficient, general-purpose method for sorting data is the merge sort algorithm. It works by repeatedly breaking down the data into parts until it can compare single units to each other. Then, it decides their order in the intermediary steps that will merge repeatedly until the final sorted result. To implement this divide-and-conquer approach, merge sort must use recursion. We ran the program using a large dataset of numbers and observed a 7% improvement in execution throughput and a 4.5% reduction in execution time.
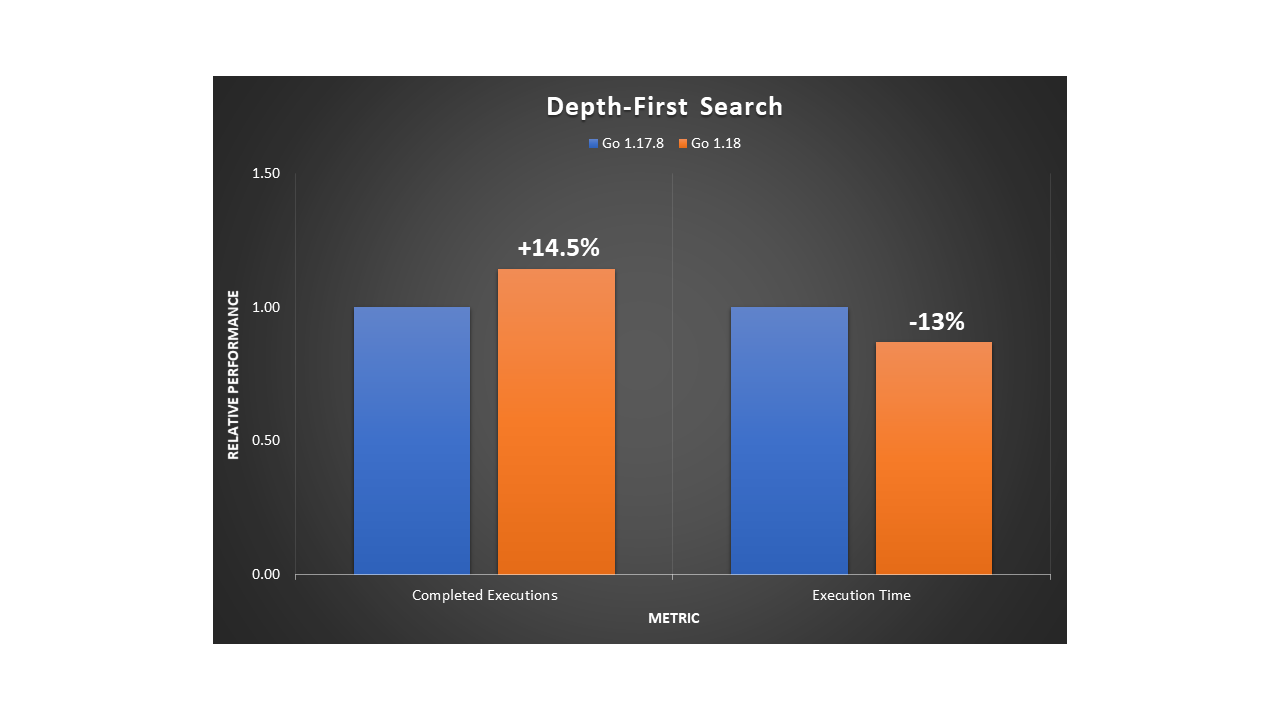
Depth-first search (DFS) is a fundamental recursive algorithm for traversing tree or graph data structures. Many complex applications rely on DFS variants to solve or optimize hard problems in various areas, such as path finding, scheduling, or circuit design. We implemented a standard DFS traversal in a fully-connected graph. Then we observed a 14.5% improvement in execution throughput and a 13% reduction in execution time.
Conclusion
In this post, we’ve shown that a variety of applications, not just those primarily compute-bound, can benefit from the 64-bit Arm CPU performance improvements released in Go 1.18. Programs with an object-oriented design, recursion, or that have many function calls in their implementation will likely benefit more from the new register ABI calling convention.
By using AWS Graviton EC2 instances, you can benefit from up to a 40% price/performance improvement over other instance types. Furthermore, you can save even more with Graviton through the additional performance improvements by simply recompiling your Go applications with Go 1.18.
Today, I am happy to share two new features of CodeGuru Reviewer:
A new Detector Library describes in detail the detectors that CodeGuru Reviewer uses when looking for possible defects and includes code samples for both Java and Python.
New security detectors have been introduced for detecting log-injection flaws in Java and Python code, similar to what happened with the recent Apache Log4j vulnerability we described in this blog post.
Let’s see these new features in more detail.
Using the Detector Library To help you understand more clearly which detectors CodeGuru Reviewer uses to review your code, we are now sharing a Detector Library where you can find detailed information and code samples.
These detectors help you build secure and efficient applications on AWS. In the Detector Library, you can find detailed information about CodeGuru Reviewer’s security and code quality detectors, including descriptions, their severity and potential impact on your application, and additional information that helps you mitigate risks.
Note that each detector looks for a wide range of code defects. We include one noncompliant and compliant code example for each detector. However, CodeGuru uses machine learning and automated reasoning to identify possible issues. For this reason, each detector can find a range of defects in addition to the explicit code example shown on the detector’s description page.
Let’s have a look at a few detectors. One detector is looking for insecure cross-origin resource sharing (CORS) policies that are too permissive and may lead to loading content from untrusted or malicious sources.
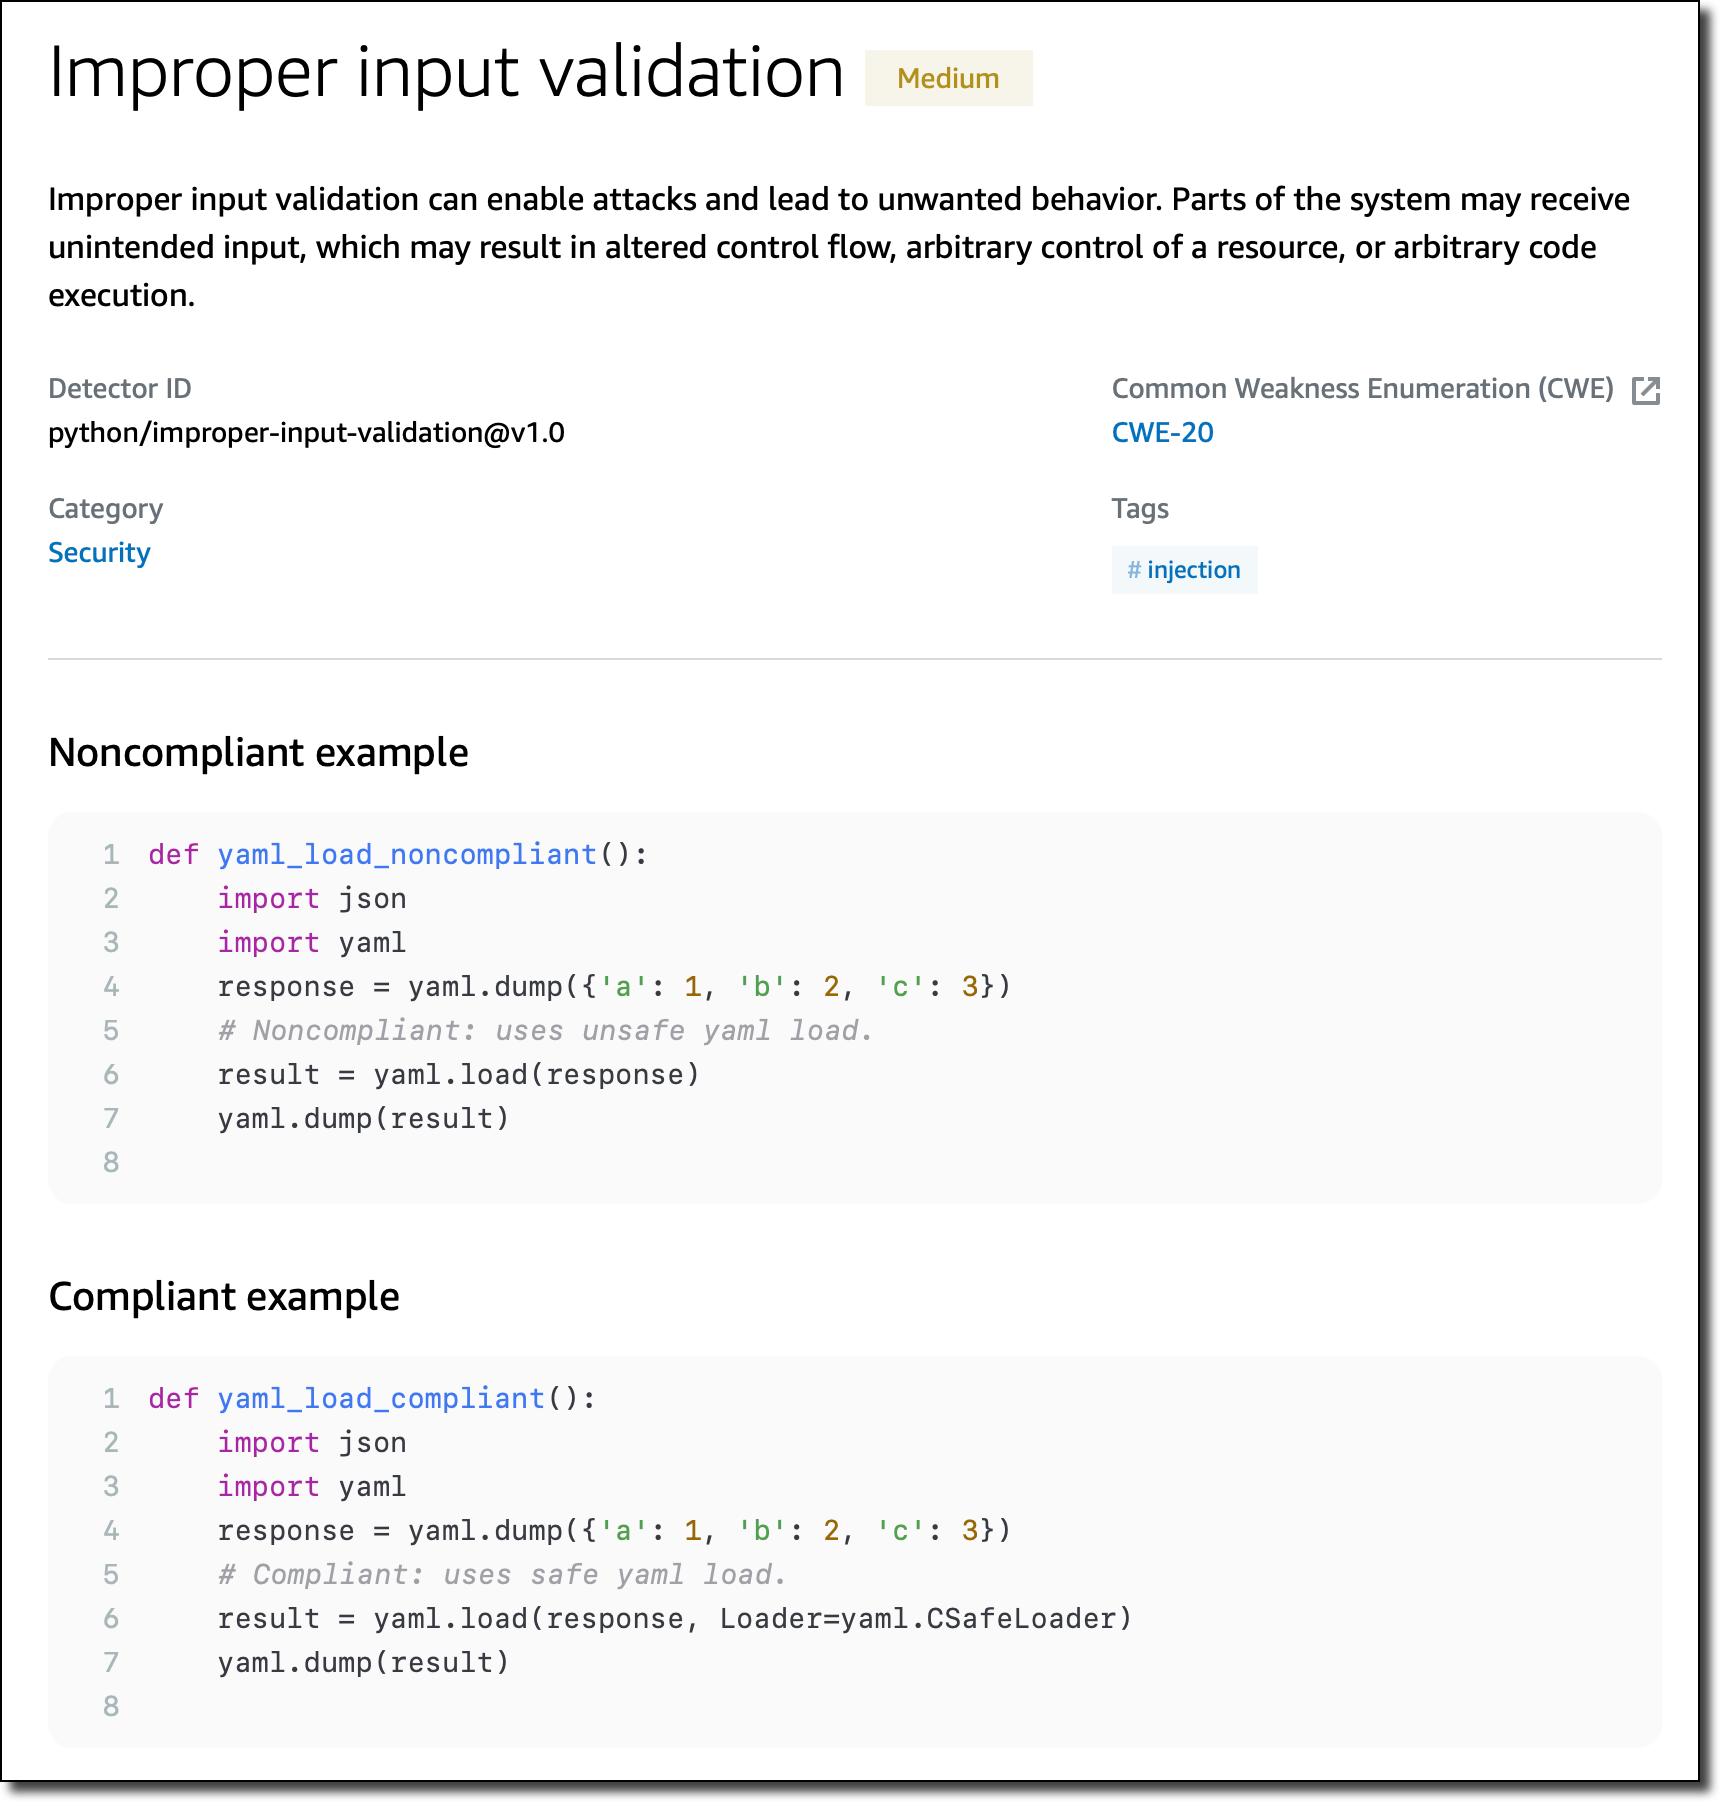
Another detector checks for improper input validation that can enable attacks and lead to unwanted behavior.
Specific detectors help you use the AWS SDK for Java and the AWS SDK for Python (Boto3) in your applications. For example, there are detectors that can detect hardcoded credentials, such as passwords and access keys, or inefficient polling of AWS resources.
New Detectors for Log-Injection Flaws Following the recent Apache Log4j vulnerability, we introduced in CodeGuru Reviewer new detectors that check if you’re logging anything that is not sanitized and possibly executable. These detectors cover the issue described in CWE-117: Improper Output Neutralization for Logs.
These detectors work with Java and Python code and, for Java, are not limited to the Log4j library. They don’t work by looking at the version of the libraries you use, but check what you are actually logging. In this way, they can protect you if similar bugs happen in the future.
Following these detectors, user-provided inputs must be sanitized before they are logged. This avoids having an attacker be able to use this input to break the integrity of your logs, forge log entries, or bypass log monitors.
The Detector Library is free to browse as part of the documentation. For the new detectors looking for log-injection flaws, standard pricing applies. See the CodeGuru pricing page for more information.
2020 was the year that ARM chips made the headlines by moving from largely mobile form factors into the cloud thanks to AWS Graviton2, allowing you to have up to 40% better price performance over comparable current generation x86 Amazon Elastic Compute Cloud (Amazon EC2) and Amazon Relational Database Service (Amazon RDS) instances.
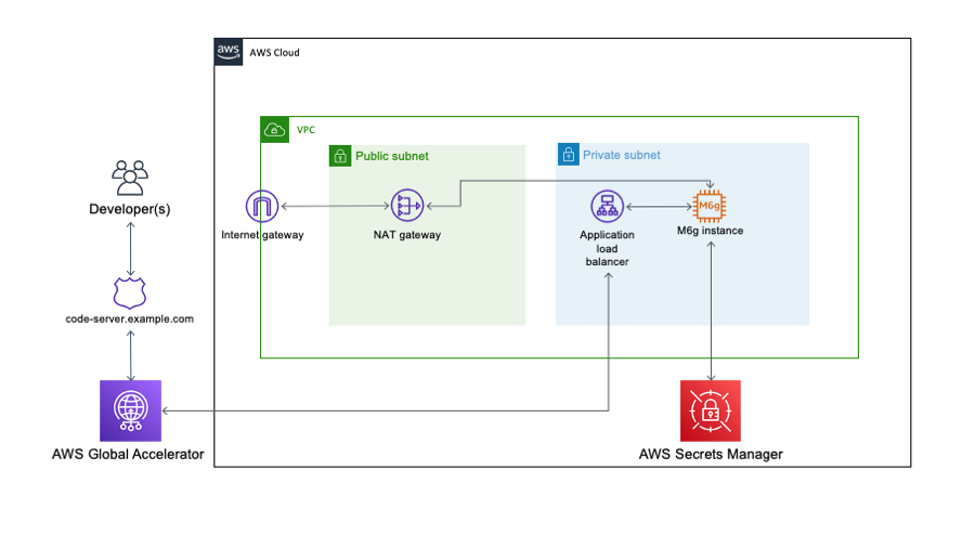
We speak to customers daily about Graviton2. One recurring question we hear is “Graviton2 is great, but how can my team develop for ARM natively without the complexity of cross-compilation or having to buy custom hardware on premises?” This post seeks to answer that question by setting up the Visual Studio Code-based Code Server IDE, running on a Graviton2 EC2 instance that enables native development in a cost-effective and secure manner accessed via your browser.
Code Server queries AWS Secrets Manager to initially set the login password on startup and allow for continued password-based authentication and easy password rotation. The EC2 instance has access to the internet through a NAT gateway and has no public IP address or key pair associated, and is accessible only through AWS Systems Manager Session Manager.
Prerequisites
For this walkthrough, the following are prerequisites:
A private CIDR range for the new VPC that is created as part of the AWS Cloud Development Kit (AWS CDK) stack
AWS CDK stack
In order to deploy our architecture, I use the AWS CDK. As a developer, it’s more intuitive to me to define my infrastructure using a language and tooling with which I am familiar. I can also do things like environment variable injection and scripting as part of the stack creation to add stack parameters and customization points.
The AWS CDK application is comprised of five stacks. Each stack defines a separate part of the architecture:
Networking – Defines a VPC across two Availability Zones with the CIDR range of your choice. The routing and public/private subnet creation is done for us as part of the default configuration.
Certificate – This is the reason for the domain prerequisite. It’s a best practice to encrypt web applications using TLS, and for that we need a certificate and therefore a domain. This stack creates a certificate for the subdomain you specify as part of the stack creation and DNS validation in Route 53.
Amazon EC2 configuration – This defines both our AMI and the instance type and configuration. In this case, we’re using Amazon Linux 2 ARM64 edition. Here we also set the instance-managed roles that allow Session Manager connectivity and Secrets Manager access.
ALB configuration – Here we define the internal load balancer and specify the listener, certificate, and target configuration. I have injected the Amazon EC2 configuration as part of the class constructor so that I can reference it directly as a target.
Global accelerator configuration – Finally, the accelerator is defined here with two ports open, the ALB we defined in the ALB stack as a target, and most importantly adds in a CNAME DNS entry pointing to the DNS name of the accelerator.
Walkthrough overview
This walkthrough uses the AWS CDK command line tools to deploy the stack. Session Manager is enabled to allow access to the EC2 instance and configure the Code Server application and associated plugins.
The walkthrough specifically covers the following steps:
Deploy the AWS CDK stacks via CloudShell to build out the application infrastructure and associated IAM roles.
Launch Code Server via the official Docker container with the commands to get and set the password stored in Secrets Manager.
Log in and build the rust-analyzer and CodeLLDB plugins from a terminal to allow for debugging within a “Hello World” application.
Start CloudShell and install the appropriate tooling
In this section, I use dummy values for the domain, the VPC CIDR, AWS Region, and the secret password. You need to submit real values as appropriate.
Sign in to CloudShell and enter the following commands:
Open the extensions panel and enter Rust Analyzer in the search bar. Then install the plugin.
Install the debugger
Go back to the extensions panel in the Code Server application and enter CodeLLDB into the search bar. Then install this extension.
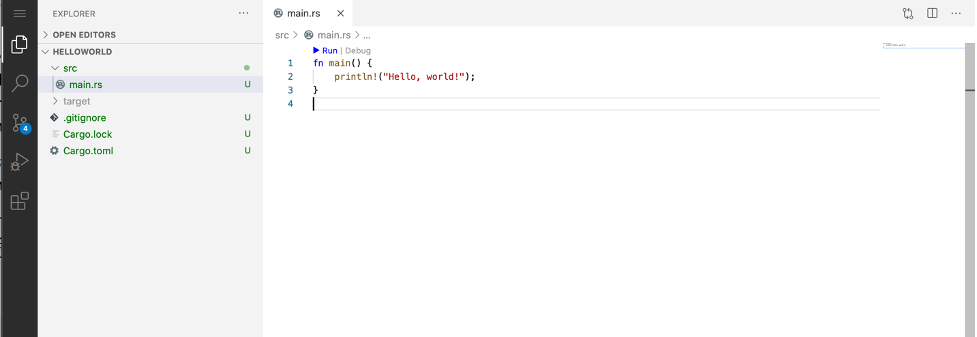
Create a sample application and open it in the Code Server window
To create and use our sample application, complete the following steps:
In the existing Code Server terminal, enter the following:
mkdir -p ~/src/
cd ~/src
cargo new helloworld --bin
Open the newly created folder in Code Server verifying that the helloworld directory was successfully created.
Rust-analyzer runs when you open up src/main.rs and index the file.
You can run the program by choosing Run in the editor.
Similarly, to launch the debugger, choose Debug in the editor.
Troubleshooting
If the CloudShell session times out, you need to reset your environment variables in order to re-deploy, modify, and delete the stack deployment.
Clean up
This stack incurs an estimated monthly cost of $143.00.
To delete the stack, log in to CloudShell and enter the following commands:
cd cdk-graviton2-alb-aga-route53
source bin/activate

# Re-set the environment variables again if required
export VPC_CIDR=”10.0.0.1/16” #Substitute your CIDR here.
export CDK_DEPLOY_ACCOUNT=`aws sts get-caller-identity | jq -r '.Account'`
export CDK_DEPLOY_REGION=$AWS_REGION
export R53_DOMAIN=”code-server.example.com” #Substitute your domain here.
cdk destroy --all
This destroys all the resources created in the first step. You can verify this by browsing to the AWS CloudFormation console and noting the deletion of all the stacks.
Conclusion
AWS is a place where builders can reinvent the future. The future of development means supporting different chipsets depending on different business requirements. This post is designed to enable development targeting the ARM64 microarchitecture by utilizing AWS Graviton2. Happy building!
Author bio
Alistair is a Principal Solutions Architect at AWS focused on EdTech customers. Originally from the west coast of Scotland, Alistair now lives in Fairfield, Connecticut, with his wife and two daughters and enjoys spending time with his family, skiing, golfing, cycling, and using his pellet smoker.
The collective thoughts of the interwebz
Manage Consent
To provide the best experiences, we use technologies like cookies to store and/or access device information. Consenting to these technologies will allow us to process data such as browsing behavior or unique IDs on this site. Not consenting or withdrawing consent, may adversely affect certain features and functions.
Functional
Always active
The technical storage or access is strictly necessary for the legitimate purpose of enabling the use of a specific service explicitly requested by the subscriber or user, or for the sole purpose of carrying out the transmission of a communication over an electronic communications network.
Preferences
The technical storage or access is necessary for the legitimate purpose of storing preferences that are not requested by the subscriber or user.
Statistics
The technical storage or access that is used exclusively for statistical purposes.The technical storage or access that is used exclusively for anonymous statistical purposes. Without a subpoena, voluntary compliance on the part of your Internet Service Provider, or additional records from a third party, information stored or retrieved for this purpose alone cannot usually be used to identify you.
Marketing
The technical storage or access is required to create user profiles to send advertising, or to track the user on a website or across several websites for similar marketing purposes.


 testproject-dev: destroyed