Tag Archives: Amazon EFS

Optimizing storage performance for Amazon EKS on AWS Outposts

Post Syndicated from Arun Kumar original https://aws.amazon.com/blogs/compute/optimizing-storage-performance-for-amazon-eks-on-aws-outposts/

Amazon Elastic Kubernetes Service (Amazon EKS) on AWS Outposts brings the power of managed Kubernetes to your on-premises infrastructure. Use Amazon EKS on Outposts rack to create hybrid cloud deployments that maintain consistent AWS experiences across environments. As organizations increasingly adopt edge computing and hybrid architectures, storage optimization and performance tuning become critical for successful workload deployment.

Outposts extend AWS infrastructure, services, APIs, and tools to virtually any datacenter, co-location space, or on-premises facility. In this blog post you will learn about your storage options and their performance characteristics which is essential for building resilient, high-performing applications using Amazon EKS on Outposts.

Amazon EKS on Outposts deployment options

The following two sections outline the differences between Amazon EKS extended and local cluster deployment options available on Outposts.

Amazon EKS extended cluster architecture

Amazon EKS extended clusters on Outposts provide a powerful solution for organizations seeking to use the benefits of Kubernetes while maintaining certain workloads on-premises, as shown in the following figure. This hybrid architecture allows businesses to extend their EKS clusters from the AWS Cloud to their own data centers or edge locations using Outposts. The Kubernetes control plane remains in the AWS Region, providing centralized management and benefiting from the AWS infrastructure in the cloud and on the Outpost.

Outposts is designed to be a connected service, and needs reliable network connectivity to the AWS Region using the Outposts service link.
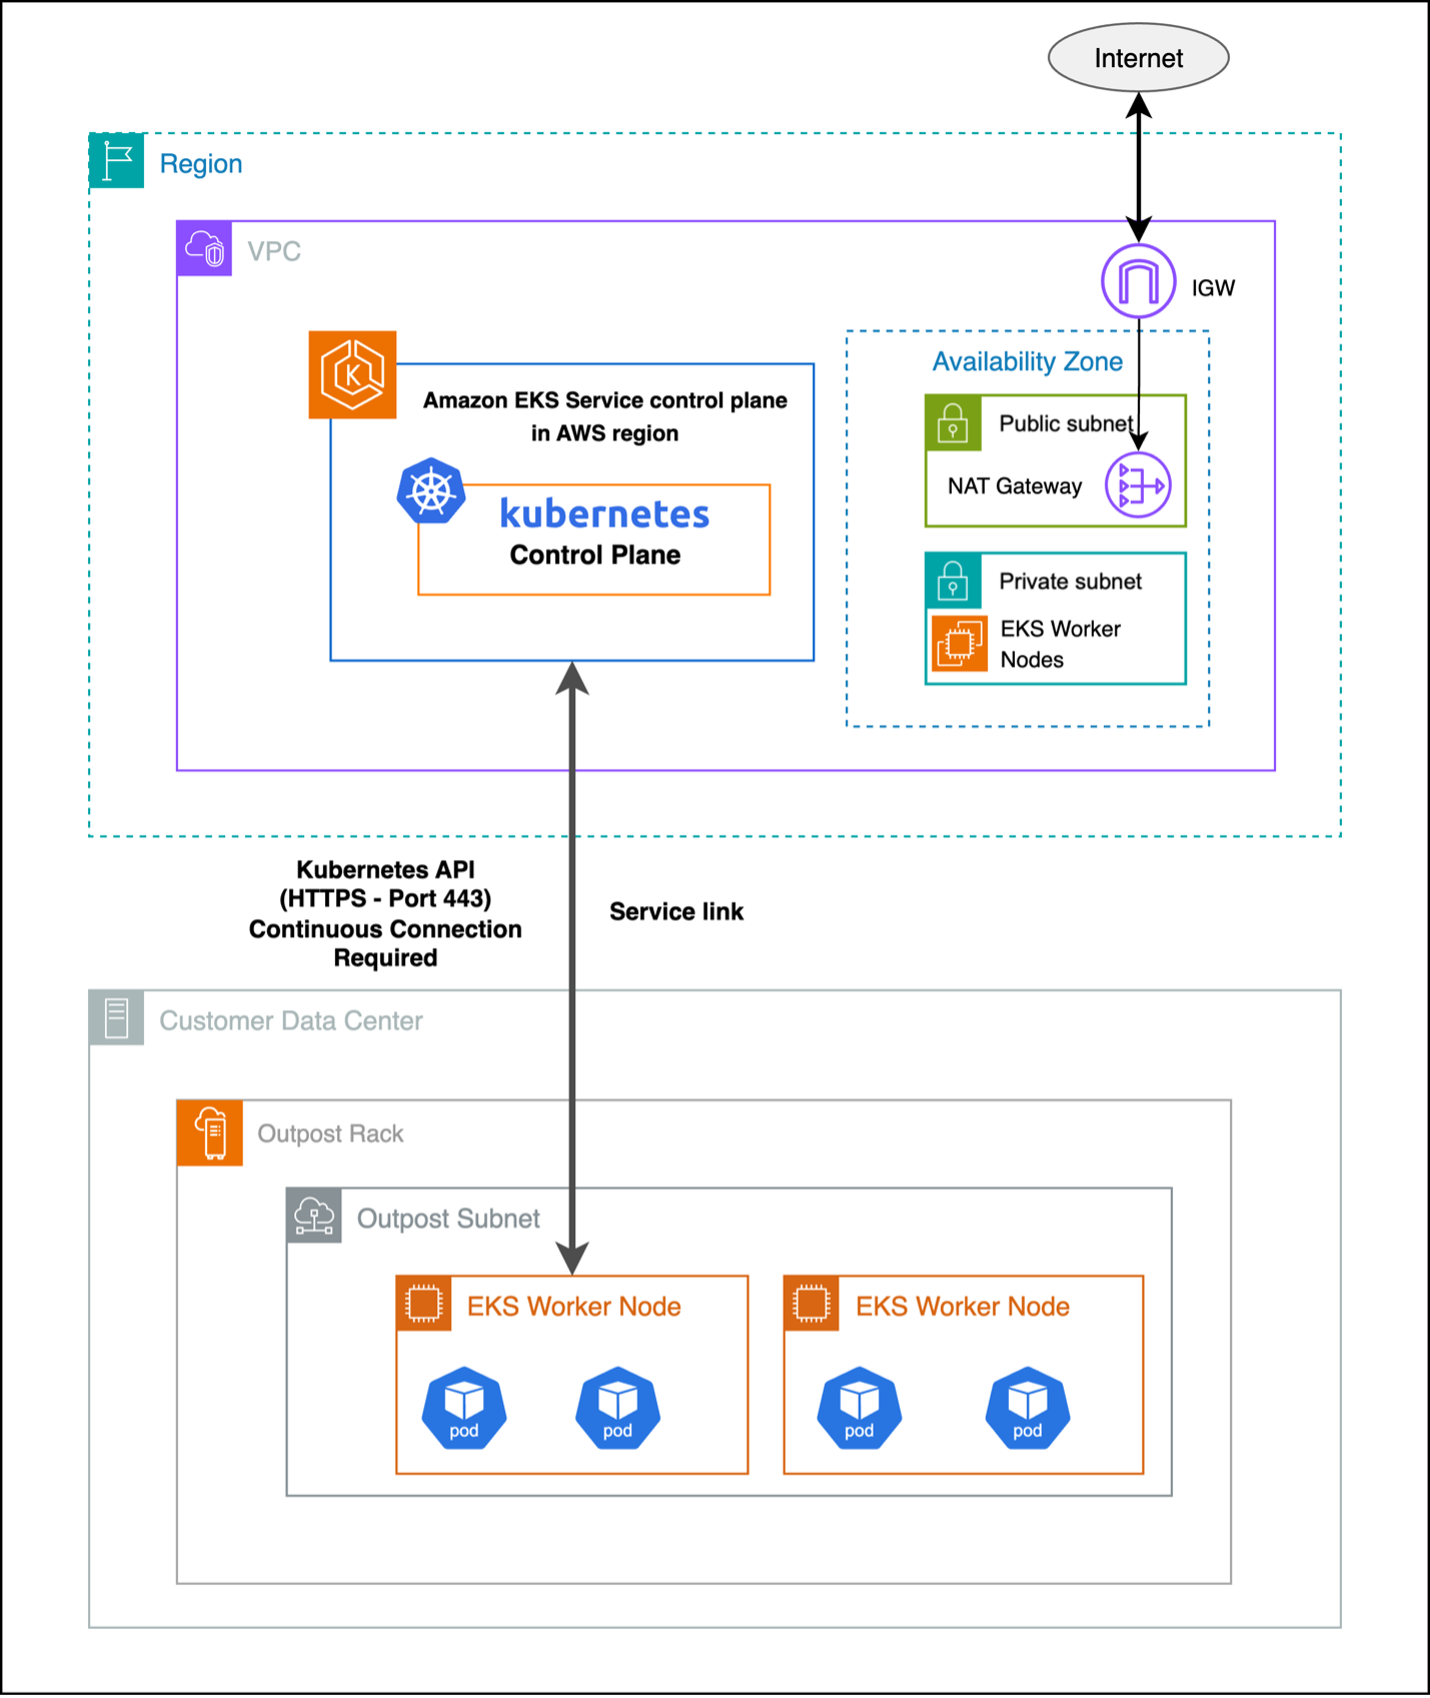
Figure 1 : Extended cluster

Amazon EKS local cluster architecture

Amazon EKS local clusters deploy the Kubernetes control plane on your Outpost, as shown in the following figure. This provides greater network resilience against outages as cluster operations run entirely on the Outposts and reduces the dependency on network connectivity to the AWS Region. Having the Kubernetes control plane hosted on your Outpost also reduces latency for cluster operations.
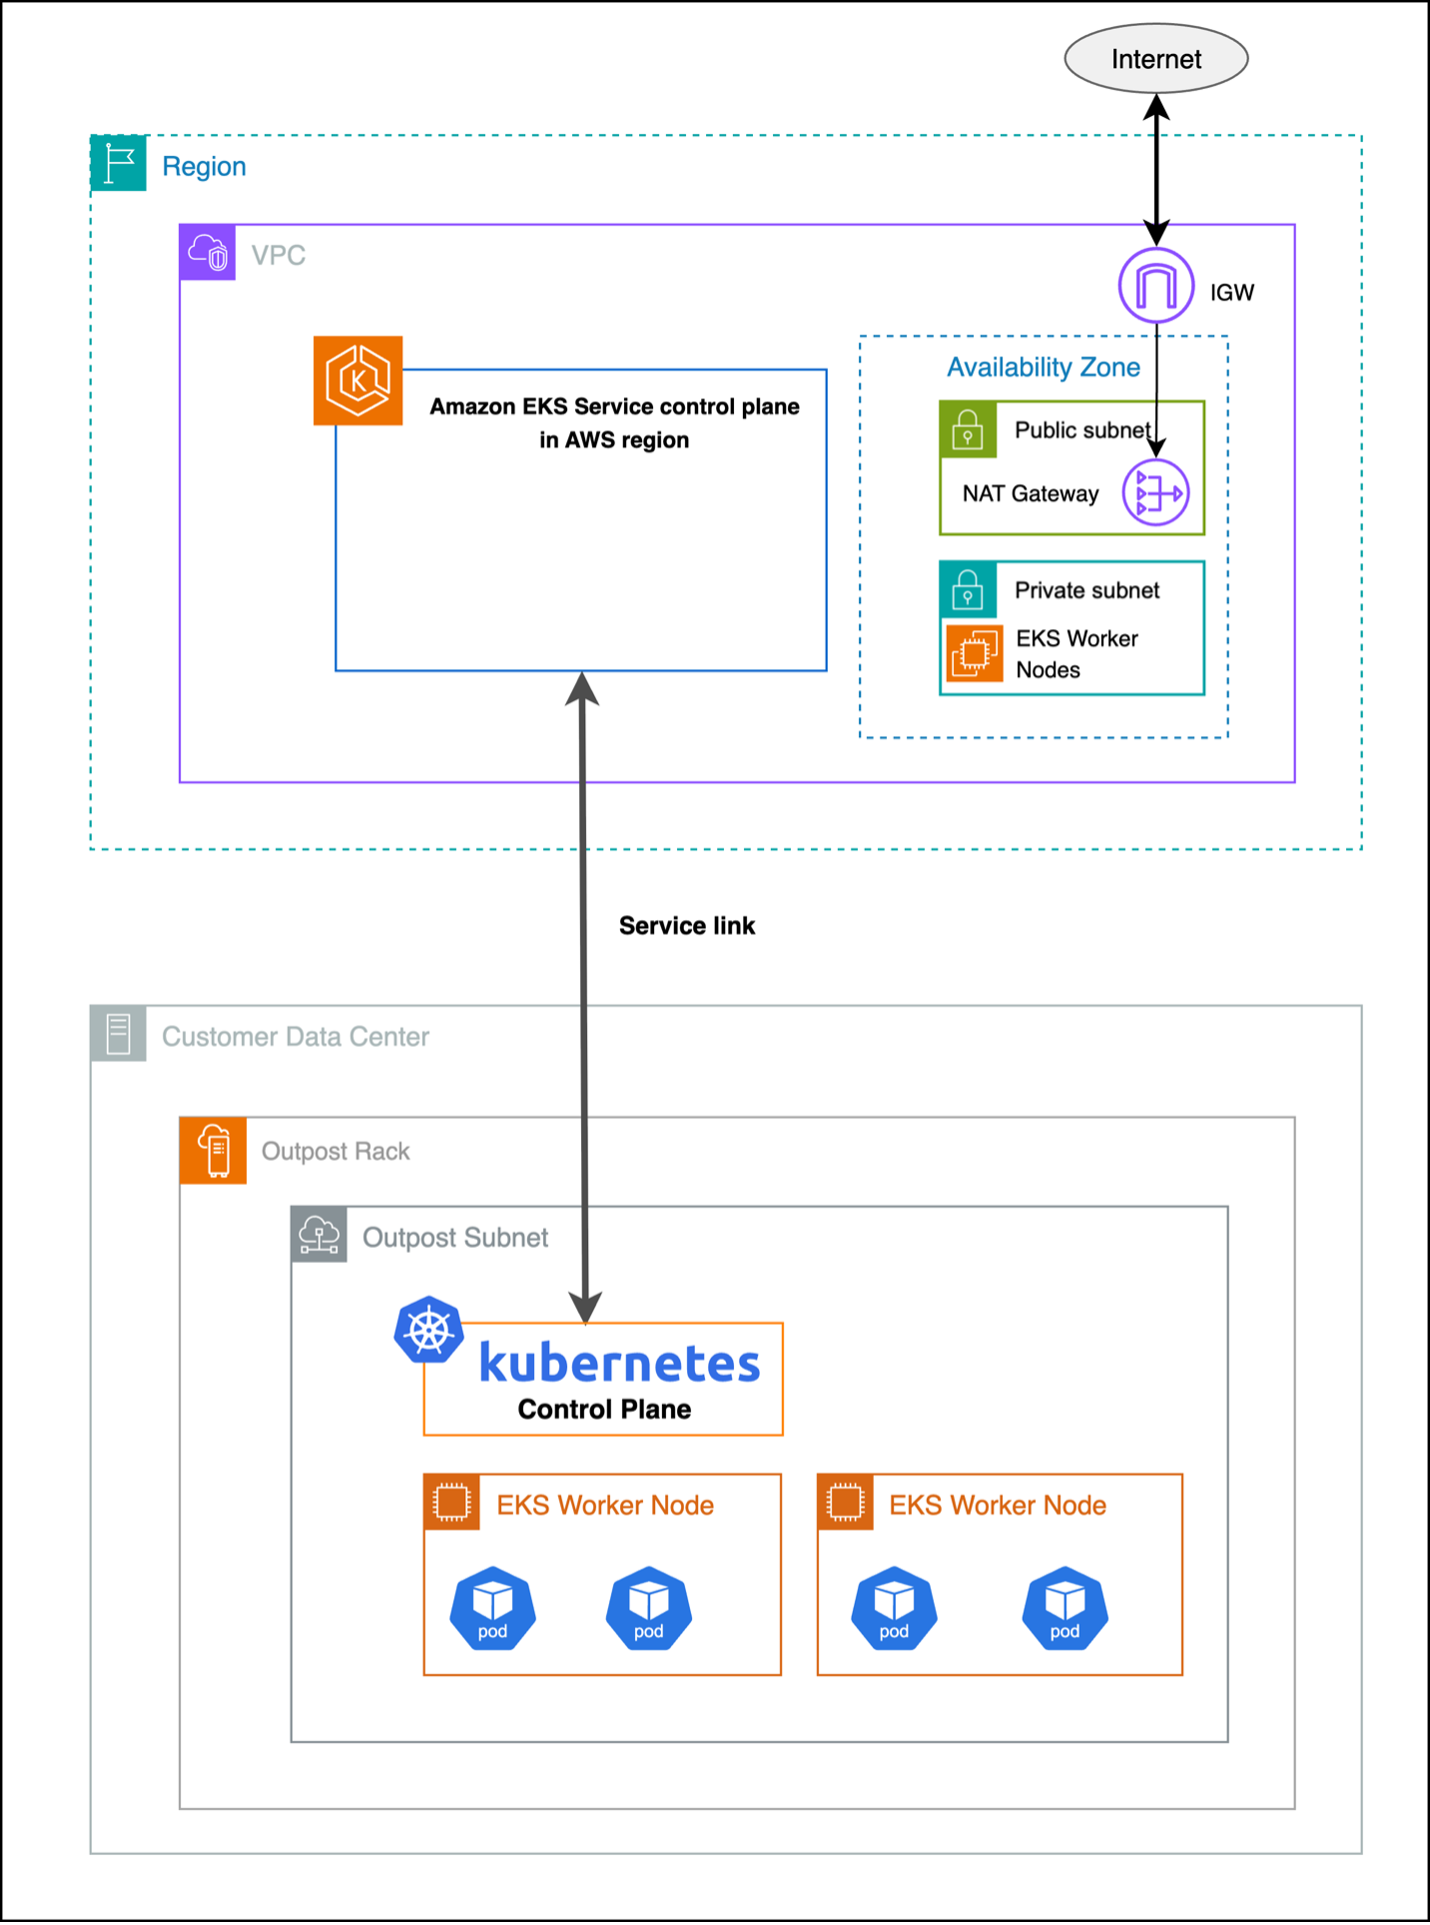
  Figure 2: Local cluster

Storage options for Amazon EKS extended clusters on Outposts

Persistent Volumes (PV) and Persistent Volume Claims (PVC) serve as a critical abstraction layer in Kubernetes, separating the storage consumption details from storage provisioning, and allowing administrators to manage storage resources independently from how applications consume them. PVs and PVCs make sure of data persistence across pod restarts and rescheduling events, making them essential for applications that need to maintain state, such as databases, file storage systems, and other data-intensive workloads. The abstraction provided by PV and PVC enables platform-agnostic storage management, where applications can request storage through PVCs without needing to know the underlying storage implementation details. PVs and PVCs support dynamic provisioning through Storage Classes, allowing for automated storage allocation based on application demands, while also providing features such as access modes, capacity management, and reclaim policies to effectively manage the storage lifecycle in a Kubernetes cluster.

Integrating Amazon EBS with Amazon EKS

Amazon Elastic Block Store (Amazon EBS) provides high-performance block storage that’s ideal for low-latency applications providing consistent performance. When deployed on Outposts racks, EBS volumes are stored on the Outposts hardware, providing significant performance advantages over network-attached storage solutions, as shown in the following figure.
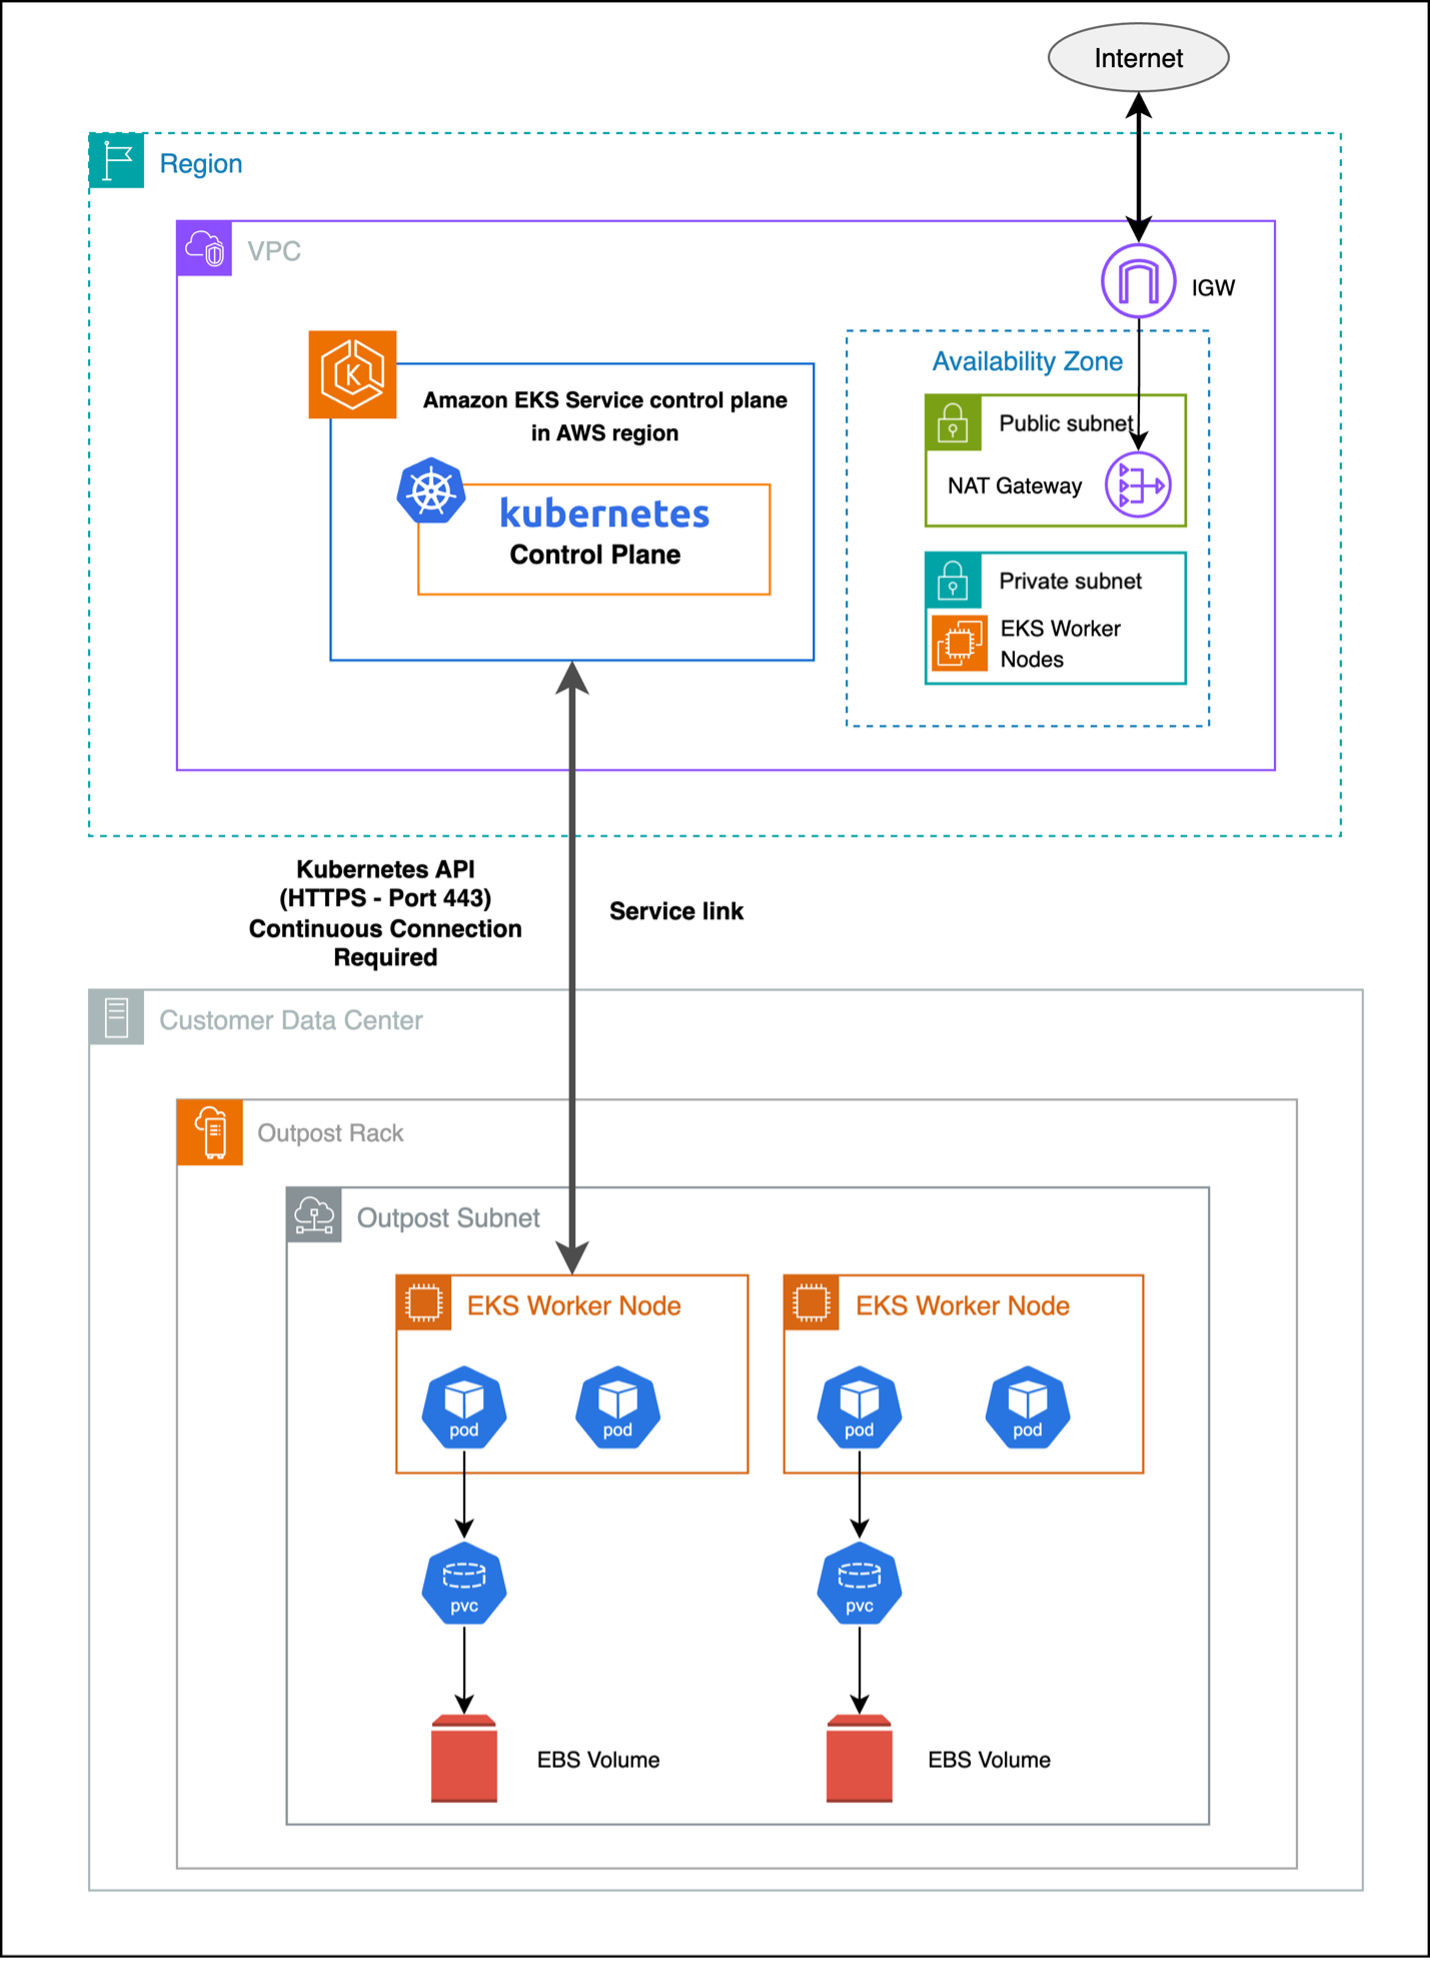
Figure 3 : Integrating Amazon EBS with Amazon EKS on Outposts

Benefits and use cases

  • Storage: EBS volumes on Outposts racks provide data access without dependency on external connectivity.
  • Performance: Local storage delivers consistent latency and high IOPS/throughput.
  • Cost: On-premises storage eliminates data transfer costs and reduces bandwidth needs, lowering the total cost of ownership.

Implementation considerations

Consider the following when using EBS on Outposts rack:

  • EBS volumes on Outposts are tied to a single rack and the availability zone the Outpost is homed to, needing applications to address single-point-of-failure risks.
  • Protect data using EBS snapshots in the parent Region and schedule regular backups.
  • Capacity on Outposts is finite, monitor Outposts storage usage and plan expansions proactively to avoid insufficient capacity errors.

Refer to Dynamic Volume Provisioning to learn more about deploying pod with the EBS volume attached.

Amazon EFS with Amazon EKS

Amazon Elastic File System (Amazon EFS) provides scalable, shared file storage that can be accessed across multiple AWS Availability Zones (AZs) and on-premises environments. Although Amazon EFS with Amazon EKS on Outposts maintains the same setup procedures as standard cloud deployments, there is a critical dependency on the service link connection between your Outposts and the AWS Region. Amazon EFS is not a locally supported service on Outposts, so connectivity to the AWS Region is required to use this service with your Outpost.

Amazon EFS allows multiple pods to concurrently access shared file systems. It is well-suited for applications that need collaborative data access, content management, and distributed processing workloads.

Amazon EFS as a persistent storage solution for Amazon EKS extended cluster instances

Amazon EFS as a PV for your Amazon EKS extended cluster operates through a hybrid architecture where the Amazon EFS file system resides in the Region, but mount points can be created on the worker nodes running on Outposts subnets through the service link as shown in the following figure.
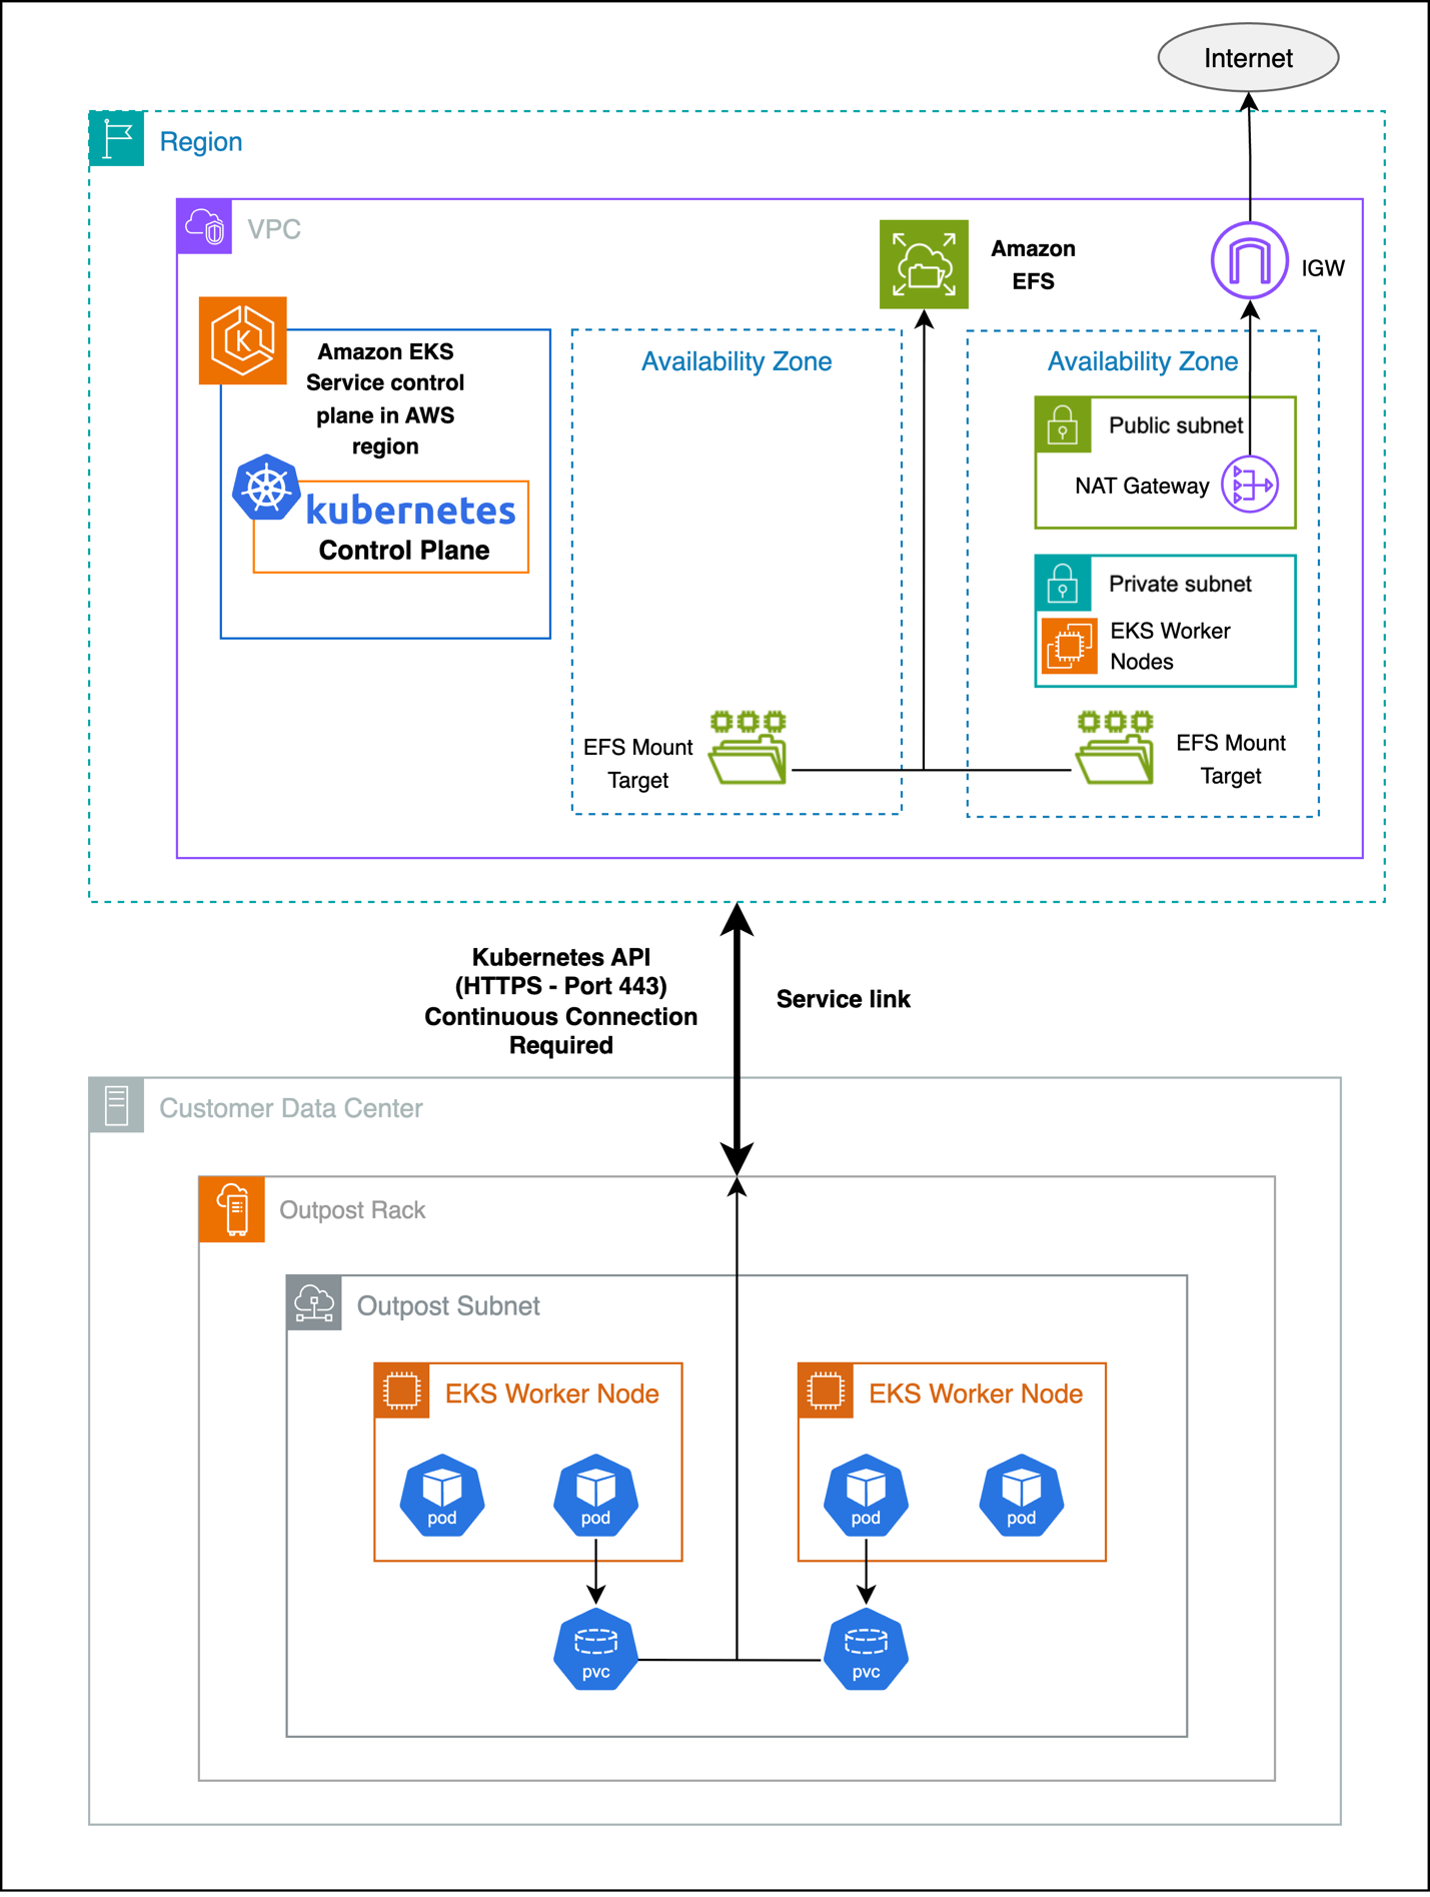
Figure 4 : Amazon EFS as a persistent storage solution for extended clusters

Benefits and use cases

  • Shared storage capabilities: multiple pods can access a centralized file system, enabling shared data, code, and assets across instances.
  • Scalability: storage capacity and performance automatically scale with usage, eliminating manual provisioning and upfront planning.
  • Compliance: Amazon EFS provides full file system features and compatibility for traditional applications, such as locking, permissions, and directory structure.

Challenges and limitations

Consider the following when using Amazon EFS with Outposts:

  • Network latency: file access involves network traversal to Amazon EFS in the Region, adding more latency and making small or metadata operations potentially slow for latency-sensitive applications.
  • Throughput: aggregate throughput is restricted by the available bandwidth on the service link between the Outposts and AWS Region. This impacts concurrent access and large file transfers during peak usage.
  • Dependency on AWS Region connectivity: Amazon EFS needs continuous connectivity to the parent Region. Disruptions may affect file system availability, operations, and disaster recovery processes.
  • Data Transfer charges: Since EFS is in AWS Parent region and EKS worker nodes and pods are in Outpost additional charges are applicable.

You can refer to Amazon EFS Features and When to Choose Amazon EFS for more detailed insights into its capabilities and use cases.

Deploying pods on extended clusters using Amazon EFS as PV

Refer to Use Elastic File System Storage with Amazon EFS for deployment guidance. Note, Create Amazon EFS mount targets in subnets that are in the same Availability Zone (AZ) as the Outposts subnets.

Amazon S3 with Amazon EKS extended cluster

Amazon Simple Storage Service (Amazon S3) on Outposts delivers local object storage on your Outposts, allowing applications to use Amazon S3 APIs for storing and retrieving data while keeping it onsite. It is ideal for workloads that need Amazon S3 compatibility, low latency access to object data, and local data residency.

You should use Amazon S3 access point Amazon Resource Names (ARNs) and not bucket ARNs for proper integration with Amazon EKS workloads.

Learn more about Amazon S3 on Outposts.
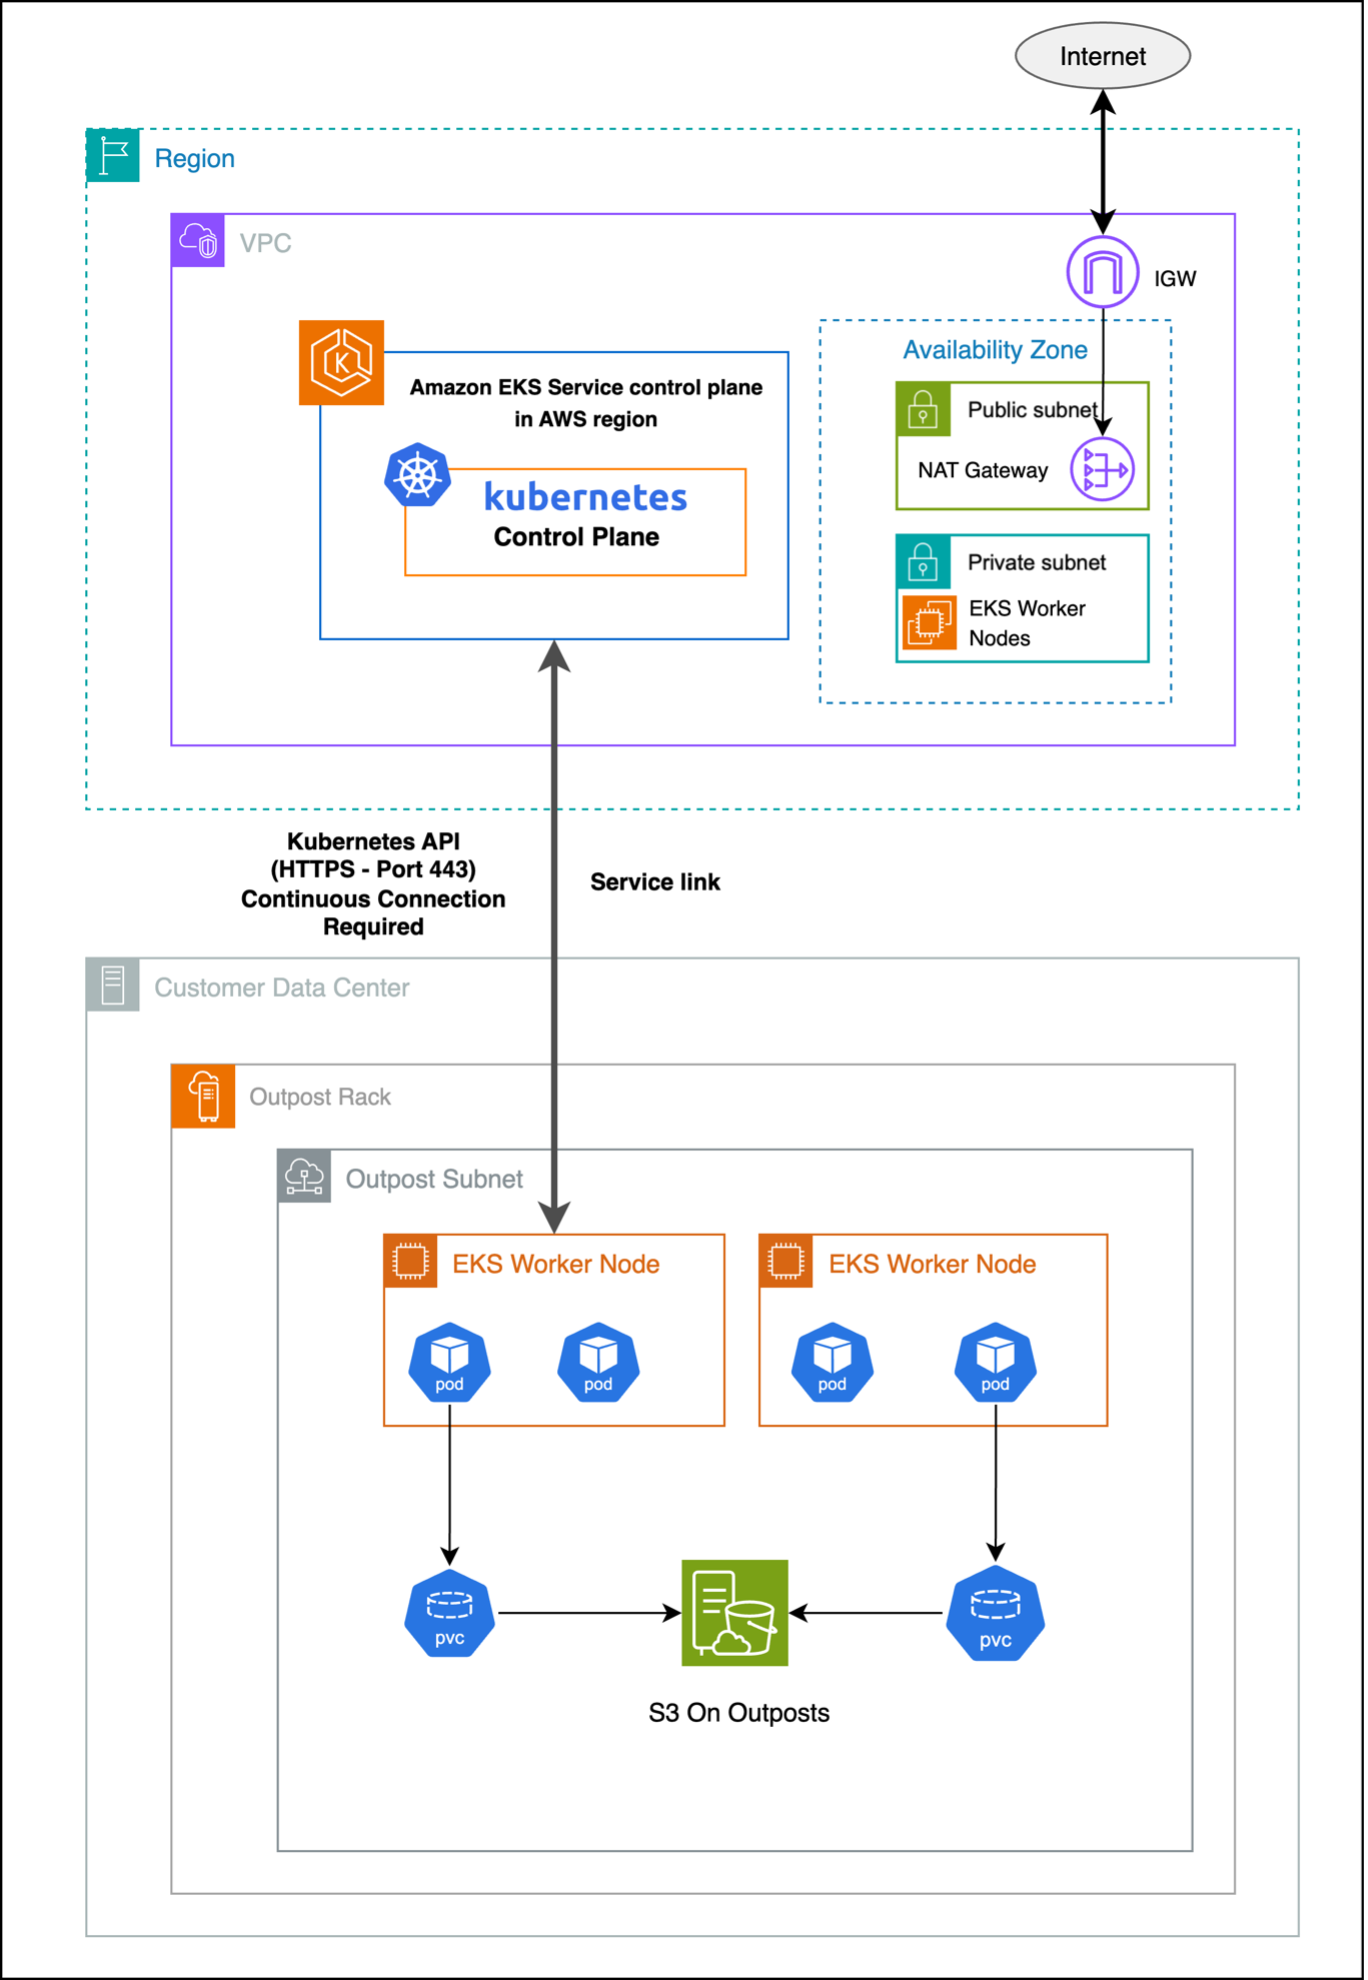
Figure 5 : Amazon S3 with Amazon EKS extended cluster on Outposts

Benefits and use cases

  • Data archiving and compliance: Enables cost-effective, locally retained storage for logs, audit trails, regulatory compliance, backups, and sensitive healthcare data with strict residency requirements.
  • Content distribution and media: Provides ultra-low latency local storage for serving static content, media streaming, digital asset management, and gaming asset delivery.
  • Data lake and analytics: Supports local data processing for analytics, ETL, machine learning (ML), real-time Internet of Things (IoT) data handling, and business intelligence with reduced latency and transfer costs.
  • Application integration: Seamlessly integrates with Amazon S3 compatible apps for backup, synchronization, microservices storage, API-driven workflows, and container image management on-premises.

Refer to How is Amazon S3 on Outposts different from Amazon S3 and the Amazon S3 on Outposts documentation to learn more.

Deploying pods on extended clusters using Amazon S3 as PV

Step 1: Create Amazon S3 on Outposts bucket
Step 2: Create Amazon S3 Access Point (necessary for Amazon EKS integration)
Step 3: Configure IAM roles and policies
Step 4: Install Amazon S3 CSI driver
Step 5: Deploying your pod with Amazon S3 volume attached
Step 6: Complete Amazon S3 configuration with Kubernetes

Refer to the documentation Static Provisioning on Outposts bucket for more details on Step 5.

Best practices for optimizing performance

Optimizing performance starts with selecting the right storage type for your workload: Amazon EBS for low-latency, high-throughput block storage; Amazon EFS for shared POSIX-compliant file systems; and Amazon S3 for scalable object storage with API compatibility. Ensure proper volume sizing, monitor usage proactively, and configure CPU and memory requests accurately to balance performance and efficiency—auto scaling and QoS classes can further optimize resource management. Improve data locality by using local storage, apply caching with intelligent eviction, and design for efficient, asynchronous, and compressed data access patterns.

Monitoring and observability

Monitoring key performance metrics is essential to maintain storage efficiency and application reliability. For Amazon EBS, track IOPS, throughput, latency, burst balance, queue depth, and snapshot performance to avoid degradation—see the Amazon CloudWatch metrics for Amazon EBS for the full list. For Amazon EFS, monitor total I/O, throughput, client connections, metadata operations, burst credits, and Regional data transfers to support effective capacity planning—refer to CloudWatch metrics for Amazon EFS. For Amazon S3, observe request and error rates, data transfer, storage usage, latency, multipart upload efficiency, and access patterns to optimize performance and cost—see Metrics and dimensions.

Security considerations

Strong security practices are critical for Amazon EKS on Outposts. Use AWS Key Management Service (AWS KMS) for Amazon EBS encryption, encrypt Amazon EFS data at rest and in transit, and enable server- or client-side encryption for Amazon S3. Enforce TLS for all data transfers and apply key rotation with compliance controls. Implement least privilege IAM policies, scoped roles, and Kubernetes Role-Based Access Control (RBAC) for granular pod access. Secure traffic with security groups and NACLs, and maintain audit logs for all storage operations.

Cost optimization strategies

Manage storage costs by right-sizing volumes, automating lifecycle policies, selecting appropriate storage classes, monitoring data transfer, and using de-duplication and compression where applicable. Lower operational expenses through automated backups, infrastructure as code (IaC), monitoring automation, leveraging managed services, applying cost allocation tags, and conducting regular usage reviews.

Conclusion

Amazon EKS on Outposts empowers organizations to build hybrid applications with storage options that align to performance, compliance, and data residency needs. By selecting the right storage solution for each workload and leveraging Outposts’ local infrastructure, you can reduce latency, minimize network dependencies, and maintain consistency across environments. As Outposts capabilities continue to evolve, they offer a strong foundation for modern, resilient, and cost-efficient hybrid cloud architectures.

Reach out to your AWS account team, or fill out this form to learn more about running containarized applications on Outposts.
Building a Cloud in the Cloud: Running Apache CloudStack on Amazon EC2, Part 2

Post Syndicated from Sheila Busser original https://aws.amazon.com/blogs/compute/building-a-cloud-in-the-cloud-running-apache-cloudstack-on-amazon-ec2-part-2/

This blog is written by Mark Rogers, SDE II – Customer Engineering AWS.

In part 1, I showed you how to run Apache CloudStack with KVM on a single Amazon Elastic Compute Cloud (Amazon EC2) instance. That simple setup is great for experimentation and light workloads. In this post, things will get a lot more interesting. I’ll show you how to create an overlay network in your Amazon Virtual Private Cloud (Amazon VPC) that allows CloudStack to scale horizontally across multiple EC2 instances. This same method could work with other hypervisors, too.

If you haven’t read it yet, then start with part 1. It explains why this network setup is necessary. The same prerequisites apply to both posts.

Making things easier

I wrote some scripts to automate the CloudStack installation and OS configuration on CentOS 7. You can customize them to meet your needs. I also wrote some AWS CloudFormation templates you can copy in order to create a demo environment. The README file has more details.

The scalable method

Our team started out using a single EC2 instance, as described in my last post. That worked at first, but it didn’t have the capacity we needed. We were limited to a couple of dozen VMs, but we needed hundreds. We also needed to scale up and down as our needs changed. This meant we needed the ability to add and remove CloudStack hosts. Using a Linux bridge as a virtual subnet was no longer adequate.

To support adding hosts, we need a subnet that spans multiple instances. The solution I found is Virtual Extensible LAN (VXLAN). It’s lightweight, easy to configure, and included in the Linux kernel. VXLAN creates a layer 2 overlay network that abstracts away the details of the underlying network. It allows machines in different parts of a network to communicate as if they’re all attached to the same simple network switch.

Another example of an overlay network is an Amazon VPC. It acts like a physical network, but it’s actually a layer on top of other networks. It’s networks all the way down. VXLAN provides a top layer where CloudStack can sit comfortably, handling all of your VM needs, blissfully unaware of the world below it.

An overlay network comes with some big advantages. The biggest improvement is that you can have multiple hosts, allowing for horizontal scaling. Having more hosts not only gives you more computing power, but also lets you do rolling maintenance. Instead of putting the database and file storage on the management server, I’ll show you how to use Amazon Elastic File System (Amazon EFS) and Amazon Relational Database Service (Amazon RDS) for scalable and reliable storage.

EC2 Instances

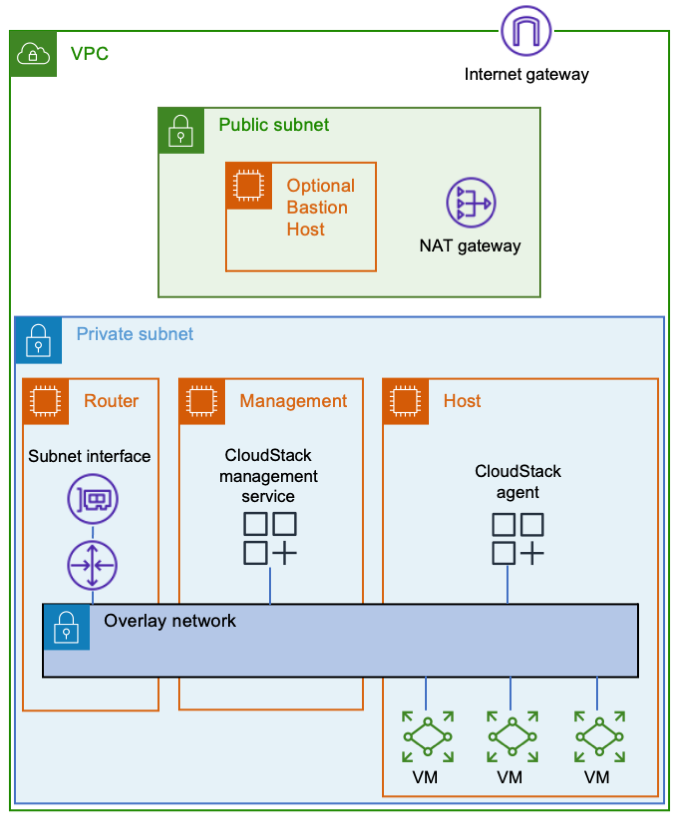
Let’s start with three Amazon EC2 instances. One will be a router between the overlay network and your Amazon VPC, the second one will be your CloudStack management server, and the third one will be your VM host. You’ll also need a way to connect to your instances, such as a bastion host or a VPN endpoint.

Three EC2 instances are connected to an AWS subnet. There's an overlay network that spans all three instances.The router instance connects the overlay network to the AWS subnet. The management instance contains the CloudStack management service, which is attached to the overlay network. The host instance contains the CloudStack agent and some VMs, all of which are connected to the overlay network.VXLAN must send and receive multicast traffic. Only Nitro instances can be multicast senders. As you plan, look at the list of Nitro instance types.

The router won’t need much computing power, but it will need enough network bandwidth to meet your needs. If you put Amazon EFS in the same subnet as your instances, then they’ll communicate with it directly, thereby reducing the load on the router. Decide how much network throughput you want, and then pick a suitable Nitro instance type.

After creating the router instance, configure AWS to use it as a router. Stop source/destination checking in the instance’s network settings. Then update the applicable AWS route tables to use the router as the target for the overlay network. The router’s security group needs to allow ingress to the CloudStack UI (TCP port 8080) and any services you plan to offer from VMs.

For the management server, you’ll want a Nitro instance type. It’s going to use more CPU than your router, so plan accordingly.

In addition to being a Nitro type, the host instance must also be a metal type. Metal instances have hardware virtualization support, which is needed by KVM. If you have a new AWS account with a low on-demand vCPU limit, then consider starting with an m5zn.metal, which has 48 vCPUs. Otherwise, I suggest going directly to a c5.metal because it provides 96 vCPUs for a similar price. There are bigger types available depending on your compute needs, budget, and vCPU limit. If your account’s on-demand vCPU limit is too low, then you can file a support ticket to have it raised.

Networking

All of the instances should be on a dedicated subnet. Sharing the subnet with other instances can cause communication issues. For an example, refer to the following figure. The subnet has an instance named TroubleMaker that’s not on the overlay network. If TroubleMaker sends a request to the management instance’s overlay network address, then here’s what happens:

  1. The request goes through the AWS subnet to the router.
  2. The router forwards the request via the overlay network.
  3. The CloudStack management instance has a connection to the same AWS subnet that TroubleMaker is on. Therefore, it responds directly instead of using the router. This isn’t the return path that AWS is expecting, so the response is dropped.

This diagram depicts the steps described in the previous paragraph.

If you move TroubleMaker to a different subnet, then the requests and responses will all go through the router. That will fix the communication issues.

The instances in the overlay network will use special interfaces that serve as VXLAN tunnel endpoints (VTEPs). The VTEPs must know how to contact each other via the underlay network. You could manually give each instance a list of all of the other instances, but that’s a maintenance nightmare. It’s better to let the VTEPs discover each other, which they can do using multicast. You can add multicast support using AWS Transit Gateway.

Here are the steps to make VXLAN multicasts work:

  1. Enable multicast support when you create the transit gateway.
  2. Attach the transit gateway to your subnet.
  3. Create a transit gateway multicast domain with IGMPv2 support enabled.
  4. Associate the multicast domain with your subnet.
  5. Configure the eth0 interface on each instance to use IGMPv2. The following sample code shows how to do this.
  6. Make sure that your instance security groups allow ingress for IGMP queries (protocol 2 traffic from 0.0.0.0/32) and VXLAN traffic (UDP port 4789 from the other instances).

CloudStack VMs must connect to the same bridge as the VXLAN interface. As mentioned in the previous post, CloudStack cares about names. I recommend giving the interface a name starting with “eth”. Moreover, this naming convention tells CloudStack which bridge to use, thereby avoiding the need for a dummy interface like the one in the simple setup.

The following snippet shows how I configured the networking in CentOS 7. You must provide values for these variables:

  • $overlay_host_ip_address, $overlay_netmask, and $overlay_gateway_ip: Use values for the overlay network that you’re creating.
  • $dns_address: I recommend using the base of the VPC IPv4 network range, plus two. You shouldn’t use 169.654.169.253 because CloudStack reserves link-local addresses for its own use.
  • $multicast_address: The multicast address that you want VXLAN to use. Pick something in the multicast range that won’t conflict with anything else. I recommend choosing from the IPv4 local scope (239.255.0.0/16).
  • $interface_name: The name of the interface VXLAN should use to communicate with the physical network. This is typically eth0.

A couple of the steps are different for the router instance than for the other instances. Pay attention to the comments!

yum install -y bridge-utils net-tools

# IMPORTANT: Omit the GATEWAY setting on the router instance!
cat << EOF > /etc/sysconfig/network-scripts/ifcfg-cloudbr0
DEVICE=cloudbr0
TYPE=Bridge
ONBOOT=yes
BOOTPROTO=none
IPV6INIT=no
IPV6_AUTOCONF=no
DELAY=5
STP=no
USERCTL=no
NM_CONTROLLED=no
IPADDR=$overlay_host_ip_address
NETMASK=$overlay_netmask
DNS1=$dns_address
GATEWAY=$overlay_gateway_ip
EOF

cat << EOF > /sbin/ifup-local
#!/bin/bash
# Set up VXLAN once cloudbr0 is available.
if [[ \$1 == "cloudbr0" ]]
then
    ip link add ethvxlan0 type vxlan id 100 dstport 4789 group "$multicast_address" dev "$interface_name"
    brctl addif cloudbr0 ethvxlan0
    ip link set up dev ethvxlan0
fi
EOF

chmod +x /sbin/ifup-local

# Transit Gateway requires IGMP version 2
echo "net.ipv4.conf.$interface_name.force_igmp_version=2" >> /etc/sysctl.conf
sysctl -p

# Enable IPv4 forwarding
# IMPORTANT: Only do this on the router instance!
echo 'net.ipv4.ip_forward=1' >> /etc/sysctl.conf
sysctl -p

# Restart the network service to make the changes take effect.
systemctl restart network

Storage

Let’s look at storage. Create an Amazon RDS database using the MySQL 8.0 engine, and set a master password for CloudStack’s database setup tool to use. Refer to the CloudStack documentation to find the MySQL settings that you’ll need. You can put the settings in an RDS parameter group. In case you’re wondering why I’m not using Amazon Aurora, it’s because CloudStack needs the MyISAM storage engine, which isn’t available in Aurora.

I recommend Amazon EFS for file storage. For efficiency, create a mount target in the subnet with your EC2 instances. That will enable them to communicate directly with the mount target, thereby bypassing the overlay network and router. Note that the system VMs will use Amazon EFS via the router.

If you want, you can consolidate your CloudStack file systems. Just create a single file system with directories for each zone and type of storage. For example, I use directories named /zone1/primary, /zone1/secondary, /zone2/primary, etc. You should also consider enabling provisioned throughput on the file system, or you may run out of bursting credits after booting a few VMs.

One consequence of the file system’s scalability is that the amount of free space (8 exabytes) will cause an integer overflow in CloudStack! To avoid this problem, reduce storage.overprovisioning.factor in CloudStack’s global settings from 2 to 1.

When your environment is ready, install CloudStack. When it asks for a default gateway, remember to use the router’s overlay network address. When you add a host, make sure that you use the host’s overlay network IP address.

Cleanup

If you used my CloudFormation template, delete the stack and remove any route table entries you added.

If you didn’t use CloudFormation, here are the things to delete:

  1. The CloudStack EC2 instances
  2. The Amazon RDS database and parameter group
  3. The Amazon EFS file system
  4. The transit gateway multicast domain subnet association
  5. The transit gateway multicast domain
  6. The transit gateway VPC attachment
  7. The transit gateway
  8. The route table entries that you created
  9. The security groups that you created for the instances, database, and file system

Conclusion

The approach I shared has many steps, but they’re not bad when you have a plan. Whether you need a simple setup for experiments, or you need a scalable environment for a data center migration, you now have a path forward. Give it a try, and comment here about the things you learned. I hope you find it useful and fun!

“Apache”, “Apache CloudStack”, and “CloudStack” are trademarks of the Apache Software Foundation.

Building a Cloud in the Cloud: Running Apache CloudStack on Amazon EC2, Part 1

Post Syndicated from Sheila Busser original https://aws.amazon.com/blogs/compute/building-a-cloud-in-the-cloud-running-apache-cloudstack-on-amazon-ec2-part-1/

This blog is written by Mark Rogers, SDE II – Customer Engineering AWS.

How do you put a cloud inside another cloud? Some features that make Amazon Elastic Compute Cloud (Amazon EC2) secure and wonderful also make running CloudStack difficult. The biggest obstacle is that AWS and CloudStack both want to manage network resources. Therefore, we must keep them out of each other’s way. This requires some steps that aren’t obvious, and it took a long time to figure out. I’m going to share what I learned, so that you can navigate the process more easily.

Apache CloudStack is an open-source platform for deploying and managing virtual machines (VMs) and the associated network and storage infrastructure. You would normally run it on your own hardware to create your own cloud. But there can be advantages to running it inside of an Amazon Virtual Private Cloud (Amazon VPC), including how it could help you migrate out of a data center. It’s a great way to create disposable environments for experiments or training. Furthermore, it’s a convenient way to test-drive the new CloudStack support in Amazon Elastic Kubernetes Service (Amazon EKS) Anywhere. In my case, I needed to create development and test environments for a project that uses the CloudStack API. The environments needed to be shared and scalable. Our build pipelines were already in AWS, so it made sense to put the new environments there, too.

CloudStack can work with a number of hypervisors. The instructions in this article will use Kernel-based Virtual Machine (KVM) on Linux. KVM will manage the VMs at a low level, and CloudStack will manage KVM.

Prerequisites

Most of the information in this article should be applicable to a range of CloudStack versions. I targeted CloudStack 4.14 on CentOS 7. I also tested CloudStack versions 4.16 and 4.17, and I recommend them.

The official CentOS 7 x86_64 HVM image works well. If you use a different Linux flavor or version, then you might have to modify some of the implementation details.

You’ll need to know the basics of CloudStack. The scope of this article is making CloudStack and AWS coexist peacefully. Once CloudStack is running, I’m assuming that you’ll handle things from there.  Refer to the AWS documentation and CloudStack documentation for information on security and other best practices.

Making things easier

I wrote some scripts to automate the installation. You can run them on EC2 instances with CentOS 7, and they’ll do all the installation and OS configuration for you. You can use them as they are, or customize them to meet your needs. I also wrote some AWS CloudFormation templates you can copy in order to create a demo environment. The README file has more details.

Amazon EC2 instance types

KVM requires hardware virtualization support. Most EC2 instances are VMs that don’t support nested virtualization. To get access to the bare hardware, you need a metal instance type.

I like c5.metal because it’s one of the least expensive metal types, and has a low cost per vCPU. It has 96 vCPUs and 192 GiB of memory. If you run 20 VMs on it, with 4 CPU cores and 8 GiB of memory each, then you’d still have 16 vCPUs and 32 GiB to share between the operating system, CloudStack, and MySQL. Using CloudStack’s overprovisioning feature, you could fit even more VMs if they’re running light loads.

Networking

The biggest challenge is the network. AWS knows which IP and MAC addresses should exist, and it knows the machines to which they should belong. It blocks any traffic that doesn’t fit its idea of how the network should behave. Simultaneously, CloudStack assumes that any IP or MAC address it invents should work just fine. When CloudStack assigns addresses to VMs on an AWS subnet, their network traffic gets blocked.

You could get around this by enabling network address translation (NAT) on the instance running CloudStack. That’s a great solution if it fits your needs, but it makes it hard for other machines in your Amazon VPC to contact your VMs. I recommend a different approach.

Although AWS restricts what you can do with its layer 2 network, it’s perfectly happy to let you run your own layer 3 router. Your EC2 instance can act as a router to a new virtual subnet that’s outside of the jurisdiction of AWS. The instance integrates with AWS just like a VPN appliance, routing traffic to wherever it needs to go. CloudStack can do whatever it wants in the virtual subnet, and everybody’s happy.

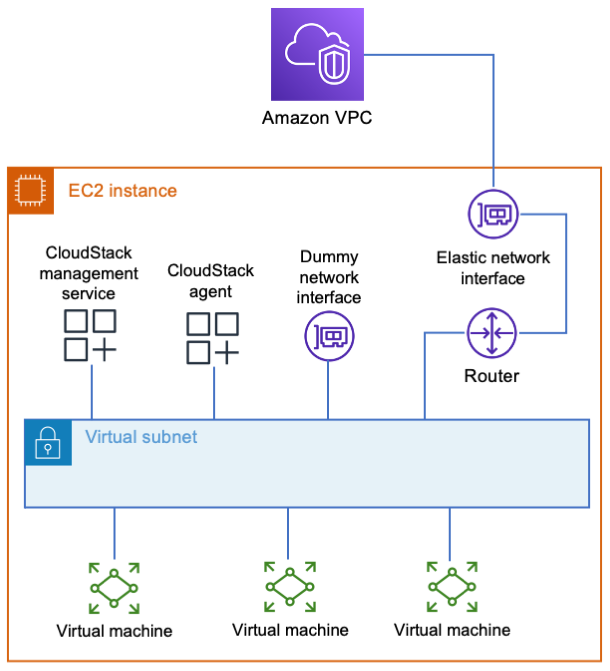
What do I mean by a virtual subnet? This is a subnet that exists only inside the EC2 instance.  It consists of logical network interfaces attached to a Linux bridge. The entire subnet exists inside a single EC2 instance. It doesn’t scale well, but it’s simple. In my next post, I’ll cover a more complicated setup with an overlay network that spans multiple instances to allow horizontal scaling.

The simple way

The simple way is to put everything in one EC2 instance, including the database, file storage, and a virtual subnet. Because everything’s stored locally, allocate enough disk space for your needs. 500 GB will be enough to support a few basic VMs. Create or select a security group for your instance that gives users access to the CloudStack UI (TCP port 8080). The security group should also allow access to any services that you’ll offer from your VMs.

EC2 instance summary info showing 1 instance, CentOS 7 (x86_64) AMI, c5.metal instance type, a security group name, and a 500 GiB volume

When you have your instance, configure AWS to treat it as a router.

  1. Go to Amazon EC2 in the AWS Management Console.
  2. Select your instance, and stop source/destination checking.

In the EC2 Actions menu, select Networking, then Change source/destination check.

3. Update the subnet route tables.

a. Go to the VPC settings, and select Route Tables.

b. Identify the tables for subnets that need CloudStack access.

c. In each of these tables, add a route to the new virtual subnet. The route target should be your EC2 instance.

4. Depending on your network needs, you may also need to add routes to transit gateways, VPN endpoints, etc.

Because everything will be on one server, creating a virtual subnet is simply a matter of creating a Linux bridge. CloudStack must find a network adapter attached to the bridge. Therefore, add a dummy interface with a name that CloudStack will recognize.

A single EC2 instance contains the CloudStack management service, the CloudStack agent, a dummy network interface, several virtual machines, and a router. All of those things are connected to each other by a virtual subnet that exists inside the instance. The instance's elastic network interface is connected between the router and the Amazon VPC.The following snippet shows how I configure networking in CentOS 7. You must provide values for the variables $virutal_host_ip_address and $virtual_netmask to reflect the virtual subnet that you want to create. For $dns_address, I recommend the base of the VPC IPv4 network range, plus two. You shouldn’t use 169.654.169.253 because CloudStack reserves link-local addresses for its own use.

yum install -y bridge-utils net-tools

# The bridge must be named cloudbr0.

cat << EOF > /etc/sysconfig/network-scripts/ifcfg-cloudbr0
DEVICE=cloudbr0
TYPE=Bridge
ONBOOT=yes
BOOTPROTO=none
IPV6INIT=no
IPV6_AUTOCONF=no
DELAY=5
STP=yes
USERCTL=no
NM_CONTROLLED=no
IPADDR=$virtual_host_ip_address
NETMASK=$virtual_netmask
DNS1=$dns_address
EOF

# Create a dummy network interface.
cat << EOF > /etc/sysconfig/modules/dummy.modules
#!/bin/sh
/sbin/modprobe dummy numdummies=1
/sbin/ip link set name ethdummy0 dev dummy0
EOF

chmod +x /etc/sysconfig/modules/dummy.modules
/etc/sysconfig/modules/dummy.modules

cat << EOF > /etc/sysconfig/network-scripts/ifcfg-ethdummy0
TYPE=Ethernet
BOOTPROTO=none
NAME=ethdummy0
DEVICE=ethdummy0
ONBOOT=yes
BRIDGE=cloudbr0
NM_CONTROLLED=no
EOF

# Turn the instance into a router

echo 'net.ipv4.ip_forward=1' >> /etc/sysctl.conf
sysctl -p

# Must kill dhclient or the network service won't restart properly.
# A reboot would also work, if you’d rather do that.

pkill dhclient
systemctl restart network

CloudStack must know which IP addresses to use for inter-service communication. It will select by resolving the machine’s fully qualified domain name (FQDN) to an address. The following commands will make it to choose the right one. You must provide a value for $virtual_host_ip_address.

hostnamectl set-hostname cloudstack.localdomain

echo "$virtual_host_ip_address cloudstack.localdomain" >> 
/etc/hosts

You can finish the setup by following the Quick Installation Guide.

Remember that CloudStack is only directly connected to your virtual network. The EC2 instance is the router that connects the virtual subnet to the Amazon VPC. When you’re configuring CloudStack, use your instance’s virtual subnet address as the default gateway.

Use the EC2 instance's virtual subnet IP address as the default gateway in CloudStack. In this example, the virtual subnet is 10.100.0.0/16, and the instance's address in that subnet is 10.100.0.1. CloudStack then uses 10.100.0.1 as the default gateway.

To access CloudStack from your workstation, you’ll need a connection to your VPC. This can be through a client VPN or a bastion host. If you use a bastion, its subnet needs a route to your virtual subnet, and you’ll need an SSH tunnel for your browser to access the CloudStack UI. The UI is at http://x.x.x.x:8080/client/, where x.x.x.x is your CloudStack instance’s virtual subnet address. Note that CloudStack’s console viewer won’t work if you’re using an SSH tunnel.

If you’re just experimenting with CloudStack, then I suggest saving money by stopping your instance when it isn’t needed. The safe way to do that is:

  1. Disable your zone in the CloudStack UI.
  2. Put the primary storage into maintenance mode.
  3. Wait for the switch to maintenance mode to be complete.
  4. Stop the EC2 instance.

When you’re ready to turn everything back on, simply reverse those steps. If you have any virtual routers in CloudStack, then you may need to start those, too.

Cleanup

If you used my CloudFormation template, then delete the stack and remove any route table entries you added. If you didn’t use CloudFormation, then terminate the EC2 instance, delete the security group you created for it, and remove any route table entries that you added.

Conclusion

Getting CloudStack to run on AWS isn’t so bad. The hardest part is simply knowing how. The setup explained here is great for small installations, but it can only scale vertically. In my next post, I’ll show you how to create an installation that scales horizontally. Instead of using a virtual subnet that exists in a single EC2 instance, we’ll build an overlay network that spans multiple instances. It will use more components and features, including some that might be new to you. I hope you find it interesting!

Now that you can create a simple setup, give it a try! I hope you have fun and learn something new along the way. Comment with the results of your experiments.

“Apache”, “Apache CloudStack”, and “CloudStack” are trademarks of the Apache Software Foundation.

Updated whitepaper available: Encrypting File Data with Amazon Elastic File System

Post Syndicated from Joe Travaglini original https://aws.amazon.com/blogs/security/updated-whitepaper-available-encrypting-file-data-with-amazon-elastic-file-system/

We’re sharing an update to the Encrypting File Data with Amazon Elastic File System whitepaper to provide customers with guidance on enforcing encryption of data at rest and in transit in Amazon Elastic File System (Amazon EFS). Amazon EFS provides simple, scalable, highly available, and highly durable shared file systems in the cloud. The file systems you create by using Amazon EFS are elastic, which allows them to grow and shrink automatically as you add and remove data. They can grow to petabytes in size, distributing data across an unconstrained number of storage servers in multiple Availability Zones.

Read the updated whitepaper to learn about best practices for encrypting Amazon EFS. Learn how to enforce encryption at rest while you create an Amazon EFS file system in the AWS Management Console and in the AWS Command Line Interface (AWS CLI), and how to enforce encryption of data in transit at the client connection layer by using AWS Identity and Access Management (IAM).

Download and read the updated whitepaper.

If you have questions or want to learn more, contact your account executive or contact AWS Support. If you have feedback about this post, submit comments in the Comments section below.

Want more AWS Security how-to content, news, and feature announcements? Follow us on Twitter.

Author

Joseph Travaglini

For over four years, Joe has been a product manager on the Amazon Elastic File System team, responsible for the Amazon EFS security and compliance roadmap, and a product lead for the launch of EFS Infrequent Access. Prior to joining the Amazon EFS team, Joe was Director of Products at Sqrrl, a cybersecurity analytics startup acquired by AWS in 2018.

Author

Peter Buonora

Pete is a Principal Solutions Architect for AWS, with a focus on enterprise cloud strategy and information security. Pete has worked with the largest customers of AWS to accelerate their cloud adoption and improve their overall security posture.

Author

Siva Rajamani

Siva is a Boston-based Enterprise Solutions Architect for AWS. He enjoys working closely with customers and supporting their digital transformation and AWS adoption journey. His core areas of focus are security, serverless computing, and application integration.