Tag Archives: AWS CLI

Federated multi-account access for AWS CodeCommit

Post Syndicated from Steven David original https://aws.amazon.com/blogs/devops/federated-multi-account-access-for-aws-codecommit/

As a developer working in a large enterprise or for a group that supports multiple products, you may often find yourself accessing Git repositories from different organizations. Currently, to securely access multiple Git repositories in other popular tools, you need SSH keys, GPG keys, a Git credential helper, and a significant amount of setup by the developer hoping to commit to the repository. In addition, administrators must be aware of the various ways to remove all the permissions granted to the developer.

AWS CodeCommit is a managed source control service. Combined with AWS Single Sign-On (AWS SSO) and git-remote-codecommit, you can quickly and easily switch between repositories owned by different groups or even managed in separate AWS accounts. You can control those permissions with AWS Identity and Access Management (IAM) roles to allow for the automated removal of the user’s permission as part of their off-boarding procedure for the company.

This post demonstrates how to grant access to various CodeCommit repositories without access keys.

Solution overview

In this solution, the user’s access is controlled with federated login via AWS SSO. You can grant that access using AWS native authentication, which eliminates the need for a Git credential helper, SSH, and GPG keys. In addition, this allows the administrator to control access by adding or removing the user’s IAM role access.

The following diagram shows the code access pattern you can achieve by using AWS SSO and git-remote-codecommit to access CodeCommit across multiple accounts.

git-remote-codecommit overview diagram

Prerequisites

To complete this tutorial, you must have the following prerequisites:

  • CodeCommit repositories in two separate accounts. For instructions, see Create an AWS CodeCommit repository.
  • AWS SSO set up to handle access federation. For instructions, see Enable AWS SSO.
  • Python 3.6 or higher installed on the developer’s local machine. To download and install the latest version of Python, see the Python website.
    • On a Mac, it can be difficult to ensure that you’re using Python 3.6, because 2.7 is installed and required by the OS. For more information about checking your version of Python, see the following GitHub repo.
  • Git installed on your local machine. To download Git, see Git Downloads.
  • PIP version 9.0.3 or higher installed on your local machine. For instructions, see Installation on the PIP website.

Configuring AWS SSO role permissions

As your first step, you should make sure each AWS SSO role has the correct permissions to access the CodeCommit repositories.

  1. On the AWS SSO console, choose AWS Accounts.
  2. On the Permissions Sets tab, choose Create permission set.
  3. On the Create a new permission set page, select Create a custom permission set.
  4. For Name, enter CodeCommitDeveloperAccess.
  5. For Description, enter This permission set gives the user access to work with CodeCommit for common developer tasks.
  6. For Session duration, choose 12 hours.

Create new permissions

  1. For Relay state, leave blank.
  2. For What policies do you want to include in your permissions set?, select Create a custom permissions policy.
  3. Use the following policy:
{
    "Version": "2012-10-17",
    "Statement": [
        {
             "Sid": "CodeCommitDeveloperAccess",
             "Effect": "Allow",
             "Action": [
                 "codecommit:GitPull",
                 "codecommit:GitPush",
                 "codecommit:ListRepositories"
             ],
             "Resource": "*"
         }
      ]
}

The preceding code grants access to all the repositories in the account. You could limit to a specific list of repositories, if needed.

  1. Choose Create.

Creating your AWS SSO group

Next, we need to create the SSO Group we want to assign the permissions.

  1. On the AWS SSO console, choose Groups.
  2. Choose create group.
  3. For Group name, enter CodeCommitAccessGroup.
  4. For Description, enter Users assigned to this group will have access to work with CodeCommit.

Create Group

  1. Choose Create.

Assigning your group and permission sets to your accounts

Now that we have our group and permission sets created, we need to assign them to the accounts with the CodeCommit repositories.

  1. On the AWS SSO console, choose AWS Accounts.
  2. Choose the account you want to use in your new group.
  3. On the account Details page, choose Assign Users.
  4. On the Select users or groups page, choose Group.
  5. Select CodeCommitGroup.
  6. Choose NEXT: Permission Sets.
  7. Choose the CodeCommitDeveloperAccess permission set and choose Finish

Assign Users

  1. Choose Proceed to Accounts to return to the AWS SSO console.
  2. Repeat these steps for each account that has a CodeCommit repository.

Assigning a user to the group

To wrap up our AWS SSO configuration, we need to assign the user to the group.

  1. On the AWS SSO console, choose Groups.
  2. Choose CodeCommitAccessGroup.
  3. Choose Add user.
  4. Select all the users you want to add to this group.
  5. Choose Add user(s).
  6. From the navigation pane, choose Settings.
  7. Record the user portal URL to use later.

Enabling AWS SSO login

The second main feature we want to enable is AWS SSO login from the AWS Command Line Interface (AWS CLI) on our local machine.

  1. Run the following command from the AWS CLI. You need to enter the user portal URL from the previous step and tell the CLI what Region has your AWS SSO deployment. The following code example has AWS SSO deployed in us-east-1:
aws configure sso 
SSO start URL [None]: https://my-sso-portal.awsapps.com/start 
SSO region [None]:us-east-1

You’re redirected to your default browser.

  1. Sign in to AWS SSO.

When you return to the CLI, you must choose your account. See the following code:

There are 2 AWS accounts available to you.
> DeveloperResearch, [email protected] (123456789123)
DeveloperTrading, [email protected] (123456789444)
  1. Choose the account with your CodeCommit repository.

Next, you see the permissions sets available to you in the account you just picked. See the following code:

Using the account ID 123456789123
There are 2 roles available to you.
> ReadOnly
CodeCommitDeveloperAccess
  1. Choose the CodeCommitDeveloperAccess permissions.

You now see the options for the profile you’re creating for these AWS SSO permissions:

CLI default client Region [None]: us-west-2<ENTER>
CLI default output format [None]: json<ENTER>
CLI profile name [123456789011_ReadOnly]: DevResearch-profile<ENTER>
  1. Repeat these steps for each AWS account you want to access.

For example, I create DevResearch-profile for my DeveloperResearch account and DevTrading-profile for the DeveloperTrading account.

Installing git-remote-codecommit

Finally, we want to install the recently released git-remote-codecommit and start working with our Git repositories.

  1. Install git-remote-codecommit with the following code:
pip install git-remote-codecommit

With some operating systems, you might need to run the following code instead:

sudo pip install git-remote-codecommit
  1. Clone the code from one of your repositories. For this use case, my CodeCommit repository is named MyDemoRepo. See the following code:
git clone codecommit://DevResearch-profile@MyDemoRepo my-demo-repo
  1. After that solution is cloned locally, you can copy code from another federated profile by simply changing to that profile and referencing the repository in that account named MyDemoRepo2. See the following code:
git clone codecommit://DevTrading-profile@MyDemoRepo2 my-demo-repo2

Cleaning up

At the end of this tutorial, complete the following steps to undo the changes you made to your local system and AWS:

  1. On the AWS SSO console, remove the user from the group you created, so any future access requests fail.
  2. To remove the AWS SSO login profiles, open the local config file with your preferred tool and remove the profile.
    1. The config file is located at %UserProfile%/.aws/config for Windows and $HOME/.aws/config for Linux or Mac.
  3. To remove git-remote-codecommit, run the PIP uninstall command:
pip uninstall git-remote-codecommit

With some operating systems, you might need to run the following code instead:

sudo pip uninstall git-remote-codecommit

Conclusion

This post reviewed an approach to securely switch between repositories and work without concerns about one Git repository’s security credentials interfering with the other Git repository. User access is controlled by the permissions assigned to the profile via federated roles from AWS SSO. This allows for access control to CodeCommit without needing access keys.
About the Author

Steven David
Steven David

Steven David is an Enterprise Solutions Architect at Amazon Web Services. He helps customers build secure and scalable solutions. He has background in application development and containers.

Jump-starting your serverless development environment

Post Syndicated from Benjamin Smith original https://aws.amazon.com/blogs/compute/jump-starting-your-serverless-development-environment/

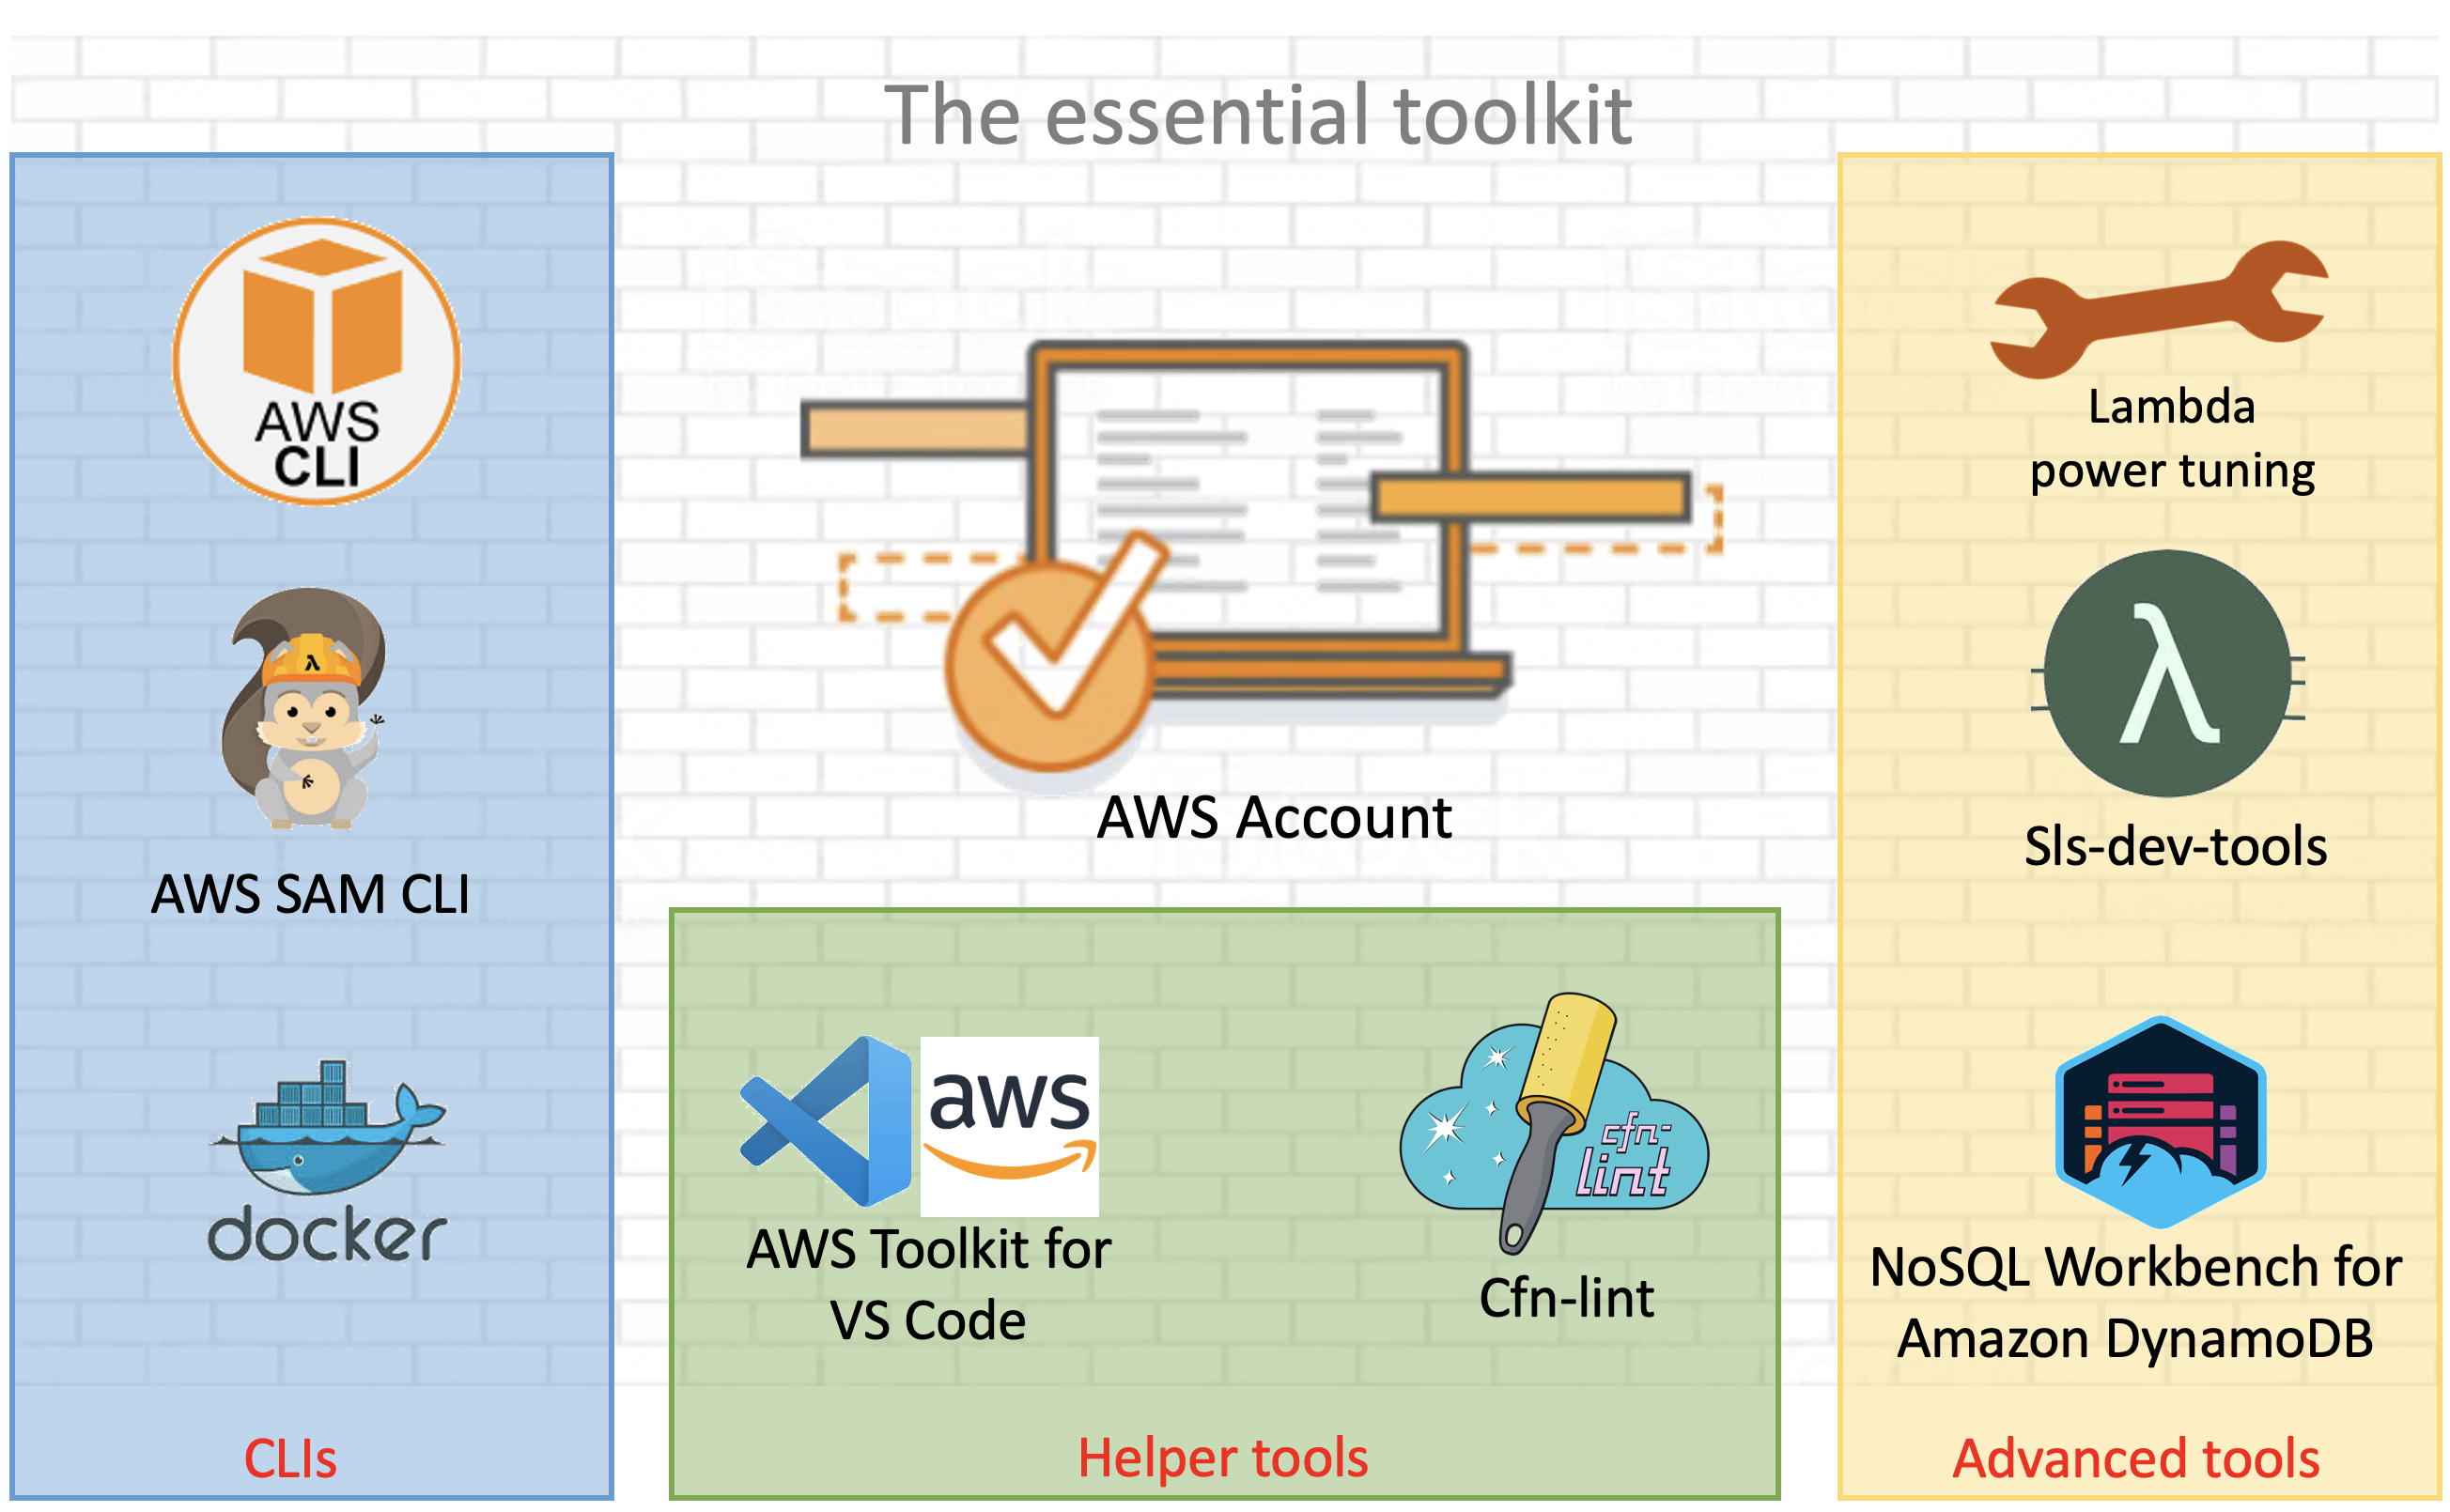
Developers building serverless applications often wonder how they can jump-start their local development environment. This blog post provides a broad guide for those developers wanting to set up a development environment for building serverless applications.

serverless development environment

AWS and open source tools for a serverless development environment .

To use AWS Lambda and other AWS services, create and activate an AWS account.

Command line tooling

Command line tools are scripts, programs, and libraries that enable rapid application development and interactions from within a command line shell.

The AWS CLI

The AWS Command Line Interface (AWS CLI) is an open source tool that enables developers to interact with AWS services using a command line shell. In many cases, the AWS CLI increases developer velocity for building cloud resources and enables automating repetitive tasks. It is an important piece of any serverless developer’s toolkit. Follow these instructions to install and configure the AWS CLI on your operating system.

AWS enables you to build infrastructure with code. This provides a single source of truth for AWS resources. It enables development teams to use version control and create deployment pipelines for their cloud infrastructure. AWS CloudFormation provides a common language to model and provision these application resources in your cloud environment.

AWS Serverless Application Model (AWS SAM CLI)

AWS Serverless Application Model (AWS SAM) is an extension for CloudFormation that further simplifies the process of building serverless application resources.

It provides shorthand syntax to define Lambda functions, APIs, databases, and event source mappings. During deployment, the AWS SAM syntax is transformed into AWS CloudFormation syntax, enabling you to build serverless applications faster.

The AWS SAM CLI is an open source command line tool used to locally build, test, debug, and deploy serverless applications defined with AWS SAM templates.

Install AWS SAM CLI on your operating system.

Test the installation by initializing a new quick start project with the following command:

$ sam init
  1. Choose 1 for the “Quick Start Templates
  2. Choose 1 for the “Node.js runtime
  3. Use the default name.

The generated /sam-app/template.yaml contains all the resource definitions for your serverless application. This includes a Lambda function with a REST API endpoint, along with the necessary IAM permissions.

Resources:
  HelloWorldFunction:
    Type: AWS::Serverless::Function # More info about Function Resource: https://github.com/awslabs/serverless-application-model/blob/master/versions/2016-10-31.md#awsserverlessfunction
    Properties:
      CodeUri: hello-world/
      Handler: app.lambdaHandler
      Runtime: nodejs12.x
      Events:
        HelloWorld:
          Type: Api # More info about API Event Source: https://github.com/awslabs/serverless-application-model/blob/master/versions/2016-10-31.md#api
          Properties:
            Path: /hello
            Method: get

Deploy this application using the AWS SAM CLI guided deploy:

$ sam deploy -g

Local testing with AWS SAM CLI

The AWS SAM CLI requires Docker containers to simulate the AWS Lambda runtime environment on your local development environment. To test locally, install Docker Engine and run the Lambda function with following command:

$ sam local invoke "HelloWorldFunction" -e events/event.json

The first time this function is invoked, Docker downloads the lambci/lambda:nodejs12.x container image. It then invokes the Lambda function with a pre-defined event JSON file.

Helper tools

There are a number of open source tools and packages available to help you monitor, author, and optimize your Lambda-based applications. Some of the most popular tools are shown in the following list.

Template validation tooling

CloudFormation Linter is a validation tool that helps with your CloudFormation development cycle. It analyses CloudFormation YAML and JSON templates to resolve and validate intrinsic functions and resource properties. By analyzing your templates before deploying them, you can save valuable development time and build automated validation into your deployment release cycle.

Follow these instructions to install the tool.

Once, installed, run the cfn-lint command with the path to your AWS SAM template provided as the first argument:

cfn-lint template.yaml
AWS SAM template validation with cfn-lint

AWS SAM template validation with cfn-lint

The following example shows that the template is not valid because the !GettAtt function does not evaluate correctly.

IDE tooling

Use AWS IDE plugins to author and invoke Lambda functions from within your existing integrated development environment (IDE). AWS IDE toolkits are available for PyCharm, IntelliJ. Visual Studio.

The AWS Toolkit for Visual Studio Code provides an integrated experience for developing serverless applications. It enables you to invoke Lambda functions, specify function configurations, locally debug, and deploy—all conveniently from within the editor. The toolkit supports Node.js, Python, and .NET.

The AWS Toolkit for Visual Studio Code

From Visual Studio Code, choose the Extensions icon on the Activity Bar. In the Search Extensions in Marketplace box, enter AWS Toolkit and then choose AWS Toolkit for Visual Studio Code as shown in the following example. This opens a new tab in the editor showing the toolkit’s installation page. Choose the Install button in the header to add the extension.

AWS Toolkit extension for Visual Studio Code

AWS Toolkit extension for Visual Studio Code

AWS Cloud9

Another option to build a development environment without having to install anything locally is to use AWS Cloud9. AWS Cloud9 is a cloud-based integrated development environment (IDE) for writing, running, and debugging code from within the browser.

It provides a seamless experience for developing serverless applications. It has a preconfigured development environment that includes AWS CLI, AWS SAM CLI, SDKs, code libraries, and many useful plugins. AWS Cloud9 also provides an environment for locally testing and debugging AWS Lambda functions. This eliminates the need to upload your code to the Lambda console. It allows developers to iterate on code directly, saving time, and improving code quality.

Follow this guide to set up AWS Cloud9 in your AWS environment.

Advanced tooling

Efficient configuration of Lambda functions is critical when expecting optimal cost and performance of your serverless applications. Lambda allows you to control the memory (RAM) allocation for each function.

Lambda charges based on the number of function requests and the duration, the time it takes for your code to run. The price for duration depends on the amount of RAM you allocate to your function. A smaller RAM allocation may reduce the performance of your application if your function is running compute-heavy workloads. If performance needs outweigh cost, you can increase the memory allocation.

Cost and performance optimization tooling

AWS Lambda power tuner is an open source tool that uses an AWS Step Functions state machine to suggest cost and performance optimizations for your Lambda functions. It invokes a given function with multiple memory configurations. It analyzes the execution log results to determine and suggest power configurations that minimize cost and maximize performance.

To deploy the tool:

  1. Clone the repository as follows:
    $ git clone https://github.com/alexcasalboni/aws-lambda-power-tuning.git
  2. Create an Amazon S3 bucket and enter the deployment configurations in /scripts/deploy.sh:
    # config
    BUCKET_NAME=your-sam-templates-bucket
    STACK_NAME=lambda-power-tuning
    PowerValues='128,512,1024,1536,3008'
  3. Run the deploy.sh script from your terminal, this uses the AWS SAM CLI to deploy the application:
    $ bash scripts/deploy.sh
  4. Run the power tuning tool from the terminal using the AWS CLI:
    aws stepfunctions start-execution \
    --state-machine-arn arn:aws:states:us-east-1:0123456789:stateMachine:powerTuningStateMachine-Vywm3ozPB6Am \
    --input "{\"lambdaARN\": \"arn:aws:lambda:us-east-1:1234567890:function:testytest\", \"powerValues\":[128,256,512,1024,2048],\"num\":50,\"payload\":{},\"parallelInvocation\":true,\"strategy\":\"cost\"}" \
    --output json
  5. The Step Functions execution output produces a link to a visual summary of the suggested results:

    AWS Lambda power tuning results

    AWS Lambda power tuning results

Monitoring and debugging tooling

Sls-dev-tools is an open source serverless tool that delivers serverless metrics directly to the terminal. It provides developers with feedback on their serverless application’s metrics and key bindings that deploy, open, and manipulate stack resources. Bringing this data directly to your terminal or IDE, reduces context switching between the developer environment and the web interfaces. This can increase application development speed and improve user experience.

Follow these instructions to install the tool onto your development environment.

To open the tool, run the following command:

$ Sls-dev-tools

Follow the in-terminal interface to choose which stack to monitor or edit.

The following example shows how the tool can be used to invoke a Lambda function with a custom payload from within the IDE.

Invoke an AWS Lambda function with a custom payload using sls-dev-tools

Invoke an AWS Lambda function with a custom payload using sls-dev-tools

Serverless database tooling

NoSQL Workbench for Amazon DynamoDB is a GUI application for modern database development and operations. It provides a visual IDE tool for data modeling and visualization with query development features to help build serverless applications with Amazon DynamoDB tables. Define data models using one or more tables and visualize the data model to see how it works in different scenarios. Run or simulate operations and generate the code for Python, JavaScript (Node.js), or Java.

Choose the correct operating system link to download and install NoSQL Workbench on your development machine.

The following example illustrates a connection to a DynamoDB table. A data scan is built using the GUI, with Node.js code generated for inclusion in a Lambda function:

Connecting to an Amazon DynamoBD table with NoSQL Workbench for AmazonDynamoDB

Connecting to an Amazon DynamoDB table with NoSQL Workbench for Amazon DynamoDB

Generating query code with NoSQL Workbench for Amazon DynamoDB

Generating query code with NoSQL Workbench for Amazon DynamoDB

Conclusion

Building serverless applications allows developers to focus on business logic instead of managing and operating infrastructure. This is achieved by using managed services. Developers often struggle with knowing which tools, libraries, and frameworks are available to help with this new approach to building applications. This post shows tools that builders can use to create a serverless developer environment to help accelerate software development.

This list represents AWS and open source tools but does not include our APN Partners. For partner offers, check here.

Read more to start building serverless applications.