Tag Archives: AWS SAM CLI

Building PHP Lambda functions with Docker container images

Post Syndicated from Benjamin Smith original https://aws.amazon.com/blogs/compute/building-php-lambda-functions-with-docker-container-images/

At re:Invent 2020, AWS announced that you can package and deploy AWS Lambda functions as container images. Packaging AWS Lambda functions as container images brings some notable benefits for developers running custom runtimes, such as PHP. This blog post explains those benefits and shows how to use the new container image support for Lambda functions to build serverless PHP applications.

Overview

Many PHP developers are familiar with building applications as containers to create a portable artifact for easier deployment. Packaging applications as containers helps to maintain consistent PHP versions, package versions, and configurations settings across multiple environments.

The new container image support for Lambda allows you to use familiar container tooling to build your applications. It also allows you to transition your applications into a serverless event-driven model. This brings the benefits of having no infrastructure to manage, automated scalability and a pay-per-use billing.

The advantages of an event-driven model for PHP applications are explained across the blog series “The serverless LAMP stack”. It explores the concepts, methods, and reasons for creating serverless applications with PHP. The architectural patterns and service limits in this blog series apply to functions packaged using both container image and zip archive formats, with some key exceptions:

Zip archive Container image
Maximum package size 250 MB 10 GB
Lambda layers Supported Include in image
Lambda Extensions Supported Include in image

Custom runtimes with container images

For custom runtimes such as PHP, Lambda provides base images containing the required Amazon Linux or Amazon Linux 2 operating system. Extend this to include your own runtime by implementing the Lambda Runtime API in a bootstrap file.

Before container image support for Lambda, a custom runtime is packaged using the .zip format. This required the developer to:

  1. Set up an Amazon Linux environment compatible with the Lambda execution environment.
  2. Install compilation dependencies and compile a version of PHP.
  3. Save the compiled PHP binary together with a bootstrap file and package as a .zip.
  4. Publish the .zip as a runtime layer.
  5. Add the runtime layer to a Lambda function.

Any edits to the custom runtime such as new packages, PHP versions, modules, or dependences require the process to be repeated. This process can be time consuming and prone to error.

Creating a custom PHP runtime using the new container image support for Lambda can simplify changing the runtime environment. Dockerfiles allow you to have a fully scripted, faster, and portable build process without setting up an Amazon Linux environment.

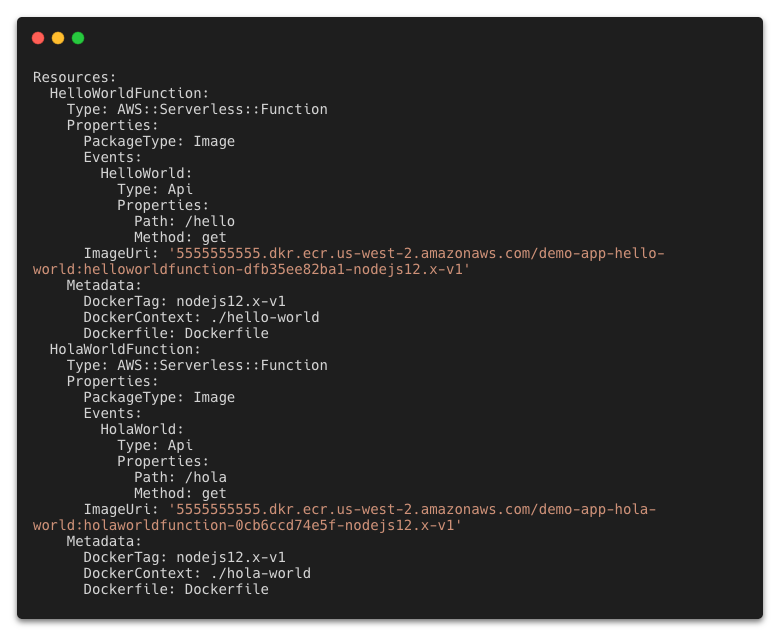
This GitHub repository contains a custom PHP runtime for Lambda functions packaged as a container image. The following Dockerfile uses the base image for Amazon Linux provided by AWS. The instructions perform the following:

  • Install system-wide Linux packages (zip, curl, tar).
  • Download and compile PHP.
  • Download and install composer dependency manager and dependencies.
  • Move PHP binaries, bootstrap, and vendor dependencies into a directory that Lambda can read from.
  • Set the container entrypoint.
#Lambda base image Amazon Linux
FROM public.ecr.aws/lambda/provided as builder 
# Set desired PHP Version
ARG php_version="7.3.6"
RUN yum clean all && \
    yum install -y autoconf \
                bison \
                bzip2-devel \
                gcc \
                gcc-c++ \
                git \
                gzip \
                libcurl-devel \
                libxml2-devel \
                make \
                openssl-devel \
                tar \
                unzip \
                zip

# Download the PHP source, compile, and install both PHP and Composer
RUN curl -sL https://github.com/php/php-src/archive/php-${php_version}.tar.gz | tar -xvz && \
    cd php-src-php-${php_version} && \
    ./buildconf --force && \
    ./configure --prefix=/opt/php-7-bin/ --with-openssl --with-curl --with-zlib --without-pear --enable-bcmath --with-bz2 --enable-mbstring --with-mysqli && \
    make -j 5 && \
    make install && \
    /opt/php-7-bin/bin/php -v && \
    curl -sS https://getcomposer.org/installer | /opt/php-7-bin/bin/php -- --install-dir=/opt/php-7-bin/bin/ --filename=composer

# Prepare runtime files
# RUN mkdir -p /lambda-php-runtime/bin && \
    # cp /opt/php-7-bin/bin/php /lambda-php-runtime/bin/php
COPY runtime/bootstrap /lambda-php-runtime/
RUN chmod 0755 /lambda-php-runtime/bootstrap

# Install Guzzle, prepare vendor files
RUN mkdir /lambda-php-vendor && \
    cd /lambda-php-vendor && \
    /opt/php-7-bin/bin/php /opt/php-7-bin/bin/composer require guzzlehttp/guzzle

###### Create runtime image ######
FROM public.ecr.aws/lambda/provided as runtime
# Layer 1: PHP Binaries
COPY --from=builder /opt/php-7-bin /var/lang
# Layer 2: Runtime Interface Client
COPY --from=builder /lambda-php-runtime /var/runtime
# Layer 3: Vendor
COPY --from=builder /lambda-php-vendor/vendor /opt/vendor

COPY src/ /var/task/

CMD [ "index" ]

To deploy this Lambda function, follow the instructions in the GitHub repository.

All runtime-related instructions are saved in the Dockerfile, which makes the custom runtime simpler to manage, update, and test. You can add additional Linux packages by appending to the yum install command. To install alternative PHP versions, change the php_version argument. Import additional PHP modules by adding to the compile command.

View the complete application in the following file tree:

project/
┣ runtime/
┃ ┗ bootstrap
┣ src/
┃ ┗ index.php
┗ Dockerfile

The Lambda function code is stored in the src directory in a file named index.php. This contains the Lambda function handler “index()”.

A bootstrap file is in the ‘runtime’ directory. This uses the Lambda runtime API to communicate with the Lambda execution environment.

The shebang hash sequence at the beginning of the bootstrap script instructs Lambda to run the file with the PHP executable, set by the Dockerfile.

All environment variables used in the bootstrap are set by the Lambda execution environment when running in the AWS Cloud. When running locally, the Lambda Runtime Interface Emulator (RIE) sets these values.

#!/var/lang/bin/php

Testing locally with the Lambda RIE

Using container image support for Lambda makes it easier for PHP developers to test Lambda functions locally. The previous container image example builds from the Lambda base image provided by AWS. This base image contains the Lambda RIE.

This is a proxy for Lambda’s Runtime and Extensions APIs. It acts as a lightweight web server that converts HTTP requests to JSON events and maintains functional parity with the Lambda Runtime API in the AWS Cloud. This allows developers to test functions locally using familiar tools such as cURL and the Docker CLI.

  1. Build the previous custom runtime image using the Docker build command:
    docker build -t phpmyfuntion .
  2. Run the function locally using the Docker run command, bound to port 9000:
    docker run -p 9000:8080 phpmyfuntion:latest
  3. This command starts up a local endpoint at:
    localhost:9000/2015-03-31/functions/function/invocations
  4. Post an event to this endpoint using a curl command. The Lambda function payload is provided by using the -d flag. This is a valid Json object required by the Runtime Interface Emulator:
    curl "http://localhost:9000/2015-03-31/functions/function/invocations" -d '{"queryStringParameters": {"name":"Ben"}}'
  5. A 200 status response is returned:

Building web applications with Bref container images

Bref is an open source runtime Lambda layer for PHP. Using the bref-fpm layer, you can build applications with traditional PHP frameworks such as Symfony and Laravel. Bref’s implementation of the FastCGI protocol returns an HTTP response instead of a JSON response. When using the zip archive format to package Lambda functions, Bref’s custom runtime is provided to the function as a Lambda layer. Functions packaged as container images do not support adding Lambda layers to the function configuration. In addition to runtime layers, Bref also provides a number of Docker images. These images use the Lambda runtime API to form a runtime interface client that communicates with the Lambda execution environment.

The following example shows how to compose a Dockerfile that uses the bref php-74-fpm container image:

# Uses PHP 74-fpm.0, as the base image
FROM bref/php-74-fpm
# download composer for dependency management
RUN curl -s https://getcomposer.org/installer | php
# install bref using composer
RUN php composer.phar require bref/bref
# copy the project files into a Location that the Lambda service can read from
COPY . /var/task
#set the function handler entry point
CMD _HANDLER=index.php /opt/bootstrap
  1. The first line sets the base image to use bref/php-74-fpm.
  2. Composer, a dependency manager for PHP is installed.
  3. Composer’s require command is used to add the bref package to the composer.json file.
  4. The project files are then copied into the /var/task directory, where the function code runs from.
  5. The function handler is set along with Bref’s bootstrap file.

The steps to build and deploy this image to the Amazon Elastic Container Registry are the same for any runtime, and explained in this announcement blog post.

Conclusion

The new container image support for Lambda functions allows developers to package Lambda functions of up to 10 GB in size. Using the container image format and a Dockerfile can make it easier to build and update functions with custom runtimes such as PHP.

Developers can include specific language versions, modules, and package dependencies. The Amazon Linux and Amazon Linux 2 base images give developers a starting point to customize the runtime. With the Lambda Runtime Interface Emulator, it’s simpler for developers to test Lambda functions locally. PHP developers can use existing third-party images, such as bref-fpm, to create web applications in a single Lambda function.

Visit serverlessland.com for more information on building serverless PHP applications.

Using container image support for AWS Lambda with AWS SAM

Post Syndicated from Eric Johnson original https://aws.amazon.com/blogs/compute/using-container-image-support-for-aws-lambda-with-aws-sam/

At AWS re:Invent 2020, AWS Lambda released Container Image Support for Lambda functions. This new feature allows developers to package and deploy Lambda functions as container images of up to 10 GB in size. With this release, AWS SAM also added support to manage, build, and deploy Lambda functions using container images.

In this blog post, I walk through building a simple serverless application that uses Lambda functions packaged as container images with AWS SAM. I demonstrate creating a new application and highlight changes to the AWS SAM template specific to container image support. I then cover building the image locally for debugging in addition to eventual deployment. Finally, I show using AWS SAM to handle packaging and deploying Lambda functions from a developer’s machine or a CI/CD pipeline.

Push to invoke lifecycle

Push to invoke lifecycle

The process for creating a Lambda function packaged as a container requires only a few steps. A developer first creates the container image and tags that image with the appropriate label. The image is then uploaded to an Amazon Elastic Container Registry (ECR) repository using docker push.

During the Lambda create or update process, the Lambda service pulls the image from ECR, optimizes the image for use, and deploys the image to the Lambda service. Once this, and any other configuration processes are complete, the Lambda function is then in Active status and ready to be invoked. The AWS SAM CLI manages most of these steps for you.

Prerequisites

The following tools are required in this walkthrough:

Create the application

Use the terminal and follow these steps to create a serverless application:

  1. Enter sam init.
  2. For Template source, select option one for AWS Quick Start Templates.
  3. For Package type, choose option two for Image.
  4. For Base image, select option one for amazon/nodejs12.x-base.
  5. Name the application demo-app.
Demonstration of sam init

Demonstration of sam init

Exploring the application

Open the template.yaml file in the root of the project to see the new options available for container image support. The AWS SAM template has two new values that are required when working with container images. PackageType: Image tells AWS SAM that this function is using container images for packaging.

AWS SAM template

AWS SAM template

The second set of required data is in the Metadata section that helps AWS SAM manage the container images. When a container is created, a new tag is added to help identify that image. By default, Docker uses the tag, latest. However, AWS SAM passes an explicit tag name to help differentiate between functions. That tag name is a combination of the Lambda function resource name, and the DockerTag value found in the Metadata. Additionally, the DockerContext points to the folder containing the function code and Dockerfile identifies the name of the Dockerfile used in building the container image.

In addition to changes in the template.yaml file, AWS SAM also uses the Docker CLI to build container images. Each Lambda function has a Dockerfile that instructs Docker how to construct the container image for that function. The Dockerfile for the HelloWorldFunction is at hello-world/Dockerfile.

Local development of the application

AWS SAM provides local development support for zip-based and container-based Lambda functions. When using container-based images, as you modify your code, update the local container image using sam build. AWS SAM then calls docker build using the Dockerfile for instructions.

Dockerfile for Lambda function

Dockerfile for Lambda function

In the case of the HelloWorldFunction that uses Node.js, the Docker command:

  1. Pulls the latest container base image for nodejs12.x from the Amazon Elastic Container Registry Public.
  2. Copies the app.js code and package.json files to the container image.
  3. Installs the dependencies inside the container image.
  4. Sets the invocation handler.
  5. Creates and tags new version of the local container image.

To build your application locally on your machine, enter:

sam build

The results are:

Results for sam build

Results for sam build

Now test the code by locally invoking the HelloWorldFunction using the following command:

sam local invoke HelloWorldFunction

The results are:

Results for sam local invoke

Results for sam local invoke

You can also combine these commands and add flags for cached and parallel builds:

sam build --cached --parallel && sam local invoke HelloWorldFunction

Deploying the application

There are two ways to deploy container-based Lambda functions with AWS SAM. The first option is to deploy from AWS SAM using the sam deploy command. The deploy command tags the local container image, uploads it to ECR, and then creates or updates your Lambda function. The second method is the sam package command used in continuous integration and continuous delivery or deployment (CI/CD) pipelines, where the deployment process is separate from the artifact creation process.

AWS SAM package tags and uploads the container image to ECR but does not deploy the application. Instead, it creates a modified version of the template.yaml file with the newly created container image location. This modified template is later used to deploy the serverless application using AWS CloudFormation.

Deploying from AWS SAM with the guided flag

Before you can deploy the application, use the AWS CLI to create a new ECR repository to store the container image for the HelloWorldFunction.

Run the following command from a terminal:

aws ecr create-repository --repository-name demo-app-hello-world \
--image-tag-mutability IMMUTABLE --image-scanning-configuration scanOnPush=true

This command creates a new ECR repository called demo-app-hello-world. The –image-tag-mutability IMMUTABLE option prevents overwriting tags. The –image-scanning-configuration scanOnPush=true enables automated vulnerability scanning whenever a new image is pushed to the repository. The output is:

Amazon ECR creation output

Amazon ECR creation output

Make a note of the repositoryUri as you need it in the next step.

Before you can push your images to this new repository, ensure that you have logged in to the managed Docker service that ECR provides. Update the bracketed tokens with your information and run the following command in the terminal:

aws ecr get-login-password --region <region> | docker login --username AWS \
--password-stdin <account id>.dkr.ecr.<region>.amazonaws.com

You can also install the Amazon ECR credentials helper to help facilitate Docker authentication with Amazon ECR.

After building the application locally and creating a repository for the container image, you can deploy the application. The first time you deploy an application, use the guided version of the sam deploy command and follow these steps:

  1. Type sam deploy --guided, or sam deploy -g.
  2. For Stack Name, enter demo-app.
  3. Choose the same Region that you created the ECR repository in.
  4. Enter the Image Repository for the HelloWorldFunction (this is the repositoryUri of the ECR repository).
  5. For Confirm changes before deploy and Allow SAM CLI IAM role creation, keep the defaults.
  6. For HelloWorldFunction may not have authorization defined, Is this okay? Select Y.
  7. Keep the defaults for the remaining prompts.
Results of sam deploy --guided

Results of sam deploy –guided

AWS SAM uploads the container images to the ECR repo and deploys the application. During this process, you see a changeset along with the status of the deployment. When the deployment is complete, the stack outputs are then displayed. Use the HelloWorldApi endpoint to test your application in production.

Deploy outputs

Deploy outputs

When you use the guided version, AWS SAM saves the entered data to the samconfig.toml file. For subsequent deployments with the same parameters, use sam deploy. If you want to make a change, use the guided deployment again.

This example demonstrates deploying a serverless application with a single, container-based Lambda function in it. However, most serverless applications contain more than one Lambda function. To work with an application that has more than one Lambda function, follow these steps to add a second Lambda function to your application:

  1. Copy the hello-world directory using the terminal command cp -R hello-world hola-world
  2. Replace the contents of the template.yaml file with the following
    AWSTemplateFormatVersion: '2010-09-09'
    Transform: AWS::Serverless-2016-10-31
    Description: demo app
      
    Globals:
      Function:
        Timeout: 3
    
    Resources:
      HelloWorldFunction:
        Type: AWS::Serverless::Function
        Properties:
          PackageType: Image
          Events:
            HelloWorld:
              Type: Api
              Properties:
                Path: /hello
                Method: get
        Metadata:
          DockerTag: nodejs12.x-v1
          DockerContext: ./hello-world
          Dockerfile: Dockerfile
          
      HolaWorldFunction:
        Type: AWS::Serverless::Function
        Properties:
          PackageType: Image
          Events:
            HolaWorld:
              Type: Api
              Properties:
                Path: /hola
                Method: get
        Metadata:
          DockerTag: nodejs12.x-v1
          DockerContext: ./hola-world
          Dockerfile: Dockerfile
    
    Outputs:
      HelloWorldApi:
        Description: "API Gateway endpoint URL for Prod stage for Hello World function"
        Value: !Sub "https://${ServerlessRestApi}.execute-api.${AWS::Region}.amazonaws.com/Prod/hello/"
      HolaWorldApi:
        Description: "API Gateway endpoint URL for Prod stage for Hola World function"
        Value: !Sub "https://${ServerlessRestApi}.execute-api.${AWS::Region}.amazonaws.com/Prod/hola/"
  3. Replace the contents of hola-world/app.js with the following
    let response;
    exports.lambdaHandler = async(event, context) => {
        try {
            response = {
                'statusCode': 200,
                'body': JSON.stringify({
                    message: 'hola world',
                })
            }
        }
        catch (err) {
            console.log(err);
            return err;
        }
        return response
    };
  4. Create an ECR repository for the HolaWorldFunction
    aws ecr create-repository --repository-name demo-app-hola-world \
    --image-tag-mutability IMMUTABLE --image-scanning-configuration scanOnPush=true
  5. Run the guided deploy to add the second repository:
    sam deploy -g

The AWS SAM guided deploy process allows you to provide the information again but prepopulates the defaults with previous values. Update the following:

  1. Keep the same stack name, Region, and Image Repository for HelloWorldFunction.
  2. Use the new repository for HolaWorldFunction.
  3. For the remaining steps, use the same values from before. For Lambda functions not to have authorization defined, enter Y.
Results of sam deploy --guided

Results of sam deploy –guided

Deploying in a CI/CD pipeline

Companies use continuous integration and continuous delivery (CI/CD) pipelines to automate application deployment. Because the process is automated, using an interactive process like a guided AWS SAM deployment is not possible.

Developers can use the packaging process in AWS SAM to prepare the artifacts for deployment and produce a separate template usable by AWS CloudFormation. The package command is:

sam package --output-template-file packaged-template.yaml \
--image-repository 5555555555.dkr.ecr.us-west-2.amazonaws.com/demo-app

For multiple repositories:

sam package --output-template-file packaged-template.yaml \ 
--image-repositories HelloWorldFunction=5555555555.dkr.ecr.us-west-2.amazonaws.com/demo-app-hello-world \
--image-repositories HolaWorldFunction=5555555555.dkr.ecr.us-west-2.amazonaws.com/demo-app-hola-world

Both cases create a file called packaged-template.yaml. The Lambda functions in this template have an added tag called ImageUri that points to the ECR repository and a tag for the Lambda function.

Packaged template

Packaged template

Using sam package to generate a separate CloudFormation template enables developers to separate artifact creation from application deployment. The deployment process can then be placed in an isolated stage allowing for greater customization and observability of the pipeline.

Conclusion

Container image support for Lambda enables larger application artifacts and the ability to use container tooling to manage Lambda images. AWS SAM simplifies application management by bringing these tools into the serverless development workflow.

In this post, you create a container-based serverless application in using command lines in the terminal. You create ECR repositories and associate them with functions in the application. You deploy the application from your local machine and package the artifacts for separate deployment in a CI/CD pipeline.

To learn more about serverless and AWS SAM, visit the Sessions with SAM series at s12d.com/sws and find more resources at serverlessland.com.

#ServerlessForEveryone

Working with Lambda layers and extensions in container images

Post Syndicated from Julian Wood original https://aws.amazon.com/blogs/compute/working-with-lambda-layers-and-extensions-in-container-images/

In this post, I explain how to use AWS Lambda layers and extensions with Lambda functions packaged and deployed as container images.

Previously, Lambda functions were packaged only as .zip archives. This includes functions created in the AWS Management Console. You can now also package and deploy Lambda functions as container images.

You can use familiar container tooling such as the Docker CLI with a Dockerfile to build, test, and tag images locally. Lambda functions built using container images can be up to 10 GB in size. You push images to an Amazon Elastic Container Registry (ECR) repository, a managed AWS container image registry service. You create your Lambda function, specifying the source code as the ECR image URL from the registry.

Lambda container image support

Lambda container image support

Lambda functions packaged as container images do not support adding Lambda layers to the function configuration. However, there are a number of solutions to use the functionality of Lambda layers with container images. You take on the responsible for packaging your preferred runtimes and dependencies as a part of the container image during the build process.

Understanding how Lambda layers and extensions work as .zip archives

If you deploy function code using a .zip archive, you can use Lambda layers as a distribution mechanism for libraries, custom runtimes, and other function dependencies.

When you include one or more layers in a function, during initialization, the contents of each layer are extracted in order to the /opt directory in the function execution environment. Each runtime then looks for libraries in a different location under /opt, depending on the language. You can include up to five layers per function, which count towards the unzipped deployment package size limit of 250 MB. Layers are automatically set as private, but they can be shared with other AWS accounts, or shared publicly.

Lambda Extensions are a way to augment your Lambda functions and are deployed as Lambda layers. You can use Lambda Extensions to integrate functions with your preferred monitoring, observability, security, and governance tools. You can choose from a broad set of tools provided by AWS, AWS Lambda Ready Partners, and AWS Partners, or create your own Lambda Extensions. For more information, see “Introducing AWS Lambda Extensions – In preview.”

Extensions can run in either of two modes, internal and external. An external extension runs as an independent process in the execution environment. They can start before the runtime process, and can continue after the function invocation is fully processed. Internal extensions run as part of the runtime process, in-process with your code.

Lambda searches the /opt/extensions directory and starts initializing any extensions found. Extensions must be executable as binaries or scripts. As the function code directory is read-only, extensions cannot modify function code.

It helps to understand that Lambda layers and extensions are just files copied into specific file paths in the execution environment during the function initialization. The files are read-only in the execution environment.

Understanding container images with Lambda

A container image is a packaged template built from a Dockerfile. The image is assembled or built from commands in the Dockerfile, starting from a parent or base image, or from scratch. Each command then creates a new layer in the image, which is stacked in order on top of the previous layer. Once built from the packaged template, a container image is immutable and read-only.

For Lambda, a container image includes the base operating system, the runtime, any Lambda extensions, your application code, and its dependencies. Lambda provides a set of open-source base images that you can use to build your container image. Lambda uses the image to construct the execution environment during function initialization. You can use the AWS Serverless Application Model (AWS SAM) CLI or native container tools such as the Docker CLI to build and test container images locally.

Using Lambda layers in container images

Container layers are added to a container image, similar to how Lambda layers are added to a .zip archive function.

There are a number of ways to use container image layering to add the functionality of Lambda layers to your Lambda function container images.

Use a container image version of a Lambda layer

A Lambda layer publisher may have a container image format equivalent of a Lambda layer. To maintain the same file path as Lambda layers, the published container images must have the equivalent files located in the /opt directory. An image containing an extension must include the files in the /opt/extensions directory.

An example Lambda function, packaged as a .zip archive, is created with two layers. One layer contains shared libraries, and the other layer is a Lambda extension from an AWS Partner.

aws lambda create-function –region us-east-1 –function-name my-function \

aws lambda create-function --region us-east-1 --function-name my-function \  
    --role arn:aws:iam::123456789012:role/lambda-role \
    --layers \
        "arn:aws:lambda:us-east-1:123456789012:layer:shared-lib-layer:1" \
        "arn:aws:lambda:us-east-1:987654321987:extensions-layer:1" \
    …

The corresponding Dockerfile syntax for a function packaged as a container image includes the following lines. These pull the container image versions of the Lambda layers and copy them into the function image. The shared library image is pulled from ECR and the extension image is pulled from Docker Hub.

FROM public.ecr.aws/myrepo/shared-lib-layer:1 AS shared-lib-layer
# Layer code
WORKDIR /opt
COPY --from=shared-lib-layer /opt/ .

FROM aws-partner/extensions-layer:1 as extensions-layer
# Extension  code
WORKDIR /opt/extensions
COPY --from=extensions-layer /opt/extensions/ .

Copy the contents of a Lambda layer into a container image

You can use existing Lambda layers, and copy the contents of the layers into the function container image /opt directory during docker build.

You need to build a Dockerfile that includes the AWS Command Line Interface to copy the layer files from Amazon S3.

The Dockerfile to add two layers into a single image includes the following lines to copy the Lambda layer contents.

FROM alpine:latest

ARG AWS_DEFAULT_REGION=${AWS_DEFAULT_REGION:-"us-east-1"}
ARG AWS_ACCESS_KEY_ID=${AWS_ACCESS_KEY_ID:-""}
ARG AWS_SECRET_ACCESS_KEY=${AWS_SECRET_ACCESS_KEY:-""}
ENV AWS_DEFAULT_REGION=${AWS_DEFAULT_REGION}
ENV AWS_ACCESS_KEY_ID=${AWS_ACCESS_KEY_ID}
ENV AWS_SECRET_ACCESS_KEY=${AWS_SECRET_ACCESS_KEY}

RUN apk add aws-cli curl unzip

RUN mkdir -p /opt

RUN curl $(aws lambda get-layer-version-by-arn --arn arn:aws:lambda:us-east-1:1234567890123:layer:shared-lib-layer:1 --query 'Content.Location' --output text) --output layer.zip
RUN unzip layer.zip -d /opt
RUN rm layer.zip

RUN curl $(aws lambda get-layer-version-by-arn --arn arn:aws:lambda:us-east-1:987654321987:extensions-layer:1 --query 'Content.Location' --output text) --output layer.zip
RUN unzip layer.zip -d /opt
RUN rm layer.zip

To run the AWS CLI, specify your AWS_ACCESS_KEY, and AWS_SECRET_ACCESS_KEY, and include the required AWS_DEFAULT_REGION as command-line arguments.

docker build . -t layer-image1:latest \
--build-arg AWS_DEFAULT_REGION=us-east-1 \
--build-arg AWS_ACCESS_KEY_ID=AKIAIOSFODNN7EXAMPLE \
--build-arg AWS_SECRET_ACCESS_KEY=wJalrXUtnFEMI/K7MDENG/bPxRfiCYEXAMPLEKEY

This creates a container image containing the existing Lambda layer and extension files. This can be pushed to ECR and used in a function.

Build a container image from a Lambda layer

You can repackage and publish Lambda layer file content as container images. Creating separate container images for different layers allows you to add them to multiple functions, and share them in a similar way as Lambda layers.

You can create a separate container image containing the files from a single layer, or combine the files from multiple layers into a single image. If you create separate container images for layer files, you then add these images into your function image.

There are two ways to manage language code dependencies. You can pre-build the dependencies and copy the files into the container image, or build the dependencies during docker build.

In this example, I migrate an existing Python application. This comprises a Lambda function and extension, from a .zip archive to separate function and extension container images. The extension writes logs to S3.

You can choose how to store images in repositories. You can either push both images to the same ECR repository with different image tags, or push to different repositories. In this example, I use separate ECR repositories.

To set up the example, visit the GitHub repo and follow the instructions in the README.md file.

The existing example extension uses a makefile to install boto3 using pip install with a requirements.txt file. This is migrated to the docker build process. I must add a Python runtime to be able to run pip install as part of the build process. I use python:3.8-alpine as a minimal base image.

I create separate Dockerfiles for the function and extension. The extension Dockerfile contains the following lines.

FROM python:3.8-alpine AS installer
#Layer Code
COPY extensionssrc /opt/
COPY extensionssrc/requirements.txt /opt/
RUN pip install -r /opt/requirements.txt -t /opt/extensions/lib

FROM scratch AS base
WORKDIR /opt/extensions
COPY --from=installer /opt/extensions .

I build, tag, login, and push the extension container image to an existing ECR repository.

docker build -t log-extension-image:latest  .
docker tag log-extension-image:latest 123456789012.dkr.ecr.us-east-1.amazonaws.com/log-extension-image:latest
aws ecr get-login-password --region us-east-1 | docker login --username AWS --password-stdin 123456789012.dkr.ecr.us-east-1.amazonaws.com
docker push 123456789012.dkr.ecr.us-east-1.amazonaws.com/log-extension-image:latest

The function Dockerfile contains the following lines, which add the files from the previously created extension image to the function image. There is no need to run pip install for the function as it does not require any additional dependencies.

FROM 123456789012.dkr.ecr.us-east-1.amazonaws.com/log-extension-image:latest AS layer
FROM public.ecr.aws/lambda/python:3.8
# Layer code
WORKDIR /opt
COPY --from=layer /opt/ .
# Function code
WORKDIR /var/task
COPY app.py .
CMD ["app.lambda_handler"]

I build, tag, and push the function container image to a separate existing ECR repository. This creates an immutable image of the Lambda function.

docker build -t log-extension-function:latest  .
docker tag log-extension-function:latest 123456789012.dkr.ecr.us-east-1.amazonaws.com/log-extension-function:latest
docker push 123456789012.dkr.ecr.us-east-1.amazonaws.com/log-extension-function:latest

The function requires a unique S3 bucket to store the logs files, which I create in the S3 console. I create a Lambda function from the ECR repository image, and specify the bucket name as a Lambda environment variable.

aws lambda create-function --region us-east-1  --function-name log-extension-function \
--package-type Image --code ImageUri=123456789012.dkr.ecr.us-east-1.amazonaws.com/log-extension-function:latest \
--role "arn:aws:iam:: 123456789012:role/lambda-role" \
--environment  "Variables": {"S3_BUCKET_NAME": "s3-logs-extension-demo-logextensionsbucket-us-east-1"}

For subsequent extension code changes, I need to update both the extension and function images. If only the function code changes, I need to update the function image. I push the function image as the :latest image to ECR. I then update the function code deployment to use the updated :latest ECR image.

aws lambda update-function-code --function-name log-extension-function --image-uri 123456789012.dkr.ecr.us-east-1.amazonaws.com/log-extension-function:latest

Using custom runtimes with container images

With .zip archive functions, custom runtimes are added using Lambda layers. With container images, you no longer need to copy in Lambda layer code for custom runtimes.

You can build your own custom runtime images starting with AWS provided base images for custom runtimes. You can add your preferred runtime, dependencies, and code to these images. To communicate with Lambda, the image must implement the Lambda Runtime API. We provide Lambda runtime interface clients for all supported runtimes, or you can implement your own for additional runtimes.

Running extensions in container images

A Lambda extension running in a function packaged as a container image works in the same way as a .zip archive function. You build a function container image including the extension files, or adding an extension image layer. Lambda looks for any external extensions in the /opt/extensions directory and starts initializing them. Extensions must be executable as binaries or scripts.

Internal extensions modify the Lambda runtime startup behavior using language-specific environment variables, or wrapper scripts. For language-specific environment variables, you can set the following environment variables in your function configuration to augment the runtime command line.

  • JAVA_TOOL_OPTIONS (Java Corretto 8 and 11)
  • NODE_OPTIONS (Node.js 10 and 12)
  • DOTNET_STARTUP_HOOKS (.NET Core 3.1)

An example Lambda environment variable for JAVA_TOOL_OPTIONS:

-javaagent:"/opt/ExampleAgent-0.0.jar"

Wrapper scripts delegate the runtime start-up to a script. The script can inject and alter arguments, set environment variables, or capture metrics, errors, and other diagnostic information. The following runtimes support wrapper scripts: Node.js 10 and 12, Python 3.8, Ruby 2.7, Java 8 and 11, and .NET Core 3.1

You specify the script by setting the value of the AWS_LAMBDA_EXEC_WRAPPER environment variable as the file system path of an executable binary or script, for example:

/opt/wrapper_script

Conclusion

You can now package and deploy Lambda functions as container images in addition to .zip archives. Lambda functions packaged as container images do not directly support adding Lambda layers to the function configuration as .zip archives do.

In this post, I show a number of solutions to use the functionality of Lambda layers and extensions with container images, including example Dockerfiles.

I show how to migrate an existing Lambda function and extension from a .zip archive to separate function and extension container images. Follow the instructions in the README.md file in the GitHub repository.

For more serverless learning resources, visit https://serverlessland.com.

Jump-starting your serverless development environment

Post Syndicated from Benjamin Smith original https://aws.amazon.com/blogs/compute/jump-starting-your-serverless-development-environment/

Developers building serverless applications often wonder how they can jump-start their local development environment. This blog post provides a broad guide for those developers wanting to set up a development environment for building serverless applications.

serverless development environment

AWS and open source tools for a serverless development environment .

To use AWS Lambda and other AWS services, create and activate an AWS account.

Command line tooling

Command line tools are scripts, programs, and libraries that enable rapid application development and interactions from within a command line shell.

The AWS CLI

The AWS Command Line Interface (AWS CLI) is an open source tool that enables developers to interact with AWS services using a command line shell. In many cases, the AWS CLI increases developer velocity for building cloud resources and enables automating repetitive tasks. It is an important piece of any serverless developer’s toolkit. Follow these instructions to install and configure the AWS CLI on your operating system.

AWS enables you to build infrastructure with code. This provides a single source of truth for AWS resources. It enables development teams to use version control and create deployment pipelines for their cloud infrastructure. AWS CloudFormation provides a common language to model and provision these application resources in your cloud environment.

AWS Serverless Application Model (AWS SAM CLI)

AWS Serverless Application Model (AWS SAM) is an extension for CloudFormation that further simplifies the process of building serverless application resources.

It provides shorthand syntax to define Lambda functions, APIs, databases, and event source mappings. During deployment, the AWS SAM syntax is transformed into AWS CloudFormation syntax, enabling you to build serverless applications faster.

The AWS SAM CLI is an open source command line tool used to locally build, test, debug, and deploy serverless applications defined with AWS SAM templates.

Install AWS SAM CLI on your operating system.

Test the installation by initializing a new quick start project with the following command:

$ sam init
  1. Choose 1 for the “Quick Start Templates
  2. Choose 1 for the “Node.js runtime
  3. Use the default name.

The generated /sam-app/template.yaml contains all the resource definitions for your serverless application. This includes a Lambda function with a REST API endpoint, along with the necessary IAM permissions.

Resources:
  HelloWorldFunction:
    Type: AWS::Serverless::Function # More info about Function Resource: https://github.com/awslabs/serverless-application-model/blob/master/versions/2016-10-31.md#awsserverlessfunction
    Properties:
      CodeUri: hello-world/
      Handler: app.lambdaHandler
      Runtime: nodejs12.x
      Events:
        HelloWorld:
          Type: Api # More info about API Event Source: https://github.com/awslabs/serverless-application-model/blob/master/versions/2016-10-31.md#api
          Properties:
            Path: /hello
            Method: get

Deploy this application using the AWS SAM CLI guided deploy:

$ sam deploy -g

Local testing with AWS SAM CLI

The AWS SAM CLI requires Docker containers to simulate the AWS Lambda runtime environment on your local development environment. To test locally, install Docker Engine and run the Lambda function with following command:

$ sam local invoke "HelloWorldFunction" -e events/event.json

The first time this function is invoked, Docker downloads the lambci/lambda:nodejs12.x container image. It then invokes the Lambda function with a pre-defined event JSON file.

Helper tools

There are a number of open source tools and packages available to help you monitor, author, and optimize your Lambda-based applications. Some of the most popular tools are shown in the following list.

Template validation tooling

CloudFormation Linter is a validation tool that helps with your CloudFormation development cycle. It analyses CloudFormation YAML and JSON templates to resolve and validate intrinsic functions and resource properties. By analyzing your templates before deploying them, you can save valuable development time and build automated validation into your deployment release cycle.

Follow these instructions to install the tool.

Once, installed, run the cfn-lint command with the path to your AWS SAM template provided as the first argument:

cfn-lint template.yaml
AWS SAM template validation with cfn-lint

AWS SAM template validation with cfn-lint

The following example shows that the template is not valid because the !GettAtt function does not evaluate correctly.

IDE tooling

Use AWS IDE plugins to author and invoke Lambda functions from within your existing integrated development environment (IDE). AWS IDE toolkits are available for PyCharm, IntelliJ. Visual Studio.

The AWS Toolkit for Visual Studio Code provides an integrated experience for developing serverless applications. It enables you to invoke Lambda functions, specify function configurations, locally debug, and deploy—all conveniently from within the editor. The toolkit supports Node.js, Python, and .NET.

The AWS Toolkit for Visual Studio Code

From Visual Studio Code, choose the Extensions icon on the Activity Bar. In the Search Extensions in Marketplace box, enter AWS Toolkit and then choose AWS Toolkit for Visual Studio Code as shown in the following example. This opens a new tab in the editor showing the toolkit’s installation page. Choose the Install button in the header to add the extension.

AWS Toolkit extension for Visual Studio Code

AWS Toolkit extension for Visual Studio Code

AWS Cloud9

Another option to build a development environment without having to install anything locally is to use AWS Cloud9. AWS Cloud9 is a cloud-based integrated development environment (IDE) for writing, running, and debugging code from within the browser.

It provides a seamless experience for developing serverless applications. It has a preconfigured development environment that includes AWS CLI, AWS SAM CLI, SDKs, code libraries, and many useful plugins. AWS Cloud9 also provides an environment for locally testing and debugging AWS Lambda functions. This eliminates the need to upload your code to the Lambda console. It allows developers to iterate on code directly, saving time, and improving code quality.

Follow this guide to set up AWS Cloud9 in your AWS environment.

Advanced tooling

Efficient configuration of Lambda functions is critical when expecting optimal cost and performance of your serverless applications. Lambda allows you to control the memory (RAM) allocation for each function.

Lambda charges based on the number of function requests and the duration, the time it takes for your code to run. The price for duration depends on the amount of RAM you allocate to your function. A smaller RAM allocation may reduce the performance of your application if your function is running compute-heavy workloads. If performance needs outweigh cost, you can increase the memory allocation.

Cost and performance optimization tooling

AWS Lambda power tuner is an open source tool that uses an AWS Step Functions state machine to suggest cost and performance optimizations for your Lambda functions. It invokes a given function with multiple memory configurations. It analyzes the execution log results to determine and suggest power configurations that minimize cost and maximize performance.

To deploy the tool:

  1. Clone the repository as follows:
    $ git clone https://github.com/alexcasalboni/aws-lambda-power-tuning.git
  2. Create an Amazon S3 bucket and enter the deployment configurations in /scripts/deploy.sh:
    # config
    BUCKET_NAME=your-sam-templates-bucket
    STACK_NAME=lambda-power-tuning
    PowerValues='128,512,1024,1536,3008'
  3. Run the deploy.sh script from your terminal, this uses the AWS SAM CLI to deploy the application:
    $ bash scripts/deploy.sh
  4. Run the power tuning tool from the terminal using the AWS CLI:
    aws stepfunctions start-execution \
    --state-machine-arn arn:aws:states:us-east-1:0123456789:stateMachine:powerTuningStateMachine-Vywm3ozPB6Am \
    --input "{\"lambdaARN\": \"arn:aws:lambda:us-east-1:1234567890:function:testytest\", \"powerValues\":[128,256,512,1024,2048],\"num\":50,\"payload\":{},\"parallelInvocation\":true,\"strategy\":\"cost\"}" \
    --output json
  5. The Step Functions execution output produces a link to a visual summary of the suggested results:

    AWS Lambda power tuning results

    AWS Lambda power tuning results

Monitoring and debugging tooling

Sls-dev-tools is an open source serverless tool that delivers serverless metrics directly to the terminal. It provides developers with feedback on their serverless application’s metrics and key bindings that deploy, open, and manipulate stack resources. Bringing this data directly to your terminal or IDE, reduces context switching between the developer environment and the web interfaces. This can increase application development speed and improve user experience.

Follow these instructions to install the tool onto your development environment.

To open the tool, run the following command:

$ Sls-dev-tools

Follow the in-terminal interface to choose which stack to monitor or edit.

The following example shows how the tool can be used to invoke a Lambda function with a custom payload from within the IDE.

Invoke an AWS Lambda function with a custom payload using sls-dev-tools

Invoke an AWS Lambda function with a custom payload using sls-dev-tools

Serverless database tooling

NoSQL Workbench for Amazon DynamoDB is a GUI application for modern database development and operations. It provides a visual IDE tool for data modeling and visualization with query development features to help build serverless applications with Amazon DynamoDB tables. Define data models using one or more tables and visualize the data model to see how it works in different scenarios. Run or simulate operations and generate the code for Python, JavaScript (Node.js), or Java.

Choose the correct operating system link to download and install NoSQL Workbench on your development machine.

The following example illustrates a connection to a DynamoDB table. A data scan is built using the GUI, with Node.js code generated for inclusion in a Lambda function:

Connecting to an Amazon DynamoBD table with NoSQL Workbench for AmazonDynamoDB

Connecting to an Amazon DynamoDB table with NoSQL Workbench for Amazon DynamoDB

Generating query code with NoSQL Workbench for Amazon DynamoDB

Generating query code with NoSQL Workbench for Amazon DynamoDB

Conclusion

Building serverless applications allows developers to focus on business logic instead of managing and operating infrastructure. This is achieved by using managed services. Developers often struggle with knowing which tools, libraries, and frameworks are available to help with this new approach to building applications. This post shows tools that builders can use to create a serverless developer environment to help accelerate software development.

This list represents AWS and open source tools but does not include our APN Partners. For partner offers, check here.

Read more to start building serverless applications.