All posts by Benjamin Smith

Introducing AWS Step Functions redrive to recover from failures more easily

Post Syndicated from Benjamin Smith original https://aws.amazon.com/blogs/compute/introducing-aws-step-functions-redrive-a-new-way-to-restart-workflows/

Developers use AWS Step Functions, a visual workflow service to build distributed applications, automate IT and business processes, and orchestrate AWS services with minimal code.

Step Functions redrive for Standard Workflows allows you to redrive a failed workflow execution from its point of failure, rather than having to restart the entire workflow. This blog post explains how to use the new redrive feature to skip unnecessary workflow steps and reduce the cost of redriving failed workflows.

Handling workflow errors

Any workflow state can encounter runtime errors. Errors happen for various reasons, including state machine definition issues, task failures, incorrect permissions, and exceptions from downstream services. By default, when a state reports an error, Step Functions causes the workflow execution to fail. Step Functions allows you to handle errors by retrying, catching, and falling back to a defined state.

Now, you can also redrive the workflow from the failed state, skipping the successful prior workflow steps. This results in faster workflow completion and lower costs. You can only redrive a failed workflow execution from the step where it failed using the same input as the last non-successful state. You cannot redrive a failed workflow execution using a state machine definition that is different from the initial workflow execution.

Choosing between retry and redrive

Use the retry mechanism for transient issues such as network connectivity problems or momentary service unavailability You can configure the number of retries, along with intervals and back-off rates, providing the workflow with multiple attempts to complete a task successfully.

In scenarios where the underlying cause of an error requires longer investigation or resolution time, redrive becomes a valuable tool. Consider a situation where a downstream service experiences extended downtime or manual intervention is needed, such as updating a database or making code changes to a Lambda function. In these cases, being able to redrive the workflow can give you time to address the root cause before resuming the workflow execution.

Combining retry and redrive

Adopt a hybrid strategy that combines retry and redrive mechanisms:

  1. Retry mechanism: Configure an initial set of retries for automatically resolvable errors. This ensures that transient issues are promptly addressed, and the workflow proceeds without unnecessary delays.
  2. Error catching and redrive: If the retry mechanism exhausts without success, allow the state to fail and use the redrive feature to restart the workflow from the last non-successful state. This approach allows for intervention where errors persist or require external actions.

Reducing costs

AWS charges for Standard Workflows based on the number of state transitions required to run a workload. Step Functions counts a state transition each time a step of your workflow runs. Step Functions charges for the total number of state transitions across state machines, including retries. The cost is $0.025 per 1,000 state transitions. This means that reducing the number of state transitions reduces the cost of running your Standard Workflows.

If a workflow has many steps, includes parallel or map states, or is prone to errors that require frequent re-runs, this new feature reduces the costs incurred. You pay only for each state transition after the failed state and those costs for every downstream service invoked as part of the re-run.

The following example explains the cost implications of retrying a workflow that has failed, with and without redrive. In this example, a Step Functions workflow orchestrates Amazon Transcribe to generate a text transcription from an .mp4 file.

Since the failed state occurs towards the end of this workflow, the redrive execution does not run the successful states, reducing the overall successful completion time. If this workflow were to fail regularly, the reduction in transitions and execution duration becomes increasingly valuable.

The first time this workflow runs, the final state, which uses an AWS Lambda function to make an HTTP request fails with an IAM error. This is because the workflow does not have the required permissions to invoke the Lambda function. After granting the required permissions to the workflow’s execution role, redrive to continue the workflow from the failed state.

After the redrive, Step Functions workflow reports a different failure. This time it is related to the configuration of the Lambda function. This is an example of a downstream failure that does not require an update to my workflow definition.

After resolving the Lambda configuration issue and redriving the workflow, the execution completes successfully. The following image shows the execution details, including the number of redrives, the total state transitions, and the last redrive time:

Getting started with redrive

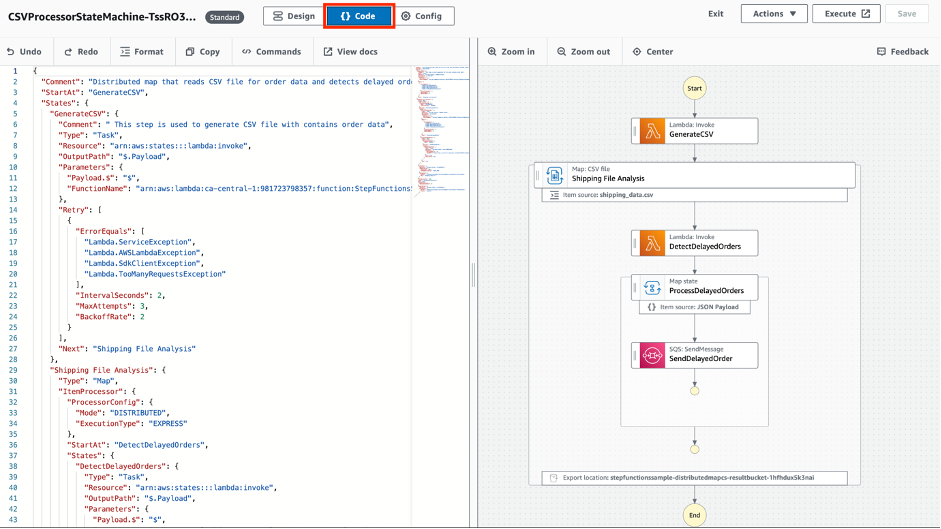
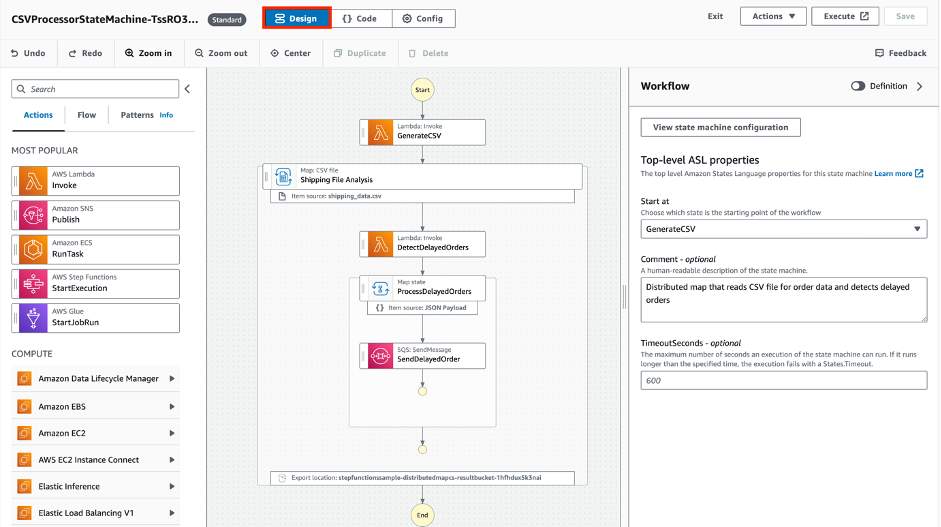
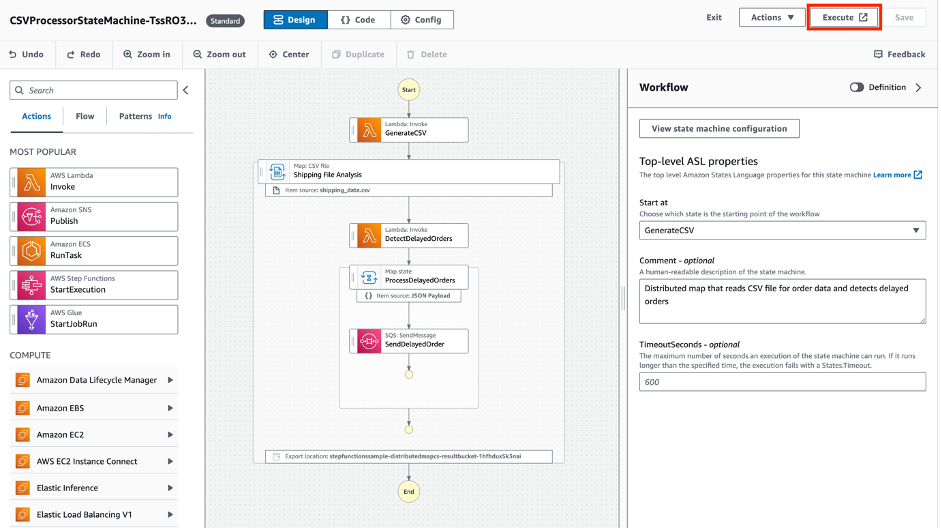
Redrive works for Standard Workflows only. You can redrive a workflow from its failed step programmatically, via the AWS CLI or AWS SDK, or using the Step Functions console, which provides a visual operator experience:

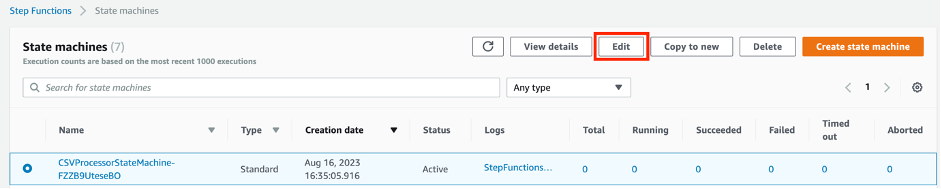
  1. From the Step Functions console, select the failed workflow you want to redrive, and choose Redrive.
  2. A modal appears with the execution details. Choose Redrive execution.

The state to redrive from, the workflow definition, and the previous input are immutable.

To redrive a workflow execution programmatically from its point of failure, call the new Redrive Execution API action. The same workflow execution starts from the last non-successful state and uses the same input as the last non-successful state from the initial failed workflow execution.

Programmatically catching failed workflow executions to redrive

Step Functions can process workloads autonomously, without the need for human interaction, or can include intervention from a user by implementing the .waitForTastToken pattern.

Redrive is for unhandled and unexpected errors only. Handling errors within a workflow using the built-in mechanisms for catch, retry, and routing to a Fail state, does not permit the workflow to redrive. However, it is possible to detect in near real-time when a workflow has failed, and programmatically redrive. When a workflow fails, it emits an event onto the Amazon EventBridge default event bus. The event looks like the following JSON object:

There are four new key/values pairs in this event:

"redriveCount": 0, 
"redriveDate": null, 
"redriveStatus": "REDRIVABLE", 
"redriveStatusReason": null,

The redrive count shows how many times the workflow has previously been redriven. The redrive status shows if the failed workflow is eligible for redrive execution.

To programmatically redrive the workflow from the failed state. Create a rule that pattern matches this event, and route the event onto a target service to handle the error. The target service uses the new States.RedriveExecution API to redrive the workflow.

Download and deploy the previous pattern from this example on serverlessland.com.

In the following example, the first state sends a post request to an API endpoint. If the request fails due to network connectivity or latency issues, the state retries. If the retry fails, then Step Functions emits a ` Step Functions Execution Status Change event onto the EventBridge default event bus. An EventBridge rule routes this event to a service where you can rectify this error and then redrive the task using the Step Functions API.

The new redrive feature also supports the distributed map state.

Redrive for express child workflow executions

For failed child workflow executions that are Express Workflows within a Distributed Map, the redrive capability ensures a seamless restart from the beginning of the child workflow. This allows you to resolve issues that are specific to individual iterations without restarting the entire map.

Redrive for standard child workflow executions

For failed child workflow executions within a Distributed Map that are Standard Workflows, the redrive feature functions in the same way in standalone Standard Workflows. You can restart the failed iteration from its point of failure, skipping unnecessary steps that have already successfully executed.

Conclusion

Step Functions redrive for Standard Workflows allows you to redrive a failed workflow execution from its point of failure rather than having to restart the entire workflow. This results in faster workflow completion and lower costs for processing failed executions. This is because it minimizes the number of state transitions and downstream service invocations.

Visit the Serverless Workflows Collection to browse the many deployable workflows to help build your serverless applications.

Orchestrating dependent file uploads with AWS Step Functions

Post Syndicated from Benjamin Smith original https://aws.amazon.com/blogs/compute/orchestrating-dependent-file-uploads-with-aws-step-functions/

This post is written by Nelson Assis, Enterprise Support Lead, Serverless and Jevon Liburd, Technical Account Manager, Serverless

Amazon S3 is an object storage service that many customers use for file storage. With the use of Amazon S3 Event Notifications or Amazon EventBridge customers can create workloads with event-driven architecture (EDA). This architecture responds to events produced when changes occur to objects in S3 buckets.

EDA involves asynchronous communication between system components. This serves to decouple the components allowing each component to be autonomous.

Some scenarios may introduce coupling in the architecture due to dependency between events. This blog post presents a common example of this coupling and how it can be handled using AWS Step Functions.

Overview

In this example, an organization has two distributed autonomous teams, the Sales team and the Warehouse team. Each team is responsible for uploading a monthly data file to an S3 bucket so it can be processed.

The files generate events when they are uploaded, initiating downstream processes. The processing of the Warehouse file cleans the data and joins it with data from the Shipping team. The processing of the Sales file correlates the data with the combined Warehouse and Shipping data. This enables analysts to perform forecasting and gain other insights.

For this correlation to happen, the Warehouse file must be processed before the Sales file. As the two teams are autonomous, there is no coordination among the teams. This means that the files can be uploaded at any time with no assurance that the Warehouse file is processed before the Sales file.

For scenarios like these, the Aggregator pattern can be used. The pattern collects and stores the events, and triggers a new event based on the combined events. In the described scenario, the combined events are the processed Warehouse file and the uploaded Sales file.

The requirements of the aggregator pattern are:

  1. Correlation – A way to group the related events. This is fulfilled by a unique identifier in the file name.
  2. Event aggregator – A stateful store for the events.
  3. Completion check and trigger – A condition when the combined events have been received and a way to publish the resulting event.

Architecture overview

The architecture uses the following AWS services:

  1. File upload: The Sales and Warehouse teams upload their respective files to S3.
  2. EventBridge: The ObjectCreated event is sent to EventBridge where there is a rule with a target of the main workflow.
  3. Main state machine: This state machine orchestrates the aggregator operations and the processing of the files. It encapsulates the workflows for each file to separate the aggregator logic from the files’ workflow logic.
  4. File parser and correlation: The business logic to identify the file and its type is run in this Lambda function.
  5. Stateful store: A DynamoDB table stores information about the file such as the name, type, and processing status. The state machine reads from and writes to the DynamoDB table. Task tokens are also stored in this table.
  6. File processing: Depending on the file type and any pre-conditions, state machines corresponding to the file type are run. These state machines contain the logic to process the specific file.
  7. Task Token & Callback: The task token is generated when the dependent file tries to be processed before the independent file. The Step Functions “Wait for a Callback” pattern continues the execution of the dependent file after the independent file is processed.

Walkthrough

You need the following prerequisites:

  • AWS CLI and AWS SAM CLI installed.
  • An AWS account.
  • Sufficient permissions to manage the AWS resources.
  • Git installed.

To deploy the example, follow the instructions in the GitHub repo.

This walkthrough shows what happens if the dependent file (Sales file) is uploaded before the independent one (Warehouse file).

  1. The workflow starts with the uploading of the Sales file to the dedicated Sales S3 bucket. The example uses separate S3 buckets for the two files as it assumes that the Sales and Warehouse teams are distributed and autonomous. You can find sample files in the code repository.
  2. Uploading the file to S3 sends an event to EventBridge, which the aggregator state machine acts on. The event pattern used in the EventBridge rule is:
    {
      "detail-type": ["Object Created"],
      "source": ["aws.s3"],
      "detail": {
        "bucket": {
          "name": ["sales-mfu-eda-09092023", "warehouse-mfu-eda-09092023"]
        },
        "reason": ["PutObject"]
      }
    }
  3. The aggregator state machine starts by invoking the file parser Lambda function. This function parses the file type and uses the identifier to correlate the files. In this example, the name of the file contains the file type and the correlation identifier (the year_month). To use other ways of representing the file type and correlation identifier, you can modify this function to parse that information.
  4. The next step in the state machine inserts a record for the event in the event aggregator DynamoDB table. The table has a composite primary key with the correlation identifier as the partition key and the file type as the sort key. The processing status of the file is tracked to give feedback on the state of the workflow.
  5. Based on the file type, the state machine determines which branch to follow. In the example, the Sales branch is run. The state machine tries to get the status of the (dependent) Warehouse file from DynamoDB using the correlation identifier. Using the result of this query, the state machine determines if the corresponding Warehouse file has already been processed.
  6. Since the Warehouse file is not processed yet, the waitForTaskToken integration pattern is used. The state machine waits at this step and creates a task token, which the external services use to trigger the state machine to continue its execution. The Sales record in the DynamoDB table is updated with the Task Token.
  7. Navigate to the S3 console and upload the sample Warehouse file to the Warehouse S3 bucket. This invokes a new instance of the Step Functions workflow, which flows through the other branch after the file type choice step. In this branch, the Warehouse state machine is run and the processing status of the file is updated in DynamoDB.

When the status of the Warehouse file is changed to “Completed”, the Warehouse state machine checks DynamoDB for a pending Sales file. If there is one, it retrieves the task token and calls the SendTaskSuccess method. This triggers the Sales state machine, which is in a waiting state to continue. The Sales state machine is started and the processing status is updated.

Conclusion

This blog post shows how to handle file dependencies in event driven architectures. You can customize the sample provided in the code repository for your own use case.

This solution is specific to file dependencies in event driven architectures. For more information on solving event dependencies and aggregators read the blog post: Moving to event-driven architectures with serverless event aggregators.

To learn more about event driven architectures, visit the event driven architecture section on Serverless Land.

Archiving and replaying messages with Amazon SNS FIFO

Post Syndicated from Benjamin Smith original https://aws.amazon.com/blogs/compute/archiving-and-replaying-messages-with-amazon-sns-fifo/

This post is written by A Mohammed Atiq, Solutions Architect and Mithun Mallick, Principal Solutions Architect, Serverless

Amazon Simple Notification Service (SNS) offers a flexible, fully managed messaging service, allowing applications to send and receive messages. SNS acts as a channel, delivering events from publishers to subscribers.

Today, AWS is announcing a new capability that enables you to archive and replay messages published to SNS FIFO (first-in first-Out) topics. Now, when enabled with an archive policy, SNS FIFO topics automatically:

  • Archives events, with a no-code, in-place message archive that doesn’t require any external resources. You only need to define an archive policy on your topic, including the required retention period (from 1 to 365 days).
  • Replays events: subscribers benefit from a managed, no-code message replay functionality, with built-in progress reporting and message filtering capabilities. To initiate a replay, subscribers simply apply a replay policy to their subscription, defining a starting point and an ending point using timestamps.

This feature can be useful in failure recovery and state replication scenarios.

Failure recovery

In failure recovery scenarios, developers can use this to reprocess a subset of messages and recover from a downstream application failure or a dependency issue.

Consider a situation where a search application needs to reprocess messages because the search engine’s index has been erased. To initiate recovery, the search application would update the ReplayPolicy attribute in its existing subscription using the SetSubscriptionAttributes API action, to start receiving messages from a specific point in time, rather than from when the Archive policy was applied to the topic.

State replication

For state replication scenarios, this feature enables new applications to duplicate the state of previously subscribed applications.

Consider an internal data warehouse application that must replicate the state of an external search application to make the data indexed in the search engine available to product managers and other internal staff. The data warehouse application subscribes its newly created endpoint (for example, an Amazon SQS FIFO queue) to the topic using the Subscribe API action and sets the ReplayPolicy subscription attribute.

If it opts to replicate the full state of the search engine, it might set the timestamp in its ReplayPolicy to coincide with the search engine’s subscription’s creation date and time, ensuring all data ever delivered to the search engine is also delivered to the data warehouse tool.

Enabling the archive policy via the SNS console

When creating a new SNS FIFO topic, you see an option for the archive policy. This policy determines how long SNS stores your messages, making them available for potential resending to a subscription if necessary. The Archive policy does not activate by default – you must enable it for each topic manually or automate the operation.

For instance, the retention period for this FIFO topic is set at 30 days. However, you can adjust this duration anywhere from 1 to 365 days. Once you activate the archive policy, messages sent to this topic are archived for the defined period.

To confirm that the archive policy is in effect after creating the topic, check the topic details. Next to the retention policy, and its status is displayed as Active.

By subscribing an SQS FIFO queue to an SNS FIFO topic, you can replay messages, and the Replay status shows Not running. You can subscribe both FIFO and standard SQS queues to their SNS FIFO topics, providing flexibility for various use-case requirements. To initiate a replay, navigate to the SNS console, choose Replay, and then choose Start replay.

When you initiate a replay, a window appears, allowing you to specify the start and end dates, as well as the exact time from which messages are archived. This feature affords the flexibility to replay only messages of interest, instead of every archived message, by allowing you to set on a specific schedule. When you choose Start replay, the service begins sending messages to the subscriber.

You can also define settings for the SNS FIFO archive and replay features with both AWS CloudFormation and the AWS Serverless Application Model (AWS SAM).

Use Cases

Replaying events for error recovery in microservices

In a scenario where an insurance application uses multiple microservices, consider one claims processing microservice encounters an error and drops a claim. Such an oversight can cause the workload to be out of sync.

With the archive and replay feature, you can revisit and replay events from the time the error was detected. This allows the microservice to recognize the missed event and complete the necessary actions, ensuring the system remains updated and accurate.

  1. Messages are published to an SNS FIFO topic from an application.
  2. Messages are delivered to an SQS FIFO queue containing claim details to be processed by a downstream microservice.
  3. The microservice fails to process a series of messages due to an exception and discards all of the messages.
  4. The user then initiates a replay from the SNS FIFO topic, specifies the time frame of messages to replay based on when the failure occurred.
  5. The microservice is now able to successfully process the replayed messages and persists data into a DynamoDB table.

Replicating state across Regions

In situations where an application spans multiple Regions, and a microservice encounters difficulties in its primary Region, you can replicate the infrastructure to another Region using an active/standby setup.

You can reroute traffic to the standby microservice in the secondary Region, maintaining synchronization through event replays. You can set an end time in the SNS replay policy but if this isn’t defined, replaying continues until all the most recent messages are sent.

After, the SNS subscription resumes normal functioning, capturing all new messages. This approach is suitable for many state replication scenarios, such as cross-Region backup strategies, as it helps minimize downtime and prevent message loss.

  1. Messages are published to an SNS FIFO topic from an application.
  2. Messages are delivered to an SQS FIFO queue containing claim details to be processed by a downstream microservice.
  3. The microservice failed to process a series of messages due to an exception and discarded all of the messages.
  4. The user then subscribes a new SQS FIFO queue in another region, initiates a replay from the SNS FIFO topic and specifies the time frame of messages to replay based on when the failure occurred.
  5. The microservice in a different region is able to retrieve the replayed messages from the new SQS FIFO queue, successfully processes the series of messages and persists data into a DynamoDB table.

Configuring SNS FIFO archive and replay for auto insurance processing

Managing auto insurance claims requires timely coordination. This walkthrough shows the combined benefits of SNS FIFO and SQS FIFO to process claims in the correct sequence.

Both SQS FIFO and SQS standard queues can be subscribed to the SNS FIFO topic, offering versatility in handling claims. The archive and replay functionality of SNS FIFO is paramount; disruptions in downstream microservices don’t compromise claim integrity due to the replay capability.

This walkthrough guides you through deploying an auto insurance claims processing example using the AWS CLI. You create an SNS FIFO topic for claim submissions and two SQS FIFO queues. The first queue is for primary processing of the claims, while the second is specifically for message replays to support application state replication across various system instances.

Prerequisites

Step 1 – Creating resources using the AWS CLI and storing variables

Run the following commands in the terminal.

REGION=$(aws configure get region)

# Create an SNS FIFO topic for auto insurance claims
AUTO_INSURANCE_TOPIC_ARN=$(aws sns create-topic --name "AutoInsuranceClaimsTopic.fifo" --attributes "FifoTopic=true,ContentBasedDeduplication=true,DisplayName=Auto Insurance Claims Topic" --region $REGION | jq -r '.TopicArn')

# Create primary and replay SQS FIFO queues
AUTO_INSURANCE_QUEUE_URL=$(aws sqs create-queue --queue-name "AutoInsuranceClaimsQueue.fifo" --attributes "FifoQueue=true" --region $REGION | jq -r '.QueueUrl')
AUTO_INSURANCE_REPLAY_QUEUE_URL=$(aws sqs create-queue --queue-name "AutoInsuranceReplayQueue.fifo" --attributes "FifoQueue=true" --region $REGION | jq -r '.QueueUrl')

# Get ARNs for both SQS queues
AUTO_INSURANCE_QUEUE_ARN=$(aws sqs get-queue-attributes --queue-url $AUTO_INSURANCE_QUEUE_URL --attribute-names QueueArn --output text --query 'Attributes.QueueArn')
AUTO_INSURANCE_REPLAY_QUEUE_ARN=$(aws sqs get-queue-attributes --queue-url $AUTO_INSURANCE_REPLAY_QUEUE_URL --attribute-names QueueArn --region $REGION | jq -r '.Attributes.QueueArn')

# Define a policy allowing the topic to publish to both queues
SQS_POLICY_TEMPLATE="{\"Policy\" : \"{ \\\"Version\\\": \\\"2012-10-17\\\", \\\"Statement\\\": [ { \\\"Sid\\\": \\\"1\\\", \\\"Effect\\\": \\\"Allow\\\", \\\"Principal\\\": { \\\"Service\\\": \\\"sns.amazonaws.com\\\" }, \\\"Action\\\": [\\\"sqs:SendMessage\\\"], \\\"Resource\\\": [\\\"$AUTO_INSURANCE_QUEUE_ARN\\\", \\\"$AUTO_INSURANCE_REPLAY_QUEUE_ARN\\\"], \\\"Condition\\\": { \\\"ArnLike\\\": { \\\"aws:SourceArn\\\": [\\\"$AUTO_INSURANCE_TOPIC_ARN\\\"] } } } ]}\"}"

# Apply the access policy to the queues
aws sqs set-queue-attributes --queue-url $AUTO_INSURANCE_QUEUE_URL --attributes file://<(echo $SQS_POLICY_TEMPLATE)
aws sqs set-queue-attributes --queue-url $AUTO_INSURANCE_REPLAY_QUEUE_URL --attributes file://<(echo $SQS_POLICY_TEMPLATE)

# Subscribe the primary queue to the created SNS FIFO topic
aws sns subscribe --topic-arn $AUTO_INSURANCE_TOPIC_ARN --protocol sqs --notification-endpoint $AUTO_INSURANCE_QUEUE_ARN --region $REGION

Step 2 – Setting the archive policy on the SNS FIFO topic

Modify the attributes of the SNS FIFO topic to set a retention period. This determines how long a message is retained in the topic archive. This example uses 30 days.

# Set a 30-day retention period for the SNS FIFO topic

aws sns set-topic-attributes --region $REGION --topic-arn $AUTO_INSURANCE_TOPIC_ARN --attribute-name ArchivePolicy --attribute-value "{\"MessageRetentionPeriod\":\"30\"}"

Step 3- Publishing auto insurance claim details

Publish a sample claim to the SNS FIFO topic. This step mimics a real-world scenario where an insurance claim must be processed by subscribers of the topic.

# Get the current timestamp and publish a sample insurance claim
TIMESTAMP_START=$(date -u +%FT%T.000Z)
aws sns publish --region $REGION --topic-arn $AUTO_INSURANCE_TOPIC_ARN --message "{ \"claim_type\": \"collision\", \"registration\": \"AB123CDE\" }" --message-group-id "group1"

Step 4 – Reading auto insurance claim details

Retrieve the insurance claim details from the primary SQS FIFO queue. This simulates a process reading the insurance claim to take action. After reading the message, the claim is deleted from the queue to avoid reprocessing.

# Fetch the claim details from the primary queue, then delete to avoid redundancy
MESSAGE=$(aws sqs receive-message --region $REGION --queue-url $AUTO_INSURANCE_QUEUE_URL --output json)
MESSAGE_TEXT=$(echo "$MESSAGE" | jq -r '.Messages[0].Body')
MESSAGE_RECEIPT=$(echo "$MESSAGE" | jq -r '.Messages[0].ReceiptHandle')
aws sqs delete-message --region $REGION --queue-url $AUTO_INSURANCE_QUEUE_URL --receipt-handle $MESSAGE_RECEIPT
echo "Received claim details: ${MESSAGE_TEXT}"

Step 5 – Subscribing the replay SQS queue to the SNS FIFO topic

To ensure no claims are lost, configure a replay policy for your SQS FIFO queue subscription. This policy sets the schedule from which messages are replayed to the SQS FIFO queue. Here, you subscribe a replay queue with a replay policy and then monitor the status of the replay queue. Once complete, read the replayed claim details from the secondary SQS FIFO queue. If any processing issues occurred initially, there is a second chance to process the claim.

Subscribe replay queue to SNS FIFO topic:

# Subscribe the replay queue to the topic and define its replay policy
NEW_SUBSCRIPTION_ARN=$(aws sns subscribe --region $REGION --topic-arn $AUTO_INSURANCE_TOPIC_ARN --protocol sqs --return-subscription-arn --notification-endpoint $AUTO_INSURANCE_REPLAY_QUEUE_ARN --attributes "{\"ReplayPolicy\":\"{\\\"PointType\\\":\\\"Timestamp\\\",\\\"StartingPoint\\\":\\\"$TIMESTAMP_START\\\"}\"}" --output json | jq -r '.SubscriptionArn')

To monitor the replay status:

# Wait for the replay to complete
while [[ $(aws sns get-subscription-attributes --region $REGION --subscription-arn $NEW_SUBSCRIPTION_ARN --output text | awk 'END{print $9}') != 'Completed' ]]; do printf "."; sleep 5; done; echo "Replay complete";

To read the replayed message and delete the message from the queue:

# Fetch the replayed message and then remove it from the queue
REPLAYED_MESSAGE=$(aws sqs receive-message --region $REGION --queue-url $AUTO_INSURANCE_REPLAY_QUEUE_URL --output json)
REPLAYED_MESSAGE_TEXT=$(echo "$REPLAYED_MESSAGE" | jq -r '.Messages[0].Body')
REPLAYED_MESSAGE_RECEIPT=$(echo "$REPLAYED_MESSAGE" | jq -r '.Messages[0].ReceiptHandle')
aws sqs delete-message --region $REGION --queue-url $AUTO_INSURANCE_REPLAY_QUEUE_URL --receipt-handle $REPLAYED_MESSAGE_RECEIPT
echo "Received replayed claim details: ${REPLAYED_MESSAGE_TEXT}"

Cleaning up

To avoid incurring unnecessary costs, clean up the resources created in this walkthrough:

# Delete the primary SQS FIFO queue
aws sqs delete-queue --queue-url $AUTO_INSURANCE_QUEUE_URL --region $REGION

# Delete the replay SQS FIFO queue
aws sqs delete-queue --queue-url $AUTO_INSURANCE_REPLAY_QUEUE_URL --region $REGION

# Unset the 'ArchivePolicy' attribute
aws sns set-topic-attributes --region $REGION --topic-arn $AUTO_INSURANCE_TOPIC_ARN --attribute-name ArchivePolicy --attribute-value "{}"

# Delete the SNS FIFO topic
aws sns delete-topic --topic-arn $AUTO_INSURANCE_TOPIC_ARN --region $REGION

Conclusion

The new SNS FIFO archive and replay feature provides a substantial foundation for event-driven applications, emphasizing failure recovery and application state replication. These features allow developers to efficiently manage and recover from disruptions, and ensure state replication across different application instances or environments.

Get started with this new SNS FIFO capability by using the AWS Management Console, AWS CLI, AWS Software Development Kit (SDK), or AWS CloudFormation. For information on cost, see SNS pricing and SQS pricing.

For more serverless learning resources, visit Serverless Land.

Serverless ICYMI Q3 2023

Post Syndicated from Benjamin Smith original https://aws.amazon.com/blogs/compute/serverless-icymi-q3-2023/

Welcome to the 23rd edition of the AWS Serverless ICYMI (in case you missed it) quarterly recap. Every quarter, we share all the most recent product launches, feature enhancements, blog posts, webinars, live streams, and other interesting things that you might have missed!

In case you missed our last ICYMI, check out what happened last quarter here.

AWS announces the general availability of Amazon Bedrock

Amazon Web Services (AWS) unveils five generative artificial intelligence (AI) innovations to democratize generative AI applications. Amazon Bedrock, now generally available, enables experimentation with top foundation models (FMs) and allows customization with proprietary data.

It supports creating managed agents for complex tasks without code and ensures security and privacy. Amazon Titan Embeddings, another FM, is generally available for various language-related use cases. Meta’s Llama 2, coming soon, enhances dialogue scenarios.

The upcoming Amazon CodeWhisperer customization capability enables secure customization using private code bases. Generative BI authoring capabilities in Amazon QuickSight simplify visualization creation for business analysts.

AWS Lambda

AWS Lambda now detects and stops recursive loops in Lambda functions. AWS Lambda now detects and halts functions caught in recursive or infinite loops, guarding against unexpected costs. Lambda identifies recursive behavior, discontinuing requests after 16 invocations. The feature addresses pitfalls stemming from misconfiguration or coding bugs, introducing detailed error messaging, and allowing users to set maximum limits on retry intervals. Notifications about recursive occurrences are relayed through the AWS Health Dashboard, emails, and CloudWatch Alarms for streamlined troubleshooting. Lambda uses AWS X-Ray trace headers for invocation tracking, requiring supported AWS SDK versions.

AWS simplifies writing .NET 6 Lambda functions. The Lambda Annotations Framework for .NET. A new programming model makes the experience of writing Lambda functions in C# feel more natural for .NET developers by using C# source generator technology. This streamlines the development workflow for .NET developers, making it easier to create serverless applications using the latest version of the .NET framework.

AWS Lambda and Amazon EventBridge Pipes now support enhanced filtering. Additional filtering capabilities include the ability to match against characters at the end of a value (suffix filtering), ignore case sensitivity (equals-ignore-case), and have a single rule match if any conditions across multiple separate fields are true (OR matching).

AWS Lambda Functions powered by AWS Graviton2 are now available in 6 additional Regions. Graviton2 processors are known for their performance benefits, and this expansion provides users with more choices for running serverless workloads.

AWS Lambda adds support for Python 3.11 allowing developers to take advantage of the latest features and improvements in the Python programming language for their serverless functions.

AWS Step Functions

AWS Step Functions enhances Workflow Studio, focusing on an Advanced Starter Template and Code Mode for efficient AWS Step Functions workflow creation. Users benefit from streamlined design-to-code transitions, pasting Amazon States Language (ASL) definitions directly into Workflow Studio, speeding up adjustments. Enhanced workflow execution and configuration allow direct execution and setting adjustments within Workflow Studio, improving user experience.

AWS Step Functions launches enhanced error handling This update helps users to identify errors with precision and refine retry strategies. Step Functions now enables detailed error messages in Fail states and precise control over retry intervals. Use the new maximum limits and jitter functionality to ensure efficient and controlled retries, preventing service overload in recovery scenarios.

AWS Step Functions distributed map is now available in the AWS GovCloud (US) Regions. This release highlights the availability of the distributed map feature in Step Functions specifically tailored for the AWS GovCloud (US) Regions. The distributed map feature is a powerful capability for orchestrating parallel and distributed processing in serverless workflows.

AWS SAM

AWS SAM CLI announces local testing and debugging support on Terraform projects.

Developers can now use AWS SAM CLI to locally test and debug AWS Lambda functions and Amazon API Gateway defined in their Terraform projects. AWS SAM CLI reads infrastructure resource information from the Terraform application, allowing users to start Lambda functions and API Gateway endpoints locally in a Docker container.

This update enables faster development cycles for Terraform users, who can use AWS SAM CLI commands like `AWS SAM local start-api`, `sam local start-lambda`, and `sam local invoke`, along with `sam local generate` for generating mock test events.

Amazon EventBridge

Amazon EventBridge Scheduler adds schedule deletion after completion. This feature offers enhanced functionality by supporting the automatic deletion of schedules upon completion of their last invocation. It is applicable to various scheduling types, including one-time, cron, and rate schedules with an end date. Amazon EventBridge Scheduler, a centralized and highly scalable service, enables the creation, execution, and management of schedules.

With the ability to schedule millions of tasks invoking over 270 AWS services and 6,000 API operations. This update streamlines the process of managing completed schedules. The automatic deletion feature reduces the need for manual intervention or custom code, saving time and simplifying scalability for users leveraging EventBridge Scheduler.

Amazon EventBridge Pipes now available in three additional Regions. This update extends the availability of Amazon EventBridge Pipes, a powerful event-routing service, to three additional Regions.

Amazon EventBridge API Destinations is now available in additional Regions. Providing users with more options for building scalable and decoupled applications.

Amazon EventBridge Schema Registry and Schema Discovery now in additional Regions. This expansion allows you to discover and store event structure – or schema – in a shared, central location. You can download code bindings for those schemas for Java, Python, TypeScript, and Golang so it’s easier to use events as objects in your code.

Amazon SNS

To enhance message privacy and security, Amazon Simple Notification Service (SNS) implemented Message Data Protection, allowing users to de-identify outbound messages via redaction or masking. Amazon SNS FIFO topics now support message delivery to Amazon SQS Standard queues. This provides users with increased flexibility in managing message delivery and ordering.

Expanding its monitoring capabilities, Amazon SNS introduced Additional Usage Metrics in Amazon CloudWatch. This enhancement allows users to gain more comprehensive insights into the performance and utilization of their SNS resources. SNS extended its global SMS sending capabilities to Israel (Tel Aviv), providing users in that Region with additional options for SMS notifications. SNS also expanded its reach by supporting Mobile Push Notifications in twelve new AWS Regions. This expansion aligns with the growing demand for mobile notification capabilities, offering a broader coverage for users across diverse Regions.

Amazon SQS

Amazon Simple Queue Service (SQS) introduced a number of updates. Attribute-Based Access Control (ABAC) was implemented for scalable access permissions, while message data protection can now de-identify outbound messages via redaction or masking. SQS FIFO topics now support message delivery to Amazon SQS Standard queues, providing enhanced flexibility. Addressing throughput demands, SQS increased the quota for FIFO High Throughput mode. JSON protocol support was previewed, offering improved message format flexibility. These updates underscore SQS’s commitment to advanced security and flexibility.

Amazon API Gateway

Amazon API Gateway undergoes a console refresh, aligning with Cloudscape Design System guidelines. Notable enhancements include improved usability, sortable tables, enhanced API key management, and direct API deployment from the Resource view. The update introduces dark mode, accessibility improvements, and visual alignment with HTTP APIs and AWS Services.

GOTO EDA day Nashville 2023

Join GOTO EDA Day in Nashville on October 26 for insights on event-driven architectures. Learn from industry leaders at Music City Center with talks, panels, and Hands-On Labs. Limited tickets available.

Serverless blog posts

July 2023

July 5- Implementing AWS Lambda error handling patterns

July 6 – Implementing AWS Lambda error handling patterns

July 7 – Understanding AWS Lambda’s invoke throttling limits

July 10 – Detecting and stopping recursive loops in AWS Lambda functions

July 11 – Implementing patterns that exit early out of a parallel state in AWS Step Functions

July 26 – Migrating AWS Lambda functions from the Go1.x runtime to the custom runtime on Amazon Linux 2

July 27 – Python 3.11 runtime now available in AWS Lambda

August 2023

August 2 – Automatically delete schedules upon completion with Amazon EventBridge Scheduler

August 7 – Using response streaming with AWS Lambda Web Adapter to optimize performance

August 15 – Integrating IBM MQ with Amazon SQS and Amazon SNS using Apache Camel

August 15 – Implementing the transactional outbox pattern with Amazon EventBridge Pipes

August 23 – Protecting an AWS Lambda function URL with Amazon CloudFront and Lambda@Edge

August 29 – Enhancing file sharing using Amazon S3 and AWS Step Functions

August 31 – Enhancing Workflow Studio with new features for streamlined authoring

September 2023

September 5 – AWS SAM support for HashiCorp Terraform now generally available

September 14 – Building a secure webhook forwarder using an AWS Lambda extension and Tailscale

September 18 – Building resilient serverless applications using chaos engineering

September 19 – Implementing idempotent AWS Lambda functions with Powertools for AWS Lambda (TypeScript)

September 19 – Centralizing management of AWS Lambda layers across multiple AWS Accounts

September 26 – Architecting for scale with Amazon API Gateway private integrations

September 26 – Visually design your application with AWS Application Composer

Videos

Serverless Office Hours – Tues 10AM PT

July 2023

July 4 – Benchmarking Lambda cold starts

July 11 – Lambda testing: AWS SAM remote invoke

July 18 – Using DynamoDB global tables

July 25 – Serverless observability with SLIC-watch

August 2023

August 1 – Step Functions versions and aliases

August 8 – Deploying Lambda with EKS and Crossplane / Managing Lambda with Kubernetes

August 15 – Serverless caching with Momento

September 2023

September 5 – Run any web app on Lambda

September 12 – Building an API platform on AWS

September 19 – Idempotency: exactly once processing

September 26 – AWS Amplify Studio + GraphQL

FooBar Serverless YouTube channel

July 2023

July 27 – Generative AI and Serverless to create a new story everyday

August 2023

August 3Getting started with Data Streaming

August 10 – Amazon Kinesis Data Streams – Shards? Provisioned? On-demand? What does all this mean?

August 17 – Put and consume events with AWS Lambda, Amazon Kinesis Data Stream and Event Source Mapping

August 24 – Create powerful data pipelines with Amazon Kinesis and EventBridge Pipes

August 31 – New Step Functions versions and alias!

September 2023

September 7 – Amazon Kinesis Data Firehose – What is this service for?

September 14 – Kinesis Data Firehose with AWS CDK – Lambda transformations

September 21 – Advanced Event Source Mapping configuration | AWS Lambda and Amazon Kinesis Data Streams

September 28 – Data Streaming Patterns

Still looking for more?

The Serverless landing page has more information. The Lambda resources page contains case studies, webinars, whitepapers, customer stories, reference architectures, and even more Getting Started tutorials.

You can also follow the Serverless Developer Advocacy team on Twitter to see the latest news, follow conversations, and interact with the team.

Enhancing Workflow Studio with new features for streamlined authoring

Post Syndicated from Benjamin Smith original https://aws.amazon.com/blogs/compute/enhancing-workflow-studio-with-new-features-for-streamlined-authoring/

AWS Step Functions is emerging as a foundational tool for building scalable and distributed serverless applications through workflows. In 2021, the Step Functions team launched Workflow Studio, a low-code visual tool for creating Step Functions workflows in the AWS Management Console. This made workflow building accessible even to those with limited coding experience.

In response to feedback from customers, today the Step Functions team introduces a comprehensive set of new features. Addressing some of the most common requests, these make the authoring experience even more intuitive, versatile, and aligned with your specific development approach.

What’s new?

The latest release includes three new components:

1. Enhanced Starter Template Experience: This update offers developers and business users an advanced foundational point, streamlining the process of creating and prototyping workflows swiftly.

2. Code Mode for Workflow Studio: Today, Workflow Studio introduces a new code mode, enabling builders to alternate between design and code authoring views. This feature expedites workflow construction by reducing the need for context switching. For instance, you can seamlessly paste an Amazon States Language (ASL) workflow definition from the Step Functions workflows collection directly into Workflow Studio. You can then transition to the design view to continue your workflow development. Alternatively, opt for a starter template from the new authoring experience. If necessary, you can switch to the new code mode for meticulous adjustments.

3. Enhanced Workflow Execution and Configuration: This version of Workflow Studio also incorporates the capability to execute your workflows directly from the authoring view within Workflow Studio. Additionally, you can configure supplementary workflow settings such as permissions, logging, and tracing to enhance your workflow management.

Introducing the starter template experience

A standout feature is the introduction of the improved starter template experience. This is a new interface designed to expedite the workflow creation process.

By allowing you to filter templates by use-case or service, this feature provides a curated selection that aligns with your project’s needs. The starter template experience serves as a powerful stepping stone, equipping you with a robust foundation to build upon.

To create a workflow from a template:

  1. Navigate to the Step Functions state machines page in the AWS Management Console.
  2. Choose Create state machine.
  3. This presents you with the new template selection. Search by keyword, or filter by use-case and service:
  4. Choose “Distributed Map to Process a CSV file in S3” and choose Select.
  5. The following view shows a visual representation of the workflow, along with a detailed description.

    There are two usage options for each template:

    • Run a demo: Step Functions automatically deploys an AWS CloudFormation stack to your account, equipped with the state machine and all related resources. This ready-to-run demo workflow not only showcases the capabilities of your chosen template, but also serves as a springboard for your unique creations. Building upon this foundation, customize, fine tune, and tailor workflows to meet your exact specifications.
    • Build on it: This places the workflow’s ASL into the new Workflow Studio code view. Importantly, this transition does not deploy any associated resources. The goal is to let you with an expedited workflow creation process that uses best practices templates, while allowing you to customize and adapt them to your specific needs without the need to build from scratch.
  6. Choose Run a demo, and then choose Use template. This places the workflow template into Workflow Studio in Read-only mode. Allowing you to inspect the workflow definition further before deploying the demo resources.
  7. To deploy the demo, choose Deploy and run:

    After a few moments, the demo application is deployed to your account.

Seamless transitions between drag-and-drop design and code mode

Another enhancement in Workflow Studio is the ability to switch seamlessly between the drag-and-drop design view and the new code mode. This versatility allows you to transition between visual design and code-based authoring, catering to varying preferences and skill sets. While the design view offers an intuitive approach to creating workflows, the code mode provides a dynamic space akin to familiar coding environments.

Open up the previously deployed workflow demo by selecting it from the state machines console and choosing Edit:

Choose the Code button to switch to the code authoring view:

Here you are presented with an interface reminiscent of industry standard coding environments such as Visual Studio Code. This transformation lets experienced developers use the full potential of ASL enabling intricate customization and fine-tuning. It also allows you to use the graph visualization on the right to re-order easily and quickly, duplicate, or delete steps.

Chose the Design button to toggle back to the low code editor:

This is ideal for builders that are less experienced in ASL or for experienced developers needing to build workflow mocks rapidly, templates for further editing or prototype workflows.

Execute workflows directly from Workflow Studio

Workflow Studio now enables you to start a workflow from within the interface. This feature bridges the gap between design and execution, allowing developers to start their workflow from the Workflow Studio authoring environment.

To start a workflow from within Workflow Studio, choose the Execute button:

This takes you directly to the Step Functions executions interface where you can enter an input payload and inspect the workflow execution. This feature reduces the need to switch between interfaces, enabling developers to iterate more swiftly and efficiently. Choose Edit to jump directly back into Workflow Studio and continue iteratively refining your workflow.

Workflow Studio can now also view and edit execution role permissions, configure logging, and adjust additional parameters. To access this view, choose the Config button from Workflow Studio:

Availability for existing workflows

The new features are automatically available for all your existing workflows at no additional cost. This ensures that you can use the enhanced capabilities of Workflow Studio without any additional steps or configuration.

Workflow Studio’s new features allow developers to amplify their efforts. By simplifying the creation and execution of workflows, developers can channel more time and energy into the creative aspects of application development. Workflow Studio’s enhancements not only boost productivity but also provide a platform for turning creative designs into tangible, impactful applications.

Conclusion

Workflow Studio continues to evolve with the ongoing goal of simplifying and enhancing the process of building Step Functions workflows. The introduction of seamless authoring mode transitions, direct execution capabilities, and the improved starter template experience represents a pragmatic step towards improving authoring efficiency and flexibility, establishing Workflow Studio as the default authoring experience to Step Functions.

For additional starter templates, patterns, and best practices, visit the Serverless Workflows Collection on Serverless land.

Implementing patterns that exit early out of a parallel state in AWS Step Functions

Post Syndicated from Benjamin Smith original https://aws.amazon.com/blogs/compute/implementing-patterns-that-exit-early-out-of-a-parallel-state-in-aws-step-functions/

This post is written by Madhav Vishnubhatta, Senior Technical Account Manager, Enterprise Support.

This blog post explains how to implement patterns in AWS Step Functions that control the break out of a parallel state as soon as a minimum requirement is met. The parallel state usually completes only when all the parallel flows inside it are completed. But if you do not want to wait for all of the parallel flows to complete before moving to the next step, this post provides patterns to help implement this functionality.

You can use AWS Step Functions to set up visual serverless workflows that orchestrate and coordinate multiple AWS services into a serverless workflow. This allows you to build complex, stateful, and scalable applications without managing the underlying infrastructure. In Step Functions, the individual steps are called states.

Step Functions offers multiple types of states. Some states help control the logic of the workflow. For example, the choice state enables conditional logic to control the flow to any one of the multiple possible next states, depending on the conditions defined in the state. The parallel state helps control the logic, but rather than choose one of multiple next states (as the choice state does), the parallel state allows all the branches to run as parallel flows concurrently. When all the parallel flows are complete, control moves on to the Parallel state’s next state.

Patterns that do not need to wait for all parallel flows to finish

Consider a scenario where the Step Functions workflow represents the process of an employee requesting a laptop in your organization. The process begins with a request from the employee as the first step, but the approval of this request could come from either of two IT managers.

In this case there could be two parallel flows, each waiting for an approval from one IT manager. But, as soon as one person provides approval, the workflow can move forward to the next step of actually issuing a laptop to the employee. This is an “either-or” pattern.

Consider a similar use-case but with a slightly different requirement. Instead of just one person’s approval being enough to issue a laptop, what if approval is needed from a minimum of two out of three IT managers before the laptop is issued. This is the “quorum” pattern.

The parallel state does not directly support these two patterns because the state waits for all the flows to complete. In this case, that means all the managers must provide an approval before a laptop can be issued.

Solution overview

Step Functions provides an error handling mechanism with the fail state, which can be used to fail the workflow with an error. This error can be caught downstream in the workflow and handled as needed. Both the either-or and the quorum patterns can be implemented with this fail state along with the error handling capability.

In case of either-or, as soon as the parallel flow is finished, the fail state can throw an error, which is caught outside the parallel state for further processing. Even though it is the fail state, it might not represent an error scenario in your use-case.

The quorum pattern needs an additional mechanism to store the status of each parallel flow, using an Amazon DynamoDB table. The quorum pattern creates an item in the DynamoDB table at the beginning of the workflow that is updated by each parallel flow as soon as it has completed. Each parallel flow checks the DynamoDB table to look at the number of processes that have completed and compare it against the quorum. If the quorum is met, that flow raises an error with a fail state that can be caught outside the parallel step.

Prerequisites

Both of these patterns are published on Serverless Land:

To deploy and use these patterns, you need:

  1. An AWS Account
  2. Access to login as a user or assume a role that can:
  3. Familiarity with AWS Serverless Application Model (AWS SAM).
  4. AWS SAM Command Line Interface installed.

Example walkthrough

Either-or pattern

To deploy the Either-or pattern, follow the deployment Instructions section in the GitHub repo. This deployment creates the following resources:

  1. A Step Functions workflow.
  2. An IAM role that is assumed by the Step Functions workflow during execution.

Navigate to the AWS CloudFormation page in the AWS Management Console and choose the stack with the name provided during deployment. Choose the State Machine resource in the Resources section of the CloudFormation stack to go to the Step Functions console. Choose Edit and then choose WorkflowStudio to see a visual representation of the workflow.

You can see the exported workflow in the GitHub repo. This is the logic of the workflow:

Either-or patter. Conceptual flow.

  1. There are three (numbered) parallel flows in this workflow.
  2. Flows #1 and #2 are the main parallel flows, one of which completing should move the control to outside the Parallel state.
  3. Flow #3 is the time out flow so that the workflow can exit after a set amount of time if neither of the other two parallel flows complete by then.
  4. Each of the two main parallel flows follows the following logic:
    • Wait for the process to complete. This is a filler and can be replaced with your business logic on how to monitor process completion. This could be a human approval, or any other job that needs to finish.
    • Once process is complete, throw a dummy error, which moves control to outside the parallel state.
  5. The dummy errors for the two flows are caught outside the parallel state with corresponding catch condition.
  6. The errors from the two flows need not be caught separately. You might just do the same action no matter which of the parallel flows finished, but I show separate steps in case you need to do something different based on which parallel flow finished.

To test the workflow, follow the instructions provided in the Testing section of the README file at the GitHub repo.

To clean up the resources created, run:

sam delete

Quorum pattern

To deploy the Quorum pattern, follow the Deployment Instructions section in the GitHub repo. This deployment creates the following resources:

  1. A Step Functions workflow.
  2. An IAM role that is assumed by the Step Functions workflow during execution.
  3. A DynamoDB Table called “QuorumWorkflowTable”.

Navigate to CloudFormation in the AWS Management Console and choose the stack with the name provided during deployment. Choose the state machine resource in the Resources section of the CloudFormation stack to go to the Step Functions console.

Choose Edit and then choose WorkflowStudio to see a visual representation of the workflow.

You can see the the exported workflow in the GitHub repo. This is the logic of the workflow:

Quorum pattern. Conceptual flow.

  1. The first step creates an entry in the DynamoDB table with the execution ID of the workflow’s execution. This item in the table tracks the completion of processes.
  2. The next state is the parallel state, which has three parallel flows and a fourth time out flow. All the four flows are numbered.
  3. Flow #1, #2, and #3 are the main parallel flows, two of which completing should move the control to outside the parallel state.
  4. Flow #4 is the timeout flow so that the workflow can exit after a set amount of time, if neither of the other two parallel flows complete by then.
  5. Each of the three main parallel flows uses the following logic:
    • Wait for the process to complete.
    • Once complete, update the DynamoDB table entry to mark the completion of the process.
    • After the update, query the item from DynamoDB to get the list of processes that have completed and check if the quorum has been met.
    • If the quorum has been met, raise an “Error” (which is actually a success criterion in terms of business case), to move the control to outside the parallel state.

To test the workflow, follow the instructions provided in the Testing section of the README file at the GitHub repo.

To clean up the resources created, run:

sam delete

Conclusion

This blog post shows how you can implement patterns that must exit early out of a parallel state in an AWS Step Functions workflow.

The use-cases for this approach are not limited to these two patterns. More complicated use-cases like having different combinations of conditions to exit a parallel state can all be implemented using parallel and fail states.

Visit Serverless Land for more Step Functions workflow patterns.

Serverless ICYMI Q2 2023

Post Syndicated from Benjamin Smith original https://aws.amazon.com/blogs/compute/serverless-icymi-q2-2023/

Welcome to the 22nd edition of the AWS Serverless ICYMI (in case you missed it) quarterly recap. Every quarter, we share all the most recent product launches, feature enhancements, blog posts, webinars, live streams, and other interesting things that you might have missed!

In case you missed our last ICYMI, check out what happened last quarter here.

Serverless Innovation Day

AWS recently hosted the Serverless Innovation Day, a day of live streams that showcased AWS serverless technologies such as AWS Lambda, Amazon ECS with AWS Fargate, Amazon EventBridge, and AWS Step Functions. The event included insights from AWS leaders such as Holly Mesrobian, Ajay Nair, and Usman Khalid, as well as prominent customers and our serverless Developer Advocate team. It provided insights into serverless modernization success stories, use cases, and best practices. If you missed the event, you can catch up on the recorded sessions here.

Serverless Land, your go-to resource for all things serverless, expanded to include a new Serverless Testing section. This provides valuable insights, patterns, and best practices for testing integrations using AWS SAM and CDK templates.

Serverless Land also launched a new learning page featuring a collection of resources, including blog posts, videos, workshops, and training materials, allowing users to choose a learning path from a variety of topics. “EventBridge Visuals“, small, easily digestible visuals focused on EventBridge have also been added.

AWS Lambda

Lambda introduced support for response payload streaming allowing functions to progressively stream response data to clients. This feature significantly improves performance by reducing the time to first byte (TTFB) latency, benefiting web and mobile applications.

Response streaming is particularly useful for applications with large payloads such as images, videos, documents, or database results. It eliminates the need to buffer the entire payload in memory and enables the transfer of responses larger than Lambda’s 6 MB limit, up to a soft limit of 20 MB.

By configuring the Function URL to use the InvokeWithResponseStream API, streaming responses can be accessed through an HTTP client that supports incremental response data. This enhancement expands Lambda’s capabilities, allowing developers to handle larger payloads more efficiently and enhance the overall performance and user experience of their web and mobile applications.

Lambda now supports Java 17 with Amazon Corretto distribution, providing long-term support and improved performance. Java 17 introduces new language features like records, sealed classes, and multi-line strings. The runtime uses ZGC and Shenandoah garbage collectors to reduce latency. Default JVM configuration changes optimize tiered compilation for reduced startup latency. Developers can use Java 17 in Lambda through AWS Management Console, AWS SAM, and AWS CDK. Popular frameworks like Spring Boot 3 and Micronaut 4 require Java 17 as a minimum. Micronaut provides a web service to generate example projects using Java 17 and AWS CDK infrastructure.

Lambda now supports the Ruby 3.2 runtime, enabling you to write serverless functions using the latest version of the Ruby programming language. This update enhances developer productivity and brings new features and improvements to your Ruby-based Lambda functions.

Lambda introduced support for Kafka and Amazon MQ event sources in four additional Regions. This expanded availability allows developers to build event-driven architectures using these messaging systems in more regions around the world, providing greater flexibility and scalability. It also supports Kafka and Amazon MQ event sources in AWS GovCloud (US) Regions, allowing government organizations to leverage the benefits of event-driven architectures in their cloud environments.

Lambda also added support for starting from a specific timestamp for Kafka event sources, allowing for precise message processing and useful scenarios like Disaster Recovery, without any additional charges.

Serverless Land has launched new learning paths for Lambda to help you level up your serverless skills:

  • The Java Replatforming learning path guides Java developers through the process of migrating existing Java applications to a serverless architecture.
  • The Lift and Shift to Serverless learning path provides guidance on migrating traditional applications to a serverless environment.
  • Lambda Fundamentals is a 23-part video series providing practical examples and tips to help you get started with serverless development using Lambda.

The new AWS Tech Talk, Best practices for building interactive applications with AWS Lambda, helps you learn best practices and architectural patterns for building web and mobile backends as well as API-driven microservices on Lambda. Explore how to take advantage of features in Lambda, Amazon API Gateway, Amazon DynamoDB, and more to easily build highly scalable serverless web applications.

AWS Step Functions

The latest update to AWS Step Functions introduces versions and aliases, allows users to run specific state machine revisions, ensuring reliable deployments, reducing risks, and providing version visibility. Appending version numbers to the state machine ARN enables selection of desired versions, even after updates. Aliases distribute execution requests based on weights, supporting incremental deployment patterns.

This enhances confidence in state machine updates, improves observability, auditing, and can be managed through the Step Functions console or AWS CloudFormation. Versions and aliases are available in all supported AWS Regions at no extra cost.

AWS SAM

AWS SAM CLI has introduced a new feature called remote invoke that allows developers to test Lambda functions in the AWS Cloud. This feature enables developers to invoke Lambda functions from their local development environment and provides options for event payloads, output formats, and logging.

It can be used with or without AWS SAM and can be combined with AWS SAM Accelerate for streamlined development and testing. Overall, the remote invoke feature simplifies serverless application testing in the AWS Cloud.

Amazon EventBridge

EventBridge announced an open-source connector for Kafka Connect, providing seamless integration between EventBridge and Kafka Connect. This connector simplifies the process of streaming events from Kafka topics to EventBridge, enabling you to build event-driven architectures with ease.

EventBridge has improved end-to-end latencies for event buses, delivering events up to 80% faster. This enables broader use in latency-sensitive applications such as industrial and medical applications, with the lower latencies applied by default across all AWS Regions at no extra cost.

Amazon Aurora Serverless v2

Amazon Aurora Serverless v2 is now available in four additional Regions, expanding the reach of this scalable and cost-effective serverless database option. With Aurora Serverless v2, you can benefit from automatic scaling, pause-and-resume capability, and pay-per-use pricing, enabling you to optimize costs and manage your databases more efficiently.

Amazon SNS

Amazon SNS now supports message data protection in five additional Regions, ensuring the security and integrity of your message payloads. With this feature, you can encrypt sensitive message data at rest and in transit, meeting compliance requirements and safeguarding your data.

Serverless Blog Posts

April 2023

Apr 27 – AWS Lambda now supports Java 17

Apr 27 – Optimizing Amazon EC2 Spot Instances with Spot Placement Scores

Apr 26 – Building private serverless APIs with AWS Lambda and Amazon VPC Lattice

Apr 25 – Implementing error handling for AWS Lambda asynchronous invocations

Apr 20 – Understanding techniques to reduce AWS Lambda costs in serverless applications

Apr 18 – Python 3.10 runtime now available in AWS Lambda

Apr 13 – Optimizing AWS Lambda extensions in C# and Rust

Apr 7 – Introducing AWS Lambda response streaming

May 2023

May 24 – Developing a serverless Slack app using AWS Step Functions and AWS Lambda

May 11 – Automating stopping and starting Amazon MWAA environments to reduce cost

May 10 – Monitor Amazon SNS-based applications end-to-end with AWS X-Ray active tracing

May 10 – Debugging SnapStart-enabled Lambda functions made easy with AWS X-Ray

May 10 – Implementing cross-account CI/CD with AWS SAM for container-based Lambda functions

May 3 – Extending a serverless, event-driven architecture to existing container workloads

May 3 – Patterns for building an API to upload files to Amazon S3

June 2023

Jun 7 – Ruby 3.2 runtime now available in AWS Lambda

Jun 5 – Implementing custom domain names for Amazon API Gateway private endpoints using a reverse proxy

June 22 – Deploying state machines incrementally with versions and aliases in AWS Step Functions

June 22 – Testing AWS Lambda functions with AWS SAM remote invoke

Videos

Serverless Office Hours – Tues 10AM PT

Weekly live virtual office hours. In each session we talk about a specific topic or technology related to serverless and open it up to helping you with your real serverless challenges and issues.

YouTube: youtube.com/serverlessland
Twitch: twitch.tv/aws

LinkedIn:  linkedin.com/company/serverlessland

April 2023

Apr 4 – Serverless AI with ChatGPT and DALL-E

Apr 11 – Building Java apps with AWS SAM

Apr 18 – Managing EventBridge with Kubernetes

Apr 25 – Lambda response streaming

May 2023

May 2 – Automating your life with serverless 

May 9 – Building real-life asynchronous architectures

May 16 – Testing Serverless Applications

May 23 – Build faster with Amazon CodeCatalyst 

May 30 – Serverless networking with VPC Lattice

June 2023

June 6 – AWS AppSync: Private APIs and Merged APIs 

June 13 – Integrating EventBridge and Kafka

June 20 – AWS Copilot for serverless containers

June 27 – Serverless high performance modeling

FooBar Serverless YouTube channel

April 2023

Apr 6 – Designing a DynamoDB Table in 4 Steps: From Entities to Access Patterns

Apr 14 – Amazon CodeWhisperer – Improve developer productivity using machine learning (ML)

Apr 20 – Beginner’s Guide to DynamoDB with AWS CDK: Step-by-Step Tutorial for provisioning NoSQL Databases

Apr 27 – Build a WebApp that uses DynamoDB in 6 steps | DynamoDB Expressions

May 2023

May 4 – How to Migrate Data to DynamoDB?

May 11 – Load Testing DynamoDB: Observability and Performance tuning

May 18 – DynamoDB Streams – THE most powerful feature from DynamoDB for event-driven applications

May 25 – Track Application Events with DynamoDB streams and Email Notifications using EventBridge Pipes

June 2023

Jun 1 – How to filter messages based on the payload using Amazon SNS

June 8 – Getting started with Amazon Kinesis

Still looking for more?

The Serverless landing page has more information. The Lambda resources page contains case studies, webinars, whitepapers, customer stories, reference architectures, and even more Getting Started tutorials.

You can also follow the Serverless Developer Advocacy team on Twitter to see the latest news, follow conversations, and interact with the team.

Deploying state machines incrementally with versions and aliases in AWS Step Functions

Post Syndicated from Benjamin Smith original https://aws.amazon.com/blogs/compute/deploying-state-machines-incrementally-with-versions-and-aliases-in-aws-step-functions/

This post is written by Peter Smith, Principal Engineer for AWS Step Functions

This blog post explains the new versions and aliases feature in AWS Step Functions, allowing you to run specific revisions of the state machine instead of always using the latest. This allows for more reliable deployments that help control risk, and provide visibility into exactly which version is run. This post describes how to use this feature, with incremental deployment patterns such as blue/green, canary, and linear deployments, each providing greater assurance that your state machine updates are sufficiently tested.

Step Functions is a low-code, visual workflow service to build distributed applications. Developers use the service to automate IT and business processes, and orchestrate AWS services with minimal code. It uses the Amazon States Language (ASL) to describe state machines and you can modify their definition over time. Until now, when a state machine was run, it used the ASL definition from the most recent update. If the latest change contained defects, disruptions could occur. The resolution either required another ASL update to fix the problem, or an explicit action to revert the state machine to a previous definition.

Using versions and aliases

Every update to a state machine’s ASL definition can now be versioned, either via the Step Functions console, the AWS SDK, the AWS CLI, AWS CloudFormation, or a similar tool. You must choose to publish a new version explicitly, usually at the same time your ASL definition is updated. Version numbers are automatically assigned, starting with version 1.

To control which version of a state machine runs, you can now append a version number to the state machine ARN:

aws stepfunctions start-execution –-state-machine-arn \ 
    arn:aws:states:us-east-1:123456789012:stateMachine:demo:5

This example starts version 5 of the demo state machine. Even if the state machine has since been updated, qualifying the state machine ARN ensures that version 5’s definition is used. You can now test newer versions (such as version 6) with confidence that executions of version 5 continue without interruption.

To ease the management of versions, symbolic aliases can be assigned to a specific version, but then be updated at any time to refer to a different version. It’s also possible for an alias to split execution requests between two different versions. For example, 90% of executions use version 5, and 10% use version 6.

To start a state machine execution using an alias, you can now append the alias name (such as prod) to the state machine ARN:

aws stepfunctions start-execution –-state-machine-arn \ 
    arn:aws:states:us-east-1:123456789012:stateMachine:demo:prod

This example runs the state machine version that the prod alias currently refers to. If prod splits executions between two versions, one of them is selected based on the assigned weights. For example, version 5 is chosen 90% of the time, and version 6 is chosen 10% of the time.

Incremental deployment use cases

Using common deployment patterns helps avoid the pitfalls of traditional “big bang” updates, such as all executions failing when new software is deployed. By using an alias to gradually transition state machine executions to the newly published version (for example, 10% at a time), newly introduced bugs have limited impact. Once there’s confidence in the new version, it can be used for the entire production workload.

Blue/green deployments

In this approach, the existing state machine version (currently used in production) is the “blue” version, whereas a newly deployed state machine is the “green” version. As a rule, you should deploy the blue version in production, while testing the newer green version in a separate environment. Once the green version is validated, use it in production (it becomes the new blue version).

If version 6 causes issues in production, roll back the “blue” alias to the previous value so that executions revert to version 5.

This approach provides a higher degree of quality assurance for state machines. However, unless your test suite provides an accurate representation of your production workload, you should also consider canary or linear (or rolling) deployments to validate with real data.

Canary and linear deployments

With canary deployments, configure the prod alias to split traffic between the earlier version (for example, 95% of requests) and the new version (5% of requests). If there’s no resulting increase in failures, you can adjust the alias to direct 100% of requests to the new version. On failure, revert the alias to send 100% of requests to the earlier version.

A linear deployment takes a similar approach, but incrementally adjusts the weights over time until the new version receives 100% of requests. For example, start with 10%/90%, then 20%/80%, continuing at regular intervals until you reach 100%/0%. If an elevated number of failures is detected, immediately rollback to the earlier version.

Deploying a full application

Another scenario is when state machines are deployed as part of a larger application, with the application code and state machine being updated in lock-step. The following example shows a blue/green deployment where the application version 56 uses state machine version 5, and application version 64 uses version 6.

The application must use the correct version ARN when invoking the state machine. This avoids unexpected behavior changes in the blue version when the green version (still to be tested) is first deployed. If you unintentionally use the unqualified ARN (without the version number), the outdated application (version 56) would incorrectly use the latest state machine definition (version 6) instead of the previously deployed version 5.

Observability and auditing use cases

A significant benefit of using version ARNs is seen when examining execution history, especially with long-running executions. State machines can run for up to one year, accessing other AWS resources (such as AWS Lambda functions) throughout this time. For the sake of auditing resources, it’s important to know the version of each running state machine. Once all executions have completed, you can remove the resources they depend on (in the following example, the ProcessInventory Lambda function).

Depending on your use case, you may have other auditing or compliance needs where it’s important to know exactly which version of the state machine you’re running.

Feature walkthrough

To create a new state machine version in the Step Functions console, choose Publish Version immediately after saving your state machine definition. You are prompted to enter an optional description, such as “Initial Implementation”.

You can also choose Publish Version after updating an existing state machine, adding an optional description for the recent changes, such as “Add retry logic”.

On the main state machine detail page, there are two new tabs: Aliases and Versions. The Versions tab shows a list of state machine versions, their descriptions, when each was last run, and which aliases refer to that version. This example shows several new versions.

To start running a specific version, select the radio button to the left of the version number, then choose Start execution.

On the state machine detail page, choose the Executions tab to see the completed and in-progress executions. Additional columns indicate which version or alias started each execution. You can filter the execution list by version or alias to refine the list.

To create a state machine alias, return to the state machine detail page, select the Alias tab, then choose Create Alias. Provide an alias name, an optional description, and a routing configuration. For the simple case, select a single version to use (100% of executions) whenever an execution is started using the alias.

To create an alias that routes traffic to two versions (as seen in the incremental-deployment examples), provide a routing configuration with two different version numbers. Specify the percentage of the state machine executions for each of the versions.

Implementing CI/CD Deployments with AWS CloudFormation

To support incremental deployments, new AWS CloudFormation resources are able to publish state machine versions, define aliases, and to incrementally deploy state machine updates using a blue/green, canary, or linear approach.

The following example shows the AWS::StepFunctions::StateMachine, AWS::StepFunctions::StateMachineVersion, and AWS::StepFunctions::StateMachineAlias resources used to define a state machine, to publish a single version, and to deploy using the prod alias linearly.

Description: "Example of Linear Deployment of a State Machine"

Parameters:
  StateMachineBucket:
    Type: "String"
  StateMachineKey:
    Type: "String"
  StateMachineRole:
    Type: "String"

Resources:
  DemoStateMachine:
    Type: "AWS::StepFunctions::StateMachine"
    Properties:
      StateMachineName: DemoStateMachine
      DefinitionS3Location:
        Bucket: !Ref StateMachineBucket
        Key: !Ref StateMachineKey
      RoleArn: !Ref StateMachineRole

  DemoStateMachineVersion:
    Type: "AWS::StepFunctions::StateMachineVersion"
    Properties:
      StateMachineArn: !Ref DemoStateMachine
      StateMachineRevisionId: !GetAtt DemoStateMachine.StateMachineRevisionId

  DemoAlias:
    Type: "AWS::StepFunctions::StateMachineAlias"
    Properties:
      Name: prod
      DeploymentPreference:
        StateMachineVersionArn: !Ref DemoStateMachineVersion
        Type: LINEAR
        Interval: 2
        Percentage: 20
        Alarms:
          - !Ref DemoCloudWatchAlarm

Each time you modify the state machine, update the StateMachineKey parameter with a new date-stamped file, such as state_machine-202305251336.asl.json, then redeploy the CloudFormation template. Executions of this state machine linearly transition from the previous version to the new version over a ten-minute period, using five equal intervals of two minutes each. If the specified Amazon CloudWatch Alarm is triggered, the alias automatically rolls back to the previous state machine version.

Additionally, for users of common third-party CI/CD tools, such as Jenkins or Spinnaker, or even your custom systems, a reference implementation demonstrates how to implement incremental deployments using the AWS SDK or AWS CLI, complete with automated rollback if a CloudWatch alarm is triggered.

Pricing and availability

Customers can use Step Functions versions and aliases within all Regions where Step Functions is available. Step Functions versions and aliases is included in Step Functions pricing at no additional fee.

Conclusion

The new Step Functions versions and aliases feature allows you to run specific revisions of the state machine, instead of always using the latest. This allows for more reliable deployments that help control deployment risks, and also provide visibility into exactly which version was run. After updating your state machine definition, you may optionally publish a version of that state machine, then run the version by using a versioned state machine ARN.

Likewise, an alias (such as test or prod) can reference state machine versions that change over time. For example, starting an execution using the prod alias ensures that you only use well-tested revisions of the state machine, even if newer non-production-ready revisions are present.

Aliases can split executions between two different versions, using percentage weights to choose between them. This feature supports incremental-deployment patterns such as blue/green, canary, and linear deployments, each providing greater assurance that your state machine updates deploy successfully.

For more serverless learning resources, visit Serverless Land.

AWS Lambda now supports Java 17

Post Syndicated from Benjamin Smith original https://aws.amazon.com/blogs/compute/java-17-runtime-now-available-on-aws-lambda/

This post was written by Mark Sailes, Senior Specialist Solutions Architect, Serverless.

You can now develop AWS Lambda functions with the Amazon Corretto distribution of Java 17. This version of Corretto comes with long-term support (LTS), which means it will receive updates and bug fixes for an extended period, providing stability and reliability to developers who build applications on it. This runtime also supports AWS Lambda SnapStart, so you can upgrade to the latest managed runtime without losing your performance improvements.

Java 17 comes with new language features for developers, including Java records, sealed classes, and multi-line strings. It also comes with improvements to further optimize running Java on ARM CPU architectures, such as Graviton.

This blog explains how to get started using Java 17 with Lambda, how to use the new language features, and what else has changed with the runtime.

New language features

In Java, it is common to pass data using an immutable object. Before Java 17, this resulted in boiler plate code or the use of an external library like Lombok. For example, a generic Person object may look like this:

public class Person {
    
    private final String name;
    private final int age;

    public Person(String name, int age) {
        this.name = name;
        this.age = age;
    }

    public String getName() {
        return name;
    }

    public int getAge() {
        return age;
    }
    
    @Override
    public boolean equals(Object o) {
        if (this == o) return true;
        if (o == null || getClass() != o.getClass()) return false;

        Person person = (Person) o;

        if (age != person.age) return false;
        return Objects.equals(name, person.name);
    }

    @Override
    public int hashCode() {
        return Objects.hash(name, age);
    }

    @Override
    public String toString() {
        return "Person{" +
                "name='" + name + '\'' +
                ", age=" + age +
                '}';
    }
}

In Java 17, you can replace this entire class with a record, expressed as:

public record Person(String name, int age) {

}

The equals, hashCode, and toString methods, as well as the private, final fields and public constructor, are generated by the Java compiler. This simplifies the code that you have to maintain.

The Java 17 managed runtime introduces a new feature allowing developers to use records as the object to represent event data in the handler method. Records were introduced in Java 14 and provide a simpler syntax to declare classes primarily used to store data. Records allow developers to define an immutable class with a set of named properties and methods to access those properties, making them perfect for event data. This feature simplifies code, making it easier to read and maintain. Additionally, it can provide better performance since records are immutable by default, and Java’s runtime can optimize the memory allocation and garbage collection process. To use records as the parameter for the event handler method, define the record with the required properties, and pass the record to the method. The ability to use records as the object to represent event data in the handler method is a useful addition to the Java language, providing a concise and efficient way to define event data structures.

For example, the following Lambda function uses a Person record to represent the event data:

public class App implements RequestHandler<Person, APIGatewayProxyResponseEvent> {

    public APIGatewayProxyResponseEvent handleRequest(Person person, Context context) {
        
        String id = UUID.randomUUID().toString();
        Optional<Person> savedPerson = createPerson(id, person.name(), person.age());
        if (savedPerson.isPresent()) {
            return new APIGatewayProxyResponseEvent().withStatusCode(200);
        } else {
            return new APIGatewayProxyResponseEvent().withStatusCode(500);
        }
    }

Garbage collection

Java 17 makes available two new Java garbage collectors (GCs): Z Garbage Collector (ZGC) introduced in Java 15 and Shenandoah introduced in Java 12.

You can evaluate GCs against three axes:

  • Throughput: the amount of work that can be done.
  • Latency: how long work takes to complete.
  • Memory footprint: how much additional memory is required.

Both the ZGC and Shenandoah GCs trade throughput and footprint to focus on reducing latency where possible. They perform all expensive work concurrently, without stopping the execution of application threads for more than a few milliseconds.

In the Java 17 managed runtime, Lambda continues to use the Serial GC as it does in Java 11. This is a low footprint GC well-suited for single processor machines, which is often the case when using Lambda functions.

You can change the default GC using the JAVA_TOOL_OPTIONS environment variable to an alternative if required. For example, if you were running with more memory and therefore multiple CPUs consider the Parallel GC. To use this, set JAVA_TOOL_OPTIONS to -XX:+UseParallelGC.

Runtime JVM configuration changes

In the Java 17 runtime, the JVM flag for tiered compilation is now set to stop at level 1 by default. In previous versions, you would have to do this by setting the JAVA_TOOL_OPTIONS to -XX:+TieredCompilation -XX:TieredStopAtLevel=1.

This is helpful in the majority of synchronous workloads because it can reduce startup latency by up to 60%. For more information on configuring tiered compilation, see “Optimizing AWS Lambda function performance for Java“.

If you are running a workload that processes large numbers of batches, simulates events, or any other highly repetitive action, you might find that this slows the duration of your function. An example of this would be Monte Carlo simulations. To change back to the previous settings, set JAVA_TOOL_OPTIONS to -XX:-TieredCompilation.

Using Java 17 in Lambda

AWS Management Console

To use the Java 17 runtime to develop your Lambda functions, set the runtime value to Java 17 when creating or updating a function.

To update an existing Lambda function to Java 17, navigate to the function in the Lambda console, then choose Edit in the Runtime settings panel. The new version is available in the Runtime dropdown:

AWS Serverless Application Model (AWS SAM)

In AWS SAM, set the Runtime attribute to java17 to use this version:

AWSTemplateFormatVersion: '2010-09-09'
Transform: AWS::Serverless-2016-10-31
Description: Simple Lambda Function

Resources:
  HelloWorldFunction:
    Type: AWS::Serverless::Function 
    Properties:
      CodeUri: HelloWorldFunction
      Handler: helloworld.App::handleRequest
      Runtime: java17
      MemorySize: 1024

AWS SAM supports the generation of this template with Java 17 out of the box for new serverless applications using the sam init command. Refer to the AWS SAM documentation here.

AWS Cloud Development Kit (AWS CDK)

In the AWS CDK, set the runtime attribute to Runtime.JAVA_17 to use this version. In Java:

import software.amazon.awscdk.core.Construct;
import software.amazon.awscdk.core.Stack;
import software.amazon.awscdk.core.StackProps;
import software.amazon.awscdk.services.lambda.Code;
import software.amazon.awscdk.services.lambda.Function;
import software.amazon.awscdk.services.lambda.Runtime;

public class InfrastructureStack extends Stack {

    public InfrastructureStack(final Construct parent, final String id, final StackProps props) {
        super(parent, id, props);

        Function.Builder.create(this, "HelloWorldFunction")
                .runtime(Runtime.JAVA_17)
                .code(Code.fromAsset("target/hello-world.jar"))
                .handler("helloworld.App::handleRequest")
                .memorySize(1024)
                .build();
    }
}

Application frameworks

Java application frameworks Spring and Micronaut have announced that their latest versions Spring Boot 3 and Micronaut 4 require Java 17 as a minimum. Quarkus 3 continues to support Java 11. Java 17 is faster than 8 or 11, and framework developers want to pass on the performance improvements to customers. They also want to use the improvements to the Java language in their own code and show code examples with the most modern ways of working.

To try Micronaut 4 and Java 17, you can use the Micronaut launch web service to generate an example project that includes all the application code and AWS Cloud Development Kit (CDK) infrastructure as code you need to deploy it to Lambda.

The following command creates a Micronaut application, which uses the common controller pattern to handle REST requests. The infrastructure code will create an Amazon API Gateway and proxy all its requests to the Lambda function.

curl --location --request GET 'https://launch.micronaut.io/create/default/blog.example.lambda-java-17?lang=JAVA&build=MAVEN&test=JUNIT&javaVersion=JDK_17&features=amazon-api-gateway&features=aws-cdk&features=crac' --output lambda-java-17.zip

Unzip the downloaded file then run the following Maven command to generate the deployable artifact.

./mvnw package

Finally, deploy the resources to AWS with CDK:

cd infra
cdk deploy

Conclusion

This blog post describes how to create a new Lambda function running the Amazon Corretto Java 17 managed runtime. It introduces the new records language feature to model the event being sent to your Lambda function and explains how changes to the default JVM configuration might affect the performance of your functions.

If you’re interested in learning more, visit serverlessland.com. If this has inspired you to try migrating an existing application to Lambda, read our re-platforming guide.

Implementing reactive progress tracking for AWS Step Functions

Post Syndicated from Benjamin Smith original https://aws.amazon.com/blogs/compute/implementing-reactive-progress-tracking-for-aws-step-functions/

This blog post is written by Alexey Paramonov, Solutions Architect, ISV and Maximilian Schellhorn, Solutions Architect ISV

This blog post demonstrates a solution based on AWS Step Functions and Amazon API Gateway WebSockets to track execution progress of a long running workflow. The solution updates the frontend regularly and users are able to track the progress and receive detailed status messages.

Websites with long-running processes often don’t provide feedback to users, leading to a poor customer experience. You might have experienced this when booking tickets, searching for hotels, or buying goods online. These sites often call multiple backend and third-party endpoints and aggregate the results to complete your request, causing the delay. In these long running scenarios, a transparent progress tracking solution can create a better user experience.

Overview

The example provided uses:

  • AWS Serverless Application Model (AWS SAM) for deployment: an open-source framework for building serverless applications.
  • AWS Step Functions for orchestrating the workflow.
  • AWS Lambda for mocking long running processes.
  • API Gateway to provide a WebSocket API for bidirectional communications between clients and the backend.
  • Amazon DynamoDB for storing connection IDs from the clients.

The example provides different options to report the progress back to the WebSocket connection by using Step Functions SDK integration, Lambda integrations, or Amazon EventBridge.

The following diagram outlines the example:

  1. The user opens a connection to WebSocket API. The OnConnect and OnDisconnect Lambda functions in the “WebSocket Connection Management” section persist this connection in DynamoDB (see documentation). The connection is bidirectional, meaning that the user can send requests through the open connection and the backend can respond with a new progress status whenever it is available.
  2. The user sends a new order through the WebSocket API. API Gateway routes the request to the “OnOrder” AWS Lambda function, which starts the state machine execution.
  3. As the request propagates through the state machine, we send progress updates back to the user via the WebSocket API using AWS SDK service integrations.
  4. For more customized status responses, we can use a centralized AWS Lambda function “ReportProgress” that updates the WebSocket API.

How to respond to the client?

To send the status updates back to the client via the WebSocket API, three options are explored:

Option 1: AWS SDK integration with API Gateway invocation

As the diagram shows, the API Gateway workflow tasks starting with the prefix “Report:” send responses directly to the client via the WebSocket API. This is an example of the state machine definition for this step:

          'Report: Workflow started':
            Type: Task
            Resource: arn:aws:states:::apigateway:invoke
            ResultPath: $.Params
            Parameters:
              ApiEndpoint: !Join [ '.',[ !Ref ProgressTrackingWebsocket, execute-api, !Ref 'AWS::Region', amazonaws.com ] ]
              Method: POST
              Stage: !Ref ApiStageName
              Path.$: States.Format('/@connections/{}', $.ConnectionId)
              RequestBody:
                Message: 🥁 Workflow started
                Progress: 10
              AuthType: IAM_ROLE
            Next: 'Mock: Inventory check'

This option reports the progress directly without using any additional Lambda functions. This limits the system complexity, reduces latency between the progress update and the response delivered to the client, and potentially reduces costs by reducing Lambda execution duration. A potential drawback is the limited customization of the response and getting familiar with the definition language.

Option 2: Using a Lambda function for reporting the progress status

To further customize response logic, create a Lambda function for reporting. As shown in point 4 of the diagram, you can also invoke a “ReportProgress” function directly from the state machine. This Python code snippet reports the progress status back to the WebSocket API:

apigw_management_api_client = boto3.client('apigatewaymanagementapi', endpoint_url=api_url)
apigw_management_api_client.post_to_connection(
            ConnectionId=connection_id,
            Data=bytes(json.dumps(event), 'utf-8')
        )

This option allows for more customizations and integration into the business logic of other Lambda functions to track progress in more detail. For example, execution of loops and reporting back on every iteration. The tradeoff is that you must handle exceptions and retries in your code. It also increases overall system complexity and additional costs associated with Lambda execution.

Option 3: Using EventBridge

You can combine option 2 with EventBridge to provide a centralized solution for reporting the progress status. The solution also handles retries with back-off if the “ReportProgress” function can’t communicate with the WebSocket API.

You can also use AWS SDK integrations from the state machine to EventBridge instead of using API Gateway. This has the additional benefit of a loosely coupled and resilient system but you could experience increased latency due to the additional services used. The combination of EventBridge and the Lambda function adds a minimal latency, but it might not be acceptable for short-lived workflows. However, if the workflow takes tens of seconds to complete and involves numerous steps, option 3 may be more suitable.

This is the architecture:

  1. As before.
  2. As before.
  3. AWS SDK integration sends the status message to EventBridge.
  4. The message propagates to the “ReportProgress” Lambda function.
  5. The Lambda function sends the processed message through the WebSocket API back to the client.

Deploying the example

Prerequisites

Make sure you can manage AWS resources from your terminal.

  • AWS CLI and AWS SAM CLI installed.
  • You have an AWS account. If not, visit this page.
  • Your user has sufficient permissions to manage AWS resources.
  • Git is installed.
  • NPM is installed (only for local frontend deployment).

To view the source code and documentation, visit the GitHub repo. This contains both the frontend and backend code.

To deploy:

  1. Clone the repository:
    git clone "https://github.com/aws-samples/aws-step-functions-progress-tracking.git"
  2. Navigate to the root of the repository.
  3. Build and deploy the AWS SAM template:
    sam build && sam deploy --guided
  4. Copy the value of WebSocketURL in the output for later.
  5. The backend is now running. To test it, use a hosted frontend.

Alternatively, you can deploy the React-based frontend on your local machine:

  1. Navigate to “progress-tracker-frontend/”:
    cd progress-tracker-frontend
  2. Launch the react app:
    npm start
  3. The command opens the React app in your default browser. If it does not happen automatically, navigate to http://localhost:3000/ manually.

Now the application is ready to test.

Testing the example application

  1. The webpage requests a WebSocket URL – this is the value from the AWS SAM template deployment. Paste it into Enter WebSocket URL in the browser and choose Connect.
  2. On the next page, choose Send Order and watch how the progress changes.

    This sends the new order request to the state machine. As it progresses, you receive status messages back through the WebSocket API.
  3. Optionally, you can inspect the raw messages arriving to the client. Open the Developer tools in your browser and navigate to the Network tab. Filter for WS (stands for WebSocket) and refresh the page. Specify the WebSocket URL, choose Connect and then choose Send Order.

Cleaning up

The services used in this solution are eligible for AWS Free Tier. To clean up the resources, in the root directory of the repository run:

sam delete

This removes all resources provisioned by the template.yml file.

Conclusion

In this post, you learn how to augment your Step Functions workflows with low latency progress tracking via API Gateway WebSockets. Consider adding the progress tracking to your long running workflows to improve the customer experience and provide a reactive look and feel for your application.

Navigate to the GitHub repository and review the implementation to see how your solution could become more user friendly and responsive. Start with examining the template.yml and the state machine’s definition and see how the frontend handles WebSocket communication and message visualization.

For more serverless learning resources, visit  Serverless Land.

Building ad-hoc consumers for event-driven architectures

Post Syndicated from Benjamin Smith original https://aws.amazon.com/blogs/compute/building-ad-hoc-consumers-for-event-driven-architectures/

This post is written by Corneliu Croitoru (Media Streaming and Edge Architect) and Benjamin Smith (Principal Developer Advocate, Serverless)

In January 2022, the Serverless Developer Advocate team launched Serverlesspresso Extensions, a program that lets you contribute to Serverlesspresso. This is a multi-tenant event-driven application for a pop-up coffee bar that allows you to order from your phone. In 2022, Serverlesspresso processed over 20,000 orders at technology events around the world. The goal of Serverlesspresso extensions is to showcase the power and simplicity of evolving an event-driven application.

Event-driven architecture is a design pattern that allows developers to create and evolve applications by responding to events generated by various parts of the system. For modern applications, the need for flexible and scalable approaches is critical, and event-driven architecture can provide a powerful solution.

This blog post shows how to build and deploy an extension to an event-driven application. It describes the benefits and challenges of evolving event-driven applications. It also walks through a real-life example that was created in under 24 hours.

Decoupled integrations

A key benefit of event-driven architecture is its ability to decouple different parts of the system, making it easier to manage changes and evolve the application. In traditional, monolithic applications, changes to one part of the system can affect the entire application.

With event-driven architecture, you can change individual parts of the system without affecting the rest of the application. Event-driven architecture also makes it easier to integrate new functionality into an existing application by creating new event handlers to respond to existing events. This way, you can add new functionality without affecting the existing system, making it easier to test and deploy.

The following diagrams illustrate how to add and remove consumers and producers without affecting the core application.

Adding and removing event-driven extensions

Extension 2 is consuming events from the event bus and emitting events back onto the bus. It can be added to the core application without creating any dependencies. When extension 2 is removed, the core application remains unchanged.

In monolithic applications, additional features can create dependencies on the core application. Removing those features keeps those dependencies in place, making it more complex to remove them.

Adding and removing monolithic extensions

Collaboration

In a traditional monolithic application, it can be difficult to collaborate with multiple developers on a single code base. It can lead to conflicts, bugs, and other issues that must be resolved. Integrating new features and components into these applications can be challenging, especially when multiple developers are using different technologies. Deploying updates can also be complex when multiple developers are involved and different parts of the application must be updated simultaneously.

With event-based applications, these challenges are often less significant. A well-designed consumer contains well-defined permissions boundaries. Its resources should not need permission to interact with resources outside the extension definition. This means you can deploy and delete them independently of other extensions and of the core application. This makes it easier to collaborate with multiple developers across different languages, runtimes, and deployment frameworks.

Near real-time feedback

Another characteristic of event-driven architecture is the ability to provide real-time feedback to users. This is because consumers can process events as they occur, making it possible to provide immediate feedback. This can be useful in applications that handle high volumes of data or interact with multiple users, as they can provide real-time updates and ensure that the application remains responsive.

An alternative approach for near real-time feedback is to use batching. This involves grouping multiple events or data points into a batch and processing them. Choosing between batching and processing data in real-time with events depends on the amount of data being processed, the latency requirements, and the complexity of the processing logic. Batching can be more efficient for large volumes of data as it reduces the overhead of processing each event individually, while processing data with events can be better suited for real-time applications that require low latency.

The newest Serverlesspresso extension uses an event-driven approach to gain real-time insight into the application.

The average wait time extension

A new extension was created by Corneliu Croitoru that calculates the average wait for each drink at the Serverlesspresso coffee bar. This extension uses AWS Step Functions, DynamoDB, and AWS Lambda. The app displays the results in near real-time, allowing customers to see how long they may need to wait for their order. The extension uses the AWS Cloud Development Kit (CDK) for deployment.

The extension uses the existing Amazon EventBridge event bus to start a Step Functions workflow. The workflow is triggered by the order submission and order completion events and calculates the average wait time for each type of drink (for example, Caffe Latte). This information is then sent back to the Serverlesspresso event bus.

The following diagram illustrates the Step Functions workflow:

When a new order submission event is emitted, the Step Functions workflow persists the event timestamp to a DynamoDB table, a key/value data store. It uses the unique order ID as the key. When an order completion event is emitted, the workflow persists the completion timestamp to DynamoDB. The workflow then invokes a Lambda function to calculate the average duration of that specific drink by using the last 10 orders stored in the DynamoDB table.

This is the DynamoDB table structure:

The workflow sends an event to the Serverlesspresso event bus with the calculated duration and drink type. A rule on the event bus routes this event to an IoT topic, which publishes it to the front-end application via an existing open WebSocket connection. The result appears on the front end:

Alternative approaches

There are a number of alternative approaches that you could use to build a real-time “average wait” extension without using events.

One such approach might be to use DynamoDB as a cache for the event-driven data. This way it would be possible to query the database periodically to check for updates. This approach can be implemented by adding a timestamp field to the database records and querying for records that have been updated since the last time you checked.

Alternatively, you could use DynamoDB streams to capture changes as they occur instead of subscribing to new events directly. However, these approaches may face several challenges. The extension would require permission to read data from the DynamoDB table or stream. Since the DynamoDB table resource is defined in the application’s core template, this presents challenges of ownership, permissions boundaries and dependencies. It adds additional complexity to the application as the extension would not be decoupled from the core.

The challenges

The biggest challenge in building this extension is the required shift in developer mindset. Despite understanding the principles of decoupled event-driven architecture, it was not until building an event-driven architecture extension that the concept became clear.

For example, you may think it necessary to deploy the existing application to submit orders, emit events onto the application event bus, and interact with various core resources. The development team had discussions about the degree to which the extension should interact with existing application components. This was not an event-driven mindset.

Each new extension must be based entirely on events. This means it can only interact with the core application through the shared event bus by consuming and emitting events. It also means that you could write the extension in any runtime, with any infrastructure as code (IaC) framework, and that it should be possible to deploy and destroy the extension stack with no effect on the core application.

Once you understand this, the next challenge is discoverability. Finding the right events to consume may prove harder than expected. This is why documenting events as you build your application is important. The event schema, producer and consumer should be documented, and evolve with each version of the event. The Serverlesspresso Events Catalog helps to overcome this in this example.

Finally, the event player can emit realistic Serverlesspresso events onto the event bus. This replaces the need to deploy the core application stack.

Conclusion

The Serverlesspresso Extensions program shows the simplicity of developing event-driven applications. Building event-driven architectures allows for decoupled integrations, making it easier to manage changes and develop the application. It also simplifies collaboration among multiple teams as consumers of events can come and go independently without affecting the procedure or core application.

Using these principles, the average wait time extension was built and deployed within 24 hours, using a different IaC framework to the core application.

Use the Serverlesspresso extensions GitHub repository to read how to build more Serverlesspresso extensions.

For more serverless learning resources, visit Serverless Land.

Best practices for working with the Apache Velocity Template Language in Amazon API Gateway

Post Syndicated from Benjamin Smith original https://aws.amazon.com/blogs/compute/best-practices-for-working-with-the-apache-velocity-template-language-in-amazon-api-gateway/

This post is written by Ben Freiberg, Senior Solutions Architect, and Marcus Ziller, Senior Solutions Architect.

One of the most common serverless patterns are APIs built with Amazon API Gateway and AWS Lambda. This approach is supported by many different frameworks across many languages. However, direct integration with AWS can enable customers to increase the cost-efficiency and resiliency of their serverless architecture. This blog post discusses best practices for using Apache Velocity Templates for direct service integration in API Gateway.

Deciding between integration via Velocity templates and Lambda functions

Many use cases of Velocity templates in API Gateway can also be solved with Lambda. With Lambda, the complexity of integrating with different backends is moved from the Velocity templating language (VTL) to the programming language. This allows customers to use existing frameworks and methodologies from the ecosystem of their preferred programming language.

However, many customers choose serverless on AWS to build lean architectures and using additional services such as Lambda functions can add complexity to your application. There are different considerations that customers can use to assess the trade-offs between the two approaches.

Developer experience

Apache Velocity has a number of operators that can be used when an expression is evaluated, most prominently in #if and #set directives. These operators allow you to implement complex transformations and business logic in your Velocity templates.

However, this adds complexity to multiple aspects of the development workflow:

  • Testing: Testing Velocity templates is possible but the tools and methodologies are less mature than for traditional programming languages used in Lambda functions.
  • Libraries: API Gateway offers utility functions for VTL that simplify common use cases such as data transformation. Other functionality commonly offered by programming language libraries (for example, Python Standard Library) might not be available in your template.
  • Logging: It is not possible to log information to Amazon CloudWatch from a Velocity template, so there is no option to retain this information.
  • Tracing: API Gateway supports request tracing via AWS X-Ray for native integrations with services such as Amazon DynamoDB.

You should use VTL for data mapping and transformations rather than complex business logic. There are exceptions but the drawbacks of using VTL for other use cases often outweigh the benefits.

API lifecycle

The API lifecycle is an important aspect to consider when deciding on Velocity or Lambda. In early stages, requirements are typically not well defined and can change rapidly while exploring the solution space. This often happens when integrating with databases such as Amazon DynamoDB and finding out the best way to organize data on the persistence layer.

For DynamoDB, this often means changes to attributes, data types, or primary keys. In such cases, it is a sensible decision to start with Lambda. Writing code in a programming language can give developers more leeway and flexibility when incorporating changes. This shortens the feedback loop for changes and can improve the developer experience.

When an API matures and is run in production, changes typically become less frequent and stability increases. At this point, it can make sense to evaluate if the Lambda function can be replaced by moving logic into Velocity templates. Especially for busy APIs, the one-time effort of moving Lambda logic to Velocity templates can pay off in the long run as it removes the cost of Lambda invocations.

Latency

In web applications, a major factor of user perceived performance is the time it takes for a page to load. In modern single page applications, this often means multiple requests to backend APIs. API Gateway offers features to minimize the latency for calls on the API layer. With Lambda for service integration, an additional component is added into the execution flow of the request, which inevitably introduces additional latency.

The degree of that additional latency depends on the specifics of the workload, and often is as low as a few milliseconds.

The following example measures no meaningful difference in latency other than cold starts of the execution environments for a basic CRUD API with a Node.js Lambda function that queries DynamoDB. I observe similar results for Go and Python.

Concurrency and scalability

Concurrency and scalability of an API changes when having an additional Lambda function in the execution path of the request. This is due to different Service Quotas and general scaling behaviors in different services.

For API Gateway, the current default quota is 10,000 requests per second (RPS) with an additional burst capacity provided by the token bucket algorithm, using a maximum bucket capacity of 5,000 requests. API Gateway quotas are independent of Region, while Lambda default concurrency limits depend on the Region.

After the initial burst, your functions’ concurrency can scale by an additional 500 instances each minute. This continues until there are enough instances to serve all requests, or until a concurrency limit is reached. For more details on this topic, refer to Understanding AWS Lambda scaling and throughput.

If your workload experiences sharp spikes of traffic, a direct integration with your persistence layer can lead to a better ability to handle such spikes without throttling user requests. Especially for Regions with an initial burst capacity of 1000 or 500, this can help avoid throttling and provide a more consistent user experience.

Best practices

Organize your project for tooling support

When VTL is used in Infrastructure as Code (IaC) artifacts such as AWS CloudFormation templates, it must be embedded into the IaC document as a string.

This approach has three main disadvantages:

  • Especially with multi-line Velocity templates, this leads to IaC definitions that are difficult to read or write.
  • Tools such as IDEs or Linters do not work with string representations of Velocity templates.
  • The templates cannot be easily used outside of the IaC definition, such as for local testing.

Each aspect impacts developer productivity and make the implementation more prone to errors.

You should decouple the definition of Velocity templates from the definition of IaC templates wherever possible. For the CDK, the implementation requires only a few lines of code.

// The following code is licensed under MIT-0 
import { readFileSync } from 'fs';
import * as path from 'path';

const getUserIntegrationWithVTL = new AwsIntegration({
      service: 'dynamodb',
      integrationHttpMethod: HttpMethods.POST,
      action: 'GetItem',
      options: {
        // Omitted for brevity
        requestTemplates: {
          'application/json': readFileSync(path.join('path', 'to', 'vtl', 'request.vm'), 'utf8').toString(),
        },
        integrationResponses: [
          {
            statusCode: '200',
            responseParameters: {
              'method.response.header.access-control-allow-origin': "'*'",
            },
            responseTemplates: {
              'application/json': readFileSync(path.join('path', 'to', 'vtl', 'request.vm'), 'utf8').toString(),
            },
          },
        ],
      },
    });

Another advantage of this approach is that it forces you to externalize variables in your templates. When defining Velocity templates inside of IaC documents, it is possible to refer to other resources in the same IaC document and set this value in the Velocity template through string concatenation. However, this hardcodes the value into the template as opposed to the recommended way of using Stage Variables.

Test Velocity templates locally

A frequent challenge that customers face with Velocity templates is how to shorten the feedback loop when implementing a template. A common workflow to test changes to templates is:

  1. Make changes to the template.
  2. Deploy the stack.
  3. Test the API endpoint.
  4. Evaluate the results or check logs for errors.
  5. Complete or return to step 1.

Depending on the duration of the stack deployment, this can often lead to feedback loops of several minutes. Although the test ecosystem for Velocity is far from being as extensive as it is for mainstream programming languages, there are still ways to improve the developer experience when writing VTL.

Local Velocity rendering engine with AWS SDK

When API Gateway receives a request that has an AWS integration target, the following things happen:

  1. Retrieve request context: API Gateway retrieves request parameters and stage variables.
  2. Make request: body:  API Gateway uses the template and variables from 1 to render a JSON document.
  3. Send request: API Gateway makes an API call to the respective AWS Service. It abstracts Authorization (via it’s IAM Role), Encoding and other aspects of the request away so that only the request body needs to be provided by API Gateway
  4. Retrieve response: API Gateway retrieves a JSON response from the API call.
  5. Make response body: If the call was successful the JSON response is used as input to render the response template. The result will then be sent back to the client that initiated the request to the API Gateway

To simplify our developing workflow, you can locally replicate the above flow with the AWS SDK and a Velocity rendering engine of your choice.

I recommend using Node.js for two reasons:

  • The velocityjs library is a lightweight but powerful Velocity render engine
  • The client methods (e.g. dynamoDbClient.query(jsonBody)) of the AWS SDK for JavaScript generally expect the same JSON body like the AWS REST API does. For most use cases, no transformation (e.g. camel case to Pascal case) is thus needed

The following snippet shows how to test Velocity templates for request and response of a DynamoDB Service Integration. It loads templates from files and renders them with context and parameters. Refer to the git repository for more details.

// The following code is licensed under MIT-0 
const fs = require('fs')
const Velocity = require('velocityjs');
const AWS = require('@aws-sdk/client-dynamodb');
const ddb = new AWS.DynamoDB()

const requestTemplate = fs.readFileSync('path/to/vtl/request.vm', 'utf8')
const responseTemplate = fs.readFileSync(''path/to/vtl/response.vm', 'utf8')

async function testDynamoDbIntegration() {
  const requestTemplateAsString = Velocity.render(requestTemplate, {
    // Mocks the variables provided by API Gateway
    context: {
      arguments: {
        tableName: 'MyTable'
      }
    },
    input: {
      params: function() {
        return 'someId123'
      },
    },
  });

  print(requestTemplateAsString)

  const sdkJsonRequestBody = JSON.parse(requestTemplateAsString)
  const item = await ddb.query(sdkJsonRequestBody)

  const response = Velocity.render(responseTemplate, {
    input: {
      path: function() {
        return {
          Items: item.Items
        }
      },
    },
  })

  const jsonResponse = JSON.parse(response)
}

This approach does not cover all use cases and ultimately must be validated by a deployment of the template. However, it helps to reduce the length of one feedback loop from minutes to a few seconds and allows for faster iterations in the development of Velocity templates.

Conclusion

This blog post discusses considerations and best practices for working with Velocity Templates in API Gateway. Developer experience, latency, API lifecycle, cost, and scalability are key factors when choosing between Lambda and VTL. For most use cases, we recommend Lambda as a starting point and VTL as an optimization step.

Setting up a local test environment for VTL helps shorten the feedback loop significantly and increase developer productivity. The AWS CDK is the recommended IaC framework for working with VTL projects, since it enables you to efficiently organize your infrastructure as code project for tooling support.

For more serverless learning resources, visit Serverless Land.

Introducing Serverlesspresso Extensions

Post Syndicated from Benjamin Smith original https://aws.amazon.com/blogs/compute/introducing-serverlesspresso-extensions/

Today the Serverless DA team is launching Serverlesspresso Extensions, a new program that lets you contribute to Serverlesspresso. The best extensions will be added to the Serverlesspresso application running in production and featured on the AWS Compute Blog.

What is Serverlesspresso?

Serverlesspresso is a multi-tenant event-driven serverless application for a pop-up coffee bar that allows you to order from your phone. In 2022, Serverlesspresso processed over 20,000 orders at technology events around the world. At this year’s re:Invent, it featured in the keynote of Amazon CTO, Dr Werner Vogels. It was showcased as an example of an event-driven application that can be easily evolved.

The architecture comprises several serverless apps and has been open-source and freely available since it was launched at re:Invent 2021.

What is extensibility?

Extensibility is the ability to add new functionality to an existing piece of software without modifying the core code already in place. Extensions for web browsers are an example of how useful extensibility can be. The core web browser code is not changed or affected when third parties write extensions, but end users can gain new, rich functionality not envisioned or intended by the original browser authors.

In many production business applications extensibility can help you keep up with the pace of your users requests. It allows you to create new and useful functionality without having to rearchitect the core, original part of your code. Choosing an architectural style that supports this concept can help you retain flexibility as your users needs change.

How EDA supports extensibility

Serverlesspresso is built on an event-driven architecture (EDA). This is an architecture style that uses events to decouple an application’s components. Event-driven architecture offers an effective way to create loosely coupled communication between microservices. This makes it a good architectural choice when you are designing workloads that will require extensibility.

Loosely coupled microservices are able to scale and fail independently, increasing the resilience of the application. Development teams can build and release features for their team’s microservice quickly, without needing to worry about the behavior of other microservices in the application. In addition, new features can be added on top of existing events without making changes to the rest of the application.

Choreography and orchestration are two different models for how distributed services can communicate with one another. In orchestration, communication is more tightly controlled. A central service coordinates the interaction and order in which services are invoked.

Choreography achieves communication without tight control. Events flow between services without any centralized coordination. Many applications, including Serverlesspresso use both choreography and orchestration for different use cases. Event buses such as Amazon EventBridge can be used for choreography, and workflow orchestration services like AWS Step Functions can help build for orchestration.

New functional requirements come up all the time in production applications. We can address new requirements for an event driven application by creating new rules for events in the Event Bus. These rules can add new functionality to the application without having any impact to the existing application stack.

Characteristics of a Serverlesspresso EDA extension

  1. Extension resources do not have permission to interact with resources outside the extension definition (including core app resources).
  2. Extensions must contain at least one new EventBridge rule that routes existing Serverlesspresso events.
  3. Extensions can be deployed and deleted independently of other extensions and the core application.

Building a Serverlesspresso extension

This section shows how to build an extension for Serverlesspresso that adds new functionality while remaining decoupled from the core application. Anyone can contribute an extension to Serverlesspresso. Use the Serverlesspresso extensions GitHub repository to host your extension:

  1. Complete the GitHub issue template:
  2. Clone the repository. Duplicate, and rename the example _extension_model directory.
  3. Add the associated extension template and source files.
  4. Add the required meta information to `README.md`.
  5. Make a pull request to the repository with the new extension files.

Additional guidance can be found in the repository’s PUBLISHING.md file.

Tools and resources to help you build

Event decoupling introduces a new set of challenges. Finding events and their schema can be a difficult process. Developers must coordinate with the team responsible for publishing an event, or look through documentation to find its schema, and then manually create an object for the event in order to use it in their code.

The Amazon EventBridge schema registry helps solve this challenge. It automatically finds events and their structure, or schema, and stores them in a shared central location. For serverlesspresso Extensions, we have created the Serverlesspresso events catalog, and filled it with events from the EventBridge schema registry. Here, all Serverlesspresso events have been documented to help you understand how to use them in your extensions. This includes the services that produce and consumer the event as well as example schemes for each event.

The event player

The event player is a Step Functions workflow that simulates 15 minutes of operation at the Serverlesspresso bar. It does this by replaying an array of realistic events. Use the event player to generate Serverlesspresso events, when building and testing your extensions. Each event is emitted onto an event bus named Serverlesspresso.

  1. Clone this repository: git clone https://github.com/aws-samples/serverless-coffee.git
  2. Change directory to the event player: cd extensibility/EventPlayer
  3. Deploy the EventPlayer using the AWS SAM CLI:
    sam build && sam deploy --guided

This deploys a Step Functions workflow and a custom event bus called “Serverlesspresso

Running the events player

  1. Open the event player from the AWS Management Console.
  2. Choose Start execution, leave the default input payload and choose Start execution.

The player takes approximately 15 minutes to complete.

About your extension submission

Extensions will be reviewed by the Serverless DA team within 14 days of submission. When submitting your extension, your extension will become part of the open source offering and is covered by the existing license in the repo. It may be used by any customer under the same license. For additional guidance and ideas to help build your Serverlesspresso extensions, use the following resources:

Conclusion

You can now build extensions for Serverlesspresso, and potentially be featured on the AWS Compute Blog by submitting a Serverlesspresso extension. The best extensions will be added to Serverlesspresso in production.

Some demo extensions have been built and documented at https://github.com/aws-samples/serverless-coffee/tree/main/extensions. You can download and install these extensions to see how they are constructed before creating your own.

Visit the Serverless Workflows Collection to browse the many deployable workflows to help build your serverless applications.

ICYMI: Serverless pre:Invent 2022

Post Syndicated from Benjamin Smith original https://aws.amazon.com/blogs/compute/icymi-serverless-preinvent-2022/

During the last few weeks, the AWS serverless team has been releasing a wave of new features in the build-up to AWS re:Invent 2022. This post recaps some of the most important releases for serverless developers building event-driven applications.

AWS Lambda

Lambda Support for Node.js 18

You can now develop Lambda functions using the Node.js 18 runtime. This version is in active LTS status and considered ready for general use. When creating or updating functions, specify a runtime parameter value of nodejs18.x or use the appropriate container base image to use this new runtime. Lambda’s Node.js runtimes include the AWS SDK for JavaScript.

This enables customers to use the AWS SDK to connect to other AWS services from their function code, without having to include the AWS SDK in their function deployment. This is especially useful when creating functions in the AWS Management Console. It’s also useful for Lambda functions deployed as inline code in CloudFormation templates. This blog post explains the major changes available with the Node.js 18 runtime in Lambda.

Lambda Telemetry API

The AWS Lambda team launched Lambda Telemetry API to provide an easier way to receive enhanced function telemetry directly from the Lambda service and send it to custom destinations. This makes it easier for developers and operators using third-party observability extensions to monitor and observe their Lambda functions.

The Lambda Telemetry API is an enhanced version of Logs API, which enables extensions to receive platform events, traces, and metrics directly from Lambda in addition to logs. This enables tooling vendors to collect enriched telemetry from their extensions, and send to any destination.

To see how the Telemetry API works, try the demos in the GitHub repository. Build your own extensions using the Telemetry API today, or use extensions provided by the Lambda observability partners.

.NET tooling

Lambda launched tooling support to enable applications running .NET 7 to be built and deployed on AWS Lambda. This includes applications compiled using .NET 7 native AOT. .NET 7 is the latest version of .NET and brings many performance improvements and optimizations. Customers can use .NET 7 with Lambda in two ways. First, Lambda has released a base container image for .NET 7, enabling customers to build and deploy .NET 7 functions as container images. Second, you can use Lambda’s custom runtime support to run functions compiled to native code using .NET 7 native AOT.

The new AWS Parameters and Secrets Lambda Extension provides a convenient method for Lambda users to retrieve parameters from AWS Systems Manager Parameter Store and secrets from AWS Secrets Manager. Use the extension to improve application performance by reducing latency and cost of retrieving parameters and secrets. The extension caches parameters and secrets, and persists them throughout the lifecycle of the Lambda function.

Amazon EventBridge

Amazon EventBridge Scheduler

Amazon EventBridge announced Amazon EventBridge Scheduler, a new capability that allows you to create, run, and manage scheduled tasks at scale. With EventBridge Scheduler, you can schedule one-time or recurrently tens of millions of tasks across many AWS services without provisioning or managing underlying infrastructure.

With EventBridge Scheduler, you can create schedules that trigger over 200 services with more than 6,000 APIs. EventBridge Scheduler allows you to configure schedules with a minimum granularity of one minute. It is priced per one million invocations, and the service is included in the AWS Free Tier. See the pricing page for more information. Visit the launch blog post to get started with EventBridge scheduler.

EventBridge now supports enhanced filtering capabilities including the ability to match against characters at the end of a value (suffix filtering), to ignore case sensitivity (equals-ignore-case), and to have a single EventBridge rule match if any conditions across multiple separate fields are true (OR matching). The bounds supported for numeric values has also been increased from -5e9 to 5e9 from -1e9 to 1e9. The new filtering capabilities further reduce the need to write and manage custom filtering code in downstream services.

AWS Step Functions

Intrinsic Functions

We have added 14 new intrinsic functions to AWS Step Functions. These are Amazon States Language (ASL) functions that perform basic data transformations. Intrinsic functions allow you to reduce the use of other services, such as AWS Lambda or AWS Fargate to perform basic data manipulation. This helps to reduce the amount of code and maintenance in your application. Intrinsics can also help reduce the cost of running your workflows by decreasing the number of states, number of transitions, and total workflow duration.

Standard Workflows, Express Workflows, and synchronous Express Workflows all support the new intrinsic functions, which can be grouped into six categories:

The intrinsic functions documentation contains the complete list of intrinsics.

Cross-account access capabilities

Now, customers can take advantage of identity-based policies in Step Functions so your workflow can directly invoke resources in other AWS accounts, allowing cross-account service API integrations. The compute blog post demonstrates how to use cross-account capability using two AWS accounts.

New executions experience for Express Workflows

Step Functions now provides a new console experience for viewing and debugging your Express Workflow executions that makes it easier to trace and root cause issues in your executions.

You can opt in to the new console experience of Step Functions, which allows you to inspect executions using three different views: graph, table, and event view, and add many new features to enhance the navigation and analysis of the executions. You can search and filter your executions and the events in your executions using unique attributes such as state name and error type. Errors are now easier to root cause as the experience highlights the reason for failure in a workflow execution.

The new execution experience for Express Workflows is now available in all Regions where AWS Step Functions is available. For a complete list of Regions and service offerings, see AWS Regions.

Step Functions Workflows Collection

The AWS Serverless Developer Advocate team created the Step Functions Workflows Collection, a fresh experience that makes it easier to discover, deploy, and share Step Functions workflows. Use the Step Functions workflows collection to find simple “building blocks”, reusable patterns, and example applications to help build your serverless applications with Step Functions. All Step Functions builders are invited to contribute to the collection. This is done by submitting a pull request to the Step Functions Workflows Collection GitHub repository. Each submission is reviewed by the Serverless Developer advocate team for quality and relevancy before publishing.

AWS Serverless Application Model (AWS SAM)

AWS SAM Connector

Speed up serverless development while maintaining secure best practices using new AWS SAM connector. AWS SAM Connector allows builders to focus on the relationships between components without expert knowledge of AWS Identity and Access Management (IAM) or direct creation of custom policies. AWS SAM connector supports AWS Step Functions, Amazon DynamoDB, AWS Lambda, Amazon SQS, Amazon SNS, Amazon API Gateway, Amazon EventBridge and Amazon S3, with more resources planned in the future.

Connectors are best for those getting started and who want to focus on modeling the flow of data and events within their applications. Connectors will take the desired relationship model and create the permissions for the relationship to exist and function as intended.

View the Developer Guide to find out more about AWS SAM connectors.

SAM CLI Pipelines now supports Open ID Connect Protocol

SAM Pipelines make it easier to create continuous integration and deployment (CI/CD) pipelines for serverless applications with Jenkins, GitLab, GitHub Actions, Atlassian Bitbucket Pipelines, and AWS CodePipeline. With this launch, SAM Pipelines can be configured to support OIDC authentication from providers supporting OIDC, such as GitHub Actions, GitLab and BitBucket. SAM Pipelines will use the OIDC tokens to configure the AWS Identity and Access Management (IAM) identity providers, simplifying the setup process.

AWS SAM CLI Terraform support

You can now use AWS SAM CLI to test and debug serverless applications defined using Terraform configurations. This public preview allows you to build locally, test, and debug Lambda functions defined in Terraform. Support for the Terraform configuration is currently in preview, and the team is asking for feedback and feature request submissions. The goal is for both communities to help improve the local development process using AWS SAM CLI. Submit your feedback by creating a GitHub issue here.

­­­­­Still looking for more?

Get your free online pass to watch all the biggest AWS news and updates from this year’s re:Invent.

For more learning resources, visit Serverless Land.

Implementing a UML state machine using AWS Step Functions

Post Syndicated from Benjamin Smith original https://aws.amazon.com/blogs/compute/implementing-a-uml-state-machine-using-aws-step-functions/

This post is written by  Michael Havey, Senior Specialist Solutions Architect, AWS

This post shows how to model a Unified Modeling Language (UML) state machine as an AWS Step Functions workflow. A UML state machine models the behavior of an object, naming each of its possible resting states and specifying how it moves from one state to another. A Step Functions state machine implements the object behavior. This post shows how the UML diagram guides the state machine implementation and traces back to it.

State machines are often used to model real-time systems and devices. This post uses a stock order as an example. What drives a business object from one state to another is its interaction with applications through services. When the object enters a new state, it typically responds by calling the application through a service. It is typically an event arising from that application that transitions the business object to the next state. The UML model declares each state and the service interactions. Step Functions, which is designed for service orchestration, implements the behavior.

Overview

This is the approach discussed in this post:

  1. A developer implements a Step Functions state machine guided by a UML state machine designed in a third-party UML modeling tool. The implementation explicitly traces back to the UML model by logging execution of state machine activities.
  2. To invoke the target application, the Step Functions state machine invokes an AWS Lambda handler function. This invocation implements a UML state machine activity.
  3. The handler function, in turn, invokes the application. The implementation of the call is application-specific.
  4. If a callback from the application is expected, the application sends an event to a Lambda event dispatcher function. The implementation of this message exchange is application-specific.
  5. If a callback is expected, the Lambda event dispatcher function calls back the Step Functions state machine with the application event. This enables the Step Functions state machine to implement a UML state transition to the next state.

Traceability is the best way to link the Step Functions implementation to the UML model. This is because it ensures that the implementation is doing what the model intends.

An alternative is to generate Step Functions code based on the UML model using a standard XML format known as XML Metadata Interchange (XMI). A code generator tool can introspect the XMI to generate code from it. While technically feasible, UML state machines are highly expressive with many patterns and idioms. A generator often can’t produce code as lean and readable as that of a developer.

Walkthrough

This example shows a UML state machine in MagicDraw, a UML design tool. This diagram is the basis for the Step Functions implementation. This Git repository includes the XMI file for the UML diagram and the code to set up the Step Functions implementation.

The walkthrough has the following steps:

  1. Deploy Step Functions and AWS Lambda resources.
  2. Run the Step Functions state machine. Check the execution results to see how they trace back to the UML state machine.
  3. Clean up AWS resources.

Provision resources

To run this example, you need an AWS account with permission to use Step Functions and Lambda. On your machine, install the AWS Command Line Interface (CLI) and the AWS Serverless Application Model (AWS SAM) CLI.

Complete the following steps on your machine:

  1. Clone the Git repository.
  2. In a command shell, navigate to the sam folder of the clone.
  3. Run sam build to build the application.
  4. Run sam deploy –-guided to deploy the application to your AWS account.
  5. In the output, find names of Step Functions state machines and Lambda functions created.

The application creates several state machines, but in this post we consider the simplest: Test Buy Sell. The example models the behavior of a buy/sell stock order, which is based on an example from the Step Functions documentation: https://docs.aws.amazon.com/step-functions/latest/dg/sample-lambda-orchestration.html.

Explore UML model for Test BuySell

Begin with the following UML model (also available in the GitHub repository).

In the model:

  1. The black dot on the upper left is the initial state. It has an arrow (a transition) to CheckingStockPrice (a state).
  2. CheckingStockPrice has an activity, called checkStockPrice, of type do. When that state is visited, the activity is automatically run. When the activity finishes, the machine transitions automatically (a completion transition) to the next state.
  3. That state, GeneratingBuySellRecommendation, has its own do activity generateBuySellRecommendation. Completion of that activity moves to the next state.
  4. The next state is Approving, whose activity routeForApproval is of type entry. That activity is run when the state is entered. It waits for an event to move the machine forward. There are three transitions from Approving. Each has a trigger, indicating the type of event expected, called approvalComplete. Each has a guard that distinguishes the outcome of the approval.
  5. If the guard is sell, transition to the state SellingStock.
  6. If it’s buy, transition to the state BuyingStock.
  7. If it’s reject, transition to the terminate state (denoted by an X) and run a transition activity called logReject.
  8. BuyingStock and SellingStock each have a do activity – buyStock and sellStock – and transition on completion to the state ReportingResult. That state has do activity reportResult.
  9. Transition to the final state (the black dot enclosed in a circle).

Explore Step Functions implementation

Find the Step Functions implementation in the AWS Console. Under the list of State Machines, select the function with a name starting with BlogBuySell. Choose Edit to view the design of the machine. From there, open it in Workflow Studio to show the state machine workflow visualization:

The Step Function state machine implements all the activities from the UML state machine. There are Lambda tasks to implement the major state do activities: Check Stock Price, Generate Buy/Sell Recommendation, Buy Stock, Sell Stock, Report Result. There is also a Lambda function for the transition activity: Log Reject. Each Lambda function traces back to the UML state machine and uses the following format to log trace records:

{
 "sourceState": S,
 "activityType": stateEntry|stateExit|stateDo|transition,
 "activityName": N
 "trigger" T, // if transition activity
 "guard": G // if transition activity and has a guard
}

The control flow in the Step Functions state machine intuitively matches the UML state machine. The UML model has mostly completion transitions, so the Step Functions state machine largely flows from one Lambda task to another. However, I must consider the Approving state, where the machine waits for an event and then transitions in one of three directions from the choice state Buy or Sell. For this, use the Step Functions callback capability. Route For Approval is a Lambda task with the Wait For Callback option enabled. The Lambda task has three responsibilities:

  • Executes the UML state entry activity routeForApproval by calling the application.
  • Logs a tracing record that it has executed that activity.
  • Passes the task token provided by the Step Functions state machine to the application.

When the application has an approval decision, it sends an event through messaging. A separate Lambda event dispatcher function receives the message and, using the Step Functions API, calls back the Step Functions state machine with key details from the message: task token, trigger, guard.

Finally, notice the fail step after Log Reject. This implements the terminate state in the UML model.

Execute the Step Functions state machine

Execute the state machine by choosing Start Execution for the BlogBuySell state machine in the Step Functions console. Use this input:

{"appData": "Insert your JSON here"}

The console shows a graph view of the progress of the state machine. It should pause at the Route For Approval task.

Confirm traceability

Check the event view to confirm the tracing back to the UML model. The Task Scheduled event for Check Stock Price shows:

      "sourceState": "CheckingStockPrice",
      "activityType": "stateDo",
      "activityName": "checkStockPrice",

The Task Scheduled event for Generate buy/sell Recommendation shows:

      "sourceState": "GeneratingBuySellRecommendation",
      "activityType": "stateDo",
      "activityName": "generateBuySellRecommendation",

The Task Scheduled event for Route For Approval shows output resembling the following. Your taskToken will be different.

      "sourceState": "Approving",
      "activityType": "stateEntry",
      "activityName": "routeForApproval",
   "taskToken": "AAAAK . . . 99es="

Approve for buy

The state machine is waiting at Route For Approval. Simulate an application event to continue it forward. First, copy the task token value from above, excluding the quotes.

In a separate browser tab, open the Lambda console and find the function whose name contains BlogDummyUMLEventDispatcher. In the Test tab, create a new event:

{
    "taskToken": "<paste the task token here>",
    "trigger": "approvalComplete",
    "guard": "buy",
    "appData": {"x": "y"}
}
 

Choose Test to call the Lambda function with this input, which calls back the state machine.

Confirm execution of approval

In the Step Functions console, confirm that the flow is completed and taken the Buy stock path.

More examples and patterns

The AWS SAM application deploys two additional examples, which show important patterns:

  • Hierarchical or composite states.
  • Parallel or orthogonal states
  • Cancellation events
  • Internal transitions
  • Transition to history
  • Using an event loop for complex flow

You can find a discussion of these examples in the Git repo.

Comparing UML and Step Functions state machines

Step Functions transitions tasks in sequence with the ability to conditionally branch, loop, or parallelize tasks. These tasks aren’t quite the same as states in a UML model. In this approach, tasks map to UML states or transition activities.

A UML state machine spends most of its time waiting in its current state for the next event to happen. A standard workflow in Step Functions can wait too. It can run for up to one year because some activities can pause until they are called back by an external trigger. I used that capability to implement a pattern to trigger the next transition by calling back the Step Functions state machine.

Cleaning up

To avoid incurring future charges, navigate to the directory where you deployed the application and run sam delete to undeploy it.

Conclusion

This post shows code recipes for implementing UML state machines using Step Functions. If your organization already uses modeling tools, this discussion helps you understand the Step Functions implementation path. If you are a Step Functions designer, this discussion shows UML’s expressive power as the model for your implementation.

Learn more about Step Functions implementations on the Sample projects for Step Functions page.

Integrating Amazon MemoryDB for Redis with Java-based AWS Lambda

Post Syndicated from Benjamin Smith original https://aws.amazon.com/blogs/compute/integrating-amazon-memorydb-for-redis-with-java-based-aws-lambda/

This post is written by Mansi Y Doshi, Consultant and Aditya Goteti, Sr. Lead Consultant.

Enterprises are modernizing and migrating their applications to the AWS Cloud to improve scalability, reduce cost, innovate, and reduce time to market new features. Legacy applications are often built with RDBMS as the only backend solution.

Modernizing legacy Java applications with microservices requires breaking down a single monolithic application into multiple independent services. Each microservice does a specific job and requires its own database to persist data, but one database does not fit all use cases. Modern applications require purpose-built databases catering to their specific needs and data models.

This post discusses some of the common use cases for one such data store, Amazon MemoryDB for Redis, which is built to provide durability and faster reads and writes.

Use cases

Modern tech stacks often begin with a backend that interacts with a durable database like MongoDB, Amazon Aurora, or Amazon DynamoDB for their data persistence needs.

But, as traffic volume increases, it often makes sense to introduce a caching layer like ElastiCache. This is populated with data by service logic each time a database read happens, such that the subsequent reads of the same data become faster. While ElastiCache is effective, you must manage and pay for two separate data sources for the same data. You must also write custom logic to handle the cache reads/writes besides the existing read/write logic used for durable databases.

While traditional databases like MySQL, Postgres and DynamoDB provide data durability at the cost of speed, transient data stores like ElastiCache trade durability for faster reads/writes (usually within microseconds). ElastiCache provides writes and strongly consistent reads on the primary node of each shard and eventually consistent reads from read replicas. There is a possibility that the latest data written to the primary node is lost during a failover, which makes ElastiCache fast but not durable.

MemoryDB addresses both these issues. It provides strong consistency on the primary node and eventual consistency reads on replica nodes. The consistency model of MemoryDB is like ElastiCache for Redis. However, in MemoryDB, data is not lost across failovers, allowing clients to read their writes from primaries regardless of node failures. Only data that is successfully persisted in the Multi-AZ transaction log is visible. Replica nodes are still eventually consistent. Because of its distributed transaction model, MemoryDB can provide both durability and microsecond response time.

MemoryDB is most ideal for services that are read-heavy and sensitive to latency, like configuration, search, authentication and leaderboard services. These must operate at microsecond read latency and still be able to persist the data for high availability and durability. Services like leaderboards, having millions of records, often break down the data into smaller chunks/batches and process them in parallel. This needs a data store that can perform calculations on the fly and also store results temporarily. Redis can process millions of operations per second and store temporary calculations for fast retrieval and also run other operations (like aggregations). Since Redis is single-threaded, from the command’s execution point of view, it also helps to avoid dirty writes and reads.

Another use case is a configuration service, where users store, change, and retrieve their configuration data. In large distributed systems, there are often hundreds of independent services interacting with each other using well-defined REST APIs. These services depend on the configuration data to perform specific actions. The configuration service must serve the required information at a low latency to avoid being a bottleneck for the other dependent services.

MemoryDB can read at microsecond latencies durably. It also persists data across multiple Availability Zones. It uses multi- Availability Zone transaction logs to enable fast failover, database recovery, and node restarts. You can use it as a primary database without the need to maintain another cache to lower the data access latency. This also reduces the need to maintain additional caching service, which further reduces cost.

These use cases are a good fit for using MemoryDB. Next, you see how to access, store, and retrieve data in MemoryDB from your Java-based AWS Lambda function.

Overview

This blog shows how to build an Amazon MemoryDB cluster and integrate it with AWS Lambda. Amazon API Gateway and Lambda can be paired together to create a client-facing application, which can be easier to maintain, highly scalable, and secure. Both are fully managed services with no need to provision or manage servers. They can be cost effective when compared to running the application on servers for workloads with long idle periods. Using Lambda authorizers you can also write custom code to control access to your API.

Walkthrough

The following steps show how to provision an Amazon MemoryDB cluster along with Amazon VPC, subnets, security groups and integrate it with a Lambda function using Redis/Jedis Java client. Here, the Lambda function is configured to connect to the same VPC where MemoryDB is provisioned. The steps include provisioning through an AWS SAM template.

Prerequisites

  1. Create an AWS account if you do not already have one and login.
  2. Configure your account and set up permissions to access MemoryDB.
  3. Java 8 or above
  4. Install Maven
  5. Java Client for Redis
  6. Install AWS SAM if you do not already have one

Creating the MemoryDB cluster

Refer to the serverless pattern for a quick setup and customize as required. The AWS SAM template creates VPC, subnets, security groups, the MemoryDB cluster, API Gateway, and Lambda.

To access the MemoryDB cluster from the Lambda function, the security group of the Lambda function is added to the security group of the cluster. The MemoryDB cluster is always launched in a VPC. If the subnet is not specified, the cluster is launched into your default Amazon VPC.

You can also use your existing VPC and subnets and customize the template accordingly. If you are creating a new VPC, you can change the CIDR block and other configuration values as needed. Make sure the DNS hostname and DNS Support of the VPC is enabled. Use the optional parameters section to customize your templates. Parameters enable you to input custom values to your template each time you create or update a stack.

Recommendations

As your workload requirements change, you might want to increase the performance of your cluster or reduce costs by scaling in/out the cluster. To improve the read/write performance, you can scale your cluster horizontally by increasing the number of read replicas or shards for read and write throughout, respectively.

To reduce cost in case the instances are over-provisioned, you can perform vertical scale-in by reducing the size of your cluster, or scale-out by increasing the size to overcome CPU bottlenecks/ memory pressure. Both vertical scaling and horizontal scaling are applied with no downtime and cluster restarts are not required. You can customize the following parameters in the memoryDBCluster as required.

NodeType: db.t4g.small
NumReplicasPerShard: 2
NumShards: 2

In MemoryDB, all the writes are carried on a primary node in a shard and all the reads are performed on the standby nodes. Identifying the right number of read replicas, type of nodes and shards in a cluster is crucial to get the optimal performance and to avoid any additional cost because of over-provisioning the resources. It’s recommended to always start with a minimal number of required resources and scale out as needed.

Replicas improve read scalability, and it is recommended to have at least two read replicas per shard but depending upon the size of the payload and for read heavy workloads, it might be more than two. Adding more read replicas than required does not give any performance improvement, and it attracts additional cost. The following benchmarking is performed using the tool Redis benchmark. The benchmarking is done only on GET requests to simulate a read heavy workload.

The metrics on both the clusters are almost the same with 10 million requests with 1kb of data payload per request. Increasing the size of the payload to 5kb and number of GET requests to 20 million, the cluster with two primary and two replicas could not process, whereas the second cluster processed successfully. To achieve the right sizing, load testing is recommended on the staging/pre-production environment with a similar load as production.

Creating a Lambda function and allow access to the MemoryDB cluster

In the lambda-redis/HelloWorldFunction/pom.xml file, add the following dependency. This adds the Java Jedis client to connect the MemoryDB cluster:

<dependency>
    <groupId>redis.clients</groupId>
    <artifactId>jedis</artifactId>
    <version>4.2.0</version>
</dependency>

The simplest way to connect the Lambda function to the MemoryDB cluster is by configuring it within the same VPC where the MemoryDB cluster was launched.

To create a Lambda function, add the following code in the template.yaml file in the Resources section:

HelloWorldFunction:
    Type: AWS::Serverless::Function
    Properties:
      CodeUri: HelloWorldFunction
      Handler: helloworld.App::handleRequest
      Runtime: java8
      MemorySize: 512
      Timeout: 900 #seconds
      Events:
        HelloWorld:
          Type: Api
          Properties:
            Path: /hello
            Method: get
      VpcConfig:
        SecurityGroupIds:
          - !GetAtt lambdaSG.GroupId
        SubnetIds:
          - !GetAtt privateSubnetA.SubnetId
          - !GetAtt privateSubnetB.SubnetId
      Environment:
        Variables:
          ClusterAddress: !GetAtt memoryDBCluster.ClusterEndpoint.Address

Java code to access MemoryDB

  1. In your Java class, connect to Redis using Jedis client:
    HostAndPort hostAndPort = new HostAndPort(System.getenv("ClusterAddress"), 6379);
    JedisCluster jedisCluster = new JedisCluster(Collections.singleton(hostAndPort), 5000, 5000, 2, null, null, new GenericObjectPoolConfig (), true);
  2. You can now perform set and get operations on Redis as follows
    jedisCluster.set(“test”, “value”)
    jedisCluster.get(“test”)

JedisCluster maintains its own pool of connections and takes care of connection teardown. But you can also customize the configuration for closing idle connections using the GenericObjectPoolConfig object.

Clean Up

To delete the entire stack, run the command “sam delete”.

Conclusion

In this post, you learn how to provision a MemoryDB cluster and access it using Lambda. MemoryDB is suitable for applications requiring microsecond reads and single-digit millisecond writes along with durable storage. Accessing MemoryDB through Lambda using API Gateway reduces the further need for provisioning and maintaining servers.

For more serverless learning resources, visit Serverless Land.

Introducing new intrinsic functions for AWS Step Functions

Post Syndicated from Benjamin Smith original https://aws.amazon.com/blogs/compute/introducing-new-intrinsic-functions-for-aws-step-functions/

Developers use AWS Step Functions, a low-code visual workflow service to build distributed applications, automate IT and business processes, and orchestrate AWS services with minimal code. Step Functions Amazon States Language (ASL) provides a set of functions known as intrinsics that perform basic data transformations.

Customers have asked for additional intrinsics to perform more data transformation tasks, such as formatting JSON strings, creating arrays, generating UUIDs, and encoding data. We have added 14 new intrinsic functions to Step Functions. This blog post examines how to use intrinsic functions to optimize and simplify your workflows.

Why use intrinsic functions?

Intrinsic functions can allow you to reduce the use of other services, such as AWS Lambda or AWS Fargate to perform basic data manipulation. This helps to reduce the amount of code and maintenance in your application.

Intrinsics can also help reduce the cost of running your workflows by decreasing the number of states, number of transitions, and total workflow duration. This allows you to focus on delivering business value, using the time spent on writing custom code for more complex processing operations rather than basic transformations.

Using intrinsic functions

Amazon States Language is a JSON-based, structured language used to define Step Functions workflows. Each state within a workflow receives a JSON input and passes a JSON output to the next state.

ASL enables developers to filter and manipulate data at various stages of a workflow state’s execution using paths. A path is a string beginning with $ that lets you identify and filter subsets of JSON text. Learn how to apply these filters to build efficient workflows with minimal state transitions.

Apply intrinsics using ASL in task states within the ResultSelector field, or in a Pass state in either the Parameters or Result field. All intrinsic functions have the prefix “States.” followed by function, as shown in the following example, which uses the new UUID intrinsic for a generating Unique Universal ID:

  "Type": "Pass",
      "End": true,
      "Result": {
        "ticketId.$": "States.UUID()"
      }
    }

Reducing execution duration with intrinsic functions to lower cost

The following example shows the cost and simplicity benefits of intrinsic functions. The same payload is input to both examples. One uses intrinsic functions, the other uses a Lambda function with custom code. This is an extract from a workflow that is used in production for Serverlesspresso, a serverless ordering system for a pop-up coffee bar. It sanitizes new customer orders against menu options stored in an Amazon DynamoDB table.

This example uses a Lambda function to unmartial data from a DynamoDB table and iterates through each item, checking if the order is present and therefore valid. This Lambda function has 18 lines of code with dependencies on an SDK library for DynamoDB operations.

The improved workflow uses a Map state to iterate through, and unmarshal DynamoDB data, and then an intrinsic function within a pass state to sanitize new customer orders against the menu options. Here, the intrinsic used is the new States. ArrayContains(). It searches an array for a value.

I run both workflows 1000 times. The following image from an Amazon CloudWatch dashboard shows their average execution time and billed execution time.

The billed execution time for the workflow using intrinsics is half that of the workflow using a Lambda function (100ms vs. 200ms).

These are Express Workflows, so the total workflow cost is calculated as execution cost + duration cost x number of requests. This means the workflow that uses intrinsics costs approximately half that of the one using Lambda. This doesn’t consider the additional cost associated with running Lambda functions. Read more about building cost efficient workflows from this blog post.

Cost saving: Reducing state transitions with intrinsic functions

The previous example shows how a single intrinsic function can have a large impact on workflow duration, which directly affects the cost of running an Express Workflow. Intrinsics can also help to reduce the number of states in a workflow. This directly affects the cost of running a Standard Workflow, which is billed on the number of state transitions.

The following example runs a sentiment analysis on a text input. If it detects negative sentiment, it invokes a Lambda function to generate a UUID; it saves the information to a DynamoDB table and notifies an administrator. The workflow then pauses using the .waitFortaskToken pattern. The workflow resumes when an administrator takes action, to either allow or deny a refund. The most common path through this workflow comprises 9 state transitions.

In the following example, I remove the Lambda function, which generates a UUID. It contained the following code:

var AWS = require ('aws-sdk');
exports. handler = async (event, context) => {
    let r = Math.random().toString(36).substring(7);
    return r;
};

Instead, I use the new States.UUID() intrinsic in the ResultPath of the DetectSentimentState.

 "DetectSentiment": {
      "Type": "Task",
      "Next": "Record Transaction",
      "Parameters": {
        "LanguageCode": "en",
        "Text. $": "$. message"
      },
      "Resource": "arn:aws:states:::aws-sdk:comprehend:detectSentiment",
      "ResultSelector": {
        "ticketId.$": "States.UUID()"
      },
      "ResultPath": "$.Sentiment"
    },

This has reduced code, resources, and states. The reduction in states from 9 to 8 means that there is one less state transition in the workflow. This has a positive effect on the cost of my Standard Workflow, which is billed by the number of state transitions. It also means that there are no longer any costs incurred for running a Lambda function.

The new intrinsic functions

Standard Workflows, Express Workflows, and synchronous Express Workflows all support the new intrinsic functions. The new intrinsics can be grouped into six categories:

The intrinsic functions documentation contains the complete list of intrinsics.

Doing more with workflows

With the new intrinsic functions, you can do more with workflows. The following example shows how I apply the States.ArrayLength intrinsic function in the Serverlesspresso workflow to check how many instances of the workflow are currently running, and branch accordingly.

The Step Functions List executions SDK task is first used to retrieve a list of executions for the given state machine. I use the States.ArrayLength in the ResultsSelector path to retrieve the length of the response array (total number of executions). It passes the result to a choice state as a numerical constant, allowing the workflow to branch accordingly. Serverlesspresso uses this as a graceful denial of service mechanism, preventing a new customer order when there are too many orders currently in flight.

Conclusion

AWS has added an additional 14 intrinsic functions to Step Functions. These allow you to reduce the use of other services to perform basic data manipulations. This can help reduce workflow duration, state transitions, code, and additional resource management and configuration.

Apply intrinsics using ASL in Task states within the ResultSelector field, or in a Pass state in either the Parameters or Result field. Check the AWS intrinsic functions documentation for the complete list of intrinsics.

Visit the Serverless Workflows Collection to browse the many deployable workflows to help build your serverless applications.

Building cost-effective AWS Step Functions workflows

Post Syndicated from Benjamin Smith original https://aws.amazon.com/blogs/compute/building-cost-effective-aws-step-functions-workflows/

Builders create AWS Step Functions workflows to orchestrate multiple services into business-critical applications with minimal code. Customers are looking for best practices and guidelines to build cost-effective workflows with Step Functions.

This blog post explains the difference between Standard and Express Workflows. It shows the cost of running the same workload as Express or Standard Workflows. Then it covers how to migrate from Standard to Express, how to combine workflow types to optimize for cost, and how to modularize and nest one workflow inside another.

Step Functions Express Workflows

Express Workflows orchestrate AWS services at a higher throughput of up to 100,000 state transitions per second. It also provides a lower cost of $1.00 per million invocations versus $25 per million for Standard Workflows.

Express Workflows can run for a maximum duration of 5 minutes and do not support the .waitForTaskToken or .sync integration pattern. Most Step Functions workflows that do not use these integrations patterns and complete within the 5-minute duration limit see both cost and throughput optimizations by converting the workflow type from Standard to Express.

Consider the following example, a naïve implementation of an ecommerce workflow:

When started, it emits a message onto an Amazon SQS queue. An AWS Lambda function processes and approves this asynchronously (not shown). Once processed, the Lambda function persists the state to an Amazon DynamoDB table. The workflow polls the table to check when the action is completed. It then moves on to process the payment, where it repeats the pattern. Finally, the workflow runs a series of update tasks in sequence before completing.

I run this workflow 1,000 times as a Standard workflow. I then convert this to an Express Workflow and run another 1,000 times. I create an Amazon CloudWatch dashboard to display the average execution times. The Express Workflow runs on average 0.5 seconds faster than the Standard Workflow and also shows improvements in cost:

Workflow Execution times

Running the Standard Workflow 1,000 times costs approximately $0.42. This excludes the 4,000 state transitions included in the AWS Free Tier every month, and the additional services that are being used. In contrast to this, running the Express Workflow 1000 times costs $0.01. How is this calculated?

Standard Workflow cost calculation formula:

Standard Workflows are charged based on the number of state transitions required to run a workload. Step Functions count a state transition each time a step of your workflow runs. You are charged for the total number of state transitions across all your state machines, including retries. The cost is $0.025 per 1,000 state transitions.

A happy path through the workflow comprises 17 transitions (including start and finish).

Total cost = (number of transitions per execution x number of executions) x $0.000025
Total cost = (17 X 1000) X 0.000025 = $0.42*

*Excluding the 4,000 state transitions included in the AWS Free Tier every month.

Express Workflow cost calculation formula:

Express Workflows are charged based on the number of requests and its duration. Duration is calculated from the time that your workflow begins running until it completes or otherwise finishes, rounded up to the nearest 100 ms, and the amount of memory used in running your workflow, billed in 64-MB chunks.

Total cost = (Execution cost + Duration cost) x Number of Requests
Duration cost = (Avg billed duration ms / 100) * price per 100 ms
Execution cost = $0.000001 per request

Total cost = ($0.000001 + $0.0000117746) x 1000 = $0.01
Duration cost = (11300 MS /100) * $ 0.0000001042 = $0.0000117746
Execution cost = $0.000001 per request

This cost changes depending on the number of GB-hours and memory sizes used. The memory usage for this State machine is less than 64 MB.
See the Step Functions pricing page for full more information.

Converting a Standard Workflow to an Express Workflow

Given the cost benefits shown in the previous section, converting existing Standard Workflows to Express Workflows is often a good idea. However, some considerations should be made before doing this. The workflow must finish in less than 5 minutes and not use .WaitForTaskToken or .sync integration patterns. Express Workflows send logging history to CloudWatch Logs at an additional cost.

An additional consideration is idempotency, and exactly once versus at least once execution requirements. If a workload requires a guaranteed once execution model, then a Standard Workflow is preferred. Here, tasks and states are never run more than once unless you have specified retry behavior in Amazon States Language (ASL). This makes them suited to orchestrating non-idempotent actions, such as starting an Amazon EMR cluster or processing payments. Express Workflows use an at-least-once model, where there is a possibility that an execution might be run more than once. This makes them ideal for orchestrating idempotent actions. Idempotence refers to an operation that produces the same result (for a given input) irrespective of how many times it is applied.

To convert a Standard Workflow to an Express Workflow directly from within the Step Functions console:

  1. Go to the Step Functions workflow you want to convert, and choose Actions, Copy to new.

  2. Choose Design your workflow visually.
  3. Choose Express then choose Next.
  4. The next two steps allow you to make changes to your workflow design. Choose Next twice.
  5. Name the workflow, assign permissions, logging and tracing configurations, then choose Create state machine.

If converting a Standard Workflow defined in a templating language such as AWS CDK or AWS SAM, you must change both the Type value and the Resource name. The following example shows how to do this in AWS SAM:

StateMachinetoDDBStandard:
    Type: AWS::Serverless::StateMachine
    Properties:
      Type: STANDARD

Becomes:

StateMachinetoDDBExpress:
    Type: AWS::Serverless::StateMachine
    Properties:
      Type: EXPRESS

This does not overwrite the existing workflow, but creates a new workflow with a new name and type.

Better together

Some workloads may require a combination of both long-running and high-event-rate workflows. By using Step Functions workflows, you can build larger, more complex workflows out of smaller, simpler workflows.

For example, the initial step in the previous workflow may require a pause for human interaction that takes more than 5 minutes, followed by running a series of idempotent actions. These types of workloads can be ideal for using both Standard and Express workflow types together. This can be achieved by nesting a “child” Express Workflow within a “parent” Standard Workflow. The previous workflow example has been refactored as a parent-child nested workflow.

Deploy this nested workflow solution from the Serverless Workflows Collection.

Nesting workflows

Parent Standard Workflow

Child Express Workflow


Nested workflow metrics

This new blended workflow has a number of advantages. First the polling pattern is replaced by .WaitForTaskToken. This pauses the workflow until a response is received indicating success or failure. In this case, the response is sent by a Lambda function (not shown). This pause can last for up to 1 year, and the wait time is not billable.

This not only simplifies the workflow but also reduces the number of state transitions. Next, the idempotent steps are moved into an Express Workflow, this reduces the number of state transitions from the Standard Workflow, and benefits from the high throughput provided by Express Workflows. The child workflow is invoked by using the StartExecution StepFunctions API call from the parent workflow.

This new workflow combination runs 1,000 times, costing a total cost of 20 cents. There is no additional charge for starting a nested workflow: It is treated as another state transition. The nested workflow itself is billed the same way as all Step Functions workflows.

Here’s how the cost is calculated:

Parent Standard Workflow:

Total cost = (number of transitions per execution x number of executions) x $0.000025
Total cost =(8*1000) *0.000025 = $0.20

Child Express Workflow:

Total cost = (Execution cost + Duration cost) x No Requests
Duration cost = (Avg billed duration ms / 100) * price per 100ms
Execution cost = $0.000001 per request

Total cost = ($0.000001 + $0.0000013546) x 1000 = $0.0002
Duration cost = (1300 ms /100) * $ 0.0000001042 = $0.0000013546
Execution cost = $0.000001 per request

Total cost for nested workflow = (cost of Parent Standard Workflow) + (cost of Child Express Workflow)
Total cost for nested workflow = 0.20 cents  / 1000 executions.

Conclusion

This blog post explains the difference between Standard and Express Workflows. It describes the exactly once and at-least-one execution models and how this relates to idempotency. It compares the cost of running the same workload as an Express and Standard Workflow, showing how to migrate from one to the other and the considerations to make before doing so.

Finally, it explains how to combine workflow types to optimize for cost. Nesting state machines between types enables teams to work on individual workflows, turning them into modular reusable building blocks.

Visit the Serverless Workflows Collection to browse the many deployable workflows to help build your serverless applications.

Introducing the new AWS Step Functions Workflows Collection

Post Syndicated from Benjamin Smith original https://aws.amazon.com/blogs/compute/introducing-the-new-aws-step-functions-workflows-collection/

Today, the AWS Serverless Developer Advocate team introduces the Step Functions Workflows Collection, a fresh experience that makes it easier to discover, deploy, and share Step Functions workflows.

Builders create Step Functions workflows to orchestrate multiple services into business-critical applications with minimal code. Customers were looking for opinionated templates that implement best practices for building serverless applications with Step Functions.

This blog post explains what Step Functions workflows are and what challenges they help solve. It shows how to use the new Step Functions workflows collection to find simple “building blocks”, reusable patterns, and example applications to help build your serverless applications with Step Functions.

Overview

Large serverless applications often comprise multiple decoupled resources. These are sometimes challenging to observe and discover errors. Step Functions is a low-code visual workflow service that helps solve this challenge. It provides instant visual understanding of an application, the services it integrates with, and any errors that might occur during execution.

Step Functions workflows comprise a sequence of steps where the output of one step passes on as input to the next. Step Functions can integrate with over 220 AWS services by using an AWS SDK integration task. This allows users to call AWS SDK actions directly without the need to write additional code.

Getting started with the Step Functions workflows collection

Explore the Step Functions workflows collection to discover new workflows. The collection has three levels of workflows:

  1. Fundamental: A simple, reusable building block.
  2. Pattern: A common reusable component of an application.
  3. Application: A complete serverless application or microservice.

Workflows are also categorized by multiple use-cases, including data processing, SaaS integration, and security automation. Once you find a workflow that want to use in your application:

  1. Choose View to go to the workflow details page.
  2. Choose Template from the workflow details page to view the infrastructure as code (IaC) deployment template. Here, you can see how to configure resources with AWS best practices.
    The workflows collection currently supports deployable workflow templates defined with AWS Serverless Applications Model (AWS SAM) or the AWS Cloud Development Kit (AWS CDK)Structure of an AWS SAM template

    AWS SAM is an open-source framework for building serverless applications. It provides shorthand syntax that makes it easier to build and deploy serverless applications. With only a few lines, you can define each resource using YAML or JSON.

    An AWS SAM template can have serverless-specific resources or standard AWS CloudFormation resources. When you run sam deploy, sam transforms serverless resources into CloudFormation syntax.

    Structure of an AWS CDK template

    The AWS CDK provides another way to define your application resources using common programming languages. The CDK is an open source framework that you can use to model your applications. As with AWS SAM, when you run ‘npx cdk deploy –app ‘ts-node .’ , the CDK transforms the template into AWS CloudFormation syntax and creates the specified resources for you.

  3. Choose Workflow Definition to see the Amazon States Language definition (ASL). That defines the workflow.ASL is a JSON-based, structured language for authoring Step Functions workflows. It enables developers to filter and manipulate data at various stages of a workflow state’s execution using paths. A path is a string beginning with $ that lets you identify and filter subsets of JSON text. Learning how to apply these filters helps to build efficient workflows with minimal state transitions.

    The more advanced workflows in the collection show how to use intrinsic functions to manipulate payload data. Intrinsic functions are ASL constructs that help build and convert payloads without creating additional task state transitions. Use intrinsic functions in Task states within the ResultSelector field, or in a Pass state in either the Parameters or ResultSelector field. The Step Functions documentation shows examples of how to:

    1. Construct strings from interpolated values.
    2. Convert a JSON object to a string.
    3. Convert arguments to an array.Use the workflow definition to see how to configure each workflow state. This is helpful to understand how to define task types you are unfamiliar with and how to apply intrinsic functions to help reduce state transitions. Use the data flow simulator to model and refine your input and output path processing.
  4. Follow the Download and Deployment commands to deploy the workflow into your AWS account. Use the Additional resources to read more about the workflow.
  5. Once you have deployed the workflow into your AWS account, continue building in the AWS Management Console with Workflow studio or locally by editing the downloaded files.Continue building with Workflow Studio
    To edit the workflow in Workflow Studio, select the workflow from the Step Functions console and choose Edit > Workflow Studio.
    From here, you can drag-and-drop flow and Task states onto the canvas, then configure states and data transformations using built-in forms. Workflow Studio composes your workflow definition in real time. If you are new to Step Functions, Workflow Studio provides an easy way to continue building your first workflow that delivers business value.

    Continue building in your local IDE
    For developers who prefer to build locally, the AWS Toolkit for VS Code enables you to define, visualize, and create your Step Functions workflows without leaving the VS Code. The toolkit also provides code snippets for seven different ASL state types and additional service integrations to speed up workflow development. To continue building locally with VS Code:

    1. Download the AWS Toolkit for VS Code
    2. Open the statemachine.asl.json definition file, and choose Render graph to visual the workflow as you build.

Contributing to the Step Functions Workflows collection

Anyone can contribute a workflow to the Step Functions workflows collection. GitHub can host new workflow files in the AWS workflows-collection repository, or in a pre-existing repository of your own.

To submit a workflow:

  1. Choose Submit a workflow from the navigation section.
  2. Fill out the GitHub issue template.
  3. Clone the repository, and duplicate and rename the example _workflow_model directory.
  4. Add the associated workflow template files, ASL, and workflow image.
  5. Add the required meta information to `example-workflow.json`
  6. Make a Pull Request to the repository with the new workflow files.

Additional guidance can be found in the repository’s PUBLISHING.md file.

Conclusion

Today, the AWS Serverless Developer Advocate team is launching a new Serverless Land experience called “The Step Functions workflows collection”. This helps builders search, deploy, and contribute example Step Functions workflows.

The workflows collection simplifies the Step Functions getting started experience, and also shows more advanced users how to apply best practices to their workflows. These examples consist of fundamental building blocks for workflows, common application patterns implemented as workflows, and end to end applications.

All Step Functions builders are invited to contribute to the collection. This is done by submitting a pull request to the Step Functions Workflows Collection GitHub repository. Each submission is reviewed by the Serverless Developer advocate for quality and relevancy before publishing.

You can now learn to use Step Functions with a new workshop called the AWS Step Functions Workshop. This self-paced tutorial teaches you how to use the primary features of Step Functions through a series of interactive modules.

For more information on building applications with Step Functions visit Serverlessland.com.

Orchestrating AWS Glue crawlers using AWS Step Functions

Post Syndicated from Benjamin Smith original https://aws.amazon.com/blogs/compute/orchestrating-aws-glue-crawlers-using-aws-step-functions/

This blog post is written by Justin Callison, General Manager, AWS Workflow.

Organizations generate terabytes of data every day in a variety of semistructured formats. AWS Glue and Amazon Athena can give you a simpler and more cost-effective way to analyze this data with no infrastructure to manage. AWS Glue crawlers identify the schema of your data and manage the metadata required to analyze the data in place, without the need to transform this data and load into a data warehouse.

The timing of when your crawlers run and complete is important. You must ensure the crawler runs after your data has updated and before you query it with Athena or analyze with an AWS Glue job. If not, your analysis may experience errors or return incomplete results.

In this blog, you learn how to use AWS Step Functions, a low-code visual workflow service that integrates with over 220 AWS services. The service orchestrates your crawlers to control when they start, confirm completion, and combine them into end-to-end, serverless data processing workflows.

Using Step Functions to orchestrate multiple AWS Glue crawlers, provides a number of benefits when compared to implementing a solution directly with code. Firstly, the workflow provides an instant visual understanding of the application, and any errors that might occur during execution. Step Functions’ ability to run nested workflows inside a Map state helps to decouple and reuse application components with native array iteration. Finally, the Step Functions wait state lets the workflow periodically poll the status of the crawl job, without incurring additional cost for idol wait time.

Deploying the example

With this example, you create three datasets in Amazon S3, then use Step Functions to orchestrate AWS Glue crawlers to analyze the datasets and make them available to query using Athena.

You deploy the example with AWS CloudFormation using the following steps:

  1. Download the template.yaml file from here.
  2. Log in to the AWS Management Console and go to AWS CloudFormation.
  3. Navigate to Stacks -> Create stack and select With new resources (standard).
  4. Select Template is ready and Upload a template file, then Choose File and select the template.yaml file that you downloaded in Step 1 and choose Next.
  5. Enter a stack name, such as glue-stepfunctions-demo, and choose Next.
  6. Choose Next, check the acknowledgement boxes in the Capabilities and transforms section, then choose Create stack.
  7. After deployment, the status updates to CREATE_COMPLETE.

Create your datasets

Navigate to Step Functions in the AWS Management Console and select the create-dataset state machine from the list. This state machine uses Express Workflows and the Parallel state to build three datasets concurrently in S3. The first two datasets include information by user and location respectively and include files per day over the 5-year period from 2016 to 2020. The third dataset is a simpler, all-time summary of data by location.

To create the datasets, you choose Start execution from the toolbar for the create-dataset state machine, then choose Start execution again in the dialog box. This runs the state machine and creates the datasets in S3.

Navigate to the S3 console and view the glue-demo-databucket created for this example. In this bucket, in a folder named data, there are three subfolders, each containing a dataset.

The all-time-location-summaries folder contains a set of JSON files, one for each location.

The daily-user-summaries and daily-location-summaries contain a folder structure with nested folders for each year, month, and date. In addition to making this data easier to navigate via the console, this folder structure provides hints to AWS Glue that it can use to partition this dataset and make it more efficient to query.

Crawling

You now use AWS Glue crawlers to analyze these datasets and make them available to query. Navigate to the AWS Glue console, select Crawlers to see the list of Crawlers that you created when you deployed this example. Select the daily-user-summaries crawler to view details and note that they have tags assigned to indicate metadata such as the datatype of the data and whether the dataset is-partitioned.

Now, return to the Step Functions console and view the run-crawlers-with-tags state machine. This state machine uses AWS SDK service integrations to get a list of all crawlers matching the tag criteria you enter. It then uses the map state and the optimized service integration for Step Functions to execute the run-crawler state machine for each of the matching crawlers concurrently. The run-crawler state machine starts each crawler and monitors status until the crawler completes. Once each of the individual crawlers have completed, the run-crawlers-with-tags state machine also completes.

To initiate the crawlers:

  1. Choose Start execution from the top of the page when viewing the run-crawlers-with-tags state machine
  2. Provide the following as Input
    {"tags": {"datatype": "json"}}
  3. Choose Start execution.

After 2-3 minutes, the execution finishes with a Succeeded status once all three crawlers have completed. During this time, you can navigate to the run-crawler state machine to view the individual, nested executions per crawler or to the AWS Glue console to see the status of the crawlers.

Querying the data using Amazon Athena

Now, navigate to the Athena console where you can see the database and tables created by your crawlers. Note that AWS Glue recognized the partitioning scheme and included fields for year, month, and date in addition to user and usage fields for the data contained in the JSON files.

If you have not used Athena in this account before, you see a message instructing you to set a query result location. Choose View settings -> Manage -> Browse S3 and select the athena-results bucket that you created when you deployed the example. Choose Save then return to the Editor to continue.

You can now run queries such as the following, to calculate the total usage for all users over 5 years.

SELECT SUM(usage) all_time_usage FROM “daily_user_summaries”

You can also add filters, as shown in the following example, which limit results to those from 2016.

SELECT SUM(usage) all_time_usage FROM “daily_user_summaries” WHERE year = ‘2016’

Note this second query scanned only 17% as much data (133 KB vs 797 KB) and completed faster. This is because Athena used the partitioning information to avoid querying the full dataset. While the differences in this example are small, for real-world datasets with terabytes of data, your cost and latency savings from partitioning data can be substantial.

The disadvantage of a partitioning scheme is that new folders are not included in query results until you add new partitions. Re-running your crawler identifies and adds the new partitions and using Step Functions to orchestrate these crawlers makes that task simpler.

Extending the example

You can use these example state machines as they are in your AWS accounts to manage your existing crawlers. You can use Amazon S3 event notifications with Amazon EventBridge to trigger crawlers based on data changes. With the Optimized service integration for Amazon Athena, you can extend your workflows to execute queries against these crawled datasets. And you can use these examples to integrate crawler execution into your end-to-end data processing workflows, creating reliable, auditable workflows from ingestion through to analysis.

Conclusion

In this blog post, you learn how to use Step Functions to orchestrate AWS Glue crawlers. You deploy an example that generates three datasets, then uses Step Functions to start and coordinate crawler runs that analyze this data and make it available to query using Athena.

To learn more about Step Functions, visit Serverless Land.