Tag Archives: AWS Greengrass

Building a Controlled Environment Agriculture Platform

Post Syndicated from Ashu Joshi original https://aws.amazon.com/blogs/architecture/building-a-controlled-environment-agriculture-platform/

This post was co-written by Michael Wirig, Software Engineering Manager at Grōv Technologies.

A substantial percentage of the world’s habitable land is used for livestock farming for dairy and meat production. The dairy industry has leveraged technology to gain insights that have led to drastic improvements and are continuing to accelerate. A gallon of milk in 2017 involved 30% less water, 21% less land, a 19% smaller carbon footprint, and 20% less manure than it did in 2007 (US Dairy, 2019). By focusing on smarter water usage and sustainable land usage, livestock farming can grow to provide sustainable and nutrient-dense food for consumers and livestock alike.

Grōv Technologies (Grōv) has pioneered the Olympus Tower Farm, a fully automated Controlled Environment Agriculture (CEA) system. Unique amongst vertical farming startups, Grōv is growing cattle feed to improve that sustainable use of land for livestock farming while increasing the economic margins for dairy and beef producers.

The challenges of CEA

The set of growing conditions for a CEA is called a “recipe,” which is a combination of ingredients like temperature, humidity, light, carbon dioxide levels, and water. The optimal recipe is dynamic and is sensitive to its ingredients. Crops must be monitored in near-real time, and CEAs should be able to self-correct in order to maintain the recipe. To build a system with these capabilities requires answers to the following questions:

  • What parameters are needed to measure for indoor cattle feed production?
  • What sensors enable the accuracy and price trade-offs at scale?
  • Where do you place the sensors to ensure a consistent crop?
  • How do you correlate the data from sensors to the nutrient value?

To progress from a passively monitored system to a self-correcting, autonomous one, the CEA platform also needs to address:

  • How to maintain optimum crop conditions
  • How the system can learn and adapt to new seed varieties
  • How to communicate key business drivers such as yield and dry matter percentage

Grōv partnered with AWS Professional Services (AWS ProServe) to build a digital CEA platform addressing the challenges posed above.

Olympus Tower - Grov Technologies

Tower automation and edge platform

The Olympus Tower is instrumented for measuring recipe ingredients by combining the mechanical, electrical, and domain expertise of the Grōv team with the IoT edge and sensor expertise of the AWS ProServe team. The teams identified a primary set of features such as height, weight, and evenness of the growth to be measured at multiple stages within the Tower. Sensors were also added to measure secondary features such as water level, water pH, temperature, humidity, and carbon dioxide.

The teams designed and developed a purpose-built modular and industrial sensor station. Each sensor station has sensors for direct measurement of the features identified. The sensor stations are extended to support indirect measurement of features using a combination of Computer Vision and Machine Learning (CV/ML).

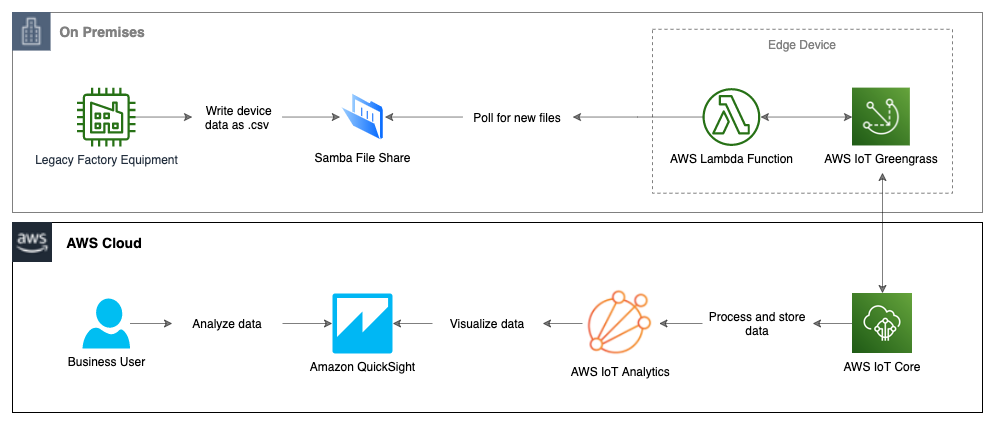
The trays with the growing cattle feed circulate through the Olympus Tower. A growth cycle starts on a tray with seeding, circulates through the tower over the cycle, and returns to the starting position to be harvested. The sensor station at the seeding location on the Olympus Tower tags each new growth cycle in a tray with a unique “Grow ID.” As trays pass by, each sensor station in the Tower collects the feature data. The firmware, jointly developed for the sensor station, uses AWS IoT SDK to stream the sensor data along with the Grow ID and metadata that’s specific to the sensor station. This information is sent every five minutes to an on-site edge gateway powered by AWS IoT Greengrass. Dedicated AWS Lambda functions manage the lifecycle of the Grow IDs and the sensor data processing on the edge.

The Grōv team developed AWS Greengrass Lambda functions running at the edge to ingest critical metrics from the operation automation software running the Olympus Towers. This information provides the ability to not just monitor the operational efficiency, but to provide the hooks to control the feedback loop.

The two sources of data were augmented with site-level data by installing sensor stations at the building level or site level to capture environmental data such as weather and energy consumption of the Towers.

All three sources of data are streamed to AWS IoT Greengrass and are processed by AWS Lambda functions. The edge software also fuses the data and correlates all categories of data together. This enables two major actions for the Grōv team – operational capability in real-time at the edge and enhanced data streamed into the cloud.

Grov Technologies - Architecture

Cloud pipeline/platform: analytics and visualization

As the data is streamed to AWS IoT Core via AWS IoT Greengrass. AWS IoT rules are used to route ingested data to store in Amazon Simple Sotrage Service (Amazon S3) and Amazon DynamoDB. The data pipeline also includes Amazon Kinesis Data Streams for batching and additional processing on the incoming data.

A ReactJS-based dashboard application is powered using Amazon API Gateway and AWS Lambda functions to report relevant metrics such as daily yield and machine uptime.

A data pipeline is deployed to analyze data using Amazon QuickSight. AWS Glue is used to create a dataset from the data stored in Amazon S3. Amazon Athena is used to query the dataset to make it available to Amazon QuickSight. This provides the extended Grōv tech team of research scientists the ability to perform a series of what-if analyses on the data coming in from the Tower Systems beyond what is available in the react-based dashboard.

Data pipeline - Grov Technologies

Completing the data-driven loop

Now that the data has been collected from all sources and stored it in a data lake architecture, the Grōv CEA platform established a strong foundation for harnessing the insights and delivering the customer outcomes using machine learning.

The integrated and fused data from the edge (sourced from the Olympus Tower instrumentation, Olympus automation software data, and site-level data) is co-related to the lab analysis performed by Grōv Research Center (GRC). Harvest samples are routinely collected and sent to the lab, which performs wet chemistry and microbiological analysis. Trays sent as samples to the lab are associated with the results of the analysis with the sensor data by corresponding Grow IDs. This serves as a mechanism for labeling and correlating the recipe data with the parameters used by dairy and beef producers – dry matter percentage, micro and macronutrients, and the presence of myco-toxins.

Grōv has chosen Amazon SageMaker to build a machine learning pipeline on its comprehensive data set, which will enable fine tuning the growing protocols in near real-time. Historical data collection unlocks machine learning use cases for future detection of anomalous sensors readings and sensor health monitoring, as well.

Because the solution is flexible, the Grōv team plans to integrate data from animal studies on their health and feed efficiency into the CEA platform. Machine learning on the data from animal studies will enhance the tuning of recipe ingredients that impact the animals’ health. This will give the farmer an unprecedented view of the impact of feed nutrition on the end product and consumer.

Conclusion

Grōv Technologies and AWS ProServe have built a strong foundation for an extensible and scalable architecture for a CEA platform that will nourish animals for better health and yield, produce healthier foods and to enable continued research into dairy production, rumination and animal health to empower sustainable farming practices.

Announcing AWS IoT Greengrass 2.0 – With an Open Source Edge Runtime and New Developer Capabilities

Post Syndicated from Channy Yun original https://aws.amazon.com/blogs/aws/announcing-aws-iot-greengrass-2-0-with-an-open-source-edge-runtime-and-new-developer-capabilities/

I am happy to announce AWS IoT Greengrass 2.0, a new version of AWS IoT Greengrass that makes it easy for device builders to build, deploy, and manage intelligent device software. AWS IoT Greengrass 2.0 provides an open source edge runtime, a rich set of pre-built software components, tools for local software development, and new features for managing software on large fleets of devices.


AWS IoT Greengrass 2.0 edge runtime is now open source under an Apache 2.0 license, and available on Github. Access to the source code allows you to more easily integrate your applications, troubleshoot problems, and build more reliable and performant applications that use AWS IoT Greengrass.

You can add or remove pre-built software components based on your IoT use case and your device’s CPU and memory resources. For example, you can choose to include pre-built AWS IoT Greengrass components such as stream manager only when you need to process data streams with your application, or machine learning components only when you want to perform machine learning inference locally on your devices.

The AWS IoT Greengrass IoT Greengrass 2.0 includes a new command-line interface (CLI) that allows you to locally develop and debug applications on your device. In addition, there is a new local debug console that helps you visually debug applications on your device. With these new capabilities, you can rapidly develop and debug code on a test device before using the cloud to deploy to your production devices.

AWS IoT Greengrass 2.0 is also integrated with AWS IoT thing groups, enabling you to easily organize your devices in groups and manage application deployments across your devices with features to control rollout rates, timeouts, and rollbacks.

AWS IoT Greengrass 2.0 – Getting Started
Device builders can use AWS IoT Greengrass 2.0 by going to the AWS IoT Greengrass console where you can find a download and install command that you run on your device. Once the installer is downloaded to the device, you can use it to install Greengrass software with all essential features, register the device as an AWS IoT Thing, and create a simple “hello world” software component in less than 10 minutes.

To get started in the AWS IoT Greengrass console, you first register a test device by clicking Set up core device. You assign the name and group of your core device. To deploy to only the core device, select No group. In the next step, install the AWS IoT Greengrass Core software in your device.

When the installer completes, you can find your device in the list of AWS IoT Greengrass Core devices on the Core devices page.

AWS IoT Greengrass components enable you to develop and deploy software to your AWS IoT Greengrass Core devices. You can write your application functionality and bundle it as a private component for deployment. AWS IoT Greengrass also provides public components, which provide pre-built software for common use cases that you can deploy to your devices as you develop your device software. When you finish developing the software for your component, you can register it with AWS IoT Greengrass. Then, you can deploy and run the component on your AWS IoT Greengrass Core devices.


To create a component, click the Create component button on the Components page. You can use a recipe or import an AWS Lambda function. The component recipe is a YAML or JSON file that defines the component’s details, dependencies, compatibility, and lifecycle. To learn about the specifications, visit the recipe reference guide.

Here is an example of a YAML recipe.

When you finish developing your component, you can add it to a deployment configuration to deploy to one or more core devices. To create a new deployment or configure the components to deploy to core devices, click the Create button on the Deployments page. You can deploy to a core device or a thing group as a target, and select the components to deploy. The deployment includes the dependencies for each component that you select.


You can edit the version and parameters of selected components and advanced settings such as the rollout configuration, which defines the rate at which the configuration deploys to the target devices; timeout configuration, which defines the duration that each device has to apply the deployment; or cancel configuration, which defines when to automatically stop the deployment.

Moving to AWS IoT Greengrass 2.0
Existing devices running AWS IoT Greengrass 1.x will continue to run without any changes. If you want to take advantage of new AWS IoT Greengrass 2.0 features, you will need to move your existing AWS IoT Greengrass 1.x devices and workloads to AWS IoT Greengrass 2.0. To learn how to do this, visit the migration guide.

After you move your 1.x applications over, you can start adding components to your applications using new version 2 features, while leaving your version 1 code as-is until you decide to update them.

AWS IoT Greengrass 2.0 Partners
At launch, industry-leading partners NVIDIA and NXP have qualified a number of their devices for AWS IoT Greengrass 2.0:

See all partner device listings in the AWS Partner Device Catalog. To learn about getting your device qualified, visit the AWS Device Qualification Program.

Available Now
AWS IoT Greengrass 2.0 is available today. Please see the AWS Region table for all the regions where AWS IoT Greengrass is available. For more information, see the developer guide.

Starting today, to help you evaluate, test, and develop with this new release of AWS IoT Greengrass, the first 1,000 devices in your account will not incur any AWS IoT Greengrass charges until December 31, 2021. For pricing information, check out the AWS IoT Greengrass pricing page.

Give it a try, and please send us feedback through your usual AWS Support contacts or the AWS forum for AWS IoT Greengrass.

Learn all the details about AWS IoT Greengrass 2.0 and get started with the new version today.

Channy

Field Notes: Ingest and Visualize Your Flat-file IoT Data with AWS IoT Services

Post Syndicated from Paul Ramsey original https://aws.amazon.com/blogs/architecture/field-notes-ingest-and-visualize-your-flat-file-iot-data-with-aws-iot-services/

Customers who maintain manufacturing facilities often find it challenging to ingest, centralize, and visualize IoT data that is emitted in flat-file format from their factory equipment. While modern IoT-enabled industrial devices can communicate over standard protocols like MQTT, there are still some legacy devices that generate useful data but are only capable of writing it locally to a flat file. This results in siloed data that is either analyzed in a vacuum without the broader context, or it is not available to business users to be analyzed at all.

AWS provides a suite of IoT and Edge services that can be used to solve this problem. In this blog, I walk you through one method of leveraging these services to ingest hard-to-reach data into the AWS cloud and extract business value from it.

Overview of solution

This solution provides a working example of an edge device running AWS IoT Greengrass with an AWS Lambda function that watches a Samba file share for new .csv files (presumably containing device or assembly line data). When it finds a new file, it will transform it to JSON format and write it to AWS IoT Core. The data is then sent to AWS IoT Analytics for processing and storage, and Amazon QuickSight is used to visualize and gain insights from the data.

Samba file share solution diagram

Since we don’t have an actual on-premises environment to use for this walkthrough, we’ll simulate pieces of it:

  • In place of the legacy factory equipment, an EC2 instance running Windows Server 2019 will generate data in .csv format and write it to the Samba file share.
    • We’re using a Windows Server for this function to demonstrate that the solution is platform-agnostic. As long as the flat file is written to a file share, AWS IoT Greengrass can ingest it.
  • An EC2 instance running Amazon Linux will act as the edge device and will host AWS IoT Greengrass Core and the Samba share.
    • In the real world, these could be two separate devices, and the device running AWS IoT Greengrass could be as small as a Raspberry Pi.

Prerequisites

For this walkthrough, you should have the following prerequisites:

  • An AWS Account
  • Access to provision and delete AWS resources
  • Basic knowledge of Windows and Linux server administration
  • If you’re unfamiliar with AWS IoT Greengrass concepts like Subscriptions and Cores, review the AWS IoT Greengrass documentation for a detailed description.

Walkthrough

First, we’ll show you the steps to launch the AWS IoT Greengrass resources using AWS CloudFormation. The AWS CloudFormation template is derived from the template provided in this blog post. Review the post for a detailed description of the template and its various options.

  1. Create a key pair. This will be used to access the EC2 instances created by the CloudFormation template in the next step.
  2. Launch a new AWS CloudFormation stack in the N. Virginia (us-east-1) Region using iot-cfn.yml, which represents the simulated environment described in the preceding bullet.
    •  Parameters:
      • Name the stack IoTGreengrass.
      • For EC2KeyPairName, select the EC2 key pair you just created from the drop-down menu.
      • For SecurityAccessCIDR, use your public IP with a /32 CIDR (i.e. 1.1.1.1/32).
      • You can also accept the default of 0.0.0.0/0 if you can have SSH and RDP open to all sources on the EC2 instances in this demo environment.
      • Accept the defaults for the remaining parameters.
  •  View the Resources tab after stack creation completes. The stack creates the following resources:
    • A VPC with two subnets, two route tables with routes, an internet gateway, and a security group.
    • Two EC2 instances, one running Amazon Linux and the other running Windows Server 2019.
    • An IAM role, policy, and instance profile for the Amazon Linux instance.
    • A Lambda function called GGSampleFunction, which we’ll update with code to parse our flat-files with AWS IoT Greengrass in a later step.
    • An AWS IoT Greengrass Group, Subscription, and Core.
    • Other supporting objects and custom resource types.
  • View the Outputs tab and copy the IPs somewhere easy to retrieve. You’ll need them for multiple provisioning steps below.

3. Review the AWS IoT Greengrass resources created on your behalf by CloudFormation:

    • Search for IoT Greengrass in the Services drop-down menu and select it.
    • Click Manage your Groups.
    • Click file_ingestion.
    • Navigate through the SubscriptionsCores, and other tabs to review the configurations.

Leveraging a device running AWS IoT Greengrass at the edge, we can now interact with flat-file data that was previously difficult to collect, centralize, aggregate, and analyze.

Set up the Samba file share

Now, we set up the Samba file share where we will write our flat-file data. In our demo environment, we’re creating the file share on the same server that runs the Greengrass software. In the real world, this file share could be hosted elsewhere as long as the device that runs Greengrass can access it via the network.

  • Follow the instructions in setup_file_share.md to set up the Samba file share on the AWS IoT Greengrass EC2 instance.
  • Keep your terminal window open. You’ll need it again for a later step.

Configure Lambda Function for AWS IoT Greengrass

AWS IoT Greengrass provides a Lambda runtime environment for user-defined code that you author in AWS Lambda. Lambda functions that are deployed to an AWS IoT Greengrass Core run in the Core’s local Lambda runtime. In this example, we update the Lambda function created by CloudFormation with code that watches for new files on the Samba share, parses them, and writes the data to an MQTT topic.

  1. Update the Lambda function:
    • Search for Lambda in the Services drop-down menu and select it.
    • Select the file_ingestion_lambda function.
    • From the Function code pane, click Actions then Upload a .zip file.
    • Upload the provided zip file containing the Lambda code.
    • Select Actions > Publish new version > Publish.

2. Update the Lambda Alias to point to the new version.

    • Select the Version: X drop-down (“X” being the latest version number).
    • Choose the Aliases tab and select gg_file_ingestion.
    • Scroll down to Alias configuration and select Edit.
    • Choose the newest version number and click Save.
    • Do NOT use $LATEST as it is not supported by AWS IoT Greengrass.

3. Associate the Lambda function with AWS IoT Greengrass.

    • Search for IoT Greengrass in the Services drop-down menu and select it.
    • Select Groups and choose file_ingestion.
    • Select Lambdas > Add Lambda.
    • Click Use existing Lambda.
    • Select file_ingestion_lambda > Next.
    • Select Alias: gg_file_ingestion > Finish.
    • You should now see your Lambda associated with the AWS IoT Greengrass group.
    • Still on the Lambda function tab, click the ellipsis and choose Edit configuration.
    • Change the following Lambda settings then click Update:
      • Set Containerization to No container (always).
      • Set Timeout to 25 seconds (or longer if you have large files to process).
      • Set Lambda lifecycle to Make this function long-lived and keep it running indefinitely.

Deploy AWS IoT Greengrass Group

  1. Restart the AWS IoT Greengrass daemon:
    • A daemon restart is required after changing containerization settings. Run the following commands on the Greengrass instance to restart the AWS IoT Greengrass daemon:
 cd /greengrass/ggc/core/

 sudo ./greengrassd stop

 sudo ./greengrassd start

2. Deploy the AWS IoT Greengrass Group to the Core device.

    • Return to the file_ingestion AWS IoT Greengrass Group in the console.
    • Select Actions Deploy.
    • Select Automatic detection.
    • After a few minutes, you should see a Status of Successfully completed. If the deployment fails, check the logs, fix the issues, and deploy again.

Generate test data

You can now generate test data that is ingested by AWS IoT Greengrass, written to AWS IoT Core, and then sent to AWS IoT Analytics and visualized by Amazon QuickSight.

  1. Follow the instructions in generate_test_data.md to generate the test data.
  2. Verify that the data is being written to AWS IoT Core following these instructions (Use iot/data for the MQTT Subscription Topic instead of hello/world).

screenshot

Setup AWS IoT Analytics

Now that our data is in IoT Cloud, it only takes a few clicks to configure AWS IoT Analytics to process, store, and analyze our data.

  1. Search for IoT Analytics in the Services drop-down menu and select it.
  2. Set Resources prefix to file_ingestion and Topic to iot/data. Click Quick Create.
  3. Populate the data set by selecting Data sets > file_ingestion_dataset >Actions > Run now. If you don’t get data on the first run, you may need to wait a couple of minutes and run it again.

Visualize the Data from AWS IoT Analytics in Amazon QuickSight

We can now use Amazon QuickSight to visualize the IoT data in our AWS IoT Analytics data set.

  1. Search for QuickSight in the Services drop-down menu and select it.
  2. If your account is not signed up for QuickSight yet, follow these instructions to sign up (use Standard Edition for this demo)
  3. Build a new report:
    • Click New analysis > New dataset.
    • Select AWS IoT Analytics.
    • Set Data source name to iot-file-ingestion and select file_ingestion_dataset. Click Create data source.
    • Click Visualize. Wait a moment while your rows are imported into SPICE.
    • You can now drag and drop data fields onto field wells. Review the QuickSight documentation for detailed instructions on creating visuals.
    • Following is an example of a QuickSight dashboard you can build using the demo data we generated in this walkthrough.

Cleaning up

Be sure to clean up the objects you created to avoid ongoing charges to your account.

  • In Amazon QuickSight, Cancel your subscription.
  • In AWS IoT Analytics, delete the datastore, channel, pipeline, data set, role, and topic rule you created.
  • In CloudFormation, delete the IoTGreengrass stack.
  • In Amazon CloudWatch, delete the log files associated with this solution.

Conclusion

Gaining valuable insights from device data that was once out of reach is now possible thanks to AWS’s suite of IoT services. In this walkthrough, we collected and transformed flat-file data at the edge and sent it to IoT Cloud using AWS IoT Greengrass. We then used AWS IoT Analytics to process, store, and analyze that data, and we built an intelligent dashboard to visualize and gain insights from the data using Amazon QuickSight. You can use this data to discover operational anomalies, enable better compliance reporting, monitor product quality, and many other use cases.

For more information on AWS IoT services, check out the overviews, use cases, and case studies on our product page. If you’re new to IoT concepts, I’d highly encourage you to take our free Internet of Things Foundation Series training.

Field Notes provides hands-on technical guidance from AWS Solutions Architects, consultants, and technical account managers, based on their experiences in the field solving real-world business problems for customers.

Field Notes: Integrating IoT and ITSM using AWS IoT Greengrass and AWS Secrets Manager – Part 2

Post Syndicated from Gary Emmerton original https://aws.amazon.com/blogs/architecture/field-notes-integrating-iot-and-itsm-using-aws-iot-greengrass-and-aws-secrets-manager-part-2/

In part 1 of this blog I introduced the need for organizations to securely connect thousands of IoT devices with many different systems in the hyperconnected world that exists today, and how that can be addressed using AWS IoT Greengrass and AWS Secrets Manager.  We walked through the creation of ServiceNow credentials in AWS Secrets Manager, the creation of IAM roles and the Lambda functions that will run on our edge device (a Raspberry Pi).

In this second part of the blog, we will setup AWS IoT Greengrass, on our Raspberry Pi, and AWS IoT Core so that we can run the AWS Lambda functions and access our ServiceNow credentials, retrieved securely from AWS Secrets Manager.

Setting up AWS IoT Core and AWS IoT Greengrass

The overall sequence for configuring AWS IoT Core and AWS IoT Greengrass is:

  • Create a certificate, and IoT Thing and link them
  • Create AWS IoT Greengrass group
  • Associate IAM role to the AWS IoT Greengrass group
  • Create and attach a policy to the certificate
  • Create an AWS IoT Greengrass Resource Definition for our ‘Secret’
  • Create an AWS IoT Greengrass Function Definition for our Lambda functions
  • Create an AWS IoT Greengrass Subscription Definition for IoT Topics to be used
  • Finally associate our Resource, Function and Subscription Definitions with our AWS IoT Greengrass Core

Steps

For this walkthrough, I have selected the AWS region “eu-west-1”, however, feel free to use other Regions where AWS IoT Core and AWS IoT Greengrass are available.

First, let’s install Greengrass on the Raspberry Pi:

  • Follow the instructions to configure the pre-requisites on the Raspberry Pi
  • Then we download the AWS IoT Greengrass software
  • And then we unzip the AWS IoT Greengrass software using the following command (note, this command is for version 1.10.0 of Greengrass and will change as later versions are released):

sudo tar -xzvf greengrass-linux-armv6l-1.10.0.tar.gz -C /

Note that AWS IoT Greengrass must be compatible with the version of the AWS Greengrass SDK installed to identify what versions are compatible and use sudo pip3 install greengrasssdk==<version_number> to install the SDK compatible with the version of AWS IoT Greengrass that we installed.

Our AWS IoT Greengrass core will authenticate with AWS IoT Core in AWS using certificates, so we need to generate these first using the following command:

aws iot create-keys-and-certificate --set-as-active --certificate-pem-outfile "iot-ge.cert.pem" --public-key-outfile "iot-ge.public.key" --private-key-outfile "iot-ge.private.key"

This command will generate three files containing the private key, public key and certificate.  All of these files need to be copied to the /greengrass/certs folder on the Raspberry Pi.  Also, the output of the preceding command will give the ARN of the certificate – we need to make a note of this ARN as we will use it in the next steps.

We also need to download a copy of the Amazon Root CA into the /greegrass/certs folder using the command below:

sudo wget -O root.ca.pem https://www.amazontrust.com/repository/AmazonRootCA1.pem

For the next step we need our AWS account number and IoT Host address unique to our account – we get the IoT Host address using the command:

aws iot describe-endpoint --endpoint-type iot:Data-ATS

Now we need to create a config.json file on the Raspberry Pi in the /greengrass/config folder, with the account number and IoT Host address obtained in the previous step;

{
  "coreThing" : {
    "caPath" : "root.ca.pem",
    "certPath" : "iot-ge.cert.pem",
    "keyPath" : "iot-ge.private.key",
    "thingArn" : "arn:aws:iot:eu-west-1:<aws_account_number>:thing/IoT-blog_Core",
    "iotHost" : "<endpoint_address>",
    "ggHost" : "greengrass-ats.iot.eu-west-1.amazonaws.com",
    "keepAlive" : 600
  },
  "runtime" : {
    "cgroup" : {
      "useSystemd" : "yes"
    },
    "allowFunctionsToRunAsRoot" : "yes"
  },
  "managedRespawn" : false,
  "crypto" : {
    "principals" : {
      "SecretsManager" : {
        "privateKeyPath" : "file:///greengrass/certs/iot-ge.private.key"
      },
      "IoTCertificate" : {
        "privateKeyPath" : "file:///greengrass/certs/iot-ge.private.key",
        "certificatePath" : "file:///greengrass/certs/iot-ge.cert.pem"
      }
    },
    "caPath" : "file:///greengrass/certs/root.ca.pem"
  }
}

Note that the line "allowFunctionsToRunAsRoot" : "yes" allows the Lambda functions to easily access the SenseHat on the Raspberry Pi. This configuration should normally be avoided in Production environments for security reasons but has been used here for simplicity.

Next we create the IoT Thing to represent our Raspberry Pi to match the entry we added into the config.json file previously:

aws iot create-thing --thing-name IoT-blog_Core

Now that our config.json file is in place and our IoT ‘thing’ created we can start the AWS IoT Greengrass software using the following commands:

cd /greengrass/ggc/core/
sudo ./greengrassd start

Then we attach the certificate to our new Thing – we need the ARN of the certificate that was noted in the earlier steps when we created the certificates:

aws iot attach-thing-principal --thing-name "IoT-blog_Core" --principal "<certificate_arn>"

Now we create the AWS IoT Greengrass group – make a note of the Group ID in the output of this command as we use it later:

aws greengrass create-group --name IoT-blog-group

Next we create the AWS IoT Greengrass Core definition file – create this using a text editor and save as core-def.json

{
  "Cores": [
    {
      "CertificateArn": "<certificate_arn>",
      "Id": "<IoT Thing Name>",
      "SyncShadow": true,
      "ThingArn": "<thing_arn>"
    }
  ]
}

Then, using the preceding file we just created, we create the core definition using the following command:

aws greengrass create-core-definition --name "IoT-blog_Core" --initial-version file://core-def.json

Now we associate the AWS IoT Greengrass core with the AWS IoT Greengrass group – we need the LatestVersionARN from the output of the command above and the group ID of your existing AWS IoT Greengrass group (in the output from the command for creation of the group in previous steps):

aws greengrass create-group-version --group-id "<greengrass_group_id>" --core-definition-version-arn "<core_definition_version_arn>"

Then we associate the IAM role (created earlier) to the AWS IoT Greengrass group;

aws greengrass associate-role-to-group --group-id "<greengrass_group_id>" --role-arn "arn:aws:iam::<aws_account_number>:role/IoTGGRole"

We need to create a policy to associate with the certificate so that our AWS IoT Greengrass Core (authenticated/authorized by our certificates) has rights to interact with AWS IoT Core.  To do this we create the policy.json file:

{
  "Version": "2012-10-17",
  "Statement": [
    {
      "Effect": "Allow",
      "Action": [
        "iot:Publish",
        "iot:Subscribe",
        "iot:Connect",
        "iot:Receive"
      ],
      "Resource": [
        "*"
      ]
    },
    {
      "Effect": "Allow",
      "Action": [
        "iot:GetThingShadow",
        "iot:UpdateThingShadow",
        "iot:DeleteThingShadow"
      ],
      "Resource": [
        "*"
      ]
    },
    {
      "Effect": "Allow",
      "Action": [
        "greengrass:*"
      ],
      "Resource": [
        "*"
      ]
    }
  ]
}

Then create the policy using the policy file using the command below:

aws iot create-policy --policy-name myGGPolicy --policy-document file://policy.json

And finally attach our new policy to the certificate – as the certificate is attached to our AWS IoT Greengrass Core, this gives the rights defined in the policy to our AWS IoT Greengrass Core;

aws iot attach-policy --target "<certificate_arn>" --policy-name "myGGPolicy"

Now we have the AWS IoT Greengrass Core and permissions in place, it’s time to add our Secret as a resource for AWS IoT Greengrass.

First, we need to create a resource definition that refers to the ARN of the secret we created earlier.  Get the ARN of the secret using the following command:

aws secretsmanager describe-secret --secret-id "greengrass-snow-creds"

And then we create a text file containing the following and save it as resource.json:

{
"Resources": [
    {
      "Id": "SNOW-Credentials",
      "Name": "SNOW-Credentials",
      "ResourceDataContainer": {
        "SecretsManagerSecretResourceData": {
          "ARN": "<secret_arn>"
        }
      }
    }
  ]
}

Now we command to create the resource reference in IoT to the Secret:

aws greengrass create-resource-definition --name "MySNOWSecret" --initial-version file://resource.json

Note the Resource ID from the output as it is needed as it has to be added to the Lambda definition json file in the next steps.  The function definition file contains the details of the Lambda function(s) that we will attach to our AWS IoT Greengrass group.  We create a text file with the content below and save as lambda-def.json.

We also specify a couple of variables in the definition file; these are the same as the environment variables that can be specified for Lambda, but they make the variables available in AWS IoT Greengrass.

Note, if we specify environment variables for the functions in the Lambda console then these will NOT be available when the function is running under AWS IoT Greengrass.  We will need our ServiceNow API URL to add to the configuration below, and this will be in the form of https://devXXXXX.service-now.com/api/now/table/incident, where XXXXX is the developer instance number assigned by ServiceNow when our instance is created.

We need the ARNs of the Lambda functions that we created in part 1 of the blog – these appear in the output after successfully creating the functions from the command line, or can be obtained using the aws lambda list-functions command – we need to have the ‘:1’ at the end of the ARN as AWS IoT Greengrass needs to reference published function versions.

{
  "DefaultConfig": {
    "Execution": {
      "IsolationMode": "NoContainer",
      "RunAs": {
        "Gid": 0,
        "Uid": 0
      }
    }
  },
  "Functions": [
    {
      "FunctionArn": "<lambda_function1_arn>:1",
      "FunctionConfiguration": {
        "EncodingType": "json",
        "Environment": {
          "Execution": {
            "IsolationMode": "NoContainer"
          },
          "Variables": { 
            "tempLimit": "30",
            "humidLimit": "50"
          }
        },
        "ExecArgs": "string",
        "Executable": "lambda_function.lambda_handler",
        "Pinned": true,
        "Timeout": 10
      },
    "Id": "sensorLambda"
    },
    {
      "FunctionArn": "<lambda_function2_arn>:1",
      "FunctionConfiguration": {
        "EncodingType": "json",
        "Environment": {
          "Execution": {
            "IsolationMode": "NoContainer"
          },
          "ResourceAccessPolicies": [
            {
              "Permission": "ro",
              "ResourceId": "SNOW-Credentials"
            }
          ],
          "Variables": { 
            "snowUrl": "<service_now_api_url>"
          }
        },
        "ExecArgs": "string",
        "Executable": "lambda_function.lambda_handler",
        "Pinned": false,
        "Timeout": 10
      },
    "Id": "anomalyLambda"
    }
  ]
}

The Lambda function now needs to be registered within our AWS IoT Greengrass core using the definition file just created, using the following command:

aws greengrass create-function-definition --name "IoT-blog-lambda" --initial-version file://lambda-def.json

Create Subscriptions

We now need to create some IoT Topics to pass data between the two Lambda functions and also to submit all sensor data to AWS IoT Core, which gives us visibility of the successful collection of sensor data.cd.

First, let’s create a subscription configuration file (subscriptions.json) for sensor data and anomaly data:

{
  "Subscriptions": [
    {
      "Id": "SensorData",
      "Source": "<lambda_function1_arn>:1",
      "Subject": "IoTBlog/sensorData",
      "Target": "cloud"
    },
    {
      "Id": "AnomalyData",
      "Source": "<lambda_function1_arn>:1",
      "Subject": "IoTBlog/anomaly",
      "Target": "<lambda_function2_arn>:1"
    },
    {
      "Id": "AnomalyDataB",
      "Source": "<lambda_function1_arn>:1",
      "Subject": "IoTBlog/anomaly",
      "Target": "cloud"
    }
  ]
}

And next, we run the command to create the subscription from this configuration:

aws greengrass create-subscription-definition --name "IoT-sensor-subs" --initial-version file://subscriptions.json

Update AWS IoT Greengrass Group Associations and Deploy

Now that the functions, subscriptions and resources have been defined, we run the following command to update our AWS IoT Greengrass group to the new version with those components included:

aws greengrass create-group-version --group-id <gg_group_id> --core-definition-version-arn "<core_def_version_arn>" --function-definition-version-arn "<function_def_version_arn>" --resource-definition-version-arn "<resource_def_version_arn>" --subscription-definition-version-arn "<subscription_def_version_arn>"

And finally, we can deploy our configuration.  Use the following command to deploy the Greengrass group to our device, using the group-version-id from the output of the previous command and also the group-id:

aws greengrass create-deployment --deployment-type NewDeployment --group-id <gg_group_id> --group-version-id <gg_group_version_id>

Summarized below is the integration between the different functions and components that we have now deployed to get from our sensor data through to an incident being raised in ServiceNow:

Raspberry PI

Create an Incident

Everything is setup now from an IoT perspective, so we can attempt to trigger a threshold breach on the sensors to trigger the creation of an incident in ServiceNow.  In order to trigger the incident creation, let’s raise the humidity around the sensor so that it breaches the threshold defined in the environment variables of the Lambda function.

Under normal conditions we will just see the data published by the first Lambda function in the IoTBlog/sensorData topic:

IoTblog sensordata

However, when a threshold is breached (in our example, humidity above 50%), the data is published to the IoTBlog/anomaly topic as shown below:

ioTblog Anomaly

Via the AWS IoT Greengrass subscriptions created earlier, this message arriving in the anomaly topic also triggers the second Lambda function to create the ticket in ServiceNow.

The log for the second Lambda function on AWS IoT Greengrass (stored in /greengrass/ggc/var/log/user/<region>/<aws_account_number>/ on the Raspberry Pi) will show a ‘201’ return code if the incident is successfully created in ServiceNow.

201 response

Now let’s log on to ServiceNow and check out our new incident.  Good news, our new incident appears correctly:

And when we click on our incident we can see the detail, including the full data from the IoT topic in the Activities section;

This is only a basic use of the ServiceNow API and there are many other parameters that you can use to increase the richness of the incident, refer to the ServiceNow API documentation for more details.

Cleaning up

To avoid incurring future charges, delete the resources that you created in the walkthrough.

Conclusion

We have built an IoT device (Raspberry Pi), running AWS IoT Greengrass, AWS Lambda, and using ServiceNow credentials managed in AWS Secrets Manager.  Using this we have triggered an anomaly event that has created an incident automatically in ServiceNow, directly from the Lambda function running on our Pi.  You can use this architecture as the foundation to integrate your edge devices and ITSM solution to automate ticket generation in your organization.

Look out for follow-up blogs that will extend this solution to provide a real-time dashboard for the sensor data and store the sensor data in a Data Lake for historical visualization.

Find out more about deploying Secrets to AWS IoT Greengrass Core.

Check out the AWS IoT Blog for more examples of how to use AWS to integrate your edge devices with the AWS Cloud.

Field Notes provides hands-on technical guidance from AWS Solutions Architects, consultants, and technical account managers, based on their experiences in the field solving real-world business problems for customers.


Field Notes: Integrating IoT and ITSM using AWS IoT Greengrass and AWS Secrets Manager – Part 1

Post Syndicated from Gary Emmerton original https://aws.amazon.com/blogs/architecture/field-notes-integrating-iot-and-itsm-using-aws-iot-greengrass-and-aws-secrets-manager-part-1/

IT Security is a hot topic in every organization, and in a hyper connected world the need to integrate thousands of IoT devices securely with many different systems at scale is critical.

AWS Secrets Manager helps customers manage their system credentials securely in the AWS Cloud, and with its integration with AWS IoT Greengrass, that capability now extends out to your edge-connected IoT devices.

In this two part blog post, I will walk through the steps to use this integration to give edge devices the capability to connect to and log incidents directly into ServiceNow. The credentials for connecting to ServiceNow are created in AWS Secrets Manager, and deployed locally (encrypted) to the edge device via AWS IoT Greengrass.

Part 1 (this post) gives an overview of the whole solution and the steps for setting up AWS Secrets Manager, creating the required IAM roles and AWS Lambda functions.  In part 2 of the blog we will then set up AWS IoT Greengrass and AWS IoT Core so that we can run the functions and access the secret on our edge device (Raspberry Pi).

Enabling edge devices to automatically raise incidents in your organization’s ITSM toolset ensures that you can use existing workflows and incident escalation paths for your edge devices.  Previously this would have been challenging to integrate. Additionally, by running this capability at the edge, it enables quicker responses and reduces the need to make calls back to the AWS Cloud.

Overview of solution

The solution makes use of a Raspberry Pi, running AWS IoT Greengrass. AWS Lambda functions on AWS IoT Greengrass capture temperature and humidity sensor data and make calls directly to ServiceNow when thresholds are breached.  The integration of AWS Secrets Manager with AWS IoT Core enables the credentials required for the ServiceNow API calls to be available locally. These calls are encrypted and available on the Pi for the Lambda function to use.

The sensors for temperature and humidity in this example are on a Raspberry Pi Sense Hat, which illustrates sensors that could be used in an industrial or manufacturing use case.  You can use any type of sensor such as vibration, strain gauges, or other electro-mechanical sensors.

One of the Lambda functions running on AWS IoT Greengrass on the RPi captures the sensor readings, and should a threshold on either be exceeded then it triggers a second Lambda function (again running on AWS IoT Greengrass). This then makes a ‘create incident’ API call to ServiceNow, using the credentials stored in AWS Secrets Manager.

In order to have visibility of the sensor data, and to manage communications between the first and second Lambda functions, all data from the sensors is published to one IoT Topic Data related to any threshold breaches is published to another IoT Topic.

Following is a high-level diagram for the architecture used in this blog.

ServiceNow RA

Prerequisites

To complete the steps in this blog, you need:

  • An AWS Account
  • A ServiceNow developer instance or other test ServiceNow instance that you can access – You can sign-up for a free ServiceNow developer account 
  • A Raspberry Pi (I used a Pi 3B with Raspbian Buster)
  • A Raspberry Pi SenseHat
  • A workstation with the latest AWS Command Line Interface (CLI) installed

Additionally, ensure that you have Python 3.7.x installed with the following Python modules on the Raspberry Pi (Raspian Buster includes Python 3.7 by default). Install the following packages as the root user (sudo pip):

  • greengrasssdk
  • boto3
  • requests
  • sense_hat
  • datetime

I have taken the approach of having these modules installed on the Pi in order to simplify the creation of the Lambda function.  This ensures the function will run locally on the Pi rather than having to build all of the Python modules on the Pi and then zip them to run the Lambda in an AWS IoT Greengrass container.

Walkthrough

The steps in the walkthrough can be achieved from the AWS console. I have focused on the command line approach, using the AWS CLI, as this will give a more detailed view of what is happening and the dependencies between the different components.  The overall sequence for the steps is:

  • Create secret in AWS Secrets Manager – this will contain the credentials required to access ServiceNow for Lambda running on AWS IoT Greengrass
  • Create IAM role – provides permissions for AWS IoT Greengrass to other AWS services, including AWS Secrets Manager
  • Create Lambda functions – the functions that will capture sensor data and create the Service Now ticket
  • Configure and Deploy IoT Core – deploy our configuration to the Raspberry Pi, covered in Part 2 of this blog

I’ve structured the order of the steps in a logical sequence so that any dependencies of later steps are created first.  There are a number of places where a value in the output of one command (such as an ARN) needs to be noted as required for subsequent commands. At times the steps may seem counter-intuitive, but whilst developing this blog, I found this sequence has proven to be the most effective.

Create Secret

First, we create our ‘Secret’ in AWS Secrets Manager.  This consists of a secret string containing a JSON object for the username and password required for authentication to the API of my ServiceNow developer instance.  For the purposes of this example, we will use the default encryption key for the AWS Secrets Manager service.

The following command, from the AWS CLI, is used to create the new secret, entering the relevant username and password for the ServiceNow instance.

IMPORTANT: the name of the secret must start with “greengrass-“(specified in the command after the “–name” parameter) because the IAM Greengrass managed service role (which we will use later) has permission by default to access secrets that start with this text.

aws secretsmanager create-secret --name "greengrass-snow-creds" --description "Credentials for ServiceNow API access" --secret-string '{"username":"&lt;username&gt;","password":"&lt;password&gt;"}'

The successful completion of the *preceding command results in an output on your terminal screen, containing the ARN (Amazon Resource Name) for the new secret.

Create IAM roles

In order for AWS IoT Greengrass to access our new secret and download it securely to AWS IoT Greengrass running on the Pi, we need to give it an IAM role. If we do not set this up correctly then there will be an error when trying to deploy the AWS IoT Greengrass group later in the walkthrough.

Our new IAM role needs a policy document that describes the permissions that we will give the role.  The first step is to create the IAM policy document, containing only the permissions for the Greengrass service this new role – to do this we create a text file called assume-role.json containing the following:

{
  "Version": "2012-10-17",
  "Statement": [
    {
      "Effect": "Allow",
      "Principal": {
        "Service": "greengrass.amazonaws.com"
      },
      "Action": "sts:AssumeRole"
    }
  ]
}

Then we run the following command, referencing the file just created:

aws iam create-role --role-name "IoTGGRole" --assume-role-policy-document file://assume-role.json

And finally we need to attach the IAM managed AWS IoT Greengrass service role to our new custom role:

aws iam attach-role-policy --role-name "IoTGGRole" --policy-arn arn:aws:iam::aws:policy/service-role/AWSGreengrassResourceAccessRolePolicy

We also need a role for our Lambda functions with basic execution permissions; create a text file called lambda-role.json containing the following:

{
  "Version": "2012-10-17",
  "Statement": [
    {
      "Effect": "Allow",
      "Principal": {
        "Service": "lambda.amazonaws.com"
      },
      "Action": "sts:AssumeRole"
    }
  ]
}

Then we run the following command, referencing the file just created:

aws iam create-role --role-name "IoTLambdaRole" --assume-role-policy-document file://lambda-role.json

And finally we need to attach the IAM managed Lambda basic execution role to our new custom role:

aws iam attach-role-policy --role-name "IoTLambdaRole" --policy-arn arn:aws:iam::aws:policy/service-role/AWSLambdaBasicExecutionRole

Create Lambda Functions

We now create the Lambda functions that will be deployed to Greengrass – these functions manage the interactions between the sensors and ServiceNow.

Lambda Function 1 – Get/Publish Sensor Data

The first Lambda function reads the sensor data and publishes the data to an IoT Topic (IoTBlog/sensorData), every 5 seconds, which can then be used by downstream services for analytics.  This function also determines whether a threshold has been breached and if so, it publishes the data to a separate IoT Topic (IotBlog/anomaly) to which our second Lambda function is subscribed.

import os
import json
from datetime import datetime
import time
import sys
from sense_hat import SenseHat
import greengrasssdk
import boto3

client = greengrasssdk.client('iot-data')
secClient = greengrasssdk.client('secretsmanager')
sense = SenseHat()
sense.clear()

t_threshold = int(os.environ['tempLimit'])
h_threshold = int(os.environ['humidLimit'])

def lambda_handler(event, context):
    return
 
# Get sensor data and check against thresholds
def getSensorData():
    while True:
        eventTitle = "no event"
        anomaly = False
        ts = time.time()
        dt = datetime.fromtimestamp(ts).strftime('%Y-%m-%d %H:%M:%S')
        
        temp     = round(sense.get_temperature(),2)
        humidity = round(sense.get_humidity(),2)
        
        time.sleep(5)

        if (temp > int(t_threshold)):
            anomaly = True
            eventTitle = "Temperature breach"
            
        if (humidity > int(h_threshold)):
            anomaly = True
            eventTitle = "Humidity breach"

        sensorData = { 'title': eventTitle,'dt':dt,'ts':ts,'t':temp,'h':humidity }
        publishData(anomaly,sensorData)

# Publish sensor data to IoT topic(s)
def publishData(anomaly,myData):
    response = client.publish(
        topic = 'IoTBlog/sensorData',
        payload = json.dumps(myData) )
    

We create a text file lambda_function.py containing the code above and then compress into a zip file named lambda_function_1.zip.  Once this is done we can then create the function in AWS using the following command:

aws lambda create-function --function-name "1-IoT-GetSensorData" --runtime python3.7 --zip-file fileb://lambda_function_1.zip --handler lambda_function.lambda_handler –role arn:aws:iam::&lt;aws_account_number&gt;:role/IoTLambdaRole
In order to make use of Lambda functions in AWS IoT Greengrass we then need to publish a version of the function using the following command:
aws lambda publish-version --function-name "1-IoT-GetSensorData"

Lambda Function 2 – Create Anomaly Ticket

The second Lambda function is triggered through its subscription to the anomaly data published to the anomaly IoT Topic by the first Lambda function. This then makes a call to the ServiceNow API to create an incident.  Prior to making the API call, the function obtains the ServiceNow credentials from the secret that has been made available to AWS IoT Greengrass.

As this is a Resource within the AWS IoT Greengrass Core, it is automatically downloaded to the Raspberry Pi as part of the deployment of the AWS IoT Greengrass Core.

import os
import json
import sys
import greengrasssdk
import requests

client = greengrasssdk.client('iot-data')
secClient = greengrasssdk.client('secretsmanager')
secret_name = "greengrass-snow-creds"
snow_instance = os.environ['snowUrl']
msg = ""

def publishAnomaly(msg,title):
    auth = getLocalSecret()
    createTicket(auth,msg,title)

# Get secret from GG
def getLocalSecret():
    secret = secClient.get_secret_value(SecretId=secret_name)
    rawSecret = secret.get('SecretString')
    return json.loads(str(rawSecret))

# Create ticket in ServiceNow            
def createTicket(auth,eventData,title):
    API_ENDPOINT = snow_instance
    HEADERS = {"Content-Type":"application/json","Accept":"application/json"}
    PARAMS = { 
        "short_description":title,
        "assignment_group":"sensor_team",
        "urgency":"2",
        "impact":"2",
        "comments":eventData
    } 

    request = requests.post(url = API_ENDPOINT, auth=(str(auth["username"]),str(auth["password"])), headers=HEADERS, data = json.dumps(PARAMS))
    print("Response:",request)

def lambda_handler(event, context):
    msg = json.dumps(event)
    msg = json.loads(msg)
    title = "Sensor Threshold - " + msg["title"]
    
    publishAnomaly(msg,title)
    return

We create another text file, lambda_function.py containing the code above and then compress into a zip file named lambda_function_2.zip.  Once this is done we can then create the function in AWS using the following command:

aws lambda create-function --function-name "2-IoT-ServiceNow" --runtime python3.7 --zip-file fileb://lambda_function_2.zip --handler lambda_function.lambda_handler –role arn:aws:iam::&lt;account_number&gt;:role/IoTLambdaRole

In order to make use of Lambda functions in Greengrass we then need to publish a version of the function using the following command:

aws lambda publish-version --function-name "2-IoT-ServiceNow"

Conclusion

In this post, I showed you the steps for integrating IoT and ITSM by setting up AWS Secrets Manager, creating the required IAM roles and AWS Lambda functions.  Now you can proceed to part 2 of the blog to set up AWS IoT-Core and AWS IoT Greengrass to make use of the secret and functions that you created in this post.

Field Notes provides hands-on technical guidance from AWS Solutions Architects, consultants, and technical account managers, based on their experiences in the field solving real-world business problems for customers.