Data lakes are a centralized repository for storing structured and unstructured data at scale. Data lakes enable you to create dashboards, perform big data processing and real-time analytics, and create machine learning (ML) models on your data to drive business decisions.
Many customers are choosing AWS Lake Formation as their data lake management solution. Lake Formation is an integrated data lake service that makes it simple for you to ingest, clean, catalog, transform, and secure your data and make it available for analysis and ML.
However, some companies require account authentication and authorization to be managed through AWS IAM Identity Center (successor to AWS Single Sign-On), which doesn’t have a built-in integration with Lake Formation.
Integrating Lake Formation with IAM Identity Center can help you manage data access at the organization level, consolidating AWS account and data lake authentication and authorization.
In this post, we walk through the steps to integrate IAM Identity Center with Lake Formation.
Solution overview
In this post, we configure IAM Identity Center with permission sets for your data lake personas. These are the permissions that allow your data lake users to access Lake Formation. When the permission sets are assigned to your data lake account, IAM Identity Center creates Identity and Access Management (IAM) roles in that account. The IAM roles are prefixed with AWSReservedSSO_<Permission Set Name>.
In Lake Formation, you can grant data resource permissions to IAM users and roles. To integrate with IAM Identity Center, you will grant data resource access to the IAM roles created by IAM Identity Center.
Now, when users access the data lake account through the IAM Identity Center portal, they assume an IAM role that has access to Lake Formation resources.
The following diagram illustrates this solution architecture.
To implement the solution, complete the following high-level steps:
Create a permission set within IAM Identity Center
Grant Users or Groups access to the data lake account in IAM Identity Center
Assign an IAM Identity Center role as a Data Lake Administrator
Grant IAM Identity Center generated IAM role data lake permissions in Lake Formation
Grant IAM Identity Center generated IAM role data location permissions in Lake Formation
Prerequisites
For this walkthrough, you should have the following prerequisites:
Verify that your Lake Formation data lake account is part of your organization
Create a permission set with IAM Identity Center
To create your permission set, complete the following steps:
Sign into the AWS Management Console with your management account and go to the Region where IAM Identity Center is configured.
On the IAM Identity Center Console, choose Permissions sets in the navigation pane.
Choose Create permission set.
Select Custom permission set, then choose Next.
Next, you must specify policies. The first permission set you create should have data lake admin privileges. AWS recommends granting data lake admins the following AWS managed policies: AWSGlueConsoleFullAccess, AWSLakeFormationCrossAccountManager, AWSLakeFormationDataAdmin, AmazonAthenaFullAccess, and CloudWatchLogsReadOnlyAccess. However, if these permissions are too permissive or not permissive enough, you may prefer using customer managed policies.
Choose Next
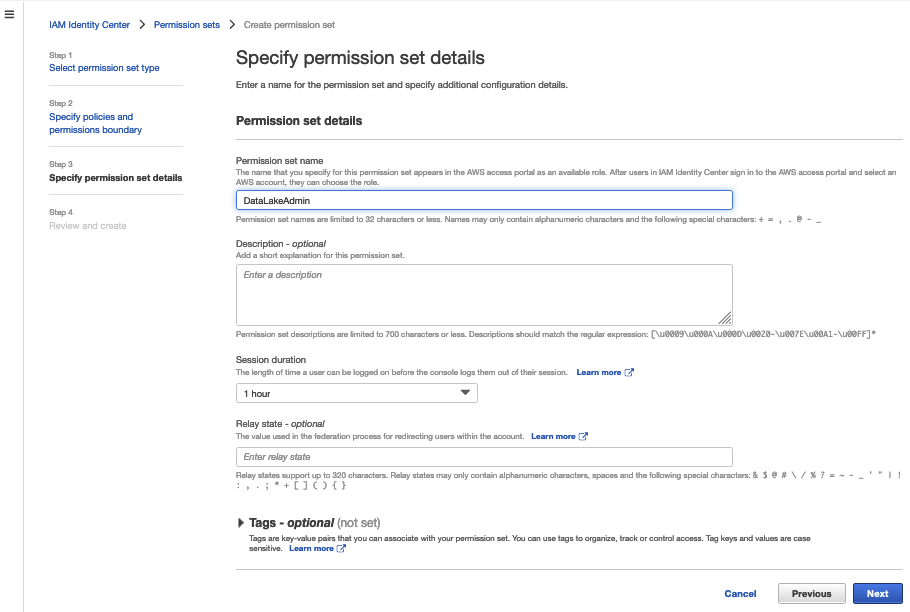
Specify permission set details, then choose Next.
Review your settings, then choose Create.
Repeat the steps to create a data analyst role to grant Lake Formation access. For this post, we created the role LakeFormationDataAnalyst with the policy AmazonAthenaFullAccess.
Grant users or groups access to the data lake account in IAM Identity Center
To grant access to users and groups, complete the following steps:
On the IAM Identity Center console, chose AWS accounts in the navigation pane.
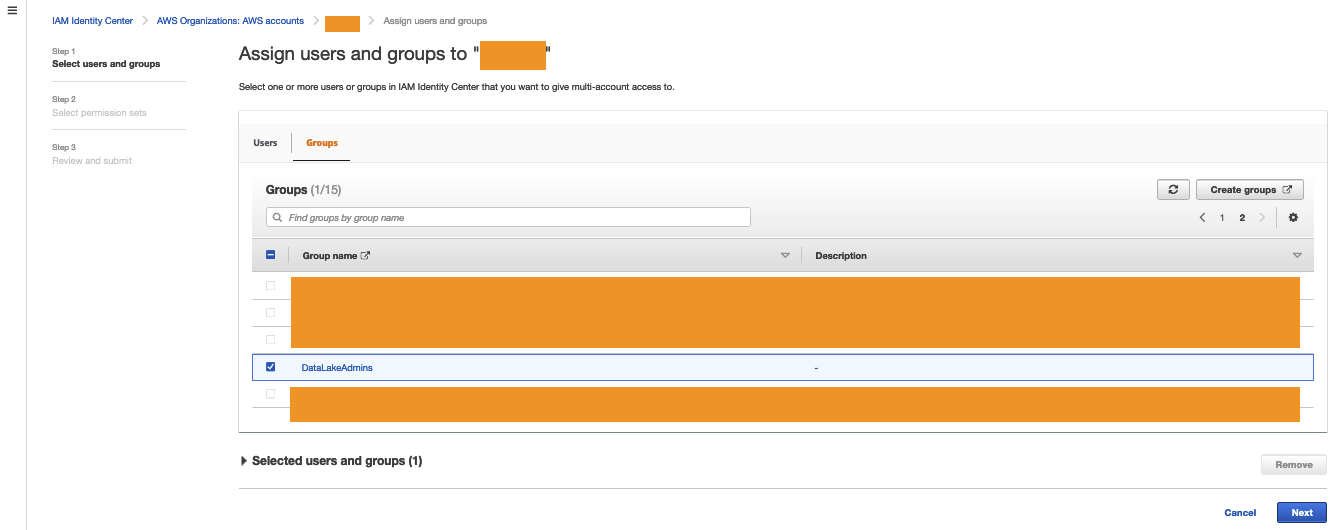
Choose Assign users or groups.
Select the user or group you want to assign the data lake account permissions to (DataLakeAdmin).
Choose Next.
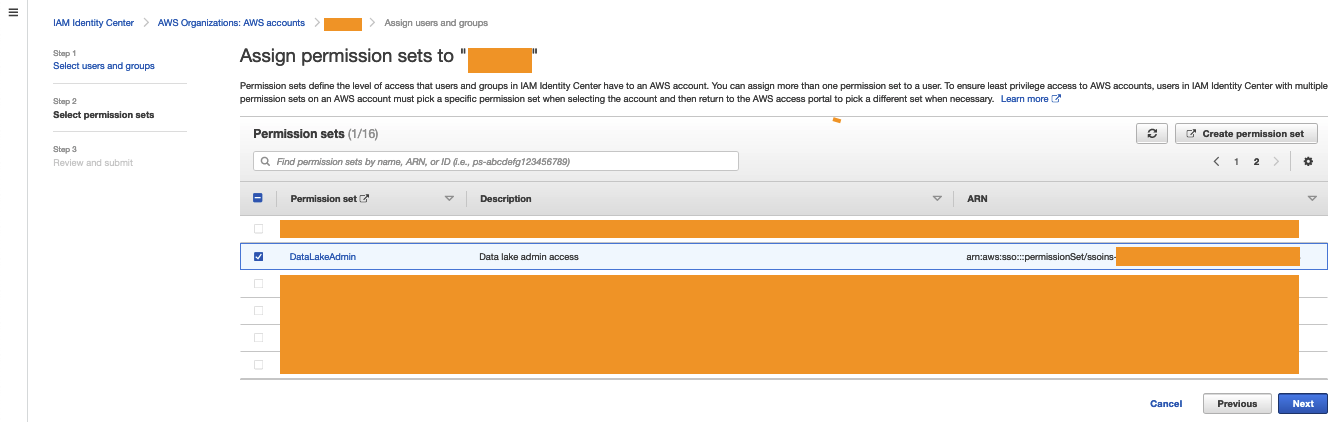
Select the permission you created earlier.
Choose Next.
Review your settings, then choose Submit.
Verify your IAM Identity Center permissions have been successfully granted by visiting your IAM Identity Center Portal, choosing the data lake admin, and signing in to the console.
Assign an IAM Identity Center role as a data lake administrator
The following steps set up a data lake administrator with the IAM role created by IAM Identity Center. Administrators have full access to the Lake Formation console, and control the initial data configuration and access permissions. For all users and groups that don’t need to be data lake administrators, skip to the next series of steps.
Sign in to the console as the data lake account with admin access.
Open the Lake Formation console.A pop-up window appears, prompting you to define your administrators.
Select Add other AWS users or roles.
Choose the permission set you created earlier (starting with AWSReservedSSO_DataLakeAdmin).
Choose Get started.
On the Administrative roles and tasks page, under Database creators, choose Grant.
Choose your data lake admin role.
Select Create database under Catalog permissions and Grantable permissions.
Choose Grant.
You now have an IAM Identity Center-generated IAM principal that is assigned as the data lake administrator and database creator.
Grant the IAM Identity Center role data lake permissions in Lake Formation
Whether you’re managing permissions with LF-tags or named resources, the steps for granting access remain the same
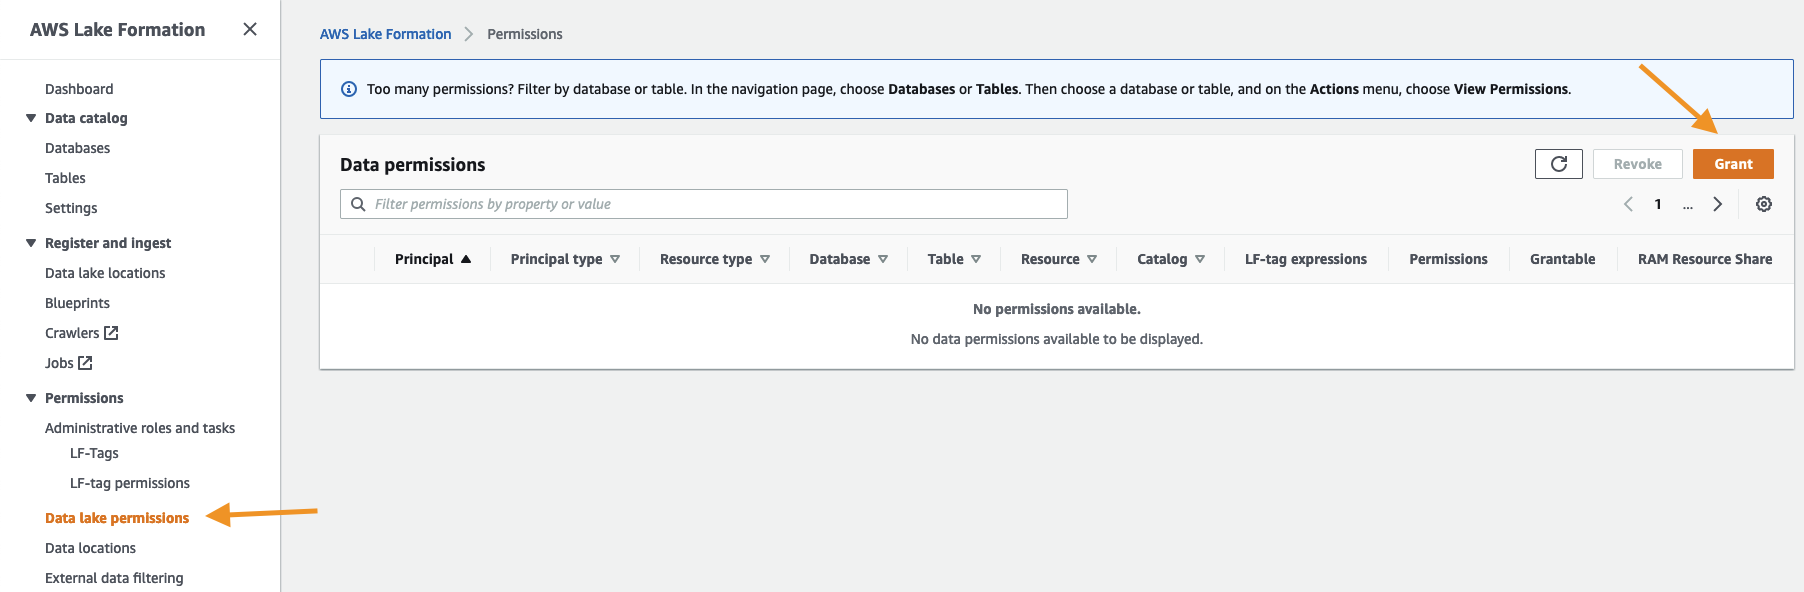
On the Lake Formation console, under Permissions in the navigation pane, choose Data lake permissions.
Choose Grant.
Select IAM users and roles.
Choose the AWSReservedSSO_LakeFormationDataAnalyst role.
Grant access to database and table permissions as applicable, then choose Grant.
You now have an IAM Identity Center-generated IAM principal data permissions.
Grant the IAM Identity Center role data location permissions in Lake Formation
When granting access to data locations, the process remains the same.
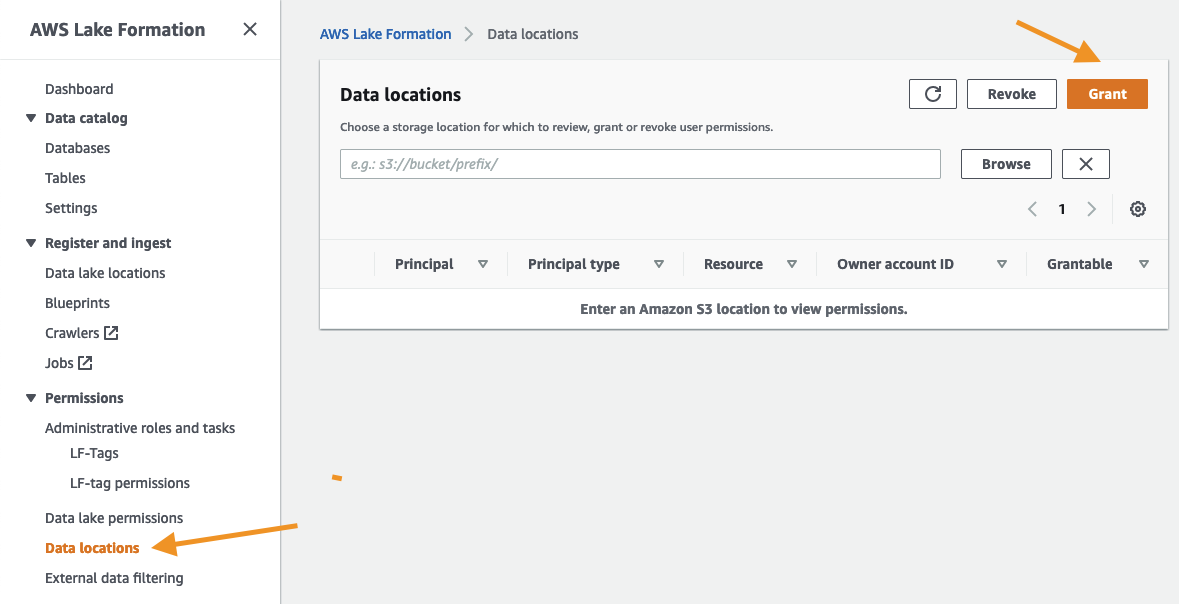
On the Lake Formation console, under Permissions in the navigation pane, choose Data locations.
Choose Grant.
Choose the AWSReservedSSO_LakeFormationDataAnalyst role.
Complete the remaining fields and choose Grant.
You now have an IAM Identity Center-generated IAM principal with Data location access.
Validate data access
We now validate data access for the IAM Identity Center principal.
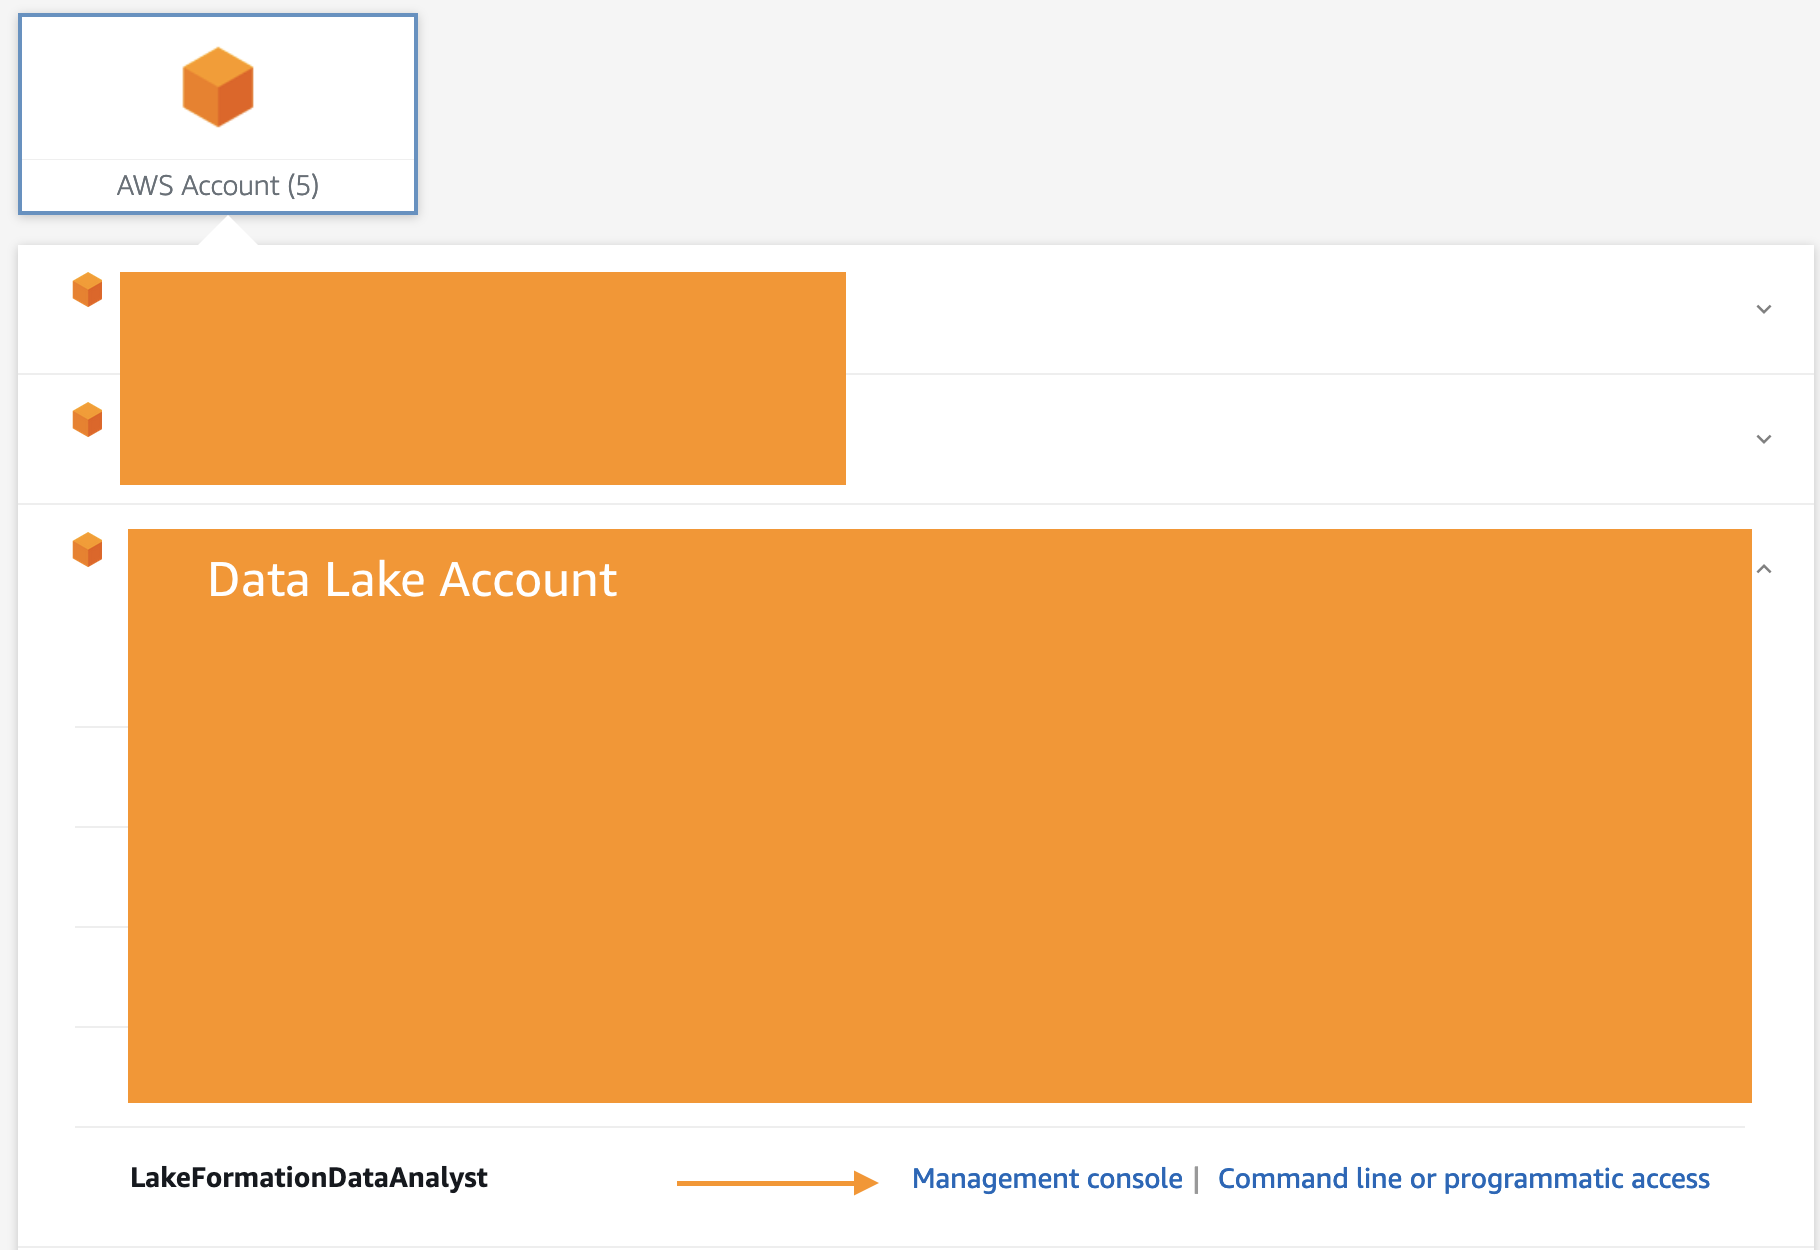
Sign in to the console through IAM Identity Center as the principal you granted access to. For this post, we’re logging in as the LakeFormationDataAnalyst role. To test data access, we run some queries in Amazon Athena.
On the Athena console, choose Query editor.
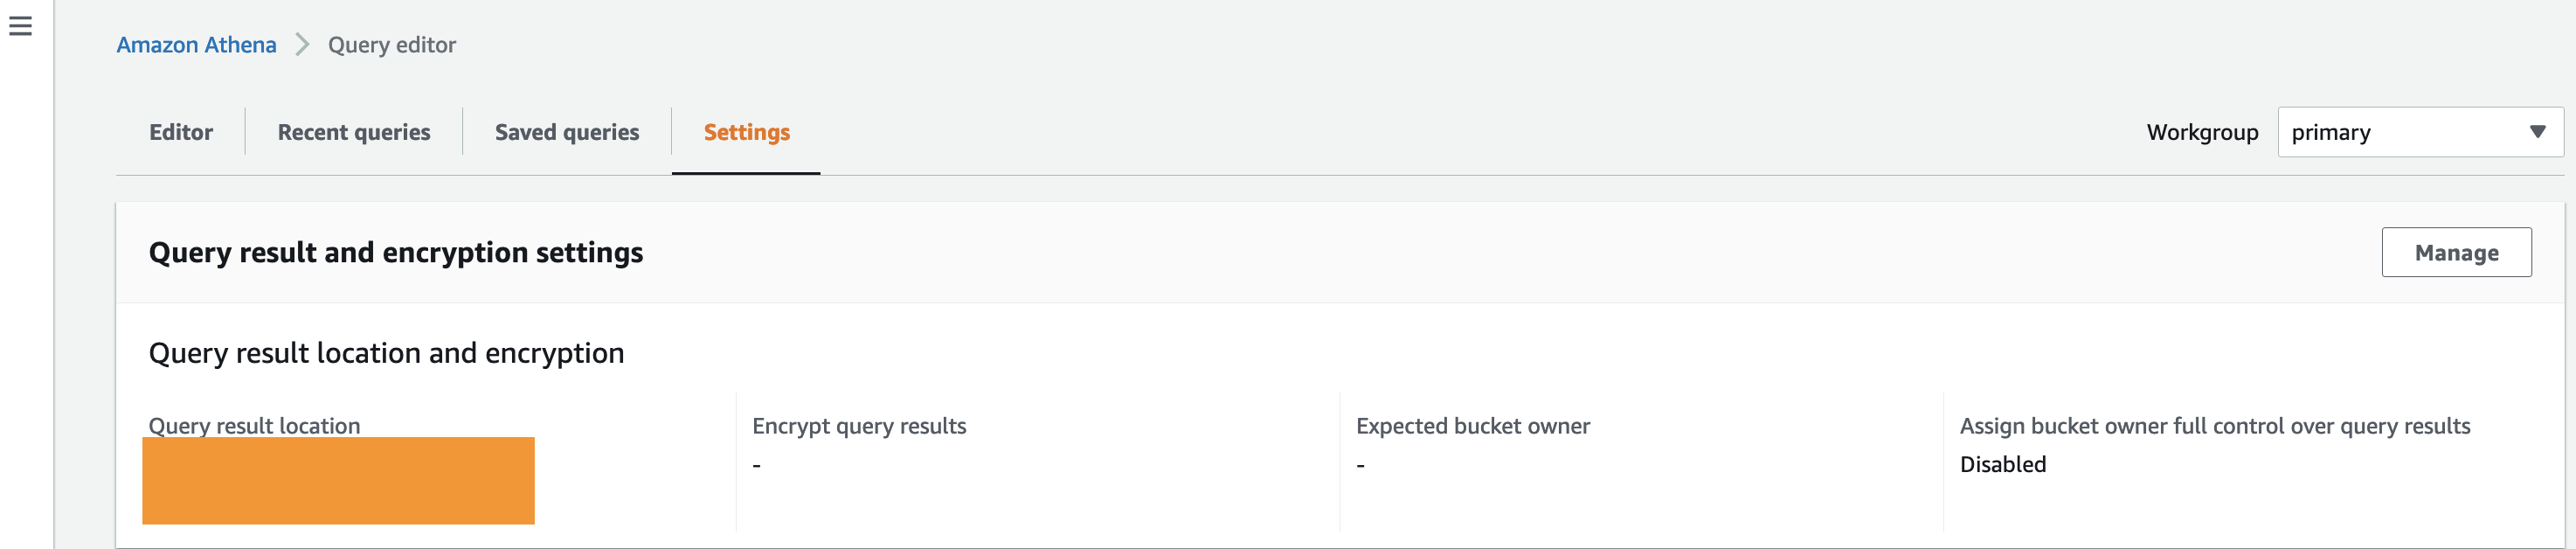
On the Settings tab, confirm that a query result location is set up.
If you don’t have a query result location, choose Manage and configure your query result location and encryption.
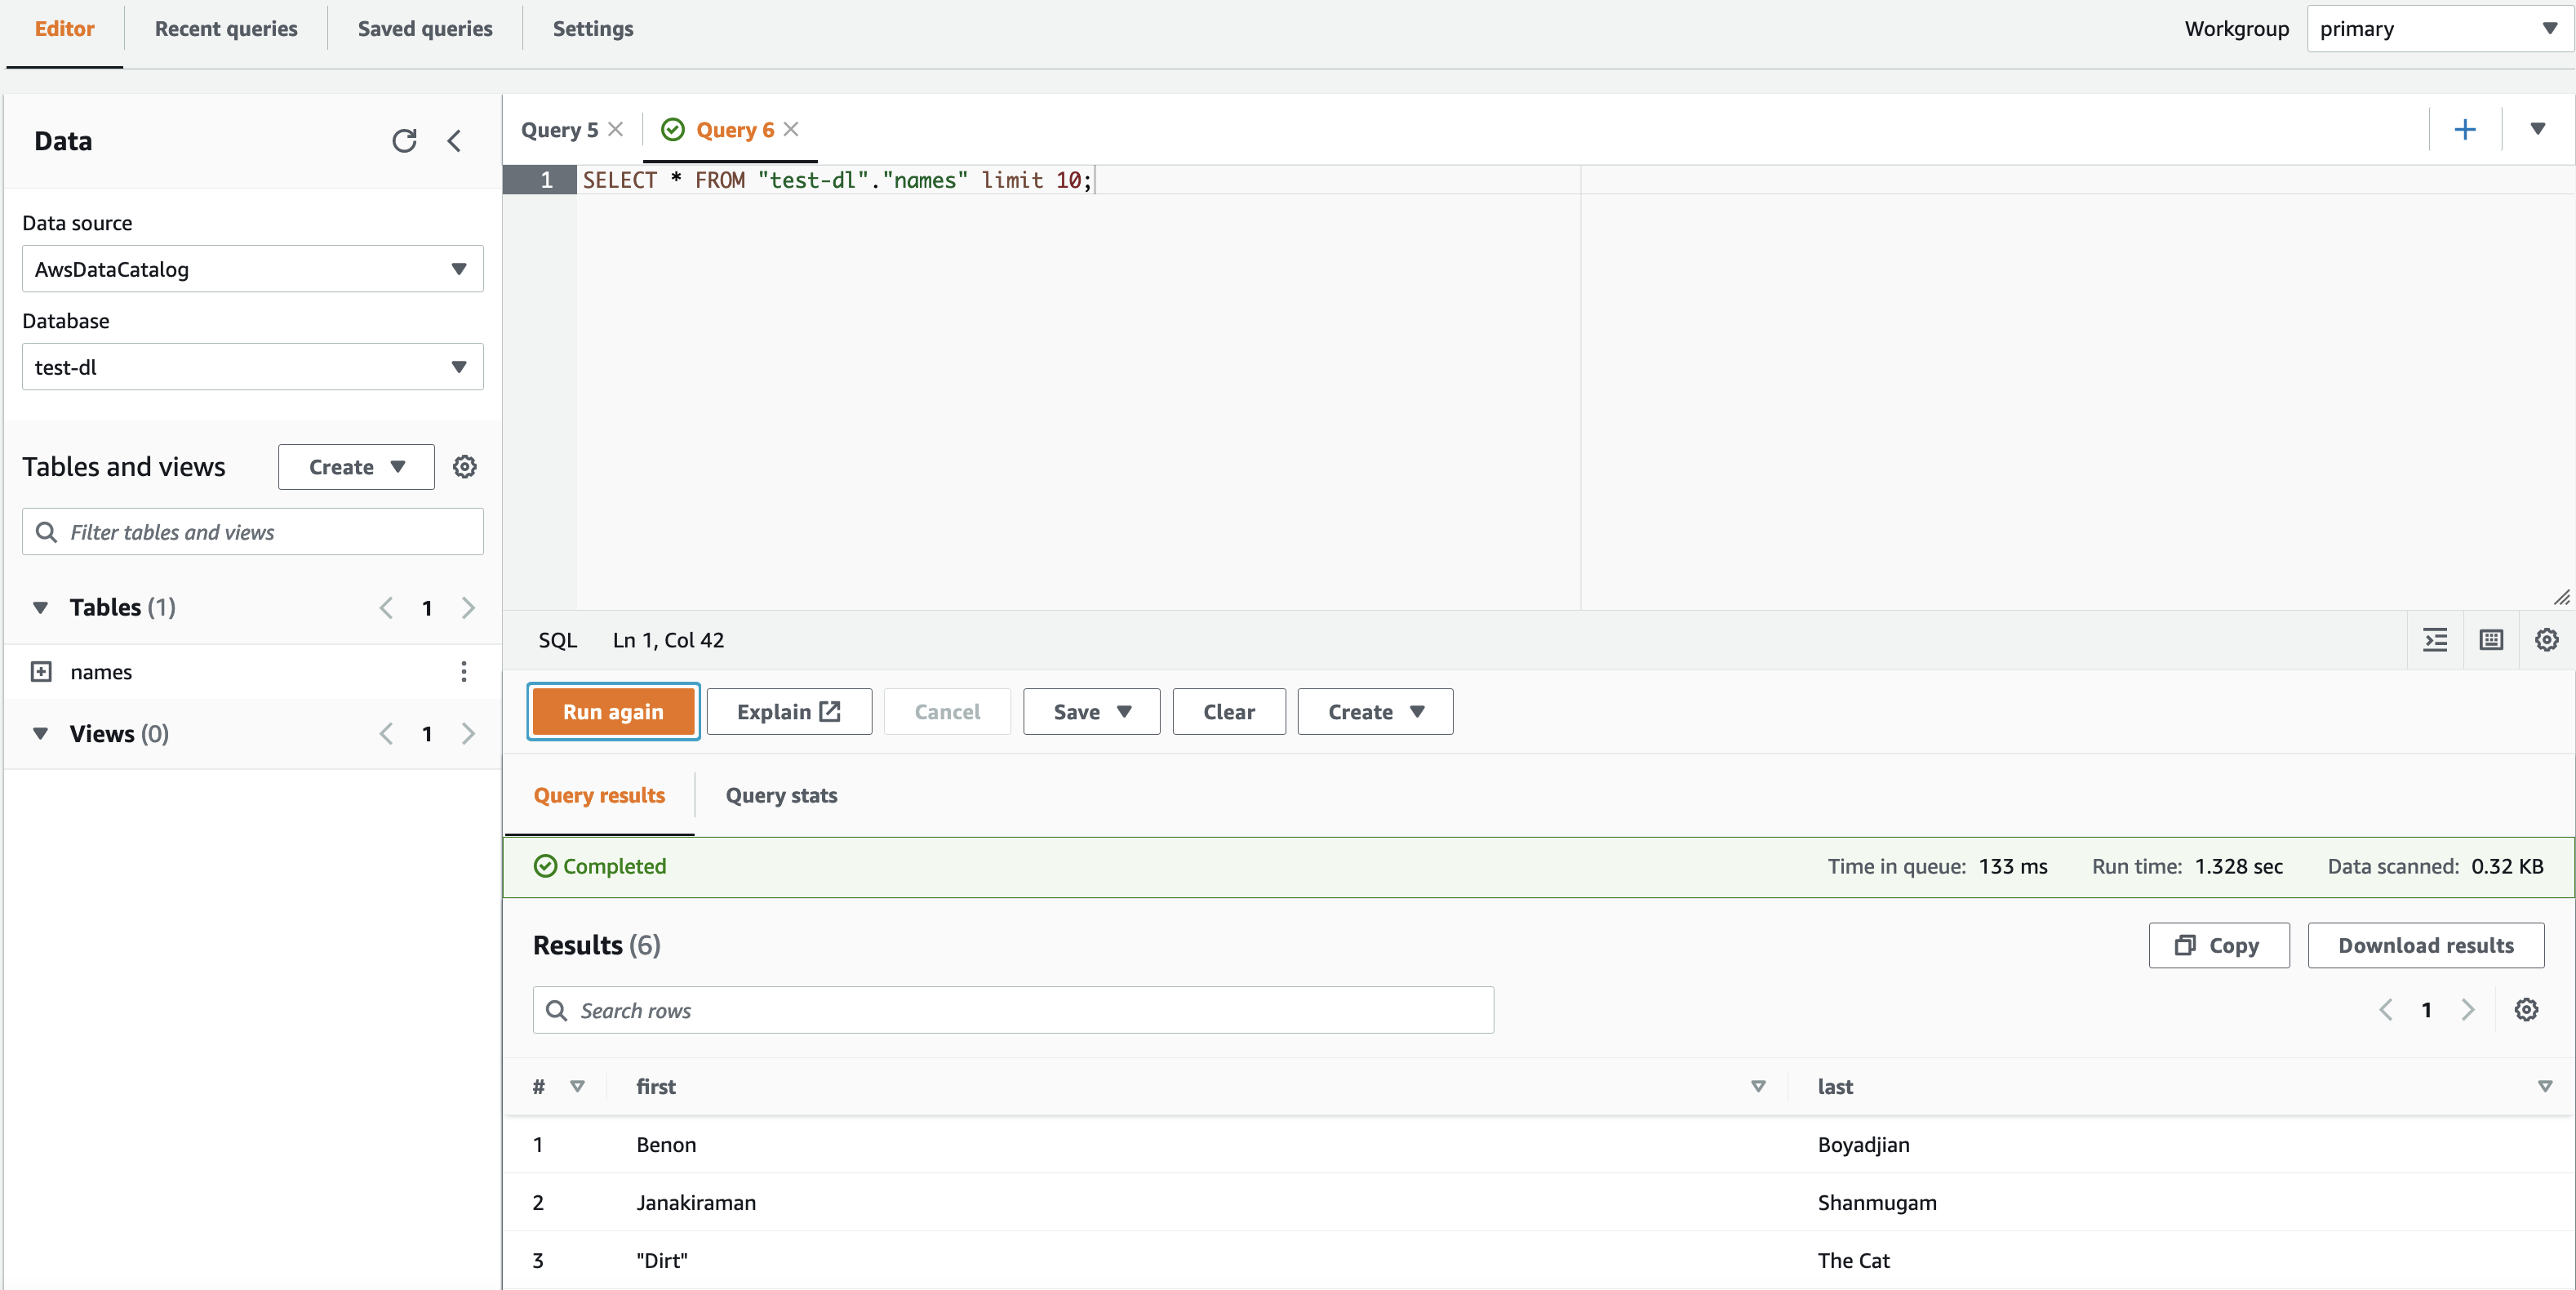
In the Athena query editor, on the Editor tab, choose the database that you granted access to.If the principal doesn’t have access to the Lake Formation table and data location, you won’t be able to view data in Athena.
Choose the menu icon next to your table and choose Generate table DDL.
Confirm that the data appears on the Query results tab.
Conclusion
In this post, we demonstrated how to integrate IAM Identity Center with Lake Formation permissions. You can now grant IAM Identity Center identities administrator, database creation, database and table, and data location access in Lake Formation. Managing data lake permissions through IAM Identity Center allows you to control data access from your management account, helping to improve your scalability and security.
Benon Boyadjian is a Private Equity Solutions Architect at AWS. He is passionate about helping customers understand the impact AWS can have on their businesses and guiding their AWS implementations. In his free time, he enjoys swimming, snowboarding, and playing with his cat Dirt.
Janakiraman Shanmugam is a Senior Data Architect at Amazon Web Services . He has a focus in Data & Analytics and enjoys helping customers to solve Big data & machine learning problems. Outside of the office, he loves to be with his friends and family and spend time outdoors.
Are you looking for a simpler way to manage permissions across all your AWS accounts? Perhaps you federate your identity provider (IdP) to each account and divide permissions and authorization between cloud and identity teams, but want a simpler administrative model. Maybe you use AWS IAM Identity Center (successor to AWS Single Sign-On) but are running out of room in your permission set policies; or need a way to keep the role models you have while tailoring the policies in each account to reference their specific resources. Or perhaps you are considering IAM Identity Center as an alternative to per-account federation, but need a way to reuse the customer managed policies that you have already created. Great news! Now you can use customer managed policies (CMPs) and permissions boundaries (PBs) to help with these more advanced situations.
In this blog post, we explain how you can use CMPS and PBs with IAM Identity Center to address these considerations. We describe how IAM Identity Center works, how these types of policies work with IAM Identity Center, and how to best use CMPs and PBs with IAM Identity Center. We also show you how to configure and use CMPs in your IAM Identity Center deployment.
IAM Identity Center background
With IAM Identity Center, you can centrally manage access to multiple AWS accounts and business applications, while providing your workplace users a single sign-on experience with your choice of identity system. Rather than manage identity in each account individually, IAM Identity Center provides one place to connect an existing IdP, Microsoft Active Directory Domain Services (AD DS), or workforce users that you create directly in AWS. Because IAM Identity Center integrates with AWS Organizations, it also provides a central place to define your roles, assign them to your users and groups, and give your users a portal where they can access their assigned accounts.
With AWS Identity Center, you manage access to accounts by creating and assigning permission sets. These are AWS Identity and Access Management (IAM) role templates that define (among other things) which policies to include in a role. If you’re just getting started, you can attach AWS managed policies to the permission set. These policies, created by AWS service teams, enable you to get started without having to learn how to author IAM policies in JSON.
For more advanced cases, where you are unable to express policies sufficiently using inline policies, you can create a custom policy in the permission set. When you assign a permission set to users or groups in a specified account, IAM Identity Center creates a role from the template and then controls single sign-on access to the role. During role creation, IAM Identity Center attaches any specified AWS managed policies, and adds any custom policy to the role as an inline policy. These custom policies must be within the 10,240 character IAM quota of inline policies.
IAM provides two other types of custom policies that increase flexibility when managing access in AWS accounts. Customer managed policies (CMPs) are standalone policies that you create and can attach to roles in your AWS accounts to grant or deny access to AWS resources. Permissions boundaries (PBs) provide an advanced feature that specifies the maximum permissions that a role can have. For both CMPs and PBs, you create the custom policy in your account and then attach it to roles. IAM Identity Center now supports attaching both of these to permission sets so you can handle cases where AWS Managed Policies and inline policies may not be enough.
How CMPs and PBs work with IAM Identity Center
Although you can create IAM users to manage access to AWS accounts and resources, AWS recommends that you use roles instead of IAM users for this purpose. Roles act as an identity (sometimes called an IAM principal), and you assign permissions (identity-based policies) to the role. If you use the AWS Management Console or the AWS Command Line Interface to assume a role, you get the permissions of the role that you assumed. With its simpler way to maintain your users and groups in one AWS location and its ability to centrally manage and assign roles, AWS recommends that you use IAM Identity Center to manage access to your AWS accounts.
With this new IAM Identity Center release, you have the option to specify the names of CMPs and one PB in your permission set (role definition). Doing so modifies how IAM Identity Center provisions roles into accounts. When you assign a user or group to a permission set, IAM Identity Center checks the target account to verify that all specified CMPs and the PB are present. If they are all present, IAM Identity Center creates the role in the account and attaches the specified policies. If any of the specified CMPs or the PB are missing, IAM Identity Center fails the role creation.
This all sounds simple enough, but there are important implications to consider.
If you modify the permission set, IAM Identity Center updates the corresponding roles in all accounts to which you assigned the permission set. What is different when using CMPs and PBs is that IAM Identity Center is uninvolved in the creation or maintenance of the CMPs or PBs. It’s your responsibility to make sure that the CMPs and PBs are created and managed in all of the accounts to which you assign permission sets that use the CMPs and PBs. This means that you must be careful in how you name, create, and maintain these policies in your accounts, to avoid unintended consequences. For example, if you do not apply changes to CMPs consistently across all your accounts, the behavior of an IAM Identity Center created role will vary between accounts.
What CMPs do for you
By using CMPs with permission sets, you gain four main benefits:
If you federate to your accounts directly and have CMPs already, you can reuse your CMPs with permission sets in IAM Identity Center. We describe exceptions later in this post.
If you are running out of space in your permission set inline policies, you can add permission sets to increase the aggregate size of your policies.
Policies often need to refer to account-specific resources by Amazon Resource Name (ARN). Designing an inline policy that does this correctly across all your accounts can be challenging and, in some cases, may not be possible. By specifying a CMP in a permission set, you can tailor the CMPs in each of your accounts to reference the resources of the account. When IAM Identity Center creates the role and attaches the CMPs of the account, the policies used by the IAM Identity Center–generated role are now specific to the account. We highlight this example later in this post.
You get the benefit of a central location to define your roles, which gives you visibility of all the policies that are in use across the accounts where you assigned permission sets. This enables you to have a list of CMP and PB names that you should monitor for change across your accounts. This helps you ensure that you are maintaining your policies correctly.
Considerations and best practices
Start simple, avoid complex – If you’re just starting out, try using AWS managed policies first. With managed policies, you don’t need to know JSON policy to get started. If you need more advanced policies, start by creating identity-based inline custom policies in the permission set. These policies are provisioned as inline policies, and they will be identical in all your accounts. If you need larger policies or more advanced capabilities, use CMPs as your next option. In most cases, you can accomplish what you need with inline and customer managed policies. When you can’t achieve your objective using CMPs, use PBs. For information about intended use cases for PBs, see the blog post When and where to use IAM permissions boundaries.
Permissions boundaries don’t constrain IAM Identity Center admins who create permission sets – IAM Identity Center administrators (your staff) that you authorize to create permission sets can create inline policies and attach CMPs and PBs to permission sets, without restrictions. Permissions boundary policies set the maximum permissions of a role and the maximum permissions that the role can grant within an account through IAM only. For example, PBs can set the maximum permissions of a role that uses IAM to create other roles for use by code or services. However, a PB doesn’t set maximum permissions of the IAM Identity Center permission set creator. What does that mean? Suppose you created an IAM Identity Center Admin permission set that has a PB attached, and you assigned it to John Doe. John Doe can then sign in to IAM Identity Center and modify permission sets with any policy, regardless of what you put in the PB. The PB doesn’t restrict the policies that John Doe can put into a permission set.
In short, use PBs only for roles that need to create IAM roles for use by code or services. Don’t use PBs for permission sets that authorize IAM Identity Center admins who create permission sets.
Create and use a policy naming plan – IAM Identity Center doesn’t consider the content of a named policy that you attach to a permission set. If you assign a permission set in multiple accounts, make sure that all referenced policies have the same intent. Failure to do this will result in unexpected and inconsistent role behavior between different accounts. Imagine a CMP named “S3” that grants S3 read access in account A, and another CMP named “S3” that grants S3 administrative permissions over all S3 buckets in account B. A permission set that attaches the S3 policy and is assigned in accounts A and B will be confusing at best, because the level access is quite different in each of the accounts. It’s better to have more specific names, such as “S3Reader” and “S3Admin,” for your policies and ensure they are identical except for the account-specific resource ARNs.
Use automation to provision policies in accounts – Using tools such as AWS CloudFormation stacksets, or other infrastructure-as-code tools, can help ensure that naming and policies are consistent across your accounts. It also helps reduce the potential for administrators to modify policies in undesirable ways.
Policies must match the capabilities of IAM Identity Center – Although IAM Identity Center supports most IAM semantics, there are exceptions:
If you use an identity provider as your identity source, IAM Identity Center passes only PrincipalTag attributes that come through SAML assertions to IAM. IAM Identity Center doesn’t process or forward other SAML assertions to IAM. If you have CMPs or PBs that rely on other information from SAML assertions, they won’t work. For example, IAM Identity Center doesn’t provide multi-factor authentication (MFA) context keys or SourceIdentity.
Resource policies that reference role names or tags as part of trust policies don’t work with IAM Identity Center. You can use resource policies that use attribute-based access control (ABAC). IAM Identity Center role names are not static, and you can’t tag the roles that IAM Identity Center creates from its permission sets.
How to use CMPs with permission sets
Now that you understand permission sets and how they work with CMPs and PBs, let’s take a look at how you can configure a permission set to use CMPs.
In this example, we show you how to use one or more permission sets that attach a CMP that enables Amazon CloudWatch operations to the log group of specified accounts. Specifically, the AllowCloudWatch_permission set attaches a CMP named AllowCloudWatchForOperations. When we assign the permission set in two separate accounts, the assigned users can perform CloudWatch operations against the log groups of the assigned account only. Because the CloudWatch operations policies are in CMPs rather than inline policies, the log groups can be account specific, and you can reuse the CMPs in other permission sets if you want to have CloudWatch operations available through multiple permission sets.
Note: For this blog post, we demonstrate using CMPs by utilizing the IAM Management Console to create policies and assignments. We recommend that after you learn how to do this, you create your policies through automation for production environments. For example, use AWS CloudFormation. The intent of this example is to demonstrate how you can have a policy in two separate accounts that refer to different resources; something that is harder to accomplish using inline policies. The use case itself is not that advanced, but the use of CMPs to have different resources referenced in each account is a more advanced idea. We kept this simple to make it easier to focus on the feature than the use case.
Prerequisites
In this example, we assume that you know how to use the AWS Management Console, create accounts, navigate between accounts, and create customer managed policies. You also need administrative privileges to enable IAM Identity Center and to create policies in your accounts.
Configure an IAM Identity Center permission set to use a CMP
Follow these four procedures to use a CMP with a permission set:
Create CMPs with consistent names in your target accounts
Create a permission set that references the CMP that you created
Assign groups or users to the permission set in accounts where you created CMPs
Test your assignments
Step 1: Create CMPs with consistent names in your target accounts
In this step, you create a customer managed policy named AllowCloudWatchForOperations in two member accounts. The policy allows your cloud operations users to access a predefined CloudWatch log group in the account.
To create CMPs in your target accounts
Sign into AWS.
Note: You can sign in to IAM Identity Center if you have existing permission sets that enable you to create policies in member accounts. Alternatively, you can sign in using IAM federation or as an IAM user that has access to roles that enable you to navigate to other accounts where you can create policies. Your sign-in should also give you access to a role that can administer IAM Identity Center permission sets.
Navigate to an AWS Organizations member account.
Note: If you signed in through IAM Identity Center, use the user portal page to navigate to the account and role. If you signed in by using IAM federation or as an IAM user, choose your sign-in name that is displayed in the upper right corner of the AWS Management Console and then choose switch role, as shown in Figure 1.
Figure 1: Switch role for IAM user or IAM federation
In the upper right of the page, choose Create policy.
On the Create Policy page, choose the JSON tab.
Paste the following policy into the JSON text box. Replace <account-id> with the ID of the account in which the policy is created.
Tip: To copy your account number, choose your sign-in name that is displayed in the upper right corner of the AWS Management Console, and then choose the copy icon next to the account ID, as shown in Figure 2.
On the Create Policy/Review Policy page, in the Name field, enter AllowCloudWatchForOperations. This is the name that you will use when you attach the CMP to the permission set in the next procedure (Step 2).
Repeat steps 1 through 7 in at least one other member account. Be sure to replace the <account-id> element in the policy with the account ID of each account where you create the policy. The only difference between the policies in each account is the <account-id> in the policy.
Step 2: Create a permission set that references the CMP that you created
At this point, you have at least two member accounts containing the same policy with the same policy name. However, the ResourceARN in each policy refers to log groups that belong to the respective accounts. In this step, you create a permission set and attach the policy to the permission set. Importantly, you attach only the name of the policy to the permission set. The actual attachment of the policy to the role that IAM Identity Center creates, happens when you assign the permission set to a user or group in Step 3.
To create a permission set that references the CMP
Sign in to the Organizations management account or the IAM Identity Center delegated administration account.
On the Select Permission set type screen, select Custom permission Set and choose Next.
Figure 3: Select custom permission set
On the Specify policies and permissions boundary page, expand the Customer managed policies option, and choose Attach policies.
Figure 4: Specify policies and permissions boundary
For Policy names, enter the name of the policy. This name must match the name of the policy that you created in Step 1. In our example, the name is AllowCloudWatchForOperations. Choose Next.
On the Permission set details page, enter a name for your permission set. In this example, use AllowCloudWatch_PermissionSet. You can alspecify additional details for your permission sets, such as session duration and relay state (these are a link to a specific AWS Management Console page of your choice).
Figure 5: Permission set details
Choose Next, and then choose Create.
Step 3: Assign groups or users to the permission set in accounts where you created your CMPs
In the preceding steps, you created a customer managed policy in two or more member accounts, and a permission set with the customer managed policy attached. In this step, you assign users to the permission set in your accounts.
To assign groups or users to the permission set
Sign in to the Organizations management account or the IAM Identity Center delegated administration account.
For testing purposes, in the AWS Organization section, select all the accounts where you created the customer managed policy. This means that any users or groups that you assign during the process will have access to the AllowCloudWatch_PermissionSet role in each account. Then, on the top right, choose Assign users or groups.
Choose the Users or Groups tab and then select the users or groups that you want to assign to the permission set. You can select multiple users and multiple groups in this step. For this example, we recommend that you select a single user for which you have credentials, so that you can sign in as that user to test the setup later. After selecting the users or groups that you want to assign, choose Next.
Figure 7: Assign users and groups to AWS accounts
Select the permission set that you created in Step 2 and choose Next.
Review the users and groups that you are assigning and choose Submit.
You will see a message that IAM Identity Center is configuring the accounts. In this step, IAM Identity Center creates roles in each of the accounts that you selected. It does this for each account, so it looks in the account for the CMP that you specified in the permission set. If the name of the CMP that you specified in the permission set matches the name that you provided when creating the CMP, IAM Identity Center creates a role from the permission set. If the names don’t match or if the CMP isn’t present in the account to which you assigned the permission set, you see an error message associated with that account. After successful submission, you will see the following message: We reprovisioned your AWS accounts successfully and applied the updated permission set to the accounts.
Step 4: Test your assignments
Congratulations! You have successfully created CMPs in multiple AWS accounts, created a permission set and attached the CMPs by name, and assigned the permission set to users and groups in the accounts. Now it’s time to test the results.
Copy the user portal URL, and then paste the user portal URL into your browser.
At the sign-in prompt, sign in as one of the users that you assigned to the permission set.
The IAM Identity Center user portal shows the accounts and roles that you can access. In the example shown in Figure 8, the user has access to the AllowCloudWatch_PermissionSet created in two accounts.
Figure 8: User portal
If you choose AllowCloudWatch_PermissionSet in the member-account, you will have access to the CloudWatch log group in the member-account account. If you choose the role in member-account-1, you will have access to CloudWatch Log group in member-account-1.
Test the access by choosing Management Console for the AllowCloudWatch_PermissionSet in the member-account.
In the navigation pane, choose Log groups. You should be able to access log groups, as shown in Figure 9.
Figure 9: CloudWatch log groups
Open the IAM console. You shouldn’t have permissions to see the details on this console, as shown in figure 10. This is because AllowCloudWatch_PermissionSet only provided CloudWatch log access.
Figure 10: Blocked access to the IAM console
Return to the IAM Identity Center user portal.
Repeat steps 4 through 8 using member-account-1.
Answers to key questions
What happens if I delete a CMP or PB that is attached to a role that IAM Identity Center created? IAM prevents you from deleting policies that are attached to IAM roles.
How can I delete a CMP or PB that is attached to a role that IAM Identity Center created? Remove the CMP or PB reference from all your permission sets. Then re-provision the roles in your accounts. This detaches the CMP or PB from IAM Identity Center–created roles. If the policies are unused by other IAM roles in your account or by IAM users, you can delete the policy.
What happens if I modify a CMP or PB that is attached to an IAM Identity Center provisioned role? The IAM Identity Center role picks up the policy change the next time that someone assumes the role.
Conclusion
In this post, you learned how IAM Identity Center works with customer managed policies and permissions boundaries that you create in your AWS accounts. You learned different ways that this capability can help you, and some of the key considerations and best practices to succeed in your deployments. That includes the principle of starting simple and avoiding unnecessarily complex configurations. Remember these four principles:
In most cases, you can accomplish everything you need by starting with custom (inline) policies.
Use customer managed policies for more advanced cases.
Use permissions boundary policies only when necessary.
Use CloudFormation to manage your customer managed policies and permissions boundaries rather than having administrators deploy them manually in accounts.
To learn more about this capability, see the IAM Identity Center User Guide. If you have feedback about this post, submit comments in the Comments section below. If you have questions about this post, start a new thread on the AWS IAM re:Post or contact AWS Support.
Want more AWS Security news? Follow us on Twitter.
The collective thoughts of the interwebz
Manage Consent
To provide the best experiences, we use technologies like cookies to store and/or access device information. Consenting to these technologies will allow us to process data such as browsing behavior or unique IDs on this site. Not consenting or withdrawing consent, may adversely affect certain features and functions.
Functional
Always active
The technical storage or access is strictly necessary for the legitimate purpose of enabling the use of a specific service explicitly requested by the subscriber or user, or for the sole purpose of carrying out the transmission of a communication over an electronic communications network.
Preferences
The technical storage or access is necessary for the legitimate purpose of storing preferences that are not requested by the subscriber or user.
Statistics
The technical storage or access that is used exclusively for statistical purposes.The technical storage or access that is used exclusively for anonymous statistical purposes. Without a subpoena, voluntary compliance on the part of your Internet Service Provider, or additional records from a third party, information stored or retrieved for this purpose alone cannot usually be used to identify you.
Marketing
The technical storage or access is required to create user profiles to send advertising, or to track the user on a website or across several websites for similar marketing purposes.












 Benon Boyadjian is a Private Equity Solutions Architect at AWS. He is passionate about helping customers understand the impact AWS can have on their businesses and guiding their AWS implementations. In his free time, he enjoys swimming, snowboarding, and playing with his cat Dirt.
 Janakiraman Shanmugam is a Senior Data Architect at Amazon Web Services . He has a focus in Data & Analytics and enjoys helping customers to solve Big data & machine learning problems. Outside of the office, he loves to be with his friends and family and spend time outdoors.


