My LinkedIn feed was absolutely packed this week with pictures from the AWS Heroes Summit event in Seattle. It was heartwarming to see so many familiar faces and new Heroes coming together.
For those not familiar with the AWS Heroes program, it’s a global community recognition initiative that honors individuals who make outstanding contributions to the AWS community. These Heroes share their deep AWS knowledge through content creation, speaking at events, organizing community gatherings, and contributing to open-source projects.
The AWS Heroes Summit brings these exceptional community leaders together, providing a unique platform for knowledge exchange, networking, and collaboration. As someone who regularly interacts with Heroes through our AWS initiatives, I always find these summits invaluable – they offer deep technical discussions, early access to AWS roadmaps, and opportunities to provide direct feedback to AWS service teams. The insights and connections made at these events often translate into better resources and guidance for the broader AWS community.
Last week’s launches
In addition to this inspiring community, here are some AWS launches that caught my attention:
We launched two new instance families this week: the new storage-optimized I8ge and the general-purpose M8i instances —Our I8ge instances, powered by AWS Graviton4 processors, deliver up to 60% better compute performance compared to their Graviton2-based predecessors. These instances feature third-generation AWS Nitro SSDs, providing up to 55% better real-time storage performance per TB and significantly lower I/O latency. With 120 TB of storage and sizes up to 48xlarge (including two metal options), they offer the highest storage density among AWS Graviton-based storage optimized instances. We also launched M8i and M8i-flex instances with custom Intel Xeon 6 processors. These instances deliver up to 15% better price-performance and 2.5x more memory bandwidth than their predecessors. M8i-flex instances are ideal for general-purpose workloads, available from large to 16xlarge. For demanding applications, you can choose from our SAP-certified M8i instances in 13 sizes, including 2 bare metal options and a new 96xlarge size.
Amazon EC2 Mac Dedicated hosts now support Host Recovery and Reboot-based host maintenance — you can enable two new capabilities for your EC2 Mac Dedicated Hosts: Host Recovery and Reboot-based Host Maintenance. Host Recovery automatically detects potential hardware issues on Mac Dedicated Hosts and seamlessly migrates Mac instances to a new replacement host, minimizing disruption to workloads. Reboot-based Host Maintenance automatically stops and restarts instances on replacement hosts when scheduled maintenance events occur, eliminating the need for manual intervention during planned maintenance windows.
Amazon Q Developer now supports MCP admin control — Administrators have now the ability to enable or disable the MCP functionality for all the Q Developer clients in their organization. When an administrator disables the functionality, users will not be allowed to add any MCP servers, nor will any previously defined servers be initialized.
Other AWS news
Here are some additional projects and blog posts that you might find interesting:
Mastering Amazon Q Developer with Rules — I read an interesting article about Amazon Q Developer’s rules feature this weekend that I want to share with you. What caught my attention is how it solves a pain point I often encounter when working with AI assistants – having to repeatedly explain my coding preferences and standards. With rules, you define your preferences once in Markdown files, and Amazon Q Developer automatically follows them for every interaction. I particularly like how transparent the system is, showing which rules it’s following, and how it helps maintain consistency across teams. Since implementing rules in my projects, I’ve seen more consistent code quality, all while reducing the cognitive load of having to repeatedly explain our standards.
Strategies for excelling across all four exam domains of the AWS Certified Machine Learning – Specialty certification. The AWS Training & Certification team, where I spent my first three years at AWS, shared how to prepare for the AWS Certified Machine Learning – Specialty certification, whether you’re starting from scratch or building upon existing AWS Certifications. They share the prerequisites and guidance to help you get ready for this certification and demonstrate your expertise in building ML solutions with AWS.
As is now our tradition after Prime Day, we shared the impressive metrics showing how AWS services scaled to support one of the world’s largest shopping events. Amazon Prime Day 2025 was the biggest ever, setting records for both sales volume and total items sold during the 4-day event. This year was particularly special as we saw a significant transformation in the Prime Day experience through advancements in our generative AI offerings, with customers using Alexa+, Rufus, and AI Shopping Guides to discover deals and get product information. The numbers are staggering – Amazon DynamoDB handled tens of trillions of API calls while maintaining high availability, delivering single-digit millisecond responses and peaking at 151 million requests per second. Amazon API Gateway processed over 1 trillion internal service requests—a 30 percent increase in requests on average per day compared to Prime Day 2024.
Upcoming AWS events Check your calendars and sign up for these upcoming AWS events:
AWS Summits — Join free online and in-person events that bring the cloud computing community together to connect, collaborate, and learn about AWS. Register in your nearest city: Toronto (September 4), Los Angeles (September 17), and Bogotá (October 9).
AWS re:Invent 2025 — This flagship annual conference is coming to Las Vegas from December 1–5. The event catalog is now available. Mark your calendars for this not to be missed gathering of the AWS community.
AWS Community Days — Join community-led conferences that feature technical discussions, workshops, and hands-on labs led by expert AWS users and industry leaders from around the world: Adria (September 5), Baltic (September 10), Aotearoa (September 18), South Africa (September 20), Bolivia (September 20), Portugal (September 27).
AWS Client VPN is a managed client-based VPN service that enables users to use an OpenVPN-based client to securely access their resources in Amazon Web Services (AWS) and in their on-premises network from any location. In this blog post, we show you how you can integrate Client VPN with your existing AWS Single Sign-On via a custom SAML 2.0 application to authenticate and authorize your Client VPN connections and traffic.
Maintaining a separate set of credentials to authenticate users and authorize access for each resource is not only tedious, it’s not scalable. A common way to solve this challenge is to use a central identity store such as AWS SSO, which functions as your identity provider (IdP). You can then use Security Assertion Markup Language 2.0 (SAML 2.0) to integrate AWS SSO with each of your resources or applications, also known as service providers (SPs). The IdP authenticates users and passes their identity and security information to the SP via SAML. With SAML, you can enable a single sign-on experience for your users across many SAML-enabled applications and services. Users authenticate with the IdP once using a single set of credentials, and then have access to multiple applications and services without additional sign-ins.
Client VPN supports identity federation with SAML 2.0 for Client VPN endpoints. Deploying custom SAML applications can present some challenges, specifically around the mapping of attributes between what the SP expects to receive and what the IdP can provide. We’ve taken the guesswork out of the process and show you the exact mappings needed for the Client VPN to AWS SSO integration. The integration lets you use AWS SSO groups to not only grant access to create a Client VPN connection, but also to allow access to specific network ranges based upon group membership. We walk you through setting up all of the components required to implement the authentication workflow described in Figure 1. This consists of creating the custom SAML applications and tying them into AWS Identity and Access Management (IAM), creating and configuring the Client VPN endpoint, creating a Client VPN connection with an AWS SSO user, and testing your connectivity.
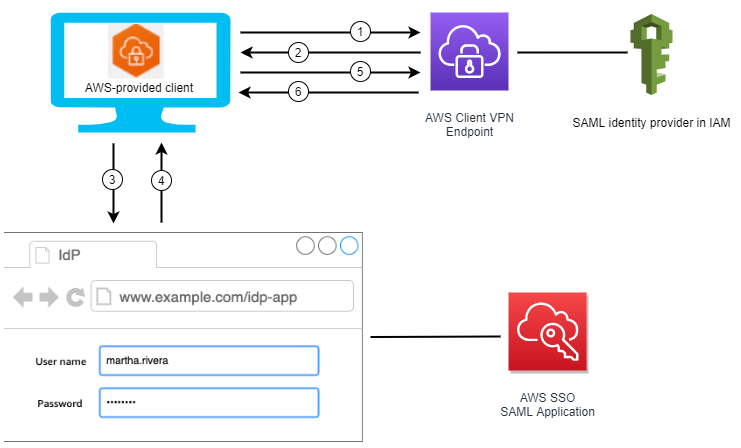
Figure 1: Authentication workflow
The steps illustrated in Figure 1 are:
The user opens the AWS-provided VPN client on their device and initiates a connection to the Client VPN endpoint.
The Client VPN endpoint sends an IdP URL and authentication request back to the client, based on the information that was provided in the IAM SAML provider.
The AWS provided VPN client opens a new browser window on the user’s device. The browser makes a request to the IdP and displays a sign-in page. This is the same sign-in experience as the AWS SSO user portal, as the IdP URL points to a custom SAML application created within AWS SSO.
The user enters their credentials on the sign-in page, and the IdP sends a signed SAML assertion back to the client in the form of an HTTP POST to the AWS provided VPN client.
The SAML assertion is passed from the AWS provided VPN client to the Client VPN endpoint.
The endpoint validates the assertion and either allows or denies access to the user.
Prerequisites
Here are the requirements to complete the VPN and SSO setup:
AWS SSO is configured to use the internal AWS SSO identity store. Refer to the AWS Single Sign-On Getting Started guide for help configuring AWS SSO. AWS SSO can exist in a different AWS account than the account where you deploy Client VPN endpoints. The steps outlined in this blog post are specific to the internal AWS SSO identity store, however they could be adapted to support other identity stores that support SAML 2.0.
Two AWS SSO users and two AWS SSO groups for testing. Each user should be a member of only one of the SSO groups. The purpose of this configuration is to demonstrate how access can be allowed or denied based upon group membership.
An x.509 certificate imported into AWS Certificate Manager (ACM). You can generate a self-signed certificate for this walkthrough, however you should review the prerequisites for importing certificates into ACM. This certificate will be used for encrypted communication between the client VPN software and the client VPN endpoint.
Administrative access to your AWS environment, or at least sufficient access to create AWS SSO applications, ACM certificates, EC2 Instances, and Client VPN endpoints.
A client device running Windows or macOS with the latest version of Client VPN software installed. You can download it from the AWS Client VPN download.
Solution walkthrough
For this solution, you’ll complete the following steps:
Establish trust with your IdP
Create and configure Client VPN SAML applications in AWS SSO.
Integrate the Client VPN SAML applications with IAM.
Create and configure the Client VPN endpoint.
Test the solution.
Cleanup the test environment.
Establish trust with your IdP
In this walkthrough, Client VPN is the SAML SP and AWS SSO is the SAML IdP. One of the key steps to deploying this solution is to establish trust between the SP and IdP. This one-time configuration is done by creating custom SAML applications within AWS SSO and exporting application-specific metadata information from the applications. This metadata is then uploaded—in the form of IAM IdPs—into your AWS account where the Client VPN endpoint is created. IAM IdPs let you manage your user identities in a centralized identity store, such as AWS SSO, and grant those user identities permissions to AWS resources within your account. For organizations with multiple AWS accounts, the use of IAM IdPs resolves the management, scalability, and security issues associated with creating IAM users directly within each account.
Create and configure the Client VPN SAML applications in AWS SSO
Create two custom SAML 2.0 applications in AWS SSO. One will be the IdP for the Client VPN software, the other will be a self-service portal that allows users to download their Client VPN software and client configuration file.
To create the VPN client SAML application:
In the AWS SSO console, select Applications from the left pane and select Add a new application.
Select Add a custom SAML 2.0 application to use as the IdP for the Client VPN software.
Figure 2: Add a SAML application
In the Details section, set Display name to VPN Client.
In the Application Metadata section, select If you don’t have a metadata file, you can manually type your metadata values and enter the following values:
Select the Attribute mappings tab and configure the mappings as shown in the table and Figure 3 below.
Note: For production environments, you should grant access to these applications via an AWS SSO group instead of individual users as shown in this walkthrough.
User attribute in the application
Maps to this string value or user attribute in AWS SSO
Format
Subject
${user:email}
emailAddress
Name
${user:email}
unspecified
FirstName
${user:givenName}
unspecified
LastName
${user:familyName}
unspecified
memberOf
${user:groups}
unspecified
Figure 3: VPN client attribute mappings
On the Assign users tab, add your two test user accounts.
On the application configuration page, choose the download link for AWS SSO SAML metadata. Save the file to use in a later step.
To create the VPN client self-service SAML application
In the AWS SSO console, select Applications from the left pane and select Add a new application.
Select Add a custom SAML 2.0 application to use as the application that will serve as the IdP for the Client VPN software.
Figure 4: Add a SAML application
In the Details section, set Display name to VPN Client Self Service.
In the Application Metadata section, select If you don’t have a metadata file, you can manually type your metadata values and enter the following values:
Choose the Attribute mappings tab and configure the mappings as shown in the following table and in Figure 5.
Note: For production environments you should grant access to these applications via an AWS SSO group instead of individual users as shown in this walkthrough. For the purposes of this walkthrough, you grant individual users access to the SAML applications but grant network access via group membership. This is done to allow easier demonstration of the ability to grant or deny network specific access via groups when testing the solution.
User attribute in the application
Maps to this string value or user attribute in AWS SSO
On the Assign users tab, add your two test user accounts.
On the application’s Configuration page, choose the download link for AWS SSO SAML metadata. Save the file to use in a later step.
Integrate the Client VPN SAML applications with IAM
Client VPN requires a unique IdP definition in IAM. You must set up the IdP in the same AWS account where the Client VPN endpoint will be created.
To create the IAM IdP:
In the IAM console, select Identity providers and Add provider. Name the provider aws-client-vpn and upload the metadata document that you downloaded from the VPN Client SAML application.
Add a second provider, name the provider aws-client-vpn-self-service and upload the metadata document that you downloaded from the VPN Client Self Service SAML application.
Create and configure the Client VPN endpoint
All Client VPN sessions end at the Client VPN endpoint. You configure the Client VPN endpoint to manage and control all Client VPN sessions. In the following steps, you create a Client VPN endpoint and configure it to use the newly added IAM IdPs. You then associate the endpoint with a VPC and configure authorization rules to allow traffic into the VPC, then set up the Client VPN self-service portal.
To create the Client VPN endpoint
Open the AWS VPC console and select Client VPN Endpoints and then select Create Client VPN endpoint.
Enter a NameTag and Description for the endpoint.
Enter 172.16.0.0/22 for the Client IPv4 CIDR. This is the IP range that will be allocated to your VPN clients. It shouldn’t overlap the CIDR of your AWS VPCs or of the network that your client device is connected to and must be at least a /22 bitmask. You can adjust this value as needed for your specific network requirements. The Client IPv4 CIDR value can only be set during endpoint creation.
Note: For production environments you should review the Client VPN documentation for scaling considerations before you create the endpoint.
In the Server certificate ARN drop down menu, select the ACM certificate that you created for your VPN clients.
Set the Authentication Options to Use user-based authentication with Federated authentication. Select the aws-client-vpn IAM IdP for the SAML provider ARN, and select the aws-client-vpn-self-service IAM IdP as the Self-service SAML provider ARN.
Figure 6: Authentication settings
For this walkthrough, set Connection Logging to No. Connection logging is a feature of Client VPN that enables you to capture connection logs for your Client VPN endpoint. Those logs are published to an Amazon CloudWatch Logs log group in your account. For production environments or for troubleshooting purposes, you can enable connection logging while or after you create the endpoint.
Select the VPC ID to associate with the endpoint. This should be the VPC with an EC2 instance deployed that can be used to test connectivity. You can select an existing security group, or create a new one for the VPN endpoint. The only requirement for this walkthrough is that it has outbound rules that allow access to your test EC2 instance. For additional flexibility, you can create and apply multiple security groups that use different rulesets to the endpoint to provide fine-grained control of which resources can be accessed within the VPC.
Select Enable self-service portal and—if desired—select Enable split-tunnel. Split tunneling is designed to ensure that only client traffic destined for the IP ranges configured on the Client VPN endpoint is routed to your VPC. By default, all traffic, including internet bound traffic, is routed through your VPC.
Choose Create Client VPN endpoint.
To configure the Client VPN endpoint
On the Client VPN endpoint Associations tab, select Associate. Select the same VPC that you chose when you set up the endpoint and select a subnet to associate. This creates an elastic network interface (ENI) in the selected subnet that will be the ingress point from VPN clients into your AWS VPC. For production environments, you should select at least two subnets based upon your redundancy requirements.
Authorizing VPN ingress traffic from your users can be done either globally for all users or via group membership. When granting access via an AWS SSO group, you must use the group ID of the AWS SSO group, not the friendly name of the group. After selecting a group in the AWS SSO management console, you can find group ID in the Details section. You can also obtain the group ID by using AWS Command Line Interface (AWS CLI) to issue the following command, replacing the <AWSRegion>, <Identity Store ID>, and <AWS SSO Group Display Name> variables with your information. This command should be issued within the same AWS account where AWS SSO is configured. The identity store ID can be found in the AWS SSO console under Settings.
aws identitystore list-groups --region <AWSRegion> --identity-store-id <Identity Store ID> --filter AttributePath=DisplayName,AttributeValue=<AWS SSO Group Display Name>
Create an ingress authorization rule by selecting Authorize Ingress on the Authorization tab. Configure the destination network to enable as 0.0.0.0/0, set Grant access to: Allow access to users in a specific access group and enter the access group ID that you discovered in the previous step. This should be the group that contains one of your test user accounts. For production environments, you should follow the principle of least privilege and narrow the destination network range to only what is required. Ingress authorization rules can be used to restrict network access to specific network ranges based upon IdP group membership. You can use a client connection handler to enforce additional security policies on Client VPN connections. Refer to the Client VPN documentation for additional details.
From the Client VPN Endpoint Summary tab, copy the Self-service portal URL to use in the next step.
To set up the Client VPN self-service portal
Open the Client VPN self-service SAML application in the AWS SSO management console to edit the configuration.
In the Application start URL textbox, paste the Client VPN endpoint self-service portal URL that you copied in the previous section. This ties the Client VPN self-service SAML application to the self-service portal URL for the specific Client VPN endpoint that you created, allowing users to download their AWS VPN Client configuration file.
Figure 8: Client VPN self-service portal
Test the solution
During the testing phase, you download the VPN client configuration file and configure the VPN client application. You then create a Client VPN connection and validate that you have access to your target VPC. You also test the Client VPN connection with multiple user accounts in order to confirm that the ingress authorization rules are functioning as expected.
To test the Client VPN solution:
Open an internet browser and sign in to your AWS SSO user portal as a user who has access to the VPN Client SAML applications and is a member of the AWS SSO group defined in the VPN endpoint ingress authorization rule. You should see two new SAML applications. Select the VPN client self-service application.
In the VPN Client Self Service portal, you can download the AWS VPN Client software if you haven’t already done so. Select Download client configuration and save the file on your local device. Close the browser window that you used to sign in to the AWS SSO user portal.
Open the AWS VPN Client application and configure a new profile, selecting the client configuration file that you downloaded in the previous step. Once your client profile has been created, select Connect.
Figure 9: VPN Client ready to connect
A new browser window should open automatically to an AWS SSO sign-in page. Enter the credentials of your test user who is a member of the AWS SSO group defined in your ingress authorization rule.
Upon a successful connection through the VPN client, you can make a management connection (RDP, SSH, HTTP, or other) to one of the EC2 instances within your VPC. Connect to the private IPv4 address of your EC2 instance (rfc1918)—you should not attempt to connect to your EC2 instance through an EIP. You might need to adjust the security group rules on your EC2 instance to allow traffic from the subnets that you selected when you created the VPN endpoint associations.
Once you have a successful connection to your test EC2 instance and you know that your Client VPN connectivity is working, you should also validate that access is denied for users who aren’t a member of the group specified in your ingress authorization rule.
Disconnect from your Client VPN connection and close all browser windows.
Depending upon your internet browser and its configuration, you might need to delete any cookies associated with your AWS SSO user portal in order to sign in as a different AWS SSO user.
Initiate a new Client VPN connection and sign in as the test user account that is not a member of the AWS SSO group specified in the ingress authorization rule.
You should be able to successfully establish the Client VPN connection, but not to access your test EC2 instance. This validates that the ingress authorization rule isn’t allowing Client VPN traffic from users who aren’t a member of the AWS SSO group to enter your VPC.
Troubleshooting
If you have any issues completing the walkthrough and testing, here are some things that you can check:
In the AWS VPC management console, review the Connections tab to verify that you see a connection from your test user account and that it’s active.
Confirm that your test user account is in the group that was defined in your ingress authorization rule.
Confirm that the access group ID specified in the ingress authorization rule is for the AWS SSO group that your test user is a member of.
Confirm that the AWS SSO group still exists and hasn’t been deleted. You might encounter an error message similar to the one shown in Figure 10 if you attempt a Client VPN connection but the AWS SSO group no longer exists.
Figure 10: Error message
If you receive a credential error when attempting to sign in to the AWS SSO browser window that’s launched by the VPN Client application, you might have an issue with the ACM certificate that you’re using. There can be authentication related issues if the root CA certificates aren’t correct or if any part of the certificate chain is missing.
Validate your EC2 instance security group rules and VPC route table configuration. From a routing perspective, your test EC2 instance must be accessible from the subnet that you selected when you created the Client VPN endpoint association.
If you want to see the SAML assertion that’s being sent to the AWS VPN client application. Sign in to the AWS SSO user portal, and hold down the Shift key while selecting the VPN client SAML application. A new browser tab will open with the SAML assertion visible. The SAML assertion contains the access group IDs of all groups that your test user is a member of. You can use this information to validate that the correct group memberships and group IDs are defined in your ingress authorization rules.
Make sure that TCP port 35001 is available on your client device. It shouldn’t be used by any other process or blocked by a firewall. Port 35001 only needs to be open on your localhost interface. The SAML assertion is sent to localhost on port 35001 as an HTTP POST from the browser window opened by the AWS VPN client application after a successful sign-in.
Clean up the test environment
To avoid charges for the use of AWS EC2, Client VPN, SSO, or ACM services, remove any components that were created as part of this walkthrough. Components that can be deleted if applicable are:
The Client VPN endpoint. You must first remove all associations that were created for the endpoint.
The EC2 instance and VPC.
The test IdPs from IAM.
The VPN client custom SAML applications from AWS SSO.
AWS SSO users and groups.
The ACM certificate.
Conclusion
In this blog post, we’ve shown how you can integrate Client VPN and AWS SSO to provide a familiar and seamless VPN connection experience to your users. By adding the Client VPN self-service portal, you can reduce the effort needed to deploy the solution by allowing users to perform their own VPN client application installation and configuration. We demonstrated the creation of IdPs using AWS SSO custom applications and then showed you how to configure a Client VPN endpoint to use SAML-based federated authentication and associate it with the IdPs. Client VPN users can then use their centralized credentials to connect to the Client VPN endpoint and access specific network ranges based upon their group membership or further refined through a client connection handler.
If you have feedback about this post, submit comments in the Comments section below.
Want more AWS Security how-to content, news, and feature announcements? Follow us on Twitter.
You can improve your organization’s security posture by enforcing access to Amazon Web Services (AWS) resources based on IP address and geolocation. For example, users in your organization might bring their own devices, which might require additional security authorization checks and posture assessment in order to comply with corporate security requirements. Enforcing access to AWS resources based on geolocation can help you to automate compliance with corporate security requirements by auditing the connection establishment requests. In this blog post, we walk you through the steps to allow AWS Identity and Access Management (IAM) roles to access AWS resources only from specific geographic locations.
Solution overview
AWS Client VPN is a managed client-based VPN service that enables you to securely access your AWS resources and your on-premises network resources. With Client VPN, you can access your resources from any location using an OpenVPN-based VPN client. A client VPN session terminates at the Client VPN endpoint, which is provisioned in your Amazon Virtual Private Cloud (Amazon VPC) and therefore enables a secure connection to resources running inside your VPC network.
This solution uses Client VPN to implement geolocation authentication rules. When a client VPN connection is established, authentication is implemented at the first point of entry into the AWS Cloud. It’s used to determine if clients are allowed to connect to the Client VPN endpoint. You configure an AWS Lambda function as the client connect handler for your Client VPN endpoint. You can use the handler to run custom logic that authorizes a new connection. When a user initiates a new client VPN connection, the custom logic is the point at which you can determine the geolocation of this user. In order to enforce geolocation authorization rules, you need:
AWS WAF to determine the user’s geolocation based on their IP address.
An IAM policy that is attached to the IAM role and validated by AWS when the request origin IP address matches the IP address of the NAT gateway.
One of the key features of AWS WAF is the ability to allow or block web requests based on country of origin. When the client connection handler Lambda function is invoked by your Client VPN endpoint, the Client VPN service invokes the Lambda function on your behalf. The Lambda function receives the device, user, and connection attributes. The user’s public IP address is one of the device attributes that are used to identify the user’s geolocation by using the AWS WAF geolocation feature. Only connections that are authorized by the Lambda function are allowed to connect to the Client VPN endpoint.
Note: The accuracy of the IP address to country lookup database varies by region. Based on recent tests, the overall accuracy for the IP address to country mapping is 99.8 percent. We recommend that you work with regulatory compliance experts to decide if your solution meets your compliance needs.
A NAT gateway allows resources in a private subnet to connect to the internet or other AWS services, but prevents a host on the internet from connecting to those resources. You must also specify an Elastic IP address to associate with the NAT gateway when you create it. Since an Elastic IP address is static, any request originating from a private subnet will be seen with a public IP address that you can trust because it will be the elastic IP address of your NAT gateway.
AWS Identity and Access Management (IAM) is a web service for securely controlling access to AWS services. You manage access in AWS by creating policies and attaching them to IAM identities (users, groups of users, or roles) or AWS resources. A policy is an object in AWS that, when associated with an identity or resource, defines their permissions. In an IAM policy, you can define the global condition key aws:SourceIp to restrict API calls to your AWS resources from specific IP addresses.
Note: Throughout this post, the user is authenticating with a SAML identity provider (IdP) and assumes an IAM role.
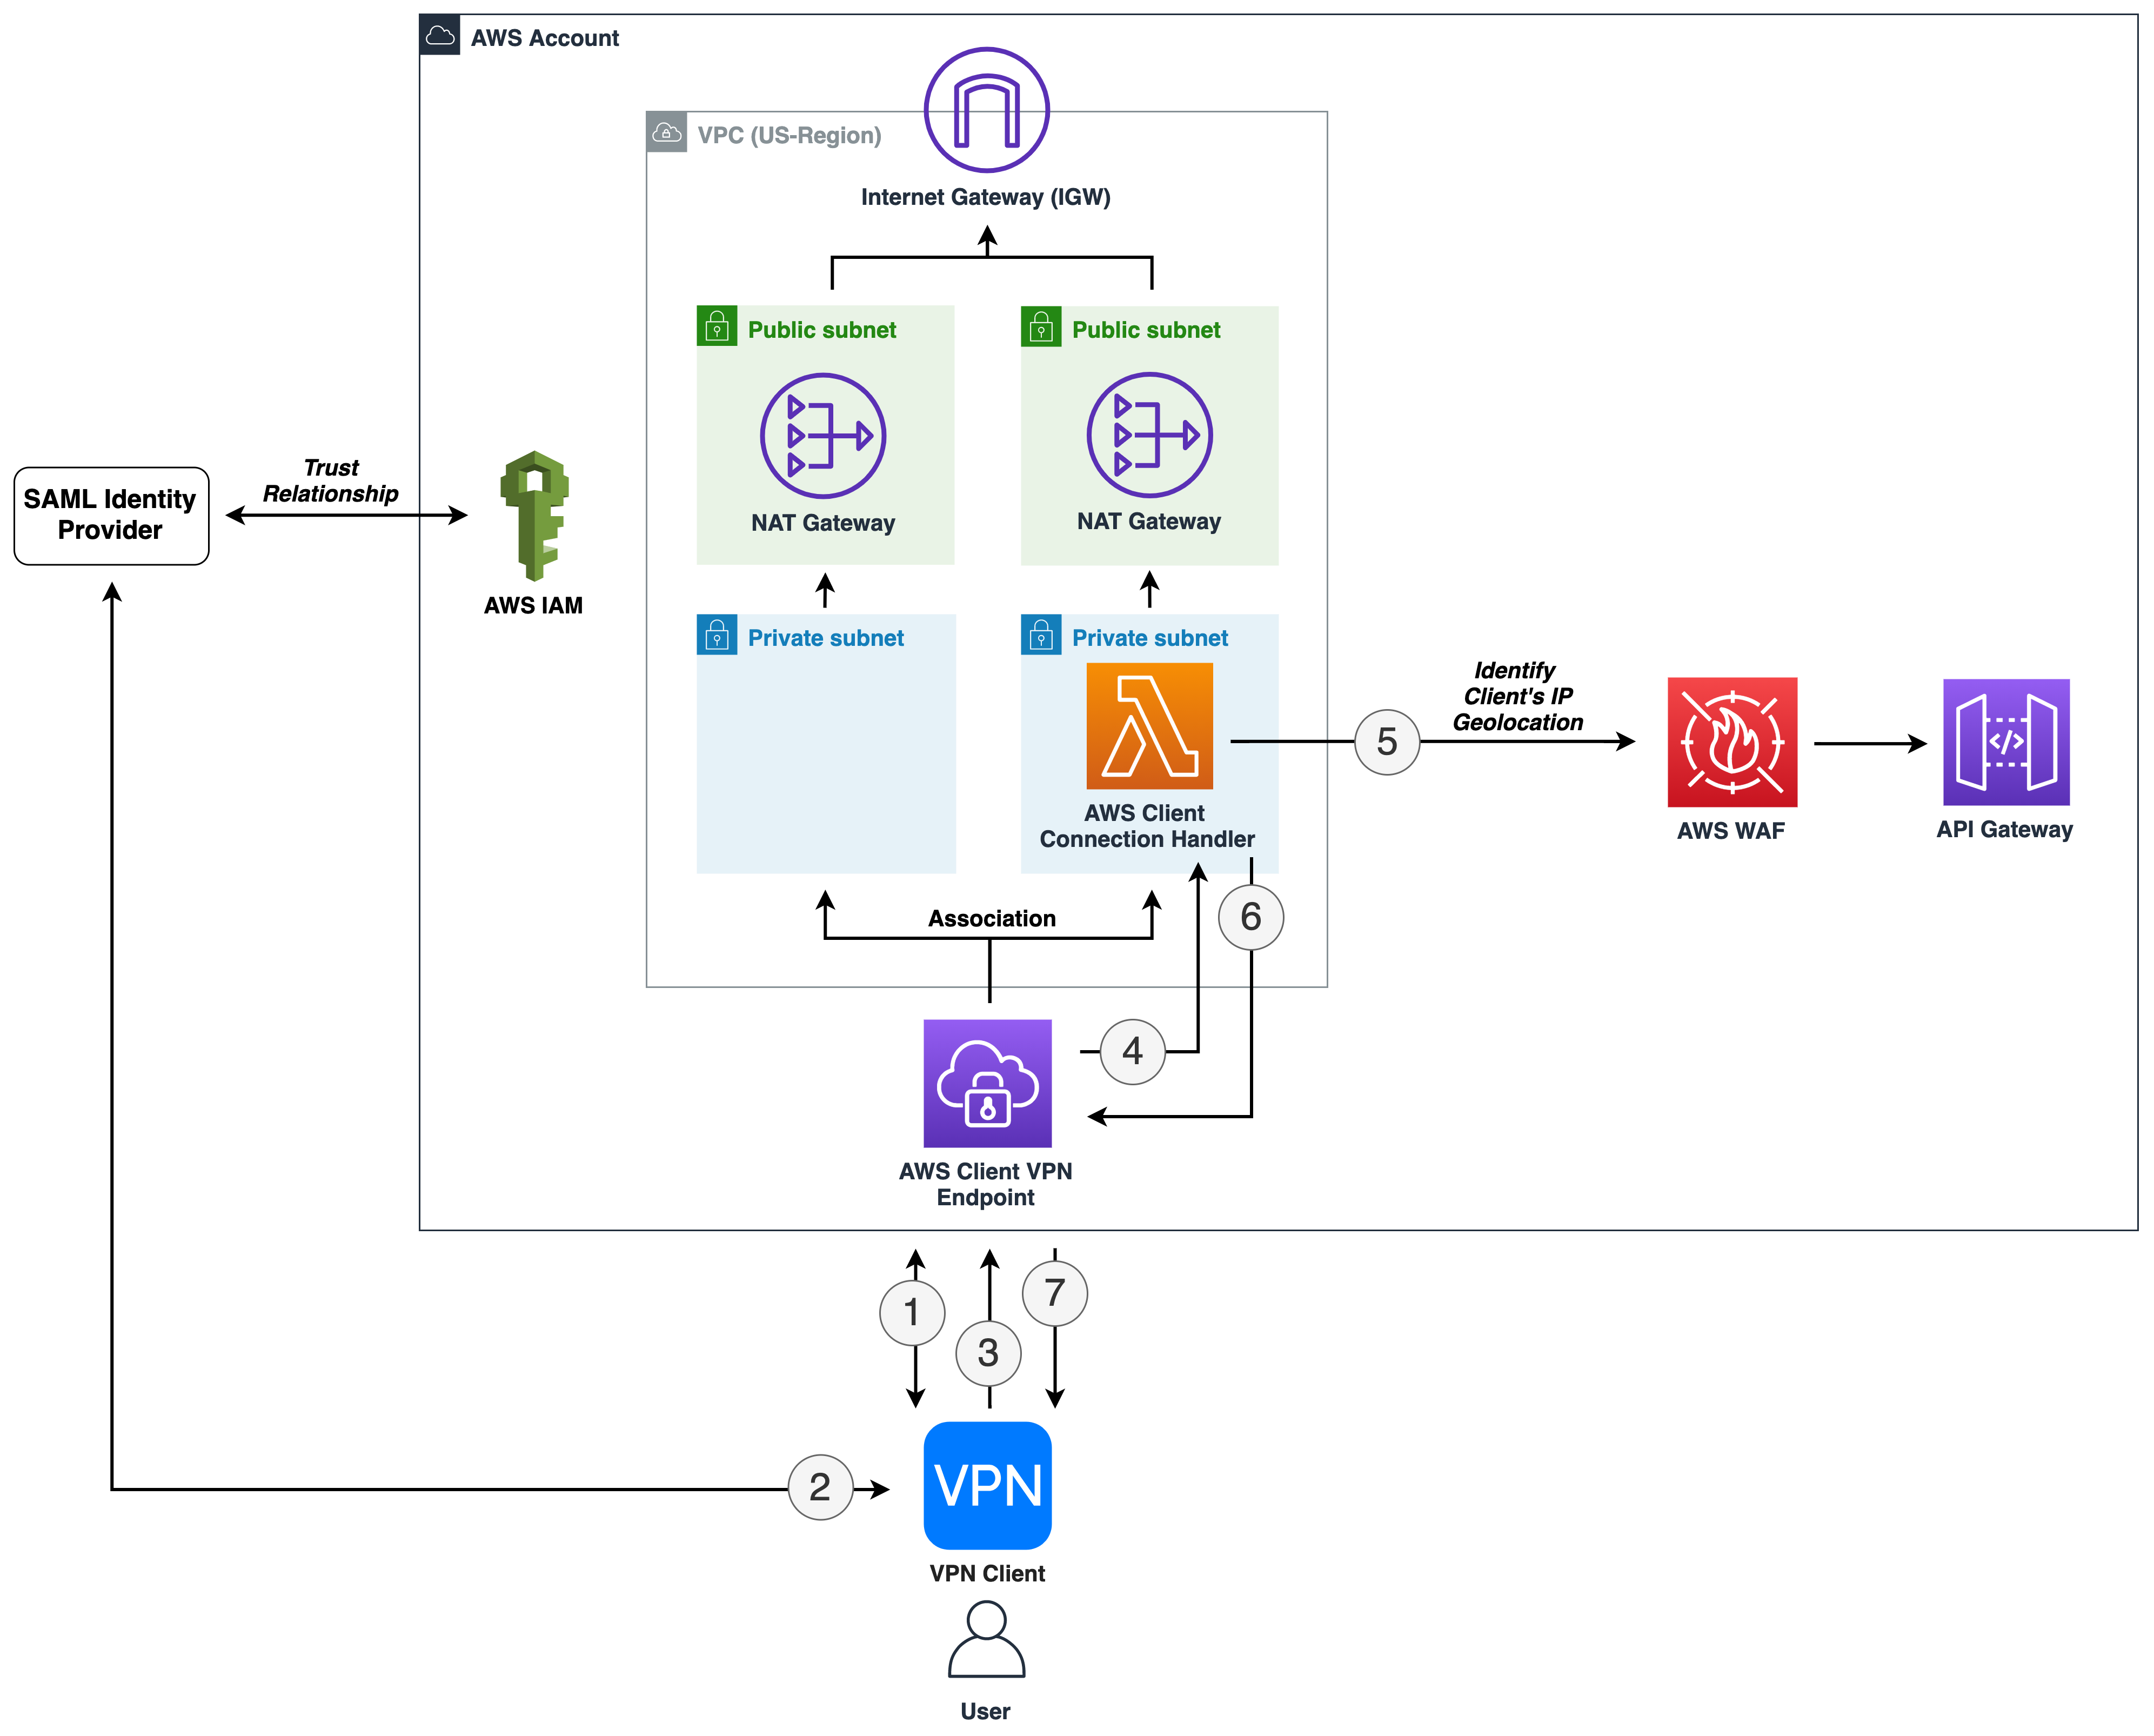
Figure 1 illustrates the authentication process when a user tries to establish a new Client VPN connection session.
Figure 1: Enforce connection to Client VPN from specific geolocations
Let’s look at how the process illustrated in Figure 1 works.
The user device initiates a new client VPN connection session.
The Client VPN service redirects the user to authenticate against an IdP.
After user authentication succeeds, the client connects to the Client VPN endpoint.
The Client VPN endpoint invokes the Lambda function synchronously. The function is invoked after device and user authentication, and before the authorization rules are evaluated.
The Lambda function extracts the public-ip device attribute from the input and makes an HTTPS request to the Amazon API Gateway endpoint, passing the user’s public IP address in the X-Forwarded-For header.Because you’re using AWS WAF to protect API Gateway, and have geographic match conditions configured, a response with the status code 200 is returned only if the user’s public IP address originates from an allowed country of origin. Additionally, AWS WAF has another rule configured that blocks all requests to API Gateway if the request doesn’t originate from one of the NAT gateway IP addresses. Because Lambda is deployed in a VPC, it has a NAT gateway IP address, and therefore the request isn’t blocked by AWS WAF. To learn more about running a Lambda function in a VPC, see Configuring a Lambda function to access resources in a VPC.The following code example showcases Lambda code that performs the described step.
Note: Optionally, you can implement additional controls by creating specific authorization rules. Authorization rules act as firewall rules that grant access to networks. You should have an authorization rule for each network for which you want to grant access. To learn more, see Authorization rules.
The Lambda function returns the authorization request response to Client VPN.
When the Lambda function—shown following—returns an allow response, Client VPN establishes the VPN session.
import os
import http.client


cloud_front_url = os.getenv("ENDPOINT_DNS")
endpoint = os.getenv("ENDPOINT")
success_status_codes = [200]


def build_response(allow, status):
    return {
        "allow": allow,
        "error-msg-on-failed-posture-compliance": "Error establishing connection. Please contact your administrator.",
        "posture-compliance-statuses": [status],
        "schema-version": "v1"
    }


def handler(event, context):
    ip = event['public-ip']

    conn = http.client.HTTPSConnection(cloud_front_url)
    conn.request("GET", f'/{endpoint}', headers={'X-Forwarded-For': ip})
    r1 = conn.getresponse()
    conn.close()

    status_code = r1.status

    if status_code in success_status_codes:
        print("User's IP is based from an allowed country. Allowing the connection to VPN.")
        return build_response(True, 'compliant')

    print("User's IP is NOT based from an allowed country. Blocking the connection to VPN.")
    return build_response(False, 'quarantined')
After the client VPN session is established successfully, the request from the user device flows through the NAT gateway. The originating source IP address is recognized, because it is the Elastic IP address associated with the NAT gateway. An IAM policy is defined that denies any request to your AWS resources that doesn’t originate from the NAT gateway Elastic IP address. By attaching this IAM policy to users, you can control which AWS resources they can access.
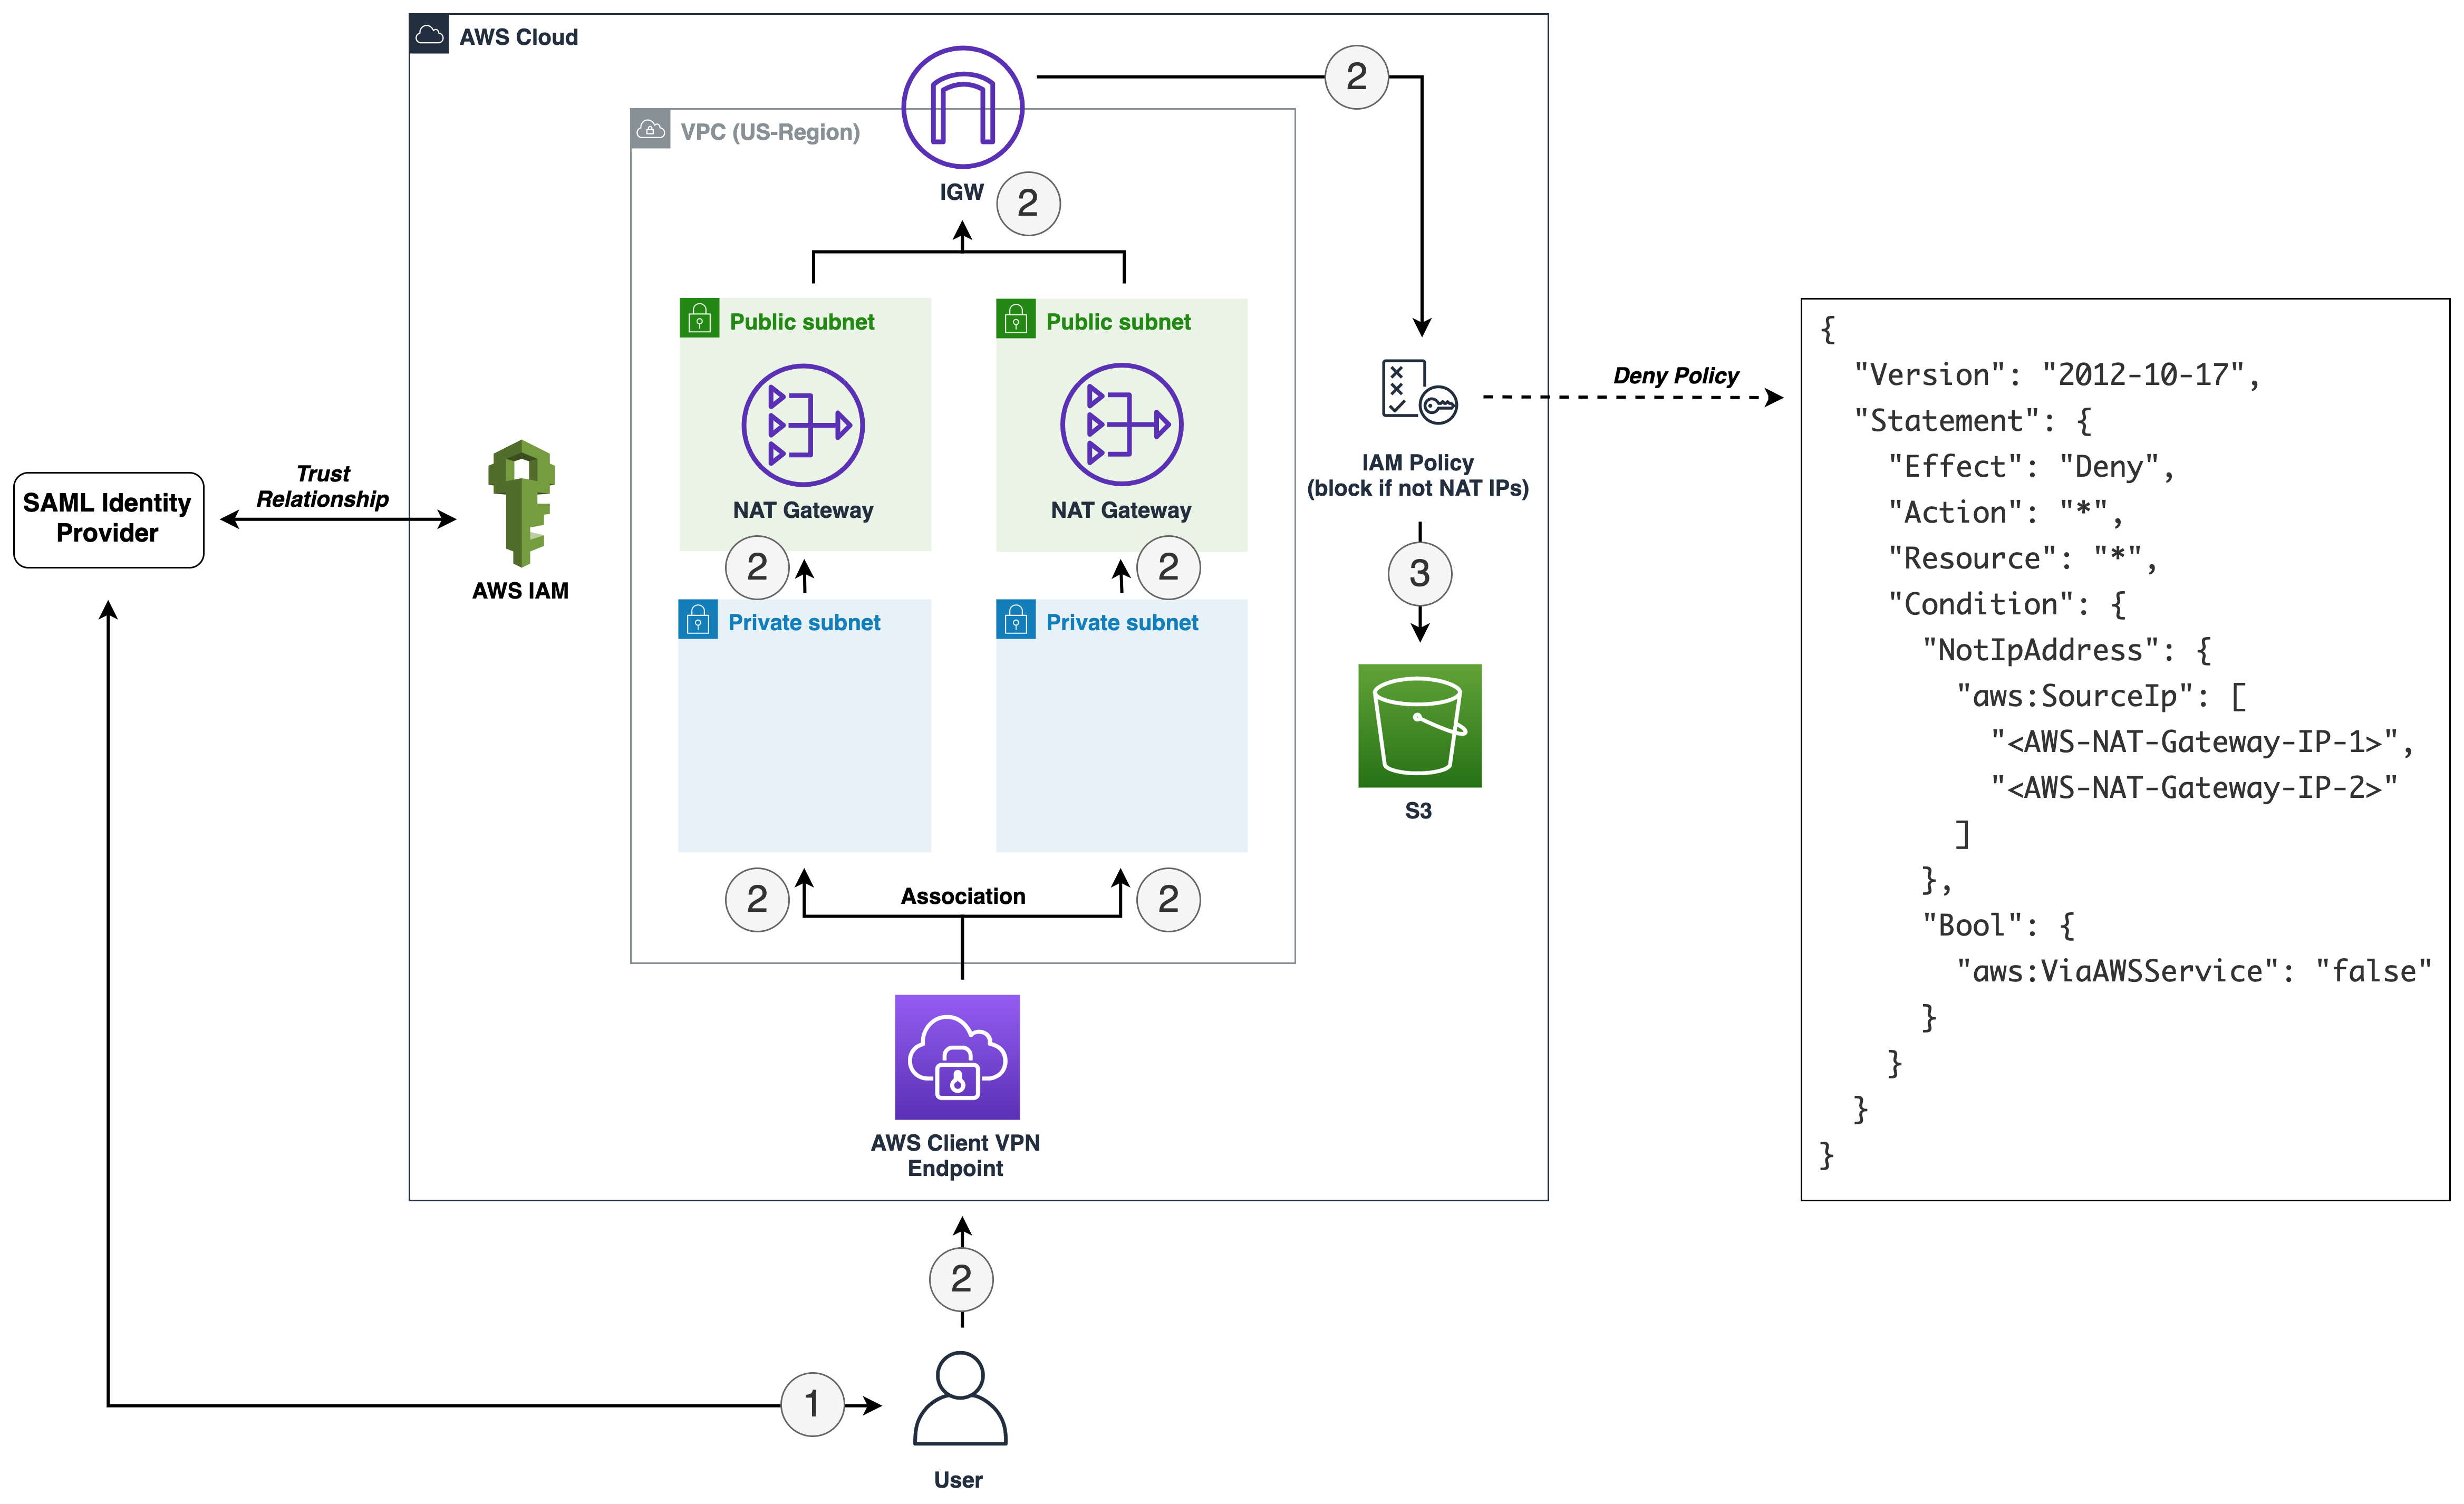
Figure 2: Enforce access to AWS resources from specific IPs
Let’s look at how the process illustrated in Figure 2 works.
A user signs in to the AWS Management Console by authenticating against the IdP and assumes an IAM role.
Using the IAM role, the user makes a request to list Amazon S3 buckets. The IAM policy of the user is evaluated to form an allow or deny decision.
If the request is allowed, an API request is made to Amazon S3.
The aws:SourceIp condition key is used in a policy to deny requests from principals if the origin IP address isn’t the NAT gateway IP address. However, this policy also denies access if an AWS service makes calls on a principal’s behalf. For example, when you use AWS CloudFormation to provision a stack, it provisions resources by using its own IP address, not the IP address of the originating request. In this case, you use aws:SourceIp with the aws:ViaAWSService key to ensure that the source IP address restriction applies only to requests made directly by a principal.
IAM deny policy
The IAM policy doesn’t allow any actions. What the policy does is deny any action on any resource if the source IP address doesn’t match any of the IP addresses in the condition. Use this policy in combination with other policies that allow specific actions.
Prerequisites
Make sure that you have the following in place before you deploy the solution:
Client VPN to connect to a Client VPN endpoint. You can follow the AWS Client VPN download instructions to download the desktop client.
In this section, you create a CloudFormation stack that creates AWS resources for this solution. To start the deployment process, select the following Launch Stack button.
You also can download the CloudFormation template if you want to modify the code before the deployment.
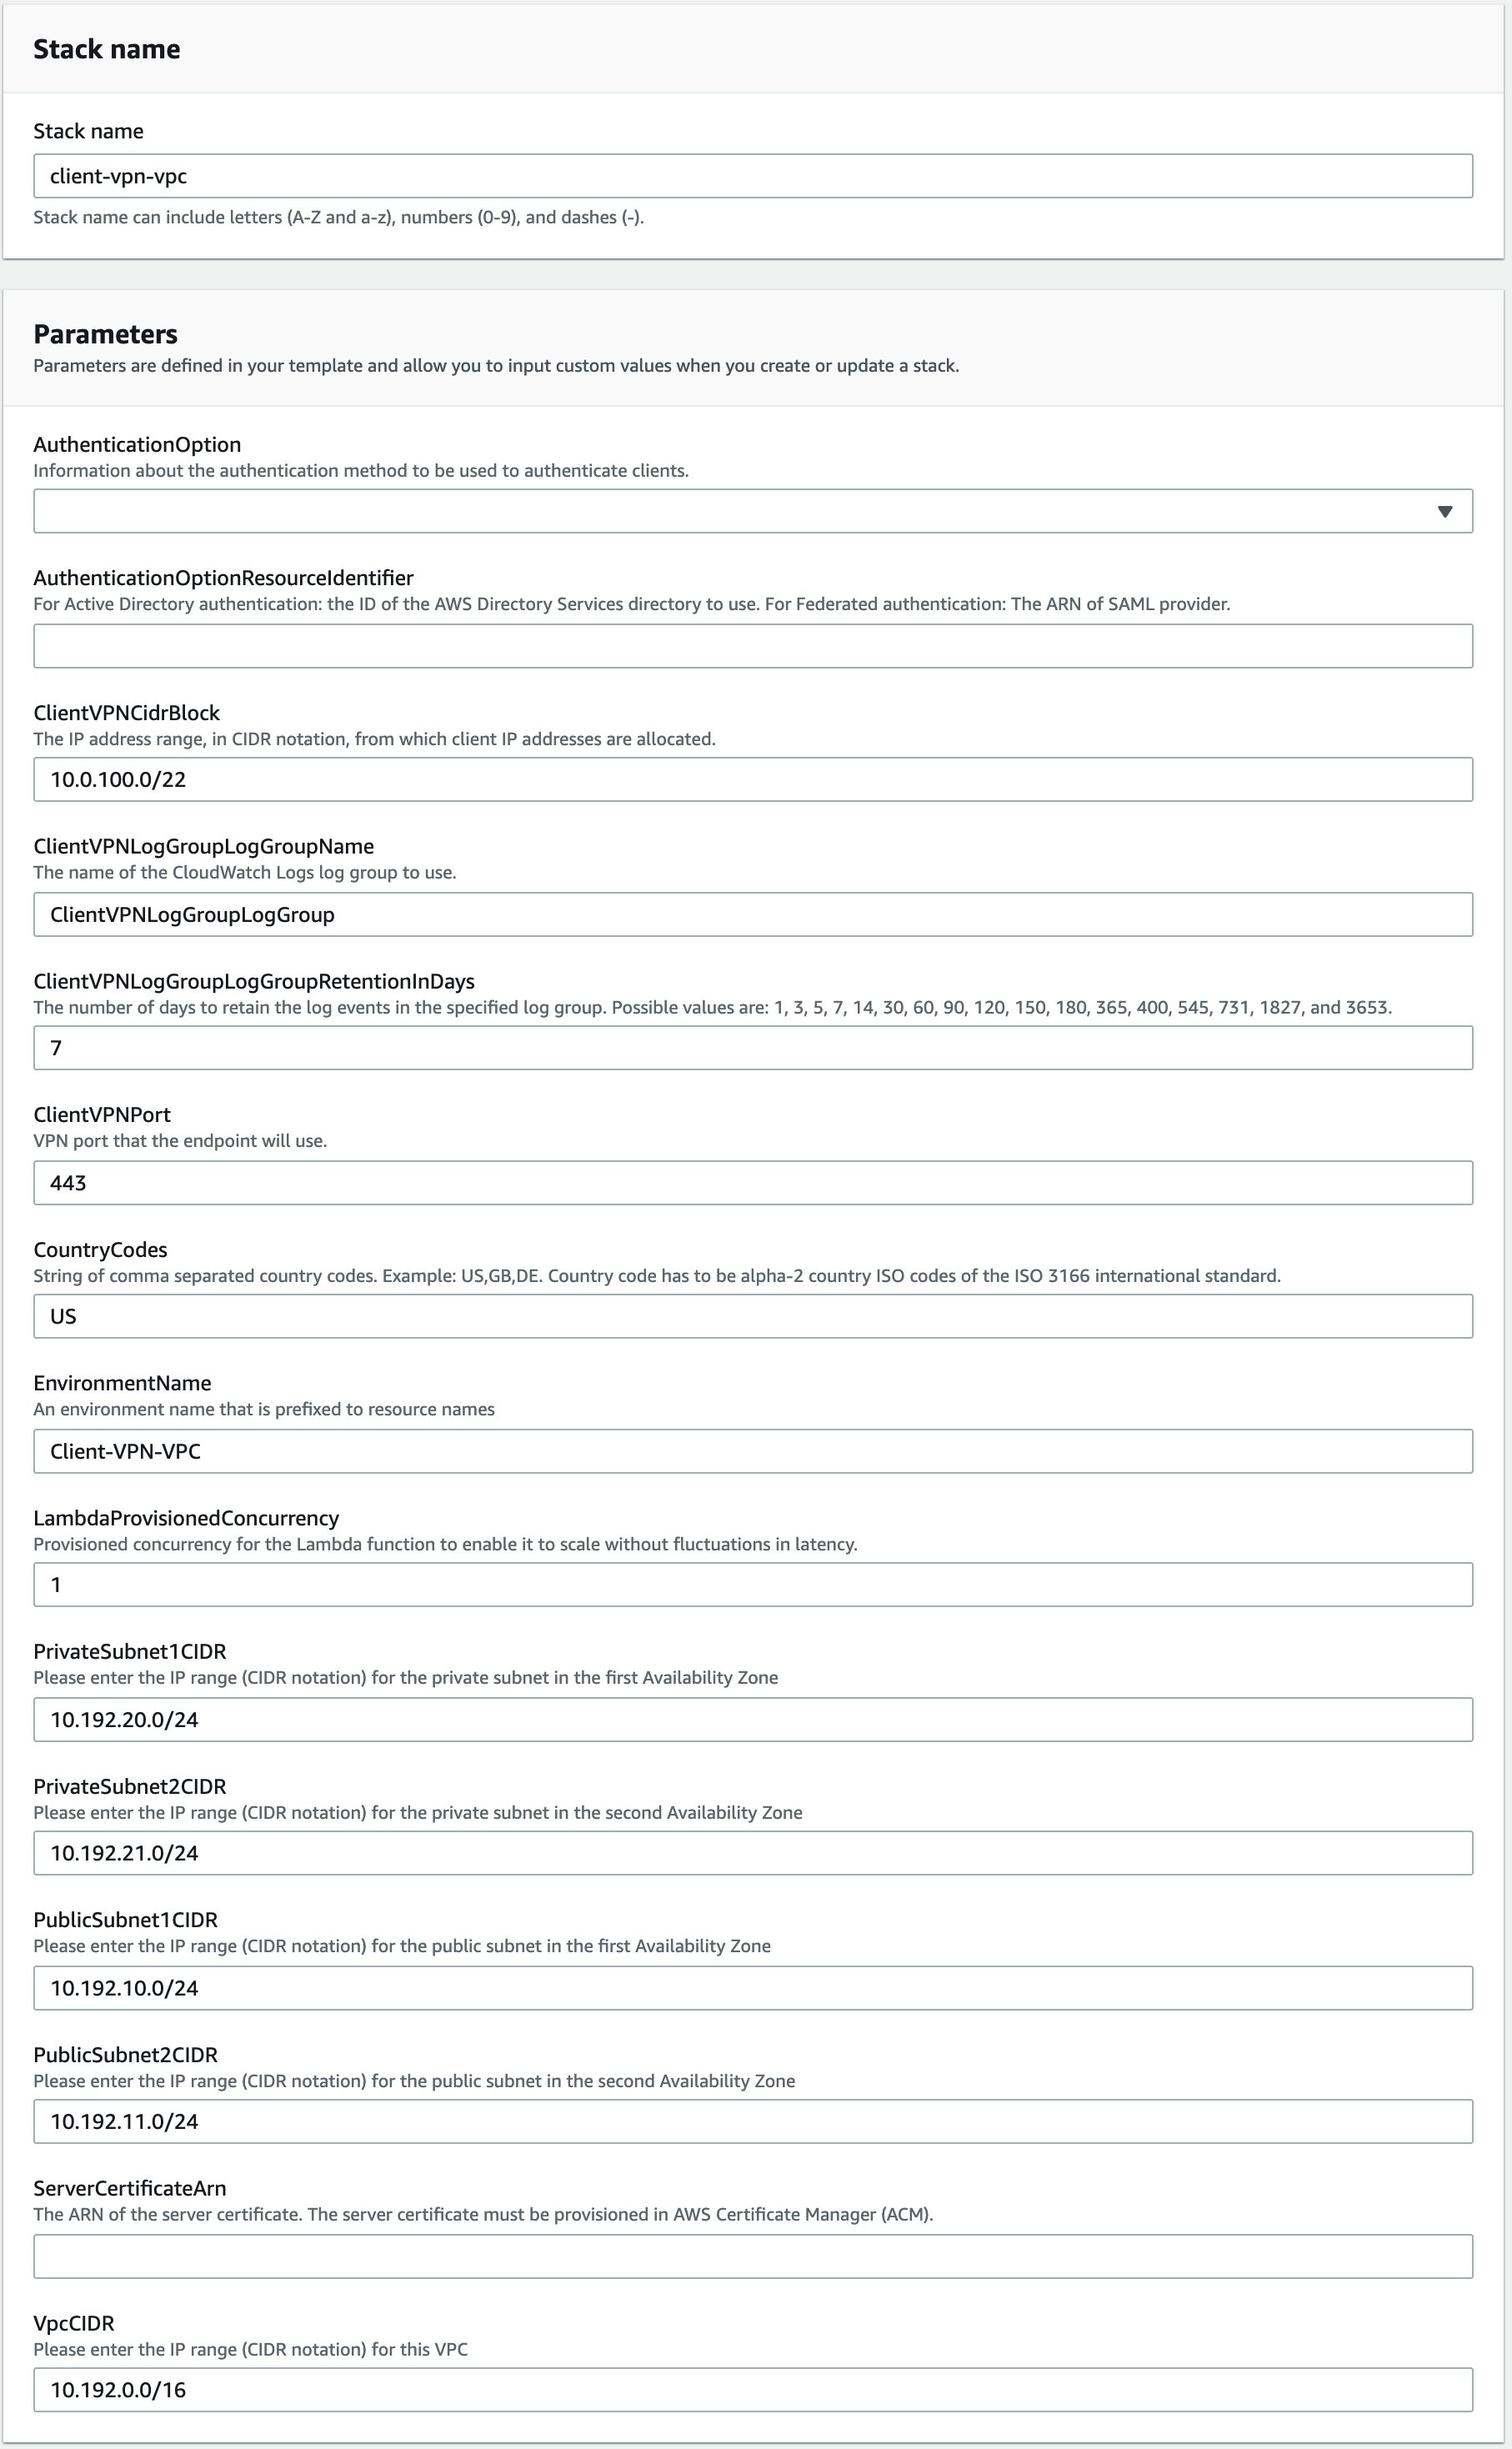
The template in Figure 3 takes several parameters. Let’s go over the key parameters.
AuthenticationOptionResourceIdentifier: The ID of the AWS Managed Microsoft AD directory to use for Active Directory authentication, or the Amazon Resource Number (ARN) of the SAML provider for federated authentication.
ServerCertificateArn: The ARN of the server certificate. The server certificate must be provisioned in ACM.
LambdaProvisionedConcurrency: Provisioned concurrency for the client connection handler. We recommend that you configure provisioned concurrency for the Lambda function to enable it to scale without fluctuations in latency.
All other input fields have default values that you can either accept or override. Once you provide the parameter input values and reach the final screen, choose Create stack to deploy the CloudFormation stack.
This template creates several resources in your AWS account, as follows:
A VPC and associated resources, such as InternetGateway, Subnets, ElasticIP, NatGateway, RouteTables, and SecurityGroup.
A Client VPN endpoint, which provides connectivity to your VPC.
A Lambda function, which is invoked by the Client VPN endpoint to determine the country origin of the user’s IP address.
An API Gateway for the Lambda function to make an HTTPS request.
AWS WAF in front of API Gateway, which only allows requests to go through to API Gateway if the user’s IP address is based in one of the allowed countries.
A deny policy with a NAT gateway IP addresses condition. Attaching this policy to a role or user enforces that the user can’t access your AWS resources unless they are connected to your client VPN.
Note: CloudFormation stack deployment can take up to 20 minutes to provision all AWS resources.
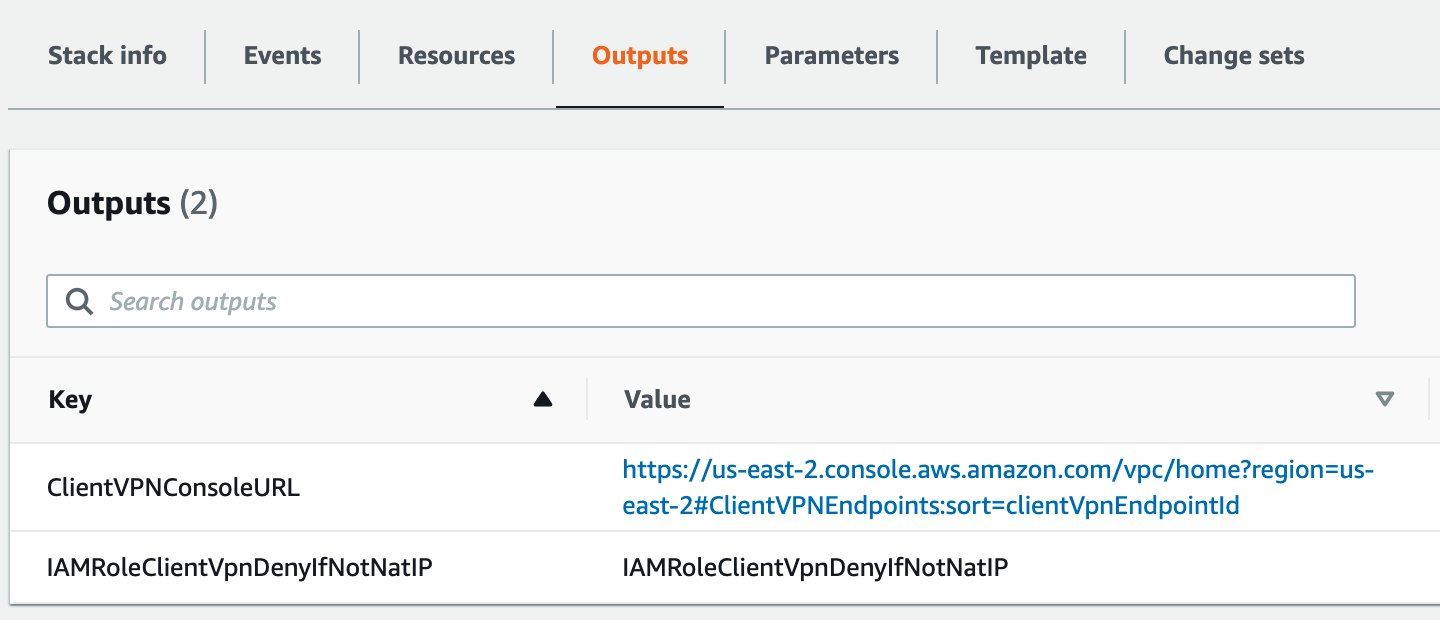
After creating the stack, there are two outputs in the Outputs section, as shown in Figure 4.
Figure 4: CloudFormation stack outputs
ClientVPNConsoleURL: The URL where you can download the client VPN configuration file.
IAMRoleClientVpnDenyIfNotNatIP: The IAM policy to be attached to an IAM role or IAM user to enforce access control.
Attach the IAMRoleClientVpnDenyIfNotNatIP policy to a role
This policy is used to enforce access to your AWS resources based on geolocation. Attach this policy to the role that you are using for testing the solution. You can use the steps in Adding IAM identity permissions to do so.
Configure the AWS client VPN desktop application
When you open the URL that you see in ClientVPNConsoleURL, you see the newly provisioned Client VPN endpoint. Select Download Client Configuration to download the configuration file.
Figure 5: Client VPN endpoint
Confirm the download request by selecting Download.
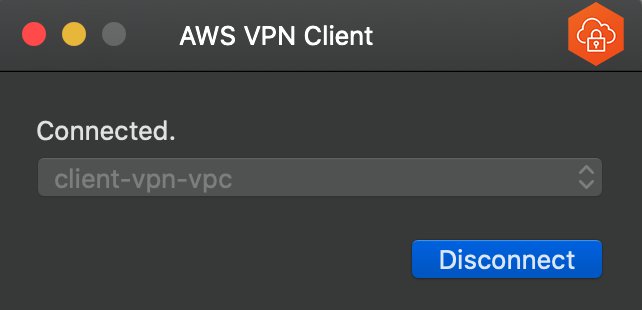
To connect to the Client VPN endpoint, follow the steps in Connect to the VPN. After a successful connection is established, you should see the message Connected. in your AWS Client VPN desktop application.
If you can’t establish a Client VPN connection, here are some things to try:
Confirm that the Client VPN connection has successfully established. It should be in the Connected state. To troubleshoot connection issues, you can follow this guide.
If the connection isn’t establishing, make sure that your machine has TCP port 35001 available. This is the port used for receiving the SAML assertion.
Validate that the user you’re using for testing is a member of the correct SAML group on your IdP.
Confirm that the IdP is sending the right details in the SAML assertion. You can use browser plugins, such as SAML-tracer, to inspect the information received in the SAML assertion.
Test the solution
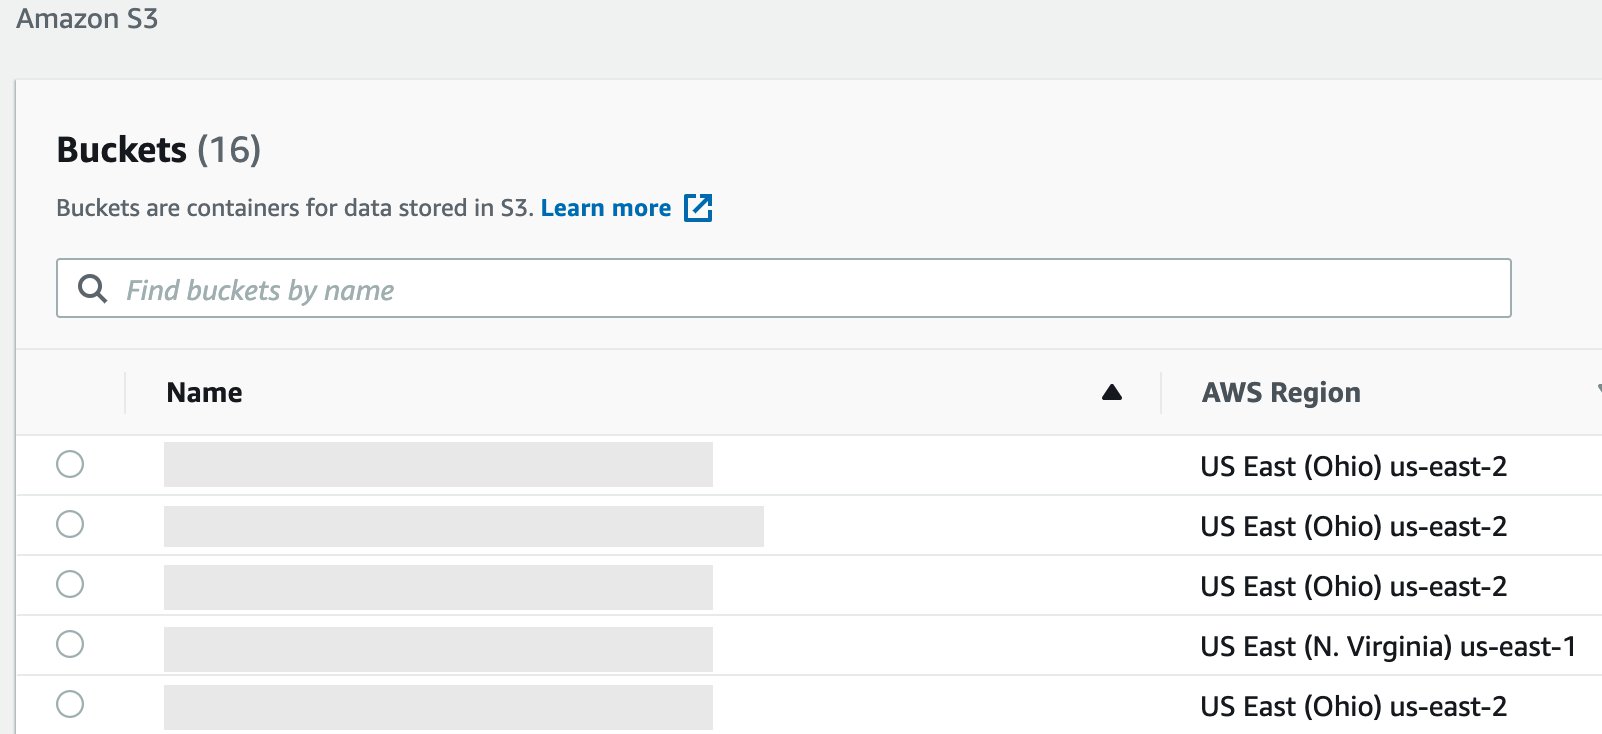
Now that you’re connected to Client VPN, open the console, sign in to your AWS account, and navigate to the Amazon S3 page. Since you’re connected to the VPN, your origin IP address is one of the NAT gateway IPs, and the request is allowed. You can see your S3 bucket, if any exist.
Figure 8: Amazon S3 service console view – user connected to AWS Client VPN
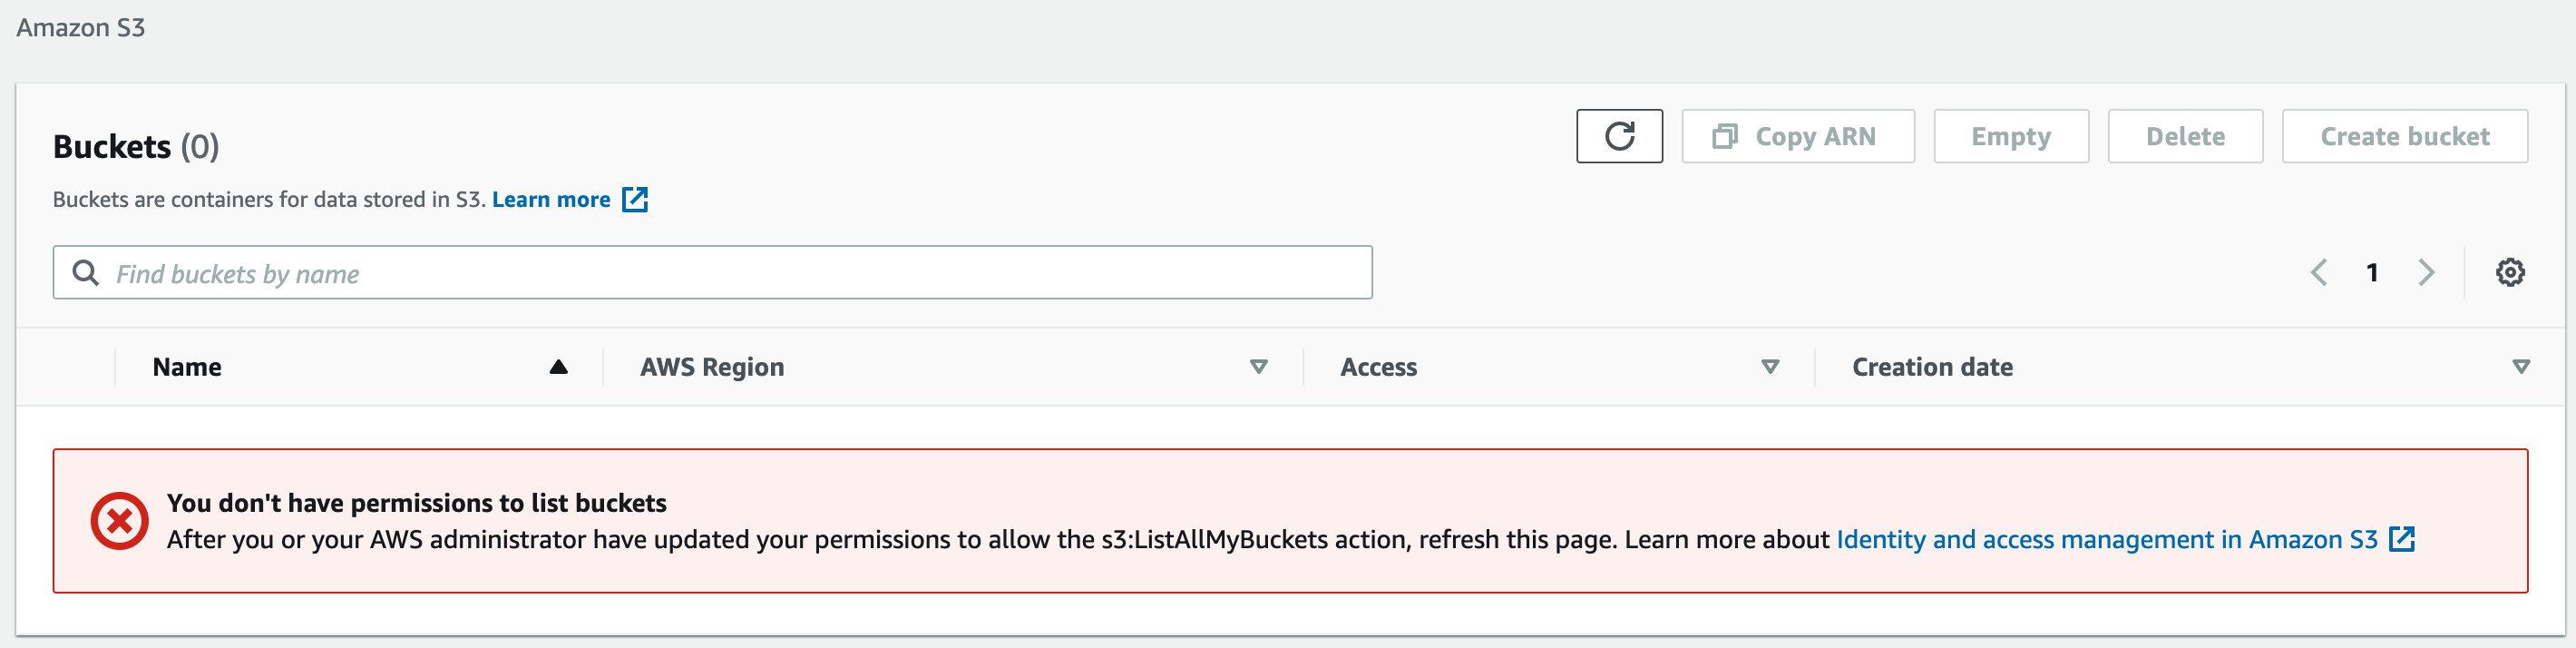
Now that you’ve verified that you can access your AWS resources, go back to the Client VPN desktop application and disconnect your VPN connection. Once the VPN connection is disconnected, go back to the Amazon S3 page and reload it. This time you should see an error message that you don’t have permission to list buckets, as shown in Figure 9.
Figure 9: Amazon S3 service console view – user is disconnected from AWS Client VPN
Access has been denied because your origin public IP address is no longer one of the NAT gateway IP addresses. As mentioned earlier, since the policy denies any action on any resource without an established VPN connection to the Client VPN endpoint, access to all your AWS resources is denied.
Scale the solution in AWS Organizations
With AWS Organizations, you can centrally manage and govern your environment as you grow and scale your AWS resources. You can use Organizations to apply policies that give your teams the freedom to build with the resources they need, while staying within the boundaries you set. By organizing accounts into organizational units (OUs), which are groups of accounts that serve an application or service, you can apply service control policies (SCPs) to create targeted governance boundaries for your OUs. To learn more about Organizations, see AWS Organizations terminology and concepts.
SCPs help you to ensure that your accounts stay within your organization’s access control guidelines across all your accounts within OUs. In particular, these are the key benefits of using SCPs in your AWS Organizations:
You don’t have to create an IAM policy with each new account, but instead create one SCP and apply it to one or more OUs as needed.
You don’t have to apply the IAM policy to every IAM user or role, existing or new.
This solution can be deployed in a separate account, such as a shared infrastructure account. This helps to decouple infrastructure tooling from business application accounts.
The following figure, Figure 10, illustrates the solution in an Organizations environment.
Figure 10: Use SCPs to enforce policy across many AWS accounts
The Client VPN account is the account the solution is deployed into. This account can also be used for other networking related services. The SCP is created in the Organizations root account and attached to one or more OUs. This allows you to centrally control access to your AWS resources.
Let’s review the new condition that’s added to the IAM policy:
The aws:PrincipalARN condition key allows your AWS services to communicate to other AWS services even though those won’t have a NAT IP address as the source IP address. For instance, when a Lambda function needs to read a file from your S3 bucket.
Note: Appending policies to existing resources might cause an unintended disruption to your application. Consider testing your policies in a test environment or to non-critical resources before applying them to production resources. You can do that by attaching the SCP to a specific OU or to an individual AWS account.
Cleanup
After you’ve tested the solution, you can clean up all the created AWS resources by deleting the CloudFormation stack.
Conclusion
In this post, we showed you how you can restrict IAM users to access AWS resources from specific geographic locations. You used Client VPN to allow users to establish a client VPN connection from a desktop. You used an AWS client connection handler (as a Lambda function), and API Gateway with AWS WAF to identify the user’s geolocation. NAT gateway IPs served as trusted source IPs, and an IAM policy protects access to your AWS resources. Lastly, you learned how to scale this solution to many AWS accounts with Organizations.
If you have feedback about this post, submit comments in the Comments section below.
Want more AWS Security how-to content, news, and feature announcements? Follow us on Twitter.
The collective thoughts of the interwebz
Manage Consent
To provide the best experiences, we use technologies like cookies to store and/or access device information. Consenting to these technologies will allow us to process data such as browsing behavior or unique IDs on this site. Not consenting or withdrawing consent, may adversely affect certain features and functions.
Functional
Always active
The technical storage or access is strictly necessary for the legitimate purpose of enabling the use of a specific service explicitly requested by the subscriber or user, or for the sole purpose of carrying out the transmission of a communication over an electronic communications network.
Preferences
The technical storage or access is necessary for the legitimate purpose of storing preferences that are not requested by the subscriber or user.
Statistics
The technical storage or access that is used exclusively for statistical purposes.The technical storage or access that is used exclusively for anonymous statistical purposes. Without a subpoena, voluntary compliance on the part of your Internet Service Provider, or additional records from a third party, information stored or retrieved for this purpose alone cannot usually be used to identify you.
Marketing
The technical storage or access is required to create user profiles to send advertising, or to track the user on a website or across several websites for similar marketing purposes.