The purpose of this article is to give insights into analyzing and predicting “out of memory” or OOM kills on the Netflix App. Unlike strong compute devices, TVs and set top boxes usually have stronger memory constraints. More importantly, the low resource availability or “out of memory” scenario is one of the common reasons for crashes/kills. We at Netflix, as a streaming service running on millions of devices, have a tremendous amount of data about device capabilities/characteristics and runtime data in our big data platform. With large data, comes the opportunity to leverage the data for predictive and classification based analysis. Specifically, if we are able to predict or analyze the Out of Memory kills, we can take device specific actions to pre-emptively lower the performance in favor of not crashing — aiming to give the user the ultimate Netflix Experience within the “performance vs pre-emptive action” tradeoff limitations. A major advantage of prediction and taking pre-emptive action, is the fact that we can take actions to better the user experience.
This is done by first elaborating on the dataset curation stage — specially focussing on device capabilities and OOM kill related memory readings. We also highlight steps and guidelines for exploratory analysis and prediction to understand Out of Memory kills on a sample set of devices. Since memory management is not something one usually associates with classification problems, this blog focuses on formulating the problem as an ML problem and the data engineering that goes along with it. We also explore graphical analysis of the labeled dataset and suggest some feature engineering and accuracy measures for future exploration.
Challenges of Dataset Curation and Labeling
Unlike other Machine Learning tasks, OOM kill prediction is tricky because the dataset will be polled from different sources — device characteristics come from our on-field knowledge and runtime memory data comes from real-time user data pushed to our servers.
Secondly, and more importantly, the sheer volume of the runtime data is a lot. Several devices running Netflix will log memory usage at fixed intervals. Since the Netflix App does not get killed very often (fortunately!), this means most of these entries represent normal/ideal/as expected runtime states. The dataset will thus be very biased/skewed. We will soon see how we actually label which entries are erroneous and which are not.
Dataset Features and Components
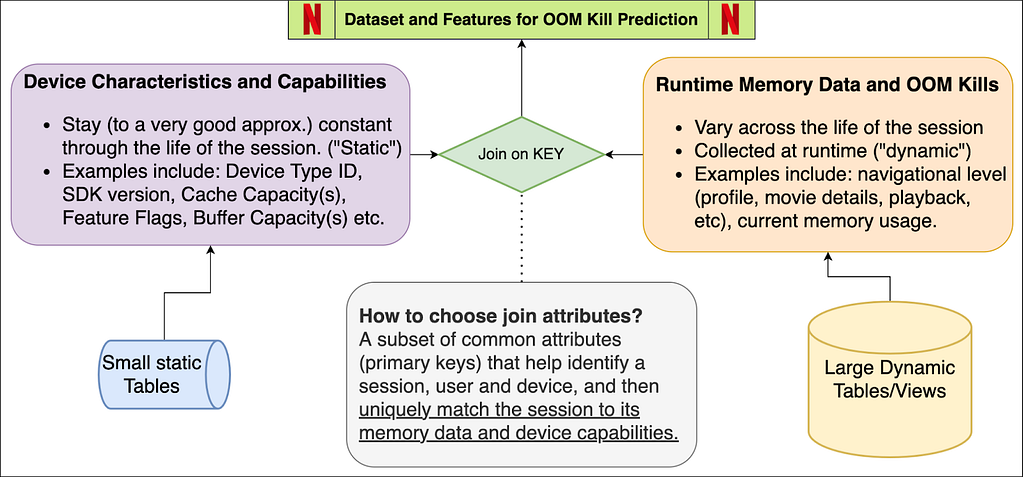
The schema figure above describes the two components of the dataset — device capabilities/characteristics and runtime memory data. When joined together based on attributes that can uniquely match the memory entry with its device’s capabilities. These attributes may be different for different streaming services — for us at Netflix, this is a combination of the device type, app session ID and software development kit version (SDK version). We now explore each of these components individually, while highlighting the nuances of the data pipeline and pre-processing.
Device Capabilities
All the device capabilities may not reside in one source table — requiring multiple if not several joins to gather the data. While creating the device capability table, we decided to primary index it through a composite key of (device type ID, SDK version). So given these two attributes, Netflix can uniquely identify several of the device capabilities. Some nuances while creating this dataset come from the on-field domain knowledge of our engineers. Some features (as an example) include Device Type ID, SDK Version, Buffer Sizes, Cache Capacities, UI resolution, Chipset Manufacturer and Brand.
Major Milestones in Data Engineering for Device Characteristics
Structuring the data in an ML-consumable format: The device capability data needed for the prediction was distributed in over three different schemas across the Big Data Platform. Joining them together and building a single indexable schema that can directly become a part of a bigger data pipeline is a big milestone.
Dealing with ambiguities and missing data: Sometimes the entries in BDP are contaminated with testing entries and NULL values, along with ambiguous values that have no meaning or just simply contradictory values due to unreal test environments. We deal with all of this by a simple majority voting (statistical mode) on the view that is indexed by the device type ID and SDK version from the user query. We thus verify the hypothesis that actual device characteristics are always in majority in the data lake.
Incorporating On-site and field knowledge of devices and engineers: This is probably the single most important achievement of the task because some of the features mentioned above (and some of the ones redacted) involved engineering the features manually. Example: Missing values or NULL values might mean the absence of a flag or feature in some attribute, while it might require extra tasks in others. So if we have a missing value for a feature flag, that might mean “False”, whereas a missing value in some buffer size feature might mean that we need subqueries to fetch and fill the missing data.
Runtime Memory, OOM Kill Data and ground truth labeling
Runtime data is always increasing and constantly evolving. The tables and views we use are refreshed every 24 hours and joining between any two such tables will lead to tremendous compute and time resources. In order to curate this part of the dataset, we suggest some tips given below (written from the point of view of SparkSQL-like distributed query processors):
Filtering the entries (conditions) before JOIN, and for this purpose using WHERE and LEFT JOIN clauses carefully. Conditions that eliminate entries after the join operation are much more expensive than when elimination happens before the join. It also prevents the system running out of memory during execution of the query.
Restricting Testing and Analysis to one day and device at a time. It is always good to pick a single high frequency day like New Years, or Memorial day, etc. to increase frequency counts and get normalized distributions across various features.
Striking a balance between driver and executor memory configurations in SparkSQL-like systems. Too high allocations may fail and restrict system processes. Too low memory allocations may fail at the time of a local collect or when the driver tries to accumulate the results.
Labeling the data — Ground Truth
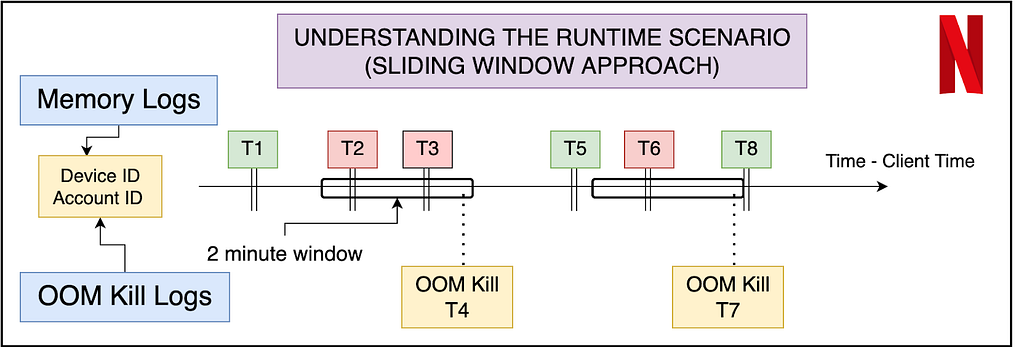
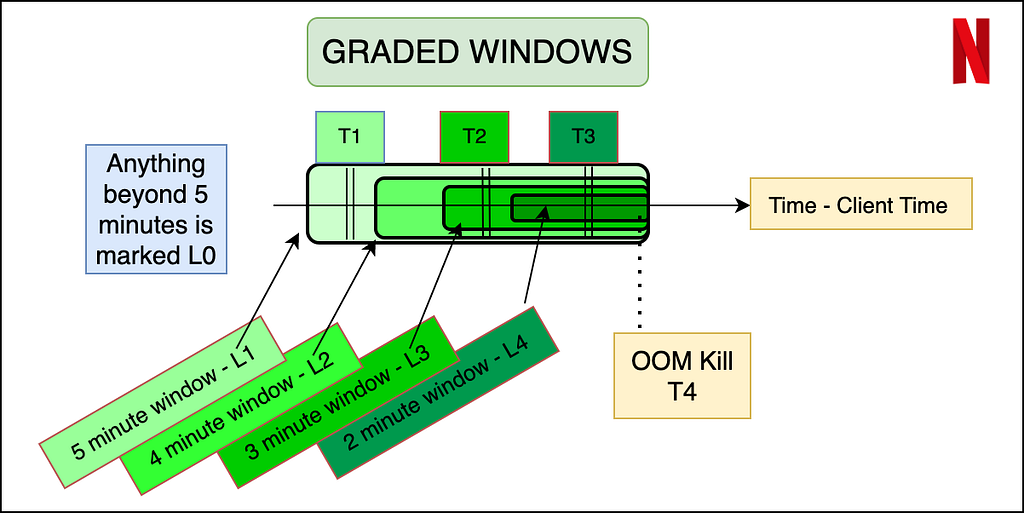
An important aspect of the dataset is to understand what features will be available to us at inference time. Thus memory data (that contains the navigational level and memory reading) can be labeled using the OOM kill data, but the latter cannot be reflected in the input features. The best way to do this is to use a sliding window approach where we label the memory readings of the sessions in a fixed window before the OOM kill as erroneous, and the rest of the entries as non-erroneous. In order to make the labeling more granular, and bring more variation in a binary classification model, we propose a graded window approach as explained by the image below. Basically, it assigns higher levels to memory readings closer to the OOM kill, making it a multi-class classification problem. Level 4 is the most near to the OOM kill (range of 2 minutes), whereas Level 0 is beyond 5 minutes of any OOM kill ahead of it. We note here that the device and session of the OOM kill instance and the memory reading needs to match for the sanity of the labeling. Later the confusion matrix and model’s results can later be reduced to binary if need be.
Summary of OOM Prediction — Problem Formulation
The dataset now consists of several entries — each of which has certain runtime features (navigational level and memory reading in our case) and device characteristics (a mix of over 15 features that may be numerical, boolean or categorical). The output variable is the graded or ungraded classification variable which is labeled in accordance with the section above — primarily based on the nearness of the memory reading stamp to the OOM kill. Now we can use any multi-class classification algorithm — ANNs, XGBoost, AdaBoost, ElasticNet with softmax etc. Thus we have successfully formulated the problem of OOM kill prediction for a device streaming Netflix.
Data Analysis and Observations
Without diving very deep into the actual devices and results of the classification, we now show some examples of how we could use the structured data for some preliminary analysis and make observations. We do so by just looking at the peak of OOM kills in a distribution over the memory readings within 5 minutes prior to the kill.
Different device types
From the graph above, we show how even without doing any modeling, the structured data can give us immense knowledge about the memory domain. For example, the early peaks (marked in red) are mostly crashes not visible to users, but were marked erroneously as user-facing crashes. The peaks marked in green are real user-facing crashes. Device 2 is an example of a sharp peak towards the higher memory range, with a decline that is sharp and almost no entries after the peak ends. Hence, for Device 1 and 2, the task of OOM prediction is relatively easier, after which we can start taking pre-emptive action to lower our memory usage. In case of Device 3, we have a normalized gaussian like distribution — indicating that the OOM kills occur all over, with the decline not being very sharp, and the crashes happen all over in an approximately normalized fashion.
Feature Engineering, Accuracy Measures and Future Work Directions
We leave the reader with some ideas to engineer more features and accuracy measures specific to the memory usage context in a streaming environment for a device.
We could manually engineer features on memory to utilize the time-series nature of the memory value when aggregated over a user’s session. Suggestions include a running mean of the last 3 values, or a difference of the current entry and running exponential average. The analysis of the growth of memory by the user could give insights into whether the kill was caused by in-app streaming demand, or due to external factors.
Another feature could be the time spent in different navigational levels. Internally, the app caches several pre-fetched data, images, descriptions etc, and the time spent in the level could indicate whether or not those caches are cleared.
When deciding on accuracy measures for the problem, it is important to analyze the distinction between false positives and false negatives. The dataset (fortunately for Netflix!) will be highly biased — as an example, over 99.1% entries are non-kill related. In general, false negatives (not predicting the kill when actually the app is killed) are more detrimental than false positives (predicting a kill even though the app could have survived). This is because since the kill happens rarely (0.9% in this example), even if we end up lowering memory and performance 2% of the time and catch almost all the 0.9% OOM kills, we will have eliminated approximately. all OOM kills with the tradeoff of lowering the performance/clearing the cache an extra 1.1% of the time (False Positives).
Summary
This post has focussed on throwing light on dataset curation and engineering when dealing with memory and low resource crashes for streaming services on device. We also cover the distinction between non-changing attributes and runtime attributes and strategies to join them to make one cohesive dataset for OOM kill prediction. We covered labeling strategies that involved graded window based approaches and explored some graphical analysis on the structured dataset. Finally, we ended with some future directions and possibilities for feature engineering and accuracy measurements in the memory context.
Stay tuned for further posts on memory management and the use of ML modeling to deal with systemic and low latency data collected at the device level. We will try to soon post results of our models on the dataset that we have created.
Acknowledgements I would like to thank the members of various teams — Partner Engineering (Mihir Daftari, Akshay Garg), TVUI team (Andrew Eichacker, Jason Munning), Streaming Data Team, Big Data Platform Team, Device Ecosystem Team and Data Science Engineering Team (Chris Pham), for all their support.
This blog post shows you how to share encrypted Amazon Simple Storage Service (Amazon S3) buckets across accounts on a multi-tenant data lake. Our objective is to show scalability over a larger volume of accounts that can access the data lake, in a scenario where there is one central account to share from. Most use cases involve multiple groups or customers that need to access data across multiple accounts, which makes data lake solutions inherently multi-tenant. Therefore, it becomes very important to associate data assets and set policies to manage these assets in a consistent way. The use of AWS Key Management Service (AWS KMS) simplifies seamless integration with AWS services and offers improved data protection to ultimately enable data lake services (for example, Amazon EMR, AWS Glue, or Amazon Redshift).
To further enable access at scale, you can use AWS Identity and Access Management (IAM) to restrict access to all IAM principals in your organization in AWS Organizations through the aws:PrincipalOrgID condition key. When used in a role trust policy, this key enables you to restrict access to IAM principals in your organization when assuming the role to gain access to resources in your account. This is more scalable than adding every role or account that needs access in the trust policy’s Principal element, and automatically includes future accounts that you may add to your organization.
A data lake that is built on AWS uses Amazon S3 as its primary storage location; Amazon S3 provides an optimal foundation for a data lake because of its virtually unlimited scalability and high durability. AWS Lake Formation can be used as your authorization engine to manage or enforce permissions to your data lake with integrated services such as Amazon Athena, Amazon EMR, and Amazon Redshift Spectrum. For AWS services that integrate with Lake Formation and honor Lake Formation permissions, see the Lake Formation Developer Guide.
This post focuses on services that are not integrated with Lake Formation or where Lake Formation is not enabled on the account; in these cases, direct access for S3 buckets is required for defining and enforcing access control policies. You will learn how to use attribute-based access control (ABAC) as an authorization strategy that defines fine-grained permissions based on attributes, where fewer IAM roles are required to be provisioned, which helps scale your authorization needs. By using ABAC in conjunction with S3 bucket policies, you can authorize users to read objects based on one or more tags that are applied to S3 objects and to the IAM role session of your users based on key-value pair attributes, named session tags. ABAC reduces the number of policies, because session tags are easier to manage and establish a differentiation in job policies. The session tags will be passed when you assume an IAM role or federate a user (through your identity provider) in AWS Security Token Service (AWS STS). This enables administrators to configure a SAML-based identity provider (IdP) to send specific employee attributes as tags in AWS. As a result, you can simplify the creation of fine-grained permissions for employees to get access only to the AWS resources with matching tags.
For simplicity, in this solution you will be using an AWS Command Line Interface (AWS CLI) request for temporary security credentials when generating a session. You will apply the global aws:PrincipalOrgID condition key in your resource-based policies to restrict access to accounts in your AWS organization. This key will restrict access even though the Principal element uses the wildcard character * which applies to all AWS principals in the Principal element. We will suggest additional controls where feasible.
Cross-account access
From a high-level overview perspective, the following items are a starting point when enabling cross-account access. In order to grant cross-account access to AWS KMS-encrypted S3 objects in Account A to a user in Account B, you must have the following permissions in place (objective #1):
The bucket policy in Account A must grant access to Account B.
The AWS KMS key policy in Account A must grant access to the user in Account B.
By establishing these permissions, you will learn how to maintain entitlements (objective #2) at the bucket or object level, explore cross-account bucket sharing at scale, and overcome limitations such as inline policy size or bucket policy file size (you can learn more details in the Policies overview section). As an extension, you:
Enable granular permissions.
Grant access to groups of resources by tags.
Configuration options can be challenging for cross-account access, especially when the objective is to scale across a large number of accounts to a multi-tenant data lake. This post offers to orchestrate the various configurations options in such a way that both objectives #1 and #2 are met and challenges are addressed. Note that although not all AWS services support tag-based authorization today, we are seeing an increase in support for ABAC.
Solution overview
Our objective is to overcome challenges and design backwards with scalability in mind. The following table depicts the challenges, and outlines recommendations for a better design.
Challenge
Recommendation detail
Use employee attributes from your corporate directory
You can configure your SAML-based or web identity provider to pass session tags to AWS. When your employees federate into AWS, their attributes are applied to their resulting principal in AWS. You can then use ABAC to allow or deny permissions based on those attributes.
Enable granular permissions
ABAC requires fewer policies, because differentiation in job policies is given through session tags, which are easier to manage. Permissions are granted automatically based on attributes.
Grant access to resources by tags
When you use ABAC, you can allow actions on all resources, but only if the resource tag matches the principal’s tag and/or the organization’s tag. It’s best practice to grant least privilege.
Not all services support tag-based authorization
Check for service updates and design around the limitations.
Scale with innovation
ABAC permissions scale with innovation, because it’s not necessary for the administrator to update existing policies to allow access to new resources.
Architecture overview
Figure 1: High-level architecture
The high-level architecture in Figure 1 is designed to show you the advantages of scaling ABAC across accounts and to reflect on a common model that applies to most large organizations.
Solution walkthrough
Here is a brief introduction to the basic components that make up the solution:
Identity provider (IdP) – Can be either on-premises or in the cloud. Your administrators configure your SAML-based IdP to allow workforce users federated access to AWS resources using credentials from your corporate directory (backed by Active Directory). Now you can configure your IdP to pass in user attributes as session tags in federated AWS sessions. These tags can also be transitive, persisting even across subsequent role assumptions.
Central governance account – Helps to establish the access control policies. It takes in the user’s attributes from the IdP and grants permission to access resources. The X-Acct Control Manager is a collection of IAM roles with trust boundaries that grants access to the SAML role by role re-assumption, also known as role chaining. The governance account manages access to the SAML role and trust relationship by using OpenID Connect (OIDC) to allow users to assume roles and pass session tags. This account’s primary purpose is to manage permissions for secure data access. This account can also consume data from the lake if necessary.
Multiple accounts to connect to a multi-tenant data lake – Mirrors a large organization with a multitude of accounts that would like cross-account read access. Each account uses a pre-pave data manager role (one that has been previously established) that can tag or untag any IAM roles in the account, with the cross-account trust allowing users to assume a role to a specific central account. Any role besides the data manager should be prevented from tagging or untagging IAM principals to help prevent unauthorized changes.
Member Analytics organizational unit (OU) – Is where the EMR analytics clusters are connecting to the data in the consumptions layer to visualize by using business intelligence (BI) tools such as Tableau. Access to the shared buckets is granted through bucket and identity policies. Multiple accounts may also have access to buckets within their own accounts. Since this is a consumer account, this account is only joining the lake to consume data from the lake and will not be contributing any data to the data lake.
Central Data Lake OU – Is the account that owns the data stored on Amazon S3. The objects are encrypted, which will require the IAM role to have permissions to the specified AWS KMS key in the key policy. AWS KMS supports the use of the aws:ResourceTag/tag-key global condition context key within identity policies, which lets you control access to AWS KMS keys based on the tags on the key.
Prerequisites
For using SAML session tags for ABAC, you need to have the following:
Access to a SAML-based IdP where you can create test users with specific attributes.
For simplicity, you will be using an AWS CLI request for temporary security credentials when generating a session.
You’ll be passing session tags using AssumeRoleWithSAML.
AWS accounts where users can sign in. There are five accounts for interaction defined with accommodating policies and permission, as outlined in Figure 1. The numerals listed here refer to the labels on the figure:
IdP account – IAM user with administrative permission (1)
Central governance account – Admin/Writer ABAC policy (2)
Sample accounts to connect to multi-tenant data lake – Reader ABAC policy (3)
Member Analytics OU account – Assume roles in shared bucket (4)
Central Data Lake OU account – Pave (that is create) or update virtual private cloud (VPC) condition and principals/PrincipalOrgId in a shared bucket (5)
AWS resources, such as Amazon S3, AWS KMS, or Amazon EMR.
Any third-party software or hardware, such as BI tools.
Our objective is to design an AWS perimeter where access is allowed only if necessary and sufficient conditions are met for getting inside the AWS perimeter. See the following table, and the blog post Establishing a data perimeter on AWS for more information.
Boundary
Perimeter objective
AWS services used
Identity
Only My Resources Only My Networks
Identity-based policies and SCPs
Resource
Only My IAM Principals Only My Networks
Resource-based policies
Network
Only My IAM Principals Only My Resources
VPC endpoint (VPCE) policies
There are multiple design options, as described in the whitepaper Building A Data Perimeter on AWS, but this post will focus on option A, which is a logical AND (∧) conjunction of principal organization, resource, and network:
(Only My aws:PrincipalOrgID) ∧ (Only My Resource) ∧ (Only My Network)
(Only My IAM Principals) ∧ (Only My Resource) ∧ (Only My Network)
(Only My aws:PrincipalOrgID) ∧ (Only My IAM Principals) ∧ (Only My Resource) ∧ (Only My Network)
Policies overview
In order to properly design and consider control points as well as scalability limitations, the following table shows an overview of the policies applied in this post. It outlines the design limitations and briefly discusses the proposed solutions, which are described in more detail in the Establish an ABAC policy section.
Policy type
Sample policies
Limitations to overcome
Solutions outlined in this blog
IAM user policy
AllowIamUserAssumeRole
AllowPassSessionTagsAndTransitive
IAMPolicyWithResourceTagForKMS
Inline JSON policy document is limited to (2048 bytes).
For using KMS keys, accounts are limited to specific AWS Regions.
Enable session tags, which expire and require credentials.
It is a best practice to grant least privilege permissions with AWS Identity and Access Management (IAM) policies.
S3 bucket policy
Principals-only-from-given-Org
Access-to-specific-VPCE-only
KMS-Decrypt-with-specific-key
DenyUntaggedData
The bucket policy has a 20 KB maximum file size.
Data exfiltration or non-trusted writing to buckets can be restricted by a combination of policies and conditions.
Use aws:PrincipalOrgID to simplify specifying the Principal element in a resource-based policy.
No manual updating of account IDs required, if they belong to the intended organization.
~ VPCE policy
DenyNonApprovedIPAddresses VPCEndpointsNonAdmin
DenyNonSSLConnections
DenyIncorrectEncryptionKey
DenyUnEncryptedObjectUploads
aws:PrincipalOrgID opens up broadly to accounts with single control—requiring additional controls.
Make sure that principals aren’t inadvertently allowed or denied access.
Restrict access to VPC with endpoint policies and deny statements.
KMS key policy
Allow-use-of-the-KMS-key-for-organization
Listing all AWS account IDs in an organization.
Maximum key policy document size is 32 KB, which applies to KMS key.
Changing a tag or alias might allow or deny permission to a KMS key.
Specify the organization ID in the condition element, instead of listing all the AWS account IDs.
AWS owned keys do not count against these quotas, so use these where possible.
Assure visibility of API operations
By using a combination of these policies and conditions, you can work to mitigate accidental or intentional exfiltration of data, IAM credentials, and VPC endpoints. You can also alleviate writing to a bucket that is owned by a non-trusted account by using even more restrictive policies for write operations. For example, use the s3:ResourceAccount condition key to filter access to trusted S3 buckets that belong only to specific AWS accounts.
Today, the scalability of cross-account bucket sharing is limited by the current allowed S3 bucket policy size (20 KB) and KMS key policy size (32 KB). Cross-account sharing also may increase risk, unless the appropriate guardrails are in place. The aws:PrincipalOrgID condition helps by allowing sharing of resources such as buckets only to accounts and principals within your organization. If ABAC is also used for enforcement, tags used for authorization also need to be governed across all participating accounts; this includes protecting them from modification and also helps ensure only authorized principals can use ABAC when gaining access.
Figure 2 demonstrates a sample scenario for the roles from a specific organization in AWS Organizations, including multiple application accounts (Consumer Account 1, Consumer Account 2) with defined tags accessing an S3 bucket that is owned by Central Data Lake Account.
Figure 2: Sample scenario
Establish an ABAC policy
AWS has published additional blog posts and documentation for various services and features that are helpful supplements to this post. For more information, see the following resources:
Federate the user with permissions to assume roles with the same tags. By way of tagging the users, they automatically get access to assume the correct role, if they work only on one project and team.
Create the customer managed policy to attach to the federated user that uses ABAC to allow role assumption.
The federated user can assume a role only when the user and role tags are matching. More detailed instructions for defining permissions to access AWS resources based on tags are available in Create the ABAC policy in the IAM tutorial: Define permissions to access AWS resources based on tags.
Policy sample to allow the user to assume the role
The AllowUserAssumeRole statement in the following sample policy allows the federated user to assume the role test-session-tags with the attached policy. When that federated user assumes the role, they must pass the required session tags. For more information about federation, see Identity providers and federation in the AWS Identity and Access Management User Guide.
Allow cross-account access to an AWS KMS key. This is a key policy to allow principals to call specific operations on KMS keys.
Using ABAC with AWS KMS provides a flexible way to authorize access without editing policies or managing grants. Additionally, the aws:PrincipalOrgID global condition key can be used to restrict access to all accounts in your organization. This is more scalable than having to list all the account IDs in an organization within a policy. You accomplish this by specifying the organization ID in the condition element with the condition key aws:PrincipalOrgID. For detailed instructions about changing the key policy by using the AWS Management Console, see Changing a key policy in the AWS KMS Developer Guide.
You should use these features with care so that principals aren’t inadvertently allowed or denied access.
Policy sample to allow a role in another account to use a KMS key
To grant another account access to a KMS key, update its key policy to grant access to the external account or role. For instructions, see Allowing users in other accounts to use a KMS key in the AWS KMS Developer Guide.
The accounts are limited to roles that have an access-project=CDO5951 tag. You might attach this policy to roles in the example Alpha project.
Note: when using ABAC to grant access to an external account, you need to ensure that the tags used for ABAC are protected from modification across your organization.
Configure the S3 bucket policy.
For cross-account permissions to other AWS accounts or users in another account, you must use a bucket policy. Bucket policy is limited to a size of 20KB. For more information, see Access policy guidelines.
The idea of the S3 bucket policy is based on data classification, where the S3 bucket policy is used with deny statements that apply if the user doesn’t have the appropriate tags applied. You don’t need to explicitly deny all actions in the bucket policy, because a user must be authorized in both their identity policy and the S3 bucket policy in a cross-account scenario.
Policy sample for the S3 bucket
You can use the Amazon S3 console to add a new bucket policy or edit an existing bucket policy. For detailed instructions to create or edit a bucket policy, see Adding a bucket policy using the Amazon S3 console in the Amazon S3 User Guide. The following sample policy restricts access only to principals from organizations as listed in the policy and a specific VPC endpoint. It is important to test that all the AWS services involved in a solution can access this S3 bucket. For more information, see Resource-based policy examples in the whitepaper Building A Data Perimeter on AWS.
To create an interface endpoint, you must specify the VPC in which to create the interface endpoint, and the service to which to establish the connection.
Configure the SAML IdP (if you have one) or post in commands manually.
Typically, you configure your SAML IdP to pass in the project, cost-center, and department attributes as session tags. For more information, see Passing session tags using AssumeRoleWithSAML.
The following assume-role AWS CLI command helps you perform and test this request.
This example request assumes the test-session-tags role for the specified duration with the included session policy, session tags, external ID, and source identity. The resulting session is named my-session.
Cleanup
To avoid unwanted charges to your AWS account, follow the instructions to delete the AWS resources that you created during this walkthrough.
Conclusion
This post explains how to share encrypted S3 buckets across accounts at scale by granting access across a large number of accounts to a multi-tenant data lake. The approach does not use Lake Formation, which may have advantages for use-cases requiring fine-grained access control. Instead, this solution uses a central governance account combining role-chaining with session tags to produce data for the lake. Permissions are granted through these tags. For read-only consumption of data by multiple accounts, cross-account read-only access is granted through Amazon EMR analytics clusters that access the data, visualizing them though BI tools. Access to the shared buckets is restricted through bucket and identity policies. Through the use of multiple AWS services and IAM features such as KMS key policies, IAM policies, S3 bucket policies, and VPCE policies, this solution enables controls that help secure access to the data, while enabling the users to use ABAC for access.
This approach is focused on scalability; you can generalize and repurpose the steps for different requirements and projects. As a result, this scalable solution for services not integrated with AWS Lake Formation can be customized with AWS KMS by way of combining with ABAC to authorize access without editing policies or managing grants. For services that honor Lake Formation permissions, you can use the Lake Formation Developer Guide to more easily set up integrated services to encrypt and decrypt data.
In summary, the design provided here is feasible for large projects, with appropriate controls to allow scalability potentially across more than 1,000 accounts.
If you have feedback about this post, submit comments in the Comments section below. If you have questions about this post, contact AWS Support.
Want more AWS Security news? Follow us on Twitter.
The collective thoughts of the interwebz
Manage Consent
To provide the best experiences, we use technologies like cookies to store and/or access device information. Consenting to these technologies will allow us to process data such as browsing behavior or unique IDs on this site. Not consenting or withdrawing consent, may adversely affect certain features and functions.
Functional
Always active
The technical storage or access is strictly necessary for the legitimate purpose of enabling the use of a specific service explicitly requested by the subscriber or user, or for the sole purpose of carrying out the transmission of a communication over an electronic communications network.
Preferences
The technical storage or access is necessary for the legitimate purpose of storing preferences that are not requested by the subscriber or user.
Statistics
The technical storage or access that is used exclusively for statistical purposes.The technical storage or access that is used exclusively for anonymous statistical purposes. Without a subpoena, voluntary compliance on the part of your Internet Service Provider, or additional records from a third party, information stored or retrieved for this purpose alone cannot usually be used to identify you.
Marketing
The technical storage or access is required to create user profiles to send advertising, or to track the user on a website or across several websites for similar marketing purposes.