Post Syndicated from Bineesh Ravindran original https://aws.amazon.com/blogs/devops/devsecops-with-amazon-codeguru-reviewer-cli-and-bitbucket-pipelines/
DevSecOps refers to a set of best practices that integrate security controls into the continuous integration and delivery (CI/CD) workflow. One of the first controls is Static Application Security Testing (SAST). SAST tools run on every code change and search for potential security vulnerabilities before the code is executed for the first time. Catching security issues early in the development process significantly reduces the cost of fixing them and the risk of exposure.
This blog post, shows how we can set up a CI/CD using Bitbucket Pipelines and Amazon CodeGuru Reviewer . Bitbucket Pipelines is a cloud-based continuous delivery system that allows developers to automate builds, tests, and security checks with just a few lines of code. CodeGuru Reviewer is a cloud-based static analysis tool that uses machine learning and automated reasoning to generate code quality and security recommendations for Java and Python code.
We demonstrate step-by-step how to set up a pipeline with Bitbucket Pipelines, and how to call CodeGuru Reviewer from there. We then show how to view the recommendations produced by CodeGuru Reviewer in Bitbucket Code Insights, and how to triage and manage recommendations during the development process.
Bitbucket Overview
Bitbucket is a Git-based code hosting and collaboration tool built for teams. Bitbucket’s best-in-class Jira and Trello integrations are designed to bring the entire software team together to execute a project. Bitbucket provides one place for a team to collaborate on code from concept to cloud, build quality code through automated testing, and deploy code with confidence. Bitbucket makes it easy for teams to collaborate and reduce issues found during integration by providing a way to combine easily and test code frequently. Bitbucket gives teams easy access to tools needed in other parts of the feedback loop, from creating an issue to deploying on your hardware of choice. It also provides more advanced features for those customers that need them, like SAML authentication and secrets storage.
Solution Overview
Bitbucket Pipelines uses a Docker container to perform the build steps. You can specify any Docker image accessible by Bitbucket, including private images, if you specify credentials to access them. The container starts and then runs the build steps in the order specified in your configuration file. The build steps specified in the configuration file are nothing more than shell commands executed on the Docker image. Therefore, you can run scripts, in any language supported by the Docker image you choose, as part of the build steps. These scripts can be stored either directly in your repository or an Internet-accessible location. This solution demonstrates an easy way to integrate Bitbucket pipelines with AWS CodeReviewer using bitbucket-pipelines.yml file.
You can interact with your Amazon Web Services (AWS) account from your Bitbucket Pipeline using the OpenID Connect (OIDC) feature. OpenID Connect is an identity layer above the OAuth 2.0 protocol.
Now that you understand how Bitbucket and your AWS Account securely communicate with each other, let’s look into the overall summary of steps to configure this solution.
- Fork the repository
- Configure Bitbucket Pipelines as an IdP on AWS.
- Create an IAM role.
- Add repository variables needed for pipeline
- Adding the CodeGuru Reviewer CLI to your pipeline
- Review CodeGuru recommendations
Now let’s look into each step in detail. To configure the solution, follow steps mentioned below.
Step 1: Fork this repo
Log in to Bitbucket and choose **Fork** to fork this example app to your Bitbucket account.
https://bitbucket.org/aws-samples/amazon-codeguru-samples
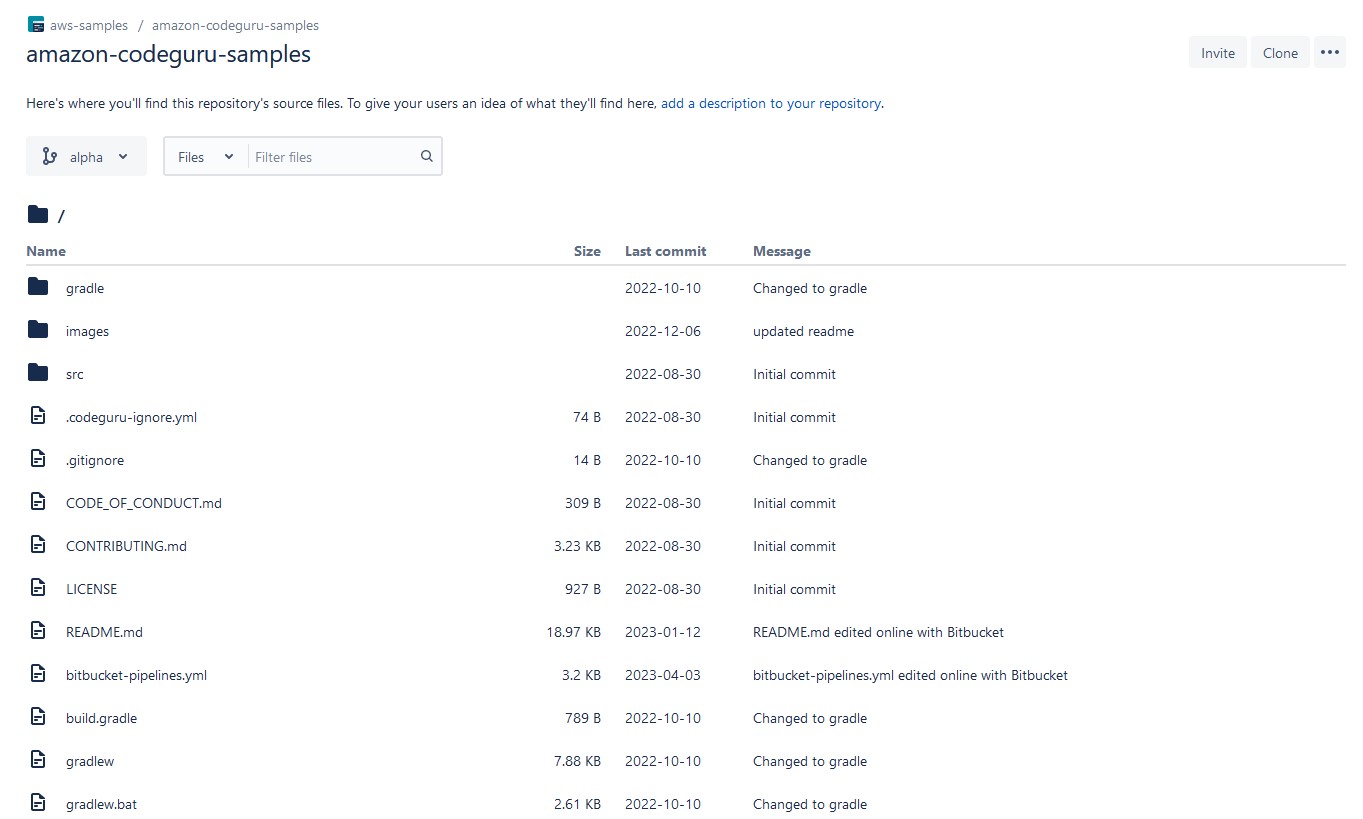
Figure 1 : Fork amazon-codeguru-samples bitbucket repository.
Step 2: Configure Bitbucket Pipelines as an Identity Provider on AWS
Configuring Bitbucket Pipelines as an IdP in IAM enables Bitbucket Pipelines to issue authentication tokens to users to connect to AWS.
In your Bitbucket repo, go to Repository Settings > OpenID Connect. Note the provider URL and the Audience variable on that screen.
The Identity Provider URL will look like this:
https://api.bitbucket.org/2.0/workspaces/YOUR_WORKSPACE/pipelines-config/identity/oidc – This is the issuer URL for authentication requests. This URL issues a token to a requester automatically as part of the workflow. See more detail about issuer URL in RFC . Here “YOUR_WORKSPACE” need to be replaced with name of your bitbucket workspace.
And the Audience will look like:
ari:cloud:bitbucket::workspace/ari:cloud:bitbucket::workspace/84c08677-e352-4a1c-a107-6df387cfeef7 – This is the recipient the token is intended for. See more detail about audience in Request For Comments (RFC) which is memorandum published by the Internet Engineering Task Force(IETF) describing methods and behavior for securely transmitting information between two parties usinf JSON Web Token ( JWT).
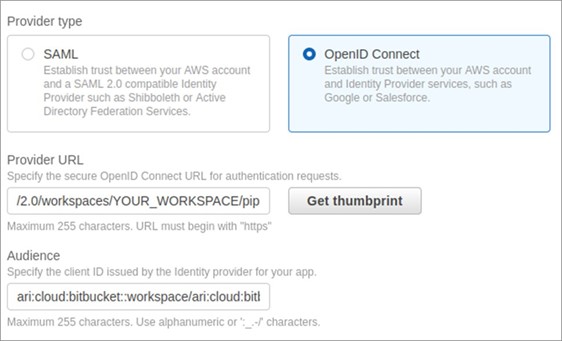
Figure 2 : Configure Bitbucket Pipelines as an Identity Provider on AWS
Next, navigate to the IAM dashboard > Identity Providers > Add provider, and paste in the above info. This tells AWS that Bitbucket Pipelines is a token issuer.
Step 3: Create a custom policy
You can always use the CLI with Admin credentials but if you want to have a specific role to use the CLI, your credentials must have at least the following permissions:
{
    "Version": "2012-10-17",
    "Statement": [
        {
            "Action": [
                "codeguru-reviewer:ListRepositoryAssociations",
                "codeguru-reviewer:AssociateRepository",
                "codeguru-reviewer:DescribeRepositoryAssociation",
                "codeguru-reviewer:CreateCodeReview",
                "codeguru-reviewer:DescribeCodeReview",
                "codeguru-reviewer:ListRecommendations",
                "iam:CreateServiceLinkedRole"
            ],
            "Resource": "*",
            "Effect": "Allow"
        },
        {
            "Action": [
                "s3:CreateBucket",
                "s3:GetBucket*",
                "s3:List*",
                "s3:GetObject",
                "s3:PutObject",
                "s3:DeleteObject"
            ],
            "Resource": [
                "arn:aws:s3:::codeguru-reviewer-cli-<AWS ACCOUNT ID>*",
                "arn:aws:s3:::codeguru-reviewer-cli-<AWS ACCOUNT ID>*/*"
            ],
            "Effect": "Allow"
        }
    ]
}
To create an IAM policy, navigate to the IAM dashboard > Policies > Create Policy
Now then paste the above mentioned json document into the json tab as shown in screenshot below and replace <AWS ACCOUNT ID> with your own AWS Account ID
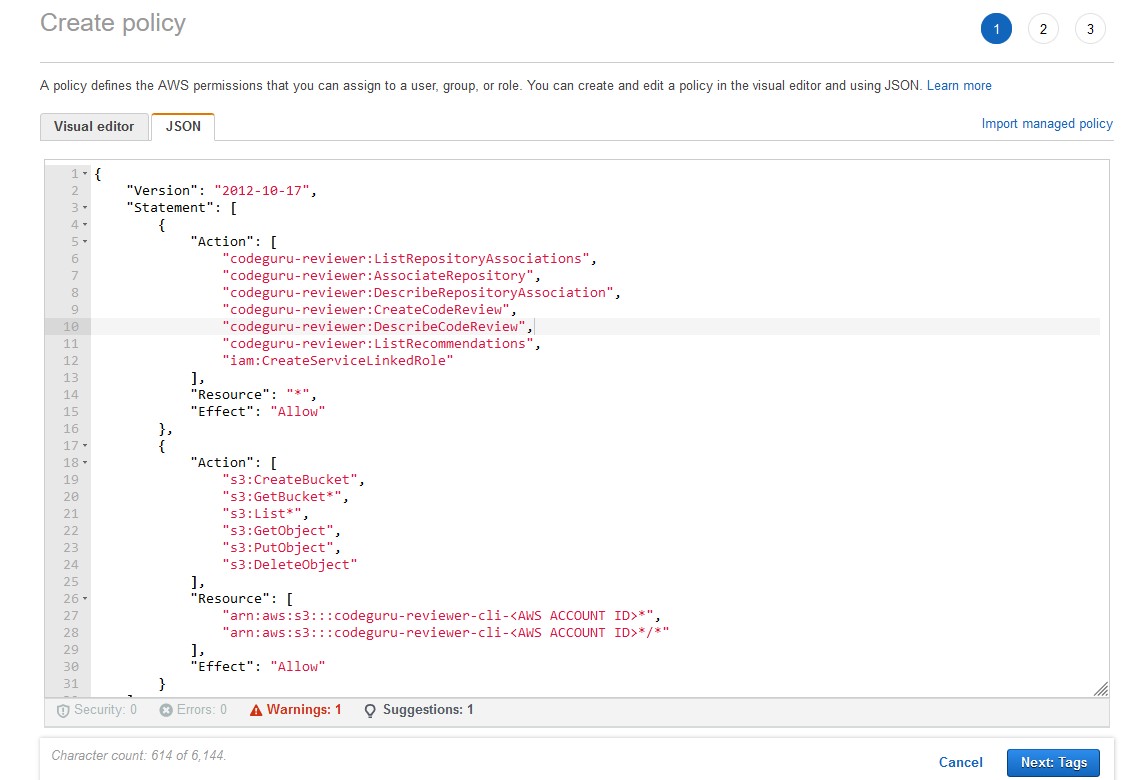
Figure 3 : Create a Policy.
Name your policy; in our example, we name it CodeGuruReviewerOIDC.
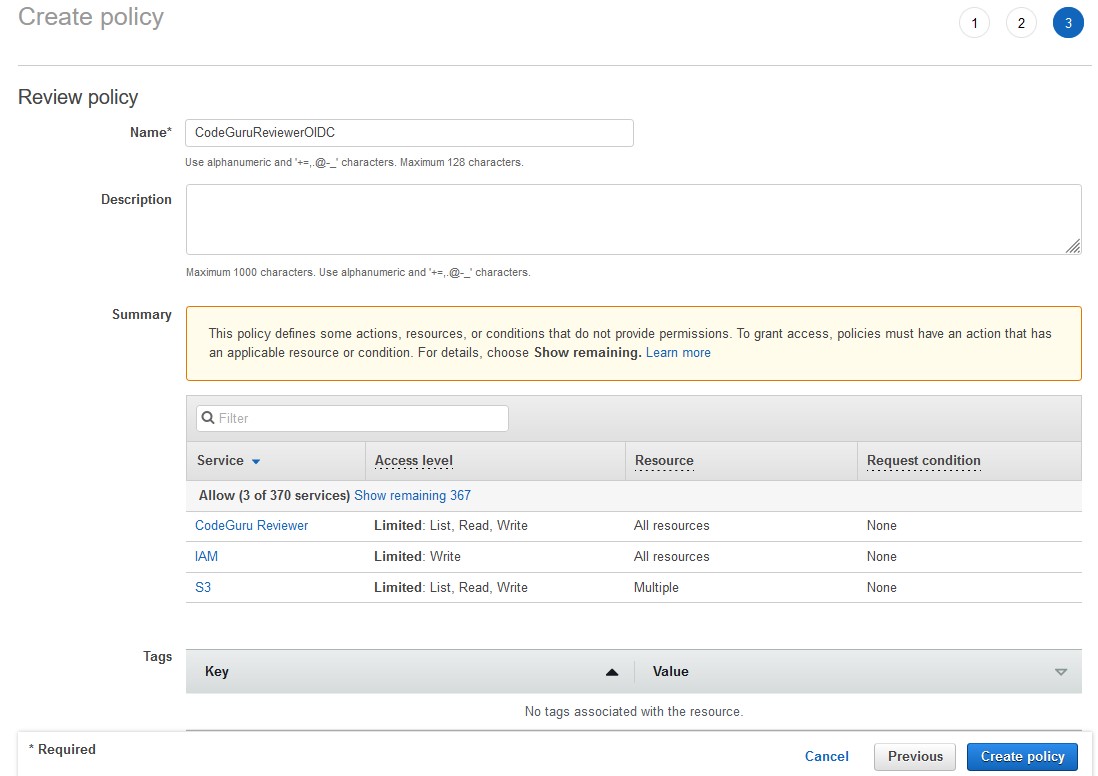
Figure 4 : Review and Create a IAM policy.
Step 4: Create an IAM Role
Once you’ve enabled Bitbucket Pipelines as a token issuer, you need to configure permissions for those tokens so they can execute actions on AWS.
To create an IAM web identity role, navigate to the IAM dashboard > Roles > Create Role, and choose the IdP and audience you just created.
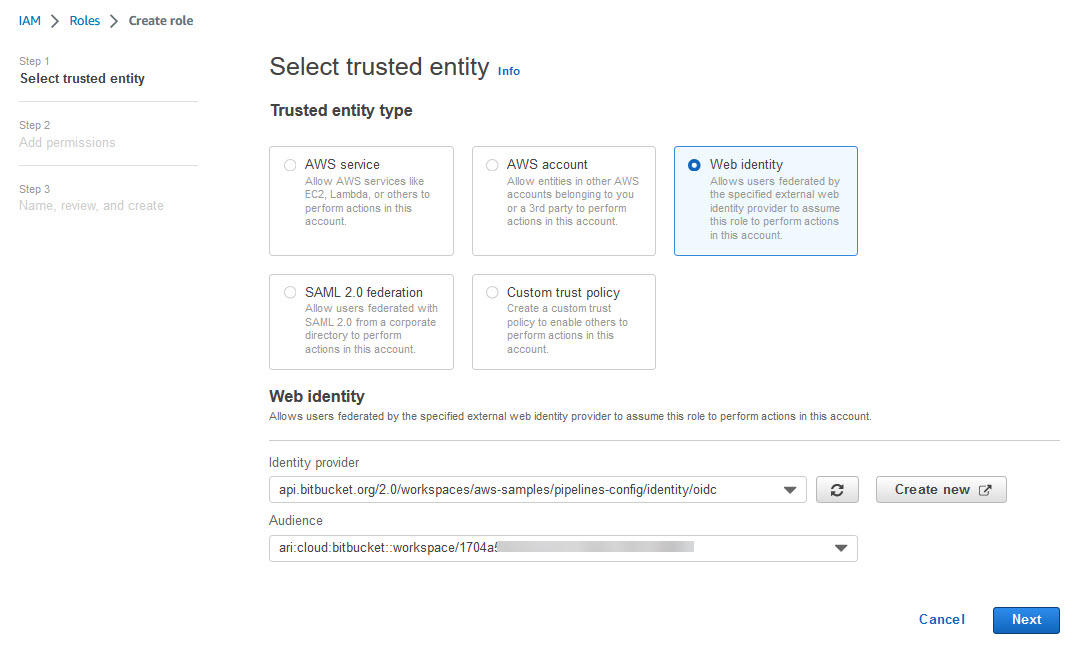
Figure 5 : Create an IAM role
Next, select the “CodeGuruReviewerOIDC “ policy to attach to the role.
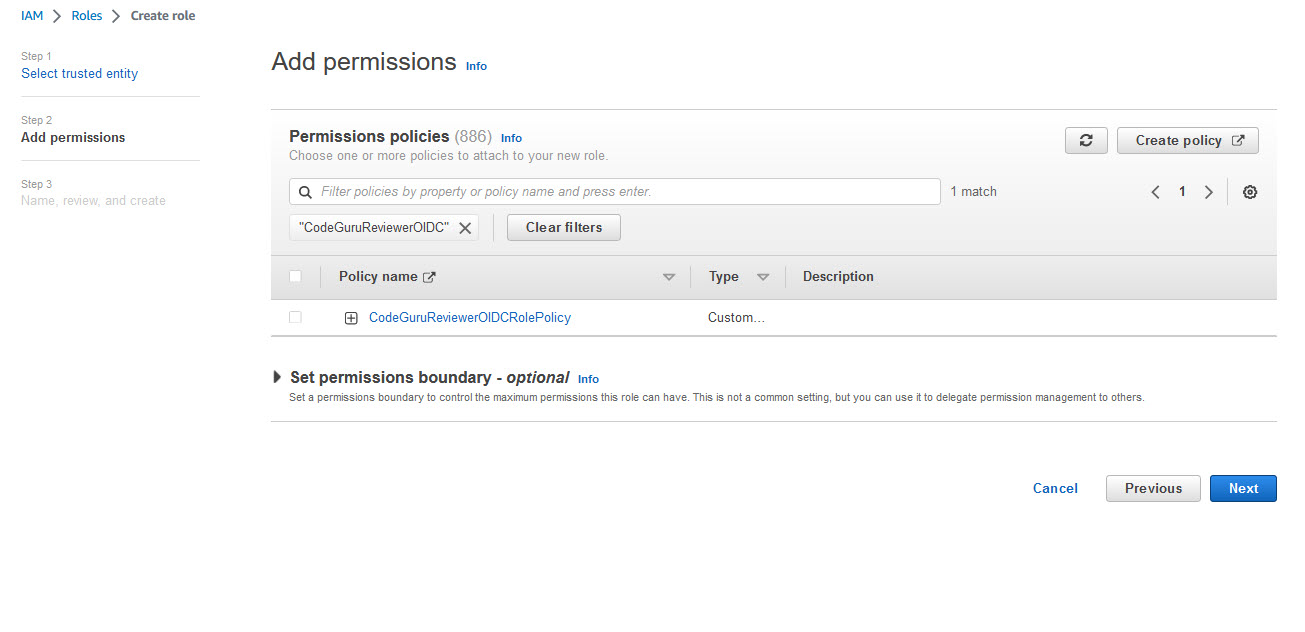
Figure 6 : Assign policy to role
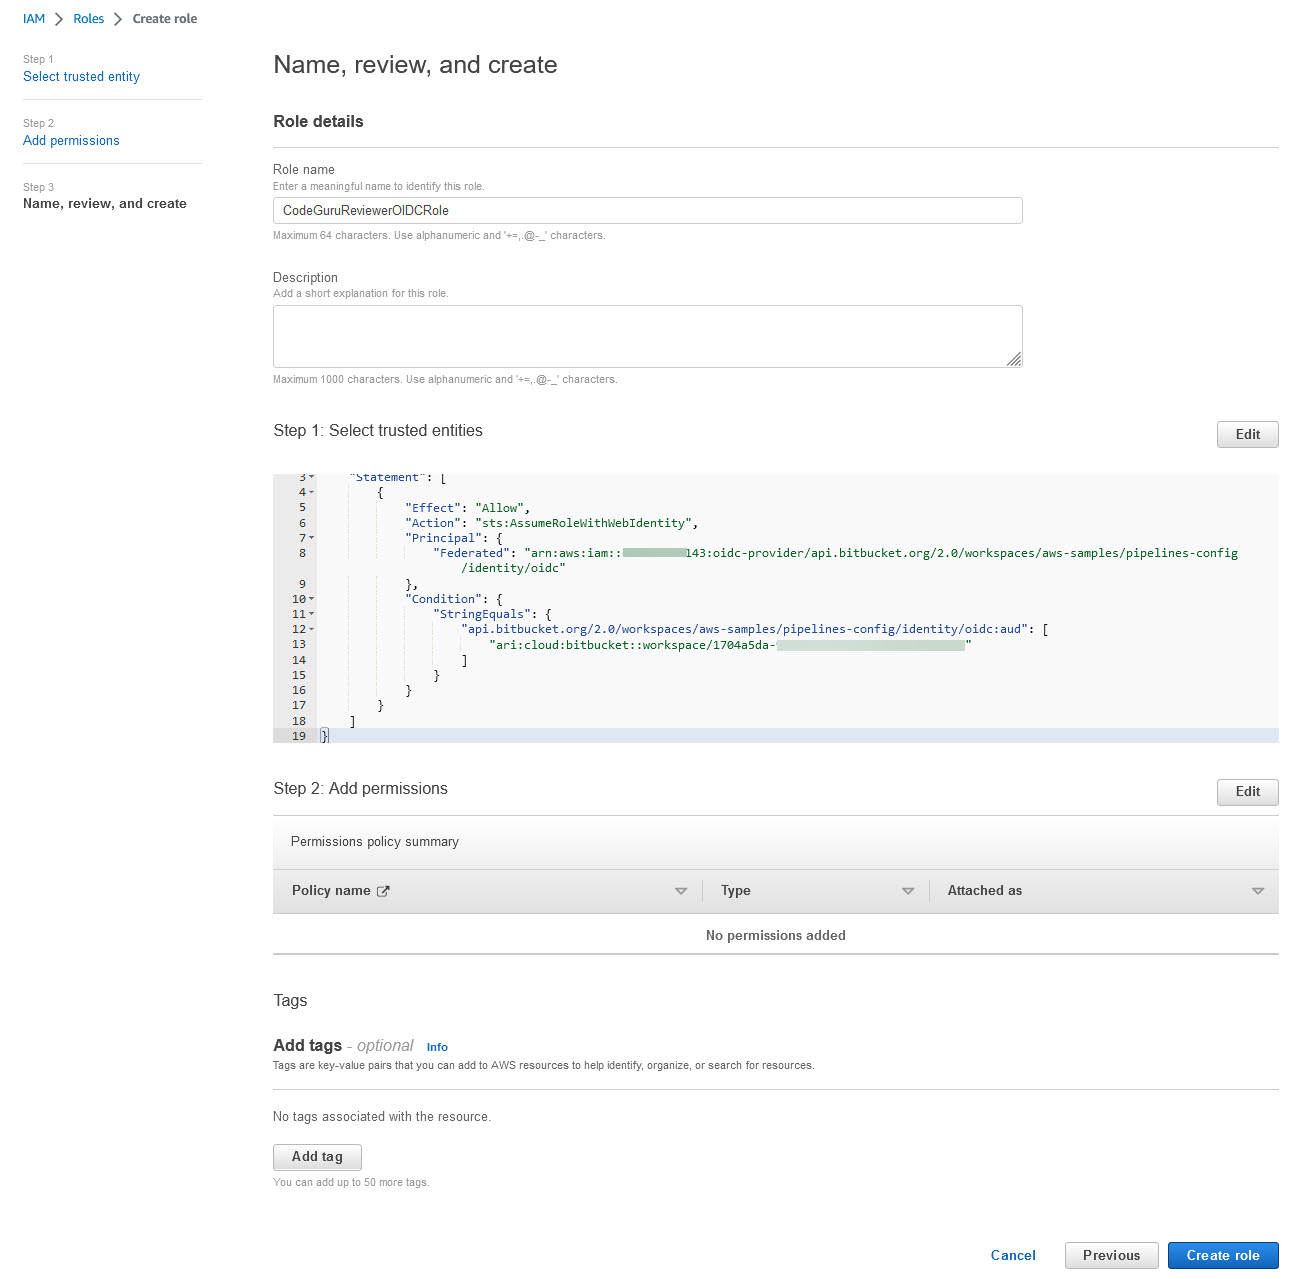
Figure 7 : Review and Create role
Name your role; in our example, we name it CodeGuruReviewerOIDCRole.
After adding a role, copy the Amazon Resource Name (ARN) of the role created:
The Amazon Resource Name (ARN) will look like this:
arn:aws:iam::000000000000:role/CodeGuruReviewerOIDCRole
we will need this in a later step when we create AWS_OIDC_ROLE_ARN as a repository variable.
Step 5: Add repository variables needed for pipeline
Variables are configured as environment variables in the build container. You can access the variables from the bitbucket-pipelines.yml file or any script that you invoke by referring to them. Pipelines provides a set of default variables that are available for builds, and can be used in scripts .Along with default variables we need to configure few additional variables called Repository Variables which are used to pass special parameter to the pipeline.
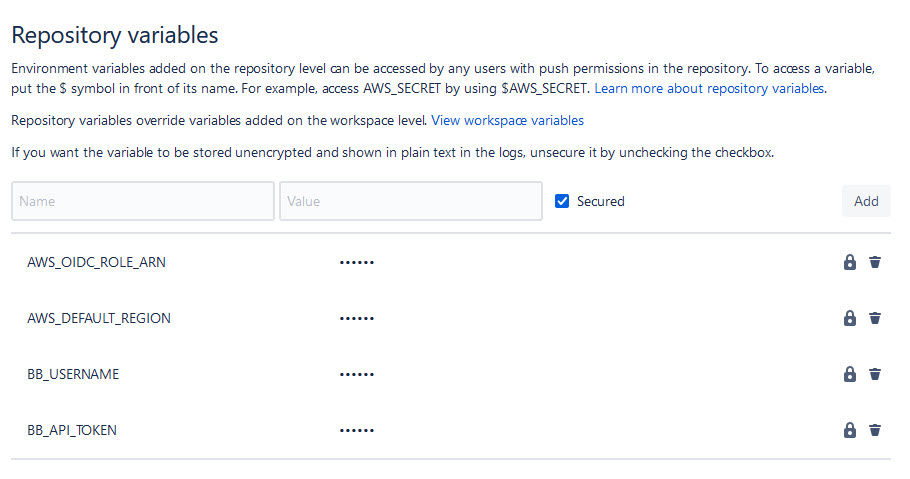
Figure 8 : Create repository variables
Figure 8 Create repository variables
Below mentioned are the few repository variables that need to be configured for this solution.
1.AWS_DEFAULT_REGION Create a repository variableAWS_DEFAULT_REGION with value “us-east-1”
2.BB_API_TOKEN Create a new repository variable BB_API_TOKEN and paste the below created App password as the value
App passwords are user-based access tokens for scripting tasks and integrating tools (such as CI/CD tools) with Bitbucket Cloud.These access tokens have reduced user access (specified at the time of creation) and can be useful for scripting, CI/CD tools, and testing Bitbucket connected applications while they are in development.
To create an App password:
-
- Select your avatar (Your profile and settings) from the navigation bar at the top of the screen.
- Under Settings, select Personal settings.
- On the sidebar, select App passwords.
- Select Create app password.
- Give the App password a name, usually related to the application that will use the password.
- Select the permissions the App password needs. For detailed descriptions of each permission, see: App password permissions.
- Select the Create button. The page will display the New app password dialog.
- Copy the generated password and either record or paste it into the application you want to give access. The password is only displayed once and can’t be retrieved later.
3.BB_USERNAME Create a repository variable BB_USERNAME and add your bitbucket username as the value of this variable
4.AWS_OIDC_ROLE_ARN
After adding a role in Step 4, copy the Amazon Resource Name (ARN) of the role created:
The Amazon Resource Name (ARN) will look something like this:
arn:aws:iam::000000000000:role/CodeGuruReviewerOIDCRole
and create AWS_OIDC_ROLE_ARN as a repository variable in the target Bitbucket repository.
Step 6: Adding the CodeGuru Reviewer CLI to your pipeline
In order to add CodeGuruRevewer CLi to your pipeline update the bitbucket-pipelines.yml file as shown below
#  Template maven-build

 #  This template allows you to test and build your Java project with Maven.
 #  The workflow allows running tests, code checkstyle and security scans on the default branch.

 # Prerequisites: pom.xml and appropriate project structure should exist in the repository.

 image: docker-public.packages.atlassian.com/atlassian/bitbucket-pipelines-mvn-python3-awscli

 pipelines:
  default:
    - step:
        name: Build Source Code
        caches:
          - maven
        script:
          - cd $BITBUCKET_CLONE_DIR
          - chmod 777 ./gradlew
          - ./gradlew build
        artifacts:
          - build/**
    - step:
        name: Download and Install CodeReviewer CLI
        script:
          - curl -OL https://github.com/aws/aws-codeguru-cli/releases/download/0.2.3/aws-codeguru-cli.zip
          - unzip aws-codeguru-cli.zip
        artifacts:
          - aws-codeguru-cli/**
    - step:
        name: Run CodeGuruReviewer
        oidc: true
        script:
          - export AWS_DEFAULT_REGION=$AWS_DEFAULT_REGION
          - export AWS_ROLE_ARN=$AWS_OIDC_ROLE_ARN
          - export S3_BUCKET=$S3_BUCKET

          # Setup aws cli
          - export AWS_WEB_IDENTITY_TOKEN_FILE=$(pwd)/web-identity-token
          - echo $BITBUCKET_STEP_OIDC_TOKEN > $(pwd)/web-identity-token
          - aws configure set web_identity_token_file "${AWS_WEB_IDENTITY_TOKEN_FILE}"
          - aws configure set role_arn "${AWS_ROLE_ARN}"
          - aws sts get-caller-identity

          # setup codegurureviewercli
          - export PATH=$PATH:./aws-codeguru-cli/bin
          - chmod 777 ./aws-codeguru-cli/bin/aws-codeguru-cli

          - export SRC=$BITBUCKET_CLONE_DIR/src
          - export OUTPUT=$BITBUCKET_CLONE_DIR/test-reports
          - export CODE_INSIGHTS=$BITBUCKET_CLONE_DIR/bb-report

          # Calling Code Reviewer CLI
          - ./aws-codeguru-cli/bin/aws-codeguru-cli --region $AWS_DEFAULT_REGION  --root-dir $BITBUCKET_CLONE_DIR --build $BITBUCKET_CLONE_DIR/build/classes/java --src $SRC --output $OUTPUT --no-prompt --bitbucket-code-insights $CODE_INSIGHTS
        artifacts:
          - test-reports/*.*
          - target/**
          - bb-report/**
    - step:
        name: Upload Code Insights Artifacts to Bitbucket Reports
        script:
          - chmod 777 upload.sh
          - ./upload.sh bb-report/report.json bb-report/annotations.json
    - step:
        name: Upload Artifacts to Bitbucket Downloads       # Optional Step
        script:
          - pipe: atlassian/bitbucket-upload-file:0.3.3
            variables:
              BITBUCKET_USERNAME: $BB_USERNAME
              BITBUCKET_APP_PASSWORD: $BB_API_TOKEN
              FILENAME: '**/*.json'
    - step:
          name: Validate Findings     #Optional Step
          script:
            # Looking into CodeReviewer results and failing if there are Critical recommendations
            - grep -o "Critical" test-reports/recommendations.json | wc -l
            - count="$(grep -o "Critical" test-reports/recommendations.json | wc -l)"
            - echo $count
            - if (( $count > 0 )); then
            - echo "Critical findings discovered. Failing."
            - exit 1
            - fi
          artifacts:
            - '**/*.json'
Let’s look into the pipeline file to understand various steps defined in this pipeline
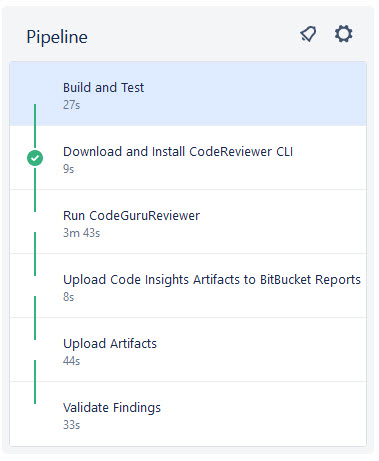
Figure 9 : Bitbucket pipeline execution steps
Step 1) Build Source Code
In this step source code is downloaded into a working directory and build using Gradle.All the build artifacts are then passed on to next step
Step 2) Download and Install Amazon CodeGuru Reviewer CLI
In this step Amazon CodeGuru Reviewer is CLI is downloaded from a public github repo and extracted into working directory. All artifacts downloaded and extracted are then passed on to next step
Step 3) Run CodeGuruReviewer
This step uses flag oidc: true which declares you are using the OIDC authentication method, while AWS_OIDC_ROLE_ARN declares the role created in the previous step that contains all of the necessary permissions to deal with AWS resources.
Further repository variables are exported, which is then used to set AWS CLI .Amazon CodeGuruReviewer CLI which was downloaded and extracted in previous step is then used to invoke CodeGuruReviewer along with some parameters .
Following are the parameters that are passed on to the CodeGuruReviewer CLI
--region $AWS_DEFAULT_REGION The AWS region in which CodeGuru Reviewer will run (in this blog we used us-east-1).
--root-dir $BITBUCKET_CLONE_DIR The root directory of the repository that CodeGuru Reviewer should analyze.
--build $BITBUCKET_CLONE_DIR/build/classes/java Points to the build artifacts. Passing the Java build artifacts allows CodeGuru Reviewer to perform more in-depth bytecode analysis, but passing the build artifacts is not required.
--src $SRC Points the source code that should be analyzed. This can be used to focus the analysis on certain source files, e.g., to exclude test files. This parameter is optional, but focusing on relevant code can shorten analysis time and cost.
--output $OUTPUT The directory where CodeGuru Reviewer will store its recommendations.
--no-prompt This ensures that CodeGuru Reviewer does run in interactive mode where it pauses for user input.
–-bitbucket-code-insights $CODE_INSIGHTS The location where recommendations in Bitbucket CodeInsights format should be written to.
Once Amazon CodeGuruReviewer scans the code based on the above parameters, it generates two json files (reports.json and annotations.json) Code Insight Reports which is then passed on as artifacts to the next step.
Step 4) Upload Code Insights Artifacts to Bitbucket Reports
In this step code Insight Report generated by Amazon CodeGuru Reviewer is then uploaded to Bitbucket Reports. This makes the report available in the reports section in the pipeline as displayed in the screenshot
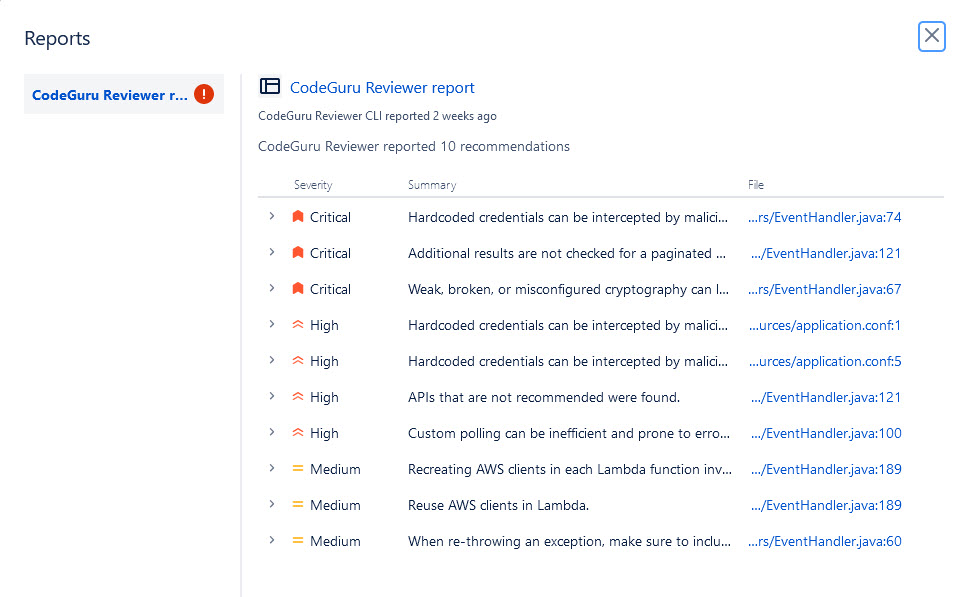
Figure 10 : CodeGuru Reviewer Report
Step 5) [Optional] Upload the copy of these reports to Bitbucket Downloads
This is an Optional step where you can upload the artifacts to Bitbucket Downloads. This is especially useful because the artifacts inside a build pipeline gets deleted after 14 days of the pipeline run. Using Bitbucket Downloads, you can store these artifacts for a much longer duration.
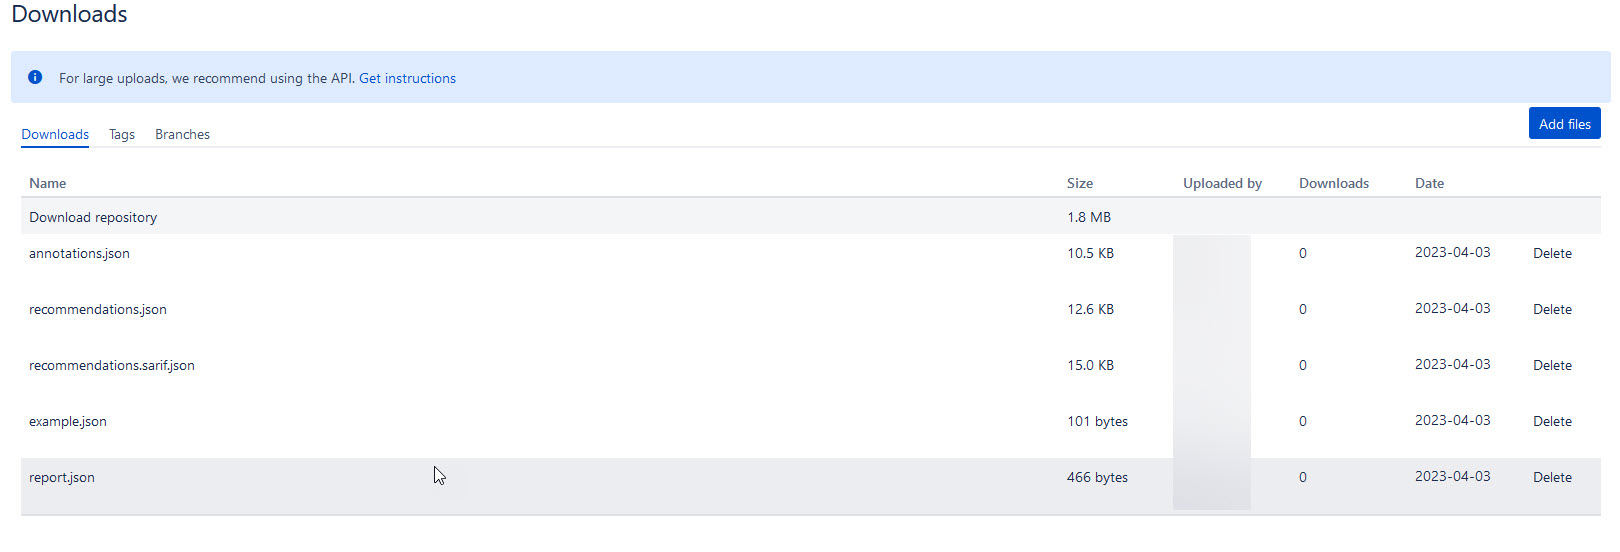
Figure 11 : Bitbucket downloads
Step 6) [Optional] Validate Findings by looking into results and failing is there are any Critical Recommendations
This is an optional step showcasing how the results for CodeGururReviewer can be used to trigger the success and failure of a Bitbucket pipeline. In this step the pipeline fails, if a critical recommendation exists in report.
Step 7: Review CodeGuru recommendations
CodeGuru Reviewer supports different recommendation formats, including CodeGuru recommendation summaries, SARIF, and Bitbucket CodeInsights.
Keeping your Pipeline Green
Now that CodeGuru Reviewer is running in our pipeline, we need to learn how to unblock ourselves if there are recommendations. The easiest way to unblock a pipeline after is to address the CodeGuru recommendation. If we want to validate on our local machine that a change addresses a recommendation using the same CLI that we use as part of our pipeline.
Sometimes, it is not convenient to address a recommendation. E.g., because there are mitigations outside of the code that make the recommendation less relevant, or simply because the team agrees that they don’t want to block deployments on recommendations unless they are critical. For these cases, developers can add a .codeguru-ignore.yml file to their repository where they can use a variety of criteria under which a recommendation should not be reported. Below we explain all available criteria to filter recommendations. Developers can use any subset of those criteria in their .codeguru-ignore.yml file. We will give a specific example in the following sections.
version: 1.0 # The version number is mandatory. All other entries are optional.

# The CodeGuru Reviewer CLI produces a recommendations.json file which contains deterministic IDs for each
# recommendation. This ID can be excluded so that this recommendation will not be reported in future runs of the
# CLI.
 ExcludeById:
 - '4d2c43618a2dac129818bef77093730e84a4e139eef3f0166334657503ecd88d'
# We can tell the CLI to exclude all recommendations below a certain severity. This can be useful in CI/CD integration.
 ExcludeBelowSeverity: 'HIGH'
# We can exclude all recommendations that have a certain tag. Available Tags can be found here:
# https://docs.aws.amazon.com/codeguru/detector-library/java/tags/
# https://docs.aws.amazon.com/codeguru/detector-library/python/tags/
 ExcludeTags:
  - 'maintainability'
# We can also exclude recommendations by Detector ID. Detector IDs can be found here:
# https://docs.aws.amazon.com/codeguru/detector-library
 ExcludeRecommendations:
# Ignore all recommendations for a given Detector ID
  - detectorId: 'java/[email protected]'
# Ignore all recommendations for a given Detector ID in a provided set of locations.
# Locations can be written as Unix GLOB expressions using wildcard symbols.
  - detectorId: 'java/[email protected]'
    Locations:
      - 'src/main/java/com/folder01/*.java'
# Excludes all recommendations in the provided files. Files can be provided as Unix GLOB expressions.
 ExcludeFiles:
  - tst/**
The recommendations will still be reported in the CodeGuru Reviewer console, but not by the CodeGuru Reviewer CLI and thus they will not block the pipeline anymore.
Conclusion
In this post, we outlined how you can set up a CI/CD pipeline using Bitbucket Pipelines, and Amazon CodeGuru Reviewer and we outlined how you can integrate Amazon CodeGuru Reviewer CLI with the Bitbucket cloud-based continuous delivery system that allows developers to automate builds, tests, and security checks with just a few lines of code. We showed you how to create a Bitbucket pipeline job and integrate the CodeGuru Reviewer CLI to detect issues in your Java and Python code, and access the recommendations for remediating these issues.
We presented an example where you can stop the build upon finding critical violations. Furthermore, we discussed how you could upload these artifacts to BitBucket downloads and store these artifacts for a much longer duration. The CodeGuru Reviewer CLI offers you a one-line command to scan any code on your machine and retrieve recommendations .You can use the CLI to integrate CodeGuru Reviewer into your favorite CI tool, as a pre-commit hook, in your workflow. In turn, you can combine CodeGuru Reviewer with Dynamic Application Security Testing (DAST) and Software Composition Analysis (SCA) tools to achieve a hybrid application security testing method that helps you combine the inside-out and outside-in testing approaches, cross-reference results, and detect vulnerabilities that both exist and are exploitable.
If you need hands-on keyboard support, then AWS Professional Services can help implement this solution in your enterprise, and introduce you to our AWS DevOps services and offerings.
About the authors: