Post Syndicated from Vinay Ujjini original https://aws.amazon.com/blogs/messaging-and-targeting/amazon-ses-set-up-notifications-for-bounces-and-complaints/
Why is it important to monitor bounces and complaints when using Amazon Simple Email Service?
Amazon Simple Email Service (Amazon SES) is a scalable cloud email service provider that is cost-effective and flexible. Amazon SES allows businesses and individuals to send bulk emails to their customers and subscribers. However, as with any email service, there is always a risk of emails bouncing or being marked as spam by recipients. These bounces and complaints can have serious consequences for your email deliverability and can even lead to your email account being suspended or blocked. That’s why it’s important to monitor bounces and complaints when using Amazon SES for email sending. By using Simple Notification Services (Amazon SNS) notifications, you can set up notifications and proactively address any issues and ensure that your emails are delivered successfully to your intended recipients. In this blog, we’ll show how to set up notifications for bounces and complaints in Amazon SES, so you can stay on top of your email deliverability and maintain a positive sender reputation.
Understanding bounces and complaints:
Understanding bounces and complaints is crucial when it comes to email marketing. In simple terms, a bounce occurs when an email is undeliverable and is returned to the sender. There are two types of bounces: soft bounces and hard bounces. A soft bounce is a temporary issue, such as a full inbox or a server error, and the email may be delivered successfully on a subsequent attempt. A hard bounce, on the other hand, is a permanent issue, such as an invalid email address, and the email will never be delivered. On the other hand, a complaint occurs when a recipient marks an email as spam or unwanted. Complaints can be particularly damaging to your email deliverability and can lead to your emails being blocked or sent to the recipient’s spam folder. By monitoring bounces and complaints and taking appropriate action, you can maintain a positive sender reputation and ensure that your emails are delivered successfully to your intended recipients.
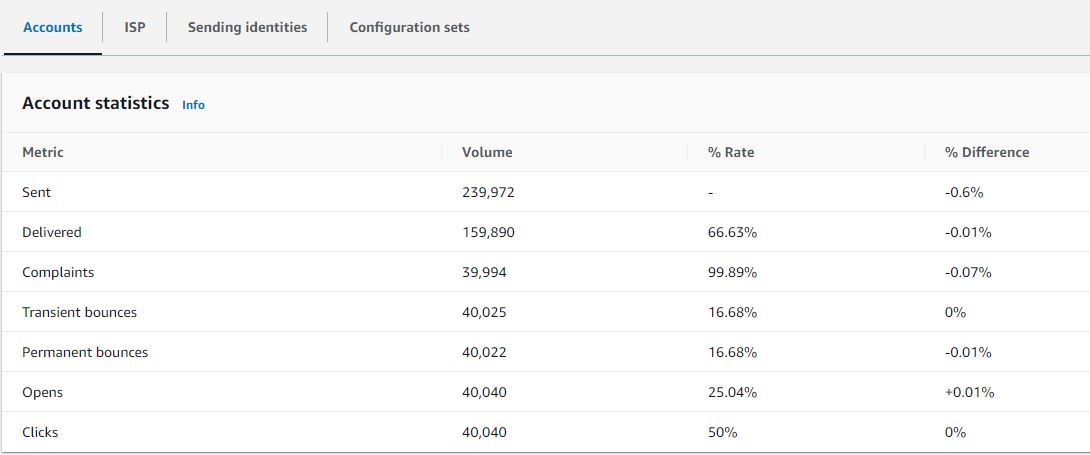
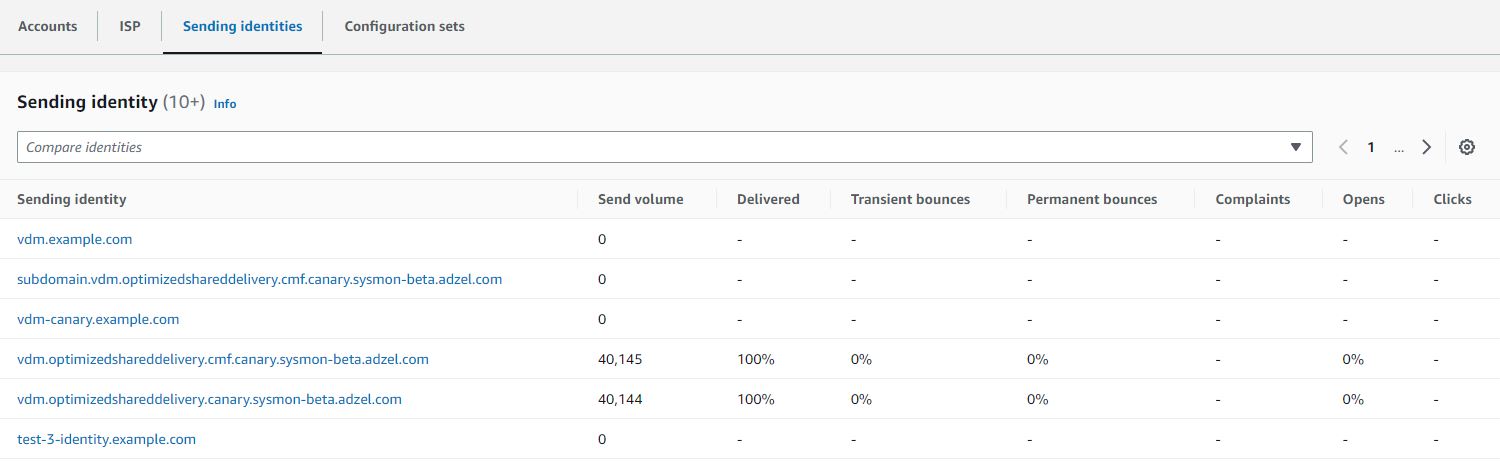
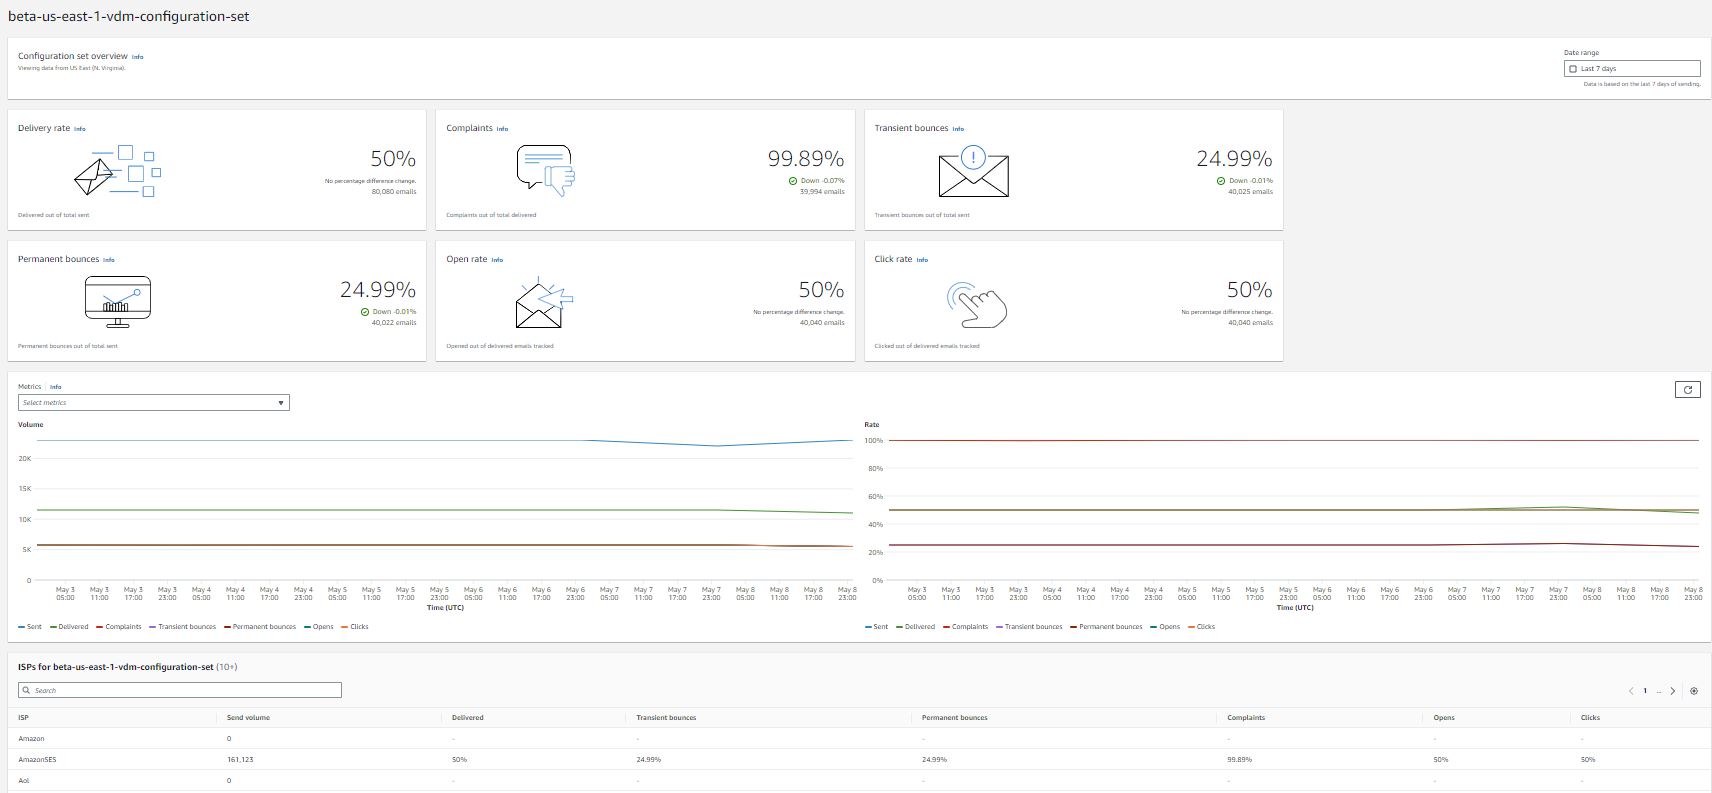
Amazon SES provides tools like Virtual Deliverability Manager (VDM) to manage the deliverability at the ISP, sub-domain or configuration set level. You can see the details in this blog.
Solution walkthrough:
This post gives detailed instructions on how to use Amazon Simple Notification Service SNS to monitor and receive notifications on bounces and complaints in Amazon SES. This blog also has FAQs and troubleshooting tips if you are not receiving notifications following the setup: (below are the steps with detailed instructions and screenshots)
Prerequisites:
For this walkthrough, you should have the following prerequisites:
- An active AWS account.
- A verified identity (Email address or Domain) in Amazon SES.
- Administrative Access to Amazon SES Console and Amazon SNS Console.
Step 1: Create an Amazon SNS topic and subscription:
-
-
- Sign in to the Amazon SNS console.
- Under Amazon SNS homepage provide a Topic name and click on Next steps:

- For Type, choose a topic type Standard.
Note: Standard topics are better suited for use cases that require higher message publish and delivery throughput rates which fits the SES bounces and complaints monitoring. 
- (Optional) Expand the Encryption section if you would like to encrypt the SNS topic.
- Choose Enable encryption.
- Specify the AWS KMS key. For more information, see Key terms.
- For each KMS type, the Description, Account, and KMS ARN are displayed.

- Scroll to the end of the form and choose Create topic. The topic is created and the console opens the new topic’s Details page.
- To create the subscription on the Subscriptions page, choose Create subscription.

- On the Create subscription page, choose the Topic ARN that you created in the previous step.
- For Protocol, choose Email. There are multiple protocols available to use and it depends on where you would like to receive the SNS notifications for bounces and complaints. Please refer to list of available protocols.
- For Endpoint, enter an email address that can receive notifications.
Note: this should be existing email address with accessible mailbox. 
- Scroll to the bottom and click Create subscription. The console opens the new subscription’s Details page.
- After your subscription is created, you need to confirm it through the email address provided above.
- Check your email inbox you provided in the endpoint in previous step and and choose Confirm subscription in the email from AWS Notifications. The sender ID is usually “[email protected]“.

- Amazon SNS opens your web browser and displays a subscription confirmation with your subscription ID.

- After subscription is confirmed, refresh the subscription’s Details page and the subscription status will move from Pending to Confirmed.

-
-
Step 2: Configure Amazon SES to send bounces and complaints to the Amazon SNS topic created:


In this step, I am presenting two methods to monitor your bounces and complaints. Follow Demo 1, if you are looking for a simple way to monitor bounces and complaints events for a specific email identity. Follow Demo 2, if you have many email identities and you want to monitor bounces and complaints along with other events using configuration sets “groups of rules that you can apply to all your verified identities”.
Demo 1: Configure Amazon SES to monitor bounces and complaints for specific email identity (Email, Domain):
The domain/sub-domain/email identity must have a Verified status. If the identity is not in verified status, refer to steps to verify identity with Amazon SES before continuing further.
Prior to starting this demo, it is important to know if you have a verified domain, subdomain, or an email address that shares the root domain. The identity settings (such as SNS and feedback notifications) apply at the most granular level you have set up the verification. Hierarchy is as below:
- Verified email address identity settings override verified domain identity settings.
- Verified subdomain identity settings override verified domain identity settings. (lower-level subdomain settings override higher-level subdomain settings).
Hence, if you want to monitor bounces and complaints for all email addresses under one domain, it is recommended to verify the domain identity with SES and apply this setting at the domain identity level. If you want to monitor bounces and complaints for specific email address under a verified domain identity, verify this email address explicitly with SES and apply this settings into the email identity level.
- Sign in to the Amazon SES console.
- In the navigation pane, under Configuration, choose Verified identities.

- Select the verified identity in which you want to monitor for bounces and complaints notifications.
- In the details screen of the verified identity you selected, choose the Notifications tab and select Edit in the Feedback notifications container.

- Expand the SNS topic list box of bounce and complaint feedback type and select the SNS topic you created in Step 1.
(Optional) If you want your topic notification to include the headers from the original email, check the Include original email headers box directly underneath the SNS topic name of each feedback type then click on save changes. 
- After configured SNS topic for bounces and complaints, you can disable Email Feedback Forwarding notifications to avoid receive double notifications through Email Feedback Forwarding and SNS notifications.
- To Disable it, under the Notifications tab on the details screen of the verified identity, in the Email Feedback Forwarding container, choose Edit, uncheck the Enabled box, and choose Save changes.


Demo 2: Configure Amazon SES to monitor bounces and complaints for emails sent with a configuration set using Amazon SES event publishing.
Configuration sets in SES are groups of rules, that you can apply to your verified identities. When you apply a configuration set to an email, all of the rules in that configuration set are applied to the email. You can use different type of rules with a configuration set. This demo will use event destination, which will allow you to publish bounces and complaints to the SNS topic.
Note: You must pass the name of the configuration set when sending an email. This can be done by either specifying the configuration set name in the headers of emails, or specifying it as a default configuration set. This can be done at the time of identity creation, or later while editing a verified identity.
- Sign in to the Amazon SES console.
- In the navigation pane, under Configuration, choose Configuration sets. Choose Create set.

- Enter Configuration set name, leave the rest of fields to default, scroll to the send and click on Create set.

- After Configuration set is created, you now need to create Amazon SES event destinations as shown below. Amazon SES sends all bounce and complaint notifications to event destination. In this blog the event destination is Amazon SNS topic.
- Navigate to the configuration set you created in step 3. Under configuration set home page click on Event destinations and select Add destination.

- Under Select event types, check hard bounces and complaints boxes and click Next.

- Specify destination for receiving bounce and complaints notifications, there’s couple of destinations types to choose from. in this demo, we will use Amazon SNS.
- Name – enter the name of the destination for this configuration set. The name can include letters, numbers, dashes, and hyphens.
- Event publishing – to turn on event publishing for this destination, select the Enabled check box.
- Under Amazon Simple Notification Service (SNS) topic , Expand the SNS topic list box and select the SNS topic you created in Step 1 and click Next.

- Review, When you are satisfied that your entries are correct, choose Add destination to add your event destination.
- Once you choose Add destination , the summary of event destination will show a “Successfully validated SNS topic for Amazon SES event publishing” email.


Step 3: Using Amazon SES Mailbox Simulator to test send and receive a bounce notification via SNS topic:
Test 1: Send a test email to test Demo 1 “Configure Amazon SES to monitor bounces and complaints for specific email identity (Email, Domain) ” in previous step
In this test, I will send a test message from my verified identity which configured to send any bounce and complaint notifications it receives to SNS topic and email address subscribed to the topic. I will use SES mailbox simulator to simulate a bounce message to test this setup.
- Sign in to the Amazon SES console.
- In the navigation pane, under Configuration, choose Verified identities.
- Select the verified identity you configured SNS notifications for bounces and complaints in Demo 1. In this test, I selected a verified domain identity.
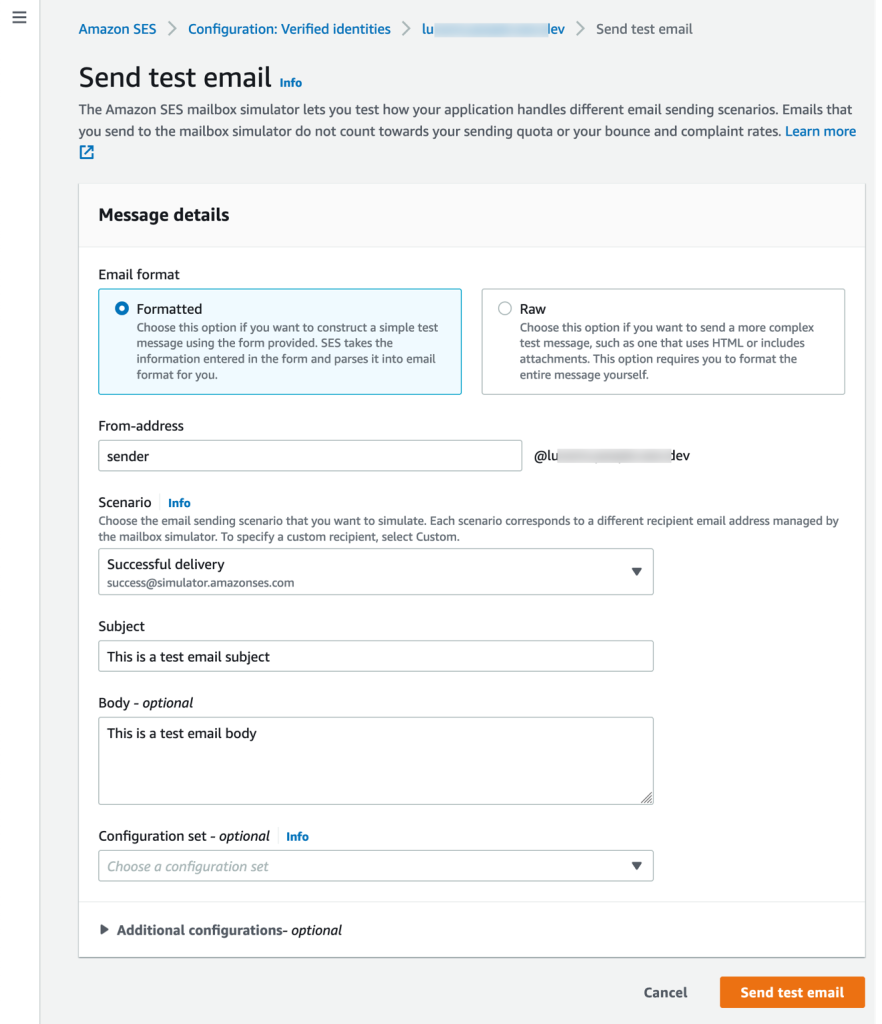
- Click on Send test email from the upper right corner.

- Under send message details, in From-address enter the first part of email address under this verified domain (from-address could be pre-populated).
- For Scenario, Expand the simulated scenarios and select Bounce scenario to test send a bounce message.
- For Subject, enter the desired email subject. For Body, type an optional body text then leave the rest of options as a default. Click on Send test email to send the email.

- You should have an email from AWS notifications with bounce notification and details on the bounce.
- Content of bounce message includes the notificationType “Bounce/Complaint”, bouncedRecipients, diagnosticCode “reason the message bounced”, remoteMtaIp “IP of the recipient MTA rejected the message”, SourceIp “IP of the sender application”, callerIdentity “IAM user sending this message”. These details can help in identifying the reason behind why email is not delivered and bounced and will help you avoid such bounces in the future. Refer this document for additional content on bounce events.


Test 2: Send a test email to test Demo 2 “Configure Amazon SES to monitor bounces and complaints for emails sent with a configuration set using Amazon SES event publishing” in previous step
In this test, you can send a test message from any verified identity and by using the configuration set created in Step 2 which is configured to send any bounce and complaint notifications to SNS topic and email address subscribed to the topic. You can use SES mailbox simulator to simulate a bounce message to test this setup.
- Sign in to the Amazon SES console.
- In the navigation pane, under Configuration, choose Verified identities.
- Select any verified identity you want to send emails from. In this test, I selected a verified domain identity.
- Click on Send test email from the upper right corner.
- Under send message details From-address enter the first part of email address under this verified domain.
- For Scenario, Expand the simulated scenarios and select Bounce scenario to test send a bounce message.
- For Subject, enter the desired email subject. For Body, type an optional body text.
- For Configuration set, Expand the drop-down list and choose the configuration set you created in Demo 2.
- Click on Send test email to send the email.

- You will find an email from AWS notifications with bounce notification and all details of the bounce.
- Content of bounce message includes the EventType “Bounce/Complaint”, bouncedRecipients, diagnosticCode “reason the message bounced” , remoteMTA “IP of the recipient MTA rejected the message”, SourceIp “IP of the sender application”, callerIdentity “IAM user sending this message”, ses:configuration-set “name of the configuration set you use when sending the email” all of this details can help you to identify the reason behind why email is not delivered and bounced and will help you to avoid such bounces in the future. Refer this document for more details on contents of bounce events.


FAQ on this set up:
I configured SNS topic with KMS encryption and I am not receiving bounce or complain notifications for emails:
If your Amazon SNS topic uses AWS Key Management Service (AWS KMS) for server-side encryption, you have to add permissions to the AWS KMS key policy to allow SES service access the KMS key, an example policy can be found here.
I followed Demo 2. However, when I try to send emails from any verified identity, I don’t receive bounce or complain notifications for emails:
When sending the email, make sure to select the configuration set you configured for bounce and complaints notification. If you followed demo 2 and you sent the email without explicitly using the configuration set in email headers, you will lose tracking for bounce and complaints events.
I am testing the setup. After I sent an email to the bounce simulator, I am not receiving don’t receive any bounce notification emails:
Check the SNS topic subscription if its in pending status and make sure you confirm the topic subscription via subscription email sent to you. If the topic subscription is confirmed, make sure you have access to the inbox of subscription email address and you are not applying any email filters.
Cleaning up:
You should have now successfully setup SNS notifications to monitor bounce and complaints for you Amazon SES emails. To avoid incurring any extra charges, remember to delete any resources created manually if you no longer need them for monitoring.
Resources to delete from SES console:
- In the navigation pane, under Configuration, choose the verified identity you configured for SNS notifications.
- In the details screen of the verified identity you selected, choose the Notifications tab and select Edit in the Feedback notifications container.
- Choose No SNS topic from bounce and complaint feedback dropdown menu and click Save changes.
- Under the same Notifications tab on the details screen of the verified identity, in the Email Feedback Forwarding container, choose Edit, check the Enabled box, and choose Save changes.
- In the navigation pane, under Configuration, choose Configuration sets.
- Check the box beside Configuration set you created and select Delete.
Resources to delete from SNS console:
- In the navigation pane, from the left side menu, choose Topics.
- Check the radio button beside the SNS topic you created and select Delete.
- Confirm the topic deletion by writing “delete me”.
Conclusion:
Monitoring bounces and complaints is an essential part of maintaining a successful email sending system, using Amazon SES. By setting up SNS notifications for bounces and complaints, you can quickly identify any issues and take appropriate action to ensure that your emails are delivered successfully to your subscribers. By proactively managing your email deliverability, you can maintain a positive sender reputation and avoid any negative impact on your email marketing efforts.
About the authors:

Alaa Hammad is a Senior Cloud Support Engineer at AWS and subject matter expert in Amazon Simple Email Service and AWS Backup service. She has a 10 years of diverse experience in supporting enterprise customers across different industries. She enjoys cooking and try new recipes from different cuisines.

Vinay Ujjini is an Amazon Pinpoint and Amazon Simple Email Service Worldwide Principal Specialist Solutions Architect at AWS. He has been solving customer’s omni-channel challenges for over 15 years. He is an avid sports enthusiast and in his spare time, enjoys playing tennis & cricket.