Post Syndicated from Vinay Ujjini original https://aws.amazon.com/blogs/messaging-and-targeting/navigate-bulk-sender-requirements-with-amazon-ses/
Introduction
Email communication remains a critical component of business operations and customer engagement. As the digital landscape evolves, major mailbox providers continually update their policies to enhance security and user experience. This blog will explore the changes implemented by Microsoft for bulk senders trying to reach Outlook.com (supporting Hotmail.com, live.com consumer domain addresses). This follows the Google & Yahoo! bulk sender requirements changes in February of 2024. Microsoft is implementing the enforcement of sender requirements for bulk email senders, particularly those sending over 5,000 messages daily, starting May 5, 2025. These requirements focus on improving email authentication and trust. This will ensure Outlook and Hotmail recipients are receiving messages that are authenticated and from who they claim to be from. These measures will help reduce spoofing, phishing, and spam, and safeguarding individuals and businesses relying on email.
This blog will discuss what these changes mean for you, and how Amazon Simple Email Service (Amazon SES) can help you maintain compliance and optimize your email sending practices.
Background
In February 2024, Google and Yahoo implemented new requirements for bulk email senders, building upon industry efforts to combat spam and improve email deliverability. These changes aligned with Google’s 2024 bulk sender requirements initiative, signaling a unified approach among major mailbox providers to enhance the privacy and compliance in email.
What does this mean for customers and email senders?
What’s Changing?
Microsoft’s New Requirements
- DMARC enforcement with at least a p=none policy
- Sender domain authentication (SPF, DKIM)
- Functional unsubscribe links required in the email
- Requirement for From and Reply-to addresses to be deliverable
Why These Changes Matter?
These new requirements serve several crucial purposes:
- Enhances trust in your sending domain: Validates that the sender is who they are claiming to be. Enhances trust by delivering messages that are authenticated and aligned with the bulk sender requirements.
- Improved Deliverability: Ensuring legitimate emails reach the recipients who have subscribed to sender’s messages.
- User-Centric: Providing recipients with control over their inboxes.
- Industry Standardization: Aligning sender requirements across major email providers
Best Practices for Compliance
To adhere to these new requirements and optimize your email sending practices, consider the following best practices:
1. Implement Strong Authentication
- Configure SPF: SPF (Sender Policy Framework) is an email authentication standard that’s designed to prevent email spoofing. Domain owners use SPF to tell email providers which servers are allowed to send email from their domains. Follow setup instructions to authenticate your email with SPF. Must pass SPF for sending domain.
- Configure “custom MAIL FROM“, which is how senders can ensure that the SPF-authenticated domain is aligned with the From header domain’s DMARC policy.
- Enable DKIM signing: DomainKeys Identified Mail (DKIM) is an email security standard. It is designed to ensure that an email that claims to have come from a specific domain, was indeed authorized by the owner of that domain. It uses public-key cryptography to sign an email with a private key. Recipient servers use a public key, published to a domain’s DNS to verify that parts of the email have not been modified during the transit. Follow these set up instructions to authenticate email with DKIM in SES. Must pass to validate email integrity and authenticity.
- Verify your domain with Easy DKIM. If currently using email identities, you have to move to domain
- If you utilize email identities only, you will default all authentication to amazonses.com. That will not align with your friendly from address which will not satisfy the bulk sender requirements. This means that when you send email to mailbox providers, your messages will be rejected because you do not have proper authentication on your emails. To satisfy the bulk sender requirements, you must use domain verified identities which ensure that you have ownership of or permission to use the sending domain. That will allow SES to sign the outgoing emails with a DKIM signature that aligns with the friendly from domain.
- Set up DMARC with an appropriate policy: Domain-based Message Authentication, Reporting and Conformance (DMARC) is an email authentication protocol that uses SPF and DKIM to detect email spoofing and phishing. To comply with DMARC, messages must be authenticated through either SPF or DKIM. Ideally, when both are used with DMARC, you’ll be ensuring the highest level of protection possible for your email sending.
| Name | Type | Value |
| _dmarc.example.com | TXT | “v=DMARC1;p=none;rua=mailto:[email protected]“ |
In the preceding records:
-
- example.com is your domain
- Value of the TXT record contains the DMARC policy that applies to your domain.
- In this example, the policy tells email providers to do the following:
- At least p=none should be implemented.
2. Optimize Email Content
- Clearly identify yourself as the sender: Use a recognizable “From” name and email address that accurately represents your brand or organization. For example, use “[email protected]” instead of a generic or misleading address.
- Implement user friendly unsubscribe mechanisms: Include a visible, easy-to-use unsubscribe link in every email, typically in the header. Ensure the unsubscribe process is simple and honors requests promptly, ideally within 24-48 hours. Visit this guide on how Amazon SES helps you do that.
- Subject line aligns with content: Avoid deceptive subject lines that don’t match the email content.
- Clearly identify commercial content: If your email is promotional, make it obvious. Use clear language in the subject line and body that indicates the nature of the email, such as “Special Offer” or “Newsletter.”
- Include a valid physical address: Add your company’s physical mailing address in the email footer. This is not only a legal requirement in many jurisdictions but builds trust with recipients.
- Verify URLS in the emails: Verify that links in the emails you send work and are not misleading to the reader/subscriber. Be transparent with URLs/links in the email content.
3. Monitor and Maintain
- Monitor bounces: A bounce typically indicates why a message was not delivered. The SMTP response in the bounce message will have details on why the message was bounced. For example: if it is missing authentication records (fix: include authentication records for the domain – quick fix) versus an IP or domain reputation bounce reason (this maybe a longer term fix).
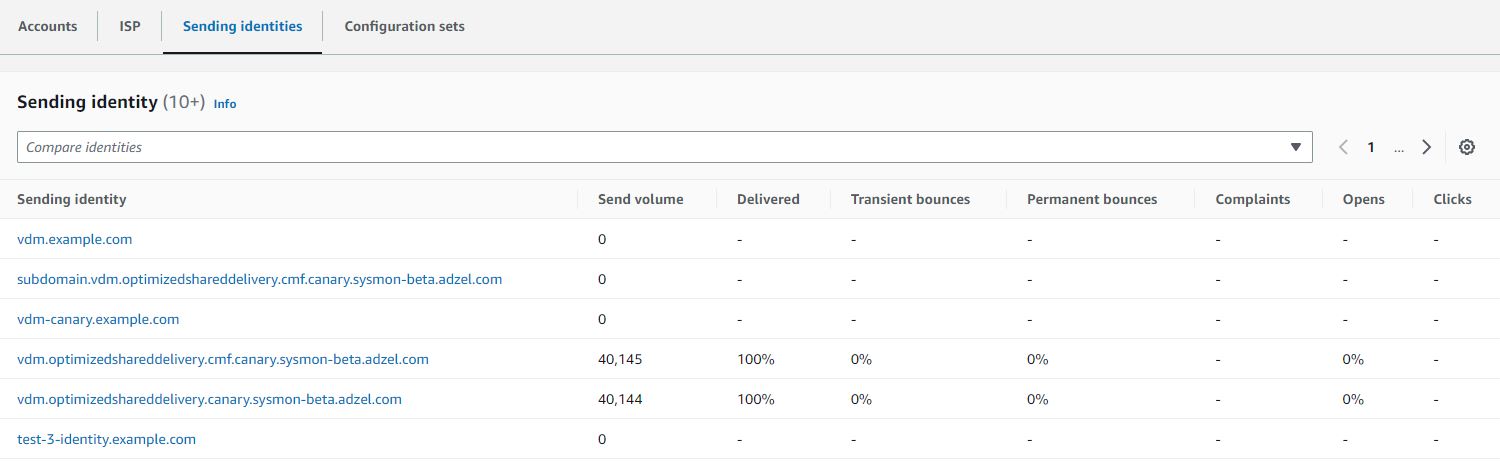
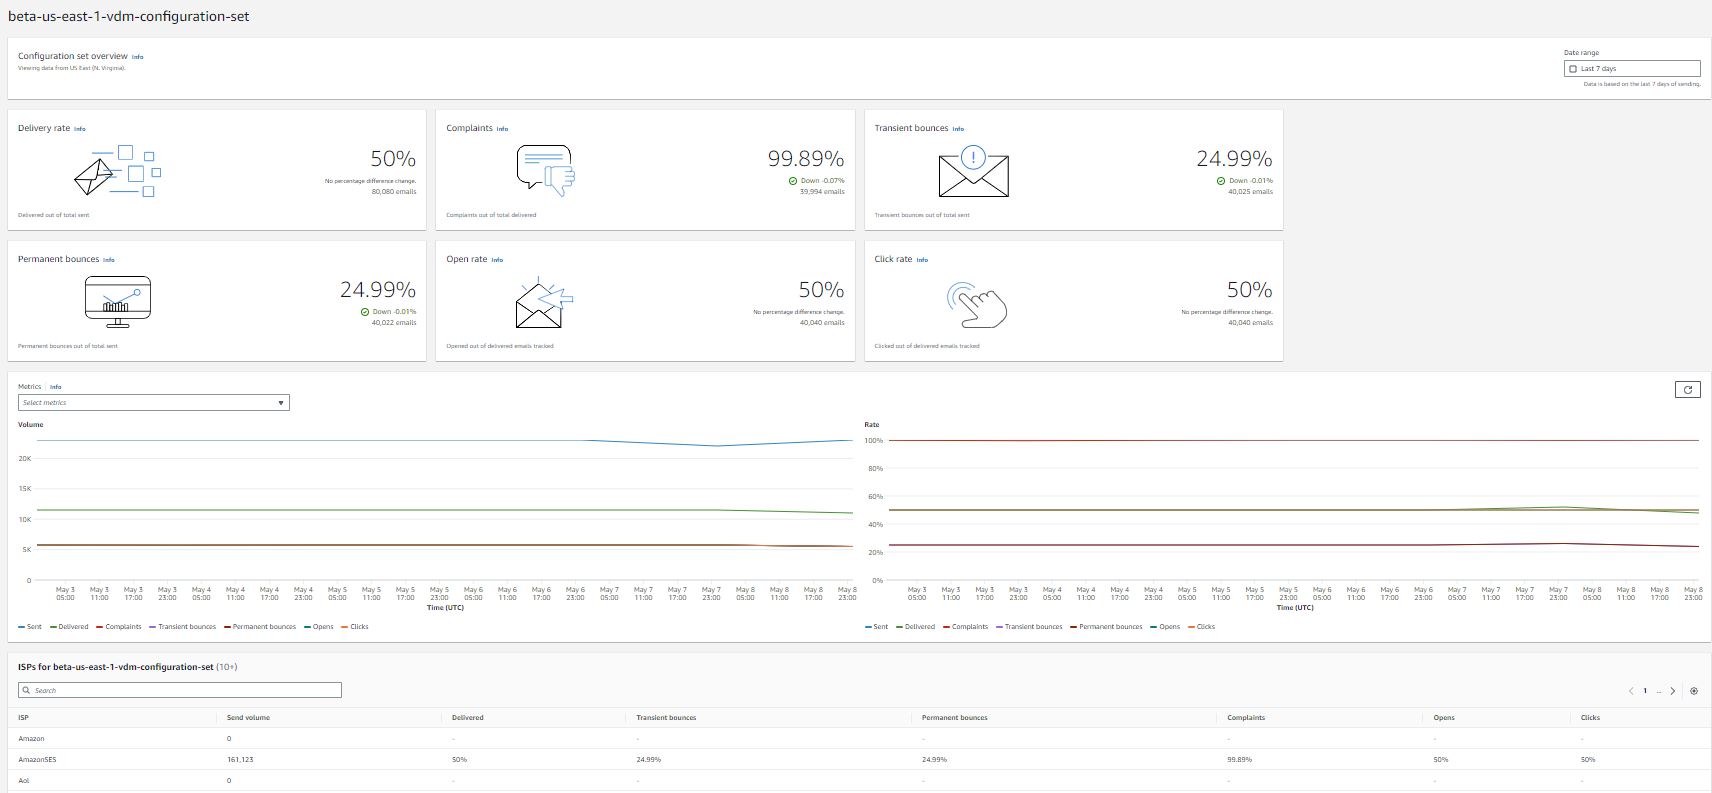
- Track both hard bounces (permanent delivery failures) and soft bounces (temporary issues). High bounce rates can indicate list quality problems or delivery issues. Visit this blog to set up notifications for bounces & complaints. Virtual Deliverability Manager (VDM) is an Amazon SES feature that helps you enhance email deliverability. It helps increasing inbox deliverability and email conversions, by providing insights into your sending and delivery data. VDM advices on how to fix the issues that are negatively affecting your delivery success rate and reputation.
- Track complaint rates: Regularly monitor the number of spam complaints your emails receive with a goal of keeping the complaint rate under 0.2%. Not all mailbox providers have complaint feedback loop data, so use aggregate data from the mailbox providers that do, such as Hotmail and Yahoo. Email providers that don’t provide complaint feedback loops, such as Gmail may have alternative dashboards or tools available like Google Postmaster tools.
- Perform regular authentication checks: Periodically verify that your SPF, DKIM, and DMARC records are correctly set up and functioning. Alternative to manual DNS checks, Amazon SES has a feature in Virtual Deliverability Manager that performs authentication checks for your sending identities.
- Maintain list hygiene: Regularly clean your email list by removing inactive subscribers, correcting typos in email addresses, and honoring unsubscribe requests. This helps improve deliverability and engagement rates.
How Amazon SES Helps
Amazon SES provides a robust set of features to help you meet these new requirements and optimize your email sending practices:
Authentication Support
- Easy DKIM configuration
- SPF record management
- DMARC implementation guidance
Comprehensive Monitoring
- Virtual Deliverability Manager
- Complaint tracking
- Bounce rate monitoring
- Event publishing to Amazon CloudWatch, SNS , Kinesis Firehose and Event Bridge
- Detailed sending statistics
Compliance Tools
- List management capabilities (included with SES)
- Suppression list handling (included with SES)
- Feedback loop processing (included with SES)
- Authentication status tracking: This is done through Amazon SES feature Virtual Deliverability Manager (VDM).
Implementation Strategy
To successfully implement these changes, consider the following strategy:
- Assessment: Audit your current email practices, review authentication status, and evaluate compliance gaps.
- Technical Implementation: Configure authentication protocols, update DNS records, and implement required unsubscribe mechanisms.
- Monitoring and Optimization: Track deliverability metrics, monitor complaint rates, and adjust sending practices as needed.
Measuring Success
To ensure ongoing compliance and optimize your email practices, track these key metrics:
- Delivery rates
- Complaint rates
- Authentication pass rates
- Engagement metrics (open rates, click-through rates)
Conclusion
The new bulk sender requirements from Microsoft and Yahoo represent an important step towards a more secure and reliable email ecosystem. By leveraging Amazon SES’s powerful features and following industry best practices, you can maintain compliance, improve deliverability, and enhance the overall effectiveness of your email communications.
Amazon SES is committed to helping you navigate these changes and optimize your email sending practices. For the most up-to-date guidance and support, please consult SES’s documentation or contact Amazon SES support.
Additional Resources
The email landscape is constantly evolving. Stay informed and adaptable to ensure your email practices remain effective and compliant.
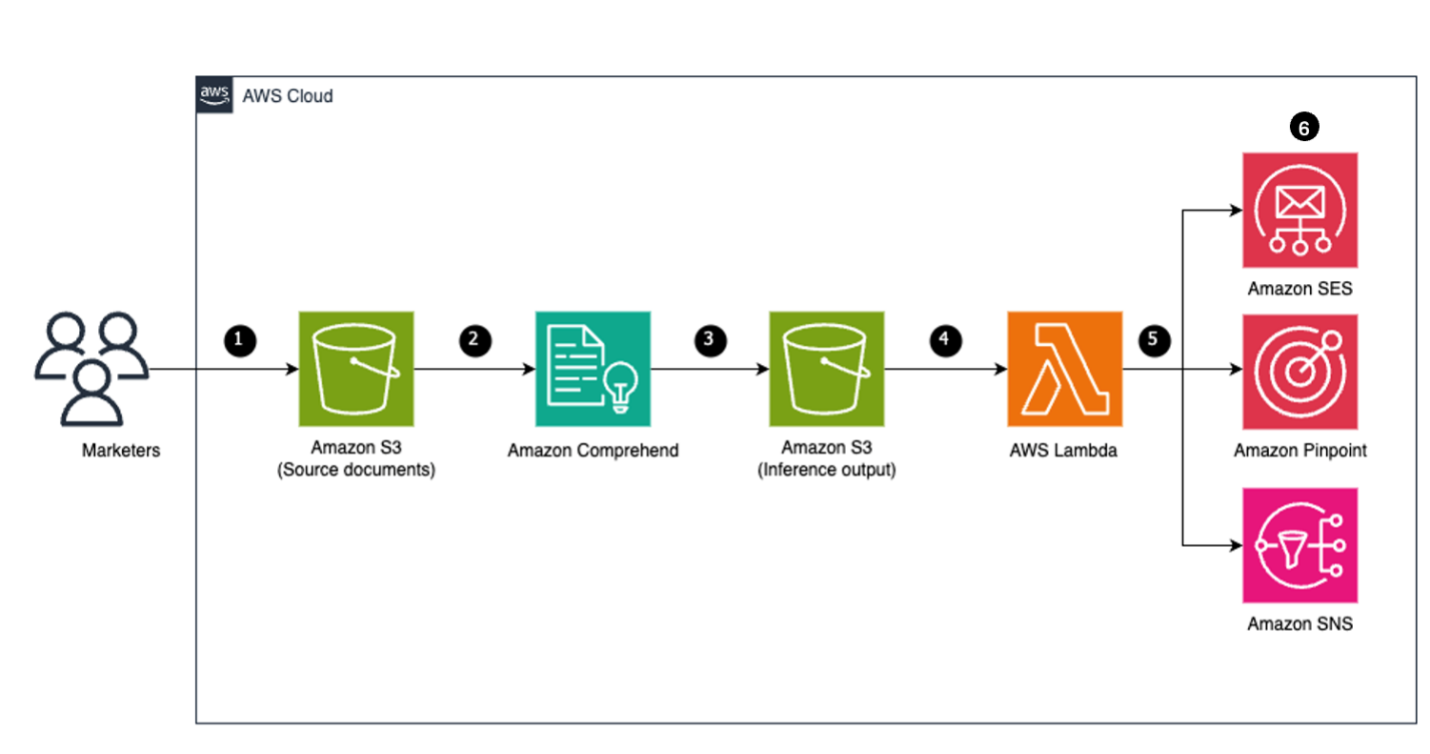


 Figure 8: Amazon Comprehend – Endpoint settings


 If you have previously leased several standard dedicated IP addresses to use with Amazon SES, you would have created groups of those addresses, called dedicated IP pools. Grouping dedicated IPs together in a pool makes them easier to manage. A common scenario is to create one pool for sending marketing communications, and another for sending transactional emails. Your sender reputation for transactional emails is then isolated from that of your marketing emails. In this scenario, if a marketing campaign generates a large number of complaints, the delivery of your transactional emails is not impacted. If you already have dedicated IPs (standard) pools you can now convert these pools to managed IP pools in one click. Converting from a dedicated IP (standard) pool to a dedicated IP (managed) pool automatically transfers all of your standard IPs over to managed. So, you keep the same set of IPs, but you no longer have to worry about monitoring and managing them. You will no longer be charged per IP that you lease, but rather by the volume of emails that you send. For more information on pricing see the


