Amazon Redshift Serverless lets you avoid managing infrastructure while only paying for what you use. Etleap provides data integration software that is natively built on AWS. It’s an AWS Advanced Technology Partner with the AWS Data & Analytics Competency and Amazon Redshift Service Ready designation.
In this post, we share how you can minimize the usage of resources for some workload patterns and maximize savings while seamlessly managing data pipelines. We illustrate an example of how Redshift Serverless and Etleap’s load synchronization feature can reduce active Redshift Serverless time, further optimizing extract, transform, and load (ETL) costs.
Introduction to Redshift Serverless
Redshift Serverless makes it easy to run and scale analytics in seconds without the need to set up and manage data warehouse clusters. With Redshift Serverless, you pay for the compute only when the data warehouse is in use. This is ideal when it’s difficult to predict compute needs such as variable workloads, periodic workloads with idle time, and steady-state workloads with spikes. As your demand evolves with new workloads and more concurrent users, Redshift Serverless automatically provisions the right compute resources, and your data warehouse scales seamlessly and automatically.
You can create a Redshift Serverless data warehouse either using the default settings or custom settings. Redshift Serverless creates a default workgroup and associates that to the default namespace. You can also create multiple Redshift Serverless endpoints per AWS account and Region using namespaces and workgroups.
A namespace is a collection of database objects and users, with properties such as database name and password, permissions, and encryption and security. The following screenshot shows an example of a namespace configuration on the Redshift Serverless console.
A workgroup is a collection of compute resources, which includes network and security settings. Workgroup configuration allows you to create a private or public serverless endpoint that you can use to connect with your applications. The following screenshot shows an example workgroup on the Redshift Serverless console.
When the Redshift Serverless endpoint is available, choose Query data to launch the Amazon Redshift Query Editor v2 to create database objects, load data, and analyze and visualize data. You can also connect to Redshift Serverless endpoints using your preferred SQL client tools via Amazon Redshift JDBC/ODBC drivers.
With Redshift Serverless, you pay separately for the compute and storage you use. Compute capacity is measured in Redshift Processing Units (RPUs), and you pay for the workloads in RPU-hours with a minimum charge of 60 seconds, metered on a per-second basis. Data lake queries are also part of the same RPU-hours, and Redshift Serverless doesn’t charge separately for the per-TB based pricing of Amazon Redshift Spectrum. The default base capacity is 128 RPUs, but you can adjust it from 32 RPUs to 512 RPUs in units of 8 using the Redshift Serverless console. For storage, you pay for data stored in Amazon Redshift-managed storage and storage used for manual snapshots, similar to what you would pay with Amazon Redshift provisioned RA3 instances.
To control your costs, you can specify usage limits and define actions that Amazon Redshift automatically takes if those limits are reached. You can specify usage limits in RPU-hours and associated with a daily, weekly, or monthly duration. Setting higher usage limits can improve the overall throughput of the system, especially for workloads that need to handle high concurrency while maintaining consistently high performance.
Why Etleap customers need Redshift Serverless
Etleap gives customers robust and flexible pipelines without the hassle of coding and managing infrastructure. Redshift Serverless has a similar benefit, letting you run Amazon Redshift without worrying about provisioning and maintaining data warehouse.
With the close Etleap-AWS integration, you can get started working with multiple data sources in Redshift Serverless in minutes.
Redshift Serverless can also reduce users’ costs because it automatically scales data warehouse capacity up and down to match usage and only charges when the serverless instance is active. ETL workloads are often batch-based and characterized by spikes, so the dynamic scaling of Redshift Serverless reduces unnecessary costs.
The following diagram illustrates this solution architecture.
One of the main sources of cost savings when using Redshift Serverless comes from its auto-pausing feature. When a Redshift Serverless instance is idle, it will auto-pause and you aren’t charged during this period of inactivity.
However, high frequency ETL pipelines (such as those from streams or CDC sources) can constantly resume the Redshift Serverless instance, negating the cost benefit. To maximize the advantages of the auto-pausing feature of Redshift Serverless, Etleap provides the option of load synchronization. As shown in the following figure, this reduces the number of load batches, thereby lowering active Redshift Serverless instance time and cost.
It sometimes makes sense to maximize the frequency of data ingestion, but not all use cases justify the higher cost of an always-on Amazon Redshift instance. Etleap users can set their load frequency at a cost-efficient once-per-hour or as frequently as every 5 minutes.
Amazon Redshift users typically run some SQL transformations after data is loaded in the warehouse. Etleap’s models feature lets you define the SQL transformations and their dependencies and control when these transformations are run. As with data loading, however, if these aren’t designed thoughtfully, there is a risk that models will trigger updates that unnecessarily wake up an idle Redshift Serverless instance, negating the cost savings of the Redshift Serverless auto-pausing feature.
To avoid this, Etleap schedules the models to update immediately after all the dependent tables have been updated. This maximizes the instance usage while it’s awake and allows it to pause when the loads and updates have completed.
Cost savings example
Let’s illustrate the cost savings benefits of Redshift Serverless by means of an example. A customer has set a 1-hour load synchronization schedule and has 100 pipelines and 10 models. Although by default Redshift Serverless has a provisioned base capacity of 128 RPUs, a provisioned base capacity of 32 RPUs is sufficient for the load requirements of this example. A typical average load time for Etleap customers into Amazon Redshift is 6 seconds. In Etleap, we perform a maximum of five loads at a time to avoid overloading the Redshift Serverless instance.
Here is an example of how the sequence would work for the pipelines:
When the hourly schedule triggers, Etleap begins the extraction and transformation of source data for all pipelines with new data to process.
After all the pipelines have finished extraction and transformation, Etleap begins to load the data into Amazon Redshift. This resumes the serverless instance. At an average of 6 seconds per load and five loads running in parallel, it takes 120 seconds to load all the pipelines (100 / 5 pipeline cycles * 6 seconds each).
When the load is complete, Etleap triggers the model updates. A typical model in Etleap takes about 130 seconds to update. As with loads, Etleap limits models to five simultaneous updates to reduce the load on the Redshift Serverless instance. Therefore, updating all 10 models takes 260 seconds of total instance run time (130 seconds * 10/5 model cycles).
At this point, you’re being charged for 380 seconds of active workload, and Redshift Serverless will become idle after some time.
Additionally, Etleap runs daily vacuum operations on applicable tables to minimize storage and improve query efficiency. The length of this process depends on the tables and the number of updates and deletes. For a customer with this amount of pipeline volume, 20 minutes is a typical length of time to vacuum the tables, adding that much daily runtime for the instance.
This results in a total daily runtime of 172 minutes ((380 seconds * 24 daily cycles / 60) + 20 minutes), which translates into a cost of $34.40 per day for a 32 RPU serverless instance. This is 88% lower cost than a comparable Amazon Redshift provisioned environment without the benefits of Etleap and Redshift Serverless: an always-on provisioned Amazon Redshift cluster with similar performance (1 year reserved instance pricing for 16 ra3.xlplus nodes running 24 hours/day).
Other ETL optimizations on Etleap using Redshift Serverless
Etleap natively supports Redshift Serverless by updating its ETL solution to ensure you can continue to seamlessly ingest diverse data sources.
Redshift Serverless offers new system views that are used for tracking and managing ingestion, and Etleap utilizes these new system views to natively handle tracking ingestion loads and vacuuming operations in their platform. For example, Etleap uses sys_query_history to determine which loads are in progress or complete, and thereby helps avoid double loading a batch.
Redshift Serverless automatically initiates optimizations such as sort and vacuum in the background and doesn’t charge for these automatic optimizations. As a best practice, after Etleap load synchronization, Etleap periodically runs the vacuum function on applicable tables, which reduces storage and improves query performance. Etleap uses the vacuum_sort_benefit column in svv_table_info, which provides the statistics for each table, informing which would benefit from vacuuming.
Summary
In this post, we described how Redshift Serverless frees you from managing data warehouse infrastructure and reduces costs. In particular, we illustrated a data integration pattern where Etleap can ensure further cost savings through its load synchronization feature by optimally choosing a cost-efficient once-per-hour load frequency. Although this proves to be an optimal solution for uses cases where you prefer cost efficiency over real-time data insights, Etleap also allows you to set the load frequency as low as 5 minutes for use cases where near-real-time data insights are important.
Start using Redshift Serverless to run and scale analytics without having to manage data warehouse infrastructure and take advantage of further cost savings through Etleap’s load synchronization feature. To get started with Etleap, start a free trial or request a tailored demo.
About the Authors
Caius Brindescu is an engineer at Etleap with over 4 years of experience in developing ETL software. In addition to development work, he helps customers make the most out of Etleap and Amazon Redshift. He holds a PhD from Oregon State University and one AWS certification (Big Data – Specialty).
Maneesh Sharma is a Senior Database Engineer at AWS with more than a decade of experience designing and implementing large-scale data warehouse and analytics solutions. He collaborates with various Amazon Redshift Partners and customers to drive better integration.
Sathisan Vannadil is a Senior Partner Solutions Architect at Amazon Web Services (AWS). His primary focus is on helping independent software vendor (ISV) partners design and build solutions at scale on AWS. Prior to AWS, Sathisan held diverse technical positions and has over 20 years of experience in the field of data and analytics.
At Amazon Web Services (AWS), we’re committed to providing customers with continued assurance over the security, availability, and confidentiality of the AWS control environment. We’re proud to deliver the Fall 2022 System and Organizational Controls (SOC) 1, 2, and 3 reports, which cover April 1–September 30, 2022, to support our customers’ confidence in AWS services.
AWS has also updated the associated infrastructure supporting our in-scope products and services to reflect new edge locations, AWS Wavelength zones, and AWS Local Zones.
The Fall 2022 SOC reports include an additional seven services in scope, for a new total of 154 services. See the full list on our Services in Scope by Compliance Program page.
The following are the additional seven services now in scope for the Fall 2022 SOC reports:
AWS strives to bring services into the scope of its compliance programs to help you meet your architectural and regulatory needs. If there are additional AWS services that you would like to see added to the scope of our SOC reports (or other compliance programs), reach out to your AWS representatives.
As always, we value your feedback and questions. Feel free to reach out to the team through the Contact Us page. If you have feedback about this post, submit comments in the Comments section below.
Want more AWS Security how-to-content, news, and feature announcements? Follow us on Twitter.
Your privacy considerations are at the core of our compliance work at Amazon Web Services (AWS), and we are focused on the protection of your content while using AWS services.
We are happy to announce that our Fall 2022 SOC 2 Type 2 Privacy report is now available. The report provides a third-party attestation of our system and the suitability of the design of our privacy controls. The SOC 2 Privacy Trust Service Criteria (TSC), developed by the American Institute of Certified Public Accountants (AICPA), establishes the criteria for evaluating controls that relate to how personal information is collected, used, retained, disclosed, and disposed of. For more information about our privacy commitments supporting the SOC 2 Type 2 report, see the AWS Customer Agreement.
The scope of the Fall 2022 SOC 2 Type 2 Privacy report includes information about how we handle the content that you upload to AWS, and how that content is protected across the services and locations that are in scope for the latest AWS SOC reports. AWS customers can download the SOC 2 Type 2 Privacy report through AWS Artifact in the AWS Management Console.
As always, we value your feedback and questions. Feel free to reach out to the compliance team through the AWS Compliance Contact Us page. If you have feedback about this post, submit comments in the Comments section below.
Want more AWS Security how-to-content, news, and feature announcements? Follow us on Twitter.
Now, you can add multiple MFA devices to AWS account root users and AWS Identity and Access Management (IAM) users in your AWS accounts. This helps you to raise the security bar in your accounts and limit access management to highly privileged principals, such as root users. Previously, you could only have one MFA device associated with root users or IAM users, but now you can associate up to eight MFA devices of the currently supported types with root users and IAM users.
In this blog post, we review the current MFA features for IAM, share use cases for multiple MFA devices, and show you how to manage and sign in with the additional MFA devices for better resiliency and flexibility.
Overview of MFA for IAM
First, let’s recap some of the benefits and available MFA configurations for IAM.
The use of MFA is an important security best practice on AWS. With MFA, you have an additional layer of protection to help prevent unauthorized individuals from gaining access to your systems and data. MFA can help protect your AWS environments if a password associated with your root user or IAM user became compromised.
To help meet different customer needs, AWS supports three types of MFA devices for IAM, including FIDO security keys, virtual authenticator applications, and time-based one-time password (TOTP) hardware tokens. You should select the device type that aligns with your security and operational requirements. You can associate different types of MFA devices with an IAM principal.
Use cases for multiple MFA devices
There are several use cases in which associating multiple MFA devices with an IAM principal is beneficial to the security and operational efficiency of your organization, such as the following:
In the event of a lost, stolen, or inaccessible MFA device, you can use one of the remaining MFA devices to access the account without performing the AWS account recovery procedure. If an MFA device is lost or stolen, it’s best practice to disassociate the lost or stolen device from the root users or IAM users that it’s associated with.
Geographically dispersed teams, or teams working remotely, can use hardware-based MFA to access AWS, without shipping a single hardware device or coordinating a physical exchange of a single hardware device between team members.
If the holder of an MFA device isn’t available, you can maintain access to your root users and IAM users by using a different MFA device associated with an IAM principal.
You can store additional MFA devices in a secure physical location, such as a vault or safe, while retaining physical access to another MFA device for redundancy.
How to manage multiple MFA devices in IAM
You can register up to eight MFA devices, in any combination of the currently supported MFA types, with your root users and IAM users.
For Multi-factor authentication (MFA), choose Assign MFA device.
Select the type of MFA device that you want to use and then choose Next.
With multiple MFA devices, you only need one MFA device to sign in to the console or to create a session through the AWS Command Line Interface (AWS CLI) as that principal.
You don’t need to make permissions changes in order for your organization to start taking advantage of multiple MFA devices. The root users and IAM users in your accounts that manage MFA devices today can use their existing IAM permissions to enable additional MFA devices.
Changes to Cloudtrail log entries
In support of this new feature, the identifier of the MFA device used will now be added to the console sign-in events of the root user and IAM user that use MFA. With these changes to AWS CloudTrail log entries, you can now view both the user and the MFA device used to authenticate to AWS. This provides better traceability and audibility for your accounts.
You can find this information in the MFAIdentifier field in CloudTrail, within additionalEventData. You don’t need to take action for this information to be logged. The following is a sample log from CloudTrail that includes the MFAIdentifier.
For Additional verification required, select the type of MFA device that you want to use to continue authenticating, and then choose Next:
Figure 1: MFA device selection when authenticating to the console as an IAM user or root user with different types of MFA devices available
You will then be prompted to authenticate with the type of device that you selected.
Figure 2: Prompt to authenticate with a FIDO security key
Conclusion
In this blog post, you learned about the new multiple MFA devices feature in IAM, and how to set up and manage multiple MFA devices in IAM. Associating multiple MFA devices with your root users and IAM users can make it simpler for you to manage access to them. This feature is available now for AWS customers, except for customers operating in AWS GovCloud (US) Regions or in the AWS China Regions. For more information about how to configure multiple MFA devices on your root users and IAM users, see the documentation on MFA in IAM. There is no extra charge to use MFA devices in IAM.
As we head into 2023, it’s time to think about lessons from this year and incorporate them into planning for the next year and beyond. At AWS, we continually learn from our customers, who influence the best practices that we share and the security services that we offer.
We heard that you’re looking for more prescriptive guidance, patterns, and trends that AWS Security is seeing in the industry, so I’m happy to share an ebook that I recently authored called Security Predictions in 2023 and Beyond. In this ebook, you’ll learn about what we think is next for the security industry and some high-level pointers on how you can stay ahead.
The last few years has brought rapid acceleration of digital transformation in a short time and forced organizations to manage disruptions to their business, such as the impact of remote work. As security and risk management leaders handle the recovery and renewal phases from the past two years, they must consider forward-looking strategic planning assumptions when allocating budget, selecting services, and prioritizing employee effort. We are now at an interesting point in time where it will take the right mix of technology and humans to shape the future of cybersecurity.
I encourage you to read through the ebook and consider how these predictions could influence strategic planning for your security program. Drop us your feedback in the comments or reach out to your account team with questions. You can also follow @AWSSecurityInfo for the latest from AWS Security, and you can find me at @mosescj58.
If you have feedback about this post, submit comments in the Comments section below.
Want more AWS Security news? Follow us on Twitter.
Automated scripts, known as bots, can generate significant volumes of traffic to your mobile applications, websites, and APIs. Targeted bots take this a step further by targeting website content, such as product availability or pricing.
Traffic from targeted bots can result in a poor user experience by competing against legitimate user traffic for website access to high-demand inventory, increasing business risk through chargebacks from fraudulent transactions, and increasing infrastructure costs.
In 2021, AWS released AWS WAF Bot Control for Common Bots to help you detect and control common bots. In October 2022, AWS released a new feature—AWS Bot Control for Targeted Bots—that can help you detect and protect against bots that use advanced techniques to actively avoid detection.
In this post, I provide an overview of Bot Control for Targeted Bots and show you how to enable Bot Control to detect and block both common and targeted bots.
Overview of Bot Control for Targeted Bots
Bot Control for Targeted Bots provides sophisticated bot detection and mitigation by creating an intelligent baseline of traffic patterns. Bot Control for Targeted Bots uses browser fingerprinting techniques and client-side JavaScript interrogation methods to help protect your application from advanced bots that mimic human traffic patterns and actively try to evade detection.
Bot Control detects anomalies in usage patterns and provides new flexible mitigation options to isolate bad bots. These options include dynamic rate-limiting, challenge actions, and the ability to block based on labels and confidence scores.
With Bot Control for Targeted Bots, you can use bot protection rules to allow verified common bot traffic and, at the same time, to challenge unwanted advanced bot traffic. You can achieve both tasks from the same configuration page without making application or architectural changes. You can also configure fine-grained rule sets. For example, you can configure blocking actions for high-risk bots while allowing for exceptions for known IP ranges.
This release also introduces token domains, which is the ability to use the same AWS WAF web ACL across multiple domain names and Amazon CloudFront distributions to simplify client-side configuration. For example, you can use token domains to accept tokens that are generated by www.example.com for api.example.com and vice versa. In addition, you can now specify a resource path directly in the managed rule configuration, enabling you to only require a token for API calls, but not for cached, content-like images.
Bot Control for Targeted Bots sends metrics to Amazon CloudWatch to identify application access trends. The metrics include the percentage of human traffic compared to bot traffic and the count of requests for sensitive web pages such as login and checkout pages. Each rule in Bot Control produces a unique label so that you can review CloudWatch metrics and filter logs to understand traffic patterns. By using these mechanisms, you can identify, isolate, and remediate operational issues.
Walkthrough
In this walkthrough, I will show you how to set up Bot Control for Targeted Bots to help protect a CloudFront distribution.
You will set up an AWS WAF web ACL with an AWS Managed Rule for Bot Control for Targeted Bots. The rule detects bots and then decides the appropriate action:
Dynamically rate limit verified bots – Based on traffic history, Bot Control creates an intelligent baseline and then applies rate limits to abnormally high volumes.
Enable the challenge action – You have a new option, called challenge, along with the already supported options of count, allow, block, and CAPTCHA. The challenge option initiates a process of challenge interstitial, which means that Bot Control provides a challenge to the browser and creates a domain token when the challenge is resolved.
Set up Bot Control for Targeted Bots
In this section, I will show you how to set up Bot Control for Targeted Bots by creating a new web ACL or editing an existing one.
To create a new web ACL, choose Create a new web ACL.
To edit an existing web ACL, choose the name of the ACL.
On the Rules tab, for the Add rules drop-down, select Add managed rule groups.
Add a Bot Control rule set to the web ACL. Choose Edit to edit the rule.
For Bot Control inspection level, select the inspection level for Bot Control. For this walkthrough, we chose Targeted to enable Bot Control for Targeted Bots.
Figure 1: Bot Control – Select inspection level
Review and select the actions to be taken on each category of bots detected, and then choose Save rule. In our example, we set allow, challenge, and count rules for the categories, as shown in Figure 2.
Figure 2: Bot Control – Select actions for each category
You can select different actions for each category based on your application security needs:
Allow: Allows the request to be sent to a protected resource.
Block: Blocks the request, returning an HTTP 403 (Forbidden) response.
Count: Allows the request to be sent to the protected resource while counting detections. The count shows you bot activity that is occurring without blocking or challenging. When you turn on rules for the first time, this information can help you see what the detections are, before you change the actions.
CAPTCHA and Challenge: use CAPTCHA puzzles and silent challenges with tokens to track successful client responses.
In this example you will configure a scope-down statement to apply Bot Control for a given URI path only.
On the same page in the step above, you can add a scope-down statement to ensure you use and incur Targeted Bots charges for the requests where you need protections. There are more examples of how to use scope-down statements in our documentation.
Select “Enable scope-down statement” and configure the rule to inspect the URI path as per figure 3.
Figure 3: Bot Control – Add the scope-down statement
To add domain names to be protected, scroll to the bottom of the web ACL and choose Edit. In the Token domain list – optional section, enter the domain name or names to which the token verification applies. Tokens that are generated are valid for these domains.
Create the SDK link for the AWS WAF integration
In this section, I’ll show you how to find the AWS WAF SDK and add it to your application pages.
The token SDK manages the token authorization and includes the tokens in the requests that you send to your protected resources. By adding the SDK link to application pages, you can help ensure that the remote procedure calls by your client contain a valid token.
To add the SDK to your application pages
In the AWS WAF console, in the left navigation pane, choose Application integration SDKs.
Under JavaScript SDK, copy the provided code snippet. This code snippet allows for creation of the cryptographic token in the background when the application loads for the first time, providing a better customer experience.
Add the code snippet to your pages. For example, paste the provided script code within the <head> section of the HTML.
When this integration is in place on your application’s pages, you can add AWS WAF rules in your web ACL to block requests that don’t contain a valid token. Replace the <Web ACL integration URL> with the provided integration URL from the AWS WAF console or copy the script tag from the console:
Figure 4 shows the SDK link for application pages.
Figure 4: Bot Control – Add SDK link to application pages
Review metrics
Now that you’ve set up the web ACL and application, you can use the bot visualization dashboard to review bot traffic patterns. Bot rules emit metrics corresponding to their labels, helping you identify which rule within the AWS Managed Rule for Bot Control for Targeted Bots initiated an action. You can also use these labels and rule actions to filter AWS WAF logs so that you can further examine a request.
To view AWS WAF metrics for the distribution
In the AWS WAF console, in the left navigation pane, select Web ACLs.
Select the web ACL that Bot Control is enabled on and then choose the Bot Control tab to view the metrics.
Figure 5: Bot Control – Review web ACL metrics
Best practices
In this section, I describe best practices for your Bot Control setup.
Set priority ordering of AWS WAF rules to help lower costs
You can set the priority of rule groups in a web ACL such that the order of the rule matches requests more efficiently. AWS WAF will take the action associated to the first rule it matches. If the incoming traffic matches the more wider criteria (such as IPset rules at priority 1), the associated action is taken. That request is never analyzed by the Bot Control rule and hence do not incur the bot control request analysis fees. For example, the following list shows rules ranked in order from highest priority (1) to lowest priority (5):
Use allow and deny lists – provide IP addresses to allow or deny
AWS Managed Rule groups for IP reputation – block bots and other threats
General rate limit – help prevent HTTP flood across the protected resource
AWS WAF Bot Control rule group – scoped-down to exclude static content such as images
Rate limit for login pages – scoped-down for specific URLs and HTTP POST methods
Figure 6 shows the prioritized rules in AWS WAF.
Figure 6: AWS WAF – Web ACL rule order
Use scope-down statements
You can use scope-down statements to limit the requests evaluated for a rule group. For example, a scope-down statement that excludes checking requests for static assets, such as images for a given URI and HTTP method (GET), can help reduce Bot Control costs.
Block requests without tokens
If a request has a token absent or is rejected, you can block that request. For example, you might want to block requests on login or payment processing pages. To block requests with a missing or rejected token, add a rule to run after the Bot Control rule to block requests matching the labels rejected and absent:
awswaf:managed:token:rejected – The request token is present but is either corrupt or has an expired challenge timestamp.
awswaf:managed:token:absent – The request doesn’t have a token.
Use SDK integration
After you add the token domains and the provided script to your application pages, you can add a rule to block requests that don’t have a token. Use of the SDK helps AWS WAF verify the client application with silent challenges and provide AWS token acquisition and management. The SDK provides the full functionality of both AWS WAF Bot Control and AWS WAF Fraud Control, reducing the need for multiple SDKs if either or both rule groups are used in the web ACL.
Create CloudWatch alarms
You can add CloudWatch alarms to help you assess whether there is activity outside of the norm for your application. For example, you can monitor for a high number of token-absent metrics for a given time period.
Configure a billing alarm
To help you track costs, you can configure a billing alarm that sends an alert when you have exceeded the threshold for your expected costs.
Pricing and availability
Bot Control for Targeted Bots is available today in AWS Regions where AWS WAF is available, excluding AWS GovCloud (US) and China Regions. For information on pricing, see AWS WAF Pricing.
Conclusion
In this post, you learned how to use Bot Control for Targeted Bots to add visibility into bot activity on your website or applications. With Bot Control for common and targeted bots, you can detect, challenge, and block unwanted bot activity. Because Bot Control is customizable, you can tailor how you address legitimate bots while protecting against bots that use advanced techniques to actively avoid detection. For more information and to get started today, see AWS WAF Bot Control.
If you have feedback about this post, submit comments in the Comments section below. If you have questions about this post, contact AWS Support.
Want more AWS Security news? Follow us on Twitter.
Amazon Athena is an interactive query service that makes it easy to analyze data in Amazon Simple Storage Service (Amazon S3) using standard SQL. Athena is serverless, so there is no infrastructure to manage, and you pay only for the queries that you run on datasets at petabyte scale. You can use Athena to query your S3 data lake for use cases such as data exploration for machine learning (ML) and AI, business intelligence (BI) reporting, and ad hoc querying.
It’s not uncommon for datasets in data lakes to update only daily, or at most a few times per day, yet queries running on these datasets may be repeated more frequently. Previously, all queries resulted in a data scan, even if the same query was repeated again. When the source data hasn’t changed, repeat queries run needlessly, leading to the same results with higher data scan costs and query latency. Wouldn’t it be better if the results of a recent query could be reused instead?
Query Result Reuse is a new feature available in Athena engine version 3 that makes it possible to reuse the results of a previous query. This can improve performance and reduce cost for frequently run queries, by skipping scanning the source data and instead returning a previously calculated result directly. With Query Result Reuse, you can tell Athena that you want to reuse results of a previous query run, with a maximum age setting that controls how recent a previous result has to be.
Athena automatically reuses any previous results that match your query and maximum age setting, or transparently runs the query again if no match is found. If you know that a dataset changes a few times per day, you can, for example, tell Athena to reuse results that are up to an hour old to avoid rerunning most queries, but still get new results when you run a query soon after new data has become available.
In this post, we demonstrate how to reduce cost and improve query performance with the new Query Result Reuse feature.
When should you use Query Result Reuse?
We recommend using Query Result Reuse for every query where the source data doesn’t change frequently. You can configure the maximum age of results to reuse per query, or use the default, which is 60 minutes. In certain cases where queries include non-deterministic functions such as RAND(), the query fetches fresh data from the input source even if the Query Result Reuse feature is enabled.
Query Result Reuse allows results to be shared among users in a workgroup, as long as they have access to the tables and data. This means Query Result Reuse can benefit not only a single user, but also other users in the workgroup who might be running the same queries. One example where this may be especially beneficial is when you have dashboards that are viewed by many users. The dashboard widgets run the same queries for all users, and are therefore accelerated by Query Result Reuse, when enabled.
Another example is if you have a dataset that is updated daily, and many users who all query the most recent data to create reports. Different people might run the same queries as part of their work; with Query Result Reuse, they can collectively avoid running the same query more than once, making everyone more productive and lowering overall cost by avoiding repeated scans of the same data.
Finally, if you have a historical dataset that is frequently queried, but never or very rarely updated, you can configure queries to reuse results that are up to 7 days old to maximize the chances of reusing results and avoid unnecessary costs.
How does Query Result Reuse work?
Query Result Reuse takes advantage of the fact that Athena writes query results to Amazon S3 as a CSV file. Before the introduction of Query Result Reuse, it was possible to reuse query results by reading these files directly. You could also use the ClientRequestToken parameter of the StartQueryExecution API to ensure queries are run only once, and subsequent runs return the same results. With Query Result Reuse, the process of reusing query results is easier and more versatile.
When Athena receives a query with Query Result Reuse enabled, it looks for a result for a query with the same query string that was run in the same workgroup. The query string has to be identical in order to match.
Query Result Reuse is enabled on a per query basis. When you run a query, you specify how old a result can be for it to be reused, from 1 minute up to 7 days. If the query has been run before, and a result exists that matches the request, it’s returned, otherwise the query is run and a new result is calculated. This new result is then available to be reused by subsequent queries.
You can run the query multiple times with different settings for how old a result you can accept. Results can be reused within the same workgroup, even if a different user ran the query previously.
Before a query result is reused, Athena does a few checks to make sure that the user is still allowed to see the results. It checks that the user has access to the tables involved in the query and permission to read the result file on Amazon S3.
There are some situations where query results can’t be reused, for example if the query uses non-deterministic functions, or has AWS Lake Form ation fine-grained access controls enabled. These limitations are described in more detail later in this post.
Run queries with Query Result Reuse
In this section, we demonstrate how to run queries with the Query Result Reuse feature via the Athena API, the Athena console, and the JDBC and ODBC drivers.
Run queries using the Athena API
For applications that use the Athena API through the AWS Command Line Interface (AWS CLI) or the AWS SDKs, the StartQueryExecution API call now has the additional parameter ResultReuseConfiguration, where you can enable Query Result Reuse and specify the maximum age of results. For example, when using the AWS CLI, you can run a query with Query Result Reuse enabled as follows:
These examples assume that my_work_group uses Athena engine v3, that the workgroup has an output location configured, and that the AWS Region has been set in the AWS CLI configuration.
When a query result is reused, you can see in the statistics section of the response from the GetQueryExecution API call that no data was scanned and that results were reused:
When you run queries on the Athena console, Query Result Reuse is now enabled by default. You can enable and disable Query Result Reuse in the query editor. You can also choose the pen icon to change the maximum age of results. This setting applies to all queries run on the Athena console.
The following screenshot shows an example query run against AWS CloudTrail logs with Query Result Reuse enabled.
When we ran the query again, the results showed up immediately, and we could see the message “using reused query results” in the Query results pane as a confirmation that the results of our first query had been reused. The Data scanned statistic also showed “-” to indicate that no data was scanned.
Run queries using the JDBC and ODBC drivers
If you use the JDBC or ODBC driver to query Athena, you can now add enableResultReuse=1 to your connection parameters to enable Query Result Reuse, and use ageforResultReuse=60 to set the maximum age to 60 minutes. The drivers automatically apply the setting to all queries running in the context of the connection.
Query Result Reuse is supported for most Athena queries, but there are some limitations. We want to ensure that reusing results doesn’t create surprising situations, or expose results that a user shouldn’t have access to. For that reason, Athena always runs a fresh query in the following situations:
Non-deterministic functions – Some functions and expressions produce different results from query to query, such as CURRENT_TIME and RAND(). Results for queries that use temporal and non-deterministic expressions and functions aren’t reusable because that could create surprising and inconsistent results.
Fine-grained access controls – Row-level and column-level permissions are configured in Lake Formation, and Athena can’t know if these have changed since a previous query result was created. Users using the same workgroup can also have different permissions, and checking all permissions would undo many of the cost and performance savings you get from Query Result Reuse.
Federated queries, user-defined functions (UDFs), and external Hive metastores – Users using the same workgroup can have different permissions to invoke the AWS Lambda functions that these features rely on. Athena isn’t able to check that a user that wants to reuse a result has permission to invoke these Lambda functions without running the query, which would negate the cost and performance savings.
Athena detects these conditions automatically and runs the query as if Query Result Reuse wasn’t enabled. You won’t get errors, but you can determine that Query Result Reuse wasn’t in effect by inspecting the query status (see our earlier examples).
Query Result Reuse is available in Athena engine version 3 only.
Conclusion
Query Result Reuse is a new feature in Athena that aims to reduce cost and query response times for datasets that change less frequently than they are queried. For teams that often run the same query, or have dashboards that are used more often than the data changes, Query Result Reuse can result in lower costs and faster results. It’s easy to get started with Query Result Reuse via the Athena console, API, and JDBC/ODBC; all you have to do is set the maximum age of results, and run your queries as usual.
We hope that you will like this new feature, and that it will save cost and improve performance for you and your team!
About the authors
Theo Tolv is a Senior Big Data Architect in the Athena team. He’s worked with small and big data for most of his career and often hangs out on Stack Overflow answering questions about Athena.
Vijay Jain is a Senior Product Manager in Amazon Web Services (AWS) Athena team. He is passionate about building scalable analytics technologies and products working closely with enterprise customers. Outside of work, Vijay likes running and spending time with his family.
AWS Certificate Manager (ACM) is a managed service that enables you to provision, manage, and deploy public and private SSL/TLS certificates that you can use to securely encrypt network traffic. You can now use ACM to request Elliptic Curve Digital Signature Algorithm (ECDSA) certificates and associate the certificates with AWS services like Application Load Balancer (ALB) or Amazon CloudFront. As a result, you get the benefit of managed renewal, where ACM can automatically renew ECDSA certificates before they expire. Previously, you could only request certificates with an RSA 2048 key algorithm from ACM. ECDSA certificates could be imported to ACM, but imported certificates cannot use managed renewal.
You can request both ECDSA P-256 and P-384 certificates from ACM. If you do not request an ECDSA certificate, ACM will issue an RSA 2048 certificate by default.
In this blog post, we will briefly examine the differences between RSA and ECDSA certificates, discuss some important considerations when evaluating which certificate type to use, and walk through how you can request an ECDSA certificate and associate it with an application load balancer in AWS.
Cryptographic certificates overview
TLS certificates are used to secure network communications and establish the identity of websites over the internet, as well as the identity of resources on private networks. Public certificates that you request through ACM are obtained from Amazon Trust Services, which is an Amazon managed public certificate authority (CA).
Both public and private certificates can help customers identify resources on networks and secure communication between these resources. Public certificates identify resources on the public internet, whereas private certificates do the same for private networks. One key difference is that applications and browsers trust public certificates by default, but an administrator must explicitly configure applications and devices to trust private certificates.
RSA and ECDSA primer
RSA and ECDSA are two widely used public-key cryptographic algorithms—algorithms that use two different keys to encrypt and decrypt data. In the case of TLS, a public key is used to encrypt data, and a private key is used to decrypt data. Public key (or asymmetric key) algorithms are not as computationally efficient as symmetric key algorithms like AES. For this reason, public key algorithms like RSA and ECDSA are primarily used to exchange secrets between two parties initiating a TLS connection. These secrets are then used by both parties to decipher the same symmetric key that actually encrypts the data in transit.
RSA stands for Rivest, Shamir, and Adleman: the researchers who first publicly described this algorithm in 1977. The basic functionality of RSA relies on the idea that large prime numbers are very difficult to efficiently factor. ECDSA, or Elliptic Curve Digital Signature Algorithm, is based on certain unique mathematical properties of elliptic curves that make them very useful for cryptographic operations. The cryptographic utility of ECDSA comes from a concept called the discrete logarithm problem.
Considerations when choosing between RSA and ECDSA
What are the important differences between RSA and ECDSA certificates? When should you choose ECDSA certificates to encrypt network traffic? In this section, we’ll examine the security and performance considerations that help to determine whether ECDSA or RSA certificates are the best choice for your workload.
Security
In cryptography, security is measured as the computational work it takes to exhaust all possible values of a symmetric key in an ideal cipher. An ideal cipher is a theoretical algorithm that has no weaknesses, so you must try every possible key to discover which is the correct key. This is similar to the idea of “brute forcing” a password: trying every possible character combination to find the correct password.
Let’s imagine you have a 112-bit key ideal cipher, which means it would take 2112 tries to exhaust the key space—we would say this cipher has a 112-bit security strength. However, it is important to realize that security strength and key length are not always equal—meaning that an encryption key with a length of 112 bits will not always have a 112-bit security strength.
ECDSA provides higher security strength for lower computational cost. ECDSA P-256, for example, provides 128-bit security strength and is equivalent to an RSA 3072 key. Meanwhile, ECDSA P-384 provides 192-bit security strength, equivalent to the key associated with an RSA 7680 certificate. In other words, an ECDSA P-384 key would require 2192 tries to exhaust the key space.
The following table provides an in-depth comparison of the different security strengths for RSA key lengths and ECDSA curve types. Note that only RSA 2048 and ECDSA P-256 and P-384 are currently issued by ACM. However, ACM does support the import and usage of the other certificate types listed in the table. For more information, see Importing certificates into AWS Certificate Manager.
Security strength
RSA key length
ECDSA curve type
80-bit
1024
160
112-bit
2048
224
128-bit
3072
256
192-bit
7680
384
256-bit
15360
512
Performance
ECDSA provides a higher security strength (for a given key length) than RSA but does not add performance overhead. For example, ECDSA P-256 is as performant as RSA 2048 while providing security strength that is comparable to RSA 3072.
ECDSA certificates also have up to a 50% smaller certificate size when compared to RSA certificates, and are therefore more suitable to protect data-in-transit over low bandwidth or for applications with limited memory and storage, such as Internet of Things (IoT) devices.
Take a look at the following certificate examples; you can see the size difference between RSA and ECDSA certificates.
Consider a small IoT sensor device that tracks temperature in an office building. This device typically has very low storage capacity and compute power, so the smaller ECDSA certificate will be easier to process and store. In the case of an IoT device, you might not be able to store the entire RSA certificate chain on the device due to memory limitations and the larger size of RSA certificates. This can make it more difficult to validate the chain of trust for that certificate.
Using ECDSA, customers can take advantage of the smaller size of the certificates (and the certificate trust chain) and store the entire chain of trust on the IoT device itself, enabling the IoT device to more easily validate the certificate.
When should I use ECDSA certificates from ACM?
In general, you should consider using ECDSA certificates wherever possible, because they provide stronger security (for a given key length) compared to RSA, without impacting performance. You can also choose to issue ECDSA certificates from ACM to implement 128-bit or 192-bit TLS security, where previously you could request up to 112-bit security from ACM by using RSA 2048 certificates.
ECDSA certificates are strongly recommended for applications that need to securely send data over low-bandwidth connections, or when you are using IoT devices that might not have much memory or computational power to store and process the larger certificate sizes that RSA offers.
If your application is not ECDSA compatible, you will need to continue using RSA certificates. RSA 2048 remains the default certificate type issued by ACM, in order to prevent compatibility issues with legacy applications or with applications that do not support ECDSA certificate types. We will provide links to check if your application is compatible with ECDSA certificate types in the next section of this blog.
Getting started with ECDSA certificates
Modern browsers and operating systems are ECDSA compatible. That said, some custom applications might not be ECDSA compatible. You can check whether your calling application is ECDSA compatible by accessing the following links from your application:
When you access one of these links, you should see a message stating “Expected Status: good”. This indicates that the application is ECDSA compatible. See Figure 1 for an example of a successful result.
Figure 1: ECDSA application compatibility example
When you terminate your TLS traffic with ALB, you can work around compatibility concerns by binding both ECDSA and RSA certificates for a given domain. ALB will prioritize and present the ECDSA certificate when the calling application is ECDSA compatible and will use the RSA certificate if the calling application is not ECDSA compatible. We’ll walk through this configuration in the demonstration portion of this post.
How to request an ECDSA certificate from ACM
You can use the ACM console, APIs, or AWS Command Line Interface (AWS CLI) to issue public or private ECDSA P-256 and P-384 TLS certificates. When you request certificates by using the API or AWS CLI, you can use the request-certificate API action with either EC_prime256v1 or EC_secp384r1 as the key-algorithm parameter to request a P-256 or P-384 ECDSA certificate, respectively.
Certificates have a defined validity period, and ACM will attempt to renew certificates that were issued by ACM and that are in use before they expire. ACM will also attempt to automatically bind the renewed certificates with an integrated service. ACM issued private ECDSA certificates can also be exported and used on other workloads to terminate TLS traffic.
Associate an ECDSA certificate with an Application Load Balancer for TLS
To demonstrate how to request and use ECDSA certificates from ACM, let’s examine a common use case: requesting a public certificate from ACM and associating it with an ALB. This walkthrough will also include requesting an RSA 2048 certificate and associating it with the same ALB, to facilitate TLS connections for applications that do not support ECDSA. ALB will prioritize and present the ECDSA certificate when the calling application is ECDSA compatible, and will use the RSA certificate if the calling application is not ECDSA compatible.
Navigate to the ACM console and choose Request a certificate.
Choose Request a public certificate, and then choose Next.
For Fully qualified domain name, enter your domain name.
Choose DNS validation. DNS validation is recommended wherever possible, because it enables automatic renewal of ACM issued certificates with no action required by the domain owner. If you use Amazon Route 53, you can use ACM to directly update your DNS records. DNS-validated certificates will be renewed by ACM as long as the certificate is in use and the DNS record is in place.
Figure 2: Requesting a public ECDSA certificate
In the Key algorithm options section, select your preferred algorithm based on your security requirements:
ECDSA P-256 — Equivalent in security strength to RSA 3072
ECDSA P-384 — Equivalent in security strength to RSA 7680
Figure 3: Key algorithms
(Optional) Add tags to help you identify and manage your certificate. You can find more information on using tags in Tagging AWS resources in the AWS General Reference.
Choose Request to request the public certificate.
The certificate will now be in the Pending Validation state until the domain can be validated, either through DNS or email validation, depending on your selection in the previous steps. For information on how to validate ownership of the domain name or names, see Validating domain ownership in the AWS Certificate Manager User Guide.
Take note of the certificate ARN; you will need this later to identify the certificate.
To request an RSA 2048 certificate from ACM
To request a public RSA 2048 certificate, use the same steps noted in the preceding section, but select RSA 2048 in the Key algorithm options section.
Make sure that both certificates you request have the same fully qualified domain name.
For this post, we will use an Application Load Balancer. You can view more details on each type of Load Balancer, and see a feature-to-feature breakdown, on the Elastic Load Balancing features page.
For the Application Load Balancer type, choose Create.
Enter a name for your load balancer.
Select the scheme and IP address type of the application load balancer. For this post, we will choose Internet-facing for the scheme and use the IPv4 address type.
Under Default SSL/TLS certificate, verify thatFrom ACM is selected, and then in the drop-down list, select the RSA certificate you requested earlier.
Note: We are using the RSA certificate as the default so that the ALB will use this certificate if the connecting client does not support ECDSA or the Server Name Indication (SNI) protocol. This is to maximize availability and compatibility with legacy applications.
Figure 6: Secure listener settings
(Optional) Add tags to the Application Load Balancer.
Review your selections, and then choose Create load balancer.
Figure 7: Review and create load balancer
To associate the ECDSA certificate with the Application Load Balancer
In the EC2 console, select the new ALB you just created, and choose the Listeners tab.
In the SSL Certificate column, you should see the default certificate you added when you created the ALB. Choose View/edit certificates to see the full list of certificates associated with this ALB.
Figure 8: ALB listeners
Under Listener certificates for SNI, choose Add certificate.
Figure 9: Listener certificates for SNI
Under ACM and IAM certificates, select the ECDSA certificate you requested earlier.
Note: You can use the certificate ARN to identify the appropriate certificate.
Choose Include as pending below to add the ECDSA certificate to the listener.
Figure 10: Adding the ECDSA certificate to the load balancer listener
Under Listener certificates for SNI, confirm that the ECDSA certificate is listed as pending, and choose Add pending certificates.
Figure 11: Confirm addition of pending certificates
Great! We’ve used ACM to request a public ECDSA certificate and a public RSA 2048 certificate. Next, we associated both of these certificates with an Application Load Balancer to facilitate TLS communications between the load balancer and client devices.
If clients support the SNI protocol, the ALB uses a smart certificate selection algorithm. The load balancer will select the best certificate that the client can support from the certificate list. Certificate selection is based on the following criteria, in the following order:
Public key algorithm (prefer ECDSA over RSA)
Hashing algorithm (prefer SHA over MD5)
Key length (prefer the longest key)
Validity period
In the earlier example, this means if clients support SNI and ECDSA, the ECDSA certificate will be prioritized and presented to the client. If the client does not support SNI or ECDSA, the RSA certificate will be used to maximize compatibility with legacy applications.
Conclusion
In this blog post, we discussed the basic differences between RSA and ECDSA certificates, when you might choose ECDSA over RSA, and how you can use AWS Certificate Manager to request public or private ECDSA certificates. We also covered how to request a public ECDSA certificate from ACM and associate it with an Application Load Balancer. Finally, we showed you how to request an RSA 2048 certificate and associate it with the same load balancer to facilitate TLS for applications that do not support ECDSA certificates.
As Cybersecurity Awareness Month comes to a close, we want to share some of the work we’ve done and made available to you throughout October. Over the last four weeks, we have shared insights and resources aligned with this year’s theme—”See Yourself in Cyber”—to help advance awareness training, and inspire people to join the rapidly growing security industry. Here are a few highlights.
Roundtable with the Cybersecurity and Infrastructure Security Agency (CISA): Amazon Chief Security Officer Steve Schmidt hosted CISA director Jen Easterly in Seattle for a roundtable with leaders across higher education, state and local government, and private industry to discuss ways to develop the cybersecurity workforce through skills training, partnerships between government and industry, and creating pathways to cybersecurity careers.
How AWS, Cisco, Netflix & SAP Are Approaching Cybersecurity Awareness Month. I joined Cisco Chief Security and Trust Officer Brad Arkin, Netflix Head of Cloud Security Srinath Kuruvardi, and SAP Chief Trust Officer Elena Kvochko to describe how AWS, Cisco, Netflix, and SAP are instilling strong cybersecurity training and practices within our organizations, with the goal of inspiring other organizations to do the same.
Cybersecurity Awareness Month 2022 Briefing. Amazon Security Director Jenny Brinkley—who leads Amazon’s internal and external awareness training activities—participated in a Cybersecurity Awareness Month panel discussion hosted by the National Cybersecurity Alliance. Jenny met with executives from KnowBe4, Google, NortonLifeLock, and Dell and chatted about how the cybersecurity landscape has changed over the past few years, and how those changes have impacted the perception of security as a part of daily life.
Making Cybersecurity Relevant for Consumers: The Case for Personal Agency. In addition to the briefing, Jenny spoke to the National Cybersecurity Alliance about staying safe online. She highlighted simple steps that everyone can take to be safer online, including staying consistent on software updates for connected devices, using strong passwords, activating multi-factor authentication (MFA) on accounts when possible, and being on the lookout for phishing attempts.
National Cybersecurity Alliance and Nasdaq Cybersecurity Summit. Jenny and Amazon Head of Global Security Training Jyllian Clarke also joined the National Cybersecurity Alliance, Nasdaq, and public and private sector security leaders in New York City for a cybersecurity summit and got to ring the opening bell.
Resources
AWS offers free Cybersecurity Awareness Training to individuals and businesses around the world, and we’re providing complimentary MFA security keys to AWS account owners in the United States. More than 40 security-focused courses are available through AWS Skill Builder, ranging from foundational to advanced content. By subscribing to AWS Skill Builder, you gain access to security-related interactive challenges with AWS Jam, which guides you through solving real-world problems.
Additionally, Amazon and the National Cybersecurity Alliance launched a cybersecurity awareness campaign called Protect & Connect. The campaign includes a public service announcement featuring Prime Video actor Michael B. Jordan and actress-producer Tessa Thompson as “internet bodyguards,” as well as a Protect & Connect microsite for consumers, featuring additional videos on topics such as MFA and how to identify and avoid phishing attempts.
Humanizing security
Cybersecurity can seem like a complex subject but ultimately, it’s all about people. Most of today’s threats need people to activate them, so you need to train people to develop intuition, which is something that can’t be automated. By meeting employees where they are with an engaging approach to awareness training that moves security to the forefront of everything they do, you can promote positive behavioral change, and start building a security-first culture.
If you have feedback about this post, submit comments in the Comments section below.
Want more AWS Security news? Follow us on Twitter.
This post is co-written with Darren Demicoli from The Mill Adventure.
The Mill Adventure is an iGaming industry enabler offering customizable turnkey solutions to B2B partners and custom branding enablement for its B2C partners. They provide a complete gaming platform, including licenses and operations, for rapid deployment and success in iGaming, and are committed to improving the iGaming experience by being a differentiator through innovation. The Mill Adventure already provides its services to a number of iGaming brands and seeks to continuously grow through the ranks of the industry.
In this post, we show how The Mill Adventure is helping its partners answer business-critical iGaming questions by building a data analytics application using modern data strategy using AWS. This modern data strategy approach has led to high velocity innovation while lowering the total operating cost.
With a gross market revenue exceeding $70 billion and a global player base of around 3 billion players (per a recent imarc Market Overview 2022-2027), the iGaming industry has, without a doubt, been booming over the past few years. This presents a lucrative opportunity to an ever-growing list of businesses seeking to tap into the market and attract a bigger share as their audience. Needless to say, staying competitive in this somewhat saturated market is extremely challenging. Making data-driven decisions is critical to the growth and success of iGaming businesses.
Business challenges
Gaming companies typically generate a massive amount of data, which could potentially enable meaningful insights and answer business-critical questions. Some of the critical and common business challenges in iGaming industry are:
What impacts the brand’s turnover—its new players, retained players, or a mix of both?
How to assess the effectiveness of a marketing campaign? Should a campaign be reinstated? Which games to promote via campaigns?
Which affiliates drive quality players that have better conversion rates? Which paid traffic channels should be discontinued?
For how long does the typical player stay active within a brand? What is the lifetime deposit from a player?
How to improve the registration to first deposit processes? What are the most pressing issues impacting player conversion?
Though sufficient data was captured, The Mill Adventure found two key challenges in their ability to generate actionable insights:
Lack of analysis-ready datasets (not raw and unusable data formats)
Lack of timely access to business-critical data
For example, The Mill Adventure generates over 50 GB of data daily. Its partners have access to this data. However, due to the data being in a raw form, they find it of little value in answering their business-critical questions. This affects their decision-making processes.
To address these challenges, The Mill Adventure chose to build a modern data platform on AWS that was not only capable of providing timely and meaningful business insights for the iGaming industry, but also efficiently manageable, low-cost, scalable, and secure.
Modern data architecture
The Mill Adventure wanted to build a data analytics platform using a modern data strategy that would grow as the company grows. Key tenets of this modern data strategy are:
Build a modern business application and store data in the cloud
Unify data from different application sources into a common data lake, preferably in its native format or in an open file format
Innovate using analytics and machine learning, with an overarching need to meet security and governance compliance requirements
A modern data architecture on AWS applies these tenets. Two key features that form the basic foundation of a modern data architecture on AWS are serverless and microservices.
The Mill Adventure solution
The Mill Adventure built a serverless iGaming data analytics platform that allows its partners to have quick and easy access to a dashboard with data visualizations driven by the varied sources of gaming data, including real-time streaming data. With this platform, stakeholders can use data to devise strategies and plan for future growth based on past performance, evaluate outcomes, and respond to market events with more agility. Having the capability to access insightful information in a timely manner and respond promptly has substantial impact on the turnover and revenue of the business.
A serverless iGaming platform on AWS
In building the iGaming platform, The Mill Adventure was quick to recognize the benefits of having a serverless microservice infrastructure. We wanted to spend time on innovating and building new applications, not managing infrastructure. AWS services such as Amazon API Gateway, AWS Lambda, Amazon DynamoDB, Amazon Kinesis Data Streams, Amazon Simple Storage Service (Amazon S3), Amazon Athena, and Amazon QuickSight are at the core of this data platform solution. Moving to AWS serverless services has saved time, reduced cost, and improved productivity. A microservice architecture has enabled us to accelerate time to value, increase innovation speed, and reduce the need to re-platform, refactor, and rearchitect in the future.
The following diagram illustrates the data flow from the gaming platform to QuickSight.
The data flow includes the following steps:
As players access the gaming portal, associated business functions such as gaming activity, payment, bonus, accounts management, and session management capture the relevant player actions.
Each business function has a corresponding Lambda-based microservice that handles the ingestion of the data from that business function. For example, the Session service handles player session management. The Payment service handles player funds, including deposits and withdrawals from player wallets. Each microservice stores data locally in DynamoDB and manages the create, read, update, and delete (CRUD) tasks for the data. For event sourcing implementation details, see How The Mill Adventure Implemented Event Sourcing at Scale Using DynamoDB.
Data records resulting from the CRUD outputs are written in real time to Kinesis Data Streams, which forms the primary data source for the analytics dashboards of the platform.
Amazon S3 forms the underlying storage for data in Kinesis Data Streams and forms the internal real-time data lake containing raw data.
The raw data is transformed and optimized through custom-built extract, transform, and load (ETL) pipelines and stored in a different S3 bucket in the data lake.
Both raw and processed data are immediately available for querying via Athena and QuickSight.
Raw data is transformed, optimized, and stored as processed data using an hourly data pipeline to meet analytics and business intelligence needs. The following figure shows an example of record counts and the size of the data being written into Kinesis Data Streams, which eventually needs to be processed from the data lake.
These data pipeline jobs can be broadly classified into six main stages:
Cleanup – Filtering out invalid records
Deduplicate – Removing duplicate data records
Aggregate at various levels – Grouping data at various aggregation levels of interest (such as per player, per session, or per hour or day)
Optimize – Writing files to Amazon S3 in optimized Parquet format
Report – Triggering connectors with updated data (such as updates to affiliate providers and compliance)
Ingest – Triggering an event to ingest data in QuickSight for analytics and visualizations
The output of this data pipeline is two-fold:
A transformed data lake that is designed and optimized for fast query performance
A refreshed view of data for all QuickSight dashboards and analyses
Cultivating a data-driven mindset with QuickSight
The Mill Adventure’s partners access their data securely via QuickSight datasets. These datasets are purposefully curated views on top of the transformed data lake. Each partner can access and visualize their data immediately. With QuickSight, partners can build useful dashboards without having deep technical knowledge or familiarity with the internal structure of the data. This approach significantly reduces the time and effort required and speeds up access to valuable gaming insights for business decision-making.
The Mill Adventure also provides each partner with a set of readily available dashboards. These dashboards are built on the years of experience that The Mill Adventure has in the iGaming industry, cover the most common business intelligence requirements, and jumpstart a data-driven mindset.
In the following sections, we provide a high-level overview of some of The Mill Adventure iGaming dashboard features and how these are used to meet the iGaming business analytics needs.
Key performance indicators
This analysis provides a comprehensive set of iGaming key performance indicators (KPIs) across different functional areas, including but not limited to payment activity (deposits and withdrawals), game activity (bets, gross game wins, return to player) and conversion metrics (active customers, active players, unique depositing customers, newly registered customers, new depositing customers, first-time depositors). These are presented concisely in both a quantitative view and in more visual forms.
In the following example KPI report, we can see how by presenting different iGaming metrics for key periods and lifetime, we can identify the overall performance of the brand.
Affiliates analysis
This analysis presents metrics related to the activity generated by players acquired through affiliates. Affiliates usually account for a large share of the traffic driven to gaming sites, and such a report helps identify the most effective affiliates. It informs performance trends per affiliate and compares across different affiliates. By combining data from multiple sources via QuickSight cross-data source joins, affiliate provider-related data such as earnings and clicks can be presented together with other key gaming platform metrics. By having these metrics broken down by affiliate, we can determine which affiliates contribute the most to the brand, as shown in the following example figure.
Cohort analysis
Cohort analyses track the progression of KPIs (such as average deposits) over a period of time for groups of players after their first deposit day. In the following figure, the average deposits per user (ADPU) is presented for players registering in different quarters within the last 2 years. By moving horizontally along each row on the graph, we can see how the ADPU changes for successive quarters for the same group of players. In the following example, the ADPU decreases substantially, indicating higher player churn.
We can use cohort analyses to calculate the churn rate (rate of players who become inactive). Additionally, by averaging the ADPU figures from this analysis, you can extract the lifetime value (LTV) of the ADPU. This shows the average deposit that can be expected to be deposited by players over their lifetime with the brand.
Player onboarding journey
Player onboarding is not a single-step process. In particular, jurisdictional requirements impose a number of compliance checks that need to be fulfilled along various stages during registration flow. All these, plus other steps along the registration (such as email verification), could pose potential pitfalls for players, leading them to fail to complete registration. Showing these steps in QuickSight funnel visuals helps identify such issues and pinpoint any bottlenecks in such flows, as shown in the following example. Additionally, Sankey visuals are used to monitor player movement across registration steps, identifying steps that need to be optimized.
Campaign outcome analysis
Bonus campaigns are a valuable promotional technique used to reward players and boost engagement. Campaigns can drive turnover and revenue, but there is always an inherent cost associated. It’s critical to assess the performance of campaigns and determine the net outcome. We have built a specific analysis to simplify the task of evaluating these promotions. A number of key metrics related to players activated by campaigns are available. These include both monetary incentives for game activity and deposits and other details related to player demographics (such as country, age group, gender, and channel). Individual campaign performance is analyzed and high-performance ones are identified.
In the following example, the figure on the left shows a time series distribution of deposits coming from campaigns in comparison to the global ones. The figure on the right shows a geographic plot of players activated from selected campaigns.
Demographics distribution analysis
Brands may seek to improve player engagement and retention by tailoring their content for their player base. They need to collect and understand information about their players’ demographics. Players’ demographic distribution varies from brand to brand, and the outcome of actions taken on different brands will vary due to this distribution. Keeping an eye on this demographic (age, country, gender) distribution helps shape a brand strategy in the best way that suits the player base and helps choose the right promotions that appeal most to its audience.
Through visuals such as the following example, it’s possible to quickly analyze the distribution of the selected metric along different demographic categories.
In addition, grouping players by the number of days since registration indicates which players are making a higher contribution to revenue, whether it is existing players or newly registered players. In the following figure, we can see that players who registered in the last 3 months continually account for the highest contribution to deposits. In addition, the proportion of deposits coming from the other two bands of players isn’t increasing, indicating an issue with player retention.
Compliance and responsible gaming
The Mill Adventure treats player protection with the utmost priority. Each iGaming regulated market has its own rules that need to be followed by the gaming operators. These include a number of compliance reports that need to be regularly sent to authorities in the respective jurisdictions. This process was simplified for new brands by creating a common reports template and automating the report creation in QuickSight. This helps new B2B brands meet these reporting requirements quickly and with minimal effort.
In addition, a number of control reports highlighting different areas of player protection are in place. As shown in the following example, responsible gaming reports such as those outlining player behavior deviations help identify accounts with problematic gambling patterns.
Players whose gaming pattern varies from the identified norm are flagged for inspection. This is useful to identify players who may need intervention.
Assessing game play and releases
It’s important to measure the performance and popularity of new games post release. Metrics such as unique player participation and player stakes are monitored during the initial days after the release, as shown in the following figures.
Not only does this help evaluate the overall player engagement, but it can also give a clear indication of how these games will perform in the future. By identifying popular games, a brand may choose to focus marketing campaigns on those games, and therefore ensure that it’s promoting games that appeal to its player base.
As shown in these example dashboards, we can use QuickSight to design and create business analytics insights of the iGaming data. This helps us answer real-life business-critical questions and take measurable actions using these insights.
Conclusion
In the iGaming industry, decisions not backed up by data are like an attempt to hit the bullseye blindfolded. With QuickSight, The Mill Adventure empowers its B2B partners and customers to harness data in a timely and convenient manner and support decision-making with winning strategies. Ultimately, in addition to gaining a competitive edge in maximizing revenue opportunities, improved decision-making will also lead to enhanced player experiences.
Reach out to The Mill Adventure and kick-start your iGaming journey today.
Explore rich set of out-of-the-box Amazon QuickSight ML Insights. Amazon QuickSight Q enables dashboards with natural language querying capabilities. For more information and resources on how to get started with free trial, visit Amazon QuickSight.
About the authors
Darren Demicoli is a Senior Devops and Business Intelligence Engineer at The Mill Adventure. He has worked in different roles in technical infrastructure, software development and database administration and has been building solutions for the iGaming sector for the past few years. Outside work, he enjoys travelling, exploring good food and spending time with his family.
Padmaja Suren is a Technical Business Development Manager serving the Public Sector Field Community in Market Intelligence on Analytics. She has 20+ years of experience in building scalable data platforms using a variety of technologies. At AWS she has served as Specialist Solution Architect on services such as Database, Analytics and QuickSight. Prior to AWS, she has implemented successful data and BI initiatives for diverse industry sectors in her capacity as Datawarehouse and BI Architect. She dedicates her free time on her passion project SanghWE which delivers psychosocial education for sexual trauma survivors to heal and recover.
Deepak Singh is a Solution Architect at AWS with specialization in business intelligence and analytics. Deepak has worked across a number of industry verticals such as Finance, Healthcare, Utilities, Retail, and High Tech. Throughout his career, he has focused on solving complex business problems to help customers achieve impactful business outcomes using applied intelligence solutions and services.
For up-to-date information related to the certification, visit the AWS Compliance Program page and choose GSMA under Europe, Middle East & Africa.
AWS was evaluated by independent third-party auditors selected by GSMA. The Certificate of Compliance that shows that AWS achieved GSMA compliance status is available on the GSMA website and through AWS Artifact. AWS Artifact is a self-service portal for on-demand access to AWS compliance reports. Sign in to AWS Artifact in the AWS Management Console, or learn more at Getting Started with AWS Artifact.
To learn more about our compliance and security programs, see AWS Compliance Programs. As always, we value your feedback and questions; reach out to the AWS Compliance team through the Contact Us page. If you have feedback about this post, you can submit comments in the Comments section below.
Want more AWS Security news? Follow us on Twitter.
Customers tell us they want to have stronger performance and lower costs for their data analytics applications and workloads. Customers also want to use AWS as a platform that hosts managed versions of their favorite open-source projects, which will frequently adopt the latest features from the open-source communities. With Amazon Athena engine version 3, we continue to increase performance, provide new features and now deliver better currency with the Trino and Presto projects.
Athena is an interactive query service that makes it easy to analyze data in Amazon Simple Storage Service (Amazon S3) using standard SQL. Athena is serverless, so there is no infrastructure to manage, and you pay only for the queries that you run. Customers such as Orca Security, the Agentless Cloud Security Platform, are already realizing the benefits of using Athena engine version 3 with the Apache Iceberg.
“At Orca Security, we are excited about the launch of Athena engine version 3,” says Arie Teter, VP R&D at Orca Security. “With Athena engine version 3, we will be able to query our massive petabyte-scale data lake more efficiently and at a lower cost. We are especially excited about being able to leverage all the latest Trino features with Athena’s new engine in order to deliver our customers the best-of-breed, ML-driven anomaly detection solution.”
In this post, we discuss benefits of Athena engine version 3, performance benchmark results for different table formats and information about upgrading to engine version 3.
New features, more often
One of the most exciting aspects of engine version 3 is its new continuous integration approach to open source software management that will improve currency with the Trino and PrestoDB projects. This approach enables Athena to deliver increased performance and new features at an even faster pace.
At AWS, we are committed to bringing the value of open source to our customers and providing contributions to open source communities. The Athena development team is actively contributing bug fixes and security, scalability, performance, and feature enhancements back to these open-source code bases, so anyone using Trino, PrestoDB and Apache Iceberg can benefit from the team’s contributions. For more information on AWS’s commitment to the open-source community, refer to Open source at AWS.
Athena engine version 3 incorporates over 50 new SQL functions, and 30 new features from the open-source Trino project. For example, Athena engine version 3 supports T-Digest functions that can be used to approximate rank-based statistics with high accuracy, new Geospatial functions to run optimized Geospatial queries, and new query syntaxes such as MATCH_RECOGNIZE for identifying data patterns in applications such as fraud detection and sensor data analysis.
Athena engine version 3 also gives you more AWS-specific features. For example, we have worked closely with the AWS Glue data catalog team to improve Athena’s metadata retrieval time, which we explain in the section “Faster query planning with AWS Glue Data Catalog” below.
For more information about what’s new in Athena engine version 3, refer to the Athena engine version 3 Improvements and new features.
Faster runtime, lower cost
Last year, we shared benchmark testing on Athena engine version 2 using TPC-DS benchmark queries at 3 TB scale and observed that query performance improved by three times and cost decreased by 70% as a result of reduced scanned data. These improvements have been a combination of enhancements developed by Athena and AWS engineering teams as well as contributions from the PrestoDB and Trino open-source communities.
The new engine version 3 will allow Athena to continue delivering performance improvements at a rapid pace. We performed benchmark testing on engine version 3 using TPC-DS benchmark queries at 3 TB scale, and observed 20% query performance improvement when compared to the latest release of engine version 2. Athena engine version 3 includes performance improvement across operators, clauses, and decoders: such as performance improvement of joins involving comparisons with the <,<=, >,>= operators, queries that contains JOIN, UNION, UNNEST, GROUP BY clauses, queries using IN predicate with a short list of constant. Athena engine version 3 also provides query execution improvements that reduce the amount of data scanned which gives you additional performance gains. With Athena, you are charged based on the amount of data scanned by each query, so this also translates to lower costs. For more information, refer to Amazon Athena pricing.
Faster query planning with AWS Glue Data Catalog
Athena engine version 3 provides better integration with AWS Glue Data Catalog to improve query planning performance by up to ten times. Query planning is the process of listing instructions the query engine will follow in order to run a query. During query planning, Athena uses AWS Glue API to retrieve various information such as table and partition metadata, and column statistics. As the number of tables increases, the number of calls to the Glue API for metadata also increase which results in additional query latency. In engine version 3, we reduced this Glue API overhead thus brought down the overall query planning time. For smaller datasets and datasets with large number of tables, you can see the total runtime has been reduced significantly because the query planning time is a higher percentage of the total run time.
Figure 1 below charts the top 10 queries from the TPC-DS benchmark with the most performance improvement from engine version 2 to engine version 3 based on the Amazon CloudWatch metric for total runtime. Each query involves joining multiple tables with complex predicates.
Faster query runtime with Apache Iceberg integration
Athena engine version 3 provides better integration with the Apache Iceberg table format. Features such as Iceberg’s hidden partitioning now augment Athena optimizations such as partition pruning and dynamic filtering to reduce data scanned and improve query performance in Athena engine v3. You do not need to maintain partition columns or even understand the physical table layout to load data to table and achieve good query performance.
We performed TPC-DS benchmark testing by loading data into the Apache Iceberg table format, with hidden partitions configured, and compared the performance between Athena engine version 2 and 3. Figure 2 below is a chart of the top 10 query improvements, which all include complex predicates. The top query, query 52, has five WHERE predicates and two GROUP BY operations. Compared to engine version 2, the query runs thirteen times faster with sixteen times less data scanned on engine version 3.
Upgrading to Athena engine version 3
To use Athena engine version 3, you can create a new workgroup, or configure an existing workgroup, and select the recommended Athena engine version 3. Any Athena workgroup can upgrade from engine version 2 to engine version 3 without interruption in your ability to submit queries. For more information and instructions for changing your Athena engine version, refer to Changing Athena engine versions.
Athena engine version 3 includes additional improvements to support ANSI SQL compliance. This results in some changes to syntax, data processing, and timestamps that may cause errors when running the same queries in the new engine version. For information about error messages, causes, and suggested solutions, refer to Athena engine version 3 Limitations, Breaking changes, Data processing changes, and Timestamp changes.
To make sure that your Athena engine version upgrade goes smoothly, we recommend the following practices to facilitate your upgrade process. After you have confirmed your query behavior works as you expect, you can safely upgrade your existing Athena workgroups.
Test in pre-production to validate and qualify your queries against Athena engine version 3 by creating a test workgroup or upgrading an existing pre-production environment. For example, you can create a new test workgroup running engine version 3 to run integration tests from your pre-production or staging environment, and monitor for failures or performance regressions. For information about CloudWatch metrics and dimensions published by Athena, refer to Monitoring Athena queries with CloudWatch metrics.
Upgrade each query based on metrics to test your queries against an Athena engine version 3 workgroup. For example, you can create a new workgroup with engine version 3 alongside your existing engine version 2 workgroup. You can send a small percentage of queries to the engine version 3 workgroup, monitor for failures or performance regressions, then increase the number of queries if they’re successful and performant. Repeat until all your queries have been migrated to Athena engine version 3.
With our simplified automatic engine upgrade process, you can configure existing workgroups to be automatically upgraded to engine version 3 without requiring manual review or intervention. The upgrade behavior is as follows:
If Query engine version is set to Automatic, your workgroup will remain on engine version 2 pending the automatic upgrade, and Athena will choose when to upgrade the workgroup to engine version 3. Before upgrading a workgroup, we perform a set of validation tests to confirm that its queries perform correctly and efficiently on engine version 3. Because our validation is performed on a best effort basis, we recommend you perform your own validation testing to ensure all queries run as expected.
If Query engine version is set to Manual, you will have the ability to select your version. The default choice is set to engine version 3, with the ability to toggle to engine version 2.
Conclusion
This post discussed Athena engine version 3 benefits, performance benchmark results, and how you can start using engine version 3 today with minimal work required. You can get started with Athena engine version 3 by using the Athena Console, the AWS CLI, or the AWS SDK. To learn more about Athena, refer to the Amazon Athena User Guide.
Thanks for reading this post! If you have questions on Athena engine version 3, don’t hesitate to leave a comment in the comments section.
About the authors
Blayze Stefaniak is a Senior Solutions Architect for the Technical Strategist Program supporting Executive Customer Programs in AWS Marketing. He has experience working across industries including healthcare, automotive, and public sector. He is passionate about breaking down complex situations into something practical and actionable. In his spare time, you can find Blayze listening to Star Wars audiobooks, trying to make his dogs laugh, and probably talking on mute.
Daniel Chen is a Senior Product Manager at Amazon Web Services (AWS) Athena. He has experience in Banking and Capital Market of financial service industry and works closely with enterprise customers building data lakes and analytical applications on the AWS platform. In his spare time, he loves playing tennis and ping pong.
Theo Tolv is a Senior Big Data Architect in the Athena team. He’s worked with small and big data for most of his career and often hangs out on Stack Overflow answering questions about Athena.
Jack Ye is a software engineer of the Athena Data Lake and Storage team. He is an Apache Iceberg Committer and PMC member.
In this post, we’ll walk through the best practices to implement before you enable Amazon Macie across all of your AWS accounts within AWS Organizations.
Amazon Macie is a data classification and data protection service that uses machine learning and pattern matching to help secure your critical data in AWS. To do this, Macie first automatically provides an inventory of Amazon Simple Storage Service (Amazon S3) buckets in AWS accounts managed by Macie and identifies S3 buckets with security risks, including unencrypted buckets, publicly accessible buckets, and buckets shared with AWS accounts external to AWS Organizations. Second, Macie applies machine learning and pattern matching techniques to the buckets you select to discover, identify, and create alerts for sensitive data, such as personally identifiable information (PII). With the visibility provided by Macie, you can centrally manage your sensitive data findings across your data estate and automate and take actions on Macie findings.
By enabling Amazon Macie within AWS Organizations, you immediately start receiving the benefits of viewing your Macie policy findings and sensitive data findings from jobs that ran for member AWS accounts. When you enable Macie for member accounts, a service-linked role is created within each member AWS account. Macie uses a service-linked role (AWSServiceRoleForAmazonMacie) to monitor resources on your behalf. The service-linked role has a trust relationship with the Macie service (macie.amazonaws.com). For more information about using Macie in your AWS Organizations architecture, see the AWS Security Reference Architecture (AWS SRA).
The best practices we’ll walk through include how to create least-privilege AWS Identity and Access Management (IAM) policies for Macie-delegated administrators and for security engineers who will use Macie on a day-to-day basis. We’ll also show you how to create classification buckets, provide you with the correct resource permissions to allow the Macie service-linked role in each AWS account, and cover how to troubleshoot common issues.
IAM roles to provision for Amazon Macie
The least-privilege principle is important when managing access to sensitive data within your AWS accounts. In this section, we’ll show you how to create least-privilege IAM roles for the following personas for Macie:
Data administrator
Data security engineers
DevOps/DevSecOps engineer
Macie sensitive data findings reviewer
The personas can vary based on your organization, and this list is primarily meant to serve as an example. You will need to align the appropriate permissions to each role in order to enable Macie with the principle of least privilege. You can create your own customer managed policies after you know the specific permissions required for each persona.
Important: In general, AWS strongly recommends you limit the use of wildcards where possible. However, in some of the persona policies that follow, wildcards are necessary to accomplish the task. To implement the principle of least privilege where wildcards must be used, you should put limits on the resources that the persona can access. You can do this by adding condition keys for Macie; or if you deployed Macie by using AWS Organizations, you can add a condition for aws:ResourceOrgId.
Persona 1: Data administrator
This persona is a data administrator who is responsible for setting up and configuring Macie within AWS Organizations. To enforce separation of duties, this persona is not able to view or access Macie findings. You can perform the following steps to verify that the entity has the required permissions to enable the Macie-delegated administrator, and onboard the member AWS accounts within AWS Organizations. You can find the full procedure for each step by following the links to the Macie User Guide.
It’s important to note that Macie is a Regional service. This means that the designation of a Macie administrator account is a Regional designation. A Macie administrator account in a specific AWS Region can manage Macie for member accounts only in that Region. To centrally manage Macie accounts in multiple Regions, the management account must log in to each Region where the organization uses Macie, and then designate the Macie administrator account in each of those Regions. You can use a single Macie administrator account to centrally manage up to 5,000 AWS accounts.
In the following policy, replace <account-id> with the Macie-delegated administrator account ID.
This persona is a data security engineer who has day-to-day responsibility for reviewing Macie findings or Macie sensitive data discovery job configurations. Depending on your use case, you may need to separate this persona into two distinct personas where one is responsible to view Macie findings and the other to set Macie job configurations. To allow an IAM principal read-only permissions to view the Macie dashboard, configurations, and features, you can use the following policy. To enforce least privilege and restrict the resources to the Macie-delegated administrator, replace <region> with the AWS Region in which the delegated administrator is designated, and replace <account-id> with the Macie delegated administrator account ID.
This persona is a DevOps or DevSecOps engineer who is responsible for building and maintaining applications that run on AWS resources. These application builders typically receive top-level security guidance from central security, and they are directly responsible for the security of the applications that they design, build, and operate in AWS. DevSecOps engineers might need limited additional IAM permissions to configure Macie discovery jobs, depending on how Macie will be used within AWS Organizations. To allow an IAM principal the ability to pause or stop Macie jobs, you can add the following policy. Be sure to replace <region> with the AWS Region in which the delegated administrator is designated, and replace <account-id> with the Macie delegated administrator AWS account number.
This persona is a reviewer (usually a security engineer) who is responsible for investigating the sensitive data associated with Macie findings. There are a number of ways this persona can be set up, based on your specific use case and the needs of your organization. In this section, we will describe two of the options for setting up this persona.
In this option, Macie doesn’t use the Macie service-linked role for your account to perform these tasks. Instead, you use your IAM identity to locate, retrieve, encrypt, and reveal the samples for sensitive findings. You can retrieve and reveal sensitive data samples for a finding if you’re allowed to access the requisite resources and data, and you’re allowed to perform the requisite actions. All the requisite actions are logged in AWS CloudTrail. In the following policy, be sure to replace <account-id>, <region>, and <key-id> with your own values.
Option 2: Create IAM roles to review findings and objects in the same AWS account where objects are located
For a command line utility to help you investigate the sensitive data, you can use the Macie Finding Data Reveal project. The Macie Finding Data Reveal project needs permissions to invoke macie:GetFindings on the account and s3:GetObject on the specific object reported in the finding.
In the following policy, be sure to replace <DOC-EXAMPLE-BUCKET> with the values for the S3 bucket where the finding is reported; and replace <account-id>, <region>, and <key-id> with your own values. You will also need to configure the KMS key and S3 bucket resource policies to allow permissions to your IAM role.
If you use an IAM role in the same AWS account, you can specify permissions to access the object and encryption key by using resource policies, and you can leave off the ReportedS3Object and KMSPermissions statement ID (Sid).
Apply SCPs to restrict unauthorized changes to Macie
After you create the personas, you need to verify that the Macie configurations to manage Macie members within AWS Organizations are only updated by authorized IAM principals. The following is an example service control policy (SCP) that you can use to prevent users from disabling Macie, or from modifying Macie configurations within the organization. Make sure to replace <account-id> and <data-admin-role-name> with your own values for the authorized IAM principal.
Allow the Macie service-linked IAM role to scan S3 objects
When Macie analyzes files, it needs permissions to analyze encrypted files. This is important so that you don’t have blind spots in your data protection initiatives.
Before you run a Macie job against S3 objects, make sure that existing KMS keys that are used to encrypt the S3 buckets also grant the Macie service-linked IAM role in the AWS account the necessary permissions to decrypt the S3 objects. For more information, see Service-linked roles for Amazon Macie. To confirm that Macie can scan encrypted objects, the associated KMS key resource policies must allow the Macie service-linked role to use the KMS key to decrypt objects.
Furthermore, depending on the object’s type of encryption, Macie might not be able to fully scan the object. The following table summarizes types of object encryption and the ability Macie has to scan the object. For more information, see Macie supported encryption types.
S3 object encryption type
Macie scan ability
Client-side encryption
Macie cannot decrypt and analyze the object. Macie can only store and report metadata for the object.
Server-side encryption with Amazon S3 managed keys (SSE-S3)
Macie can decrypt and analyze the object.
Server-side encryption with AWS managed AWS KMS encryption (AWS-KMS)
Macie can decrypt and analyze the object.
Server-side encryption with customer managed AWS KMS encryption (SSE-KMS)
Macie can decrypt and analyze the object if Macie is authorized to use the KMS key. Otherwise, Macie can only store and report metadata for the object.
Server-side encryption with customer provided key (SSE-C)
Macie cannot decrypt and analyze the object. Macie can only store and report metadata for the object.
The Macie service-linked role (AWSServiceRoleForAmazonMacie) is not authorized to decrypt S3 objects in Macie member accounts, because no resource-based policy allows the kms:Decrypt action. Check for the following error message in AWS CloudTrail if the AWS KMS resource-based policy implicitly denies the Macie service-linked role. Your error message will show <account-id> and <region> as your own values.
sourceIPAddress: "macie.amazonaws.com" and eventSource : "kms.amazonaws.com" and eventName : "Decrypt" and errorCode : "AccessDenied" Filter the results by error message: “User: arn:aws:sts::<account-id>:assumed-role/AWSServiceRoleForAmazonMacie/classifier-content-fetcher is not authorized to perform: kms:Decrypt on resource: arn:aws:kms:<region>:key/key-id because no resource-based policy allows the kms:Decrypt action…”
In order to remediate a KMS implicit deny error for a customer-managed key, add the following to the customer managed key policy. Be sure to replace <account_name> with your own value.
The Macie service-linked role (AWSServiceRoleForAmazonMacie) is not authorized to decrypt S3 objects in Macie member accounts, because resource-based policies explicitly deny the kms:Decrypt action for the Macie service-linked role. Check for the following error message in AWS CloudTrail if the AWS KMS resource-based policy explicitly denies the Macie service-linked role. Your error message will show <account_name> and <region> as your own values.
sourceIPAddress : "macie.amazonaws.com" and eventSource : "kms.amazonaws.com" and eventName : "Decrypt" and errorCode : "AccessDenied" Filter the results by error message:
 “User:arn:aws:sts::<account_name>:assumed-role/AWSServiceRoleForAmazonMacie/classifier-content-fetcher is not authorized to perform: kms:Decrypt on resource: arn:aws:kms:<region>:key/key-id with an explicit deny in resource-based policy…”
In order to remediate a KMS explicit deny error, update the policy statement to allow the Macie service-linked role access to decrypt and describe key actions. Be sure to replace <account_name> with your own value.
The Macie service-linked role (AWSServiceRoleForAmazonMacie) is explicitly denied in the S3 bucket policy. Check for the following error messages in AWS CloudTrail for S3 explicit deny.
userIdentity.sessionContext.sessionIssuer.userName: "AWSServiceRoleForAmazonMacie" and eventSource: "s3.amazonaws.com" and eventName: " GetBucketEncryption" and errorcode: “ServerSideEncryptionConfigurationNotFoundError” and errormessage: “The server side encryption configuration was not found” OR userIdentity.sessionContext.sessionIssuer.userName: "AWSServiceRoleForAmazonMacie" and eventSource: "s3.amazonaws.com" and eventName: "GetBucketReplication" and errorcode: " ReplicationConfigurationNotFoundError" and errormessage: “The replication configuration was not found” OR userIdentity.sessionContext.sessionIssuer.userName: "AWSServiceRoleForAmazonMacie" and eventSource: "s3.amazonaws.com" and eventName: " GetBucketTagging" and errorcode: " NoSuchTagSet" and errormessage: “The TagSet does not exist” OR userIdentity.sessionContext.sessionIssuer.userName: "AWSServiceRoleForAmazonMacie" and eventSource: "s3.amazonaws.com" and eventName: "GetBucketAcl" and responseElements: "null" OR userIdentity.sessionContext.sessionIssuer.userName: "AWSServiceRoleForAmazonMacie" and eventSource: "s3.amazonaws.com" and eventName: " GetBucketPublicAccessBlock" and responseElements: "null" OR userIdentity.sessionContext.sessionIssuer.userName: "AWSServiceRoleForAmazonMacie" and eventSource: "s3.amazonaws.com" and eventName: "GetBucketLocation" and responseElements: "null" OR userIdentity.sessionContext.sessionIssuer.userName: "AWSServiceRoleForAmazonMacie" and eventSource: "s3.amazonaws.com" and eventName: "GetBucketVersioning" and responseElements: "null" OR userIdentity.sessionContext.sessionIssuer.userName: "AWSServiceRoleForAmazonMacie" and eventSource: "s3.amazonaws.com" and eventName: " GetBucketPolicy" and errorcode: "NoSuchBucketPolicy" and errormessage: “The bucket policy does not exist” OR userIdentity.sessionContext.sessionIssuer.userName: "AWSServiceRoleForAmazonMacie" and eventSource: "s3.amazonaws.com" and eventName: " GetBucketEncryption" and responseElements: "null" OR userIdentity.sessionContext.sessionIssuer.userName: "AWSServiceRoleForAmazonMacie" and eventSource: "s3.amazonaws.com" and eventName: " GetBucketPolicy" and responseElements: "null"
Note: Nearly all S3 explicit deny and S3 object ownership error messages have the same event names. See the Ensure S3 and KMS resource policy compliance section in this post to view the S3 object ownership setting.
Macie cannot decrypt and analyze S3 objects if there is an explicit deny in the S3 bucket policy. The following is an example of an S3 bucket policy that explicitly denies the Macie service-linked role. Be sure to replace <DOC-EXAMPLE-BUCKET> and <account_id> with your own values.
Macie can decrypt and analyze S3 objects if there is no explicit deny in the S3 bucket. The following is an example of the permission for the S3 bucket policy to explicitly allow the Macie service-linked role to have access to your S3 bucket. Be sure to replace <DOC-EXAMPLE-BUCKET> and <account-id> with your own values.
Macie is unable to scan S3 objects that are owned by another AWS account, due to access control list (ACL) settings and permissions. Event names are identical for both S3 explicit deny errors and S3 Object Ownership errors. S3 explicit deny has the following additional two event names.
userIdentity.sessionContext.sessionIssuer.userName: "AWSServiceRoleForAmazonMacie" and eventSource: "s3.amazonaws.com" and eventName: " GetBucketEncryption" and errorcode: “ServerSideEncryptionConfigurationNotFoundError” and errormessage: “The server side encryption configuration was not found” OR userIdentity.sessionContext.sessionIssuer.userName: "AWSServiceRoleForAmazonMacie" and eventSource: "s3.amazonaws.com" and eventName: " GetBucketPolicy" and errorcode: "NoSuchBucketPolicy" and errormessage: “The bucket policy does not exist”
The S3 Object Ownership feature has the following three settings that you can use to control ownership of objects that are uploaded to your bucket, and to disable or enable ACLs. We recommend that you disable ACLs on your S3 buckets.
Bucket owner enforced (recommended) – ACLs are disabled, and the bucket owner automatically owns and has full control over every object in the bucket. ACLs no longer affect permissions to data in the S3 bucket. The bucket uses policies to define access control.
Bucket owner preferred – The bucket owner owns and has full control over new objects that other accounts write to the bucket with the bucket-owner-full-control canned ACL.
Object writer (default) – The AWS account that uploads an object owns the object, has full control over it, and can grant other users access to it through ACLs.
In order to remediate an S3 object ownership issue, there are two options available:
Option 1: Change object ownership settings to bucket owner enforced (recommended). When you disable ACLs, it changes the ownership of existing objects to the bucket owner account. You should consider the following scenarios prior to changing the S3 Object Ownership setting.
S3 objects in the source bucket (account A) are encrypted with a customer-managed key, and you copy the object in the destination bucket (account B) that has the object writer object ownership setting and its own customer managed key. If you copy S3 objects from the source bucket (account A) to the destination bucket (account B), and you do not specify a customer-managed key to use during the copy command, and the object ownership setting in the destination bucket (account B) is bucket owner enforced (ACLs disabled), then this will result in an object ownership change to bucket owner. These actions will also set the object’s server-side encryption to use the encryption settings in the destination bucket (account B).
However, if you specify a customer-managed key during the S3 copy command, then the object’s server-side encryption remains with the source bucket account (account A) customer managed key.
Option 2: Use S3 batch operations to copy objects and set ACLs. Changing the object ownership
setting to bucket owner preferred only applies to new objects and not the existing objects. You can use one one-time batch operation to set ACLs on existing objects.
Ensure S3 and KMS resource policy compliance
Another best practice to follow when you enable Macie with AWS Organizations is to use Macie to verify your organization’s policy compliance for S3 objects and KMS resources. In the Macie-delegated admin account, the summary page provides an overview of S3 data and security and access control in your organization in AWS Organizations. Users can view information about S3 security posture, such as whether S3 buckets are public or not, server-side encryption of S3 buckets, and whether S3 buckets are shared inside or outside of your organization. Data privacy and compliance groups can get organization-wide visibility across their accounts and buckets.
Your organization is responsible for introducing guardrails based on your organization’s security policies. To automate compliance checks for S3 objects and KMS resources, make sure to update your continuous integration and continuous deployment (CI/CD) pipeline. This will allow you to set up continuous compliance checks for the Macie service-linked role by using tools like CloudFormation Guard or Open Policy Agent.
In order to check S3 object ownership settings, you can use AWS Command Line Interface (AWS CLI) commands to view bucket ownership settings. Currently, Macie and AWS Config do not report on S3 object ownership as part of the resource configuration. You can run the following AWS CLI command in AWS accounts within AWS Organizations, making sure to replace <DOC-EXAMPLE-BUCKET> with your own value, to view bucket ownership settings. This can be scripted to list all AWS accounts within AWS Organizations, list all S3 buckets within the AWS account, then get the bucket ownership configuration.
After checking these ownership settings, you can run the following AWS CLI commands to view the S3 objects ownership settings, making sure to replace <DOC-EXAMPLE-BUCKET> with your own value.
You should also consider the following recommendations before you enable Macie, so that you can manage Macie findings and member accounts efficiently at scale:
Enable Security Hub Region aggregation to consolidate Macie findings in a single Region.
Ingest logs from AWS CloudWatch Logs to enable custom alerting for Macie sensitive data discovery job results.
In Macie settings, turn on the Auto-enable setting. That way, Macie will automatically be enabled for new accounts when the accounts are added to your organization in AWS Organizations.
Store sensitive data discovery results in an S3 bucket, with default encryption enabled, after you have configured your Macie delegated administrator account.
Conclusion
In this blog post, we walked you through the best practices to implement before you enable Amazon Macie across your AWS accounts within AWS Organizations. In order to efficiently use Macie within AWS Organizations, it is important to understand why failures can occur, how to investigate the logs, and how to remediate the issues for both existing and future resources.
Now that you have a better understanding of how to prepare for using Macie, try running a Macie sensitive data discovery job. The next aspect to start thinking about is how to review and respond to Macie findings. You can deploy another solution to automatically send notifications with Slack when Macie findings are generated.
If you have feedback about this post, submit comments in the Comments section below. If you have any questions about this post, start a thread on the Amazon Macie forum.
Want more AWS Security news? Follow us on Twitter.
Amazon QuickSight users now can add bookmarks in dashboards to save customized dashboard preferences into a list of bookmarks for easy one-click access to specific views of the dashboard without having to manually make multiple filter and parameter changes every time. Combined with the “Share this view” functionality, you can also now share your bookmark views with other readers for easy collaboration and discussion.
In this post, we introduce the bookmark functionality and its capabilities, and demonstrate typical use cases. We also discuss several scenarios extending the usage of bookmarks for sharing and presentation.
Create a bookmark
Open the published dashboard that you want to view and make changes to the filters, controls, or select the sheet that you want. For example, you can filter to the Region that interests you, or you can select a specific date range using a sheet control on the dashboard.
To create a bookmark of this view, choose the bookmark icon, then choose Add bookmark.
Enter a name, then choose Save.
The bookmark is saved, and the dashboard name on the banner updates with the bookmark name.
You can return to the original dashboard view that the author published at any time by going back to the bookmark icon and choosing Original dashboard.
Rename or delete a bookmark
To rename or delete a bookmark, on the bookmark pane, choose the context menu (three vertical dots) and choose Rename or Delete.
Although you can make any of these edits to bookmarks you have created, the Original dashboard view can’t be renamed, deleted, or updated, because it’s what the author has published.
Update a bookmark
At any time, you can change a bookmark dashboard view and update the bookmark to always reflect those changes.
After you make your edits, on the banner, you can see Modified next to the bookmark you’re currently editing.
To save your updates, on the bookmarks pane, choose the context menu and choose Update.
Make a bookmark the default view
After you create a bookmark, you can set it as the default view of the dashboard that you see when you open the dashboard in a new session. This doesn’t affect anyone else’s view of the dashboard. You can also set the Original dashboard that the author published as the default view. When a default view is set, any time that you open the dashboard, the bookmark view is presented to you, regardless of the changes you made during your last session. However, if no default bookmark has been set, QuickSight will persist your current filter selections when you leave the dashboard. This way, readers can still pick up where they left off and don’t have to re-select filters.
To do this, in the Bookmarks pane, choose the context menu (the three dots) for the bookmark that you want to set as your default view, then choose Set as default.
Share a bookmark
After you create a bookmark, you can share a URL link for the view with others who have permission to view the dashboard. They can then save that view as their own bookmark. The shared view is a snapshot of your bookmark, meaning that if you make any updates to your bookmark after generating the URL link, the shared view doesn’t change.
To do this, choose the bookmark that you want to share so that the dashboard updates to that view. Choose the share icon, then choose Share this view. You can then copy the generated URL to share it with others.
Presentation with bookmarks
One extended use case of the new bookmarks feature is the ability to create a presentation through visuals in a much more elegant fashion. Previously, you may have had to change multiple filters and controls before arriving at your next presentation. Now you can save each presentation as a bookmark beforehand and just go through each bookmark like a slideshow. By creating a snapshot for each of the configurations you want to show, you create a smoother and cleaner experience for your audience.
For example, let’s prepare a presentation through bookmarks using a Restaurant Operations dashboard. We can start with the global view of all the states and their related KPIs.
Best vs. worst performing restaurant
We’re interested in analyzing the difference between the best performing and worst performing store based on revenue. If we had to filter this dashboard on the fly, it would be much more time-consuming because we would have to manually enter both store names into the filter. However, with bookmarks, we can pre-filter to the two addresses, save the bookmark, and be automatically directed to the desired stores when we select it.
Worst performing restaurant analysis
When comparing the best and worst performing stores, we see that the worst performing store (10 Resort Plz) had a below average revenue amount in December 2021. We’re interested in seeing how we can better boost sales around the holiday season and if there is something the owner lacked in that month. We can create a bookmark that directs us to the Owner View with the filters selected to December 2021 and the address and city pre-filtered.
Pennsylvania December 2021 analysis
After looking at this bookmark, we found that in the month of December, the call for support score in the restaurant category was high. Additionally, in the week of December 19, 2021 product sales were at the monthly low. We want to see how these KPIs compare to other stores in the same state for that week. Is it just a seasonal trend, or do we need to look even deeper and take action? Again, we can create a bookmark that gives us this comparison on a state level.
From the last bookmark, we can see that the other store in the same state (Pennsylvania) also had lower than average product sales in the week of December 19, 2021. For the purpose of this demo, we can go ahead and stop here, but we could create even more bookmarks to help answer additional questions, such as if we see this trend across other cities and states.
With these three bookmarks, we have created a top-down presentation looking at the worst performing store and its relevant metrics and comparisons. If we wanted to present this, it would be as simple as cycling through the bookmarks we’ve created to put together a cohesive presentation instead of having distracting onscreen filtering.
Conclusion
In this post, we discussed how we can create, modify, and delete bookmarks, along with setting it as a default view and sharing bookmarks. We also demonstrated an extended use case of presentation with bookmarks. The new bookmarks functionality is now generally available in all supported QuickSight Regions.
We’re looking forward to your feedback and stories on how you apply these calculations for your business needs.
Did you know that you can also ask questions of you data in natural language with QuickSight Q? Watch this video to learn more.
About the Authors
Mei Qu is a Business Intelligence Engineer on the AWS QuickSight ProServe Team. She helps customers and partners leverage their data to develop key business insights and monitor ongoing initiatives. She also develops QuickSight proof of concept projects, delivers technical workshops, and supports implementation projects.
Emily Zhu is a Senior Product Manager at Amazon QuickSight, AWS’s cloud-native, fully managed SaaS BI service. She leads the development of QuickSight analytics and query capabilities. Before joining AWS, she was working in the Amazon Prime Air drone delivery program and the Boeing company as senior strategist for several years. Emily is passionate about potentials of cloud-based BI solutions and looks forward to helping customers advance in their data-driven strategy-making.
Earning and maintaining customer trust is an ongoing commitment at Amazon Web Services (AWS). Our customers’ security requirements drive the scope and portfolio of the compliance reports, attestations, and certifications we pursue. We’re excited to announce that AWS has achieved authorization under the Information System Security Management and Assessment Program (ISMAP) program, effective from April 1, 2022 to March 31, 2023. The authorization scope covers a total of 145 AWS services (an increase of 22 services over the previous authorization) across 22 AWS Regions, including the Asia Pacific (Tokyo) Region and the Asia Pacific (Osaka) Region. This is the second time AWS has undergone an assessment since ISMAP was first published by the ISMAP steering committee in March 2020.
ISMAP is a Japanese government program for assessing the security of public cloud services. The purpose of ISMAP is to provide a common set of security standards for cloud service providers (CSPs) to comply with as a baseline requirement for government procurement. ISMAP introduces security requirements for cloud domains, practices, and procedures that CSPs must implement. CSPs must engage with an ISMAP-approved third-party assessor to assess compliance with the ISMAP security requirements in order to apply as an ISMAP-registered CSP. The ISMAP program will evaluate the security of each CSP and register those that satisfy the Japanese government’s security requirements. Upon successful ISMAP registration of CSPs, government procurement departments and agencies can accelerate their engagement with the registered CSPs and contribute to the smooth introduction of cloud services in government information systems.
The achievement of this authorization demonstrates the proactive approach AWS has taken to help customers meet compliance requirements set by the Japanese government and to deliver secure AWS services to our customers. Service providers and customers of AWS can use the ISMAP authorization of AWS services to support their own ISMAP authorization programs. The full list of 145 ISMAP-authorized AWS services is available on the AWS Services in Scope by Compliance Program webpage, and you can also use the ISMAP Customer Package on AWS Artifact. You can confirm the AWS ISMAP authorization status and find detailed scope information on the ISMAP Portal.
As always, we are committed to bringing new services and Regions into the scope of our ISMAP program, based on your business needs. If you have any questions, don’t hesitate to contact your AWS Account Manager.
If you have feedback about this post, submit comments in the Comments section below. Want more AWS Security how-to content, news, and feature announcements? Follow us on Twitter.
The AWS HITRUST Compliance Team is excited to announce that 154 Amazon Web Services (AWS) services are certified for the Health Information Trust Alliance (HITRUST) Common Security Framework (CSF) v9.6 for the 2022 cycle.
These 154 AWS services were audited by a third-party assessor and certified under the HITRUST CSF. The full list is now available on the AWS Services in Scope by Compliance Program page. As an AWS customer, you can view and download our HITRUST CSF certification at any time through AWS Artifact.
AWS HITRUST CSF certification is available for customer inheritance
As an AWS customer, you can deploy business solutions into the AWS Cloud environment and inherit the AWS HITRUST CSF certification, provided that your organization uses only in-scope services, and you properly apply the controls that your organization is responsible for as detailed in the HITRUST Shared Responsibility and Inheritance Program.
With 154 AWS services receiving HITRUST certification, as an AWS customer you can tailor your security control baselines to a variety of factors—including, but not limited to, your regulatory requirements and your organization type. The HITRUST CSF is widely adopted by leading organizations in a variety of industries as part of their approach to security and privacy. For more information, see the HITRUST website.
As always, we value your feedback and questions and are committed to helping you achieve and maintain the highest standard of security and compliance. Feel free to contact the team through AWS Compliance Contact Us. If you have feedback about this post, please submit comments in the Comments section below.
Want more AWS Security how-to content, news, and feature announcements? Follow us on Twitter.
This post is co-written by Kanti Singh, Director of Data & Analytics at Fresenius Medical Care.
Fresenius Medical Care is the world’s leading provider of kidney care products and services, and operates more than 2,600 dialysis centers in the US alone. The company provides comprehensive solutions for people living with chronic kidney disease and related conditions, with a mission to improve the quality of life of every patient, every day, by transforming healthcare through research, innovation, and compassion. Data analysis that leads to timely interventions is critical to this mission, and essential to reduce hospitalizations and prevent adverse events.
In this post, we walk you through the solution architecture, performance considerations, and how a research partnership with AWS around medical complexity led to an automated solution that helped deliver alerts for potential adverse events.
Why Fresenius Medical Care chose AWS
The Fresenius Medical Care technical team chose AWS as their preferred cloud platform for two key reasons.
First, we determined that AWS IoT Core was more mature than other solutions and would likely face fewer issues with deployment and certificates. As an organization, we wanted to go with a cloud platform that had a proven track record and established technical solutions and services in the IoT and data analytics space. This included Amazon Athena, which is an easy-to-use serverless service that you can use to run queries on data stored in Amazon Simple Storage Service (Amazon S3) for analysis.
Another factor that played a major role in our decision was the fact that AWS offered the largest set of serverless services for analytics than any other cloud provider. We ultimately determined that AWS innovations met the company’s current needs as well as positioned the company for the future as we worked to expand our predictive capabilities.
Solution overview
We needed to develop a near-real-time analytics solution that would collect dynamic dialysis machine data every 10 seconds during hemodialysis treatment in near-real time and personalize it to predict every 30 minutes if a patient is at a health risk for intradialytic hypotension (IDH) within the next 15–75 minutes. This solution needed to scale to all our dialysis centers nationwide, with each location sending 10 MBps of treatment data at peak times.
The complexities that needed to be managed in the solution included handling high throughput data, a low-latency time-sensitive solution of 10 seconds from data origination to reporting and notification, a highly available solution, and a cost-effective solution with on-demand scaling up or down based on data volume.
Fresenius Medical Care partnered with AWS on this mission and developed an architecture that met our technical and business requirements. Core components in the architecture included Amazon Kinesis Data Streams, Amazon Kinesis Data Analytics, and Amazon SageMaker. We chose Kinesis Data Streams and Kinesis Data Analytics primarily because they’re serverless and highly available (99.9%), offer very high throughput, and are easy to scale. We chose SageMaker due to its unique capability that allows ease of building, training, and running machine learning (ML) models at scale.
The following diagram illustrates the architecture.
The solution consists of the following key components:
Data collection
Data ingestion and aggregation
Data lake storage
ML Inference and operational analytics
Let’s discuss each stage in the workflow in more detail.
Data collection
Dialysis machines located in Fresenius Medical Care centers help patients in the treatment of end-stage renal disease by performing hemodialysis. The dialysis machines provide immediate access to all treatment and clinical trending data across the fleet of hemodialysis machines in all centers in the US.
These machines transmit a data payload every 10 seconds to Kafka brokers located in Fresenius Medical Care’s on-premises data center for use by several applications.
Data ingestion and aggregation
We use a Kinesis-Kafka connector hosted on self-managed Amazon Elastic Compute Cloud (Amazon EC2) instances to ingest data from a Kafka topic in near-real time into Kinesis Data Streams.
We use AWS Lambda to read the data points and filter the datasets accordingly to Kinesis Data Analytics. Upon reaching the batch size threshold, Lambda sends the data to Kinesis Data Analytics for instream analytics.
We chose Kinesis Data Analytics due to the ease-of-use it provides for SQL-based stream analytics. By using SQL with KDA (KDA Studio/Flink SQL), we can create dynamic features based on machine interval data arriving in real time. This data is joined with the patient demographic, historical clinical, treatment, and laboratory data (enriched with Amazon S3 data) to create the complete set of features required for a downstream ML model.
Data lake storage
Amazon Kinesis Data Firehose was the simplest way to consistently load streaming data to build a raw data lake in Amazon S3. Kinesis Data Firehose micro-batches data into 128 MB file sizes and delivers streaming data to Amazon S3.
Clinical datasets are required to enrich stream data sourced from on-premises data warehouses via AWS Glue Spark jobs on a nightly basis. The AWS Glue jobs extract patient demographic, historical clinical, treatment, and laboratory data from the data warehouse to Amazon S3 and transform machine data from JSON to Parquet format for better storage and retrieval costs in Amazon S3. AWS Glue also helps build the static features for the intradialytic hypotension (IDH) ML model, which are required for downstream ML inference.
ML Inference and Operational analytics
Lambda batches the stream data from Kinesis Data Analytics that has all the features required for IDH ML model inference.
SageMaker, a fully managed service, trains and deploys the IDH predictive model. The deployed ML model provides a SageMaker endpoint that is used by Lambda for ML inference.
Amazon OpenSearch Service helps store the IDH inference results it received from Lambda. The results are then used for visualization through Kibana, which displays a personalized health prediction dashboard visual for each patient undergoing treatment and is available in near-real time for the care team to provide intervention proactively.
Observability and traceability for failures
Because this solution offers the potential for life-saving interventions, it’s considered business critical. The following key measures are taken to proactively monitor the AWS jobs in Fresenius Medical Care’s VPC account:
For AWS Glue jobs that have failures and errors in Lambda functions, an immediate email and Amazon CloudWatch alert is sent to the Data Ops team for resolution.
CloudWatch alarms are also generated for Amazon OpenSearch Service whenever there are blocks on writes or the cluster is overloaded with shard capacity, CPU utilization, or other issues, as recommended by AWS.
Kinesis Data Analytics and Kinesis Data Streams generate data quality alerts on data rejections or empty results.
Data quality alerts are also generated whenever data quality rules on data points are mismatched. To check mismatched data, we use quality rule comparison and sanity checks between message payloads in the stream with data loaded in the data lake.
These systematic and automated monitoring and alerting mechanisms help our team stay one step ahead to ensure that systems are running smoothly and successfully, and any unforeseen problems can be resolved as quickly as possible before it causes any adverse impact on users of the system.
AWS partnership
After Fresenius Medical Care took advantage of the AWS Data Lab to create a working prototype within one week, expert Solutions Architects from AWS became trusted advisors, helping our team with prescriptive guidance from ideation to production. The AWS team helped with both solution-based and service-specific best practices, helped resolve key blockers in every phase from development through production, and performed architecture reviews to ensure the solution was robust and resilient to business needs.
Solution results
This solution allows Fresenius Medical Care to better personalize care to patients undergoing dialysis treatment with a proactive intervention by clinicians at the point of care that has the potential to save patient lives. The following are some of the key benefits due to this solution:
Cloud computing resources enable the development, analysis, and integration of real-time predictive IDH that can be easily and seamlessly scaled as needed to reach additional clinics.
The use of our tool may be particularly useful in institutions facing staff shortages and, possibly, during home dialysis. Additionally, it may provide insights on strategies to prevent and manage IDH.
The solution enables modern and innovative solutions that improve patient care by providing world-class research and data-driven insights.
This solution has been proven to scale to an acceptable performance level of 6,000 messages per second, translating to 19 MB/sec with 60,000/sec concurrent Lambda invocations. The ability to adapt by scaling up and down every component in the architecture with ease kept costs very low, which wouldn’t have been possible elsewhere.
Conclusion
Successful implementation of this solution led to a think big approach in modernizing several legacy data assets and has set Fresenius Medical Care on the path of building an enterprise unified data analytics platform on AWS using Amazon S3, AWS Glue, Amazon EMR, and AWS Lake Formation. The unified data analytics platform offers robust data security and data sharing for multi-tenants in various geographies across the US. Similar to Fresenius, you can accelerate time to market by using the right tool for the job, using the broad and deep variety of AWS analytic native services.
About the authors
Kanti Singh is a Director of Data & Analytics at Fresenius Medical Care, leading the big data platform, architecture, and the engineering team. She loves to explore new technologies and how to leverage them to solve complex business problems. In her free time, she loves traveling, dancing, and spending time with family.
Harsha Tadiparthi is a Specialist Principal Solutions Architect specialized in analytics at Amazon Web Services. He enjoys solving complex customer problems in databases and analytics, and delivering successful outcomes. Outside of work, he loves to spend time with his family, watch movies, and travel whenever possible.
AWS re:Inforce returned to Boston, MA, in July after 2 years, and we were so glad to be back in person with customers. The conference featured over 250 sessions and hands-on labs, 100 AWS partner sponsors, and over 6,000 attendees over 2 days. If you weren’t able to join us in person, or just want to revisit some of the themes, this blog post is for you. It summarizes all the key announcements and points to where you can watch the event keynote, sessions, and partner lightning talks on demand.
Key announcements
Here are some of the announcements that we made at AWS re:Inforce 2022.
Free MFA token ordering portal – We’ve made our free multi-factor authentication (MFA) security key program easier. We now have an ordering portal in the AWS Management Console where eligible customers can order their token. In response to customer demand, we’ve streamlined the ordering process, especially for linked accounts. At this time, only US-based AWS account root users who have spent more than $100 each month over the past 3 months are eligible to place an order.
IAM Roles Anywhere – This new feature extends the capabilities of AWS Identity and Access Management (IAM) roles to workloads outside of AWS. You can use IAM Roles Anywhere to provide a secure way for on-premises servers, containers, or applications to obtain temporary AWS credentials and remove the need for creating and managing long-term AWS credentials.
AWS Marketplace Vendor Insights – This new feature helps simplify third-party software risk assessments by compiling security and compliance information in a unified dashboard.
AWS Cloud Audit Academy – PCI DSS on AWS – Cloud Audit Academy (CAA) PCI DSS on AWS is the third course in the AWS security auditing learning path. This path is designed for those who are in auditing, risk, and compliance roles and who are involved in assessing regulated workloads in the cloud.
New workshop – Threat modeling the right way for builders – This workshop introduces you to the background of threat modeling and why to do it, as well as some of the tools and techniques for modeling systems, identifying threats, and selecting mitigations.
Enable secure communication with end-to-end encryption with AWS Wickr, and collaborate on calls with confidence. AWS Wickr encrypts messages, calls, and files with a proprietary, 256-bit end-to-end encryption protocol. No one but intended recipients can decrypt them, reducing the risk of person-in-the-middle attacks.
Watch on demand
You can also watch these talks and learning sessions on demand.
Keynotes and leadership sessions
Watch the AWS re:Inforce 2022 keynote where Amazon Chief Security Officer Stephen Schmidt, AWS Chief Information Security Officer CJ Moses, Vice President of AWS Platform Kurt Kufeld, and MongoDB Chief Information Security Officer Lena Smart share the latest innovations in cloud security from AWS and what you can do to foster a culture of security in your business. Additionally, you can review all the leadership sessions to learn best practices for managing security, compliance, identity, and privacy in the cloud.
Breakout sessions and partner lightning talks
Data Protection and Privacy track – See how AWS, customers, and partners work together to protect data. Learn about trends in data management, cryptography, data security, data privacy, encryption, and key rotation and storage.
Governance, Risk, and Compliance track – Dive into the latest hot topics in governance and compliance for security practitioners, and discover how to automate compliance tools and services for operational use.
Identity and Access Management track – Hear from AWS, customers, and partners on how to use AWS Identity Services to manage identities, resources, and permissions securely and at scale. Learn how to configure fine-grained access controls for your employees, applications, and devices and deploy permission guardrails across your organization.
Network and Infrastructure Security track – Gain practical expertise on the services, tools, and products that AWS, customers, and partners use to protect the usability and integrity of their networks and data.
Threat Detection and Incident Response track – Learn how AWS, customers, and partners get the visibility they need to improve their security posture, reduce the risk profile of their environments, identify issues before they impact business, and implement incident response best practices.
Session presentation downloads are also available on our AWS Event Contents page. Consider joining us for more in-person security learning opportunities by registering for AWS re:Invent 2022, which will be held November 28 through December 2 in Las Vegas. We look forward to seeing you there!
If you’d like to discuss how these new announcements can help your organization improve its security posture, AWS is here to help. Contact your AWS account team today.
If you have feedback about this post, submit comments in the Comments section below. If you have questions about this post, contact AWS Support.
Want more AWS Security news? Follow us on Twitter.
At Amazon Web Services (AWS), we’re continuously expanding our compliance programs to provide you with more tools and resources to perform effective due diligence on AWS. We’re excited to announce the availability of the AWS CyberVadis report to help you reduce the burden of performing due diligence on your third-party suppliers.
With the increase in adoption of cloud products and services across multiple sectors and industries, AWS is a critical component of customers’ third-party environments. Regulated customers, such as those in the financial services sector, are held to high standards by regulators and auditors when it comes to exercising effective due diligence on third parties.
Many customers use third-party cyber risk management (TPCRM) services such as CyberVadis to better manage risks from their evolving third-party environments and to drive operational efficiencies. To help with such efforts, AWS has completed the CyberVadis assessment of its security posture. CyberVadis security analysts perform the assessment and validate the results annually.
CyberVadis is a comprehensive third-party risk assessment process that combines the speed and scalability of automation with the certainty of analyst validation. The CyberVadis cybersecurity rating methodology assesses the maturity of a company’s information security management system (ISMS) through its policies, implementation measures, and results.
CyberVadis integrates responses from AWS with analytics and risk models to provide an in-depth view of the AWS security posture. The CyberVadis methodology maps to major international compliance standards, including the following:
Customers can download the AWS CyberVadis report at no additional cost. For details on how to access the report, see our AWS CyberVadis report page.
As always, we value your feedback and questions. Reach out to the AWS Compliance team through the Contact Us page. If you have feedback about this post, submit comments in the Comments section below. To learn more about our other compliance and security programs, see AWS Compliance Programs.
Want more AWS Security news? Follow us on Twitter.
Interactive Sessions for Jupyter is a new notebook interface in the AWS Glue serverless Spark environment. Starting in seconds and automatically stopping compute when idle, interactive sessions provide an on-demand, highly-scalable, serverless Spark backend to Jupyter notebooks and Jupyter-based IDEs such as Jupyter Lab, Microsoft Visual Studio Code, JetBrains PyCharm, and more. Interactive sessions replace AWS Glue development endpoints for interactive job development with AWS Glue and offers the following benefits:
No clusters to provision or manage
No idle clusters to pay for
No up-front configuration required
No resource contention for the same development environment
Easy installation and usage
The exact same serverless Spark runtime and platform as AWS Glue extract, transform, and load (ETL) jobs
Getting started with interactive sessions for Jupyter
Installing interactive sessions is simple and only takes a few terminal commands. After you install it, you can run interactive sessions anytime within seconds of deciding to run. In the following sections, we walk you through installation on macOS and getting started in Jupyter.
Install AWS Glue interactive sessions on macOS and Linux
To install AWS Glue interactive sessions, complete the following steps:
Open a terminal and run the following to install and upgrade Jupyter, Boto3, and AWS Glue interactive sessions from PyPi. If desired, you can install Jupyter Lab instead of Jupyter.
To validate your install, run the following command:
jupyter kernelspec list
In the output, you should see both the AWS Glue PySpark and the AWS Glue Spark kernels listed alongside the default Python3 kernel. It should look something like the following:
Available kernels:
  Python3		~/.venv/share/jupyter/kernels/python3
  glue_pyspark    /usr/local/share/jupyter/kernels/glue_pyspark
  glue_spark      /usr/local/share/jupyter/kernels/glue_spark
Choose and prepare IAM principals
Interactive sessions use two AWS Identity and Access Management (IAM) principals (user or role) to function. The first is used to call the interactive sessions APIs and is likely the same user or role that you use with the AWS CLI. The second is GlueServiceRole, the role that AWS Glue assumes to run your session. This is the same role as AWS Glue jobs; if you’re developing a job with your notebook, you should use the same role for both interactive sessions and the job you create.
Prepare the client user or role
In the case of local development, the first role is already configured if you can run the AWS CLI. If you can’t run the AWS CLI, follow these steps for setting up. If you often use the AWS CLI or Boto3 to interact with AWS Glue and have full AWS Glue permissions, you can likely skip this step.
To validate this first user or role is set up, open a new terminal window and run the following code:
aws sts get-caller-identity
You should see a response like the following. If not, you may not have permissions to call AWS Security Token Service (AWS STS), or you don’t have the AWS CLI set up properly. If you simply get access denied calling AWS STS, you may continue if you know your user or role and its needed permissions.
Ensure your IAM user or role can call the AWS Glue interactive sessions APIs by attaching the AWSGlueConsoleFullAccess managed IAM policy to your role.
If your caller identity returned a user, run the following:
aws iam attach-user-policy --role-name <myIAMUser> --policy-arn arn:aws:iam::aws:policy/AWSGlueConsoleFullAccess
If your caller identity returned a role, run the following:
aws iam attach-role-policy --role-name, --policy-arn arn:aws:iam::aws:policy/AWSGlueConsoleFullAccess
Prepare the AWS Glue service role for interactive sessions
You can specify the second principal, GlueServiceRole, either in the notebook itself by using the %iam_role magic or stored alongside the AWS CLI config. If you have a role that you typically use with AWS Glue jobs, this will be that role. If you don’t have a role you use for AWS Glue jobs, refer to Setting up IAM permissions for AWS Glue to set one up.
To set this role as the default role for interactive sessions, edit the AWS CLI credentials file and add glue_role_arn to the profile you intend to use.
With a text editor, open ~/.aws/credentials. On Windows, use C:\Users\username\.aws\credentials.
Look for the profile you use for AWS Glue; if you don’t use a profile, you’re looking for [Default].
Add a line in the profile for the role you intend to use like, glue_role_arn=<AWSGlueServiceRole>.
I recommend adding a default Region to your profile if one is not specified already. You can do so by adding the line region=us-east-1, replacing us-east-1 with your desired Region. If you don’t add a Region to your profile, you’re required to specify the Region at the top of each notebook with the %region magic.When finished, your config should look something like the following:
To start Jupyter and your notebook, complete the following steps:
Run the following command in your terminal to open the Jupyter notebook in your browser:
jupyter notebook
Your browser should open and you’re presented with a page that looks like the following screenshot.
On the New menu, choose Glue PySpark.
A new tab opens with a blank Jupyter notebook using the AWS Glue PySpark kernel.
Configure your notebook with magics
AWS Glue interactive sessions are configured with Jupyter magics. Magics are small commands prefixed with % at the start of Jupyter cells that provide shortcuts to control the environment. In AWS Glue interactive sessions, magics are used for all configuration needs, including:
%region – Region
%profile – AWS CLI profile
%iam_role – IAM role for the AWS Glue service role
%worker_type – Worker type
%number_of_workers – Number of workers
%idle_timeout – How long to allow a session to idle before stopping it
%additional_python_modules – Python libraries to install from pip
Magics are placed at the beginning of your first cell, before your code, to configure AWS Glue. To discover all the magics of interactive sessions, run %help in a cell and a full list is printed. With the exception of %%sql, running a cell of only magics doesn’t start a session, but sets the configuration for the session that starts next when you run your first cell of code. For this post, we use three magics to configure AWS Glue with version 2.0 and two G.2X workers. Let’s enter the following magics into our first cell and run it:
%glue_version 2.0
%number_of_workers 2
%worker_type G.2X
%idle_tiemout 60


Welcome to the Glue Interactive Sessions Kernel
For more information on available magic commands, please type %help in any new cell.

Please view our Getting Started page to access the most up-to-date information on the Interactive Sessions kernel: https://docs.aws.amazon.com/glue/latest/dg/interactive-sessions.html
Setting Glue version to: 2.0
Previous number of workers: 5
Setting new number of workers to: 2
Previous worker type: G.1X
Setting new worker type to: G.2X
When you run magics, the output lets us know the values we’re changing along with their previous settings. Explicitly setting all your configuration in magics helps ensure consistent runs of your notebook every time and is recommended for production workloads.
Run your first code cell and author your AWS Glue notebook
Next, we run our first code cell. This is when a session is provisioned for use with this notebook. When interactive sessions are properly configured within an account, the session is completely isolated to this notebook. If you open another notebook in a new tab, it gets its own session on its own isolated compute. Run your code cell as follows:
from awsglue.context import GlueContext
from awsglue.job import Job
from awsglue.transforms import *
from awsglue.utils import getResolvedOptions
from pyspark.context import SparkContext

sc = SparkContext.getOrCreate()
glueContext = GlueContext(sc)
spark = glueContext.spark_session
job = Job(glueContext)

Authenticating with profile=default
glue_role_arn defined by user: arn:aws:iam::123456789123:role/AWSGlueServiceRoleForSessions
Attempting to use existing AssumeRole session credentials.
Trying to create a Glue session for the kernel.
Worker Type: G.2X
Number of Workers: 2
Session ID: 12345678-12fa-5315-a234-567890abcdef
Applying the following default arguments:
--glue_kernel_version 0.31
--enable-glue-datacatalog true
Waiting for session 12345678-12fa-5315-a234-567890abcdef to get into ready status...
Session 12345678-12fa-5315-a234-567890abcdef has been created
When you ran the first cell containing code, Jupyter invoked interactive sessions, provisioned an AWS Glue cluster, and sent the code to AWS Glue Spark. The notebook was given a session ID, as shown in the preceding code. We can also see the properties used to provision AWS Glue, including the IAM role that AWS Glue used to create the session, the number of workers and their type, and any other options that were passed as part of the creation.
Interactive sessions automatically initialize a Spark session as spark and SparkContext as sc; having Spark ready to go saves a lot of boilerplate code. However, if you want to convert your notebook to a job, spark and sc must be initialized and declared explicitly.
Work in the notebook
Now that we have a session up, let’s do some work. In this exercise, we look at population estimates from the AWS COVID-19 dataset, clean them up, and write the results a table.
This walkthrough uses data from the COVID-19 data lake.
To make the data from the AWS COVID-19 data lake available in the Data Catalog in your AWS account, create an AWS CloudFormation stack using the following template.
If you’re signed in to your AWS account, deploy the CloudFormation stack by clicking the following Launch stack button:
It fills out most of the stack creation form for you. All you need to do is choose Create stack. For instructions on creating a CloudFormation stack, see Get started.
When I’m working on a new data integration process, the first thing I often do is identify and preview the datasets I’m going to work on. If I don’t recall the exact location or table name, I typically open the AWS Glue console and search or browse for the table then return to my notebook to preview it. With interactive sessions, there is a quicker way to browse the Data Catalog. We can use the %%sql magic to show databases and tables without leaving the notebook. For this example, the population table I want in is the COVID-19 dataset but I don’t recall its exact name, so I use the %%sql magic to look it up:
%%sql
show tables in `covid-19`  # Remember, dashes in names must be escaped with backticks.

+--------+--------------------+-----------+
|database|           tableName|isTemporary|
+--------+--------------------+-----------+
|covid-19|alleninstitute_co...|      false|
|covid-19|alleninstitute_me...|      false|
|covid-19|aspirevc_crowd_tr...|      false|
|covid-19|aspirevc_crowd_tr...|      false|
|covid-19|cdc_moderna_vacci...|      false|
|covid-19|cdc_pfizer_vaccin...|      false|
|covid-19|       country_codes|      false|
|covid-19|  county_populations|      false|
|covid-19|covid_knowledge_g...|      false|
|covid-19|covid_knowledge_g...|      false|
|covid-19|covid_knowledge_g...|      false|
|covid-19|covid_knowledge_g...|      false|
|covid-19|covid_knowledge_g...|      false|
|covid-19|covid_knowledge_g...|      false|
|covid-19|covid_testing_sta...|      false|
|covid-19|covid_testing_us_...|      false|
|covid-19|covid_testing_us_...|      false|
|covid-19|      covidcast_data|      false|
|covid-19|  covidcast_metadata|      false|
|covid-19|enigma_aggregatio...|      false|
+--------+--------------------+-----------+
only showing top 20 rows
Looking through the returned list, we see a table named county_populations. Let’s select from this table, sorting for the largest counties by population:
Our query returned data but in an unexpected order. It looks like population estimate 2018 sorted lexicographically if the values were strings. Let’s use an AWS Glue DynamicFrame to get the schema of the table and verify the issue:
# Create a DynamicFrame of county_populations and print it's schema
dyf = glueContext.create_dynamic_frame.from_catalog(
    database="covid-19", table_name="county_populations"
)
dyf.printSchema()

root
|-- id: string
|-- id2: string
|-- county: string
|-- state: string
|-- population estimate 2018: string
The schema shows population estimate 2018 to be a string, which is why our column isn’t sorting properly. We can use the apply_mapping transform in our next cell to correct the column type. In the same transform, we also clean up the column names and other column types: clarifying the distinction between id and id2, removing spaces from population estimate 2018 (conforming to Hive’s standards), and casting id2 as an integer for proper sorting. After validating the schema, we show the data with the new schema:
With the data sorting correctly, we can write it to Amazon Simple Storage Service (Amazon S3) as a new table in the AWS Glue Data Catalog. We use the mapped DynamicFrame for this write because we didn’t modify any data past that transform:
# Create "demo" Database if none exists
spark.sql("create database if not exists demo")


# Set glueContext sink for writing new table
S3_BUCKET = "<S3_BUCKET>"
s3output = glueContext.getSink(
    path=f"s3://{S3_BUCKET}/interactive-sessions-blog/populations/",
    connection_type="s3",
    updateBehavior="UPDATE_IN_DATABASE",
    partitionKeys=[],
    compression="snappy",
    enableUpdateCatalog=True,
    transformation_ctx="s3output",
)
s3output.setCatalogInfo(catalogDatabase="demo", catalogTableName="populations")
s3output.setFormat("glueparquet")
s3output.writeFrame(mapped)


# Write out ‘mapped’ to a table in Glue Catalog
s3output = glueContext.getSink(
    path=f"s3://{S3_BUCKET}/interactive-sessions-blog/populations/",
    connection_type="s3",
    updateBehavior="UPDATE_IN_DATABASE",
    partitionKeys=[],
    compression="snappy",
    enableUpdateCatalog=True,
    transformation_ctx="s3output",
)
s3output.setCatalogInfo(catalogDatabase="demo", catalogTableName="populations")
s3output.setFormat("glueparquet")
s3output.writeFrame(mapped)
Finally, we run a query against our new table to show our table created successfully and validate our work:
%%sql
select * from demo.populations
Convert notebooks to AWS Glue jobs with nbconvert
Jupyter notebooks are saved as .ipynb files. AWS Glue doesn’t currently run .ipynb files directly, so they need to be converted to Python scripts before they can be uploaded to Amazon S3 as jobs. Use the jupyter nbconvert command from a terminal to convert the script.
Open a new terminal or PowerShell tab or window.
cd to the working directory where your notebook is. This is likely the same directory where you ran jupyter notebook at the beginning of this post.
Run the following bash command to convert the notebook, providing the correct file name for your notebook:
jupyter nbconvert --to script <Untitled-1>.ipynb
Run cat <Untitled-1>.ipynb to view your new file.
Upload the .py file to Amazon S3 using the following command, replacing the bucket, path, and file name as needed:
Create your AWS Glue job with the following command.
Note that the magics aren’t automatically converted to job parameters when converting notebooks locally. You need to put in your job arguments correctly, or import your notebook to AWS Glue Studio and complete the following steps to keep your magic settings.
After you have authored the notebook, converted it to a Python file, uploaded it to Amazon S3, and finally made it into an AWS Glue job, the only thing left to do is run it. Do so with the following terminal command:
AWS Glue interactive sessions offer a new way to interact with the AWS Glue serverless Spark environment. Set it up in minutes, start sessions in seconds, and only pay for what you use. You can use interactive sessions for AWS Glue job development, ad hoc data integration and exploration, or for large queries and audits. AWS Glue interactive sessions are generally available in all Regions that support AWS Glue.
To learn more and get started using AWS Glue Interactive Sessions visit our developer guide and begin coding in seconds.
About the author
Zach Mitchell is a Sr. Big Data Architect. He works within the product team to enhance understanding between product engineers and their customers while guiding customers through their journey to develop data lakes and other data solutions on AWS analytics services.
The collective thoughts of the interwebz
Manage Consent
To provide the best experiences, we use technologies like cookies to store and/or access device information. Consenting to these technologies will allow us to process data such as browsing behavior or unique IDs on this site. Not consenting or withdrawing consent, may adversely affect certain features and functions.
Functional
Always active
The technical storage or access is strictly necessary for the legitimate purpose of enabling the use of a specific service explicitly requested by the subscriber or user, or for the sole purpose of carrying out the transmission of a communication over an electronic communications network.
Preferences
The technical storage or access is necessary for the legitimate purpose of storing preferences that are not requested by the subscriber or user.
Statistics
The technical storage or access that is used exclusively for statistical purposes.The technical storage or access that is used exclusively for anonymous statistical purposes. Without a subpoena, voluntary compliance on the part of your Internet Service Provider, or additional records from a third party, information stored or retrieved for this purpose alone cannot usually be used to identify you.
Marketing
The technical storage or access is required to create user profiles to send advertising, or to track the user on a website or across several websites for similar marketing purposes.
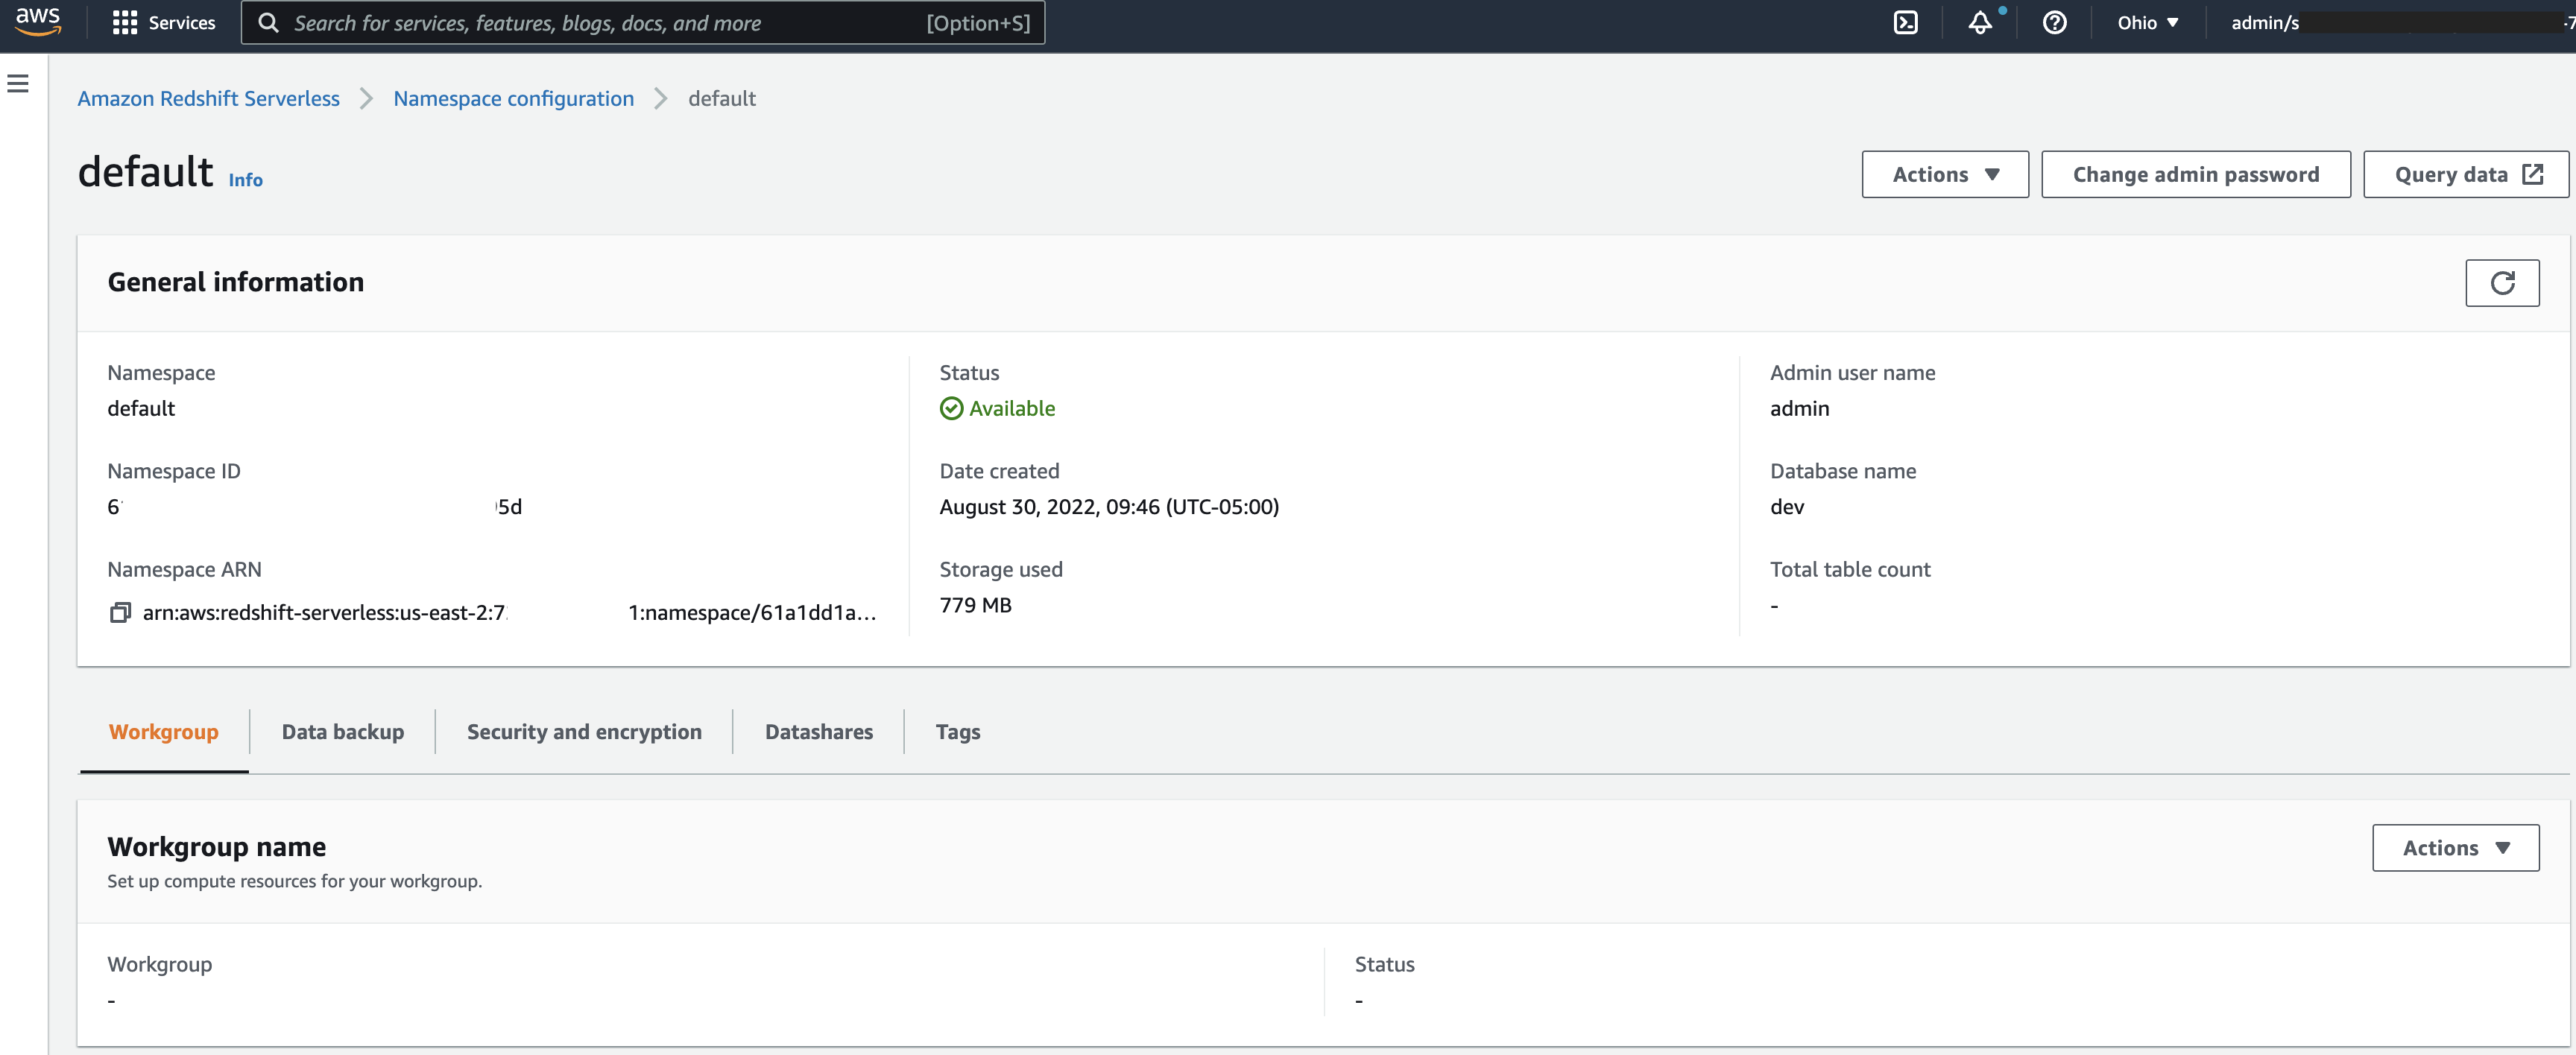
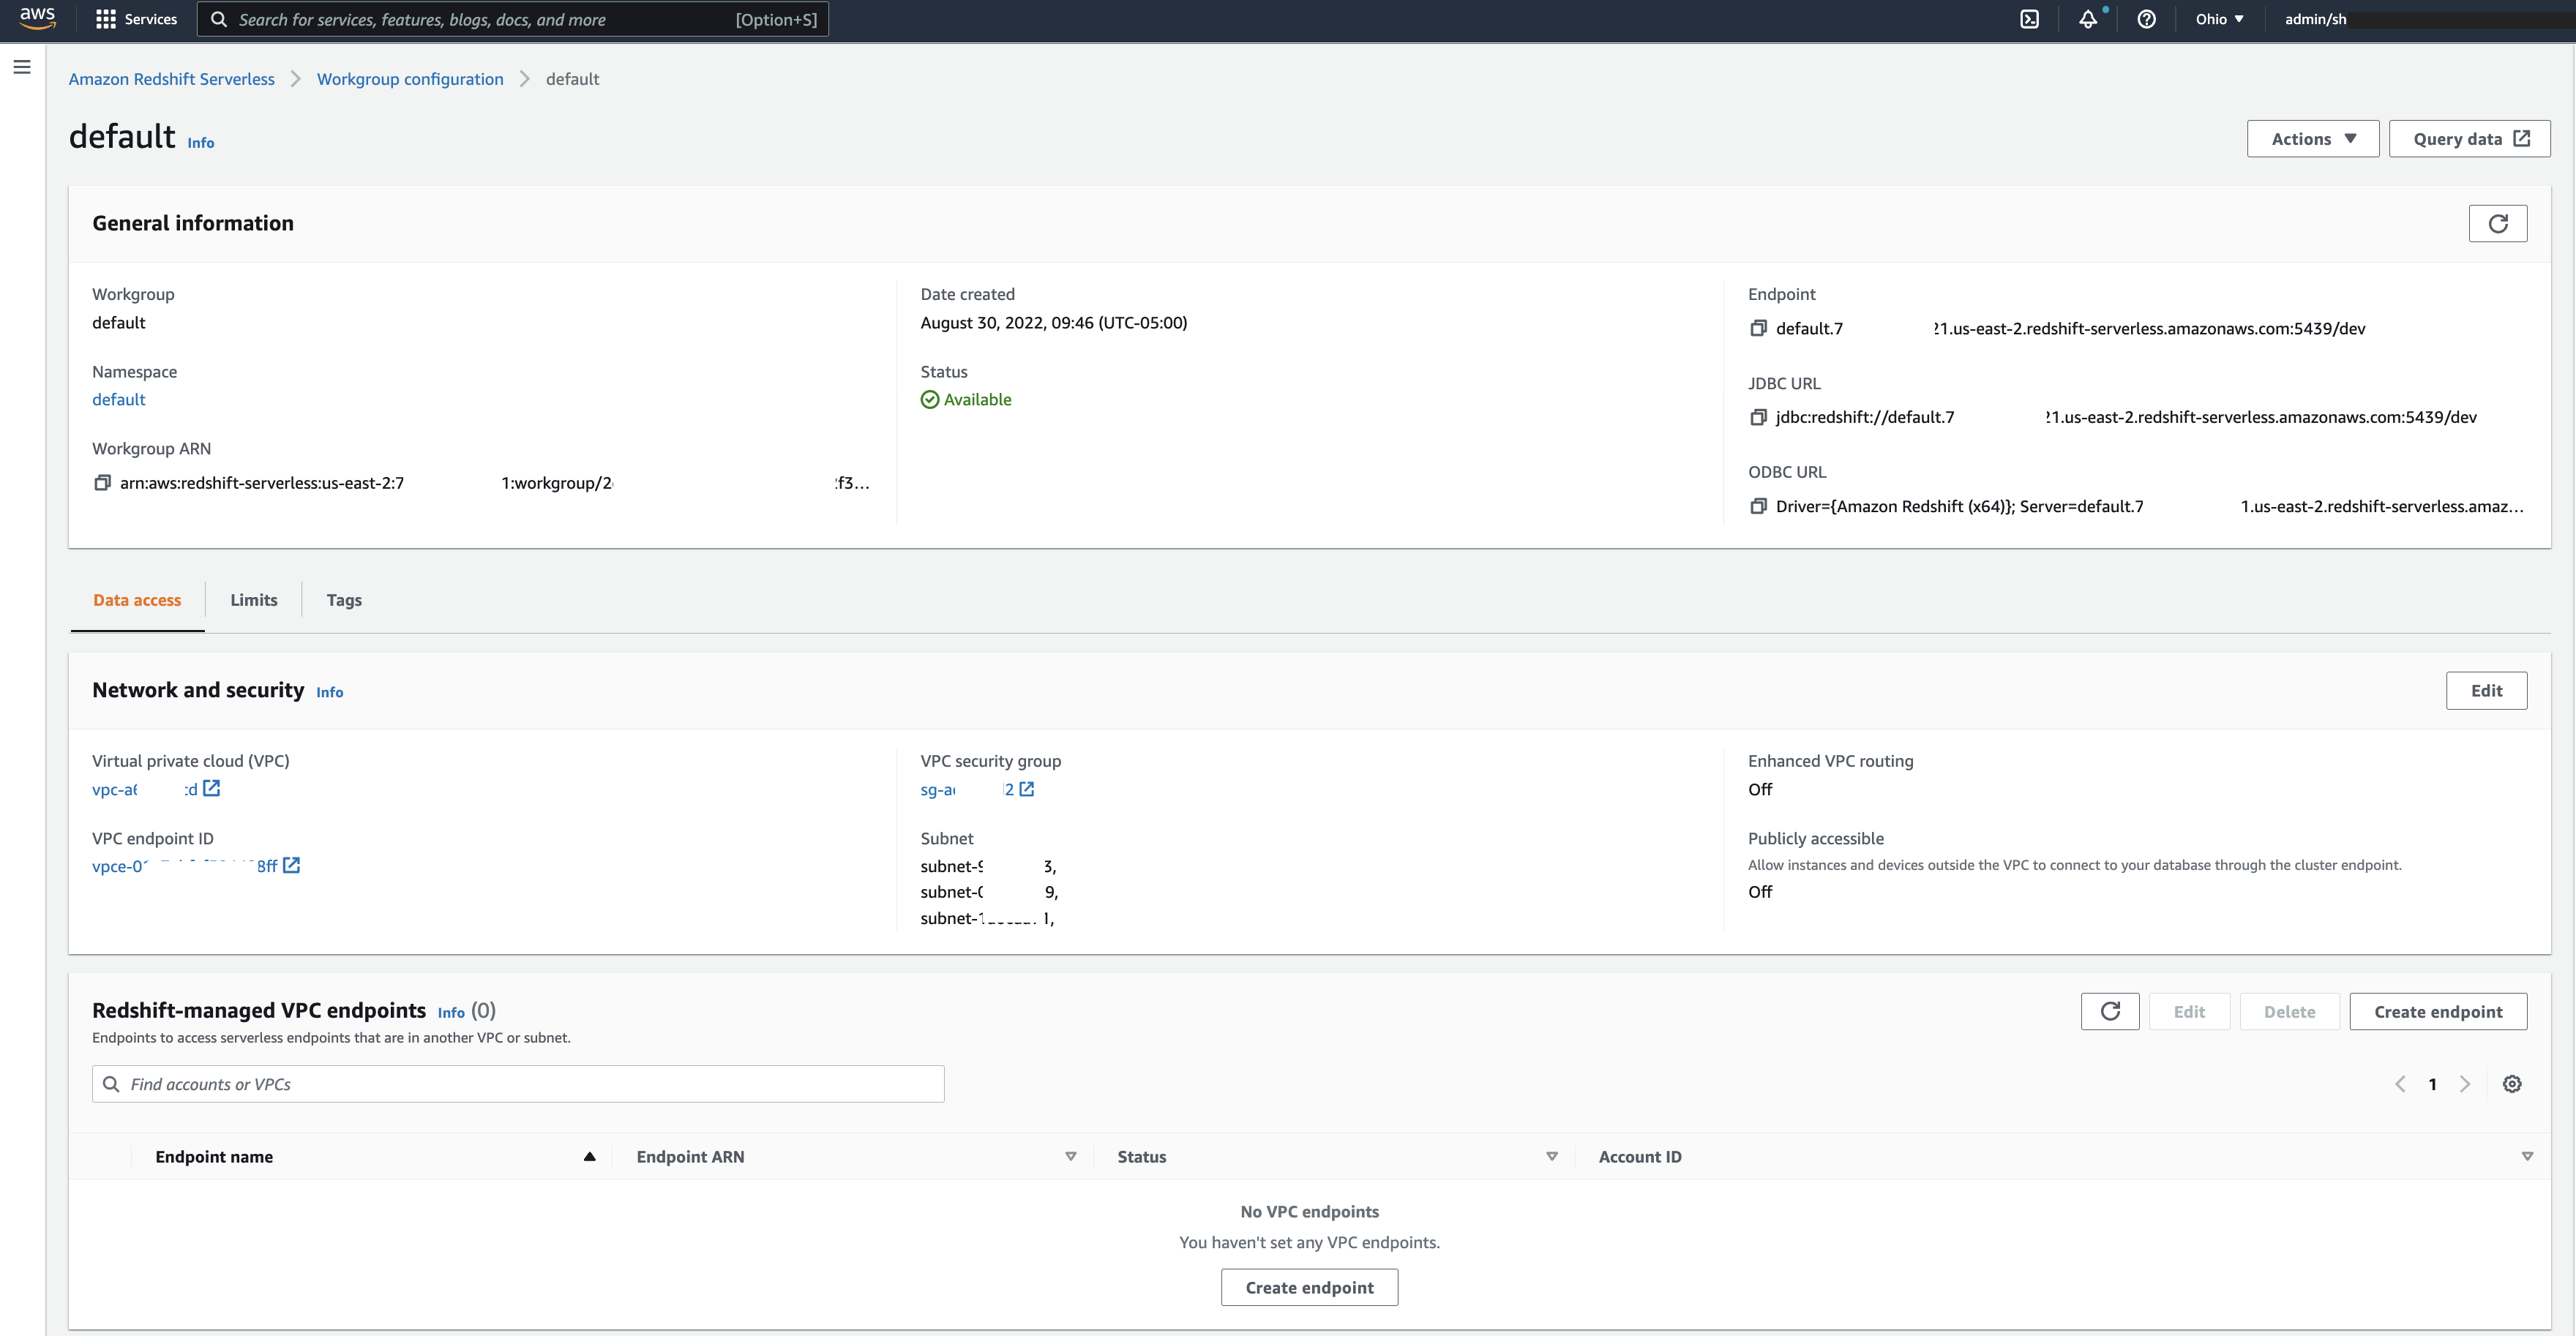
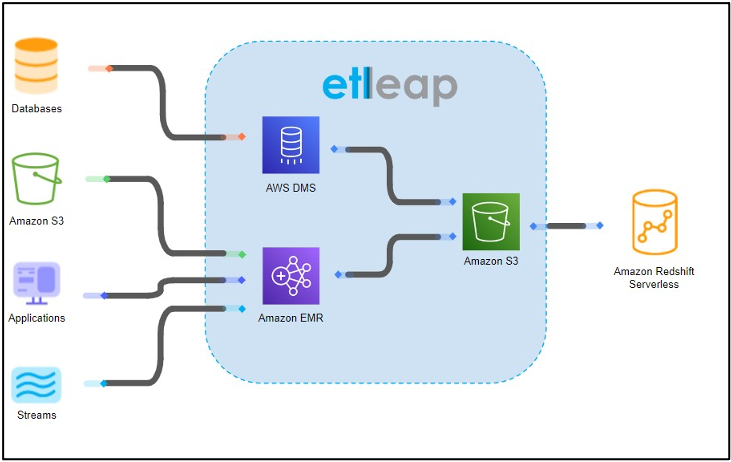
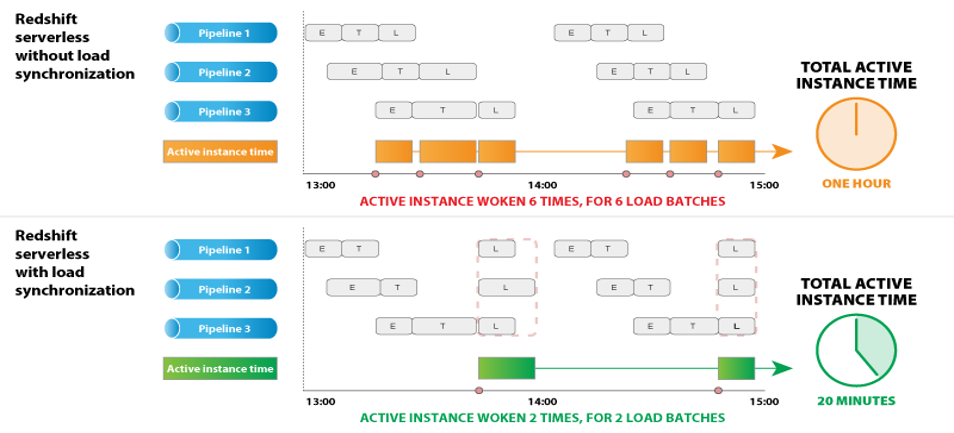
 Caius Brindescu is an engineer at Etleap with over 4 years of experience in developing ETL software. In addition to development work, he helps customers make the most out of Etleap and Amazon Redshift. He holds a PhD from Oregon State University and one AWS certification (Big Data – Specialty).
 Maneesh Sharma is a Senior Database Engineer at AWS with more than a decade of experience designing and implementing large-scale data warehouse and analytics solutions. He collaborates with various Amazon Redshift Partners and customers to drive better integration.
 Sathisan Vannadil is a Senior Partner Solutions Architect at Amazon Web Services (AWS). His primary focus is on helping independent software vendor (ISV) partners design and build solutions at scale on AWS. Prior to AWS, Sathisan held diverse technical positions and has over 20 years of experience in the field of data and analytics.


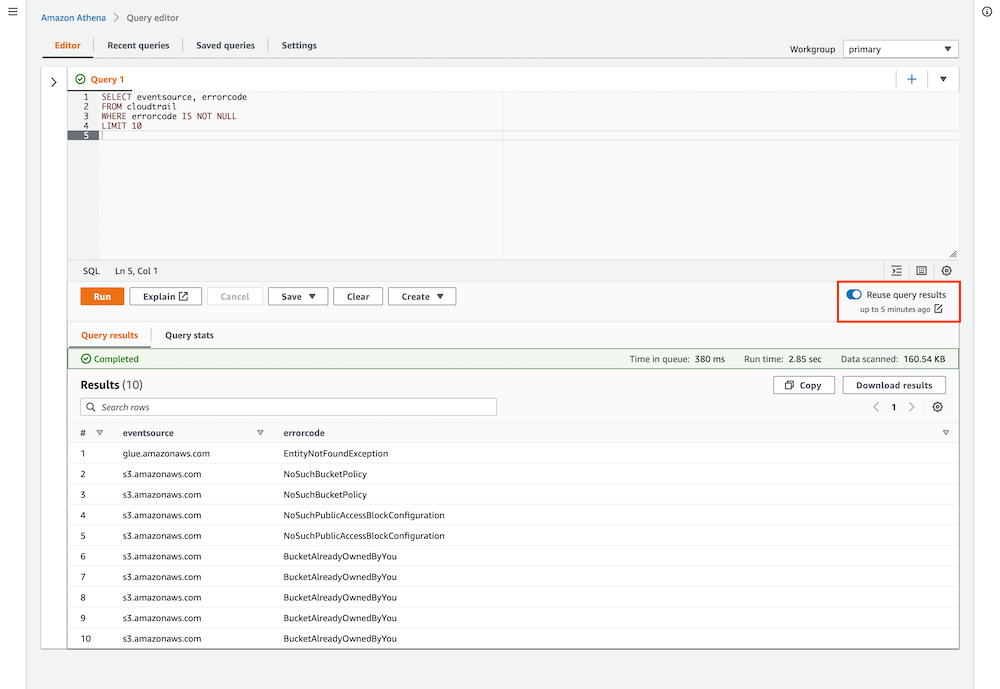


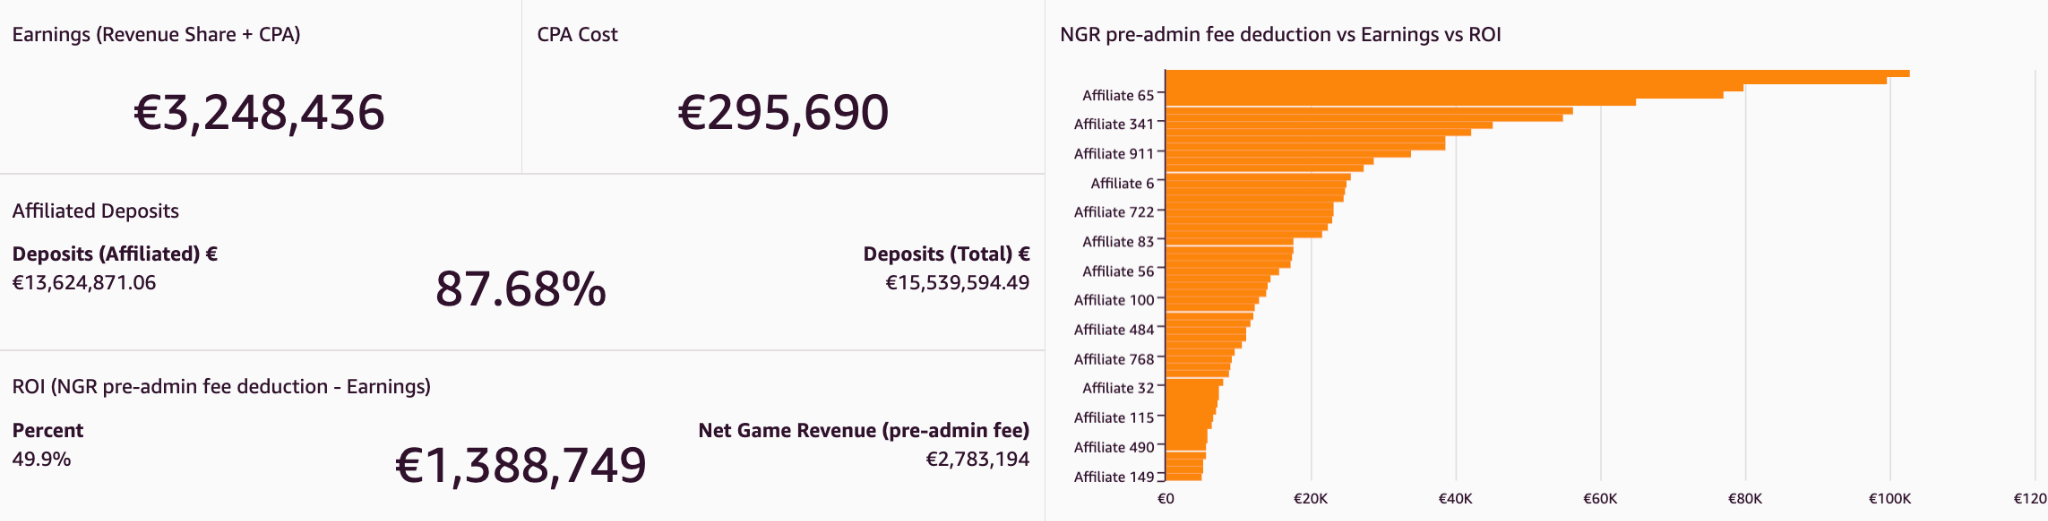
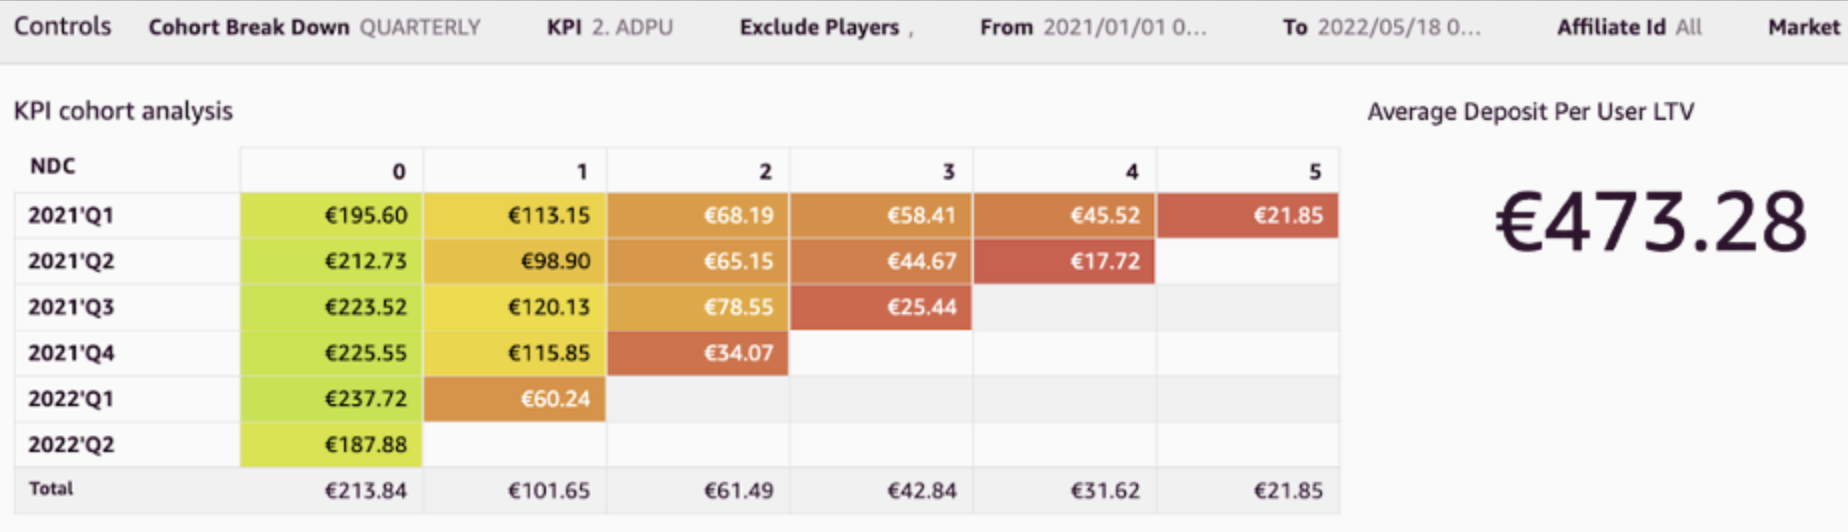

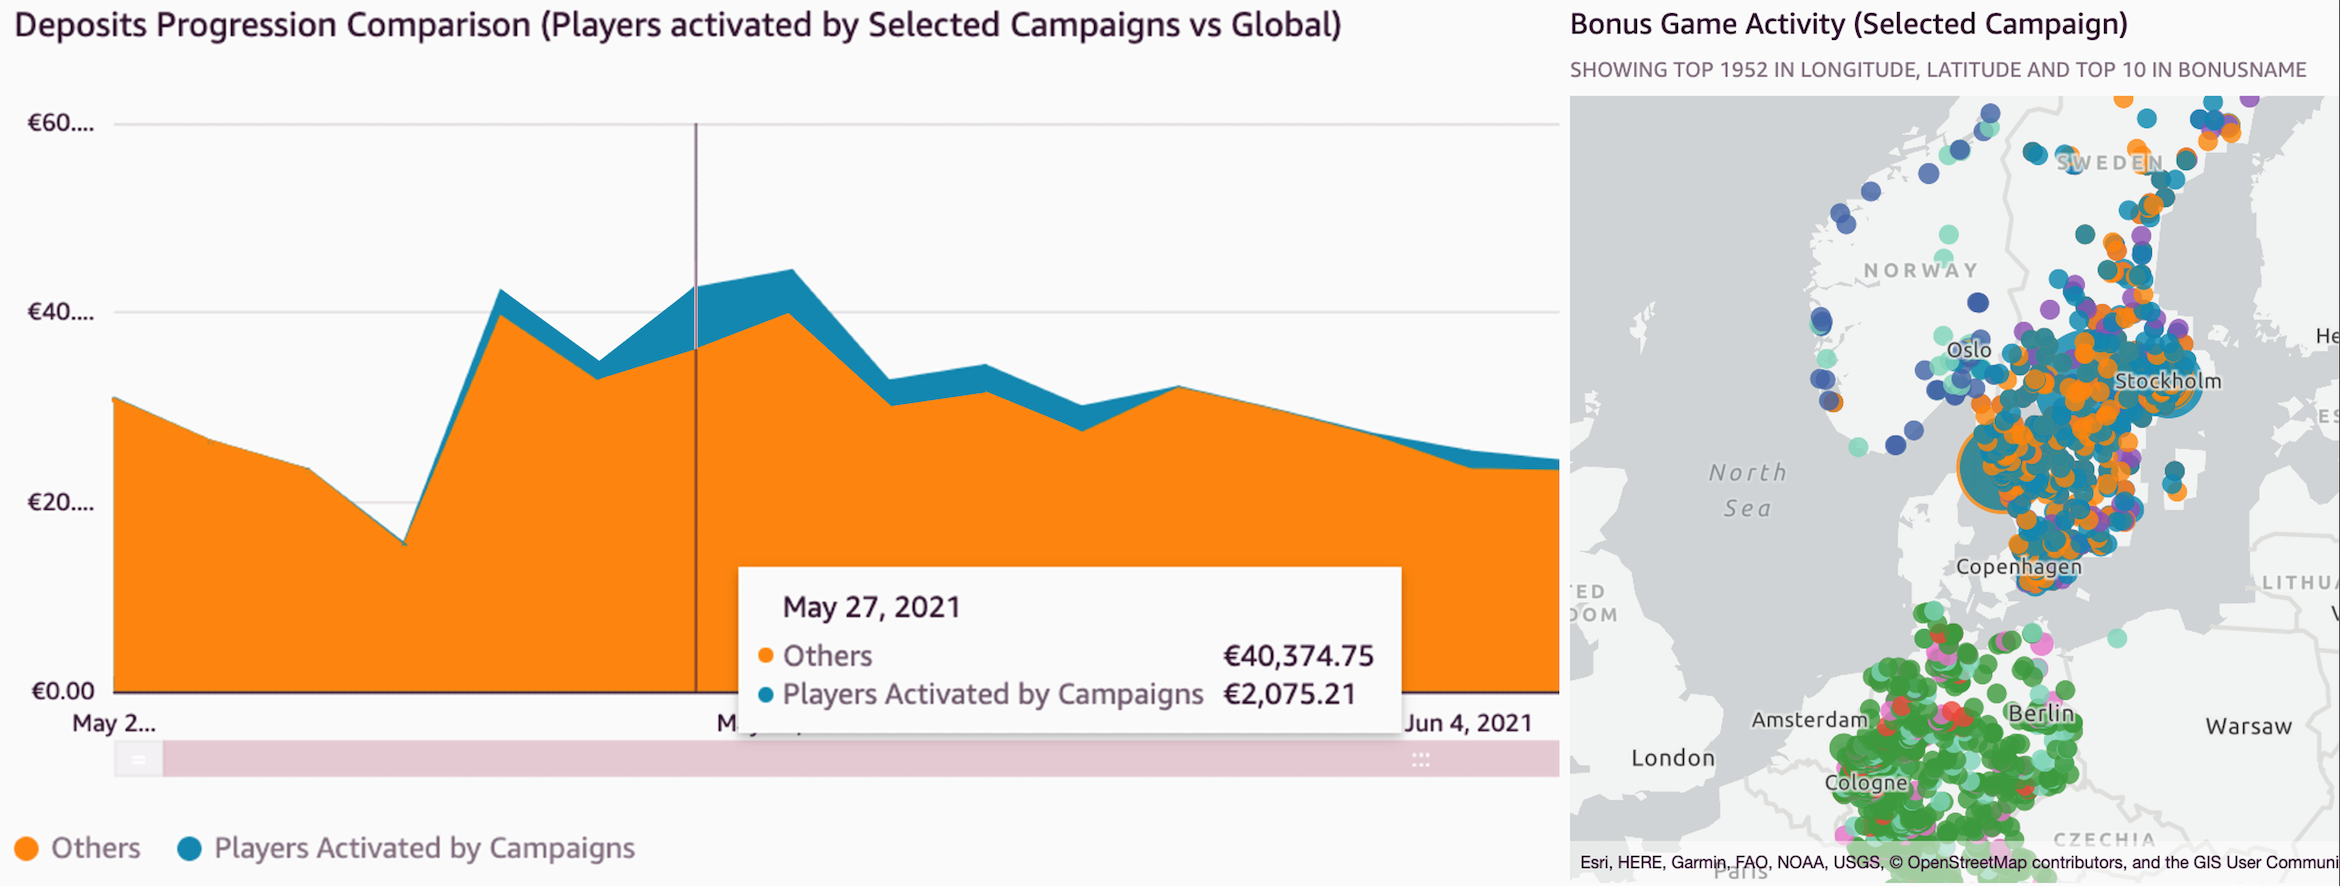
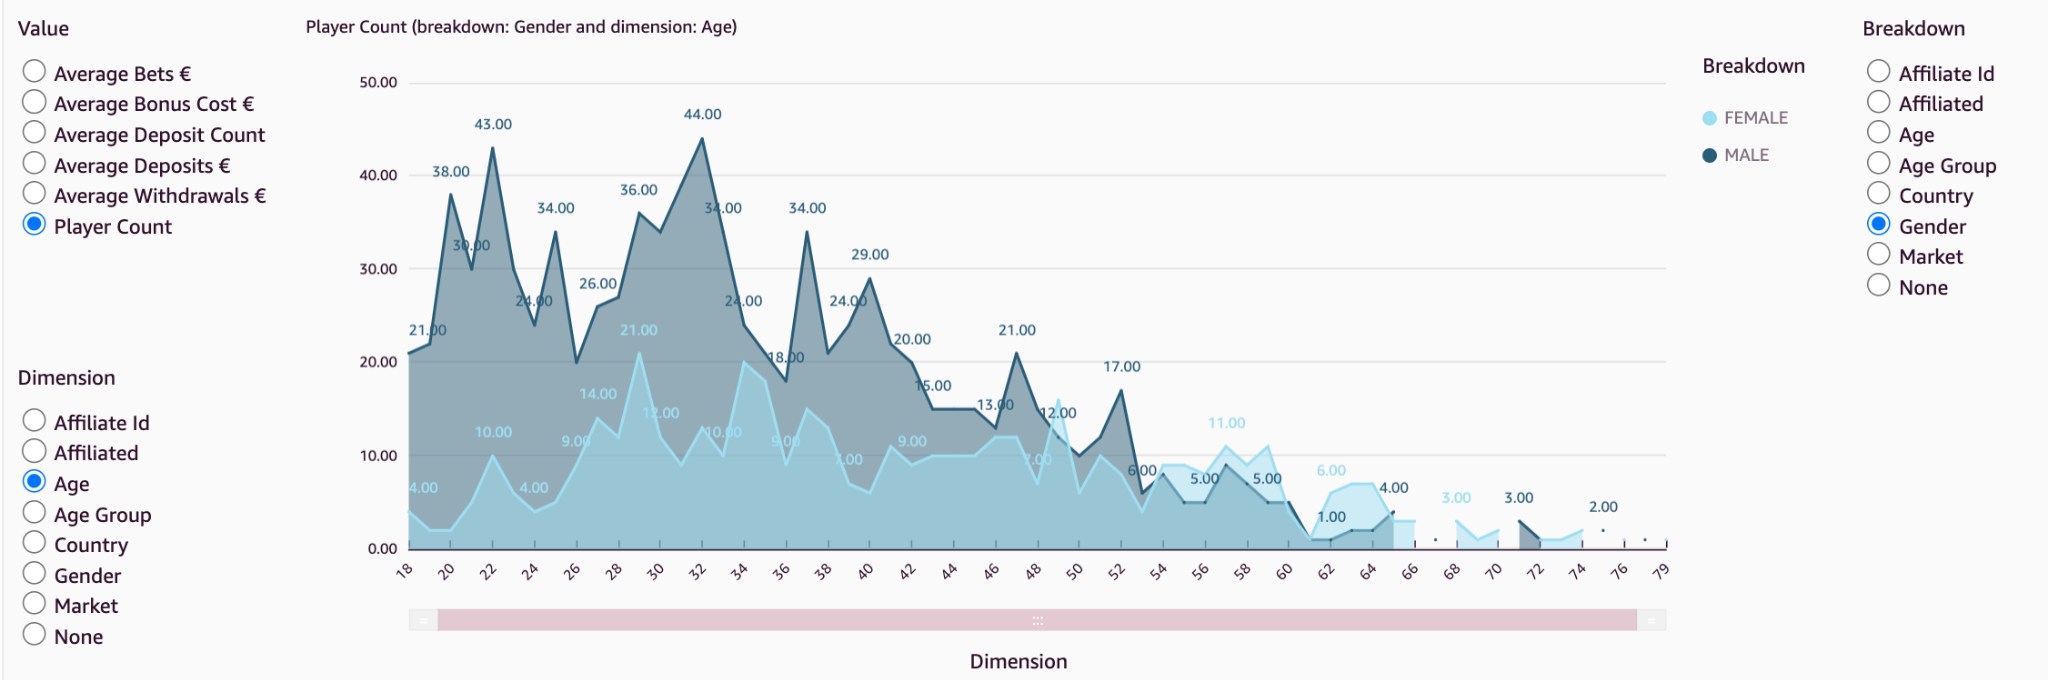
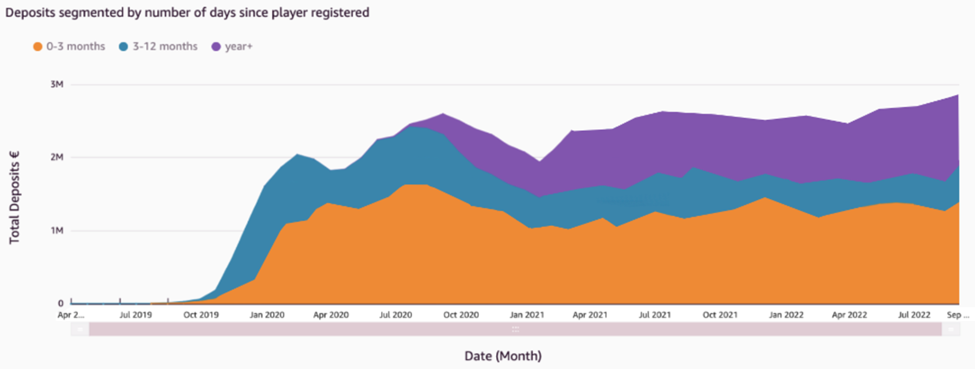


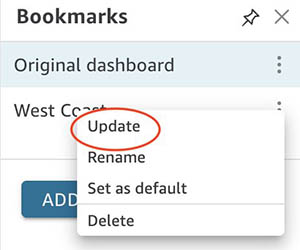


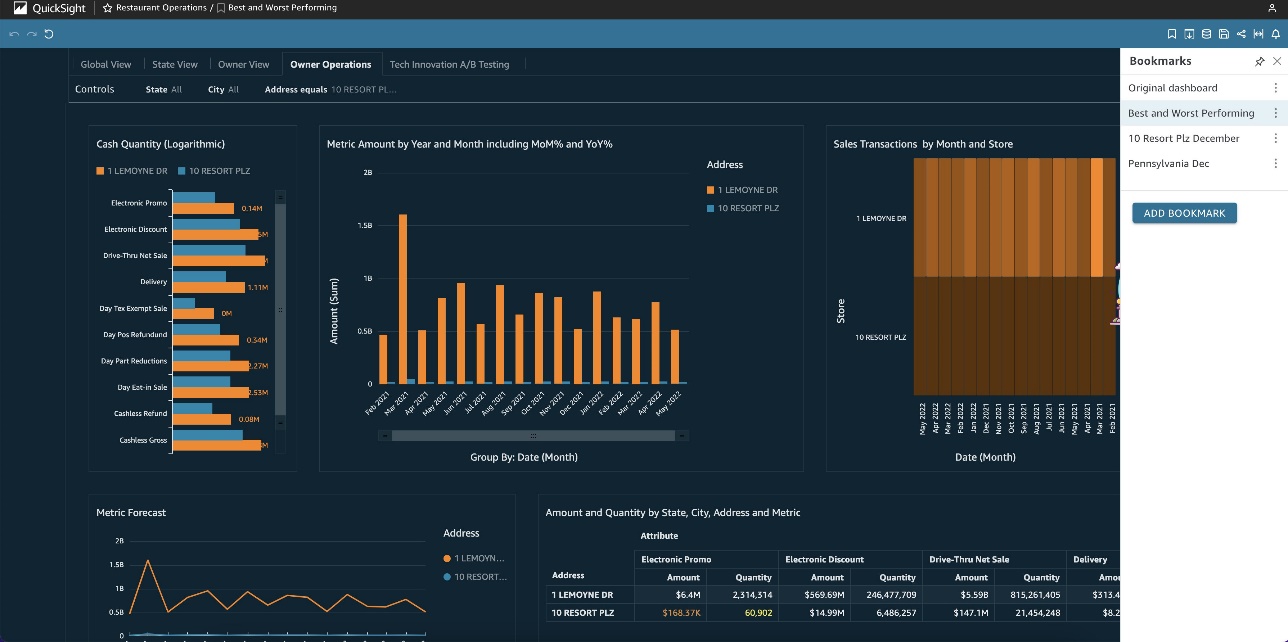
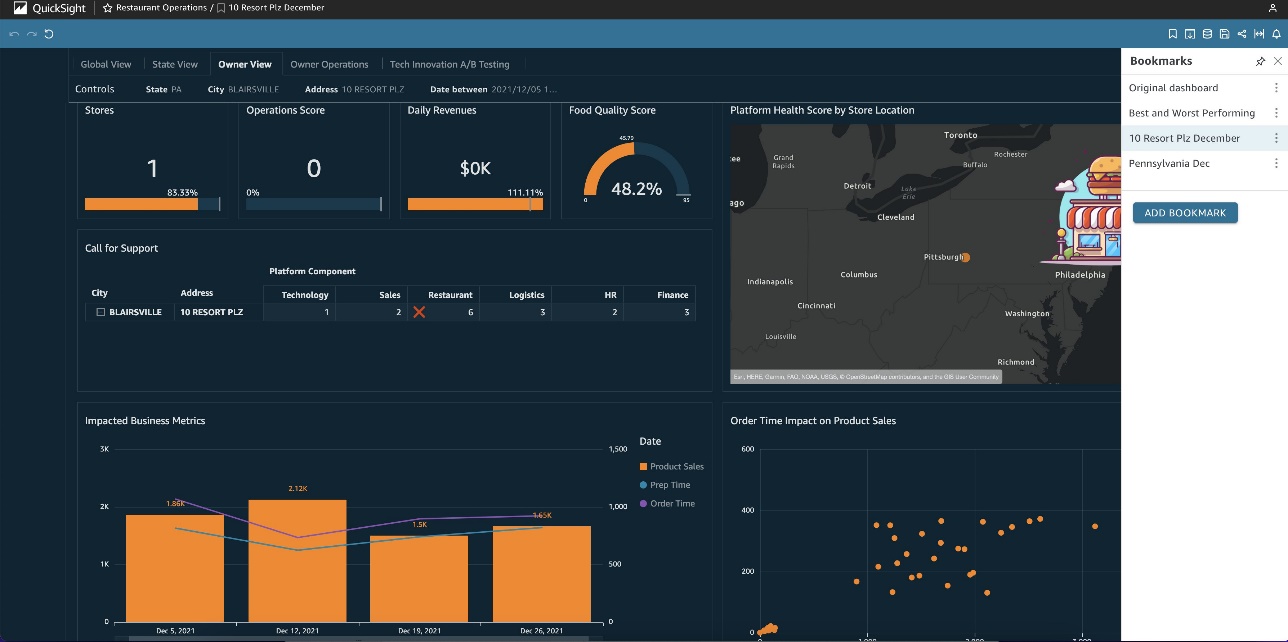
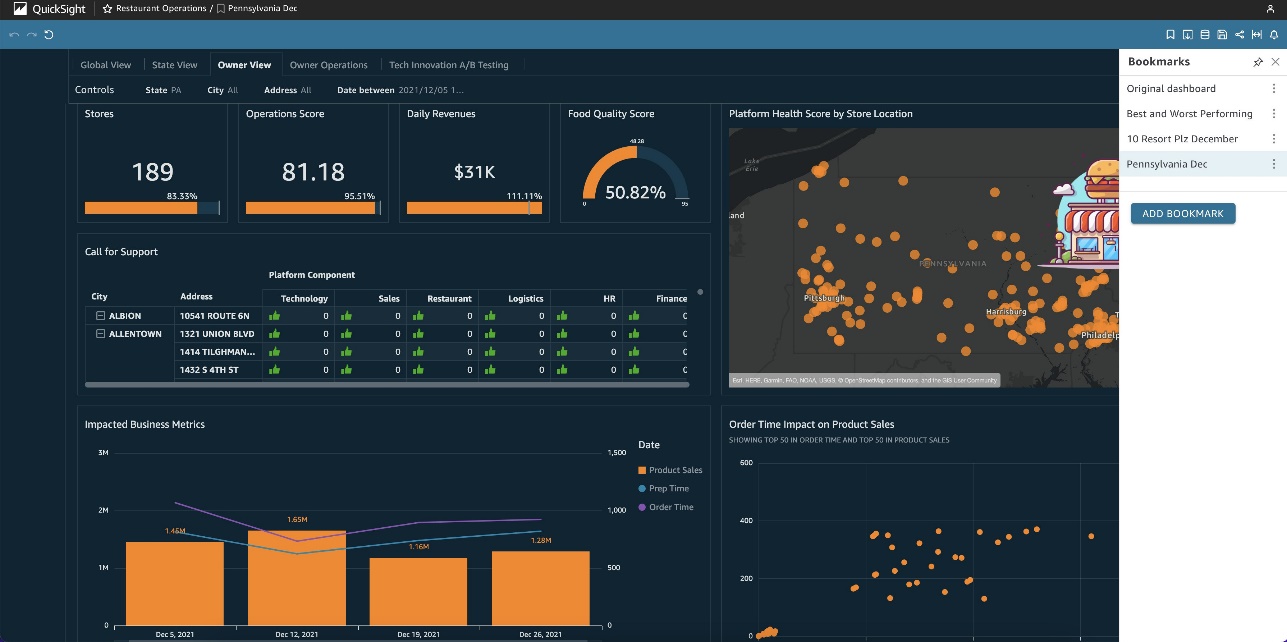


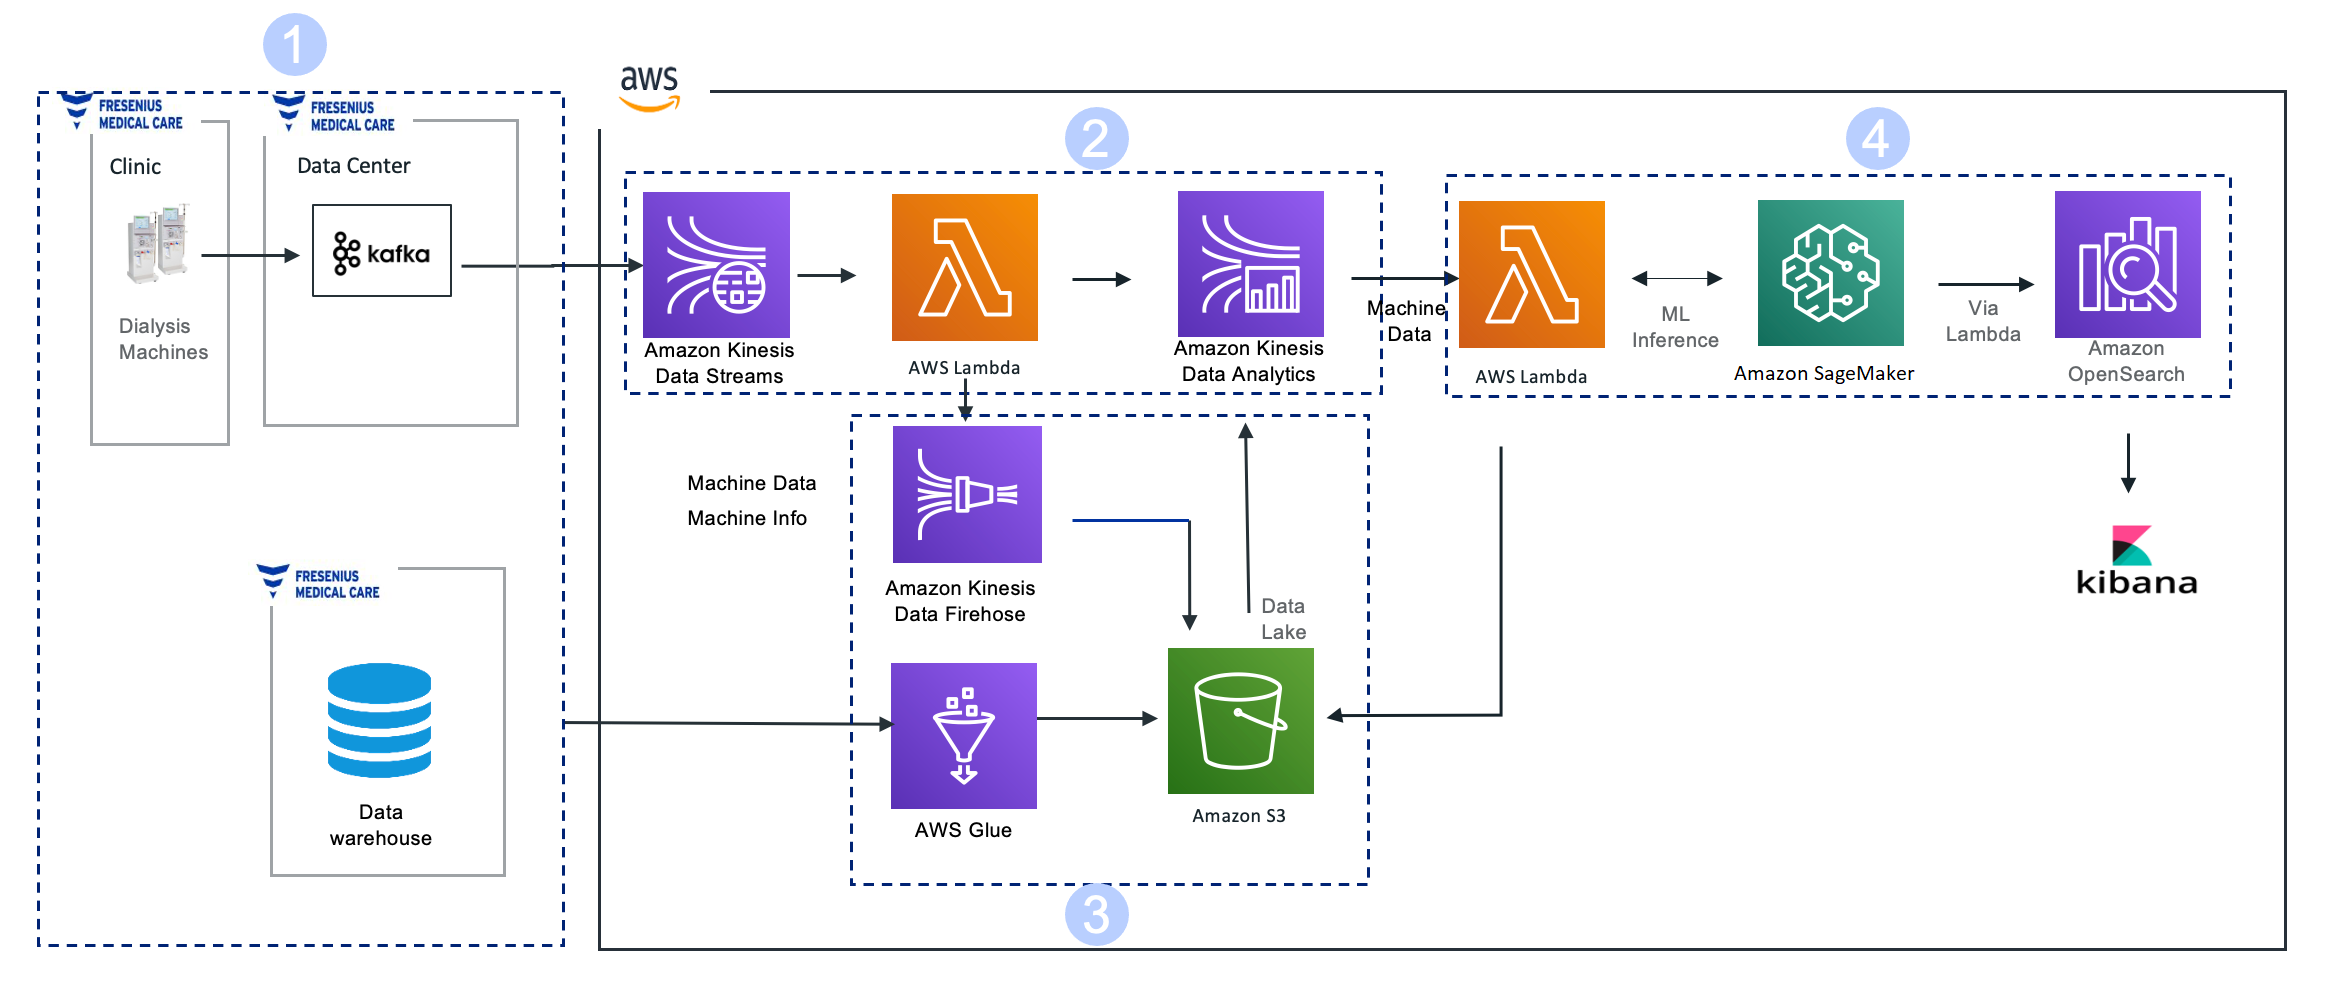


 Zach Mitchell is a Sr. Big Data Architect. He works within the product team to enhance understanding between product engineers and their customers while guiding customers through their journey to develop data lakes and other data solutions on AWS analytics services.