Tag Archives: Front End

Building vertical microfrontends on Cloudflare’s platform

Post Syndicated from Brayden Wilmoth original https://blog.cloudflare.com/vertical-microfrontends/

Updated at 6:55 a.m. PT

Today, we’re introducing a new Worker template for Vertical Microfrontends (VMFE). This template allows you to map multiple independent Cloudflare Workers to a single domain, enabling teams to work in complete silos — shipping marketing, docs, and dashboards independently — while presenting a single, seamless application to the user.

Most microfrontend architectures are “horizontal”, meaning different parts of a single page are fetched from different services. Vertical microfrontends take a different approach by splitting the application by URL path. In this model, a team owning the `/blog` path doesn’t just own a component; they own the entire vertical stack for that route – framework, library choice, CI/CD and more. Owning the entire stack of a path, or set of paths, allows teams to have true ownership of their work and ship with confidence.

Teams face problems as they grow, where different frameworks serve varying use cases. A marketing website could be better utilized with Astro, for example, while a dashboard might be better with React. Or say you have a monolithic code base where many teams ship as a collective. An update to add new features from several teams can get frustratingly rolled back because a single team introduced a regression. How do we solve the problem of obscuring the technical implementation details away from the user and letting teams ship a cohesive user experience with full autonomy and control of their domains?

Vertical microfrontends can be the answer. Let’s dive in and explore how they solve developer pain points together.

What are vertical microfrontends?

A vertical microfrontend is an architectural pattern where a single independent team owns an entire slice of the application’s functionality, from the user interface all the way down to the CI/CD pipeline. These slices are defined by paths on a domain where you can associate individual Workers with specific paths:

/      = Marketing
/docs  = Documentation
/blog  = Blog
/dash  = Dashboard

We could take it a step further and focus on more granular sub-path Worker associations, too, such as a dashboard. Within a dashboard, you likely segment out various features or products by adding depth to your URL path (e.g. /dash/product-a) and navigating between two products could mean two entirely different code bases. 

Now with vertical microfrontends, we could also have the following:

/dash/product-a  = WorkerA
/dash/product-b  = WorkerB

Each of the above paths are their own frontend project with zero shared code between them. The product-a and product-b routes map to separately deployed frontend applications that have their own frameworks, libraries, CI/CD pipelines defined and owned by their own teams. FINALLY.

You can now own your own code from end to end. But now we need to find a way to stitch these separate projects together, and even more so, make them feel as if they are a unified experience.

We experience this pain point ourselves here at Cloudflare, as the dashboard has many individual teams owning their own products. Teams must contend with the fact that changes made outside their control impact how users experience their product. 

Internally, we are now using a similar strategy for our own dashboard. When users navigate from the core dashboard into our ZeroTrust product, in reality they are two entirely separate projects and the user is simply being routed to that project by its path /:accountId/one.

Visually unified experiences

Stitching these individual projects together to make them feel like a unified experience isn’t as difficult as you might think: It only takes a few lines of CSS magic. What we absolutely do not want to happen is to leak our implementation details and internal decisions to our users. If we fail to make this user experience feel like one cohesive frontend, then we’ve done a grave injustice to our users. 

To accomplish this sleight of hand, let us take a little trip in understanding how view transitions and document preloading come into play.

View transitions

When we want to seamlessly navigate between two distinct pages while making it feel smooth to the end user, view transitions are quite useful. Defining specific DOM elements on our page to stick around until the next page is visible, and defining how any changes are handled, make for quite the powerful quilt-stitching tool for multi-page applications.

There may be, however, instances where making the various vertical microfrontends feel different is more than acceptable. Perhaps our marketing website, documentation, and dashboard are each uniquely defined, for instance. A user would not expect all three of those to feel cohesive as you navigate between the three parts. But… if you decide to introduce vertical slices to an individual experience such as the dashboard (e.g. /dash/product-a & /dash/product-b), then users should never know they are two different repositories/workers/projects underneath.

Okay, enough talk — let’s get to work. I mentioned it was low-effort to make two separate projects feel as if they were one to a user, and if you have yet to hear about CSS View Transitions then I’m about to blow your mind.

What if I told you that you could make animated transitions between different views  — single-page app (SPA) or multi-page app (MPA) — feel as if they were one? Before any view transitions are added, if we navigate between pages owned by two different Workers, the interstitial loading state would be the white blank screen in our browser for some few hundred milliseconds until the full next page began rendering. Pages would not feel cohesive, and it certainly would not feel like a single-page application.
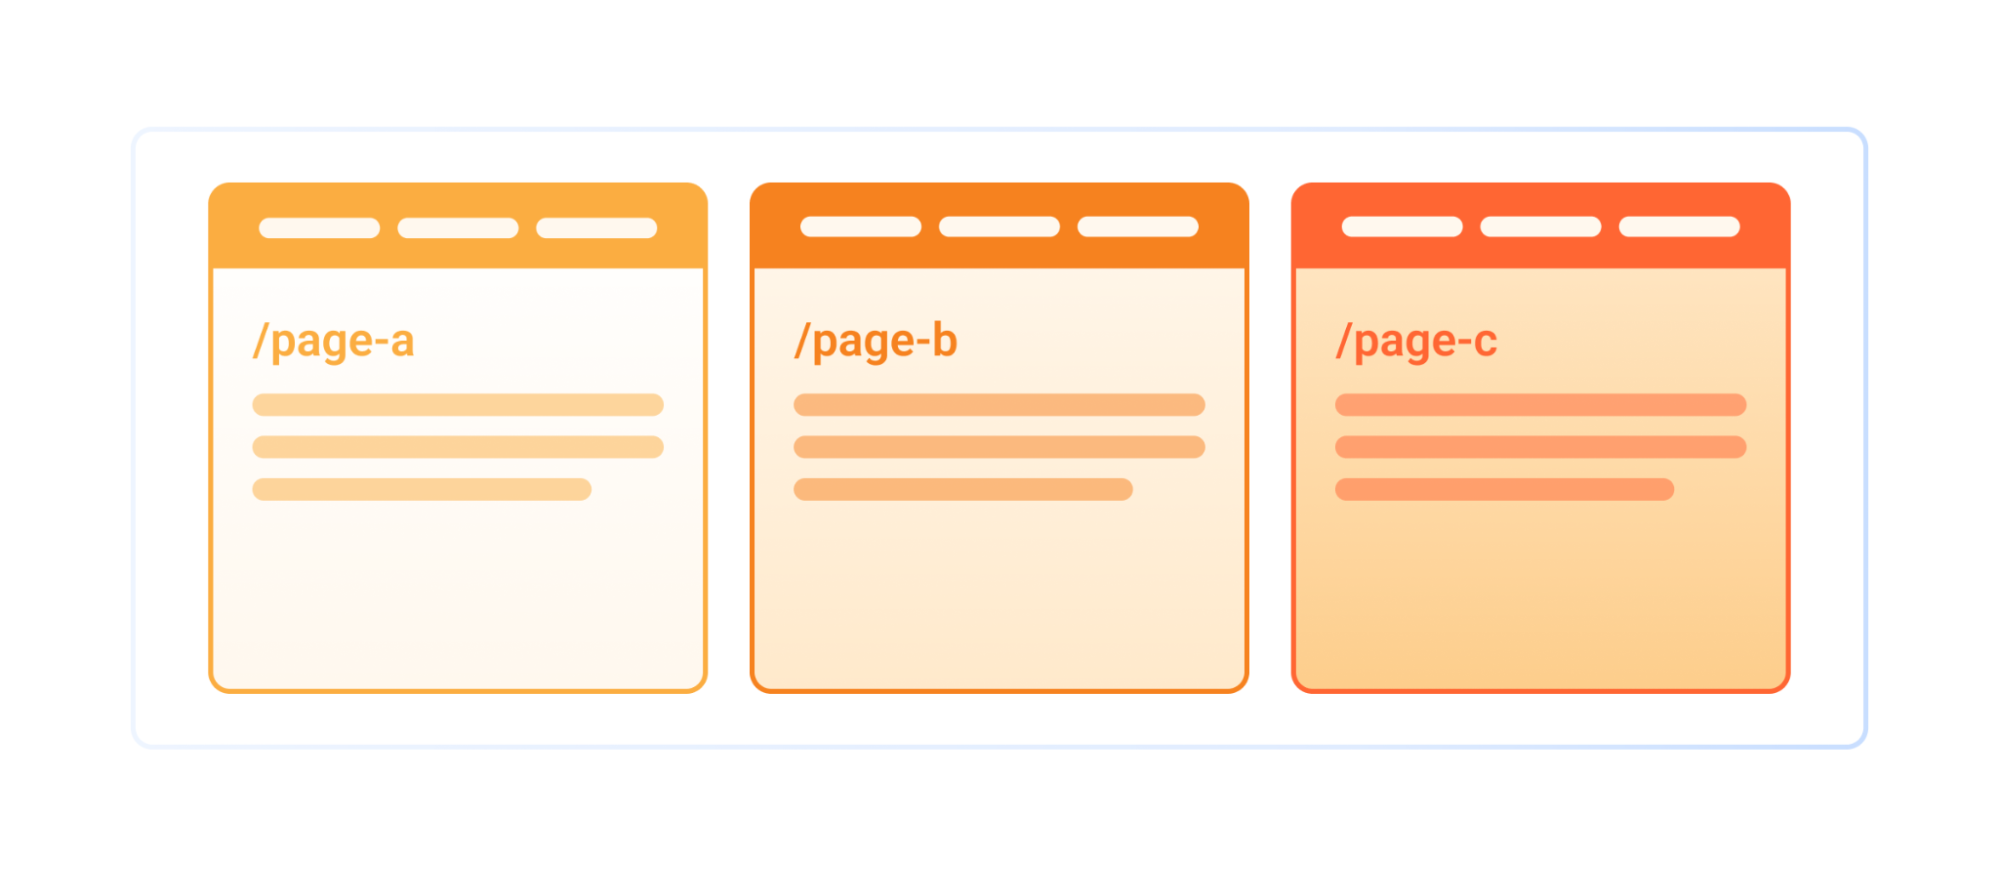

Appears as multiple navigation elements between each site.

If we want elements to stick around, rather than seeing a white blank page, we can achieve that by defining CSS View Transitions. With the code below, we’re telling our current document page that when a view transition event is about to happen, keep the nav DOM element on the screen, and if any delta in appearance exists between our existing page and our destination page, then we’ll animate that with an ease-in-out transition.

All of a sudden, two different Workers feel like one.

@supports (view-transition-name: none) {
  ::view-transition-old(root),
  ::view-transition-new(root) {
    animation-duration: 0.3s;
    animation-timing-function: ease-in-out;
  }
  nav { view-transition-name: navigation; }
}
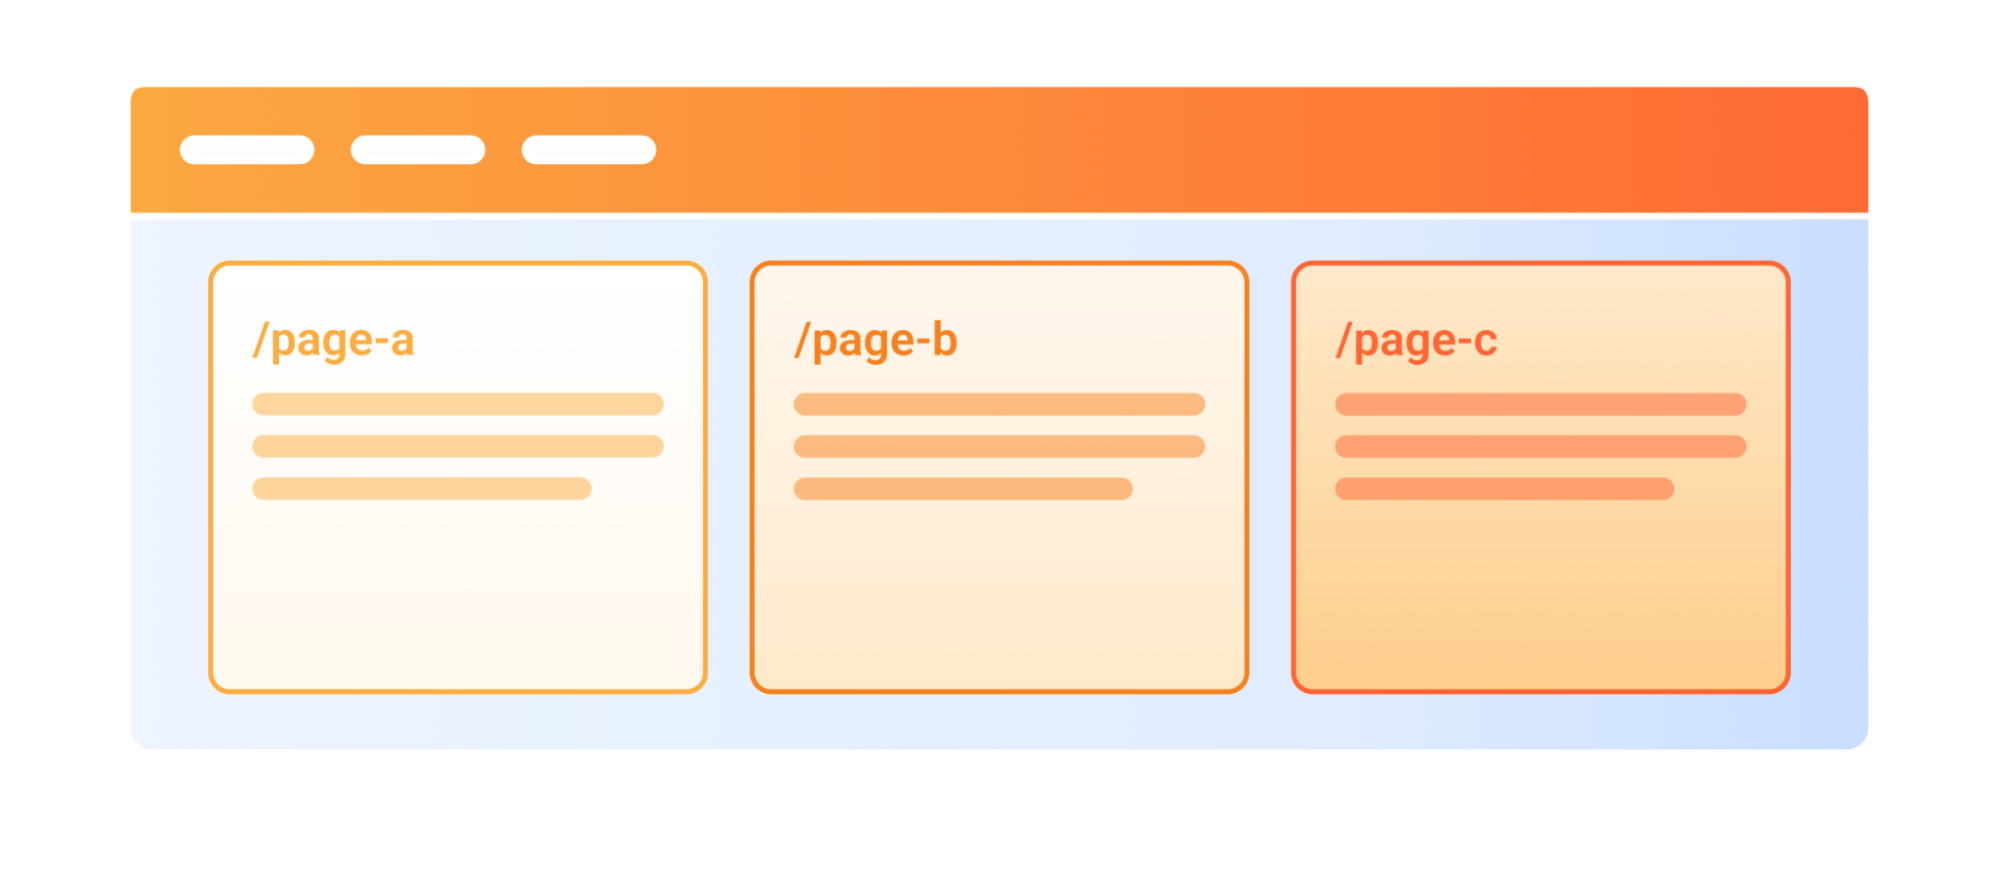
Appears as a single navigation element between three distinct sites.

Preloading

Transitioning between two pages makes it look seamless — and we also want it to feel as instant as a client-side SPA. While currently Firefox and Safari do not support Speculation Rules, Chrome/Edge/Opera do support the more recent newcomer. The speculation rules API is designed to improve performance for future navigations, particularly for document URLs, making multi-page applications feel more like single-page applications.

Breaking it down into code, what we need to define is a script rule in a specific format that tells the supporting browsers how to prefetch the other vertical slices that are connected to our web application — likely linked through some shared navigation.

<script type="speculationrules">
  {
    "prefetch": [
      {
        "urls": ["https://product-a.com", "https://product-b.com"],
        "requires": ["anonymous-client-ip-when-cross-origin"],
        "referrer_policy": "no-referrer"
      }
    ]
  }
</script>

With that, our application prefetches our other microfrontends and holds them in our in-memory cache, so if we were to navigate to those pages it would feel nearly instant.

You likely won’t require this for clearly discernible vertical slices (marketing, docs, dashboard) because users would expect a slight load between them. However, it is highly encouraged to use when vertical slices are defined within a specific visible experience (e.g. within dashboard pages).

Between View Transitions and Speculation Rules, we are able to tie together entirely different code repositories to feel as if they were served from a single-page application. Wild if you ask me.

Zero-config request routing

Now we need a mechanism to host multiple applications, and a method to stitch them together as requests stream in. Defining a single Cloudflare Worker as the “Router” allows a single logical point (at the edge) to handle network requests and then forward them to whichever vertical microfrontend is responsible for that URL path. Plus it doesn’t hurt that then we can map a single domain to that router Worker and the rest “just works.”

Service bindings

If you have yet to explore Cloudflare Worker service bindings, then it is worth taking a moment to do so.

Service bindings allow one Worker to call into another, without going through a publicly-accessible URL. A Service binding allows Worker A to call a method on Worker B, or to forward a request from Worker A to Worker. Breaking it down further, the Router Worker can call into each vertical microfrontend Worker that has been defined (e.g. marketing, docs, dashboard), assuming each of them were Cloudflare Workers.

Why is this important? This is precisely the mechanism that “stitches” these vertical slices together. We’ll dig into how the request routing is handling the traffic split in the next section. But to define each of these microfrontends, we’ll need to update our Router Worker’s wrangler definition, so it knows which frontends it’s allowed to call into.

{
  "$schema": "./node_modules/wrangler/config-schema.json",
  "name": "router",
  "main": "./src/router.js",
  "services": [
    {
      "binding": "HOME",
      "service": "worker_marketing"
    },
    {
      "binding": "DOCS",
      "service": "worker_docs"
    },
    {
      "binding": "DASH",
      "service": "worker_dash"
    },
  ]
}

Our above sample definition is defined in our Router Worker, which then tells us that we are permitted to make requests into three separate additional Workers (marketing, docs, and dash). Granting permissions is as simple as that, but let’s tumble into some of the more complex logic with request routing and HTML rewriting network responses.

Request routing

With knowledge of the various other Workers we are able to call into if needed, now we need some logic in place to know where to direct network requests when. Since the Router Worker is assigned to our custom domain, all incoming requests hit it first at the network edge. It then determines which Worker should handle the request and manages the resulting response. 

The first step is to map URL paths to associated Workers. When a certain request URL is received, we need to know where it needs to be forwarded. We do this by defining rules. While we support wildcard routes, dynamic paths, and parameter constraints, we are going to stay focused on the basics — literal path prefixes — as it illustrates the point more clearly. 

 In this example, we have three microfrontends:

/      = Marketing
/docs  = Documentation
/dash  = Dashboard

Each of the above paths need to be mapped to an actual Worker (see our wrangler definition for services in the section above). For our Router Worker, we define an additional variable with the following data, so we can know which paths should map to which service bindings. We now know where to route users as requests come in! Define a wrangler variable with the name ROUTES and the following contents:

{
  "routes":[
    {"binding": "HOME", "path": "/"},
    {"binding": "DOCS", "path": "/docs"},
    {"binding": "DASH", "path": "/dash"}
  ]
}

Let’s envision a user visiting our website path /docs/installation. Under the hood, what happens is the request first reaches our Router Worker which is in charge of understanding what URL paths map to which individual Workers. It understands that the /docs path prefix is mapped to our DOCS service binding which referencing our wrangler file points us at our worker_docs project. Our Router Worker, knowing that /docs is defined as a vertical microfrontend route, removes the /docs prefix from the path and forwards the request to our worker_docs Worker to handle the request and then finally returns whatever response we get.

Why does it drop the /docs path, though? This was an implementation detail choice that was made so that when the Worker is accessed via the Router Worker, it can clean up the URL to handle the request as if it were called from outside our Router Worker. Like any Cloudflare Worker, our worker_docs service might have its own individual URL where it can be accessed. We decided we wanted that service URL to continue to work independently. When it’s attached to our new Router Worker, it would automatically handle removing the prefix, so the service could be accessible from its own defined URL or through our Router Worker… either place, doesn’t matter.

HTMLRewriter

Splitting our various frontend services with URL paths (e.g. /docs or /dash) makes it easy for us to forward a request, but when our response contains HTML that doesn’t know it’s being reverse proxied through a path component… well, that causes problems. 

Say our documentation website has an image tag in the response <img src="./logo.png" />. If our user was visiting this page at https://website.com/docs/, then loading the logo.png file would likely fail because our /docs path is somewhat artificially defined only by our Router Worker.

Only when our services are accessed through our Router Worker do we need to do some HTML rewriting of absolute paths so our returned browser response references valid assets. In practice what happens is that when a request passes through our Router Worker, we pass the request to the correct Service Binding, and we receive the response from that. Before we pass that back to the client, we have an opportunity to rewrite the DOM — so where we see absolute paths, we go ahead and prepend that with the proxied path. Where previously our HTML was returning our image tag with <img src="./logo.png" /> we now modify it before returning to the client browser to <img src="./docs/logo.png" />.


Let’s return for a moment to the magic of CSS view transitions and document preloading. We could of course manually place that code into our projects and have it work, but this Router Worker will automatically handle that logic for us by also using HTMLRewriter

In your Router Worker ROUTES variable, if you set smoothTransitions to true at the root level, then the CSS transition views code will be added automatically. Additionally, if you set the preload key within a route to true, then the script code speculation rules for that route will automatically be added as well. 

Below is an example of both in action:

{
  "smoothTransitions":true, 
  "routes":[
    {"binding": "APP1", "path": "/app1", "preload": true},
    {"binding": "APP2", "path": "/app2", "preload": true}
  ]
}

Get started

You can start building with the Vertical Microfrontend template today.

Visit the Cloudflare Dashboard deeplink here or go to “Workers & Pages” and click the “Create application” button to get started. From there, click “Select a template” and then “Create microfrontend” and you can begin configuring your setup.
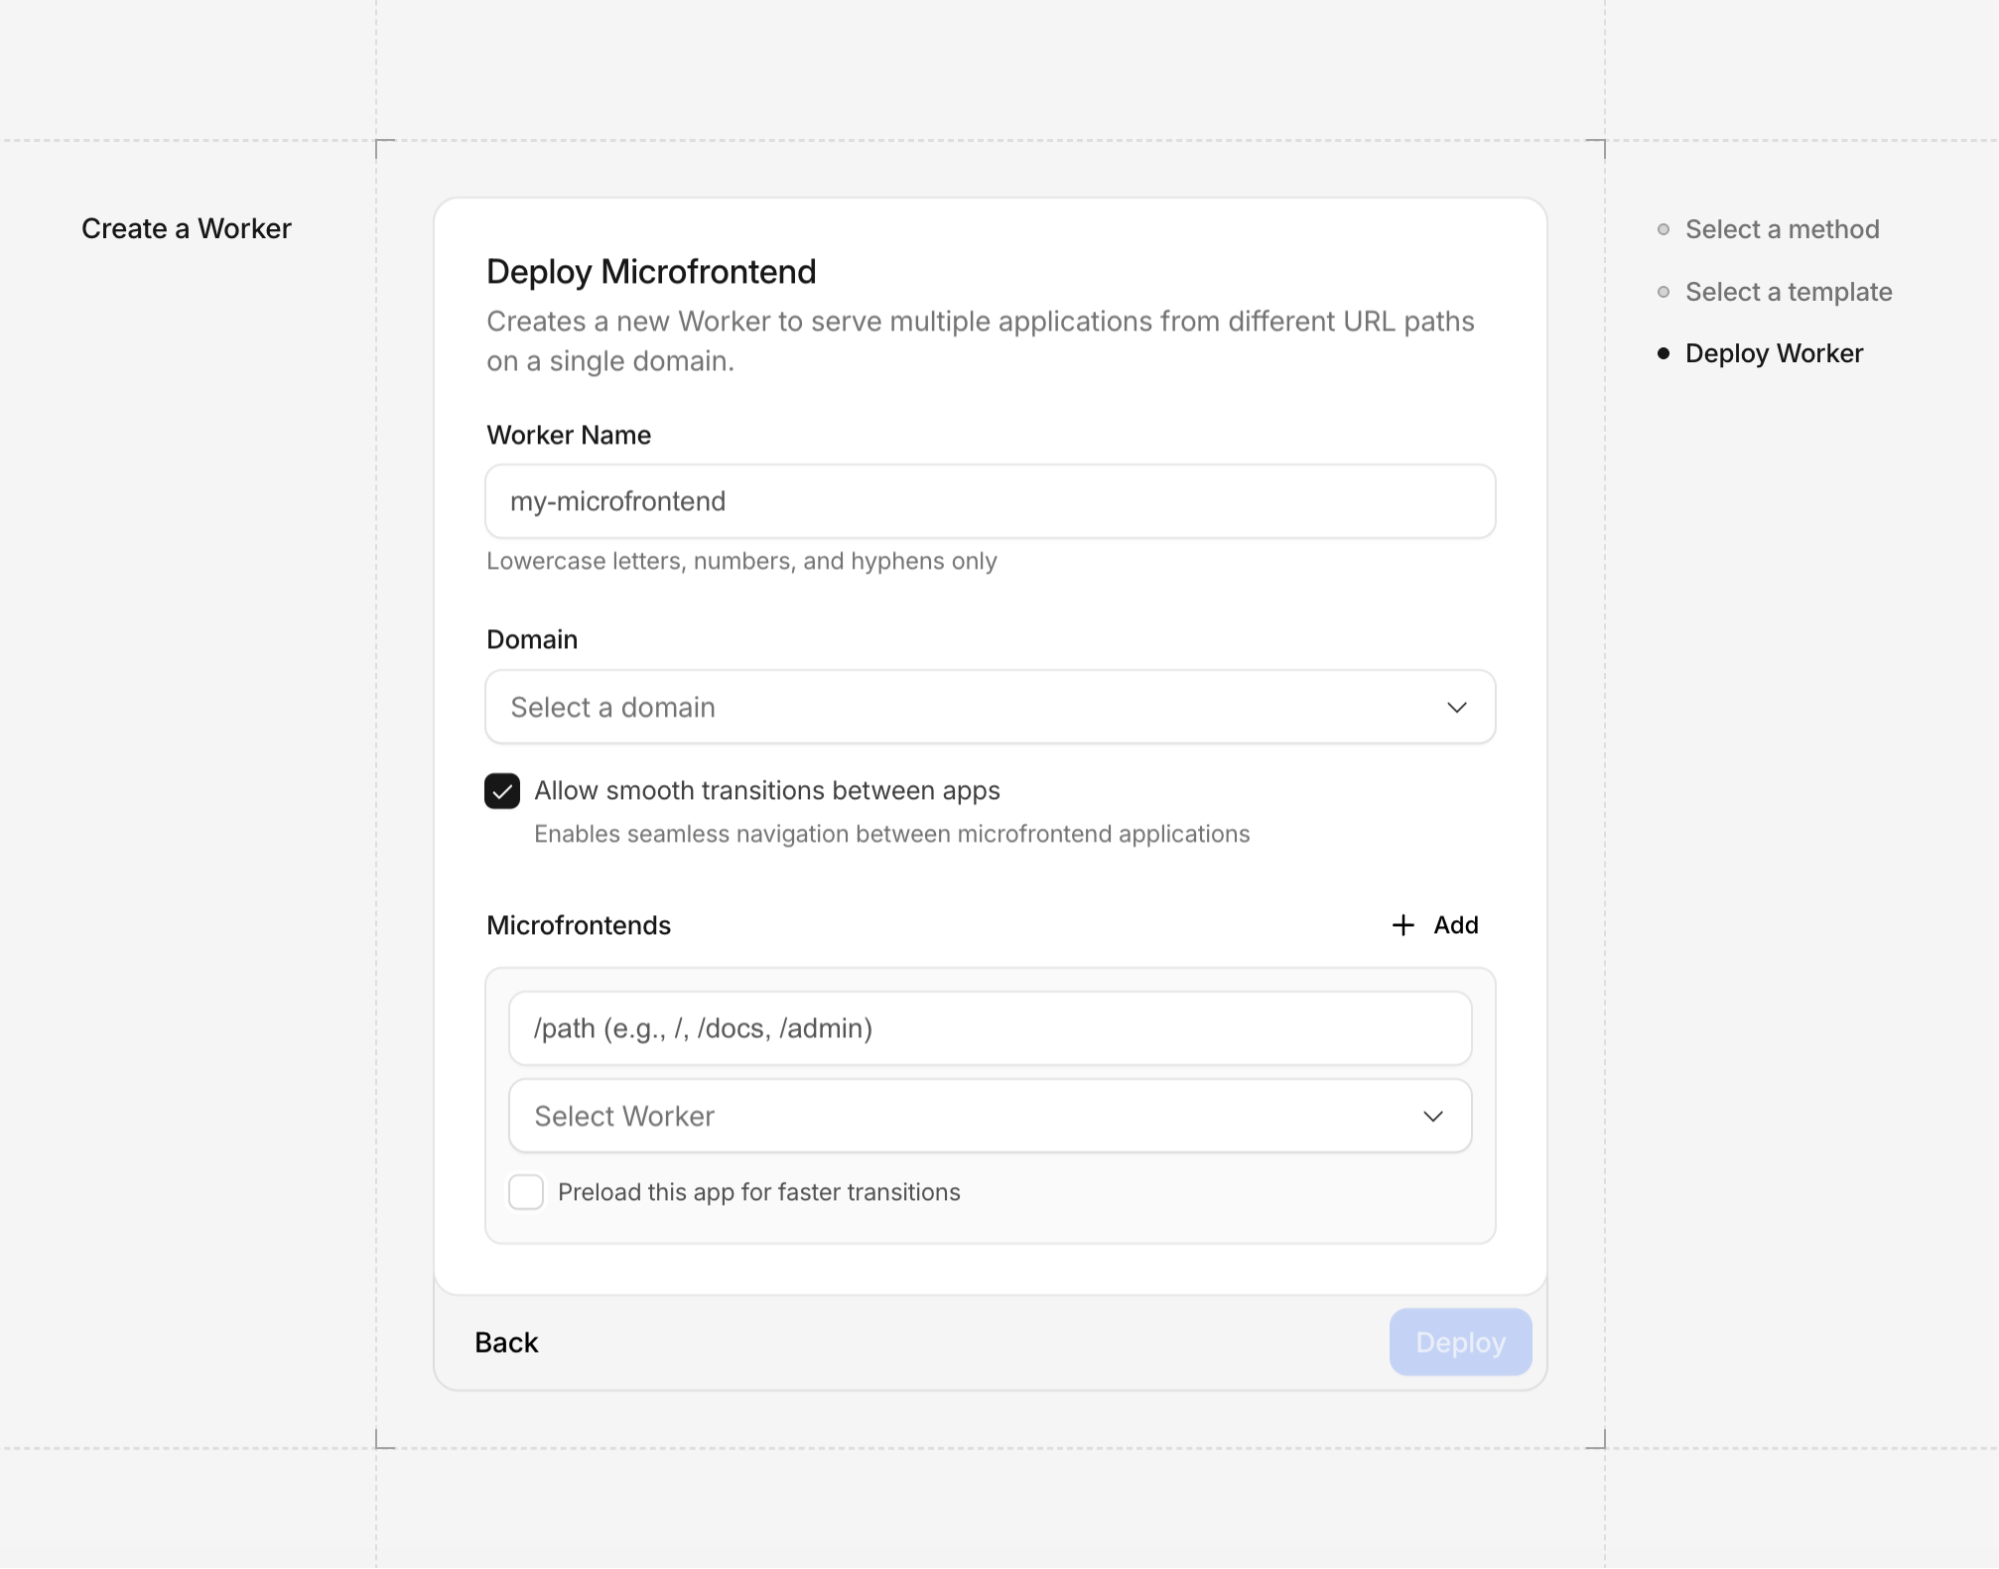

Check out the documentation to see how to map your existing Workers and enable View Transitions. We can’t wait to see what complex, multi-team applications you build on the edge!
Your frontend, backend, and database — now in one Cloudflare Worker

Post Syndicated from Korinne Alpers original https://blog.cloudflare.com/full-stack-development-on-cloudflare-workers/

In September 2024, we introduced beta support for hosting, storing, and serving static assets for free on Cloudflare Workers — something that was previously only possible on Cloudflare Pages. Being able to host these assets — your client-side JavaScript, HTML, CSS, fonts, and images — was a critical missing piece for developers looking to build a full-stack application within a single Worker

Today we’re announcing ten big improvements to building apps on Cloudflare. All together, these new additions allow you to build and host projects ranging from simple static sites to full-stack applications, all on Cloudflare Workers:

These improvements allow you to build both simple static sites and more complex server-side rendered applications. Like Pages, you only get charged when your Worker code runs, meaning you can host and serve static sites for free. When you want to do any rendering on the server or need to build an API, simply add a Worker to handle your backend. And when you need to read or write data in your app, you can connect to an existing database with Hyperdrive, or use any of our storage solutions: Workers KV, R2, Durable Objects, or D1

If you’d like to dive straight into code, you can deploy a single-page application built with Vite and React, with the option to connect to a hosted database with Hyperdrive, by clicking this “Deploy to Cloudflare” button: 


Start with Workers

Previously, you needed to choose between building on Cloudflare Pages or Workers (or use Pages for one part of your app, and Workers for another) just to get started. This meant figuring out what your app needed from the start, and hoping that if your project evolved, you wouldn’t be stuck with the wrong platform and architecture. Workers was designed to be a flexible platform, allowing developers to evolve projects as needed — and so, we’ve worked to bring pieces of Pages into Workers over the years.  

Now that Workers supports both serving static assets and server-side rendering, you should start with Workers. Cloudflare Pages will continue to be supported, but, going forward, all of our investment, optimizations, and feature work will be dedicated to improving Workers. We aim to make Workers the best platform for building full-stack apps, building upon your feedback of what went well with Pages and what we could improve. 

Before, building an app on Pages meant you got a really easy, opinionated on-ramp, but you’d eventually hit a wall if your application got more complex. If you wanted to use Durable Objects to manage state, you would need to set up an entirely separate Worker to do so, ending up with a complicated deployment and more overhead. You also were limited to real-time logs, and could only roll out changes all in one go. 

When you build on Workers, you can immediately bind to any other Developer Platform service (including Durable Objects, Email Workers, and more), and manage both your front end and back end in a single project — all with a single deployment. You also get the whole suite of Workers observability tooling built into the platform, such as Workers Logs. And if you want to rollout changes to only a certain percentage of traffic, you can do so with Gradual Deployments.  

These latest improvements are part of our goal to bring the best parts of Pages into Workers. For example, we now support static  _headers and _redirects config files, so that you can easily take an existing project from Pages (or another platform) and move it over to Workers, without needing to change your project. We also directly integrate with GitHub and GitLab with Workers Builds, providing automatic builds and deployments. And starting today, Preview URLs are posted back to your repository as a comment, with feature branch aliases and environments coming soon. 

To learn how to migrate an existing project from Pages to Workers, read our migration guide

Next, let’s talk about how you can build applications with different rendering modes on Workers.  

Building static sites, SPAs, and SSR on Workers

As a quick primer, here are all the architectures and rendering modes we’ll be discussing that are supported on Workers: 

  • Static sites: When you visit a static site, the server immediately returns pre-built static assets — HTML, CSS, JavaScript, images, and fonts. There’s no dynamic rendering happening on the server at request-time. Static assets are typically generated at build-time and served directly from a CDN, making static sites fast and easily cacheable. This approach works well for sites with content that rarely changes.

  • Single-Page Applications (SPAs):  When you load an SPA, the server initially sends a minimal HTML shell and a JavaScript bundle (served as static assets). Your browser downloads this JavaScript, which then takes over to render the entire user interface client-side. After the initial load, all navigation occurs without full-page refreshes, typically via client-side routing. This creates a fast, app-like experience. 

  • Server-Side Rendered (SSR) applications: When you first visit a site that uses SSR, the server generates a fully-rendered HTML page on-demand for that request. Your browser immediately displays this complete HTML, resulting in a fast first page load. Once loaded, JavaScript “hydrates” the page, adding interactivity. Subsequent navigations can either trigger new server-rendered pages or, in many modern frameworks, transition into client-side rendering similar to an SPA.

Next, we’ll dive into how you can build these kinds of applications on Workers, starting with setting up your development environment. 

Setup: build and dev

Before uploading your application, you need to bundle all of your client-side code into a directory of static assets. Wrangler bundles and builds your code when you run wrangler dev, but we also now support Vite with our new Vite plugin. This is a great option for those already using Vite’s build tooling and development server — you can continue developing (and testing with Vitest) using Vite’s development server, all using the Workers runtime. 

To get started using the Cloudflare Vite plugin, you can scaffold a React application using Vite and our plugin, by running: 

npm create cloudflare@latest my-react-app -- --framework=react

When you open the project, you should see a directory structure like this: 

...
├── api
│   └── index.ts
├── public
│   └── ...
├── src
│   └── ...
...
├── index.html
├── package.json
├── vite.config.ts
└── wrangler.jsonc

If you run npm run build, you’ll see a new folder appear, named /dist

...
├── api
│   └── index.ts
├── dist
│   └── ...
├── public
│   └── ...
├── src
│   └── ...
...
├── index.html
├── package.json
├── vite.config.ts
└── wrangler.jsonc

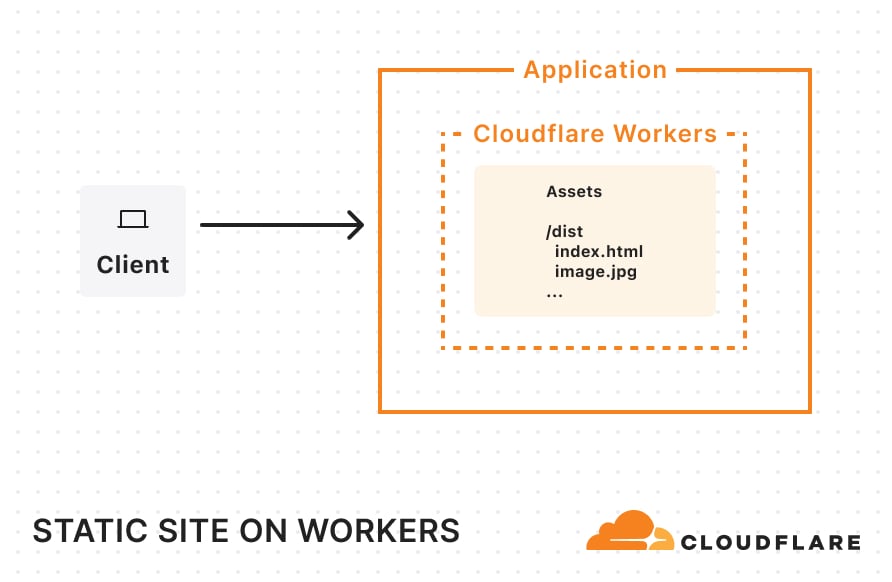
The Vite plugin informs Wrangler that this /dist directory contains the project’s built static assets — which, in this case, includes client-side code, some CSS files, and images. 

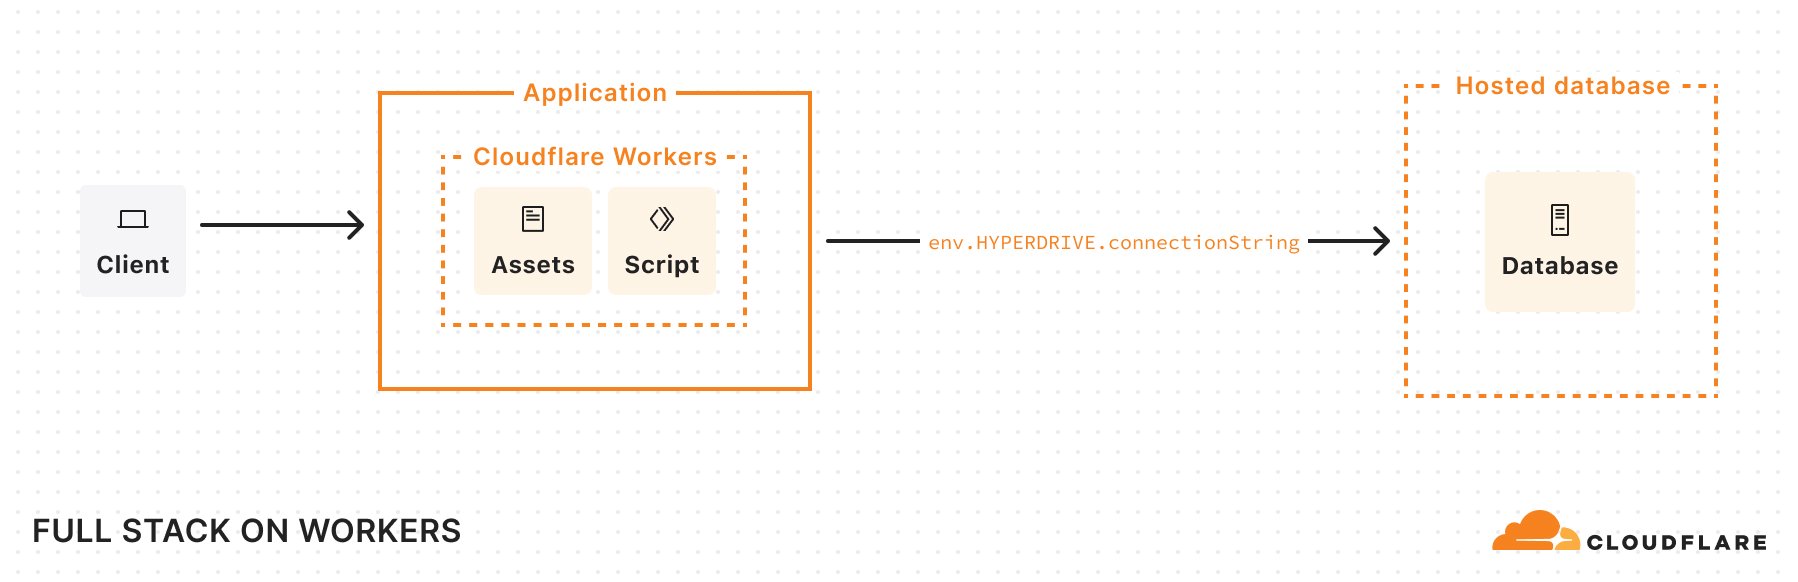
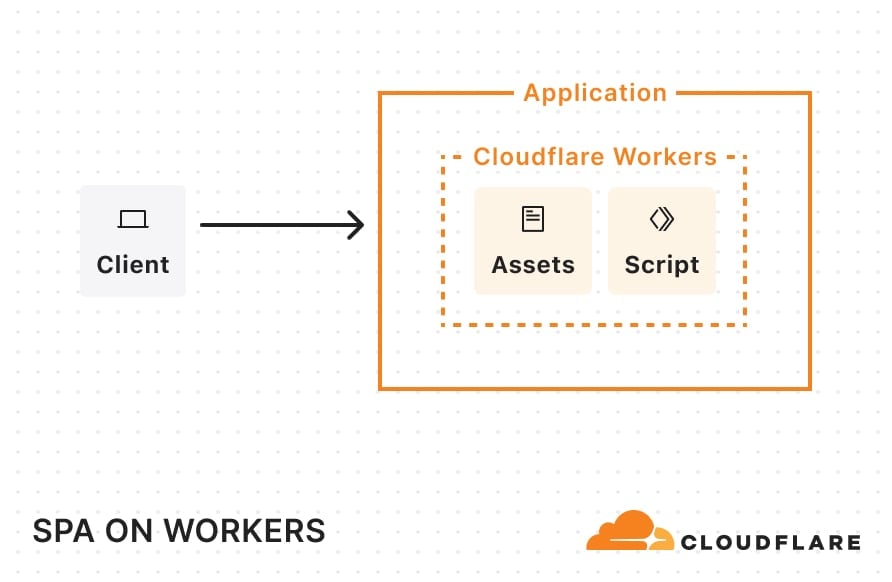
Once deployed, this single-page application (SPA) architecture will look something like this: 


When a request comes in, Cloudflare looks at the pathname and automatically serves any static assets that match that pathname. For example, if your static assets directory includes a blog.html file, requests for example.com/blog get that file. 

Static sites

If you have a static site created by a static site generator (SSG) like Astro, all you need to do is create a wrangler.jsonc file (or wrangler.toml) and tell Cloudflare where to find your built assets: 

// wrangler.jsonc 

{
  "name": "my-static-site",
  "compatibility_date": "2025-04-01",
  "assets": {
    "directory": "./dist",
  }
}

Once you’ve added this configuration, you can simply build your project and run wrangler deploy.  Your entire site will then be uploaded and ready for traffic on Workers. Once deployed and requests start flowing in, your static site will be cached across Cloudflare’s network.


You can try starting a fresh Astro project on Workers today by running:

npm create cloudflare@latest my-astro-app -- --framework=astro

You can see our other supported Frameworks and how to get started in our framework guides

Single-page applications (SPAs) 

If you have a single-page application, you can explicitly enable single-page-application mode in your Wrangler configuration: 

{
 "name": "example-spa-worker-hyperdrive",
 "main": "api/index.js",
 "compatibility_flags": ["nodejs_compat"],
 "compatibility_date": "2025-04-01",
 },
 "assets": {
   "directory": "./dist",
   "binding": "ASSETS",
   "not_found_handling": "single-page-application"
 },
 "hyperdrive": [
   {
     "binding": "HYPERDRIVE",
     "id": "d9c9cfb2587f44ee9b0730baa692ffec",
     "localConnectionString": "postgresql://myuser:mypassword@localhost:5432/mydatabase"
   }
 ],
 "placement": {
   "mode": "smart"
 }
}

By enabling this, the platform assumes that any navigation request (requests which include a Sec-Fetch-Mode: navigate header) are intended for static assets and will serve up index.html whenever a matching static asset match cannot be found. For non-navigation requests (such as requests for data) that don’t match a static asset, Cloudflare will invoke the Worker script. With this setup, you can render the frontend with React, use a Worker to handle back-end operations, and use Vite to help stitch the two together. This is a great option for porting over older SPAs built with create-react-app, which was recently sunset

Another thing to note in this Wrangler configuration file: we’ve defined a Hyperdrive binding and enabled Smart Placement. Hyperdrive lets us use an existing database and handles connection pooling. This solves a long-standing challenge of connecting Workers (which run in a highly distributed, serverless environment) directly to traditional databases. By design, Workers operate in lightweight V8 isolates with no persistent TCP sockets and a strict CPU/memory limit. This isolation is great for security and speed, but it makes it difficult to hold open database connections. Hyperdrive addresses these constraints by acting as a “bridge” between Cloudflare’s network and your database, taking care of the heavy lifting of maintaining stable connections or pools so that Workers can reuse them.  By turning on Smart Placement, we also ensure that if requests to our Worker originate far from the database (causing latency), Cloudflare can choose to relocate both the Worker—which handles the database connection—and the Hyperdrive “bridge” to a location closer to the database, ​​reducing round-trip times. 

SPA example: Worker code

Let’s look at the “Deploy to Cloudflare” example at the top of this blog. In api/index.js, we’ve defined an API (using Hono) which connects to a hosted database through Hyperdrive. 

import { Hono } from "hono";
import postgres from "postgres";
import booksRouter from "./routes/books";
import bookRelatedRouter from "./routes/book-related";

const app = new Hono();

// Setup SQL client middleware
app.use("*", async (c, next) => {
 // Create SQL client
 const sql = postgres(c.env.HYPERDRIVE.connectionString, {
   max: 5,
   fetch_types: false,
 });

 c.env.SQL = sql;

 // Process the request
 await next();

 // Close the SQL connection after the response is sent
 c.executionCtx.waitUntil(sql.end());
});

app.route("/api/books", booksRouter);
app.route("/api/books/:id/related", bookRelatedRouter);


export default {
 fetch: app.fetch,
};

When deployed, our app’s architecture looks something like this: 


If Smart Placement moves the placement of my Worker to run closer to my database, it could look like this: 

Server-Side Rendering (SSR)

If you want to handle rendering on the server, we support a number of popular full-stack frameworks

Here’s a version of our previous example, now using React Router v7’s server-side rendering:

You could also use Next.js with the OpenNext adapter, or any other framework listed in our framework guides

Deploy to Workers, with as few changes as possible

Node.js compatibility

We’ve also continued to make progress supporting Node.js APIs, recently adding support for the crypto, tls, net, and dns modules. This allows existing applications and libraries that rely on these Node.js modules to run on Workers. Let’s take a look at an example:

Previously, if you tried to use the mongodb package, you encountered the following error:

Error: [unenv] dns.resolveTxt is not implemented yet!

This occurred when mongodb used the node:dns module to do a DNS lookup of a hostname. Even if you avoided that issue, you would have encountered another error when mongodb tried to use node:tls to securely connect to a database.

Now, you can use mongodb as expected because node:dns and node:tls are supported. The same can be said for libraries relying on node:crypto and node:net.

Additionally, Workers now expose environment variables and secrets on the process.env object when the nodejs_compat compatibility flag is on and the compatibility date is set to 2025-04-01 or beyond. Some libraries (and developers) assume that this object will be populated with variables, and rely on it for top-level configuration. Without the tweak, libraries may have previously broken unexpectedly and developers had to write additional logic to handle variables on Cloudflare Workers.

Now, you can just access your variables as you would in Node.js.

const LOG_LEVEL = process.env.LOG_LEVEL || "info";

Additional Worker CPU time

We have also raised the maximum CPU time per Worker request from 30 seconds to 5 minutes. This allows for compute-intensive operations to run for longer without timing out. Say you want to use the newly supported node:crypto module to hash a very large file, you can now do this on Workers without having to rely on external compute for CPU-intensive operations.

Workers Builds 

We’ve also made improvements to Workers Builds, which allows you to connect a Git repository to your Worker, so that you can have automatic builds and deployments on every pushed change. Workers Builds was introduced during Builder Day 2024, and initially only allowed you to connect a repository to an existing Worker. Now, you can bring a repository and immediately deploy it as a new Worker, reducing the amount of setup and button clicking needed to bring a project over. We’ve improved the performance of Workers Builds by reducing the latency of build starts by 6 seconds — they now start within 10 seconds on average. We also boosted API responsiveness, achieving a 7x latency improvement thanks to Smart Placement. 

  • Note: On April 2, 2025, Workers Builds transitioned to a new pricing model, as announced during Builder Day 2024. Free plan users are now capped at 3,000 minutes of build time, and Workers Paid subscription users will have a new usage-based model with 6,000 free minutes included and $0.005 per build minute pricing after. To better support concurrent builds, Paid plans will also now get six (6) concurrent builds, making it easier to work across multiple projects and monorepos. For more information on pricing, see the documentation.

You can also set up Workers Builds to run on non-production branches, and preview URLs will be posted back to GitHub as a comment

Bind the Images API to your Worker

Last week, we wrote a blog post that covers how the Images binding enables more flexible, programmatic workflows for image optimization.

Previously, you could access image optimization features by calling fetch() in your Worker. This method requires the original image to be retrievable by URL. However, you may have cases where images aren’t accessible from a URL, like when you want to compress user-uploaded images before they are uploaded to your storage. With the Images binding, you can directly optimize an image by operating on its body as a stream of bytes.

To learn more, read our guide on transforming an image before it gets uploaded to R2.

Start building today

We’re excited to see what you’ll build, and are focused on new features and improvements to make it  easier to create any application on Workers. Much of this work was made even better by community feedback, and we encourage everyone to join our Discord to participate in the discussion. 

Helpful resources to get you started:

Cloudflare Pages now partners with your favorite CMS

Post Syndicated from Nevi Shah original https://blog.cloudflare.com/cloudflare-pages-headless-cms-partnerships/

Cloudflare Pages now partners with your favorite CMS

Cloudflare Pages now partners with your favorite CMS

Interest in headless CMSes has seen spectacular growth over the past few years with many businesses looking to adopt the tooling. As audiences consume content through new interfaces taking different forms — smartphones, wearables, personal devices — the idea of decoupling content with its backend begins to provide a better experience both for developing teams and end users. Because of this, we believe there are and will be more opportunities in the future to utilize headless CMSes which is why today, we’re thrilled to announce our partnerships with Sanity and Strapi and also share existing integrations with Contentful and WordPress — all your favorite CMS providers.

A little on headless CMSes

Headless CMSes are one of the most common API integrations we’ve seen so far among you and your teams — whether it’s for your marketing site, blog or e-commerce site. It provides your teams the ability to input the contents of your site through a user-friendly interface and store them in a database, so that updates can easily be made to your site without touching the code base. As a Jamstack platform, a big part of our roadmap is understanding how we can build our own tools or provide integrations for tools that fit in with your development ecosystem and Pages, which is why in August this year we announced Pages support for Deploy Hooks.

What’s a hook got to do with it?

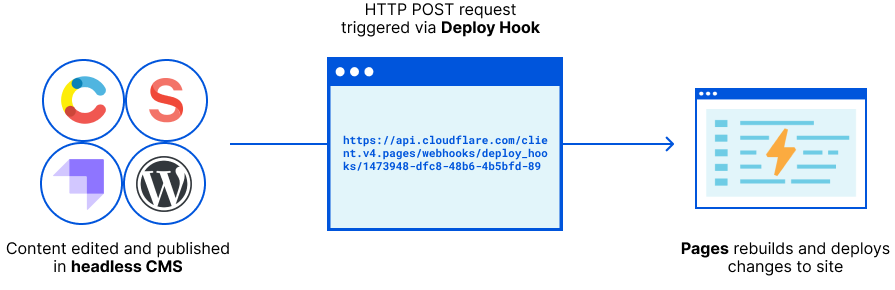
Deploy Hooks are the key to what allows you to connect and trigger deployments in Pages via updates made in your headless CMS. As developers, instead of getting pinged several times a day to make content updates to your site, your marketing team can update the site directly within the headless CMS’s interface by way of a Deploy Hook. This is a URL created on Pages that accepts an HTTP POST request to trigger new deployments outside the realm of your git commands. You can configure settings within your CMS to accept the Deploy Hook so that anytime content is updated within your CMS, a new deployment is started in the Pages dashboard automatically — it couldn’t be any easier!

Cloudflare Pages now partners with your favorite CMS

How can I create a Deploy Hook?

Within the Pages interface, there are two things you need to do to create your Deploy Hook:

  1. Choose your Deploy Hook name: You can name your deploy hook anything you’d like
  2. Select the Branch to Build: You can specify which branch will be built and deployed when the URL is requested with the Deploy Hook.

Once you are given your Deploy Hook, you’re all set to set up a webhook within your chosen CMS where you will paste your Deploy Hook.

That’s it! Now leave it to your marketing team to update their rich content and watch the builds trigger automatically to update your site!

Our partners

Of course, Deploy Hooks is just a starting point of ways we can provide a better dev experience for your team when using the headless CMS of your choice with your Pages site. But our story of integrations does not stop here. Introducing our CMS partners and integrations: Sanity, Strapi, Contentful, and WordPress!

Cloudflare Pages now partners with your favorite CMS

We continue to see the highest usage rates of these four CMSes on Pages among you and your teams, and in the months to come we’ll be working closely with our partners to build even more for you.

We’re delighted to partner with Cloudflare and excited by this new release from Cloudflare Pages. At Sanity, we care deeply about people working with content on our platform. Cloudflare’s new deploy hooks allow developers to automate builds for static sites based on content changes, which is a huge improvement for content creators. Combining these with structured content and our GROQ-powered Webhooks, our customers can be strategic about when these builds should happen. We’re stoked to be part of this release and can’t wait to see what the community will build with Sanity and Cloudflare!
Even Westvang, Co-founder, Sanity.io

Check out Sanity’s video tutorial on how to build your site using Pages and Sanity!

At Strapi, we’re excited about this partnership with Cloudflare because it enables developers to abstract away the complexity of deploying changes to production for content teams. By using the Deploy Hook for Strapi, everyone can push new content and updates quickly and autonomously.
Pierre Burgy, CEO, Strapi.io

With this integration, our customers can work more efficiently and cross-functionally with their teams. Marketing teams can update Contentful directly to automatically trigger deployments without relying on their developers to update any of their code base, which results in a better, more productive experience for all teams involved.
– Jeff Blattel, Director of Technical Partnerships at Contentful

Get started

For now, to learn more about how you can connect your Pages project to one of our partner CMSes, check out our Deploy Hooks documentation to deploy your first project today!