Tag Archives: Quantum Technologies

Quantum-resistant signing on AWS, Part 2: Enforce your ML-DSA algorithm policy with SCPs and IAM

Post Syndicated from Harshvardhan Chunawala original https://aws.amazon.com/blogs/security/quantum-resistant-signing-on-aws-part-2-enforce-your-ml-dsa-algorithm-policy-with-scps-and-iam/

You want to set a cryptographic algorithm policy and stop non-compliant choices from being made in your Amazon Web Services (AWS) environment. This post shows you how. As you adopt post-quantum cryptography, one of the first decisions you face is which algorithms and parameter sets fit your business needs, balancing security against signature size, key size, and performance. Your cloud environment’s job is to let you express that decision and enforce it consistently, so an approved choice stays fully usable while an excluded one cannot be introduced. This post works through one concrete example on AWS: taking an organization’s cryptographic algorithm policy and turning it into preventive and detective controls. The same patterns apply to whatever your approved set is today and whatever it becomes as standards evolve.

This post is Part 2 of a two-part series on quantum-resistant signing on AWS. Part 1, Build a software supply chain with ML-DSA, is for builders and constructs an end-to-end ML-DSA signing pipeline for binaries, container images, and software bills of materials. This part is for the security, governance, and compliance teams who decide which algorithms that pipeline, and everything else in the organization, is permitted to use, and who need that decision enforced.

AWS Key Management Service (AWS KMS) supports the ML-DSA digital signature scheme (FIPS 204) through three parameter sets, ML-DSA-44, ML-DSA-65, and ML-DSA-87, targeting NIST security categories 2, 3, and 5. All three are strong, standardized choices. Each one trades signature size, key size, and speed against security margin, the amount of cryptographic strength a parameter set holds in reserve above its target security category. ML-DSA-44 is the most compact and fastest. ML-DSA-65 and ML-DSA-87 carry a larger security margin, which is what you want for signatures that must stay trustworthy over a long lifetime.

Throughout this post, the examples use the same example policy: an organization that has standardized on ML-DSA-65 and ML-DSA-87 and wants ML-DSA-44 kept out of its approved set. That is a standardization decision, not a judgment that ML-DSA-44 is insecure (see the following note). Wherever you see ML-DSA-44 in the controls that follow, read it as the variant your policy doesn’t include; the mechanics are identical for any allow/deny split you choose. The approved set here is also the one the Part 1 architecture deploys: ML-DSA-87 for the root certificate authority (CA) and ML-DSA-65 for the subordinate CA and the code-signing key. Part 1 makes the choice; this post makes it stick.

Note: ML-DSA-44 is a valid choice. ML-DSA-44 is a fully NIST-standardized parameter set (FIPS 204) at NIST security category 2, which targets roughly 128-bit-class classical security (category 2 is benchmarked against the collision resistance of SHA-256). It produces the smallest signatures and public keys of the three variants (a 1312-byte public key and 2420-byte signature) and is the fastest to sign and verify, which makes it a strong fit for constrained devices, high-volume signing, and bandwidth- or storage-sensitive workloads. You would choose ML-DSA-65 or ML-DSA-87 instead to gain extra security margin for long-lived signatures or to align with an internal standard, not because ML-DSA-44 is weak.

What success looks like

The approved variants (ML-DSA-65 and ML-DSA-87 in the example) remain fully usable throughout. What you want to rule out is the introduction of a variant outside the policy (here, ML-DSA-44). Concretely, within the AWS service surfaces in scope, principals shouldn’t be able to:

  • Create ML-DSA-44 key material
  • Use existing ML-DSA-44 keys for signing or verification
  • Stand up private certificate authorities (CAs) that would introduce ML-DSA-44.

And any drift from those settings should be detected.

Scope and limitations

These controls operate on AWS service APIs, principally AWS KMS, AWS Private Certificate Authority (AWS Private CA), and AWS Certificate Manager (ACM). They don’t and can’t govern cryptography that runs on compute you control. For example, OpenSSL or an application might perform ML-DSA-44 signing on an Amazon Elastic Compute Cloud (Amazon EC2) instance, container, or AWS Lambda function. Protocol-level use, such as OpenSSH’s hybrid ssh-mldsa44-ed25519 public key authentication, is also outside the reach of Service control policies (SCPs) and AWS Identity and Access Management (IAM) and isn’t addressed in this post.

Certificate material brought in through acm:ImportCertificate or iam:UploadServerCertificate is also not algorithm-aware (see the Private CA section). Other TLS-terminating or signing services (for example Amazon CloudFront and Amazon API Gateway) and AWS IAM Roles Anywhere aren’t covered in this post and should be assessed separately. (Part 1 of this series uses IAM Roles Anywhere with ML-DSA certificates; controls for that service are out of scope here.)

These controls are intended to be applied as defense in depth. You can apply all of them or only a subset, depending on how prescriptive you want to be:

  • A blanket SCP at the organization root prevents member accounts from creating or using ML-DSA-44 keys. (SCPs don’t apply to the management account, so workloads there aren’t restricted.)
  • An SCP at a production organizational unit (OU) restricts keys only in production accounts.
  • If you need flexibility inside an account, use IAM permission boundaries instead of account-wide settings enforced through an SCP.

Choose the combination that matches your operating model. The policy examples here are written to apply across all AWS Regions. If you need to scope a control to specific Regions, add an aws:RequestedRegion condition.

The policies in this post are illustrative starting points. Authoring, validating, and maintaining the specific SCPs, IAM policies, and permission boundaries for your environment is your responsibility. Test all policies in a non-production environment before deployment and adjust example values (such as policy names and key Amazon Resource Names (ARNs)) to match your organization’s approved standards.

A note on cryptographic agility

Your algorithm policy isn’t fixed forever, and these controls shouldn’t be either. The point of expressing the policy as AWS controls is that you can revise it as your needs and the relevant standards change, tightening, loosening, or swapping the approved set without re-architecting. Treat the examples here as a template you adjust to whatever your current policy is.

A deny-based control that names specific algorithms is, in effect, an allow-list of everything it does not name. The risk is default-allow: any parameter set you have not explicitly denied is permitted, so a newly introduced variant, including one you have not yet evaluated, becomes usable until you notice it and add it to the deny list. Deprecation of an already-approved variant is easy to handle in this model, because you simply add the deprecated variant to the deny list. What the model does not catch on its own is the arrival of something new. Review these controls periodically and pair the deny-list with detection so a variant outside your policy surfaces quickly rather than waiting to be discovered.

The alternative is to write the condition against the approved set rather than the excluded one. A Deny that uses StringNotEquals with a list of approved key specs fires when the request’s key spec matches none of them, so a new or not-yet-evaluated variant is blocked by default until you add it. That closes the default-allow gap, at the cost of a policy update before anyone can use a newly approved variant. The family-level SCP in Part 1 of this series takes this shape: it denies creation of any signing key whose key spec isn’t ML_DSA_*. The examples in this post take the other shape and name the excluded variant, so that approved variants stay usable without a policy change. Both are valid. Choose based on whether you would rather block something new first and approve it later, or notice it first and decide then.

{
  "Sid": "OnlyApprovedMlDsaVariants",
  "Effect": "Deny",
  "Action": "kms:CreateKey",
  "Resource": "*",
  "Condition": {
    "StringLike": {
      "kms:KeySpec": "ML_DSA_*"
    },
    "StringNotEquals": {
      "kms:KeySpec": ["ML_DSA_65", "ML_DSA_87"]
    }
  }
}

The StringLike clause scopes the statement to ML-DSA key specs so it doesn’t affect other key types; the StringNotEquals clause denies any ML-DSA variant outside the approved list.

Just as algorithms and key sizes will be introduced over time, or move from approved to unapproved, so will AWS service operations. The set of operations through which an ML-DSA-44 key can be used today (AWS KMS Sign, Verify, and GetPublicKey) reflects current service capabilities and might expand as AWS releases new features. If your policy is to block use in addition to creation, you should periodically review the list of operations you restrict, because services evolve over time.

Background: Key spec compared to signing algorithm

AWS KMS support for ML-DSA introduces three key specs—ML_DSA_44, ML_DSA_65, and ML_DSA_87—that all use a single post-quantum signing algorithm: ML_DSA_SHAKE_256. This distinction drives which controls are effective.

  1. kms:KeySpec: Reflects the KeySpec property of the key. It’s evaluated both on CreateKey (the requested key spec) and on AWS KMS key resource operations that act on a specific key, including Sign, Verify, and GetPublicKey. This makes kms:KeySpec a reliable lever for both preventing creation of ML-DSA-44 keys and restricting use of existing ones, because it can single out ML_DSA_44 from ML_DSA_65 and ML_DSA_87.
  2. kms:SigningAlgorithm: Reflects the signing algorithm supplied on Sign and Verify, which is ML_DSA_SHAKE_256 for all three variants. It therefore can’t distinguish ML-DSA-44 from the approved variants and shouldn’t be used for this purpose.

The practical consequence: for keys held in AWS KMS, preventing ML-DSA-44 key material from being created is the most robust single control. If no ML-DSA-44 KMS keys exist, none can be used for signing through AWS KMS and none can become the subject key of a certificate. CA keys and TLS server keys are separate material: AWS Private CA generates and holds a CA’s key pair in its own HSMs, and ACM-issued, imported, or uploaded TLS certificates carry their own keys, so those surfaces are governed by the AWS Private CA and certificate controls later in this post. Where ML-DSA-44 KMS keys already exist, their use can additionally be restricted with kms:KeySpec.

Organization and account-level blocking using SCPs

SCPs can be applied at the organization root or to a specific OU to restrict ML-DSA-44. Placement determines the effective scope: it applies organization-wide when attached at the root; attached to an OU, it applies to the accounts within that OU. An SCP is the broadest-scope preventive control available.

Note that SCPs apply to member accounts and OUs but not to the organization’s management account, so avoid running ML-DSA-44-capable workloads in the management account, where an SCP will not restrict them.

The following example SCP denies both the creation of ML-DSA-44 keys (kms:CreateKey) and their use (kms:Sign, kms:Verify, kms:GetPublicKey), matching on the ML_DSA_44 key spec in each case. The creation deny stops new keys from being created; the usage deny covers keys that already exist, whether created before the SCP was attached or living in an account that later joins the OU, because kms:KeySpec is also evaluated at request time on those usage operations.SCPs are guardrails: a Deny in an SCP can’t be overridden by any IAM policy within member accounts.

Attach the following SCP at the organization root (or relevant OU):

{
  "Version": "2012-10-17",
  "Statement": [
    {
      "Sid": "DenyMLDSA44KeyCreation",
      "Effect": "Deny",
      "Action": "kms:CreateKey",
      "Resource": "*",
      "Condition": {
        "StringEquals": {
          "kms:KeySpec": "ML_DSA_44"
        }
      }
    },
    {
      "Sid": "DenyMLDSA44KeyUsage",
      "Effect": "Deny",
      "Action": [
        "kms:Sign",
        "kms:Verify",
        "kms:GetPublicKey"
      ],
      "Resource": "*",
      "Condition": {
        "StringEquals": {
          "kms:KeySpec": "ML_DSA_44"
        }
      }
    }
  ]
}

Scope the usage deny to the three key-spec-aware actions. Limit the use of Deny to kms:Sign, kms:Verify, and kms:GetPublicKey (testing confirmed kms:KeySpec is evaluated on all three). Avoid a blanket kms:*: a wildcard that would also catch management operations such as DescribeKey, DisableKey, and ScheduleKeyDeletion, which you need to inspect or clean up those same keys, effectively locking you out of managing the keys you’re trying to remove. If you use multi-Region keys, also add kms:ReplicateKey to the creation deny: replicating an ML-DSA-44 primary key creates a new ML-DSA-44 key in another Region, and kms:KeySpec is evaluated on ReplicateKey as well.

Combining with a family-level guardrail. This SCP governs which ML-DSA parameter set is allowed; it says nothing about RSA or ECDSA. Part 1 of this series includes a complementary SCP that denies creation of any signing key whose key spec isn’t ML-DSA. Attached together, they require every new signing key to be ML-DSA and to be an approved variant.

Operational considerations. A blanket Deny at the organization root is the strongest control but has trade-offs: it removes any ability to create ML-DSA-44 keys anywhere in scope, with no exception path, which can block legitimate testing and might cause infrastructure as code (IaC) or pipeline runs that attempt ML-DSA-44 creation to fail. To preserve flexibility, consider scoping the Deny to a production OU and using IAM permission boundaries (see the following section) in build and non-production accounts.

What the caller sees. When an SCP denies a request, the caller receives an AccessDenied error indicating an explicit deny in a service control policy. For same-account and same-organization requests, the error includes the type of the denying policy and, as the enhanced error messages roll out across services, its ARN. The error doesn’t expose the SCP policy contents, and the user being blocked often can’t see the SCPs applied to their environment. Document the SCP ARN and its purpose internally so support teams can map an AccessDenied quickly.

Prevent ML-DSA-44 key creation in AWS KMS (principal-level)

The following IAM policy blocks ML-DSA-44 at the principal level. It is the identity-based counterpart to the SCP shown earlier, useful when you want per-account or per-role control rather than an organization-wide guardrail. Attach it to the IAM role or user you want to constrain.

{
  "Version": "2012-10-17",
  "Statement": [
    {
      "Sid": "DenyMLDSA44KeyCreation",
      "Effect": "Deny",
      "Action": "kms:CreateKey",
      "Resource": "*",
      "Condition": {
        "StringEquals": {
          "kms:KeySpec": "ML_DSA_44"
        }
      }
    }
  ]
}

Key points:

  1. The condition value is ML_DSA_44 (underscores, not hyphens).
  2. This policy blocks CreateKey only. To also block use of existing ML-DSA-44 keys at the principal level, add the Sign, Verify, and GetPublicKey deny shown in the Restricting use of existing ML-DSA-44 keys section.
  3. For comprehensive, non-overridable coverage, deploy as an SCP rather than relying solely on principal-level policies.

IAM permission boundaries

IAM permission boundaries set the maximum permissions an identity-based policy can grant to an IAM role or user and can be used as an alternative or complement to using SCPs. The effective permissions are the intersection of the identity-based policy and the boundary, and a Deny in a boundary can’t be overridden by an attached policy. Boundaries are useful where you want per-account or per-role flexibility (for example, in build or non-production accounts) rather than a blanket, multi-account deny.

Operational consideration. A permission boundary only takes effect on principals that have it attached. To rely on boundaries as a control, you need a mechanism to enforce the boundary on all IAM principals programmatically. One example enforcement mechanism would be an SCP that denies iam:CreateRole, iam:CreateUser, iam:PutRolePermissionsBoundary, and iam:PutUserPermissionsBoundary unless the approved boundary is set (using the iam:PermissionsBoundary condition key), and denies iam:DeleteRolePermissionsBoundary and iam:DeleteUserPermissionsBoundary outright so the boundary can’t be removed after the fact. You would also want to probe for non-conforming principals periodically and respond, perhaps by automatically attaching the PermissionsBoundary. IAM users shouldn’t be used, but the enforcement should account for the possibility that they exist.

Because a boundary only sets a ceiling and does not itself grant anything, it opens with Allow on all actions, then denies ML-DSA-44 key creation specifically. The following permission boundary denies creation of ML-DSA-44 keys:

{
  "Version": "2012-10-17",
  "Statement": [
    {
      "Sid": "AllowAll",
      "Effect": "Allow",
      "Action": "*",
      "Resource": "*"
    },
    {
      "Sid": "DenyMLDSA44KeyCreation",
      "Effect": "Deny",
      "Action": "kms:CreateKey",
      "Resource": "*",
      "Condition": {
        "StringEquals": {
          "kms:KeySpec": "ML_DSA_44"
        }
      }
    }
  ]
}

To also block use of existing ML-DSA-44 keys for the principals carrying this boundary, add the Sign, Verify, and GetPublicKey deny statement shown in the following section (which also uses kms:KeySpec).

Restricting use of existing ML-DSA-44 keys

As described in the Background section, kms:KeySpec is also evaluated on Sign, Verify, and GetPublicKey, reflecting the KeySpec of the key being used. You can therefore deny those operations when kms:KeySpec equals ML_DSA_44 while continuing to permit ML_DSA_65 and ML_DSA_87. The IAM policy below, attached to an IAM principal, does exactly that.

{
  "Version": "2012-10-17",
  "Statement": [
    {
      "Sid": "DenyMLDSA44KeyUsage",
      "Effect": "Deny",
      "Action": [
        "kms:Sign",
        "kms:Verify",
        "kms:GetPublicKey"
      ],
      "Resource": "*",
      "Condition": {
        "StringEquals": {
          "kms:KeySpec": "ML_DSA_44"
        }
      }
    }
  ]
}

This deny can also live in an AWS KMS key policy. The same kms:KeySpec deny can be placed directly in the key policy of an AWS KMS key. A key policy is a resource policy, so the statement must include a Principal element. Identity policies and SCPs do not name principals to which they apply. A deny in the key policy is a resource-side backstop that protects a specific key, while an SCP gives non-overridable organization-wide coverage. To turn the previous example into an AWS KMS key policy, add a Principal element to the statement (for example "Principal": {"AWS": "*"}, or a more specific principal), and keep the rest of it the same.

Additional approaches

Depending on your goals you might also want to remove the key material itself rather than only deny its use. Remember that it is difficult to know what data has been signed by a specific key, unless you track that somehow. Deleting a key that was used will make signature verification impossible. Take great care to make sure keys are not used before deleting them.

  1. Disable or schedule deletion of the keys. Disabling stops key use immediately and is reversible. Key deletion is definitive but irreversible after the waiting period, so confirm before scheduling.
  2. Deny Sign, Verify, and GetPublicKey by specific key ARN. You can target named keys rather than the whole key spec. To do this, you would list the exact key ARNs in the Resource element of the IAM policy (no condition key required). This is effective for targeting a single key specifically, but it is difficult to maintain lists of key ARNs. Use this strategy sparingly. If you’re considering using an IAM policy naming a key ARN, remember that a Deny in the key policy of the target key accomplishes the same goal and is attached to the key itself.
  3. Finding existing keys (only needed if you disable or delete). A Deny in an IAM policy or SCP, based on kms:KeySpec, doesn’t require you to know which keys exist – it applies by key spec at request time. If you want to disable or delete existing ML-DSA-44 keys, you need to locate them. AWS KMS has no server-side filter for key spec, so you must enumerate keys with ListKeys and call DescribeKey and inspect each KeySpec. This client-side filtering pattern is common across AWS APIs and is well supported by pagination in the AWS SDKs. You can also use AWS Config to record and query KMS key resources.

Reference: Choosing a KMS key spec – kms:KeySpec condition key

Approved ML-DSA variants and control of AWS Private CA

AWS Private CA sets a certificate authority’s (CA’s) signing algorithm at creation time, in the CertificateAuthorityConfiguration parameter of CreateCertificateAuthority (valid values include ML_DSA_44, ML_DSA_65, and ML_DSA_87). There is currently no condition key for the algorithm, so an SCP cannot enforce signing algorithm. The approach in this section controls who can create CAs and pins the algorithm in that trusted path, backed by AWS CloudTrail-based detection.

Recommended approach

  1. Restrict who can create CAs. Deny acm-pca:CreateCertificateAuthority broadly via SCP, and allow it only for a small set of trusted roles or an approved provisioning pipeline. This removes the ability for arbitrary principals to stand up a CA with an unapproved algorithm.
  2. Pin the algorithm in the trusted path. Have that approved pipeline or infrastructure-as-code template hard-code SigningAlgorithm to ML_DSA_65 or ML_DSA_87 in CertificateAuthorityConfiguration. Because AWS Private CA exposes no algorithm condition key, this provisioning path is the enforcement point. Note that the CA’s algorithm pins the signature on the certificates it issues; the subject key in each certificate comes from the CSR, which AWS Private CA copies without validating its algorithm, so pin the CSR key algorithm in the same issuance pipeline.
  3. Control the trust chain. On the PKI side, only add approved CAs to your trust stores and issuance hierarchies, and do not trust or subordinate CAs that could issue ML-DSA-44. This prevents an unapproved CA from being introduced into a trusted path.
  4. Detect drift. Use CloudTrail to capture CreateCertificateAuthority calls and AWS Config to flag any CA whose configuration uses ML_DSA_44, so an unapproved CA is caught quickly.

Part 1 of this series shows what this looks like in practice: it creates an ML-DSA-87 root CA and an ML-DSA-65 subordinate CA with CreateCertificateAuthority, activates them, and distributes the resulting chain to verifiers. In the model described here, those are the calls that only your approved provisioning pipeline is allowed to make.

Setting the ML-DSA value in CertificateAuthorityConfiguration. The same variant goes in both the KeyAlgorithm and SigningAlgorithm fields (for example, KeyAlgorithm=ML_DSA_65 with SigningAlgorithm=ML_DSA_65). Note a difference in signing algorithms between AWS KMS and AWS Private CA. With AWS Private CA, the SigningAlgorithm takes the variant value directly (ML_DSA_44, ML_DSA_65, and ML_DSA_87), and doesn’t accept ML_DSA_SHAKE_256. In contrast, AWS KMS uses ML_DSA_SHAKE_256 as its signing algorithm. Be aware that some older AWS Command Line Interface (AWS CLI) builds omitted descriptions of the ML-DSA variants from the built-in CLI help, so don’t rely on the help in the AWS CLI to determine valid values. For more information, see CertificateAuthorityConfiguration API Reference.

Known limitation. Some surfaces have no algorithm condition key, so you enforce them through provisioning and detection rather than policy. acm-pca:CreateCertificateAuthority has no condition key for the algorithm, and acm:ImportCertificate and iam:UploadServerCertificate are not algorithm-aware, so a disallowed signature setting on a created, imported, or uploaded certificate cannot be blocked by an IAM policy or SCP condition. Govern these through your provisioning process, restrict who can call them, and deny the import and upload actions entirely where they are not required. The controls above remain the available mitigation.

In particular, iam:UploadServerCertificate doesn’t support any method to prevent use of particular algorithms, and AWS doesn’t recommend using this API to generate and upload certificates. This API predates ACM and exists mainly to cover AWS Regions or partitions where ACM is not yet available. While a new Region or partition is being built out, workloads can still need a TLS server certificate before ACM support has shipped there, and uploading a certificate to IAM gives you a place to store and reference it in the meantime. Once ACM is available in that Region, you should use ACM instead. Outside that narrow case, deny iam:UploadServerCertificate unless it is genuinely required.

ACM-issued leaf certificates. A CA’s own key and signing algorithm are separate from the leaf certificates that ACM issues from it. If you use ACM to request leaf certificates, you can constrain the leaf’s key algorithm with the acm:KeyAlgorithm condition key on acm:RequestCertificate. This lets you allow-list approved algorithms for leaf certificates using SCPs or IAM policies, similar to the AWS KMS examples earlier in this post. Be aware that, at the time of writing, ACM doesn’t offer ML-DSA leaf certificates. So a policy like this is a forward-looking defense-in-depth control rather than an immediate ML-DSA-44 risk. The IAM example below is illustrative (using example approved algorithms). Since this is an evolving part of the service, be sure to validate this in your environment before relying on it.

{
  "Version": "2012-10-17",
  "Statement": [
    {
      "Sid": "RestrictACMLeafKeyAlgorithm",
      "Effect": "Deny",
      "Action": "acm:RequestCertificate",
      "Resource": "*",
      "Condition": {
        "StringNotEqualsIfExists": {
          "acm:KeyAlgorithm": [
            "EC_secp384r1",
            "RSA_2048"
          ]
        }
      }
    }
  ]
}

This example uses StringNotEqualsIfExists so it denies only requests that specify a disallowed algorithm. With plain StringNotEquals, a request that omits acm:KeyAlgorithm would also be denied, because the missing key makes the condition evaluate true. Choose the operator that matches whether you want to block requests that leave the algorithm unspecified.

Prevent ML-DSA-44 usage in TLS for NLB and ALB

Elastic Load Balancing, for both network load balancers (NLB) and application load balancers (ALB), terminates TLS on behalf of your applications. The certificates used by these listeners are requested through or imported into ACM, or uploaded to IAM. A listener’s configured security policy and its certificate determine what’s offered during negotiation. At the time of writing, ACM requests and imports accept RSA and ECDSA keys only, and NLB and ALB listeners accept RSA and ECDSA certificates only, so no ML-DSA certificate can be bound to a listener today. As with the ACM leaf-certificate policy earlier, the controls in this section are forward-looking defense in depth rather than a mitigation of an immediate ML-DSA-44 risk.

Certificate controls (the effective mechanism for ML-DSA-44)

Because the listener API calls reference a certificate only by ARN, you can’t write an SCP on CreateListener, ModifyListener, or AddListenerCertificates that inspects the certificate’s algorithm. IAM conditions can’t reference attributes of a separately-referenced resource. Keeping ML-DSA-44 out of TLS therefore relies on there being no ML-DSA-44 certificate material to associate:

  1. Configure your private CA to issue only ML_DSA_65 or ML_DSA_87 certificates, and control who can create CAs.
  2. Prevent ML-DSA-44 key creation in AWS KMS, so that no KMS-held ML-DSA-44 key can become the subject key of a certificate. TLS server keys for ACM-issued, imported, or uploaded certificates are not KMS keys; those are governed by items 1 and 3.
  3. Control imported and uploaded certificates through your provisioning process or deny the import and upload actions where not required, as described in the AWS Private CA section.

Detective controls

CloudTrail records the certificate and listener API calls in this section: certificate creation and import (acm-pca:CreateCertificateAuthority, acm:ImportCertificate, iam:UploadServerCertificate) and listener configuration (CreateListener, ModifyListener, AddListenerCertificates). Whether the algorithm shows up in the event depends on what the call itself carries. Creation calls that take the algorithm as an input record it: kms:CreateKey logs the KeySpec, and acm-pca:CreateCertificateAuthority logs the signing algorithm. That makes CloudTrail effective for catching the creation of ML-DSA-44 key material or a CA. A listener binding references its certificate only by ARN, so the certificate’s algorithm does not appear in that event. To evaluate the algorithm of a bound or imported certificate, use AWS Config resource evaluation as the detective backstop.

Summary for TLS

The primary preventive control is the certificate material itself: with no ML-DSA-44 CA, no ML-DSA-44 KMS key, and certificate import and upload controlled, no ML-DSA-44 certificate can be issued or bound. Where you also operate an allow-list of permitted TLS security policies, the elasticloadbalancing:SecurityPolicy condition key (on CreateListener and ModifyListener) can additionally constrain which TLS policies listeners can use.

Summary of controls

The following table maps the example policy (allow ML-DSA-65 or ML-DSA-87, exclude ML-DSA-44) to the available controls. Modify the controls to limit use to the approved set of algorithms your policies require.

Area Control Status
Block ML-DSA-44 key creation (Organization-wide or for all accounts in an organization OU) SCP on kms:CreateKey using kms:KeySpec Fully supported via condition key
Block ML-DSA-44 key creation (per account or per role) IAM policy or permission boundary using kms:KeySpec Supported; requires programmatic enforcement of boundaries
Block use of existing ML-DSA-44 keys Deny Sign, Verify, and GetPublicKey using kms:KeySpec (key policy, IAM, or SCP); optionally disable and delete keys Supported using kms:KeySpec (not kms:SigningAlgorithm)
Only allow approved variants in Private CA Restrict who can create CAs; pin ML_DSA_65 or ML_DSA_87 in provisioning path No algorithm condition key; enforce using process and detection
Limit variants in imported or uploaded TLS certificates Process controls, or deny import or upload APIs (prefer ACM over iam:UploadServerCertificate) APIs aren’t algorithm-aware
Block use of ML-DSA-44 in TLS with network load balancers (NLB) and application load balancers (ALB) Restrict TLS policy using elasticloadbalancing:SecurityPolicy; control cert material TLS-policy restriction supported; no per-cert algorithm condition
Detect use of unapproved variants CloudTrail (API-level) and AWS Config custom rules Supported using custom AWS Config rules; not managed rules

Conclusion

In this post, you learned how to use ML-DSA as an example of turning a cryptographic algorithm policy into enforceable AWS controls. The key lever is the kms:KeySpec condition key: it keeps your approved parameter sets (ML-DSA-65 and ML-DSA-87) fully usable while preventing the creation and use of a parameter set you’ve excluded (ML-DSA-44) on the CreateKey, in addition to the Sign, Verify, and GetPublicKey operations, where kms:SigningAlgorithm can’t tell the variants apart. Applied as defense in depth across SCPs, IAM policies, permission boundaries, and KMS key policies, and extended to the surfaces that have no algorithm condition key (AWS Private CA, certificate import, and Elastic Load Balancing TLS) through provisioning controls plus AWS CloudTrail and AWS Config drift detection, these controls give you a consistent way to keep an unapproved variant out of your accounts.

The pattern isn’t specific to ML-DSA-44. Because your algorithm policy will change as standards and your own requirements evolve, treat these controls as a reusable template and re-point the same condition keys and guardrails at whatever your approved set becomes. This adaptability is the practical meaning of cryptographic agility: changing what you allow without re-engineering how you enforce it.

To get started, review ML-DSA keys in AWS KMS and Choosing a KMS key spec, and test the example policies in a non-production environment before you deploy them.

To see the workloads these controls govern, read Part 1 of this series, which builds a complete ML-DSA signing pipeline, from key creation and PKI through artifact signing and verification, using the approved set enforced here.

Resources

If you have feedback about this post, submit comments in the Comments section below.

Harshvardhan Chunawala

Harshvardhan Chunawala

Harshvardhan is a Solutions Architect and Security SME at AWS, where he leads cross-team efforts with Amazon Leo, Amazon Security, and AWS Agentic AI. A Golden Jacket awardee with over a decade in cloud security, he’s an advisory board member, Visiting Faculty, and researcher at Carnegie Mellon University. He advises C-suite executives, enterprise leaders, and startup founders worldwide on building secure, scalable cloud platforms.

Blake Roberts

Blake Roberts

Blake Roberts is a Sr. Solutions Architect at AWS and a member of the AWS Security Technical Field Community. He helps UK public sector customers navigate the security challenges and questions they face, covering post-quantum cryptography, threat detection and incident response, governance at a strategic scale, and more. Prior to joining AWS, Blake served in the British Army for 9 years. Blake is an avid reader and keen runner.

Quantum-resistant signing on AWS, Part 1: Build a software supply chain with ML-DSA

Post Syndicated from Harshvardhan Chunawala original https://aws.amazon.com/blogs/security/quantum-resistant-signing-on-aws-part-1-build-a-software-supply-chain-with-ml-dsa/

Software supply chain attacks have grown in both frequency and sophistication. Recent high-profile compromises of build systems and open source dependencies demonstrate that attackers increasingly target the trust mechanisms that verify software integrity. Those trust mechanisms rely on digital signature algorithms, and today many use traditional algorithms such as Rivest-Shamir-Adleman (RSA) and the Elliptic Curve Digital Signature Algorithm (ECDSA). If a sufficiently powerful quantum computer could forge these signatures, an attacker could potentially inject unauthorized code into signed artifacts, fabricate build attestations, or impersonate legitimate publishers. Using quantum-resistant signatures today defends against threats that might emerge in the future.

Since 2025, the Commercial National Security Algorithm Suite 2.0 (CNSA 2.0), published by the US National Security Agency (NSA), has required US National Security Systems (NSS) to “support and prefer” quantum-resistant signatures for software and firmware, with exclusive use mandated by 2030. The EU Cyber Resilience Act (CRA) takes full effect in December 2027. It requires manufacturers to maintain verifiable software integrity throughout a product’s lifecycle. Organizations that ship software to US federal agencies or sell products in the European market face converging deadlines that demand action now.

Amazon Web Services (AWS) provides the building blocks to construct a quantum-resistant software supply chain today using production-ready, generally available services. In this post, I show you how to combine Module-Lattice-Based Digital Signature Algorithm (ML-DSA) keys in AWS Key Management Service (AWS KMS), ML-DSA certificate hierarchies in AWS Private Certificate Authority, and ML-DSA trust anchors in AWS Identity and Access Management (IAM) Roles Anywhere into an end-to-end signing architecture for binaries, container images, and software bills of materials (SBOMs).

This post is Part 1 of a two-part series on adopting ML-DSA signatures, standardized in NIST FIPS 204 (ML-DSA) signatures, on AWS. As of Oct 2026, this series is the first end-to-end guide from any cloud provider for post-quantum signing across the software supply chain, from establishing an ML-DSA root of trust to enforcing algorithm policy across an organization. This part is for builders and walks through constructing and operating the signing pipeline. Part 2, Enforce your ML-DSA algorithm policy with SCPs and IAM, is for security and governance teams and shows how to turn the algorithm choices made here into preventive and detective controls across an organization.

Understanding the harvest now, forge later threat

After a cryptographically relevant quantum computer (CRQC) exists, the mathematical problems protecting today’s public-key cryptography can be solved efficiently. Attacks that are impractical today because of the computational complexity suddenly become practical using a CRQC. Most discussions of post-quantum cryptography (PQC) focus on the harvest now, decrypt later threat to data confidentiality. The asymmetric keys protecting data in transit can be efficiently derived using a CRQC, exposing the data that was meant to be protected. Digital signatures rely on the same asymmetric mathematical problems that a CRQC would break. This means that software supply chains face a parallel threat that targets integrity rather than confidentiality. An attacker who records signed artifacts today can forge those signatures in the future on a totally different artifact, using a CRQC.

Consider firmware signed with ECDSA P-256 and deployed to a fleet of embedded devices in 2026. These devices verify the firmware signature on every boot for their 15-year operational lifetime and can’t be recalled to re-sign after deployment. If a CRQC becomes operational in 2035, an attacker could produce a valid-looking signature over tampered firmware, and every device in the fleet would accept it as authentic on next restart. For organizations that rely on classical digital signatures as the primary mechanism for verifying software integrity, this weakens a critical link in the verification chain. This is why CNSA 2.0 specifies aggressive timelines for digital signatures: the artifacts you sign today must remain trustworthy for their full operational lifetime.

ML-DSA is designed to resist attacks from both classical and quantum computers. AWS KMS, AWS Private CA, and AWS IAM Roles Anywhere all support ML-DSA, making it possible to address the forge-later threat across your supply chain today without additional tooling.

Architecture overview: Five pillars of a quantum-resistant supply chain

The architecture comprises five trust pillars that together protect your software delivery pipeline:

  1. ML-DSA key management in AWS KMS – All signing keys are generated and protected in FIPS 140-3 Security Level 3 hardware security modules (HSMs). Private keys never leave the HSM boundary.
  2. ML-DSA public key infrastructure (PKI) through AWS Private CA – A certificate hierarchy (root CA, subordinate CA, end-entity certificates) binds ML-DSA public keys to identities, establishing who signed what. CA private keys are generated and stored in hardware-protected HSMs managed by the service and never leave the HSM boundary.
  3. Quantum-resistant workload identity (for external build agents) – For continuous integration and delivery (CI/CD) agents running outside AWS that authenticate through X.509 certificates, IAM Roles Anywhere with ML-DSA certificates ties the signer’s identity back to the same quantum-resistant root of trust.
  4. ML-DSA artifact signing – Build outputs (binaries, container image manifests, packages) are signed using AWS KMS ML-DSA keys. Signatures are stored alongside artifacts in Amazon Simple Storage Service (Amazon S3) or Amazon Elastic Container Registry (Amazon ECR).
  5. ML-DSA SBOM integrity attestation – The SBOM for each release is wrapped in an in-toto Statement that names the artifact it describes by digest, and the Statement is signed with the same ML-DSA code-signing key. This provides quantum-resistant proof that the dependency manifest hasn’t been tampered with and that it belongs to the artifact it accompanies.

These pillars create a chain of trust: AWS Private CA protects the root CA key in its own HSMs, issues certificates that bind identities to AWS KMS code-signing keys, IAM Roles Anywhere uses those certificates to authenticate build agents, and authenticated agents sign every artifact and SBOM they produce.

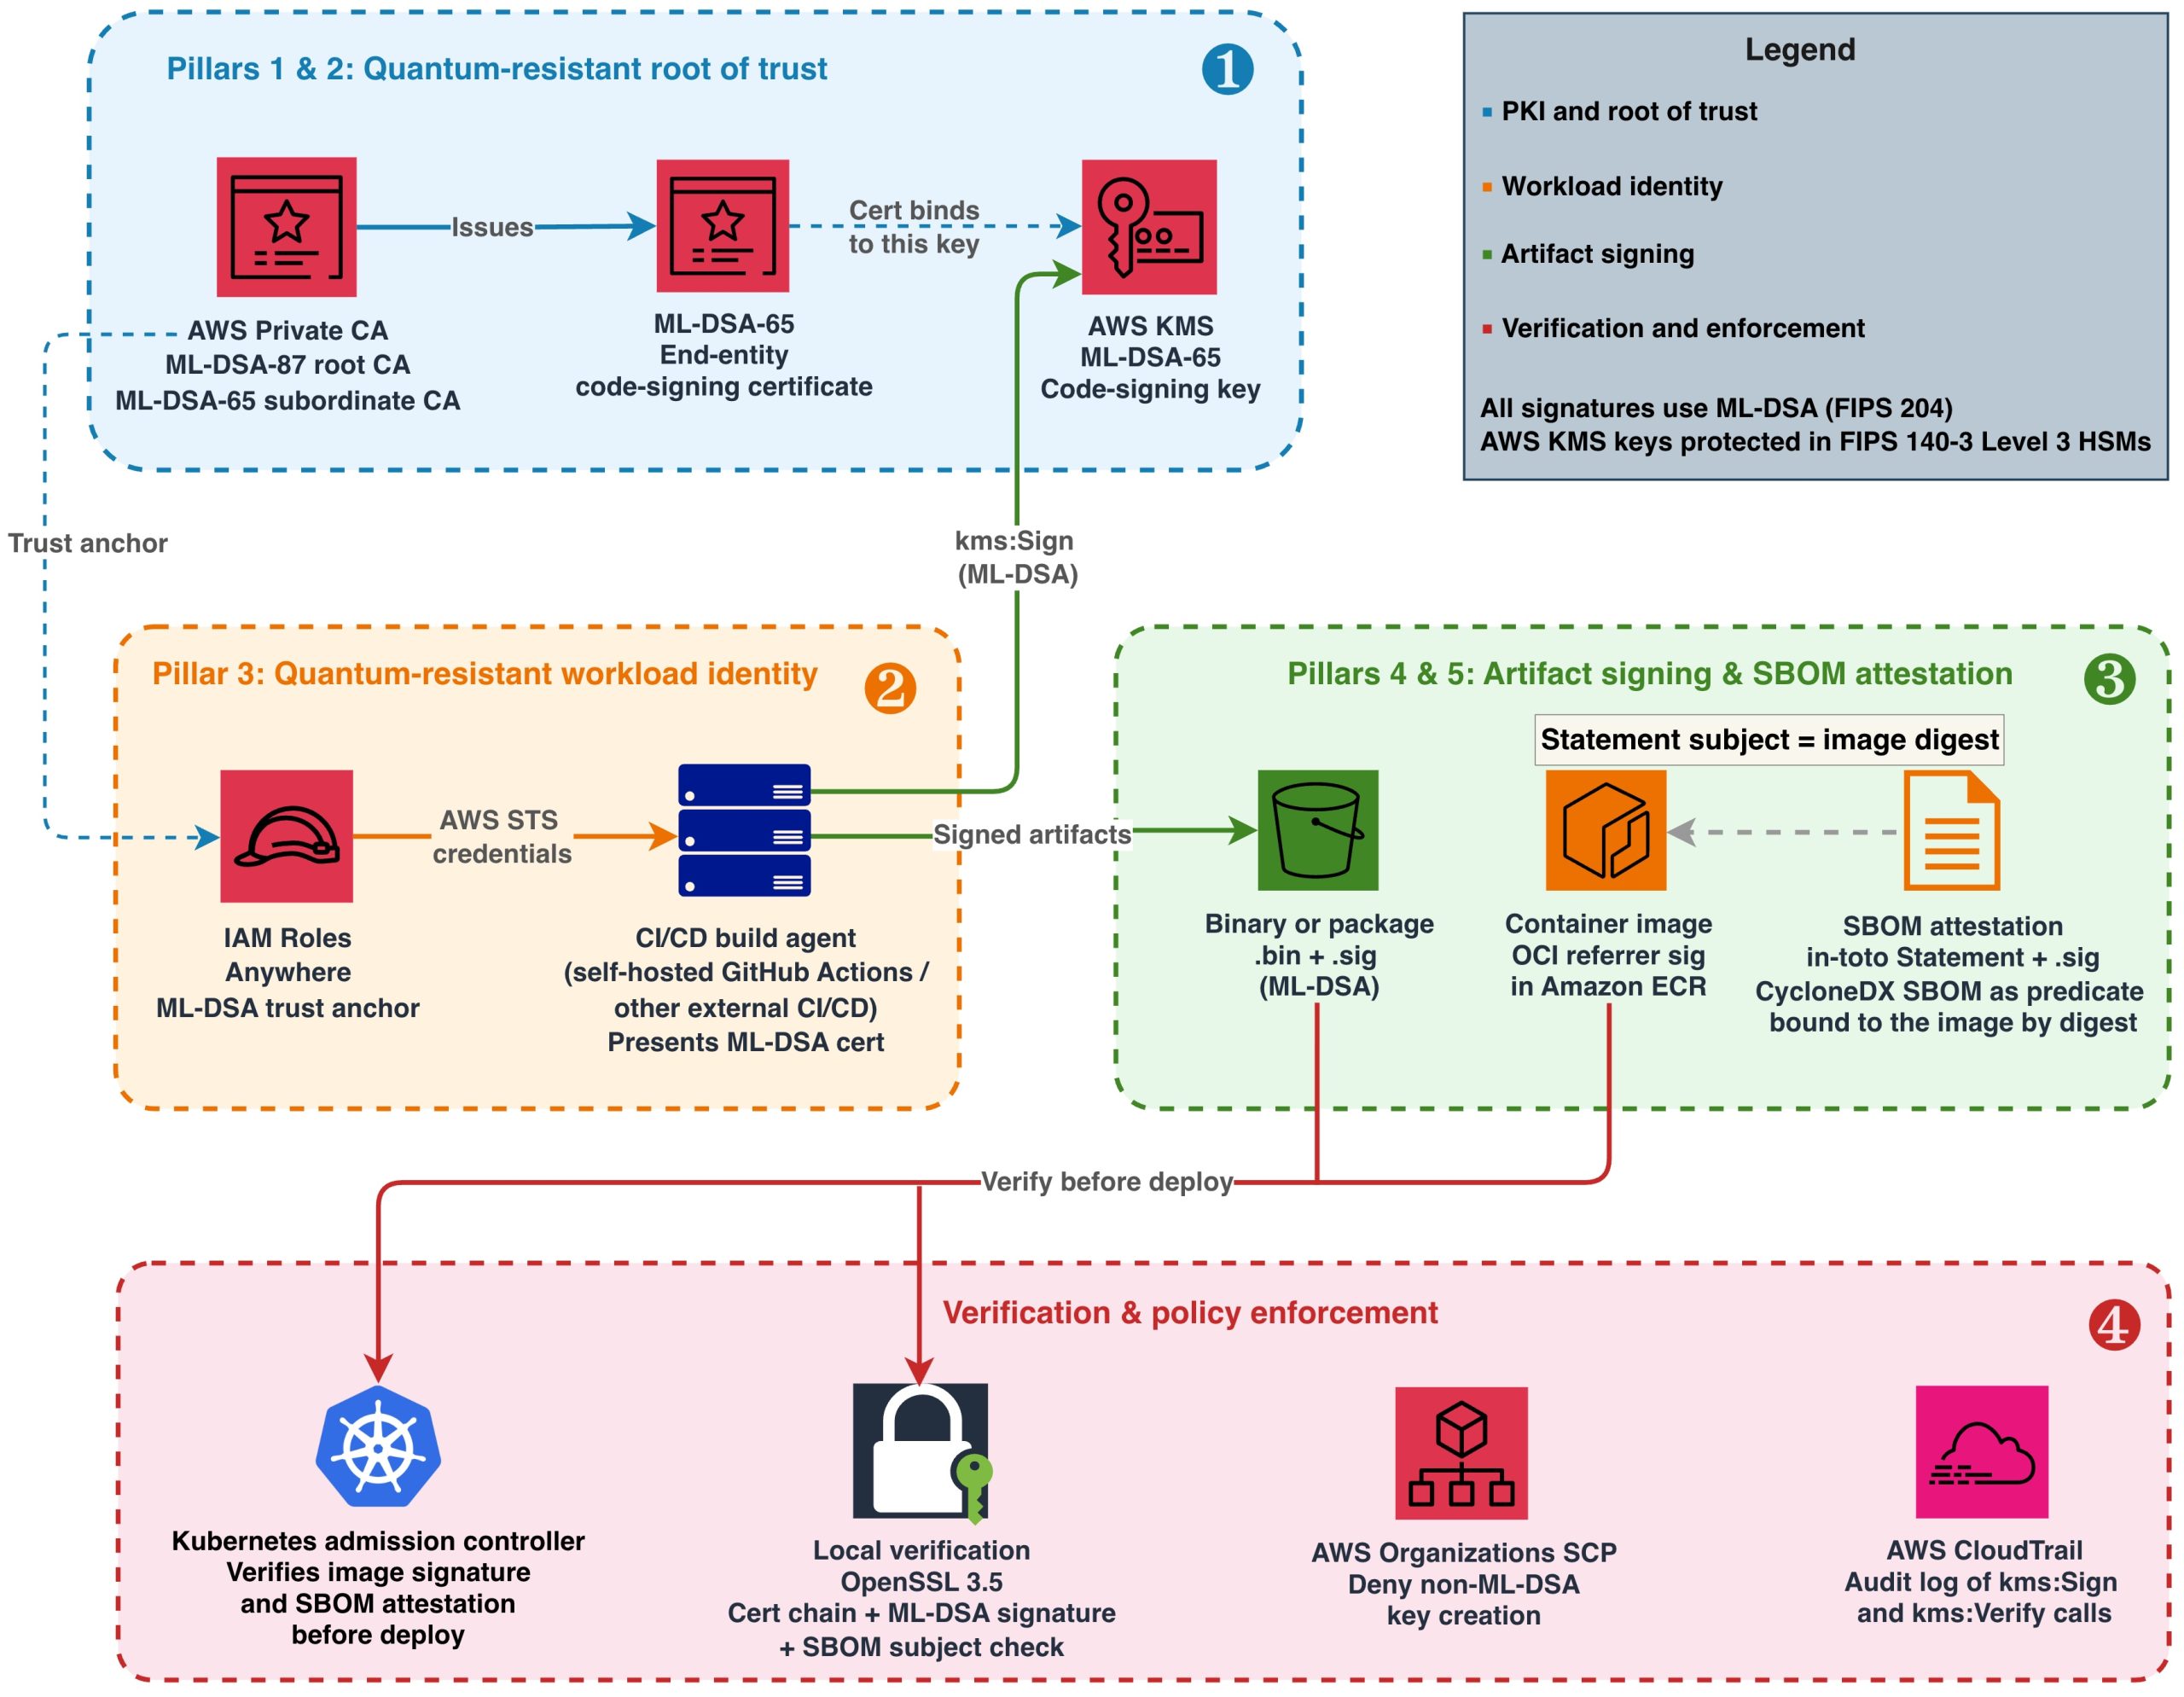
Figure 1: End-to-end quantum-resistant software supply chain on AWS

Figure 1: End-to-end quantum-resistant software supply chain on AWS

Figure 1 illustrates this architecture in four layers, numbered in the order you build them:

  1. Root of trust (Pillars 1 and 2) – Establish your AWS Private CA hierarchy and create your code-signing key in AWS KMS.
  2. Workload identity (Pillar 3) – Register the CA as an IAM Roles Anywhere trust anchor and issue ML-DSA certificates to build agents, ensuring the signer’s identity chains back to the same quantum-resistant root of trust.
  3. Artifact signing (Pillars 4 and 5) – Sign binaries, container images, and SBOMs using the authenticated build agent.
  4. Verification and enforcement – Validate signatures at deployment and enforce ML-DSA-only policies.

Prerequisites

To follow along, you need:

  • An AWS account with permissions to create resources in AWS KMS, AWS Private CA, IAM Roles Anywhere, and Amazon ECR.
  • AWS Command Line Interface (AWS CLI) v2 configured with appropriate credentials.
  • IAM Roles Anywhere credential helper (aws_signing_helper) v1.8.0 or later, the first release that supports ML-DSA keys and certificates, for workload authentication. Download from the IAM Roles Anywhere documentation.
  • OpenSSL 3.5 or later (required for ML-DSA signature verification and mu computation).
  • ORAS CLI v1.2 or later (for attaching Open Container Initiative (OCI) referrer artifacts to container images). Alternatively, you can use the Notation CLI with a custom plugin or any OCI-compliant client that supports the OCI Referrers API.
  • jq, for constructing and parsing the in-toto Statements used for SBOM attestation and for parsing ORAS output.
  • Amazon Inspector SBOM Generator (Sbomgen), or another tool that produces a CycloneDX JSON SBOM, for the SBOM example. Sbomgen runs only on Linux (x86-64 and ARM64), so run that step on a Linux build agent or container. It uses the registry credentials that oras login stores in the Docker config file, and it also accepts them through --username or the INSPECTOR_SBOMGEN_USERNAME and INSPECTOR_SBOMGEN_PASSWORD environment variables.
  • Java 11 or later and Apache Maven, to run the diy-code-signing-kms-private-ca sample that produces the code-signing CSR in Step 4 of Building the ML-DSA PKI foundation.
  • A container image pushed to Amazon ECR (for the container signing example).

Building the ML-DSA PKI foundation

Start by creating the certificate hierarchy that will anchor your supply chain trust. AWS Private CA generates and stores its own CA signing keys internally in hardware-protected HSMs when you create a certificate authority. Use ML-DSA-87 (NIST security category 5, defined as at least as hard to break as exhaustive key search on AES-256) for the root CA because it protects the longest-lived trust anchor. Use ML-DSA-65 (NIST security category 3) for the subordinate CA to balance security with smaller signature sizes for frequently issued certificates.

The parameter sets used here, ML-DSA-87 and ML-DSA-65, are also the approved set in the example algorithm policy that Part 2 of this series turns into enforceable controls. If your organization has standardized on a different set, substitute it in the commands that follow; the build steps don’t change.

Step 1: Create the root CA in AWS Private CA

When you specify KeyAlgorithm: ML_DSA_87, Private CA generates an ML-DSA-87 key pair internally. You don’t need to create a separate AWS KMS key for the CA.

aws acm-pca create-certificate-authority \
  --certificate-authority-configuration '{
    "KeyAlgorithm": "ML_DSA_87",
    "SigningAlgorithm": "ML_DSA_87",
    "Subject": {
      "CommonName": "PQC Supply Chain Root CA",
      "Organization": "Example Corp",
      "Country": "US"
    }
  }' \
  --certificate-authority-type ROOT

After creation, the root CA is in PENDING_CERTIFICATE state. Activate it by self-signing its certificate. This is where you set the root CA’s validity period (10 years is typical for a root):

# Retrieve the root CA's CSR
aws acm-pca get-certificate-authority-csr \
  --certificate-authority-arn <root-ca-arn> \
  --output text > root-ca.csr

# Self-sign the root CA certificate (valid for 10 years)
ROOT_CERT_ARN=$(aws acm-pca issue-certificate \
  --certificate-authority-arn <root-ca-arn> \
  --csr fileb://root-ca.csr \
  --signing-algorithm ML_DSA_87 \
  --validity Value=3650,Type=DAYS \
  --template-arn arn:aws:acm-pca:::template/RootCACertificate/V1 \
  --query CertificateArn --output text)

# Retrieve and install the self-signed root certificate
aws acm-pca get-certificate \
  --certificate-authority-arn <root-ca-arn> \
  --certificate-arn $ROOT_CERT_ARN \
  --query Certificate --output text > root-ca-cert.pem

aws acm-pca import-certificate-authority-certificate \
  --certificate-authority-arn <root-ca-arn> \
  --certificate fileb://root-ca-cert.pem

Step 2: Create a subordinate CA for code signing

aws acm-pca create-certificate-authority \
  --certificate-authority-configuration '{
    "KeyAlgorithm": "ML_DSA_65",
    "SigningAlgorithm": "ML_DSA_65",
    "Subject": {
      "CommonName": "PQC Code Signing CA",
      "Organization": "Example Corp",
      "Country": "US"
    }
  }' \
  --certificate-authority-type SUBORDINATE

After creation, the subordinate CA enters PENDING_CERTIFICATE state with no link to the root. Activate it by signing its certificate signing request (CSR) with the root CA:

# Retrieve the subordinate CA's certificate signing request
aws acm-pca get-certificate-authority-csr \
  --certificate-authority-arn <sub-ca-arn> \
  --output text > sub-ca.csr

# Sign the CSR using the root CA (this establishes the trust hierarchy)
SUB_CERT_ARN=$(aws acm-pca issue-certificate \
  --certificate-authority-arn <root-ca-arn> \
  --csr fileb://sub-ca.csr \
  --signing-algorithm ML_DSA_87 \
  --validity Value=1825,Type=DAYS \
  --template-arn arn:aws:acm-pca:::template/SubordinateCACertificate_PathLen0/V1 \
  --query CertificateArn --output text)

# Retrieve the signed certificate and import it to activate the subordinate CA
aws acm-pca get-certificate \
  --certificate-authority-arn <root-ca-arn> \
  --certificate-arn $SUB_CERT_ARN \
  --query Certificate --output text > sub-ca-cert.pem

aws acm-pca import-certificate-authority-certificate \
  --certificate-authority-arn <sub-ca-arn> \
  --certificate fileb://sub-ca-cert.pem \
  --certificate-chain fileb://root-ca-cert.pem

Step 3: Create the code-signing key in AWS KMS

Your build agents use this key to sign artifacts, so their IAM roles need the kms:Sign permission on it. The end-entity certificate issued by your subordinate CA binds an identity to this key’s public key.

aws kms create-key \
  --key-spec ML_DSA_65 \
  --key-usage SIGN_VERIFY \
  --description "PQC code-signing key for supply chain" \
  --tags TagKey=Purpose,TagValue=CodeSigning

Create an alias for convenient reference in your CI/CD scripts:

aws kms create-alias \
  --alias-name alias/pqc-code-signing \
  --target-key-id <key-id-from-above>

Step 4: Issue the end-entity code signing certificate

To issue a certificate, you need a CSR. Because the ML-DSA private key never leaves the AWS KMS HSM, you can’t generate the CSR locally with OpenSSL. Instead, you construct the CSR’s TBS (to-be-signed) structure containing your subject name and public key, sign it remotely by calling aws kms sign, and assemble the final CSR from those components.

For a working implementation that assembles an ML-DSA CSR around a KMS-managed private key and signs it with AWS KMS, see Post-quantum (ML-DSA) code signing with AWS Private CA and AWS KMS and its diy-code-signing-kms-private-ca sample on GitHub (Java, built with Maven). There is no AWS CLI-only path for this step: the CSR must be constructed and signed in code, and the sample is the reference implementation.

After you have the code-signing.csr file, issue the certificate from your subordinate CA:

# Issue a code-signing certificate valid for one year, signed by the subordinate CA using ML-DSA-65.
# Replace <sub-ca-arn> with the ARN that create-certificate-authority returned for the subordinate CA in Step 2.
CODE_SIGNING_CERT_ARN=$(aws acm-pca issue-certificate \
  --certificate-authority-arn <sub-ca-arn> \
  --csr fileb://code-signing.csr \
  --signing-algorithm ML_DSA_65 \
  --validity Value=365,Type=DAYS \
  --template-arn arn:aws:acm-pca:::template/CodeSigningCertificate/V1 \
  --query CertificateArn --output text)

# Retrieve the issued certificate
aws acm-pca get-certificate \
  --certificate-authority-arn <sub-ca-arn> \
  --certificate-arn $CODE_SIGNING_CERT_ARN \
  --query Certificate --output text > code-signing-cert.pem

This certificate binds the signer identity to the AWS KMS code-signing key material. Note that the certificate validity period (365 days in this example) determines how long verifiers can validate signatures by checking the certificate alone. AWS Private CA lets you choose the validity period of an issued certificate, as long as it ends no later than the issuing CA’s own certificate; in this example the subordinate CA certificate from Step 2 is valid for 1,825 days, so the three-year option below fits inside it. For artifacts that must remain verifiable beyond the certificate’s expiry, consider these approaches:

  • Longer certificate validity – For private PKI, code-signing certificates are commonly issued with multi-year validity (for example, Value=1095,Type=DAYS for 3 years) because you control the issuance policy.
  • Trusted timestamping (RFC 3161) – Countersign each signature with an RFC 3161 timestamp from a Time Stamping Authority (TSA) at signing time. The timestamp proves the signature was created while the certificate was valid, allowing verification indefinitely. AWS doesn’t provide a managed TSA; use a third-party TSA or operate your own.
  • Re-signing – Before a certificate expires, re-sign active artifacts with a newly issued certificate.

Distribute the certificate chain (root CA certificate, subordinate CA certificate, and end-entity certificate) to systems that need to verify your signatures.

Signing artifacts with ML-DSA in your CI/CD pipeline

With the PKI hierarchy in place, integrate ML-DSA signing into your build process. The approach depends on artifact type. ML-DSA-65 signatures are 3,309 bytes (compared to 64 bytes for ECDSA P-256), and the latency of the AWS KMS Sign operation for ML-DSA is comparable to existing asymmetric operations. The larger signature size has negligible impact when stored alongside multi-megabyte container images or packages, but is worth accounting for in size-constrained environments like embedded device images transmitted over low-bandwidth links.

Binary and package signing

Most build outputs, including compiled binaries and packages, are far larger than the 4,096-byte limit that AWS KMS places on the message passed to aws kms sign. Make the EXTERNAL_MU method your pipeline’s default: compute the 64-byte message representative (mu) externally with OpenSSL 3.5, then pass only mu to AWS KMS. This handles an artifact of any size and never needs to change as your artifacts grow. AWS KMS also accepts content directly with --message-type RAW, up to 4,096 bytes. Use RAW only for inputs whose size is fixed by construction, such as the 71-character manifest digest in the container image example that follows. An artifact that fits today is likely to outgrow the limit later, and a pipeline that depends on RAW fails when it does. Both methods produce cryptographically identical signatures. The verifier doesn’t need to know which method was used; standard ML-DSA verification applies in either case.

# Retrieve the public key
aws kms get-public-key --key-id alias/pqc-code-signing \
  --query PublicKey --output text | base64 --decode > pk.der

# Extract raw public key bytes from the DER-encoded SubjectPublicKeyInfo.
# The BIT STRING starts at offset 17 for all ML-DSA key sizes. 
# Expected output: 1,312 bytes (ML-DSA-44), 1,952 bytes (ML-DSA-65), or 2,592 bytes (ML-DSA-87).

openssl asn1parse -inform DER -in pk.der -strparse 17 -noout -out pk_raw.bin

# Compute mu per FIPS 204 Section 6.2
printf '\x00\x00' | cat - artifact.bin > m_prime.bin
openssl dgst -shake256 -xoflen 64 -binary pk_raw.bin > pk_hash.bin
cat pk_hash.bin m_prime.bin | openssl dgst -shake256 -xoflen 64 -binary > mu.bin

# Sign the mu value
aws kms sign \
  --key-id alias/pqc-code-signing \
  --message fileb://mu.bin \
  --message-type EXTERNAL_MU \
  --signing-algorithm ML_DSA_SHAKE_256 \
  --query Signature --output text | base64 --decode > artifact.bin.sig

Store the .sig file alongside the artifact in Amazon S3 or your package repository. Protect the integrity of both the artifact and its signature by enabling S3 Object Lock (WORM protection) or at minimum S3 Versioning with restricted write access. If an attacker can modify or delete either file, verification can’t be trusted. For comprehensive guidance, see Security best practices for Amazon S3.

Container image signing

For container image signing, use the OCI referrer pattern, defined in the OCI Image and Distribution Specifications v1.1. A referrer is an artifact, such as a signature or an SBOM, whose manifest names another image in its subject field. Registries that support the pattern, including Amazon ECR, return these artifacts when a client asks for an image’s referrers. This approach uses AWS KMS ML-DSA keys to generate the signature and stores it as a referrer of the image:

# Repository URI used by ORAS here and in the SBOM steps; replace the account ID and Region
ECR_URI=111122223333.dkr.ecr.us-east-1.amazonaws.com/myapp

# Authenticate ORAS to Amazon ECR
aws ecr get-login-password --region us-east-1 | \
  oras login --username AWS --password-stdin 111122223333.dkr.ecr.us-east-1.amazonaws.com

# Get the image manifest digest
IMAGE_DIGEST=$(aws ecr batch-get-image \
  --repository-name myapp \
  --image-ids imageTag=v1.2.0 \
  --query 'images[0].imageId.imageDigest' --output text)

# Sign the digest. It is a fixed 71 characters, so RAW is safe here (see Binary and package signing).
# AWS CLI v2 expects blob parameters to be base64, so write the digest to a file and pass it with fileb://
echo -n "$IMAGE_DIGEST" > digest.txt
aws kms sign \
  --key-id alias/pqc-code-signing \
  --message fileb://digest.txt \
  --message-type RAW \
  --signing-algorithm ML_DSA_SHAKE_256 \
  --query Signature --output text | base64 --decode > image.mldsa.sig

# Attach signature as OCI referrer using ORAS
oras attach $ECR_URI@$IMAGE_DIGEST \
  --artifact-type "application/vnd.example.mldsa-signature.v1" \
  image.mldsa.sig:application/octet-stream

At deployment time, your admission controller retrieves the referrer artifact and verifies the ML-DSA signature before allowing the image to run. See Verifying a container image signature before deployment later in this post for the full verification workflow and admission control implementation.

SBOM signing

A software bill of materials (SBOM) is a structured inventory of every component, library, and dependency included in a software release. It lists package names, versions, suppliers, and dependency relationships. Organizations use SBOMs to track vulnerabilities, verify license compliance, and respond quickly when a compromised component is disclosed.

Signing the SBOM file on its own proves that the inventory hasn’t been tampered with since it was signed, but not which artifact it describes. If the image signature and the SBOM signature are independent of each other, an attacker who holds a legitimately signed SBOM for a clean image can present it alongside a different signed image and claim that the two correspond. Attaching the SBOM to the image as an OCI referrer doesn’t close this gap by itself, because the subject field of a referrer manifest is set by whoever pushes the referrer; it’s a discovery mechanism, not a cryptographic binding. The binding must be inside the bytes that the signature covers.

To create that binding, wrap the SBOM in an in-toto Statement before signing it. A Statement names the artifacts it describes in its subject field, by digest, and carries the SBOM as its predicate. Because the image manifest digest is part of the signed content, a verifier can confirm that the SBOM in hand was issued for exactly the image it is about to deploy, and a swapped SBOM or a swapped digest fails verification. Embedding the SBOM in the image filesystem is another way to bind the two, because the image digest then covers the SBOM bytes. This post uses the Statement approach because it also works for SBOMs generated by scanning a finished image, for artifacts that have no filesystem such as binaries and firmware, and for images that are already in your registry, and because the SBOM stays readable from the registry without pulling the image.

Generate the SBOM with your preferred tool (such as Amazon Inspector SBOM Generator (Sbomgen) for container images), wrap it in a Statement, and sign the Statement with the same EXTERNAL_MU step you use for binaries:

# Scan the pushed image by digest so the inventory describes exactly the manifest you signed.
# Sbomgen reuses the registry login from the oras login step in the previous section.
inspector-sbomgen container --image $ECR_URI@$IMAGE_DIGEST -o sbom.json

# Wrap the SBOM in an in-toto Statement whose subject is the image manifest digest.
# This puts the digest inside the signed bytes, which binds this SBOM to this image.
jq -n \
  --arg name "$ECR_URI" \
  --arg digest "${IMAGE_DIGEST#sha256:}" \
  --slurpfile sbom sbom.json \
  '{
    "_type": "https://in-toto.io/Statement/v1",
    "subject": [{"name": $name, "digest": {"sha256": $digest}}],
    "predicateType": "https://cyclonedx.org/bom",
    "predicate": $sbom[0]
  }' > sbom.statement.json

# Sign using EXTERNAL_MU (same mu computation as binary signing above,
# with sbom.statement.json as the input)
# ... compute mu from sbom.statement.json ...
aws kms sign \
  --key-id alias/pqc-code-signing \
  --message fileb://mu.bin \
  --message-type EXTERNAL_MU \
  --signing-algorithm ML_DSA_SHAKE_256 \
  --query Signature --output text | base64 --decode > sbom.statement.json.sig

# Attach the Statement and its signature to the image as an OCI referrer so
# verifiers discover them alongside the image signature
oras attach $ECR_URI@$IMAGE_DIGEST \
  --artifact-type "application/vnd.example.mldsa-sbom-attestation.v1" \
  sbom.statement.json:application/vnd.in-toto+json \
  sbom.statement.json.sig:application/octet-stream

Ship the Statement and its .sig file together; the SBOM itself is the Statement’s predicate field, and verifiers extract it after verification. The same pattern binds an SBOM to a binary or package: set the subject digest to the SHA-256 of the file instead of an image manifest digest. The Verifying a binary or SBOM signature section later in this post walks through the full verification workflow, including the subject check that completes the binding.

Quantum-resistant workload identity for build agents

Signing artifacts with ML-DSA keys addresses the integrity of the artifacts themselves. Separately, build agents running outside AWS (on-premises Jenkins, self-hosted GitHub Actions runners, or third-party CI/CD systems) authenticate using X.509 certificates or OIDC tokens typically signed with RSA or ECDSA. These authentication credentials represent a classical cryptographic dependency in the pipeline. IAM Roles Anywhere with ML-DSA certificates replaces that dependency: the credential that the external build agent presents, and the CA that vouches for it, no longer rely on algorithms that are vulnerable to quantum attack. (The TLS connection that carries the request still authenticates the AWS endpoint with a traditional certificate, as public TLS does today; that is a transport concern separate from the signing identity this post is about.) Build agents running on AWS with an attached IAM role don’t have this dependency: their API requests are authenticated with AWS Signature Version 4 (SigV4), which uses a symmetric hash-based message authentication code (HMAC-SHA256). Symmetric schemes like this are already considered quantum-resistant, so no additional action is needed.

Step 1: Register a workload identity CA as a trust anchor

For this walkthrough, reuse the subordinate CA that you created earlier; that avoids the monthly charge for a second CA, and the commands that follow assume it. In production, use a dedicated subordinate CA for workload identity certificates, separate from your code-signing CA. This limits the blast radius if either CA is compromised and has to be revoked, and it lets you apply different issuance policies to the two certificate types.

# Use the ARN that create-certificate-authority returned when you created the
# subordinate CA earlier. If you no longer have it, list your CAs and copy the
# ARN of the SUBORDINATE one.
aws acm-pca list-certificate-authorities \
  --query "CertificateAuthorities[?Type=='SUBORDINATE'].[Arn,Status,CertificateAuthorityConfiguration.Subject.CommonName]" \
  --output table
SUB_CA_ARN=arn:aws:acm-pca:us-east-1:111122223333:certificate-authority/abc-123   # replace with yours

# Register the subordinate CA as an IAM Roles Anywhere trust anchor
aws rolesanywhere create-trust-anchor \
  --name "PQC-CI-CD-Trust-Anchor" \
  --source "sourceType=AWS_ACM_PCA,sourceData={acmPcaArn=$SUB_CA_ARN}" \
  --enabled

Step 2: Create the build agent role and a profile that references it

An IAM Roles Anywhere profile specifies which IAM roles a workload can assume after it authenticates with a certificate from your trust anchor. Create the role first. Its trust policy lets IAM Roles Anywhere assume it only through your trust anchor and only for a certificate whose subject common name identifies the build agent; without those conditions, any certificate that the trust anchor CA issues could assume the role. Its permissions policy grants only what signing requires, on only the code-signing key. Save the trust policy as build-agent-trust.json, replacing the trust anchor ARN with the one that create-trust-anchor returned in Step 1:

{
  "Version": "2012-10-17",
  "Statement": [
    {
      "Effect": "Allow",
      "Principal": {"Service": "rolesanywhere.amazonaws.com"},
      "Action": ["sts:AssumeRole", "sts:TagSession", "sts:SetSourceIdentity"],
      "Condition": {
        "ArnEquals": {
          "aws:SourceArn": "arn:aws:rolesanywhere:us-east-1:111122223333:trust-anchor/ta-id"
        },
        "StringEquals": {
          "aws:PrincipalTag/x509Subject/CN": "pqc-build-agent-01"
        }
      }
    }
  ]
}

Save the permissions policy as build-agent-permissions.json, replacing the resource with your key’s ARN (aws kms describe-key --key-id alias/pqc-code-signing --query KeyMetadata.Arn --output text):

{
  "Version": "2012-10-17",
  "Statement": [
    {
      "Effect": "Allow",
      "Action": ["kms:Sign", "kms:GetPublicKey", "kms:DescribeKey"],
      "Resource": "<code-signing-key-arn>"
    }
  ]
}

Create the role, attach the policy, and then create a profile that references the role:

aws iam create-role \
  --role-name PQCBuildAgentRole \
  --assume-role-policy-document file://build-agent-trust.json

aws iam put-role-policy \
  --role-name PQCBuildAgentRole \
  --policy-name pqc-code-signing \
  --policy-document file://build-agent-permissions.json

aws rolesanywhere create-profile \
  --name "PQC-Build-Agent-Profile" \
  --role-arns "arn:aws:iam::111122223333:role/PQCBuildAgentRole" \
  --enabled

Step 3: Issue the build agent certificate and configure the credential helper

Generate the build agent’s ML-DSA-65 key pair and CSR locally with OpenSSL, have the subordinate CA issue a client authentication certificate for it, and then configure the IAM Roles Anywhere credential helper to present that certificate:

# Generate the build agent's key pair and CSR. The CN must match the
# aws:PrincipalTag/x509Subject/CN condition in the role's trust policy.
openssl genpkey -algorithm ML-DSA-65 -out build-agent-mldsa-key.pem
chmod 400 build-agent-mldsa-key.pem
openssl req -new -key build-agent-mldsa-key.pem \
  -subj "/C=US/O=Example Corp/CN=pqc-build-agent-01" \
  -out build-agent.csr

# Issue a 30-day client authentication certificate from the subordinate CA
# registered as the trust anchor in Step 1.
BUILD_AGENT_CERT_ARN=$(aws acm-pca issue-certificate \
  --certificate-authority-arn $SUB_CA_ARN \
  --csr fileb://build-agent.csr \
  --signing-algorithm ML_DSA_65 \
  --validity Value=30,Type=DAYS \
  --template-arn arn:aws:acm-pca:::template/EndEntityClientAuthCertificate/V1 \
  --query CertificateArn --output text)

aws acm-pca get-certificate \
  --certificate-authority-arn $SUB_CA_ARN \
  --certificate-arn $BUILD_AGENT_CERT_ARN \
  --query Certificate --output text > build-agent-mldsa.pem

# In production, store the private key in a TPM or HSM rather than as a plaintext file.
aws_signing_helper credential-process \
  --certificate build-agent-mldsa.pem \
  --private-key build-agent-mldsa-key.pem \
  --trust-anchor-arn arn:aws:rolesanywhere:us-east-1:111122223333:trust-anchor/ta-id \
  --profile-arn arn:aws:rolesanywhere:us-east-1:111122223333:profile/profile-id \
  --role-arn arn:aws:iam::111122223333:role/PQCBuildAgentRole

The helper produces short-lived AWS Security Token Service (AWS STS) credentials scoped to the build role, replacing long-lived AWS access keys. In production, protect the ML-DSA private key with hardware-backed storage such as a Trusted Platform Module (TPM), an HSM, or an encrypted credential store with restricted file permissions. The plaintext file path shown here is for demonstration purposes. The private key authorizes access to your code-signing infrastructure and should be treated with the same protection level as any signing key. On Linux build agents, at minimum restrict the file to chmod 400 owned by the service account and consider using a PKCS#11 provider to avoid storing the raw key on disk entirely.

Verification and policy enforcement

A signing architecture is only as strong as its verification. Producing signatures is half the story. The other half is giving the systems and people that deploy your artifacts, such as deployment pipelines, Kubernetes admission controllers, and engineers installing a package, a concrete way to verify those signatures and make trust decisions before an artifact is deployed or run.

Distributing your trust chain

Before any verifier can check a signature, it needs to trust the CA that issued the code-signing certificate. This trust is established through a trust store: a local collection of root CA certificates that a system treats as authoritative. Trust stores exist in operating systems (such as /etc/pki/ca-trust/ on Linux, Keychain on macOS), language run-times (Java cacerts), container base images, and custom application configurations.

For private PKI hierarchies like the one in this post, your root CA certificate isn’t in any default public trust store. You must explicitly add it to the trust stores of every system that will verify your signatures. Common approaches include:

  • Baking the root CA certificate into your container base images during the build process
  • Distributing it through configuration management (AWS Systems Manager Parameter Store, AWS Secrets Manager, or your existing configuration tooling)
  • Publishing it to an internal S3 bucket with versioning and access logging
  • Storing it as an OCI artifact in Amazon ECR alongside the images it protects

Treat trust store management with the same rigor as credential management. If an attacker can inject a rogue root certificate into your trust stores, they can make forged signatures appear valid. Restrict write access to trust stores and audit changes through AWS CloudTrail or your system-level audit logs.

Exporting your certificate chain requires exporting the root CA, and then any subordinate CAs that issue certificates that will be involved in verifying signatures:

# Export the root CA certificate
aws acm-pca get-certificate-authority-certificate \
  --certificate-authority-arn <root-ca-arn> \
  --query Certificate --output text > root-ca.pem

# Export the subordinate CA certificate. Select only the Certificate field: for a
# subordinate CA this call also returns CertificateChain, and --output text would
# print both on one tab-separated line, producing a file that OpenSSL can't parse.
aws acm-pca get-certificate-authority-certificate \
  --certificate-authority-arn <sub-ca-arn> \
  --query Certificate --output text > sub-ca.pem
  
# Bundle the full chain for verifiers
cat root-ca.pem sub-ca.pem > trust-chain.pem

Verifiers use this chain to confirm that the code-signing public key was issued by a CA they trust.

The CAs in this post are created without a revocation configuration, and the verification commands that follow don’t check revocation status, which keeps the walkthrough short. In production, configure a certificate revocation list (CRL) or an Online Certificate Status Protocol (OCSP) responder on the subordinate CA (see Plan your AWS Private CA certificate revocation method in the AWS Private CA User Guide; both work with ML-DSA CAs). If you use a CRL, distribute it alongside the trust chain and add -crl_check -CRLfile <crl-file> to the openssl verify command below, where <crl-file> is the CRL that AWS Private CA publishes to your S3 bucket, so that a revoked code-signing certificate fails verification.

Verifying a binary or SBOM signature

Verify the code-signing certificate against the trust chain, confirm that it is a code-signing certificate issued to the signer you expect, extract its public key, and then verify the signature with OpenSSL 3.5. The second check matters: a chain check alone accepts every certificate that the CA hierarchy has issued, including the build agent client certificates from the previous section, so pin the expected subject in your verifier configuration:

# Step 1: Verify that the code-signing certificate chains to the trusted root CA and carries the
# Code Signing extended key usage. -purpose codesign (OpenSSL 3.2 and later) rejects a certificate
# that chains correctly but was issued for another purpose, such as a build agent's client
# authentication certificate from the same subordinate CA.
# trust-chain.pem contains the root CA and subordinate CA certificates distributed in the previous section.
openssl verify -CAfile trust-chain.pem -purpose codesign code-signing-cert.pem
# Confirm that the certificate was issued to the signer you expect. Replace <signer-cn> with the
# common name in your code-signing certificate's subject.
openssl x509 -in code-signing-cert.pem -noout -subject -nameopt RFC2253 | grep -q "CN=<signer-cn>" || { echo "Unexpected signer"; exit 1; }

# Step 2: Extract the public key from the verified certificate.
openssl x509 -in code-signing-cert.pem -pubkey -noout > signing-key.pem

# Step 3: Verify the artifact signature using the trusted public key.
openssl pkeyutl -verify \
  -pubin -inkey signing-key.pem \
  -in artifact.bin \
  -sigfile artifact.bin.sig \
  -rawin

A successful verification prints Signature Verified Successfully and returns an exit status of 0. A failed verification prints Signature Verification Failure and returns a nonzero exit status. In shell scripts, check the exit status of each command, or run the block with set -e, so that a failed certificate chain check stops the script before signature verification and a failed signature check blocks downstream actions.

For an SBOM, run the same three steps with sbom.statement.json as the -in file and sbom.statement.json.sig as the -sigfile, then add a fourth: confirm that the subject digest inside the verified Statement is the digest of the artifact you are about to deploy. Signature verification proves the Statement is authentic; the subject check proves it describes this artifact and not another one. The digest you compare against must come from the artifact itself, resolved from the registry for an image or computed from the file for a binary, never from the Statement. For an image, this is the same digest you verify the image signature against, so the two checks together establish that this SBOM describes this signed image.

# Step 4 (SBOM only): the signed Statement must name the image being deployed.
# Resolve the digest from Amazon ECR, not from the Statement.
IMAGE_DIGEST=$(aws ecr batch-get-image \
  --repository-name myapp \
  --image-ids imageTag=v1.2.0 \
  --query 'images[0].imageId.imageDigest' --output text)
SUBJECT_DIGEST=$(jq -r '.subject[0].digest.sha256' sbom.statement.json)
[ "sha256:$SUBJECT_DIGEST" = "$IMAGE_DIGEST" ] || { echo "SBOM does not describe this image"; exit 1; }

# Only now extract the SBOM for downstream tooling
jq '.predicate' sbom.statement.json > sbom.json

For a binary, compare the subject digest to the output of sha256sum artifact.bin instead. Reject the SBOM if either the signature or the subject check fails.

Verifying a container image signature before deployment

Pull the ML-DSA signature from the OCI referrer artifact in Amazon ECR, then verify it against the image manifest digest:

# Pull the signature referrer. ORAS 1.2 lists referrers under "manifests";
# ORAS 1.3 and later list them under "referrers". The jq filter accepts either.
oras discover $ECR_URI@$IMAGE_DIGEST \
  --artifact-type "application/vnd.example.mldsa-signature.v1" --format json | \
  jq -r '(.referrers // .manifests)[0].digest' | \
  xargs -I{} oras pull $ECR_URI@{} -o /tmp/sig/

# Re-derive the image digest and verify
echo -n "$IMAGE_DIGEST" > /tmp/digest.txt
openssl pkeyutl -verify \
  -pubin -inkey signing-key.pem \
  -in /tmp/digest.txt \
  -sigfile /tmp/sig/image.mldsa.sig \
  -rawin

# Exit code 0 = image is authentic; non-zero = reject deployment

The same oras discover command with --artifact-type "application/vnd.example.mldsa-sbom-attestation.v1" retrieves the SBOM attestation and its signature; verify them as described in the previous section, including the subject check. The jq filter shown takes the first referrer of the requested type. Don’t rely on the order in which a registry lists referrers, and expect more than one after an image has been re-signed: a production verifier should check every referrer of that type and accept the image if at least one signature verifies against a certificate that chains to your trust store. Taking only the first can reject a correctly signed image, but it can never accept an unsigned one.

To enforce these checks at deployment time, run them in a Kubernetes admission controller, a component that the API server calls before it accepts a pod and that can reject the request. You can write one as a validating admission webhook (see Dynamic Admission Control in the Kubernetes documentation), or use Open Policy Agent (OPA) Gatekeeper, an admission webhook that enforces policies evaluated by the OPA policy engine, and package the verification steps as a Gatekeeper external data provider that a constraint calls. For a worked example of gating Amazon EKS deployments on image signatures, see Announcing Container Image Signing with AWS Signer and Amazon EKS, which verifies AWS Signer signatures at admission with Kyverno and discusses the Gatekeeper and custom webhook alternatives. The ML-DSA signature referrer in this post is a custom artifact type that those tools don’t verify out of the box, so the verification steps in this section run in code you supply. In either design, the controller runs before any pod is scheduled, rejecting images that lack a valid ML-DSA signature referrer in Amazon ECR or whose SBOM attestation doesn’t name the image being deployed.

Preventive and detective controls

Signature verification stops the use of an untrusted artifact at deployment. Organization-level controls apply earlier and more broadly: preventive controls stop teams from creating new traditional signing keys, and detective controls record every signing operation so you can audit which principal signed each artifact and when.

Preventive guardrails. Use an AWS Organizations Service control policy (SCP) to block creation of traditional signing keys in security-critical accounts, forcing all new signing workloads to use ML-DSA:

{
  "Version": "2012-10-17",
  "Statement": [
    {
      "Sid": "RequirePQCSigningKeys",
      "Effect": "Deny",
      "Action": "kms:CreateKey",
      "Resource": "*",
      "Condition": {
        "StringNotLike": {
          "kms:KeySpec": "ML_DSA_*"
        },
        "StringEquals": {
          "kms:KeyUsage": "SIGN_VERIFY"
        }
      }
    }
  ]
}

This SCP prevents teams from creating new RSA or ECDSA signing keys, enforcing quantum-resistant signatures as the only option for new workloads. Note that this SCP constrains the algorithm family, not the parameter set: it would still permit an ML-DSA-44 key, which this architecture doesn’t use. Part 2 of this series picks up at exactly this point. It shows how to express a complete algorithm policy (in its example, approve ML-DSA-65 and ML-DSA-87 and exclude ML-DSA-44) as layered controls using the kms:KeySpec condition key in SCPs, IAM permission boundaries, and AWS KMS key policies; how to restrict the use of keys that already exist; and how to govern surfaces such as AWS Private CA that have no algorithm condition key. This SCP and the parameter-set SCP in Part 2 work together: attach both, and every new signing key must use an approved parameter set.

Audit trail. AWS CloudTrail logs every kms:Sign and kms:Verify API call, providing an immutable record of when each artifact was signed and by which principal. Use an organization trail and query its logs with Amazon Athena to analyze signing activity across accounts and correlate it with your deployment events.

Regulatory timeline and recommended actions

The following table maps regulatory milestones to specific actions you can take today using the architecture described in this post. This information is provided for general awareness only and does not constitute legal or compliance advice. Consult your legal and compliance teams to determine your organization’s specific obligations. For a broader overview of global PQC regulatory timelines, see Migrating to Post-Quantum Cryptography.

Regulation Deadline Regulatory language Action on AWS
CNSA 2.0: Support and prefer 2025 (in effect) CNSA 2.0 timeline (Sep 2022, FAQ v2.1 Dec 2024): Software and firmware signing must “support and prefer” CNSA 2.0 algorithms by 2025 Create ML-DSA keys in AWS KMS, begin signing artifacts with ML-DSA alongside existing traditional signatures
CNSA 2.0: New system acquisitions January 2027 CNSA 2.0 FAQ v2.1 (Dec 2024): “All new NSS acquisitions must be CNSA 2.0 compliant at deployment, effective 1 January 2027” Full ML-DSA PKI operational, IAM Roles Anywhere trust anchors using ML-DSA, all new builds carry ML-DSA signatures
EU Cyber Resilience Act 11 December 2027 Regulation (EU) 2024/2847, Annex I, Part I(2)(f): Products must “protect the integrity of stored, transmitted or otherwise processed data, personal or other, commands, programs and configuration against any manipulation or modification not authorised by the user, and report on corruptions”; Part II(7): Manufacturers must “provide for mechanisms to securely distribute updates” ML-DSA code signing for all software updates shipped to EU markets, signed SBOMs accompany every release
CNSA 2.0: Exclusive use 2030 CNSA 2.0 timeline: Software and firmware signing must “exclusively use” CNSA 2.0 algorithms by 2030 Remove traditional signing keys from supply chain, SCP enforcement of ML-DSA-only key creation
PCI DSS 4.0 Req 12.3.3 Mandatory since March 2025 PCI DSS v4.0.1, Requirement 12.3.3: “Cryptographic cipher suites and protocols in use are documented and reviewed at least once every 12 months”, including an up-to-date inventory of the cipher suites and protocols in use Document cryptographic inventory in AWS KMS, tag ML-DSA versus traditional keys, maintain migration progress tracking

Note for NSS customers and other CNSA 2.0 adopters: CNSA 2.0 is the quantum-resistant algorithm suite that the NSA requires for NSS, the federal systems that carry classified information or support intelligence, cryptologic, military command and control, and weapons functions. When ML-DSA is used for any signature purpose, including software and firmware signing, CNSA 2.0 permits only the ML-DSA-87 parameter set. (For software and firmware signing it also approves the stateful hash-based schemes LMS and XMSS, which this post doesn’t cover.) The ML-DSA-65 parameter set used in this post’s code-signing examples is appropriate for commercial workloads but isn’t permitted on NSS. CNSA 2.0 is binding only for NSS, but it’s followed voluntarily well beyond that boundary: by suppliers to the US defense and intelligence market, in the United States and allied countries, whose products must meet NSS requirements, and by commercial organizations in and outside the United States that adopt it as a conservative baseline because it specifies the highest NIST security category and removes the need to revisit parameter choices later. If your systems fall under CNSA 2.0 scope, or you’ve chosen to align with it, substitute ML-DSA-87 for all signing keys and certificates. Part 2 of this series shows how to make that substitution enforceable: the same kms:KeySpec controls that exclude ML-DSA-44 in its example can be pointed at ML_DSA_87 as the only approved key spec.

For organizations serving both US government and EU commercial markets, the January 2027 and December 2027 deadlines converge into a single migration window. Starting now provides margin for testing, key rotation planning, and certificate chain validation.

Clean up

You created a number of cryptographic resources in the prior steps and examples. AWS Private CA charges a monthly fee per CA and AWS KMS charges per key per month. To avoid ongoing charges, delete them if you aren’t actively using them. Start by listing what exists, so that you catch every resource you created, including duplicates from repeated runs. These commands list one Region; if you worked in more than one, repeat them with --region for each.

# List every private CA with its type, status, key algorithm, and subject.
# A CA you already deleted shows DELETED until its restoration window ends.
aws acm-pca list-certificate-authorities \
  --query 'CertificateAuthorities[].[Arn,Type,Status,CertificateAuthorityConfiguration.KeyAlgorithm,CertificateAuthorityConfiguration.Subject.CommonName]' \
  --output table

# List every ML-DSA key in AWS KMS with its state and creation date.
# A key already scheduled for deletion shows PendingDeletion.
for KEY_ID in $(aws kms list-keys --query 'Keys[].KeyId' --output text); do
  aws kms describe-key --key-id "$KEY_ID" \
    --query 'KeyMetadata.[KeyId,KeySpec,KeyState,CreationDate]' --output text
done | grep ML_DSA

# Show which alias points at which key. A key that no alias points at
# is usually a leftover from an earlier run.
aws kms list-aliases --query 'Aliases[].[AliasName,TargetKeyId]' --output text | grep -v '^alias/aws/'

AWS Private CA has no command that lists the certificates a CA has issued. If you need serial numbers for the revocation step that follows, generate an audit report with aws acm-pca create-certificate-authority-audit-report, which writes a list of every certificate the CA has issued or revoked to an S3 bucket that grants the service write access.

Delete each resource that you don’t need, including any extra copies that the listing revealed, then run the listing again to confirm that nothing is left:

# Revoke any issued end-entity certificates while the subordinate CA is still active
aws acm-pca revoke-certificate \
  --certificate-authority-arn <sub-ca-arn> \
  --certificate-serial <serial-number> \
  --revocation-reason CESSATION_OF_OPERATION

# Delete the IAM Roles Anywhere resources that reference the CA
aws rolesanywhere delete-profile --profile-id <profile-id>
aws rolesanywhere delete-trust-anchor --trust-anchor-id <trust-anchor-id>

# Delete the build agent role that the profile referenced, and the local copy of its private key
aws iam delete-role-policy --role-name PQCBuildAgentRole --policy-name pqc-code-signing
aws iam delete-role --role-name PQCBuildAgentRole
rm -f build-agent-mldsa-key.pem

# Delete the AWS KMS code-signing key (schedule 7-day waiting period).
# ScheduleKeyDeletion doesn't accept an alias, so resolve the key ID first.
KEY_ID=$(aws kms describe-key --key-id alias/pqc-code-signing \
  --query KeyMetadata.KeyId --output text)
aws kms schedule-key-deletion --key-id $KEY_ID --pending-window-in-days 7

# Remove the alias. It survives key deletion and would otherwise show up in the
# listing above on your next run.
aws kms delete-alias --alias-name alias/pqc-code-signing

# Disable and delete the subordinate CA
aws acm-pca update-certificate-authority \
  --certificate-authority-arn <sub-ca-arn> --status DISABLED
aws acm-pca delete-certificate-authority \
  --certificate-authority-arn <sub-ca-arn> --permanent-deletion-time-in-days 7

# Disable and delete the root CA
aws acm-pca update-certificate-authority \
  --certificate-authority-arn <root-ca-arn> --status DISABLED
aws acm-pca delete-certificate-authority \
  --certificate-authority-arn <root-ca-arn> --permanent-deletion-time-in-days 7

If you are adapting this for long-term use, plan for log retention. CloudTrail Event History keeps only the last 90 days of management events and is not a substitute for a trail. For the audit trail described earlier, create a trail that delivers to an S3 bucket with the lifecycle policy and access controls your retention requirements call for.

Conclusion

In this post, I showed you how to build a quantum-resistant software supply chain on AWS by combining ML-DSA signing in AWS KMS, ML-DSA certificate hierarchies in AWS Private CA, and ML-DSA workload authentication through IAM Roles Anywhere. The architecture covers the full pipeline; from authenticated build agents through signed binaries, container images, and SBOMs, to verification and policy enforcement at deployment.

Every ML-DSA capability used in this post is generally available. AWS Private CA and IAM Roles Anywhere support ML-DSA in all commercial AWS Regions, the AWS GovCloud (US) Regions, and the China Regions, and AWS KMS supports ML-DSA in commercial AWS Regions. You don’t need to wait for a standards body or third-party tool to finalize PQC support. The primitives are ready.

To get started, create your first ML-DSA key in AWS KMS and sign a test artifact. From there, extend to your PKI hierarchy, integrate IAM Roles Anywhere for your build agents, and add ML-DSA signatures to your container and SBOM workflows.

Building the pipeline is half the work. The other half is making sure the algorithm choices you made stay in force as accounts, teams, and standards change. That’s the subject of Part 2 of this series, Enforce your ML-DSA algorithm policy with SCPs and IAM, written for the security and governance teams who own that problem.

For more information, see:

If you have feedback about this post, submit comments in the Comments section below.


Harshvardhan Chunawala

Harshvardhan Chunawala

Harshvardhan is a Solutions Architect and Security SME at AWS, where he leads cross-team efforts with Amazon Leo, Amazon Security, and AWS Agentic AI. A Golden Jacket awardee with over a decade in cloud security, he’s an advisory board member, Visiting Faculty, and researcher at Carnegie Mellon University. He advises C-suite executives, enterprise leaders, and startup founders worldwide on building secure, scalable cloud platforms.

Reserve quantum computers, get guidance and cutting-edge capabilities with Amazon Braket Direct

Post Syndicated from Channy Yun original https://aws.amazon.com/blogs/aws/reserve-quantum-computers-get-expertise-and-cutting-edge-capabilities-with-amazon-braket-direct/

Today, we are announcing the availability of Braket Direct, a new Amazon Braket program that helps quantum researchers dive deeper into quantum computing. This program lets you get dedicated, private access to the full capacity of various quantum processing units (QPUs) without any queues or wait times, connect with quantum computing specialists to receive expert guidance for your workloads, and get early access to features and devices with limited availability to conduct cutting-edge research on today’s noisy quantum devices.

Since its launch in 2020, Amazon Braket has democratized access to quantum computing by offering on-demand access to various QPUs using shared, public availability windows, where you only pay for the duration of your reservation.

You can now use Braket Direct to reserve the entire dedicated machine for a period of time on IonQ Aria, QuEra Aquila, and Rigetti Aspen-M-3 devices for running your most complex, long-running, time-sensitive workloads, or conducting live events such as training workshops and hackathons, where you pay only for what you reserve.

To further your research, you can now engage directly with Braket’s experts through free office hours or one-on-one, hands-on reservation prep sessions. For deeper research collaborations, you can connect with specialists from quantum hardware providers such as IonQ, Oxford Quantum Circuits, QuEra, Rigetti, or Amazon Quantum Solutions Lab, our dedicated professional services team.

Finally, to truly push the boundaries, you can gain access to experimental capabilities that have limited or reduced availability starting with IonQ’s highest fidelity, 30-qubit Forte device.

Braket Direct expands on our commitment to accelerate research and innovation in quantum computing without requiring any upfront fees or long-term commitments.

Getting started with Braket Direct
To get started, go to the Amazon Braket console and choose Braket Direct in the left pane. You can see new features such as quantum hardware reservation, expert advice and get access to next-generation quantum hardware and features.

1. Request a quantum hardware reservation
To create a reservation, choose Reserve device and select the Device that you would like to reserve. Provide your contact information, including your name and email address, any details about the workload that you would like to execute using your reservation, such as desired reservation length, relevant constraints, and desired schedule.

Braket Direct assures that you have the full capacity of the QPU during your reservation and the predictability that your workloads will execute when your reservation begins.

If you are interested in connecting with a Braket expert for a one-on-one reservation prep session after your reservation is confirmed, you can select that option at no additional cost.

Choose Submit to complete your reservation request. A Braket team member will email you within 2–3 business days, pending request verification. To make the most of your reservation, you can choose to pre-create your tasks and jobs prior to a reservation to maximize use of the time.

To learn more about your quantum tasks and hybrid jobs to execute in a device reservation, see Get started with Braket Direct in the AWS documentation.

2. Get support from quantum computing experts
You can get in touch with quantum experts and get advice about your workload. With Braket office hours, Braket experts can help you go from ideation to execution faster at no additional cost. Explore your device to fit your use case, identify options to make best use of Braket for your algorithm, and get recommendations on how to use certain Braket features like Hybrid Jobs, Braket Pulse, or Analog Hamiltonian Simulation.

To book an upcoming Braket office hours slot, choose Sign up and fill out your contact information, workload details, and any desired discussion topics. You will receive a calendar invitation to the next available slot by email.

To take advantage of experts from quantum hardware providers, choose Connect and browse their professional services listings on AWS Marketplace.

The Amazon Quantum Solutions Lab is a collaborative research and professional services team staffed with quantum computing experts who can assist you in more effectively exploring quantum computing, engaging in quantum research, and assessing the current performance of this technology. To contact the Quantum Solutions Lab, select Connect and fill out contact information and use case details. The team will email you with next steps.

3. Access to cutting-edge capabilities

To move your research quicker, you can get early access to innovative new capabilities. With Braket Direct, you can easily request access to cutting-edge capabilities, such as new quantum devices with limited availability, directly in the Braket console. Today, you can get reservation-only access to IonQ’s highest-fidelity Forte QPU. Due to its limited availability, this device is currently only available through Braket Direct reservations.

Now available
Braket Direct is now generally available in all AWS Regions where Amazon Braket is available. To learn more, see the Braket Direct page and pricing page.

Give it a try and send feedback to AWS re:Post for Amazon Braket, Quantum Computing Stack Exchange, or through your usual AWS Support contacts.

— Channy

AWS Week In Review – June 6, 2022

Post Syndicated from Antje Barth original https://aws.amazon.com/blogs/aws/aws-week-in-review-june-6-2022/

This post is part of our Week in Review series. Check back each week for a quick roundup of interesting news and announcements from AWS!

I’ve just come back from a long (extended) holiday weekend here in the US and I’m still catching up on all the AWS launches that happened this past week. I’m particularly excited about some of the data, machine learning, and quantum computing news. Let’s have a look!

Last Week’s Launches
The launches that caught my attention last week are the following:

Amazon EMR Serverless is now generally available – Amazon EMR Serverless allows you to run big data applications using open-source frameworks such as Apache Spark and Apache Hive without configuring, managing, and scaling clusters. The new serverless deployment option for Amazon EMR automatically scales resources up and down to provide just the right amount of capacity for your application, and you only pay for what you use. To learn more, check out Channy’s blog post and listen to The Official AWS Podcast episode on EMR Serverless.

AWS PrivateLink is now supported by additional AWS services – AWS PrivateLink provides private connectivity between your virtual private cloud (VPC), AWS services, and your on-premises networks without exposing your traffic to the public internet. The following AWS services just added support for PrivateLink:

  • Amazon S3 on Outposts has added support for PrivateLink to perform management operations on your S3 storage by using private IP addresses in your VPC. This eliminates the need to use public IPs or proxy servers. Read the June 1 What’s New post for more information.
  • AWS Panorama now supports PrivateLink, allowing you to access AWS Panorama from your VPC without using public endpoints. AWS Panorama is a machine learning appliance and software development kit (SDK) that allows you to add computer vision (CV) to your on-premises cameras. Read the June 2 What’s New post for more information.
  • AWS Backup has added PrivateLink support for VMware workloads, providing direct access to AWS Backup from your VMware environment via a private endpoint within your VPC. Read the June 3 What’s New post for more information.

Amazon SageMaker JumpStart now supports incremental model training and automatic tuning – Besides ready-to-deploy solution templates for common machine learning (ML) use cases, SageMaker JumpStart also provides access to more than 300 pre-trained, open-source ML models. You can now incrementally train all the JumpStart models with new data without training from scratch. Through this fine-tuning process, you can shorten the training time to reach a better model. SageMaker JumpStart now also supports model tuning with SageMaker Automatic Model Tuning from its pre-trained model, solution templates, and example notebooks. Automatic tuning allows you to automatically search for the best hyperparameter configuration for your model.

Amazon Transcribe now supports automatic language identification for multi-lingual audio – Amazon Transcribe converts audio input into text using automatic speech recognition (ASR) technology. If your audio recording contains more than one language, you can now enable multi-language identification, which identifies all languages spoken in the audio file and creates a transcript using each identified language. Automatic language identification for multilingual audio is supported for all 37 languages that are currently supported for batch transcriptions. Read the What’s New post from Amazon Transcribe to learn more.

Amazon Braket adds support for Borealis, the first publicly accessible quantum computer that is claimed to offer quantum advantage – If you are interested in quantum computing, you’ve likely heard the term “quantum advantage.” It refers to the technical milestone when a quantum computer outperforms the world’s fastest supercomputers on a well-defined task. Until now, none of the devices claimed to demonstrate quantum advantage have been accessible to the public. The Borealis device, a new photonic quantum processing unit (QPU) from Xanadu, is the first publicly available quantum computer that is claimed to have achieved quantum advantage. Amazon Braket, the quantum computing service from AWS, has just added support for Borealis. To learn more about how you can test a quantum advantage claim for yourself now on Amazon Braket, check out the What’s New post covering the addition of Borealis support.

For a full list of AWS announcements, be sure to keep an eye on the What’s New at AWS page.

Other AWS News
Some other updates and news that you may have missed:

New AWS Heroes – A warm welcome to our newest AWS Heroes! The AWS Heroes program is a worldwide initiative that acknowledges individuals who have truly gone above and beyond to share knowledge in technical communities. Get to know them in the June 2022 introduction blog post!

AWS open-source news and updates – My colleague Ricardo Sueiras writes this weekly open-source newsletter in which he highlights new open-source projects, tools, and demos from the AWS Community. Read edition #115 here.

Upcoming AWS Events
Join me in Las Vegas for Amazon re:MARS 2022. The conference takes place June 21–24 and is all about the latest innovations in machine learning, automation, robotics, and space. I will deliver a talk on how machine learning can help to improve disaster response. Say “Hi!” if you happen to be around and see me.

We also have more AWS Summits coming up over the next couple of months, both in-person and virtual.

In Europe:

In North America:

In South America:

Find an AWS Summit near you, and get notified when registration opens in your area.

Imagine Conference 2022You can now register for IMAGINE 2022 (August 3, Seattle). The IMAGINE 2022 conference is a no-cost event that brings together education, state, and local leaders to learn about the latest innovations and best practices in the cloud.

Sign up for the SQL Server Database Modernization webinar on June 21 to learn how to modernize and cost-optimize Microsoft SQL Server on AWS.

That’s all for this week. Check back next Monday for another Week in Review!

— Antje

Introducing Amazon Braket Hybrid Jobs – Set Up, Monitor, and Efficiently Run Hybrid Quantum-Classical Workloads

Post Syndicated from Danilo Poccia original https://aws.amazon.com/blogs/aws/introducing-amazon-braket-hybrid-jobs-set-up-monitor-and-efficiently-run-hybrid-quantum-classical-workloads/

I find quantum computing fascinating! At its simplest level, it extends the concept of bits, that have 0 or 1 values, with quantum bits, or qubits, that can have a combination of two different (quantum) states.

Two characteristics make qubits really interesting:

  • When you look at the value of a qubit, you get only one of the two possible states with a probability that depends on how its own states are combined.
  • Multiple qubits can be “connected” together (this is called quantum entanglement) so that by changing the state of one, even just by reading its value, you alter the states of the others.

These characteristics come from low-level properties described by quantum mechanics, a fundamental theory in physics that provides a description of the physical properties of nature at atomic and subatomic scales. Luckily, we don’t need a degree in quantum mechanics to use quantum computing in the same way we don’t need to be expert in semiconductors to use an ordinary computer.

Using qubits, researchers are designing new algorithms that have the potential to be much faster than what classical computers can achieve. To help speed up scientific research and software development for quantum computing, we introduced Amazon Braket at re:Invent 2019. A fully managed quantum computing service, Amazon Braket allows you to build, test, and run quantum algorithms on simulators and quantum computers.

Hybrid Algorithms and Quantum Processing Units (QPUs)
Quantum algorithms, which would be transformational in many different areas, require the execution of hundreds of thousands to millions of quantum gates. Unfortunately, the current generation of QPUs suffer from noise, creating errors that limit operations to only a few hundreds or thousands of gates before the errors take over.

To help solve this, we can take inspiration from machine learning: instead of using fixed quantum circuits, the logic that implements the algorithm, we let the algorithm “learn” by adjusting the parameters that tune the circuit to have a better chance of solving a given problem by adapting to the noise in a particular device (think of them as “self-learning quantum algorithms”).

This is similar to computer vision: instead of hand-crafting the features to distinguish a dog from a cat (which is notoriously difficult for a computer), machine learning algorithms “learn” the right features by iteratively adjusting parameters of a neural network.

A rapidly emerging area of research in quantum computing uses QPUs, the processors used by quantum computers, in the same way as GPUs are used in machine learning: Quantum circuits are parameterized, initialized with some values, and then run on the QPU. Like the weights in a neural network, these parameters are then iteratively adjusted based on the results of the computation. These so-called hybrid algorithms rely on rapid, iterative computations between classical computers and QPUs.

Architectural diagram.

To run hybrid algorithms, you need to manually set up a classical infrastructure, install the required software, and manage the interaction between your quantum and classical compute processes for the duration of your hybrid algorithm. You then need to build custom monitoring solutions to visualize the progress of your algorithm to make sure it converges to the solution as expected or intervene if necessary to adjust the parameters of the algorithm.

Another big challenge is that QPUs are shared, inelastic resources, and you compete with others for access. This can slow down the execution of your algorithm. A single large workload from another customer can bring the algorithm to a halt, potentially extending your total runtime for hours. This is not only inconvenient but also impacts the quality of the results because today’s QPUs need periodic re-calibration, which can invalidate the progress of a hybrid algorithm. In the worst case, the algorithm fails, wasting budget and time.

Introducing Amazon Braket Hybrid Jobs
Today, I am happy to introduce Amazon Braket Hybrid Jobs, a new capability of Amazon Braket that simplifies the process of setting up, monitoring, and efficiently executing hybrid quantum-classical algorithms. Jobs are fully managed so you can avoid extensive infrastructure and software management and confidently execute your algorithms quickly and predictably, with on-demand priority access to QPUs.

When you create a job, Amazon Braket spins up the job instance (providing a CPU environment based on an Amazon Elastic Compute Cloud (Amazon EC2) instance), executes the algorithm (using quantum hardware or simulators), and releases the resources once the job is completed so that you only pay for what you use. You can also define custom metrics for algorithms, which are automatically logged by Amazon CloudWatch and displayed in near real-time in the Amazon Braket console as the algorithm runs. This provides you with live insights into how your algorithm is progressing, creating the opportunity to adjust your algorithm as necessary and innovate more quickly.

Architectural diagram.

To run hybrid algorithms as jobs, you can define your algorithm using the Amazon Braket SDK or with PennyLane, an open-source library for hybrid quantum computing. Let’s see how that works in practice with a couple of examples.

Using Amazon Braket Hybrid Jobs
Before building a trainable quantum algorithm, let’s get started by running a series of fixed quantum operations, what we’ll refer to as quantum tasks. I use Python and the Amazon Braket SDK to define a circuit that constructs what is called a bell state, a state which has a fifty-fifty chance of resolving to each of two states. It’s the quantum computing equivalent of tossing a coin.

Here’s the content of the algorithm_script.py file:

import os

from braket.aws import AwsDevice
from braket.circuits import Circuit
from braket.jobs import save_job_result


def start_here():

    print("Test job started!")

    device = AwsDevice(os.environ["AMZN_BRAKET_DEVICE_ARN"])

    results = []
    
    bell = Circuit().h(0).cnot(0, 1)
    for count in range(5):
        task = device.run(bell, shots=100)
        print(task.result().measurement_counts)
        results.append(task.result().measurement_counts)

    save_job_result({ "measurement_counts": results })
    
    print("Test job completed!")

This script uses the environment variable AMZN_BRAKET_DEVICE_ARN to instantiate the device that I select when creating the job.

Quantum computing is probabilistic. For this reason, circuits need to be evaluated multiple times to get accurate results. A single run is called a shot. The higher the number of shots, the better the accuracy of the result. In this case, the circuit is run for 100 shots.

I use the save_job_result function to store the results of my job so that I can analyze them at the end.

In the Amazon Braket console, I choose Jobs on the left panel and then Create job. To start, I give the job a name.

Console screenshot.

Then, I pass the file with the algorithm. The CPU component of the hybrid algorithm runs in a container, and I can choose which container image to use. For example, I can use a pre-built container image that includes software my algorithm depends on, such as PennyLane, TensorFlow, or PyTorch, or bring my own custom image. I select the Base container image because I don’t have external dependencies.

I leave all other settings to their default value. In this way, I use the SV1 simulator, rather than quantum hardware, to run the quantum tasks.

After some time, the job has completed, and I follow the link to the Amazon Simple Storage Service (Amazon S3) console to download the result. As expected, for each of the five tasks, the results show that the proportion of the 00 and 11 states is roughly 50:50. The proportions vary slightly because of the probabilistic nature of quantum computing.

{
    "braketSchemaHeader": {
        "name": "braket.jobs_data.persisted_job_data",
        "version": "1"
    },
    "dataDictionary": {
        "measurement_counts": [
            {
                "00": 51,
                "11": 49
            },
            {
                "00": 44,
                "11": 56
            },
            {
                "11": 51,
                "00": 49
            },
            {
                "00": 56,
                "11": 44
            },
            {
                "00": 49,
                "11": 51
            }
        ]
    },
    "dataFormat": "plaintext"
}

This example is quite basic because I am not running any classical logic other than initiating tasks. To see the real value, let’s see how it works with a hybrid algorithm where we tweak the parameters of the quantum circuit iteratively from task to task.

Using Amazon Braket Hybrid Jobs with Hybrid Algorithms
For a more advanced example, I use a well-known example of an actual hybrid algorithm, called the quantum approximate optimization algorithm (QAOA), included in the examples provided by Amazon Braket when creating a notebook from the Braket console. QAOA is a quantum algorithm that produces approximate solutions for combinatorial optimization problems. You can also find the example in this GitHub repo.

In this case, I am using QAOA to solve the Max-Cut problem: when partitioning nodes of a graph in two, what is the maximum number of edges connecting nodes between the two parts? For example, in the figure below, there are six nodes connected by eight edges. The thick yellow line partitions the nodes into two sets by crossing six edges.

In the QAOA example, the tuning of parameters that are used to run the successive rounds of quantum tasks is optimized in a classical computing environment (such as an EC2 instance) using tools like TensorFlow or PyTorch. In one of the notebook cells, I can choose which interface to use to tune the parameters as well as the other hyperparameters in a similar way to what I’d do for machine learning training.

Braket jobs then coordinates running the classical and quantum computing parts of the algorithm and the exchange of parameters and results between them. I can just sit back and relax as I watch my algorithm converge, ready to retrieve my results from S3, as before, for deeper analysis.

Running Hybrid Algorithms in Local Mode
To test and debug hybrid algorithms quickly, the Amazon Braket SDK can run jobs in local mode. With local mode, Braket jobs are run locally on your machine (for example, your laptop). In this way, you can get fast feedback and iterate quickly during the development of your algorithms.

To run a job in local mode, you just need to replace AwsQuantumJob with LocalQuantumJob. Note that AwsQuantumJob is imported from braket.aws , while LocalQuantumJob is imported from braket.jobs.local.

Availability and Pricing
Amazon Braket Hybrid Jobs are available today in all AWS Regions where Amazon Braket is available. For more information, see the AWS Regional Services List.

With Amazon Braket Hybrid Jobs, you only pay for the resources you use. There is no need to deploy, configure, and manage classical infrastructure, making it easy to experiment and improve algorithms iteratively. For more information, see the Amazon Braket pricing page.

Instead of relying on theoretical studies, you can start to use quantum computers as the primary tool to understand and improve hybrid algorithms and test their applicability for industry and research use cases. In this way, you can focus on your research and not deal with setting up and coordinating these different compute resources for your experiments.

During the development of this new capability, we talked with customers and partners to understand their needs. “As application developers, Braket Hybrid Jobs gives us the opportunity to explore the potential of hybrid variational algorithms with our customers,” says Vic Putz head of engineering at QCWare. “We are excited to extend our integration with Amazon Braket and the ability to run our own proprietary algorithms libraries in custom containers means we can innovate quickly in a secure environment. The operational maturity of Amazon Braket and the convenience of priority access to different types of quantum hardware means we can build this new capability into our stack with confidence.”

Simplify running hybrid quantum-classical workloads with Amazon Braket Hybrid Jobs.

— Danilo

PennyLane on Braket + Progress Toward Fault-Tolerant Quantum Computing + Tensor Network Simulator

Post Syndicated from Jeff Barr original https://aws.amazon.com/blogs/aws/pennylane-on-braket-progress-toward-fault-tolerant-quantum-computing-tensor-network-simulator/

I first wrote about Amazon Braket last year and invited you to Get Started with Quantum Computing! Since that launch we have continued to push forward, and have added several important & powerful new features to Amazon Braket:

August 2020 – General Availability of Amazon Braket with access to quantum computing hardware from D-Wave, IonQ, and Rigetti.

September 2020 – Access to D-Wave’s Advantage Quantum Processing Unit (QPU), which includes more than 5,000 qubits and 15-way connectivity.

November 2020 – Support for resource tagging, AWS PrivateLink, and manual qubit allocation. The first two features make it easy for you to connect your existing AWS applications to the new ones that you build with Amazon Braket, and should help you to envision what a production-class cloud-based quantum computing application will look like in the future. The last feature is particularly interesting to researchers; from what I understand, certain qubits within a given piece of quantum computing hardware can have individual physical and connectivity properties that might make them perform somewhat better when used as part of a quantum circuit. You can read about Allocating Qubits on QPU Devices to learn more (this is somewhat similar to the way that a compiler allocates CPU registers to frequently used variables).

In my initial blog post I also announced the formation of the AWS Center for Quantum Computing adjacent to Caltech.

As I write this, we are in the Noisy Intermediate Scale Quantum (NISQ) era. This description captures the state of the art in quantum computers: each gate in a quantum computing circuit introduces a certain amount of accuracy-destroying noise, and the cumulative effect of this noise imposes some practical limits on the scale of the problems.

Update Time
We are working to address this challenge, as are many others in the quantum computing field. Today I would like to give you an update on what we are doing at the practical and the theoretical level.

Similar to the way that CPUs and GPUs work hand-in-hand to address large scale classical computing problems, the emerging field of hybrid quantum algorithms joins CPUs and QPUs to speed up specific calculations within a classical algorithm. This allows for shorter quantum executions that are less susceptible to the cumulative effects of noise and that run well on today’s devices.

Variational quantum algorithms are an important type of hybrid quantum algorithm. The classical code (in the CPU) iteratively adjusts the parameters of a parameterized quantum circuit, in a manner reminiscent of the way that a neural network is built by repeatedly processing batches of training data and adjusting the parameters based on the results of an objective function. The output of the objective function provides the classical code with guidance that helps to steer the process of tuning the parameters in the desired direction. Mathematically (I’m way past the edge of my comfort zone here), this is called differentiable quantum computing.

So, with this rather lengthy introduction, what are we doing?

First, we are making the PennyLane library available so that you can build hybrid quantum-classical algorithms and run them on Amazon Braket. This library lets you “follow the gradient” and write code to address problems in computational chemistry (by way of the included Q-Chem library), machine learning, and optimization. My AWS colleagues have been working with the PennyLane team to create an integrated experience when PennyLane is used together with Amazon Braket.

PennyLane is pre-installed in Braket notebooks and you can also install the Braket-PennyLane plugin in your IDE. Once you do this, you can train quantum circuits as you would train neural networks, while also making use of familiar machine learning libraries such as PyTorch and TensorFlow. When you use PennyLane on the managed simulators that are included in Amazon Braket, you can train your circuits up to 10 times faster by using parallel circuit execution.

Second, the AWS Center for Quantum Computing is working to address the noise issue in two different ways: we are investigating ways to make the gates themselves more accurate, while also working on the development of more efficient ways to encode information redundantly across multiple qubits. Our new paper, Building a Fault-Tolerant Quantum Computer Using Concatenated Cat Codes speaks to both of these efforts. While not light reading, the 100+ page paper proposes the construction of a 2-D grid of micron-scale electro-acoustic qubits that are coupled via superconducting circuits:

Interestingly, this proposed qubit design was used to model a Toffoli gate, and then tested via simulations that ran for 170 hours on c5.18xlarge instances. In a very real sense, the classical computers are being used to design and then simulate their future quantum companions.

The proposed hybrid electro-acoustic qubits are far smaller than what is available today, and also offer a > 10x reduction in overhead (measured in the number of physical qubits required per error-corrected qubit and the associated control lines). In addition to working on the experimental development of this architecture based around hybrid electro-acoustic qubits, the AWS CQC team will also continue to explore other promising alternatives for fault-tolerant quantum computing to bring new, more powerful computing resources to the world.

And Third, we are expanding the choice of managed simulators that are available on Amazon Braket. In addition to the state vector simulator (which can simulate up to 34 qubits), you can use the new tensor network simulator that can simulate up to 50 qubits for certain circuits. This simulator builds a graph representation of the quantum circuit and uses the graph to find an optimized way to process it.

Help Wanted
If you are ready to help us to push the state of the art in quantum computing, take a look at our open positions. We are looking for Quantum Research Scientists, Software Developers, Hardware Developers, and Solutions Architects.

Time to Learn
It is still Day One (as we often say at Amazon) when it comes to quantum computing and now is the time to learn more and to get some experience with. Be sure to check out the Braket Tutorials repository and let me know what you think.

— Jeff;

PS – If you are ready to start exploring ways that you can put quantum computing to work in your organization, be sure to take a look at the Amazon Quantum Solutions Lab.