Post Syndicated from Mamadou Ba original https://aws.amazon.com/blogs/messaging-and-targeting/enhance-email-security-using-vpc-endpoints-with-amazon-ses/
Email’s universal adoption and accessibility make Amazon Simple Email Service (Amazon SES) an ideal platform for delivering critical business communications, such as customer notifications or password resets. However, the ubiquity of email also invites bad actors who seek to actively exploit email’s ubiquity to launch sophisticated attacks. Business email transmissions traverse a complex network with potential vulnerabilities, making email systems prime targets for these malicious actors. Common threats include message interception, email spoofing, unauthorized access to sending services, and service disruption attacks.
Amazon SES handles millions of sensitive communications daily. For example, healthcare providers transmit patient data, financial institutions send transaction alerts, and businesses exchange confidential information. Securing this critical infrastructure requires deep expertise in email systems, threat detection, and advanced security protocols to provide message integrity and confidentiality.
In this post, we discuss and guide you in enhancing your email security by using VPC endpoints with Amazon SES.
Common security challenges customers face sending email with Amazon SES
Consider the challenges faced by a large healthcare provider seeking to send automated appointment reminders and confidential lab results. Although Amazon SES meets their email delivery needs, the IT team must implement strict security measures to satisfy industry, government, and internal requirements. These likely include secure SMTP connections, identity-based access controls, and network isolation to safeguard sensitive patient information.
These common security requirements seek to address two critical concerns. First, they aim to prevent unauthorized access to the organization’s Amazon SES accounts, thereby safeguarding sensitive communications from potential breaches. Second, these measures mitigate the risks of bad actors co-opting their Amazon SES accounts to launch sophisticated email spoofing and phishing attacks.
Either breach could compromise trusted domains, undermining the security of the healthcare provider’s email communications and damaging their reputation.
For organizations with specific network security requirements or compliance mandates, Amazon SES offers VPC endpoint integration to provide additional network-level controls. This approach is particularly valuable for customers who prefer to avoid API calls traversing the public internet or need to ensure email processing workflows remain within private network boundaries.
VPC endpoints create a direct connection between your applications and Amazon SES, offering the following capabilities:
- Enhanced network isolation: Keeps email traffic within your private network infrastructure
- Compliance alignment: Supports regulatory frameworks like HIPAA and GDPR that may require additional network controls
- Network-based access controls: Restricts SES access to authorized IP ranges and subnets
- Simplified hybrid connectivity: Leverages existing VPN or Direct Connect infrastructure for seamless integration
- Defense-in-depth architecture: Adds an additional layer of network security to your email infrastructure
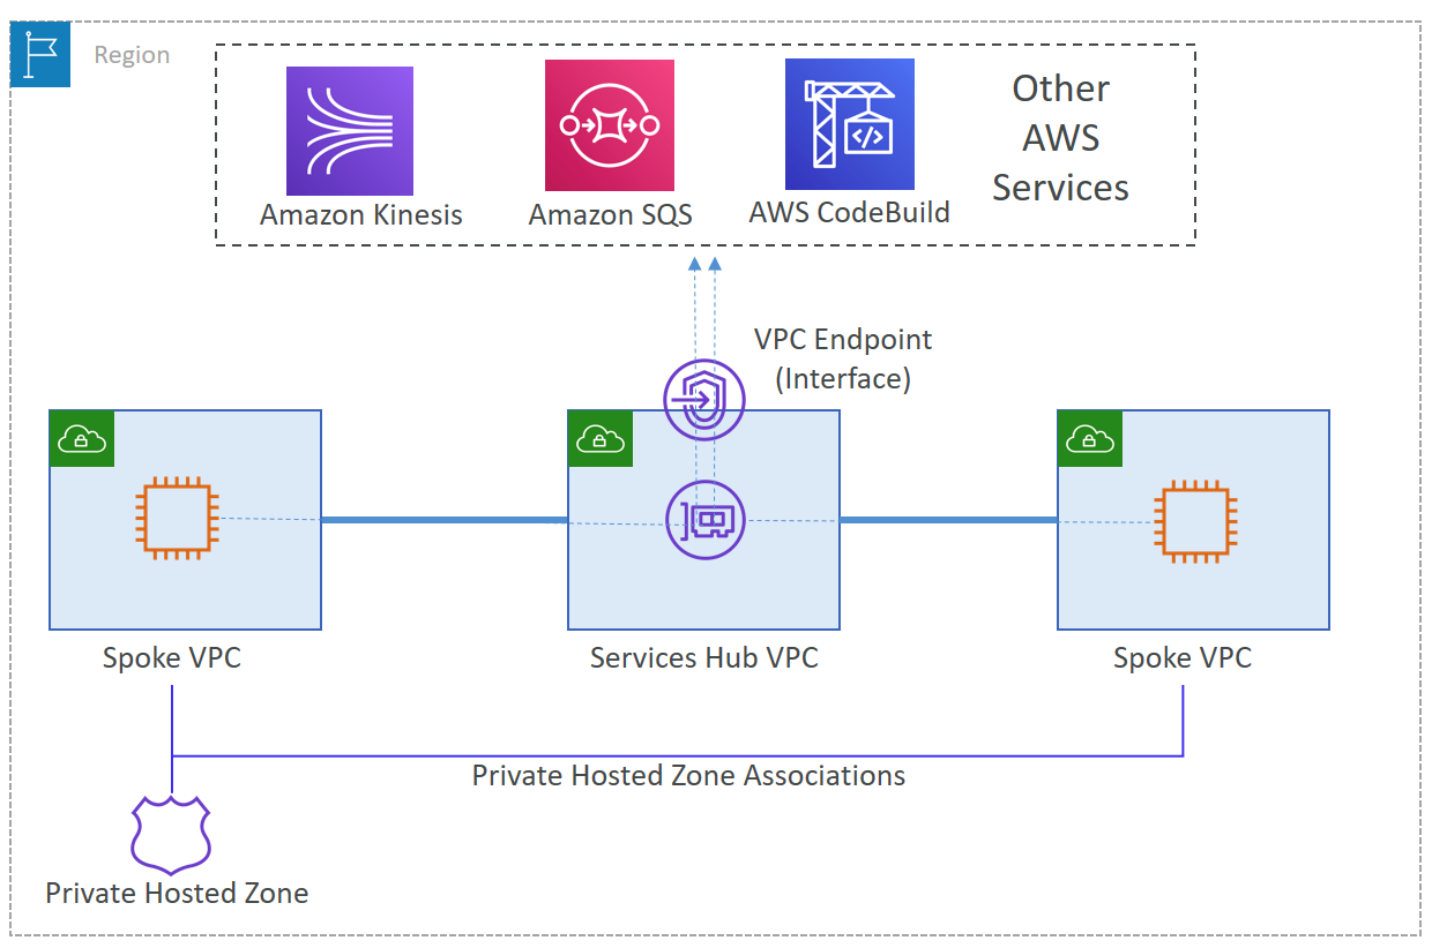
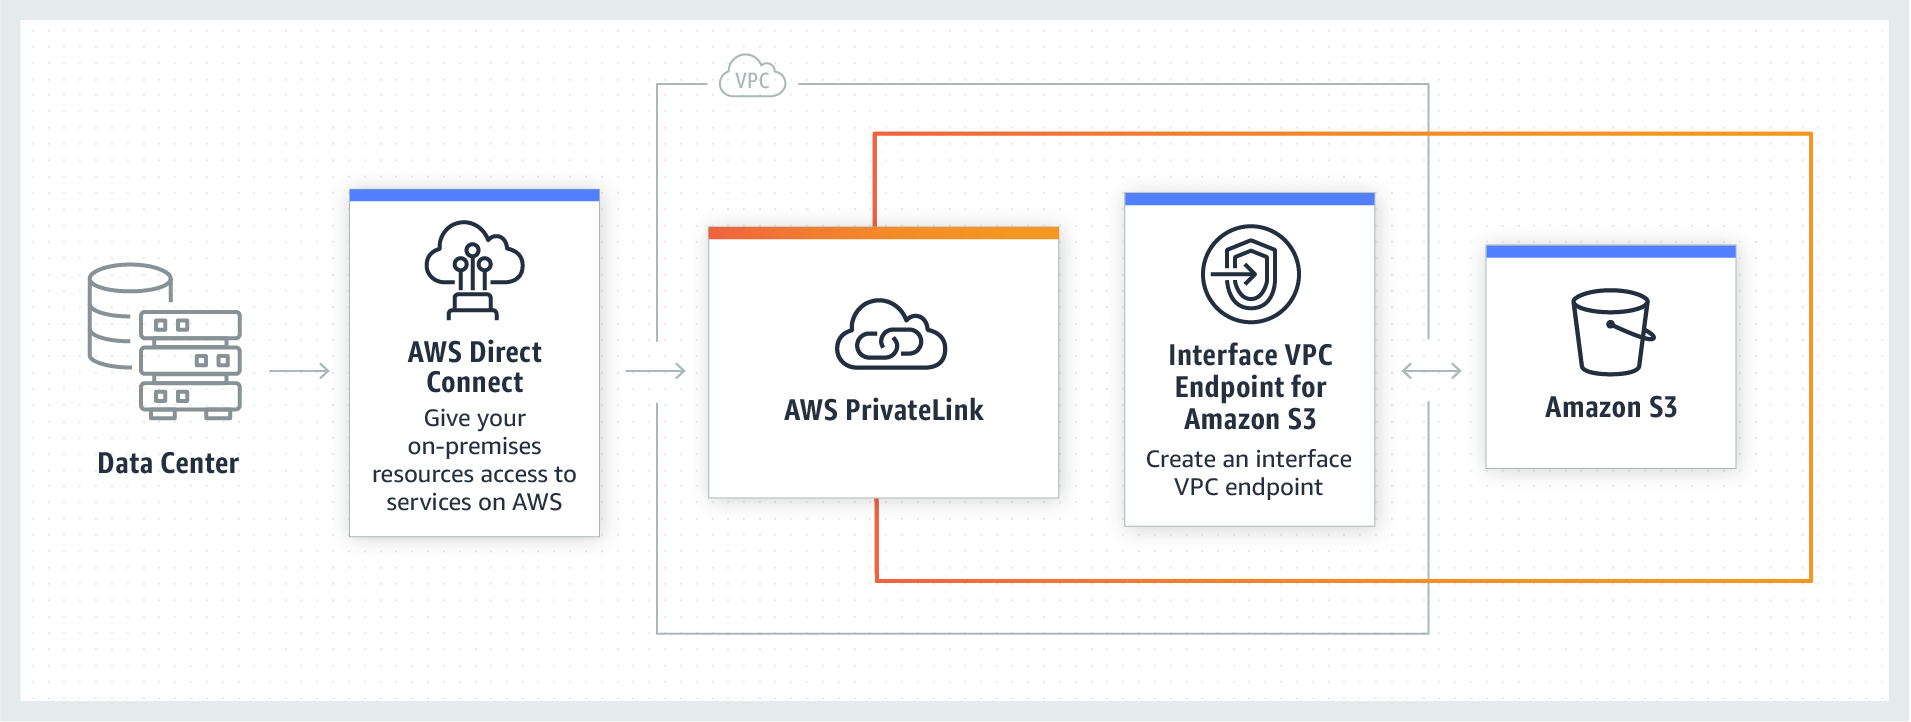
Amazon SES VPC endpoints are enabled by AWS PrivateLink for SMTP message traffic. With these VPC endpoints, you can route SMTP email traffic privately within the AWS network between your sending applications, optionally with encryption, and Amazon SES. When using a VPC endpoint, traffic to Amazon SES doesn’t transmit over the internet and never leaves the Amazon network to securely connect your VPC to Amazon SES without availability risks or bandwidth constraints on your network traffic.
At the time of writing, Amazon SES VPC endpoints don’t support API-based email sending (such as SendEmail, SendRawEmail, or SDKs). Amazon SES API traffic should be encrypted and routed using a VPC through a NAT gateway or over the public internet.
Solution overview
Our solution can help you secure your SMTP message traffic by using the following components:
- Authorized SMTP applications that optionally enforce TLS encryption and transport messages only over approved, private networks
- Amazon Virtual Private Cloud (Amazon VPC) endpoints powered by PrivateLink
- AWS security groups to further limit SMTP message traffic to approved network subnets
- AWS Identity and Access Management (IAM) policies to limit Amazon SES usage to only authorized SMTP credentialed accounts
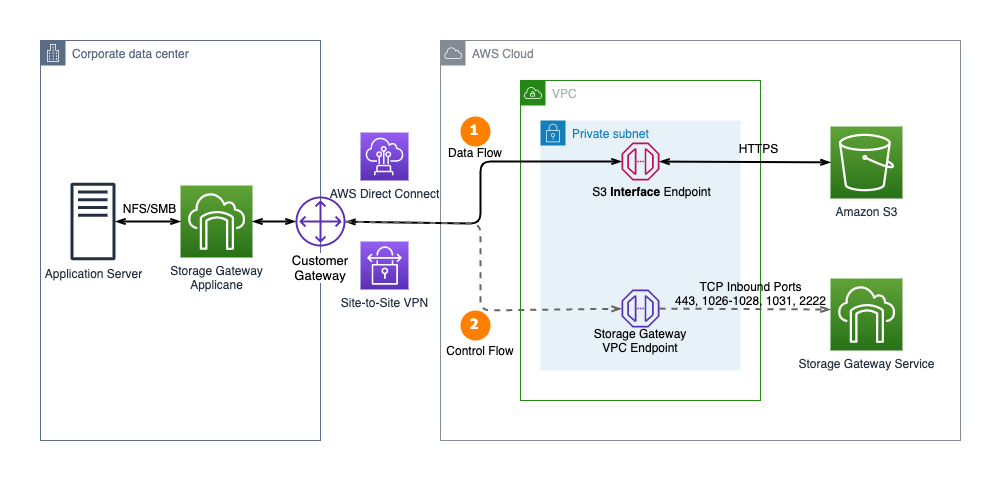
The following diagram illustrates the solution architecture. The architecture assumes you already have connectivity from your on-premises network to your VPC. For instructions to connect your on-premises network to AWS, refer to Hybrid network connections.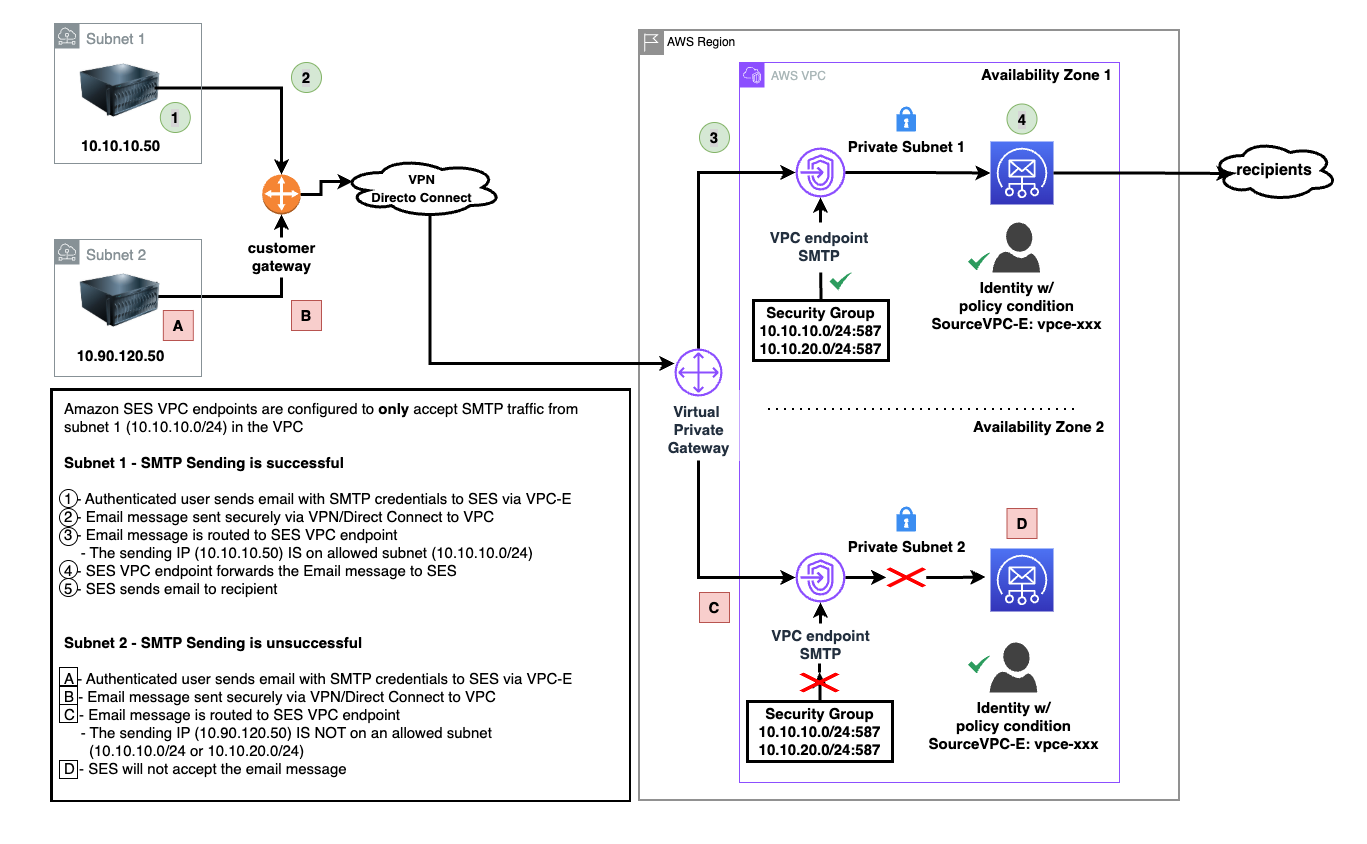
For testing purposes, we use connectivity within AWS. The same concept applies if you’re connecting from an on-premises network that is connected to your VPC either through a Virtual Private Network (VPN) or Direct Connect (DX).
The solution workflow consists of the following steps:
- Your SMTP sending applications and services are located on premises or in your data center using two subnets:
- Subnet A (IP range: 10.10.10.50)
- Subnet B (IP range: 10.90.120.50)
- Secure connections are transmitted using AWS Direct Connect or VPN connection to a VPC in the same AWS Region as your Amazon SES account.
- The SMTP message traffic, optionally encrypted, is sent to the Amazon SES VPC endpoints configured to restrict network connections from the VPC to only specific subnets:
- Traffic on approved subnet A (10.10.10.50) is sent to Amazon SES.
- Traffic on denied subnet B (10.90.120.50) is dropped (not sent to Amazon SES).
- SMTP traffic from only the allowed subnet A is further restricted to an IAM policy with valid SMTP credentials.
- Messages that conform to the traffic and authentication policies are passed to Amazon SES for final delivery to recipients.
Prerequisites
To implement this solution, you must have the following prerequisites:
- Amazon SES, configured with at least one verified identity, in the same Region as the VPC.
- An existing VPC in the same Region as Amazon SES. This can be the default VPC. For more information, see Plan your VPC.
- An SMTP sending application (optionally supporting TLS encryption) located in one of the following options:
- On premises or in a data center that is connected to the VPC through a private network connection (such as Direct Connect or VPN). For more details about private network connections to AWS, refer to Network-to-Amazon VPC connectivity options.
- In the VPC running on a compute resource such as Amazon Elastic Compute Cloud (Amazon EC2) or AWS Lambda. For this post, we use an EC2 instance in the VPC and connect to Amazon SES through the VPC endpoint on port 587 with TLS enabled. Note that AWS blocks outbound SMTP traffic on port 25 across most AWS services. Use an alternative TCP port, such as 465, 587, 2465, or 2587. Request port 25 exemption by submitting a request to AWS Support from your AWS account using the “Request to remove email sending limitations” form. This can take upwards of 7 business days to be reviewed; approval is not guaranteed. Amazon SES uses an opportunistic TLS policy by default for encrypting messages when the receiving host supports it. You should use encryption whenever it is available.
- For testing, you can use one of the following options:
- Bash or Windows PowerShell script from on-premises server.
- Use the third-party Sendmail application on an EC2 instance in the VPC. For details, see Integrating Amazon SES with Sendmail.
- PHP or Java on an EC2 instance in the VPC. For details, see Sending emails programmatically through the Amazon SES SMTP interface.
- DNS resolution for resources in the VPC with the Amazon SES VPC endpoints in the source network. To learn more, see Resolving DNS queries between VPCs and your network.
Create security group
The first step is to create a security group with inbound rules that only allow a specific IP range on the appropriate port (host-permitting, 25, 465, 587, 2465, or 2587). In our example, we only allow subnet A (IP range: 10.10.10.50) on port 587. Complete the following steps to create the security group:
- In the navigation pane of the Amazon EC2 console, under Network & Security, choose Security groups.
- Choose Create security group.
- For Security group name, enter a unique name that identifies the security group (we use
ses-vpce-sec-group). - For Description, enter the purpose of the security group.
- For VPC, choose the VPC in which you will host the application that will use Amazon SES.
- Under Inbound rules, choose Add rule.
- For Type, choose Custom TCP.
- For Port range, enter the port number that you want to use to send email. You can choose from 465, 587, 2465, or 2587. For this post, we use 587.
- For Source type, choose Custom.
- Enter the private IP CIDR range for subnet A (IP range: 10.10.10.50), which contains the resources that will use the VPC endpoint to communicate with Amazon SES.
- Choose Create security group.
Create VPC endpoint to connect the VPC to Amazon SES
Complete the following steps to create your VPC endpoint:
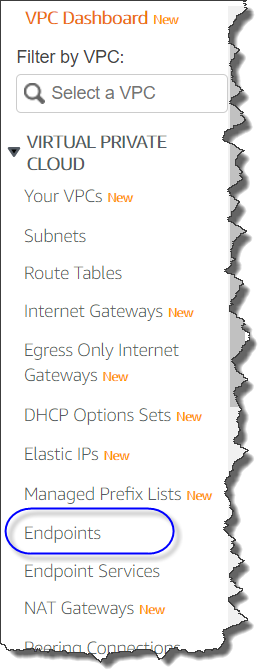
- On the Amazon VPC console, in the navigation pane, under PrivateLink and Lattice, choose Endpoints.
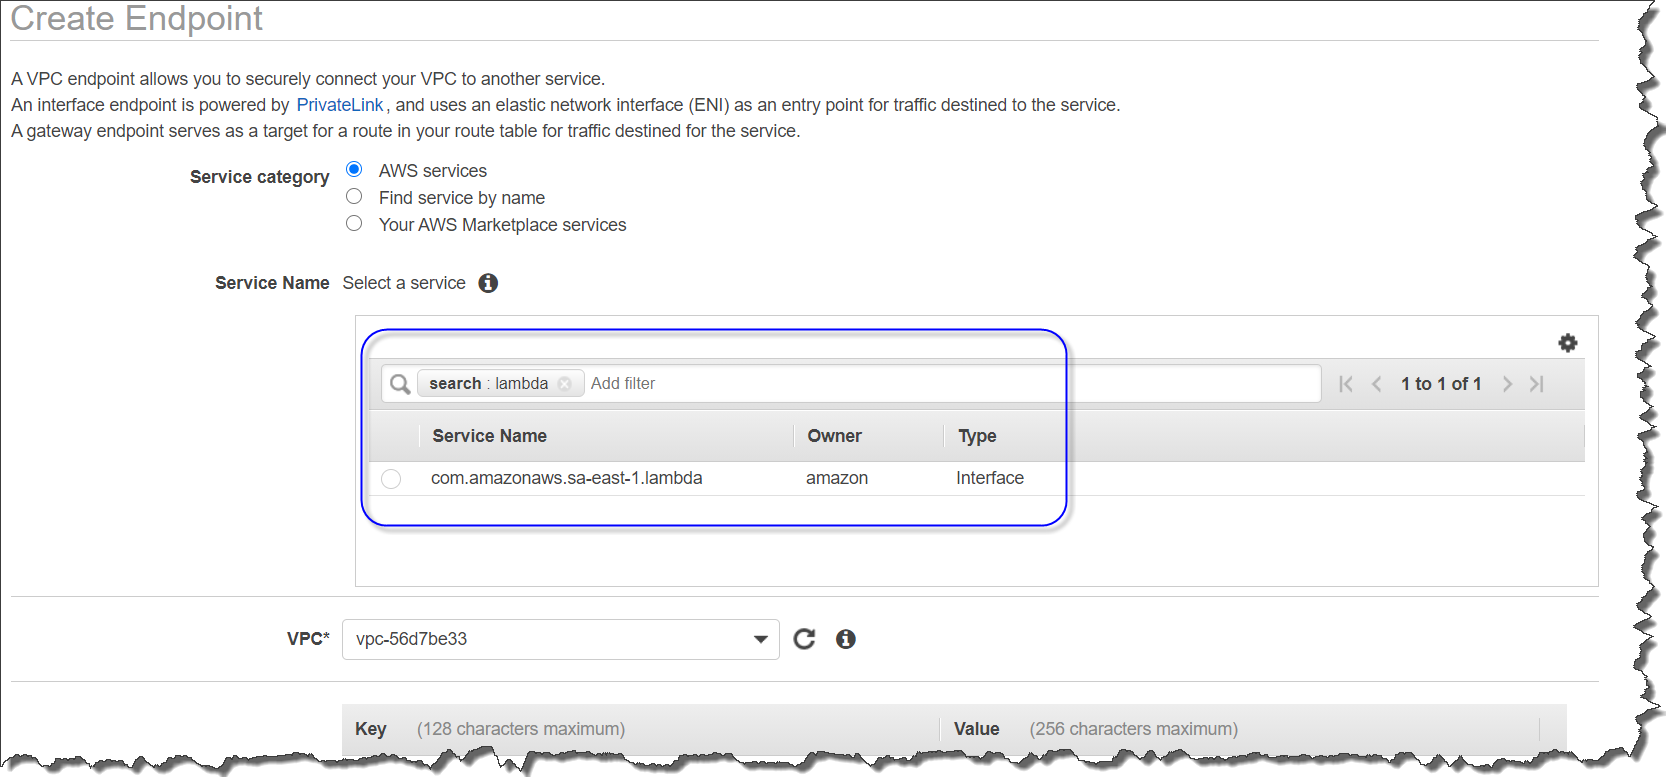
- Choose Create endpoint.
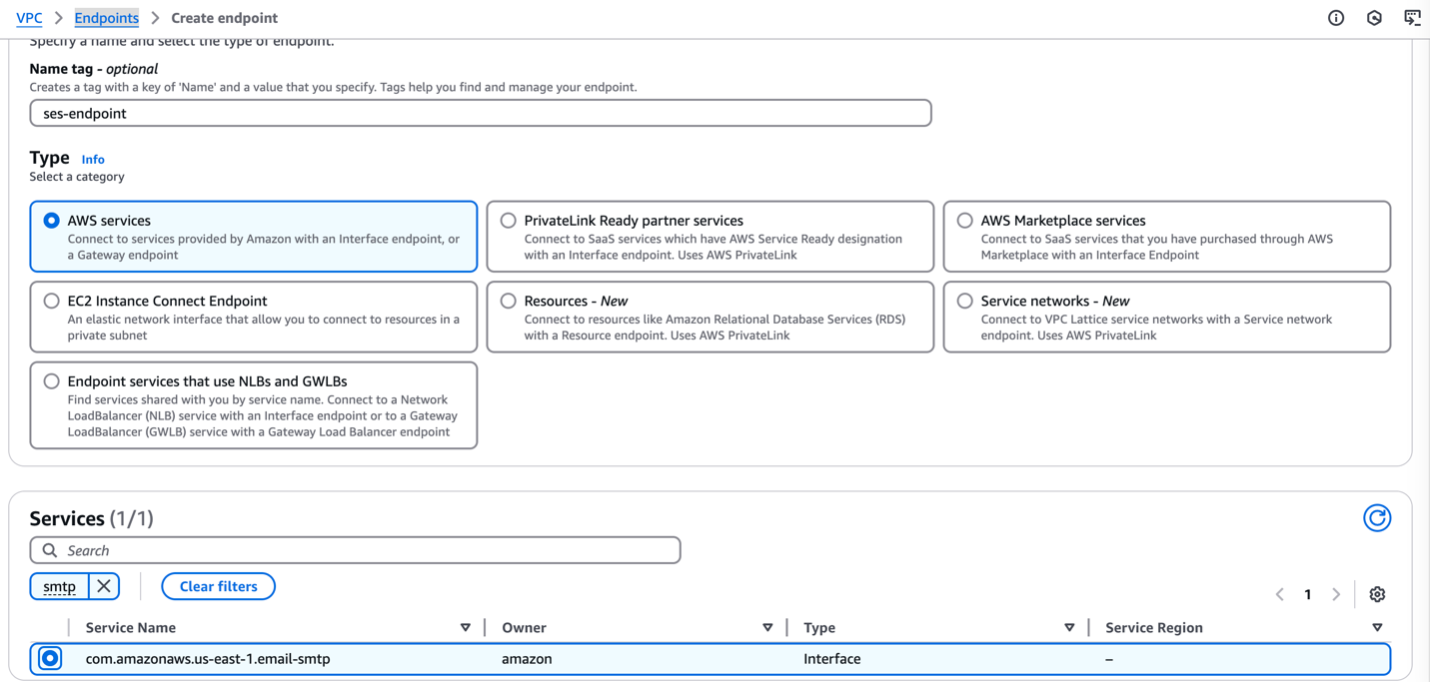
- Optionally, under Endpoint settings, create a tag in the Name tag field.
- For Service category, select AWS services.
- For Services, filter for and select
smtp. - For VPC, choose a VPC (for more details, see Prerequisites).
- For Subnets, select Availability Zones and Subnet IDs.
Amazon SES doesn’t support VPC endpoints in the following Availability Zones:use1-az2,use1-az3,use1-az5,usw1-az2,usw2-az4,apne2-az4,cac1-az3, andcac1-az4.
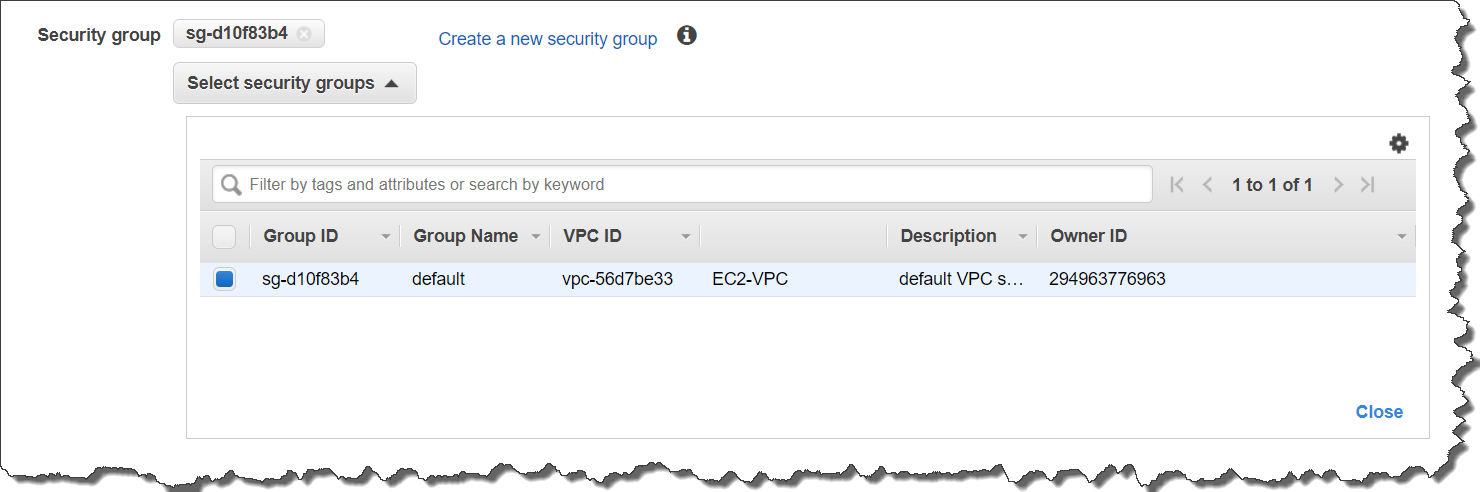
- For Security groups, choose the security group you created earlier.
- Optionally, for Tags, create one or more tags.
- Choose Create endpoint.
 Wait approximately 5 minutes while Amazon VPC creates the endpoint. When the endpoint is ready to use, the value in the Status column changes to Available.
 - Copy the VPC endpoint ID to your clipboard to use in the next step.
 Wait approximately 5 minutes while Amazon VPC creates the endpoint. When the endpoint is ready to use, the value in the Status column changes to Available.
Optionally, you can test the connection to make sure the VPC endpoint is configured properly by using command line tools to send a test email using the Amazon SES SMTP interface from an EC2 instance in the same VPC where you just created the email-smtp VPC endpoint. For more information, see Using the Amazon SES SMTP interface to send email.
Create SMTP credentials in Amazon SES that will be used by sender applications to authenticate
Complete the following steps to create SMTP credentials:
- On the Amazon SES console, choose SMTP Settings in the navigation pane.
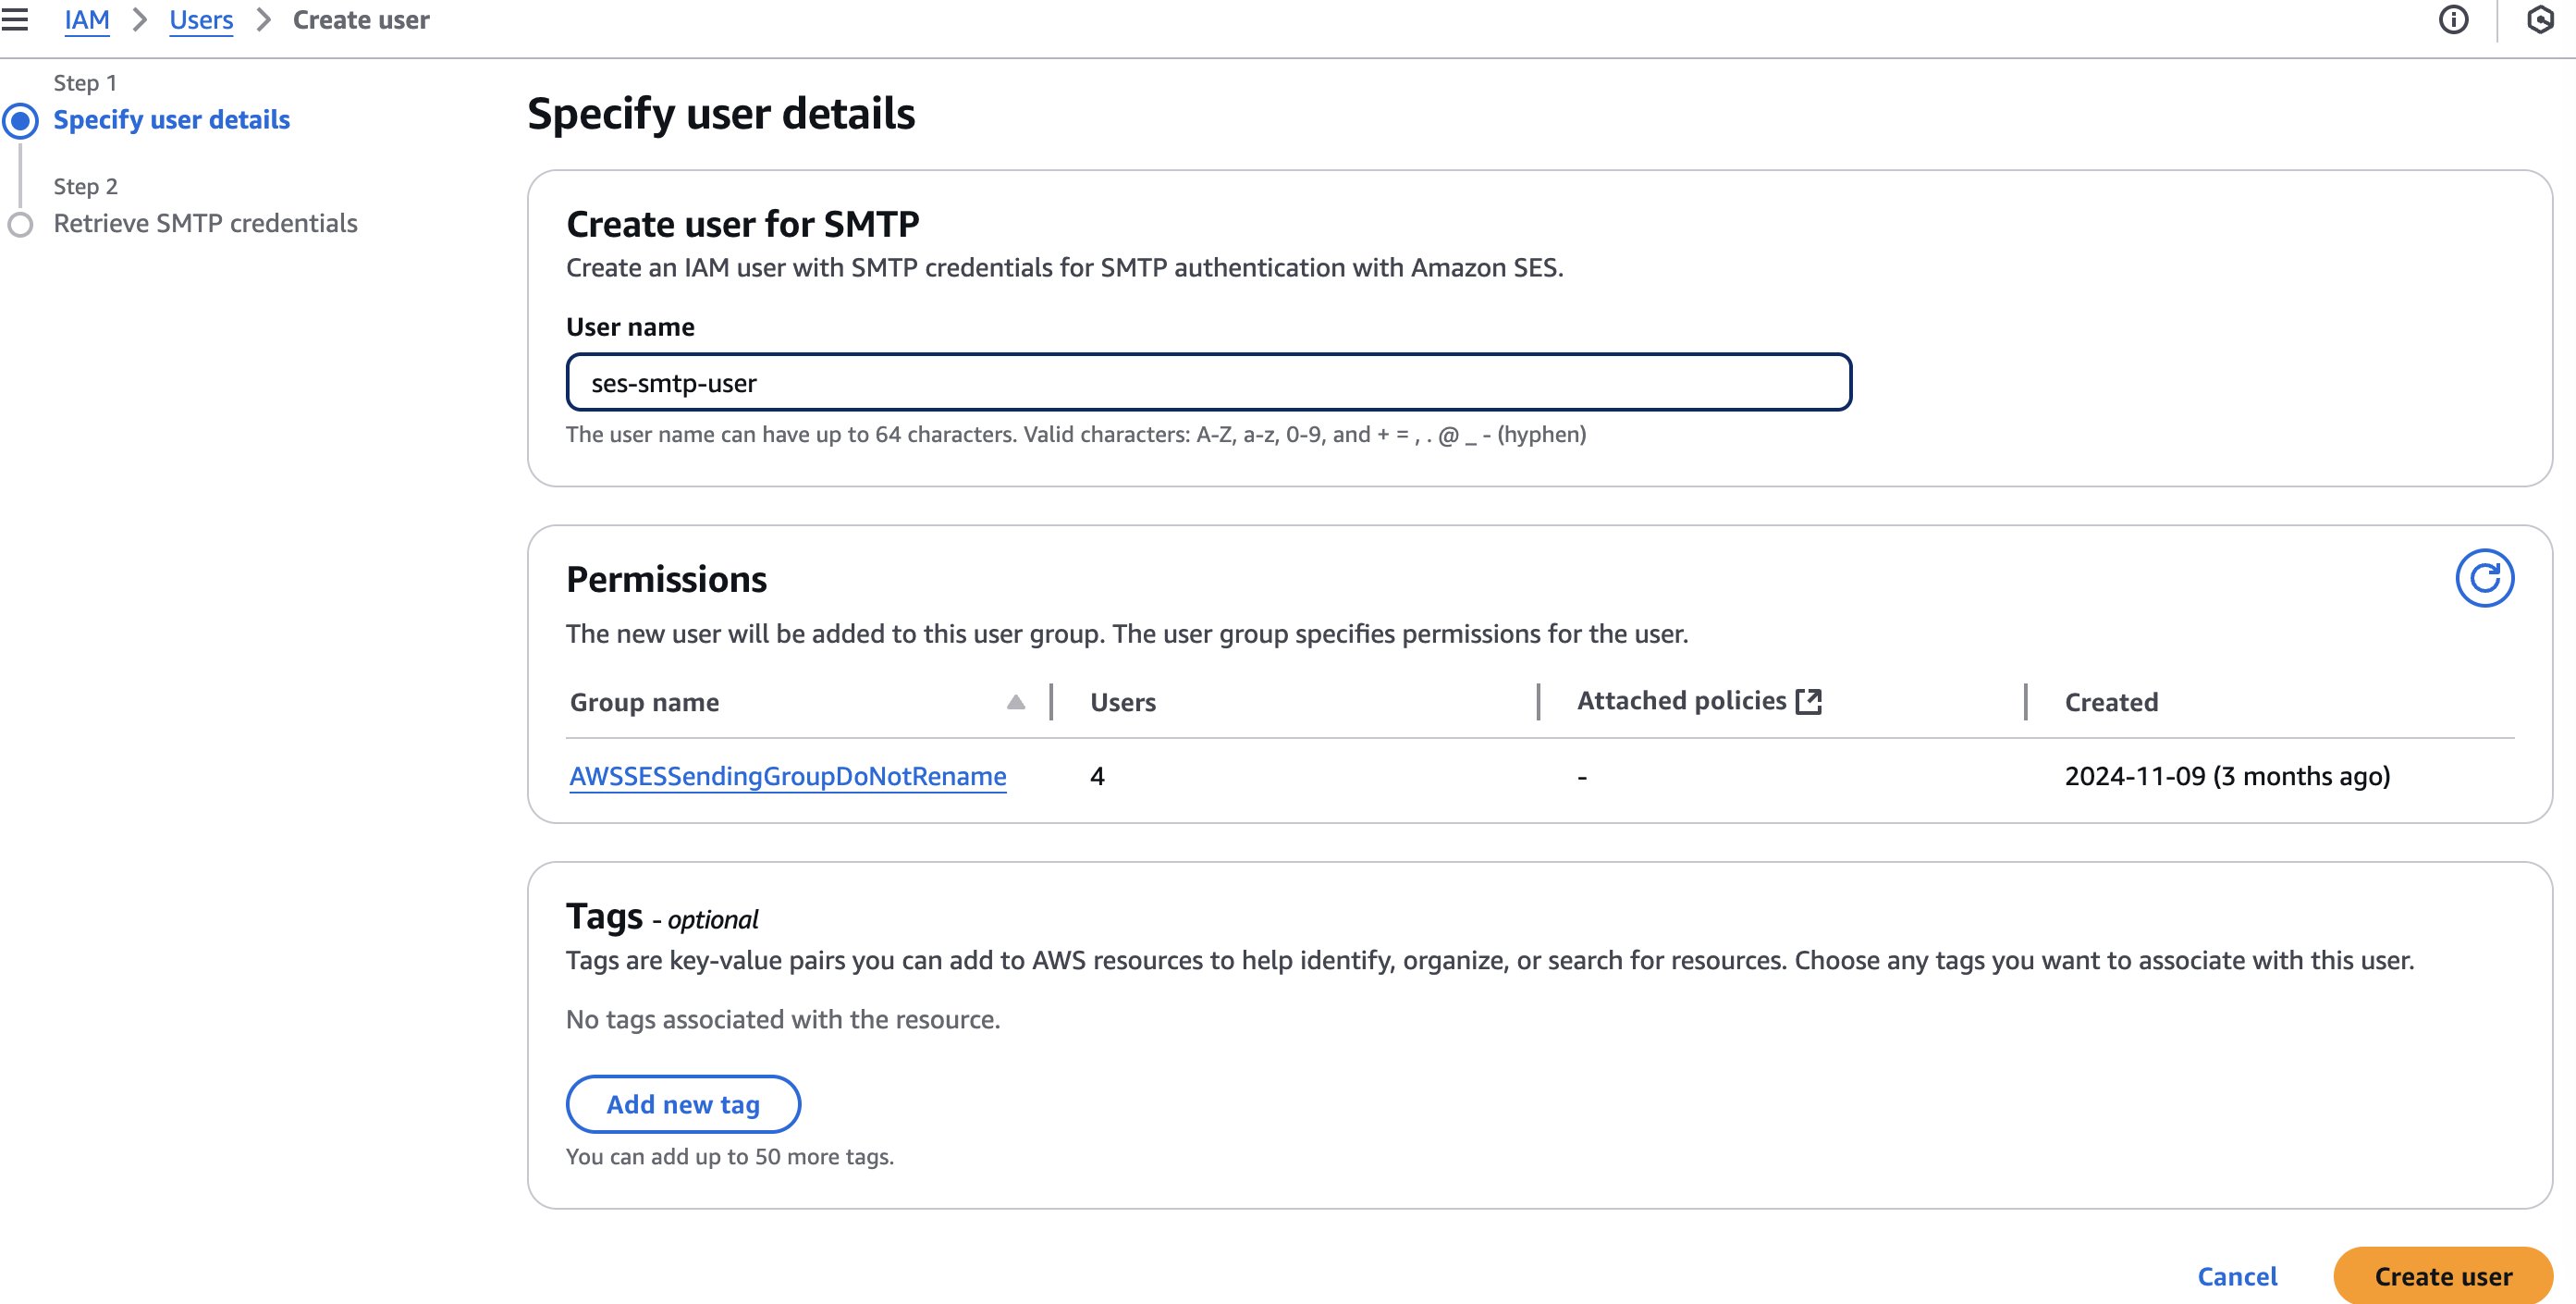
- Choose Create SMTP credentials.

- Enter your preferred user name and choose Create user.

- Download the user’s SMTP credentials or copy the credentials to AWS Secrets Manager. (we will use these SMTP credentials in the next step).
- Return to the SES console.

Limit traffic to the Amazon SES VPC endpoint using IAM
In this step, we limit traffic to the Amazon SES VPC endpoint using an IAM policy. The IAM policy has a condition that restricts access to aws:SourceVpce. Complete the following steps:
- On the Amazon SES console, choose SMTP Settings in the navigation pane.
- Choose Manage my existing SMTP credentials.
- Choose the user you created earlier, then choose Permissions.
- Choose the policy name
AmazonSesSendingAccessto go to the IAM policy editor. - Replace the policy content in JSON view with the following policy, which adds the conditions for traffic to come from the Amazon SES VPC endpoint:
- Choose Next.
- Choose Save changes.
As a best practice, rotate your SMTP credentials on a periodic basis and whenever there is concern over the confidentiality of the credentials. For more information, see Automate the Creation & Rotation of Amazon Simple Email Service SMTP Credentials.
Test permissions and connectivity
To test permissions and connectivity by sending a test email, complete the following steps to create an EC2 instance in your VPC:
- On the Amazon EC2 console, create a new EC2 instance.
- Make sure to specify your VPC and subnet. The subnet must be the same as the one selected in previous steps.
- Use the SMTP script in the Amazon SES documentation for testing.
This screenshot shows the test result using the SMTP VPC Endpoint URL.
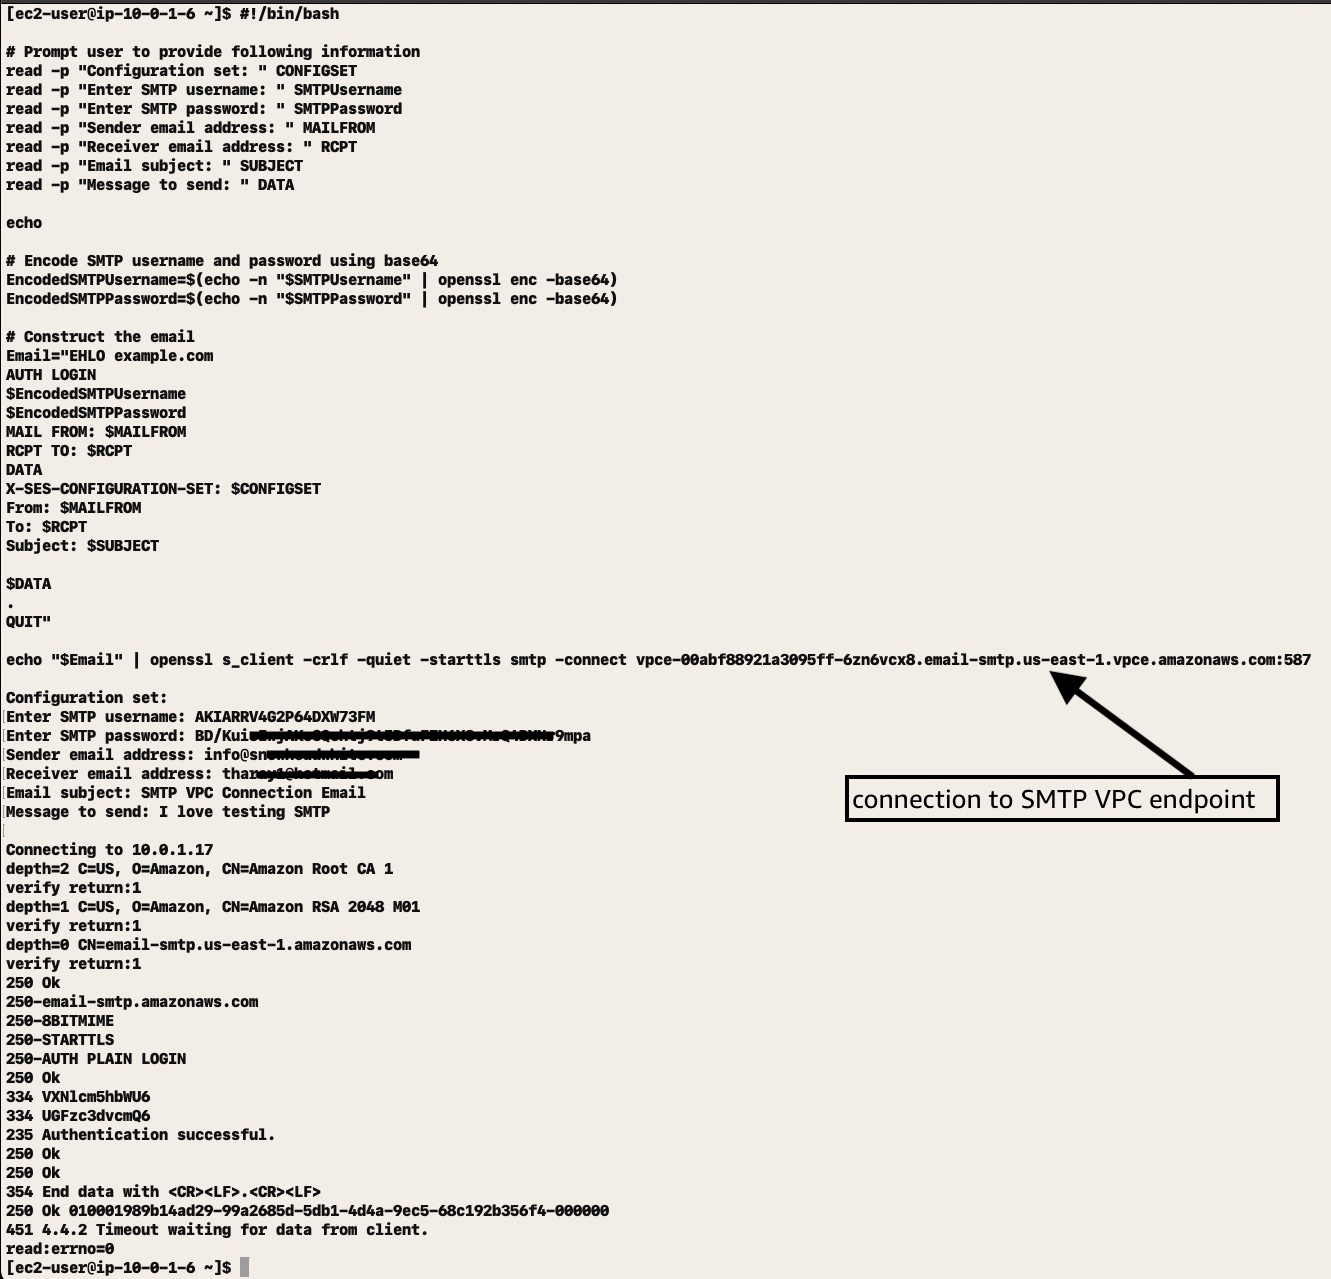
This configuration allows Amazon SES to only accept SMTP message traffic from applications from allowed on-premises subnets with connectivity to AWS and in the VPC that originates from the permitted SMTP IAM identity policy. This design follows the AWS least privilege access approach to security. To learn more, refer to Strategies for achieving least privilege at scale.
Clean up
After testing, if you don’t want to keep these configurations you should delete the EC2 instance, the VPC endpoint, the SMTP credential, and the IAM user.
Conclusion
In this post, we demonstrated how to implement a secure Amazon SES environment by combining multiple AWS security controls. By using Amazon SES VPC endpoints, security groups, and IAM policies, you can create a robust security architecture that restricts email sending capabilities to authorized networks only.
This multi-layered approach addresses critical security challenges by avoiding public internet exposure for SMTP traffic, enabling comprehensive traffic monitoring through VPC flow logs, and establishing defined network boundaries that satisfy strict compliance requirements.
The solution provides significant security benefits while maintaining the scalability and reliability that Amazon SES customers expect. Organizations can effectively protect sensitive email communications, prevent unauthorized access, and maintain compliance with industry regulations like HIPAA and GDPR. This becomes increasingly important as email-based threats continue to evolve and regulatory requirements become more stringent.
Start implementing these security controls today:
- Deploy this solution in your development environment first, testing each component thoroughly
- Review the security best practices for Amazon SES and VPC endpoints
- Validate your implementation against your organization’s security requirements
- Create a detailed migration plan for your production environment
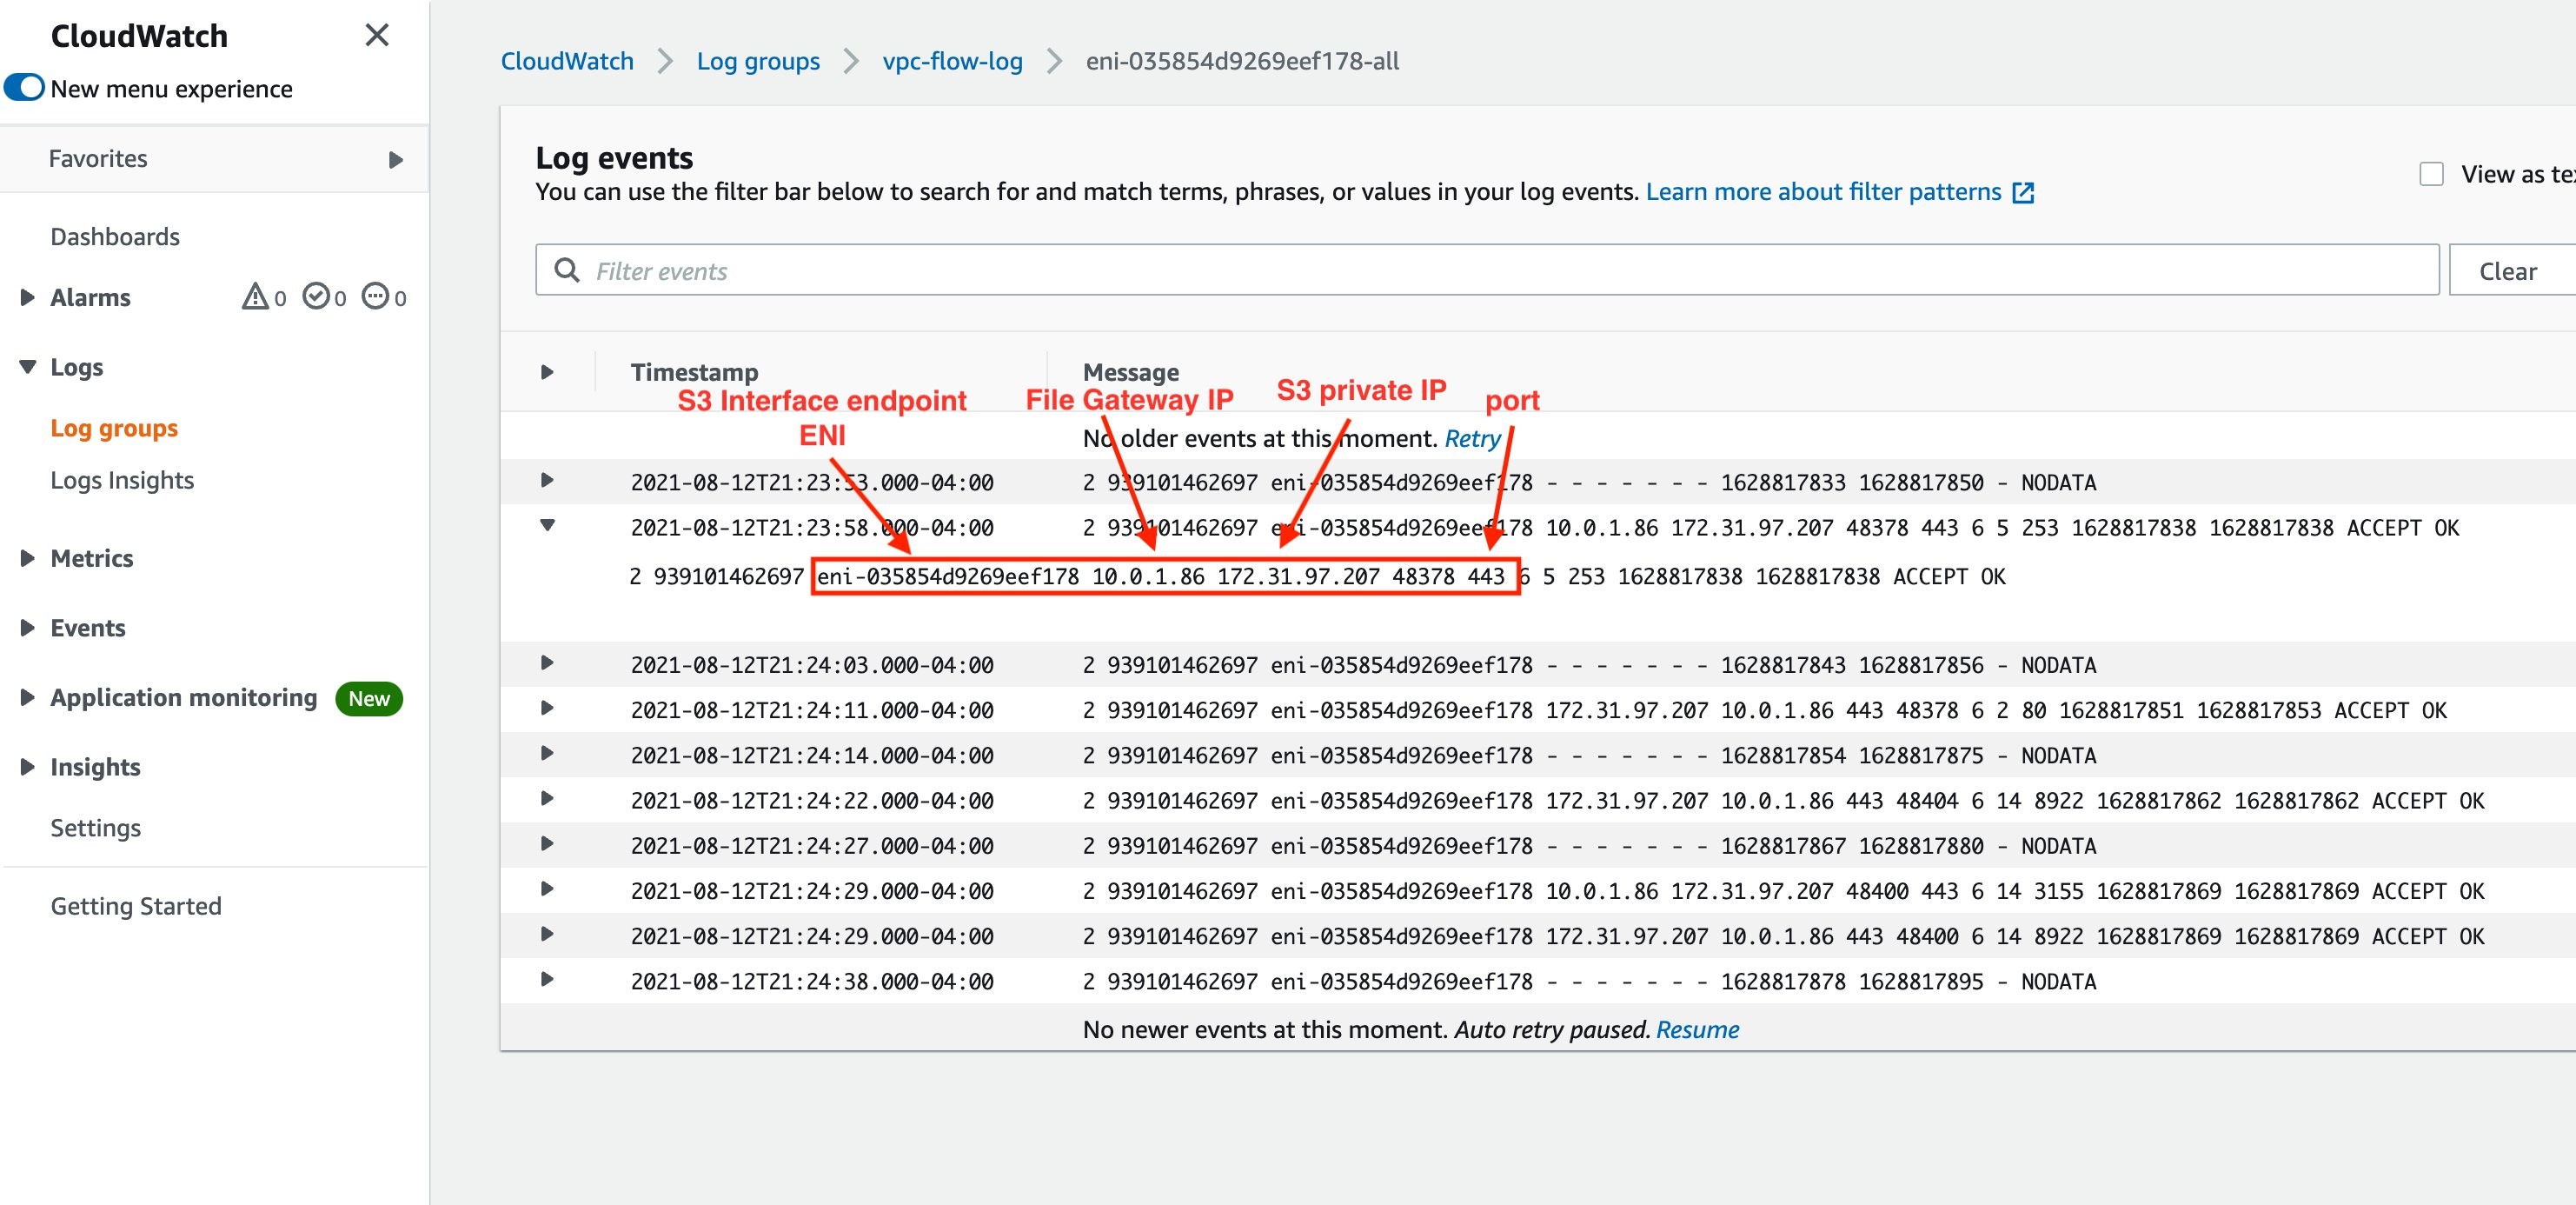
- Monitor and audit your email infrastructure regularly using VPC Flow Logs and Amazon CloudWatch
For additional guidance, consult the Amazon SES documentation, explore the AWS Security Blog for related articles, or engage with AWS Support. Remember to periodically review and update your security configurations as new features and best practices emerge.


 Ankush Goyal is a Enterprise Support Lead in AWS Enterprise Support who helps customers streamline their cloud operations on AWS. He is a results-driven IT professional with over 20 years of experience.
 Anvesh Koganti is a Solutions Architect at AWS specializing in Networking. He focuses on helping customers build networking architectures for highly scalable and resilient AWS environments. Outside of work, Anvesh is passionate about consumer technology and enjoys listening to podcasts on tech and business. When disconnecting from the digital world, Anvesh spends time outdoors hiking and biking.
 Salman Ahmed is a Senior Technical Account Manager in AWS Enterprise Support. He specializes in guiding customers through the design, implementation, and support of AWS solutions. Combining his networking expertise with a drive to explore new technologies, he helps organizations successfully navigate their cloud journey. Outside of work, he enjoys photography, traveling, and watching his favorite sports teams.


 As we move into the second week of 2025, China is celebrating Laba Festival (腊八节), a traditional holiday, which marks the beginning of Chinese New Year preparations. On this day, Chinese people prepare


 We also have more
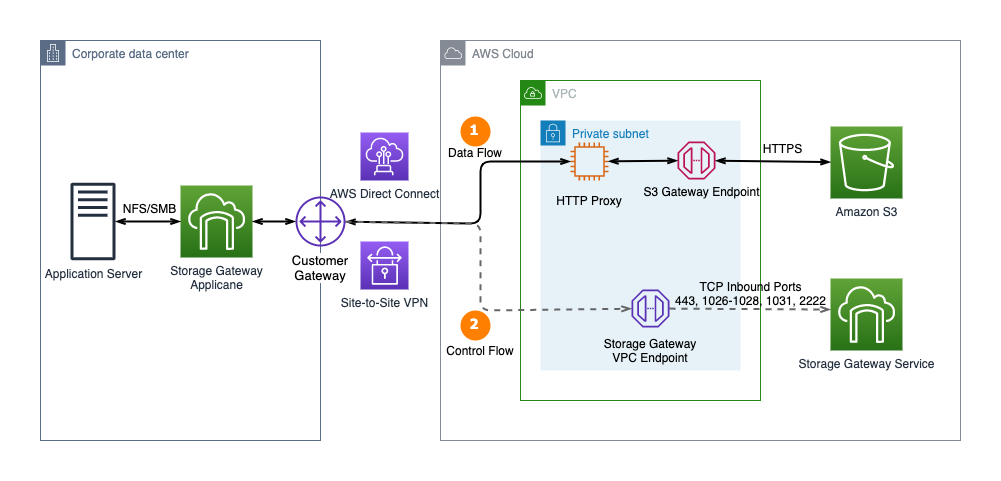


 Lotfi Mouhib is a Senior Solutions Architect working for the Public Sector team with Amazon Web Services. He helps public sector customers across EMEA realize their ideas, build new services, and innovate for citizens. In his spare time, Lotfi enjoys cycling and running.