By implementing the PBHVA control overlay over a CCCS Medium baseline, you can better protect your organization’s most critical assets from potential threats and vulnerabilities, providing continuity of essential government operations and safeguarding sensitive information.
Understanding CCCS PBHVA overlay requirements
The CCCS PBHVA overlay consists of 137 controls designed to protect high-value assets, including 69 new controls and 68 controls from CCCS Medium. These controls provide enhanced data protection, particularly for integrity and availability, and are based on NIST SP 800-53 Revision 5.
Key findings from the Coalfire assessment
Coalfire’s assessment found that the LZA on AWS solution significantly supports CCCS PBHVA overlay compliance requirements:
71 percent of in-scope controls (97 of 137) are supported by the AWS contribution to compliance in the shared responsibility model
The solution uses over 35 AWS services to provide comprehensive security capabilities
Strong network segmentation is achieved through network account and network-boundary VPC design
Infrastructure-as-code (IaC) enables reliable build and deployment results
The 29 percent of controls not addressed by the LZA are on the customer side of the shared responsibility model. They are addressed in the customer’s application stack or as non-technical controls such as policies and procedures.
Key security capabilities
The LZA solution implements several critical security features:
While the LZA solution provides significant compliance support, organizations should note:
The solution alone does not guarantee compliance
Organizations must implement their own policies, standards, and procedures
A thorough understanding of the shared responsibility model is essential
The AWS Landing Zone Accelerator Verified Reference Architecture documentation is available for customer download in AWS Artifact. This resource can help organizations reduce the time and effort required to deploy an environment that aligns with CCCS PBHVA overlay requirements.
Conclusion
The Coalfire assessment confirms that the LZA on AWS solution provides effective support for CCCS PBHVA overlay compliance objectives. However, organizations should remember that compliance is an ongoing process that requires active management and cannot be achieved through technology alone.
For more information about implementing the Landing Zone Accelerator for CCCS PBHVA overlay requirements, contact your AWS account team or the AWS Public Sector team directly.
If you have feedback about this post, submit comments in the Comments section below. If you have questions about this post, contact AWS Support.
Generative artificial intelligence (AI) is now a household topic and popular across various public applications. Users enter prompts to get answers to questions, write code, create images, improve their writing, and synthesize information. As people become familiar with generative AI, businesses are looking for ways to apply these concepts to their enterprise use cases in a simple, scalable, and cost-effective way. These same needs are shared by a variety of security stakeholders. For example, if security directors want to summarize their security posture in natural language, a security architect will need to triage alerts or findings and investigate AWS CloudTrail logs to identify high priority remediation actions or detect potential threat actors by identifying potentially malicious activity. There are many ways to deploy solutions for these use cases.
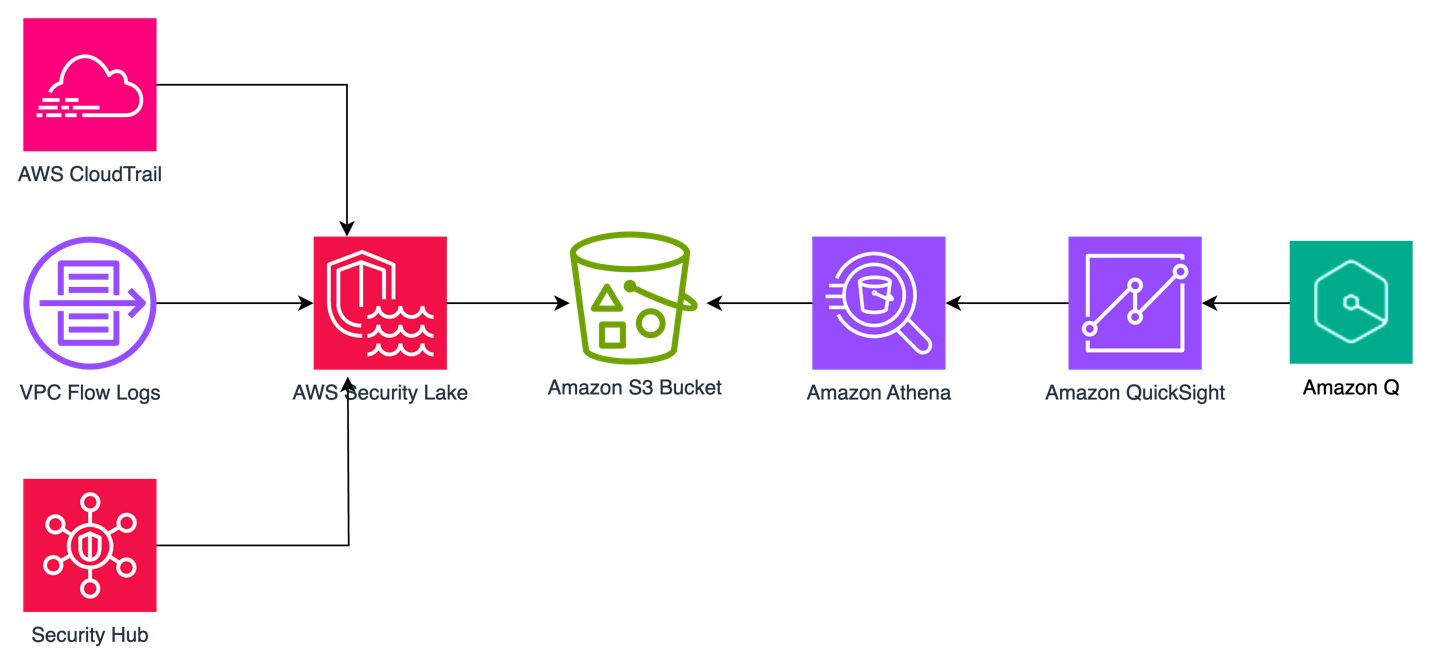
In this blog post, we review a fully serverless solution for querying data stored in Amazon Security Lake using natural language (human language) with Amazon Q in QuickSight. This solution has multiple use cases, such as generating visualizations and querying vulnerability information for vulnerability management using tools such as Amazon Inspector that feed into AWS Security Hub. The solution helps reduce the time from detection to investigation by using natural language to query CloudTrail logs and Amazon Virtual Private Cloud (VPC) Flow Logs, resulting in quicker response to threats in your environment.
Amazon Security Lake is a fully managed security data lake service that automatically centralizes security data from AWS environments, software as a service (SaaS) providers, and on-premises and cloud sources into a purpose-built data lake that’s stored in your AWS account. The data lake is backed by Amazon Simple Storage Service (Amazon S3) buckets, and you retain ownership over your data. Security Lake converts ingested data into Apache Parquet format and a standard open source schema called the Open Cybersecurity Schema Framework (OCSF). With OCSF support, Security Lake normalizes and combines security data from AWS and a broad range of enterprise security data sources.
Amazon QuickSight is a cloud-scale business intelligence (BI) service that delivers insights to stakeholders, wherever they are. QuickSight connects to your data in the cloud and combines data from a variety of different sources. With QuickSight, users can meet varying analytic needs from the same source of truth through interactive dashboards, reports, natural language queries, and embedded analytics. With Amazon Q in QuickSight, business analysts and users can use natural language to build, discover, and share meaningful insights.
The recent announcements for Amazon Q in QuickSight, Security Lake, and the OCSF present a unique opportunity to apply generative AI to fully managed hybrid multi-cloud security related logs and findings from over 100 independent software vendors and partners.
Solution overview
The solution uses Security Lake as the data lake which has native ingestion for CloudTrail, VPC Flow Logs, and Security Hub findings as shown in Figure 1. Logs from these sources are sent to S3 buckets in your AWS account and are maintained by Security Lake. We then create Amazon Athena views from tables created by Security Lake for Security Hub findings, CloudTrail logs, and VPC Flow Logs to define the interesting fields from each of the log sources. Each of these views are ingested into a QuickSight dataset. From these datasets, we generate analyses and dashboards. We use Amazon Q topics to label columns in the dataset that are human-readable and create a named entity to present contextual and multi-visual answers in response to questions. After the topics are created, users can perform their analysis using Q topics, QuickSight analyses, or QuickSight dashboards.
Figure 1: Solution architecture
You can use the rollup AWS Region feature in Security Lake to aggregate logs from multiple Regions into a single Region. Specifying a rollup Region can help you adhere to regional compliance requirements. If you use rollup Regions, you must set up the solution described in this post for datasets only in rollup Regions. If you don’t use a rollup Region, you must deploy this solution for each Region you that want to collect data from.
Prerequisites
To implement the solution described in this post, you must meet the following requirements:
Basic understanding of Security Lake, Athena, and QuickSight.
Security Lake is already deployed and accepting CloudTrail management events, VPC Flow Logs, and Security Hub findings as sources. If you haven’t deployed Security Lake yet, we recommend following the best practices established in the security reference architecture.
This solution uses Security Lake data source version 2 to create the dashboards and visualizations. If you aren’t already using data source version 2, you will see a banner in your Security Lake console with instructions to update.
An existing QuickSight deployment that will be used to visualize Security Lake data or an account that is able to sign up for QuickSight to create visualizations.
QuickSight Author Pro and Reader Pro licenses are needed for using Amazon Q features in QuickSight. Non-pro Authors and Readers can still access Q topics if an Author Pro or Admin Pro user shares the topic with them. Non-pro Authors and Readers can also access data stories if a Reader Pro, Author Pro, or Admin Pro shares one with them. Review Generative AI features supported by each QuickSight licensing tiers.
In the following section, we walk through the steps to ingest Security Lake data into QuickSight using Athena views and then using Amazon Q in QuickSight to create visualizations and query data using natural language.
Provide cross-account query access
In alignment with our security reference architecture, it’s a best practice to isolate the Security Lake account from the accounts that are running the visualization and querying workloads. It’s recommended that QuickSight for security use cases be deployed in the security tooling account. See How to visualize Amazon Security Lake findings with Amazon QuickSight for information on how to set up cross-account query access. Follow the steps in the Configure a Security Lake subscriber section and configure Athena to visualize your data section.
When you get to the create resource link steps, create a resource link for data source version 2 for Security Hub, CloudTrail, and VPC flow log tables for a total of three resource links. The way to identify data source version 2 tables is by their name; it ends in _2_0. For example:
For the remainder of this post, we will be referencing the database name security_lake_visualization and the resource link names for Security Hub findings, CloudTrail logs, and VPC Flow Logs respectively, as shown in Figure 2:
We will call the QuickSight account the visualization account. If you plan to use same account as the Security Lake delegated administrator and QuickSight, then skip this step and go to the next section where you will create views in Athena.
Create views in Athena
A view in Athena is a logical table that helps simplify your queries by working with only a subset of the relevant data. Follow these steps to create three views in Athena, one each for Security Hub findings, CloudTrail logs, and the VPC Flow Logs in the visualization account.
These queries default to the previous week’s data starting from the previous day, but you can change the time frame by modifying the last line in the query from 8 to the number of days you prefer. Keep in mind that there is a limitation on the size of each SPICE table of 1 TB. If you want to limit the volume of data, you can delete the rows that you find unnecessary. We included the fields customers have identified as relevant to reduce the burden of writing the parsing details yourself.
To create views:
Sign in to the AWS Management Console in the visualization account and navigate to the Athena console.
If a Security Lake rollup Region is used, select the rollup Region.
Choose Launch Query Editor.
If this is the first time you’re using Athena, you will need to choose a bucket to store your query results.
Choose Edit Settings.
Choose Browse S3.
Search for your bucket name.
Select the radio button next to the name of your bucket.
Select Choose.
For Data Source, select AWSDataCatalog.
Select Database as security_lake_visualization. If you used a different name for the database for cross account query access, then select that database.
Figure 3: Athena database selection
Copy the query for the security_hub_view from the GitHub repo for this post. If you’re using a different name for the database and table resource link than the one specified in this post, edit the FROM statement at the bottom of the query to reflect the correct names.
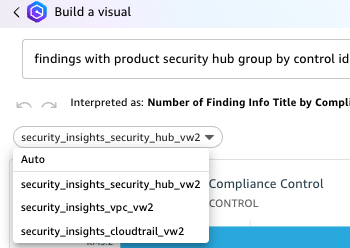
Paste the query in the query editor and then choose Run. The name of the view is set in the first line of the query which is security_insights_security_hub_vw2.
To confirm this view was created correctly, choose the three dots next to the view that was created and select Preview View.
Figure 4: Previewing the view
Repeat steps 5–9 to create the CloudTrail and VPC Flow Logs views. The queries for each can be found in the GitHub repo.
Figure 5: Athena views
Create QuickSight dataset
Now that you’ve created the views, use Athena as the data source to create a dataset in QuickSight. Repeat these steps for the Security Hub findings, CloudTrail logs, and VPC Flow Logs. Start by creating a dataset for the Security Hub findings.
To configure permissions on tables:
Sign in to the QuickSight console in the visualization account. If a Security Lake rollup Region is used, select the rollup Region.
Although there are multiple ways to sign in to QuickSight, we used IAM based access to build the dashboards. To use QuickSight with Athena and Lake Formation, you first need to authorize connections through Lake Formation.
When using a cross-account configuration with AWS Glue Data Catalog, you need to configure permissions on tables that are shared through Lake Formation. For the use case in this post, use the following steps to grant access on the cross-account tables in the Glue Catalog. You must perform these steps for each of the Security Hub, CloudTrail, and VPC Flow Logs tables that you created in the preceding cross-account query access section. Because granting permissions on a resource link doesn’t grant permissions on the target (linked) database or table, you will grant permission twice, once to the target (linked table) and then to the resource link.
In the Lake Formation console, navigate to the Tables section and select the resource link for the Security Hub table. For example:
Select Actions. Under Permissions, select Grant on target.
For the next step, you need the Amazon Resource Name (ARN) of the QuickSight users or groups that need access to the table. To obtain the ARN through the AWS Command Line Interface (AWS CLI), run following commands (replacing account ID and Region with that of the visualization account.) You can use AWS CloudShell for this purpose.
After you have the ARN of the user or group, copy it and go back to the LakeFormation console Grant on Target page. For Principals, select SAML users and groups, and then add the QuickSight user’s ARN.
Figure 6: Selecting principals
For LF-Tags or catalog resources, keep the default settings.
Figure 7: Table grant on target permissions
For Table permissions, select Select for both Table Permissions and Grantable Permissions, and then choose Grant.
Figure 8: Selecting table permissions
Navigate back to the Tables section and select the resource link for the Security Hub table. For example:
Select Actions. This time under Permissions, and then choose Grant.
For Principals, select SAML users and groups, and then add the QuickSight user’s ARN captured earlier.
For the LF-Tags or catalog resources section, use the default settings.
For Resource link permissions choose Describe for both Table Permissions and Grantable Permissions.
Repeat steps a–k for the CloudTrail and VPC Flow Logs resource links.
To create datasets from views:
After permissions are in place, you create three datasets from the views created earlier. Because both Quicksight and Lake Formation are Regional services, verify that you’re using QuickSight in the same Region where Lake Formation is sharing the data. The simplest way to determine your Region is to check the QuickSight URL in your web browser. The Region will be at the beginning of the URL, such as us-east-1. To change the Region, select the settings icon in the top right of the QuickSight screen and select the correct Region from the list of available Regions in the drop-down menu.
Navigate back to the QuickSight console.
Select Datasets, and then choose New dataset.
Select Athena from the list of available data sources.
Enter a Data source name, for example security_lake_securityhub_dataset and leave the Athena workgroup as [primary]. Choose Create data source.
At the Choose your table prompt, for Catalog, select AwsDataCatalog. For Database, select security_lake_visualization. If you used a different name for the database for cross-account query access, then select that database. For Tables, select the view name security_insights_security_hub_vw2 to build your dashboards for Security Hub findings. Then choose Select.
Figure 9: Choose a table during QuickSight dataset creation
At the Finish dataset creation prompt, select Import to SPICE for quicker analytics. Choose Visualize. This will create a new dataset in QuickSight using the name of the Athena view, which is security_insights_security_hub_vw2. You will be taken to the Analysis page, exit out of it.
Go back to the QuickSight console and repeat steps 3–8 for the CloudTrail and VPC Flow Log datasets.
Create a topic
Now that you have created a dataset, you can create a topic. Q topics are collections of one or more datasets that represent a subject area for your business users to ask questions. Topics allow users to ask questions in natural language and to build visualizations using natural language.
To create a Q topic:
Navigate to the QuickSight console.
Choose Topics in the left navigation pane.
Figure 10: QuickSight navigation pane
Choose New topic. Create one topic each for the Security Hub findings, CloudTrail logs, and VPC Flow Logs
Figure 11: QuickSight topic creation
On the New topic page, do the following:
For Topic name, enter a descriptive name for the topic. Name the first one SecurityHubTopic. Your business users will identify the topic by this name and use it to ask questions.
For Description, enter a description for the topic. Your users can use this description to get more details about the topic.
Choose Continue.
On the Add data to topic page, choose the dataset you created in the Create a QuickSight dataset section. Start with the Security Hub dataset security_insights_security_hub_vw2.
Choose Continue. It will take a few minutes to create the topic.
Now that your topic has been created, navigate to the Data tab of the topic.
Your Data Fields sub-tab should be selected already. If not, choose Data Fields.
Figure 12: Topics data fields
For each of the fields in the list, turn on Include to make sure that all fields are included. For this example, we selected all fields, but you can adjust the included columns as needed for your use case. Note, you might see a banner at the top of the page indicating that the indexing is in progress. Depending on the size of your data, it might take some time for Q to make those fields available for querying. Most of the time, indexing is complete in less than 15 minutes.
Review the Synonyms column. These alternate representations of your column name are automatically generated by Amazon Q. You can add and remove synonyms as needed for your use case.
At this point, you’re ready to ask questions about your data using Amazon Q in QuickSight. Choose Ask a question about SecurityHubTopic at the top of the page.
Figure 13: Ask questions using Q
You can now ask questions about Security Hub findings in the prompt. Enter Show me findings with compliance status failed along with control id.
Figure 14: Q answers
Under the question, you will see how it was interpreted by QuickSight.
Repeat steps 1–13 to create CloudTrail and VPC Flow Log QuickSight topics.
Create named entities for your topics
Now that you’ve created your topics, you will now add named entities. Named entities are optional, but we’re using them in the solution to help make queries more effective. The information contained in named entities, the ordering of fields, and their ranking make it possible to present contextual, multi-visual answers in response to even vague questions.
To create a named entity:
In the QuickSight console, navigate to Topics.
Select the Security Hub topic that you created in the previous section.
Under the Data tab, select the Named Entity subtab, and choose Add Named Entity.
Figure 15: Named entity subtab
Enter Security Findings as the entity name.
Select the following datafields: Status, Metadata Product Name, Finding Info Title, Region, Severity, Cloud Account Uid, Time Dt, Compliance Status, and AccountId. The order of the fields helps Q to prioritize the data, so rearrange your data fields as needed.
Choose Save in the top right corner to save your results.
Repeat steps 1–6 with the CloudTrail dataset using the following datafields: API operation, Time Dt, Region, Status, AccountId, API Response Error, Actor User Credential Uid, Actor User Name, Actor User Type, Api Service Name, Actor Idp Name, Cloud Provider, Session Issuer, and Unmapped.
Figure 17: CloudTrail named entity creation
Repeat steps 1–6 with the VPC Flow Log dataset using the following datafields: Src Endpoint IP, Src Endpoint Port, Dst Endpoint IP, Dst Endpoint Port, Connection Info Direction, Traffic Bytes, Action, Accountid, Time Dt, and Region.
Figure 18: VPC Flow log named entity creation
Create visualizations using natural language
After your topic is done indexing, you can start creating visualizations using natural language. In QuickSight, an analysis is the same thing as a dashboard, but is only accessible by the authors. You can keep it private and make it as robust and detailed as you want. When you decide to publish it, the shared version is called a dashboard.
To create visualizations:
Open the QuickSight console and navigate to the Analysis tab.
In the top right, select New analysis.
Select the dataset you created previously, it will have the same naming convention as the Athena view. For reference, the Athena view query created a Security Hub dataset called security_insights_security_hub_vw2.
Validate the information about the data set you’re going to use in the analysis and choose USE IN ANALYSIS.
On the pop up, select the interactive sheet option and choose Create.
For datasets that have a corresponding Q topic, which you created in a previous step, choose Build visual at the top of the screen.
Figure 19: Build visual using natural language
Enter your prompt and choose BUILD. For example, enter findings with product security hub group by control id include count. Q automatically generates a visualization.
Figure 20: Q response
To add to your dashboard, choose ADD TO ANALYSIS to see your new visualization module in your current analysis.
The supplied questions are targeted towards a Security Hub findings topic, where you can ask questions about your security hub findings data. For example, show all Security Hub findings for critical severity for a specific resource or ARN.
If you use Amazon Inspector for software vulnerability management and you want to monitor top common vulnerabilities and exposures (CVEs) affecting your organization, choose Build visual and enter show all ACTIVE findings with product inspector group by Title add count in the prompt. We used the keyword ACTIVE because ACTIVE is a finding state in Security Hub that indicates the finding is still active as per the finding source and Amazon Inspector has not closed the finding yet. If Amazon Inspector has closed the finding, the finding will have a state of ARCHIVED.
Figure 21: Q Response for an Amazon Inspector findings question
To add the remaining datasets, which allows you to visualize data from multiple datasets in a single view, select the dropdown in the left navigation under Dataset.
Select Add a new dataset.
Search the name of the remaining datasets you created previously.
Select anywhere on the name of the dataset to make the radial button blue for the single dataset you want to add. Choose Select.
Repeat steps 7–12 in this section to add all the corresponding datasets you created previously.
Note: When you add additional datasets to the same Analysis and use Build visual to generate visualizations using natural language, the corresponding datasets with Q Topics are populated in the drop down under the prompt. Be sure to choose the correct dataset when asking questions.
Figure 22: Choosing a QuickSight dataset
To create dashboards:
After you’ve created the visual and are ready to publish the analysis as a dashboard, select PUBLISH in the top right corner.
Enter a name for your dashboard.
Choose Publish Dashboard.
After your dashboard is published, your users can ask questions about the data through the dashboard as well. This dashboard can be shared with other users. Users with QuickSight Reader Pro licenses can ask questions using Amazon Q.
To ask questions using the dashboard:
Navigate to the Dashboards section on the left navigation.
Select the dashboard you previously published.
Select Ask a question about [Topic Name] at the top of the screen. A module will open from the side of your screen. Questions can only be addressed to a single topic. To change the topic, select the name of the topic and a drop-down will appear. Select the name of the current topic to see other options and select the topic you want to ask a question about. For this example, select CloudTrailTopic.
Figure 23: Selecting a topic
Enter a question in the prompt. For this example, enter show top API operations in the last 24 hours with accessdenied.
Figure 24: CloudTrail question 1
Enter show all activity by user johndoe in the last 3 days.
Figure 25: CloudTrail question 2
Q will automatically build a small dashboard based on the questions provided.
Now change the topic to VPCFlowTopic as described in step 3.
Enter show me the top 5 dst ip by bytes for outbound traffic with dst port 443.
Figure 26: VPC Flow Log question
You can build executive summaries using QuickSight data stories, which also use generative AI. Data stories use Amazon Q prompts and visuals to produce a draft that incorporates the details that you provide. For example, you can create a data story about how a specific CVE affects your organization by asking Q questions, then add visuals from analyses you already created.
Conclusion
In this blog post, you learned how to use generative AI for your security use cases. We showed you how to use cross-account query access to allow a QuickSight visualization account to subscribe to Security Lake data for Security Hub findings, CloudTrail logs, and VPC Flow Logs. We then provided instructions for creating, Athena views, QuickSight datasets, Q topics, named entities, and for using natural language to build dashboards and query your data. You can customize the Athena views to create, update, or delete columns and column names as needed for your use case. You can also customize the Q topics and named entities to use naming conventions and structure responses based on your organization’s needs.
If you have feedback about this post, submit comments in the Comments section below. If you have questions about this post, contact AWS Support.
As security best practices have evolved over the years, so has the range of security telemetry options. Customers face the challenge of navigating through security-relevant telemetry and log data produced by multiple tools, technologies, and vendors while trying to monitor, detect, respond to, and mitigate new and existing security issues. In this post, we provide you with three patterns to centralize the ingestion of log data into Amazon Security Lake, regardless of the source. You can use the patterns in this post to help streamline the extract, transform and load (ETL) of security log data so you can focus on analyzing threats, detecting anomalies, and improving your overall security posture. We also provide the corresponding code and mapping for the patterns in the amazon-security-lake-transformation-library.
Security Lake automatically centralizes security data into a purpose-built data lake in your organization in AWS Organizations. You can use Security Lake to collect logs from multiple sources, including natively supported AWS services, Software-as-a-Service (SaaS) providers, on-premises systems, and cloud sources.
Centralized log collection in a distributed and hybrid IT environment can help streamline the process, but log sources generate logs in disparate formats. This leads to security teams spending time building custom queries based on the schemas of the logs and events before the logs can be correlated for effective incident response and investigation. You can use the patterns presented in this post to help build a scalable and flexible data pipeline to transform log data using Open Cybersecurity Schema Framework (OCSF) and stream the transformed data into Security Lake.
Security Lake custom sources
You can configure custom sources to bring your security data into Security Lake. Enterprise security teams spend a significant amount of time discovering log sources in various formats and correlating them for security analytics. Custom source configuration helps security teams centralize distributed and disparate log sources in the same format. Security data in Security Lake is centralized and normalized into OCSF and compressed in open source, columnar Apache Parquet format for storage optimization and query efficiency. Having log sources in a centralized location and in a single format can significantly improve your security team’s timelines when performing security analytics. With Security Lake, you retain full ownership of the security data stored in your account and have complete freedom of choice for analytics. Before discussing creating custom sources in detail, it’s important to understand the OCSF core schema, which will help you map attributes and build out the transformation functions for the custom sources of your choice.
Understanding the OCSF
OCSF is a vendor-agnostic and open source standard that you can use to address the complex and heterogeneous nature of security log collection and analysis. You can extend and adapt the OCSF core security schema for a range of use cases in your IT environment, application, or solution while complementing your existing security standards and processes. As of this writing, the most recent major version release of the schema is v1.2.0, which contains six categories: System Activity, Findings, Identity and Access Management, Network Activity, Discovery, and Application Activity. Each category consists of different classes based on the type of activity, and each class has a unique class UID. For example, File System Activity has a class UID of 1001.
As of this writing, Security Lake (version 1) supports OCSF v1.1.0. As Security Lake continues to support newer releases of OCSF, you can continue to use the patterns from this post. However, you should revisit the mappings in case there’s a change in the classes you’re using.
Prerequisites
You must have the following prerequisites for log ingestion into Amazon Security Lake. Each pattern has a sub-section of prerequisites that are relevant to the data pipeline for the custom log source.
AWS Organizations is configured your AWS environment. AWS Organizations is an AWS account management service that provides account management and consolidated billing capabilities that you can use to consolidate multiple AWS accounts and manage them centrally.
Open the AWS Management Console and navigate to AWS Organizations. Set up an organization with a Log Archive account. The Log Archive account should be used as the delegated Security Lake administrator account where you will configure Security Lake. For more information on deploying the full complement of AWS security services in a multi-account environment, see AWS Security Reference Architecture.
Configure permissions for the Security Lake administrator access by using an AWS Identity and Access Management (IAM) role. This role should be used by your security teams to administer Security Lake configuration, including managing custom sources.
Enable Security Lake in the AWS Region of your choice in the Log Archive account. When you configure Security Lake, you can define your collection objectives, including log sources, the Regions that you want to collect the log sources from, and the lifecycle policy you want to assign to the log sources. Security Lake uses Amazon Simple Storage Service (Amazon S3) as the underlying storage for the log data. Amazon S3 is an object storage service offering industry-leading scalability, data availability, security, and performance. S3 is built to store and retrieve data from practically anywhere. Security Lake creates and configures individual S3 buckets in each Region identified in the collection objectives in the Log Archive account.
To use the transformation library, you should understand how to build the mapping configuration file. The mapping configuration file holds mapping information from raw events to OCSF formatted logs. The transformation function builds the OCSF formatted logs based on the attributes mapped in the file and streams them to the Security Lake S3 buckets.
The mapping configuration file is a JSON-formatted file that’s used by the transformation function to evaluate the attributes of the raw logs and map them to the relevant OCSF class attributes. The configuration is based on the mapping identified in Table 3 (File System Activity class mapping) and extended to the Process Activity class. The file uses the $. notation to identify attributes that the transformation function should evaluate from the event.
Configuration in the mapping file is stored under the custom_source_events key. You must keep the value for the key source_name the same as the name of the custom source you add for Security Lake. The matched_field is the key that the transformation function uses to iterate over the log events. The iterator (1), in the preceding snippet, is the Sysmon event ID and the data structure that follows is the OCSF attribute mapping.
Some OCSF attributes are of an Object data type with a map of pre-defined values based on the event signature such as activity_id. You represent such attributes in the mapping configuration as shown in the following example:
In the preceding snippet, you can see the words enum and evaluate. These keywords tell the underlying mapping function that the result will be the value from the map defined in values and the key to evaluate is the EventId, which is listed as the value of the evaluate key. You can build your own transformation function based on your custom sources and mapping or you can extend the function provided in this post.
Pattern 1: Log collection in a hybrid environment using Kinesis Data Streams
The first pattern we discuss in this post is the collection of log data from hybrid sources such as operating system logs collected from Microsoft Windows operating systems using System Monitor (Sysmon). Sysmon is a service that monitors and logs system activity to the Windows event log. It’s one of the log collection tools used by customers in a Windows Operating System environment because it provides detailed information about process creations, network connections, and file modifications This host-level information can prove crucial during threat hunting scenarios and security analytics.
Solution overview
The solution for this pattern uses Amazon Kinesis Data Streams and Lambda to implement the schema transformation. Kinesis Data Streams is a serverless streaming service that makes it convenient to capture and process data at any scale. You can configure stream consumers—such as Lambda functions—to operate on the events in the stream and convert them into required formats—such as OCSF—for analysis without maintaining processing infrastructure. Lambda is a serverless, event-driven compute service that you can use to run code for a range of applications or backend services without provisioning or managing servers. This solution integrates Lambda with Kinesis Data Streams to launch transformation tasks on events in the stream.
To stream Sysmon logs from the host, you use Amazon Kinesis Agent for Microsoft Windows. You can run this agent on fleets of Windows servers hosted on-premises or in your cloud environment.
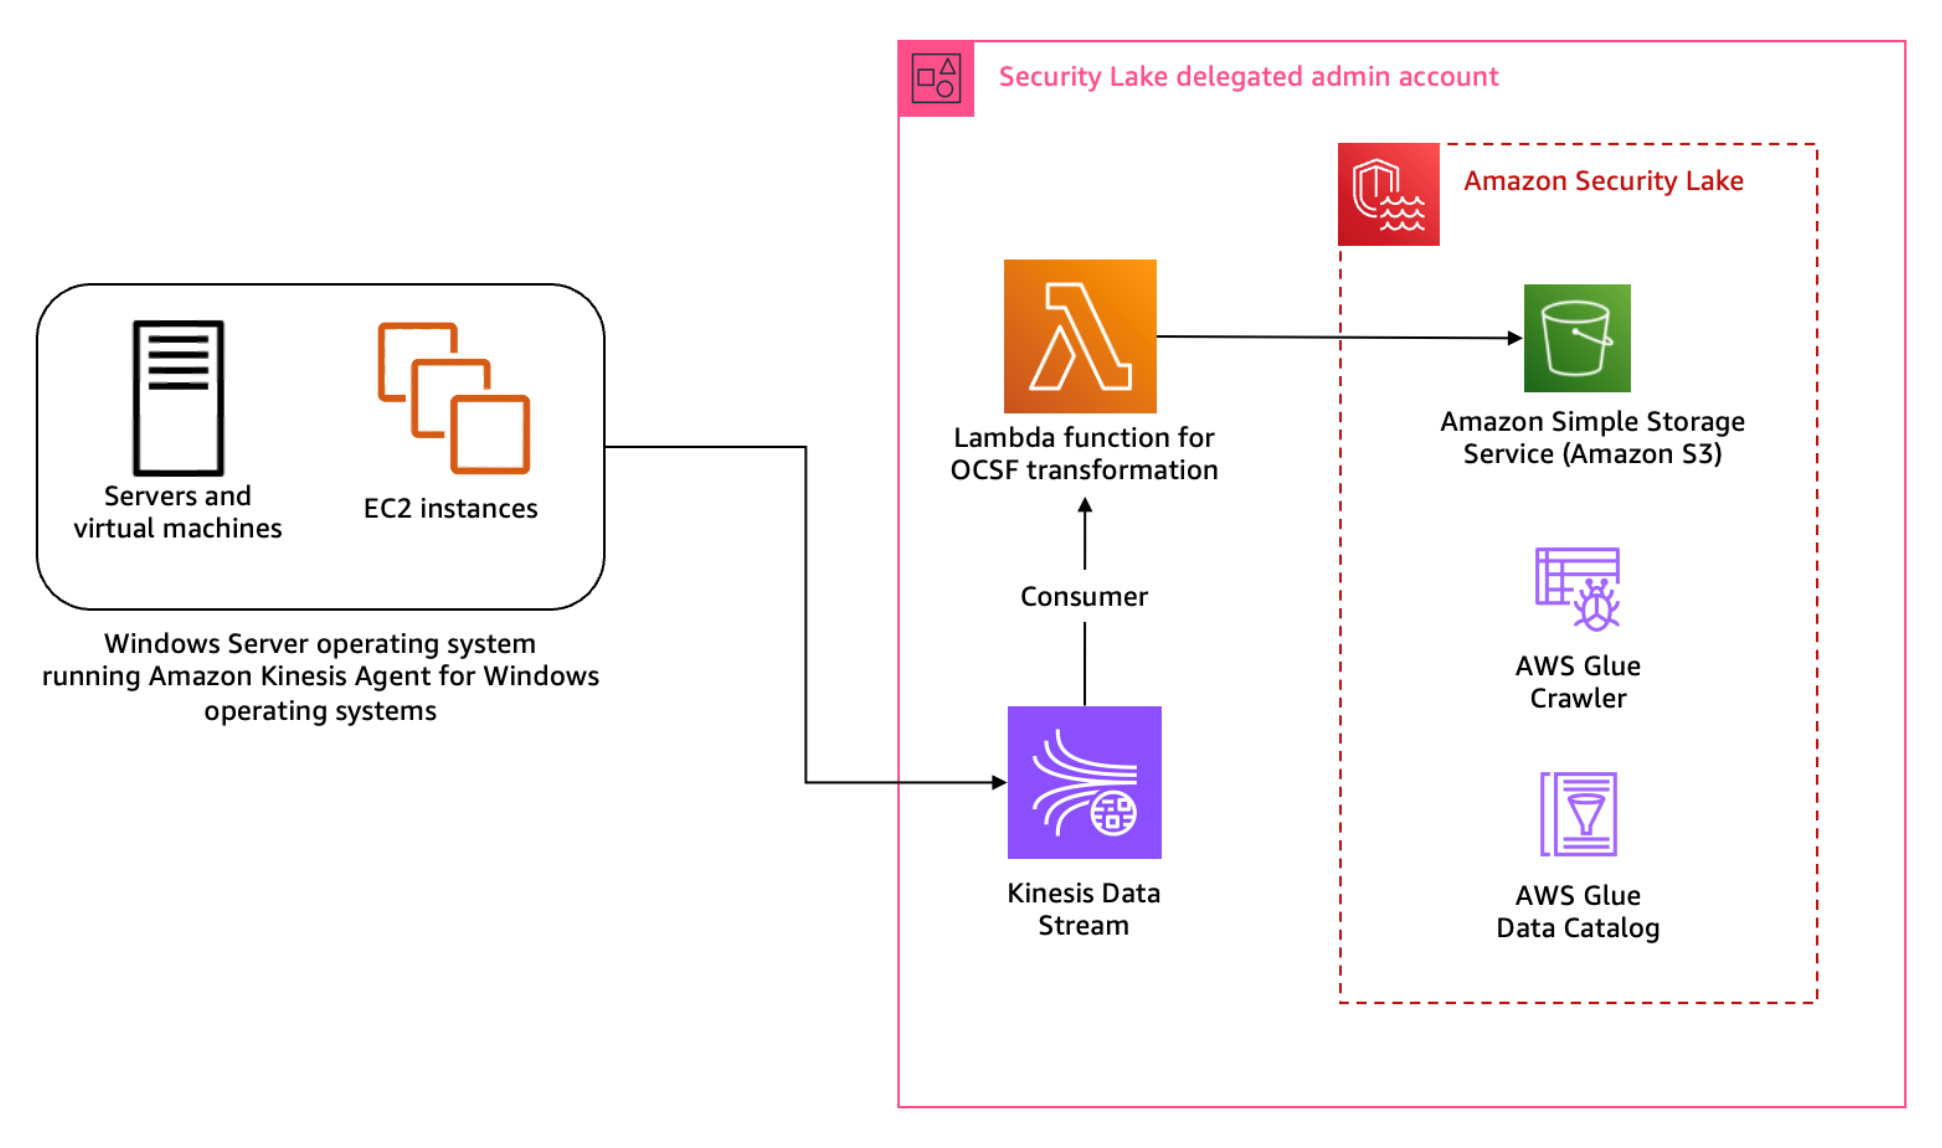
Figure 1: Architecture diagram for Sysmon event logs custom source
Figure 1 shows the interaction of services involved in building the custom source ingestion. The servers and instances generating logs run the Kinesis Agent for Windows to stream log data to the Kinesis Data Stream which invokes a consumer Lambda function. The Lambda function transforms the log data into OCSF based on the mapping provided in the configuration file and puts the transformed log data into Security Lake S3 buckets. We cover the solution implementation later in this post, but first let’s review how you can map Sysmon event streaming through Kinesis Data Streams into the relevant OCSF classes. You can deploy the infrastructure using the AWS Serverless Application Model (AWS SAM)template provided in the solution code. AWS SAM is an extension of the AWS Command Line Interface (AWS CLI), which adds functionality for building and testing applications using Lambda functions.
Mapping
Windows Sysmon events map to various OCSF classes. To build the transformation of the Sysmon events, work through the mapping of events with relevant OCSF classes. The latest version of Sysmon (v15.14) defines 30 events including a catch-all error event.
Table 1: Sysmon event mapping with OCSF (v1.1.0) classes
Start by mapping the Sysmon events to the relevant OCSF classes in plain text as shown in Table 1 before adding them to the mapping configuration file for the transformation library. This mapping is flexible; you can choose to map an event to a different event class depending on the standard defined within the security engineering function. Based on our mapping, Table 1 indicates that a majority of the events reported by Sysmon align with the File System Activity or the Process Activity class. Registry events map better with the Registry Key Activity and Registry Value Activity classes, but these classes are deprecated in OCSF v1.0.0, so we recommend using File System Activity instead of registry events for compatibility with future versions of OCSF. You can be selective about the events captured and reported by Sysmon by altering the Sysmon configuration file. For this post, we’re using the sysmonconfig.xml published in the sysmon-modular project. The project provides a modular configuration along with publishing tactics, techniques, and procedures (TTPs) with Sysmon events to help in TTP-based threat hunting use cases. If you have your own curated Sysmon configuration, you can use that. While this solution offers mapping advice, if you’re using your own Sysmon configuration, you should make sure that you’re mapping the relevant attributes using this solution as a guide. As a best practice, mapping should be non-destructive to keep your information after the OCSF transformation. If there are attributes in the log data that you cannot map to an available attribute in the OCSF class, then you should use the unmapped attribute to collect all such information. In this pattern, RuleName captures the TTPs associated with the Sysmon event, because TTPs don’t map to a specific attribute within OCSF.
Across all classes in OCSF, there are some common attributes that are mandatory. The common mandatory attributes are mapped shown in Table 2. You need to set these attributes regardless of the OCSF class you’re transforming the log data to.
OCSF
Raw
metadata.profiles
[host]
metadata.version
v1.1.0
metadata.product.name
System Monitor (Sysmon)
metadata.product.vendor_name
Microsoft Sysinternals
metadata.product.version
v15.14
severity
Informational
severity_id
1
Table 2: Mapping mandatory attributes
Each OCSF class has its own schema, which is extendable. After mapping the common attributes, you can map the attributes in the File System Activity class relevant to the log information. Some of the attribute values can be derived from a map of options standardised by the OCSF schema. One such attribute is Activity ID. Depending on the type of activity performed on the file, you can assign a value from the pre-defined set of values in the schema such as 0 if the event activity is unknown, 1 if a file was created, 2 if a file was read, and so on. You can find more information on standard attribute maps in File System Activity, System Activity Category.
File system activity mapping example
The following is a sample file creation event reported by Sysmon:
When the event is streamed to the Kinesis Data Streams stream, the Kinesis Agent can be used to enrich the event. We’re enriching the event with source_instance_id using ObjectDecoration configured in the agent configuration file.
Because the transformation Lambda function reads from a Kinesis Data Stream, we use the event information from the stream to map the attributes of the File System Activity class. The following mapping table has attributes mapped to the values based on OCSF requirements, the values enclosed in brackets (<>) will come from the event. In the solution implementation section for this pattern, you learn about the transformation Lambda function and mapping implementation for a sample set of events.
First update the mapping configuration, then add the custom source in Security Lake and deploy and configure the log streaming and transformation infrastructure, which includes the Kinesis Data Stream, transformation Lambda function and associated IAM roles.
Step 1: Update mapping configuration
Each supported custom source documentation contains the mapping configuration. Update the mapping configuration for the windows-sysmon custom source for the transformation function.
To add the custom source for Sysmon events, configure an IAM role for the AWS Glue crawler that will be associated with the custom source to update the schema in the Security Lake AWS Glue database. You can deploy the ASLCustomSourceGlueRole.yaml CloudFormation template to automate the creation of the IAM role associated with the custom source AWS Glue crawler.
Capture the Amazon Resource Name (ARN) for the IAM role, which is configured as an output of the infrastructure deployed in the previous step.
Add a custom source using the following AWS CLI command. Make sure you replace the <AWS_ACCOUNT_ID>, <SECURITY_LAKE_REGION> and the <GLUE_IAM_ROLE_ARN> placeholders with the AWS account ID you’re deploying into, the Security Lake deployment Region and the ARN of the IAM role created above, respectively. External ID is a unique identifier that is used to establish trust with the AWS identity. You can use External ID to add conditional access from third-party sources and to subscribers.
Note: When creating the custom log source, you only need to specify FILE_ACTIVITY and PROCESS_ACTIVITY event classes as these are the only classes mapped in the example configuration deployed in Step 1. If you extend your mapping configuration to handle additional classes, you would add them here.
Step 3: Deploy the transformation infrastructure
The solution uses the AWS SAM framework—an open source framework for building serverless applications—to deploy the OCSF transformation infrastructure. The infrastructure includes a transformation Lambda function, Kinesis data stream, IAM roles for the Lambda function and the hosts running the Kinesis Agent, and encryption keys for the Kinesis data stream. The Lambda function is configured to read events streamed into the Kinesis Data Stream and transform the data into OCSF based on the mapping configuration file. The transformed events are then written to an S3 bucket managed by Security Lake. A sample of the configuration file is provided in the solution repository capturing a subset of the events. You can extend the same for the remaining Sysmon events.
To deploy the infrastructure:
Clone the solution codebase into your choice of integrated development environment (IDE). You can also use AWS CloudShell or AWS Cloud9.
Sign in to the Security Lake delegated administrator account.
Review the prerequisites and detailed deployment steps in the project’s README file. Use the SAM CLI to build and deploy the streaming infrastructure by running the following commands:
sam build

sam deploy –guided
Step 4: Update the default AWS Glue crawler
Sysmon logs are a complex use case because a single source of logs contains events mapped to multiple schemas. The transformation library handles this by writing each schema to different prefixes (folders) within the target Security Lake bucket. The AWS Glue crawler deployed by Security Lake for the custom log source must be updated to handle prefixes that contain differing schemas.
To update the default AWS Glue crawler:
In the Security Lake delegated administrator account, navigate to the AWS Glue console.
Navigate to Crawlers in the Data Catalog section. Search for the crawler associated with the custom source. It will have the same name as the custom source name. For example, windows-sysmon. Select the check box next to the crawler name, then choose Action and select Edit Crawler.
Figure 2: Select and edit an AWS Glue crawler
Select Edit for the Step 2: Choose data sources and classifiers section on the Review and update page.
In the Choose data sources and classifiers section, make the following changes:
For Is your data already mapped to Glue tables?, change the selection to Not yet.
For Data sources, select Add a data source. In the selection prompt, select the Security Lake S3 bucket location as presented in the output of the create-custom-source command above. For example, s3://aws-security-data-lake-<region>–<exampleid>/ext/windows-sysmon/. Make sure you include the path all the way to the custom source name and replace the <region> and <exampleid> placeholders with the actual values. Then choose Add S3 data source.
Choose Next.
On the Configure security settings page, leave everything as is and choose Next.
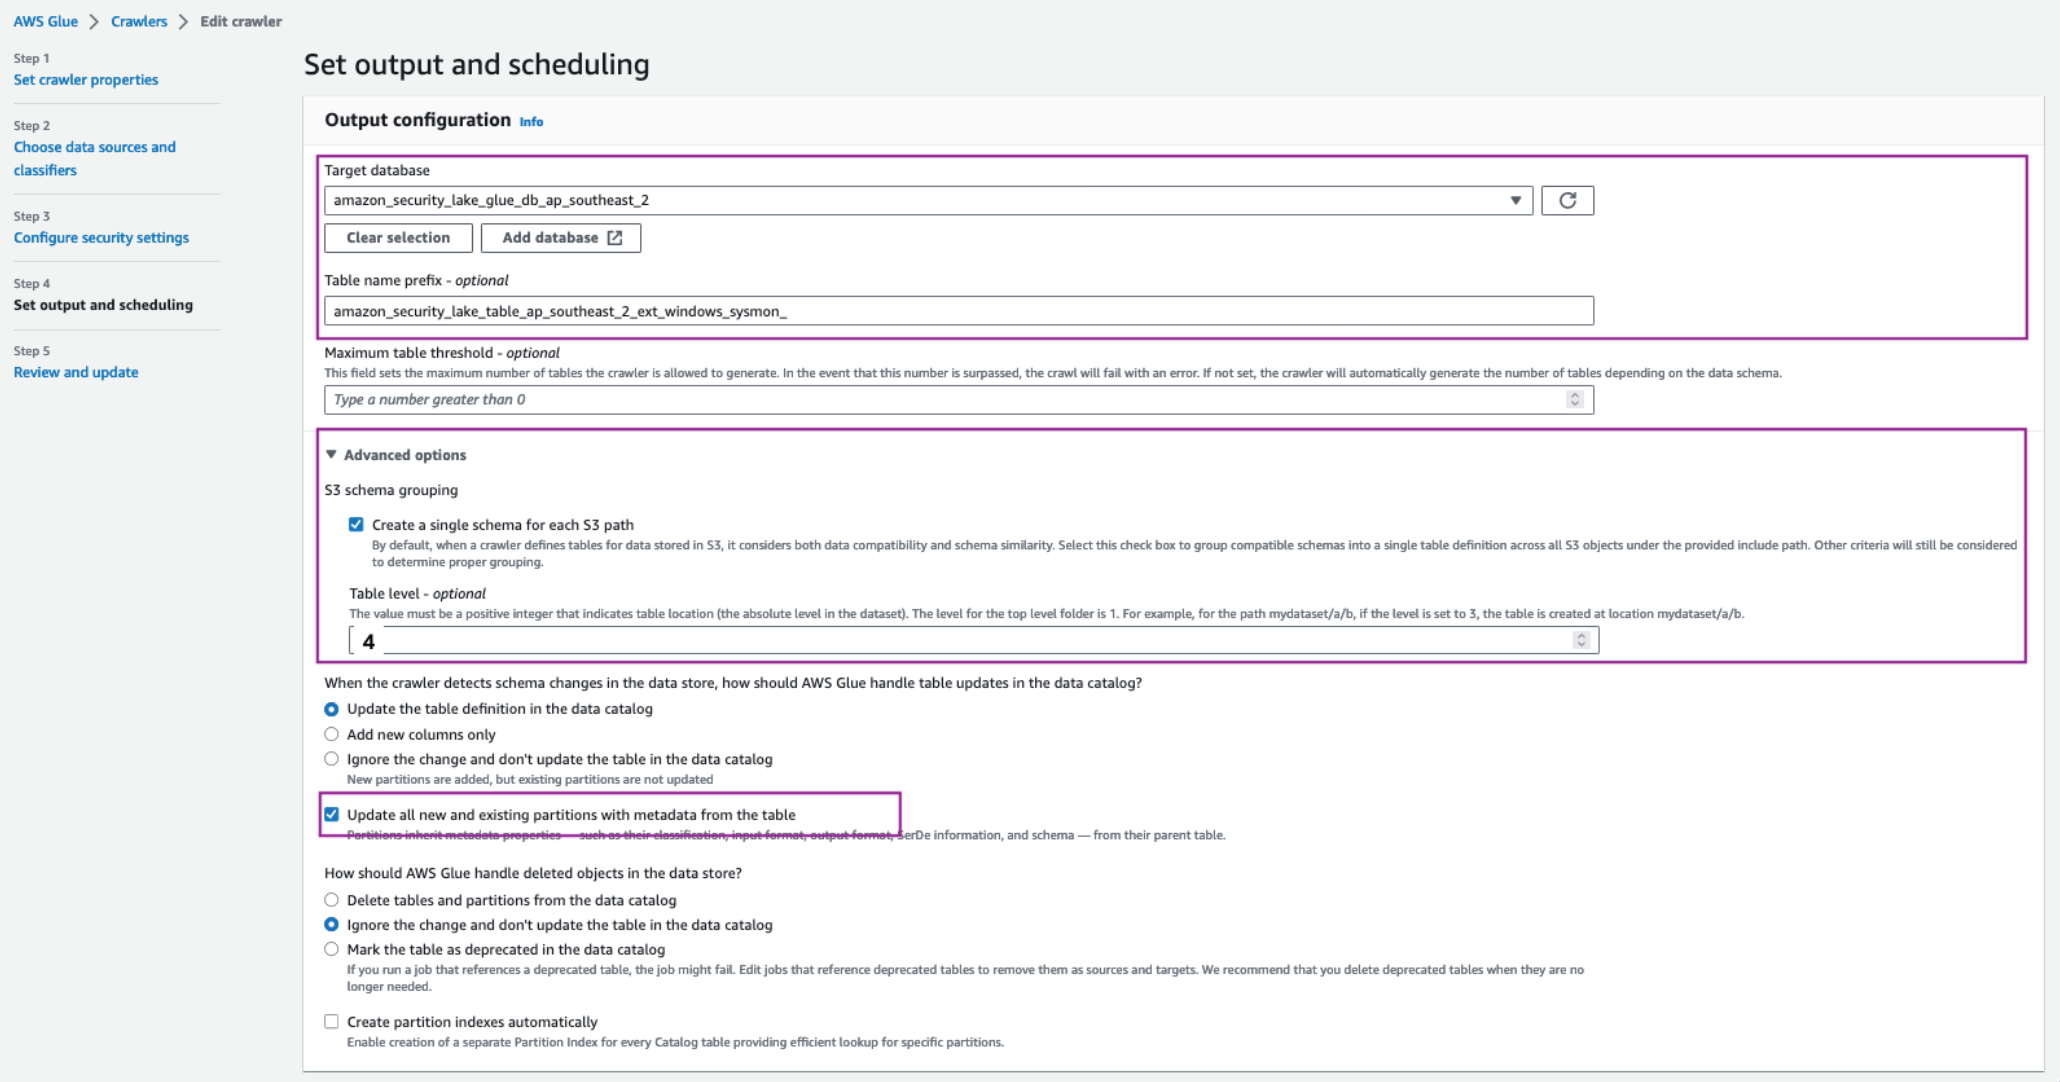
On the Set output and scheduling page, select the Target database as the Security Lake Glue database.
In a separate tab, navigate to AWS Glue > Tables. Copy the name of the custom source table created by Security Lake.
Navigate back to the AWS Glue crawler configuration tab, update the Table name prefix with the copied table name and add an underscore (_) at the end. For example, amazon_security_lake_table_ap_southeast_2_ext_windows_sysmon_.
Under Advanced options, select the checkbox for Create a single schema for each S3 path and for Table level enter 4.
Make sure you allow the crawler to enforce table schema to the partitions by selecting the Update all new and existing partitions with metadata from the table checkbox.
For the Crawler schedule section, select Monthly from the Frequency dropdown. For Minute, enter 0. This configuration will run the crawler every month.
Choose Next, then Update.
Figure 3: Set AWS Glue crawler output and scheduling
To configure hosts to stream log information:
As discussed in the Solution overview section, you use Kinesis Data Streams with a Lambda function to stream Sysmon logs and transform the information into OCSF.
Install Kinesis Agent for Microsoft Windows. There are three ways to install Kinesis Agent on Windows Operating Systems. Using AWS Systems Manager helps automate the deployment and upgrade process. You can also install Kinesis Agent by using a Windows installer package or PowerShell scripts.
After installation you must configure Kinesis Agent to stream log data to Kinesis Data Streams (you can use the following code for this). Kinesis Agent for Windows helps capture important metadata of the host system and enrich information streamed to the Kinesis Data Stream. The Kinesis Agent configuration file is located at %PROGRAMFILES%\Amazon\AWSKinesisTap\appsettings.json and includes three parts—sources, pipes, and sinks:
The preceding configuration shows the information flow through sources, pipes, and sinks using the Kinesis Agent for Windows. Use the sample configuration file provided in the solution repository. Observe the ObjectDecoration key in the Sink configuration; you can use this key to add key information to identify the generating system. For example, to identify whether the event is being generated by an Amazon Elastic Compute Cloud (Amazon EC2) instance or a hybrid server. This information can be used to map the Device attribute in the various OCSF classes such as File System Activity and Process Activity. The <KinesisAgentIAMRoleARN> is configured by the transformation library deployment unless you create your own IAM role and provide it as a parameter to the deployment.
Update the Kinesis agent configuration file %PROGRAMFILES%\Amazon\AWSKinesisTap\appsettings.json with the contents of the kinesis_agent_configuration.json file from this repository. Make sure you replace the <LogCollectionStreamName> and <KinesisAgentIAMRoleARN> placeholders with the value of the CloudFormation outputs, LogCollectionStreamName and KinesisAgentIAMRoleARN, that you captured in the Deploy transformation infrastructure step.
Start Kinesis Agent on the hosts to start streaming the logs to Security Lake buckets. Open an elevated PowerShell command prompt window, and start Kinesis Agent for Windows using the following PowerShell command:
Start-Service -Name AWSKinesisTap
Pattern 2: Log collection from services and products using AWS Glue
You can use Amazon VPC to launch resources in an isolated network. AWS Network Firewall provides the capability to filter network traffic at the perimeter of your VPCs and define stateful rules to configure fine-grained control over network flow. Common Network Firewall use cases include intrusion detection and protection, Transport Layer Security (TLS) inspection, and egress filtering. Network Firewall supports multiple destinations for log delivery, including Amazon S3.
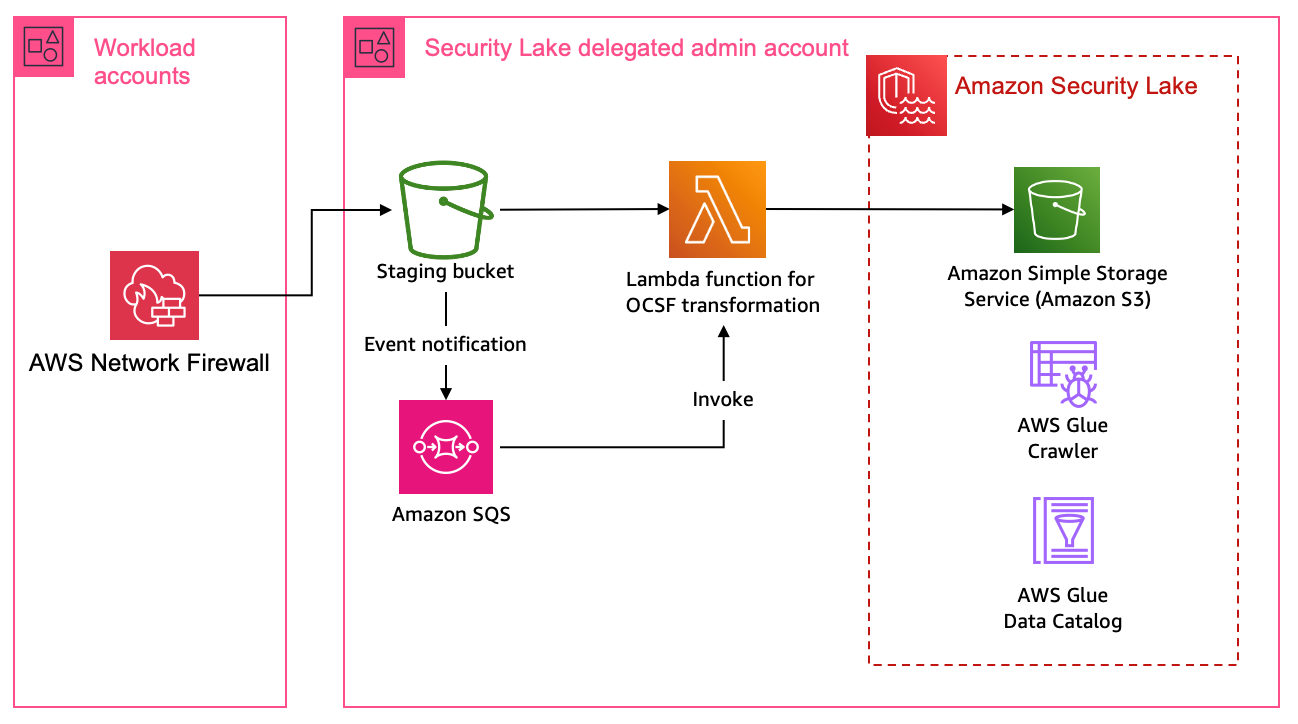
In this pattern, you focus on adding a custom source in Security Lake where the product in use delivers raw logs to an S3 bucket.
Solution overview
This solution uses an S3 bucket (the staging bucket) for raw log storage using the prerequisites defined earlier in this post. Use AWS Glue to configure the ETL and load the OCSF transformed logs into the Security Lake S3 bucket.
Figure 4: Architecture using AWS Glue for ETL
Figure 4 shows the architecture for this pattern. This pattern applies to AWS services or partner services that natively support log storage in S3 buckets. The solution starts by defining the OCSF mapping.
Mapping
Network firewall records two types of log information—alert logs and netflow logs. Alert logs report traffic that matches the stateful rules configured in your environment. Flow logs are network traffic flow logs that capture network traffic information for standard stateless rule groups. You can use stateful rules for use cases such as egress filtering to restrict the external domains that the resources deployed in a VPC in your AWS account have access to. In the Network Firewall use case, events can be mapped to various attributes in the Network Activity class in the Network Activity category.
Configure the log source to use Amazon S3 for log delivery
Add a custom source in Security Lake
Deploy the log staging and transformation infrastructure
Because Network Firewall logs can be mapped to a single OCSF class, you don’t need to update the AWS Glue crawler as in the previous pattern. However, you must update the AWS Glue crawler if you want to add a custom source with multiple OCSF classes.
Step 1: Update the mapping configuration
Each supported custom source documentation contains the mapping configuration. Update the mapping configuration for the Network Firewall custom source for the transformation function.
Step 2: Configure the log source to use S3 for log delivery
Configure Network Firewall to log to Amazon S3. The transformation function infrastructure deploys a staging S3 bucket for raw log storage. If you already have an S3 bucket configured for raw log delivery, you can update the value of the parameter RawLogS3BucketName during deployment. The deployment configures event notifications with Amazon Simple Queue Service (Amazon SQS). The transformation Lambda function is invoked by SQS event notifications when Network Firewall delivers log files in the staging S3 bucket.
Step 3: Add a custom source in Security Lake
As with the previous pattern, add a custom source for Network Firewall in Security Lake. In the previous pattern you used the AWS CLI to create and configure the custom source. In this pattern, we take you through the steps to do the same using the AWS console.
Under Custom source details enter a name for the custom log source such as network_firewall and choose Network Activity as the OCSF Event class
Figure 6: Data source name and OCSF Event class
Under Account details, enter your AWS account ID for the AWS account ID and External ID fields. Leave Create and use a new service role selected and choose Create.
Figure 7: Account details and service access
The custom log source will now be available.
Step 4: Deploy transformation infrastructure
As with the previous pattern, use AWS SAM CLI to deploy the transformation infrastructure.
To deploy the transformation infrastructure:
Clone the solution codebase into your choice of IDE.
Sign in to the Security Lake delegated administrator account.
The infrastructure is deployed using the AWS SAM, which is an open source framework for building serverless applications. Review the prerequisites and detailed deployment steps in the project’s README file. Use the SAM CLI to build and deploy the streaming infrastructure by running the following commands:
sam build

sam deploy --guided
Clean up
The resources created in the previous patterns can be cleaned up by running the following command:
sam delete
You also need to manually delete the custom source by following the instructions from the Security Lake User Guide.
Pattern 3: Log collection using integration with supported AWS services.
In a threat hunting and response use case, customers often use multiple sources of logs to correlate information to find more information on unauthorized third-party interactions originating from trusted software vendors. These interactions can be due to vulnerable components in the product or exposed credentials such as integration API keys. An operationally effective way to source logs from partner software and external vendors is to use the supported AWS services that natively integrate with Security Lake.
AWS Security Hub
AWS Security Hub is a cloud security posture measurement service that provides a comprehensive view of the security posture of your AWS environment. Security Hub supports integration with several AWS services including AWS Systems Manager Patch Manager, Amazon Macie, Amazon GuardDuty, and Amazon Inspector. For the full list, see AWS service integrations with AWS Security Hub. Security Hub also integrates with multiple third-party partner products that you can use. These products support sending findings to Security Hub seamlessly.
Security Lake natively supports ingestion of Security Hub findings, which centralizes the findings from the source integrations into Security Lake. Before you start building a custom source, we recommend you review whether the product is supported by Security Hub, which could remove the need for building manual mapping and transformation solutions.
AWS AppFabric
AWS AppFabric is a fully managed software as a service (SaaS) interoperability solution. Security Lake supports AppFabric output schema and format—OCSF and JSON respectively. Security Lake supports AppFabric as a custom source using Amazon Kinesis Data Firehose delivery stream. You can find step-by-step instructions in the AppFabric user guide.
Conclusion
Security Lake offers customers the capability to centralize disparate log sources in a single format, OCSF. Using OCSF improves correlation and enrichment activities because security teams no longer have to build queries based on the individual log source schema. Log data is normalized such that customers can use the same schema across the log data collected. Using the patterns and solution identified in this post, you can significantly reduce the effort involved in building custom sources to bring your own data into Security Lake.
You can extend the concepts and mapping function code provided in the amazon-security-lake-transformation-library to build out a log ingestion and ETL solution. You can use the flexibility offered by Security Lake and the custom source feature to ingest log data generated by all sources including third-party tools, log forwarding software, AWS services, and hybrid solutions.
In this post, we provided you with three patterns that you can use across multiple log sources. The most flexible being Pattern 1, where you can choose the OCSF mapped class and attributes that are in-line with your organizational mappings and custom source configuration with Security Lake. You can continue to use the mapping function code from the amazon-security-lake-transformation-library demonstrated through this post and update the mapping variable for the OCSF class you’re mapping to. This solution can be scaled to build a range of custom sources to enhance your threat detection and investigation workflow.
If you have feedback about this post, submit comments in the Comments section below. If you have questions about this post, contact AWS Support.
Compliance with the Payment Card Industry Data Security Standard (PCI DSS) is critical for organizations that handle cardholder data. Achieving and maintaining PCI DSS compliance can be a complex and challenging endeavor. Serverless technology has transformed application development, offering agility, performance, cost, and security.
In this blog post, we examine the benefits of using AWS serverless services and highlight how you can use them to help align with your PCI DSS compliance responsibilities. You can remove additional undifferentiated compliance heavy lifting by building modern applications with abstracted AWS services. We review an example payment application and workflow that uses AWS serverless services and showcases the potential reduction in effort and responsibility that a serverless architecture could provide to help align with your compliance requirements. We present the review through the lens of a merchant that has an ecommerce website and include key topics such as access control, data encryption, monitoring, and auditing—all within the context of the example payment application. We don’t discuss additional service provider requirements from the PCI DSS in this post.
This example will help you navigate the intricate landscape of PCI DSS compliance. This can help you focus on building robust and secure payment solutions without getting lost in the complexities of compliance. This can also help reduce your compliance burden and empower you to develop your own secure, scalable applications. Join us in this journey as we explore how AWS serverless services can help you meet your PCI DSS compliance objectives.
Disclaimer
This document is provided for the purposes of information only; it is not legal advice, and should not be relied on as legal advice. Customers are responsible for making their own independent assessment of the information in this document. This document: (a) is for informational purposes only, (b) represents current AWS product offerings and practices, which are subject to change without notice, and (c) does not create any commitments or assurances from AWS and its affiliates, suppliers or licensors. AWS products or services are provided “as is” without warranties, representations, or conditions of any kind, whether express or implied. The responsibilities and liabilities of AWS to its customers are controlled by AWS agreements, and this document is not part of, nor does it modify, any agreement between AWS and its customers.
AWS encourages its customers to obtain appropriate advice on their implementation of privacy and data protection environments, and more generally, applicable laws and other obligations relevant to their business.
PCI DSS v4.0 and serverless
In April 2022, the Payment Card Industry Security Standards Council (PCI SSC) updated the security payment standard to “address emerging threats and technologies and enable innovative methods to combat new threats.” Two of the high-level goals of these updates are enhancing validation methods and procedures and promoting security as a continuous process. Adopting serverless architectures can help meet some of the new and updated requirements in version 4.0, such as enhanced software and encryption inventories. If a customer has access to change a configuration, it’s the customer’s responsibility to verify that the configuration meets PCI DSS requirements. There are more than 20 PCI DSS requirements applicable to Amazon Elastic Compute Cloud (Amazon EC2). To fulfill these requirements, customer organizations must implement controls such as file integrity monitoring, operating system level access management, system logging, and asset inventories. Using AWS abstracted services in this scenario can remove undifferentiated heavy lifting from your environment. With abstracted AWS services, because there is no operating system to manage, AWS becomes responsible for maintaining consistent time settings for an abstracted service to meet Requirement 10.6. This will also shift your compliance focus more towards your application code and data.
This makes more of your PCI DSS responsibility addressable through the AWS PCI DSS Attestation of Compliance (AOC) and Responsibility Summary. This attestation package is available to AWS customers through AWS Artifact.
Reduction in compliance burden
You can use three common architectural patterns within AWS to design payment applications and meet PCI DSS requirements: infrastructure, containerized, and abstracted. We look into EC2 instance-based architecture (infrastructure or containerized patterns) and modernized architectures using serverless services (abstracted patterns). While both approaches can help align with PCI DSS requirements, there are notable differences in how they handle certain elements. EC2 instances provide more control and flexibility over the underlying infrastructure and operating system, assisting you in customizing security measures based on your organization’s operational and security requirements. However, this also means that you bear more responsibility for configuring and maintaining security controls applicable to the operating systems, such as network security controls, patching, file integrity monitoring, and vulnerability scanning.
On the other hand, serverless architectures similar to the preceding example can reduce much of the infrastructure management requirements. This can relieve you, the application owner or cloud service consumer, of the burden of configuring and securing those underlying virtual servers. This can streamline meeting certain PCI requirements, such as file integrity monitoring, patch management, and vulnerability management, because AWS handles these responsibilities.
Using serverless architecture on AWS can significantly reduce the PCI compliance burden. Approximately 43 percent of the overall PCI compliance requirements, encompassing both technical and non-technical tests, are addressed by the AWS PCI DSS Attestation of Compliance.
Customer responsible 52%
AWS responsible 43%
N/A 5%
The following table provides an analysis of each PCI DSS requirement against the serverless architecture in Figure 1, which shows a sample payment application workflow. You must evaluate your own use and secure configuration of AWS workload and architectures for a successful audit.
PCI DSS 4.0 requirements
Test cases
Customer responsible
AWS responsible
N/A
Requirement 1: Install and maintain network security controls
35
13
22
0
Requirement 2: Apply secure configurations to all system components
27
16
11
0
Requirement 3: Protect stored account data
55
24
29
2
Requirement 4: Protect cardholder data with strong cryptography during transmission over open, public networks
12
7
5
0
Requirement 5: Protect all systems and networks from malicious software
25
4
21
0
Requirement 6: Develop and maintain secure systems and software
35
31
4
0
Requirement 7: Restrict access to system components and cardholder data by business need-to-know
22
19
3
0
Requirement 8: Identify users and authenticate access to system components
52
43
6
3
Requirement 9: Restrict physical access to cardholder data
56
3
53
0
Requirement 10: Log and monitor all access to system components and cardholder data
38
17
19
2
Requirement 11: Test security of systems and networks regularly
51
22
23
6
Requirement 12: Support information security with organizational policies
56
44
2
10
Total
464
243
198
23
Percentage
52%
43%
5%
Note: The preceding table is based on the example reference architecture that follows. The actual extent of PCI DSS requirements reduction can vary significantly depending on your cardholder data environment (CDE) scope, implementation, and configurations.
Sample payment application and workflow
This example serverless payment application and workflow in Figure 1 consists of several interconnected steps, each using different AWS services. The steps are listed in the following text and include brief descriptions. They cover two use cases within this example application — consumers making a payment and a business analyst generating a report.
The example outlines a basic serverless payment application workflow using AWS serverless services. However, it’s important to note that the actual implementation and behavior of the workflow may vary based on specific configurations, dependencies, and external factors. The example serves as a general guide and may require adjustments to suit the unique requirements of your application or infrastructure.
Several factors, including but not limited to, AWS service configurations, network settings, security policies, and third-party integrations, can influence the behavior of the system. Before deploying a similar solution in a production environment, we recommend thoroughly reviewing and adapting the example to align with your specific use case and requirements.
Keep in mind that AWS services and features may evolve over time, and new updates or changes may impact the behavior of the components described in this example. Regularly consult the AWS documentation and ensure that your configurations adhere to best practices and compliance standards.
This example is intended to provide a starting point and should be considered as a reference rather than an exhaustive solution. Always conduct thorough testing and validation in your specific environment to ensure the desired functionality and security.
Figure 1: Serverless payment architecture and workflow
Use case 1: Consumers make a payment
Consumers visit the e-commerce payment page to make a payment.
The request is routed to the payment application’s domain using Amazon Route 53, which acts as a DNS service.
The payment page is protected by AWS WAF to inspect the initial incoming request for any malicious patterns, web-based attacks (such as cross-site scripting (XSS) attacks), and unwanted bots.
An HTTPS GET request (over TLS) is sent to the public target IP. Amazon CloudFront, a content delivery network (CDN), acts as a front-end proxy and caches and fetches static content from an Amazon Simple Storage Service (Amazon S3) bucket.
AWS WAF inspects the incoming request for any malicious patterns, if the request is blocked, the request doesn’t return static content from the S3 bucket.
User authentication and authorization are handled by Amazon Cognito, providing a secure login and scalable customer identity and access management system (CIAM)
AWS WAF processes the request to protect against web exploits, then Amazon API Gateway forwards it to the payment application API endpoint.
API Gateway launches AWS Lambda functions to handle payment requests. AWS Step Functions state machine oversees the entire process, directing the running of multiple Lambda functions to communicate with the payment processor, initiate the payment transaction, and process the response.
The cardholder data (CHD) is temporarily cached in Amazon DynamoDB for troubleshooting and retry attempts in the event of transaction failures.
A Lambda function validates the transaction details and performs necessary checks against the data stored in DynamoDB. A web notification is sent to the consumer for any invalid data.
A Lambda function calculates the transaction fees.
A Lambda function authenticates the transaction and initiates the payment transaction with the third-party payment provider.
A Lambda function is initiated when a payment transaction with the third-party payment provider is completed. It receives the transaction status from the provider and performs multiple actions.
Use case 2: An admin or analyst generates the report for non-PCI data
An admin accesses the web-based reporting dashboard using their browser to generate a report.
The request is routed to AWS WAF to verify the source that initiated the request.
An HTTPS GET request (over TLS) is sent to the public target IP. CloudFront fetches static content from an S3 bucket.
AWS WAF inspects incoming requests for any malicious patterns, if the request is blocked, the request doesn’t return static content from the S3 bucket. The validated traffic is sent to Amazon S3 to retrieve the reporting page.
The backend requests of the reporting page pass through AWS WAF again to provide protection against common web exploits before being forwarded to the reporting API endpoint through API Gateway.
API Gateway launches a Lambda function for report generation. The Lambda function retrieves data from DynamoDB storage for the reporting mechanism.
The AWS Security Token Service (AWS STS) issues temporary credentials to the Lambda service in the non-PCI serverless account, allowing it to launch the Lambda function in the PCI serverless account. The Lambda function retrieves non-PCI data and writes it into DynamoDB.
The Lambda function fetches the non-PCI data based on the report criteria from the DynamoDB table from the same account.
Additional AWS security and governance services that would be implemented throughout the architecture are shown in Figure 1, Label-25. For example, Amazon CloudWatch monitors and alerts on all the Lambda functions within the environment.
Label-26 demonstrates frameworks that can be used to build the serverless applications.
Scoping and requirements
Now that we’ve established the reference architecture and workflow, lets delve into how it aligns with PCI DSS scope and requirements.
PCI scoping
Serverless services are inherently segmented by AWS, but they can be used within the context of an AWS account hierarchy to provide various levels of isolation as described in the reference architecture example.
Segregating PCI data and non-PCI data into separate AWS accounts can help in de-scoping non-PCI environments and reducing the complexity and audit requirements for components that don’t handle cardholder data.
PCI serverless production account
This AWS account is dedicated to handling PCI data and applications that directly process, transmit, or store cardholder data.
Services such as Amazon Cognito, DynamoDB, API Gateway, CloudFront, Amazon SNS, Amazon SES, Amazon SQS, and Step Functions are provisioned in this account to support the PCI data workflow.
Security controls, logging, monitoring, and access controls in this account are specifically designed to meet PCI DSS requirements.
Non-PCI serverless production account
This separate AWS account is used to host applications that don’t handle PCI data.
Since this account doesn’t handle cardholder data, the scope of PCI DSS compliance is reduced, simplifying the compliance process.
Note: You can use AWS Organizations to centrally manage multiple AWS accounts.
Now, let’s look at the PCI DSS requirements that this architectural pattern can help address.
Requirement 1: Install and maintain network security controls
Network security controls are limited to AWS Identity and Access Management (IAM) and application permissions because there is no customer controlled or defined network. VPC-centric requirements aren’t applicable because there is no VPC. The configuration settings for serverless services can be covered under Requirement 6 to for secure configuration standards. This supports compliance with Requirements 1.2 and 1.3.
Requirement 2: Apply secure configurations to all system components
AWS services are single function by default and exist with only the necessary functionality enabled for the functioning of that service. This supports compliance with much of Requirement 2.2.
Access to AWS services is considered non-console and only accessible through HTTPS through the service API. This supports compliance with Requirement 2.2.7.
The wireless requirements under Requirement 2.3 are not applicable, because wireless environments don’t exist in AWS environments.
Requirement 3: Protect stored account data
AWS is responsible for destruction of account data configured for deletion based on DynamoDB Time to Live (TTL) values. This supports compliance with Requirement 3.2.
DynamoDB and Amazon S3 offer secure storage of account data, encryption by default in transit and at rest, and integration with AWS Key Management Service (AWS KMS). This supports compliance with Requirements 3.5 and 4.2.
AWS is responsible for the generation, distribution, storage, rotation, destruction, and overall protection of encryption keys within AWS KMS. This supports compliance with Requirements 3.6 and 3.7.
Manual cleartext cryptographic keys aren’t available in this solution, Requirement 3.7.6 is not applicable.
Requirement 4: Protect cardholder data with strong cryptography during transmission over open, public networks
AWS Certificate Manager (ACM) integrates with API Gateway and enables the use of trusted certificates and HTTPS (TLS) for secure communication between clients and the API. This supports compliance with Requirement 4.2.
Requirement 4.2.1.2 is not applicable because there are no wireless technologies in use in this solution. Customers are responsible for ensuring strong cryptography exists for authentication and transmission over other wireless networks they manage outside of AWS.
Requirement 4.2.2 is not applicable because no end-user technologies exist in this solution. Customers are responsible for ensuring the use of strong cryptography if primary account numbers (PAN) are sent through end-user messaging technologies in other environments.
Requirement 5: Protect a ll systems and networks from malicious software
There are no customer-managed compute resources in this example payment environment, Requirements 5.2 and 5.3 are the responsibility of AWS.
Requirement 6: Develop and maintain secure systems and software
Amazon Inspector helps identify vulnerabilities and security weaknesses in the payment application’s code, dependencies, and configuration. This supports compliance with Requirement 6.3.
AWS WAF is designed to protect applications from common attacks, such as SQL injections, cross-site scripting, and other web exploits. AWS WAF can filter and block malicious traffic before it reaches the application. This supports compliance with Requirement 6.4.2.
Requirement 7: Restrict access to system components and cardholder data by business need to know
IAM and Amazon Cognito allow for fine-grained role- and job-based permissions and access control. Customers can use these capabilities to configure access following the principles of least privilege and need-to-know. IAM and Cognito support the use of strong identification, authentication, authorization, and multi-factor authentication (MFA). This supports compliance with much of Requirement 7.
Requirement 8: Identify users and authenticate access to system components
IAM and Amazon Cognito also support compliance with much of Requirement 8.
Some of the controls in this requirement are usually met by the identity provider for internal access to the cardholder data environment (CDE).
Requirement 9: Restrict physical access to cardholder data
AWS is responsible for the destruction of data in DynamoDB based on the customer configuration of content TTL values for Requirement 9.4.7. Customers are responsible for ensuring their database instance is configured for appropriate removal of data by enabling TTL on DDB attributes.
Requirement 9 is otherwise not applicable for this serverless example environment because there are no physical media, electronic media not already addressed under Requirement 3.2, or hard-copy materials with cardholder data. AWS is responsible for the physical infrastructure under the Shared Responsibility Model.
Requirement 10: Log and monitor all access to system components and cardholder data
AWS CloudTrail provides detailed logs of API activity for auditing and monitoring purposes. This supports compliance with Requirement 10.2 and contains all of the events and data elements listed.
CloudWatch can be used for monitoring and alerting on system events and performance metrics. This supports compliance with Requirement 10.4.
AWS Security Hub provides a comprehensive view of security alerts and compliance status, consolidating findings from various security services, which helps in ongoing security monitoring and testing. Customers must enable PCI DSS security standard, which supports compliance with Requirement 10.4.2.
AWS is responsible for maintaining accurate system time for AWS services. In this example, there are no compute resources for which customers can configure time. Requirement 10.6 is addressable through the AWS Attestation of Compliance and Responsibility Summary available in AWS Artifact.
Requirement 11: Regularly test security systems and processes
Testing for rogue wireless activity within the AWS-based CDE is the responsibility of AWS. AWS is responsible for the management of the physical infrastructure under Requirement 11.2. Customers are still responsible for wireless testing for their environments outside of AWS, such as where administrative workstations exist.
AWS is responsible for internal vulnerability testing of AWS services, and supports compliance with Requirement 11.3.1.
Amazon GuardDuty, a threat detection service that continuously monitors for malicious activity and unauthorized access, providing continuous security monitoring. This supports the IDS requirements under Requirement 11.5.1, and covers the entire AWS-based CDE.
AWS Config allows customers to catalog, monitor and manage configuration changes for their AWS resources. This supports compliance with Requirement 11.5.2.
Customers can use AWS Config to monitor the configuration of the S3 bucket hosting the static website. This supports compliance with Requirement 11.6.1.
Requirement 12: Support information security with organizational policies and programs
Customers can download the AWS AOC and Responsibility Summary package from Artifact to support Requirement 12.8.5 and the identification of which PCI DSS requirements are managed by the third-party service provider (TSPS) and which by the customer.
Conclusion
Using AWS serverless services when developing your payment application can significantly help reduce the number of PCI DSS requirements you need to meet by yourself. By offloading infrastructure management to AWS and using serverless services such as Lambda, API Gateway, DynamoDB, Amazon S3, and others, you can benefit from built-in security features and help align with your PCI DSS compliance requirements.
Contact us to help design an architecture that works for your organization. AWS Security Assurance Services is a Payment Card Industry-Qualified Security Assessor company (PCI-QSAC) and HITRUST External Assessor firm. We are a team of industry-certified assessors who help you to achieve, maintain, and automate compliance in the cloud by tying together applicable audit standards to AWS service-specific features and functionality. We help you build on frameworks such as PCI DSS, HITRUST CSF, NIST, SOC 2, HIPAA, ISO 27001, GDPR, and CCPA.
More information on how to build applications using AWS serverless technologies can be found at Serverless on AWS.
Want more AWS Security news? Follow us on Twitter.
Amazon Web Services (AWS) has re-published the whitepaper Architecting for PCI DSS Scoping and Segmentation on AWS to provide guidance on how to properly define the scope of your Payment Card Industry (PCI) Data Security Standard (DSS) workloads that are running in the AWS Cloud. The whitepaper has been refreshed to include updated AWS best practices and technologies, and updates that are applicable to the new PCI DSS v4.0 requirements. The whitepaper looks at how to define segmentation boundaries between your in-scope and out-of-scope resources by using cloud-based AWS services.
The whitepaper is intended for engineers and solution builders, but it also serves as a guide for Qualified Security Assessors (QSAs) and internal security assessors (ISAs) to better understand the different segmentation controls that are available within AWS products and services, along with associated scoping considerations.
Compared to on-premises environments, software-defined networking on AWS transforms the scoping process for applications by providing additional segmentation controls beyond network segmentation. Thoughtful design of your applications and selection of security-impacting services for implementing your required controls can reduce the number of systems and services in your cardholder data environment (CDE).
In this blog post, we show you how to automatically resolve AWS Identity and Access Management (IAM) Access Analyzer findings generated in response to unintended cross-account access for IAM roles. The solution automates the resolution by responding to the Amazon EventBridge event generated by IAM Access Analyzer for each active finding.
You can use identity-based policies and resource-based policies to granularly control access to a specific resource and how you use it across the entire AWS Cloud environment. It is important to ensure that policies you create adhere to your organization’s requirements on data/resource access and security best practices. IAM Access Analyzer is a feature that you can enable to continuously monitor policies for changes, and generate detailed findings related to access from external entities to your AWS resources.
When you enable Access Analyzer, you create an analyzer for your entire organization or your account. The organization or account you choose is known as the zone of trust for the analyzer. The zone of trust determines what type of access is considered trusted by Access Analyzer. Access Analyzer continuously monitors all supported resources to identify policies that grant public or cross-account access from outside the zone of trust, and generates findings. In this post, we will focus on an IAM Access Analyzer finding that is generated when an IAM role is granted access to an external AWS principal that is outside your zone of trust. To resolve the finding, we will show you how to automatically block such unintended access by adding explicit deny statement to the IAM role trust policy.
Prerequisites
To ensure that the solution only prevents unintended cross account access for IAM roles, we highly recommend you to do the following within your AWS environment before deploying the solution described in the blog post:
Review the generated findings that are active, and create a baseline for intended cross-account access for IAM roles by creating archive rules and applying the rule on those existing findings.
Note: This solution adds an explicit deny in the IAM role trust policy to block the unintended access, which overrides any existing allow actions. We recommend that you carefully evaluate that this is the resolution action you want to apply.
Solution overview
To demonstrate this solution, we will take a scenario where you are asked to grant access to an external AWS account. In order to grant access, you create an IAM role named Audit_CrossAccountRole on your AWS account 123456789012. You grant permission to assume the role Audit_CrossAccountRole to an AWS principal named Alice in AWS account 999988887777, which is out-side of your AWS Organizations. The following is an example of the trust policy for the IAM role Audit_CrossAccountRole:
Assuming the principal arn:aws:iam::999988887777:user/Alice was not archived previously in Access Analyzer, you see an active finding in Access Analyzer as shown in Figure 1.
Figure 1: Sample IAM Access Analyzer finding in AWS Console
Typically, you will review this finding and determine whether this access is intended or not. If the access is unintended, you can block access to the principal 999988887777/Alice by adding an explicit deny to the IAM role trust policy, and then follow up with IAM role owner to find out if there is a reason to allow this cross-account access. If the access is intended, then you can create an archive rule that will archive the finding and suppress such findings in future.
We will walk through the solution to automate this resolution process in the remainder of this blog post.
Solution walkthrough
Access Analyzer sends an event to Amazon EventBridge for every active finding. This solution configures an event rule in EventBridge to match an active finding, and triggers a resolution AWS Lambda function. The Lambda function checks that the resource type in the finding is an IAM role, and then adds a deny statement to the associated IAM role trust policy as a resolution. The Lambda function also sends an email through Amazon Simple Notification Service (Amazon SNS) to the email address configured in the solution. The individual or group who receives the email can then review the automatic resolution and the IAM role. They can then decide either to remove the role for unintended access, or to delete the deny statement from the IAM trust policy and create an archive rule in Access Analyzer to suppress such findings in future.
Figure 2: Automated resolution followed by human review
Figure 2 shows the following steps of the resolution solution.
Access Analyzer scans resources and generates findings based on the zone of trust and the archive rules configuration. The following is an example of an Access Analyzer active finding event sent to Amazon EventBridge:
EventBridge receives an event for the Access Analyzer finding, and triggers the AWS Lambda function based on the event rule configuration. The following is an example of the EventBridge event pattern to match active Access Analyzer findings:
Then, the Lambda function adds an explicit deny statement in the trust policy of the IAM role where the Sid of the new statement references the Access Analyzer finding ID.
Note: After Access Analyzer adds the deny statement, on the next scan, Access Analyzer finds the resource is no longer shared outside of your zone of trust. Access Analyzer changes the status of the finding to Resolved and the finding appears in the Resolved findings table.
The Lambda function sends a notification to an SNS topic that sends an email to the configured email address (which should be the business owner or security team) subscribed to the SNS topic. The email notifies them that a specific IAM role has been blocked from the cross-account access. The following is an example of the SNS code for the notification.
def send_notifications(sns_topic,principal, resource_arn, finding_id):
    sns_client = boto3.client("sns")
    message = "The IAM Role resource {} allows access to the principal {}. Trust policy for the role has been updated to deny the external access. Please review the IAM Role and its trust policy. If this access is intended, update the IAM Role trust policy to remove a statement with SID matching with the finding id {} and mark the finding as archived or create an archive rule. If this access is not intended then delete the IAM Role.". format(
        resource_arn, principal)
    subject = "Access Analyzer finding {} was automatically resolved ".format(finding_id)
    snsResponse = sns_client.publish(
        TopicArn=sns_topic,
        Message=message,
        Subject=subject
    )
Figure 3 shows an example of the email notification.
Figure 3: Sample resolution email generated by the solution
The security team or business owner who receives the email reviews the role and does one of the following steps:
If you find that the IAM role with cross-account access is intended then:Remove the deny statement added in the trust policy through AWS CLI or AWS Management Console. As mentioned above, the solution adds the Access Analyzer finding ID as Sid for the deny statement. The following command shows removing the deny statement for role_name through AWS CLI using the finding id available in the email notification.
POLICY_DOCUMENT=`aws iam get-role --role-name '<role_name>' --query "Role.AssumeRolePolicyDocument.{Version: Version, Statement: Statement[?Sid!='<finding_id>']}"`
aws iam update-assume-role-policy --role-name '<role_name>' --policy-document "$POLICY_DOCUMENT"
Further, you can create an archive rule with criteria such as AWS Account ID, resource type, and principal, to automatically archive new findings that match the criteria.
If you find that the IAM role provides unintentional cross-account access then you may delete the IAM role. Also, you should investigate who created the IAM role by checking relevant AWS CloudTrail events like iam:createRole, so that you can plan for preventive actions.
To deploy the solution by using the AWS Management Console
In your AWS account, launch the template by choosing the Launch Stack button, which creates the stack the in us-east-1 Region.
On the Quick create stack page, for Stack name, enter a unique stack name for this account; for example, iam-accessanalyzer-findings-resolution, as shown in Figure 4.
Figure 4: Deploy the solution using CloudFormation template
For NotificationEmail, enter the email address to receive notifications for any resolution actions taken by the solution.
After deployment, you must confirm the AWS Amazon SNS email subscription to get the notifications from the solution.
To confirm the email address for notifications
Check your email inbox and choose Confirm subscription in the email from Amazon SNS.
Amazon SNS opens your web browser and displays a subscription confirmation with your subscription ID.
To test the solution
Create an IAM role with a trust policy with another AWS account as principal that is neither part of archive rule nor within your zone of trust. Also, for this test, do not attach any permission policies to the IAM role. You will receive an email notification after a few minutes, similar to the one shown previously in Figure 3.
As a next step, review the resolution action as described in step 5 in the solution walkthrough section above.
Clean up
If you launched the solution in the AWS Management Console by using the Launch Stack button, you can delete the stack by navigating to CloudFormation console, selecting the specific stack by its name, and then clicking the Delete button.
If you deployed the solution using AWS CDK, you can perform the cleanup using the following CDK command from the local directory where the solution was cloned from GitHub.
cdk destroy
Cost estimate
Deploying the solution alone will not incur any costs, but there is a cost associated with the AWS Lambda execution and Amazon SNS notifications through email, when the findings generated by IAM Access Analyzer match the EventBridge event rule and the notifications are sent. AWS Lambda and Amazon SNS have perpetual free tier and you will be charged only when the usage goes beyond the free tier usage each month.
Summary
In this blog post, we showed you how to automate the resolution of unintended cross-account IAM roles using IAM Access Analyzer. As a resolution, this solution added a deny statement into the IAM role’s trust policy.
You can expand the solution to resolve Access Analyzer findings for Amazon S3 and KMS, by modifying the associated resource policies. You can also include capabilities like automating the rollback of the resolution if the role is intended, or introducing an approval workflow to resolve the finding to suit to your organization’s process requirements. Also, IAM Access Analyzer now enables you to preview and validate public and cross-account access before deploying permissions changes.
If you have feedback about this post, submit comments in the Comments section below. If you have questions about this post, start a new thread on the AWS IAM forum.
Want more AWS Security how-to content, news, and feature announcements? Follow us on Twitter.
The collective thoughts of the interwebz
Manage Consent
To provide the best experiences, we use technologies like cookies to store and/or access device information. Consenting to these technologies will allow us to process data such as browsing behavior or unique IDs on this site. Not consenting or withdrawing consent, may adversely affect certain features and functions.
Functional
Always active
The technical storage or access is strictly necessary for the legitimate purpose of enabling the use of a specific service explicitly requested by the subscriber or user, or for the sole purpose of carrying out the transmission of a communication over an electronic communications network.
Preferences
The technical storage or access is necessary for the legitimate purpose of storing preferences that are not requested by the subscriber or user.
Statistics
The technical storage or access that is used exclusively for statistical purposes.The technical storage or access that is used exclusively for anonymous statistical purposes. Without a subpoena, voluntary compliance on the part of your Internet Service Provider, or additional records from a third party, information stored or retrieved for this purpose alone cannot usually be used to identify you.
Marketing
The technical storage or access is required to create user profiles to send advertising, or to track the user on a website or across several websites for similar marketing purposes.