Today, we’re announcing a new capability in AWS IAM Access Analyzer that helps security teams verify which AWS Identity and Access Management (IAM) roles and users have access to their critical AWS resources. This new feature provides comprehensive visibility into access granted from within your Amazon Web Services (AWS) organization, complementing the existing external access analysis.
Security teams in regulated industries, such as financial services and healthcare, need to verify access to sensitive data stores like Amazon Simple Storage Service (Amazon S3) buckets containing credit card information or healthcare records. Previously, teams had to invest considerable time and resources conducting manual reviews of AWS Identity and Access Management (IAM) policies or rely on pattern-matching tools to understand internal access patterns.
The new IAM Access Analyzer internal access findings identify who within your AWS organization has access to your critical AWS resources. It uses automated reasoning to collectively evaluate multiple policies, including service control policies (SCPs), resource control policies (RCPs), and identity-based policies, and generates findings when a user or role has access to your S3 buckets, Amazon DynamoDB tables, or Amazon Relational Database Service (Amazon RDS) snapshots. The findings are aggregated in a unified dashboard, simplifying access review and management. You can use Amazon EventBridge to automatically notify development teams of new findings to remove unintended access. Internal access findings provide security teams with the visibility to strengthen access controls on their critical resources and help compliance teams demonstrate access control audit requirements.
Let’s try it out
To begin using this new capability, you can enable IAM Access Analyzer to monitor specific resources using the AWS Management Console. Navigate to IAM and select Analyzer settings under the Access reports section of the left-hand navigation menu. From here, select Create analyzer.
From the Create analyzer page, select the option of Resource analysis – Internal access. Under Analyzer details, you can customize your analyzer’s name to whatever you prefer or use the automatically generated name. Next, you need to select your Zone of trust. If your account is the management account for an AWS organization, you can choose to monitor resources across all accounts within your organization or the current account you’re logged in to. If your account is a member account of an AWS organization or a standalone account, then you can monitor resources within your account.
The zone of trust also determines which IAM roles and users are considered in scope for analysis. An organization zone of trust analyzer evaluates all IAM roles and users in the organization for potential access to a resource, whereas an account zone of trust only evaluates the IAM roles and users in that account.
For this first example, we assume our account is the management account and create an analyzer with the organization as the zone of trust.
Next, we need to select the resources we wish to analyze. Selecting Add resources gives us three options. Let’s first examine how we can select resources by identifying the account and resource type for analysis.
You can use Add resources by account dialog to choose resource types through a new interface. Here, we select All supported resource types and select the accounts we wish to monitor. This will create an analyzer that monitors all supported resource types. You can either select accounts through the organization structure (shown in the following screenshot) or paste in account IDs using the Enter AWS account ID option.
You can also choose to use the Define specific resource types dialog, which you can use to pick from a list of supported resource types (as shown in the following screenshot). By creating an analyzer with this configuration, IAM Access Analyzer will continually monitor both existing and new resources of the selected type within the account, checking for internal access.
After you’ve completed your selections, choose Add resources.
Alternatively, you can use the Add resources by resource ARN option.
Or you can use the Add resources by uploading a CSV file option to configure monitoring a list of specific resources at scale.
After you’ve completed the creation of your analyzer, IAM Access Analyzer will analyze policies daily and generate findings that show access granted to IAM roles and users within your organization. The updated IAM Access Analyzer dashboard now provides a resource-centric view. The Active findings section summarizes access into three distinct categories: public access, external access outside of the organization (requires creation of a separate external access analyzer), and access within the organization. The Key resources section highlights the top resources with active findings across the three categories. You can see a list of all analyzed resources by selecting View all active findings or Resource analysis on the left-hand navigation menu.
On the Resource analysis page, you can filter the list of all analyzed resources for further analysis.
When you select a specific resource, any available external access and internal access findings are listed on the Resource details page. Use this feature to evaluate all possible access to your selected resource. For each finding, IAM Access Analyzer provides you with detailed information about allowed IAM actions and their conditions, including the impact of any applicable SCPs and RCPs. This means you can verify that access is appropriately restricted and meets least-privilege requirements.
Pricing and availability
This new IAM Access Analyzer capability is available today in all commercial Regions. Pricing is based on the number of critical AWS resources monitored per month. External access analysis remains available at no additional charge. Pricing for EventBridge applies separately.
To learn more about IAM Access Analyzer and get started with analyzing internal access to your critical resources, visit the IAM Access Analyzer documentation.
AWS Identity and Access Management (IAM) Access Analyzer is a feature that you can use to identify resources in your AWS organization and accounts that are shared with external entities and to identify unused access. In this post, we explore how the unused access analyzer in IAM Access Analyzer works, dive into the cost implications, and share practical approaches to manage and optimize how you use it with a primary focus on cost optimization.
Note: While security best practices for managing AWS Identity and Access Management (IAM) resources are critical, this post emphasizes cost-saving strategies rather than detailed security guidance. We don’t cover step-by-step implementation details for the recommendations here; instead, we provide links to resources that you can use as guides for the process.
Understanding the unused access analyzer in IAM Access Analyzer
IAM Access Analyzer has two capabilities to generate findings:
External access analysis (no additional charge): Identifies resources shared with external entities. It requires one analyzer per AWS Region where you have resources.
Unused access analysis (paid): Detects unused roles, access keys, and permissions. It requires only one analyzer per AWS account and analyzes IAM roles and users across Regions from a single analyzer.
Both external access analysis and unused access analysis support AWS Organizations and you can create a single analyzer per organization (in the case of external access analysis, per organization per Region).
IAM Access Analyzer unused access analysis costs $0.20 per IAM role or user analyzed each month. The charges for existing roles and users happen at the beginning of the month. As new roles and users are added throughout the month, they are analyzed and charged at a rate of $0.20 per role or user. To help avoid duplicate charges, create only one unused access analyzer per account if using an account-level analyzer, or one unused access analyzer for the entire organization if using an organizational-level analyzer. You should avoid deleting and recreating an analyzer. If you recreate an analyzer, you will be charged again for the analysis.
Reviewing and optimizing your usage
Before taking any actions to reduce costs, it’s crucial to understand your current usage. You can use the AWS Cost and Usage Report (AWS CUR) to identify how many unused access analyzers you have in your environment. To learn more, see Querying Cost and Usage Reports using Amazon Athena.
Use the following Athena query on your CUR data to identify the unused access analyzers within your organization. Replace <CUR_TABLE> with the name of your CUR table.
SELECT
line_item_usage_type,
product_region,
line_item_resource_id,
bill_payer_account_id,
line_item_usage_account_id,
SUM(line_item_unblended_cost)
FROM <CUR_TABLE>
WHERE line_item_product_code = 'AWSIAMAccessAnalyzer'
AND line_item_line_item_type = 'Usage'
GROUP BY
line_item_usage_type,
product_region,
line_item_resource_id,
bill_payer_account_id,
line_item_usage_account_id
This query will give you a comprehensive view of your IAM Access Analyzer usage across your organization, including the cost per analyzer.
Now, let’s walk through four things that you can do today to optimize your IAM Access Analyzer unused access analysis costs.
Consolidate unused analyzers
Review your AWS CUR analysis results to identify opportunities for consolidation. If you’re using an organizational unused access analyzer, you should use a single analyzer. If you’re using an unused access analyzer per account, make sure a single account doesn’t have more than one analyzer.
Use tags to exclude some roles or users
Consider using tags to exclude certain roles or users from analysis. This approach can help scope your analysis and reduce costs by avoiding roles and users that you don’t want to analyze. To do this, you’ll need to implement a tagging strategy for your IAM roles and users, identifying principals that might not require regular access analysis. Then, when creating or modifying an analyzer, use exclusion to skip analysis of tagged IAM roles and users. Regularly review your exclusion strategy to validate that it aligns with your organization’s security policies and compliance requirements.
Periodically review and remove unnecessary IAM roles and users. Because IAM Access Analyzer unused access analysis charges are based on the number of roles and users analyzed, removing unused roles and users will help reduce unused access findings cost. This is also a security best practice for IAM.
Monitor and adjust
Set up AWS Budgets or AWS Cost Anomaly Detection to track your IAM Access Analyzer unused access analysis costs. Create alerts for when costs exceed expected thresholds. By using the proactive approach, you can quickly identify and address unexpected cost increases.
Conclusion
IAM Access Analyzer is a valuable tool for improving your organization’s security posture by detecting unused IAM roles, unused access keys for IAM users, unused passwords for IAM users, and unused services and actions for active IAM roles and users. You can then act based on those findings and support your effort to achieve least privilege access. By understanding the billing model and implementing these cost optimization strategies, you can maximize benefits while keeping costs under control. Remember, cost optimization is an ongoing process. Regularly review your usage and adjust your strategy as your needs evolve.
Amazon Web Services (AWS) provides service reference information in JSON format to help you automate policy management workflows. With the service reference information, you can access available actions across AWS services from machine-readable files. The service reference information helps to address a key customer need: keeping up with the ever-growing list of services and actions in AWS. As new services launch and existing services expand their capabilities, you can now conveniently identify and incorporate available actions, resources, and condition keys for each AWS service into your policy authoring and validation workflows. As your business expands and your AWS footprint grows, you might decide to automate your policy management workflows. With the service authorization reference, you can build custom tools to make it easier to evaluate and use new actions, resources, and condition keys that AWS services introduce.
Getting started with service reference information
The service reference information is static information about the actions, resources, and condition keys available for each service in AWS. To obtain the list of AWS services for which reference information is available, go to the following URL: https://servicereference.us-east-1.amazonaws.com/v1/service-list.json
This URL endpoint provides a JSON file that contains an up-to-date catalog of AWS services with available reference information. By querying this endpoint, you can retrieve the most current list of services supported by the AWS Service Reference Information feature.
To retrieve the list of actions, resources, and condition keys for a specific AWS service, go to the following URL: https://servicereference.us-east-1.amazonaws.com/v1/<service-name>/<service-name>.json
Replace <service-name> with the name of the desired AWS service (for example, “s3” for Amazon Simple Storage service (Amazon S3) or “ec2” for Amazon Elastic Compute Cloud (Amazon EC2)). This URL endpoint provides a JSON file that contains the comprehensive list of actions, resources, and condition keys that are available for that particular service.
The following example shows the format of the output from the service-list.json file, which contains the service names and URLs for each service’s reference information:
You can navigate to the service information page by using the url field to view the list of permissions for the service. You can also download the JSON file to use in your policy authoring workflows. For example, you can download the permissions for Amazon S3 by following this URL: https://servicereference.us-east-1.amazonaws.com/v1/s3/s3.json
The following example shows a partial output of the permissions for Amazon S3. The AWS Identity and Access Management (IAM) actions are available in JSON format, and each action is its own JSON object. The Name field for those objects provides the name of the IAM action, the ActionConditionKeys field provides the available condition keys for this action, and the Resources field provides the available resources for this action.
What can you build with the service reference information?
Let’s explore how you can make use of the service reference information through practical examples. To help you get started, here are two custom tools that use the service reference information. You can find these tools in our GitHub repository, ready for you to use and adapt to your specific needs. You can download the source code for these tools by visiting the following links:
The SCP pre-processor provides a convenient way to write SCPs. You run the SCP pre-processor as a command-line tool. The tool takes a single, monolithic JSON file and runs a series of transformations and optimizations, then outputs a collection of valid service control policies that fit within policy size quotas. The tool uses AWS service reference information data in order to optimize lists of IAM actions.
Notification tool for new or removed IAM actions
You might find yourself needing to update various policies throughout your AWS environment when new IAM actions or services are released. You can use this tool to notify you when new services or new actions are added or removed. It works by downloading the service reference information and comparing it to the previous version of the file when the tool last ran. You can use these notifications to perform actions like automatically updating IAM policies when new actions are added or manually reviewing the notifications for new, sensitive actions.
The AWS service reference information makes it easier for you to create automation for policy authoring and validation. By providing the AWS service actions reference in JSON format, this feature enables you to create custom tools for policy authoring and management.
We’re excited to know what kind of policy authoring tools you can think up.
If you have feedback about this post, submit comments in the Comments section below. If you have questions about this post, contact AWS Support.
In this blog post, we show how you can integrate IAM Access Analyzer custom policy check capability into VS Code, so you can identify overly permissive IAM policies and fine-tune access controls early in the development process. This proactive approach to security and compliance helps to ensure that your IAM policies are validated before they are deployed, reducing the risk of introducing misconfigurations or granting unintended access. It also saves developer time by providing fast feedback to developers when they write a policy that does not meet organizational standards.
What is the problem?
Although security teams oversee an organization’s overall security posture, developers create applications that require specific permissions. To enable developers to work efficiently while maintaining high security standards, organizations often seek ways to safely delegate the authoring of AWS Identity and Access Management (IAM) policies to developers. Many AWS customers manually review developer-authored IAM policies before deploying them to production environments to help prevent granting excessive or unintended permissions. However, depending on the volume and complexity of policies, these manual reviews can be time-consuming, leading to development delays and potential bottlenecks in the deployment of applications and services. Organizations need to balance secure access management with the agility required for rapid application development and deployment.
How to use IAM Access Analyzer custom policy checks in VS Code
Custom policy checks are a feature in IAM Access Analyzer that are designed to help security teams proactively identify and analyze critical permissions within their IAM policies. In this section, we provide step-by-step instructions for using custom policy checks directly in VS Code.
Prerequisites
To complete the examples in our walkthrough, you first need to do the following:
Install Python version 3.6 or later.
Assuming you are already using the VS Code Integrated Development Environment (IDE), search for and install the AWS Toolkit extension.
So that you can open IAM Access Analyzer policy checks in the VS Code editor, open the VS Code Command Palette by pressing Ctrl+Shift+P, search for IAM Policy Checks, and then choose AWS: Open IAM Policy Checks as shown in Figure 1.
Figure 1: Search for the AWS: Open IAM Policy Checks option
By using the IAM policy checks option in VS Code, you can perform four types of checks:
We’ll walk through examples of each of these checks in the sections that follow.
Example 1: ValidatePolicy
In this example, we use the ValidatePolicy option provided by the IAM policy check plugin to validate IAM policies against IAM policy grammar and AWS best practices. When you run this check, you can view policy validation check findings that include security warnings, errors, general warnings, and suggestions for your policy. These actionable recommendations help you author policies that are aligned with AWS best practices.
To run the ValidatePolicy check
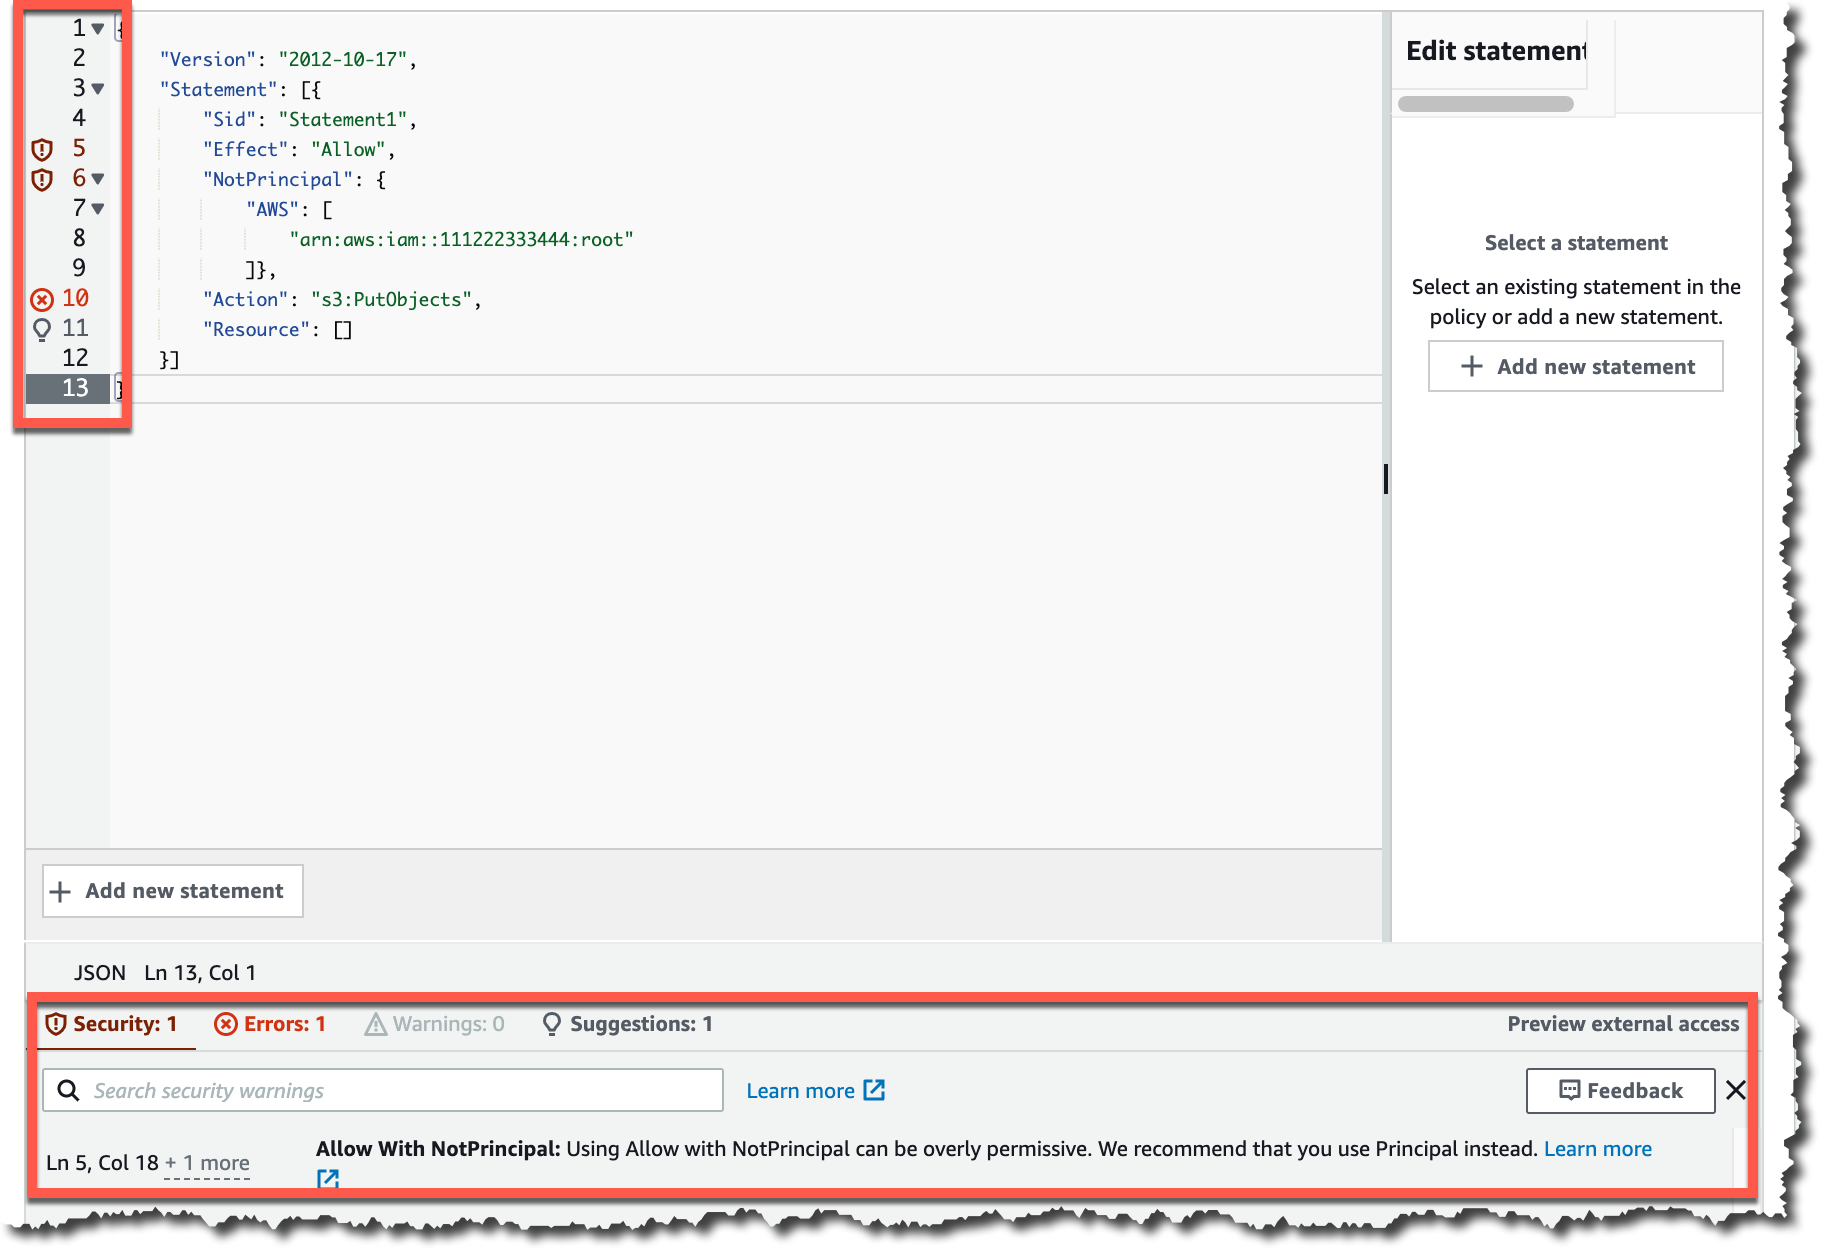
Let’s use the following IAM policy for illustration purposes. You can see that resource * (a wildcard) is being used in the first statement, which indicates that the iam:PassRole action is allowed for all resources.
In the VS Code editor, navigate to the IAM Policy Checks pane. Choose the document type JSON Policy Language and policy type Identity. Then choose Run Policy Validation.
Figure 2: IAM Access Analyzer ValidatePolicy check results
You can see that Access Analyzer has detected an issue, which is shown in the PROBLEMS pane.
Figure 3: Problems pane with finding details for the ValidatePolicy check
The security warning shown in Figure 3 states that the iam:PassRole action with a wildcard (*) in the resource can be overly permissive because it allows the ability to pass any IAM role in that account.
Now, let’s modify the IAM policy by replacing the wildcard (*) with a specific role Amazon Resource Name (ARN).
Verify the policy again by running the ValidatePolicy check to make sure that it doesn’t generate findings after you updated the IAM policy.
Figure 4: Results of the ValidatePolicy check after IAM policy correction
Example 2: CheckNoPublicAccess
With the CheckNoPublicAccess option, you can verify whether your resource policy grants public access for supported resource types.
To run the CheckNoPublicAccess check
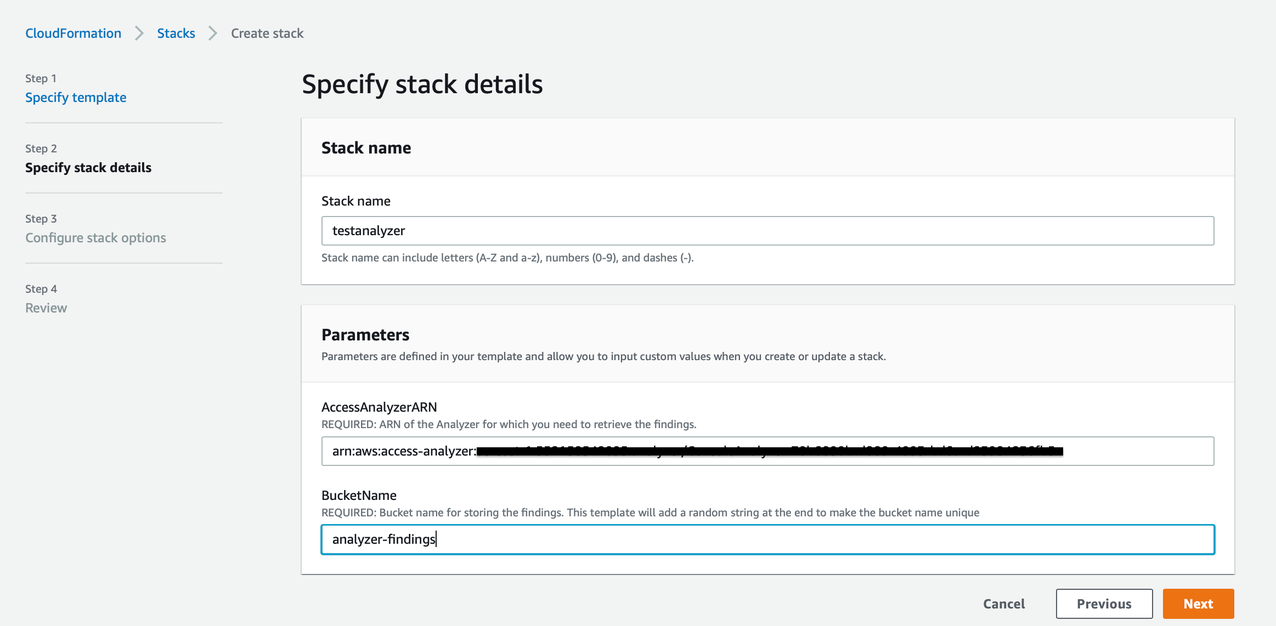
To test whether a policy does not allow public access, create a new bucket using a CloudFormation template and attach a resource policy that grants access to any principal to see the objects in this bucket.
WARNING: This sample bucket policy should not be used in production. Using a wildcard in the principal element of a bucket policy would allow any IAM principal to view the contents of the bucket.
Select the document type CloudFormation template and then choose Run Custom Policy Check to see whether this resource policy passes the CheckNoPublicAccess check.
Figure 5: IAM Access Analyzer CheckNoPublicAccess check results
The policy check returns a failed result because this bucket does allow public access.
Figure 6: Problems pane finding details for CheckNoPublicAccess check
Next, fix this policy to allow access from a role within the same account by restricting the policy to a specific role ARN.
Re-run the CheckNoPublicAccess check. The resource policy no longer grants public access and the status of the policy check is PASS.
Example 3: CheckAccessNotGranted
The CheckAccessNotGranted option allows you to check whether a policy allows access to a list of IAM actions and resource ARNs. You can use this check to give developers fast feedback that certain permissions or access to certain resources are not allowed.
To run the CheckAccessNotGranted check
Identify sensitive actions and resources.
In the VS Code editor, under Custom Policy Checks, choose the check type CheckAccessNotGranted. Using a comma-separated list, create a list of actions and resource ARNs that you don’t want to allow in your IAM policy. You can also create a JSON file with your actions and resources by using the syntax shown in Figure 7. For this example, set the s3:PutBucketPolicy and dynamodb:DeleteTable IAM actions to “not allowed” in the IAM policy.
Figure 7: Configure the CheckAccessNotGranted check
Create a sample CloudFormation template that contains an IAM policy attached to an IAM role, as follows. This policy grants access to some of the actions that you deemed sensitive in Figure 7.
In the VS Code editor, choose Run Custom Policy Check to identify whether one of the sensitive actions or resources is allowed in the IAM policy. The policy check returns FAIL because the policy has the actions s3:PutBucketPolicy and dynamodb:DeleteTable, which you marked as actions that you don’t want developers to grant access to. Remove the restricted actions from the policy and run the check again to see a PASS result for the policy check.
Example 4: CheckNoNewAccess
The CheckNoNewAccess option is a custom policy check that verifies whether your policy grants new access compared to a reference policy.
You use a reference policy to check whether a candidate policy allows more access than the reference policy does. In other words, the check passes if the candidate policy is a subset of the reference policy. A reference policy typically starts by allowing all access. You then add a statement or statements that deny the access that you want the reference policy to check for. For more details and examples of reference policies, see the iam-access-analyzer-custom-policy-check-samples repository on GitHub.
The ability to use a reference policy provides you with the flexibility to look for almost anything in an IAM policy. This is useful when you have custom requirements for your organization that may not be met with some of the other custom policy checks.
To run the CheckNoNewAccess check
Create a reference policy: In your project, create a new JSON policy document that will serve as your reference policy.
The following reference policy checks that an IAM role trust policy only grants access to an allowlisted set of AWS services. This enables you to allow builders to create roles, but constrain the use of those roles to the set of AWS services specified.
In this reference policy, only the specified AWS service principals ec2.amazonaws.com, lambda.amazonaws.com, and ecs-tasks.amazonaws.com are allowed to assume the role.
Enter the reference policy in the VS Code editor. In the IAM Policy Checks pane, select the check type CheckNoNewAccess. Then set the reference policy type to Resource, because this is a trust policy that defines which principals can assume the role. In addition, provide the path of the reference policy that you created in Step 1. You can also directly enter the reference policy as a JSON policy document, as shown in Figure 8.
Figure 8: Enter the reference policy for the CheckNoNewAccess check
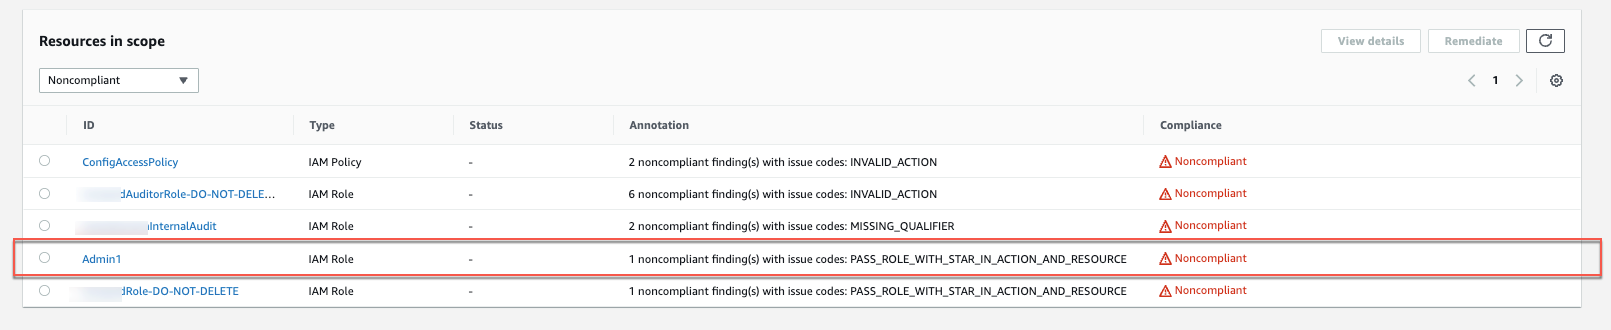
Create a CloudFormation template, as follows. This template creates an IAM role that allows the AWS service principals lambda.amazonaws.com and glue.amazonaws.com to assume the sample-application-role IAM role.
In the VS Code editor, choose Run Custom Policy Check to check your CloudFormation template against the reference policy you configured in Step 1. The check will return FAIL and you will see a security warning in the editor in the PROBLEMS pane.
Figure 9: Problems pane finding details for the CheckNoNewAccess check
The issue is that glue.amazonaws.com was not listed as a service principal that was allowed to assume a role in your reference policy. You can remove glue.amazonaws.com from the CloudFormation template and re-run the check to receive a PASS result.
Conclusion
In this post, we explored how you can use the integration of VS Code with IAM Access Analyzer in your development workflow to make sure that your IAM policies align with best practices and adhere to your organization’s security requirements. The four critical checks provided by IAM Access Analyzer can be summarized as follows:
The ValidatePolicy check provides actionable recommendations that help you author policies that are aligned with AWS best practices.
The CheckNoPublicAccess check helps protect resources from being exposed publicly and mitigates the risk of unauthorized public access.
The CheckAccesNotGranted check looks for specific IAM actions and resource ARNs to help enforce access restrictions and help prevent unauthorized access to critical data or services.
The CheckNoNewAccess check validates that the permissions granted in your IAM policies remain within the intended scope, as defined by your organization’s requirements.
AWS Identity and Access Management Access Analyzer simplifies inspecting unused access to guide you towards least privilege. You can use unused access findings to identify over-permissive access granted to AWS Identity and Access Management (IAM) roles and users in your accounts or organization. From a delegated administrator account for IAM Access Analyzer, you can use the dashboard to review unused access findings across your organization and prioritize the accounts to inspect based on the volume and type of findings. The findings highlight unused roles, unused access keys for IAM users, and unused passwords for IAM users. For active IAM users and roles, the findings provide visibility into unused services and actions. Recently, IAM Access Analyzer launched new configuration capabilities that you can use to customize the analysis. You can select accounts, roles, and users to exclude, and focus on the areas that matter the most to you. You can use identifiers such as account ID or scale configuration using tags. By scoping the IAM Access Analyzer to monitor a subset of accounts and roles, you can reduce noise from unwanted findings. You can update the configuration when needed to change the scope of analysis. With this new offering, IAM Access Analyzer provides enhanced controls to help you tailor the analysis more closely to your organization’s security needs.
In this post, we walk you through an example scenario. Imagine that you’re a cloud administrator in a company that uses Amazon Web Services (AWS). You use AWS Organizations to organize your workload into several organizational units (OUs) and accounts. You have dedicated accounts for testing and experimenting with new AWS features called sandbox accounts across your organization. The sandbox accounts can be created by anyone in your company and are centrally recorded. You’re using tags on IAM resources and have followed AWS best practices and strategies when tagging your AWS resources. Tags are applied to the IAM roles created by your teams.
To make sure that your teams are following the principle of least privilege and are working with only the required permissions to access the AWS accounts, you use IAM Access Analyzer. You created an unused access analyzer at the organization level so it will monitor the AWS accounts in your organization. You noticed that you have multiple unused access findings. After analysis, your security team suggests the exclusion of some AWS accounts, IAM roles, and users so they can focus on the relevant findings. They want the sandbox accounts and the IAM roles they use for security purposes (such as auditing, incident response) to be excluded from the unused access analysis.
You can select accounts and roles to exclude when you create a new analyzer or update the analyzer later. In this post, we show you how to configure IAM Access Analyzer unused access finding to exclude specific accounts across your organization and specific principals (IAM roles and IAM users) once you have set up an analyzer. There is no additional pricing for using the prescriptive recommendations after you have enabled unused access findings.
Prerequisites
The following are the prerequisites to configure IAM Access Analyzer for unused access analysis:
An unused access analyzer created at the organization level
Administrative level access to the IAM Access Analyzer delegated administrator account
A list of account IDs that you want to exclude
IAM roles with tags
In the following sections, you will learn how to customize your IAM Access Analyzer to better suit your organization’s needs. This includes the following:
Explore how to exclude specific AWS accounts from the analyzer’s unused access findings.
See how to exclude tagged IAM roles from the analysis, allowing you to focus on the most relevant security insights and you see how to review exclusions on your analyzer to modify them as needed.
By the end, you will have a tailored unused access analyzer that provides more meaningful and actionable results for your organization.
Exclude specific accounts across your organization
In this section, you will see how to update your existing unused access analyzer at the organization level through the AWS Management Console and AWS Command Line Interface (AWS CLI) to exclude specific AWS account IDs from its analysis.
If you don’t have an unused access analyzer in the organization, see this post for instructions on how to create one.
Use the console to update your unused access analyzer:
Connect to your IAM Access Analyzer delegated administrator account (by default, your organization management account).
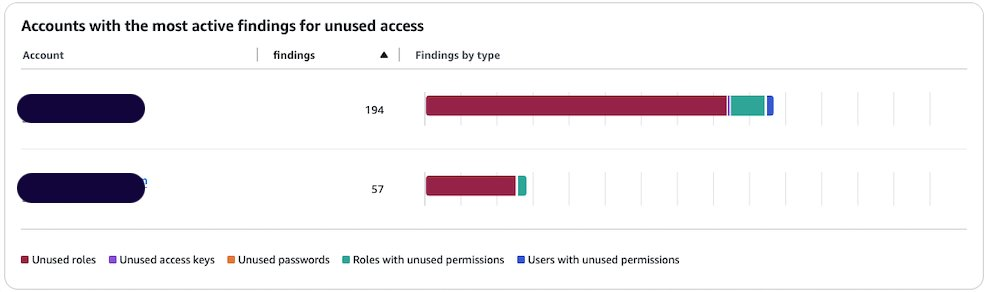
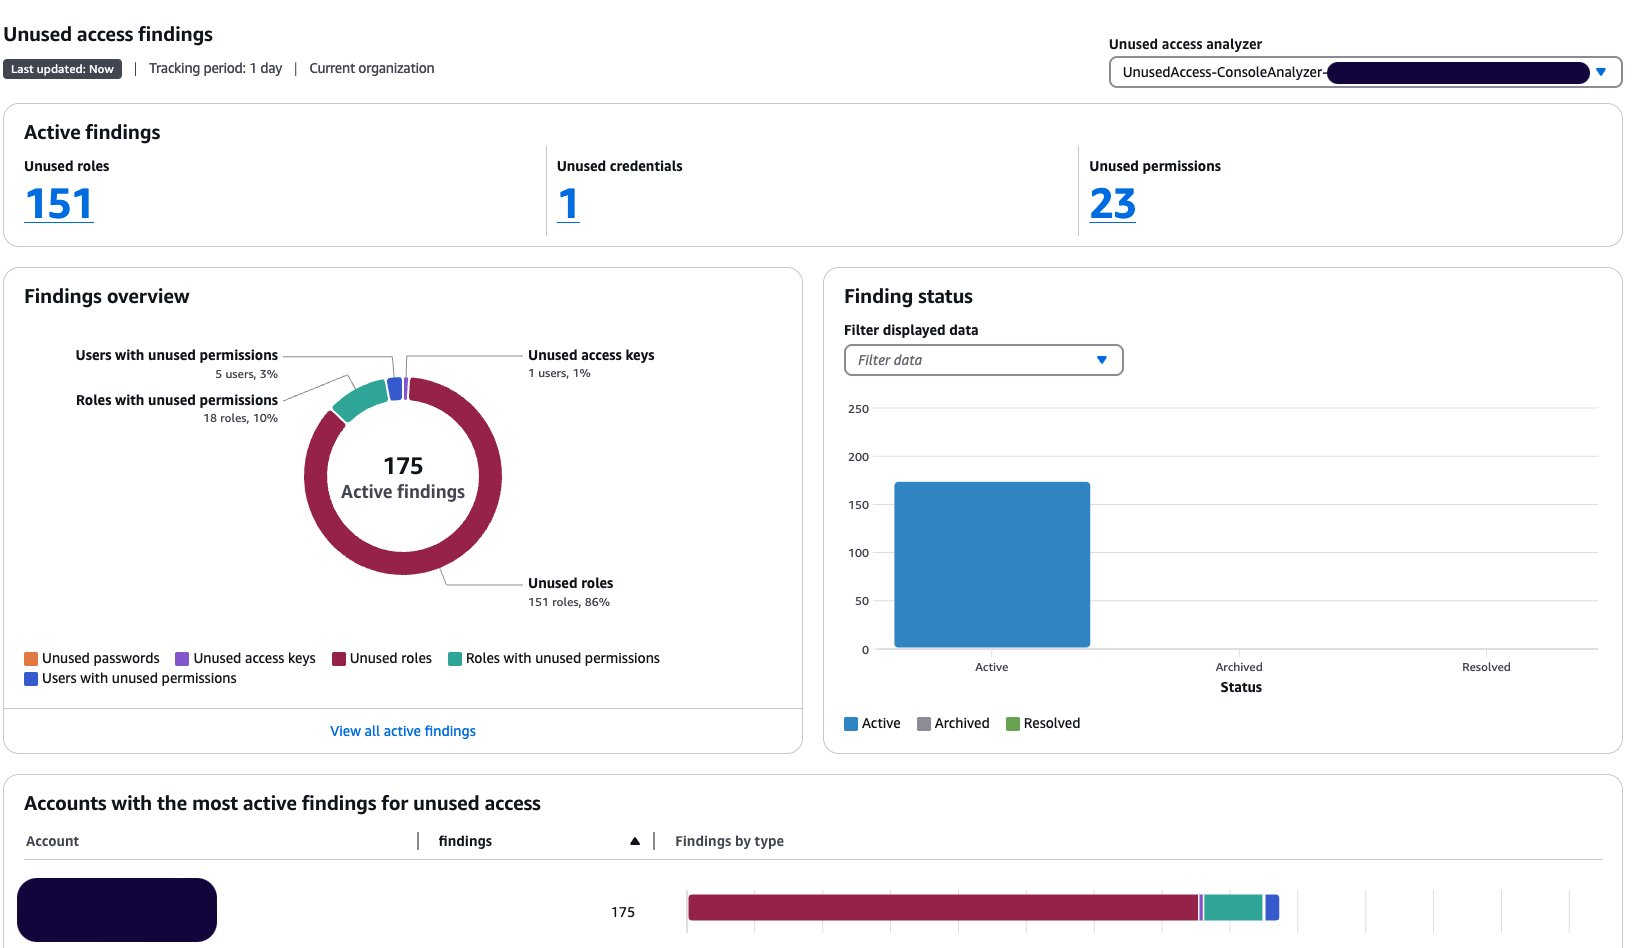
Open the IAM Access Analyzer console in your management account. You will see the dashboard with your active finding by selecting the analyzer of your choice on the top right. In this example, the analyzer has 251 active findings.
Figure 1: Unused access findings dashboard without exclusions
You can see the split of active findings per account. The example account has 57 active findings that you want to exclude from it.
Figure 2: Unused access findings per account
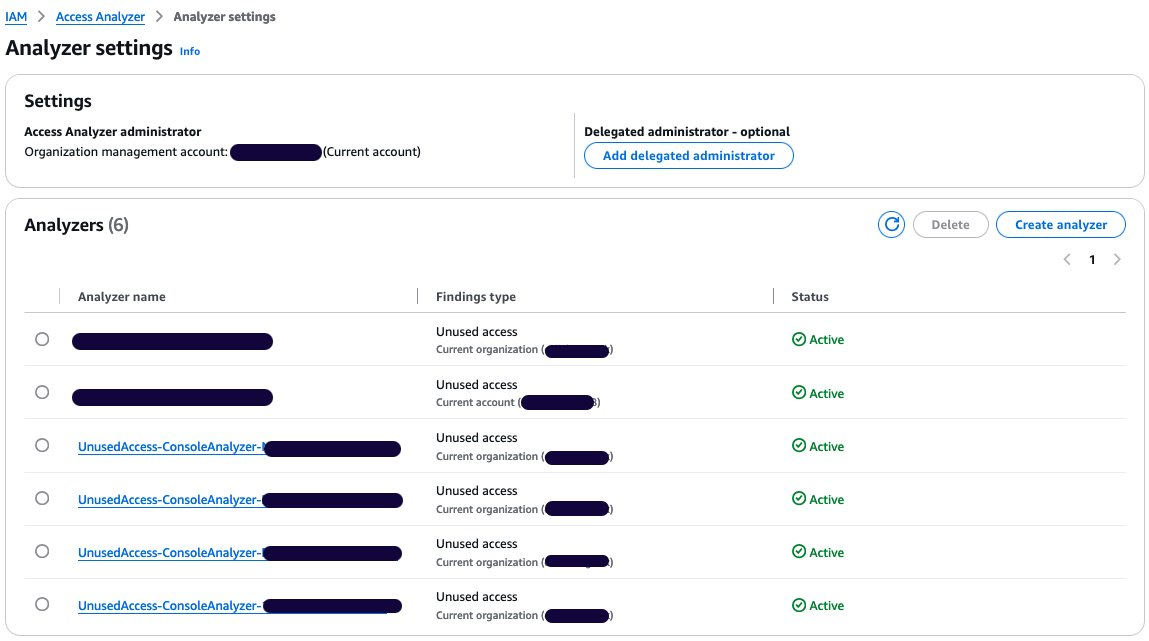
Select Analyzer settings under Access Analyzer in that navigation pane.
The analyzer settings page presents the analyzers in your AWS Region and their status.
Select your unused access analyzer in the list based on its name.
Figure 3: Active access analyzers
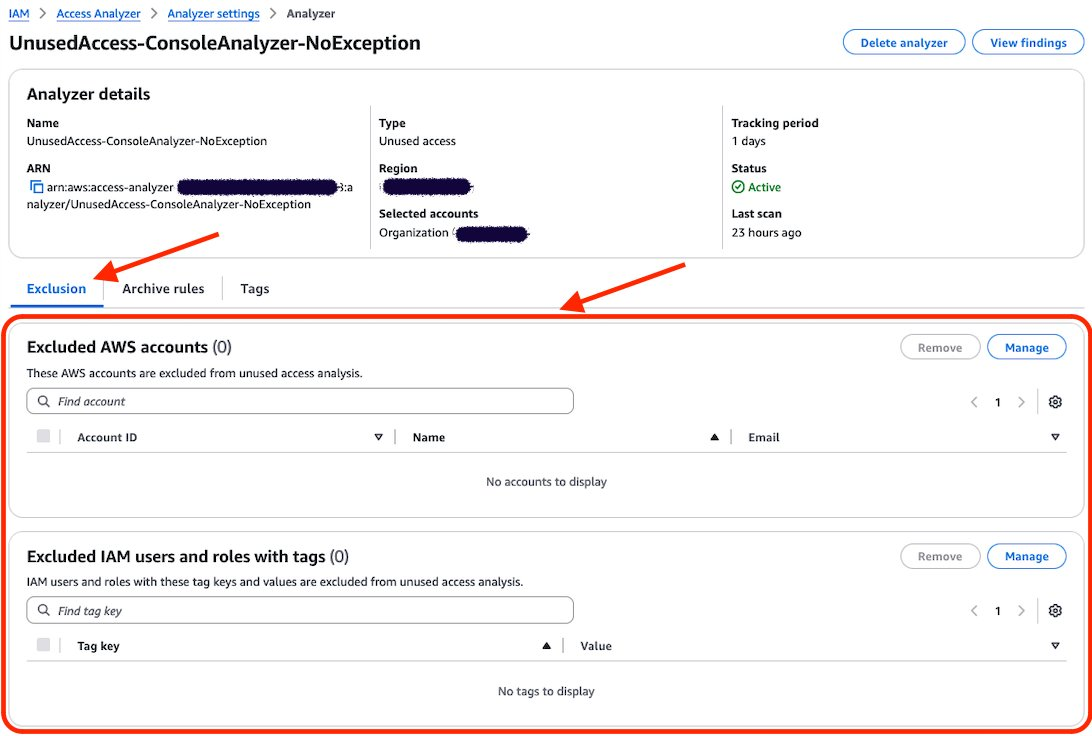
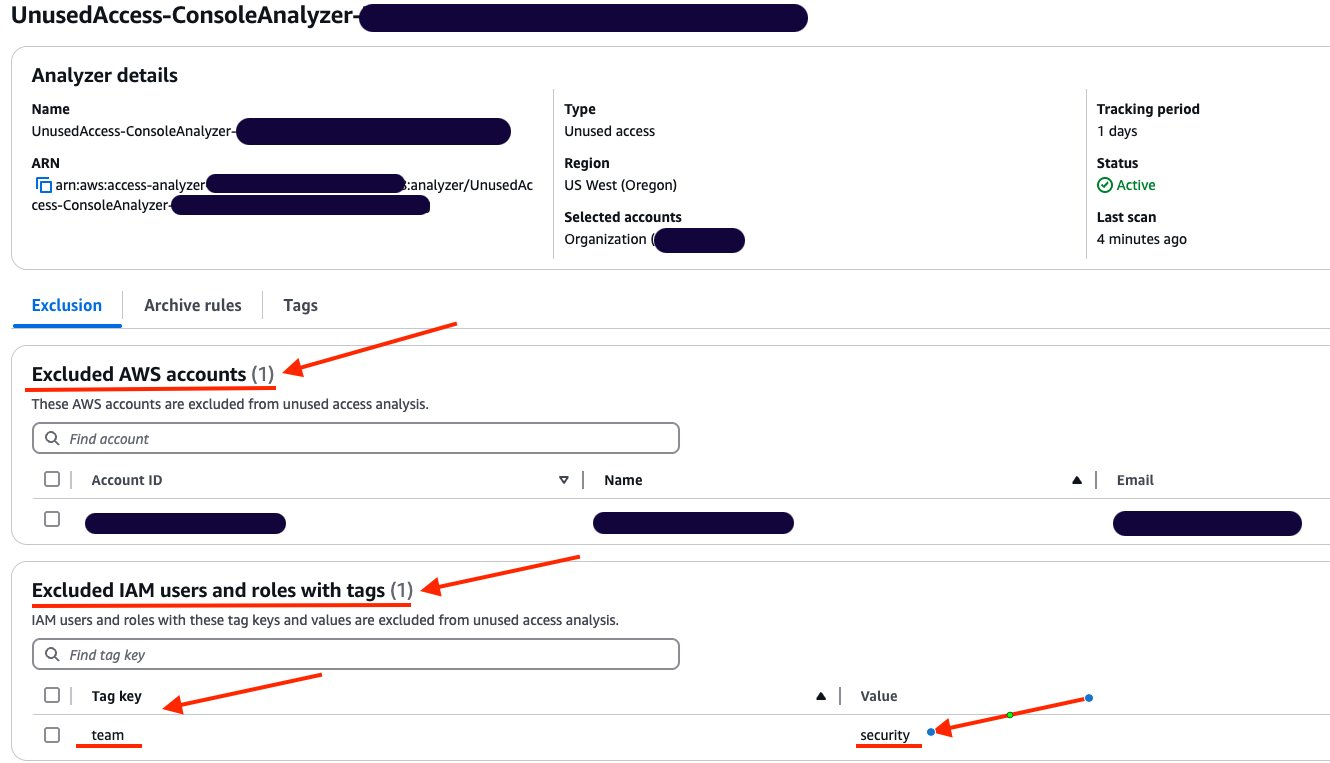
On the Analyzer page, you can see the analyzer settings and a new tab called Exclusion. Because you have no excluded AWS accounts, the count of Excluded AWS accounts is 0 and there are no accounts displayed.
Figure 4: Unused access analyzer exclusion tab
Choose Manage in the Excluded AWS accounts section.
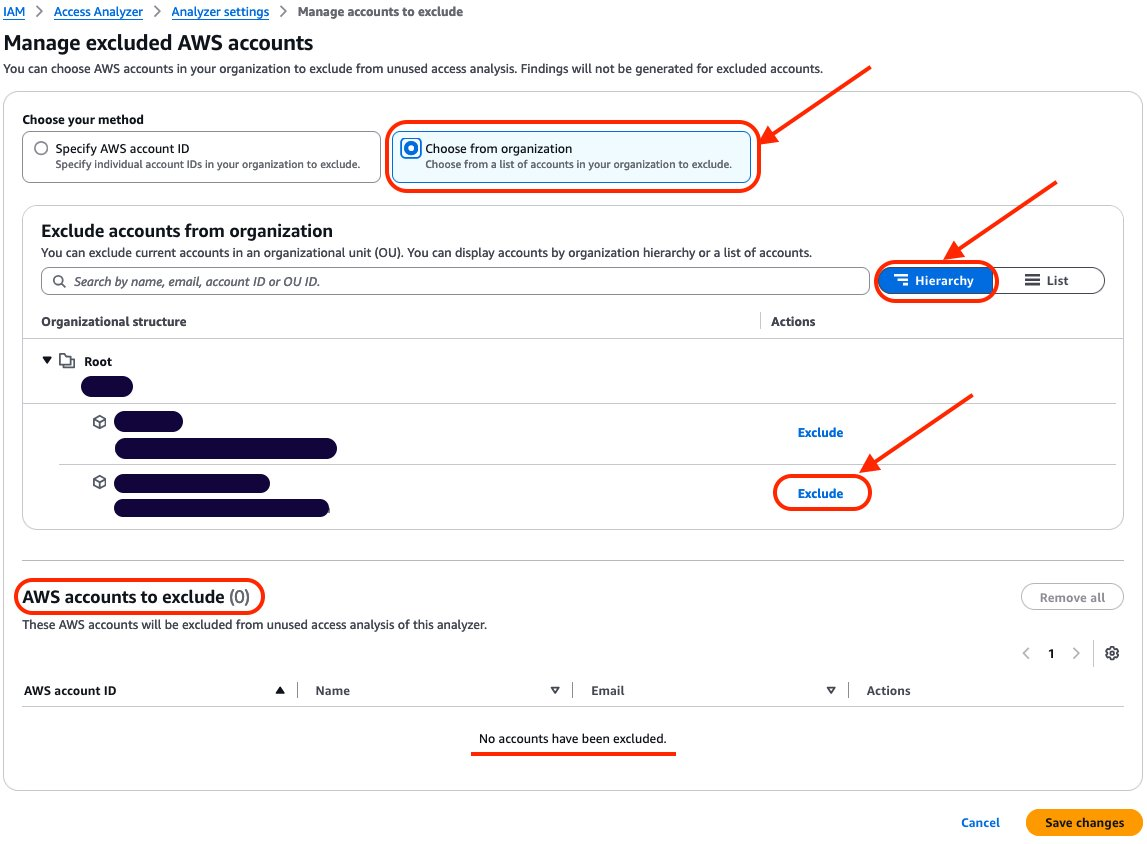
Select Choose from organization and Hierarchy and choose Exclude next to the sandbox account that you want to exclude.
Figure 5: Exclude sandbox account
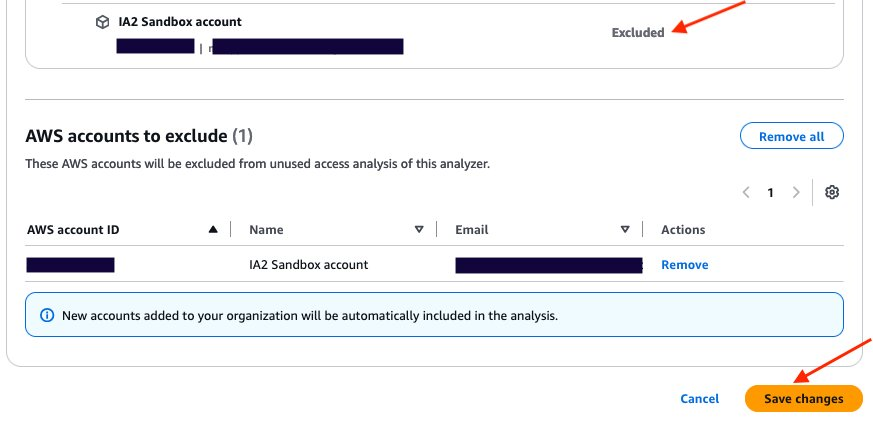
After you select Exclude for the sandbox account, the account will be deselected and will appear in AWS accounts to exclude. The count of accounts to exclude has changed from 0 to 1. After you have finished, choose Save changes.
Figure 6: Verify that the account is excluded and save changes
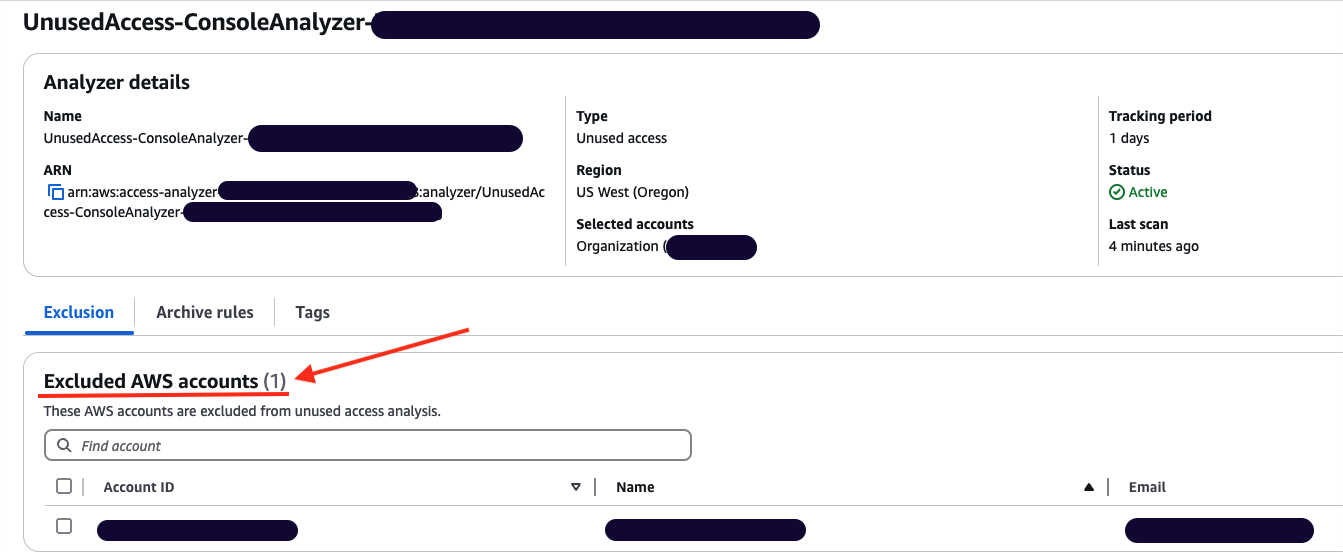
The page will be automatically updated with your changes. You can then review the Excluded AWS accounts and verify that your excluded account is correctly configured.
Figure 7: Analyzer configuration updated with excluded account
You can go back to the console dashboard and see the results. In this example, the exclusion of the sandbox account has caused the total number of active findings to go down from 251 to 194.
Figure 8: Dashboard showing a reduction in active findings
Use AWS CLI to update your unused access analyzer:
You can update your existing analyzer using the AWS CLI command aws accessanalyzer update-analyzer. Use the following command, replacing <YOUR-ANALYZER-NAME> with the name of your analyzer.
You have successfully excluded a sandbox account from the unused access analysis. Now you will exclude the IAM roles used by the security team to audit your accounts based on tags.
Excluding specific principals in your organization using tags
In this section, you will see how to update an existing unused access analyzer by excluding tagged IAM roles in your organization using the console and then AWS CLI.
Use the console to update your unused access analyzer:
Open the IAM Access Analyzer console.
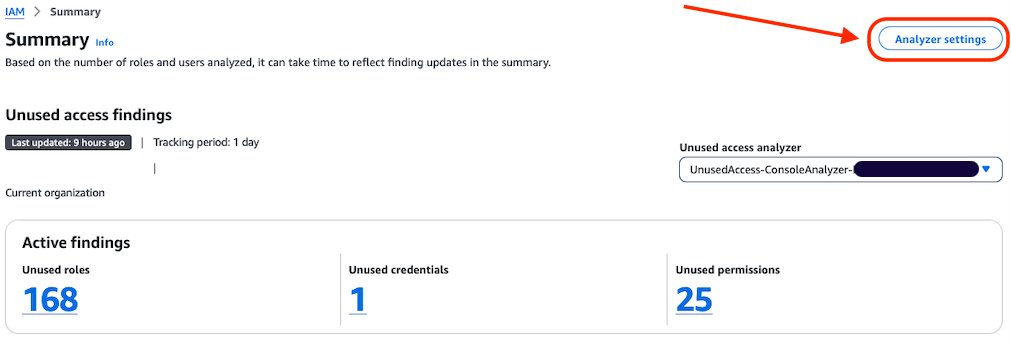
Review the summary dashboard containing your unused findings. Choose Analyzer settings at the top of the screen.
Figure 9: IAM Access Analyzer summary dashboard
You will see a list of analyzers created in your account in that Region. Select the analyzer that you want to update.
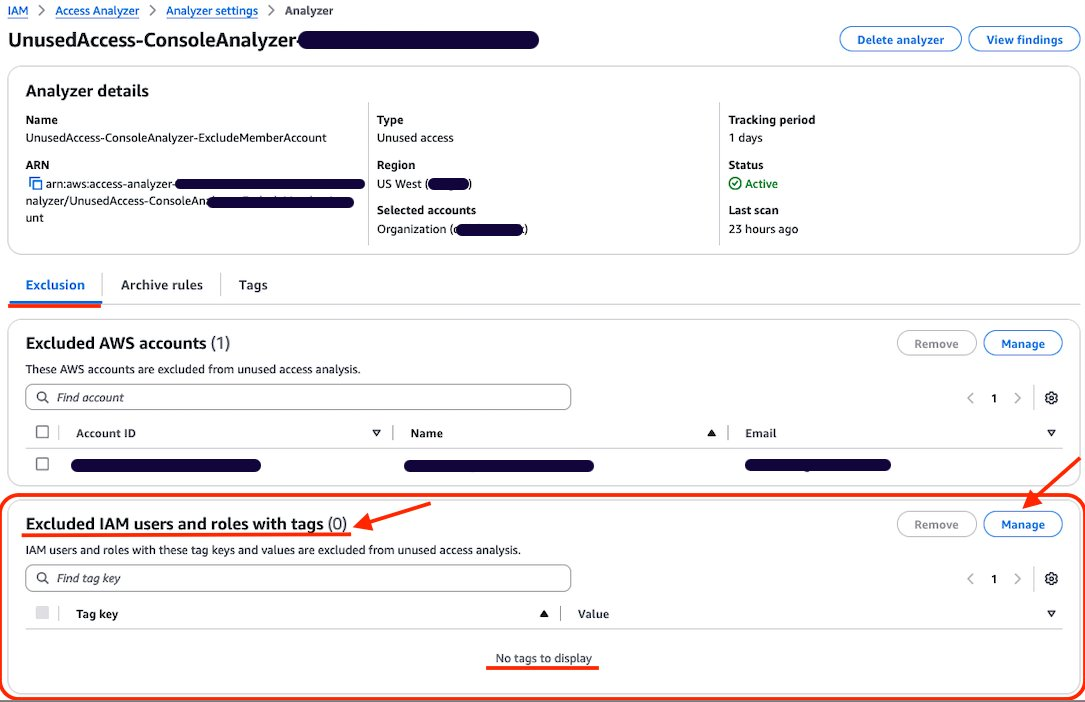
Review the analyzer page. On the Exclusion tab, you will see Exclude IAM users and roles with tags with a count of 0.
Figure 10: Configure exclusion of IAM roles using tag
Choose Manage in the Excluded IAM users and roles with tags section.
Add the tags attached to the roles that you want to exclude from the analysis and choose Save changes.
Figure 11: Add tag to exclude
You can now see that Excluded IAM users and roles with tags now has a count of 1, and you can see the tags in the list.
Figure 12: List of exclusion tags
Use AWS CLI to update your unused access analyzer:
You can also update your existing analyzer using the AWS CLI command aws accessanalyzer update-analyzer. Using the following command, replace <YOUR-ANALYZER-NAME> with the name of your analyzer.
You can review, remove, or update the exclusions configured on your analyzer by using the console or AWS CLI. For example, as a security administrator managing multiple accounts, you might initially exclude IAM roles that have the tag security from analysis. However, you might need to review these exclusions if your policies change, requiring analysis of certain security roles or removing the exclusion entirely. By adjusting your exclusions, you can make sure that your analyzer’s results remain relevant to your organization’s needs and account structure.
Review the exclusion on unused access analyzer using the console:
In this section, review the tags that have been excluded from an analyzer.
Open the IAM console.
Select Access Analyzer, under Access reports, you will see a summary dashboard of findings from an analyzer.
The Active findings section shows the number of active findings for unused roles, the number of active findings for unused credentials and the number of active findings for unused permissions.
The Findings overview section includes a breakdown of the active findings.
The Findings status section shows the status of findings (whether active, archived or resolved).
Figure 13: Unused access analyzer dashboard
Select the Analyzer settings at the top of the screen.
Select the analyzer that you want to review to see the exclusion tags.
After applying the tags, the updated dashboard is shown after the next scan.
Figure 15: Dashboard showing reduction of findings after exclusions
Review the exclusion on an unused access analyzer using AWS CLI:
Using the name of your analyzer, you can run the command get-analyzer to see the configured exclusion. Using the following command, replace <YOUR-ANALYZER-NAME> with the name of your analyzer:
In this post, you learned how to tailor your unused access analyzer to your needs by excluding specific accounts and IAM roles. To exclude the accounts in your organization from being monitored by IAM Access Analyzer, you can use a list of account IDs or select them from a hierarchical view of your organization structure. You can exclude IAM roles and IAM users based on tags. By customizing the exclusion on the unused access analyzer, you saw that the number of active findings went down, helping you focus on the findings that matter most. With this new offering, IAM Access Analyzer provides enhanced controls to help you tailor the analysis more closely to your organization’s security needs.
As a security team lead, your goal is to manage security for your organization at scale and ensure that your team follows AWS Identity and Access Management (IAM)security best practices, such as the principle of least privilege. As your developers build on AWS, you need visibility across your organization to make sure that teams are working with only the required privileges. Now, AWS Identity and Access Management Analyzer offers prescriptive recommendations with actionable guidance that you can share with your developers to quickly refine unused access.
In this post, we show you how to use IAM Access Analyzer recommendations to refine unused access. To do this, we start by focusing on the recommendations to refine unused permissions and show you how to generate the recommendations and the actions you can take. For example, we show you how to filter unused permissions findings, generate recommendations, and remediate issues. Now, with IAM Access Analyzer, you can include step-by-step recommendations to help developers refine unused permissions quickly.
Unused access recommendations
IAM Access Analyzer continuously analyzes your accounts to identify unused access and consolidates findings in a centralized dashboard. The dashboard helps review findings and prioritize accounts based on the volume of findings. The findings highlight unused IAM roles and unused access keys and passwords for IAM users. For active IAM roles and users, the findings provide visibility into unused services and actions. You can learn more about unused access analysis through the IAM Access Analyzer documentation.
For unused IAM roles, access keys, and passwords, IAM Access Analyzer provides quick links in the console to help you delete them. You can use the quick links to act on the recommendations or use export to share the details with the AWS account owner. For overly permissive IAM roles and users, IAM Access Analyzer provides policy recommendations with actionable steps that guide you to refine unused permissions. The recommended policies retain resource and condition context from existing policies, helping you update your policies iteratively.
Throughout this post, we use an IAM role in an AWS account and configure the permissions by doing the following:
We use an inline policy to demonstrate that IAM Access Analyzer unused access recommendations are applicable for that use case. The recommendations are also applicable when using AWS managed policies and customer managed policies.
In your AWS account, after you have configured an unused access analyzer, you can select an IAM role that you have used recently and see if there are unused access permissions findings and recommendations.
In this post we explore three options for generating recommendations for IAM Access Analyzer unused permissions findings: the console, AWS CLI, and AWS API.
Generate recommendations for unused permissions using the console
After you have created an unused access analyzer as described in the prerequisites, wait a few minutes to see the analysis results. Then use the AWS Management Console to view the proposed recommendations for the unused permissions.
To list unused permissions findings
Go to the IAM console and under Access Analyzer, choose Unused access from the navigation pane.
Search for active findings with the type Unused permissions in the search box.
Select Active from the Status drop-down list.
In the search box, select Findings type under Properties.
Select Equals as Operators.
Select Findings Type = Unused permissions.
This list shows the active findings for IAM resources with unused permissions.
Figure 1: Filter on unused permissions in the IAM console
Select a finding to learn more about the unused permissions granted to a given role or user.
To obtain recommendations for unused permissions
On the findings detail page, you will see a list of the unused permissions under Unused permissions.
Following that, there is a new section called Recommendations. The Recommendations section presents two steps to remediate the finding:
Review the existing permissions on the resource.
Create new policies with the suggested refined permissions and detach the existing policies.
Figure 2: Recommendations section
The generation of recommendations is on-demand and is done in the background when you’re using the console. The message Analysis in progress indicates that recommendations are being generated. The recommendations exclude the unused actions from the recommended policies.
When an IAM principal, such as an IAM role or user, has multiple permissions policies attached, an analysis of unused permissions is made for each of permissions policies:
If no permissions have been used, the recommended action is to detach the existing permissions policy.
If some permissions have been used, only the used permissions are kept in the recommended policy, helping you apply the principle of least privilege.
The recommendations are presented for each existing policy in the column Recommended policy. In this example, the existing policies are:
AmazonBedrockReadOnly
AmazonS3ReadOnlyAccess
InlinePolicyListLambda
And the recommended policies are:
None
AmazonS3ReadOnlyAccess-recommended
InlinePolicyListLambda-recommended
Figure 3: Recommended policies
There is no recommended policy for AmazonBedrockReadOnly because the recommended action is to detach it. When hovering over None, the following message is displayed: There are no recommended policies to create for the existing permissions policy.
AmazonS3ReadOnlyAccess and InlinePolicyListLambda and their associated recommended policy can be previewed by choosing Preview policy.
To preview a recommended policy
IAM Access Analyzer has proposed two recommended policies based on the unused actions.
To preview each recommended policy, choose Preview policy for that policy to see a comparison between the existing and recommended permissions.
Choose Preview policy for AmazonS3ReadOnlyAccess-recommended.
The existing policy has been analyzed and the broad permissions—s3:Get* and s3:List*—have been scoped down to detailed permissions in the recommended policy.
The permissions s3:Describe*, s3-object-lambda:Get*, and s3-object-lambda:List* can be removed because they weren’t used.
Figure 4: Preview of the recommended policy for AmazonS3ReadOnlyAccess
Choose Preview policy for InlinePolicyListLambda-recommended to see a comparison between the existing inline policy InlinePolicyListLambda and its recommended version.
The existing permissions, lambda:ListFunctions and lambda:ListLayers, are kept in the recommended policy, as well as the existing condition.
The permissions in lambda:ListAliases and lambda:ListFunctionUrlConfigs can be removed because they weren’t used.
Figure 5: Preview the recommended policy for the existing inline policy InlinePolicyListLambda
To download the recommended policies file
Choose Download JSON to download the suggested recommendations locally.
Figure 6: Download the recommended policies
A .zip file that contains the recommended policies in JSON format will be downloaded.
Figure 7: Downloaded recommended policies as JSON files
The content of the AmazonS3ReadOnlyAccess-recommended-1-2024-07-22T20/08/44.793Z.json file the same as the recommended policy shown in Figure 4.
Generate recommendations for unused permissions using AWS CLI
Use the following code to refine the results by filtering on the type UnusedPermission and selecting only the active findings. Copy the Amazon Resource Name (ARN) of your unused access analyzer and use it to replace the ARN in the following code:
This command provides the following results. For more information about the meaning and structure of the recommendations, see Anatomy of a recommendation later in this post.
Note: The recommendations consider AWS managed policies, customer managed policies, and inline policies. The IAM conditions in the initial policy are maintained in the recommendations if the actions they’re related to are used.
The remediations suggested are to do the following:
Detach AmazonBedrockReadOnly policy because it is unused: DETACH_POLICY
Create a new recommended policy with scoped down permissions from the managed policy AmazonS3ReadOnlyAccess: CREATE_POLICY
Detach AmazonS3ReadOnlyAccess: DETACH_POLICY
Embed a new recommended policy with scoped down permissions from the inline policy: CREATE_POLICY
To generate recommendations for unused permissions using the IAM Access Analyzer API
The findings are generated on-demand. For that purpose, IAM Access Analyzer API GenerateFindingRecommendation can be called with two parameters: the ARN of the analyzer and the finding ID.
After the recommendations are generated, they can be obtained by calling the API GetFindingRecommendation with the same parameters: the ARN of the analyzer and the finding ID.
Use AWS SDK for Python (boto3) for the API call as follows:
The recommendations are generated as actionable guidance that you can follow. They propose new IAM policies that exclude the unused actions, helping you rightsize your permissions.
Anatomy of a recommendation
The recommendations are usually presented in the following way:
Date and time: startedAt, completedAt. Respectively when the API call was made and when the analysis was completed and the results were provided.
Resource ARN: The ARN of the resource being analyzed.
Recommended steps: The recommended steps, such as creating a new policy based on the actions used and detaching the existing policy.
Status: The status of retrieving the finding recommendation. The status values include SUCCEEDED, FAILED, and IN_PROGRESS.
For more information about the structure of recommendations, see the output section of get-finding-recommendation.
Recommended policy review
You must review the recommended policy. The recommended actions depend on the original policy. The original policy will be one of the following:
An AWS managed policy: You need to create a new IAM policy using recommendedPolicy. Attach this newly created policy to your IAM role. Then detach the former policy.
A customer managed policy or an inline policy: Review the policy, verify its scope, consider how often it’s attached to other principals (customer managed policy only), and when you are confident to proceed, use the recommended policy to create a new policy and detach the former policy.
Use cases to consider when reviewing recommendations
During your review process, keep in mind that the unused actions are determined based on the time defined in your tracking period. The following are some use cases you might have where a necessary role or action might be identified as unused (this is not an exhaustive list of use cases). It’s important to review the recommendations based on your business needs. You can also archive some findings related to the use cases such as the ones that follow:
Backup activities: If your tracking period is 28 days and you have a specific role for your backup activities running at the end of each month, you might discover that after 29 days some of the permissions for that backup role are identified as unused.
IAM permissions associated to an infrastructure as code deployment pipeline: You should also consider the permissions associated to specific IAM roles such an IAM for infrastructure as code (IaC) deployment pipeline. Your pipeline can be used to deploy Amazon Simple Storage Service (Amazon S3) buckets based on your internal guidelines. After deployment is complete, the pipeline permissions can become unused after your tracking period, but removing those unused permissions can prevent you from updating your S3 buckets configuration or from deleting it.
IAM roles associated with disaster recovery activities: While it’s recommended to have a disaster recovery plan, the IAM roles used to perform those activities might be flagged by IAM Access Analyzer for having unused permissions or being unused roles.
To apply the suggested recommendations
Of the three original policies attached to IAMRole_IA2_Blog_EC2Role, AmazonBedrockReadOnly can be detached and AmazonS3ReadOnlyAccess and InlinePolicyListLambda can be refined.
DetachAmazonBedrockReadOnly
No permissions are used in this policy, and the recommended action is to detach it from your IAM role. To detach it, you can use the IAM console, the AWS CLI, or the AWS API.
Create a new policy called AmazonS3ReadOnlyAccess-recommended and detach AmazonS3ReadOnlyAccess.
The unused access analyzer has identified unused permissions in the managed policy AmazonS3ReadOnlyAccess and proposed a new policy AmazonS3ReadOnlyAccess-recommended that contains only the used actions. This is a step towards least privilege because the unused actions can be removed by using the recommended policy.
Create a new IAM policy named AmazonS3ReadOnlyAccess-recommended that contains only the following recommended policy or one based on the downloaded JSON file.
Embed a new inline policy InlinePolicyListLambda-recommended and delete InlinePolicyListLambda. This inline policy lists AWS Lambda aliases, functions, layers, and function URLs only when coming from a specific source IP address.
After updating the policies based on the Recommended policy proposed, the finding Status will change from Active to Resolved.
Figure 9: The finding is resolved
Pricing
There is no additional pricing for using the prescriptive recommendations after you have enabled unused access findings.
Conclusion
As a developer writing policies, you can use the actionable guidance provided in recommendations to continually rightsize your policies to include only the roles and actions you need. You can export the recommendations through the console or set up automated workflows to notify your developers about new IAM Access Analyzer findings.
This new IAM Access Analyzer unused access recommendations feature streamlines the process towards least privilege by selecting the permissions that are used and retaining the resource and condition context from existing policies. It saves an impressive amount of time by the actions used by your principals and guiding you to refine them.
By using the IAM Access Analyzer findings and access recommendations, you can quickly see how to refine the permissions granted. We have shown in this blog post how to generate prescriptive recommendations with actionable guidance for unused permissions using AWS CLI, API calls, and the console.
Customers use Amazon Web Services (AWS) to securely build, deploy, and scale their applications. As your organization grows, you want to streamline permissions management towards least privilege for your identities and resources. At AWS, we see two customer personas working towards least privilege permissions: security teams and developers. Security teams want to centrally inspect permissions across their organizations to identify and remediate access-related risks, such as excessive permissions, anomalous access to resources or compliance of identities. Developers want policy verification tools that help them set effective permissions and maintain least privilege as they build their applications.
Customers are increasingly turning to cloud infrastructure entitlement management (CIEM) solutions to guide their permissions management strategies. CIEM solutions are designed to identify, manage, and mitigate risks associated with access privileges granted to identities and resources in cloud environments. While the specific pillars of CIEM vary, four fundamental capabilities are widely recognized: rightsizing permissions, detecting anomalies, visualization, and compliance reporting. AWS provides these capabilities through services such as AWS Identity and Access Management (IAM) Access Analyzer, Amazon GuardDuty, Amazon Detective, AWS Audit Manager, and AWS Security Hub. I explore these services in this blog post.
Rightsizing permissions
Customers primarily explore CIEM solutions to rightsize their existing permissions by identifying and remediating identities with excessive permissions that pose potential security risks. In AWS, IAM Access Analyzer is a powerful tool designed to assist you in achieving this goal. IAM Access Analyzer guides you to set, verify, and refine permissions.
After IAM Access Analyzer is set up, it continuously monitors AWS Identity and Access Management (IAM) users and roles within your organization and offers granular visibility into overly permissive identities. This empowers your security team to centrally review and identify instances of unused access, enabling them to take proactive measures to refine access and mitigate risks.
While most CIEM solutions prioritize tools for security teams, it’s essential to also help developers make sure that their policies adhere to security best practices before deployment. IAM Access Analyzer provides developers with policy validation and custom policy checks to make sure their policies are functional and secure. Now, they can use policy recommendations to refine unused access, making sure that identities have only the permissions required for their intended functions.
Anomaly detection
Security teams use anomaly detection capabilities to identify unexpected events, observations, or activities that deviate from the baseline behavior of an identity. In AWS, Amazon GuardDuty supports anomaly detection in an identity’s usage patterns, such as unusual sign-in attempts, unauthorized access attempts, or suspicious API calls made using compromised credentials.
By using machine learning and threat intelligence, GuardDuty can establish baselines for normal behavior and flag deviations that might indicate potential threats or compromised identities. When establishing CIEM capabilities, your security team can use GuardDuty to identify threat and anomalous behavior pertaining to their identities.
Visualization
With visualization, you have two goals. The first is to centrally inspect the security posture of identities, and the second is to comprehensively understand how identities are connected to various resources within your AWS environment. IAM Access Analyzer provides a dashboard to centrally review identities. The dashboard helps security teams gain visibility into the effective use of permissions at scale and identify top accounts that need attention. By reviewing the dashboard, you can pinpoint areas that need focus by analyzing accounts with the highest number of findings and the most commonly occurring issues such as unused roles.
Amazon Detective helps you to visually review individual identities in AWS. When GuardDuty identifies a threat, Detective generates a visual representation of identities and their relationships with resources, such as Amazon Elastic Compute Cloud (Amazon EC2) instances, Amazon Simple Storage Service (Amazon S3) buckets, or AWS Lambda functions. This graphical view provides a clear understanding of the access patterns associated with each identity. Detective visualizes access patterns, highlighting unusual or anomalous activities related to identities. This can include unauthorized access attempts, suspicious API calls, or unexpected resource interactions. You can depend on Detective to generate a visual representation of the relationship between identities and resources.
Compliance reporting
Security teams work with auditors to assess whether identities, resources, and permissions adhere to the organization’s compliance requirements. AWS Audit Manager automates evidence collection to help you meet compliance reporting and audit needs. These automated evidence packages include reporting on identities. Specifically, you can use Audit Manager to analyze IAM policies and roles to identify potential misconfigurations, excessive permissions, or deviations from best practices.
Audit Manager provides detailed compliance reports that highlight non-compliant identities or access controls, allowing your auditors and security teams to take corrective actions and support ongoing adherence to regulatory and organizational standards. In addition to monitoring and reporting, Audit Manager offers guidance to remediate certain types of non-compliant identities or access controls, reducing the burden on security teams and supporting timely resolution of identified issues.
Single pane of glass
While customers appreciate the diverse capabilities AWS offers across various services, they also seek a unified and consolidated view that brings together data from these different sources. AWS Security Hub addresses this need by providing a single pane of glass that enables you to gain a holistic understanding of your security posture. Security Hub acts as a centralized hub, consuming findings from multiple AWS services and presenting a comprehensive view of how identities are being managed and used across the organization.
Conclusion
CIEM solutions are designed to identify, manage, and mitigate risks associated with access privileges granted to identities and resources in cloud environments. The AWS services mentioned in this post can help you achieve your CIEM goals. If you want to explore CIEM capabilities in AWS, use the services mentioned in this post or see the following resources.
In this post, we continue with our recommendations for achieving least privilege at scale with AWS Identity and Access Management (IAM). In Part 1 of this two-part series, we described the first five of nine strategies for implementing least privilege in IAM at scale. We also looked at a few mental models that can assist you to scale your approach. In this post, Part 2, we’ll continue to look at the remaining four strategies and related mental models for scaling least privilege across your organization.
6. Empower developers to author application policies
If you’re the only developer working in your cloud environment, then you naturally write your own IAM policies. However, a common trend we’ve seen within organizations that are scaling up their cloud usage is that a centralized security, identity, or cloud team administrator will step in to help developers write customized IAM policies on behalf of the development teams. This may be due to variety of reasons, including unfamiliarity with the policy language or a fear of creating potential security risk by granting excess privileges. Centralized creation of IAM policies might work well for a while, but as the team or business grows, this practice often becomes a bottleneck, as indicated in Figure 1.
Figure 1: Bottleneck in a centralized policy authoring process
This mental model is known as the theory of constraints. With this model in mind, you should be keen to search for constraints, or bottlenecks, faced by your team or organization, identify the root cause, and solve for the constraint. That might sound obvious, but when you’re moving at a fast pace, the constraint might not appear until agility is already impaired. As your organization grows, a process that worked years ago might no longer be effective today.
A software developer generally understands the intent of the applications they build, and to some extent the permissions required. At the same time, the centralized cloud, identity, or security teams tend to feel they are the experts at safely authoring policies, but lack a deep knowledge of the application’s code. The goal here is to enable developers to write the policies in order to mitigate bottlenecks.
The question is, how do you equip developers with the right tools and skills to confidently and safely create the required policies for their applications? A simple way to start is by investing in training. AWS offers a variety of formal training options and ramp-up guides that can help your team gain a deeper understanding of AWS services, including IAM. However, even self-hosting a small hackathon or workshop session in your organization can drive improved outcomes. Consider the following four workshops as simple options for self-hosting a learning series with your teams.
IAM policy learning experience workshop – Learn how to write different types of IAM policies and implement access controls on principals and resources, using conditions to scope down access.
IAM troubleshooting workshop – Learn how to create fine-grained access policies with the help of the IAM API, AWS Management Console, IAM Access Analyzer, and AWS CloudTrail, and review key concepts of the IAM policy evaluation logic.
Refining IAM Permissions Like A Pro – Learn how to use IAM Access Analyzer programmatically, use tools to check IAM policies in CI/CD pipeline and AWS Lambda functions, and get hands-on practice in using the tools from the perspectives of both Security and DevOps teams.
As a next step, you can help your teams along the way by setting up processes that foster collaboration and improve quality. For example, peer reviews are highly recommended, and we’ll cover this later. Additionally, administrators can use AWS native tools such as permissions boundaries and IAM Access Analyzer policy generation to help your developers begin to author their own policies more safely.
Let’s look at permissions boundaries first. An IAM permissions boundary should generally be used to delegate the responsibility of policy creation to your development team. You can set up the developer’s IAM role so that they can create new roles only if the new role has a specific permissions boundary attached to it, and that permissions boundary allows you (as an administrator) to set the maximum permissions that can be granted by the developer. This restriction is implemented by a condition on the developer’s identity-based policy, requiring that specific actions—such as iam:CreateRole or iam:CreatePolicy—are allowed only if a specified permissions boundary is attached.
In this way, when a developer creates an IAM role or policy to grant an application some set of required permissions, they are required to add the specified permissions boundary that will “bound” the maximum permissions available to that application. So even if the policy that the developer creates—such as for their AWS Lambda function—is not sufficiently fine-grained, the permissions boundary helps the organization’s cloud administrators make sure that the Lambda function’s policy is not greater than a maximum set of predefined permissions. So with permissions boundaries, your development team can be allowed to create new roles and policies (with constraints) without administrators creating a manual bottleneck.
Another tool developers can use is IAM Access Analyzer policy generation. IAM Access Analyzer reviews your CloudTrail logs and autogenerates an IAM policy based on your access activity over a specified time range. This greatly simplifies the process of writing granular IAM policies that allow end users access to AWS services.
A classic use case for IAM Access Analyzer policy generation is to generate an IAM policy within the test environment. This provides a good starting point to help identify the needed permissions and refine your policy for the production environment. For example, IAM Access Analyzer can’t identify the production resources used, so it adds resource placeholders for you to modify and add the specific Amazon Resource Names (ARNs) your application team needs. However, not every policy needs to be customized, and the next strategy will focus on reusing some policies.
7. Maintain well-written policies
Strategies seven and eight focus on processes. The first process we’ll focus on is to maintain well-written policies. To begin, not every policy needs to be a work of art. There is some wisdom in reusing well-written policies across your accounts, because that can be an effective way to scale permissions management. There are three steps to approach this task:
Identify your use cases
Create policy templates
Maintain repositories of policy templates
For example, if you were new to AWS and using a new account, we would recommend that you use AWS managed policies as a reference to get started. However, the permissions in these policies might not fit how you intend to use the cloud as time progresses. Eventually, you would want to identify the repetitive or common use cases in your own accounts and create common policies or templates for those situations.
When creating templates, you must understand who or what the template is for. One thing to note here is that the developer’s needs tend to be different from the application’s needs. When a developer is working with resources in your accounts, they often need to create or delete resources—for example, creating and deleting Amazon Simple Storage Service (Amazon S3) buckets for the application to use.
Conversely, a software application generally needs to read or write data—in this example, to read and write objects to the S3 bucket that was created by the developer. Notice that the developer’s permissions needs (to create the bucket) are different than the application’s needs (reading objects in the bucket). Because these are different access patterns, you’ll need to create different policy templates tailored to the different use cases and entities.
Figure 2 highlights this issue further. Out of the set of all possible AWS services and API actions, there are a set of permissions that are relevant for your developers (or more likely, their DevOps build and delivery tools) and there’s a set of permissions that are relevant for the software applications that they are building. Those two sets may have some overlap, but they are not identical.
Figure 2: Visualizing intersecting sets of permissions by use case
When discussing policy reuse, you’re likely already thinking about common policies in your accounts, such as default federation permissions for team members or automation that runs routine security audits across multiple accounts in your organization. Many of these policies could be considered default policies that are common across your accounts and generally do not vary. Likewise, permissions boundary policies (which we discussed earlier) can have commonality across accounts with low amounts of variation. There’s value in reusing both of these sets of policies. However, reusing policies too broadly could cause challenges if variation is needed—to make a change to a “reusable policy,” you would have to modify every instance of that policy, even if it’s only needed by one application.
You might find that you have relatively common resource policies that multiple teams need (such as an S3 bucket policy), but with slight variations. This is where you might find it useful to create a repeatable template that abides by your organization’s security policies, and make it available for your teams to copy. We call it a template here, because the teams might need to change a few elements, such as the Principals that they authorize to access the resource. The policies for the applications (such as the policy a developer creates to attach to an Amazon Elastic Compute Cloud (Amazon EC2) instance role) are generally more bespoke or customized and might not be appropriate in a template.
Figure 3 illustrates that some policies have low amounts of variation while others are more bespoke.
Figure 3: Identifying bespoke versus common policy types
Regardless of whether you choose to reuse a policy or turn it into a template, an important step is to store these reusable policies and templates securely in a repository (in this case, AWS CodeCommit). Many customers use infrastructure-as-code modules to make it simple for development teams to input their customizations and generate IAM policies that fit their security policies in a programmatic way. Some customers document these policies and templates directly in the repository while others use internal wikis accompanied with other relevant information. You’ll need to decide which process works best for your organization. Whatever mechanism you choose, make it accessible and searchable by your teams.
8. Peer review and validate policies
We mentioned in Part 1 that least privilege is a journey and having a feedback loop is a critical part. You can implement feedback through human review, or you can automate the review and validate the findings. This is equally as important for the core default policies as it is for the customized, bespoke policies.
Let’s start with some automated tools you can use. One great tool that we recommend is using AWS IAM Access Analyzer policy validation and custom policy checks. Policy validation helps you while you’re authoring your policy to set secure and functional policies. The feature is available through APIs and the AWS Management Console. IAM Access Analyzer validates your policy against IAM policy grammar and AWS best practices. You can view policy validation check findings that include security warnings, errors, general warnings, and suggestions for your policy.
Let’s review some of the finding categories.
Finding type
Description
Security
Includes warnings if your policy allows access that AWS considers a security risk because the access is overly permissive.
Errors
Includes errors if your policy includes lines that prevent the policy from functioning.
Warning
Includes warnings if your policy doesn’t conform to best practices, but the issues are not security risks.
Suggestions
Includes suggestions if AWS recommends improvements that don’t impact the permissions of the policy.
Custom policy checks are a new IAM Access Analyzer capability that helps security teams accurately and proactively identify critical permissions in their policies. You can use this to check against a reference policy (that is, determine if an updated policy grants new access compared to an existing version of the policy) or check against a list of IAM actions (that is, verify that specific IAM actions are not allowed by your policy). Custom policy checks use automated reasoning, a form of static analysis, to provide a higher level of security assurance in the cloud.
In Figure 4, you’ll see a typical development workflow. This is a simplified version of a CI/CD pipeline with three stages: a commit stage, a validation stage, and a deploy stage. In the diagram, the developer’s code (including IAM policies) is checked across multiple steps.
Figure 4: A pipeline with a policy validation step
In the commit stage, if your developers are authoring policies, you can quickly incorporate peer reviews at the time they commit to the source code, and this creates some accountability within a team to author least privilege policies. Additionally, you can use automation by introducing IAM Access Analyzer policy validation in a validation stage, so that the work can only proceed if there are no security findings detected. To learn more about how to deploy this architecture in your accounts, see this blog post. For a Terraform version of this process, we encourage you to check out this GitHub repository.
9. Remove excess privileges over time
Our final strategy focuses on existing permissions and how to remove excess privileges over time. You can determine which privileges are excessive by analyzing the data on which permissions are granted and determining what’s used and what’s not used. Even if you’re developing new policies, you might later discover that some permissions that you enabled were unused, and you can remove that access later. This means that you don’t have to be 100% perfect when you create a policy today, but can rather improve your policies over time. To help with this, we’ll quickly review three recommendations:
Restrict unused permissions by using service control policies (SCPs)
Remove unused identities
Remove unused services and actions from policies
First, as discussed in Part 1 of this series, SCPs are a broad guardrail type of control that can deny permissions across your AWS Organizations organization, a set of your AWS accounts, or a single account. You can start by identifying services that are not used by your teams, despite being allowed by these SCPs. You might also want to identify services that your organization doesn’t intend to use. In those cases, you might consider restricting that access, so that you retain access only to the services that are actually required in your accounts. If you’re interested in doing this, we’d recommend that you review the Refining permissions in AWS using last accessed information topic in the IAM documentation to get started.
Second, you can focus your attention more narrowly to identify unused IAM roles, unused access keys for IAM users, and unused passwords for IAM users either at an account-specific level or the organization-wide level. To do this, you can use IAM Access Analyzer’s Unused Access Analyzer capability.
Third, the same Unused Access Analyzer capability also enables you to go a step further to identify permissions that are granted but not actually used, with the goal of removing unused permissions. IAM Access Analyzer creates findings for the unused permissions. If the granted access is required and intentional, then you can archive the finding and create an archive rule to automatically archive similar findings. However, if the granted access is not required, you can modify or remove the policy that grants the unintended access. The following screenshot shows an example of the dashboard for IAM Access Analyzer’s unused access findings.
Figure 5: Screenshot of IAM Access Analyzer dashboard
When we talk to customers, we often hear that the principle of least privilege is great in principle, but they would rather focus on having just enough privilege. One mental model that’s relevant here is the 80/20 rule (also known as the Pareto principle), which states that 80% of your outcome comes from 20% of your input (or effort). The flip side is that the remaining 20% of outcome will require 80% of the effort—which means that there are diminishing returns for additional effort. Figure 6 shows how the Pareto principle relates to the concept of least privilege, on a scale from maximum privilege to perfect least privilege.
Figure 6: Applying the Pareto principle (80/20 rule) to the concept of least privilege
The application of the 80/20 rule to permissions management—such as refining existing permissions—is to identify what your acceptable risk threshold is and to recognize that as you perform additional effort to eliminate that risk, you might produce only diminishing returns. However, in pursuit of least privilege, you’ll still want to work toward that remaining 20%, while being pragmatic about the remainder of the effort.
Remember that least privilege is a journey. Two ways to be pragmatic along this journey are to use feedback loops as you refine your permissions, and to prioritize. For example, focus on what is sensitive to your accounts and your team. Restrict access to production identities first before moving to environments with less risk, such as development or testing. Prioritize reviewing permissions for roles or resources that enable external, cross-account access before moving to the roles that are used in less sensitive areas. Then move on to the next priority for your organization.
Conclusion
Thank you for taking the time to read this two-part series. In these two blog posts, we described nine strategies for implementing least privilege in IAM at scale. Across these nine strategies, we introduced some mental models, tools, and capabilities that can assist you to scale your approach. Let’s consider some of the key takeaways that you can use in your journey of setting, verifying, and refining permissions.
Cloud administrators and developers will then verify permissions. For this task, they can use both IAM Access Analyzer’s policy validation and peer review to determine if the permissions that were set have issues or security risks. These tools can be leveraged in a CI/CD pipeline too, before the permissions are set. IAM Access Analyzer’s custom policy checks can be used to detect nonconformant updates to policies.
To both verify existing permissions and refine permissions over time, cloud administrators and developers can use IAM Access Analyzer’s external access analyzers to identify resources that were shared with external entities. They can also use either IAM Access Advisor’s last accessed information or IAM Access Analyzer’s unused access analyzer to find unused access. In short, if you’re looking for a next step to streamline your journey toward least privilege, be sure to check out IAM Access Analyzer.
If you have feedback about this post, submit comments in the Comments section below. If you have questions about this post, contact AWS Support.
Least privilege is an important security topic for Amazon Web Services (AWS) customers. In previous blog posts, we’ve provided tactical advice on how to write least privilege policies, which we would encourage you to review. You might feel comfortable writing a few least privilege policies for yourself, but to scale this up to thousands of developers or hundreds of AWS accounts requires strategy to minimize the total effort needed across an organization.
At re:Inforce 2022, we recommended nine strategies for achieving least privilege at scale. Although the strategies we recommend remain the same, this blog series serves as an update, with a deeper discussion of some of the strategies. In this series, we focus only on AWS Identity and Access Management (IAM), not application or infrastructure identities. We’ll review least privilege in AWS, then dive into each of the nine strategies, and finally review some key takeaways. This blog post, Part 1, covers the first five strategies, while Part 2 of the series covers the remaining four.
Overview of least privilege
The principle of least privilege refers to the concept that you should grant users and systems the narrowest set of privileges needed to complete required tasks. This is the ideal, but it’s not so simple when change is constant—your staff or users change, systems change, and new technologies become available. AWS is continually adding new services or features, and individuals on your team might want to adopt them. If the policies assigned to those users were perfectly least privilege, then you would need to update permissions constantly as the users ask for more or different access. For many, applying the narrowest set of permissions could be too restrictive. The irony is that perfect least privilege can cause maximum effort.
We want to find a more pragmatic approach. To start, you should first recognize that there is some tension between two competing goals—between things you don’t want and things you do want, as indicated in Figure 1. For example, you don’t want expensive resources created, but you do want freedom for your builders to choose their own resources.
Figure 1: Tension between two competing goals
There’s a natural tension between competing goals when you’re thinking about least privilege, and you have a number of controls that you can adjust to securely enable agility. I’ve spoken with hundreds of customers about this topic, and many focus primarily on writing near-perfect permission policies assigned to their builders or machines, attempting to brute force their way to least privilege.
However, that approach isn’t very effective. So where should you start? To answer this, we’re going to break this question down into three components: strategies, tools, and mental models. The first two may be clear to you, but you might be wondering, “What is a mental model”? Mental models help us conceptualize something complex as something relatively simpler, though naturally this leaves some information out of the simpler model.
Teams
Teams generally differ based on the size of the organization. We recognize that each customer is unique, and that customer needs vary across enterprises, government agencies, startups, and so on. If you feel the following example descriptions don’t apply to you today, or that your organization is too small for this many teams to co-exist, then keep in mind that the scenarios might be more applicable in the future as your organization continues to grow. Before we can consider least privilege, let’s consider some common scenarios.
Customers who operate in the cloud tend to have teams that fall into one of two categories: decentralized and centralized. Decentralized teams might be developers or groups of developers, operators, or contractors working in your cloud environment. Centralized teams often consist of administrators. Examples include a cloud environment team, an infrastructure team, the security team, the network team, or the identity team.
Scenarios
To achieve least privilege in an organization effectively, teams must collaborate. Let’s consider three common scenarios:
Creating default roles and policies (for teams and monitoring)
Creating roles and policies for applications
Verifying and refining existing permissions
The first scenario focuses on the baseline set of roles and permissions that are necessary to start using AWS. Centralized teams (such as a cloud environmentteam or identity and access management team) commonly create these initial default roles and policies that you deploy by using your account factory, IAM Identity Center, or through AWS Control Tower. These default permissions typically enable federation for builders or enable some automation, such as tools for monitoring or deployments.
The second scenario is to create roles and policies for applications. After foundational access and permissions are established, the next step is for your builders to use the cloud to build. Decentralized teams (software developers, operators, or contractors) use the roles and policies from the first scenario to then create systems, software, or applications that need their own permissions to perform useful functions. These teams often need to create new roles and policies for their software to interact with databases, Amazon Simple Storage Service (Amazon S3), Amazon Simple Queue Service (Amazon SQS) queues, and other resources.
Lastly, the third scenario is to verify and refine existing permissions, a task that both sets of teams should be responsible for.
Journeys
At AWS, we often say that least privilege is a journey, because change is a constant. Your builders may change, systems may change, you may swap which services you use, and the services you use may add new features that your teams want to adopt, in order to enable faster or more efficient ways of working. Therefore, what you consider least privilege today may be considered insufficient by your users tomorrow.
This journey is made up of a lifecycle of setting, verifying, and refining permissions. Cloud administrators and developers will set permissions, they will then verify permissions, and then they refine those permissions over time, and the cycle repeats as illustrated in Figure 2. This produces feedback loops of continuous improvement, which add up to the journey to least privilege.
Figure 2: Least privilege is a journey
Strategies for implementing least privilege
The following sections will dive into nine strategies for implementing least privilege at scale:
Part 1 (this post):
(Plan) Begin with coarse-grained controls
(Plan) Use accounts as strong boundaries around resources
(Policy) Empower developers to author application policies
(Process) Maintain well-written policies
(Process) Peer-review and validate policies
(Process) Remove excess privileges over time
To provide some logical structure, the strategies can be grouped into three categories—plan, policy, and process. Plan is where you consider your goals and the outcomes that you want to achieve and then design your cloud environment to simplify those outcomes. Policy focuses on the fact that you will need to implement some of those goals in either the IAM policy language or as code (such as infrastructure-as-code). The Process category will look at an iterative approach to continuous improvement. Let’s begin.
1. Begin with coarse-grained controls
Most systems have relationships, and these relationships can be visualized. For example, AWS accounts relationships can be visualized as a hierarchy, with an organization’s management account and groups of AWS accounts within that hierarchy, and principals and policies within those accounts, as shown in Figure 3.
Figure 3: Icicle diagram representing an account hierarchy
When discussing least privilege, it’s tempting to put excessive focus on the policies at the bottom of the hierarchy, but you should reverse that thinking if you want to implement least privilege at scale. Instead, this strategy focuses on coarse-grained controls, which refer to a top-level, broader set of controls. Examples of these broad controls include multi-account strategy, service control policies, blocking public access, and data perimeters.
Before you implement coarse-grained controls, you must consider which controls will achieve the outcomes you desire. After the relevant coarse-grained controls are in place, you can tailor the permissions down the hierarchy by using more fine-grained controls along the way. The next strategy reviews the first coarse-grained control we recommend.
2. Use accounts as strong boundaries around resources
Although you can start with a single AWS account, we encourage customers to adopt a multi-account strategy. As customers continue to use the cloud, they often need explicit security boundaries, the ability to control limits, and billing separation. The isolation designed into an AWS account can help you meet these needs.
Customers can group individual accounts into different assortments (organizational units) by using AWS Organizations. Some customers might choose to align this grouping by environment (for example: Dev, Pre-Production, Test, Production) or by business units, cost center, or some other option. You can choose how you want to construct your organization, and AWS has provided prescriptive guidance to assist customers when they adopt a multi-account strategy.
Similarly, you can use this approach for grouping security controls. As you layer in preventative or detective controls, you can choose which groups of accounts to apply them to. When you think of how to group these accounts, consider where you want to apply your security controls that could affect permissions.
AWS accounts give you strong boundaries between accounts (and the entities that exist in those accounts). As shown in Figure 4, by default these principals and resources cannot cross their account boundary (represented by the red dotted line on the left).
Figure 4: Account hierarchy and account boundaries
In order for these accounts to communicate with each other, you need to explicitly enable access by adding narrow permissions. For use cases such as cross-account resource sharing, or cross-VPC networking, or cross-account role assumptions, you would need to explicitly enable the required access by creating the necessary permissions. Then you could review those permissions by using IAM Access Analyzer.
One type of analyzer within IAM Access Analyzer, external access, helps you identify resources (such as S3 buckets, IAM roles, SQS queues, and more) in your organization or accounts that are shared with an external entity. This helps you identify if there’s potential for unintended access that could be a security risk to your organization. Although you could use IAM Access Analyzer (external access) with a single account, we recommend using it at the organization level. You can configure an access analyzer for your entire organization by setting the organization as the zone of trust, to identify access allowed from outside your organization.
To get started, you create the analyzer and it begins analyzing permissions. The analysis may produce findings, which you can review for intended and unintended access. You can archive the intended access findings, but you’ll want to act quickly on the unintended access to mitigate security risks.
In summary, you should use accounts as strong boundaries around resources, and use IAM Access Analyzer to help validate your assumptions and find unintended access permissions in an automated way across the account boundaries.
3. Prioritize short-term credentials
When it comes to access control, shorter is better. Compared to long-term access keys or passwords that could be stored in plaintext or mistakenly shared, a short-term credential is requested dynamically by using strong identities. Because the credentials are being requested dynamically, they are temporary and automatically expire. Therefore, you don’t have to explicitly revoke or rotate the credentials, nor embed them within your application.
In the context of IAM, when we’re discussing short-term credentials, we’re effectively talking about IAM roles. We can split the applicable use cases of short-term credentials into two categories—short-term credentials for builders and short-term credentials for applications.
Builders (human users) typically interact with the AWS Cloud in one of two ways; either through the AWS Management Console or programmatically through the AWS CLI. For console access, you can use direct federation from your identity provider to individual AWS accounts or something more centralized through IAM Identity Center. For programmatic builder access, you can get short-term credentials into your AWS account through IAM Identity Center using the AWS CLI.
However, organizations might still have long-term secrets, like database credentials, that need to be stored somewhere. You can store these secrets with AWS Secrets Manager, which will encrypt the secret by using an AWS KMS encryption key. Further, you can configure automatic rotation of that secret to help reduce the risk of those long-term secrets.
4. Enforce broad security invariants
Security invariants are essentially conditions that should always be true. For example, let’s assume an organization has identified some core security conditions that they want enforced:
You can enable these conditions by using service control policies (SCPs) at the organization level for groups of accounts using an organizational unit (OU), or for individual member accounts.
Notice these words—block, disable, and prevent. If you’re considering these actions in the context of all users or all principals except for the administrators, that’s where you’ll begin to implement broad security invariants, generally by using service control policies. However, a common challenge for customers is identifying what conditions to apply and the scope. This depends on what services you use, the size of your organization, the number of teams you have, and how your organization uses the AWS Cloud.
Some actions have inherently greater risk, while others may have nominal risk or are more easily reversible. One mental model that has helped customers to consider these issues is an XY graph, as illustrated in the example in Figure 5.
Figure 5: Using an XY graph for analyzing potential risk versus frequency of use
The X-axis in this graph represents the potential risk associated with using a service functionality within a particular account or environment, while the Y-axis represents the frequency of use of that service functionality. In this representative example, the top-left part of the graph covers actions that occur frequently and are relatively safe—for example, read-only actions.
The functionality in the bottom-right section is where you want to focus your time. Consider this for yourself—if you were to create a similar graph for your environment—what are the actions you would consider to be high-risk, with an expected low or rare usage within your environment? For example, if you enable CloudTrail for logging, you want to make sure that someone doesn’t invoke the CloudTrail StopLogging API operation or delete the CloudTrail logs. Another high-risk, low-usage example could include restricting AWS Direct Connect or network configuration changes to only your network administrators.
Over time, you can use the mental model of the XY graph to decide when to use preventative guardrails for actions that should never happen, versus conditional or alternative guardrails for situational use cases. You could also move from preventative to detective security controls, while accounting for factors such as the user persona and the environment type (production, development, or testing). Finally, you could consider doing this exercise broadly at the service level before thinking of it in a more fine-grained way, feature-by-feature.
You can think of IAM as a toolbox that offers many tools that provide different types of value. We can group these tools into two broad categories: guardrails and grants.
Guardrails are the set of tools that help you restrict or deny access to your accounts. At a high level, they help you figure out the boundary for the set of permissions that you want to retain. SCPs are a great example of guardrails, because they enable you to restrict the scope of actions that principals in your account or your organization can take. Permissions boundaries are another great example, because they enable you to safely delegate the creation of new principals (roles or users) and permissions by setting maximum permissions on the new identity.
Although guardrails help you restrict access, they don’t inherently grant any permissions. To grant permissions, you use either an identity-based policy or resource-based policy. Identity policies are attached to principals (roles or users), while resource-based policies are applied to specific resources, such as an S3 bucket.
A common question is how to decide when to use an identity policy versus a resource policy to grant permissions. IAM, in a nutshell, seeks to answer the question: who can access what? Can you spot the nuance in the following policy examples?
You likely noticed the difference here is that with identity-based (principal) policies, the principal is implicit (that is, the principal of the policy is the entity to which the policy is applied), while in a resource-based policy, the principal must be explicit (that is, the principal has to be specified in the policy). A resource-based policy can enable cross-account access to resources (or even make a resource effectively public), but the identity-based policies likewise need to allow the access to that cross-account resource. Identity-based policies with sufficient permissions can then access resources that are “shared.” In essence, both the principal and the resource need to be granted sufficient permissions.
When thinking about grants, you can address the “who” angle by focusing on the identity-based policies, or the “what” angle by focusing on resource-based policies. For additional reading on this topic, see this blog post. For information about how guardrails and grants are evaluated, review the policy evaluation logic documentation.
This blog post walked through the first five (of nine) strategies for achieving least privilege at scale. For the remaining four strategies, see Part 2 of this series.
If you have feedback about this post, submit comments in the Comments section below. If you have questions about this post, contact AWS Support.
We are making IAM Access Analyzer even more powerful, extending custom policy checks and adding easy access to guidance that will help you to fine-tune your IAM policies. Both of these new features build on the Custom Policy Checks and the Unused Access analysis that were launched at re:Invent 2023. Here’s what we are launching:
New Custom Policy Checks – Using the power of automated reasoning, the new checks help you to detect policies that grant access to specific, critical AWS resources, or that grant any type of public access. Both of the checks are designed to be used ahead of deployment, possibly as part of your CI/CD pipeline, and will help you proactively detect updates that do not conform to your organization’s security practices and policies.
Guided Revocation – IAM Access Analyzer now gives you guidance that you can share with your developers so that they can revoke permissions that grant access that is not actually needed. This includes unused roles, roles with unused permissions, unused access keys for IAM users, and unused passwords for IAM users. The guidance includes the steps needed to either remove the extra items or to replace them with more restrictive ones.
New Custom Policy Checks The new policy checks can be invoked from the command line or by calling an API function. The checks examine a policy document that is supplied as part of the request and return a PASS or FAIL value. In both cases, PASS indicates that the policy document properly disallows the given access, and FAIL indicates that the policy might allow some or all of the permissions. Here are the new checks:
Check No Public Access – This check operates on a resource policy, and checks to see if the policy grants public access to a specified resource type. For example, you can check a policy to see if it allows public access to an S3 bucket by specifying the AWS::S3::Bucket resource type. Valid resource types include DynamoDB tables and streams, EFS file systems, OpenSearch domains, Kinesis streams and stream consumers, KMS keys, Lambda functions, S3 buckets and access points, S3 Express directory buckets, S3 Outposts buckets and access points, Glacier, Secrets Manager secrets, SNS topics and queues, and IAM policy documents that assume roles. The list of valid resource types will expand over time and can be found in the CheckNoPublicAccess documentation,
{
    "result": "FAIL",
    "message": "The resource policy grants public access for the given resource type.",
    "reasons": [
        {
            "description": "Public access granted in the following statement with sid: SqsResourcePolicy.",
            "statementIndex": 0,
            "statementId": "SqsResourcePolicy"
        }
    ]
}
I edit the policy to remove the access grant and try again, and this time the check passes:
{
    "result": "PASS",
    "message": "The resource policy does not grant public access for the given resource type."
}
Check Access Not Granted – This check operates on a single resource policy or identity policy at a time. It also accepts an list of actions and resources, both in the form that are acceptable as part of an IAM policy. The check sees if the policy grants unintended access to any of the resources in the list by way of the listed actions. For example, this check could be used to make sure that a policy does not allow a critical CloudTrail trail to be deleted:
IAM Access Analyzer indicates that the check fails:
{
    "result": "FAIL",
    "message": "The policy document grants access to perform one or more of the listed actions or resources.",
    "reasons": [
        {
            "description": "One or more of the listed actions or resources in the statement with index: 0.",
            "statementIndex": 0
        }
    ]
}
I fix the policy and try again, and this time the check passes, indicating that the policy does not grant access to the listed resources:
{
    "result": "PASS",
    "message": "The policy document does not grant access to perform the listed actions or resources."
}
Guided Revocation In my earlier post I showed you how IAM Access Analyzer discovers and lists IAM items that grant access which is not actually needed. With today’s launch, you now get guidance to help you (or your developer team) to resolve these findings. Here are the latest findings from my AWS account:
Some of these are leftovers from times when I was given early access to a service so that I could use and then blog about it; others are due to my general ineptness as a cloud admin! Either way, I need to clean these up. Let’s start with the second one, Unused access key. I click on the item and can see the new Recommendations section at the bottom:
I can follow the steps and delete the access key or I can click Archive to remove the finding from the list of active findings and add it to the list of archived ones. I can also create an archive rule that will do the same for similar findings in the future. Similar recommendations are provided for unused IAM users, IAM roles, and passwords.
Now let’s take a look at a finding of Unused permissions:
The recommendation is to replace the existing policy with a new one. I can preview the new policy side-by-side with the existing one:
As in the first example I can follow the steps or I can archive the finding.
The findings and the recommendations are also available from the command line. I generate the recommendation by specifying an analyzer and a finding from it:
Unused Access Analyzer – A new analyzer that continuously monitors roles and users looking for permissions that are granted but not actually used. Central security teams can take advantage of a dashboard view that will help them to find the accounts that can most benefit from a review of unused permissions, roles, and IAM users.
Custom Policy Checks – Validation that newly authored policies do not grant additional (and perhaps unintended) permissions. You can exercise tighter control over your IAM policies and accelerate the process of moving AWS applications from development to production by adding automated policy reviews to your CI/CD pipelines and custom policy tools.
Let’s take a look at today’s launches!
Unused Access Analyzer You can already create an analyzer that monitors for external access. With today’s launch you can create one that looks for access permissions that are either overly generous or that have fallen into disuse. This includes unused IAM roles, unused access keys for IAM users, unused passwords for IAM users, and unused services and actions for active IAM roles and users.
After reviewing the findings generated by an organization-wide or account-specific analyzer, you can take action by removing permissions that you don’t need. You can create analyzers and analyze findings from the AWS Management Console, CLI, or API. Let’s start with the IAM Console. I click Analyzers and settings in the left-side navigation:
I can see my current analyzers (none, in this case). I click Create analyzer to proceed:
I specify Unused access analysis, leave the default tracking period of 90 days as-is, and opt to check my account rather than my Organization, then I click Create analyzer:
My analyzer is created, and I check back a little while later to see what it finds. My findings were available within a minute, but this will vary. Here are some of the findings:
As you can see, I have lots of unused IAM roles and permissions (clearly I am a bad Role model). I can click on a Finding to learn more:
If this is a role that I need, I can click Archive to remove it from the list of active findings. I can also create archive rules that will do the same for similar findings:
The external access analyzer works in a similar way, and is a perfect place to start when you are new to Access Analyzer and are ready to find and remove extra permissions:
The dashboard gives me an overview of all active findings:
If I create an analyzer and specify my Organization as the Zone of trust, I can also view a list that shows the accounts that have the largest number of active findings:
This feature is also available from the command line. I can create a new analyzer like this:
This feature is priced based on the number of IAM roles analyzed each month and is available in all AWS Regions where IAM is available.
Custom Policy Checks You can now validate that IAM policies adhere to your security standards ahead of deployments and proactively detect non-conformant updates to policies. This will help you to innovate more quickly, move apps from development to production more efficiently, and to have confidence that any changes you make represent your intent.
Let’s start with my allow-all-ssm policy:
For illustrative purposes, I edit it to add S3 access:
Then I click Check for new access, confirm that I understand that a charge will be made, and click Check policy:
The automated reasoning verifies the policy and tells me that I did enable new access. If that was my intent I click Next to proceed, otherwise I rethink my changes to the policy:
This is a very simple and contrived example, but I am confident that you can see how useful and valuable this can be to your security efforts. You can also access this from the CLI (check-no-new-access) and API (CheckNoNewAccess).
There’s also another command and function that is designed to be used in your CI/CD pipelines, AWS CloudFormation hooks, and custom policy tools. check-access-not-granted and CheckAccessNotGranted accept a policy document and a permission such as s3:Get*, and check to make sure that the policy does not grant the permission. You could use this, for example, to make sure that a policy which specifies that Security Hub should be disabled cannot be deployed. This will help you to move from development to production with the confidence that your policies adhere to your organization’s security standards.
This feature is priced based on the number of checks that are performed each month and is available in all AWS commercial and AWS GovCloud Regions.
The year is coming to an end, and there are only 50 days until Christmas and 21 days to AWS re:Invent! If you are in Las Vegas, come and say hi to me. I will be around the Serverlesspresso booth most of the time.
Last week’s launches Here are some launches that got my attention during the previous week.
Amazon EC2 – Amazon EC2 announced Capacity Blocks for ML. This means that you can now reserve GPU compute capacity for your short-duration ML workloads. Learn more about this launch on the feature page and announcement blog post.
Finch – Finch is now generally available. Finch is an open source tool for local container development on macOS (using Intel or Apple Silicon). It provides a command line developer tool for building, running, and publishing Linux containers on macOS. Learn more about Finch in this blog post written by Phil Estes or on the Finch website.
AWS IAM– IAM increased the actions last accessed to 60 more services. This functionality is very useful when fine-tuning the permissions of the roles, identifying unused permissions, and granting the least amount of permissions that your roles need.
Other AWS news Some other news and blog posts that you may have missed:
AWS Compute Blog – Daniel Wirjo and Justin Plock wrote a very interesting article about how you can send and receive webhooks on AWS using different AWS serverless services. This is a good read if you are working with webhooks on your application, as it not only shows you how to build these solutions but also what considerations you should have when building them.
Amazon Science Blog – David Fan wrote an article about how to build better foundation models for video representation. This article is based on a paper that Prime Video presented at a conference about this topic.
The Official AWS Podcast – Listen each week for updates on the latest AWS news and deep dives into exciting use cases. There are also official AWS podcasts in several languages. Check out the ones in French, German, Italian, and Spanish.
AWS open-source news and updates – This is a newsletter curated by my colleague Ricardo to bring you the latest open source projects, posts, events, and more.
Upcoming AWS events Check your calendars and sign up for these AWS events:
AWS Community Days – Join a community-led conference run by AWS user group leaders in your region: Ecuador (November 7), Mexico (November 11), Montevideo (November 14), Central Asia (Kazakhstan, Uzbekistan, Kyrgyzstan, and Mongolia on November 17–18), and Guatemala (November 18).
When you build on Amazon Web Services (AWS) across accounts, you might use an AWS Identity and Access Management (IAM) role to allow an authenticated identity from outside your account—such as an IAM entity or a user from an external identity provider—to access the resources in your account. IAM roles have two types of policies attached to them: a trust policy that allows access to an external entity, and a permissions policy that defines what actions the role can take. This blog post focuses on how to use AWS Identity and Access Management Access Analyzer cross-account access findings and IAM action last accessed information to refine the permissions policies of your IAM roles that have a trust policy.
IAM Access Analyzer helps you set, verify, and refine permissions. To learn more about how IAM Access Analyzer guides you toward least-privilege permissions, visit Using AWS IAM Access Analyzer. Action last accessed information helps you identify unused permissions and refine the access of your IAM roles to only the actions they use. IAM now provides action last accessed information for more than 140 services such as Amazon Kinesis Data Streams and Data Firehose, Amazon DynamoDB, and Amazon Simple Queue Service (Amazon SQS).
This blog post walks you through how to use IAM Access Analyzer and action last accessed to refine the required permissions for your IAM roles that have a trust policy, which allows entities outside of your account to assume a role and access your resources.
Use IAM roles to grant access to an external entity
You can create an IAM role that grants permissions for an entity outside your account to access the resources in your account. For example, if you’re an application developer, you might grant cross-account access to your AWS resources by using a role and attaching a trust policy to the role.
To allow an external entity access to your resources by using a role, you first create a role with a role trust policy to grant access to entities outside your account, and then grant permissions that specify which actions the role can take. The external entities can then assume the role in your account and access your resources based on the permissions you granted to the role. See Cross-account access using roles for more information.
You should restrict the access of roles that grant access outside of your account to just the permissions required to perform a specific task.
Use IAM Access Analyzer cross-account access findings to identify roles that grant access to external entities
When you use role trust policies to grant account access to entities outside your account, those entities can access and take the allowed actions on your resources. IAM Access Analyzer continuously monitors your account to identify the resources in your account that can be accessed from outside your account and helps you verify whether the access permissions meet your intent. For the example in this post, if you were to add a new trust policy to your ApplicationRole to grant permissions to an external account to access an application in your account, IAM Access Analyzer would let you know that ApplicationRole is accessible by entities from outside your account.
Use IAM action last accessed information to identify and remove unused permissions
After you’ve identified the IAM roles that grant access to entities outside your account, review what those roles can do and remove unused permissions. You can use action last accessed to show you the latest timestamp when your IAM role used an action, analyze its access permissions, and remove unused permissions.
Refine permissions for externally accessible roles by using IAM Access Analyzer cross-account access findings and action last accessed information
This example demonstrates how you can combine the information from IAM Access Analyzer cross-account access findings and IAM action last accessed information to identify roles that can be assumed from outside your account, review unused and unnecessary actions, and reduce the permissions available to external roles.
To view action last accessed information in the IAM console
Open the AWS Management Console and go to the IAM console, and then select Access analyzer in the navigation pane.
Review your findings on the IAM Access Analyzer tab.
Under Active findings, for Filter active findings, enter AWS::IAM::Role. The list of Active findings shows you the roles that can be accessed by entities outside your account.
Figure 1: Findings filtered by resource types
Under the Finding ID column, select a finding for a role (for example, ApplicationRole) that you want to review.
A new page for the Finding ID will appear. Choose the resource ARN link in the Resource field under the Details section.
Figure 2: Findings page
A new page for the role will appear. Select the Access Advisor tab to review the last accessed information of your services for this role. This tab displays the AWS services to which the role has permissions. Action last accessed reports the actions listed in the IAM action last accessed information services and actions. The tracking period for services is the last 400 days—fewer if your AWS Region began tracking within the last 400 days. Learn more about Where AWS tracks last accessed information.
Figure 3: Last accessed information of allowed services
In this exercise, we will use DynamoDB as an example. Under Allowed services, for Search, enter Amazon DynamoDB and under the Service column, choose Amazon DynamoDB. This will take you to a new section titled Allowed management actions for Amazon DynamoDB, which displays the action last accessed information of your role for DynamoDB. The Action column displays the action, the Last Accessed column displays the timestamp of when access was last attempted, and the Region accessed column displays in which region access was last attempted.
The Action column on the resulting Allowed management actions for Amazon DynamoDB section includes the actions to which the role has permissions, when the role last accessed each action, and the Region accessed. You can sort the actions by choosing the arrow next to Last accessed.
Figure 4: Action last accessed information for Amazon DynamoDB
Because you want to remove unused permissions, filter for all unused actions for the role by selecting Servicesnot accessed from the Last accessed dropdown list. This will show you the actions that haven’t been accessed during the tracking period.
Figure 5: Action last accessed information ordered by not accessed
To return to the service view, choose Back to Allowed services and then select the Permissions tab. Select the plus sign to the left of DynamoDBAccess to see the JSON of the customer managed policy.
Figure 6: The JSON code of the customer managed policy
Choose Next and then Save changes. Return to the Access Advisor tab to confirm that all the retained permissions have been used recently.
Conclusion
In this post, you learned how to use IAM Access Analyzer and action last accessed information to identify and refine permissions for externally accessible roles in your journey toward least privilege. You first used IAM Access Analyzer cross-account access findings to identify IAM roles that can be accessed from outside your account. You then used IAM action last accessed information to review the permissions those roles are using and to remove unused permissions.
If you have feedback about this post, submit comments in the Comments section below. If you have questions about this post, start a new thread on the AWS re:Post or contact AWS Support.
You can use the IAM Policy Validator for AWS CloudFormation and the IAM Policy Validator for Terraform solutions to integrate Access Analyzer policy validation in a proactive manner within your continuous integration and continuous delivery CI/CD pipeline before deploying IAM policies to your Amazon Web Service (AWS) environment. Customers requested a similar capability to validate policies already deployed within their environments as part of the defense-in-depth strategy.
In this post, you learn how to set up and continuously validate and report on compliance of the IAM policies in your environment using AWS Config. AWS Config evaluates the configuration settings of your AWS resources with the help of AWS Config rules, which represent your ideal configuration settings. AWS Config continuously tracks the configuration changes that occur among your resources and checks whether these changes conform to the conditions in your rules. If a resource doesn’t conform to a rule, AWS Config flags the resource and the rule as noncompliant.
You can use this solution to validate identity-based and resource-based IAM policies attached to resources in your AWS environment that might have grammatical or syntactical errors or might not follow AWS best practices. The code used in this post is hosted in a GitHub repository.
Note: You only need to enable globally recorded resource types in the AWS Region where you’ve configured AWS Config because they aren’t tied to a specific Region and can be used in other Regions. The globally recorded resource types that AWS Config supports are IAM users, groups, roles, and customer managed policies.
Step 2: Deploy the CloudFormation template
In this section, you deploy and test a sample AWS CloudFormation template that creates the following:
An AWS Config rule that reports the compliance of IAM policies.
An AWS Lambda function that implements and then makes the requests to IAM Access Analyzer and returns the policy validation findings.
An IAM role that’s used by the Lambda function with permissions to validate IAM policies using the Access Analyzer ValidatePolicy API.
Navigate to the iam-access-analyzer-config-rule folder of the cloned repository.
cd aws-iam-access-analyzer-policy-validation-config-rule
Deploy the CloudFormation template using the AWS CLI.
Note: Change the Region for the parameter — RegionToValidateGlobalResources — to the Region you enabled for global resources in Step 1. Optionally, you can add an email address if you want to receive notifications if the AWS Config rule stops working. Use the code that follows, replacing <us-east-1> with the Region you enabled and <EMAIL_ADDRESS> with your chosen address.
After successful deployment, you will see the message Successfully created/updated stack – iam-policy-validation-config-rule.
Figure 3: Successful CloudFormation stack creation reported on the terminal
Note: If the CloudFormation stack creation fails, go to the CloudFormation console and select the iam-policy-validation-config-rule stack. Choose Events to review the failure reason.
After deployment, open the CloudFormation console and select the iam-policy-validation-config-rule stack.
Choose Resources to see the resources created by the template.
Step 3: Check noncompliant resources discovered by AWS Config
The AWS Config rule is designed to mark resources that have IAM policies as noncompliant if the resources have validation findings found using the IAM Access Analyzer ValidatePolicy API.
You might want to exempt certain resources from specific policy validation checks. For example, you might need to deploy a more privileged role—such as an administrator role—to your environment and you don’t want that role’s policies to have policy validation findings.
Figure 7: AWS Config rules page showing a noncompliant administrator role
This section shows you how to configure an exceptions file to exempt specific resources.
Start by configuring an exceptions file similar to the one that follows to log general warning findings across the accounts in your organization to make sure your policies conform to best practices by setting ignoreWarningFindings to False.
Additionally, you might want to create an exception that allows administrator roles to use the iam:PassRole action on another role. This combination of action and resource is usually reserved for privileged users. The example file below shows an exception for all the roles created with Administrator in the role path from account 12345678912.
After the exceptions file is ready, upload the JSON file to the S3 bucket you created as a part of the prerequisites.
You can manage this exceptions file by hosting it in a central Git repository. When teams need to exempt a particular resource from these policy validation checks, they can submit a pull request to the central repository. An approver can then approve or reject this request and, if approved, deploy the updated exceptions file.
Modify the bucket policy so that the bucket is accessible to your AWS Config rule if the rule is operating in a different account than the bucket was created in. Below is an example of a bucket policy that allows the accounts in your organization to read the exceptions file.
Deploy the CloudFormation template again using the ExceptionsS3BucketName and ExceptionsS3FilePrefix parameters. The file prefix should be the full prefix of the S3 object exceptions file.
After you see the Successfully created/updated stack – iam-policy-validation-config-rule message on the terminal or command line and the AWS Config rule has been re-evaluated, the resources mentioned in the exception file should show as Compliant.
To avoid recurring charges and to remove the resources used in testing the solution outlined in this post, use the CloudFormation console to delete the iam-policy-validation-config-rule CloudFormation stack.
Figure 9: AWS CloudFormation stack deletion
Conclusion
In this post, we demonstrated how you can set up a centralized compliance and monitoring workflow using AWS IAM Access Analyzer policy validation with AWS Config rules to validate identity-based and resource-based policies attached to resources in your account. Using this solution, you can create a single pane of glass to monitor resources and govern centralized compliance for AWS Config-supported resources across accounts. You can also build and maintain exceptions customized to your environment as shown in the example policy validation exceptions file. You can visit the Access Analyzer policy checks reference page for a complete list of policy check validation errors and resolutions.
If you have feedback about this post, submit comments in the Comments section below. If you have questions about this post, contact AWS Support.
Want more AWS Security news? Follow us on Twitter.
In this blog post, we show you how to create an Amazon QuickSight dashboard to visualize the policy validation findings from AWS Identity and Access Management (IAM) Access Analyzer. You can use this dashboard to better understand your policies and how to achieve least privilege by periodically validating your IAM roles against IAM best practices. This blog post walks you through the deployment for a multi-account environment using AWS Organizations.
Policy validation is a feature of IAM Access Analyzer that guides you to author and validate secure and functional policies with more than 100 policy checks. You can use these checks when creating new policies or to validate existing policies. To learn how to use IAM Access Analyzer policy validation APIs when creating new policies, see Validate IAM policies in CloudFormation templates using IAM Access Analyzer. In this post, we focus on how to validate existing IAM policies.
Approach to visualize IAM Access Analyzer findings
As shown in Figure 1, there are four high-level steps to build the visualization.
Figure 1: Steps to visualize IAM Access Analyzer findings
Collect IAM policies
To validate your IAM policies with IAM Access Analyzer in your organization, start by periodically sending the content of your IAM policies (inline and customer-managed) to a central account, such as your Security Tooling account.
Validate IAM policies
After you collect the IAM policies in a central account, run an IAM Access Analyzer ValidatePolicy API call on each policy. The API calls return a list of findings. The findings can help you identify issues, provide actionable recommendations to resolve the issues, and enable you to author functional policies that can meet security best practices. The findings are stored in an Amazon Simple Storage Service (Amazon S3) bucket. To learn about different findings, see Access Analyzer policy check reference.
Visualize findings
IAM Access Analyzer policy validation findings are stored centrally in an S3 bucket. The S3 bucket is owned by the central (hub) account of your choosing. You can use Amazon Athena to query the findings from the S3 bucket, and then create a QuickSight analysis to visualize the findings.
Publish dashboards
Finally, you can publish a shareable QuickSight dashboard. Figure 2 shows an example of the dashboard.
Figure 2: Dashboard overview
Design overview
This implementation is a serverless job initiated by Amazon EventBridge rules. It collects IAM policies into a hub account (such as your Security Tooling account), validates the policies, stores the validation results in an S3 bucket, and uses Athena to query the findings and QuickSight to visualize them. Figure 3 gives a design overview of our implementation.
Figure 3: Design overview of the implementation
As shown in Figure 3, the implementation includes the following steps:
A time-based rule is set to run daily. The rule triggers an AWS Lambda function that lists the IAM policies of the AWS account it is running in.
When new messages are received, the Amazon SQS queue initiates the second Lambda function. For each message, the Lambda function extracts the policy document and validates it by using the IAM Access Analyzer ValidatePolicy API call.
The Lambda function stores validation results in an S3 bucket.
An AWS Glue table contains the schema for the IAM Access Analyzer findings. Athena natively uses the AWS Glue Data Catalog.
Athena queries the findings stored in the S3 bucket.
QuickSight uses Athena as a data source to visualize IAM Access Analyzer findings.
Benefits of the implementation
By implementing this solution, you can achieve the following benefits:
Store your IAM Access Analyzer policy validation results in a scalable and cost-effective manner with Amazon S3.
Add scalability and fault tolerance to your validation workflow with Amazon SQS.
Partition your evaluation results in Athena and restrict the amount of data scanned by each query, helping to improve performance and reduce cost.
Gain insights from IAM Access Analyzer policy validation findings with QuickSight dashboards. You can use the dashboard to identify IAM policies that don’t comply with AWS best practices and then take action to correct them.
Prerequisites
Before you implement the solution, make sure you’ve completed the following steps:
If you plan to deploy the implementation in a multi-account environment using Organizations, enable all features and enable trusted access with Organizations to operate a service-managed stack set.
Note: This implementation works in accounts that don’t have AWS Lake Formation enabled. If Lake Formation is enabled in your account, you might need to grant Lake Formation permissions in addition to the implementation IAM permissions. For details, see Lake Formation access control overview.
Walkthrough
In this section, we will show you how to deploy an AWS CloudFormation template to your central account (such as your Security Tooling account), which is the hub for IAM Access Analyzer findings. The central account collects, validates, and visualizes your findings.
To deploy the implementation to your multi-account environment
Deploy the CloudFormation stack to your central account.
In your central account, run the following commands in a terminal. These commands clone the GitHub repository and deploy the CloudFormation stack to your central account.
# A) Clone the repository
git clone https://github.com/aws-samples/visualize-iam-access-analyzer-policy-validation-findings.git # B) Switch to the repository's directory
cd visualize-iam-access-analyzer-policy-validation-findings # C) Deploy the CloudFormation stack to your central security account (hub). For<AWSRegion>enter your AWS Region without quotes.
make deploy-hub aws-region=<AWSRegion>
If you want to send IAM policies from other member accounts to your central account, you will need to make note of the CloudFormation stack outputs for SQSQueueUrl and KMSKeyArn when the deployment is complete.
make describe-hub-outputs aws-region=<AWSRegion>
Switch to your organization’s management account and deploy the stack sets to the member accounts. For <SQSQueueUrl> and <KMSKeyArn>, use the values from the previous step.
# Create a CloudFormation stack set to deploy the resources to the member accounts.

make deploy-members SQSQueueUrl=<SQSQueueUrl> KMSKeyArn=<KMSKeyArn< aws-region=<AWSRegion>
To deploy the QuickSight dashboard to your central account
Make sure that QuickSight is using the IAM role aws-quicksight-service-role.
In QuickSight, in the navigation bar at the top right, choose your account (indicated by a person icon) and then choose Manage QuickSight.
On the Manage QuickSight page, in the menu at the left, choose Security & Permissions.
On the Security & Permissions page, under QuickSight access to AWS services, choose Manage.
For IAM role, choose Use an existing role, and then do one of the following:
If you see a list of existing IAM roles, choose the role
# <aws-region> your Quicksight main Region, for example eu-west-1
# <account-id> The ID of your account, for example 123456789012
# <namespace-name> Quicksight namespace, for example default.
# You can list the namespaces by using aws quicksight list-namespaces --aws-account-id<account-id>
aws quicksight list-users --region <aws-region> --aws-account-id <account-id> --namespace <namespace-name>
Make a note of the user’s ARN that you want to grant permissions to list, describe, or update the QuickSight dashboard. This information is found in the arn element. For example, arn:aws:quicksight:us-east-1:111122223333:user/default/User1
To launch the deployment stack for the QuickSight dashboard, run the following command. Replace <quicksight-user-arn> with the user’s ARN from the previous step.
make deploy-dashboard-hub aws-region=<AWSRegion> quicksight-user-arn=<quicksight-user-arn>
Publish and share the QuickSight dashboard with the policy validation findings
You can publish your QuickSight dashboard and then share it with other QuickSight users for reporting purposes. The dashboard preserves the configuration of the analysis at the time that it’s published and reflects the current data in the datasets used by the analysis.
To publish the QuickSight dashboard
In the QuickSight console, choose Analyses and then choose access-analyzer-validation-findings.
In your analysis, in the application bar at the upper right, choose Share, and then choose Publish dashboard.
On the Publish dashboard page, choose Publish new dashboard as and enter IAM Access Analyzer Policy Validation.
Choose Publish dashboard. The dashboard is now published.
On the QuickSight start page, choose Dashboards.
Select the IAM Access Analyzer Policy Validation dashboard. IAM Access Analyzer policy validation findings will appear within the next 24 hours.
Note: If you don’t want to wait until the Lambda function is initiated automatically, you can invoke the function that lists customer-managed policies and inline policies by using the aws lambda invoke AWS CLI command on the hub account and wait one to two minutes to see the policy validation findings:
In the QuickSight console, choose Dashboards and then choose IAM Access Analyzer Policy Validation.
In your dashboard, in the application bar at the upper right, choose Share, and then choose Share dashboard.
On the Share dashboard page that opens, do the following:
For Invite users and groups to dashboard on the left pane, enter a user email or group name in the search box. Users or groups that match your query appear in a list below the search box. Only active users and groups appear in the list.
For the user or group that you want to grant access to the dashboard, choose Add. Then choose the level of permissions that you want them to have.
After you grant users access to a dashboard, you can copy a link to it and send it to them.
Your teams can use this dashboard to better understand their IAM policies and how to move toward least-privilege permissions, as outlined in the section Validate your IAM roles of the blog post Top 10 security items to improve in your AWS account.
Clean up
To avoid incurring additional charges in your accounts, remove the resources that you created in this walkthrough.
Before deleting the CloudFormation stacks and stack sets in your accounts, make sure that the S3 buckets that you created are empty. To delete everything (including old versioned objects) in a versioned bucket, we recommend emptying the bucket through the console. Before deleting the CloudFormation stack from the central account, delete the Athena workgroup.
To delete remaining resources from your AWS accounts
Delete the CloudFormation stack from your central account by running the following command. Make sure to replace <AWSRegion> with your own Region.
make delete-stackset-instances aws-region=<AWSRegion>

# Wait for the operation to finish. You can check its progress on the CloudFormation console.

make delete-stackset aws-region=<AWSRegion>
Delete the QuickSight dashboard by running the following command using the central account credentials. Make sure to replace <AWSRegion> with your own Region.
In this post, you learned how to validate your existing IAM policies by using the IAM Access Analyzer ValidatePolicy API and visualizing the results with AWS analytics tools. By using the implementation, you can better understand your IAM policies and work to reach least privilege in a scalable, fault-tolerant, and cost-effective way. This will help you identify opportunities to tighten your permissions and to grant the right fine-grained permissions to help enhance your overall security posture.
If you have feedback about this post, submit comments in the Comments section below. If you have questions about this post, start a new thread on the AWS Security, Identity, & Compliance re:Post.
Want more AWS Security news? Follow us on Twitter.
AWS Identity and Access Management (IAM) Access Analyzer provides many tools to help you set, verify, and refine permissions. One part of IAM Access Analyzer—policy validation—helps you author secure and functional policies that grant the intended permissions. Now, I’m excited to announce that AWS has updated the IAM console experience for role trust policies to make it simpler for you to author and validate the policy that controls who can assume a role. In this post, I’ll describe the new capabilities and show you how to use them as you author a role trust policy in the IAM console.
Overview of changes
A role trust policy is a JSON policy document in which you define the principals that you trust to assume the role. The principals that you can specify in the trust policy include users, roles, accounts, and services. The new IAM console experience provides the following features to help you set the right permissions in the trust policy:
An interactive policy editor prompts you to add the right policy elements, such as the principal and the allowed actions, and offers context-specific documentation.
As you author the policy, IAM Access Analyzer runs over 100 checks against your policy and highlights issues to fix. This includes new policy checks specific to role trust policies, such as a check to make sure that you’ve formatted your identity provider correctly. These new checks are also available through the IAM Access Analyzer policy validation API.
Before saving the policy, you can preview findings for the external access granted by your trust policy. This helps you review external access, such as access granted to a federated identity provider, and confirm that you grant only the intended access when you create the policy. This functionality was previously available through the APIs, but now it’s also available in the IAM console.
In the following sections, I’ll walk you through how to use these new features.
Example scenario
For the walkthrough, consider the following example, which is illustrated in Figure 1. You are a developer for Example Corp., and you are working on a web application. You want to grant the application hosted in one account—the ApplicationHost account—access to data in another account—the BusinessData account. To do this, you can use an IAM role in the BusinessData account to grant temporary access to the application through a role trust policy. You will grant a role in the ApplicationHost account—the PaymentApplication role—to access the BusinessData account through a role—the ApplicationAccess role. In this example, you create the ApplicationAccess role and grant cross-account permissions through the trust policy by using the new IAM console experience that helps you set the right permissions.
Figure 1: Visual explanation of the scenario
Create the role and grant permissions through a role trust policy with the policy editor
In this section, I will show you how to create a role trust policy for the ApplicationAccess role to grant the application access to the data in your account through the policy editor in the IAM console.
To create a role and grant access
In the BusinessData account, open the IAM console, and in the left navigation pane, choose Roles.
Choose Create role, and then select Custom trust policy, as shown in Figure 2.
Figure 2: Select “Custom trust policy” when creating a role
In the Custom trust policy section, for 1. Add actions for STS, select the actions that you need for your policy. For example, to add the action sts:AssumeRole, choose AssumeRole.
Figure 3: JSON role trust policy
For 2. Add a principal, choose Add to add a principal.
In the Add principal box, for Principal type, select IAM roles. This populates the ARN field with the format of the role ARN that you need to add to the policy, as shown in Figure 4.
Figure 4: Add a principal to your role trust policy
Update the role ARN template with the actual account and role information, and then choose Add principal. In our example, the account is ApplicationHost with an AWS account number of 111122223333, and the role is PaymentApplication role. Therefore, the role ARN is arn:aws:iam:: 111122223333: role/PaymentApplication. Figure 5 shows the role trust policy with the action and principal added.
Figure 5: Sample role trust policy
(Optional) To add a condition, for 3. Add a condition, choose Add, and then complete the Add condition box according to your needs.
Author secure policies by reviewing policy validation findings
As you author the policy, you can see errors or warnings related to your policy in the policy validation window, which is located below the policy editor in the console. With this launch, policy validation in IAM Access Analyzer includes 13 new checks focused on the trust relationship for the role. The following are a few examples of these checks and how to address them:
Role trust policy unsupported wildcard in principal – you can’t use a * in your role trust policy.
Invalid federated principal syntax in role trust policy – you need to fix the format of the identity provider.
Missing action for condition key – you need to add the right action for a given condition, such as the sts:TagSession when there are session tag conditions.
In the policy validation window, do the following:
Choose the Security tab to check if your policy is overly permissive.
Choose the Errors tab to review any errors associated with the policy.
Choose the Warnings tab to review if aspects of the policy don’t align with AWS best practices.
Choose the Suggestions tab to get recommendations on how to improve the quality of your policy.
Figure 6: Policy validation window in IAM Access Analyzer with a finding for your policy
For each finding, choose Learn more to review the documentation associated with the finding and take steps to fix it. For example, Figure 6 shows the error Mismatched Action For Principal. To fix the error, remove the action sts:AssumeRoleWithWebIdentity.
Preview external access by reviewing cross-account access findings
IAM Access Analyzer also generates findings to help you assess if a policy grants access to external entities. You can review the findings before you create the policy to make sure that the policy grants only intended access. To preview the findings, you create an analyzer and then review the findings.
To preview findings for external access
Below the policy editor, in the Preview external access section, choose Go to Access Analyzer, as shown in Figure 7.
Note: IAM Access Analyzer is a regional service, and you can create a new analyzer in each AWS Region where you operate. In this situation, IAM Access Analyzer looks for an analyzer in the Region where you landed on the IAM console. If IAM Access Analyzer doesn’t find an analyzer there, it asks you to create an analyzer.
Figure 7: Preview external access widget without an analyzer
On the Create analyzer page, do the following to create an analyzer:
For Name, enter a name for your analyzer.
For Zone of trust, select the correct account.
Choose Create analyzer.
Figure 8: Create an analyzer to preview findings
After you create the analyzer, navigate back to the role trust policy for your role to review the external access granted by this policy. The following figure shows that external access is granted to PaymentApplication.
Figure 9: Preview finding
If the access is intended, you don’t need to take any action. In this example, I want the PaymentApplication role in the ApplicationHost account to assume the role that I’m creating.
If the access is unintended, resolve the finding by updating the role ARN information.
Select Next and grant the required IAM permissions for the role.
Name the role ApplicationAccess, and then choose Save to save the role.
Now the application can use this role to access the BusinessData account.
Conclusion
By using the new IAM console experience for role trust policies, you can confidently author policies that grant the intended access. IAM Access Analyzer helps you in your least-privilege journey by evaluating the policy for potential issues to make it simpler for you to author secure policies. IAM Access Analyzer also helps you preview external access granted through the trust policy to help ensure that the granted access is intended. To learn more about how to preview IAM Access Analyzer cross-account findings, see Preview access in the documentation. To learn more about IAM Access Analyzer policy validation checks, see Access Analyzer policy validation. These features are also available through APIs.
If you have feedback about this post, submit comments in the Comments section below. If you have questions about this post, start a new thread at AWS IAM re:Post or contact AWS Support.
When building serverless applications using AWS Lambda, there are a number of considerations regarding security, governance, and compliance. This post highlights how Lambda, as a serverless service, simplifies cloud security and compliance so you can concentrate on your business logic. It covers controls that you can implement for your Lambda workloads to ensure that your applications conform to your organizational requirements.
The Shared Responsibility Model
The AWS Shared Responsibility Model distinguishes between what AWS is responsible for and what customers are responsible for with cloud workloads. AWS is responsible for “Security of the Cloud” where AWS protects the infrastructure that runs all the services offered in the AWS Cloud. Customers are responsible for “Security in the Cloud”, managing and securing their workloads. When building traditional applications, you take on responsibility for many infrastructure services, including operating systems and network configuration.
Traditional application shared responsibility
One major benefit when building serverless applications is shifting more responsibility to AWS so you can concentrate on your business applications. AWS handles managing and patching the underlying servers, operating systems, and networking as part of running the services.
Serverless application shared responsibility
For Lambda, AWS manages the application platform where your code runs, which includes patching and updating the managed language runtimes. This reduces the attack surface while making cloud security simpler. You are responsible for the security of your code and AWS Identity and Access Management (IAM) to the Lambda service and within your function.
Lambda functions run in separate isolated AWS accounts that are dedicated to the Lambda service. Lambda invokes your code in a secure and isolated runtime environment within the Lambda service account. A runtime environment is a collection of resources running in a dedicated hardware-virtualized Micro Virtual Machines (MVM) on a Lambda worker node.
Lambda workers are bare metalEC2 Nitro instances, which are managed and patched by the Lambda service team. They have a maximum lease lifetime of 14 hours to keep the underlying infrastructure secure and fresh. MVMs are created by Firecracker, an open source virtual machine monitor (VMM) that uses Linux’s Kernel-based Virtual Machine (KVM) to create and manage MVMs securely at scale.
MVMs maintain a strong separation between runtime environments at the virtual machine hardware level, which increases security. Runtime environments are never reused across functions, function versions, or AWS accounts.
Isolation model for AWS Lambda workers
Network security
Lambda functions always run inside secure Amazon Virtual Private Cloud (Amazon VPCs) owned by the Lambda service. This gives the Lambda function access to AWS services and the public internet. There is no direct network inbound access to Lambda workers, runtime environments, or Lambda functions. All inbound access to a Lambda function only comes via the Lambda Invoke API, which sends the event object to the function handler.
You can configure a Lambda function to connect to private subnets in a VPC in your account if necessary, which you can control with IAM condition keys . The Lambda function still runs inside the Lambda service VPC but sends all network traffic through your VPC. Function outbound traffic comes from your own network address space.
AWS Lambda service VPC with VPC-to-VPC NAT to customer VPC
To give your VPC-connected function access to the internet, route outbound traffic to a NAT gateway in a public subnet. Connecting a function to a public subnet doesn’t give it internet access or a public IP address, as the function is still running in the Lambda service VPC and then routing network traffic into your VPC.
All internal AWS traffic uses the AWS Global Backbone rather than traversing the internet. You do not need to connect your functions to a VPC to avoid connectivity to AWS services over the internet. VPC connected functions allow you to control and audit outbound network access.
You can use security groups to control outbound traffic for VPC-connected functions and network ACLs to block access to CIDR IP ranges or ports. VPC endpoints allow you to enable private communications with supported AWS services without internet access.
You can use VPC Flow Logs to audit traffic going to and from network interfaces in your VPC.
Runtime environment re-use
Each runtime environment processes a single request at a time. After Lambda finishes processing the request, the runtime environment is ready to process an additional request for the same function version. For more information on how Lambda manages runtime environments, see Understanding AWS Lambda scaling and throughput.
Data can persist in the local temporary filesystem path, in globally scoped variables, and in environment variables across subsequent invocations of the same function version. Ensure that you only handle sensitive information within individual invocations of the function by processing it in the function handler, or using local variables. Do not re-use files in the local temporary filesystem to process unencrypted sensitive data. Do not put sensitive or confidential information into Lambda environment variables, tags, or other freeform fields such as Name fields.
AWS recommends using multiple accounts to isolate your resources because they provide natural boundaries for security, access, and billing. Use AWS Organizations to manage and govern individual member accounts centrally. You can use AWS Control Tower to automate many of the account build steps and apply managed guardrails to govern your environment. These include preventative guardrails to limit actions and detective guardrails to detect and alert on non-compliance resources for remediation.
Lambda access controls
Lambda permissions define what a Lambda function can do, and who or what can invoke the function. Consider the following areas when applying access controls to your Lambda functions to ensure least privilege:
Execution role
Lambda functions have permission to access other AWS resources using execution roles. This is an AWS principal that the Lambda service assumes which grants permissions using identity policy statements assigned to the role. The Lambda service uses this role to fetch and cache temporary security credentials, which are then available as environment variables during a function’s invocation. It may re-use them across different runtime environments that use the same execution role.
Ensure that each function has its own unique role with the minimum set of permissions..
Identity/user policies
IAM identity policies are attached to IAM users, groups, or roles. These policies allow users or callers to perform operations on Lambda functions. You can restrict who can create functions, or control what functions particular users can manage.
Resource policies
Resource policies define what identities have fine-grained inbound access to managed services. For example, you can restrict which Lambda function versions can add events to a specific Amazon EventBridge event bus. You can use resource-based policies on Lambda resources to control what AWS IAM identities and event sources can invoke a specific version or alias of your function. You also use a resource-based policy to allow an AWS service to invoke your function on your behalf. To see which services support resource-based policies, see “AWS services that work with IAM”.
Attribute-based access control (ABAC)
With attribute-based access control (ABAC), you can use tags to control access to your Lambda functions. With ABAC, you can scale an access control strategy by setting granular permissions with tags without requiring permissions updates for every new user or resource as your organization scales. You can also use tag policies with AWS Organizations to standardize tags across resources.
Permissions boundaries
Permissions boundaries are a way to delegate permission management safely. The boundary places a limit on the maximum permissions that a policy can grant. For example, you can use boundary permissions to limit the scope of the execution role to allow only read access to databases. A builder with permission to manage a function or with write access to the applications code repository cannot escalate the permissions beyond the boundary to allow write access.
Service control policies
When using AWS Organizations, you can use Service control policies (SCPs) to manage permissions in your organization. These provide guardrails for what actions IAM users and roles within the organization root or OUs can do. For more information, see the AWS Organizations documentation, which includes example service control policies.
Code signing
As you are responsible for the code that runs in your Lambda functions, you can ensure that only trusted code runs by using code signing with the AWS Signer service. AWS Signer digitally signs your code packages and Lambda validates the code package before accepting the deployment, which can be part of your automated software deployment process.
Auditing Lambda configuration, permissions and access
You should audit access and permissions regularly to ensure that your workloads are secure. Use the IAM console to view when an IAM role was last used.
IAM last used
IAM access advisor
Use IAM access advisor on the Access Advisor tab in the IAM console to review when was the last time an AWS service was used from a specific IAM user or role. You can use this to remove IAM policies and access from your IAM roles.
You can validate policies using IAM Access Analyzer, which provides over 100 policy checks with security warnings for overly permissive policies. To learn more about policy checks provided by IAM Access Analyzer, see “IAM Access Analyzer policy validation”.
You can also generate IAM policies based on access activity from CloudTrail logs, which contain the permissions that the role used in your specified date range.
IAM Access Analyzer
AWS Config
AWS Config provides you with a record of the configuration history of your AWS resources. AWS Config monitors the resource configuration and includes rules to alert when they fall into a non-compliant state.
For Lambda, you can track and alert on changes to your function configuration, along with the IAM execution role. This allows you to gather Lambda function lifecycle data for potential audit and compliance requirements. For more information, see the Lambda Operators Guide.
Lambda makes cloud security simpler by taking on more responsibility using the AWS Shared Responsibility Model. Lambda implements strict workload security at scale to isolate your code and prevent network intrusion to your functions. This post provides guidance on assessing and implementing best practices and tools for Lambda to improve your security, governance, and compliance controls. These include permissions, access controls, multiple accounts, and code security. Learn how to audit your function permissions, configuration, and access to ensure that your applications conform to your organizational requirements.
For more serverless learning resources, visit Serverless Land.
Data Services teams in all industries are developing centralized data platforms that provide shared access to datasets across multiple business units and teams within the organization. This makes data governance easier, minimizes data redundancy thus reducing cost, and improves data integrity. The central data platform is often built with AWS Simple Storage Service (S3).
A common pattern for providing access to this data is for you to set up cross-account IAM Users and IAM Roles to allow direct access to the datasets stored in S3 buckets. You then enforce the permission on these datasets with S3 Bucket Policies or S3 Access Point policies. These policies can be very granular and you can provide access at the bucket level, prefix level as well as object level within an S3 bucket.
To reduce risk and unintended access, you can use Access Analyzer for S3 to identify S3 buckets within your zone of trust (Account or Organization) that are shared with external identities. Access Analyzer for S3 provides a lot of useful information at the bucket level but you often need S3 audit capability one layer down, at the S3 prefix level, since you are most likely going to organize your data using S3 prefixes.
Common use cases
Many organizations need to ingest a lot of third-party/vendor datasets and then distribute these datasets within the organization in a subscription-based model. Irrespective of how the data is ingested, whether it is using AWS Transfer Family service or other mechanisms, all the ingested datasets are stored in a single S3 bucket with a separate prefix for each vendor dataset. The hierarchy can be represented as:
Based on this design, access is also granted to the data subscribers at the S3 prefix level. Access Analyzer for S3 does not provide visibility at the S3 prefix level so you need to develop custom scripts to extract this information from the S3 policy documents. You also need the information in an easy-to-consume format, for example, a csv file, that can be queried, filtered, readily downloaded and shared across the organization.
To help address this requirement, we show how to implement a solution that builds on the S3 access analyzer findings to generate a csv file on a pre-configured frequency. This solution provides details about:
External Principals outside your trust zone that have access to your S3 buckets
Permissions granted to these external principals (read, write)
List of s3 prefixes these external principals have access to that is configured using S3 bucket policy and/or S3 access point policies.
Architecture Overview
Figure 1 – How to Audit and Report S3 prefix level access using S3 Access Analyzer
The solution entails the following steps:
Step 1 – The Access Analyzer ARN and the S3 bucket parameters are passed to an AWS Lambda function via Environment variables.
Step 2 – The Lambda code uses the Access Analyzer ARN to call the list-findings API to retrieve the findings information and store it in the S3 bucket (under json prefix) in JSON format.
Step 3 – The Lambda function then also parses the JSON file to get the required fields and store it as a csv file in the same S3 bucket (under report prefix). It also scans the bucket policy and/or the access point policies to retrieve the S3 prefix level permission granted to the external identity. That information is added to the csv file.
Steps 4 and 5 – As part of the initial deployment, an AWS Glue crawler is provided to discover and create the schema of the csv file and store it in the AWS Glue Data Catalog.
Step 6 – An Amazon Athena query is run to create a spreadsheet of the findings that can be downloaded and distributed for audit.
Prerequisites
For this walkthrough, you should have the following prerequisites:
An AWS account
S3 buckets that are shared with external identities via cross-account IAM roles or IAM users. Follow these instructions in this user guide to set up cross-account S3 bucket access.
IAM Access Analyzer enabled for your AWS account. Follow these instructions to enable IAM Access Analyzer within your account.
Once the IAM Access Analyzer is enabled, you should be able to view the Analyzer findings from the S3 console by selecting the bucket name and clicking on the ‘View findings’ box or directly going to the Access Analyzer findings on the IAM console.
When you select a ‘Finding id’ for an S3 Bucket, a screen similar to the following will appear:
Figure 2 – IAM Console Screenshot
Setup
Now that your access analyzer is running, you can open the link below to deploy the CloudFormation template. Make sure to launch the CloudFormation in the same AWS Region where IAM Access Analyzer has been enabled.
Specify a name for the stack and input the following parameters:
ARN of the Access Analyzer which you can find from the IAM Console.
New S3 bucket where your findings will be stored. The Cloudformation template will add a suffix to the bucket name you provide to ensure uniqueness.
Figure 3 – CloudFormation Template screenshot
Select Next twice and on the final screen check the box allowing CloudFormation to create the IAM resources before selecting Create Stack.
It will take a couple of minutes for the stack to create the resources and launch the AWS Lambda function.
Once the stack is in CREATE_COMPLETE status, go to the Outputs tab of the stack and note down the value against the DataS3BucketName key. This is the S3 bucket the template generated. It would be of the format analyzer-findings-xxxxxxxxxxxx. Go to the S3 console and view the contents of the bucket. There should be two folders archive/ and report/. In the report folder you should have the csv file containing the findings report.
You can download the csv directly and open it in a excel sheet to view the contents. If would like to query the csv based on different attributes, follow the next set of steps. Go to the AWS Glue console and click on Crawlers. There should be an analyzer-crawler created for you. Select the crawler to run it.
After the crawler runs successfully, you should see a new table, analyzer-report created under analyzerdb Glue database.
Select the tablename to view the table properties and schema.
To query the table, go to the Athena console and select the analyzerdb database. Then you can run a query like “Select * from analyzer-report where externalaccount = <<valid external account>>” to list all the S3 buckets the external account has access to.
Figure 4 – Amazon Athena Console screenshot
The output of the query with a subset of columns is shown as follows:
Figure 5 – Output of Amazon Athena Query
This CloudFormation template also creates a Cloudwatch event rule, testanalyzer-ScheduledRule-xxxxxxx, that launches the Lambda function every Monday to generate a new version of the findings csv file. You can update the rule to set it to a frequency you desire.
Clean Up
To avoid incurring costs, remember to delete the resources you created. First, manually delete the folders ‘archive’ and ‘report’ in the S3 bucket and then delete the CloudFormation stack you deployed at the beginning of the setup.
Conclusion
In this blog, we showed how you can build audit capabilities for external principals accessing your S3 buckets at a prefix level. Organizations looking to provide shared access to datasets across multiple business units will find this solution helpful in improving their security posture. Give this solution a try and share your feedback!
Today, we are introducing a couple new features that simplify access management for data stored in Amazon Simple Storage Service (Amazon S3). First, we are introducing a new Amazon S3 Object Ownership setting that lets you disable access control lists (ACLs) to simplify access management for data stored in Amazon S3. Second, the Amazon S3 console policy editor now reports security warnings, errors, and suggestions powered by IAM Access Analyzer as you author your S3 policies.
ACLs are an access control mechanism in which each bucket and object has an ACL attached to it. ACLs define which AWS accounts or groups are granted access as well as the type of access. When an object is created, the ownership of it belongs to the creator. This ownership information is embedded in the object ACL. When you upload an object to a bucket owned by another AWS account, and you want the bucket owner to access the object, then permissions need to be granted in the ACL. In many cases, ACLs and other kinds of policies are used within the same bucket.
The new Amazon S3 Object Ownership setting, Bucket owner enforced, lets you disable all of the ACLs associated with a bucket and the objects in it. When you apply this bucket-level setting, all of the objects in the bucket become owned by the AWS account that created the bucket, and ACLs are no longer used to grant access. Once applied, ownership changes automatically, and applications that write data to the bucket no longer need to specify any ACL. As a result, access to your data is based on policies. This simplifies access management for data stored in Amazon S3.
With this launch, when creating a new bucket in the Amazon S3 console, you can choose whether ACLs are enabled or disabled. In the Amazon S3 console, when you create a bucket, the default selection is that ACLs are disabled. If you wish to keep ACLs enabled, you can choose other configurations for Object Ownership, specifically:
Bucket owner preferred: All new objects written to this bucket with the bucket-owner-full-controlled canned ACL will be owned by the bucket owner. ACLs are still used for access control.
Object writer: The object writer remains the object owner. ACLs are still used for access control.
For existing buckets, you can view and manage this setting in the Permissions tab.
Before enabling the Bucket owner enforced setting for Object Ownership on an existing bucket, you must migrate access granted to other AWS accounts from the bucket ACL to the bucket policy. Otherwise, you will receive an error when enabling the setting. This helps you ensure applications writing data to your bucket are uninterrupted. Make sure to test your applications after you migrate the access.
Policy validation in the Amazon S3 console We are also introducing policy validation in the Amazon S3 console to help you out when writing resource-based policies for Amazon S3. This simplifies authoring access control policies for Amazon S3 buckets and access points with over 100 actionable policy checks powered by IAM Access Analyzer.
To access policy validation in the Amazon S3 console, first go to the detail page for a bucket. Then, go to the Permissions tab and edit the bucket policy.
When you start writing your policy, you see that, as you type, different findings appear at the bottom of the screen. Policy checks from IAM Access Analyzer are designed to validate your policies and report security warnings, errors, and suggestions as findings based on their impact to help you make your policy more secure.
You can also perform these checks and validations using the IAM Access Analyzer’s ValidatePolicy API.
Availability Amazon S3 Object Ownership is available at no additional cost in all AWS Regions, excluding the AWS China Regions and AWS GovCloud Regions. IAM Access Analyzer policy validation in the Amazon S3 console is available at no additional cost in all AWS Regions, including the AWS China Regions and AWS GovCloud Regions.
Embedding this validation in a CI/CD pipeline can help prevent IAM policies that have IAM Access Analyzer findings from being deployed to your AWS environment. This tool acts as a guardrail that can allow you to delegate the creation of IAM policies to the developers in your organization. You can also use the tool to provide additional confidence in your existing policy authoring process, enabling you to catch mistakes prior to IAM policy deployment.
What is IAM Access Analyzer?
IAM Access Analyzer mathematically analyzes access control policies that are attached to resources, and determines which resources can be accessed publicly or from other accounts. IAM Access Analyzer can also validate both identity and resource policies against over 100 checks, each designed to improve your security posture and to help you to simplify policy management at scale.
The IAM Policy Validator for AWS CloudFormation tool
IAM Policy Validator for AWS CloudFormation (cfn-policy-validator) is a new command-line tool that parses resource-based and identity-based IAM policies from your CloudFormation template, and runs the policies through IAM Access Analyzer checks. The tool is designed to run in the CI/CD pipeline that deploys your CloudFormation templates, and to prevent a deployment when an IAM Access Analyzer finding is detected. This ensures that changes made to IAM policies are validated before they can be deployed.
The cfn-policy-validator tool looks for all identity-based policies, and a subset of resource-based policies, from your templates. For the full list of supported resource-based policies, see the cfn-policy-validator GitHub repository.
Parsing IAM policies from a CloudFormation template
One of the challenges you can face when parsing IAM policies from a CloudFormation template is that these policies often contain CloudFormation intrinsic functions (such as Ref and Fn::GetAtt) and pseudo parameters (such as AWS::AccountId and AWS::Region). As an example, it’s common for least privileged IAM policies to reference the Amazon Resource Name (ARN) of another CloudFormation resource. Take a look at the following example CloudFormation resources that create an Amazon Simple Queue Service (Amazon SQS) queue, and an IAM role with a policy that grants access to perform the sqs:SendMessage action on the SQS queue.
Figure 1- Example policy in CloudFormation template
As you can see in Figure 1, line 21 uses the function Fn::Sub to restrict this policy to MySQSQueue created earlier in the template.
In this example, if you were to pass the root policy (lines 15-21) as written to IAM Access Analyzer, you would get an error because !Sub ${MySQSQueue.Arn} is syntax that is specific to CloudFormation. The cfn-policy-validator tool takes the policy and translates the CloudFormation syntax to valid IAM policy syntax that Access Analyzer can parse.
The cfn-policy-validator tool recognizes when an intrinsic function such as !Sub ${MySQSQueue.Arn} evaluates to a resource’s ARN, and generates a valid ARN for the resource. The tool creates the ARN by mapping the type of CloudFormation resource (in this example AWS::SQS::Queue) to a pattern that represents what the ARN of the resource will look like when it is deployed. For example, the following is what the mapping looks like for the SQS queue referenced previously:
For some CloudFormation resources, the Ref intrinsic function also returns an ARN. The cfn-policy-validator tool handles these cases as well.
Cfn-policy-validator walks through each of the six parts of an ARN and substitutes values for variables in the ARN pattern (any text contained within ${}). The values of ${Partition} and ${Account} are taken from the identity of the role that runs the cfn-policy-validator tool, and the value for ${Region} is provided as an input flag. The cfn-policy-validator tool performs a best-effort resolution of the QueueName, but typically defaults it to the name of the CloudFormation resource (in the previous example, MySQSQueue). Validation of policies with IAM Access Analyzer does not rely on the name of the resource, so the cfn-policy-validator tool is able to substitute a replacement name without affecting the policy checks.
The final ARN generated for the MySQSQueue resource looks like the following (for an account with ID of 111111111111):
arn:aws:sqs:us-east-1:111111111111:MySQSQueue
The cfn-policy-validator tool substitutes this generated ARN for !Sub ${MySQSQueue.Arn}, which allows the cfn-policy-validator tool to parse a policy from the template that can be fed into IAM Access Analyzer for validation. The cfn-policy-validator tool walks through your entire CloudFormation template and performs this ARN substitution until it has generated ARNs for all policies in your template.
Validating the policies with IAM Access Analyzer
After the cfn-policy-validator tool has your IAM policies in a valid format (with no CloudFormation intrinsic functions or pseudo parameters), it can take those policies and feed them into IAM Access Analyzer for validation. The cfn-policy-validator tool runs resource-based and identity-based policies in your CloudFormation template through the ValidatePolicy action of the IAM Access Analyzer. ValidatePolicy is what ensures that your policies have correct grammar and follow IAM policy best practices (for example, not allowing iam:PassRole to all resources). The cfn-policy-validator tool also makes a call to the CreateAccessPreview action for supported resource policies to determine if the policy would grant unintended public or cross-account access to your resource.
The cfn-policy-validator tool categorizes findings from IAM Access Analyzer into the categories blocking or non-blocking. Findings categorized as blocking cause the tool to exit with a non-zero exit code, thereby causing your deployment to fail and preventing your CI/CD pipeline from continuing. If there are no findings, or only non-blocking findings detected, the tool will exit with an exit code of zero (0) and your pipeline can to continue to the next stage. For more information about how the cfn-policy-validator tool decides what findings to categorize as blocking and non-blocking, as well as how to customize the categorization, see the cfn-policy-validator GitHub repository.
Example of running the cfn-policy-validator tool
This section guides you through an example of what happens when you run a CloudFormation template that has some policy violations through the cfn-policy-validator tool.
The following template has two CloudFormation resources with policy findings: an SQS queue policy that grants account 111122223333 access to the SQS queue, and an IAM role with a policy that allows the role to perform a misspelled sqs:ReceiveMessages action. These issues are highlighted in the policy below.
Important: The policy in Figure 2 is written to illustrate a CloudFormation template with potentiallyundesirable IAM policies. You should be careful when setting the Principal element to an account that is not your own.
Figure 2: CloudFormation template with undesirable IAM policies
When you pass this template as a parameter to the cfn-policy-validator tool, you specify the AWS Region that you want to deploy the template to, as follows:
The output from the cfn-policy-validator tool includes the type of finding, the code for the finding, and a message that explains the finding. It also includes the resource and policy name from the CloudFormation template, to allow you to quickly track down and resolve the finding in your template. In the previous example, you can see that IAM Access Analyzer has detected two findings, one security warning and one error, which the cfn-policy-validator tool has classified as blocking. The actual response from IAM Access Analyzer is returned under details, but is excluded above for brevity.
If account 111122223333 is an account that you trust and you are certain that it should have access to the SQS queue, then you can suppress the finding for external access from the 111122223333 account in this example. Modify the call to the cfn-policy-validator tool to ignore this specific finding by using the –-allow-external-principals flag, as follows:
Now that you’ve seen an example of how you can run the cfn-policy-validator tool to validate policies that are on your local machine, you will take it a step further and see how you can embed the cfn-policy-validator tool in a CI/CD pipeline. By embedding the cfn-policy-validator tool in your CI/CD pipeline, you can ensure that your IAM policies are validated each time a commit is made to your repository.
Embedding the cfn-policy-validator tool in a CI/CD pipeline
The CI/CD pipeline you will create in this post uses AWS CodePipeline and AWS CodeBuild. AWS CodePipeline is a continuous delivery service that enables you to model, visualize, and automate the steps required to release your software. AWS CodeBuild is a fully-managed continuous integration service that compiles source code, runs tests, and produces software packages that are ready to deploy. You will also use AWS CodeCommit as the source repository where your CloudFormation template is stored. AWS CodeCommit is a fully managed source-control service that hosts secure Git-based repositories.
To deploy the pipeline
To deploy the CloudFormation template that builds the source repository and AWS CodePipeline pipeline, select the following Launch Stack button.
In the CloudFormation console, choose Next until you reach the Review page.
Select I acknowledge that AWS CloudFormation might create IAM resources and choose Create stack.
Watch as your commit travels through the pipeline. If you followed the previous instructions and made two separate commits, you can ignore the failed results of the first pipeline execution. As shown in Figure 3, you will see that the pipeline fails in the Validation stage on the CfnPolicyValidator action, because it detected a blocking finding in the template you committed, which prevents the invalid policy from reaching your AWS environment.
Figure 3: Validation failed on the CfnPolicyValidator action
Under CfnPolicyValidator, choose Details, as shown in Figure 3.
In the Action execution failed pop-up, choose Link to execution details to view the cfn-policy-validator tool output in AWS CodeBuild.
Architectural overview of deploying cfn-policy-validator in your pipeline
You can see the architecture diagram for the CI/CD pipeline you deployed in Figure 4.
Figure 4 shows the following steps, starting with the CodeCommit source action on the left:
The pipeline starts when you commit to your AWS CodeCommit source code repository. The AWS CodeCommit repository is what contains the CloudFormation template that has the IAM policies that you would like to deploy to your AWS environment.
AWS CodePipeline detects the change in your source code repository and begins the Validation stage. The first step it takes is to start an AWS CodeBuild project that runs the CloudFormation template through the AWS CloudFormation Linter (cfn-lint). The cfn-lint tool validates your template against the CloudFormation resource specification. Taking this initial step ensures that you have a valid CloudFormation template before validating your IAM policies. This is an optional step, but a recommended one. Early schema validation provides fast feedback for any typos or mistakes in your template. There’s little benefit to running additional static analysis tools if your template has an invalid schema.
If the cfn-lint tool completes successfully, you then call a separate AWS CodeBuild project that invokes the IAM Policy Validator for AWS CloudFormation (cfn-policy-validator). The cfn-policy-validator tool then extracts the identity-based and resource-based policies from your template, as described earlier, and runs the policies through IAM Access Analyzer.
Note: if your template has parameters, then you need to provide them to the cfn-policy-validator tool. You can provide parameters as command-line arguments, or use a template configuration file. It is recommended to use a template configuration file when running validation with an AWS CodePipeline pipeline. The same file can also be used in the deploy stage to deploy the CloudFormation template. By using the template configuration file, you can ensure that you use the same parameters to validate and deploy your template. The CloudFormation template for the pipeline provided with this blog post defaults to using a template configuration file.
If there are no blocking findings found in the policy validation, the cfn-policy-validator tool exits with an exit code of zero (0) and the pipeline moves to the next stage. If any blocking findings are detected, the cfn-policy-validator tool will exit with a non-zero exit code and the pipeline stops, to prevent the deployment of undesired IAM policies.
The final stage of the pipeline uses the AWS CloudFormation action in AWS CodePipeline to deploy the template to your environment. Your template will only make it to this stage if it passes all static analysis checks run in the Validation Stage.
Cleaning Up
To avoid incurring future charges, in the AWS CloudFormation console delete the validate-iam-policy-pipeline stack. This will remove the validation pipeline from your AWS account.
Summary
In this blog post, I introduced the IAM Policy Validator for AWS CloudFormation (cfn-policy-validator). The cfn-policy-validator tool automates the parsing of identity-based and resource-based IAM policies from your CloudFormation templates and runs those policies through IAM Access Analyzer. This enables you to validate that the policies in your templates follow IAM best practices and do not allow unintended external access to your AWS resources.
I showed you how the IAM Policy Validator for AWS CloudFormation can be included in a CI/CD pipeline. This allows you to run validation on your IAM policies on every commit to your repository and only deploy the template if validation succeeds.
If you have feedback about this post, submit comments in the Comments section below.
Want more AWS Security how-to content, news, and feature announcements? Follow us on Twitter.
The collective thoughts of the interwebz
Manage Consent
To provide the best experiences, we use technologies like cookies to store and/or access device information. Consenting to these technologies will allow us to process data such as browsing behavior or unique IDs on this site. Not consenting or withdrawing consent, may adversely affect certain features and functions.
Functional
Always active
The technical storage or access is strictly necessary for the legitimate purpose of enabling the use of a specific service explicitly requested by the subscriber or user, or for the sole purpose of carrying out the transmission of a communication over an electronic communications network.
Preferences
The technical storage or access is necessary for the legitimate purpose of storing preferences that are not requested by the subscriber or user.
Statistics
The technical storage or access that is used exclusively for statistical purposes.The technical storage or access that is used exclusively for anonymous statistical purposes. Without a subpoena, voluntary compliance on the part of your Internet Service Provider, or additional records from a third party, information stored or retrieved for this purpose alone cannot usually be used to identify you.
Marketing
The technical storage or access is required to create user profiles to send advertising, or to track the user on a website or across several websites for similar marketing purposes.