Post Syndicated from Alex Bocharov original https://blog.cloudflare.com/making-waf-ai-models-go-brr

We made our WAF Machine Learning models 5.5x faster, reducing execution time by approximately 82%, from 1519 to 275 microseconds! Read on to find out how we achieved this remarkable improvement.
WAF Attack Score is Cloudflare’s machine learning (ML)-powered layer built on top of our Web Application Firewall (WAF). Its goal is to complement the WAF and detect attack bypasses that we haven’t encountered before. This has proven invaluable in catching zero-day vulnerabilities, like the one detected in Ivanti Connect Secure, before they are publicly disclosed and enhancing our customers’ protection against emerging and unknown threats.
Since its launch in 2022, WAF attack score adoption has grown exponentially, now protecting millions of Internet properties and running real-time inference on tens of millions of requests per second. The feature’s popularity has driven us to seek performance improvements, enabling even broader customer use and enhancing Internet security.
In this post, we will discuss the performance optimizations we’ve implemented for our WAF ML product. We’ll guide you through specific code examples and benchmark numbers, demonstrating how these enhancements have significantly improved our system’s efficiency. Additionally, we’ll share the impressive latency reduction numbers observed after the rollout.
Before diving into the optimizations, let’s take a moment to review the inner workings of the WAF Attack Score, which powers our WAF ML product.
WAF Attack Score system design
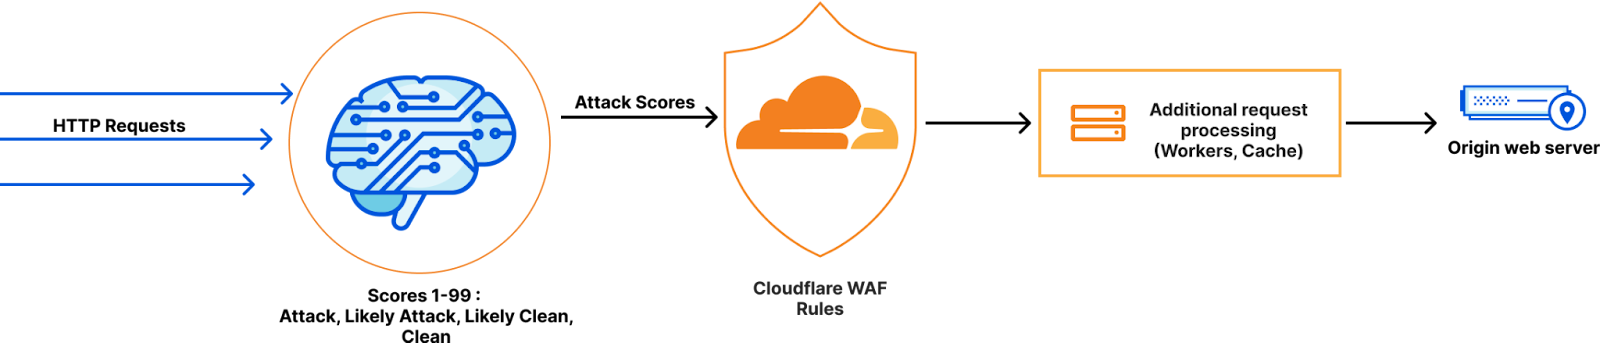
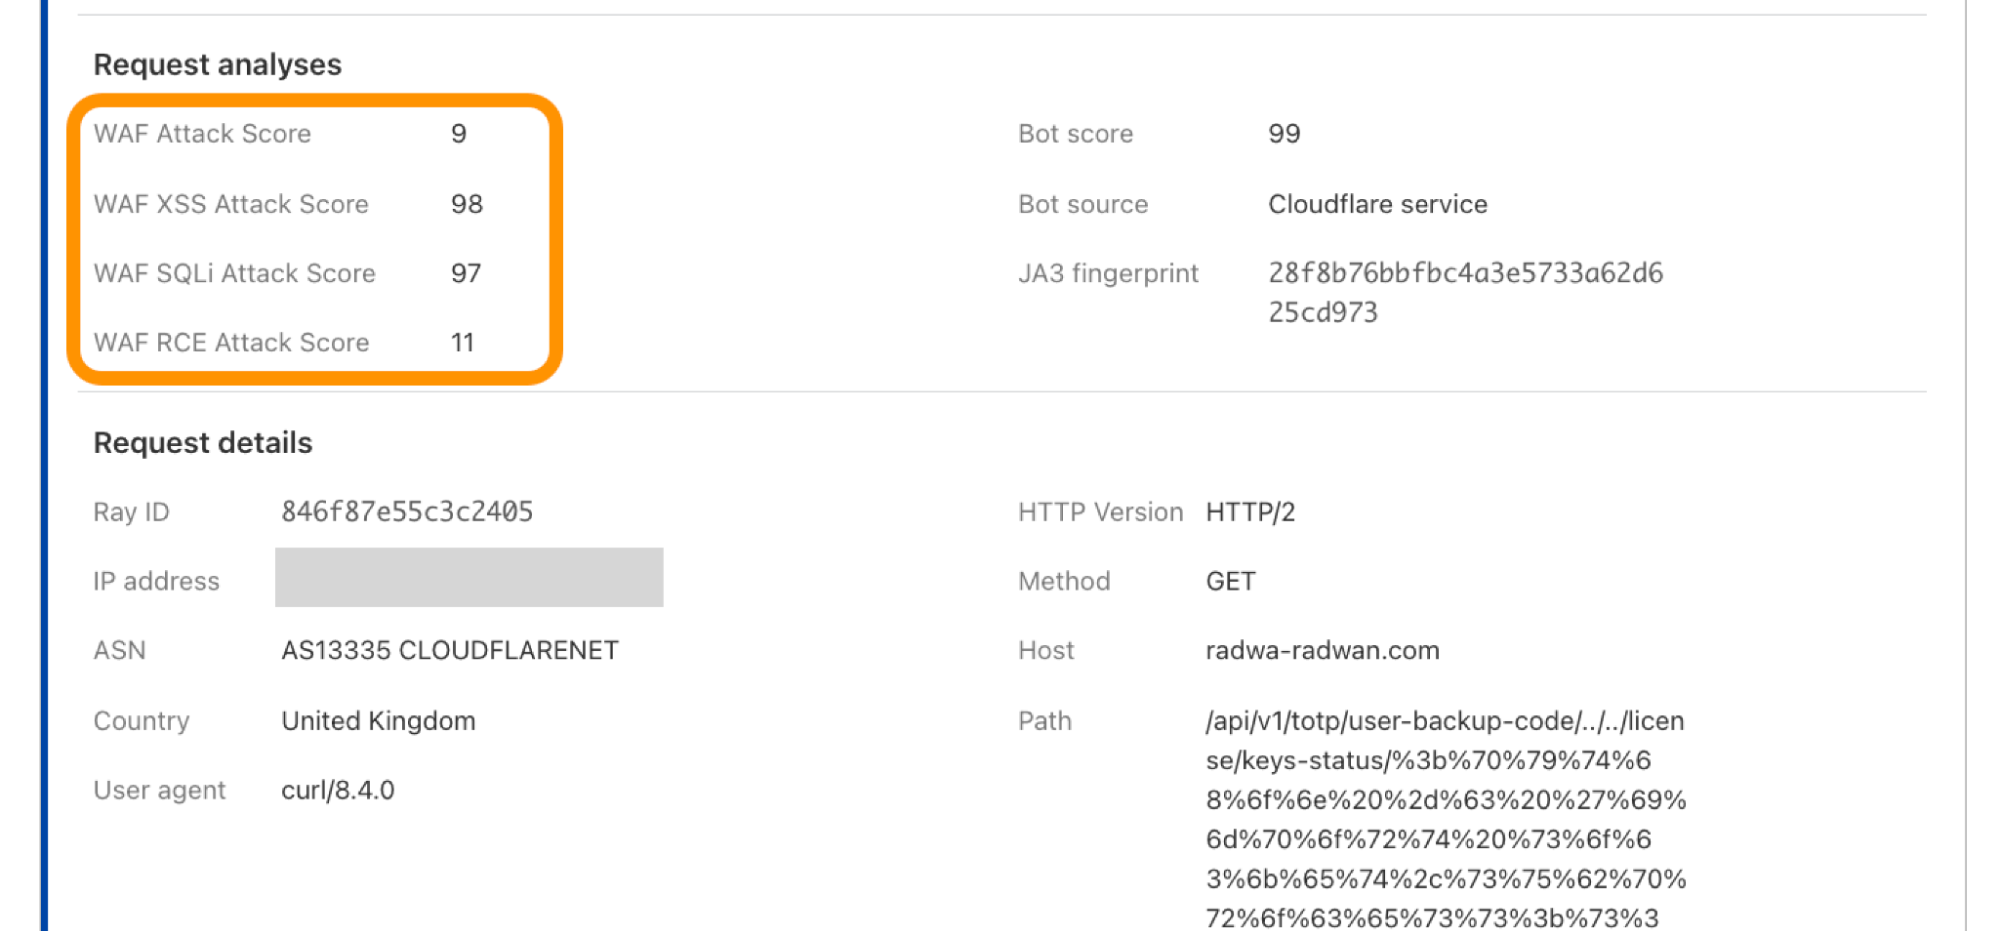
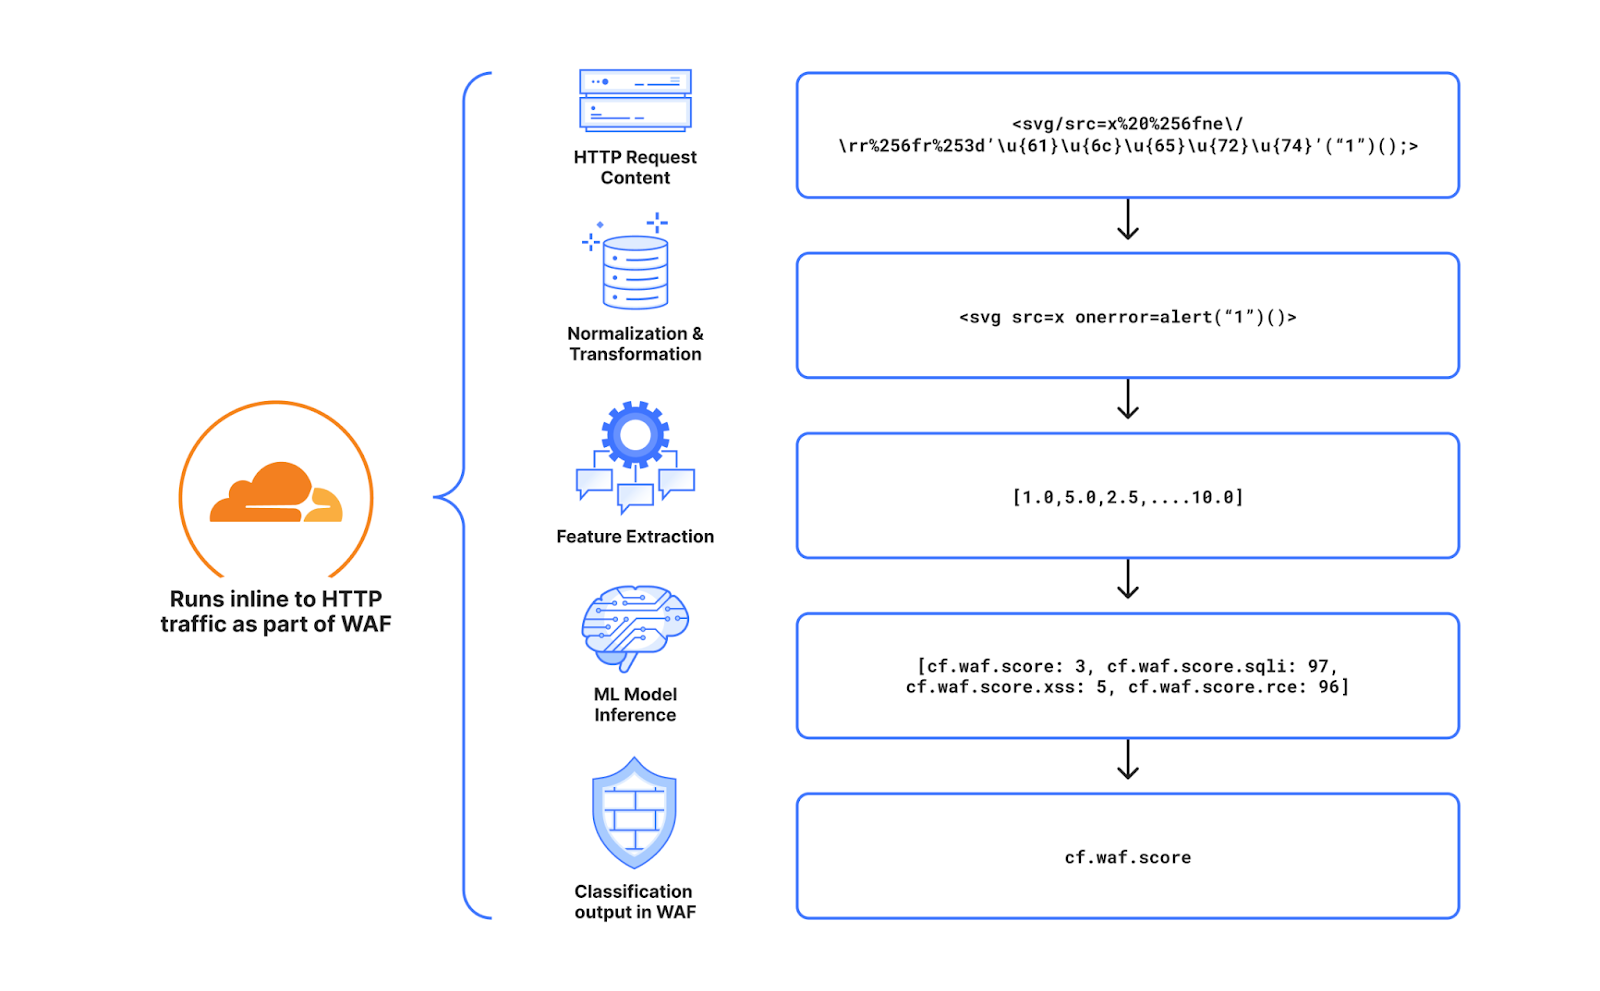
Cloudflare’s WAF attack score identifies various traffic types and attack vectors (SQLi, XSS, Command Injection, etc.) based on structural or statistical content properties. Here’s how it works during inference:
- HTTP Request Content: Start with raw HTTP input.
- Normalization & Transformation: Standardize and clean the data, applying normalization, content substitutions, and de-duplication.
- Feature Extraction: Tokenize the transformed content to generate statistical and structural data.
- Machine Learning Model Inference: Analyze the extracted features with pre-trained models, mapping content representations to classes (e.g., XSS, SQLi or RCE) or scores.
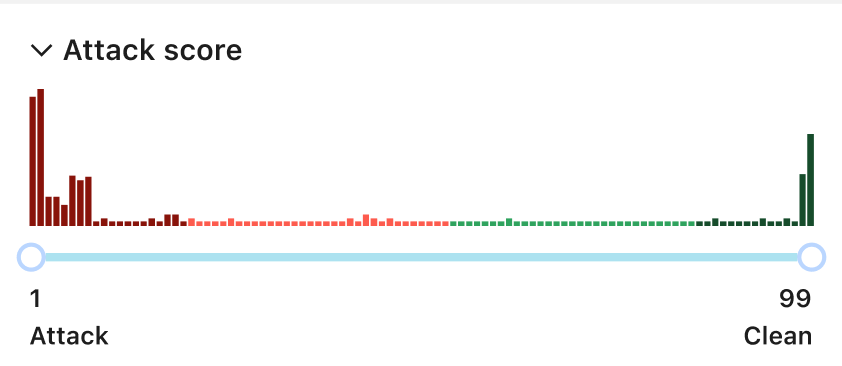
- Classification Output in WAF: Assign a score to the input, ranging from 1 (likely malicious) to 99 (likely clean), guiding security actions.
Next, we will explore feature extraction and inference optimizations.
Feature extraction optimizations
In the context of the WAF Attack Score ML model, feature extraction or pre-processing is essentially a process of tokenizing the given input and producing a float tensor of 1 x m size:
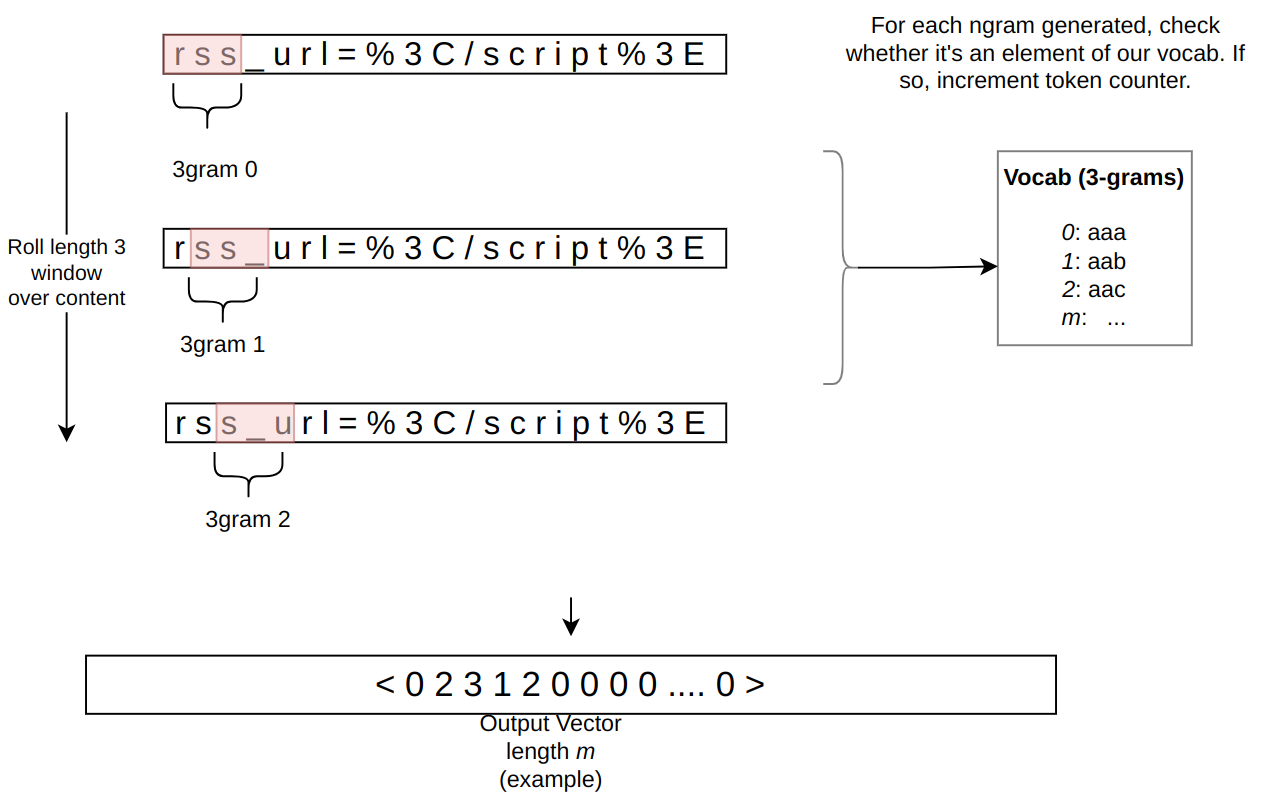
In our initial pre-processing implementation, this is achieved via a sliding window of 3 bytes over the input with the help of Rust’s std::collections::HashMap to look up the tensor index for a given ngram.
Initial benchmarks
To establish performance baselines, we’ve set up four benchmark cases representing example inputs of various lengths, ranging from 44 to 9482 bytes. Each case exemplifies typical input sizes, including those for a request body, user agent, and URI. We run benchmarks using the Criterion.rs statistics-driven micro-benchmarking tool:
RUSTFLAGS="-C opt-level=3 -C target-cpu=native" cargo criterion
Here are initial numbers for these benchmarks executed on a Linux laptop with a 13th Gen Intel® Core™ i7-13800H processor:
| Benchmark case | Pre-processing time, μs | Throughput, MiB/s |
|---|---|---|
| preprocessing/long-body-9482 | 248.46 | 36.40 |
| preprocessing/avg-body-1000 | 28.19 | 33.83 |
| preprocessing/avg-url-44 | 1.45 | 28.94 |
| preprocessing/avg-ua-91 | 2.87 | 30.24 |
An important observation from these results is that pre-processing time correlates with the length of the input string, with throughput ranging from 28 MiB/s to 36 MiB/s. This suggests that considerable time is spent iterating over longer input strings. Optimizing this part of the process could significantly enhance performance. The dependency of processing time on input size highlights a key area for performance optimization. To validate this, we should examine where the processing time is spent by analyzing flamegraphs created from a 100-second profiling session visualized using pprof:
RUSTFLAGS="-C opt-level=3 -C target-cpu=native" cargo criterion -- --profile-time 100

go tool pprof -http=: target/criterion/profile/preprocessing/avg-body-1000/profile.pb

Looking at the pre-processing flamegraph above, it’s clear that most of the time was spent on the following two operations:
| Function name | % Time spent |
|---|---|
| std::collections::hash::map::HashMap<K,V,S>::get | 61.8% |
| regex::regex::bytes::Regex::replace_all | 18.5% |
Let’s tackle the HashMap lookups first. Lookups are happening inside the tensor_populate_ngrams function, where input is split into windows of 3 bytes representing ngram and then lookup inside two hash maps:
fn tensor_populate_ngrams(tensor: &mut [f32], input: &[u8]) {
   // Populate the NORM ngrams
   let mut unknown_norm_ngrams = 0;
   let norm_offset = 1;

   for s in input.windows(3) {
       match NORM_VOCAB.get(s) {
           Some(pos) => {
               tensor[*pos as usize + norm_offset] += 1.0f32;
           }
           None => {
               unknown_norm_ngrams += 1;
           }
       };
   }

   // Populate the SIG ngrams
   let mut unknown_sig_ngrams = 0;
   let sig_offset = norm_offset + NORM_VOCAB.len();

   let res = SIG_REGEX.replace_all(&input, b"#");

   for s in res.windows(3) {
       match SIG_VOCAB.get(s) {
           Some(pos) => {
               // adding +1 here as the first position will be the unknown_sig_ngrams
               tensor[*pos as usize + sig_offset + 1] += 1.0f32;
           }
           None => {
               unknown_sig_ngrams += 1;
           }
       }
   }
}
So essentially the pre-processing function performs a ton of hash map lookups, the volume of which depends on the size of the input string, e.g. 1469 lookups for the given benchmark case avg-body-1000.
Optimization attempt #1: HashMap → Aho-Corasick
Rust hash maps are generally quite fast. However, when that many lookups are being performed, it’s not very cache friendly.
So can we do better than hash maps, and what should we try first? The answer is the Aho-Corasick library.
This library provides multiple pattern search principally through an implementation of the Aho-Corasick algorithm, which builds a fast finite state machine for executing searches in linear time.
We can also tune Aho-Corasick settings based on this recommendation:
“You might want to use AhoCorasickBuilder::kind to set your searcher to always use AhoCorasickKind::DFA if search speed is critical and memory usage isn’t a concern.”
static ref NORM_VOCAB_AC: AhoCorasick = AhoCorasick::builder().kind(Some(AhoCorasickKind::DFA)).build(&[
    "abc",
    "def",
    "wuq",
    "ijf",
    "iru",
    "piw",
    "mjw",
    "isn",
    "od ",
    "pro",
    ...
]).unwrap();
Then we use the constructed AhoCorasick dictionary to lookup ngrams using its find_overlapping_iter method:
for mat in NORM_VOCAB_AC.find_overlapping_iter(&input) {
    tensor_input_data[mat.pattern().as_usize() + 1] += 1.0;
}
We ran benchmarks and compared them against the baseline times shown above:
| Benchmark case | Baseline time, μs | Aho-Corasick time, μs | Optimization |
|---|---|---|---|
| preprocessing/long-body-9482 | 248.46 | 129.59 | -47.84% or 1.64x |
| preprocessing/avg-body-1000 | 28.19 | 16.47 | -41.56% or 1.71x |
| preprocessing/avg-url-44 | 1.45 | 1.01 | -30.38% or 1.44x |
| preprocessing/avg-ua-91 | 2.87 | 1.90 | -33.60% or 1.51x |
That’s substantially better – Aho-Corasick DFA does wonders.
Optimization attempt #2: Aho-Corasick → match
One would think optimization with Aho-Corasick DFA is enough and that it seems unlikely that anything else can beat it. Yet, we can throw Aho-Corasick away and simply use the Rust match statement and let the compiler do the optimization for us!
#[inline]
const fn norm_vocab_lookup(ngram: &[u8; 3]) -> usize {
    match ngram {
        b"abc" => 1,
        b"def" => 2,
        b"wuq" => 3,
        b"ijf" => 4,
        b"iru" => 5,
        b"piw" => 6,
        b"mjw" => 7,
        b"isn" => 8,
        b"od " => 9,
        b"pro" => 10,
        ...
        _ => 0,
    }
}```
Here’s how it performs in practice, based on the assembly generated by the Godbolt compiler explorer. The corresponding assembly code efficiently implements this lookup by employing a jump table and byte-wise comparisons to determine the return value based on input sequences, optimizing for quick decisions and minimal branching. Although the example only includes ten ngrams, it’s important to note that in applications like our WAF Attack Score ML models, we deal with thousands of ngrams. This simple match-based approach outshines both HashMap lookups and the Aho-Corasick method.
| Benchmark case | Baseline time, μs | Match time, μs | Optimization |
|---|---|---|---|
| preprocessing/long-body-9482 | 248.46 | 112.96 | -54.54% or 2.20x |
| preprocessing/avg-body-1000 | 28.19 | 13.12 | -53.45% or 2.15x |
| preprocessing/avg-url-44 | 1.45 | 0.75 | -48.37% or 1.94x |
| preprocessing/avg-ua-91 | 2.87 | 1.4076 | -50.91% or 2.04x |
Switching to match gave us another 7-18% drop in latency, depending on the case.
Optimization attempt #3: Regex → WindowedReplacer
So, what exactly is the purpose of Regex::replace_all in pre-processing? Regex is defined and used like this:
pub static SIG_REGEX: Lazy<Regex> =
    Lazy::new(|| RegexBuilder::new("[a-z]+").unicode(false).build().unwrap());
    ...
    let res = SIG_REGEX.replace_all(&input, b"#");
    for s in res.windows(3) {
        tensor[sig_vocab_lookup(s.try_into().unwrap())] += 1.0;
    }
Essentially, all we need is to:
- Replace every sequence of lowercase letters in the input with a single byte “#”.
- Iterate over replaced bytes in a windowed fashion with a step of 3 bytes representing an ngram.
- Look up the ngram index and increment it in the tensor.
This logic seems simple enough that we could implement it more efficiently with a single pass over the input and without any allocations:
type Window = [u8; 3];
type Iter<'a> = Peekable<std::slice::Iter<'a, u8>>;

pub struct WindowedReplacer<'a> {
    window: Window,
    input_iter: Iter<'a>,
}

#[inline]
fn is_replaceable(byte: u8) -> bool {
    matches!(byte, b'a'..=b'z')
}

#[inline]
fn next_byte(iter: &mut Iter) -> Option<u8> {
    let byte = iter.next().copied()?;
    if is_replaceable(byte) {
        while iter.next_if(|b| is_replaceable(**b)).is_some() {}
        Some(b'#')
    } else {
        Some(byte)
    }
}

impl<'a> WindowedReplacer<'a> {
    pub fn new(input: &'a [u8]) -> Option<Self> {
        let mut window: Window = Default::default();
        let mut iter = input.iter().peekable();
        for byte in window.iter_mut().skip(1) {
            *byte = next_byte(&mut iter)?;
        }
        Some(WindowedReplacer {
            window,
            input_iter: iter,
        })
    }
}

impl<'a> Iterator for WindowedReplacer<'a> {
    type Item = Window;

    #[inline]
    fn next(&mut self) -> Option<Self::Item> {
        for i in 0..2 {
            self.window[i] = self.window[i + 1];
        }
        let byte = next_byte(&mut self.input_iter)?;
        self.window[2] = byte;
        Some(self.window)
    }
}
By utilizing the WindowedReplacer, we simplify the replacement logic:
if let Some(replacer) = WindowedReplacer::new(&input) {
    for ngram in replacer.windows(3) {
        tensor[sig_vocab_lookup(ngram.try_into().unwrap())] += 1.0;
    }
}
This new approach not only eliminates the need for allocating additional buffers to store replaced content, but also leverages Rust’s iterator optimizations, which the compiler can more effectively optimize. You can view an example of the assembly output for this new iterator at the provided Godbolt link.
Now let’s benchmark this and compare against the original implementation:
| Benchmark case | Baseline time, μs | Match time, μs | Optimization |
|---|---|---|---|
| preprocessing/long-body-9482 | 248.46 | 51.00 | -79.47% or 4.87x |
| preprocessing/avg-body-1000 | 28.19 | 5.53 | -80.36% or 5.09x |
| preprocessing/avg-url-44 | 1.45 | 0.40 | -72.11% or 3.59x |
| preprocessing/avg-ua-91 | 2.87 | 0.69 | -76.07% or 4.18x |
The new letters replacement implementation has doubled the preprocessing speed compared to the previously optimized version using match statements, and it is four to five times faster than the original version!
Optimization attempt #4: Going nuclear with branchless ngram lookups
At this point, 4-5x improvement might seem like a lot and there is no point pursuing any further optimizations. After all, using an ngram lookup with a match statement has beaten the following methods, with benchmarks omitted for brevity:
| Lookup method | Description |
|---|---|
| std::collections::HashMap | Uses Google’s SwissTable design with SIMD lookups to scan multiple hash entries in parallel. |
| Aho-Corasick matcher with and without DFA | Also utilizes SIMD instructions in some cases. |
| phf crate | A library to generate efficient lookup tables at compile time using perfect hash functions. |
| ph crate | Another Rust library of data structures based on perfect hashing. |
| quickphf crate | A Rust crate that allows you to use static compile-time generated hash maps and hash sets using PTHash perfect hash functions. |
However, if we look again at the assembly of the norm_vocab_lookup function, it is clear that the execution flow has to perform a bunch of comparisons using cmp instructions. This creates many branches for the CPU to handle, which can lead to branch mispredictions. Branch mispredictions occur when the CPU incorrectly guesses the path of execution, causing delays as it discards partially completed instructions and fetches the correct ones. By reducing or eliminating these branches, we can avoid these mispredictions and improve the efficiency of the lookup process. How can we get rid of those branches when there is a need to look up thousands of unique ngrams?
Since there are only 3 bytes in each ngram, we can build two lookup tables of 256 x 256 x 256 size, storing the ngram tensor index. With this naive approach, our memory requirements will be: 256 x 256 x 256 x 2 x 2 = 64 MB, which seems like a lot.
However, given that we only care about ASCII bytes 0..127, then memory requirements can be lower: 128 x 128 x 128 x 2 x 2 = 8 MB, which is better. However, we will need to check for bytes >= 128, which will introduce a branch again.
So can we do better? Considering that the actual number of distinct byte values used in the ngrams is significantly less than the total possible 256 values, we can reduce memory requirements further by employing the following technique:
1. To avoid the branching caused by comparisons, we use precomputed offset lookup tables. This means instead of comparing each byte of the ngram during each lookup, we precompute the positions of each possible byte in a lookup table. This way, we replace the comparison operations with direct memory accesses, which are much faster and do not involve branching. We build an ngram bytes offsets lookup const array, storing each unique ngram byte offset position multiplied by the number of unique ngram bytes:
const NGRAM_OFFSETS: [[u32; 256]; 3] = [
    [
        // offsets of first byte in ngram
    ],
    [
        // offsets of second byte in ngram
    ],
    [
        // offsets of third byte in ngram
    ],
];
2. Then to obtain the ngram index, we can use this simple const function:
#[inline]
const fn ngram_index(ngram: [u8; 3]) -> usize {
    (NGRAM_OFFSETS[0][ngram[0] as usize]
        + NGRAM_OFFSETS[1][ngram[1] as usize]
        + NGRAM_OFFSETS[2][ngram[2] as usize]) as usize
}
3. To look up the tensor index based on the ngram index, we construct another const array at compile time using a list of all ngrams, where N is the number of unique ngram bytes:
const NGRAM_TENSOR_IDX: [u16; N * N * N] = {
    let mut arr = [0; N * N * N];
    arr[ngram_index(*b"abc")] = 1;
    arr[ngram_index(*b"def")] = 2;
    arr[ngram_index(*b"wuq")] = 3;
    arr[ngram_index(*b"ijf")] = 4;
    arr[ngram_index(*b"iru")] = 5;
    arr[ngram_index(*b"piw")] = 6;
    arr[ngram_index(*b"mjw")] = 7;
    arr[ngram_index(*b"isn")] = 8;
    arr[ngram_index(*b"od ")] = 9;
    ...
    arr
};
4. Finally, to update the tensor based on given ngram, we lookup the ngram index, then the tensor index, and then increment it with help of get_unchecked_mut, which avoids unnecessary (in this case) boundary checks and eliminates another source of branching:
#[inline]
fn update_tensor_with_ngram(tensor: &mut [f32], ngram: [u8; 3]) {
    let ngram_idx = ngram_index(ngram);
    debug_assert!(ngram_idx < NGRAM_TENSOR_IDX.len());
    unsafe {
        let tensor_idx = *NGRAM_TENSOR_IDX.get_unchecked(ngram_idx) as usize;
        debug_assert!(tensor_idx < tensor.len());
        *tensor.get_unchecked_mut(tensor_idx) += 1.0;
    }
}
This logic works effectively, passes correctness tests, and most importantly, it’s completely branchless! Moreover, the memory footprint of used lookup arrays is tiny – just ~500 KiB of memory – which easily fits into modern CPU L2/L3 caches, ensuring that expensive cache misses are rare and performance is optimal.
The last trick we will employ is loop unrolling for ngrams processing. By taking 6 ngrams (corresponding to 8 bytes of the input array) at a time, the compiler can unroll the second loop and auto-vectorize it, leveraging parallel execution to improve performance:
const CHUNK_SIZE: usize = 6;

let chunks_max_offset =
    ((input.len().saturating_sub(2)) / CHUNK_SIZE) * CHUNK_SIZE;
for i in (0..chunks_max_offset).step_by(CHUNK_SIZE) {
    for ngram in input[i..i + CHUNK_SIZE + 2].windows(3) {
        update_tensor_with_ngram(tensor, ngram.try_into().unwrap());
    }
}
Tying up everything together, our final pre-processing benchmarks show the following:
| Benchmark case | Baseline time, μs | Branchless time, μs | Optimization |
|---|---|---|---|
| preprocessing/long-body-9482 | 248.46 | 21.53 | -91.33% or 11.54x |
| preprocessing/avg-body-1000 | 28.19 | 2.33 | -91.73% or 12.09x |
| preprocessing/avg-url-44 | 1.45 | 0.26 | -82.34% or 5.66x |
| preprocessing/avg-ua-91 | 2.87 | 0.43 | -84.92% or 6.63x |
The longer input is, the higher the latency drop will be due to branchless ngram lookups and loop unrolling, ranging from six to twelve times faster than baseline implementation.
After trying various optimizations, the final version of pre-processing retains optimization attempts 3 and 4, using branchless ngram lookup with offset tables and a single-pass non-allocating replacement iterator.
There are potentially more CPU cycles left on the table, and techniques like memory pre-fetching and manual SIMD intrinsics could speed this up a bit further. However, let’s now switch gears into looking at inference latency a bit closer.
Model inference optimizations
Initial benchmarks
Let’s have a look at original performance numbers of the WAF Attack Score ML model, which uses TensorFlow Lite 2.6.0:
| Benchmark case | Inference time, μs |
|---|---|
| inference/long-body-9482 | 247.31 |
| inference/avg-body-1000 | 246.31 |
| inference/avg-url-44 | 246.40 |
| inference/avg-ua-91 | 246.88 |
Model inference is actually independent of the original input length, as inputs are transformed into tensors of predetermined size during the pre-processing phase, which we optimized above. From now on, we will refer to a singular inference time when benchmarking our optimizations.
Digging deeper with profiler, we observed that most of the time is spent on the following operations:

| Function name | % Time spent |
|---|---|
| tflite::tensor_utils::PortableMatrixBatchVectorMultiplyAccumulate | 42.46% |
| tflite::tensor_utils::PortableAsymmetricQuantizeFloats | 30.59% |
| tflite::optimized_ops::SoftmaxImpl | 12.02% |
| tflite::reference_ops::MaximumMinimumBroadcastSlow | 5.35% |
| tflite::ops::builtin::elementwise::LogEval | 4.13% |
The most expensive operation is matrix multiplication, which boils down to iteration within three nested loops:
void PortableMatrixBatchVectorMultiplyAccumulate(const float* matrix,
                                                 int m_rows, int m_cols,
                                                 const float* vector,
                                                 int n_batch, float* result) {
  float* result_in_batch = result;
  for (int b = 0; b < n_batch; b++) {
    const float* matrix_ptr = matrix;
    for (int r = 0; r < m_rows; r++) {
      float dot_prod = 0.0f;
      const float* vector_in_batch = vector + b * m_cols;
      for (int c = 0; c < m_cols; c++) {
        dot_prod += *matrix_ptr++ * *vector_in_batch++;
      }
      *result_in_batch += dot_prod;
     ++result_in_batch;
    }
  }
}
This doesn’t look very efficient and many blogs and research papers have been written on how matrix multiplication can be optimized, which basically boils down to:
- Blocking: Divide matrices into smaller blocks that fit into the cache, improving cache reuse and reducing memory access latency.
- Vectorization: Use SIMD instructions to process multiple data points in parallel, enhancing efficiency with vector registers.
- Loop Unrolling: Reduce loop control overhead and increase parallelism by executing multiple loop iterations simultaneously.
To gain a better understanding of how these techniques work, we recommend watching this video, which brilliantly depicts the process of matrix multiplication:
Tensorflow Lite with AVX2
TensorFlow Lite does, in fact, support SIMD matrix multiplication – we just need to enable it and re-compile the TensorFlow Lite library:
if [[ "$(uname -m)" == x86_64* ]]; then
    # On x86_64 target x86-64-v3 CPU to enable AVX2 and FMA.
    arguments+=("--copt=-march=x86-64-v3")
fi
After running profiler again using the SIMD-optimized TensorFlow Lite library:

Top operations as per profiler output:
| Function name | % Time spent |
|---|---|
| tflite::tensor_utils::SseMatrixBatchVectorMultiplyAccumulateImpl | 43.01% |
| tflite::tensor_utils::NeonAsymmetricQuantizeFloats | 22.46% |
| tflite::reference_ops::MaximumMinimumBroadcastSlow | 7.82% |
| tflite::optimized_ops::SoftmaxImpl | 6.61% |
| tflite::ops::builtin::elementwise::LogEval | 4.63% |
Matrix multiplication now uses AVX2 instructions, which uses blocks of 8×8 to multiply and accumulate the multiplication result.
Proportionally, matrix multiplication and quantization operations take a similar time share when compared to non-SIMD version, however in absolute numbers, it’s almost twice as fast when SIMD optimizations are enabled:
| Benchmark case | Baseline time, μs | SIMD time, μs | Optimization |
|---|---|---|---|
| inference/avg-body-1000 | 246.31 | 130.07 | -47.19% or 1.89x |
Quite a nice performance boost just from a few lines of build config change!
Tensorflow Lite with XNNPACK
Tensorflow Lite comes with a useful benchmarking tool called benchmark_model, which also has a built-in profiler.
The tool can be built locally using the command:
bazel build -j 4 --copt=-march=native -c opt tensorflow/lite/tools/benchmark:benchmark_model
After building, benchmarks were run with different settings:
| Benchmark run | Inference time, μs |
|---|---|
| benchmark_model –graph=model.tflite –num_runs=100000 –use_xnnpack=false | 105.61 |
| benchmark_model –graph=model.tflite –num_runs=100000 –use_xnnpack=true –xnnpack_force_fp16=true | 111.95 |
| benchmark_model –graph=model.tflite –num_runs=100000 –use_xnnpack=true | 49.05 |
Tensorflow Lite with XNNPACK enabled emerges as a leader, achieving ~50% latency reduction, when compared to the original Tensorflow Lite implementation.
More technical details about XNNPACK can be found in these blog posts:
Re-running benchmarks with XNNPack enabled, we get the following results:
| Benchmark case | Baseline time, μs TFLite 2.6.0 |
SIMD time, μs TFLite 2.6.0 |
SIMD time, μs TFLite 2.16.1 |
SIMD + XNNPack time, μs TFLite 2.16.1 |
Optimization |
|---|---|---|---|---|---|
| inference/avg-body-1000 | 246.31 | 130.07 | 115.17 | 56.22 | -77.17% or 4.38x |
By upgrading TensorFlow Lite from 2.6.0 to 2.16.1 and enabling SIMD optimizations along with the XNNPack, we were able to decrease WAF ML model inference time more than four-fold, achieving a 77.17% reduction.
Caching inference result
While making code faster through pre-processing and inference optimizations is great, it’s even better when code doesn’t need to run at all. This is where caching comes in. Amdahl’s Law suggests that optimizing only parts of a program has diminishing returns. By avoiding redundant executions with caching, we can achieve significant performance gains beyond the limitations of traditional code optimization.
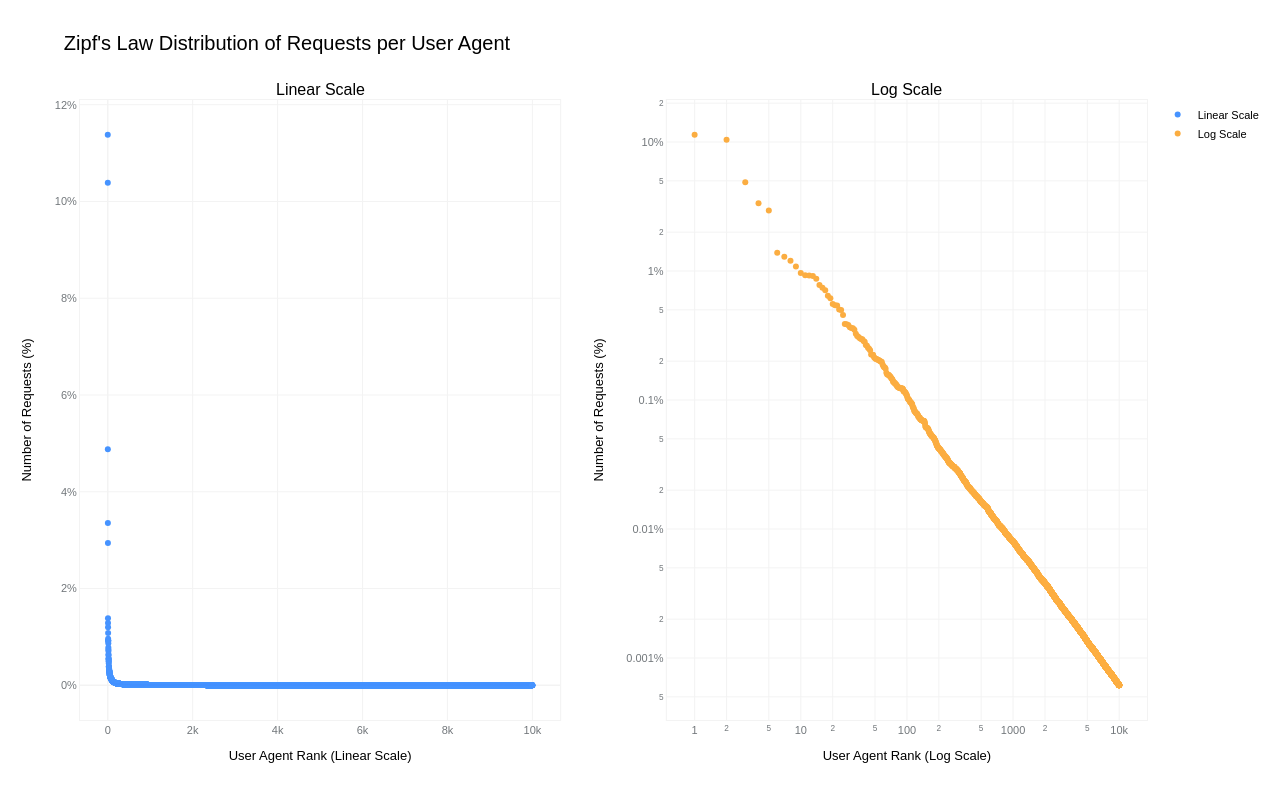
A simple key-value cache would quickly occupy all available memory on the server due to the high cardinality of URLs, HTTP headers, and HTTP bodies. However, because “everything on the Internet has an L-shape” or more specifically, follows a Zipf’s law distribution, we can optimize our caching strategy.
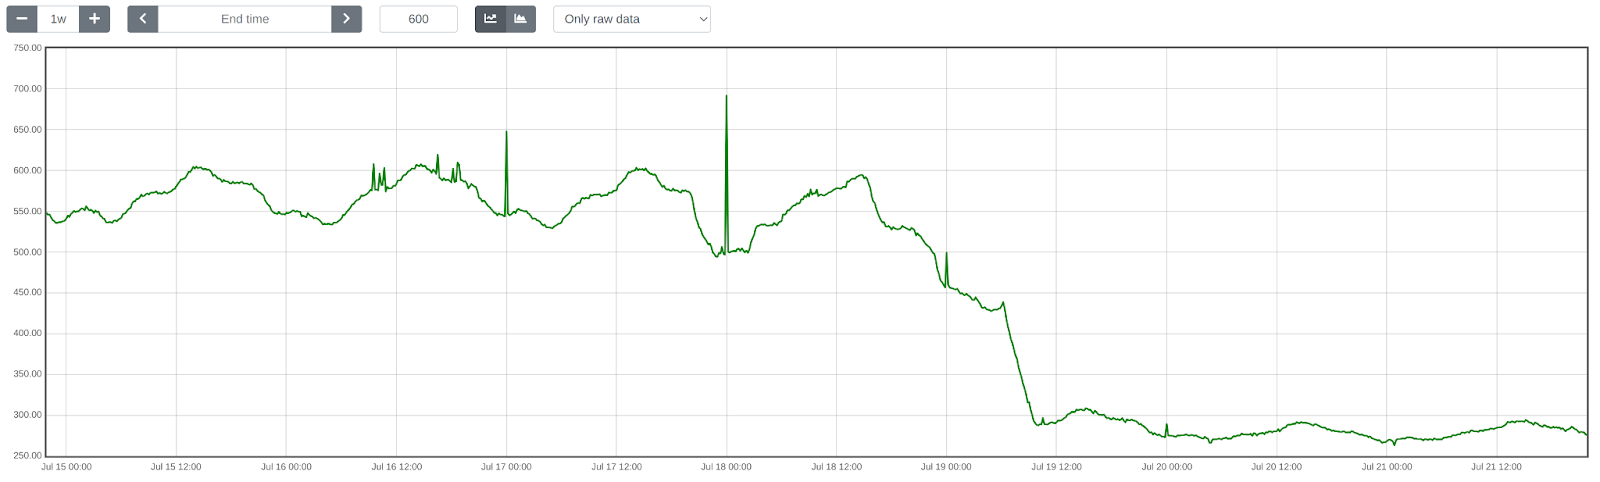
Zipf‘s law states that in many natural datasets, the frequency of any item is inversely proportional to its rank in the frequency table. In other words, a few items are extremely common, while the majority are rare. By analyzing our request data, we found that URLs, HTTP headers, and even HTTP bodies follow this distribution. For example, here is the user agent header frequency distribution against its rank:
By caching the top-N most frequently occurring inputs and their corresponding inference results, we can ensure that both pre-processing and inference are skipped for the majority of requests. This is where the Least Recently Used (LRU) cache comes in – frequently used items stay hot in the cache, while the least recently used ones are evicted.
We use lua-resty-mlcache as our caching solution, allowing us to share cached inference results between different Nginx workers via a shared memory dictionary. The LRU cache effectively exploits the space-time trade-off, where we trade a small amount of memory for significant CPU time savings.
This approach enables us to achieve a ~70% cache hit ratio, significantly reducing latency further, as we will analyze in the final section below.
Optimization results
The optimizations discussed in this post were rolled out in several phases to ensure system correctness and stability.
First, we enabled SIMD optimizations for TensorFlow Lite, which reduced WAF ML total execution time by approximately 41.80%, decreasing from 1519 ➔ 884 μs on average.
Next, we upgraded TensorFlow Lite from version 2.6.0 to 2.16.1, enabled XNNPack, and implemented pre-processing optimizations. This further reduced WAF ML total execution time by ~40.77%, bringing it down from 932 ➔ 552 μs on average. The initial average time of 932 μs was slightly higher than the previous 884 μs due to the increased number of customers using this feature and the months that passed between changes.
Lastly, we introduced LRU caching, which led to an additional reduction in WAF ML total execution time by ~50.18%, from 552 ➔ 275 μs on average.
Overall, we cut WAF ML execution time by ~81.90%, decreasing from 1519 ➔ 275 μs, or 5.5x faster!
To illustrate the significance of this: with Cloudflare’s average rate of 9.5 million requests per second passing through WAF ML, saving 1244 microseconds per request equates to saving ~32 years of processing time every single day! That’s in addition to the savings of 523 microseconds per request or 65 years of processing time per day demonstrated last year in our Every request, every microsecond: scalable machine learning at Cloudflare post about our Bot Management product.
Conclusion
We hope you enjoyed reading about how we made our WAF ML models go brrr, just as much as we enjoyed implementing these optimizations to bring scalable WAF ML to more customers on a truly global scale.
Looking ahead, we are developing even more sophisticated ML security models. These advancements aim to bring our WAF and Bot Management products to the next level, making them even more useful and effective for our customers.