Today we’re happy to introduce Deployments for Workers. Deployments allow developers to keep track of changes to their Worker; not just the code, but the configuration and bindings as well. With deployments, developers now have access to a powerful audit log of changes to their production applications.
And tracking changes is just the beginning! Deployments provide a strong foundation to add: automated deployments, rollbacks, and integration with version control.
Today we’ll dive into the details of deployments, how you can use them, and what we’re thinking about next.
Deployments
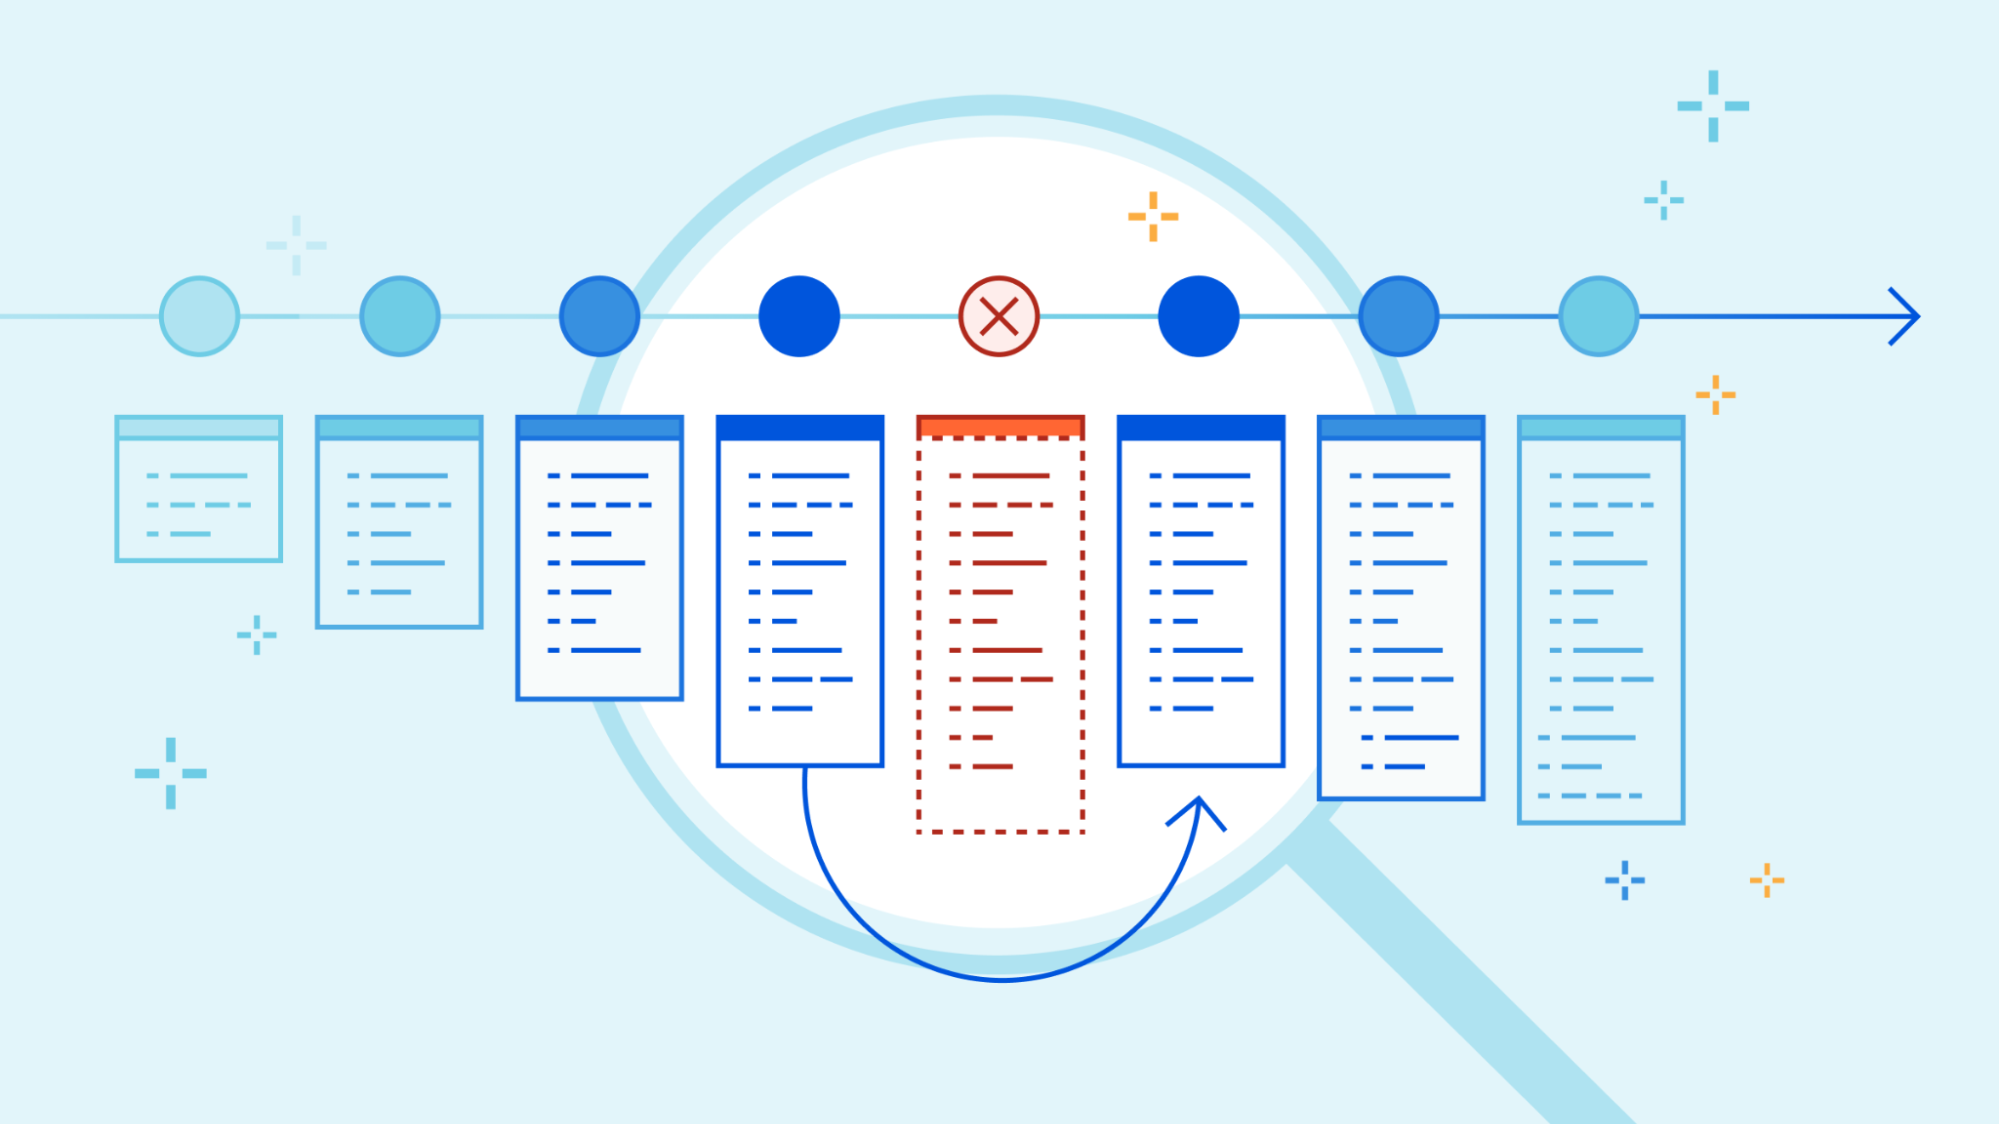
Deployments are a powerful new way to track changes to your Workers. With them, you can track who’s making changes to your Workers, where those changes are coming from, and when those changes are being made.
Cloudflare reports on deployments made from wrangler, API, dashboard, or Terraform anytime you make changes to your Worker’s code, edit resource bindings and environment variables, or modify configuration like name or usage model.
We expose the source of your deployments, so you can track where changes are coming from. For example, if you have a CI job that’s responsible for changes, and you see a user made a change through the Cloudflare dashboard, it’s easy to flag that and dig into whether the deployment was a mistake.
Interacting with deployments
Cloudflare tracks the authors, sources, and timestamps of deployments. If you have a set of users responsible for deployment, or an API Token that’s associated with your CI tool, it’s easy to see which made recent deployments. Each deployment also includes a timestamp, so you can track when those changes were made.
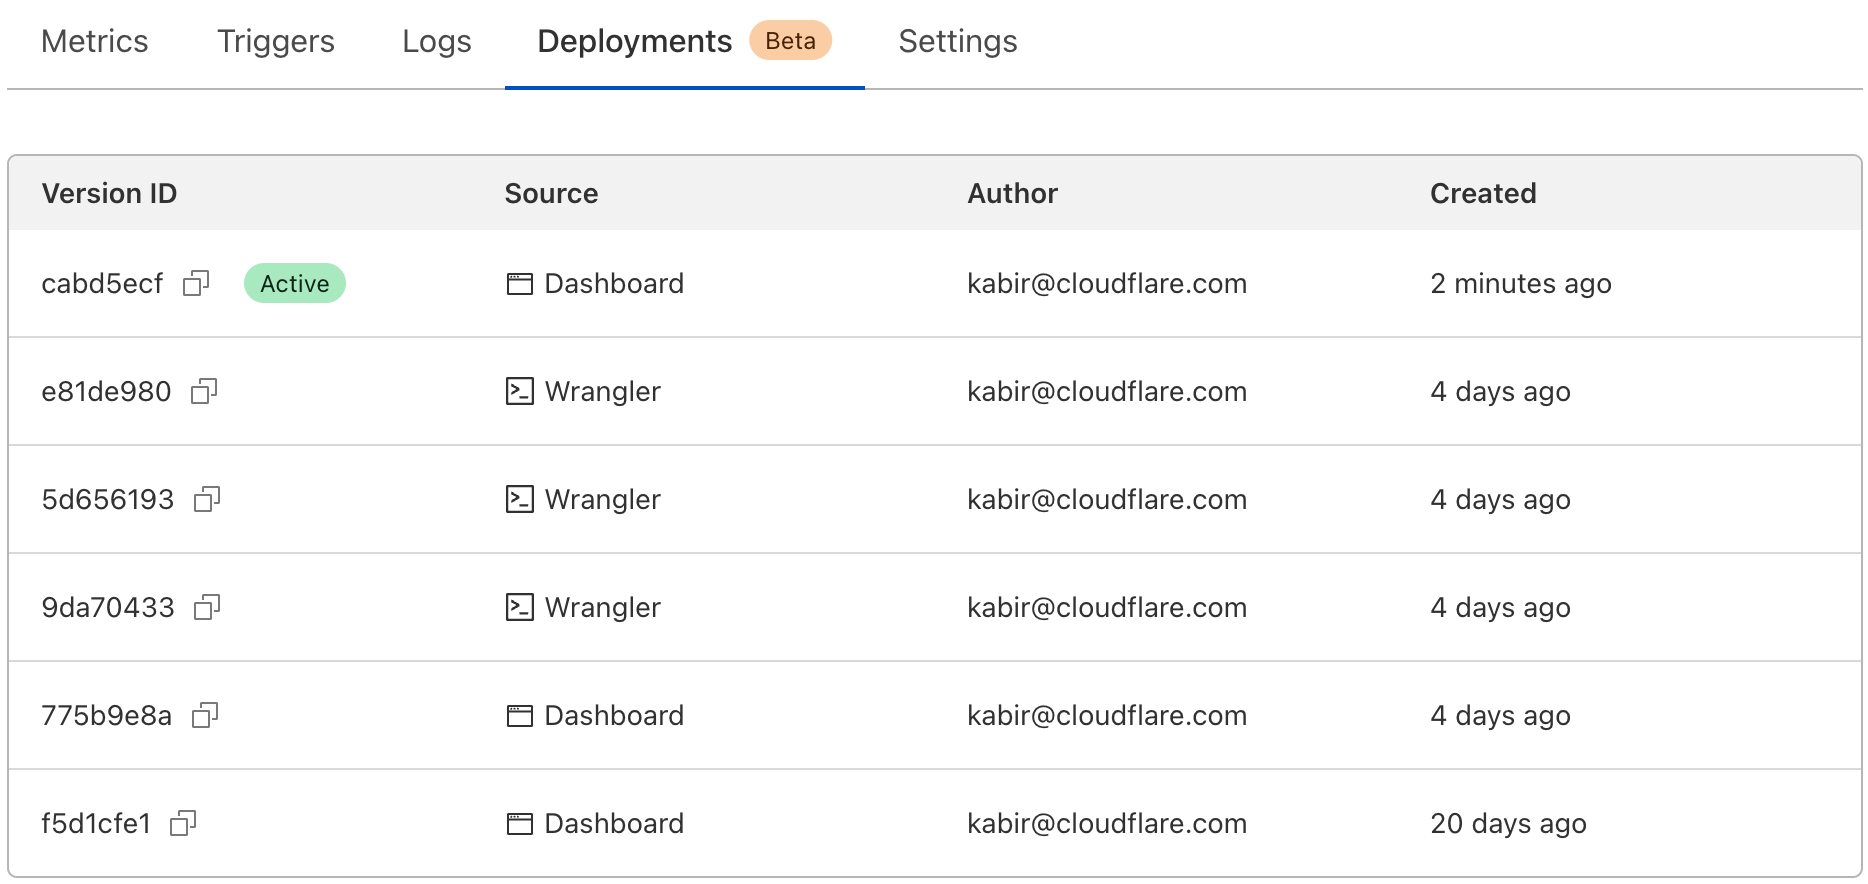
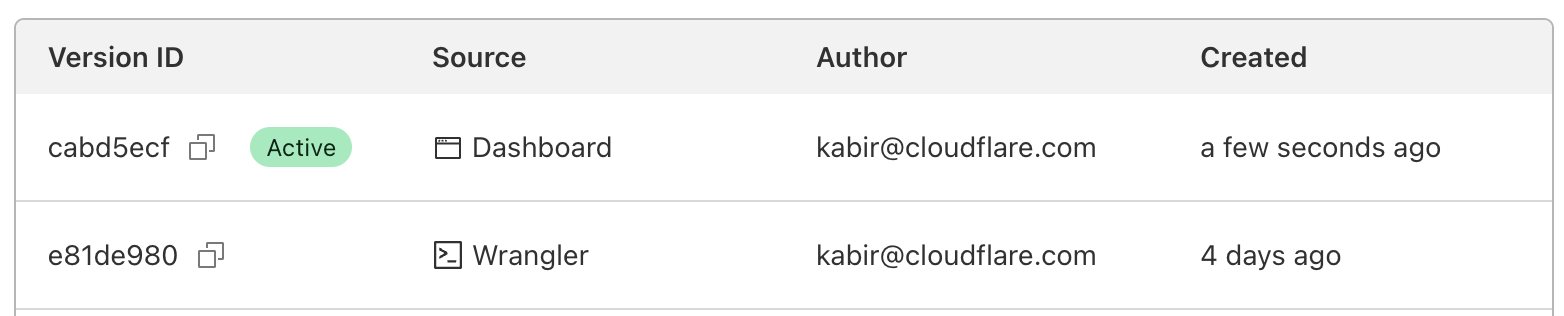
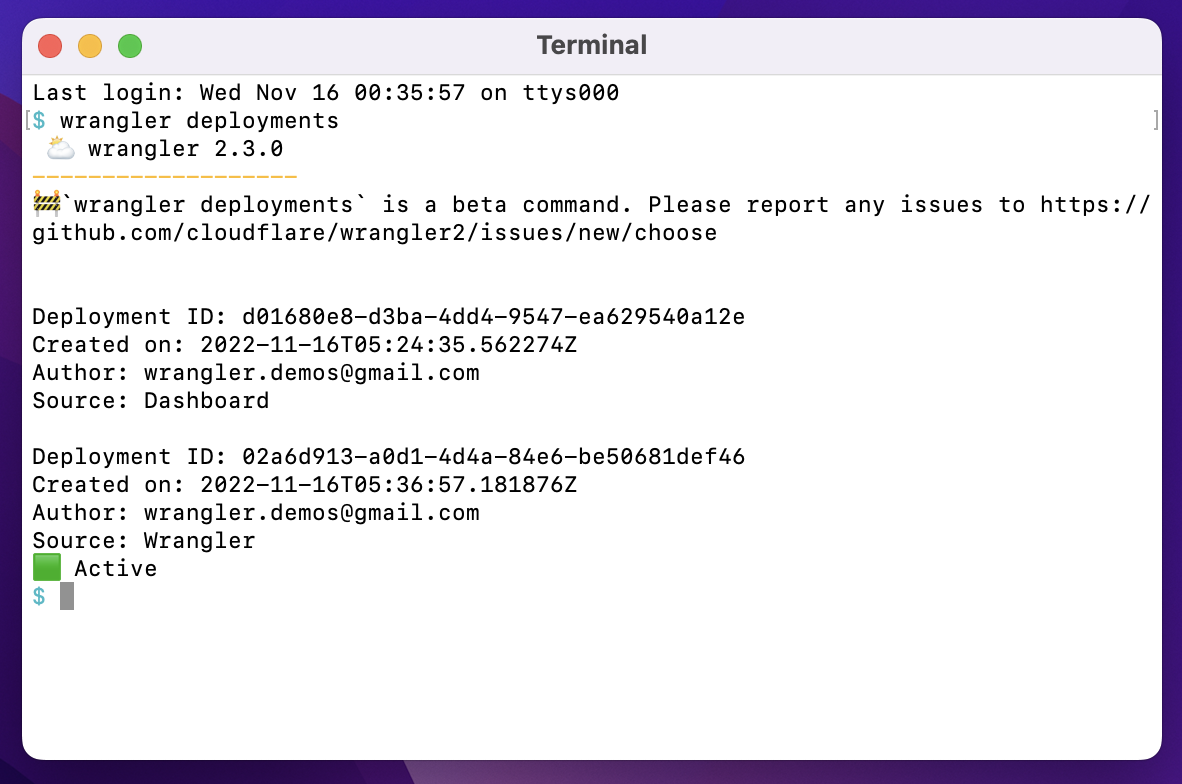
You can access all this deployment information in your Cloudflare dashboard, under your Worker’s Deployments tab. We also report on the active version right at the front of your Worker’s detail page. Wrangler will also report on deployment information. wrangler publish now reports the latest deployed version, and a new `wrangler deployments` command can be used to view a deployment history.
We’re excited to share deployments with our customers, available today in an open beta. As we mentioned up front, we’re just getting started with deployments. We’re also excited for more on-platform tooling like rollbacks, deploy status, deployment rules, and a view-only mode to historical deployments. Beyond that, we want to ensure deployments can be automated from commits to your repository, which means working on version control integrations to services like GitHub, Bitbucket, and Gitlab. We’d love to hear more about how you’re currently using Workers and how we can improve developer experience. If you’re interested, let’s chat.
If you’d like to join the conversation, head over to Cloudflare’s Developer Discord and give us a shout! We love hearing from our customers, and we’re excited to see what you build with Cloudflare.
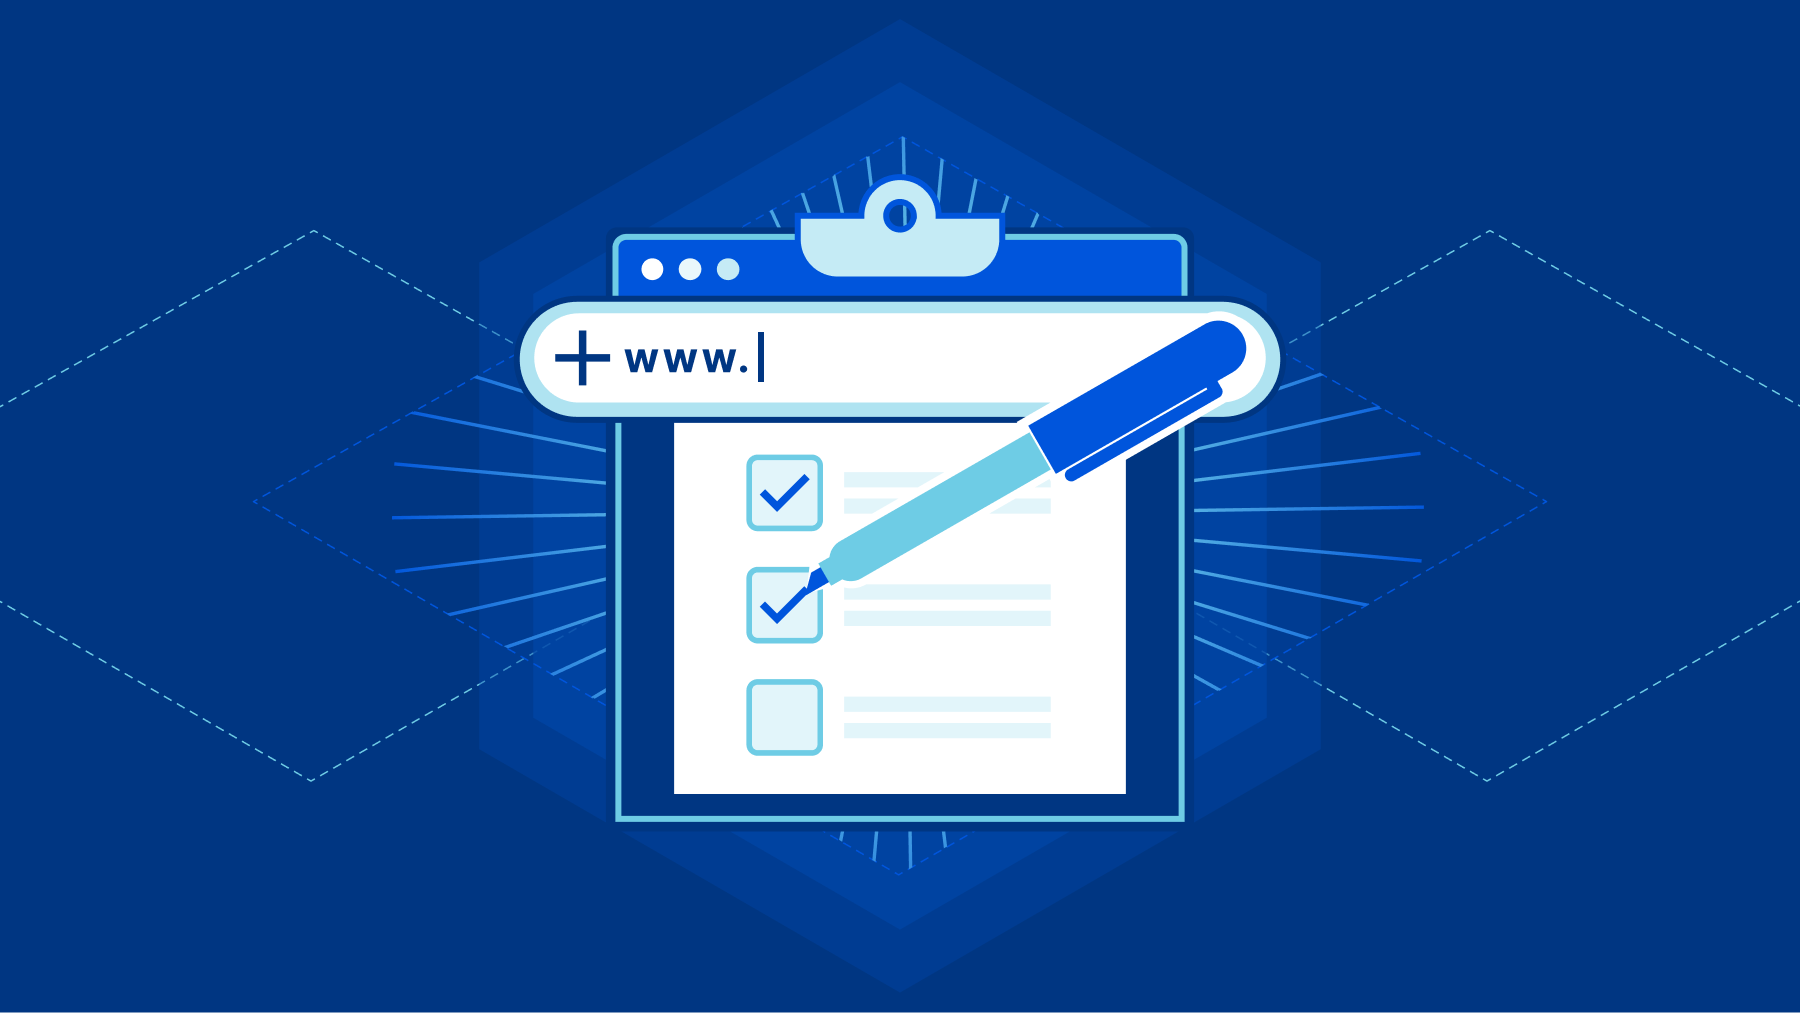
A few months ago we launched Custom Domains into an open beta. Custom Domains allow you to hook up your Workers to the Internet, without having to deal with DNS records or certificates – just enter a valid hostname and Cloudflare will do the rest! The beta’s over, and Custom Domains are now GA.
Custom Domains aren’t just about a seamless developer experience; they also allow you to build a globally distributed instantly scalable application on Cloudflare’s Developer Platform. That’s because Workers leveraging Custom Domains have no concept of an ‘Origin Server’. There’s no ‘home’ to phone to – and that also means your application can use the power of Cloudflare’s global network to run your application, well, everywhere. It’s truly serverless.
Let’s build “Todo”, but without the servers
Today we’ll start a series of posts outlining a simple todo list application. We’ll start with an API and hook it up to the Internet using Custom Domains.
With Custom Domains, you’re treating the whole network as the application server. Any time a request comes into a Cloudflare data center, Workers are triggered in that data center and connect to resources across the network as needed. Our developers don’t need to think about regions, or replication, or spinning up the right number of instances to handle unforeseen load. Instead, just deploy your Workers and Cloudflare will handle the rest.
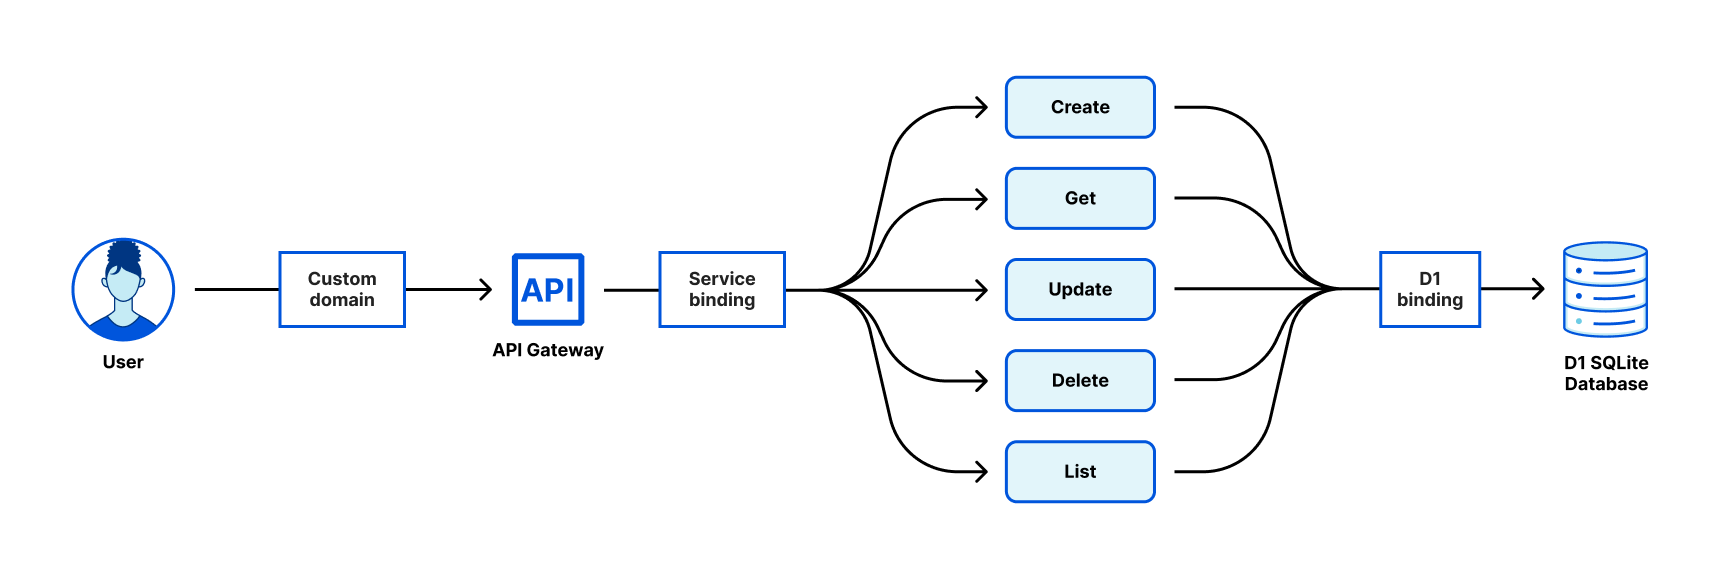
For our todo application, we begin by building an API Gateway to perform routing, any authorization checks, and drop invalid requests. We then fan out to each individual use case in a separate Worker, so our teams can independently make updates or add features to each endpoint without a full redeploy of the whole application. Finally, each Worker has a D1 binding to be able to create, read, update, and delete records from the database. All of this happens on Cloudflare’s global network, so your API is truly available everywhere. The architecture will look something like this:
Bootstrap the D1 Database
First off, we’re going to need a D1 database set up, with a schema for our todo application to run on. If you’re not familiar with D1, it’s Cloudflare’s serverless database offering – explained in more detail here. To get started, we use the wrangler d1 command to create a new database:
After executing this command, you will be asked to add a snippet of code to your wrangler.tomlfile that looks something like this:
[[ d1_databases ]]
binding = "db" # i.e. available in your Worker on env.db
database_name = "<todo | custom-database-name>"
database_id = "<UUID>"
Let’s save that for now, and we’ll put these into each of our private microservices in a few moments. Next, we’re going to create our database schema. It’s a simple todo application, so it’ll look something like this, with some seeded data:
db/schema.sql
DROP TABLE IF EXISTS todos;
CREATE TABLE todos (id INTEGER PRIMARY KEY, todo TEXT, todoStatus BOOLEAN NOT NULL CHECK (todoStatus IN (0, 1)));
INSERT INTO todos (todo, todoStatus) VALUES ("Fold my laundry", 0),("Get flowers for mum’s birthday", 0),("Find Nemo", 0),("Water the monstera", 1);
You can bootstrap your new D1 database by running:
Great! We’ve now got a database running entirely on Cloudflare’s global network.
Build the endpoint Workers
To talk to your database, we’ll spin up a series of private microservices for each endpoint in our application. We want to be able to create, read, update, delete, and list our todos. The full source code for each is available here. Below is code from a Worker that lists all our todos from D1.
The Worker ‘todo-list’ needs to be able to access D1 from the environment variable db. To do this, we’ll define the D1 binding in our wrangler.toml file. We also specify that workers_dev is false, preventing a preview from being generated via workers.dev (we want this to be a private microservice).
list/wrangler.toml
name = "todo-list"
main = "src/list.js"
compatibility_date = "2022-09-07"
workers_dev = false
usage_model = "unbound"

[[ d1_databases ]]
binding = "db" # i.e. available in your Worker on env.db
database_name = "<todo | custom-database-name>"
database_id = "UUID"
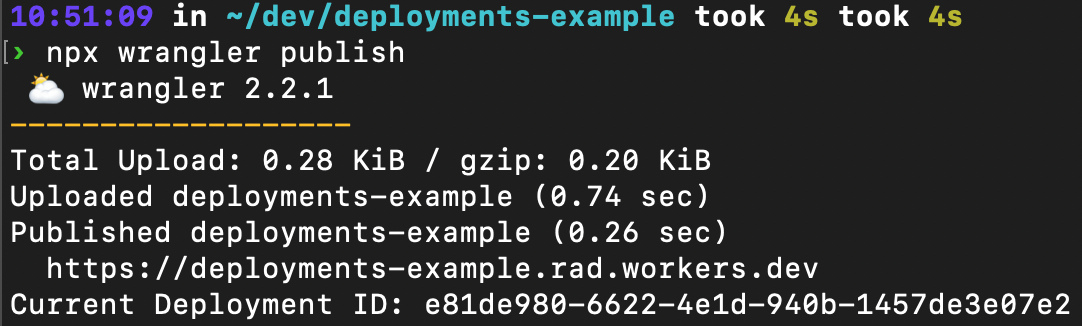
Finally, use wrangler publish to deploy this microservice.
todo/list on ∞main [!]
› wrangler publish
 ⛅️ wrangler 0.0.0-893830aa
-----------------------------------------------------------------------
Retrieving cached values for account from ../../../node_modules/.cache/wrangler
Your worker has access to the following bindings:
- D1 Databases:
  - db: todo (UUID)
Total Upload: 4.71 KiB / gzip: 1.60 KiB
Uploaded todo-list (0.96 sec)
No publish targets for todo-list (0.00 sec)
Notice that wrangler mentions there are no ‘publish targets’ for todo-list. That’s because we haven’t hooked todo-list up to any HTTP endpoints. That’s fine! We’re going to use Service Bindings to route requests through a gateway worker, as described in the architecture diagram above.
Next, reuse these steps to create similar microservices for each of our create, read, update, and delete endpoints. The source code is available to follow along.
Tying it all together with an API Gateway
Each of our Workers are able to talk to the D1 database, but how can our application talk to our API? We’ll build out a simple API gateway to route incoming requests to the appropriate microservice. For the purposes of our application, we’re using a combination of URL pathname and request method to detect which endpoint is appropriate.
gateway/src/gateway.js
export default {
 async fetch(request, env) {
   try{
     const url = new URL(request.url)
     const idPattern = new URLPattern({ pathname: '/:id' })
     if (idPattern.test(request.url)) {
       switch (request.method){
         case 'GET':
           return await env.get.fetch(request.clone())
         case 'PATCH':
           return await env.update.fetch(request.clone())
         case 'DELETE':
           return await env.delete.fetch(request.clone())
         default:
           return new Response("Unsupported method for endpoint /:id", {status: 405})
       }
     } else if (url.pathname == '/') {
       switch (request.method){
         case 'GET':
           return await env.list.fetch(request.clone())
         case 'POST':
           return await env.create.fetch(request.clone())
         default:
           return new Response("Unsupported method for endpoint /", {status: 405})
       }
     }
     return new Response("Not found. Supported endpoints are /:id and /", {status: 404})
   } catch(e) {
     return new Response(e, {status: 500})
   }
 },
};
With our API gateway all set, we just need to expose our application to the Internet using a Custom Domain, and hook up our Service Bindings, so the gateway Worker can access each appropriate microservice. We’ll set this up in a wrangler.toml.
Next, use wrangler publish to deploy your application to the Cloudflare network. Seconds later, you’ll have a simple, functioning todo API built entirely on Cloudflare’s Developer Platform!
› wrangler publish
 ⛅️ wrangler 0.0.0-893830aa
-----------------------------------------------------------------------
Retrieving cached values for account from ../../../node_modules/.cache/wrangler
Your worker has access to the following bindings:
- Services:
  - get: todo-get
  - delete: todo-delete
  - create: todo-create
  - update: todo-update
  - list: todo-list
Total Upload: 1.21 KiB / gzip: 0.42 KiB
Uploaded todo-gateway (0.62 sec)
Published todo-gateway (0.51 sec)
  todos.radiobox.tv (custom domain - zone name: radiobox.tv)
Natively Global
Since it’s built natively on Cloudflare, you can also include Cloudflare’s security suite in front of the application. If we want to prevent SQL Injection attacks for this endpoint, we can enable the appropriate Managed WAF rules on our todos API endpoint. Alternatively, if we wanted to prevent global access to our API (only allowing privileged clients to access the application), we can simply put Cloudflare Access in front, with custom Access Rules.
With Custom Domains on Workers, you’re able to easily create applications that are native to Cloudflare’s global network, instantly. Best of all, your developers don’t need to worry about maintaining DNS records or certificate renewal – Cloudflare handles it all on their behalf. We’d like to give a huge shout out to the 5,000+ developers who used Custom Domains during the open beta period, and those that gave feedback along the way to make this possible. Can’t wait to see what you build next! As always, if you have any questions or would like to get involved, please join us on Discord.
Tune in next time to see how we can build a frontend for our application. In the meantime, you can play around with the todos API we built today at todos.radiobox.tv.
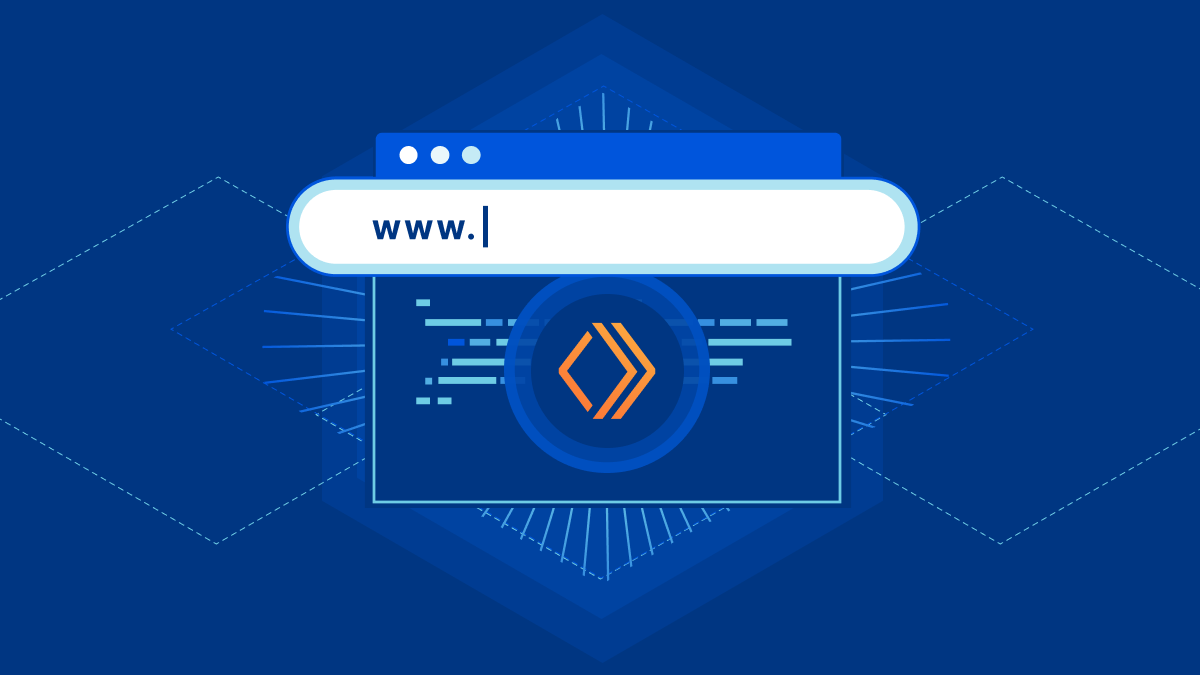
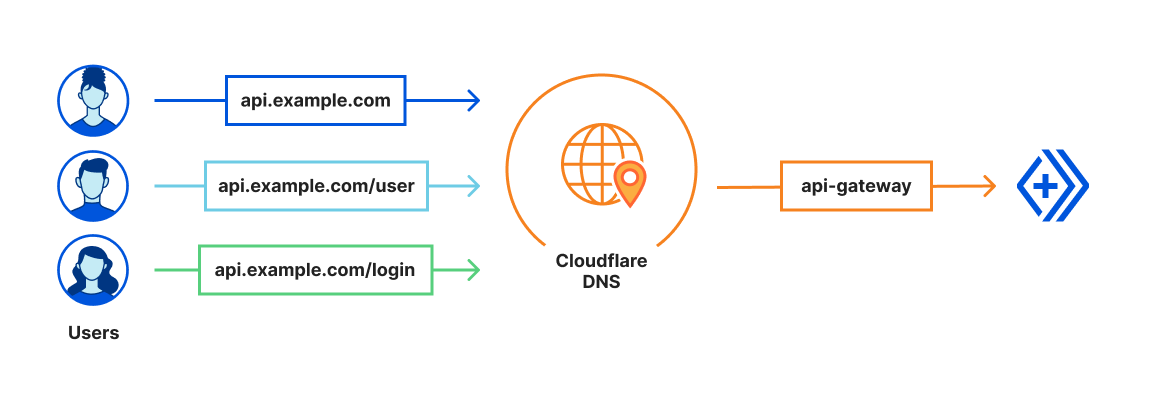
Today, we’re happy to announce Custom Domains for Workers. Custom Domains allow you to hook up a domain to your Worker, without having to fuss about certificates, origin servers or DNS – it just works. Let’s take a look at how we built Custom Domains and how you can use them.
The magic of Cloudflare DNS
Under the hood, we’re leveraging Cloudflare DNS to register your Worker as the origin for your domain. All you need to do is head to your Worker, go to the Triggers tab, and click Add Custom Domain. Cloudflare will handle creating the DNS record and issuing a certificate on your behalf. In seconds, your domain will point to your Worker, and all you need to worry about is writing your code. We’ll also help guide you through the process of creating these new records and replace any existing ones. We built this with a straightforward ethos in mind: we should be clear and transparent about actions we’re taking, and make it easy to understand.
We’ve made a few welcome changes when you’re using a Custom Domain on your Worker. First off, when you send a request to any path on that Custom Domain, your Worker will be triggered. No need to create a route with /* at the end.
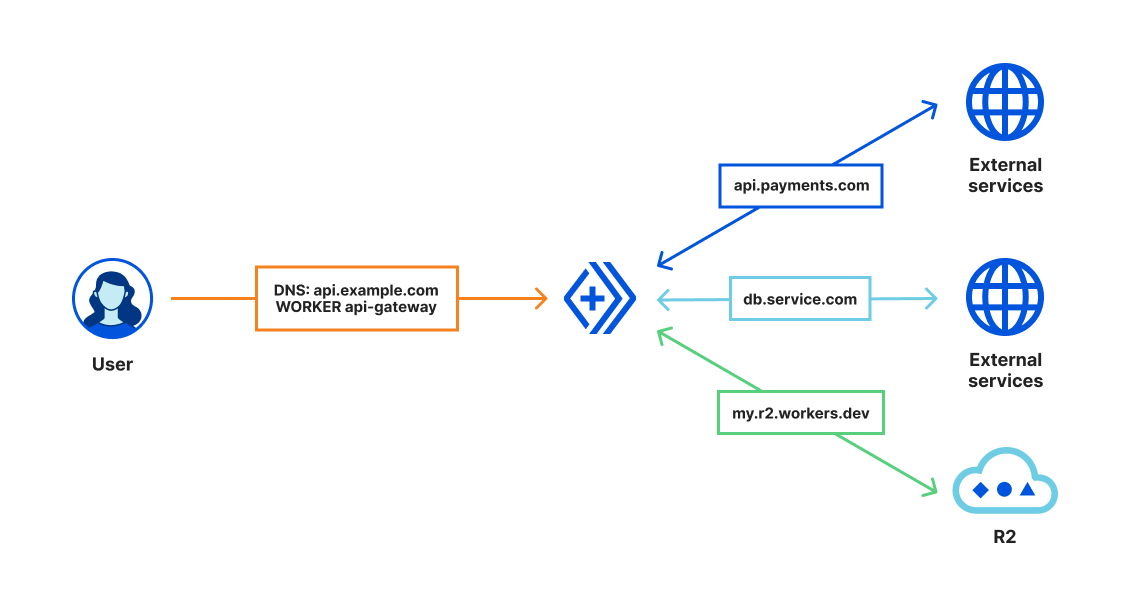
Second, your Custom Domain Worker is considered the ‘origin server’. That means, no need to `fetch(event.request)` once you’re in that Worker; instead, talk to any internal or external services you need to by creating request objects in your code, or talk to other Workers services using any of our available bindings. We’ve increased the limit of external requests you can make, when using our Unbound usage model, to 1,000. You can talk to any services you’d like to – things like payment, communication, analytics, or tracking services come to mind, not to mention your databases. If that’s not enough for your use case, feel free to reach out via Discord or support, and we’ll happily chat.
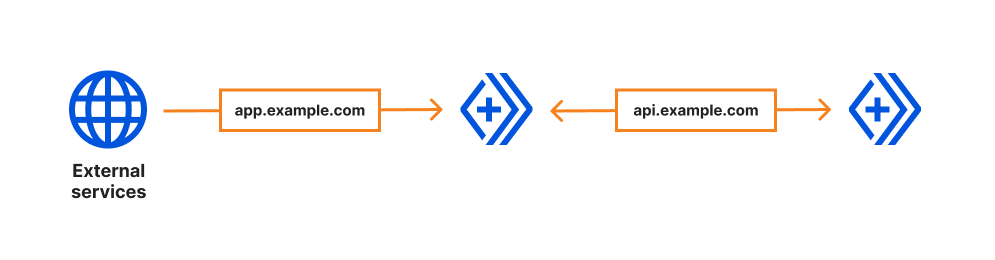
Finally, what if you need to talk to your Worker from another one? Since these Workers act as an origin server, you can just send a normal request to the associated endpoint, and we’ll invoke that Worker – even if it’s on the same Cloudflare zone.
Let’s build an example application
We’ll start by writing our application. I have an example that I’ve called api-gateway below. It checks the incoming request path, and delegates work to downstream Workers using Service Bindings. For any privileged endpoints, it performs an authorization check before executing that code:
export default {
 async fetch(request, environment) {
   const url = new URL(request.url);
   switch (url.pathname) {
     case '/login':
       return await environment.login.fetch(request);

     case '/logout':
       return await environment.logout.fetch(request);

     case '/admin': {
       // Check that the "Authorization" header is sent when authenticated.
       const authCheck = await environment.auth.fetch(request.clone());
       if (authCheck.status != 200) { return authCheck }
       // If the auth check passes, send the request to the /admin endpoint
       return await environment.admin.fetch(request);
     }

     case '/robots.txt':
       return new Response(null, { status: 204 });
   }
   return new Response('Not Found.', { status: 404 });
 }
}```
Now that I have a working application, I want to serve it on my Custom Domain. To hook this up, head over to Workers, Triggers, click ‘Add Custom Domain’, and type in your desired hostname. You’ll be guided through a simple workflow to generate your new Worker record, and your Worker will be the target.
Best of all, with Custom Domains you can reap the performance benefits of DNS-routable Workers; Cloudflare never has to look through a routing table to invoke your Worker. And, by leveraging Service Bindings, you can customize your routing to your heart’s content – using URL parameters, headers, request content, or query strings to appropriately invoke the right Worker at the right time.
We’re excited to see what you build with Custom Domains. Custom Domains are available in an Open Beta starting today. Support is built right into the Cloudflare Dashboard and API’s, and CLI support via Wrangler is coming soon.
Today, we’re happy to unveil a new way to communicate between your Workers. In the spirit of baking more and more flexibility into our Developer Platform, our team has been hard at work building a new API to facilitate Worker to Worker communication: Service Bindings. Service Bindings allow your Workers to send requests to other Workers Services, from your code, without those requests going over the Internet. It opens up a world of composability that was previously closed off by a difficult interface, and makes it a lot easier for you to build complex applications on our developer platform.
Service Bindings allow teams to segment application logic across multiple Workers. By segmenting your logic, your teams can now build with more confidence by only deploying narrowly scoped changes to your applications, instead of recommitting the whole application every time. Service Bindings give developers both composability and confidence. We’ve seen some excellent uses so far, and today we’ll go through one of the more common examples. Alongside this functionality, we’ll show you how Cloudflare’s cost efficiency will save you money.
Example: An API Gateway
Service Bindings allow you to easily expand the number of services running on a single request. Developers can now create a pipeline of Workers that call one another and create a complex series of compute blocks. The ability to separate and compose application logic together has opened Cloudflare Workers up to even more uses.
With Service Bindings, one of our customers has moved multiple services off of their legacy infrastructure by creating a gateway Worker that serves as the entry point of a request. This gateway Worker handles decision-making about request routing and quickly shifts requests to appropriate services – be it on their legacy application servers or their newly created Workers. This project enabled several new teams to onboard as a result, each managing their Worker independently. Large teams need a development ecosystem that allows for granular deployments, minimizing the scope of impact when a bad push to production occurs.
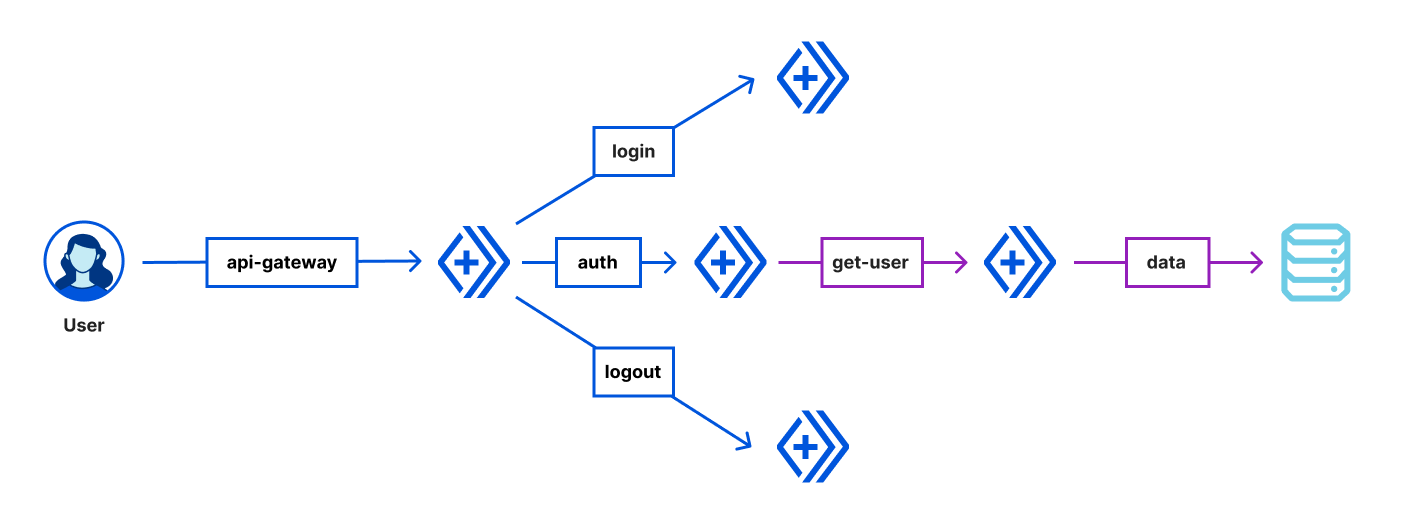
Let’s walk through a simple example of an API gateway Worker that handles routing and user authentication. We’ll build an application that takes in a user request and checks for authorization. If the user isn’t authorized, we block the request. If the user has valid credentials, we’ll fetch the user data. The application will also implement login and logout to change the user authentication state.
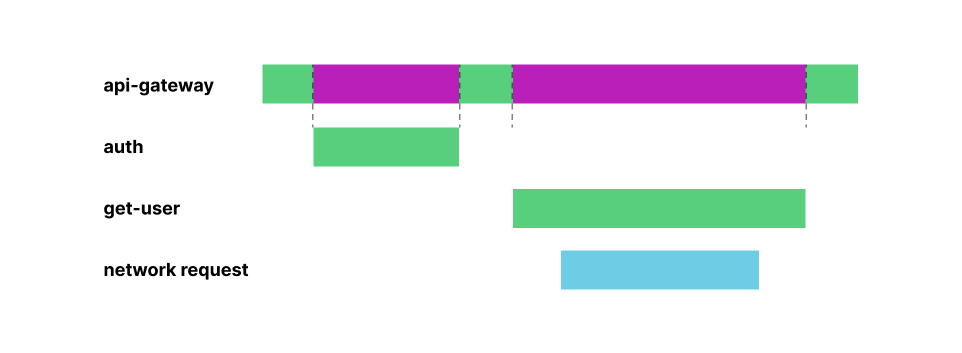
Here, the api-gateway Worker calls login and logout Workers for authentication to privileged endpoints like /getuser. The api-gateway Worker also checks each request for authorization via the auth Worker and allows valid requests to call the get-user Worker. The get-user Worker then makes an outbound network request to gather the required user information, and passes that data back to the client via our api-gateway Worker. The api-gateway Worker is therefore bound to four other Worker Services: auth, get-user, login, and logout.
Let’s take a look at the code for the api-gateway Worker. We’ll see the routes /login, /logout, and /getuser are implemented on this API. For the /getuser route, the api-gateway Worker requires authorization via the auth Worker. Requests to any other endpoints will return a 404 HTTP status code.
export default {
 async fetch(request, environment) {
   const url = new URL(request.url);
   switch (url.pathname) {
     case '/login':
       return await environment.login.fetch(request);

     case '/logout':
       return await environment.logout.fetch(request);

     case '/getuser': {
       // Check that the "Authorization" header is sent when authenticated.
       const authCheck = await environment.auth.fetch(request.clone());
       if (authCheck.status != 200) { return authCheck }
       // If the auth check passes, send the request to the /admin endpoint
       return await environment.getuser.fetch(request);
     }
   }
   return new Response('Not Found.', { status: 404 });
 }
}
The code really is that simple. The separation of concerns allows your teams to work independently of each other, relying on each service to do what it is supposed to do in production. It allows you to separate your code by use case, developing, testing, and debugging more effectively.
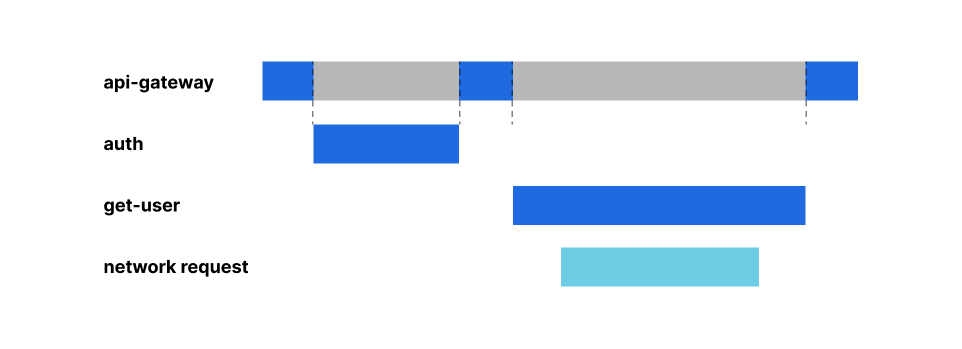
But your next question might be, what am I charged for? Before we get into price, let’s first talk about where the compute execution is happening using our example above. A request to /getuser may look something like this, when looking across the request’s lifecycle:
The get-user Worker makes a network call to gather user information while the auth Worker executes entirely within the Workers runtime. Now that we understand what a single execution looks like, let’s talk about cost efficiency.
Cost efficiency that saves you money
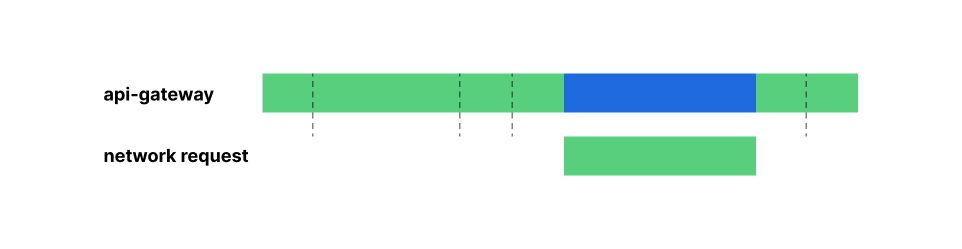
Service Bindings are available for you to use starting today. They cost the same as any normal Worker; each invocation is charged as if it’s a request from the Internet – with one major and important difference. We’re removing the concept of “idle resources” across Workers. You will be charged a single billable duration across all Workers triggered by a single incoming request. This is possible because Cloudflare can share compute resources used by each request across your Workers and pass the resulting cost savings on to our customers.
Revisiting our example above, the api-gateway Worker may be waiting on other dependencies to perform some work, while it sits idle. When we say idle, we mean the time the api-gateway Worker is awaiting a response from the auth and get-user Workers – represented by the gray bars in the request lifetime graphic.
When using Service Bindings, you no longer have to pay for those “idle resources”. With the Workers model, customers can execute work on a single shared compute thread across multiple individual Services, for each and every request. Cloudflare will charge for the amount of time that thread is allocated to your Workers and the time your Workers are awaiting external dependencies. Cloudflare won’t double charge for any overlap.
This is in stark contrast to classic serverless compute models (like Amazon Web Services’ Lambda), where resources are allocated on a per-instance basis, and as such cost is passed to the customer even when those resources are not actively being used. That extra charge is represented by the magenta portions of the request lifetime graphic below.
Cloudflare is able to squash duration down to a single charge, since Cloudflare can share the compute resources between your services. We pass those cost savings on to our customers, so you can pay only for the work you need done, when you need it done, every time.
Getting Started
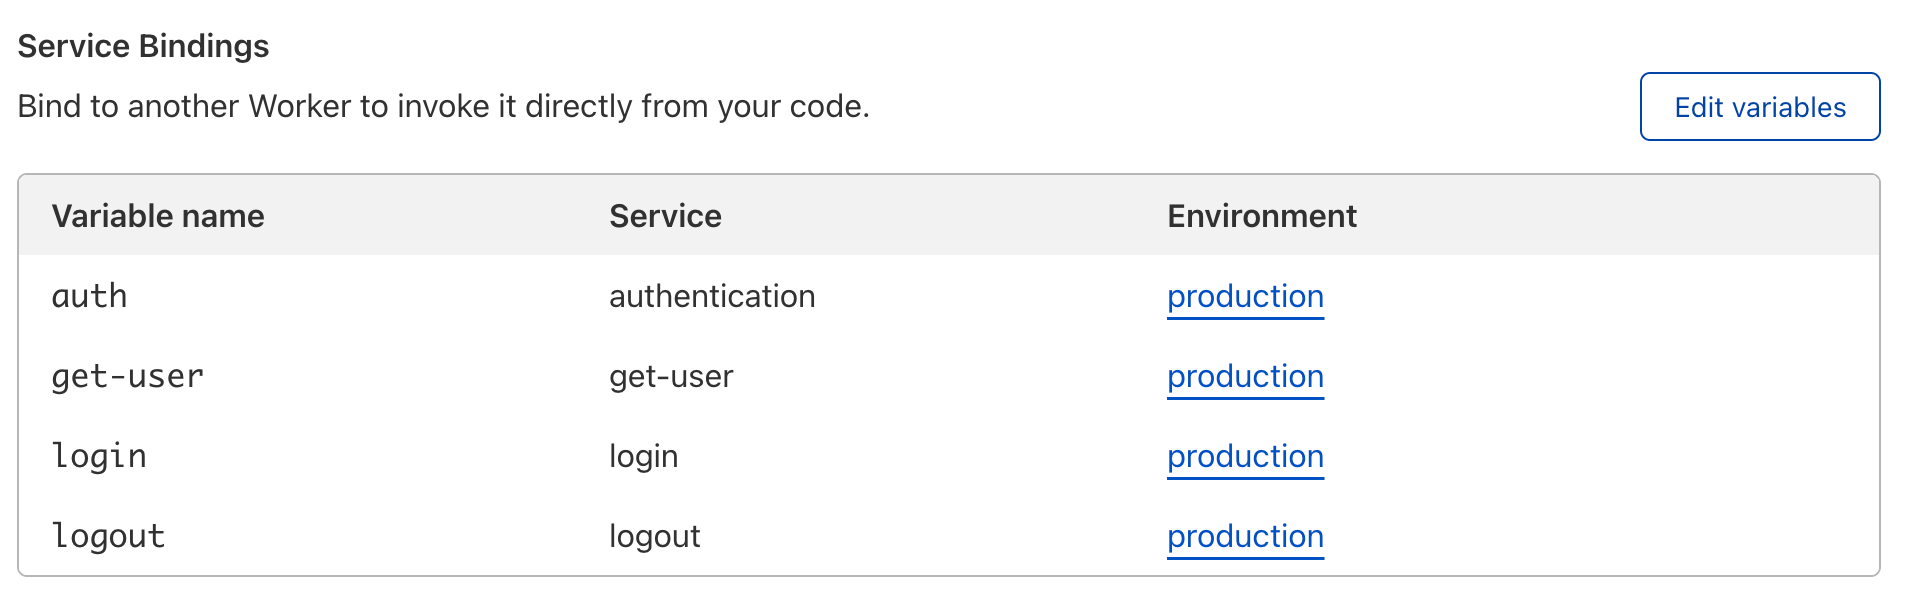
Excited to try our Service Bindings? Head over to the Settings => Variables tab of your Worker, and click ‘Edit Variables’ under Service Bindings. You can then reference those bindings within your code and call fetch() on any one of them.
We can’t wait to see what you build. Check us out on Discord to join the conversation.
Reducing the environmental impact of web searches via Crawler Hints
Providing customers with visibility about their Scope 3 emissions with Carbon Impact Reports
And we are just getting started. We are working to make the Cloudflare network — and our customers’ websites, applications, and networks — as efficient as possible in terms of design, hardware, systems, and protocols. After all, we do not want to lose sight of our responsibilities to our home: our planet Earth.
Green Compute for Workers Cron Triggers
During Impact Week last year, we began testing Green Compute in a closed beta. Green Compute makes Workers Cron Triggers run only in facilities that are powered by renewable energy. We are hoping to incentivize more facilities to implement responsible climate and energy policies.
With Green Compute enabled, Workers Cron Triggers will run only on Cloudflare points of presence that are located in data centers that are powered by 100% renewable energy.
Based on carbon accounting and renewable energy standards like RE100, all Cloudflare operations are considered 100% powered by renewable energy because we purchase the same amount of renewable energy as the total energy we use globally.
However, the data centers we operate in are co-located with facilities owned by other companies. Although our renewable energy purchases cover the energy used by our equipment, all other energy consumed at that facility may or may not be renewable.
Renewable energy can be purchased in a number of ways, including:
Through on-site generation (wind turbines, solar panels)
Directly from renewable energy producers through contractual agreements called Power Purchase Agreements (PPA)
In the form of Renewable Energy Credits (RECs, IRECs, GoOs) from an energy credit market that helps offset energy use on-site
How to get started with Green Compute
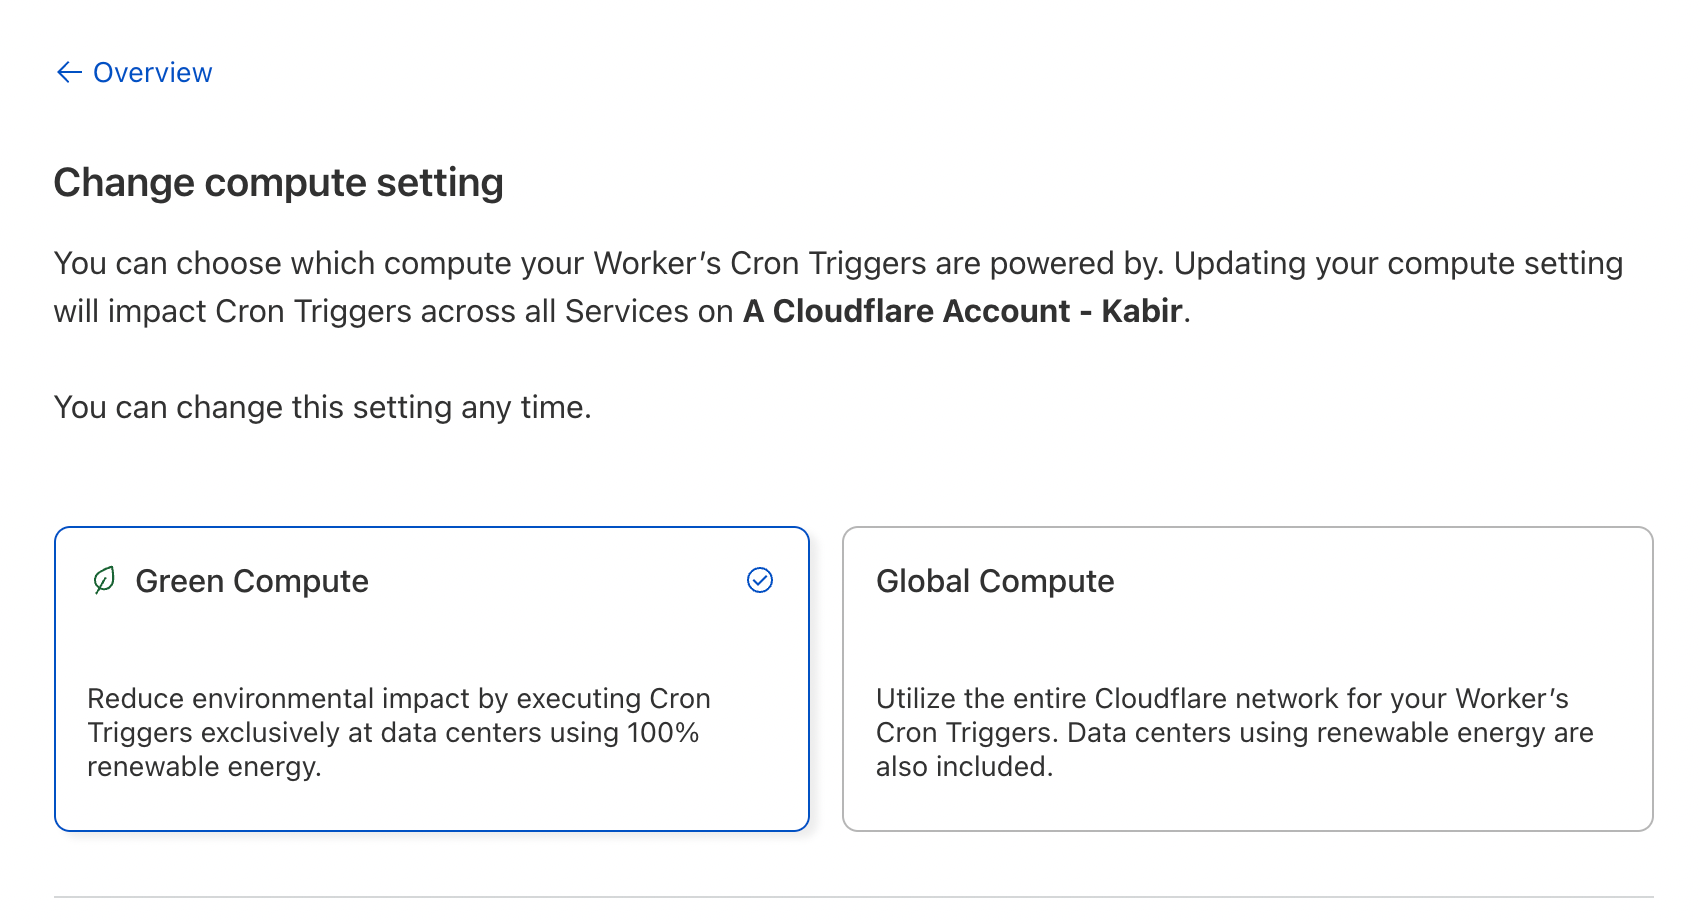
Today, we are happy to announce that we are bringing this function to all our developers — Green Compute is now in open beta. To get started, head to your Workers App, click Change Setting under Compute Setting, and select Green Compute.
Now, any time you create a scheduled workload, you will see a leaf icon indicating that your schedules will be run in data centers powered by renewable energy sources. With just one click, you can help build a better Internet.
Next steps
Want to get more involved with the Cloudflare Developer community, help shape what we build next, or give feedback on Green Compute? Enter our Discord and join the conversation.
Learn more about how Cloudflare is helping build a better Internet via Cloudflare Impact.
Our mission is to enable developers to build their applications, end to end, on our platform, and ruthlessly eliminate limitations that may get in the way. Today, we’re excited to announce you can build large, data-intensive applications on our network, all without breaking the bank; starting today, we’re dropping egress fees to zero.
More Affordable: No Egress Fees
Building more on any platform historically comes with a caveat — high data transfer cost. These costs often come in the form of egress fees. Especially in the case of data intensive workloads, egress data transfer costs can come at a high premium, depending on the provider.
What exactly are data egress fees? They are the costs of retrieving data from a cloud provider. Cloud infrastructure providers generally pay for bandwidth based on capacity, but often bill customers based on the amount of data transferred. Curious to learn more about what this means for end users? We recently wrote an analysis of AWS’ Egregious Egress — a good read if you would like to learn more about the ‘Hotel California’ model AWS has spun up. Effectively, data egress fees lock you into their platform, making you choose your provider based not on which provider has the best infrastructure for your use case, but instead choosing the provider where your data resides.
At Cloudflare, we’re working to flip the script for our customers. Our recently announced R2 Storage waives the data egress fees other providers implement for similar products. Cloudflare is a founding member of the Bandwidth Alliance, aiming to help our mutual customers overcome these data transfer fees.
We’re keeping true to our mission and, effective immediately, dropping all Egress Data Transfer fees associated with Workers Unbound and Durable Objects. If you’re using Workers Unbound today, your next bill will no longer include Egress Data Transfer fees. If you’re not using Unbound yet, now is a great time to experiment. With Workers Unbound, get access to longer CPU time limits and pay only for what you use, and don’t worry about the data transfer cost. When paired with Bandwidth Alliance partners, this is a cost-effective solution for any data intensive workloads.
More Unbound: 15 Minutes
This week has been about defining what the future of computing is going to look like. Workers are great for your latency sensitive workloads, with zero-milliseconds cold start times, fast global deployment, and the power of Cloudflare’s network. But Workers are not limited to lightweight tasks — we want you to run your heavy workloads on our platform as well. That’s why we’re announcing you can now use up to 15 minutes of CPU time on your Workers! You can run your most compute-intensive tasks on Workers using Cron Triggers. To get started, head to the Settings tab in your Worker and select the ‘Unbound’ usage model.
Once you’ve confirmed your Usage Model is Unbound, switch to the Triggers tab and click Add Cron Trigger. You’ll see a ‘Maximum Duration’ is listed, indicating whether your schedule is eligible for 15 Minute workloads.
Wait, there’s more (literally!)
That’s not all. As a platform, it is validating to see our customers want to grow even more with us, and we’ve been working to address these restrictions. That’s why, starting today, all customers will be allowed to deploy up to 100 Worker scripts. With the introduction of Services, that represents up to 100 environments per account. This higher limit will allow our customers to migrate more use cases to the Workers platform.
We’re also delighted to announce that, alongside this increase, the Workers platform will plan to support scripts larger in size. This increase will allow developers to build Workers with more libraries and new possibilities, like running Golang with WASM. Check out an example of esbuild running on a Worker, in a script that’s just over 2MB compressed. If you’re interested in larger script sizes, sign up here.
The future of cloud computing is here, and it’s on Cloudflare. Workers has always been the secure, fast serverless offering, and has recently been named a leader in the space. Now, it is even more affordable and flexible too. We can’t wait to see what ambitious projects our customers build. Developers are now better positioned than ever to deploy large and complex applications on Cloudflare. Excited to build using Workers, or get engaged with the community? Join our Discord server to keep up with the latest on Cloudflare Workers.
At Cloudflare, we’re building the best compute platform in the world. We want to make it easy, seamless, and obvious to build your applications with us. But simply making the best compute platform is not enough — at the heart of your applications are the data they interact with.
Cloudflare has multiple data storage solutions available today: Workers KV, R2, and Durable Objects. All three follow Cloudflare’s design goals for Workers: global by default, infinitely scalable, and delightful for developers to use. We’ve partnered with third-party storage solutions like Fauna, MongoDB and Prisma, who have built data platforms that align beautifully with our design goals and written tutorials for databases that already support HTTP connections.
The one area that’s been sorely missed: relational databases. Cloudflare itself runs on relational databases, and we’re not alone. In April, we asked which Node libraries you wanted us to support, and four of the top five requests were related to databases. For this Full Stack Week, we asked ourselves: how could we support relational databases in a way that aligned with our design goals?
Today, we’re taking a first step towards that world by announcing support for relational databases, including Postgres and MySQL from Workers.
Connecting to a database is no simple task — if it were as easy as passing a connection string to a database driver, we would have already done it. We’ve had to overcome several hurdles to reach this point, and have several more still to conquer.
Our goal with this announcement is to work with you, our developers, to solve the unique pain points that come from accessing databases inside Workers. If you’d like to work with us, fill out this form or join us on Discord — this is just the beginning. If you’d just like to grab the code and play around, use this example to get started connecting to your own database, or check out our demo.
Why are Database Connectors so hard to build?
Serverless database connections are challenging to support for several reasons.
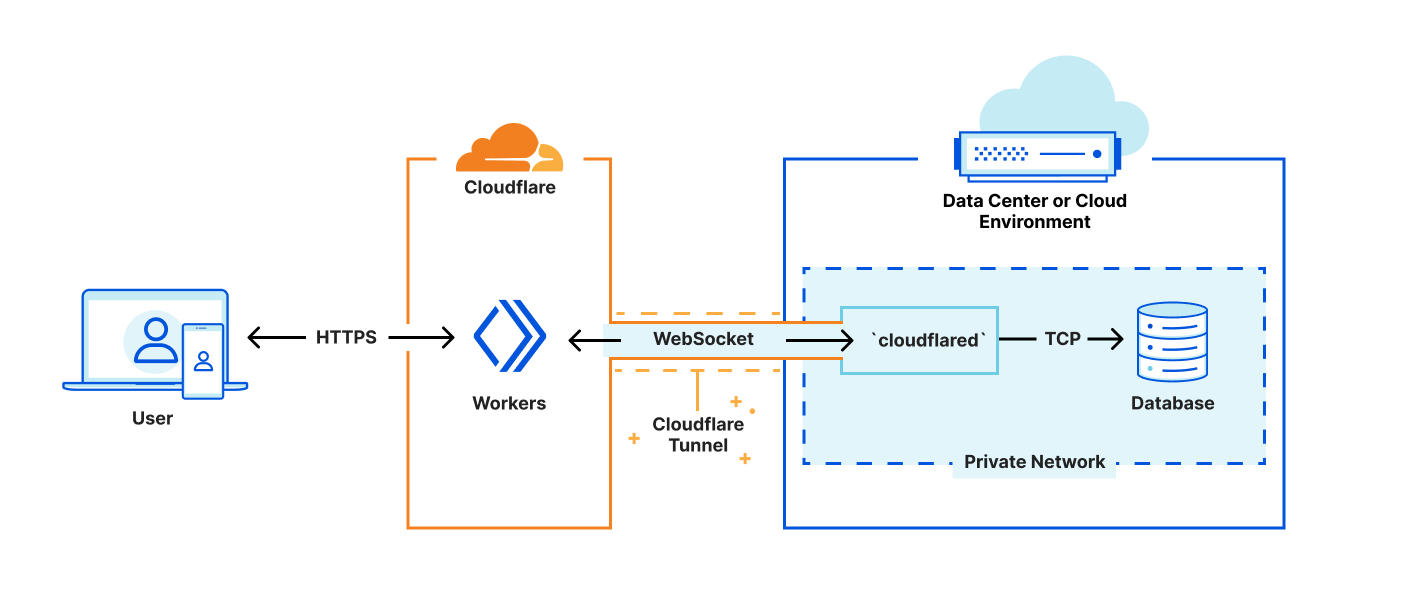
Databases are needy — they often require TCP connections, since they assume long-lived connections between an application server and the database. The Workers runtime doesn’t currently support TCP connections, so we’ve only been able to support HTTP-based databases or proxies.
Like a relationship, establishing a connection isn’t quite enough. Developers use client libraries for databases to make submitting queries and managing the responses easy. Since the Workers runtime is not entirely Node.js compatible, we need to either roll our own database library or find one that does not use unsupported built-in libraries.
Finally, databases are sensitive. It often takes external libraries to manage shared connections between an application server and a database, since these connections tend to be expensive to establish.
Moving past these challenges
Our approach today gives us the foundation to address each of these challenges in creative ways going forward.
First, we’re leveraging cloudflared to create a secure tunnel between Cloudflare and a private network within your existing infrastructure. Cloudflared already supports proxying HTTP to TCP over WebSockets — Our challenge is providing interfaces that look like the socket interfaces existing libraries expect, while rewiring the implementations to redirect reads and writes to our websocket. This method is fast, safe, and secure; but limiting in that we lack control of where to direct the final connections. This is a problem we will solve soon, but until then our approach is essential to gathering latency and performance data to see where else we need to improve.
Next, we’ve created a shim-layer that adapts the socket API from a popular runtime to connect directly to databases using a WebSocket. This allows us to bundle code as-is, without forking or otherwise making significant changes to the database library. As part of this announcement, we’ve published a tutorial on how to connect to and query a Postgres database from your Workers, using existing Cloudflare technology and a driver from the growing community at Deno. We’re excited to work with the upstream maintainers, on expanding support.
Finally, we’re most excited for how this approach will let us begin to manage connection pooling and connection establishment overhead. While our current tech demo requires setting up the Cloudflare Tunnel on your own infrastructure, we’re looking for customers who’d like to pilot a model where Cloudflare hosts the tunnel for you.
Where we’re going
We’re just getting started. Our goal with today’s announcement is to find customers who are looking to build new applications or migrate existing applications to Workers while working with data that’s stored in a relational database.
Just as Cloudflare started by providing security, performance, and reliability for customer’s websites, we’re excited about a future where Cloudflare manages database connections, handles replication of data across cloud providers and provides low-latency access to data globally.
First, we’re looking to add support for TCP into the runtime natively. With native support for TCP we’ll not only have better support for databases, but expand the Workers runtime to work with data infrastructure more broadly.
Our position in the network layer of the stack makes providing performance, security benefits and extremely reduced egress costs to global databases all possible realities. To do so, we’ll repurpose the HTTP to TCP proxy service that we’ve currently built and run it for developers as a connection pooling service, managing connections to their databases on their behalf.
Finally, our network makes caching data and making it accessible globally at low latency possible. Once we have connections back to your data, making it globally accessible in Cloudflare’s network will unlock fundamentally new architectures for distributed data.
Take our connectors for a spin
Want to check things out? There are three main steps to getting up-and-running:
Deploying cloudflared within your infrastructure.
Deploying a database that connects to cloudflared.
Deploying a Worker with the database driver that submits queries.
To provide the best experiences, we use technologies like cookies to store and/or access device information. Consenting to these technologies will allow us to process data such as browsing behavior or unique IDs on this site. Not consenting or withdrawing consent, may adversely affect certain features and functions.
Functional
Always active
The technical storage or access is strictly necessary for the legitimate purpose of enabling the use of a specific service explicitly requested by the subscriber or user, or for the sole purpose of carrying out the transmission of a communication over an electronic communications network.
Preferences
The technical storage or access is necessary for the legitimate purpose of storing preferences that are not requested by the subscriber or user.
Statistics
The technical storage or access that is used exclusively for statistical purposes.The technical storage or access that is used exclusively for anonymous statistical purposes. Without a subpoena, voluntary compliance on the part of your Internet Service Provider, or additional records from a third party, information stored or retrieved for this purpose alone cannot usually be used to identify you.
Marketing
The technical storage or access is required to create user profiles to send advertising, or to track the user on a website or across several websites for similar marketing purposes.