Remote bindings are bindings that connect to a deployed resource on your Cloudflare account instead of a locally simulated resource – and recently, we announced that remote bindings are now generally available.
With this launch, you can now connect to deployed resources like R2 buckets and D1 databases while running Worker code on your local machine. This means you can test your local code changes against real data and services, without the overhead of deploying for each iteration.
In this blog post, we’ll dig into the technical details of how we built it, creating a seamless local development experience.
Developing on the Workers platform
A key part of the Cloudflare Workers platform has been the ability to develop your code locally without having to deploy it every time you wanted to test something – though the way we’ve supported this has changed greatly over the years.
We started with wrangler dev running in remote mode. This works by deploying and connecting to a preview version of your Worker that runs on Cloudflare’s network every time you make a change to your code, allowing you to test things out as you develop. However, remote mode isn’t perfect — it’s complex and hard to maintain. And the developer experience leaves a lot to be desired: slow iteration speed, unstable debugging connections, and lack of support for multi-worker scenarios.
Still, the original remote mode remained accessible via a flag: wrangler dev --remote. When using remote mode, all the DX benefits of a fully local experience and the improvements we’ve made over the last few years are bypassed. So why do people still use it? It enables one key unique feature: binding to remote resources while locally developing. When you use local mode to develop a Worker locally, all of your bindings are simulated locally using local (initially empty) data. This is fantastic for iterating on your app’s logic with test data – but sometimes that’s not enough, whether you want to share resources across your team, reproduce bugs tied to real data, or just be confident that your app will work in production with real resources.
Given this, we saw an opportunity: If we could bring the best parts of remote mode (i.e. access to remote resources) to wrangler dev, there’d be one single flow for developing Workers that would enable many use cases, while not locking people out of the advancements we’ve made to local development. And that’s what we did!
As of Wrangler v4.37.0 you can pick on a per-binding basis whether a binding should use remote or local resources, simply by specifying the remote option. It’s important to re-emphasise this—you only need to add remote: true! There’s no complex management of API keys and credentials involved, it all just works using Wrangler’s existing Oauth connection to the Cloudflare API.
The eagle-eyed among you might have realised that some bindings already worked like this, accessing remote resources from local dev. Most prominently, the AI binding was a trailblazer for what a general remote bindings solution could look like. From its introduction, the AI binding always connected to a remote resource, since a true local experience that supports all the different models you can use with Workers AI would be impractical and require a huge upfront download of AI models.
As we realised different products within Workers needed something similar to remote bindings (Images and Hyperdrive, for instance), we ended up with a bit of a patchwork of different solutions. We’ve now unified under a single remote bindings solution that works for all binding types.
How we built it
We wanted to make it really easy for developers to access remote resources without having to change their production Workers code, and so we landed on a solution that required us to fetch data from the remote resource at the point of use in your Worker.
const value = await env.KV.get("some-key")
The above code snippet shows accessing the “some-key” value in the env.KV KV namespace, which is not available locally and needs to be fetched over the network.
So if that was our requirement, how would we get there? For instance, how would we get from a user calling env.KV.put(“key”, “value”) in their Worker to actually storing that in a remote KV store? The obvious solution was perhaps to use the Cloudflare API. We could have just replaced the entire env locally with stub objects that made API calls, transforming env.KV.put() into PUT http:///accounts/{account_id}/storage/kv/namespaces/{namespace_id}/values/{key_name}.
This would’ve worked great for KV, R2, D1, and other bindings with mature HTTP APIs, but it would have been a pretty complex solution to implement and maintain. We would have had to replicate the entire bindings API surface and transform every possible operation on a binding to an equivalent API call. Additionally, some binding operations don’t have an equivalent API call, and wouldn’t be supportable using this strategy.
Instead, we realised that we already had a ready-made API waiting for us — the one we use in production!
How bindings work under the hood in production
Most bindings on the Workers platform boil down to essentially a service binding. A service binding is a link between two Workers that allows them to communicate over HTTP or JSRPC (we’ll come back to JSRPC later).
For example, the KV binding is implemented as a service binding between your authored Worker and a platform Worker, speaking HTTP. The JS API for the KV binding is implemented in the Workers runtime, and translates calls like env.KV.get() to HTTP calls to the Worker that implements the KV service.
Diagram showing a simplified model of how a KV binding works in production
You may notice that there’s a natural async network boundary here — between the runtime translating the env.KV.get() call and the Worker that implements the KV service. We realised that we could use that natural network boundary to implement remote bindings. Instead of the production runtime translating env.KV.get() to an HTTP call, we could have the local runtime (workerd) translate env.KV.get() to an HTTP call, and then send it directly to the KV service, bypassing the production runtime. And so that’s what we did!
Diagram showing a locally run worker with a single KV binding, with a single remote proxy client that communicates to the remote proxy server, which in turn communicates with the remote KV
The above diagram shows a local Worker running with a remote KV binding. Instead of being handled by the local KV simulation, it’s now being handled by a remote proxy client. This Worker then communicates with a remote proxy server connected to the real remote KV resource, ultimately allowing the local Worker to communicate with the remote KV data seamlessly.
Each binding can independently either be handled by a remote proxy client (all connected to the same remote proxy server) or by a local simulation, allowing for very dynamic workflows where some bindings are locally simulated while others connect to the real remote resource, as illustrated in the example below:
The above diagram and config shows a Worker (running on your computer) bound to 3 different resources—two local (KV & R2), and one remote (KV_2)
How JSRPC fits in
The above section deals with bindings that are backed by HTTP connections (like KV and R2), but modern bindings use JSRPC. That means we needed a way for the locally running workerd to speak JSRPC to a production runtime instance.
In a stroke of good luck, a parallel project was going on to make this possible, as detailed in the Cap’n Web blog. We integrated that by making the connection between the local workerd instance and the remote runtime instance communicate over websockets using Cap’n Web, enabling bindings backed by JSRPC to work. This includes newer bindings like Images, as well as JSRPC service bindings to your own Workers.
Remote bindings with Vite, Vitest and the JavaScript ecosystem
We didn’t want to limit this exciting new feature to only wrangler dev. We wanted to support it in our Cloudflare Vite Plugin and vitest-pool-workers packages, as well as allowing any other potential tools and use cases from the JavaScript ecosystem to also benefit from it.
In order to achieve this, the wrangler package now exports utilities such as startRemoteProxySession that allow tools not leveraging wrangler dev to also support remote bindings. You can find more details in the official remote bindings documentation.
How do I try this out?
Just use wrangler dev! As of Wrangler v4.37.0 (@cloudflare/vite-plugin v1.13.0, @cloudflare/vitest-pool-workers v0.9.0), remote bindings are available in all projects, and can be turned on a per-binding basis by adding remote: true to the binding definition in your Wrangler config file.
Read replication of D1 databases is in public beta!
D1 read replication makes read-only copies of your database available in multiple regions across Cloudflare’s network. For busy, read-heavy applications like e-commerce websites, content management tools, and mobile apps:
D1 read replication lowers average latency by routing user requests to read replicas in nearby regions.
D1 read replication increases overall throughput by offloading read queries to read replicas, allowing the primary database to handle more write queries.
The main copy of your database is called the primary database and the read-only copies are called read replicas. When you enable replication for a D1 database, the D1 service automatically creates and maintains read replicas of your primary database. As your users make requests, D1 routes those requests to an appropriate copy of the database (either the primary or a replica) based on performance heuristics, the type of queries made in those requests, and the query consistency needs as expressed by your application.
All of this global replica creation and request routing is handled by Cloudflare at no additional cost.
To take advantage of read replication, your Worker needs to use the new D1 Sessions API. Click the button below to run a Worker using D1 read replication with this code example to see for yourself!
D1 Sessions API
D1’s read replication feature is built around the concept of database sessions. A session encapsulates all the queries representing one logical session for your application. For example, a session might represent all requests coming from a particular web browser or all requests coming from a mobile app used by one of your users. If you use sessions, your queries will use the appropriate copy of the D1 database that makes the most sense for your request, be that the primary database or a nearby replica.
The sessions implementation ensures sequential consistency for all queries in the session, no matter what copy of the database each query is routed to. The sequential consistency model has important properties like “read my own writes” and “writes follow reads,” as well as a total ordering of writes. The total ordering of writes means that every replica will see transactions committed in the same order, which is exactly the behavior we want in a transactional system. Said another way, sequential consistency guarantees that the reads and writes are executed in the order in which you write them in your code.
Some examples of consistency implications in real-world applications:
You are using an online store and just placed an order (write query), followed by a visit to the account page to list all your orders (read query handled by a replica). You want the newly placed order to be listed there as well.
You are using your bank’s web application and make a transfer to your electricity provider (write query), and then immediately navigate to the account balance page (read query handled by a replica) to check the latest balance of your account, including that last payment.
Why do we need the Sessions API? Why can we not just query replicas directly?
Applications using D1 read replication need the Sessions API because D1 runs on Cloudflare’s global network and there’s no way to ensure that requests from the same client get routed to the same replica for every request. For example, the client may switch from WiFi to a mobile network in a way that changes how their requests are routed to Cloudflare. Or the data center that handled previous requests could be down because of an outage or maintenance.
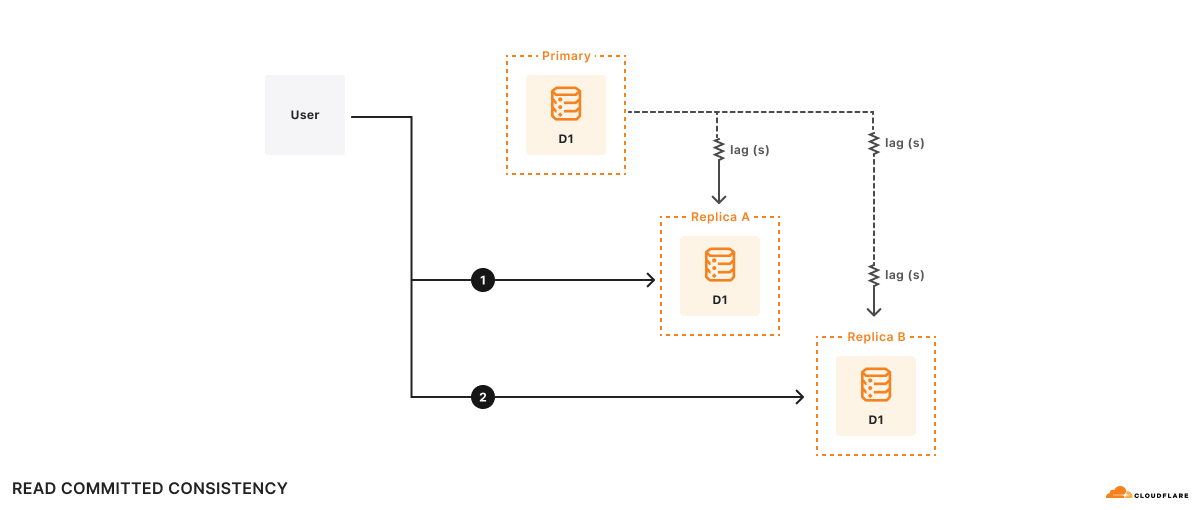
D1’s read replication is asynchronous, so it’s possible that when you switch between replicas, the replica you switch to lags behind the replica you were using. This could mean that, for example, the new replica hasn’t learned of the writes you just completed. We could no longer guarantee useful properties like “read your own writes”. In fact, in the presence of shifty routing, the only consistency property we could guarantee is that what you read had been committed at some point in the past (read committed consistency), which isn’t very useful at all!
Since we can’t guarantee routing to the same replica, we flip the script and use the information we get from the Sessions API to make sure whatever replica we land on can handle the request in a sequentially-consistent manner.
Here’s what the Sessions API looks like in a Worker:
export default {
  async fetch(request: Request, env: Env) {
    // A. Create the session.
    // When we create a D1 session, we can continue where we left off from a previous
    // session if we have that session's last bookmark or use a constraint.
    const bookmark = request.headers.get('x-d1-bookmark') ?? 'first-unconstrained'
    const session = env.DB.withSession(bookmark)

    // Use this session for all our Workers' routes.
    const response = await handleRequest(request, session)

    // B. Return the bookmark so we can continue the session in another request.
    response.headers.set('x-d1-bookmark', session.getBookmark())

    return response
  }
}

async function handleRequest(request: Request, session: D1DatabaseSession) {
  const { pathname } = new URL(request.url)

  if (request.method === "GET" && pathname === '/api/orders') {
    // C. Session read query.
    const { results } = await session.prepare('SELECT * FROM Orders').all()
    return Response.json(results)

  } else if (request.method === "POST" && pathname === '/api/orders') {
    const order = await request.json<Order>()

    // D. Session write query.
    // Since this is a write query, D1 will transparently forward it to the primary.
    await session
      .prepare('INSERT INTO Orders VALUES (?, ?, ?)')
      .bind(order.orderId, order.customerId, order.quantity)
      .run()

    // E. Session read-after-write query.
    // In order for the application to be correct, this SELECT statement must see
    // the results of the INSERT statement above.
    const { results } = await session
      .prepare('SELECT * FROM Orders')
      .all()

    return Response.json(results)
  }

  return new Response('Not found', { status: 404 })
}
To use the Session API, you first need to create a session using the withSession method (step A). The withSession method takes a bookmark as a parameter, or a constraint. The provided constraint instructs D1 where to forward the first query of the session. Using first-unconstrained allows the first query to be processed by any replica without any restriction on how up-to-date it is. Using first-primary ensures that the first query of the session will be forwarded to the primary.
// A. Create the session.
const bookmark = request.headers.get('x-d1-bookmark') ?? 'first-unconstrained'
const session = env.DB.withSession(bookmark)
Providing an explicit bookmark instructs D1 that whichever database instance processes the query has to be at least as up-to-date as the provided bookmark (in case of a replica; the primary database is always up-to-date by definition). Explicit bookmarks are how we can continue from previously-created sessions and maintain sequential consistency across user requests.
Once you’ve created the session, make queries like you normally would with D1. The session object ensures that the queries you make are sequentially consistent with regards to each other.
// C. Session read query.
const { results } = await session.prepare('SELECT * FROM Orders').all()
For example, in the code example above, the session read query for listing the orders (step C) will return results that are at least as up-to-date as the bookmark used to create the session (step A).
More interesting is the write query to add a new order (step D) followed by the read query to list all orders (step E). Because both queries are executed on the same session, it is guaranteed that the read query will observe a database copy that includes the write query, thus maintaining sequential consistency.
// D. Session write query.
await session
  .prepare('INSERT INTO Orders VALUES (?, ?, ?)')
  .bind(order.orderId, order.customerId, order.quantity)
  .run()

// E. Session read-after-write query.
const { results } = await session
  .prepare('SELECT * FROM Orders')
  .all()
Note that we could make a single batch query to the primary including both the write and the list, but the benefit of using the new Sessions API is that you can use the extra read replica databases for your read queries and allow the primary database to handle more write queries.
The session object does the necessary bookkeeping to maintain the latest bookmark observed across all queries executed using that specific session, and always includes that latest bookmark in requests to D1. Note that any query executed without using the session object is not guaranteed to be sequentially consistent with the queries executed in the session.
When possible, we suggest continuing sessions across requests by including bookmarks in your responses to clients (step B), and having clients passing previously received bookmarks in their future requests.
// B. Return the bookmark so we can continue the session in another request.
response.headers.set('x-d1-bookmark', session.getBookmark())
This allows all of a client’s requests to be in the same session. You can do this by grabbing the session’s current bookmark at the end of the request (session.getBookmark()) and sending the bookmark in the response back to the client in HTTP headers, in HTTP cookies, or in the response body itself.
Consistency with and without Sessions API
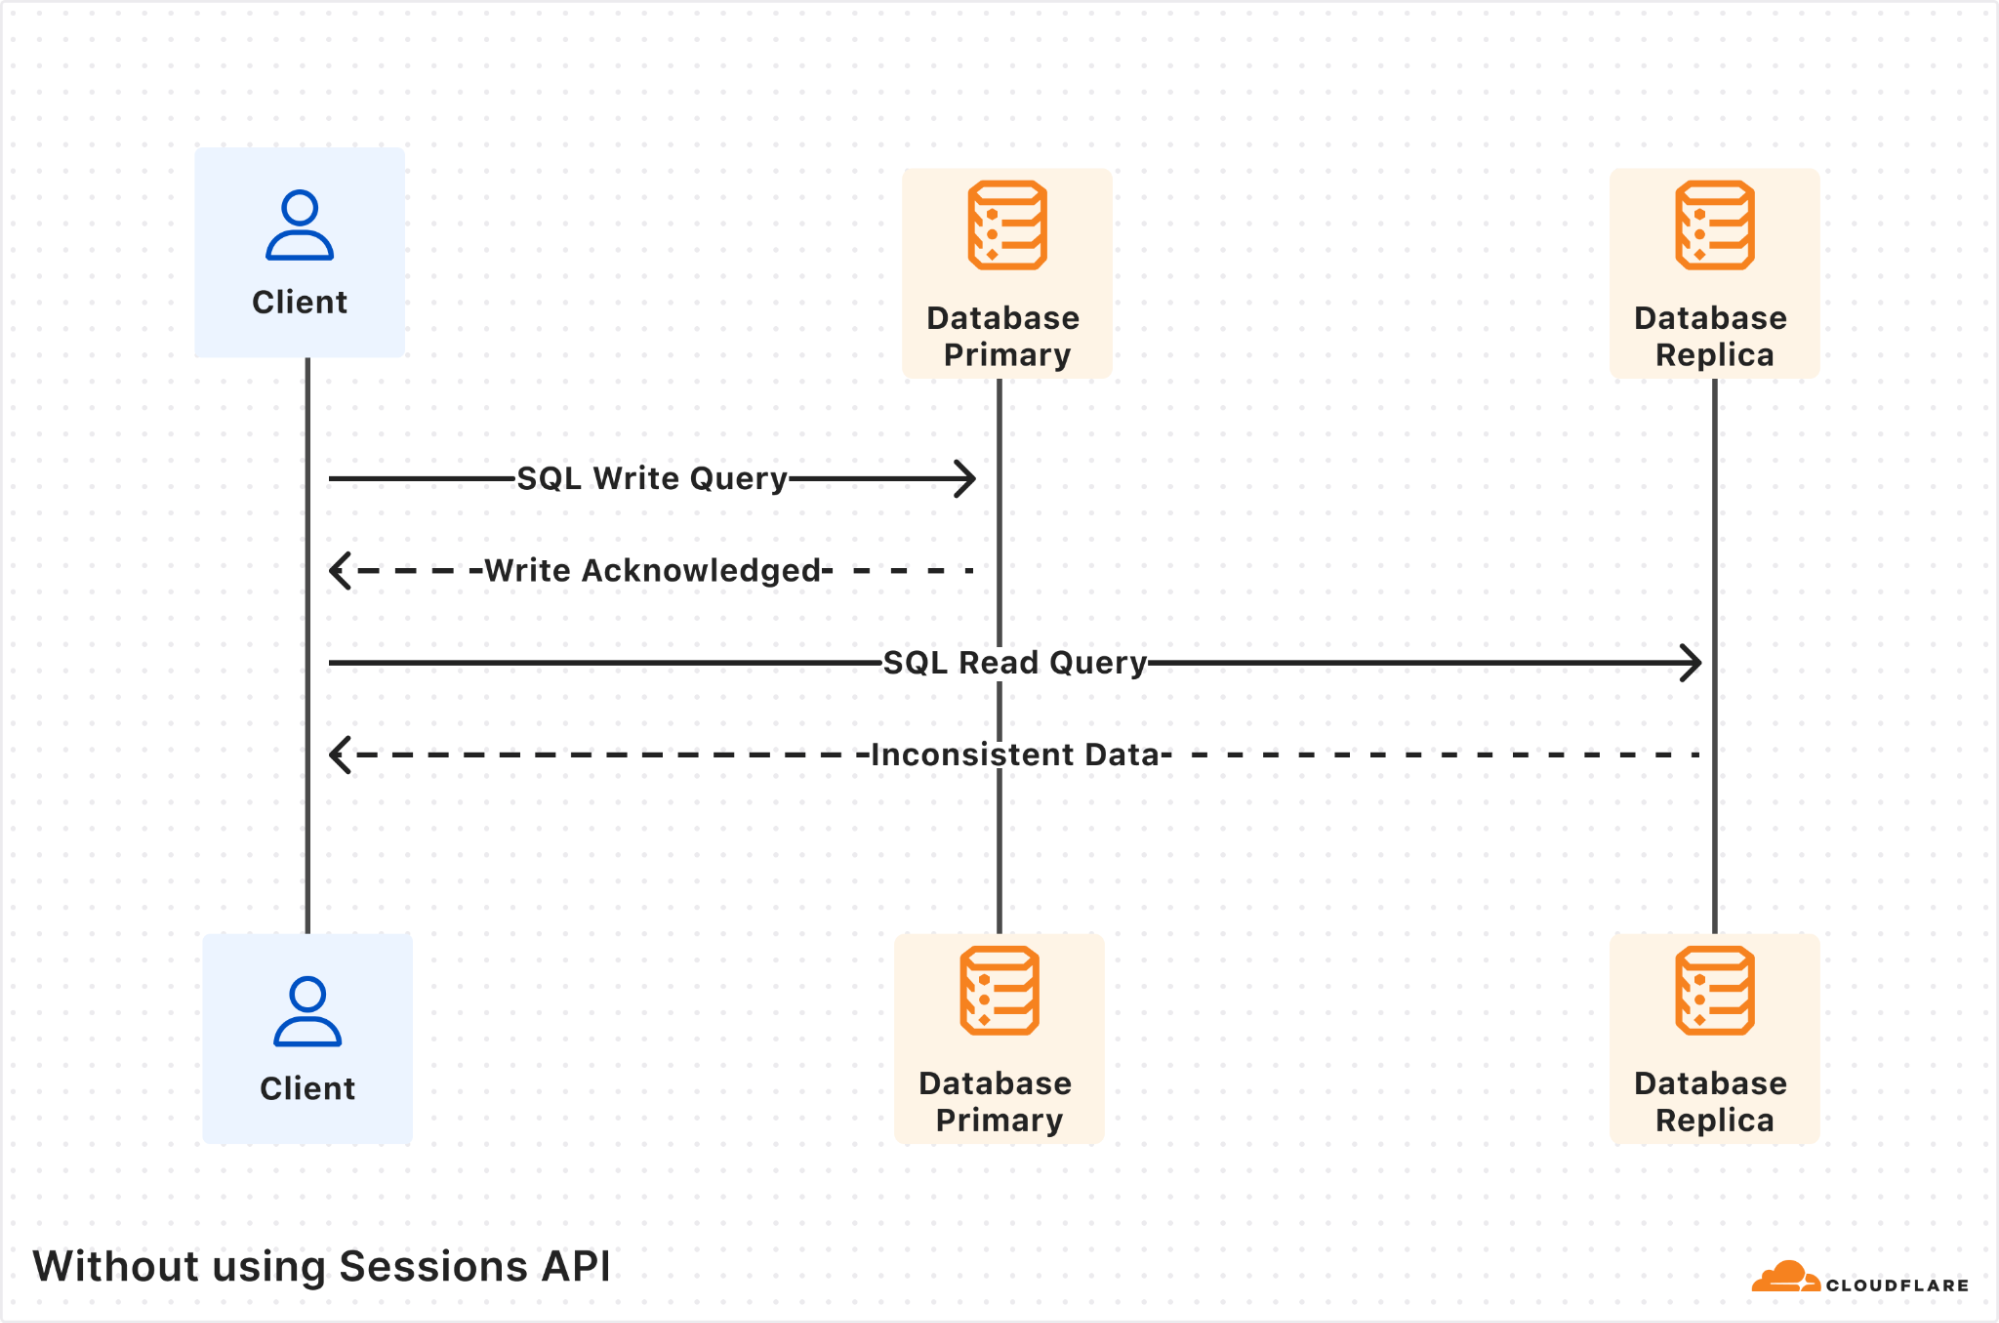
In this section, we will explore the classic scenario of a read-after-write query to showcase how using the new D1 Sessions API ensures that we get sequential consistency and avoid any issues with inconsistent results in our application.
The Client, a user Worker, sends a D1 write query that gets processed by the database primary and gets the results back. However, the subsequent read query ends up being processed by a database replica. If the database replica is lagging far enough behind the database primary, such that it does not yet include the first write query, then the returned results will be inconsistent, and probably incorrect for your application business logic.
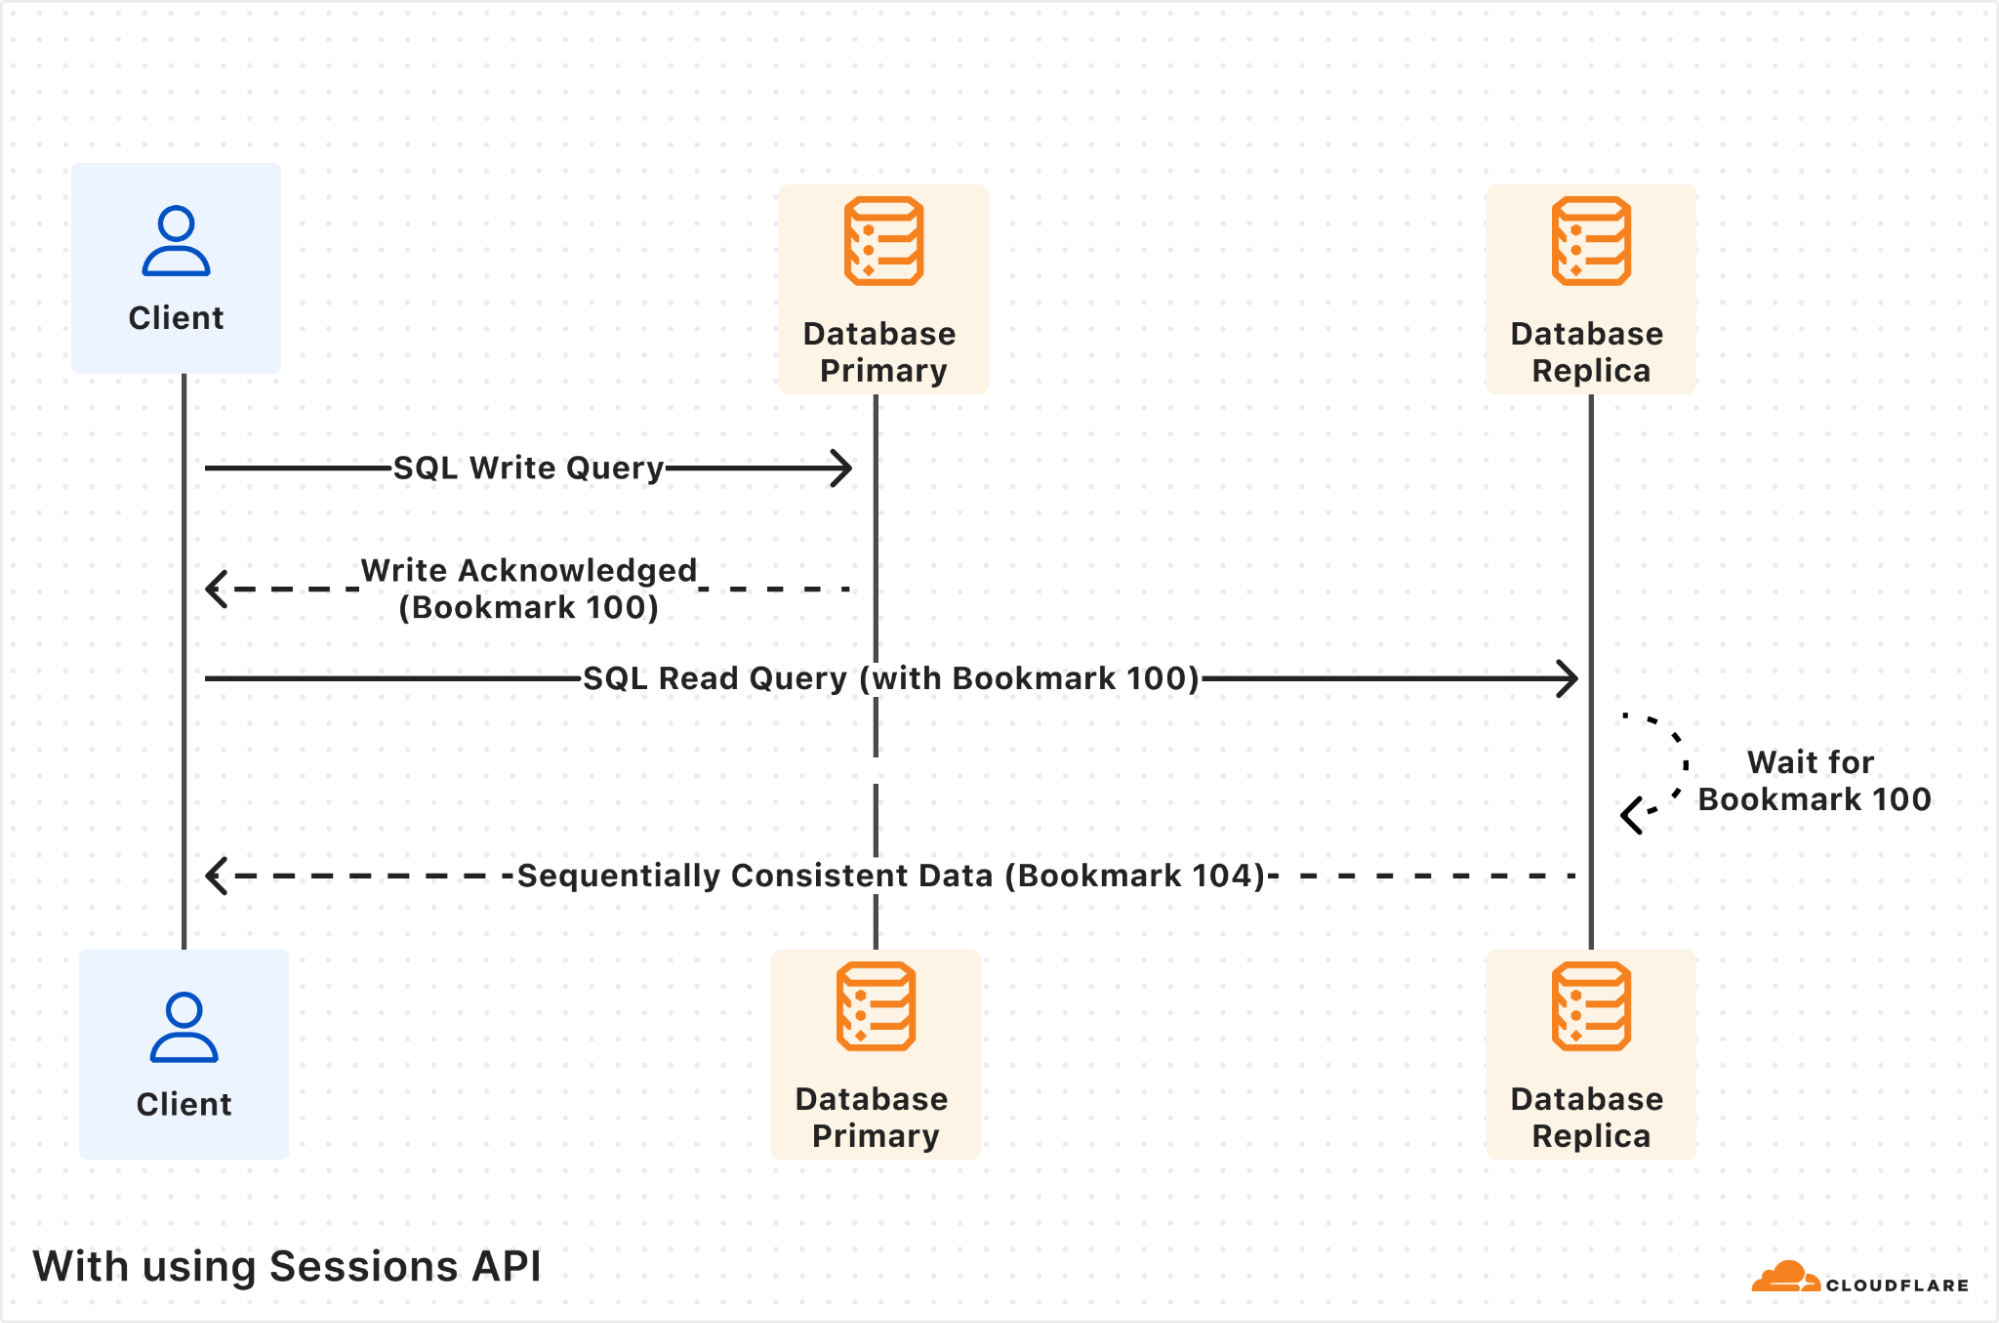
Using the Sessions API fixes the inconsistency issue. The first write query is again processed by the database primary, and this time the response includes “Bookmark 100”. The session object will store this bookmark for you transparently.
The subsequent read query is processed by database replica as before, but now since the query includes the previously received “Bookmark 100”, the database replica will wait until its database copy is at least up-to-date as “Bookmark 100”. Only once it’s up-to-date, the read query will be processed and the results returned, including the replica’s latest bookmark “Bookmark 104”.
Notice that the returned bookmark for the read query is “Bookmark 104”, which is different from the one passed in the query request. This can happen if there were other writes from other client requests that also got replicated to the database replica in-between the two queries our own client executed.
Enabling read replication
To start using D1 read replication:
Update your Worker to use the D1 Sessions API to tell D1 what queries are part of the same database session. The Sessions API works with databases that do not have read replication enabled as well, so it’s safe to ship this code even before you enable replicas. Here’s an example.
D1 read replication is built into D1, and you don’t pay extra storage or compute costs for replicas. You incur the exact same D1 usage with or without replicas, based on rows_read and rows_written by your queries. Unlike other traditional database systems with replication, you don’t have to manually create replicas, including where they run, or decide how to route requests between the primary database and read replicas. Cloudflare handles this when using the Sessions API while ensuring sequential consistency.
Since D1 read replication is in beta, we recommend trying D1 read replication on a non-production database first, and migrate to your production workloads after validating read replication works for your use case.
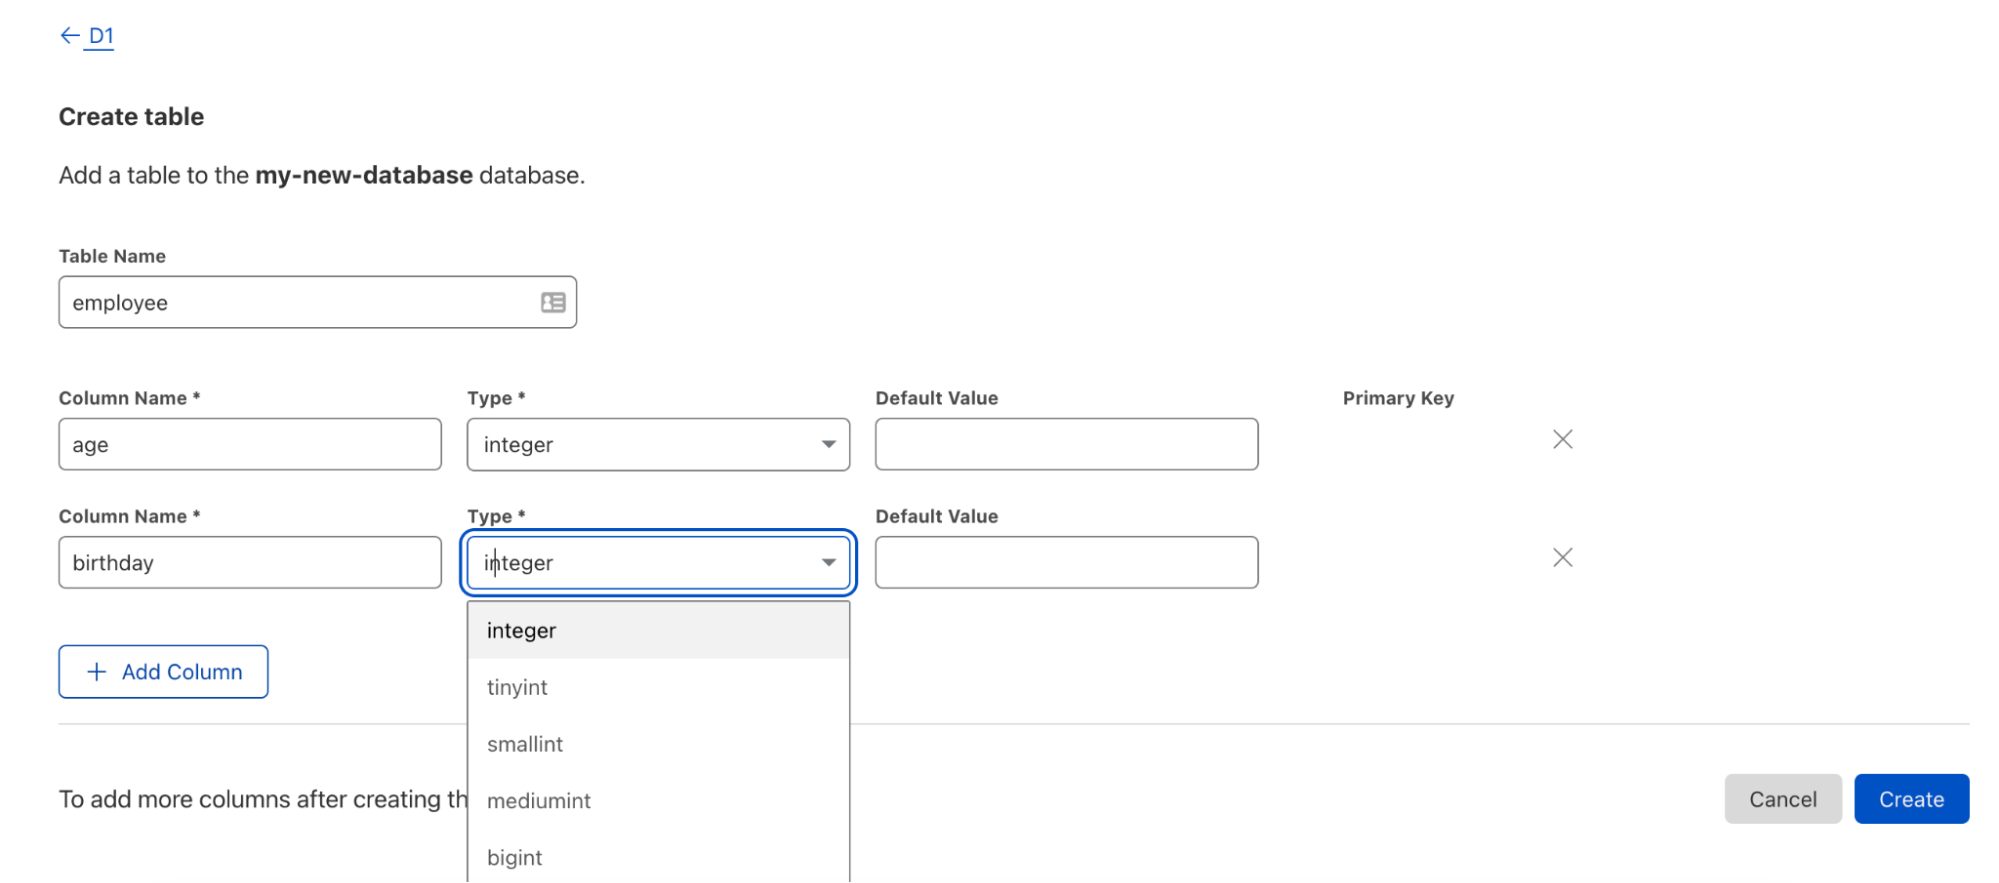
If you don’t have a D1 database and want to try out D1 read replication, create a test database in the Cloudflare dashboard.
Observing your replicas
Once you’ve enabled D1 read replication, read queries will start to be processed by replica database instances. The response of each query includes information in the nested meta object relevant to read replication, like served_by_region and served_by_primary. The first denotes the region of the database instance that processed the query, and the latter will be true if-and-only-if your query was processed by the primary database instance.
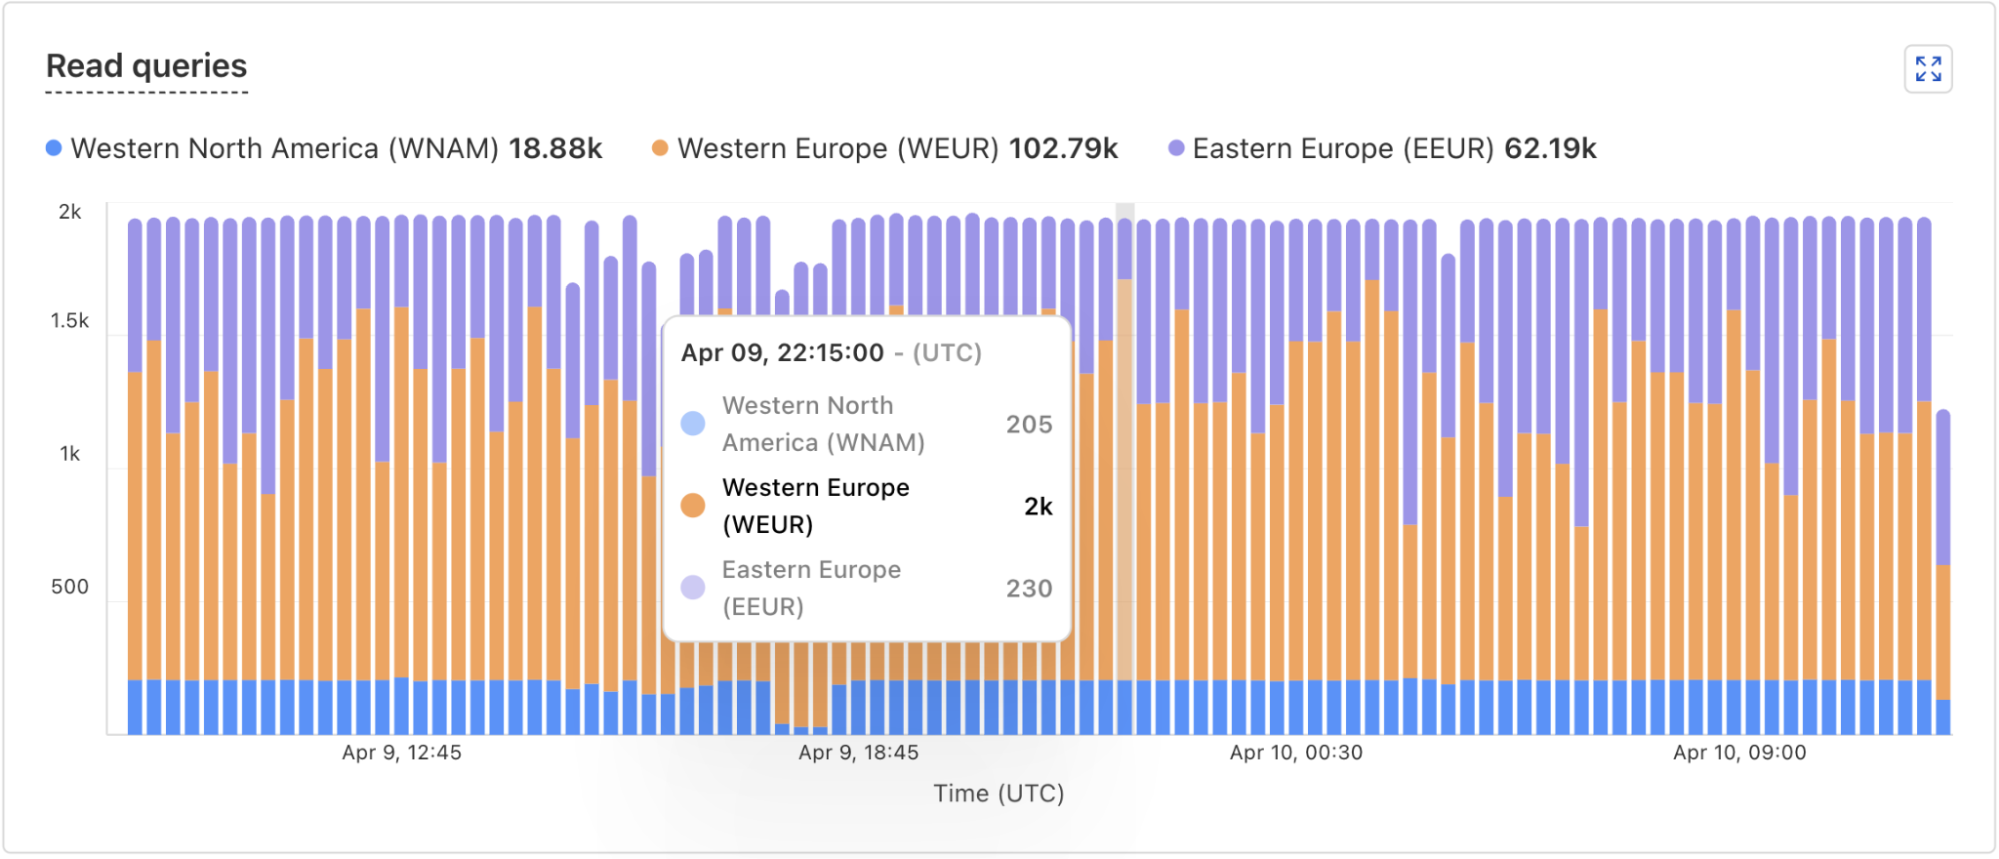
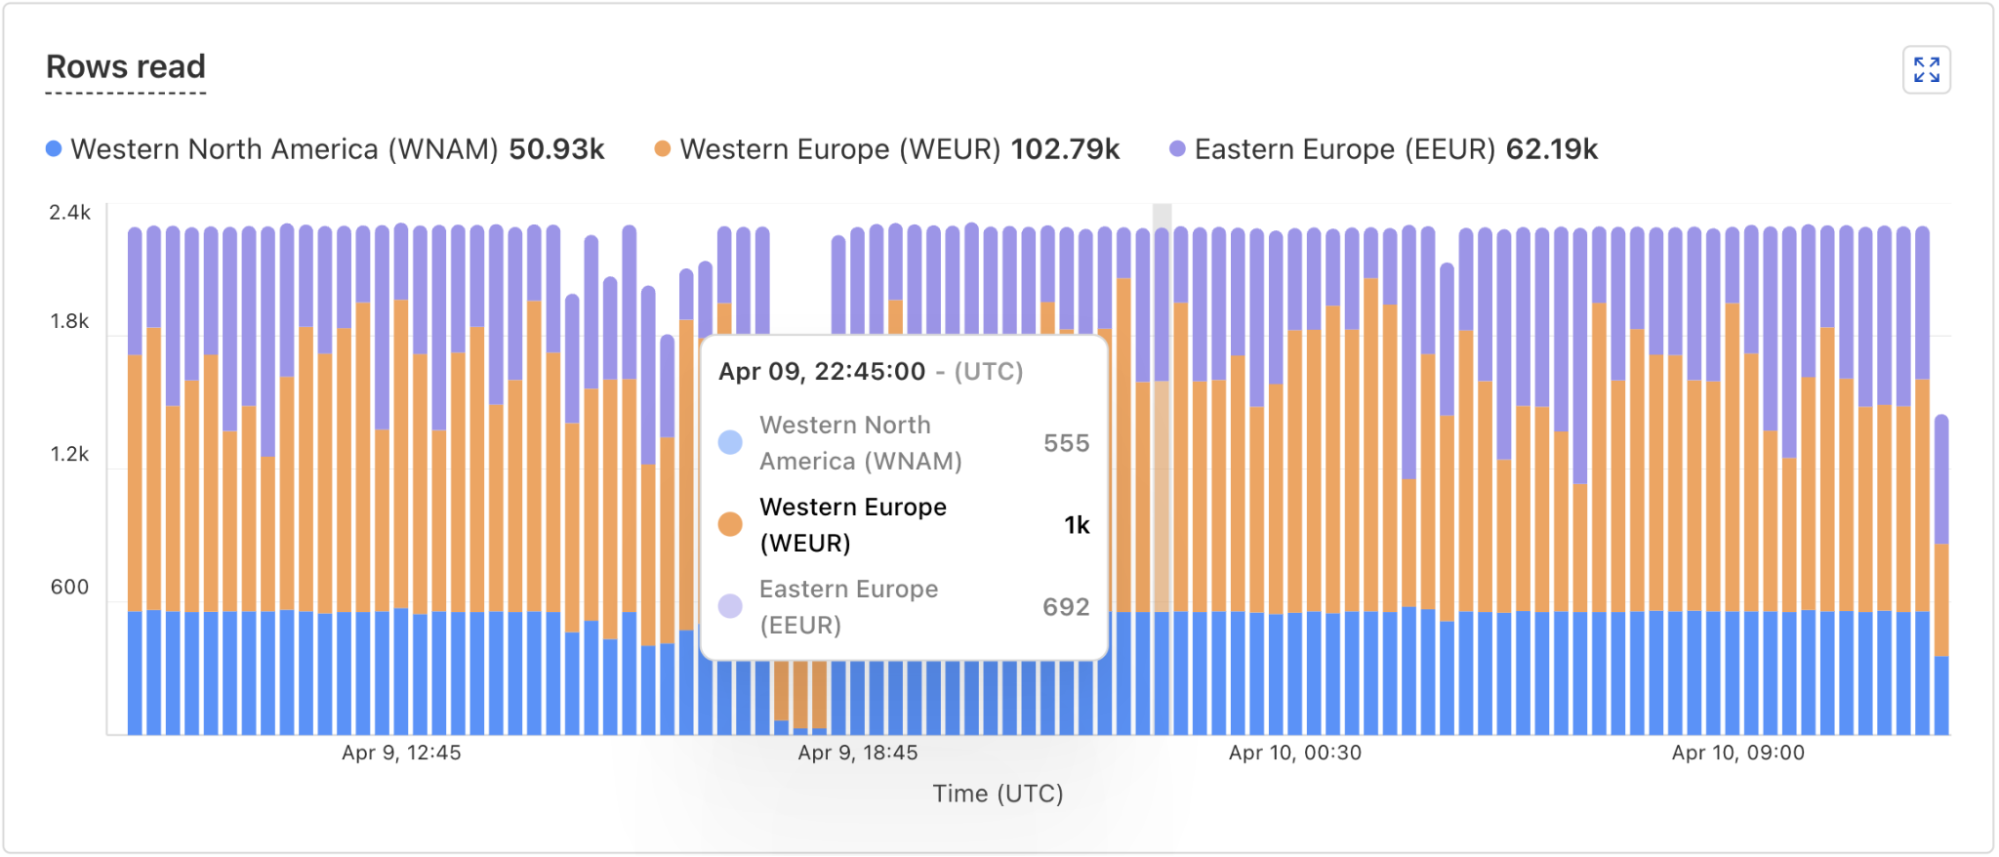
In addition, the D1 dashboard overview for a database now includes information about the database instances handling your queries. You can see how many queries are handled by the primary instance or by a replica, and a breakdown of the queries processed by region. The example screenshots below show graphs displaying the number of queries executed and number of rows read by each region.
Under the hood: how D1 read replication is implemented
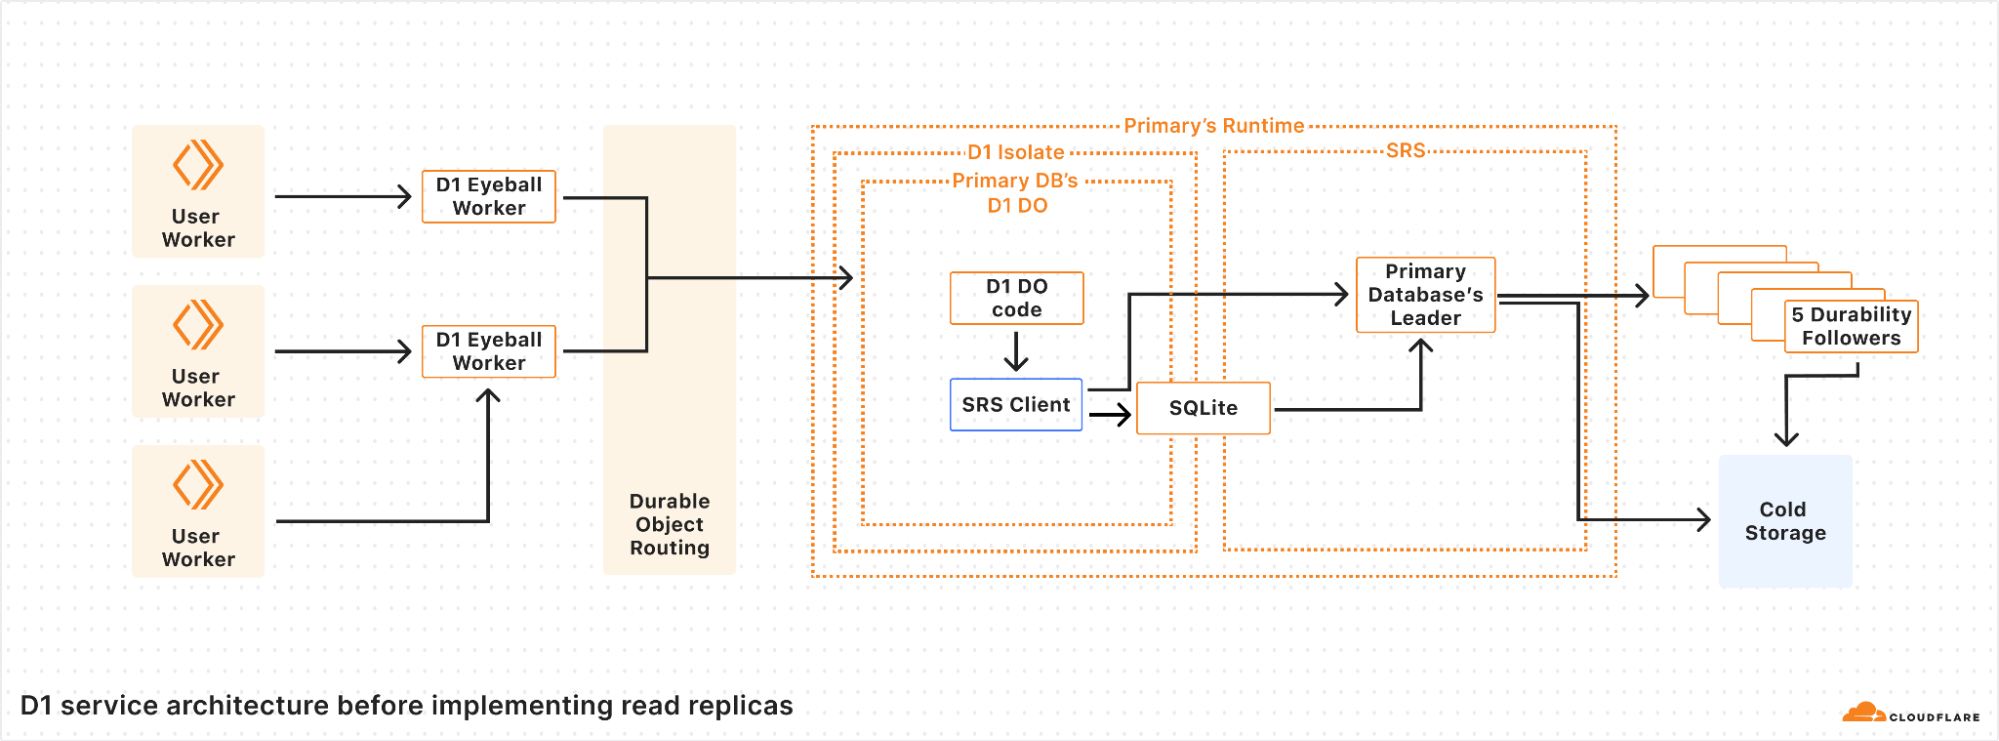
D1 is implemented on top of SQLite-backed Durable Objects running on top of Cloudflare’s Storage Relay Service.
D1 is structured with a 3-layer architecture. First is the binding API layer that runs in the customer’s Worker. Next is a stateless Worker layer that routes requests based on database ID to a layer of Durable Objects that handle the actual SQL operations behind D1. This is similar to how most applications using Cloudflare Workers and Durable Objects are structured.
For a non-replicated database, there is exactly one Durable Object per database. When a user’s Worker makes a request with the D1 binding for the database, that request is first routed to a D1 Worker running in the same location as the user’s Worker. The D1 Worker figures out which D1 Durable Object backs the user’s D1 database and fetches an RPC stub to that Durable Object. The Durable Objects routing layer figures out where the Durable Object is located, and opens an RPC connection to it. Finally, the D1 Durable Object then handles the query on behalf of the user’s Worker using the Durable Objects SQL API.
In the Durable Objects SQL API, all queries go to a SQLite database on the local disk of the server where the Durable Object is running. Durable Objects run SQLite in WAL mode. In WAL mode, every write query appends to a write-ahead log (the WAL). As SQLite appends entries to the end of the WAL file, a database-specific component called the Storage Relay Service leader synchronously replicates the entries to 5 durability followers on servers in different datacenters. When a quorum (at least 3 out of 5) of the durability followers acknowledge that they have safely stored the data, the leader allows SQLite’s write queries to commit and opens the Durable Object’s output gate, so that the Durable Object can respond to requests.
Our implementation of WAL mode allows us to have a complete log of all of the committed changes to the database. This enables a couple of important features in SQLite-backed Durable Objects and D1:
We construct databases anywhere in the world by downloading all of the WAL entries from cold storage and replaying each WAL entry in order.
We implement Point-in-time recovery (PITR) by replaying WAL entries up to a specific bookmark rather than to the end of the log.
Unfortunately, having the main data structure of the database be a log is not ideal. WAL entries are in write order, which is often neither convenient nor fast. In order to cut down on the overheads of the log, SQLite checkpoints the log by copying the WAL entries back into the main database file. Read queries are serviced directly by SQLite using files on disk — either the main database file for checkpointed queries, or the WAL file for writes more recent than the last checkpoint. Similarly, the Storage Relay Service snapshots the database to cold storage so that we can replay a database by downloading the most recent snapshot and replaying the WAL from there, rather than having to download an enormous number of individual WAL entries.
WAL mode is the foundation for implementing read replication, since we can stream writes to locations other than cold storage in real time.
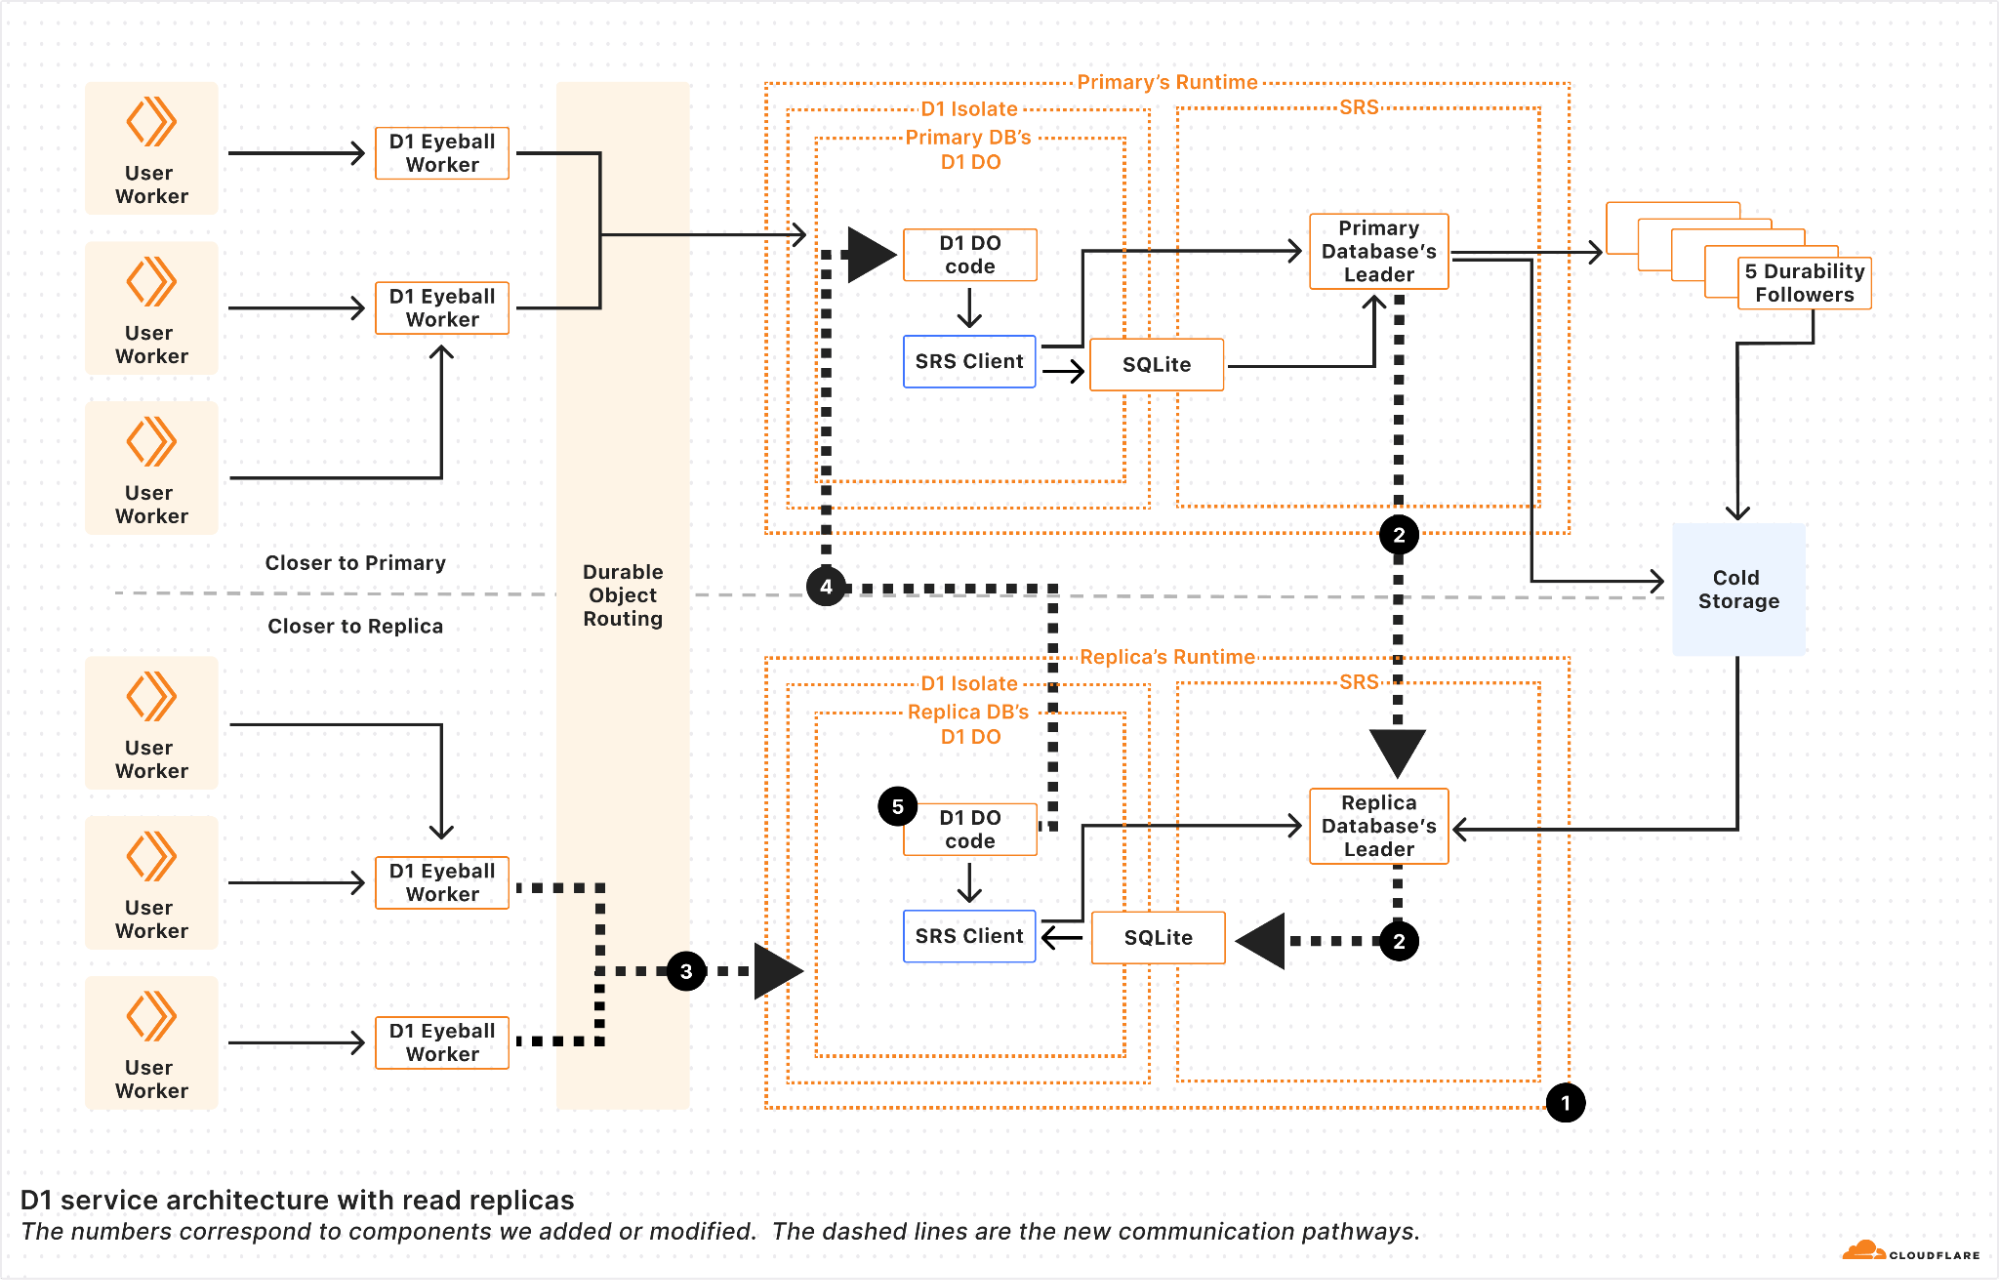
We implemented read replication in 5 major steps.
First, we made it possible to make replica Durable Objects with a read-only copy of the database. These replica objects boot by fetching the latest snapshot and replaying the log from cold storage to whatever bookmark primary database’s leader last committed. This basically gave us point-in-time replicas, since without continuous updates, the replicas never updated until the Durable Object restarted.
Second, we registered the replica leader with the primary’s leader so that the primary leader sends the replicas every entry written to the WAL at the same time that it sends the WAL entries to the durability followers. Each of the WAL entries is marked with a bookmark that uniquely identifies the WAL entry in the sequence of WAL entries. We’ll use the bookmark later.
Note that since these writes are sent to the replicas before a quorum of durability followers have confirmed them, the writes are actually unconfirmed writes, and the replica leader must be careful to keep the writes hidden from the replica Durable Object until they are confirmed. The replica leader in the Storage Relay Service does this by implementing enough of SQLite’s WAL-index protocol, so that the unconfirmed writes coming from the primary leader look to SQLite as though it’s just another SQLite client doing unconfirmed writes. SQLite knows to ignore the writes until they are confirmed in the log. The upshot of this is that the replica leader can write WAL entries to the SQLite WAL immediately, and then “commit” them when the primary leader tells the replica that the entries have been confirmed by durability followers.
One neat thing about this approach is that writes are sent from the primary to the replica as quickly as they are generated by the primary, helping to minimize lag between replicas. In theory, if the write query was proxied through a replica to the primary, the response back to the replica will arrive at almost the same time as the message that updates the replica. In such a case, it looks like there’s no replica lag at all!
In practice, we find that replication is really fast. Internally, we measure confirm lag, defined as the time from when a primary confirms a change to when the replica confirms a change. The table below shows the confirm lag for two D1 databases whose primaries are in different regions.
Replica Region
Database A
(Primary region: ENAM)
Database B (Primary region: WNAM)
ENAM
N/A
30 ms
WNAM
45 ms
N/A
WEUR
55 ms
75 ms
EEUR
67 ms
75 ms
Confirm lag for 2 replicated databases. N/A means that we have no data for this combination. The region abbreviations are the same ones used for Durable Object location hints.
The table shows that confirm lag is correlated with the network round-trip time between the data centers hosting the primary databases and their replicas. This is clearly visible in the difference between the confirm lag for the European replicas of the two databases. As airline route planners know, EEUR is appreciably further away from ENAM than WNAM, but from WNAM, both European regions (WEUR and EEUR) are about equally as far away. We see that in our replication numbers.
The exact placement of the D1 database in the region matters too. Regions like ENAM and WNAM are quite large in themselves. Database A’s placement in ENAM happens to be further away from most data centers in WNAM compared to database B’s placement in WNAM relative to the ENAM data centers. As such, database B sees slightly lower confirm lag.
Try as we might, we can’t beat the speed of light!
Third, we updated the Durable Object routing system to be aware of Durable Object replicas. When read replication is enabled on a Durable Object, two things happen. First, we create a set of replicas according to a replication policy. The current replication policy that D1 uses is simple: a static set of replicas in every region that D1 supports. Second, we turn on a routing policy for the Durable Object. The current policy that D1 uses is also simple: route to the Durable Object replica in the region close to where the user request is. With this step, we have updateable read-only replicas, and can route requests to them!
Fourth, we updated D1’s Durable Object code to handle write queries on replicas. D1 uses SQLite to figure out whether a request is a write query or a read query. This means that the determination of whether something is a read or write query happens after the request is routed. Read replicas will have to handle write requests! We solve this by instantiating each replica D1 Durable Object with a reference to its primary. If the D1 Durable Object determines that the query is a write query, it forwards the request to the primary for the primary to handle. This happens transparently, keeping the user code simple.
As of this fourth step, we can handle read and write queries at every copy of the D1 Durable Object, whether it’s a primary or not. Unfortunately, as outlined above, if a user’s requests get routed to different read replicas, they may see different views of the database, leading to a very weak consistency model. So the last step is to implement the Sessions API across the D1 Worker and D1 Durable Object. Recall that every WAL entry is marked with a bookmark. These bookmarks uniquely identify a point in (logical) time in the database. Our bookmarks are strictly monotonically increasing; every write to a database makes a new bookmark with a value greater than any other bookmark for that database.
Using bookmarks, we implement the Sessions API with the following algorithm split across the D1 binding implementation, the D1 Worker, and D1 Durable Object.
First up in the D1 binding, we have code that creates the D1DatabaseSession object and code within the D1DatabaseSession object to keep track of the latest bookmark.
// D1Binding is the binding code running within the user's Worker
// that provides the existing D1 Workers API and the new withSession method.
class D1Binding {
  // Injected by the runtime to the D1 Binding.
  d1Service: D1ServiceBinding

  function withSession(initialBookmark) {
    return D1DatabaseSession(this.d1Service, this.databaseId, initialBookmark);
  }
}

// D1DatabaseSession holds metadata about the session, most importantly the
// latest bookmark we know about for this session.
class D1DatabaseSession {
  constructor(d1Service, databaseId, initialBookmark) {
    this.d1Service = d1Service;
    this.databaseId = databaseId;
    this.bookmark = initialBookmark;
  }

  async exec(query) {
    // The exec method in the binding sends the query to the D1 Worker
    // and waits for the the response, updating the bookmark as
    // necessary so that future calls to exec use the updated bookmark.
    var resp = await this.d1Service.handleUserQuery(databaseId, query, bookmark);
    if (isNewerBookmark(this.bookmark, resp.bookmark)) {
      this.bookmark = resp.bookmark;
    }
    return resp;
  }

  // batch and other SQL APIs are implemented similarly.
}
The binding code calls into the D1 stateless Worker (d1Service in the snippet above), which figures out which Durable Object to use, and proxies the request to the Durable Object.
class D1Worker {
  async handleUserQuery(databaseId, query) {
    var doId = /* look up Durable Object for databaseId */;
    return await this.D1_DO.get(doId).handleWorkerQuery(query, bookmark)
  }
}
Finally, we reach the Durable Objects layer, which figures out how to actually handle the request.
class D1DurableObject {
  async handleWorkerQuery(queries, bookmark) {
    var bookmark = bookmark ?? "first-primary";
    var results = {};

    if (this.isPrimaryDatabase()) {
      // The primary always has the latest data so we can run the
      // query without checking the bookmark.
      var result = /* execute query directly */;
      bookmark = getCurrentBookmark();
      results = result;
    } else {
      // This is running on a replica.
      if (bookmark === "first-primary" || isWriteQuery(query)) {
        // The primary must handle this request, so we'll proxy the
        // request to the primary.
        var resp = await this.primary.handleWorkerQuery(query, bookmark);
        bookmark = resp.bookmark;
        results = resp.results;
      } else {
        // The replica can handle this request, but only after the
        // database is up-to-date with the bookmark.
        if (bookmark !== "first-unconstrained") {
          await waitForBookmark(bookmark);
        }
        var result = /* execute query locally */;
        bookmark = getCurrentBookmark();
        results = result;
      }
    }
    return { results: results, bookmark: bookmark };
  }
}
The D1 Durable Object first figures out if this instance can handle the query, or if the query needs to be sent to the primary. If the Durable Object can execute the query, it ensures that we execute the query with a bookmark at least as up-to-date as the bookmark requested by the binding.
The upshot is that the three pieces of code work together to ensure that all of the queries in the session see the database in a sequentially consistent order, because each new query will be blocked until it has seen the results of previous queries within the same session.
Conclusion
D1’s new read replication feature is a significant step towards making globally distributed databases easier to use without sacrificing consistency. With automatically provisioned replicas in every region, your applications can now serve read queries faster while maintaining strong sequential consistency across requests, and keeping your application Worker code simple.
We’re excited for developers to explore this feature and see how it improves the performance of your applications. The public beta is just the beginning—we’re actively refining and expanding D1’s capabilities, including evolving replica placement policies, and your feedback will help shape what’s next.
Note that the Sessions API is only available through the D1 Worker Binding for now, and support for the HTTP REST API will follow soon.
Try out D1 read replication today by clicking the “Deploy to Cloudflare” button, check out documentation and examples, and let us know what you build in the D1 Discord channel!
I’m thrilled to share that Cloudflare has acquired Outerbase. This is such an amazing opportunity for us, and I want to explain how we got here, what we’ve built so far, and why we are so excited about becoming part of the Cloudflare team.
Databases are key to building almost any production application: you need to persist state for your users (or agents), be able to query it from a number of different clients, and you want it to be fast. But databases aren’t always easy to use: designing a good schema, writing performant queries, creating indexes, and optimizing your access patterns tends to require a lot of experience. Add that to exposing your data through easy-to-grok APIs that make the ‘right’ way to do things obvious, a great developer experience (from dashboard to CLI), and well… there’s a lot of work involved.
The Outerbase team is already getting to work on some big changes to how databases (and your data) are viewed, edited, and visualized from within Workers, and we’re excited to give you a few sneak peeks into what we’ll be landing as we get to work.
Database DX
When we first started Outerbase, we saw how complicated databases could be. Even experienced developers struggled with writing queries, indexing data, and locking down their data. Meanwhile, non-developers often felt locked out and that they couldn’t access the data they needed. We believed there had to be a better way. From day one, our goal was to make data accessible to everyone, no matter their skill level. While it started out by simply building a better database interface, it quickly evolved into something much more special.
Outerbase became a platform that helps you manage data in a way that feels natural. You can browse tables, edit rows, and run queries without having to deal with memorizing SQL structure. Even if you do know SQL, you can use Outerbase to dive in deeper and share your knowledge with your team. We also added visualization features so entire teams, both technical and not, could see what’s happening with their data at a glance. Then, with the growth of AI, we realized we could use it to handle many of the more complicated tasks.
One of our more exciting offerings is Starbase, a SQLite-compatible database built on top of Cloudflare’s Durable Objects. Our goal was never to simply wrap a legacy system in a shiny interface; we wanted to make it so easy to get started from day one with nothing, and Cloudflare’s Durable Objects gave us a way to easily manage and spin up databases for anyone who needed one. On top of them, we provided automatic REST APIs, row-level security, WebSocket support for streaming queries, and much more.
1 + 1 = 3
Our collaboration with Cloudflare first started last year, when we introduced a way for developers to import and manage their D1 databases inside Outerbase. We were impressed with how powerful Cloudflare’s tools are for deploying and scaling applications. As we worked together, we quickly saw how well our missions aligned. Cloudflare was building the infrastructure we wished we’d had when we first started, and we were building the data experience that many Cloudflare developers were asking for. This eventually led to the seemingly obvious decision of Outerbase joining Cloudflare — it just made so much sense.
Going forward, we’ll integrate Outerbase’s core features into Cloudflare’s platform. If you’re a developer using D1 or Durable Objects, you’ll start seeing features from Outerbase show up in the Cloudflare dashboard. Expect to see our data explorer for browsing and editing tables, new REST APIs, query editor with type-ahead functionality, real-time data capture, and more of the other tooling we’ve been refining over the last couple of years show up inside the Cloudflare dashboard.
As part of this transition, the hosted Outerbase cloud will shut down on October 15, 2025, which is about six months from now. We know some of you rely on Outerbase as it stands today, so we’re leaving the open-source repositories as they are.
You will still be able to self-host Outerbase if you prefer, and we’ll provide guidance on how to do that within your own Cloudflare account. Our main goal will be to ensure that the best parts of Outerbase become part of the Cloudflare developer experience, so you no longer have to make a choice (it’ll be obvious!).
Sneak peek
We’ve already done a lot of thinking about how we’re going to bring the best parts of Outerbase into D1, Durable Objects, Workflows, and Agents, and we’re going to a share a little about what will be landing over the course of Q2 2025 as the Outerbase team gets to work.
Specifically, we’ll be heads-down focusing on:
Adapting the powerful table viewer and query runner experiences to D1 and Durable Objects (amongst many other things!)
Making it easier to get started with Durable Objects: improving the experience in Wrangler (our CLI tooling), the Cloudflare dashboard, and how you plug into them from your client applications
Improvements to how you visualize the state of a Workflow and the (thousands to millions!) of Workflow instances you might have at any point in time
Pre- and post-query hooks for D1 that allow you to automatically register handlers that can act on your data
Bringing the Starbase API to D1, expanding D1’s existing REST API, and adding WebSockets support — making it easier to use D1, even for applications hosted outside of Workers.
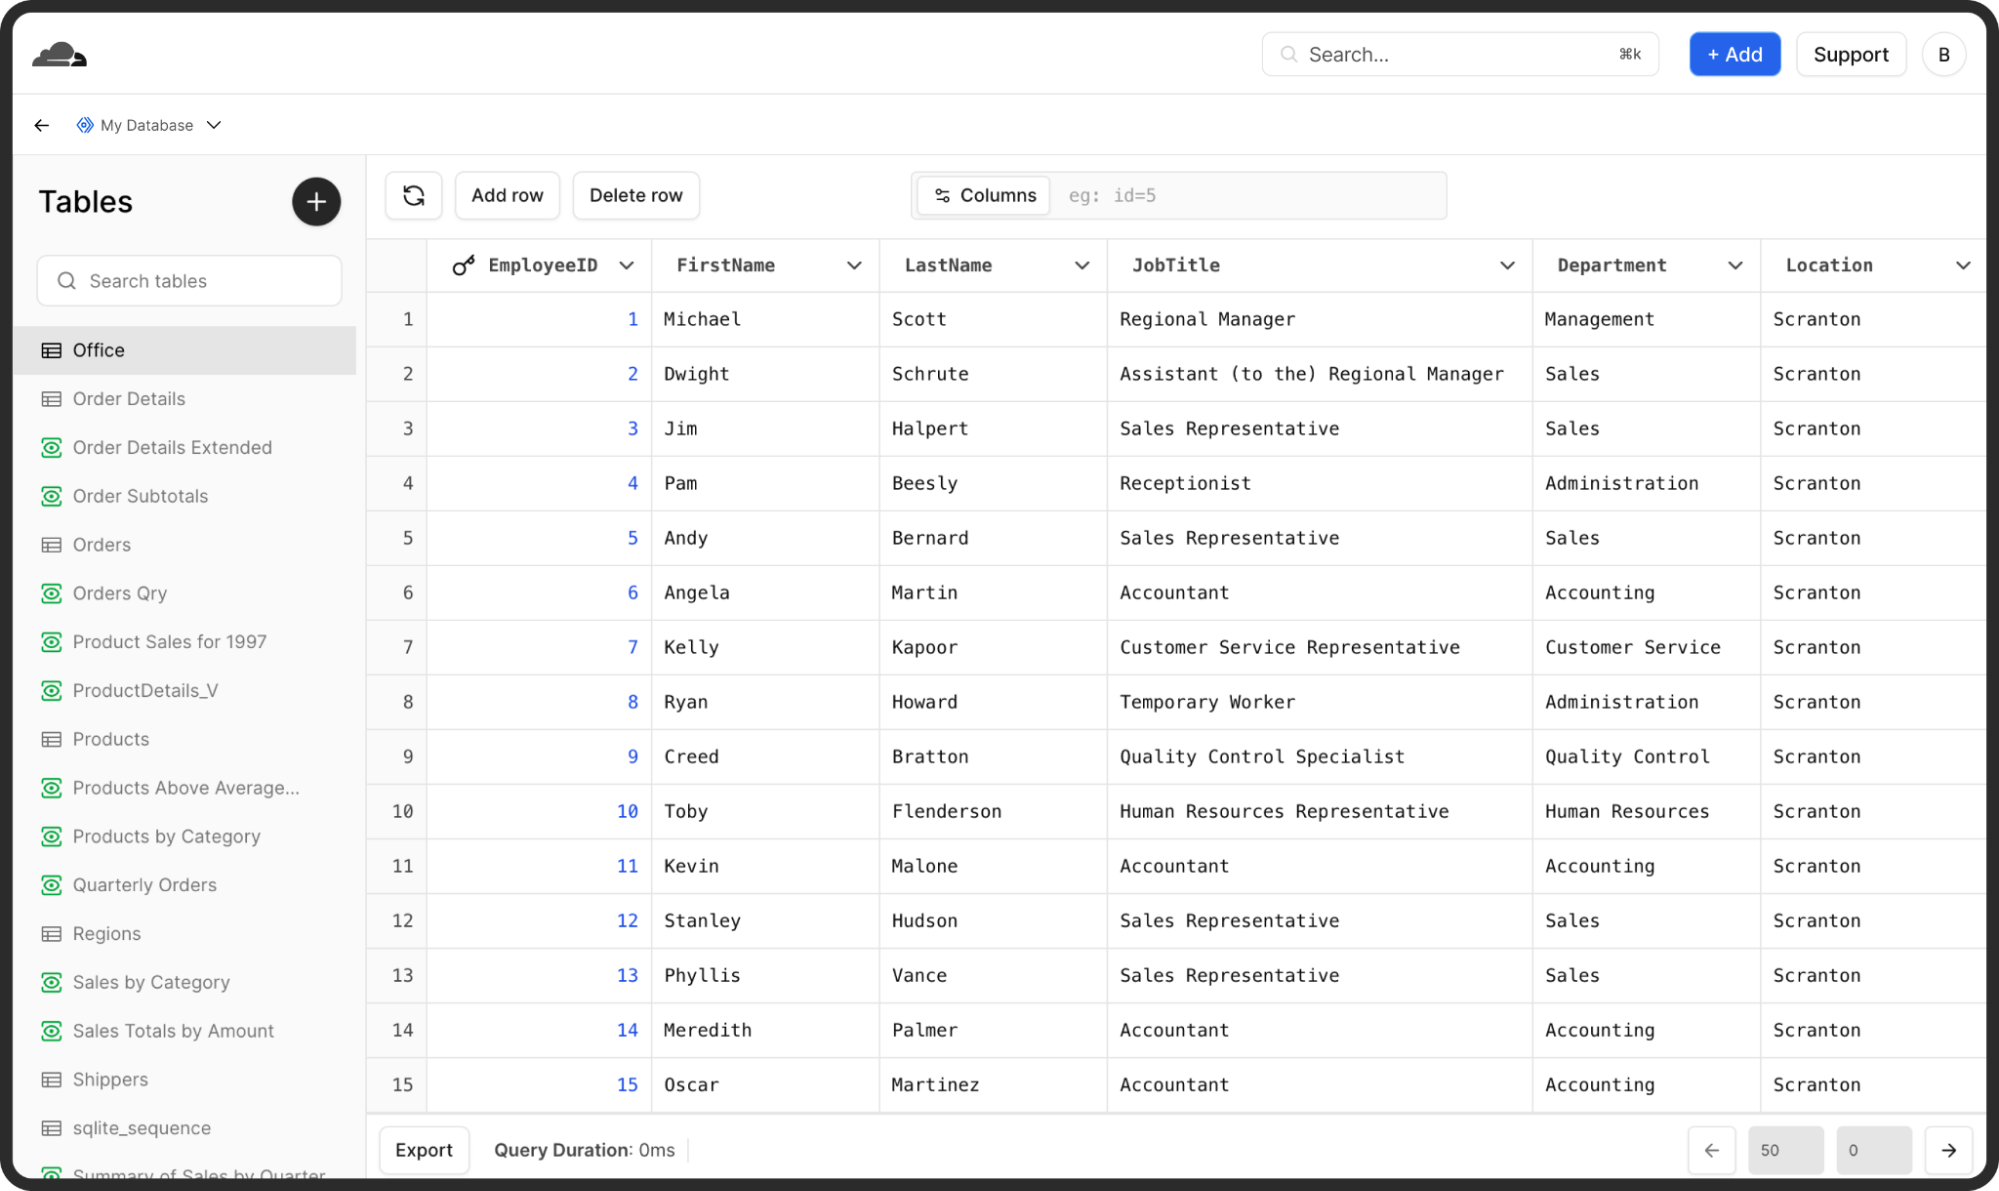
We have already started laying the groundwork for these changes. In the coming weeks, we’ll release a unified data explorer for D1 and Durable Objects that borrows heavily from the Outerbase interface you know.
Bringing Outerbase’s Data Explorer into the Cloudflare Dashboard
We’ll also tie some of Starbase’s features directly into Cloudflare’s platform, so you can tap into its unique offerings like pre- and post-query hooks or row-level security right from your existing D1 databases and Durable Objects:
const beforeQuery = ({ sql, params }) => {
    // Prevent unauthorized queries
    if (!isAllowedQuery(sql)) throw new Error('Query not allowed');
};

const afterQuery = ({ sql, result }) => {
    // Basic PII masking example
    for (const row of result) {
        if ('email' in row) row.email = '[redacted]';
    }
};

// Execute the query with pre- and post- query hooks
const { results } = await env.DB.prepare("SELECT * FROM users;", beforeQuery, afterQuery);
Define hooks on your D1 queries that can be re-used, shared and automatically executed before or after your queries run.
This should give you more clarity and control over your data, as well as new ways to secure and optimize it.
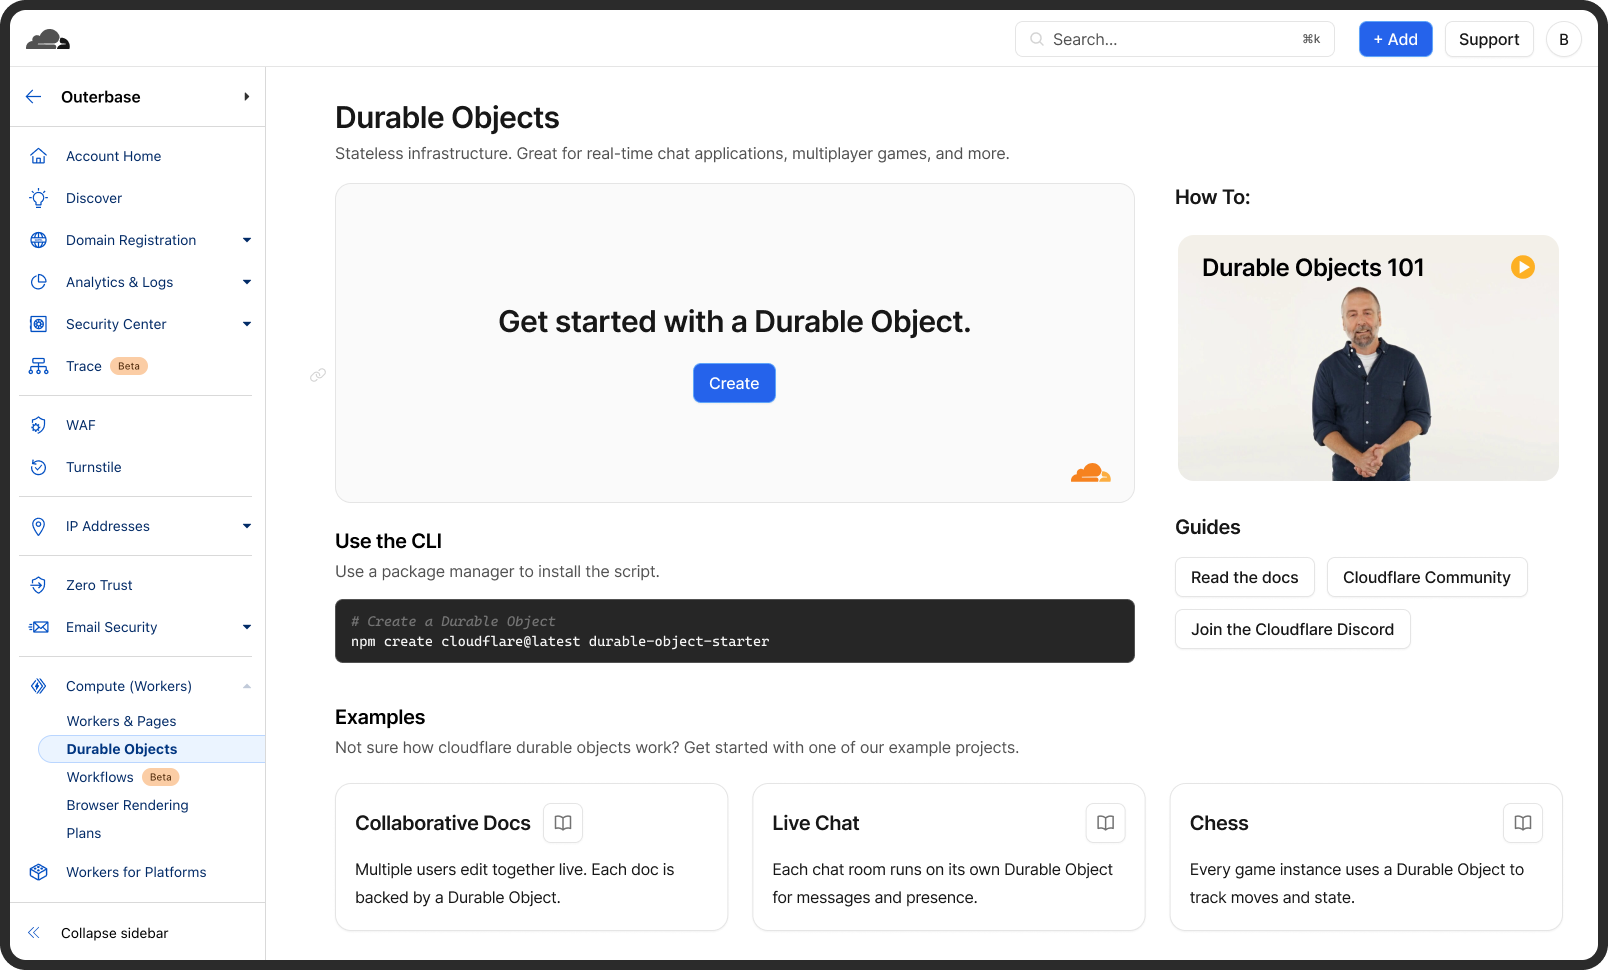
Rethinking the Durable Objects getting started experience
We have even begun optimizing the Cloudflare dashboard experience around Durable Objects and D1 to improve the empty state, provide more Getting Started resources, and overall, make managing and tracking your database resources even easier.
For those of you who’ve supported us, given us feedback, and stuck with us as we grew: thank you. You have helped shape Outerbase into what it is today. This acquisition means we can pour even more resources and attention into building the data experience we’ve always wanted to deliver. Our hope is that, by working as part of Cloudflare, we can help reach even more developers by building intuitive experiences, accelerating the speed of innovation, and creating tools that naturally fit into your workflows.
This is a big step for Outerbase, and we couldn’t be more excited. Thank you for being part of our journey so far. We can’t wait to show you what we’ve got in store as we continue to make data more accessible, intuitive, and powerful — together with Cloudflare.
What’s next?
We’re planning to get to work on some of the big changes to how you interact with your data on Cloudflare, starting with D1 and Durable Objects.
We’ll also be ensuring we bring a great developer experience to the broader database & storage platform on Cloudflare, including how you access data in Workers KV, R2, Workflows and even your AI Agents (just to name a few).
With the rapid advancements occurring in the AI space, developers face significant challenges in keeping up with the ever-changing landscape. New models and providers are continuously emerging, and understandably, developers want to experiment and test these options to find the best fit for their use cases. This creates the need for a streamlined approach to managing multiple models and providers, as well as a centralized platform to efficiently monitor usage, implement controls, and gather data for optimization.
AI Gateway is specifically designed to address these pain points. Since its launch in September 2023, AI Gateway has empowered developers and organizations by successfully proxying over 2 billion requests in just one year, as we highlighted during September’s Birthday Week. With AI Gateway, developers can easily store, analyze, and optimize their AI inference requests and responses in real time.
With our initial architecture, AI Gateway faced a significant challenge: the logs, those critical trails of data interactions between applications and AI models, could only be retained for 30 minutes. This limitation was not just a minor inconvenience; it posed a substantial barrier for developers and businesses needing to analyze long-term patterns, ensure compliance, or simply debug over more extended periods.
In this post, we’ll explore the technical challenges and strategic decisions behind extending our log storage capabilities from 30 minutes to being able to store billions of logs indefinitely. We’ll discuss the challenges of scale, the intricacies of data management, and how we’ve engineered a system that not only meets the demands of today, but is also scalable for the future of AI development.
Background
AI Gateway is built on Cloudflare Workers, a serverless platform that runs on the Cloudflare network, allowing developers to write small JavaScript functions that can execute at the point of need, near the user, on Cloudflare’s vast network of data centers, without worrying about platform scalability.
Our customers use multiple providers and models and are always looking to optimize the way they do inference. And, of course, in order to evaluate their prompts, performance, cost, and to troubleshoot what’s going on, AI Gateway’s customers need to store requests and responses. New requests show up within 15 seconds and customers can check a request’s cost, duration, number of tokens, and provide their feedback (thumbs up or down).
This scales in a way where an account can have multiple gateways and each gateway has its own settings. In our first implementation, a backend worker was responsible for storing Real Time Logs and other background tasks. However, in the rapidly evolving domain of artificial intelligence, where real-time data is as precious as the insights it provides, managing log data efficiently becomes paramount. We recognized that to truly empower our users, we needed to offer a solution where logs weren’t just transient records but could be stored permanently. Permanent log storage means developers can now track the performance, security, and operational insights of their AI applications over time, enabling not only immediate troubleshooting but also longitudinal studies of AI behavior, usage trends, and system health.
The diagram above describes our old architecture, which could only store 30 minutes of data.
Tracing the path of a request through the AI Gateway, as depicted in the sequence above:
A developer sends a new inference request, which is first received by our Gateway Worker.
The Gateway Worker then performs several checks: it looks for cached results, enforces rate limits, and verifies any other configurations set by the user for their gateway. Provided all conditions are met, it forwards the request to the selected inference provider (in this diagram, OpenAI).
The inference provider processes the request and sends back the response.
Simultaneously, as the response is relayed back to the developer, the request and response details are also dispatched to our Backend Worker. This worker’s role is to manage and store the log of this transaction.
The challenge: Store two billion logs
First step: real-time logs
Initially, the AI Gateway project stored both request metadata and the actual request bodies in a D1 database. This approach facilitated rapid development in the project’s infancy. However, as customer engagement grew, the D1 database began to fill at an accelerating rate, eventually retaining logs for only 30 minutes at a time.
To mitigate this, we first optimized the database schema, which extended the log retention to one hour. However, we soon encountered diminishing returns due to the sheer volume of byte data from the request bodies. Post-launch, it became clear that a more scalable solution was necessary. We decided to migrate the request bodies to R2 storage, significantly alleviating the data load on D1. This adjustment allowed us to incrementally extend log retention to 24 hours.
Consequently, D1 functioned primarily as a log index, enabling users to search and filter logs efficiently. When users needed to view details or download a log, these actions were seamlessly proxied through to R2.
This dual-system approach provided us with the breathing room to contemplate and develop more sophisticated storage solutions for the future.
Second step: persistent logs and Durable Object transactional storage
As our traffic surged, we encountered a growing number of requests from customers wanting to access and compare older logs.
Upon learning that the Durable Objects team was seeking beta testers for their new Durable Objects with SQLite, we eagerly signed up.
Originally, we considered Durable Objects as the ideal solution for expanding our log storage capacity, which required us to shard the logs by a unique string. Initially, this string was the account ID, but during a mid-development load test, we hit a cap at 10 million logs per Durable Object. This limitation meant that each account could only support up to this number of logs.
Given our commitment to the DO migration, we saw an opportunity rather than a constraint. To overcome the 10 million log limit per account, we refined our approach to shard by both account ID and gateway name. This adjustment effectively raised the storage ceiling from 10 million logs per account to 10 million per gateway. With the default setting allowing each account up to 10 gateways, the potential storage for each account skyrocketed to 100 million logs.
This strategic pivot not only enabled us to store a significantly larger number of logs. But also enhanced our flexibility in gateway management. Now, when a gateway is deleted, we can simply remove the corresponding Durable Object.
Additionally, this sharding method isolates high-volume request scenarios. If one customer’s heavy usage slows down log insertion, it only impacts their specific Durable Object, thereby preserving performance for other customers.
Taking a glance at the revised architecture diagram, we replaced the Backend Worker with our newly integrated Durable Object. The rest of the request flow remains unchanged, including the concurrent response to the user and the interaction with the Durable Object, which occurs in the fourth step.
Leveraging Cloudflare’s network, our Gateway Worker operates near the user’s location, which in turn positions the user’s Durable Object close by. This proximity significantly enhances the speed of log insertion and query operations.
Third step: managing thousands of Durable Objects
As the number of users and requests on AI Gateway grows, managing each unique Durable Object (DO) becomes increasingly complex. New customers join continuously, and we needed an efficient method to track each DO, ensure users stay within their 10 gateway limit, and manage the storage capacity for free users.
To address these challenges, we introduced another layer of control with a new Durable Object we’ve named the Account Manager. The primary function of the Account Manager is straightforward yet crucial: it keeps user activities in check.
Here’s how it works: before any Gateway commits a new log to permanent storage, it consults the Account Manager. This check determines whether the gateway is allowed to insert the log based on the user’s current usage and entitlements. The Account Manager uses its own SQLite database to verify the total number of rows a user has and their service level. If all checks pass, it signals the Gateway that the log can be inserted. It was paramount to guarantee that this entire validation process occurred in the background, ensuring that the user experience remains seamless and uninterrupted.
The Account Manager stays updated by periodically receiving data from each Gateway’s Durable Object. Specifically, after every 1000 inference requests, the Gateway sends an update on its total rows to the Account Manager, which then updates its local records. This system ensures that the Account Manager has the most current data when making its decisions.
Additionally, the Account Manager is responsible for monitoring customer entitlements. It tracks whether an account is on a free or paid plan, how many gateways a user is permitted to create, and the log storage capacity allocated to each gateway.
Through these mechanisms, the Account Manager not only helps in maintaining system integrity but also ensures fair usage across all users of AI Gateway.
AI evaluations and Durable Objects sharding
As we continue to develop evaluations to fully automatic and, in the future, use Large Language Models (LLMs), we are now taking the first step towards this goal and launching the open beta phase of comprehensive AI evaluations, centered on Human-in-the-Loop feedback.
This feature empowers users to create bespoke datasets from their application logs, thereby enabling them to score and evaluate the performance, speed, and cost-effectiveness of their models, with a primary focus on LLMs and automated scoring, analyzing the performance of LLMs, providing developers with objective, data-driven insights to refine their models.
To do this, developers require a reliable logging mechanism that persists logs from multiple gateways, storing up to 100 million logs in total (10 million logs per gateway, across 10 gateways). This represents a significant volume of data, as each request made through the AI Gateway generates a log entry, with some log entries potentially exceeding 50 MB in size.
This necessity leads us to work on the expansion of log storage capabilities. Since log storage is limited to 10 million logs per gateway, in future iterations, we aim to scale this capacity by implementing sharded Durable Objects (DO), allowing multiple Durable Objects per gateway to handle and store logs. This scaling strategy will enable us to store significantly larger volumes of logs, providing richer data for evaluations (using LLMs as a judge or from user input), all through AI Gateway.
Coming Soon
We are working on improving our existing Universal Endpoint, the next step on an enhanced solution that builds on existing fallback mechanisms to offer greater resilience, flexibility, and intelligence in request management.
Currently, when a provider encounters an error or is unavailable, our system falls back to an alternative provider to ensure continuity. The improved Universal Endpoint takes this a step further by introducing automatic retry capabilities, allowing failed requests to be reattempted before fallback is triggered. This significantly improves reliability by handling transient errors and increasing the likelihood of successful request fulfillment. It will look something like this:
The request to the improved Universal Endpoint system demonstrates how it handles multiple providers with integrated retry mechanisms and fallback logic. In this example, the first request is sent to a provider like OpenAI, asking it to generate a text-to-image prompt. The “retry” option ensures that transient issues don’t result in immediate failure.
The system’s ability to seamlessly switch between providers while applying retry strategies ensures higher reliability and robustness in managing requests. By leveraging fallback logic, the Improved Universal Endpoint can dynamically adapt to provider failures, ensuring that tasks are completed successfully even in complex, multi-step workflows.
In addition to retry logic, we will have the ability to inspect requests and responses and make dynamic decisions based on the content of the result. This enables developers to create conditional workflows where the system can adapt its behavior depending on the nature of the response, creating a highly flexible and intelligent decision-making process.
If you haven’t yet used AI Gateway, check out our developer documentation on how to get started. If you have any questions, reach out on our Discord channel.
Developer Week 2024 has officially come to a close. Each day last week, we shipped new products and functionality geared towards giving developers the components they need to build full-stack applications on Cloudflare.
Even though Developer Week is now over, we are continuing to innovate with the over two million developers who build on our platform. Building a platform is only as exciting as seeing what developers build on it. Before we dive into a recap of the announcements, to send off the week, we wanted to share how a couple of companies are using Cloudflare to power their applications:
We have been using Workers for image delivery using R2 and have been able to maintain stable operations for a year after implementation. The speed of deployment and the flexibility of detailed configurations have greatly reduced the time and effort required for traditional server management. In particular, we have seen a noticeable cost savings and are deeply appreciative of the support we have received from Cloudflare Workers. – FAN Communications
Milkshake helps creators, influencers, and business owners create engaging web pages directly from their phone, to simply and creatively promote their projects and passions. Cloudflare has helped us migrate data quickly and affordably with R2. We use Workers as a routing layer between our users’ websites and their images and assets, and to build a personalized analytics offering affordably. Cloudflare’s innovations have consistently allowed us to run infrastructure at a fraction of the cost of other developer platforms and we have been eagerly awaiting updates to D1 and Queues to sustainably scale Milkshake as the product continues to grow. – Milkshake
In case you missed anything, here’s a quick recap of the announcements and in-depth technical explorations that went out last week:
A core part of any full-stack application is storing and persisting data! We kicked off the week with announcements that help developers build stateful applications on top of Cloudflare, including making D1, Cloudflare’s SQL database and Hyperdrive, our database accelerating service, generally available.
D1, Cloudflare’s SQL database, is now generally available. With new support for 10GB databases, data export, and enhanced query debugging, we empower developers to build production-ready applications with D1 to meet all their relational SQL needs. To support Workers in global applications, we’re sharing a sneak peek of our design and API for D1 global read replication to demonstrate how developers scale their workloads with D1.
Bindings don’t just reduce boilerplate. They are a core design feature of the Workers platform which simultaneously improve developer experience and application security in several ways. Usually these two goals are in opposition to each other, but bindings elegantly solve for both at the same time.
We made a series of AI-related announcements, including Workers AI, Cloudflare’s inference platform becoming GA, support for fine-tuned models with LoRAs, one-click deploys from HuggingFace, Python support for Cloudflare Workers, and more.
Workers AI now supports fine-tuned models using LoRAs. But what is a LoRA and how does it work? In this post, we dive into fine-tuning, LoRAs and even some math to share the details of how it all works under the hood.
We introduced Python support for Cloudflare Workers, now in open beta. We’ve revamped our systems to support Python, from the Workers runtime itself to the way Workers are deployed to Cloudflare’s network. Learn about a Python Worker’s lifecycle, Pyodide, dynamic linking, and memory snapshots in this post.
We announced three new features for Cloudflare R2: event notifications, support for migrations from Google Cloud Storage, and an infrequent access storage tier.
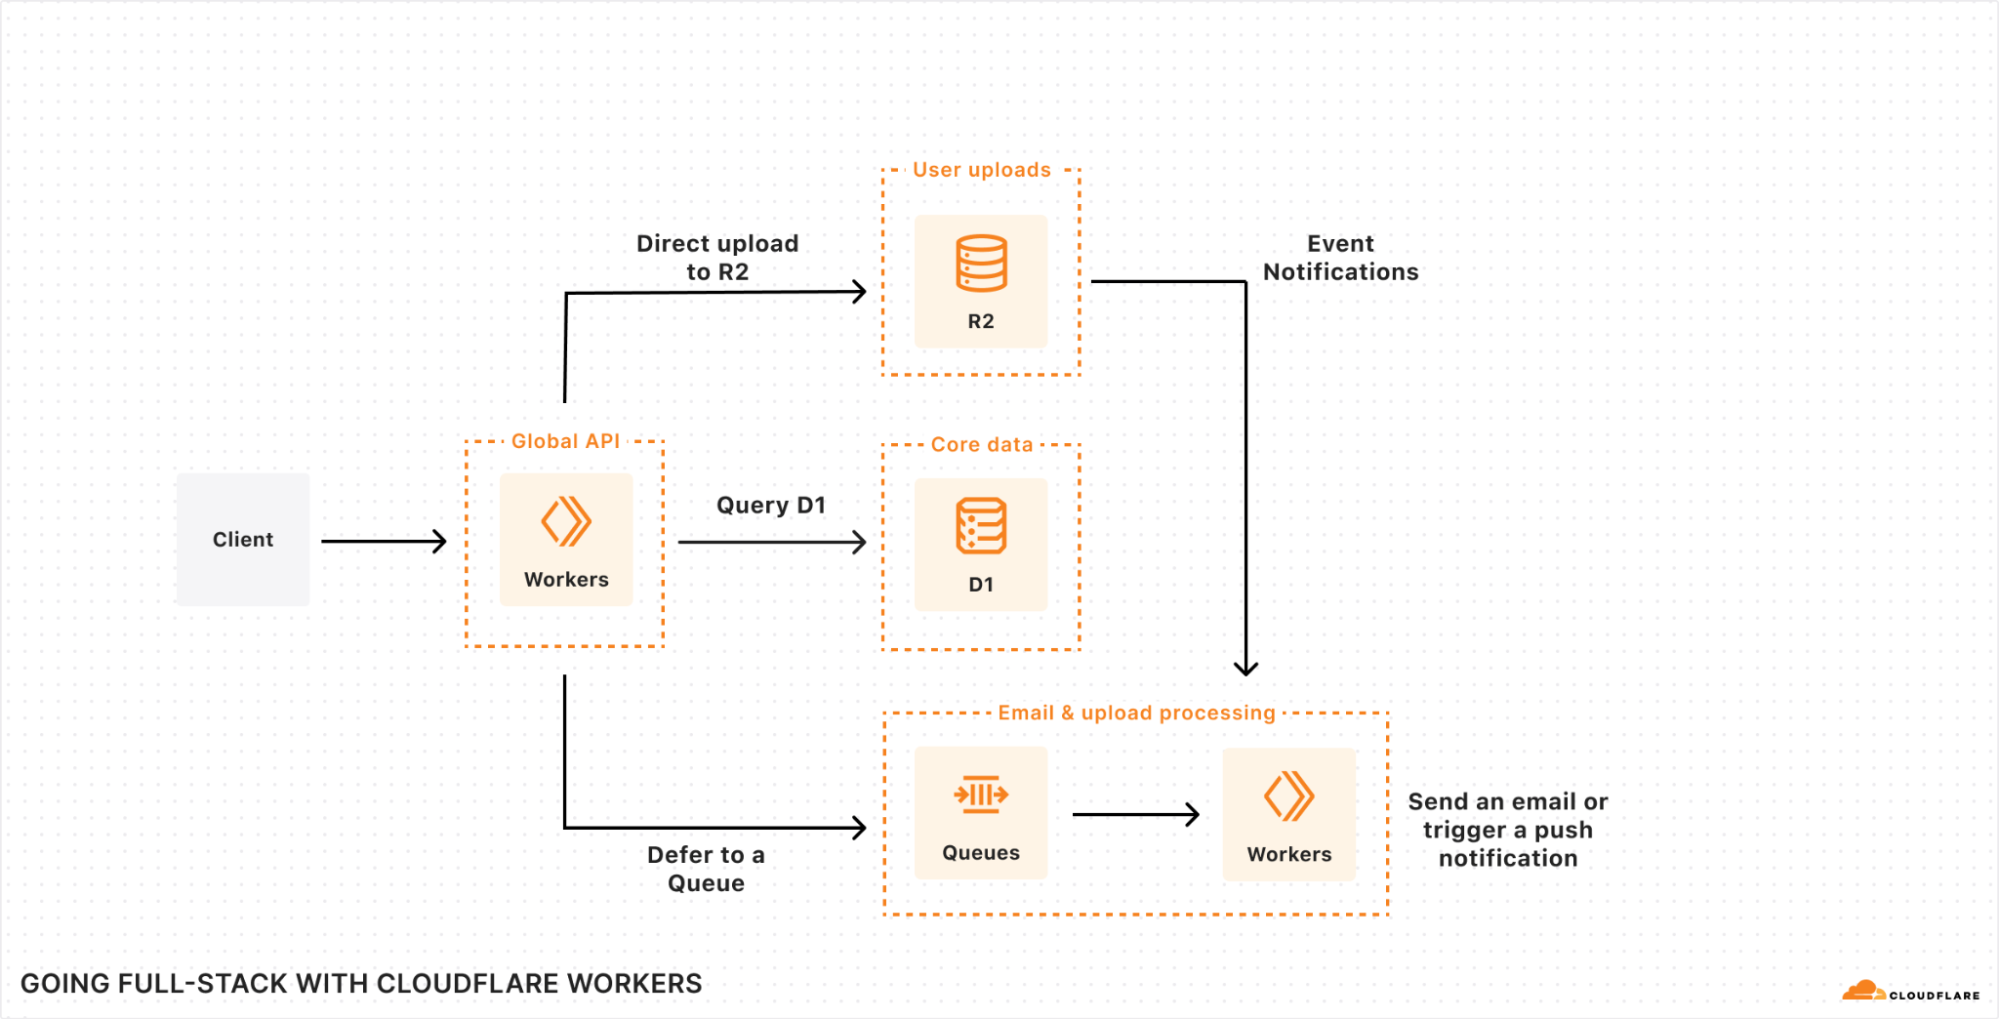
We’re making it easier to build scalable, reliable, data-driven applications on top of our global network, and so we announced a new Event Notifications framework; our take on durable execution, Workflows; and an upcoming streaming ingestion service, Pipelines.
Together, Cloudflare and Prisma make it easier than ever to deploy globally available apps with a focus on developer experience. To further that goal, Prisma ORM now natively supports Cloudflare Workers and D1 in Preview. With version 5.12.0 of Prisma ORM you can now interact with your data stored in D1 from your Cloudflare Workers with the convenience of the Prisma Client API. Learn more and try it out now.
Picsart, one of the world’s largest digital creation platforms, encountered performance challenges in catering to its global audience. Adopting Cloudflare’s global-by-default Developer Platform emerged as the optimal solution, empowering Picsart to enhance performance and scalability substantially.
We launched four improvements to Pages that bring functionality previously restricted to Workers, with the goal of unifying the development experience between the two. Support for monorepos, wrangler.toml, new additions to Next.js support and database integrations!
Production readiness isn’t just about scale and reliability of the services you build with. We announced five updates that put more power in your hands – Gradual Deployments, Source mapped stack traces in Tail Workers, a new Rate Limiting API, brand-new API SDKs, and updates to Durable Objects – each built with mission-critical production services in mind.
With Cloudflare Calls in open beta, you can build real-time, serverless video and audio applications. Cloudflare Stream lets your viewers instantly clip from ongoing streams. Finally, Cloudflare Images now supports automatic face cropping and has an upload widget that lets you easily integrate into your application.
Cloudflare Calls is a serverless SFU and TURN service running at Cloudflare’s edge. It’s now in open beta and costs $0.05/ real-time GB. It’s 100% anycast WebRTC.
We announced that PartyKit, a trailblazer in enabling developers to craft ambitious real-time, collaborative, multiplayer applications, is now a part of Cloudflare. This acquisition marks a significant milestone in our journey to redefine the boundaries of serverless computing, making it more dynamic, interactive, and, importantly, stateful.
Full-stack web development with Cloudflare is now faster and easier! You can now use your framework’s development server while accessing D1 databases, R2 object stores, AI models, and more. Iterate locally in milliseconds to build sophisticated web apps that run on Cloudflare. Let’s dev together!
Cloudflare Workers now features a built-in RPC (Remote Procedure Call) system for use in Worker-to-Worker and Worker-to-Durable Object communication, with absolutely minimal boilerplate. We’ve designed an RPC system so expressive that calling a remote service can feel like using a library.
We closed out Developer Week by sharing updates on our Workers Launchpad program, our latest Developer Challenge, and the work we’re doing to ensure our community spaces – like our Discord and Community forums – are safe and inclusive for all developers.
Continue the conversation
Thank you for being a part of Developer Week! Want to continue the conversation and share what you’re building? Join us on Discord. To get started building on Workers, check out our developer documentation.
Working with databases can be difficult. Developers face increasing data complexity and needs beyond simple create, read, update, and delete (CRUD) operations. Unfortunately, these issues also compound on themselves: developers have a harder time iterating in an increasingly complex environment. Cloudflare Workers and D1 help by reducing time spent managing infrastructure and deploying applications, and Prisma provides a great experience for your team to work and interact with data.
Together, Cloudflare and Prisma make it easier than ever to deploy globally available apps with a focus on developer experience. To further that goal, Prisma Object Relational Mapper (ORM) now natively supports Cloudflare Workers and D1 in Preview. With version 5.12.0 of Prisma ORM you can now interact with your data stored in D1 from your Cloudflare Workers with the convenience of the Prisma Client API. Learn more and try it out now.
What is Prisma?
From writing to debugging, SQL queries take a long time and slow developer productivity. Even before writing queries, modeling tables can quickly become unwieldy, and migrating data is a nerve-wracking process. Prisma ORM looks to resolve all of these issues by providing an intuitive data modeling language, an automated migration workflow, and a developer-friendly and type-safe client for JavaScript and TypeScript, allowing developers to focus on what they enjoy: developing!
Prisma is focused on making working with data easy. Alongside an ORM, Prisma offers Accelerate and Pulse, products built on Cloudflare that cover needs from connection pooling, to query caching, to real-time type-safe database subscriptions.
How to get started with Prisma ORM, Cloudflare Workers, and D1
To get started with Prisma ORM and D1, first create a basic Cloudflare Workers app. This guide will start with the ”Hello World” Worker example app, but any Workers example app will work. If you don’t have a project yet, start by creating a new one. Name your project something memorable, like my-d1-prisma-app and select “Hello World” worker and TypeScript. For now, we will choose to not deploy and will wait until after we have set up D1 and Prisma ORM.
npm create cloudflare@latest
Next, move into your newly created project and make sure that dependencies are installed:
cd my-d1-prisma-app && npm install
After dependencies are installed, we can move on to the D1 setup.
First, create a new D1 database for your app.
npx wrangler d1 create prod-prisma-d1-app
.
.
.

[[d1_databases]]
binding = "DB" # i.e. available in your Worker on env.DB
database_name = "prod-prisma-d1-app"
database_id = "<unique-ID-for-your-database>"
The section starting with [[d1_databases]] is the binding configuration needed in your wrangler.toml for your Worker to communicate with D1. Add that now:
// wrangler.toml
name="my-d1-prisma-app"
main = "src/index.ts"
compatibility_date = "2024-03-20"
compatibility_flags = ["nodejs_compat"]

[[d1_databases]]
binding = "DB" # i.e. available in your Worker on env.DB
database_name = "prod-prisma-d1-app"
database_id = "<unique-ID-for-your-database>"
Your application now has D1 available! Next, add Prisma ORM to manage your queries, schema and migrations! To add Prisma ORM, first make sure the latest version is installed. Prisma ORM versions 5.12.0 and up support Cloudflare Workers and D1.
Now run npx prisma init in order to create the necessary files to start with. Since D1 uses SQLite’s SQL dialect, we set the provider to be sqlite.
npx prisma init --datasource-provider sqlite
This will create a few files, but the one to look at first is your Prisma schema file, available at prisma/schema.prisma
// schema.prisma
// This is your Prisma schema file,
// learn more about it in the docs: https://pris.ly/d/prisma-schema

generator client {
  provider = "prisma-client-js"
}

datasource db {
  provider = "sqlite"
  url  = env("DATABASE_URL")
}
Before you can create any models, first enable the driverAdapters Preview feature. This will allow the Prisma Client to use an adapter to communicate with D1.
// schema.prisma
// This is your Prisma schema file,
// learn more about it in the docs: https://pris.ly/d/prisma-schema

generator client {
  provider = "prisma-client-js"
+ previewFeatures = ["driverAdapters"]
}

datasource db {
  provider = "sqlite"
  url      = env("DATABASE_URL")
}
Now you are ready to create your first model! In this app, you will be creating a “ticker”, a mainstay of many classic Internet sites.
Add a new model to your schema, Visit, which will track that an individual visited your site. A Visit is a simple model that will have a unique ID and the time at which an individual visited your site.
// This is your Prisma schema file,
// learn more about it in the docs: https://pris.ly/d/prisma-schema

generator client {
  provider        = "prisma-client-js"
  previewFeatures = ["driverAdapters"]
}

datasource db {
  provider = "sqlite"
  url      = env("DATABASE_URL")
}

+ model Visit {
+   id        Int      @id @default(autoincrement())
+   visitTime DateTime @default(now())
+ }
Now that you have a schema and a model, let’s create a migration. First use wrangler to generate an empty migration file and prisma migrate to fill it. If prompted, select “yes” to create a migrations folder at the root of your project.
npx wrangler d1 migrations create prod-prisma-d1-app init
 ⛅️ wrangler 3.36.0
-------------------
✔ No migrations folder found. Set `migrations_dir` in wrangler.toml to choose a different path.
Ok to create /path/to/your/project/my-d1-prisma-app/migrations? … yes
✅ Successfully created Migration '0001_init.sql'!

The migration is available for editing here
/path/to/your/project/my-d1-prisma-app/migrations/0001_init.sql
The npx prisma migrate diff command takes the difference between your database (which is currently empty) and the Prisma schema. It then saves this difference to a new file in the migrations directory.
Make sure to import PrismaClient and PrismaD1, define the binding for your D1 database, and you’re ready to use Prisma in your application.
// src/index.ts
import { PrismaClient } from "@prisma/client";
import { PrismaD1 } from "@prisma/adapter-d1";

export interface Env {
  DB: D1Database,
}

export default {
  async fetch(request: Request, env: Env, ctx: ExecutionContext): Promise<Response> {
    const adapter = new PrismaD1(env.DB);
    const prisma = new PrismaClient({ adapter });
    const { pathname } = new URL(request.url);

    if (pathname === '/') {
      const numVisitors = await prisma.visit.count();
      return new Response(
        `You have had ${numVisitors} visitors!`
      );
    }

    return new Response('');
  },
};
You may notice that there’s always 0 visitors. Add another route to create a new visitor whenever someone visits the /visit route
// src/index.ts
import { PrismaClient } from "@prisma/client";
import { PrismaD1 } from "@prisma/adapter-d1";

export interface Env {
  DB: D1Database,
}

export default {
  async fetch(request: Request, env: Env, ctx: ExecutionContext): Promise<Response> {
    const adapter = new PrismaD1(env.DB);
    const prisma = new PrismaClient({ adapter });
    const { pathname } = new URL(request.url);

    if (pathname === '/') {
      const numVisitors = await prisma.visit.count();
      return new Response(
        `You have had ${numVisitors} visitors!`
      );
    } else if (pathname === '/visit') {
      const newVisitor = await prisma.visit.create({ data: {} });
      return new Response(
        `You visited at ${newVisitor.visitTime}. Thanks!`
      );
    }

    return new Response('');
  },
};
Your app is now set up to record visits and report how many visitors you have had!
Summary and further reading
We were able to build a simple app easily with Cloudflare Workers, D1 and Prisma ORM, but the benefits don’t stop there! Check the official documentation for information on using Prisma ORM with D1 along with workflows for migrating your data, and even extending the Prisma Client for your specific needs.
Developers who build Worker applications focus on what they’re creating, not the infrastructure required, and benefit from the global reach of Cloudflare’s network. Many applications require persistent data, from personal projects to business-critical workloads. Workers offer various database and storage options tailored to developer needs, such as key-value and object storage.
Relational databases are the backbone of many applications today. D1, Cloudflare’s relational database complement, is now generally available. Our journey from alpha in late 2022 to GA in April 2024 focused on enabling developers to build production workloads with the familiarity of relational data and SQL.
What’s D1?
D1 is Cloudflare’s built-in, serverless relational database. For Worker applications, D1 offers SQL’s expressiveness, leveraging SQLite’s SQL dialect, and developer tooling integrations, including object-relational mappers (ORMs) like Drizzle ORM. D1 is accessible via Workers or an HTTP API.
Serverless means no provisioning, default disaster recovery with Time Travel, and usage-based pricing. D1 includes a generous free tier that allows developers to experiment with D1 and then graduate those trials to production.
How to make data global?
D1 GA has focused on reliability and developer experience. Now, we plan on extending D1 to better support globally-distributed applications.
In the Workers model, an incoming request invokes serverless execution in the closest data center. A Worker application can scale globally with user requests. Application data, however, remains stored in centralized databases, and global user traffic must account for access round trips to data locations. For example, a D1 database today resides in a single location.
Workers support Smart Placement to account for frequently accessed data locality. Smart Placement invokes a Worker closer to centralized backend services like databases to lower latency and improve application performance. We’ve addressed Workers placement in global applications, but need to solve data placement.
The question, then, is how can D1, as Cloudflare’s built-in database solution, better support data placement for global applications? The answer is asynchronous read replication.
What is asynchronous read replication?
In a server-based database management system, like Postgres, MySQL, SQL Server, or Oracle, a read replica is a separate database server that serves as a read-only, almost up-to-date copy of the primary database server. An administrator creates a read replica by starting a new server from a snapshot of the primary server and configuring the primary server to send updates asynchronously to the replica server. Since the updates are asynchronous, the read replica may be behind the current state of the primary server. The difference between the primary server and a replica is called replica lag. It’s possible to have more than one read replica.
Asynchronous read replication is a time-proven solution for improving the performance of databases:
It’s possible to increase throughput by distributing load across multiple replicas.
It’s possible to lower query latency when the replicas are close to the users making queries.
Note that some database systems also offer synchronous replication. In a synchronous replicated system, writes must wait until all replicas have confirmed the write. Synchronous replicated systems can run only as fast as the slowest replica and come to a halt when a replica fails. If we’re trying to improve performance on a global scale, we want to avoid synchronous replication as much as possible!
Consistency models & read replicas
Most database systems provide read committed, snapshot isolation, or serializable consistency models, depending on their configuration. For example, Postgres defaults to read committed but can be configured to use stronger modes. SQLite provides snapshot isolation in WAL mode. Stronger modes like snapshot isolation or serializable are easier to program against because they limit the permitted system concurrency scenarios and the kind of concurrency race conditions the programmer has to worry about.
Read replicas are updated independently, so each replica’s contents may differ at any moment. If all of your queries go to the same server, whether the primary or a read replica, your results should be consistent according to whatever consistency model your underlying database provides. If you’re using a read replica, the results may just be a little old.
In a server-based database with read replicas, it’s important to stick with the same server for all of the queries in a session. If you switch among different read replicas in the same session, you compromise the consistency model provided by your application, which may violate your assumptions about how the database acts and cause your application to return incorrect results!
Example For example, there are two replicas, A and B. Replica A lags the primary database by 100ms, and replica B lags the primary database by 2s. Suppose a user wishes to:
Execute query 1
1a. Do some computation based on query 1 results
Execute query 2 based on the results of the computation in (1a)
At time t=10s, query 1 goes to replica A and returns. Query 1 sees what the primary database looked like at t=9.9s. Suppose it takes 500ms to do the computation, so at t=10.5s, query 2 goes to replica B. Remember, replica B lags the primary database by 2s, so at t=10.5s, query 2 sees what the database looks like at t=8.5s. As far as the application is concerned, the results of query 2 look like the database has gone backwards in time!
Formally, this is read committed consistency since your queries will only see committed data, but there’s no other guarantee – not even that you can read your own writes. While read committed is a valid consistency model, it’s hard to reason about all of the possible race conditions the read committed model allows, making it difficult to write applications correctly.
Snapshot isolation is a familiar consistency model that most developers find easy to use. We implement this consistency model in D1 by ensuring at most one active copy of the D1 database and routing all HTTP requests to that single database. While ensuring that there’s at most one active copy of the D1 database is a gnarly distributed systems problem, it’s one that we’ve solved by building D1 using Durable Objects. Durable Objects guarantee global uniqueness, so once we depend on Durable Objects, routing HTTP requests is easy: just send them to the D1 Durable Object.
This trick doesn’t work if you have multiple active copies of the database since there’s no 100% reliable way to look at a generic incoming HTTP request and route it to the same replica 100% of the time. Unfortunately, as we saw in the previous section’s example, if we don’t route related requests to the same replica 100% of the time, the best consistency model we can provide is read committed.
Given that it’s impossible to route to a particular replica consistently, another approach is to route requests to any replica and ensure that the chosen replica responds to requests according to a consistency model that “makes sense” to the programmer. If we’re willing to include a Lamport timestamp in our requests, we can implement sequential consistency using any replica. The sequential consistency model has important properties like “read my own writes” and “writes follow reads,” as well as a total ordering of writes. The total ordering of writes means that every replica will see transactions commit in the same order, which is exactly the behavior we want in a transactional system. Sequential consistency comes with the caveat that any individual entity in the system may be arbitrarily out of date, but that caveat is a feature for us because it allows us to consider replica lag when designing our APIs.
The idea is that if D1 gives applications a Lamport timestamp for every database query and those applications tell D1 the last Lamport timestamp they’ve seen, we can have each replica determine how to make queries work according to the sequential consistency model.
A robust, yet simple, way to implement sequential consistency with replicas is to:
Associate a Lamport timestamp with every single request to the database. A monotonically increasing commit token works well for this.
Send all write queries to the primary database to ensure the total ordering of writes.
Send read queries to any replica, but have the replica delay servicing the query until the replica receives updates from the primary database that are later than the Lamport timestamp in the query.
What’s nice about this implementation is that it’s fast in the common case where a read-heavy workload always goes to the same replica and will work even if requests get routed to different replicas.
Sneak Preview: bringing read replication to D1 with Sessions
To bring read replication to D1, we will expand the D1 API with a new concept: Sessions. A Session encapsulates all the queries representing one logical session for your application. For example, a Session might represent all requests coming from a particular web browser or all requests coming from a mobile app. If you use Sessions, your queries will use whatever copy of the D1 database makes the most sense for your request, be that the primary database or a nearby replica. D1’s Sessions implementation will ensure sequential consistency for all queries in the Session.
Since the Sessions API changes D1’s consistency model, developers must opt-in to the new API. Existing D1 API methods are unchanged and will still have the same snapshot isolation consistency model as before. However, only queries made using the new Sessions API will use replicas.
Here’s an example of the D1 Sessions API:
export default {
  async fetch(request: Request, env: Env) {
    // When we create a D1 Session, we can continue where we left off
    // from a previous Session if we have that Session's last commit
    // token.  This Worker will return the commit token back to the
    // browser, so that it can send it back on the next request to
    // continue the Session.
    //
    // If we don't have a commit token, make the first query in this
    // session an "unconditional" query that will use the state of the
    // database at whatever replica we land on.
    const token = request.headers.get('x-d1-token') ?? 'first-unconditional'
    const session = env.DB.withSession(token)


    // Use this Session for all our Workers' routes.
    const response = await handleRequest(request, session)


    if (response.status === 200) {
      // Set the token so we can continue the Session in another request.
      response.headers.set('x-d1-token', session.latestCommitToken)
    }
    return response
  }
}


async function handleRequest(request: Request, session: D1DatabaseSession) {
  const { pathname } = new URL(request.url)


  if (pathname === '/api/orders/list') {
    // This statement is a read query, so it will execute on any
    // replica that has a commit equal or later than `token` we used
    // to create the Session.
    const { results } = await session.prepare('SELECT * FROM Orders').all()


    return Response.json(results)
  } else if (pathname === '/api/orders/add') {
    const order = await request.json<Order>()


    // This statement is a write query, so D1 will send the query to
    // the primary, which always has the latest commit token.
    await session
      .prepare('INSERT INTO Orders VALUES (?, ?, ?)')
      .bind(order.orderName, order.customer, order.value)
      .run()


    // In order for the application to be correct, this SELECT
    // statement must see the results of the INSERT statement above.
    // The Session API keeps track of commit tokens for queries
    // within the session and will ensure that we won't execute this
    // query until whatever replica we're using has seen the results
    // of the INSERT.
    const { results } = await session
      .prepare('SELECT COUNT(*) FROM Orders')
      .all()


    return Response.json(results)
  }


  return new Response('Not found', { status: 404 })
}
D1’s implementation of Sessions makes use of commit tokens. Commit tokens identify a particular committed query to the database. Within a session, D1 will use commit tokens to ensure that queries are sequentially ordered. In the example above, the D1 session ensures that the “SELECT COUNT(*)” query happens after the “INSERT” of the new order, even if we switch replicas between the awaits.
There are several options on how you want to start a session in a Workers fetch handler. db.withSession(<condition>) accepts these arguments:
condition argument
Behavior
<commit_token>
(1) starts Session as of given commit token
(2) subsequent queries have sequential consistency
first-unconditional
(1) if the first query is read, read whatever current replica has and use the commit token of that read as the basis for subsequent queries. If the first query is a write, forward the query to the primary and use the commit token of the write as the basis for subsequent queries.
(2) subsequent queries have sequential consistency
first-primary
(1) runs first query, read or write, against the primary
(2) subsequent queries have sequential consistency
null or missing argument
treated like first-unconditional
It’s possible to have a session span multiple requests by “round-tripping” the commit token from the last query of the session and using it to start a new session. This enables individual user agents, like a web app or a mobile app, to make sure that all of the queries the user sees are sequentially consistent.
D1’s read replication will be built-in, will not incur extra usage or storage costs, and will require no replica configuration. Cloudflare will monitor an application’s D1 traffic and automatically create database replicas to spread user traffic across multiple servers in locations closer to users. Aligned with our serverless model, D1 developers shouldn’t worry about replica provisioning and management. Instead, developers should focus on designing applications for replication and data consistency tradeoffs.
We’re actively working on global read replication and realizing the above proposal (share feedback In the #d1 channel on our Developer Discord). Until then, D1 GA includes several exciting new additions.
Check out D1 GA
Since D1’s open beta in October 2023, we’ve focused on D1’s reliability, scalability, and developer experience demanded of critical services. We’ve invested in several new features that allow developers to build and debug applications faster with D1.
Build bigger with larger databases We’ve listened to developers who requested larger databases. D1 now supports up to 10GB databases, with 50K databases on the Workers Paid plan. With D1’s horizontal scaleout, applications can model database-per-business-entity use cases. Since beta, new D1 databases process 40x more requests than D1 alpha databases in a given period.
Import & export bulk data Developers import and export data for multiple reasons:
Database migration testing to/from different database systems
Data copies for local development or testing
Manual backups for custom requirements like compliance
While you could execute SQL files against D1 before, we’re improving wrangler d1 execute –file=<filename> to ensure large imports are atomic operations, never leaving your database in a halfway state. wrangler d1 execute also now defaults to local-first to protect your remote production database.
To import our Northwind Traders demo database, you can download the schema & data and execute the SQL files.
npx wrangler d1 create northwind-traders

# omit --remote to run on a local database for development
npx wrangler d1 execute northwind-traders --remote --file=./schema.sql

npx wrangler d1 execute northwind-traders --remote --file=./data.sql
D1 database data & schema, schema-only, or data-only can be exported to a SQL file using:
# database schema & data
npx wrangler d1 export northwind-traders --remote --output=./database.sql

# single table schema & data
npx wrangler d1 export northwind-traders --remote --table='Employee' --output=./table.sql

# database schema only
npx wrangler d1 export <database_name> --remote --output=./database-schema.sql --no-data=true
Debug query performance Understanding SQL query performance and debugging slow queries is a crucial step for production workloads. We’ve added the experimental wrangler d1 insights to help developers analyze query performance metrics also available via GraphQL API.
# To find top 10 queries by average execution time:
npx wrangler d1 insights <database_name> --sort-type=avg --sort-by=time --count=10
Developer tooling Various community developer projects support D1. New additions include Prisma ORM, in version 5.12.0, which now supports Workers and D1.
Next steps
The features available now with GA and our global read replication design are just the start of delivering the SQL database needs for developer applications. If you haven’t yet used D1, you can get started right now, visit D1’s developer documentation to spark some ideas, or join the #d1 channel on our Developer Discord to talk to other D1 developers and our product engineering team.
Today might be April Fools, and while we like to have fun as much as anyone else, we like to use this day for serious announcements. In fact, as of today, there are over 2 million developers building on top of Cloudflare’s platform — that’s no joke!
To kick off this Developer Week, we’re flipping the big “production ready” switch on three products: D1, our serverless SQL database; Hyperdrive, which makes your existing databases feel like they’re distributed (and faster!); and Workers Analytics Engine, our time-series database.
We’ve been on a mission to allow developers to bring their entire stack to Cloudflare for some time, but what might an application built on Cloudflare look like?
The diagram itself shouldn’t look too different from the tools you’re already familiar with: you want a database for your core user data. Object storage for assets and user content. Maybe a queue for background tasks, like email or upload processing. A fast key-value store for runtime configuration. Maybe even a time-series database for aggregating user events and/or performance data. And that’s before we get to AI, which is increasingly becoming a core part of many applications in search, recommendation and/or image analysis tasks (at the very least!).
Yet, without having to think about it, this architecture runs on Region: Earth, which means it’s scalable, reliable and fast — all out of the box.
D1: Production Ready
Your core database is one of the most critical pieces of your infrastructure. It needs to be ultra-reliable. It can’t lose data. It needs to scale. And so we’ve been heads down over the last year getting the pieces into place to make sure D1 is production-ready, and we’re extremely excited to say that D1 — our global, serverless SQL database — is now Generally Available.
The GA for D1 lands some of the most asked-for features, including:
Support for 10GB databases — and 50,000 databases per account;
New data export capabilities; and
Enhanced query debugging (we call it “D1 Insights”) — that allows you to understand what queries are consuming the most time, cost, or that are just plain inefficient…
… to empower developers to build production-ready applications with D1 to meet all their relational SQL needs. And importantly, in an era where the concept of a “free plan” or “hobby plan” is seemingly at risk, we have no intention of removing the free tier for D1 or reducing the 25 billion row reads included in the $5/mo Workers Paid plan:
Plan
Rows Read
Rows Written
Storage
WorkersPaid
First 25 billion / month included + $0.001 / million rows
First 50 million / month included + $1.00 / million rows
First 5 GB included
+ $0.75 / GB-mo
Workers Free
5 million / day
100,000 / day
5 GB (total)
For those who’ve been following D1 since the start: this is the same pricing we announced at open beta
But things don’t just stop at GA: we have some major new features lined up for D1, including global read replication, even larger databases, more Time Travel capabilities that will allow you to branch your database, and new APIs for dynamically querying and/or creating new databases-on-the-fly from within a Worker.
D1’s read replication will automatically deploy read replicas as needed to get data closer to your users: and without you having to spin up, manage scaling, or run into consistency (replication lag) issues. Here’s a sneak preview of what D1’s upcoming Replication API looks like:
export default {
  async fetch(request: Request, env: Env) {
    const {pathname} = new URL(request.url);
    let resp = null;
    let session = env.DB.withSession(token); // An optional commit token or mode

    // Handle requests within the session.
    if (pathname === "/api/orders/list") {
      // This statement is a read query, so it will work against any
      // replica that has a commit equal or later than `token`.
      const { results } = await session.prepare("SELECT * FROM Orders");
      resp = Response.json(results);
    } else if (pathname === "/api/orders/add") {
      order = await request.json();

      // This statement is a write query, so D1 will send the query to
      // the primary, which always has the latest commit token.
      await session.prepare("INSERT INTO Orders VALUES (?, ?, ?)")
        .bind(order.orderName, order.customer, order.value);
        .run();

      // In order for the application to be correct, this SELECT
      // statement must see the results of the INSERT statement above.
      //
      // D1's new Session API keeps track of commit tokens for queries
      // within the session and will ensure that we won't execute this
      // query until whatever replica we're using has seen the results
      // of the INSERT.
      const { results } = await session.prepare("SELECT COUNT(*) FROM Orders")
        .run();
      resp = Response.json(results);
    }

    // Set the token so we can continue the session in another request.
    resp.headers.set("x-d1-token", session.latestCommitToken);
    return resp;
  }
}
Importantly, we will give developers the ability to maintain session-based consistency, so that users still see their own changes reflected, whilst still benefiting from the performance and latency gains that replication can bring.
You can learn more about how D1’s read replication works under the hood in our deep-dive post, and if you want to start building on D1 today, head to our developer docs to create your first database.
Hyperdrive: GA
We launched Hyperdrive into open beta last September during Birthday Week, and it’s now Generally Available — or in other words, battle-tested and production-ready.
If you’re not caught up on what Hyperdrive is, it’s designed to make the centralized databases you already have feel like they’re global. We use our global network to get faster routes to your database, keep connection pools primed, and cache your most frequently run queries as close to users as possible.
Importantly, Hyperdrive supports the most popular drivers and ORM (Object Relational Mapper) libraries out of the box, so you don’t have to re-learn or re-write your queries:
// Use the popular 'pg' driver? Easy. Hyperdrive just exposes a connection string
// to your Worker.
const client = new Client({ connectionString: env.HYPERDRIVE.connectionString });
await client.connect();

// Prefer using an ORM like Drizzle? Use it with Hyperdrive too.
// https://orm.drizzle.team/docs/get-started-postgresql#node-postgres
const client = new Client({ connectionString: env.HYPERDRIVE.connectionString });
await client.connect();
const db = drizzle(client);
But the work on Hyperdrive doesn’t stop just because it’s now “GA”. Over the next few months, we’ll be bringing support for the other most widely deployed database engine there is: MySQL. We’ll also be bringing support for connecting to databases inside private networks (including cloud VPC networks) via Cloudflare Tunnel and Magic WAN On top of that, we plan to bring more configurability around invalidation and caching strategies, so that you can make more fine-grained decisions around performance vs. data freshness.
As we thought about how we wanted to price Hyperdrive, we realized that it just didn’t seem right to charge for it. After all, the performance benefits from Hyperdrive are not only significant, but essential to connecting to traditional database engines. Without Hyperdrive, paying the latency overhead of 6+ round-trips to connect & query your database per request just isn’t right.
And so we’re happy to announce that for any developer on a Workers Paid plan, Hyperdrive is free. That includes both query caching and connection pooling, as well as the ability to create multiple Hyperdrives — to separate different applications, prod vs. staging, or to provide different configurations (cached vs. uncached, for example).
Plan
Price per query
Connection Pooling
WorkersPaid
$0
$0
To get started with Hyperdrive, head over to the docs to learn how to connect your existing database and start querying it from your Workers.
Queues: Pull From Anywhere
The task queue is an increasingly critical part of building a modern, full-stack application, and this is what we had in mind when we originally announced the open beta of Queues. We’ve since been working on several major Queues features, and we’re launching two of them this week: pull-based consumers and new message delivery controls.
Any HTTP-speaking client can now pull messages from a queue: call the new /pull endpoint on a queue to request a batch of messages, and call the /ack endpoint to acknowledge each message (or batch of messages) as you successfully process them:
// Pull and acknowledge messages from a Queue using any HTTP client
$  curl "https://api.cloudflare.com/client/v4/accounts/${CF_ACCOUNT_ID}/queues/${QUEUE_ID}/messages/pull" -X POST --data '{"visibilityTimeout":10000,"batchSize":100}}' \
     -H "Authorization: Bearer ${QUEUES_TOKEN}" \
     -H "Content-Type:application/json"

// Ack the messages you processed successfully; mark others to be retried.
$ curl "https://api.cloudflare.com/client/v4/accounts/${CF_ACCOUNT_ID}/queues/${QUEUE_ID}/messages/ack" -X POST --data '{"acks":["lease-id-1", "lease-id-2"],"retries":["lease-id-100"]}' \
     -H "Authorization: Bearer ${QUEUES_TOKEN}" \
     -H "Content-Type:application/json"
A pull-based consumer can run anywhere, allowing you to run queue consumers alongside your existing legacy cloud infrastructure. Teams inside Cloudflare adopted this early on, with one use-case focused on writing device telemetry to a queue from our 310+ data centers and consuming within some of our back-of-house infrastructure running on Kubernetes. Importantly, our globally distributed queue infrastructure means that messages are retained within the queue until the consumer is ready to process them.
Queues also now supports delaying messages, both when sending to a queue, as well as when marking a message for retry. This can be useful to queue (pun intended) tasks for the future, as well apply a backoff mechanism if an upstream API or infrastructure has rate limits that require you to pace how quickly you are processing messages.
// Apply a delay to a message when sending it
await env.YOUR_QUEUE.send(msg, { delaySeconds: 3600 })

// Delay a message (or a batch of messages) when marking it for retry
for (const msg of batch.messages) {
	msg.retry({delaySeconds: 300})
}
We’ll also be bringing substantially increased per-queue throughput over the coming months on the path to getting Queues to GA. It’s important to us that Queues is extremely reliable: lost or dropped messages means that a user doesn’t get their order confirmation email, that password reset notification, and/or their uploads processed — each of those are user-impacting and hard to recover from.
Workers Analytics Engine
Workers Analytics Engine provides unlimited-cardinality analytics at scale, via a built-in API to write data points from Workers, and a SQL API to query that data.
Workers Analytics Engine is backed by the same ClickHouse-based system we have depended on for years at Cloudflare. We use it ourselves to observe the health of our own services, to capture product usage data for billing, and to answer questions about specific customers’ usage patterns. At least one data point is written to this system on nearly every request to Cloudflare’s network. Workers Analytics Engine lets you build your own custom analytics using this same infrastructure, while we manage the hard parts for you.
Since launching in beta, developers have started depending on Workers Analytics Engine for these same use cases and more, from large enterprises to open-source projects like Counterscale. Workers Analytics Engine has been operating at production scale with mission-critical workloads for years — but we hadn’t shared anything about pricing, until today.
We are keeping Workers Analytics Engine pricing simple, and based on two metrics:
Data points written — every time you call writeDataPoint() in a Worker, this counts as one data point written. Every data point costs the same amount — unlike other platforms, there is no penalty for adding dimensions or cardinality, and no need to predict what the size and cost of a compressed data point might be.
Read queries — every time you post to the Workers Analytics Engine SQL API, this counts as one read query. Every query costs the same amount — unlike other platforms, there is no penalty for query complexity, and no need to reason about the number of rows of data that will be read by each query.
Both the Workers Free and Workers Paid plans will include an allocation of data points written and read queries, with pricing for additional usage as follows:
Plan
Data points written
Read queries
WorkersPaid
10 million included per month
+$0.25 per additional million
1 million included per month
+$1.00 per additional million
Workers Free
100,000 included per day
10,000 included per day
With this pricing, you can answer, “how much will Workers Analytics Engine cost me?” by counting the number of times you call a function in your Worker, and how many times you make a request to a HTTP API endpoint. Napkin math, rather than spreadsheet math.
This pricing will be made available to everyone in coming months. Between now and then, Workers Analytics Engine continues to be available at no cost. You can start writing data points from your Worker today — it takes just a few minutes and less than 10 lines of code to start capturing data. We’d love to hear what you think.
The week is just getting started
Tune in to what we have in store for you tomorrow on our second day of Developer Week. If you have questions or want to show off something cool you already built, please join our developer Discord.
During Developer Week, we announced LangChain support for Cloudflare Workers. Langchain is an open-source framework that allows developers to create powerful AI workflows by combining different models, providers, and plugins using a declarative API — and it dovetails perfectly with Workers for creating full stack, AI-powered applications.
Since then, we’ve been working with the LangChain team on deeper integration of many tools across Cloudflare’s developer platform and are excited to share what we’ve been up to.
Today, we’re announcing five new key integrations with LangChain:
Workers AI Instruct Models: This allows you to use Workers AI models fine-tuned for instruct use-cases, such as Mistral and CodeLlama, inside your Langchain.js application.
Vectorize Vector Store: When working with a Vector database and LangChain.js, you now have the option of using Vectorize, Cloudflare’s powerful vector database.
Cloudflare D1-Backed Chat Memory: For longer-term persistence across chat sessions, you can swap out LangChain’s default in-memory chatHistory that backs chat memory classes like BufferMemory for a Cloudflare D1 instance.
With the addition of these five Cloudflare AI tools into LangChain, developers have powerful new primitives to integrate into new and existing AI applications. With LangChain’s expressive tooling for mixing and matching AI tools and models, you can use Vectorize, Cloudflare AI’s text embedding and generation models, and Cloudflare D1 to build a fully-featured AI application in just a few lines of code.
This is a full persistent chat app powered by an LLM in 10 lines of code–deployed to @Cloudflare Workers, powered by @LangChainAI and @Cloudflare D1.
This application shows how various pieces of Cloudflare Workers AI fit together and expands on the concept of retrieval augmented generation (RAG) to build a conversational retrieval system that can route between multiple data sources, choosing the one more relevant based on the incoming question. This method helps cut down on distraction from off-topic documents getting pulled in by a vector store’s similarity search, which could occur if only a single database were used.
The base version runs entirely on the Cloudflare Workers AI stack with the Llama 2-7B model. It uses:
A chat variant of Llama 2-7B run on Cloudflare Workers AI
A Cloudflare Workers AI embeddings model
Two different Cloudflare Vectorize DBs (though you could add more!)
The bot will classify incoming questions as being about Cloudflare, AI, or neither, and draw on the corresponding data source for more targeted results. Everything is fully customizable – you can change the content of the ingested data, the models used, and all prompts!
And if you have access to the LangSmith beta, the app also has tracing set up so that you can easily see and debug each step in the application.
We can’t wait to see what you build
We can’t wait to see what you all build with LangChain and Cloudflare. Come tell us about it in discord or on our community forums.
This year, Cloudflare officially became a teenager, turning 13 years old. We celebrated this milestone with a series of announcements that benefit both our customers and the Internet community.
From developing applications in the age of AI to securing against the most advanced attacks that are yet to come, Cloudflare is proud to provide the tools that help our customers stay one step ahead.
We hope you’ve had a great time following along and for anyone looking for a recap of everything we launched this week, here it is:
Cloudflare Stream’s LL-HLS support is now in open beta. You can deliver video to your audience faster, reducing the latency a viewer may experience on their player to as little as 3 seconds.
Cloudflare account permissions are now available to all customers, not just Enterprise. In addition, we’ll show you how you can use them and best practices.
Now available: Workers AI, a serverless GPU cloud for AI, Vectorize so you can build your own vector databases, and AI Gateway to help manage costs and observability of your AI applications.
Cloudflare delivers the best infrastructure for next-gen AI applications, supported by partnerships with NVIDIA, Microsoft, Hugging Face, Databricks, and Meta.
Launching Workers AI — AI inference as a service platform, empowering developers to run AI models with just a few lines of code, all powered by our global network of GPUs.
Cloudflare’s vector database, designed to allow engineers to build full-stack, AI-powered applications entirely on Cloudflare's global network — available in Beta.
AI Gateway helps developers have greater control and visibility in their AI apps, so that you can focus on building without worrying about observability, reliability, and scaling. AI Gateway handles the things that nearly all AI applications need, saving you engineering time so you can focus on what you're building.
Developers can now use WebGPU in Cloudflare Workers. Learn more about why WebGPUs are important, why we’re offering them to customers, and what’s next.
Many AI companies are using Cloudflare to build next generation applications. Learn more about what they’re building and how Cloudflare is helping them on their journey.
Cloudflare launches a new product, Hyperdrive, that makes existing regional databases much faster by dramatically speeding up queries that are made from Cloudflare Workers.
D1 is now in open beta, and the theme is “scale”: with higher per-database storage limits and the ability to create more databases, we’re unlocking the ability for developers to build production-scale applications on D1.
Introducing the Browser Rendering API, which enables developers to utilize the Puppeteer browser automation library within Workers, eliminating the need for serverless browser automation system setup and maintenance
We partnered with Microsoft Edge to provide a fast and secure VPN, right in the browser. Users don’t have to install anything new or understand complex concepts to get the latest in network-level privacy: Edge Secure Network VPN is available on the latest consumer version of Microsoft Edge in most markets, and automatically comes with 5GB of data.
We are revamping the playground that demonstrates the power of Workers, along with new development tooling, and the ability to share your playground code and deploy instantly to Cloudflare’s global network
Engineers from Cloudflare and Vercel have published a draft specification of the connect() sockets API for review by the community, along with a Node.js compatible polyfill for the connect() API that developers can start using.
Announcing new pricing for Cloudflare Workers, where you are billed based on CPU time, and never for the idle time that your Worker spends waiting on network requests and other I/O.
Cloudflare is rolling out post-quantum cryptography support to customers, services, and internal systems to proactively protect against advanced attacks.
Announcing a contribution that helps improve privacy for everyone on the Internet. Encrypted Client Hello, a new standard that prevents networks from snooping on which websites a user is visiting, is now available on all Cloudflare plans.
Cloudflare customers can now scan messages within their Office 365 Inboxes for threats. The Retro Scan will let you look back seven days to see what threats your current email security tool has missed.
Any Cloudflare user, on any plan, can choose specific categories of bots that they want to allow or block, including AI crawlers. We are also recommending a new standard to robots.txt that will make it easier for websites to clearly direct how AI bots can and can’t crawl.
Deep dive into Cloudflare’s approach and ongoing research into detecting novel web attack vectors in our WAF before they are seen by a security researcher.
Deep dive into the fundamental concepts behind the Distributed Aggregation Protocol (DAP) protocol with examples on how we’ve implemented it into Daphne, our open source aggregator server.
We are rolling out post-quantum cryptography support for outbound connections to origins and Cloudflare Workers fetch() calls. Learn more about what we enabled, how we rolled it out in a safe manner, and how you can add support to your origin server today.
Cloudflare’s updated benchmark results regarding network performance plus a dive into the tools and processes that we use to monitor and improve our network performance.
One More Thing
When Cloudflare turned 12 last year, we announced the Workers Launchpad Funding Program – you can think of it like a startup accelerator program for companies building on Cloudlare’s Developer Platform, with no restrictions on your size, stage, or geography.
A refresher on how the Launchpad works: Each quarter, we admit a group of startups who then get access to a wide range of technical advice, mentorship, and fundraising opportunities. That includes our Founders Bootcamp, Open Office Hours with our Solution Architects, and Demo Day. Those who are ready to fundraise will also be connected to our community of 40+ leading global Venture Capital firms.
In exchange, we just ask for your honest feedback. We want to know what works, what doesn’t and what you need us to build for you. We don’t ask for a stake in your company, and we don’t ask you to pay to be a part of the program.
Targum (my startup) was one of the first AI companies (w/ @jamdotdev ) in the Cloudflare workers launchpad!
In return to tons of stuff we got from CF 🙏 they asked for feedback, and my main one was, let me do everything end to end on CF, I don't want to rent GPU servers… https://t.co/0j2ZymXpsL
Over the past year, we’ve received applications from nearly 60 different countries. We’ve had a chance to work closely with 50 amazing early and growth-stage startups admitted into the first two cohorts, and have grown our VC partner community to 40+ firms and more than $2 billion in potential investments in startups building on Cloudflare.
Next up: Cohort #3! Between recently wrapping up Cohort #2 (check out their Demo Day!), celebrating the Launchpad’s 1st birthday, and the heaps of announcements we made last week, we thought that everyone could use a little extra time to catch up on all the news – which is why we are extending the deadline for Cohort #3 a few weeks to October 13, 2023. AND we’re reserving 5 spots in the class for those who are already using any of last Wednesday’s AI announcements. Just be sure to mention what you’re using in your application.
So once you’ve had a chance to check out the announcements and pour yourself a cup of coffee, check out the Workers Launchpad. Applying is a breeze — you’ll be done long before your coffee gets cold.
Until next time
That’s all for Birthday Week 2023. We hope you enjoyed the ride, and we’ll see you at our next innovation week!
D1 is now in open beta, and the theme is “scale”: with higher per-database storage limits and the ability to create more databases, we’re unlocking the ability for developers to build production-scale applications on D1. Any developers with an existing paid Workers plan don’t need to lift a finger to benefit: we’ve retroactively applied this to all existing D1 databases.
D1 our native serverless database, which we launched into alpha in November last year: the queryable database complement to Workers KV, Durable Objects and R2.
When we set out to build D1, we knew a few things for certain: it needed to be fast, it needed to be incredibly easy to create a database, and it needed to be SQL-based.
That last one was critical: so that developers could a) avoid learning another custom query language and b) make it easier for existing query buildings, ORM (object relational mapper) libraries and other tools to connect to D1 with minimal effort. From this, we’ve seen a huge number of projects build support in for D1: from support for D1 in the Drizzle ORM and Kysely, to the T4 App, a full-stack toolkit that uses D1 as its database.
We also knew that D1 couldn’t be the only way to query a database from Workers: for teams with existing databases and thousands of lines of SQL or existing ORM code, migrating across to D1 isn’t going to be an afternoon’s work. For those teams, we built Hyperdrive, allowing you to connect to your existing databases and make them feel global. We think this gives teams flexibility: combine D1 and Workers for globally distributed apps, and use Hyperdrive for querying the databases you have in legacy clouds and just can’t get rid of overnight.
Larger databases, and more of them
This has been the biggest ask from the thousands of D1 users throughout the alpha: not just more databases, but also bigger databases.
Developers on the Workers paid plan will now be able to grow each database up to 2GB and create 25 databases (up from 500MB and 10).
We’ll be continuing to work on unlocking even larger databases over the coming weeks and months: developers using the D1 beta will see automatic increases to these limits published on D1’s public changelog.
One of the biggest impediments to double-digit-gigabyte databases is performance: we want to ensure that a database can load in and be ready really quickly — cold starts of seconds (or more) just aren’t acceptable. A 10GB or 20GB database that takes 15 seconds before it can answer a query ends up being pretty frustrating to use.
Users on the Workers free plan will keep the ten 500MB databases (changelog) forever: we want to give more developers the room to experiment with D1 and Workers before jumping in.
Time Travel is here
Time Travel allows you to roll your database back to a specific point in time: specifically, any minute in the last 30 days. And it’s enabled by default for every D1 database, doesn’t cost any more, and doesn’t count against your storage limit.
For those who have been keeping tabs: we originally announced Time Travel earlier this year, and made it available to all D1 users in July. At its core, it’s deceptively simple: Time Travel introduces the concept of a “bookmark” to D1. A bookmark represents the state of a database at a specific point in time, and is effectively an append-only log. Time Travel can take a timestamp and turn it into a bookmark, or a bookmark directly: allowing you to restore back to that point. Even better: restoring doesn’t prevent you from going back further.
We think Time Travel works best with an example, so let’s make a change to a database: one with an Order table that stores every order made against our e-commerce store:
# To illustrate: we have 89,185 unique addresses in our order database.
# To illustrate: we have 89,185 unique addresses in our order database.
➜  wrangler d1 execute northwind --command "SELECT count(distinct ShipAddress) FROM [Order]"
┌──────────┐
│ count(*) │
├──────────┤
│ 89185    │
└──────────┘
OK, great. Now what if we wanted to make a change to a specific set of orders: an address change or freight company change?
# I think we might be forgetting something here...
➜  wrangler d1 execute northwind --command "UPDATE [Order] SET ShipAddress = 'Av. Veracruz 38, Roma Nte., Cuauhtémoc, 06700 Ciudad de México, CDMX, Mexico'
Wait: we’ve made a mistake that many, many folks have before: we forgot the WHERE clause on our UPDATE query. Instead of updating a specific order Id, we’ve instead updated the ShipAddress for every order in our table.
# Every order is now going to a wine bar in Mexico City.
➜  wrangler d1 execute northwind --command "SELECT count(distinct ShipAddress) FROM [Order]"
┌──────────┐
│ count(*) │
├──────────┤
│ 1        │
└──────────┘
Panic sets in. Did we remember to make a backup before we did this? How long ago was it? Did we turn on point-in-time recovery? It seemed potentially expensive at the time…
It’s OK. We’re using D1. We can Time Travel. It’s on by default: let’s fix this and travel back a few minutes.
# Let's go back in time.
➜  wrangler d1 time-travel restore northwind --timestamp="2023-09-23T14:20:00Z"

🚧 Restoring database northwind from bookmark 0000000b-00000002-00004ca7-9f3dba64bda132e1c1706a4b9d44c3c9
✔ OK to proceed (y/N) … yes

⚡️ Time travel in progress...
✅ Database dash-db restored back to bookmark 00000000-00000004-00004ca7-97a8857d35583887de16219c766c0785
↩️ To undo this operation, you can restore to the previous bookmark: 00000013-ffffffff-00004ca7-90b029f26ab5bd88843c55c87b26f497
We think that Time Travel becomes even more powerful when you have many smaller databases, too: the downsides of any restore operation is reduced further and scoped to a single user or tenant.
This is also just the beginning for Time Travel: we’re working to support not just only restoring a database, but also the ability to fork from and overwrite existing databases. If you can fork a database with a single command and/or test migrations and schema changes against real data, you can de-risk a lot of the traditional challenges that working with databases has historically implied.
Row-based pricing
Back in May we announced pricing for D1, to a lot of positive feedback around how much we’d included in our Free and Paid plans. In August, we published a new row-based model, replacing the prior byte-units, that makes it easier to predict and quantify your usage. Specifically, we moved to rows as it’s easier to reason about: if you’re writing a row, it doesn’t matter if it’s 1KB or 1MB. If your read query uses an indexed column to filter on, you’ll see not only performance benefits, but cost savings too.
Here’s D1’s pricing — almost everything has stayed the same, with the added benefit of charging based on rows:
As before, D1 does not charge you for “database hours”, the number of databases, or point-in-time recovery (Time Travel) — just query D1 and pay for your reads, writes, and storage — that’s it.
We believe this makes D1 not only far more cost-efficient, but also makes it easier to manage multiple databases to isolate customer data or prod vs. staging: we don’t care which database you query. Manage your data how you like, separate your customer data, and avoid having to fall for the trap of “Billing Based Architecture”, where you build solely around how you’re charged, even if it’s not intuitive or what makes sense for your team.
To make it easier to both see how much a given query charges and when to optimize your queries with indexes, D1 also returns the number of rows a query read or wrote (or both) so that you can understand how it’s costing you in both cents and speed.
For example, the following query filters over orders based on date:
The unindexed query above scans 16,800 rows. Even if we don’t optimize it, D1 includes 25 billion queries per month for free, meaning we could make this query 1.4 million times for a whole month before having to worry about extra costs.
But we can do better with an index:
CREATE INDEX IF NOT EXISTS idx_orders_date ON [Order](ShippedDate)
With the index created, let’s see how many rows our query needs to read now:
The same query with an index on the ShippedDate column reads just 417 rows: not only it is faster (duration is in milliseconds!), but it costs us less: we could run this query 59 million times per month before we’d have to pay any more than what the $5 Workers plan gives us.
D1 also exposes row counts via both the Cloudflare dashboard and our GraphQL analytics API: so not only can you look at this per-query when you’re tuning performance, but also break down query patterns across all of your databases.
D1 for Platforms
Throughout D1’s alpha period, we’ve both heard from and worked with teams who are excited about D1’s ability to scale out horizontally: the ability to deploy a database-per-customer (or user!) in order to keep data closer to where teams access it and more strongly isolate that data from their other users.
Teams building the next big thing on Workers for Platforms — think of it as “Functions as a Service, as a Service” — can use D1 to deploy a database per user — keeping customer data strongly separated from each other.
For example, and as one of the early adopters of D1, RONIN is building an edge-first content & data platform backed by a dedicated D1 database per customer, which allows customers to place data closer to users and provides each customer isolation from the queries of others.
Instead of spinning up and managing countless traditional database instances, RONIN uses D1 for Platforms to offer automatic infinite scalability at the edge. This allows RONIN to focus on providing a sleek, intuitive editing experience for your content & data.
When it comes to enabling “D1 for Platforms”, we’ve thought about this in a few ways from the very beginning:
Support for more than 100,000+ databases for Workers for Platforms users (there’s no limit, but if we said “unlimited” you might not believe us).
D1’s pricing – you don’t pay per-database or for “idle databases”. If you have a range of users, from thousands of QPS down to 1-2 every 10 minutes — you aren’t paying more for “database hours” on the less trafficked databases, or having to plan around spiky workloads across your user-base.
The ability to programmatically configure more databases via D1’s HTTP APIand attach them to your Worker without re-deploying. There’s no “provisioning” delay, either: you create the database, and it’s immediately ready to query by you or your users.
Detailed per-database analytics, so you can understand which databases are being used and how they’re being queried via D1’s GraphQL analytics API.
If you’re building the next big platform on top of Workers & want to use D1 at scale — whether you’re part of the Workers Launchpad program or not — reach out.
What’s next for D1?
We’re setting a clear goal: we want to make D1 “generally available” (GA) for production use-cases by early next year(Q1 2024). Although you can already use D1 without a waitlist or approval process, we understand that the GA label is an important one for many when it comes to a database (and as do we).
Between now and GA, we’re working on some really key parts of the D1 vision, with a continued focus on reliability and performance.
One of the biggest remaining pieces of that vision is global read replication, which we wrote about earlier this year. Importantly, replication will be free, won’t multiply your storage consumption, and will still enable session consistency (read-your-writes). Part of D1’s mission is about getting data closer to where users are, and we’re excited to land it.
We’re also working to expand Time Travel, D1’s built-in point-in-time recovery capabilities, so that you can branch and/or clone a database from a specific point-in-time on the fly.
We’ll also be progressively opening up our limits around per-database storage, unlocking more storage per account, and the number of databases you can create over the rest of this year, so keep an eye on the D1 changelog (or your inbox).
In the meantime, if you haven’t yet used D1, you can get started right now, visit D1’s developer documentation to spark some ideas, or join the #d1-beta channel on our Developer Discord to talk to other D1 developers and our product-engineering team.
Building applications on Cloudflare Workers has always been fun. Workers applications have low latency response times by default, and easy developer ergonomics thanks to Wrangler. It’s no surprise that for years now, developers have been going from idea to production with Workers in just a few minutes.
Internally, we’re no different. When a member of our team has a project idea, we often reach for Workers first, and not just for the MVP stage, but in production, too. Workers have been a secret ingredient to Cloudflare’s innovation for some time now, allowing us to build products like Access, Stream and Workers KV. Even better, when we have new ideas and we can use new Cloudflare products to build them, it’s a great way to give feedback on those products.
We’ve discussed this in the past on the Cloudflare blog – in May last year, I wrote how we rebuilt Cloudflare’s developer documentation using many of the tools that had recently been released in the Workers ecosystem: Cloudflare Pages for hosting, and Bulk Redirects for the redirect rules. In November, we released a new version of our API documentation, which again used Pages for hosting, and Pages functions for intelligent caching and transformation of our API schema.
In this blog post, I’m excited to show off some of the new tools in Cloudflare’s developer arsenal, D1 and Queues, to prototype and ship an internal tool for our SEO experts at Cloudflare. We’ve made this project, which we’re calling Prospector, open-source too – check it out in our cloudflare/templates repo on GitHub. Whether you’re a developer looking to understand how to use multiple parts of Cloudflare’s developer stack together, or an SEO specialist who may want to deploy the tool in production, we’ve made it incredibly easy to get up and running.
What we’re building
Prospector is a tool that allows Cloudflare’s SEO experts to monitor our blog and marketing site for specific keywords. When a keyword is matched on a page, Prospector will notify an email address. This allows our SEO experts to stay informed of any changes to our website, and take action accordingly.
Using MailChannels’ integration with Workers, we can quickly and easily send emails from our application using a single API call. This allows us to focus on the core functionality of the application, and not worry about the details of sending emails.
Prospector uses Cloudflare Workers as the user-facing API for the application. It uses D1 to store and retrieve data in real-time, and Queues to handle the fetching of all URLs and the notification process. We’ve also included an intuitive user interface for the application, which is built with HTML, CSS, and JavaScript.
Why we built it
It is widely known in SEO that both internal and external links help Google and other search engines understand what a website is about, which impacts keyword rankings. Not only do these links guide readers to additional helpful information, they also allow web crawlers for search engines to discover and index content on the site.
Acquiring external links is often a time-consuming process and at the discretion of third parties, whereas website owners typically have much more control over internal links. As a result, internal linking is one of the most useful levers available in SEO.
In an ideal world, every piece of content would be fully formed upon publication, replete with helpful internal links throughout the piece. However, this is often not the case. Many times, content is edited after the fact or additional pieces of relevant content come along after initial publication. These situations result in missed opportunities for internal linking.
Like other large organizations, Cloudflare has published thousands of blogs and web pages over the years. We share new content every time a product/technology is introduced and improved. Ultimately, that also means it’s become more challenging to identify opportunities for internal linking in a timely, automated fashion. We needed a tool that would allow us to identify internal linking opportunities as they appear, and speed up the time it takes to identify new internal linking opportunities.
Although we tested several tools that might solve this problem, we found that they were limited in several ways. First, some tools only scanned the first 2,000 characters of a web page. Any opportunities found beyond that limit would not be detected. Next, some tools did not allow us to limit searches to certain areas of the site and resulted in many false positives. Finally, other potential solutions required manual operation, leaving the process at the mercy of human memory.
To solve our problem (and ultimately, improve our SEO), we needed an automated tool that could discover and notify us of new instances of targeted phrases on a specified range of pages.
How it works
Data model
First, let’s explore the data model for Prospector. We have two main tables: notifiers and urls. The notifiers table stores the email address and keyword that we want to monitor. The urls table stores the URL and sitemap that we want to scrape. The notifiers table has a one-to-many relationship with the urls table, meaning that each notifier can have many URLs associated with it.
In addition, we have a sitemaps table that stores the sitemap URLs that we’ve scraped. Many larger websites don’t just have a single sitemap: the Cloudflare blog, for instance, has a primary sitemap that contains four sub-sitemaps. When the application is deployed, a primary sitemap is provided as configuration, and Prospector will parse it to find all of the sub-sitemaps.
Finally, notifier_matches is a table that stores the matches between a notifier and a URL. This allows us to keep track of which URLs have already been matched, and which ones still need to be processed. When a match has been found, the notifier_matches table is updated to reflect that, and “matches” for a keyword are no longer processed. This saves our SEO experts from a crowded inbox, and allows them to focus and act on new matches.
Connecting the pieces with Cloudflare Queues Cloudflare Queues acts as the work queue for Prospector. When a new notifier is added, a new job is created for it and added to the queue. Behind the scenes, Queues will distribute the work across multiple Workers, allowing us to scale the application as needed. When a job is processed, Prospector will scrape the URL and check for matches. If a match is found, Prospector will send an email to the notifier’s email address.
Using the Cron Triggers functionality in Workers, we can schedule the scraping process to run at a regular interval – by default, once a day. This allows us to keep our data up-to-date, and ensures that we’re always notified of any changes to our website. It also allows the end-user to configure when they receive emails in case they want to receive them more or less frequently, or at the beginning of their workday.
The Module Workers syntax for Workers makes accessing the application bindings – the constants available in the application for querying D1, Queues, and other services – incredibly easy. src/index.ts, the entrypoint for the application, looks like this:
With this syntax, we can see where the various events incoming to the application – the fetch event, the queue event, and the scheduled event – are handled. The fetch event is the main entrypoint for the application, and is where we handle all of the API routes. The queue event is where we handle the work that’s been added to the queue, and the scheduled event is where we handle the scheduled scraping process.
Central to the application, of course, is Workers – acting as the API gateway and coordinator. We’ve elected to use the popular open-source framework Hono, an Express-style API for Workers, in Prospector. With Hono, we can quickly map out a REST API in just a few lines of code. Here’s an example of a few API routes and how they’re defined with Hono:
With these bindings, we can define the types for our environment variables, and use them in our application. Here’s an example of the Env type, which defines the environment variables that we use in the application:
Notice the types of the DB and QUEUE bindings – D1Database and Queue, respectively. These types are automatically generated, complete with type signatures for each method inside of the D1 and Queue APIs. This means that we can be sure that we’re using the correct methods, and that we’re passing the correct arguments to them, directly from our text editor – without having to refer to the documentation.
How to use it
One of my favorite things about Workers is that deploying applications is quick and easy. Using `wrangler.toml` and some simple build scripts, we can deploy a fully-functional application in just a few minutes. Prospector is no different. With just a few commands, we can create the necessary D1 database and Queues instance, and deploy the application to our account.
First, you’ll need to clone the repository from our cloudflare/templates repository:
git clone $URL
If you haven’t installed wrangler yet, you can do so by running:
npm install @cloudflare/wrangler -g
With Wrangler installed, you can login to your account by running:
wrangler login
After you’ve done that, you’ll need to create a new D1 database, as well as a Queues instance. You can do this by running the following commands:
Next, you can run the bin/migrate script to create the tables in your database:
bin/migrate
This will create all the needed tables in your database, both in development (locally) and in production. Note that you’ll even see the creation of a honest-to-goodness .sqlite3 file in your project directory – this is the local development database, which you can connect to directly using the same SQLite CLI that you’re used to:
Finally, you can deploy the application to your account:
npm run deploy
With a deployed application, you can visit your Workers URL to see the user interface. From there, you can add new notifiers and URLs, and see the results of your scraping process. When a new keyword match is found, you’ll receive an email with the details of the match instantly:
Conclusion
For some time, there have been a great deal of applications that were hard to build on Workers without relational data or background task tooling. Now, with D1 and Queues, we can build applications that seamlessly integrate between real-time user interfaces, geographically distributed data, background processing, and more, all using the same developer ergonomics and low latency that Workers is known for.
D1 has been crucial for building this application. On larger sites, the number of URLs that need to be scraped can be quite large. If we were to use Workers KV, our key-value store, for storing this data, we would quickly struggle with how to model, retrieve, and update the data needed for this use-case. With D1, we can build relational data models and quickly query just the data we need for each queued processing task.
Using these tools, developers can build internal tools and applications for their companies that are more powerful and more scalable than ever before. With the integration of Cloudflare’s Zero Trust suite, developers can make these applications secure by default, and deploy them to Cloudflare’s global network. This allows developers to build applications that are fast, secure, and reliable, all without having to worry about the underlying infrastructure.
Prospector is a great example of how easy it is to build applications on Cloudflare Workers. With the recent addition of D1 and Queues, we’ve been able to build fully-functional applications that require real-time data and background processing in just a few hours. We’re excited to share the open-source code for Prospector, and we’d love to hear your feedback on the project.
If you have any questions, feel free to reach out to us on Twitter at @cloudflaredev, or join us in the Cloudflare Workers Discord community, which recently hit 20k members and is a great place to ask questions and get help from other developers.
The Fediverse has been a hot topic of discussion lately, with thousands, if not millions, of new users creating accounts on platforms like Mastodon to either move entirely to “the other side” or experiment and learn about this new social network.
Today we’re introducing Wildebeest, an open-source, easy-to-deploy ActivityPub and Mastodon-compatible server built entirely on top of Cloudflare’s Supercloud. If you want to run your own spot in the Fediverse you can now do it entirely on Cloudflare.
The Fediverse, built on Cloudflare
Today you’re left with two options if you want to join the Mastodon federated network: either you join one of the existing servers (servers are also called communities, and each one has its own infrastructure and rules), or you can run your self-hosted server.
There are a few reasons why you’d want to run your own server:
You want to create a new community and attract other users over a common theme and usage rules.
You don’t want to have to trust third-party servers or abide by their policies and want your server, under your domain, for your personal account.
You want complete control over your data, personal information, and content and visibility over what happens with your instance.
The Mastodon gGmbH non-profit organization provides a server implementation using Ruby, Node.js, PostgreSQL and Redis. Running the official server can be challenging, though. You need to own or rent a server or VPS somewhere; you have to install and configure the software, set up the database and public-facing web server, and configure and protect your network against attacks or abuse. And then you have to maintain all of that and deal with constant updates. It’s a lot of scripting and technical work before you can get it up and running; definitely not something for the less technical enthusiasts.
Wildebeest serves two purposes: you can quickly deploy your Mastodon-compatible server on top of Cloudflare and connect it to the Fediverse in minutes, and you don’t need to worry about maintaining or protecting it from abuse or attacks; Cloudflare will do it for you automatically.
Wildebeest is not a managed service. It’s your instance, data, and code running in our cloud under your Cloudflare account. Furthermore, it’s open-sourced, which means it keeps evolving with more features, and anyone can extend and improve it.
Compatible with the most popular Mastodon web (like Pinafore), desktop, and mobile clients. We also provide a simple read-only web interface to explore the timelines and user profiles.
You can publish, edit, boost, or delete posts, sorry, toots. We support text, images, and (soon) video.
Anyone can follow you; you can follow anyone.
You can search for content.
You can register one or multiple accounts under your instance. Authentication can be email-based on or using any Cloudflare Access compatible IdP, like GitHub or Google.
You can edit your profile information, avatar, and header image.
How we built it
Our implementation is built entirely on top of our products and APIs. Building Wildebeest was another excellent opportunity to showcase our technology stack’s power and versatility and prove how anyone can also use Cloudflare to build larger applications that involve multiple systems and complex requirements.
Here’s a birds-eye diagram of Wildebeest’s architecture:
Let’s get into the details and get technical now.
Cloudflare Pages
At the core, Wildebeest is a Cloudflare Pages project running its code using Pages Functions. Cloudflare Pages provides an excellent foundation for building and deploying your application and serving your bundled assets, Functions gives you full access to the Workers ecosystem, where you can run any code.
Functions has a built-in file-based router. The /functions directory structure, which is uploaded by Wildebeest’s continuous deployment builds, defines your application routes and what files and code will process each HTTP endpoint request. This routing technique is similar to what other frameworks like Next.js use.
Unit testing these endpoints becomes easier too, since we only have to call the handleRequest() function from the testing framework. Check one of our Jest tests, mastodon.spec.ts:
import * as v1_instance from 'wildebeest/functions/api/v1/instance'

describe('Mastodon APIs', () => {
	describe('instance', () => {
		test('return the instance infos v1', async () => {
			const res = await v1_instance.handleRequest(domain, env)
			assert.equal(res.status, 200)
			assertCORS(res)

			const data = await res.json<Data>()
			assert.equal(data.rules.length, 0)
			assert(data.version.includes('Wildebeest'))
		})
       })
})
As with any other regular Worker, Functions also lets you set up bindings to interact with other Cloudflare products and features like KV, R2, D1, Durable Objects, and more. The list keeps growing.
We use Functions to implement a large portion of the official Mastodon API specification, making Wildebeest compatible with the existing ecosystem of other servers and client applications, and also to run our own read-only web frontend under the same project codebase.
Wildebeest’s web frontend uses Qwik, a general-purpose web framework that is optimized for speed, uses modern concepts like the JSX JavaScript syntax extension and supports server-side-rendering (SSR) and static site generation (SSG).
Qwik provides a Cloudflare Pages Adaptor out of the box, so we use that (check our framework guide to know more about how to deploy a Qwik site on Cloudflare Pages). For styling we use the Tailwind CSS framework, which Qwik supports natively.
Our frontend website code and static assets can be found under the /frontend directory. The application is handled by the /functions/[[path]].js dynamic route, which basically catches all the non-API requests, and then invokes Qwik’s own internal router, Qwik City, which takes over everything else after that.
The power and versatility of Pages and Functions routes make it possible to run both the backend APIs and a server-side-rendered dynamic client, effectively a full-stack app, under the same project.
Let’s dig even deeper now, and understand how the server interacts with the other components in our architecture.
D1
Wildebeest uses D1, Cloudflare’s first SQL database for the Workers platform built on top of SQLite, now open to everyone in alpha, to store and query data. Here’s our schema:
The schema will probably change in the future, as we add more features. That’s fine, D1 supports migrations which are great when you need to update your database schema without losing your data. With each new Wildebeest version, we can create a new migration file if it requires database schema changes.
-- Migration number: 0001 	 2023-01-16T13:09:04.033Z

CREATE UNIQUE INDEX unique_actor_following ON actor_following (actor_id, target_actor_id);
D1 exposes a powerful client API that developers can use to manipulate and query data from Worker scripts, or in our case, Pages Functions.
Here’s a simplified example of how we interact with D1 when you start following someone on the Fediverse:
export async function addFollowing(db, actor, target, targetAcct): Promise<UUID> {
	const query = `INSERT OR IGNORE INTO actor_following (id, actor_id, target_actor_id, state, target_actor_acct) VALUES (?, ?, ?, ?, ?)`
	const out = await db
		.prepare(query)
		.bind(id, actor.id.toString(), target.id.toString(), STATE_PENDING, targetAcct)
		.run()
	return id
}
Cloudflare’s culture of dogfooding and building on top of our own products means that we sometimes experience their shortcomings before our users. We did face a few challenges using D1, which is built on SQLite, to store our data. Here are two examples.
ActivityPub uses UUIDs to identify objects and reference them in URIs extensively. These objects need to be stored in the database. Other databases like PostgreSQL provide built-in functions to generate unique identifiers. SQLite and D1 don’t have that, yet, it’s in our roadmap.
Mastodon content has a lot of rich media. We don’t need to reinvent the wheel and build an image pipeline; Cloudflare Images provides APIs to upload, transform, and serve optimized images from our global CDN, so it’s the perfect fit for Wildebeest’s requirements.
Things like posting content images, the profile avatar, or headers, all use the Images APIs. See /backend/src/media/image.ts to understand how we interface with Images.
Cloudflare Images is also available from the dashboard. You can use it to browse or manage your catalog quickly.
Queues
The ActivityPub protocol is chatty by design. Depending on the size of your social graph, there might be a lot of back-and-forth HTTP traffic. We can’t have the clients blocked waiting for hundreds of Fediverse message deliveries every time someone posts something.
We needed a way to work asynchronously and launch background jobs to offload data processing away from the main app and keep the clients snappy. The official Mastodon server has a similar strategy using Sidekiq to do background processing.
Fortunately, we don’t need to worry about any of this complexity either. Cloudflare Queues allows developers to send and receive messages with guaranteed delivery, and offload work from your Workers’ requests, effectively providing you with asynchronous batch job capabilities.
To put it simply, you have a queue topic identifier, which is basically a buffered list that scales automatically, then you have one or more producers that, well, produce structured messages, JSON objects in our case, and put them in the queue (you define their schema), and finally you have one or more consumers that subscribes that queue, receive its messages and process them, at their own speed.
In our case, the main application produces queue jobs whenever any incoming API call requires long, expensive operations. For example, when someone posts, sorry, toots something, we need to broadcast that to their followers’ inboxes, potentially triggering many requests to remote servers. Here we are queueing a job for that, thus freeing the APIs to keep responding:
Similarly, we don’t want to stop the main APIs when remote servers deliver messages to our instance inboxes. Here’s Wildebeest creating asynchronous jobs when it receives messages in the inbox:
And the final piece of the puzzle, our queue consumer runs in a separate Worker, independently from the Pages project. The consumer listens for new messages and processes them sequentially, at its rhythm, freeing everyone else from blocking. When things get busy, the queue grows its buffer. Still, things keep running, and the jobs will eventually get dispatched, freeing the main APIs for the critical stuff: responding to remote servers and clients as quickly as possible.
export default {
async queue(batch, env, ctx) {
for (const message of batch.messages) {
…
switch (message.body.type) {
case MessageType.Inbox: {
await handleInboxMessage(...)
break
}
case MessageType.Deliver: {
await handleDeliverMessage(...)
break
}
}
}
},
}
Caching repetitive operations is yet another strategy for improving performance in complex applications that require data processing. A famous Netscape developer, Phil Karlton, once said: “There are only two hard things in Computer Science: cache invalidation and naming things.”
Cloudflare obviously knows a lot about caching since it’s a core feature of our global CDN. We also provide Workers KV to our customers, a global, low-latency, key-value data store that anyone can use to cache data objects in our data centers and build fast websites and applications.
However, KV achieves its performance by being eventually consistent. While this is fine for many applications and use cases, it’s not ideal for others.
The ActivityPub protocol is highly transactional and can’t afford eventual consistency. Here’s an example: generating complete timelines is expensive, so we cache that operation. However, when you post something, we need to invalidate that cache before we reply to the client. Otherwise, the new post won’t be in the timeline and the client can fail with an error because it doesn’t see it. This actually happened to us with one of the most popular clients.
We needed to get clever. The team discussed a few options. Fortunately, our API catalog has plenty of options. Meet Durable Objects.
Durable Objects are single-instance Workers that provide a transactional storage API. They’re ideal when you need central coordination, strong consistency, and state persistence. You can use Durable Objects in cases like handling the state of multiple WebSocket connections, coordinating and routing messages in a chatroom, or even running a multiplayer game like Doom.
You know where this is going now. Yes, we implemented our key-value caching subsystem for Wildebeest on top of a Durable Object. By taking advantage of the DO’s native transactional storage API, we can have strong guarantees that whenever we create or change a key, the next read will always return the latest version.
The idea is so simple and effective that it took us literally a few lines of code to implement a key-value cache with two primitives: HTTP PUT and GET.
export class WildebeestCache {
async fetch(request: Request) {
if (request.method === 'GET') {
const { pathname } = new URL(request.url)
const key = pathname.slice(1)
const value = await this.storage.get(key)
return new Response(JSON.stringify(value))
}
if (request.method === 'PUT') {
const { key, value } = await request.json()
await this.storage.put(key, value)
return new Response('', { status: 201 })
}
}
}
Strong consistency it is. Lets move to user registration and authentication now.
Zero Trust Access
The official Mastodon server handles user registrations, typically using email, before you can choose your local user name and start using the service. Handling user registration and authentication can be daunting and time-consuming if we were to build it from scratch though.
Furthermore, people don’t want to create new credentials for every new service they want to use and instead want more convenient OAuth-like authorization and authentication methods so that they can reuse their existing Apple, Google, or GitHub accounts.
We wanted to simplify things using Cloudflare’s built-in features. Needless to say, we have a product that handles user onboarding, authentication, and access policies to any application behind Cloudflare; it’s called Zero Trust. So we put Wildebeest behind it.
Zero Trust Access can either do one-time PIN (OTP) authentication using email or single-sign-on (SSO) with many identity providers (examples: Google, Facebook, GitHub, Linkedin), including any generic one supporting SAML 2.0.
When you start using Wildebeest with a client, you don’t need to register at all. Instead, you go straight to log in, which will redirect you to the Access page and handle the authentication according to the policy that you, the owner of your instance, configured.
The policy defines who can authenticate, and how.
When authenticated, Access will redirect you back to Wildebeest. The first time this happens, we will detect that we don’t have information about the user and ask for your Username and Display Name. This will be asked only once and is what will be to create your public Mastodon profile.
Technically, Wildebeest implements the OAuth 2 specification. Zero Trust protects the /oauth/authorize endpoint and issues a valid JWT token in the request headers when the user is authenticated. Wildebeest then reads and verifies the JWT and returns an authorization code in the URL redirect.
Once the client has an authorization code, it can use the /oauth/token endpoint to obtain an API access token. Subsequent API calls inject a bearer token in the Authorization header:
Authorization: Bearer access_token
Deployment and Continuous Integration
We didn’t want to run a managed service for Mastodon as it would somewhat diminish the concepts of federation and data ownership. Also, we recognize that ActivityPub and Mastodon are emerging, fast-paced technologies that will evolve quickly and in ways that are difficult to predict just yet.
For these reasons, we thought the best way to help the ecosystem right now would be to provide an open-source software package that anyone could use, customize, improve, and deploy on top of our cloud. Cloudflare will obviously keep improving Wildebeest and support the community, but we want to give our Fediverse maintainers complete control and ownership of their instances and data.
The remaining question was, how do we distribute the Wildebeest bundle and make it easy to deploy into someone’s account when it requires configuring so many Cloudflare features, and how do we facilitate updating the software over time?
The Deploy with Workers button is a specially crafted link that auto-generates a workflow page where the user gets asked some questions, and Cloudflare handles authorizing GitHub to deploy to Workers, automatically forks the Wildebeest repository into the user’s account, and then configures and deploys the project using a GitHub Actions workflow.
A GitHub Actions workflow is a YAML file that declares what to do in every step. Here’s the Wildebeest workflow (simplified):
This workflow runs automatically every time the main branch changes, so updating the Wildebeest is as easy as synchronizing the upstream official repository with the fork. You don’t even need to use git commands for that; GitHub provides a convenient Sync button in the UI that you can simply click.
What’s more? Updates are incremental and non-destructive. When the GitHub Actions workflow redeploys Wildebeest, we only make the necessary changes to your configuration and nothing else. You don’t lose your data; we don’t need to delete your existing configurations. Here’s how we achieved this:
We use Terraform, a declarative configuration language and tool that interacts with our APIs and can query and configure your Cloudflare features. Here’s the trick, whenever we apply a new configuration, we keep a copy of the Terraform state for Wildebeest in a Cloudflare KV key. When a new deployment is triggered, we get that state from the KV copy, calculate the differences, then change only what’s necessary.
Data loss is not a problem either because, as you read above, D1 supports migrations. If we need to add a new column to a table or a new table, we don’t need to destroy the database and create it again; we just apply the necessary SQL to that change.
Protection, optimization and observability, naturally
Once Wildebeest is up and running, you can protect it from bad traffic and malicious actors. Cloudflare offers you DDoS, WAF, and Bot Management protection out of the box at a click’s distance.
Likewise, you’ll get instant network and content delivery optimizations from our products and analytics on how your Wildebeest instance is performing and being used.
ActivityPub, WebFinger, NodeInfo and Mastodon APIs
Mastodon popularized the Fediverse concept, but many of the underlying technologies used have been around for quite a while. This is one of those rare moments when everything finally comes together to create a working platform that answers an actual use case for Internet users. Let’s quickly go through the protocols that Wildebeest had to implement:
ActivityPub
ActivityPub is a decentralized social networking protocol and has been around as a W3C recommendation since at least 2018. It defines client APIs for creating and manipulating content and server-to-server APIs for content exchange and notifications, also known as federation. ActivityPub uses ActivityStreams, an even older W3C protocol, for its vocabulary.
The concepts of Actors (profiles), messages or Objects (the toots), inbox (where you receive toots from people you follow), and outbox (where you send your toots to the people you follow), to name a few of many other actions and activities, are all defined on the ActivityPub specification.
import type { APObject } from 'wildebeest/backend/src/activitypub/objects'
import type { Actor } from 'wildebeest/backend/src/activitypub/actors'
export async function addObjectInInbox(db, actor, obj) {
	const id = crypto.randomUUID()
	const out = await db
		.prepare('INSERT INTO inbox_objects(id, actor_id, object_id) VALUES(?, ?, ?)')
		.bind(id, actor.id.toString(), obj.id.toString())
		.run()
}
WebFinger
WebFinger is a simple HTTP protocol used to discover information about any entity, like a profile, a server, or a specific feature. It resolves URIs to resource objects.
Mastodon uses WebFinger lookups to discover information about remote users. For example, say you want to interact with @[email protected]. Your local server would request https://example.com/.well-known/webfinger?resource=acct:[email protected] (using the acct scheme) and get something like this:
export async function handleRequest(request, db): Promise<Response> {
	…
	const jsonLink = /* … link to actor */

	const res: WebFingerResponse = {
		subject: `acct:...`,
		aliases: [jsonLink],
		links: [
			{
				rel: 'self',
				type: 'application/activity+json',
				href: jsonLink,
			},
		],
	}
	return new Response(JSON.stringify(res), { headers })
}
Mastodon API
Finally, things like setting your server information, profile information, generating timelines, notifications, and searches, are all Mastodon-specific APIs. The Mastodon open-source project defines a catalog of REST APIs, and you can find all the documentation for them on their website.
Our Mastodon API implementation can be found here (REST endpoints) and here (backend primitives). Here’s an example of Mastodon’s server information /api/v2/instance implemented by Wildebeest:
Wildebeest also implements WebPush for client notifications and NodeInfo for server information.
Other Mastodon-compatible servers had to implement all these protocols too; Wildebeest is one of them. The community is very active in discussing future enhancements; we will keep improving our compatibility and adding support to more features over time, ensuring that Wildebeest plays well with the Fediverse ecosystem of servers and clients emerging.
Get started now
Enough about technology; let’s get you into the Fediverse. We tried to detail all the steps to deploy your server. To start using Wildebeest, head to the public GitHub repository and check our Get Started tutorial.
Most of Wildebeest’s dependencies offer a generous free plan that allows you to try them for personal or hobby projects that aren’t business-critical, however you will need to subscribe an Images plan (the lowest tier should be enough for most needs) and, depending on your server load, Workers Unbound (again, the minimum cost should be plenty for most use cases).
Following our dogfooding mantra, Cloudflare is also officially joining the Fediverse today. You can start following our Mastodon accounts and get the same experience of having regular updates from Cloudflare as you get from us on other social platforms, using your favorite Mastodon apps. These accounts are entirely running on top of a Wildebeest server:
Wildebeest is compatible with most client apps; we are confirmed to work with the official Mastodon Android and iOS apps, Pinafore, Mammoth, and tooot, and looking into others like Ivory. If your favorite isn’t working, please submit an issue here, we’ll do our best to help support it.
Final words
Wildebeest was built entirely on top of our Supercloud stack. It was one of the most complete and complex projects we have created that uses various Cloudflare products and features.
We hope this write-up inspires you to not only try deploying Wildebeest and joining the Fediverse, but also building your next application, however demanding it is, on top of Cloudflare.
Wildebeest is a minimally viable Mastodon-compatible server right now, but we will keep improving it with more features and supporting it over time; after all, we’re using it for our official accounts. It is also open-sourced, meaning you are more than welcome to contribute with pull requests or feedback.
In the meantime, we opened a Wildebeest room on our Developers Discord Server and are keeping an eye open on the GitHub repo issues tab. Feel free to engage with us; the team is eager to know how you use Wildebeest and answer your questions.
PS: The code snippets in this blog were simplified to benefit readability and space (the TypeScript types and error handling code were removed, for example). Please refer to the GitHub repo links for the complete versions.
Developer Week 2022 has come to a close. Over the last week we’ve shared with you 31 posts on what you can build on Cloudflare and our vision and roadmap on where we’re headed. We shared product announcements, customer and partner stories, and provided technical deep dives. In case you missed any of the posts here’s a handy recap.
Our vision of the cloud — a model of cloud computing that promises to make developers highly productive at scaling from one to Internet-scale in the most flexible, efficient, and economical way.
We’ve revamped our API reference documentation to standardize our API content and improve the overall developer experience when using the Cloudflare APIs.
The Segment Edge SDK, built on Workers, helps applications collect and track events from the client, and get access to realtime user state to personalize experiences.
Next
And that’s it for Developer Week 2022. But you can keep the conversation going by joining our Discord Community.
There are many ways to store data in your applications. For example, in Cloudflare Workers applications, we have Workers KV for key-value storage and Durable Objects for real-time, coordinated storage without compromising on consistency. Outside the Cloudflare ecosystem, you can also plug in other tools like NoSQL and graph databases.
But sometimes, you want SQL. Indexes allow us to retrieve data quickly. Joins enable us to describe complex relationships between different tables. SQL declaratively describes how our application’s data is validated, created, and performantly queried.
D1 was released today in open alpha, and to celebrate, I want to share my experience building apps with D1: specifically, how to get started, and why I’m excited about D1 joining the long list of tools you can use to build apps on Cloudflare.
D1 is remarkable because it’s an instant value-add to applications without needing new tools or stepping out of the Cloudflare ecosystem. Using wrangler, we can do local development on our Workers applications, and with the addition of D1 in wrangler, we can now develop proper stateful applications locally as well. Then, when it’s time to deploy the application, wrangler allows us to both access and execute commands to your D1 database, as well as your API itself.
What we’re building
In this blog post, I’ll show you how to use D1 to add comments to a static blog site. To do this, we’ll construct a new D1 database and build a simple JSON API that allows the creation and retrieval of comments.
As I mentioned, separating D1 from the app itself – an API and database that remains separate from the static site – allows us to abstract the static and dynamic pieces of our website from each other. It also makes it easier to deploy our application: we will deploy the frontend to Cloudflare Pages, and the D1-powered API to Cloudflare Workers.
Building a new application
First, we’ll add a basic API in Workers. Create a new directory and in it a new wrangler project inside it:
$ mkdir d1-example && d1-example
$ wrangler init
In this example, we’ll use Hono, an Express.js-style framework, to rapidly build our API. To use Hono in this project, install it using NPM:
$ npm install hono
Then, in src/index.ts, we’ll initialize a new Hono app, and define a few endpoints – GET /API/posts/:slug/comments, and POST /get/api/:slug/comments.
import { Hono } from 'hono'
import { cors } from 'hono/cors'

const app = new Hono()

app.get('/api/posts/:slug/comments', async c => {
  // do something
})

app.post('/api/posts/:slug/comments', async c => {
  // do something
})

export default app
Now we’ll create a D1 database. In Wrangler 2, there is support for the wrangler d1 subcommand, which allows you to create and query your D1 databases directly from the command line. So, for example, we can create a new database with a single command:
$ wrangler d1 create d1-example
With our created database, we can take the database name ID and associate it with a binding inside of wrangler.toml, wrangler’s configuration file. Bindings allow us to access Cloudflare resources, like D1 databases, KV namespaces, and R2 buckets, using a simple variable name in our code. Below, we’ll create the binding DB and use it to represent our new database:
[[ d1_databases ]]
binding = "DB" # i.e. available in your Worker on env.DB
database_name = "d1-example"
database_id = "4e1c28a9-90e4-41da-8b4b-6cf36e5abb29"
Note that this directive, the [[d1_databases]] field, currently requires a beta version of wrangler. You can install this for your project using the command npm install -D wrangler/beta.
With the database configured in our wrangler.toml, we can start interacting with it from the command line and inside our Workers function.
First, you can issue direct SQL commands using wrangler d1 execute:
$ wrangler d1 execute d1-example --command "SELECT name FROM sqlite_schema WHERE type ='table'"
Executing on d1-example:
┌─────────────────┐
│ name │
├─────────────────┤
│ sqlite_sequence │
└─────────────────┘
You can also pass a SQL file – perfect for initial data seeding in a single command. Create src/schema.sql, which will create a new comments table for our project:
drop table if exists comments;
create table comments (
  id integer primary key autoincrement,
  author text not null,
  body text not null,
  post_slug text not null
);
create index idx_comments_post_id on comments (post_slug);

-- Optionally, uncomment the below query to create data

-- insert into comments (author, body, post_slug)
-- values ("Kristian", "Great post!", "hello-world");
With the file created, execute the schema file against the D1 database by passing it with the flag --file:
We’ve created a SQL database with just a few commands and seeded it with initial data. Now we can add a route to our Workers function to retrieve data from that database. Based on our wrangler.toml config, the D1 database is now accessible via the DB binding. In our code, we can use the binding to prepare SQL statements and execute them, for instance, to retrieve comments:
app.get('/api/posts/:slug/comments', async c => {
  const { slug } = c.req.param()
  const { results } = await c.env.DB.prepare(`
    select * from comments where post_slug = ?
  `).bind(slug).all()
  return c.json(results)
})
In this function, we accept a slug URL query parameter and set up a new SQL statement where we select all comments with a matching post_slug value to our query parameter. We can then return it as a simple JSON response.
So far, we’ve built read-only access to our data. But “inserting” values to SQL is, of course, possible as well. So let’s define another function that allows POST-ing to an endpoint to create a new comment:
app.post('/API/posts/:slug/comments', async c => {
  const { slug } = c.req.param()
  const { author, body } = await c.req.json<Comment>()

  if (!author) return c.text("Missing author value for new comment")
  if (!body) return c.text("Missing body value for new comment")

  const { success } = await c.env.DB.prepare(`
    insert into comments (author, body, post_slug) values (?, ?, ?)
  `).bind(author, body, slug).run()

  if (success) {
    c.status(201)
    return c.text("Created")
  } else {
    c.status(500)
    return c.text("Something went wrong")
  }
})
In this example, we built a comments API for powering a blog. To see the source for this D1-powered comments API, you can visit cloudflare/templates/worker-d1-api.
Conclusion
One of the things most exciting about D1 is the opportunity to augment existing applications or websites with dynamic, relational data. As a former Ruby on Rails developer, one of the things I miss most about that framework in the world of JavaScript and serverless development tools is the ability to rapidly spin up full data-driven applications without needing to be an expert in managing database infrastructure. With D1 and its easy onramp to SQL-based data, we can build true data-driven applications without compromising on performance or developer experience.
This shift corresponds nicely with the advent of static sites in the last few years, using tools like Hugo or Gatsby. A blog built with a static site generator like Hugo is incredibly performant – it will build in seconds with small asset sizes.
But by trading a tool like WordPress for a static site generator, you lose the opportunity to add dynamic information to your site. Many developers have patched over this problem by adding more complexity to their build processes: fetching and retrieving data and generating pages using that data as part of the build.
This addition of complexity in the build process attempts to fix the lack of dynamism in applications, but it still isn’t genuinely dynamic. Instead of being able to retrieve and display new data as it’s created, the application rebuilds and redeploys whenever data changes so that it appears to be a live, dynamic representation of data. Your application can remain static, and the dynamic data will live geographically close to the users of your site, accessible via a queryable and expressive API.
When we announced D1 in May of this year, we knew it would be the start of something new – our first SQL database with Cloudflare Workers. Prior to D1 we’ve announced storage options like KV (key-value store), Durable Objects (single location, strongly consistent data storage) and R2 (blob storage). But the question always remained “How can I store and query relational data without latency concerns and an easy API?”
The long awaited “Cloudflare Database” was the true missing piece to build your application entirely on Cloudflare’s global network, going from a blank canvas in VSCode to a full stack application in seconds. Compatible with the popular SQLite API, D1 empowers developers to build out their databases without getting bogged down by complexity and having to manage every underlying layer.
Since our launch announcement in May and private beta in June, we’ve made great strides in building out our vision of a serverless database. With D1 still in private beta but an open beta on the horizon, we’re excited to show and tell our journey of building D1 and what’s to come.
The D1 Experience
We knew from Cloudflare Workers feedback that using Wrangler as the mechanism to create and deploy applications is loved and preferred by many. That’s why when Wrangler 2.0 was announced this past May alongside D1, we took advantage of the new and improved CLI for every part of the experience from data creation to every update and iteration. Let’s take a quick look on how to get set up in a few easy steps.
Create your database
With the latest version of Wrangler installed, you can create an initialized empty database with a quick
npx wrangler d1 create my_database_name
To get your database up and running! Now it’s time to add your data.
Bootstrap it
It wouldn’t be the “Cloudflare way” if you had to sit through an agonizingly long process to get set up. So we made it easy and painless to bring your existing data from an old database and bootstrap your new D1 database. You can run
and pass through an existing SQLite .sql file of your choice. Your database is now ready for action.
Develop & Test Locally
With all the improvements we’ve made to Wrangler since version 2 launched a few months ago, we’re pleased to report that D1 has full remote & local wrangler dev support:
When running wrangler dev -–local -–persist, an SQLite file will be created inside .wrangler/state. You can then use a local GUI program for managing it, like SQLiteFlow (https://www.sqliteflow.com/) or Beekeeper (https://www.beekeeperstudio.io/).
Or you can simply use SQLite directly with the SQLite command line by running sqlite3 .wrangler/state/d1/DB.sqlite3:
Automatic backups & one-click restore
No matter how much you test your changes, sometimes things don’t always go according to plan. But with Wrangler you can create a backup of your data, view your list of backups or restore your database from an existing backup. In fact, during the beta, we’re taking backups of your data every hour automatically and storing them in R2, so you will have the option to rollback if needed.
And the best part – if you want to use a production snapshot for local development or to reproduce a bug, simply copy it into the .wrangler/state directory and wrangler dev –-local –-persist will pick it up!
Let’s download a D1 backup to our local disk. It’s SQLite compatible.
Now let’s run our D1 worker locally, from the backup.
Create and Manage from the dashboard
However, we realize that CLIs are not everyone’s jam. In fact, we believe databases should be accessible to every kind of developer – even those without much database experience! D1 is available right from the Cloudflare dashboard giving you near total command parity with Wrangler in just a few clicks. Bootstrapping your database, creating tables, updating your database, viewing tables and triggering backups are all accessible right at your fingertips.
Changes made in the UI are instantly available to your Worker — no deploy required!
We’ve told you about some of the improvements we’ve landed since we first announced D1, but as always, we also wanted to give you a small taste (with some technical details) of what’s ahead. One really important functionality of a database is transactions — something D1 wouldn’t be complete without.
Sneak peek: how we’re bringing JavaScript transactions to D1
With D1, we strive to present a dramatically simplified interface to creating and querying relational data, which for the most part is a good thing. But simplification occasionally introduces drawbacks, where a use-case is no longer easily supported without introducing some new concepts. D1 transactions are one example.
Transactions are a unique challenge
You don’t need to specify where a Cloudflare Worker or a D1 database run—they simply run everywhere they need to. For Workers, that is as close as possible to the users that are hitting your site right this second. For D1 today, we don’t try to run a copy in every location worldwide, but dynamically manage the number and location of read-only replicas based on how many queries your database is getting, and from where. However, for queries that make changes to a database (which we generally call “writes” for short), they all have to travel back to the single Primary D1 instance to do their work, to ensure consistency.
But what if you need to do a series of updates at once? While you can send multiple SQL queries with .batch() (which does in fact use database transactions under the hood), it’s likely that, at some point, you’ll want to interleave database queries & JS code in a single unit of work.
This is exactly what database transactions were invented for, but if you try running BEGIN TRANSACTION in D1 you’ll get an error. Let’s talk about why that is.
Why native transactions don’t work The problem arises from SQL statements and JavaScript code running in dramatically different places—your SQL executes inside your D1 database (primary for writes, nearest replica for reads), but your Worker is running near the user, which might be on the other side of the world. And because D1 is built on SQLite, only one write transaction can be open at once. Meaning that, if we permitted BEGIN TRANSACTION, any one Worker request, anywhere in the world, could effectively block your whole database! This is a quite dangerous thing to allow:
A Worker could start a transaction then crash due to a software bug, without calling ROLLBACK. The primary would be blocked, waiting for more commands from a Worker that would never come (until, probably, some timeout).
Even without bugs or crashes, transactions that require multiple round-trips between JavaScript and SQL could end up blocking your whole system for multiple seconds, dramatically limiting how high an application built with Workers & D1 could scale.
But allowing a developer to define transactions that mix both SQL and JavaScript makes building applications with Workers & D1 so much more flexible and powerful. We need a new solution (or, in our case, a new version of an old solution).
A way forward: stored procedures Stored procedures are snippets of code that are uploaded to the database, to be executed directly next to the data. Which, at first blush, sounds exactly like what we want.
However, in practice, stored procedures in traditional databases are notoriously frustrating to work with, as anyone who’s developed a system making heavy use of them will tell you:
They’re often written in a different language to the rest of your application. They’re usually written in (a specific dialect of) SQL or an embedded language like Tcl/Perl/Python. And while it’s technically possible to write them in JavaScript (using an embedded V8 engine), they run in such a different environment to your application code it still requires significant context-switching to maintain them.
Having both application code and in-database code affects every part of the development lifecycle, from authoring, testing, deployment, rollbacks and debugging. But because stored procedures are usually introduced to solve a specific problem, not as a general purpose application layer, they’re often managed completely manually. You can end up with them being written once, added to the database, then never changed for fear of breaking something.
With D1, we can do better.
The point of a stored procedure was to execute directly next to the data—uploading the code and executing it inside the database was simply a means to that end. But we’re using Workers, a global JavaScript execution platform, can we use them to solve this problem?
It turns out, absolutely! But here we have a few options of exactly how to make it work, and we’re working with our private beta users to find the right API. In this section, I’d like to share with you our current leading proposal, and invite you all to give us your feedback.
When you connect a Worker project to a D1 database, you add the section like the following to your wrangler.toml:
[[ d1_databases ]]
# What binding name to use (e.g. env.DB):
binding = "DB"
# The name of the DB (used for wrangler d1 commands):
database_name = "my-d1-database"
# The D1's ID for deployment:
database_id = "48a4224e-...3b09"
# Which D1 to use for `wrangler dev`:
# (can be the same as the previous line)
preview_database_id = "48a4224e-...3b09"

# NEW: adding "procedures", pointing to a new JS file:
procedures = "./src/db/procedures.js"
That D1 Procedures file would contain the following (note the new db.transaction() API, that is only available within a file like this):
export default class Procedures {
  constructor(db, env, ctx) {
    this.db = db
  }

  // any methods you define here are available on env.DB.Procedures
  // inside your Worker
  async Checkout(cartId: number) {
    // Inside a Procedure, we have a new db.transaction() API
    const result = await this.db.transaction(async (txn) => {

      // Transaction has begun: we know the user can't add anything to
      // their cart while these actions are in progress.
      const [cart, user] = Helpers.loadCartAndUser(cartId)

      // We can update the DB first, knowing that if any of the later steps
      // fail, all these changes will be undone.
      await this.db
        .prepare(`UPDATE cart SET status = ?1 WHERE cart_id = ?2`)
        .bind('purchased', cartId)
        .run()
      const newBalance = user.balance - cart.total_cost
      await this.db
        .prepare(`UPDATE user SET balance = ?1 WHERE user_id = ?2`)
        // Note: the DB may have a CHECK to guarantee 'user.balance' can not
        // be negative. In that case, this statement may fail, an exception
        // will be thrown, and the transaction will be rolled back.
        .bind(newBalance, cart.user_id)
        .run()

      // Once all the DB changes have been applied, attempt the payment:
      const { ok, details } = await PaymentAPI.processPayment(
        user.payment_method_id,
        cart.total_cost
      )
      if (!ok) {
        // If we throw an Exception, the transaction will be rolled back
        // and result.error will be populated:
        // throw new PaymentFailedError(details)

        // Alternatively, we can do both of those steps explicitly
        await txn.rollback()
        // The transaction is rolled back, our DB is now as it was when we
        // started. We can either move on and try something new, or just exit.
        return { error: new PaymentFailedError(details) }
      }

      // This is implicitly called when the .transaction() block finishes,
      // but you can explicitly call it too (potentially committing multiple
      // times in a single db.transaction() block).
      await txn.commit()

      // Anything we return here will be returned by the
      // db.transaction() block
      return {
        amount_charged: cart.total_cost,
        remaining_balance: newBalance,
      }
    })

    if (result.error) {
      // Our db.transaction block returned an error or threw an exception.
    }

    // We're still in the Procedure, but the Transaction is complete and
    // the DB is available for other writes. We can either do more work
    // here (start another transaction?) or return a response to our Worker.
    return result
  }
}
And in your Worker, your DB binding now has a “Procedures” property with your function names available:
const { error, amount_charged, remaining_balance } =
  await env.DB.Procedures.Checkout(params.cartId)

if (error) {
  // Something went wrong, `error` has details
} else {
  // Display `amount_charged` and `remaining_balance` to the user.
}
Multiple Procedures can be triggered at one time, but only one db.transaction() function can be active at once: any other write queries or other transaction blocks will be queued, but all read queries will continue to hit local replicas and run as normal. This API gives you the ability to ensure consistency when it’s essential but with the minimal impact on total overall performance worldwide.
Request for feedback
As with all our products, feedback from our users drives the roadmap and development. While the D1 API is in beta testing today, we’re still seeking feedback on the specifics. However, we’re pleased that it solves both the problems with transactions that are specific to D1 and the problems with stored procedures described earlier:
Code is executing as close as possible to the database, removing network latency while a transaction is open.
Any exceptions or cancellations of a transaction cause an instant rollback—there is no way to accidentally leave one open and block the whole D1 instance.
The code is in the same language as the rest of your Worker code, in the exact same dialect (e.g. same TypeScript config as it’s part of the same build).
It’s deployed seamlessly as part of your Worker. If two Workers bind to the same D1 instance but define different procedures, they’ll only see their own code. If you want to share code between projects or databases, extract a library as you would with any other shared code.
In local development and test, the procedure works just like it does in production, but without the network call, allowing seamless testing and debugging as if it was a local function.
Because procedures and the Worker that define them are treated as a single unit, rolling back to an earlier version never causes a skew between the code in the database and the code in the Worker.
The D1 ecosystem: contributions from the community
We’ve told you about what we’ve been up to and what’s ahead, but one of the unique things about this project is all the contributions from our users. One of our favorite parts of private betas is not only getting feedback and feature requests, but also seeing what ideas and projects come to fruition. While sometimes this means personal projects, with D1, we’re seeing some incredible contributions to the D1 ecosystem. Needless to say, the work on D1 hasn’t just been coming from within the D1 team, but also from the wider community and other developers at Cloudflare. Users have been showing off their D1 additions within our Discord private beta channel and giving others the opportunity to use them as well. We wanted to take a moment to highlight them.
workers-qb
Dealing with raw SQL syntax is powerful (and using the D1 .bind() API, safe against SQL injections) but it can be a little clumsy. On the other hand, most existing query builders assume direct access to the underlying DB, and so aren’t suitable to use with D1. So Cloudflare developer Gabriel Massadas designed a small, zero-dependency query builder called workers-qb:
While you can interact with D1 through both Wrangler and the dashboard, Cloudflare Community champion, Isaac McFadyen created the very first D1 console where you can quickly execute a series of queries right through your terminal. With the D1 console, you don’t need to spend time writing the various Wrangler commands we’ve created – just execute your queries.
This includes all bells and whistles you would expect from a modern database console including multiline input, command history, validation for things D1 may not yet support, and ability to save your Cloudflare credentials for later use.
Check out the full project on GitHub or NPM for more information.
Miniflare test Integration
The Miniflare project, which powers Wrangler’s local development experience, also provides fully-fledged test environments for popular JavaScript test runners, Jest and Vitest. With this comes the concept of Isolated Storage, allowing each test to run independently, so that changes made in one don’t affect the others. Brendan Coll, creator of Miniflare, guided the D1 test implementation to give the same benefits:
import Worker from ‘../src/index.ts’
const { DB } = getMiniflareBindings();

beforeAll(async () => {
  // Your D1 starts completely empty, so first you must create tables
  // or restore from a schema.sql file.
  await DB.exec(`CREATE TABLE entries (id INTEGER PRIMARY KEY, value TEXT)`);
});

// Each describe block & each test gets its own view of the data.
describe(‘with an empty DB’, () => {
  it(‘should report 0 entries’, async () => {
    await Worker.fetch(...)
  })
  it(‘should allow new entries’, async () => {
    await Worker.fetch(...)
  })
])

// Use beforeAll & beforeEach inside describe blocks to set up particular DB states for a set of tests
describe(‘with two entries in the DB’, () => {
  beforeEach(async () => {
    await DB.prepare(`INSERT INTO entries (value) VALUES (?), (?)`)
            .bind(‘aaa’, ‘bbb’)
            .run()
  })
  // Now, all tests will run with a DB with those two values
  it(‘should report 2 entries’, async () => {
    await Worker.fetch(...)
  })
  it(‘should not allow duplicate entries’, async () => {
    await Worker.fetch(...)
  })
])
All the databases for tests are run in-memory, so these are lightning fast. And fast, reliable testing is a big part of building maintainable real-world apps, so we’re thrilled to extend that to D1.
Want access to the private beta?
Feeling inspired?
We love to see what our beta users build or want to build especially when our products are at an early stage. As we march toward an open beta, we’ll be looking specifically for your feedback. We are slowly letting more folks into the beta, but if you haven’t received your “golden ticket” yet with access, sign up here! Once you’ve been invited in, you’ll receive an official welcome email.
A few months ago we launched Custom Domains into an open beta. Custom Domains allow you to hook up your Workers to the Internet, without having to deal with DNS records or certificates – just enter a valid hostname and Cloudflare will do the rest! The beta’s over, and Custom Domains are now GA.
Custom Domains aren’t just about a seamless developer experience; they also allow you to build a globally distributed instantly scalable application on Cloudflare’s Developer Platform. That’s because Workers leveraging Custom Domains have no concept of an ‘Origin Server’. There’s no ‘home’ to phone to – and that also means your application can use the power of Cloudflare’s global network to run your application, well, everywhere. It’s truly serverless.
Let’s build “Todo”, but without the servers
Today we’ll start a series of posts outlining a simple todo list application. We’ll start with an API and hook it up to the Internet using Custom Domains.
With Custom Domains, you’re treating the whole network as the application server. Any time a request comes into a Cloudflare data center, Workers are triggered in that data center and connect to resources across the network as needed. Our developers don’t need to think about regions, or replication, or spinning up the right number of instances to handle unforeseen load. Instead, just deploy your Workers and Cloudflare will handle the rest.
For our todo application, we begin by building an API Gateway to perform routing, any authorization checks, and drop invalid requests. We then fan out to each individual use case in a separate Worker, so our teams can independently make updates or add features to each endpoint without a full redeploy of the whole application. Finally, each Worker has a D1 binding to be able to create, read, update, and delete records from the database. All of this happens on Cloudflare’s global network, so your API is truly available everywhere. The architecture will look something like this:
Bootstrap the D1 Database
First off, we’re going to need a D1 database set up, with a schema for our todo application to run on. If you’re not familiar with D1, it’s Cloudflare’s serverless database offering – explained in more detail here. To get started, we use the wrangler d1 command to create a new database:
After executing this command, you will be asked to add a snippet of code to your wrangler.tomlfile that looks something like this:
[[ d1_databases ]]
binding = "db" # i.e. available in your Worker on env.db
database_name = "<todo | custom-database-name>"
database_id = "<UUID>"
Let’s save that for now, and we’ll put these into each of our private microservices in a few moments. Next, we’re going to create our database schema. It’s a simple todo application, so it’ll look something like this, with some seeded data:
db/schema.sql
DROP TABLE IF EXISTS todos;
CREATE TABLE todos (id INTEGER PRIMARY KEY, todo TEXT, todoStatus BOOLEAN NOT NULL CHECK (todoStatus IN (0, 1)));
INSERT INTO todos (todo, todoStatus) VALUES ("Fold my laundry", 0),("Get flowers for mum’s birthday", 0),("Find Nemo", 0),("Water the monstera", 1);
You can bootstrap your new D1 database by running:
Great! We’ve now got a database running entirely on Cloudflare’s global network.
Build the endpoint Workers
To talk to your database, we’ll spin up a series of private microservices for each endpoint in our application. We want to be able to create, read, update, delete, and list our todos. The full source code for each is available here. Below is code from a Worker that lists all our todos from D1.
The Worker ‘todo-list’ needs to be able to access D1 from the environment variable db. To do this, we’ll define the D1 binding in our wrangler.toml file. We also specify that workers_dev is false, preventing a preview from being generated via workers.dev (we want this to be a private microservice).
list/wrangler.toml
name = "todo-list"
main = "src/list.js"
compatibility_date = "2022-09-07"
workers_dev = false
usage_model = "unbound"

[[ d1_databases ]]
binding = "db" # i.e. available in your Worker on env.db
database_name = "<todo | custom-database-name>"
database_id = "UUID"
Finally, use wrangler publish to deploy this microservice.
todo/list on ∞main [!]
› wrangler publish
 ⛅️ wrangler 0.0.0-893830aa
-----------------------------------------------------------------------
Retrieving cached values for account from ../../../node_modules/.cache/wrangler
Your worker has access to the following bindings:
- D1 Databases:
  - db: todo (UUID)
Total Upload: 4.71 KiB / gzip: 1.60 KiB
Uploaded todo-list (0.96 sec)
No publish targets for todo-list (0.00 sec)
Notice that wrangler mentions there are no ‘publish targets’ for todo-list. That’s because we haven’t hooked todo-list up to any HTTP endpoints. That’s fine! We’re going to use Service Bindings to route requests through a gateway worker, as described in the architecture diagram above.
Next, reuse these steps to create similar microservices for each of our create, read, update, and delete endpoints. The source code is available to follow along.
Tying it all together with an API Gateway
Each of our Workers are able to talk to the D1 database, but how can our application talk to our API? We’ll build out a simple API gateway to route incoming requests to the appropriate microservice. For the purposes of our application, we’re using a combination of URL pathname and request method to detect which endpoint is appropriate.
gateway/src/gateway.js
export default {
 async fetch(request, env) {
   try{
     const url = new URL(request.url)
     const idPattern = new URLPattern({ pathname: '/:id' })
     if (idPattern.test(request.url)) {
       switch (request.method){
         case 'GET':
           return await env.get.fetch(request.clone())
         case 'PATCH':
           return await env.update.fetch(request.clone())
         case 'DELETE':
           return await env.delete.fetch(request.clone())
         default:
           return new Response("Unsupported method for endpoint /:id", {status: 405})
       }
     } else if (url.pathname == '/') {
       switch (request.method){
         case 'GET':
           return await env.list.fetch(request.clone())
         case 'POST':
           return await env.create.fetch(request.clone())
         default:
           return new Response("Unsupported method for endpoint /", {status: 405})
       }
     }
     return new Response("Not found. Supported endpoints are /:id and /", {status: 404})
   } catch(e) {
     return new Response(e, {status: 500})
   }
 },
};
With our API gateway all set, we just need to expose our application to the Internet using a Custom Domain, and hook up our Service Bindings, so the gateway Worker can access each appropriate microservice. We’ll set this up in a wrangler.toml.
Next, use wrangler publish to deploy your application to the Cloudflare network. Seconds later, you’ll have a simple, functioning todo API built entirely on Cloudflare’s Developer Platform!
› wrangler publish
 ⛅️ wrangler 0.0.0-893830aa
-----------------------------------------------------------------------
Retrieving cached values for account from ../../../node_modules/.cache/wrangler
Your worker has access to the following bindings:
- Services:
  - get: todo-get
  - delete: todo-delete
  - create: todo-create
  - update: todo-update
  - list: todo-list
Total Upload: 1.21 KiB / gzip: 0.42 KiB
Uploaded todo-gateway (0.62 sec)
Published todo-gateway (0.51 sec)
  todos.radiobox.tv (custom domain - zone name: radiobox.tv)
Natively Global
Since it’s built natively on Cloudflare, you can also include Cloudflare’s security suite in front of the application. If we want to prevent SQL Injection attacks for this endpoint, we can enable the appropriate Managed WAF rules on our todos API endpoint. Alternatively, if we wanted to prevent global access to our API (only allowing privileged clients to access the application), we can simply put Cloudflare Access in front, with custom Access Rules.
With Custom Domains on Workers, you’re able to easily create applications that are native to Cloudflare’s global network, instantly. Best of all, your developers don’t need to worry about maintaining DNS records or certificate renewal – Cloudflare handles it all on their behalf. We’d like to give a huge shout out to the 5,000+ developers who used Custom Domains during the open beta period, and those that gave feedback along the way to make this possible. Can’t wait to see what you build next! As always, if you have any questions or would like to get involved, please join us on Discord.
Tune in next time to see how we can build a frontend for our application. In the meantime, you can play around with the todos API we built today at todos.radiobox.tv.
The collective thoughts of the interwebz
Manage Consent
To provide the best experiences, we use technologies like cookies to store and/or access device information. Consenting to these technologies will allow us to process data such as browsing behavior or unique IDs on this site. Not consenting or withdrawing consent, may adversely affect certain features and functions.
Functional
Always active
The technical storage or access is strictly necessary for the legitimate purpose of enabling the use of a specific service explicitly requested by the subscriber or user, or for the sole purpose of carrying out the transmission of a communication over an electronic communications network.
Preferences
The technical storage or access is necessary for the legitimate purpose of storing preferences that are not requested by the subscriber or user.
Statistics
The technical storage or access that is used exclusively for statistical purposes.The technical storage or access that is used exclusively for anonymous statistical purposes. Without a subpoena, voluntary compliance on the part of your Internet Service Provider, or additional records from a third party, information stored or retrieved for this purpose alone cannot usually be used to identify you.
Marketing
The technical storage or access is required to create user profiles to send advertising, or to track the user on a website or across several websites for similar marketing purposes.