Post Syndicated from Matteo Luigi Restelli original https://aws.amazon.com/blogs/devops/announcing-the-new-aws-cdk-eks-v2-l2-constructs/
Introduction
Today, we’re announcing the release of aws-eks-v2 construct, a new alpha version of AWS Cloud Development Kit (CDK) L2 construct for Amazon Elastic Kubernetes Service (EKS). This construct represents a significant change in how developers can define and manage their EKS environments using infrastructure as code. While maintaining the powerful capabilities of its predecessor library for creating and managing EKS clusters, this alpha release introduces key architectural improvements that enhance both flexibility and maintainability.
The AWS Cloud Development Kit (AWS CDK) is an open-source software development framework that enables you to define your cloud infrastructure using familiar programming languages and deploy it through AWS CloudFormation.
The CDK uses constructs – a layered abstraction concept where Layer 1 (L1) constructs map directly to CloudFormation resources, while Layer 2 (L2) constructs provide intuitive APIs, helper functions, best-practice defaults, and generate a lot of the boilerplate code and glue logic for you. This layered approach means you can seamlessly move between high-level abstractions for common use cases and low-level resource definitions when you need fine-grained control. The result is an Infrastructure as Code (IaC) experience that helps you maintain productivity while ensuring you have access to the full power of AWS services when you need it.
You can read more about constructs and their benefits in the CDK user guide.
In this post we’ll explore:
- The reasoning behind the creation of a new L2 construct for EKS and the improvements introduced by this new library
- How to use the new EKS v2 construct
Background
Amazon EKS is a managed Kubernetes service that makes it easy to run Kubernetes on AWS without needing to manage the control plane or nodes. EKS automatically handles critical tasks like patching, node provisioning, and upgrades. You can run EKS using EC2 instances for worker nodes, AWS Fargate for serverless containers, or a combination of both, providing the flexibility to choose the right compute option for your workloads.
While the existing EKS L2 construct has served customers well, we identified opportunities to further enhance the developer experience and operational efficiency based on their feedback. The new aws-eks-v2 construct delivers significant improvements through native AWS CloudFormation resources, modern Access Entry-based authentication, and enhanced architectural flexibility. Key benefits include reduced deployment overhead, simplified cluster access management, support for multiple EKS clusters within a single stack, and granular control over resource creation with features like the optional kubectl Lambda handler.
These improvements help customers build and manage their EKS infrastructure more efficiently while maintaining the robust functionality they expect from AWS CDK constructs.
Using the L2
Given that this construct is in the alpha stage, you’ll need to install and import the construct using the experimental construct libraries process. During the alpha stage, the CDK team is actively gathering customer feedback and iterating on the implementation. Once the construct meets our bar for general availability, we’ll integrate it directly into the AWS CDK core library, making it as easily accessible as our other L1 and L2 constructs. This approach allows us to rapidly deliver new capabilities while ensuring they meet the high standards our customers expect.
Deploying EKS Cluster with Default Configuration
Let’s explore how to create an Amazon EKS cluster using AWS CDK aws-eks-v2 construct with minimal configuration requirements. The following example demonstrates the most straightforward way to define an EKS cluster, leveraging the power of CDK’s opinionated defaults.
Creating a new cluster is done using the Cluster construct. The only required property is the Kubernetes version.
import * as eksv2 from '@aws-cdk/aws-eks-v2-alpha';
// Creating an EKS Cluster with default properties
const eksCluster = new eksv2.Cluster(this, 'EksCluster', {
version: eksv2.KubernetesVersion.V1_32
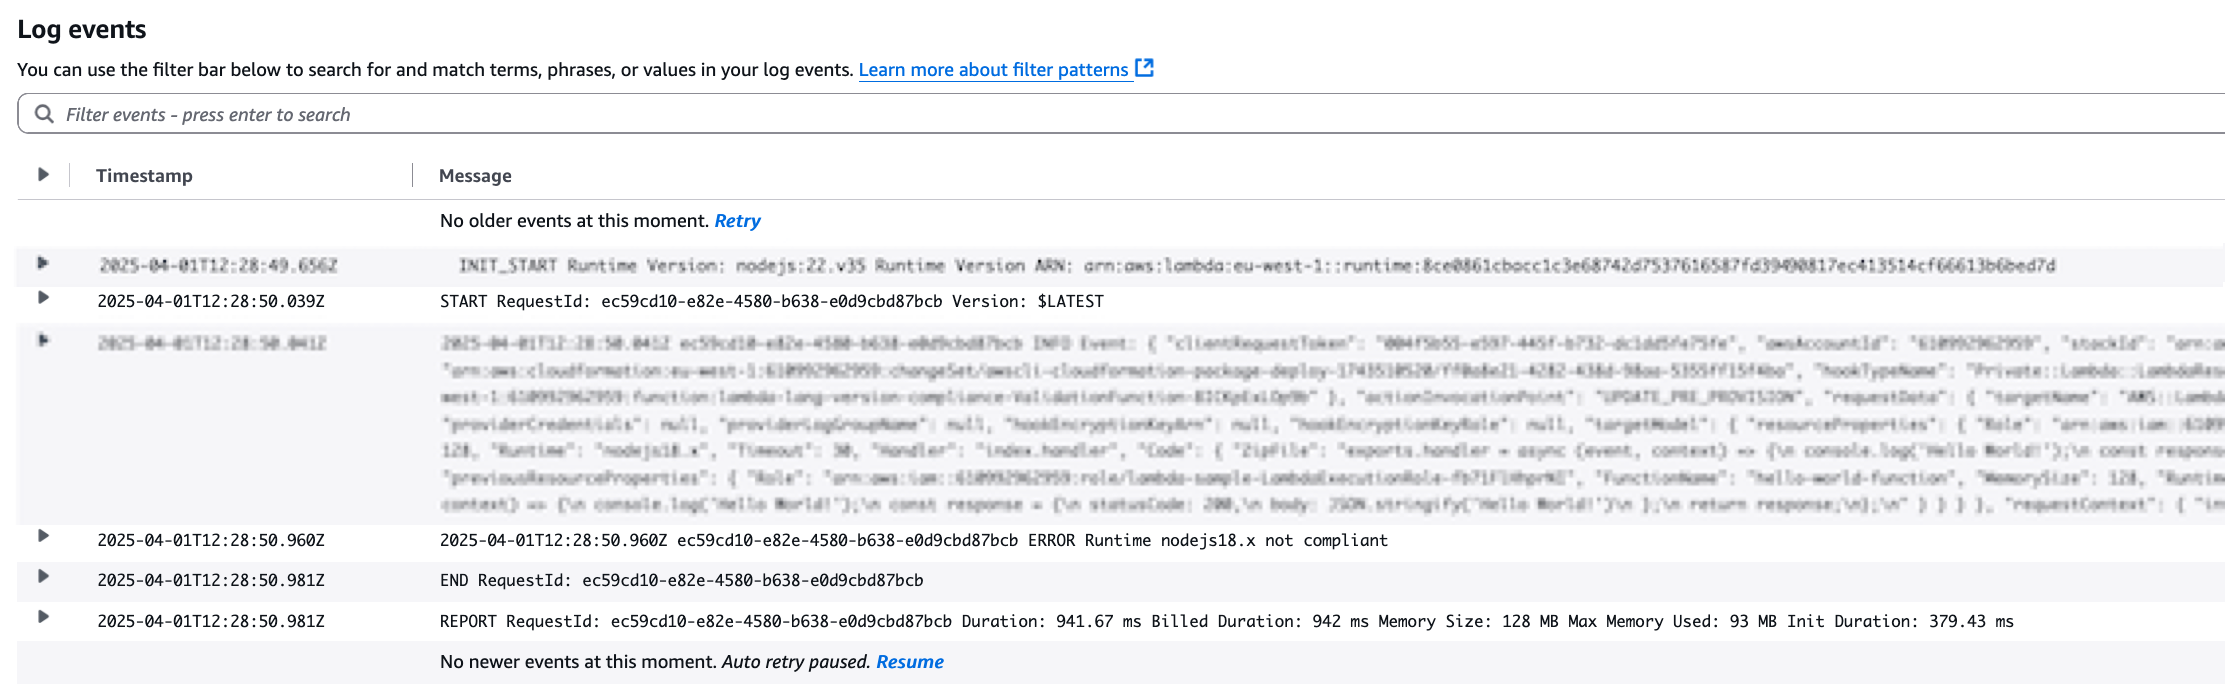
});This translates in the following Architecture as shown in figure 1:

Figure 1 – L2 CDK construct v2 for EKS, Default Architecture
- Amazon Virtual Private Cloud (VPC) – A logically isolated section of the AWS Cloud that spans across two Availability Zones, equipped with an Internet Gateway to enable secure communication with the internet. This multi-AZ design helps ensure your applications remain available even if an Availability Zone experiences issues.
- Amazon EKS Control Plane – A fully managed Kubernetes control plane deployed in an AWS-managed VPC , providing high availability and automatic version management for the Kubernetes control plane components.
- Public Subnet Infrastructure – Two public subnets, each with its own NAT Gateway Instance, enabling your cluster components to securely access the internet for essential operations like pulling container images and downloading updates. These NAT Gateways provide a secure outbound path while protecting your workloads from direct internet exposure.
- Private Subnet Configuration – Two private subnets optimized for running your EKS worker nodes, offering enhanced security by isolating your workloads from direct internet access while maintaining the ability to communicate with AWS services and the internet through the NAT Gateways.
- IAM Security Foundation – A comprehensive set of IAM roles and policies that implement the principle of least privilege:
- Control plane service role that enables EKS to manage AWS resources on your behalf
- Node IAM role that allows worker nodes to interact with other AWS services and join the EKS cluster
You can also use FargateCluster to provision a cluster that uses only Fargate workers.
import * as eksv2 from '@aws-cdk/aws-eks-v2-alpha';

// Creating an EKS Cluster with default properties and Fargate workers
const eksFargateCluster = new eksv2.FargateCluster(this, 'EksFargateCluster', {
   version: eksv2.KubernetesVersion.V1_32,
});
To help our customers maintain better control over their cluster access patterns, the Kubectl Handler is not automatically deployed with the default configuration. You can easily enable this functionality by configuring the kubectlProviderOptions property when you need kubectl access management as shown below.
import * as eksv2 from '@aws-cdk/aws-eks-v2-alpha';
import { KubectlV32Layer } from '@aws-cdk/lambda-layer-kubectl-v32'

// Creating an EKS Cluster with default properties and kubectl handler
const eksCluster = new eksv2.Cluster(this, 'EksCluster', {
   version: eksv2.KubernetesVersion.V1_32,
   kubectlProviderOptions: {
      kubectlLayer: new KubectlV32Layer(this, 'KubectlLayer')
   },
});
Deploying EKS Cluster with AutoMode
EKS Auto Mode represents a significant advancement in how Amazon EKS manages compute capacity for Kubernetes clusters. This intelligent capacity management system automatically provisions and scales node groups based on workload demands, removing the need for manual capacity planning.
When you create a new cluster with the aws-eks-v2 construct, EKS Automode is activated by default, by means that DefaultCapacityType.AUTOMODE is automatically set as the default capacity type for the EKS Cluster. If you prefer, you can specify the defaultCapacityType to AutoMode:
import * as eksv2 from '@aws-cdk/aws-eks-v2-alpha';

// Creating an EKS Cluster with AutoMode
const eksCluster = new eksv2.Cluster(this, 'EksCluster', {
   version: eksv2.KubernetesVersion.V1_32,
   defaultCapacityType: eksv2.DefaultCapacityType.AUTOMODE, // default value
});
After deploying the Stack containing the construct instance, in the EKS Console you’ll be able to see that an EKS Cluster has been created with AutoMode enabled:
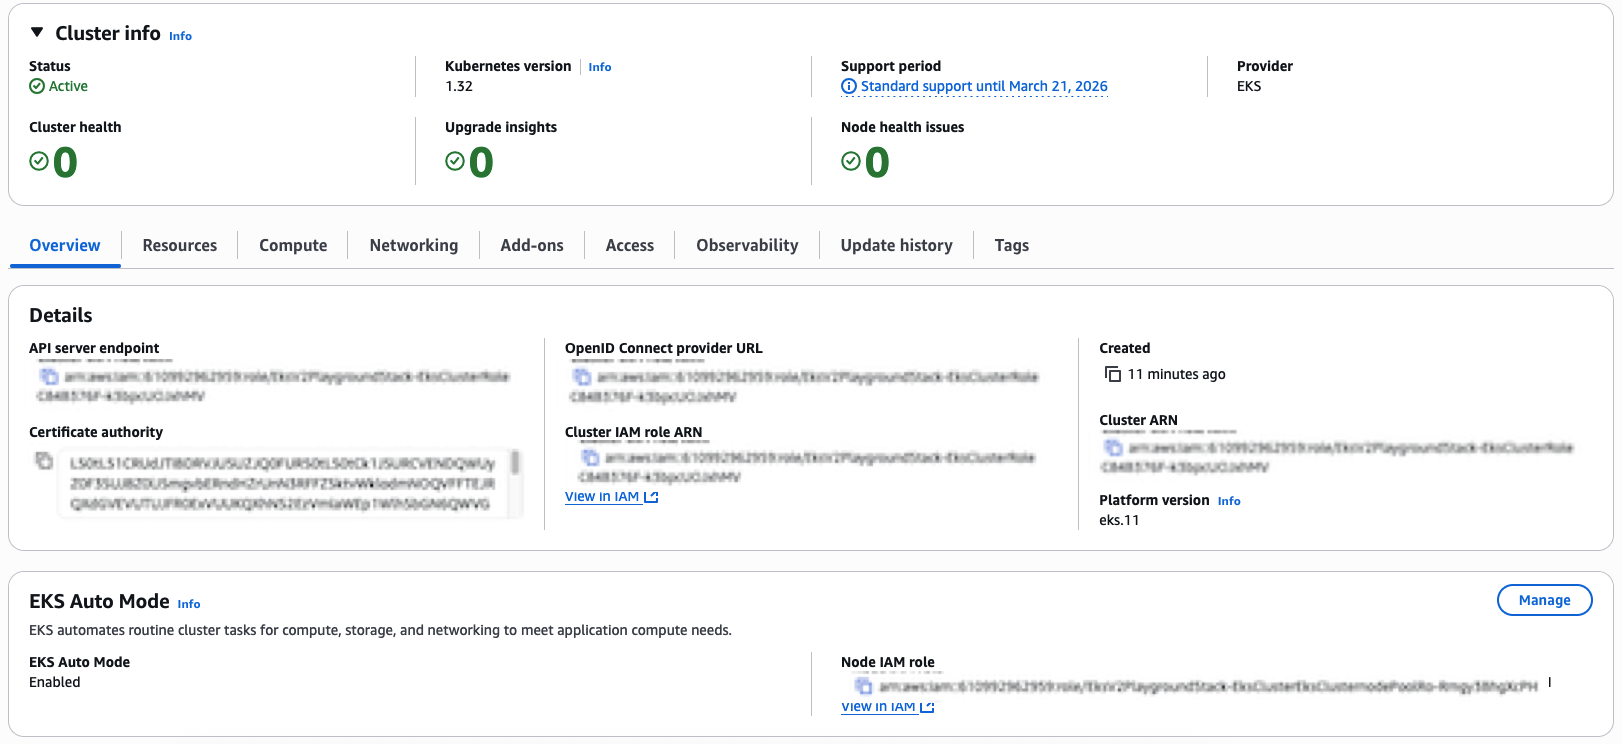
Figure 2 – EKS Cluster Deployed with Automode
Auto Mode enhances your Amazon EKS experience by automatically configuring two strategically designed node pools out of the box:
- A system node pool optimized for running critical cluster system components and add-ons, ensuring reliable cluster operations.
- A general node pool specifically tuned for your application workloads, providing the flexibility needed for diverse containerized applications.
You can configure which node pools to enable through the compute property:
import * as eksv2 from '@aws-cdk/aws-eks-v2-alpha';

// Creating an EKS Cluster with Automode and selecting nodePools
const eksCluster = new eksv2.Cluster(this, 'EksCluster', {
   version: eksv2.KubernetesVersion.V1_32,
   defaultCapacityType: eksv2.DefaultCapacityType.AUTOMODE,
   compute: {
      nodePools: ['system', 'general-purpose'],
   },
});
Deploying EKS Cluster with Managed Node Groups
Amazon EKS Managed Node Groups deliver a seamless compute management experience for your Kubernetes clusters. This powerful capability eliminates operational complexity by automating the end-to-end lifecycle of Amazon EC2 instances that power your containerized applications.
Behind the scenes, Amazon EKS managed node groups intelligently orchestrate these changes, ensuring zero-disruption to your applications through graceful node draining. The service automatically leverages the latest Amazon EKS-optimized AMIs, providing a secure and optimized foundation for your workloads.
By setting defaultCapacityType to NODEGROUP, customers can leverage the traditional managed node group management approach:
import * as eksv2 from '@aws-cdk/aws-eks-v2-alpha';

// Creating an EKS Cluster with Managed Node Groups and default instance types
const eksCluster = new eksv2.Cluster(this, 'EksCluster', {
   version: eksv2.KubernetesVersion.V1_32,
   defaultCapacityType: eksv2.DefaultCapacityType.NODEGROUP,
});
By default, when using DefaultCapacityType.NODEGROUP, this library will allocate a managed node group with two m5.large instances.
After deploying the above code, you can check the EKS Console to see that an EKS Cluster has been deployed as shown in figure 3:
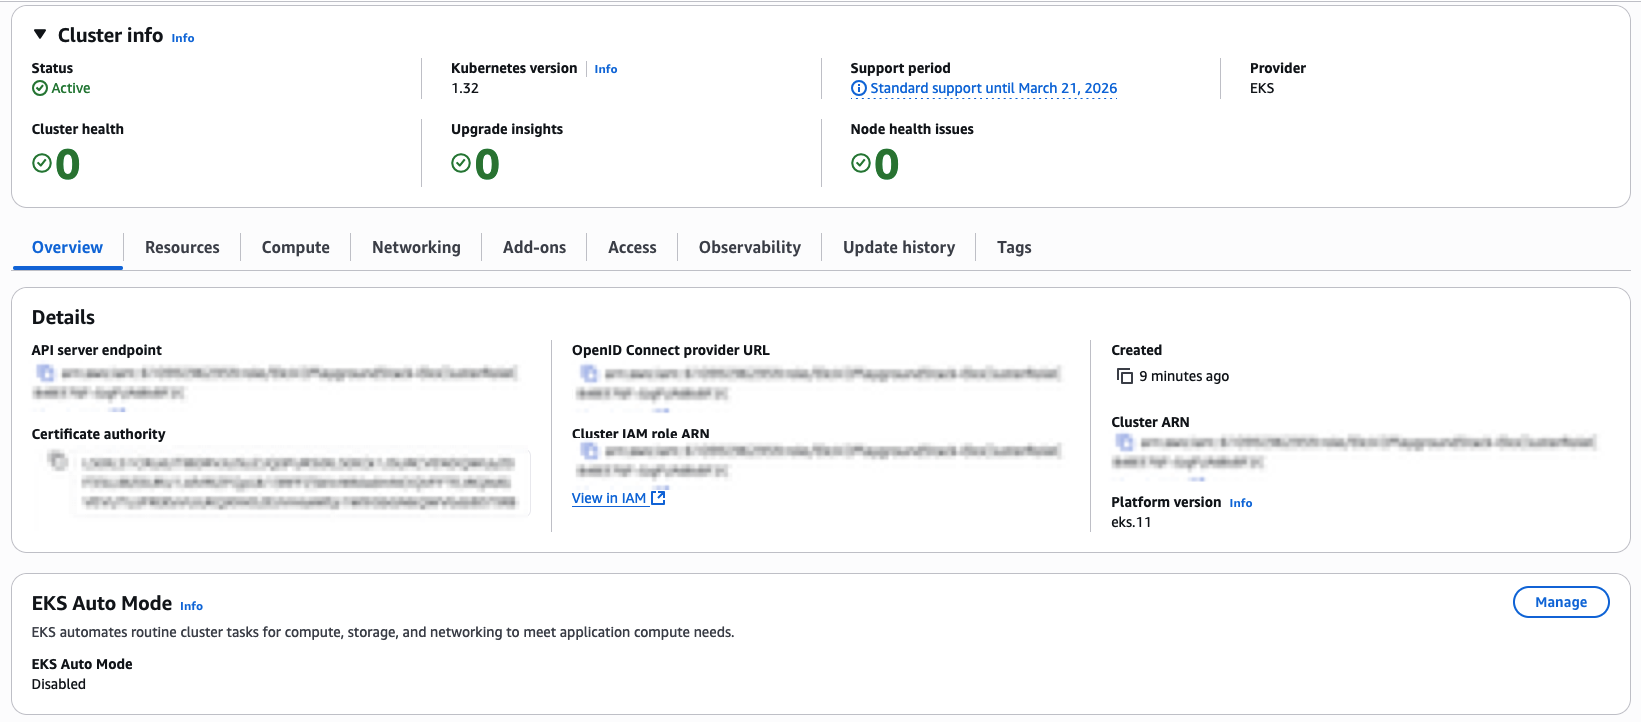
Figure 3 – EKS Cluster Deployed with Managed Node Groups
You can also check the Compute tab and see the Managed Node Group Configuration as shown in figure 4:

Figure 4 – EKS Cluster Managed Node Group Default Configuration
If you want to have control over instance types of a Managed Node Group, you can specify the default EC2 type as property of the construct:
import * as eksv2 from '@aws-cdk/aws-eks-v2-alpha';
import * as ec2 from 'aws-cdk-lib/aws-ec2'

// Creating an EKS Cluster with Managed Node Groups and specific instance types
const eksCluster = new eksv2.Cluster(this, 'EksCluster', {
   version: eksv2.KubernetesVersion.V1_32,
   defaultCapacityType: eksv2.DefaultCapacityType.NODEGROUP,
   defaultCapacity: 5,
   defaultCapacityInstance: ec2.InstanceType.of(ec2.InstanceClass.M5, ec2.InstanceSize.SMALL),
});
You can also specify additional customizations after the EKS cluster declaration, via the addNodegroupCapacity method:
import * as eksv2 from '@aws-cdk/aws-eks-v2-alpha';
import * as ec2 from 'aws-cdk-lib/aws-ec2'

// Creating an EKS Cluster with Managed Node Groups and specific instance types
const eksCluster = new eksv2.Cluster(this, 'EksCluster', {
   version: eksv2.KubernetesVersion.V1_32,
   defaultCapacityType: eksv2.DefaultCapacityType.NODEGROUP,
   defaultCapacity: 0,
});

eksCluster.addNodegroupCapacity('custom-node-group', {
  instanceTypes: [new ec2.InstanceType('m5.large')],
  minSize: 4,
  diskSize: 100,
});
Managing Permissions through Access Entries
The new aws-eks-v2 construct transitions away from the previous ConfigMap-based authentication (which is deprecated in EKS) in favor of the Access Entries Authentication mode. This change introduces Access Entry as the standardized method for managing cluster permissions, offering a more streamlined and secure approach to granting cluster access to IAM users and roles.
You can define Access Policies through the AccessPolicy construct and you can adjust the scope of the Access Policy to the entire EKS cluster or to specific EKS Namespaces:
import * as eksv2 from '@aws-cdk/aws-eks-v2-alpha';

// AmazonEKSClusterAdminPolicy with `cluster` scope
eks.AccessPolicy.fromAccessPolicyName('AmazonEKSClusterAdminPolicy', {
   accessScopeType: eks.AccessScopeType.CLUSTER,
});

// AmazonEKSAdminPolicy with `namespace` scope
eks.AccessPolicy.fromAccessPolicyName('AmazonEKSAdminPolicy', {
   accessScopeType: eks.AccessScopeType.NAMESPACE,
   namespaces: ['foo', 'bar']
});
You can then grant access to specific IAM Roles using the grantAccess method:
import * as iam from 'aws-cdk-lib/aws-iam'

// Defining a IAM Role
const clusterAdminRole = new iam.Role(this, 'ClusterAdminRole', {
   assumedBy: new iam.ArnPrincipal('arn_for_trusted_principal'),
});

// Creating an EKS Cluster with AutoMode
const eksCluster = new eksv2.Cluster(this, 'EksCluster', {
   version: eksv2.KubernetesVersion.V1_32,
   defaultCapacityType: eksv2.DefaultCapacityType.AUTOMODE,
});

// Cluster Admin role for this cluster
eksCluster.grantAccess('clusterAdminAccess', clusterAdminRole.roleArn, [
	eks.AccessPolicy.fromAccessPolicyName('AmazonEKSClusterAdminPolicy', {
   	    accessScopeType: eks.AccessScopeType.CLUSTER,
    }),
]);
When the Principal assumes the ClusterAdminRole, it receives seamless access to the EKS cluster through a carefully orchestrated permission chain. This access is governed by the AmazonEKSClusterAdminPolicy, which is automatically attached to the Access Policy linked to the IAM Role.
Conclusion
In this post, we introduced the new AWS CDK L2 construct (aws-eks-v2) for Amazon EKS, demonstrating how it simplifies cluster deployment while offering enhanced flexibility and operational efficiency. Through practical examples, we showcased how customers can leverage the construct’s intelligent defaults and customization options to build production-ready Kubernetes environments on AWS
The new L2 construct for Amazon EKS delivers significant improvements that help customers accelerate their container adoption journey:
- Enhanced Performance: Eliminates dependency on Custom Resources and AWS Lambda functions by utilizing native AWS CloudFormation resources, resulting in faster and more reliable deployments.
- Modern Authentication: Implements Access Entry-based authentication, replacing the deprecated ConfigMap approach with a more secure and programmable solution.
- Improved Scalability: Removes the single-cluster-per-stack limitation and eliminates nested stacks, enabling more flexible architectural patterns.
- Optimized Resource Creation: Makes the kubectl Lambda handler optional, giving customers fine-grained control over their infrastructure components.
- Streamlined Operations: Provides automated node group management with intelligent defaults while maintaining full customer control when needed.
To get started with the new EKS L2 construct, visit the AWS CDK documentation. If you have specific features you’d like to see added, we encourage you to submit a feature request in the aws-cdk GitHub repository. Your feedback helps us continue innovating on your behalf.