When it comes to AWS authentication, relying on long-term credentials, such as AWS Identity and Access Management (IAM) access keys, introduces unnecessary risks; including potential credential exposure, unauthorized sharing, or theft. In this post, I present five common use cases where AWS customers traditionally use IAM access keys and present more secure alternatives that you should consider.
AWS CLI access: Embrace CloudShell
If you’re primarily using access keys for AWS Command Line Interface (AWS CLI) access, consider AWS CloudShell—a browser-based CLI that minimizes the need for local credential management while providing the same powerful CLI capabilities that you’re accustomed to.
AWS CLI with enhanced security: IAM Identity Center
If you need a more robust solution, AWS CLI v2 combined with AWS IAM Identity Center offers a superior authentication approach. This integration enables:
For developers working in local environments, modern integrated development environments (IDEs) such as Visual Studio Code, with AWS Toolkit support offer secure authentication through IAM Identity Center. This alleviates the need for static access keys while maintaining a smooth development experience. Learn more about AWS IDE integrations.
AWS compute services and CI/CD access
When your applications and automation pipelines need AWS resource access, whether running on AWS compute services (Amazon Elastic Compute Cloud (Amazon EC2), Amazon Elastic Container Service (Amazon ECS), or AWS Lambda) or through continuous integration and delivery (CI/CD) tools, IAM roles can provide the ideal solution. These roles automatically manage temporary credential rotation and follow security best practices.
For AWS compute services: Use standard IAM roles with your compute resources. Review the EC2 IAM roles documentation for implementation details.
For CI/CD tools self-hosted on Amazon EC2: If you’re running tools such as Jenkins or GitLab on AWS resources, use the instance profile roles the same as you would with other compute services.
For third-party CI/CD services (such as GitHub Actions, CircleCI, and so on), see External access requirements.
External access requirements
For scenarios involving third-party applications or on-premises workloads, AWS offers three methods:
Third-party applications: Implement temporary security credentials through IAM roles instead of static access keys. Never use root account access keys. See third-party access documentation.
CI/CD software as a service (SaaS): For cloud-based CI/CD services, use OpenID Connect (OIDC) integration with IAM roles to minimize the need for long-term credentials. This allows your CI/CD pipelines to obtain temporary credentials through trust relationships. See the AWS OIDC provider documentation for implementation details.
Best practice: Principle of least privilege
Regardless of your authentication method, always implement the principle of least privilege. This helps make sure that users and applications have only the permissions they need. For guidance on crafting precise IAM policies, see Techniques for writing least privilege IAM policies.
Note: AWS also offers policy generation based on AWS CloudTrail logs, helping you create permission templates based on actual usage patterns. Learn about this feature in the IAM policy generation documentation.
Conclusion
As you’ve seen, there are numerous secure alternatives to IAM access keys that you can use to enhance your AWS authentication strategy while reducing security risks. By using tools such as CloudShell, IAM Identity Center, IDE integrations, IAM roles, and IAM Roles Anywhere, you can implement robust authentication mechanisms that align with modern security best practices.Key takeaways:
Prefer temporary credentials over long-term access keys
Choose the authentication method that best fits your use case
Implement the principle of least privilege across all access methods
Take advantage of the built-in tools provided by AWS for policy generation and management
Regularly review and update your authentication methods as new solutions become available
By making these changes, you can not only improve your security posture but also streamline your authentication processes across your AWS environment. Start small by identifying your current IAM access key use cases and gradually transition to these more secure alternatives. Your future self—and your security team—will thank you.
If you have feedback about this post, submit comments in the Comments section below.
Welcome to the second post in our series on Security Guardians, a mechanism to distribute security ownership at Amazon Web Services (AWS) that trains, develops, and empowers builder teams to make security decisions about the software that they create. In the previous post, you learned the importance of building a culture of security ownership to scale security within your organization, and how AWS achieves this using the Security Guardians program. Since then, many customers have asked how they can build their own, similar program.
In this post, you will learn the steps to build your own Security Guardians program for your organization, including how to:
Set the vision, mission, and goals of your program
Identify developer teams that can pilot your new program
Define the expected behaviors for those teams
Develop training and create opportunities for career development to keep your teams engaged in the program
The guidance in this post is based on what we learned at AWS. Because every organization is different, the final version of the program you build is likely to look different from the one at AWS. Your program needs to reflect the current state of your organization’s culture of security and be designed to cultivate the security-related behaviors that are most important to your organization.
Security Guardians program mechanism
As discussed in the previous post, mechanisms form a key part of our business at AWS. Figure 1 demonstrates how a mechanism is a complete process, or virtuous cycle, that reinforces and improves itself as it operates. It takes controllable inputs and transforms them into ongoing outputs to address a recurring business challenge. In this case, the business challenge AWS faced was that security findings were being identified late in the development lifecycle, making it more expensive—in terms of time, money and effort—to remediate them. This led to bottlenecks in our security review process. The culture of security at AWS, specifically our culture of ownership, provides support to solve this challenge, but we needed the Security Guardians mechanism to actually do it.
Figure 1: AWS mechanism cycle
With most mechanisms, driving adoption is difficult, especially when the mechanism requires human participation to succeed. This is also true in the case of Security Guardians, and you can use our experience to help you avoid some of the challenges and growing pains of driving adoption.
Getting everyone aligned
“If I had an hour to solve a problem and my life depended on the solution, I would spend the first 55 minutes determining the proper question to ask, for once I know the proper question, I could solve the problem in less than five minutes.” – Albert Einstein
Getting alignment for the need to distribute security expertise starts with deeply understanding what problems need to be addressed. For example:
Is product delivery velocity being negatively impacted by delays in the security review process?
What business goal or metric are these delays negatively impacting?
Where in the security review process are those delays occurring?
What factors are contributing to those delays?
Is it a lack of time, people, or skills?
Thoroughly understanding the specific problems and their root causes, as identified by answering those questions, allows you to evaluate whether distributing security ownership is the appropriate solution. This in turn makes it easier to gain alignment and buy-in across the organization for the chosen approach.
A component of a culture of security
Building a strong culture of security requires support from executive leadership to set the direction for the rest of the organization. Executive support makes it easier for product leaders to secure the resources and finances needed for a Security Guardians program to be successful. To align with your organization’s leaders, you can reflect on the goals of your leaders and how the Security Guardians program can be built to meet those goals.
For example, if your business goal is to ship products 25 percent faster, understand how a particular resourcing effort from Security Guardians is going to help your organization meet that goal. AWS benefited from the program with a 26.9 percent reduction in the time to review a new service or feature when a Security Guardian was involved.
Our experience is that it’s challenging to establish a Security Guardians program without executive support. If you’re struggling to identify a business leader to sponsor the program and provide insight on the business problem, your AWS account team—including your account manager or solutions architect—can help. If you’re a business leader or executive reading this post, consider becoming that sponsor yourself.
One step at a time
A step-by-step approach to implementing the Security Guardians program helps overcome organizational challenges and avoid common pitfalls that could lead to failure. These steps, shown in Figure 2, are:
Set the vision
Choose innovators
Define behaviors
Maintain interest
Measure success
These steps support the activities that make a mechanism successful: adoption, inspection, and tools.
Figure 2: Steps for implementing a Security Guardians program
Set the vision
Now that you’ve identified the business problem or business goal, set the vision for the Security Guardians program by working backwards from this problem or goal to define the purpose of your program. For example, the vision of the AWS Security Guardians is “To nourish security ownership that consistently delights our customers with security-by-design throughout the development lifecycle.”
Craft an ambitious vision for your Security Guardians program. Think beyond easy wins and focus on bold, forward-thinking security outcomes for your organization. Make sure that each element of your vision aligns with a business problem or goal. The following table is an example of how the vision of the program is aligned with business goals:
Business goals
Security outcome
Long-term goals
Develop products faster and more efficiently.
To improve developer agility while reducing security risk.
Increase the number of threat models performed by Security Guardians (instead of by application security engineers). Over time, this goal could change to “increase the quality of threat models.”.
Decrease the average monthly security issue rate.
Train three new Security Guardians each quarter.
Reduce long-term security spend.
To identify and mitigate security risk as early as possible.
Increase customer trust.
To exceed customer security expectations by raising the security bar.
The next step is to define a clear mission that is supported with measurable goals. The mission and goals must be achievable and help to move the needle towards the long-term vision.
The final part is to name your program. We chose Security Guardians, like Marvel’s Guardians of the Galaxy. We’ve also heard customers using Security Champions, Security Advocates, Security Innovators, and Security Drivers. Have fun with it and make sure the name resonates with as many participants as possible.
After you’ve defined the vision, future state, mission, measurable goals, and name of the program, review them with your security and business leaders. It’s beneficial to include your innovators or Security Guardians who will be early adopters of the program in this review. In the next section, you’ll learn how to identify these innovators.
Choosing innovators
Just as you develop for and iterate with early adopters of the products you’re building, you should identify individuals and teams who will pilot the program with you. Before the AWS Security Guardians program, our application security engineering teams built relationships with product teams through security reviews.
This meant that they already knew which individuals within those product teams had an interest in security. This is where AWS started, but the success of your program isn’t dependent on whether you already know who these individuals are. Development teams will self-identify and nominate Security Guardians from their own teams. Figure 4 shows examples to help you get started understanding which development teams will be good early adopters for your program.
Figure 3: Example product teams for early program adopters
The examples in Figure 3 include:
Candidate A: Quick wins team
Early adopters typically share key traits, including existing security measures and a designated security role or team members with security expertise. Essentially, they already prioritize security at the team level.
Candidate B: High impact team
This is the team most impacted by the disparity between product development teams and security teams; the agility and time-related benefits of the Security Guardians program will be the highest for this team. For example, this team might be facing long delays in launching products because of the current security review process at your organization.
Candidate C: High risk team
This team owns a product that has a high security risk because of the nature of the product. This team will benefit the most from additional security scrutiny and from raising the security bar at your organization. For example, this team might be building a product that’s considered a critical asset, hosts sensitive data, or performs critical processes.
After you’ve identified one or more teams that could be good early adopters of the program, you need to identify at least one individual from each team to serve as the Security Guardian. Keep the vision and goals of your program in mind when selecting your Security Guardian. Your early Security Guardians should have at least the following characteristics:
Ability to exercise well-informed and decisive judgement
Maintain and showcase their knowledge
Not afraid to have their work be independently validated
Advocate for their security needs in internal discussions
Hold a high security bar
Thoughtful and assertive to make customer security a top priority on their team
In terms of time commitment, our experience is that each Security Guardian spends an average of 3.5 hours each month on activities such as answering general security questions, identifying security stories needed for sprints, diving deep into security related tasks and supporting security related tasks. Each application security review takes approximately 4 hours of effort.
The first post of this series contains even more details on the characteristics that make a good Security Guardian.
Defining behaviors
It’s important to set expectations on what behaviors you want Security Guardians, developers, and security teams to exhibit within the context of the program. These behaviors typically relate directly to the goals of the program. For example, if one of the goals is to increase the number of threat models created, then create threat modeling will be one of the defined behaviors. The behaviors need to be measurable with some flexibility for change as you improve the program.
At AWS, our Security Guardians have access to a runbook that lists the activities each Guardian should take when engaged as part of a review. With each of these activities understood, the program team will then make sure appropriate training is provided so that the Security Guardians are able to complete each of the activities. For example, AWS Security Guardians are asked to help develop threat models. To support this, the program team has developed and released training material to teach Security Guardians how to create a threat model.
With the defined behaviors, understand how the Security Guardian and product development team will engage with the security team. Although we’re clearly defining behaviors, the behaviors aren’t typically done in a silo for the successful launch of a secure product. At AWS, the Security Guardians and product developers engage with the security teams in key partnership areas. If you’re unsure of where to start in defining the behaviors of your program, Figure 4 shows an example of how teams interact at AWS, beginning with the creation of an initial threat model and going through review, remediation, and testing. Consider creating your own version of the model to help define the behaviors and key partnership areas at your organization.
Figure 4: Example behaviors and partnership areas at AWS
In the example of a threat model review, the Guardian and the central security team will jointly create and review the threat model. Specific activity examples include reviewing threats that have no documented mitigations and discussing additional threats that haven’t yet been considered.
As part of encouraging a culture of ownership, AWS recommends allowing Security Guardians to influence the role within a set of boundaries. An example of this is allowing the Security Guardians to be a part of recurring reviews of the program growth metrics, actively collecting their feedback, and encouraging them to host their own training sessions. Active Security Guardians are key to the success of the program and allowing them to influence the program will give them a sense of ownership and inclusion.
Maintaining interest
It’s important to not lose sight that a program like the AWS Security Guardians program is supported by volunteers. Most of your Security Guardians will be product developers who already have a full-time job developing products for your organization. The time and effort to find and onboard new Security Guardians will have a low return on investment if they stop engaging because the program owners didn’t keep them engaged. Keeping Security Guardians is just as important as finding them.
At AWS, we invest time to understand how to build trust with Security Guardians and provide value by working backwards from their wants and needs. Some Security Guardians joined the program to learn new skills and for career growth opportunities. AWS built training programs that were designed for Security Guardians and provide metrics that are used to document their impact to their managers and leaders.
AWS Security Guardians constantly tell us that they value recognition of their contributions by leadership. We work to build mechanisms to continuously surface the great work of our Security Guardians. We also recognize the contributions Security Guardians make through awards, gifts, and other incentives. For example, each quarter, the AWS Security Guardians team sends out a newsletter to senior leaders of the organization. This communication identifies the Guardians within their organization and highlights their contributions, including the number and impact of reviews they’ve completed.
Another way that AWS recognizes the contributions of our Security Guardians is through the Guardians Belt Program. The Guardians Belt Program is designed to recognize Security Guardians for their contributions and support them as they work to advance their security skills and expand their scope of impact. Security Guardians earn Black, Green, Yellow, and White belts with each belt corresponding to significant accomplishments that require consistent commitment to raising the security bar.
To make sure that Security Guardians value the program, your organization should provide and actively facilitate benefits. The benefits must be accessible without requiring additional time or effort from the Security Guardians, promoting immediate and direct gains. Consider the following examples of benefits to maintain Security Guardian interest and support:
Specialized training: Workshops, game days, challenges and contests.
Impact opportunities: Ability to impact multiple products by working with other teams in the organization, ability to help define patterns, best practices, and automation for the program.
Community: Collaborate, connect, share and learn from experts and individuals with similar interests.
Ownership opportunities: Ability to accelerate certain steps in the process.
Leadership opportunities: Active involvement in recurring program or business reviews.
The best ways to maintain interest are determined by the culture of your organization. What does your organization value the most, and how will the program provide that to your Security Guardians? Sometimes, the best way to answer these questions is to ask your early or potential Security Guardians.
Measuring success
The final step of building a successful Security Guardians program is to measure program success. Measuring success is equivalent to the inspection step from Figure 1. This verifies that your desired outcomes are being achieved and provides a jumping off point for iteration. Measuring success also gives you the opportunity to audit the output or results of the Security Guardians program and perform corrections and improvements.
Earlier in this post, we covered identifying the business problem and creating the vision and measurable goals for your Security Guardians program. Example metrics include:
Average time to release features
Average number of security issues per team
Average time spent by Security Guardians and builders doing security work
Percentage of Security Guardians who have taken required and non-required training
Measuring success includes steps to collect feedback and tune the program over time, shown in Figure 5.
Figure 5: Feedback and tuning steps for Security Guardians program.
The cycle to gather feedback and tune the program includes:
Report on metrics
Communicate wins
Measure outcome and cycle time
Identify trends
Review goals
Gathering feedback from Security Guardians is as important as providing feedback to them. One of the ways AWS collects feedback from Security Guardians is through an annual survey that collects feedback on their experiences of program and tooling. To help both builders and Security Guardians improve over time, our security review tooling captures feedback from security engineers on the inputs from Security Guardians. Combined, the data gathered through these surveys helps our security ownership mechanism reinforce and improve itself over time.
Figure 6 summarizes the steps that you can take to develop your program.
Figure 6: Security Guardians program steps
The broad steps to develop a program include:
Set the vision: Set your vision for the program and metrics for success. Get sponsorship from leadership. Choose a name for your program.
Choose innovators: Identify innovators who have a passion for security and foster a community with continuous knowledge sharing.
Define behaviors: Redefine your RACI (responsible, accountable, consulted, informed) and be clear on expectations from your security advocates.
Maintain interest: Provide clear training and learning paths and opportunities for career advancement.
Measure success: Gather feedback and measure the program’s effectiveness.
Conclusion
This post and the previous post covered numerous concepts, considerations, and ideas, including:
The initial intention of the Security Guardians program is to focus on training developers in product teams. This improves early security-focused design thinking.
An alternative approach is to embed or align security engineers directly with product development teams. This can be more effective in organizations where reporting structures and accountability are key considerations.
Some organizations draw Security Guardians from all job types. The program can also be used to focus on uplifting developers and broad security culture.
You must regularly inspect the outcomes delivered by the Security Guardians program and use the information to make incremental improvements as the program matures.
For additional support building a Security Guardians program, contact your AWS account representative and they will get you in touch with a specialist who can help you develop your program.
If you have feedback about this post, submit comments in the Comments section below. If you have questions about this post, contact AWS Support.
AWS Identity and Access Management (IAM)Access Analyzer was launched in late 2019. Access Analyzer guides customers toward least-privilege permissions across Amazon Web Services (AWS) by using analysis techniques, such as automated reasoning, to make it simpler for customers to set, verify, and refine IAM permissions. Today, we are excited to announce the general availability of IAM Access Analyzer custom policy checks, a new IAM Access Analyzer feature that helps customers accurately and proactively check IAM policies for critical permissions and increases in policy permissiveness.
In this post, we’ll show how you can integrate custom policy checks into builder workflows to automate the identification of overly permissive IAM policies and IAM policies that contain permissions that you decide are sensitive or critical.
What is the problem?
Although security teams are responsible for the overall security posture of the organization, developers are the ones creating the applications that require permissions. To enable developers to move fast while maintaining high levels of security, organizations look for ways to safely delegate the ability of developers to author IAM policies. Many AWS customers implement manual IAM policy reviews before deploying developer-authored policies to production environments. Customers follow this practice to try to prevent excessive or unwanted permissions finding their way into production. Depending on the volume and complexity of the policies that need to be reviewed; these reviews can be intensive and take time. The result is a slowdown in development and potential delay in deployment of applications and services. Some customers write custom tooling to remove the manual burden of policy reviews, but this can be costly to build and maintain.
How do custom policy checks solve that problem?
Custom policy checks are a new IAM Access Analyzer capability that helps security teams accurately and proactively identify critical permissions in their policies. Custom policy checks can also tell you if a new version of a policy is more permissive than the previous version. Custom policy checks use automated reasoning, a form of static analysis, to provide a higher level of security assurance in the cloud. For more information, see Formal Reasoning About the Security of Amazon Web Services.
Custom policy checks can be embedded in a continuous integration and continuous delivery (CI/CD) pipeline so that checks can be run against policies without having to deploy the policies. In addition, developers can run custom policy checks from their local development environments and get fast feedback about whether or not the policies they are authoring are in line with your organization’s security standards.
How to analyze IAM policies with custom policy checks
In this section, we provide step-by-step instructions for using custom policy checks to analyze IAM policies.
Prerequisites
To complete the examples in our walkthrough, you will need the following:
An AWS account, and an identity that has permissions to use the AWS services, and create the resources, used in the following examples. For more information, see the full sample code used in this blog post on GitHub.
An installed and configured AWS CLI. For more information, see Configure the AWS CLI.
Example 1: Use custom policy checks to compare two IAM policies and check that one does not grant more access than the other
In this example, you will create two IAM identity policy documents, NewPolicyDocument and ExistingPolicyDocument. You will use the new CheckNoNewAccess API to compare these two policies and check that NewPolicyDocument does not grant more access than ExistingPolicyDocument.
Step 1: Create two IAM identity policy documents
Use the following command to create ExistingPolicyDocument.
Notice that ExistingPolicyDocument grants access to the ec2:StartInstances and ec2:StopInstances actions if the condition key aws:ResourceTag/Owner resolves to true. In other words, the value of the tag matches the policy variable aws:username. NewPolicyDocument grants access to the same actions, but does not include a condition key.
Step 2: Check the policies by using the AWS CLI
Use the following command to call the CheckNoNewAccess API to check whether NewPolicyDocument grants more access than ExistingPolicyDocument.
After a moment, you will see a response from Access Analyzer. The response will look similar to the following.
{
    "result": "FAIL",
    "message": "The modified permissions grant new access compared to your existing policy.",
    "reasons": [
        {
            "description": "New access in the statement with index: 1.",
            "statementIndex": 1
        }
    ]
}
In this example, the validation returned a result of FAIL. This is because NewPolicyDocument is missing the condition key, potentially granting any principal with this identity policy attached more access than intended or needed.
Example 2: Use custom policy checks to check that an IAM policy does not contain sensitive permissions
In this example, you will create an IAM identity-based policy that contains a set of permissions. You will use the CheckAccessNotGranted API to check that the new policy does not give permissions to disable AWS CloudTrail or delete any associated trails.
Step 1: Create a new IAM identity policy document
Use the following command to create IamPolicyDocument.
Use the following command to call the CheckAccessNotGranted API to check if the new policy grants permission to the set of sensitive actions. In this example, you are asking Access Analyzer to check that IamPolicyDocument does not contain the actions cloudtrail:StopLogging or cloudtrail:DeleteTrail (passed as a list to the access parameter).
Because the policy that you created contains both cloudtrail:StopLogging and cloudtrail:DeleteTrail actions, Access Analyzer returns a FAIL.
{
    "result": "FAIL",
    "message": "The policy document grants access to perform one or more of the listed actions.",
    "reasons": [
        {
            "description": "One or more of the listed actions in the statement with index: 0.",
            "statementIndex": 0
        }
    ]
}
Example 3: Integrate custom policy checks into the developer workflow
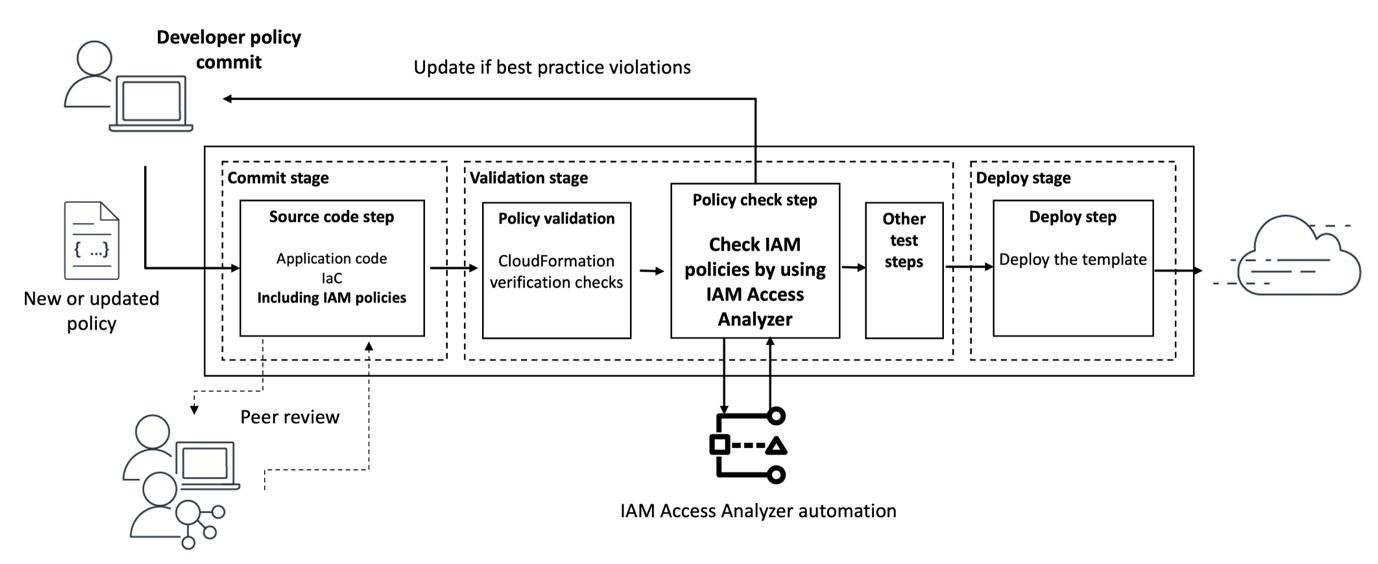
Building on the previous two examples, in this example, you will automate the analysis of the IAM policies defined in an AWS CloudFormation template. Figure 1 shows the workflow that will be used. The workflow will initiate each time a pull request is created against the main branch of an AWS CodeCommit repository called my-iam-policy (the commit stage in Figure 1). The first check uses the CheckNoNewAccess API to determine if the updated policy is more permissive than a reference IAM policy. The second check uses the CheckAccessNotGranted API to automatically check for critical permissions within the policy (the validation stage in Figure 1). In both cases, if the updated policy is more permissive, or contains critical permissions, a comment with the results of the validation is posted to the pull request. This information can then be used to decide whether the pull request is merged into the main branch for deployment (the deploy stage is shown in Figure 1).
Figure 1: Diagram of the pipeline that will check policies
Step 1: Deploy the infrastructure and set up the pipeline
Use the following command to download and unzip the Cloud Development Kit (CDK) project associated with this blog post.
git clone https://github.com/aws-samples/access-analyzer-automated-policy-analysis-blog.git
cd ./access-analyzer-automated-policy-analysis-blog
Create a virtual Python environment to contain the project dependencies by using the following command.
python3 -m venv .venv
Activate the virtual environment with the following command.
source .venv/bin/activate
Install the project requirements by using the following command.
pip install -r requirements.txt
Use the following command to update the CDK CLI to the latest major version.
npm install -g aws-cdk@2 --force
Before you can deploy the CDK project, use the following command to bootstrap your AWS environment. Bootstrapping is the process of creating resources needed for deploying CDK projects. These resources include an Amazon Simple Storage Service (Amazon S3) bucket for storing files and IAM roles that grant permissions needed to perform deployments.
cdk bootstrap
Finally, use the following command to deploy the pipeline infrastructure.
cdk deploy --require-approval never
The deployment will take a few minutes to complete. Feel free to grab a coffee and check back shortly.
When the deployment completes, there will be two stack outputs listed: one with a name that contains CodeCommitRepo and another with a name that contains ConfigBucket. Make a note of the values of these outputs, because you will need them later.
The deployed pipeline is displayed in the AWS CodePipeline console and should look similar to the pipeline shown in Figure 2.
Figure 2: AWS CodePipeline and CodeBuild Management Console view
In addition to initiating when a pull request is created, the newly deployed pipeline can also be initiated when changes to the main branch of the AWS CodeCommit repository are detected. The pipeline has three stages, CheckoutSources, IAMPolicyAnalysis, and deploy. The CheckoutSource stage checks out the contents of the my-iam-policy repository when the pipeline is triggered due to a change in the main branch.
The IAMPolicyAnalysis stage, which runs after the CheckoutSource stage or when a pull request has been created against the main branch, has two actions. The first action, Check no new access, verifies that changes to the IAM policies in the CloudFormation template do not grant more access than a pre-defined reference policy. The second action, Check access not granted, verifies that those same updates do not grant access to API actions that are deemed sensitive or critical. Finally, the Deploy stage will deploy the resources defined in the CloudFormation template, if the actions in the IAMPolicyAnalysis stage are successful.
To analyze the IAM policies, the Check no new access and Check access not granted actions depend on a reference policy and a predefined list of API actions, respectively.
Use the following command to create the reference policy.
This reference policy sets out the maximum permissions for policies that you plan to validate with custom policy checks. The iam:PassRole permission is a permission that allows an IAM principal to pass an IAM role to an AWS service, like Amazon Elastic Compute Cloud (Amazon EC2) or AWS Lambda. The reference policy says that the only way that a policy is more permissive is if it allows iam:PassRole on this group of sensitive resources: arn:aws:iam::*:role/my-sensitive-roles/*”.
Why might a reference policy be useful? A reference policy helps ensure that a particular combination of actions, resources, and conditions is not allowed in your environment. Reference policies typically allow actions and resources in one statement, then deny the problematic permissions in a second statement. This means that a policy that is more permissive than the reference policy allows access to a permission that the reference policy has denied.
In this example, a developer who is authorized to create IAM roles could, intentionally or unintentionally, create an IAM role for an AWS service (like EC2 for AWS Lambda) that has permission to pass a privileged role to another service or principal, leading to an escalation of privilege.
Use the following command to create a list of sensitive actions. This list will be parsed during the build pipeline and passed to the CheckAccessNotGranted API. If the policy grants access to one or more of the sensitive actions in this list, a result of FAIL will be returned. To keep this example simple, add a single API action, as follows.
So that the CodeBuild projects can access the dependencies, use the following command to copy the cnna-reference-policy.file and sensitive-actions.file to an S3 bucket. Refer to the stack outputs you noted earlier and replace <ConfigBucket> with the name of the S3 bucket created in your environment.
Step 2: Create a new CloudFormation template that defines an IAM policy
With the pipeline deployed, the next step is to clone the repository that was created and populate it with a CloudFormation template that defines an IAM policy.
Install git-remote-codecommit by using the following command.
pip install git-remote-codecommit
For more information on installing and configuring git-remote-codecommit, see the AWS CodeCommit User Guide.
With git-remote-codecommit installed, use the following command to clone the my-iam-policy repository from AWS CodeCommit.
git clone codecommit://my-iam-policy && cd ./my-iam-policy
If you’ve configured a named profile for use with the AWS CLI, use the following command, replacing <profile> with the name of your named profile.
git clone codecommit://<profile>@my-iam-policy && cd ./my-iam-policy
Use the following command to create the CloudFormation template in the local clone of the repository.
The actions in the IAMPolicyValidation stage are run by a CodeBuild project. CodeBuild environments run arbitrary commands that are passed to the project using a buildspec file. Each project has already been configured to use an inline buildspec file.
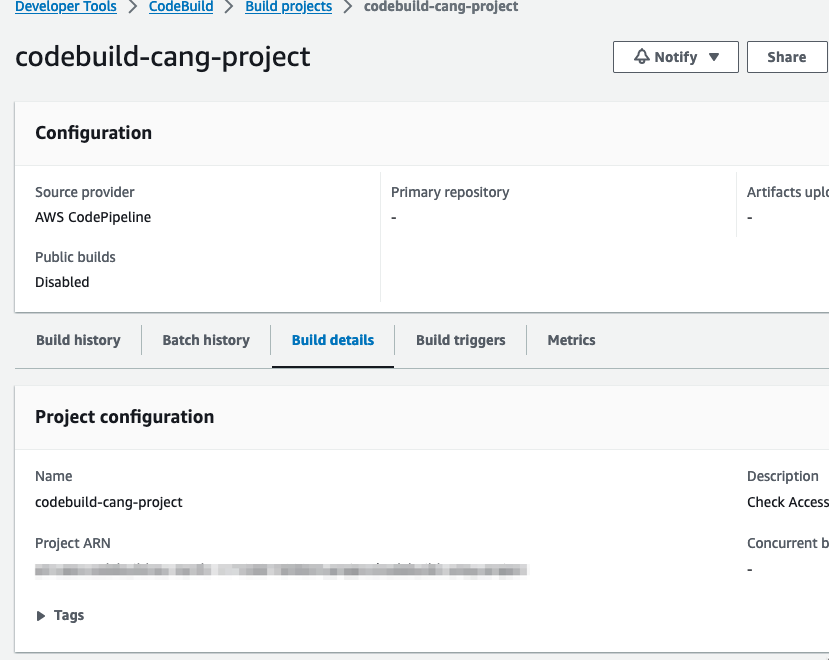
You can inspect the buildspec file for each project by opening the project’s Build details page as shown in Figure 3.
Figure 3: AWS CodeBuild console and build details
Step 3: Run analysis on the IAM policy
The next step involves checking in the first version of the CloudFormation template to the repository and checking two things. First, that the policy does not grant more access than the reference policy. Second, that the policy does not contain any of the sensitive actions defined in the sensitive-actions.file.
To begin tracking the CloudFormation template created earlier, use the following command.
git add ec2-instance-role.yaml
Commit the changes you have made to the repository.
git commit -m 'committing a new CFN template with IAM policy'
Finally, push these changes to the remote repository.
git push
Pushing these changes will initiate the pipeline. After a few minutes the pipeline should complete successfully. To view the status of the pipeline, do the following:
Navigate to https://<region>.console.aws.amazon.com/codesuite/codepipeline/pipelines (replacing <region> with your AWS Region).
Choose the pipeline called accessanalyzer-pipeline.
Scroll down to the IAMPolicyValidation stage of the pipeline.
For both the check no new access and check access not granted actions, choose View Logs to inspect the log output.
If you inspect the build logs for both the check no new access and check access not granted actions within the pipeline, you should see that there were no blocking or non-blocking findings, similar to what is shown in Figure 4. This indicates that the policy was validated successfully. In other words, the policy was not more permissive than the reference policy, and it did not include any of the critical permissions.
Figure 4: CodeBuild log entry confirming that the IAM policy was successfully validated
Step 4: Create a pull request to merge a new update to the CloudFormation template
In this step, you will make a change to the IAM policy in the CloudFormation template. The change deliberately makes the policy grant more access than the reference policy. The change also includes a critical permission.
Use the following command to create a new branch called add-new-permissions in the local clone of the repository.
git checkout -b add-new-permissions
Next, edit the IAM policy in ec2-instance-role.yaml to include an additional API action, dynamodb:Delete* and update the resource property of the inline policy to use an IAM role in the /my-sensitive-roles/*” path. You can copy the following example, if you’re unsure of how to do this.
Commit the policy change and push the updated policy document to the repo by using the following commands.
git add ec2-instance-role.yaml
git commit -m "adding new permission and allowing my ec2 instance to assume a pass sensitive IAM role"
The add-new-permissions branch is currently a local branch. Use the following command to push the branch to the remote repository. This action will not initiate the pipeline, because the pipeline only runs when changes are made to the repository’s main branch.
git push -u origin add-new-permissions
With the new branch and changes pushed to the repository, follow these steps to create a pull request:
Navigate to https://console.aws.amazon.com/codesuite/codecommit/repositories (don’t forget to the switch to the correct Region).
Choose the repository called my-iam-policy.
Choose the branch add-new-permissions from the drop-down list at the top of the repository screen.
Figure 5: my-iam-policy repository with new branch available
Choose Create pull request.
Enter a title and description for the pull request.
(Optional) Scroll down to see the differences between the current version and new version of the CloudFormation template highlighted.
Choose Create pull request.
The creation of the pull request will Initiate the pipeline to fetch the CloudFormation template from the repository and run the check no new access and check access not granted analysis actions.
After a few minutes, choose the Activity tab for the pull request. You should see a comment from the pipeline that contains the results of the failed validation.
Figure 6: Results from the failed validation posted as a comment to the pull request
Why did the validations fail?
The updated IAM role and inline policy failed validation for two reasons. First, the reference policy said that no one should have more permissions than the reference policy does. The reference policy in this example included a deny statement for the iam:PassRole permission with a resource of /my-sensitive-role/*. The new created inline policy included an allow statement for the iam:PassRole permission with a resource of arn:aws:iam::*:role/my-sensitive-roles/my-custom-admin-role. In other words, the new policy had more permissions than the reference policy.
Second, the list of critical permissions included the dynamodb:DeleteTable permission. The inline policy included a statement that would allow the EC2 instance to perform the dynamodb:DeleteTable action.
Cleanup
Use the following command to delete the infrastructure that was provisioned as part of the examples in this blog post.
cdk destroy
Conclusion
In this post, I introduced you to two new IAM Access Analyzer APIs: CheckNoNewAccess and CheckAccessNotGranted. The main example in the post demonstrated one way in which you can use these APIs to automate security testing throughout the development lifecycle. The example did this by integrating both APIs into the developer workflow and validating the developer-authored IAM policy when the developer created a pull request to merge changes into the repository’s main branch. The automation helped the developer to get feedback about the problems with the IAM policy quickly, allowing the developer to take action in a timely way. This is often referred to as shifting security left — identifying misconfigurations early and automatically supporting an iterative, fail-fast model of continuous development and testing. Ultimately, this enables teams to make security an inherent part of a system’s design and architecture and can speed up product development workflow.
You can find the full sample code used in this blog post on GitHub.
With GitHub Actions, you can automate, customize, and run software development workflows directly within a repository. Workflows are defined using YAML and are stored alongside your code. I’ll discuss the specifics of how you can set up and use GitHub actions within a repository in the sections that follow.
The cfn-policy-validator tool is a command-line tool that takes an AWS CloudFormation template, finds and parses the IAM policies that are attached to IAM roles, users, groups, and resources, and then runs the policies through IAM Access Analyzerpolicy checks. Implementing IAM policy validation checks at the time of code check-in helps shift security to the left (closer to the developer) and shortens the time between when developers commit code and when they get feedback on their work.
Let’s walk through an example that checks the policies that are attached to an IAM role in a CloudFormation template. In this example, the cfn-policy-validator tool will find that the trust policy attached to the IAM role allows the role to be assumed by external principals. This configuration could lead to unintended access to your resources and data, which is a security risk.
Prerequisites
To complete this example, you will need the following:
A GitHub account
An AWS account, and an identity within that account that has permissions to create the IAM roles and resources used in this example
Step 1: Create a repository that will host the CloudFormation template to be validated
To begin with, you need to create a GitHub repository to host the CloudFormation template that is going to be validated by the cfn-policy-validator tool.
In the upper-right corner of the page, in the drop-down menu, choose New repository. For Repository name, enter a short, memorable name for your repository.
(Optional) Add a description of your repository.
Choose either the option Public (the repository is accessible to everyone on the internet) or Private (the repository is accessible only to people access is explicitly shared with).
Choose Initialize this repository with: Add a README file.
Choose Create repository. Make a note of the repository’s name.
Step 2: Clone the repository locally
Now that the repository has been created, clone it locally and add a CloudFormation template.
To clone the repository locally and add a CloudFormation template:
Open the command-line tool of your choice.
Use the following command to clone the new repository locally. Make sure to replace <GitHubOrg> and <RepositoryName> with your own values.
Change in to the directory that contains the locally-cloned repository.
cd <RepositoryName>
Now that the repository is locally cloned, populate the locally-cloned repository with the following sample CloudFormation template. This template creates a single IAM role that allows a principal to assume the role to perform the S3:GetObject action.
Use the following command to create the sample CloudFormation template file.
WARNING: This sample role and policy should not be used in production. Using a wildcard in the principal element of a role’s trust policy would allow any IAM principal in any account to assume the role.
Notice that AssumeRolePolicyDocument refers to a trust policy that includes a wildcard value in the principal element. This means that the role could potentially be assumed by an external identity, and that’s a risk you want to know about.
Step 3: Vend temporary AWS credentials for GitHub Actions workflows
In order for the cfn-policy-validator tool that’s running in the GitHub Actions workflow to use the IAM Access Analyzer API, the GitHub Actions workflow needs a set of temporary AWS credentials. The AWS Credentials for GitHub Actions action helps address this requirement. This action implements the AWS SDK credential resolution chain and exports environment variables for other actions to use in a workflow. Environment variable exports are detected by the cfn-policy-validator tool.
AWS Credentials for GitHub Actions supports four methods for fetching credentials from AWS, but the recommended approach is to use GitHub’s OpenID Connect (OIDC) provider in conjunction with a configured IAM identity provider endpoint.
To configure an IAM identity provider endpoint for use in conjunction with GitHub’s OIDC provider:
In the left-hand menu, choose Identity providers, and then choose Add provider.
For Provider type, choose OpenID Connect.
For Provider URL, enter https://token.actions.githubusercontent.com
Choose Get thumbprint.
For Audiences, enter sts.amazonaws.com
Choose Add provider to complete the setup.
At this point, make a note of the OIDC provider name. You’ll need this information in the next step.
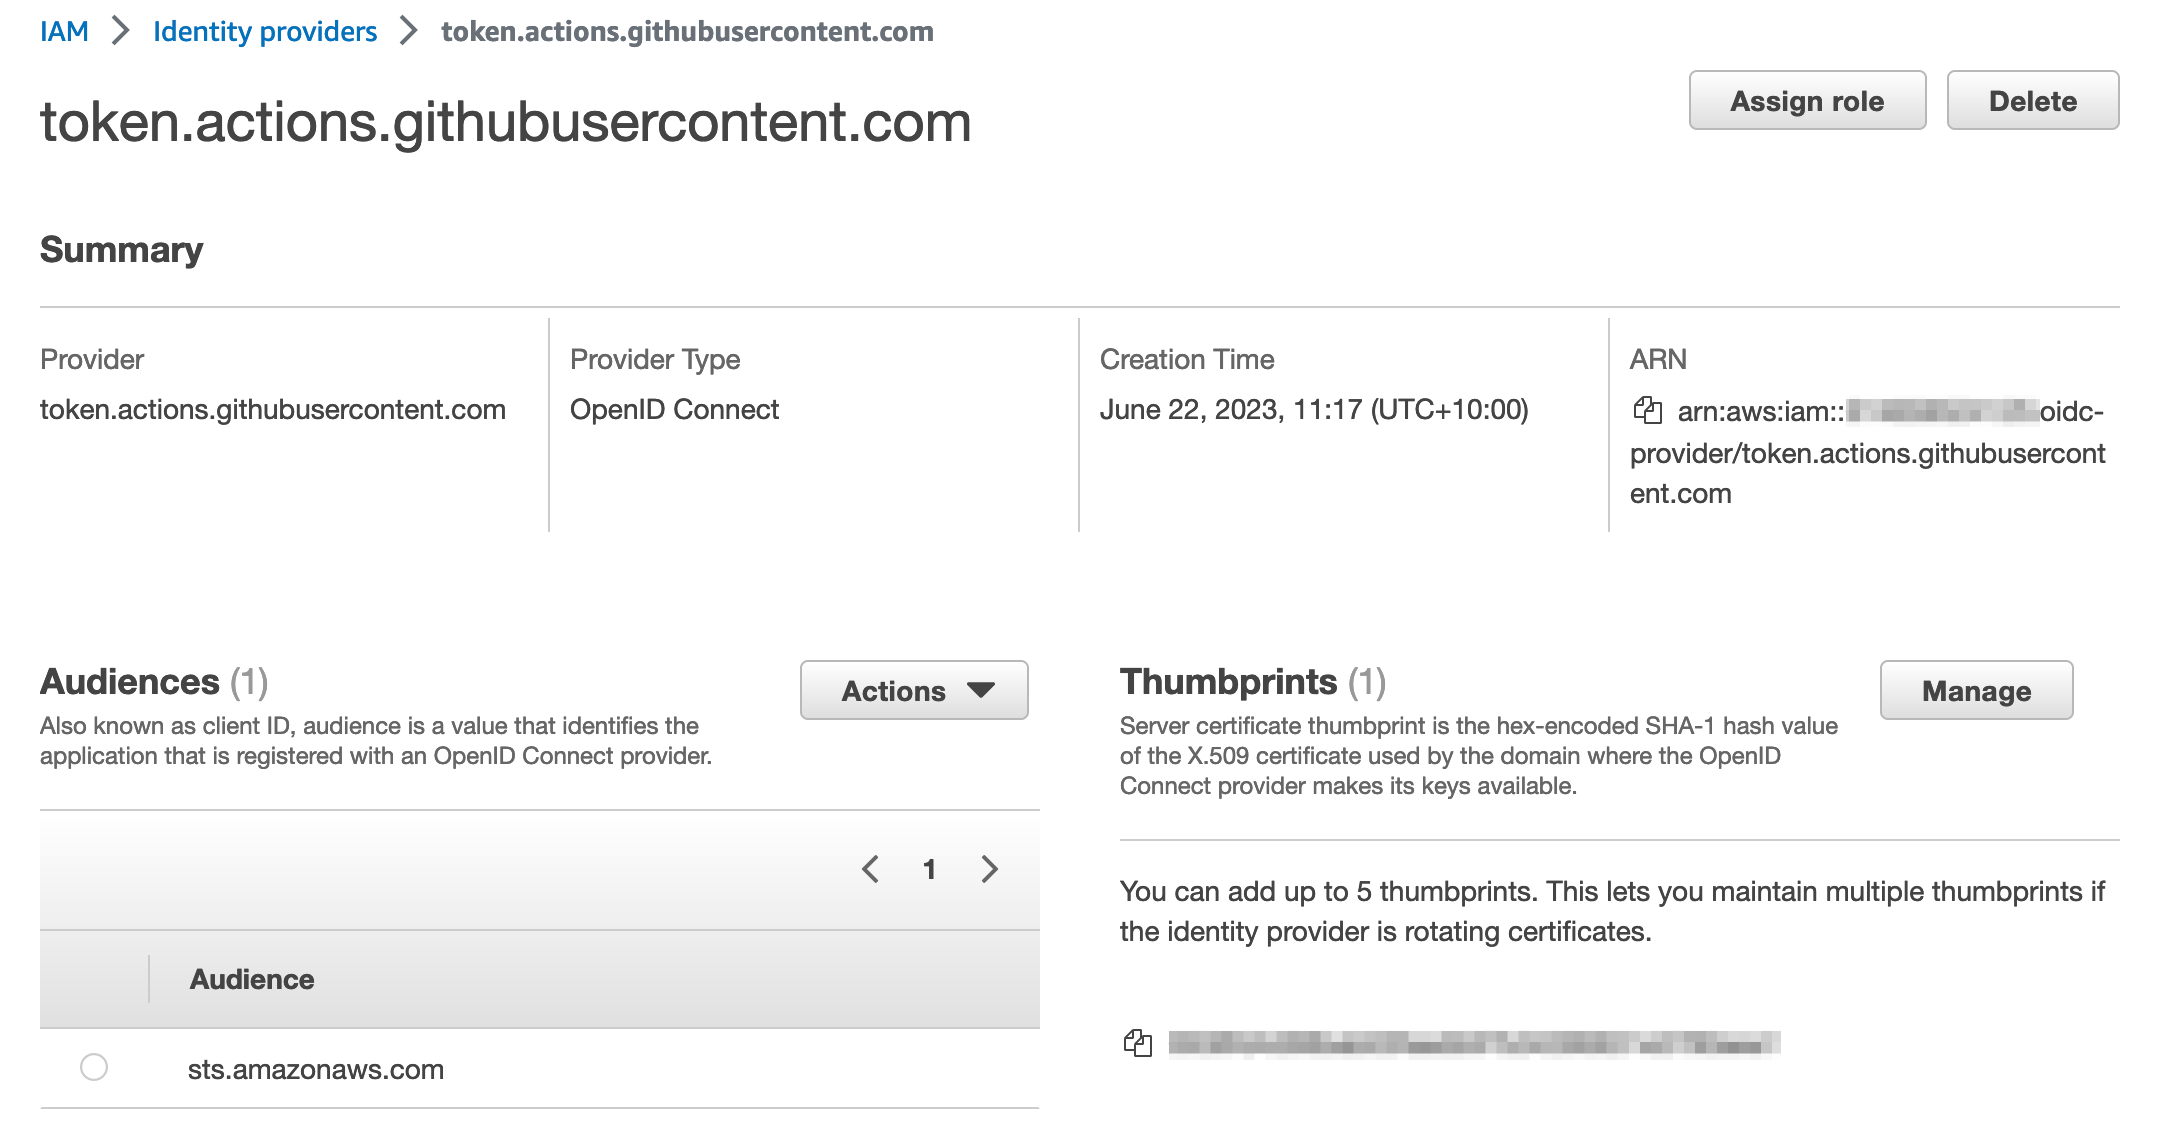
After it’s configured, the IAM identity provider endpoint should look similar to the following:
Figure 1: IAM Identity provider details
Step 4: Create an IAM role with permissions to call the IAM Access Analyzer API
In this step, you will create an IAM role that can be assumed by the GitHub Actions workflow and that provides the necessary permissions to run the cfn-policy-validator tool.
To create the IAM role:
In the IAM console, in the left-hand menu, choose Roles, and then choose Create role.
For Trust entity type, choose Web identity.
In the Provider list, choose the new GitHub OIDC provider that you created in the earlier step. For Audience, select sts.amazonaws.com from the list.
After you’ve attached the new policy, choose Next.
Note: For a full explanation of each of these actions and a CloudFormation template example that you can use to create this role, see the IAM Policy Validator for AWS CloudFormation GitHub project.
The default policy you just created allows GitHub Actions from organizations or repositories outside of your control to assume the role. To align with the IAM best practice of granting least privilege, let’s scope it down further to only allow a specific GitHub organization and the repository that you created earlier to assume it.
Replace the policy to look like the following, but don’t forget to replace {AWSAccountID}, {GitHubOrg} and {RepositoryName} with your own values.
At this point, you’ve created and configured the following resources:
A GitHub repository that has been locally cloned and filled with a sample CloudFormation template.
An IAM identity provider endpoint for use in conjunction with GitHub’s OIDC provider.
A role that can be assumed by GitHub actions, and a set of associated permissions that allow the role to make requests to IAM Access Analyzer to validate policies.
Step 5: Create a definition for the GitHub Actions workflow
The workflow runs steps on hosted runners. For this example, we are going to use Ubuntu as the operating system for the hosted runners. The workflow runs the following steps on the runner:
The workflow checks out the CloudFormation template by using the community actions/checkout action.
The workflow then uses the aws-actions/configure-aws-credentials GitHub action to request a set of credentials through the IAM identity provider endpoint and the IAM role that you created earlier.
The workflow runs a validation against the CloudFormation template by using the cfn-policy-validator tool.
The workflow is defined in a YAML document. In order for GitHub Actions to pick up the workflow, you need to place the definition file in a specific location within the repository: .github/workflows/main.yml. Note the “.” prefix in the directory name, indicating that this is a hidden directory.
To create the workflow:
Use the following command to create the folder structure within the locally cloned repository:
mkdir -p .github/workflows
Create the sample workflow definition file in the .github/workflows directory. Make sure to replace <AWSAccountID> and <AWSRegion> with your own information.
Push the local changes to the remote GitHub repository.
git push
After the changes are pushed to the remote repository, go back to https://github.com and open the repository that you created earlier. In the top-right corner of the repository window, there is a small orange indicator, as shown in Figure 2. This shows that your GitHub Actions workflow is running.
Figure 2: GitHub repository window with the orange workflow indicator
Because the sample CloudFormation template used a wildcard value “*” in the principal element of the policy as described in the section Step 2: Clone the repository locally, the orange indicator turns to a red x (shown in Figure 3), which signals that something failed in the workflow.
Figure 3: GitHub repository window with the red cross workflow indicator
Choose the red x to see more information about the workflow’s status, as shown in Figure 4.
Figure 4: Pop-up displayed after choosing the workflow indicator
Choose Details to review the workflow logs.
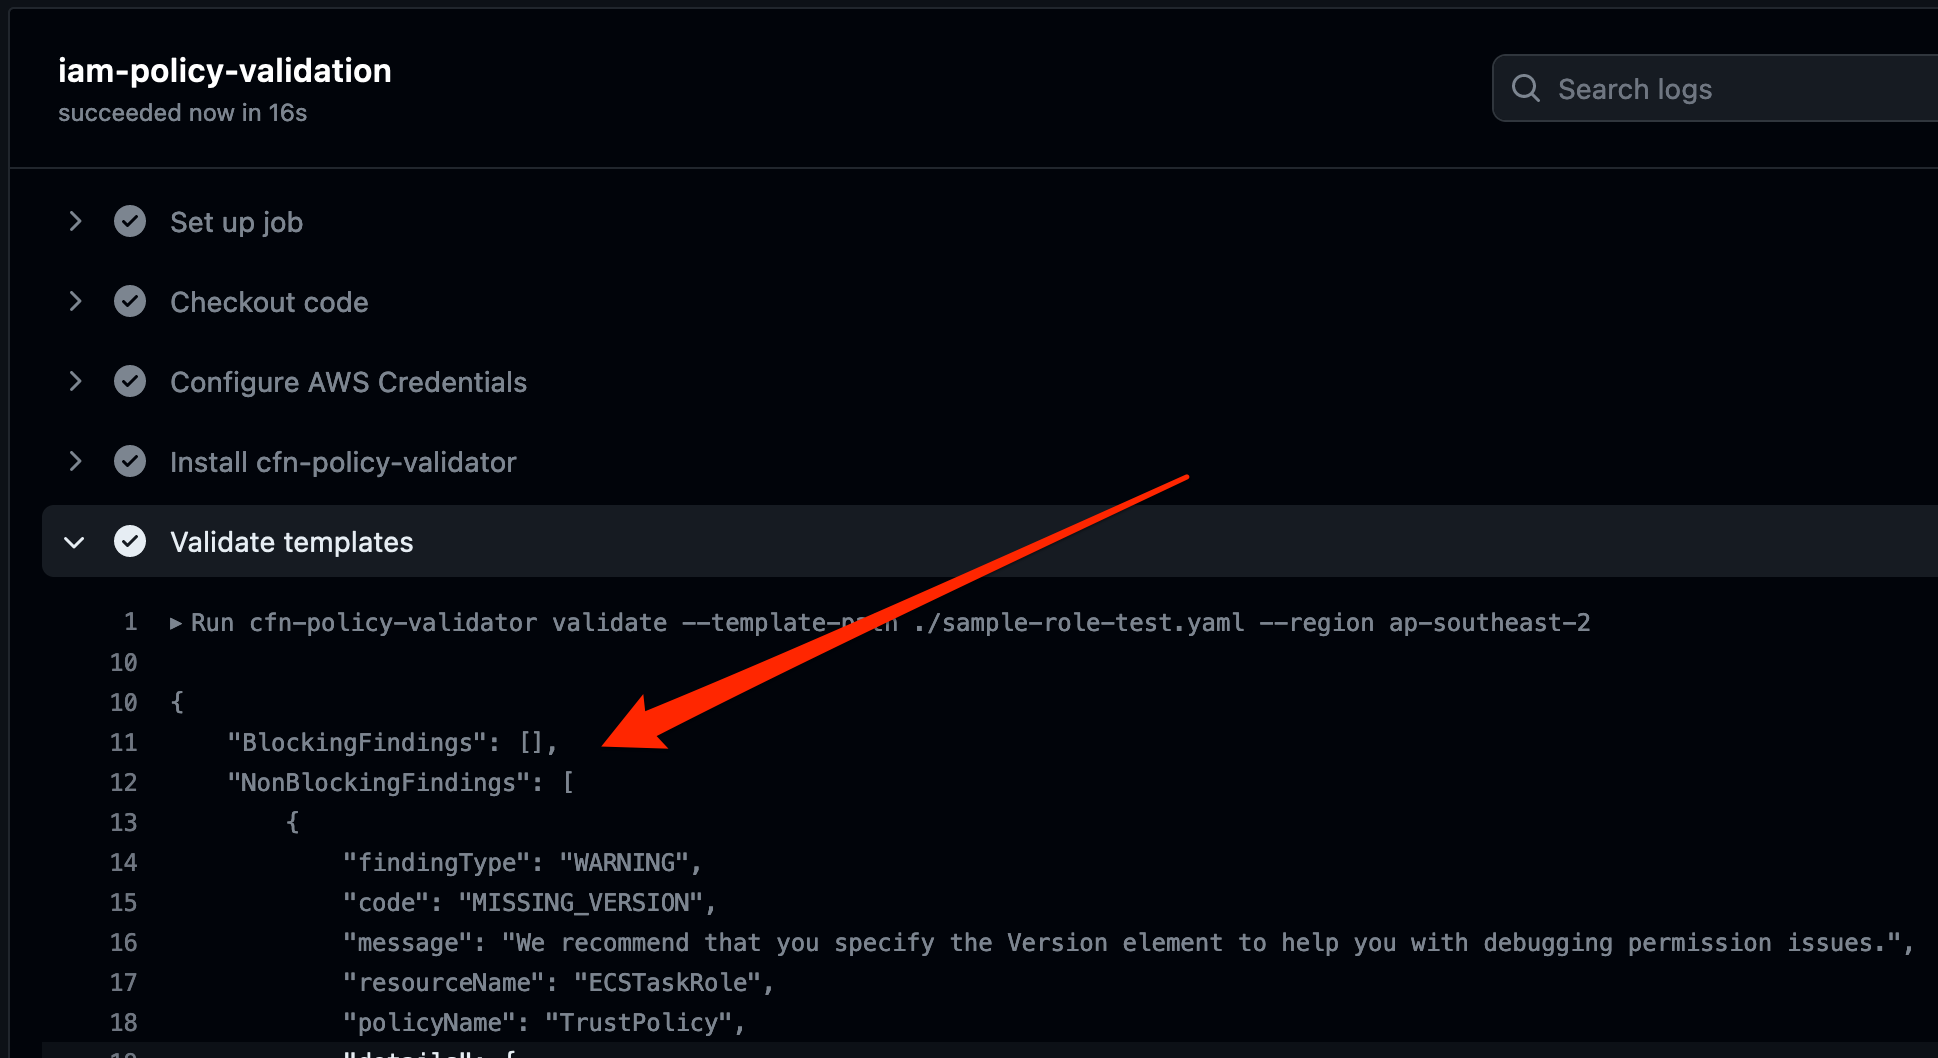
In this example, the Validate templates step in the workflow has failed. A closer inspection shows that there is a blocking finding with the CloudFormation template. As shown in Figure 5, the finding is labelled as EXTERNAL_PRINCIPAL and has a description of Trust policy allows access from external principals.
Figure 5: Details logs from the workflow showing the blocking finding
To remediate this blocking finding, you need to update the principal element of the trust policy to include a principal from your AWS account (considered a zone of trust). The resources and principals within your account comprises of the zone of trust for the cfn-policy-validator tool. In the initial version of sample-role.yaml, the IAM roles trust policy used a wildcard in the Principal element. This allowed principals outside of your control to assume the associated role, which caused the cfn-policy-validator tool to generate a blocking finding.
In this case, the intent is that principals within the current AWS account (zone of trust) should be able to assume this role. To achieve this result, replace the wildcard value with the account principal by following the remaining steps.
Open sample-role.yaml by using your preferred text editor, such as nano.
nano sample-role.yaml
Replace the wildcard value in the principal element with the account principal arn:aws:iam::<AccountID>:root. Make sure to replace <AWSAccountID> with your own AWS account ID.
Add the updated file, commit the changes, and push the updates to the remote GitHub repository.
git add sample-role.yaml
git commit -m ‘replacing wildcard principal with account principal’
git push
After the changes have been pushed to the remote repository, go back to https://github.com and open the repository. The orange indicator in the top right of the window should change to a green tick (check mark), as shown in Figure 6.
Figure 6: GitHub repository window with the green tick workflow indicator
This indicates that no blocking findings were identified, as shown in Figure 7.
Figure 7: Detailed logs from the workflow showing no more blocking findings
Conclusion
In this post, I showed you how to automate IAM policy validation by using GitHub Actions and the IAM Policy Validator for CloudFormation. Although the example was a simple one, it demonstrates the benefits of automating security testing at the start of the development lifecycle. This is often referred to as shifting security left. Identifying misconfigurations early and automatically supports an iterative, fail-fast model of continuous development and testing. Ultimately, this enables teams to make security an inherent part of a system’s design and architecture and can speed up product development workflows.
In addition to the example I covered today, IAM Policy Validator for CloudFormation can validate IAM policies by using a range of IAM Access Analyzer policy checks. For more information about these policy checks, see Access Analyzer reference policy checks.
If you have feedback about this post, submit comments in the Comments section below. If you have questions about this post, contact AWS Support.
Want more AWS Security news? Follow us on Twitter.
The collective thoughts of the interwebz
Manage Consent
To provide the best experiences, we use technologies like cookies to store and/or access device information. Consenting to these technologies will allow us to process data such as browsing behavior or unique IDs on this site. Not consenting or withdrawing consent, may adversely affect certain features and functions.
Functional
Always active
The technical storage or access is strictly necessary for the legitimate purpose of enabling the use of a specific service explicitly requested by the subscriber or user, or for the sole purpose of carrying out the transmission of a communication over an electronic communications network.
Preferences
The technical storage or access is necessary for the legitimate purpose of storing preferences that are not requested by the subscriber or user.
Statistics
The technical storage or access that is used exclusively for statistical purposes.The technical storage or access that is used exclusively for anonymous statistical purposes. Without a subpoena, voluntary compliance on the part of your Internet Service Provider, or additional records from a third party, information stored or retrieved for this purpose alone cannot usually be used to identify you.
Marketing
The technical storage or access is required to create user profiles to send advertising, or to track the user on a website or across several websites for similar marketing purposes.