Post Syndicated from Rahul Sahni original https://aws.amazon.com/blogs/security/building-identity-first-security-a-guide-to-the-identity-and-access-management-track-at-aws-reinforce-2025/

Join us at AWS re:Inforce 2025 from June 16 to 18 as we dive deep into identity and access management, where we’ll explore how organizations are securing identities at scale. As the traditional security perimeter continues to dissolve in our hybrid and multi-cloud world, this year’s sessions showcase how AWS customers are building comprehensive identity-centric security strategies that span workforce and customer identities. From authenticating and authorizing human and machine identities to implementing least privilege access controls and securing identities that help drive AI adoption, you’ll discover practical approaches to modernizing your identity architecture.
Whether you’re managing enterprise workforce identities across complex organizational structures or building customer-facing applications that require seamless and secure authentication experiences, the Identity and Access Management track offers insights for every security professional. We’ve carefully curated sessions that address today’s most pressing identity challenges, including zero trust implementation patterns, unified workforce identity management across cloud and on-premises environments, and scalable customer identity and access management (CIAM) solutions. Through technical deep-dives, hands-on workshops, and customer case studies, you’ll learn how to use AWS Identity and Access Management (IAM), AWS IAM Identity Center, AWS Directory Services, Amazon Cognito, and other AWS services to build robust identity foundations that support both security and business agility.
In this post, we highlight some of the key sessions. With over 30 sessions dedicated to identity management, we feature valuable learnings for executives and practitioners alike. Let AWS experts and partners share practical challenges and solutions with you. Let’s explore what you can expect at this year’s conference.
Zero trust and principle of least privilege
IAM304 | Breakout session | Empowering developers to implement least-privilege IAM permissions
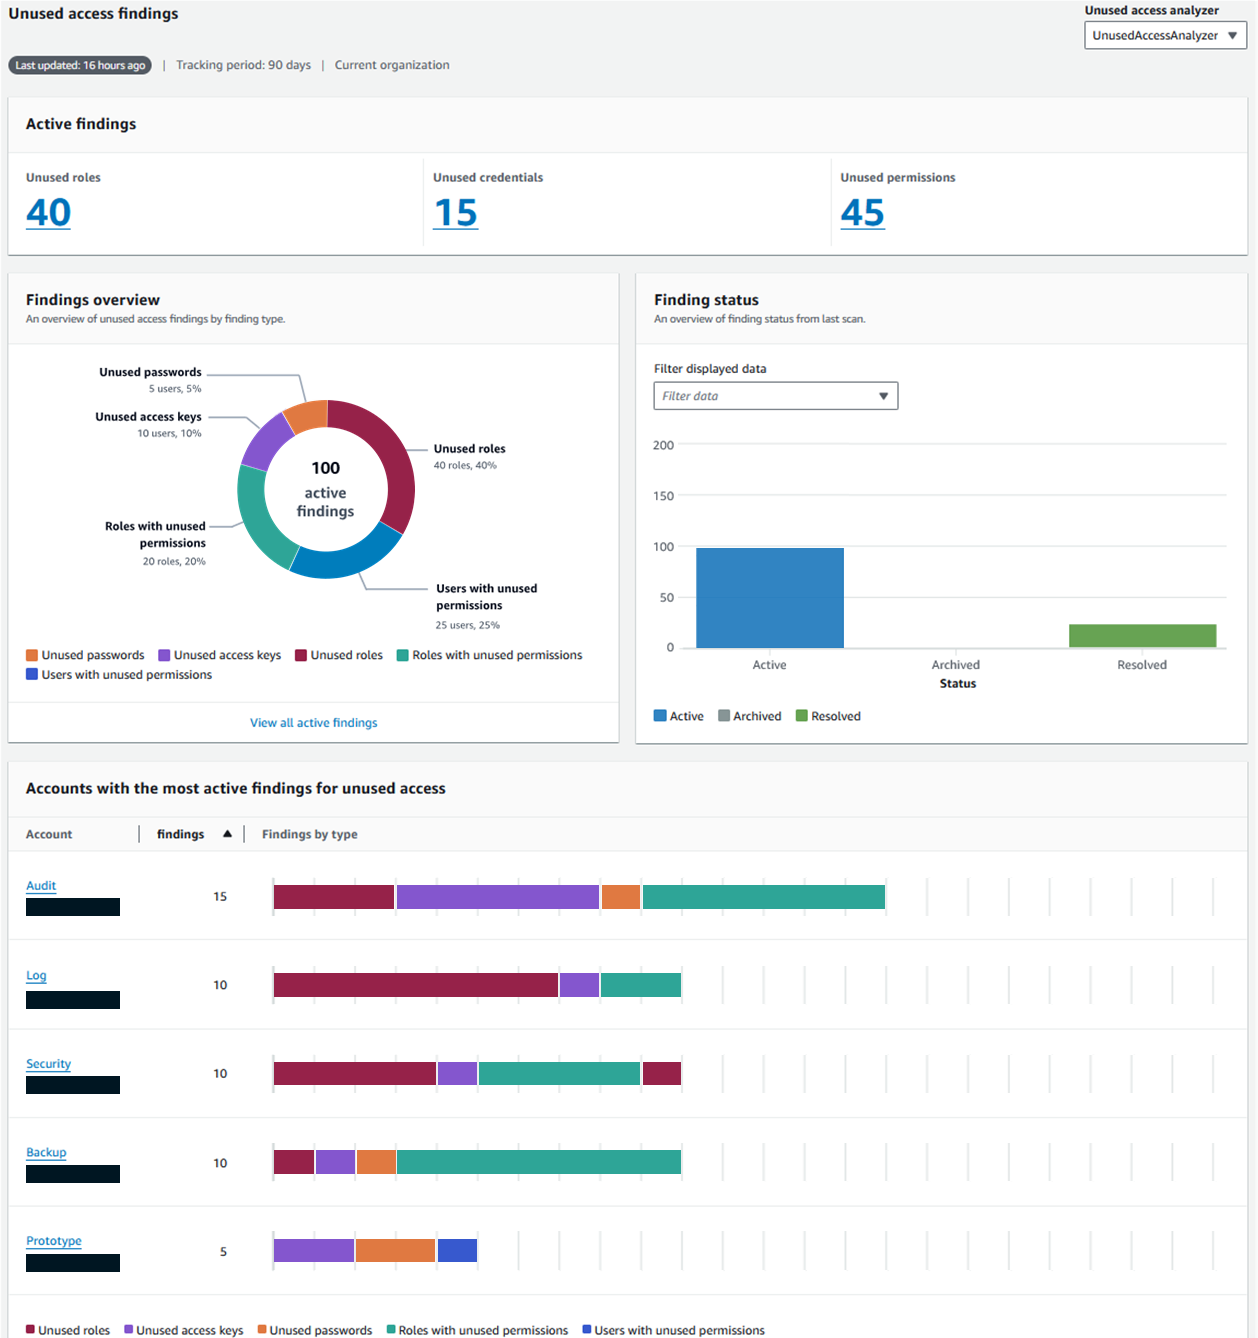
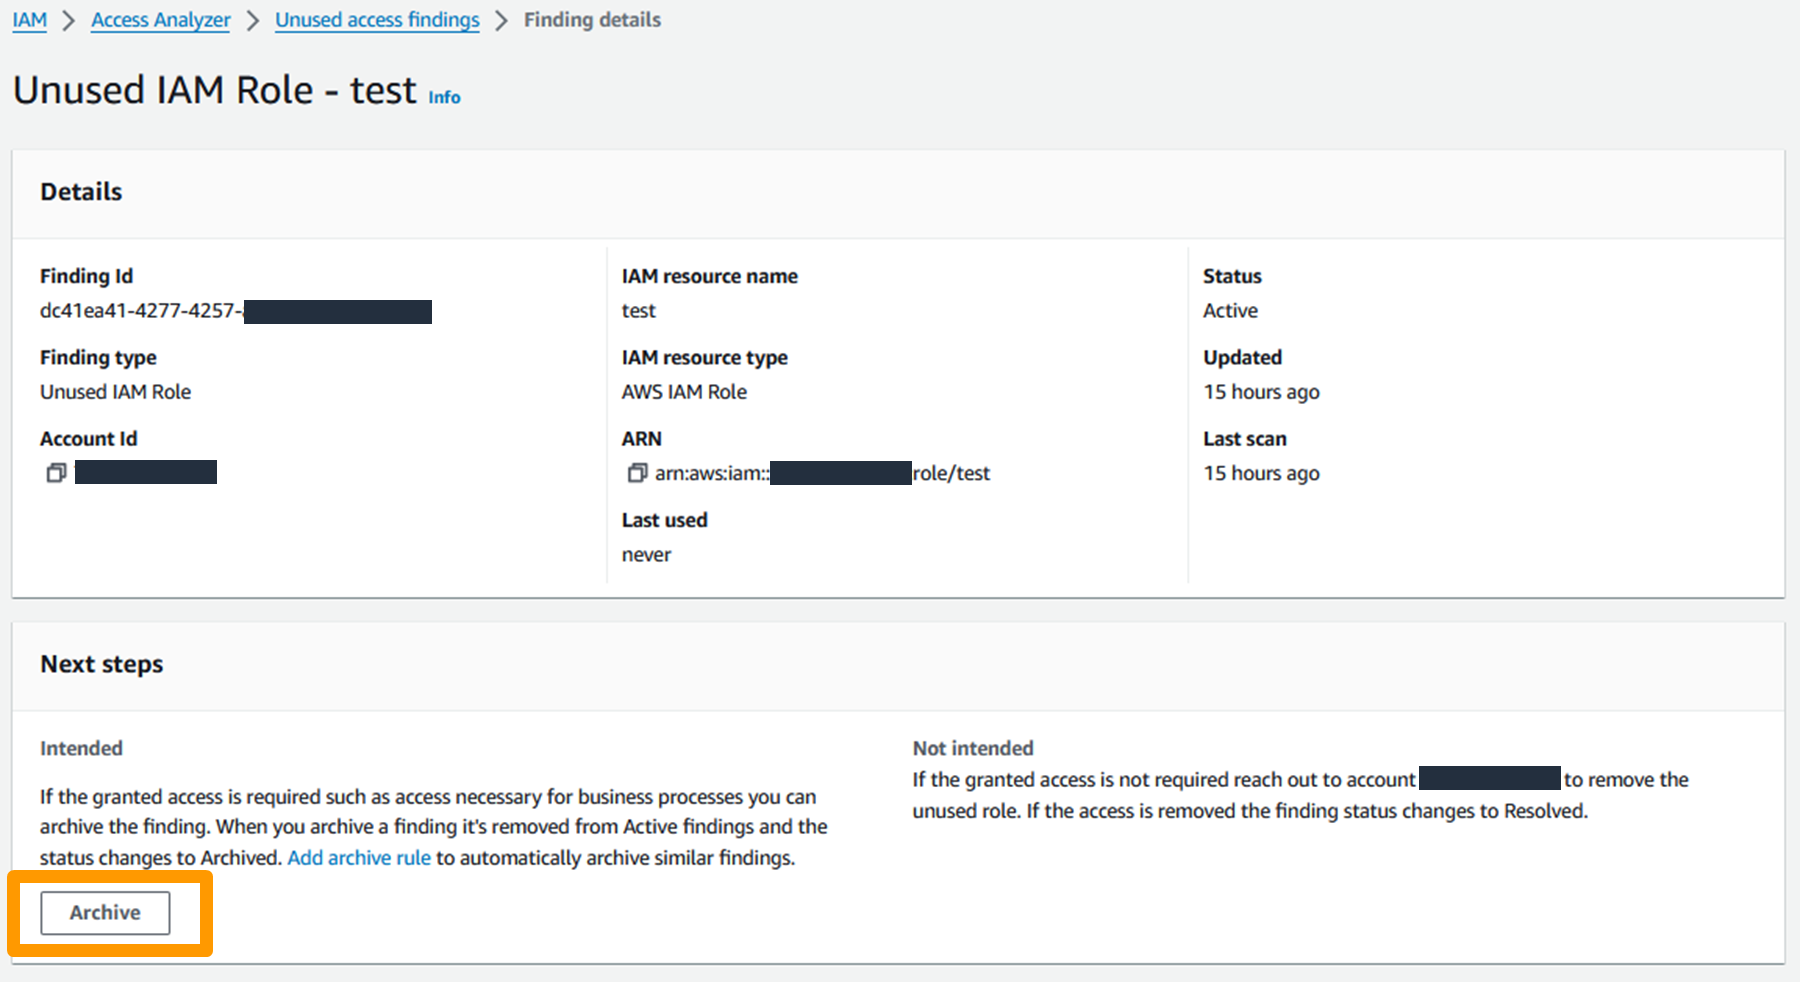
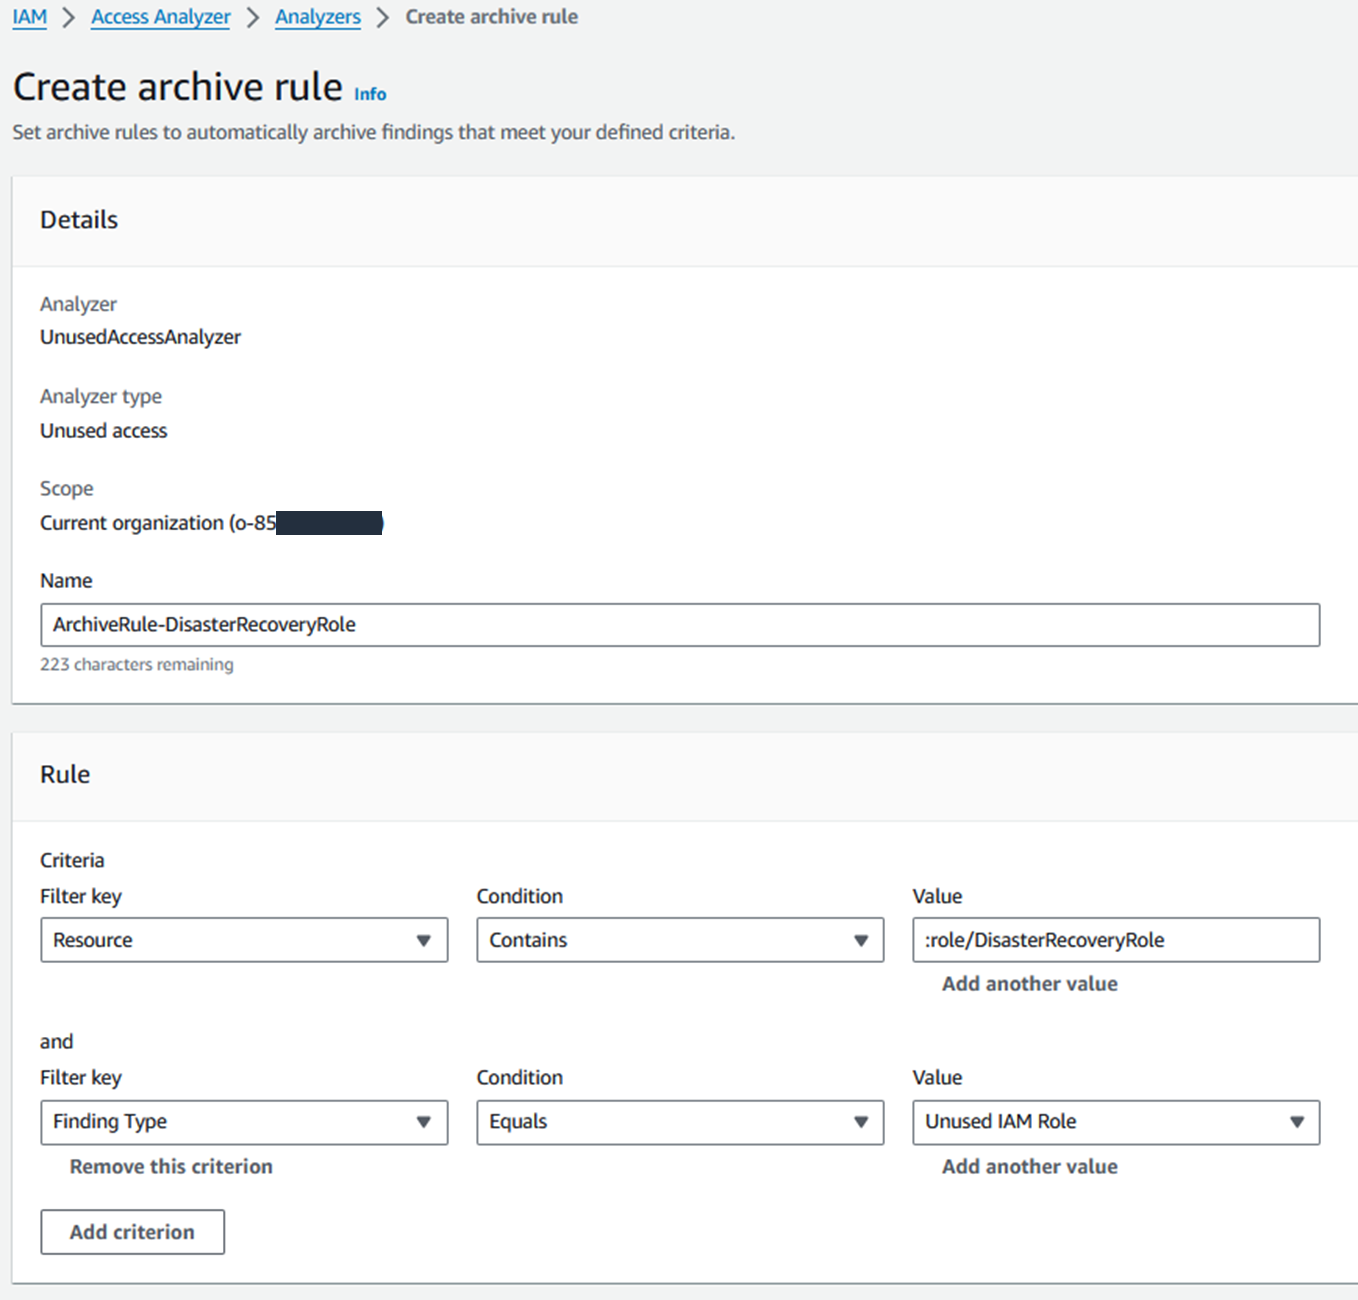
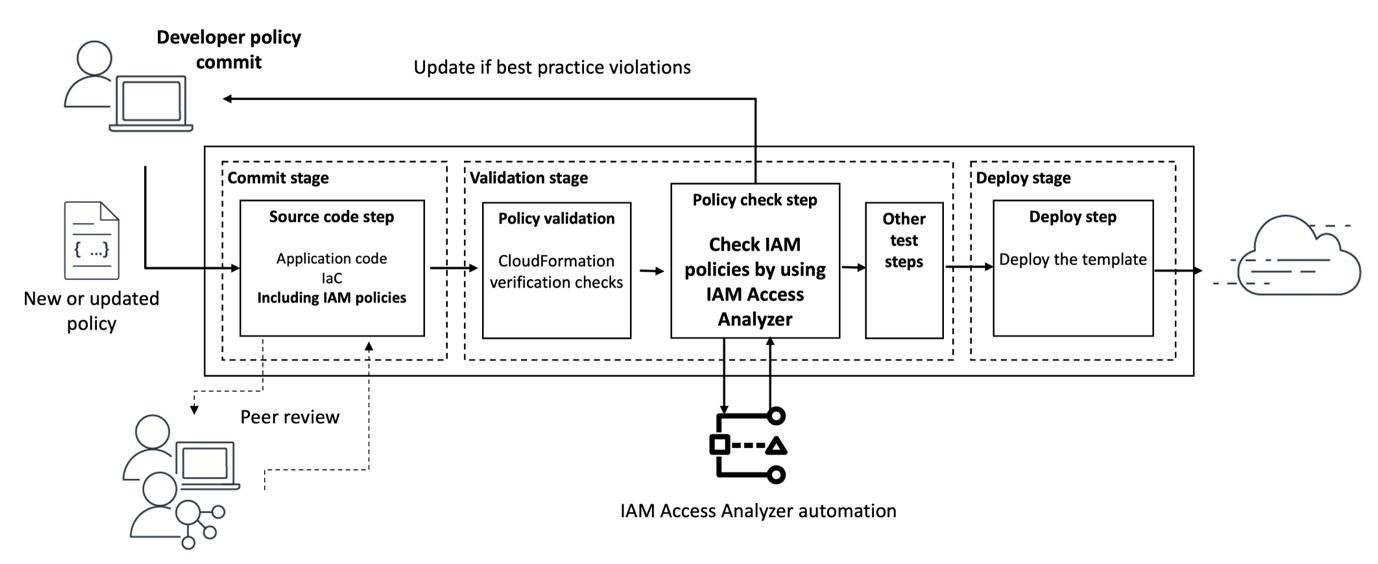
Wolters Kluwer, a global provider of professional information, software solutions, and services and GoTo Technologies (formerly LogMeIn Inc.), a U.S.-based software company that provides cloud-based remote work tools for collaboration and IT management use AWS IAM Access Analyzer to simplify and accelerate their journey to least privilege. Join this session to learn more about their use cases and their journey to empower their builders to refine IAM policies to remove excessive permissions. Gain insights into their strategies, best practices, and lessons learned for continuously monitoring unused permissions across their organization and building processes to streamline remediations.
IAM343 | Code talk | Scale Beyond RBAC: Transform App Access Control using AVP & Cedar
This session focuses on transforming an existing application from role-based access control (RBAC) to policy-based access control (PBAC) using Amazon Verified Permissions (AVP) and Cedar policy. The drive for least privilege has led to role explosion in RBAC model and necessitates a shift towards PBAC, augmenting RBAC with attribute-based access control (ABAC). You will learn how to move authorization logic out of application code and implementing a centralized PBAC model. Attendees will also learn to define permissions as policies using Cedar and seamlessly migrate from RBAC to PBAC with minimal application logic changes, enabling more granular and scalable access control.
Securing Identities in the AI era
IAM373 | Workshop | Identity without barriers: user-aware access for AWS analytics services
This hands-on workshop explores AWS IAM Identity Center’s Trusted Identity Propagation, teaching participants how to enable secure identity propagation across integrated applications. Through practical exercises, attendees will learn to configure identity propagation and use it with services such as Amazon Redshift, Amazon Athena, Amazon Q Business, and more. Participants will gain experience with cross-account scenarios, audit logging configuration, and troubleshooting common integration challenges. You must bring your laptop to participate.
IAM321 | Lightning talk | Building trust in Agentic AI through authentication and access control
AI agents execute tasks for humans, operating independently with or without human presence, while collaborating seamlessly across on-premise and multi-cloud environments. This dynamic setup poses unique challenges in human/agent authentication, identity propagation/delegation, and resource authorization. Leverage Amazon Cognito, Verified Permissions, and Bedrock to master effective Identity and Access Management (IAM) for your AI agents. Through real-world examples using OAuth2-based identity management, machine-to-machine authentication, and policy-based access control, you’ll unlock the ability to scale complex agent interactions securely, empowering you to build robust, scalable Agentic AI solutions.
IAM441 | Code Talk | The Right Way to Secure AI Agents with Code Examples
GenAI agents run tasks on behalf of human users with or without users being present, and often interact with each other across on-premise and different cloud providers. This brings new challenges in identity authentication, propagation, delegation, and resource authorization in the overall agentic AI solution. Learn how Amazon Cognito’s OAuth2-based identity management, machine-to-machine authentication, combined with Amazon Verified Permission’s fine-grained authorization can enable secure delegation patterns for AI agents, while preserving human identity and consent, agent machine identity, and other request context throughout the agent chain. We’ll walk through real-world examples with agents built on Amazon Bedrock or other frameworks.
Workforce identity management
IAM302 | Breakout session | Workforce identity for gen AI and analytics
Managing secure, consistent workforce access for generative AI and analytics is critical for unlocking innovation while protecting sensitive data. In this demo-filled session, you’ll see how centralized identity management and trusted identity propagation can deliver a user-centric data access experience. You’ll also learn how AWS IAM Identity Center simplifies access to AWS services such as Amazon Redshift, Amazon Athena, and AWS Lake Formation, while enabling fine-grained access to data based on user identity to help meet your security and compliance needs.
IAM341 | Code Talk | Visualizing Workforce Identity: Graph-Based Analysis for Access Rights
Discover how to gain deep insights into workforce identity relationships and resource access patterns by visualizing AWS IAM Identity Center data using graph databases. Learn how you can explore complex identity relationships, permission inheritance and resource access across your organization; get practical approaches to ingestion of identity data, creating graph queries for security analysis, and building visualization dashboards to help identify potential resource access risks. We’ll explore real-world scenarios for detecting excessive permissions, analyzing group memberships and resource access, and tracking resource access rights changes over time to strengthen your identity security posture.
Customer and Machine identity management
IAM332 | Chalk Talk | Securing and monitoring machine identities with Amazon Cognito
Unlock the power of secure machine-to-machine (M2M) authorization using Amazon Cognito’s OAuth2 client credentials flow. This session dives deep into implementing M2M authorization, featuring real-world optimization strategies for both security and cost. Learn essential security best practices, multi-tenant reference architectures, and monitoring techniques that ensure your M2M usage remains efficient and secure. Whether you’re building microservices, handling API authorization, or scaling your distributed systems, this session will equip you with actionable insights and patterns for successful M2M implementations. Bring your challenges and questions for an interactive discussion on Cognito-powered M2M authorization.
IAM372 | Workshop | Building CIAM Solutions with Amazon Cognito
Learn how to use Amazon Cognito for your solutions’ CIAM needs. Use hands on examples to build fully functional solutions and see some of the new features in action like the new Managed Login UI, Passwordless logins now supported natively and more.
AWS identity foundation
IAM305 | Breakout session | Establishing a data perimeter on AWS, featuring Block, Inc.
Organizations are storing an unprecedented and increasing amount of data on AWS for a range of use cases including data lakes, analytics, machine learning, and enterprise applications. They want to make sure that sensitive non-public data is protected from unintended access. In this session, dive deep into the controls that you can use to create a data perimeter to help ensure that only your trusted identities are accessing trusted resources from expected networks. Hear from Block, Inc. a leading fintech company about how they use data perimeter controls in their AWS environment to meet their security objectives.
IAM451 | Builders session | Securing GenAI Apps: Fine-Grained Access Control for Amazon Bedrock Agents
Want to secure GenAI applications accessing your organizational data? Learn how to implement intelligent access controls for Amazon Bedrock-powered applications accessing your organizational data. In this builder’s session, you’ll build a defense-in-depth approach that combines authentication using Amazon Cognito and fine-grained authorization with Amazon Verified Permissions to secure access for Bedrock AI Agents. Implement layered permissions that protect sensitive data without limiting your GenAI capabilities.
Conclusion
As organizations continue to navigate the complexities of modern identity architecture, implementing a robust IAM framework remains critical for maintaining security posture while enabling seamless access across hybrid environments. The disappearance of the identity perimeter and the shift towards identity-first security demands a more sophisticated approach to authentication and authorization workflows, making continuous validation and adaptive access policies paramount. The community at re:inforce, strives to provide you with solutions, tactics, and strategies that you can use to propel your business forward.
If you have feedback about this post, submit comments in the Comments section below.