Baggage Tag Scam

Post Syndicated from Bruce Schneier original https://www.schneier.com/blog/archives/2025/08/baggage-tag-scam.html

I just heard about this:

There’s a travel scam warning going around the internet right now: You should keep your baggage tags on your bags until you get home, then shred them, because scammers are using luggage tags to file fraudulent claims for missing baggage with the airline.

First, the scam is possible. I had a bag destroyed by baggage handlers on a recent flight, and all the information I needed to file a claim was on my luggage tag. I have no idea if I will successfully get any money from the airline, or what form it will be in, or how it will be tied to my name, but at least the first step is possible.

But…is it actually happening? No one knows. It feels like a kind of dumb way to make not a lot of money. The origin of this rumor seems to be single Reddit post.

And why should I care about this scam? No one is scamming me; it’s the airline being scammed. I suppose the airline might ding me for reporting a damage bag, but it seems like a very minor risk.

Use scalable controls to help prevent access from unexpected networks

Post Syndicated from Sowjanya Rajavaram original https://aws.amazon.com/blogs/security/use-scalable-controls-to-help-prevent-access-from-unexpected-networks/

As your organization grows, the amount of data you own and the number of data sources to store and process your data across multiple Amazon Web Services (AWS) accounts increases. Enforcing consistent access controls that restrict access to known networks might become a key part in protecting your organization’s sensitive data.

Previously, AWS customers could rely on AWS Identity and Access Management (IAM) global condition keys such as aws:SourceVpc and aws:SourceVpce to restrict access to specific virtual private clouds (VPCs) or VPC endpoints. These condition keys work well for organizations with few accounts and for use cases limited to specific workloads. However, as the number of your VPCs grow, using these keys could introduce challenges in scaling the control across a large set of resources.

To address this challenge, AWS has introduced three new global condition keys for scalable access controls based on request origin: aws:VpceAccount, aws:VpceOrgPaths, and aws:VpceOrgID.

In this blog post, we demonstrate how these keys can help make sure that your AWS resources are accessible only from expected VPCs, so that you can scale your data perimeter implementation across your organization within AWS Organizations.

Background

Organizations often store data in AWS resources such as Amazon Simple Storage Service (Amazon S3) buckets. For example, you might use Amazon S3 as your data lake foundation with data scientists and analysts running their data processing and analytics workflows against data stored in a centralized S3 bucket.

To limit access to data stored in your S3 buckets to expected networks, you can use IAM policies associated with your identities and resources. You can define expected networks in a policy using specific IAM global condition keys based on your organization’s intended data access patterns and unique requirements. For example, use aws:SourceIp to specify your corporate IP CIDR ranges, and aws:SourceVpc or aws:SourceVpce to list VPC and VPC endpoint IDs you expect requests to come from. These condition keys help make sure that only workloads operating within your expected network boundaries can access sensitive data.

However, there are scenarios where you might want to allow access from multiple networks within your organization, as illustrated in Figure 1.

Figure 1: Applications and users accessing an S3 bucket from VPCs and public networks

Figure 1: Applications and users accessing an S3 bucket from VPCs and public networks

In such cases, using the aws:SourceVpc and aws:SourceVpce condition keys requires enumerating all expected VPC and VPC endpoint IDs and updating policies whenever new VPCs or VPC endpoints are added or deleted. This approach creates operational overhead and increases the risk of misconfigurations. The operational complexity grows as organizations scale their data processing capacity across multiple AWS Regions and accounts. While many organizations have developed automated mechanisms to detect changes in VPC configurations and update policies accordingly, auditing lengthy policies that enumerate VPCs within their organization remains challenging.

The new global condition keys provide a more scalable way to restrict access to expected networks:

  • aws:VpceAccount – Restricts the use of your identities and resources to networks that belong to a specific AWS account.
  • aws:VpceOrgPaths – Restricts the use of your identities and resources to networks that belong to a specific organizational unit (OU) in your organization.
  • aws:VpceOrgID – Restricts the use of your identities and resources to networks that belong to your organization.

The value of these keys in the request context is the ID of the account (for example, 111122223333), organization unit (OU) (for example, o-abcdef0123/r-acroot/ou-development/*), or organization (for example, o-abcdef0123) that owns the VPC endpoint the request is made through.

You can use the preceding keys in relevant IAM policies such as resource control policies (RCPs), service control policies (SCPs), session policies, permissions boundaries, identity-based policies, and resource-based policies.

Note that at the time of writing, not all services support these keys. See AWS global condition context keys for a list of supported services.

Implementation examples

Let’s look at how to restrict access to expected networks using the three new condition keys for common use cases. Each of the use cases demonstrates how the new condition keys help simplify controlling access to your resources in the sample scenario from Figure 1.

Use case 1: Allow access to your S3 buckets only from networks of data processing accounts

Data owners might want to strictly manage what data workflows can access their data sources and restrict cross-account access to specific data processing accounts and networks. They can use the aws:VpceAccount condition key to allow access based on the account that owns the VPC endpoint the request is made through. The following is an example S3 bucket policy.

{
  "Version": "2012-10-17",
  "Statement": [
    {
      "Sid": "AllowDataProcessingAccounts",
      "Effect": "Allow",
      "Principal": {
        "AWS": [
          "arn:aws:iam::<Central-ETL-account-ID>:role/<ETLRoleName>",
          "arn:aws:iam::<Shared-analytics-account-ID>:role/<AnalyticsRoleName>",
          "arn:aws:iam::<ML-processing-account-ID>:role/<MLRoleName>"
        ]
      },
      "Action": [
        "s3:GetObject",
        "s3:ListBucket"
      ],
      "Resource": [
        "arn:aws:s3:::<Datalake-S3-bucket-name>",
        "arn:aws:s3:::<Datalake-S3-bucket-name>/*"
      ],
      "Condition": {
        "StringEquals": {
          "aws:VpceAccount": [
             "<Central-ETL-account-ID>",
             "<Shared-analytics-account-ID>",
             "<ML-processing-account-ID>"
          ]
        }
      }
    }
  ]
}

This policy allows specific principals listed in the Principal element to list and download objects from the data lake bucket but only if they make requests from networks in one of the specified AWS accounts (StringEquals and aws:VpceAccount). Using the aws:VpceAccount condition key in this policy alleviates the need to maintain a list of VPC IDs or VPC endpoint IDs for the data processing accounts, reduces the size of the policy document, and simplifies auditing.

Use case 2: Restricting access to company networks for resources across multiple accounts

Central security teams often look for ways to enforce a set of standard access controls on resources across their entire organization. This is to meet compliance and security requirements, fulfill legal and contractual obligations, and to protect corporate data from unintended access. One such control could be used to limit access to only expected networks within the organization. In our sample scenario, this control helps prevent your data analysts and scientists from using their credentials to access data outside of your corporate environment.
The following RCP demonstrates how to enforce the network perimeter controls on S3 buckets:

{
  "Version": "2012-10-17",
  "Statement": [
    {
      "Sid": "RestrictAccessToOrgVPCs",
      "Effect": "Deny",
      "Principal": "*",
      "Action": "s3:*",
      "Resource": "*",
      "Condition": {
        "NotIpAddressIfExists": {
          "aws:SourceIp": "<My-corporate-CIDR>"
        },
        "StringNotEqualsIfExists": {
          "aws:VpceOrgID": "<My-corporate-org-ID>",
          "aws:PrincipalTag/network-perimeter-exception": "true"
        },
        "BoolIfExists": {
          "aws:PrincipalIsAWSService": "false",
          "aws:ViaAWSService": "false"
        }
      }
    }
  ]
}

This policy denies access to S3 buckets and objects unless it is from expected networks defined as: your corporate IP CIDR range (NotIpAddressIfExists and aws:SourceIp), VPC endpoints in your organization (StringNotEqualsIfExists and aws:VpceOrgID), networks of AWS services that use their service principals or forward access sessions (FAS) to act on your behalf (BoolIfExists with aws:PrincipalIsAWSService and aws:ViaAWSService). It also allows access to networks of AWS services using specific service roles to access your resources (StringNotEqualsIfExists and aws:PrincipalTag/network-perimeter-exception set to true). Some organizations might need to edit this policy to allow third-party partner access. See Establishing a data perimeter on AWS: Allow access to company data only from expected networks for additional information on access patterns that need to be accounted for to meet the needs of your organization.

We used an RCP because it can be used to apply access controls centrally on resources across multiple accounts. Central security teams use RCPs to enforce security invariants on resources across their entire organization. For best practices in designing and deploying RCPs, see Effectively implementing resource control policies in a multi-account environment.

Remember to reference the list of services that support aws:VpceOrgID before using it in a policy such as an RCP. Enforcing it on an unsupported service might prevent your developers from using the service. If you need to restrict access to expected networks on a wider range of services, consider using the aws:SourceVpc and aws:SourceVpce condition keys. See the data perimeter policy examples repository that illustrate how to implement network perimeter controls for a wider range of services.

Use case 3: Restricting access based on intra-organization boundaries

Organizations often need to segment environments within their organization with varying data access requirements. For example, they might need to separate production from non-production environments or create boundaries between different business units, such as Finance, Marketing, and Sales; each operating in separate accounts. This might include making sure that resources within a specific OU can only be accessed from networks in the same OU. Central security teams can use aws:VpceOrgPaths to achieve this objective at scale.

The following is an example RCP that restricts access to your Amazon S3 and AWS Key Management Service (AWS KMS) resources so that they can only be accessed through VPC endpoints in a specific OU.

{
  "Version": "2012-10-17",
  "Statement": [
    {
      "Sid": "RestrictAccessToOUVPCs",
      "Effect": "Deny",
      "Principal": "*",
      "Action": [
          "s3:*",
          "kms:*"
      ],
      "Resource": "*",
      "Condition": {
        "NotIpAddressIfExists": {
          "aws:SourceIp": "<My-corporate-CIDR>"
        },
        "ForAllValues:StringNotLikeIfExists": {
          "aws:VpceOrgPaths": "<My-corporate-org-path>"
        },
       "StringNotEqualsIfExists": {
          "aws:PrincipalTag/network-perimeter-exception": "true"
        },
        "BoolIfExists": {
          "aws:PrincipalIsAWSService": "false",
          "aws:ViaAWSService": "false"
        }
      }
    }
  ]
}

This policy is similar to the one we built for the previous use case but uses aws:VpceOrgPaths instead of aws:VpceOrgID to enforce a more granular boundary based on the requests’ network origin.

Best practices and considerations

When implementing the new condition keys, consider the following best practices.

Identify opportunities to adopt the new global condition keys by reviewing your security objectives and controls

If you currently restrict access to a wide range of resources using the aws:SourceVpc and aws:SourceVpce condition keys and want to avoid the need to enumerate VPC or VPC endpoint IDs in your policies, evaluate if you can migrate to aws:VpceAccount, aws:VpceOrgPaths, or aws:VpceOrgID. This migration decision depends on whether services you restrict access to are supported by the new condition keys. Similarly, if you plan to add network perimeter restrictions to your security baseline, first evaluate whether the new condition keys offer a more scalable solution for your target services. Only enforce the new keys on services that are currently supported. If you need to enforce the restriction on a service not yet supported, you should use aws:SourceVpc and aws:SourceVpce. Also, continue using aws:SourceVpc and aws:SourceVpce to achieve your least privilege objectives, for example if the network boundary you need to maintain for a subset of resources is scoped to specific VPCs or VPC endpoints.

Plan the implementation of the new condition keys

We recommend that you test access controls updates in a non-production environment and only promote them to production after validating their expected behavior. If you currently maintain an automation to enumerate VPC or VPC endpoint IDs in your policies and plan to migrate to the new keys, deactivate your automation only after you have completed policy updates across all environments. This approach helps make sure that your existing security posture remains intact while you progressively deploy the changes.

Monitor and validate the implementation

Use AWS CloudTrail to audit access patterns and regularly review and update your access controls as your organization structure evolves and security objectives change. For example, you might need to adjust access controls when accounts requiring access to your data lakes change, or when organizational boundaries need modification to accommodate new integrations between business units. You must establish processes to continuously evaluate the effectiveness of your controls in meeting both security and business objectives.

Conclusion

In this post, you learned how to use the new global condition keys—aws:VpceAccount, aws:VpceOrgPaths, and aws:VpceOrgID—to restrict access to expected networks at scale. By using these keys, you can:

  • Implement network perimeter controls that scale with your AWS organization.
  • Reduce the operational overhead of managing access to your data.
  • Simplify your IAM policies and reduce the risk of misconfigurations.
  • Scale your data lake implementation while maintaining security.

For more information, see:

If you have feedback about this post, submit comments in the Comments section below. If you have questions about this post, start a new thread on AWS IAM re:Post or contact AWS Support.


Sowjanya Rajavaram

Sowjanya Rajavaram

Sowjanya is a Sr Solution Architect who specializes in Identity and Security in AWS. Her entire career has been focused on helping customers of all sizes solve their identity and access management problems. She enjoys traveling and experiencing new cultures and food.

Tatyana Yatskevich

Tatyana Yatskevich

Tatyana is a Principal Solutions Architect in AWS Identity. She works with customers to help them build and operate in AWS in the most secure and efficient manner.

Python: The Documentary

Post Syndicated from jzb original https://lwn.net/Articles/1035537/

Attendees at EuroPython had the chance to preview part of
Python: The Documentary during a
keynote panel
. The full film, created by CultRepo, is now available on YouTube:

This is the story of the world’s most beloved programming language:
Python. What began as a side project in Amsterdam during the 1990s
became the software powering artificial intelligence, data science and
some of the world’s biggest companies. But Python’s future wasn’t
certain; at one point it almost disappeared.

This 90-minute documentary features Guido van Rossum, Travis
Oliphant, Barry Warsaw, and many more, and they tell the story of
Python’s rise, its community-driven evolution, the conflicts that
almost tore it apart, and the language’s impact on… well…
everything.

The video
of the keynote is also available.

New general-purpose Amazon EC2 M8i and M8i Flex instances are now available

Post Syndicated from Channy Yun (윤석찬) original https://aws.amazon.com/blogs/aws/new-general-purpose-amazon-ec2-m8i-and-m8i-flex-instances-are-now-available/

Today, we’re announcing the general availability of Amazon Elastic Compute Cloud (Amazon EC2) general-purpose M8i and M8i-Flex instances powered by custom Intel Xeon 6 processors available only on AWS with sustained all-core 3.9 GHz turbo frequency. These instances deliver the highest performance and fastest memory bandwidth among comparable Intel processors in the cloud. They also deliver up to 15 percent better price performance, up to 20 percent higher performance, and 2.5 times more memory bandwidth compared to previous generation M7i and M7i-Flex instances.

M8i and M8i-flex instances are ideal for running general purpose workloads such as general web application servers, virtual desktops, batch processing, microservices, databases, and enterprise applications. In terms of performance, these instances are specifically up to 60 percent faster for NGINX web applications, up to 30 percent faster for PostgreSQL database workloads, and up to 40 percent faster for AI deep learning recommendation models compared to M7i and M7i-Flex instances.

As like R8i and R8i-Flex instances, these instances use the new sixth generation AWS Nitro Cards, delivering up to two times more network and Amazon Elastic Block Storage (Amazon EBS) bandwidth compared to the previous generation instances. It greatly improves network throughput for workloads handling small packets such as web, application, and gaming servers. They also support bandwidth configuration with 25 percent allocation adjustments between network and Amazon EBS bandwidth, enabling better database performance, query processing, and logging speeds.

M8i instances
M8i instances provide up to 384 vCPUs and 1.5 TB memory including bare metal instances that provide dedicated access to the underlying physical hardware. These SAP-certified instances help you to run large application servers and databases, gaming servers, CPU-based inference, and video streaming that need the largest instance sizes or high CPU continuously.

Here are the specs for M8i instances:

Instance size vCPUs Memory (GiB) Network bandwidth (Gbps) EBS bandwidth (Gbps)
m8i.large 2 8 Up to 12.5 Up to 10
m8i.xlarge 4 16 Up to 12.5 Up to 10
m8i.2xlarge 8 32 Up to 15 Up to 10
m8i.4xlarge 16 64 Up to 15 Up to 10
m8i.8xlarge 32 128 15 10
m8i.12xlarge 48 192 22.5 15
m8i.16xlarge 64 256 30 20
m8i.24xlarge 96 384 40 30
m8i.32xlarge 128 512 50 40
m8i.48xlarge 192 768 75 60
m8i.96xlarge 384 1536 100 80
m8i.metal-48xl 192 768 75 60
m8i.metal-96xl 384 1536 100 80

M8i-Flex instances
M8i-Flex instances are a lower-cost variant of the M8i instances, with 5 percent better price performance at 5 percent lower prices. They’re designed for workloads that benefit from the latest generation performance but don’t fully utilize all compute resources. These instances can reach up to the full CPU performance 95 percent of the time.

Here are the specs for the M8i-Flex instances:

Instance size vCPUs Memory (GiB) Network bandwidth (Gbps) EBS bandwidth (Gbps)
m8i-flex.large 2 8 Up to 12.5 Up to 10
m8i-flex.xlarge 4 16 Up to 12.5 Up to 10
m8i-flex.2xlarge 8 32 Up to 15 Up to 10
m8i-flex.4xlarge 16 64 Up to 15 Up to 10
m8i-flex.8xlarge 32 128 Up to 15 Up to 10
m8i-flex.12xlarge 48 192 Up to 22.5 Up to 15
m8i-flex.16xlarge 64 256 Up to 30 Up to 20

If you’re currently using earlier generations of general-purpose instances, you can adopt M8i-Flex instances without having to make changes to your application or your workload.

Now available
Amazon EC2 M8i and M8i-Flex instances are available today in the US East (N. Virginia), US East (Ohio), US West (Oregon), and Europe (Spain) AWS Regions. M8i and M8i-Flex instances can be purchased as On-Demand, Savings Plan, and Spot instances. M8i instances are also available in Dedicated Instances and Dedicated Hosts. To learn more, visit the Amazon EC2 Pricing page.

Give M8i and M8i-Flex instances a try in the Amazon EC2 console. To learn more, visit the Amazon EC2 M8i instances page and send feedback to AWS re:Post for EC2 or through your usual AWS Support contacts.

Channy

Dell Precision 3240 Compact Mini PC with PCIe Card Slot Overview

Post Syndicated from Patrick Kennedy original https://www.servethehome.com/dell-precision-3240-compact-mini-review-intel-xeon-nvidia/

We take a look at the Dell Precision 3240 Compact in a second act role of being a homelab node with features like a Xeon CPU and NVIDIA GPU

The post Dell Precision 3240 Compact Mini PC with PCIe Card Slot Overview appeared first on ServeTheHome.

Improvements to the Code Club Projects website

Post Syndicated from Divya Mahadevan original https://www.raspberrypi.org/blog/improvements-to-the-code-club-projects-website/

Getting creative with technology is now easier than ever on the Code Club Projects website. If you’ve visited Code Club Projects recently, you may have noticed that the site has changed over the last few months. In the spring, we launched an initiative to make it easier to find a project. I’m excited to share some of the changes we’ve made based on feedback from young people and mentors. 

A mentor with a young coder in a Code Club session.

Finding projects based on difficulty

Being able to filter projects by skill level (beginner, intermediate, advanced) has been the feature most requested by mentors. A survey we ran in the spring confirmed that young people find levels helpful when trying to find a project on their own. While our project paths have always had levels, our expert educators have now reviewed every single project on the site and categorised them as a Level 1, Level 2, or Level 3 project. These difficulty levels are easily available as filters on the side of the search page.

“[The Code Club] resources are extremely helpful, particularly for mentors with limited experience; step-by-step guidance is very useful and effective.” – Code Club mentor, Tunisia

Screenshot of level on project card and filters

Finding projects based on interest

For young people and mentors who aren’t sure where to get started with coding, an easy question to ask is “What do you like to do”? With over 200+ projects on the site, there is a wide variety of projects that span a number of young people’s passions, such as games, art, or nature. In fact, in the same spring survey, young people largely preferred finding projects by interest over technology (e.g., Scratch, Python). 

That’s why we’ve created a brand-new set of pages dedicated to helping young people find projects by interest. We believe making it easy to find a project by an existing interest will help young people get excited about coding. 

“[Attending Code Club] … combined with watching peers make cool things seems to be a great encouragement to go build rather than just consume.” – Code club mentor, Japan

Screenshot of different Interest categories on the Code Club Projects site.

Code Clubs projects are designed to appeal to creators’ interests, including creating their own games.

Finding projects based on technology

Through the Clubs annual survey, we know that some young people enjoy following our project pathways and others enjoy finding an individual project to work on during club time. We also know that some of our top search terms are “Scratch” and “Python”, which allow users to see all Scratch projects that are available on the site. We’ve redesigned our technology pages so it’s easy to see paths and projects per technology in the same place. 

“I think [Raspberry Pi Foundation projects are] really easy to understand and encourage young people to learn more and more.” – Code Club leader, Brazil

Screenshot of different Technology categories on the Code Club Projects site.

What’s next?

We’ve heard from mentors that our projects are too long to print out. We’re working to improve that, starting with brand-new short PDFs for the Intro to Scratch path projects. Each PDF is no more than six pages, double-sided.

Are there other projects you’d like to see PDF versions of? Let us know. 

We’re currently working on an idea tentatively titled “project challenges”. If you’re interested in helping us develop the idea, please get in touch

If you have not started a club yet but are interested in supporting the young people in your community to explore coding, you can find out more on the Code Club website. The team will support you every step of the way with resources, training, and a collaborative community.

The post Improvements to the Code Club Projects website appeared first on Raspberry Pi Foundation.

Mastering Amazon Q Developer with Rules

Post Syndicated from Aurelien Plancque original https://aws.amazon.com/blogs/devops/mastering-amazon-q-developer-with-rules/

When I first started working with Amazon Q Developer, I was impressed by its capabilities, but I quickly found myself in a familiar pattern. Development teams using AI assistants face a common challenge: repeatedly explaining coding standards, workflow preferences, and established patterns in every conversation. This repetitive setup reduces productivity and creates inconsistent AI guidance across team members. Sound familiar?

That’s when I discovered the power of custom rules – and it completely transformed how I work with AI assistance.

What Are Amazon Q Developer Rules?

Rules in Amazon Q Developer are a way to build a library of coding standards and best practices that are automatically used as context when interacting with the assistant.

These rules are defined in Markdown files stored in your project’s .amazonq/rules folder. Once created, they automatically become part of the context for developers interacting with Amazon Q Developer within your project, maintaining consistency across team members regardless of their experience level. Currently, rules are supported in the Amazon Q Developer IDE extensions and in the Amazon Q Developer CLI.

The Power of Rules-Based AI Assistance

What I find most compelling about rules-based AI assistance is how it minimizes the repetitive setup that usually comes with AI interactions. Instead of repeatedly instructing your AI assistant on your preferences and standards for each request, you can define these once as rules. This creates a consistent, predictable AI experience that automatically respects your team’s conventions and best practices.

The real game-changer for me has been the consistency. Whether I’m working on a new feature, debugging an issue, or reviewing code, Amazon Q Developer now understands my context from the start. This means I can focus on the actual problem-solving instead of repeatedly explaining how I like things done.

Understanding the Rule Lifecycle

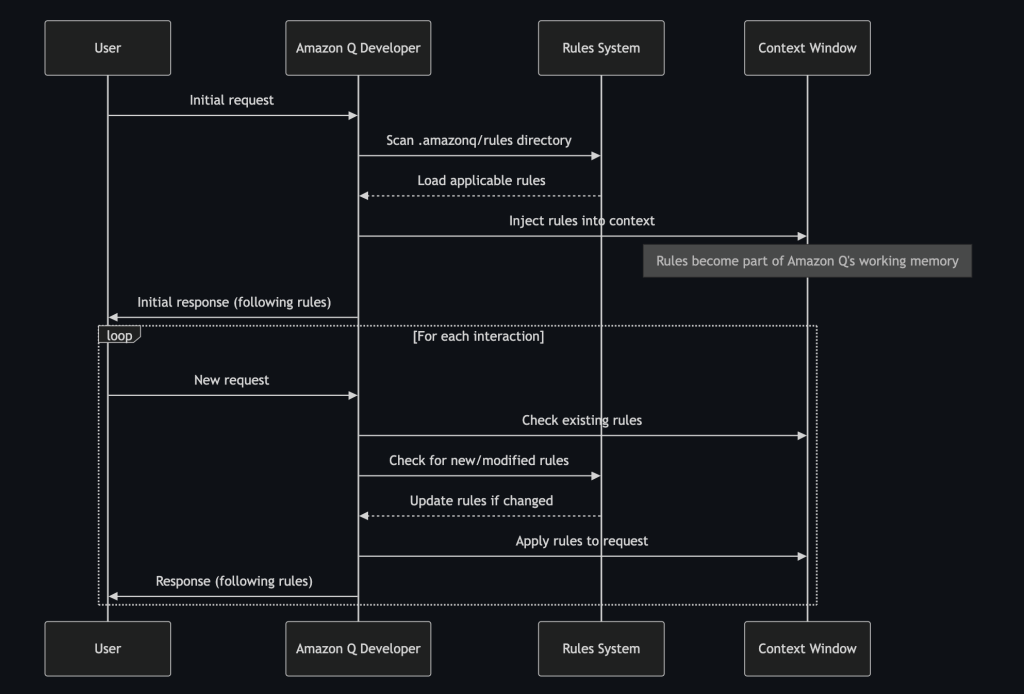
One thing that consistently surprises developers is how seamlessly rules integrate into Amazon Q Developer workflow. Understanding when and how rules are injected into the context helps you make the most of this capability. Here’s how the process works:

A diagram depicting the rule lifecycle for Amazon Q Developer

The rule lifecycle in Amazon Q Developer

Rules are injected at several key moments:

1. Initial Context Loading: When you first interact with Amazon Q Developer in a project, it scans the `.amazonq/rules` directory and loads the applicable rules into its context.

2. Request Processing: Before generating a response, Amazon Q Developer evaluates your request against the loaded rules to determine which ones apply.

3. Response Generation: While crafting its response, Amazon Q Developer follows the instructions from applicable rules, prioritizing them based on their specified priority levels.

4. Dynamic Updates: If you modify existing rules or add new ones during a session, Amazon Q Developer detects these changes and updates its behavior accordingly.

This continuous integration makes sure that Amazon Q Developer’s responses consistently align with your standards without requiring you to repeat instructions in every conversation.

Why Rules-Based AI Makes a Difference ?

What I’ve found most valuable about this approach is how it transforms the AI from a generic assistant into something that feels like it truly understands your team’s way of working. Here are the key benefits I’ve experienced:

Consistency: Every team member gets the same AI-guided experience, making sure code and documentation remain consistent regardless of who wrote them.

Knowledge Preservation: Rules capture your team’s accumulated wisdom and best practices, making them accessible to everyone.

Reduced Cognitive Load: You can focus on solving problems rather than remembering and enforcing standards.

Faster Onboarding: New team members automatically receive guidance aligned with your team’s practices.

Adaptability: Rules can evolve alongside your project, making sure AI assistance remains relevant as your needs change.

The difference between generic AI assistance and rules-guided assistance becomes clear quickly. Generic AI might suggest any valid solution, while rules-guided AI suggests solutions that fit your specific context and standards.

Building Effective Rules: A Practical Approach

Now that you’ve seen the power of rules, let me walk you through how to create them. While there’s no “official” format for Amazon Q Developer rules (the beauty is in the flexibility!), the approach I’m about to share has consistently delivered excellent results for me and my team.

Rule File Format and Location

Here’s what I’ve learned about organizing rules for Amazon Q Developer:

  • Rules must be written in Markdown format (.md files)
  • They should be placed in the .amazonq/rules directory of your project
  • You can use a filename of your choice, though descriptive names help with organization (examples: monitoring-rule.md, frontend-react.rule.md)
  • Rules can be organized in sub-directories for better structure (for example, .amazonq/rules/frontend/react.rule.md)
  • The filename itself is arbitrary – Amazon Q Developer will read the .md files in the directory. However, using meaningful names makes your rule system easier to maintain as it grows.

Essential Rule Structure

What I find works best is a well-crafted rule file that contains these key sections:

# Rule Name
## Purpose
A clear, concise statement explaining why this rule exists.
## Instructions
- Specific directives for Amazon Q Developer to follow
- Additional instructions with their own identifiers
- Conditions under which instructions apply
## Priority
[Critical/High/Medium/Low]
## Error Handling
- How Amazon Q Developer should behave when exceptions occur
- Fallback strategies when primary instructions can't be followed

Let me show you this structure in action with a complete example of a monitoring rule that has been particularly effective for my team:

# Monitoring
## Purpose
This rule ensures that monitoring coverage is maintained when major features are added to the project.
## Instructions
- When implementing a major feature (new service, API endpoint, or core functionality), ALWAYS check if MONITORING_PLAN.md needs updates.
- Major features include: new microservices, AI integrations, WebSocket endpoints, database operations, external API integrations, or user-facing functionality.
- ALWAYS update MONITORING_PLAN.md to include relevant metrics, dashboards, and alerts for the new feature.
- When updating monitoring plan, include: custom metrics, CloudWatch dashboards, alarms, and logging requirements specific to the new feature.
- After updating MONITORING_PLAN.md, ALWAYS output "📊 Updated monitoring plan for: [feature description]".
## Priority
High
## Error Handling
- If MONITORING_PLAN.md doesn't exist, create it with basic monitoring structure and note the creation
- If monitoring plan is unreadable, create a backup and start fresh with current feature requirements
- If unsure whether a feature qualifies as "major", err on the side of caution and update monitoring plan

I saved this as monitoring.rule.md in my project’s .amazonq/rules directory.

Rule Components That Work

Now let me break down each component and show you why this structure works so well.

Rule Name

Think of this as the “class name” for your rule. It should be descriptive and domain-specific, like “Frontend – React” or “Monitoring.” This helps organize your rules into logical categories and makes them easier to maintain as your ruleset grows.

Purpose

This section is crucial, it’s where you explain the “why” behind your rule. What I’ve learned is that a clear purpose helps Amazon Q Developer understand the intent behind your instructions, allowing it to make better decisions when faced with edge cases. For example:

## Purpose
Ensures consistent monitoring coverage is maintained when adding new features to the project.

This simple statement guides Amazon Q Developer to prioritize monitoring considerations, even when they’re not explicitly mentioned in your request.

Instructions

This is where the magic happens. Instructions are specific directives that shape Amazon Q Developer’s behavior. What I’ve found works best is when each instruction:

  1. Is clear and actionable
  2. Focuses on a single aspect of behavior
  3. Uses consistent formatting for easy scanning

For example:

## Instructions
- When implementing a major feature, ALWAYS check if MONITORING_PLAN.md needs updates.
- Major features include: new microservices, AI integrations, WebSocket endpoints.
- After updating MONITORING_PLAN.md, output "📊 Updated monitoring plan for: [feature]".

These clear, focused instructions give Amazon Q Developer specific guidance on how to behave in different situations, maintaining consistent responses across your team.

Priority

Not all rules are created equal. What I’ve discovered is that the priority level helps Amazon Q Developer resolve conflicts when multiple rules could apply to a situation. I typically use four levels:

  • Critical: Must be followed without exception
  • High: Should be followed unless conflicting with a critical rule
  • Medium: Important guidelines that shape behavior
  • Low: Preferences that can be overridden when necessary
Error Handling

This often-overlooked section is what makes rules robust in real-world scenarios. Good error handling instructions tell Amazon Q Developer what to do when things don’t go as planned:

## Error Handling
- If MONITORING_PLAN.md doesn't exist, create it with basic monitoring structure
- If unsure whether a feature qualifies as "major," err on the side of caution

These fallback strategies make sure Amazon Q Developer remains helpful even when facing unexpected situations.

Seeing Rules in Action

To show you how effective this structure can be, let me give you a simple example. Without rules, asking Amazon Q Developer to “add a new React component for user profiles” might result in a component that doesn’t match your project’s patterns.

But with a well-crafted frontend rule, Amazon Q Developer would automatically:

  1. Check existing component structures
  2. Follow your naming conventions
  3. Create appropriate prop interfaces
  4. Add the right level of documentation
  5. Place the file in your preferred directory structure

All without you having to specify these details every time!

Making Rules Transparent: A Game-Changing Technique

One particularly powerful technique I’ve discovered is teaching Amazon Q Developer to explicitly acknowledge which rules it’s following. This isn’t a default behavior of Amazon Q Developer, but rather a custom enhancement you can implement through a specific conversation rule.

Adding Unique Identifiers for Traceability

The key to this system is adding unique identifiers (IDs) to each instruction in your rules. For example:

## Instructions
- When implementing a major feature, ALWAYS check if MONITORING_PLAN.md needs updates. (ID: CHECK_MONITORING_PLAN)
- Major features include: new microservices, AI integrations, WebSocket endpoints. (ID: MAJOR_FEATURE_CRITERIA)
- After updating MONITORING_PLAN.md, output "📊 Updated monitoring plan for: [feature]". (ID: ANNOUNCE_MONITORING_UPDATE)

These IDs serve as “traceable markers” that Amazon Q Developer can reference when following a rule.

Creating the Acknowledgment Behavior

Next, you can create a conversation rule that instructs Amazon Q Developer to acknowledge which rules it’s following. Here’s a complete example of such a rule:

# Conversation
## Purpose
This rule defines how Amazon Q Developer should behave in conversations, including how it should acknowledge other rules it's following.
## Instructions
- ALWAYS consider your rules before using a tool or responding. (ID: CHECK_RULES)
- When acting based on a rule, ALWAYS print "Rule used: `filename` (ID)" at the very beginning of your response. (ID: PRINT_RULES)
- If multiple rules are matched, list all: "Rule used: `file1.rule.md` (ID1), `file2.rule.md` (ID2)". (ID: PRINT_MULTIPLE)
- DO NOT start responses with general mentions about using rules or context, but DO print specific rule usage as specified above. (ID: NO_GENERIC_MENTIONS)
## Priority
Critical
## Error Handling
- If rule files are unreadable, continue but note the issue
- If multiple conflicting rules apply, follow the highest priority rule and note the conflict

Save this as conversation.rule.md in your .amazonq/rules directory.

When Amazon Q Developer follows a rule, it will now explicitly state which rule and identifier guided its actions:

An image showing Q Developer CLI printing the rules it uses in its answers

You can get Amazon Q Developer to state which instruction it is following.

What I find most valuable about this simple addition is the remarkable benefits it creates:

  • Transparency: Team members can immediately see which guidelines influenced Amazon Q Developer’s response
  • Debugging: When Amazon Q Developer behaves unexpectedly, you can identify which rule caused the behavior
  • Learning: New team members discover relevant rules by seeing which ones are being applied
  • Validation: You can confirm that your rules are working as intended
  • Continuous Improvement: Identify which rules are most frequently used and which might need refinement

By making rules visible, you turn Amazon Q Developer into a collaborative partner that not only follows your guidelines and helps team members discover and engage with your established practices. The IDs aren’t just organizational tools—they’re the foundation of a self-documenting AI assistance workflow that grows more valuable as your rule system expands.

Getting Started with Your Own Rules

What I love about this approach is that you can start small. Begin with one or two rules addressing your most common pain points, then expand as you see the benefits. Some good starting points include:

  • Code style and organization rules
  • Documentation standards
  • Testing requirements
  • Git commit message formats

Remember, the goal isn’t to create an exhaustive rulebook—it’s to capture the aspects of your development process that matter most to your team’s productivity and code quality.

Practical Examples: Rules in Action

To show you the real-world impact of rules, let me walk you through some concrete scenarios that demonstrate how rules transform the AI assistance experience. These examples show the difference between generic AI help and rules-guided assistance.

Scenario 1: Time-Based Data Analysis

This scenario demonstrates how rules help Amazon Q Developer understand your environment’s context for time-related operations and analysis. Here are examples of this rule in action in VS Code.

Here is a rule I use to inform Amazon Q Developer how to behave when it needs to understand the current time:

# Time
## Purpose
This rule defines how Amazon Q Developer (the agent) handles time-related operations and queries
## Instructions
- When determining the current time, ALWAYS use bash commands with AEST timezone: `date` (ID: GET_AEST_TIME)
- When timestamps are needed for logging or documentation, use ISO format with AEST timezone (ID: ISO_TIMESTAMP)
- When comparing times or calculating durations, ensure all times are in AEST for consistency (ID: CONSISTENT_TIMEZONE)
- For time-sensitive operations, always verify the current AEST time before proceeding (ID: VERIFY_TIME)
## Priority
Medium
## Error Handling
- If date command fails, note the system time issue and continue with available information
- If timezone conversion is needed, use appropriate date formatting commands
Without Rules:

When Amazon Q Developer doesn’t have the time rule, it lacks the context needed for time-based queries:

An image showing Amazon Q Developer in the IDE trying to understand what is the date

An Amazon Q Developer interaction without a time rule

As you can see, without the rule, Amazon Q Developer needs clarification about timezone context and doesn’t know how to determine the current time in your environment.
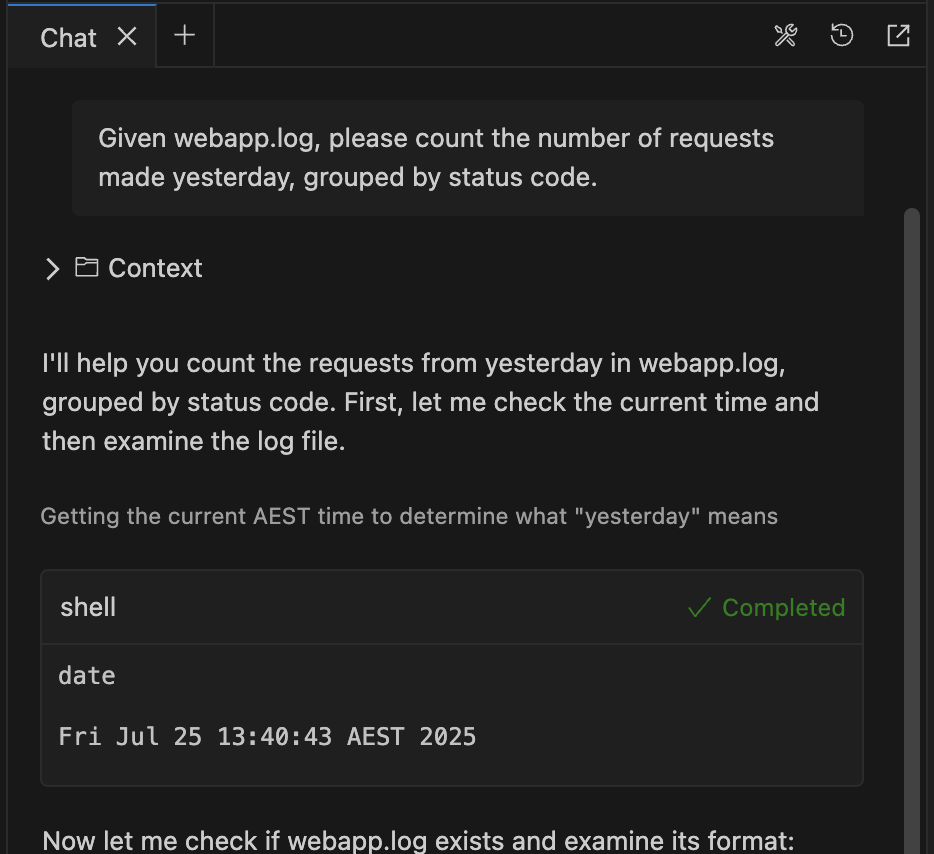
With the Time Rule:

Here’s a similar query with the time rule in place:

An image showing Amazon Q Developer in the IDE using the time rule to get the time and date

Amazon Q Developer follows the instructions of the rule

Notice how Amazon Q Developer immediately uses the `date` command to get the current AEST time, exactly as specified in the rule, without needing clarification.

The Impact:
  • Automatic Context: Amazon Q Developer immediately knows to use the date command to get AEST time
  • No Clarification Needed: It understands “yesterday” relative to the current AEST time without asking
  • Consistent Behavior: The same approach works for other time-based queries across team members
  • Environmental Awareness: It knows exactly how to determine time in your specific system environment
  • Transparent Process: You can see it’s following the rule by using the bash date command as specified

This example shows how the time rule transforms a potentially confusing interaction into a smooth, context-aware analysis that works consistently every time.

Scenario 2: Frontend Component Development

This scenario demonstrates how rules can help prevent technical debt accumulation and maintain consistent component architecture across your team.

Without Rules:

When Amazon Q Developer doesn’t have frontend-specific guidance, different developers can get inconsistent suggestions for component creation. Some might create reusable components immediately, others get copy-paste solutions, and component organization varies based on individual preferences.

With Frontend Rules:

Here’s a real React rule from my development workflow that addresses these consistency issues:

# Frontend - React
## Purpose
Defines how to act when writing React
## Instructions
- ALWAYS evaluate reusability potential for new visual elements using these criteria: used in 2+ places, has configurable props, or represents a common UI pattern. (ID: EVALUATE_REUSABILITY)
- If reusability potential is high (meets 2+ criteria above), create a dedicated component in appropriate folder (components/, shared/, or ui/) with clear prop interfaces and JSDoc comments. (ID: CREATE_REUSABLE_COMPONENT)
- When creating reusable components, include explicit comments explaining: purpose, key props, usage examples, and any important behavior. (ID: DOCUMENT_COMPONENTS)
- Follow existing component structure and naming conventions found in the project's components folder. (ID: FOLLOW_CONVENTIONS)
- Prefer composition over inheritance - create small, focused components that can be combined. (ID: PREFER_COMPOSITION)
## Priority
Medium
## Error Handling
- If component folder structure is unclear, place new components in src/components/ and ask user for preferred organization
- If existing conventions are inconsistent, follow the most recent or most common pattern and note the inconsistency
The Impact:
  • Consistent Architecture: Team members get the same component creation guidance regardless of experience level
  • Reduced Technical Debt: Automatic evaluation of reusability helps prevent duplicated UI elements
  • Better Documentation: Components automatically include proper JSDoc comments and usage examples
  • Maintainable Structure: Consistent naming conventions and folder organization across the project
  • Scalable Patterns: Composition-focused approach creates more flexible, reusable components

This make sure that whether a junior developer or senior architect is working with Amazon Q Developer, the resulting components follow the same quality standards and architectural patterns.

Scenario 3: Version Control Workflow

This scenario demonstrates how rules can act as safety mechanisms and workflow controllers, facilitating consistent practices around version control operations.

Without Rules:

Amazon Q Developer might suggest git operations without considering your team’s workflow preferences or safety requirements. It could recommend immediate pushes, generic commit messages, or skip confirmation steps that help prevent mistakes.

With Git Rules:

Here’s a real git rule that transforms how Amazon Q Developer handles version control operations:

# Git
## Purpose
This rule dictates Amazon Q Developer (the agent) behavior related to git.
## Instructions
- ALWAYS ask confirmation from the user before pushing to git (ID: GIT_PUSH)
- ALWAYS ensure commit messages are meaningful and detailed, including what was changed and why (ID: GIT_COMMIT)
- Commit message should be accurate but playful and not too formal, with comprehensive details about the changes (ID: GIT_COMMIT_STYLE)
- Include specific files/components modified and the impact of changes in commit messages (ID: GIT_COMMIT_DETAILS)
## Priority
Medium
## Error Handling
N/A

Here’s this rule in action when I asked Amazon Q Developer to commit our changes:

> Let's commit our latest changes to git.
> Rule used: git.rule.md (GIT_COMMIT), git.rule.md (GIT_COMMIT_STYLE), 
git.rule.md (GIT_COMMIT_DETAILS)
I'll commit all the changes we've made to remove messaging functionality and 
focus the platform on location-based discovery. Let me create a comprehensive 
commit with all the modifications.
🛠 Using tool: execute_bash (trusted)
 ● I will run the following shell command: 
cd /path/to/your/project/rules-blog && git status
 ↳ Purpose: Check git status to see all changed files
On branch main
Changes not staged for commit:
[... output truncated for brevity ...]
Untracked files:
[... output truncated for brevity ...]
● Completed in 0.54s
🛠 Using tool: execute_bash (trusted)
 ● I will run the following shell command: 
cd /path/to/your/project/rules-blog && git add.
 ↳ Purpose: Add all changes to git staging
 ● Completed in 0.101s
🛠 Using tool: execute_bash (trusted)
 ● I will run the following shell command: 
cd /path/to/your/project/rules-blog && git commit -m "🎯 Refocus platform on location-based discovery: Remove messaging, complete React app
Major platform refocus to pure location-based discovery:
MESSAGING FUNCTIONALITY REMOVED:
[... output truncated for brevity ...]
DOCUMENTATION UPDATES:
[... output truncated for brevity ...]
INFRASTRUCTURE IMPROVEMENTS:
[... output truncated for brevity ...]
PLATFORM FOCUS NOW:
✅ Location-based discovery
✅ Browsing and following
✅ Information and contact details
✅ Notifications by location
❌ No messaging/booking - pure discovery platform
Files modified: 13 core files, 1 new frontend package
Infrastructure: 7 Lambda functions, tagged resources, clean API
Tests: 12/12 passing, production build successful"
[... output truncated for brevity ...]

Note: Notice how Amazon Q Developer automatically shows Rule used: git.rule.md (GIT_COMMIT), git.rule.md (GIT_COMMIT_STYLE), git.rule.md (GIT_COMMIT_DETAILS) at the beginning of its response – this is the rule transparency system we discussed earlier in action, showing exactly which rule instructions guided the commit message creation.

The Impact:
  • Helps Prevent Accidents: The confirmation requirement stops accidental pushes that could disrupt team workflows
  • Consistent Commit Quality: Commit messages follow the same detailed, informative style regardless of who’s working
  • Team Personality: The “playful but not too formal” style maintains team culture while preserving professionalism
  • Better Git History: Detailed commit messages make code archaeology much more straightforward for future debugging
  • Workflow Safety: Acts as a guardrail that respects human oversight in critical operations

This rule shows how Amazon Q Developer can be more than just a code assistant – it becomes a workflow partner that understands and enforces your team’s operational preferences and safety requirements.

What’s Next for Rules-Based Development

Through this exploration of Amazon Q Developer rules, we’ve discovered how a simple concept – defining your preferences once instead of repeating them constantly – can transform your development workflow. The key learnings are clear: rules help you avoid repetitive setup, help with team consistency, preserve institutional knowledge, and create transparent AI interactions that grow more valuable over time.

Reduced cognitive load, faster onboarding, consistent code quality, and AI assistance that truly understands your team’s context – what started as a solution to repetitive explanations has evolved into a comprehensive system for scaling development practices across my team.

My Amazon Q Developer rules system continues to evolve, and I’m excited about the possibilities ahead. As more teams adopt this approach, I expect we’ll see community-shared rule libraries and even more sophisticated customization options.

What I find most promising is how rules create a foundation for more advanced AI assistance. When your AI assistant understands your context deeply, it can provide more sophisticated suggestions and catch potential issues before they become problems.

I encourage you to start experimenting with rules – pick one area where you find yourself repeating instructions to AI assistants and create your first rule. You’ll be surprised how quickly this approach transforms your development workflow.

The key is to remember that rules aren’t about constraining creativity – they’re about freeing you to focus on the interesting problems by automating the routine decisions. When Amazon Q Developer knows how you like things done, you can spend more time on what you’re building and less time on how to build it.

Ready to get started with Amazon Q Developer rules? Check out the Amazon Q Developer documentation for setup instructions and more examples.

[$] Changing GNOME technical governance?

Post Syndicated from jake original https://lwn.net/Articles/1034684/

The GNOME project, which recently celebrated its
28th birthday
, has never had a formal technical governance; progress
has been driven by individuals and groups that advocated for—and worked
toward—a particular goal in an ad hoc fashion. Longtime GNOME contributor
Emmanuele Bassi would like to see that change by adding cross-project teams
and a steering committee for the project; to that end, he gave a talk (YouTube
video
) at GUADEC 2025
in late July on his idea to establish some technical governance for the
project. He also put together a blog
post
with his notes from the talk. The audience reaction was
favorable, so he has followed up on the GNOME discussion forum with an RFC on
governance
to try to move the effort along.

Security updates for Thursday

Post Syndicated from jake original https://lwn.net/Articles/1035464/

Security updates have been issued by AlmaLinux (aide, firefox, kernel, and mod_http2), Debian (chromium and unbound), Fedora (mod_auth_openidc), Oracle (fence-agents and kernel), SUSE (ignition, jetty-minimal, kernel, libmozjs-128-0, matrix-synapse, postgresql13, postgresql15, postgresql16, and postgresql17), and Ubuntu (kernel).

The collective thoughts of the interwebz