I Signed an OSI Board Agreement in Anticipation of Election Results

Post Syndicated from Bradley M. Kuhn original http://ebb.org/bkuhn/blog/2025/03/21/open-source-initiative-osi-2025-elections-unfair-results-hidden.html

I ran in the “Affiliate district” in the 2025 election for
Board of Directors of the Open Source Initiative (OSI) on
a joint platform for OSI Reform with my colleague, Richard
Fontana (who among other accomplishments, is currently Senior Commercial
Counsel at IBM’s Red Hat).

After voting closed, we received a strange request demanding that we sign
the OSI‘s Board Agreement
within 47 hours — and before we or anyone else (outside of OSI) were
told the election results. This varies from all past elections in OSI’s
history, and instructions that 2025 candidates received in orientation.
Fontana specifically verified with a question during orientation that
candidates need not sign the Board Agreement unless/until we
succeeded in the election and were a true candidate for a Directorship.
Tracy Hinds, then chairperson of OSI’s Board, confirmed this verbally for
all candidates at the orientation. (And, that position is consistent with
logic, since the OSI elections are purely advisory and its Board has
discretion to ignore the election results in any event.

My and
Fontana’s platform
had four planks — all of which called for
reforms to OSI’s status quo.
The third
plank

. OSI acknowledged that they received a signed Board
Agreement from both

I Signed an OSI Board Agreement in Anticipation of Election Results

Post Syndicated from Bradley M. Kuhn original http://ebb.org/bkuhn/blog/2025/03/21/open-source-initiative-osi-2025-elections-unfair-results-hidden.html

I ran in the “Affiliate district” in the 2025 election for
Board of Directors of the Open Source Initiative (OSI) on
a joint platform for OSI Reform with my colleague, Richard
Fontana (who among other accomplishments, is currently Senior Commercial
Counsel at IBM’s Red Hat).

After voting closed, we received a strange request demanding that we sign
the OSI‘s Board Agreement
within 47 hours — and before we or anyone else (outside of OSI) were
told the election results. This varies from all past elections in OSI’s
history, and instructions that 2025 candidates received in orientation.
Fontana specifically verified with a question during orientation that
candidates need not sign the Board Agreement unless/until we
succeeded in the election and were a true candidate for a Directorship.
Tracy Hinds, then chairperson of OSI’s Board, confirmed this verbally for
all candidates at the orientation. (And, that position is consistent with
logic, since the OSI elections are purely advisory and its Board has
discretion to ignore the election results in any event.

My and
Fontana’s platform
had four planks — all of which called for
reforms to OSI’s status quo.
The third
plank

Т.Е. от Е.Т. – епизод 7

Post Syndicated from Тоест original https://www.toest.bg/t-e-ot-e-t-epizod-7/

Т.Е. от Е.Т. – епизод 7

Имаме магазини в пощи, протести като инвестиция, любов на ръба, малко Тръмп, повече Пеевски – защото от хубавото трябва по много, един Орбан за цвят и Ванга за финал. Алелелейлей!

Следете видеорубриката на Елена Телбис за „Тоест“ и в Instagram и TikTok.

The NVIDIA DGX Spark is a Tiny 128GB AI Mini PC Made for Scale-Out Clustering

Post Syndicated from Patrick Kennedy original https://www.servethehome.com/the-nvidia-dgx-spark-is-a-tiny-128gb-ai-mini-pc-made-for-scale-out-clustering-arm/

The NVIDIA DGX Spark supports 200GbE RDMA clustering of the GB10 mini systems with 128GB of LPDDR5X, 20 Arm cores, and a Blackwell GPU

The post The NVIDIA DGX Spark is a Tiny 128GB AI Mini PC Made for Scale-Out Clustering appeared first on ServeTheHome.

Introducing vector search with UltraWarm in Amazon OpenSearch Service

Post Syndicated from Kunal Kotwani original https://aws.amazon.com/blogs/big-data/introducing-vector-search-with-ultrawarm-in-amazon-opensearch-service/

Amazon OpenSearch Service has been providing vector database capabilities to enable efficient vector similarity searches using specialized k-nearest neighbor (k-NN) indexes to customers since 2019. This functionality has supported various use cases such as semantic search, Retrieval Augmented Generation (RAG) with large language models (LLMs), and rich media searching. With the explosion of AI capabilities and the increasing creation of generative AI applications, customers are seeking vector databases with rich feature sets.

OpenSearch Service also offers a multi-tiered storage solution to its customers in the form of UltraWarm and Cold tiers. UltraWarm provides cost-effective storage for less-active data with query capabilities, though with higher latency compared to hot storage. Cold tier offers even lower-cost archival storage for detached indexes that can be reattached when needed. Moving data to UltraWarm makes it immutable, which aligns well with use cases where data updates are infrequent like log analytics.

Until now, there was a limitation where UltraWarm or Cold storage tiers couldn’t store k-NN indexes. As customers adopt OpenSearch Service for vector use cases, we’ve observed that they’re facing high costs due to memory and storage becoming bottlenecks for their workloads.

To provide similar cost-saving economics for larger datasets, we are now supporting k-NN indexes in both UltraWarm and Cold tiers. This will enable you to save costs, especially for workloads where:

  • A significant portion of your vector data is accessed less frequently (for example, historical product catalogs, archived content embeddings, or older document repositories)
  • You need isolation between frequently and infrequently accessed workloads, minimizing the need to scale hot tier instances to help prevent interference from indexes that can be moved to the warm tier

In this post, we discuss this new capability and its use cases, and provide a cost-benefit analysis in different scenarios.

New capability: K-NN indexes in UltraWarm and Cold tiers

You can now enable UltraWarm and Cold tiers for your k-NN indexes from OpenSearch Service version 2.17 and up. This feature is available for both new and existing domains upgraded to version 2.17. K-NN indexes created after OpenSearch Service version 2.x are eligible for migration to warm and cold tiers. K-NN indexes using various types of engines (FAISS, NMSLib, and Lucene) are eligible to migrate.

Use cases

This multi-tiered approach to k-NN vector search benefits the following various use cases:

  • Long-term semantic search – Maintain searchability on years of historical text data for legal, research, or compliance purposes
  • Evolving AI models – Store embeddings from multiple versions of AI models, allowing comparisons and backward compatibility without the cost of keeping all data in hot storage
  • Large-scale image and video similarity – Build extensive libraries of visual content that can be searched efficiently, even as the dataset grows beyond the practical limits of hot storage
  • Ecommerce product recommendations – Store and search through vast product catalogs, moving less popular or seasonal items to cheaper tiers while maintaining search capabilities

Let’s explore real-world scenarios to illustrate the potential cost benefits of using k-NN indexes with UltraWarm and Cold storage tiers. We will be using us-east-1 as the representative AWS Region for these scenarios.

Scenario 1: Balancing hot and warm storage for mixed workloads

Let’s say you have 100 million vectors of 768 dimensions (around 330 GB of raw vectors) spread across 20 Lucene engine indexes of 5 million vectors each (roughly 16.5 GB), out of which 50% of data (about 10 indexes or 165 GB) is queried infrequently.

Domain setup without UltraWarm support

In this approach, you prioritize maximum performance by keeping all of the data in hot storage, providing the fastest possible query responses for the vectors. You deploy a cluster with 6x r6gd.4xlarge instances.

The monthly cost for this setup comes to $7,550 per month with a data instance cost of $6,700.

Although this provides top-tier performance for the queries, it might be over-provisioned given the mixed access patterns of your data.

Cost-saving strategy: UltraWarm domain setup

In this approach, you align your storage strategy with the observed access patterns, optimizing for both performance and cost. The hot tier continues to provide optimal performance for frequently accessed data, while less critical data moves to UltraWarm storage.

While UltraWarm queries experience higher latency compared to hot storage—this trade-off is often acceptable for less frequently accessed data. Additionally, since UltraWarm data becomes immutable, this strategy works best for stable datasets that don’t require any updates.

You keep the frequently accessed 50% of data (roughly 165 GB) in hot storage, allowing you to reduce your hot tier to 3x r6gd.4xlarge.search instances. For the less frequently accessed 50% of data (roughly 165 GB), you introduce 2x ultrawarm1.medium.search instances as UltraWarm nodes. This tier offers a cost-effective solution for data that doesn’t require the absolute fastest access times.

By tiering your data based on access patterns, you significantly reduce your hot tier footprint while introducing a small warm tier for less critical data. This strategy allows you to maintain high performance for frequent queries while optimizing costs for the entire system.

The hot tier continues to provide optimal performance for the majority of queries targeting frequently accessed data. For the warm tier, you see an increase in latency for queries on less frequently accessed data, but this is mitigated by effective caching on the UltraWarm nodes. Overall, the system maintains high availability and fault tolerance.

This balanced approach reduces your monthly cost to $5,350, with $3,350 for the hot tier and $350 for the warm tier, reducing the monthly costs by roughly 29% overall.

Scenario 2: Managing Growing Vector Database with Access-Based Patterns

Imagine your system processes and indexes vast amounts of content (text, images, and videos), generating vector embeddings using the Lucene engine for advanced content recommendation and similarity search. As your content library grows, you’ve observed clear access patterns where newer or popular content is queried frequently while older or less popular content sees decreased activity but still needs to be searchable.

To effectively leverage tiered storage in OpenSearch Service, consider organizing your data into separate indices based on expected query patterns. This index-level organization is important because data migration between tiers happens at the index level, allowing you to move specific indices to cost-effective storage tiers as their access patterns change.

Your current dataset consists of 150 GB of vector data, growing by 50 GB monthly as new content is added. The data access patterns show:

  • About 30% of your content receives 70% of the queries, typically newer or popular items
  • Another 30% sees moderate query volume
  • The remaining 40% is accessed infrequently but must remain searchable for completeness and occasional deep analysis

Given these characteristics, let’s explore a single-tiered and multi-tiered approach to managing this growing dataset efficiently.

Single-tiered configuration

For a single-tiered configuration, as the dataset expands, the vector data will grow to be around 400 GB over 6 months, all stored in a hot (default) tier. In the case of r6gd.8xlarge.search instances, the data instance count would be around 3 nodes.

The overall monthly costs for the domain under a single-tiered setup would be around $8050 with a data instance cost of around $6700.

Multi-tiered configuration

To optimize performance and cost, you implement a multi-tiered storage strategy using Index State Management (ISM) policies to automate the movement of indices between tiers as access patterns evolve:

  • Hot tier – Stores frequently accessed indices for fastest access
  • Warm tier – Houses moderately accessed indices with higher latency
  • Cold tier – Archives rarely accessed indices for cost-effective long-term retention

For the data distribution, you start with a total of 150 GB with a monthly growth of 50 GB. The following is the projected data distribution when the data reaches 400 GB at around the 6 month mark:

  • Hot tier – Approximately 100 GB (most frequently queried content) on 1x r6gd.8xlarge
  • Warm Tier – Approximately 100 GB (moderately accessed content) on 2x ultrawarm1.medium.search
  • Cold Tier – Approximately 200 GB (rarely accessed content)

Under the multi-tiered setup, the cost for the vector data domain totals $3880, including $2330 cost of data nodes, $350 cost of UltraWarm nodes, and $5.00 of cold storage costs.

You see compute savings as the hot tier instance size reduced by around 66%. Your overall cost savings were around 50% year-over-year with multi-tiered domains.

Scenario 3: Large-scale disk-based vector search with UltraWarm

Let’s consider a system managing 1 billion vectors of 768 dimensions distributed across 100 indexes of 10 million vectors each. The system predominantly uses disk-based vector search with 32x FAISS quantization for cost optimization, and about 70% of queries target 30% of the data, making it an ideal candidate for tiered storage.

Domain setup without UltraWarm support

In this approach, using disk-based vector search to handle the large-scale data, you deploy a cluster with 4x r6gd.4xlarge instances. This setup provides adequate storage capacity while optimizing memory usage through disk-based search.

The monthly cost for this setup comes to $6,500 per month with a data instance cost of $4,470.

Cost-saving strategy: UltraWarm domain setup

In this approach, you align your storage strategy with the observed query patterns, similar to Scenario 1.

You keep the frequently accessed 30% of data in hot storage, using 1x r6gd.4xlarge instances. For the less frequently accessed 70% of data, you use 2x ultrawarm1.medium.search instances.

You use disk-based vector search in both storage tiers to optimize memory usage. This balanced approach reduces your monthly cost to $3,270, with $1,120 for the hot tier and $400 for the warm tier, reducing the monthly costs by roughly 50% overall.

Get started with UltraWarm and Cold storage

To take advantage of k-NN indexes in UltraWarm and Cold tiers, make sure that your domain is running OpenSearch Service 2.17 or later. For instructions to migrate k-NN indexes across storage tiers, refer to UltraWarm storage for Amazon OpenSearch Service.

Consider the following best practices for multi-tiered vector search:

  • Analyze your query patterns to optimize data placement across tiers
  • Use Index State Management (ISM) to manage the data lifecycle across tiers transparently
  • Monitor cache hit rates using the k-NN stats and adjust tiering and node sizing as needed

Summary

The introduction of k-NN vector search capabilities in UltraWarm and Cold tiers for OpenSearch Service marks a significant step forward in providing cost-effective, scalable solutions for vector search workloads. This feature allows you to balance performance and cost by keeping frequently accessed data in hot storage for lowest latency, while moving less active data to UltraWarm for cost savings. While UltraWarm storage introduces some performance trade-offs and makes data immutable, these characteristics often align well with real-world access patterns where older data sees fewer queries and updates.

We encourage you to evaluate your current vector search workloads and consider how this multi-tier approach could benefit your use cases. As AI and machine learning continue to evolve, we remain committed to enhancing our services to meet your growing needs.

Stay tuned for future updates as we continue to innovate and expand the capabilities of vector search in OpenSearch Service.


About the Authors

Kunal Kotwani is a software engineer at Amazon Web Services, focusing on OpenSearch core and vector search technologies. His major contributions include developing storage optimization solutions for both local and remote storage systems that help customers run their search workloads more cost-effectively.

Navneet Verma is a senior software engineer at AWS OpenSearch . His primary interests include machine learning, search engines and improving search relevancy. Outside of work, he enjoys playing badminton.

Sorabh Hamirwasia is a senior software engineer at AWS working on the OpenSearch Project. His primary interest include building cost optimized and performant distributed systems.

Rapid7 and IDC ASM Spotlight Paper Blog Jan 25

Post Syndicated from Ed Montgomery original https://blog.rapid7.com/2025/03/20/rapid7-and-idc-asm-spotlight-paper-blog-jan-25/

Rapid7 and IDC ASM Spotlight Paper Blog Jan 25

Rapid7 recently collaborated with IDC on their comprehensive Attack Surface Management Spotlight guide. These Spotlight publications deliver expert analyst perspectives on critical business and technology challenges, emerging industry trends, and innovative solutions. We’re pleased to share IDC analyst Michelle Abraham’s insights on cyber risk exposure management and the imperative for organizations to implement proactive security strategies.

IDC’s trend forecast

“Managing exposures with proactive cybersecurity tools and platforms should be a mindset for the entire organisation, from the C-suite to the back office.”

IDC agrees that it is no longer realistic to conduct asset management on spreadsheets due to the increasing complexity of cloud, SaaS and Generative AI technologies used by many organizations. IT teams have an added complexity brought about by hybrid and remote working. This expansion signifies that CAASM and ASM should be part of a wider exposure management system to cover cloud security, application security and vulnerability management.

IDC key takeaways

  • Foundational visibility: Establishing comprehensive awareness of all assets, whether on-premises or in cloud environments. .
  • Contextual intelligence:  Integrating business context and threat intelligence to accurately assess risk levels and prioritize response strategies.
  • Cross-functional utilization: Extending security data beyond the security team to support additional organizational use cases.

Understanding Key Exposure Management Concepts

Check out this blog which will cover off the definitions for ASM, CAASM and EASM.

You can’t protect what you can’t see.” – Aaron Herndon, Principal Security Consultant, Rapid7

The benefits of holistic exposure management

Organizations that adopt a holistic approach to exposure management gain the ability to aggregate, deduplicate, and analyze data from diverse IT and business tools, resulting in a more comprehensive understanding of their security posture.

According to IDC, the most valuable ASM use cases include:

  1. Identifying which assets do not have Vulnerability Management software installed.
  2. Finding assets without endpoint protection solutions.
  3. Determining users, with Admin access, who have not got multi-factor authentication (MFA) activated.
  4. Proactively suggesting users who have a propensity to open and click on Phishing emails utilizing a high phishing susceptibility score.

Organizations that adopt a holistic approach to exposure management gain the ability to aggregate, deduplicate, and analyze data from diverse IT and business tools, resulting in a more comprehensive understanding of their security posture.

Business context is critical. The correct ASM tool will provide insight on the relative importance and criticality of each asset.

Which assets are exposed to the internet and whether there is sensitive data in these assets? Sharing data around asset management is extremely helpful for IT and security teams, ensuring everyone is operating from a “single-source of truth”.

The benefits of CAASM and ASM  extend beyond the security team, in fact other job functions will reap rewards from highly contextualized asset data, including IT, finance and compliance. Security is a team sport.
We have developed several self-guided product tours highlighting key use cases identified by IDC above, for Surface Command and Exposure Command which you can check out at your leisure.

Using CAASM and ASM is all about reducing risk.” – Quote: Michelle Abraham, IDC

IDC’s review of Surface Command and Exposure Command

“Surface Command reconciles data about assets, threats, vulnerabilities, and controls to determine the true attack surface.”

IDC provides context around our Surface Command product that was released in August 2024, following the acquisition of Noetic Cyber.

Rapid7 delivers unparalleled  attack surface visibility through the Command Platform, empowering  security teams to identify, prioritize, and remediate risk across hybrid environments. Surface Command is the only solution available that combines native external and internal scanning into a single unified view of your attack surface, enriched with telemetry from third party security and ITOps tools via more than 130 out-of-the-box connectors.  

The power behind Surface Command is its graph database, showing the relationships between assets, identities and the potential exposure to present the context of the business risk.

Exposure Command builds on this foundational attack surface visibility, layering on adversary-aware risk prioritization and integrated remediation workflows that make it easy for security teams to anticipate where attackers are going to target, pinpoint their most pressing exposures and act swiftly and collaboratively to address issues before they can be exploited.

Elevate your security posture with proactive exposure management

As highlighted by IDC analyst Michelle Abraham in this comprehensive Spotlight report, organizations that implement robust exposure management strategies gain significant advantages:

  • Reduced attack surface: Identify and remediate vulnerabilities before they can be exploited
  • Enhanced visibility: Maintain complete awareness of your entire digital footprint
  • Improved resource allocation: Focus security efforts where they’ll have the greatest impact
  • Cross-functional value: Leverage security data across IT, compliance, and business operations

Rapid7’s Command Platform delivers the comprehensive visibility and actionable intelligence needed to effectively manage your organization’s attack surface. By combining external and internal scanning with powerful contextual analysis, our solutions enable security teams to stay ahead of sophisticated threat actors in today’s complex technological environments.

Ready to transform your approach to exposure management?

Download the complete IDC Spotlight report to discover how proactive security strategies can protect your critical assets and strengthen your overall security posture.

Трябва да се ядосаме, … а после?

Post Syndicated from Боян Юруков original https://yurukov.net/blog/2025/trqbva-da-se-qdosame/

Много се изписа като интерпретации на думите на Терзиев, притеснения какво е публично и какво не, както и идеи какво следва да се направи за ония небостъргач. Вярвам, че всички сме на една страна и съм убеден, че в администрацията има премного хора работещи за по-добра градска среда и в обществена полза. „Просто“ явно не си говорят достатъчно.

Днес се сетих как наскоро архитекти от съюзи и инвеститорски фирми ме обвиняваха, че картата ми за застрояване е лъжела и тия неща дето били в червено нямало да ги има или да са въобще така. Долу виждате не само 215 метровия небостъргач, а и всичко, което се планира около него. Всъщност, когато изготвях картата, пропуснах тази сграда, защото реших, че има грешка в данните на НАГ. Нямаше да е за пръв път и ми се стори невъзможно. Именно хората, от които сте чели днес за случая ми потвърдиха, че е вярно и гласувано от СОС.

Не знам дали общината или общинския съвет имат полезни ходове. Знам, че процесите са сложни с много замесени лица, регулации и врати в полето вложени в закона. Знам също, че тези, които не чухме днес да се изказват за проекта, се възползват прекрасно от тази сложност и къде с поставени лица, със заплахи и корупция си издействат лисчетата нужни за заветното разрешително. Знам, че отказите без основание лесно падат в администативните съдилища и плащаме обезщетения от данъците си, но и дори добре аргументираните в обществена полза също биват нелогично и в разрез със закона спирани поради аналогични на предишната ми точка причини. Знам и че в администацията има редица чиновници, които еднолично са натоварени с отговорността да контролират, но не го правят, както и че често натискът от инвеститори и недостига на хора на тези контролни функции прави надзора над подобни проекти, строителството и след това почти невъзможни.

Докато искаме намаляване на разходите в администрацията, контролът над всички недъзи на града, наглите по улиците, замърсяващите индустриално и прочие изисква голям човешки ресурс. Аналогично всеки ръководещ дори малка организация знае колко трудно е да изкорениш откровено вредните елементи от нея, особено когато трябва да ги замениш с квалифицирани такива рискова позиция със заплата по-ниска от продавач на вейпове.

Знам и че всичко това е до болка познато и като граждани на града искаме просто да се спре и някой друг да измисли как. Днес в парламента видяхме какво става когато хора успяват да прокарат икономическите си интереси през политическа власт. Ако не друго, това следва да покаже, че мотивацията на тези на власт е от голямо значение. Има много паралели между градоустройството в София и пробитата каца и обслужване на здравеопазването. Тук обаче искам на друго да наблегна.

По стечение на обстоятелствата съм се фокусирал много върху прозрачността именно на градоустройството в София и разбиране какво стои зад проблемите. Не като специалист, защото не съм, а като потърпевш на недъзите, натрупаните проблеми и липсата на видим напредък. Виждам как ще изглежда града, ако не направим нещо с постоянство и в широк спектър от сфери, закони, администрация и надзор. Има хора, които искат да подобрят положението с наличните инструменти и са готови да жертват сигурността и името си за това. Има също разминаване в разбиранията как следва да се случи и кой да носи отговорност. Липсва обща работа и комуникация, което първосигнално ескалира в надвикване, затваряне и мръщене от всички страни.

Отстрани това изглежда като „същото както другите“, а всъщност разликата е огромна. Въпросът е как да се решат тези заложени подводни камъни систематично без да си избождаме очите един друг. Та дори да не е баш по правилата, имайки предвид, че нито регулаторите, нито министерствата, нито съд и прокуратура, нито ДНСК или дори някои районни кметове работят според закона и задълженията си.

Не призовавам към търпение, а точно обратното – трябва да се ядосаме. Следва обаче да се научим, че онези със схема не са хората, които биха оправили наболелите проблеми, а ще се възползват от тях. Да се опитаме да различим хората с план от хората със схема и да накараме първите да работят заедно, защото решенията са трудни, мъчни и спорни, а схемите обединяват най-лесно и тихо и го виждаме премного в СОС и парламента.

Повече за случая може да прочетете мнения на районния кмет Димитър Божилов, Борис Бонев и Спаси София тук, тук и тук, Любо Георгиев от План за София. Това, което показвам в началото ще намерите в картата със застрояването.

The post Трябва да се ядосаме, … а после? first appeared on Блогът на Юруков.

Build a data lakehouse in a hybrid Environment using Amazon EMR Serverless, Apache DolphinScheduler, and TiDB

Post Syndicated from Shiyang Wei original https://aws.amazon.com/blogs/big-data/build-a-data-lakehouse-in-a-hybrid-environment-using-amazon-emr-serverless-apache-dolphinscheduler-and-tidb/

While helping our customers build systems on AWS, we found out that a large number of enterprise customers who pay great attention to data security and compliance, such as B2C FinTech enterprises, build data-sensitive applications on premises and use other applications on AWS to take advantage AWS managed services. Using AWS managed services can greatly simplify daily operation and maintenance, as well as help you achieve optimized resource utilization and performance.

This post discusses a decoupled approach of building a serverless data lakehouse using AWS Cloud-centered services, including Amazon EMR Serverless, Amazon Athena, Amazon Simple Storage Service (Amazon S3), Apache DolphinScheduler (an open source data job scheduler) as well as PingCAP TiDB, a third-party data warehouse product that can be deployed either on premises or on the cloud or through a software as a service (SaaS).

Solution overview

For our use case, an enterprise data warehouse with business data is hosted on an on-premises TiDB platform, an AWS Global Partner that is also available on AWS through AWS Marketplace.

The data is then processed by an Amazon EMR Serverless Job to achieve data lakehouse tiering logic. Different tiering data are stored in separate S3 buckets or separate S3 prefixes under the same S3 bucket. Typically, there are four layers in terms of data warehouse design.

  1. Operational data store layer (ODS) – This layer stores raw data of the data warehouse
  2. Data warehouse stage layer (DWS) – This layer is a temporary staging area within the data warehousing architecture where data from various sources is loaded, cleaned, transformed, and prepared before being loaded into the data warehouse database layer;
  3. Data warehouse database layer (DWD) – This layer is the central repository in a data warehousing environment where data from various sources is integrated, transformed, and stored in a structured format for analytical purposes;
  4. Analytical data store (ADS) – This layer is a subset of the data warehousing that is specifically designed and optimized for a particular business function, department, or analytical purpose.

For this post, we only use ODS and ADS layers to demonstrate the technical feasibility.

The schema of this data is managed through the AWS Glue Data Catalog, and can be queried using Athena. The EMR Serverless Jobs are orchestrated using Apache DolphinScheduler deployed in cluster mode on Amazon Elasctic Compute Cloud (Amazon EC2) instances, with meta data stored in an Amazon Relational Database Service (Amazon RDS) for MySQL instance.

Using DolphinScheduler as the data lakehouse job orchestrator offers the following advantages:

  • Its distributed architecture allows for better scalability, and the visual DAG designer makes workflow creation more intuitive for team members with varying technical expertise
  • It provides more granular task-level controls and supports a wider range of task types out-of-the-box, including Spark, Flink, and machine learning (ML) workflows, without requiring additional plugin installations;
  • Its multi-tenancy feature enables better resource isolation and access control across different teams within an organization.

However, DolphinScheduler requires more initial setup and maintenance effort, making it more suitable for organizations with strong DevOps capabilities and a desire for complete control over their workflow infrastructure.

The following diagram illustrates the solution architecture.

Prerequisites

You need to create an AWS account and set up an AWS Identity and Access Management (IAM) user as a prerequisite for the following implementation. Complete the following steps:

For AWS account signing up, please follow up the actions guided per page link.

  1. Create an AWS account.
  2. Sign in to the account using the root user for the first time.
  3. One the IAM console, create an IAM user with AdministratorAccess Policy.
  4. Use this IAM user to log in AWS Management Console rather the root user.
  5. On the IAM console, choose Users in the navigation pane.
  6. Navigate to your user, and on the Security credentials tab, create an access key.
  7. Store the access key and secret key in a secure place and use them for further API access of the resources of this AWS account.

Set up DolphinScheduler, IAM configuration, and the TiDB Cloud table

In this section, we walk through the steps to install DolphinScheduler, complete additional IAM configurations to enable the EMR Serverless job, and provision the TiDB Cloud table.

Install DolphinScheduler on an EC2 instance with an RDS for MySQL instance storing DolphinScheduler metadata. The production deployment mode of DolphinScheduler is cluster mode. In this blog, we use pseudo cluster mode which has the same installation steps as cluster mode, and could achieve resource economy. We name the EC2 instance ds-pseudo.

Make sure the inbound rule of the security group attached to the EC2 instance allows port 12345’s TCP traffic. Then complete the following steps:

  1. Log in to Amazon EC2 as the root user, and install jvm:
    sudo dnf install java-1.8.0-amazon-corretto
    java -version

  2. Switch to dir /usr/local/src:
    cd /usr/local/src
  3. Install Apache Zookeeper:
    wget https://archive.apache.org/dist/zookeeper/zookeeper-3.8.0/apache-zookeeper-3.8.0-bin.tar.gz
    tar -zxvf apache-zookeeper-3.8.0-bin.tar.gz
    cd apache-zookeeper-3.8.0-bin/conf
    cp zoo_sample.cfg zoo.cfg
    cd ..
    nohup bin/zkServer.sh start-foreground &> nohup_zk.out &
    bin/zkServer.sh status

  4. Check the Python version:
    python3 --version

    The version should be 3.9 or above. It is recommended that you use Amazon Linux 2023 or later as the Amazon EC2 operating system (OS); Python version 3.9 meets the requirement. For detail information, refer to Python in AL2023.

  5. Install Dolphinscheduler
    1. Download the dolphinscheduler package:
      cd /usr/local/src
      wget https://dlcdn.apache.org/dolphinscheduler/3.1.9/apache-dolphinscheduler-3.1.9-bin.tar.gz
      tar -zxvf apache-dolphinscheduler-3.1.9-bin.tar.gz
      mv apache-dolphinscheduler-3.1.9-bin apache-dolphinscheduler
    2. Download the mysql connector package:
      wget https://downloads.mysql.com/archives/get/p/3/file/mysql-connector-j-8.0.31.tar.gz
      tar -zxvf mysql-connector-j-8.0.31.tar.gz
    3. Copy specific mysql connector JAR file to the following destinations:
      cp mysql-connector-j-8.0.31/mysql-connector-j-8.0.31.jar ./apache-dolphinscheduler/api-server/libs/
      cp mysql-connector-j-8.0.31/mysql-connector-j-8.0.31.jar ./apache-dolphinscheduler/alert-server/libs/
      cp mysql-connector-j-8.0.31/mysql-connector-j-8.0.31.jar ./apache-dolphinscheduler/master-server/libs/
      cp mysql-connector-j-8.0.31/mysql-connector-j-8.0.31.jar ./apache-dolphinscheduler/worker-server/libs/
      cp mysql-connector-j-8.0.31/mysql-connector-j-8.0.31.jar ./apache-dolphinscheduler/tools/libs/
    4. Add the user dolphinscheduler, and make sure the directory apache-dolphinscheduler and the files under it are owned by the user dolphinscheduler:
      useradd dolphinscheduler
      echo "dolphinscheduler" | passwd --stdin dolphinscheduler
      sed -i '$adolphinscheduler ALL=(ALL) NOPASSWD: NOPASSWD: ALL' /etc/sudoers
      sed -i 's/Defaults   requirett/#Defaults requirett/g' /etc/sudoers
      chown -R dolphinscheduler:dolphinscheduler apache-dolphinscheduler
  6. Install the mysql client:
    sudo dnf update -y 
    sudo dnf install mariadb105
  7. On the Amazon RDS console, provision an RDS for MySQL instance with the following configurations:
    1. For Database Creation Method, select Standard create.
    2. For Engine options, choose MySQL.
    3. For Edition: choose MySQL 8.0.35.
    4. For Templates: select Dev/Test.
    5. For Availability and durability, select Single DB instance.
    6. For Credentials management, select Self-managed.
    7. For Connectivity, select Connect to an EC2 compute resource, and choose the EC2 instance created earlier.
    8. For Database Authentication: choose Password Authentication.
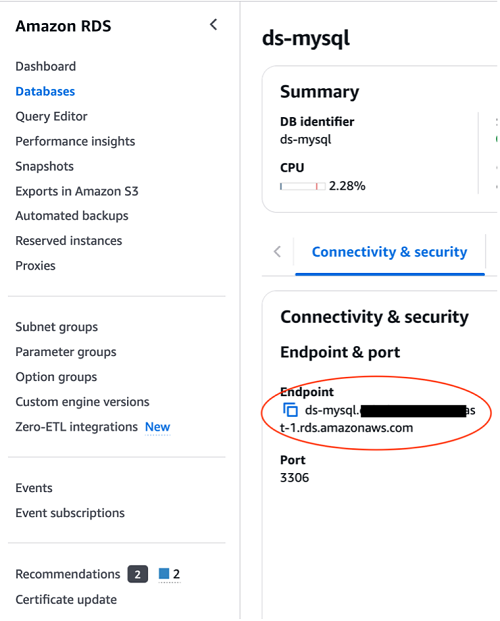
  8. Navigate to the ds- mysql database details page, and under Connectivity & security, copy the RDS for MySQL endpoint.
  9. Configure the intance:
    mysql -h <RDS for mysql Endpoint> -u admin -p
    mysql> CREATE DATABASE dolphinscheduler DEFAULT CHARACTER SET utf8 DEFAULT COLLATE utf8_general_ci;
    mysql> exit;
  10. Configure the dolphinscheduler configuration file:
    cd /usr/local/src/apache-dolphinscheduler/
  11. Revise dolphinscheduler_env.sh:
    vim bin/env/dolphinscheduler_env.sh
    export DATABASE=${DATABASE:-mysql}
    export SPRING_PROFILES_ACTIVE=${DATABASE}
    export SPRING_DATASOURCE_URL="jdbc:mysql://ds-mysql.cq**********.us-east-1.rds.amazonaws.com/dolphinscheduler?useUnicode=true&amp;characterEncoding=UTF-8&amp;useSSL=false"
    export SPRING_DATASOURCE_USERNAME="admin"
    export SPRING_DATASOURCE_PASSWORD="<your password>"
  12. On the Amazon EC2 console, navigate to the instance details page and copy the private IP address.
  13. Revise install_env.sh:
    vim bin/env/install_env.sh
    ips=${ips:-"<private ip address of ds-pseudo EC2 instance>"}
    masters=${masters:-"<private ip address of ds-pseudo EC2 instance>"}
    workers=${workers:-" private ip address of ds-pseudo EC2 instance:default"}
    alertServer=${alertServer:-" private ip address of ds-pseudo EC2 instance "}
    apiServers=${apiServers:-" private ip address of ds-pseudo EC2 instance "}
    installPath=${installPath:-"~/dolphinscheduler"}
    export JAVA_HOME=${JAVA_HOME:-/usr/lib/jvm/jre-1.8.0-openjdk}
    export PYTHON_HOME=${PYTHON_HOME:-/bin/python3}
  14. Configure the dolphinscheduler configuration file:
    cd /usr/local/src/apache-dolphinscheduler/
    bash tools/bin/upgrade-schema.sh
  15. Install DolphinScheduler:
    cd /usr/local/src/apache-dolphinscheduler/
    su dolphinscheduler
    bash ./bin/install.sh
  16. Start DolphinScheduler after installation:
    cd /usr/local/src/apache-dolphinscheduler/
    su dolphinscheduler
    bash ./bin/start-all.sh
  17. Open the DolphinScheduler console:
    http://<ec2 ip address>:12345/dolphinscheduler/ui/login

After input the initial username and password, press Login button to enter into the dashboard shown as below.

initial user/password admin/dolphinscheduler123

Configure IAM role to enable the EMR serverless job

The EMR serverless job role needs to have permission to access a specific S3 bucket to read job scripts and potentially write results, and also have permission to access AWS Glue to read the Data Catalog which stores the tables’ meta data. For detailed guidance, please refer to Grant permission to use EMR Serverless or EMR Serverless Samples.

The following screenshot shows the IAM role configured with the trust policy attached.


The IAM role should have the following permissions policies attached, as shown in the following screenshot.

Provision the TiDB Cloud table

  1. To provision the TiDB Cloud table, complete the following steps:
    1. Register for TiDB Cloud.
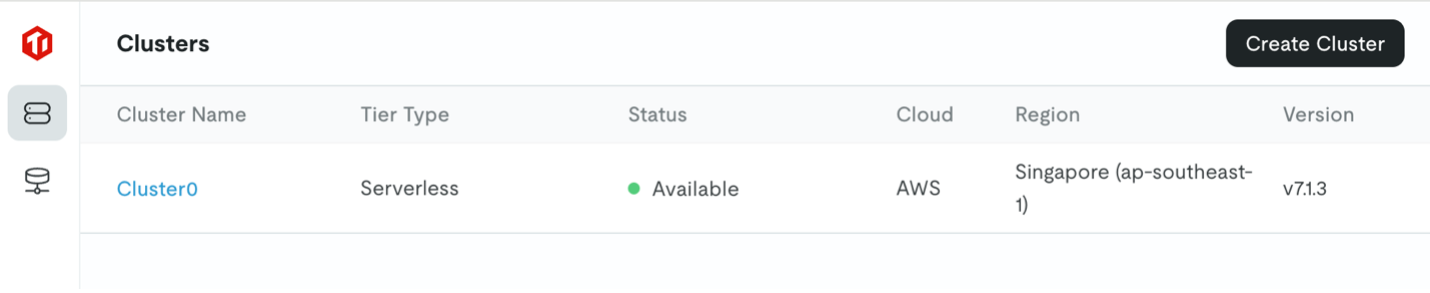
    2. Create a serverless cluster, as shown in the following screenshot. For this post, we name the cluster Cluster0.
  2. Choose Cluster0, then choose SQL Editor to create a database named test:
    create table testtable (id varchar(255));
    insert into testtable values (1);
    insert into testtable values (2);
    insert into testtable values (3);

Synchronize data between on-premises TiDB and AWS

In this section, we discuss how to synchronize historical data as well as incremental data between TiDB and AWS.

Use TiDB Dumpling to sync historical data from TiDB to Amazon S3

Use the commands in this section to dump data stored in TiDB as CSV files into a S3 bucket. For full details on how to achieve a data sync from on-premises TiDB to Amazon S3, see Export data to Amazon S3 cloud storage. For this post, we use TiDB tool Dumpling. Complete the following steps:

  1. Log in to the EC2 instance created earlier as root.
  2. Run the following command to install TiUP:
    curl --proto '=https' --tlsv1.2 -sSf https://tiup-mirrors.pingcap.com/install.sh | sh
    
    cd /root
    source .bash_profile
    
    tiup --version

  3. Run the following command to install Dumpling:
    tiup install dumpling
  4. Run the following command to achieve target database table dumpling to the specific S3 bucket.
    tiup dumpling -u <prefix.root> -P 4000 -h <tidb serverless endpoint/host> -r 200000 -o "s3://<specific s3 bucket>" --sql "select * from <target database>.<target table>" --ca "/etc/pki/tls/certs/ca-bundle.crt" --password <tidb serverless password>
  5. To acquire the TiDB serverless connection information, navigate to the TiDB Cloud console and choose Connect.

You can collect the specific connection information of test database from the following screenshot.

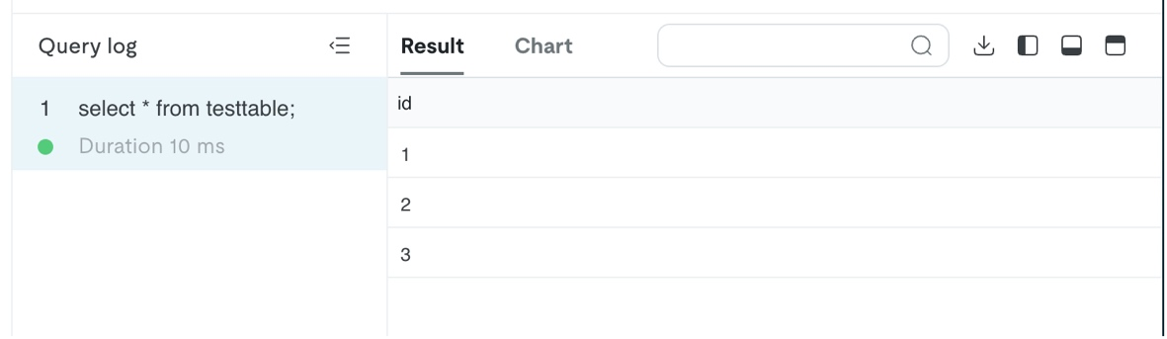
Yan can view the data stored in the S3 bucket on the Amazon S3 console.

You can use Amazon S3 Select to query the data and get results similar to the following screenshot, confirming that the data has been ingested into testtable.

Use TiDB Dumpling with a self-managed checkpoint to sync incremental data from TiDB to Amazon S3

To achieve incremental data synchronization using TiDB Dumpling, it’s essential to self-manage the check point of the target synchronized data. One recommended way is to store the ID of the final ingested record into a certain media (such as Amazon ElastiCache for Redis, Amazon DynamoDB) to achieve a self-managing checkpoint when running the shell/Python job that trigges TiDB Dumpling. The prerequisite for implementing this is that the target table has a monotonically increasing id field as its primary key.

You can use the following TiDB Dumpling command to filter the exported data:

tiup dumpling -u <prefix.root> -P 4000 -h <tidb serverless endpoint/host> -r 200000 -o "s3://<specific s3 bucket>" --sql "select * from <target database>.<target table> where id > 2" --ca "/etc/pki/tls/certs/ca-bundle.crt" --password <tidb serverless password>

Use the TiDB CDC connector to sync incremental data from TiDB to Amazon S3

The advantage of using TiDB CDC connector to achieve incremental data synchronization from TiDB to Amazon S3 is that there is built-in change data capture (CDC) mechanism, and because the backend engine is Flink, the performance is fast. However, there is one trade-off: you need to create several Flink tables to map the ODS tables on AWS.

For instructions to implement the TiDB CDC connector, refer to TiDB CDC.

Use an EMR serverless job to sync historical and incremental data from a Data Catalog table to the TiDB table

Data usually flows from on premises to the AWS Cloud. However, in some cases, the data might flow from the AWS Cloud to your on-premises database.

After landing on AWS, the data will be wrapped up and managed by the Data Catalog by created Athena tables with the specific tables’ schema. The table DDL script is as follows:

CREATE EXTERNAL TABLE IF NOT EXISTS `testtable`(
  `id` string
) 
ROW FORMAT SERDE 'org.apache.hadoop.hive.serde2.OpenCSVSerde'
LOCATION 's3://<bucket_name>/<prefix_name>/';  

The screenshot below showcases the DDL running result using Athena console.

The data stored in testtable table is queried using select * from testable SQL. The query result is shown as follows:

In this case, an EMR serverless spark job can accomplish the work of synchronizing data from an AWS Glue table to your on premises table.

If the Spark job is written in Scala, the sample code is as below:

package com.example
import org.apache.spark.sql.{DataFrame, SparkSession}

object Main  {

  def main(args: Array[String]): Unit = {

    val spark = SparkSession.builder()
      .appName("<specific app name>")
      .enableHiveSupport()
      .getOrCreate()

    spark.sql("show databases").show()
    spark.sql("use default")
    var df=spark.sql("select * from testtable")

    df.write
      .format("jdbc")
      .option("driver","com.mysql.cj.jdbc.Driver")
      .option("url", "jdbc:mysql://<tidbcloud_endpoint>:4000/namespace")
      .option("dbtable", "<table_name>")
      .option("user", "<user_name>")
      .option("password", "<password_string>")
      .save()

    spark.close()
  }
}

You can acquire the TiDB serverless endpoint connection information on the TiDB console by choosing Connect, as shown earlier in this post.

After you have wrapped the Scala code as JAR file using SBT, you can submit the job to EMR Serverless with the following AWS Command Line Interface (AWS CLI) command:

export applicationId=00fev6mdk***

export job_role_arn=arn:aws:iam::<aws account id>:role/emr-serverless-job-role

aws emr-serverless start-job-run \
    --application-id $applicationId \
    --execution-role-arn $job_role_arn \
    --job-driver '{
        "sparkSubmit": {
            "entryPoint": "<s3 object url for the wrapped jar file>",
            "sparkSubmitParameters": "--conf spark.hadoop.hive.metastore.client.factory.class=com.amazonaws.glue.catalog.metastore.AWSGlueDataCatalogHiveClientFactory --conf spark.driver.cores=1 --conf spark.driver.memory=3g --conf spark.executor.cores=4 --conf spark.executor.memory=3g --jars s3://spark-sql-test-nov23rd/mysql-connector-j-8.2.0.jar"
        }
    }'

If the Spark job is written in PySpark, the sample code is as follows:

import os
import sys
import pyspark.sql.functions as F
from pyspark.sql import SparkSession

if __name__ == "__main__":

    spark = SparkSession\
        .builder\
        .appName("app1")\
        .enableHiveSupport()\
        .getOrCreate()

    df=spark.sql(f"select * from {str(sys.argv[1])}")

    df.write.format("jdbc").options(
        driver="com.mysql.cj.jdbc.Driver",
        url="jdbc:mysql://tidbcloud_endpoint:4000/namespace ",
        dbtable="table_name",
        user="use_name",
        password="password_string").save()

    spark.stop()

You can submit the job to EMR Serverless using the following AWS CLI command:

export applicationId=00fev6mdk***

export job_role_arn=arn:aws:iam::<aws account id>:role/emr-serverless-job-role

aws emr-serverless start-job-run \
    --application-id $applicationId \
    --execution-role-arn $job_role_arn \
    --job-driver '{
        "sparkSubmit": {
            "entryPoint": "<s3 object url for the python script file>",
            "entryPointArguments": ["testspark"],
            "sparkSubmitParameters": "--conf spark.hadoop.hive.metastore.client.factory.class=com.amazonaws.glue.catalog.metastore.AWSGlueDataCatalogHiveClientFactory --conf spark.driver.cores=1 --conf spark.driver.memory=3g --conf spark.executor.cores=4 --conf spark.executor.memory=3g --jars s3://spark-sql-test-nov23rd/mysql-connector-j-8.2.0.jar"
        }
    }'

The preceding PySpark code and AWS CLI command achieves outbound parameter input as well: the table name (specifically testspark) is ingested into the SQL sentence when submitting the job.

EMR Serverless job pperation essentials

An EMR Serverless application is a resource pool concept. An application holds a certain capacity of compute, memory, and storage resources for jobs running on it to use. You can configure the resource capacity using AWS CLI or the console. Because it’s a resource pool, EMR Serverless application creation is usually a one-time action with the initial capacity and maximum capacity being configured.

An EMR Serverless job is a working unit that actually processes the compute task. In order for a job to work, you need to set the EMR Serverless application ID, the execution IAM role (discussed previously), and the specific application configuration (the resources the job is planning to use). Although you can create the EMR Serverless job on the console, it’s recommended to create the EMR Serverless job using the AWS CLI for further integration with the scheduler and scripts.

For more details on EMR Serverless application creation and EMR Serverless job provisioning, refer to EMR Serverless Hive query or EMR Serverless PySpark job

DolphinScheduler integration and job orchestration

DolphinScheduler is a modern data orchestration platform. It’s agile to create high- performance workflows with low code. It also provides a powerful UI, dedicated to solving complex task dependencies in the data pipeline and providing various types of jobs out of the box.

DolphinScheduler is developed and maintained by WhaleOps, and available in AWS Marketplace as WhaleStudio.

DolphinScheduler has been natively integrated with Hadoop: DolphinScheduler cluster mode is by default recommended to be deployed on a Hadoop cluster (usually on HDFS data nodes), and the HQL scripts uploaded to DolphinScheduler Resource Manager are stored by default on HDFS, and can be orchestrated using the following native Hive shell command:

Hive -f example.sql

Moreover, for specific case in which the orchestration DAGs are quite complicated, each DAG consists of several jobs (for example, more than 300), and almost all the jobs are HQL scripts stored in DolphinScheduler Resource Manager.

Complete the steps listed in this section to achieve a seamless integration between DolphinScheduler and EMR Serverless.

Switch the storage layer of DolphinScheduler Resource Center from HDFS to Amazon S3

Edit the common.properties files under directories /usr/local/src/apache-dolphinscheduler/api-server/ and directory /usr/local/src/apache-dolphinscheduler/worker-server/conf. The following code snippet shows the part of the file that needs to be revised:

# resource storage type: HDFS, S3, OSS, NONE
#resource.storage.type=NONE
resource.storage.type=S3
# resource store on HDFS/S3 path, resource file will store to this base path, self configuration, please make sure the directory exists on hdfs and have read write permissions. "/dolphinscheduler" is recommended
resource.storage.upload.base.path=/dolphinscheduler

# The AWS access key. if resource.storage.type=S3 or use EMR-Task, This configuration is required
resource.aws.access.key.id=AKIA************
# The AWS secret access key. if resource.storage.type=S3 or use EMR-Task, This configuration is required
resource.aws.secret.access.key=lAm8R2TQzt*************
# The AWS Region to use. if resource.storage.type=S3 or use EMR-Task, This configuration is required
resource.aws.region=us-east-1
# The name of the bucket. You need to create them by yourself. Otherwise, the system cannot start. All buckets in Amazon S3 share a single namespace; ensure the bucket is given a unique name.
resource.aws.s3.bucket.name=dolphinscheduler-shiyang
# You need to set this parameter when private cloud s3. If S3 uses public cloud, you only need to set resource.aws.region or set to the endpoint of a public cloud such as S3.cn-north-1.amazonaws.com.cn
resource.aws.s3.endpoint=s3.us-east-1.amazonaws.com

After editing and saving the two files, restart the api-server and worker-server by running the following commands, under folder path /usr/local/src/apache-dolphinscheduler/

bash ./bin/stop-all.sh
bash ./bin/start-all.sh
bash ./bin/status-all.sh

You can validate whether switching the storage layer to Amazon S3 was successful by uploading a script using DolphinScheduler Resource Center Console, check if the file appears in relevant S3 bucket folder.

Before verifying that Amazon S3 is now the storage location of DolphinScheduler, you need to create a tenant on the DolphinScheduler console and bundle the admin user with the tenant, as illustrated in the following screenshots:

After that, you can create a folder on the DolphinScheduler console, and check whether the folder is visible on the Amazon S3 console.

Make sure the job scripts uploaded from Amazon S3 are available in the DolphinScheduler Resource Center

After accomplishing the first task, you can upload the scripts from the DolphinScheduler Resource Center console, and confirm that the scripts are stored in Amazon S3. However, in practice, you need to migrate all scripts directly to Amazon S3. You can find and modify the scripts stored in Amazon S3 using DolphinScheduler Resource Center console. To do so, you can revise the metadata table t_ds_resources by inserting all the scripts’ metadata. The table schema of table t_ds_resources is shown in the following screenshot.

The insert command is as follows:

insert into t_ds_resources values(6, 'count.java', ' count.java','',1,1,0,'2024-11-09 04:46:44', '2024-11-09 04:46:44', -1, 'count.java',0);

Now there are two records in the table t_ds_resoruces.

You can access relevant records on the DolphinScheduler console.

The following screenshot shows the files on the Amazon S3 console.

Make the DolphinScheduler DAG orchestrator aware of the jobs’ status so the DAG can move forward or take relevant actions

As mentioned earlier, DolphinScheduler is natively integrated with the Hadoop ecosystem, and the HQL scripts can be orchestrated by the DolphinScheduler DAG orchestrator via Hive -f xxx.sql command. As a result, when the scripts changed to shell scripts or Python scripts (EMR Severless jobs needs to be orchestrated via shell scripts or Python scripts rather than the simple Hive command), the DAG orchestrator can start the job, but can’t get the real time status of the job, and therefore can’t continue the workflow to further steps. Because the DAGs in this case are very complicated, it’s not feasible to amend the DAGs; instead we follow a lift-and-shift strategy.

We use the following scripts to capture jobs’ status and take appropriate actions.

Persist the application ID list with the following code:

var=$(cat applicationlist.txt|grep appid1)
applicationId=${var#* }
echo $applicationId

Enable the DolphinScheduler step status auto-check using a Linux shell:

app_state
{
  response2=$(aws emr-serverless get-application --application-id $applicationId)
  application=$(echo $response1 | jq -r '.application')
  state=$(echo $application | jq -r '.state')
  echo $state
}

job_state
{
  response4=$(aws emr-serverless get-job-run --application-id $applicationId --job-run-id $JOB_RUN_ID)
  jobRun=$(echo $response4 | jq -r '.jobRun')
  JOB_RUN_ID=$(echo $jobRun | jq -r '.jobRunId')
  JOB_STATE=$(echo $jobRun | jq -r '.state')
  echo $JOB_STATE
}

state=$(job_state)

while [ $state != "SUCCESS" ]; do
  case $state in
    RUNNING)
         state=$(job_state)
         ;;
    SCHEDULED)
         state=$(job_state)
         ;;
    PENDING)
         state=$(job_state)
         ;;
    FAILED)
         break
         ;;
   esac
done

if [ $state == "FAILED" ]
then
  false
else
  true
fi

Clean up

To clean up your resources, we recommend using APIs through the following steps:

  1. Delete the EC2 instance:
    1. Find the instance using the following command:
      aws ec2 describe-instances 
    2. Delete the instance using the following command:
      aws ec2 terminate-instances –instance-ids <specific instance id>
  2. Delete the RDS instance:
    1. Find the instance using the following command:
      aws rds describe-db-instances
    2. Delete the instance using the following command:
      aws rds delete-db-instances –db-instance-identifier <speficic rds instance id>
  3. Delete the EMR Serverless application
    1. Find the EMR Serverless application using the following command:
      aws emr-serverless list-applications 
    2. Delete the EMR Serverless application using the following command:
       aws emr-serverless delete-application –application-id <specific application id>

Conclusion

In this post, we discussed how EMR Serverless, as AWS managed serverless big data compute engine, integrates with popular OSS products like TiDB and DolphinScheduler. We discussed how to achieve data synchronization between TiDB and the AWS Cloud, and how to use DolphineScheduler to orchestrate EMR Serverless jobs.

Try out the solution with your own use case, and share your feedback in the comments.


About the Author

Shiyang Wei is Senior Solutions Architect at Amazon Web Services. He is specializing in cloud system architecture and solution design for the financial industry. Particularly, he focused on big data and machine learning applications in finance, as well as the impact of regulatory compliance on cloud architecture design in the financial sector. He has over 10 years of experience in data domain development and architectural design.

DR 101: Assembling Your Incident Response Team

Post Syndicated from Kari Rivas original https://www.backblaze.com/blog/dr-101-assembling-your-incident-response-team/

A decorative image showing a computer screen with several profiles and a cloud.

A well-defined disaster recovery (DR) plan relies heavily on a coordinated incident response team. Think of your incident response team like a pit crew. It’s easy to assume you’ll have a good race when everything is performing smoothly, but the real test comes when something goes wrong—maybe a tire blows or the engine overheats. In those moments, success isn’t about having the best tools in the garage; it’s about having the right team, working together, to quickly solve problems and get back on track.

When your team is facing a disaster recovery scenario, whether it’s a cyber attack, natural disaster, outage, or data breach, the speed and coordination of your team determines how quickly and how well you can move forward. In this post, I’m breaking down how to assemble a team that can respond with precision, minimize downtime, and keep your organization running smoothly when unexpected issues arise.

Establishing key team members, roles, and hierarchy

The incident response team (IRT) is the backbone of your DR response and is responsible for leading the recovery efforts during a disaster. Here’s a breakdown of possible key IRT roles:

  • Incident commander: Oversees the entire incident response process, making critical decisions and delegating tasks to team members.
  • Technical lead: Provides technical expertise, directing recovery efforts for IT infrastructure and data restoration.
  • Communications lead: Handles external and internal communication, ensuring timely updates for stakeholders and mitigating potential reputational damage.
  • Documentation lead: Maintains the DR runbook, ensuring its accuracy and updating it with post-incident findings.
  • Legal counsel: Provides legal guidance and ensures compliance with relevant regulations during the response and recovery process.

Building redundancy

Building redundancy in your IRT allows you to account for team member absences. This includes IT leadership; don’t assume you’ll be in the office when a disaster happens. Assign backup personnel for critical roles within the team to ensure continuity in the event of unforeseen circumstances.

Establish a clear succession plan for leadership roles within the IRT. This ensures a smooth transition if the primary incident commander or other key personnel become unavailable during a disaster.

Establishing a reporting hierarchy

Clearly define a reporting hierarchy within the IRT, outlining who reports to whom and the escalation process for making critical decisions. A clear chain of command during a crisis prevents confusion and delays that could result in prolonged downtime and increased risks.

The importance of clear communication

A critical component of any DR plan is clear communication to employees and executives regarding their specific roles during a security incident. This ensures that the assigned team leader can coordinate a unified response. Remember to include guidelines about incident escalation, as well as agreed-upon methods of communication (e.g., email, direct messaging, video calls, etc.).

Executive sponsorship: Beyond awareness

Executive buy-in is paramount for a successful DR strategy. While awareness of the impact of ransomware attacks has grown over the years, contextualizing DR plans with historical financial impacts, downtime implications, and reputational risk associated with such attacks can help to communicate why DR is a top-line priority.

Tip: Educating executives

Framing the DR plan in terms of cost avoidance, user downtime minimization, and reputational risk mitigation can resonate better with executives. Quantify the potential financial losses from data breaches and system outages to garner executive support for DR initiatives.

Beyond cell phones: Communication channels

Disasters can disrupt traditional communication methods like cell phone service. Develop alternative communication channels for the IRT, such as designated email threads, satellite phones, or pre-arranged conference call bridges. It is imperative to include this information and contact details in your DR runbook for immediate accessibility during crises.

By establishing a well-defined team structure with clear roles, communication protocols, and redundancy measures, enterprise businesses can ensure a coordinated and efficient response to data disasters. 

A well-prepared team leads to a resilient recovery

Your DR strategy is only as effective as the team behind it. By defining clear roles, building in redundancy, and establishing a reporting hierarchy, IT leaders can eliminate confusion and accelerate recovery efforts. Moreover, securing executive sponsorship and ensuring clear communication strengthens your ability to respond effectively. DR isn’t just about the plan on paper. It’s about how you execute that plan and set your team up for success. 

The post DR 101: Assembling Your Incident Response Team appeared first on Backblaze Blog | Cloud Storage & Cloud Backup

Critical GitHub Attack

Post Syndicated from Bruce Schneier original https://www.schneier.com/blog/archives/2025/03/critical-github-attack.html

This is serious:

A sophisticated cascading supply chain attack has compromised multiple GitHub Actions, exposing critical CI/CD secrets across tens of thousands of repositories. The attack, which originally targeted the widely used “tj-actions/changed-files” utility, is now believed to have originated from an earlier breach of the “reviewdog/action-setup@v1” GitHub Action, according to a report.

[…]

CISA confirmed the vulnerability has been patched in version 46.0.1.

Given that the utility is used by more than 23,000 GitHub repositories, the scale of potential impact has raised significant alarm throughout the developer community.

The collective thoughts of the interwebz