Post Syndicated from corbet original https://lwn.net/Articles/1041069/
Security updates have been issued by Fedora (chromium), Red Hat (kernel, open-vm-tools, and postgresql), SUSE (chromedriver and chromium), and Ubuntu (haproxy and pam-u2f).
Post Syndicated from corbet original https://lwn.net/Articles/1041069/
Security updates have been issued by Fedora (chromium), Red Hat (kernel, open-vm-tools, and postgresql), SUSE (chromedriver and chromium), and Ubuntu (haproxy and pam-u2f).
Post Syndicated from Йовко Ламбрев original https://yovko.net/costa-rica-anaerobic-tarrazu/
Вкус на есен: Кафе с нотки на ябълков пай и канела
Post Syndicated from Ина Иванова original https://www.toest.bg/violeta-martinova-tam-kudeto-nyamashe-puteki-nie-napravihme-putishta/

Повечето хора свързват розовия цвят с надежда и деликатност. В областта на социалните услуги обаче са тема, по която положението никак не е розово. В България има един-единствен нископрагов център за работа с хора, зависими от наркотици и алкохол – и това е Розовата къща.
Тя предоставя защитена среда (в рамките на работното време), подслон, храна, топла напитка, пералня, баня, дреха, подкрепяща комуникация или консултация с психолог, както и базови медицински грижи за зависими хора, които живеят в лоши битови условия, а често са и бездомни.
Философията на този подход е, че специалистът отива при човека със зависимост, предлагайки базови услуги – предотвратяване на инфекции, обучение за рискове, вместо да чака зависимият сам да потърси лечение.
От началото на 2025 г. филиал на Розовата къща има и в Пловдив. Психолог и основен двигател е Виолета Мартинова – и макар да не обича да застава в светлината на прожекторите, именно тя сформира екипа. Филиалът заработва почти мигновено, в момента го посещават около 50 души, тъй като е на познато място. Община Пловдив предоставя на екипа малка сграда, в която е имало център за работа със социално уязвими хора още през 2003 г. Организацията тогава е една от първите в България, които започват да предлагат услуги за намаляване на вредите (Harm Reduction) сред употребяващи наркотици. „Големият бум“ на хероинозависими избухва в средата на 90-те, а държавата се оказва напълно неподготвена да реагира. Обществените нагласи към зависимите хора са крайно негативни и отхвърлящи, стигмата се прехвърля дори върху социалните работници. Едва напоследък ангажираните с проблема забелязват промяна, може би защото все повече хора лично се сблъскват с факта, че никой не е застрахован, че всеки би могъл да бъде здраво хванат в капана на наркотици, алкохол или хазартна зависимост.
И когато ретроспективно поглежда към над двайсетгодишния си стаж, признава, че нашето общество все още не е готово да приеме зависимостите като хронично заболяване (каквито са диабетът, хипертонията, исхемичната болест на сърцето и др.).
Като специалисти от помагащи професии полагаме доживотни грижи и подкрепа за хората с т.нар. социалнозначими и хронични заболявания, но очакваме тези, страдащи от зависимости, да се справят без същата грижа и подкрепа – „защото сами са си го причинили“. Имаме държавни метадонови програми, но не и достъпни програми за психосоциална рехабилитация. Разчитаме, че хората ще се справят сами. Укоряваме ги. Да, те са избрали да опитат наркотици. Но нека не забравяме, че част от тях са започнали във време, в което информацията беше силно изкривена и не особено достъпна. Да, те са експериментирали. След това обаче наркотикът започва да говори вместо тях.
Виолета Мартинова не е работила в център за зависими единствено в интервала между 2019 и 2024 г., когато е част от корпоративния свят. После ѝ се обажда Юлия Георгиева от Розовата къща в София, споделя, че „нашите хора в Пловдив“ имат нужда от дом, и ѝ предлага да се върне – на същото място, където е започнала като млад социален работник, отново на ул. „Пламък“.
„Където е трудно, ние сме там“, обосновава своя етичен избор Виолета.
Ако нямаш безусловното приемане на тези хора, които са в труден етап от живота си, не можеш да отделиш тяхната личност от измененията, които са част от зависимостта им. Между нас има много ценни, много човешки разговори.
Виолета Мартинова и екипът на Розовата къща с изненада установяват, че получават подкрепа от различни хора. Вярват, че промяната в отношението към зависимите се дължи на информираността:
Хората направиха важни допускания. Осъзнаха, че към зависимостите можем да прибавим хазартната, зависимостта от устройства, пазаруване или храна. В началото зависимостта започва като нещо, което ти носи удоволствие. При наркотиците много бързо тя те лишава от собствената ти воля.
Какво обаче прави държавата? Виолета е категорична:
Държавата разчита основно на субституираща терапия – метадон или друг вид заместване, което е изключително недостатъчно, защото това е само част от лечението. Да, този тип лечение е необходимо, но хората са оставени без възможност да научат или актуализират базови социални и трудови умения. А те тепърва трябва да изградят навици, за да бъдат в състояние да продължат живота си. Разбира се, нашите хора ще продължат да бъдат хронично болни, но им трябва система от умения, за да се адаптират. За един тесен сегмент заместващата програма ще остане единствената възможност, но за повечето има смисъл от подкрепа за интеграция в обществото, за да водят пълноценен живот.
Това, което пропускаме всъщност, е, че физиологично е допустимо човек дълго време да бъде на медикаментозна терапия, но не е необходимо. Необходимо е да му бъде предложена алтернатива, за да се научи да организира ежедневието си и да изгради базови социални умения.
Понякога обаче става въпрос и за конкретна битова грижа.
Розовата къща е нашият малък оазис. Ние успяваме с много малко средства да предложим тесен сегмент от услуги. Но на фона на това, че няма нищо друго, нашите хора са благодарни. Част от зависимите живеят без дом. Когато видиш бездомен човек, който е гладен, зависим и в момент на криза, той изглежда много различно от човека, който е изкъпан и преоблечен. Тук, при нас, някой ще му помогне да се подстриже и избръсне, ще му предложи набор от чисти дрехи и обувки.
Съществуващата социална подкрепа в България обаче е обвързана с адресна регистрация, тоест за бездомните такава помощ априори е недостъпна.
Това, което ние можем да им предложим, е да бъдат прегледани при нас, защото те често са с тежки, страховити рани, гангренозни рани и абсцеси. Имаме медицинска сестра, която прави превръзки, и през лятото наистина спасихме няколко живота. Имаме и джипи, което следи състоянието на нашите хора.
Повечето посещаващи Розовата къща зависими са над 40-годишни, но има и млади хора, особено от ромската общност, които са потенциални жертви. Често децата на наркозависими са живели в изключително трудни условия и без равен старт в живота са обречени да последват съдбата на родителите си.
Виолета Мартинова и колегите ѝ се сблъскват с наистина тежки човешки съдби.
Розовата къща е място, на което нашите хора няма да бъдат съдени и те добре го знаят. Ние си даваме сметка, че не вървят по пътя, който на нас ни се иска, но трябва да се съобразим с факта, че всеки един от тях има собствен ход, собствено темпо. Да бъдем назидателни и да им обясняваме как трябва да спрат и колко увреждат здравето си… това не работи.
Дали Виолета Мартинова успява да се абстрахира от случаите, с които се сблъсква ежедневно? Дали успява да излезе от Къщата, да заключи вратата и да не мисли по казусите до следващия ден? Тя казва, че се е научила.
Когато съм в Розовата къща, горя на сто процента, но след края на работното си време имам и други ангажименти. Открих, че това работи при мен. Истината е, че иначе е доста изчерпващо. И психологически погледнато, трябва да получавам някаква емоционална награда.
Затова Виолета има също индивидуална практика с клиенти. А времето, в което е работила корпоративна работа, ѝ дава възможността сега да консултира хора от висшия мениджмънт и да води групи по справяне с работа в екип, комуникативни трудности, мотивиране на персонал, описание и картографиране на бизнес процеси и др. Смяната на различни амплоа вероятно е спасителна, самата тя я назовава „за момента работещ механизъм, в който виждаш различни светове“.
Каузата ѝ (която тя деликатно и дисциплинирано нарича „работа“) я среща с трудни съдби, със счупени човешки същества, понякога с невъзвратимото. „Приех, че не мога винаги да помогна. Когато съм подала ръка и отсреща не я приемат, трябва да уважа избора.“ Това ѝ върши работа и в личния живот.
Обществото ни зрее за това да приема различните. Бавно, но ние сме доста консервативни, така че очевидно това е нашето темпо, Но днес, благодарение на дарители, ние успяваме да изхранваме 45–50 човека, които бяха отчаяни. Притеснителното е, че трябва да успеем да подсигурим това и занапред, защото броят на хората, които се нуждаят от нашите услуги, е доста стабилен, а разчитаме основно на дарения за всички режийни разходи. Надяваме се през 2026 г. да получим финансиране през програма на Министерството по труда и социалните грижи, за да можем да осигурим устойчивост на предлаганите в Розовата къща грижи и услуги.
Работата в Розовата къща е крайно специфична, насочена към тесен социален сегмент и хората в екипа не се стараят да шумят около нея. Напоследък обаче осъзнават, че не е лошо за обществото да бъдат озвучени подобни услуги. Ако споделят, че имат нужда от конкретна помощ, това всъщност дава възможност на хората да допринесат. Да откликнат. Лично. Затова и Виолета Мартинова е благодарна на Юлия Георгиева, която от години стои зад каузата на Фондация „Център за хуманни политики“ и която публично оповестява ежемесечно дейността на Розовата къща.
В гласа на Виолета Мартинова има звънливост и вяра. Точно тя и хората от екипа ѝ, които работят със социално най-уязвимите – парадоксално, – намират основания да вярват в човешката способност за съчувствие и съпричастност. В хуманността на дело.
Бяхме писали, че имаме нужда от огледало, и получихме 4 огледала,
споделя тя и – сигурна съм! – двете чуваме знаковата стойност на казаното.
Виолета завършва „Социални дейности“ преди малко повече от двайсет години и с ентусиазъм се хвърля в първата си работа отново тук, на същото място на ул. „Пламък“ №2. След това надгражда образованието си с психология. В момента завършва специализация по когнитивно-поведенческа психотерапия, а втора година учи фамилна психотерапия. Като дете е искала да стане лекарка, по-късно родителите ѝ я съветват да избере правото. По някакъв начин сегашните ѝ дейности съчетават и двете.
Изборът да посветя голяма част от времето си на Розовата къща е емоционален. Харесвам предизвикателствата – те ме държат в кондиция, карат ме да се променям, да търся решения. Разликата от преди, когато бях заета само с корпоративна работа, е, че сега мога да избирам в кои проекти да участвам, както и методите и подходите, с които да работя.
Хората, които тихо и кротко променят средата, формират общности и задават посоки, в които има смисъл да тръгнем заедно. Тук ви срещаме с тях. Това са „Тези хора“.
Post Syndicated from The History Guy: History Deserves to Be Remembered original https://www.youtube.com/shorts/qQIg1aE8JQA
Post Syndicated from Let's Encrypt original https://letsencrypt.org/2025/10/07/ten-yrs-community-forum.html
Seth Schoen was an early contributor to Let’s Encrypt through his work at the Electronic Frontier Foundation. He’s also one of the longest standing participants in the Let’s Encrypt community support forum, so we asked him to offer his thoughts on the role and impact of the forum as a resource for our users. Thank you for your many years of expertise and participation, Seth!
Along with the tenth anniversary of Let’s Encrypt’s first certificate, we’re also celebrating ten years of the Let’s Encrypt Community Forum, which has played a vital role in the Let’s Encrypt community.
It’s been the first stop for end users with technical questions. It’s been the main way that client developers got help with ACME and debugged compatibility issues. It’s been the place where Let’s Encrypt staff made technical announcements and got immediate feedback from affected parties.
It’s happened in many different languages (including official French, Spanish, and Portuguese categories, use of numerous volunteers’ native languages, as well as many successful conversations via machine translation). For example, people have gotten help in Dutch, Russian, German, and Chinese.
Thousands of volunteers have provided help and successfully helped tens of thousands of users get their certificates. Occasionally, they’ve also reported bugs in client software, documentation, or even the Let’s Encrypt service itself. Many times a responsible developer was there to interact directly with the bug reporter.
Here are the monthly pageviews from the creation of the Community Forum until the present day:

The most common kind of interaction on the forum is one in which a Let’s Encrypt end user shows up with some kind of problem, usually an inability to get or renew a certificate. In most cases, if the user is willing to answer some questions, the community is ultimately able to resolve the problem.
I’ve often compared the satisfaction of helping users on the Let’s Encrypt forum to what I felt while installing bike lights at a local cycling organization’s bike light giveaway event. In both cases, one could engage for a few minutes with someone, maybe deal with some unanticipated oddities (extra-thick handlebars? an unusual seat post or cargo rack? a strange DNS setup? an unusual Apache configuration?). Usually, this would lead to a concrete practical improvement in safety afterward (the blinking red tail light freshly installed on someone’s bike, or the lovely https:// prefix or padlock icon newly visible in the browser bar when browsing to a visitor’s website). It’s common in the Internet security world not to be able to see or appreciate how what we do helps people, so “we just helped make connections to your specific web site more secure” is especially satisfying.
Tangible safety upgrades!

Let’s Encrypt describes itself as “free, automated, and open”; part of that openness consists of its use of open standards (ACME) and open source CA software (Boulder). Part of it is also about how much of the CA’s thinking happens in public! One example (of dozens) is that the September 2025 Let’s Encrypt root ceremony was discussed ahead of time on the forum, starting back in July, with the plans and details all open for discussion and review. Let’s Encrypt staff have even asked the community for feedback on how production and testing certificates ought to be named!
In other cases, like when there was new functionality announced, or substantive technical changes affecting certificate issuance, or proposed rate limit changes, or problems requiring mass revocation, or expiring root certificates, Let’s Encrypt staff were available talking about all the details and directly answering end users’ questions. Again, there are lots of other examples, where changes large or small got announced, proposed, or discussed on the forum, with Let’s Encrypt’s own experts engaging with the community.
The forum runs on Discourse, which has continued to be an effective choice of forum software for the community. Discourse has nice technical and user interface features, but it’s also pleasantly unobtrusive. The Discourse company has also generously been donating pro bono hosting for the forum for many years, and, of course, it uses a Let’s Encrypt certificate.
The volunteers on the Let’s Encrypt forum have made a huge contribution to Let’s Encrypt’s success. It’s easy to imagine that many users might have given up on Let’s Encrypt in frustration were it not for the efforts of dedicated volunteers to draw out the necessary details, notice the relevant issues, and patiently explain concepts that were confusing people. There are also volunteer moderators who’ve worked hard to keep the forum on track, stop spam, and defuse distracting conflicts. Thanks to all of you.
Several software projects have been informed by discussions and issues on the forum, as developers there found opportunities to help large numbers of users. I would particularly highlight Alex Zorin’s Let’s Debug and Jonathan Griffin’s CertSage as examples in this category. Let’s Debug runs a series of practical live tests on a specified site to help users figure out why certificate issuance is failing, giving useful explanations of many of the most common failure reasons. CertSage is a client meant for users who have hosting plans without native support for Let’s Encrypt, and without administrative access—but where they can run PHP scripts. These projects grew out of Alex’s and Jonathan’s experiences helping users on the forum and seeing the kinds of issues that came up repeatedly there. Joona Hoikkala’s helpful acme-dns, which helps subscribers complete the ACME DNS challenge with a dedicated service instead of using an existing DNS server, also helped respond to a common issue that brought many people to the forum.
I would also like to thank Jacob Hoffman-Andrews for his early efforts to set a positive and welcoming tone on the forum. Jacob and other forum administrators always reminded the community to be patient and welcoming to each visitor, emphasizing that the forum was many users’ first interaction with Let’s Encrypt, and that users ought to be welcomed regardless of their expertise or background (and regardless of whether their questions had been asked before by others).
Post Syndicated from Juan Pablo Melgarejo Zamora original https://aws.amazon.com/blogs/devops/beyond-bootstrap-bootstrapless-cdk-deployments-at-godaddy/
This is a guest post written by Ramanathan Nachiappan from GoDaddy.
In the world of infrastructure as code, the AWS Cloud Development Kit (AWS CDK) has revolutionized how teams define and provision cloud resources. Central to its operation is the bootstrapping process, which ensures all required resources and permissions are in place to enable secure and scalable deployments.
At GoDaddy, our cloud journey has always prioritized governance, compliance, and a great developer experience. As our AWS footprint expanded across hundreds of teams and thousands of deployments, we faced a classic engineering dilemma: how do we uphold rigorous governance standards without compromising developer velocity?
AWS CDK’s default bootstrapping process—while essential—often clashed with our governance model, creating friction, workarounds, and wasted cycles. This post details how we evolved beyond that friction, eliminating the explicit bootstrap step entirely and replacing it with a seamless, zero-touch experience. The result: a “bootstrapless” CDK deployment flow that enforces governance invisibly and empowers developers to deploy with a single command.
GoDaddy’s governance model isn’t just a checkbox for compliance; it’s the foundation of our cloud security posture. Our approach requires all AWS resource modifications to flow through AWS CloudFormation, with each deployment evaluated against our rule sets covering:
Our CloudFormation hooks evaluate every resource against these rules pre-deployment, helping to reduce the likelihood of non-compliant resources being created. This proactive approach is designed to support governance from day one, rather than retroactively detecting violations.
AWS CDK V1 vs AWS CDK V2:
When AWS CDK v2 arrived, its bootstrap process introduced crucial changes designed to standardize authentication across multiple deployment tools and scenarios (CLI, cross-account deployments, pipelines, etc.). The standard cdk bootstrap command creates several essential components:
# Creates the default bootstrap stack with resources
cdk bootstrap
This command provisions:
Here’s where things got interesting for GoDaddy. While the default AWS CDK setup includes security measures (like encrypted Amazon S3 buckets), our enterprise governance requirements had additional specifications that created some difficulty with the default bootstrap resources:
These GoDaddy-specific governance requirements meant the default bootstrap resources do not pass our validation checks, creating deployment slowdown for developers and increasing support overhead for GoDaddy’s governance platform as teams worked around the governance failures.
Our first step toward enhancing the developer experience was creating a customized bootstrap approach using two key components:
We developed a specialized CDK construct called GDStack extending the native CDK Stack. This custom stack framework used CDK Aspects to automatically ensure governance compliance:
This approach dramatically reduced turnaround time for developers, who previously had to manually correct violations in their application specific CloudFormation stacks after failed deployments. Instead, the system intelligently fixed issues before they became deployment failures.
Instead of using AWS CDK’s default deployment roles, we used the CliCredentialsStackSynthesizer to:
Our solution required a custom bootstrap command:
# Custom bootstrap with governance-compliant template
npx cdk bootstrap --template node_modules/internal-constructs/bootstrap-template.yaml --tags governance=safeguard
This approach worked well, but still required teams to run a bootstrap step with precise GoDaddy-specific parameters. Although our platform documentation was extensive, some users still encountered issues as they continued to use the native cdk bootstrap command instead of the custom command. This behavior likely stemmed from the habit of running cdk bootstrap first, as trained by the native AWS CDK workflow. As a result, this approach still maintained some support troubleshooting workload for teams. We needed a more elegant solution for our needs!
As AWS CDK evolved, so did our thinking. The introduction of the AppStagingSynthesizer opened new possibilities, leading us to develop a completely bootstrapless solution.
We engineered an elegant chain of specialized components:
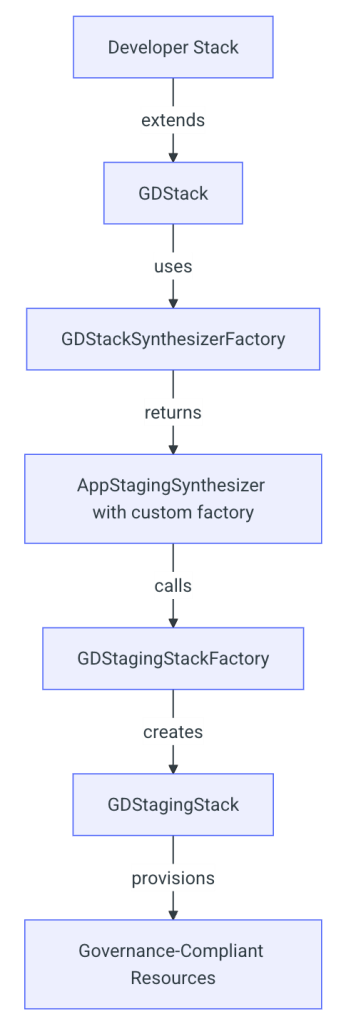
Bootstrapless CDK Factory Pattern Design
Each component plays a crucial role:
This is the only component developers interact with directly:
// Developer simply extends GDStack instead of Stack
export class MyApplicationStack extends GDStack {
  constructor(scope: Construct, id: string, props: GDStackProps) {
    super(scope, id, props);

    // Normal CDK resource definitions
    new s3.Bucket(this, 'MyBucket', { ... });
  }
}
This factory connects our custom components with CDK’s synthesis system:
export const GDStackSynthesizerFactory = () => {
    return AppStagingSynthesizer.customFactory({
        factory: new GDStagingStackFactory(),
        deploymentIdentities: DeploymentIdentities.cliCredentials(),
    });
};This implements the IStagingResourcesFactory interface to dynamically create staging resources:
export class GDStagingStackFactory implements IStagingResourcesFactory {
    public obtainStagingResources(
        stack: cdk.Stack,
        context: ObtainStagingResourcesContext,
    ): IStagingResources {
        const app = cdk.App.of(stack)!;
        const appId = getAppIdFromContext(app.node);

        const stagingStack = new GDStagingStack(
            app!,
            `StagingStack-${appId}-${context.environmentString}`,
            {
                env: { region: stack.region, account: stack.account },
                appId: appId,
            },
        );

        return stagingStack;
    }
}This stack implements IStagingResources and creates rule-compliant assets on demand:
export class GDStagingStack extends cdk.Stack implements IStagingResources {
    constructor(scope: Construct, id: string, props: GDStagingStackProps) {
        super(scope, id, {
            ...props,
            // The magic ingredient - BootstraplessCliSynthesizer
            synthesizer: new BootstraplessCliSynthesizer(),
            description: `This stack includes resources needed to deploy the AWS CDK app ${props.appId} into this environment`,
        });

        // Apply governance conformers to everything
        this.applyGovernanceConformers();

        // Create compliant resources
        const bucket = new s3.Bucket(this, "CdkStagingBucket", {
            bucketName: `cdk-${this.appId}-staging-${this.account}-${this.region}`,
            // Conformers ensure encryption, logging, and other requirements
        });

        // Additional resource creation...
    }
}
The cornerstone of our solution is a custom synthesizer BootstraplessCliSynthesizer that combines the best aspects of AWS CDK’s built-in synthesizers BootstraplessSynthesizer and CliCredentialsStackSynthesizer.
It brings together key features from both AWS CDK synthesizers while adding our own innovations:
This synthesizer:
export class BootstraplessCliSynthesizer extends cdk.StackSynthesizer {
    constructor() {
        super();
    }

    // Prevent asset uploads to enforce governance compliance
    public addFileAsset(_asset: cdk.FileAssetSource): cdk.FileAssetLocation {
        throw new Error(
            "Cannot add assets to a Stack that uses the BootstraplessCliSynthesizer",
        );
    }

    public addDockerImageAsset(
        _asset: cdk.DockerImageAssetSource,
    ): cdk.DockerImageAssetLocation {
        throw new Error(
            "Cannot add assets to a Stack that uses the BootstraplessCliSynthesizer",
        );
    }

    // Minimal synthesis - just template generation and artifact emission
    public synthesize(session: cdk.ISynthesisSession): void {
        // Same as LegacySynthesizer
        this.synthesizeTemplate(session);
        this.emitArtifact(session);
    }
}
Our innovation was creating a synthesizer used only for the GDStagingStack that works in concert with our factory pattern. Rather than assuming pre-existing bootstrap resources, it enables the staging stack itself to create the required asset resources on demand, achieving enhanced bootstrapless deployments while maintaining governance compliance.
Our solution transformed the developer experience through intelligent, on-demand resource provisioning:
Our Previous Custom Approach:
# Pre-provision compliant bootstrap resources
npx cdk bootstrap --template node_modules/internal-constructs/bootstrap-template.yaml --tags governance=safeguard
# Deploy applications
npx cdk deploy
Our New Enhanced Bootstrapless Approach:
# Deploy directly - compliant staging resources created automatically when needed
npx cdk deploy
The key advantage is our intelligent asset management:
Behind the scenes, our architecture:
| Approach | Bootstrap Required | Security Model | Asset Management | GoDaddy Governance | Developer Workflow |
| AWS CDK v2 Default | Yes (one-time) | 5 deployment roles | Pre-provisioned bootstrap stack | Failed validation checks | Standard setup + deploy |
| Custom Template + CliCredentialsStackSynthesizer | Yes (one-time) | CLI credentials | Compliant bootstrap stack via custom template | Passes all checks | Setup + deploy |
| GDStagingStack + BootstraplessCliSynthesizer | No | CLI credentials | Compliant staging resources created dynamically on-demand | Passes all checks | Deploy only |
The business value of our bootstrapless approach has been significant for GoDaddy’s infrastructure teams:
This bootstrapless approach has worked well for GoDaddy’s specific governance requirements and development workflow preferences, demonstrating one way to integrate enterprise compliance seamlessly into AWS CDK deployments.
The evolution from bootstrap – dependent to bootstrapless CDK deployments represents more than a technical improvement—it demonstrates a pathway to eliminate friction while strengthening organization specific governance. Our implementation at GoDaddy validates that enterprise compliance and developer productivity can be achieved simultaneously.
The future of infrastructure as code lies in systems that enforce governance invisibly while empowering developers to focus on business logic. As AWS CDK continues to evolve, the patterns we’ve demonstrated at GoDaddy provide a foundation for organizations to build their own invisible frameworks—where compliance becomes a catalyst for velocity rather than an obstacle to innovation.
The content and opinions in this blog are those of the third-party author and AWS is not responsible for the content or accuracy of this blog.
Post Syndicated from Naresh Rajaram original https://aws.amazon.com/blogs/big-data/bridging-data-silos-cross-bounded-context-querying-with-vanguards-operational-read-only-data-store-ords-using-amazon-redshift/
Are you modernizing your legacy batch processing systems? At Vanguard, we faced significant challenges with our legacy mainframe system that limited our ability to deliver modern, personalized customer experiences. Our centralized database architecture created performance bottlenecks and made it difficult to scale services independently for our millions of personal and institutional investors.
In this post, we show you how we modernized our data architecture using Amazon Redshift as our Operational Read-only Data Store (ORDS). You’ll learn how we transitioned to a cloud-native, domain-driven architecture while preserving critical batch processing capabilities. We show you how this solution enabled us to create logically isolated data domains while maintaining cross-domain analytics capabilities—all while adhering to the principles of bounded contexts and distributed data ownership.
Background and challenges
As financial needs continue to evolve, Vanguard is committed to delivering adaptable, top-notch experiences that foster long-lasting customer relationships. This commitment spans from enhancing the personal investor journey to bringing personalized mobile dashboards and connecting institutional clients with advanced advice offerings.
To elevate customer experience and drive digital transformation, Vanguard has embraced domain-driven design principles. This approach focuses on creating autonomous teams, fostering faster innovation, and building data mesh architecture. Central to this transformation is the Personal Investor team’s mainframe modernization effort, transitioning from a legacy system to a cloud-based, distributed data architecture organized around bounded contexts – distinct business domains that manage their own data. As part of this shift, each microservice now manages its own local data store using Amazon Aurora PostgreSQL-Compatible Edition or Amazon DynamoDB. This approach enables domain-level data ownership and operational autonomy.
Vanguard’s existing mainframe system, built on a centralized Db2 database, enables cross-domain data access and integration but also introduces several architectural challenges. Though batch processes can join data across multiple bounded contexts using SQL joins and database operations to integrate information from various sources, this tight coupling creates significant risks and operational issues.
Challenges with the centralized database approach include:
To address these architectural challenges, we chose to use Amazon Redshift as our Operational Read-only Data Store (ORDS). The Amazon Redshift architecture has compute and storage separation, which enables us to create multi-cluster architectures with a separate endpoint for each domain with independent scaling of compute and storage resources. Our solution leverages the data sharing capabilities of Amazon Redshift to create logically isolated data domains while maintaining the ability to perform cross-domain analytics when needed.
Key benefits of the Amazon Redshift solution include:
Let’s explore the different solutions we evaluated before selecting ORDS with Amazon Redshift as our optimal approach.
We implemented ORDS as our optimal solution after conducting a comprehensive evaluation of available options. This section outlines our decision-making process and examines the alternatives we considered during our assessment.
Operational Read-only Data Store (ORDS):
In our evaluation, we found that using Amazon Redshift for ORDS provides a powerful solution for handling data across different business areas. It excels at managing large volumes of data from multiple sources, providing fast access to replicated data for batch processes that require cross-bounded context data, and combining information using familiar SQL queries. The solution particularly shines in handling high-volume reads from our data sources.
Advantages:
Disadvantages:
Here are the other solutions we evaluated:
Bulk APIs:
We found that Bulk APIs provides an approach for handling large volumes of data.
Advantages:
Disadvantages:
While Bulk APIs offer powerful capabilities, we found they require substantial team coordination and careful implementation to be effective.
Data Lake:
Our evaluation showed that data lakes can effectively combine information from different parts of our business. They excel at processing large amounts of data at once, providing search capabilities through unified data formats, and managing large volumes of diverse and complex data.
Advantages:
Disadvantages:
While data lakes excel at big-picture analysis of large datasets, they weren’t optimal for our real-time data needs and complex data relationships.
S3 Export/Exchange:
In our analysis, we found that S3 Export/Exchange provides a method for sharing data between different business areas using file storage. This approach effectively handles large volumes of data and allows straightforward filtering of information using data frames.
Advantages:
Disadvantages:
While S3 Export/Exchange works well for sharing large datasets between teams, it didn’t meet our requirements for quick, real-time access or immediately usable data formats.
The following table provides a high-level comparison of the different data integration solutions we considered for our modernization efforts. It outlines where each solution is most appropriate to use and when it might not be the best choice:
| Solution | Bulk APIs | Data Lake | ORDS | S3 Export/Exchange |
| When to use | Real-time operational data is needed
Fetching specific data subsets |
Processing large amounts of data at once
Many bounded context |
Near real-time access across multiple bounded contexts
Large volume batch processing |
Few bounded contextsHandling large volumes of data
Point-in-time export is sufficient |
| When not to use | Many bounded contexts involved | Real-time data access needed
Structured, transactional data processing |
Within a single bounded context | Real-time data needs
Many bounded contexts |
Table 1: Data Integration Solutions Comparison
Based on our comparison, we found ORDS to be the optimal solution for our needs, particularly when our batch processes require access to data from multiple bounded contexts in real-time. Our implementation efficiently handles large volumes of data, significantly improving the performance of our batch jobs. We chose ORDS because it stores data in a familiar table format, accessible via SQL, making it simple and efficient for our teams to use.
The architecture also aligns with our domain-driven design principles by enforcing clear data ownership, where each bounded context maintains responsibility for its own data management. This approach provides us with both scalability and reliability, reducing the risk of a single point of failure.
Amazon Redshift serves as the backbone of our ORDS implementation, offering several crucial features that support our modernization goals:
Data Sharing
Our solution leveraged the robust data sharing capabilities of Amazon Redshift, available on both Server-based Redshift RA3 instances and Redshift Serverless options. This functionality provided us with instant, secure, and live data access without copies, maintaining transactional consistency across our environment. The flexibility of same account, cross-account, and cross-Region data sharing has been particularly valuable for our distributed architecture.
High Performance
We’ve achieved significant performance improvements through Amazon Redshift’s efficient query processing and data retrieval capabilities. The system effectively handles our complex data needs while maintaining robust performance across various workloads and data volumes.
Multi-Availability Zone Support
Our implementation benefited from Amazon Redshift’s Multi-AZ support, which maintains high availability and reliability for our critical operations. This feature minimizes downtime without requiring extensive setup and significantly reduces our risk of data loss.
Familiar Interface
The relational environment of Amazon Redshift, similar traditional databases like Amazon RDS and IBM Db2, has enabled a smooth transition for our teams. This familiarity has accelerated adoption and improved productivity, as our teams can leverage their existing SQL expertise. By centralizing data from multiple business areas in ORDS using Amazon Redshift, we maintain consistent, efficient, and secure data access across our product teams. This setup is particularly valuable for our batch processing that requires data from various parts of the business, offering us a blend of performance, reliability, and ease of use.
Here’s how our ORDS architecture implements Amazon Redshift data sharing to solve these challenges:
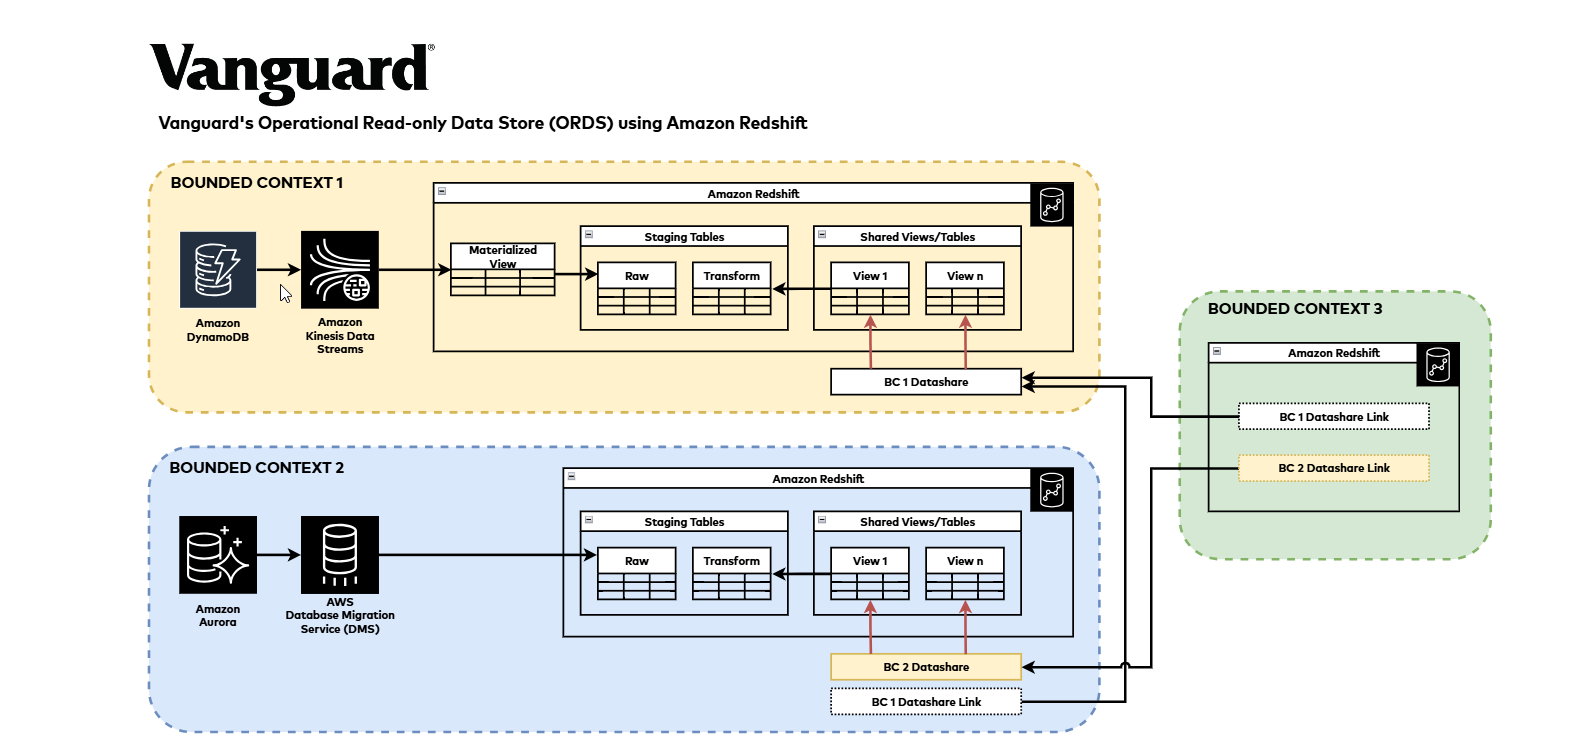
Figure 1: Vanguard’s ORDS Architecture using Amazon Redshift Data Sharing
Amazon Redshift Ingestion Pattern:
We utilized Amazon Redshift’s zero-ETL functionality to integrate data and enable real-time analytics directly on operational data, which helped reduce complexity and maintenance overhead. To complement this capability and to fulfill our comprehensive compliance requirements that necessitate complete transaction replication, we implemented additional data ingestion pipelines.
Our data ingestion strategy for Amazon Redshift employs different AWS services depending on the source. For Amazon Aurora PostgreSQL databases, we use AWS Database Migration Service (AWS DMS) to directly replicate data into Amazon Redshift. For data from Amazon DynamoDB, we leverage Amazon Kinesis to stream the data into Amazon Redshift, where it lands in materialized views. These views are then further processed to generate tables for end-users.
This approach allows us to efficiently ingest data from our operational data stores while meeting both analytical needs and compliance requirements.
Amazon Redshift Data Sharing:
We used the Amazon Redshift’s data sharing feature to effectively decouple our data producers from consumers, allowing each group to operate within their own boundaries while maintaining a unified and simplified governed mechanism for data sharing.
Our implementation followed a clear process: once data is ingested and available in Amazon Redshift table format, we created views for consumers to access the data. We then established data shares and granted access to these views to consumer Amazon Redshift data warehouses for batch processing. In our environment with multiple bounded contexts, we’ve established a collaborative model where consumers work with various producer teams to access data from different data shares, each created per bounded context.
This access remained strictly read-only—when consumers need to update or write new data that falls outside their bounded context, they must use APIs or other designated mechanisms for such operations. This approach has proven effective for our organization, promoting clear data ownership and governance while enabling flexible data access across organizational boundaries. It simplified our data management and made sure each team can operate independently while still sharing data effectively.
Disclaimer: This is provided for reference purposes only and does not represent a real example.
Let’s look at a practical example: our brokerage account statement generation process. This cross-bounded context batch process requires integrating data from multiple sources, accessing hundreds of tables and processing large volumes of data monthly. The challenge was to create an efficient, cost-effective solution that minimizes data replication while maintaining data accessibility.ORDS proved ideal for this use case, as it provides data from multiple bounded contexts without replication, offers near real-time access, and enables straightforward data aggregation using SQL-like queries in Amazon Redshift.
The following diagram shows how we implemented this solution:
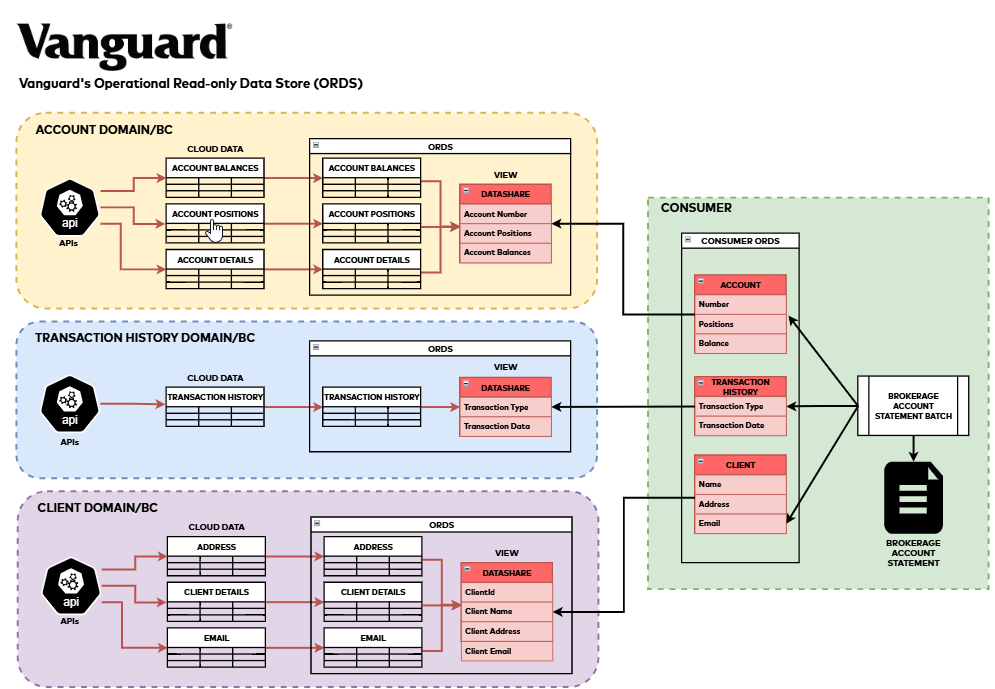
Figure 2: Cross-Bounded Context Example for Brokerage Account Statement Generation
We need the following bounded contexts to generate brokerage statements for millions of our clients.
Through this architecture, we efficiently generate accurate and comprehensive brokerage account statements by consolidating data from these bounded contexts, meeting both our clients’ needs and regulatory requirements.
Our journey with the Operational Read-only Data Store (ORDS) and Amazon Redshift has enhanced our client experience (CX) through improved data management and accessibility. By transitioning from our mainframe system to a cloud-based, domain-driven architecture, we have empowered our autonomous teams and established a resilient batch architecture.
This shift facilitates efficient cross-domain data access, maintains high-quality data consistency, and provides scalability. Our ORDS implementation, supported by Amazon Redshift, offers near-real-time access to large data volumes, guaranteeing high performance, reliability, and cost-effectiveness. This modernization effort aligns with our mission to deliver exceptional, personalized client experiences and sustain long-lasting client relationships.
If you are facing similar challenges with your batch processing systems, we encourage you to explore how an Operational Read-only Data Store (ORDS) can transform your data architecture. Start by assessing your current system’s limitations and identifying opportunities for improvement through domain-driven design and cloud-based solutions. Consider how this approach can help you manage large volumes of data from multiple sources, provide fast access to replicated data for batch processes, and support high-volume reads from various data sources.
Take the next step by conducting a proof of concept (POC) to evaluate ORDS effectiveness in achieving efficient cross-domain data access, improving the performance of batch jobs, and maintaining clear data ownership within your business domains. By implementing this solution, you can enhance your data management capabilities, reduce operational risks, and drive innovation within your organization. Embrace this opportunity to elevate your data architecture and deliver exceptional customer experiences.
Our transition to a cloud-native, domain-driven architecture with ORDS using Amazon Redshift has successfully transformed our batch processing capabilities in AWS cloud. This modernization effort has significantly enhanced the performance, reliability, and scalability of our batch operations while maintaining seamless data access and integration across different business domains.
The strategic adoption of ORDS has harnessed the potential of cross-domain data access in a distributed environment, providing us with a robust solution for real-time data access and efficient batch processing. This transformation has empowered us to better meet the demands of the digital age, delivering superior customer experiences and reinforcing our commitment to innovation in the financial services industry.
© 2025 The Vanguard Group, Inc. All rights reserved.
Post Syndicated from Ray Wang original https://aws.amazon.com/blogs/big-data/seamlessly-integrate-data-on-google-bigquery-and-clickhouse-cloud-with-aws-glue/
Migrating from Google Cloud’s BigQuery to ClickHouse Cloud on AWS allows businesses to leverage the speed and efficiency of ClickHouse for real-time analytics while benefiting from AWS’s scalable and secure environment. This article provides a comprehensive guide to executing a direct data migration using AWS Glue ETL, highlighting the advantages and best practices for a seamless transition.
AWS Glue ETL enables organizations to discover, prepare, and integrate data at scale without the burden of managing infrastructure. With its built-in connectivity, Glue can seamlessly read data from Google Cloud’s BigQuery and write it to ClickHouse Cloud on AWS, removing the need for custom connectors or complex integration scripts. Beyond connectivity, Glue also provides advanced capabilities such as a visual ETL authoring interface, automated job scheduling, and serverless scaling, allowing teams to design, monitor, and manage their pipelines more efficiently. Together, these features simplify data integration, reduce latency, and deliver significant cost savings, enabling faster and more reliable migrations.
Before using AWS Glue to integrate data into ClickHouse Cloud, you must first set up the ClickHouse environment on AWS. This includes creating and configuring your ClickHouse Cloud on AWS, making sure network access and security groups are properly defined, and verifying that the cluster endpoint is accessible. Once the ClickHouse environment is ready, you can leverage the AWS Glue built-in connector to seamlessly write data into ClickHouse Cloud from sources such as Google Cloud BigQuery. You can follow the next section to complete the setup.
ClickHouse in the search bar. Then choose ClickHouse Connector for AWS Glue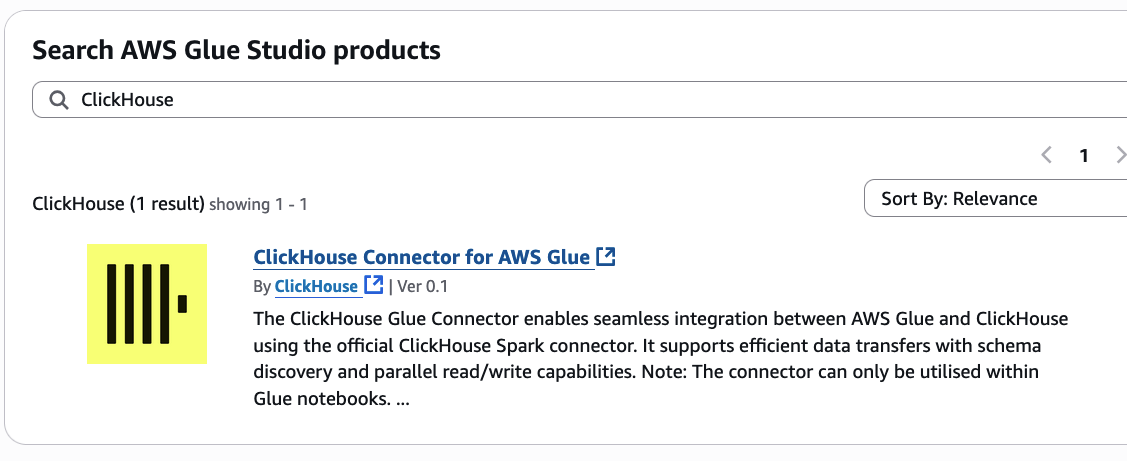
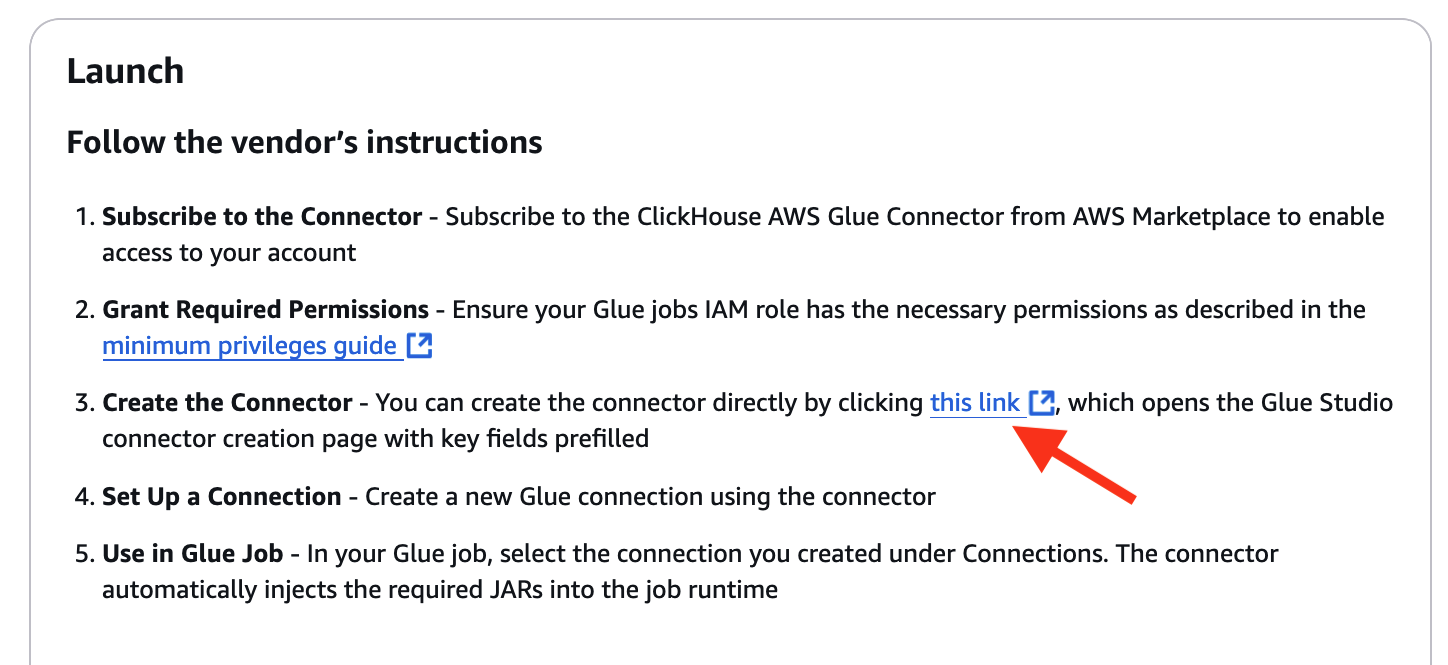
AWS Glue enables direct migration by connecting with ClickHouse Cloud on AWS through built-in connectors, allowing for seamless ETL operations. Within the Glue console, users can configure jobs to read data from S3 and write it directly to ClickHouse Cloud. Using AWS Glue Data Catalog, data in S3 can be indexed for efficient processing, while Glue’s PySpark support allows for complex data transformations, including data type conversions, to support compatibility with ClickHouse’s schema.
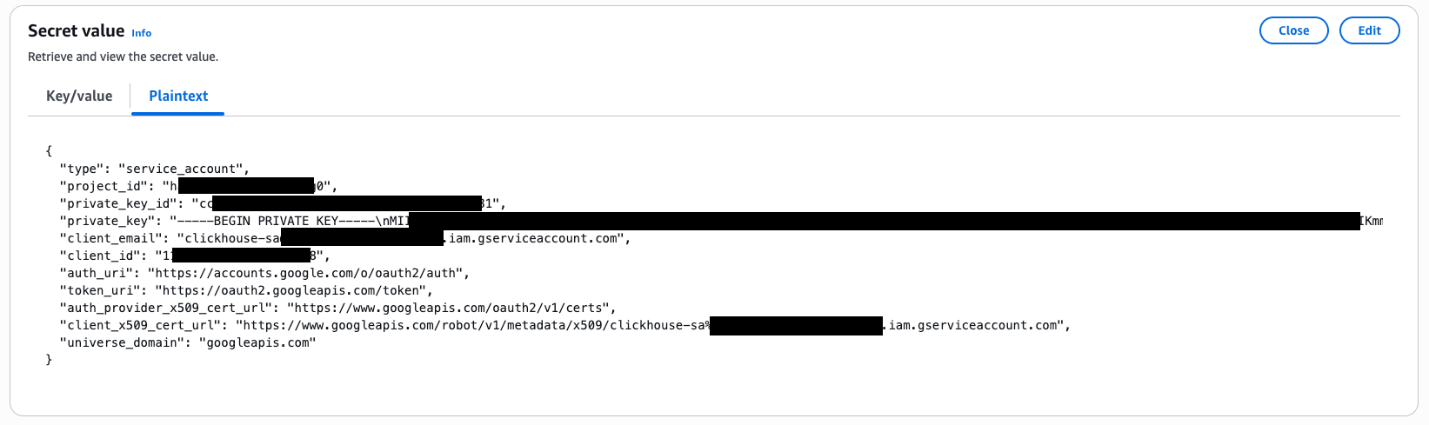
type: service_account.project_id: The ID of the GCP project.private_key_id: A unique ID for the private key within the file.private_key: The actual private key.client_email: The email address of the service account.client_id: A unique client ID associated with the service account.client_x509_cert_url: URLs for authentication and token exchange with Google’s identity and access management systems.universe_domain: The domain name of GCP, googleapis.com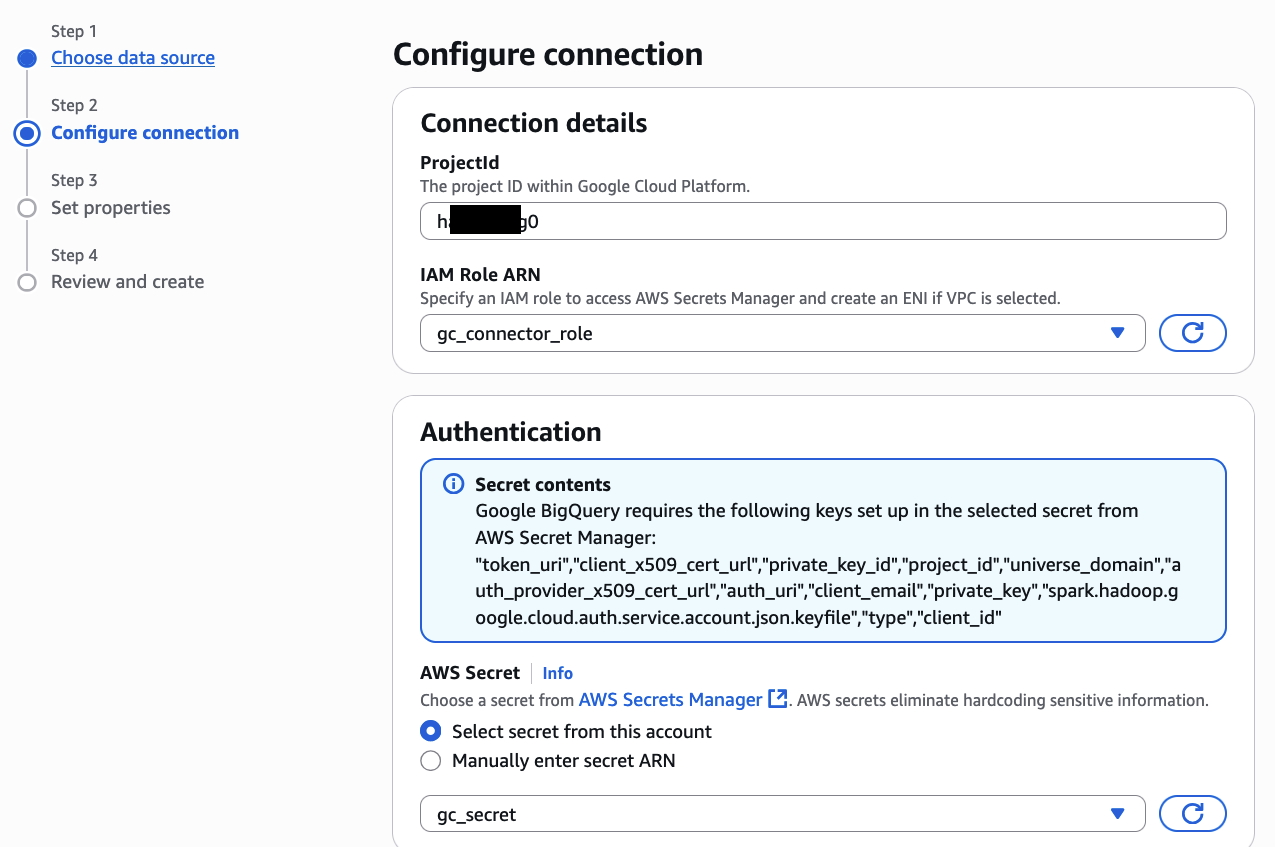
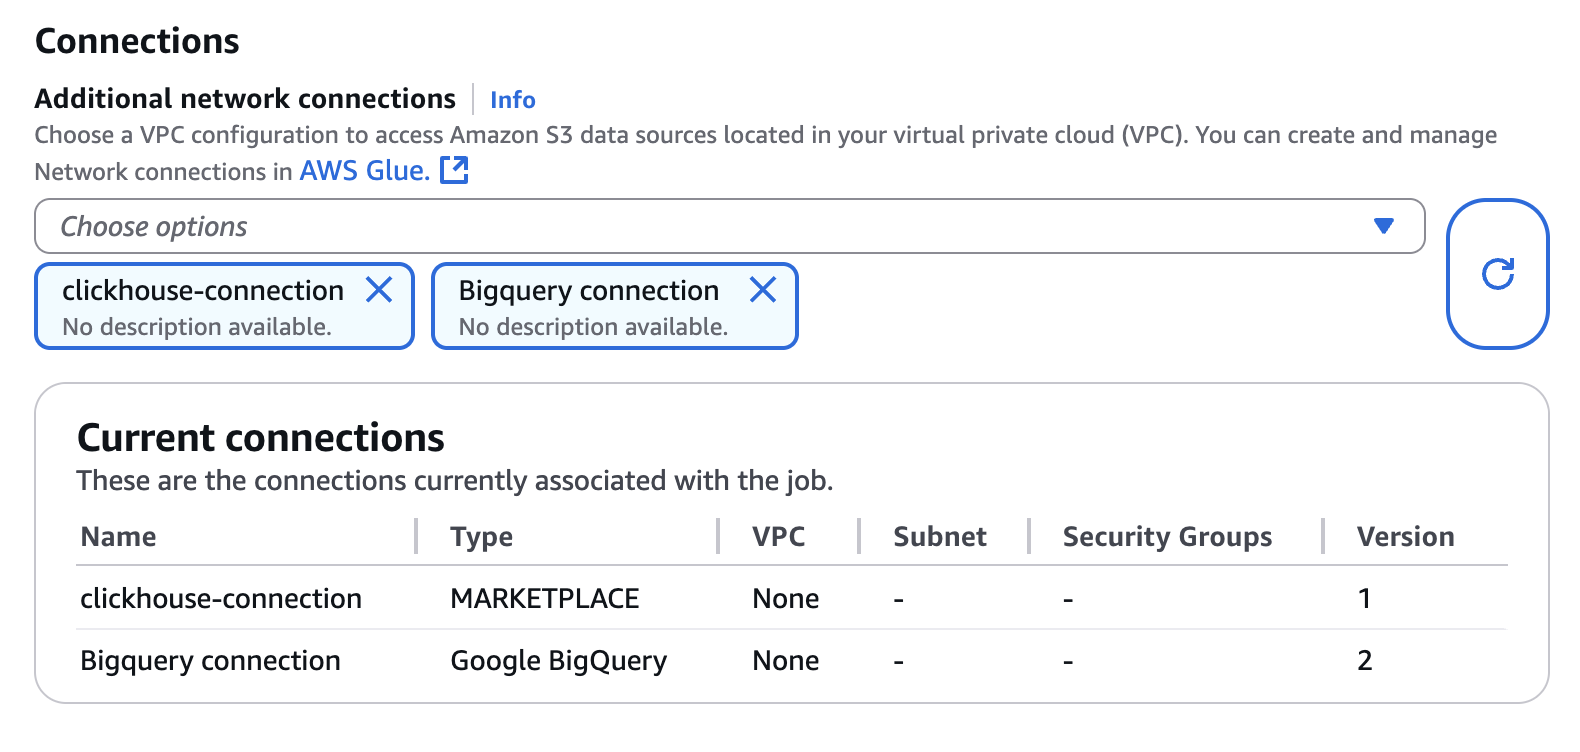
clickhouse-connection as its connection name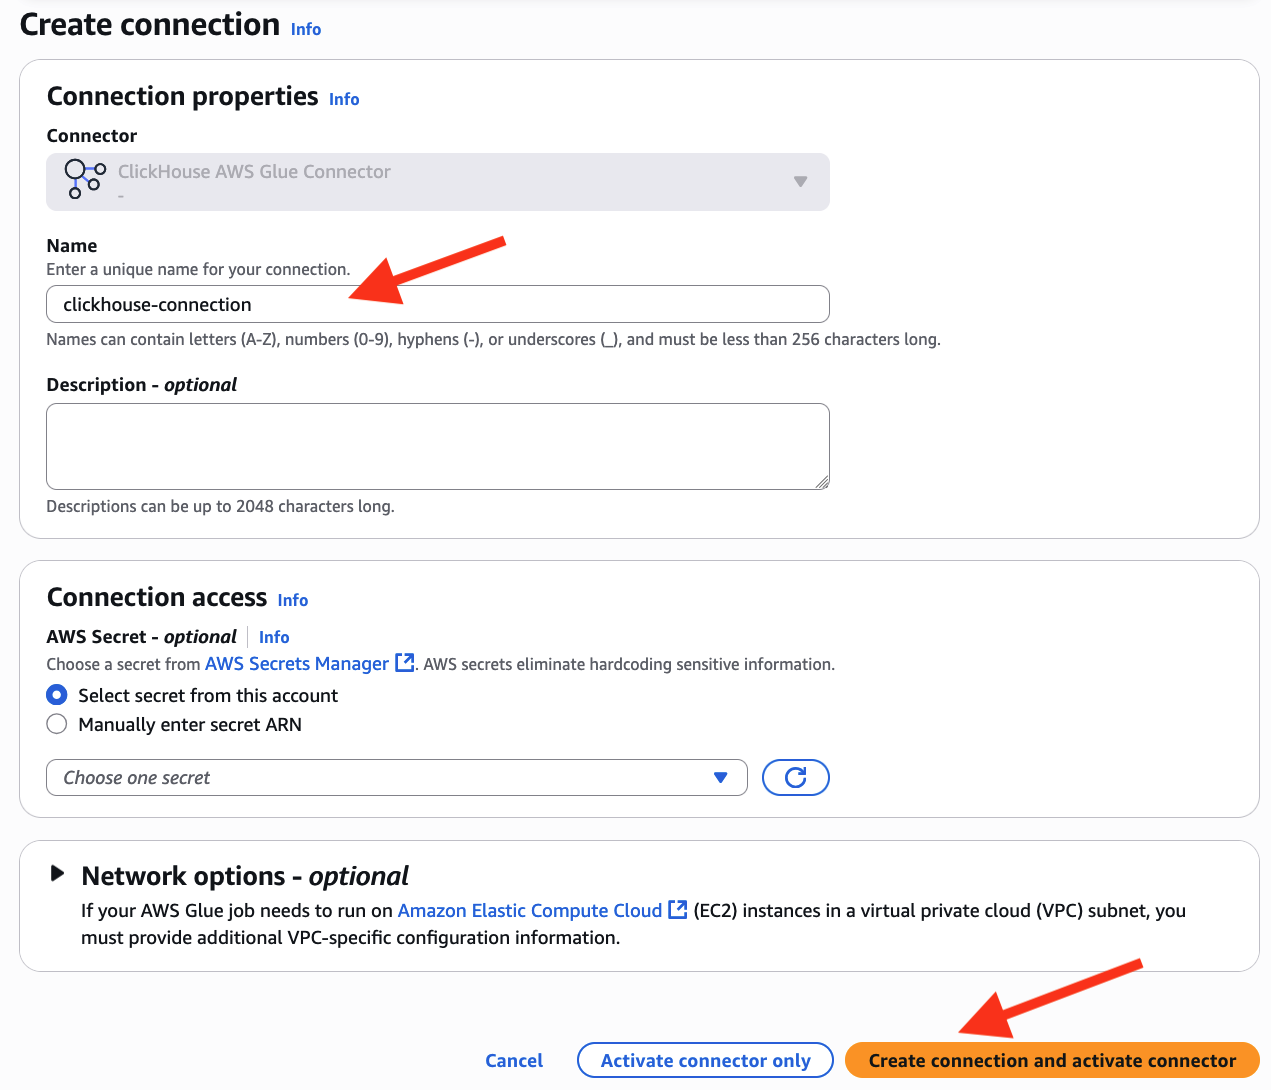
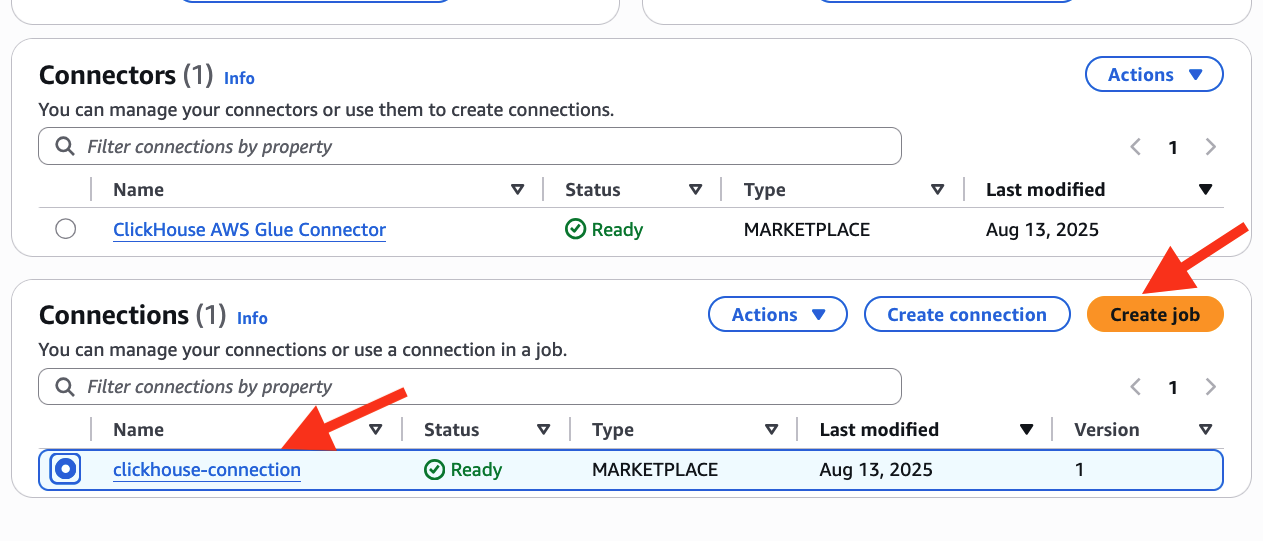
bq_to_clickhouse as its job name and configure gc_connector_role as its IAM Role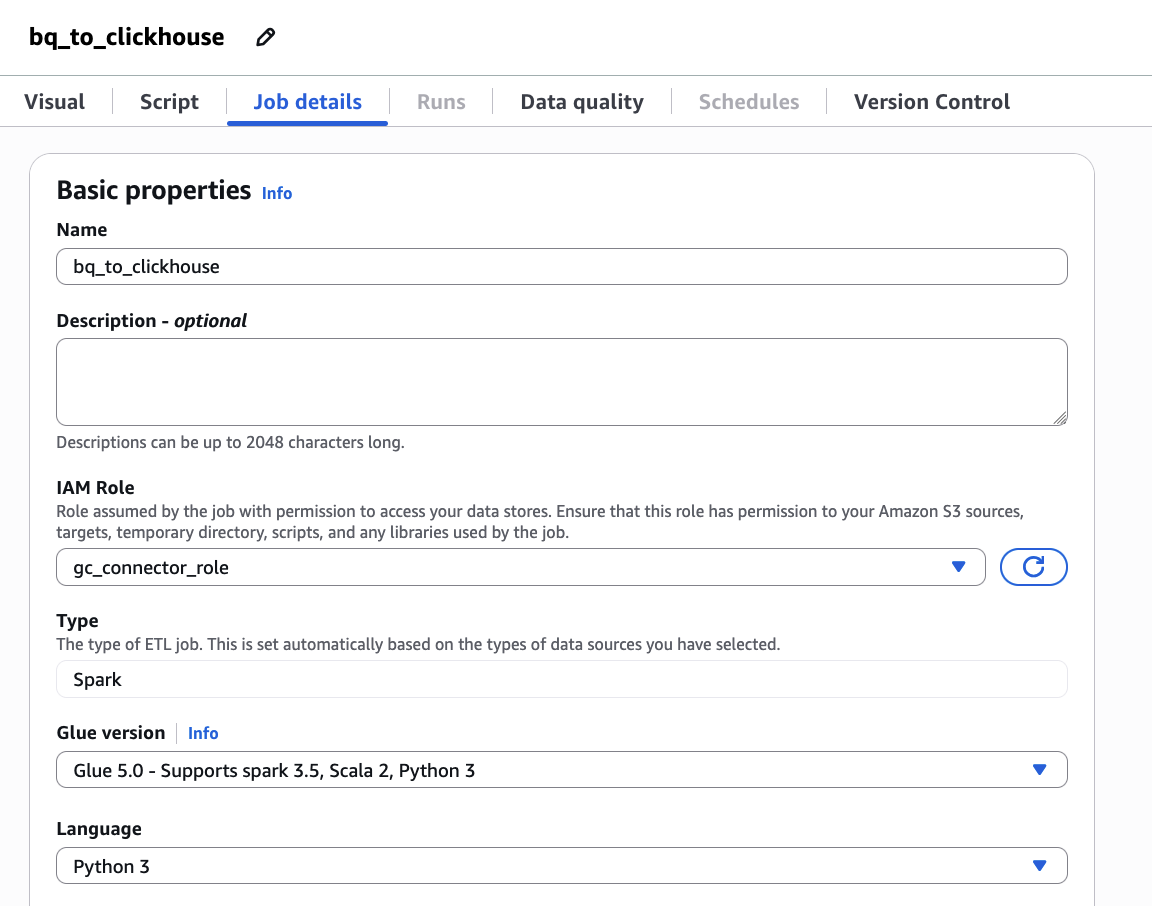
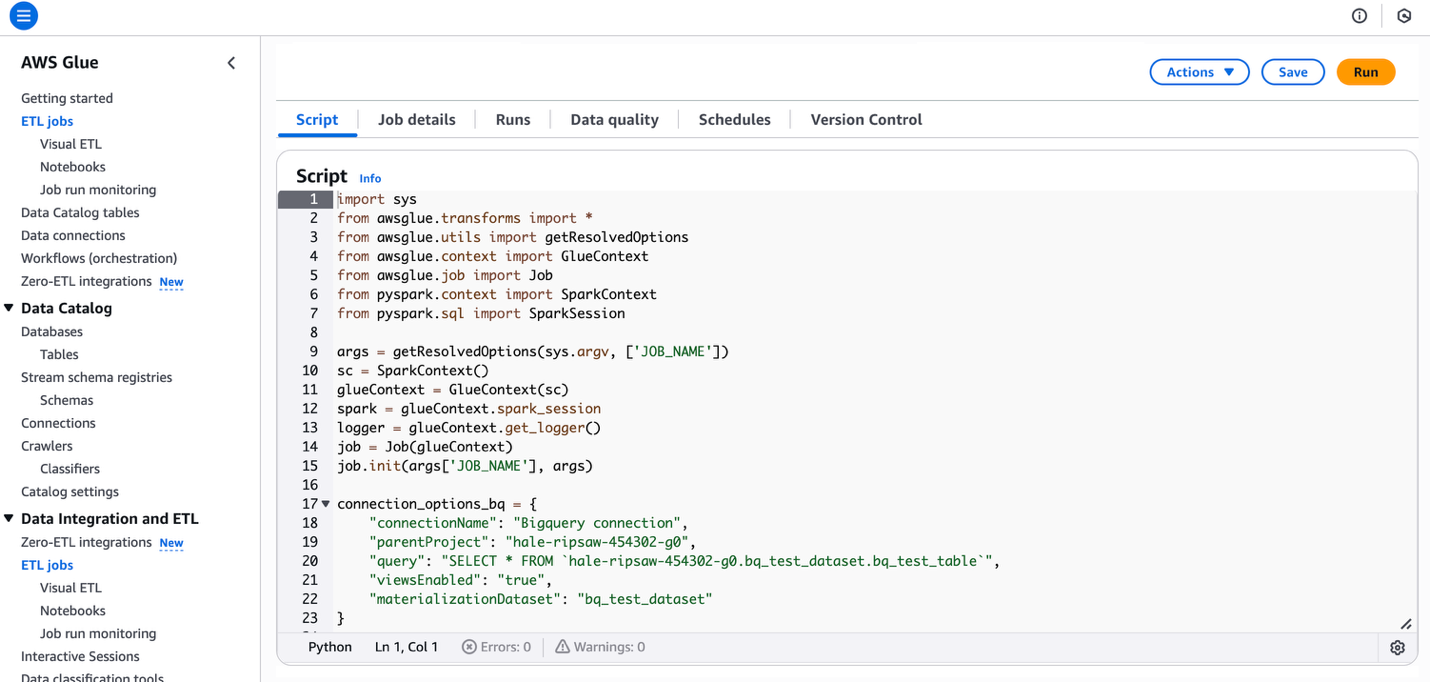
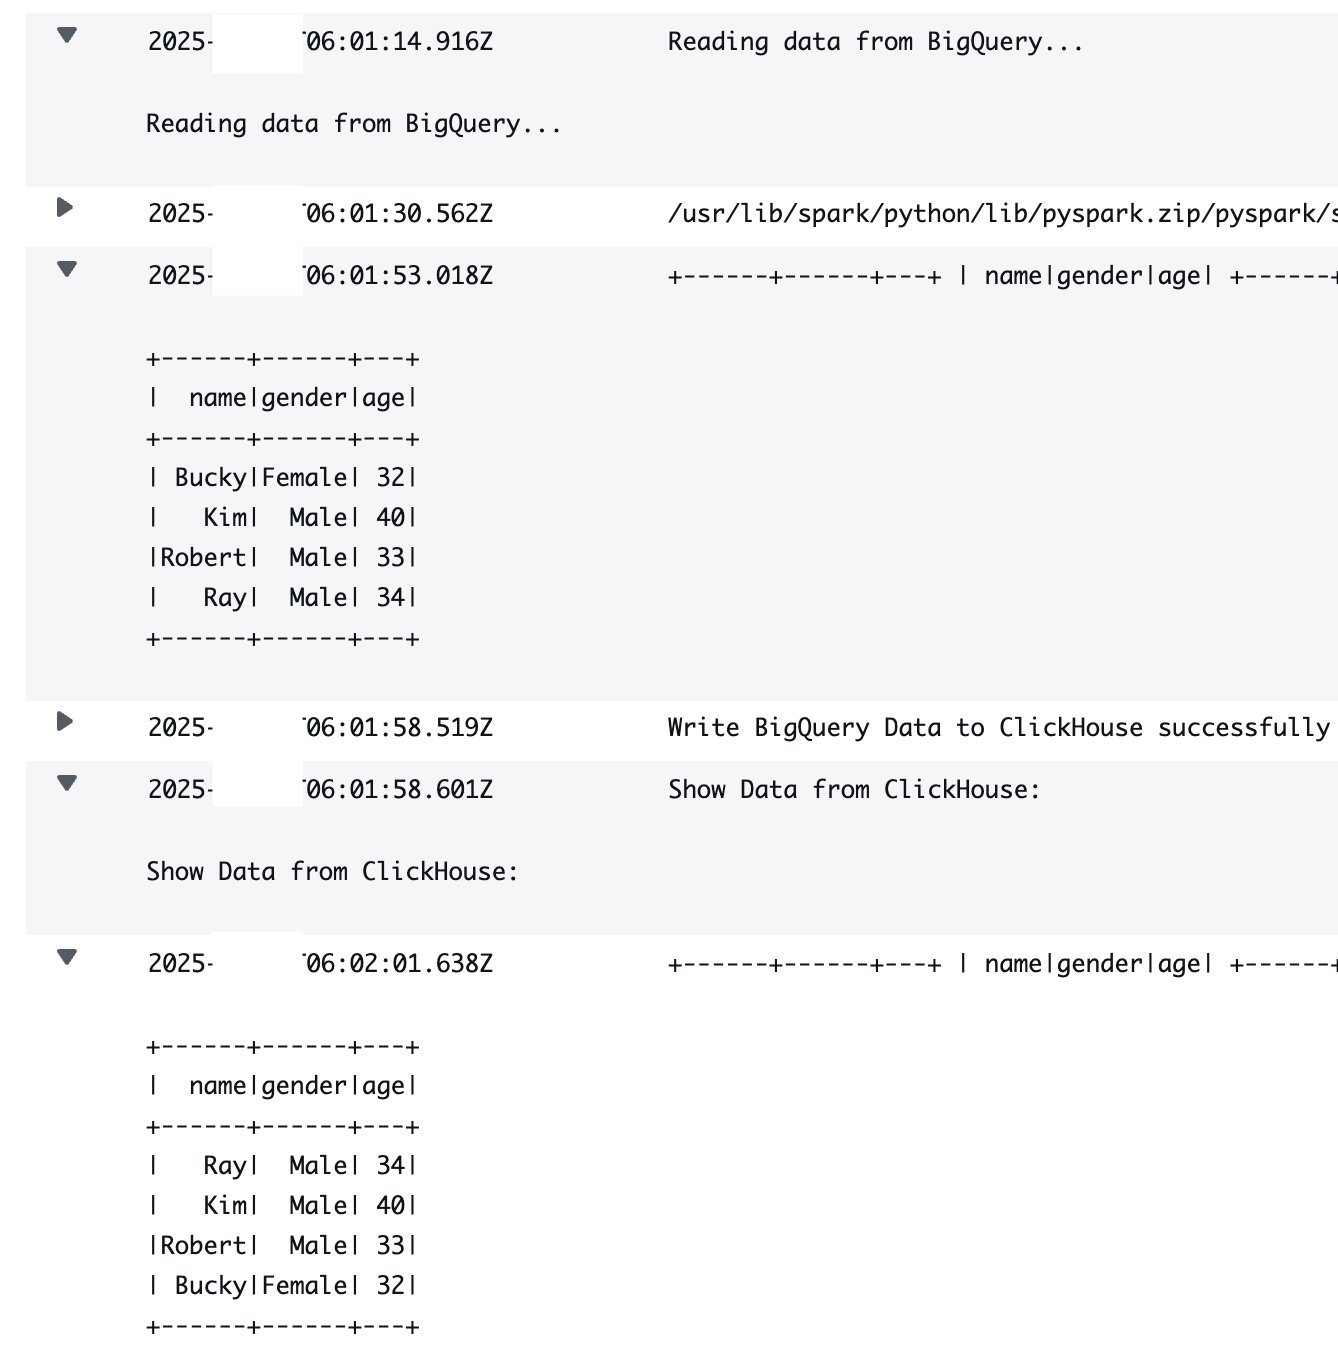
Testing is crucial to verify data accuracy and performance in the new environment. After the migration completes, run data integrity checks to confirm record counts and data quality in ClickHouse Cloud. Schema validation is essential, as each data field must align correctly with ClickHouse’s format. Running performance benchmarks, such as sample queries, will help verify that ClickHouse’s setup delivers the desired speed and efficiency gains.
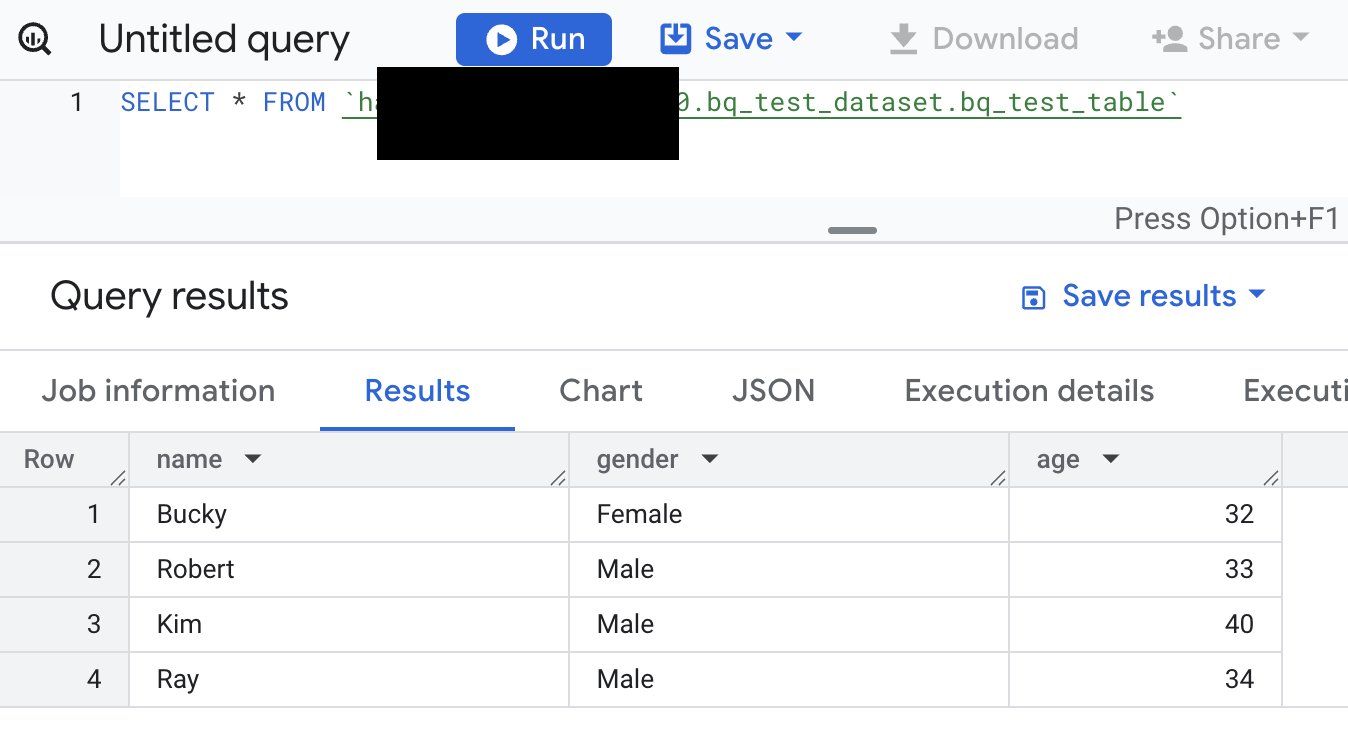
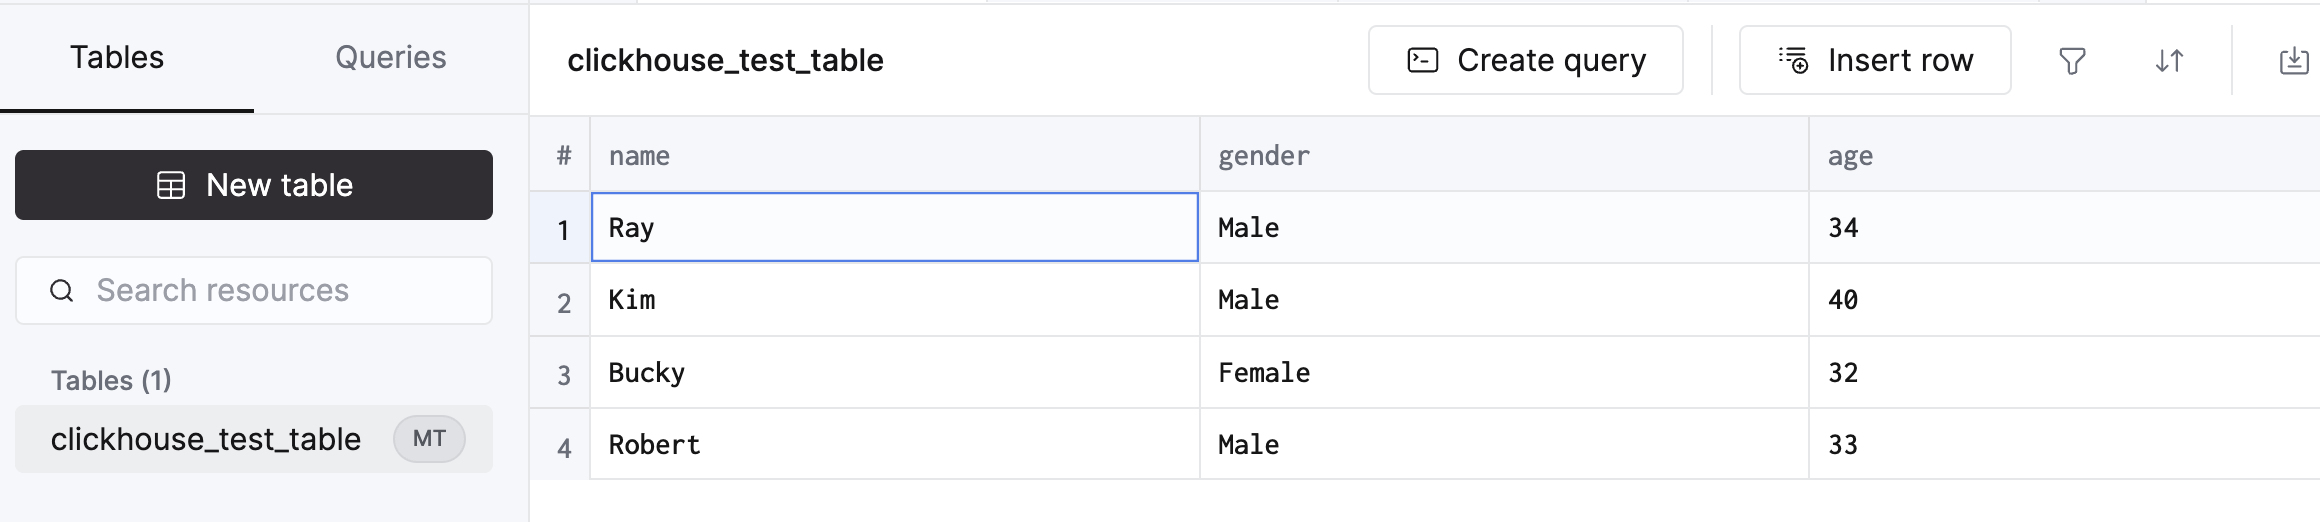
After completing the migration, it’s important to clean up unused resources—such as BigQuery for sample data import and database resources in ClickHouse Cloud—to avoid unnecessary costs. Regarding IAM permissions, adhering to the principle of least privilege is advisable. This involves granting users and roles only the permissions necessary for their tasks and removing unnecessary permissions when they are no longer required. This approach enhances security by minimizing potential threat surfaces. Additionally, reviewing AWS Glue job costs and configurations can help identify optimization opportunities for future migrations. Monitoring overall costs and analyzing usage can reveal areas where code or configuration improvements may lead to cost savings.
AWS Glue ETL offers a robust and user-friendly solution for migrating data from BigQuery to ClickHouse Cloud on AWS. By utilizing Glue’s serverless architecture, organizations can perform data migrations that are efficient, secure, and cost-effective. The direct integration with ClickHouse streamlines data transfer, supporting high performance and flexibility. This migration approach is particularly well-suited for companies looking to enhance their real-time analytics capabilities on AWS.
Post Syndicated from jake original https://lwn.net/Articles/1041023/
Version 2025.10 of the U-Boot boot loader
has been released with new features, including Python tooling improvements,
cleanups for implicit header inclusions, better support for numerous Arm
platforms, support for new RISC-V platforms, better documentation, and
more. Maintainer Tom Rini also reports on some project news:
As I mentioned with the v2025.07
release, I was looking for a few people to step up and help with the
overall organization and management of the project. To that end, Peter
Robinson and Neil Armstrong have stepped up and have been helping me.
This has been part of the process for the project to join up under the
Software Freedom Conservancy’s (SFC) umbrella and have a legal entity
that can help the project work with other legal entities on things like
donations.
Post Syndicated from Channy Yun (윤석찬) original https://aws.amazon.com/blogs/aws/introducing-new-compute-optimized-amazon-ec2-c8i-and-c8i-flex-instances/
After launching Amazon Elastic Compute Cloud (Amazon EC2) memory-optimized R8i and R8i-flex instances and general-purpose M8i and M8i-flex instances, I am happy to announce the general availability of compute-optimized C8i and C8i-flex instances powered by custom Intel Xeon 6 processors available only on AWS with sustained all-core 3.9 GHz turbo frequency and feature a 2:1 ratio of memory to vCPU. These instances deliver the highest performance and fastest memory bandwidth among comparable Intel processors in the cloud.
The C8i and C8i-flex instances offer up to 15 percent better price-performance, and 2.5 times more memory bandwidth compared to C7i and C7i-flex instances. The C8i and C8i-flex instances are up to 60 percent faster for NGINX web applications, up to 40 percent faster for AI deep learning recommendation models, and 35 percent faster for Memcached stores compared to C7i and C7i-flex instances.
C8i and C8i-flex instances are ideal for running compute-intensive workloads, such as web servers, caching, Apache.Kafka, ElasticSearch, batch processing, distributed analytics, high performance computing (HPC), ad serving, highly scalable multiplayer gaming, and video encoding.
As like other 8th generation instances, these instances use the new sixth generation AWS Nitro Cards, delivering up to two times more network and Amazon Elastic Block Storage (Amazon EBS) bandwidth compared to the previous generation instances. They also support bandwidth configuration with 25 percent allocation adjustments between network and Amazon EBS bandwidth, enabling better database performance, query processing, and logging speeds.
C8i instances
C8i instances provide up to 384 vCPUs and 768 TB memory including bare metal instances that provide dedicated access to the underlying physical hardware. These instances help you to run compute-intensive workloads, such as CPU-based inference, and video streaming that need the largest instance sizes or high CPU continuously.
Here are the specs for C8i instances:
| Instance size | vCPUs | Memory (GiB) | Network bandwidth (Gbps) | EBS bandwidth (Gbps) |
| c8i.large | 2 | 4 | Up to 12.5 | Up to 10 |
| c8i.xlarge | 4 | 8 | Up to 12.5 | Up to 10 |
| c8i.2xlarge | 8 | 16 | Up to 15 | Up to 10 |
| c8i.4xlarge | 16 | 32 | Up to 15 | Up to 10 |
| c8i.8xlarge | 32 | 64 | 15 | 10 |
| c8i.12xlarge | 48 | 96 | 22.5 | 15 |
| c8i.16xlarge | 64 | 128 | 30 | 20 |
| c8i.24xlarge | 96 | 192 | 40 | 30 |
| c8i.32xlarge | 128 | 256 | 50 | 40 |
| c8i.48xlarge | 192 | 384 | 75 | 60 |
| c8i.96xlarge | 384 | 768 | 100 | 80 |
| c8i.metal-48xl | 192 | 384 | 75 | 60 |
| c8i.metal-96xl | 384 | 768 | 100 | 80 |
C8i-flex instances
C8i-flex instances are a lower-cost variant of the C8i instances, with 5 percent better price performance at 5 percent lower prices. These instances are designed for workloads that benefit from the latest generation performance but don’t fully utilize all compute resources. These instances can reach up to the full CPU performance 95 percent of the time.
Here are the specs for the C8i-flex instances:
| Instance size | vCPUs | Memory (GiB) | Network bandwidth (Gbps) | EBS bandwidth (Gbps) |
| c8i-flex.large | 2 | 4 | Up to 12.5 | Up to 10 |
| c8i-flex.xlarge | 4 | 8 | Up to 12.5 | Up to 10 |
| c8i-flex.2xlarge | 8 | 16 | Up to 15 | Up to 10 |
| c8i-flex.4xlarge | 16 | 32 | Up to 15 | Up to 10 |
| c8i-flex.8xlarge | 32 | 64 | Up to 15 | Up to 10 |
| c8i-flex.12xlarge | 48 | 96 | Up to 22.5 | Up to 15 |
| c8i-flex.16xlarge | 64 | 128 | Up to 30 | Up to 20 |
If you’re currently using earlier generations of compute-optimized instances, you can adopt C8i-flex instances without having to make changes to your application or your workload.
Now available
Amazon EC2 C8i and C8i-flex instances are available today in the US East (N. Virginia), US East (Ohio), US West (Oregon), and Europe (Spain) AWS Regions. C8i and C8i-flex instances can be purchased as On-Demand, Savings Plan, and Spot instances. C8i instances are also available in Dedicated Instances and Dedicated Hosts. To learn more, visit the Amazon EC2 Pricing page.
Give C8i and C8i-flex instances a try in the Amazon EC2 console. To learn more, visit the Amazon EC2 C8i instances page and send feedback to AWS re:Post for EC2 or through your usual AWS Support contacts.
— Channy
Post Syndicated from Sébastien Stormacq original https://aws.amazon.com/blogs/aws/aws-iam-identity-center-now-supports-customer-managed-kms-keys-for-encryption-at-rest/
Starting today, you can use your own AWS Key Management Service (AWS KMS) keys to encrypt identity data, such as user and group attributes, stored in AWS IAM Identity Center organization instances.
Many organizations operating in regulated industries need complete control over encryption key management. While Identity Center already encrypts data at rest using AWS-owned keys, some customers require the ability to manage their own encryption keys for audit and compliance purposes.
With this launch, you can now use customer-managed KMS keys (CMKs) to encrypt Identity Center identity data at rest. CMKs provide you with full control over the key lifecycle, including creation, rotation, and deletion. You can configure granular access controls to keys with AWS Key Management Service (AWS KMS) key policies and IAM policies, helping to ensure that only authorized principals can access your encrypted data. At launch time, the CMK must reside in the same AWS account and Region as your IAM Identity Center instance. The integration between Identity Center and KMS provides detailed AWS CloudTrail logs for auditing key usage and helps meet regulatory compliance requirements.
Identity Center supports both single-Region and multi-Region keys to match your deployment needs. While Identity Center instances can currently only be deployed in a single Region, we recommend using multi-Region AWS KMS keys unless your company policies restrict you to single-Region keys. Multi-Region keys provide consistent key material across Regions while maintaining independent key infrastructure in each Region. This gives you more flexibility in your encryption strategy and helps future-proof your deployment.
Let’s get started
Let’s imagine I want to use a CMK to encrypt the identity data of my Identity Center organization instance. My organization uses Identity Center to give employees access to AWS managed applications, such as Amazon Q Business or Amazon Athena.
As of today, some AWS managed applications cannot be used with Identity Center configured with a customer managed KMS key. See AWS managed applications that you can use with Identity Center to keep you updated with the ever evolving list of compatible applications.
The high-level process requires first to create a symmetric customer managed key (CMK) in AWS KMS. The key must be configured for encrypt and decrypt operations. Next, I configure the key policies to grant access to Identity Center, AWS managed applications, administrators, and other principals who need access the Identity Center and IAM Identity Center service APIs. Depending on your usage of Identity Center, you’ll have to define different policies for the key and IAM policies for IAM principals. The service documentation has more details to help you cover the most common use cases.
This demo is in three parts. I first create a customer managed key in AWS KMS and configure it with permissions that will authorize Identity Center and AWS managed applications to use it. Second, I update the IAM policies for the principals that will use the key from another AWS account, such as AWS applications administrators. Finally, I configure Identity Center to use the key.
Part 1: Create the key and define permissions
First, let’s create a new CMK in AWS KMS.
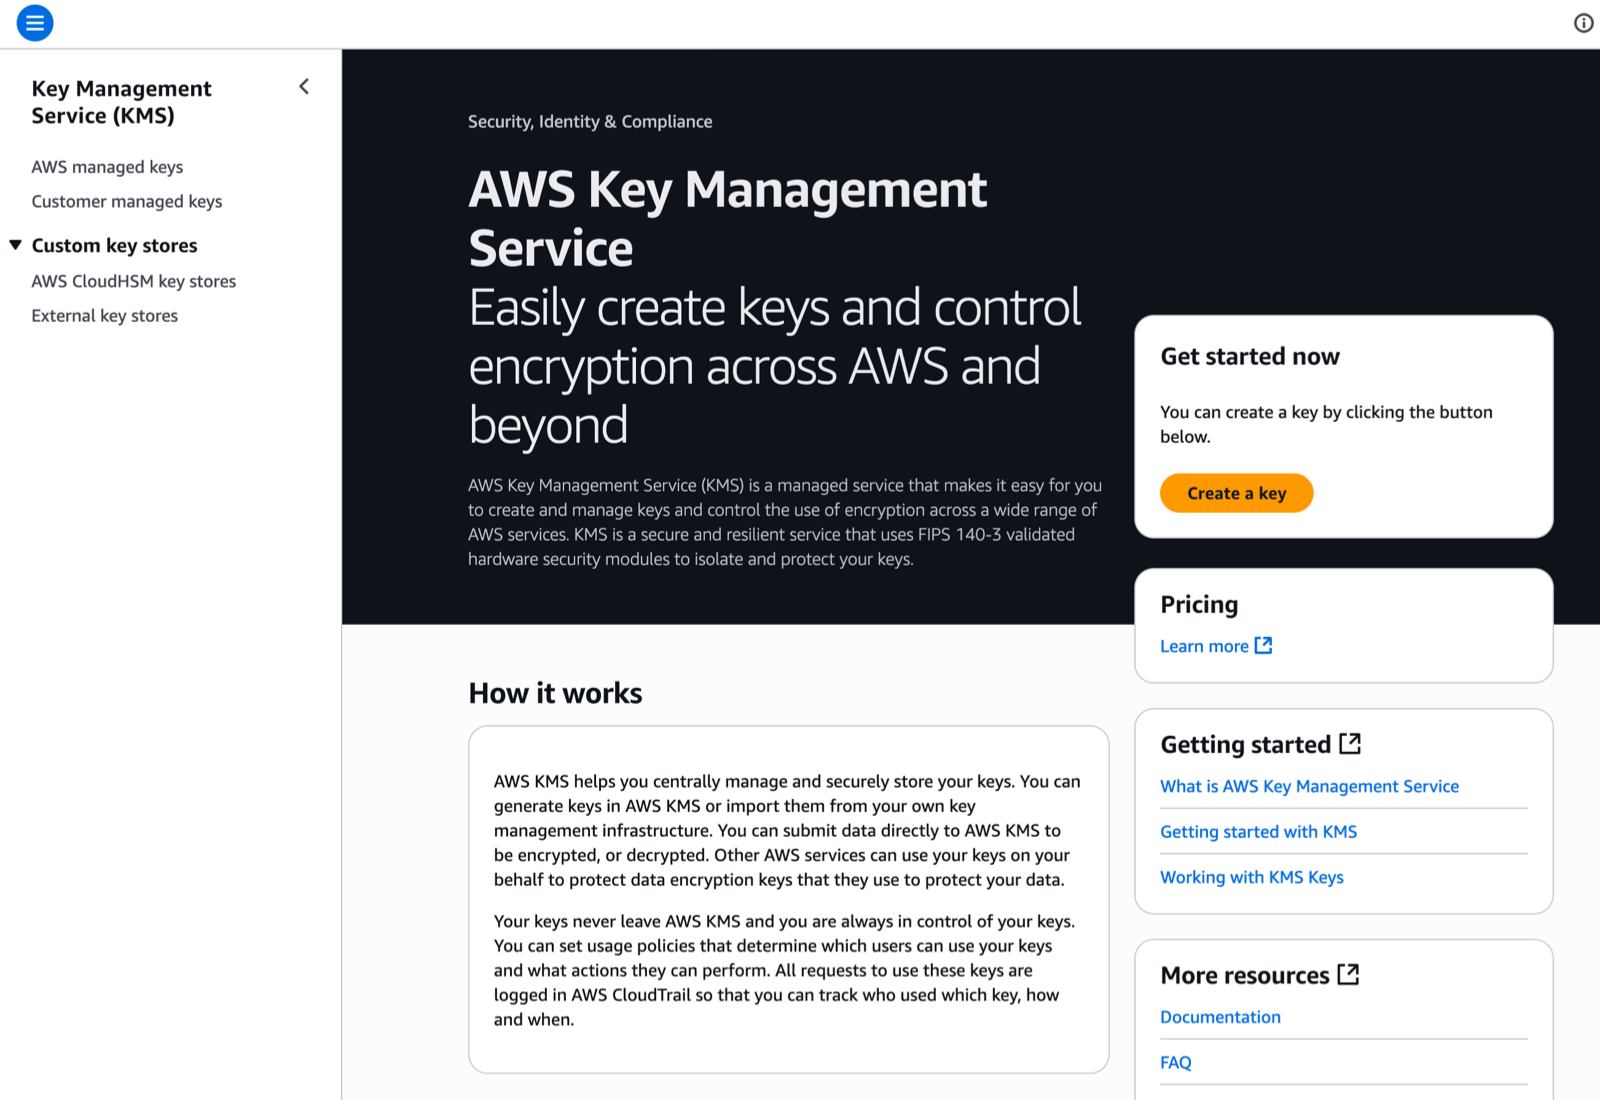
The key must be in the same AWS Region and AWS account as the Identity Center instance. You must create the Identity Center instance and the key in the management account of your organization within AWS Organization.
I navigate to the AWS Key Management Service (AWS KMS) console in the same Region as my Identity Center instance, then I choose Create a key. This launches me into the key creation wizard.
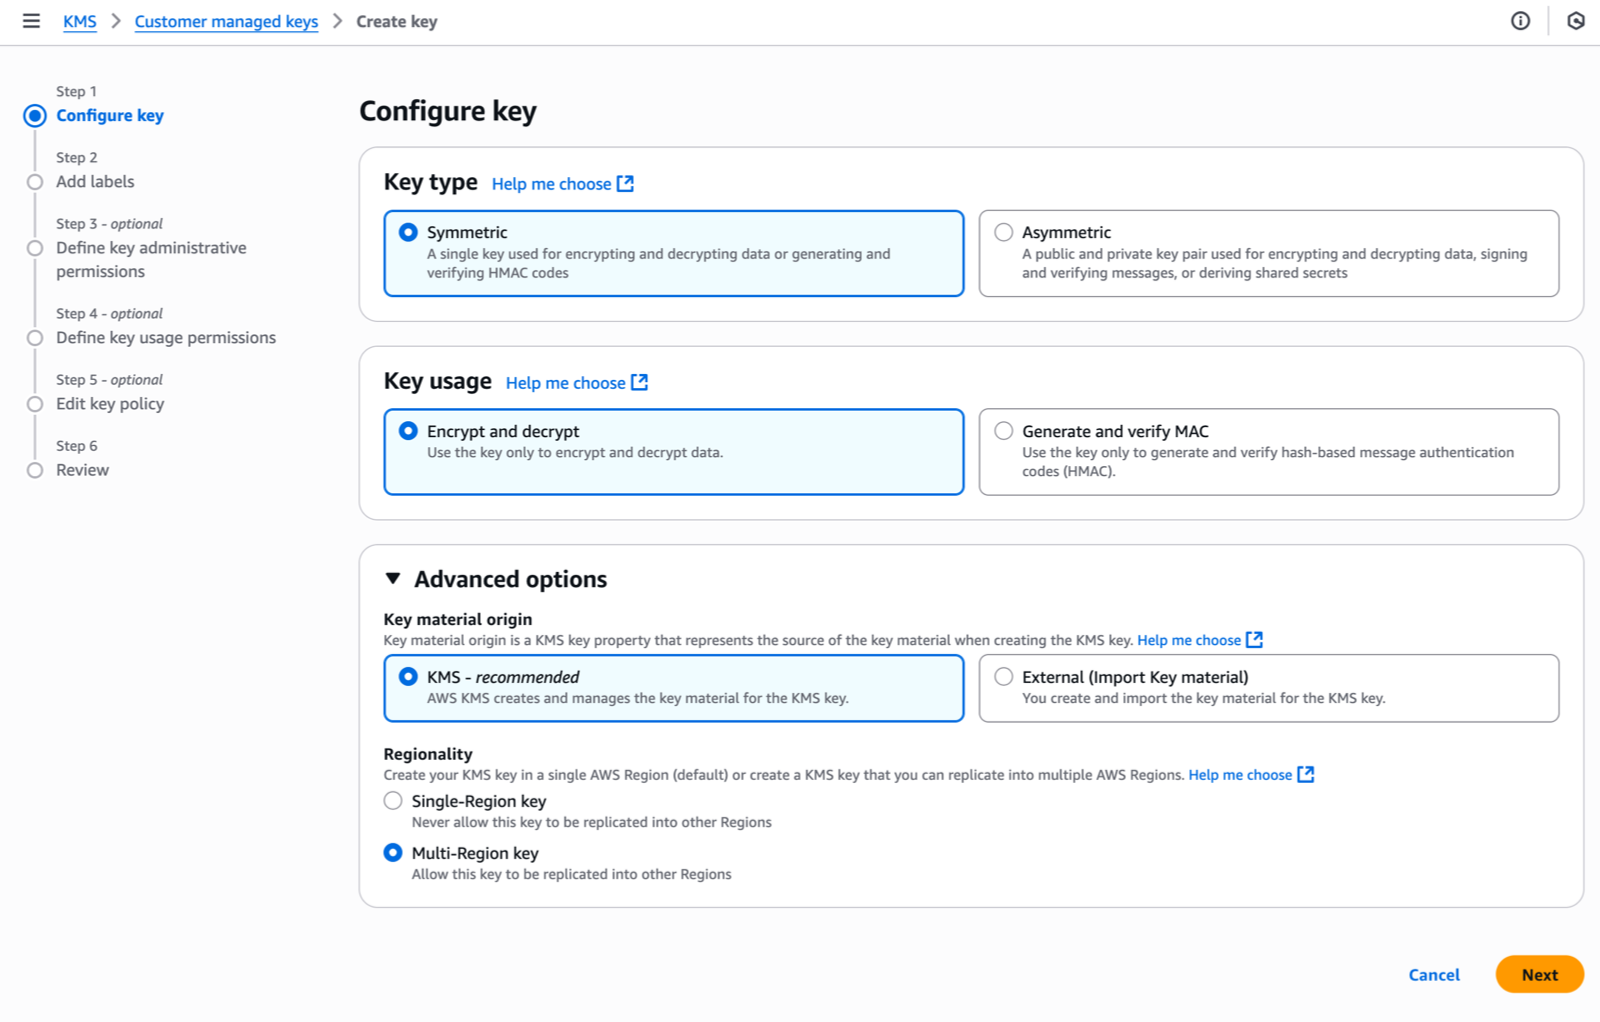
Under Step 1–Configure key, I select the key type–either Symmetric (a single key used for both encryption and decryption) or Asymmetric (a public-private key pair for encryption/decryption and signing/verification). Identity Center requires symmetric keys for encryption at rest. I select Symmetric.
For key usage, I select Encrypt and decrypt which allows the key to be used only for encrypting and decrypting data.
Under Advanced options, I select KMS – recommended for Key material origin, so AWS KMS creates and manages the key material.
For Regionality, I choose between Single-Region or Multi-Region key. I select Multi-Region key to allow key administrators to replicate the key to other Regions. As explained already, Identity Center doesn’t require this today but it helps to future-proof your configuration. Remember that you can not transform a single-Region key to a multi-Region one after its creation (but you can change the key used by Identity Center).
Then, I choose Next to proceed with additional configuration steps, such as adding labels, defining administrative permissions, setting usage permissions, and reviewing the final configuration before creating the key.
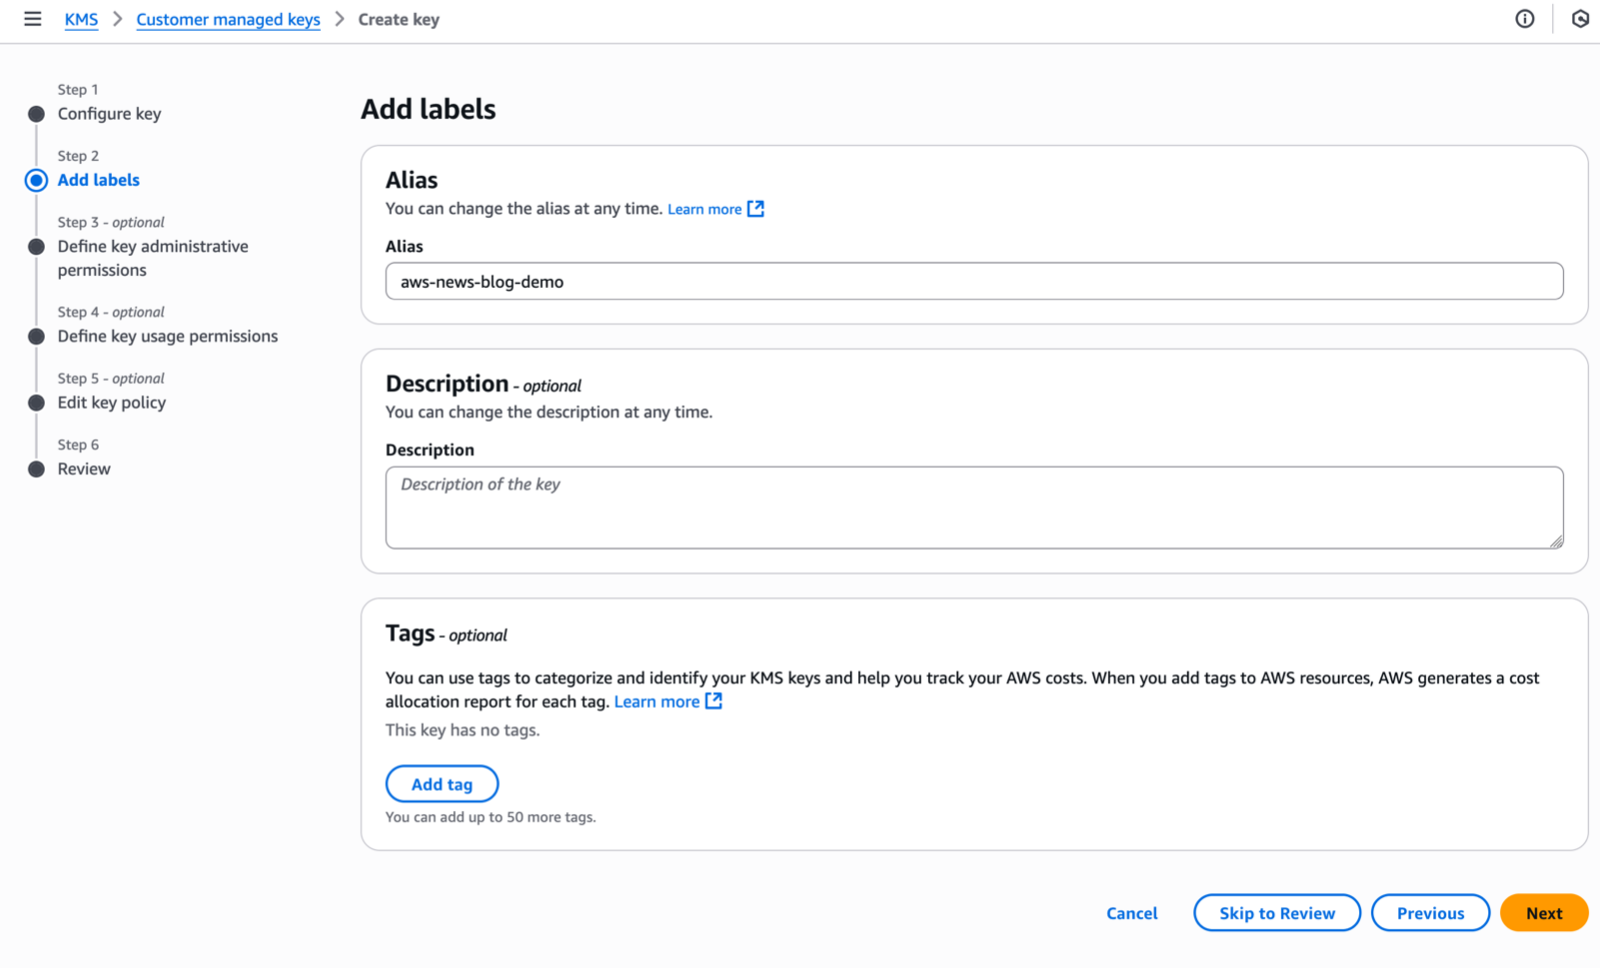
Under Step 2–Add Labels, I enter an Alias name for my key and select Next.
In this demo, I am editing the key policy by adding policy statements using templates provided in the documentation. I skip Step 3 and Step 4 and navigate to Step 5–Edit key policy.
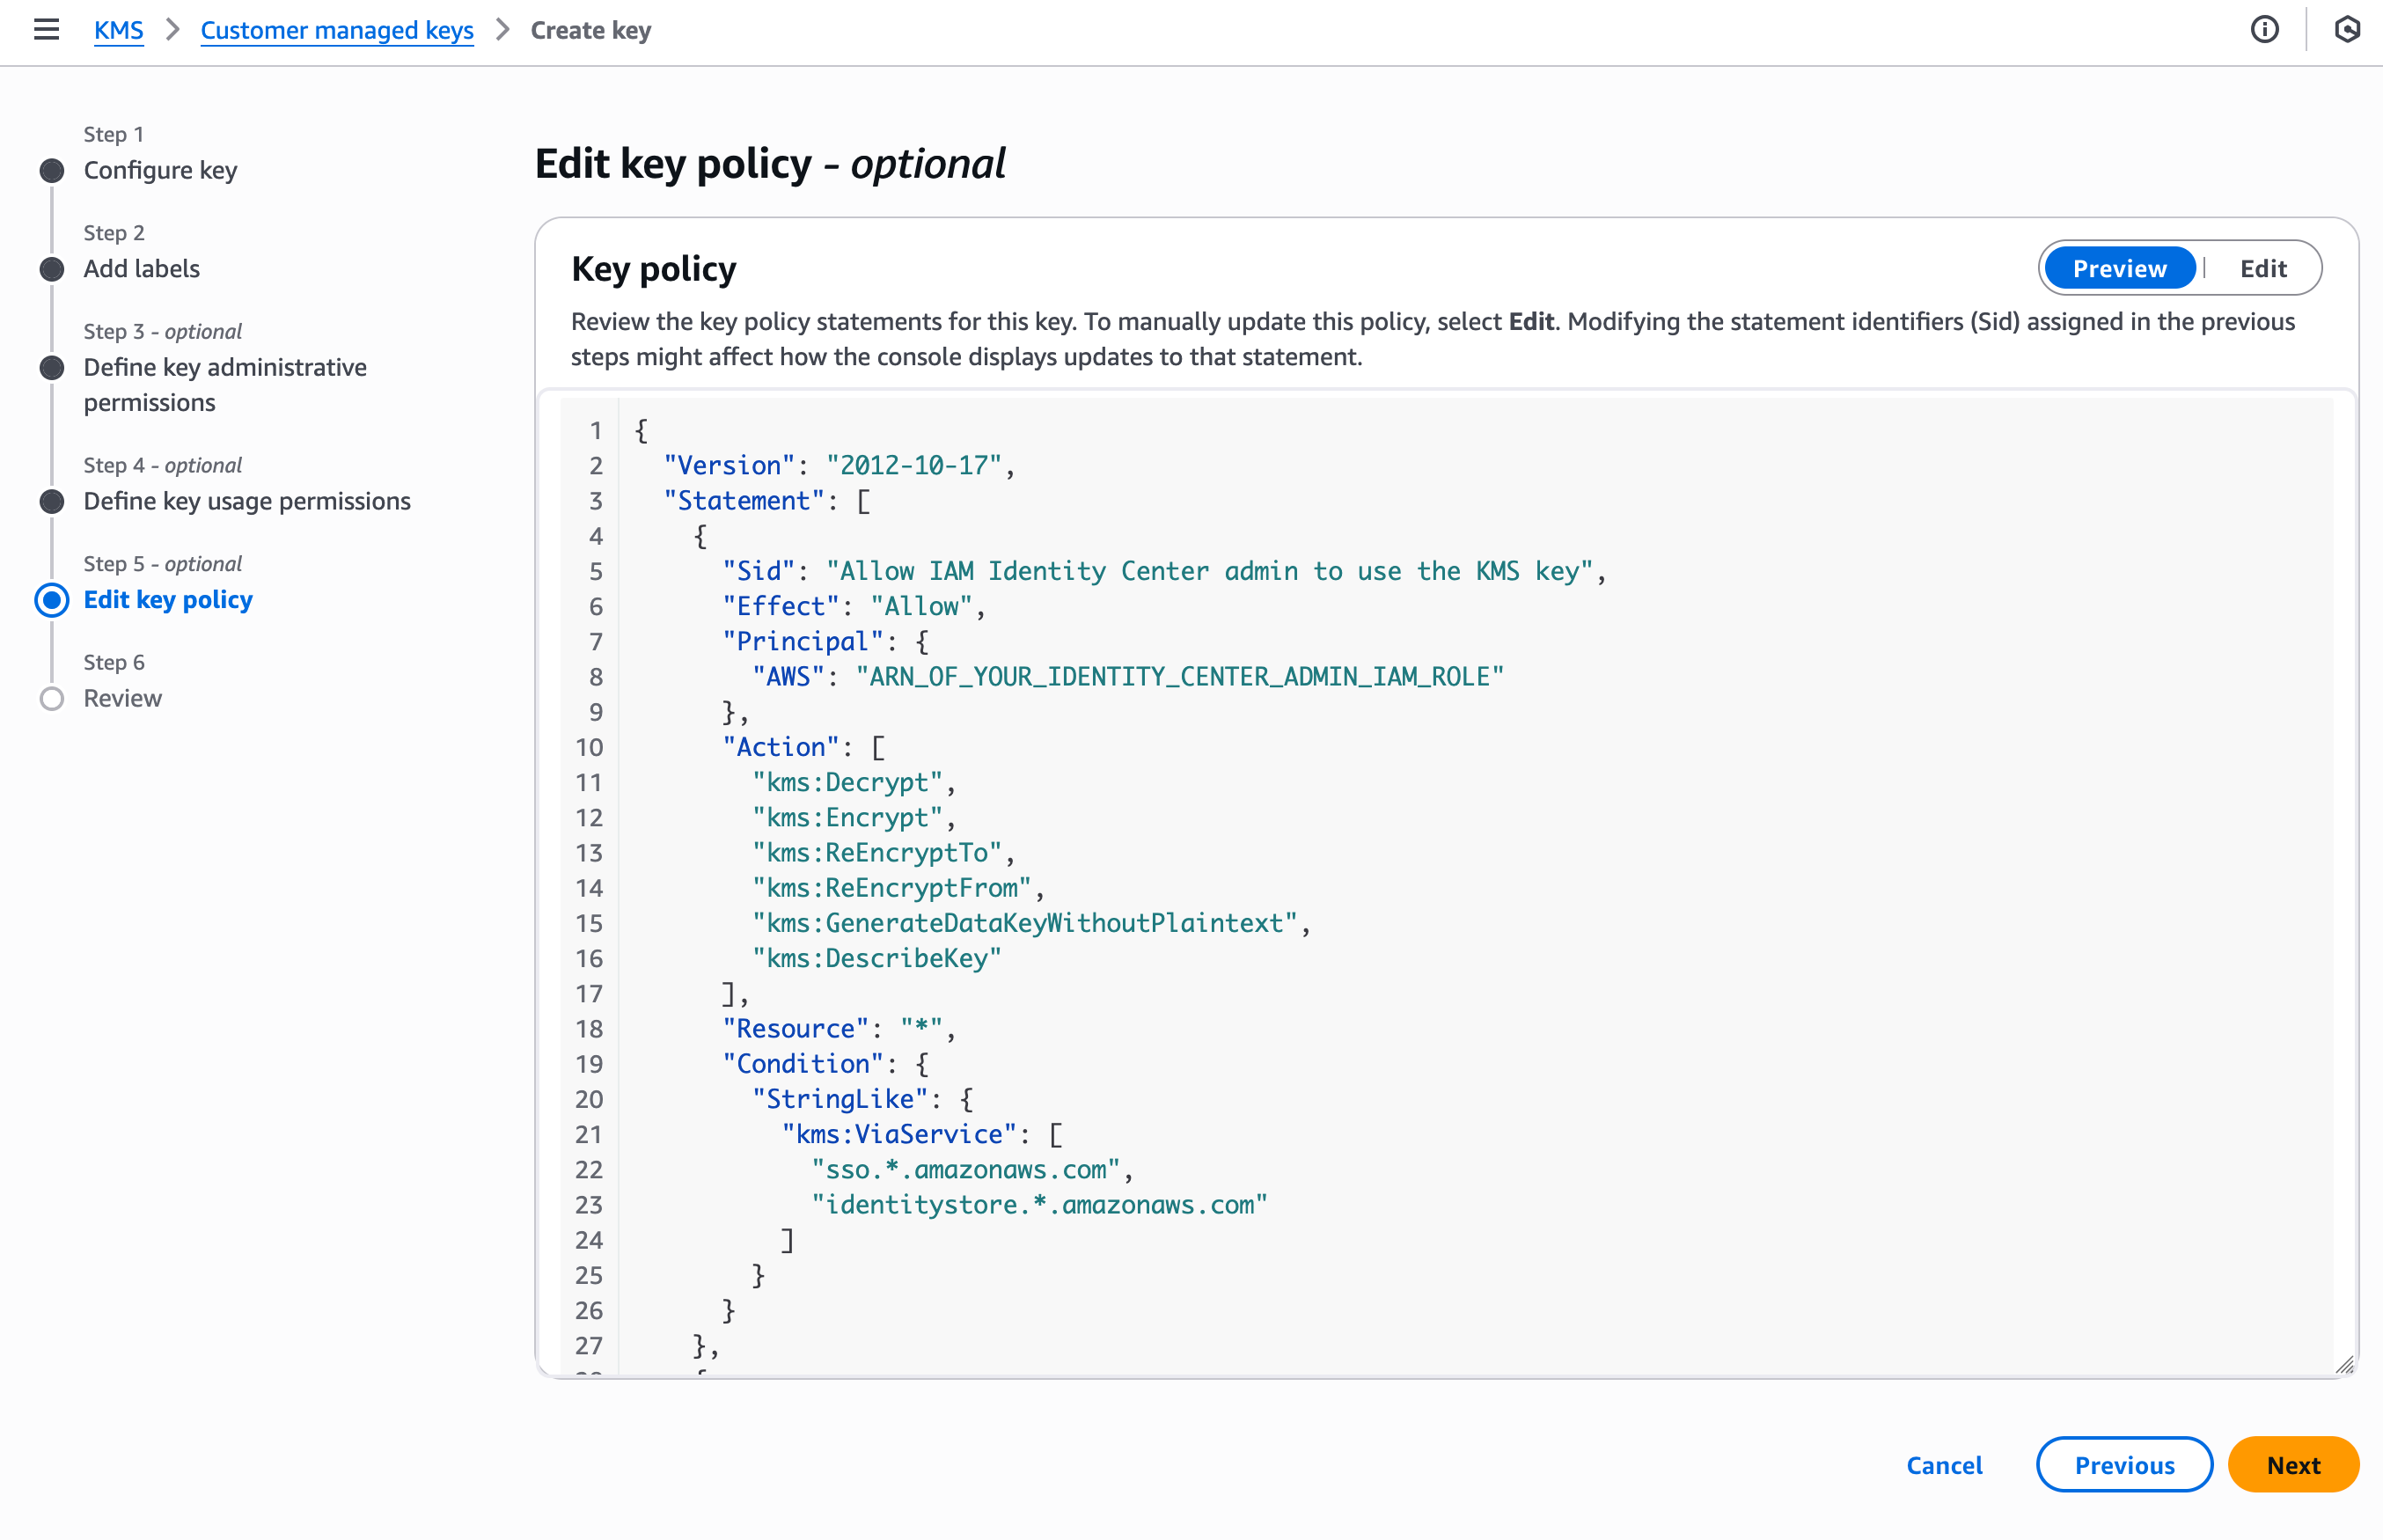
Identity Center requires, at the minimum, permissions allowing Identity Center and its administrators to use the key. Therefore, I add three policy statements, the first and second authorize the administrators of the service, the third one to authorize the Identity Center service itself.
{
	"Version": "2012-10-17",
	"Id": "key-consolepolicy-3",
	"Statement": [
		{
			"Sid": "Allow_IAMIdentityCenter_Admin_to_use_the_KMS_key_via_IdentityCenter_and_IdentityStore",
			"Effect": "Allow",
			"Principal": {
				"AWS": "ARN_OF_YOUR_IDENTITY_CENTER_ADMIN_IAM_ROLE"
			},
			"Action": [
				"kms:Decrypt",
				"kms:Encrypt",
				"kms:GenerateDataKeyWithoutPlaintext"
			],
			"Resource": "*",
			"Condition": {
				"StringLike": {
					"kms:ViaService": [
						"sso.*.amazonaws.com",
						"identitystore.*.amazonaws.com"
					]
				}
			}
		},
		{
			"Sid": "Allow_IdentityCenter_admin_to_describe_the_KMS_key",
			"Effect": "Allow",
			"Principal": {
				"AWS": "ARN_OF_YOUR_IDENTITY_CENTER_ADMIN_IAM_ROLE"
			},
			"Action": "kms:DescribeKey",
			"Resource": "*"
		},
		{
			"Sid": "Allow_IdentityCenter_and_IdentityStore_to_use_the_KMS_key",
			"Effect": "Allow",
			"Principal": {
				"Service": [
					"sso.amazonaws.com",
					"identitystore.amazonaws.com"
				]
			},
			"Action": [
				"kms:Decrypt",
				"kms:ReEncryptTo",
				"kms:ReEncryptFrom",
				"kms:GenerateDataKeyWithoutPlaintext"
			],
			"Resource": "*",
            "Condition": {
    	       "StringEquals": {
                      "aws:SourceAccount": "<Identity Center Account ID>"
	           }
            }
		},
		{
			"Sid": "Allow_IdentityCenter_and_IdentityStore_to_describe_the_KMS_key",
			"Effect": "Allow",
			"Principal": {
				"Service": [
					"sso.amazonaws.com",
					"identitystore.amazonaws.com"
				]
			},
			"Action": [
				"kms:DescribeKey"
			],
			"Resource": "*"
		}
	]
}
I also have to add additional policy statements to allow my use case: the use of AWS managed applications. I add these two policy statements to authorize AWS managed applications and their administrators to use the KMS key. The document lists additional use cases and their respective policies.
{
    "Sid": "Allow_AWS_app_admins_in_the_same_AWS_organization_to_use_the_KMS_key",
    "Effect": "Allow",
    "Principal": "*",
    "Action": [
        "kms:Decrypt"
    ],
    "Resource": "*",
    "Condition": {
        "StringEquals" : {
           "aws:PrincipalOrgID": "MY_ORG_ID (format: o-xxxxxxxx)"
        },
        "StringLike": {
            "kms:ViaService": [
                "sso.*.amazonaws.com", "identitystore.*.amazonaws.com"
            ]
        }
    }
},
{
   "Sid": "Allow_managed_apps_to_use_the_KMS_Key",
   "Effect": "Allow",
   "Principal": "*",
   "Action": [
      "kms:Decrypt"
    ],
   "Resource": "*",
   "Condition": {
      "Bool": { "aws:PrincipalIsAWSService": "true" },
      "StringLike": {
         "kms:ViaService": [
             "sso.*.amazonaws.com", "identitystore.*.amazonaws.com"
         ]
      },
      "StringEquals": { "aws:SourceOrgID": "MY_ORG_ID (format: o-xxxxxxxx)" }
   }
}
You can further restrict the key usage to a specific Identity Center instance, specific application instances, or specific application administrators. The documentation contains examples of advanced key policies for your use cases.
To help protect against IAM role name changes when permission sets are recreated, use the approach described in the Custom trust policy example.
Part 2: Update IAM policies to allow use of the KMS key from another AWS account
Any IAM principal that uses the Identity Center service APIs from another AWS account, such as Identity Center delegated administrators and AWS application administrators, need an IAM policy statement that allows use of the KMS key via these APIs.
I grant permissions to access the key by creating a new policy and attaching the policy to the IAM role relevant for my use case. You can also add these statements to the existing identity-based policies of the IAM role.
To do so, after the key is created, I locate its ARN and replace the key_ARNin the template below. Then, I attach the policy to the managed application administrator IAM principal. The documentation also covers IAM policies that grants Identity Center delegated administrators permissions to access the key.
Here is an example for managed application administrators:
{
      "Sid": "Allow_app_admins_to_use_the_KMS_key_via_IdentityCenter_and_IdentityStore",
      "Effect": "Allow",
      "Action":
        "kms:Decrypt",
      "Resource": "<key_ARN>",
      "Condition": {
        "StringLike": {
          "kms:ViaService": [
            "sso.*.amazonaws.com",
            "identitystore.*.amazonaws.com"
          ]
        }
      }
    }
The documentation shares IAM policies template for the most common use cases.
Part 3: Configure IAM Identity Center to use the key
I can configure a CMK either during the enablement of an Identity Center organization instance or on an existing instance, and I can change the encryption configuration at any time by switching between CMKs or reverting to AWS-owned keys.
Please note that an incorrect configuration of KMS key permissions can disrupt Identity Center operations and access to AWS managed applications and accounts through Identity Center. Proceed carefully to this final step and ensure you have read and understood the documentation.
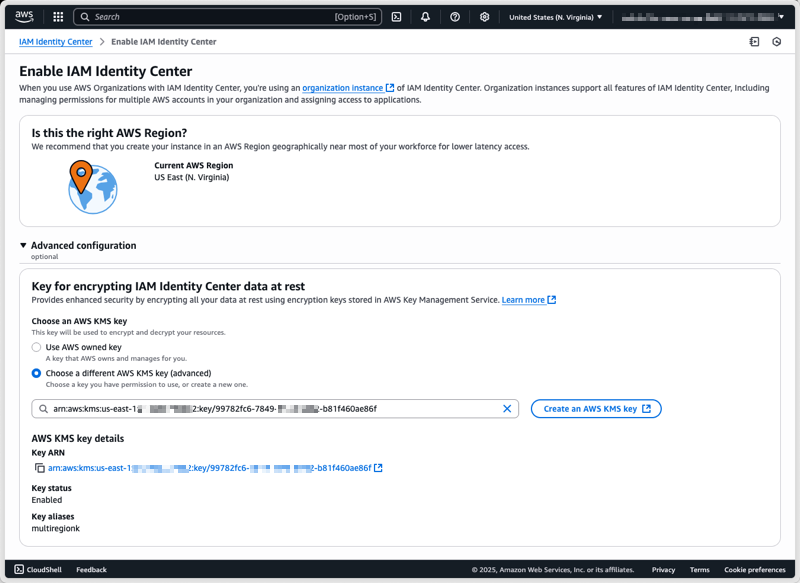
After I have created and configured my CMK, I can select it under Advanced configuration when enabling Identity Center.
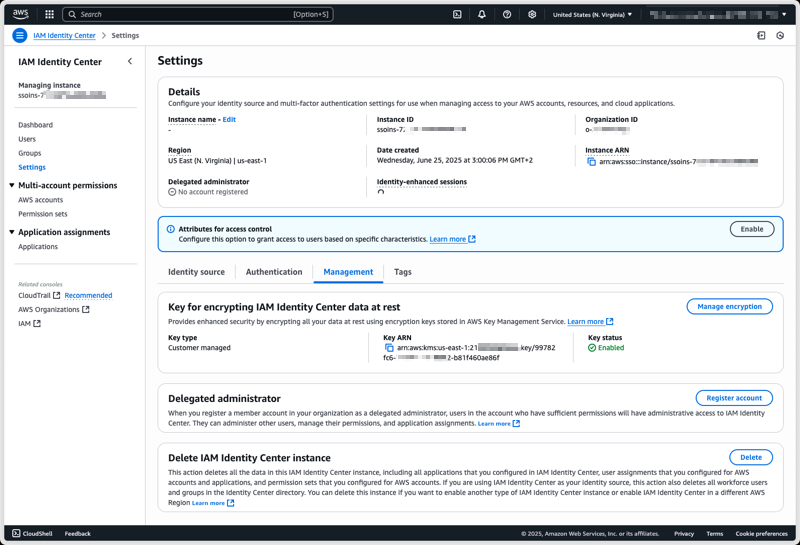
To configure a CMK on an existing Identity Center instance using the AWS Management Console, I start by navigating to the Identity Center section of the AWS Management Console. From there, I select Settings from the navigation pane, then I select the Management tab, and select Manage encryption in the Key for encrypting IAM Identity Center data at rest section.
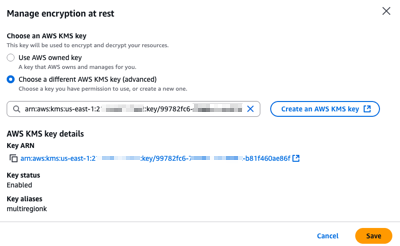
At any time, I can select another CMK from the same AWS Account, or switch back to an AWS-managed key.
After choosing Save, the key change process takes a few seconds to complete. All service functionalities continue uninterrupted during the transition. If, for whatever reasons, Identity Center can not access the new key, an error message will be returned and Identity Center will continue to use the current key, keeping your identity data encrypted with the mechanism it is already encrypted with.
Things to keep in mind
The encryption key you create becomes a crucial component of your Identity Center. When you choose to use your own managed key to encrypt identity attributes at rest, you have to verify the following points.
"Condition": {
   "StringLike": {
      "kms:EncryptionContext:aws:sso:instance-arn": "${identity_center_arn}",
      "kms:ViaService": "sso.*.amazonaws.com"
    }
}
or this for Identity Store:
"Condition": {
   "StringLike": {
      "kms:EncryptionContext:aws:identitystore:identitystore-arn": "${identity_store_arn}",
      "kms:ViaService": "identitystore.*.amazonaws.com"
    }
}
Pricing and availability
Standard AWS KMS charges apply for key storage and API usage. Identity Center remains available at no additional cost.
This capability is now available in all AWS commercial Regions, AWS GovCloud (US), and AWS China Regions. To learn more, visit the IAM Identity Center User Guide.
We look forward to learning how you use this new capability to meet your security and compliance requirements.
Post Syndicated from daroc original https://lwn.net/Articles/1040203/
At the time of writing, there have been 9,099 commits in the 6.18 merge window,
8,475 non-merges and 624 merges. The
changes so far include core-kernel, graphics, and networking work, among others.
There are no big surprises, but several items that were discussed at this year’s
LFSMM+BPF Summit have now been merged.
Post Syndicated from LastWeekTonight original https://www.youtube.com/shorts/JOoHELC8w8M
Post Syndicated from corbet original https://lwn.net/Articles/1039827/
Support for BPF in the kernel has been tied to the LLVM toolchain since the
advent of extended BPF. There has been a growing effort to add BPF support
to the GNU toolchain as well, though. At the 2025 GNU Tools Cauldron, the
developers involved got together with representatives of the kernel
community to talk about the state of that work and what needs to happen
next.
Post Syndicated from Prasad Rao original https://aws.amazon.com/blogs/aws/aws-weekly-roundup-amazon-bedrock-aws-outposts-amazon-ecs-managed-instances-aws-builder-id-and-more-october-6-2025/
Last week, Anthropic’s Claude Sonnet 4.5—the world’s best coding model according to SWE-Bench – became available in Amazon Q command line interface (CLI) and Kiro. I’m excited about this for two reasons:
First, a few weeks ago I spent 4 intensive days with a global customer delivering an AI-assisted development workshop, where I experienced firsthand how Amazon Q CLI boosts developer productivity. During the workshop, the customer was able to add a new feature in their application within a day using Amazon Q CLI, which would have traditionally taken them at least a couple of weeks. With Anthropic’s Claude Sonnet 4.5 in Amazon Q CLI, I know developer productivity will be enhanced further.
Second, I’ve started preparing for my code talk at AWS re:Invent 2025, where my co-speaker and I will show live coding to modernize a legacy codebase using Kiro. I can’t wait to use Anthropic’s Claude Sonnet 4.5 in Kiro to create a live demo. If you want to see this demo and over a thousand other sessions on cloud and AI, join us at AWS re:Invent 2025 in Las Vegas from December 1–5.
Last week’s launches
Here are some launches that got my attention:
Additional Updates
Here are some additional news items and blog posts that I found interesting:
Upcoming AWS events
Check your calendar and sign up for upcoming AWS events:
You can browse all upcoming AWS events and AWS startup events.
That’s all for this week. Check back next Monday for another Weekly Roundup!
— Prasad
Post Syndicated from jake original https://lwn.net/Articles/1040991/
Security updates have been issued by AlmaLinux (kernel), Debian (dovecot, git, log4cxx, and openssl), Fedora (containernetworking-plugins, firebird, firefox, jupyterlab, mupdf, and thunderbird), Oracle (ipa), Red Hat (container-tools:rhel8, firefox, gnutls, kernel, kernel-rt, multiple packages, mysql, mysql:8.0, nginx, podman, and thunderbird), Slackware (fetchmail), SUSE (afterburn, chromium, firefox, haproxy, libvmtools-devel, logback, python311-Django, python311-Django4, and redis), and Ubuntu (linux-gcp, linux-gcp-6.14, linux-oem-6.14, linux-nvidia-tegra-igx, linux-oracle, mysql-8.0, poppler, and squid).
Post Syndicated from Patrick Kennedy original https://www.servethehome.com/amd-and-openai-ink-megadeal-for-6gw-of-future-ai-compute/
AMD and OpenAI inked a megadeal for AI compute covering 6GW of compute including 1GW of MI450 targeting 2H 2026 deployment
The post AMD and OpenAI Ink Megadeal for 6GW of Future AI Compute appeared first on ServeTheHome.
Post Syndicated from Brian van Baekel original https://blog.zabbix.com/netbox-and-zabbix-an-integration-that-just-fits/31404/

If you are running Zabbix, you know that it can be a tedious job to add hosts, link templates, and (even harder) make sure it is consistent with your CMDB. What if you already have a CMDB? In that case, it means you need to synchronize the CMDB with Zabbix…manually? Of course not!
Before we continue – this blog post and plugin both belong to Opensource ICT Solutions. We specialize in Zabbix (it’s our core business!) and as such try to make a living out of this open-source product. The plugin we will discuss is open source, and as such we do not have a commercial benefit from it – it’s brought to you by us, as a way to give back to the community (and maybe score some consultancy opportunities).
If you are familiar with NetBox already, it’s time to get excited. If you are not familiar with it, NetBox provides a powerful “single source of truth” for managing everything in your network: IP address management (IPAM), data center infrastructure management (DCIM), device inventory, rack layouts, cabling, virtual assets, and more. It’s built under the Apache 2.0 license, so the core software is fully open source, with an active community contributing plugins, integrations, and custom extensions. The platform is highly flexible – you can add custom fields, enforce custom validation and protection rules, integrate via REST and GraphQL APIs, and run multiple automations.
How cool would it be if you could use that in combination with Zabbix, so that if you create a new entity in your CMDB (your single source of truth) and sync that with Zabbix, you could just focus on one product and always can be assured your monitoring is complete?
Many of our customers use NetBox as their CMDB and Zabbix as their monitoring solution. The challenge they run into is keeping NetBox and Zabbix in sync — a task engineers don’t usually enjoy.
For customers who don’t use a CMDB (or at least not NetBox), there’s always the uncertainty of whether a host in Zabbix has the right templates and macros applied. While Zabbix does allow bulk updates, you still need detailed knowledge of each device’s role to keep things consistent.
NetBox, on the other hand, already stores much richer context about configuration items. A device or virtual machine can have a role, device type, tenant, and even its site or location defined. All that’s missing is a way to leverage this information to make sure those devices are monitored correctly in Zabbix.
On top of that, this approach makes it simple – if a device is registered in the CMDB (and therefore something you’re responsible for), it’s also monitored in the right way. From a project delivery perspective, documentation only needs to be done once, and it ensures that it’s actually done. In short: if it’s not in the CMDB, it’s not monitored — and therefore not our responsibility.
It also means the project delivery engineer(s) don’t necessarily need to know in depth how Zabbix works: as long as they can populate the CMDB – the monitoring will be taken care of automatically.
In short, a native plugin for NetBox that communicates with the Zabbix API. From there, it will gather information like templates and macros that exist in your Zabbix environment. This is completely API based, so in NetBox you just add an new Zabbix Server and let it synchronize:
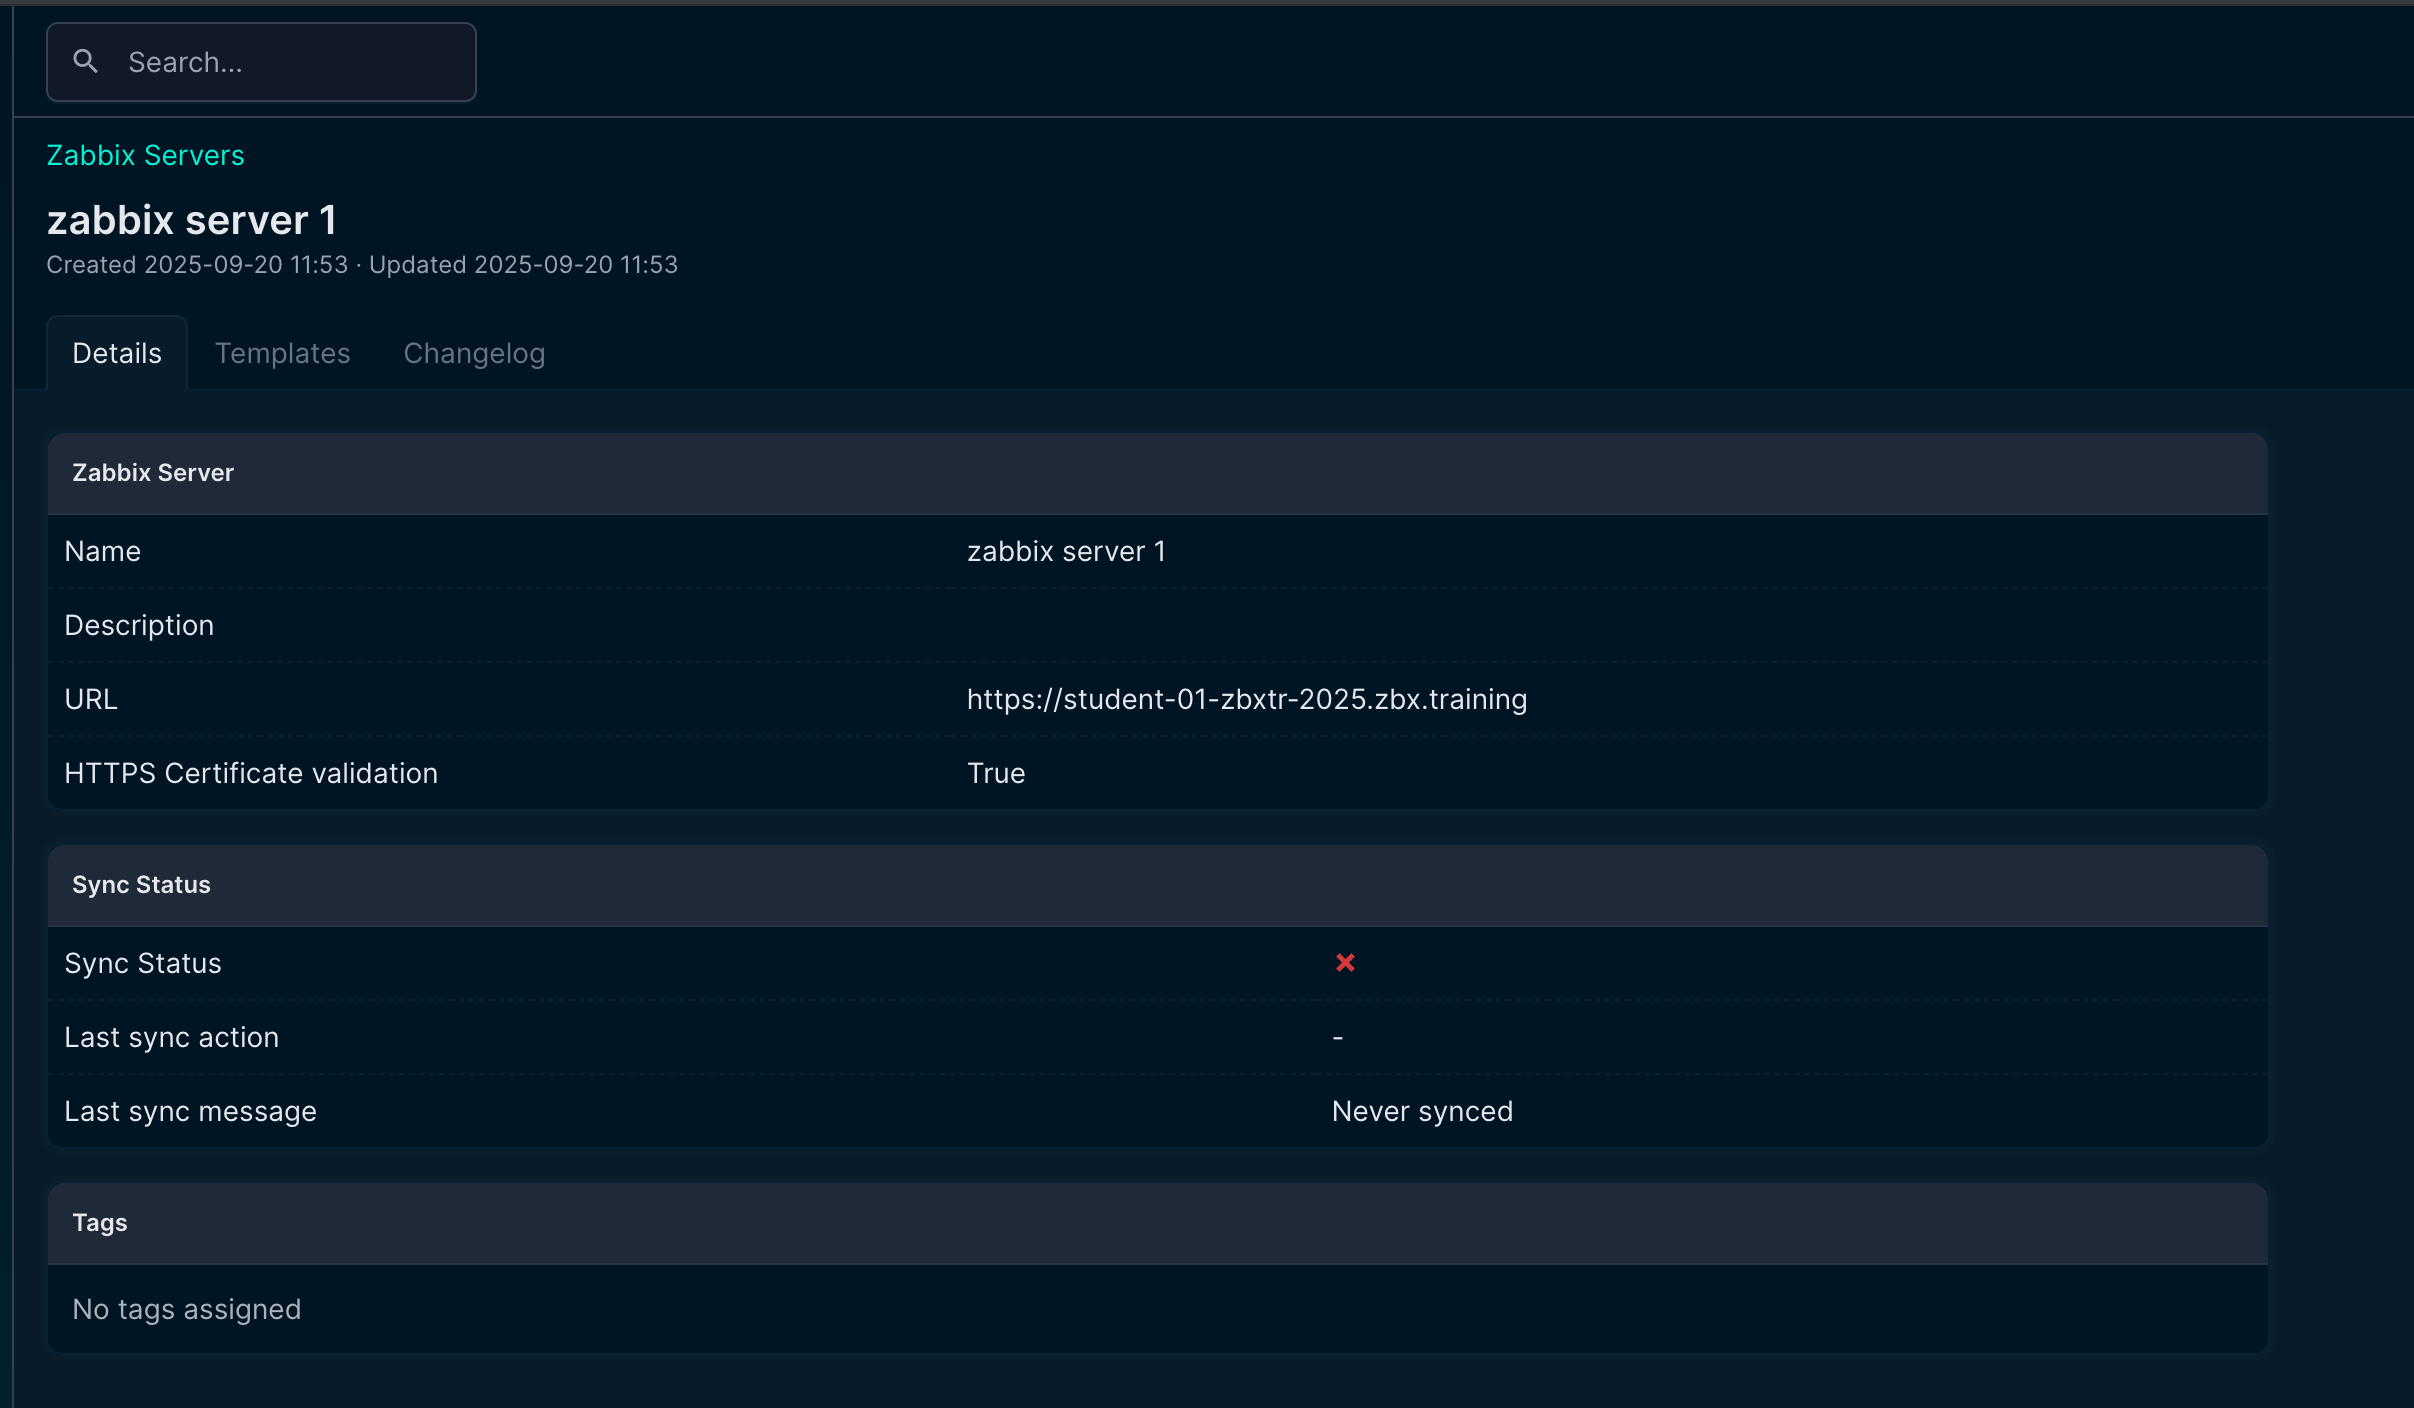
At this point, nothing fancy happens. It is just establishing the connection and synchronizing templates, macros, etc. The rest of the configuration is done in your NetBox instance.
|
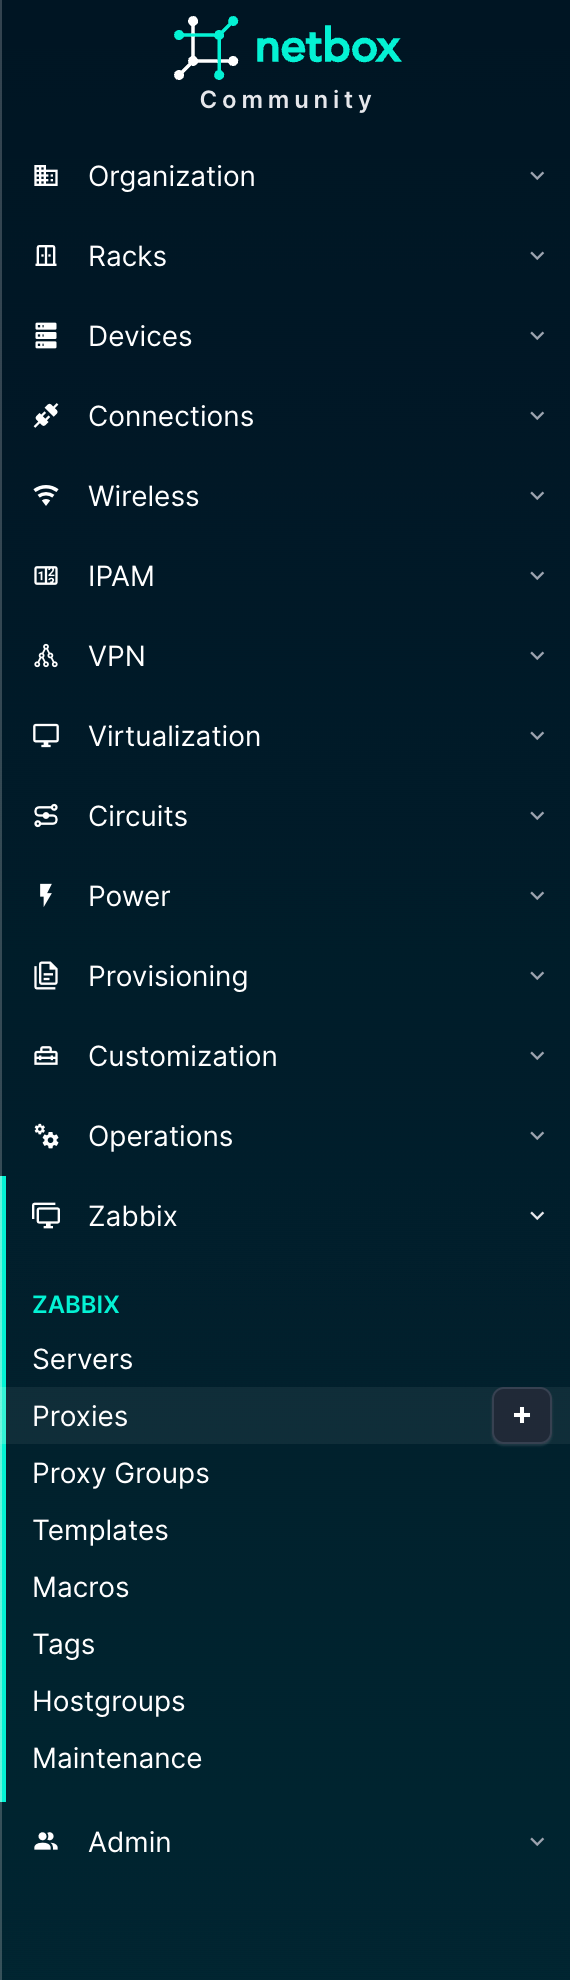
We’ve got the normal/native menu list items from NetBox, and for those familiar with it already the list below shows nothing new except for the “Zabbix” option:
The Zabbix menu is new here and actually gives us control over what is present in Zabbix. The objects here should look familiar if you know Zabbix:
|
|
In the various NetBox native objects, there will be information regarding the Zabbix setup.
Of course it is, otherwise this blog post would’ve been completely useless! Installation can be done via https://pypi.org/project/nbxsync.
We released our NetBox plugin under the GNU Affero General Public License v3 (AGPL-3.0) because it best protects both our work and the community. Unlike permissive licenses, AGPL ensures that anyone who modifies or extends the plugin must share their changes under the same license, even if the software is only offered as a service. This prevents closed forks, guarantees improvements flow back into the community, and aligns with the collaborative spirit of NetBox and Zabbix.
While AGPL still allows use in commercial environments, it prevents organizations from profiting off private modifications without contributing back. In short, AGPL-3.0 keeps the plugin fair, transparent, and truly open source. This is also the license Zabbix uses, so the community is already familiar with it.
We’ve open-sourced and released the code on our Opensource ICT Solutions GitHub,. and it can be found here: https://github.com/OpensourceICTSolutions/nbxsync
We think documentation is important, as we’ve often been in a situation where we had to discover ourselves how something works due to lack of documentation. We really try to keep you out of that situation and therefor created extensive documentation for this project. Obviously, we can help you when you are lost, but as that costs us time as well it won’t be a free service. The documentation is available here: https://nbxsync.com.
As we think it’s great to work on a project together, we welcome community contributions. However, in order to accept any pull requests, please create an issue on our Github repo first. Please do read our development guidelines and understand that we are more than happy to incorporate suggestions/pull requests if they benefit the wider community.
Yes. We will assume you’ve got NetBox in place already. If not, please follow the official NetBox documentation to install it: https://netboxlabs.com/docs/netbox/installation/.
As it’s a native plugin, the installation is straightforward and well documented by NetBox: https://netboxlabs.com/docs/netbox/plugins/installation/. In our documentation, we provide the plugin-specific configuration. If this feels daunting, we’re more than happy to assist you with it as part of our consultancy offering.
So, with NetBox in place and the plugin installed, let’s actually walk through the NetBox configuration to give you a feeling of how it works. We will have to configure quite a bit in NetBox as a foundation, which hopefully is done already if you’ve got NetBox implemented in your organization.
In any case, we need to add one or multiple new Zabbix servers. We open the Zabbix menu and click on “Servers” where we add this server:
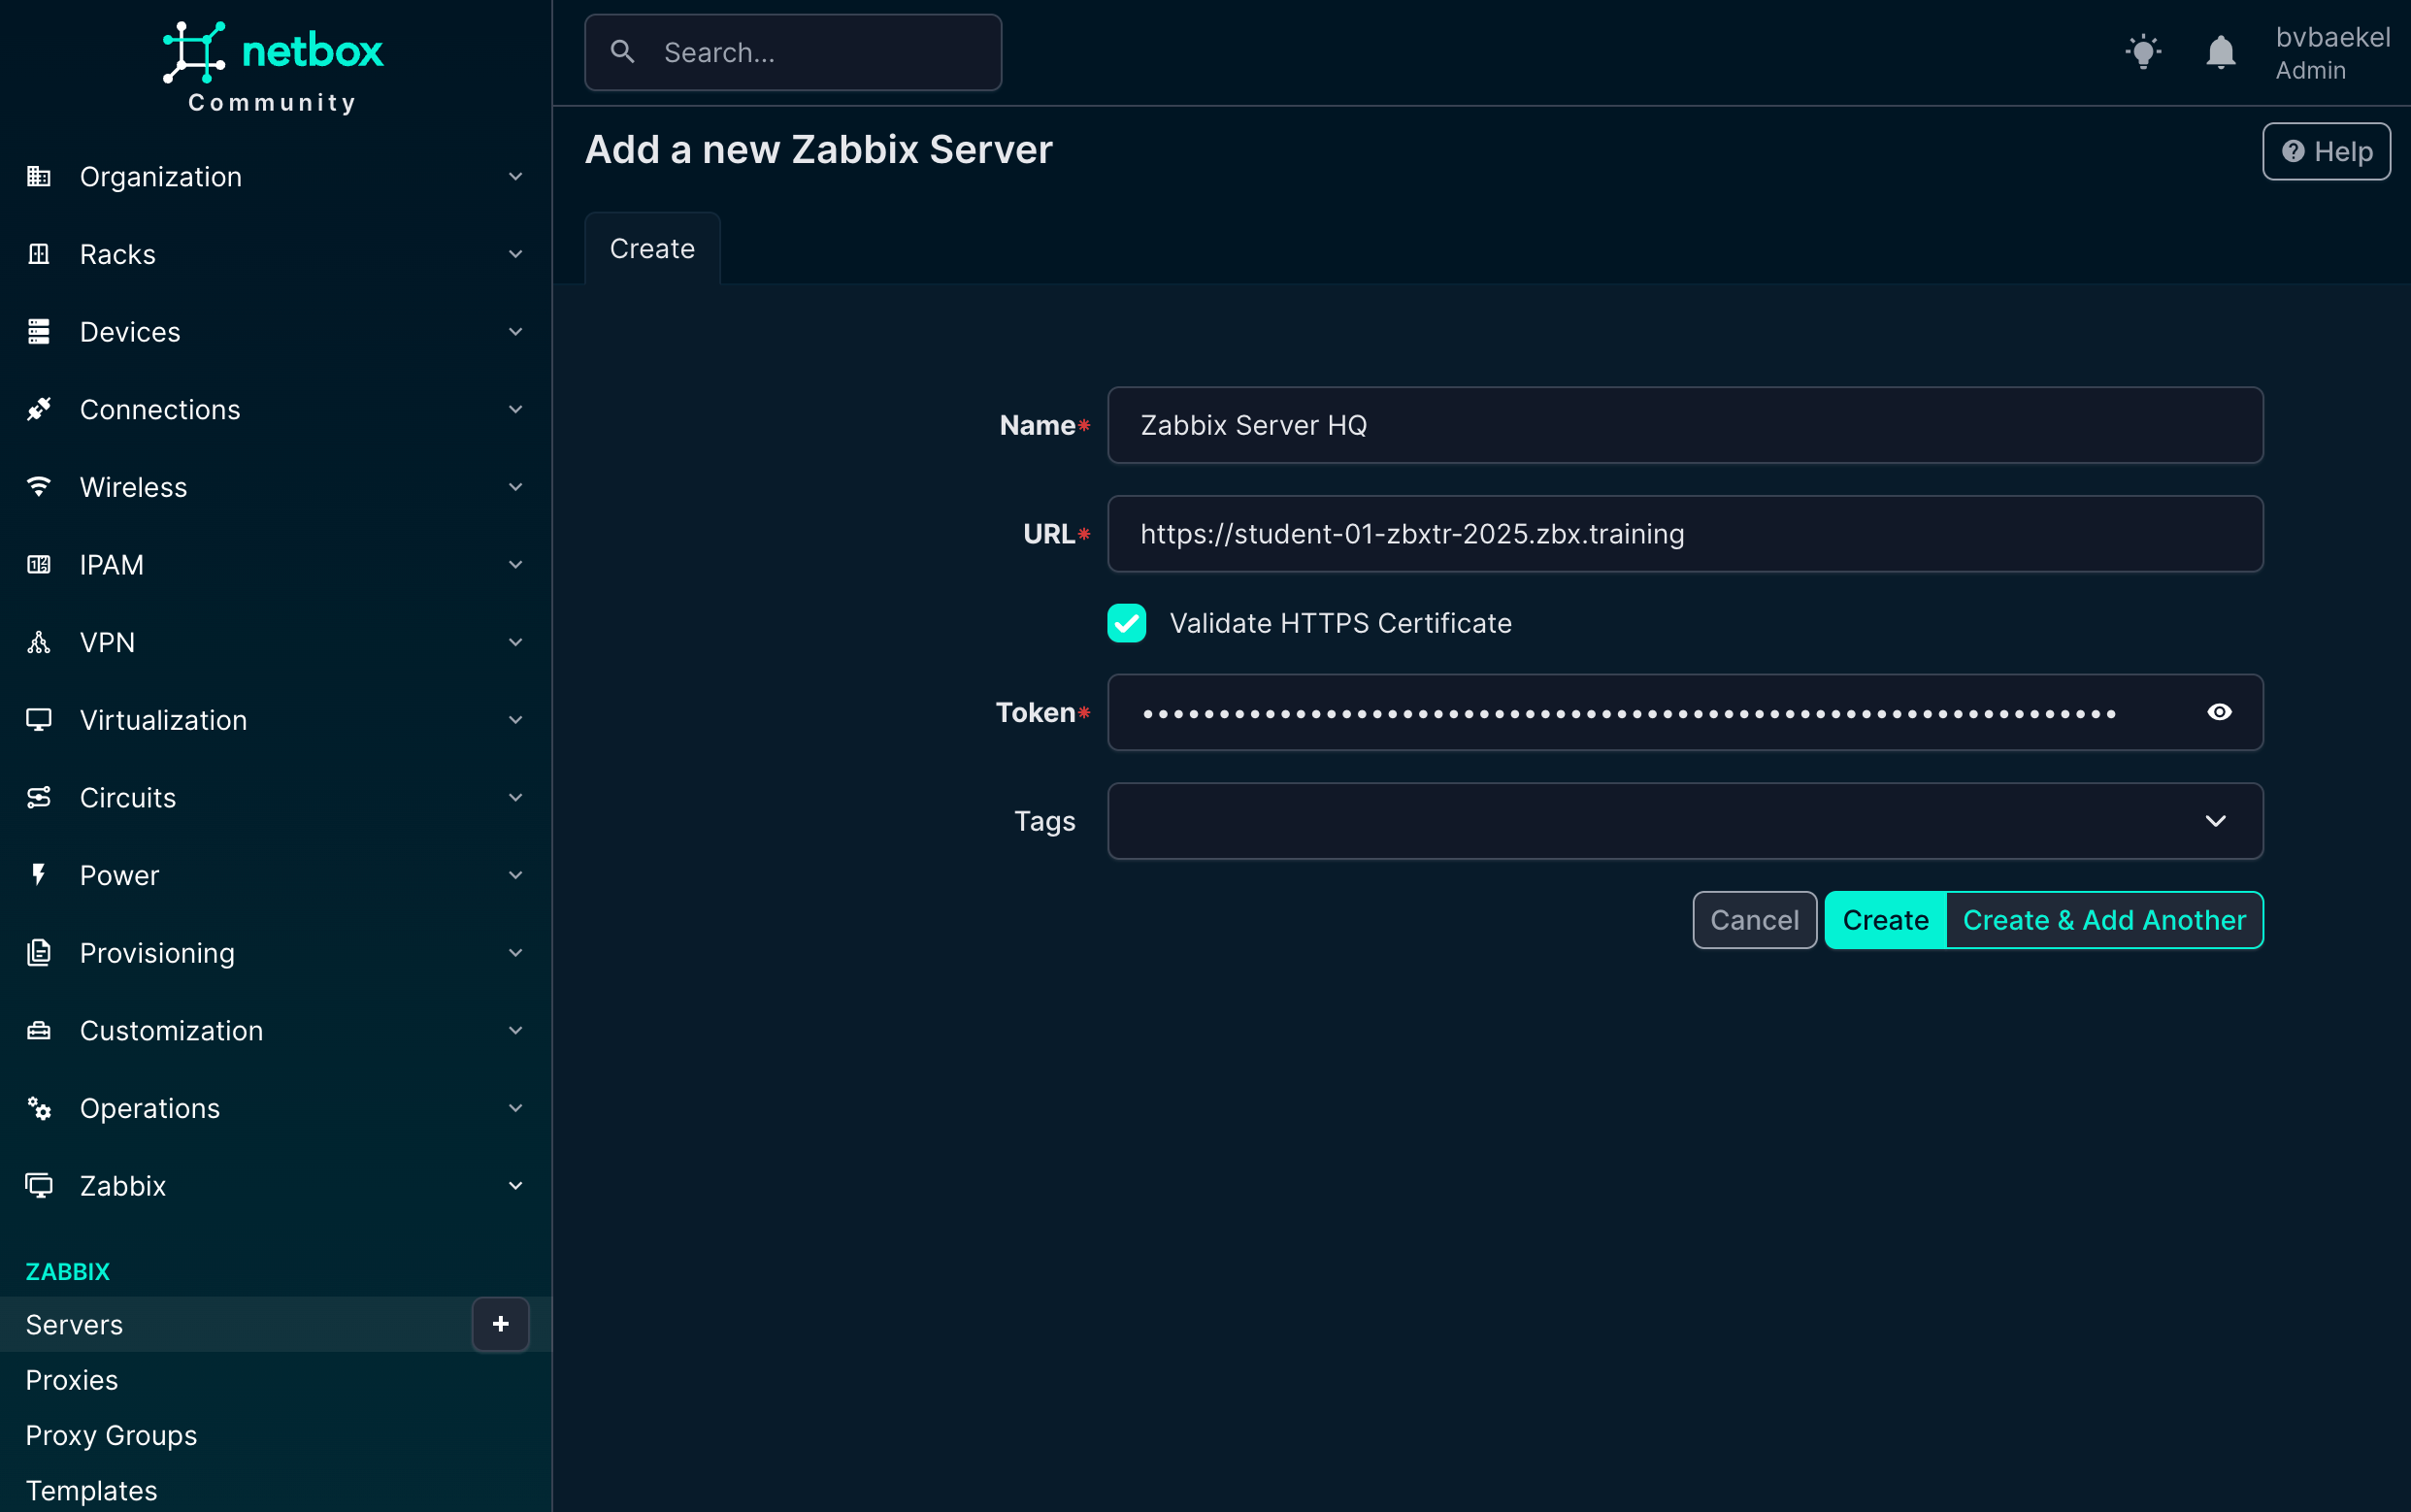
Once added, NetBox will automatically synchronize with the Zabbix server and get the templates out of it, ready to be used! The macros will also get synchronized along with the templates,, so they are also available in NetBox.
NetBox dictates that devices should be in a site, so we start with that. In Organization → Sites we create a new site. A few fields are mandatory and populated in the screenshot below:
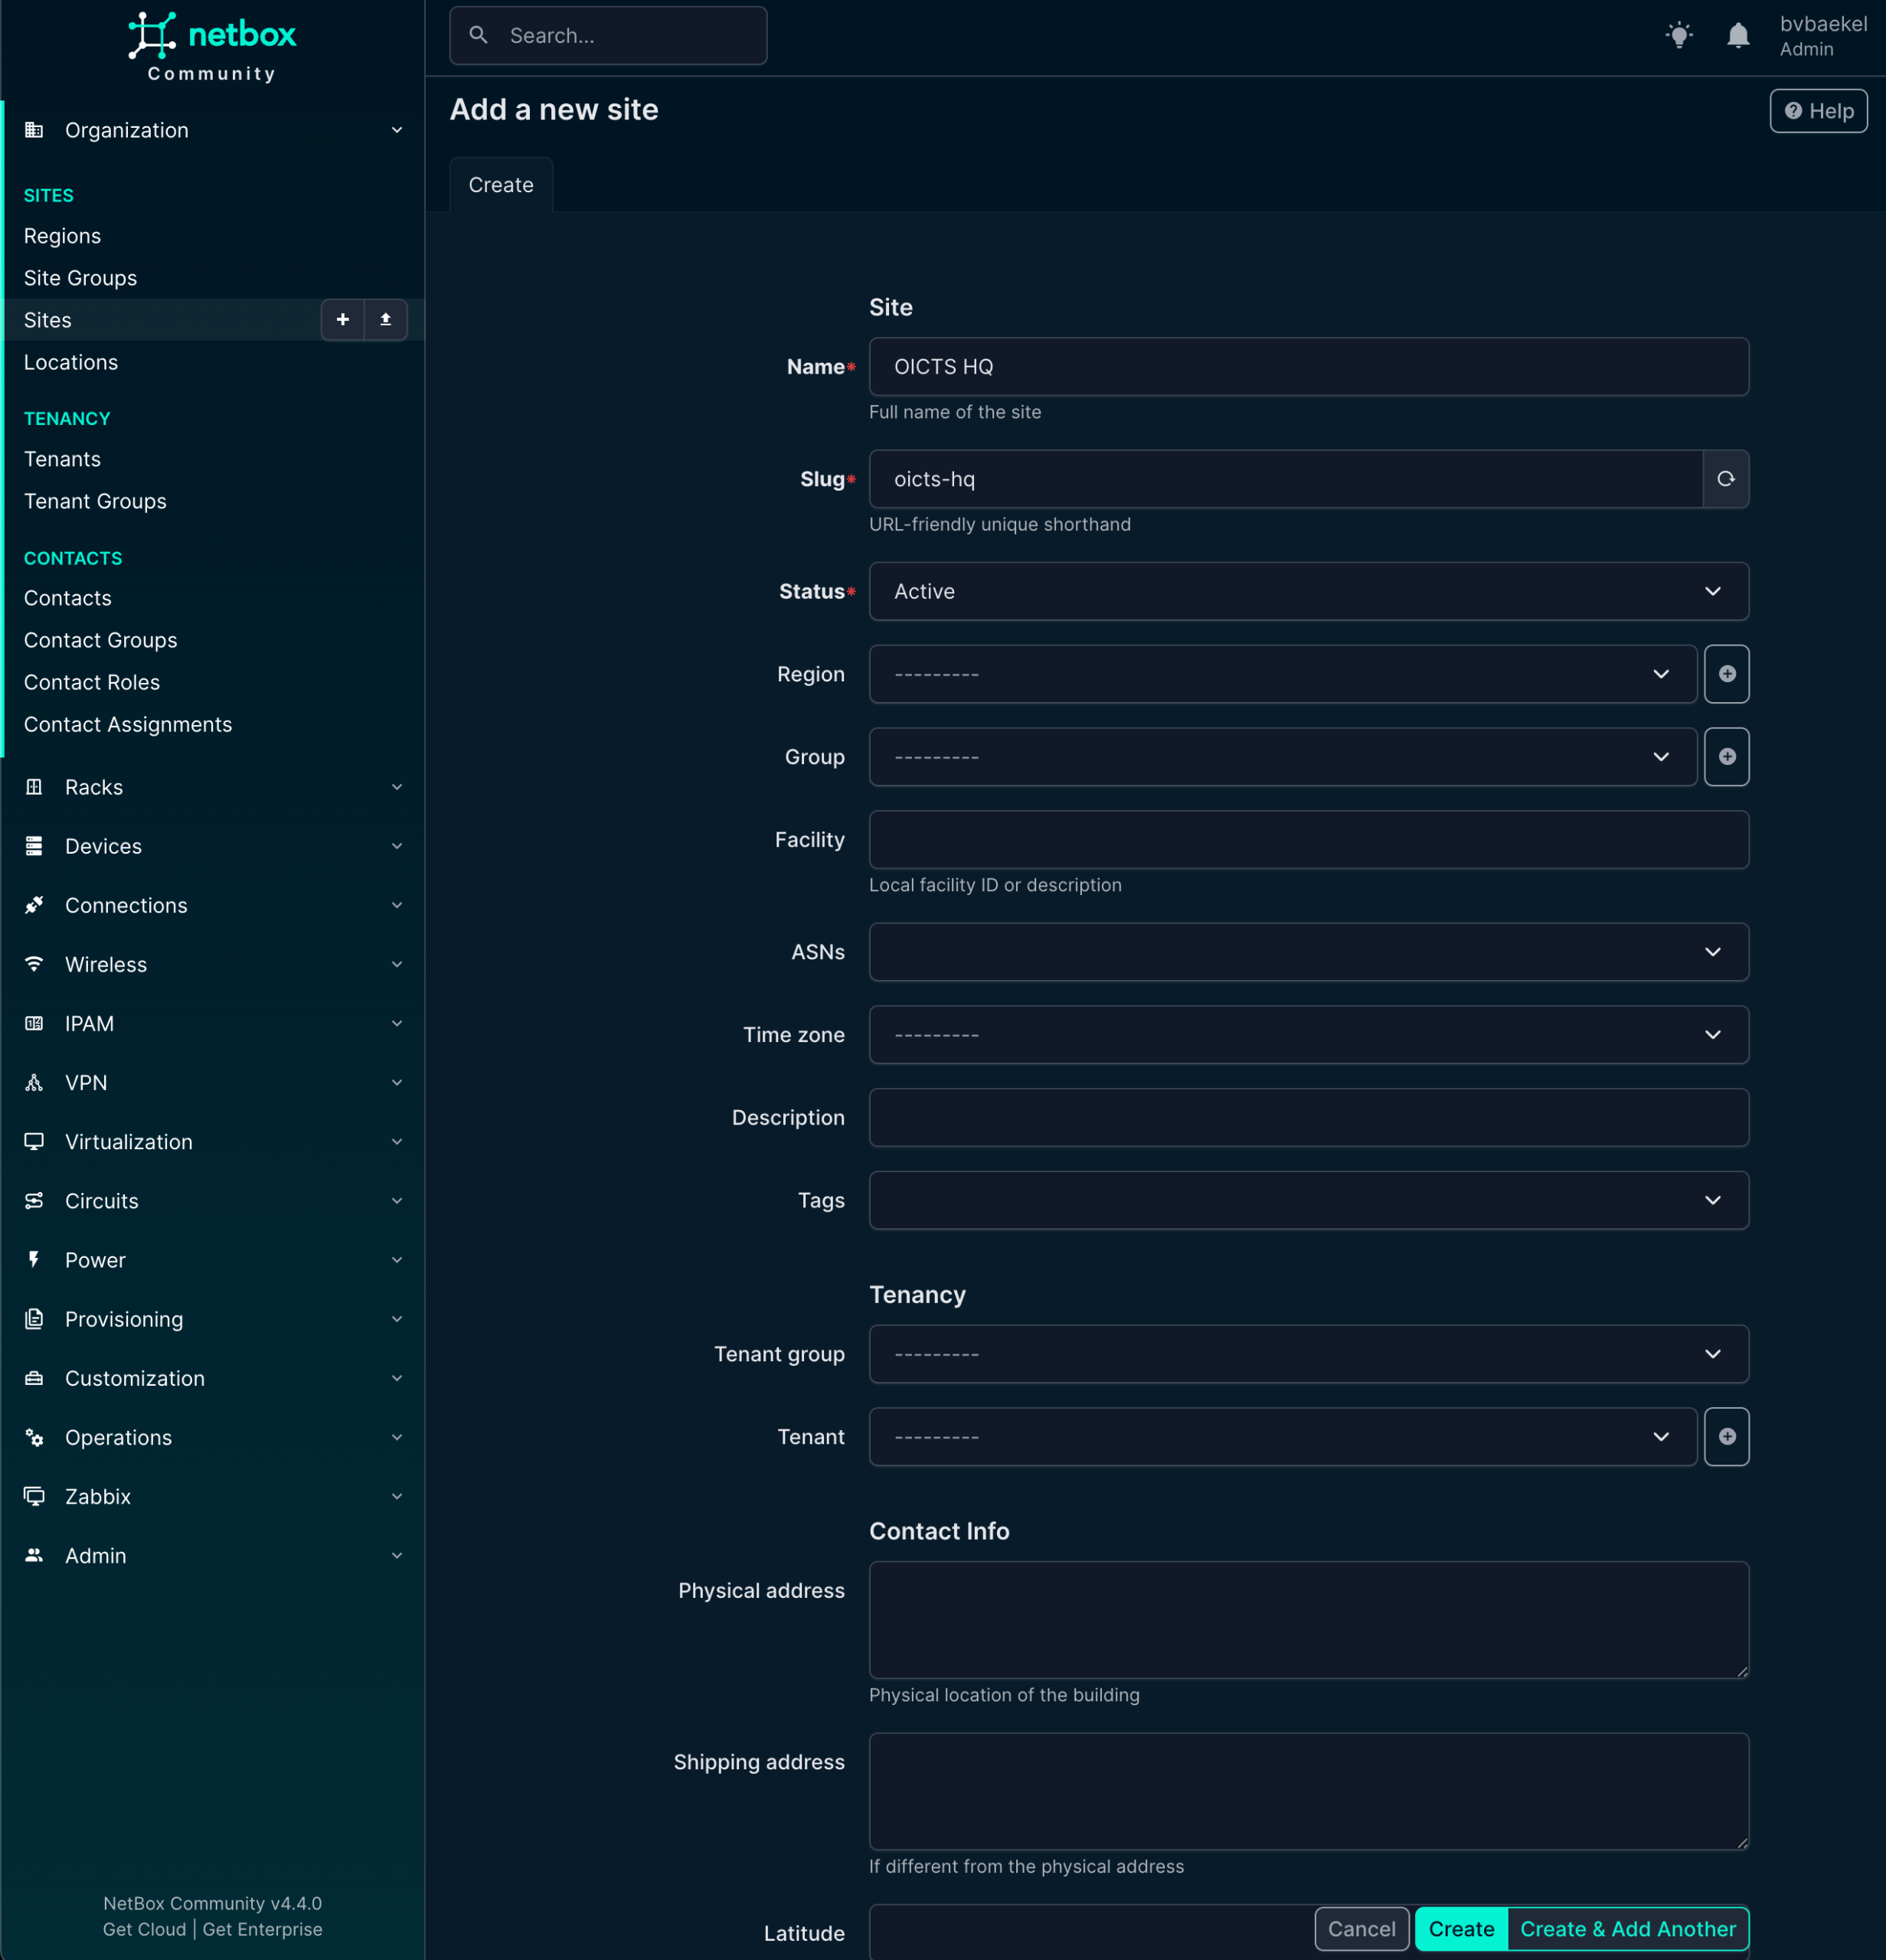
Name, Slug, and Status are mandatory. In a production setup, you probably want to populate some other fields as well, such as Tenant, Region, etc. But we are not writing a NetBox tutorial and as such we will completely ignore that. Once you are done, click on “Create” at the bottom of the configuration.
After the site has been created, it is time to add a Manufacturer under the menu “Devices.”
In this case we will add Cisco as a vendor:
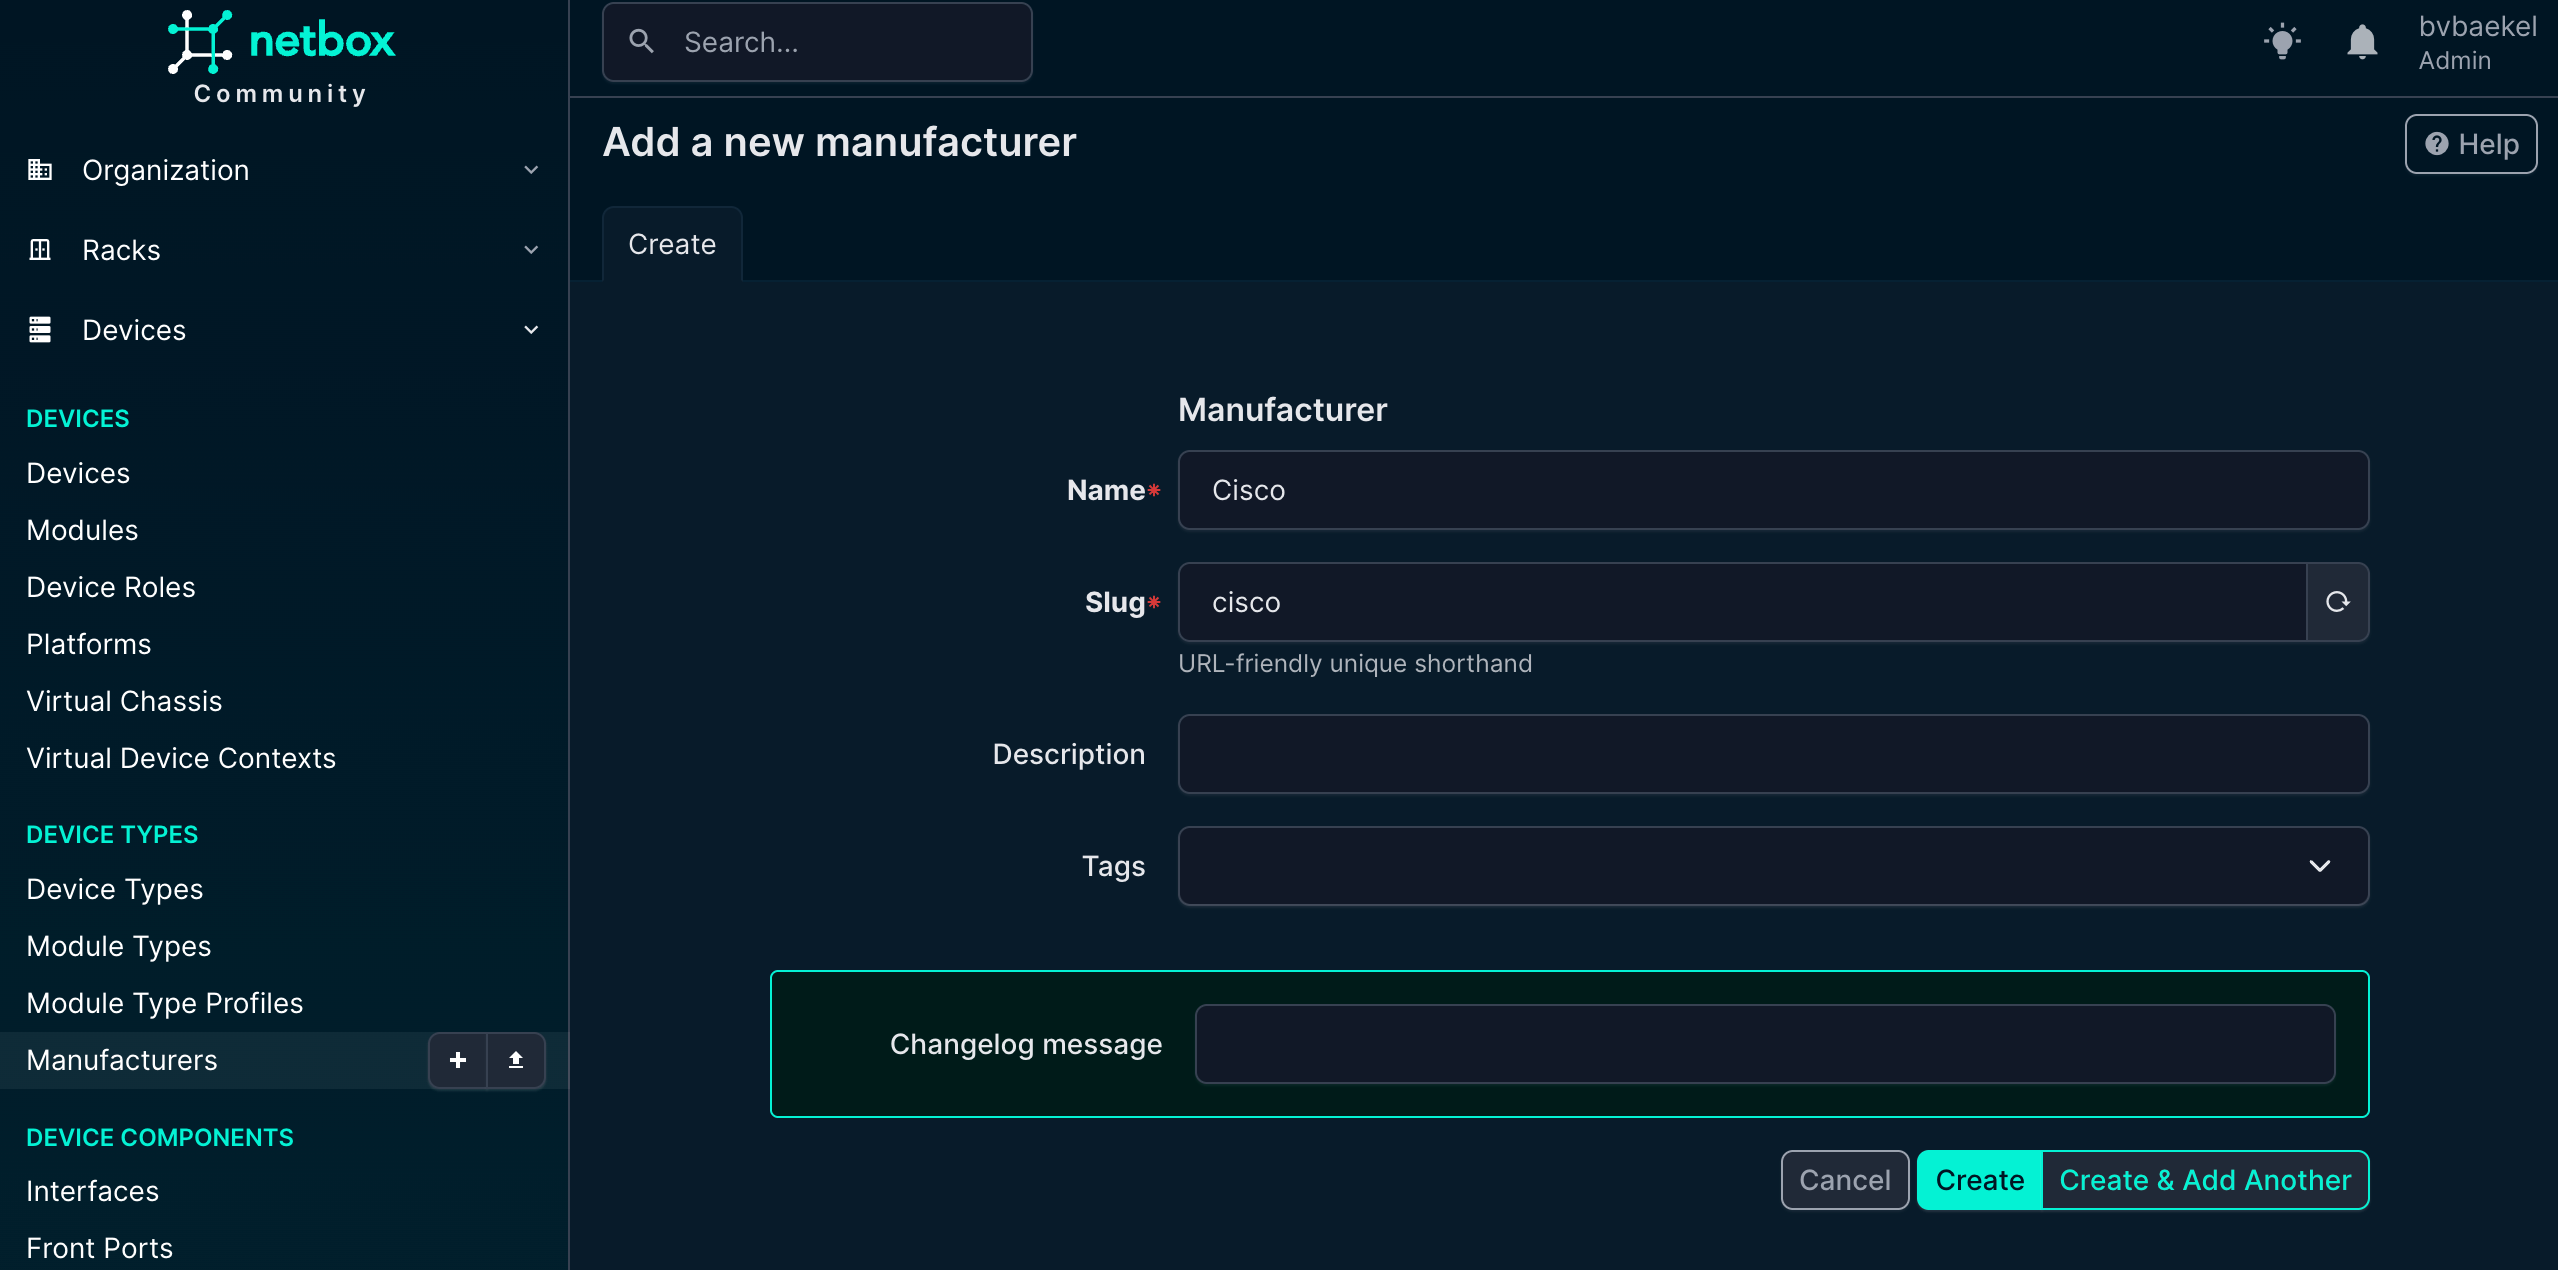
Once done, click on “Create” at the bottom of the configuration. Of course you can (or should) add multiple vendors – all that you actually use!
The next step is device type. In the end, we need to know the vendor, but it is equally important to know what type of device we are monitoring. As such, the next step is to add a device type, again under the main menu “Devices.” As we add in the example, we are going to add a CBS220 switch:
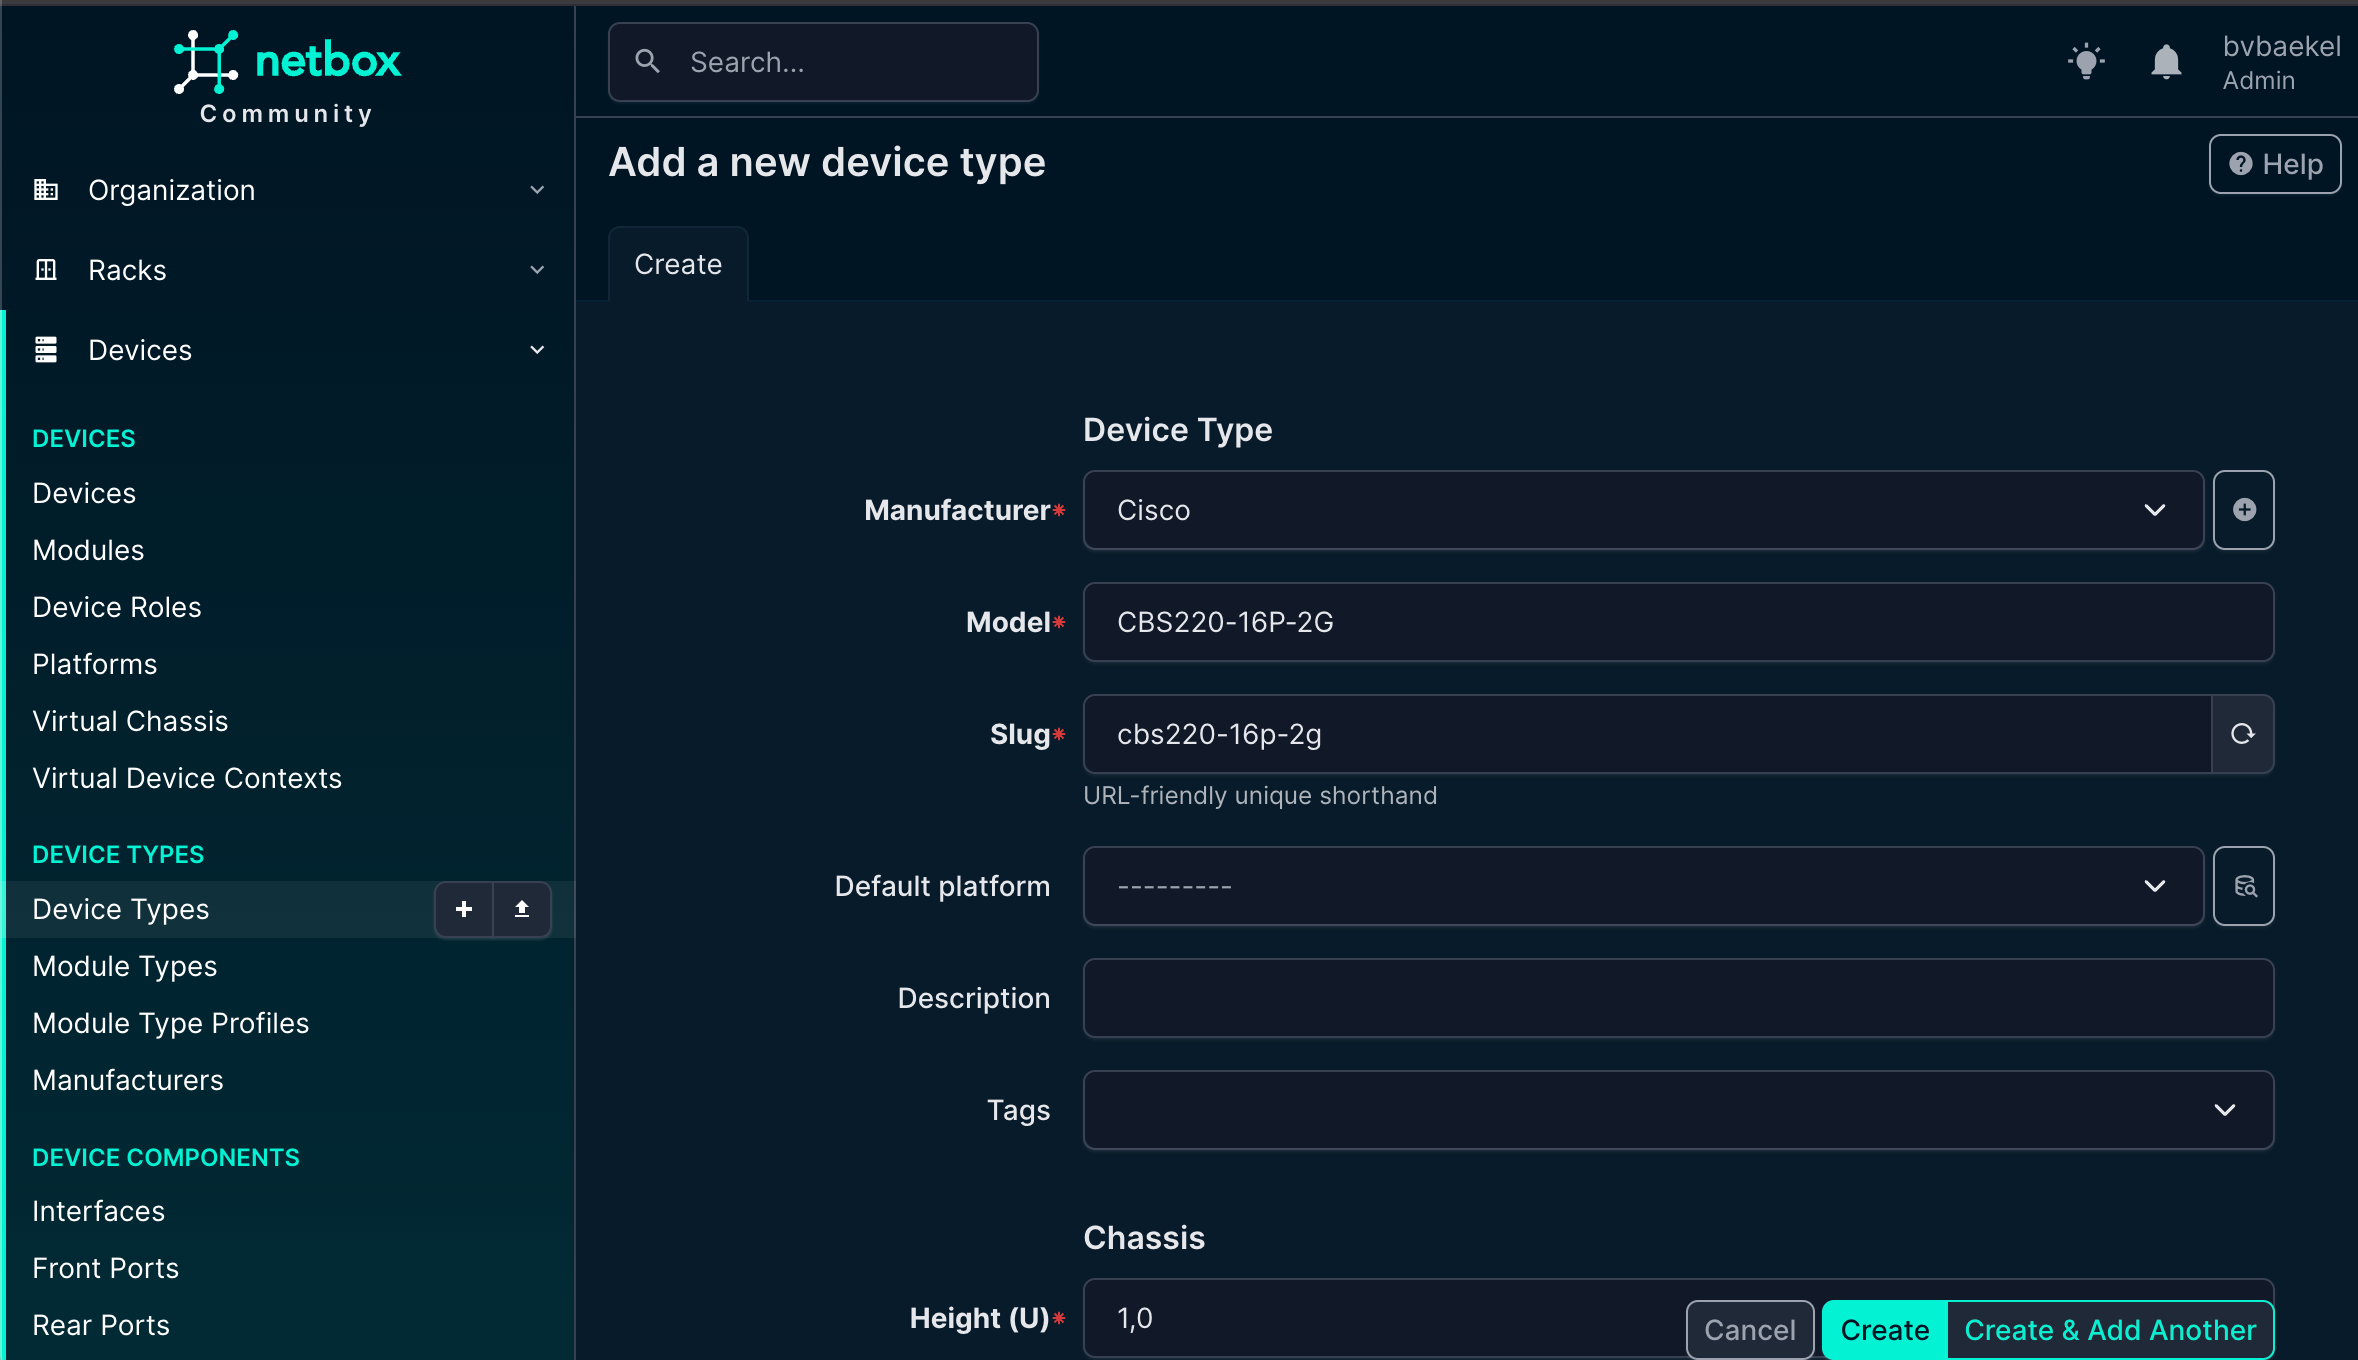
Once again, click on “create” when you are done.
Last but not least, we need to add a device role. The device role is an important attribute because it helps us clearly define the function of the device within the network. By categorizing devices based on their role (such as router, switch, firewall, server, or access point) we create a structured overview that makes it much easier to manage, monitor, and troubleshoot the environment. Assigning roles also ensures consistency, improves documentation quality, and allows us to quickly identify the purpose of each device in larger infrastructures.
We go to “Devices” → Device roles and from there:
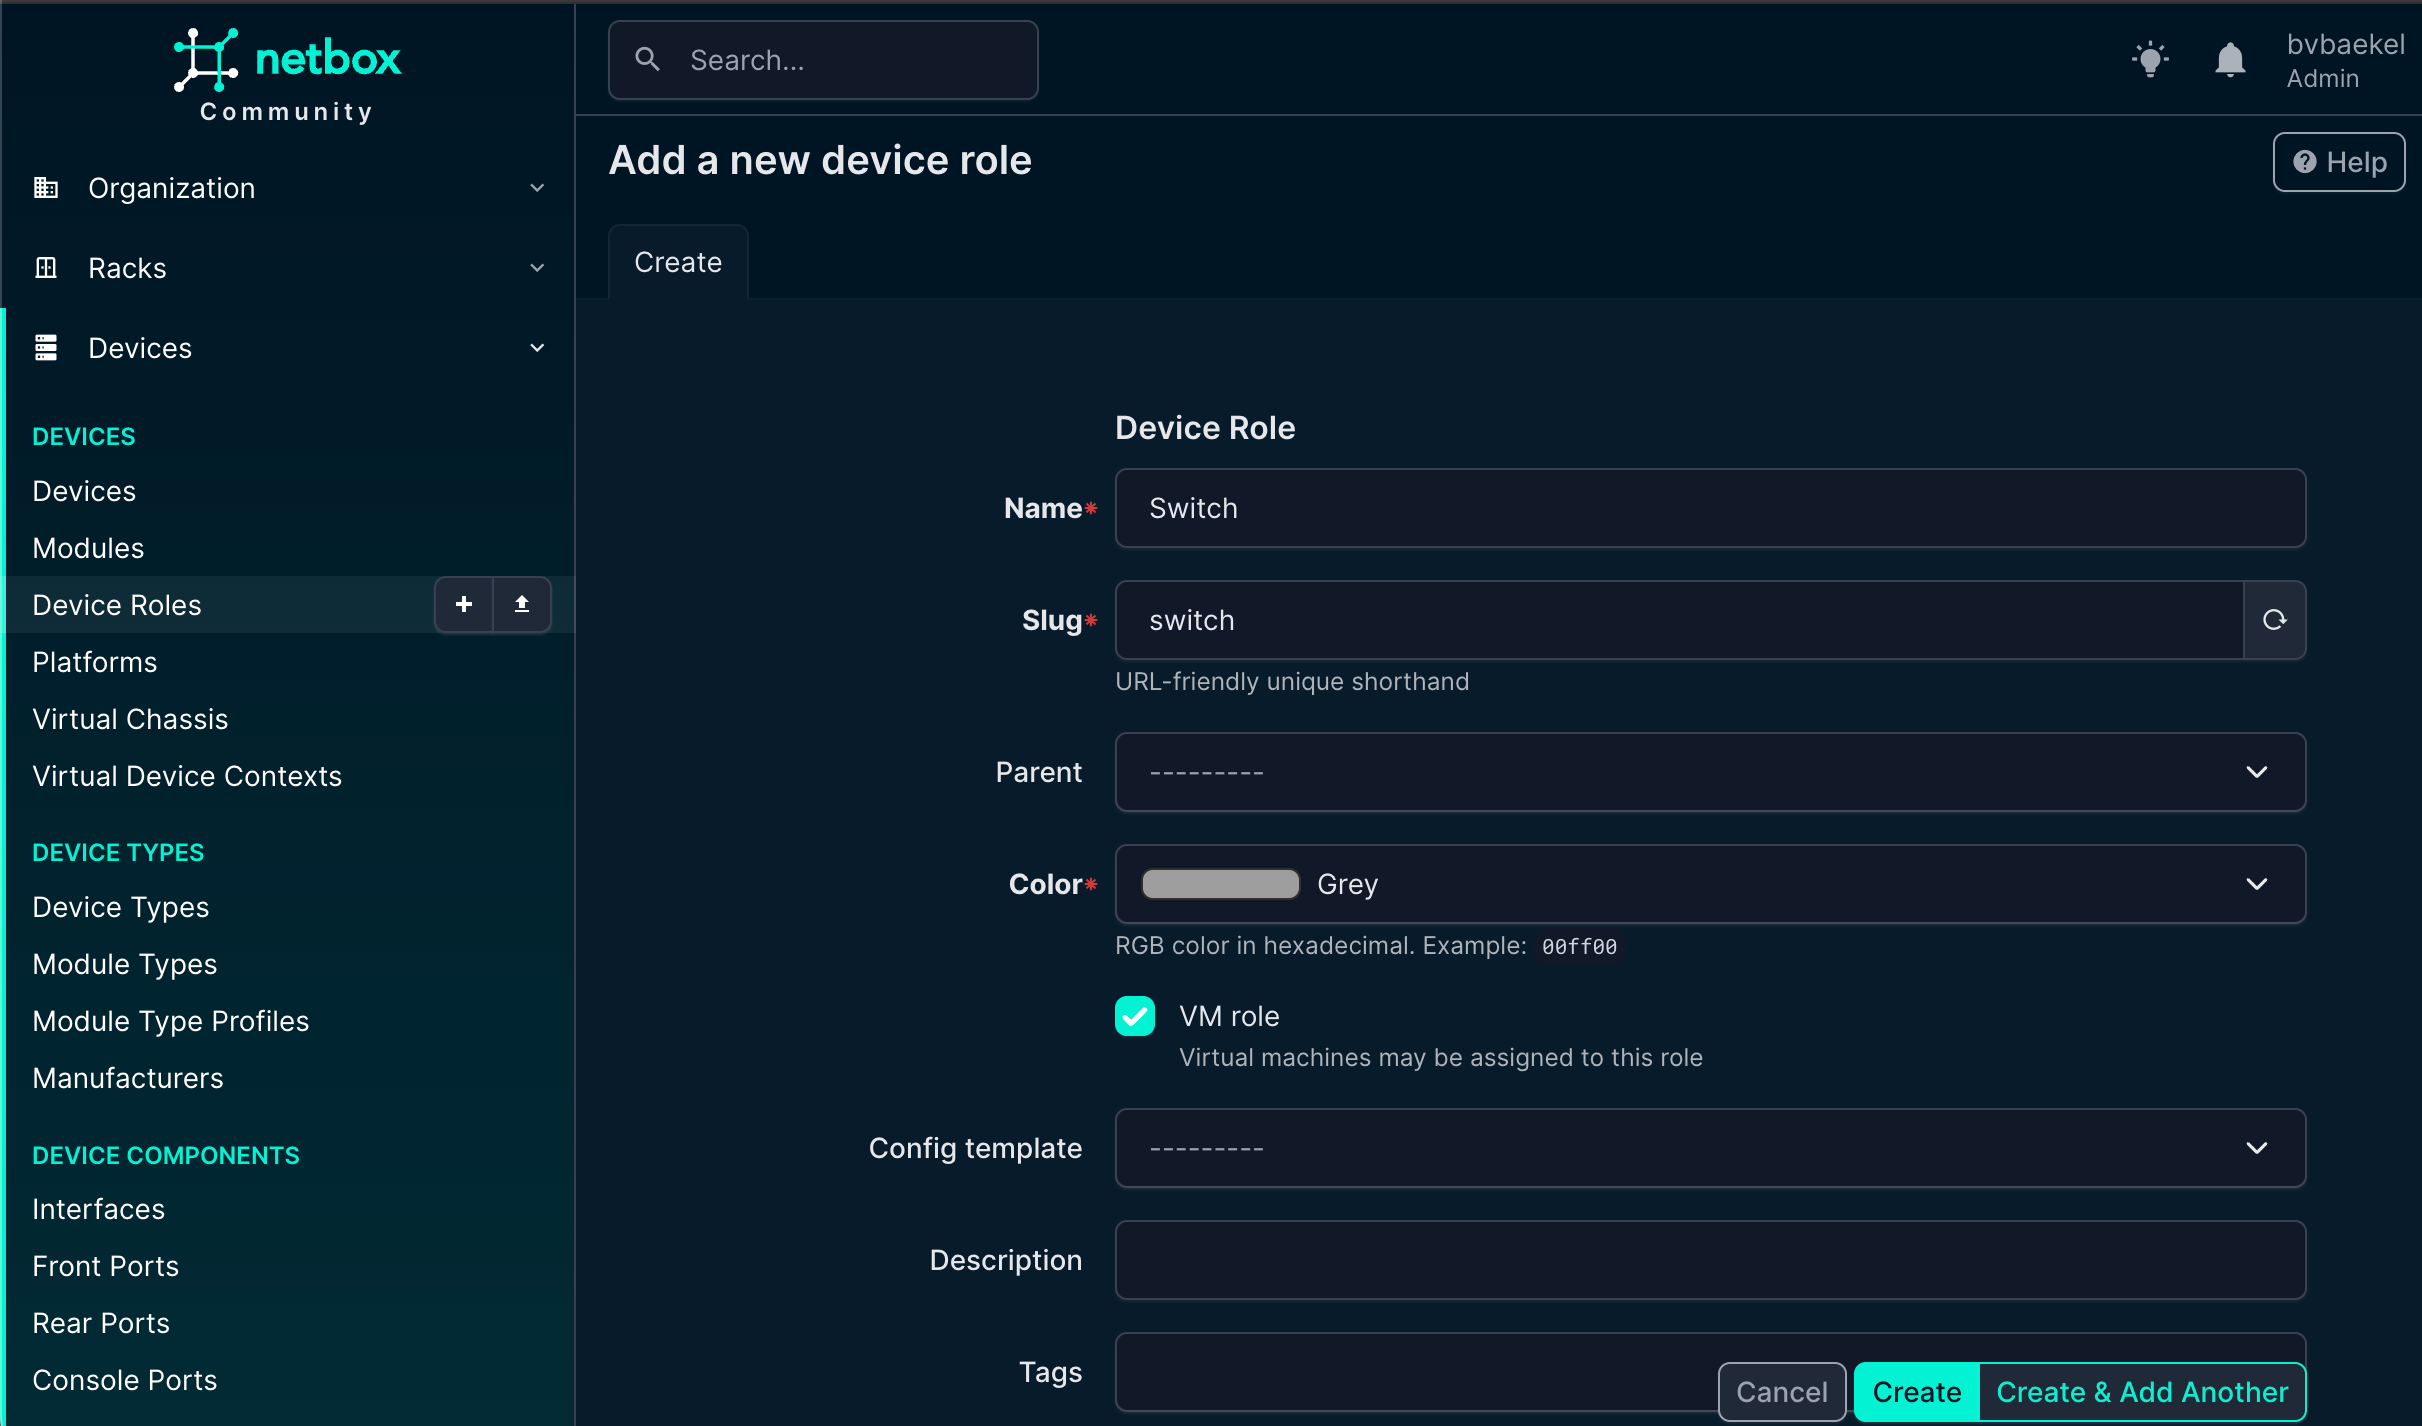
Now we can finally add the device itself! This is what it all is about – the work we’ve done before is really just laying the foundation for this moment. We add a device which will eventually become a Host in Zabbix, with all related properties pushed from NetBox its configuration.
So we navigate to Devices → Devices and from there add it:
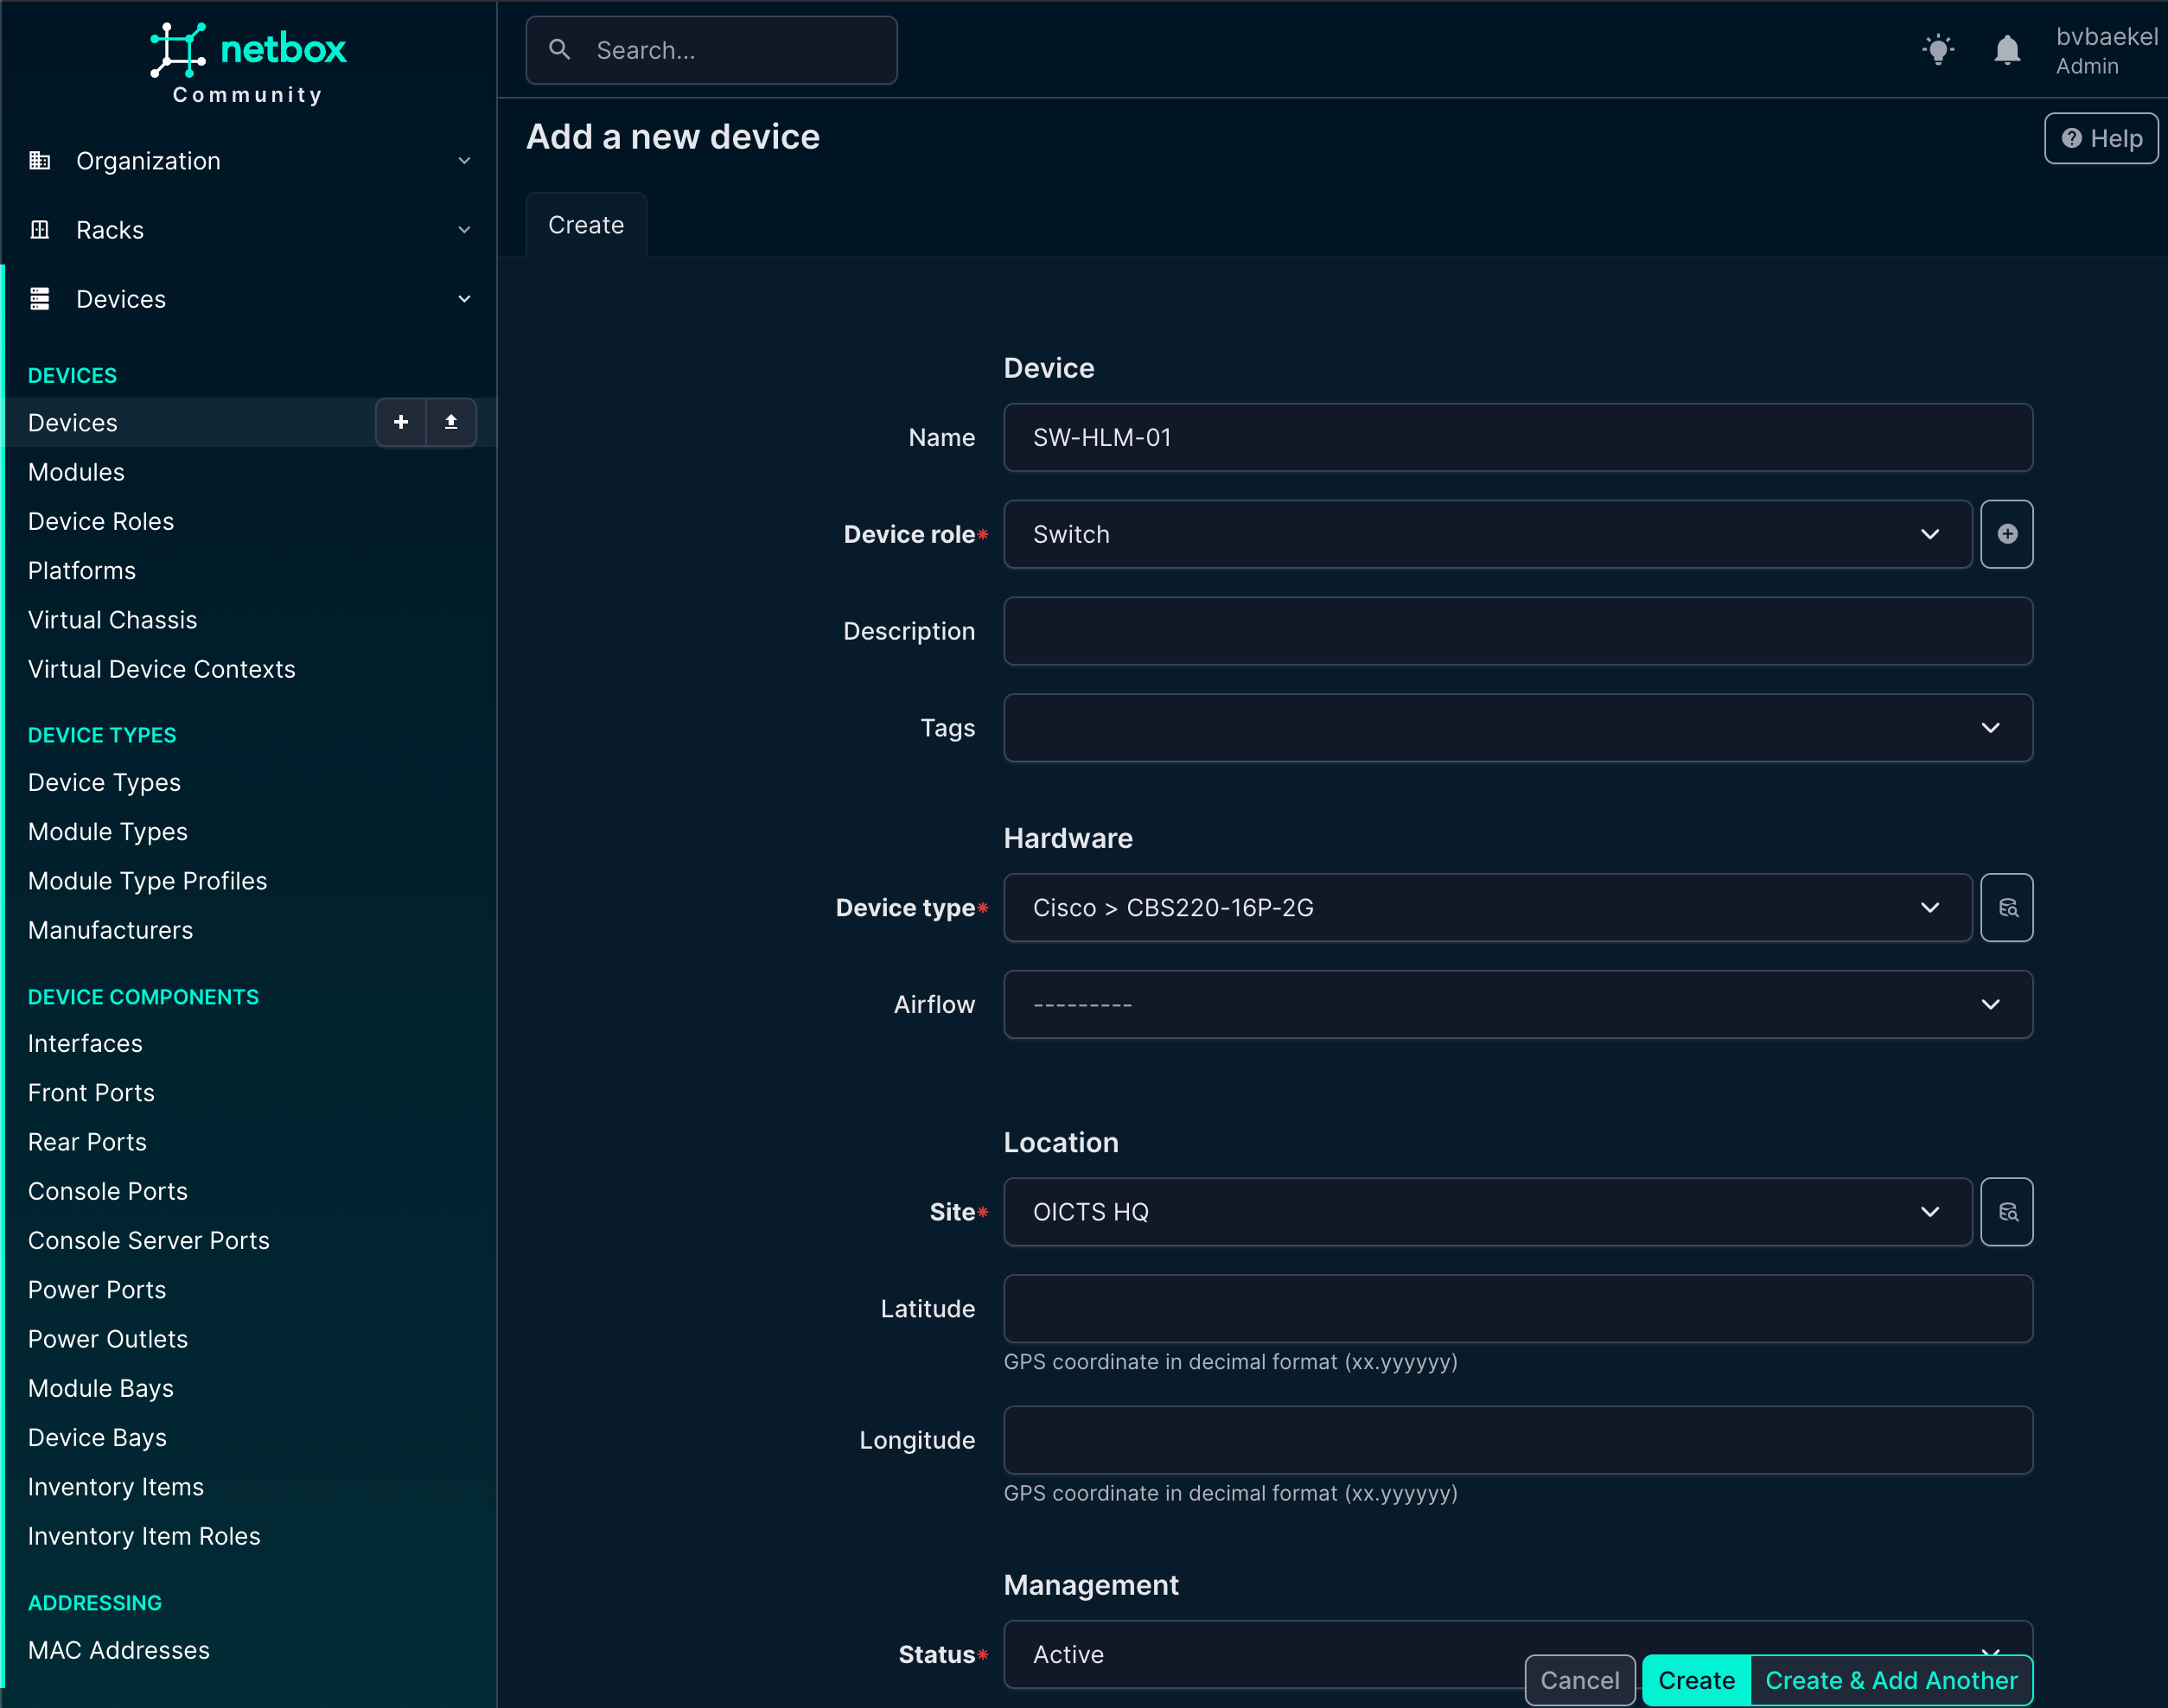
After we save the device by clicking “Create,” NetBox immediately takes us to the newly created device’s detail page. Here we can see an overview of all the information we have just entered, such as the device name, role, site, rack position, and other attributes. This page acts as the central point for managing and extending the device configuration.
From here, we can add interfaces, assign IP addresses, connect cables, or link the device to virtual resources. In other words, once created the device record becomes the foundation for documenting its place and function in the network.
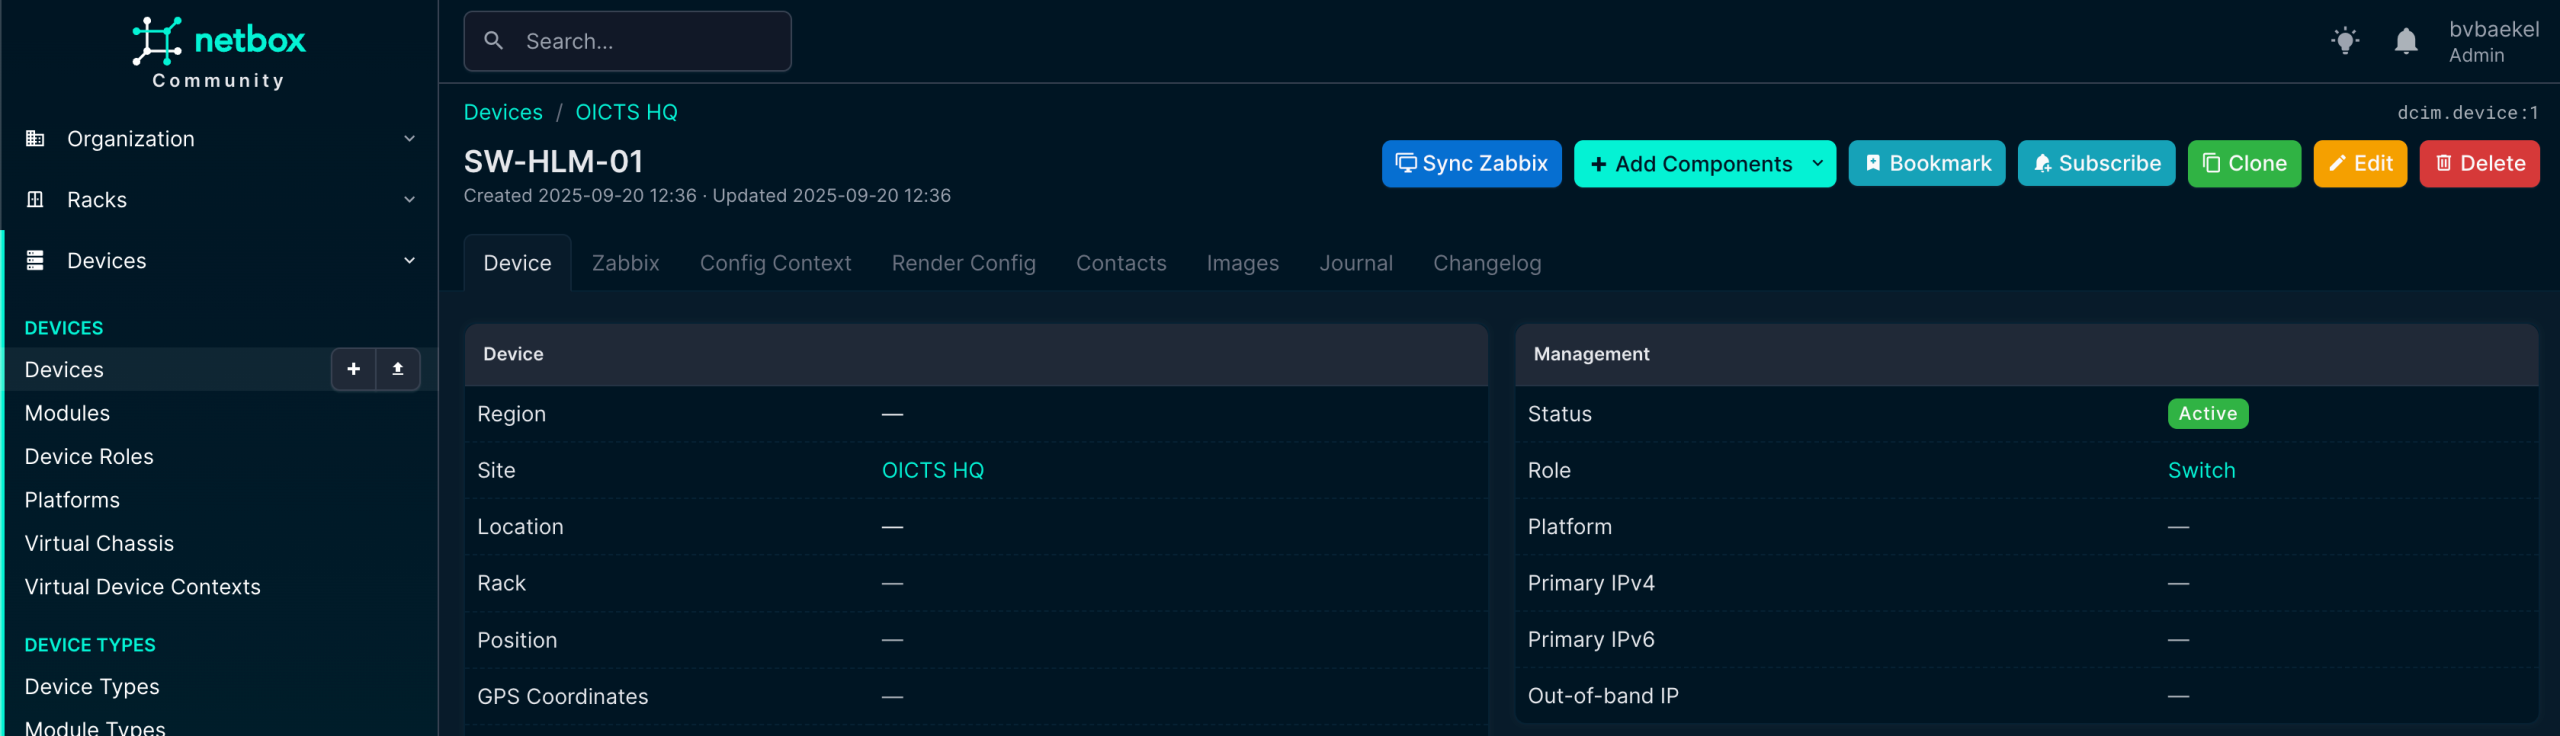
In this screenshot, we can see already that there is a new tab “Zabbix” (just under the device name) and we’ve also got a new button “Sync Zabbix.”
In the tab “Zabbix” we should assign this device to a Zabbix server, as by default it will not get assigned to any. You might think this is a bit strange, especially if you’ve got one Zabbix server. However, the mindset during development is that NetBox typically is used by MSPs, which have multiple Zabbix servers and even might have the need to assign multiple Zabbix servers to this device for operational reasons.
We open the tab “Zabbix” and click on “Add” next to the Zabbix Servers. A new configuration page opens and we select the server we just added:
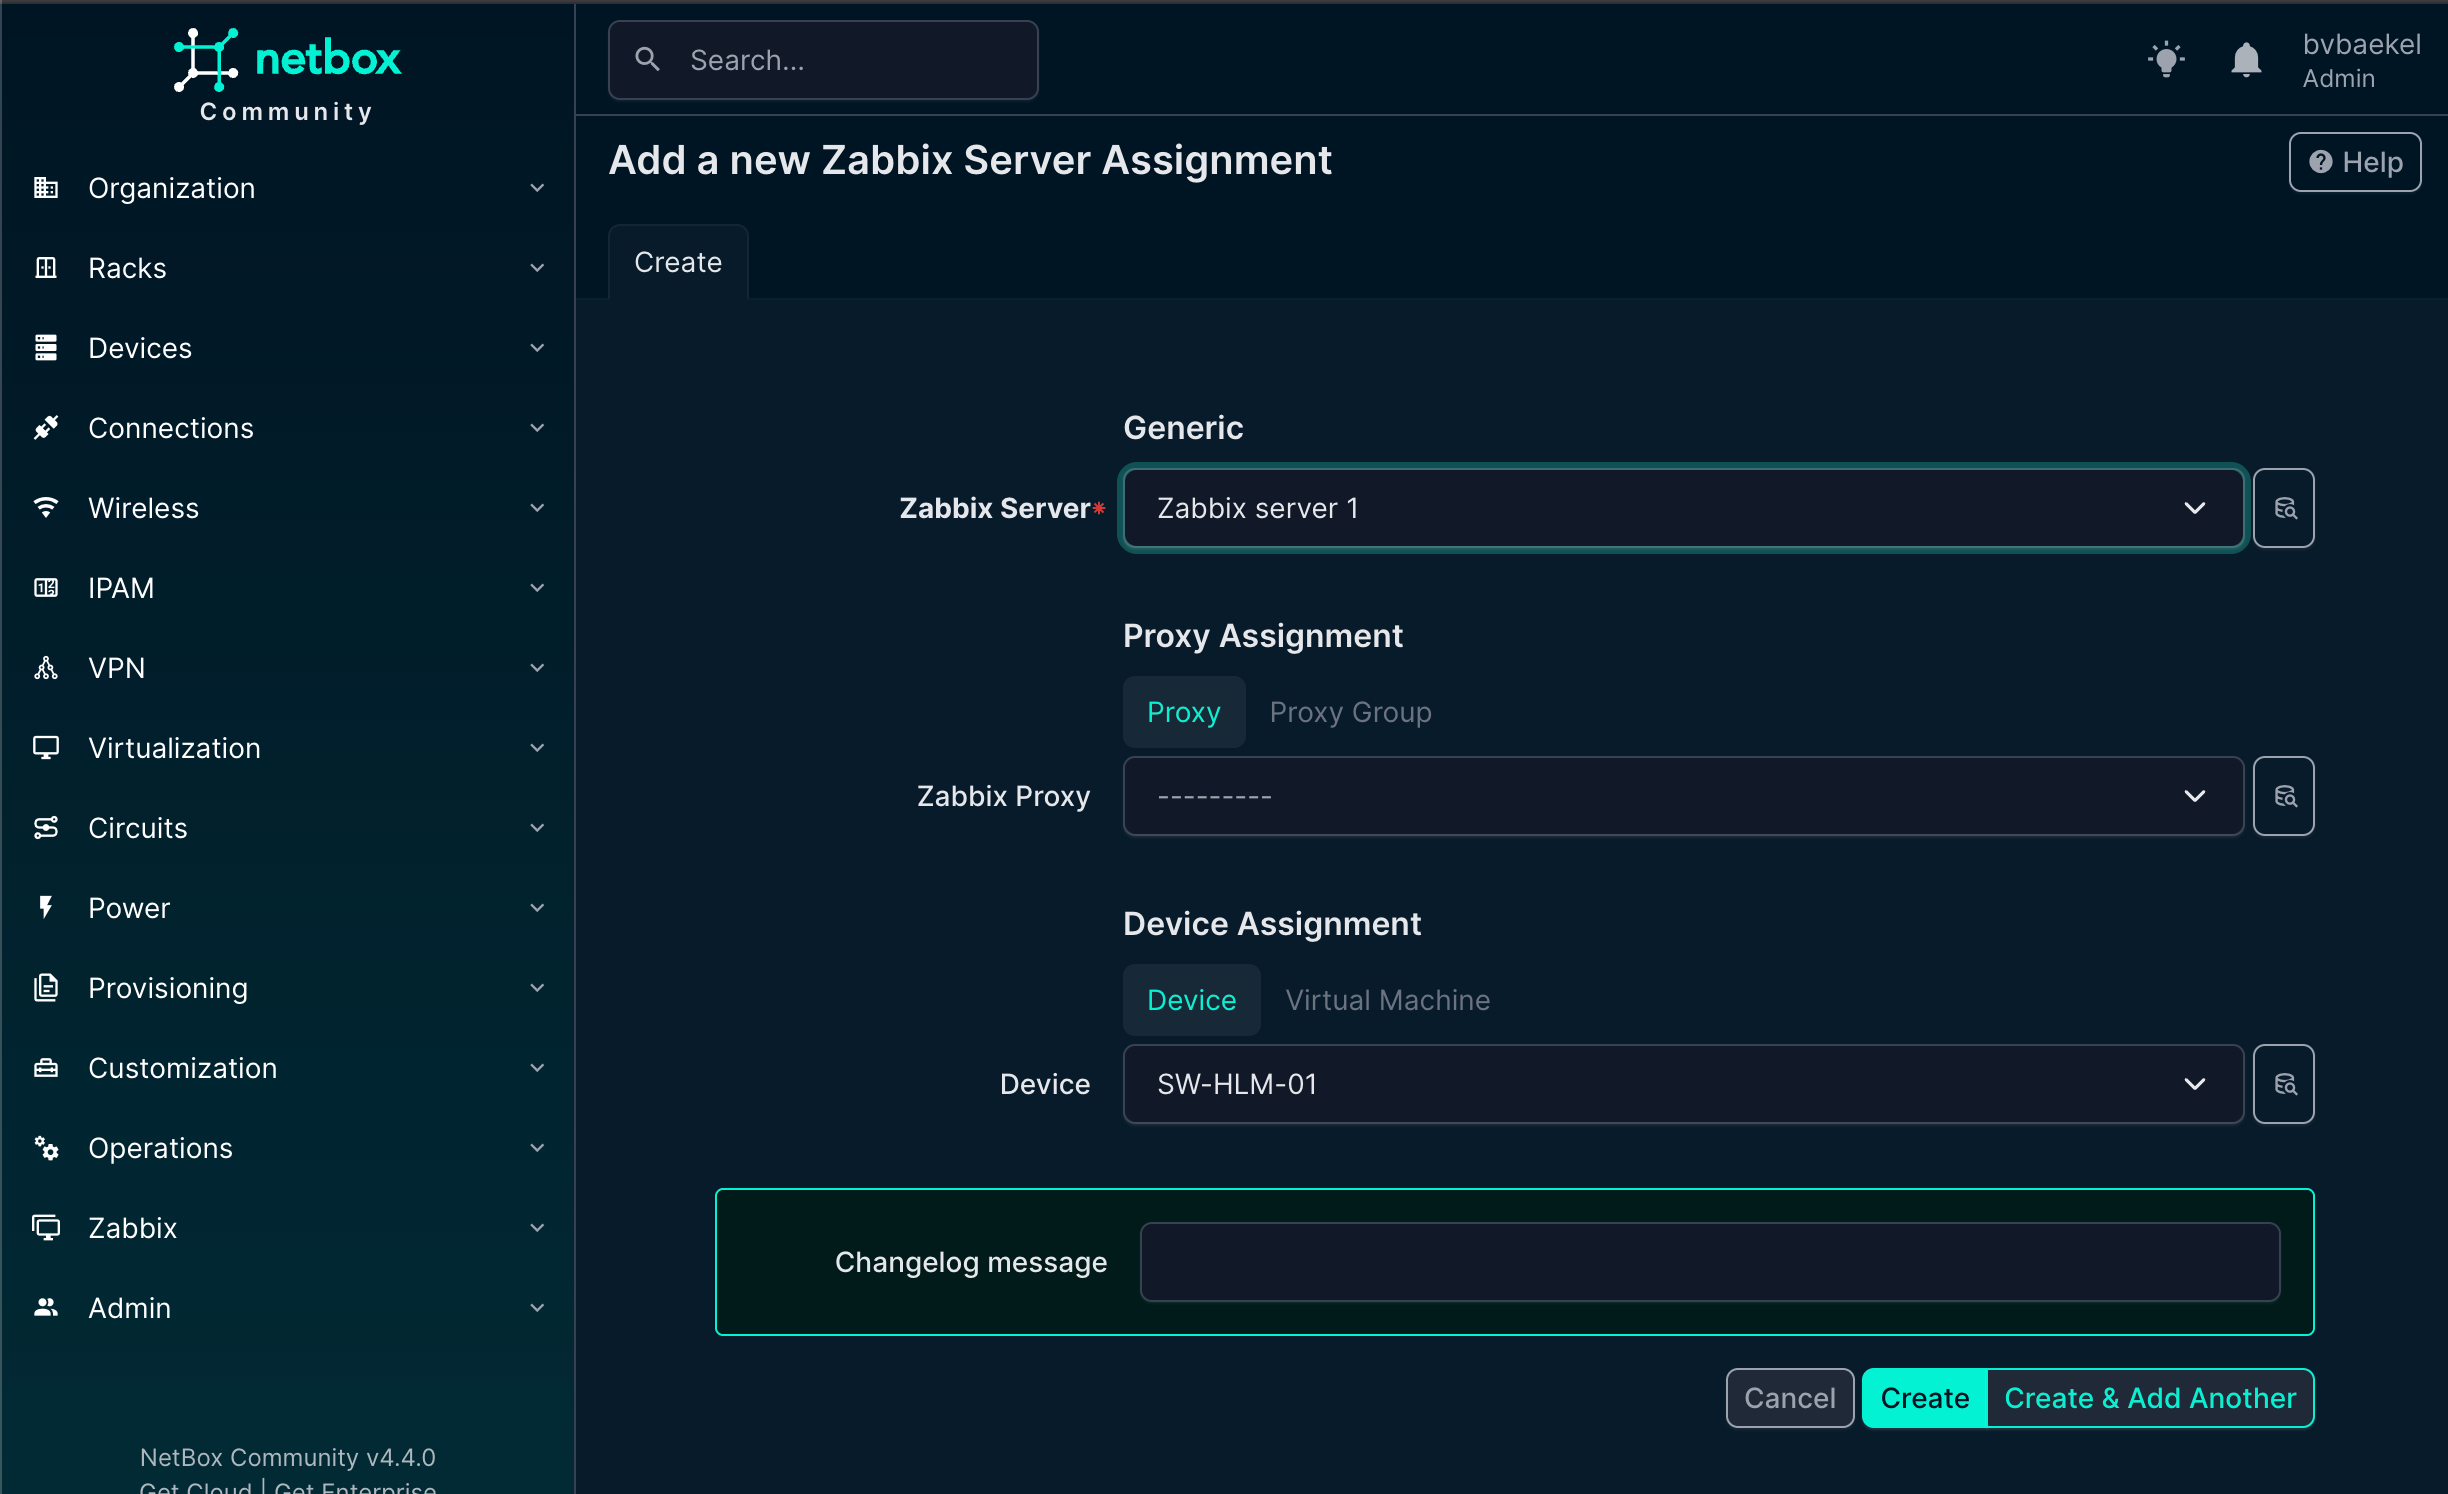
When you click on “create” the server is assigned. We can of course add an template to it, but as we know the vendor and type already, there should be some inheritance!
Let’s go back to Device → Manufacturers and click on the vendor(Cisco) we just added. Click on the name and you will see that this object also got a new “Zabbix” tab. In this tab you can configure that for this vendor, always these templates, hostgroups, tags and macros should be used. Here we will just add the template to this vendor, to show inheritance:
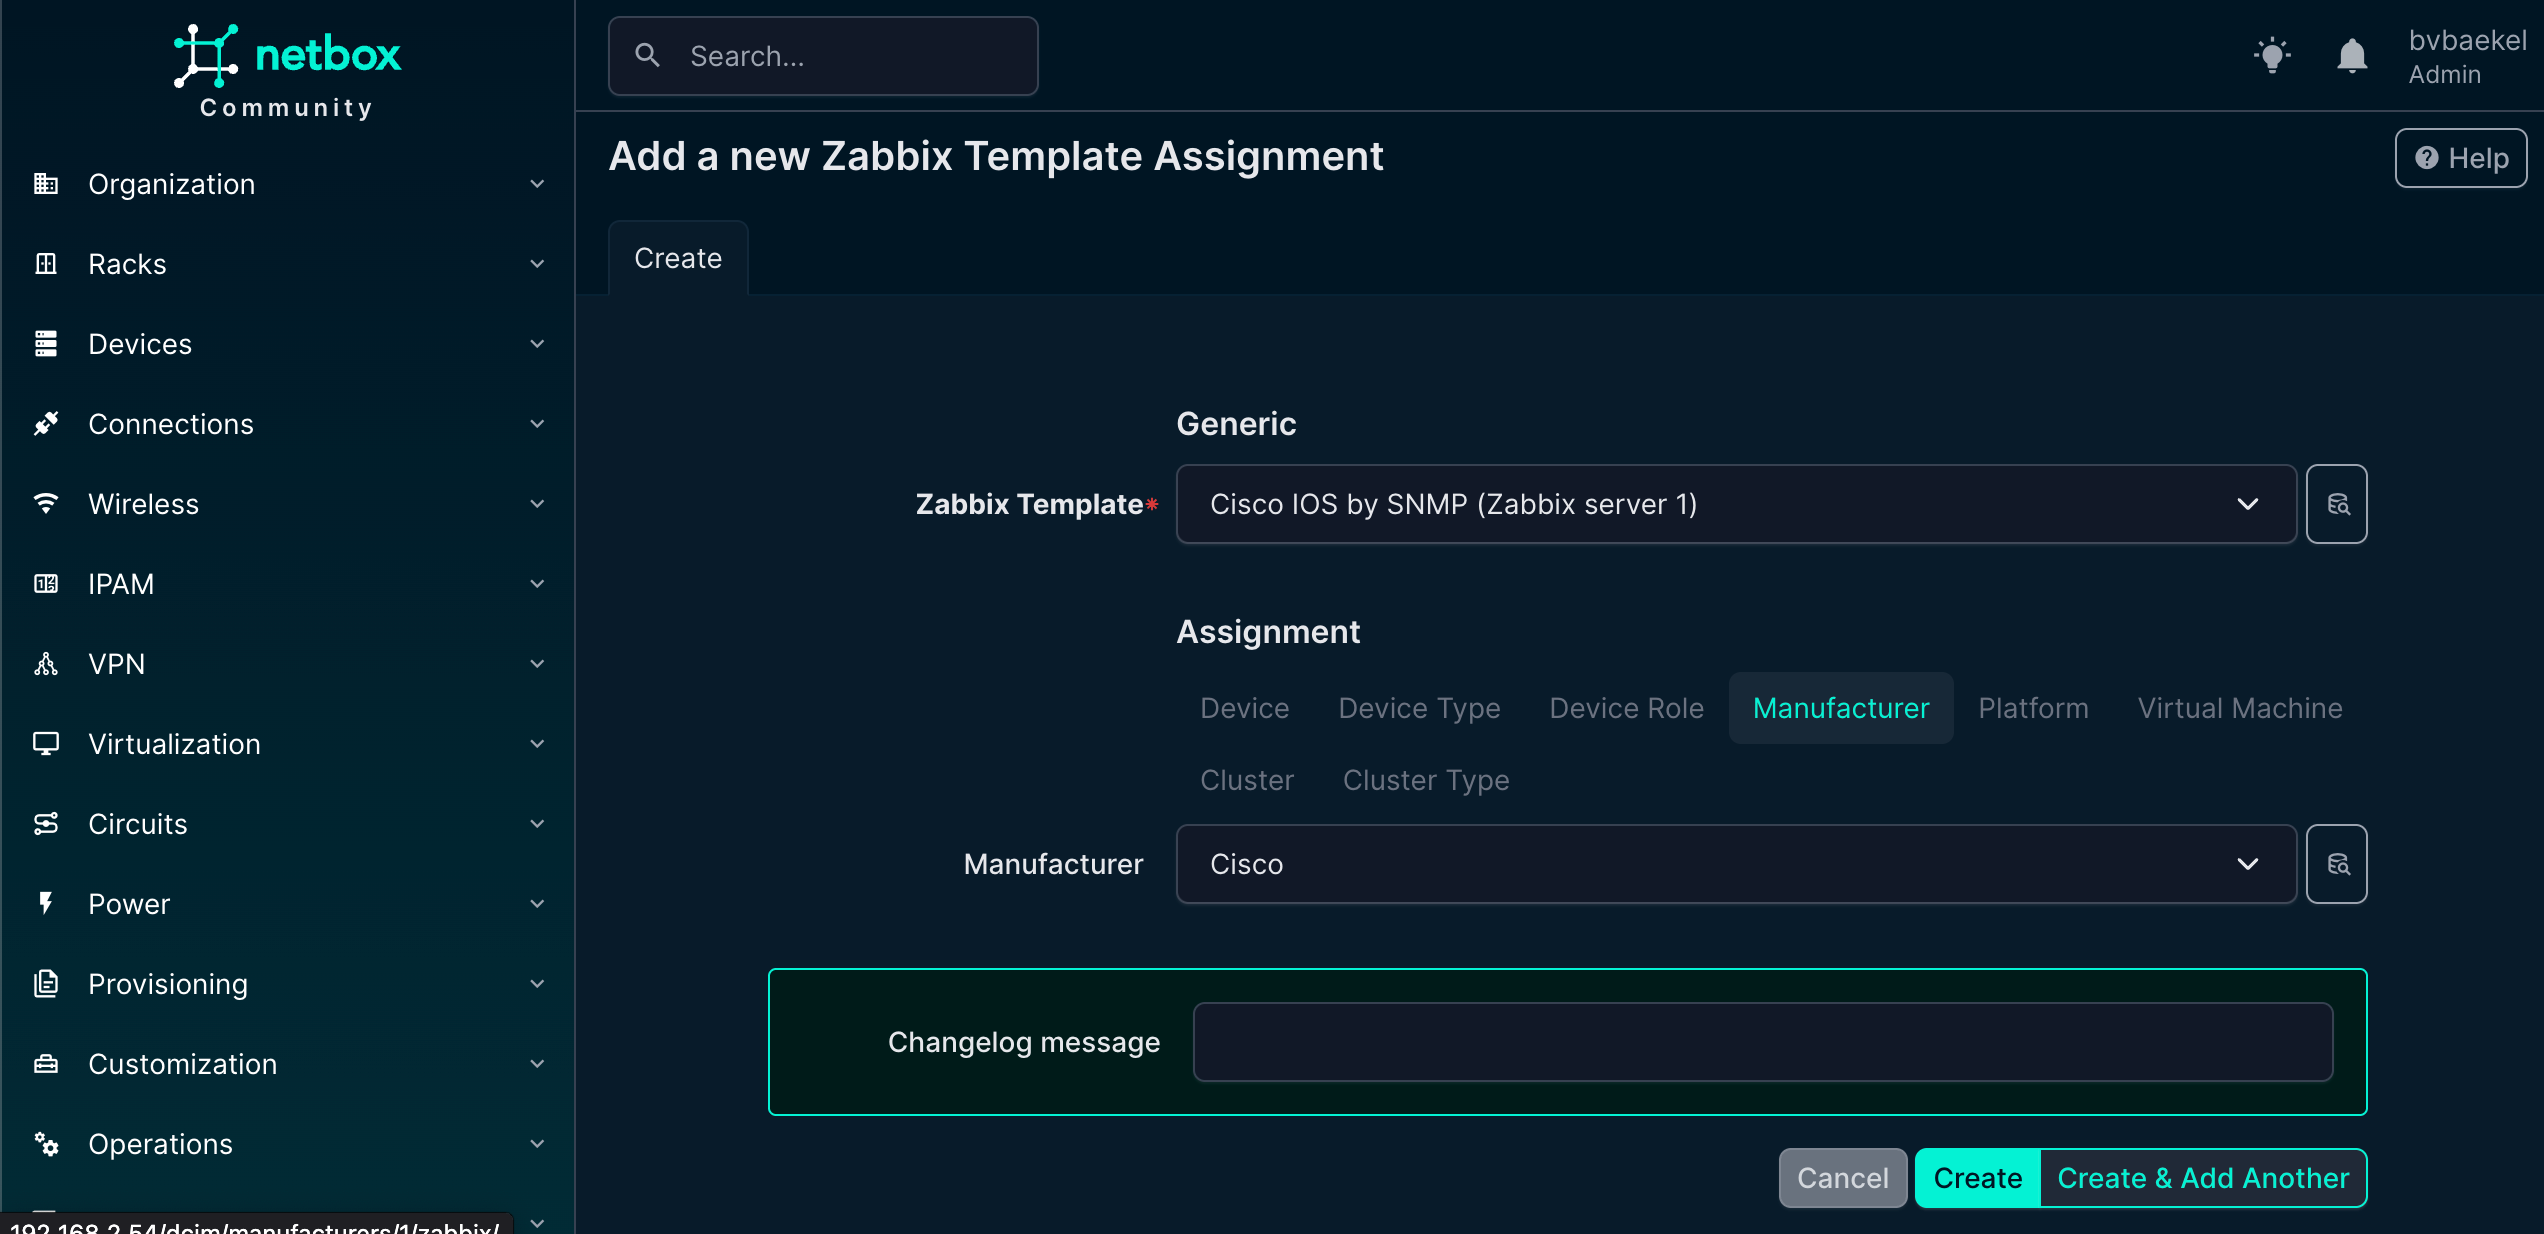
Once you’ve clicked on Create, navigate back to the device we made and observe how the template is inherited. As Zabbix also requires a host group and an interface, we are going to configure that now.
We will start with the host group, so click on Zabbix -> Hostgroups. There we create a new one as per the screenshot below. There is something strange with our configuration, as we use Jinja2 templates instead of static names.
The object name is “Device site” but the actual value will resolve to the site name we created (OICTS HQ) earlier. The power here lies in the variables – if we create a new device for another site and link this hostgroup, it will automatically resolve to the correct site name with no need for static configurations anymore!
Of course, the host group should be assigned to a Zabbix server again:
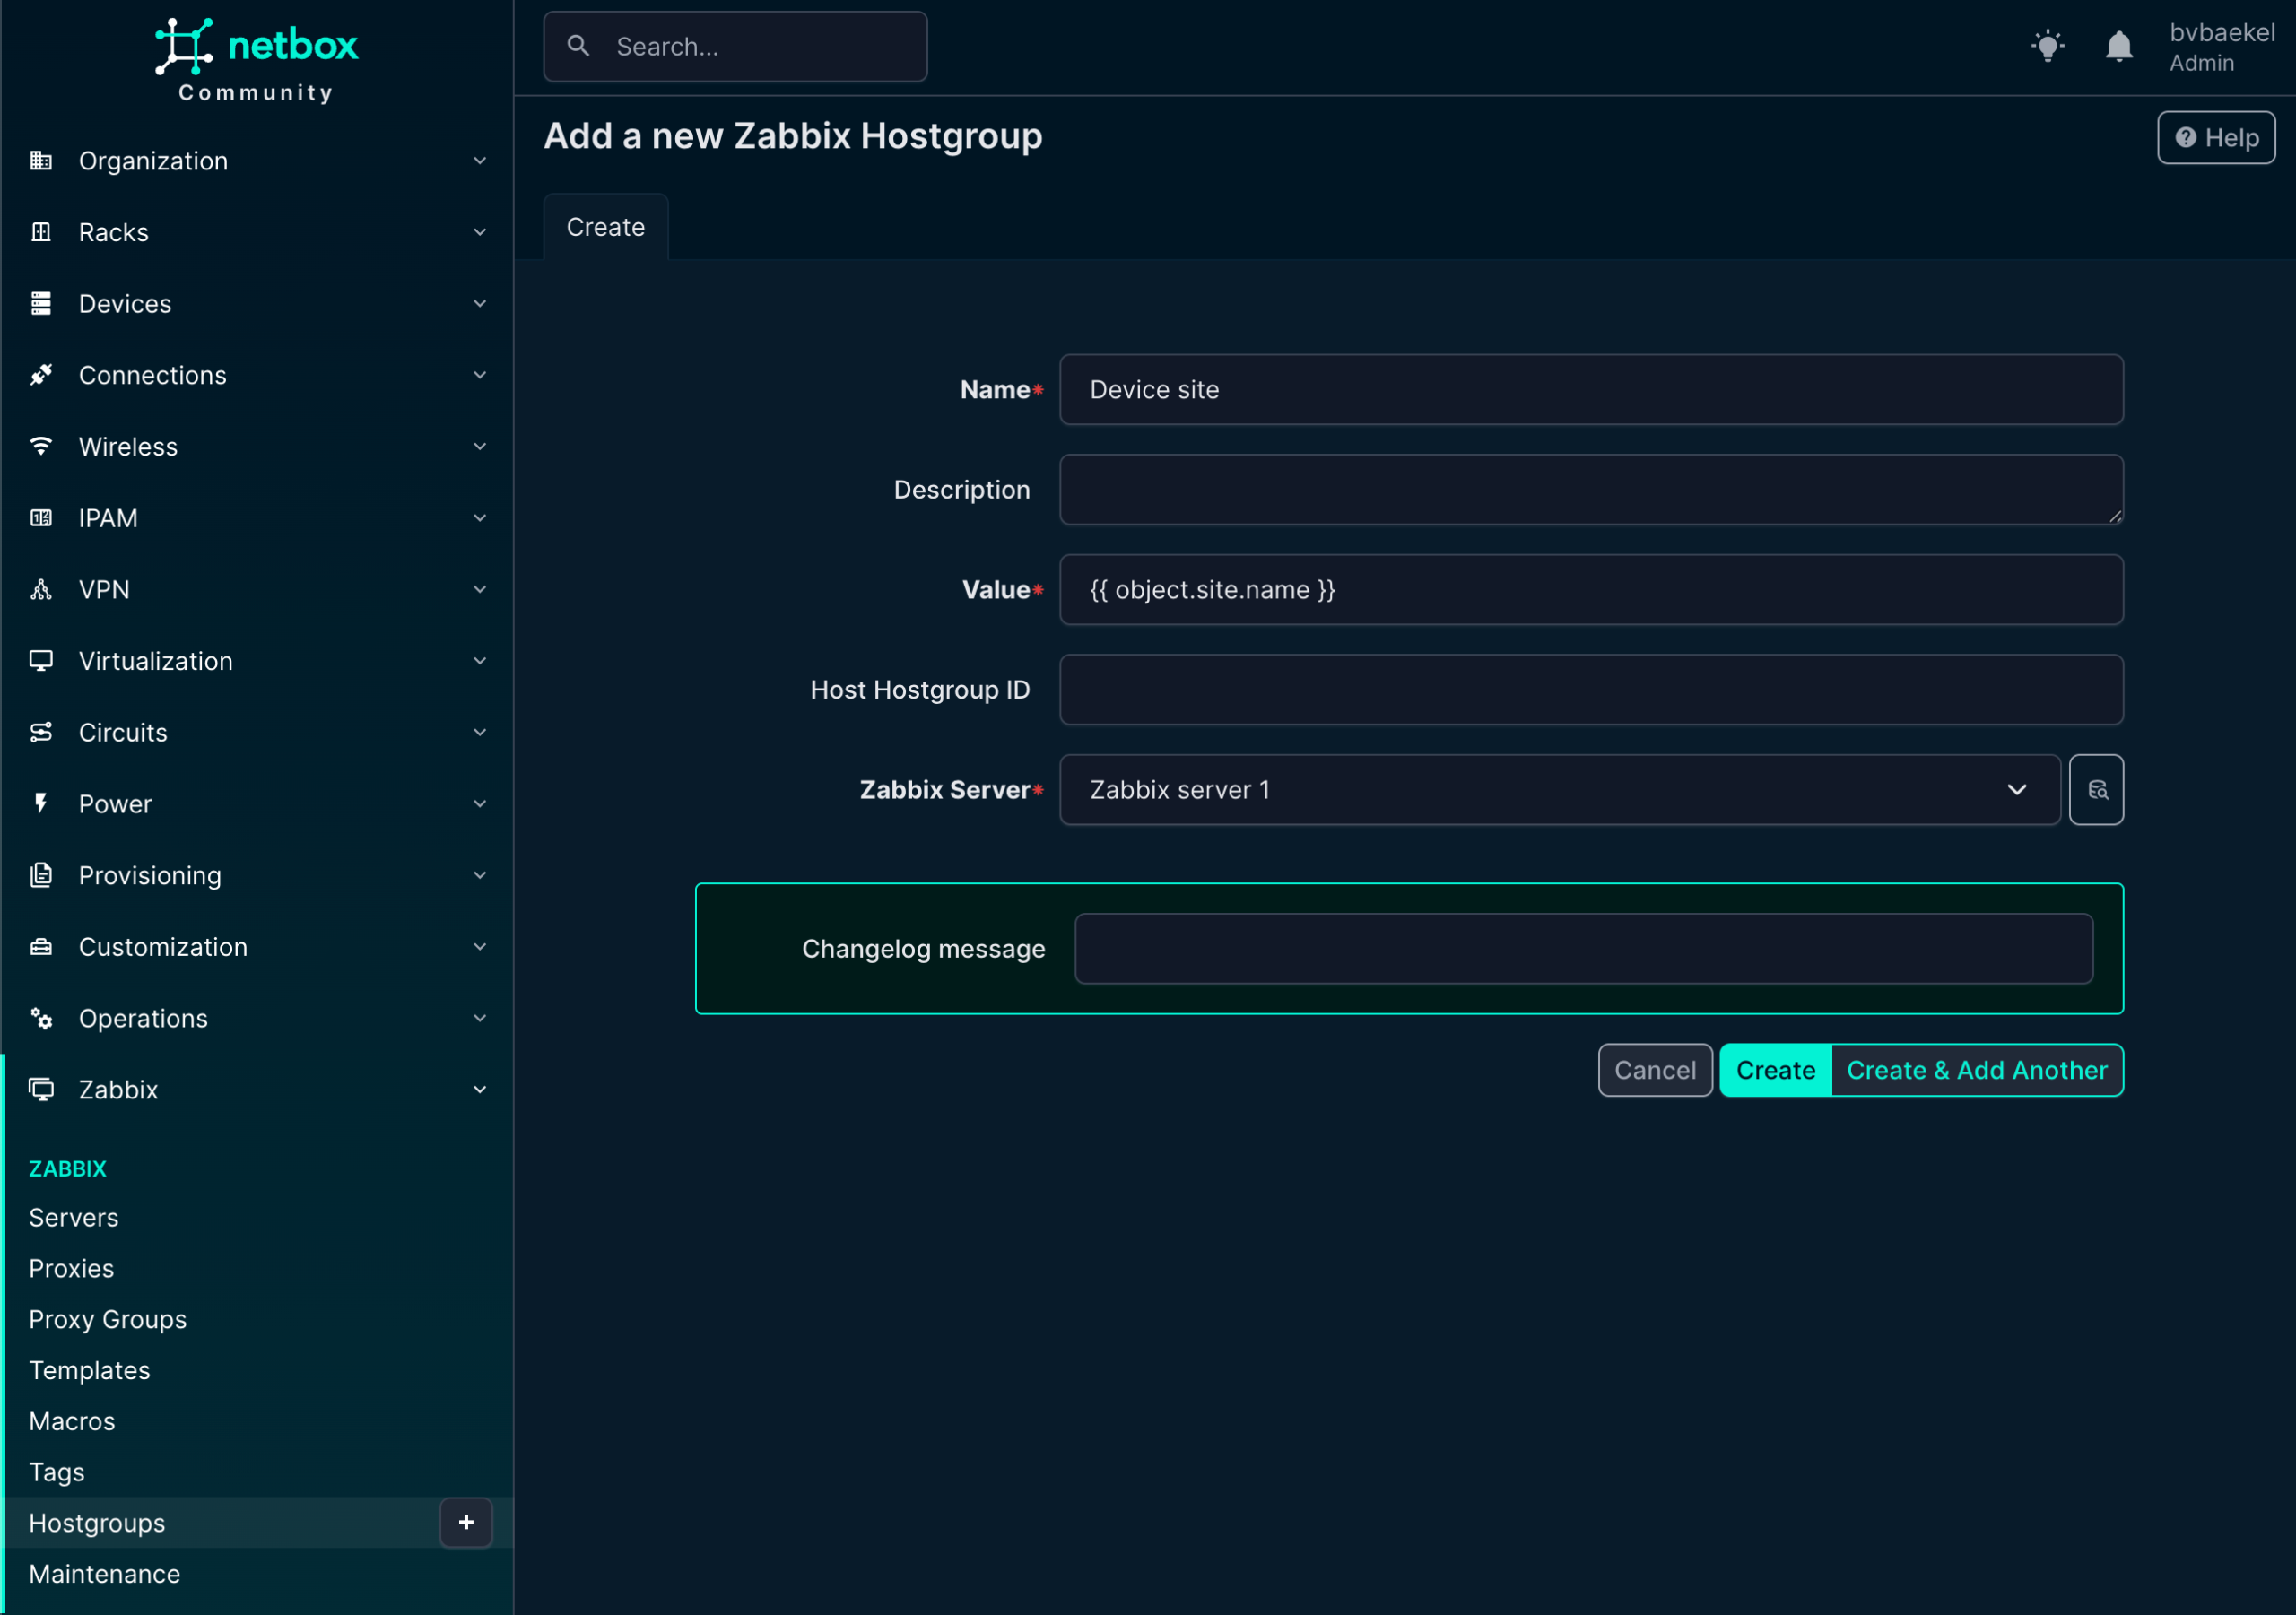
The next step is to create a Zabbix host interface, which is essential for monitoring and communication between Zabbix and the device. To do this, we leverage the IPAM (IP Address Management) functionality within NetBox.
IPAM provides a structured way to manage and allocate addresses across the network, ensuring consistency and avoiding conflicts. In this case, we navigate to IPAM → IP Addresses and add a new IP address that will serve as the management interface for the device. This IP address will later be linked to the Zabbix host configuration, allowing monitoring data to flow seamlessly.
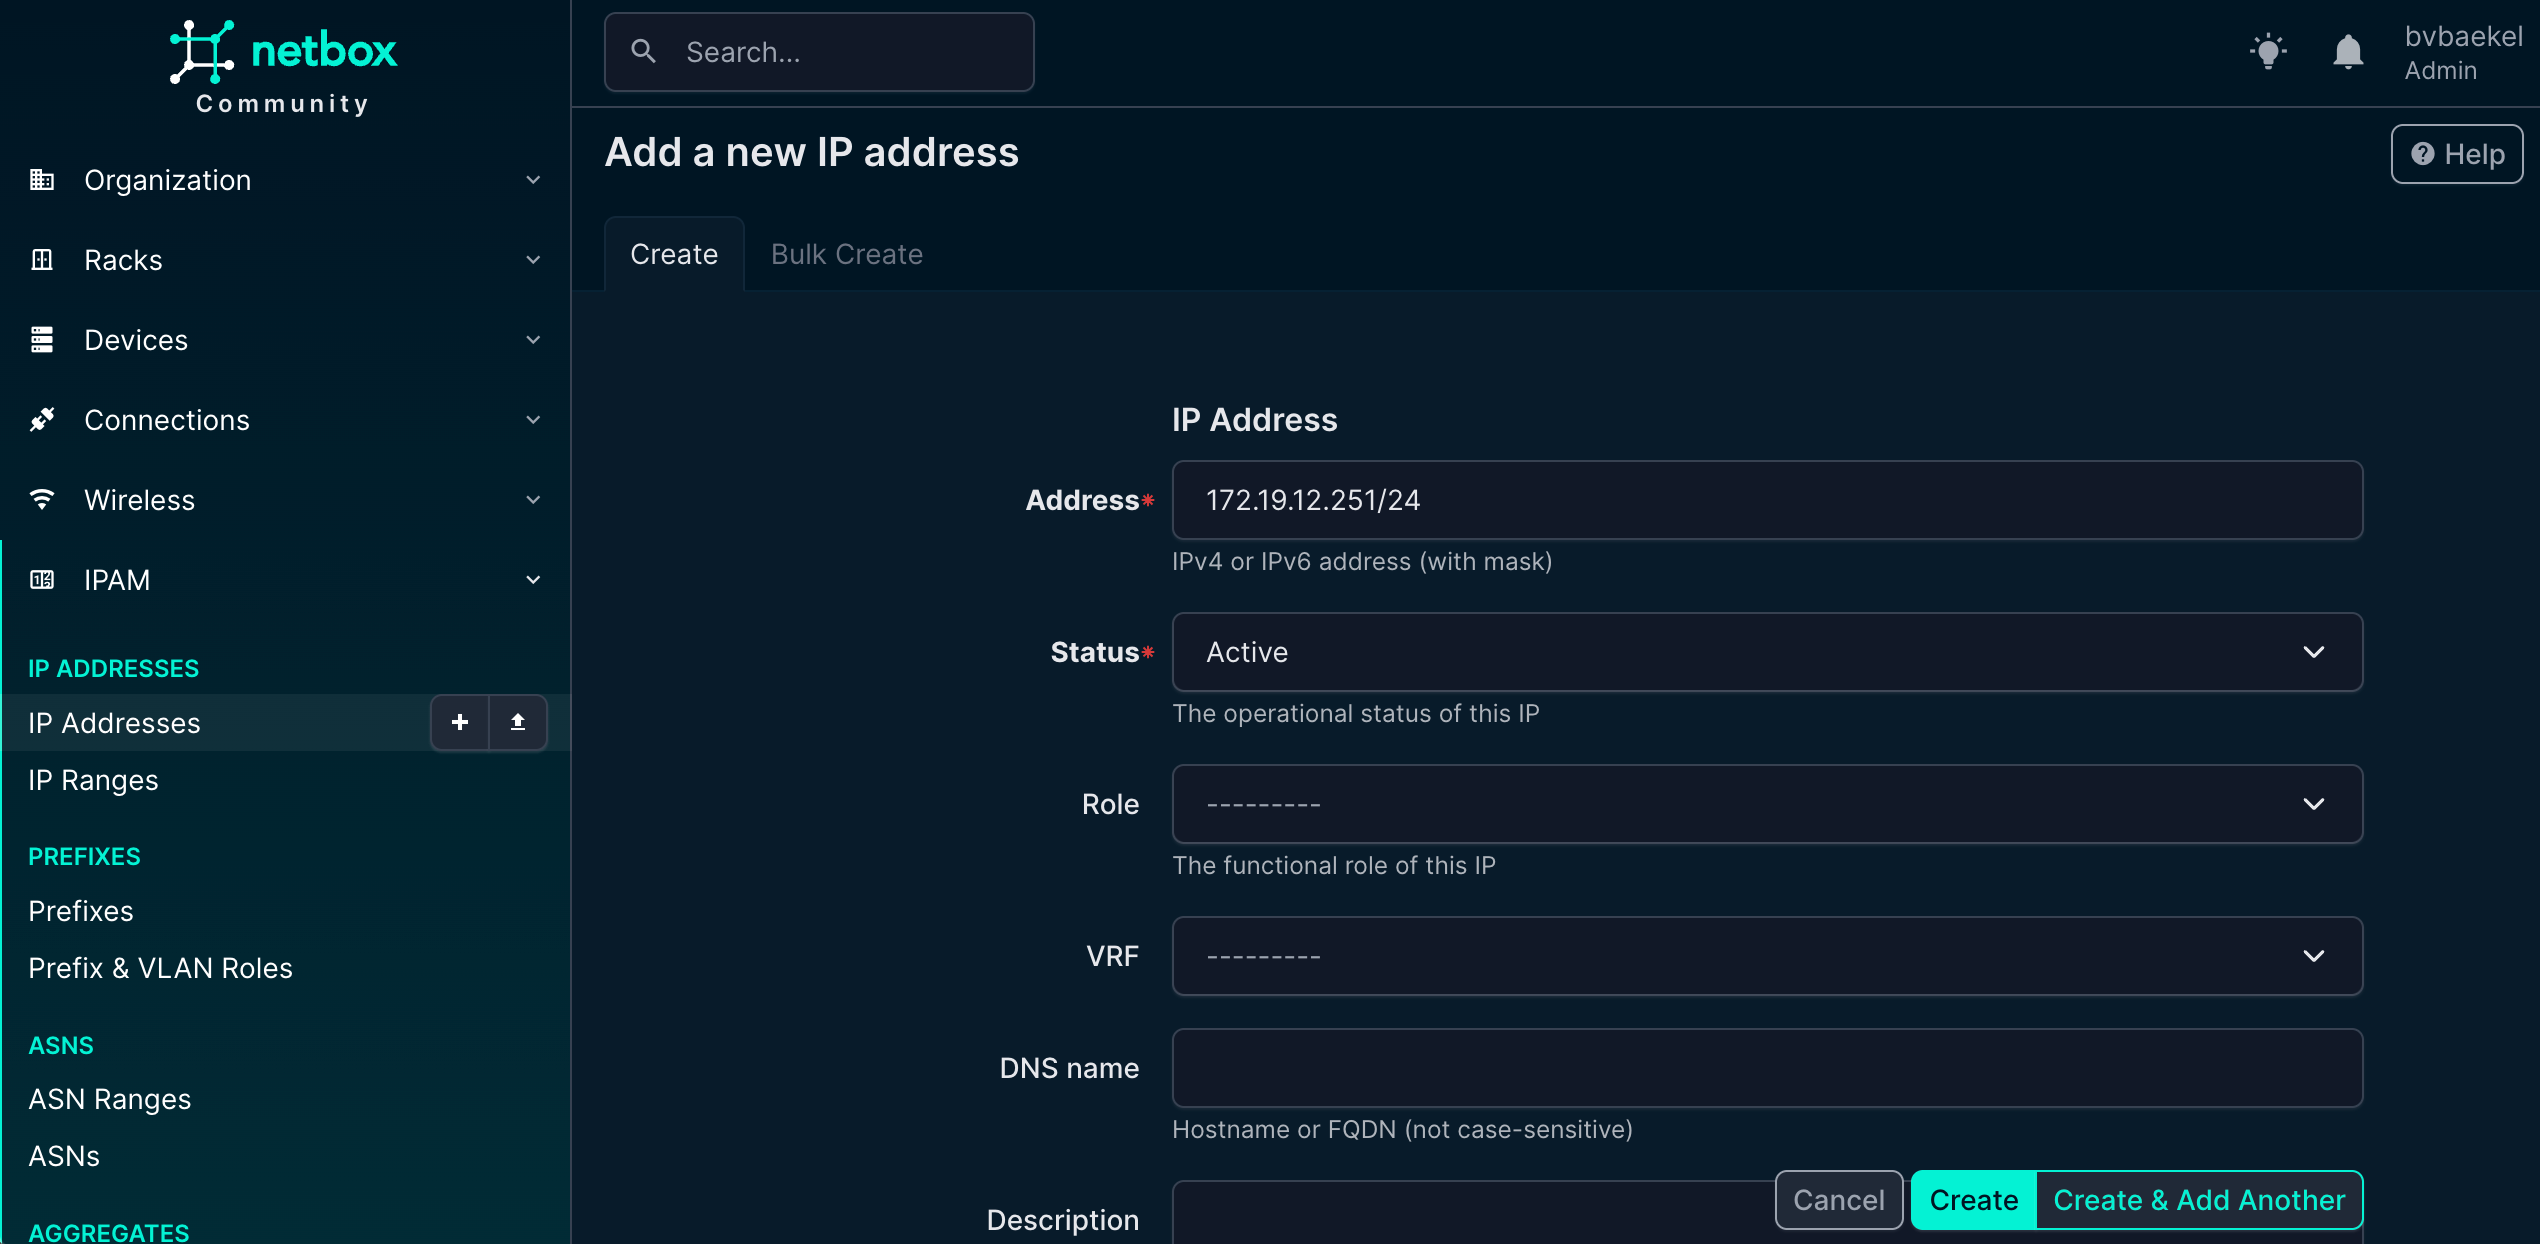
If we now go back to Devices -> the device we want to configure → tab “Zabbix” we should add an Host interface and Host group. Click on Add for the respective config and populate the minimum fields. For the Host interfaces that looks like this:
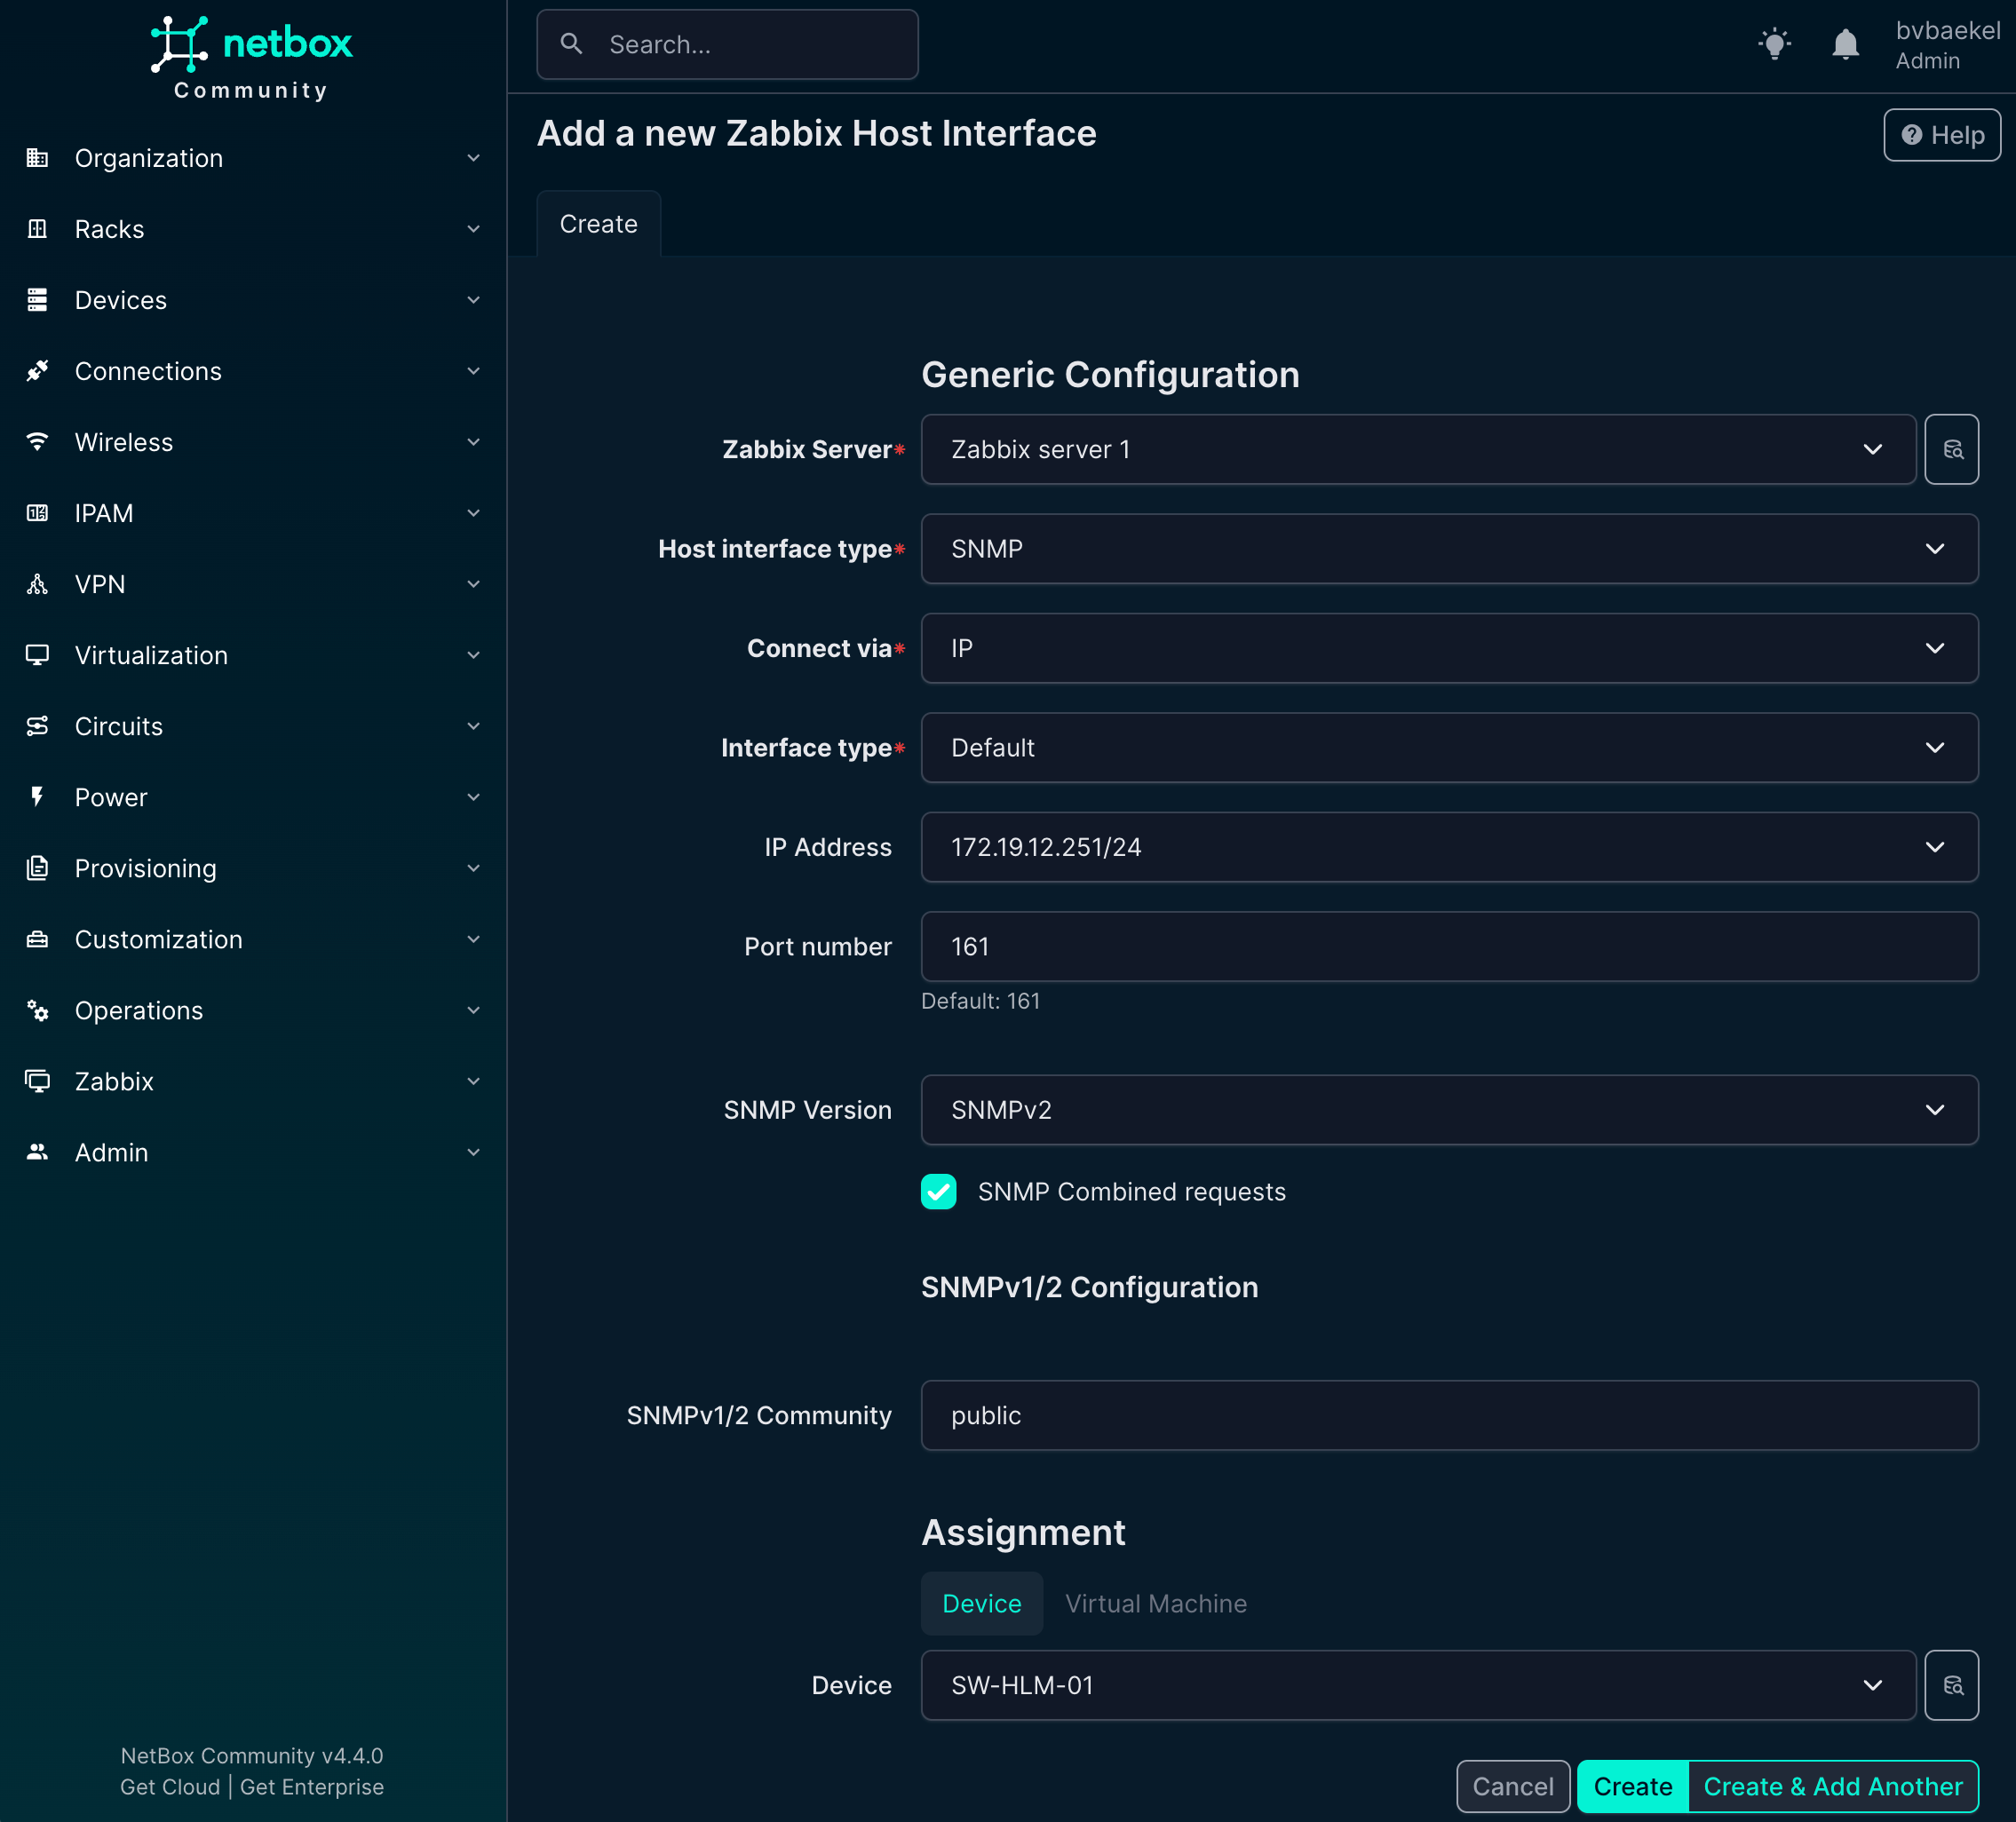
For the host group, there are fewer fields to fill in compared to other objects. All you need to do is select the appropriate group from the available options. This keeps the process straightforward and avoids unnecessary configuration.
Once saved, the host group will be correctly linked and ready for use in Zabbix:
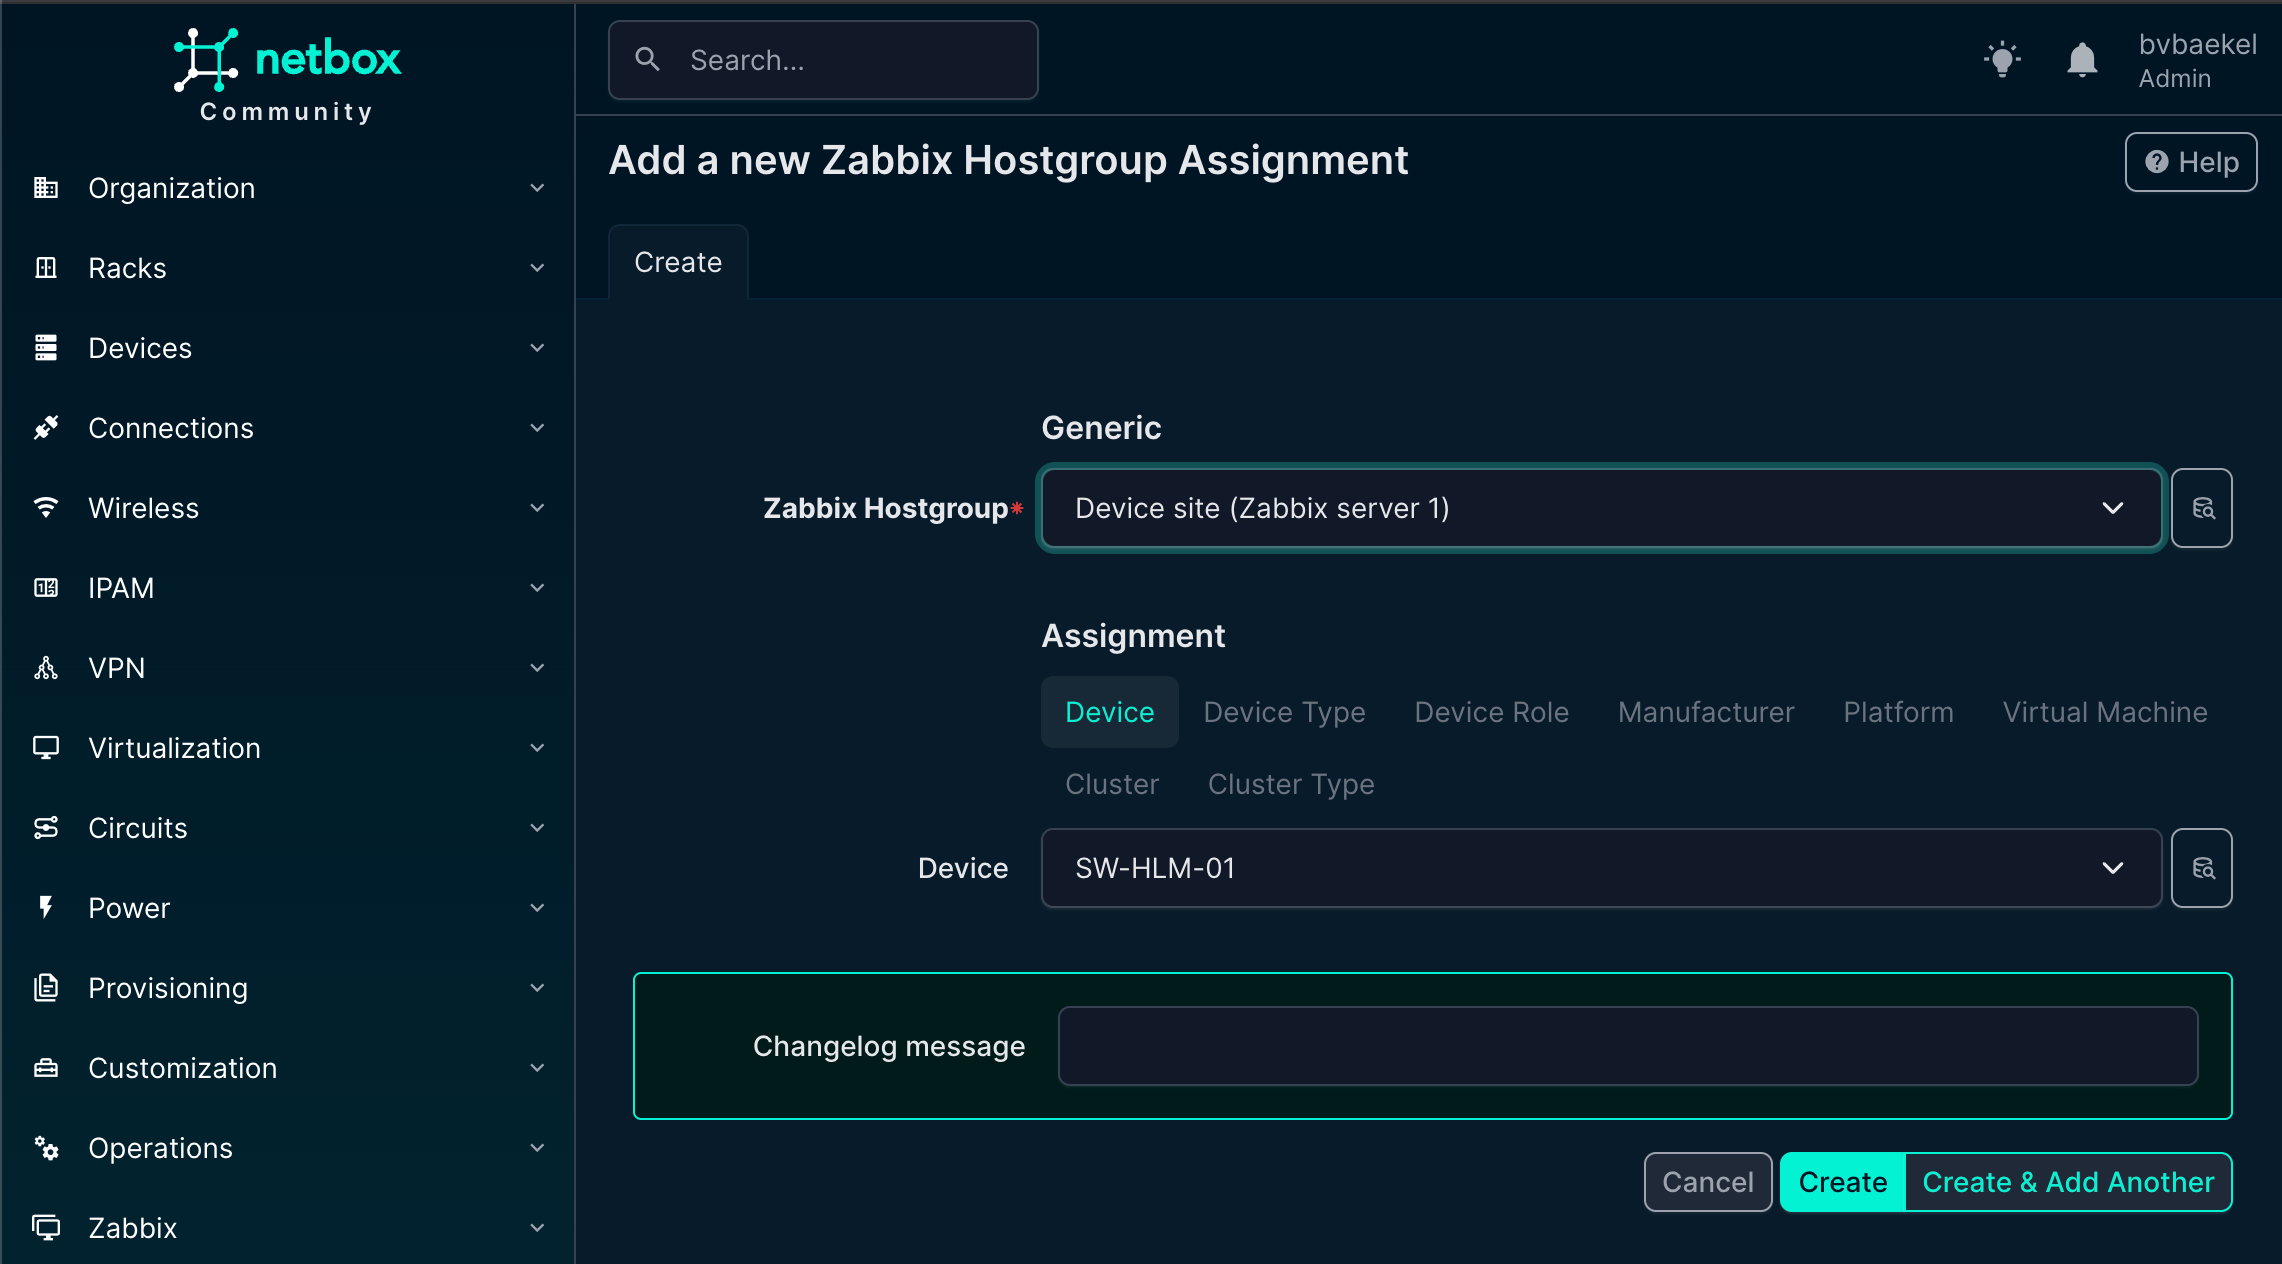
So the final result looks like this. At this point, all of the required elements have been configured in NetBox and properly linked to the Zabbix environment. The device now has its host group, host interface, and templates assigned, giving us a complete picture of how it will appear in monitoring.
What we see here is essentially the end-to-end outcome of the earlier configuration steps, where NetBox acts as the single source of truth and Zabbix automatically inherits the correct setup.
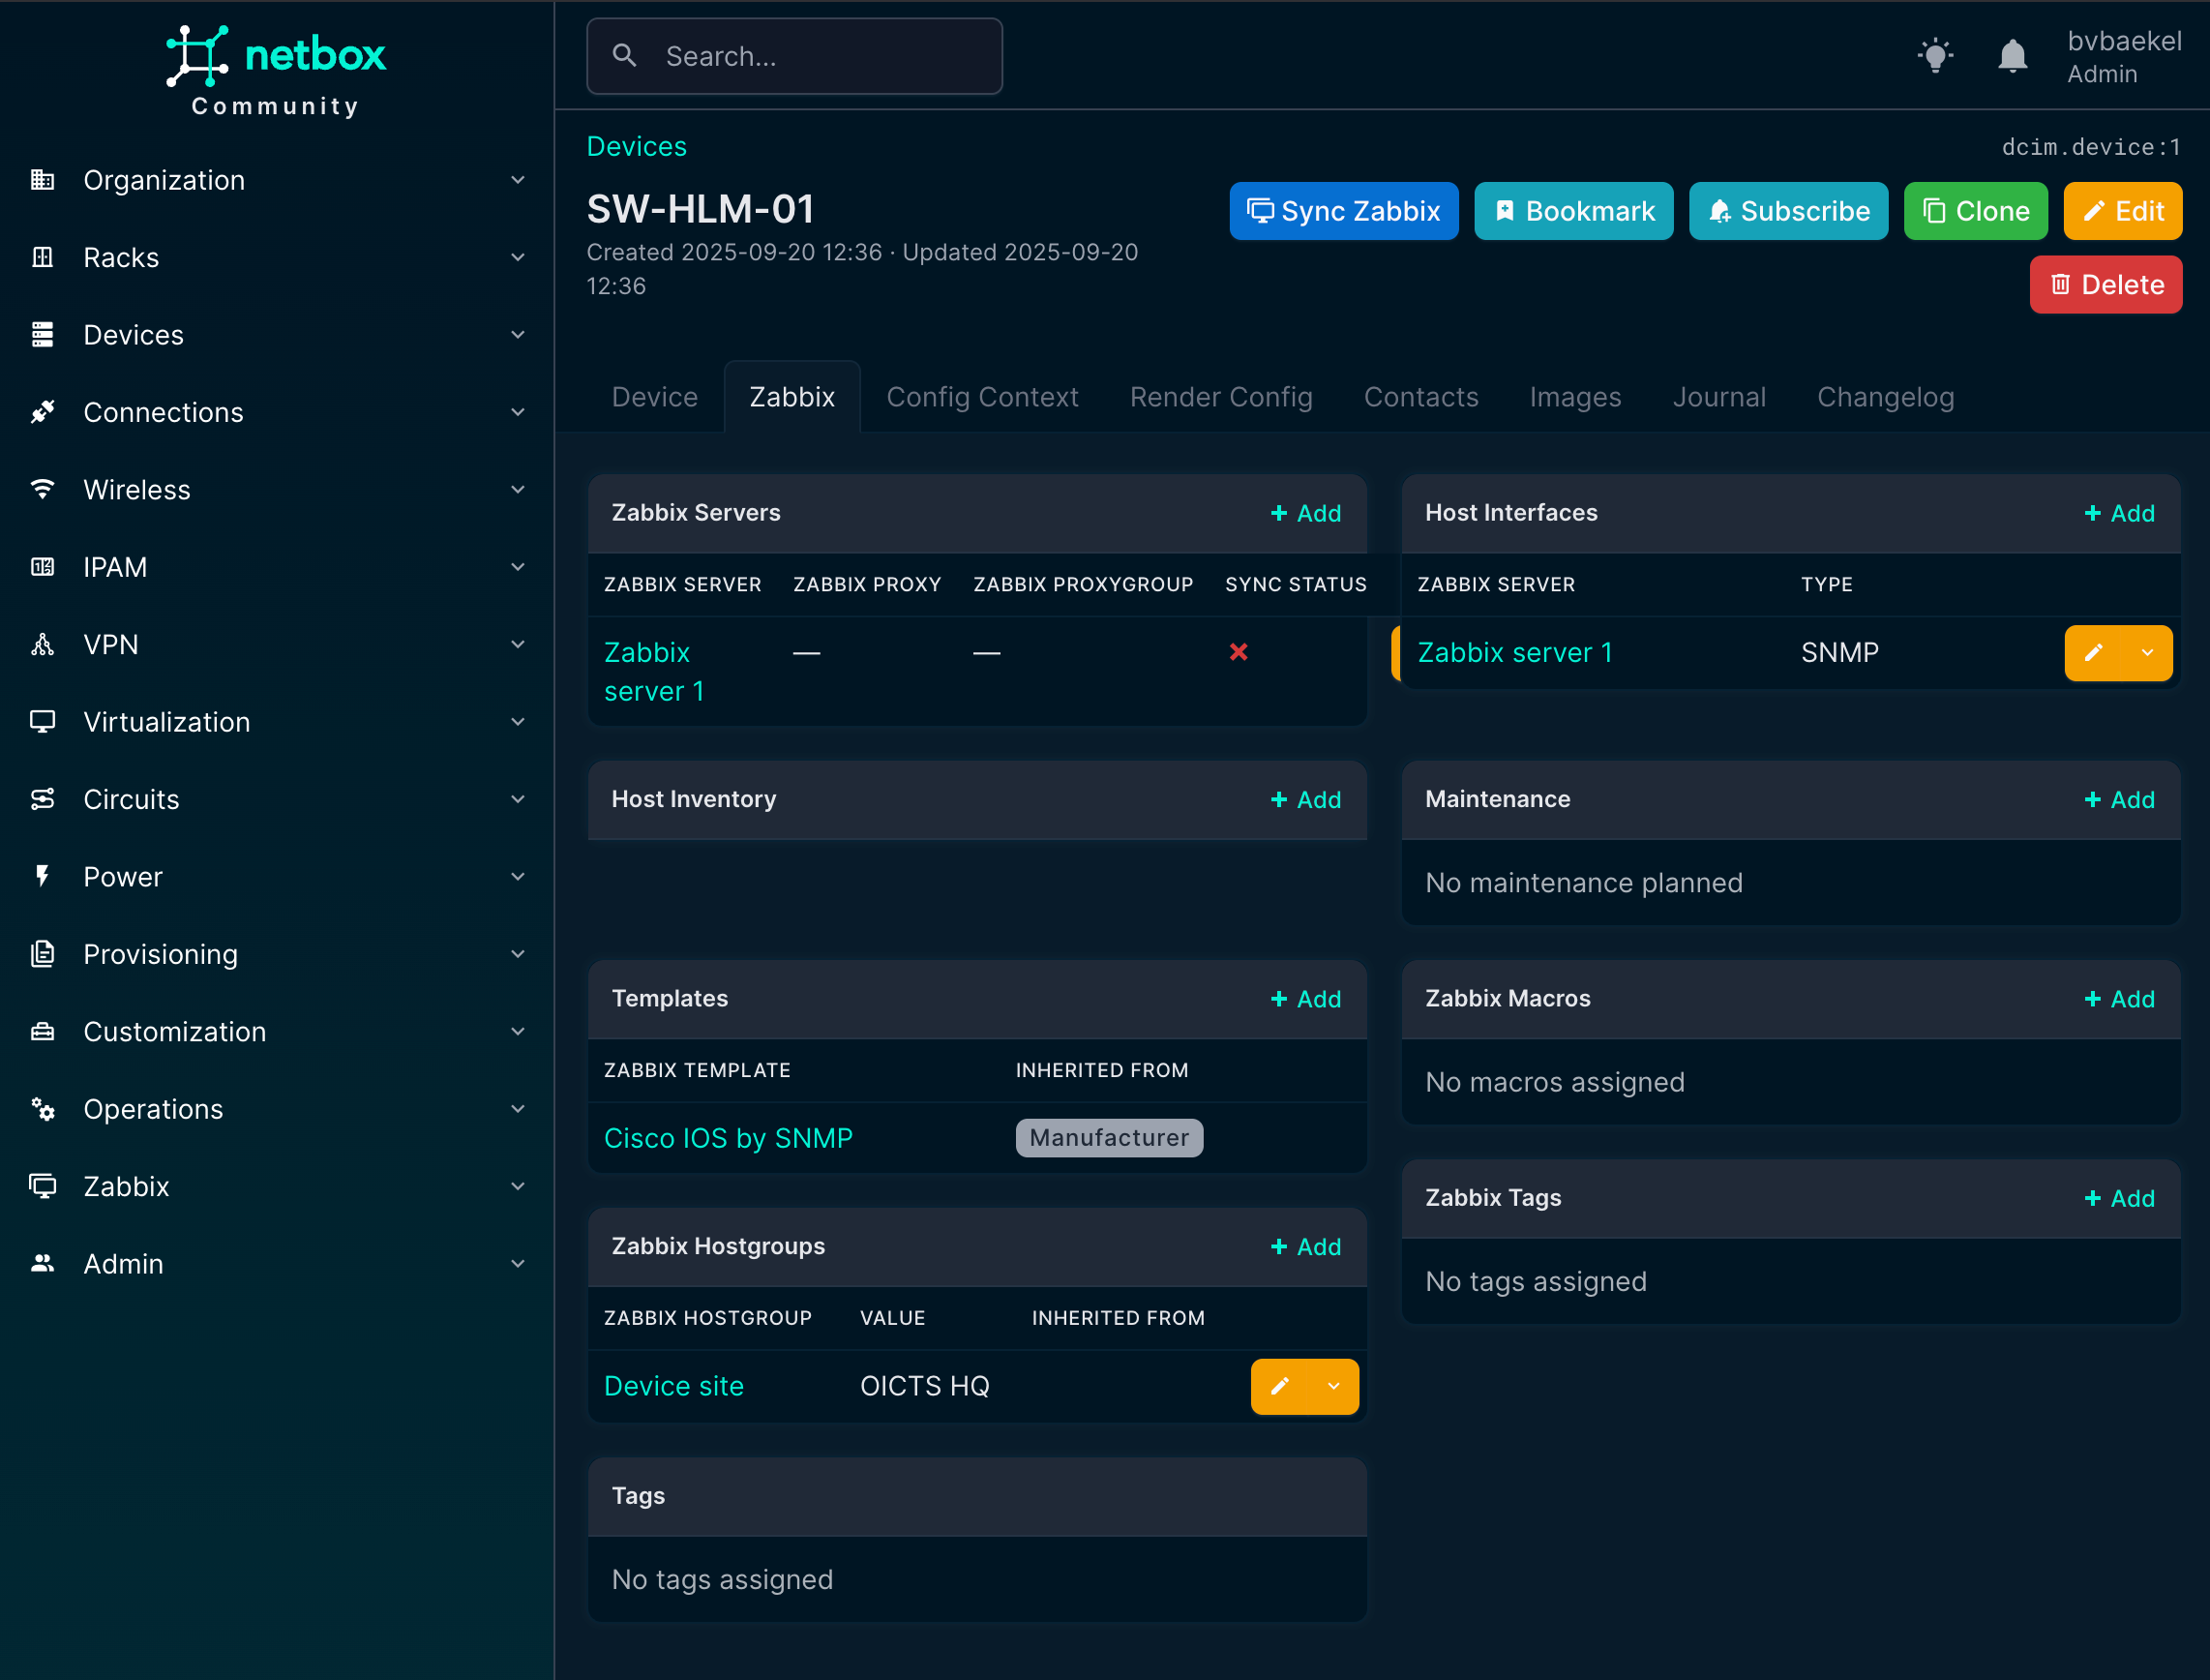
Now it’s time to actually synchronize the device with Zabbix. At the top of the device detail page, right next to the device name, there is a button labeled “Sync Zabbix.” By clicking this button, NetBox will push all the information we’ve configured—such as interfaces, templates, and host groups—directly into Zabbix.
Within a few seconds, the host is created and fully ready for monitoring, without any manual setup inside Zabbix. With the heavy lifting automated, you can sit back and relax knowing that the device has been synchronized correctly.
Actually, let’s head over to Zabbix and confirm the synchronization:
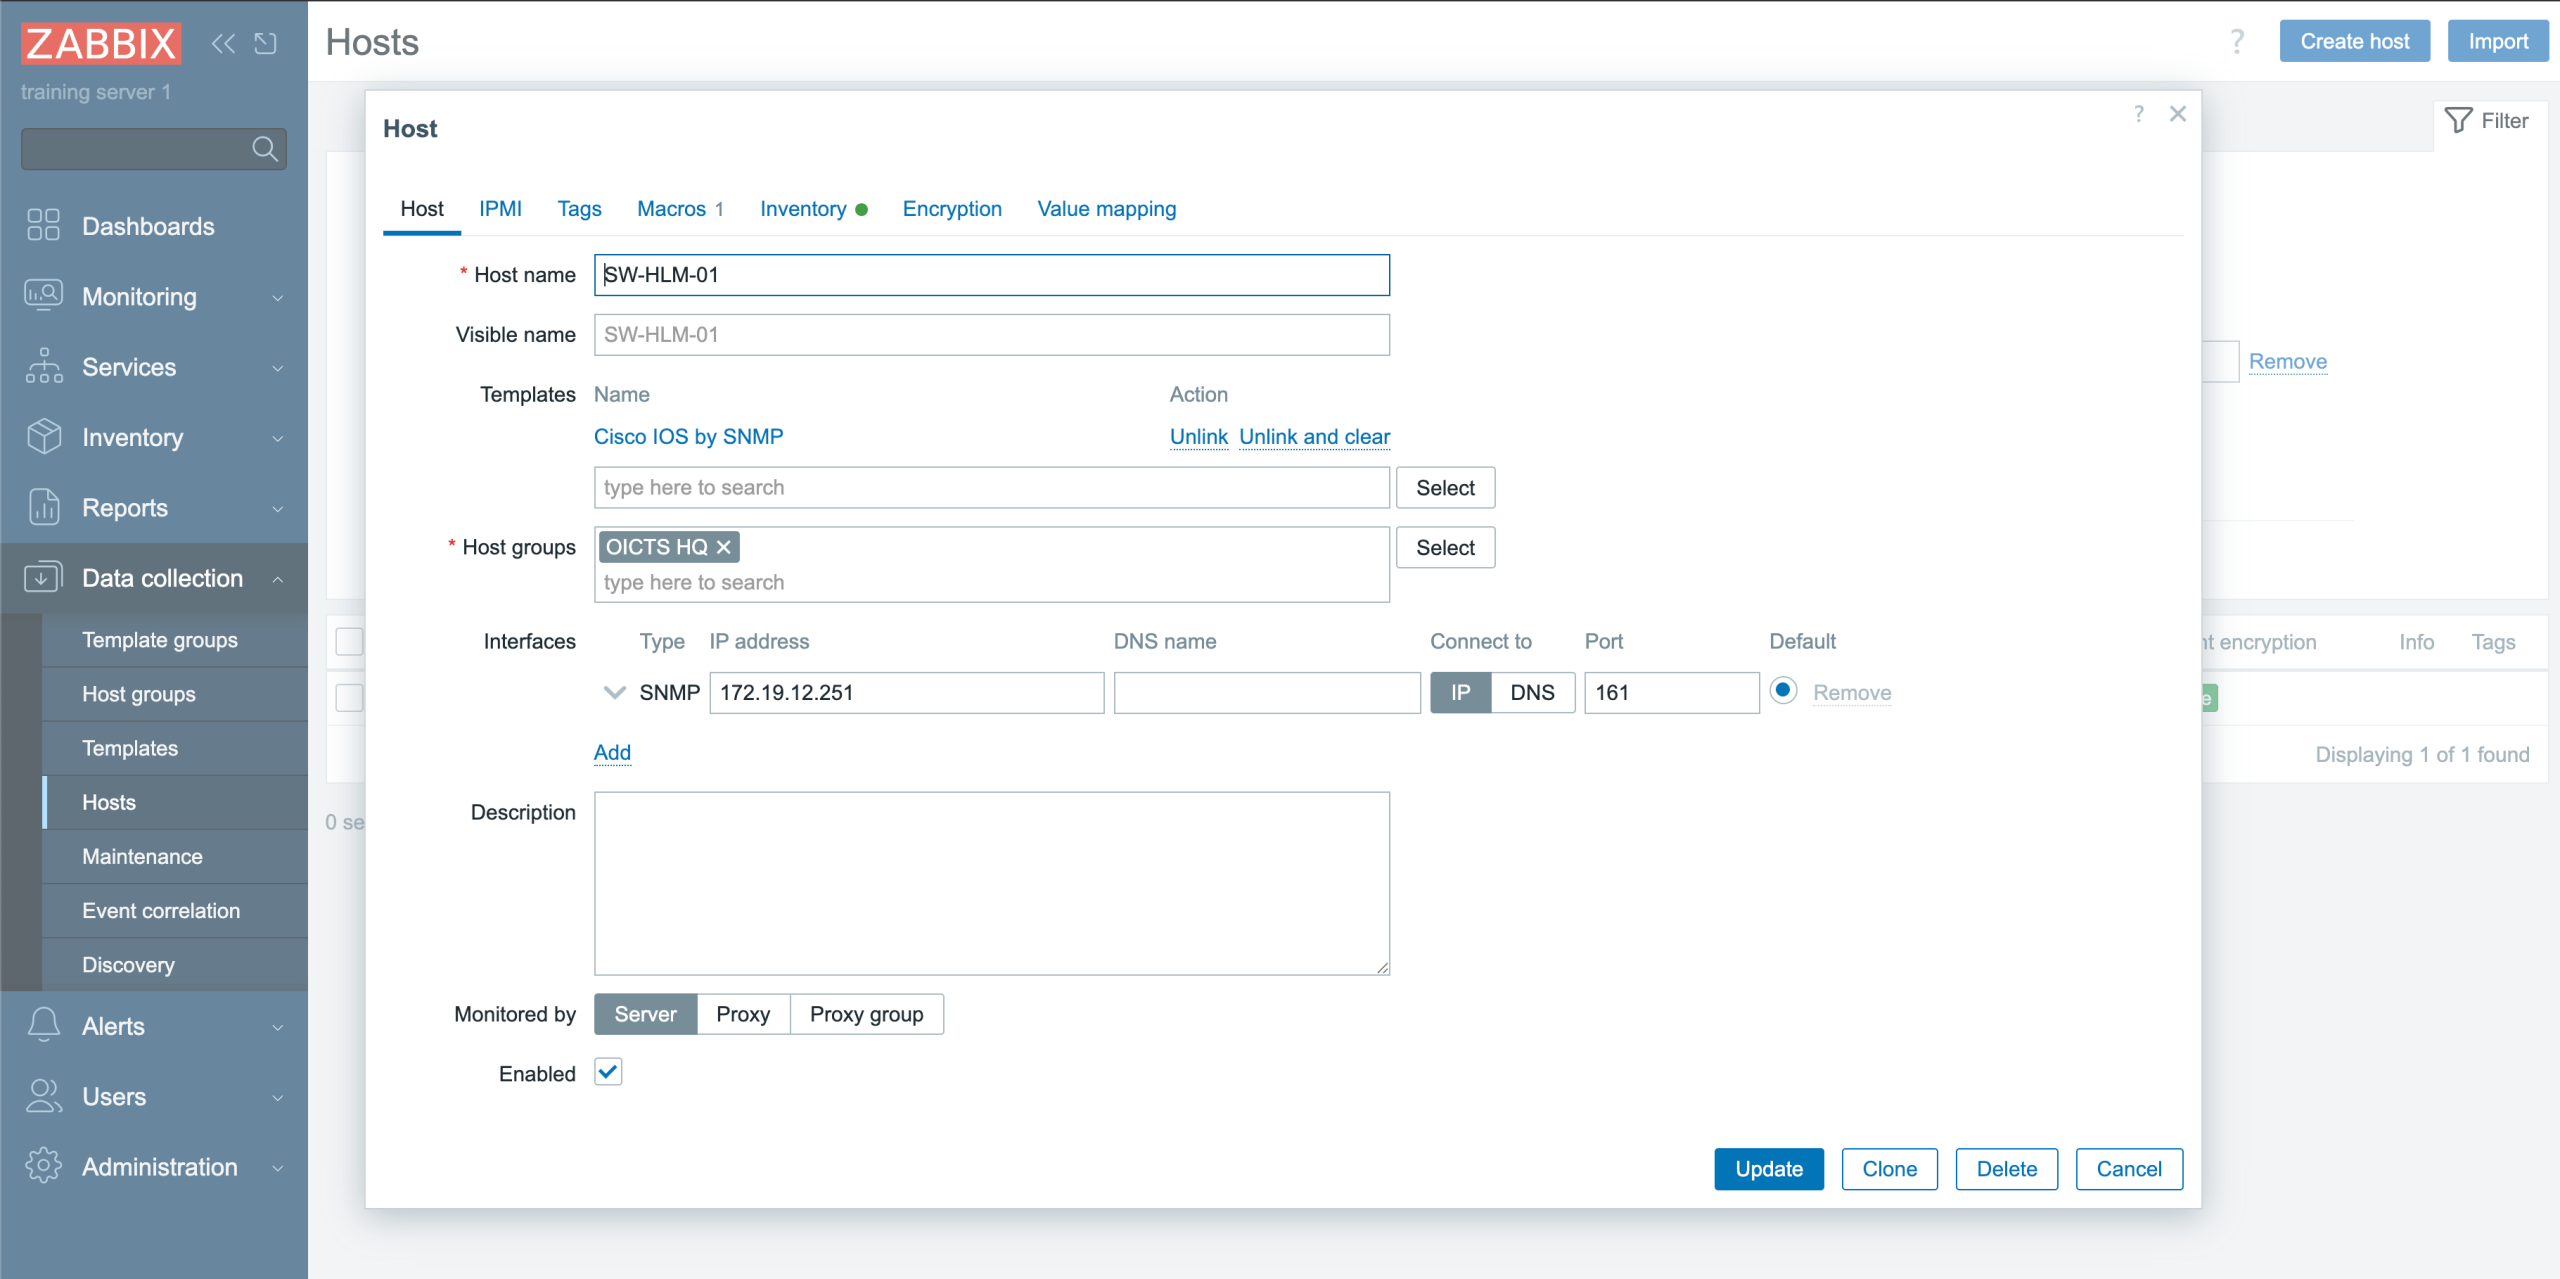
Brilliant! The host is there, the template is linked, the host group automatically was set to “OICTS HQ” and the interface also looks correct. Monitoring will start and we did not touch Zabbix itself!
Can do! We’ve created a YouTube video for you to actually see how it works. On top of that, we plan to host webinars regarding this plugin as well. You can register for all our webinars for free via the Zabbix website.
No! Actually there is a lot more we can do with this NetBox plugin, but it’s just that this blog post is not the correct place to show it all. Just to give you an idea, we can set maintenance from NetBox, which automatically will sync it to Zabbix. This way we again have a single source of truth and make sure we can see from a helicopter view where the impact is.
Furthermore, automatic synchronization can be set up so that any changes in Zabbix are overridden by the NetBox configuration. This way, we make sure there is no drift between NetBox and Zabbix. It also guarantees that if engineers forget to manually synchronize, no harm is done. However, the manual sync button will always be there, as nobody wants to wait to fix the monitoring when changes are made!
In addition, the plugin fully supports proxies and proxy groups – just as you know them from Zabbix. We’ve just haven’t shown it here to keep it somewhat short.
Although this project is just a side gig (we still dedicate our resources to Zabbix) we of course have a vision and roadmap that we would like to chase.
One major feature that’s on the roadmap is to show host problems in NetBox. By retrieving the current problems for a given host and showing them in NetBox, we should be able to limit the time spent in Zabbix even further. Our goal is to realize a “Single Pane of Glass” (just as NetBox is the “Single Source of Truth.”
The post NetBox and Zabbix – An Integration that Just Fits appeared first on Zabbix Blog.
Post Syndicated from Нева Мичева original https://www.toest.bg/san-sebastian-2025-iberiyskata-sleda/

Извън основната селекция от филми в надпреварата за Златна и Сребърни раковини фестивалът в Сан Себастиан всяка година оформя по още няколко подборки (също конкурсни, но с отделно жури, като „Латинохоризонти“ и „Нови режисьори“, или пък „мострени“, като „Направено в Испания“ и „Перли от други фестивали“), в които се помества най-любопитното от новото испанско и латиноамериканско кино. По-долу сме отсели шест от най-коментираните през 2025 г. истории на иберийски езици (в случая: испански, португалски, каталунски, галисийски), прожектирани в рамките на 73-тото издание на фестивала. За отбелязване е, че премиерите на пет от тях се състояха през май в Кан. И че сме ги подредили от шедьовър (най-горе) до ерзац.
В обичайния случай тук щеше да има и поне едно произведение от Аржентина, чиято продукция е традиционно силна, но поради липса на подходящо заглавие ще вмъкнем цитат. Откакто в края на 2023 г. президент стана Хавиер Милеи,
започна борба с киното, защото то е пространство на идентичността, паметта и поставянето под съмнение. Институтът за кино вече не работи, парите не се използват по предназначение, а като няма образование, конкурси и подкрепа за дебюти, няма бъдеще…
Това каза в Сан Себастиан Мария Алче, съсценаристка на Лукресия Мартел в документалния филм „Нашата земя“.)

„Поет“ (Колумбия). Малък филм с огромен характер – главната роля умно е поверена на изключително интересен натуршчик, наблюдаван отблизо с лакомо любопитство, а способността на киното да разказва с прескоци, метафори, музикални намигания, смяна на скоростите и активно съучастие с публиката е използвана без стеснение. Оскар Рестрепо (ве-ли-ко-ле-пен Убеймар Риос, в живота учител по философия) е прехвърлил 50-те готованец, разчитащ на грижите на пенсионираната си майка, поет с две книжлета от младини, неудовлетворен търсач на възвишеното и алкохолик – „едно печално стихотворение“, както го нарича друг герой. В същото време той е и комично-симпатичен, а в непрокопсаната му траектория просияват искреност и рядкото умение да отделя зрънцето на поезията от плявата на дните.
„Поет“ (награда на журито в раздела „Особен поглед“ в Кан плюс отличия от Мелбърн, Мюнхен, Лима, Биариц) работи с фантастична емоционална амплитуда и няма как да бъде сведен просто до сюжета си – Рестрепо става наставник на ученичка с дарба; дебютът на ученичката в поетичното общество се проваля с гръм и трясък; от новото пожарище изникват нови надежди. Филмът съдържа такива количества нежност и нелепост, че от един момент става свидетелство за човешкото същество въобще и за необходимостта му от нещо отвъд килията на делника. Безкомпромисното, хапливо вглеждане в определени социални превземки, което предизвиква смях в залата, няколко пласта по-надолу преобръща играта и разкрива трогателни детайли с реална важност. При получаването на приза в раздела „Латинохоризонти“ в Сан Себастиан режисьорът Симон Меса Сото каза:
Посвещавам наградата на всичките си колеги в Латинска Америка, където е толкова трудно да се прави кино! Този филм се роди от фрустрацията ми.

„Глуха“ (Испания). Един от най-хубавите моменти на „Сан Себастиан 2025“ беше, когато по време на разговора между екип и публика след прожекцията на „Глуха“ (награда на публиката в раздел „Панорама“ на тазгодишното „Берлинале“) всички зрители минаха от привичното ръкопляскане към аплодисменти на жестомимичен език – с високо вдигане и въртене на разперени длани. За да напише и снима тази история, Ева Либертад се вдъхновява от личните перипетии и разсъждения на сестра си Мириам Гарло, художничка, фотографка и първа глуха актриса с главна роля в испански филм. Анхела (Мириам) е в любяща връзка с Ектор (Алваро Сервантес), с когото чакат дете. Но радостта от раждането на тяхното чуващо (като баща си) момиченце е помътена от съмненията, обзели майката – до каква степен ще се промени сега балансът в семейството ѝ? До каква степен тя ще се окаже неволно изключена, неусетно подценена?
Във всяка връзка на обич има места, където единият не може да придружи другия,
отбеляза режисьорката.
Самоосъществяващите се прогнози винаги са били благодатна почва за киноразказа, а този в „Глуха“ е и превъзходно изграден и изигран – напрегнат, но и забавен, неочакван, красив (едно от любимите ми музикални открития тази година е баската Верде Прато именно заради една песен от саундтрака на филма). Занимава се със специфични и все пак напълно разбираеми отношения и докато носи наслада, разширява мирогледа… (Сещам се за броени други филми, които се опитват да вникнат в глухотата, но все такива, които бих препоръчала без угризения: американския „Дете на глухи родители“, украинския „Племето“, френския „Чети по устните ми“, австралийския „Шум“.)

„Тайният агент“ (Бразилия) на Клебер Мендонса Фильо започва като роудмуви през 1977 г. (насред военната диктатура, мъчила страната до средата на 80-те), продължава като трилър и завършва като разследване в наши дни. Да, материалът е като за три филма, но 158-те минути, които трае, се услаждат. Богатството и своеобразието на колорита, звука, формите, местата и лицата са като от сънищата, а фактът, че действието започва в карнавалния период, додава елемент на колективна лудост – каквато в крайна сметка е всяка диктатура.
Главният герой се оказва не агент, а човек на науката, принуден да мине в нелегалност, за да се добере до родния си град, да вземе детето си и да се спаси в чужбина. По пътя му има преследвачи, помагачи и десетки свидетелства за прогниването на системата (зашеметяващите нива на корупцията и неуважението към човешката цялост например не подлежат на обсъждане в печата, където обаче охотно се спряга градската легенда за Косматия крак, дето нощем напада с ритници нищо неподозиращи минувачи…).
В Сан Себастиан авторът каза, че за стила на филма (с награди за най-добър режисьор и за мъжка роля от „Кан 2025“) се е повлиял от бразилската класика „Лусио Флавио“ и въображението на Серджо Леоне, и добави:
Замислих този проект преди десетина години заради чувството, че определен дискурс, който смятахме за преодолян и прибран в музея на историята, отново завзема политическата сцена….

„Поклонение“ (Испания). Карла Симон („киното ми позволява да си измислям спомените, които нямам“) изгря на световния екран с две награди от „Берлинале 2017“ за „Лятото на 1993-та“ и „Златна мечка“ от „Берлинале 2022“ за „Алкарас“ – две силно автобиографични, минималистични истории, деликатно структурирани около тежки загуби в детството. Третият ѝ филм е от същото тесто и с някои от същите параметри (рано починали родители хероиномани), но се връща по-наблизо в миналото, прибягва до една дълга фантазийна вметка и беше селектиран в Кан. Действието се развива през 2004 г., когато 18-годишната Марина (сияен екранен дебют на Люсия Гарсия) от Каталуния, където живее с роднини на покойната си майка, отива в Галисия, при роднините на покойния си баща, които едва помни.
Момичето пристига с видеокамера и с дневника на майка си (благодарение на който периодично се връщаме към една ярка любовна предистория) и е посрещнато с цял букет от сърдечности и неловкости, родови табута и легенди. Повествованието се дели на глави, всяка от които поставя съществени въпроси („Да си от една кръв с някого прави ли ви семейство?“). Вълнуващо е да се види как е устроен протагонизмът на водещия женски образ, за разлика от обичайния за филмите и романите мъжки – Марина се впуска не да покорява света чрез подвизи, а да го наблюдава, докато не се почувства в състояние да си го обясни. „Поклонение“ е отново солидно, умно кино, макар и да не стига до тихата мощ на „Лятото на 1993-та“.

„Загадъчният поглед на фламингото“ (Чили) е пълнометражният дебют на 30-годишния Диего Сеспедес („смехът е винаги революционен акт“), който му спечели основния приз в „Особен поглед“ в „Кан 2025“, а в Сан Себастиан – безапелационно – наградата на младежта, гласувана от жури от 150 души на възраст между 18 и 25 години. Действието е изнесено през 80-те години на ХХ век, а мястото е мина в пустинята, но епохата и средата не се виждат кой знае колко – събитията протичат в сравнително къс отрязък от време и в театрално стилизирана среда.
От едната страна са къщите на миньорите (мрачни, недодялани мъже), от другата – ханът на артистките (място, където група пъстри травестити живеят, изнасят представления и понякога утоляват самотата на миньорите). Някои от едните и от другите са болни от незнайна „чума“ (СПИН не се споменава, но препратката е очевидна), обвинения летят в двете посоки. „За тях момичетата са загадка – казва на дъщеря си Фламинго, една от болните артистки, – а аз не искам да си отида от този свят неразгадана…“ Сюжетните нишки са няколко, едни завършват с любов, други – със смърт, трети – с бягство, четвърти – в нищото. И все пак, колкото и хаотична и чепата да е историята, „Загадъчният поглед на фламингото“ успява да създаде собствена атмосфера (почти магична на места) и привързаност към персонажите.

В двучасовия „Сират“ (Испания) има една-единствена сцена, направена със сърце, и тя трае около минута: мъж с отрязан крак разиграва театър с чукана си, превърнат в кукла, която уж свири на китара и пее песничка по текст на Борис Виан. Нищо от останалото не е на нивото на този момент. Филмът разчита преобладаващо на натуршчици, но вместо естественият потенциал на тези хора да бъде изявен от режисьора Оливер Лаше, те са вкарани като марионетки в хилав сценарий и дървено изпълняват нелепи действия и елементарен диалог. Дългите празни кадри, в които визуалната, емоционалната и друга информация е нищожна, но пък мъчително развлачена, постигат чувствено отъпяване, нарушено в последната третина от няколко jump scares (най-недостойното средство за впечатляване на зрителя, равносилно на това да се промъкнеш зад него и да креснеш „бу!“ в ухото му).
Вижда се, че Лаше е гледал „Забриски пойнт“, „Свещената планина“ и „Лудия Макс“ и му се е прищяло да хвърли група чудаци в пустинята, но сякаш не е разбрал, че по пътя ще трябва и още нещо освен вдигащи прахоляк коли. Логична дестинация например, правдоподобен конфликт, отличими персонажи с минимален заряд от каквото и да било (предистория? лична философия? обаяние? мотивация?). Или поне гениален оператор с амбициозен план плюс композитор, който да се раздаде като за последно. Поради липса на всичко по-горно „Сират“ е едно безрадостно времеубийство, в което (парадоксално, защото е пълен с движение) не помръдваме и на йота в опознаването на образите, ситуацията, света и себе си. То обаче е продуцирано от Алмодовар, получи наградата на журито в Кан, и беше предложено като испански кандидат за следващите Оскари, а в пресата се разглежда като феномен.
* По някое време преди поредната прожекция две зрителки от предния ред се обърнаха към мен, едната кимна към екрана и попита: „Извинявай, знаеш ли коя е тази жена?“. На екрана беше плакатът на 73-тото издание на фестивала с Мариса Паредес на него и въпросът мъничко разби сърцето ми. Паредес (1946–2024) беше една от иконите на испанското кино – елегантна, талантлива, различна – и си заслужава да не я забравяме: като певицата идол от „Високи токчета“ или актрисата идол от „Всичко за майка ми“ на Алмодовар, но и незаобиколима част от хубави филми на Агусти Виляронга, Артуро Рипстейн, Гилермо дел Торо и много други.