Security updates have been issued by Fedora (apptainer, civetweb, mod_http2, openssl, pandoc, and pandoc-cli), Oracle (kernel), Red Hat (gstreamer1-plugins-bad-free, iputils, kernel, open-vm-tools, and podman), SUSE (cairo, firefox, ghostscript, gimp, gstreamer-plugins-rs, libxslt, logback, openssl-1_0_0, openssl-1_1, python-xmltodict, and rubygem-puma), and Ubuntu (gst-plugins-base1.0, linux-aws-6.8, linux-aws-fips, linux-azure, linux-azure-nvidia, linux-gke, linux-nvidia-tegra-igx, and linux-raspi).
The Global Clubs Partner network brings together 52 partners from 45 countries, all working together to positively impact their local communities and open up opportunities for the next generation.
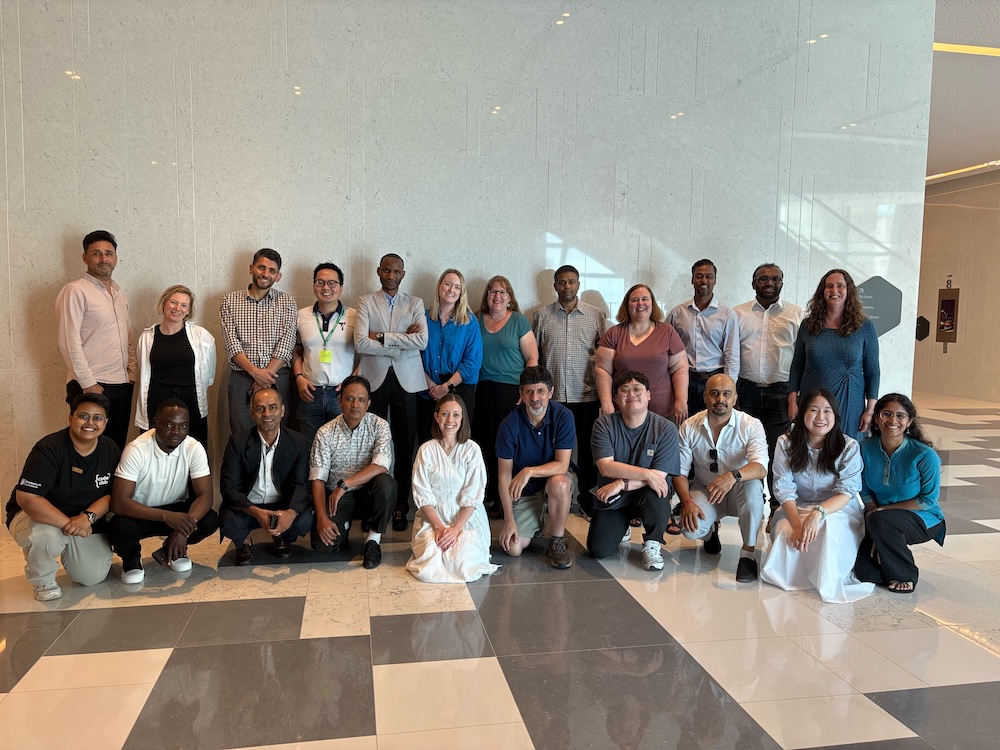
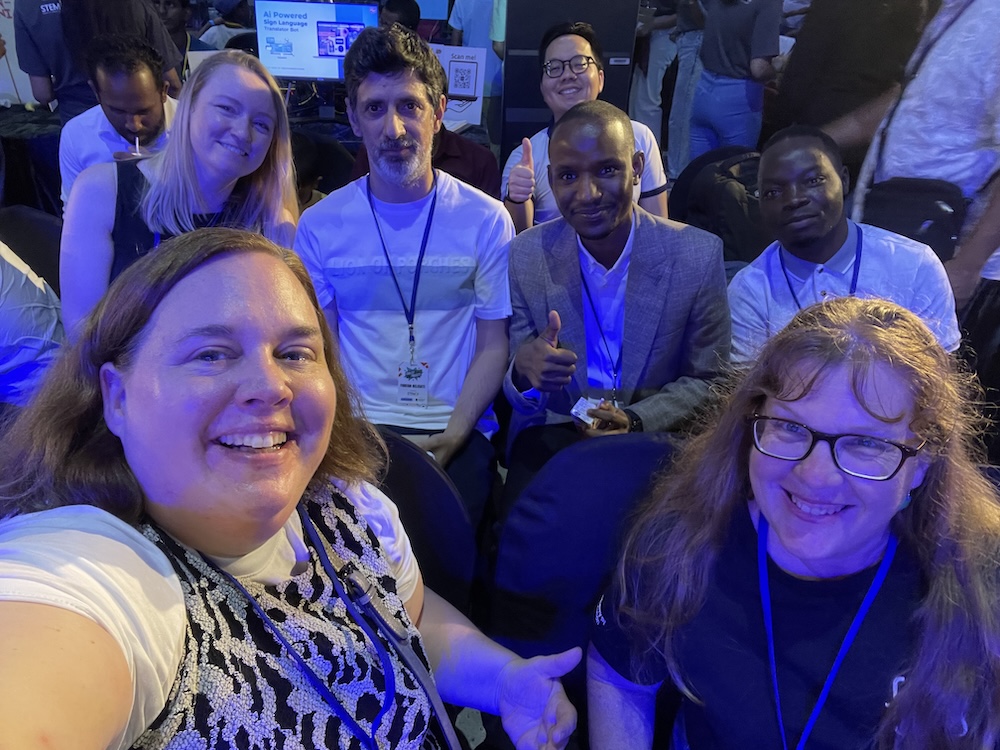
Last month, our Global Clubs Partners came together in Sri Lanka for our annual meetup, celebrating collaboration and community. Hosted alongside the second-ever Coolest Projects Sri Lanka, the gathering brought partners from across the world to share ideas, learn together, and build connections that will carry into the year ahead.
Building connections across the network
The in-person meetups are all about strengthening the sense of community among Global Clubs Partners. Ellie Proffitt from the RPF Global Partners team shared why coming together is so important:
“It was wonderful to hear everyone’s experiences and connect over our shared mission. Everyone was so keen to learn from each other, and being able to do that face to face made it even more valuable.”
The Sri Lanka meetup gave partners the space to get to know one another, learn from each other’s experiences, and think together about future goals for their clubs.
Exploring together
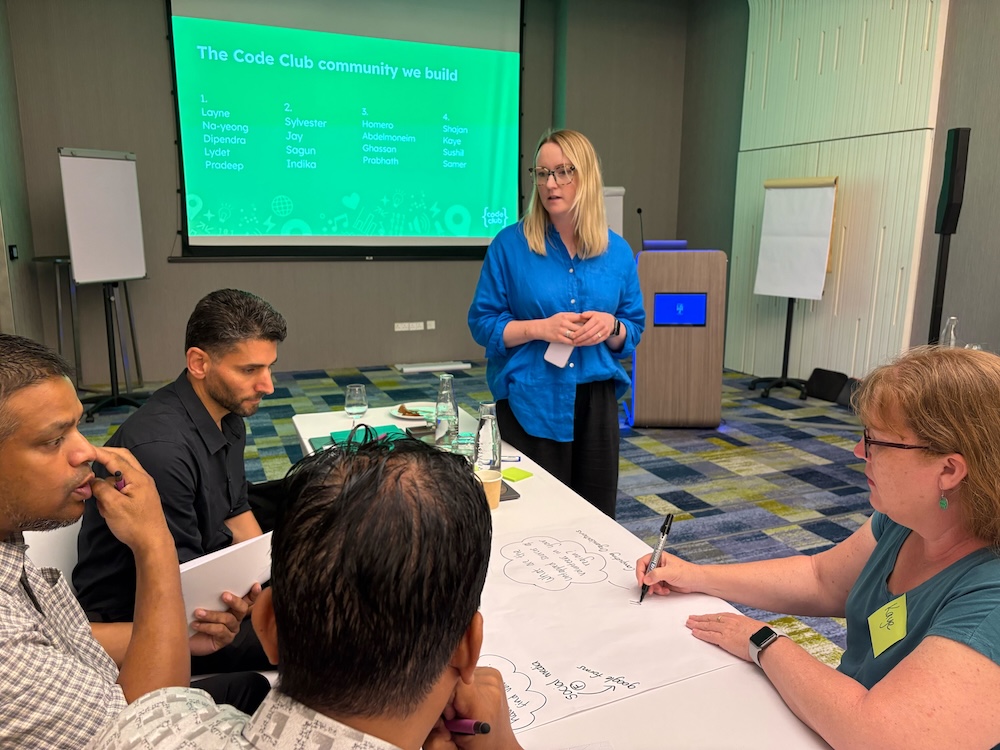
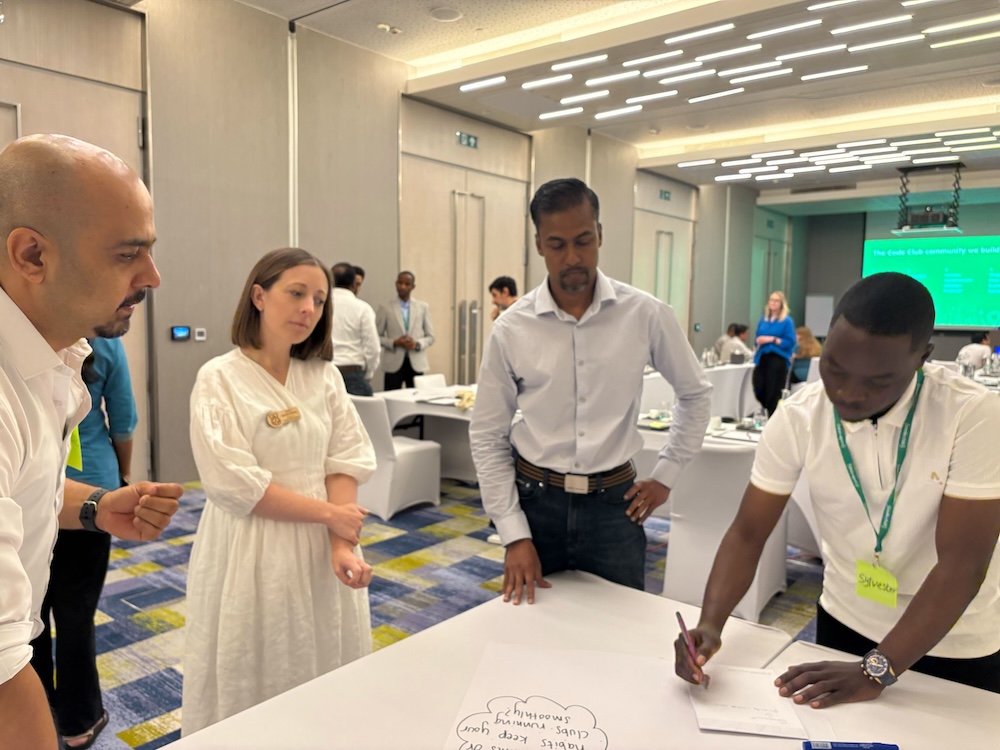
The agenda combined presentations, workshops, and plenty of time for discussion. It began with the Raspberry Pi Foundation team giving a presentation on our mission and strategy for partner work and beyond. Afterwards, each organisation introduced themselves and partners showcased their activities and successes. Together we explored how to build and sustain Code Club communities, experimented with creative ways to use AI in clubs, and got hands-on with unplugged activities that make computing accessible in low-tech settings. Partners also shared approaches to adapting content for their local contexts, and finished by developing their own vision and strategy for the next 12 months.
The variety of sessions meant there was something for everyone, whether partners were looking for new teaching ideas, strategic guidance, or inspiration from peers.
“There were so many interesting topics, I wish we had more time to go more in depth. I love being able to speak with other organisations doing similar work. Having the Raspberry Pi Foundation facilitate the connections is an asset.” – Global Partner
Inspiring moments at Coolest Projects Sri Lanka
As part of the meetup, partners had the chance to attend Coolest Projects Sri Lanka 2025, where young people showcased their incredible tech creations. Seeing children proudly present projects ranging from apps to hardware builds was a highlight for many.
“We have picked the top 100 [Coolest Projects] entries and they are here today exhibiting that to all our visitors joining from various parts of the world and we are happy to have representatives from the global Raspberry Pi Foundation family also.” – Prabhath, Code Club mentor and founder of STEMUp Educational Foundation
Looking ahead
The team left Sri Lanka with deeper connections, renewed energy, and a shared commitment to making computing education accessible to all.
“I feel part of something bigger — a worldwide movement where kids everywhere are learning to create with technology, not just consume it. Being a Global Partner means we can learn from what’s working in other countries, adapt those ideas for us, and also contribute our own innovations back to the network.” – Global Partner
Could your organisation become a Global Clubs Partner?
You can find out how your organisation could join our Global Clubs Partner network on the Code Club website, or contact us directly with your questions or ideas about a partnership.
Version
3.14.0 of the Python language has been released. There are a lot of
changes this time around, including official support for free threading, template string literals, and much more; see
the announcement for details.
Apache Airflow 3.x on Amazon MWAA introduces architectural improvements such as API-based task execution that provides enhanced security and isolation. Other major updates include a redesigned UI for better user experience, scheduler-based backfills for improved performance, and support for Python 3.12. Unlike in-place minor Airflow version upgrades in Amazon MWAA, upgrading to Airflow 3 from Airflow 2 requires careful planning and execution through a migration approach due to fundamental breaking changes.
This migration presents an opportunity to embrace next-generation workflow orchestration capabilities while providing business continuity. However, it’s more than a simple upgrade. Organizations migrating to Airflow 3.x on Amazon MWAA must understand key breaking changes, including the removal of direct metadata database access from workers, deprecation of SubDAGs, changes to default scheduling behavior, and library dependency updates. This post provides best practices and a streamlined approach to successfully navigate this critical migration, providing minimal disruption to your mission-critical data pipelines while maximizing the enhanced capabilities of Airflow 3.
Understanding the migration process
The journey from Airflow 2.x to 3.x on Amazon MWAA introduces several fundamental changes that organizations must understand before beginning their migration. These changes affect core workflow operations and require careful planning to achieve a smooth transition.
You should be aware of the following breaking changes:
Removal of direct database access – A critical change in Airflow 3 is the removal of direct metadata database access from worker nodes. Tasks and custom operators must now communicate through the REST API instead of direct database connections. This architectural change affects code that previously accessed the metadata database directly through SQLAlchemy connections, requiring refactoring of existing DAGs and custom operators.
SubDAG deprecation – Airflow 3 removes the SubDAG construct in favor of TaskGroups, Assets, and Data Aware Scheduling. Organizations must refactor existing SubDAGs to one of the previously mentioned constructs.
Scheduling behavior changes – Two notable changes to default scheduling options require an impact analysis:
The default values for catchup_by_default and create_cron_data_intervals changed to False. This change affects DAGs that don’t explicitly set these options.
Airflow 3 removes several context variables, such as execution_date, tomorrow_ds, yesterday_ds, prev_ds, and next_ds. You must replace these variables with currently supported context variables.
Library and dependency changes – A significant number of libraries change in Airflow 3.x, requiring DAG code refactoring. Many previously included provider packages might need explicit addition to the requirements.txt file.
Authentication system – Although Airflow 3.0.1 and later versions default to SimpleAuthManager instead of Flask-AppBuilder, Amazon MWAA will continue using Flask-AppBuilder for Airflow 3.x. This means customers on Amazon MWAA will not see any authentication changes.
The migration requires creating a new environment rather than performing an in-place upgrade. Although this approach demands more planning and resources, it provides the advantage of maintaining your existing environment as a fallback option during the transition, facilitating business continuity throughout the migration process.
Pre-migration planning and assessment
Successful migration depends on thorough planning and assessment of your current environment. This phase establishes the foundation for a smooth transition by identifying dependencies, configurations, and potential compatibility issues. Evaluate your environment and code against the previously mentioned breaking changes to have a successful migration.
Environment assessment
Begin by conducting a complete inventory of your current Amazon MWAA environment. Document all DAGs, custom operators, plugins, and dependencies, including their specific versions and configurations. Make sure your current environment is on version 2.10.x, because this provides the best compatibility path for upgrading to Amazon MWAA with Airflow 3.x.
Identify the structure of the Amazon Simple Storage Service (Amazon S3) bucket containing your DAG code, requirements file, startup script, and plugins. You will replicate this structure in a new bucket for the new environment. Creating separate buckets for each environment avoids conflicts and allows continued development without affecting current pipelines.
Configuration documentation
Document all custom Amazon MWAA environment variables, Airflow connections, and environment configurations. Review AWS Identity and Access Management (IAM) resources, because your new environment’s execution role will need identical policies. IAM users or roles accessing the Airflow UI require the CreateWebLoginToken permission for the new environment.
Pipeline dependencies
Understanding pipeline dependencies is critical for a successful phased migration. Identify interdependencies through Datasets (now Assets), SubDAGs, TriggerDagRun operators, or external API interactions. Develop your migration plan around these dependencies so related DAGs can migrate at the same time.
Consider DAG scheduling frequency when planning migration waves. DAGs with longer intervals between runs provide larger migration windows and lower risk of duplicate execution compared with frequently running DAGs.
Testing strategy
Create your testing strategy by defining a systematic approach to identifying compatibility issues. Use the ruff linter with the AIR30 ruleset to automatically identify code requiring updates:
Then, review and update your environment’s requirements.txt file to make sure package versions comply with the updated constraints file. Additionally, commonly used Operators previously included in the airflow-core package now reside in a separate package and need to be added to your requirements file.
Test your DAGs using the Amazon MWAA Docker images for Airflow 3.x. These images make it possible to create and test your requirements file, and confirm the Scheduler successfully parses your DAGs.
Migration strategy and best practices
A methodical migration approach minimizes risk while providing clear validation checkpoints. The recommended strategy employs a phased blue/green deployment model that provides reliable migrations and immediate rollback capabilities.
Phased migration approach
The following migration phases can assist you in defining your migration plan:
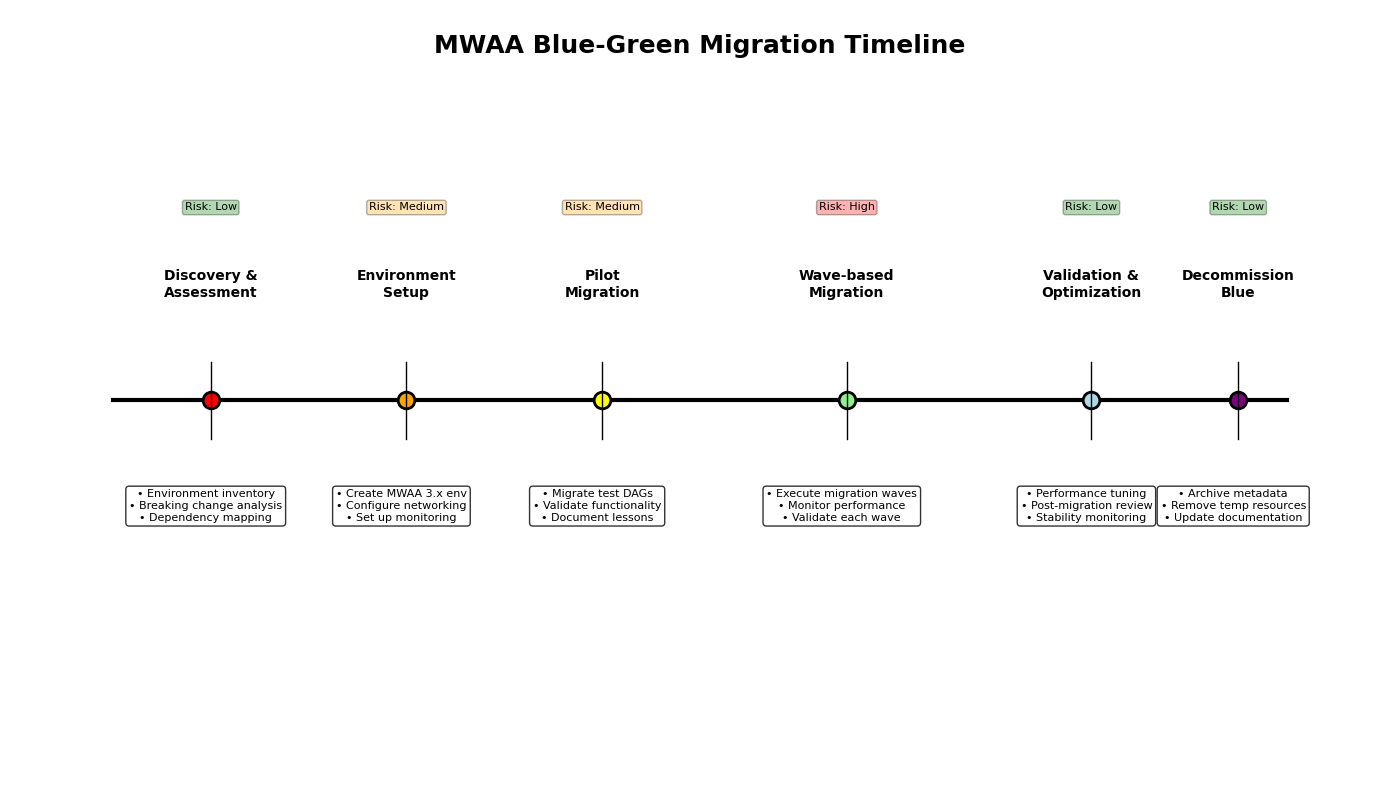
Phase 1: Discovery, assessment, and planning – In this phase, complete your environment inventory, dependency mapping, and breaking change analysis. With the gathered information, develop the detailed migration plan. This plan will include steps for updating code, updating your requirements file, creating a test environment, testing, creating the blue/green environment (discussed later in this post), and the migration steps. Planning must also include the training, monitoring strategy, rollback conditions, and the rollback plan.
Phase 2: Pilot migration – The pilot migration phase serves to validate your detailed migration plan in a controlled environment with a small range of impact. Focus the pilot on two or three non-critical DAGs with diverse characteristics, such as different schedules and dependencies. Migrate the selected DAGs using the migration plan defined in the previous phase. Use this phase to validate your plan and monitoring tools, and adjust both based on actual results. During the pilot, establish baseline migration metrics to help predict the performance of the full migration.
Phase 3: Wave-based production migration – After a successful pilot, you are ready to begin the full wave-based migration for the remaining DAGs. Group remaining DAGs into logical waves based on business criticality (least critical first), technical complexity, interdependencies (migrate dependent DAGs together), and scheduling frequency (less frequent DAGs provide larger migration windows). After you define the waves, work with stakeholders to develop the wave schedule. Include sufficient validation periods between waves to confirm the wave is successful before starting the next wave. This time also reduces the range of impact in the event of a migration issue, and provides sufficient time to perform a rollback.
Phase 4: Post-migration review and decommissioning – After all waves are complete, conduct a post-migration review to identify lessons learned, optimization opportunities, and any other unresolved items. This is also a good time to provide an approval on system stability. The final step is decommissioning the original Airflow 2.x environment. After stability is determined, based on business requirements and input, decommission the original (blue) environment.
Blue/green deployment strategy
Implement a blue/green deployment strategy for safe, reversible migration. With this strategy, you will have two Amazon MWAA environments operating during the migration and manage which DAGs operate in which environment.
The blue environment (current Airflow 2.x) maintains production workloads during transition. You can implement a freeze window for DAG changes before migration to avoid last-minute code conflicts. This environment serves as the immediate rollback environment if an issue is identified in the new (green) environment.
The green environment (new Airflow 3.x) receives migrated DAGs in controlled waves. It mirrors the networking, IAM roles, and security configurations from the blue environment. Configure this environment with the same options as the blue environment, and create identical monitoring mechanisms so both environments can be monitored simultaneously. To avoid duplicate DAG runs, make sure a DAG only runs in a single environment. This involves pausing the DAG in the blue environment before activating the DAG in the green environment.Maintain the blue environment in warm standby mode during the entire migration. Document specific rollback steps for each migration wave, and test your rollback procedure for at least one non-critical DAG. Additionally, define clear criteria for triggering the rollback (such as specific failure rates or SLA violations).
Step-by-step migration process
This section provides detailed steps for conducting the migration.
Pre-migration assessment and preparation
Before initiating the migration process, conduct a thorough assessment of your current environment and develop the migration plan:
Make sure your current Amazon MWAA environment is on version 2.10.x
Create a detailed inventory of your DAGs, custom operators, and plugins including their dependencies and versions
Review your current requirements.txt file to understand package requirements
Document all environment variables, connections, and configuration settings
Determine your migration success criteria, rollback conditions, and rollback plan
Identify a small number of DAGs suitable for the pilot migration
Develop a plan to train, or familiarize, Amazon MWAA users on Airflow 3
Compatibility checks
Identifying compatibility issues is critical to a successful migration. This step helps developers focus on specific code that is incompatible with Airflow 3.
Use the ruff linter with the AIR30 ruleset to automatically identify code requiring updates:
Based on your findings during compatibility testing, update the affected DAG code for Airflow 3.x. The ruff DAG check utility can automatically fix common changes. Use the following command to run the utility in update mode:
ruff check dag/ --select AIR301 --fix –preview
Common changes include:
Replace direct metadata database access with API calls:
# Before (Airflow 2.x) - Direct DB access
from airflow.settings import Session
from airflow.models.taskInstance import TaskInstance
session=Session()
result=session.query(TaskInstance)

For Apache Airflow v3.x, utilize  in the Amazon MWAA SDK.
Update core construct imports with the new Airflow SDK namespace:
# Before (Airflow 2.x)
from airflow.decorators import dag, task

# After (Airflow 3.x)
from airflow.sdk import dag, task
Replace deprecated context variables with their modern equivalents:
# Before (Airflow 2.x)
def my_task(execution_date, **context):
    # Using execution_date

# After (Airflow 3.x)
def my_task(logical_date, **context):
    # Using logical_date
Next, evaluate the usage of the two scheduling-related default changes. catchup_by_default is now False, meaning missing DAG runs will no longer automatically backfill. If backfill is required, update the DAG definition with catchup=True. If your DAGs require backfill, you must consider the impact of this migration and backfilling. Because you’re migrating a DAG to a clean environment with no history, enabling backfilling will create DAG runs for all runs beginning with the specified start_date. Consider updating the start_date to avoid unnecessary runs.
create_cron_data_intervals is also now False. With this change, cron expressions are evaluated as a CronTriggerTimetable construct.
Finally, evaluate the usage of deprecated context variables for manually and Asset-triggered DAGs, then update your code with suitable replacements.
Updating requirements and testing
In addition to possible package version changes, several core Airflow operators previously included in the airflow-core package moved to the apache-airflow-providers-standard package. These changes must be incorporated into your requirements.txt file. Specifying, or pinning, package versions in your requirements file is a best practice and recommended for this migration.To update your requirements file, complete the following steps:
Download and configure the Amazon MWAA Docker images. For more details, refer to the GitHub repo.
Copy the current environment’s requirements.txt file to a new file.
If needed, add the apache-airflow-providers-standard package to the new requirements file.
Download the appropriate Airflow constraints file for your target Airflow version to your working director. A constraints file is available for each Airflow version and Python version combination. The URL takes the following form: https://raw.githubusercontent.com/apache/airflow/constraints-${AIRFLOW_VERSION}/constraints-${PYTHON_VERSION}.txt
Create your versioned requirements file using your un-versioned file and the constraints file. For guidance on creating a requirements file, see Creating a requirements.txt file. Make sure there are no dependency conflicts before moving forward.
Verify your requirements file using the Docker image. Run the following command inside the running container:
./run.sh test-requirements
Address any installation errors by updating package versions.
As a best practice, we recommend packaging your packages into a ZIP file for deployment in Amazon MWAA. This makes sure the same exact packages are installed on all Airflow nodes. Refer to Installing Python dependencies using PyPi.org Requirements File Format for detailed information about packaging dependencies.
Creating a new Amazon MWAA 3.x environment
Because Amazon MWAA requires a migration approach for major version upgrades, you must create a new environment for your blue/green deployment. This post uses the AWS Command Line Interface (AWS CLI) as an example, you can also use infrastructure as code (IaC).
Create a new S3 bucket using the same structure as the current S3 bucket.
Upload the updated requirements file and any plugin packages to the new S3 bucket.
Generate a template for your new environment configuration:
Copy configurations from your existing environment.
Update the environment name.
Set the AirflowVersion parameter to the target 3.x version.
Update the S3 bucket properties with the new S3 bucket name.
Review and update other configuration parameters as needed.
Configure the new environment with the same networking settings, security groups, and IAM roles as your existing environment. Refer to the Amazon MWAA User Guide for these configurations.
Your new environment requires the same variables, connections, roles, and pool configurations. Use this section as a guide for migrating this information. If you’re using AWS Secrets Manager as your secrets backend, you don’t need to migrate any connections. Depending your environment’s size, you can migrate this metadata using the Airflow UI or the Apache Airflow REST API.
Update any custom pool information in the new environment using the Airflow UI.
For environments using the metadatabase as a secrets backend, migrate all connections to the new environment.
Migrate all variables to the new environment.
Migrate any custom Airflow roles to the new environment.
Migration execution and validation
Plan and execute the transition from your old environment to the new one:
Schedule the migration during a period of low workflow activity to minimize disruption.
Implement a freeze window for DAG changes before and during the migration.
Execute the migration in phases:
Pause DAGs in the old environment. For a small number of DAGs, you can use the Airflow UI. For larger groups, consider using the REST API.
Verify all running tasks have completed in the Airflow UI.
Redirect DAG triggers and external integrations to the new environment.
Copy the updated DAGs to the new environment’s S3 bucket.
Enable DAGs in the new environment. For a small number of DAGs, you can use the Airflow UI. For larger groups, consider using the REST API.
Monitor the new environment closely during the initial operation period:
Watch for failed tasks or scheduling issues.
Check for missing variables or connections.
Verify external system integrations are functioning correctly.
Monitor Amazon CloudWatch metrics to confirm the environment is performing as expected.
Post-migration validation
After the migration, thoroughly validate the new environment:
Verify that all DAGs are being scheduled correctly according to their defined schedules
Check that task history and logs are accessible and complete
Test critical workflows end-to-end to confirm they execute successfully
Validate connections to external systems are functioning properly
Monitor CloudWatch metrics for performance validation
Cleanup and documentation
When the migration is complete and the new environment is stable, complete the following steps:
Document the changes made during the migration process.
Update runbooks and operational procedures to reflect the new environment.
After a sufficient stability period, defined by stakeholders, decommission the old environment:
aws mwaa delete-environment --name old-mwaa2-env
Archive backup data according to your organization’s retention policies.
Conclusion
The journey from Airflow 2.x to 3.x on Amazon MWAA is an opportunity to embrace next-generation workflow orchestration capabilities while maintaining the reliability of your workflow operations. By following these best practices and maintaining a methodical approach, you can successfully navigate this transition while minimizing risks and disruptions to your business operations.
A successful migration requires thorough preparation, systematic testing, and maintaining clear documentation throughout the process. Although the migration approach requires more initial effort, it provides the safety and control needed for such a significant upgrade.
Over the years, organizations have invested in building purpose-built cloud-based data warehouses that are siloed from one another. One of the major challenges these organizations encounter today is enabling cross-organization discovery and access to data across these siloed data warehouses built using different technology stacks. The data mesh pattern addresses these issues, founded in four principles: domain-oriented decentralized data ownership and architecture, treating data as a product, providing self-serve data infrastructure as a platform, and implementing federated governance. The data mesh pattern helps organizations mimic their organizational structure into data domains and makes it possible to share the data across the organization and beyond to improve their business models.
In 2019, Volkswagen AG and Amazon Web Services (AWS) started their collaboration to co-develop the Digital Production Platform (DPP), with the goal of enhancing production and logistics efficiency by 30% while reducing production costs by the same margin. The DPP was developed to streamline access to data from shop floor devices and manufacturing systems by handling integrations and providing a range of standardized interfaces. However, as applications and use cases evolved on the platform, a significant challenge emerged: the ability to share data across applications stored in isolated data warehouses (within Amazon Redshift in isolated AWS accounts designated for specific use cases), without the need to consolidate data into a central data warehouse. Another challenge was discovering all the available data stored across multiple data warehouses and facilitating a workflow to request access to data across business domains within each plant. The common method used was largely manual, relying on emails and general communication (through tickets and emails). The manual approach not only increased the overhead but also varied from one use case to another in terms of data governance.
In this post, we introduce Amazon DataZone and explore how Volkswagen used Amazon DataZone to build their data mesh, tackle the challenges encountered, and break the data silos. A key aspect of the solution was enabling data providers to automatically publish their data products to Amazon DataZone, serving as a central data mesh for enhanced data discoverability. Additionally, we provide code to guide you through the deployment and implementation process.
Introduction to Amazon DataZone
Amazon DataZone is a data management service that makes it faster and straightforward to catalog, discover, share, and govern data stored across AWS, on-premises, and third-party sources. Key features of Amazon DataZone include the business data catalog, with which users can search for published data, request access, and start working on data in days instead of weeks. In addition, the service facilitates collaboration across teams and helps them manage and monitor data assets across different organizational units. The service also includes the Amazon DataZone portal, which offers a personalized analytics experience for data assets through a web-based application or API. Lastly, Amazon DataZone offers governed data sharing, which makes sure the right data is accessed by the right user for the right purpose with a governed workflow.
Solution overview
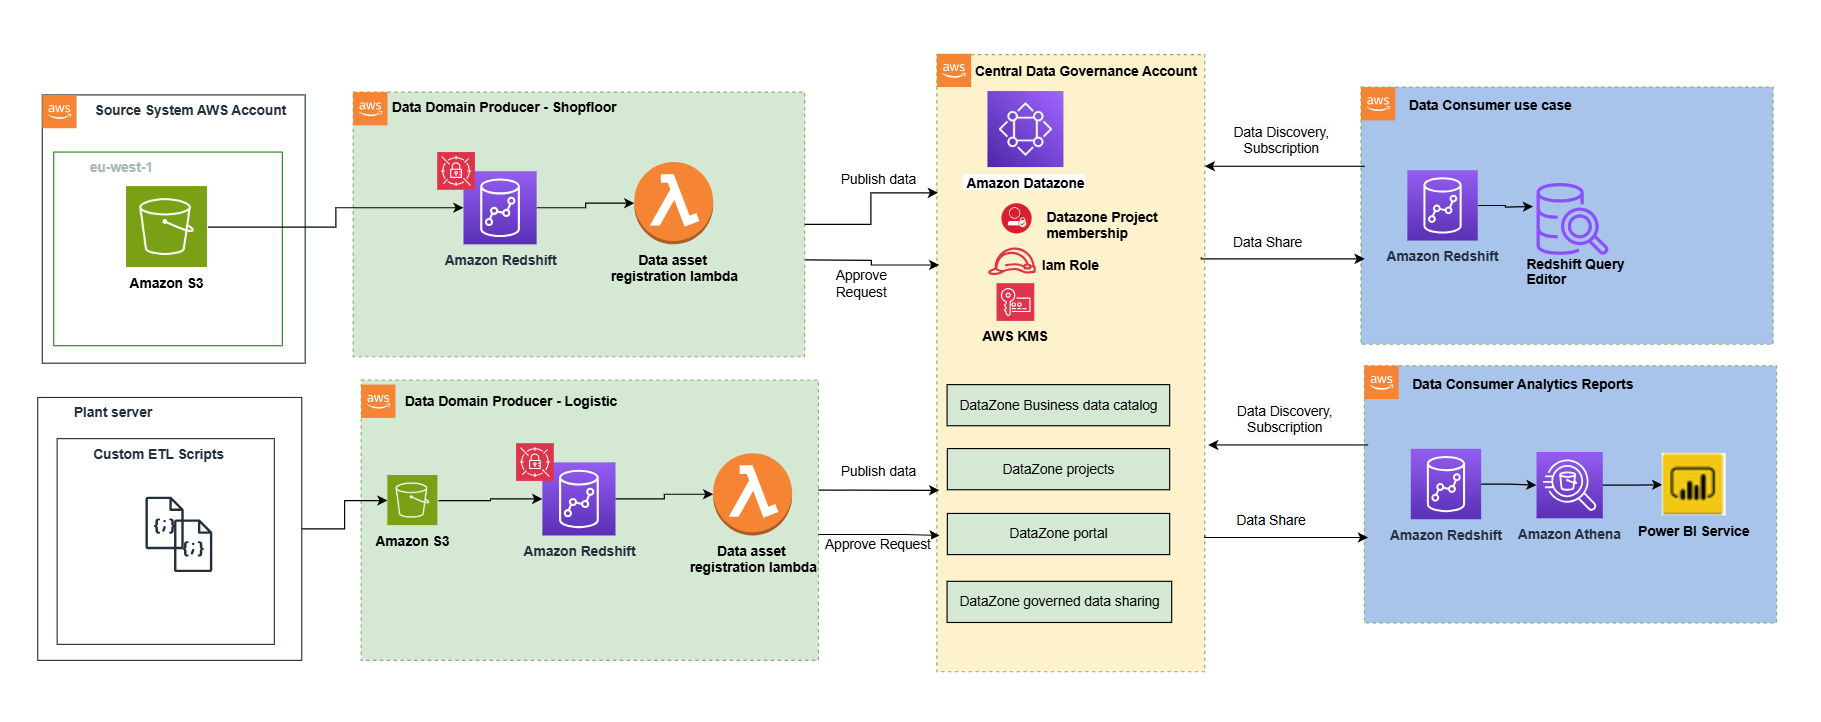
The following architecture diagram represents a high-level design that is built on top of the data mesh pattern. It separates source systems, data domain producers (data publishers), data domain subscribers (data consumers), and central governance to highlight the key aspects. This data mesh architecture is specially tailored for cross-AWS account usage. The objective of this approach is to create a foundation for building data governance on a scale, supporting the objectives of data producers and consumers with strong and consistent governance.
This architecture allows for the integration of multiple data warehouses into a centralized governance account that stores all the metadata from each environment.
A data domain producer uses Amazon Redshift as their analytical data warehouse to store, process, and manage structured and semi-structured data. The data domain producers load data into their respective Amazon Redshift clusters through extract, transform, and load (ETL) pipelines they manage, own, and operate. The producers maintain control over their data through Amazon Redshift security features, including column-level access controls and dynamic data masking, supporting data governance at the source. A data domain producer uses Amazon Redshift ETL and Amazon Redshift Spectrum to process and transform raw data into consumable data products. The data products could be Amazon Redshift tables, views, or materialized views.
Data domain producers expose datasets to the rest of the organization by registering them to Amazon DataZone service, which acts as a central data catalog. They can choose what data assets to share, for how long, and how consumers can interact with these. They’re also responsible for maintaining the data and making sure it’s accurate and current.
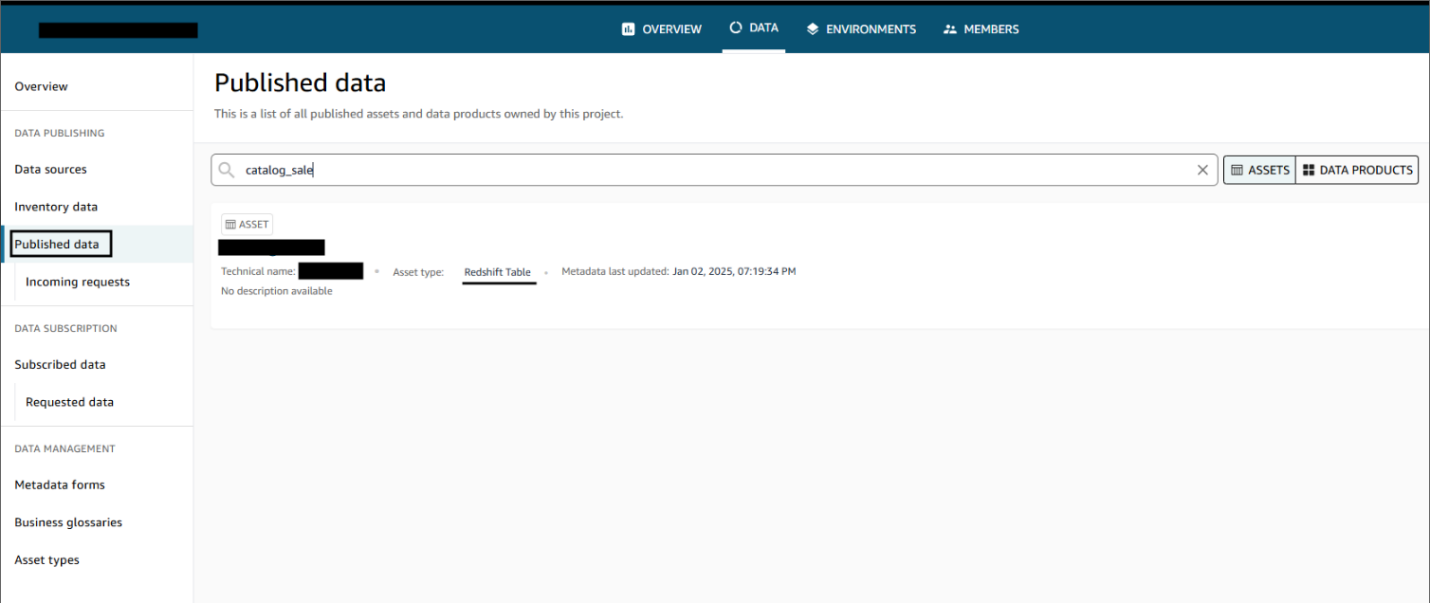
The data assets from the producers are then published using the data source run to Amazon DataZone in the central governance account. This process populates the technical metadata into the business data catalog for each data asset. The business metadata can be added by business users (data analysts) to provide business context, tags, and data classification for the datasets. This approach provides the required features to allow producers to create catalog entries with Amazon Redshift from all their data warehouses built in with Redshift clusters. In addition, the central data governance account is used to share datasets securely between producers and consumers. It’s important to note that sharing is done through metadata linking alone. No data (except logs) exists in the governance account. The data isn’t copied to the central account; just a reference to the data is used, so that the data ownership remains with the producer.
Amazon DataZone provides a streamlined way to search for data. The Amazon DataZone data portal provides a personalized view for users to discover and search data assets. An Amazon DataZone user (consumer) with permissions to access the data portal can search for assets and submit requests for subscription of data assets using a web-based application. An approver can then approve or reject the subscription request.
When a data domain consumer has access to an asset in the catalog, they can consume it (query and analyze) using the Amazon Redshift query editor. Each consumer runs their own workload based on their use case. In this way, the team can choose the tools for the job to perform analytics and machine learning activities in its AWS consumer environment.
Publishing and registering data assets to Amazon DataZone
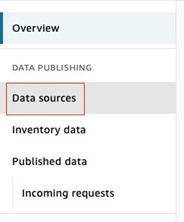
To publish a data asset from the producer account, each asset must be registered in Amazon DataZone for consumer subscription. For more information, refer to Create and run an Amazon DataZone data source for Amazon Redshift. In the absence of an automated registration process, required tasks must be completed manually for each data asset.
Using the automated registration workflow, the manual steps can be automated for the Amazon Redshift data asset (Redshift table or view) that needs to be published in an Amazon DataZone domain or when there’s a schema change in an already published data asset.
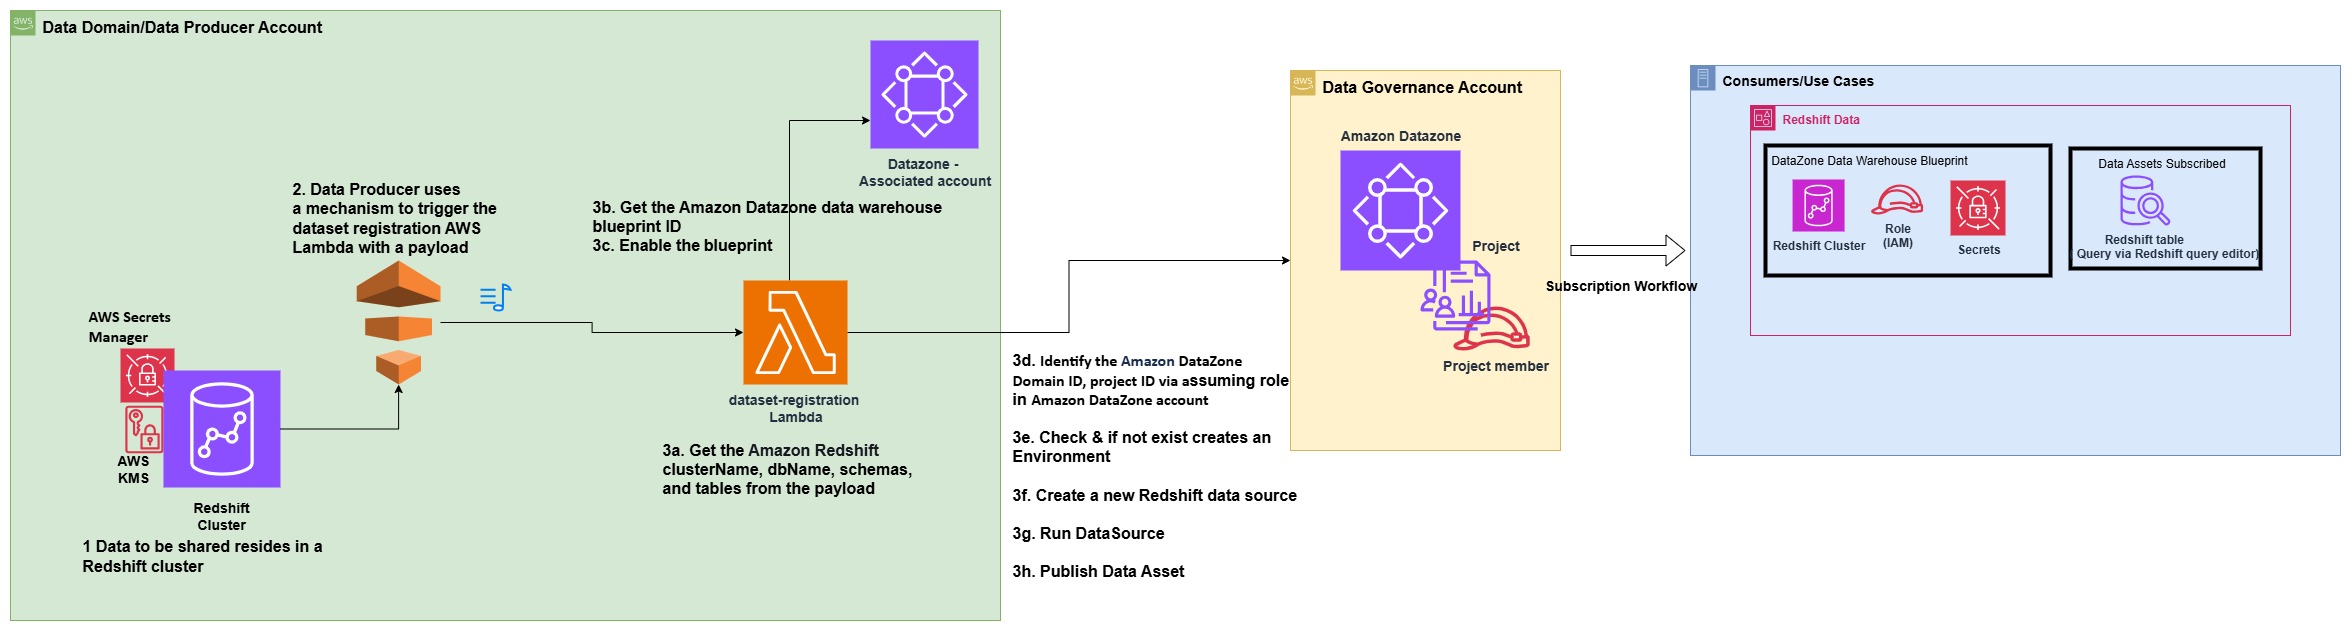
The following architecture diagram represents how data assets from Amazon Redshift data warehouses have been automatically published to the data mesh created with Amazon DataZone.
The process consists of the following steps:
In the producer account (Account B), the data to be shared resides in a Redshift cluster.
The producer account (Account B) uses a mechanism to trigger the dataset registration AWS Lambda function with a specific payload containing the information and name of the database, schema, table, or view that has a change in metadata.
The Lambda function performs the steps to automatically register and publish the dataset in Amazon DataZone:
Get the Amazon Redshift clusterName, dbName, schemas, and tables from the JSON payload, which is used as the event to trigger the Lambda function.
Get the Amazon DataZone data warehouse blueprint ID.
Enable the blueprint in the data producer account.
Identify the Amazon DataZone Domain ID and project ID for the producer via assuming role in Amazon DataZone account (Account A).
Check if an environment already exists in the project. If not, create an environment.
Create a new Redshift data source by providing the correct Redshift database information in the newly created environment.
Initiate a data source run request in the data source to make the Redshift tables or views available in Amazon DataZone.
Publish the tables or views in the Amazon DataZone catalog.
Prerequisites
The following prerequisites are required before starting:
Two AWS accounts to implement the solution have been described in this post. However, you can also use Amazon DataZone to publish data within a single account or across multiple accounts.
Amazon DataZone account (Account A) – This is the central data governance account, which will have the Amazon DataZone domain and project.
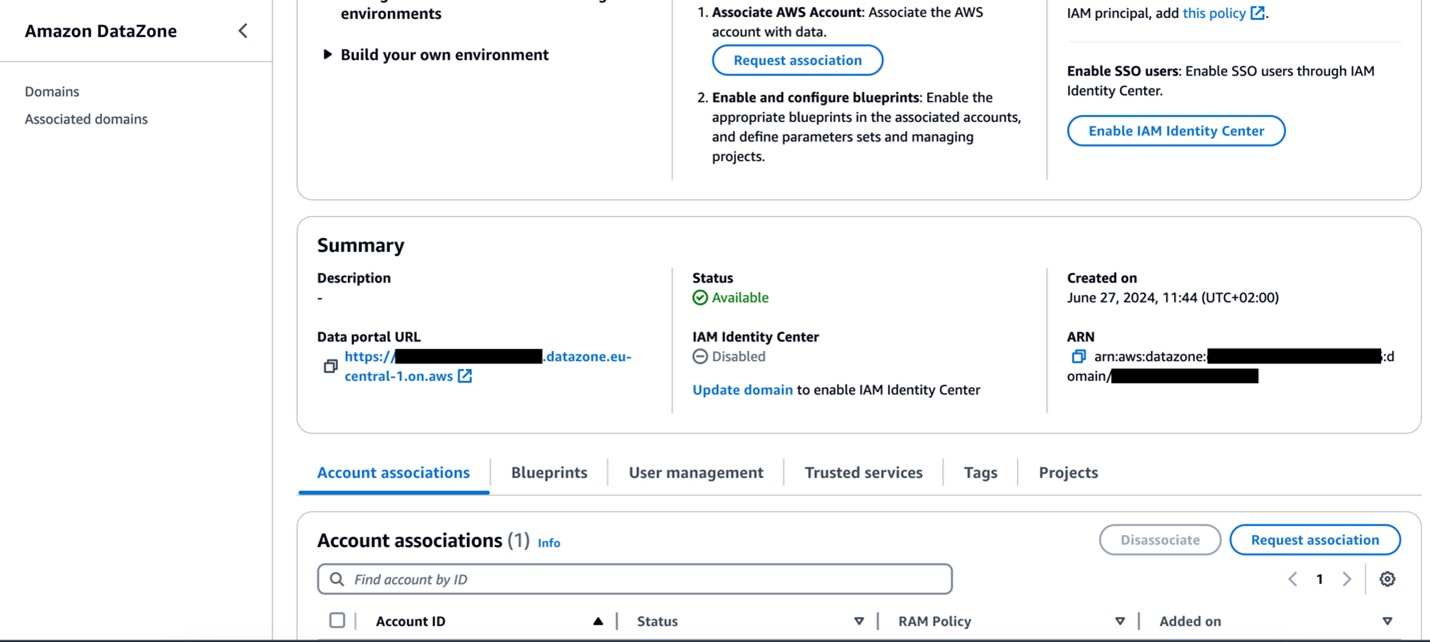
Data domain producer account (Account B) – This account acts as the data domain producer. It has been added as an associated account to Account A.
Prerequisites in data domain producer account (Account B)
As part of this post, we want to publish assets and subscribe to assets from a Redshift cluster that already exists. Complete the following prerequisite steps to set up Account B:
Set up the Redshift cluster, including database, schema, tables, and views (optional). The node type must be from the RA3 family. For more information, see Amazon Redshift provisioned clusters.
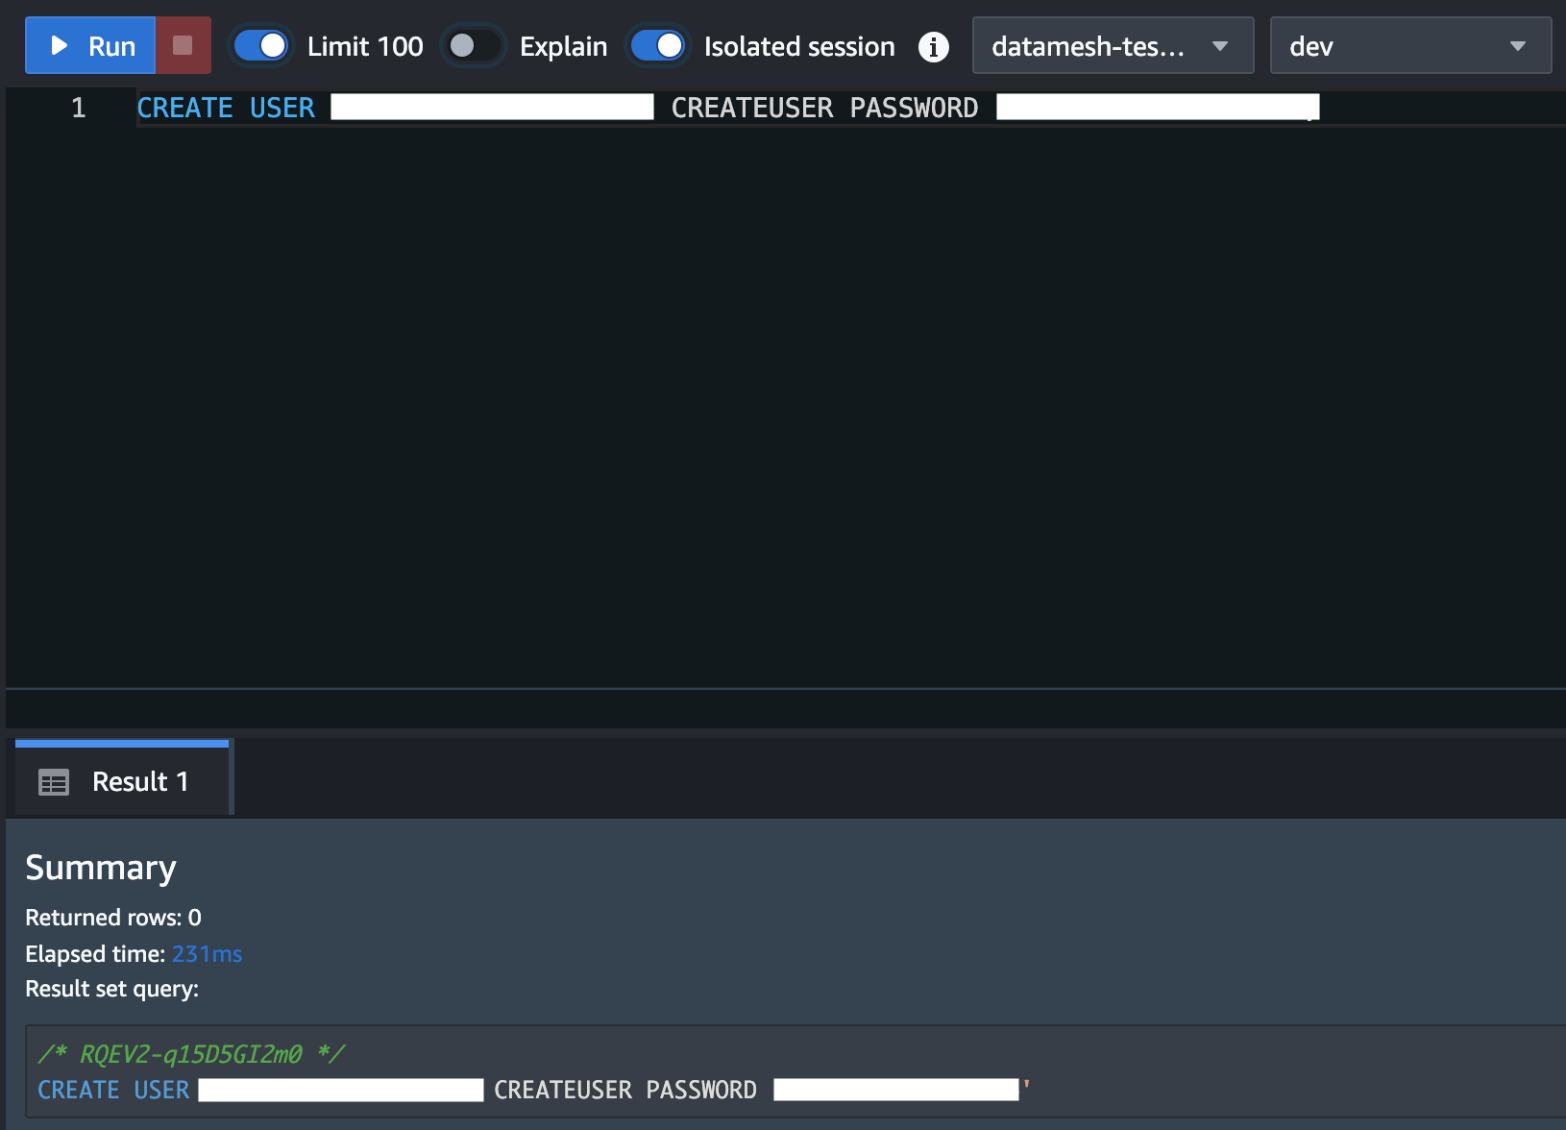
Create a superuser in Amazon Redshift for Amazon DataZone. For the Redshift cluster, the database user you provide in AWS Secrets Manager must have superuser permissions. For reference please see the note section in this QuickStart guide with sample Amazon Redshift data
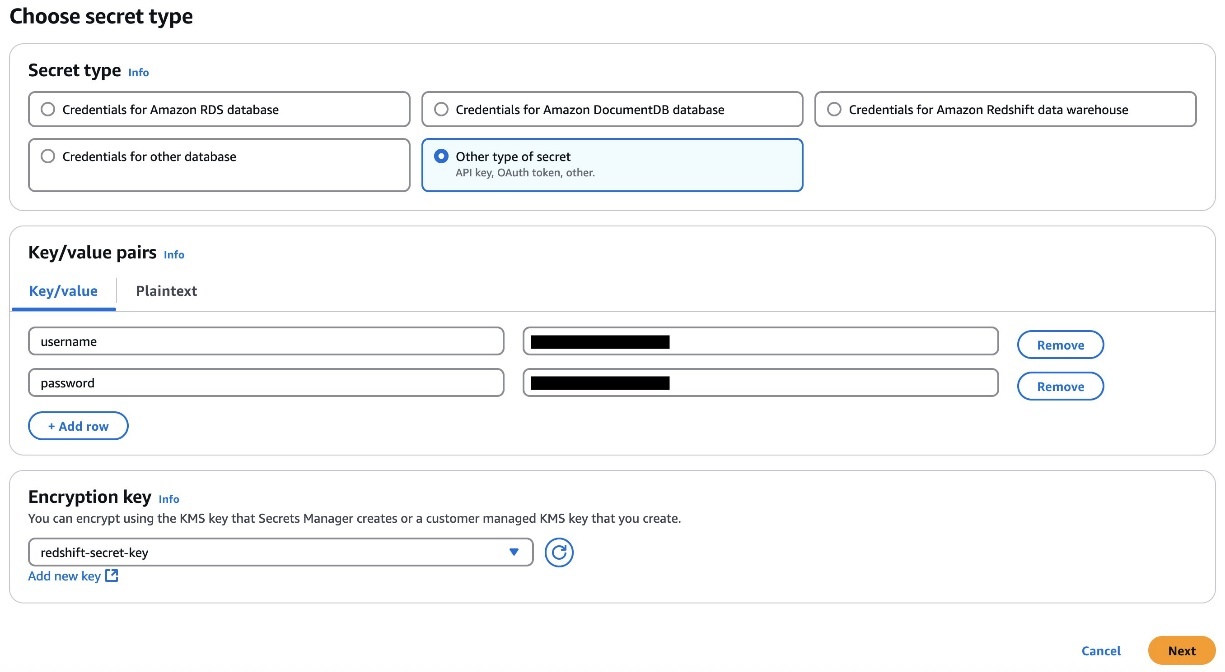
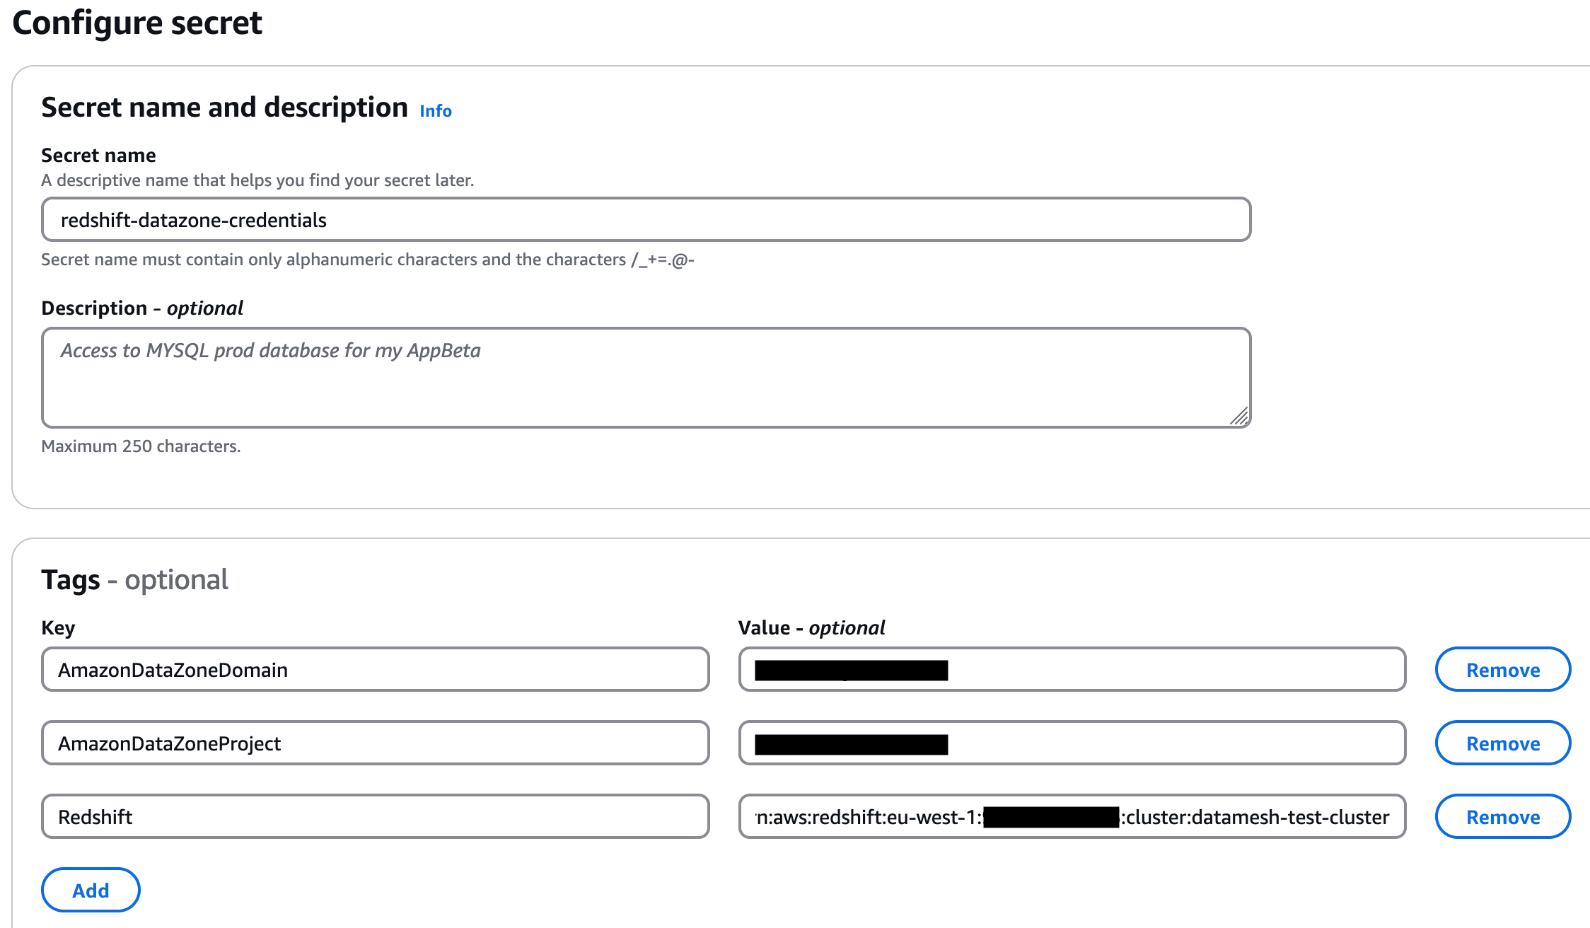
Store the user’s credentials in Secrets Manager. Select the credential type, enter the credential values, and choose the AWS Key Management Service (AWS KMS) key with which to encrypt the secret.
Add the tags to the Secret Manager secret to allow Amazon DataZone to find this secret and limit the access to a particular Amazon DataZone domain and Amazon DataZone project. The Redshift cluster Amazon Resource Name (ARN) must be added as a tag so it can be used by Amazon Redshift as a valid credential. For reference please see the note section in this QuickStart guide with sample Amazon Redshift data
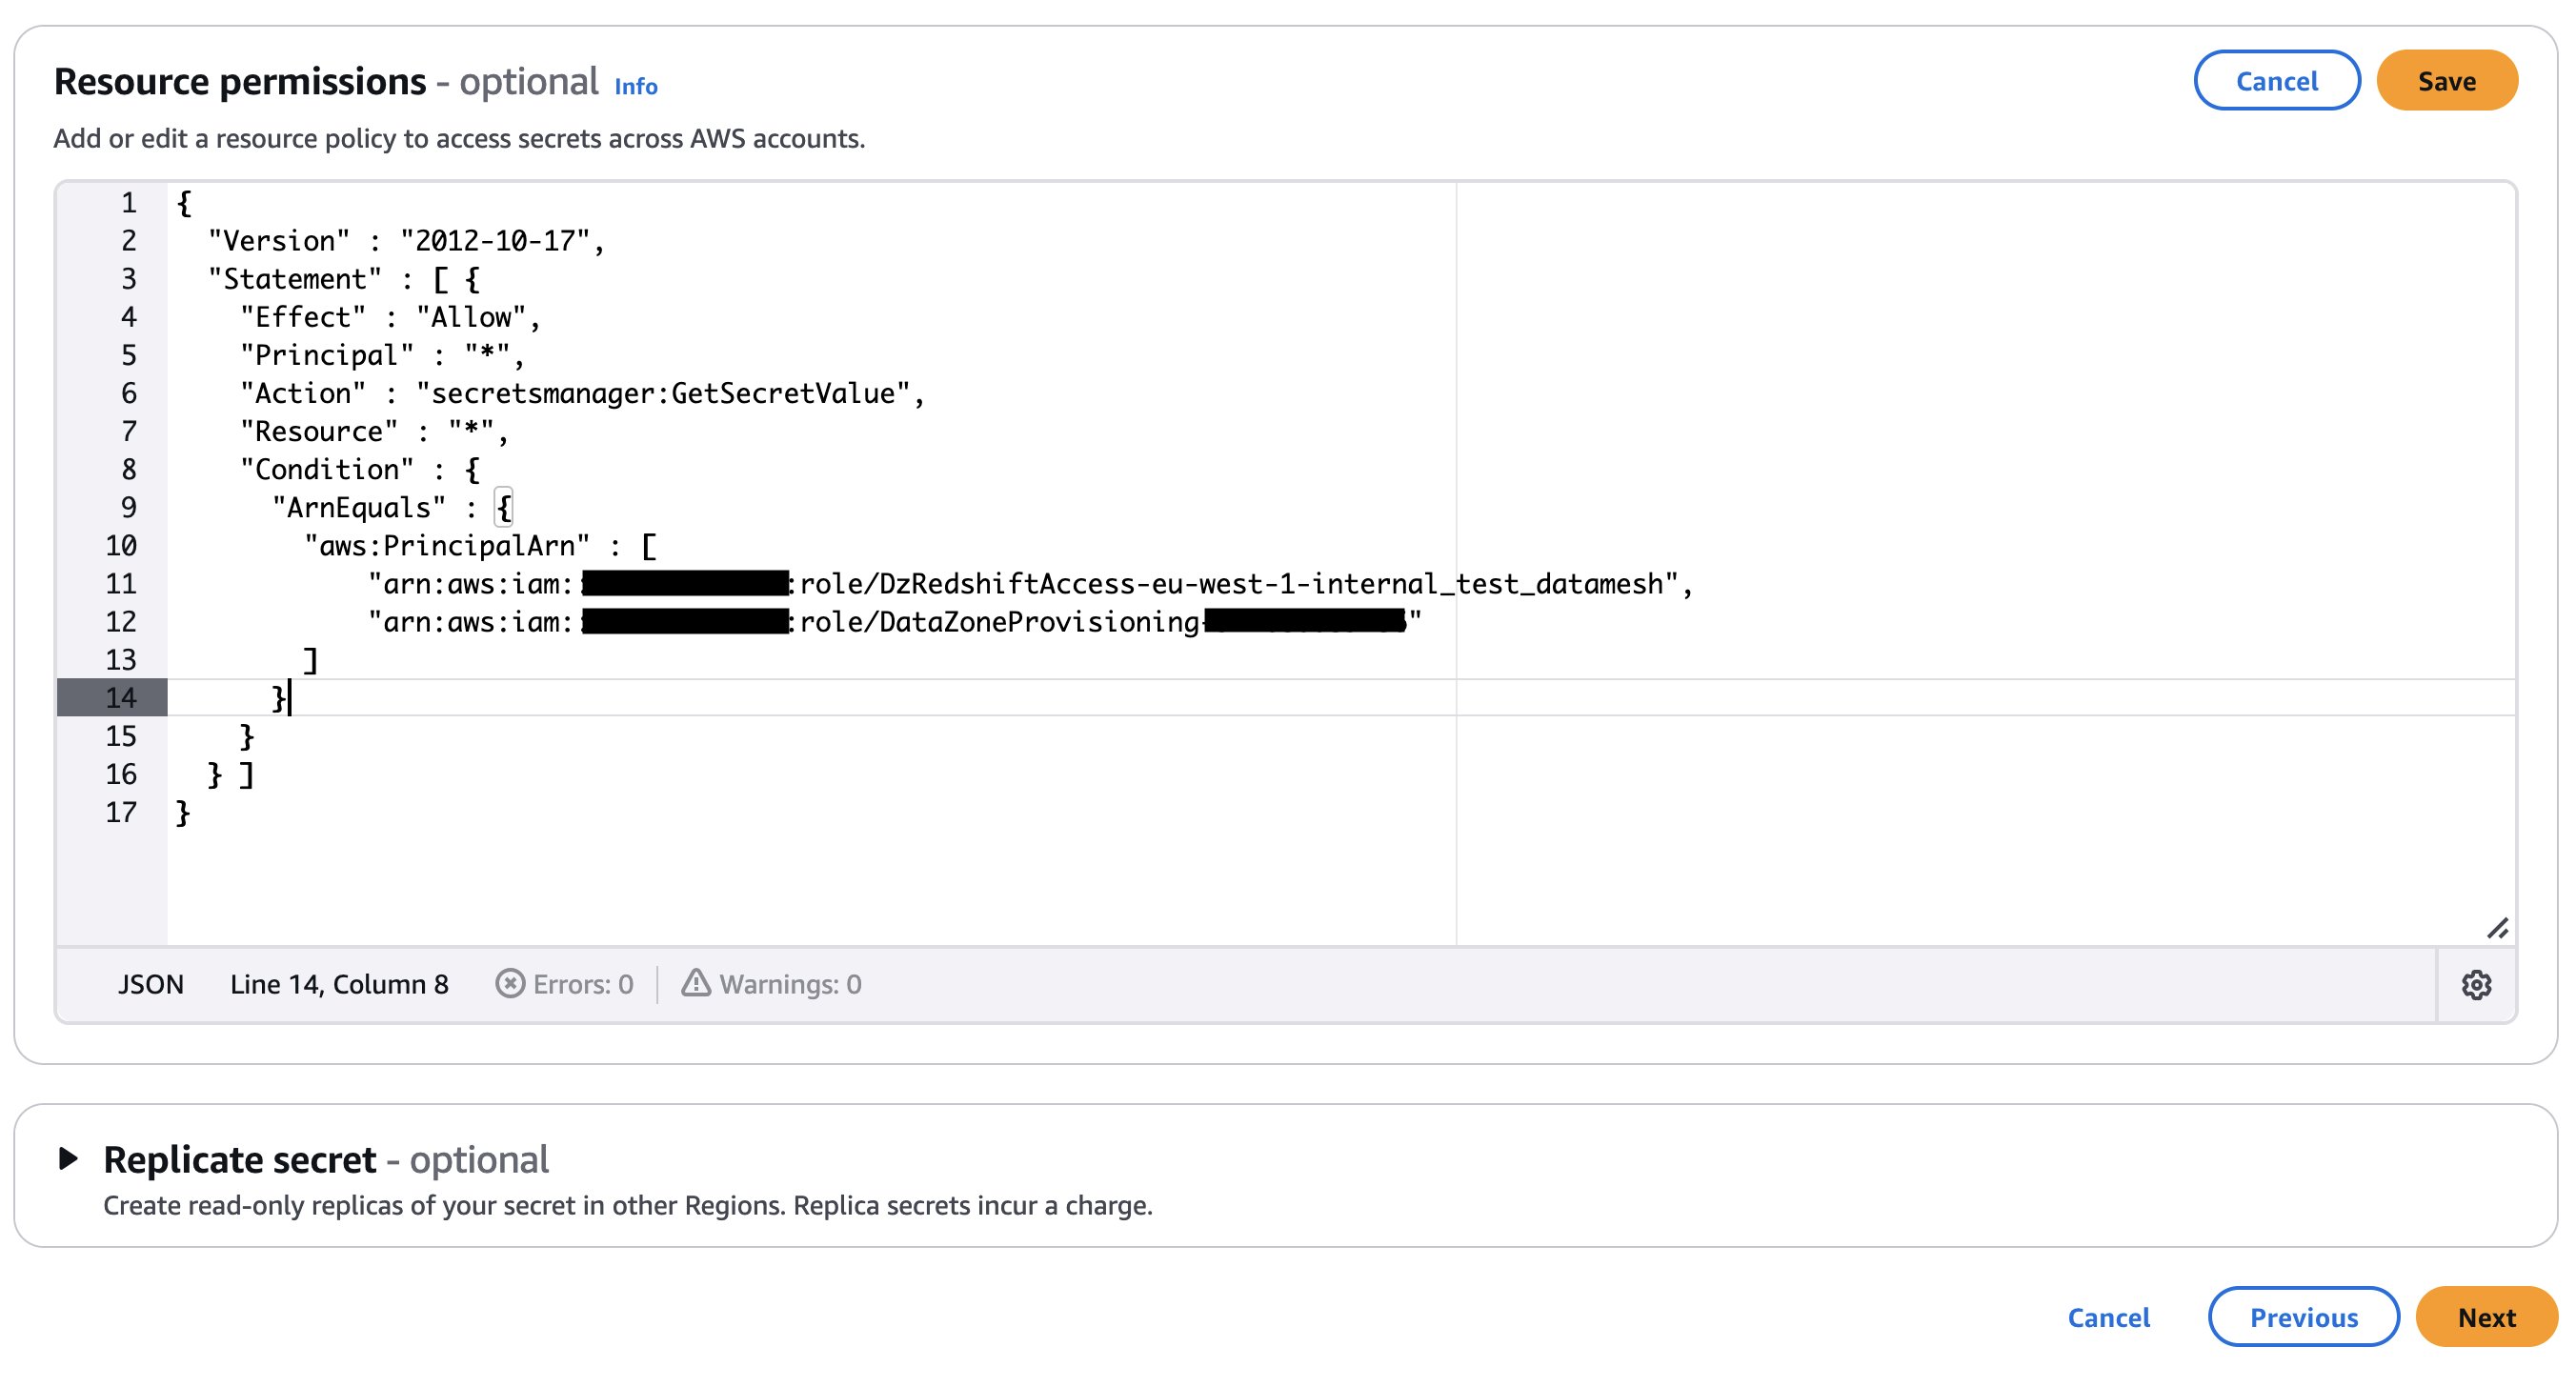
If your secret is encrypted with a custom KMS key, append the key policy with the following statement and add a tag to the key: AmazonDatazoneEnvironment = All. You can skip this step if you’re using an AWS managed KMS key.
Place a mechanism to generate the following payload to trigger the dataset registration Lambda function. The payload must contain the relevant Redshift database, schema, and table or view that you want to publish in the Amazon DataZone domain. The following example code assumes you have three databases in your Redshift cluster and within those databases you have different schemas, tables, and views. You should adjust the payload based on your use case.
Prerequisites in Amazon DataZone account (Account A)
Complete the following steps to set up your Amazon DataZone account (Account A):
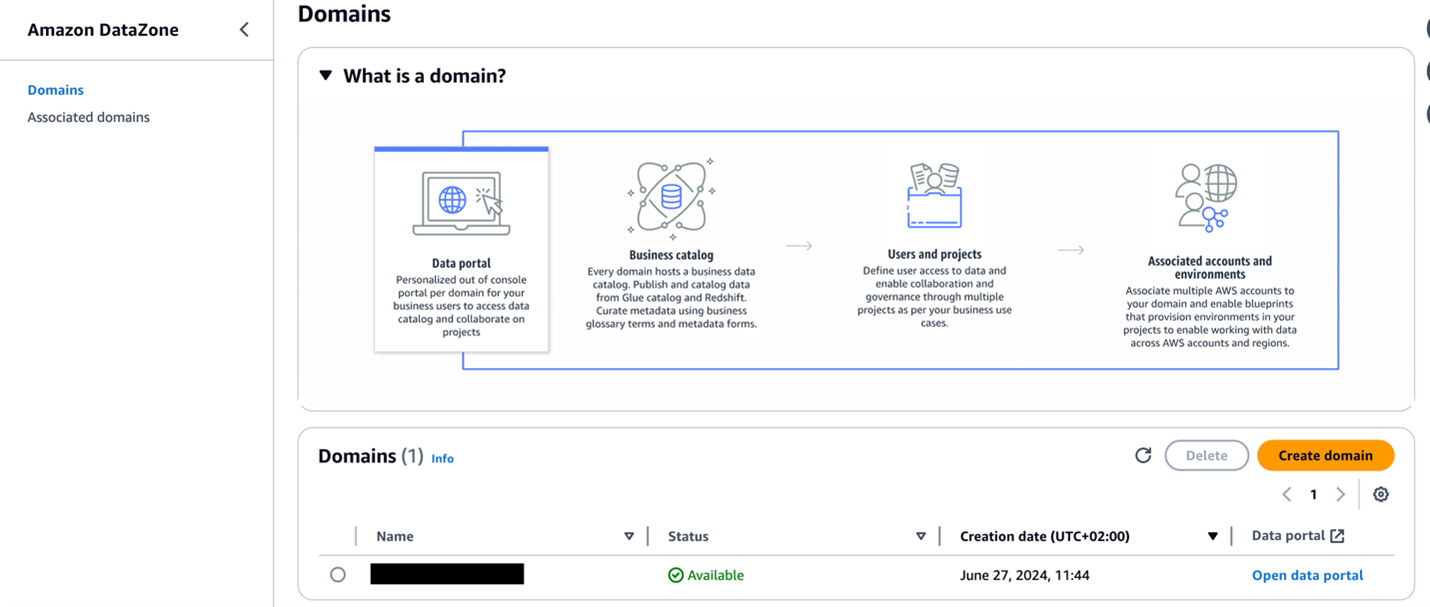
Sign in to Account A and make sure you have already deployed an Amazon DataZone domain and a project within that domain. Refer to Create Amazon DataZone domains for instructions to create a domain.
If your Amazon DataZone domain is encrypted with a KMS key, add the data domain account (Account B) to the KMS key policy with the following actions:
Create an IAM role that is assumable by Account B and make sure the role has a following policy attached and is a member (as contributor) of your Amazon DataZone project. For this post, we call the role dz-assumable-env-dataset-registration-role. By adding this role, you can successfully run the registration Lambda function.
In the following policy, provide the AWS Region and account ID corresponding to where your Amazon DataZone domain is created, and the KMS key ARN used to encrypt the domain:
Add the role as a member of the Amazon DataZone project in which you want to register your data sources. For more information, see Add members to a project.
Additional tools
The following tools are needed to deploy the solution using the AWS CDK:
After you complete the prerequisites, use the AWS CDK stack provided on the GitHub repo to deploy the solution for automatic registration of data assets into the Amazon DataZone domain. Complete the following steps:
Clone the repository from GitHub to your preferred integrated development environment (IDE) using the following commands:
Bootstrap the AWS CDK environment with the following commands at the base of the repository folder. Provide the profile name of your deployment account (Account B). Bootstrapping is a one-time activity and is not needed if your AWS account is already bootstrapped.
$ export AWS_PROFILE=<<PROFILE_NAME>>
$ npm run cdk bootstrap
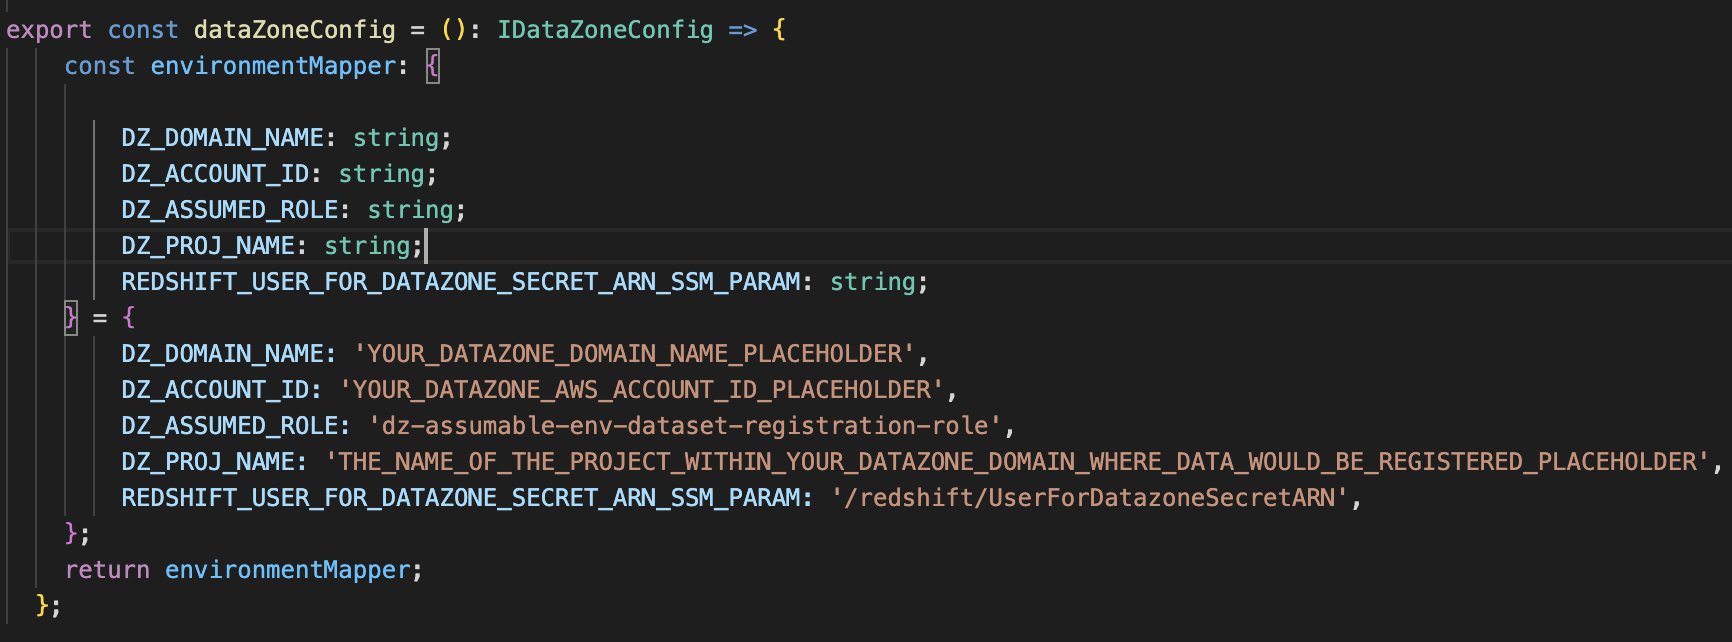
Replace the placeholder parameters (marked with the suffix _PLACEHOLDER) in the file config/DataZoneConfig.ts:
Amazon DataZone domain and project name of your Amazon DataZone instance. Make sure all names are in lowercase.
The AWS account ID of the Amazon DataZone account (Account A).
The assumable IAM role from the prerequisites.
The AWS Systems Manager parameter name containing the Secrets Manager secret ARN of the Amazon Redshift credentials.
Use the following command in the base folder to deploy the AWS CDK solution. During deployment, enter y if you want to deploy the changes for some stacks when you see the prompt Do you wish to deploy these changes (y/n)?
npm run cdk deploy --all
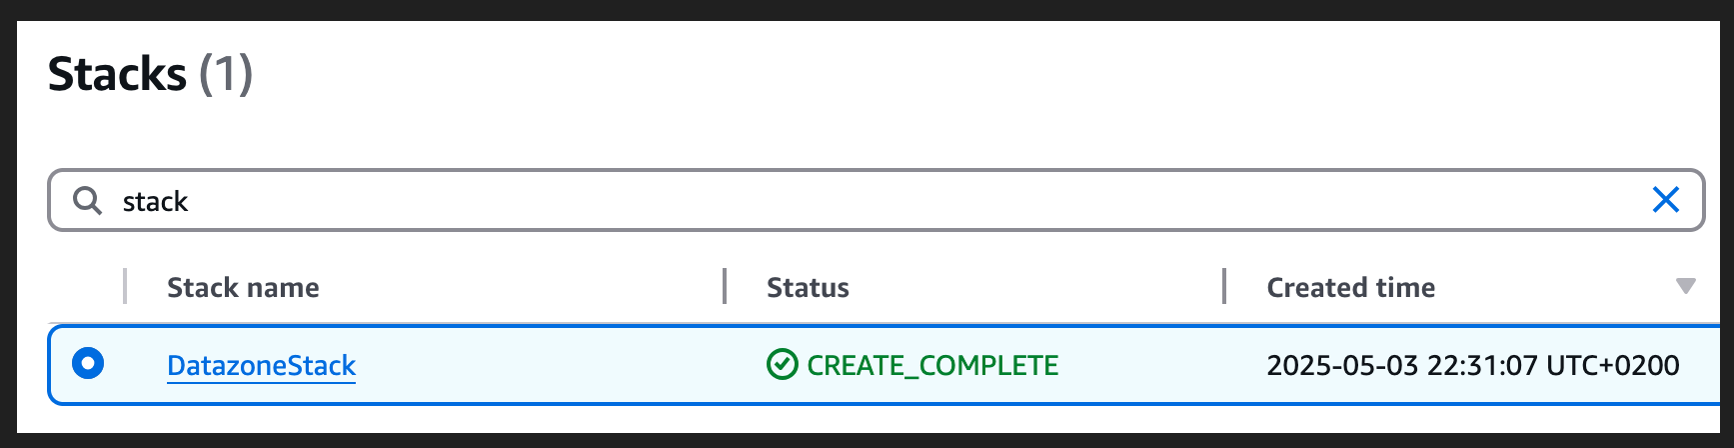
After the deployment is complete, sign in to Account B and open the AWS CloudFormation console to verify that the infrastructure was deployed.
Test automatic data registration to Amazon DataZone
Complete the following steps to test the solution:
Sign in to Account B (producer account).
On the Lambda console, open the datazone-redshift-dataset-registration function.
Under TEST EVENTS, choose Create new test event.
For Event name, enter Redshift, and for Event JSON, enter the following JSON structure (change the cluster, schema, database, and table names according to your environment):
Complete the following steps to clean up the resources deployed through the AWS CDK:
Sign in to Account B, go to the Amazon DataZone domain portal, and check there is no subscription for your published data asset. If there is a subscription, either ask the subscriber to unsubscribe or revoke the subscription request.
Delete the published data assets that were created in the Amazon DataZone project by the dataset registration Lambda function.
Delete the remaining resources created using the following command in the base folder:
npm run cdk destroy –all
Conclusion
Amazon DataZone offers a seamless integration with AWS services, providing a powerful solution for organizations like Volkswagen to break down their data silos and implement effective data mesh architectures through a straightforward implementation highlighted in this post. By using Amazon DataZone, Volkswagen addressed its immediate data sharing hurdles and laid the groundwork for a more agile, data-driven future in automotive manufacturing. The automated data publishing from various warehouses, coupled with standardized governance workflows, has significantly reduced the manual overhead that once slowed down Volkswagen’s data engineering teams. Now, instead of navigating a labyrinth of emails, tickets, and communication, Volkswagen’s data engineers and data scientists can quickly discover and access the data they need, all while maintaining their security and compliance standards.
By using Amazon DataZone, organizations can bring their isolated data together in ways that make it simpler for teams to collaborate while maintaining security and compliance at scale. This approach not only addresses current data governance challenges but also creates a highly scalable foundation for future data-driven innovations. For guidance on establishing your organization’s data mesh with Amazon DataZone, contact your AWS team today.
The whitepaper covers the core security principles of Amazon EKS Auto Mode, highlighting its unique approach to managing Kubernetes clusters. This includes how AWS has reimagined node management by building on top of Amazon Elastic Compute Cloud (Amazon EC2) managed instances, which introduces a new way for customers to delegate operational control of EC2 instances to an AWS service.
Designed for cloud architects, security professionals, and Kubernetes practitioners, the whitepaper serves as a comprehensive guide to understanding the security architecture of Amazon EKS Auto Mode. It represents the AWS commitment to providing secure, manageable, and innovative Kubernetes infrastructure solutions that minimize undifferentiated heavy lifting, so that customers can focus more on application development and less on infrastructure management.
If you have feedback about this post, submit comments in the Comments section below. If you have questions about this post, contact AWS Support.
At Backblaze, we’ve always believed that data protection should be easy, reliable, and seamless. Our Computer Backup product has long provided individuals and organizations with unlimited, automatic, and affordable cloud backup. But for IT admins managing fleets of devices, visibility and control are just as critical as the backup itself.
That’s where our integration with Jamf Pro comes in. By developing extension attributes that surface key information about Backblaze Computer Backup directly into Jamf Pro, we’ve made it simpler than ever for admins to monitor and manage backup health across their organization.
Why extension attributes matter
Jamf Pro is the industry standard for managing Apple devices, giving IT teams centralized oversight and policy enforcement across Macs, iPhones, and iPads. Extension attributes allow admins to collect custom data points beyond Jamf’s built-in inventory. By plugging Backblaze-specific attributes into Jamf, organizations gain real-time insight into the backup status of every managed Mac—without jumping between multiple dashboards.
This alignment reduces blind spots, helps meet compliance requirements, and, most importantly, gives peace of mind that critical company data is safe.
The four key extension attributes
We’ve developed four extension attributes that bring actionable backup insights into Jamf Pro:
1. Backup selected
This attribute shows whether Backblaze Computer Backup is enabled on a device. IT admins can quickly confirm if backups are actively running, ensuring no endpoint is left unprotected.
2. Backup size
Data size matters—not just for storage costs, but for understanding the scope of protection. This attribute reports the total size of the data being backed up, helping teams gauge usage and anticipate trends.
3. Last backup date
Knowing when a device last backed up is critical to risk management. This attribute ensures admins can spot machines that haven’t backed up recently and take proactive steps before a potential data loss occurs.
4. Safety frozen status
Backblaze’s Safety Freeze feature protects users from data loss by preventing accidental or malicious changes to a backup. By surfacing this status in Jamf, admins gain visibility into whether a device’s backup is frozen and can act accordingly.
Benefits for IT teams and end users
By combining Backblaze’s reliable backup with Jamf’s centralized management, organizations gain:
Proactive risk management: Spotting gaps in backup coverage before they become crises.
Streamlined compliance: Meeting audit requirements with centralized backup data reporting.
Operational efficiency: Saving IT teams from switching between tools and reducing the need for manual checks.
Automatic, seamless backups: Employees know their data is being protected without interruptions or extra effort.
Looking ahead
The development of these Jamf Pro extension attributes is part of our broader mission to empower IT teams with tools that reduce friction and strengthen resilience. As remote and hybrid work environments continue to expand, seamless integrations like these will only become more valuable.
At Backblaze, we’re proud to provide more than just a backup service—we’re delivering visibility, control, and confidence.
Want to try it yourself? Get started today and see how these Jamf Pro extension attributes can make managing backups as simple as possible.
Paul McKenney gave a remote presentation at
Kangrejos 2025 following up on the
talk he gave last year about the
lifetime-end-pointer-zapping problem: certain common patterns for multithreaded code are
technically undefined behavior, and changes to the C and C++ specifications
will be needed to correct that. Those changes could also impact code that uses
unsafe Rust, such as the kernel’s Rust bindings. Progress on the problem has been slow,
but McKenney believes that a solution is near at hand.
Systemd
v258 was released on September 17 after more than nine months
of development. LWN has already covered some of the
features and changes being readied for v258 before it was final. Now
that the release is out, it is time to look at more of what came in
v258, including a sandbox shell, new boot options, service-level disk
quotas, and enhancements to systemd-resolved.
In June, we launched the first set of content for Experience CS, our integrated computer science curriculum for students ages 8–14. Experience CS was designed for all educators, including those without a computer science background, so that anyone can bring engaging, creative computer science learning into their classroom.
Since launch, we’ve seen educators across the US and beyond implement the first six integrated units, explore the tutorials, and join our webinars. We’re incredibly grateful to our early adopters who are already helping to shape the program’s future. With so much exciting content already available, what’s next for Experience CS?
Translations: Making Experience CS more accessible
We’re delighted to share that the initial six units are now available in Spanish and French. From the beginning, our goal has been to make Experience CS accessible to as many educators and learners as possible. We will continue translating new materials so more communities can integrate computer science into their classrooms.
New units: Expanding knowledge with Experience CS
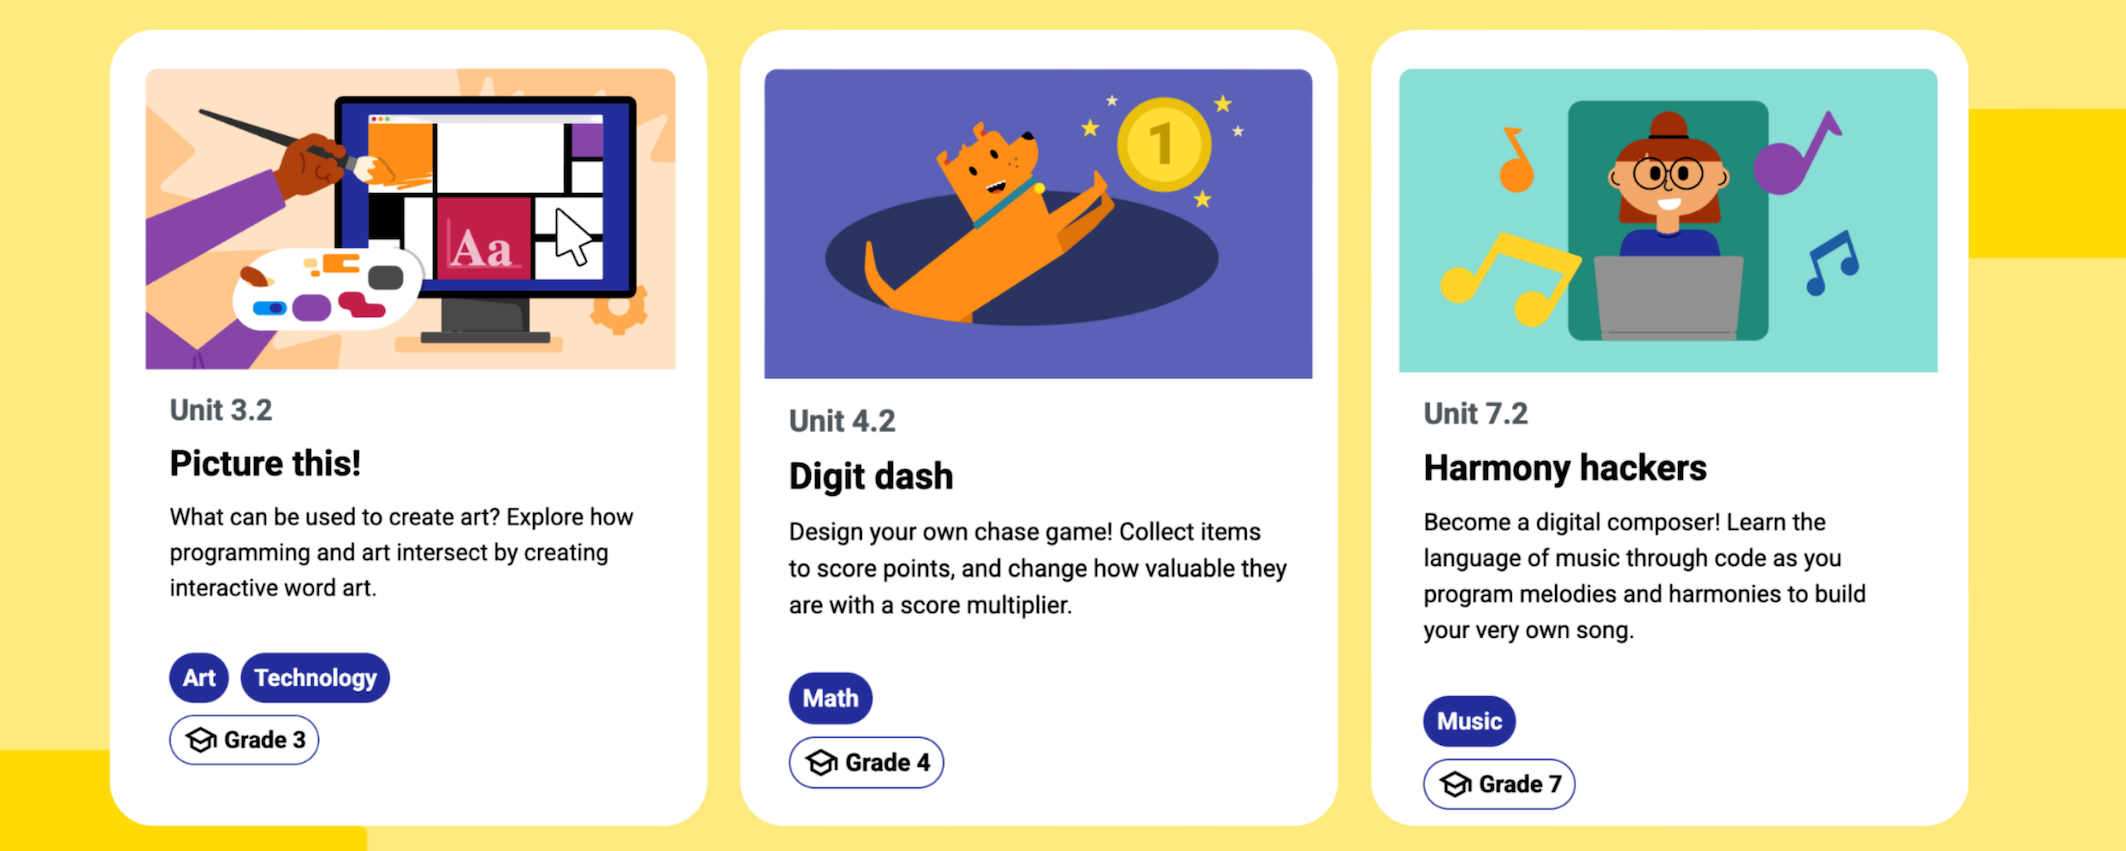
Educators asked us for more units — and we listened. Three brand-new units for grades 3, 4, and 7 are now available, with additional units on the way. These new resources give educators and students the chance to go deeper into computing concepts while connecting them to other subject areas.
3.2 Picture this! What can be used to create art? Explore how programming and art intersect by creating interactive word art.
4.2 Digit dash: Design your own chase game! Collect items to score points, and change how valuable they are with a score multiplier.
7.2 Harmony hackers: Become a digital composer! Learn the language of music through code as you program melodies and harmonies to build your very own song.
The new units are currently available in English, with Spanish and French translations coming soon!
Updates to the website and tools
Experience CS is a platform built by teachers, for teachers. We’ve been listening closely to your feedback and making improvements to streamline the classroom experience. With new updates, educators can:
Import a classroom and students from Google Classroom
Upload and administer student accounts in Code Editor for Education
Access improved lesson materials based on teacher feedback
Our focus is on making it easier than ever for you to bring computer science into your teaching.
How to get started
Bringing Experience CS into your classroom is simple and always free.
Need additional help? Everything you need to get started is right on our Getting Started page.
Stay up to date
We’re just getting started with Experience CS. New curriculum units, more translations, and additional platform improvements are already in the works. Join our mailing list to stay informed about the latest updates. Also, sign up for this month’s webinar to get a deeper look at what’s next for Experience CS.
We can’t wait to keep bringing the power of computer science to more classrooms with you.
This post is co-written with Rayco Martínez Hernández, Head of Cloud Governance at Moeve.
Moeve, formerly known as Cepsa, is a global integrated energy company with over 90 years of experience and more than 11,000 employees. Moeve is committed to driving Europe’s energy transition and accelerating decarbonization efforts. The company has embraced digital transformation to enhance energy efficiency, safety, and sustainability, focusing on investments in green hydrogen, second-generation biofuels, and ultra-fast electric vehicle charging infrastructure.
At Moeve, we decided to make AWS Control Tower our central governance tool and the foundation of our landing zone at the end of 2022. However, as an organization that wants to ensure that all deployed resources comply with the established requirements, it was challenging for us to remediate errors or vulnerabilities that arise when resources were deployed without compliance with our security definitions. The foundation of controls should be proactive. This is where AWS CloudFormationHooks, along with other AWS measures like Service Control Policies (SCPs), play a differential role.
We have become familiar with CloudFormation Hooks thanks to the Guard Rules that we deploy as part of our proactive deployment policy on AWS. There are times when you want to block the deployment of Amazon API Gateway without security, Amazon VPC security groups with source 0.0.0.0/0, or with an ALL port range open. In these and other cases, we want to take a step further and create our own controls that are more in line with our own policies, and now we can do so in a simple and agile way, using the managed hooks launched in November 2024.
To be able to use these tools, it is essential, among other things, to ensure that resource deployments are only done through Infrastructure as Code (IaC) tools.
Would you like to know how we achieved it? Let’s get to it!
Background
At Moeve, we ensure that all our deployments within our organization are done through IaC. We enforce this by requiring all deployments to go through CloudFormation, which also allows us to enforce organizational policies using CloudFormation Guard Hooks.
However, for teams with more advanced technical expertise, we allow the use of the AWS Cloud Development Kit (CDK). The AWS CDK enables developers to define infrastructure using general-purpose programming languages, which facilitates code reuse, modular design, and better integration with existing development workflows. It provides high-level abstractions that accelerate the definition of common AWS patterns, while also allowing low-level control when needed. Even though it introduces an abstraction layer, the CDK synthesizes into standard CloudFormation templates, maintaining full compatibility with our governance and compliance mechanisms based on CloudFormation Guard Hooks.
We have several ways to perform deployments: directly launching actions against CloudFormation from the AWS Command Line Interface (CLI), through pipelines, or even by executing actions from code. However, the common basis for these deployments is that they cannot be done with Permission Sets associated with individuals. Users do not have access to deploy resources directly; they have read access and can assume a role that can deploy resources.
To make this more user-friendly, we have a small tool that assumes the role with enough permissions and deploys the template code we specify, with just a call like this:
cloudformation-deployer test.yml
It is crucial to make these controls easy for developers if you want them to comply with the established security measures.
Solution
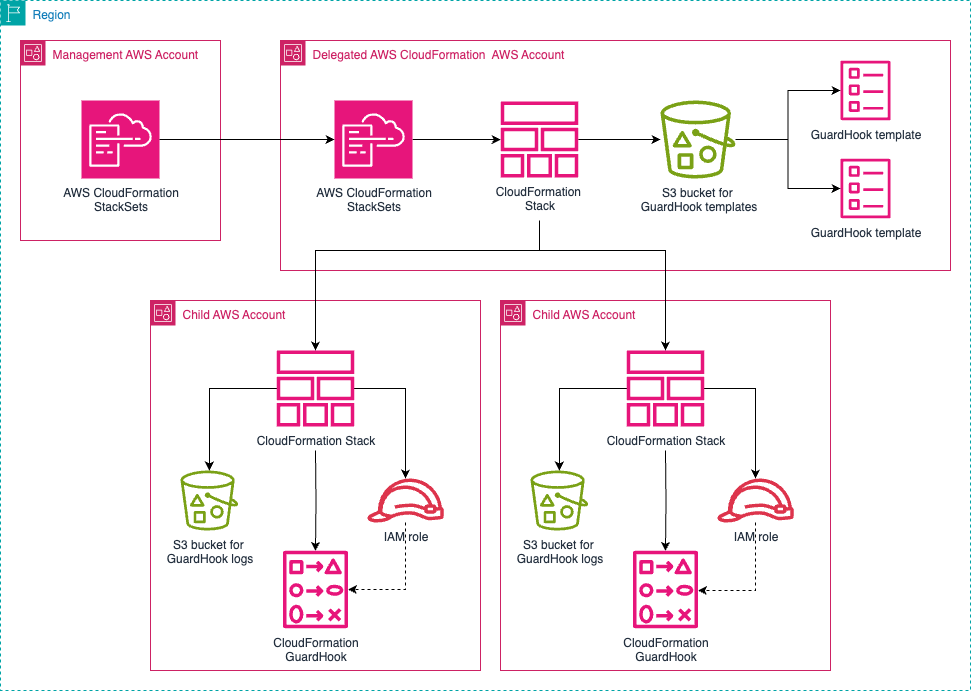
At Moeve, as a best practice, we have delegated the management of Cloudformation StackSets to an AWS account different from the management account. In this account, we deploy an Amazon S3 bucket where we will store all the files for the CloudFormation Guard hooks or the AWS Lambda functions if they are Lambda type. In Figure 1, you can see a simplified version of our multi-account architecture when deploying resources using StackSets.
Figure 1. AWS CloudFormation StackSets configuration in a multi-Account environment
An example of a stack that manages the buckets can be seen below:
AWSTemplateFormatVersion: "2010-09-09"

Description: |
  This template creates an Amazon S3 bucket that you can use to deploy an AWS CloudFormation hook.

Parameters:
  GuardHooksBucketName:
    Type: String
    Description: Name for S3 bucket storing the CloudFormation Guard hooks
  OrgId:
    Description: Organization Id which is in the format o-xyzabcdefg
    Type: String
    AllowedPattern: ^o-[a-z0-9]{10,32}$

Resources:
  S3Bucket:
    Type: AWS::S3::Bucket
    Properties:
      BucketName: !Sub ${GuardHooksBucketName}-${AWS::Region}-${AWS::AccountId}
      BucketEncryption:
        ServerSideEncryptionConfiguration:
          - ServerSideEncryptionByDefault:
              SSEAlgorithm: AES256
      PublicAccessBlockConfiguration:
        BlockPublicAcls: true
        BlockPublicPolicy: true
        IgnorePublicAcls: true
        RestrictPublicBuckets: true
      LifecycleConfiguration:
        Rules:
          - Id: MultipartClean
            Status: Enabled
            AbortIncompleteMultipartUpload:
              DaysAfterInitiation: 5
      Tags:
        - Key: project
          Value: shared
      VersioningConfiguration:
        Status: Enabled

  S3BucketPolicy:
    Type: AWS::S3::BucketPolicy
    Properties:
      Bucket: !Ref S3Bucket
      PolicyDocument:
        Version: 2012-10-17
        Statement:
          - Sid: AllowSSLRequestsOnly
            Effect: Deny
            Action: s3:*
            Resource:
              - !Sub ${S3Bucket.Arn}/* # "arn:aws:s3:::arn:aws:s3:::<bucket-name>/<path>/*"
              - !Sub ${S3Bucket.Arn} # "arn:aws:s3:::arn:aws:s3:::<bucket-name>/<path>/"
            Principal: '*'
            Condition:
              Bool:
                aws:SecureTransport: 'false'
          - Sid: AllowOrgAccountsDeployAccess
            Effect: Allow
            Principal:
              AWS: "*"
            Action: "s3:GetObject"
            Resource: !Join
              - ""
              - - "arn:aws:s3:::"
                - !Ref S3Bucket
                - /*
            Condition:
              ForAnyValue:StringLike:
                "aws:PrincipalOrgPaths": !Sub "${OrgId}/*"
With this, we achieve having a centralized S3 bucket with an access policy according to which anyone within our organization can access and retrieve the objects. Versioning is configured to keep previous versions of the hooks we deploy. Then, in the bucket, we will store the files of our hooks, differentiating them by folders.
Child Accounts
For the child accounts, we will deploy a StackSet in the central account over the Organizational Units (OUs) that are defined. Auto-deployment will be configured so that all new Accounts added to the OU acquire these same hooks.
Check the example below where an S3 bucket will be deployed to store the logs of the hooks with the IAM role that the hooks will use, and two hooks: to evaluate the creation and update of API Gateway.
AWSTemplateFormatVersion: "2010-09-09"

Description: |
  Registers the hook in the AWS CloudFormation Private Registry and bucket to logs.

Parameters:
  CustomHooksLogBucketName:
    Type: String
    Description: Name for S3 bucket storing the CloudFormation Guard hook logs
  GuardHooksBucketName:
    Type: String
    Description: Name for S3 bucket storing the CloudFormation Guard hooks

Resources:
  # S3 bucket used to store logs generated by CloudFormation Guard hooks
  LogBucket:
    Type: AWS::S3::Bucket
    Properties:
     # Bucket name is built dynamically with account ID and region
      BucketName: !Sub ${CustomHooksLogBucketName}-${AWS::AccountId}-${AWS::Region}
      BucketEncryption:
        ServerSideEncryptionConfiguration:
          - ServerSideEncryptionByDefault:
              SSEAlgorithm: AES256	# Enforce AES256 encryption
      PublicAccessBlockConfiguration:
        BlockPublicAcls: true
        BlockPublicPolicy: true
        IgnorePublicAcls: true
        RestrictPublicBuckets: true
      LifecycleConfiguration:		# Manage bucket lifecycle
        Rules:
          - Id: MultipartClean
            Status: Enabled
            AbortIncompleteMultipartUpload:
              DaysAfterInitiation: 5	# Abort incomplete uploads after 5 days
          - Id: ExpireAfterOneWeek
            Status: Enabled
            Prefix: ""
            ExpirationInDays: 7	# Expire objects after 7 days
      Tags:
        - Key: project
          Value: shared
  # Bucket policy that enforces SSL-only access to the log bucket
  S3BucketPolicy:
    Type: AWS::S3::BucketPolicy
    Properties:
      Bucket: !Ref LogBucket
      PolicyDocument:
        Version: 2012-10-17
        Statement:
          - Sid: AllowSSLRequestsOnly
            Effect: Deny
            Action: s3:*
            Resource:
              - !Sub ${LogBucket.Arn}/* # "arn:aws:s3:::arn:aws:s3:::<bucket-name>/<path>/*" # Apply to all objects in the bucket
              - !Sub ${LogBucket.Arn} # "arn:aws:s3:::arn:aws:s3:::<bucket-name>/<path>/" # Apply to the bucket itself
            Principal: '*'
            Condition:
              Bool:
                aws:SecureTransport: 'false' 	# Deny if not using HTTPS
   # IAM Role that CloudFormation Guard hooks assume to interact with S3
  GuardHookRole:
    Type: AWS::IAM::Role
    Properties:
      AssumeRolePolicyDocument:		# Trust policy for CloudFormation hooks
        Statement:
          - Action: sts:AssumeRole
            Condition:
              StringEquals:
                aws:SourceAccount: !Ref 'AWS::AccountId'
              StringLike:
                'aws:SourceArn': !Sub arn:${AWS::Partition}:cloudformation:${AWS::Region}:${AWS::AccountId}:type/hook/Moeve-*/*
            Effect: Allow
            Principal:
              Service:
                - hooks.cloudformation.amazonaws.com
                - resources.cloudformation.amazonaws.com
        Version: "2012-10-17"
      MaxSessionDuration: 8400
      Path: /
      Policies:
        - PolicyName: HookS3Policy		# Policy granting permissions to write/read from the log bucket
          PolicyDocument:
            Statement:
              - Action:
                - 's3:GetEncryptionConfiguration'
                - 's3:ListAllMyBuckets'
                - 's3:ListBucket'
                - 's3:GetObject'
                - 's3:PutObject'
                Effect: Allow
                Resource:
                  - !Sub arn:${AWS::Partition}:s3:::${LogBucket}
                  - !Sub arn:${AWS::Partition}:s3:::${LogBucket}/*
            Version: "2012-10-17"
        - PolicyName: HookGeneralS3Policy	# Policy granting read access to the bucket containing Guard rules
          PolicyDocument:
            Statement:
              - Action:
                - 's3:GetEncryptionConfiguration'
                - 's3:ListBucket'
                - 's3:GetObject'
                Effect: Allow
                Resource:
                  - !Sub arn:${AWS::Partition}:s3:::${GuardHooksBucketName}
                  - !Sub arn:${AWS::Partition}:s3:::${GuardHooksBucketName}/*
            Version: "2012-10-17"
      Tags:
        - Key: project
          Value: shared

   # Guard hook that validates API Gateway methods before provisioning
  GuardHookApiGateway:
    Type: AWS::CloudFormation::GuardHook
    Properties:
      ExecutionRole: !GetAtt GuardHookRole.Arn
      LogBucket: !Ref LogBucket
      Alias: Moeve::ApiGatewayAuthorization::Coe
      FailureMode: FAIL	# Fail the operation if validation fails
      HookStatus: ENABLED
      TargetOperations:
        - RESOURCE	# Applies at the resource level
      TargetFilters:
        Actions:
          - CREATE		# Triggered on CREATE operations
        TargetNames:
          - AWS::ApiGateway::Method
        InvocationPoints:
          - PRE_PROVISION		# Runs before resource provisioning
      RuleLocation:
        Uri: !Sub
          - s3://${GuardS3Bucket}/${GuardS3File}	# Location of Guard rules in S3
          - GuardS3Bucket: !Ref GuardHooksBucketName
            GuardS3File: APIGATEWAY/ApiGatewaySecureMethod.guard
      StackFilters:
        FilteringCriteria: ALL
        StackNames:
          Exclude:
            - !Ref AWS::StackName	# Exclude the current stack from evaluation

   # Guard hook that validates API Gateway at stack UPDATE level
  GuardHookApiGatewaySR:
    Type: AWS::CloudFormation::GuardHook
    Properties:
      ExecutionRole: !GetAtt GuardHookRole.Arn
      LogBucket: !Ref LogBucket
      Alias: Moeve::ApiGatewayAuthorizationwithSR::Coe
      FailureMode: FAIL
      HookStatus: ENABLED
      TargetOperations:
        - STACK		# Applies at the stack level
      TargetFilters:
        Actions:
          - UPDATE		# Triggered on UPDATE operations
      RuleLocation:
        Uri: !Sub
          - s3://${GuardS3Bucket}/${GuardS3File}
          - GuardS3Bucket: !Ref GuardHooksBucketName
            GuardS3File: APIGATEWAY/ApiGatewaySecureMethodwithSR.guard
      StackFilters:
        FilteringCriteria: ALL
        StackNames:
          Exclude:
            - !Ref AWS::StackName
It is very important to configure backdoors to avoid blocking our own deployments when working with hooks deployed with CloudFormation StackSets across our organization or in OUs with multiple accounts. For this, we will configure a filter in the hook so that it does not activate on the stack that manages them. If this filter is not applied, it may happen that due to a misconfiguration, the stack cannot be updated and has to be deleted entirely.
Examples
In the following examples, we are going to ensure that no one can deploy an unsecured API Gateway, but at the same time, we do not want to break the current deployments. For this, we have defined two hooks.
When the custom hooks are triggered during deployment, they analyze the CloudFormation template and targets resources of type AWS::ApiGateway::Method, excluding methods that use the OPTIONS HTTP verb. The hooks apply two sequential validation rules to ensure that all API operations are properly secured.
The first rule checks whether each method defines either the ApiKeyRequired or the AuthorizationType property. If neither is present, the hook fails with a clear message: “Fallo en el paso 1 porque no existe ApiKeyRequired o AuthorizationType” (“Step 1 failed because there is no ApiKeyRequired or AuthorizationType”). If the first condition is satisfied, the second rule verifies whether the values themselves enforce security. Specifically, it checks that ApiKeyRequired is set to true, or that AuthorizationType is defined and not set to NONE. If not, the deployment is blocked again with the message: “Fallo en el paso 2, porque existe AuthorizationType o ApiKeyRequired, pero no son valores válidos.” (“Step 2 failed, because AuthorizationType or ApiKeyRequired exists, but they are not valid values.”).
If any of these rules fail, CloudFormation immediately stops the deployment before any resources are created. This avoids partial or insecure configurations and ensures consistency with organizational security standards. The error appears directly in the CloudFormation console or in CI/CD logs and includes the custom message defined in the hook, helping developers quickly identify the issue.
The development team receives immediate feedback during deployment, whether through their CI/CD pipeline (like CodePipeline or GitHub Actions) or the AWS console. The hook’s clear, custom messages make it easy to pinpoint and fix issues. In more mature environments, these failures can also trigger alerts, update dashboards, or create automated tickets, ensuring security enforcement without slowing down delivery.
The responsibility to fix the issue usually lies with the same team that wrote the template, since the error occurs before any infrastructure is provisioned. This approach allows teams to move quickly while still respecting the compliance and security controls in place. In cases where the issue is tied to a broader policy update, the resolution might involve collaboration with the platform or security team
Hook 1: Activates when an API Gateway is created. This hook checks at the resource level for Resources.Type == 'AWS::ApiGateway::Method', and if it does not meet the requirements, this resource cannot be deployed.
let api_gateway_method = Resources.*[ Type == 'AWS::ApiGateway::Method'
  Properties.HttpMethod != /(?i)options/
]

#
# Primary Rules
#

rule api_gw_authorization_method_check when %api_gateway_method !empty {
    %api_gateway_method{
        Properties.ApiKeyRequired exists or
        Properties.AuthorizationType exists
        <<Fallo en el paso 1 Porque no existe ApiKeyRequired o AuthorizationType>>
    }
}

rule api_gw_authorization_method_check_2 when api_gw_authorization_method_check {
    %api_gateway_method{
        Properties.ApiKeyRequired == true or
        Properties.AuthorizationType != /(?i)none/
        <<Fallo en el paso 2, porque existe AuthorizationType o ApiKeyRequired, pero no son valores validos. >>
    }
}
Hook 2: Activates when an API Gateway is updated. This hook checks at the resource level for Resources.Type == 'AWS::ApiGateway::Method', and if it does not meet the requirements, this resource cannot be deployed.
let api_gateway_method = Resources.*[ Type == 'AWS::ApiGateway::Method'
    Properties.HttpMethod != /(?i)options/
    Metadata.guard.SuppressedRules not exists or
    Metadata.guard.SuppressedRules.* != "API_GW_METHOD_AUTHORIZATION_TYPE_RULE"
]

#
# Primary Rules
#

rule api_gw_authorization_method_check when %api_gateway_method !empty {
    %api_gateway_method{
        Properties.ApiKeyRequired exists or
        Properties.AuthorizationType exists
        <<Fallo en el paso 1 Porque no existe ApiKeyRequired o AuthorizationType>>
    }
}


rule api_gw_authorization_method_check_2 when api_gw_authorization_method_check {
    %api_gateway_method{
        Properties.ApiKeyRequired == true or
        Properties.AuthorizationType != /(?i)none/
        <<Fallo en el paso 2, porque existe AuthorizationType o ApiKeyRequired, pero no son valores validos. >>
    }
}
To avoid breaking existing deployments, a backdoor is configured so that if specific metadata is applied, the hook will not activate, and deployments can continue without modifying the code beyond the metadata.
AWSTemplateFormatVersion: '2010-09-09'

Description: |
  This template creates an Amazon API Gateway REST API. It shows an example on how to suppress specific checks from CloudFormation Guard.

Resources:
  Api:
    Type: AWS::ApiGateway::RestApi
    Properties:
      Name: myAPI
  MyApiGatewayMethod:
    Type: AWS::ApiGateway::Method
    Metadata:
      guard:
        SuppressedRules:
          - API_GW_METHOD_AUTHORIZATION_TYPE_RULE
    Properties:
      RestApiId: !Ref Api
      ResourceId: !GetAtt Api.RootResourceId
      HttpMethod: GET
      AuthorizationType: 'NONE'
      ApiKeyRequired: false
      Integration:
        IntegrationHttpMethod: 'POST'
        Type: 'MOCK'

  OptionsMethod:
    Type: 'AWS::ApiGateway::Method'
    Properties:
      AuthorizationType: 'NONE'
      HttpMethod: 'OPTIONS'
      RestApiId: !Ref Api
      ResourceId: !GetAtt Api.RootResourceId
      Integration:
        IntegrationHttpMethod: 'POST'
        Type: 'MOCK'
Conclusion
The implementation of our own hook controls in CloudFormation has significantly improved infrastructure management and deployment within Moeve. This capability has allowed us to achieve a balance between flexibility, autonomy, and governance at scale. One of the key benefits is the automation of validations and specific controls, which helps us reduce manual errors and ensure greater consistency in deployments. This also enhances traceability and simplifies infrastructure maintenance, ensuring that our configurations adhere to established best practices.
From a security perspective, having custom rules allows us to strengthen regulatory compliance and minimize risks. We can ensure that only secure configurations aligned with our operational needs are implemented, reducing vulnerabilities and improving our cloud security posture. Preventing incorrect configurations from the start of the resource lifecycle also contributes to greater system stability and resilience. By avoiding infrastructure failures, we create more reliable environments that are prepared for growth.
Additionally, by ensuring optimal configurations during resource deployment, we optimize resource usage and avoid bottlenecks, resulting in better performance. This, in turn, helps us manage costs more effectively by preventing the use of unnecessary or oversized resources. Also, automating controls reduces manual intervention and minimizes waste, making our operations more efficient and sustainable over time.
In summary, the creation and management of our own hooks in CloudFormation provide us with full control over our infrastructure, ensuring an optimal balance between security, scalability, and operational efficiency. This strengthens our ability to innovate without compromising governance, enabling us to operate more agilely and securely in the cloud.
Citizen Lab has uncovered a coordinated AI-enabled influence operation against the Iranian government, probably conducted by Israel.
Key Findings
A coordinated network of more than 50 inauthentic X profiles is conducting an AI-enabled influence operation. The network, which we refer to as “PRISONBREAK,” is spreading narratives inciting Iranian audiences to revolt against the Islamic Republic of Iran.
While the network was created in 2023, almost all of its activity was conducted starting in January 2025, and continues to the present day.
The profiles’ activity appears to have been synchronized, at least in part, with the military campaign that the Israel Defense Forces conducted against Iranian targets in June 2025.
While organic engagement with PRISONBREAK’s content appears to be limited, some of the posts achieved tens of thousands of views. The operation seeded such posts to large public communities on X, and possibly also paid for their promotion.
After systematically reviewing alternative explanations, we assess that the hypothesis most consistent with the available evidence is that an unidentified agency of the Israeli government, or a sub-contractor working under its close supervision, is directly conducting the operation.
Taylor Blau has posted an
extensive set of notes from the recently concluded Git Contributor’s
Summit. Covered topics include the SHA-256 transition, Rust, Change-ID
headers, Git 3.0, and many more. The note are also available on
Google Docs for those who prefer that format.
The collective thoughts of the interwebz
Manage Consent
To provide the best experiences, we use technologies like cookies to store and/or access device information. Consenting to these technologies will allow us to process data such as browsing behavior or unique IDs on this site. Not consenting or withdrawing consent, may adversely affect certain features and functions.
Functional
Always active
The technical storage or access is strictly necessary for the legitimate purpose of enabling the use of a specific service explicitly requested by the subscriber or user, or for the sole purpose of carrying out the transmission of a communication over an electronic communications network.
Preferences
The technical storage or access is necessary for the legitimate purpose of storing preferences that are not requested by the subscriber or user.
Statistics
The technical storage or access that is used exclusively for statistical purposes.The technical storage or access that is used exclusively for anonymous statistical purposes. Without a subpoena, voluntary compliance on the part of your Internet Service Provider, or additional records from a third party, information stored or retrieved for this purpose alone cannot usually be used to identify you.
Marketing
The technical storage or access is required to create user profiles to send advertising, or to track the user on a website or across several websites for similar marketing purposes.
 If your secret is encrypted with a custom KMS key, append the key policy with the following statement and add a tag to the key: