Post Syndicated from The Atlantic original https://www.youtube.com/watch?v=D_Q-eLtSlh0
Title Launch Observability at Netflix Scale
Post Syndicated from Netflix Technology Blog original https://netflixtechblog.com/title-launch-observability-at-netflix-scale-19ea916be1ed
Part 2: Navigating Ambiguity
By: Varun Khaitan
With special thanks to my stunning colleagues: Mallika Rao, Esmir Mesic, Hugo Marques
Building on the foundation laid in Part 1, where we explored the “what” behind the challenges of title launch observability at Netflix, this post shifts focus to the “how.” How do we ensure every title launches seamlessly and remains discoverable by the right audience?
In the dynamic world of technology, it’s tempting to leap into problem-solving mode. But the key to lasting success lies in taking a step back — understanding the broader context before diving into solutions. This thoughtful approach doesn’t just address immediate hurdles; it builds the resilience and scalability needed for the future. Let’s explore how this mindset drives results.
Understanding the Bigger Picture
Let’s take a comprehensive look at all the elements involved and how they interconnect. We should aim to address questions such as: What is vital to the business? Which aspects of the problem are essential to resolve? And how did we arrive at this point?
This process involves:
- Identifying Stakeholders: Determine who is impacted by the issue and whose input is crucial for a successful resolution. In this case, the main stakeholders are:
– Title Launch Operators
Role: Responsible for setting up the title and its metadata into our systems.
Challenge: Don’t understand the cascading effects of their setup on these perceived black box personalization systems– Personalization System Engineers
Role: Develop and operate the personalization systems.
Challenge: End up spending unplanned cycles on title launch and personalization investigations.– Product Managers
Role: Ensure we put forward the best experience for our members.
Challenge: Members may not connect with the most relevant title.– Creative Representatives
Role: Mediator between the content creators and Netflix.
Challenge: Build trust in the Netflix brand with content creators. - Mapping the Current Landscape: By charting the existing landscape, we can pinpoint areas ripe for improvement and steer clear of redundant efforts. Beyond the scattered solutions and makeshift scripts, it became evident that there was no established solution for title launch observability. This suggests that this area has been neglected for quite some time and likely requires significant investment. This situation presents both challenges and opportunities; while it may be more difficult to make initial progress, there are plenty of easy wins to capitalize on.
- Clarifying the Core Problem: By clearly defining the problem, we can ensure that our solutions address the root cause rather than just the symptoms. While there were many issues and problems we could address, the core problem here was to make sure every title was treated fairly by our personalization stack. If we can ensure fair treatment with confidence and bring that visibility to all our stakeholders, we can address all their challenges.
- Assessing Business Priorities: Understanding what is most important to the organization helps prioritize actions and resources effectively. In this context, we’re focused on developing systems that ensure successful title launches, build trust between content creators and our brand, and reduce engineering operational overhead. While this is a critical business need and we definitely should solve it, it’s essential to evaluate how it stacks up against other priorities across different areas of the organization.
Defining Title Health
Navigating such an ambiguous space required a shared understanding to foster clarity and collaboration. To address this, we introduced the term “Title Health,” a concept designed to help us communicate effectively and capture the nuances of maintaining each title’s visibility and performance. This shared language became a foundation for discussing the complexities of this domain.
“Title Health” encompasses various metrics and indicators that reflect how well a title is performing, in terms of discoverability and member engagement. The three main questions we try to answer are:
- Is this title visible at all to any member?
- Is this title visible to an appropriate audience size?
- Is this title reaching all the appropriate audiences?
Defining Title Health provided a framework to monitor and optimize each title’s lifecycle. It allowed us to align with partners on principles and requirements before building solutions, ensuring every title reaches its intended audience seamlessly. This common language not only introduced the problem space effectively but also accelerated collaboration and decision-making across teams.
Categories of issues
To build a robust plan for title launch observability, we first needed to categorize the types of issues we encounter. This structured approach allows us to address all aspects of title health comprehensively.
Currently, these issues are grouped into three primary categories:
1. Title Setup
A title’s setup includes essential attributes like metadata (e.g., launch dates, audio and subtitle languages, editorial tags) and assets (e.g., artwork, trailers, supplemental messages). These elements are critical for a title’s eligibility in a row, accurate personalization, and an engaging presentation. Since these attributes feed directly into algorithms, any delays or inaccuracies can ripple through the system.
The observability system must ensure that title setup is complete and validated in a timely manner, identify potential bottlenecks and ensure a smooth launch process.
2. Personalization Systems
Titles are eligible to be recommended across multiple canvases on product — HomePage, Coming Soon, Messaging, Search and more. Personalization systems handle the recommendation and serving of titles on these canvases, leveraging a vast ecosystem of microservices, caches, databases, code, and configurations to build these product canvases.
We aim to validate that titles are eligible in all appropriate product canvases across the end to end personalization stack during all of the title’s launch phases.
3. Algorithms
Complex algorithms drive each personalized product experience, recommending titles tailored to individual members. Observability here means validating the accuracy of algorithmic recommendations for all titles.
Algorithmic performance can be affected by various factors, such as model shortcomings, incomplete or inaccurate input signals, feature anomalies, or interactions between titles. Identifying and addressing these issues ensures that recommendations remain precise and effective.
By categorizing issues into these areas, we can systematically address challenges and deliver a reliable, personalized experience for every title on our platform.
Issue Analysis
Let’s also learn more about how often we see each of these types of issues and how much effort it takes to fix them once they come up.
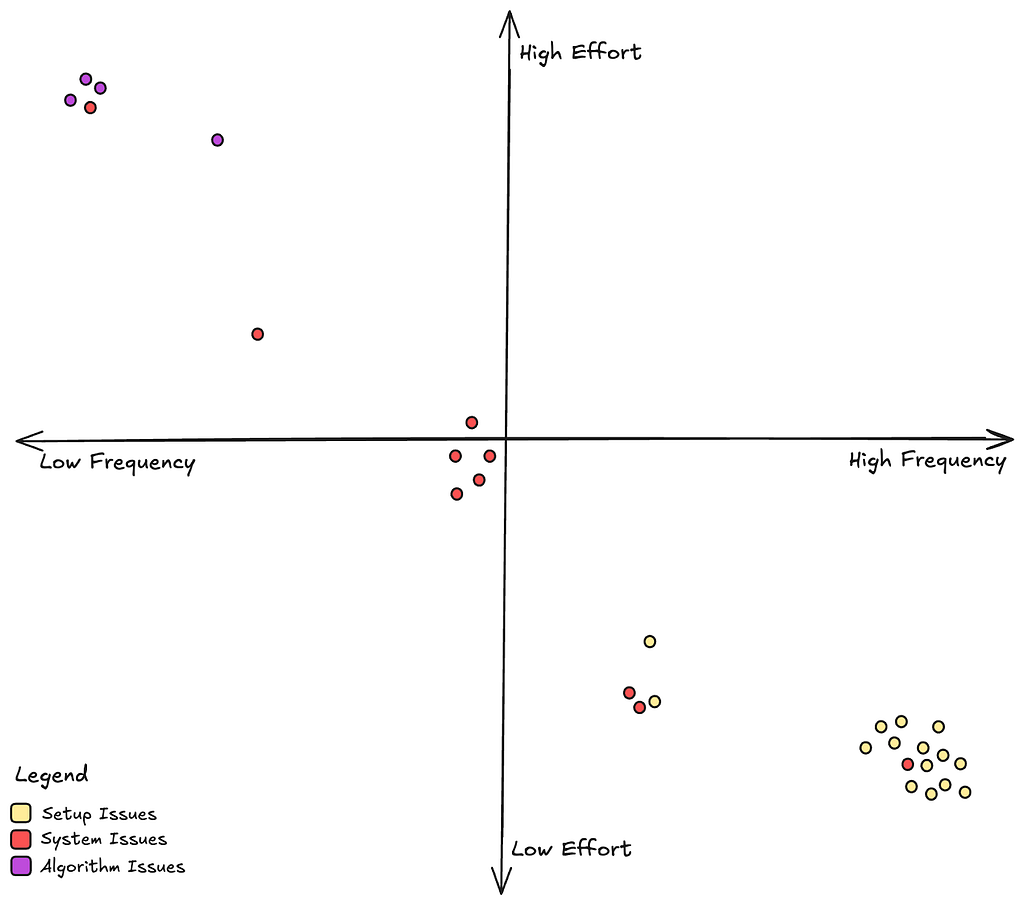
From the above chart, we see that setup issues are the most common but they are also easy to fix since it’s relatively straightforward to go back and rectify a title’s metadata. System issues, which mostly manifest as bugs in our personalization microservices are not uncommon, and they take moderate effort to address. Algorithm issues, while rare, are really difficult to address since these often involve interpreting and retraining complex machine learning models.
Evaluating Our Options
Now that we understand more deeply about the problems we want to address and how we should go about prioritizing our resources. Lets go back to the two options we discussed in Part 1, and make an informed decision.
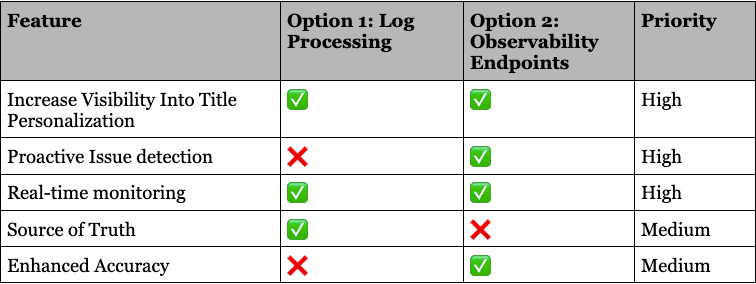
Ultimately, we realized this space demands the full spectrum of features we’ve discussed. But the question remained: Where do we start?
After careful consideration, we chose to focus on proactive issue detection first. Catching problems before launch offered the greatest potential for business impact, ensuring smoother launches, better member experiences, and stronger system reliability.
This decision wasn’t just about solving today’s challenges — it was about laying the foundation for a scalable, robust system that can grow with the complexities of our ever-evolving platform.
Up next
In the next iteration we will talk about how to design an observability endpoint that works for all personalization systems. What are the main things to keep in mind while creating a microservice API endpoint? How do we ensure standardization? What is the architecture of the systems involved?
Keep an eye out for our next binge-worthy episode!
![]()
Title Launch Observability at Netflix Scale was originally published in Netflix TechBlog on Medium, where people are continuing the conversation by highlighting and responding to this story.
A Tragic Accident
Post Syndicated from The History Guy: History Deserves to Be Remembered original https://www.youtube.com/watch?v=Fa28Wi4ZZpo
NVIDIA CES 2025 Keynote Live Coverage
Post Syndicated from Ryan Smith original https://www.servethehome.com/nvidia-ces-2025-keynote-live-coverage/
Our coverage of NVIDIA’s big CES 2025 opening keynote! Stay tuned for some of the company’s major, AI-centric announcements for 2025
The post NVIDIA CES 2025 Keynote Live Coverage appeared first on ServeTheHome.
Comic for 2025.01.07 – Reset
Post Syndicated from Explosm.net original https://explosm.net/comics/reset
New Cyanide and Happiness Comic
Unlocking innovation: three key themes from AWS re:Invent 2024
Post Syndicated from Anne Grahn original https://aws.amazon.com/blogs/messaging-and-targeting/unlocking-innovation-three-key-themes-from-aws-reinvent-2024/
Amazon Web Services (AWS) re:Invent drew nearly 60,000 attendees from across the globe to Las Vegas, Nevada, December 2–6, 2024. The conference featured 5 keynotes, 18 innovation talks, and 1,900 sessions and hands-on labs offering immersive learning and networking opportunities.
With dozens of service and feature announcements, and innumerable best practices shared by AWS executives, customers, and partners—summarizing highlights isn’t easy. Three themes caught my attention: generative artificial intelligence (AI), digital sovereignty, and security.
Generative AI
The impact of generative AI was a central focus, as emphasized by Dr. Swami Sivasubramanian, Vice President of Data and AI at AWS, during his re:Invent keynote. The convergence of massive data sets and specialized compute made available through the cloud have created the perfect conditions for artificial intelligence to flourish. New tools and interfaces are enabling widespread adoption at an unprecedented pace, driving efficiency and unlocking creativity for all of us.
People’s expectations for applications are changing with generative AI. Organizations need more than just a chatbot or a single, powerful large language model (LLM) as they look to innovate and enhance customer experiences.
In their innovation talk, Architectural methods and breakthroughs in innovative apps in the cloud, Shaown Nandi, Director of Technology, and Ben Cabanas, Asia Pacific Director of Technology at AWS, showcased generative AI and advancements in developer tools. These advancements are transforming application design and removing the undifferentiated heavy lifting, empowering you to modernize systems and develop robust data strategies.
Nandi and Cabanas, along with leaders at Intuit, Anz Bank, and Siemens, explored three areas of cloud architecture (shown in Figure 1). These areas can give you the leverage you need to amplify the impact of your developers and data with cutting-edge techniques and breakthrough technologies like generative AI.
Watch Nandi and Cabanas’ session for more details.

Figure 1: Three focus areas to gain leverage and accelerate solutions
Many of the announcements made during re:Invent are designed to help you meet real-world challenges, and gain the leverage you need to be successful as you build and scale transformative generative AI applications. The next generation of Amazon SageMaker, Amazon Nova foundation models (FMs), new Amazon Q capabilities, Amazon Bedrock Guardrails Automated Reasoning checks, and the task governance capability in Amazon SageMaker HyperPod are just a few of the new products and features you can use to increase agility, build trust, and control costs as you accelerate AI initiatives.
Visit the AWS News Blog for more top announcements.
Digital sovereignty
Digital sovereignty challenges and the technical measures, operational controls, and contract protections AWS offers to address them also featured prominently during the conference.
Customers are increasingly focused on maintaining control of their data and being able to meet regulatory requirements anywhere they operate. Digital sovereignty is emerging as a top priority, especially in the European Union.
In his breakout session, Digital sovereignty: overcome complexity and enable future-readiness, Max Peterson, Vice President of Sovereign Cloud at AWS, noted that digital sovereignty can mean different things to different organizations. Countries and regions around the world have their own requirements, and there is no uniform guidance around the types of workloads, industries, or sectors that need to meet them. Key challenges (depicted in Figure 2) include data residency, operator access restrictions, resilience and survivability, and independence and transparency—all of which are rooted in trust.

Figure 2: Digital sovereignty challenges
End users entrust organizations with sensitive information, and they need to feel confident that it’s handled safely and ethically. They expect the services they rely on to be secure, simple-to-use, and available. Likewise, the organizations that are building those services to store data need to trust the infrastructure they’re building on. They have to be able to provide assured proof that data and privacy are protected, and that control over data remains in the hands of those with the proper authority.
There is no one-size-fits-all approach to driving innovation while meeting digital sovereignty requirements. However, with AWS you can achieve the full benefits of the cloud while maintaining control over where you locate your data, who can access it, and how it’s used.
Peterson highlighted the AWS Nitro System that powers AWS Regions for trusted and confidential computing, and generative AI and machine learning (ML) innovations such as Amazon Bedrock. AWS sovereign cloud offerings range from encryption services to the new AWS European Sovereign Cloud (planned for Q4 2025). These offerings facilitate the control and choice you need to overcome data sovereignty challenges. They also balance the benefits of emerging technologies with the need to keep up with the evolving requirements of citizens and customers.
Watch Peterson’s session to learn more about AWS sovereignty controls and features.
Security
Raising the bar on security was an overarching theme. Chris Betz, CISO at AWS, set the tone during his innovation talk, Security insights and innovation from AWS, noting that security is the single most important expectation AWS customers have. We continuously invest in our security culture—working hard to help you do the same. Betz underscored the effectiveness of our Security Guardians program, which provides the tools, resources, and guidance developers need to address security considerations at each stage of development, and launch products that are Secure by Design. The program, Betz pointed out, has accelerated secure development and improved overall security at scale at AWS.
Watch Betz’s innovation talk to hear how Commonwealth Bank of Australia used a similar approach to support its DevSecOps transformation, and visit the AWS Security Blog to find out how you can build your own Security Guardians program.
For more about security culture, watch re:Invent breakout sessions Building a resilient and effective culture of security, Emotionally intelligent security leadership to drive business impact, and Better together: Protecting data through culture and technology.
Best practices for securing generative AI, AWS Identity and Access Management (IAM), and threat detection and response were also spotlighted. In the breakout session How Amazon threat intelligence helps protect your infrastructure, Will Bowditch, Security Engineer, and Saleem Muhammad, Principal Product Manager at AWS, described how AWS generates threat intelligence. Internal tools that include Madpot, Sonaris, and Mithra (described in Figure 3) allow us to proactively detect and act on millions of potential threats every day, before they become real security issues for customers.
Watch the session to learn more.

Figure 3: Internal Amazon threat intelligence tools
Noteworthy announcements included AWS Security Incident Response, a new service that provides automated triage, coordinated communication, and expert guidance to help you streamline security event responses and recover from cybersecurity threats.
Not surprisingly, the subject of end-to-end encryption (E2EE) also grabbed attention in the wake of the ongoing breach of telecommunication networks by a state-sponsored threat actor known as Salt Typhoon. Because unauthorized parties may have access to unencrypted texts and phone calls, the Cybersecurity and Infrastructure Security Agency (CISA) and the Federal Bureau of Investigation (FBI) are advising Americans to start using encrypted messaging apps to protect text and voice communications.
In the breakout session How the U.S. Army uses AWS Wickr to secure mission-critical comms, Gabe Chiulli, Cloud CTO, and Christopher Watts, Cloud Services Division Chief at U.S. Army, highlighted how the U.S. Army Enterprise Cloud Management Agency uses AWS Wickr to allow users to chat freely while protecting sensitive communications.
Wickr helps organizations in all industries secure one-to-one and group messaging, voice and video calling, file sharing, screen sharing, and location sharing with 256-bit E2EE. Data residency controls allow you to host conversations in the region of your choice, and your technical teams can build and deploy Wickr Bot integrations to bring AWS ML and generative AI services to edge devices in a simple chatbot interface. Additionally, unlike consumer messaging apps, Wickr offers the data retention and administrative controls needed to help meet recordkeeping requirements, and manage user and device data remotely.
Visit our website, and read The Forrester Wave for Secure Communications Solutions, Q3 2024 report for more information.
Additional areas of interest
Engaging sessions covering additional topics such as quantum computing, multicloud environments, and lessons for dealing with complexity from Amazon CTO, Dr. Werner Vogels, also captured my interest during the conference.
The learning continues
It’s clear that generative AI will continue to expand technology horizons, and reshape customer experiences. Digital sovereignty needs will evolve with regulations, increasing efforts to maintain control over data. And security, as always, remains top-of-mind.
AWS re:Invent 2024 introduced new capabilities, best practices, and strategic partnerships to help you innovate and address challenges in these areas. It was an awe-inspiring experience, and I can’t wait to see what re:Invent 2025 will bring!
For more information about product announcements during AWS re:Invent, visit the AWS News Blog and AWS Blog hub.
To watch keynotes, innovation talks, and breakout sessions on demand, visit the conference website.
What is this? A Router for Ants? MikroTik mAP Lite
Post Syndicated from Crosstalk Solutions original https://www.youtube.com/watch?v=O6mSadY_mlo
[$] Emacs in Scheme
Post Syndicated from jake original https://lwn.net/Articles/1001929/
During EmacsConf 2024, which
was held online in early December 2024, Ramin Honary gave a talk about Project
Gypsum, which is his effort to rewrite Emacs in Scheme. Unlike most other Emacs clones,
which simply replicate the key bindings, Gypsum is also implementing Emacs
Lisp (or Elisp). Honary is initially targeting Guile, which is an
implementation of Scheme, but wants to make the code portable
to any implementation of R7RS Scheme.
Нов по-лесен процес за изваждане на Европейска здравна карта
Post Syndicated from Боян Юруков original https://yurukov.net/blog/2025/ezok-nov-nachin/
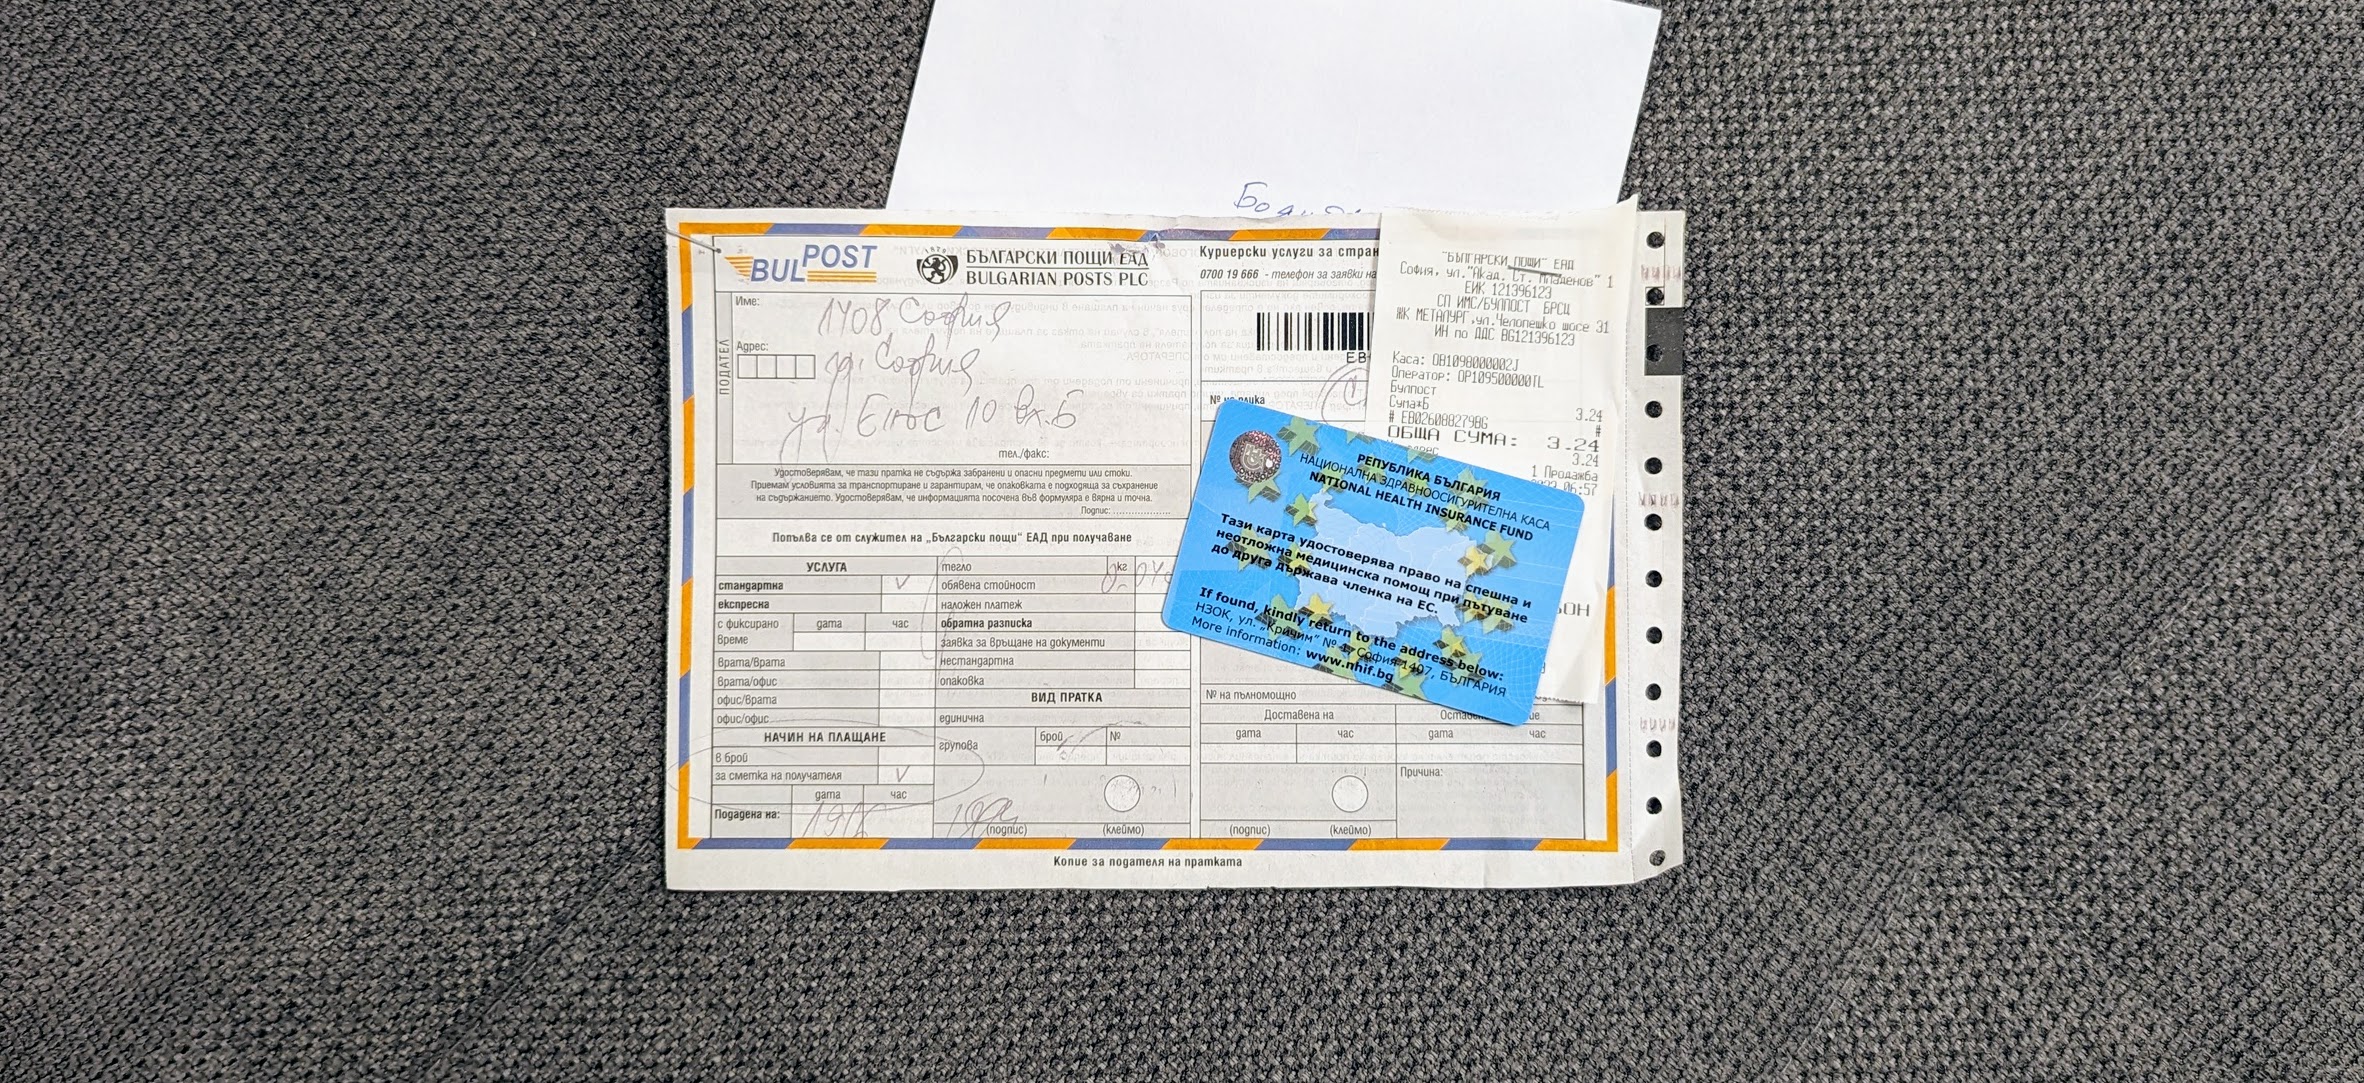
Преди три години реших, че е добра идея да извадя Европейски здравноосигурителни карти на всички в семейството. Запънах се и в крайна сметка накарах НЗОК да приеме заявлението ми електронно. Година по-късно – през юни 2023-та вече бяха направили този процес официален и го описах подробно в статия. В последствие други допълваха със съвети – например, че може само с ПИК на НАП.
Голям недостатък си остана това, че заявлението беше Word документ, попълваше се трудно и доста хора се налагаше отново да го печатат и подписват. Днес в коментарите под статията ми Петър добави още една важна новина. От края на миналата година е възможно заявлението да се подаде изцяло през електронен формуляр.
Вече с изцяло електронен формуляр
За целта използва еФорми на портала на eGov. Може да прочетете подробно за услугата на страницата ѝ или направо да отворите формуляра. Използва се както с електронен подпис, така и с ПИК на НАП или която и да е друга форма на идентификация, която се поддържа. Тъй като за пръв път използвах този тип форми, ме пита за потребителско име и друга информация, след което даде грешка. При второ отваряне обаче нямаше проблем.
Избира се служба, която да изпълни услугата. Това би следвало да е автоматично, тъй като трябва да изберете тази по местоживеене. След това попълвате формуляра със същите данни, както тези в хартиения вид. Удобството е, че част от данните се попълват автоматично. Също така, изглежда че има възможност да се подава заявление за карта на дете само от единия родител – нещо, което беше усложнение в досегашния вариант.
Стъпка напред и все пак…
Един основен недостатък, която си остава, е това, което коментирах от самото начало. В случая определено виждаме напредък и подобрение в процеса, но отново се дигитализира и оптимизира нещо, което изначално не следва да съществува. В случая може да говорим за формуляра само, но дори принципът на работа на картите е сбъркан. Първо дори данните, които искат да попълваме ги имат вече в базите, знаят много добре къде живеем и къде сме поръчвали до сега. Целият процес би могъл да бъде с един бутон или дори по-лесно – опция за отказване и автоматично изпращане на картата при изтичане на старата.
Още по-добре би било да се удължи срокът на самите карти. Като аргумент защо са едногодишни за всички освен деца и пенсионери, отговорът на НЗОК беше, че така намаляват риска от злоупотреби. Т.е. някой да се лекува в чужбина при спрени здравни права. При запитване по ЗДОИ преди две години колко пъти това се е случвало при едногодишните карти, както и колко често се е случвало въобще на някой с валидна Европейска здравна карта да му изтекат правата по средата на периода, те отговориха, че не знаят. Всъщност, оказа се, че в никой момент НЗОК не може да каже колко хора са със здравни права. За всеки се прави индивидуална справка при нужда. Това далеч не е основният или дори от големите недъзи на НЗОК, но на практика с никакви данни и аргументи не могат да подкрепят решението срокът да е от една година, извън чисто чиновническия подход да се въвеждат забрани и ограничения. Така преди години са се опитали да намалят срока дори на шест месеца.
Защо въобще има пластика и липсва електронна система за проверка в реално време на правата при опит за използване на здравни услуги зад граница е отдавна стоящ въпрос. Отговорът за първото е, че форматът на ЕЗОК и въобще изискванията да е пластика и да се харчат толкова пари е междуведомствено решение на европейско ниво, което само чака някое председателство на ЕС да промени. Аналогично, електронна система за проверка на здравни права има и всяка каса може да сверява с друга, но не е автоматизирана и не е интегрирана за целите на това, което обсъждаме тук. Тоест има нужда от работа по решението, но инвестицията в такова решение ще е далеч по-малко, отколкото това, което отива за сега. Липсва политическа воля, а и има замесени интереси.
Въпреки че самите карти са безплатни за нас осигуряващите се, те струват доста на бюджета. Докато в миналото е имало някаква конкуренция в печатането им, в последните години дежурен кандидат и печелещ поръчката е печатницата на един конкретен депутат на БСП станал известен с лобизма си за запазване на прескъпите стикери за ГТП на колите, които отново той печата. Е, след като писах за спряната поръчка това лято и рискът да няма кой да печата картите, скоро беше пусната нова и отново същите я спечелиха на двойна цена спрямо предходните години.
Междувременно от електронният механизъм за поръчване на картата през първите шест месеца след статията ми и пускането на възможността се възползваха доста малко хора. Поисках данни в началото на 2024-та и имаше отчетливо увеличение. Ще поискам данните за цялата година и ще ги обобщя по-късно обаче, защото доста хора се сещат едва през юни и юли за тези карти – точно преди почивката си.
Затова ви препоръчвам да не чакате до лятото, а да се възползвате от електронната форма и доставка с куриер още в началото на годината, която натоварването и сроковете за обработка са по-малки.
The post Нов по-лесен процес за изваждане на Европейска здравна карта first appeared on Блогът на Юруков.
Mourning Steve Langasek
Post Syndicated from corbet original https://lwn.net/Articles/1004297/
From the Ubuntu Discourse instance comes the
sad news that longtime Debian and Ubuntu contributor Steve Langasek has
passed away.
Steve passed away at the dawn of 2025. His time was short but
remarkable. He will forever remain an inspiration. Judging by the
outpouring of feelings this week, he is equally missed and mourned
by colleagues and friends across the open source landscape, in
particular in Ubuntu and Debian where he was a great mind, mentor
and conscience.
Part 3: A Survey of Analytics Engineering Work at Netflix
Post Syndicated from Netflix Technology Blog original https://netflixtechblog.com/part-3-a-survey-of-analytics-engineering-work-at-netflix-e67f0aa82183
This article is the last in a multi-part series sharing a breadth of Analytics Engineering work at Netflix, recently presented as part of our annual internal Analytics Engineering conference. Need to catch up? Check out Part 1, which detailed how we’re empowering Netflix to efficiently produce and effectively deliver high quality, actionable analytic insights across the company and Part 2, which stepped through a few exciting business applications for Analytics Engineering. This post will go into aspects of technical craft.
Dashboard Design Tips
What is design, and why does it matter? Often people think design is about how things look, but design is actually about how things work. Everything is designed, because we’re all making choices about how things work, but not everything is designed well. Good design doesn’t waste time or mental energy; instead, it helps the user achieve their goals.
When applying this to a dashboard application, the easiest way to use design effectively is to leverage existing patterns. (For example, people have learned that blue underlined text on a website means it’s a clickable link.) So knowing the arsenal of available patterns and what they imply is useful when making the choice of when to use which pattern.
First, to design a dashboard well, you need to understand your user.
- Talk to your users throughout the entire product lifecycle. Talk to them early and often, through whatever means you can.
- Understand their needs, ask why, then ask why again. Separate symptoms from problems from solutions.
- Prioritize and clarify — less is more! Distill what you can build that’s differentiated and provides the most value to your user.
Here is a framework for thinking about what your users are trying to achieve. Where do your users fall on these axes? Don’t solve for multiple positions across these axes in a given view; if that exists, then create different views or potentially different dashboards.
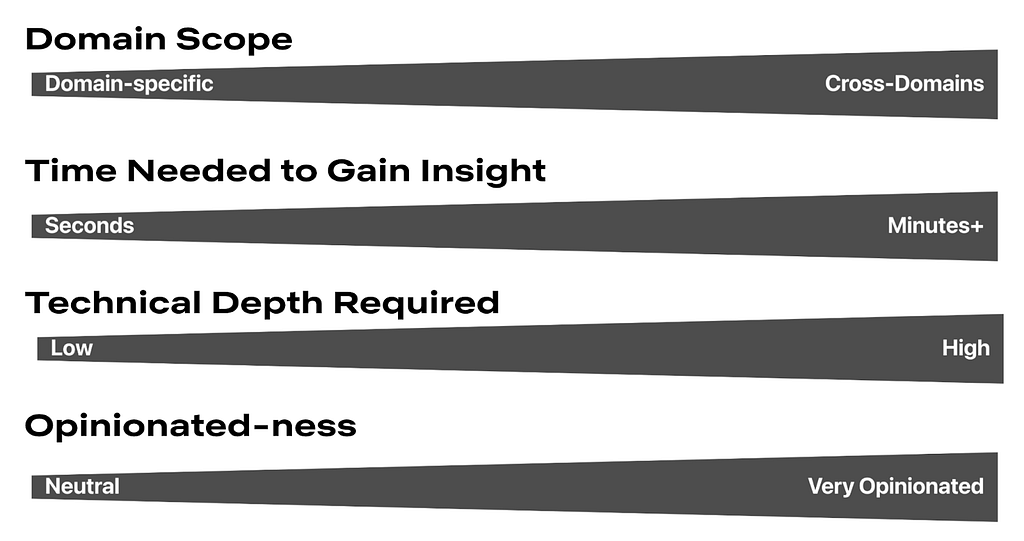
Second, understanding your users’ mental models will allow you to choose how to structure your app to match. A few questions to ask yourself when considering the information architecture of your app include:
- Do you have different user groups trying to accomplish different things? Split them into different apps or different views.
- What should go together on a single page? All the information needed for a single user type to accomplish their “job.” If there are multiple jobs to be done, split each out onto its own page.
- What should go together within a single section on a page? All the information needed to answer a single question.
- Does your dashboard feel too difficult to use? You probably have too much information! When in doubt, keep it simple. If needed, hide complexity under an “Advanced” section.
Here are some general guidelines for page layouts:
- Choose infinite scrolling vs. clicking through multiple pages depending on which option suits your users’ expectations better
- Lead with the most-used information first, above the fold
- Create signposts that cue the user to where they are by labeling pages, sections, and links
- Use cards or borders to visually group related items together
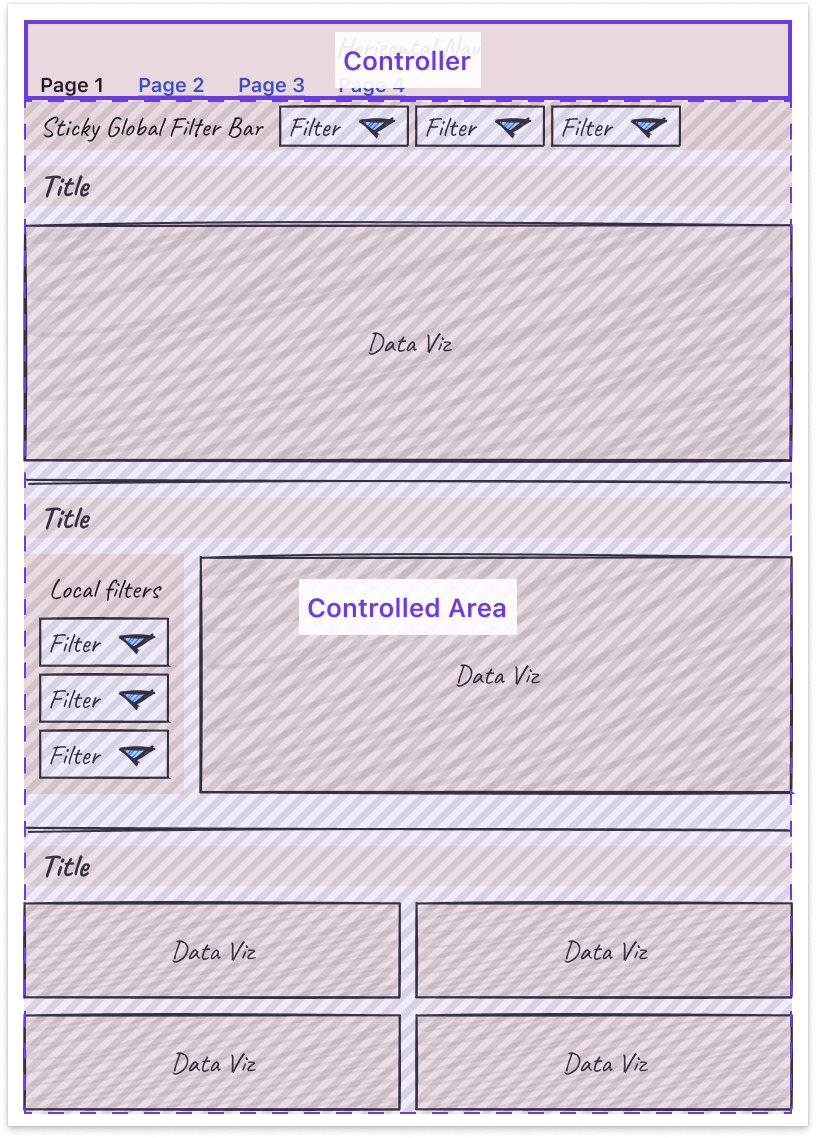
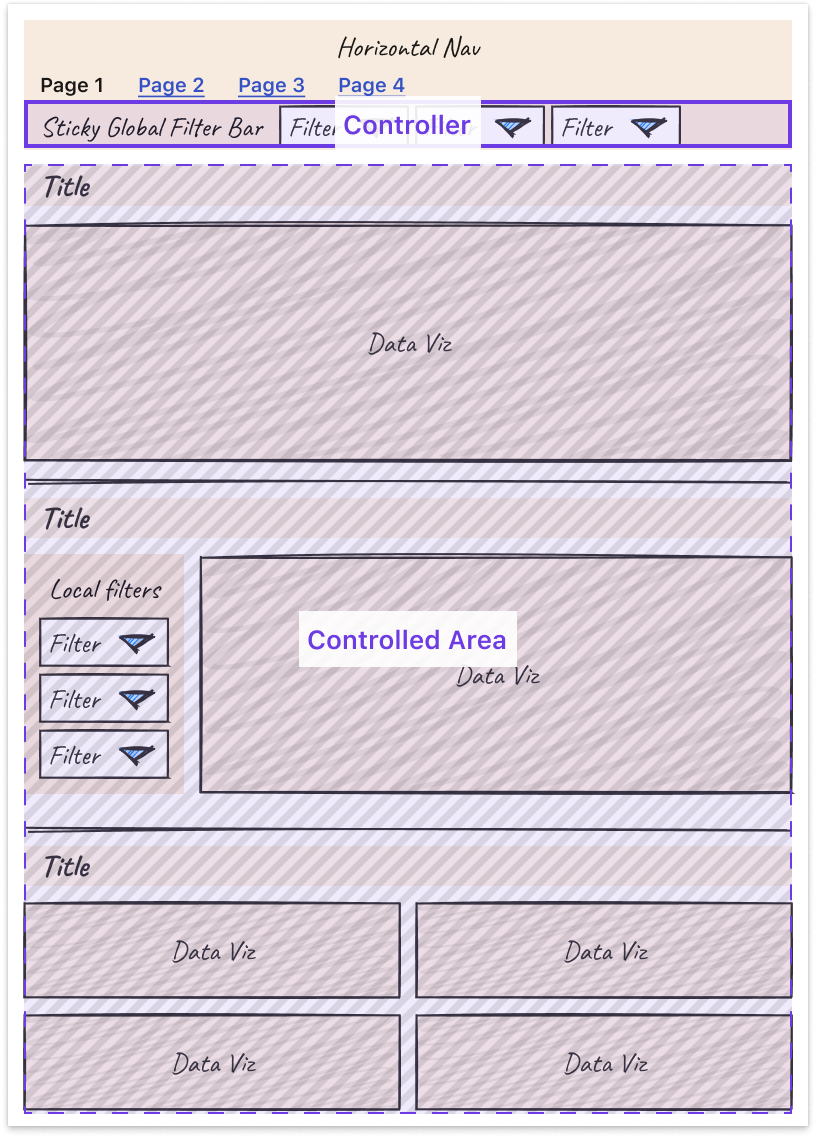
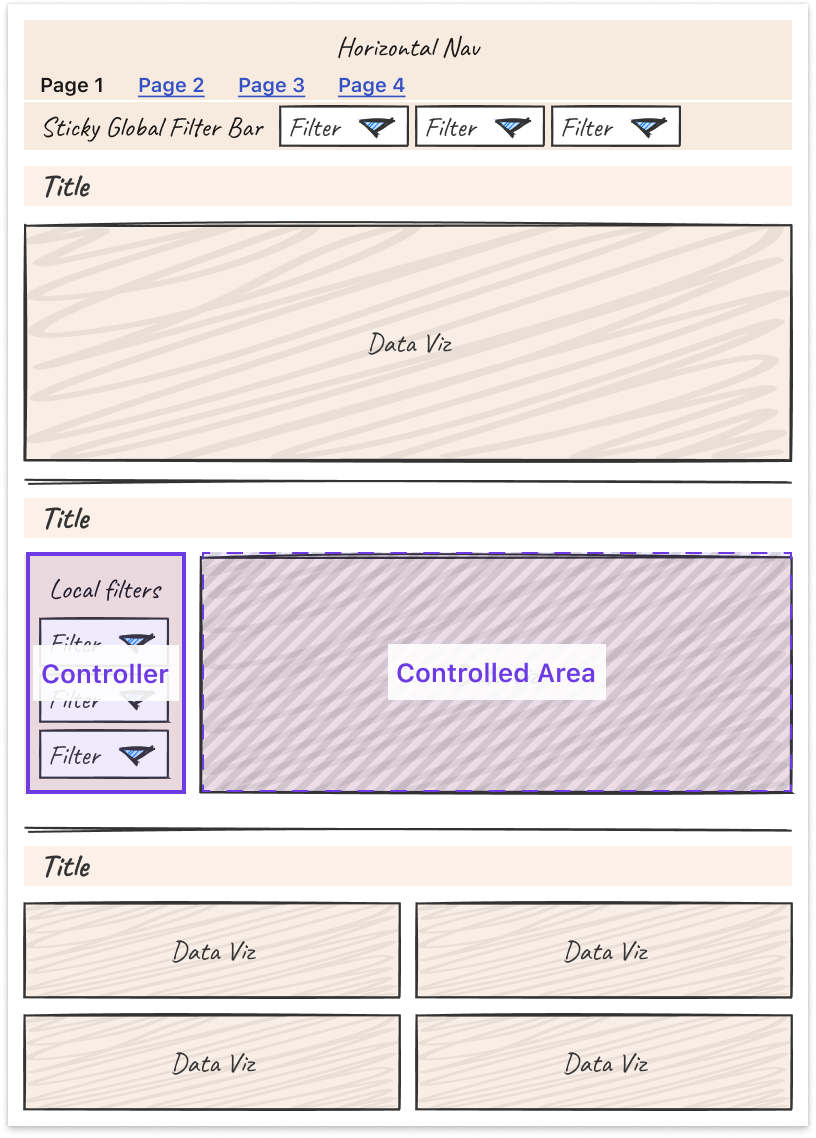
- Leverage nesting to create well-understood “scopes of control.” Specifically, users expect a controller object to affect children either: Below it (if horizontal) or To the right of it (if vertical)
Third, some tips and tricks can help you more easily tackle the unique design challenges that come with making interactive charts.
- Titles: Make sure filters are represented in the title or subtitle of the chart for easy scannability and screenshot-ability.
- Tooltips: Core details should be on the page, while the context in the tooltip is for deeper information. Annotate multiple points when there are only a handful of lines.
- Annotations: Provide annotations on charts to explain shifts in values so all users can access that context.
- Color: Limit the number of colors you use. Be consistent in how you use colors. Otherwise, colors lose meaning.
- Onboarding: Separate out onboarding to your dashboard from routine usage.
Finally, it is important to note that these are general guidelines, but there is always room for interpretation and/or the use of good judgment to adapt them to suit your own product and use cases. At the end of the day, the most important thing is that a user can leverage the data insights provided by your dashboard to perform their work, and good design is a means to that end.
Learnings from Deploying an Analytics API at Netflix
At Netflix Studio, we operate at the intersection of art and science. Data is a tool that enhances decision-making, complementing the deep expertise and industry knowledge of our creative professionals.
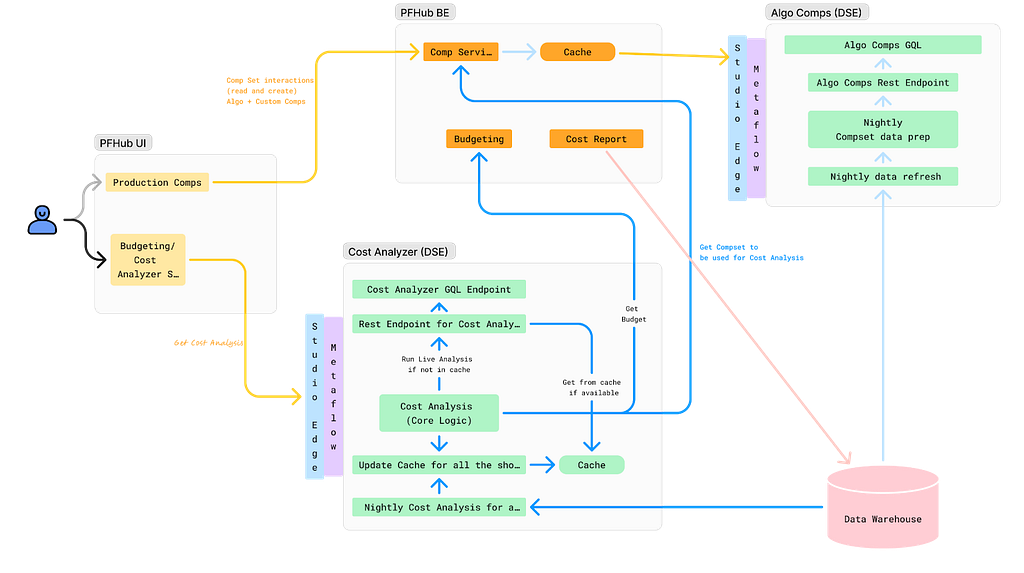
One example is in production budgeting — namely, determining how much we should spend to produce a given show or movie. Although there was already a process for creating and comparing budgets for new productions against similar past projects, it was highly manual. We developed a tool that automatically selects and compares similar Netflix productions, flagging any anomalies for Production Finance to review.
To ensure success, it was essential that results be delivered in real-time and integrated seamlessly into existing tools. This required close collaboration among product teams, DSE, and front-end and back-end developers. We developed a GraphQL endpoint using Metaflow, integrating it into the existing budgeting product. This solution enabled data to be used more effectively for real-time decision-making.
We recently launched our MVP and continue to iterate on the product. Reflecting on our journey, the path to launch was complex and filled with unexpected challenges. As an analytics engineer accustomed to crafting quick solutions, I underestimated the effort required to deploy a production-grade analytics API.

With hindsight, below are my key learnings.
Measure Impact and Necessity of Real-Time Results
Before implementing real-time analytics, assess whether real-time results are truly necessary for your use case. This can significantly impact the complexity and cost of your solution. Batch processing data may provide a similar impact and take significantly less time. It’s easier to develop and maintain, and tends to be more familiar for analytics engineers, data scientists, and data engineers.
Additionally, if you are developing a proof of concept, the upfront investment may not be worth it. Scrappy solutions can often be the best choice for analytics work.
Explore All Available Solutions
At Netflix, there were multiple established methods for creating an API, but none perfectly suited our specific use case. Metaflow, a tool developed at Netflix for data science projects, already supported REST APIs. However, this approach did not align with the preferred workflow of our engineering partners. Although they could integrate with REST endpoints, this solution presented inherent limitations. Large response sizes rendered the API/front-end integration unreliable, necessitating the addition of filter parameters to reduce the response size.
Additionally, the product we were integrating into was using GraphQL, and deviating from this established engineering approach was not ideal. Lastly, given our goal to overlay results throughout the product, GraphQL features, such as federation, proved to be particularly advantageous.
After realizing there wasn’t an existing solution at Netflix for deploying python endpoints with GraphQL, we worked with the Metaflow team to build this feature. This allowed us to continue developing via Metaflow and allowed our engineering partners to stay on their paved path.
Align on Performance Expectations
A major challenge during development was managing API latency. Much of this could have been mitigated by aligning on performance expectations from the outset. Initially, we operated under our assumptions of what constituted an acceptable response time, which differed greatly from the actual needs of our users and our engineering partners.
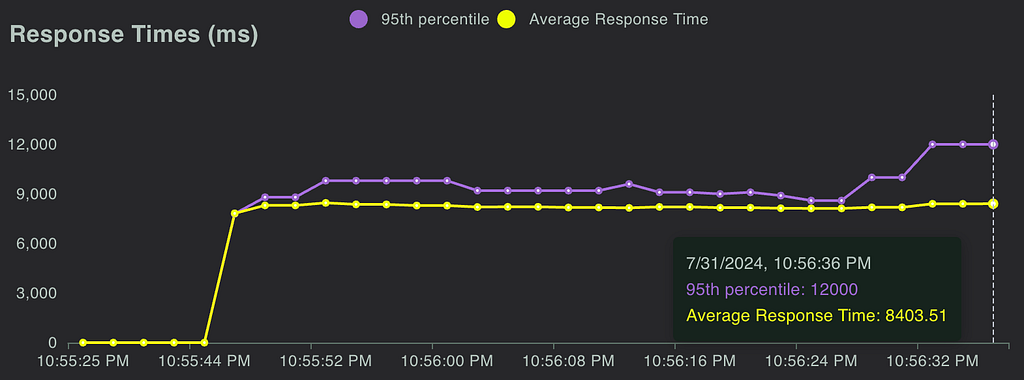
Understanding user expectations is key to designing an effective solution. Our methodology resulted in a full budget analysis taking, on average, 7 seconds. Users were willing to wait for an analysis when they modified a budget, but not every time they accessed one. To address this, we implemented caching using Metaflow, reducing the API response time to approximately 1 second for cached results. Additionally, we set up a nightly batch job to pre-cache results.
While users were generally okay with waiting for analysis during changes, we had to be mindful of GraphQL’s 30-second limit. This highlighted the importance of continuously monitoring the impact of changes on response times, leading us to our next key learning: rigorous testing.
Real-Time Analysis Requires Rigorous Testing
Load Testing: We leveraged Locust to measure the response time of our endpoint and assess how the endpoint responded to reasonable and elevated loads. We were able to use FullStory, which was already being used in the product, to estimate expected calls per minute.
Unit Tests & Integration Tests: Code testing is always a good idea, but it can often be overlooked in analytics. It is especially important when you are delivering live analysis to circumvent end users from being the first to see an error or incorrect information. We implemented unit testing and full integration tests, ensuring that our analysis would return correct results.
The Importance of Aligning Workflows and Collaboration
This project marked the first time our team collaborated directly with our engineering partners to integrate a DSE API into their product. Throughout the process, we discovered significant gaps in our understanding of each other’s workflows. Assumptions about each other’s knowledge and processes led to misunderstandings and delays.
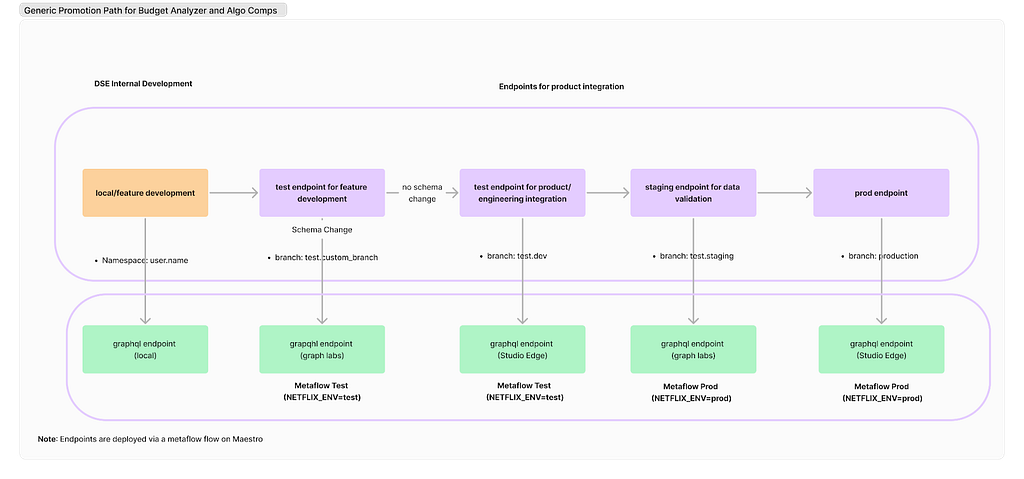
Deployment Paths: Our engineering partners followed a strict deployment path, whereas our approach on the DSE side was more flexible. We typically tested our work on feature branches using Metaflow projects and then pushed results to production. However, this lack of control led to issues, such as inadvertently deploying changes to production before the corresponding product updates were ready and difficulties in managing a test endpoint. Ultimately, we deferred to our engineering partners to establish a deployment path and collaborated with the Metaflow team and data engineers to implement it effectively.
Work Planning: While the engineering team operated on sprints, our DSE team planned by quarters. This misalignment in planning cycles is an ongoing challenge that we are actively working to resolve.
Looking ahead, our team is committed to continuing this partnership with our engineering colleagues. Both teams have invested significant time in building this relationship, and we are optimistic that it will yield substantial benefits in future projects.
External Speaker: Benn Stancil
In addition to the above presentations, we kicked off our Analytics Summit with a keynote talk from Benn Stancil, Founder of Mode Analytics. Benn stepped through a history of the modern data stack, and the group discussed ideas on the future of analytics.
Analytics Engineering is a key contributor to building our deep data culture at Netflix, and we are proud to have a large group of stunning colleagues that are not only applying but advancing our analytical capabilities at Netflix. The 2024 Analytics Summit continued to be a wonderful way to give visibility to one another on work across business verticals, celebrate our collective impact, and highlight what’s to come in analytics practice at Netflix.
To learn more, follow the Netflix Research Site, and if you are also interested in entertaining the world, have a look at our open roles!
![]()
Part 3: A Survey of Analytics Engineering Work at Netflix was originally published in Netflix TechBlog on Medium, where people are continuing the conversation by highlighting and responding to this story.
Comic for 2025.01.06 – Sharing Buttholes
Post Syndicated from Explosm.net original https://explosm.net/comics/two-buttholes
New Cyanide and Happiness Comic
Ingest data from Google Analytics 4 and Google Sheets to Amazon Redshift using Amazon AppFlow
Post Syndicated from Ritesh Sinha original https://aws.amazon.com/blogs/big-data/ingest-data-from-google-analytics-4-and-google-sheets-to-amazon-redshift-using-amazon-appflow/
Google Analytics 4 (GA4) provides valuable insights into user behavior across websites and apps. But what if you need to combine GA4 data with other sources or perform deeper analysis? That’s where Amazon Redshift and Amazon AppFlow come in. Amazon AppFlow bridges the gap between Google applications and Amazon Redshift, empowering organizations to unlock deeper insights and drive data-informed decisions. In this post, we show you how to establish the data ingestion pipeline between Google Analytics 4, Google Sheets, and an Amazon Redshift Serverless workgroup.
Amazon AppFlow is a fully managed integration service that you can use to securely transfer data from software as a service (SaaS) applications, such as Google BigQuery, Salesforce, SAP, HubSpot, and ServiceNow, to Amazon Web Services (AWS) services such as Amazon Simple Storage Service (Amazon S3) and Amazon Redshift, in just a few clicks. With Amazon AppFlow, you can run data flows at nearly any scale and at the frequency you choose—on a schedule, in response to a business event, or on demand. You can configure data transformation capabilities such as filtering and validation to generate rich, ready-to-use data as part of the flow itself, without additional steps. Amazon AppFlow automatically encrypts data in motion, and allows you to restrict data from flowing over the public internet for SaaS applications that are integrated with AWS PrivateLink, reducing exposure to security threats.
Amazon Redshift is a fast, scalable, and fully managed cloud data warehouse that allows you to process and run your complex SQL analytics workloads on structured and semi-structured data. It also helps you securely access your data in operational databases, data lakes, or third-party datasets with minimal movement or copying of data. Tens of thousands of customers use Amazon Redshift to process large amounts of data, modernize their data analytics workloads, and provide insights for their business users.
Prerequisites
Before starting this walkthrough, you need to have the following prerequisites in place:
- An AWS account.
- In your Google Cloud project, you’ve enabled the following APIs:
- Google Analytics API
- Google Analytics Admin API
- Google Analytics Data API
- Google Sheets API
- Google Drive API
For more information, refer to Amazon AppFlow support for Google Sheets.
For the steps to enable these APIs, see Enable and disable APIs on the API Console Help for Google Cloud Platform.
- Create a report on Google Analytics.
- An AWS Identity and Access Management (IAM) role that grants Amazon Redshift read-only access to Amazon S3. This role will be attached to the Redshift cluster or Amazon Redshift Serverless namespace during creation. Refer to the Amazon Redshift Database Developer Guide for more details.
- An Amazon Redshift provisioned cluster or Amazon Redshift Serverless
- An S3 bucket.
Architecture overview
The following architecture shows how Amazon AppFlow can transform and move data from SaaS applications to processing and storage destinations. Three sections appear from left to right in the diagram: Source, Move, Target. These sections are described in the following section.

- Source – The leftmost section on the diagram represents different applications acting as a source, including Google Analytics, Google Sheets, and Google BigQuery.
- Move – The middle section is labeled Amazon AppFlow. The section contains boxes that represent Amazon AppFlow operations such as Mask Fields, Map Fields, Merge Fields, Filter Data, and others. In this post, we focus on setting up the data movement using Amazon AppFlow and filtering data based on start date. The other transformation operations such as mapping, masking, and merging fields are not covered in this post.
- Destination – The section on the right of the diagram is labeled Destination and represents targets such as Amazon Redshift and Amazon S3. In this psot, we primarily focus on Amazon Redshift as the destination.
This post has two parts. The first part covers integrating from Google Analytics. The second part focuses on connecting with Google Sheets.
Application configuration in Google Cloud Platform
Amazon AppFlow requires OAuth 2.0 for authentication. You need to create an OAuth 2.0 client ID, which Amazon AppFlow uses when requesting an OAuth 2.0 access token. To create an OAuth 2.0 client ID in the Google Cloud Platform console, follow these steps:
- On the Google Cloud Platform Console, from the projects list, select a project or create a new one.
- If the APIs & Services page isn’t already open, choose the menu icon on the upper left and select APIs & Services.
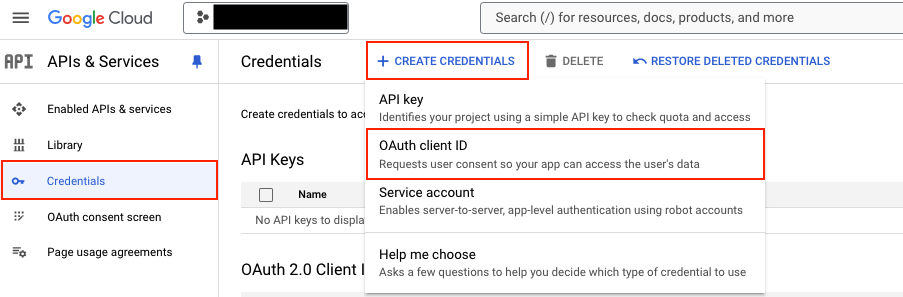
- In the navigation pane, choose Credentials.
- Choose CREATE CREDENTIALS, then choose OAuth client ID, as shown in the following screenshot.
- Select the application type Web application, enter the name demo-google-aws, and provide URIs for Authorized JavaScript origins
https://console.aws.amazon.com. For Authorized redirect URIs, addhttps://us-east-1.console.aws.amazon.com/appflow/oauth. Choose SAVE, as shown in the following screenshot.

- The OAuth client ID is now created. Select demo-google-aws.

- Under Additional information, as shown in the following screenshot, note down the Client ID and Client secret.

Data ingestion from Google Analytics 4 to Amazon Redshift
In this section, you configure Amazon AppFlow to set up a connection between Google Analytics 4 and Amazon Redshift for data migration. This procedure can be classified into the following steps:
- Create a connection to Google Analytics 4 in Amazon AppFlow
- Create an IAM role for Amazon AppFlow integration with Amazon Redshift
- Set up Amazon AppFlow connection for Amazon Redshift
- Set up table and permission in Amazon Redshift
- Create data flow in Amazon AppFlow
Create a connection to Google Analytics 4 in Amazon AppFlow
To create a connection to Google Analytics 4 in Amazon AppFlow, follow these steps:
- Sign in to the AWS Management Console and open Amazon AppFlow.
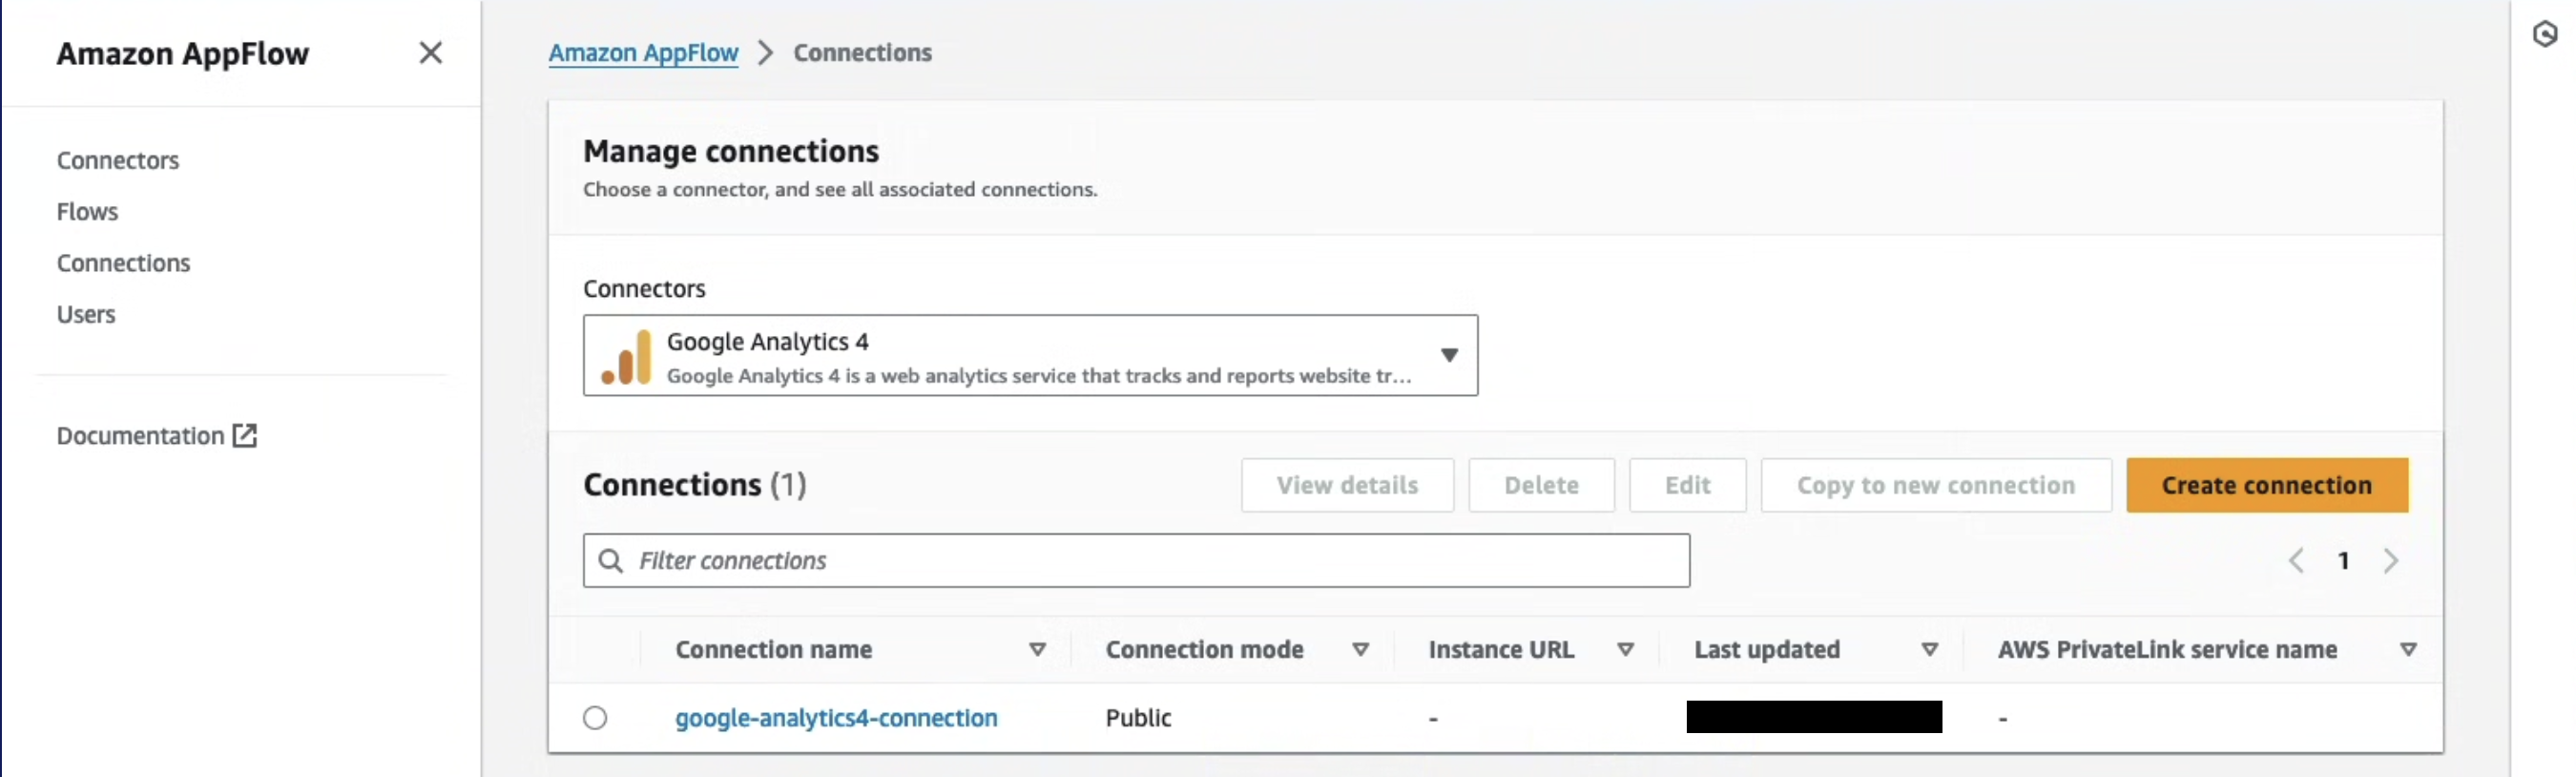
- In the navigation pane on the left, choose Connections.
- On the Manage connections page, for Connectors, choose Google Analytics 4.
- Choose Create connection.
- In the Connect to Google Analytics 4 window, enter the following information. For Client ID, enter the client ID of the OAuth 2.0 client ID in your Google Cloud project created in the previous section. For Client secret, enter the client secret of the OAuth 2.0 client ID in your Google Cloud project created in the previous section.
- (Optional) under Data encryption, choose Customize encryption settings (advanced) if you want to encrypt your data with a customer managed key in AWS Key Management Service (AWS KMS). By default, Amazon AppFlow encrypts your data with an AWS KMS key that AWS creates, uses, and manages for you. Choose this option if you want to encrypt your data with your own AWS KMS key instead.
The following screenshot shows the Connect to Google Analytics 4 window.

Amazon AppFlow encrypts your data during transit and at rest. For more information, see Data protection in Amazon AppFlow.
If you want to use an AWS KMS key from the current AWS account, select this key under Choose an AWS KMS key. If you want to use an AWS KMS key from a different AWS account, enter the Amazon Resource Name (ARN) for that key:
- For Connection name, enter a name for your connection
- Choose Continue
- In the window that appears, sign in to your Google account and grant access to Amazon AppFlow
On the Manage connections page, your new connection appears in the Connections table. When you create a flow that uses Google Analytics 4 as the data source, you can select this connection.
Create an IAM role for Amazon AppFlow integration with Amazon Redshift
You can use Amazon AppFlow to transfer data from supported sources into your Amazon Redshift databases. You need an IAM role because Amazon AppFlow needs authorization to access Amazon Redshift using an Amazon Redshift Data API.
- Sign in to the AWS Management Console, preferably as admin user, and in the navigation pane of the IAM dashboard, choose Policies.
- Choose Create policy.
- Select the JSON tab and paste in the following policy. Amazon AppFlow needs the following permissions to gain access and run SQL statements with the Amazon Redshift database.
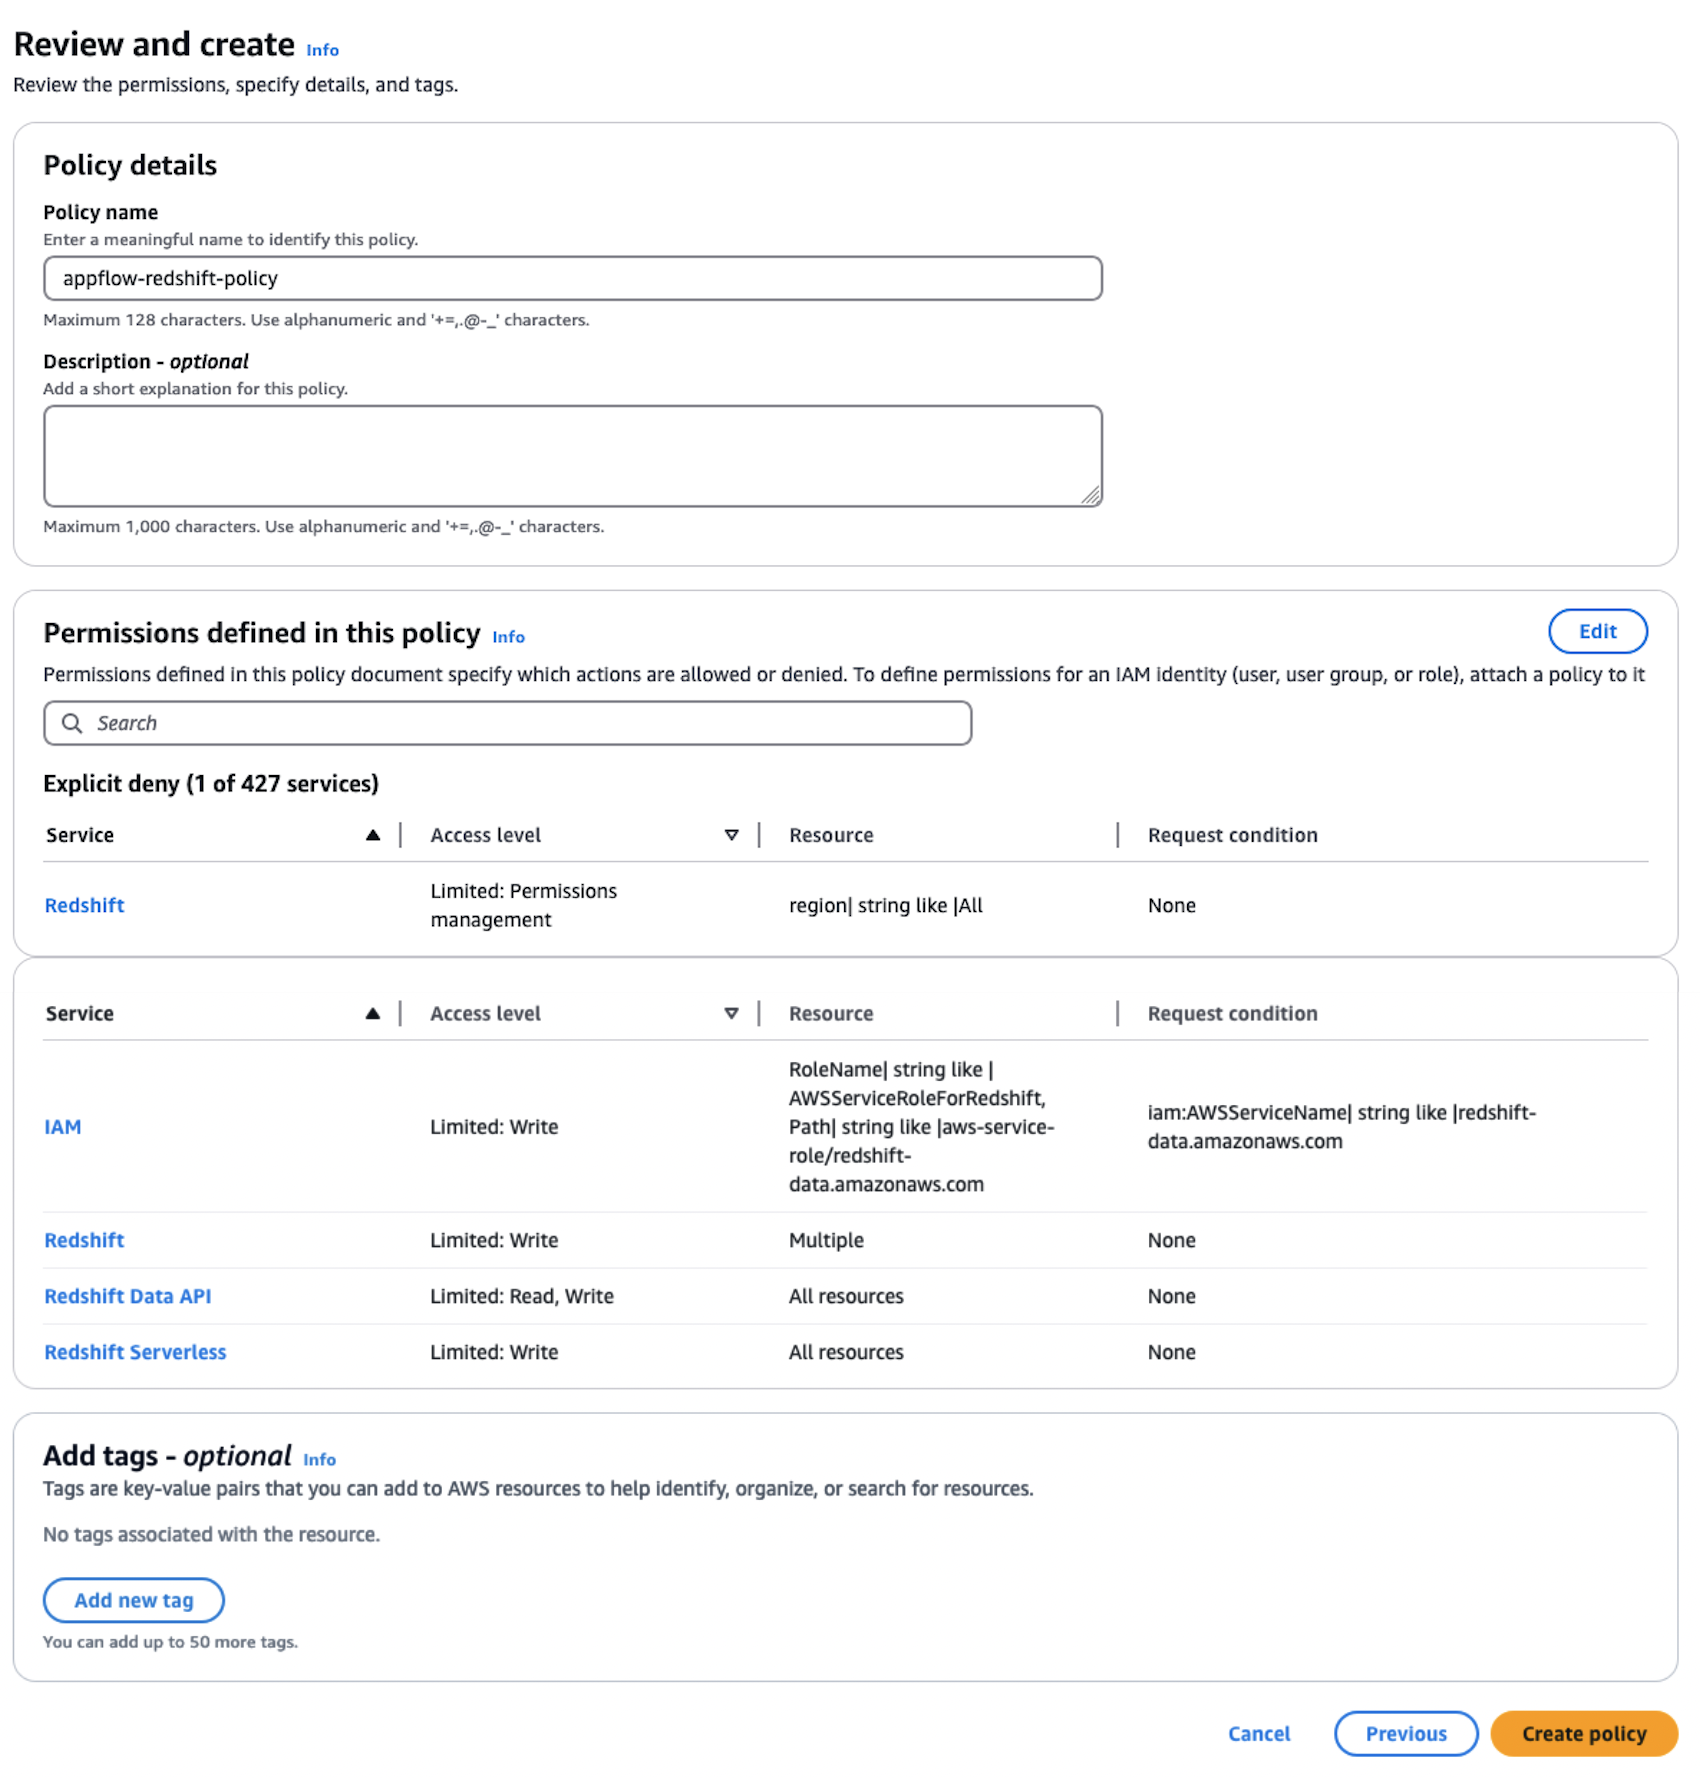
- Choose Next, provide the Policy name as
appflow-redshift-policy, Description as appflow redshift policy, and choose Create policy.
- In the navigation pane, choose Roles and Create role. Choose Custom trust policy and paste in the following. Choose Next. This trust policy grants Amazon AppFlow the ability to assume the role for Amazon AppFlow to access and process data.
- Search for policy
appflow-redshift-policy, check the box next to it, and choose Next.

- Provide the role name
appflow-redshift-access-roleand Description and choose Create role.
Set up Amazon AppFlow connection for Amazon Redshift
To set up an Amazon AppFlow connection for Amazon Redshift, follow these steps:
- On the Amazon AppFlow console, in the navigation pane, choose Connectors, select Amazon Redshift, and choose Create connection.

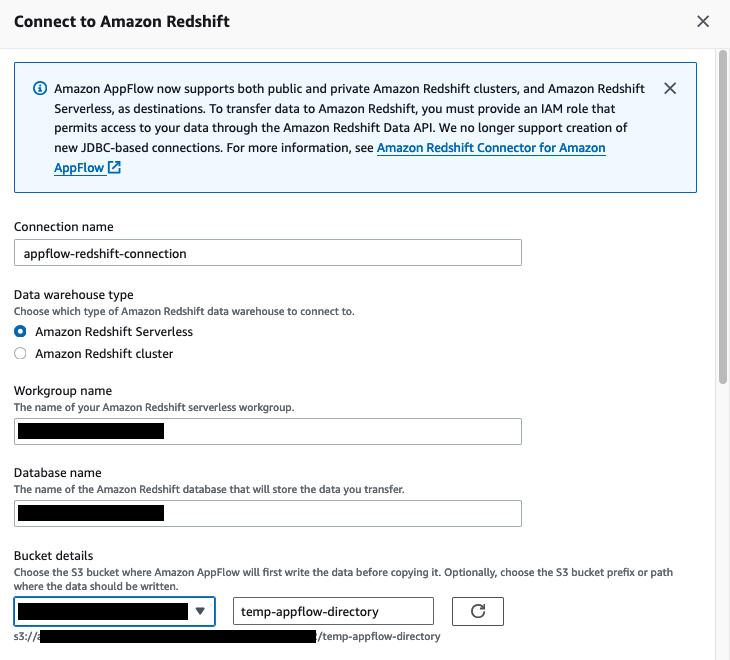
- Enter the connection name appflow-redshift-connection. You can either use Amazon Redshift provisioned or Amazon Redshift Serverless, but in this example we are using Amazon Redshift Serverless. Select Amazon Redshift Serverless and enter the workgroup name and database name.
- Choose the S3 bucket and enter the bucket prefix.
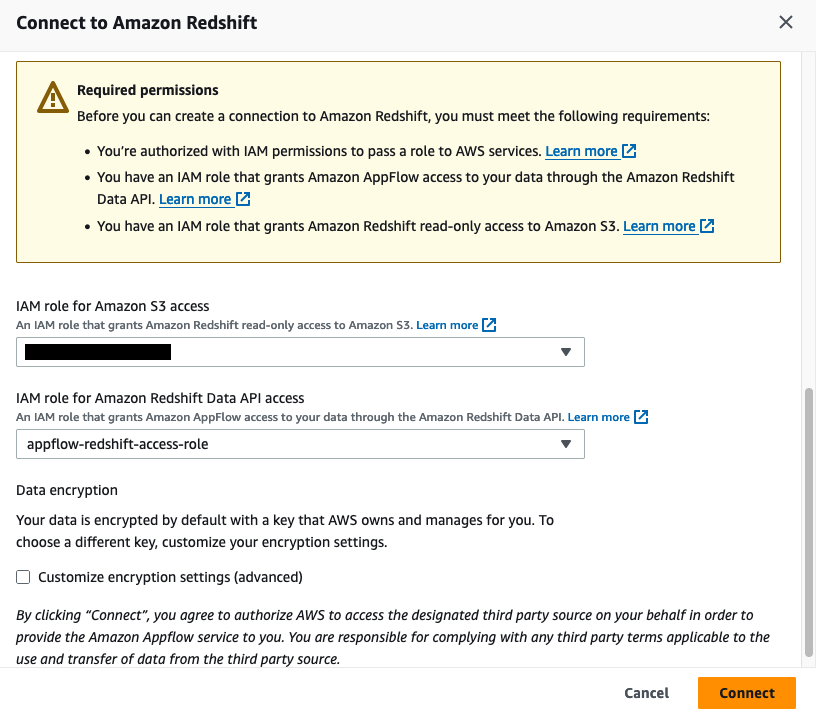
- For Amazon S3 access, select the IAM role attached to the Redshift cluster or namespace during the creation of the Redshift cluster. Additionally, for the Amazon Redshift Data API, choose the IAM role
appflow-redshift-access-rolecreated in the previous section and then choose
Set up a table and permission in Amazon Redshift
To set up table and permission in Amazon Redshift, follow these steps:
- On the Amazon Redshift console, choose Query editor v2 in Explorer.
- Connect to your existing Redshift cluster or Amazon Redshift Serverless workgroup.
- Create a table with the following Data Definition Language (DDL).
The following screenshot shows the successful creation of this table in Amazon Redshift:

The following step is only applicable to Amazon Redshift Serverless. If you are using a Redshift provisioned cluster, you can skip this step.
- Grant the permissions on the table to the IAM user used by Amazon AppFlow to load data into Amazon Redshift Serverless, for example,
appflow-redshift-access-role.
Create data flow in Amazon AppFlow
To create a data flow in Amazon AppFlow, follow these steps:
- On the Amazon AppFlow console, choose Flows and select Amazon Redshift. Choose Create flow and enter the flow name and the flow description, as shown in the following screenshot.

- In Source name, choose Google Analytics 4. Choose the Google Analytics 4 connection.
- Select the Google Analytics 4 object, then choose Amazon Redshift as the destination, selecting the
publicschema andstg_ga4_daily_summarytable in your Redshift instance.

- For Flow trigger, choose Run on demand and choose Next, as shown in the following screenshot.
You can run the flow on schedule to pull either full or incremental data refresh. For more information, see Schedule-triggered flows.

- Select Manually map fields. From the Source field name dropdown menu, select the attribute
date, and from the Destination field name, selectevent_dateand choose Map fields, as shown in the following screenshot.
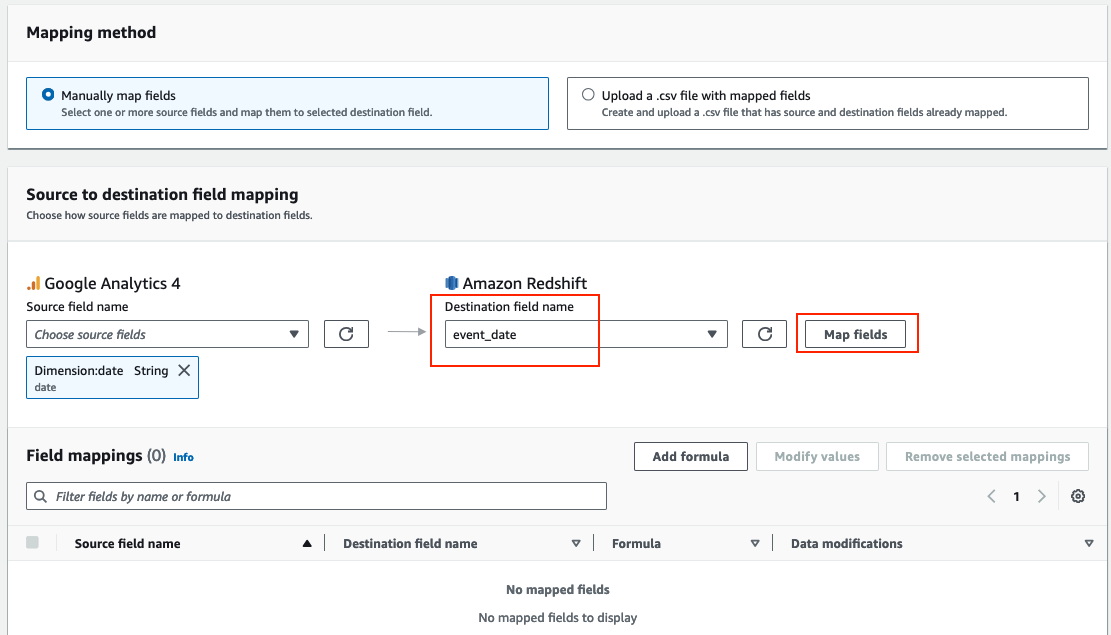
- Repeat the previous step (step 5) for the following attributes and then choose Next. The following screenshot shows the mapping.
The Google Analytics API provides various dimensions and metrics for reporting purposes. Refer to API Dimensions & Metrics for details.

- In Field name, enter the filter
start_end_dateand choose Next, as shown in the following screenshot. The Amazon AppFlow date filter supports both a start date (criteria1) and an end date (criteria2) to define the desired date range for data transfer. We are using the date range because we have sample data created for this range.

- Review the configurations and choose Create flow.
- Choose Run flow, as shown in the following screenshot, and wait for the flow execution to be completed.

- On the Amazon Redshift console, choose Query editor v2 in Explorer.
- Connect to your existing Redshift cluster or Amazon Redshift Serverless workgroup.
- Enter the following SQL to verify the data in Amazon Redshift.
The screenshot below shows the results loaded into the stg_ga4_daily_summary table.

Data ingestion from Google Sheets to Amazon Redshift
Ingesting data from Google Sheets to Amazon Redshift using Amazon AppFlow streamlines analytics, enabling seamless transfer and deeper insights. In this section, we demonstrate how business users can maintain their business glossary in Google Sheets and integrate that using Amazon AppFlow with Amazon Redshift and get meaningful insights.
For this demo, you can upload the Nation Market segment file to your Google sheet before proceeding to the next steps. These steps show how to configure Amazon AppFlow to set up a connection between Google Sheets and Amazon Redshift for data migration. This procedure can be classified into the following steps:
- Create Google Sheets connection in Amazon AppFlow
- Set up table and permission in Amazon Redshift
- Create data flow in Amazon AppFlow
Create Google Sheets connection in Amazon AppFlow
To create a Google Sheets connection in Amazon AppFlow, follow these steps:
- On the Amazon AppFlow console, choose Connectors, select Google Sheets, then choose Create connection.
- In the Connect to Google Sheets window, enter the following information. For Client ID, enter the client ID of the OAuth 2.0 client ID in your Google Sheets project. For Client secret, enter the client secret of the OAuth 2.0 client ID in your Google Sheets project.
- For Connection name, enter a name for your connection.
- (Optional) Under Data encryption, choose Customize encryption settings (advanced) if you want to encrypt your data with a customer managed key in AWS KMS. By default, Amazon AppFlow encrypts your data with an AWS KMS key that AWS creates, uses, and manages for you. Choose this option if you want to encrypt your data with your own AWS KMS key instead.
- Choose Connect.
- In the window that appears, sign in to your Google account and grant access to Amazon AppFlow.
Set up table and permission in Amazon Redshift
To set up a table and permission in Amazon Redshift, follow these steps:
- On the Amazon Redshift console, choose Query editor v2 in Explorer
- Connect to your existing Redshift cluster or Amazon Redshift Serverless workgroup
- Create a table with the following DDL
he following steps are only applicable to Amazon Redshift Serverless. If you are using a Redshift provisioned cluster, you can skip this step.
- Grant the permissions on the table to the IAM user used by Amazon AppFlow to load data into Amazon Redshift Serverless, for example,
appflow-redshift-access-role
Create data flow in Amazon AppFlow
- On the Amazon AppFlow console, choose Flows and select Google Sheets. Choose Create flow, enter the flow name and flow description, and choose Next.
- Select Google Sheets in Source name and choose the Google Sheets connection.
- Select the Google Sheets object
nation_market_segment#Sheet1. - Choose the Destination name as Amazon Redshift, then select
stg_nation_market_segmentas your Amazon Redshift object, as shown in the following screenshot.

- For Flow trigger, select On demand and choose Next.
You can run the flow on schedule to pull full or incremental data refresh. Read more at Schedule-triggered flows.
- Select Manually map fields. From the Source field name dropdown menu, select Map all fields directly. When a dialog box pops up, choose the respective attribute values and choose Map fields, as shown in the following screenshot. Choose Next.

The following screenshot shows the mapping.

- On the Add Filters page, choose Next.
- On the Review and create page, choose Create flow.
- Choose Run flow and wait for the flow execution to finish.
The screenshot below shows the execution details of the flow job.

- On the Amazon Redshift console, choose Query editor v2 in Explorer.
- Connect to your existing Redshift cluster or Amazon Redshift Serverless workgroup.
- Run the following SQL to verify the data in Amazon Redshift.
The screenshot below shows the results loaded into the stg_nation_market_segment table.

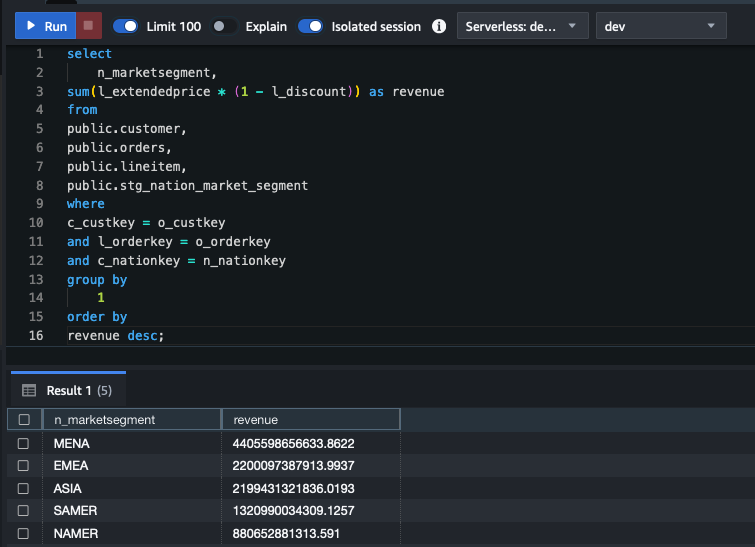
- Run the following SQL to prepare a sample dataset in Amazon Redshift.
- Run the following SQL to do the data analytics using Google Sheets business data classification in the Amazon Redshift dataset.
The screenshot below shows the results from the aggregated query in Amazon Redshift from data loaded using Amazon Appflow.
Clean up
To avoid incurring charges, clean up the resources in your AWS account by completing the following steps:
- On the Amazon AppFlow console, in the navigation pane, choose Flows.
- From the list of flows, select the flow name created and delete it.
- Enter “delete” to delete the flow.
- Delete the Amazon Redshift workgroup.
- Clean up resources in your Google account by deleting the project that contains the Google BigQuery resources. Follow the documentation to clean up the Google resources.
Conclusion
In this post, we walked you through the process of using Amazon AppFlow to integrate data from Google Ads and Google Sheets. We demonstrated how the complexities of data integration are minimized so you can focus on deriving actionable insights from your data. Whether you’re archiving historical data, performing complex analytics, or preparing data for machine learning, this connector streamlines the process, making it accessible to a broader range of data professionals.
For more information, refer to Amazon AppFlow support for Google Sheets and Google Ads.
About the authors
 Ritesh Kumar Sinha is an Analytics Specialist Solutions Architect based out of San Francisco. He has helped customers build scalable data warehousing and big data solutions for over 16 years. He loves to design and build efficient end-to-end solutions on AWS. In his spare time, he loves reading, walking, and doing yoga.
 Tahir Aziz is an Analytics Solution Architect at AWS. He has worked with building data warehouses and big data solutions for over 13 years. He loves to help customers design end-to-end analytics solutions on AWS. Outside of work, he enjoys traveling and cooking.
 Raza Hafeez is a Senior Product Manager at Amazon Redshift. He has over 13 years of professional experience building and optimizing enterprise data warehouses and is passionate about enabling customers to realize the power of their data. He specializes in migrating enterprise data warehouses to AWS Modern Data Architecture.
 Amit Ghodke is an Analytics Specialist Solutions Architect based out of Austin. He has worked with databases, data warehouses and analytical applications for the past 16 years. He loves to help customers implement analytical solutions at scale to derive maximum business value.
Happy New Year! AWS Weekly Roundup: 2025 Tech Predictions, Llama 3.3 70B, Stable Diffusion 3.5 Large, custom billing view, and more (January 6, 2025)
Post Syndicated from Prasad Rao original https://aws.amazon.com/blogs/aws/happy-new-year-aws-weekly-roundup-2025-tech-predictions-llama-3-3-70b-stable-diffusion-3-5-large-custom-billing-view-and-more-january-6-2025/
Happy New Year! We are witnessing technology augment human ingenuity in inspiring ways. In the coming years, using technology for positive impact will redefine the way we think about success. Amazon CTO, Dr. Werner Vogels, offers five forward-looking tech predictions for 2025, and beyond:
- The workforce of tomorrow is mission-driven
- A new era of energy efficiency drives innovation
- Technology tips the scales in the discovery of truth
- Open data drives decentralized disaster preparedness
- Intention-driven consumer technology takes hold
Download the Werner Vogels’ Tech Predictions for 2025 and Beyond ebook, or read Werner’s All Things Distributed blog to learn more about how these technological trends are shaping our world and paving the way for a more innovative, efficient, and purposeful future.
AWS re:Invent 2025 videos and re:Caps
If you’re looking to catch up on re:Invent announcements or delve deeper into the latest AWS innovations, you have several options available like:
- Watch the keynotes, innovation talks, and breakout sessions on-demand.
- Download the summary of key AWS re:Invent announcements.
- Attend free in-person community re:Cap sessions organized by volunteers from AWS User Groups around the world.
Launches from the last few weeks
Since our last week in review on December 16, 2024, I’d like to highlight some launches from year end, as well as from last week:
Availability of Llama 3.3 70B in Amazon SageMaker JumpStart and in Amazon Bedrock – Meta’s Llama 3.3 70B represents a significant advancement in model efficiency and performance optimization. Llama 3.3 70B is a text-only instruction-tuned model that provides enhanced performance relative to Llama 3.1 70B and Llama 3.2 90B when used for text-only applications. You can now use the model in both Amazon SageMaker JumpStart, as well as in Amazon Bedrock.
Availability of Stable Diffusion 3.5 Large in Amazon Bedrock – Stable Diffusion 3.5 Large by Stability AI is the most powerful model in the Stable Diffusion family at 8.1 billion parameters trained on Amazon SageMaker HyperPod. You can now use Stable Diffusion 3.5 Large in Amazon Bedrock to generate high-quality images from text descriptions.
New Amazon Kinesis source connector for Apache Flink – The Apache Flink community has released version 5.0.0 of AWS services connectors, an AWS open source contribution. This release introduces the Kinesis Streams Source, a new connector for reading data from Amazon Kinesis Data Streams, replacing the previous Kinesis Consumer.
Support of AWS Global Accelerator in Amazon WorkSpaces Personal – Amazon WorkSpaces Personal now integrates with AWS Global Accelerator (AGA) to enhance WorkSpaces connection performance by optimizing streaming traffic through the AWS Global Network and edge locations. This feature particularly benefits customers whose end users connect to WorkSpaces across long distances. You can enable the AGA feature at either the WorkSpaces directory level or for individual WorkSpaces running Amazon DCV protocol.
New resource insights in AWS Resource Explorer – With the enhanced Resource Explorer experience, relevant data and insights from multiple AWS services is centralized for supported resource types. You can use the new features to take actions on resources directly from the Resource Explorer console, such as manage tags, add resources to applications, and get additional information about a resource with Amazon Q.
General availability of custom billing view in AWS Billing and Cost Management – Custom billing view allows you to provide application and business unit owners access to relevant cost management data across multiple AWS accounts using a single view in AWS Cost Explorer without granting access to the AWS management account. You can create filtered views of cost management data based on cost allocation tags or specific AWS accounts.
For a full list of AWS announcements, be sure to keep an eye on the What’s New at AWS page.
Upcoming AWS events
Check your calendars and sign up for these AWS events:
AWS at CES 2025 (January 7-10) – AWS will be representing some of the latest cloud services and solutions that are purpose built for the automotive, mobility, transportation, and manufacturing industries. Join us to learn about the latest cloud capabilities across generative AI, software define vehicles, product engineering, sustainability, new digital customer experiences, connected mobility, autonomous driving, and so much more, in Amazon Experience Area.
AWS at NRF 2025 (January 12-14) – Join AWS at the retail’s big show to see generative AI and cutting-edge technologies in action. Listen to innovative big ideas sessions, curated TechTalks, and experience the latest in retail trends, and technologies and more.
Amazon QuickSight Learning Series – Kick off your 2025 by supercharging your data skills. Join the online Learning Series in January to learn about the cutting-edge features of Amazon QuickSight unveiled at re:Invent 2024.
You can browse all upcoming in-person and virtual events.
That’s all for this week. Check back next Monday for another Weekly Roundup!
This post is part of our Weekly Roundup series. Check back each week for a quick roundup of interesting news and announcements from AWS!
How to enhance Amazon Macie data discovery capabilities using Amazon Textract
Post Syndicated from ZhiWei Huang original https://aws.amazon.com/blogs/security/how-to-enhance-amazon-macie-data-discovery-capabilities-using-amazon-textract/
Amazon Macie is a managed service that uses machine learning (ML) and deterministic pattern matching to help discover sensitive data that’s stored in Amazon Simple Storage Service (Amazon S3) buckets. Macie can detect sensitive data in many different formats, including commonly used compression and archive formats. However, Macie doesn’t support the discovery of sensitive data within images, audio, video, or other types of multimedia content. Customers often ask how to effectively detect whether there’s sensitive data in images. This can be a significant challenge for organizations, especially those operating in highly regulated industries with strict data protection requirements.
In this post, we show you how to gain visibility of sensitive data embedded in images that are stored within your S3 buckets by adding an additional conversion layer to extract image-based data into a format supported by Macie. The solution also uses the recommended set of managed identifiers and custom data identifiers supported by Macie to cover most use cases.
Solution overview
In this section, we walk through the components of the solution. The solution is deployed using AWS Serverless Application Model (AWS SAM), which is an open source framework for building serverless applications. AWS SAM helps to organize related components and operate on a single stack. When used together with the AWS SAM CLI, it’s a useful tool for developing, testing, and building serverless applications on AWS. We provided an AWS SAM template that you can use to set up the required services and AWS Lambda functions. Figure 1 illustrates the architecture of the solution.

Figure 1: Solution architecture and workflow
The solution workflow is as follows:
- A user uploads images that might contain sensitive data into the S3 bucket.
- After you have verified that potentially sensitive data has been uploaded into the S3 bucket, you can manually invoke the Lambda function
textract-triggerto start the process. This function calls Amazon Textract asynchronously to process files in the S3 bucket with filename extensions such as .png, .jpg, and .jpeg. Amazon Textract creates a job for each image and extracts the text found in each image. - Because the operation is asynchronous, the job ID and status of each call is stored in an Amazon DynamoDB table to track the status of jobs and make sure that all of the jobs are completed before Macie is triggered to scan the S3 bucket.
- The resulting JSON file from the Amazon Textract job is stored within the same S3 bucket as the original image.
- For each analysis job, Amazon Textract sends a job completion notification to the registered Amazon Simple Notification Service (Amazon SNS) topic
AmazonTextractJobSNSTopic. The Lambda functionmacie-triggeris subscribed to the SNS topic and triggered every time an SNS message is received for a completed Amazon Textract analysis job. - Further post-processing is done by the Lambda function
macie-triggerto extract the values from the JSON file into a text file. This text file is then uploaded into the same S3 bucket. - The function then checks for other in-progress Amazon Textract jobs in the DynamoDB table. If there are pending jobs, the function exits and waits to be triggered again.
- After all of the Amazon Textract jobs are marked as complete in the DynamoDB table, the Lambda function
macie-triggercreates a Macie classification job. - Macie then scans the bucket for sensitive data based on managed identifiers and your custom data identifiers.
- Macie will continuously publish the classification job status to Amazon CloudWatch Logs.
- It might take some time to scan all the files in the S3 bucket, and you will be notified through SNS email when the Macie job is completed. The Lambda function
MacieCompletedSNSLambdawill filter for completed job status and send an email notification using the SNS topicMacieSnsTopic.
When deploying the solution, you can specify an existing S3 bucket in your AWS account that’s already storing data that might be sensitive or deploy a new S3 bucket as part of the setup. If you specify an existing S3 bucket, make sure that there are no additional statements in the bucket policy or KMS key policy that will deny the relevant solution components access to the S3 bucket. If no existing S3 bucket is specified, a new S3 bucket will be created with the name s3-with-sensitive-data-<account-id>-<random-string>.
Prerequisites
Before deploying the solution, make sure the following prerequisites are in place.
- Enable Macie in your account. For instructions, see Getting Started with Amazon Macie.
- Determine the regular expression (regex) pattern for sensitive textual data that you want Macie to detect. This will allow you to create custom data identifiers that complement the managed data identifiers provided by Macie. For more information, see Building custom data identifiers in Amazon Macie. There’s an example in the pre-deployment steps that you can follow, with the sample images that come with the solution.
- Make sure that you have the permissions to deploy the AWS services detailed in the solution: Lambda, Amazon S3, Amazon Textract, Amazon SNS, Macie, Amazon CloudWatch, and DynamoDB.
- Install the AWS SAM CLI, which you will use to deploy the solution. To learn more about how AWS SAM works, see The AWS SAM project and AWS SAM template.
Pre-deployment steps
With the prerequisites in place, you need to set up one or more custom identifiers through the AWS Management Console for Macie before you can deploy the solution. Use the following steps to set up an example custom identifier for the images provided in this post.
To set up custom identifiers:
- Navigate to the Amazon Macie console.
- Choose Custom data identifiers in the navigation pane, and then choose Create.
- Enter a name and description for the custom identifier, such as the following examples:
- Name:
Singapore NRIC Number - Description:
This expression can be used to find or validate a Singapore NRIC Number that begins with the character S, F, T, or G, followed by seven digits and ending with any character from A to Z.
- Name:
- For Regular expression, enter:
[SFTG]\d{7}[A-Z]. - For Keywords, enter:
Singapore,Identity, Card.
Keywords are important because they can help to improve the accuracy of the detection and refine the results. - Leave the other fields as default and choose Submit.
- Navigate to the newly created custom identifier and note the ID. This ID is required as an input when deploying the AWS SAM solution.

Figure 2: ID of a newly created Macie custom identifier

Deploy the solution
With the prerequisites in place and pre-deployment steps complete, you’re ready to deploy the solution.
To deploy the solution:
- Open a CLI window, navigate to your preferred local directory and run
git clone https://github.com/aws-samples/enhancing-macie-with-textract.- Navigate to this directory by using
cd enhancing-macie-with-textract. - Run
sam deploy --guidedand follow the step-by-step instructions to indicate the deployment details such as the desired CloudFormation stack name, AWS Region, and other details. The following are descriptions of some of the requested parameters:- ExistingS3BucketName: This is the name of the S3 bucket that you want the solution to scan. This is an optional parameter. If it’s left blank, the solution will create an S3 bucket for you to store the objects that you want to scan.
- MacieCustomCustomIdentifierIDList: This is the ID that you noted in the final pre-deployment step. Use this field to enter a list of custom identifiers for Macie to detect with. If there is more than one ID, each ID should be separated by a comma (for example,
59fd2814-0ba8-41cc-adb2-1ffec6a0bb3c, 665cf948-ea30-42df-9f63-9a858cbfe1a8). - EmailAddress: This is the email address that you want Amazon SNS email notifications to be sent to when a Macie job is complete.
- MacieLogGroupExists: This checks if you have an existing Macie CloudWatch Log Group (
/aws/macie/classificationjobs). If this is your first time running a Macie job, enterNoorn. Otherwise, enterYesory.
- Navigate to this directory by using
- When completed, a confirmation request will be presented for the creation of the required resources. AWS SAM creates a default S3 bucket to store the necessary resources and then proceeds to the deployment prompt. Enter
yto deploy and wait for deployment to complete. - After deployment is complete, you should see the following output:
Successfully created/updated stack – {StackName} in {AWSRegion}. You can review the resources and stack in the CloudFormation console.

Figure 3: CloudFormation console of the deployed stack
- An email will be sent from [email protected] to the email address that you entered in step 3. Choose Confirm subscription to allow SNS to send you Macie job completion emails.

Figure 4: Sample email from Amazon SNS for subscription confirmation


Test the solution
With the solution deployed, use a set of sample images to verify that it can detect sensitive data within images.
To test the solution:
- Use the Amazon S3 console to navigate to the bucket you specified during deployment. If you didn’t specify an S3 bucket to scan, look for a new bucket named
s3-with-sensitive-data-<account-id>-<random-string>. - In your project directory, there are sample images in
sample-images.zip. Unzip the file and upload the sample images into the S3 bucket. The sample images include a US driver’s license, social security card, passport, and a Singapore National Registration Identity Card (NRIC). - Navigate to the AWS Lambda console and select the
{StackName}-TextractTriggerLambda-<random-string>function. - Choose the Test tab and then choose Test to start the automated sensitive data discovery process for the uploaded images.

Figure 5: Trigger an Amazon Textract scan on all images in the S3 bucket
- The whole process will take about 15 minutes to complete. You will receive an email notification after the Macie scan is completed.

Figure 6: Sample email from Amazon SNS for Macie job completion
- Navigate to the Amazon Macie console and select Jobs in the navigation pane. You should see the job Scan for [number of] objects [datetime stamp] that matches the job name shown in the email notification.
- In the details panel, choose Show results button and then choose Show findings.

Figure 7: Show Macie data discovery job findings
- You will see the findings related to the Macie sensitive data discovery job ID that you selected.

Figure 8: Findings from the data discovery job


Understanding the findings
In this section, we take a closer look at each finding.
- In the console, look in the Resources affected column for the finding that ends with singapore-pink-nric-postprocessed.txt and select it. The finding type SensitiveData:S3Object/CustomIdentifier means that the resource contains text that matches the detection criteria of a custom data identifier. The other finding types in this example are from managed data identifiers. See Types of sensitive data findings for more information about Macie finding types.
- In the finding information panel, you can also see:
- In the Overview section, the resource indicates which resource contains sensitive data. The resource identifies the text file; however, you can identify the original image file because it has the same object name (other than the file type).
- In the Custom data identifiers section, you can see the type of sensitive data found. In this case, the finding involves data that matches the regex of a Singapore NRIC.
By using this solution, you can use Macie to detect sensitive data within the images in your S3 bucket and which images each finding corresponds to.
Using the solution
In this post, you have configured a single custom data identifier and a recommended set of managed identifiers. However, you can create and use multiple custom data identifiers in the solution by providing them as a comma-separated list, as mentioned in step 3 of Deploy the solution.
This solution has been designed to enable sensitive data discovery of text in image objects within a single S3 bucket. To expand the scope to include multiple S3 buckets, some additional code and permission changes are required to allow the Lambda functions to process and access multiple existing S3 buckets.
It’s important to note the language capabilities of Amazon Textract. Amazon Textract can extract printed text and handwriting from the standard English alphabet and ASCII symbols. Currently, Amazon Textract supports extraction in English, German, French, Italian, and Portuguese. For more information on what textual information Amazon Textract can identify, see Amazon Textract FAQs.
Clean up the resources
To clean up the resources that you created for this example:
- If you didn’t set up the scan on your own S3 bucket, empty the S3 bucket that was created as part of the solution. Open the Amazon S3 console, search for the bucket name
s3-with-sensitive-data-<account-id>-<random-string>and choose Empty. - Use one of the following methods to delete the CloudFormation stack:
- Use the CloudFormation console to delete the stack.
- Use AWS SAM CLI to run
sam deletein your terminal. Follow the instructions and enter y when prompted to delete the stack.
Conclusion
In this post, you learned how to enhance the capabilities of Amazon Macie to conduct sensitive data discovery within image files. With this solution, you can extend the benefits of Amazon Macie beyond structured file formats.
If you want to extend the benefits of Amazon Macie to scan your databases for sensitive data, you might find these blog posts useful:
- Enabling data classification for Amazon RDS database with Macie
- Detecting sensitive data in DynamoDB with Macie.
If you have feedback about this post, submit comments in the Comments section. If you have questions about this post, start a new thread on the AWS Security, Identity, & Compliance re:Post or contact AWS Support.
Portable SSD NAS, UPS, Card Reader, RAID… Too good to be true?
Post Syndicated from Matt Granger original https://www.youtube.com/watch?v=L9GGyIHcM9c
Intel CES 2025 Keynote Live Coverage
Post Syndicated from Cliff Robinson original https://www.servethehome.com/intel-ces-2025-keynote-coverage-live/
We have live coverage of the Intel CES 2025 Keynote where it is talking about its new products for the AI era
The post Intel CES 2025 Keynote Live Coverage appeared first on ServeTheHome.
AMD CES 2025 Keynote Live Coverage
Post Syndicated from Ryan Smith original https://www.servethehome.com/amd-ces-2025-keynote-live-coverage/
Our coverage of the big AMD CES 2025 keynote! Stay tuned for some of the company’s major announcements for 2025
The post AMD CES 2025 Keynote Live Coverage appeared first on ServeTheHome.
Security updates for Monday
Post Syndicated from jake original https://lwn.net/Articles/1004262/
Security updates have been issued by Fedora (ofono and webkitgtk), Mageia (ruby and virtualbox & kmod-virtualbox), Red Hat (oci-seccomp-bpf-hook and runc), SUSE (corepack22, dpdk, libpoppler-cpp1, pcp, python-Jinja2, and sysstat), and Ubuntu (tinyproxy).
Out With the Old, In With the New: Securely Disposing of Smart Devices
Post Syndicated from Deral Heiland original https://blog.rapid7.com/2025/01/06/out-with-the-old-in-with-the-new-securely-disposing-of-smart-devices/

So, what did you get for Christmas this year?
Hopefully you received some cool smart technology, or maybe you just upgraded your smart camera or voice assistant to a newer model or version. If you upgraded to a new model or version, what is your plan for the old device? Is it still working or is it broken?
Either way, you will need to figure out what to do with it: Donate it, sell it online, or maybe dispose of it as electronic waste. Before you make up your mind, let’s think through a few things.
Have you done a factory reset?
The key reason you want to do a factory reset is to make sure the device is no longer customized according to your environment and that personal information such as WiFi passwords, email addresses, username and account passwords, and your name and home address are properly removed from the device prior to it leaving your hands.
Factory resets are accomplished in different ways, depending upon the device. For example, some devices have a button you press and hold, while others may use a mobile or web application to trigger the reset. I have also seen devices where you just cycle the power multiple times in sequence to reset the devices. Regardless of what the manufacturer’s recommended process is, it is very important that you follow it.
But what if the device appears to be broken? Well, if your old device truly is 100% dead, then there’s not much you can do about that. But the truth is, an IoT device may not be completely functioning yet it may still allow a factory reset to be done. For example, if the device appears to power up but doesn’t communicate correctly, you can try pushing and holding the reset button and see if the device resets (often indicated by the lights).
Now, let’s say the device has a web application online or a mobile application and it shows the device is online — such as a smart light bulb or an Amazon Echo — but you cannot get it to work correctly. For example, the LED lights on a smart bulb don’t light up or the Echo doesn’t respond to your voice. If the application is still showing the device is online, then chances are the network communication is still working, and the application may allow you to remote reset the device.
Again, if you can find a way to accomplish a factory reset, then you should do it.
What could go wrong?
What could happen if you don’t properly reset a device and then dispose of it by selling it or giving it to someone else, who may in turn sell the device?
Out of curiosity and an attempt to answer this question, I purchased a box full of previously owned Amazon Echos online. Many of them were supposed to be broken, with most of them marked “dead speakers.” With that said, I had an important question to answer. Did the owner use the Amazon Alexa online application to factory reset and remove the Echo device before selling or giving the device to the person who sold it to me? I proceeded to disassemble 10 of these devices and dumped their memory so that I could evaluate the results to see if any of them were still provisioned and contained any user data.

Out of the 10 devices I examined, 4 were found to still be provisioned. As a small example of the potential data accessible on these 4 devices, I conducted further examination and found these devices still containing the WiFi SSID and Pre-shared Key (PSK) for the user’s home networks. Having the PSK in hand can give a malicious actor access to the user’s home network.
To make matters worse, in one of the 4 provisioned devices, the user used his last name for the SSID and his home phone number for PSK. Using personally identifiable information in an SSID, such as a name and/or phone number, greatly increases the ease in tracing a device back to a specific person and physical location. In other words, I highly recommend you not do this.
In the case of the Amazon Echo specifically, critical data such as personal Amazon authentication account information is currently stored in encrypted storage on the devices; therefore, it would take more work for someone to gain access to that, but I would not say it is impossible. Also, it’s important to note that although Echo devices may be encrypting the user account information they store, not all smart products on the market follow those recommendations. So — once again — to reduce the risk of your data being compromised, it is important that you factory reset your devices prior to disposal.
The proliferation of consumer-grade IoT devices in business.
It’s important to point out that the issue I’ve been discussing here doesn’t just apply to general consumers but also to businesses. Often, we assume that consumer-grade IoT technologies are only used by home users when in fact businesses of all sizes can and do leverage consumer-based IoT technology in the workplace environment.
It’s common to see WiFi access points, smart TVs, smart cameras, TV streaming boxes, smart exercise equipment, consumer-grade printers, and yes, even smart voice assistants, being used within a number of organizations. For example, every year I build out exercises for DEF CON IoT Village to help expose people to, and train them on, various aspects of hardware hacking. I purchase devices on the secondary market for this training and every year at least 40-50% of the devices I’ve purchased have not been factory reset. On more than one occasion, I have even purchased blocks of devices from a single reseller to find that those devices were not factory reset and were still configured with data from an operational business.
Start the year off securely.
To summarize, here are the key takeaways from my experiment and the bigger conversation around disposing of old smart devices:
- Business IT and security leaders should have clear, cradle-to-grave processes governing the IoT technologies purchased, so that the organization is not exposed to unnecessary risk. Cradle to grave covers initial installation and provisioning, ongoing maintenance, and, in the end, safe and secure disposal of the technology.
- Consumers should make sure to do a proper factory reset prior to the disposal or resale of any smart devices. Keep in mind that even if the device appears to be broken, a factory reset is still often possible — see my guidance earlier in this blog.
- If you cannot factory reset your device and you’re concerned about the data on the device, you can always change your SSID, PSK, and account password.
Finally, always remember to never dispose of your IoT technology in the trash, as landfills are not the proper place to send them. Instead, these devices should be sent to an electronic waste disposal option in your local area.
If you are looking for a deeper dive check out this research paper on Amazon echo dot devices from Northeastern University. Happy New Year!