Safer deployment of streaming applications

Post Syndicated from Grab Tech original https://engineering.grab.com/safer-flink-deployments

The Flink framework has gained popularity as a real-time stateful stream processing solution for distributed stream and batch data processing. Flink also provides data distribution, communication, and fault tolerance for distributed computations over data streams. To fully leverage Flink’s features, Coban, Grab’s real-time data platform team, has adopted Flink as part of our service offerings.

In this article, we explore how we ensure that deploying Flink applications remain safe as we incorporate the lessons learned through our journey to continuous delivery.

Background

Figure 1. Flink platform architecture within Coban

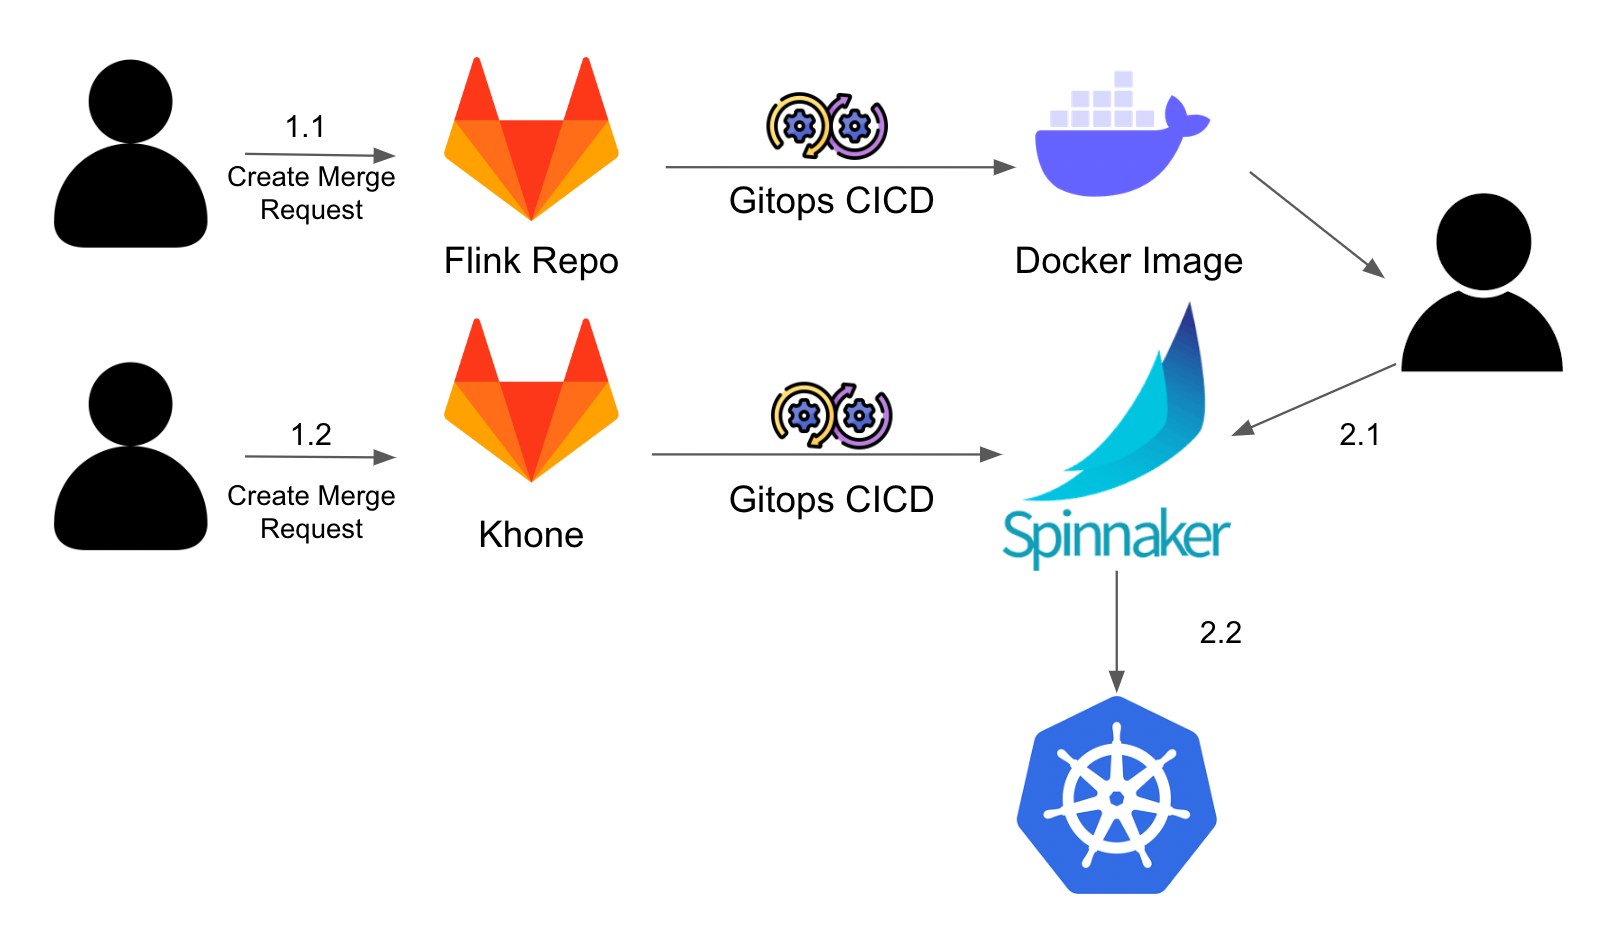
Users interact with our systems to develop and deploy Flink applications in three different ways.

Firstly, users create a Merge Request (MR) to develop their Flink applications on our Flink Scala repository, according to business requirements. After the MR is merged, GitOps Continuous Integration/Continuous Deployment (CI/CD) automatically runs and dockerises the application, allowing the containerised applications to be deployed easily.

Secondly, users create another MR to our infrastructure as a code repository. The GitOps CI/CD that is integrated with Terraform runs and configures the created Spinnaker application. This process configures the Flink application that will be deployed.

Finally, users trigger the actual deployment of the Flink applications on Spinnaker, which orchestrates the deployment of the Docker image onto our Kubernetes cluster. Flink applications are deployed as standalone clusters in Grab to ensure resource isolation.

Problem

The main issue we noticed with streaming pipelines like these, is that they are often interconnected, where application A depends on application B’s output. This makes it hard to find a solution that perfectly includes integration tests and ensures that propagated changes do not affect downstream applications.

However, this problem statement is too large to solve with a single solution. As such, we are narrowing the problem statement to focus on ensuring safety of our applications, where engineers can deploy Flink applications that will be rolled back if they fail health checks. In our case, the definition of a Flink application’s health is limited to the uptime of the Flink application itself.

It is worth noting that Flink applications are designed to be stateful streaming applications, meaning a “state” is shared between events (stream entities) and thus, past events can influence the way current events are processed. This also implies that traditional deployment strategies do not apply to the deployment of Flink applications.

Current strategy

Figure 2. Current deployment stages

In Figure 2, our current deployment stages are split into three parts:

  1. Delete current deployment: Remove current configurations (if applicable) to allow applications to pick up the new configurations.
  2. Bake (Manifest): Bake the Helm charts with the provided configurations.
  3. Deploy (Manifest): Deploy the charts onto Kubernetes.

Over time, we learnt that this strategy can be risky. Part 2 can result in a loss of Flink application states due to how internal CI/CD processes are set up. There is also no easy way to rollback if an issue arises. Engineers will need to revert all config changes and rollback the deployment manually by re-deploying the older Docker image – which results in slower operation recovery.

Lastly, there are no in-built monitoring mechanisms that perform regular health probes. Engineers need to manually monitor their applications to see if their deployment was successful or if they need to perform a rollback.

With all these issues, deploying Flink applications for engineers are often stressful and fraught with uncertainty. Common mitigation strategies are canary and blue-green deployments, which we cover in the next section.

Canary deployments

Figure 3. Canary deployment

In canary deployments, you gradually roll out new versions of the application in parallel with the production version, while serving a percentage of total traffic before promoting it gradually.

This does not work for Flink deployments due to the nature of stream processing. Applications are frequently required to do streaming operations like stream joining, which involves matching related events in different Kafka topics. So, if a Flink application is only receiving a portion of the total traffic, the data generated will be considered inaccurate due to incomplete data inputs.

Blue-green deployments

Figure 4. Blue-green deployment

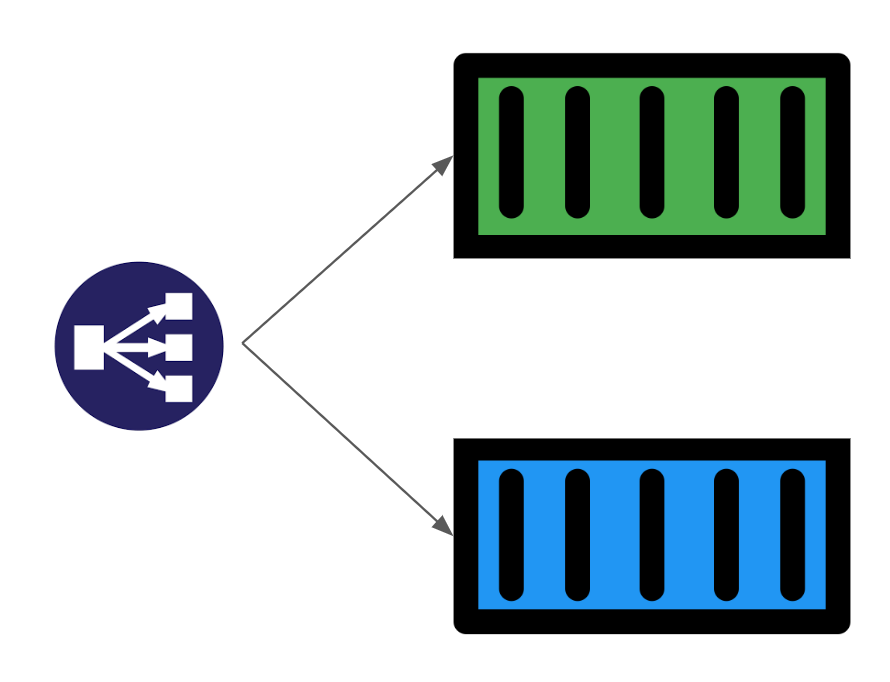
Blue-green deployments work by running two versions of the application with a Load Balancer that acts as a traffic switch, which determines which version traffic is directed to.

This method might work for Flink applications if we only allow one version of the application to consume Kafka messages at any point in time. However, we noticed some issues when switching traffic to another version. For example, the state of both versions will be inconsistent because of the different data traffic each version receives, which complicates the process of switching Kafka consumption traffic.

So if there’s a failure and we need to rollback from Green to Blue deployment, or vice versa, we will need to take an extra step and ensure that before the failure, the data traffic received is exactly the same for both deployments.

Solution

As previously mentioned, it is crucial for streaming applications to ensure that at any point in time, only one application is receiving data traffic to ensure data completeness and accuracy. Although employing blue-green deployments can technically fulfil this requirement, the process must be modified to handle state consistency such that both versions have the same starting internal state and receive the same data traffic as each other, if a rollback is needed.

Figure 5. Visualised deployment flow

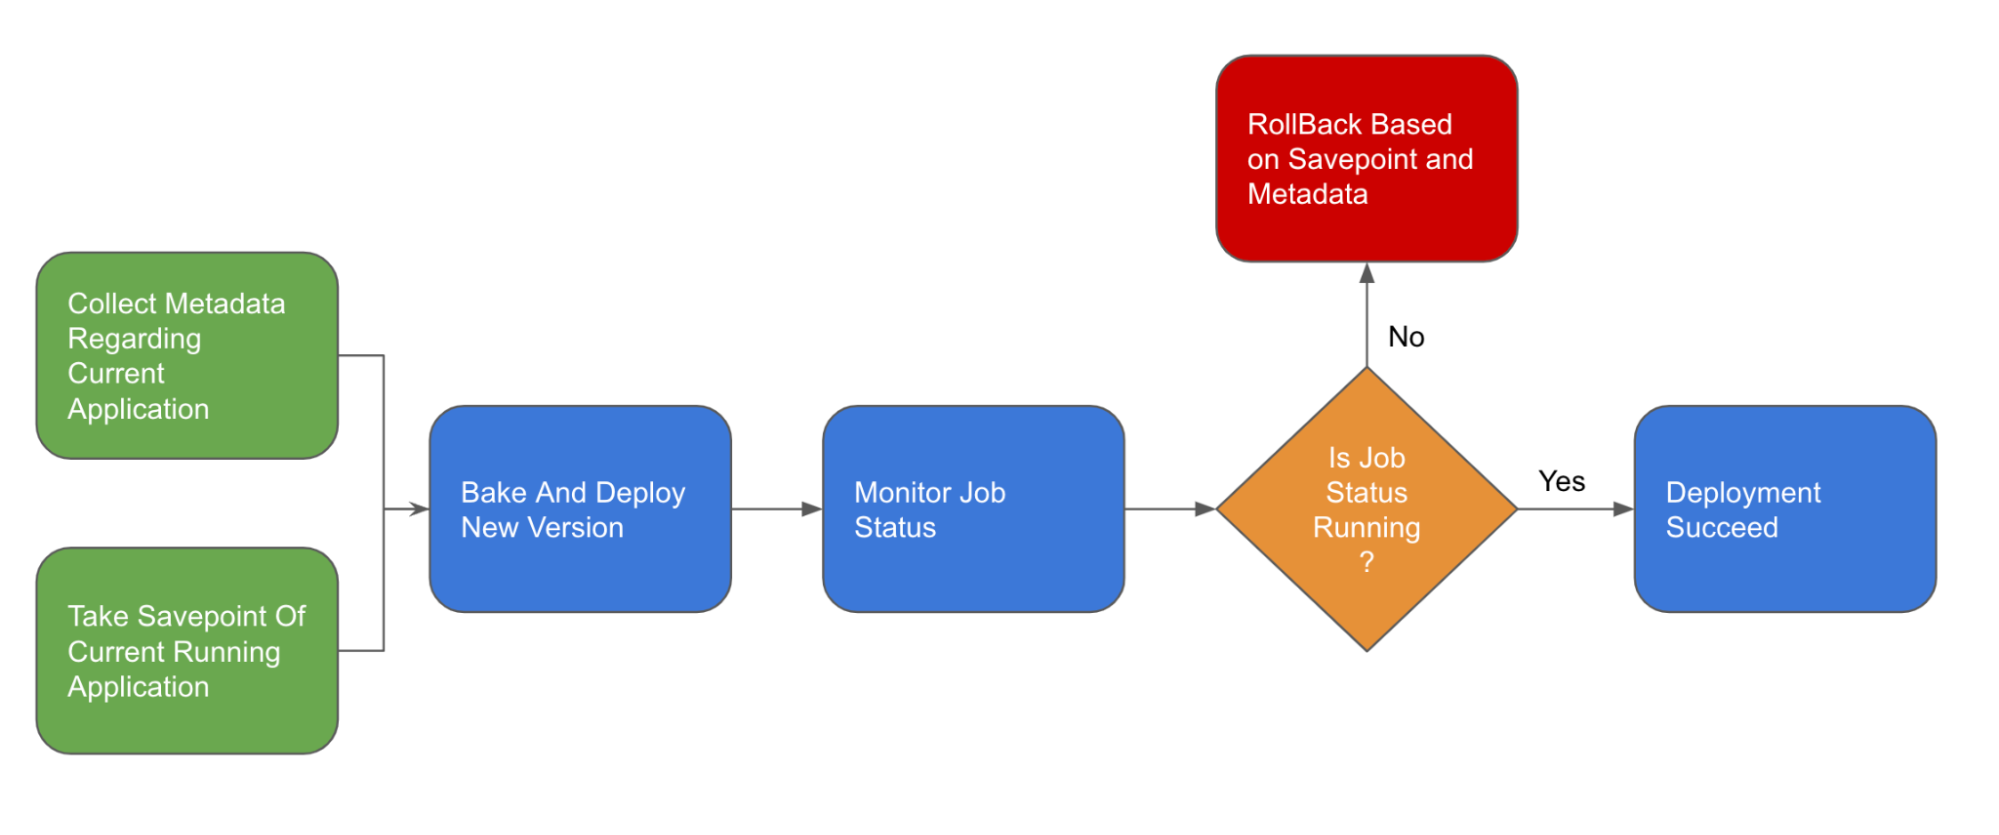
This deployment flow will operate in the following way:

  1. Collect metadata regarding current application
  2. Take savepoint and stop the current application
  3. Clear up high availability configurations
  4. Bake and deploy the new application
  5. Monitor application and rollback if the health check fails

Let’s elaborate on the key changes implemented in this new process.

Savepointing

Flink’s savepointing feature helps address the issue of state consistency and ensures safer deployments.

A savepoint in Flink is a snapshot of a Flink application’s state at the point in time. This savepoint allows us to pause the Flink application and restore the application to this snapshot state, if there’s an issue.

Before deploying a Flink application, we perform a savepoint via the Flink API before killing the current application. This would enable us to save the current state of the Flink application and rollback if our deployment fails – just like how you would do a quick save before attempting a difficult level when playing games. This mechanism ensures that both deployment versions have the same internal state during deployment as they both start from the same savepoint.

Additionally, this feature allows us to easily handle Kafka offsets since these consumed offsets are stored as part of the savepoint. As Flink manages their own state, they don’t need to rely on Kafka’s consumer offset management. With this savepoint feature, we can ensure that the application receives the same data traffic post rollback and that no messages are lost due to processing on the failed version.

Monitoring

To consistently monitor Flink applications, we can conduct health probes to the respective API endpoints to check if the application is stuck in a restart state or if it is running healthily.

We also configured our monitoring jobs to wait for a few minutes for the deployment to stabilise before probing it over a defined duration, to ensure that the application is in a stable running state.

Rollback

If the health checks fail, we then perform an automatic rollback. Typically, Flink applications are deployed as a standalone cluster and a rollback involves changes in one of the following:

  • Application and Flink configurations
  • Taskmanager or Jobmanager resource provision

For configuration changes, we leverage the fact that Spinnaker performs versioned deployment of configmap resources. In this case, a rollback simply involves mounting the old configmap back onto the Kubernetes deployment.

To retrieve the old version of the configmap mount, we can simply utilise Kubernetes’ rollback mechanisms – Kubernetes updates a deployment by creating a new replicaset with an incremental version before attaching it to the current deployment and scaling the previous replicaset to 0. To retrieve previous deployment specs, we just need to list all replicasets related to the deployment and find the previous deployed version, before updating the current deployment to mimic the previous template specifications.

However, this deployment does not contain the number of replicas of previously configured task managers. Kubernetes does not register the number of replicas as part of deployment configuration as this is a dynamic configuration and might be changed during processing due to auto scaling operations.

Our Flink applications are deployed as standalone clusters and do not use native or yarn resource providers. Coupled with the fact that Flink has strict resource provision, we realised that we do not have enough information to perform rollbacks, without the exact number of replicas created.

Taskmanager or Jobmanager resource provision changes

To gather information about resource provision changes, we can simply include the previously configured number of replicas as part of our metadata annotation. This allows us to retrieve it in future during rollback.

Making this change involves creating an additional step of metadata retrieval to retrieve and store previous deployment states as annotations of the new deployment.

Impact

With this solution, the deployment flow on Spinnaker looks like this:

Figure 6. New deployment flow on Spinnaker

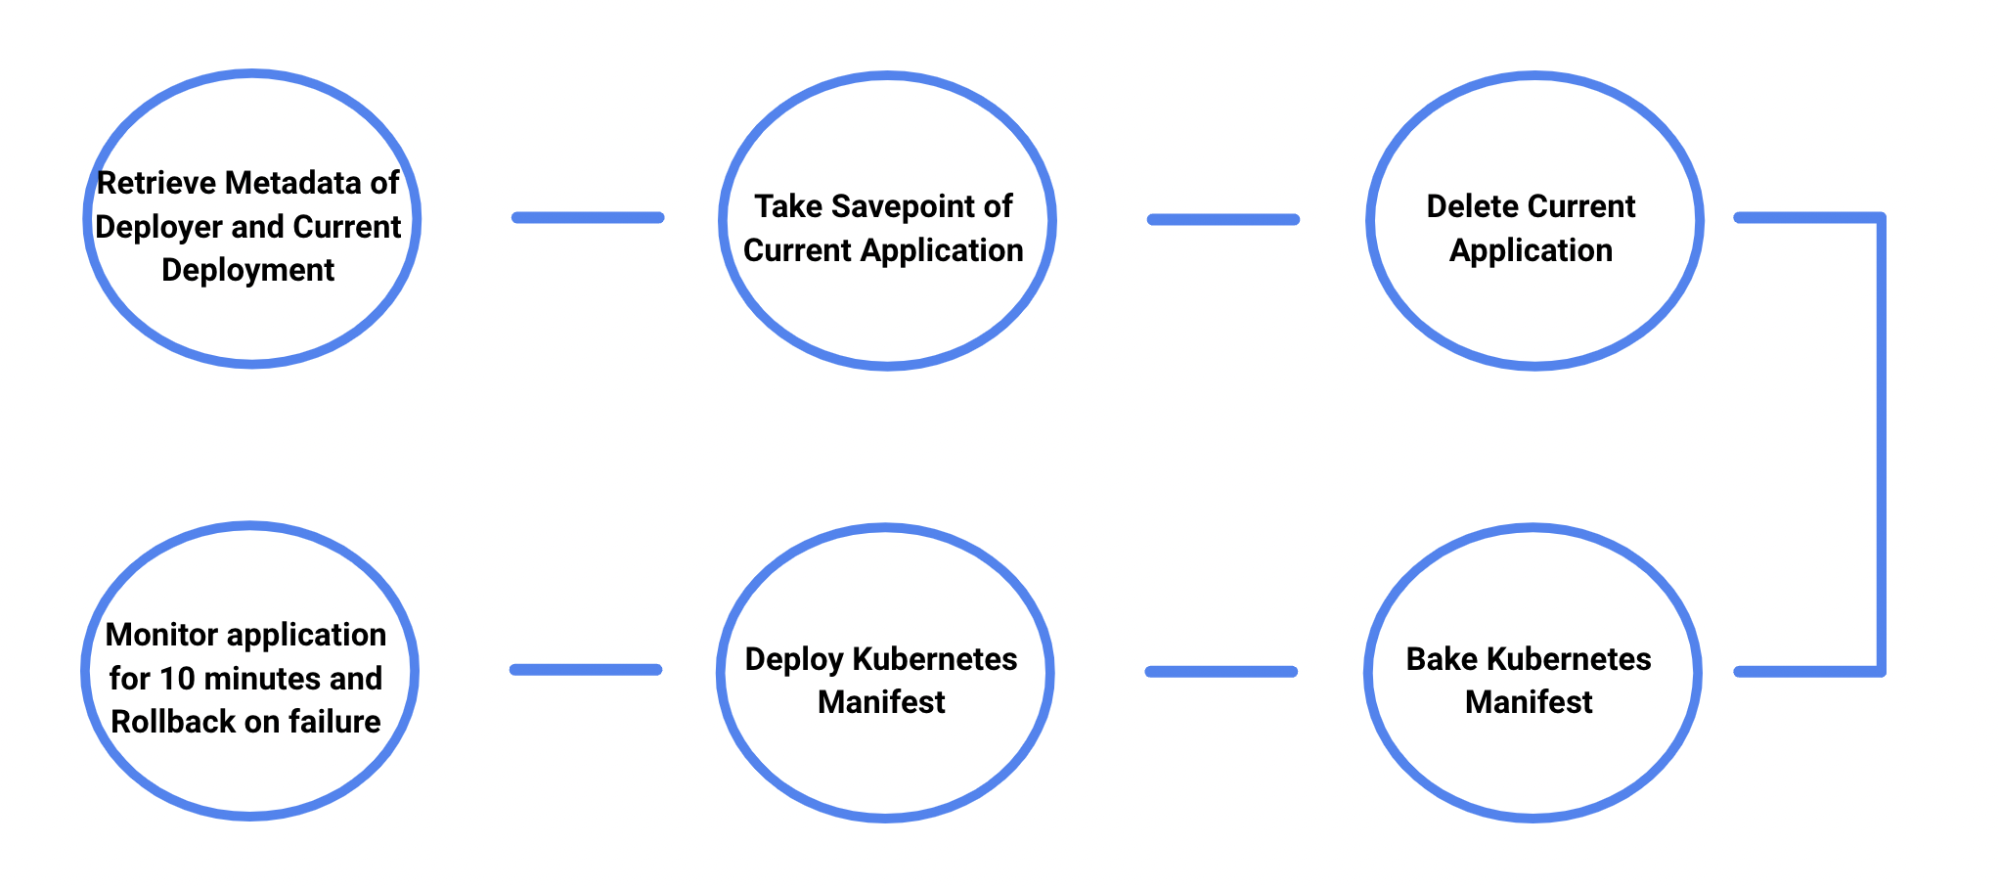
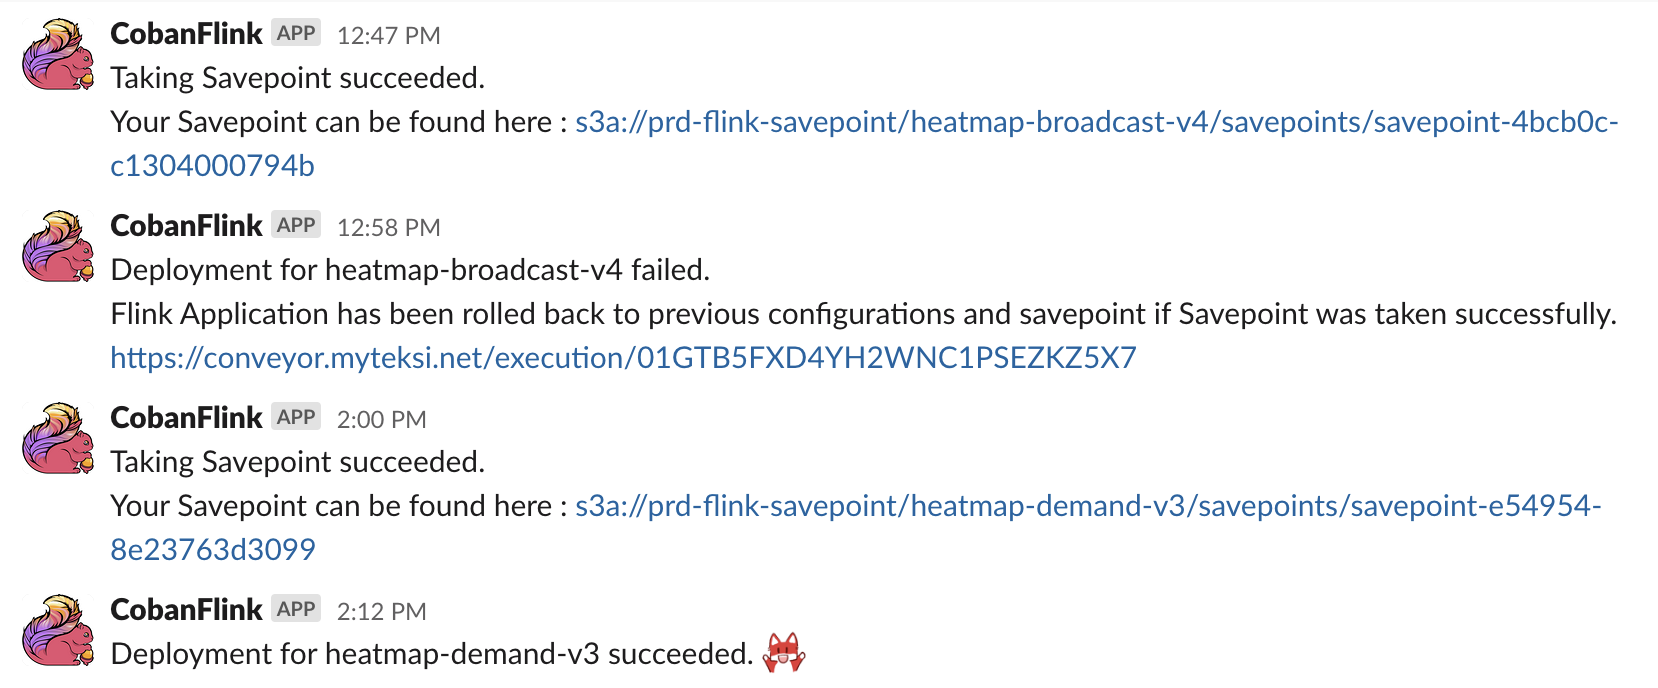
Engineers no longer need to monitor the deployment pipeline as closely as they get notified of their application’s deployment status via Slack. They only need to interact or take action when they get notified that the different stages of the deployment pipeline are completed.

Figure 7. Slack notifications on deployment status

It is also easier to deploy Flink applications since failures and rollbacks are handled automatically. Furthermore, application state management is also automated, which reduces the amount of uncertainties.

What’s next?

As we work to further improve our deployment pipeline, we will look into extending the capabilities at our monitoring stage to allow engineers to define and configure their own health probes, allowing our deployment configurations to be more extendable.

Another interesting improvement will be to make this deployment flow seamlessly, ensuring as little downtime as possible by minimising cold start duration.

Coban also looks forward to pushing more features on our Flink platform to enable our engineers to explore more use cases that utilises real-time data to allow our operations to become auto adaptive and make data-driven decisions.

References

Join us

Grab is the leading superapp platform in Southeast Asia, providing everyday services that matter to consumers. More than just a ride-hailing and food delivery app, Grab offers a wide range of on-demand services in the region, including mobility, food, package and grocery delivery services, mobile payments, and financial services across 428 cities in eight countries.

Powered by technology and driven by heart, our mission is to drive Southeast Asia forward by creating economic empowerment for everyone. If this mission speaks to you, join our team today!

Week in Review – AWS Verified Access, Java 17, Amplify Flutter, Conferences, and More – May 1, 2023

Post Syndicated from Sébastien Stormacq original https://aws.amazon.com/blogs/aws/week-in-review-aws-verified-access-java-17-amplify-flutter-conferences-and-more-may-1-2023/

Conference season has started and I was happy to meet and talk with iOS and Swift developers at the New York Swifty conference last week. I will travel again to Turino (Italy), Amsterdam (Netherlands), Frankfurt (Germany), and London (UK) in the coming weeks. Feel free to stop by and say hi if you are around. But, while I was queuing for passport control at JFK airport, AWS teams continued to listen to your feedback and innovate on your behalf.

What happened on AWS last week ? I counted 26 new capabilities since last Monday (not counting last Friday, since I am writing these lines before the start of the day in the US). Here are the eight that caught my attention.

Last Week on AWS

Amplify Flutter now supports web and desktop apps. You can now write Flutter applications that target six platforms, including iOS, Android, Web, Linux, MacOS, and Windows with a single codebase. This update encompasses not only the Amplify libraries but also the Flutter Authenticator UI library, which has been entirely rewritten in Dart. As a result, you can now deliver a consistent experience across all targeted platforms.

AWS Lambda adds support for Java 17. AWS Lambda now supports Java 17 as both a managed runtime and a container base image. Developers creating serverless applications in Lambda with Java 17 can take advantage of new language features including Java records, sealed classes, and multi-line strings. The Lambda Java 17 runtime also has numerous performance improvements, including optimizations when running Lambda functions on Graviton 2 processors. It supports AWS Lambda Snap Start (in supported Regions) for fast cold starts, and the latest versions of the popular Spring Boot 3 and Micronaut 4 application frameworks

AWS Verified Access is now generally available. I first wrote about Verified Access when we announced the preview at the re:Invent conference last year. AWS Verified Access is now available. This new service helps you provide secure access to your corporate applications without using a VPN. Built based on AWS Zero Trust principles, you can use Verified Access to implement a work-from-anywhere model with added security and scalability.

AWS Support is now available in Korean. As the number of customers speaking Korean grows, AWS Support is invested in providing the best support experience possible. You can now communicate with AWS Support engineers and agents in Korean when you create a support case at the AWS Support Center.

AWS DataSync Discovery is now generally available. DataSync Discovery enables you to understand your on-premises storage performance and capacity through automated data collection and analysis. It helps you quickly identify data to be migrated and evaluate suggested AWS Storage services that align with your performance and capacity needs. Capabilities added since preview include support for NetApp ONTAP 9.7, recommendations at cluster and storage virtual machine (SVM) levels, and discovery job events in Amazon EventBridge.

Amazon Location Service adds support for long-distance matrix routing. This makes it easier for you to quickly calculate driving time and driving distance between multiple origins and destinations, no matter how far apart they are. Developers can now make a single API request to calculate up to 122,500 routes (350 origins and 350 destinations) within a 180 km region or up to 100 routes without any distance limitation.

AWS Firewall Manager adds support for multiple administrators. You can now create up to 10 AWS Firewall Manager administrator accounts from AWS Organizations to manage your firewall policies. You can delegate responsibility for firewall administration at a granular scope by restricting access based on OU, account, policy type, and Region, thereby enabling policy management tasks to be implemented faster and more effectively.

AWS AppSync supports TypeScript and source maps in JavaScript resolvers. With this update, you can take advantage of TypeScript features when you write JavaScript resolvers. With the updated libraries, you get improved support for types and generics in AppSync’s utility functions. The updated AppSync documentation provides guidance on how to get started and how to bundle your code when you want to use TypeScript.

Amazon Athena Provisioned Capacity. Athena is a query service that makes it simple to analyze data in S3 data lakes and 30 different data sources, including on-premises data sources or other cloud systems, using standard SQL queries. Athena is serverless, so there is no infrastructure to manage, and–until today–you pay only for the queries that you run. Starting last week, you can now get dedicated capacity for your queries and use new workload management features to prioritize, control, and scale your most important queries, paying only for the capacity you provision.

X in Y – We made existing services available in additional Regions and locations:

Upcoming AWS Events
And to finish this post, I recommend you check your calendars and sign up for these AWS events:

AWS Serverless Innovation DayJoin us on May 17, 2023, for a virtual event hosted on the Twitch AWS channel. We will showcase AWS serverless technology choices such as AWS Lambda, Amazon ECS with AWS Fargate, Amazon EventBridge, and AWS Step Functions. In addition, we will share serverless modernization success stories, use cases, and best practices.

AWS re:Inforce 2023 – Now register for AWS re:Inforce, in Anaheim, California, June 13–14. AWS Chief Information Security Officer CJ Moses will share the latest innovations in cloud security and what AWS Security is focused on. The breakout sessions will provide real-world examples of how security is embedded into the way businesses operate. To learn more and get the limited discount code to register, see CJ’s blog post Gain insights and knowledge at AWS re:Inforce 2023 in the AWS Security Blog.

AWS Global Summits – Check your calendars and sign up for the AWS Summit close to where you live or work: Seoul (May 3–4), Berlin and Singapore (May 4), Stockholm (May 11), Hong Kong (May 23), Amsterdam (June 1), London (June 7), Madrid (June 15), and Milano (June 22).

AWS Community Day – Join community-led conferences driven by AWS user group leaders close to your city: Chicago (June 15), Manila (June 29–30), and Munich (September 14). Recently, we have been bringing together AWS user groups from around the world into Meetup Pro accounts. Find your group and its meetups in your city!

AWS User Group Peru Conference – There is more than a new edge location opening in Lima. The local AWS User Group announced a one-day cloud event in Spanish and English in Lima on September 23. Three of us from the AWS News blog team will attend. I will be joined by my colleagues Marcia and Jeff. Save the date and register today!

You can browse all upcoming AWS-led in-person and virtual events and developer-focused events such as AWS DevDay.

Stay Informed
That was my selection for this week! To better keep up with all of this news, don’t forget to check out the following resources:

That’s all for this week. Check back next Monday for another Week in Review!

— seb

This post is part of our Week in Review series. Check back each week for a quick roundup of interesting news and announcements from AWS!

How to monitor the expiration of SAML identity provider certificates in an Amazon Cognito user pool

Post Syndicated from Karthik Nagarajan original https://aws.amazon.com/blogs/security/how-to-monitor-the-expiration-of-saml-identity-provider-certificates-in-an-amazon-cognito-user-pool/

With Amazon Cognito user pools, you can configure third-party SAML identity providers (IdPs) so that users can log in by using the IdP credentials. The Amazon Cognito user pool manages the federation and handling of tokens returned by a configured SAML IdP. It uses the public certificate of the SAML IdP to verify the signature in the SAML assertion returned by the IdP. Public certificates have an expiry date, and an expired public certificate will result in a SAML user federation failing because it can no longer be used for signature verification. To avoid user authentication failures, you must monitor and rotate SAML public certificates before expiration.

You can configure SAML IdPs in an Amazon Cognito user pool by using a SAML metadata document or a URL that points to the metadata document. If you use the SAML metadata document option, you must manually upload the SAML metadata. If you use the URL option, Amazon Cognito downloads the metadata from the URL and automatically configures the SAML IdP. In either scenario, if you don’t rotate the SAML certificate before expiration, users can’t log in using that SAML IdP.

In this blog post, I will show you how to monitor SAML certificates that are about to expire or already expired in an Amazon Cognito user pool by using an AWS Lambda function initiated by an Amazon EventBridge rule.

Solution overview

In this section, you will learn how to configure a Lambda function that checks the validity period of the SAML IdP certificates in an Amazon Cognito user pool, logs the findings to AWS Security Hub, and sends out an Amazon Simple Notification Service (Amazon SNS) notification with the list of certificates that are about to expire or have already expired. This Lambda function is invoked by an EventBridge rule that uses a rate or cron expression and runs on a defined schedule. For example, if the rate expression is defined as 1 day, the EventBridge rule initiates the Lambda function once each day. Figure 1 shows an overview of this process.

Figure 1: Lambda function initiated by EventBridge rule

Figure 1: Lambda function initiated by EventBridge rule

As shown in Figure 1, this process involves the following steps:

  1. EventBridge runs a rule using a rate expression or cron expression and invokes the Lambda function.
  2. The Lambda function performs the following tasks:
    1. Gets the list of SAML IdPs and corresponding X509 certificates.
    2. Verifies if the X509 certificates are about to expire or already expired based on the dates in the certificate.
  3. Based on the results of step 2, the Lambda function logs the findings in AWS Security Hub. Each finding shows the SAML certificate that is about to expire or is already expired.
  4. Based on the results of step 2, the Lambda function publishes a notification to the Amazon SNS topic with the certificate expiration details. For example, if CERT_EXPIRY_DAYS=60, the details of SAML certificates that are going to expire within 60 days or are already expired are published in the SNS notification.
  5. Amazon SNS sends messages to the subscribers of the topic, such as an email address.

Prerequisites

For this setup, you will need to have the following in place:

Implementation details

In this section, we will walk you through how to deploy the Lambda function and configure an EventBridge rule that invokes the Lambda function.

Step 1: Create the Node.js Lambda package

  1. Open a command line terminal or shell.
  2. Create a folder named saml-certificate-expiration-monitoring.
  3. Install the fast-xml-parser module by running the following command:
    cd saml-certificate-expiration-monitoring
    npm install fast-xml-parser
  4. Create a file named index.js and paste the following content in the file.
    const AWS = require('aws-sdk');
    const { X509Certificate } = require('crypto');
    const { XMLParser} = require("fast-xml-parser");
    const https = require('https');
    
    exports.handler = async function(event, context, callback) {
      
        const cognitoUPID = process.env.COGNITO_UPID;
        const expiryDays = process.env.CERT_EXPIRY_DAYS;
        const snsTopic = process.env.SNS_TOPIC_ARN;
        const postToSh = process.env.ENABLE_SH_MONITORING; //Enable security hub monitoring
        var securityhub = new AWS.SecurityHub({apiVersion: '2018-10-26'});
        
        var shParams = {
          Findings: []
        };
    
        AWS.config.apiVersions = {
          cognitoidentityserviceprovider: '2016-04-18',
        };
    
        // Initialize CognitoIdentityServiceProvider.
        const cognitoidentityserviceprovider = new AWS.CognitoIdentityServiceProvider();
    
        let listProvidersParams = {
          UserPoolId: cognitoUPID /* required */
        };
        
        let hasNext = true;
        const providerNames = [];
        
        while (hasNext) {
          const listProvidersResp = await cognitoidentityserviceprovider.listIdentityProviders(listProvidersParams).promise();
          listProvidersResp['Providers'].forEach(function(provider) {
                if(provider.ProviderType == 'SAML') {
                  providerNames.push(provider.ProviderName);
                }
            });
          
          listProvidersParams.NextToken = listProvidersResp.NextToken;
          hasNext = !!listProvidersResp.NextToken; //Keep iterating if there are more pages
        }
     
        let describeIdentityProviderParams = {
          UserPoolId: cognitoUPID /* required */
        };
        
        //Initialize the options for fast-xml-parser  
        //Parse KeyDescriptor as an array
        const alwaysArray = [
          "EntityDescriptor.IDPSSODescriptor.KeyDescriptor"
        ];
        const options = {
          removeNSPrefix: true,
          isArray: (name, jpath, isLeafNode, isAttribute) => { 
            if( alwaysArray.indexOf(jpath) !== -1) return true;
          },
          ignoreDeclaration: true
        };
        const parser = new XMLParser(options);
        
        let certExpMessage = '';
        const today = new Date();
        
        if(providerNames.length == 0) {
          console.log("There are no SAML providers in this Cognito user pool. ID : " + cognitoUPID);
        }
        
        for (let provider of providerNames) {
          describeIdentityProviderParams.ProviderName = provider;
          const descProviderResp = await cognitoidentityserviceprovider.describeIdentityProvider(describeIdentityProviderParams).promise();
          let xml = '';
          //Read SAML metadata from Cognito if the file is available. Else, read the SAML metadata from URL
          if('MetadataFile' in descProviderResp.IdentityProvider.ProviderDetails) {
            xml = descProviderResp.IdentityProvider.ProviderDetails.MetadataFile;
          } else {
            let metadata_promise = getMetadata(descProviderResp.IdentityProvider.ProviderDetails.MetadataURL);
    		    xml = await metadata_promise;
          }
          let jObj = parser.parse(xml);
          if('EntityDescriptor' in jObj) {
            //SAML metadata can have multiple certificates for signature verification. 
            for (let cert of jObj['EntityDescriptor']['IDPSSODescriptor']['KeyDescriptor']) {
              let certificate = '-----BEGIN CERTIFICATE-----\n' 
              + cert['KeyInfo']['X509Data']['X509Certificate'] 
              + '\n-----END CERTIFICATE-----';
              let x509cert = new X509Certificate(certificate);
              console.log("------ Provider : " + provider + "-------");
              console.log("Cert Expiry: " + x509cert.validTo);
              const diffTime = Math.abs(new Date(x509cert.validTo) - today);
              const diffDays = Math.ceil(diffTime / (1000 * 60 * 60 * 24));
              console.log("Days Remaining: " + diffDays);
              if(diffDays <= expiryDays) {
                
                certExpMessage += 'Provider name: ' + provider + ' SAML certificate (serialnumber : '+ x509cert.serialNumber + ') expiring in ' + diffDays + ' days \n';
                
                if(postToSh === 'true') {
                  //Log finding for security hub
                  logFindingToSh(context, shParams,
                  'Provider name: ' + provider + ' SAML certificate is expiring in ' + diffDays + ' days. Please contact the Identity provider to rotate the certificate.',
                  x509cert.fingerprint, cognitoUPID, provider); 
                }
              }
            }
          }
        }
        //Send a SNS message if a certificate is about to expire or already expired
        if(certExpMessage) {
          console.log("SAML certificates expiring within next " + expiryDays + " days :\n");
          console.log(certExpMessage);
          certExpMessage = "SAML certificates expiring within next " + expiryDays + " days :\n" + certExpMessage;
          // Create publish parameters
          let snsParams = {
            Message: certExpMessage, /* required */
            TopicArn: snsTopic
          };
          // Create promise and SNS service object
          let publishTextPromise = await new AWS.SNS({apiVersion: '2010-03-31'}).publish(snsParams).promise();
          console.log(publishTextPromise);
          
          if(postToSh === 'true') {
            console.log("Posting the finding to SecurityHub");
            let shPromise = await securityhub.batchImportFindings(shParams).promise();
            console.log("shPromise : " + JSON.stringify(shPromise));
          }
          
        } else {
          console.log("No certificates are expiring within " + expiryDays + " days");
        }
    };
    
    function getMetadata(url) {
    	return new Promise((resolve, reject) => {
    		https.get(url, (response) => {
    			let chunks_of_data = [];
    
    			response.on('data', (fragments) => {
    				chunks_of_data.push(fragments);
    			});
    
    			response.on('end', () => {
    				let response_body = Buffer.concat(chunks_of_data);
    				resolve(response_body.toString());
    			});
    
    			response.on('error', (error) => {
    				reject(error);
    			});
    		});
    	});
    }
    
    function logFindingToSh(context, shParams, remediationMsg, certFp, cognitoUPID, provider) {
      const accountID = context.invokedFunctionArn.split(':')[4];
      const region = process.env.AWS_REGION;
      const sh_product_arn = `arn:aws:securityhub:${region}:${accountID}:product/${accountID}/default`;
      const today = new Date().toISOString();
      
      shParams.Findings.push(
            {
          SchemaVersion: "2018-10-08",
          AwsAccountId: `${accountID}`, /* required */
          CreatedAt: `${today}`, /* required */
          UpdatedAt: `${today}`,
          Title: 'SAML Certificate expiration',
          Description: 'SAML certificate expiry', /* required */
          GeneratorId: `${context.invokedFunctionArn}`, /* required */
          Id: `${cognitoUPID}:${provider}:${certFp}`, /* required */
          ProductArn: `${sh_product_arn}`, /* required */
          Severity: {
              Original: '89.0',
              Label: 'HIGH'
          },
          Types: [
                    "Software and Configuration Checks/AWS Config Analysis"
          ],
          Compliance: {Status: 'WARNING'},
          Resources: [ /* required */
            {
              Id: `${cognitoUPID}`, /* required */
              Type: 'AWSCognitoUserPool', /* required */
              Region: `${region}`,
              Details : {
                Other: { 
                           "IdPIdentifier" : `${provider}` 
                }
              }
            }
          ],
          Remediation: {
                    Recommendation: {
                        Text: `${remediationMsg}`,
                        Url: `https://console.aws.amazon.com/cognito/v2/idp/user-pools/${cognitoUPID}/sign-in/identity-providers/details/${provider}`
                    }
          }
        }
      );
    }
  5. To create the deployment package for a .zip file archive, you can use a built-in .zip file archive utility or other third-party zip file utility. If you are using Linux or Mac OS, run the following command.
    zip -r saml-certificate-expiration-monitoring.zip .

Step 2: Create an Amazon SNS topic

  1. Create a standard Amazon SNS topic named saml-certificate-expiration-monitoring-topic for the Lambda function to use to send out notifications, as described in Creating an Amazon SNS topic.
  2. Copy the Amazon Resource Name (ARN) for Amazon SNS. Later in this post, you will use this ARN in the AWS Identity and Access Management (IAM) policy and Lambda environment variable configuration.
  3. After you create the Amazon SNS topic, create email subscribers to this topic.

Step 3: Configure the IAM role and policies and deploy the Lambda function

  1. In the IAM documentation, review the section Creating policies on the JSON tab. Then, using those instructions, use the following template to create an IAM policy named lambda-saml-certificate-expiration-monitoring-function-policy for the Lambda role to use. Replace <REGION> with your Region, <AWS-ACCT-NUMBER> with your AWS account ID, <SNS-ARN> with the Amazon SNS ARN from Step 2: Create an Amazon SNS topic, and <USER_POOL_ID> with your Amazon Cognito user pool ID that you want to monitor.
    {
        "Version": "2012-10-17",
        "Statement": [
            {
                "Sid": "AllowLambdaToCreateGroup",
                "Effect": "Allow",
                "Action": "logs:CreateLogGroup",
                "Resource": "arn:aws:logs:<REGION>:<AWS-ACCT-NUMBER>:*"
            },
            {
                "Sid": "AllowLambdaToPutLogs",
                "Effect": "Allow",
                "Action": [
                    "logs:CreateLogStream",
                    "logs:PutLogEvents"
                ],
                "Resource": [
                    "arn:aws:logs:<REGION>:<AWS-ACCT-NUMBER>:log-group:/aws/lambda/saml-certificate-expiration-monitoring:*"
                ]
            },
            {
                "Sid": "AllowLambdaToGetCognitoIDPDetails",
                "Effect": "Allow",
                "Action": [
                    "cognito-idp:DescribeIdentityProvider",
                    "cognito-idp:ListIdentityProviders",
                    "cognito-idp:GetIdentityProviderByIdentifier"
                ],
                "Resource": "arn:aws:cognito-idp:<REGION>:<AWS-ACCT-NUMBER>:userpool/<USER_POOL_ID>"
            },
            {
                "Sid": "AllowLambdaToPublishToSNS",
                "Effect": "Allow",
                "Action": "SNS:Publish",
                "Resource": "<SNS-ARN>"
            } ,
            {
                "Sid": "AllowLambdaToPublishToSecurityHub",
                "Effect": "Allow",
                "Action": [
                    "SecurityHub:BatchImportFindings"
                ],
                "Resource": "arn:aws:securityhub:<REGION>:<AWS-ACCT-NUMBER>:product/<AWS-ACCT-NUMBER>/default"
            }
        ]
    }

  2. After the policy is created, create a role for the Lambda function to use the policy, by following the instructions in Creating a role to delegate permissions to an AWS service. Choose Lambda as the service to assume the role and attach the policy lambda-saml-certificate-expiration-monitoring-function-policy that you created in step 1 of this section. Specify a role named lambda-saml-certificate-expiration-monitoring-function-role, and then create the role.
  3. Review the topic Create a Lambda function with the console within the Lambda documentation. Then create the Lambda function, choosing the following options:
    1. Under Create function, choose Author from scratch to create the function.
    2. For the function name, enter saml-certificate-expiration-monitoring, and for Runtime, choose Node.js 16.x.
    3. For Execution role, expand Change default execution role, select Use an existing role, and select the role created in step 2 of this section.
    4. Choose Create function to open the Designer, and upload the zip file that was created in Step 1: Create the Node.js Lambda package.
    5. You should see the index.js code in the Lambda console.
  4. After the Lambda function is created, you will need to adjust the timeout duration. Set the Lambda timeout to 10 seconds. For more information, see the timeout entry in Configuring functions in the console. If you receive a timeout error, see How do I troubleshoot Lambda function invocation timeout errors?
  5. If you make code changes after uploading, deploy the Lambda function.

Step 4: Create an EventBridge rule

  1. Follow the instructions in creating an Amazon EventBridge rule that runs on a schedule to create a rule named saml-certificate-expiration-monitoring-rule. You can use a rate expression of 24 hours to initiate the event. This rule will invoke the Lambda function once per day.
  2. For Select a target, choose AWS Lambda service.
  3. For Lambda function, select the saml-certificate-expiration-monitoring function that you deployed in Step 3: Configure the IAM role and policies and deploy the Lambda function.

Step 5: Test the Lambda function

  1. Open the Lambda console, select the function that you created earlier, and configure the following environment variables:
    1. Create an environment variable called CERT_EXPIRY_DAYS. This specifies how much lead time, in days, you want to have before the certificate expiration notification is sent.
    2. Create an environment variable called COGNITO_UPID. This identifies the Amazon Cognito user pool ID that needs to be monitored.
    3. Create an environment variable called SNS_TOPIC_ARN and set it to the Amazon SNS topic ARN from Step 2: Create an Amazon SNS topic.
    4. Create an environment variable called ENABLE_SH_MONITORING and set it to true or false. If you set it to true, the Lambda function will log the findings in AWS Security Hub.
  2. Configure a test event for the Lambda function by using the default template and name it TC1, as shown in Figure 2.
    Figure 2: Create a Lambda test case

    Figure 2: Create a Lambda test case

  3. Run the TC1 test case to test the Lambda function. To make sure that the Lambda function ran successfully, check the Amazon CloudWatch logs. You should see the console log messages from the Lambda function. If ENABLE_SH_MONITORING is set to true in the Lambda environment variables, you will see a list of findings in AWS Security Hub for certificates with an expiry of less than or equal to the value of the CERT_EXPIRY_DAYS environment variable. Also, an email will be sent to each subscriber of the Amazon SNS topic.

Cleanup

To avoid future charges, delete the following resources used in this post (if you don’t need them) and disable AWS Security Hub.

  • Lambda function
  • EventBridge rule
  • CloudWatch logs associated with the Lambda function
  • Amazon SNS topic
  • IAM role and policy that you created for the Lambda function

Conclusion

An Amazon Cognito user pool with hundreds of SAML IdPs can be challenging to monitor. If a SAML IdP certificate expires, users can’t log in using that SAML IdP. This post provides the steps to monitor your SAML IdP certificates and send an alert to Amazon Cognito user pool administrators when a certificate is about to expire so that you can proactively work with your SAML IdP administrator to rotate the certificate. Now that you’ve learned the benefits of monitoring your IdP certificates for expiration, I recommend that you implement these, or similar, controls to make sure that you’re notified of these events before they occur.

If you have feedback about this post, submit comments in the Comments section below. If you have questions about this post, start a new thread on the Amazon Cognito re:Post or contact AWS Support.

Want more AWS Security news? Follow us on Twitter.

Karthik Nagarajan

Karthik Nagarajan

Karthik is Security Engineer with AWS Identity Security Team. He helps the Amazon Cognito team to build a secure product for the customers.

Celebrating Australia’s Privacy Awareness Week 2023

Post Syndicated from Emily Hancock original http://blog.cloudflare.com/celebrating-australia-privacy-awareness-week-2023/

Celebrating Australia’s Privacy Awareness Week 2023

Celebrating Australia’s Privacy Awareness Week 2023

When a country throws a privacy party, Cloudflare is there! We are proud to be an official sponsor of the Australian Privacy Awareness Week 2023, and we think this year’s theme of “Privacy 101: Back to Basics” is more important now than ever. In recent months, Australians have been hit with the news of massive personal data privacy breaches where millions of Australian citizens' private and sensitive data was compromised, seemingly easily. Meanwhile, the Australian Attorney General released its Privacy Act Review Report 2022 earlier this year, calling for a number of changes to Australia’s privacy regulations.

You’re probably familiar with the old-school privacy basics of giving users notice and consent. But we think it’s time for some new “privacy basics”. Thanks to rapid developments in new technologies and new security threat vectors, notice and consent can only go so far to protect the privacy of your personal data. New challenges call for new solutions: security solutions and privacy enhancing technologies to keep personal data protected. Cloudflare is excited to play a role in building and using these technologies to help our customers keep their sensitive information private and enable individual consumers to protect themselves. Investing in and offering these technologies is part of our mission to help build a better Internet – one that is more private and more secure.

Cloudflare is fully committed to supporting Australian individuals and organizations in protecting their and their users’ privacy. We’ve been in Australia since Sydney became Cloudflare’s 15th data center in 2012, and we launched our Australian entity in 2019. We support more than 300 customers in Australia and New Zealand, including some of Australia’s largest banks and online digital natives with our world-leading privacy and security products and services.

For example, Australian tech darling Canva, whose online graphic design tool is used by over 35 million people worldwide each month, uses a number of our solutions that help Canva protect its network from attacks, which in turn ensures that the data of its millions of users is not breached. And we are proud to support Citizens of the Great Barrier Reef, which is a participant of Cloudflare’s Project Galileo. Through Project Galileo, we’ve helped them to secure their origin server from large bursts of traffic or malicious actors attempting to access the website.

This is why we’re proud to support Australia’s Privacy Awareness Week 2023, and we want to share our expertise on how to empower Australian organizations in securing and protecting the privacy of their users. So let’s look at a few key privacy basics and how we think about them at Cloudflare:

  • Minimize the data you collect, and then only use that data for the purpose for which it was collected.
  • Employ reasonable and appropriate security measures — with the bar for what this means going higher every day.
  • Create a culture of privacy by default.

Minimizing personal data in the clear

At Cloudflare, we believe in empowering individuals and entities of all sizes with technological tools to reduce the amount of personal data that gets funneled into the data ocean that is the Internet — regardless of whether someone lives in a country with laws protecting the privacy of their personal data. If we can build tools to help individuals share less personal data online, then that’s a win for privacy no matter what their country of residence.

In 2018, Cloudflare launched the 1.1.1.1 public DNS resolver — the Internet's fastest, privacy-first public DNS resolver. Our public resolver doesn’t retain any personal data about web requests. And because we baked anonymization best practices into the 1.1.1.1 resolver when we built it, we were able to demonstrate that we didn’t have any personal data to sell when we asked independent accountants to conduct a privacy examination of the 1.1.1.1 resolver. And when you combine our 1.1.1.1 public resolver with Warp, our VPN, then your Internet service provider can no longer see every site and app you use—even if they’re encrypted. Which means that even if they wanted to, the ISP can’t sell your data or use it to target you with ads.

We’ve also invested heavily in new technologies that aim to secure Internet traffic from bad actors; the prying eyes of ISPs or other man-in-the-middle machines that might find your Internet communications of interest for advertising purposes; or government entities that might want to crack down on individuals exercising their freedom of speech.

For example, DNS records are like the addresses on the outside of an envelope, and the website content you’re viewing is like the letter inside that envelope. In the snail mail world, courts have long recognized that the address on the outside of a letter doesn’t deserve as much privacy protection as the letter itself. But we’re not living in an age where the only thing someone can tell from the outside of the envelope are the “to” and “from” addresses and place of postage. The digital envelopes of DNS requests can contain much more information about a person than you might expect. Not only is there information about the sender and recipient addresses, but there is specific timestamp information about when requests were submitted, the domains and subdomains visited, and even how long someone stayed on a certain site. Since these digital envelopes contain so much personal information, we think it’s just as important to encrypt this information as to encrypt the contents of the digital letter inside. This is why we doubled down on DNS over HTTPS (DoH).

But we thought we could go further. We were an early supporter of Oblivious DoH (ODoH). ODoH is a proposed DNS standard — co-authored by engineers from Cloudflare, Apple, and Fastly — that separates IP addresses from queries, so that no single entity can see both at the same time. ODoH requires a proxy as a key part of the communication path between client and resolver, with encryption ensuring that the proxy does not know the contents of the DNS query (only where to send it), and the resolver knowing what the query is but not who originally requested it (only the proxy’s IP address). This means the identity of the requester and the content of the request are unlinkable. This technology has formed the basis of Apple’s iCloud Private Relay system, which ensures that no single party handling user data has complete information on both who the user is and what they are trying to access. Cloudflare is proud to serve as a second relay for Apple Private Relay.

But wait – there’s more! We’ve also invested heavily in Oblivious HTTP (OHTTP), an emerging IETF standard and is built upon standard hybrid public-key cryptography. Our Privacy Gateway service relays encrypted HTTP requests and responses between a client and application server. With Privacy Gateway, Cloudflare knows where the request is coming from, but not what it contains, and applications can see what the request contains, but not where it comes from. Neither Cloudflare nor the application server has the full picture, improving end-user privacy.

We recently deployed Privacy Gateway for Flo Health Inc., a leading female health app, for the launch of their Anonymous Mode. With Privacy Gateway in place, all request data for Anonymous Mode users is encrypted between the app user and Flo, which prevents Flo from seeing the IP addresses of those users and Cloudflare from seeing the contents of that request data.

And in the area of analytics, we’ve developed a privacy-first, free web analytics tool. Popular analytics vendors glean visitor and site data in return for web analytics. With business models driven by ad revenue, many analytics vendors track visitor behavior on websites and create buyer profiles to retarget website visitors with ads. But we wanted to give our customers a better option, so they wouldn’t have to sacrifice their visitors’ privacy to get essential and accurate metrics on website usage. Cloudflare Web Analytics works by adding a JavaScript snippet to a website instead of using client-side cookies or instead of fingerprinting individuals using their IP address.

Investing in security to protect data privacy

A key “privacy basic” that is also a fundamental element of almost all data protection legislation globally is the requirement to adopt reasonable and appropriate security measures for the personal data that is being processed. And as was the case with the most recent data breaches in Australia, if personal data is accessed without authorization, poor or failed security measures are often to blame.

Cloudflare's security services enable our customers to screen for cybersecurity risks on Cloudflare's network before those risks can reach the customer's internal network. This helps protect our customers and our customers’ data from a range of cyber threats. By doing so, Cloudflare's services are essentially fulfilling a privacy-enhancing function in themselves. From the beginning, we have built our systems to ensure that data is kept private, even from us, and we have made public policy and contractual commitments about keeping that data private and secure.

But beyond securing our network for the benefit of our customers, Cloudflare is most well-known for its application layer security services – Web Application Firewall (WAF), bot management, DDoS protection, SSL/TLS, Page Shield, and more. We also embrace the critical importance of encryption in transit. In fact, we see encryption as so important that in 2014, Cloudflare introduced Universal SSL to support SSL (and now TLS) connections to every Cloudflare customer. And at the same time, we recognize that blindly passing along encrypted packets would undercut some of the very security that we’re trying to provide. Data privacy and security are a balance. If we let encrypted malicious code get to an end destination, then the malicious code may be used to access information that should otherwise have been protected. If data isn’t encrypted in transit, it’s at risk for interception. But by supporting encryption in transit and ensuring malicious code doesn’t get to its intended destination, we can protect private personal information even more effectively.

Let’s take an example – In June 2022, Atlassian released a Security Advisory relating to a remote code execution (RCE) vulnerability affecting Confluence Server and Confluence Data Center products. Cloudflare responded immediately to roll out a new WAF rule for all of our customers. For customers without this WAF protection, all the trade secret and personal information on their instances of Confluence were potentially vulnerable to data breach. These types of security measures are critical to protecting personal data. And it wouldn’t have mattered if the personal data were stored on a server in Australia, Germany, the U.S., or India – the RCE vulnerability would have exposed data wherever it was stored. Instead, the data was protected because a global network was able to roll out a WAF rule immediately to protect all of its customers globally.

Some of the biggest data breaches in recent years have happened as a result of something pretty simple – an attacker uses a phishing email or social engineering to get an employee of a company to visit a site that infects the employee’s computer with malware or enter their credentials on a fake site that lets the bad actor capture the credentials and then use those to impersonate the employee and log into a company’s systems. Depending on the type of information compromised, these kinds of data breaches can have a huge impact on individuals’ privacy. For this reason, Cloudflare has invested in a number of technologies designed to protect corporate networks, and the personal data on those networks.

As we noted during our CIO week earlier this year, the FBI’s latest Internet Crime Report shows that business email compromise and email account compromise, a subset of malicious phishing campaigns, are the most costly – with U.S. businesses losing nearly $2.4 billion. Cloudflare has invested in a number of Zero Trust solutions to help fight this very problem:

  • Link Isolation means that when an employee clicks a link in an email, it will automatically be opened using Cloudflare’s Remote Browser Isolation technology that isolates potentially risky links, downloads, or other zero-day attacks from impacting that user’s computer and the wider corporate network.
  • With our Data Loss Prevention tools, businesses can identify and stop exfiltration of data.
  • Our Area 1 solution identifies phishing attempts, emails containing malicious code, and emails containing ransomware payloads and prevents them from landing in the inbox of unsuspecting employees.

These Zero Trust tools, combined with the use of hardware keys for multifactor authentication, were key in Cloudflare’s ability to prevent a breach by an SMS phishing attack that targeted more than 130 companies in July and August 2022. Many of these companies reported the disclosure of customer personal information as a result of employees falling victim to this SMS phishing effort.

And remember the Atlassian Confluence RCE vulnerability we mentioned earlier? Cloudflare remained protected not only due to our rapid update of our WAF rules, but also because we use our own Cloudflare Access solution (part of our Zero Trust suite) to ensure that only individuals with Cloudflare credentials are able to access our internal systems. Cloudflare Access verified every request made to a Confluence application to ensure it was coming from an authenticated user.

All of these Zero Trust solutions require sophisticated machine learning to detect patterns of malicious activity, and none of them require data to be stored in a specific location to keep the data safe. Thwarting these kinds of security threats aren’t only important for protecting organizations’ internal networks from intrusion – they are critical for keeping large scale data sets private for the benefit of millions of individuals.

How we do privacy at Cloudflare

All the technologies we build are public examples of how at Cloudflare we put our money where our mouth is when it comes to privacy. We also want to tell you about the ways — some public, some not — we infuse privacy principles at all levels at Cloudflare.

  • Employee education and mindset: An understanding of privacy is core to a Cloudflare employee’s experience right from the start. Employees learn about the role privacy and security play in helping to build a better Internet in their first weeks at Cloudflare. During the comprehensive employee orientation, we stress the role each employee plays in keeping the company and our customers secure. All employees are required to take annual data protection training, and we do targeted training for individual teams, depending on their engagement with personal data, throughout the year.
  • Privacy in product development: Cloudflare employees take privacy-by-design seriously. We develop products and processes with the principles of data minimization, purpose limitation, and data security always front of mind. We have a product development lifecycle that includes performing privacy impact assessments when we may process personal data. We retain personal data we process for as short a time as necessary to provide our services to our customers. We do not track customers’ end users across sites. We don’t sell personal information. We don’t monetize DNS requests. We detect, deter, and deflect bad actors — we’re not in the business of looking at what any one person (or more specifically, browser) is doing when they browse the Internet. That’s not what we’re about.
  • Certifications: In addition to the extensive internal security mechanisms we have in place to protect our customers’ data, we also have become certified under industry standards to demonstrate our commitment to data security. We hold the following certifications: ISO 27001, ISO 27701, ISO 27018, AICPA SOC2 Type II, FedRamp Moderate, PCI DSS 3.2.1, WCAG 2.1 AA and Section 508, C5:2020, and, most recently, the EU Cloud Code of Conduct.
  • Privacy-focused response to government and third-party requests for information: Our respect for our customers' privacy applies with equal force to commercial requests and to government or law enforcement requests. Any law enforcement requests that we receive must strictly adhere to the due process of law and be subject to judicial oversight. We believe that U.S. law enforcement requests for the personal data of a non-U.S. person that conflict with the privacy laws of that person’s country of residence (such as Australia’s Privacy Act) should be legally challenged. We commit in our Data Processing Addendum that we will fight government data requests where such a conflict exists. In addition, it is our policy to notify our customers of a subpoena or other legal process requesting their customer or billing information before disclosure of that information, whether the legal process comes from the government or private parties involved in civil litigation, unless legally prohibited. We also publicly report on the types of requests we receive, as well as our responses, in our semi-annual Transparency Report. Finally, we publicly list certain types of actions that Cloudflare has never taken in response to government requests, and we commit that if Cloudflare were asked to do any of the things on this list, we would exhaust all legal remedies in order to protect our customers from what we believe are illegal or unconstitutional requests.

And there’s more to come…

Cloudflare is committed to fully support Australia’s privacy goals, and we are paying close attention to the current conversations around updating Australia’s privacy law and regulatory structure. And our 2023 roadmap includes focusing on the APEC Cross-Border Privacy Rules (CBPR) System as a way to demonstrate our continued commitment to global privacy and paving the way for beneficial cross-border data transfers.

Happy Privacy Awareness Week 2023!

Build an analytics pipeline for a multi-account support case dashboard

Post Syndicated from Sindhura Palakodety original https://aws.amazon.com/blogs/big-data/build-an-analytics-pipeline-for-a-multi-account-support-case-dashboard/

As organizations mature in their cloud journey, they have many accounts (even hundreds) that they need to manage. Imagine having to manage support cases for these accounts without a unified dashboard. Administrators have to access each account either by switching roles or with single sign-on (SSO) in order to view and manage support cases.

This post demonstrates how you can build an analytics pipeline to push support cases created in individual member AWS accounts into a central account. We also show you how to build an analytics dashboard to gain visibility and insights on all support cases created in various accounts within your organization.

Overview of solution

In this post, we go through the process to create a pipeline to ingest, store, process, analyze, and visualize AWS support cases. We use the following AWS services as key components:

The following diagram illustrates the architecture.

The central account is the AWS account that you use to centrally manage the support case data.

Member accounts are the AWS accounts where, whenever the support cases are created, the data flows into an S3 bucket in the central account that can be visualized using the QuickSight dashboard in the central account.

To implement this solution, you complete the following high-level steps:

  1. Determine the AWS accounts to use for the central account and member accounts.
  2. Set up permissions for AWS CloudFormation StackSets on the central account and member accounts.
  3. Create resources on the central account using AWS CloudFormation.
  4. Create resources on the member accounts using CloudFormation StackSets.
  5. Open up support cases on the member accounts.
  6. Visualize the data in a QuickSight dashboard in the central account.

Prerequisites

Complete the following prerequisite steps:

  1. Create AWS accounts if you haven’t done so already.
  2. Before you get started, make sure that you have a Business or Enterprise support plan for your member accounts.
  3. Sign up for QuickSight if you have never used QuickSight in this account before. To use the forecast capability in QuickSight, sign up for the Enterprise Edition.

Preparation for CloudFormation StackSets

In this section, we go through the steps to set up permissions for StackSets in both the central and member accounts.

Set up permissions for StackSets on the central account

To set up permissions on the central account, complete the following steps:

  1. Sign in to the AWS Management Console of the central account.
  2. Download the administrator role CloudFormation template.
  3. On the AWS CloudFormation console, choose Create stack and With new resources.
  4. Leave the Prepare template setting as default.
  5. For Template source, select Upload a template file.
  6. Choose Choose file and supply the CloudFormation template you downloaded: AWSCloudFormationStackSetAdministrationRole.yml.
  7. Choose Next.
  8. For Stack name, enter StackSetAdministratorRole.
  9. Choose Next.
  10. For Configure stack options, we recommend configuring tags, which are key-value pairs that can help you identify your stacks and the resources they create. For example, enter Owner as the key, and your email address as the value.
  11. We don’t use additional permissions or advanced options, so accept the default values and choose Next.
  12. Review your configuration and select I acknowledge that AWS CloudFormation might create IAM resources with custom names.
  13. Choose Create stack.

The stack takes about 30 seconds to complete.

Set up permissions for StackSets on member accounts

Now that we’ve created a StackSet administrator role on the central account, we need to create the StackSet execution role on the member accounts. Perform the following steps on all member accounts:

  1. Sign in to the console on the member account.
  2. Download the execution role CloudFormation template.
  3. On the AWS CloudFormation console, choose Create stack and With new resources.
  4. Leave the Prepare template setting as default.
  5. For Template source, select Upload a template file.
  6. Choose Choose file and supply the CloudFormation template you downloaded: AWSCloudFormationStackSetExecutionRole.yml.
  7. Choose Next.
  8. For Stack name, use StackSetExecutionRole.
  9. For Parameters, enter the 12-digit account ID for the central account.
  10. Choose Next.
  11. For Configure stack options, we recommend configuring tags. For example, enter Owner as the key and your email address as the value.
  12. We don’t use additional permissions or advanced options, so choose Next.

For more information, see Setting AWS CloudFormation stack options.

  1. Review your configuration and select I acknowledge that AWS CloudFormation might create IAM resources with custom names.
  2. Choose Create stack.

The stack takes about 30 seconds to complete.

Set up the infrastructure for the central account and member accounts

In this section, we go through the steps to create your resources for both accounts and launch the StackSets.

Create resources on the central account with AWS CloudFormation

To launch the provided CloudFormation template, complete the following steps:

  1. Sign in to the console on the central account.
  2. Choose Launch Stack:
  3. Choose Next.
  4. For Stack name, enter a name. For example, support-case-central-account.
  5. For AWSMemberAccountIDs, enter the member account IDs separated by commas from where support case data is gathered.
  6. For Support Case Raw Data Bucket, enter the S3 bucket in the central account that holds the support case raw data from all member accounts. Note the name of this bucket to use in future steps.
  7. For Support Case Transformed Data Bucket, enter the S3 bucket in central account that holds the support case transformed data. Note the name of this bucket to use in future steps.
  8. Choose Next.
  9. Enter any tags you want to assign to the stack and choose Next.
  10. Select the acknowledgement check boxes and choose Create stack.

The stack takes approximately 5 minutes to complete. Wait until the stack is complete before proceeding to the next steps.

Launch CloudFormation StackSets from the central account

To launch StackSets, complete the following steps:

  1. Sign in to the console on the central account.
  2. On the AWS CloudFormation console, choose StackSets in the navigation pane.
  3. Choose Create StackSet.
  4. Leave the IAM execution role name as AWSCloudFormationStackSetExecutionRole.
  5. If AWS Organizations is enabled, under permissions, select Service-managed permissions.
  6. Leave the Prepare template setting as default.
  7. For Template source, select Amazon S3 URL.
  8. Enter the following Amazon S3 URL under Specify Template: https://aws-blogs-artifacts-public.s3.amazonaws.com/artifacts/BDB-2583/AWS_MemberAccount_SupportCaseDashboard_CF.yaml
  9. Choose Next.
  10. For StackSet name, enter a name. For example, support-case-member-account.
  11. For CentralSupportCaseRawBucket, enter the name of the Support Case Raw Data Bucket created in the central account, which you noted previously.
  12. For CentralAccountID, enter the account ID of the central account.
  13. For Configure StackSet options, we recommend configuring tags.
  14. Leave the rest as default and choose Next.
  15. If AWS Organizations is enabled, in the Set deployment options step, for Deployment targets, you can either choose Deploy to organization or Deploy to organizational units (OU).
    • If you deploy to OUs, you will need to specify the AWS OU ID.
  16. If AWS Organizations is not enabled, on the Set Deployment Options page, under Accounts, select Deploy stacks in accounts.
    • Under Account numbers, enter the 12-digit account IDs for the member accounts as a comma-separated list. For example: 111111111111,222222222222.
  17. Under Specify regions, choose US East (N. Virginia).

Due to the limitation of EventBridge with the AWS Support API, this StackSet has to be deployed only in the US East (N. Virginia) Region.

  1. Optionally, you can change the maximum concurrent accounts to match the number of member accounts, adjust the failure tolerance to at least 1, and choose Region Concurrency to be Parallel to set up resources in parallel on the member accounts.
  2. Review your selections, select the acknowledgement check boxes, and choose Submit.

The operation takes about 2–3 minutes to complete.

Visualize your support cases in QuickSight in the central account

In this section, we go through the steps to visualize your support cases in QuickSight.

Grant QuickSight permissions

To grant QuickSight permissions, complete the following steps:

  1. Sign in to the console on the central account.
  2. On the QuickSight console, on the Admin drop-down menu in top right-hand corner, choose Manage QuickSight.
  3. In the navigation pane, choose Security & permissions.
  4. Under QuickSight access to AWS services, choose Manage.
  5. Select Amazon Athena.
  6. Select Amazon S3 to edit QuickSight access to your S3 buckets.
  7. Select the bucket you specified during stack creation.
  8. Choose Finish.
  9. Choose Save.

Prepare the datasets

To prepare your datasets, complete the following steps:

  1. On the QuickSight console, choose Datasets in the navigation pane.
  2. Choose New dataset.
  3. Choose Athena.
  4. For Data source name, enter support-case-data-source.
  5. Choose Validate connection.
  6. After your connection is validated, choose Create data source.
  7. For Database, choose support-case-transformed-data.
  8. For Tables, select the table under the database (there should only be one table that matches the name of the S3 bucket you set as the destination for the transformed data).
  9. Choose Edit/Preview data.
  10. Leave Query mode set as Direct Query.
  11. Choose the options menu (three dots) next to the field case_creation_year and set Change data type to Date.
  12. Enter the date format as yyyy, then choose Validate and Update.
  13. Similarly, right-click on the field case_creation_month and set Change data type to Date.
  14. Enter the date format as MM, then choose Validate and Update.
  15. Right-click on the field case_creation_day and set Change data type to Date.
  16. Enter the date format as dd, then choose Validate and Update.
  17. Right-click on the field case_creation_time and set Change data type to Date.
  18. Enter the date format as yyyy-MM-dd’T’HH:mm:ss.SSSZ, then choose Validate and Update.
  19. Change the name of the QuickSight dataset to support-cases-dataset.
  20. Choose Save & publish.
  21. Note the dataset ID from the URL (alpha-numeric string between datasets and view, excluding slashes) to use later for QuickSight dashboard creation.

  1. Choose Cancel to exit this page.

Set up the QuickSight dashboard from a template

To set up your QuickSight dashboard, complete the following steps:

  1. Navigate to the following link, then right-click and choose Save As to download the QuickSight dashboard JSON template from the browser.
  2. On the console, choose the user profile drop-down menu.
  3. Choose the copy icon next to the Account ID: field (of the central account).

  1. Open the JSON file with a text editor and replace xxxxx with the account ID. This will be replaced in two places.
  2. Replace yyyyy with the dataset ID that you previously noted.
  3. Replace rrrrr with the Region where you deployed resources in the central account.

To determine the principal (user) to be used for the dashboard creation, you can use AWS CloudShell.

  1. Navigate to CloudShell on the console. Ensure it’s the same Region where your resources are deployed.

  1. Wait until the environment gets created and you see the CloudShell prompt.

  1. Run the following command, providing your account ID (central account) and Region:
    aws quicksight list-users –region <region> --aws-account-id <account-id> --namespace default

  2. From the output, select the value of the ARN field. Replace the value of zzzzz with the ARN.
  3. Optionally, you can change the name of the dashboard by changing the value of the fields in the JSON file:
    • For DashboardId, enter SupportCaseCentralDashboard.
    • For Name, enter SupportCaseCentralDashboard.
  4. Save the changes to the JSON file.

Now we use CloudShell to upload the JSON file provided in the previous step.

  1. On the Actions menu, choose Upload file.

  1. To create the QuickSight dashboard from the JSON template, use the following AWS Command Line Interface (AWS CLI) command and pass the updated JSON file as an argument, providing your Region:
    aws quicksight create-dashboard –region <region> --cli-input-json file://support-case-dashboard-template.json

The output of the command looks similar to the following screenshot.

  1. In case of any issues or if you want to see more details about the dashboard, you can use the following command:
    aws quicksight describe-dashboard --region <region> --aws-account-id <central-account-id> --dashboard-id <DashboardId in screenshot above>

  2. On the QuickSight console, choose Dashboards in the navigation pane.
  3. Choose Support Cases Dashboard.

You should see a dashboard similar to the screenshot shown at the beginning of this post, but there should only be one case.

Add additional member accounts

If you want to add additional member accounts, you need to update the CloudFormation stack that you created earlier on the central account. If you followed our name recommendation, the stack is called support-case-central-account-stack. Add the additional account number in the Member Account IDs parameter.

Next, go to the StackSet in the central account. If you followed our naming recommendation, the StackSet is called support-case-member-account. Select the StackSet and on the Actions menu, choose Add stacks to StackSet. Then follow the same instructions that you followed previously when you created the StackSet.

Monitor support cases created in the central account

So far, our setup will monitor all support cases created in the member accounts that you specified. However, it doesn’t include support cases that you create in the central account. To set up monitoring for the central account, complete the following steps:

  1. Update the CloudFormation stack that you created earlier on the central account. If you followed our name recommendation, the stack is called support-case-central-account-stack. Add the central account ID in the Member Account IDs parameter.
  2. Sign in to the CloudFormation console in the central account.
  3. Choose Launch Stack:
  4. Choose Next.
  5. For Stack name, enter a name. For example, support-case-central-as-member-account.
  6. For CentralAccountIDs, enter the central account ID.
  7. For CentralSupportCaseRawBucket, enter the S3 bucket in the central account that holds the support case raw data from all member accounts.
  8. Choose Next.
  9. Enter any tags you want to assign to the stack and choose Next.
  10. Select the acknowledgement check boxes and choose Create stack.

Clean up

To avoid incurring future charges, delete the resources you created as part of this solution.

Troubleshooting

Note the following troubleshooting tips:

  • Make sure that you create the CloudFormation stacks and StackSet in the correct accounts: central and member.
  • If you get a permission denied error from Athena on the S3 path (see the following screenshot), review the steps to grant QuickSight permissions.

  • When creating the QuickSight dashboard using the template, if you get an error similar to the following, make sure that you use the ARN value from the output generated by the aws quicksight list-users --region <region> --aws-account-id <account-id> --namespace default command.

An error occurred (InvalidParameterValueException) when calling the CreateDashboard operation: Principal ARN xxxx is not part of the same account yyyy

  • When deleting the stack, if you encounter the DELETE_FAILED error, it means that your S3 bucket is not empty. To fix it, empty the contents of the bucket and try to delete the Stack again.

Conclusion

Congratulations! You have successfully built an analytics pipeline to push support cases created in individual member accounts into a central account. You have also built an analytics dashboard to gain visibility and insights on all support cases created in various accounts. As you start creating support cases in your member accounts, you will be able to view them in a single pane of glass.

With the steps and resources described in this post, you can build your own analytics dashboard to gain visibility and insights on all support cases created in various accounts within your organization.


About the authors

Sindhura Palakodety is a Solutions Architect at AWS. She is passionate about helping customers build enterprise-scale Well-Architected solutions on the AWS platform and specializes in the data analytics domain.

Shu Sia Lukito is a Partner Solutions Architect at AWS. She is on a mission to help AWS partners build successful AWS practices and help their customers accelerate their journey to the cloud. In her spare time, she enjoys spending time with her family and making spicy food.

Real-time anomaly detection via Random Cut Forest in Amazon Kinesis Data Analytics

Post Syndicated from Daren Wong original https://aws.amazon.com/blogs/big-data/real-time-anomaly-detection-via-random-cut-forest-in-amazon-kinesis-data-analytics/

Real-time anomaly detection describes a use case to detect and flag unexpected behavior in streaming data as it occurs. Online machine learning (ML) algorithms are popular for this use case because they don’t require any explicit rules and are able to adapt to a changing baseline, which is particularly useful for continuous streams of data where incoming data changes continuously over time.

Random Cut Forest (RCF) is one such algorithm widely used for anomaly detection use cases. In typical setups, we want to be able to run the RCF algorithm on input data with large throughput, and streaming data processing frameworks can help with that. We are excited to share that RCF is possible with Amazon Kinesis Data Analytics for Apache Flink. Apache Flink is a popular open-source framework for real-time, stateful computations over data streams, and can be used to run RCF on input streams with large throughput.

This post demonstrates how we can use Kinesis Data Analytics for Apache Flink to run an online RCF algorithm for anomaly detection.

Solution overview

The following diagram illustrates our architecture, which consists of three components: an input data stream using Amazon Kinesis Data Streams, a Flink job, and an output Kinesis data stream. In terms of data flow, we use a Python script to generate anomalous sine wave data into the input data stream, the data is then processed by RCF in a Flink job, and the resultant anomaly score is delivered to the output data stream.

The following graph shows an example of our expected result, which indicates that the anomaly score peaked when the sine wave data source anomalously dropped to constant -17.

We can implement this solution in three simple steps:

  1. Set up AWS resources via AWS CloudFormation.
  2. Set up a data generator to produce data into the source data stream.
  3. Run the RCF Flink Java code on Kinesis Data Analytics.

Set up AWS resources via AWS CloudFormation

The following CloudFormation stack will create all the AWS resources we need for this tutorial, including two Kinesis data streams, a Kinesis Data Analytics app, and an Amazon Simple Storage Service (Amazon S3) bucket.

Sign in to your AWS account, then choose Launch Stack:

BDB-2063-launch-cloudformation-stack

Follow the steps on the AWS CloudFormation console to create the stack.

Set up a data generator

Run the following Python script to populate the input data stream with the anomalous sine wave data:

import json
import boto3
import math 

STREAM_NAME = "ExampleInputStream-RCF"


def get_data(time):
    rad = (time/100)%360
    val = math.sin(rad)*10 + 10

    if rad > 2.4 and rad < 2.6:
        val = -17

    return {'time': time, 'value': val}

def generate(stream_name, kinesis_client):
    time = 0

    while True:
        data = get_data(time)
        kinesis_client.put_record(
            StreamName=stream_name,
            Data=json.dumps(data),
            PartitionKey="partitionkey")

        time += 1


if __name__ == '__main__':
    generate(STREAM_NAME, boto3.client('kinesis', region_name='us-west-2'))

Run the RCF Flink Java code on Kinesis Data Analytics

The CloudFormation stack automatically downloaded and packaged the RCF Flink job JAR file for you. Therefore, you can simply go to the Kinesis Data Analytics console to run your application.

That’s it! We now have a running Flink job that continuously reads in data from an input Kinesis data stream and calculates the anomaly score for each new data point given the previous data points it has seen.

The following sections explain the RCF implementation and Flink job code in more detail.

RCF implementation

Numerous RCF implementations are publicly available. For this tutorial, we use the AWS implementation by wrapping it around a custom wrapper (RandomCutForestOperator) to be used in our Flink job.

RandomCutForestOperator is implemented as an Apache Flink ProcessFunction, which is a function that allows us to write custom logic to process every element in the stream. Our custom logic starts with a data transformation via inputDataMapper.apply, followed by getting the anomaly score by calling the AWS RCF library via rcf.getAnomalyScore. The code implementation of RandomCutForestOperator can be found on GitHub.

RandomCutForestOperatorBuilder requires two main types of parameters:

  • RandomCutForestOperator hyperparameters – We use the following:
    • Dimensions – We set this to 1 because our input data is a 1-dimensional sine wave consisting of the float data type.
    • ShingleSize – We set this to 1, which means our RCF algorithm will take into account the previous and current data points in anomaly score deduction. Note that this can be increased to account for seasonality in data.
    • SampleSize – We set this to 628, which means a maximum of 628 data points is kept in the data sample for each tree.
  • DataMapper parameters for input and output processing – We use the following:
    • InputDataMapper – We use RandomCutForestOperator.SIMPLE_FLOAT_INPUT_DATA_MAPPER to map input data from float to float[].
    • ResultMapper – We use RandomCutForestOperator.SIMPLE_TUPLE_RESULT_DATA_MAPPER, which is a BiFunction that joins the anomaly score with the corresponding sine wave data point into a tuple.

Flink job code

The following code snippet illustrates the core streaming structure of our Apache Flink streaming Java code. It first reads in data from the source Kinesis data stream, then processes it using the RCF algorithm. The computed anomaly score is then written to an output Kinesis data stream.

DataStream<Float> sineWaveSource = createSourceFromStaticConfig(env);

sineWaveSource
        .process(
                RandomCutForestOperator.<Float, Tuple2<Float, Double>>builder()
                        .setDimensions(1)
                        .setShingleSize(1)
                        .setSampleSize(628)
                        .setInputDataMapper(RandomCutForestOperator.SIMPLE_FLOAT_INPUT_DATA_MAPPER)
                        .setResultMapper(RandomCutForestOperator.SIMPLE_TUPLE_RESULT_DATA_MAPPER)
                        .build(),
                TupleTypeInfo.getBasicTupleTypeInfo(Float.class, Double.class))
       .addSink(createSinkFromStaticConfig());

In this example, our baseline input data is a sine wave. As shown in the following screenshot, a low anomaly score is returned when the data is regular. However, when there is an anomaly in the data (when the sine wave input data drops to a constant), a high anomaly score is returned. The anomaly score is delivered into an output Kinesis data stream. You can visualize this result by creating a Kinesis Data Analytics Studio app; for instructions, refer to Interactive analysis of streaming data.

Because this is an unsupervised algorithm, you don’t need to provide any explicit rules or labeled datasets for this operator. In short, only the input data stream, data conversions, and some hyperparameters were provided. The RCF algorithm itself determined the expected baseline based on the input data and identified any unexpected behavior.

Furthermore, this means the model will continuously adapt even if the baseline changes over time. As such, minimal retraining cadence is required. This is powerful for anomaly detection on streaming data because the data will often drift slowly over time due seasonal trends, inflation, equipment calibration drift, and so on.

Clean up

To avoid incurring future charges, complete the following steps:

  1. On the Amazon S3 console, empty the S3 bucket created by the CloudFormation stack.
  2. On the AWS CloudFormation console, delete the CloudFormation stack.

Conclusion

This post demonstrated how to perform anomaly detection on input streaming data with RCF, an online unsupervised ML algorithm using Kinesis Data Analytics. We also showed how this algorithm learns the data baseline on its own, and can adapt to changes in the baseline over time. We hope you consider this solution for your real-time anomaly detection use cases.


About the Authors

Daren Wong is a Software Development Engineer in AWS. He works on Amazon Kinesis Data Analytics, the managed offering for running Apache Flink applications on AWS.

Aleksandr Pilipenko is a Software Development Engineer in AWS. He works on Amazon Kinesis Data Analytics, the managed offering for running Apache Flink applications on AWS.

Hong Liang Teoh is a Software Development Engineer in AWS. He works on Amazon Kinesis Data Analytics, the managed offering for running Apache Flink applications on AWS.

Gigabyte Giga Computing TO24-JD1 Broadcom SAS4 2OU JBOD at OCP Regional Summit 2023 Prague

Post Syndicated from Cliff Robinson original https://www.servethehome.com/gigabyte-giga-computing-to24-jd1-broadcom-sas4-2ou-jbod-at-ocp-regional-summit-2023-prague/

We saw the Giga Computing/ Gigabyte TO24-JD1 SAS4 JBOD at the OCP Regional Summit in Prague for a next-gen 2OU 32-bay JBOD

The post Gigabyte Giga Computing TO24-JD1 Broadcom SAS4 2OU JBOD at OCP Regional Summit 2023 Prague appeared first on ServeTheHome.

[$] A kernel without buffer heads

Post Syndicated from original https://lwn.net/Articles/930173/

No data structures found in the Linux kernel — at least, in any version
that escaped from Linus Torvalds’s development machine — are older than the
buffer head. Like many other legacies from the early days of Linux, buffer
heads have been targeted for removal for years. They persist, though,
despite the problems they present. Now, Christoph Hellwig has posted a patch
series
that enables the building of a kernel without buffer heads — but
the cost of doing so at this point will be more than most want to pay.

Security updates for Monday

Post Syndicated from original https://lwn.net/Articles/930588/

Security updates have been issued by Debian (distro-info-data, ffmpeg, jackson-databind, jruby, libapache2-mod-auth-openidc, libxml2, openvswitch, sniproxy, and wireshark), Fedora (git, libsignal-protocol-c, php-nyholm-psr7, python-setuptools, rust-askama, rust-askama_shared, rust-comrak, thunderbird, and webkitgtk), SUSE (git, glib2, shadow, thunderbird, and webkit2gtk3), and Ubuntu (Apache Commons Net, git, linux-azure-5.15, linux-azure-fde, linux-kvm, linux-ibm-5.4, linux-snapdragon, netty, and ZenLib).

The collective thoughts of the interwebz