Data transformation plays a pivotal role in providing the necessary data insights for businesses in any organization, small and large. To gain these insights, customers often perform ETL (extract, transform, and load) jobs from their source systems and output an enriched dataset. Many organizations today are using AWS Glue to build ETL pipelines that bring data from disparate sources and store the data in repositories like a data lake, database, or data warehouse for further consumption. These organizations are looking for ways they can reduce cost across their IT environments and still be operationally performant and efficient.
Picture a scenario where you, the VP of Data and Analytics, are in charge of your data and analytics environments and workloads running on AWS where you manage a team of data engineers and analysts. This team is allowed to create AWS Glue for Spark jobs in development, test, and production environments. During testing, one of the jobs wasn’t configured to automatically scale its compute resources, resulting in jobs timing out, costing the organization more than anticipated. The next steps usually include completing an analysis of the jobs, looking at cost reports to see which account generated the spike in usage, going through logs to see when what happened with the job, and so on. After the ETL job has been corrected, you may want to implement monitoring and set standard alert thresholds for your AWS Glue environment.
This post will help organizations proactively monitor and cost optimize their AWS Glue environments by providing an easier path for teams to measure efficiency of their ETL jobs and align configuration details according to organizational requirements. Included is a solution you will be able to deploy that will notify your team via email about any Glue job that has been configured incorrectly. Additionally, a weekly report is generated and sent via email that aggregates resource usage and provides cost estimates per job.
AWS Glue cost considerations
AWS Glue for Apache Spark jobs are provisioned with a number of workers and a worker type. These jobs can be either G.1X, G.2X, G.4X, G.8X or Z.2X (Ray) worker types that map to data processing units (DPUs). DPUs include a certain amount of CPU, memory, and disk space. The following table contains more details.
Worker Type
DPUs
vCPUs
Memory (GB)
Disk (GB)
G.1X
1
4
16
64
G.2X
2
8
32
128
G.4X
4
16
64
256
G.8X
8
32
128
512
Z.2X
2
8
32
128
For example, if a job is provisioned with 10 workers as G.1X worker type, the job will have access to 40 vCPU and 160 GB of RAM to process data and double using G.2X. Over-provisioning workers can lead to increased cost, due to not all workers being utilized efficiently.
In April 2022, Auto Scaling for AWS Glue was released for AWS Glue version 3.0 and later, which includes AWS Glue for Apache Spark and streaming jobs. Enabling auto scaling on your Glue for Apache Spark jobs will allow you to only allocate workers as needed, up to the worker maximum you specify. We recommend enabling auto scaling for your AWS Glue 3.0 & 4.0 jobs because this feature will help reduce cost and optimize your ETL jobs.
Amazon CloudWatch metrics are also a great way to monitor your AWS Glue environment by creating alarms for certain metrics like average CPU or memory usage. To learn more about how to use CloudWatch metrics with AWS Glue, refer to Monitoring AWS Glue using Amazon CloudWatch metrics.
The following solution provides a simple way to set AWS Glue worker and job duration thresholds, configure monitoring, and receive emails for notifications on how your AWS Glue environment is performing. If a Glue job finishes and detects worker or job duration thresholds were exceeded, it will notify you after the job run has completed, failed, or timed out.
Solution overview
The following diagram illustrates the solution architecture.
When you deploy this application via AWS Serverless Application Model (AWS SAM), it will ask what AWS Glue worker and job duration thresholds you would like to set to monitor the AWS Glue for Apache Spark and AWS Glue for Ray jobs running in that account. The solution will use these values as the decision criteria when invoked. The following is a breakdown of each step in the architecture:
Any AWS Glue for Apache Spark job that succeeds, fails, stops, or times out is sent to Amazon EventBridge.
EventBridge picks up the event from AWS Glue and triggers an AWS Lambda function.
The Lambda function processes the event and determines if the data and analytics team should be notified about the particular job run. The function performs the following tasks:
If the AWS Glue job succeeded or was stopped without going over the worker or job duration thresholds, or is tagged to not be monitored, no alerts or notifications are sent.
If the job succeeded but ran with a worker or job duration thresholds higher than allowed, or the job either failed or timed out, Amazon SNS sends a notification to the designated email with information about the AWS Glue job, run ID, and reason for alerting, along with a link to the specific run ID on the AWS Glue console.
The function logs the job run information to Amazon DynamoDB for a weekly aggregated report delivered to email. The Dynamo table has Time to Live enabled for 7 days, which keeps the storage to minimum.
Once a week, the data within DynamoDB is aggregated by a separate Lambda function with meaningful information like longest-running jobs, number of retries, failures, timeouts, cost analysis, and more.
Amazon Simple Email Service (Amazon SES) is used to deliver the report because it can be better formatted than using Amazon SNS. The email is formatted via HTML output that provides tables for the aggregated job run data.
The data and analytics team is notified about the ongoing job runs through Amazon SNS, and they receive the weekly aggregation report through Amazon SES.
Note that AWS Glue Python shell and streaming ETL jobs are not supported because they’re not in scope of this solution.
GlueJobWorkerThreshold – Enter the maximum number of workers you want an AWS Glue job to be able to run with before sending threshold alert. The default is 10. An alert will be sent if a Glue job runs with higher workers than specified.
GlueJobDurationThreshold – Enter the maximum duration in minutes you want an AWS Glue job to run before sending threshold alert. The default is 480 minutes (8 hours). An alert will be sent if a Glue job runs with higher job duration than specified.
GlueJobNotifications – Enter an email or distribution list of those who need to be notified through Amazon SNS and Amazon SES. You can go to the SNS topic after the deployment is complete and add emails as needed.
To receive emails from Amazon SNS and Amazon SES, you must confirm your subscriptions. After the stack is deployed, check your email that was specified in the template and confirm by choosing the link in each message. When the application is successfully provisioned, it will begin monitoring your AWS Glue for Apache Spark job environment. The next time a job fails, times out, or exceeds a specified threshold, you will receive an email via Amazon SNS. For example, the following screenshot shows an SNS message about a job that succeeded but had a job duration threshold violation.
You might have jobs that need to run at a higher worker or job duration threshold, and you don’t want the solution to evaluate them. You can simply tag that job with the key/value of remediate and false. The step function will still be invoked, but will use the PASS state when it recognizes the tag. For more information on job tagging, refer to AWS tags in AWS Glue.
Configure weekly reporting
As mentioned previously, when an AWS Glue for Apache Spark job succeeds, fails, times out, or is stopped, EventBridge forwards this event to Lambda, where it logs specific information about each job run. Once a week, a separate Lambda function queries DynamoDB and aggregates your job runs to provide meaningful insights and recommendations about your AWS Glue for Apache Spark environment. This report is sent via email with a tabular structure as shown in the following screenshot. It’s meant for top-level visibility so you’re able to see your longest job runs over time, jobs that have had many retries, failures, and more. It also provides an overall cost calculation as an estimate of what each AWS Glue job will cost for that week. It should not be used as a guaranteed cost. If you would like to see exact cost per job, the AWS Cost and Usage Report is the best resource to use. The following screenshot shows one table (of five total) from the AWS Glue report function.
Clean up
If you don’t want to run the solution anymore, delete the AWS SAM application for each account that it was provisioned in. To delete your AWS SAM stack, run the following command from your project directory:
sam delete
Conclusion
In this post, we discussed how you can monitor and cost-optimize your AWS Glue job configurations to comply with organizational standards and policy. This method can provide cost controls over AWS Glue jobs across your organization. Some other ways to help control the costs of your AWS Glue for Apache Spark jobs include the newly released AWS Glue Flex jobs and Auto Scaling. We also provided an AWS SAM application as a solution to deploy into your accounts. We encourage you to review the resources provided in this post to continue learning about AWS Glue. To learn more about monitoring and optimizing for cost using AWS Glue, please visit this recent blog. It goes in depth on all of the cost optimization options and includes a template that builds a CloudWatch dashboard for you with metrics about all of your Glue job runs.
About the authors
Michael Hamilton is a Sr Analytics Solutions Architect focusing on helping enterprise customers in the south east modernize and simplify their analytics workloads on AWS. He enjoys mountain biking and spending time with his wife and three children when not working.
Angus Ferguson is a Solutions Architect at AWS who is passionate about meeting customers across the world, helping them solve their technical challenges. Angus specializes in Data & Analytics with a focus on customers in the financial services industry.
Apache Iceberg is an open table format for large datasets in Amazon Simple Storage Service (Amazon S3) and provides fast query performance over large tables, atomic commits, concurrent writes, and SQL-compatible table evolution. When you build your transactional data lake using Apache Iceberg to solve your functional use cases, you need to focus on operational use cases for your S3 data lake to optimize the production environment. Some of the important non-functional use cases for an S3 data lake that organizations are focusing on include storage cost optimizations, capabilities for disaster recovery and business continuity, cross-account and multi-Region access to the data lake, and handling increased Amazon S3 request rates.
In this post, we show you how to improve operational efficiencies of your Apache Iceberg tables built on Amazon S3 data lake and Amazon EMR big data platform.
Optimize data lake storage
One of the major advantages of building modern data lakes on Amazon S3 is it offers lower cost without compromising on performance. You can use Amazon S3 Lifecycle configurations and Amazon S3 object tagging with Apache Iceberg tables to optimize the cost of your overall data lake storage. An Amazon S3 Lifecycle configuration is a set of rules that define actions that Amazon S3 applies to a group of objects. There are two types of actions:
Transition actions – These actions define when objects transition to another storage class; for example, Amazon S3 Standard to Amazon S3 Glacier.
Expiration actions – These actions define when objects expire. Amazon S3 deletes expired objects on your behalf.
Amazon S3 uses object tagging to categorize storage where each tag is a key-value pair. From an Apache Iceberg perspective, it supports custom Amazon S3 object tags that can be added to S3 objects while writing and deleting into the table. Iceberg also let you configure a tag-based object lifecycle policy at the bucket level to transition objects to different Amazon S3 tiers. With the s3.delete.tags config property in Iceberg, objects are tagged with the configured key-value pairs before deletion. When the catalog property s3.delete-enabled is set to false, the objects are not hard-deleted from Amazon S3. This is expected to be used in combination with Amazon S3 delete tagging, so objects are tagged and removed using an Amazon S3 lifecycle policy. This property is set to true by default.
The example notebook in this post shows an example implementation of S3 object tagging and lifecycle rules for Apache Iceberg tables to optimize storage cost.
Implement business continuity
Amazon S3 gives any developer access to the same highly scalable, reliable, fast, inexpensive data storage infrastructure that Amazon uses to run its own global network of web sites. Amazon S3 is designed for 99.999999999% (11 9’s) of durability, S3 Standard is designed for 99.99% availability, and Standard – IA is designed for 99.9% availability. Still, to make your data lake workloads highly available in an unlikely outage situation, you can replicate your S3 data to another AWS Region as a backup. With S3 data residing in multiple Regions, you can use an S3 multi-Region access point as a solution to access the data from the backup Region. With Amazon S3 multi-Region access point failover controls, you can route all S3 data request traffic through a single global endpoint and directly control the shift of S3 data request traffic between Regions at any time. During a planned or unplanned regional traffic disruption, failover controls let you control failover between buckets in different Regions and accounts within minutes. Apache Iceberg supports access points to perform S3 operations by specifying a mapping of bucket to access points. We include an example implementation of an S3 access point with Apache Iceberg later in this post.
Increase Amazon S3 performance and throughput
Amazon S3 supports a request rate of 3,500 PUT/COPY/POST/DELETE or 5,500 GET/HEAD requests per second per prefix in a bucket. The resources for this request rate aren’t automatically assigned when a prefix is created. Instead, as the request rate for a prefix increases gradually, Amazon S3 automatically scales to handle the increased request rate. For certain workloads that need a sudden increase in the request rate for objects in a prefix, Amazon S3 might return 503 Slow Down errors, also known as S3 throttling. It does this while it scales in the background to handle the increased request rate. Also, if supported request rates are exceeded, it’s a best practice to distribute objects and requests across multiple prefixes. Implementing this solution to distribute objects and requests across multiple prefixes involves changes to your data ingress or data egress applications. Using Apache Iceberg file format for your S3 data lake can significantly reduce the engineering effort through enabling the ObjectStoreLocationProvider feature, which adds an S3 hash [0*7FFFFF] prefix in your specified S3 object path.
Iceberg by default uses the Hive storage layout, but you can switch it to use the ObjectStoreLocationProvider. This option is not enabled by default to provide flexibility to choose the location where you want to add the hash prefix. With ObjectStoreLocationProvider, a deterministic hash is generated for each stored file and a subfolder is appended right after the S3 folder specified using the parameter write.data.path (write.object-storage-path for Iceberg version 0.12 and below). This ensures that files written to Amazon S3 are equally distributed across multiple prefixes in your S3 bucket, thereby minimizing the throttling errors. In the following example, we set the write.data.path value as s3://my-table-data-bucket, and Iceberg-generated S3 hash prefixes will be appended after this location:
CREATE TABLE my_catalog.my_ns.my_table
( id bigint,
data string,
category string)
USING iceberg OPTIONS
( 'write.object-storage.enabled'=true,
'write.data.path'='s3://my-table-data-bucket')
PARTITIONED BY (category);
Your S3 files will be arranged under MURMUR3 S3 hash prefixes like the following:
Using Iceberg ObjectStoreLocationProvider is not a foolproof mechanism to avoid S3 503 errors. You still need to set appropriate EMRFS retries to provide additional resiliency. You can adjust your retry strategy by increasing the maximum retry limit for the default exponential backoff retry strategy or enabling and configuring the additive-increase/multiplicative-decrease (AIMD) retry strategy. AIMD is supported for Amazon EMR releases 6.4.0 and later. For more information, refer to Retry Amazon S3 requests with EMRFS.
In the following sections, we provide examples for these use cases.
Storage cost optimizations
In this example, we use Iceberg’s S3 tags feature with the write tag as write-tag-name=created and delete tag as delete-tag-name=deleted. This example is demonstrated on an EMR version emr-6.10.0 cluster with installed applications Hadoop 3.3.3, Jupyter Enterprise Gateway 2.6.0, and Spark 3.3.1. The examples are run on a Jupyter Notebook environment attached to the EMR cluster. To learn more about how to create an EMR cluster with Iceberg and use Amazon EMR Studio, refer to Use an Iceberg cluster with Spark and the Amazon EMR Studio Management Guide, respectively.
The following examples are also available in the sample notebook in the aws-samples GitHub repo for quick experimentation.
Configure Iceberg on a Spark session
Configure your Spark session using the %%configure magic command. You can use either the AWS Glue Data Catalog (recommended) or a Hive catalog for Iceberg tables. In this example, we use a Hive catalog, but we can change to the Data Catalog with the following configuration:
Before you run this step, create a S3 bucket and an iceberg folder in your AWS account with the naming convention <your-iceberg-storage-blog>/iceberg/.
Update your-iceberg-storage-blog in the following configuration with the bucket that you created to test this example. Note the configuration parameters s3.write.tags.write-tag-name and s3.delete.tags.delete-tag-name, which will tag the new S3 objects and deleted objects with corresponding tag values. We use these tags in later steps to implement S3 lifecycle policies to transition the objects to a lower-cost storage tier or expire them based on the use case.
Insert a single record into the same Iceberg table so that it creates a partition with the current review_date:
spark.sql("""insert into dev.db.amazon_reviews_iceberg values ("US", "99999999","R2RX7KLOQQ5VBG","B00000JBAT","738692522","Diamond Rio Digital",3,0,0,"N","N","Why just 30 minutes?","RIO is really great",date("2023-04-06"),2023)""")
You can check the new snapshot is created after this append operation by querying the Iceberg snapshot:
spark.sql("""SELECT * FROM dev.db.amazon_reviews_iceberg.snapshots""").show()
You will see an output similar to the following showing the operations performed on the table.
Check the S3 tag population
You can use the AWS Command Line Interface (AWS CLI) or the AWS Management Console to check the tags populated for the new writes. Let’s check the tag corresponding to the object created by a single row insert.
On the Amazon S3 console, check the S3 folder s3://your-iceberg-storage-blog/iceberg/db/amazon_reviews_iceberg/data/ and point to the partition review_date_year=2023/. Then check the Parquet file under this folder to check the tags associated with the data file in Parquet format.
From the AWS CLI, run the following command to see that the tag is created based on the Spark configuration spark.sql.catalog.dev.s3.write.tags.write-tag-name":"created":
In this step, we delete a record from the Iceberg table and expire the snapshot corresponding to the deleted record. We delete the new single record that we inserted with the current review_date:
spark.sql("""delete from dev.db.amazon_reviews_iceberg where review_date = '2023-04-06'""")
We can now check that a new snapshot was created with the operation flagged as delete:
spark.sql("""SELECT * FROM dev.db.amazon_reviews_iceberg.snapshots""").show()
This is useful if we want to time travel and check the deleted row in the future. In that case, we have to query the table with the snapshot-id corresponding to the deleted row. However, we don’t discuss time travel as part of this post.
We expire the old snapshots from the table and keep only the last two. You can modify the query based on your specific requirements to retain the snapshots:
If we run the same query on the snapshots, we can see that we have only two snapshots available:
spark.sql("""SELECT * FROM dev.db.amazon_reviews_iceberg.snapshots""").show()
From the AWS CLI, you can run the following command to see that the tag is created based on the Spark configuration spark.sql.catalog.dev.s3. delete.tags.delete-tag-name":"deleted":
You can view the existing metadata files from the metadata log entries metatable after the expiration of snapshots:
spark.sql("""SELECT * FROM dev.db.amazon_reviews_iceberg.metadata_log_entries""").show()
The snapshots that have expired show the latest snapshot ID as null.
Create S3 lifecycle rules to transition the buckets to a different storage tier
Create a lifecycle configuration for the bucket to transition objects with the delete-tag-name=deleted S3 tag to the Glacier Instant Retrieval class. Amazon S3 runs lifecycle rules one time every day at midnight Universal Coordinated Time (UTC), and new lifecycle rules can take up to 48 hours to complete the first run. Amazon S3 Glacier is well suited to archive data that needs immediate access (with milliseconds retrieval). With S3 Glacier Instant Retrieval, you can save up to 68% on storage costs compared to using the S3 Standard-Infrequent Access (S3 Standard-IA) storage class, when the data is accessed once per quarter.
When you want to access the data back, you can bulk restore the archived objects. After you restore the objects back in S3 Standard class, you can register the metadata and data as an archival table for query purposes. The metadata file location can be fetched from the metadata log entries metatable as illustrated earlier. As mentioned before, the latest snapshot ID with Null values indicates expired snapshots. We can take one of the expired snapshots and do the bulk restore:
Capabilities for disaster recovery and business continuity, cross-account and multi-Region access to the data lake
Because Iceberg doesn’t support relative paths, you can use access points to perform Amazon S3 operations by specifying a mapping of buckets to access points. This is useful for multi-Region access, cross-Region access, disaster recovery, and more.
For cross-Region access points, we need to additionally set the use-arn-region-enabled catalog property to true to enable S3FileIO to make cross-Region calls. If an Amazon S3 resource ARN is passed in as the target of an Amazon S3 operation that has a different Region than the one the client was configured with, this flag must be set to ‘true‘ to permit the client to make a cross-Region call to the Region specified in the ARN, otherwise an exception will be thrown. However, for the same or multi-Region access points, the use-arn-region-enabled flag should be set to ‘false’.
For example, to use an S3 access point with multi-Region access in Spark 3.3, you can start the Spark SQL shell with the following code:
In this example, the objects in Amazon S3 on my-bucket1 and my-bucket2 buckets use the arn:aws:s3::123456789012:accesspoint:mfzwi23gnjvgw.mrap access point for all Amazon S3 operations.
Let’s say your table path is under mybucket1, so both mybucket1 in Region 1 and mybucket2 in Region have paths of mybucket1 inside the metadata files. At the time of the S3 (GET/PUT) call, we replace the mybucket1 reference with a multi-Region access point.
Handling increased S3 request rates
When using ObjectStoreLocationProvider (for more details, see Object Store File Layout), a deterministic hash is generated for each stored file, with the hash appended directly after the write.data.path. The problem with this is that the default hashing algorithm generates hash values up to Integer MAX_VALUE, which in Java is (2^31)-1. When this is converted to hex, it produces 0x7FFFFFFF, so the first character variance is restricted to only [0-8]. As per Amazon S3 recommendations, we should have the maximum variance here to mitigate this.
Starting from Amazon EMR 6.10, Amazon EMR added an optimized location provider that makes sure the generated prefix hash has uniform distribution in the first two characters using the character set from [0-9][A-Z][a-z].
To use, make sure the iceberg.enabled classification is set to true, and write.location-provider.impl is set to org.apache.iceberg.emr.OptimizedS3LocationProvider.
The following example shows that when you enable the object storage in your Iceberg table, it adds the hash prefix in your S3 path directly after the location you provide in your DDL.
Define the table write.object-storage.enabled parameter and provide the S3 path, after which you want to add the hash prefix using write.data.path (for Iceberg Version 0.13 and above) or write.object-storage.path (for Iceberg Version 0.12 and below) parameters.
Insert data into the table you created.
The hash prefix is added right after the /current/ prefix in the S3 path as defined in the DDL.
Clean up
After you complete the test, clean up your resources to avoid any recurring costs:
Delete the S3 buckets that you created for this test.
Delete the EMR cluster.
Stop and delete the EMR notebook instance.
Conclusion
As companies continue to build newer transactional data lake use cases using Apache Iceberg open table format on very large datasets on S3 data lakes, there will be an increased focus on optimizing those petabyte-scale production environments to reduce cost, improve efficiency, and implement high availability. This post demonstrated mechanisms to implement the operational efficiencies for Apache Iceberg open table formats running on AWS.
To learn more about Apache Iceberg and implement this open table format for your transactional data lake use cases, refer to the following resources:
Avijit Goswami is a Principal Solutions Architect at AWS specialized in data and analytics. He supports AWS strategic customers in building high-performing, secure, and scalable data lake solutions on AWS using AWS managed services and open-source solutions. Outside of his work, Avijit likes to travel, hike in the San Francisco Bay Area trails, watch sports, and listen to music.
Rajarshi Sarkar is a Software Development Engineer at Amazon EMR/Athena. He works on cutting-edge features of Amazon EMR/Athena and is also involved in open-source projects such as Apache Iceberg and Trino. In his spare time, he likes to travel, watch movies, and hang out with friends.
Prashant Singh is a Software Development Engineer at AWS. He is interested in Databases and Data Warehouse engines and has worked on Optimizing Apache Spark performance on EMR. He is an active contributor in open source projects like Apache Spark and Apache Iceberg. During his free time, he enjoys exploring new places, food and hiking.
Deriving insight from data is hard. It’s even harder when your organization is dealing with silos that impede data access across different data stores. Seamless data integration is a key requirement in a modern data architecture to break down data silos. AWS Glue is a serverless data integration service that makes data preparation simpler, faster, and cheaper. You can discover and connect to over 70 diverse data sources, manage your data in a centralized data catalog, and create, run, and monitor data integration pipelines to load data into your data lakes and your data warehouses. AWS Glue for Apache Spark takes advantage of Apache Spark’s powerful engine to process large data integration jobs at scale.
In this post, we discuss the main benefits that this new AWS Glue version brings and how it can help you build better data integration pipelines.
Spark upgrade highlights
The new version of Spark included in AWS Glue 4.0 brings a number of valuable features, which we highlight in this section. For more details, refer to Spark Release 3.3.0 and Spark Release 3.2.0.
Support for the pandas API
Support for the pandas API allows users familiar with the popular Python library to start writing distributed extract, transform, and load (ETL) jobs without having to learn a new framework API. We discuss this in more detail later in this post.
Python UDF profiling
With Python UDF profiling, now you can profile regular and pandas user-defined functions (UDFs). Calling show_profiles() on the SparkContext to get details about the Python run was added on Spark 1 for RDD; now it also works for DataFrame Python UDFs and provides valuable information about how many calls to the UDF are made and how much time is spent on it.
For instance, to illustrate how the profiler measures time, the following example is the profile of a pandas UDF that processes over a million rows (but the pandas UDF only needs 112 calls) and sleeps for 1 second. We can use the command spark.sparkContext.show_profiles(), as shown in the following screenshot.
Pushdown filters
Pushdown filters are used in more scenarios, such as aggregations or limits. The upgrade also offers support for Bloom filters and skew optimization. These improvements allow for handling larger datasets by reading less data and processing it more efficiently. For more information, refer to Spark Release 3.3.0.
ANSI SQL
Now you can ask SparkSQL to follow the ANSI behavior on those points that it traditionally differed from the standard. This helps users bring their existing SQL skills and start producing value on AWS Glue faster. For more information, refer to ANSI Compliance.
Adaptive query execution by default
Adaptive query execution (AQE) by default helps optimize Spark SQL performance. You can turn AQE on and off by using spark.sql.adaptive.enabled as an umbrella configuration. Since AWS Glue 4.0, it’s enabled by default, so you no longer need to enable this explicitly.
Improved error messages
Improved error messages provide better context and easy resolution. For instance, if you have a division by zero in a SQL statement on ANSI mode, previously you would get just a Java exception: java.lang.ArithmeticException: divide by zero. Depending on the complexity and number of queries, the cause might not be obvious and might require some reruns with trial and error until it’s identified.
On the new version, you get a much more revealing error:
Caused by: org.apache.spark.SparkArithmeticException: Division by zero.
Use `try_divide` to tolerate divisor being 0 and return NULL instead.
If necessary set "spark.sql.ansi.enabled" to "false" (except for ANSI interval type) to bypass this error.
== SQL(line 1, position 8) ==
select sum(cost)/(select count(1) from items where cost > 100) from items
       ^^^^^^^^^^^^^^^^^^^^^^^^^^^^^^^^^^^^^^^^^^^^^^^
Not only does it show the query that caused the issue, but it also indicates the specific operation where the error occurred (the division in this case). In addition, it provides some guidance on resolving the issue.
New pandas API on Spark
The Spark upgrade brings a new, exciting feature, which is the chance to use your existing Python pandas framework knowledge in a distributed and scalable runtime. This lowers the barrier of entry for teams without previous Spark experience, so they can start delivering value quickly and make the most of the AWS Glue for Spark runtime.
The new API provides a pandas DataFrame-compatible API, so you can use existing pandas code and migrate it to AWS Glue for Spark changing the imports, although it’s not 100% compatible.
If you just want to migrate existing pandas code to run on pandas on Spark, you could replace the import and test:
# Replace pure pandas
import pandas as pd
# With pandas API on Spark
import pyspark.pandas as pd
In some cases, you might want to use multiple implementations on the same script, for instance because a feature is still not available on the pandas API for Spark or the data is so small that some operations are more efficient if done locally rather than distributed. In that situation, to avoid confusion, it’s better to use a different alias for the pandas and the pandas on Spark module imports, and to follow a convention to name the different types of DataFrames, because it has implications in performance and features, for instance, pandas DataFrame variables starting with pdf_, pandas on Spark as psdf_, and standard Spark as sdf_ or just df_.
You can also convert to a standard Spark DataFrame calling to_spark(). This allows you to use features not available on pandas such as writing directly to catalog tables or using some Spark connectors.
The following code shows an example of combining the different types of APIs:
# The job has the parameter "--additional-python-modules":"openpyxl",
#  the Excel library is not provided by default

import pandas as pd
# pdf is a pure pandas DF which resides in the driver memory only
pdf = pd.read_excel('s3://mybucket/mypath/MyExcel.xlsx', index_col=0)

import pyspark.pandas as ps
# psdf behaves like a pandas df but operations on it will be distributed among nodes
psdf = ps.from_pandas(pdf)
means_series = psdf.mean()

# Convert to a dataframe of column names and means
#  pandas on Spark series don't allow iteration so we convert to pure pandas
#  on a big dataset this could cause the driver to be overwhelmed but not here
# We reset to have the index labels as a columns to use them later
pdf_means = pd.DataFrame(means_series.to_pandas()).reset_index(level=0)
# Set meaningful column names
pdf_means.columns = ["excel_column", "excel_average"]

# We want to use this to enrich a Spark DF representing a huge table
#  convert to standard Spark DF so we can use the start API
sdf_means = ps.from_pandas(pdf_means).to_spark()

sdf_bigtable = spark.table("somecatalog.sometable")
sdf_bigtable.join(sdf_means, sdf_bigtable.category == sdf_means.excel_column)
Writing allowed based on column names instead of position
An optimized serializer to increase performance when reading from Amazon Redshift
Other minor improvements like trimming pre- and post-actions and handling numeric time zone formats
This new Amazon Redshift connector is built on top of an existing open-source connector project and offers further enhancements for performance and security, helping you gain up to 10 times faster application performance. It accelerates AWS Glue jobs when reading from Amazon Redshift, and also enables you to run data-intensive workloads more reliably. For more details, see Moving data to and from Amazon Redshift. To learn more about how to use it, refer to New – Amazon Redshift Integration with Apache Spark.
When you use the new Amazon Redshift connector on an AWS Glue DynamicFrame, use the existing methods: GlueContext.create_data_frame and GlueContext.write_data_frame.
When you use the new Amazon Redshift connector on a Spark DataFrame, use the format io.github.spark_redshift_community.spark.redshift, as shown in the following code snippet:
In addition to all the new features, AWS Glue 4.0 brings performance improvements at lower cost. In summary, AWS Glue 4.0 with Amazon Simple Storage Service (Amazon S3) is 2.7 times faster than AWS Glue 3.0, and AWS Glue 4.0 with Amazon Redshift is 7.1 times faster than AWS Glue 3.0. In the following sections, we provide details about AWS Glue 4.0 performance results with Amazon S3 and Amazon Redshift.
Amazon S3
The following chart shows the total job runtime for all queries (in seconds) in the 3 TB query dataset between AWS Glue 3.0 and AWS Glue 4.0. The TPC-DS dataset is located in an S3 bucket in Parquet format, and we used 30 G.2X workers in AWS Glue. We observed that our TPC-DS tests on Amazon S3 had a total job runtime on AWS Glue 4.0 that was 2.7 times faster than that on AWS Glue 3.0. Detailed instructions are explained in the appendix of this post.
.
AWS Glue 3.0
AWS Glue 4.0
Total Query Time
5084.94274
1896.1904
Geometric Mean
14.00217
10.09472
Amazon Redshift
The following chart shows the total job runtime for all queries (in seconds) in the 1 TB query dataset between AWS Glue 3.0 and AWS Glue 4.0. The TPC-DS dataset is located in a five-node ra3.4xlarge Amazon Redshift cluster, and we used 150 G.2X workers in AWS Glue. We observed that our TPC-DS tests on Amazon Redshift had a total job runtime on AWS Glue 4.0 that was 7.1 times faster than that on AWS Glue 3.0.
.
AWS Glue 3.0
AWS Glue 4.0
Total Query Time
22020.58
3075.96633
Geometric Mean
142.38525
8.69973
Get started with AWS Glue 4.0
You can start using AWS Glue 4.0 via AWS Glue Studio, the AWS Glue console, the latest AWS SDK, and the AWS Command Line Interface (AWS CLI).
To start using AWS Glue 4.0 in AWS Glue Studio, open the AWS Glue job and on the Job details tab, choose the version Glue 4.0 – Supports spark 3.3, Scala 2, Python 3.
In this post, we discussed the main upgrades provided by the new 4.0 version of AWS Glue. You can already start writing new jobs on that version and benefit from all the improvements, as well as migrate your existing jobs.
About the authors
Gonzalo Herreros is a Senior Big Data Architect on the AWS Glue team. He’s been an Apache Spark enthusiast since version 0.8. In his spare time, he likes playing board games.
Noritaka Sekiyama is a Principal Big Data Architect on the AWS Glue team. He works based in Tokyo, Japan. He is responsible for building software artifacts to help customers. In his spare time, he enjoys cycling with his road bike.
Bo Li is a Senior Software Development Engineer on the AWS Glue team. He is devoted to designing and building end-to-end solutions to address customer’s data analytic and processing needs with cloud-based data-intensive technologies.
Rajendra Gujja is a Senior Software Development Engineer on the AWS Glue team. He is passionate about distributed computing and everything and anything about the data.
Savio Dsouza is a Software Development Manager on the AWS Glue team. His team works on solving challenging distributed systems problems for data integration on Glue platform for customers using Apache Spark.
Mohit Saxena is a Senior Software Development Manager on the AWS Glue team. His team works on distributed systems for building data lakes on AWS and simplifying integration with data warehouses for customers using Apache Spark.
Appendix: TPC-DS benchmark on AWS Glue against a dataset on Amazon S3
To perform a TPC-DS benchmark on AWS Glue against a dataset in an S3 bucket, you need to copy the TPC-DS dataset into your S3 bucket. These instructions are based on emr-spark-benchmark:
Create a new S3 bucket in your test account if needed. In the following code, replace $YOUR_S3_BUCKET with your S3 bucket name. We suggest you export YOUR_S3_BUCKET as an environment variable:
Copy the TPC-DS source data as input to your S3 bucket. If it’s not exported as an environment variable, replace $YOUR_S3_BUCKET with your S3 bucket name:
With Amazon Relational Database Service (Amazon RDS), you can set up, operate, and scale a relational database in the AWS Cloud. Amazon RDS provides cost-efficient, resizable capacity for an industry-standard relational database and manages common database administration tasks.
If you use Amazon RDS for your workloads, you can now use Amazon GuardDutyRDS Protection to help detect threats to your data stored in Amazon Aurora databases. GuardDuty is a continuous security monitoring service that can help you identify and prioritize potential threats in your AWS environment. By analyzing and profiling RDS login activity to your Aurora databases, GuardDuty can detect threats, such as high severity brute force events, suspicious logins, access from Tor, and access by known threat actors.
In this post, we will provide an overview of how to get started with RDS Protection, dive into its finding types, and walk you through examples of how to investigate and remediate findings.
Overview of RDS Protection
RDS Protection in GuardDuty analyzes and profiles Amazon RDS login activity to identify potential threats to your data stored in Aurora databases by using a combination of threat intelligence and machine learning. At launch, RDS Protection supports Aurora MySQL versions 2.10.2 and 3.2.1 or later and Aurora PostgreSQL versions 10.17, 11.12, 12.7, 13.3, and 14.3 or later. An updated list of the supported engines and versions is available in the GuardDuty documentation. RDS Protection doesn’t require additional infrastructure, and you don’t need to configure, collect, or store RDS logs in your own account. RDS Protection is also designed to have no impact on the performance of your database instances so that you don’t have to worry about compromising performance to better secure your data stored in Amazon RDS.
When RDS Protection detects a suspicious or anomalous login attempt that indicates a potential threat to your database instance, GuardDuty generates a finding with details to help you quickly identify relevant information to assist in remediation. RDS Protection findings include details on both anomalous and normal login activity in addition to information such as database instance details, database user details, action information, and actor information. These findings are available to you in the GuardDuty console, AWS Command Line Interface (AWS CLI), and API, and all GuardDuty findings are sent to Amazon EventBridge and AWS Security Hub, giving you options to respond by sending alerts to chat or ticketing systems, or by using AWS Lambda and AWS Systems Manager for automatic remediation.
Enable RDS Protection
Getting started with RDS Protection is simple, and you can do it with just a few steps in the console. Both new and existing GuardDuty customers can take advantage of the GuardDuty RDS Protection 30-day free trial. You can turn RDS Protection on or off for each of your accounts in supported AWS Regions. If you already use GuardDuty, you will need to enable RDS Protection either in the console or CLI, or through the API. You will have the option to enable it in the account that you are currently in, or if you are using a GuardDuty delegated administrator account (as shown in Figure 1), you can enable it for all accounts in your AWS Organizations organization. You’ll also have the ability to auto-enable. The auto-enable feature helps ensure that RDS Protection is enabled for each new account added to your organization, without the need for you to configure anything in each member account. If you are turning on GuardDuty for the first time, RDS Protection is enabled by default.
After GuardDuty generates a finding, you will need to analyze the finding so that you understand the potential impact to your environment. We recommend that you familiarize yourself with the GuardDuty finding types. Understanding GuardDuty finding types can help you understand the types of activity that GuardDuty is looking for and help you prepare for how to respond if they occur in your environment.
As adversaries become more sophisticated, it becomes even more important for you to align to a common framework to understand the tactics, techniques, and procedures (TTPs) behind an individual event. GuardDuty aligns findings using the MITRE ATT&CK framework, which is a globally-accessible knowledge base of adversary tactics and techniques based on real-world observations. GuardDuty findings have a specific finding format that helps you understand the details of each finding. You can examine the Threat Purpose section of the GuardDuty finding types to see finding types associated with various MITRE ATT&CK tactics, including CredentialAccess and Discovery. This can help you identify and understand the type of activity associated with a finding.
For example, consider two finding types that seem similar: CredentialAccess:RDS/MaliciousIPCaller.SuccessfulLoginand Discovery:RDS/MaliciousIPCaller. The difference between them is the ThreatPurpose aspect, located at the beginning of the finding type. GuardDuty has determined that both are involved with MaliciousIPCaller, and the difference is the intent of the activity associated with each finding. CredentialAccess SuccessfulLogin indicates that there was a successful login to your RDS database from a known malicious IP address. Discovery indicates that a threat actor opened a connection to the database, but didn’t attempt to authenticate. This indicates scanning behavior, but it might not be targeted at RDS instances. For more information, see GuardDuty RDS Protection finding types.
GuardDuty uses threat intelligence and machine learning to continually monitor and identify potential threats in your environment. To understand how to investigate RDS Protection finding types, you need to understand the details of a finding type that are derived from machine learning. As shown in Figure 2, RDS Protection finding types have two sections: one that shows the unusual behavior and one that shows the normal, historical behavior. To determine this, GuardDuty uses machine learning models to evaluate API requests to your account and identify anomalous events that are associated with tactics used by adversaries. The machine learning model tracks various factors of the API request, such as the user that made the request, the location the request was made from, and the specific API that was requested. It also looks at information such as successfulLoginCount, failedLoginCount, and incompleteConnectionCount for anomalies based on login activity. For more information about anomalous activity in GuardDuty findings, see Anomalous behavior.
With RDS Protection, you now have an additional mechanism to gain insight into your Amazon RDS databases across your accounts to continuously monitor for suspicious activity. RDS Protection can alert you to suspicious activity in Amazon RDS, such as a potentially suspicious or anomalous login attempt, unusual pattern in a series of successful, failed, or incomplete login attempts, and unauthorized access to your database instance from a previously unseen internal or external actor. With this new feature, GuardDuty also extends support for finding types that you might already be familiar with that also apply to RDS databases. These finding types include calls to an RDS database API from a Tor node, or calls to an RDS database from a known malicious IP address, which can indicate that there are interactions with your RDS database from sources that are associated with known malicious activity.
Remediate RDS Protection findings
In this section, we describe two RDS Protection findings and how you can investigate and remediate them. Understanding how to remediate these findings can help you maintain the integrity of your database. We share recommendations that focus specifically on security groups, network access control lists (network ACLs), and firewall rules.
The CredentialAccess:RDS/AnomalousBehavior.SuccessfulLogin finding informs you that an anomalous successful login was observed on an RDS database in your AWS environment. It might indicate that a previous unseen user logged in to an RDS database for the first time. A common scenario involves an internal user logging in to a database that is accessed programmatically by applications and not by individual users. A potential malicious actor might have compromised and accessed the role on your RDS database. The default Severity for this finding varies, depending on the anomalous behavior associated with the finding.
Figure 3 shows an example of this finding.
Figure 3: Finding of an anomalous behavior successful login
How to remediate
If the activity is unexpected for the associated database, AWS recommends that you change the password of the associated database user, and review available audit logs for activity that the user performed. Medium and high severity findings might indicate an overly permissive access policy to the database, and user credentials might have been exposed or compromised. We recommend that you place the database in a private virtual private cloud (VPC), and limit the security group rules to allow traffic only from necessary sources. For more information, see Remediating potentially compromised database with successful login events.
We recommend that you take the following steps to remediate this finding:
Remediation step 1: Identify the affected database and user
Identify the affected database and user and confirm whether the behavior is expected or unexpected by looking through the GuardDuty finding details, which provide the name of the affected database instance and the corresponding user details. Use the findings to confirm if the behavior is expected or not—for example, the findings might help you identify a user who logs in to their database instance after a long time has passed; a user who logs in to their database instance only occasionally, such as a financial analyst who logs in each quarter; or a suspicious actor who is involved in a successful login attempt that isn’t authorized and potentially compromises the database instance. Review the IP address of the finding. Public IP addresses might signify overly permissive access if it’s not a known network associated with your account.
Figure 4: Finding with details showing Amazon RDS database instance and user details
If the behavior is unexpected, complete the following steps:
Restrict database instance access for the suspected accounts and the source of the login activity. For more information, see Remediating potentially compromised credentials and Restrict network access. You can identify the user in the RDS DB user details section within the finding panel in the console, or within the resource.rdsDbUserDetails of the findings JSON. These user details include user name, application used, database accessed, SSL version, and authentication method.
The following CLI command is an example of how to revoke access to a user in a MySQL database. If the behavior is unexpected, you can revoke the privileges while you assess if the user is malicious.
REVOKE CONNECTION_ADMIN ON *.* FROM 'fakeadmin'@'%';
You can revoke privileges from the user, but when taking this action, you should make sure that the user isn’t vital to your system and that revoking permissions won’t break your production or development application. The following CLI command is an example of how to revoke privileges from a user:
REVOKE ALL PRIVILEGES ON *.* FROM 'fakeadmin'@'%';
If you know that the user isn’t necessary for your database or application to function, then you can remove the user from the system. To make sure that your security team can run forensics, check your company’s incident response policy. If you need help getting started with incident response, see AWS sample incident response playbooks. The following CLI command is an example of how to remove a user:
DROP USER 'fakeadmin'@'%';
Let’s say that you find the behavior unexpected, but the user turns out to be the application user, and making a change to the database credential will break your application. You can use AWS Systems Manager to help in this scenario, in which the affected RDS user is the account that is tied to your application. In many cases, a password rotation can break your application, depending on how you connect. If you rotate the password without notifying your application, the application might require additional cascading changes. You could lose connectivity to your application because the credentials that your application is using to connect to your database didn’t change, and now you are experiencing an outage that will remain until you update the credentials. Systems Manager can tie into your application code to automatically update the rotated database credentials in your application. For more information, see Rotate Amazon RDS database credentials automatically with AWS Secrets Manager.
The following figure shows a CLI command to get a secret from Secrets Manager — for this example, we assume the secret is compromised.
Figure 5: Example compromised credentials
The following figures shows that we have a new set of credentials that replace our old credentials, as indicated by “CreatedDate”.
Figure 6: Example remediated credentials
Remediation step 3: Assess the impact and determine what information was accessed
To learn how to restrict IP access on a security group, see Control traffic to resources using security groups. You can identify the user in the RDS DB user details section within the finding panel in the console, or within the resource.rdsDbUserDetails of the findings JSON. These user details include user name, application used, database accessed, SSL version, and authentication method.
Remediation step 5: Perform root-cause analysis and determine the steps that potentially led to this activity
Implementing a lessons-learned framework and methodology can help improve your incident response capabilities and also help prevent the incident from recurring. By learning from each incident, you can help avoid repeating the same mistakes, exposures, or misconfigurations, which can both improve your security posture and reduce the time lost to preventable situations. To learn more about post-incident activity, see AWS Security Incident Response Guide.
The CredentialAccess:RDS/AnomalousBehavior.successfulBruteForce finding informs you that an anomalous login occurred that is indicative of a successful brute force event, as observed on an RDS database in your AWS environment. Before the anomalous successful login, a consistent pattern of unusual failed login attempts was observed. This indicates that the user and password associated with the RDS database in your account might have been compromised, and a potentially malicious actor might have accessed the RDS database. The Severity of this finding is high. Figure 7 shows an example of this finding.
Figure 7: Example of an anomalous successful brute force finding
How to remediate
This activity indicates that database credentials might have been exposed or compromised. We recommend that you change the password of the associated database user, and review available audit logs for activity performed by the potentially compromised user. A consistent pattern of unusual failed login attempts indicates an overly permissive access policy to the database, or that the database might also have been publicly exposed. AWS recommends that you place the database in a private VPC, and limit the security group rules to allow traffic only from necessary sources. For more information, see Remediating potentially compromised database with successful login events.
We recommend that you take the following steps to remediate this finding
Remediation step 1: Identify the affected database and user
The generated GuardDuty finding provides the name of the affected database instance and the corresponding user details. For more information, see Finding details.
Figure 8: Finding details showing Amazon RDS database instance and user details
Remediation step 2: Identify the source of the failed login attempts
In the generated GuardDuty finding, you can find the IP address, and if it was a public connection, the ASN organization in the Actor section of the finding panel. An autonomous system is a group of one or more IP prefixes (lists of IP addresses accessible on a network) run by one or more network operators that maintain a single, clearly-defined routing policy. Network operators need autonomous system numbers (ASNs) to control routing within their networks and to exchange routing information with other internet service providers.
Figure 9: Action and actor details related to GuardDuty brute force finding
Remediation step 3: Confirm that the behavior is unexpected
Examine if this activity represents an attempt to gain additional unauthorized access to the database instance as follows:
If the source is internal to your network, examine if an application is misconfigured and attempting a connection repeatedly.
If this is an external actor, examine whether the corresponding database instance is public facing or is misconfigured and thus allowing potential malicious actors to attempt to log in with common user names.
If the behavior is unexpected, complete the following steps:
As discussed previously for the CredentialAccess:RDS/AnomalousBehavior.SuccessfulLogin finding, you can restrict access to the database through credentials or network access:
Remediation step 5: Perform root-cause analysis and determine the steps that potentially led to this activity
By learning from each incident, you can help avoid repeating the same mistakes, exposures, or misconfigurations, which can both improve your security posture and reduce time lost to preventable situations.
Conclusion
In this post, you learned about the new GuardDuty RDS Protection feature and how to understand, operationalize, and respond to the new findings. You can enable this feature through the GuardDuty console, CLI, or APIs to start monitoring your Amazon RDS workloads today.
If you’ve created EventBridge rules to send findings from GuardDuty to a target, make sure that you’ve configured your rules to deliver the newly added findings. After you enable GuardDuty findings, consider creating IR playbooks, doing tabletops and AWS gamedays, and mapping out what you want to automate. For more information, see the AWS Security Incident Response Guide and AWS Incident Response Playbook resources. To gain hands-on experience with different AWS Security services, see AWS Activation Days. The Activation Days workshops begin with hands-on work with different services in sandbox accounts, and then take you through the steps to deploy them across your organization.
To make it more efficient for you to operate securely on AWS, we are committed to continually improving GuardDuty, and we value your feedback. If you have feedback about this post, submit comments in the Comments section below. If you have questions about this post, start a new thread on AWS re:Post or contact AWS Support.
Want more AWS Security news? Follow us on Twitter.
Amazon OpenSearch Service recently announced Multi-AZ with standby, a new deployment option for managed clusters that enables 99.99% availability and consistent performance for business-critical workloads. With Multi-AZ with standby, clusters are resilient to infrastructure failures like hardware or networking failure. This option provides improved reliability and the added benefit of simplifying cluster configuration and management by enforcing best practices and reducing complexity.
In this post, we share how Multi-AZ with standby works under the hood to achieve high resiliency and consistent performance to meet the four 9s.
Background
One of the principles in designing highly available systems is that they need to be ready for impairments before they happen. OpenSearch is a distributed system, which runs on a cluster of instances that have different roles. In OpenSearch Service, you can deploy data nodes to store your data and respond to indexing and search requests, you can also deploy dedicated cluster manager nodes to manage and orchestrate the cluster. To provide high availability, one common approach for the cloud is to deploy infrastructure across multiple AWS Availability Zones. Even in the rare case that a full zone becomes unavailable, the available zones continue to serve traffic with replicas.
When you use OpenSearch Service, you create indexes to hold your data and specify partitioning and replication for those indexes. Each index is comprised of a set of primary shards and zero to many replicas of those shards. When you additionally use the Multi-AZ feature, OpenSearch Service ensures that primary shards and replica shards are distributed so that they’re in different Availability Zones.
When there is an impairment in an Availability Zone, the service would scale up in other Availability Zones and redistribute shards to spread out the load evenly. This approach was reactive at best. Additionally, shard redistribution during failure events causes increased resource utilization, leading to increased latencies and overloaded nodes, further impacting availability and effectively defeating the purpose of fault-tolerant, multi-AZ clusters. A more effective, statically stable cluster configuration requires provisioning infrastructure to the point where it can continue operating correctly without having to launch any new capacity or redistribute any shards even if an Availability Zone becomes impaired.
Designing for high availability
OpenSearch Service manages tens of thousands of OpenSearch clusters. We’ve gained insights into which cluster configurations like hardware (data or cluster-manager instance types) or storage (EBS volume types), shard sizes, and so on are more resilient to failures and can meet the demands of common customer workloads. Some of these configurations have been included in Multi-AZ with standby to simplify configuring the clusters. However, this alone is not enough. A key ingredient in achieving high availability is maintaining data redundancy.
When you configure a single replica (two copies) for your indexes, the cluster can tolerate the loss of one shard (primary or replica) and still recover by copying the remaining shard. A two-replica (three copies) configuration can tolerate failure of two copies. In the case of a single replica with two copies, you can still sustain data loss. For example, you could lose data if there is a catastrophic failure in one Availability Zone for a prolonged duration, and at the same time, a node in a second zone fails. To ensure data redundancy at all times, the cluster enforces a minimum of two replicas (three copies) across all its indexes. The following diagram illustrates this architecture.
The Multi-AZ with standby feature deploys infrastructure in three Availability Zones, while keeping two zones as active and one zone as standby. The standby zone offers consistent performance even during zonal failures by ensuring same capacity at all times and by using a statically stable design without any capacity provisioning or data movements during failure. During normal operations, the active zone serves coordinator traffic for read and write requests and shard query traffic, and only replication traffic goes to the standby zone. OpenSearch uses synchronous replication protocol for write requests, which by design has zero replication lag, enabling the service to instantaneously promote a standby zone to active in the event of any failure in an active zone. This event is referred to as a zonal failover. The previously active zone is demoted to the standby mode and recovery operations to bring the state back to healthy begin.
Why zonal failover is critical but hard to do right
One or more nodes in an Availability Zone can fail due to a wide variety of reasons, like hardware failures, infrastructure failures like fiber cuts, power or thermal issues, or inter-zone or intra-zone networking problems. Read requests can be served by any of the active zones, whereas write requests need to be synchronously replicated to all copies across multiple Availability Zones. OpenSearch Service orchestrates two modes of failovers: read failovers and the write failovers.
The primarily goals of read failovers are high availability and consistent performance. This requires the system to constantly monitor for faults and shift traffic away from the unhealthy nodes in the impacted zone. The system takes care of handling the failovers gracefully, allowing all in-flight requests to finish while simultaneously shifting new incoming traffic to a healthy zone. However, it’s also possible for multiple shard copies across both active zones to be unavailable in cases of two node failures or one zone plus one node failure (often referred to as double faults), which poses a risk to availability. To solve this challenge, the system uses a fail-open mechanism to serve traffic off the third zone while it may still be in a standby mode to ensure the system remains highly available. The following diagram illustrates this architecture.
An impaired network device impacting inter-zone communication can cause write requests to significantly slow down, owing to the synchronous nature of replication. In such an event, the system orchestrates a write failover to isolate the impaired zone, cutting off all ingress and egress traffic. Although with write failovers the recovery is immediate, it results in all nodes along with its shards being taken offline. However, after the impacted zone is brought back after network recovery, shard recovery should still be able to use unchanged data from its local disk, avoiding full segment copy. Because the write failover results in the shard copy to be unavailable, we exercise write failovers with extreme caution, neither too frequently nor during transient failures.
The following graph depicts that during a zonal failure, automatic read failover prevents any impact to availability.
The following depicts that during a networking slowdown in a zone, write failover helps recover availability.
To ensure that the zonal failover mechanism is predictable (able to seamlessly shift traffic during an actual failure event), we regularly exercise failovers and keep rotating active and standby zones even during steady state. This not only verifies all network paths, ensuring we don’t hit surprises like clock skews, stale credentials, or networking issues during failover, but it also keeps gradually shifting caches to avoid cold starts on failovers, ensuring we deliver consistent performance at all times.
Improving the resiliency of the service
OpenSearch Service uses several principles and best practices to increase reliability, like automatic detection and faster recovery from failure, throttling excess requests, fail fast strategies, limiting queue sizes, quickly adapting to meet workload demands, implementing loosely coupled dependencies, continuously testing for failures, and more. We discuss a few of these methods in this section.
Automatic failure detection and recovery
All faults get monitored at a minutely granularity, across multiple sub-minutely metrics data points. Once detected, the system automatically triggers a recovery action on the impacted node. Although most classes of failures discussed so far in this post refer to binary failures where the failure is definitive, there is another kind of failure: non-binary failures, termed gray failures, whose manifestations are subtle and usually defy quick detection. Slow disk I/O is one example, which causes performance to be adversely impacted. The monitoring system detects anomalies in I/O wait times, latencies, and throughput, to detect and replace a node with slow I/O. Faster and effective detection and quick recovery is our best bet for a wide variety of infrastructure failures beyond our control.
Effective workload management in a dynamic environment
We’ve studied workload patterns that cause the system either to be overloaded with too many requests, maxing out CPU/memory, or a few rogue queries that can that either allocate huge chunks of memory or runaway queries that can exhaust multiple cores, either degrading the latencies of other critical requests or causing multiple nodes to fail due to the system’s resources running low. Some of the improvements in this direction are being done as a part of search backpressure initiatives, starting with tracking the request footprint at various checkpoints that prevents accommodating more requests and cancels the ones already running if they breach the resource limits for a sustained duration. To supplement backpressure in traffic shaping, we use admission control, which provides capabilities to reject a request at the entry point to avoid doing non-productive work (requests either time out or get cancelled) when the system is already run high on CPU and memory. Most of the workload management mechanisms have configurable knobs. No one size fits all workloads, therefore we use Auto-Tune to control them more granularly.
The cluster manager performs critical coordination tasks like metadata management and cluster formation, and orchestrates a few background operations like snapshot and shard placement. We added a task throttler to control the rate of dynamic mapping updates, snapshot tasks, and so on to prevent overwhelming it and to let critical operations run deterministically all the time. But what happens when there is no cluster manager in the cluster? The next section covers how we solved this.
Decoupling critical dependencies
In the event of cluster manager failure, searches continue as usual, but all write requests start to fail. We concluded that allowing writes in this state should still be safe as long as it doesn’t need to update the cluster metadata. This change further improves the write availability without compromising data consistency. Other service dependencies were evaluated to ensure downstream dependencies can scale as the cluster grows.
Failure mode testing
Although it’s hard to mimic all kinds of failures, we rely on AWS Fault Injection Simulator (AWS FIS) to inject common faults in the system like node failures, disk impairment, or network impairment. Testing with AWS FIS regularly in our pipelines helps us improve our detection, monitoring, and recovery times.
Contributing to open source
OpenSearch is an open-source, community-driven software. Most of the changes including the high availability design to support active and standby zones have been contributed to open source; in fact, we follow an open-source first development model. The fundamental primitive that enables zonal traffic shift and failover is based on a weighted traffic routing policy (active zones are assigned weights as 1 and standby zones are assigned weights as 0). Write failovers use the zonal decommission action, which evacuates all traffic from a given zone. Resiliency improvements for search backpressure and cluster manager task throttling are some of the ongoing efforts. If you’re excited to contribute to OpenSearch, open up a GitHub issue and let us know your thoughts.
Summary
Efforts to improve reliability is a never-ending cycle as we continue to learn and improve. With the Multi-AZ with standby feature, OpenSearch Service has integrated best practices for cluster configuration, improved workload management, and achieved four 9s of availability and consistent performance. OpenSearch Service also raised the bar by continuously verifying availability with zonal traffic rotations and automated tests via AWS FIS.
We are excited to continue our efforts into improving the reliability and fault tolerance even further and to see what new and existing solutions builders can create using OpenSearch Service. We hope this leads to a deeper understanding of the right level of availability based on the needs of your business and how this offering achieves the availability SLA. We would love to hear from you, especially about your success stories achieving high levels of availability on AWS. If you have other questions, please leave a comment.
About the authors
Bukhtawar Khan is a Principal Engineer working on Amazon OpenSearch Service. He is interested in building distributed and autonomous systems. He is a maintainer and an active contributor to OpenSearch.
Gaurav Bafna is a Senior Software Engineer working on OpenSearch at Amazon Web Services. He is fascinated about solving problems in distributed systems. He is a maintainer and an active contributor to OpenSearch.
Murali Krishna is a Senior Principal Engineer at AWS OpenSearch Service. He has built AWS OpenSearch Service and AWS CloudSearch. His areas of expertise include Information Retrieval, Large scale distributed computing, low latency real time serving systems etc. He has vast experience in designing and building web scale systems for crawling, processing, indexing and serving text and multimedia content. Prior to Amazon, he was part of Yahoo!, building crawling and indexing systems for their search products.
Ranjith Ramachandra is a Senior Engineering Manager working on Amazon OpenSearch Service. He is passionate about highly scalable distributed systems, high performance and resilient systems.
Rohin Bhargava is a Sr. Product Manager with the Amazon OpenSearch Service team. His passion at AWS is to help customers find the correct mix of AWS services to achieve success for their business goals.
Amazon QuickSight is a scalable, serverless, machine learning (ML)-powered business intelligence (BI) solution that makes it easy to connect to your data, create interactive dashboards, get access to ML-enabled insights, and share visuals and dashboards with tens of thousands of internal and external users, either within QuickSight itself or embedded into any application.
A write-back is the ability to update a data mart, data warehouse, or any other database backend from within BI dashboards and analyze the updated data in near-real time within the dashboard itself. In this post, we show how to perform secure database write-backs with QuickSight.
Use case overview
To demonstrate how to enable a write-back capability with QuickSight, let’s consider a fictional company, AnyCompany Inc. AnyCompany is a professional services firm that specializes in providing workforce solutions to their customers. AnyCompany determined that running workloads in the cloud to support its growing global business needs is a competitive advantage and uses the cloud to host all its workloads. AnyCompany decided to enhance the way its branches provide quotes to its customers. Currently, the branches generate customer quotes manually, and as a first step in this innovation journey, AnyCompany is looking to develop an enterprise solution for customer quote generation with the capability to dynamically apply local pricing data at the time of quote generation.
AnyCompany currently uses Amazon Redshift as their enterprise data warehouse platform and QuickSight as their BI solution.
Building a new solution comes with the following challenges:
AnyCompany wants a solution that is easy to build and maintain, and they don’t want to invest in building a separate user interface.
AnyCompany wants to extend the capabilities of their existing QuickSight BI dashboard to also enable quote generation and quote acceptance. This will simplify feature rollouts because their employees already use QuickSight dashboards and enjoy the easy-to-use interface that QuickSight provides.
AnyCompany wants to store the quote negotiation history that includes generated, reviewed, and accepted quotes.
AnyCompany wants to build a new dashboard with quote history data for analysis and business insights.
This post goes through the steps to enable write-back functionality to Amazon Redshift from QuickSight. Note that the traditional BI tools are read-only with little to no options to update source data.
Solution overview
This solution uses the following AWS services:
Amazon API Gateway – Hosts and secures the write-back REST API that will be invoked by QuickSight
AWS Lambda – Runs the compute function required to generate the hash and a second function to securely perform the write-back
Amazon QuickSight – Offers BI dashboards and quote generation capabilities
Amazon Redshift – Stores quotes, prices, and other relevant datasets
AWS Secrets Manager – Stores and manages keys to sign hashes (message digest)
Although this solution uses Amazon Redshift as the data store, a similar approach can be implemented with any database that supports creating user-defined functions (UDFs) that can invoke Lambda.
The following figure shows the workflow to perform write-backs from QuickSight.
The first step in the solution is to generate a hash or a message digest of the set of attributes in Amazon Redshift by invoking a Lambda function. This step prevents request tampering. To generate a hash, Amazon Redshift invokes a scalar Lambda UDF. The hashing mechanism used here is the popular BLAKE2 function (available in the Python library hashlib). To further secure the hash, keyed hashing is used, which is a faster and simpler alternative to hash-based message authentication code (HMAC). This key is generated and stored by Secrets Manager and should be accessible only to allowed applications. After the secure hash is generated, it’s returned to Amazon Redshift and combined in an Amazon Redshift view.
Writing the generated quote back to Amazon Redshift is performed by the write-back Lambda function, and an API Gateway REST API endpoint is created to secure and pass requests to the write-back function. The write-back function performs the following actions:
Generate the hash based on the API input parameters received from QuickSight.
Sign the hash by applying the key from Secrets Manager.
Compare the generated hash with the hash received from the input parameters using the compare_digest method available in the HMAC module.
Upon successful validation, write the record to the quote submission table in Amazon Redshift.
The following section provide detailed steps with sample payloads and code snippets.
Generate the hash
The hash is generated using a Lambda UDF in Amazon Redshift. Additionally, a Secrets Manager key is used to sign the hash. To create the hash, complete the following steps:
Create a Lambda UDF to generate a hash for encryption:
import boto3
import base64
import json
from hashlib import blake2b
from botocore.exceptions import ClientError

def get_secret(): 	#This key is used by the Lambda function to further secure the hash.

    secret_name = "<name_of_secret>"
    region_name = "<aws_region_name>"

    # Create a Secrets Manager client
    session = boto3.session.Session()
    client = session.client(service_name='secretsmanager', region_name=<aws_region_name>    )

    # In this sample we only handle the specific exceptions for the 'GetSecretValue' API.
    # See https://docs.aws.amazon.com/secretsmanager/latest/apireference/API_GetSecretValue.html
    # We rethrow the exception by default.

    try:
        get_secret_value_response = client.get_secret_value(SecretId=secret_name)
    except Exception as e:
            raise e

   if "SecretString" in get_secret_value_response:
       access_token = get_secret_value_response["SecretString"]
   else:
       access_token = get_secret_value_response["SecretBinary"]

   return json.loads(access_token)[<token key name>]

SECRET_KEY = get_secret()
AUTH_SIZE = 16

def sign(payload):
    h = blake2b(digest_size=AUTH_SIZE, key=SECRET_KEY)
    h.update(payload)
    return h.hexdigest().encode('utf-8')

def lambda_handler(event, context):
ret = dict()
 try:
  res = []
  for argument in event['arguments']:

   try:
     msg = json.dumps(argument)
     signed_key = sign(str.encode(msg))
     res.append(signed_key.decode('utf-8'))

   except:
   res.append(None)
   ret['success'] = True
   ret['results'] = res

except Exception as e:
  ret['success'] = False
  ret['error_msg'] = str(e)

 return json.dumps(ret)
Define an Amazon Redshift UDF to call the Lambda function to create a hash:
CREATE OR REPLACE EXTERNAL FUNCTION udf_get_digest (par1 varchar)
RETURNS varchar STABLE
LAMBDA 'redshift_get_digest'
IAM_ROLE 'arn:aws:iam::<AWSACCOUNTID>role/service-role/<role_name>';
The AWS Identity and Access Management (IAM) role in the preceding step should have the following policy attached to be able to invoke the Lambda function:
This key is used by the Lambda function to further secure the hash. This is indicated in the get_secret function in Step 2.
Set up Amazon Redshift datasets in QuickSight
The quote generation dashboard uses the following Amazon Redshift view.
Create an Amazon Redshift view that uses all the preceding columns along with the hash column:
create view quote_gen_vw as select *, udf_get_digest
( customername || BGCheckRequired || Skill|| Shift ||State ||Cost ) from billing_input_tbl
The records will look like the following screenshot.
The preceding view will be used as the QuickSight dataset to generate quotes. A QuickSight analysis will be created using the dataset. For near-real-time analysis, you can use QuickSight direct query mode.
Create API Gateway resources
The write-back operation is initiated by QuickSight invoking an API Gateway resource, which invokes the Lambda write-back function. As a prerequisite for creating the calculated field in QuickSight to call the write-back API, you must first create these resources.
API Gateway secures and invokes the write-back Lambda function with the parameters created as URL query string parameters with mapping templates. The mapping parameters can be avoided by using the Lambda proxy integration.
The following screenshot shows the details for creating a query string parameter for each parameter passed to API Gateway.
The following screenshot shows the details for creating a mapping template parameter for each parameter passed to API Gateway.
Create the Lambda function
Create a new Lambda function for the API Gateway to invoke. The Lambda function performs the following steps:
Receive parameters from QuickSight through API Gateway and hash the concatenated parameters.
The following code example retrieves parameters from the API Gateway call using the event object of the Lambda function:
   customer= event['customer’])
    bgc = event['bgc']
The function performs the hashing logic as shown in the create hash step earlier using the concatenated parameters passed by QuickSight.
Compare the hashed output with the hash parameter.
If these don’t match, the write-back won’t happen.
If the hashes match, perform a write-back. Check for the presence of a record in the quote generation table by generating a query from the table using the parameters passed from QuickSight:
query_str = "select * From tbquote where cust = '" + cust + "' and bgc = '" + bgc +"'" +" and skilledtrades = '" + skilledtrades + "' and shift = '" +shift + "' and jobdutydescription ='" + jobdutydescription + "'"
Complete the following action based on the results of the query:
If no record exists for the preceding combination, generate and run an insert query using all parameters with the status as generated.
If a record exists for the preceding combination, generate and run an insert query with the status as in review. The quote_Id for the existing combination will be reused.
Create a QuickSight visual
This step involves creating a table visual that uses a calculated field to pass parameters to API Gateway and invoke the preceding Lambda function.
Add a QuickSight calculated field named Generate Quote to hold the API Gateway hosted URL that will be triggered to write back the quote history into Amazon Redshift:
Add required fields such as Customer, Skill, and Cost.
Add the Generate Quote calculated field and style this as a hyperlink.
Choosing this link will write the record into Amazon Redshift. This is incumbent on the same hash value returning when the Lambda function performs the hash on the parameters.
The following screenshot shows a sample table visual.
Write to the Amazon Redshift database
The Secrets Manager key is fetched and used by the Lambda function to generate the hash for comparison. The write-back will be performed only if the hash matches with the hash passed in the parameter.
The following Amazon Redshift table will capture the quote history as populated by the Lambda function. Records in green represent the most recent records for the quote.
Considerations and next steps
Using secure hashes prevents the tampering of payload parameters that are visible in the browser window when the write-back URL is invoked. To further secure the write-back URL, you can employ the following techniques:
Deploy the REST API in a private VPC that is accessible only to QuickSight users.
To prevent replay attacks, a timestamp can be generated alongside the hashing function and passed as an additional parameter in the write-back URL. The backend Lambda function can then be modified to only allow write-backs within a certain time-based threshold.
Mitigate potential Denial of Service for public-facing APIs.
You can further enhance this solution to render a web-based form when the write-back URL is opened. This could be implemented by dynamically generating an HTML form in the backend Lambda function to support the input of additional information. If your workload requires a high number of write-backs that require higher throughput or concurrency, a purpose-built data store like Amazon Aurora PostgreSQL-Compatible Edition might be a better choice. For more information, refer to Invoking an AWS Lambda function from an Aurora PostgreSQL DB cluster. These updates can then be synchronized into Amazon Redshift tables using federated queries.
Conclusion
This post showed how to use QuickSight along with Lambda, API Gateway, Secrets Manager, and Amazon Redshift to capture user input data and securely update your Amazon Redshift data warehouse without leaving your QuickSight BI environment. This solution eliminates the need to create an external application or user interface for database update or insert operations, and reduces related development and maintenance overhead. The API Gateway call can also be secured using a key or token to ensure only calls originating from QuickSight are accepted by the API Gateway. This will be covered in subsequent posts.
About the Authors
Srikanth Baheti is a Specialized World Wide Principal Solutions Architect for Amazon QuickSight. He started his career as a consultant and worked for multiple private and government organizations. Later he worked for PerkinElmer Health and Sciences & eResearch Technology Inc, where he was responsible for designing and developing high traffic web applications, highly scalable and maintainable data pipelines for reporting platforms using AWS services and Serverless computing.
Raji Sivasubramaniam is a Sr. Solutions Architect at AWS, focusing on Analytics. Raji is specialized in architecting end-to-end Enterprise Data Management, Business Intelligence and Analytics solutions for Fortune 500 and Fortune 100 companies across the globe. She has in-depth experience in integrated healthcare data and analytics with wide variety of healthcare datasets including managed market, physician targeting and patient analytics.
This post is a guest post co-written with SeonJeong Lee, JaeRyun Yim, and HyeonSeok Yang from Encored Technologies.
Encored Technologies (Encored) is an energy IT company in Korea that helps their customers generate higher revenue and reduce operational costs in renewable energy industries by providing various AI-based solutions. Encored develops machine learning (ML) applications predicting and optimizing various energy-related processes, and their key initiative is to predict the amount of power generated at renewable energy power plants.
In this post, we share how Encored runs data engineering pipelines for containerized ML applications on AWS and how they use AWS Lambda to achieve performance improvement, cost reduction, and operational efficiency. We also demonstrate how to use AWS services to ingest and process GRIB (GRIdded Binary) format data, which is a file format commonly used in meteorology to store and exchange weather and climate data in a compressed binary form. It allows for efficient data storage and transmission, as well as easy manipulation of the data using specialized software.
Business and technical challenge
Encored is expanding their business into multiple countries to provide power trading services for end customers. The amount of data and the number of power plants they need to collect data are rapidly increasing over time. For example, the volume of data required for training one of the ML models is more than 200 TB. To meet the growing requirements of the business, the data science and platform team needed to speed up the process of delivering model outputs. As a solution, Encored aimed to migrate existing data and run ML applications in the AWS Cloud environment to efficiently process a scalable and robust end-to-end data and ML pipeline.
Solution overview
The primary objective of the solution is to develop an optimized data ingestion pipeline that addresses the scaling challenges related to data ingestion. During its previous deployment in an on-premises environment, the time taken to process data from ingestion to preparing the training dataset exceeded the required service level agreement (SLA). One of the input datasets required for ML models is weather data supplied by the Korea Meteorological Administration (KMA). In order to use the GRIB datasets for the ML models, Encored needed to prepare the raw data to make it suitable for building and training ML models. The first step was to convert GRIB to the Parquet file format.
Encored used Lambda to run an existing data ingestion pipeline built in a Linux-based container image. Lambda is a compute service that lets you run code without provisioning or managing servers. Lambda runs your code on a high-availability compute infrastructure and performs all of the administration of the compute resources, including server and operating system maintenance, capacity provisioning and automatic scaling, and logging. AWS Lambda is triggered to ingest and process GRIB data files when they are uploaded to Amazon Simple Storage Service (Amazon S3). Once the files are processed, they are stored in Parquet format in the other S3 bucket. Encored receives GRIB files throughout the day, and whenever new files arrive, an AWS Lambda function runs a container image registered in Amazon Elastic Container Registry (ECR). This event-based pipeline triggers a customized data pipeline that is packaged in a container-based solution. Leveraging Amazon AWS Lambda, this solution is cost-effective, scalable, and high-performing.Encored uses Python as their preferred language.
The following diagram illustrates the solution architecture.
For data-intensive tasks such as extract, transform, and load (ETL) jobs and ML inference, Lambda is an ideal solution because it offers several key benefits, including rapid scaling to meet demand, automatic scaling to zero when not in use, and S3 event triggers that can initiate actions in response to object-created events. All this contributes to building a scalable and cost-effective data event-driven pipeline. In addition to these benefits, Lambda allows you to configure ephemeral storage (/tmp) between 512–10,240 MB. Encored used this storage for their data application when reading or writing data, enabling them to optimize performance and cost-effectiveness. Furthermore, Lambda’s pay-per-use pricing model means that users only pay for the compute time in use, making it a cost-effective solution for a wide range of use cases.
Prerequisites
For this walkthrough, you should have the following:
Build your application required for your Docker image
The first step is to develop an application that can ingest and process files. This application reads the bucket name and object key passed from a trigger added to Lambda function. The processing logic involves three parts: downloading the file from Amazon S3 into ephemeral storage (/tmp), parsing the GRIB formatted data, and saving the parsed data to Parquet format.
The customer has a Python script (for example, app.py) that performs these tasks as follows:
import os
import tempfile
import boto3
import numpy as np
import pandas as pd
import pygrib

s3_client = boto3.client('s3')
def handler(event, context):
    try:
        # Get trigger file name
        bucket_name = event["Records"][0]["s3"]["bucket"]["name"]
        s3_file_name = event["Records"][0]["s3"]["object"]["key"]

        # Handle temp files: all temp objects are deleted when the with-clause is closed
        with tempfile.NamedTemporaryFile(delete=True) as tmp_file:
            # Step1> Download file from s3 into temp area
            s3_file_basename = os.path.basename(s3_file_name)
            s3_file_dirname = os.path.dirname(s3_file_name)
            local_filename = tmp_file.name
            s3_client.download_file(
                Bucket=bucket_name,
                Key=f"{s3_file_dirname}/{s3_file_basename}",
                Filename=local_filename
            )

            # Step2> Parse – GRIB2
            grbs = pygrib.open(local_filename)
            list_of_name = []
            list_of_values = []
            for grb in grbs:
                list_of_name.append(grb.name)
                list_of_values.append(grb.values)
            _, lat, lon = grb.data()
            list_of_name += ["lat", "lon"]
            list_of_values += [lat, lon]
            grbs.close()

            dat = pd.DataFrame(
                np.transpose(np.stack(list_of_values).reshape(len(list_of_values), -1)),
                columns=list_of_name,
            )

        # Step3> To Parquet
        s3_dest_uri = S3path
        dat.to_parquet(s3_dest_uri, compression="snappy")

    except Exception as err:
        print(err)
Prepare a Docker file
The second step is to create a Docker image using an AWS base image. To achieve this, you can create a new Dockerfile using a text editor on your local machine. This Dockerfile should contain two environment variables:
LAMBDA_TASK_ROOT=/var/task
LAMBDA_RUNTIME_DIR=/var/runtime
It’s important to install any dependencies under the ${LAMBDA_TASK_ROOT} directory alongside the function handler to ensure that the Lambda runtime can locate them when the function is invoked. Refer to the available Lambda base images for custom runtime for more information.
FROM public.ecr.aws/lambda/python:3.8

# Install the function's dependencies using file requirements.txt
# from your project folder.

COPY requirements.txt  .
RUN pip3 install -r requirements.txt --target "${LAMBDA_TASK_ROOT}"

# Copy function code
COPY app.py ${LAMBDA_TASK_ROOT}

# Set the CMD to your handler (could also be done as a parameter override outside of the Dockerfile)
CMD [ "app.handler" ]
Build a Docker image
The third step is to build your Docker image using the docker build command. When running this command, make sure to enter a name for the image. For example:
docker build -t process-grib .
In this example, the name of the image is process-grib. You can choose any name you like for your Docker image.
Upload the image to the Amazon ECR repository
Your container image needs to reside in an Amazon Elastic Container Registry (Amazon ECR) repository. Amazon ECR is a fully managed container registry offering high-performance hosting, so you can reliably deploy application images and artifacts anywhere. For instructions on creating an ECR repository, refer to Creating a private repository.
The first step is to authenticate the Docker CLI to your ECR registry as follows:
The second step is to tag your image to match your repository name, and deploy the image to Amazon ECR using the docker push command:
docker tag  hello-world:latest 123456789012.dkr.ecr. ap-northeast-2.amazonaws.com/hello-world:latest
docker push 123456789012.dkr.ecr. ap-northeast-2.amazonaws.com/hello-world:latest
Deploy Lambda functions as container images
To create your Lambda function, complete the following steps:
On the Lambda console, choose Functions in the navigation pane.
Choose Create function.
Choose the Container image option.
For Function name, enter a name.
For Container image URI, provide a container image. You can enter the ECR image URI or browse for the ECR image.
Under Container image overrides, you can override configuration settings such as the entry point or working directory that are included in the Dockerfile.
Under Permissions, expand Change default execution role.
Choose to create a new role or use an existing role.
Choose Create function.
Key considerations
To handle a large amount of data concurrently and quickly, Encored needed to store GRIB formatted files in the ephemeral storage (/tmp) that comes with Lambda. To achieve this requirement, Encored used tempfile.NamedTemporaryFile, which allows users to create temporary files easily that are deleted when no longer needed. With Lambda, you can configure ephemeral storage between 512 MB–10,240 MB for reading or writing data, allowing you to run ETL jobs, ML inference, or other data-intensive workloads.
Business outcome
Hyoseop Lee (CTO at Encored Technologies) said, “Encored has experienced positive outcomes since migrating to AWS Cloud. Initially, there was a perception that running workloads on AWS would be more expensive than using an on-premises environment. However, we discovered that this was not the case once we started running our applications on AWS. One of the most fascinating aspects of AWS services is the flexible architecture options it provides for processing, storing, and accessing large volumes of data that are only required infrequently.”
Conclusion
In this post, we covered how Encored built serverless data pipelines with Lambda and Amazon ECR to achieve performance improvement, cost reduction, and operational efficiency.
Encored successfully built an architecture that will support their global expansion and enhance technical capabilities through AWS services and the AWS Data Lab program. Based on the architecture and various internal datasets Encored has consolidated and curated, Encored plans to provide renewable energy forecasting and energy trading services.
Thanks for reading this post and hopefully you found it useful. To accelerate your digital transformation with ML, AWS is available to support you by providing prescriptive architectural guidance on a particular use case, sharing best practices, and removing technical roadblocks. You’ll leave the engagement with an architecture or working prototype that is custom fit to your needs, a path to production, and deeper knowledge of AWS services. Please contact your AWS Account Manager or Solutions Architect to get started. If you don’t have an AWS Account Manager, please contact Sales.
To learn more about ML inference use cases with Lambda, check out the following blog posts:
These resources will provide you with valuable insights and practical examples of how to use Lambda for ML inference.
About the Authors
SeonJeong Lee is the Head of Algorithms at Encored. She is a data practitioner who finds peace of mind from beautiful codes and formulas.
JaeRyun Yim is a Senior Data Scientist at Encored. He is striving to improve both work and life by focusing on simplicity and essence in my work.
HyeonSeok Yang is the platform team lead at Encored. He always strives to work with passion and spirit to keep challenging like a junior developer, and become a role model for others.
Younggu Yun works at AWS Data Lab in Korea. His role involves helping customers across the APAC region meet their business objectives and overcome technical challenges by providing prescriptive architectural guidance, sharing best practices, and building innovative solutions together.
Apache Spark allows you to configure the amount of Memory and vCPU cores that a job will utilize. However, tuning these values is a manual process that can be complex and ripe with pitfalls. For example, allocating too little memory can result in out-of-memory exceptions and poor job reliability. On the other hand, too much can result in over-spending on idle resources, poor cluster utilization and high costs. Moreover, it’s hard to right-size these settings for some use cases such as interactive analytics due to lack of visibility into future requirements. In the case of recurring jobs, keeping these settings up to date taking into account changing load patterns (due to external seasonal factors for instance) remains a challenge.
To address this, Amazon EMR on EKS has recently announced support for vertical autoscaling, a feature that uses the Kubernetes Vertical Pod Autoscaler (VPA) to automatically tune the memory and CPU resources of EMR Spark applications to adapt to the needs of the provided workload, simplifying the process of tuning resources and optimizing costs for these applications. You can use vertical autoscaling’s ability to tune resources based on historic data to keep memory and CPU settings up to date even when the profile of the workload varies over time. Additionally, you can use its ability to react to real-time signals to enable applications recover from out-of-memory (OOM) exceptions, helping improve job reliability.
Vertical autoscaling vs existing autoscaling solutions
Vertical autoscaling complements existing Spark autoscaling solutions such as Dynamic Resource Allocation (DRA) and Kubernetes autoscaling solutions such as Karpenter.
Features such as DRA typically work on the horizontal axis, where an increase in load results in an increase in the number of Kubernetes pods that will process the load. In the case of Spark, this results in data being processed across additional executors. When DRA is enabled, Spark starts with an initial number of executors and scales this up if it observes that there are tasks sitting and waiting for executors to run on. DRA works at the pod level and would need an underlying cluster-level auto-scaler such as Karpenter to bring in additional nodes or scale down unused nodes in response to these pods getting created and deleted.
However, for a given data profile and a query plan, sometimes the parallelism and the number of executors can’t be easily changed. As an example, if you’re attempting to join two tables that store data already sorted and bucketed by the join keys, Spark can efficiently join the data by using a fixed number of executors that equals the number of buckets in the source data. Since the number of executors cannot be changed, vertical autoscaling can help here by offering additional resources or scaling down unused resources at the executor level. This has a few advantages:
If a pod is optimally sized, the Kubernetes scheduler can efficiently pack in more pods in a single node, leading to better utilization of the underlying cluster.
The Amazon EMR on EKS uplift is charged based on the vCPU and memory resources consumed by a Kubernetes pod.This means an optimally sized pod is cheaper.
How vertical autoscaling works
Vertical autoscaling is a feature that you can opt into at the time of submitting an EMR on EKS job. When enabled, it uses VPA to track the resource utilization of your EMR Spark jobs and derive recommendations for resource assignments for Spark executor pods based on this data. The data, fetched from the Kubernetes Metric Server, feeds into statistical models that VPA constructs in order to build recommendations. When new executor pods spin up belonging to a job that has vertical autoscaling enabled, they’re autoscaled based on this recommendation, ignoring the usual sizing done via Spark’s executor memory configuration (controlled by the spark.executor.memory Spark setting).
Vertical autoscaling does not impact pods that are running, since in-place resizing of pods remains unsupported as of Kubernetes version 1.26, the latest supported version of Kubernetes on Amazon EKS as of this writing. However, it’s useful in the case of a recurring job where we can perform autoscaling based on historic data as well as scenarios when some pods go out-of-memory and get re-started by Spark, where vertical autoscaling can be used to selectively scale up the re-started pods and facilitate automatic recovery.
Data tracking and recommendations
To recap, vertical autoscaling uses VPA to track resource utilization for EMR jobs. For a deep-dive into the functionality, refer to the VPA Github repo. In short, vertical autoscaling sets up VPA to track the container_memory_working_set_bytes metric for the Spark executor pods that have vertical autoscaling enabled.
Real-time metric data is fetched from the Kubernetes Metric Server. By default, vertical autoscaling tracks the peak memory working set size for each pod and makes recommendations based on the p90 of the peak with a 40% safety margin added in. It also listens to pod events such as OOM events and reacts to these events. In the case of OOM events, VPA automatically bumps up the recommended resource assignment by 20%.
The statistical models, which also represent historic resource utilization data are stored as custom resource objects on your EKS cluster. This means that deleting these objects also purges old recommendations.
Customized recommendations through job signature
One of the major use-cases of vertical autoscaling is to aggregate usage data across different runs of EMR Spark jobs to derive resource recommendations. To do so, you need to provide a job signature. This can be a unique name or identifier that you configure at the time of submitting your job. If your job recurs at a fixed schedule (such as daily or weekly), it’s important that your job signature doesn’t change for each new instance of the job in order for VPA to aggregate and compute recommendations across different runs of the job.
A job signature can be the same even across different jobs if you believe they’ll have similar resource profiles. You can therefore use the signature to combine tracking and resource modeling across different jobs that you expect to behave similarly. Conversely, if a job’s behavior is changing at some point in time, such as due to a change in the upstream data or the query pattern, you can easily purge the old recommendations by either changing your signature or deleting the VPA custom resource for this signature (as explained later in this post).
Monitoring mode
You can use vertical autoscaling in a monitoring mode where no autoscaling is actually performed. Recommendations are reported to Prometheus if you have that setup on your cluster and you can monitor the recommendations through Grafana dashboards and use that to debug and make manual changes to the resource assignments. Monitoring mode is the default but you can override and use one of the supported autoscaling modes as well at the time of submitting a job. Refer to documentation for usage and a walkthrough on how to get started.
Monitoring vertical autoscaling through kubectl
You can use the Kubernetes command-line tool kubectl to list active recommendations on your cluster, view all the job signatures that are being tracked as well as purge resources associated with signatures that aren’t relevant anymore. In this section, we provide some example code to demonstrate listing, querying, and deleting recommendations.
List all vertical autoscaling recommendations on a cluster
You can use kubectl to get the verticalpodautoscaler resource in order to view the current status and recommendations. The following sample query lists all resources currently active on your EKS cluster:
NAME               SIGNATURE           MODE      MEM
ds-<some-id>-vpa   <some-signature>    Off       930143865
ds-<some-id>-vpa   <some-signature>    Initial   14291063673
Query and delete a recommendation
You can also use kubectl to purge recommendation for a job based on the signature. Alternately, you can use the --all flag and skip specifying the signature to purge all the resources on your cluster. Note that in this case you’ll actually be deleting the EMR vertical autoscaling job-run resource. This is a custom resource managed by EMR, deleting it automatically deletes the associated VPA object that tracks and stores recommendations. See the following code:
Monitor vertical autoscaling through Prometheus and Grafana
You can use Prometheus and Grafana to monitor the vertical autoscaling functionality on your EKS cluster. This includes viewing recommendations that evolve over time for different job signatures, monitoring the autoscaling functionality etc. For this setup, we assume Prometheus and Grafana are already installed on your EKS cluster using the official Helm charts. If not, refer to the Setting up Prometheus and Grafana for monitoring the cluster section of the Running batch workloads on Amazon EKS workshop to get them up and running on your cluster.
Modify Prometheus to collect vertical autoscaling metrics
Prometheus doesn’t track vertical autoscaling metrics by default. To enable this, you’ll need to start gathering metrics from the VPA custom resource objects on your cluster. This can be easily done by patching your Helm chart with the following configuration:
Here, prometheus-helm-values.yaml is the vertical autoscaling specific customization that tells Prometheus to gather vertical autoscaling related recommendations from the VPA resource objects, along with the minimal required metadata such as the job’s signature.
You can verify if this setup is working by running the following Prometheus queries for the newly created custom metrics:
kube_customresource_vpa_spark_rec_memory_target
kube_customresource_vpa_spark_rec_memory_lower
kube_customresource_vpa_spark_rec_memory_upper
These represent the lower bound, upper bound and target memory for EMR Spark jobs that have vertical autoscaling enabled. The query can be grouped or filtered using the signature label similar to the following Prometheus query:
Use Grafana to visualize recommendations and autoscaling functionality
You can use our sample Grafana dashboard by importing the EMR vertical autoscaling JSON model into your Grafana deployment. The dashboard visualizes vertical autoscaling recommendations alongside the memory provisioned and actually utilized by EMR Spark applications as shown in the following screenshot.
Results are presented categorized by your Kubernetes namespace and job signature. When you choose a certain namespace and signature combination, you’re presented with a pane. The pane represents a comparison of the vertical autoscaling recommendations for jobs belonging to the chosen signature, compared to the actual resource utilization of that job and the amount of Spark executor memory provisioned to the job. If autoscaling is enabled, the expectation is that the Spark executor memory would track the recommendation. If you’re in monitoring mode however, the two won’t match but you can still view the recommendations from this dashboard or use them to better understand the actual utilization and resource profile of your job.
Illustration of provisioned memory, utilization and recommendations
To better illustrate vertical autoscaling behavior and usage for different workloads, we executed query 2 of the TPC-DS benchmark for 5 iterations — The first two iterations in monitoring mode and the last 3 in autoscaling mode and visualized the results in the Grafana dashboard shared in the previous section.
Monitoring mode
This particular job was provisioned to run with 32GB of executor memory (the blue line in the image) but the actual utilization hovered at around the 10 GB mark (amber line). Vertical autoscaling computes a recommendation of approximately 14 GB based on this run (the green line). This recommendation is based on the actual utilization with a safety margin added in.
The second iteration of the job was also run in the monitoring mode and the utilization and the recommendations remained unchanged.
Autoscaling mode
Iterations 3 through 5 were run in autoscaling mode. In this case, the provisioned memory drops from 32GB to match the recommended value of 14GB (the blue line).
The utilization and recommendations remained unchanged for subsequent iterations in the case of this example. Furthermore, we observed that all the iterations of the job completed in around 5 minutes, both with and without autoscaling. This example illustrates the successful scaling down of the job’s executor memory allocation by about 56% (a drop from 32GB to approximately 14 GB) which also translates to an equivalent reduction in the EMR memory uplift costs of the job, with no impact to the job’s performance.
Automatic OOM recovery
In the earlier example, we didn’t observe any OOM events as a result of autoscaling. In the rare occasion where autoscaling results in OOM events, jobs should usually be scaled back up automatically. On the other hand, if a job that has autoscaling enabled is under-provisioned and as a result experiences OOM events, vertical autoscaling can scale up resources to facilitate automatic recovery.
In the following example, a job was provisioned with 2.5 GB of executor memory and experienced OOM exceptions during its execution. Vertical autoscaling responded to the OOM events by automatically scaling up failed executors when they were re-started. As seen in the following image, when the amber line representing memory utilization started approaching the blue line representing the provisioned memory, vertical autoscaling kicked in to increase the amount of provisioned memory for the re-started executors, allowing the automatic recovery and successful completion of the job without any intervention. The recommended memory converged to approximately 5 GB before the job completed.
All subsequent runs of jobs with the same signature will now start-up with the recommended settings computed earlier, preventing OOM events right from the start.
Cleanup
Refer to documentation for information on cleaning up vertical autoscaling related resources from your cluster. To cleanup your EMR on EKS cluster after trying out the vertical autoscaling feature, refer to the clean-up section of the EMR on EKS workshop.
Conclusion
You can use vertical autoscaling to easily monitor resource utilization for one or more EMR on EKS jobs without any impact to your production workloads. You can use standard Kubernetes tooling including Prometheus, Grafana and kubectl to interact with and monitor vertical autoscaling on your cluster. You can also autoscale your EMR Spark jobs using recommendations that are derived based on the needs of your job, allowing you to realize cost savings and optimize cluster utilization as well as build resiliency to out-of-memory errors. Additionally, you can use it in conjunction with existing autoscaling mechanisms such as Dynamic Resource Allocation and Karpenter to effortlessly achieve optimal vertical resource assignment. Looking ahead, when Kubernetes fully supports in-place resizing of pods, vertical autoscaling will be able to take advantage of it to seamlessly scale your EMR jobs up or down, further facilitating optimal costs and cluster utilization.
To learn more about EMR on EKS vertical autoscaling and getting started with it, refer to documentation. You can also use the EMR on EKS Workshop to try out the EMR on EKS deployment option for Amazon EMR.
About the author
Rajkishan Gunasekaran is a Principal Engineer for Amazon EMR on EKS at Amazon Web Services.
The Transparency in Coverage rule is a federal regulation in the United States that was finalized by the Center for Medicare and Medicaid Services (CMS) in October 2020. The rule requires health insurers to provide clear and concise information to consumers about their health plan benefits, including costs and coverage details. Under the rule, health insurers must make available to their members a list of negotiated rates for in-network providers, as well as an estimate of the member’s out-of-pocket costs for specific health care services. This information must be made available to members through an online tool that is accessible and easy to use. The Transparency in Coverage rule also requires insurers to make available data files that contain detailed information on the prices they negotiate with health care providers. This information can be used by employers, researchers, and others to compare prices across different insurers and health care providers. Phase 1 implementation of this regulation, which went into effect on July 1, 2022, requires that payors publish machine-readable files publicly for each plan that they offer. CMS (Center for Medicare and Medicaid Services) has published a technical implementation guide with file formats, file structure, and standards on producing these machine-readable files.
This post walks you through the preprocessing and processing steps required to prepare data published by health insurers in light of this federal regulation using AWS Glue. We also show how to query and derive insights using Amazon Athena.
AWS Glue is a serverless data integration service that makes it straightforward to discover, prepare, move, and integrate data from multiple sources for analytics, machine learning (ML), and application development. Athena is a serverless, interactive analytics service built on open-source frameworks, supporting open-table and file formats. Athena provides a simplified, flexible way to analyze petabytes of data.
Challenges processing these machine-readable files
The machine-readable files published by these payors vary in size. A single file can range from a few megabytes to hundreds of gigabytes. These files contain large JSON objects that are deeply nested. Unlike NDJSON and JSONL formats, where each line in the file is a JSON object, these files contain a single large JSON object that can span across multiple lines. The following figure represents the schema of an in_network rate file published by a major health insurer on their website for public access. This file, when uncompressed, is about 20 GB in size, contains a single JSON object, and is deeply nested. The following figure represents the schema of this JSON object when printed using the Spark printSchema() function. Each highlighted box in red is a nested array structure.
Loading a 20 GB deeply nested JSON object requires a machine with a large memory footprint. Data when loaded into memory is 4–10 times its size on disk. A 20 GB JSON object may need a machine with up to 200 GB memory. To process workloads larger than 20 GB, these machines need to be scaled vertically, thereby significantly increasing hardware costs. Vertical scaling has its limits, and it’s not possible to scale beyond a certain point. Analyzing this data requires unnesting and flattening of deeply nested array structures. These transformations explode the data at an exponential rate, thereby adding to the need for more memory and disk space.
You can use an in-memory distributed processing framework such as Apache Spark to process and analyze such large volumes of data. However, to load this single large JSON object as a Spark DataFrame and perform an action on it, a worker node needs enough memory to load this object in full. When a worker node tries to load this large deeply nested JSON object and there isn’t enough memory to load it in full, the processing job will fail with out-of-memory issues. This calls for splitting the large JSON object into smaller chunks using some form of preprocessing logic. Once preprocessed, these smaller files can then be further processed in parallel by worker nodes without running into out-of-memory issues.
Solution overview
The solution involves a two-step approach. The first is a preprocessing step, which takes the large JSON object as input and splits it to multiple manageable chunks. This is required to address the challenges we mentioned earlier. The second is a processing step, which prepares and publishes data for analysis.
The preprocessing step uses an AWS Glue Python shell job to split the large JSON object into smaller JSON files. The processing step unnests and flattens the array items from these smaller JSON files in parallel. It then partitions and writes the output as Parquet on Amazon Simple Storage Service (Amazon S3). The partitioned data is cataloged and analyzed using Athena. The following diagram illustrates this workflow.
Prerequisites
To implement the solution in your own AWS account, you need to create or configure the following AWS resources in advance:
An S3 bucket to persist the source and processed data. Download the input file and upload it to the path s3://yourbucket/ptd/2023-03-01_United-HealthCare-Services—Inc-_Third-Party-Administrator_PS1-50_C2_in-network-rates.json.gz.
The preprocessing step uses ijson, an open-source iterative JSON parser to extract items in the outermost array of top-level attributes. By streaming and iteratively parsing the large JSON file, the preprocessing step loads only a portion of the file into memory, thereby avoiding out-of-memory issues. It also uses s3pathlib, an open-source Python interface to Amazon S3. This makes it easy to work with S3 file systems.
To create and run the AWS Glue job for preprocessing, complete the following steps:
On the AWS Glue console, choose Jobs under Glue Studio in the navigation pane.
Create a new job.
Select Python shell script editor.
Select Create a new script with boilerplate code.
Enter the following code into the editor (adjust the S3 bucket names and paths to point to the input and output locations in Amazon S3):
import ijson
import json
import decimal
from s3pathlib import S3Path
from s3pathlib import context
import boto3
from io import StringIO

class JSONEncoder(json.JSONEncoder):
    def default(self, obj):
        if isinstance(obj, decimal.Decimal):
            return float(obj)
        return json.JSONEncoder.default(self, obj)

def upload_to_s3(data, upload_path):
    data = bytes(StringIO(json.dumps(data,cls=JSONEncoder)).getvalue(),encoding='utf-8')
    s3_client.put_object(Body=data, Bucket=bucket, Key=upload_path)

s3_client = boto3.client('s3')

#Replace with your bucket and path to JSON object on your bucket
bucket = 'yourbucket'
largefile_key = 'ptd/2023-03-01_United-HealthCare-Services--Inc-_Third-Party-Administrator_PS1-50_C2_in-network-rates.json.gz'
p = S3Path(bucket, largefile_key)


#Replace the paths to suit your needs
upload_path_base = 'ptd/preprocessed/base/base.json'
upload_path_in_network = 'ptd/preprocessed/in_network/'
upload_path_provider_references = 'ptd/preprocessed/provider_references/'

#Extract top the values of the following top level attributes and persist them on your S3 bucket
# -- reporting_entity_name
# -- reporting_entity_type
# -- last_updated_on
# -- version

base ={
    'reporting_entity_name' : '',
    'reporting_entity_type' : '',
    'last_updated_on' :'',
    'version' : ''
}

with p.open("r") as f:
    obj = ijson.items(f, 'reporting_entity_name')
    for evt in obj:
        base['reporting_entity_name'] = evt
        break

with p.open("r") as f:
    obj = ijson.items(f, 'reporting_entity_type')
    for evt in obj:
        base['reporting_entity_type'] = evt
        break

with p.open("r") as f:
    obj = ijson.items(f, 'last_updated_on')
    for evt in obj:
        base['last_updated_on'] = evt
        break

with p.open("r") as f:
    obj = ijson.items(f,'version')
    for evt in obj:
        base['version'] = evt
        break

upload_to_s3(base,upload_path_base)

#Seek the position of JSON key provider_references
#Iterate through items in provider_references array, and for every 1000 items create a JSON file on S3 bucket
with p.open("r") as f:
    provider_references = ijson.items(f, 'provider_references.item')
    fk = 0
    lst = []
    for rowcnt,row in enumerate(provider_references):
        if rowcnt % 1000 == 0:
            if fk > 0:
                dest = upload_path_provider_references + path
                upload_to_s3(lst,dest)
            lst = []
            path = 'provider_references_{0}.json'.format(fk)
            fk = fk + 1

        lst.append(row)

    path = 'provider_references_{0}.json'.format(fk)
    dest = upload_path_provider_references + path
    upload_to_s3(lst,dest)

#Seek the position of JSON key in_network
#Iterate through items in in_network array, and for every 25 items create a JSON file on S3 bucket
with p.open("r") as f:
    in_network = ijson.items(f, 'in_network.item')
    fk = 0
    lst = []
    for rowcnt,row in enumerate(in_network):
        if rowcnt % 25 == 0:
            if fk > 0:
                dest = upload_path_in_network + path
                upload_to_s3(lst,dest)
            lst = []
            path = 'in_network_{0}.json'.format(fk)
            fk = fk + 1

        lst.append(row)


    path = 'in_network_{0}.json'.format(fk)
    dest = upload_path_in_network + path
    upload_to_s3(lst,dest)
Update the properties of your job on the Job details tab:
For Type, choose Python Shell.
For Python version, choose Python 3.9.
For Data processing units, choose 1 DPU.
For Python shell jobs, you can allocate either 0.0625 or 1 DPU. The default is 0.0625 DPU. A DPU is a relative measure of processing power that consists of 4 vCPUs of compute capacity and 16 GB of memory.
The Python libraries ijson and s3pathlib are available in pip and can be installed using the AWS Glue job parameter --additional-python-modules. You can also choose to package these libraries, upload them to Amazon S3, and refer to them from your AWS Glue job. For instructions on packaging your library, refer to Providing your own Python library.
To install the Python libraries, set the following job parameters:
Key – --additional-python-modules
Value – ijson,s3pathlib
Run the job.
The preprocessing step creates three folders in the S3 bucket: base, in_network and provider_references.
Files in in_network and provider_references folders contains array of JSON objects. Each of these JSON objects represents an element in the outermost array of the original large JSON object.
Create an AWS Glue processing job
The processing job uses the output of the preprocessing step to create a denormalized view of data by extracting and flattening elements and attributes from nested arrays. The extent of unnesting depends on the attributes we need for analysis. For example, attributes such as negotiated_rate, npi, and billing_code are essential for analysis and extracting values associated with these attributes requires multiple levels of unnesting. The denormalized data is then partitioned by the billing_code column, persisted as Parquet on Amazon S3, and registered as a table on the AWS Glue Data Catalog for querying.
The following code sample guides you through the implementation using PySpark. The columns used to partition the data depends on query patterns used to analyze the data. Arriving at a partitioning strategy that is in line with the query patterns will improve overall query performance during analysis. This post assumes that the queries used for analyzing data will always use the column billing_code to filter and fetch data of interest. Data in each partition is bucketed by npi to improve query performance.
To create your AWS Glue job, complete the following steps:
On the AWS Glue console, choose Jobs under Glue Studio in the navigation pane.
Create a new job.
Select Spark script editor.
Select Create a new script with boilerplate code.
Enter the following code into the editor (adjust the S3 bucket names and paths to point to the input and output locations in Amazon S3):
import sys
from pyspark.context import SparkContext
from pyspark.sql import SparkSession
sc = SparkContext.getOrCreate()
spark = SparkSession(sc)
from pyspark.sql.functions import explode

#create a dataframe of base objects - reporting_entity_name, reporting_entity_type, version, last_updated_on
#using the output of preprocessing step

base_df = spark.read.json('s3://yourbucket/ptd/preprocessed/base/')

#create a dataframe over provider_references objects using the output of preprocessing step
prvd_df = spark.read.json('s3://yourbucket/ptd/preprocessed/provider_references/')

#cross join dataframe of base objects with dataframe of provider_references
prvd_df = prvd_df.crossJoin(base_df)

#create a dataframe over in_network objects using the output of preprocessing step
in_ntwrk_df = spark.read.json('s3://yourbucket/ptd/preprocessed/in_network/')

#unnest and flatten negotiated_rates and provider_references from in_network objects
in_ntwrk_df2 = in_ntwrk_df.select(
 in_ntwrk_df.billing_code, in_ntwrk_df.billing_code_type, in_ntwrk_df.billing_code_type_version,
 in_ntwrk_df.covered_services, in_ntwrk_df.description, in_ntwrk_df.name,
 explode(in_ntwrk_df.negotiated_rates).alias('exploded_negotiated_rates'),
 in_ntwrk_df.negotiation_arrangement)


in_ntwrk_df3 = in_ntwrk_df2.select(
 in_ntwrk_df2.billing_code, in_ntwrk_df2.billing_code_type, in_ntwrk_df2.billing_code_type_version,
 in_ntwrk_df2.covered_services, in_ntwrk_df2.description, in_ntwrk_df2.name,
 in_ntwrk_df2.exploded_negotiated_rates.negotiated_prices.alias(
 'exploded_negotiated_rates_negotiated_prices'),
 explode(in_ntwrk_df2.exploded_negotiated_rates.provider_references).alias(
 'exploded_negotiated_rates_provider_references'),
 in_ntwrk_df2.negotiation_arrangement)

#join the exploded in_network dataframe with provider_references dataframe
jdf = prvd_df.join(
 in_ntwrk_df3,
 prvd_df.provider_group_id == in_ntwrk_df3.exploded_negotiated_rates_provider_references,"fullouter")

#un-nest and flatten attributes from rest of the nested arrays.
jdf2 = jdf.select(
 jdf.reporting_entity_name,jdf.reporting_entity_type,jdf.last_updated_on,jdf.version,
 jdf.provider_group_id, jdf.provider_groups, jdf.billing_code,
 jdf.billing_code_type, jdf.billing_code_type_version, jdf.covered_services,
 jdf.description, jdf.name,
 explode(jdf.exploded_negotiated_rates_negotiated_prices).alias(
 'exploded_negotiated_rates_negotiated_prices'),
 jdf.exploded_negotiated_rates_provider_references,
 jdf.negotiation_arrangement)

jdf3 = jdf2.select(
 jdf2.reporting_entity_name,jdf2.reporting_entity_type,jdf2.last_updated_on,jdf2.version,
 jdf2.provider_group_id,
 explode(jdf2.provider_groups).alias('exploded_provider_groups'),
 jdf2.billing_code, jdf2.billing_code_type, jdf2.billing_code_type_version,
 jdf2.covered_services, jdf2.description, jdf2.name,
 jdf2.exploded_negotiated_rates_negotiated_prices.additional_information.
 alias('additional_information'),
 jdf2.exploded_negotiated_rates_negotiated_prices.billing_class.alias(
 'billing_class'),
 jdf2.exploded_negotiated_rates_negotiated_prices.billing_code_modifier.
 alias('billing_code_modifier'),
 jdf2.exploded_negotiated_rates_negotiated_prices.expiration_date.alias(
 'expiration_date'),
 jdf2.exploded_negotiated_rates_negotiated_prices.negotiated_rate.alias(
 'negotiated_rate'),
 jdf2.exploded_negotiated_rates_negotiated_prices.negotiated_type.alias(
 'negotiated_type'),
 jdf2.exploded_negotiated_rates_negotiated_prices.service_code.alias(
 'service_code'), jdf2.exploded_negotiated_rates_provider_references,
 jdf2.negotiation_arrangement)

jdf4 = jdf3.select(jdf3.reporting_entity_name,jdf3.reporting_entity_type,jdf3.last_updated_on,jdf3.version,
 jdf3.provider_group_id,
 explode(jdf3.exploded_provider_groups.npi).alias('npi'),
 jdf3.exploded_provider_groups.tin.type.alias('tin_type'),
 jdf3.exploded_provider_groups.tin.value.alias('tin'),
 jdf3.billing_code, jdf3.billing_code_type,
 jdf3.billing_code_type_version, jdf3.covered_services,
 jdf3.description, jdf3.name, jdf3.additional_information,
 jdf3.billing_class, jdf3.billing_code_modifier,
 jdf3.expiration_date, jdf3.negotiated_rate,
 jdf3.negotiated_type, jdf3.service_code,
 jdf3.negotiation_arrangement)

#repartition by billing_code.
#Repartition changes the distribution of data on spark cluster.
#By repartition data we will avoid writing too many small files.
jdf5=jdf4.repartition("billing_code")

datasink_path = "s3://yourbucket/ptd/processed/billing_code_npi/parquet/"

#persist dataframe as parquet on S3 and catalog it
#Partition the data by billing_code. This enables analytical queries to skip data and improve performance of queries
#Data is also bucketed and sorted npi to improve query performance during analysis

jdf5.write.format('parquet').mode("overwrite").partitionBy('billing_code').bucketBy(2, 'npi').sortBy('npi').saveAsTable('ptdtable', path = datasink_path)
Update the properties of your job on the Job details tab:
For Type, choose Spark.
For Glue version, choose Glue 4.0.
For Language, choose Python 3.
For Worker type, choose G 2X.
For Requested number of workers, enter 20.
Arriving at the number of workers and worker type to use for your processing job depends on factors such as the amount of data being processed, the speed at which it needs to be processed, and the partitioning strategy used. Repartitioning of data can result in out-of-memory issues, especially when data is heavily skewed on the column used to repartition. It’s possible to reach Amazon S3 service limits if too many workers are assigned to the job. This is because tasks running on these worker nodes may try to read/write from the same S3 prefix, causing Amazon S3 to throttle the incoming requests. For more details, refer to Best practices design patterns: optimizing Amazon S3 performance.
Exploding array elements creates new rows and columns, thereby exponentially increasing the amount of data that needs to be processed. Apache Spark splits this data into multiple Spark partitions on different worker nodes so that it can process large amounts of data in parallel. In Apache Spark, shuffling happens when data needs to be redistributed across the cluster. Shuffle operations are commonly triggered by wide transformations such as join, reduceByKey, groupByKey, and repartition. In case of exceptions due to local storage limitations, it helps to supplement or replace local disk storage capacity with Amazon S3 for large shuffle operations. This is possible with the AWS Glue Spark shuffle plugin with Amazon S3. With the cloud shuffle storage plugin for Apache Spark, you can avoid disk space-related failures.
To use the Spark shuffle plugin, set the following job parameters:
Key – --write-shuffle-files-to-s3
Value – true
Query the data
You can query the cataloged data using Athena. For instructions on setting up Athena, refer to Setting up.
On the Athena console, choose Query editor in the navigation pane to run your query, and specify your data source and database.
To find the minimum, maximum, and average negotiated rates for procedure codes, run the following query:
SELECT
billing_code,
round(min(negotiated_rate),2) as min_price,
round(avg(negotiated_rate),2) as avg_price,
round(max(negotiated_rate),2) as max_price,
description
FROM "default"."ptdtable"
group by billing_code, description
limit 10;
The following screenshot shows the query results.
Clean up
To avoid incurring future charges, delete the AWS resources you created:
Delete the S3 objects and bucket.
Delete the IAM policies and roles.
Delete the AWS Glue jobs for preprocessing and processing.
Conclusion
This post guided you through the necessary preprocessing and processing steps to query and analyze price transparency-related machine-readable files. Although it’s possible to use other AWS services to process such data, this post focused on preparing and publishing data using AWS Glue.
We look forward to hearing any feedback or questions.
About the Authors
Hari Thatavarthy is a Senior Solutions Architect on the AWS Data Lab team. He helps customers design and build solutions in the data and analytics space. He believes in data democratization and loves to solve complex data processing-related problems. In his spare time, he loves to play table tennis.
Krishna Maddileti is a Senior Solutions Architect on the AWS Data Lab team. He partners with customers on their AWS journey and helps them with data engineering, data lakes, and analytics. In his spare time, he enjoys spending time with his family and playing video games with his 7-year-old.
Yadukishore Tatavarthi is a Senior Partner Solutions Architect at AWS. He works closely with global system integrator partners to enable and support customers moving their workloads to AWS.
Manish Kola is a Solutions Architect on the AWS Data Lab team. He partners with customers on their AWS journey.
Noritaka Sekiyama is a Principal Big Data Architect on the AWS Glue team. He is responsible for building software artifacts to help customers. In his spare time, he enjoys cycling with his new road bike.
Customers use Amazon OpenSearch Service for mission-critical applications and monitoring. But what happens when OpenSearch Service itself is unavailable? If your ecommerce search is down, for example, you’re losing revenue. If you’re monitoring your application with OpenSearch Service, and it becomes unavailable, your ability to detect, diagnose, and repair issues with your application is diminished. In these cases, you may suffer lost revenue, customer dissatisfaction, reduced productivity, or even damage to your organization’s reputation.
OpenSearch Service offers an SLA of three 9s (99.9%) availability when following best practices. However, following those practices is complicated, and can require knowledge of and experience with OpenSearch’s data deployment and management, along with an understanding of how OpenSearch Service interacts with AWS Availability Zones and networking, distributed systems, OpenSearch’s self-healing capabilities, and its recovery methods. Furthermore, when an issue arises, such as a node becoming unresponsive, OpenSearch Service recovers by recreating the missing shards (data), causing a potentially large movement of data in the domain. This data movement increases resource usage on the cluster, which can impact performance. If the cluster is not sized properly, it can experience degraded availability, which defeats the purpose of provisioning the cluster across three Availability Zones.
Today, AWS is announcing the new deployment option Multi-AZ with Standby for OpenSearch Service, which helps you offload some of that heavy lifting in terms of high frequency monitoring, fast failure detection, and quick recovery from failure, and keeps your domains available and performant even in the event of an infrastructure failure. With Multi-AZ with Standby, you get 99.99% availability with consistent performance for a domain.
In this post, we discuss the benefits of this new option and how to configure your OpenSearch cluster with Multi-AZ with Standby.
Solution overview
The OpenSearch Service team has incorporated years of experience running tens of thousands of domains for our customers into the Multi-AZ with Standby feature. When you adopt Multi-AZ with Standby, OpenSearch Service creates a cluster across three Availability Zones, with each Availability Zone containing a complete copy of data in the cluster. OpenSearch Service then puts one Availability Zone into standby mode, routing all queries to the other two Availability Zones. When it detects a hardware-related failure, OpenSearch Service promotes nodes from the standby pool to become active in less than a minute. When you use Multi-AZ with Standby, OpenSearch Service doesn’t need to redistribute or recreate data from missing nodes. As a result, cluster performance is unaffected, removing the risk of degraded availability.
Prerequisites
Multi-AZ with Standby requires the following prerequisites:
The domain needs to run on OpenSearch 1.3 or above
The domain is deployed across three Availability Zones
The domain has three (or a multiple of three) data notes
You must use three dedicated cluster manager (master) nodes
Configure your OpenSearch cluster using Multi-AZ with Standby
You can use Multi-AZ with Standby when you create a new domain, or you can add it to an existing domain. If you’re creating a new domain using the AWS Management Console, you can create it with Multi-AZ with Standby by either selecting the new Easy create option or the traditional Standard create option. You can update existing domains to use Multi-AZ with Standby by editing their domain configuration.
The Easy create option, as the name suggests, makes creating a domain easier by defaulting to best practice choices for most of the configuration (the majority of which can be altered later). The domain will be set up for high availability from the start and deployed as Multi-AZ with Standby.
While choosing the data nodes, you should choose three (or a multiple of three) data nodes so that they are equally distributed across each of the Availability Zones. The Data nodes table on the OpenSearch Service console provides a visual representation of the data notes, showing that one of the Availability Zones will be put on standby.
Similarly, while selecting the cluster manager (master) node, consider the number of data nodes, indexes, and shards that you plan to have before deciding the instance size.
After the domain is created, you can check its deployment type on the OpenSearch Service console under Cluster configuration, as shown in the following screenshot.
While creating an index, make sure that the number of copies (primary and replica) are multiples of three. If you don’t specify the number of replicas, the service will default to two. This is important so that there is at least one copy of the data in each Availability Zone. We recommend using an index template or similar for logs workloads.
OpenSearch Service distributes the nodes and data copies equally across the three Availability Zones. During normal operations, the standby nodes don’t receive any search requests. The two active Availability Zones respond to all the search requests. However, data is replicated to these standby nodes to ensure you have a full copy of the data in each Availability Zone at all times.
Response to infrastructure failure events
OpenSearch Service continuously monitors the domain for events like node failure, disk failure, or Availability Zone failure. In the event of an infrastructure failure like an Availability Zone failure, OpenSearch Services promotes the standby nodes to active while the impacted Availability Zone recovers. Impact (if any) is limited to the in-flight requests as traffic is weighed away from the impacted Availability Zone in less a minute.
You can check the status of the domain, data node metrics for both active and standby, and Availability Zone rotation metrics on the Cluster health tab. The following screenshots show the cluster health and metrics for data nodes such as CPU utilization, JVM memory pressure, and storage.
The following screenshot of the AZ Rotation Metrics section (you can find this under Cluster health tab) shows the read and write status of the Availability Zones. OpenSearch Service rotates the standby Availability Zone every 30 minutes to ensure the system is running and ready to respond to events. Availability Zones responding to traffic have a read value of 1, and the standby Availability Zone has a value of 0.
Considerations
Several improvements and guardrails have been made for this feature that offer higher availability and maintain performance. Some static limits have been applied that are specifically related to the number of shards per node, number of shards for a domain, and the size of a shard. OpenSearch Service also enables Auto-Tune by default. Multi-AZ with Standby restricts the storage to GP3- or SSD-backed instances for the most cost-effective and performant storage options. Additionally, we’re introducing an advanced traffic shaping mechanism that will detect rogue queries, which further enhances the reliability of the domain.
We recommend evaluating your domain infrastructure needs based on your workload to achieve high availability and performance.
Conclusion
Multi-AZ with Standby is now available on OpenSearch Service in all AWS Regions globally where OpenSearch service is available, except US West (N. California), and AWS GovCloud (US-Gov-East, US-Gov-West). Try it out and send your feedback to AWS re:Post for Amazon OpenSearch Service or through your usual AWS support contacts.
About the authors
Prashant Agrawal is a Sr. Search Specialist Solutions Architect with Amazon OpenSearch Service. He works closely with customers to help them migrate their workloads to the cloud and helps existing customers fine-tune their clusters to achieve better performance and save on cost. Before joining AWS, he helped various customers use OpenSearch and Elasticsearch for their search and log analytics use cases. When not working, you can find him traveling and exploring new places. In short, he likes doing Eat → Travel → Repeat.
Rohin Bhargava is a Sr. Product Manager with the Amazon OpenSearch Service team. His passion at AWS is to help customers find the correct mix of AWS services to achieve success for their business goals.
This is a guest blog post co-written with SangSu Park and JaeHong Ahn from SOCAR.
As companies continue to expand their digital footprint, the importance of real-time data processing and analysis cannot be overstated. The ability to quickly measure and draw insights from data is critical in today’s business landscape, where rapid decision-making is key. With this capability, businesses can stay ahead of the curve and develop new initiatives that drive success.
SOCAR is the leading Korean mobility company with strong competitiveness in car-sharing. SOCAR wanted to design and build a solution for a new Fleet Management System (FMS). This system involves the collection, processing, storage, and analysis of Internet of Things (IoT) streaming data from various vehicle devices, as well as historical operational data such as location, speed, fuel level, and component status.
This post demonstrates a solution for SOCAR’s production application that allows them to load streaming data from Amazon MSK into ElastiCache for Redis, optimizing the speed and efficiency of their data processing pipeline. We also discuss the key features, considerations, and design of the solution.
Background
SOCAR operates about 20,000 cars and is planning to include other large vehicle types such as commercial vehicles and courier trucks. SOCAR has deployed in-car devices that capture data using AWS IoT Core. This data was then stored in Amazon Relational Database Service (Amazon RDS). The challenge with this approach included inefficient performance and high resource usage. Therefore, SOCAR looked for purpose-built databases tailored to the needs of their application and usage patterns while meeting the future requirements of SOCAR’s business and technical requirements. The key requirements for SOCAR included achieving maximum performance for real-time data analytics, which required storing data in an in-memory data store.
After careful consideration, ElastiCache for Redis was selected as the optimal solution due to its ability to handle complex data aggregation rules with ease. One of the challenges faced was loading data from Amazon MSK into the database, because there was no built-in Kafka connector and consumer available for this task. This post focuses on the development of a Kafka consumer application that was designed to tackle this challenge by enabling performant data loading from Amazon MSK to Redis.
Solution overview
Extracting valuable insights from streaming data can be a challenge for businesses with diverse use cases and workloads. That’s why SOCAR built a solution to seamlessly bring data from Amazon MSK into multiple purpose-built databases, while also empowering users to transform data as needed. With fully managed Apache Kafka, Amazon MSK provides a reliable and efficient platform for ingesting and processing real-time data.
The following figure shows an example of the data flow at SOCAR.
This architecture consists of three components:
Streaming data – Amazon MSK serves as a scalable and reliable platform for streaming data, capable of receiving and storing messages from a variety of sources, including AWS IoT Core, with messages organized into multiple topics and partitions
Consumer application – With a consumer application, users can seamlessly bring data from Amazon MSK into a target database or data storage while also defining data transformation rules as needed
Target databases – With the consumer application, the SOCAR team was able to load data from Amazon MSK into two separate databases, each serving a specific workload
Although this post focuses on a specific use case with ElastiCache for Redis as the target database and a single topic called gps, the consumer application we describe can handle additional topics and messages, as well as different streaming sources and target databases such as Amazon DynamoDB. Our post covers the most important aspects of the consumer application, including its features and components, design considerations, and a detailed guide to the code implementation.
Components of the consumer application
The consumer application comprises three main parts that work together to consume, transform, and load messages from Amazon MSK into a target database. The following diagram shows an example of data transformations in the handler component.
The details of each component are as follows:
Consumer – This consumes messages from Amazon MSK and then forwards the messages to a downstream handler.
Loader – This is where users specify a target database. For example, SOCAR’s target databases include ElastiCache for Redis and DynamoDB.
Handler – This is where users can apply data transformation rules to the incoming messages before loading them into a target database.
Features of the consumer application
This connection has three features:
Scalability – This solution is designed to be scalable, ensuring that the consumer application can handle an increasing volume of data and accommodate additional applications in the future. For instance, SOCAR sought to develop a solution capable of handling not only the current data from approximately 20,000 vehicles but also a larger volume of messages as the business and data continue to grow rapidly.
Performance – With this consumer application, users can achieve consistent performance, even as the volume of source messages and target databases increases. The application supports multithreading, allowing for concurrent data processing, and can handle unexpected spikes in data volume by easily increasing compute resources.
Flexibility – This consumer application can be reused for any new topics without having to build the entire consumer application again. The consumer application can be used to ingest new messages with different configuration values in the handler. SOCAR deployed multiple handlers to ingest many different messages. Also, this consumer application allows users to add additional target locations. For example, SOCAR initially developed a solution for ElastiCache for Redis and then replicated the consumer application for DynamoDB.
Design considerations of the consumer application
Note the following design considerations for the consumer application:
Scale out – A key design principle of this solution is scalability. To achieve this, the consumer application runs with Amazon Elastic Kubernetes Service (Amazon EKS) because it can allow users to increase and replicate consumer applications easily.
Consumption patterns – To receive, store, and consume data efficiently, it’s important to design Kafka topics depending on messages and consumption patterns. Depending on messages consumed at the end, messages can be received into multiple topics of different schemas. For example, SOCAR has many different topics that are consumed by different workloads.
Purpose-built database – The consumer application supports loading data into multiple target options based on the specific use case. For example, SOCAR stored real-time IoT data in ElastiCache for Redis to power real-time dashboard and web applications, while storing recent trip information in DynamoDB that didn’t require real-time processing.
Walkthrough overview
The producer of this solution is AWS IoT Core, which sends out messages into a topic called gps. The target database of this solution is ElastiCache for Redis. ElastiCache for Redis a fast in-memory data store that provides sub-millisecond latency to power internet-scale, real-time applications. Built on open-source Redis and compatible with the Redis APIs, ElastiCache for Redis combines the speed, simplicity, and versatility of open-source Redis with the manageability, security, and scalability from Amazon to power the most demanding real-time applications.
The target location can be either another database or storage depending on the use case and workload. SOCAR uses Amazon EKS to operate the containerized solution to achieve scalability, performance, and flexibility. Amazon EKS is a managed Kubernetes service to run Kubernetes in the AWS Cloud. Amazon EKS automatically manages the availability and scalability of the Kubernetes control plane nodes responsible for scheduling containers, managing application availability, storing cluster data, and other key tasks.
For the programming language, the SOCAR team decided to use the Go Programming language, utilizing both the AWS SDK for Go and a Goroutine, a lightweight logical or virtual thread managed by the Go runtime, which makes it easy to manage multiple threads. The AWS SDK for Go simplifies the use of AWS services by providing a set of libraries that are consistent and familiar for Go developers.
In the following sections, we walk through the steps to implement the solution:
Create a consumer.
Create a loader.
Create a handler.
Build a consumer application with the consumer, loader, and handler.
Deploy the consumer application.
Prerequisites
For this walkthrough, you should have the following:
In this example, we use a topic called gps, and the consumer includes a Kafka client that receives messages from the topic. SOCAR created a struct and built a consumer (called NewConsumer in the code) to make it extendable. With this approach, any additional parameters and rules can be added easily.
To authenticate with Amazon MSK, SOCAR uses IAM. Because SOCAR already uses IAM to authenticate other resources, such as Amazon EKS, it uses the same IAM role (aws_msk_iam_v2) to authenticate clients for both Amazon MSK and Apache Kafka actions.
The loader function, represented by the Loader struct, is responsible for loading messages to the target location, which in this case is ElastiCache for Redis. The NewLoader function initializes a new instance of the Loader struct with a logger and a Redis cluster client, which is used to communicate with the ElastiCache cluster. The redis.NewClusterClient object is initialized using the NewRedisClient function, which uses IAM to authenticate the client for Redis actions. This ensures secure and authorized access to the ElastiCache cluster. The Loader struct also contains the Close method to close the Kafka reader and free up resources.
A handler is used to include business rules and data transformation logic that prepares data before loading it into the target location. It acts as a bridge between a consumer and a loader. In this example, the topic name is cars.gps.json, and the message includes two keys, lng and lat, with data type Float64. The business logic can be defined in a function like handlerFuncGpsToRedis and then applied as follows:
type (
	handlerFunc    func(ctx context.Context, loader *Loader, key, value []byte) error
	handlerFuncMap map[string]handlerFunc
)

var HandlerRedis = handlerFuncMap{
	"cars.gps.json":   handlerFuncGpsToRedis
}

func GetHandlerFunc(funcMap handlerFuncMap, topic string) (handlerFunc, error) {
	handlerFunc, exist := funcMap[topic]
	if !exist {
		return nil, fmt.Errorf("failed to find handler func for '%s'", topic)
	}
	return handlerFunc, nil
}

func handlerFuncGpsToRedis(ctx context.Context, loader *Loader, key, value []byte) error {
	// unmarshal raw data to map
	data := map[string]interface{}{}
	err := json.Unmarshal(value, &data)
	if err != nil {
		return err
	}

	// prepare things to load on redis as geolocation
	name := string(key)
	lng, err := getFloat64ValueFromMap(data, "lng")
	if err != nil {
		return err
	}
	lat, err := getFloat64ValueFromMap(data, "lat")
	if err != nil {
		return err
	}

	// add geolocation to redis
	return loader.RedisGeoAdd(ctx, "cars#gps", name, lng, lat)
}
Build a consumer application with the consumer, loader, and handler
Now you have created the consumer, loader, and handler. The next step is to build a consumer application using them. In a consumer application, you read messages from your stream with a consumer, transform them using a handler, and then load transformed messages into a target location with a loader. These three components are parameterized in a consumer application function such as the one shown in the following code:
To achieve maximum parallelism, SOCAR containerizes the consumer application and deploys it into multiple pods on Amazon EKS. Each consumer application contains a unique consumer, loader, and handler. For example, if you need to receive messages from a single topic with five partitions, you can deploy five identical consumer applications, each running in its own pod. Similarly, if you have two topics with three partitions each, you should deploy two consumer applications, resulting in a total of six pods. It’s a best practice to run one consumer application per topic, and the number of pods should match the number of partitions to enable concurrent message processing. The pod number can be specified in the Kubernetes deployment configuration
There are two stages in the Dockerfile. The first stage is the builder, which installs build tools and dependencies, and builds the application. The second stage is the runner, which uses a smaller base image (Alpine) and copies only the necessary files from the builder stage. It also sets the appropriate user permissions and runs the application. It’s also worth noting that the builder stage uses a specific version of the Golang image, while the runner stage uses a specific version of the Alpine image, both of which are considered to be lightweight and secure images.
The following code is an example of the Dockerfile:
# builder
FROM golang:1.18.2-alpine3.16 AS builder
RUN apk add build-base
WORKDIR /usr/src/app
COPY go.mod go.sum ./
RUN go mod download
COPY . .
RUN go build -o connector .

# runner
FROM alpine:3.16.0 AS runner
WORKDIR /usr/bin/app
RUN apk add --no-cache tzdata
RUN addgroup --system app && adduser --system --shell /bin/false --ingroup app app
COPY --from=builder /usr/src/app/connector .
RUN chown -R app:app /usr/bin/app
USER app
ENTRYPOINT ["/usr/bin/app/connector"]
Conclusion
In this post, we discussed SOCAR’s approach to building a consumer application that enables IoT real-time streaming from Amazon MSK to target locations such as ElastiCache for Redis. We hope you found this post informative and useful. Thank you for reading!
About the Authors
SangSu Park is the Head of Operation Group at SOCAR. His passion is to keep learning, embrace challenges, and strive for mutual growth through communication. He loves to travel in search of new cities and places.
JaeHong Ahn is a DevOps Engineer in SOCAR’s cloud infrastructure team. He is dedicated to promoting collaboration between developers and operators. He enjoys creating DevOps tools and is committed to using his coding abilities to help build a better world. He loves to cook delicious meals as a private chef for his wife.
Younggu Yun works at AWS Data Lab in Korea. His role involves helping customers across the APAC region meet their business objectives and overcome technical challenges by providing prescriptive architectural guidance, sharing best practices, and building innovative solutions together.
You can now use Amazon Managed Streaming for Apache Kafka (Amazon MSK) multi-VPC private connectivity (powered by AWS PrivateLink) and cluster policy support for MSK clusters to simplify connectivity of your Kafka clients to your brokers. Amazon MSK is a fully managed service that makes it easy for you to build and run applications that use Kafka to process streaming data. When you create an MSK cluster, the cluster resources are available to clients within the same Amazon VPC. This allows you to launch the cluster within specific subnets of the VPC, associate it with security groups, and attach IP addresses from your VPC’s address space through elastic network interfaces (ENIs). Network traffic between clients and the cluster stays within the AWS network, with internet access to the cluster not possible by default.
If you have workloads segmented across several VPCs and AWS accounts, there may be scenarios in which you need to make your MSK brokers accessible to Kafka clients across VPCs. With the launch of Amazon MSK multi-VPC private connectivity, you can now privately access your MSK brokers from your client applications in another VPC within the same AWS account or another AWS account without enabling public access or creating and managing your own networking infrastructure for private connectivity. A cluster policy is an AWS Identity and Access Management (IAM) resource-based policy, which is defined for your MSK cluster to provide cross-account IAM principals permissions to set up private connectivity to the cluster.
This post introduces Amazon MSK multi-VPC connectivity and how you can privately access your MSK clusters from your clients in other VPCs. It also shows how to define a cluster policy for your MSK clusters. These new two capabilities simplify configuring cross-VPC network access and setting up permissions needed for Kafka clients to privately connect to MSK brokers in a different account.
Before Amazon MSK multi-VPC connectivity
Before Amazon MSK multi-VPC connectivity, the network admin needed to choose one of the following secure connectivity patterns. Admins had to repeat certain steps for each broker in the cluster.
Amazon VPC peering is the simplest networking construct that enables bidirectional connectivity between two VPCs. In this approach, the network admin had to update each VPC with the IP addresses of each broker in the routing tables of all subnets. You can’t use this connectivity pattern when there are overlapping IPv4 or IPv6 CIDR blocks in the VPCs.
AWS Transit Gateway provides a highly available and scalable design for connecting VPCs. In this approach, the network admin constantly had to update the routing tables attached to each transit gateway. Unlike VPC peering that can go cross-Region, AWS Transit Gateway is a regional service, but you can use inter-Region peering between transit gateways to route traffic across regions. AWS Transit Gateway has the maximum bandwidth (burst) per Availability Zone per VPC connection (50 Gbps). This could become a challenge for some workloads.
AWS PrivateLink is an AWS networking service that provides private access to a specific service instead of all resources within a VPC and without traversing the public internet. It also eliminates the need to expose the entire VPC or subnet, and prevents issues like having to deal with overlapping CIDR blocks between the VPC that hosts the MSK cluster ENIs and the Kafka client VPC. AWS PrivateLink can scale to an unlimited number of VPCs and unlike the other options, traffic here is unidirectional. Because of these benefits, AWS PrivateLink is a popular choice to manage private connectivity. However, this connectivity pattern comes with additional complexity. It requires creating multiple Network Load Balancers (NLBs) per cluster and creating private service endpoints per NLB in the service account. Furthermore, admins had to create private endpoints per private service endpoint, and an Amazon Route 53 alias record per private endpoint in every client account.
The following diagram illustrates the architecture of customer-managed VPC endpoints between different VPCs in different AWS accounts with IAM authentication.
After Amazon MSK multi-VPC connectivity and cluster policy
You can now enable multi-VPC and cross-account connectivity for your MSK clusters in a few simple steps and pay for what you use. This eliminates the overhead of creating and managing AWS PrivateLink infrastructure. When new brokers are added to a cluster, private connectivity is maintained without the need to make configuration changes, saving you from the overhead and complexity of managing the underlying network infrastructure.
The following diagram illustrates this updated architecture of using Amazon MSK multi-VPC connectivity to connect a client from a different AWS account.
Solution overview
Establishing multi-VPC private connectivity involves turning on this feature for the cluster and configuring the Kafka clients to connect privately to the cluster.
The following are the high-level steps to configure the cluster:
Enable the multi-VPC private connectivity feature for a subset of authentication schemes that are enabled for your MSK cluster.
If a Kafka client is in an AWS account that is different than the cluster, attach a resource-based policy to the MSK cluster to authorize IAM principals for creating cross-account connectivity.
Share the cluster ARN with the IAM principal associated with the Kafka client that needs to create the cross-account access to MSK cluster.
The following are the high-level steps to configure the clients:
Create a managed VPC endpoint for the client VPC that needs to connect privately to the MSK cluster.
Update the VPC endpoint’s security group settings to enable outbound connectivity to the MSK cluster.
Set up the client to use the cluster’s connection string to connect privately to the cluster.
Cluster setup
In this post, we only show the steps for enabling Amazon MSK multi-VPC connectivity for a provisioned cluster.
To enable Amazon MSK multi-VPC connectivity on your existing cluster, choose Turn on multi-VPC connectivity on the Amazon MSK console. Note that multi-VPC connectivity cannot be turned on with a cluster that allows unauthenticated access. This is to prevent unauthenticated access from different VPCs.
Select the authentication methods that you allow clients in other VPCs to use. The list of authentication methods is populated based on your cluster’s security configuration.
Review the settings and choose Turn on selection. After the multi-VPC connectivity is enabled on your cluster, Amazon MSK will create the NLB and VPC endpoint service infrastructure required for private connectivity. Amazon MSK will vend a new set of bootstrap broker strings that can be used for private connectivity. These can be accessed using the View client info option on the Amazon MSK console. The next step is to provide the IAM principals associated with your clients the permissions to connect privately to your cluster. To do this, you need to attach a cluster policy to the cluster.
Choose Edit cluster policy in the Security section of the cluster details page on the Amazon MSK console. The new cluster policy allows for defining a Basic or Advanced cluster policy. With the Basic option, you can simply enter AWS account IDs of your client’s VPCs. This policy allows all allowed principals in those AWS accounts to perform CreateVPCConnection, GetBootstrapBrokers, DescribeCluster, and DescribeClusterV2 actions that are required for creating the cross-VPC connectivity to your cluster. However, in other cases, you may need a more complex policy that allows for additional actions, or principals other than AWS accounts, such as IAM roles, role sessions, IAM users, and more. You can author a cluster policy according to IAM JSON policy guidance and provide that to the cluster in Advanced mode.
Define your cluster policy and choose Save changes.
Client setup
On the client side, first you need to attach an identity policy to the IAM principal who wants to create a managed VPC connection. The identity policy must provide permission for creating a managed VPC connection. The necessary permissions are part of the AWS managed policy AmazonMSKFullAccess.
In the other AWS account with the IAM principal you configured, use the new Managed VPC connection page on the Amazon MSK console to create Amazon MSK managed VPC connections. A managed VPC connection maps to an AWS PrivateLink endpoint under the hood, and Amazon MSK uses the managed VPC connection to orchestrate private connectivity to the cluster. You simply need to create the managed VPC connection and pay standard AWS PrivateLink charges for the underlying endpoint.
Enter the AWS Resource Name (ARN) of the cluster that you want to connect to.
Choose Verify to verify the cluster information and its minimum requirements for cross-connectivity.
Select an authentication method from the provided values.
Choose the VPC ID where your Kafka clients are located, and choose their subnet IDs. You can add more subnets using the Add subnet option. The specified client subnet must have Availability Zone IDs that match the cluster’s Availability Zone IDs. This makes sure the clients are located in a same physical Availability Zone as the cluster brokers. Amazon MSK uses the port range 14001:14100 for all authentication methods. You need to select a security group that allows outbound traffic to this port. The following screenshot shows an example.
Review the settings and choose Create connection. The process will take a few minutes.
When it’s complete, you can obtain the clients’ connection string from the details page of your connection.
The next step is to update the outbound rules for the VPC endpoint security group to allow communication to the port range 14001:14100.
Use the Amazon MSK-managed VPC connection
After you create the managed VPC connection, connecting privately to the cluster is easy. Simply use the new connection string to connect to the cluster. For example, you may connect from an Amazon Elastic Compute Cloud (Amazon EC2) instance on your client VPC. Then run the following command to verify if you can connect and perform actions against the topics in the MSK cluster:
Before the launch of Amazon MSK multi-VPC connectivity, Kafka clients in other AWS accounts who opted in IAM authentication, needed to assume another IAM role in the cluster’s account. To facilitate this, admins had to create multiple IAM roles and write a trust policy that allows authenticated principals from the client’s accounts to assume corresponding roles through the sts:AssumeRole API call. This approach was challenging to scale when the number of VPCs or AWS accounts grew. With the launch of this cluster policy, cross-account access control is now simplified because you can attach a cluster policy to your clusters to specify which cross-account clients have what permissions on resources within the cluster.
This capability allows you to manage all access to the cluster and topics in one place. For example, you can control which IAM principals have write access to certain topics, and which principals can only read from them. Users who are using IAM client authentication can also add permissions for required kafka-cluster actions in the cluster resource policy.
Availability and pricing
You can now use Amazon MSK multi-VPC connectivity in all commercial Regions where Amazon MSK is offered, including China and GovCloud (US) Regions.
You pay $0.006 per GB data processed for private connectivity and $0.0225 per private connectivity hour per authentication scheme in US East (Ohio). Refer to our Pricing page for more details.
Conclusion
With Amazon MSK multi-VPC private connectivity, you can now privately access your MSK brokers from your client applications in another VPC within the same AWS account or another AWS account, with minimal configuration. You no longer have to create, manage, and update multiple networking resources in multiple VPCs, or make Amazon MSK configuration changes to connect your Kafka clients across VPCs and accounts. Amazon MSK creates and manages the resources for you. With Cluster policy support, you can easily provide your cross-account client principals permissions to connect privately to your MSK cluster. Further, if you are using IAM client authentication, you can also leverage the cluster policy to centrally control clients’ permissions to perform operations on the cluster. Use the Amazon MSK multi-VPC connectivity and the cluster policy feature today to simplify your secure connectivity infrastructure.
Ali Alemi is a Streaming Specialist Solutions Architect at AWS. Ali advises AWS customers with architectural best practices and helps them design real-time analytics data systems that are reliable, secure, efficient, and cost-effective. He works backward from customers’ use cases and designs data solutions to solve their business problems. Prior to joining AWS, Ali supported several public sector customers and AWS consulting partners in their application modernization journey and migration to the cloud.
Rajeev Chakrabarti is a Kinesis specialist solutions architect.
Amazon Redshift is a fast, scalable, secure, and fully managed cloud data warehouse that makes it simple and cost-effective to analyze all your data using standard SQL and your existing ETL (extract, transform, and load), business intelligence (BI), and reporting tools. Tens of thousands of customers use Amazon Redshift to process exabytes of data per day and power analytics workloads such as BI, predictive analytics, and real-time streaming analytics. Amazon Redshift Serverless makes it convenient for you to run and scale analytics without having to provision and manage data warehouses. With Redshift Serverless, data analysts, developers, and data scientists can now use Amazon Redshift to get insights from data in seconds by loading data into and querying records from the data warehouse.
As a data engineer or application developer, for some use cases, you want to interact with the Redshift Serverless data warehouse to load or query data with a simple API endpoint without having to manage persistent connections. With the Amazon Redshift Data API, you can interact with Redshift Serverless without having to configure JDBC or ODBC. This makes it easier and more secure to work with Redshift Serverless and opens up new use cases.
The Data API enables you to seamlessly access data from Redshift Serverless with all types of traditional, cloud-native, and containerized serverless web service-based applications and event-driven applications.
The following diagram illustrates this architecture.
The Data API simplifies data access, ingest, and egress from programming languages and platforms supported by the AWS SDK such as Python, Go, Java, Node.js, PHP, Ruby, and C++.
The Data API simplifies access to Amazon Redshift by eliminating the need for configuring drivers and managing database connections. Instead, you can run SQL commands to Redshift Serverless by simply calling a secured API endpoint provided by the Data API. The Data API takes care of managing database connections and buffering data. The Data API is asynchronous, so you can retrieve your results later. Your query results are stored for 24 hours. The Data API federates AWS Identity and Access Management (IAM) credentials so you can use identity providers like Okta or Azure Active Directory or database credentials stored in Secrets Manager without passing database credentials in API calls.
For customers using AWS Lambda, the Data API provides a secure way to access your database without the additional overhead for Lambda functions to be launched in an Amazon VPC. Integration with the AWS SDK provides a programmatic interface to run SQL statements and retrieve results asynchronously.
Relevant use cases
The Data API is not a replacement for JDBC and ODBC drivers, and is suitable for use cases where you don’t need a persistent connection to a serverless data warehouse. It’s applicable in the following use cases:
Accessing Amazon Redshift from custom applications with any programming language supported by the AWS SDK. This enables you to integrate web service-based applications to access data from Amazon Redshift using an API to run SQL statements. For example, you can run SQL from JavaScript.
Building a serverless data processing workflow.
Designing asynchronous web dashboards because the Data API lets you run long-running queries without having to wait for them to complete.
Running your query one time and retrieving the results multiple times without having to run the query again within 24 hours.
Building your ETL pipelines with AWS Step Functions, Lambda, and stored procedures.
Having simplified access to Amazon Redshift from Amazon SageMaker and Jupyter notebooks.
Scheduling SQL scripts to simplify data load, unload, and refresh of materialized views.
The Data API GitHub repository provides examples for different use cases for both Redshift Serverless and provisioned clusters.
Create a Redshift Serverless workgroup
If you haven’t already created a Redshift Serverless data warehouse, or want to create a new one, refer to the Getting Started Guide. This guide walks you through the steps of creating a namespace and workgroup with their names as default. Also, ensure that you have created an IAM role and make sure that the IAM role you attach to your Redshift Serverless namespace has AmazonS3ReadOnlyAccess permission. You can use the AWS Management Console to create an IAM role and assign Amazon Simple Storage Service (Amazon S3) privileges (refer to Loading in data from Amazon S3). In this post, we create a table and load data using the COPY command.
Prerequisites for using the Data API
You must be authorized to access the Data API. Amazon Redshift provides the RedshiftDataFullAccess managed policy, which offers full access to Data API. This policy also allows access to Redshift Serverless workgroups, Secrets Manager, and API operations needed to authenticate and access a Redshift Serverless workgroup by using IAM credentials.
You can also create your own IAM policy that allows access to specific resources by starting with RedshiftDataFullAccess as a template.
The Data API allows you to access your database either using your IAM credentials or secrets stored in Secrets Manager. In this post, we use IAM credentials.
When you federate your IAM credentials to connect with Amazon Redshift, it automatically creates a database user for the IAM user that is being used. It uses the GetCredentials API to get temporary database credentials. If you want to provide specific database privileges to your users with this API, you can use an IAM role with the tag name RedshiftDBRoles with a list of roles separated by colons. For example, if you want to assign database roles such as sales and analyst, you can have a value sales:analyst assigned to RedshiftDBRoles.
Use the Data API from the AWS CLI
You can use the Data API from the AWS CLI to interact with the Redshift Serverless workgroup and namespace. For instructions on configuring the AWS CLI, see Setting up the AWS CLI. The Amazon Redshift Serverless CLI (aws redshift-serverless) is a part of AWS CLI that lets you manage Amazon Redshift workgroups and namespaces, such as creating, deleting, setting usage limits, tagging resource, and more. The Data API provides a command line interface to the AWS CLI (aws redshift-data) that allows you to interact with the databases in Redshift Serverless.
You can invoke help using the following command:
aws redshift-data help
The following table shows you the different commands available with the Data API CLI.
Command
Description
list-databases
Lists the databases in a workgroup.
list-schemas
Lists the schemas in a database. You can filter this by a matching schema pattern.
list-tables
Lists the tables in a database. You can filter the tables list by a schema name pattern, a matching table name pattern, or a combination of both.
describe-table
Describes the detailed information about a table including column metadata.
execute-statement
Runs a SQL statement, which can be SELECT, DML, DDL, COPY, or UNLOAD.
batch-execute-statement
Runs multiple SQL statements in a batch as a part of single transaction. The statements can be SELECT, DML, DDL, COPY, or UNLOAD.
cancel-statement
Cancels a running query. To be canceled, a query must not be in the FINISHED or FAILED state.
describe-statement
Describes the details of a specific SQL statement run. The information includes when the query started, when it finished, the number of rows processed, and the SQL statement.
list-statements
Lists the SQL statements in the last 24 hours. By default, only finished statements are shown.
get-statement-result
Fetches the temporarily cached result of the query. The result set contains the complete result set and the column metadata. You can paginate through a set of records to retrieve the entire result as needed.
If you want to get help on a specific command, run the following command:
aws redshift-data list-tables help
Now we look at how you can use these commands.
List databases
Most organizations use a single database in their Amazon Redshift workgroup. You can use the following command to list the databases in your Serverless endpoint. This operation requires you to connect to a database and therefore requires database credentials.
aws redshift-data list-databases --database dev --workgroup-name default
List schemas
Similar to listing databases, you can list your schemas by using the list-schemas command:
aws redshift-data list-schemas --database dev --workgroup-name default
If you have several schemas that match demo (demo, demo2, demo3, and so on), you can optionally provide a pattern to filter your results matching to that pattern:
aws redshift-data list-schemas --database dev --workgroup-name default --schema-pattern "demo%"
List tables
The Data API provides a simple command, list-tables, to list tables in your database. You might have thousands of tables in a schema; the Data API lets you paginate your result set or filter the table list by providing filter conditions.
You can search across your schema with table-pattern; for example, you can filter the table list by a table name prefix across all your schemas in the database or filter your tables list in a specific schema pattern by using schema-pattern.
You can run SELECT, DML, DDL, COPY, or UNLOAD commands for Amazon Redshift with the Data API. You can optionally specify the –with-event option if you want to send an event to EventBridge after the query run, then the Data API will send the event with queryId and final run status.
Create a schema
Let’s use the Data API to see how you can create a schema. The following command lets you create a schema in your database. You don’t have to run this SQL if you have pre-created the schema. You have to specify –-sql to specify your SQL commands.
The COPY command lets you load bulk data into your table in Amazon Redshift. You can use the following command to load data into the table we created earlier:
aws redshift-data execute-statement --database dev --workgroup-name default --sql "COPY demo.green_201601 \
FROM 's3://us-west-2.serverless-analytics/NYC-Pub/green/green_tripdata_2016-01' \
IAM_ROLE default \
DATEFORMAT 'auto' \
IGNOREHEADER 1 \
DELIMITER ',' \
IGNOREBLANKLINES \
REGION 'us-west-2';"
Retrieve data
The following query uses the table we created earlier:
aws redshift-data execute-statement --database dev --workgroup-name default --sql "SELECT ratecode,  \
COUNT(*) FROM demo.green_201601 WHERE \
trip_distance > 5 GROUP BY 1 ORDER BY 1;"
You can fetch results using the statement ID that you receive as an output of execute-statement.
Check the status of a statement
You can check the status of your statement by using describe-statement. The output for describe-statement provides additional details such as PID, query duration, number of rows in and size of the result set, and the query ID given by Amazon Redshift. You have to specify the statement ID that you get when you run the execute-statement command. See the following command:
{
     "CreatedAt": "2023-04-07T17:27:15.937000+00:00",
     "Duration": 2602410468,
     "HasResultSet": true,
     "Id": "cae88c08-0bb4-4279-8845-d5a8fefafade",
     "QueryString": " SELECT ratecode, COUNT(*) FROM
     demo.green_201601 WHERE
     trip_distance > 5 GROUP BY 1 ORDER BY 1;",
     "RedshiftPid": 1073815670,
     "WorkgroupName": "default",
     "UpdatedAt": "2023-04-07T17:27:18.539000+00:00"
}
The status of a statement can be STARTED, FINISHED, ABORTED, or FAILED.
Run SQL statements with parameters
You can run SQL statements with parameters. The following example uses two named parameters in the SQL that is specified using a name-value pair:
aws redshift-data execute-statement --database dev --workgroup-name default --sql "select sellerid,sum(pricepaid) totalsales from sales where eventid >= :eventid and sellerid > :selrid group by sellerid" --parameters "[{\"name\": \"selrid\", \"value\": \"100\"},{\"name\": \"eventid\", \"value\": \"100\"}]"
The describe-statement returns QueryParameters along with QueryString.
You can map the name-value pair in the parameters list to one or more parameters in the SQL text, and the name-value parameter can be in random order. You can’t specify a NULL value or zero-length value as a parameter.
Cancel a running statement
If your query is still running, you can use cancel-statement to cancel a SQL query. See the following command:
The output of the result contains metadata such as the number of records fetched, column metadata, and a token for pagination.
Run multiple SQL statements
You can run multiple SELECT, DML, DDL, COPY, or UNLOAD commands for Amazon Redshift in a single transaction with the Data API. The batch-execute-statement enables you to create tables and run multiple COPY commands or create temporary tables as part of your reporting system and run queries on that temporary table. See the following code:
aws redshift-data batch-execute-statement --database dev --workgroup-name default \
--sqls "create temporary table mysales \
(firstname, lastname, total_quantity ) as \
SELECT firstname, lastname, total_quantity \
FROM   (SELECT buyerid, sum(qtysold) total_quantity \
        FROM  sales  \
        GROUP BY buyerid \
        ORDER BY total_quantity desc limit 10) Q, users \
WHERE Q.buyerid = userid \
ORDER BY Q.total_quantity desc;" "select * from mysales limit 100;"
The describe-statement for a multi-statement query shows the status of all sub-statements:
In the preceding example, we had two SQL statements and therefore the output includes the ID for the SQL statements as 23d99d7f-fd13-4686-92c8-e2c279715c21:1 and 23d99d7f-fd13-4686-92c8-e2c279715c21:2. Each sub-statement of a batch SQL statement has a status, and the status of the batch statement is updated with the status of the last sub-statement. For example, if the last statement has status FAILED, then the status of the batch statement shows as FAILED.
You can fetch query results for each statement separately. In our example, the first statement is a SQL statement to create a temporary table, so there are no results to retrieve for the first statement. You can retrieve the result set for the second statement by providing the statement ID for the sub-statement:
The Data API allows you to use database credentials stored in Secrets Manager. You can create a secret type as Other type of secret and then specify username and password. Note you can’t choose an Amazon Redshift cluster because Redshift Serverless is different than a cluster.
Let’s assume that you created a secret key for your credentials as defaultWG. You can use the secret-arn parameter to pass your secret key as follows:
Amazon Redshift allows you to export from database tables to a set of files in an S3 bucket by using the UNLOAD command with a SELECT statement. You can unload data in either text or Parquet format. The following command shows you an example of how to use the data lake export with the Data API:
aws redshift-data execute-statement --database dev --workgroup-name default --sql "unload ('select * from demo.green_201601') to '<your-S3-bucket>' iam_role '<your-iam-role>'; "
You can use batch-execute-statement if you want to use multiple statements with UNLOAD or combine UNLOAD with other SQL statements.
Use the Data API from the AWS SDK
You can use the Data API in any of the programming languages supported by the AWS SDK. For this post, we use the AWS SDK for Python (Boto3) as an example to illustrate the capabilities of the Data API.
We first import the Boto3 package and establish a session:
import botocore.session as bc
import boto3

def get_client(service, endpoint=None, region="us-west-2"):
    session = bc.get_session()
    s = boto3.Session(botocore_session=session, region_name=region)
    if endpoint:
        return s.client(service, endpoint_url=endpoint)
    return s.client(service)
Get a client object
You can create a client object from the boto3.Session object and using RedshiftData:
rsd = get_client('redshift-data')
If you don’t want to create a session, your client is as simple as the following code:
The following example code uses the Secrets Manager key to run a statement. For this post, we use the table we created earlier. You can use DDL, DML, COPY, and UNLOAD in the SQL parameter:
resp = rsd.execute_statement(
    WorkgroupName ="default",
Database = "dev",
Sql = "SELECT ratecode, COUNT(*) totalrides FROM demo.green_201601 WHERE trip_distance > 5 GROUP BY 1 ORDER BY 1;"
)
As we discussed earlier, running a query is asynchronous; running a statement returns an ExecuteStatementOutput, which includes the statement ID.
If you want to publish an event to EventBridge when the statement is complete, you can use the additional parameter WithEvent set to true:
resp = rsd.execute_statement(
    Database="dev",
    WorkgroupName="default",
    Sql="SELECT ratecode, COUNT(*) totalrides FROM demo.green_201601 WHERE trip_distance > 5 GROUP BY 1 ORDER BY 1;",
WithEvent=True
)
Describe a statement
You can use describe_statement to find the status of the query and number of records retrieved:
id=resp['Id']
desc = rsd.describe_statement(Id=id)
if desc["Status"] == "FINISHED":
    print(desc["ResultRows"])
Fetch results from your query
You can use get_statement_result to retrieve results for your query if your query is complete:
if desc and desc["ResultRows"]  > 0:
    result = rsd.get_statement_result(Id=qid)
The get_statement_result command returns a JSON object that includes metadata for the result and the actual result set. You might need to process the data to format the result if you want to display it in a user-friendly format.
Fetch and format results
For this post, we demonstrate how to format the results with the Pandas framework. The post_process function processes the metadata and results to populate a DataFrame. The query function retrieves the result from a database in an Amazon Redshift cluster. See the following code:
import pandas as pd

def post_process(meta, records):
    columns = [k["name"] for k in meta]
    rows = []
    for r in records:
        tmp = []
        for c in r:
            tmp.append(c[list(c.keys())[0]])
        rows.append(tmp)
    return pd.DataFrame(rows, columns=columns)

def query(sql, workgroup="default ", database="dev"):
    resp = rsd.execute_statement(
        Database=database,
        WorkgroupName=workgroup,
        Sql=sql
    )
    qid = resp["Id"]
    print(qid)
    desc = None
    while True:
        desc = rsd.describe_statement(Id=qid)
        if desc["Status"] == "FINISHED" or desc["Status"] == "FAILED":
            break
    	print(desc["ResultRows"])
    if desc and desc["ResultRows"]  > 0:
        result = rsd.get_statement_result(Id=qid)
        rows, meta = result["Records"], result["ColumnMetadata"]
        return post_process(meta, rows)

pf=query("select * from demo.customer_activity limit 100;")
print(pf)
In this post, we demonstrated using the Data API with Python with Redshift Serverless. However, you can use the Data API with other programming languages supported by the AWS SDK. You can read how Roche democratized access to Amazon Redshift data using the Data API with Google Sheets. You can also address this type of use case with Redshift Serverless.
Best practices
We recommend the following best practices when using the Data API:
Federate your IAM credentials to the database to connect with Amazon Redshift. Redshift Serverless allows users to get temporary database credentials with GetCredentials. Redshift Serverless scopes the access to the specific IAM user and the database user is automatically created.
Use a custom policy to provide fine-grained access to the Data API in the production environment if you don’t want your users to use temporary credentials. You have to use Secrets Manager to manage your credentials in such use cases.
Don’t retrieve a large amount of data from your client and use the UNLOAD command to export the query results to Amazon S3. You’re limited to retrieving only 100 MB of data with the Data API.
Don’t forget to retrieve your results within 24 hours; results are stored only for 24 hours.
Conclusion
In this post, we introduced how to use the Data API with Redshift Serverless. We also demonstrated how to use the Data API from the Amazon Redshift CLI and Python using the AWS SDK. Additionally, we discussed best practices for using the Data API.
Debu Panda is a Senior Manager, Product Management at AWS, is an industry leader in analytics, application platform, and database technologies, and has more than 25 years of experience in the IT world. Debu has published numerous articles on analytics, enterprise Java, and databases and has presented at multiple conferences such as re:Invent, Oracle Open World, and Java One. He is lead author of the EJB 3 in Action (Manning Publications 2007, 2014) and Middleware Management (Packt).
Fei Peng is a Software Dev Engineer working in the Amazon Redshift team.
Amazon OpenSearch Ingestion is a serverless, auto-scaled, managed data collector that receives, transforms, and delivers data to Amazon OpenSearch Service domains or Amazon OpenSearch Serverless collections. OpenSearch Ingestion is powered by Data Prepper, an open-source, streaming ETL (extract, transform, and load) solution that’s part of the OpenSearch project. When you use OpenSearch Ingestion, you don’t need to maintain self-managed data pipelines to ingest logs, traces, metrics, and other data with OpenSearch Service. Amazon OpenSearch Ingestion responds to changing volumes of data, automatically scaling your ingest pipeline.
Distributed tracing is the leading way to locate, alert on, and remediate problems with your application and infrastructure. Distributed tracing is part of a broader observability solution, often combined with metrics and log data. OpenSearch Service gives you a native toolset to store and analyze large volumes of log, metric, and trace data. However, moving these large volumes of data is non-trivial to set up, monitor, and maintain.
In this post, we outline steps to set up a trace pipeline and strategies to deal with high volume tracing with Amazon OpenSearch Ingestion.
Solution overview
There is now a new option on the OpenSearch Service console called Pipelines under Ingestion in the navigation pane. We use this feature to create a trace pipeline.
Refer to Security in OpenSearch Ingestion to set up the permissions you need to create a pipeline and write to a pipeline, and the permissions the pipeline needs to write to a sink.
Create a trace pipeline
To create a trace pipeline, complete the following steps:
On the OpenSearch Service console, choose Pipelines under Ingestion in the navigation pane.
Choose Create pipeline.
Amazon OpenSearch Ingestion, powered by Data Prepper, uses pipelines as a mechanism to move the data from a source to a sink, with optional processors to mutate, route, sample, and detect anomalies for the data in the pipe. For more information, refer to Data Prepper. When you use Data Prepper, you build a YAML configuration file. When you use OpenSearch Ingestion, you upload your YAML configuration to the service. If you’re using the OpenSearch Service console, you can use one of the configuration blueprints that we provide. For distributed tracing, you will use an otel_trace_source and an OpenSearch Service domain as the sink.
On the Configuration blueprints menu, choose AWS-TraceAnalyticsPipeline.
Choosing this blueprint will create a sample pipeline with otel_trace_source, an OpenSearch sink, along with span-pipeline and service-map-pipeline.
Enter a name for this pipeline along with a minimum (1) and maximum (96) capacity value for Ingestion-OCUs.
Amazon OpenSearch Ingestion will scale automatically between these values to suit the volume of data you are ingesting.
Edit the configuration’s hosts, aws.sts_role_arn, and region fields of the OpenSearch Service sink.
Follow rest of the steps to complete the trace pipeline creation.
Sample trace pipeline
The following code shows the components of a sample trace pipeline:
The sample trace pipeline has three sub-pipelines in its configuration. These are entry-pipeline, span-pipeline, and service-map-pipeline. The following diagram illustrates the workflow.
entry-pipeline specifies the source of data as otel_trace_source, which creates an HTTP listener for receiving OpenTelemetry traces at the ingestion URL for the pipeline. You use a trace_peer_forwarder processor to eliminate duplicate HTTP requests and forward the data to the span-pipeline and service-map pipelines. span-pipeline gets the raw trace data from entry-pipeline and uses the otel_trace_raw processor to complete trace group-related fields for the incoming span records. You use the service_map_stateful processor to have Data Prepper create the distributed service map for visualization in OpenSearch Dashboards. After the sample trace pipeline is created, it’s ready to receive OpenTelemetry traces at its ingestion URL!
Reduce your storage footprint and optimize for cost
The volume of traces collected from instrumenting a modern production enterprise application can reach tens or hundreds of terabytes very quickly, especially when you store every trace from every request. The problem of managing the storage footprint becomes important. In this section, we discuss strategies for reducing your storage footprint and optimizing for cost.
Use storage tiering
OpenSearch Service has three storage tiers: hot, UltraWarm, and cold. You use the hot tier to store frequently accessed data for quick reading and writing, the UltraWarm tier for infrequently used, read-only data backed by Amazon Simple Storage Service (Amazon S3) for lower cost, and the cold tier to maintain re-attachable data at near-Amazon S3 cost. By adjusting relative retention periods between these tiers, you can store a high volume of traces. For example, instead of storing 1 weeks’ worth of traces in the hot tier, you can store 2 days of traces in the hot tier and 15 days in the UltraWarm tier.
Extract metrics without storing traces
You can also use Data Prepper’s aggregation process to extract metrics in the pipeline to avoid delivering all of your data to OpenSearch Service. For example, you may want to analyze request, error, and duration (RED) metrics of your traces to know the current state of your services. OpenSearch Ingestion can calculate these metrics in the pipeline, aggregating them and storing them in separate indexes for analysis, reducing the ingestion and storage footprint of your traces. The following pipeline configuration snippet shows how to use the aggregate processor to calculate a histogram of the duration metric:
When your application is running without issues, the proportion of error traces is just a small percentage of your overall trace volume. Storing all of the traces for successful requests increases the cost substantially, while offering low value. To reduce cost, you can sample your trace data, reducing the number of traces you store in OpenSearch Service. There are generally two techniques for sampling:
Head sampling – When you do head sampling, you ask OpenSearch Ingestion to make a sampling decision without looking at the whole trace. Head sampling is easy to configure and is efficient, but has a downside of possibly missing important traces.
Tail sampling – Tail sampling is where you analyze the entirety of the trace and then decide whether to sample the trace or not. This accurately captures all the needed traces at the cost of complexity in configuring and implementing.
The following configuration snippet shows an example of the percent_sampler, from the aggregate processor. In this example, you send only 25% of your traces to OpenSearch Service, based on head sampling:
Head sampling using the percentage_sampler is simple and straightforward, but is a blunt tool. A better way to sample would be to gather, for example, 10% of successful responses, and 100% of failed responses or 100% high duration traces. To solve this, use conditional routing. Routes define conditions that can be used within processors and sinks to direct the data flowing through different parts of pipeline. For example, the following configuration snippet routes traces whose status code indicates a failure to the error_trace pipeline. You forward 100% of the data in that pipe. You route traces whose duration metric is more than 1 second to the high_latency pipeline where you sample them at 80%. Other normal traces are only sampled at 20%.
In this post, you learned how to configure an OpenSearch Ingestion pipeline and several strategies to keep in mind that help minimize cost while supporting a large-scale production system for distributed tracing. As next step, refer to the Amazon OpenSearch Developer Guide to explore logs and metric pipelines that you can use to build a scalable observability solution for your enterprise applications.
About the author
Muthu Pitchaimani is a Search Specialist with Amazon OpenSearch Service. He builds large-scale search applications and solutions. Muthu is interested in the topics of networking and security, and is based out of Austin, Texas.
Amazon Athena supports the MERGE command on Apache Iceberg tables, which allows you to perform inserts, updates, and deletes in your data lake at scale using familiar SQL statements that are compliant with ACID (Atomic, Consistent, Isolated, Durable). Apache Iceberg is an open table format for data lakes that manages large collections of files as tables. It supports modern analytical data lake operations such as create table as select (CTAS), upsert and merge, and time travel queries. Athena also supports the ability to create views and perform VACUUM (snapshot expiration) on Apache Iceberg tables to optimize storage and performance. With these features, you can now build data pipelines completely in standard SQL that are serverless, more simple to build, and able to operate at scale. This enables developers to:
Focus on writing business logic and not worry about setting up and managing the underlying infrastructure
Perform data transformations with Athena
Help comply with certain data deletion requirements
Apply change data capture (CDC) from sources databases
With data lakes, data pipelines are typically configured to write data into a raw zone, which is an Amazon Simple Storage Service (Amazon S3) bucket or folder that contains data as is from source systems. Data is accumulated in this zone, such that inserts, updates, or deletes on the sources database appear as records in new files as transactions occur on the source. Although the raw zone can be queried, any downstream processing or analytical queries typically need to deduplicate data to derive a current view of the source table. For example, if a single record is updated multiple times in the source database, these be need to be deduplicated and the most recent record selected.
Typically, data transformation processes are used to perform this operation, and a final consistent view is stored in an S3 bucket or folder. Data transformation processes can be complex requiring more coding, more testing and are also error prone. This was a challenge because data lakes are based on files and have been optimized for appending data. Previously, you had to overwrite the complete S3 object or folder, which was not only inefficient but also interrupted users who were querying the same data. With the evolution of frameworks such as Apache Iceberg, you can perform SQL-based upsert in-place in Amazon S3 using Athena, without blocking user queries and while still maintaining query performance.
In this post, we demonstrate how you can use Athena to apply CDC from a relational database to target tables in an S3 data lake.
Overview of solution
For this post, consider a mock sports ticketing application based on the following project. We use a single table in that database that contains sporting events information and ingest it into an S3 data lake on a continuous basis (initial load and ongoing changes). This data ingestion pipeline can be implemented using AWS Database Migration Service (AWS DMS) to extract both full and ongoing CDC extracts. With CDC, you can determine and track data that has changed and provide it as a stream of changes that a downstream application can consume. Most databases use a transaction log to record changes made to the database. AWS DMS reads the transaction log by using engine-specific API operations and captures the changes made to the database in a nonintrusive manner.
Specifically, to extract changed data including inserts, updates, and deletes from the database, you can configure AWS DMS with two replication tasks, as described in the following workshop. The first task performs an initial copy of the full data into an S3 folder. The second task is configured to replicate ongoing CDC into a separate folder in S3, which is further organized into date-based subfolders based on the source databases’ transaction commit date. With full and CDC data in separate S3 folders, it’s easier to maintain and operate data replication and downstream processing jobs. To enable this, you can apply the following extra connection attributes to the S3 endpoint in AWS DMS, (refer to S3Settings for other CSV and related settings):
TimestampColumnName – AWS DMS adds a column that you name with timestamp information for the commit of that row in the source database.
includeOpForFullLoad – AWS DMS adds a column named Op to every file to indicate if the record is an I (INSERT), U (UPDATE), or D (DELETE).
DatePartitionEnabled, DatePartitionSequence, DatePartitionDelimiter – These settings are used to configure AWS DMS to write changed data to date/time-based folders in the data lake. By partitioning folders, you can better manage S3 objects and optimize data lake queries for subsequent downstream processing.
We use the support in Athena for Apache Iceberg tables called MERGE INTO, which can express row-level updates. Apache Iceberg supports MERGE INTO by rewriting data files that contain rows that need to be updated. After the data is merged, we demonstrate how to use Athena to perform time travel on the sporting_event table, and use views to abstract and present different versions of the data to end-users. Finally, to simplify table maintenance, we demonstrate performing VACUUM on Apache Iceberg tables to delete older snapshots, which will optimize latency and cost of both read and write operations.
The following diagram illustrates the solution architecture.
The solution workflow consists of the following steps:
Data ingestion:
Steps 1 and 2 use AWS DMS, which connects to the source database to load initial data and ongoing changes (CDC) to Amazon S3 in CSV format. For this post, we have provided sample full and CDC datasets in CSV format that have been generated using AWS DMS.
Step 3 is comprised of the following actions:
Create an external table in Athena pointing to the source data ingested in Amazon S3.
Create an Apache Iceberg target table and load data from the source table.
Merge CDC data into the Apache Iceberg table using MERGE INTO.
Data access:
In Step 4, create a view on the Apache Iceberg table.
Use the view to query data using standard SQL.
Prerequisites
Before getting started, make sure you have the required permissions to perform the following in your AWS account:
Manage a database, table, and workgroups, and run queries in Athena
Create tables on the raw data
First, create a database for this demo.
Navigate to the Athena console and choose Query editor. If this is your first time using the Athena query editor, you need to configure and specify an S3 bucket to store the query results.
Create a database with the following code:
CREATE DATABASE raw_demo;
Next, create a folder in an S3 bucket that you can use for this demo. Name this folder sporting_event_full.
Switch to the raw_demo database and create a table to point to the raw input data:
CREATE EXTERNAL TABLE raw_demo.sporting_event(
  op string,
  cdc_timestamp timestamp,
  id bigint,
  sport_type_name string,
  home_team_id int,
  away_team_id int,
  location_id smallint,
  start_date_time timestamp,
  start_date date,
  sold_out smallint)
ROW FORMAT DELIMITED
  FIELDS TERMINATED BY ','
STORED AS INPUTFORMAT 'org.apache.hadoop.mapred.TextInputFormat'
OUTPUTFORMAT 'org.apache.hadoop.hive.ql.io.HiveIgnoreKeyTextOutputFormat'
LOCATION 's3://<your bucket>/sporting_event_full/'
  ;
Run the following query to review the data:
SELECT * FROM raw_demo.sporting_event LIMIT 5;
Next, create another folder in the same S3 bucket called sporting_event_cdc.
Within this folder, create three subfolders in a time hierarchy folder structure such that the final S3 folder URI looks like s3://<your-bucket>/sporting_event_cdc/2022/09/22/.
Upload 20220922-184314489.csv into this folder.This folder structure is similar to how AWS DMS stores CDC data when you enable date-based folder partitioning.
Create a table to point to the CDC data. This table also includes a partition column because the source data in Amazon S3 is organized into date-based folders.
CREATE EXTERNAL TABLE raw_demo.sporting_event_cdc(
op string,
cdc_timestamp timestamp,
id bigint,
sport_type_name string,
home_team_id int,
away_team_id int,
location_id smallint,
start_date_time timestamp,
start_date date,
sold_out smallint)
PARTITIONED BY (partition_date string)
ROW FORMAT DELIMITED
FIELDS TERMINATED BY ','
STORED AS INPUTFORMAT 'org.apache.hadoop.mapred.TextInputFormat'
OUTPUTFORMAT 'org.apache.hadoop.hive.ql.io.HiveIgnoreKeyTextOutputFormat'
LOCATION 's3://<your-bucket>/sporting_event_cdc/'
;
Next, alter the table to add new partitions. Because the data is stored in non-Hive style format by AWS DMS, to query this data, add this partition manually or use an AWS Glue crawler. As data accumulates, continue to add new partitions to query this data.
ALTER TABLE raw_demo.sporting_event_cdc ADD PARTITION (partition_date='2022-09-22') location 's3://<your-bucket>/sporting_event_cdc/2022/09/22/'
Run the following query to review the CDC data:
SELECT * FROM raw_demo.sporting_event_cdc;
There are two records with IDs 1 and 11 that are updates with op code U. The record with ID 21 has a delete (D) op code, and the record with ID 5 is an insert (I).
Use CTAS to create the target Iceberg table in Parquet format
CTAS statements create new tables using standard SELECT queries. The resultant table is added to the AWS Glue Data Catalog and made available for querying.
First, create another database to store the target table:
CREATE DATABASE curated_demo;
Next, switch to this database and run the CTAS statement to select data from the raw input table to create the target Iceberg table (replace the location with an appropriate S3 bucket in your account):
CREATE TABLE curated_demo.sporting_event
WITH (table_type='ICEBERG',
location='s3://<your-bucket>/curated/sporting_event',
format='PARQUET',
is_external=false)
AS SELECT
id,
sport_type_name,
home_team_id,
away_team_id,
cast(location_id as int) as location_id,
cast(start_date_time as timestamp(6)) as start_date_time,
start_date,
cast(sold_out as int) as sold_out
FROM raw_demo.sporting_event
;
Run the following query to review data in the Iceberg table:
SELECT * FROM curated_demo.sporting_event LIMIT 5;
Use MERGE INTO to insert, update, and delete data into the Iceberg table
The MERGE INTO command updates the target table with data from the CDC table. The following statement uses a combination of primary keys and the Op column in the source data, which indicates if the source row is an insert, update, or delete. We use the id column as the primary key to join the target table to the source table, and we use the Op column to determine if a record needs to be deleted.
MERGE INTO curated_demo.sporting_event t
USING (SELECT op,
cdc_timestamp,
id,
sport_type_name,
home_team_id,
away_team_id,
location_id,
start_date_time,
start_date,
sold_out
FROM raw_demo.sporting_event_cdc
WHERE partition_date ='2022-09-22') s
ON t.id = s.id
WHEN MATCHED AND s.op = 'D' THEN DELETE
WHEN MATCHED THEN
UPDATE SET
sport_type_name = s.sport_type_name,
home_team_id = s.home_team_id,
location_id = s.location_id,
start_date_time = s.start_date_time,
start_date = s.start_date,
sold_out = s.sold_out
WHEN NOT MATCHED THEN
INSERT (id,
sport_type_name,
home_team_id,
away_team_id,
location_id,
start_date_time,
start_date)
VALUES
(s.id,
s.sport_type_name,
s.home_team_id,
s.away_team_id,
s.location_id,
s.start_date_time,
s.start_date)
Run the following query to verify data in the Iceberg table:
SELECT * FROM curated_demo.sporting_event WHERE id in (1, 5, 11, 21);
The record with ID 21 has been deleted, and the other records in the CDC dataset have been updated and inserted, as expected.
Create a view that contains the previous state
When you write to an Iceberg table, a new snapshot or version of a table is created each time.
A snapshot represents the state of a table at a point in time and is used to access the complete set of data files in the table. Time travel queries in Athena query Amazon S3 for historical data from a consistent snapshot as of a specified date and time or a specified snapshot ID. However, this requires knowledge of a table’s current snapshots. To abstract this information from users, you can create views on top of Iceberg tables:
CREATE VIEW curated_demo.v_sporting_event_previous_snapshot AS
SELECT id,
sport_type_name,
home_team_id,
away_team_id,
location_id,
cast(start_date_time as timestamp(3)) as start_date_time,
start_date,
sold_out
FROM curated_demo.sporting_event
FOR TIMESTAMP AS OF current_timestamp + interval '-5' minute;
Run the following query using this view to retrieve the snapshot of data before the CDC was applied:
SELECT * FROM curated_demo.v_sporting_event_previous_snapshot WHERE id = 21;
You can see the record with ID 21, which was deleted earlier.
Compliance with privacy regulations may require that you permanently delete records in all snapshots. To accomplish this, you can set properties for snapshot retention in Athena when creating the table, or you can alter the table:
ALTER TABLE curated_demo.sporting_event SET TBLPROPERTIES (
'vacuum_min_snapshots_to_keep'='1',
'vacuum_max_snapshot_age_seconds'='1'
)
This instructs Athena to store only one version of the data and not maintain any transaction history. After a table has been updated with these properties, run the VACUUM command to remove the older snapshots and clean up storage:
VACUUM curated_demo.sporting_event;
Run the following query again:
SELECT * FROM curated_demo.v_sporting_event_previous_snapshot WHERE id = 21;
The record with ID 21 has been permanently deleted.
Considerations
As data accumulates in the CDC folder of your raw zone, older files can be archived to Amazon S3 Glacier. Subsequently, the MERGE INTO statement can also be run on a single source file if needed by using $path in the WHERE condition of the USING clause:
MERGE INTO curated_demo.sporting_event t
USING (SELECT op, cdc_timestamp,id,sport_type_name, home_team_id, away_team_id, location_id, start_date_time, start_date, sold_out FROM raw_demo.sporting_event_cdc WHERE partition_date='2022-09-22' AND regexp_like("$path", ‘/sporting_event_cdc/2022/09/22/20220922-184314489.csv')
………..
This results in Athena scanning all files in the partition’s folder before the filter is applied, but can be minimized by choosing fine-grained hourly partitions. With this approach, you can trigger the MERGE INTO to run on Athena as files arrive in your S3 bucket using Amazon S3 event notifications. This could enable near-real-time use cases where users need to query a consistent view of data in the data lake as soon it is created in source systems.
Clean up
To avoid incurring ongoing costs, complete the following steps to clean up your resources:
Run the following SQL to drop the tables and views:
DROP TABLE raw_demo.sporting_event;
DROP TABLE raw_demo.sporting_event_cdc;
DROP TABLE curated_demo.sporting_event;
DROP VIEW curated_demo.v_sporting_event_previous_snapshot;
Because Iceberg tables are considered managed tables in Athena, dropping an Iceberg table also removes all the data in the corresponding S3 folder.
Run the following SQL to drop the databases:
DROP DATABASE raw_demo;
DROP DATABASE curated_demo;
Delete the S3 folders and CSV files that you had uploaded.
Conclusion
This post showed you how to apply CDC to a target Iceberg table using CTAS and MERGE INTO statements in Athena. You can perform bulk load using a CTAS statement. When new data or changed data arrives, use the MERGE INTO statement to merge the CDC changes. To optimize storage and improve performance of queries, use the VACUUM command regularly.
Ranjit Rajan is a Principal Data Lab Solutions Architect with AWS. Ranjit works with AWS customers to help them design and build data and analytics applications in the cloud.
Kannan Iyer is a Senior Data Lab Solutions Architect with AWS. Kannan works with AWS customers to help them design and build data and analytics applications in the cloud.
Alexandre Rezende is a Data Lab Solutions Architect with AWS. Alexandre works with customers on their Business Intelligence, Data Warehouse, and Data Lake use cases, design architectures to solve their business problems, and helps them build MVPs to accelerate their path to production.
Amazon OpenSearch Service is a managed service that makes it easy to secure, deploy, and operate OpenSearch and legacy Elasticsearch clusters at scale in the AWS Cloud. Amazon OpenSearch Service provisions all the resources for your cluster, launches it, and automatically detects and replaces failed nodes, reducing the overhead of self-managed infrastructures. The service makes it easy for you to perform interactive log analytics, real-time application monitoring, website searches, and more by offering the latest versions of OpenSearch, support for 19 versions of Elasticsearch (1.5 to 7.10 versions), and visualization capabilities powered by OpenSearch Dashboards and Kibana (1.5 to 7.10 versions). Amazon OpenSearch Service now offers a serverless deployment option (public preview) that makes it even easier to use OpenSearch in the AWS cloud.
A typical workflow for OpenSearch is to store documents (as JSON data) in an index, and execute searches (also JSON) to find those documents. Percolation reverses that. You store searches and query with documents. Let’s say I’m searching for a house in Chicago that costs < 500K. I could go to the website every day and run my query. A clever website would be able to store my requirements (a query) and notify me when something new (a document) comes up that matches my requirements. Percolation is an OpenSearch feature that enables the website to store these queries and run documents against them to find new matches.
In this post, We will explore how to use percolators to find matching homes from new listings.
Before getting into the details of percolators, let’s explore how search works. When you insert a document, OpenSearch maintains an internal data structure called the “inverted index” which speeds up the search.
Indexing and Searching:
Let’s take the above example of a real estate application having the simple schema of type of the house, city, and the price.
First, let’s create an index with mappings as below
If you’re curious to know how search works under the hood at high level, you can refer to this article.
Percolation:
If one of your customers wants to get notified when a townhouse in Chicago is available, and listed at less than $500,000, you can store their requirements as a query in the percolator index. When a new listing becomes available, you can run that listing against the percolator index with a _percolate query. The query will return all matches (each match is a single set of requirements from one user) for that new listing. You can then notify each user that a new listing is available that fits their requirements. This process is called percolation in OpenSearch.
OpenSearch has a dedicated data type called “percolator” that allows you to store queries.
Let’s create a percolator index with the same mapping, with additional fields for query and optional metadata. Make sure you include all the necessary fields that are part of a stored query. In our case, along with the actual fields and query, we capture the customer_id and priority to send notifications.
When you have a high volume of queries stored in the percolator index, searching queries across the index might be inefficient. You can consider segmenting your queries and use them as filters to handle the high-volume queries effectively. As we already capture priority, you can now run percolation with filters on priority that reduces the scope of matching queries.
Prefer the percolation index separate from the document index. Different index configurations, like number of shards on percolation index, can be tuned independently for performance.
Prefer using query filters to reduce matching queries to percolate from percolation index.
Consider using a buffer in your ingestion pipeline for reasons below,
You can batch the ingestion and percolation independently to suit your workload and SLA
You can prioritize the ingest and search traffic by running the percolation at off hours. Make sure that you have enough storage in the buffering layer.
Consider using an independent cluster for percolation for the below reasons,
The percolation process relies on memory and compute, your primary search will not be impacted.
You have the flexibility of scaling the clusters independently.
Conclusion
In this post, we walked through how percolation in OpenSearch works, and how to use effectively, at scale. Percolation works in both managed and serverless versions of OpenSearch. You can follow the best practices to analyze and arrange data in an index, as it is important for a snappy search performance.
If you have feedback about this post, submit your comments in the comments section.
About the author
Arun Lakshmanan is a Search Specialist with Amazon OpenSearch Service based out of Chicago, IL. He has over 20 years of experience working with enterprise customers and startups. He loves to travel and spend quality time with his family.
Building a data lake on Amazon Simple Storage Service (Amazon S3) provides numerous benefits for an organization. It allows you to access diverse data sources, build business intelligence dashboards, build AI and machine learning (ML) models to provide customized customer experiences, and accelerate the curation of new datasets for consumption by adopting a modern data architecture or data mesh architecture.
However, many use cases, like performing change data capture (CDC) from an upstream relational database to an Amazon S3-based data lake, require handling data at a record level. Performing an operation like inserting, updating, and deleting individual records from a dataset requires the processing engine to read all the objects (files), make the changes, and rewrite entire datasets as new files. Furthermore, making the data available in the data lake in near-real time often leads to the data being fragmented over many small files, resulting in poor query performance and compaction maintenance.
In 2022, we announced that you can enforce fine-grained access control policies using AWS Lake Formation and query data stored in any supported file format using table formats such as Apache Iceberg, Apache Hudi, and more using Amazon Athena queries. You get the flexibility to choose the table and file format best suited for your use case and get the benefit of centralized data governance to secure data access when using Athena.
In this post, we show you how to configure Lake Formation using Iceberg table formats. We also explain how to upsert and merge in an S3 data lake using an Iceberg framework and apply Lake Formation access control using Athena.
Iceberg is an open table format for very large analytic datasets. Iceberg manages large collections of files as tables, and it supports modern analytical data lake operations such as record-level insert, update, delete, and time travel queries. The Iceberg specification allows seamless table evolution such as schema and partition evolution, and its design is optimized for usage on Amazon S3. Iceberg also helps guarantee data correctness under concurrent write scenarios.
Solution overview
To explain this setup, we present the following architecture, which integrates Amazon S3 for the data lake (Iceberg table format), Lake Formation for access control, AWS Glue for ETL (extract, transform, and load), and Athena for querying the latest inventory data from the Iceberg tables using standard SQL.
The solution workflow consists of the following steps, including data ingestion (Steps 1–3), data governance (Step 4), and data access (Step 5):
We use AWS Database Migration Service (AWS DMS) or a similar tool to connect to the data source and move incremental data (CDC) to Amazon S3 in CSV format.
An AWS Glue PySpark job reads the incremental data from the S3 input bucket and performs deduplication of the records.
The job then invokes Iceberg’s MERGE statements to merge the data with the target S3 bucket.
We use the AWS Glue Data Catalog as a centralized catalog, which is used by AWS Glue and Athena. An AWS Glue crawler is integrated on top of S3 buckets to automatically detect the schema. Lake Formation allows you to centrally manage permissions and access control for Data Catalog resources in your S3 data lake. You can use fine-grained access control in Lake Formation to restrict access to data in query results.
We use Athena integrated with Lake Formation to query data from the Iceberg table using standard SQL and validate table- and column-level access on Iceberg tables.
For this solution, we assume that the raw data files are already available in Amazon S3, and focus on processing the data using AWS Glue with Iceberg table format. We use sample item data that has the following attributes:
op – This represents the operation on the source record. This shows values I to represent insert operations, U to represent updates, and D to represent deletes. You need to make sure this attribute is included in your CDC incremental data before it gets written to Amazon S3. Make sure you capture this attribute, so that your ETL logic can take appropriate action while merging it.
product_id – This is the primary key column in the source data table.
category – This column represents the category of an item.
product_name – This is the name of the product.
quantity_available – This is the quantity available in the inventory. When we showcase the incremental data for UPSERT or MERGE, we reduce the quantity available for the product to showcase the functionality.
last_update_time – This is the time when the item record was updated at the source data.
We demonstrate implementing the solution with the following steps:
Create an S3 bucket for input and output data.
Create input and output tables using Athena.
Insert the data into the Iceberg table from Athena.
Query the Iceberg table using Athena.
Upload incremental (CDC) data for further processing.
Run the AWS Glue job again to process the incremental files.
Query the Iceberg table again using Athena.
Define Lake Formation policies.
Prerequisites
For Athena queries, we need to configure an Athena workgroup with engine version 3 to support Iceberg table format.
To validate cross-account access through Lake Formation for Iceberg table, in this post we used two accounts (primary and secondary).
Now let’s dive into the implementation steps.
Create an S3 bucket for input and output data
Before we run the AWS Glue job, we have to upload the sample CSV files to the input bucket and process them with AWS Glue PySpark code for the output.
To create an S3 bucket, complete the following steps:
On the Amazon S3 console, choose Buckets in the navigation pane.
Choose Create bucket.
Specify the bucket name asiceberg-blog and leave the remaining fields as default.
S3 bucket names are globally unique. While implementing the solution, you may get an error saying the bucket name already exists. Make sure to provide a unique name and use the same name while implementing the rest of the implementation steps. Formatting the bucket name as<Bucket-Name>-${AWS_ACCOUNT_ID}-${AWS_REGION_CODE}might help you get a unique name.
On the bucket details page, choose Create folder.
Create two subfolders. For this post, we createiceberg-blog/raw-csv-input andiceberg-blog/iceberg-output.
The following screenshot provides a sample of the input dataset.
Create input and output tables using Athena
To create input and output Iceberg tables in the AWS Glue Data Catalog, open the Athena query editor and run the following queries in sequence:
-- Create database for the demo
CREATE DATABASE iceberg_lf_db;
As we explain later in this post, it’s essential to record the data locations when incorporating Lake Formation access controls.
-- Create external table in input CSV files. Replace the S3 path with your bucket name
CREATE EXTERNAL TABLE iceberg_lf_db.csv_input(
op string,
product_id bigint,
category string,
product_name string,
quantity_available bigint,
last_update_time string)
ROW FORMAT DELIMITED FIELDS TERMINATED BY ','
STORED AS INPUTFORMAT 'org.apache.hadoop.mapred.TextInputFormat'
OUTPUTFORMAT 'org.apache.hadoop.hive.ql.io.HiveIgnoreKeyTextOutputFormat'
LOCATION 's3://glue-iceberg-demo/raw-csv-input/'
TBLPROPERTIES (
'areColumnsQuoted'='false',
'classification'='csv',
'columnsOrdered'='true',
'compressionType'='none',
'delimiter'=',',
'typeOfData'='file');

-- Create output Iceberg table with partitioning. Replace the S3 bucket name with your bucket name
CREATE TABLE iceberg_lf_db.iceberg_table_lf (
product_id bigint,
category string,
product_name string,
quantity_available bigint,
last_update_time timestamp)
PARTITIONED BY (category, bucket(16,product_id))
LOCATION 's3://glue-iceberg-demo/iceberg_blog/iceberg-output/'
TBLPROPERTIES (
'table_type'='ICEBERG',
'format'='parquet',
'write_target_data_file_size_bytes'='536870912'
);

-- Validate the input data
SELECT * FROM iceberg_lf_db.csv_input;

SELECT * FROM iceberg_lf_db.iceberg_table_lf;
Alternatively, you can use an AWS Glue crawler to create the table definition for the input files.
Insert the data into the Iceberg table from Athena
Optionally, we can insert data into the Iceberg table through Athena using the following code:
insert into iceberg_lf_demo.iceberg_lf_output_athena (product_id,category,product_name,quantity_available,last_update_time) values (200,'Mobile','Mobile brand 1',25,cast('2023-01-19 09:51:40' as timestamp));
insert into iceberg_lf_demo.iceberg_lf_output_athena (product_id,category,product_name,quantity_available,last_update_time) values (201,'Laptop','Laptop brand 1',20,cast('2023-01-19 09:51:40' as timestamp));
insert into iceberg_lf_demo.iceberg_lf_output_athena (product_id,category,product_name,quantity_available,last_update_time) values (202,'Tablet','Kindle',30,cast('2023-01-19 09:51:41' as timestamp));
insert into iceberg_lf_demo.iceberg_lf_output_athena (product_id,category,product_name,quantity_available,last_update_time) values (203,'Speaker','Alexa',10,cast('2023-01-19 09:51:42' as timestamp));
insert into iceberg_lf_demo.iceberg_lf_output_athena (product_id,category,product_name,quantity_available,last_update_time) values (204,'Speaker','Alexa',50,cast('2023-01-19 09:51:43' as timestamp));
For this post, we load the data using an AWS Glue job. Complete the following steps to create the job:
On the AWS Glue console, choose Jobs in the navigation pane.
Choose Create job.
Select Visual with ablank canvas.
Choose Create.
Choose Editscript.
Replace the script with the following script:
import sys
from awsglue.transforms import *
from awsglue.utils import getResolvedOptions
from pyspark.context import SparkContext
from awsglue.context import GlueContext
from awsglue.job import Job

from pyspark.sql.functions import *
from awsglue.dynamicframe import DynamicFrame

from pyspark.sql.window import Window
from pyspark.sql.functions import rank, max

from pyspark.conf import SparkConf

args = getResolvedOptions(sys.argv, ["JOB_NAME"])
conf = SparkConf()

## spark.sql.catalog.job_catalog.warehouse can be passed as an ## runtime argument with value as the S3 path
## Please make sure to pass runtime argument –
## iceberg_job_catalog_warehouse with value as the S3 path
conf.set("spark.sql.catalog.job_catalog.warehouse", args['iceberg_job_catalog_warehouse'])
conf.set("spark.sql.catalog.job_catalog", "org.apache.iceberg.spark.SparkCatalog")
conf.set("spark.sql.catalog.job_catalog.catalog-impl", "org.apache.iceberg.aws.glue.GlueCatalog")
conf.set("spark.sql.catalog.job_catalog.io-impl", "org.apache.iceberg.aws.s3.S3FileIO")
conf.set("spark.sql.extensions", "org.apache.iceberg.spark.extensions.IcebergSparkSessionExtensions")
conf.set("spark.sql.sources.partitionOverwriteMode", "dynamic")
conf.set("spark.sql.iceberg.handle-timestamp-without-timezone","true")

sc = SparkContext(conf=conf)
glueContext = GlueContext(sc)
spark = glueContext.spark_session
job = Job(glueContext)
job.init(args["JOB_NAME"], args)


## Read Input Table
## glueContext.create_data_frame.from_catalog can be more
## performant and can be replaced in place of
## create_dynamic_frame.from_catalog.

IncrementalInputDyF = glueContext.create_dynamic_frame.from_catalog(database = "iceberg_lf_db", table_name = "csv_input", transformation_ctx = "IncrementalInputDyF")
IncrementalInputDF = IncrementalInputDyF.toDF()

if not IncrementalInputDF.rdd.isEmpty():
## Apply De-duplication logic on input data, to pickup latest record based on timestamp and operation
IDWindowDF = Window.partitionBy(IncrementalInputDF.product_id).orderBy(IncrementalInputDF.last_update_time).rangeBetween(-sys.maxsize, sys.maxsize)

# Add new columns to capture OP value and what is the latest timestamp
inputDFWithTS= IncrementalInputDF.withColumn("max_op_date",max(IncrementalInputDF.last_update_time).over(IDWindowDF))

# Filter out new records that are inserted, then select latest record from existing records and merge both to get deduplicated output
NewInsertsDF = inputDFWithTS.filter("last_update_time=max_op_date").filter("op='I'")
UpdateDeleteDf = inputDFWithTS.filter("last_update_time=max_op_date").filter("op IN ('U','D')")
finalInputDF = NewInsertsDF.unionAll(UpdateDeleteDf)

# Register the deduplicated input as temporary table to use in Iceberg Spark SQL statements
finalInputDF.createOrReplaceTempView("incremental_input_data")
finalInputDF.show()

## Perform merge operation on incremental input data with MERGE INTO. This section of the code uses Spark SQL to showcase the expressive SQL approach of Iceberg to perform a Merge operation
IcebergMergeOutputDF = spark.sql("""
MERGE INTO job_catalog.iceberg_lf_db.iceberg_table_lf t
USING (SELECT op, product_id, category, product_name, quantity_available, to_timestamp(last_update_time) as last_update_time FROM incremental_input_data) s
ON t.product_id = s.product_id
WHEN MATCHED AND s.op = 'D' THEN DELETE
WHEN MATCHED THEN UPDATE SET t.quantity_available = s.quantity_available, t.last_update_time = s.last_update_time
WHEN NOT MATCHED THEN INSERT (product_id, category, product_name, quantity_available, last_update_time) VALUES (s.product_id, s.category, s.product_name, s.quantity_available, s.last_update_time)
""")

job.commit()
On the Job details tab, specify the job name (iceberg-lf).
For IAM Role, assign an AWS Identity and Access Management (IAM) role that has the required permissions to run an AWS Glue job and read and write to the S3 bucket.
For Glue version, choose Glue 4.0 (Glue 3.0 is also supported).
For Language, choose Python 3.
Make sure Job bookmark has the default value of Enable.
For Job parameters, add the following:
Add the key--datalake-formatswith the valueiceberg.
Add the key--iceberg_job_catalog_warehouse with the value as your S3 path (s3://<bucket-name>/<iceberg-warehouse-path>).
Choose Save and then Run, which should write the input data to the Iceberg table with a MERGE statement.
Query the Iceberg table using Athena
After you have successfully run the AWS Glue job, you can validate the output in Athena with the following SQL query:
SELECT * FROM iceberg_lf_db.iceberg_table_lf limit 10;
The output of the query should match the input, with one difference: the Iceberg output table doesn’t have theopcolumn.
Upload incremental (CDC) data for further processing
After we process the initial full load file, let’s upload an incremental file.
This file includes updated records on two items.
Run the AWS Glue job again to process incremental files
Because the AWS Glue job has bookmarks enabled, the job picks up the new incremental file and performs a MERGE operation on the Iceberg table.
To run the job again, complete the following steps:
On the AWS Glue console, choose Jobs in the navigation pane.
Query the Iceberg table using Athena after incremental data processing
When the incremental data processing is complete, you can run the same SELECT statement again and validate that the quantity value is updated for items 200 and 201.
The following screenshot shows the output.
Define Lake Formation policies
For data governance, we use Lake Formation. Lake Formation is a fully managed service that simplifies data lake setup, supports centralized security management, and provides transactional access on top of your data lake. Moreover, it enables data sharing across accounts and organizations. There are two ways to share data resources in Lake Formation: named resource access control (NRAC) and tag-based access control (TBAC). NRAC uses AWS Resource Access Manager (AWS RAM) to share data resources across accounts using Lake Formation V3. Those are consumed via resource links that are based on created resource shares. Lake Formation tag-based access control (LF-TBAC) is another approach to share data resources in Lake Formation, which defines permissions based on attributes. These attributes are called LF-tags.
In this example, we create databases in the primary account. Our NRAC database is shared with a data domain via AWS RAM. Access to data tables that we register in this database will be handled through NRAC.
Configure access controls in the primary account
In the primary account, complete the following steps to set up access controls using Lake Formation:
On the Lake Formation console, choose Data lake locations in the navigation pane.
Choose Register location.
Update the Iceberg Amazon S3 location path shown in the following screenshot.
Grant access to the database to the secondary account
To grant database access to the external (secondary) account, complete the following steps:
On the Lake Formation console, navigate to your database.
On the Actions menu, choose Grant.
Choose External accounts and enter the secondary account number.
Select Named data catalog resources.
Verify the database name.
The first grant should be at database level, and the second grant is at table level.
For Database permissions, specify your permissions (for this post, we select Describe).
Choose Grant.
Now you need to grant permissions at the table level.
Select External accounts and enter the secondary account number.
Select Named data catalog resources.
Verify the table name.
For Table permissions, specify the permissions you want to grant. For this post, we select Select and Describe.
Choose Grant.
If you see the following error, you must revokeIAMAllowedPrincipalsfrom the data lake permissions.
To do so, select IAMAllowedPrincipals and choose Revoke.
Choose Revoke again to confirm.
After you revoke the data permissions, the permissions should appear as shown in the following screenshot.
Add AWS Glue IAM role permissions
Because the IAM principal role was revoked, the AWS Glue IAM role that was used in the AWS Glue job needs to be added exclusively to grant access as shown in the following screenshot.
You need to repeat these steps for the AWS Glue IAM role at table level.
Verify the permissions granted to the AWS Glue IAM role on the Lake Formation console.
Grant access to the Iceberg table to the external account
In the secondary account, complete the following steps to grant access to the Iceberg table to external account.
On the AWS RAM console, choose Resource shares in the navigation pane.
Choose the resource shares invitation sent from the primary account.
Choose Accept resource share.
The resource status should now be active.
Next, you need to create a resource link for the shared Iceberg table and access through Athena.
On the Lake Formation console, choose Tables in the navigation pane.
Select the Iceberg table (shared from the primary account).
On the Actions menu, choose Create resource link.
For Resource link name, enter a name (for this post,iceberg_table_lf_demo).
For Database, choose your database and verify the shared table and database are automatically populated.
Choose Create.
Select your table and on the Actions menu, choose View data.
You’re redirected to the Athena console, where you can query the data.
Grant column-based access in the primary account
For column-level restricted access, you need to grant access at the column level on the Iceberg table. Complete the following steps:
On the Lake Formation console, navigate to your database.
On the Actions menu, choose Grant.
Select External accounts and enter the secondary account number.
Select Named data catalog resources.
Verify the table name.
For Table permissions, choose the permissions you want to grant. For this post, we select Select.
Under Data permissions, choose Column-based access.
Select Include columns and choose your permission filters (for this post, Category and Quantity_available).
Choose Grant.
Data with restricted columns can now be queried through the Athena console.
Clean up
To avoid incurring ongoing costs, complete the following steps to clean up your resources:
In your secondary account, log in to the Lake Formation console.
Drop the resource share table.
In your primary account, log in to the Lake Formation console.
Revoke the access you configured.
Drop the AWS Glue tables and database.
Delete the AWS Glue job.
Delete the S3 buckets and any other resources that you created as part of the prerequisites for this post.
Conclusion
This post explains how you can use the Iceberg framework with AWS Glue and Lake Formation to define cross-account access controls and query data using Athena. It provides an overview of Iceberg and its features and integration approaches, and explains how you can ingest data, grant cross-account access, and query data through a step-by-step guide.
We hope this gives you a great starting point for using Iceberg to build your data lake platform along with AWS analytics services to implement your solution.
About the Authors
Vikram Sahadevan is a Senior Resident Architect on the AWS Data Lab team. He enjoys efforts that focus around providing prescriptive architectural guidance, sharing best practices, and removing technical roadblocks with joint engineering engagements between customers and AWS technical resources that accelerate data, analytics, artificial intelligence, and machine learning initiatives.
Suvendu Kumar Patra possesses 18 years of experience in infrastructure, database design, and data engineering, and he currently holds the position of Senior Resident Architect at Amazon Web Services. He is a member of the specialized focus group, AWS Data Lab, and his primary duties entail working with executive leadership teams of strategic AWS customers to develop their roadmaps for data, analytics, and AI/ML. Suvendu collaborates closely with customers to implement data engineering, data hub, data lake, data governance, and EDW solutions, as well as enterprise data strategy and data management.
In this blog post, we will explore the process of creating a Continuous Integration/Continuous Deployment (CI/CD) pipeline for a .NET AWS Lambda function using the CDK Pipelines. We will cover all the necessary steps to automate the deployment of the .NET Lambda function, including setting up the development environment, creating the pipeline with AWS CDK, configuring the pipeline stages, and publishing the test reports. Additionally, we will show how to promote the deployment from a lower environment to a higher environment with manual approval.
Background
AWS CDK makes it easy to deploy a stack that provisions your infrastructure to AWS from your workstation by simply running cdk deploy. This is useful when you are doing initial development and testing. However, in most real-world scenarios, there are multiple environments, such as development, testing, staging, and production. It may not be the best approach to deploy your CDK application in all these environments using cdk deploy. Deployment to these environments should happen through more reliable, automated pipelines. CDK Pipelines makes it easy to set up a continuous deployment pipeline for your CDK applications, powered by AWS CodePipeline.
The AWS CDK Developer Guide’s Continuous integration and delivery (CI/CD) using CDK Pipelines page shows you how you can use CDK Pipelines to deploy a Node.js based Lambda function. However, .NET based Lambda functions are different from Node.js or Python based Lambda functions in that .NET code first needs to be compiled to create a deployment package. As a result, we decided to write this blog as a step-by-step guide to assist our .NET customers with deploying their Lambda functions utilizing CDK Pipelines.
In this post, we dive deeper into creating a real-world pipeline that runs build and unit tests, and deploys a .NET Lambda function to one or multiple environments.
Architecture
CDK Pipelines is a construct library that allows you to provision a CodePipeline pipeline. The pipeline created by CDK pipelines is self-mutating. This means, you need to run cdk deploy one time to get the pipeline started. After that, the pipeline automatically updates itself if you add new application stages or stacks in the source code.
The following diagram captures the architecture of the CI/CD pipeline created with CDK Pipelines. Let’s explore this architecture at a high level before diving deeper into the details.
Figure 1: Reference architecture diagram
The solution creates a CodePipeline with a AWS CodeCommit repo as the source (CodePipeline Source Stage). When code is checked into CodeCommit, the pipeline is automatically triggered and retrieves the code from the CodeCommit repository branch to proceed to the Build stage.
Build stage compiles the CDK application code and generates the cloud assembly.
Update Pipeline stage updates the pipeline (if necessary).
Publish Assets stage uploads the CDK assets to Amazon S3.
After Publish Assets is complete, the pipeline deploys the Lambda function to both the development and production environments. For added control, the architecture includes a manual approval step for releases that target the production environment.
Before you use AWS CDK to deploy CDK Pipelines, you must bootstrap the AWS environments where you want to deploy the Lambda function. An environment is the target AWS account and Region into which the stack is intended to be deployed.
In this post, you deploy the Lambda function into a development environment and, optionally, a production environment. This requires bootstrapping both environments. However, deployment to a production environment is optional; you can skip bootstrapping that environment for the time being, as we will cover that later.
This is one-time activity per environment for each environment to which you want to deploy CDK applications. To bootstrap the development environment, run the below command, substituting in the AWS account ID for your dev account, the region you will use for your dev environment, and the locally-configured AWS CLI profile you wish to use for that account. See the documentation for additional details.
‐‐profile specifies the AWS CLI credential profile that will be used to bootstrap the environment. If not specified, default profile will be used. The profile should have sufficient permissions to provision the resources for the AWS CDK during bootstrap process.
‐‐cloudformation-execution-policies specifies the ARNs of managed policies that should be attached to the deployment role assumed by AWS CloudFormation during deployment of your stacks.
For this post, you will use CodeCommit to store your source code. First, create a git repository named dotnet-lambda-cdk-pipeline in CodeCommit by following these steps in the CodeCommit documentation.
After you have created the repository, generate git credentials to access the repository from your local machine if you don’t already have them. Follow the steps below to generate git credentials.
Sign in to the AWS Management Console and open the IAM console.
Next. open the user details page, choose the Security Credentials tab, and in HTTPS Git credentials for AWS CodeCommit, choose Generate.
Download credentials to download this information as a .CSV file.
Clone the recently created repository to your workstation, then cd into dotnet-lambda-cdk-pipeline directory.
git clone <CODECOMMIT-CLONE-URL>
cd dotnet-lambda-cdk-pipeline
Alternatively, you can use git-remote-codecommit to clone the repository with git clone codecommit::<REGION>://<PROFILE>@<REPOSITORY-NAME> command, replacing the placeholders with their original values. Using git-remote-codecommit does not require you to create additional IAM users to manage git credentials. To learn more, refer AWS CodeCommit with git-remote-codecommit documentation page.
Initialize the CDK project
From the command prompt, inside the dotnet-lambda-cdk-pipeline directory, initialize a AWS CDK project by running the following command.
cdk init app --language csharp
Open the generated C# solution in Visual Studio, right-click the DotnetLambdaCdkPipeline project and select Properties. Set the Target framework to .NET 6.
Create a CDK stack to provision the CodePipeline
Your CDK Pipelines application includes at least two stacks: one that represents the pipeline itself, and one or more stacks that represent the application(s) deployed via the pipeline. In this step, you create the first stack that deploys a CodePipeline pipeline in your AWS account.
From Visual Studio, open the solution by opening the .sln solution file (in the src/ folder). Once the solution has loaded, open the DotnetLambdaCdkPipelineStack.cs file, and replace its contents with the following code. Note that the filename, namespace and class name all assume you named your Git repository as shown earlier.
Note: be sure to replace “<CODECOMMIT-REPOSITORY-NAME>” in the code below with the name of your CodeCommit repository (in this blog post, we have used dotnet-lambda-cdk-pipeline).
using Amazon.CDK;
using Amazon.CDK.AWS.CodeBuild;
using Amazon.CDK.AWS.CodeCommit;
using Amazon.CDK.AWS.IAM;
using Amazon.CDK.Pipelines;
using Constructs;
using System.Collections.Generic;

namespace DotnetLambdaCdkPipeline
{
    public class DotnetLambdaCdkPipelineStack : Stack
    {
        internal DotnetLambdaCdkPipelineStack(Construct scope, string id, IStackProps props = null) : base(scope, id, props)
        {

            var repository = Repository.FromRepositoryName(this, "repository", "<CODECOMMIT-REPOSITORY-NAME>");

            // This construct creates a pipeline with 3 stages: Source, Build, and UpdatePipeline
            var pipeline = new CodePipeline(this, "pipeline", new CodePipelineProps
            {
                PipelineName = "LambdaPipeline",
                SelfMutation = true,

                // Synth represents a build step that produces the CDK Cloud Assembly.
                // The primary output of this step needs to be the cdk.out directory generated by the cdk synth command.
                Synth = new CodeBuildStep("Synth", new CodeBuildStepProps
                {
                    // The files downloaded from the repository will be placed in the working directory when the script is executed
                    Input = CodePipelineSource.CodeCommit(repository, "master"),

                    // Commands to run to generate CDK Cloud Assembly
                    Commands = new string[] { "npm install -g aws-cdk", "cdk synth" },

                    // Build environment configuration
                    BuildEnvironment = new BuildEnvironment
                    {
                        BuildImage = LinuxBuildImage.AMAZON_LINUX_2_4,
                        ComputeType = ComputeType.MEDIUM,

                        // Specify true to get a privileged container inside the build environment image
                        Privileged = true
                    }
                })
            });
        }
    }
}
In the preceding code, you use CodeBuildStep instead of ShellStep, since ShellStep doesn’t provide a property to specify BuildEnvironment. We need to specify the build environment in order to set privileged mode, which allows access to the Docker daemon in order to build container images in the build environment. This is necessary to use the CDK’s bundling feature, which is explained in later in this blog post.
Open the file src/DotnetLambdaCdkPipeline/Program.cs, and edit its contents to reflect the below. Be sure to replace the placeholders with your AWS account ID and region for your dev environment.
using Amazon.CDK;

namespace DotnetLambdaCdkPipeline
{
    sealed class Program
    {
        public static void Main(string[] args)
        {
            var app = new App();
            new DotnetLambdaCdkPipelineStack(app, "DotnetLambdaCdkPipelineStack", new StackProps
            {
                Env = new Amazon.CDK.Environment
                {
                    Account = "<DEV-ACCOUNT-ID>",
                    Region = "<DEV-REGION>"
                }
            });
            app.Synth();
        }
    }
}
Note: Instead of committing the account ID and region to source control, you can set environment variables on the CodeBuild agent and use them; see Environments in the AWS CDK documentation for more information. Because the CodeBuild agent is also configured in your CDK code, you can use the BuildEnvironmentVariableType property to store environment variables in AWS Systems Manager Parameter Store or AWS Secrets Manager.
After you make the code changes, build the solution to ensure there are no build issues. Next, commit and push all the changes you just made. Run the following commands (or alternatively use Visual Studio’s built-in Git functionality to commit and push your changes):
Then navigate to the root directory of repository where your cdk.json file is present, and run the cdk deploy command to deploy the initial version of CodePipeline. Note that the deployment can take several minutes.
The pipeline created by CDK Pipelines is self-mutating. This means you only need to run cdk deploy one time to get the pipeline started. After that, the pipeline automatically updates itself if you add new CDK applications or stages in the source code.
After the deployment has finished, a CodePipeline is created and automatically runs. The pipeline includes three stages as shown below.
Source – It fetches the source of your AWS CDK app from your CodeCommit repository and triggers the pipeline every time you push new commits to it.
Build – This stage compiles your code (if necessary) and performs a cdk synth. The output of that step is a cloud assembly.
UpdatePipeline – This stage runs cdk deploy command on the cloud assembly generated in previous stage. It modifies the pipeline if necessary. For example, if you update your code to add a new deployment stage to the pipeline to your application, the pipeline is automatically updated to reflect the changes you made.
Figure 2: Initial CDK pipeline stages
Define a CodePipeline stage to deploy .NET Lambda function
In this step, you create a stack containing a simple Lambda function and place that stack in a stage. Then you add the stage to the pipeline so it can be deployed.
To create a Lambda project, do the following:
In Visual Studio, right-click on the solution, choose Add, then choose New Project.
In the New Project dialog box, choose the AWS Lambda Project (.NET Core – C#) template, and then choose OK or Next.
For Project Name, enter SampleLambda, and then choose Create.
From the Select Blueprint dialog, choose Empty Function, then choose Finish.
Next, create a new file in the CDK project at src/DotnetLambdaCdkPipeline/SampleLambdaStack.cs to define your application stack containing a Lambda function. Update the file with the following contents (adjust the namespace as necessary):
using Amazon.CDK;
using Amazon.CDK.AWS.Lambda;
using Constructs;
using AssetOptions = Amazon.CDK.AWS.S3.Assets.AssetOptions;

namespace DotnetLambdaCdkPipeline
{
    class SampleLambdaStack: Stack
    {
        public SampleLambdaStack(Construct scope, string id, StackProps props = null) : base(scope, id, props)
        {
            // Commands executed in a AWS CDK pipeline to build, package, and extract a .NET function.
            var buildCommands = new[]
            {
                "cd /asset-input",
                "export DOTNET_CLI_HOME=\"/tmp/DOTNET_CLI_HOME\"",
                "export PATH=\"$PATH:/tmp/DOTNET_CLI_HOME/.dotnet/tools\"",
                "dotnet build",
                "dotnet tool install -g Amazon.Lambda.Tools",
                "dotnet lambda package -o output.zip",
                "unzip -o -d /asset-output output.zip"
            };

            new Function(this, "LambdaFunction", new FunctionProps
            {
                Runtime = Runtime.DOTNET_6,
                Handler = "SampleLambda::SampleLambda.Function::FunctionHandler",

                // Asset path should point to the folder where .csproj file is present.
                // Also, this path should be relative to cdk.json file.
                Code = Code.FromAsset("./src/SampleLambda", new AssetOptions
                {
                    Bundling = new BundlingOptions
                    {
                        Image = Runtime.DOTNET_6.BundlingImage,
                        Command = new[]
                        {
                            "bash", "-c", string.Join(" && ", buildCommands)
                        }
                    }
                })
            });
        }
    }
}
Building inside a Docker container
The preceding code uses bundling feature to build the Lambda function inside a docker container. Bundling starts a new docker container, copies the Lambda source code inside /asset-input directory of the container, runs the specified commands that write the package files under /asset-output directory. The files in /asset-output are copied as assets to the stack’s cloud assembly directory. In a later stage, these files are zipped and uploaded to S3 as the CDK asset.
Building Lambda functions inside Docker containers is preferable than building them locally because it reduces the host machine’s dependencies, resulting in greater consistency and reliability in your build process.
Bundling requires the creation of a docker container on your build machine. For this purpose, the privileged: true setting on the build machine has already been configured.
Adding development stage
Create a new file in the CDK project at src/DotnetLambdaCdkPipeline/DotnetLambdaCdkPipelineStage.cs to hold your stage. This class will create the development stage for your pipeline.
using Amazon.CDK;
using Constructs;

namespace DotnetLambdaCdkPipeline
{
    public class DotnetLambdaCdkPipelineStage : Stage
    {
        internal DotnetLambdaCdkPipelineStage(Construct scope, string id, IStageProps props = null) : base(scope, id, props)
        {
            Stack lambdaStack = new SampleLambdaStack(this, "LambdaStack");
        }
    }
}
Edit src/DotnetLambdaCdkPipeline/DotnetLambdaCdkPipelineStack.cs to add the stage to your pipeline. Add the bolded line from the code below to your file.
using Amazon.CDK;
using Amazon.CDK.Pipelines;

namespace DotnetLambdaCdkPipeline
{
    public class DotnetLambdaCdkPipelineStack : Stack
    {
        internal DotnetLambdaCdkPipelineStack(Construct scope, string id, IStackProps props = null) : base(scope, id, props)
        {

            var repository = Repository.FromRepositoryName(this, "repository", "dotnet-lambda-cdk-application");

            // This construct creates a pipeline with 3 stages: Source, Build, and UpdatePipeline
            var pipeline = new CodePipeline(this, "pipeline", new CodePipelineProps
            {
                PipelineName = "LambdaPipeline",
                .
                .
                .
            });

            var devStage = pipeline.AddStage(new DotnetLambdaCdkPipelineStage(this, "Development"));
        }
    }
}
Next, build the solution, then commit and push the changes to the CodeCommit repo. This will trigger the CodePipeline to start.
When the pipeline runs, UpdatePipeline stage detects the changes and updates the pipeline based on the code it finds there. After the UpdatePipeline stage completes, pipeline is updated with additional stages.
Let’s observe the changes:
An Assets stage has been added. This stage uploads all the assets you are using in your app to Amazon S3 (the S3 bucket created during bootstrapping) so that they could be used by other deployment stages later in the pipeline. For example, the CloudFormation template used by the development stage, includes reference to these assets, which is why assets are first moved to S3 and then referenced in later stages.
A Development stage with two actions has been added. The first action is to create the change set, and the second is to execute it.
Figure 3: CDK pipeline with development stage to deploy .NET Lambda function
After the Deploy stage has completed, you can find the newly-deployed Lambda function by visiting the Lambda console, selecting “Functions” from the left menu, and filtering the functions list with “LambdaStack”. Note the runtime is .NET.
Right click on the solution, choose Add, then choose New Project.
In the New Project dialog box, choose the xUnit Test Project template, and then choose OK or Next.
For Project Name, enter SampleLambda.Tests, and then choose Create or Next. Depending on your version of Visual Studio, you may be prompted to select the version of .NET to use. Choose .NET 6.0 (Long Term Support), then choose Create.
Right click on SampleLambda.Tests project, choose Add, then choose Project Reference. Select SampleLambda project, and then choose OK.
Next, edit the src/SampleLambda.Tests/UnitTest1.cs file to add a unit test. You can use the code below, which verifies that the Lambda function returns the input string as upper case.
using Xunit;

namespace SampleLambda.Tests
{
    public class UnitTest1
    {
        [Fact]
        public void TestSuccess()
        {
            var lambda = new SampleLambda.Function();

            var result = lambda.FunctionHandler("test string", context: null);

            Assert.Equal("TEST STRING", result);
        }
    }
}
You can add pre-deployment or post-deployment actions to the stage by calling its AddPre() or AddPost() method. To execute above test cases, we will use a pre-deployment action.
To add a pre-deployment action, we will edit the src/DotnetLambdaCdkPipeline/DotnetLambdaCdkPipelineStack.cs file in the CDK project, after we add code to generate test reports.
To run the unit test(s) and publish the test report in CodeBuild, we will construct a BuildSpec for our CodeBuild project. We also provide IAM policy statements to be attached to the CodeBuild service role granting it permissions to run the tests and create reports. Update the file by adding the new code (starting with “// Add this code for test reports”) below the devStage declaration you added earlier:
using Amazon.CDK;
using Amazon.CDK.Pipelines;
...

namespace DotnetLambdaCdkPipeline
{
    public class DotnetLambdaCdkPipelineStack : Stack
    {
        internal DotnetLambdaCdkPipelineStack(Construct scope, string id, IStackProps props = null) : base(scope, id, props)
        {
            // ...
            // ...
            // ...
            var devStage = pipeline.AddStage(new DotnetLambdaCdkPipelineStage(this, "Development"));


            // Add this code for test reports
            var reportGroup = new ReportGroup(this, "TestReports", new ReportGroupProps
            {
                ReportGroupName = "TestReports"
            });

            // Policy statements for CodeBuild Project Role
            var policyProps = new PolicyStatementProps()
            {
                Actions = new string[] {
                    "codebuild:CreateReportGroup",
                    "codebuild:CreateReport",
                    "codebuild:UpdateReport",
                    "codebuild:BatchPutTestCases"
                },
                Effect = Effect.ALLOW,
                Resources = new string[] { reportGroup.ReportGroupArn }
            };

            // PartialBuildSpec in AWS CDK for C# can be created using Dictionary
            var reports = new Dictionary<string, object>()
            {
                {
                    "reports", new Dictionary<string, object>()
                    {
                        {
                            reportGroup.ReportGroupArn, new Dictionary<string,object>()
                            {
                                { "file-format", "VisualStudioTrx" },
                                { "files", "**/*" },
                                { "base-directory", "./testresults" }
                            }
                        }
                    }
                }
            };
            // End of new code block
        }
    }
}
Finally, add the CodeBuildStep as a pre-deployment action to the development stage with necessary CodeBuildStepProps to set up reports. Add this after the new code you added above.
devStage.AddPre(new Step[]
{
    new CodeBuildStep("Unit Test", new CodeBuildStepProps
    {
        Commands= new string[]
        {
            "dotnet test -c Release ./src/SampleLambda.Tests/SampleLambda.Tests.csproj --logger trx --results-directory ./testresults",
        },
        PrimaryOutputDirectory = "./testresults",
        PartialBuildSpec= BuildSpec.FromObject(reports),
        RolePolicyStatements = new PolicyStatement[] { new PolicyStatement(policyProps) },
        BuildEnvironment = new BuildEnvironment
        {
            BuildImage = LinuxBuildImage.AMAZON_LINUX_2_4,
            ComputeType = ComputeType.MEDIUM
        }
    })
});
Build the solution, then commit and push the changes to the repository. Pushing the changes triggers the pipeline, runs the test cases, and publishes the report to the CodeBuild console. To view the report, after the pipeline has completed, navigate to TestReports in CodeBuild’s Report Groups as shown below.
Figure 4: Test report in CodeBuild report group
Deploying to production environment with manual approval
CDK Pipelines makes it very easy to deploy additional stages with different accounts. You have to bootstrap the accounts and Regions you want to deploy to, and they must have a trust relationship added to the pipeline account.
To bootstrap an additional production environment into which AWS CDK applications will be deployed by the pipeline, run the below command, substituting in the AWS account ID for your production account, the region you will use for your production environment, the AWS CLI profile to use with the prod account, and the AWS account ID where the pipeline is already deployed (the account you bootstrapped at the start of this blog).
The --trust option indicates which other account should have permissions to deploy AWS CDK applications into this environment. For this option, specify the pipeline’s AWS account ID.
Use below code to add a new stage for production deployment with manual approval. Add this code below the “devStage.AddPre(...)” code block you added in the previous section, and remember to replace the placeholders with your AWS account ID and region for your prod environment.
var prodStage = pipeline.AddStage(new DotnetLambdaCdkPipelineStage(this, "Production", new StageProps
{
    Env = new Environment
    {
        Account = "<PROD-ACCOUNT-ID>",
        Region = "<PROD-REGION>"
    }
}), new AddStageOpts
{
    Pre = new[] { new ManualApprovalStep("PromoteToProd") }
});
To support deploying CDK applications to another account, the artifact buckets must be encrypted, so add a CrossAccountKeys property to the CodePipeline near the top of the pipeline stack file, and set the value to true (see the line in bold in the code snippet below). This creates a KMS key for the artifact bucket, allowing cross-account deployments.
var pipeline = new CodePipeline(this, "pipeline", new CodePipelineProps
{
PipelineName = "LambdaPipeline",
SelfMutation = true,
CrossAccountKeys = true,EnableKeyRotation = true, //Enable KMS key rotation for the generated KMS keys
// ...
}
After you commit and push the changes to the repository, a new manual approval step called PromoteToProd is added to the Production stage of the pipeline. The pipeline pauses at this step and awaits manual approval as shown in the screenshot below.
Figure 5: Pipeline waiting for manual review
When you click the Review button, you are presented with the following dialog. From here, you can choose to approve or reject and add comments if needed.
Figure 6: Manual review approval dialog
Once you approve, the pipeline resumes, executes the remaining steps and completes the deployment to production environment.
Figure 7: Successful deployment to production environment
Clean up
To avoid incurring future charges, log into the AWS console of the different accounts you used, go to the AWS CloudFormation console of the Region(s) where you chose to deploy, select and click Delete on the stacks created for this activity. Alternatively, you can delete the CloudFormation Stack(s) using cdk destroy command. It will not delete the CDKToolkit stack that the bootstrap command created. If you want to delete that as well, you can do it from the AWS Console.
Conclusion
In this post, you learned how to use CDK Pipelines for automating the deployment process of .NET Lambda functions. An intuitive and flexible architecture makes it easy to set up a CI/CD pipeline that covers the entire application lifecycle, from build and test to deployment. With CDK Pipelines, you can streamline your development workflow, reduce errors, and ensure consistent and reliable deployments. For more information on CDK Pipelines and all the ways it can be used, see the CDK Pipelines reference documentation.
Customers use Amazon Redshift to run their business-critical analytics on petabytes of structured and semi-structured data. Apache Spark is a popular framework that you can use to build applications for use cases such as ETL (extract, transform, and load), interactive analytics, and machine learning (ML). Apache Spark enables you to build applications in a variety of languages, such as Java, Scala, and Python, by accessing the data in your Amazon Redshift data warehouse.
Amazon Redshift integration for Apache Spark helps developers seamlessly build and run Apache Spark applications on Amazon Redshift data. Developers can use AWS analytics and ML services such as Amazon EMR, AWS Glue, and Amazon SageMaker to effortlessly build Apache Spark applications that read from and write to their Amazon Redshift data warehouse. You can do so without compromising on the performance of your applications or transactional consistency of your data.
In this post, we discuss why Amazon Redshift integration for Apache Spark is critical and efficient for analytics and ML. In addition, we discuss use cases that use Amazon Redshift integration with Apache Spark to drive business impact. Finally, we walk you through step-by-step examples of how to use this official AWS connector in an Apache Spark application.
Amazon Redshift integration for Apache Spark
The Amazon Redshift integration for Apache Spark minimizes the cumbersome and often manual process of setting up a spark-redshift connector (community version) and shortens the time needed to prepare for analytics and ML tasks. You only need to specify the connection to your data warehouse, and you can start working with Amazon Redshift data from your Apache Spark-based applications within minutes.
You can use several pushdown capabilities for operations such as sort, aggregate, limit, join, and scalar functions so that only the relevant data is moved from your Amazon Redshift data warehouse to the consuming Apache Spark application. This allows you to improve the performance of your applications. Amazon Redshift admins can easily identify the SQL generated from Spark-based applications. In this post, we show how you can find out the SQL generated by the Apache Spark job.
Moreover, Amazon Redshift integration for Apache Spark uses Parquet file format when staging the data in a temporary directory. Amazon Redshift uses the UNLOAD SQL statement to store this temporary data on Amazon Simple Storage Service (Amazon S3). The Apache Spark application retrieves the results from the temporary directory (stored in Parquet file format), which improves performance.
You can also help make your applications more secure by utilizing AWS Identity and Access Management (IAM) credentials to connect to Amazon Redshift.
Amazon Redshift integration for Apache Spark is built on top of the spark-redshift connector (community version) and enhances it for performance and security, helping you gain up to 10 times faster application performance.
Use cases for Amazon Redshift integration with Apache Spark
For our use case, the leadership of the product-based company wants to know the sales for each product across multiple markets. As sales for the company fluctuate dynamically, it has become a challenge for the leadership to track the sales across multiple markets. However, the overall sales are declining, and the company leadership wants to find out which markets aren’t performing so that they can target these markets for promotion campaigns.
For sales across multiple markets, the product sales data such as orders, transactions, and shipment data is available on Amazon S3 in the data lake. The data engineering team can use Apache Spark with Amazon EMR or AWS Glue to analyze this data in Amazon S3.
The inventory data is available in Amazon Redshift. Similarly, the data engineering team can analyze this data with Apache Spark using Amazon EMR or an AWS Glue job by using the Amazon Redshift integration for Apache Spark to perform aggregations and transformations. The aggregated and transformed dataset can be stored back into Amazon Redshift using the Amazon Redshift integration for Apache Spark.
Using a distributed framework like Apache Spark with the Amazon Redshift integration for Apache Spark can provide the visibility across the data lake and data warehouse to generate sales insights. These insights can be made available to the business stakeholders and line of business users in Amazon Redshift to make informed decisions to run targeted promotions for the low revenue market segments.
Additionally, we can use the Amazon Redshift integration with Apache Spark in the following use cases:
An Amazon EMR or AWS Glue customer running Apache Spark jobs wants to transform data and write that into Amazon Redshift as a part of their ETL pipeline
An ML customer uses Apache Spark with SageMaker for feature engineering for accessing and transforming data in Amazon Redshift
An Amazon EMR, AWS Glue, or SageMaker customer uses Apache Spark for interactive data analysis with data on Amazon Redshift from notebooks
Examples for Amazon Redshift integration for Apache Spark in an Apache Spark application
In this post, we show the steps to connect Amazon Redshift from Amazon EMR on Amazon Elastic Compute Cloud (Amazon EC2), Amazon EMR Serverless, and AWS Glue using a common script. In the following sample code, we generate a report showing the quarterly sales for the year 2008. To do that, we join two Amazon Redshift tables using an Apache Spark DataFrame, run a predicate pushdown, aggregate and sort the data, and write the transformed data back to Amazon Redshift. The script uses PySpark
The script uses IAM-based authentication for Amazon Redshift. IAM roles used by Amazon EMR and AWS Glue should have the appropriate permissions to authenticate Amazon Redshift, and access to an S3 bucket for temporary data storage.
The following example policy allows the IAM role to call the GetClusterCredentials operations:
from pyspark.sql import SparkSession
from pyspark.sql.functions import col

# Initiate Apache Spark session
spark = SparkSession \
        .builder \
        .appName("SparkRedshiftConnector") \
        .enableHiveSupport() \
        .getOrCreate()

# Set connection options for Amazon Redshift
jdbc_iam_url = "jdbc:redshift:iam://redshift-spark-connector-1.xxxxxxxxxxx.<aws_region_name>.redshift.amazonaws.com:5439/sample_data_dev"
temp_dir = 's3://<s3_bucket_name>/redshift-temp-dir/'
aws_role = 'arn:aws:iam::xxxxxxxxxxxx:role/redshift-s3'

# Set query group for the query. More details on Amazon Redshift WLM https://docs.aws.amazon.com/redshift/latest/dg/cm-c-executing-queries.html
queryGroup = "emr-redshift"
jdbc_iam_url_withQueryGroup = jdbc_iam_url+'?queryGroup='+queryGroup

# Set User name for the query
userName = 'awsuser'
jdbc_iam_url_withUserName = jdbc_iam_url_withQueryGroup+';user='+userName

# Define the Amazon Redshift context
redshiftOptions = {
    "url": jdbc_iam_url_withUserName,
    "tempdir": temp_dir,
    "aws_iam_role" : aws_role
}

# Create the sales DataFrame from Amazon Redshift table using io.github.spark_redshift_community.spark.redshift class
sales_df = (
    spark.read
        .format("io.github.spark_redshift_community.spark.redshift")
        .options(**redshiftOptions)
        .option("dbtable", "tickit.sales")
        .load()
)

# Create the date Data Frame from Amazon Redshift table
date_df = (
    spark.read
        .format("io.github.spark_redshift_community.spark.redshift")
        .options(**redshiftOptions)
        .option("dbtable", "tickit.date")
        .load()
)

# Assign a Data Frame to the above output which will be written back to Amazon Redshift
output_df= sales_df.join(date_df, sales_df.dateid == date_df.dateid, 'inner').where(
    col("year") == 2008).groupBy("qtr").sum("qtysold").select(
        col("qtr"), col("sum(qtysold)")).sort(["qtr"], ascending=[1]).withColumnRenamed("sum(qtysold)","total_quantity_sold")

# Display the output
output_df.show()

## Lets drop the queryGroup for easy validation of push down queries
# Set User name for the query
userName = 'awsuser'
jdbc_iam_url_withUserName = jdbc_iam_url+'?user='+userName

# Define the Amazon Redshift context
redshiftWriteOptions = {
    "url": jdbc_iam_url_withUserName,
    "tempdir": temp_dir,
    "aws_iam_role" : aws_role
}

# Write the Data Frame back to Amazon Redshift
output_df.write \
    .format("io.github.spark_redshift_community.spark.redshift") \
    .mode("overwrite") \
    .options(**redshiftWriteOptions) \
    .option("dbtable", "tickit.test") \
    .save()
If you plan to use the preceding script in your environment, make sure you replace the values for the following variables with the appropriate values for your environment: jdbc_iam_url, temp_dir, and aws_role.
In the next section, we walk through the steps to run this script to aggregate a sample dataset that is made available in Amazon Redshift.
Prerequisites
Before we begin, make sure the following prerequisites are met:
You can also download the CloudFormation template to create the resources mentioned in this post through infrastructure as code (IaC). Use this template when launching a new CloudFormation stack.
Scroll down to the bottom of the page to select I acknowledge that AWS CloudFormation might create IAM resources under Capabilities, then choose Create stack.
The stack creation process takes 15–20 minutes to complete. The CloudFormation template creates the following resources:
An Amazon VPC with the needed subnets, route tables, and NAT gateway
An S3 bucket with the name redshift-spark-databucket-xxxxxxx (note that xxxxxxx is a random string to make the bucket name unique)
An Amazon Redshift cluster with sample data loaded inside the database dev and the primary user redshiftmasteruser. For the purpose of this blog post, redshiftmasteruser with administrative permissions is used. However, it is recommended to use a user with fine grained access control in production environment.
An IAM role to be used for Amazon Redshift with the ability to request temporary credentials from the Amazon Redshift cluster’s dev database
Amazon EMR release version 6.9.0 on an EC2 cluster with the needed IAM roles
An Amazon EMR Serverless application release version 6.9.0
An AWS Glue connection and AWS Glue job version 4.0
A Jupyter notebook to run using Amazon EMR Studio using Amazon EMR on an EC2 cluster
A PySpark script to run using Amazon EMR Studio and Amazon EMR Serverless
After the stack creation is complete, choose the stack name redshift-spark and navigate to the Outputs
We utilize these output values later in this post.
In the next sections, we show the steps for Amazon Redshift integration for Apache Spark from Amazon EMR on Amazon EC2, Amazon EMR Serverless, and AWS Glue.
Use Amazon Redshift integration with Apache Spark on Amazon EMR on EC2
Starting from Amazon EMR release version 6.9.0 and above, the connector using Amazon Redshift integration for Apache Spark and Amazon Redshift JDBC driver are available locally on Amazon EMR. These files are located under the /usr/share/aws/redshift/ directory. However, in the previous versions of Amazon EMR, the community version of the spark-redshiftconnector is available.
The following example shows how to connect Amazon Redshift using a PySpark kernel via an Amazon EMR Studio notebook. The CloudFormation stack created Amazon EMR Studio, Amazon EMR on an EC2 cluster, and a Jupyter notebook available to run. To go through this example, complete the following steps:
Download the Jupyter notebook made available in the S3 bucket for you:
In the CloudFormation stack outputs, look for the value for EMRStudioNotebook, which should point to the redshift-spark-emr.ipynb notebook available in the S3 bucket.
Choose the link or open the link in a new tab by copying the URL for the notebook.
After you open the link, download the notebook by choosing Download, which will save the file locally on your computer.
Access Amazon EMR Studio by choosing or copying the link provided in the CloudFormation stack outputs for the key EMRStudioURL.
In the navigation pane, choose Workspaces.
Choose Create Workspace.
Provide a name for the Workspace, for instance redshift-spark.
Expand the Advanced configuration section and select Attach Workspace to an EMR cluster.
Under Attach to an EMR cluster, choose the EMR cluster with the name emrCluster-Redshift-Spark.
Choose Create Workspace.
After the Amazon EMR Studio Workspace is created and in Attached status, you can access the Workspace by choosing the name of the Workspace.
This should open the Workspace in a new tab. Note that if you have a pop-up blocker, you may have to allow the Workspace to open or disable the pop-up blocker.
In the Amazon EMR Studio Workspace, we now upload the Jupyter notebook we downloaded earlier.
Choose Upload to browse your local file system and upload the Jupyter notebook (redshift-spark-emr.ipynb).
Choose (double-click) the redshift-spark-emr.ipynb notebook within the Workspace to open the notebook.
The notebook provides the details of different tasks that it performs. Note that in the section Define the variables to connect to Amazon Redshift cluster, you don’t need to update the values for jdbc_iam_url, temp_dir, and aws_role because these are updated for you by AWS CloudFormation. AWS CloudFormation has also performed the steps mentioned in the Prerequisites section of the notebook.
You can now start running the notebook.
Run the individual cells by selecting them and then choosing Play.
You can also use the key combination of Shift+Enter or Shift+Return. Alternatively, you can run all the cells by choosing Run All Cells on the Run menu.
Find the predicate pushdown operation performed on the Amazon Redshift cluster by the Amazon Redshift integration for Apache Spark.
We can also see the temporary data stored on Amazon S3 in the optimized Parquet format. The output can be seen from running the cell in the section Get the last query executed on Amazon Redshift.
To validate the table created by the job from Amazon EMR on Amazon EC2, navigate to the Amazon Redshift console and choose the cluster redshift-spark-redshift-cluster on the Provisioned clusters dashboard page.
In the cluster details, on the Query data menu, choose Query in query editor v2.
Choose the cluster in the navigation pane and connect to the Amazon Redshift cluster when it requests for authentication.
Select Temporary credentials.
For Database, enter dev.
For User name, enter redshiftmasteruser.
Choose Save.
In the navigation pane, expand the cluster redshift-spark-redshift-cluster, expand the dev database, expand tickit, and expand Tables to list all the tables inside the schema tickit.
You should find the table test_emr.
Choose (right-click) the table test_emr, then choose Select table to query the table.
Choose Run to run the SQL statement.
Use Amazon Redshift integration with Apache Spark on Amazon EMR Serverless
The Amazon EMR release version 6.9.0 and above provides the Amazon Redshift integration for Apache Spark JARs (managed by Amazon Redshift) and Amazon Redshift JDBC JARs locally on Amazon EMR Serverless as well. These files are located under the /usr/share/aws/redshift/ directory. In the following example, we use the Python script made available in the S3 bucket by the CloudFormation stack we created earlier.
In the CloudFormation stack outputs, make a note of the value for EMRServerlessExecutionScript, which is the location of the Python script in the S3 bucket.
Also note the value for EMRServerlessJobExecutionRole, which is the IAM role to be used with running the Amazon EMR Serverless job.
Access Amazon EMR Studio by choosing or copying the link provided in the CloudFormation stack outputs for the key EMRStudioURL.
Choose Applications under Serverless in the navigation pane.
You will find an EMR application created by the CloudFormation stack with the name emr-spark-redshift.
Choose the application name to submit a job.
Choose Submit job.
Under Job details, for Name, enter an identifiable name for the job.
For Runtime role, choose the IAM role that you noted from the CloudFormation stack output earlier.
For Script location, provide the path to the Python script you noted earlier from the CloudFormation stack output.
Expand the section Spark properties and choose the Edit in text
Enter the following value in the text box, which provides the path to the redshift-connector, Amazon Redshift JDBC driver, spark-avro JAR, and minimal-json JAR files:
Wait for the job to complete and the run status to show as Success.
Navigate to the Amazon Redshift query editor to view if the table was created successfully.
Check the pushdown queries run for Amazon Redshift query group emr-serverless-redshift. You can run the following SQL statement against the database dev:
SELECT query_text FROM SYS_QUERY_HISTORY WHERE query_label = 'emr-serverless-redshift' ORDER BY start_time DESC LIMIT 1
You can see that the pushdown query and return results are stored in Parquet file format on Amazon S3.
Use Amazon Redshift integration with Apache Spark on AWS Glue
Starting with AWS Glue version 4.0 and above, the Apache Spark jobs connecting to Amazon Redshift can use the Amazon Redshift integration for Apache Spark and Amazon Redshift JDBC driver. Existing AWS Glue jobs that already use Amazon Redshift as source or target can be upgraded to AWS Glue 4.0 to take advantage of this new connector. The CloudFormation template provided with this post creates the following AWS Glue resources:
AWS Glue connection for Amazon Redshift – The connection to establish connection from AWS Glue to Amazon Redshift using the Amazon Redshift integration for Apache Spark
IAM role attached to the AWS Glue job – The IAM role to manage permissions to run the AWS Glue job
AWS Glue job – The script for the AWS Glue job performing transformations and aggregations using the Amazon Redshift integration for Apache Spark
The following example uses the AWS Glue connection attached to the AWS Glue job with PySpark and includes the following steps:
On the AWS Glue console, choose Connections in the navigation pane.
Under Connections, choose the AWS Glue connection for Amazon Redshift created by the CloudFormation template.
Verify the connection details.
You can now reuse this connection within a job or across multiple jobs.
On the Connectors page, choose the AWS Glue job created by the CloudFormation stack under Your jobs, or access the AWS Glue job by using the URL provided for the key GlueJob in the CloudFormation stack output.
Access and verify the script for the AWS Glue job.
On the Job details tab, make sure that Glue version is set to Glue 4.0.
This ensures that the job uses the latest redshift-spark connector.
Expand Advanced properties and in the Connections section, verify that the connection created by the CloudFormation stack is attached.
Verify the job parameters added for the AWS Glue job. These values are also available in the output for the CloudFormation stack.
Choose Save and then Run.
You can view the status for the job run on the Run tab.
After the job run completes successfully, you can verify the output of the table test-glue created by the AWS Glue job.
We check the pushdown queries run for Amazon Redshift query group glue-redshift. You can run the following SQL statement against the database dev:
SELECT query_text FROM SYS_QUERY_HISTORY WHERE query_label = 'glue-redshift' ORDER BY start_time DESC LIMIT 1
Best practices
Keep in mind the following best practices:
Consider using the Amazon Redshift integration for Apache Spark from Amazon EMR instead of using the redshift-spark connector (community version) for your new Apache Spark jobs.
If you have existing Apache Spark jobs using the redshift-spark connector (community version), consider upgrading them to use the Amazon Redshift integration for Apache Spark
The Amazon Redshift integration for Apache Spark automatically applies predicate and query pushdown to optimize for performance. We recommend using supported functions (autopushdown) in your query. The Amazon Redshift integration for Apache Spark will turn the function into a SQL query and run the query in Amazon Redshift. This optimization results in required data being retrieved, so Apache Spark can process less data and have better performance.
Consider using aggregate pushdown functions like avg, count, max, min, and sum to retrieve filtered data for data processing.
Consider using Boolean pushdown operators like in, isnull, isnotnull, contains, endswith, and startswith to retrieve filtered data for data processing.
Consider using logical pushdown operators like and, or, and not (or !) to retrieve filtered data for data processing.
It’s recommended to pass an IAM role using the parameter aws_iam_role for the Amazon Redshift authentication from your Apache Spark application on Amazon EMR or AWS Glue. The IAM role should have necessary permissions to retrieve temporary IAM credentials to authenticate to Amazon Redshift as shown in this blog’s “Examples for Amazon Redshift integration for Apache Spark in an Apache Spark application” section.
With this feature, you don’t have to maintain your Amazon Redshift user name and password in the secrets manager and Amazon Redshift database.
Amazon Redshift uses the UNLOAD SQL statement to store this temporary data on Amazon S3. The Apache Spark application retrieves the results from the temporary directory (stored in Parquet file format). This temporary directory on Amazon S3 is not cleaned up automatically, and therefore could add additional cost. We recommend using Amazon S3 lifecycle policies to define the retention rules for the S3 bucket.
It’s recommended to turn on Amazon Redshift audit logging to log the information about connections and user activities in your database.
It’s recommended to turn on Amazon Redshift at-rest encryption to encrypt your data as Amazon Redshift writes it in its data centers and decrypt it for you when you access it.
It’s recommended to upgrade to AWS Glue v4.0 and above to use the Amazon Redshift integration for Apache Spark, which is available out of the box. Upgrading to this version of AWS Glue will automatically make use of this feature.
It’s recommended to upgrade to Amazon EMR v6.9.0 and above to use the Amazon Redshift integration for Apache Spark. You don’t have to manage any drivers or JAR files explicitly.
Consider using Amazon EMR Studio notebooks to interact with your Amazon Redshift data in your Apache Spark application.
Consider using AWS Glue Studio to create Apache Spark jobs using a visual interface. You can also switch to writing Apache Spark code in either Scala or PySpark within AWS Glue Studio.
Clean up
Complete the following steps to clean up the resources that are created as a part of the CloudFormation template to ensure that you’re not billed for the resources if you’ll no longer be using them:
Stop the Amazon EMR Serverless application:
Access Amazon EMR Studio by choosing or copying the link provided in the CloudFormation stack outputs for the key EMRStudioURL.
Choose Applications under Serverless in the navigation pane.
You will find an EMR application created by the CloudFormation stack with the name emr-spark-redshift.
If the application status shows as Stopped, you can move to the next steps. However, if the application status is Started, choose the application name, then choose Stop application and Stop application again to confirm.
Delete the Amazon EMR Studio Workspace:
Access Amazon EMR Studio by choosing or copying the link provided in the CloudFormation stack outputs for the key EMRStudioURL.
Choose Workspaces in the navigation pane.
Select the Workspace that you created and choose Delete, then choose Delete again to confirm.
Delete the CloudFormation stack:
On the AWS CloudFormation console, navigate to the stack you created earlier.
Choose the stack name and then choose Delete to remove the stack and delete the resources created as a part of this post.
On the confirmation screen, choose Delete stack.
Conclusion
In this post, we explained how you can use the Amazon Redshift integration for Apache Spark to build and deploy applications with Amazon EMR on Amazon EC2, Amazon EMR Serverless, and AWS Glue to automatically apply predicate and query pushdown to optimize the query performance for data in Amazon Redshift. It’s highly recommended to use Amazon Redshift integration for Apache Spark for seamless and secure connection to Amazon Redshift from your Amazon EMR or AWS Glue.
Here is what some of our customers have to say about the Amazon Redshift integration for Apache Spark:
“We empower our engineers to build their data pipelines and applications with Apache Spark using Python and Scala. We wanted a tailored solution that simplified operations and delivered faster and more efficiently for our clients, and that’s what we get with the new Amazon Redshift integration for Apache Spark.”
—Huron Consulting
“GE Aerospace uses AWS analytics and Amazon Redshift to enable critical business insights that drive important business decisions. With the support for auto-copy from Amazon S3, we can build simpler data pipelines to move data from Amazon S3 to Amazon Redshift. This accelerates our data product teams’ ability to access data and deliver insights to end-users. We spend more time adding value through data and less time on integrations.”
—GE Aerospace
“Our focus is on providing self-service access to data for all of our users at Goldman Sachs. Through Legend, our open-source data management and governance platform, we enable users to develop data-centric applications and derive data-driven insights as we collaborate across the financial services industry. With the Amazon Redshift integration for Apache Spark, our data platform team will be able to access Amazon Redshift data with minimal manual steps, allowing for zero-code ETL that will increase our ability to make it easier for engineers to focus on perfecting their workflow as they collect complete and timely information. We expect to see a performance improvement of applications and improved security as our users can now easily access the latest data in Amazon Redshift.”
—Goldman Sachs
About the Authors
Gagan Brahmi is a Senior Specialist Solutions Architect focused on big data analytics and AI/ML platform at Amazon Web Services. Gagan has over 18 years of experience in information technology. He helps customers architect and build highly scalable, performant, and secure cloud-based solutions on AWS. In his spare time, he spends time with his family and explores new places.
Vivek Gautam is a Data Architect with specialization in data lakes at AWS Professional Services. He works with enterprise customers building data products, analytics platforms, and solutions on AWS. When not building and designing data lakes, Vivek is a food enthusiast who also likes to explore new travel destinations and go on hikes.
Naresh Gautam is a Data Analytics and AI/ML leader at AWS with 20 years of experience, who enjoys helping customers architect highly available, high-performance, and cost-effective data analytics and AI/ML solutions to empower customers with data-driven decision-making. In his free time, he enjoys meditation and cooking.
Beaux Sharifi is a Software Development Engineer within the Amazon Redshift drivers’ team where he leads the development of the Amazon Redshift Integration with Apache Spark connector. He has over 20 years of experience building data-driven platforms across multiple industries. In his spare time, he enjoys spending time with his family and surfing.
Data mesh is a new approach to data management. Companies across industries are using a data mesh to decentralize data management to improve data agility and get value from data. However, when a data producer shares data products on a data mesh self-serve web portal, it’s neither intuitive nor easy for a data consumer to know which data products they can join to create new insights. This is especially true in a large enterprise with thousands of data products.
This post shows how to use machine learning (ML) and Amazon Neptune to create automated recommendations to join data products and display those recommendations alongside the existing data products. This allows data consumers to easily identify new datasets and provides agility and innovation without spending hours doing analysis and research.
Background
The success of a data-driven organization recognizes data as a key enabler to increase and sustain innovation. It follows what is called a distributed system architecture. The goal of a data product is to solve the long-standing issue of data silos and data quality. Independent data products often only have value if you can connect them, join them, and correlate them to create a higher order data product that creates additional insights. A modern data architecture is critical in order to become a data-driven organization. It allows stakeholders to manage and work with data products across the organization, enhancing the pace and scale of innovation.
Solution overview
A data mesh architecture starts to solve for the decoupled architecture by decoupling the data infrastructure from the application infrastructure, which is a common challenge in traditional data architectures. It focuses on decentralized ownership, domain design, data products, and self-serve data infrastructure. This allows for a new way of thinking and new organizational elements—namely, a modern data community.
However, today’s data mesh platform contains largely independent data products. Even with well-documented data products, knowing how to connect or join data products is a time-consuming job. Data consumers spend hours, days, or months to understand and analyze the data. Identifying links or relationships between data products is critical to create value from the data mesh and enable a data-driven organization.
The solution in this post illustrates an approach to solving these challenges. It uses a fictional insurance company with several data products shared on their data mesh marketplace. The following figure shows the sample data products used in our solution.
Suppose a consumer is browsing the customer data product in the data mesh marketplace. The consumer wonders if the customer data could be linked to claim, policy, or encounter data. Because these data products come from different lines of business (LOBs) or silos, it’s hard to know. A consumer would have to review each data product and do the necessary analysis and research to know this with any certainty.
To solve this problem, our solution uses ML and Neptune to create recommendations for the data consumer. The solution generates a list of data products, product attributes, and the associated probability scores to show join ability. This reduces the time to discover, analyze, and create new insights.
We use Valentine, a data science algorithm for comparing datasets, to improve data product recommendations. Neptune, the managed AWS graph database service, stores information about explicit connections between datasets, improving the recommendations.
Example use case
Let’s walk through a concrete example. Suppose a consumer is browsing the Customer data product in the data mesh marketplace. Customer is similar to the Policy and Encounter data products, but these products come from different silos. Their similarity to the Customer is hard to gauge. To expedite the consumer’s work, the mesh recommends how the Policy and Encounter products can be connected to the Customer product.
Let’s consider two cases. First, is Customer similar to Claim? The following is a sample of the data in each product.
Intuitively, these two products have lots of overlap. Every Cust_Nbr in Claim has a corresponding Customer_ID in Customer. There is no foreign key constraint in Claim that assures us it points to Customer. We think there is enough similarity to infer a join relationship.
The data science algorithm Valentine is an effective tool for this. Valentine is presented in the paper Valentine: Evaluating Matching Techniques for Dataset Discovery (2021, Koutras et al.). Valentine determines if two datasets are joinable or unionable. We focus on the former. Two datasets are joinable if a record from one dataset has a link to a record in the other dataset using one or more columns. Valentine addresses the use case where data is messy: there is no foreign key constraint in place, and data doesn’t match perfectly between datasets. Valentine looks for similarities, and its findings are probabilistic. It scores its proposed matches.
This solution uses an implementation of Valentine available in the following GitHub repo. The first step is to load each data product from its source into a Pandas data frame. If the data is large, load a representative subset of it, at most a few million records. Pass the frames to the valentine_match() function and select the matching method. We use COMA, one of several methods that Valentine supports. The function’s result indicates the similarity of columns and the score. In this case, it tells us that the Customer_ID for Customer matches the Cust_Nbr for Claim, with a very high score. We then instruct the data mesh to recommend Claim to the consumer browsing Customer.
A graph database isn’t required to recommend Claim; the two products could be directly compared. But let’s consider Encounter. Is Customer similar to Encounter? This case is more complicated. Many encounters in the Encounter product don’t link to a customer. An encounter occurs when someone contacts the contact center, which could be by phone or email. The party may or may not be a customer, and if they are a customer, we may not know their customer ID during this encounter. Additionally, sometimes the phone or email they use isn’t the same as the one from a customer record in the Customer product.
In the following sample encounter set, encounters 1 and 2 match to Customer_ID 4. Note that encounter 2’s inbound_email doesn’t exactly match the inbound_email in that customer’s record in the Customer product. Encounter 3 has no Customer_ID, but its inbound_email matches the customer with ID 8. Encounter 4 appears to refer to the customer with ID 8, but the email doesn’t match, and no Customer_ID is given. Encounter 5 only has Inbound_Phone, but that matches the customer with ID 1. Encounter 6 only has an Inbound_Phone, and it doesn’t appear to match any of the customers we’ve listed so far.
We don’t have a strong enough comparison to infer similarity.
But we know more about the customer than the Customer product tells us. In the Neptune database, we maintain a knowledge graph that combines multiple products and links them through relationships. A knowledge graph allows us to combine data from different sources to gain a better understanding of a specific problem domain. In Neptune, we combine the Customer product data with an additional data product: Sales Opportunity. We ingest each product from its source into the knowledge graph and model a hasSalesOpportunity relationship between Customer and SalesOpportunity resources. The following figure shows these resources, their attributes, and their relationship.
With the AWS SDK for Pandas, we combine this data by running a query against the Neptune graph. We use a graph query language (such as SPARQL) to wrangle a representative subset of customer and sales opportunity data into a Pandas data frame (shown as Enhanced Customer View in the following figure). In the following example, we enhance customers 7 and 8 with alternate phone or email contact data from sales opportunities.
We pass that frame to Valentine and compare it to Encounter. This time, two additional encounters match a customer.
The score meets our threshold, and is high enough to share with the consumer as a possible match. To the customer browsing Customer in the mesh marketplace, we present the recommendation of Encounter, along with scoring details to support the recommendation. With this recommendation, the consumer can explore the Encounter product with greater confidence.
Conclusion
Data-driven organizations are transitioning to a data product way of thinking. Utilizing strategies like data mesh generates value on a large scale. We took this a step further by creating a blueprint to create smart recommendations by linking similar data products using graph technology and ML. In this post, we showed how an organization can augment a data catalog with additional metadata by using ML and Neptune with an automated process.
This solution solves the interoperability and linkage problem for data products. Additionally, it gives organizations real-time insights, agility, and innovation without spending time on data analysis and research. This approach creates a truly connected ecosystem with simplified access to delight your data consumers. The current solution is platform agnostic; however, in a future post we will show how to implement this using data.all (open-source software) and Amazon DataZone.
Moira Lennox is a Senior Data Strategy Technical Specialist for AWS with 27 years’ experience helping companies innovate and modernize their data strategies to achieve new heights and allow for strategic decision-making. She has experience working in large enterprises and technology providers, in both business and technical roles across multiple industries, including health care live sciences, financial services, communications, digital entertainment, energy, and manufacturing.
Joel Farvault is Principal Specialist SA Analytics for AWS with 25 years’ experience working on enterprise architecture, data strategy, and analytics, mainly in the financial services industry. Joel has led data transformation projects on fraud analytics, claims automation, and data governance.
Mike Havey is a Solutions Architect for AWS with over 25 years of experience building enterprise applications. Mike is the author of two books and numerous articles. His Amazon author page
The collective thoughts of the interwebz
Manage Consent
To provide the best experiences, we use technologies like cookies to store and/or access device information. Consenting to these technologies will allow us to process data such as browsing behavior or unique IDs on this site. Not consenting or withdrawing consent, may adversely affect certain features and functions.
Functional
Always active
The technical storage or access is strictly necessary for the legitimate purpose of enabling the use of a specific service explicitly requested by the subscriber or user, or for the sole purpose of carrying out the transmission of a communication over an electronic communications network.
Preferences
The technical storage or access is necessary for the legitimate purpose of storing preferences that are not requested by the subscriber or user.
Statistics
The technical storage or access that is used exclusively for statistical purposes.The technical storage or access that is used exclusively for anonymous statistical purposes. Without a subpoena, voluntary compliance on the part of your Internet Service Provider, or additional records from a third party, information stored or retrieved for this purpose alone cannot usually be used to identify you.
Marketing
The technical storage or access is required to create user profiles to send advertising, or to track the user on a website or across several websites for similar marketing purposes.

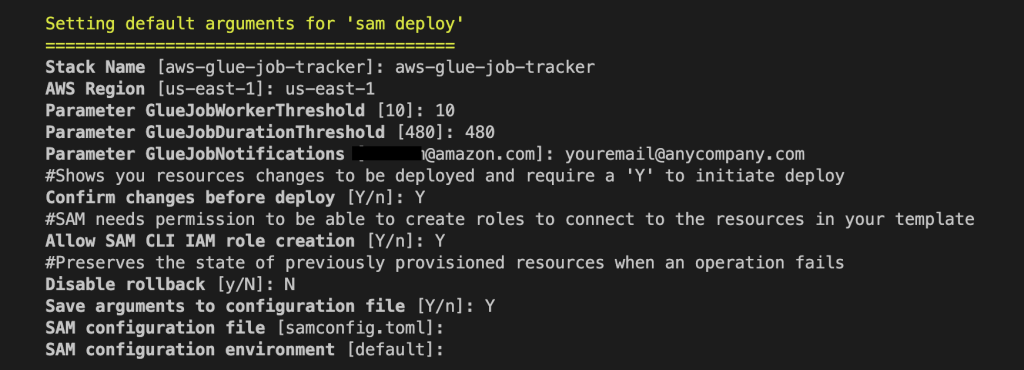

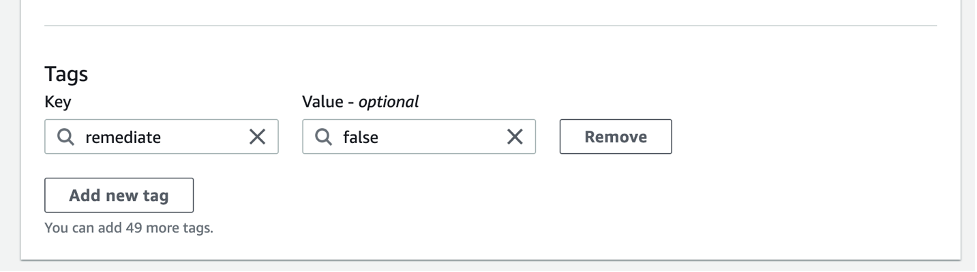
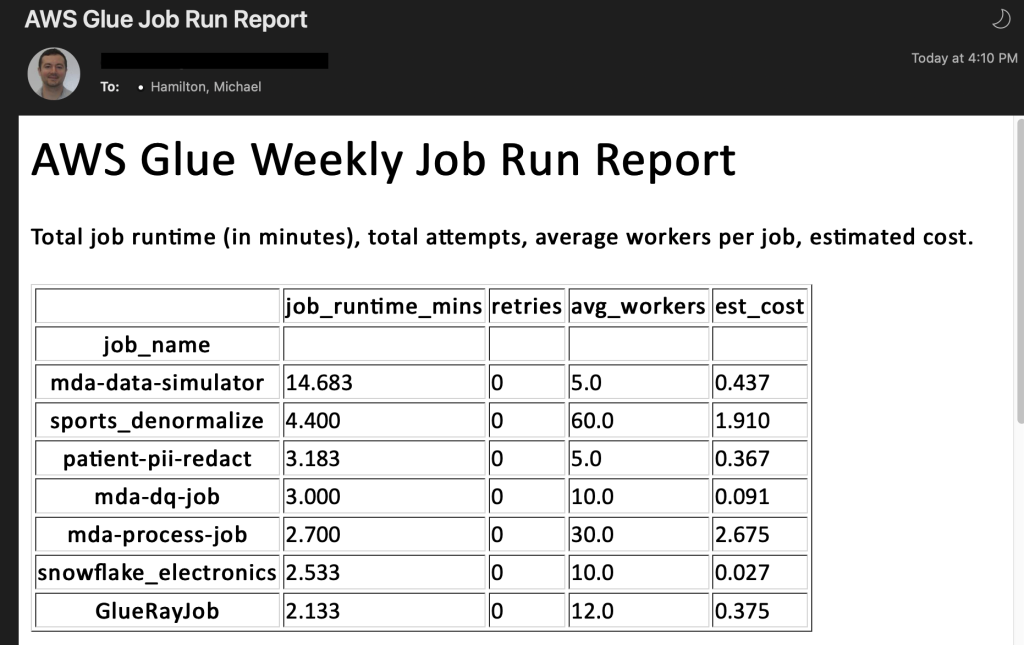
 Michael Hamilton is a Sr Analytics Solutions Architect focusing on helping enterprise customers in the south east modernize and simplify their analytics workloads on AWS. He enjoys mountain biking and spending time with his wife and three children when not working.
 Angus Ferguson is a Solutions Architect at AWS who is passionate about meeting customers across the world, helping them solve their technical challenges. Angus specializes in Data & Analytics with a focus on customers in the financial services industry.


 Avijit Goswami is a Principal Solutions Architect at AWS specialized in data and analytics. He supports AWS strategic customers in building high-performing, secure, and scalable data lake solutions on AWS using AWS managed services and open-source solutions. Outside of his work, Avijit likes to travel, hike in the San Francisco Bay Area trails, watch sports, and listen to music.
 Rajarshi Sarkar is a Software Development Engineer at Amazon EMR/Athena. He works on cutting-edge features of Amazon EMR/Athena and is also involved in open-source projects such as Apache Iceberg and Trino. In his spare time, he likes to travel, watch movies, and hang out with friends.
 Prashant Singh is a Software Development Engineer at AWS. He is interested in Databases and Data Warehouse engines and has worked on Optimizing Apache Spark performance on EMR. He is an active contributor in open source projects like Apache Spark and Apache Iceberg. During his free time, he enjoys exploring new places, food and hiking.
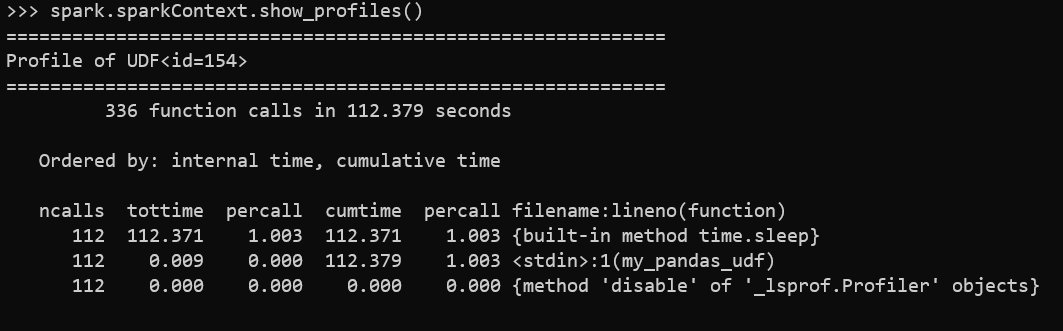
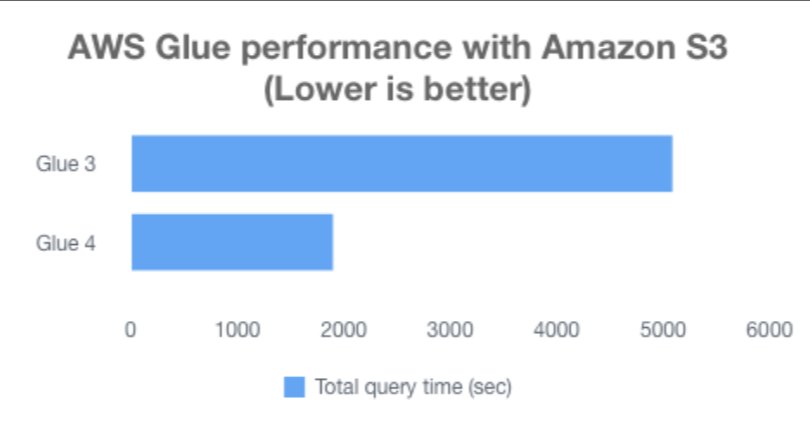


 Gonzalo Herreros is a Senior Big Data Architect on the AWS Glue team. He’s been an Apache Spark enthusiast since version 0.8. In his spare time, he likes playing board games.
 Noritaka Sekiyama is a Principal Big Data Architect on the AWS Glue team. He works based in Tokyo, Japan. He is responsible for building software artifacts to help customers. In his spare time, he enjoys cycling with his road bike.
 Bo Li is a Senior Software Development Engineer on the AWS Glue team. He is devoted to designing and building end-to-end solutions to address customer’s data analytic and processing needs with cloud-based data-intensive technologies.
 Rajendra Gujja is a Senior Software Development Engineer on the AWS Glue team. He is passionate about distributed computing and everything and anything about the data.
 Savio Dsouza is a Software Development Manager on the AWS Glue team. His team works on solving challenging distributed systems problems for data integration on Glue platform for customers using Apache Spark.
 Mohit Saxena is a Senior Software Development Manager on the AWS Glue team. His team works on distributed systems for building data lakes on AWS and simplifying integration with data warehouses for customers using Apache Spark.


 Gaurav Bafna is a Senior Software Engineer working on OpenSearch at Amazon Web Services. He is fascinated about solving problems in distributed systems. He is a maintainer and an active contributor to OpenSearch.
 Murali Krishna is a Senior Principal Engineer at AWS OpenSearch Service. He has built AWS OpenSearch Service and AWS CloudSearch. His areas of expertise include Information Retrieval, Large scale distributed computing, low latency real time serving systems etc. He has vast experience in designing and building web scale systems for crawling, processing, indexing and serving text and multimedia content. Prior to Amazon, he was part of Yahoo!, building crawling and indexing systems for their search products.
 Ranjith Ramachandra is a Senior Engineering Manager working on Amazon OpenSearch Service. He is passionate about highly scalable distributed systems, high performance and resilient systems.


 Srikanth Baheti is a Specialized World Wide Principal Solutions Architect for Amazon QuickSight. He started his career as a consultant and worked for multiple private and government organizations. Later he worked for PerkinElmer Health and Sciences & eResearch Technology Inc, where he was responsible for designing and developing high traffic web applications, highly scalable and maintainable data pipelines for reporting platforms using AWS services and Serverless computing.
 Raji Sivasubramaniam is a Sr. Solutions Architect at AWS, focusing on Analytics. Raji is specialized in architecting end-to-end Enterprise Data Management, Business Intelligence and Analytics solutions for Fortune 500 and Fortune 100 companies across the globe. She has in-depth experience in integrated healthcare data and analytics with wide variety of healthcare datasets including managed market, physician targeting and patient analytics.
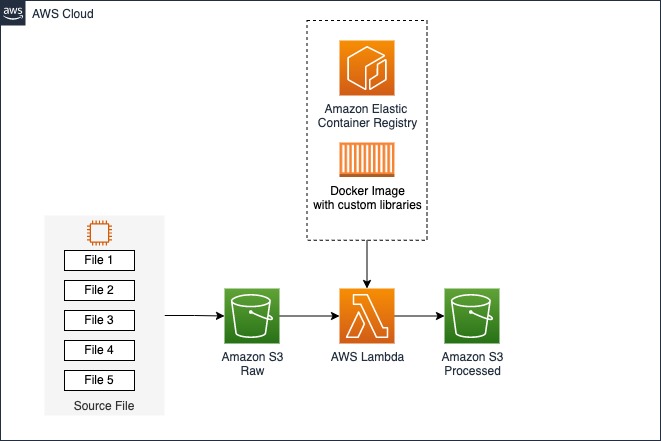


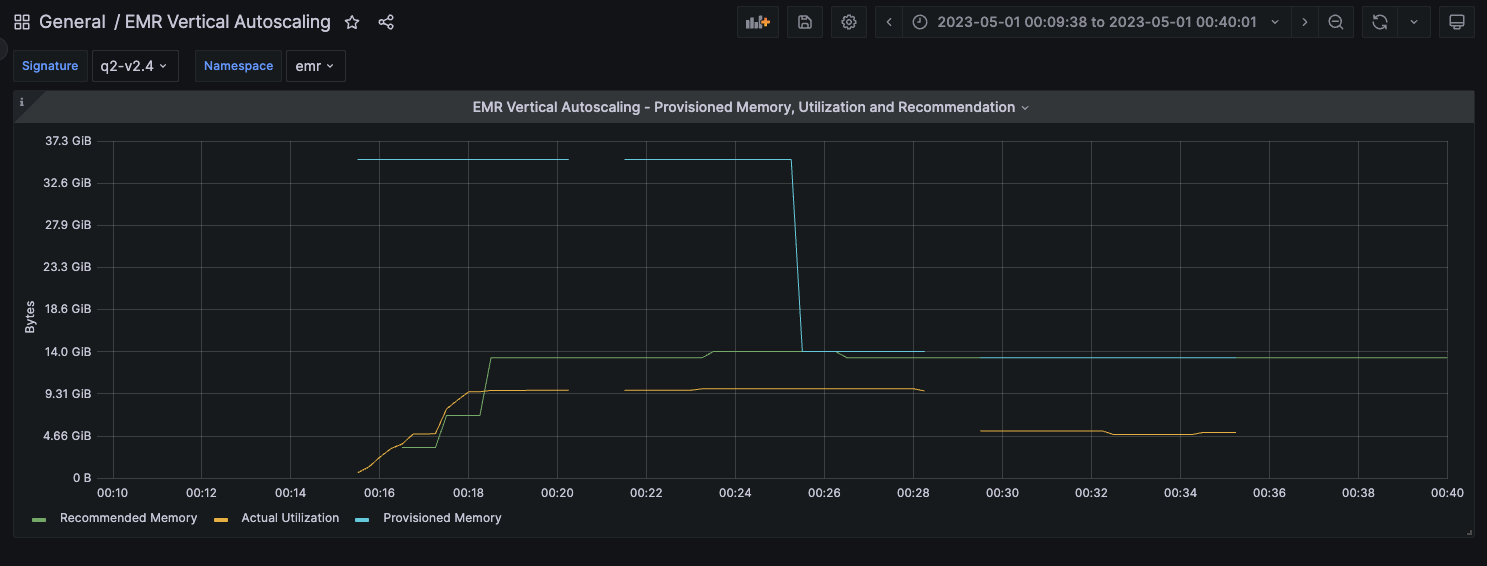
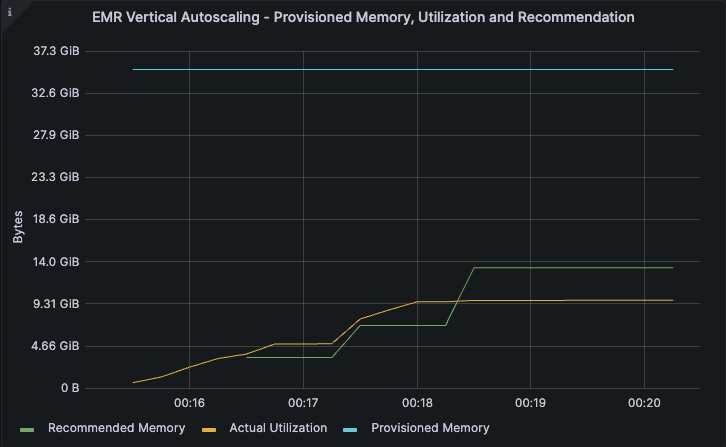

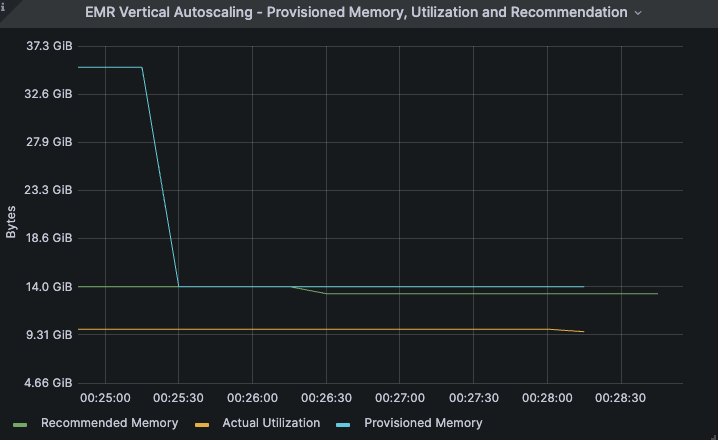
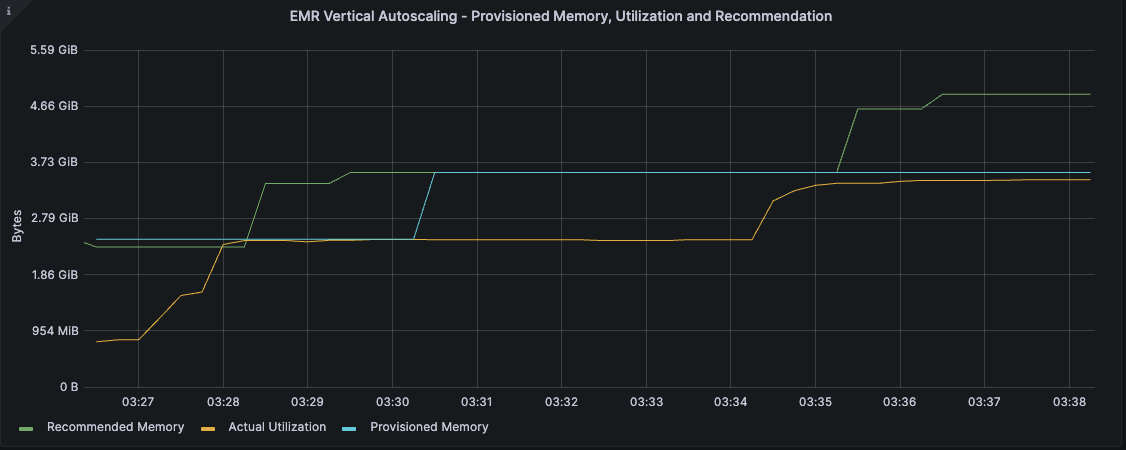


 Hari Thatavarthy is a Senior Solutions Architect on the AWS Data Lab team. He helps customers design and build solutions in the data and analytics space. He believes in data democratization and loves to solve complex data processing-related problems. In his spare time, he loves to play table tennis.
 Krishna Maddileti is a Senior Solutions Architect on the AWS Data Lab team. He partners with customers on their AWS journey and helps them with data engineering, data lakes, and analytics. In his spare time, he enjoys spending time with his family and playing video games with his 7-year-old.
 Yadukishore Tatavarthi is a Senior Partner Solutions Architect at AWS. He works closely with global system integrator partners to enable and support customers moving their workloads to AWS.
 Manish Kola is a Solutions Architect on the AWS Data Lab team. He partners with customers on their AWS journey.
 Noritaka Sekiyama is a Principal Big Data Architect on the AWS Glue team. He is responsible for building software artifacts to help customers. In his spare time, he enjoys cycling with his new road bike.
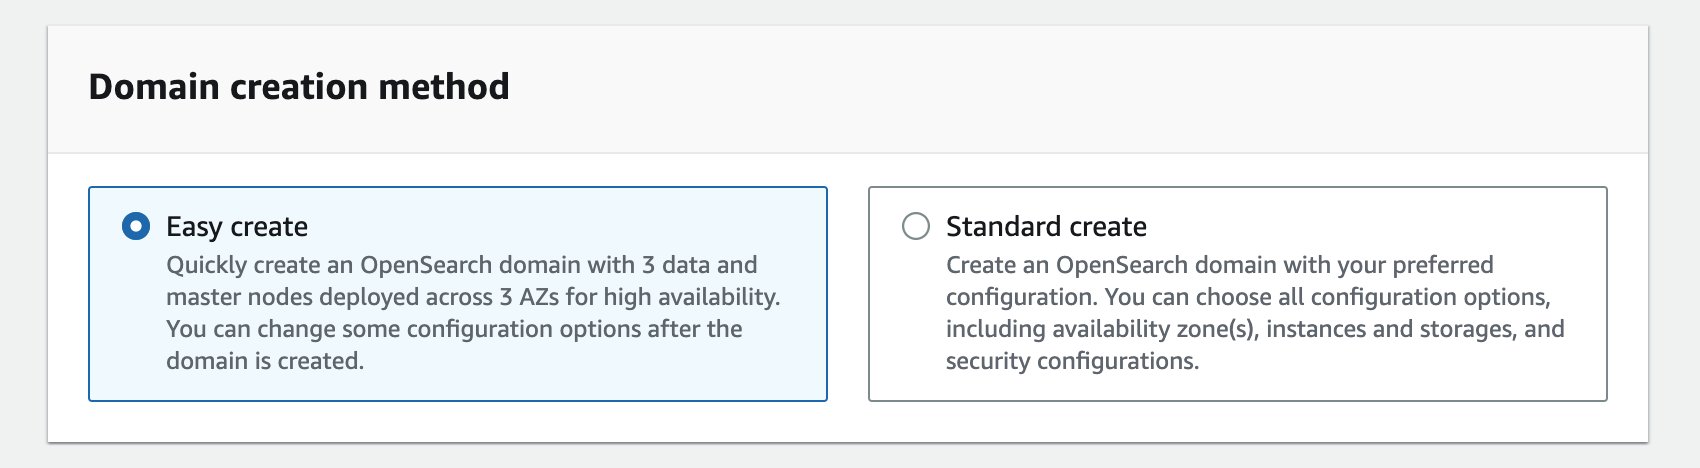


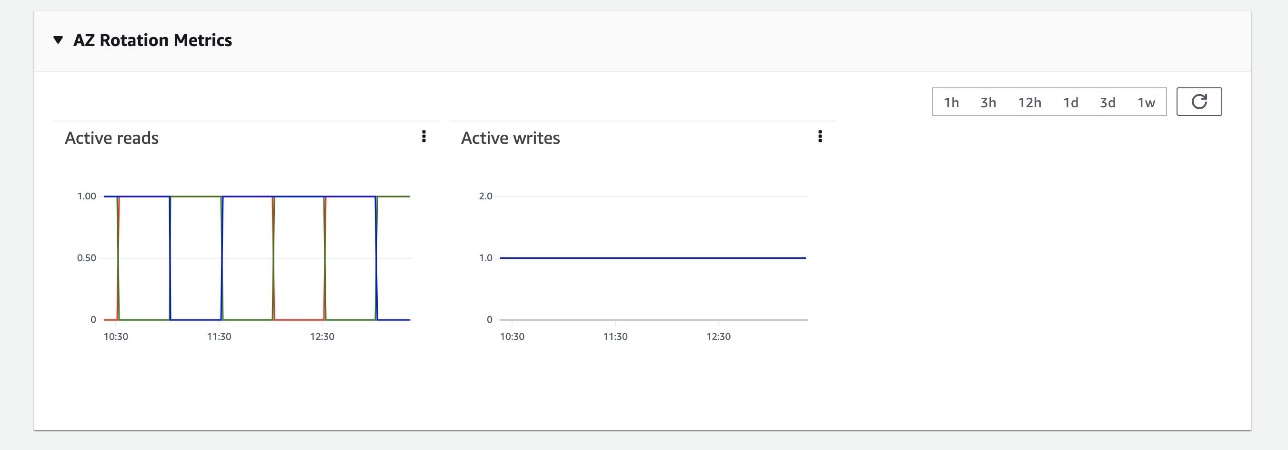
 Prashant Agrawal is a Sr. Search Specialist Solutions Architect with Amazon OpenSearch Service. He works closely with customers to help them migrate their workloads to the cloud and helps existing customers fine-tune their clusters to achieve better performance and save on cost. Before joining AWS, he helped various customers use OpenSearch and Elasticsearch for their search and log analytics use cases. When not working, you can find him traveling and exploring new places. In short, he likes doing Eat → Travel → Repeat.
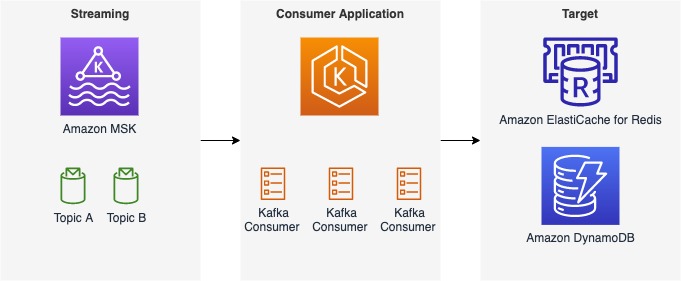


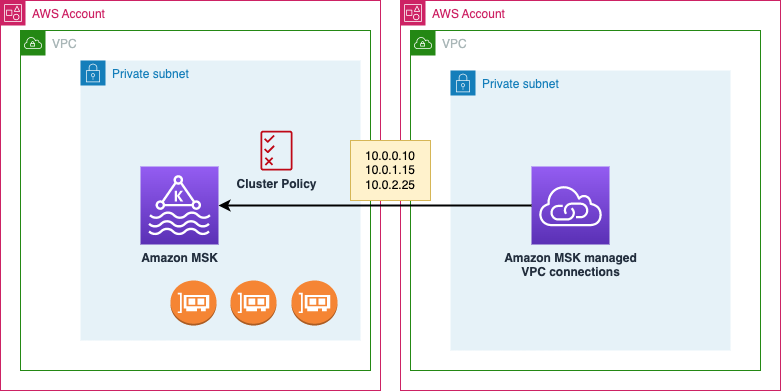


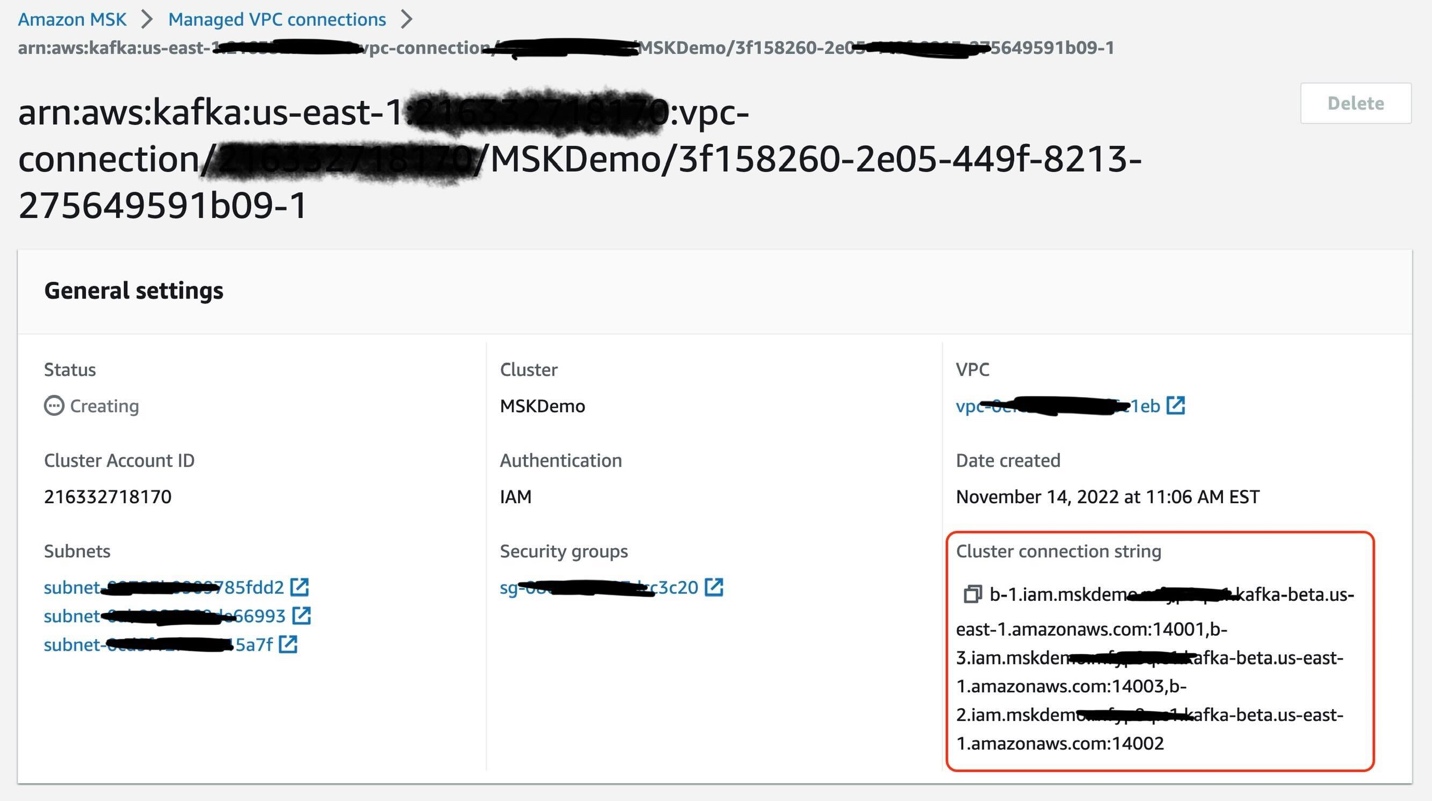

 Ali Alemi is a Streaming Specialist Solutions Architect at AWS. Ali advises AWS customers with architectural best practices and helps them design real-time analytics data systems that are reliable, secure, efficient, and cost-effective. He works backward from customers’ use cases and designs data solutions to solve their business problems. Prior to joining AWS, Ali supported several public sector customers and AWS consulting partners in their application modernization journey and migration to the cloud.
 Rajeev Chakrabarti is a Kinesis specialist solutions architect.


 Fei Peng is a Software Dev Engineer working in the Amazon Redshift team.


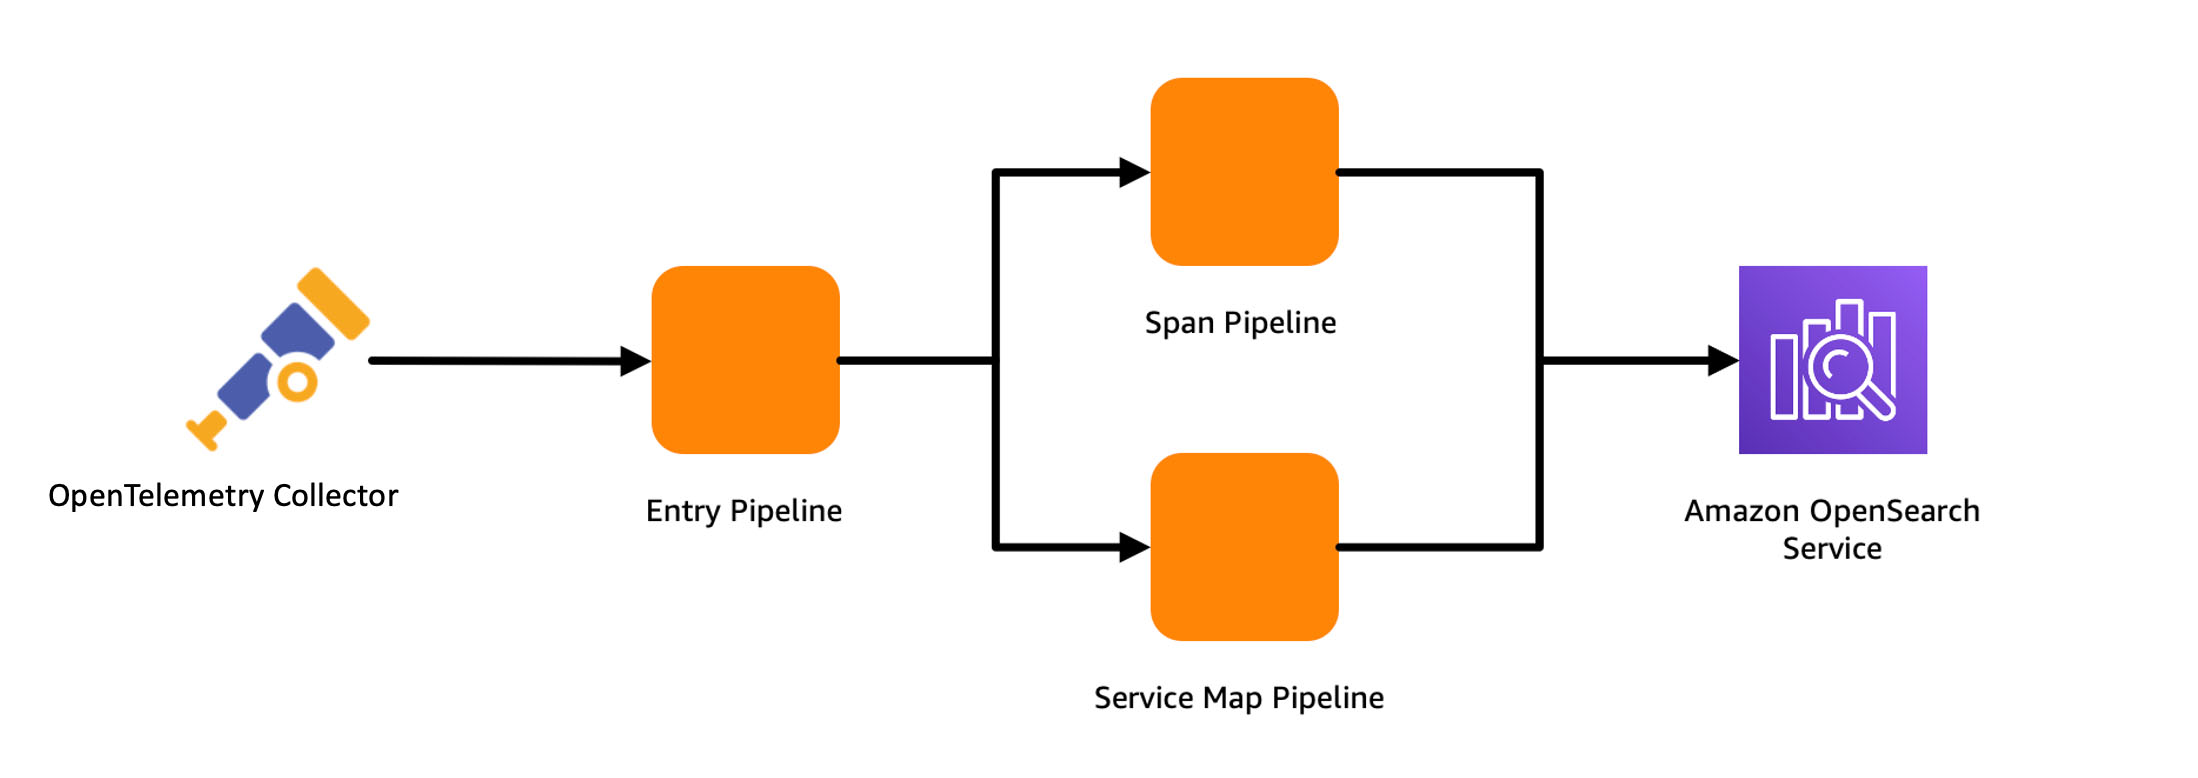
 Muthu Pitchaimani is a Search Specialist with Amazon OpenSearch Service. He builds large-scale search applications and solutions. Muthu is interested in the topics of networking and security, and is based out of Austin, Texas.
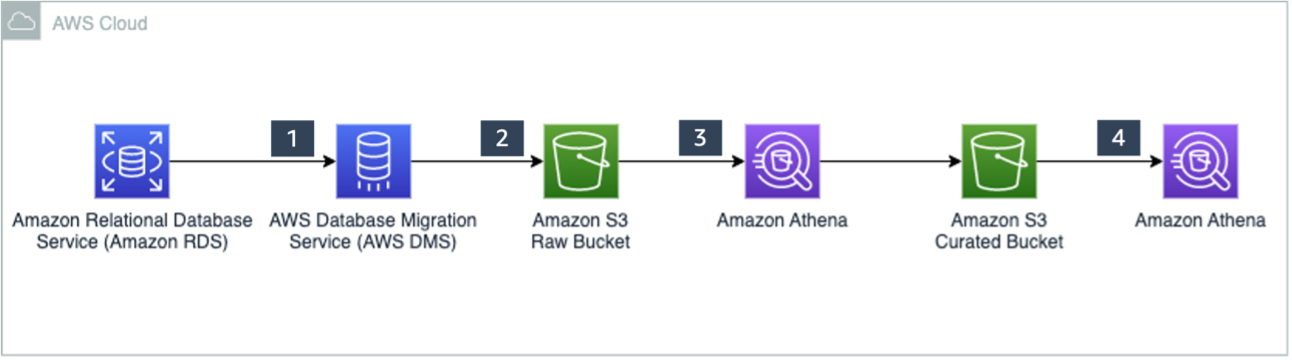

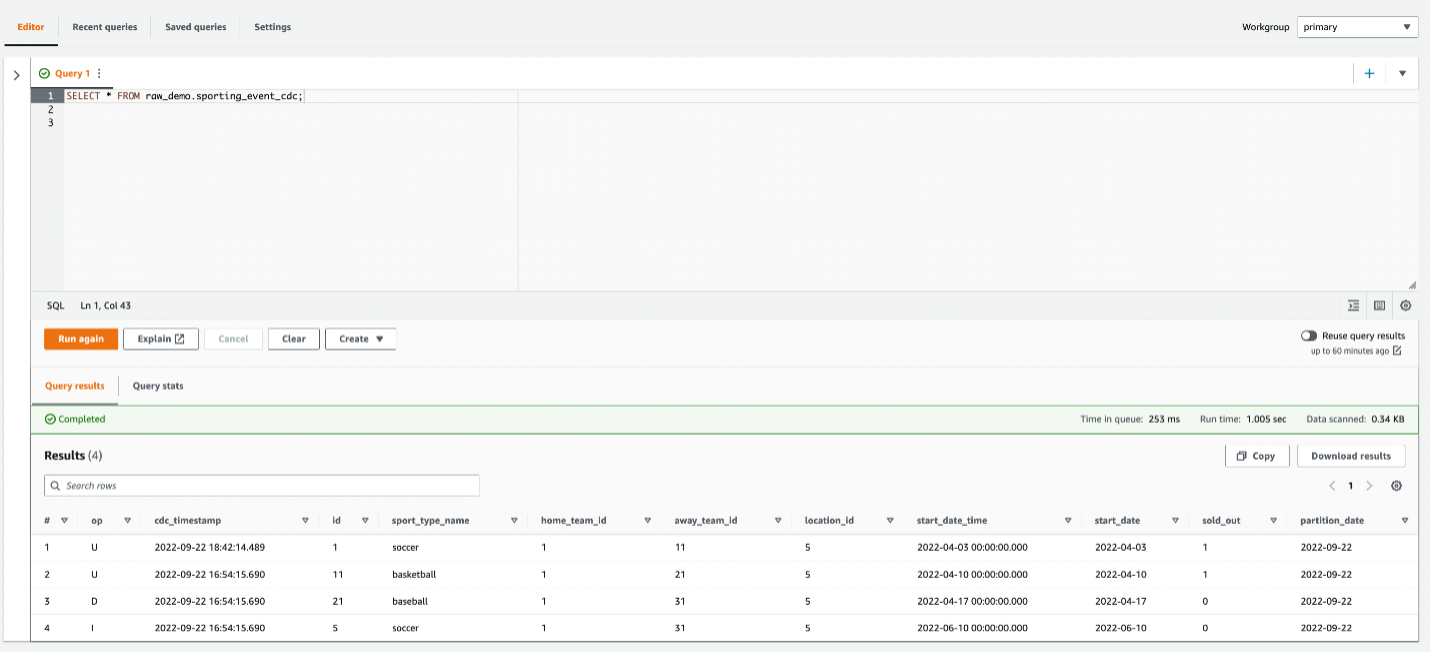
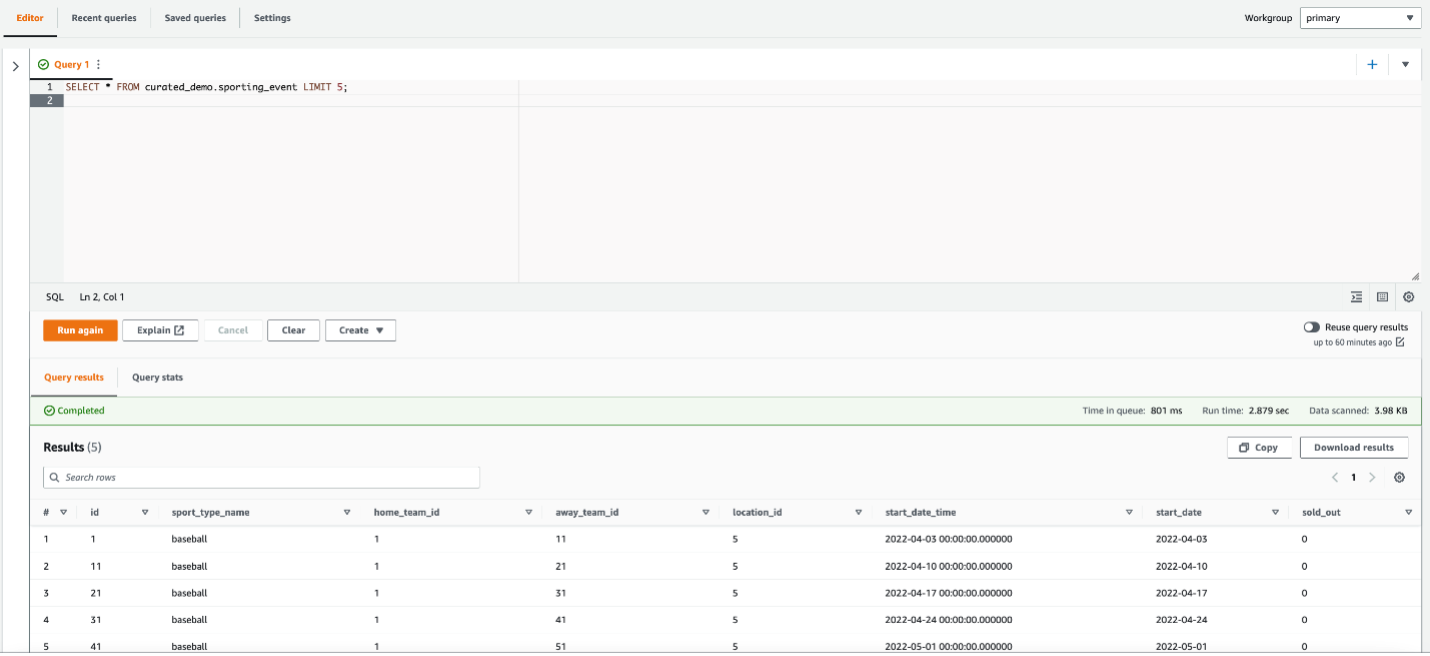

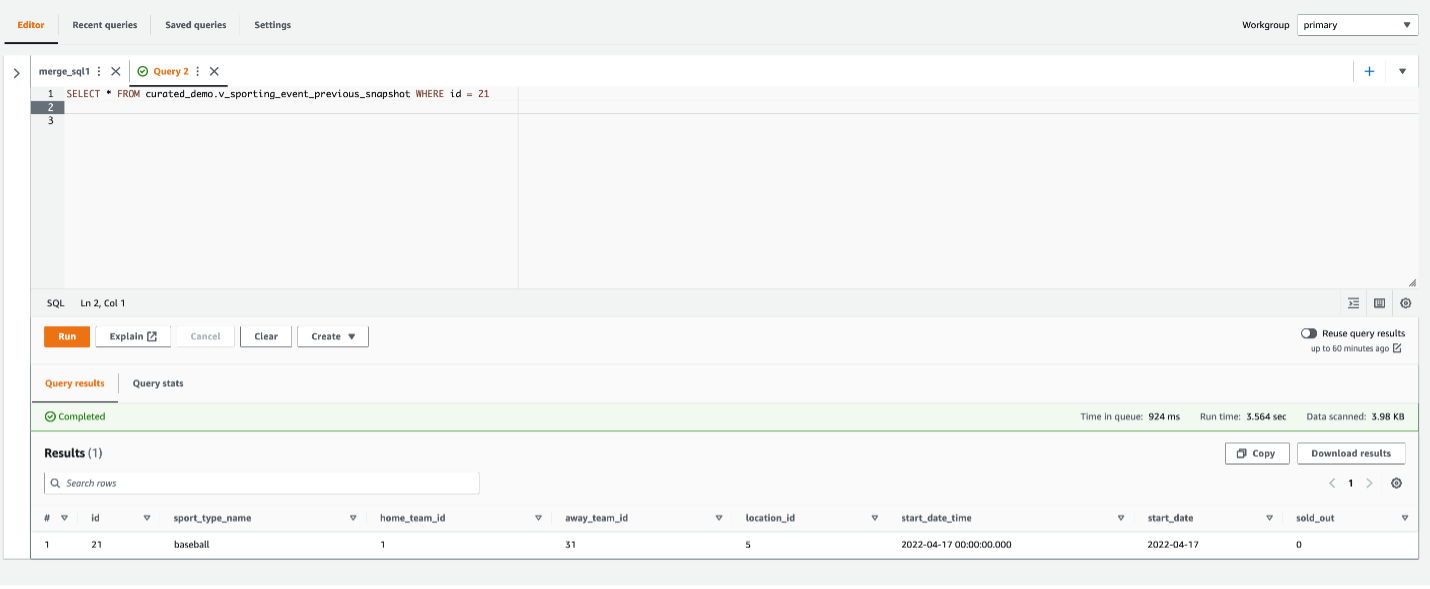
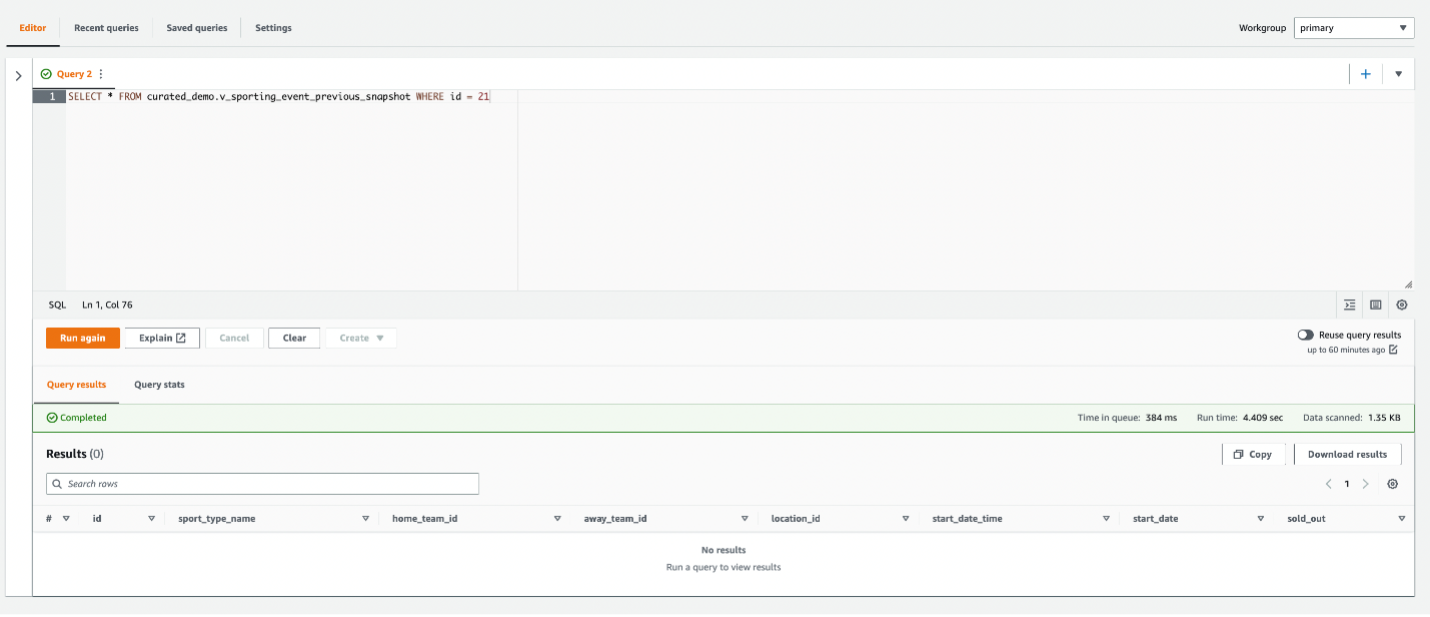
 Ranjit Rajan is a Principal Data Lab Solutions Architect with AWS. Ranjit works with AWS customers to help them design and build data and analytics applications in the cloud.
 Kannan Iyer is a Senior Data Lab Solutions Architect with AWS. Kannan works with AWS customers to help them design and build data and analytics applications in the cloud.
 Alexandre Rezende is a Data Lab Solutions Architect with AWS. Alexandre works with customers on their Business Intelligence, Data Warehouse, and Data Lake use cases, design architectures to solve their business problems, and helps them build MVPs to accelerate their path to production.

 Arun Lakshmanan is a Search Specialist with Amazon OpenSearch Service based out of Chicago, IL. He has over 20 years of experience working with enterprise customers and startups. He loves to travel and spend quality time with his family.
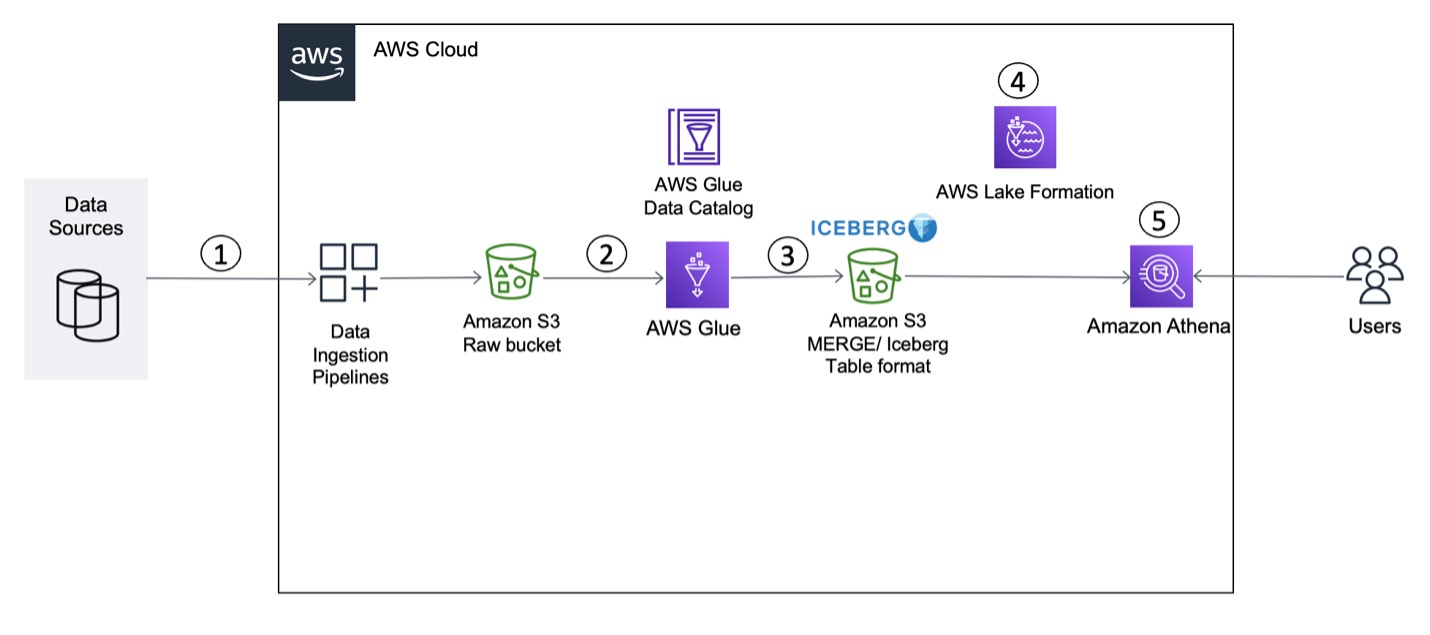


 Vikram Sahadevan is a Senior Resident Architect on the AWS Data Lab team. He enjoys efforts that focus around providing prescriptive architectural guidance, sharing best practices, and removing technical roadblocks with joint engineering engagements between customers and AWS technical resources that accelerate data, analytics, artificial intelligence, and machine learning initiatives.
 Suvendu Kumar Patra possesses 18 years of experience in infrastructure, database design, and data engineering, and he currently holds the position of Senior Resident Architect at Amazon Web Services. He is a member of the specialized focus group, AWS Data Lab, and his primary duties entail working with executive leadership teams of strategic AWS customers to develop their roadmaps for data, analytics, and AI/ML. Suvendu collaborates closely with customers to implement data engineering, data hub, data lake, data governance, and EDW solutions, as well as enterprise data strategy and data management.
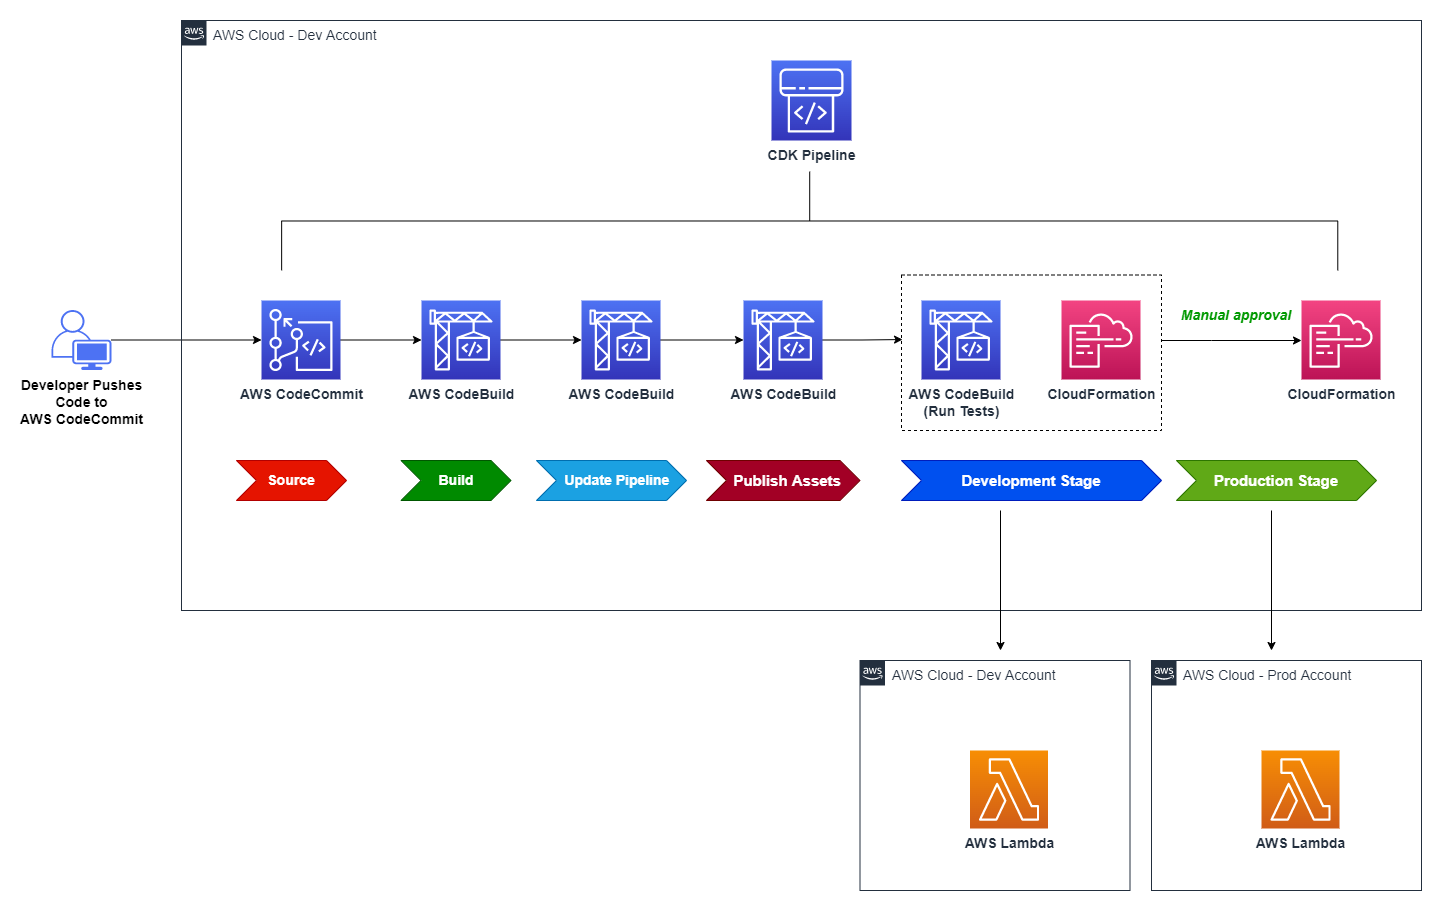
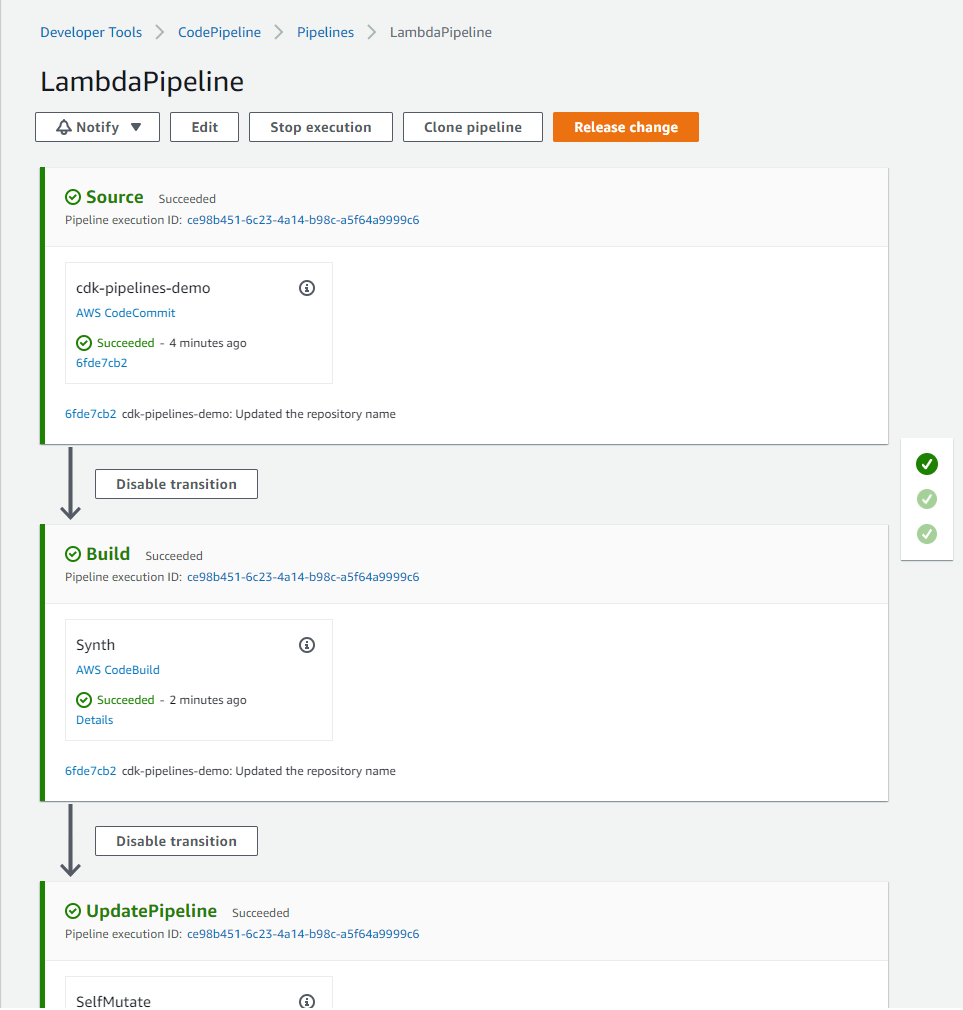
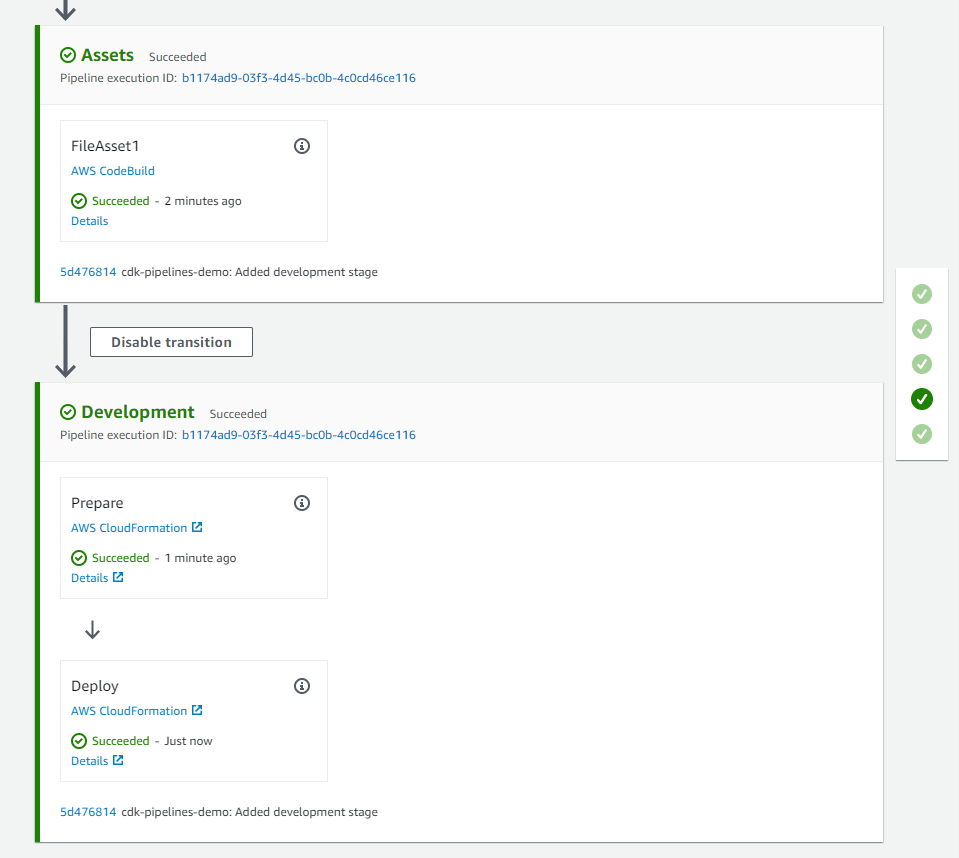
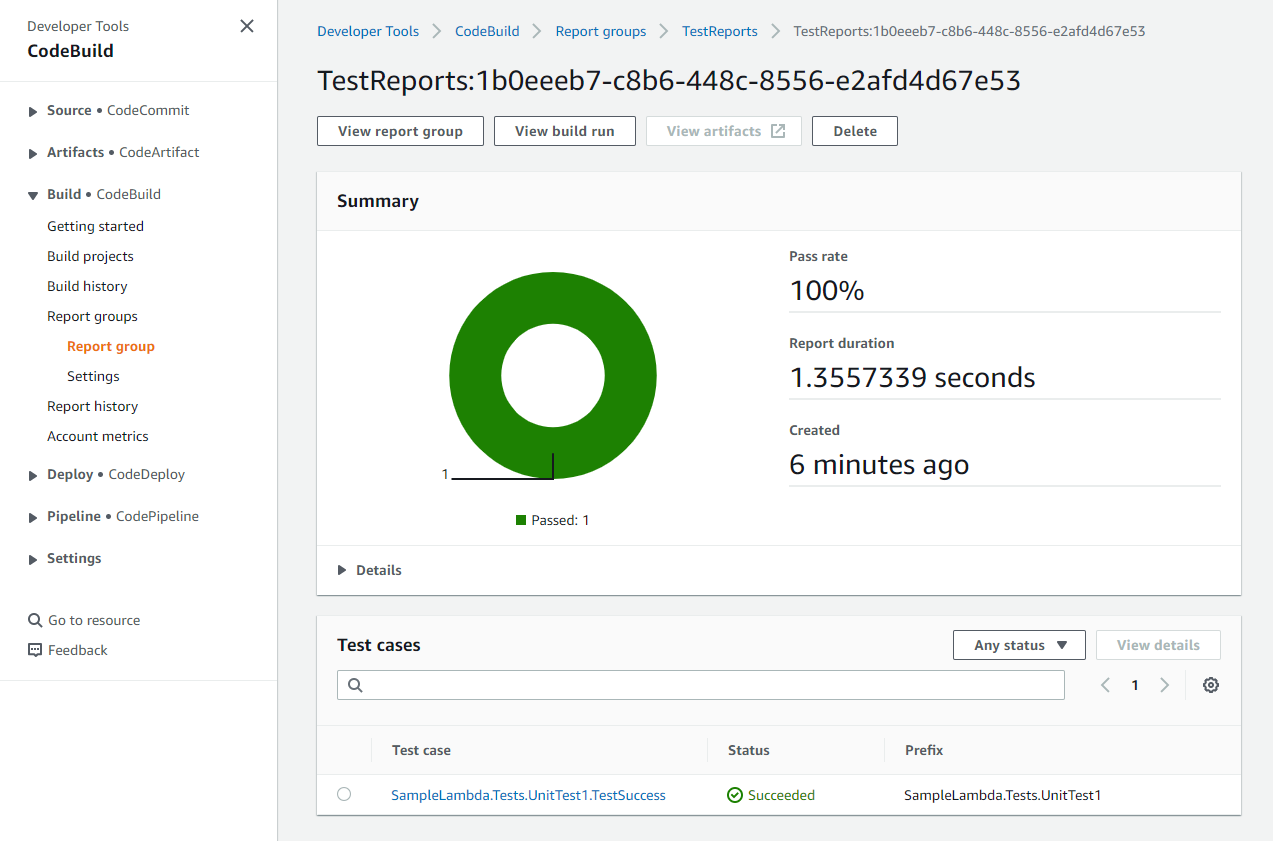
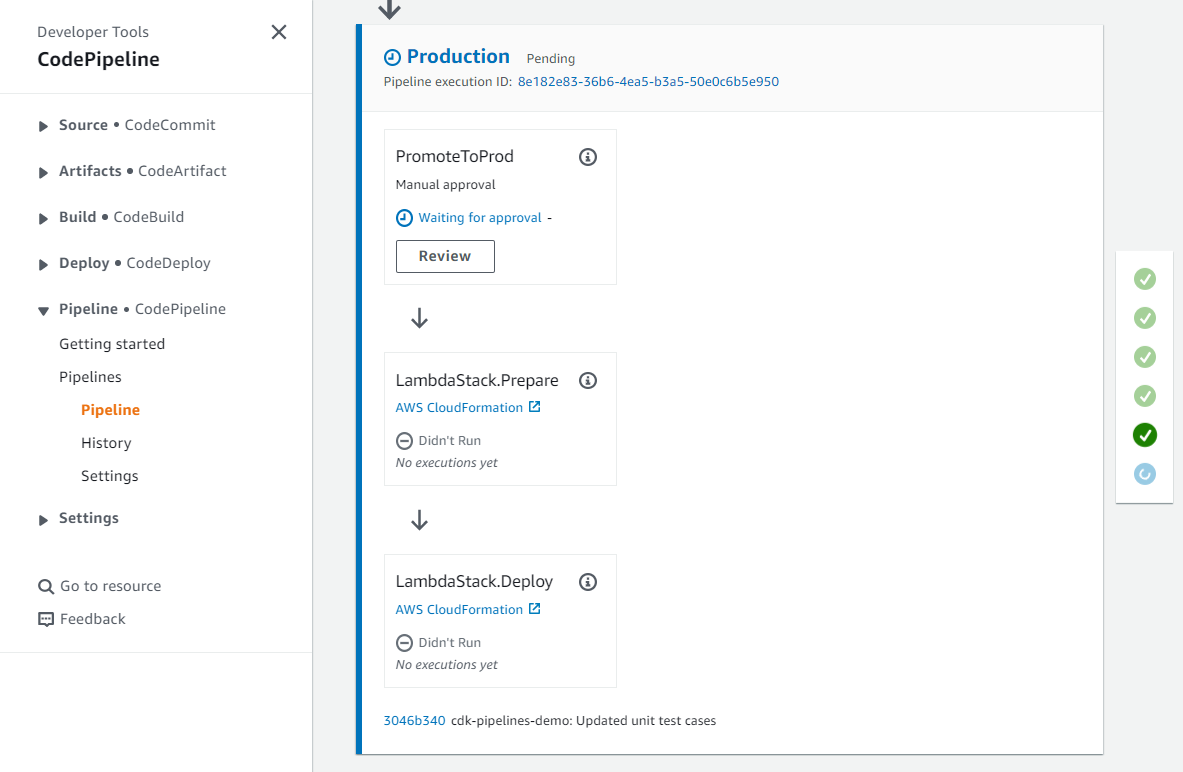
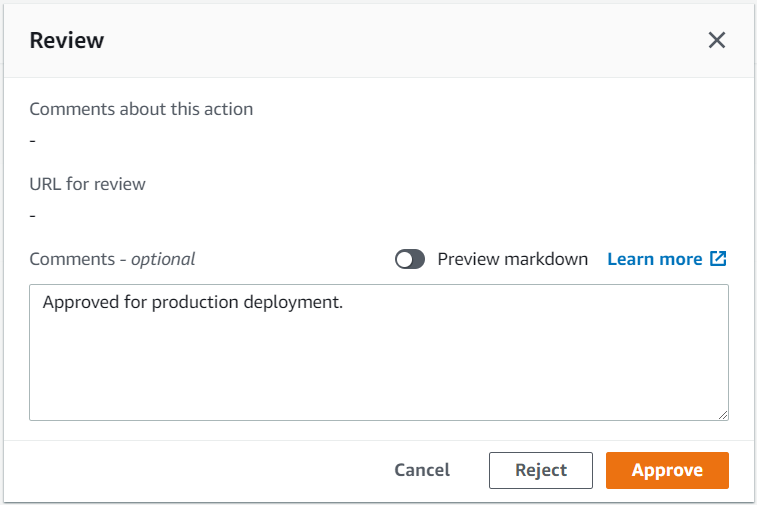


 Gagan Brahmi is a Senior Specialist Solutions Architect focused on big data analytics and AI/ML platform at Amazon Web Services. Gagan has over 18 years of experience in information technology. He helps customers architect and build highly scalable, performant, and secure cloud-based solutions on AWS. In his spare time, he spends time with his family and explores new places.
 Vivek Gautam is a Data Architect with specialization in data lakes at AWS Professional Services. He works with enterprise customers building data products, analytics platforms, and solutions on AWS. When not building and designing data lakes, Vivek is a food enthusiast who also likes to explore new travel destinations and go on hikes.
 Naresh Gautam is a Data Analytics and AI/ML leader at AWS with 20 years of experience, who enjoys helping customers architect highly available, high-performance, and cost-effective data analytics and AI/ML solutions to empower customers with data-driven decision-making. In his free time, he enjoys meditation and cooking.
 Beaux Sharifi is a Software Development Engineer within the Amazon Redshift drivers’ team where he leads the development of the Amazon Redshift Integration with Apache Spark connector. He has over 20 years of experience building data-driven platforms across multiple industries. In his spare time, he enjoys spending time with his family and surfing.
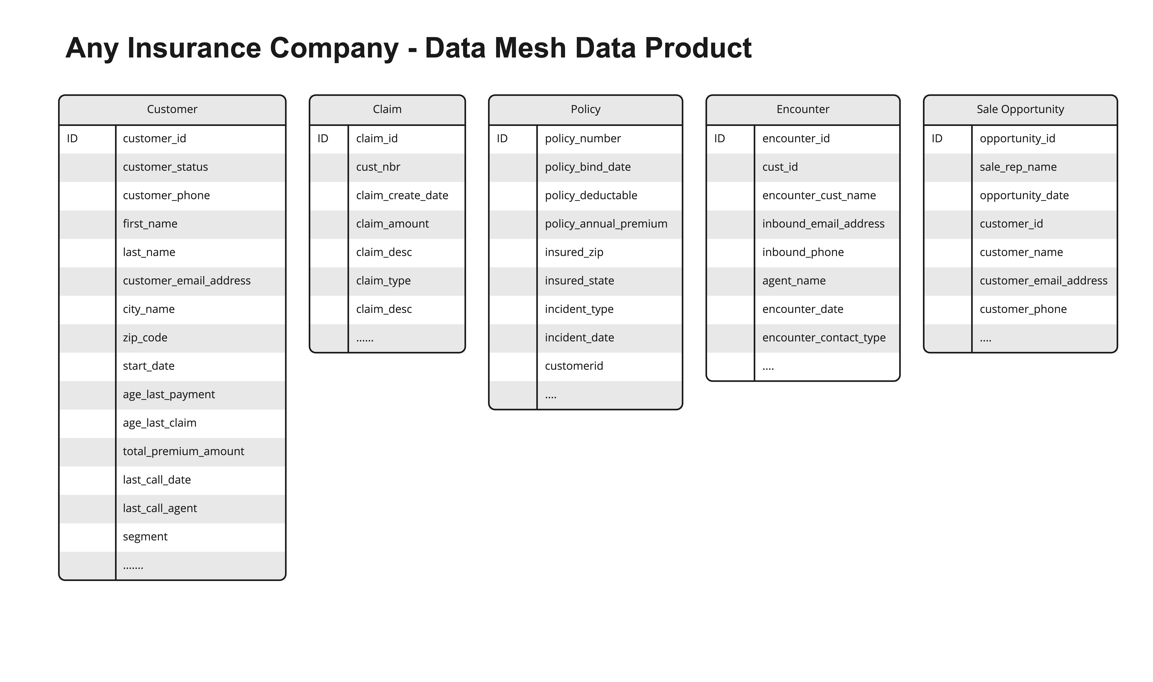
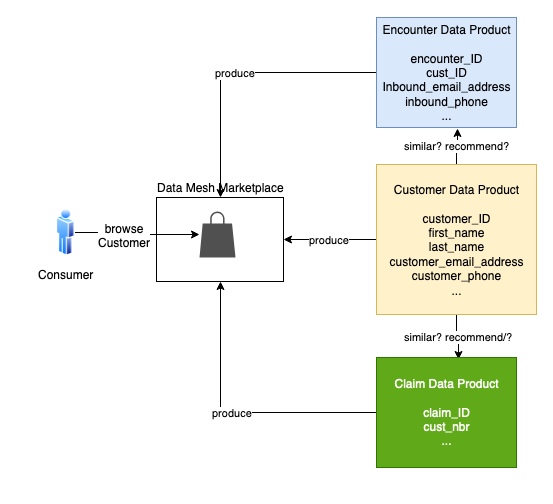

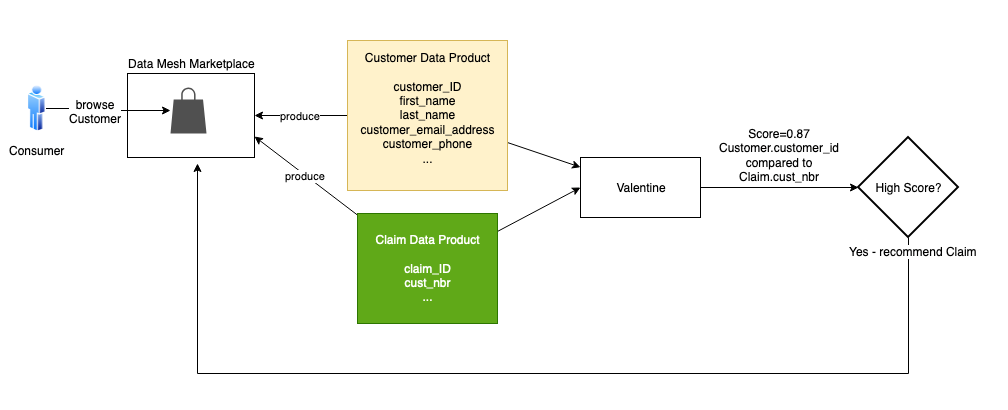


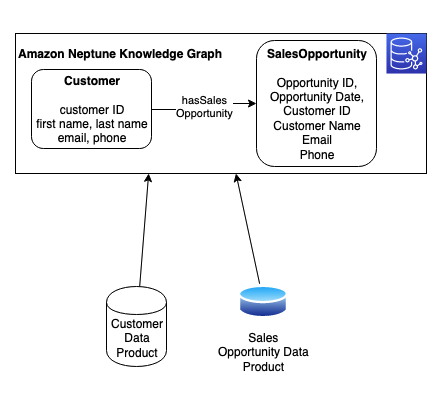
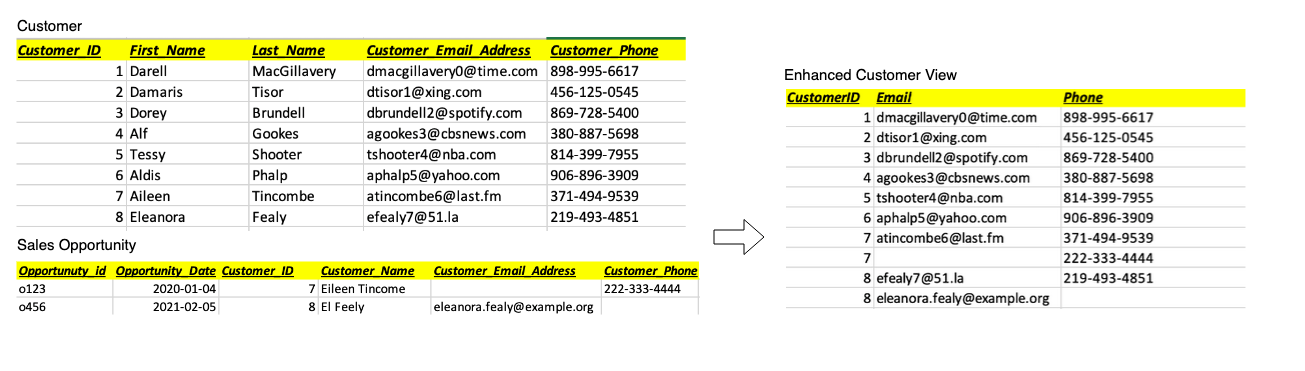
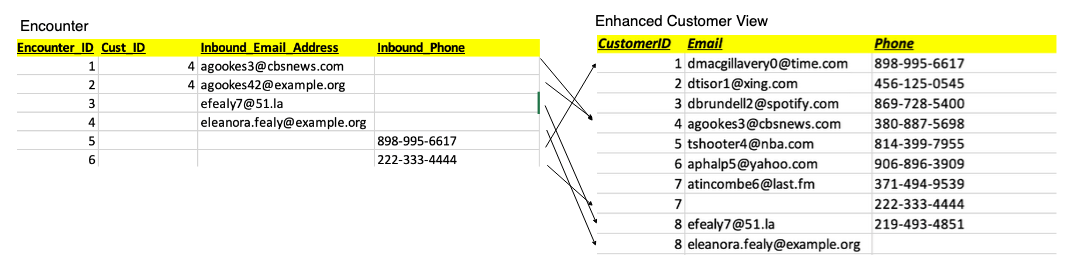
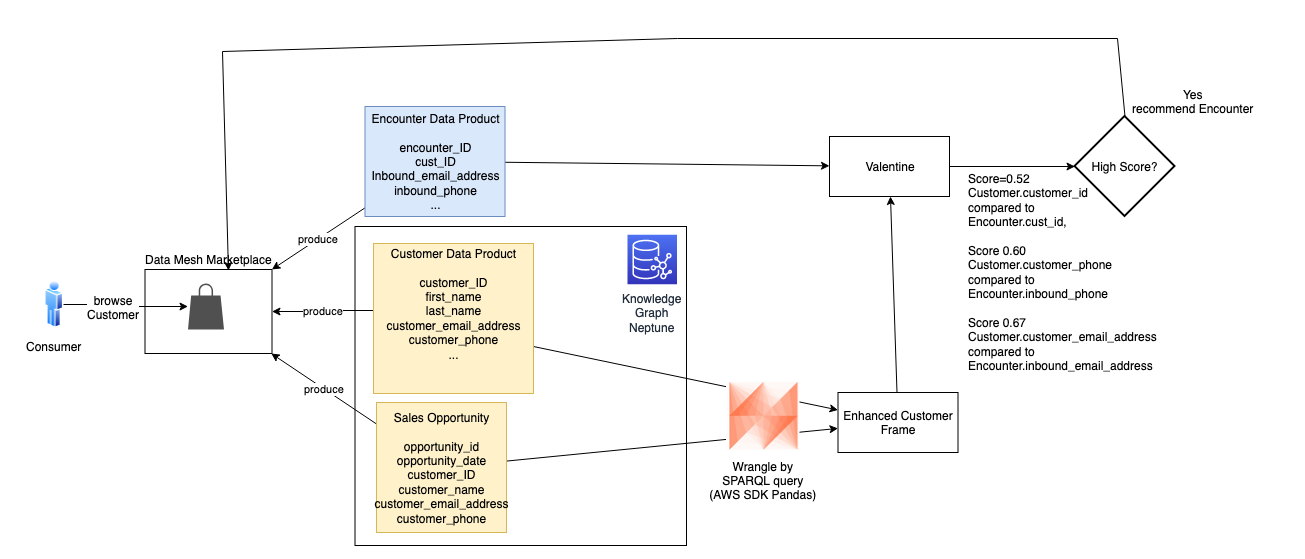
 Moira Lennox is a Senior Data Strategy Technical Specialist for AWS with 27 years’ experience helping companies innovate and modernize their data strategies to achieve new heights and allow for strategic decision-making. She has experience working in large enterprises and technology providers, in both business and technical roles across multiple industries, including health care live sciences, financial services, communications, digital entertainment, energy, and manufacturing.
 Joel Farvault is Principal Specialist SA Analytics for AWS with 25 years’ experience working on enterprise architecture, data strategy, and analytics, mainly in the financial services industry. Joel has led data transformation projects on fraud analytics, claims automation, and data governance.
 Mike Havey is a Solutions Architect for AWS with over 25 years of experience building enterprise applications. Mike is the author of two books and numerous articles. His