Post Syndicated from Neela Kulkarni original https://aws.amazon.com/blogs/security/use-saml-with-amazon-cognito-to-support-a-multi-tenant-application-with-a-single-user-pool/
Amazon Cognito is a customer identity and access management solution that scales to millions of users. With Cognito, you have four ways to secure multi-tenant applications: user pools, application clients, groups, or custom attributes. In an earlier blog post titled Role-based access control using Amazon Cognito and an external identity provider, you learned how to configure Cognito authentication and authorization with a single tenant. In this post, you will learn to configure Cognito with a single user pool for multiple tenants to securely access a business-to-business application by using SAML custom attributes. With custom-attribute–based multi-tenancy, you can store tenant identification data like tenantName as a custom attribute in a user’s profile and pass it to your application. You can then handle multi-tenancy logic in your application and backend services. With this approach, you can use a unified sign-up and sign-in experience for your users. To identify the user’s tenant, your application can use the tenantName custom attribute.
One Cognito user pool for multiple customers
Customers like the simplicity of using a single Cognito user pool for their multi-customer application. With this approach, your customers will use the same URL to access the application. You will set up each new customer by configuring SAML 2.0 integration with the customer’s external identity provider (IdP). Your customers can control access to your application by using an external identity store, such as Google Workspace, Okta, or Active Directory Federation Service (AD FS), in which they can create, manage, and revoke access for their users.
After SAML integration is configured, Cognito returns a JSON web token (JWT) to the frontend during the user authentication process. This JWT contains attributes your application can use for authorization and access control. The token contains claims about the identity of the authenticated user, such as name and email. You can use this identity information inside your application. You can also configure Cognito to add custom attributes to the JWT, such as tenantName.
In this post, we demonstrate the approach of keeping a mapping between a user’s email domain and tenant name in an Amazon DynamoDB table. The DynamoDB table will have an emailDomain field as a key and a corresponding tenantName field.
Cognito architecture
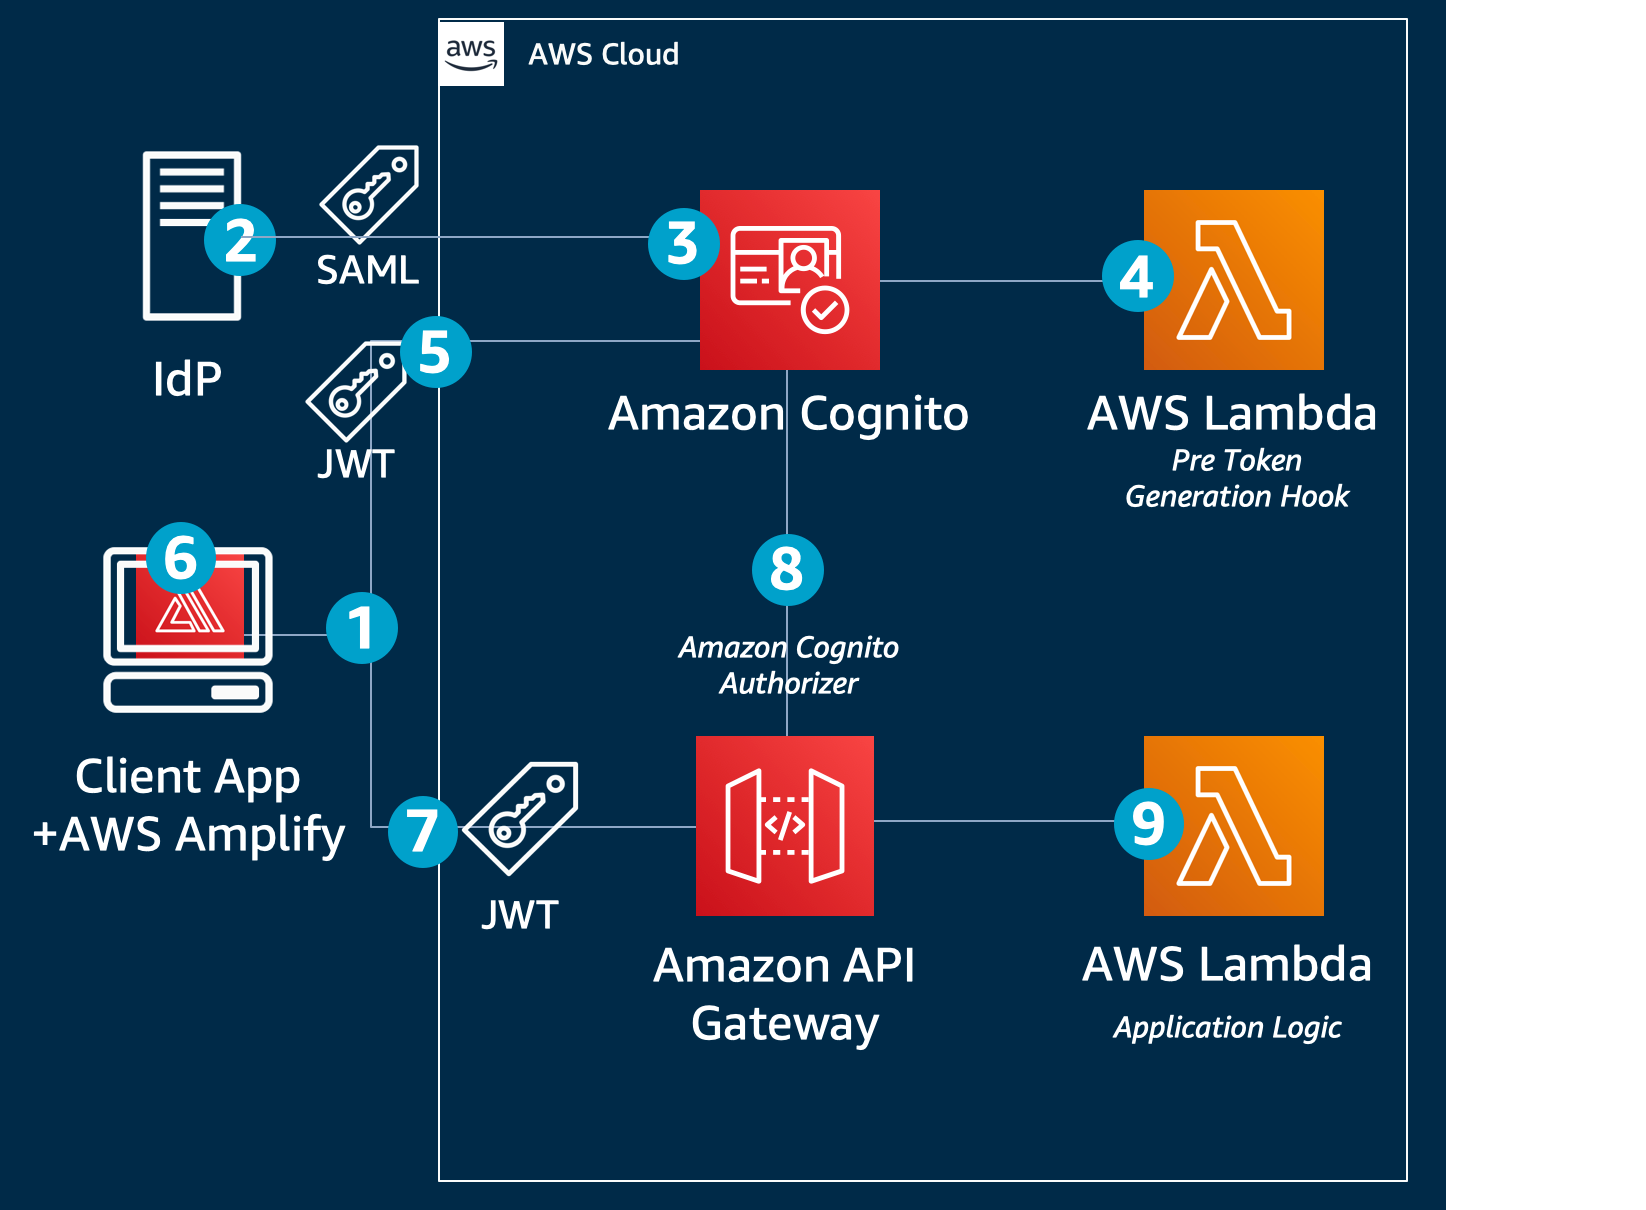
To illustrate how this works, we’ll start with a demo application that was introduced in the earlier blog post. The demo application is implemented by using Amazon Cognito, AWS Amplify, Amazon API Gateway, AWS Lambda, Amazon DynamoDB, Amazon Simple Storage Service (Amazon S3), and Amazon CloudFront to achieve a serverless architecture. This architecture is shown in Figure 1.
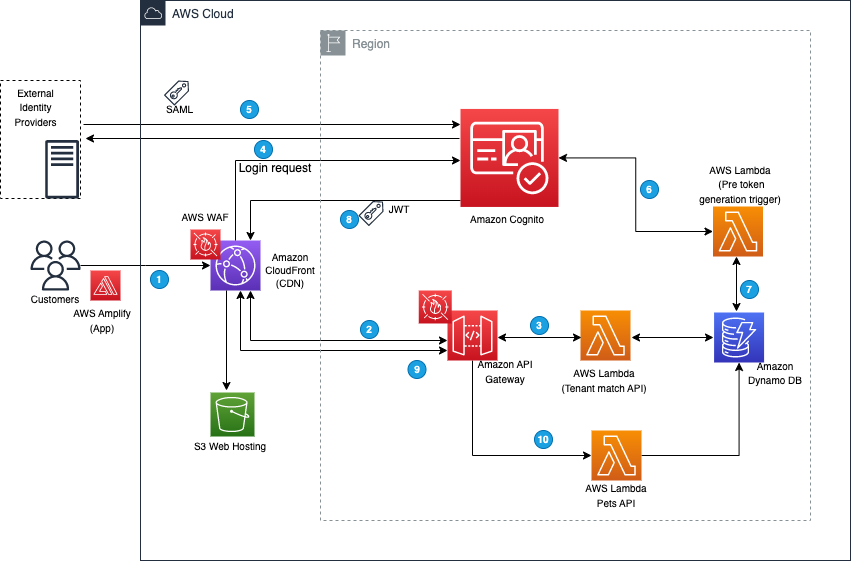
Figure 1: Demo application architecture
The workflow that happens when you access the web application for the first time using your browser is as follows (the numbered steps correspond to the numbered labels in the diagram):
- The client-side/frontend of the application prompts you to enter the email that you want to use to sign in to the application.
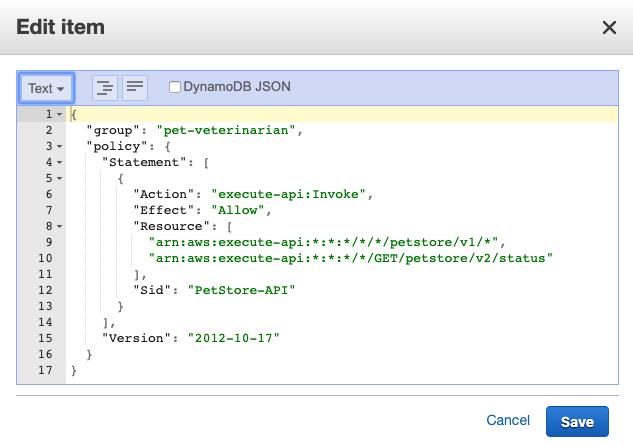
- The application invokes the Tenant Match API action through API Gateway, which, in turn, calls the Lambda function that takes the email address as an input and queries it against the DynamoDB table with the email domain. Figure 2 shows the data stored in DynamoDB, which includes the tenant name and IdP ID. You can add additional flexibility to this solution by adding web client IDs or custom redirect URLs. For the purpose of this example, we are using the same redirect URL for all tenants (the client application).

Figure 2: DynamoDB tenant table
- If a matching record is found, the Lambda function returns the record to the AWS Amplify frontend application.
- The client application uses the IdP ID from the response and passes it to Cognito for federated login. Cognito then reroutes the login request to the corresponding IdP. The AWS Amplify frontend application then redirects the browser to the IdP.
- At the IdP sign-in page, you sign in with a valid user account (for example, [email protected] or [email protected]). After you sign in successfully, a SAML response is sent back from the IdP to Cognito.
You can review the SAML content by using the instructions in How to view a SAML response in your browser for troubleshooting, as shown in Figure 3.
Figure 3: SAML content
- Cognito handles the SAML response and maps the SAML attributes to a just-in-time user profile. The SAML groups attributes is mapped to a custom user pool attribute named custom:groups.
- To identify the tenant, additional attributes are populated in the JWT. After successful authentication, a PreTokenGeneration Lambda function is invoked, which reads the mapped custom:groups attribute value from SAML, parses it, and converts it to an array. After that, the function parses the email address and captures the domain name. It then queries the DynamoDB table for the tenantName name by using the email domain name. Finally, the function sets the custom:domainName and custom:tenantName attributes in the JWT, as shown following.
This attribute conversion is optional and demonstrates how you can use a PreTokenGeneration Lambda invocation to customize your JWT token claims, mapping the IdP groups to the attributes your application recognizes. You can also use this invocation to make additional authorization decisions. For example, if user is a member of multiple groups, you may choose to map only one of them.
- Amazon Cognito returns the JWT tokens to the AWS Amplify frontend application. The Amplify client library stores the tokens and handles refreshes. This token is used to make calls to protected APIs in Amazon API Gateway.
- API Gateway uses a Cognito user pools authorizer to validate the JWT’s signature and expiration. If this is successful, API Gateway passes the JWT to the application’s Lambda function (also referred to as the backend).
- The backend application code reads the cognito:groups claim from the JWT and decides if the action is allowed. If the user is a member of the right group, then the action is allowed; otherwise the action is denied.


Implement the solution
You can implement this example application by using an AWS CloudFormation template to provision your cloud application and AWS resources.
To deploy the demo application described in this post, you need the following prerequisites:
- An AWS account.
- Familiarity with navigating the AWS Management Console or AWS CLI.
- Familiarity with deploying CloudFormation templates.
To deploy the template
- Choose the following Launch Stack button to launch a CloudFormation stack in your account.

Note: The stack will launch in the N. Virginia (us-east-1) Region. To deploy this solution into other AWS Regions, download the solution’s CloudFormation template from GitHub, modify it, and deploy it to the selected Region.
The stack creates a Cognito user pool called ExternalIdPDemoPoolXXXX in the AWS Region that you have specified. The CloudFormation Outputs field contains a list of values that you will need for further configuration.
IdP configuration
The next step is to configure your IdP. Each IdP has its own procedure for configuration, but there are some common steps you need to follow.
To configure your IdP
- Provide the IdP with the values for the following two properties:
- Single sign on URL / Assertion Consumer Service URL / ACS URL (for this example, https://<CognitoDomainURL>/saml2/idpresponse)
- Audience URI / SP Entity ID / Entity ID: (For this example, urn:amazon:cognito:sp:<yourUserPoolID>)
- Configure the field mapping for the SAML response in the IdP. Map the first name, last name, email, and groups (as a multi-value attribute) into SAML response attributes with the names firstName, lastName, email, and groups, respectively.
- Recommended: Filter the mapped groups to only those that are relevant to the application (for example, by a prefix filter). There is a 2,048-character limit on the custom attribute, so filtering helps avoid exceeding the character limit, and also helps avoid passing irrelevant information to the application.
- In each IdP, create two demo groups called pet-app-users and pet-app-admins, and create two demo users, for example, [email protected] and [email protected], and then assign one to each group, respectively.
To illustrate, we set up three different IdPs to represent three different tenants. Use the following links for instructions on how to configure each IdP:
- G-Suite (Google Workspace): How to set up Google Workspace as a SAML identity provider with an Amazon Cognito user pool
- Okta: Integrating IdP Sign In with Amazon Cognito
- Active Directory Federation Services (AD FS): How do I set up AD FS as a SAML identity provider with an Amazon Cognito user pool?
You will need the metadata URL or file from each IdP, because you will use this to configure your user pool integration. For more information, see Integrating third-party SAML identity providers with Amazon Cognito user pools.
Cognito configuration
After your IdPs are configured and your CloudFormation stack is deployed, you can configure Cognito.
To configure Cognito
- Use your browser to navigate to the Cognito console, and for User pool name, select the Cognito user pool.
Figure 4: Select the Cognito user pool
- On the Sign-in experience screen, on the Federated identity provider sign-in tab, choose Add identity provider.
- Choose SAML for the sign-in option, and then enter the values for your IdP. You can either upload the metadata XML file or provide the metadata endpoint URL. Add mapping for the attributes as shown in Figure 5.
Figure 5: Attribute mappings for the IdP
Upon completion you will see the new IdP displayed as shown in Figure 6.
Figure 6: List of federated IdPs
- On the App integration tab, select the app client that was created by the CloudFormation template.
Figure 7: Select the app client
- Under Hosted UI, choose Edit. Under Identity providers, select the Identity Providers that you want to set up for federated login, and save the change.
Figure 8: Select identity providers


API gateway
The example application uses a serverless backend. There are two API operations defined in this example, as shown in Figure 9. One operation gets tenant details and the other is the /pets API operation, which fetches information on pets based on user identity. The TenantMatch API operation will be run when you sign in with your email address. The operation passes your email address to the backend Lambda function.
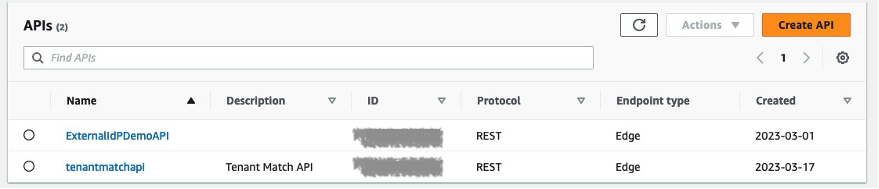
Figure 9: Example APIs
Lambda functions
You will see three Lambda functions deployed in the example application, as shown in Figure 10.

Figure 10: Lambda functions
The first one is GetTenantInfo, which is used for the TenantMatch API operation. It reads the data from the TenantTable based on the email domain and passes the record back to the application. The second function is PreTokenGeneration, which reads the mapped custom:groups attribute value, parses it, converts it to an array, and then stores it in the cognito:groups claim. The second Lambda function is invoked by the Cognito user pool after sign-in is successful. In order to customize the mapping, you can edit the Lambda function’s code in the index.js file and redeploy. The third Lambda function is added to support the Pets API operation.
DynamoDB tables
You will see three DynamoDB tables deployed in the example application, as shown in Figure 11.

Figure 11: DynamoDB tables
The TenantTable table holds the tenant details where you must add the mapping between the customer domain and the IdP ID setup in Cognito. This approach can be expanded to add more flexibility in case you want to add custom redirect URLs or Cognito app IDs for each tenant. You must create entries to correspond to the IdPs you have configured, as shown in Figure 12.
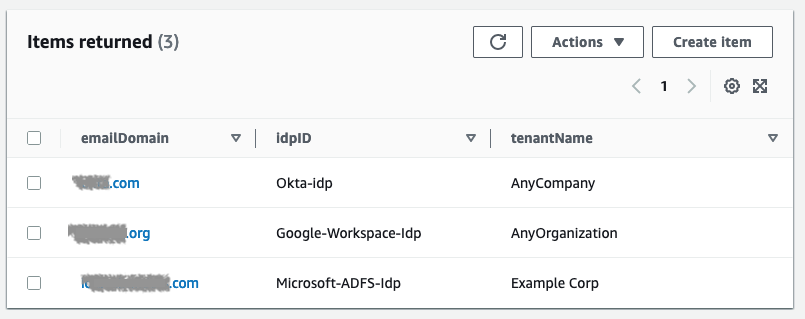
Figure 12: Tenant IdP mappings table
In addition to TenantTable, there is the ExternalIdPDemo-ItemsTable table, which holds the data related to the Pets application, based on user identity. There is also ExternalIdPDemo-UsersTable, which holds user details like the username, last forced sign-out time, and TTL required for the application to manage the user session.
You can now sign in to the example application through each IdP by navigating to the application URL found in the CloudFormation Outputs section, as shown in Figure 13.

Figure 13: Cognito sign-in screen
You will be redirected to the IdP, as shown in Figure 14.
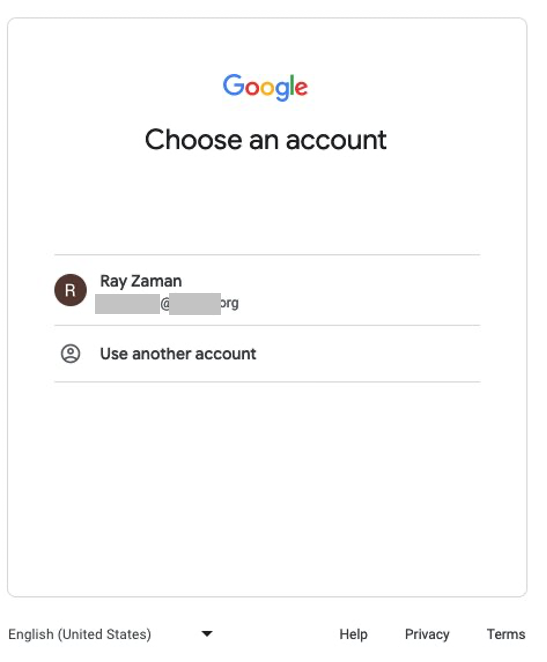
Figure 14: Google Workspace sign-in screen
The AWS Amplify frontend application parses the JWT to identify the tenant name and provide authorization based on group membership, as shown in Figure 15.

Figure 15: Application home screen upon successful sign-in
If a different user logs in with a different role, the AWS Amplify frontend application provides authorization based on specific content of the JWT.
Conclusion
You can integrate your application with your customer’s IdP of choice for authentication and authorization and map information from the IdP to the application. By using Amazon Cognito, you can normalize the structure of the JWT token that is used for this process, so that you can add multiple IdPs, each for a different tenant, through a single Cognito user pool. You can do all this without changing application code. The native integration of Amazon API Gateway with the Cognito user pools authorizer streamlines your validation of the JWT integrity, and after the JWT has been validated, you can use it to make authorization decisions in your application’s backend. By following the example in this post, you can focus on what differentiates your application, and let AWS do the undifferentiated heavy lifting of identity management for your customer-facing applications.
For the code examples described in this post, see the amazon-cognito-example-for-multi-tenant code repository on GitHub. To learn more about using Cognito with external IdPs, see the Amazon Cognito documentation. You can also learn to build software as a service (SaaS) application architectures on AWS. If you have any questions about Cognito or any other AWS services, you may post them to AWS re:Post.
If you have feedback about this post, submit comments in the Comments section below. If you have questions about this post, start a new thread on the AWS Security, Identity, & Compliance re:Post or contact AWS Support.
Want more AWS Security news? Follow us on Twitter.