Tag Archives: Amazon EKS

Orchestrate Jenkins Workloads using Dynamic Pod Autoscaling with Amazon EKS

Post Syndicated from Vladimir Toussaint original https://aws.amazon.com/blogs/devops/orchestrate-jenkins-workloads-using-dynamic-pod-autoscaling-with-amazon-eks/

This blog post will demonstrate how to leverage Jenkins with Amazon Elastic Kubernetes Service (EKS) by running a Jenkins Manager within an EKS pod. In doing so, we can run Jenkins workloads by allowing Amazon EKS to spawn dynamic Jenkins Agent(s) in order to perform application and infrastructure deployment. Traditionally, customers will setup a Jenkins Manager-Agent architecture that contains a set of manually added nodes with no autoscaling capabilities. Implementing this strategy will ensure that a robust approach optimizes the performance with the right-sized compute capacity and work needed to successfully perform the build tasks.

In setting up our Amazon EKS cluster with Jenkins, we’ll utilize the eksctl simple CLI tool for creating clusters on EKS. Then, we’ll build both the Jenkins Manager and Jenkins Agent image. Afterward, we’ll run a container deployment on our cluster to access the Jenkins application and utilize the dynamic Jenkins Agent pods to run pipelines and jobs.

Solution Overview

The architecture below illustrates the execution steps.

Solution Architecture diagram
Figure 1. Solution overview diagram

Disclaimer(s): (Note: This Jenkins application is not configured with a persistent volume storage. Therefore, you must establish and configure this template to fit that requirement).

To accomplish this deployment workflow, we will do the following:

Centralized Shared Services account

  1. Deploy the Amazon EKS Cluster into a Centralized Shared Services Account.
  2. Create the Amazon ECR Repository for the Jenkins Manager and Jenkins Agent to store docker images.
  3. Deploy the kubernetes manifest file for the Jenkins Manager.

Target Account(s)

  1. Establish a set of AWS Identity and Access Management (IAM) roles with permissions for cross-across access from the Share Services account into the Target account(s).

Jenkins Application UI

  1. Jenkins Plugins – Install and configure the Kubernetes Plugin and CloudBees AWS Credentials Plugin from Manage Plugins (you will not have to manually install this since it will be packaged and installed as part of the Jenkins image build).
  2. Jenkins Pipeline Example—Fetch the Jenkinsfile to deploy an S3 Bucket with CloudFormation in the Target account using a Jenkins parameterized pipeline.

Prerequisites

The following is the minimum requirements for ensuring this solution will work.

Account Prerequisites

  • Shared Services Account: The location of the Amazon EKS Cluster.
  • Target Account: The destination of the CI/CD pipeline deployments.

Build Requirements

Clone the Git Repository

git clone https://github.com/aws-samples/jenkins-cloudformation-deployment-example.git

Security Considerations

This blog provides a high-level overview of the best practices for cross-account deployment and isolation maintenance between the applications. We evaluated the cross-account application deployment permissions and will describe the current state as well as what to avoid. As part of the security best practices, we will maintain isolation among multiple apps deployed in these environments, e.g., Pipeline 1 does not deploy to the Pipeline 2 infrastructure.

Requirement

A Jenkins manager is running as a container in an EC2 compute instance that resides within a Shared AWS account. This Jenkins application represents individual pipelines deploying unique microservices that build and deploy to multiple environments in separate AWS accounts. The cross-account deployment utilizes the target AWS account admin credentials in order to do the deployment.

This methodology means that it is not good practice to share the account credentials externally. Additionally, the deployment errors risk should be eliminated and application isolation should be maintained within the same account.

Note that the deployment steps are being run using AWS CLIs, thus our solution will be focused on AWS CLI usage.

The risk is much lower when utilizing CloudFormation / CDK to conduct deployments because the AWS CLIs executed from the build jobs will specify stack names as parametrized inputs and the very low probability of stack-name error. However, it remains inadvisable to utilize admin credentials of the target account.

Best Practice — Current Approach

We utilized cross-account roles that can restrict unauthorized access across build jobs. Behind this approach, we will utilize the assume-role concept that will enable the requesting role to obtain temporary credentials (from the STS service) of the target role and execute actions permitted by the target role. This is safer than utilizing hard-coded credentials. The requesting role could be either the inherited EC2 instance role OR specific user credentials. However, in our case, we are utilizing the inherited EC2 instance role.

For ease of understanding, we will refer the target-role as execution-role below.

Cross account roles for Jenkins build jobs
Figure 2. Current approach

  • As per the security best practice of assigning minimum privileges, we must first create execution role in IAM in the target account that has deployment permissions (either via CloudFormation OR via CLI’s), e.g., app-dev-role in Dev account and app-prod-role in Prod account.
  • For each of those roles, we configure a trust relationship with the parent account ID (Shared Services account). This enables any roles in the Shared Services account (with assume-role permission) to assume the execution-role and deploy it on respective hosting infrastructure, e.g., the app-dev-role in Dev account will be a common execution role that will deploy various apps across infrastructure.
  • Then, we create a local role in the Shared Services account and configure credentials within Jenkins to be utilized by the Build Jobs. Provide the job with the assume-role permissions and specify the list of ARNs across every account. Alternatively, the inherited EC2 instance role can also be utilized to assume the execution-role.

Create Cross-Account IAM Roles

Cross-account IAM roles allow users to securely access AWS resources in a target account while maintaining the observability of that AWS account. The cross-account IAM role includes a trust policy allowing AWS identities in another AWS account to assume the given role. This allows us to create a role in one AWS account that delegates specific permissions to another AWS account.

  • Create an IAM role with a common name in each target account. The role name we’ve created is AWSCloudFormationStackExecutionRole. The role must have permissions to perform CloudFormation actions and any actions regarding the resources that will be created. In our case, we will be creating an S3 Bucket utilizing CloudFormation.
  • This IAM role must also have an established trust relationship to the Shared Services account. In this case, the Jenkins Agent will be granted the ability to assume the role of the particular target account from the Shared Services account.
  • In our case, the IAM entity that will assume the AWSCloudFormationStackExecutionRole is the EKS Node Instance Role that associated with the EKS Cluster Nodes.
{
    "Version": "2012-10-17",
    "Statement": [
        {
            "Effect": "Allow",
            "Action": [
                "cloudformation:CreateUploadBucket",
                "cloudformation:ListStacks",
                "cloudformation:CancelUpdateStack",
                "cloudformation:ExecuteChangeSet",
                "cloudformation:ListChangeSets",
                "cloudformation:ListStackResources",
                "cloudformation:DescribeStackResources",
                "cloudformation:DescribeStackResource",
                "cloudformation:CreateChangeSet",
                "cloudformation:DeleteChangeSet",
                "cloudformation:DescribeStacks",
                "cloudformation:ContinueUpdateRollback",
                "cloudformation:DescribeStackEvents",
                "cloudformation:CreateStack",
                "cloudformation:DeleteStack",
                "cloudformation:UpdateStack",
                "cloudformation:DescribeChangeSet",
                "s3:PutBucketPublicAccessBlock",
                "s3:CreateBucket",
                "s3:DeleteBucketPolicy",
                "s3:PutEncryptionConfiguration",
                "s3:PutBucketPolicy",
                "s3:DeleteBucket"
            ],
            "Resource": "*"
        }
    ]
}

Build Docker Images

Build the custom docker images for the Jenkins Manager and the Jenkins Agent, and then push the images to AWS ECR Repository. Navigate to the docker/ directory, then execute the command according to the required parameters with the AWS account ID, repository name, region, and the build folder name jenkins-manager/ or jenkins-agent/ that resides in the current docker directory. The custom docker images will contain a set of starter package installations.

Deploy Jenkins Application

After building both images, navigate to the k8s/ directory, modify the manifest file for the Jenkins image, and then execute the Jenkins manifest.yaml template to setup the Jenkins application. (Note: This Jenkins application is not configured with a persistent volume storage. Therefore, you will need to establish and configure this template to fit that requirement).

# Fetch the Application URL or navigate to the AWS Console for the Load Balancer
kubectl get svc -n jenkins

# Verify that jenkins deployment/pods are up running
kubectl get pods -n jenkins

# Replace with jenkins manager pod name and fetch Jenkins login password
kubectl exec -it pod/<JENKINS-MANAGER-POD-NAME> -n jenkins -- cat /var/jenkins_home/secrets/initialAdminPassword
  • The Kubernetes Plugin and CloudBees AWS Credentials Plugin should be installed as part of the Jenkins image build from the Managed Plugins.
  • Navigate: Manage Jenkins → Configure Global Security
  • Set the Crumb Issuer to remove the error pages in order to prevent Cross Site Request Forgery exploits.

Screenshot of Crumb isssuer
Figure 3. Configure Global Security

Configure Jenkins Kubernetes Cloud

  • Navigate: Manage Jenkins → Manage Nodes and Clouds → Configure Clouds
  • Click: Add a new cloud → select Kubernetes from the drop menus

Screenshot to configure Cloud on Jenkins
Figure 4a. Jenkins Configure Nodes and Clouds

Note: Before proceeding, please ensure that you can access your Amazon EKS cluster information, whether it is through Console or CLI.

  • Enter a Name in the Kubernetes Cloud configuration field.
  • Enter the Kubernetes URL which can be found via AWS Console by navigating to the Amazon EKS service and locating the API server endpoint of the cluster, or run the command kubectl cluster-info.
  • Enter the namespace that will be utilized in the Kubernetes Namespace field. This will determine where the dynamic kubernetes pods will spawn. In our case, the name of the namespace is jenkins.
  • During the initial setup of Jenkins Manager on kubernetes, there is an environment variable JENKINS_URL that automatically utilizes the Load Balancer URL to resolve requests. However, we will resolve our requests locally to the cluster IP address.
    • The format is as follows: https://<service-name>.<namespace>.svc.cluster.local

Configuring Kubernetes cloud for Jenkins
Figure 4b. Configure Kubernetes Cloud

Set AWS Credentials

Security concerns are a key reason why we’re utilizing an IAM role instead of access keys. For any given approach involving IAM, it is the best practice to utilize temporary credentials.

  • You must have the AWS Credentials Binding Plugin installed before this step. Enter the unique ID name as shown in the example below.
  • Enter the IAM Role ARN you created earlier for both the ID and IAM Role to use in the field as shown below.

Setting up credentials on Jenkins
Figure 5. AWS Credentials Binding

Configuring Global credentials
Figure 6. Managed Credentials

Create a pipeline

  • Navigate to the Jenkins main menu and select new item
  • Create a Pipeline

Screenshot for Pipeline configuration
Figure 7. Create a pipeline

Configure Jenkins Agent

Setup a Kubernetes YAML template after you’ve built the agent image. In this example, we will be using the k8sPodTemplate.yaml file stored in the k8s/ folder.

CloudFormation Execution Scripts

This deploy-stack.sh file can accept four different parameters and conduct several types of CloudFormation stack executions such as deploy, create-changeset, and execute-changeset. This is also reflected in the stages of this Jenkinsfile pipeline. As for the delete-stack.sh file, two parameters are accepted, and, when executed, it will delete a CloudFormation stack based on the given stack name and region.

Jenkinsfile

In this Jenkinsfile, the individual pipeline build jobs will deploy individual microservices. The k8sPodTemplate.yaml is utilized to specify the kubernetes pod details and the inbound-agent that will be utilized to run the pipeline.

Jenkins Pipeline: Execute a pipeline

  • Click Build with Parameters and then select a build action.

Configuring stackname in Jenkins configuration
Figure 8a. Build with Parameters

  • Examine the pipeline stages even further for the choice you selected. Also, view more details of the stages below and verify in your AWS account that the CloudFormation stack was executed.

Jenkins pipeline dashboard
Figure 8b. Pipeline Stage View

  • The Final Step is to execute your pipeline and watch the pods spin up dynamically in your terminal. As is shown below, the Jenkins agent pod spawned and then terminated after the work completed. Watch this task on your own by executing the following command:
# Watch the pods spawn in the "jenkins" namespace
kubectl get pods -n jenkins -w

CLI output showing Jenkins POD status
Figure 9. Watch Jenkins Agent Pods Spawn

Code Repository

References

Cleanup

In order to avoid incurring future charges, delete the resources utilized in the walkthrough.

  • Delete the EKS cluster. You can utilize the eksctl to delete the cluster.
  • Delete any remaining AWS resources created by EKS such as AWS LoadBalancer, Target Groups, etc.
  • Delete any related IAM entities.

Conclusion

This post walked you through the process of building out Amazon EKS based infrastructure and integrating Jenkins to orchestrate workloads. We demonstrated how you can utilize this to deploy securely across multiple accounts with dynamic Jenkins agents and create alignment to your business with similar use cases. To learn more about Amazon EKS, see our documentation pages or explore our console.

About the Authors

Vladimir Toussaint Headshot1.png

Vladimir P. Toussaint

Vladimir is a DevOps Cloud Architect at Amazon Web Services. He works with GovCloud customers to build solutions and capabilities as they move to the cloud. Previous to Amazon Web Services, Vladimir has leveraged container orchestration tools such as Kubernetes to securely manage microservice applications for large enterprises.

Matt Noyce Headshot1.png

Matt Noyce

Matt is a Sr. Cloud Application Architect at Amazon Web Services. He works primarily with health care and life sciences customers to help them architect and build applications, data lakes, and DevOps pipelines that solve their business needs. In his spare time Matt likes to run and hike along with enjoying time with friends and family.

Nikunj Vaidya Headshot1.png

Nikunj Vaidya

Nikunj is a DevOps Tech Leader at Amazon Web Services. He offers technical guidance to the customers on AWS DevOps solutions and services that would streamline the application development process, accelerate application delivery, and enable maintaining a high bar of software quality. Prior to AWS, Nikunj has worked in software engineering roles, leading transformation projects, driving releases and improvements in the software quality and customer experience.
Access token security for microservice APIs on Amazon EKS

Post Syndicated from Timothy James Power original https://aws.amazon.com/blogs/security/access-token-security-for-microservice-apis-on-amazon-eks/

In this blog post, I demonstrate how to implement service-to-service authorization using OAuth 2.0 access tokens for microservice APIs hosted on Amazon Elastic Kubernetes Service (Amazon EKS). A common use case for OAuth 2.0 access tokens is to facilitate user authorization to a public facing application. Access tokens can also be used to identify and authorize programmatic access to services with a system identity instead of a user identity. In service-to-service authorization, OAuth 2.0 access tokens can be used to help protect your microservice API for the entire development lifecycle and for every application layer. AWS Well Architected recommends that you validate security at all layers, and by incorporating access tokens validated by the microservice, you can minimize the potential impact if your application gateway allows unintended access. The solution sample application in this post includes access token security at the outset. Access tokens are validated in unit tests, local deployment, and remote cluster deployment on Amazon EKS. Amazon Cognito is used as the OAuth 2.0 token issuer.

Benefits of using access token security with microservice APIs

Some of the reasons you should consider using access token security with microservices include the following:

  • Access tokens provide production grade security for microservices in non-production environments, and are designed to ensure consistent authentication and authorization and protect the application developer from changes to security controls at a cluster level.
  • They enable service-to-service applications to identify the caller and their permissions.
  • Access tokens are short-lived credentials that expire, which makes them preferable to traditional API gateway long-lived API keys.
  • You get better system integration with a web or mobile interface, or application gateway, when you include token validation in the microservice at the outset.

Overview of solution

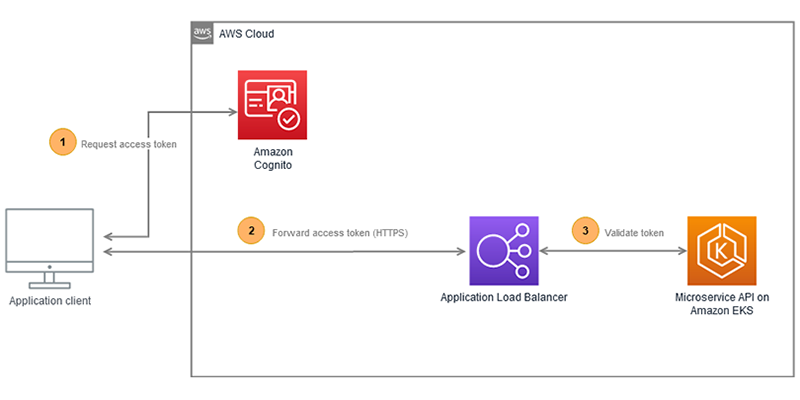
In the solution described in this post, the sample microservice API is deployed to Amazon EKS, with an Application Load Balancer (ALB) for incoming traffic. Figure 1 shows the application architecture on Amazon Web Services (AWS).

Figure 1: Application architecture

Figure 1: Application architecture

The application client shown in Figure 1 represents a service-to-service workflow on Amazon EKS, and shows the following three steps:

  1. The application client requests an access token from the Amazon Cognito user pool token endpoint.
  2. The access token is forwarded to the ALB endpoint over HTTPS when requesting the microservice API, in the bearer token authorization header. The ALB is configured to use IP Classless Inter-Domain Routing (CIDR) range filtering.
  3. The microservice deployed to Amazon EKS validates the access token using JSON Web Key Sets (JWKS), and enforces the authorization claims.

Walkthrough

The walkthrough in this post has the following steps:

  1. Amazon EKS cluster setup
  2. Amazon Cognito configuration
  3. Microservice OAuth 2.0 integration
  4. Unit test the access token claims
  5. Deployment of microservice on Amazon EKS
  6. Integration tests for local and remote deployments

Prerequisites

For this walkthrough, you should have the following prerequisites in place:

Set up

Amazon EKS is the target for your microservices deployment in the sample application. Use the following steps to create an EKS cluster. If you already have an EKS cluster, you can skip to the next section: To set up the AWS Load Balancer Controller. The following example creates an EKS cluster in the Asia Pacific (Singapore) ap-southeast-1 AWS Region. Be sure to update the Region to use your value.

To create an EKS cluster with eksctl

  1. In your Unix editor, create a file named eks-cluster-config.yaml, with the following cluster configuration:
    apiVersion: eksctl.io/v1alpha5
    kind: ClusterConfig
    
    metadata:
      name: token-demo
      region: <ap-southeast-1>
      version: '1.20'
    
    iam:
      withOIDC: true
    managedNodeGroups:
      - name: ng0
        minSize: 1
        maxSize: 3
        desiredCapacity: 2
        labels: {role: mngworker}
    
        iam:
          withAddonPolicies:
            albIngress: true
            cloudWatch: true
    
    cloudWatch:
      clusterLogging:
        enableTypes: ["*"]
    

  2. Create the cluster by using the following eksctl command:
    eksctl create cluster -f eks-cluster-config.yaml
    

    Allow 10–15 minutes for the EKS control plane and managed nodes creation. eksctl will automatically add the cluster details in your kubeconfig for use with kubectl.

    Validate your cluster node status as “ready” with the following command

    kubectl get nodes
    

  3. Create the demo namespace to host the sample application by using the following command:
    kubectl create namespace demo
    

With the EKS cluster now up and running, there is one final setup step. The ALB for inbound HTTPS traffic is created by the AWS Load Balancer Controller directly from the EKS cluster using a Kubernetes Ingress resource.

To set up the AWS Load Balancer Controller

  1. Follow the installation steps to deploy the AWS Load Balancer Controller to Amazon EKS.
  2. For your domain host (in this case, gateway.example.com) create a public certificate using Amazon Certificate Manager (ACM) that will be used for HTTPS.
  3. An Ingress resource defines the ALB configuration. You customize the ALB by using annotations. Create a file named alb.yml, and add resource definition as follows, replacing the inbound IP CIDR with your values:
    apiVersion: networking.k8s.io/v1
    kind: Ingress
    metadata:
      name: alb-ingress
      namespace: demo
      annotations:
        kubernetes.io/ingress.class: alb
        alb.ingress.kubernetes.io/scheme: internet-facing
        alb.ingress.kubernetes.io/target-type: ip
        alb.ingress.kubernetes.io/listen-ports: '[{"HTTPS":443}]'
        alb.ingress.kubernetes.io/inbound-cidrs: <xxx.xxx.xxx.xxx>/n
      labels:
        app: alb-ingress
    spec:
      rules:
        - host: <gateway.example.com>
          http:
            paths:
              - path: /api/demo/*
                pathType: Prefix
                backend:
                  service:
                    name: demo-api
                    port:
                      number: 8080
    

  4. Deploy the Ingress resource with kubectl to create the ALB by using the following command:
    kubectl apply -f alb.yml
    

    After a few moments, you should see the ALB move from status provisioning to active, with an auto-generated public DNS name.

  5. Validate the ALB DNS name and the ALB is in active status by using the following command:
    kubectl -n demo describe ingress alb-ingress
    

  6. To alias your host, in this case gateway.example.com with the ALB, create a Route 53 alias record. The remote API is now accessible using your Route 53 alias, for example: https://gateway.example.com/api/demo/*

The ALB that you created will only allow incoming HTTPS traffic on port 443, and restricts incoming traffic to known source IP addresses. If you want to share the ALB across multiple microservices, you can add the alb.ingress.kubernetes.io/group.name annotation. To help protect the application from common exploits, you should add an annotation to bind AWS Web Application Firewall (WAFv2) ACLs, including rate-limiting options for the microservice.

Configure the Amazon Cognito user pool

To manage the OAuth 2.0 client credential flow, you create an Amazon Cognito user pool. Use the following procedure to create the Amazon Cognito user pool in the console.

To create an Amazon Cognito user pool

  1. Log in to the Amazon Cognito console.
  2. Choose Manage User Pools.
  3. In the top-right corner of the page, choose Create a user pool.
  4. Provide a name for your user pool, and choose Review defaults to save the name.
  5. Review the user pool information and make any necessary changes. Scroll down and choose Create pool.
  6. Note down your created Pool Id, because you will need this for the microservice configuration.

Next, to simulate the client in subsequent tests, you will create three app clients: one for read permission, one for write permission, and one for the microservice.

To create Amazon Cognito app clients

  1. In the left navigation pane, under General settings, choose App clients.
  2. On the right pane, choose Add an app client.
  3. Enter the App client name as readClient.
  4. Leave all other options unchanged.
  5. Choose Create app client to save.
  6. Choose Add another app client, and add an app client with the name writeClient, then repeat step 5 to save.
  7. Choose Add another app client, and add an app client with the name microService. Clear Generate Client Secret, as this isn’t required for the microservice. Leave all other options unchanged. Repeat step 5 to save.
  8. Note down the App client id created for the microService app client, because you will need it to configure the microservice.

You now have three app clients: readClient, writeClient, and microService.

With the read and write clients created, the next step is to create the permission scope (role), which will be subsequently assigned.

To create read and write permission scopes (roles) for use with the app clients

  1. In the left navigation pane, under App integration, choose Resource servers.
  2. On the right pane, choose Add a resource server.
  3. Enter the name Gateway for the resource server.
  4. For the Identifier enter your host name, in this case https://gateway.example.com.Figure 2 shows the resource identifier and custom scopes for read and write role permission.

    Figure 2: Resource identifier and custom scopes

    Figure 2: Resource identifier and custom scopes

  5. In the first row under Scopes, for Name enter demo.read, and for Description enter Demo Read role.
  6. In the second row under Scopes, for Name enter demo.write, and for Description enter Demo Write role.
  7. Choose Save changes.

You have now completed configuring the custom role scopes that will be bound to the app clients. To complete the app client configuration, you will now bind the role scopes and configure the OAuth2.0 flow.

To configure app clients for client credential flow

  1. In the left navigation pane, under App Integration, select App client settings.
  2. On the right pane, the first of three app clients will be visible.
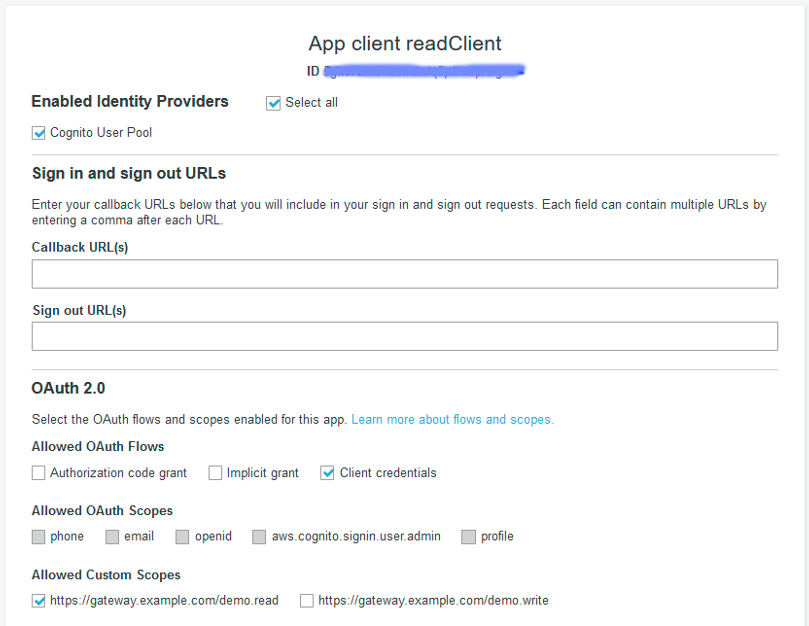
  3. Scroll to the readClient app client and make the following selections:
    • For Enabled Identity Providers, select Cognito User Pool.
    • Under OAuth 2.0, for Allowed OAuth Flows, select Client credentials.
    • Under OAuth 2.0, under Allowed Custom Scopes, select the demo.read scope.
    • Leave all other options blank.
  4. Scroll to the writeClient app client and make the following selections:
    • For Enabled Identity Providers, select Cognito User Pool.
    • Under OAuth 2.0, for Allowed OAuth Flows, select Client credentials.
    • Under OAuth 2.0, under Allowed Custom Scopes, select the demo.write scope.
    • Leave all other options blank.
  5. Scroll to the microService app client and make the following selections:
    • For Enabled Identity Providers, select Cognito User Pool.
    • Under OAuth 2.0, for Allowed OAuth Flows, select Client credentials.
    • Under OAuth 2.0, under Allowed Custom Scopes, select the demo.read scope.
    • Leave all other options blank.

Figure 3 shows the app client configured with the client credentials flow and custom scope—all other options remain blank

Figure 3: App client configuration

Figure 3: App client configuration

Your Amazon Cognito configuration is now complete. Next you will integrate the microservice with OAuth 2.0.

Microservice OAuth 2.0 integration

For the server-side microservice, you will use Quarkus with Kotlin. Quarkus is a cloud-native microservice framework with strong Kubernetes and AWS integration, for the Java Virtual Machine (JVM) and GraalVM. GraalVM native-image can be used to create native executables, for fast startup and low memory usage, which is important for microservice applications.

To create the microservice quick start project

  1. Open the Quarkus quick-start website code.quarkus.io.
  2. On the top left, you can modify the Group, Artifact and Build Tool to your preference, or accept the defaults.
  3. In the Pick your extensions search box, select each of the following extensions:
    • RESTEasy JAX-RS
    • RESTEasy Jackson
    • Kubernetes
    • Container Image Jib
    • OpenID Connect
  4. Choose Generate your application to download your application as a .zip file.

Quarkus permits low-code integration with an identity provider such as Amazon Cognito, and is configured by the project application.properties file.

To configure application properties to use the Amazon Cognito IDP

  1. Edit the application.properties file in your quick start project:
    src/main/resources/application.properties
    

  2. Add the following properties, replacing the variables with your values. Use the cognito-pool-id and microservice App client id that you noted down when creating these Amazon Cognito resources in the previous sections, along with your Region.
    quarkus.oidc.auth-server-url= https://cognito-idp.<region>.amazonaws.com/<cognito-pool-id>
    quarkus.oidc.client-id=<microService App client id>
    quarkus.oidc.roles.role-claim-path=scope
    

  3. Save and close your application.properties file.

The Kotlin code sample that follows verifies the authenticated principle by using the @Authenticated annotation filter, which performs JSON Web Key Set (JWKS) token validation. The JWKS details are cached, adding nominal latency to the application performance.

The access token claims are auto-filtered by the @RolesAllowed annotation for the custom scopes, read and write. The protected methods are illustrations of a microservice API and how to integrate this with one to two lines of code.

import io.quarkus.security.Authenticated
import javax.annotation.security.RolesAllowed
import javax.enterprise.context.RequestScoped
import javax.ws.rs.*

@Authenticated
@RequestScoped
@Path("/api/demo")
class DemoResource {

    @GET
    @Path("protectedRole/{name}")
    @RolesAllowed("https://gateway.example.com/demo.read")
    fun protectedRole(@PathParam(value = "name") name: String) = mapOf("protectedAPI" to "true", "paramName" to name)
    

    @POST
    @Path("protectedUpload")
    @RolesAllowed("https://gateway.example.com/demo.write")
    fun protectedDataUpload(values: Map<String, String>) = "Received: $values"

}

Unit test the access token claims

For the unit tests you will test three scenarios: unauthorized, forbidden, and ok. The @TestSecurity annotation injects an access token with the specified role claim using the Quarkus test security library. To include access token security in your unit test only requires one line of code, the @TestSecurity annotation, which is a strong reason to include access token security validation upfront in your development. The unit test code in the following example maps to the protectedRole method for the microservice via the uri /api/demo/protectedRole, with an additional path parameter sample-username to be returned by the method for confirmation.

import io.quarkus.test.junit.QuarkusTest
import io.quarkus.test.security.TestSecurity
import io.restassured.RestAssured
import io.restassured.http.ContentType
import org.junit.jupiter.api.Test

@QuarkusTest
class DemoResourceTest {

    @Test
    fun testNoAccessToken() {
        RestAssured.given()
            .`when`().get("/api/demo/protectedRole/sample-username")
            .then()
            .statusCode(401)
    }

    @Test
    @TestSecurity(user = "writeClient", roles = [ "https://gateway.example.com/demo.write" ])
    fun testIncorrectRole() {
        RestAssured.given()
            .`when`().get("/api/demo/protectedRole/sample-username")
            .then()
            .statusCode(403)
    }

    @Test
    @TestSecurity(user = "readClient", roles = [ "https://gateway.example.com/demo.read" ])
    fun testProtecedRole() {
        RestAssured.given()
            .`when`().get("/api/demo/protectedRole/sample-username")
            .then()
            .statusCode(200)
            .contentType(ContentType.JSON)
    }

}

Deploy the microservice on Amazon EKS

Deploying the microservice to Amazon EKS is the same as deploying to any upstream Kubernetes-compliant installation. You declare your application resources in a manifest file, and you deploy a container image of your application to your container registry. You can do this in a similar low-code manner with the Quarkus Kubernetes extension, which automatically generates the Kubernetes deployment and service resources at build time. The Quarkus Container Image Jib extension to automatically build the container image and deploys the container image to Amazon Elastic Container Registry (ECR), without the need for a Dockerfile.

Amazon ECR setup

Your microservice container image created during the build process will be published to Amazon Elastic Container Registry (Amazon ECR) in the same Region as the target Amazon EKS cluster deployment. Container images are stored in a repository in Amazon ECR, and in the following example uses a convention for the repository name of project name and microservice name. The first command that follows creates the Amazon ECR repository to host the microservice container image, and the second command obtains login credentials to publish the container image to Amazon ECR.

To set up the application for Amazon ECR integration

  1. In the AWS CLI, create an Amazon ECR repository by using the following command. Replace the project name variable with your parent project name, and replace the microservice name with the microservice name.
    aws ecr create-repository --repository-name <project-name>/<microservice-name>  --region <region>
    

  2. Obtain an ECR authorization token, by using your IAM principal with the following command. Replace the variables with your values for the AWS account ID and Region.
    aws ecr get-login-password --region <region> | docker login --username AWS --password-stdin <aws-account-id>.dkr.ecr.<region>.amazonaws.com
    

Configure the application properties to use Amazon ECR

To update the application properties with the ECR repository details

  1. Edit the application.properties file in your Quarkus project:
    src/main/resources/application.properties
    

  2. Add the following properties, replacing the variables with your values, for the AWS account ID and Region.
    quarkus.container-image.group=<microservice-name>
    quarkus.container-image.registry=<aws-account-id>.dkr.ecr.<region>.amazonaws.com
    quarkus.container-image.build=true
    quarkus.container-image.push=true
    

  3. Save and close your application.properties.
  4. Re-build your application

After the application re-build, you should now have a container image deployed to Amazon ECR in your region with the following name [project-group]/[project-name]. The Quarkus build will give an error if the push to Amazon ECR failed.

Now, you can deploy your application to Amazon EKS, with kubectl from the following build path:

kubectl apply -f build/kubernetes/kubernetes.yml

Integration tests for local and remote deployments

The following environment assumes a Unix shell: either MacOS, Linux, or Windows Subsystem for Linux (WSL 2).

How to obtain the access token from the token endpoint

Obtain the access token for the application client by using the Amazon Cognito OAuth 2.0 token endpoint, and export an environment variable for re-use. Replace the variables with your Amazon Cognito pool name, and AWS Region respectively.

export TOKEN_ENDPOINT=https://<pool-name>.auth.<region>.amazoncognito.com/token

To generate the client credentials in the required format, you need the Base64 representation of the app client client-id:client-secret. There are many tools online to help you generate a Base64 encoded string. Export the following environment variables, to avoid hard-coding in configuration or scripts.

export CLIENT_CREDENTIALS_READ=Base64(client-id:client-secret)
export CLIENT_CREDENTIALS_WRITE=Base64(client-id:client-secret)

You can use curl to post to the token endpoint, and obtain an access token for the read and write app client respectively. You can pass grant_type=client_credentials and the custom scopes as appropriate. If you pass an incorrect scope, you will receive an invalid_grant error. The Unix jq tool extracts the access token from the JSON string. If you do not have the jq tool installed, you can use your relevant package manager (such as apt-get, yum, or brew), to install using sudo [package manager] install jq.

The following shell commands obtain the access token associated with the read or write scope. The client credentials are used to authorize the generation of the access token. An environment variable stores the read or write access token for future use. Update the scope URL to your host, in this case gateway.example.com.

export access_token_read=$(curl -s -X POST --location "$TOKEN_ENDPOINT" \
     -H "Authorization: Basic $CLIENT_CREDENTIALS_READ" \
     -H "Content-Type: application/x-www-form-urlencoded" \
     -d "grant_type=client_credentials&scope=https://<gateway.example.com>/demo.read" \
| jq --raw-output '.access_token')

export access_token_write=$(curl -s -X POST --location "$TOKEN_ENDPOINT" \
     -H "Authorization: Basic $CLIENT_CREDENTIALS_WRITE" \
     -H "Content-Type: application/x-www-form-urlencoded" \
     -d "grant_type=client_credentials&scope=https://<gateway.example.com>/demo.write" \ 
| jq --raw-output '.access_token')

If the curl commands are successful, you should see the access tokens in the environment variables by using the following echo commands:

echo $access_token_read
echo $access_token_write

For more information or troubleshooting, see TOKEN Endpoint in the Amazon Cognito Developer Guide.

Test scope with automation script

Now that you have saved the read and write access tokens, you can test the API. The endpoint can be local or on a remote cluster. The process is the same, all that changes is the target URL. The simplicity of toggling the target URL between local and remote is one of the reasons why access token security can be integrated into the full development lifecycle.

To perform integration tests in bulk, use a shell script that validates the response code. The example script that follows validates the API call under three test scenarios, the same as the unit tests:

  1. If no valid access token is passed: 401 (unauthorized) response is expected.
  2. A valid access token is passed, but with an incorrect role claim: 403 (forbidden) response is expected.
  3. A valid access token and valid role-claim is passed: 200 (ok) response with content-type of application/json expected.

Name the following script, demo-api.sh. For each API method in the microservice, you duplicate these three tests, but for the sake of brevity in this post, I’m only showing you one API method here, protectedRole.

#!/bin/bash

HOST="http://localhost:8080"
if [ "_$1" != "_" ]; then
  HOST="$1"
fi

validate_response() {
  typeset http_response="$1"
  typeset expected_rc="$2"

  http_status=$(echo "$http_response" | awk 'BEGIN { FS = "!" }; { print $2 }')
  if [ $http_status -ne $expected_rc ]; then
    echo "Failed: Status code $http_status"
    exit 1
  elif [ $http_status -eq 200 ]; then
      echo "  Output: $http_response"
  fi
}

echo "Test 401-unauthorized: Protected /api/demo/protectedRole/{name}"
http_response=$(
  curl --silent -w "!%{http_code}!%{content_type}" \
    -X GET --location "$HOST/api/demo/protectedRole/sample-username" \
    -H "Cache-Control: no-cache" \
    -H "Accept: text/plain"
)
validate_response "$http_response" 401

echo "Test 403-forbidden: Protected /api/demo/protectedRole/{name}"
http_response=$(
  curl --silent -w "!%{http_code}!%{content_type}" \
    -X GET --location "$HOST/api/demo/protectedRole/sample-username" \
    -H "Accept: application/json" \
    -H "Cache-Control: no-cache" \
    -H "Content-Type: application/json" \
    -H "Authorization: Bearer $access_token_write"
)
validate_response "$http_response" 403

echo "Test 200-ok: Protected /api/demo/protectedRole/{name}"
http_response=$(
  curl --silent -w "!%{http_code}!%{content_type}" \
    -X GET --location "$HOST/api/demo/protectedRole/sample-username" \
    -H "Accept: application/json" \
    -H "Cache-Control: no-cache" \
    -H "Content-Type: application/json" \
    -H "Authorization: Bearer $access_token_read"
)
validate_response "$http_response" 200

Test the microservice API against the access token claims

Run the script for a local host deployment on http://localhost:8080, and on the remote EKS cluster, in this case https://gateway.example.com.

If everything works as expected, you will have demonstrated the same test process for local and remote deployments of your microservice. Another advantage of creating a security test automation process like the one demonstrated, is that you can also include it as part of your continuous integration/continuous delivery (CI/CD) test automation.

The test automation script accepts the microservice host URL as a parameter (the default is local), referencing the stored access tokens from the environment variables. Upon error, the script will exit with the error code. To test the remote EKS cluster, use the following command, with your host URL, in this case gateway.example.com.

./demo-api.sh https://<gateway.example.com>

Expected output:

Test 401-unauthorized: No access token for /api/demo/protectedRole/{name}
Test 403-forbidden: Incorrect role/custom-scope for /api/demo/protectedRole/{name}
Test 200-ok: Correct role for /api/demo/protectedRole/{name}
  Output: {"protectedAPI":"true","paramName":"sample-username"}!200!application/json

Best practices for a well architected production service-to-service client

For elevated security in alignment with AWS Well Architected, it is recommend to use AWS Secrets Manager to hold the client credentials. Separating your credentials from the application permits credential rotation without the requirement to release a new version of the application or modify environment variables used by the service. Access to secrets must be tightly controlled because the secrets contain extremely sensitive information. Secrets Manager uses AWS Identity and Access Management (IAM) to secure access to the secrets. By using the permissions capabilities of IAM permissions policies, you can control which users or services have access to your secrets. Secrets Manager uses envelope encryption with AWS KMS customer master keys (CMKs) and data key to protect each secret value. When you create a secret, you can choose any symmetric customer managed CMK in the AWS account and Region, or you can use the AWS managed CMK for Secrets Manager aws/secretsmanager.

Access tokens can be configured on Amazon Cognito to expire in as little as 5 minutes or as long as 24 hours. To avoid unnecessary calls to the token endpoint, the application client should cache the access token and refresh close to expiry. In the Quarkus framework used for the microservice, this can be automatically performed for a client service by adding the quarkus-oidc-client extension to the application.

Cleaning up

To avoid incurring future charges, delete all the resources created.

Conclusion

This post has focused on the last line of defense, the microservice, and the importance of a layered security approach throughout the development lifecycle. Access token security should be validated both at the application gateway and microservice for end-to-end API protection.

As an additional layer of security at the application gateway, you should consider using Amazon API Gateway, and the inbuilt JWT authorizer to perform the same API access token validation for public facing APIs. For more advanced business-to-business solutions, Amazon API Gateway provides integrated mutual TLS authentication.

To learn more about protecting information, systems, and assets that use Amazon EKS, see the Amazon EKS Best Practices Guide for Security.

If you have feedback about this post, submit comments in the Comments section below. If you have questions about this post, start a new thread on the Amazon Cognito forum or contact AWS Support.

Want more AWS Security how-to content, news, and feature announcements? Follow us on Twitter.

Author

Timothy James Power

Timothy is a Senior Solutions Architect Manager, leading the Accenture AWS Business Group in APAC and Japan. He has a keen interest in software development, spanning 20+ years, primarily in financial services. Tim is a passionate sportsperson, and loves spending time on the water, in between playing with his young children.

TLS-enabled Kubernetes clusters with ACM Private CA and Amazon EKS

Post Syndicated from Param Sharma original https://aws.amazon.com/blogs/security/tls-enabled-kubernetes-clusters-with-acm-private-ca-and-amazon-eks-2/

In this blog post, we show you how to set up end-to-end encryption on Amazon Elastic Kubernetes Service (Amazon EKS) with AWS Certificate Manager Private Certificate Authority. For this example of end-to-end encryption, traffic originates from your client and terminates at an Ingress controller server running inside a sample app. By following the instructions in this post, you can set up an NGINX ingress controller on Amazon EKS. As part of the example, we show you how to configure an AWS Network Load Balancer (NLB) with HTTPS using certificates issued via ACM Private CA in front of the ingress controller.

AWS Private CA supports an open source plugin for cert-manager that offers a more secure certificate authority solution for Kubernetes containers. cert-manager is a widely-adopted solution for TLS certificate management in Kubernetes. Customers who use cert-manager for application certificate lifecycle management can now use this solution to improve security over the default cert-manager CA, which stores keys in plaintext in server memory. Customers with regulatory requirements for controlling access to and auditing their CA operations can use this solution to improve auditability and support compliance.

Solution components

  • Kubernetes is an open-source system for automating the deployment, scaling, and management of containerized applications.
  • Amazon EKS is a managed service that you can use to run Kubernetes on Amazon Web Services (AWS) without needing to install, operate, and maintain your own Kubernetes control plane or nodes.
  • cert-manager is an add on to Kubernetes to provide TLS certificate management. cert-manager requests certificates, distributes them to Kubernetes containers, and automates certificate renewal. cert-manager ensures certificates are valid and up-to-date, and attempts to renew certificates at an appropriate time before expiry.
  • ACM Private CA enables the creation of private CA hierarchies, including root and subordinate CAs, without the investment and maintenance costs of operating an on-premises CA. With ACM Private CA, you can issue certificates for authenticating internal users, computers, applications, services, servers, and other devices, and for signing computer code. The private keys for private CAs are stored in AWS managed hardware security modules (HSMs), which are FIPS 140-2 certified, providing a better security profile compared to the default CAs in Kubernetes. Private certificates help identify and secure communication between connected resources on private networks such as servers, mobile and IoT devices, and applications.
  • AWS Private CA Issuer plugin. Kubernetes containers and applications use digital certificates to provide secure authentication and encryption over TLS. With this plugin, cert-manager requests TLS certificates from Private CA. The integration supports certificate automation for TLS in a range of configurations, including at the ingress, on the pod, and mutual TLS between pods. You can use the AWS Private CA Issuer plugin with Amazon Elastic Kubernetes Service, self managed Kubernetes on AWS, and Kubernetes on-premises.
  • The AWS Load Balancer controller manages AWS Elastic Load Balancers for a Kubernetes cluster. The controller provisions the following resources.
    • An AWS Application Load Balancer (ALB) when you create a Kubernetes Ingress.
    • An AWS Network Load Balancer (NLB) when you create a Kubernetes Service of type LoadBalancer.

Different points for terminating TLS in Kubernetes

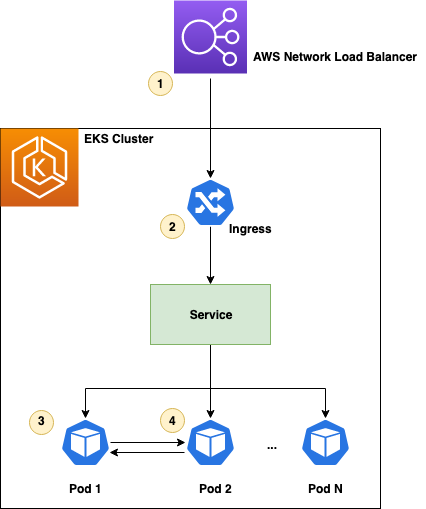
How and where you terminate your TLS connection depends on your use case, security policies, and need to comply with regulatory requirements. This section talks about four different use cases that are regularly used for terminating TLS. The use cases are illustrated in Figure 1 and described in the text that follows.

Figure 1: Terminating TLS at different points

Figure 1: Terminating TLS at different points

  1. At the load balancer: The most common use case for terminating TLS at the load balancer level is to use publicly trusted certificates. This use case is simple to deploy and the certificate is bound to the load balancer itself. For example, you can use ACM to issue a public certificate and bind it with AWS NLB. You can learn more from How do I terminate HTTPS traffic on Amazon EKS workloads with ACM?
  2. At the ingress: If there is no strict requirement for end-to-end encryption, you can offload this processing to the ingress controller or the NLB. This helps you to optimize the performance of your workloads and make them easier to configure and manage. We examine this use case in this blog post.
  3. On the pod: In Kubernetes, a pod is the smallest deployable unit of computing and it encapsulates one or more applications. End-to-end encryption of the traffic from the client all the way to a Kubernetes pod provides a secure communication model where the TLS is terminated at the pod inside the Kubernetes cluster. This could be useful for meeting certain security requirements. You can learn more from the blog post Setting up end-to-end TLS encryption on Amazon EKS with the new AWS Load Balancer Controller.
  4. Mutual TLS between pods: This use case focuses on encryption in transit for data flowing inside Kubernetes cluster. For more details on how this can be achieved with Cert-manager using an Istio service mesh, please see the Securing Istio workloads with mTLS using cert-manager blog post. You can use the AWS Private CA Issuer plugin in conjunction with cert-manager to use ACM Private CA to issue certificates for securing communication between the pods.

In this blog post, we use a scenario where there is a requirement to terminate TLS at the ingress controller level, demonstrating the second example above.

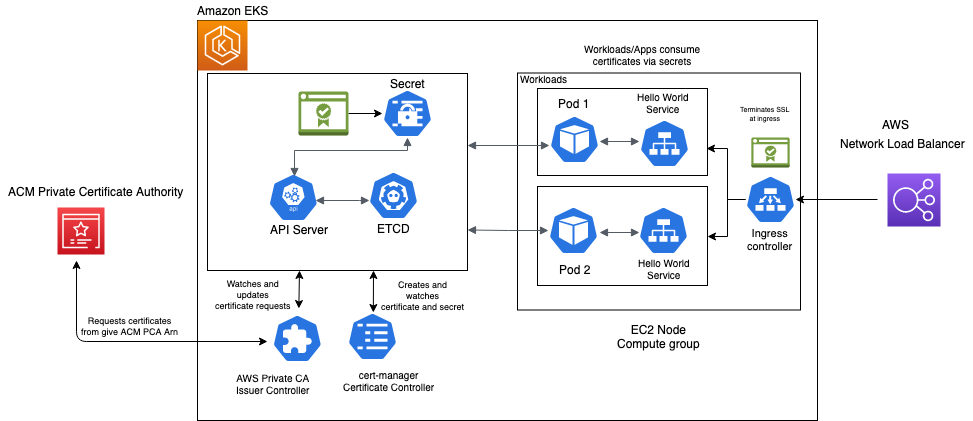
Figure 2 provides an overall picture of the solution described in this blog post. The components and steps illustrated in Figure 2 are described fully in the sections that follow.

Figure 2: Overall solution diagram

Figure 2: Overall solution diagram

Prerequisites

Before you start, you need the following:

Verify that you have the latest versions of these tools installed before you begin.

Provision an Amazon EKS cluster

If you already have a running Amazon EKS cluster, you can skip this step and move on to install NGINX Ingress.

You can use the AWS Management Console or AWS CLI, but this example uses eksctl to provision the cluster. eksctl is a tool that makes it easier to deploy and manage an Amazon EKS cluster.

This example uses the US-EAST-2 Region and the T2 node type. Select the node type and Region that are appropriate for your environment. Cluster provisioning takes approximately 15 minutes.

To provision an Amazon EKS cluster

  1. Run the following eksctl command to create an Amazon EKS cluster in the us-east-2 Region with Kubernetes version 1.19 and two nodes. You can change the Region to the one that best fits your use case.
    eksctl create cluster \
    --name acm-pca-lab \
    --version 1.19 \
    --nodegroup-name acm-pca-nlb-lab-workers \
    --node-type t2.medium \
    --nodes 2 \
    --region us-east-2
    

  2. Once your cluster has been created, verify that your cluster is running correctly by running the following command:
    $ kubectl get pods --all-namespaces
    NAMESPACE     NAME                       READY   STATUS    RESTARTS   AGE
    kube-system   aws-node-t94rp             1/1     Running   0          3m4s
    kube-system   aws-node-w7dm6             1/1     Running   0          3m19s
    kube-system   coredns-56b458df85-6tgjl   1/1     Running   0          10m
    kube-system   coredns-56b458df85-8gp94   1/1     Running   0          10m
    kube-system   kube-proxy-2pjx7           1/1     Running   0          3m19s
    kube-system   kube-proxy-hz8wq           1/1     Running   0          3m4s 
    

You should see output similar to the above, with all pods in a running state.

Install NGINX Ingress

NGINX Ingress is built around the Kubernetes Ingress resource, using a ConfigMap to store the NGINX configuration.

To install NGINX Ingress

  1. Use the following command to install NGINX Ingress:
    kubectl apply -f https://raw.githubusercontent.com/kubernetes/ingress-nginx/controller-v0.46.0/deploy/static/provider/aws/deploy.yaml
    

  2. Run the following command to determine the address that AWS has assigned to your NLB:
    $ kubectl get service -n ingress-nginx
    NAME                                 TYPE           CLUSTER-IP      EXTERNAL-IP                                                                     PORT(S)                      AGE
    ingress-nginx-controller             LoadBalancer   10.100.214.10   a3ebe22e7ca0522d1123456fbc92605c-8ac7f1d49be2fc42.elb.us-east-2.amazonaws.com   80:32598/TCP,443:30624/TCP   14s
    ingress-nginx-controller-admission   ClusterIP      10.100.118.1    <none>                                                                          443/TCP                      14s


  3. It can take up to 5 minutes for the load balancer to be ready. Once the external IP is created, run the following command to verify that traffic is being correctly routed to ingress-nginx:
    curl http://a3ebe22e7ca0522d1123456fbc92605c-8ac7f1d49be2fc42.elb.us-east-2.amazonaws.com
    <html>
    <head><title>404 Not Found</title></head>
    <body>
    <center><h1>404 Not Found</h1></center>
    <hr><center>nginx</center>
    </body>
    </html>
    

Note: Even though, it’s returning an HTTP 404 error code, in this case curl is still reaching the ingress controller and getting the expected HTTP response back.

Configure your DNS records

Once your load balancer is provisioned, the next step is to point the application’s DNS record to the URL of the NLB.

You can use your DNS provider’s console, for example Route53, and set a CNAME record pointing to your NLB. See CNAME record type for more details on how to setup a CNAME record using Route53.

This scenario uses the sample domain rsa-2048.example.com.

rsa-2048.example.com CNAME a3ebe22e7ca0522d1123456fbc92605c-8ac7f1d49be2fc42.elb.us-east-2.amazonaws.com

As you go through the scenario, replace rsa-2048.example.com with your registered domain.

Install cert-manager

cert-manager is a Kubernetes add-on that you can use to automate the management and issuance of TLS certificates from various issuing sources. It runs within your Kubernetes cluster and will ensure that certificates are valid and attempt to renew certificates at an appropriate time before they expire.

You can use the regular installation on Kubernetes guide to install cert-manager on Amazon EKS.

After you’ve deployed cert-manager, you can verify the installation by following these instructions. If all the above steps have completed without error, you’re good to go!

Note: If you’re planning to use Amazon EKS with Kubernetes pods running on AWS Fargate, please follow the cert-manager Fargate instructions to make sure cert-manager installation works as expected. AWS Fargate is a technology that provides on-demand, right-sized compute capacity for containers.

Install aws-privateca-issuer

The AWS PrivateCA Issuer plugin acts as an addon (see external cert configuration) to cert-manager that signs certificate requests using ACM Private CA.

To install aws-privateca-issuer

  1. For installation, use the following helm commands:
    kubectl create namespace aws-pca-issuer
    
    helm repo add awspca https://cert-manager.github.io/aws-privateca-issuer
    helm repo update
    helm install awspca/aws-pca-issuer --generate-name --namespace aws-pca-issuer
    

  2. Verify that the AWS Private CA Issuer is configured correctly by running the following command and ensure that it is in READY state with status as Running:
    $ kubectl get pods --namespace aws-pca-issuer
    NAME                                         READY   STATUS    RESTARTS   AGE
    aws-pca-issuer-1622570742-56474c464b-j6k8s   1/1     Running   0          21s
    

  3. You can check the chart configuration in the default values file.

Create an ACM Private CA

In this scenario, you create a private certificate authority in ACM Private CA with RSA 2048 selected as the key algorithm. You can create a CA using the AWS console, AWS CLI, or AWS CloudFormation.

To create an ACM Private CA

Download the CA certificate using the following command. Replace the <CA_ARN> and <Region> values with the values from the CA you created earlier and save it to a file named cacert.pem:

aws acm-pca get-certificate-authority-certificate --certificate-authority-arn <CA_ARN> -- region <region> --output text > cacert.pem

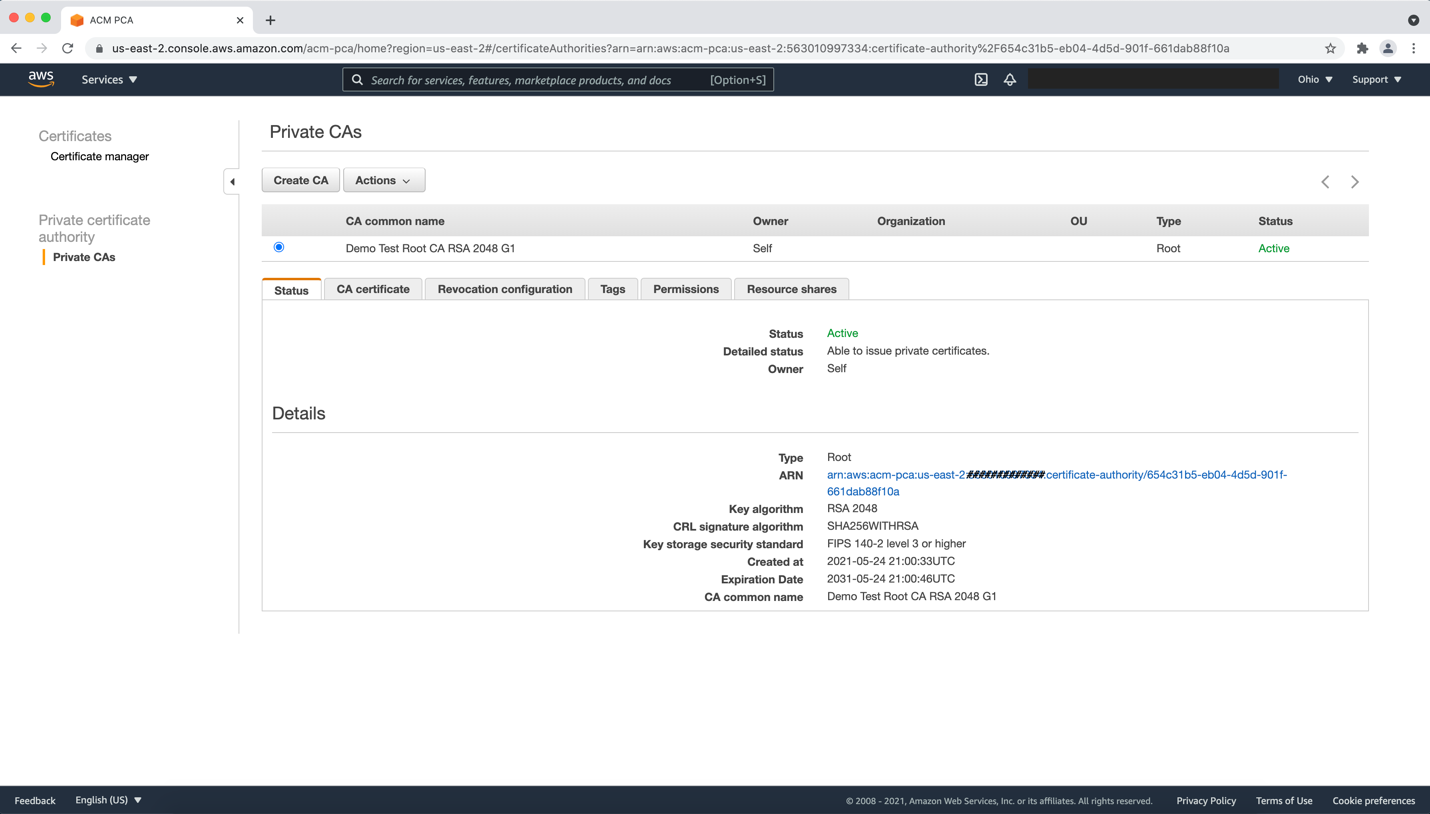
Once your private CA is active, you can proceed to the next step. You private CA will look similar to the CA in Figure 3.

Figure 3: Sample ACM Private CA

Figure 3: Sample ACM Private CA

Set EKS node permission for ACM Private CA

In order to issue a certificate from ACM Private CA, add the IAM policy from the prerequisites to your EKS NodeInstanceRole. Replace the <CA_ARN> value with the value from the CA you created earlier:

{
    "Version": "2012-10-17",
    "Statement": [
        {
            "Sid": "awspcaissuerpolicy",
            "Effect": "Allow",
            "Action": [
                "acm-pca:GetCertificate",
                "acm-pca:DescribeCertificateAuthority",
                "acm-pca:IssueCertificate"
            ],
            "Resource": "<CA_ARN>"
        }
        
    ]
}

Create an Issuer in Amazon EKS

Now that the ACM Private CA is active, you can begin requesting private certificates which can be used by Kubernetes applications. Use aws-privateca-issuer plugin to create the ClusterIssuer, which will be used with the ACM PCA to issue certificates.

Issuers (and ClusterIssuers) represent a certificate authority from which signed x509 certificates can be obtained, such as ACM Private CA. You need at least one Issuer or ClusterIssuer before you can start requesting certificates in your cluster. There are two custom resources that can be used to create an Issuer inside Kubernetes using the aws-privateca-issuer add-on:

  • AWSPCAIssuer is a regular namespaced issuer that can be used as a reference in your Certificate custom resources.
  • AWSPCAClusterIssuer is specified in exactly the same way, but it doesn’t belong to a single namespace and can be referenced by certificate resources from multiple different namespaces.

To create an Issuer in Amazon EKS

  1. For this scenario, you create an AWSPCAClusterIssuer. Start by creating a file named cluster-issuer.yaml and save the following text in it, replacing <CA_ARN> and <Region> information with your own.
    apiVersion: awspca.cert-manager.io/v1beta1
    kind: AWSPCAClusterIssuer
    metadata:
              name: demo-test-root-ca
    spec:
              arn: <CA_ARN>
              region: <Region>
    

  2. Deploy the AWSPCAClusterIssuer:
    kubectl apply -f cluster-issuer.yaml
    

  3. Verify the installation and make sure that the following command returns a Kubernetes service of kind AWSPCAClusterIssuer:
    $ kubectl get AWSPCAClusterIssuer
    NAME                AGE
    demo-test-root-ca   51s
    

Request the certificate

Now, you can begin requesting certificates which can be used by Kubernetes applications from the provisioned issuer. For more details on how to specify and request Certificate resources, please check Certificate Resources guide.

To request the certificate

  1. As a first step, create a new namespace that contains your application and secret:
    $ kubectl create namespace acm-pca-lab-demo
    namespace/acm-pca-lab-demo created
    

  2. Next, create a basic X509 private certificate for your domain.
    Create a file named rsa-2048.yaml and save the following text in it. Replace rsa-2048.example.com with your domain.
kind: Certificate
apiVersion: cert-manager.io/v1
metadata:
  name: rsa-cert-2048
  namespace: acm-pca-lab-demo
spec:
  commonName: www.rsa-2048.example.com
  dnsNames:
    - www.rsa-2048.example.com
    - rsa-2048.example.com
  duration: 2160h0m0s
  issuerRef:
    group: awspca.cert-manager.io
    kind: AWSPCAClusterIssuer
    name: demo-test-root-ca
  renewBefore: 360h0m0s
  secretName: rsa-example-cert-2048
  usages:
    - server auth
    - client auth
  privateKey:
    algorithm: "RSA"
    size: 2048


  • For a certificate with a key algorithm of RSA 2048, create the resource:
    kubectl apply -f rsa-2048.yaml -n acm-pca-lab-demo
    

  • Verify that the certificate is issued and in READY state by running the following command:
    $ kubectl get certificate -n acm-pca-lab-demo
    NAME            READY   SECRET                  AGE
    rsa-cert-2048   True    rsa-example-cert-2048   12s
    

  • Run the command kubectl describe certificate -n acm-pca—lab-demo to check the progress of your certificate.
  • Once the certificate status shows as issued, you can use the following command to check the issued certificate details:
    kubectl get secret rsa-example-cert-2048 -n acm-pca-lab-demo -o 'go-template={{index .data "tls.crt"}}' | base64 --decode | openssl x509 -noout -text


Deploy a demo application

For the purpose of this scenario, you can create a new service—a simple “hello world” website that uses echoheaders that respond with the HTTP request headers along with some cluster details.

To deploy a demo application

  1. Create a new file named hello-world.yaml with below content:
    apiVersion: v1
    kind: Service
    metadata:
      name: hello-world
      namespace: acm-pca-lab-demo
    spec:
      type: ClusterIP
      ports:
      - port: 80
        targetPort: 8080
      selector:
        app: hello-world
    ---
    apiVersion: apps/v1
    kind: Deployment
    metadata:
      name: hello-world
      namespace: acm-pca-lab-demo
    spec:
      replicas: 3
      selector:
        matchLabels:
          app: hello-world
      template:
        metadata:
          labels:
            app: hello-world
        spec:
          containers:
          - name: echoheaders
            image: k8s.gcr.io/echoserver:1.10
            args:
            - "-text=Hello World"
            imagePullPolicy: IfNotPresent
            resources:
              requests:
                cpu: 100m
                memory: 100Mi
            ports:
            - containerPort: 8080
    

  2. Create the service using the following command:
    $ kubectl apply -f hello-world.yaml
    

Expose and secure your application

Now that you’ve issued a certificate, you can expose your application using a Kubernetes Ingress resource.

To expose and secure your application

  1. Create a new file called example-ingress.yaml and add the following content:
    apiVersion: networking.k8s.io/v1
    kind: Ingress
    metadata:
      name: acm-pca-demo-ingress
      namespace: acm-pca-lab-demo
      annotations:
        kubernetes.io/ingress.class: "nginx"
    spec:
      tls:
      - hosts:
        - www.rsa-2048.example.com
        secretName: rsa-example-cert-2048
      rules:
      - host: www.rsa-2048.example.com
        http:
          paths:
          - path: /
            pathType: Exact
            backend:
              service:
                name: hello-world
                port:
                  number: 80
    

  2. Create a new Ingress resource by running the following command:
    kubectl apply -f example-ingress.yaml 
    

Access your application using TLS

After completing the previous step, you can to access this service from any computer connected to the internet.

To access your application using TLS

  1. Log in to a terminal window on a machine that has access to the internet, and run the following:
    $ curl https://rsa-2048.example.com --cacert cacert.pem 
    

  2. You should see an output similar to the following:
    Hostname: hello-world-d8fbd49c6-9bczb
    
    Pod Information:
    	-no pod information available-
    
    Server values:
    	server_version=nginx: 1.13.3 - lua: 10008
    
    Request Information:
    	client_address=192.162.32.64
    	method=GET
    	real path=/
    	query=
    	request_version=1.1
    	request_scheme=http
    	request_uri=http://rsa-2048.example.com:8080/
    
    Request Headers:
    	accept=*/*
    	host=rsa-2048.example.com
    	user-agent=curl/7.62.0
    	x-forwarded-for=52.94.2.2
    	x-forwarded-host=rsa-2048.example.com
    	x-forwarded-port=443
    	x-forwarded-proto=https
    	x-real-ip=52.94.2.2
    	x-request-id=371b6fc15a45d189430281693cccb76e
    	x-scheme=https
    
    Request Body:
    	-no body in request-…
    

    This response is returned from the service running behind the Kubernetes Ingress controller and demonstrates that a successful TLS handshake happened at port 443 with https protocol.

  3. You can use the following command to verify that the certificate issued earlier is being used for the SSL handshake:
    echo | openssl s_client -showcerts -servername www.rsa-2048.example.com -connect www.rsa-2048.example.com:443 2>/dev/null | openssl x509 -inform pem -noout -text
    

Cleanup

To avoid incurring future charges on your AWS account, perform the following steps to remove the scenario.

Delete the ACM Private CA

You can delete the ACM Private CA by following the instructions in Deleting your private CA.

As an alternative, you can use the following commands to delete the ACM Private CA, replacing the <CA_ARN> and <Region> with your own:

  1. Disable the CA.
    aws acm-pca update-certificate-authority \
    --certificate-authority-arn <CA_ARN>
    --region <Region>
    --status DISABLED
    

  2. Call the Delete Certificate Authority API
    aws acm-pca delete-certificate-authority \
    --certificate-authority-arn <CA_ARN>
    --region <Region>
    --permanent-deletion-time-in-days 7
    

Continue the cleanup

Once the ACM Private CA has been deleted, continue the cleanup by running the following commands.

  1. Delete the services:
    kubectl delete -f hello-world.yaml
    

  2. Delete the Ingress controller:
    kubectl delete -f example-ingress.yaml
    

  3. Delete the IAM NodeInstanceRole, replace role name with your EKS Node instance role created for the demo:
    aws iam delete-role --role-name eksctl-acm-pca-lab-nodegroup-acm-pca-nlb-lab-workers-NodeInstanceProfile-XXXXXXX
    

  4. Delete the Amazon EKS cluster using ekctl command:
    eksctl delete cluster acm-pca-lab --region us-east-2
    

You can also clean up from your Cloudformation console by deleting the stacks named eksctl-acm-pca-lab-nodegroup-acm-pca-nlb-lab-workers and eksctl-acm-pca-lab-cluster.

Conclusion

In this blog post, we showed you how to set up a Kubernetes Ingress controller with a service running in Amazon EKS cluster using AWS Load Balancer Controller with Network Load Balancer and set up HTTPS using private certificates issued by ACM Private CA. If you have questions or want to contribute, join the aws-privateca-issuer add-on project on GitHub.

If you have feedback about this post, submit comments in the Comments section below. If you have questions about this post, start a new thread on the AWS Certificate Manager forum or contact AWS Support.

Want more AWS Security how-to content, news, and feature announcements? Follow us on Twitter.

Author

Param Sharma

Param is a Senior Software Engineer with AWS. She is passionate about PKI, security, and privacy. She works with AWS customers to design, deploy, and manage their PKI infrastructures, helping customers improve their security, risk, and compliance in the cloud. In her spare time, she enjoys traveling, reading, and watching movies.

Author

Arindam Chatterji

Arindam is a Senior Solutions Architect with AWS SMB.