Tag Archives: Amazon Elastic File System (EFS)

Blue/Green deployment with AWS Developer tools on Amazon EC2 using Amazon EFS to host application source code

Post Syndicated from Rakesh Singh original https://aws.amazon.com/blogs/devops/blue-green-deployment-with-aws-developer-tools-on-amazon-ec2-using-amazon-efs-to-host-application-source-code/

Many organizations building modern applications require a shared and persistent storage layer for hosting and deploying data-intensive enterprise applications, such as content management systems, media and entertainment, distributed applications like machine learning training, etc. These applications demand a centralized file share that scales to petabytes without disrupting running applications and remains concurrently accessible from potentially thousands of Amazon EC2 instances.

Simultaneously, customers want to automate the end-to-end deployment workflow and leverage continuous methodologies utilizing AWS developer tools services for performing a blue/green deployment with zero downtime. A blue/green deployment is a deployment strategy wherein you create two separate, but identical environments. One environment (blue) is running the current application version, and one environment (green) is running the new application version. The blue/green deployment strategy increases application availability by generally isolating the two application environments and ensuring that spinning up a parallel green environment won’t affect the blue environment resources. This isolation reduces deployment risk by simplifying the rollback process if a deployment fails.

Amazon Elastic File System (Amazon EFS) provides a simple, scalable, and fully-managed elastic NFS file system for use with AWS Cloud services and on-premises resources. It scales on demand, thereby eliminating the need to provision and manage capacity in order to accommodate growth. Utilize Amazon EFS to create a shared directory that stores and serves code and content for numerous applications. Your application can treat a mounted Amazon EFS volume like local storage. This means you don’t have to deploy your application code every time the environment scales up to multiple instances to distribute load.

In this blog post, I will guide you through an automated process to deploy a sample web application on Amazon EC2 instances utilizing Amazon EFS mount to host application source code, and utilizing a blue/green deployment with AWS code suite services in order to deploy the application source code with no downtime.

How this solution works

This blog post includes a CloudFormation template to provision all of the resources needed for this solution. The CloudFormation stack deploys a Hello World application on Amazon Linux 2 EC2 Instances running behind an Application Load Balancer and utilizes Amazon EFS mount point to store the application content. The AWS CodePipeline project utilizes AWS CodeCommit as the version control, AWS CodeBuild for installing dependencies and creating artifacts,  and AWS CodeDeploy to conduct deployment on EC2 instances running in an Amazon EC2 Auto Scaling group.

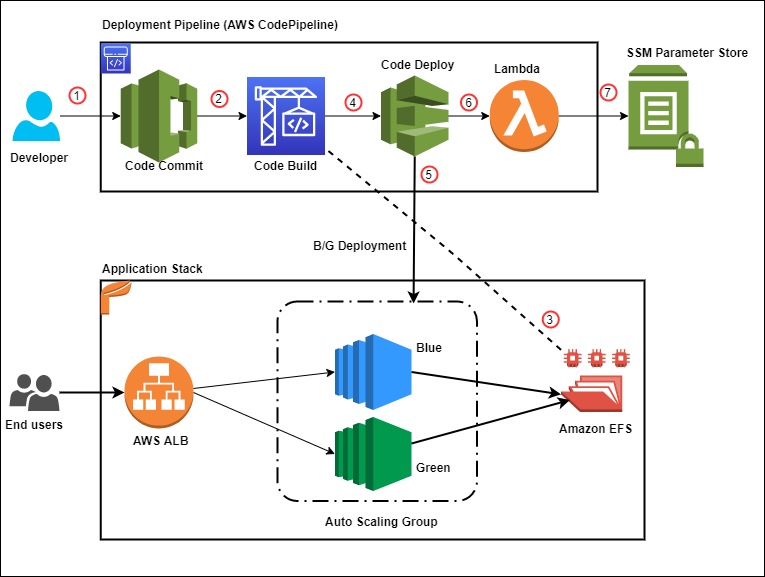
Figure 1 below illustrates our solution architecture.

Sample solution architecture

Figure 1: Sample solution architecture

The event flow in Figure 1 is as follows:

  1. A developer commits code changes from their local repo to the CodeCommit repository. The commit triggers CodePipeline execution.
  2. CodeBuild execution begins to compile source code, install dependencies, run custom commands, and create deployment artifact as per the instructions in the Build specification reference file.
  3. During the build phase, CodeBuild copies the source-code artifact to Amazon EFS file system and maintains two different directories for current (green) and new (blue) deployments.
  4. After successfully completing the build step, CodeDeploy deployment kicks in to conduct a Blue/Green deployment to a new Auto Scaling Group.
  5. During the deployment phase, CodeDeploy mounts the EFS file system on new EC2 instances as per the CodeDeploy AppSpec file reference and conducts other deployment activities.
  6. After successful deployment, a Lambda function triggers in order to store a deployment environment parameter in Systems Manager parameter store. The parameter stores the current EFS mount name that the application utilizes.
  7. The AWS Lambda function updates the parameter value during every successful deployment with the current EFS location.

Prerequisites

For this walkthrough, the following are required:

Deploy the solution

Once you’ve assembled the prerequisites, download or clone the GitHub repo and store the files on your local machine. Utilize the commands below to clone the repo:

mkdir -p ~/blue-green-sample/
cd ~/blue-green-sample/
git clone https://github.com/aws-samples/blue-green-deployment-pipeline-for-efs

Once completed, utilize the following steps to deploy the solution in your AWS account:

  1. Create a private Amazon Simple Storage Service (Amazon S3) bucket by using this documentation
    AWS S3 console view when creating a bucket

    Figure 2: AWS S3 console view when creating a bucket


  2. Upload the cloned or downloaded GitHub repo files to the root of the S3 bucket. the S3 bucket objects structure should look similar to Figure 3:
    AWS S3 bucket object structure after you upload the Github repo content

    Figure 3: AWS S3 bucket object structure


  3. Go to the S3 bucket and select the template name solution-stack-template.yml, and then copy the object URL.
  4. Open the CloudFormation console. Choose the appropriate AWS Region, and then choose Create Stack. Select With new resources.
  5. Select Amazon S3 URL as the template source, paste the object URL that you copied in Step 3, and then choose Next.
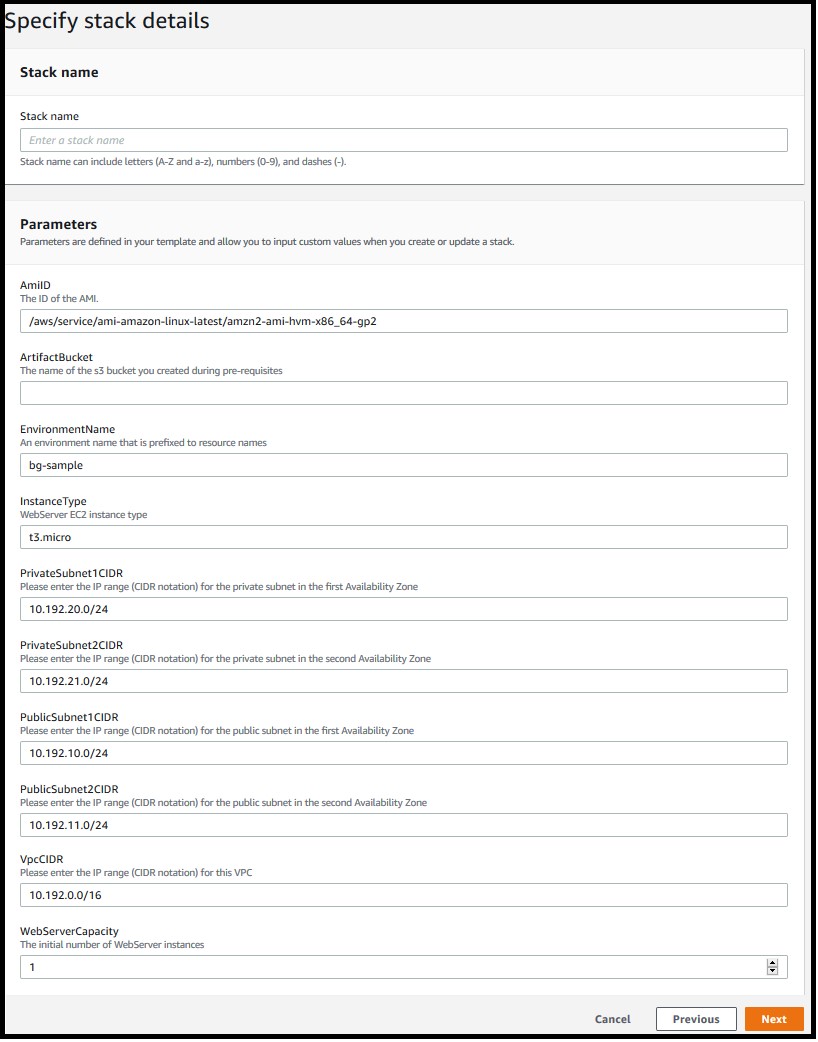
  6. On the Specify stack details page, enter a name for the stack and provide the following input parameter. Modify the default values for other parameters in order to customize the solution for your environment. You can leave everything as default for this walkthrough.
  • ArtifactBucket– The name of the S3 bucket that you created in the first step of the solution deployment. This is a mandatory parameter with no default value.
Defining the stack name and input parameters for the CloudFormation stack

Figure 4: Defining the stack name and input parameters for the CloudFormation stack

  1. Choose Next.
  2. On the Options page, keep the default values and then choose Next.
  3. On the Review page, confirm the details, acknowledge that CloudFormation might create IAM resources with custom names, and then choose Create Stack.
  4. Once the stack creation is marked as CREATE_COMPLETE, the following resources are created:
  • A virtual private cloud (VPC) configured with two public and two private subnets.
  • NAT Gateway, an EIP address, and an Internet Gateway.
  • Route tables for private and public subnets.
  • Auto Scaling Group with a single EC2 Instance.
  • Application Load Balancer and a Target Group.
  • Three security groups—one each for ALB, web servers, and EFS file system.
  • Amazon EFS file system with a mount target for each Availability Zone.
  • CodePipeline project with CodeCommit repository, CodeBuild, and CodeDeploy resources.
  • SSM parameter to store the environment current deployment status.
  • Lambda function to update the SSM parameter for every successful pipeline execution.
  • Required IAM Roles and policies.

      Note: It may take anywhere from 10-20 minutes to complete the stack creation.

Test the solution

Now that the solution stack is deployed, follow the steps below to test the solution:

  1. Validate CodePipeline execution status

After successfully creating the CloudFormation stack, a CodePipeline execution automatically triggers to deploy the default application code version from the CodeCommit repository.

  • In the AWS console, choose Services and then CloudFormation. Select your stack name. On the stack Outputs tab, look for the CodePipelineURL key and click on the URL.
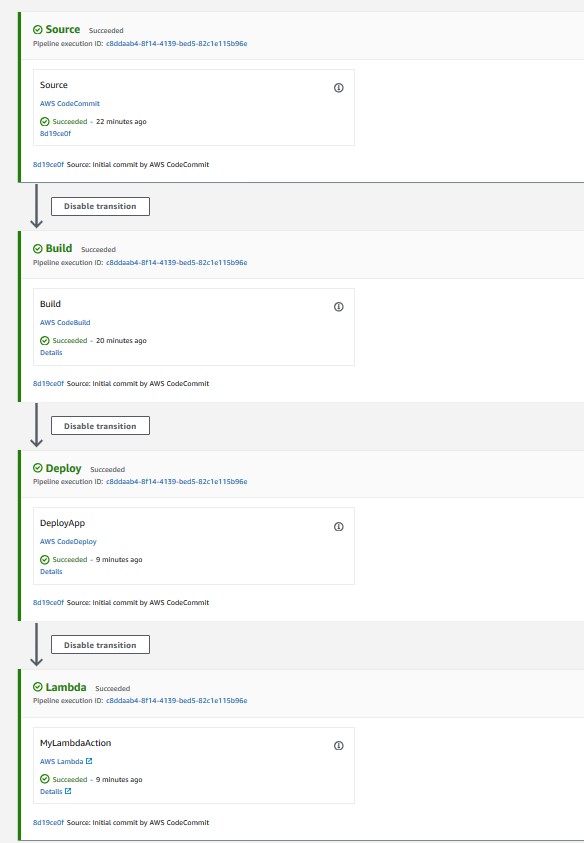
  • Validate that all steps have successfully completed. For a successful CodePipeline execution, you should see something like Figure 5. Wait for the execution to complete in case it is still in progress.
CodePipeline console showing execution status of all stages

Figure 5: CodePipeline console showing execution status of all stages


  1. Validate the Website URL

After completing the pipeline execution, hit the website URL on a browser to check if it’s working.

  • On the stack Outputs tab, look for the WebsiteURL key and click on the URL.
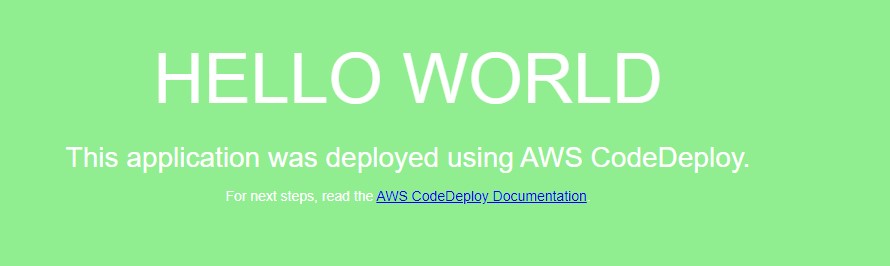
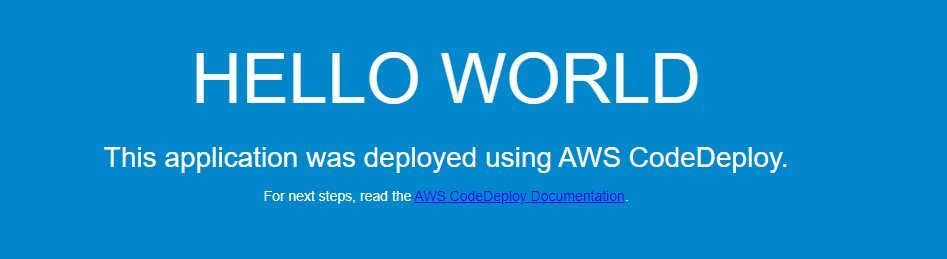
  • For a successful deployment, it should open a default page similar to Figure 6.
Sample “Hello World” application (Green deployment)

Figure 6: Sample “Hello World” application (Green deployment)


  1. Validate the EFS share

After the website deployed successfully, we will get into the application server and validate the EFS mount point and the application source code directory.

  • Open the Amazon EC2 console, and then choose Instances in the left navigation pane.
  • Select the instance named bg-sample and choose
  • For Connection method, choose Session Manager, and then choose connect

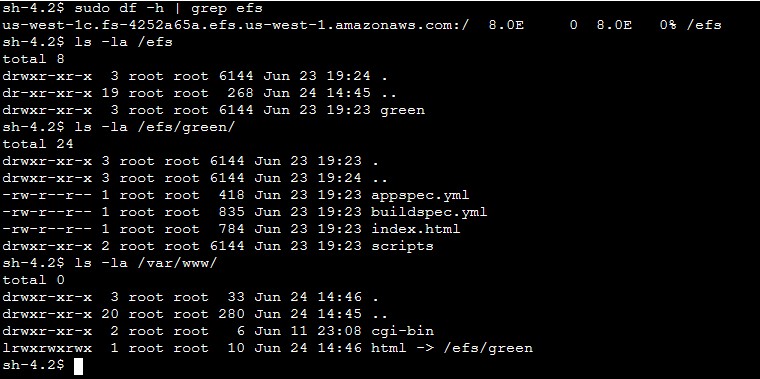
After the connection is made, run the following bash commands to validate the EFS mount and the deployed content. Figure 7 shows a sample output from running the bash commands.

sudo df –h | grep efs
ls –la /efs/green
ls –la /var/www/
Sample output from the bash command (Green deployment)

Figure 7: Sample output from the bash command (Green deployment)


  1. Deploy a new revision of the application code

After verifying the application status and the deployed code on the EFS share, commit some changes to the CodeCommit repository in order to trigger a new deployment.

  • On the stack Outputs tab, look for the CodeCommitURL key and click on the corresponding URL.
  • Click on the file html.
  • Click on
  • Uncomment line 9 and comment line 10, so that the new lines look like those below after the changes:
background-color: #0188cc; 
#background-color: #90ee90;
  • Add Author name, Email address, and then choose Commit changes.

After you commit the code, the CodePipeline triggers and executes Source, Build, Deploy, and Lambda stages. Once the execution completes, hit the Website URL and you should see a new page like Figure 8.

New Application version (Blue deployment)

Figure 8: New Application version (Blue deployment)


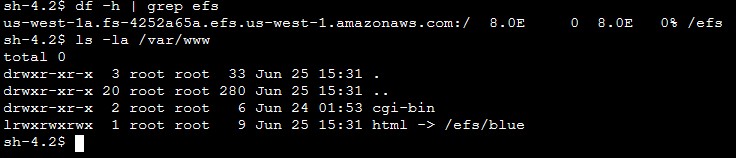
On the EFS side, the application directory on the new EC2 instance now points to /efs/blue as shown in Figure 9.

Sample output from the bash command (Blue deployment)

Figure 9: Sample output from the bash command (Blue deployment)

Solution review

Let’s review the pipeline stages details and what happens during the Blue/Green deployment:

1) Build stage

For this sample application, the CodeBuild project is configured to mount the EFS file system and utilize the buildspec.yml file present in the source code root directory to run the build. Following is the sample build spec utilized in this solution:

version: 0.2
phases:
  install:
    runtime-versions:
      php: latest   
  build:
    commands:
      - current_deployment=$(aws ssm get-parameter --name $SSM_PARAMETER --query "Parameter.Value" --region $REGION --output text)
      - echo $current_deployment
      - echo $SSM_PARAMETER
      - echo $EFS_ID $REGION
      - if [[ "$current_deployment" == "null" ]]; then echo "this is the first GREEN deployment for this project" ; dir='/efs/green' ; fi
      - if [[ "$current_deployment" == "green" ]]; then dir='/efs/blue' ; else dir='/efs/green' ; fi
      - if [ ! -d $dir ]; then  mkdir $dir >/dev/null 2>&1 ; fi
      - echo $dir
      - rsync -ar $CODEBUILD_SRC_DIR/ $dir/
artifacts:
  files:
      - '**/*'

During the build job, the following activities occur:

  • Installs latest php runtime version.
  • Reads the SSM parameter value in order to know the current deployment and decide which directory to utilize. The SSM parameter value flips between green and blue for every successful deployment.
  • Synchronizes the latest source code to the EFS mount point.
  • Creates artifacts to be utilized in subsequent stages.

Note: Utilize the default buildspec.yml as a reference and customize it further as per your requirement. See this link for more examples.

2) Deploy Stage

The solution is utilizing CodeDeploy blue/green deployment type for EC2/On-premises. The deployment environment is configured to provision a new EC2 Auto Scaling group for every new deployment in order to deploy the new application revision. CodeDeploy creates the new Auto Scaling group by copying the current one. See this link for more details on blue/green deployment configuration with CodeDeploy. During each deployment event, CodeDeploy utilizes the appspec.yml file to run the deployment steps as per the defined life cycle hooks. Following is the sample AppSpec file utilized in this solution.

version: 0.0
os: linux
hooks:
  BeforeInstall:
    - location: scripts/install_dependencies
      timeout: 180
      runas: root
  AfterInstall:
    - location: scripts/app_deployment
      timeout: 180
      runas: root
  BeforeAllowTraffic :
     - location: scripts/check_app_status
       timeout: 180
       runas: root  

Note: The scripts mentioned in the AppSpec file are available in the scripts directory of the CodeCommit repository. Utilize these sample scripts as a reference and modify as per your requirement.

For this sample, the following steps are conducted during a deployment:

  • BeforeInstall:
    • Installs required packages on the EC2 instance.
    • Mounts the EFS file system.
    • Creates a symbolic link to point the apache home directory /var/www/html to the appropriate EFS mount point. It also ensures that the new application version deploys to a different EFS directory without affecting the current running application.
  • AfterInstall:
    • Stops apache web server.
    • Fetches current EFS directory name from Systems Manager.
    • Runs some clean up commands.
    • Restarts apache web server.
  • BeforeAllowTraffic:
    • Checks application status if running fine.
    • Exits the deployment with error if the app returns a non 200 HTTP status code. 

3) Lambda Stage

After completing the deploy stage, CodePipeline triggers a Lambda function in order to update the SSM parameter value with the updated EFS directory name. This parameter value alternates between “blue” and “green” to help CodePipeline identify the right EFS file system path during the next deployment.

CodeDeploy Blue/Green deployment

Let’s review the sequence of events flow during the CodeDeploy deployment:

  1. CodeDeploy creates a new Auto Scaling group by copying the original one.
  2. Provisions a replacement EC2 instance in the new Auto Scaling Group.
  3. Conducts the deployment on the new instance as per the instructions in the yml file.
  4. Sets up health checks and redirects traffic to the new instance.
  5. Terminates the original instance along with the Auto Scaling Group.
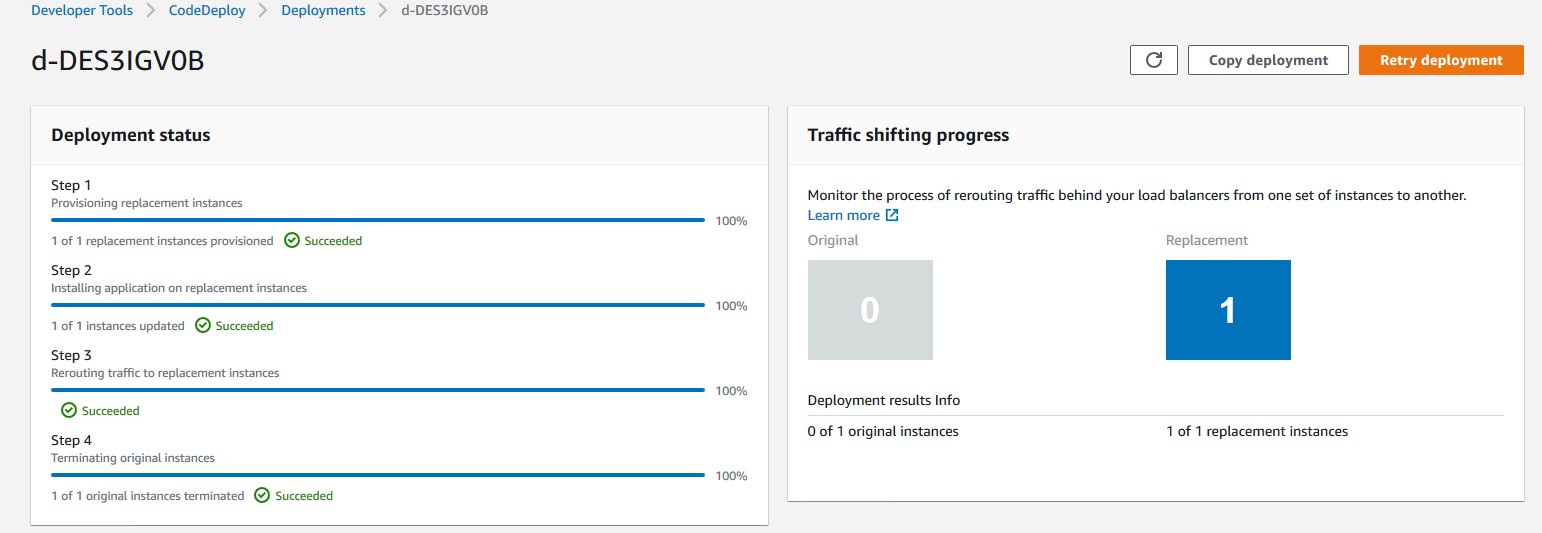
  6. After completing the deployment, it should appear as shown in Figure 10.
AWS CodeDeploy console view of a Blue/Green CodeDeploy deployment on Ec2

Figure 10: AWS console view of a Blue/Green CodeDeploy deployment on Ec2

Troubleshooting

To troubleshoot any service-related issues, see the following links:

More information

Now that you have tested the solution, here are some additional points worth noting:

  • The sample template and code utilized in this blog can work in any AWS region and are mainly intended for demonstration purposes. Utilize the sample as a reference and modify it further as per your requirement.
  • This solution works with single account, Region, and VPC combination.
  • For this sample, we have utilized AWS CodeCommit as version control, but you can also utilize any other source supported by AWS CodePipeline like Bitbucket, GitHub, or GitHub Enterprise Server

Clean up

Follow these steps to delete the components and avoid any future incurring charges:

  1. Open the AWS CloudFormation console.
  2. On the Stacks page in the CloudFormation console, select the stack that you created for this blog post. The stack must be currently running.
  3. In the stack details pane, choose Delete.
  4. Select Delete stack when prompted.
  5. Empty and delete the S3 bucket created during deployment step 1.

Conclusion

In this blog post, you learned how to set up a complete CI/CD pipeline for conducting a blue/green deployment on EC2 instances utilizing Amazon EFS file share as mount point to host application source code. The EFS share will be the central location hosting your application content, and it will help reduce your overall deployment time by eliminating the need for deploying a new revision on every EC2 instance local storage. It also helps to preserve any dynamically generated content when the life of an EC2 instance ends.

Author bio

Rakesh Singh

Rakesh is a Senior Technical Account Manager at Amazon. He loves automation and enjoys working directly with customers to solve complex technical issues and provide architectural guidance. Outside of work, he enjoys playing soccer, singing karaoke, and watching thriller movies.

Should I Run my Containers on AWS Fargate, AWS Lambda, or Both?

Post Syndicated from Rob Solomon original https://aws.amazon.com/blogs/architecture/should-i-run-my-containers-on-aws-fargate-aws-lambda-or-both/

Containers have transformed how companies build and operate software. Bundling both application code and dependencies into a single container image improves agility and reduces deployment failures. But what compute platform should you choose to be most efficient, and what factors should you consider in this decision?

With the release of container image support for AWS Lambda functions (December 2020), customers now have an additional option for building serverless applications using their existing container-oriented tooling and DevOps best practices. In addition, a single container image can be configured to run on both of these compute platforms: AWS Lambda (using serverless functions) or AWS Fargate (using containers).

Three key factors can influence the decision of what platform you use to deploy your container: startup time, task runtime, and cost. That decision may vary each time a task is initiated, as shown in the three scenarios following.

Design considerations for deploying a container

Total task duration consists of startup time and runtime. The startup time of a containerized task is the time required to provision the container compute resource and deploy the container. Task runtime is the time it takes for the application code to complete.

Startup time: Some tasks must complete quickly. For example, when a user waits for a web response, or when a series of tasks is completed in sequential order. In those situations, the total duration time must be minimal. While the application code may be optimized to run faster, startup time depends on the chosen compute platform as well. AWS Fargate container startup time typically takes from 60 to 90 seconds. AWS Lambda initial cold start can take up to 5 seconds. Following that first startup, the same containerized function has negligible startup time.

Task runtime: The amount of time it takes for a task to complete is influenced by the compute resources allocated (vCPU and memory) and application code. AWS Fargate lets you select vCPU and memory size. With AWS Lambda, you define the amount of allocated memory. Lambda then provisions a proportional quantity of vCPU. In both AWS Fargate and AWS Lambda uses, increasing the amount of compute resources may result in faster completion time. However, this will depend on the application. While the additional compute resources incur greater cost, the total duration may be shorter, so the overall cost may also be lower.

AWS Lambda has a maximum limit of 15 minutes of runtime. Lambda shouldn’t be used for these tasks to avoid the likelihood of timeout errors.

Figure 1 illustrates the proportion of startup time to total duration. The initial steepness of each line shows a rapid decrease in startup overhead. This is followed by a flattening out, showing a diminishing rate of efficiency. Startup time delay becomes less impactful as the total job duration increases. Other factors (such as cost) become more significant.

Figure 1. Ratio of startup time as a function to overall job duration for each service

Figure 1. Ratio of startup time as a function to overall job duration for each service

Cost: When making the choice between Fargate and Lambda, it is important to understand the different pricing models. This way, you can make the appropriate selection for your needs.

Figure 2 shows a cost analysis of Lambda vs Fargate. This is for the entire range of configurations for a runtime task. For most of the range of configurable memory, AWS Lambda is more expensive per second than even the most expensive configuration of Fargate.

Figure 2. Total cost for both AWS Lambda and AWS Fargate based on task duration

Figure 2. Total cost for both AWS Lambda and AWS Fargate based on task duration

From a cost perspective, AWS Fargate is more cost-effective for tasks running for several seconds or longer. If cost is the only factor at play, then Fargate would be the better choice. But the savings gained by using Fargate may be offset by the business value gained from the shorter Lambda function startup time.

Dynamically choose your compute platform

In the following scenarios, we show how a single container image can serve multiple use cases. The decision to run a given containerized application on either AWS Lambda or AWS Fargate can be determined at runtime. This decision depends on whether cost, speed, or duration are the priority.

In Figure 3, an image-processing AWS Batch job runs on a nightly schedule, processing tens of thousands of images to extract location information. When run as a batch job, image processing may take 1–2 hours. The job pulls images stored in Amazon Simple Storage Service (S3) and writes the location metadata to Amazon DynamoDB. In this case, AWS Fargate provides a good combination of compute and cost efficiency. An added benefit is that it also supports tasks that exceed 15 minutes. If a single image is submitted for real-time processing, response time is critical. In that case, the same image-processing code can be run on AWS Lambda, using the same container image. Rather than waiting for the next batch process to run, the image is processed immediately.

Figure 3. One-off invocation of a typically long-running batch job

Figure 3. One-off invocation of a typically long-running batch job

In Figure 4, a SaaS application uses an AWS Lambda function to allow customers to submit complex text search queries for files stored in an Amazon Elastic File System (EFS) volume. The task should return results quickly, which is an ideal condition for AWS Lambda. However, a small percentage of jobs run much longer than the average, exceeding the maximum duration of 15 minutes.

A straightforward approach to avoid job failure is to initiate an Amazon CloudWatch alarm when the Lambda function times out. CloudWatch alarms can automatically retry the job using Fargate. An alternate approach is to capture historical data and use it to create a machine learning model in Amazon SageMaker. When a new job is initiated, the SageMaker model can predict the time it will take the job to complete. Lambda can use that prediction to route the job to either AWS Lambda or AWS Fargate.

Figure 4. Short duration tasks with occasional outliers running longer than 15 minutes

Figure 4. Short duration tasks with occasional outliers running longer than 15 minutes

In Figure 5, a customer runs a containerized legacy application that encompasses many different kinds of functions, all related to a recurring data processing workflow. Each function performs a task of varying complexity and duration. These can range from processing data files, updating a database, or submitting machine learning jobs.

Using a container image, one code base can be configured to contain all of the individual functions. Longer running functions, such as data preparation and big data analytics, are routed to Fargate. Shorter duration functions like simple queries can be configured to run using the container image in AWS Lambda. By using AWS Step Functions as an orchestrator, the process can be automated. In this way, a monolithic application can be broken up into a set of “Units of Work” that operate independently.

Figure 5. Heterogeneous function orchestration

Figure 5. Heterogeneous function orchestration

Conclusion

If your job lasts milliseconds and requires a fast response to provide a good customer experience, use AWS Lambda. If your function is not time-sensitive and runs on the scale of minutes, use AWS Fargate. For tasks that have a total duration of under 15 minutes, customers must decide based on impacts to both business and cost. Select the service that is the most effective serverless compute environment to meet your requirements. The choice can be made manually when a job is scheduled or by using retry logic to switch to the other compute platform if the first option fails. The decision can also be based on a machine learning model trained on historical data.

Updated whitepaper available: Encrypting File Data with Amazon Elastic File System

Post Syndicated from Joe Travaglini original https://aws.amazon.com/blogs/security/updated-whitepaper-available-encrypting-file-data-with-amazon-elastic-file-system/

We’re sharing an update to the Encrypting File Data with Amazon Elastic File System whitepaper to provide customers with guidance on enforcing encryption of data at rest and in transit in Amazon Elastic File System (Amazon EFS). Amazon EFS provides simple, scalable, highly available, and highly durable shared file systems in the cloud. The file systems you create by using Amazon EFS are elastic, which allows them to grow and shrink automatically as you add and remove data. They can grow to petabytes in size, distributing data across an unconstrained number of storage servers in multiple Availability Zones.

Read the updated whitepaper to learn about best practices for encrypting Amazon EFS. Learn how to enforce encryption at rest while you create an Amazon EFS file system in the AWS Management Console and in the AWS Command Line Interface (AWS CLI), and how to enforce encryption of data in transit at the client connection layer by using AWS Identity and Access Management (IAM).

Download and read the updated whitepaper.

If you have questions or want to learn more, contact your account executive or contact AWS Support. If you have feedback about this post, submit comments in the Comments section below.

Want more AWS Security how-to content, news, and feature announcements? Follow us on Twitter.

Author

Joseph Travaglini

For over four years, Joe has been a product manager on the Amazon Elastic File System team, responsible for the Amazon EFS security and compliance roadmap, and a product lead for the launch of EFS Infrequent Access. Prior to joining the Amazon EFS team, Joe was Director of Products at Sqrrl, a cybersecurity analytics startup acquired by AWS in 2018.

Author

Peter Buonora

Pete is a Principal Solutions Architect for AWS, with a focus on enterprise cloud strategy and information security. Pete has worked with the largest customers of AWS to accelerate their cloud adoption and improve their overall security posture.

Author

Siva Rajamani

Siva is a Boston-based Enterprise Solutions Architect for AWS. He enjoys working closely with customers and supporting their digital transformation and AWS adoption journey. His core areas of focus are security, serverless computing, and application integration.

Choosing between AWS Lambda data storage options in web apps

Post Syndicated from James Beswick original https://aws.amazon.com/blogs/compute/choosing-between-aws-lambda-data-storage-options-in-web-apps/

AWS Lambda is an on-demand compute service that powers many serverless applications. Lambda functions are ephemeral, with execution environments only existing for a brief time when the function is invoked. Many compute operations need access to external data for a variety of purposes. This includes importing third-party libraries, accessing machine learning models, or exporting the output of the compute operation.

Lambda provides a comprehensive range of storage options to meet the needs of web application developers. These include other AWS services such as Amazon S3 and Amazon EFS. There are also native storage options available, such as temporary storage or Lambda layers. In this blog post, I explain the differences between these options, and discuss common use-cases to help you choose for your own applications.

This post references the Happy Path web application series, and you can download the code for that application from the repository.

Amazon S3 – Object storage

Amazon S3 is an object storage service that scales elastically. It offers high availability and 11 9’s of durability. The service is ideal for storing unstructured data. This includes binary data, such as images or media, log files and sensor data.

Sample contents from an S3 bucket.

There are certain characteristics of S3 object storage that are important to remember. While S3 objects can be versioned, you cannot append data as you could in a file system. You have to store an entirely new version of an object. S3 also has a flat storage hierarchy that’s different to a file system. Instead of directories, you use folders to logically organize objects, by prefixing ‘foldername/’ in the key name.

S3 has important event integrations for serverless developers. It has a native integration with Lambda, which allows you to invoke a function in response to an S3 event. This can provide a scalable way to trigger application workflows when objects are created or deleted in S3. In the Happy Path application, the image-processing workflows are initiated by this event integration. To learn more about using S3 to trigger automated serverless workflows, visit the learning path.

S3 is often an important repository for an organization’s data lake. If your application writes data to S3 buckets, this can be a useful staging area for downstream processing. For analytics workloads, you can use AWS Glue to perform extract, transform, and loan (ETL) operations. To create ad hoc visualizations and business analysis reports, Amazon QuickSight can connect to your S3 buckets and produce interactive dashboards. To learn how to build business intelligence dashboards for your web application, visit the Innovator Island workshop.

S3 also provides object lifecycle management. This allows you to automatically change storage classes when certain conditions are met. For example, an application for uploading expenses could automatically archive PDFs after 1 year to Amazon S3 Glacier to reduce storage costs. In the Happy Path application, the original high-resolution uploads are stored in a separate bucket from the optimized distribution assets. To reduce storage costs, lifecycle management could be configured to automatically delete these original photo assets after 30 days.

Temporary storage with /tmp

The Lambda execution environment provides a file system for your code to use at /tmp. This space has a fixed size of 512 MB. The same Lambda execution environment may be reused by multiple Lambda invocations to optimize performance. The /tmp area is preserved for the lifetime of the execution environment and provides a transient cache for data between invocations. Each time a new execution environment is created, this area is deleted.

Consequently, this is intended as an ephemeral storage area. While functions may cache data here between invocations, it should be used only for data needed by code in a single invocation. It’s not a place to store data permanently, and is better-used to support operations required by your code.

Operationally, working with files in /tmp is the same as your local hard disk, and offers fast I/O throughput. For example, to unzip a file into this space in Python, use:

import os, zipfile
os.chdir('/tmp')
with zipfile.ZipFile(myzipfile, 'r') as zip:
    zip.extractall()

Lambda layers

Your Lambda functions may use additional libraries as part of the deployment package. You can bundle these in the deployment archive or optionally move to a layer instead. A Lambda function can have up to five layers, and is subject to the maximum deployment size of 50 MB (zipped). Packages in layers are available in the /opt directory during invocations. While layers are private to you by default, you can also share layers with other AWS accounts, or make layers public.

Lambda layers in the console

There are many benefits to using layers throughout the functions in your serverless application. It’s best practice to include the AWS SDK instead of depending on the version bundled with the Lambda service. This enables you to pin the version of the SDK. By using a layer, you don’t need to bundle the package with each function, which can increase your deployment package size and slow down deployments. You can create an AWS SDK layer and then include a reference to the layer in each function.

Layers can be an effective way to bundle large dependencies, or share compiled libraries with binaries that vary by operating system. For example, the Happy Path application uses the Sharp npm graphics library to process images. Similarly, the Innovator Island workshop uses the OpenCV library to perform image manipulation, and this is imported using a shared layer.

Layers are static once they are deployed. You can only change the contents of a layer by deploying a new version. Any Lambda function using the layer binds to a specific version and must be updated to change layer versions. To learn more, see using Lambda layers to simplify your development process.

Amazon EFS for Lambda

Amazon EFS is a fully managed, elastic, shared file system that integrates with other AWS services. It is durable storage option that offers high availability. You can now mount EFS volumes in Lambda functions, which makes it simpler to share data across invocations. The file system grows and shrinks as you add or delete data, so you do not need to manage storage limits.

EFS file system in the console.

The Lambda service mounts EFS file systems when the execution environment is prepared. This happens in parallel with other initialization operations so typically does not impact cold start latency. If the execution environment is warm from previous invocations, the mount is already prepared. To use EFS, your Lambda function must be in the same VPC as the file system.

EFS enables new capabilities for serverless applications. The file system is a dynamic binding for Lambda functions, unlike layers. This makes it useful for deploying code libraries where you want to always use the latest version. You configure the mount path when integrating the file system with your function, and then include packages from this location. Additionally, you can use this to include packages that exceed the limits of layers.

Due to its speed and support of standard file operations, EFS is also useful for ingesting or writing large numbers files durably. This can be helpful for zipping or unzipping large archives, for example. For appending to existing files, EFS is also a preferred option to using S3.

To learn more, see using Amazon EFS for AWS Lambda in your serverless applications.

Comparing the different data storage options

This table compares the characteristics of these four different data storage options for Lambda:

Amazon S3 /tmp Lambda Layers Amazon EFS
Maximum size Elastic 512 MB 50 MB Elastic
Persistence Durable Ephemeral Durable Durable
Content Dynamic Dynamic Static Dynamic
Storage type Object File system Archive File system
Lambda event source integration Native N/A N/A N/A
Operations supported Atomic with versioning Any file system operation Immutable Any file system operation
Object tagging Y N N N
Object metadata Y N N N
Pricing model Storage + requests + data transfer Included in Lambda Included in Lambda Storage + data transfer + throughput
Sharing/permissions model IAM Function-only IAM IAM + NFS
Source for AWS Glue Y N N N
Source for Amazon QuickSight Y N N N
Relative data access speed from Lambda Fast Fastest Fastest Very fast

Conclusion

Lambda is a flexible, on-demand compute service for serverless application. It supports a wide variety of workloads by providing a number of different data storage options.

In this post, I compare the capabilities and use-cases of S3, EFS, Lambda layers, and temporary storage for Lambda functions. There are benefits to each approach, as each type has different behaviors and characteristics. For web application developers, these storage types support different operations depending upon the needs of your serverless backend.

As the newest integration with Lambda, EFS now enables new workloads and capabilities. This includes sharing large code packages with Lambda, or durably operating on large numbers of files. It also opens up new possibilities for developers working on deep learning inference models.

To learn more about storage options available, visit the AWS Serverless homepage. For more serverless learning resources, visit https://serverlessland.com.

Pay as you go machine learning inference with AWS Lambda

Post Syndicated from James Beswick original https://aws.amazon.com/blogs/compute/pay-as-you-go-machine-learning-inference-with-aws-lambda/

This post is courtesy of Eitan Sela, Senior Startup Solutions Architect.

Many customers want to deploy machine learning models for real-time inference, and pay only for what they use. Using Amazon EC2 instances for real-time inference may not be cost effective to support sporadic inference requests throughout the day.

AWS Lambda is a serverless compute service with pay-per-use billing. However, ML frameworks like XGBoost are too large to fit into the 250 MB application artifact size limit, or the 512 MB /tmp space limit. While you can store the packages in Amazon S3 and download to Lambda (up to 3 GB), this can increase the cost.

To address this, Lambda functions can now mount an Amazon Elastic File System (EFS). This is a scalable and elastic NFS file system storing data within and across multiple Availability Zones (AZ) for high availability and durability.

With this new capability, it’s now easier to use Python packages in Lambda that require storage space to load models and other dependencies.

In this blog post, I walk through how to:

  • Create an EFS file system and an Access Point as an application-specific entry point.
  • Provision an EC2 instance, mount EFS using the Access Point, and train a breast cancer XGBoost ML model. XGBoost, Python packages, and the model are saved on the EFS file system.
  • Create a Lambda function that loads the Python packages and model from EFS, and performs the prediction based on a test event.

Create an Amazon EFS file system with an Access Point

Configuring EFS for Lambda is straight-forward. I show how to do this in the AWS CloudFormation but you can also use the AWS CLI, AWS SDK, and AWS Serverless Application Model (AWS SAM).

EFS file systems are created within a customer VPC, so Lambda functions using the EFS file system must have access to the same VPC.

You can deploy the AWS CloudFormation stack located on this GitHub repository.

The stack includes the following:

  • Create a VPC with public subnet.
  • Create an EFS file system
  • Create an EFS Access Point
  • Create an EC2 in the VPC

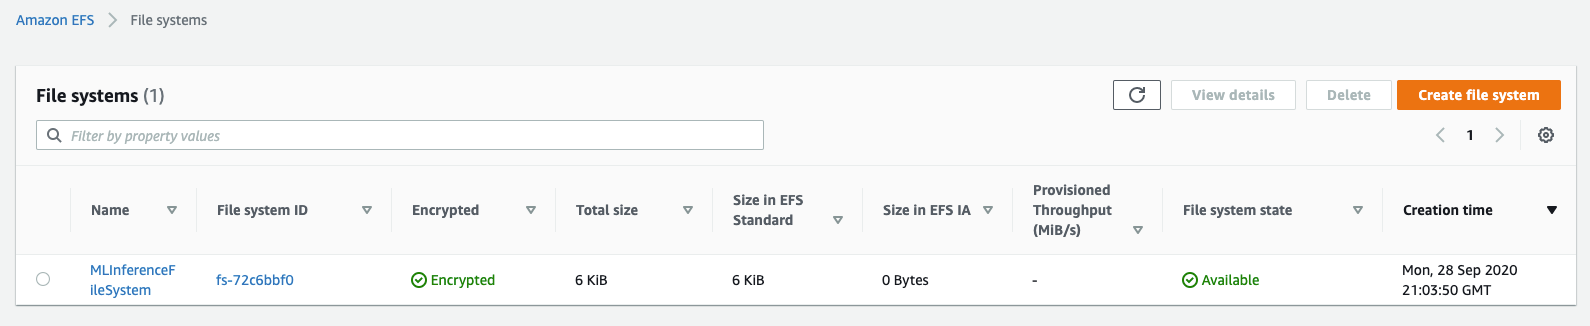
It can take up to 10 minutes for the CloudFormation stack to create the resources. After the resource creation is complete, navigate to the EFS console to see the new file system.

EFS console

Navigate to the Access Points panel to see a new Access Point with the File system ID from the previous page.

Access Points panel

Note the Access Point ID and File System ID for the following sections.

Launch an Amazon EC2 instance to train a breast cancer model

In this section, you install Python packages on the EFS file system, after mounting it to EC2. You then train the breast cancer model, and save the model in the EFS file system used by the Lambda function.

The machine learning framework you use for this function is XGBoost. This is an optimized distributed gradient boosting library designed to be highly efficient, flexible, and portable. XGBoost is one of the most popular machine learning algorithms.

Navigate to the EC2 console to see the new EC2 instance created from the CloudFormation stack. This is an Amazon Linux 2 c5.large EC2 instance named ‘xgboost-for-serverless-inference-cfn-ec2’. In the instance details, you see that the security group is configured to allow inbound SSH access (for connecting to the instance).

Security Groups on instances page

Mount the EFS file system on the EC2

Connect to the instance using SSH and mount the EFS file system previously created by using the Access Point:

  1. Install amazon-efs-utils tools:
    sudo yum -y install amazon-efs-utils
  2. Create a directory to mount EFS into:
    mkdir efs
  3. Mount the EFS file system using the Access Point:
    sudo mount -t efs -o tls,accesspoint=<Access point ID> <File system ID>:/ efs

Console output

Install Python, pip and required packages

  1. Install Python and pip:
    sudo yum -y install python37
    curl -O https://bootstrap.pypa.io/get-pip.py
    python3 get-pip.py --user
  2. Verify the installation:
    python3 --version
    pip3 --version
  3. Create a requirements.txt file containing the dependencies:
    xgboost==1.1.1
    pandas
    sklearn
    joblib
  4. Install the Python packages using the requirements file:
    pip3 install -t efs/lib/ -r requirements.txt

    Note: using bursting throughput mode with EFS File system, this action can take up to 10 minutes.
  5. Set the Python path to refer to the installed packages directory of EFS file system:
    export PYTHONPATH=/home/ec2-user/efs/lib/

Train the breast cancer model

The breast cancer model predicts whether the breast mass is a malignant tumor or benign by looking at features computed from a digitized image of a fine needle aspirate of a breast mass.

The data used to train the model consists of the diagnosis in addition to the 10 real-valued features that are computed for each cell nucleus. Such features include radius, texture, perimeter, area, smoothness, compactness, concavity, concave points, symmetry, and fractal dimension. The prediction returned by the model is either “B” for benign or “M” for malignant. This sample project uses the public Breast Cancer Wisconsin (Diagnostic) dataset.

After installing the required Python packages, train a XGBoost model on the breast cancer dataset:

  1. Create a bc_xgboost_train.py file containing the Python code needed to train a breast cancer XGBoost model. Download the code here.
  2. Start the training of the model:python3 bc_xgboost_train.pyYou see the following message:Console outputThe model file bc-xgboost-model is created in the root directory.
  3. Create a new directory on the EFS file system and copy the XGBoost breast cancer model:
    mkdir efs/model
    cp bc-xgboost-model efs/model/
  4. Check you have the required Python packages and the model on the EFS file system:
    ls efs/model/ efs/lib/

    You see all the Python packages installed previously in the lib directory, and the model file in the model directory.
  5. Review the total size of lib Python packages directory:
    du -sh efs/lib/

You can see that the total size of lib directory is 534 MB. This is a larger package size than was allowed before EFS for Lambda.

Building a serverless machine learning inference using Lambda

In this section, you use the EFS file system previously configured for the Lambda function to import the required libraries and load the model.

Using EFS with Lambda

The AWS SAM template creates the Lambda function, mount the EFS Access Point created earlier, and both IAM roles required.

It takes several minutes for the AWS SAM CLI to create the Lambda function. After, navigate to the Lambda console to see the created Lambda function.

Lambda console

In the Lambda function configuration, you see the environment variables, and basic settings, such as runtime, memory, and timeout.

Lambda function configuration

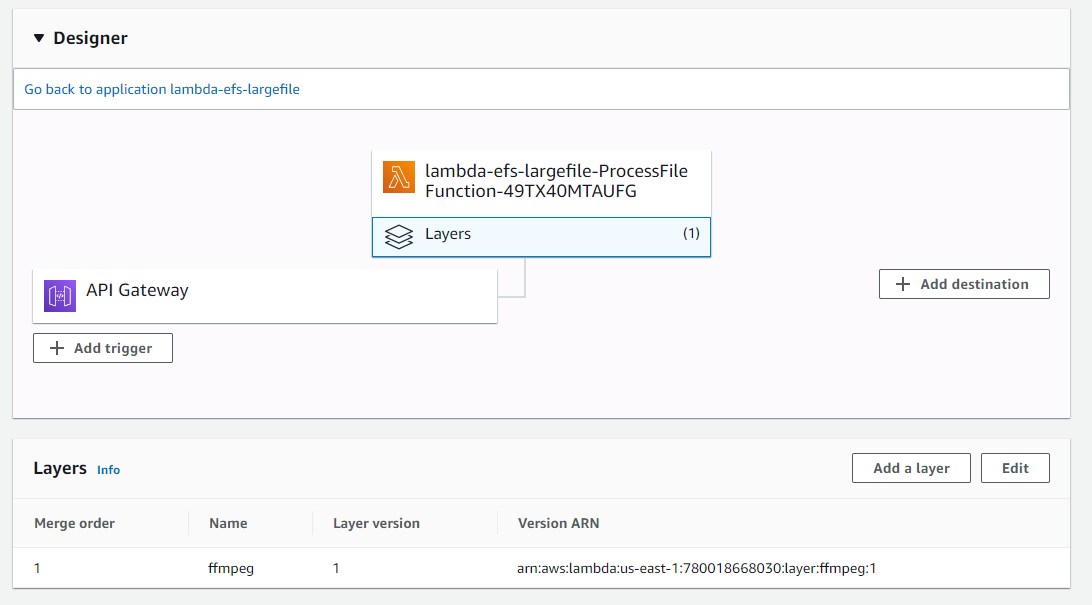
Further down, you see that the Lambda function has the VPC access configured, and the file system is mounted.

Lambda VPC configuration

Test your Lambda function

  1. In the Lambda console, select Configure test events from the Test events dropdown.
  2. For Event Name, enter InferenceTestEvent.
  3. Copy the event JSON from here and paste in the dialog box.Confiigure test event
  4. Choose Create. After saving, you see InferenceTestEvent in the Test list. Now choose Test.

You see the Lambda function inference result, log output, and duration:

Lambda function result

Conclusion

In this blog post, you train an XGBoost breast cancer model using Python packages installed on an Amazon EFS file system. You create an AWS Lambda function that loads the Python packages and the model from EFS file system, and perform the predictions.

Now you know how to call a machine learning model inference using a Lambda function. To learn more about other real-world examples, see: