Customers storing data in Backblaze B2 Cloud Storage enjoy zero-cost downloads via our Content Delivery Network (CDN) partners: Cloudflare, Fastly, and Bunny.net. Configuring a CDN to proxy access to a Backblaze B2 Bucket is straightforward and improves the user experience, since the CDN caches data close to end-users. Ensuring that end-users can only access content via the CDN, and not directly from the bucket, requires a little more effort. A new technical article, Cloudflare Workers for Backblaze B2, provides the steps to serve content from Backblaze B2 via your own Cloudflare Worker.
In this blog post, I’ll explain why you might want to prevent direct downloads from your Backblaze B2 Bucket, and how you can use a Cloudflare Worker to do so.
Why Prevent Direct Downloads?
As mentioned above, Backblaze’s partnerships with CDN providers allow our customers to deliver content to end users with zero costs for data egress from Backblaze to the CDN. To illustrate why you might want to serve data to your end users exclusively through the CDN, let’s imagine you’re creating a website, storing your website’s images in a Backblaze B2 Bucket with public-read access, acme-images.
For the initial version, you build web pages with direct links to the images of the form https://acme-images.s3.us-west-001.backblazeb2.com/logos/acme.png. As users browse your site, their browsers will download images directly from Backblaze B2. Everything works just fine for users near the Backblaze data center hosting your bucket, but the further a user is from that data center, the longer it will take each image to appear on screen. No matter how fast the network connection, there’s no getting around the speed of light!
Aside from the degraded user experience, there are costs associated with end users downloading data directly from Backblaze. The first GB of data downloaded each day is free, then we charge $0.01 for each subsequent GB. Depending on your provider’s pricing plan, adding a CDN to your architecture can both reduce download costs and improve the user experience, as the CDN will transfer data through its own network and cache content close to end users. Another detail to note when comparing costs is that Backblaze and Cloudflare’s Bandwidth Alliance means that data flows from Backblaze to Cloudflare free of download charges, unlike data flowing from, for example, Amazon S3 to Cloudflare.
Typically, you need to set up a custom domain, say images.acme.com, that resolves to an IP address at the CDN. You then configure one or more origin servers or backends at the CDN with your Backblaze B2 Buckets’ S3 endpoints. In this example, we’ll use a single bucket, with endpoint acme-images.s3.us-west-001.backblazeb2.com, but you might use Cloud Replication to replicate content between buckets in multiple regions for greater resilience.
Now, after you update the image links in your web pages to the form https://images.acme.com/logos/acme.png, your users will enjoy an improved experience, and your operating costs will be reduced.
As you might have guessed, however, there is one chink in the armor. Clients can still download images directly from the Backblaze B2 Bucket, incurring charges on your Backblaze account. For example, users might have bookmarked or shared links to images in the bucket, or browsers or web crawlers might have cached those links.
The solution is to make the bucket private and create an edge function: a small piece of code running on the CDN infrastructure at the images.acme.com endpoint, with the ability to securely access the bucket.
Both Cloudflare and Fastly offer edge computing platforms; in this blog post, I’ll focus on Cloudflare Workers and cover Fastly Compute@Edge at a later date.
Proxying Backblaze B2 Downloads With a Cloudflare Worker
API clients, such as Workers, downloading data from a private Backblaze B2 Bucket via the Backblaze S3 Compatible API must digitally sign each request with a Backblaze Application Key ID (access key ID in AWS parlance) and Application Key (secret access key). On receiving a signed request, the Backblaze B2 service verifies the identity of the sender (authentication) and that the request was not changed in transit (integrity) before returning the requested data.
So when the Worker receives an unsigned HTTP request from an end user’s browser, it must sign it, forward it to Backblaze B2, and return the response to the browser. Here are the steps in more detail:
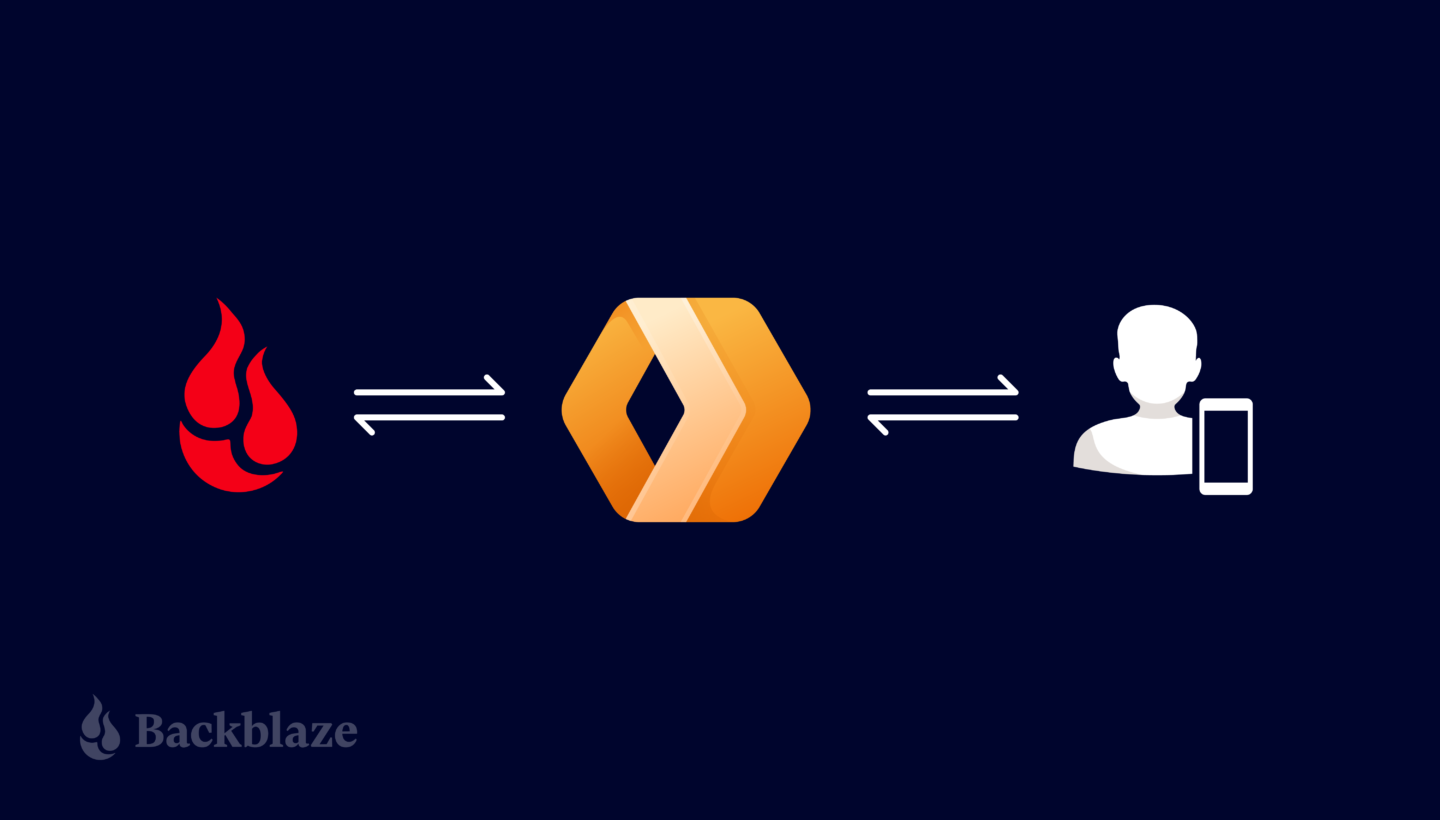
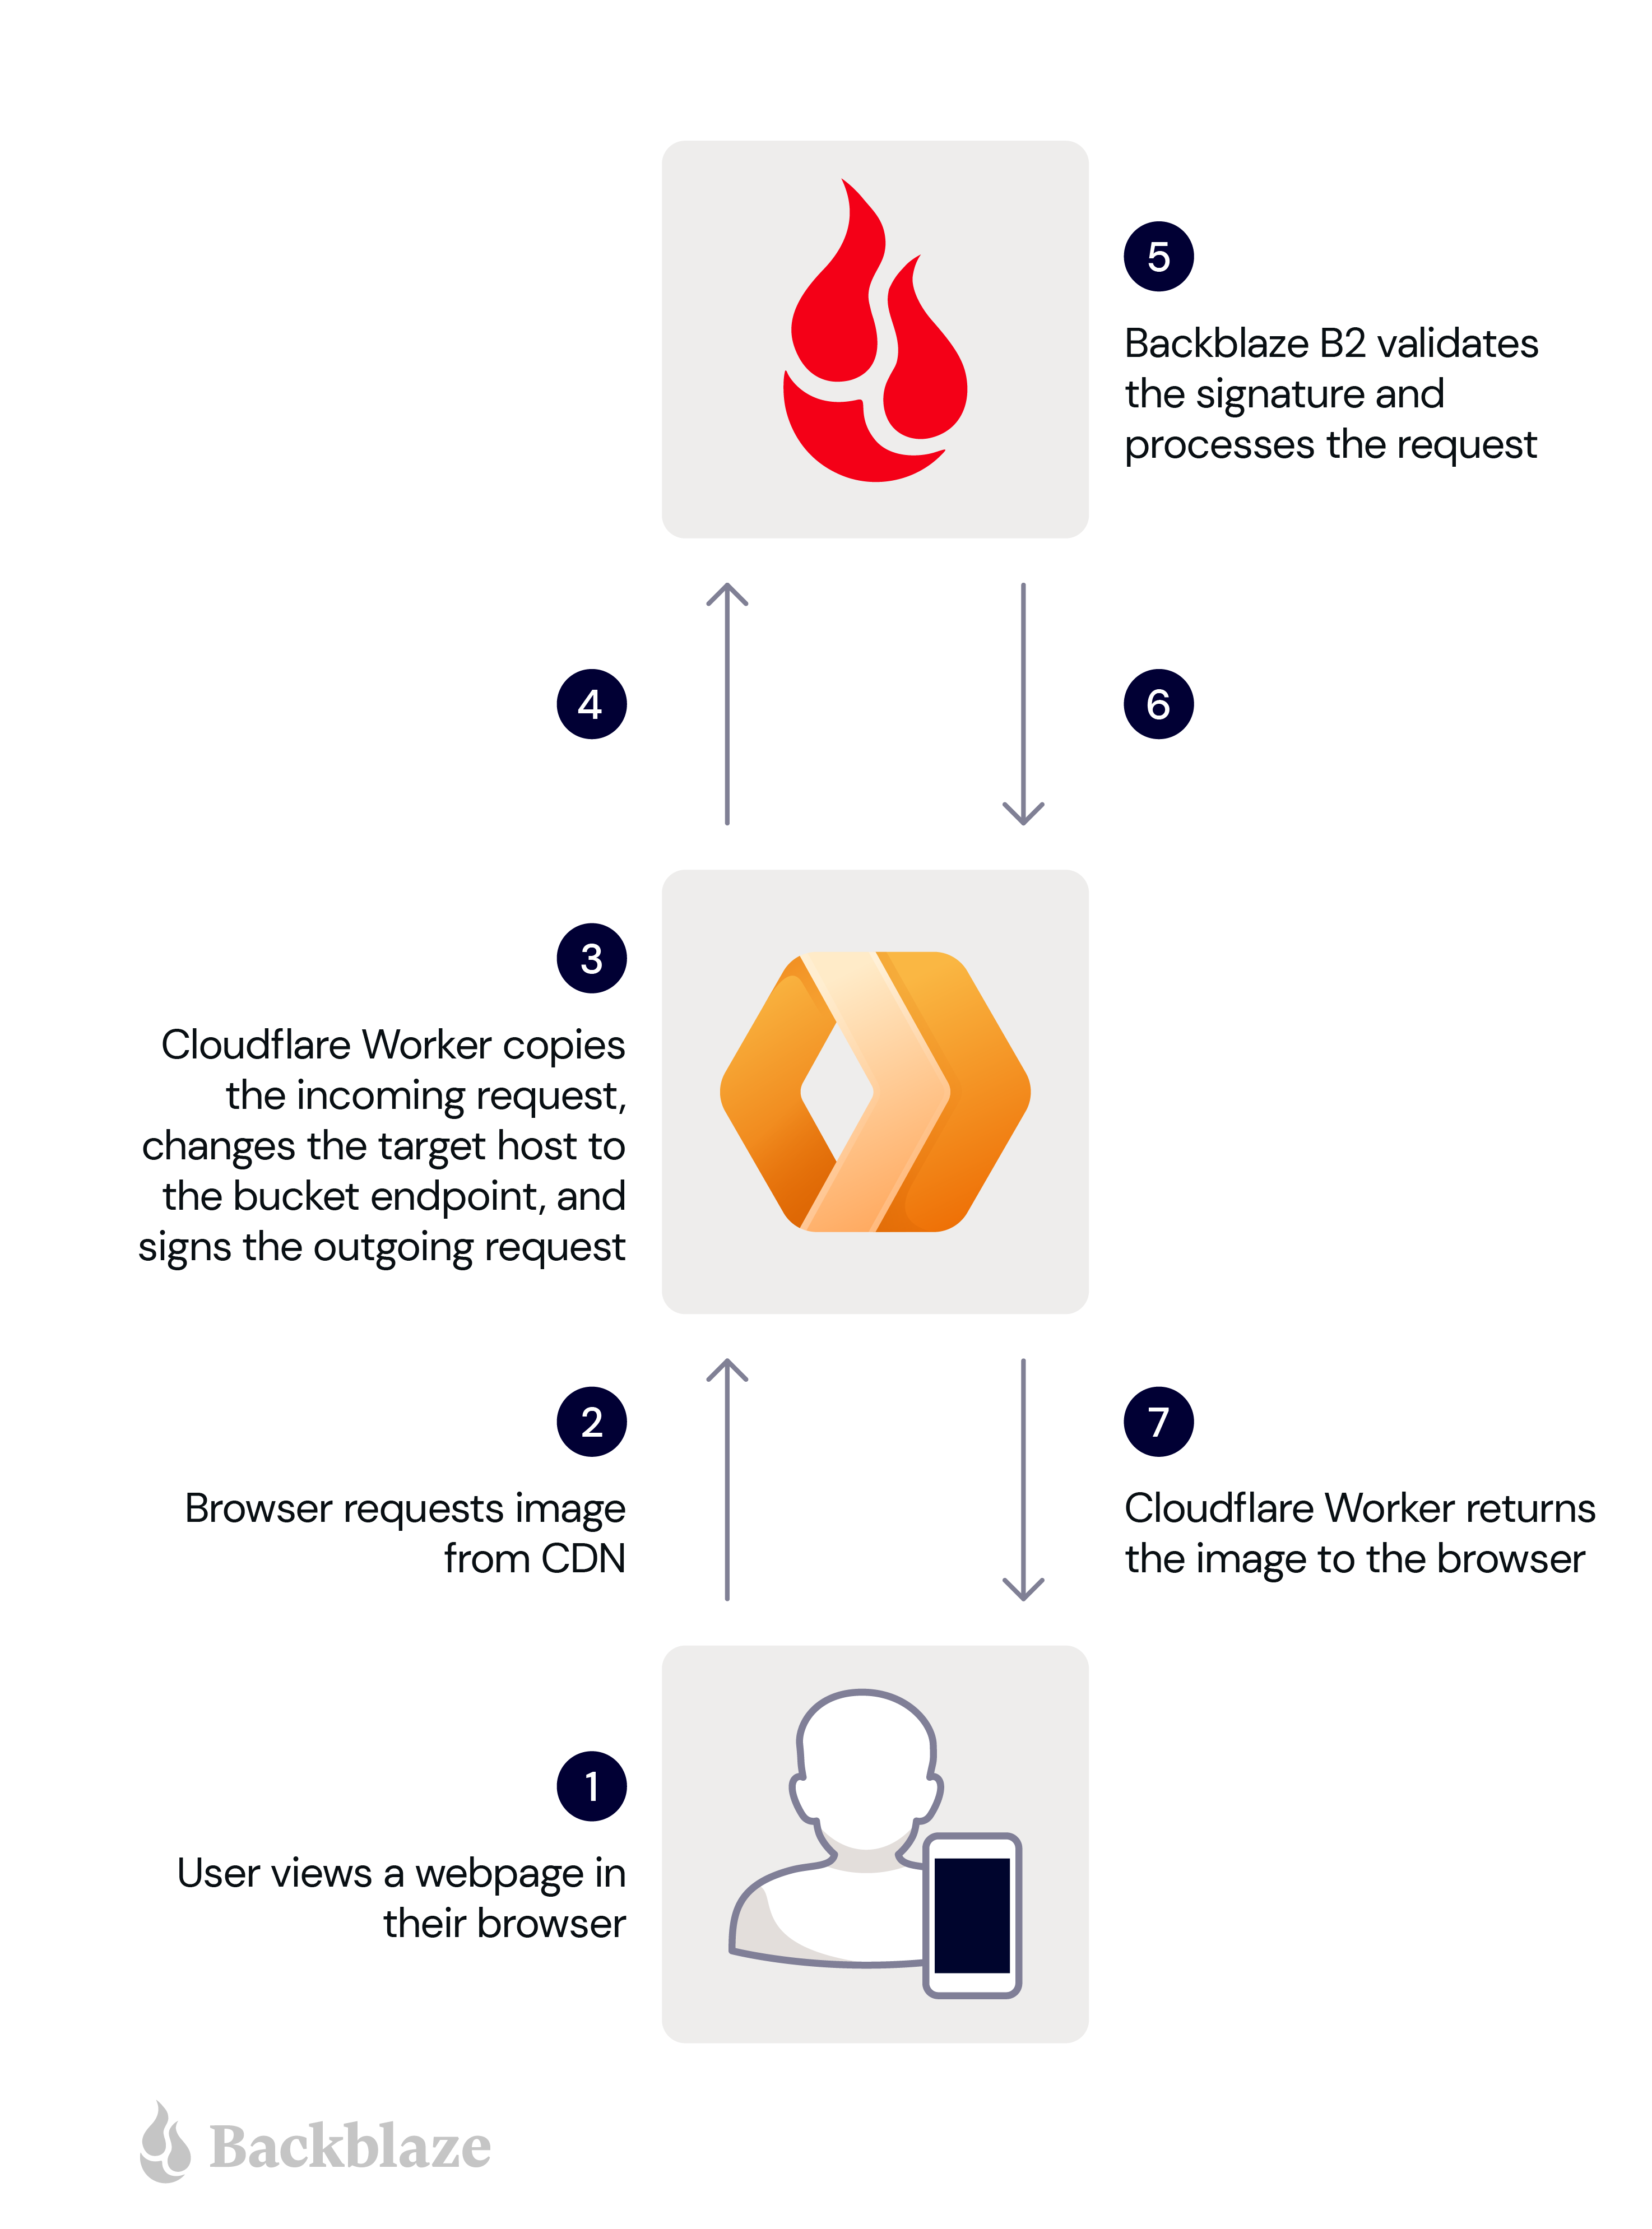
A user views a web page in their browser.
The user’s browser requests an image from the Cloudflare Worker.
The Worker makes a copy of the incoming request, changing the target host in the copy to the bucket endpoint, and signs the copy with its application key and key ID.
The Worker sends the signed request to Backblaze B2.
Backblaze B2 validates the signature, and processes the request.
Backblaze B2 returns the image to the Worker.
The Worker forwards the image to the user’s browser.
These steps are illustrated in the diagram below.
The signing process imposes minimal overhead, since GET requests have no payload. The Worker need not even read the incoming response payload into memory, instead returning the response from Backblaze B2 to the Cloudflare Workers framework to be streamed directly to the user’s browser.
Now you understand the use case, head over to our newly published technical article, Cloudflare Workers for Backblaze B2, and follow the steps to serve content from Backblaze B2 via your own Cloudflare Worker.
Put the Proxy to Work!
The Cloudflare Worker for Backblaze B2 can be used as-is to ensure that clients download files from one or more Backblaze B2 Buckets via Cloudflare, rather than directly from Backblaze B2. At the same time, it can be readily adapted for different requirements. For example, the Worker could verify that clients pass a shared secret in an HTTP header, or route requests to buckets in different data centers depending on the location of the edge server. The possibilities are endless.
Earlier this year, we introduced Cache Reserve. Cache Reserve helps users serve content from Cloudflare’s cache for longer by using R2’s persistent data storage. Serving content from Cloudflare’s cache benefits website operators by reducing their bills for egress fees from origins, while also benefiting website visitors by having content load faster.
Cache Reserve has been in closed beta for a few months while we’ve collected feedback from our initial users and continued to develop the product. After several rounds of iterating on this feedback, today we’re extremely excited to announce that Cache Reserve is graduating to open beta – users will now be able to test it and integrate it into their content delivery strategy without any additional waiting.
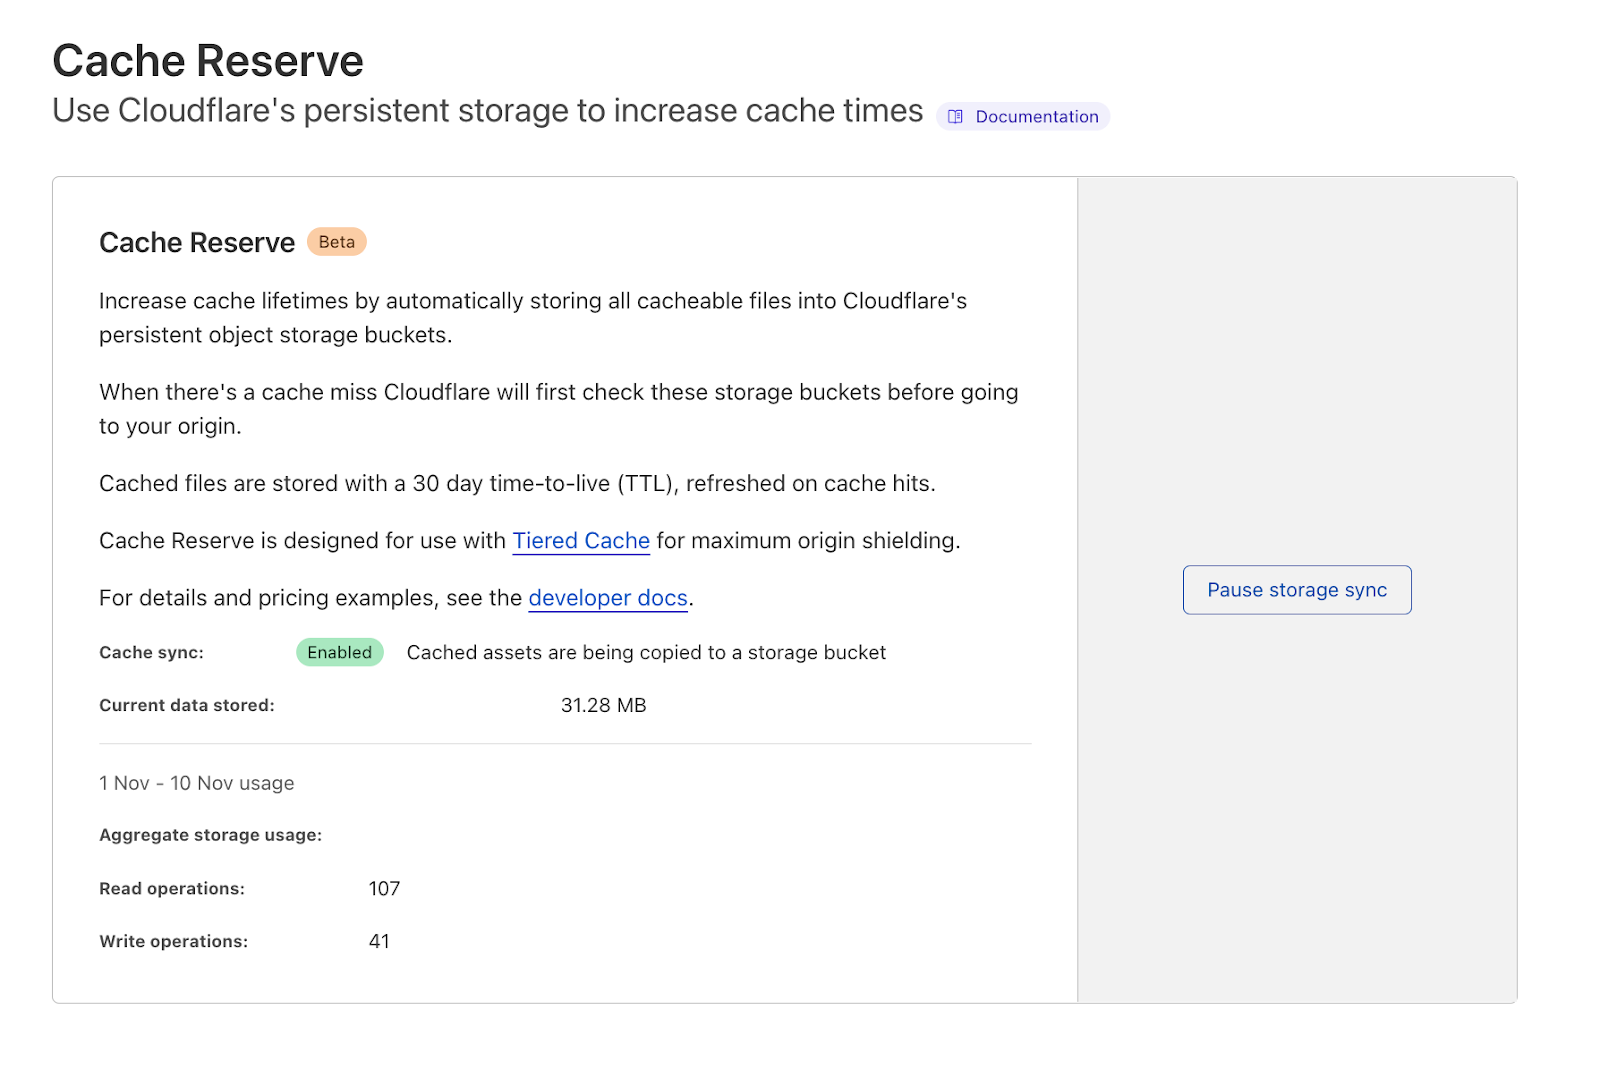
If you want to see the benefits of Cache Reserve for yourself and give us some feedback– you can go to the Cloudflare dashboard, navigate to the Caching section and enable Cache Reserve by pushing one button.
How does Cache Reserve fit into the larger picture?
Content served from Cloudflare’s cache begins its journey at an origin server, where the content is hosted. When a request reaches the origin, the origin compiles the content needed for the response and sends it back to the visitor.
The distance between the visitor and the origin can affect the performance of the asset as it may travel a long distance for the response. This is also where the user is charged a fee to move the content from where it’s stored on the origin to the visitor requesting the content. These fees, known as “bandwidth” or “egress” fees, are familiar monthly line items on the invoices for users that host their content on cloud providers.
Cloudflare’s CDN sits between the origin and visitor and evaluates the origin’s response to see if it can be cached. If it can be added to Cloudflare’s cache, then the next time a request comes in for that content, Cloudflare can respond with the cached asset, which means there’s no need to send the request to the origin– reducing egress fees for our customers. We also cache content in data centers close to the visitor to improve the performance and cut down on the transit time for a response.
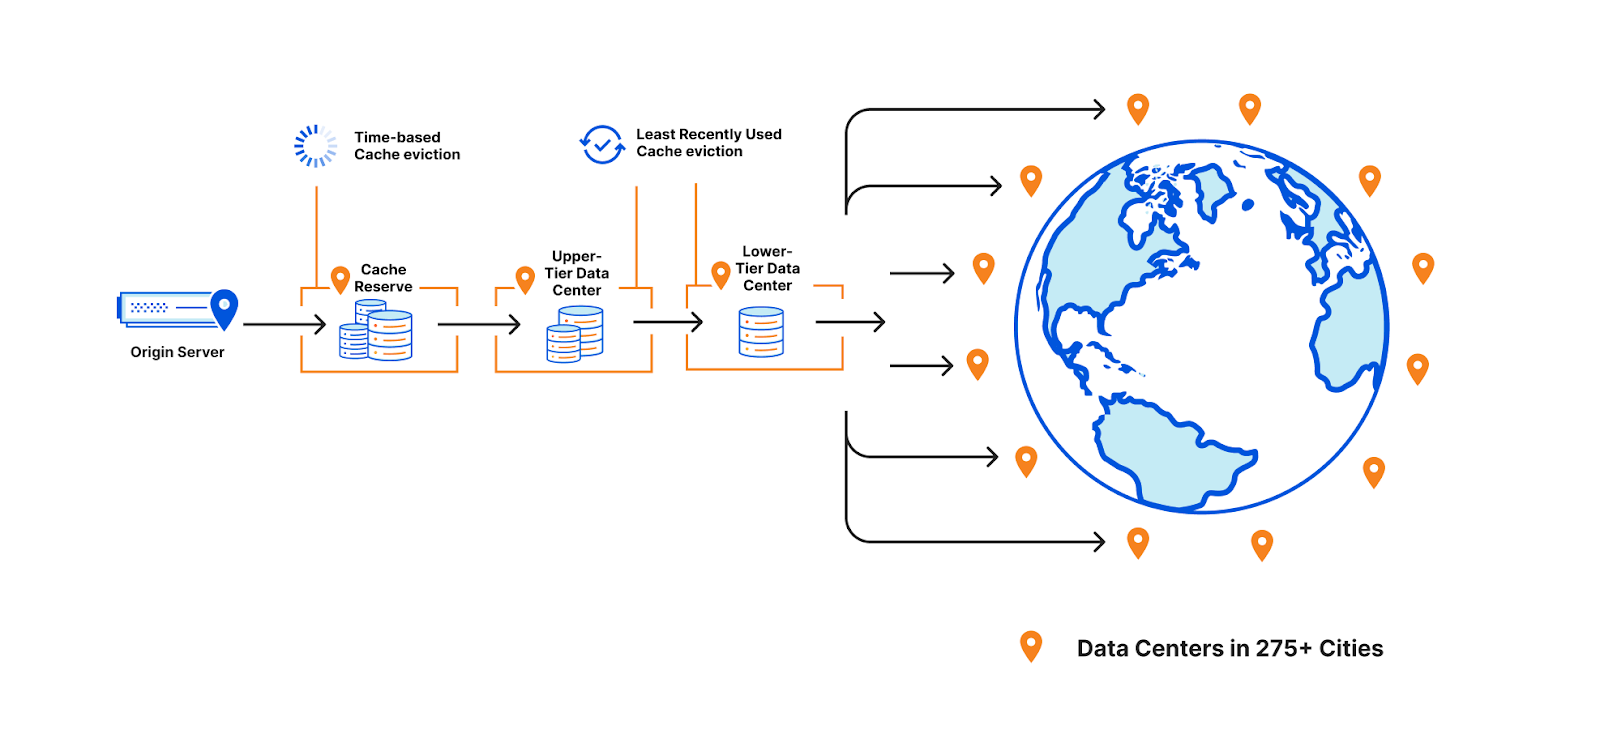
To help assets remain cached for longer, a few years ago we introduced Tiered Cache which organizes all of our 250+ global data centers into a hierarchy of lower-tiers (generally closer to visitors) and upper-tiers (generally closer to origins). When a request for content cannot be served from a lower-tier’s cache, the upper-tier is checked before going to the origin for a fresh copy of the content. Organizing our data centers into tiers helps us cache content in the right places for longer by putting multiple caches between the visitor’s request and the origin.
Why do cache misses occur? Misses occur when Cloudflare cannot serve the content from cache and must go back to the origin to retrieve a fresh copy. This can happen when a customer sets the cache-control time to signify when the content is out of date (stale) and needs to be revalidated. The other element at play – how long the network wants content to remain cached – is a bit more complicated and can fluctuate depending on eviction criteria.
CDNs must consider whether they need to evict content early to optimize storage of other assets when cache space is full. At Cloudflare, we prioritize eviction based on how recently a piece of cached content was requested by using an algorithm called “least recently used” or LRU. This means that even if cache-control signifies that a piece of content should be cached for many days, we may still need to evict it earlier (if it is least-requested in that cache) to cache more popular content.
This works well for most customers and website visitors, but is often a point of confusion for people wondering why content is unexpectedly displaying a miss. If eviction did not happen then content would need to be cached in data centers that were further away from visitors requesting that data, harming the performance of the asset and injecting inefficiencies into how Cloudflare’s network operates.
Some customers, however, have large libraries of content that may not be requested for long periods of time. Using the traditional cache, these assets would likely be evicted and, if requested again, served from the origin. Keeping assets in cache requires that they remain popular on the Internet which is hard given what’s popular or current is constantly changing. Evicting content that becomes cold means additional origin egress for the customer if that content needs to be pulled repeatedly from the origin.
Enter Cache Reserve This is where Cache Reserve shines. Cache Reserve serves as the ultimate upper-tier data center for content that might otherwise be evicted from cache. Once admitted to Cache Reserve, content can be stored for a much longer period of time– 30 days by default. If another request comes in during that period, it can be extended for another 30 days (and so on) or until cache-control signifies that we should no longer serve that content from cache. Cache Reserve serves as a safety net to backstop all cacheable content, so customers don’t have to worry about unwanted cache eviction and origin egress fees.
How does Cache Reserve save egress?
The promise of Cache Reserve is that hit ratios will increase and egress fees from origins will decrease for long tail content that is rarely requested and may be evicted from cache.
However, there are additional egress savings built into the product. For example, objects are written to Cache Reserve on misses. This means that when fetching the content from the origin on a cache miss, we both use that to respond to a request while also writing the asset to Cache Reserve, so customers won’t experience egress from serving that asset for a long time.
Cache Reserve is designed to be used with tiered cache enabled for maximum origin shielding. When there is a cache miss in both the lower and upper tiers, Cache Reserve is checked and if there is a hit, the response will be cached in both the lower and upper tier on its way back to the visitor without the origin needing to see the request or serve any additional data.
Cache Reserve accomplishes these origin egress savings for a low price, based on R2 costs. For more information on Cache Reserve prices and operations, please see the documentation here.
Scaling Cache Reserve on Cloudflare’s developer platform
When we first announced Cache Reserve, the response was overwhelming. Over 20,000 users wanted access to the beta, and we quickly made several interesting discoveries about how people wanted to use Cache Reserve.
The first big challenge we found was that users hated egress fees as much as we do and wanted to make sure that as much content as possible was in Cache Reserve. During the closed beta we saw usage above 8,000 PUT operations per second sustained, and objects served at a rate of over 3,000 GETs per second. We were also caching around 600Tb for some of our large customers. We knew that we wanted to open the product up to anyone that wanted to use it and in order to scale to meet this demand, we needed to make several changes quickly. So we turned to Cloudflare’s developer platform.
Cache Reserve stores data on R2 using its S3-compatible API. Under the hood, R2 handles all the complexity of an object storage system using our performant and scalable developer primitives: Workers and Durable Objects. We decided to use developer platform tools because it would allow us to implement different scaling strategies quickly. The advantage of building on the Cloudflare developer platform is that Cache Reserve was easily able to experiment to see how we could best distribute the high load we were seeing, all while shielding the complexity of how Cache Reserve works from users.
With the single press of a button, Cache Reserve performs these functions:
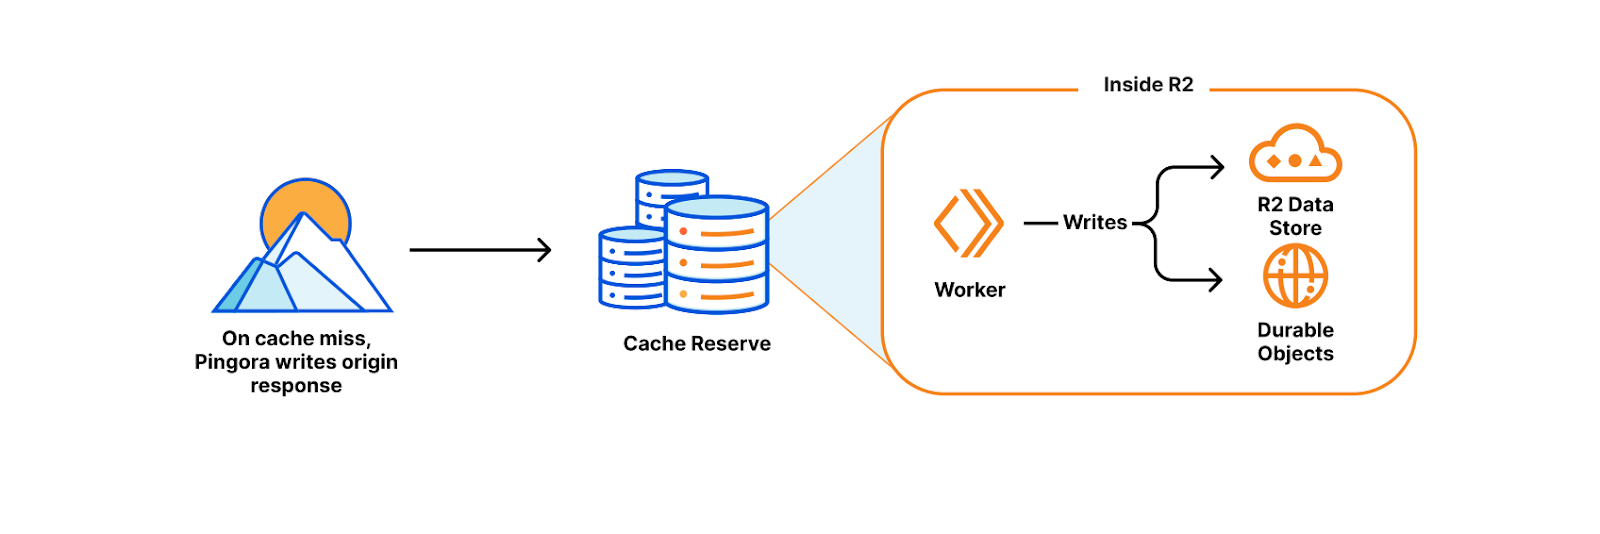
On a cache miss, Pingora (our new L7 proxy) reaches out to the origin for the content and writes the response to R2. This happens while the content continues its trip back to the visitor (thereby avoiding needless latency).
Inside R2, a Worker writes the content to R2’s persistent data storage while also keeping track of the important metadata that Pingora sends about the object (like origin headers, freshness values, and retention information) using Durable Objects storage.
When the content is next requested, Pingora looks up where the data is stored in R2 by computing the cache key. The cache key’s hash determines both the object name in R2 and which bucket it was written to, as each zone’s assets are sharded across multiple buckets to distribute load.
Once found, Pingora attaches the relevant metadata and sends the content from R2 to the nearest upper-tier to be cached, then to the lower-tier and finally back to the visitor.
This is magic! None of the above needs to be managed by the user. By bringing together R2, Workers, Durable Objects, Pingora, and Tiered Cache we were able to quickly build and make changes to Cache Reserve to scale as needed…
What’s next for Cache Reserve
In addition to the work we’ve done to scale Cache Reserve, opening the product up also opens the door to more features and integrations across Cloudflare. We plan on putting additional analytics and metrics in the hands of Cache Reserve users, so they know precisely what’s in Cache Reserve and how much egress it’s saving them. We also plan on building out more complex integrations with R2 so if customers want to begin managing their storage, they are able to easily make that transition. Finally, we’re going to be looking into providing more options for customers to control precisely what is eligible for Cache Reserve. These features represent just the beginning for how customers will control and customize their cache on Cloudflare.
What’s some of the feedback been so far?
As a long time Cloudflare customer, we were eager to deploy Cache Reserve to provide cost savings and improved performance for our end users. Ensuring our application always performs optimally for our global partners and delivery riders is a primary focus of Delivery Hero. With Cache Reserve our cache hit ratio improved by 5% enabling us to scale back our infrastructure and simplify what is needed to operate our global site and provide additional cost savings. Wai Hang Tang, Director of Engineering at Delivery Hero
Anthology uses Cloudflare’s global cache to drastically improve the performance of content for our end users at schools and universities. By pushing a single button to enable Cache Reserve, we were able to provide a great experience for teachers and students and reduce two-thirds of our daily egress traffic. Paul Pearcy, Senior Staff Engineer at Anthology
At Enjoei we’re always looking for ways to help make our end-user sites faster and more efficient. By using Cloudflare Cache Reserve, we were able to drastically improve our cache hit ratio by more than 10% which reduced our origin egress costs. Cache Reserve also improved the performance for many of our merchants’ sites in South America, which improved their SEO and discoverability across the Internet (Google, Criteo, Facebook, Tiktok)– and it took no time to set it up. Elomar Correia, Head of DevOps SRE | Enterprise Solutions Architect at Enjoei
In the live events industry, the size and demand for our cacheable content can be extremely volatile, which causes unpredictable swings in our egress fees. Additionally, keeping data as close to our users as possible is critical for customer experience in the high traffic and low bandwidth scenarios our products are used in, such as conventions and music festivals. Cache Reserve helps us mitigate both of these problems with minimal impact on our engineering teams, giving us more predictable costs and lower latency than existing solutions. Jarrett Hawrylak, VP of Engineering | Enterprise Ticketing at Patron Technology
How can I use it today?
As of today, Cache Reserve is in open beta, meaning that it’s available to anyone who wants to use it.
To use the Cache Reserve:
Simply go to the Caching tile in the dashboard.
Navigate to the Cache Reserve page and push the enable data sync button (or purchase button).
Enterprise Customers can work with their Cloudflare Account team to access Cache Reserve.
Customers can ensure Cache Reserve is working by looking at the baseline metrics regarding how much data is cached and how many operations we’ve seen in the Cache Reserve section of the dashboard. Specific requests served by Cache Reserve are available by using Logpush v2 and finding HTTP requests with the field “CacheReserveUsed.”
We will continue to make sure that we are quickly triaging the feedback you give us and making improvements to help ensure Cache Reserve is easy to use, massively beneficial, and your choice for reducing egress fees for cached content.
Try it out
We’ve been so excited to get Cache Reserve in more people’s hands. There will be more exciting developments to Cache Reserve as we continue to invest in giving you all the tools you need to build your perfect cache.
Try Cache Reserve today and let us know what you think.
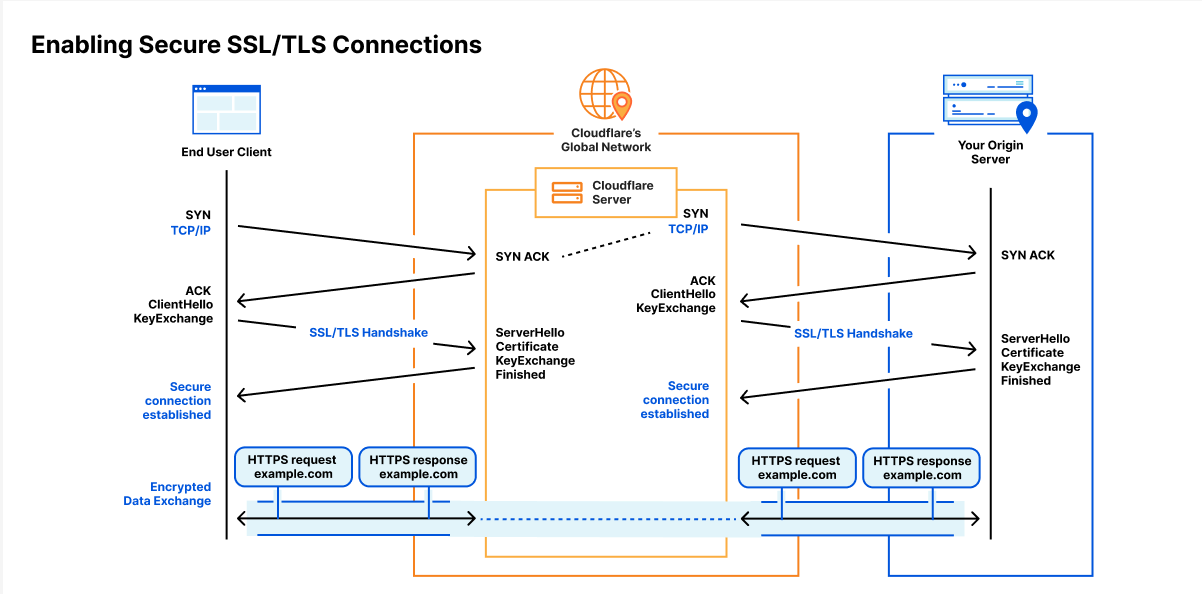
In 2014, Cloudflare set out to encrypt the Internet by introducing Universal SSL. It made getting an SSL/TLS certificate free and easy at a time when doing so was neither free, nor easy. Overnight millions of websites had a secure connection between the user’s browser and Cloudflare.
But getting the connection encrypted from Cloudflare to the customer’s origin server was more complex. Since Cloudflare and all browsers supported SSL/TLS, the connection between the browser and Cloudflare could be instantly secured. But back in 2014 configuring an origin server with an SSL/TLS certificate was complex, expensive, and sometimes not even possible.
And so we relied on users to configure the best security level for their origin server. Later we added a service that detects and recommends the highest level of security for the connection between Cloudflare and the origin server. We also introduced free origin server certificates for customers who didn’t want to get a certificate elsewhere.
Today, we’re going even further. Cloudflare will shortly find the most secure connection possible to our customers’ origin servers and use it, automatically. Doing this correctly, at scale, while not breaking a customer’s service is very complicated. This blog post explains how we are automatically achieving that highest level of security possible for those customers who don’t want to spend time configuring their SSL/TLS set up manually.
Why configuring origin SSL automatically is so hard
When we announced Universal SSL, we knew the backend security of the connection between Cloudflare and the origin was a different and harder problem to solve.
In order to configure the tightest security, customers had to procure a certificate from a third party and upload it to their origin. Then they had to indicate to Cloudflare that we should use this certificate to verify the identity of the server while also indicating the connection security capabilities of their origin. This could be an expensive and tedious process. To help alleviate this high set up cost, in 2015 Cloudflare launched a beta Origin CA service in which we provided free limited-function certificates to customer origin servers. We also provided guidance on how to correctly configure and upload the certificates, so that secure connections between Cloudflare and a customer’s origin could be established quickly and easily.
What we discovered though, is that while this service was useful to customers, it still required a lot of configuration. We didn’t see the change we did with Universal SSL because customers still had to fight with their origins in order to upload certificates and test to make sure that they had configured everything correctly. And when you throw things like load balancers into the mix or servers mapped to different subdomains, handling server-side SSL/TLS gets even more complicated.
Around the same time as that announcement, Let’s Encrypt and other services began offering certificates as a public CA for free, making TLS easier and paving the way for widespread adoption. Let’s Encrypt and Cloudflare had come to the same conclusion: by offering certificates for free, simplifying server configuration for the user, and working to streamline certificate renewal, they could make a tangible impact on the overall security of the web.
The announcements of free and easy to configure certificates correlated with an increase in attention on origin-facing security. Cloudflare customers began requesting more documentation to configure origin-facing certificates and SSL/TLS communication that were performant and intuitive. In response, in 2016 we announced the GA of origin certificate authority to provide cheap and easy origin certificates along with guidance on how to best configure backend security for any website.
The increased customer demand and attention helped pave the way for additional features that focused on backend security on Cloudflare. For example, authenticated origin pull ensures that only HTTPS requests from Cloudflare will receive a response from your origin, preventing an origin response from requests outside of Cloudflare. Another option, Cloudflare Tunnel can be set up to run on the origin servers, proactively establishing secure and private tunnels to the nearest Cloudflare data center. This configuration allows customers to completely lock down their origin servers to only receive requests routed through our network. For customers unable to lock down their origins using this method, we still encourage adopting the strongest possible security when configuring how Cloudflare should connect to an origin server.
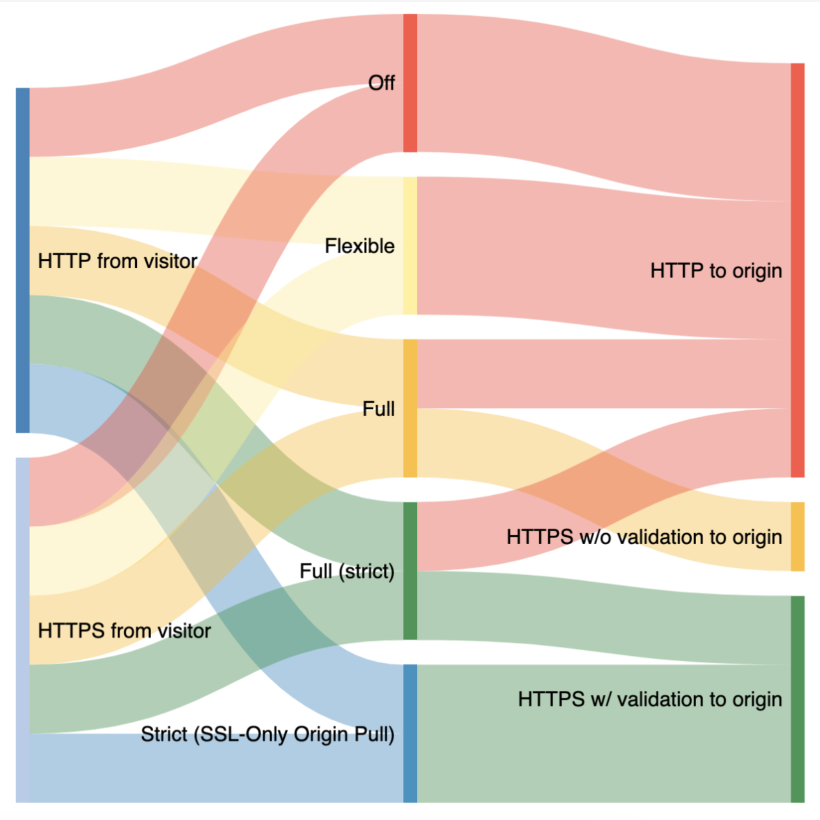
Cloudflare currently offers five options for SSL/TLS configurability that we use when communicating with origins:
In Off mode, as you might expect, traffic from browsers to Cloudflare and from Cloudflare to origins are not encrypted and will use plain text HTTP.
In Flexible mode, traffic from browsers to Cloudflare can be encrypted via HTTPS, but traffic from Cloudflare to the site’s origin server is not. This is a common selection for origins that cannot support TLS, even though we recommend upgrading this origin configuration wherever possible. A guide for upgrading can be found here.
In Full mode, Cloudflare follows whatever is happening with the browser request and uses that same option to connect to the origin. For example, if the browser uses HTTP to connect to Cloudflare, we’ll establish a connection with the origin over HTTP. If the browser uses HTTPS, we’ll use HTTPS to communicate with the origin; however we will not validate the certificate on the origin to prove the identity and trustworthiness of the server.
In Full (strict) mode, traffic between Cloudflare follows the same pattern as in Full mode, however Full (strict) mode adds validation of the origin server’s certificate. The origin certificate can either be issued by a public CA like Let’s Encrypt or by Cloudflare Origin CA.
In Strict mode, traffic from the browser to Cloudflare that is HTTP or HTTPS will always be connected to the origin over HTTPS with a validation of the origin server’s certificate.
What we have found in a lot of cases is that when customers initially signed up for Cloudflare, the origin they were using could not support the most advanced versions of encryption, resulting in origin-facing communication using unencrypted HTTP. These default values persisted over time, even though the origin has become more capable. We think the time is ripe to re-evaluate the entire concept of default SSL/TLS levels.
That’s why we will reduce the configuration burden for origin-facing security by automatically managing this on behalf of our customers. Cloudflare will provide a zero configuration option for how we will communicate with origins: we will simply look at an origin and use the most-secure option available to communicate with it.
Re-evaluating default SSL/TLS modes is only the beginning. Not only will we automatically upgrade sites to their best security setting, we will also open up all SSL/TLS modes to all plan levels. Historically, Strict mode was reserved for enterprise customers only. This was because we released this mode in 2014 when few people had origins that were able to communicate over SSL/TLS, and we were nervous about customers breaking their configurations. But this is 2022, and we think that Strict mode should be available to anyone who wants to use it. So we will be opening it up to everyone with the launch of the automatic upgrades.
How will automatic upgrading work?
To upgrade the origin-facing security of websites, we first need to determine the highest security level the origin can use. To make this determination, we will use the SSL/TLS Recommender tool that we released a year ago.
The recommender performs a series of requests from Cloudflare to the customer’s origin(s) to determine if the backend communication can be upgraded beyond what is currently configured. The recommender accomplishes this by:
Crawling the website to collect links on different pages of the site. For websites with large numbers of links, the recommender will only examine a subset. Similarly, for sites where the crawl turns up an insufficient number of links, we augment our results with a sample of links from recent visitors requests to the zone. All of this is to get a representative sample to where requests are going in order to know how responses are served from the origin.
The crawler uses the user agent Cloudflare-SSLDetector and has been added to Cloudflare’s list of known “good bots”.
Next, the recommender downloads the content of each link over both HTTP and HTTPS. The recommender makes only idempotent GET requests when scanning origin servers to avoid modifying server resource state.
Following this, the recommender runs a content similarity algorithm to determine if the content collected over HTTP and HTTPS matches.
If the content that is downloaded over HTTP matches the content downloaded over HTTPS, then it’s known that we can upgrade the security of the website without negative consequences.
If the website is already configured to Full mode, we will perform a certificate validation (without the additional need for crawling the site) to determine whether it can be updated to Full (strict) mode or higher.
If it can be determined that the customer’s origin is able to be upgraded without breaking, we will upgrade the origin-facing security automatically.
But that’s not all. Not only are we removing the configuration burden for services on Cloudflare, but we’re also providing more precise security settings by moving from per-zone SSL/TLS settings to per-origin SSL/TLS settings.
The current implementation of the backend SSL/TLS service is related to an entire website, which works well for those with a single origin. For those that have more complex setups however, this can mean that origin-facing security is defined by the lowest capable origin serving a part of the traffic for that service. For example, if a website uses img.example.com and api.example.com, and these subdomains are served by different origins that have different security capabilities, we would not want to limit the SSL/TLS capabilities of both subdomains to the least secure origin. By using our new service, we will be able to set per-origin security more precisely to allow us to maximize the security posture of each origin.
The goal of this is to maximize the origin-facing security of everything on Cloudflare. However, if any origin that we attempt to scan blocks the SSL recommender, has a non-functional origin, or opts-out of this service, we will not complete the scans and will not be able to upgrade security. Details on how to opt-out will be provided via email announcements soon.
Opting out
There are a number of reasons why someone might want to configure a lower-than-optimal security setting for their website. One common reason customers provide is a fear that having higher security settings will negatively impact the performance of their site. Others may want to set a suboptimal security setting for testing purposes or to debug some behavior. Whatever the reason, we will provide the tools needed to continue to configure the SSL/TLS mode you want, even if that’s different from what we think is the best.
When is this going to happen?
We will begin to roll this change out before the end of the year. If you read this and want to make sure you’re at the highest level of backend security already, we recommend Full (strict) or Strict mode. If you prefer to wait for us to automatically upgrade your origin security for you, please keep your eyes peeled to your inbox for the date we will begin rolling out this change for your group.
At Cloudflare, we believe that the Internet needs to be secure and private. If you’d like to help us achieve that, we’re hiring across the engineering organization.
Ten years ago, in 2012, we released a product that put “a powerful new set of tools” in the hands of Cloudflare customers, allowing website owners to control how Cloudflare would cache, apply security controls, manipulate headers, implement redirects, and more on any page of their website. This product is called Page Rules and since its introduction, it has grown substantially in terms of popularity and functionality.
Page Rules are a common choice for customers that want to have fine-grained control over how Cloudflare should cache their content. There are more than 3.5 million caching Page Rules currently deployed that help websites customize their content. We have spent the last ten years learning how customers use those rules to cache content, and it’s clear the time is ripe for evolving rules-based caching on Cloudflare. This evolution will allow for greater flexibility in caching different types of content through additional rule configurability, while providing more visibility into when and how different rules interact across Cloudflare’s ecosystem.
Today, we’ve announced that Page Rules will be re-imagined into four product-specific rule sets: Origin Rules, Cache Rules, Configuration Rules, and Redirect Rules.
In this blog we’re going to discuss Cache Rules, and how we’re applying ten years of product iteration and learning from Page Rules to give you the tools and options to best optimize your cache.
Activating Page Rules, then and now
Adding a Page Rule is very simple: users either make an API call or navigate to the dashboard, enter a full or wildcard URL pattern (e.g. example.com/images/scr1.png or example.com/images/scr*), and tell us which actions to perform when we see that pattern. For example a Page Rule could tell browsers– keep a copy of the response longer via “Browser Cache TTL”, or tell our cache that via “Edge Cache TTL”. Low effort, high impact. All this is accomplished without fighting origin configuration or writing a single line of code.
Under the hood, a lot is happening to make that rule scale: we turn every rule condition into regexes, matching them against the tens of millions of requests per second across 275+ data centers globally. The compute necessary to process and apply new values on the fly across the globe is immense and corresponds directly to the number of rules we are able to offer to users. By moving cache actions from Page Rules to Cache Rules we can allow for users to not only set more rules, but also to trigger these rules more precisely.
More than a URL
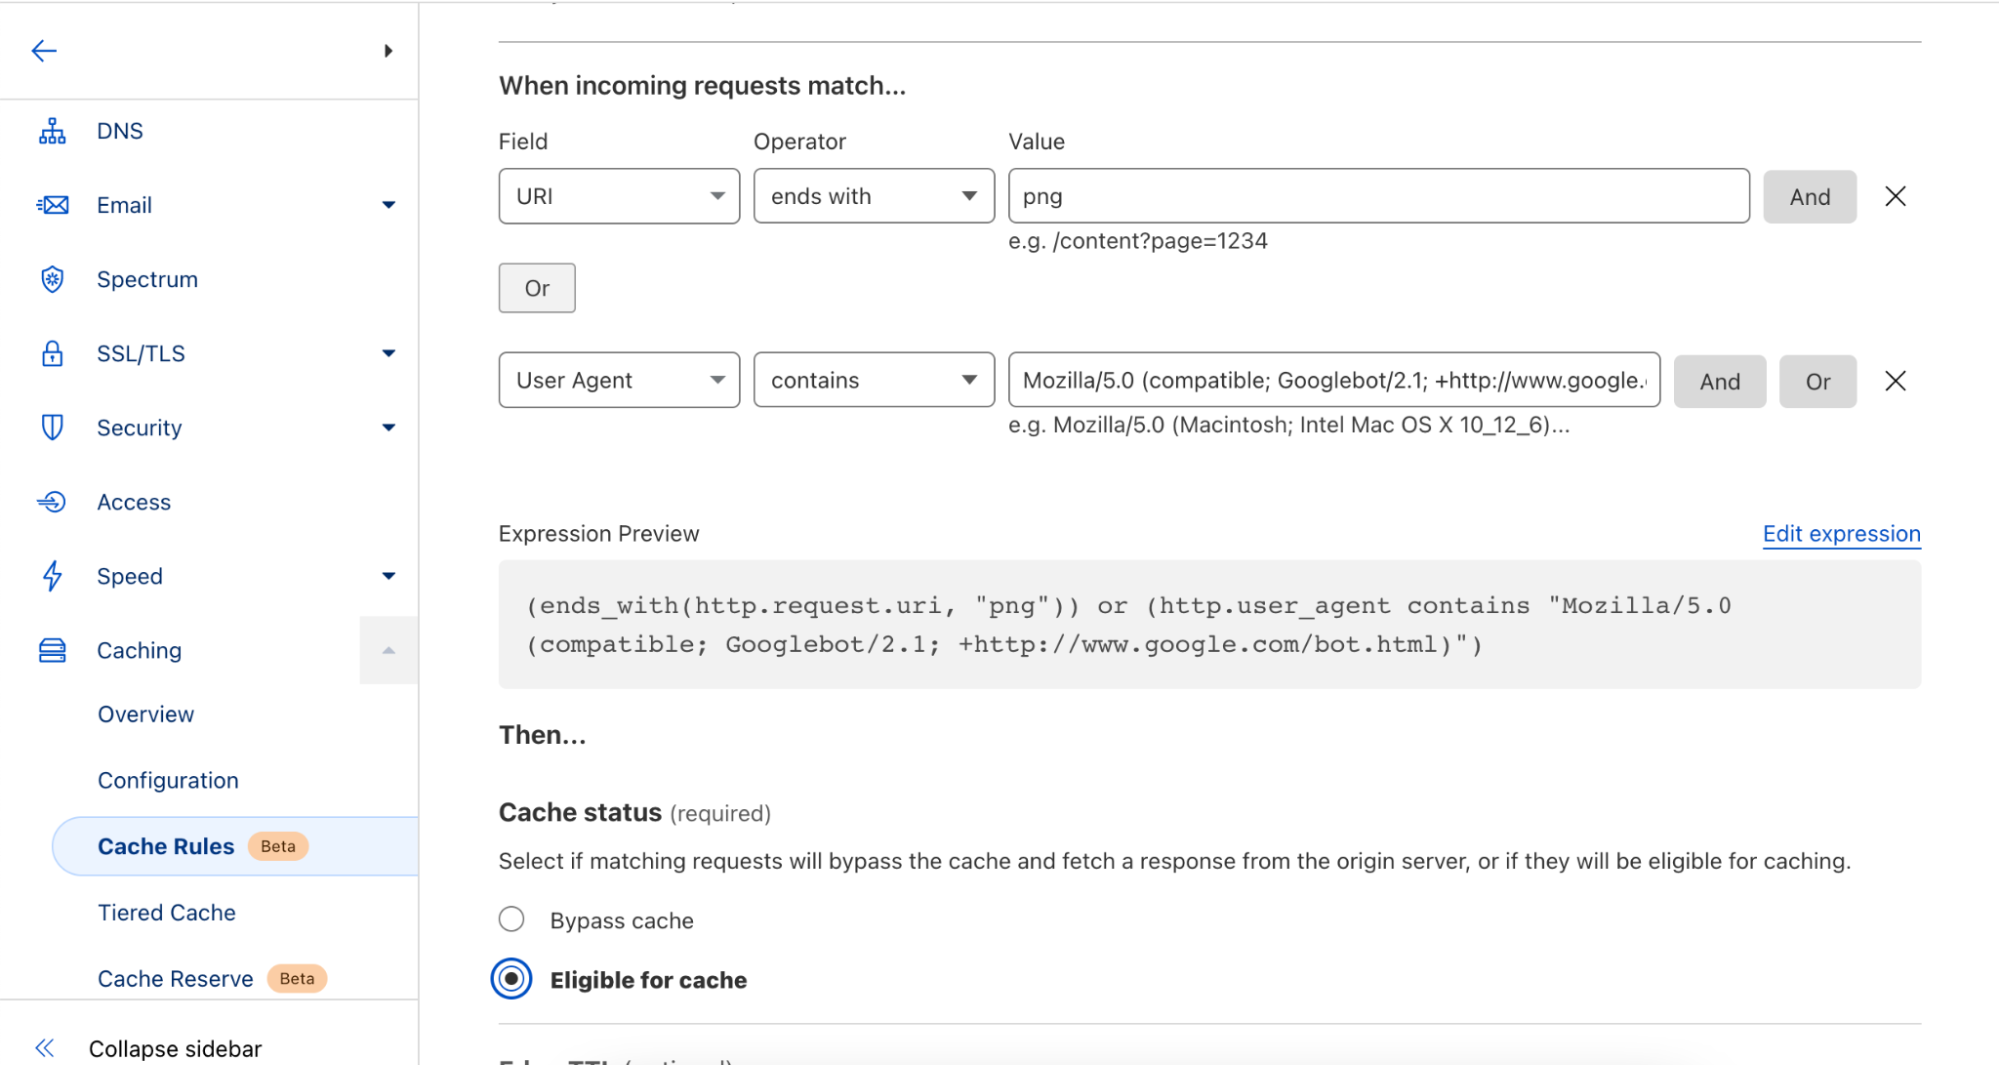
Users of Page Rules are limited to specific URLs or URL patterns to define how browsers or Cloudflare cache their websites files. Cache Rules allows users to set caching behavior on additional criteria, such as the HTTP request headers or the requested file type. Users can continue to match on the requested URL also, as used in our Page Rules example earlier. With Cache Rules, users can now define this behavior on one or more fields available.
For example, if a user wanted to specify cache behavior for all image/png content-types, it’s now as simple as pushing a few buttons in the UI or writing a small expression in the API. Cache Rules give users precise control over when and how Cloudflare and browsers cache their content. Cache Rules allow for rules to be triggered on request header values that can be simply defined like
Which triggers the Cache Rule to be applied to all image/png media types. Additionally, users may also leverage other request headers like cookie values, user-agents, or hostnames.
As a plus, these matching criteria can be stacked and configured with operators like AND and OR, providing additional simplicity in building complex rules from many discrete blocks, e.g. if you would like to target both image/png AND image/jpeg.
For the full list of fields available conditionals you can apply Cache Rules to, please refer to the Cache Rules documentation.
Visibility into how and when Rules are applied
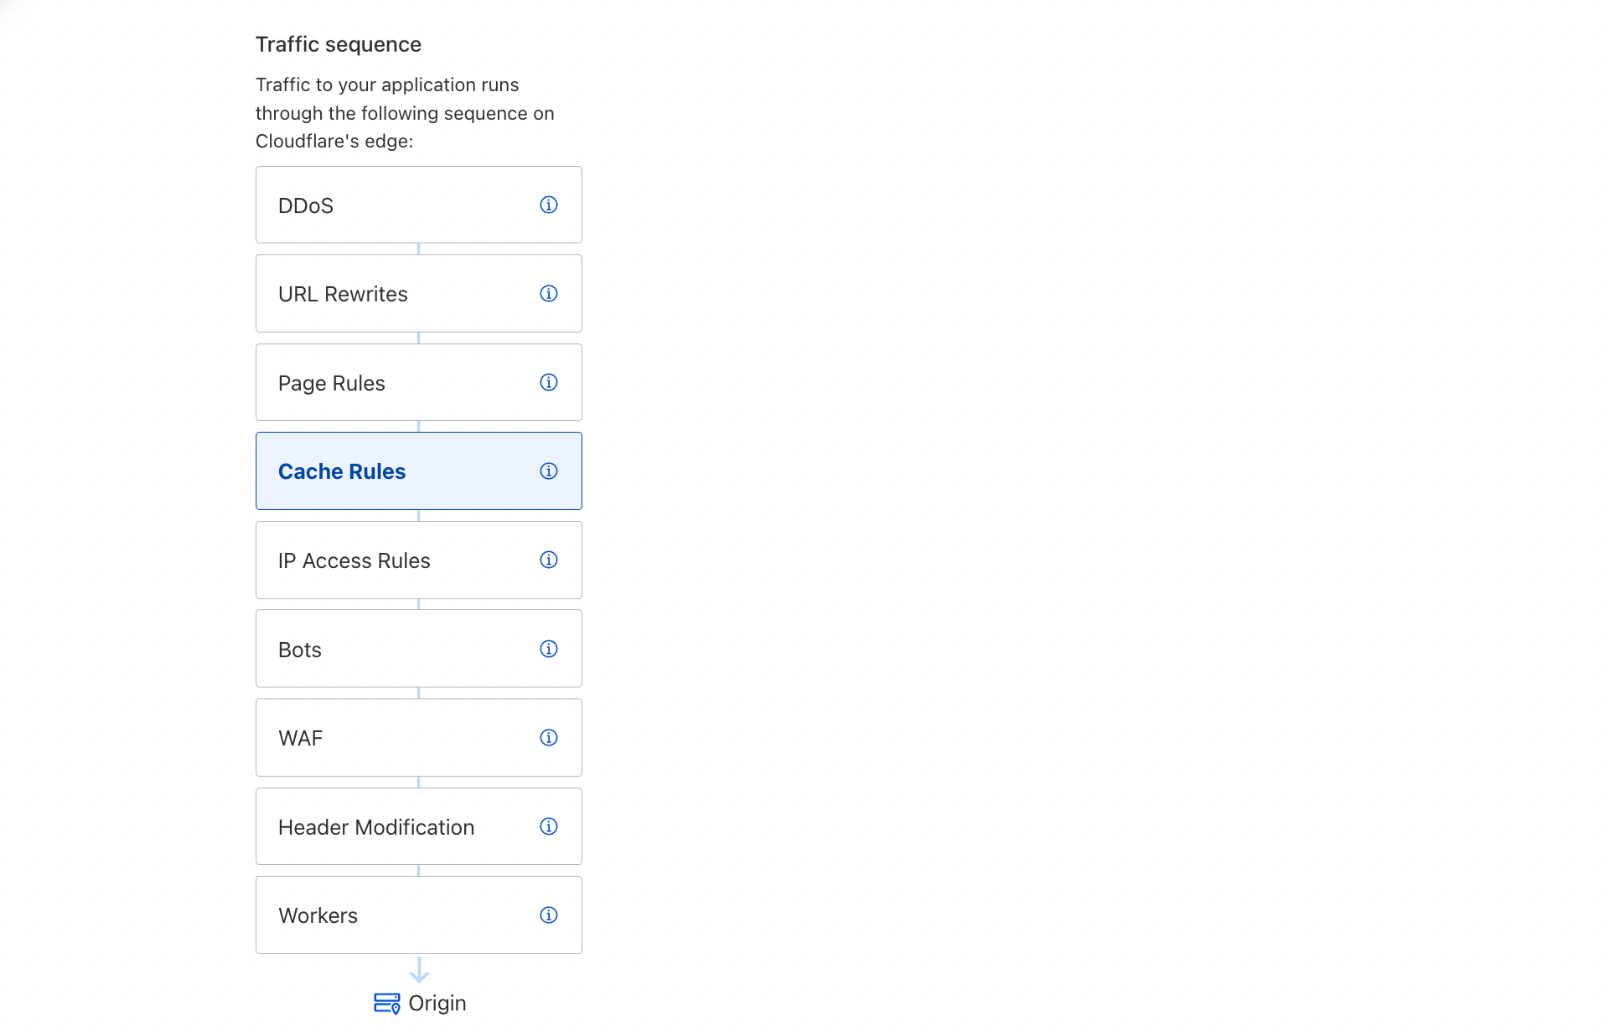
Our current offerings of Page Rules, Workers, and Transform Rules can all manipulate caching functionality for our users’ content. Often, there is some trial and error required to make sure that the confluence of several rules and/or Workers are behaving in an expected manner.
As part of upgrading Page Rules we have separated it into four new products:
Origin Rues
Cache Rules
Configuration Rules
Redirect Rules
This gives users a better understanding into how and when different parts of the Cloudflare stack are activated, reducing the spin-up and debug time. We will also be providing additional visibility in the dashboard for when rules are activated as they go through Cloudflare. As a sneak peek please see:
Our users may take advantage of this strict precedence by chaining the results of one product into another. For example, the output of URL rewrites in Transform Rules will feed into the actions of Cache Rules, and the output of Cache Rules will feed into IP Access Rules, and so on.
In the future, we plan to increase this visibility further to allow for inputs and outputs across the rules products to be observed so that the modifications made on our network can be observed before the rule is even deployed.
Cache Rules. What are they? Are they improved? Let’s find out!
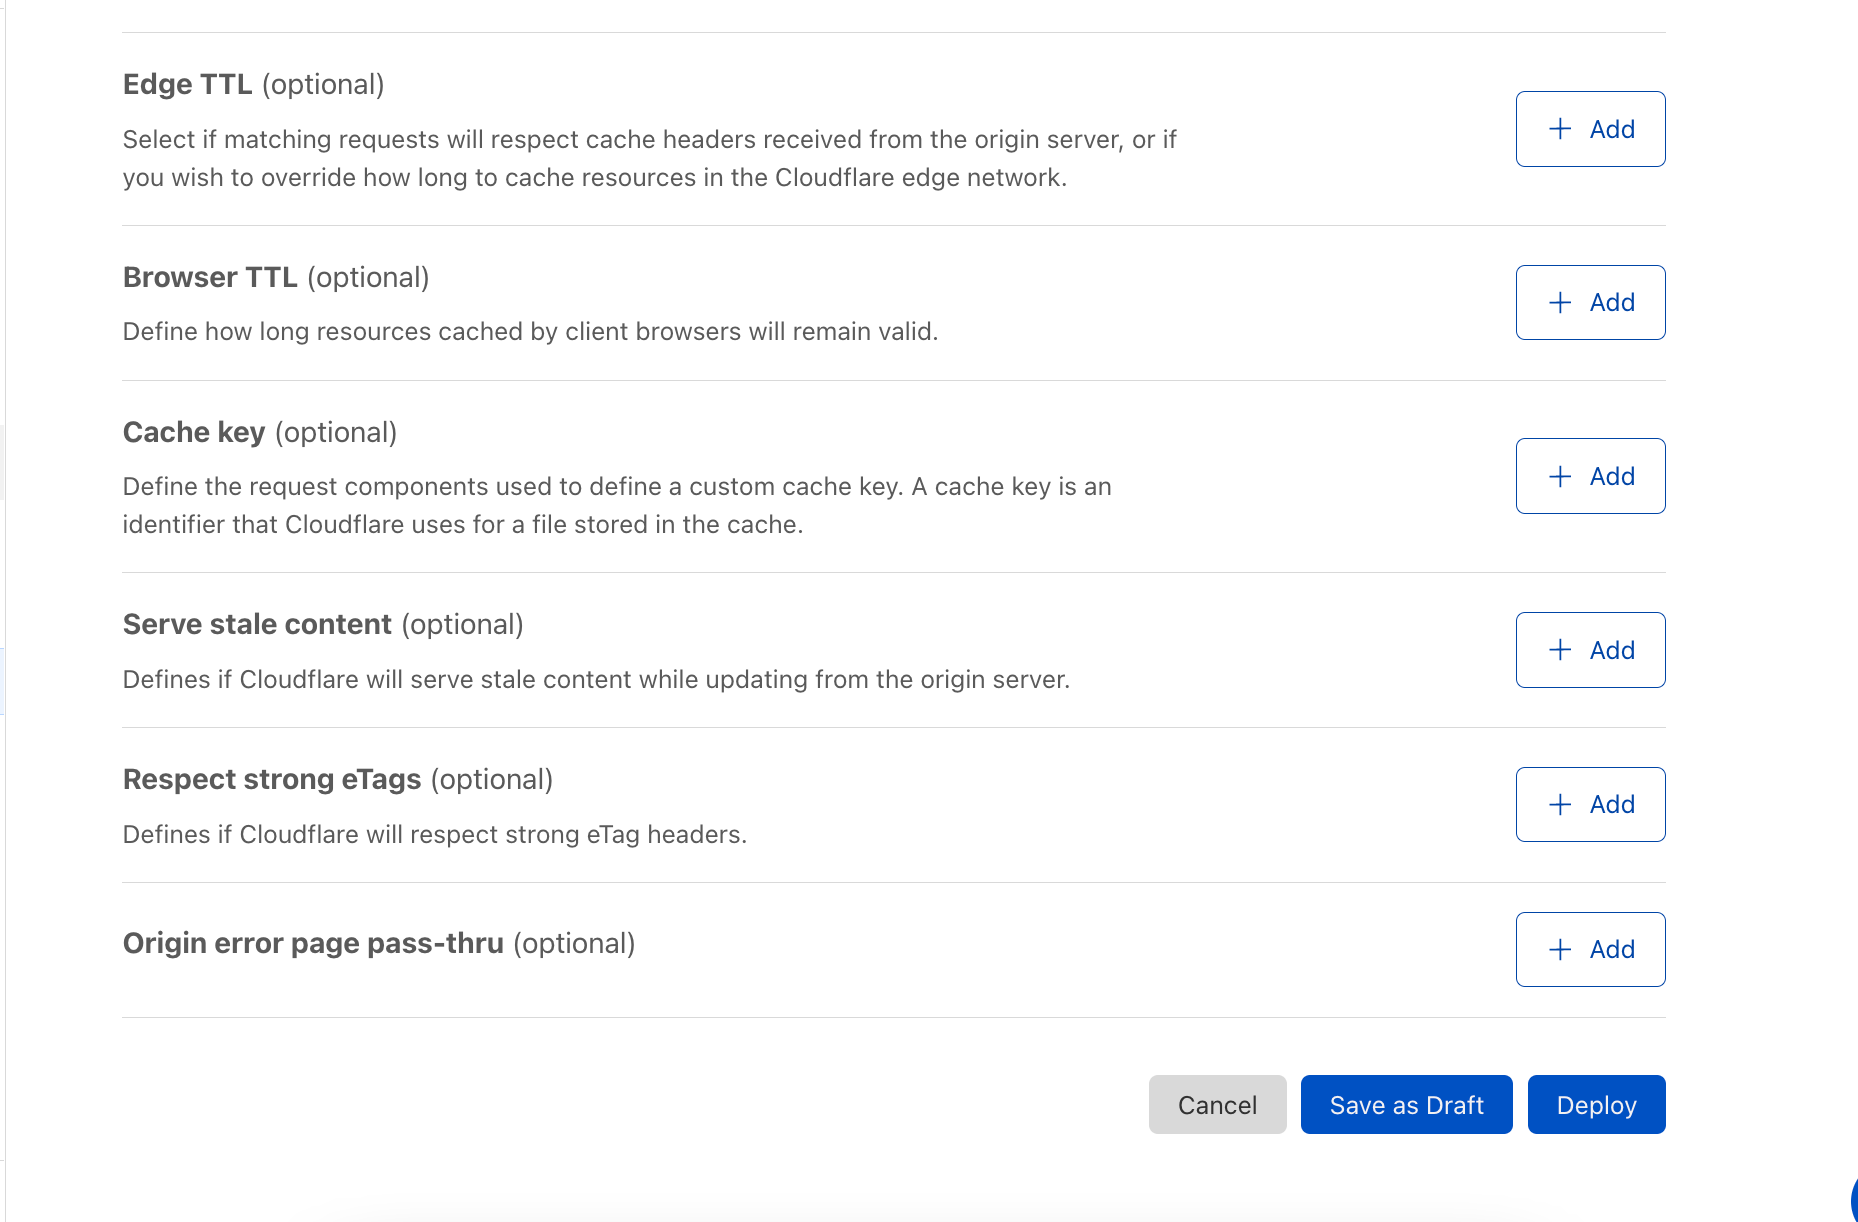
To start, Cache Rules will have all the caching functionality currently available in Page Rules. Users will be able to:
Tell Cloudflare to cache an asset or not,
Alter how long Cloudflare should cache an asset,
Alter how long a browser should cache an asset,
Define a custom cache key for an asset,
Configure how Cloudflare serves stale, revalidates, or otherwise uses header values to direct cache freshness and content continuity,
And so much more.
Cache Rules are intuitive and work similarly to our other ruleset engine-based products announced today: API or UI conditionals for URL or request headers are evaluated, and if matching, Cloudflare and browser caching options are configured on behalf of the user. For all the different options available, see our Cache Rules documentation.
Under the hood, Cache Rules apply targeted rule applications so that additional rules can be supported per user and across the whole engine. What this means for our users is that by consuming less CPU for rule evaluations, we’re able to support more rules per user. For specifics on how many additional Cache Rules you’ll be able to use, please see the Future of Rules Blog.
How can you use Cache Rules today?
Cache Rules are available today in beta and can be configured via the API, Terraform, or UI in the Caching tab of the dashboard. We welcome you to try the functionality and provide us feedback for how they are working or what additional features you’d like to see via community posts, or however else you generally get our attention 🙂.
If you have Page Rules implemented for caching on the same path, Cache Rules will take precedence by design. For our more patient users, we plan on releasing a one-click migration tool for Page Rules in the near future.
What’s in store for the future of Cache Rules?
In addition to granular control and increased visibility, the new rules products also opens the door to more complex features that can recommend rules to help customers achieve better cache hit ratios and reduce their egress costs, adding additional caching actions and visibility, so you can see precisely how Cache Rules will alter headers that Cloudflare uses to cache content, and allowing customers to run experiments with different rule configurations and see the outcome firsthand. These possibilities represent the tip of the iceberg for the next iteration of how customers will use rules on Cloudflare.
Try it out!
We look forward to you trying Cache Rules and providing feedback on what you’d like to see us build next.
We are thrilled to announce that Cloudflare has been positioned in the Leaders category in the IDC MarketScape: Worldwide Commercial CDN 2022 Vendor Assessment(doc #US47652821, March 2022).
The IDC MarketScape evaluated 10 CDN vendors based on their current capabilities and future strategies for delivering Commercial CDN services. Cloudflare is recognized as a Leader.
At Cloudflare, we release products at a dizzying pace. When we talk to our customers, we hear again and again that they appreciate Cloudflare for our relentless innovation. In 2021 alone, over the course of seven Innovation Weeks, we launched a diverse set of products and services that made our customers’ experiences on the Internet even faster, more secure, more reliable, and more private.
We leverage economies of scale and network effects to innovate at a fast pace. Of course, there’s more to our secret sauce than our pace of innovation. In the report, IDC notes that Cloudflare is “a highly innovative vendor and continues to invest in its competencies to support advanced technologies such as virtualization, serverless, AI/ML, IoT, HTTP3, 5G and (mobile) edge computing.” In addition, IDC also recognizes Cloudflare for its “integrated SASE offering (that) is appealing to global enterprise customers.”
Built for the modern Internet
Building fast scalable applications on the modern Internet requires more than just caching static content on servers around the world. Developers need to be able to build applications without worrying about underlying infrastructure. A few years ago, we set out to revolutionize the way applications are built, so developers didn’t have to worry about scale, speed, or even compliance. Our goal was to let them build the code, while we handle the rest. Our serverless platform, Cloudflare Workers, aimed to be the easiest, most powerful, and most customizable platform for developers to build and deploy their applications.
Workers was designed from the ground up for an edge-first serverless model. Since Cloudflare started with a distributed edge network, rather than trying to push compute from large centralized data centers out into the edge, working under those constraints forced us to innovate.
Today, Workers services hundreds of thousands of developers, ranging from hobbyists to enterprises all over the world, serving millions of requests per second.
According to the IDC MarketScape: “The Cloudflare Workers developer platform, based on an isolate serverless architecture, is highly customizable and provides customers with a shortened time to market which is crucial in this digitally led market.”
Data you care about, at your fingertips
Our customers today have access to extensive analytics on the dashboard and via the API around network performance, firewall actions, cache ratios, and more. We provide analytics based on raw events, which means that we go beyond simple metrics and provide powerful filtering and analysis capabilities on high-dimensionality data.
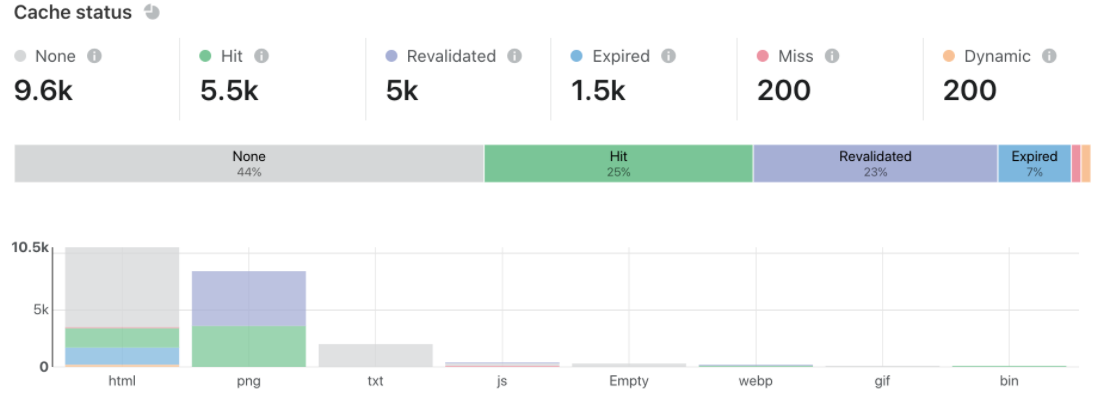
And our insights are actionable. For example, customers who are looking to optimize cache performance can analyze specific URLs and see not just hits and misses but content that is expired or revalidated (indicating a short URL). All events, both directly in the console and in the logs, are available within 30 seconds or less.
The IDC MarketScape notes that the “self-serve portal and capabilities that include dashboards with detailed analytics as well as actionable content delivery and security analytics are complemented by a comprehensive enhanced services suite for enterprise grade customers.”
The only unified SASE solution in the market
Cloudflare’s SASE offering, Cloudflare One, continues to grow and provides a unified and comprehensive solution to our customers. With our SASE offering, we aim to be the network that any business can plug into to deliver the fastest, most reliable, and most secure experiences to their customers. Cloudflare One combines network connectivity services with Zero Trust security services on our purpose-built global network.
Cloudflare Access and Gateway services natively work together to secure connectivity for any user to any application and Internet destination. To enhance threat and data protection, Cloudflare Browser Isolation and CASB services natively work across both Access and Gateway to fully control data in transit, at rest, and in use.
The old model of the corporate network has been made obsolete by mobile, SaaS, and the public cloud. We believe Zero Trust networking is the future, and we are proud to be enabling that future. The IDC MarketScape notes: “Cloudflare’s enterprise security Zero Trust services stack is extensive and meets secure access requirements of the distributed workforce. Its data localization suite and integrated SASE offering is appealing to global enterprise customers.“
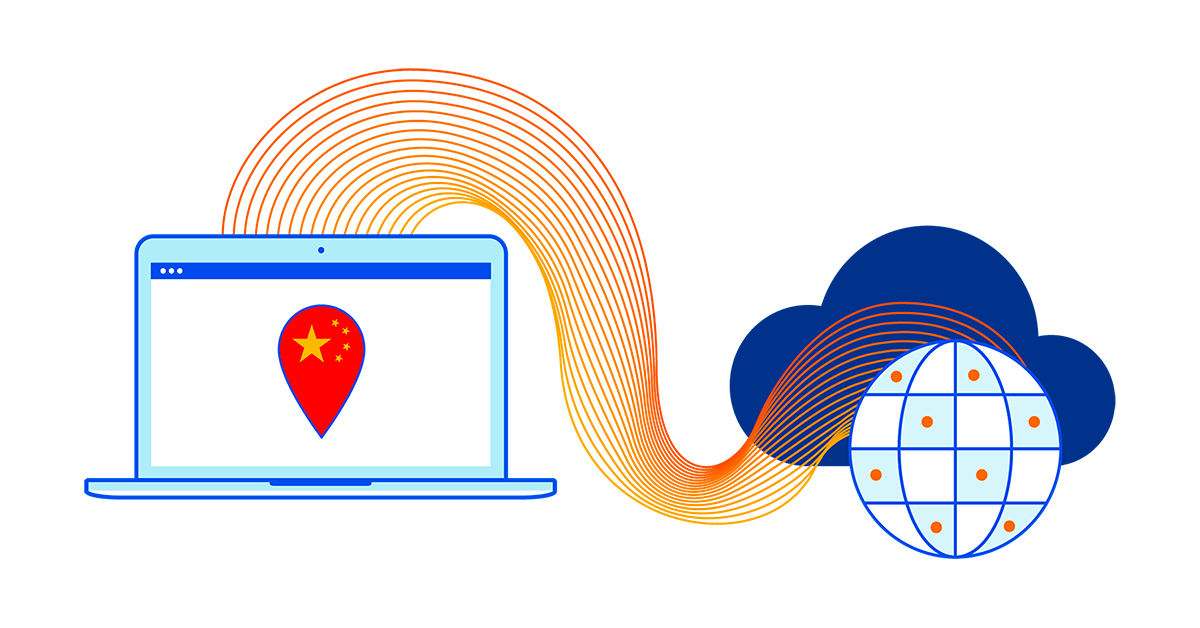
A one-stop, truly global solution
Many global companies today looking to do business in China often are restricted in their operations due to the country’s unique regulatory, political, and trade policies.
Core to Cloudflare’s mission of helping build a better Internet is making it easy for our customers to improve the performance, security, and reliability of their digital properties, no matter where in the world they might be, and this includes mainland China. Our partnership with JD Cloud & AI allows international businesses to grow their online presence in China without having to worry about managing separate tools with separate vendors for security and performance in China.
Just last year, we made advancements to allow customers to be able to serve their DNS in mainland China. This means DNS queries are answered directly from one of the JD Cloud Points of Presence (PoPs), leading to faster response times and improved reliability. This in addition to providing DDoS protection, WAF, serverless compute, SSL/TLS, and caching services from more than 35 locations in mainland China.
Here’s what the IDC MarketScape noted about Cloudflare’s China network: “Cloudflare’s strategic partnership with JD Cloud enables the vendor to provide its customers cached content in-country at any of their China data centers from origins outside of mainland China and provide the same Internet performance, security, and reliability experience in China as the rest of the world.”
A unified network that is fast, secure, reliable, customizable, and global
One of the earliest architectural decisions we made was to run the same software stack of our services across our ever-growing fleet of servers and data centers. So whether it is content caching, serverless compute, zero trust functionality, or our other performance, security, or reliability services, we run them from all of our physical points of presence. This also translates into faster performance and robust security policies for our customers, all managed from the same dashboard or APIs. This strategy has been a key enabler for us to expand our customer base significantly over the years. Today, Cloudflare’s network spans 250 cities across 100+ countries and has millions of customers, of which more than 140,000 are paying customers.
In the IDC MarketScape: Worldwide Commercial CDN 2022 Vendor Assessment, IDC notes, “[Cloudflare’s] clear strategy to invest in new technology but also expand its network as well as its sales machine across these new territories has resulted in a tremendous growth curve in the past years.”
To that, we’d humbly like to say that we are just getting started.
Stay tuned for more product and feature announcements on our blog. If you’re interested in contributing to Cloudflare’s mission, we’d love to hear from you.
Caching is a magic trick. Instead of a customer’s origin responding to every request, Cloudflare’s 200+ data centers around the world respond with content that is cached geographically close to visitors. This dramatically improves the load performance for web pages while decreasing the bandwidth costs by having Cloudflare respond to a request with cached content.
However, if content is not in cache, Cloudflare data centers must contact the origin server to receive the content. This isn’t as fast as delivering content from cache. It also places load on an origin server, and is more costly compared to serving directly from cache. These issues can be amplified depending on the geographic distribution of a website’s visitors, the number of data centers contacting the origin, and the available origin resources for responding to requests.
To decrease the number of times our network of data centers communicate with an origin, we organize data centers into tiers so that only upper-tier data centers can request content from an origin and then they spread content to lower tiers. This means content that loads faster for visitors, is cheaper to serve, and reduces origin resource consumption.
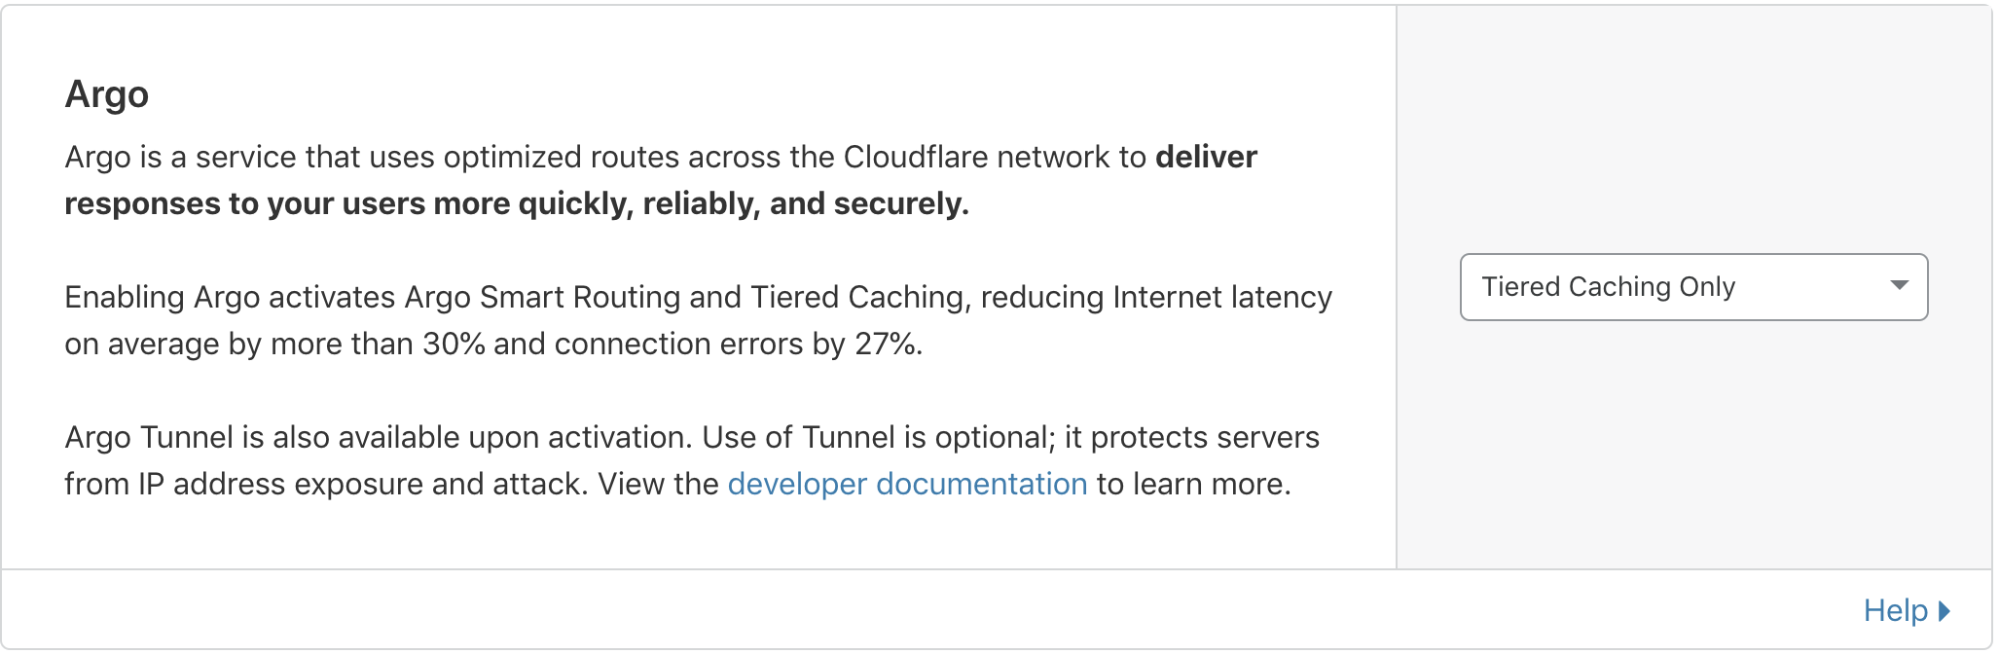
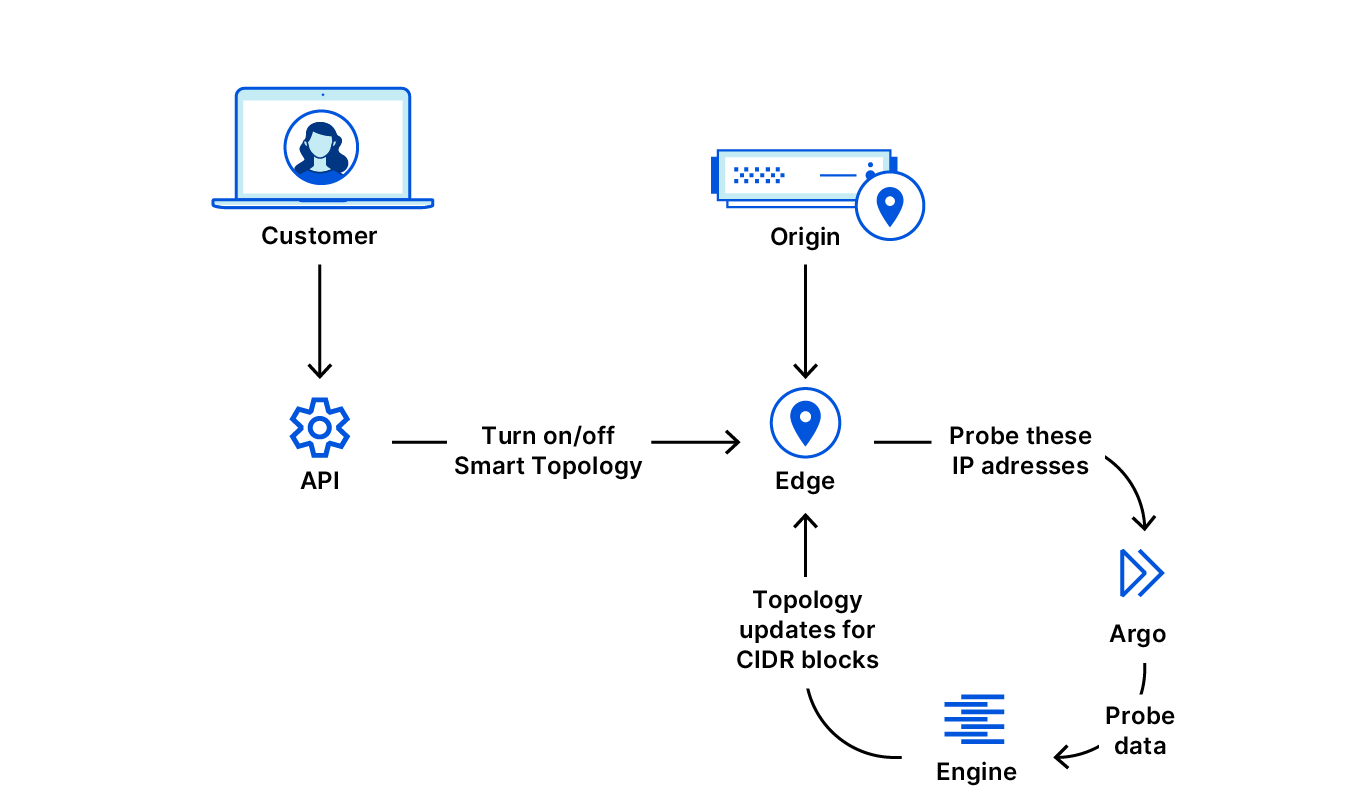
Today, I’m thrilled to announce a fundamental improvement to Argo Tiered Cache we’re calling Smart Tiered Cache Topology. When enabled, Argo Tiered Cache will now dynamically select the single best upper tier for each of your website’s origins while providing tiered cache analytics showing how your custom topology is performing.
Smarter Tiered Cache Topology Generation
Tiered Cache is part of Argo, a constellation of products that analyzes and optimizes routing decisions across the global Internet in real-time by processing information from every Cloudflare request to determine which routes to an origin are fast, which are slow, and what the optimum path from visitor to content is at any given moment. Previously, Argo Tiered Cache would use a static collection of upper-tier data centers to communicate with the origin. With the improvements we’re announcing today, Tiered Cache can now dynamically find the single best upper tier for an origin using Argo performance and routing data. When Argo is enabled and a request for particular content is made, we collect latency data for each request to pick the optimal path. Using this latency data, we can determine how well any upper-tier data center is connected with an origin and can empirically select the best data center with the lowest latency to be the upper tier for an origin.
Argo Tiered Cache
Taking one step back, tiered caching is a practice where Cloudflare’s network of global data centers are subdivided into a hierarchy of upper tiers and lower tiers. In order to control bandwidth and number of connections between an origin and Cloudflare, only upper tiers are permitted to request content from an origin and must propagate that information to the lower tiers. In this way, Cloudflare data centers first talk to each other to find content before asking the origin. This practice improves bandwidth efficiency by limiting the number of data centers that can ask the origin for content, reduces origin load, and makes websites more cost-effective to operate. Argo Tiered Cache customers only pay for data transfer between the client and edge, and we take care of the rest. Tiered caching also allows for improved performance for visitors, because distances and links traversed between Cloudflare data centers are generally shorter and faster than the links between data centers and origins.
Previously, when Argo Tiered Cache was enabled for a website, several of Cloudflare’s largest and most-connected data centers were determined to be upper tiers and could pull content from an origin on a cache MISS. While utilizing a topology consisting of numerous upper-tier data centers may be globally performant, we found that cost-sensitive customers generally wanted to find the single best upper tier for their origin to ensure efficient data transfer of their content to Cloudflare’s network. We built Smart Tiered Cache Topology for this reason.
How to enable Smart Tiered Cache Topology
When you enable Argo Tiered Cache, Cloudflare now by default concentrates connections to origin servers so they come from a single data center. This is done without needing to work with our Customer Success or Solutions Engineering organization to custom configure the best single upper tier. Argo customers can generate this topology by:
Logging into your Cloudflare account.
Navigating to the Traffic tab in the dashboard.
Ensuring you have Argo enabled.
From there, Non-Enterprise Argo customers will automatically be enrolled in Smart Tiered Cache Topology without needing to make any additional changes.
Enterprise customers can select the type of topology they’d like to generate.
Self-serve Argo customers are automatically enrolled in Smart Tiered Cache Topology
Enterprise customers can determine the tiered cache topology that works best for them.
More data, fewer problems
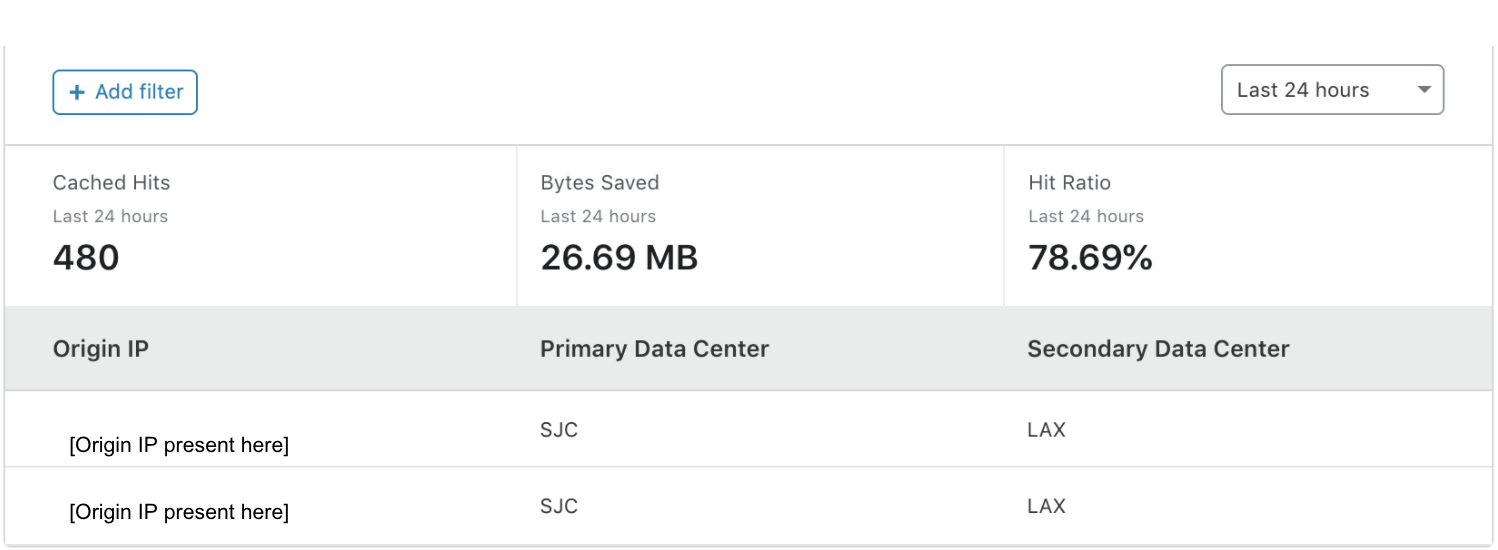
Once enabled, in addition to performance and cost improvements, Smart Tiered Cache Topology also delivers summary analytics for how the upper tiers are performing so that you can monitor the cost and performance benefits your website is receiving. These analytics are available in the Cache Tab of the dashboard in the Tiered Cache section. The “Primary Data Center” and “Secondary Data Center” fields show you which data centers were determined to be the best upper tier and failover for your origin. “Cached Hits” and the “Hit Ratio” shows you the proportion of requests that were served by the upper tier and how many needed to be forwarded on to the origin for a response. “Bytes Saved” indicates the total transfer from the upper-tier data center to the lower tiers, showing the total bandwidth saved by having Cloudflare’s lower tier data centers ask the upper tiers for the content instead of the origin.
Smart Tiered Cache Topology works with Cloudflare’s existing products to deliver you a seamless, easy, and performant experience that saves you money and provides you useful information about how your upper tiers are working with your origins. Smart Tiered Cache Topology stands on the shoulders of some of the most resilient and useful products at Cloudflare to provide even more benefits to webmasters.
If you’re interested in seeing how Argo and Smart Tiered Cache Topology can benefit your web property, please login to your Cloudflare account and find more information in the Traffic tab of the dashboard here.
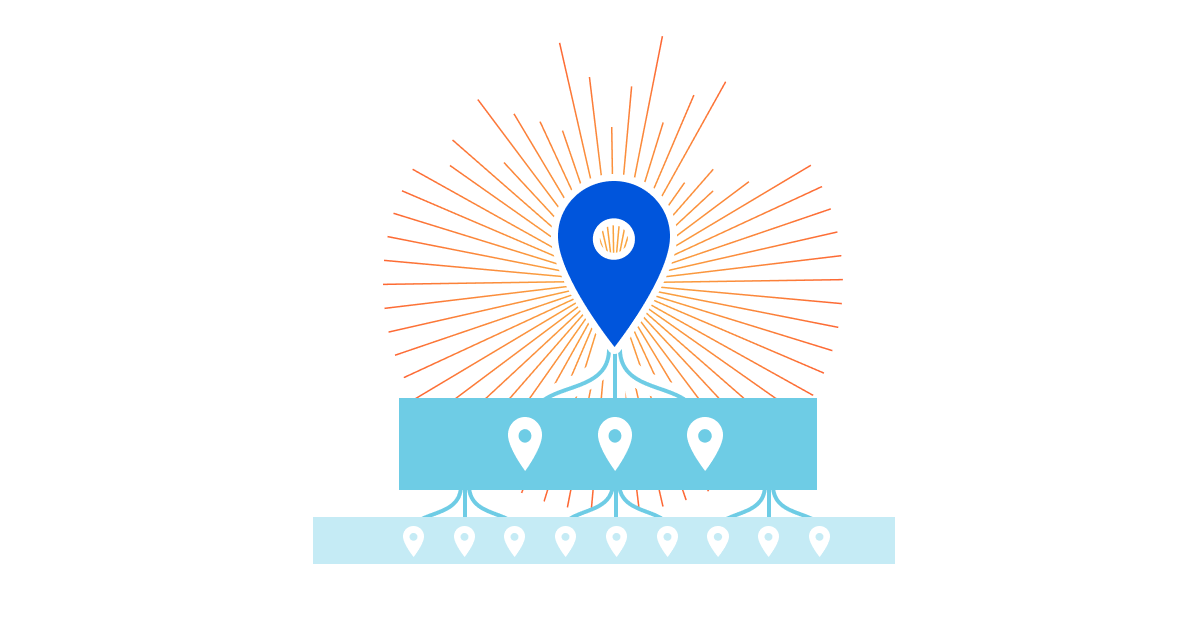
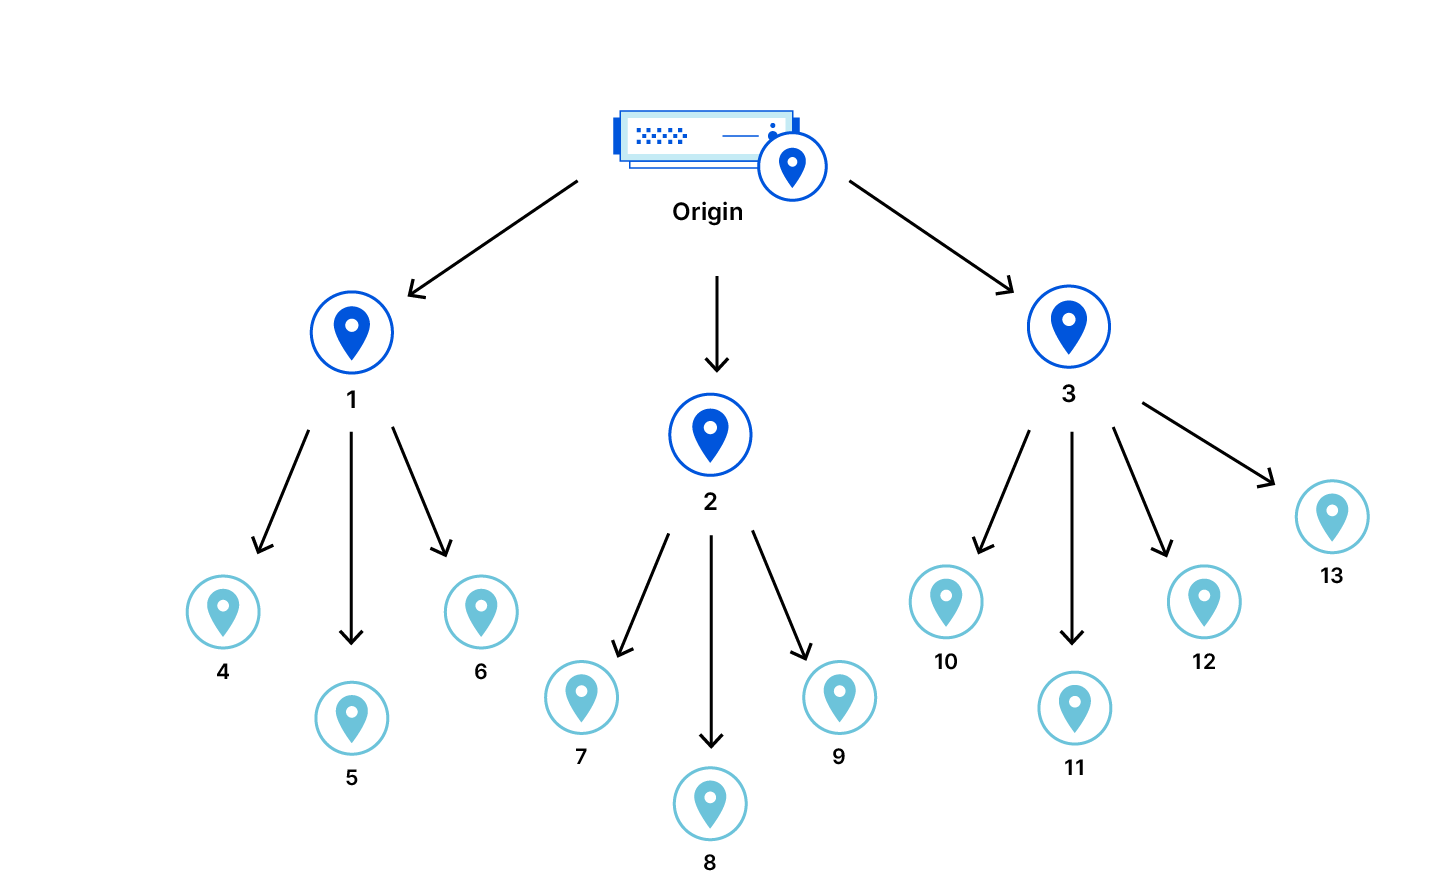
A few years ago, we released Argo to help make the Internet faster and more efficient. Argo observes network conditions and finds the optimal route across the Internet for origin server requests, avoiding congestion along the way.
Tiered Cache is an Argo feature that reduces the number of data centers responsible for requesting assets from the origin. With Tiered Cache active, a request in South Africa won’t go directly to an origin in North America, but, instead, look in a large, nearby data center to see if the data requested is cached there first. The number and location of the data centers used by Tiered Cache is controlled by a piece of configuration called the topology. By default, we use a generic topology for every customer that strikes a balance between cache hit ratios and latency that is suitable for most users.
Today we’re introducing Smart Topology, which maximizes cache hit ratios by building on Argo’s internal infrastructure to identify the single best data center for making requests to the origin.
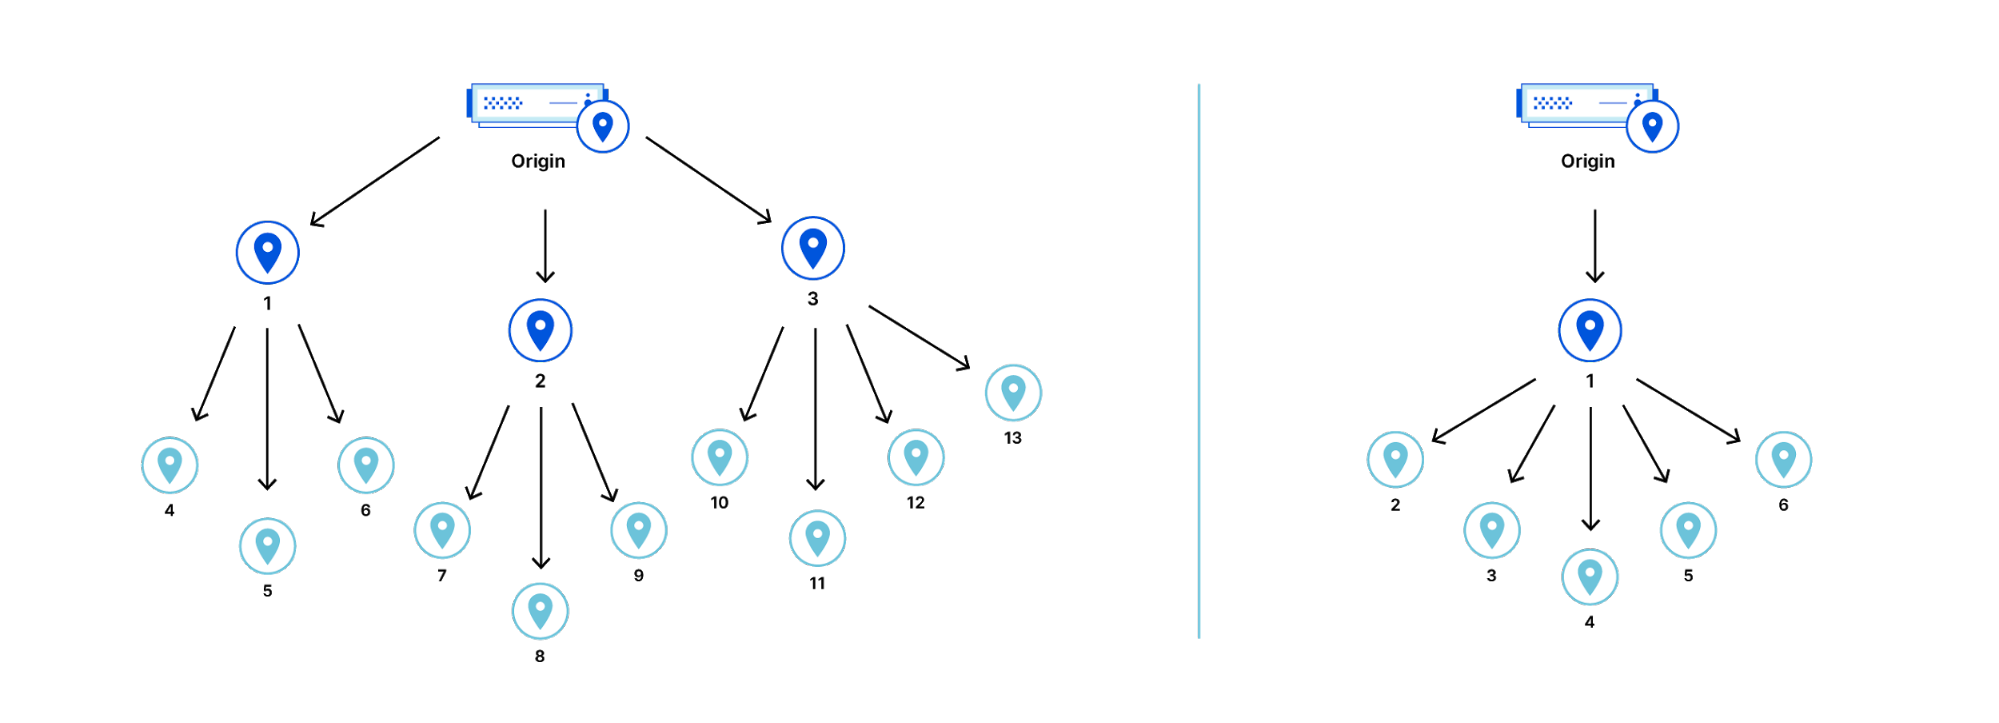
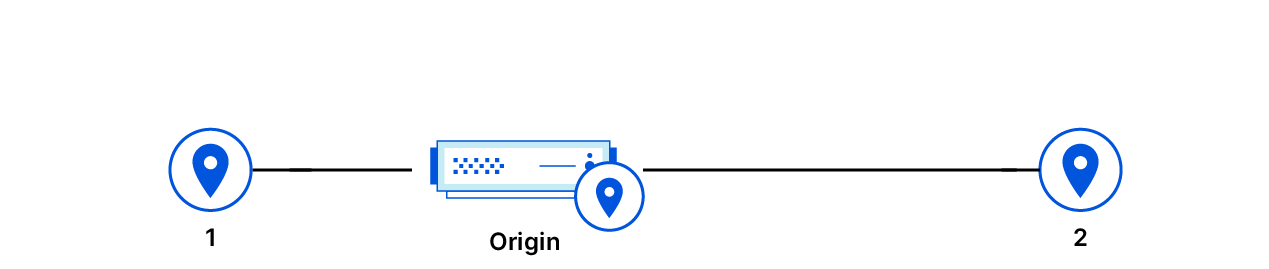
Standard Cache
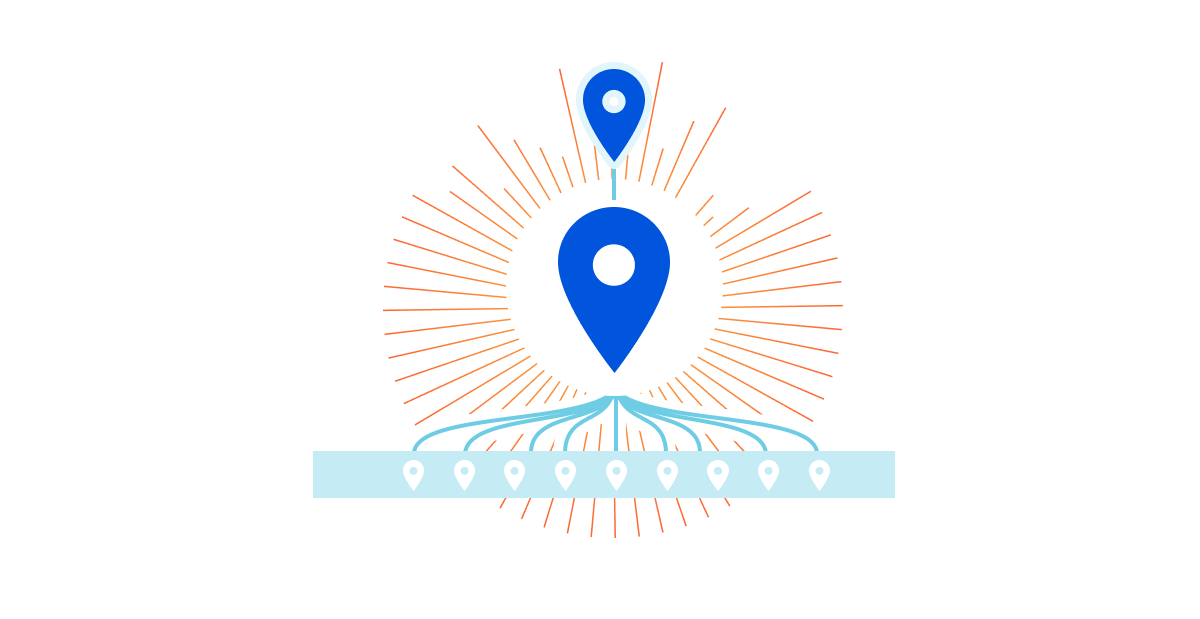
The standard method for caching assets is to let each data center be a reverse proxy for the origin server. In this scheme, a miss in any data center causes a request to the origin for an asset. A request to the origin for one asset could be made as many times as there are data centers.
A cache miss in any data center will result in a request being sent to the origin server even if the asset is cached in some other data center. This is because the data centers are completely oblivious of each other.
Theoretically, a request for the asset would have to be sent to every data center in order to reduce the cache misses to the minimum possible. However, sending every request to every data center is not practical.
The minimum possible cache hit latency is achieved if the asset is moved into the nearest cache before the request for it is made, but this kind of prediction is generally not possible. Instead, a good heuristic is to move the asset into the nearest cache after the first cache miss.
However, the asset has to be copied from somewhere and it isn’t possible to know where in the network it might be without querying each data center.
To avoid querying each data center, a copy of the asset has to be stored in a known location after the first cache miss so it is available to other data centers. This is precisely what Tiered Cache does.
Tiered Cache
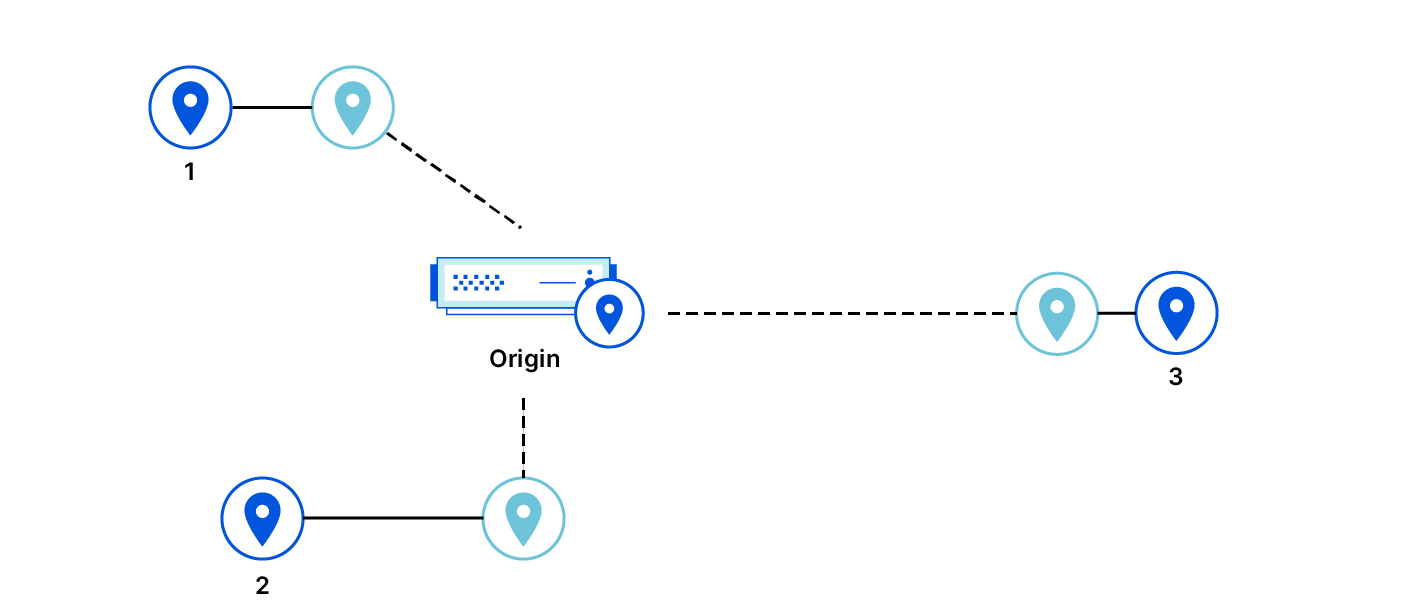
Tiered Cache improves cache hit ratios by allowing some data centers to serve as caches for others, before the latter has to make a request to the origin. With Tiered Cache, certain data centers are reverse proxies to the origin for other data centers.
If the proxied data centers make requests for the same asset, the asset will already be cached in the proxying data center and can be retrieved from there rather than from the origin. Fewer requests to the origin are made overall.
Custom Topology
In Tiered Cache, the topology describes which data center should serve as a proxy for others.
For customers, devising an optimal topology is a challenge requiring optimization and continuous maintenance. The best topology is a configuration based on information that is privately held by the customer and other information held only by Cloudflare.
For instance, knowing the desired balance of latency versus cache hit ratio is information only the customer has, but how to best make use of the Internet is something we would know. Enterprise customers usually have dedicated infrastructure teams that work with our solutions engineers to manually optimize and maintain their tiered cache topology.
Not every customer would want to personalize their topology. For this reason a generic topology exists.
Generic Topology
The generic topology is designed to achieve good latency and cache efficiency for any origin, regardless of location. A balance is struck between two constraints — cache efficiency and latency.
The generic topology has multiple proxying data centers that are distributed around the world in order to ensure that requests that result in a cache miss do not take a very long detour before going to the origin. There is a balance between the number of proxying data centers and the cache hit ratio, because the proxying data centers are oblivious to each other.
If a proxying data center is taken offline, the proxied data centers either use a fallback (if the fallback is online) or revert to behaving like Tiered Cache is disabled.
To achieve the best balance for general usage, the generic topology instructs the smaller data centers to be proxied by the larger data centers in the same geographic region.
Smart Topology
Smart Topology assumes the origin is in one place and then automatically configures itself to be optimal once the customer just flips a switch in the dashboard. In order to actually do this, Cloudflare needs to be able to determine which data center has the lowest latency to the origin without making the customer tell Cloudflare where the origin is.
Methods for Latency Determination
There are a few ways to determine which data center has the lowest latency with respect to the origin.
IP geolocation Physical distance can be used as an approximation for latency, but Smart Topology was not built this way for a couple of reasons. First, even the best commercial IP geo database doesn’t have the required coverage and accuracy. Second, even with perfect accuracy, physical distance is a questionable approximation of Internet latency.
Probing Latency to an IP address can be determined exactly by probing that address. The probe can just be the time required to perform the TCP handshake. Each data center probes the origin so that the latencies can be directly measured and the minimum can be found. Except for edge cases involving Anycast and TCP termination, we can assume that the latency to an IP address is the same as the latency to the origin server behind that IP address.
Topology Selection Algorithm
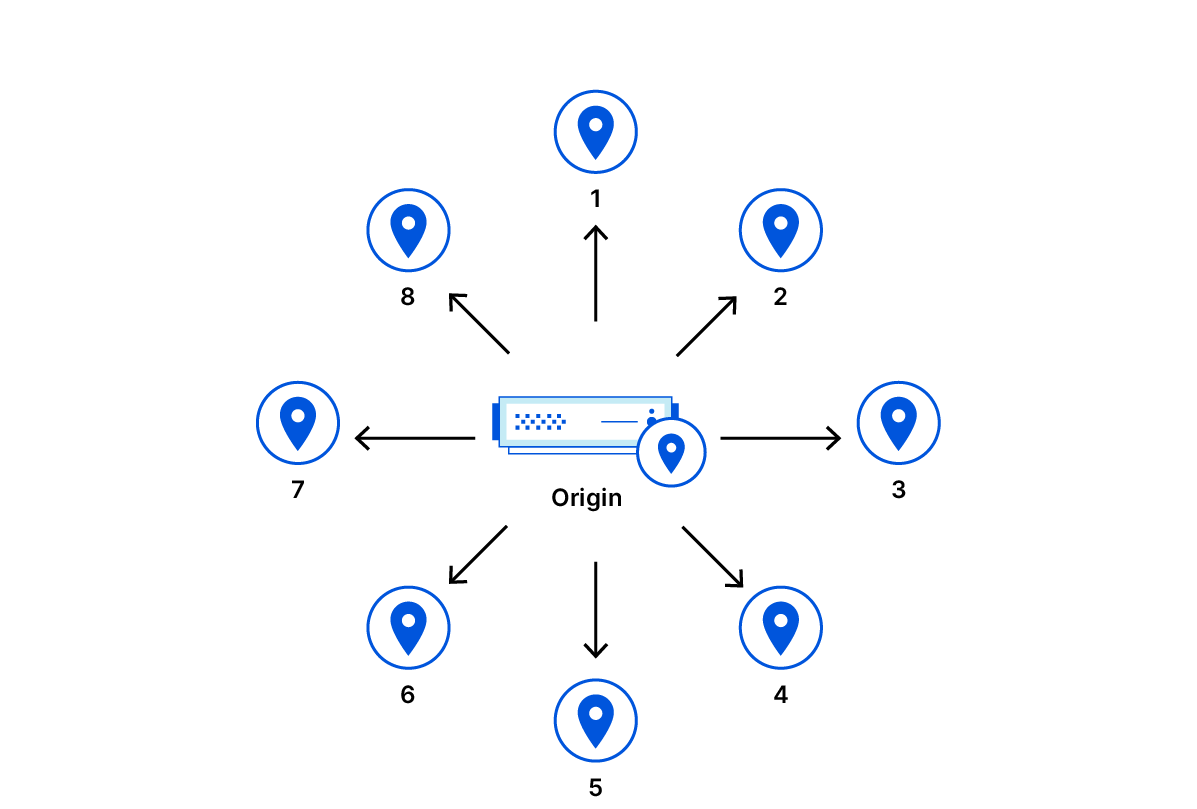
The goal of the topology selection algorithm is to minimize cache misses and latency. The topology chooses a single proxying data center in order to maximize the cache hit ratio. The proxying data center is chosen to be close to the origin so that the latencies of cache misses in the proxied data centers are not much worse than they would be with tiered cache turned off.
The choice should eventually become stable. Stability is important because each time the choice changes, cache misses in proxied data centers are likely to cause cache misses in the new proxying data center. Capacity is important because when a data center goes offline, it can cause a large number of cache misses. Minimizing latency to the origin is important to ensure that the network is used efficiently.
The data center selection algorithm is rather like a leaderboard of the fastest data center for each origin. As data is collected, a faster data center can knock others off a given origin’s leaderboard. This competition is based on the 24 hour median latency and is held each hour. Only a subset of data centers deemed large enough are permitted to compete.
Eventually, the choice for proxying data centers becomes stable. Over time, data centers produce competing records for each origin and less competitive records in the leaderboard are replaced as necessary. Thus, latencies for any origin on the leaderboard can only monotonically decrease. There are always physical limits in the real world, so eventually the ideal data center will set a record that is too good to beat.
Also, the leaderboard actually includes both the lowest latency data center and the second lowest latency data center. The second lowest latency data center serves as a fallback if the preferred data center is taken offline for maintenance.
Anycast Networks We are measuring the latency to the origin IP address and assuming that it represents the latency to the origin server, but this can break down in certain cases. A few cloud providers other than Cloudflare also use Anycast technology to provide their services. In Anycast, multiple machines can share an IP address regardless of where they are connected to the Internet, and the Internet will typically route packets destined for that address to the closest machine. If an Anycast network is used to proxy an origin server, then the apparent latency to the IP address for the origin server is actually the latency to the edge of the Anycast network rather than the latency to the origin server. The real latency to the origin server cannot be determined by probing.
The algorithm would fail to select the single best proxying data center if the latencies are not representative of the actual latency between data center and origin. Selecting the wrong data center would adversely affect latencies for requests to the origin, and could be expensive.
For instance, imagine a cloud provider provides an IP address that actually routes to multiple data centers all over the world. Packets are routed through private infrastructure to the correct destination once they enter the network. The lowest latency data center to this Anycast IP address could potentially even be on a different continent than the actual origin server. Therefore, the apparent latency cannot actually be trusted as a true measure of actual latency to the origin.
The data center selection algorithm assumes that the origin is in a single geographic location and can be probed to determine latency from each data center. These networks break one or both of these assumptions, so a procedure had to be developed in order to detect them. First, it is assumed that the IP appears in a single geographic location and is not proxied by such a network. The latency to the origin is bounded by the speed of light through fiber. Although the distance between any data center and the origin server is not known, the distances between data centers is known by Cloudflare.
Imagine putting the origin server as a pitstop in that journey. Then, the theoretical minimum possible observable pair of latencies between the origin server and any two data centers can be computed. We have the latency probe data from both of these data centers and the origin, so we can check to see whether the observed latency is lower than what is possible.
The original assumption was that the origin IP address identifies an origin server that is in one location and the latency to that IP address is the latency to the origin server. If the observed latencies are faster than light then clearly the assumption is false. Smart Topology falls back to the generic topology when the original assumption does not hold. To be extra sure, we check this constraint on a bunch of data centers around the world and fall back if there is even a single physically impossible observation.
The Big Picture
When Smart Topology is enabled many Cloudflare systems work together to ensure the correct data center is eventually used to request assets from the origin.
When the customer enables Tiered Cache Smart Topology, one of a few things can happen from the perspective of the origin. If a proxying data center has already been assigned to the CIDR block that encompasses the origin IP, the preferred or fallback data center is used to request assets from the origin. Otherwise, the generic topology is used to determine which proxying data centers to use to pull assets from the origin. The latency to the proxying data center should only decrease as the choice for proxying data center is updated over time.
Conclusion
Developing this technology offered a lot of opportunities to exercise great engineering and build an impactful product. It was not done in a vacuum; we used infrastructure that Cloudflare had already built, and we moved along that exponential gradient of using existing progress to make more progress. Building this framework opens a lot of doors to future progress too; for instance, in the future, we can explore ways to select the ideal proxying data center even for origins behind Anycast networks that hide the true latency to the origin.
Our fleet of over 200 locations comprises various generations of servers and routers. And with the ever changing landscape of services and computing demands, it’s imperative that we manage power in our data centers right. This blog is a brief Electrical Engineering 101 session going over specifically how power distribution units (PDU) work, along with some good practices on how we use them. It appears to me that we could all use a bit more knowledge on this topic, and more love and appreciation of something that’s critical but usually taken for granted, like hot showers and opposable thumbs.
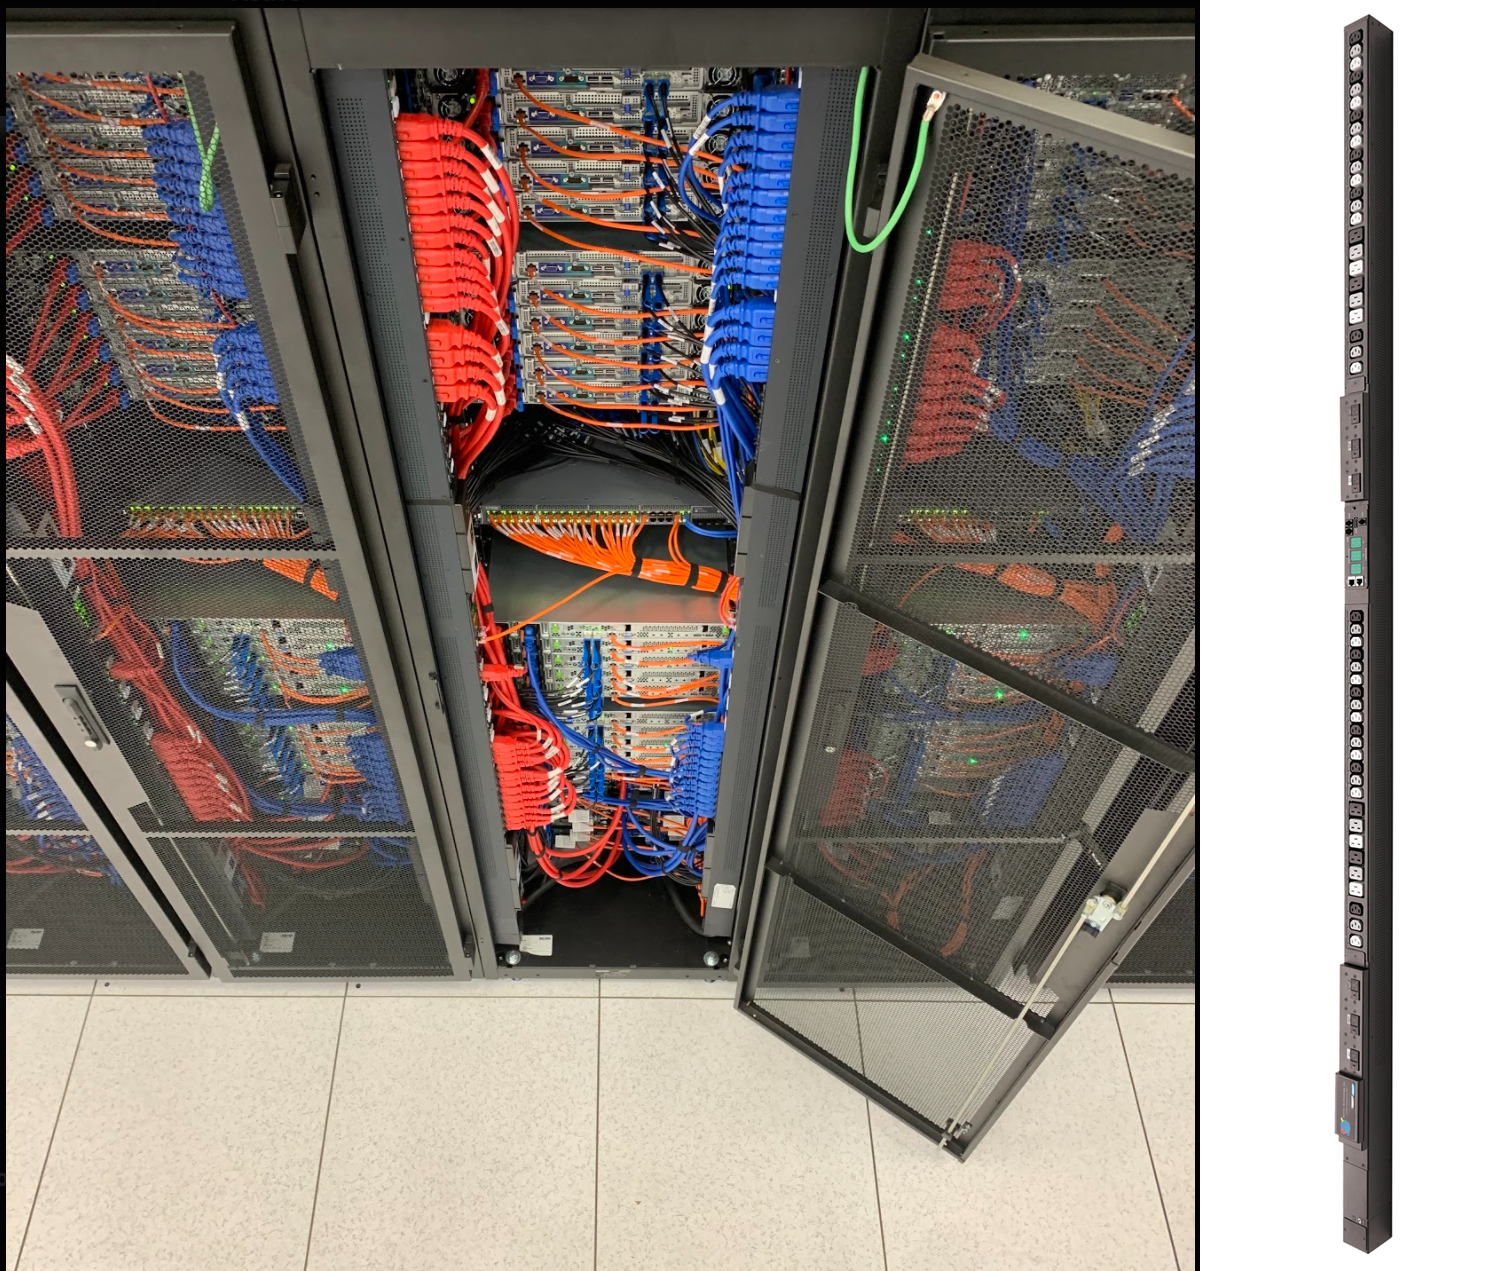
A PDU is a device used in data centers to distribute power to multiple rack-mounted machines. It’s an industrial grade power strip typically designed to power an average consumption of about seven US households. Advanced models have monitoring features and can be accessed via SSH or webGUI to turn on and off power outlets. How we choose a PDU depends on what country the data center is and what it provides in terms of voltage, phase, and plug type.
For each of our racks, all of our dual power-supply (PSU) servers are cabled to one of the two vertically mounted PDUs. As shown in the picture above, one PDU feeds a server’s PSU via a red cable, and the other PDU feeds that server’s other PSU via a blue cable. This is to ensure we have power redundancy maximizing our service uptime; in case one of the PDUs or server PSUs fail, the redundant power feed will be available keeping the server alive.
Faraday’s Law and Ohm’s Law
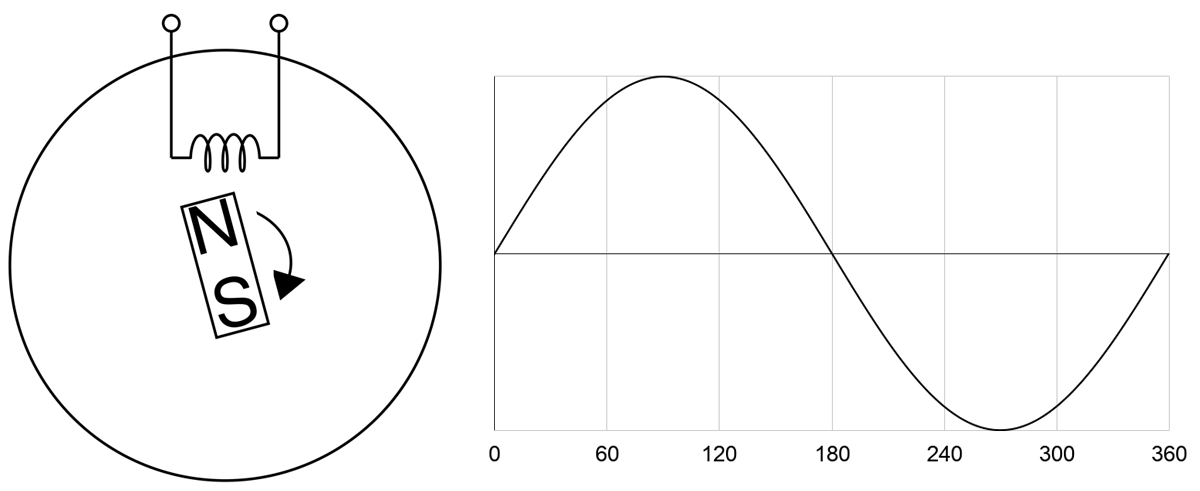
Like most high-voltage applications, PDUs and servers are designed to use AC power. Meaning voltage and current aren’t constant — they’re sine waves with magnitudes that can alternate between positive and negative at a certain frequency. For example, a voltage feed of 100V is not constantly at 100V, but it bounces between 100V and -100V like a sine wave. One complete sine wave cycle is one phase of 360 degrees, and running at 50Hz means there are 50 cycles per second.
The sine wave can be explained by Faraday’s Law and by looking at how an AC power generator works. Faraday’s Law tells us that a current is induced to flow due to a changing magnetic field. Below illustrates a simple generator with a permanent magnet rotating at constant speed and a coil coming in contact with the magnet’s magnetic field. Magnetic force is strongest at the North and South ends of the magnet. So as it rotates on itself near the coil, current flow fluctuates in the coil. One complete rotation of the magnet represents one phase. As the North end approaches the coil, current increases from zero. Once the North end leaves, current decreases to zero. The South end in turn approaches, now the current “increases” in the opposite direction. And finishing the phase, the South end leaves returning the current back to zero. Current alternates its direction at every half cycle, hence the naming of Alternating Current.
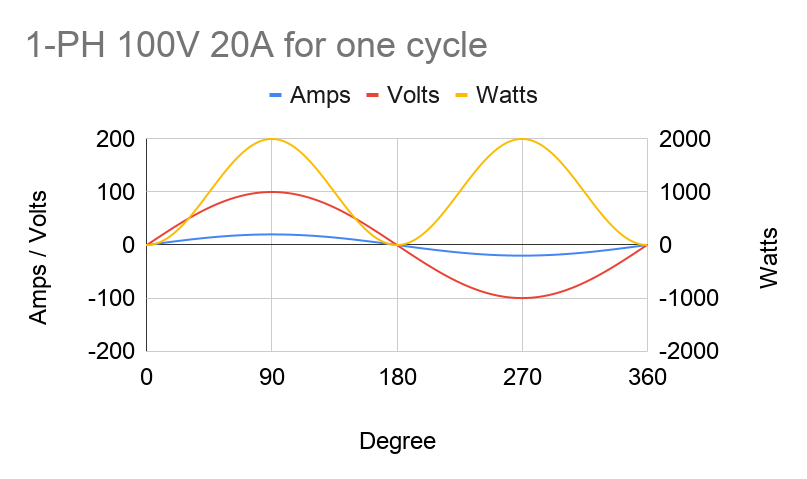
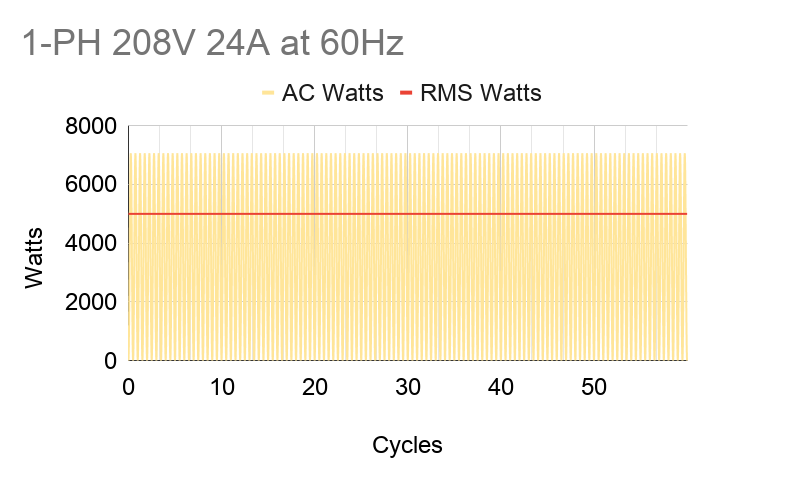
Current and voltage in AC power fluctuate in-phase, or “in tandem”, with each other. So by Ohm’s Law of Power = Voltage x Current, power will always be positive. Notice on the graph below that AC power (Watts) has two peaks per cycle. But for practical purposes, we’d like to use a constant power value. We do that by interpreting AC power into “DC” power using root-mean-square (RMS) averaging, which takes the max value and divides it by √2. For example, in the US, our conditions are 208V 24A at 60Hz. When we look at spec sheets, all of these values can be assumed as RMS’d into their constant DC equivalent values. When we say we’re fully utilizing a PDU’s max capacity of 5kW, it actually means that the power consumption of our machines bounces between 0 and 7.1kW (5kW x √2).
It’s also critical to figure out the sum of power our servers will need in a rack so that it falls under the PDU’s design max power capacity. For our US example, a PDU is typically 5kW (208 volts x 24 amps); therefore, we’re budgeting 5kW and fit as many machines as we can under that. If we need more machines and the total sum power goes above 5kW, we’d need to provision another power source. That would lead to possibly another set of PDUs and racks that we may not fully use depending on demand; e.g. more underutilized costs. All we can do is abide by P = V x I.
However there is a way we can increase the max power capacity economically — 3-phase PDU. Compared to single phase, its max capacity is √3 or 1.7 times higher. A 3-phase PDU of the same US specs above has a capacity of 8.6kW (5kW x √3), allowing us to power more machines under the same source. Using a 3-phase setup might mean it has thicker cables and bigger plug; but despite being more expensive than a 1-phase, its value is higher compared to two 1-phase rack setups for these reasons:
It’s more cost-effective, because there are fewer hardware resources to buy
Say the computing demand adds up to 215kW of hardware, we would need 25 3-phase racks compared to 43 1-phase racks.
Each rack needs two PDUs for power redundancy. Using the example above, we would need 50 3-phase PDUs compared to 86 1-phase PDUs to power 215kW worth of hardware.
That also means a smaller rack footprint and fewer power sources provided and charged by the data center, saving us up to √3 or 1.7 times in opex.
It’s more resilient, because there are more circuit breakers in a 3-phase PDU — one more than in a 1-phase. For example, a 48-outlet PDU that is 1-phase would be split into two circuits of 24 outlets. While a 3-phase one would be split into 3 circuits of 16 outlets. If a breaker tripped, we’d lose 16 outlets using a 3-phase PDU instead of 24.
The PDU shown above is a 3-phase model of 48 outlets. We can see three pairs of circuit breakers for the three branches that are intertwined with each other — white, grey, and black. Industry demands today pressure engineers to maximize compute performance and minimize physical footprint, making the 3-phase PDU a widely-used part of operating a data center.
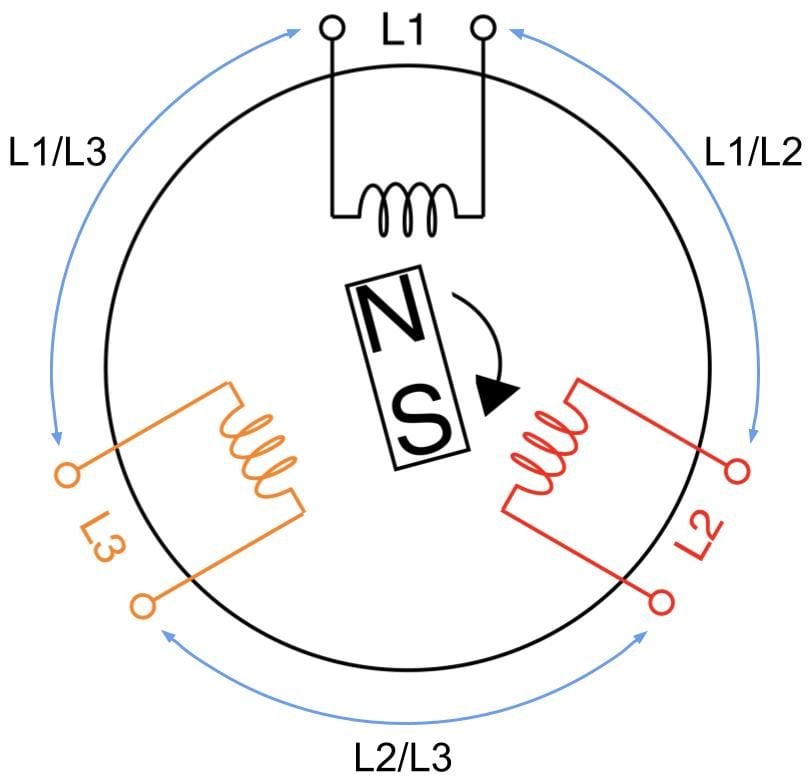
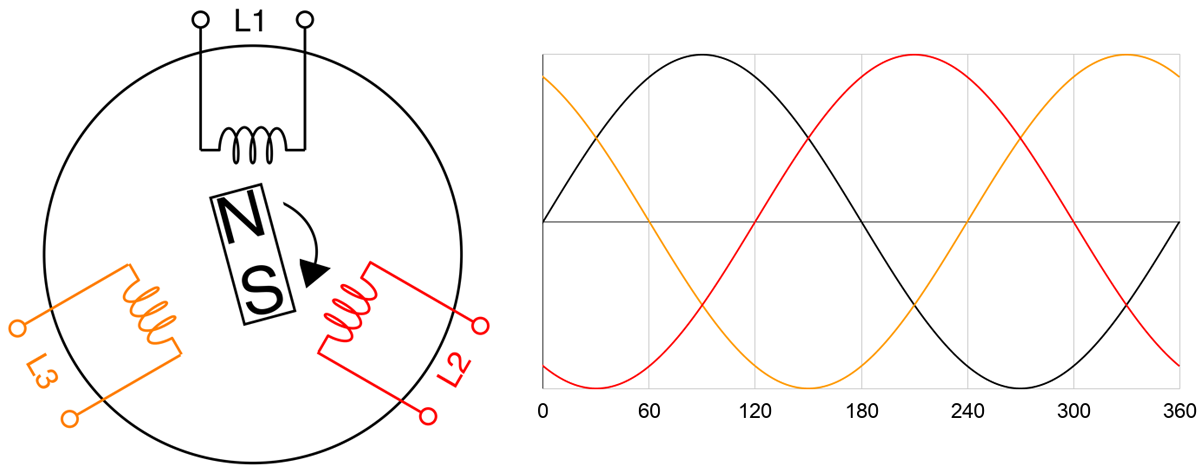
What is 3-phase?
A 3-phase AC generator has three coils instead of one where the coils are 120 degrees apart inside the cylindrical core, as shown in the figure below. Just like the 1-phase generator, current flow is induced by the rotation of the magnet thus creating power from each coil sequentially at every one-third of the magnet’s rotation cycle. In other words, we’re generating three 1-phase power offset by 120 degrees.
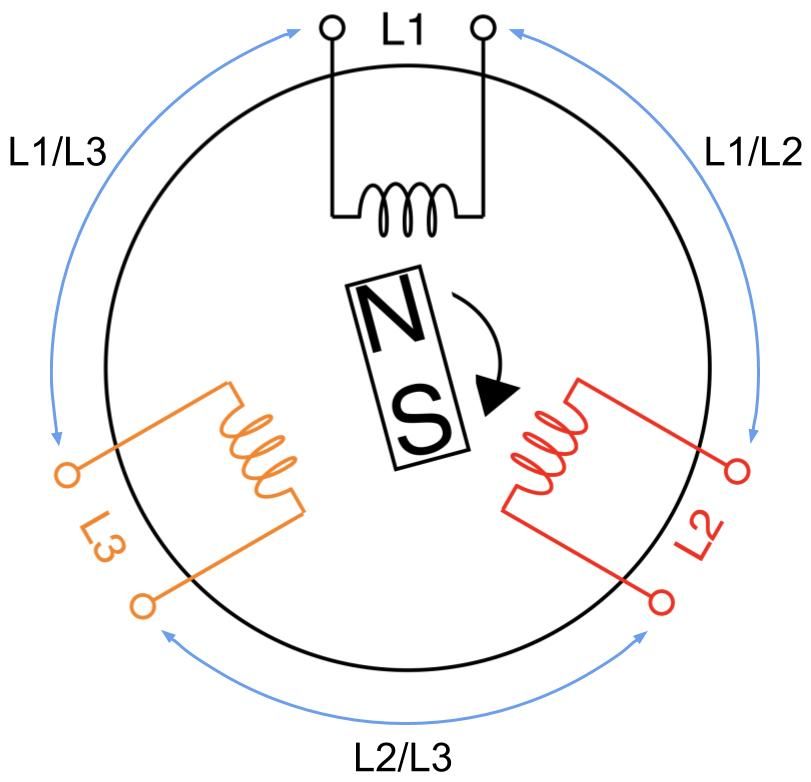
A 3-phase feed is set up by joining any of its three coils into line pairs. L1, L2, and L3 coils are live wires with each on their own phase carrying their own phase voltage and phase current. Two phases joining together form one line carrying a common line voltage and line current. L1 and L2 phase voltages create the L1/L2 line voltage. L2 and L3 phase voltages create the L2/L3 line voltage. L1 and L3 phase voltages create the L1/L3 line voltage.
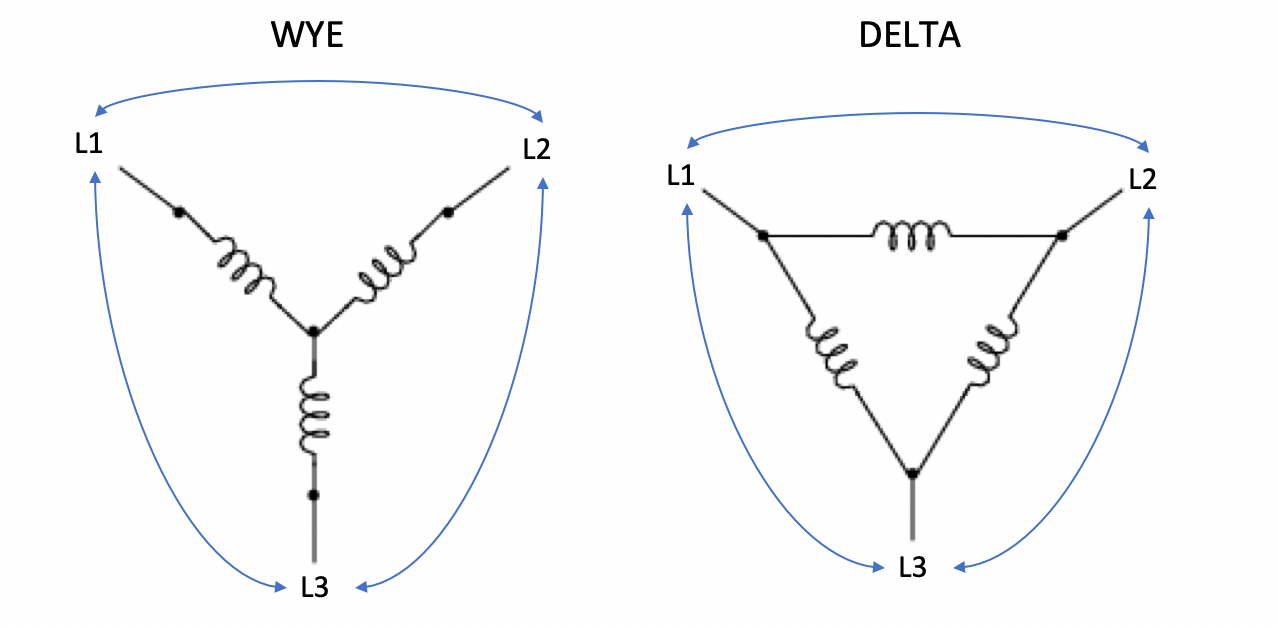
Let’s take a moment to clarify the terminology. Some other sources may refer to line voltage (or current) as line-to-line or phase-to-phase voltage (or current). It can get confusing, because line voltage is the same as phase voltage in 1-phase circuits, as there’s only one phase. Also, the magnitude of the line voltage is equal to the magnitude of the phase voltage in 3-phase Delta circuits, while the magnitude of the line current is equal to the magnitude of the phase current in 3-phase Wye circuits.
Conversely, the line current equals to phase current times √3 in Delta circuits. In Wye circuits, the line voltage equals to phase voltage times √3.
In Delta circuits:
Vline = Vphase
Iline = √3 x Iphase
In Wye circuits:
Vline = √3 x Vphase
Iline = Iphase
Delta and Wye circuits are the two methods that three wires can join together. This happens both at the power source with three coils and at the PDU end with three branches of outlets. Note that the generator and the PDU don’t need to match each other’s circuit types.
On PDUs, these phases join when we plug servers into the outlets. So we conceptually use the wirings of coils above and replace them with resistors to represent servers. Below is a simplified wiring diagram of a 3-phase Delta PDU showing the three line pairs as three modular branches. Each branch carries two phase currents and its own one common voltage drop.
And this one below is of a 3-phase Wye PDU. Note that Wye circuits have an additional line known as the neutral line where all three phases meet at one point. Here each branch carries one phase and a neutral line, therefore one common current. The neutral line isn’t considered as one of the phases.
Thanks to a neutral line, a Wye PDU can offer a second voltage source that is √3 times lower for smaller devices, like laptops or monitors. Common voltages for Wye PDUs are 230V/400V or 120V/208V, particularly in North America.
Where does the √3 come from?
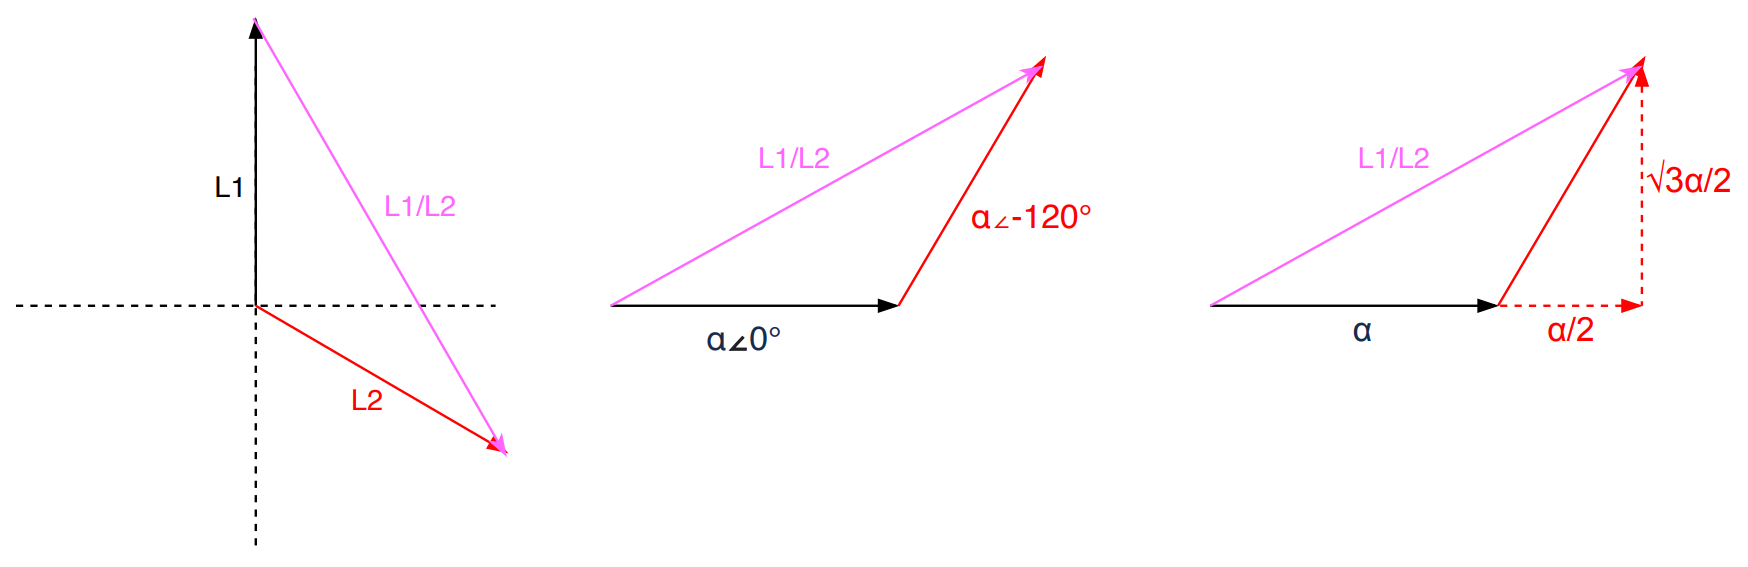
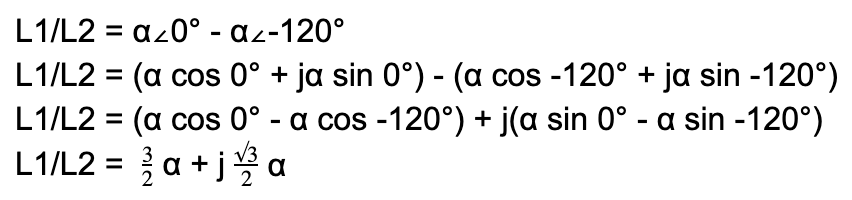
Why are we multiplying by √3? As the name implies, we are adding phasors. Phasors are complex numbers representing sine wave functions. Adding phasors is like adding vectors. Say your GPS tells you to walk 1 mile East (vector a), then walk a 1 mile North (vector b). You walked 2 miles, but you only moved by 1.4 miles NE from the original location (vector a+b). That 1.4 miles of “work” is what we want.
Let’s take in our application L1 and L2 in a Delta circuit. we add phases L1 and L2, we get a L1/L2 line. We assume the 2 coils are identical. Let’s say α represents the voltage magnitude for each phase. The 2 phases are 120 degrees offset as designed in the 3-phase power generator:
Since voltage is a scalar, we’re only interested in the “work”:
|L1/L2| = √3α
Given that α also applies for L3. This means for any of the three line pairs, we multiply the phase voltage by √3 to calculate the line voltage.
Vline = √3 x Vphase
Now with the three line powers being equal, we can add them all to get the overall effective power. The derivation below works for both Delta and Wye circuits.
Poverall = 3 x Pline
Poverall = 3 x (Vline x Iline)
Poverall = (3/√3) x (Vphase x Iphase)
Poverall = √3 x Vphase x Iphase
Using the US example, Vphase is 208V and Iphase is 24A. This leads to the overall 3-phase power to be 8646W (√3 x 208V x 24A) or 8.6kW. There lies the biggest advantage for using 3-phase systems. Adding 2 sets of coils and wires (ignoring the neutral wire), we’ve turned a generator that can produce √3 or 1.7 times more power!
Dealing with 3-phase
The derivation in the section above assumes that the magnitude at all three phases is equal, but we know in practice that’s not always the case. In fact, it’s barely ever. We rarely have servers and switches evenly distributed across all three branches on a PDU. Each machine may have different loads and different specs, so power could be wildly different, potentially causing a dramatic phase imbalance. Having a heavily imbalanced setup could potentially hinder the PDU’s available capacity.
A perfectly balanced and fully utilized PDU at 8.6kW means that each of its three branches has 2.88kW of power consumed by machines. Laid out simply, it’s spread 2.88 + 2.88 + 2.88. This is the best case scenario. If we were to take 1kW worth of machines out of one branch, spreading power to 2.88 + 1.88 + 2.88. Imbalance is introduced, the PDU is underutilized, but we’re fine. However, if we were to put back that 1kW into another branch — like 3.88 + 1.88 + 2.88 — the PDU is over capacity, even though the sum is still 8.6kW. In fact, it would be over capacity even if you just added 500W instead of 1kW on the wrong branch, thus reaching 3.18 + 1.88 + 2.88 (8.1kW).
That’s because a 8.6kW PDU is spec’d to have a maximum of 24A for each phase current. Overloading one of the branches can force phase currents to go over 24A. Theoretically, we can reach the PDU’s capacity by loading one branch until its current reaches 24A and leave the other two branches unused. That’ll render it into a 1-phase PDU, losing the benefit of the √3 multiplier. In reality, the branch would have fuses rated less than 24A (usually 20A) to ensure we won’t reach that high and cause overcurrent issues. Therefore the same 8.6kW PDU would have one of its branches tripped at 4.2kW (208V x 20A).
Loading up one branch is the easiest way to overload the PDU. Being heavily imbalanced significantly lowers PDU capacity and increases risk of failure. To help minimize that, we must:
Ensure that total power consumption of all machines is under the PDU’s max power capacity
Try to be as phase-balanced as possible by spreading cabling evenly across the three branches
Ensure that the sum of phase currents from powered machines at each branch is under the fuse rating at the circuit breaker.
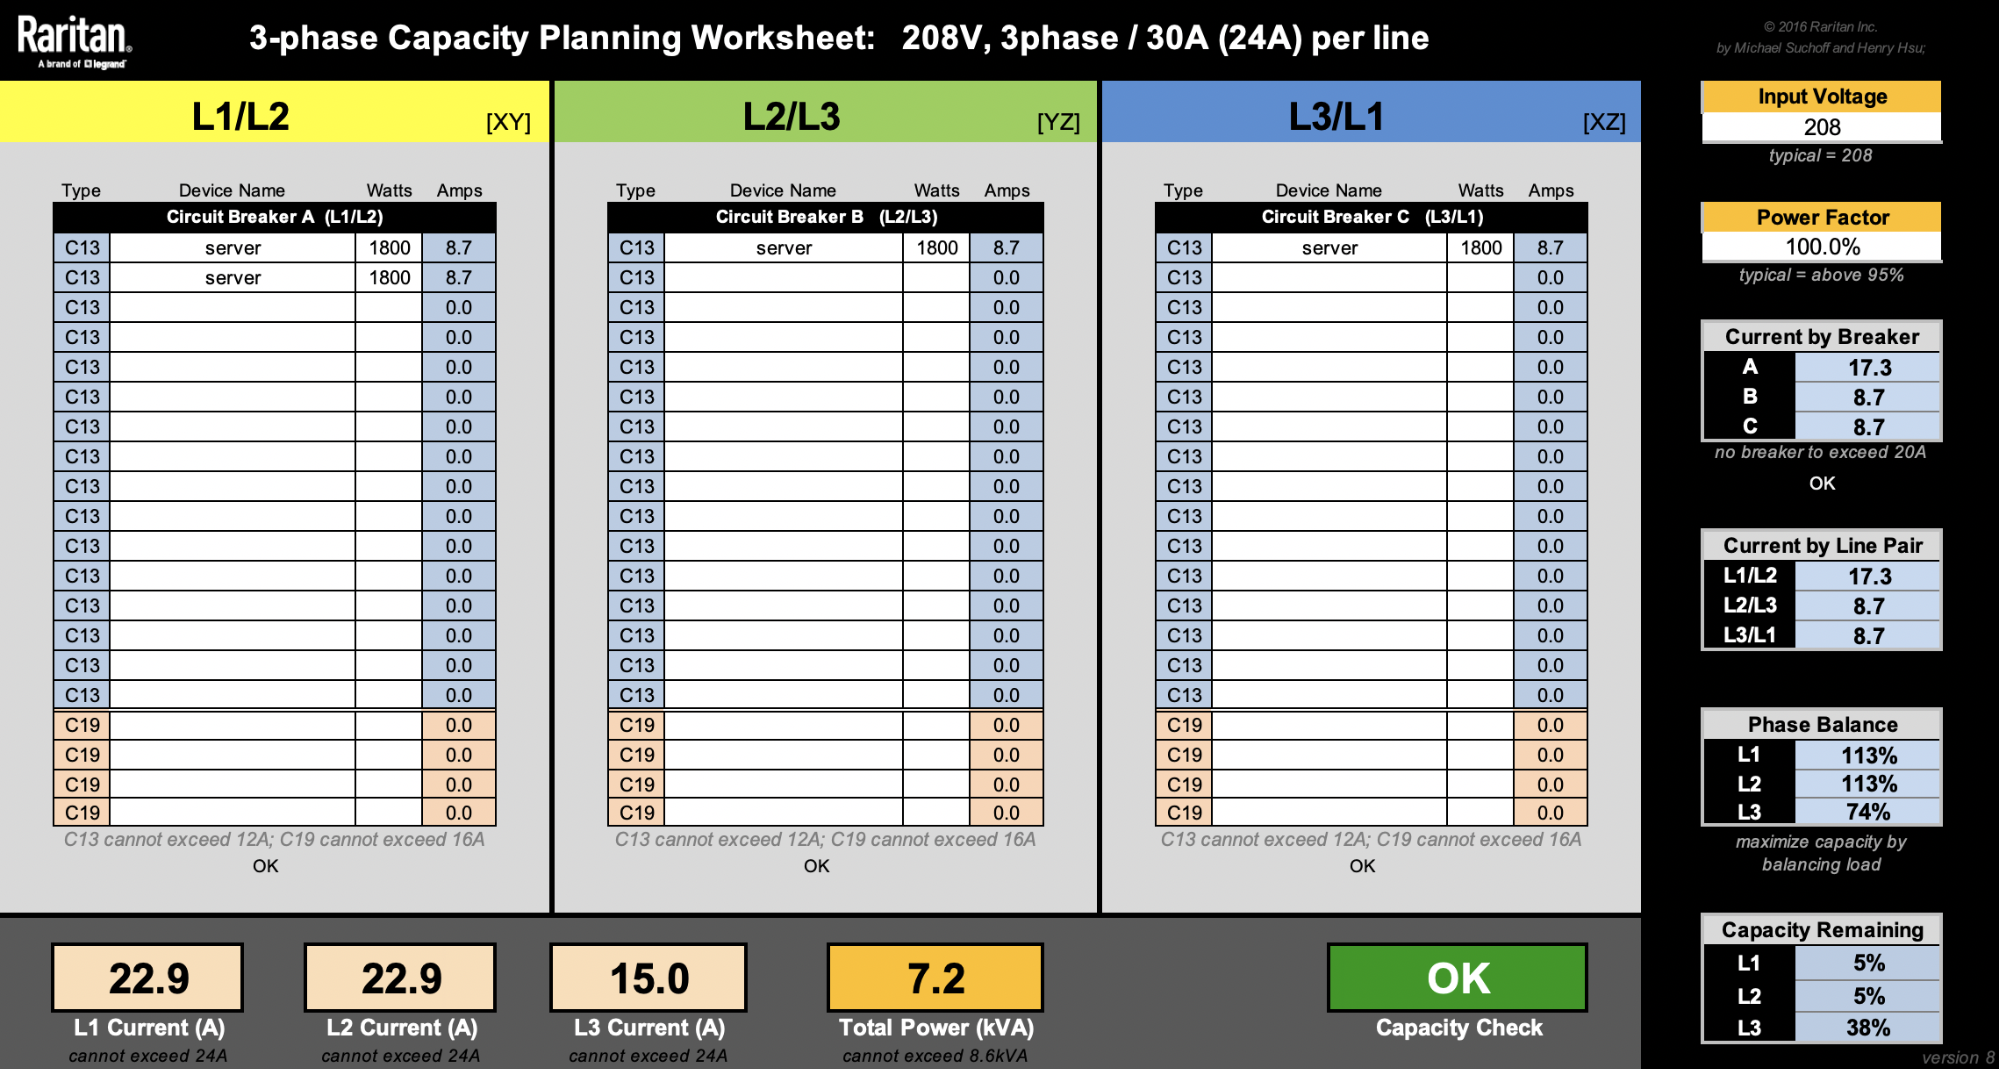
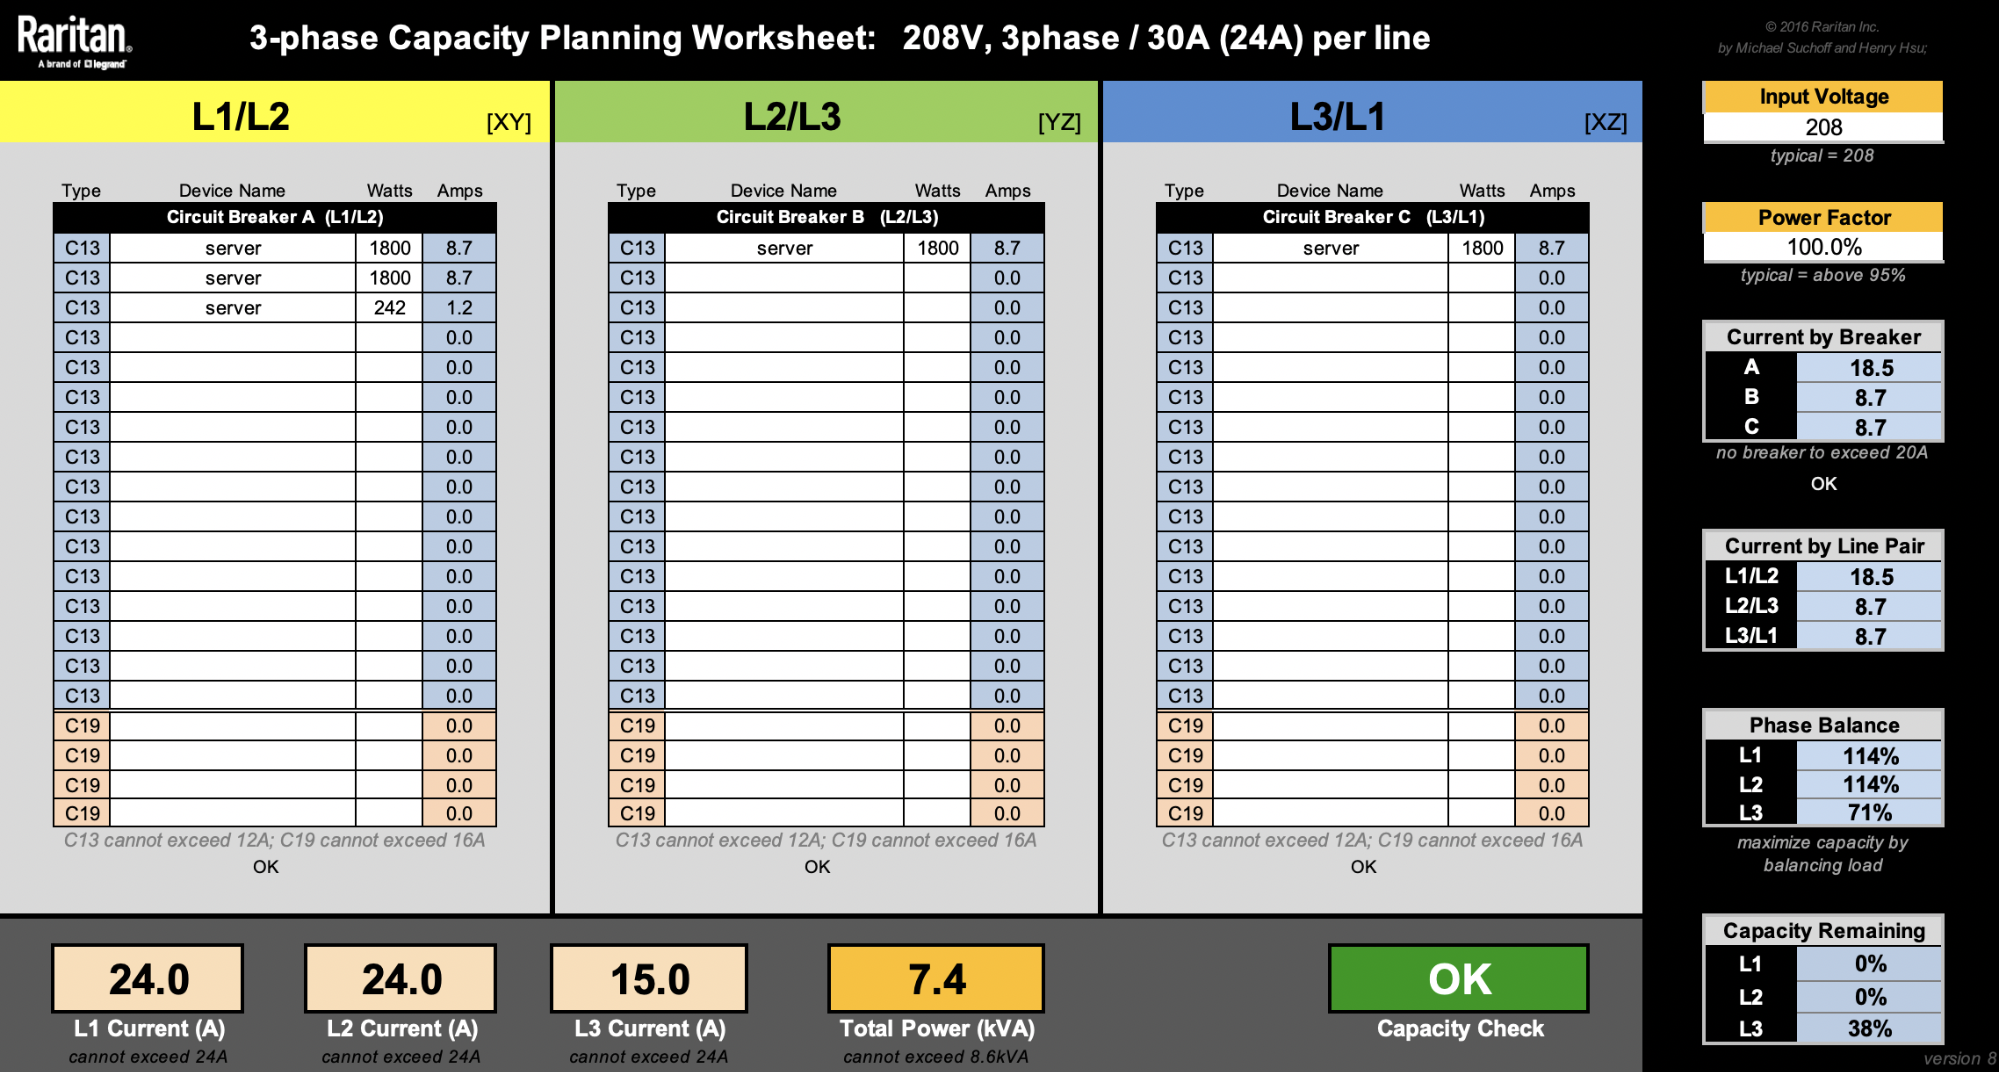
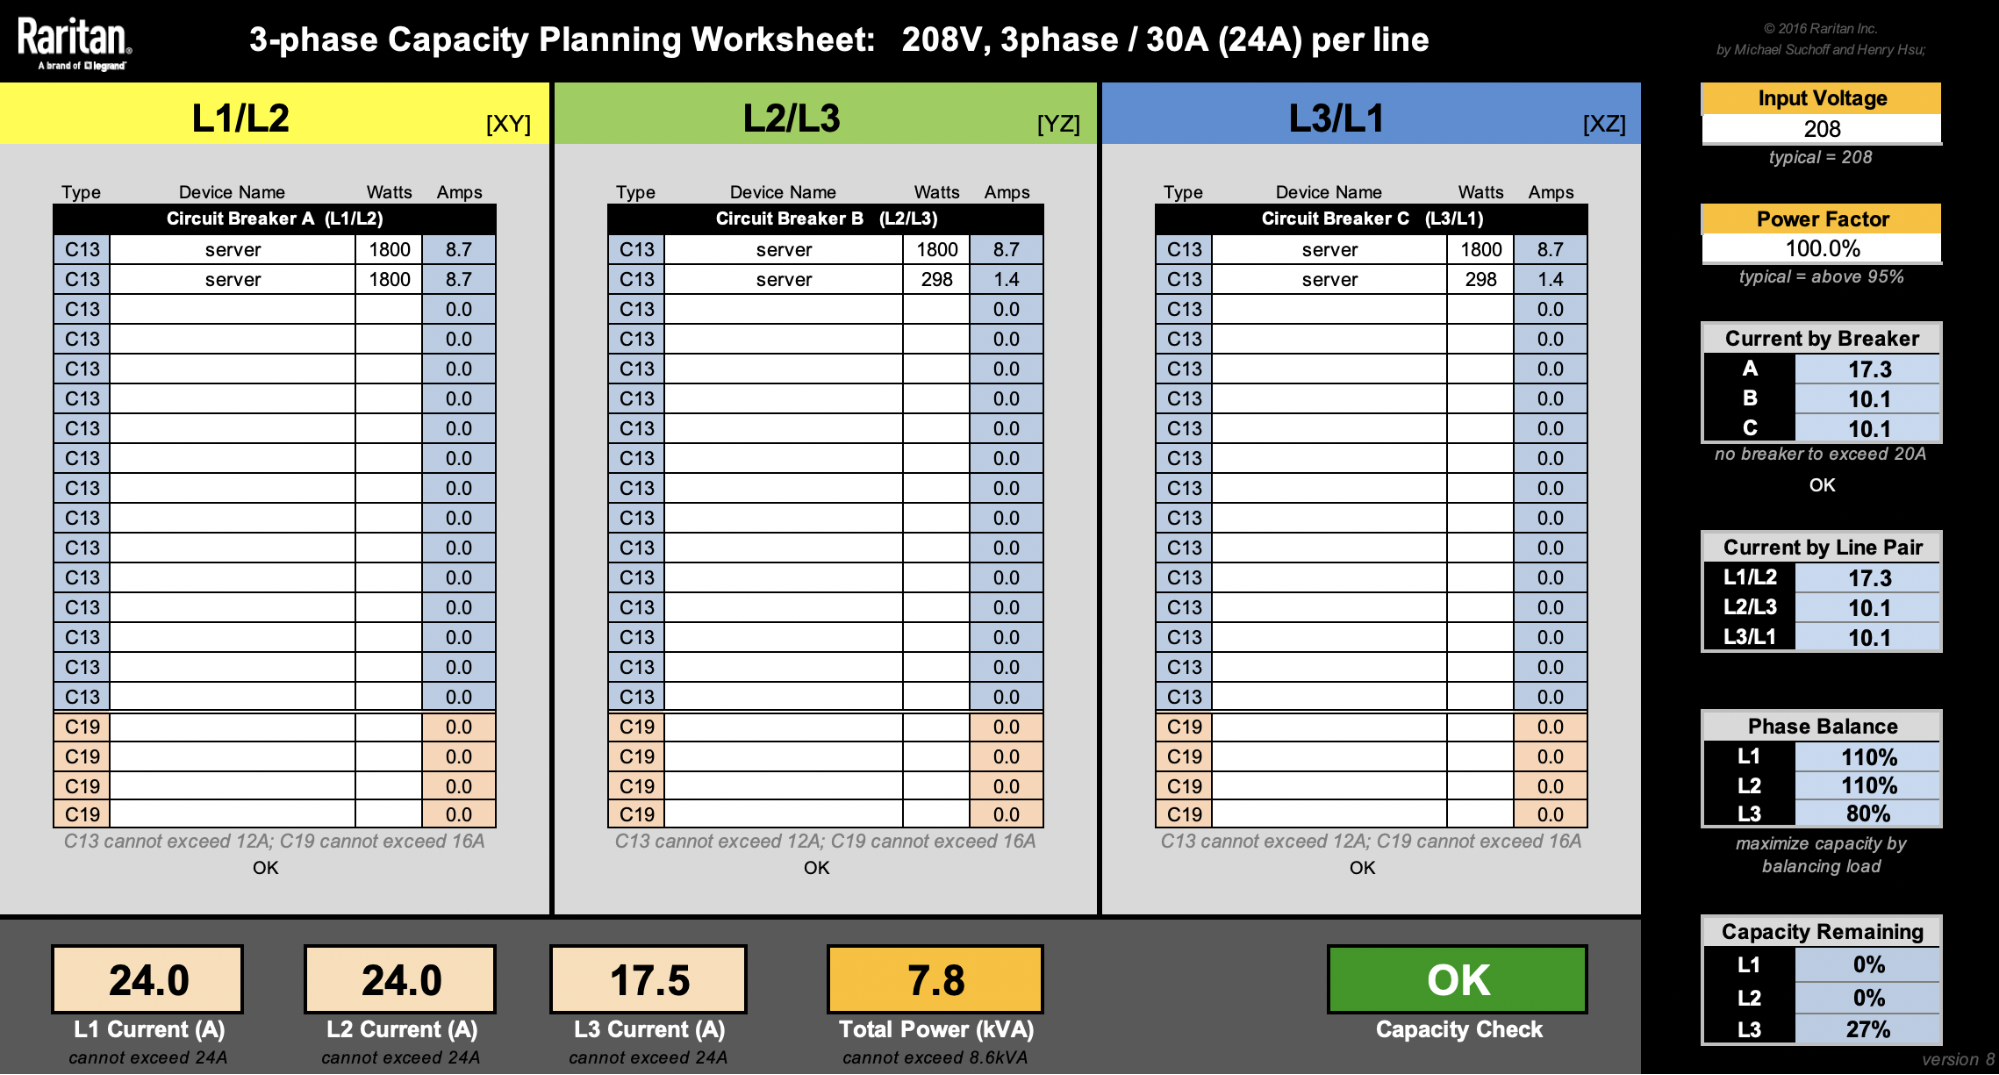
This spreadsheet from Raritan is very useful when designing racks.
For the sake of simplicity, let’s ignore other machines like switches. Our latest 2U4N servers are rated at 1800W. That means we can only fit a maximum of four of these 2U4N chassis (8600W / 1800W = 4.7 chassis). Rounding them up to 5 would reach a total rack level power consumption of 9kW, so that’s a no-no.
Splitting 4 chassis into 3 branches evenly is impossible, and will force us to have one of the branches to have 2 chassis. That would lead to a non-ideal phase balancing:
Keeping phase currents under 24A, there’s only 1.1A (24A – 22.9A) to add on L1 or L2 before the PDU gets overloaded. Say we want to add as many machines as we can under the PDU’s power capacity. One solution is we can add up to 242W on the L1/L2 branch until both L1 and L2 currents reach their 24A limit.
Alternatively, we can add up to 298W on the L2/L3 branch until L2 current reaches 24A. Note we can also add another 298W on the L3/L1 branch until L1 current reaches 24A.
In the examples above, we can see that various solutions are possible. Adding two 298W machines each at L2/L3 and L3/L1 is the most phase balanced solution, given the parameters. Nonetheless, PDU capacity isn’t optimized at 7.8kW.
Dealing with a 1800W server is not ideal, because whichever branch we choose to power one would significantly swing the phase balance unfavorably. Thankfully, our Gen X servers take up less space and are more power efficient. Smaller footprint allows us to have more flexibility and fine-grained control over our racks in many of our diverse data centers. Assuming each 1U server is 450W, as if we physically split the 1800W 2U4N into fours each with their own power supplies, we’re now able to fit 18 nodes. That’s 2 more nodes than the four 2U4N setup:
Adding two more servers here means we’ve increased our value by 12.5%. While there are more factors not considered here to calculate the Total Cost of Ownership, this is still a great way to show we can be smarter with asset costs.
Cloudflare provides the back-end services so that our customers can enjoy the performance, reliability, security, and global scale of our edge network. Meanwhile, we manage all of our hardware in over 100 countries with various power standards and compliances, and ensure that our physical infrastructure is as reliable as it can be.
To provide the best experiences, we use technologies like cookies to store and/or access device information. Consenting to these technologies will allow us to process data such as browsing behavior or unique IDs on this site. Not consenting or withdrawing consent, may adversely affect certain features and functions.
Functional
Always active
The technical storage or access is strictly necessary for the legitimate purpose of enabling the use of a specific service explicitly requested by the subscriber or user, or for the sole purpose of carrying out the transmission of a communication over an electronic communications network.
Preferences
The technical storage or access is necessary for the legitimate purpose of storing preferences that are not requested by the subscriber or user.
Statistics
The technical storage or access that is used exclusively for statistical purposes.The technical storage or access that is used exclusively for anonymous statistical purposes. Without a subpoena, voluntary compliance on the part of your Internet Service Provider, or additional records from a third party, information stored or retrieved for this purpose alone cannot usually be used to identify you.
Marketing
The technical storage or access is required to create user profiles to send advertising, or to track the user on a website or across several websites for similar marketing purposes.