Tag Archives: Featured 1

How Multi-cloud Backups Outage-proof Data

Post Syndicated from Molly Clancy original https://www.backblaze.com/blog/how-multi-cloud-backups-outage-proof-data/

Bob Graw, Director of IT for CallTrackingMetrics, a leading marketing automation platform, put words to a concern that’s increasingly troubling for businesses of all sizes: “If the data center gets wiped out, what happens to our business?”

Lately, high profile cloud outages happen at a regular clip, and the only thing you can count on is that systems will fail at some point. Savvy IT leaders work from that assumption regardless of their primary cloud provider, because they know redundant fail-safes should always be part of your plan.

Bob shared how CallTrackingMetrics outage-proofed their data by establishing a vendor-independent, multi-cloud system. Read on to learn how they did it.

About CallTrackingMetrics

CallTrackingMetrics is a conversation analytics platform that enables marketers to drive data-backed advertising strategies, track every conversion, and optimize ad spend. Customers can discover which marketing campaigns are generating leads and conversions, and use that data to automate lead flows and create better buyer experiences—across all communication channels. More than 100,000 users around the globe trust CallTrackingMetrics to align their sales and marketing teams around every customer touchpoint.

CallTrackingMetrics has been recognized in Inc. Magazine’s 5000™ list of fastest-growing private companies and best places to work, and as a leader on G2 and Gartner for call tracking and marketing attribution software.

Multi-cloud Storage Protects Data From Disasters

As CallTrackingMetrics’ data grew over the years, so did their data backups. They stored more than a petabyte of backups with one vendor. It was a strategy they grew less comfortable with over time. Their concerns included:

  • Operating with a single point of failure.
  • Becoming locked in with one vendor.
  • Maintaining compliance with data regulations.
  • Diversifying their storage infrastructure within budget.
CallTrackingMetrics generates 3TB of backups daily from the volume of data gathered through their platform.

Multi-cloud Solves for a Single Point of Failure

Bob had thought about diversifying CallTrackingMetrics’ storage infrastructure for years, and as outages continued apace, he decided to pull the trigger. He sought out an additional storage vendor where CallTrackingMetrics could store a redundant copy of their backups for disaster recovery and business continuity. “You should always have at least two viable, ready to go backups. It costs real money, but if you can’t come back to life in a disaster scenario, it is basically game over,” Bob explained.

They planned to mirror data from their diversified cloud provider in Backblaze B2, creating a robust multi-cloud strategy. With data backups in two places, they would be better protected from outages and disasters.

“We trust the Backblaze technology. I’d be very surprised if I ever lost data with Backblaze.”
—Bob Graw, Senior Software Engineer, CallTrackingMetrics

Multi-cloud Solves for Vendor Lock-in

Diversifying storage providers came with the added benefit of solving for vendor lock-in. “We did not want to be stuck with one cloud provider forever,” Bob said. Addressing storage was only one part of that strategy, though. They also intentionally avoided using specific services from their diversified cloud vendor like elastic search and databases to keep their data portable. That way, “We could really take our system to anybody that provides compute or storage, and we would be fine,” Bob said.

Solving for Compliance

Some of CallTrackingMetrics’ clients work in highly regulated industries, so compliance with regulations like HIPAA and GDPR was important for them to maintain when searching for a new storage provider. Those regulations stipulate how data is stored, the security protocols in place to protect data, and data retention requirements. “We feel like Backblaze is very secure, and we rely on Backblaze being secure so that our backups are safe and we stay compliant,” Bob said.

CallTrackingMetrics’ analytics console.

Solving for Budget Concerns

Bob and CallTrackingMetrics Founder, Todd Fisher, had both used Backblaze Personal Backup for years, so that familiarity opened the door. But the Backblaze Cloud to Cloud Migration service sealed the deal. Due to high data transfer fees, “Getting out of our previous provider isn’t cheap,” Bob said. But with data transfer fees covered through the Cloud to Cloud Migration service, they addressed one of their primary concerns—staying within budget. On top of an easy migration, after making the switch, Bob saw an immediate 50% savings on his storage bill thanks to Backblaze’s affordable, single-tier pricing.

“With Backblaze, the benefits are threefold: We like the cost savings, we like that our eggs aren’t all in one basket, and Backblaze is super simple to use.”
—Bob Graw, Senior Software Engineer, CallTrackingMetrics

Cloud Storage Helps Leading Marketing Platform Level Up

Now that CallTrackingMetrics has a multi-cloud system to protect their data from outages, they can focus on solving for the next challenge—getting better visibility into their overall cloud usage. With the savings they recouped from moving backups to Backblaze B2, Bob was able to invest in Lacework, software that helps with automation to protect their multi-cloud environment.

Thinking about going multi-cloud but worried about the cost of transferring your data? Check out our Cloud to Cloud Migration service and get started today—the first 10GB are free.

“Backblaze is our ultimate security blanket. We know our big pile of data is safe and sound.”
—Bob Graw, Senior Software Engineer, CallTrackingMetrics

The post How Multi-cloud Backups Outage-proof Data appeared first on Backblaze Blog | Cloud Storage & Cloud Backup.

Media Transcoding With Backblaze B2 and Vultr Optimized Cloud Compute

Post Syndicated from Pat Patterson original https://www.backblaze.com/blog/media-transcoding-with-backblaze-b2-and-vultr-optimized-cloud-compute/

Since announcing the Backblaze + Vultr partnership last year, we’ve seen our mutual customers build a wide variety of applications combining Vultr’s Infrastructure Cloud with Backblaze B2 Cloud Storage, taking advantage of zero-cost data transfer between Vultr and Backblaze. This week, Vultr announced Optimized Cloud Compute instances, virtual machines pairing dedicated best-in-class AMD CPUs with just the right amount of RAM and NVMe SSDs.

To mark the occasion, I built a demonstration that both showcases this new capability and gives you an example application to adapt to your own use cases.

Imagine you’re creating the next big video sharing site—CatTube—a spin-off of Catblaze, your feline-friendly backup service. You’re planning all sorts of amazing features, but the core of the user experience is very familiar:

  • A user uploads a video from their mobile or desktop device.
  • The user’s video is available for viewing on a wide variety of devices, from anywhere in the world.

Let’s take a high-level look at how this might work…

Transcoding Explained: How Video Sharing Sites Make Videos Shareable

The user will upload their video to a web application from their browser or a mobile app. The web application must store the uploaded user videos in a highly scalable, highly available service—enter Backblaze B2 Cloud Storage. Our customers store, in the aggregate, petabytes of media data including video, audio, and still images.

But, those videos may be too large for efficient sharing and streaming. Today’s mobile devices can record video with stunning quality at 4K resolution, typically 3840 × 2160 pixels. While 4K video looks great, the issue is that even with compression, it’s a lot of data—about 1MB per second. Not all of your viewers will have that kind of bandwidth available, particularly if they’re on the move.

So, CatTube, in common with other popular video sharing sites, will need to convert raw uploaded video to one or more standard, lower-resolution formats, a process known as transcoding.

Transcoding is a very different workload from running a web application’s backend. Where an application server requires high I/O capability, but relatively little CPU power, transcoding is extremely CPU-intensive. You decide that you’ll need two sets of machines for CatTube—application servers and workers. The worker machines can be optimized for the transcoding task, taking advantage of the fastest available CPUs.

For these tasks, you need appropriate cloud compute instances. I’ll walk you through how I implemented CatTube as a very simple video sharing site with Backblaze B2 and Vultr’s Infrastructure Cloud using Vultr’s Cloud Compute instances for the application servers and their new Optimized Cloud Compute instances for the transcoding workers.

Building a Video Sharing Site With Backblaze B2 + Vultr

The video sharing example comprises a web application, written in Python using the Django web framework, and a worker application, also written in Python, but using the Flask framework.

Here’s how the pieces fit together:

  1. The user uploads a video from their browser to the web app.
  2. The web app uploads the raw video to a private bucket on Backblaze B2.
  3. The web app sends a message to the worker instructing it to transcode the video.
  4. The worker downloads the raw video to local storage and transcodes it, also creating a thumbnail image.
  5. The worker uploads the transcoded video and thumbnail to Backblaze B2.
  6. The worker sends a message to the web app with the addresses of the input and output files in Backblaze B2.
  7. Viewers around the world can enjoy the video.

These steps are illustrated in the diagram below.

Click to enlarge.

There’s a more detailed description in the Backblaze B2 Video Sharing Example GitHub repository, as well as all of the code for the web application and the worker. Feel free to fork the repository and use the code as a starting point for your own projects.

Here’s a short video of the system in action:

Some Caveats:

Note that this is very much a sample implementation. The web app and the worker communicate via HTTP—this works just fine for a demo, but doesn’t account for the worker being too busy to receive the message. Nor does it scale to multiple workers. In a production implementation, these issues would be addressed by the components communicating via an asynchronous messaging system such as Kafka. Similarly, this sample transcodes to a single target format: 720p. A real video sharing site would transcode the raw video to a range of formats and resolutions.

Want to Try It for Yourself?

Vultr’s new Cloud Compute Optimized instances are a perfect match for CPU-intensive tasks such as media transcoding. Zero-cost ingress and egress between Backblaze B2 and Vultr’s Infrastructure Cloud allow you to build high performance, scalable applications to satisfy a global audience. Sign up for Backblaze B2 and Vultr’s Infrastructure Cloud today, and get to work!

The post Media Transcoding With Backblaze B2 and Vultr Optimized Cloud Compute appeared first on Backblaze Blog | Cloud Storage & Cloud Backup.

How to Back Up Yahoo and AOL Data

Post Syndicated from Barry Kaufman original https://www.backblaze.com/blog/how-to-back-up-yahoo-and-aol-data/

In case you missed it, we recently showed you how to back up your old email accounts, focusing on Outlook emails and Gmail. But what of those of us who remember the Wild Wild West days of the internet? Some of us have decades worth of emails gathering digital dust in AOL and Yahoo inboxes, and we want to back those up as well.

Let’s go through preserving these vintage emails with a little walk down memory lane.
The year was 1994. The White House had just launched its very first website; Katie Couric was famously asking, “What is the internet?” on the “Today” show; and everywhere, there was the sense that this so-called “information superhighway” might just be here to stay.

And one blog writer had just signed up for his very first America Online email address. Lured by the promises contained within each CD that arrived in his mailbox and welcomed to the digital ether by the screeching cacophony of a blazing fast 14.4K modem, he began his journey on the internet.

Looking back on those times now, I’m suddenly realizing what a time capsule I inadvertently created in my AOL inbox. The first emails I ever sent to high school friends after they went to college. Those first awkward exchanges between myself and my wife. My first dozen or so rejection letters from employers as I entered the “real world.” All locked up behind a password that I set when I was just 14.

These memories are too precious to trust to my AOL inbox, so as I look back on my digital life so far, I realize I need to preserve those moments in a backup I can trust. Join me, as I back up both my AOL and Yahoo accounts, savoring the embarrassing memories along the way.

How to Back Up Your Digital Life

Check out our series of guides to help you protect content across many different platforms—including social media, sync services, and more. This list is always a work in progress—please comment below if you’d like to see another platform covered.

How to Download Yahoo Data

We’ll start with my Yahoo Account, which should be easy since I only ever used this email address as a way to sign up for things online that I didn’t necessarily want tied to my main inbox. And since the message board for fans of the FX drama “The Shield” that I signed up for with this address has long since folded, my inbox currently sits empty. (It’s even free of spam, which is pretty impressive.)

So, I’ll simply send myself an email from an address I do use to get the ball rolling.

All I need to do is send myself my credit card number to secure my lottery winnings!

Step One: Finding Your Data

All of your Yahoo data can be found in your Privacy Dashboard, which can be tricky to find using the menus Yahoo offers, so we’ll just cut to the chase and give you the link.

This page gives you a few options, but when it comes to your inbox, it’s not as straightforward as simply downloading an MBOX file. Yahoo only gives you the option of configuring an Outlook, Mac Mail, or Thunderbird inbox using IMAP, downloading all of your data to a third-party app which you can then use to store your emails as files.

You can also use the links on the previous screen to download individual elements of your Yahoo account, from contacts and email preferences to usage and activity. However, Yahoo forces you to send a request to download this data, which they warn can take up to 30 days.

Two emails?! Look at Mr. Popularity over here.

Step Two: Getting Your Data

Your mileage may vary, but the gist of what you want to do here is to set your third-party inbox to download and store your Yahoo emails. To do that, simply configure your IMAP settings to:

Incoming Mail (IMAP) Server
Server: export.imap.mail.yahoo.com
Port: 993
Requires SSL: Yes

Outgoing Mail (SMTP) Server
Server: smtp.mail.yahoo.com
Port: 465 or 587
Requires SSL: Yes
Requires authentication: Yes

Every email client is different, but if you’re using Outlook you can find the steps to download your emails in our previous post.

How to Download AOL Data

Much to my dismay, when I logged onto my AOL account I found that all of my old emails, nearly 30 years of correspondence, were simply gone. Ah well, it’s hard to blame AOL for clearing up some space. After all, by my reckoning it had been at least 10 years since I opened this inbox. But it certainly underscores the need for backups, right?

My high school friends may not email me anymore, but the spammers do. The spammers never forget about me.

Regardless, I do have 130 emails in there so I can at least walk you through how you’d go about downloading them. Now there is always the print to PDF method, outlined in our previous post, which would certainly work here for individual emails. But if you’re looking to do a mass backup, fortunately you are not alone. Enough people have faced the same situation that a company called SysTools created an app specifically for backing up AOL emails.

Simply download the app, then either log in using your AOL credentials or by generating a one-time app password from your Account Security settings. The free version of the software will back up 100 emails, but you can purchase a license for $49 if you need to back up more. Whichever works for you, once you’re in, you’ll have four different email file formats to choose from: .EML, .MSG, .MBOX or .PST. You can also choose to save your emails as PDFs so they can be viewed across platforms.

Ah, all those precious memories, preserved forever.

And now we have all the emails in our inbox, saved on our computer in whichever file format floats our inbox, and we’re ready to move on to the next step. Your computer is just as fallible as AOL, and probably more so, so it’s time to move these into the cloud.

Backing Up Emails: To Sync or Not?

Now that we’ve rescued our emails from the digital ether, it’s time to put them somewhere a little more secure. If you use an automated backup service like Backblaze Personal Backup (and let’s be honest, you should), then it will be a pretty straightforward process consisting of two steps:

Step one: Do nothing.

Step two: Continue to do nothing, because Backblaze Personal Backup already did it for you.

Pretty easy, right?

If you want to keep archival data on the computer you use every day, you can of course use Backblaze B2 Cloud Storage to archive data. Check out our post here for all the nitty-gritty.

The post How to Back Up Yahoo and AOL Data appeared first on Backblaze Blog | Cloud Storage & Cloud Backup.

How to Run VFX Workflows in the Cloud

Post Syndicated from Molly Clancy original https://www.backblaze.com/blog/how-to-run-vfx-workflows-in-the-cloud/

An hour from Queens. An hour from Jersey. Two hours from Staten Island. That’s how long it would take Molecule VFX IT staff to travel from their homes to the closet in Manhattan that housed the team’s LTO device. All those hours, just to spend five minutes switching out one tape.

It was a huge waste of time, not to mention subway fares. The hassle of tape wasn’t the only reason Molecule decided to make their production workflows fully cloud-based, but the IT team certainly doesn’t mind skipping that trip these days.

Moving production entirely to the cloud allowed Molecule to unlock the value of their artists’ time as well as the IT staff to support them, and save money in the process. If your media team has been contemplating a fully cloud-based workflow, read on to learn how Molecule did it—including how they managed to maintain the ability to move data from the cloud back to tape on demand without maintaining on-premises tape infrastructure.

About Molecule VFX

Molecule VFX is a visual effects studio based in New York and Los Angeles that provides the elemental building blocks to tell a customer’s story. They have been servicing episodic television and feature films, like the Apple TV series, “Dickinson,” and the Hulu series, “Only Murders in the Building,” since 2005.

Molecule’s Case for the Cloud

Visual effects artists want to be able to hop into a new script, work on it, render it, review it, QC it, and call it done. Their work is the most valuable element of the business. Anything that gets in the way of that or slows down the workflow directly impacts the company’s success, and an on-premises system was doing exactly that.

  • With IT staff working from home, LTO maintenance tied them up for hours—time that could have been spent helping Molecule’s visual effects artists create.
  • Beyond tape, the team managed a whole system of machines, networks, and switches. Day-to-day issues could knock out the company’s ability to get work done for entire days.

They knew moving to the cloud would optimize staff time and mitigate those outages, but it didn’t happen overnight. Because much of their business already happens in the digital workspace, Molecule had been slowly moving to the cloud over the past few years. The shift to remote work due to the COVID-19 pandemic accelerated their transition.

Work from the Amazon Original Movie, “Bliss,” featuring Owen Wilson.

Strategies for Moving VFX Workflows to the Cloud

Molecule’s Full Stack Software Architect, Ben Zenker, explained their approach. Through the process, he identified a few key strategies that made the transition a success, including:

  • Taking a phased approach while deciding between hybrid and fully cloud-based workflows.
  • Reading the fine print when comparing providers.
  • Rolling their own solutions where possible.
  • Thoroughly testing workflows.
  • Repurposing on-premises infrastructure.

1. Take a Phased Approach

Early in the transition, the Molecule team was still using the tape system and an on-premises Isilon server for some workloads. Because they were still deciding if they were going to have a hybrid system or go fully cloud, they took an ad hoc approach to identifying what data was going to be in Backblaze B2 Cloud Storage and what production infrastructure was going to be in CoreWeave, a cloud compute partner that specializes in VFX workloads. Ben explained, “Once we decided definitively we wanted to be fully in the cloud, connecting CoreWeave and Backblaze was simple—if it was on CoreWeave, it was getting backed up in Backblaze B2 nightly.”

2. Read the Fine Print

The team planned to sync incremental backups to the cloud every night. That meant their data would change every day as staff deleted or updated files. They figured out early on that retention minimums were a non-starter. Some cloud providers charge for deleted data for 30, 60, or even 90 days, meaning Molecule would be forced to pay for storage on data they had deleted months ago. But not all cloud providers are transparent about their retention policies. Molecule took the time to track down these policies and compare costs.

“Backblaze was the only service that met our business requirements without a retention minimum.”
—Ben Zenker, Full Stack Software Architect, Molecule VFX

3. Roll Your Own Solutions Where Possible

The team creates a lot of their own web tools to interact with other technology, so it was a relatively easy lift to set up rclone commands to run syncs of their production data nightly to Backblaze B2. Using rclone, they also built a variable price reporting tool so that higher ups could easily price out different projects and catch potential problems like a runaway render.

“There are hundreds of options that you can pass into rclone, so configuring it involved some trial and error. Thankfully it’s open-source, and Backblaze has documentation. I made some small tweaks and additions to the tool myself to make it work better for us.”
—Ben Zenker, Full Stack Software Architect, Molecule VFX

4. Test and Test Again

In reflecting on the testing phase they went through, Ben acknowledges he could have been more liberal. He noted, “I went into it a little cautious because I didn’t want to end up incurring big charges for a test, but Backblaze has all sorts of safeguards in place. You can set price limits and caps, which was great for the testing period.”

5. Repurpose On-premises Infrastructure

The on-premises Isilon server and the physical tape system are no longer part of the active project workflow. They still utilized those devices to host some core services for a time—a firewall, authentication, and a VPN that some members used. In the end, they decided to fully retire all on-premises infrastructure, but repurposing the on-premises infrastructure allowed them to maximize its useful life.

But What If Clients Demand Tape?

While Molecule is more than happy to have modernized their workflows in the cloud, there are still some clients—and major clients at that—who require that contractors save final projects on tape for long-term storage. It no longer made sense to have staff trained on how to use the LTO system, so when a customer asked for a tape copy, they reached out to Backblaze for advice.

They needed a turnkey solution that they didn’t have to manage, and they definitely didn’t want to have to resort to reinvesting and managing tape hardware. Backblaze partner, TapeArk, fit the bill. TapeArk typically helps clients get data off of tape and into the cloud, but in this case they reversed the process. Molecule sent them a secure token to the exact piece of data they needed. TapeArk managed the download, put it on tape, and shipped it to the client.

If Molecule needs to send tape copies to clients in the future, they have an easy, hands-off solution and they don’t have to maintain an LTO system for infrequent use. Ben was grateful for the partnership and easy solution.

Work from the Apple TV series, “Dickinson,” featuring Hailee Steinfeld.

Cloud Workflows Free Up a Month of Time

Now that the staff no longer has to manage an LTO tape system, the team has recouped at least 30 payroll days a year that can be dedicated to supporting artists. Ben noted that with the workflows in the cloud, the nature of the IT workload has changed, and the team definitely appreciates having that time back to respond to changing demands.

Ready to move your VFX workflows to the cloud? Start testing today with 10GB of data storage free from Backblaze B2.

The post How to Run VFX Workflows in the Cloud appeared first on Backblaze Blog | Cloud Storage & Cloud Backup.

What’s the Diff: Full, Incremental, Differential, and Synthetic Full Backups

Post Syndicated from Kari Rivas original https://www.backblaze.com/blog/whats-the-diff-full-incremental-differential-and-synthetic-full-backups/

What's the Diff: Full, Incremental, Differential, Synthetic

If you made your way here to the Backblaze blog, you probably understand the value of backing up your data. Data disasters, like ransomware attacks, floods, and fires, can easily cost a business thousands of dollars in recovery expenses. But whether you’re an IT professional or a small or medium-sized business owner, what you may not realize is that knowing you need to back up is just the first step.

Next, you have to think about what kind of backup strategy you should have in place. Specifically, there are four different types of backups that you need to consider:

  • Full backups.
  • Incremental backups.
  • Synthetic full backups.
  • Differential backups.

Some of our integration tools, like MSP360 and Veeam, let you configure the type of backup you want to perform, so it’s important to understand the difference. Choosing the right backup type also means maximizing efficiency, as simply performing a full backup of your data on a daily basis would take up too much bandwidth and storage, resulting in unnecessary extra costs.

Not sure what kind of backup you need to do? In this post, learn the differences and when each should be used.

First Things First: Full Backups

A full backup is the very first backup you create of your data. You start with nothing—no backup—and then you make a complete copy of your data. It will probably take a while, because you’re starting from nothing, making this your longest backup job.

Full Backup Pros and Cons

You can see how it would be time-consuming to do a full backup each time, right? Who has time for that? In the time you’re taking to do a full backup each day, you could be balancing your bank account, reorganizing your closet, or let’s be honest here, playing Wordle (guilty). Plus, you would likely need a lot of extra bandwidth and storage to be able to run a full backup everyday.

However, full backups are also the best option for recovery, because they contain all the files you need. Because your full backup is a clone of your data, it’s super important to encrypt them. Backblaze B2 Cloud Storage stores the data you put in it. You can choose to upload only encrypted data or use a third-party integration to encrypt data before transmission to Backblaze B2 Cloud Storage. We also support server-side encryption (SSE) using the 256-bit Advanced Encryption Standard (AES-256), with multiple key management options. Don’t forget this essential step!

You should think about how often to do your full backups, given that they are the safest recovery option but also the most time-consuming and expensive to complete. Some people do full backups daily; some do them weekly; and some complete them monthly, or even less often. It all depends on your backup strategy plan and how you balance your needs for data security vs. your resources, like time, funds, etc. For example, in the image below, this person has decided to do their full backup on a Sunday. Their source data is copied exactly as-is into the cloud. This provides them the security of a 100% true copy of their data.

Click to expand.

TLDR Version:

  • ✅ 100% true copy of data.
  • ✅ Best for file restoration in terms of data fidelity.
  • ❌ Expensive.
  • ❌ Slow.

Now, Just the Changes: Incremental Backups

Once you have your full backup, you have a baseline for any subsequent backups. For reasons already explained, it’s probably not efficient for you to do a full backup each time. That’s where incremental backups come in.

Incremental backups copy the data that has changed or has been added since your last full backup and then, any newly changed or added data since the previous incremental backup. Now, there are two different types of incremental backups: file-level and block-level, but let’s keep things simple here and save that topic for a future blog post, shall we?

Let’s take a look at the image below. This person performs their full backups on Sundays and Wednesdays so that they always have a fairly recent complete copy of their data. Then, on the other days of the week, they perform incremental backups. (To be clear, we’re not recommending this cadence—it’s just for demonstration purposes.) Here’s a step-by-step overview of the process:

  • Sunday: A full backup is created.
  • Monday: After the full backup on Sunday, one file is changed (the purple triangle) and one new file is added (the red square). Both of these changes are uploaded to the backup repository in the cloud.
  • Tuesday: An additional new file is created (the second red square). This one piece of new data is sent to the cloud. You can see how incremental backups are backing up only new or changed data one piece at a time.
  • Wednesday: A new full backup is run, which creates a complete copy of the source data (including all your previously changed and added data) and stores that in the cloud. This starts the cycle of full backups to incremental backups over again.
Click to expand.

Note that there is another consideration here—whether you want your full backups to overwrite your existing backup repository or whether you would like to keep the previous versions of your files for extra security. Keeping an archive of your previous versions takes up more space (and therefore costs more) but it can be helpful to have an archive for some length of time (called your “retention period”). On the other hand, some backup providers charge retention minimums where they continue to bill you for data deleted before a certain time frame—make sure to read the terms and conditions carefully so you’re not stuck paying for deleted backups. Again, this all differs according to your data security needs. Some people keep archives going back a month. Some may keep an archive for a full year’s worth of previous versions. It’s all up to you.

Incremental Backup Pros and Cons

In a disaster recovery scenario, your restore will consist of your full backup and all of the incremental backups you’ve made. If you’ve made a lot of changes to your data since your last full backup, your restore could take some time, as it progresses through this “chain” of incremental changes. In other words, if you are only doing full backups monthly or less often and you add or change a lot of data in between, your recovery will take a long time because the restore will first process your last full backup and then each piece of incrementally changed or added data.

Another downside is that your recovery could be compromised by any missing or damaged files, which would break your “chain” of backups and would make recovery of those files impossible. For this reason (and because having a fairly recent full backup is always a good idea), it’s important to do full backups regularly so you have a “fresh” full copy of your data to work from.

Determining how often and when to do your full backups, as well as deciding how many previous versions of your backups you want to keep, is a strategic decision that should take into consideration your typical operating conditions, your risk factors, your budget, and your time. For instance, you could perform a full backup on Sundays and incremental backups Monday-Saturday. Or, you may not even perform full backups as often as that; it’s important to think about your data and how often it changes.

TLDR Version:

  • ✅ Takes up little space.
  • ✅ Cost-saving.
  • ❌ Slower recoveries.
  • ❌ Corrupted files compromise the backup.

A Better Way: Synthetic Full Backups

We’ve already talked about the need to perform regular full backups, even if (and especially if) you’re using incremental backups. We’ve also discussed how regular full backups can be time-consuming. Synthetic full backups may give you the best of all worlds. They make use of incremental backups to create a more efficient full backup experience.

In a synthetic full backup, your backup software takes your previous full backup and all the incremental backups you’ve created over a set period of time and combines them into a new full, synthesized backup. Your new synthetic backup contains the same data as an active full backup. The only difference is how the new backup is created. Instead of copying your source data to create a new, full backup, the synthetic full backup includes the unchanged data from the source plus all the incremental backups of changed data.

In the diagram below, our hypothetical Backblaze customer performed a full backup on Sunday and an incremental backup on Monday and Tuesday. On Wednesday, their backup software performed a synthetic full backup by taking the previous backups from the backup repository and forging them into a new data set that is also a faithful copy of the source data. In other words, the synthetic full backup is completed in the cloud by merging the backups in the cloud, rather than referring to the source data.

Click to expand.

Synthetic Full Backup Pros and Cons

Synthetic full backups are much faster than normal, active full backups. And because they contain a 100% copy of your data, they serve as the starting point for any subsequent incremental backups, thus resetting your backup chain.

Your backup software may have an option in your settings that needs to be turned on to enable synthetic full backups, so be sure to check out your tool’s help resources to locate this option. You will also be able to define when that synthetic full backup should be created. Put some thought into this, considering when and how often your data gets changed. Because your synthetic full backup is based on the interim incremental backups, it’s still somewhat at risk of being corrupted if one of the incremental backups is damaged.

However, since synthetic backups are much faster to create, you can regularly create new synthetic full backups to reduce that risk. For instance, let’s say you create your first full backup on Sunday. Then, Monday-Saturday you create incremental backups of your changed data. On the next Sunday, your system creates a synthetic full backup by combining the unchanged data from the first full backup plus all of the incremental backups completed during the week.

Ultimately, synthetic full backups allow you to create full backups more often, without hogging up precious bandwidth or storage space. And, having a full backup of your data is always the best way to protect your business from a data disaster.

Some of Backblaze’s integration partners support synthetic full backups, including MSP360 and Veeam, so be sure to check your backup tool’s help articles to see if this option is available to you.

TLDR Version:

  • ✅ Less time-consuming.
  • ✅ Saves on storage costs.
  • ❌ Not as effective if lots of changes are made.
  • ❌ Still relies on incremental backups.

A Specialized Solution: Differential Backups

There’s another kind of backup to be aware of. Differential backups are popular for database applications like Microsoft SQL but not used frequently otherwise. Differential backups look at the last full backup only, and they collect the changes from the full backup. As you make changes to your original data set (the one in the full backup), your differential backup grows.

In our visual below, the full backup takes place on a Sunday. Each time the differential backup runs, it “looks back” to the full backup to see what has changed from the original source data. Again, changes can be modified files (like our purple triangle) or new files (like our red squares). It adds these changes to the backup repository in a cumulative way, which means differential backups can grow to be quite large.

Click to expand.

Differential Backup Pros and Cons

Like incremental backups, differential backups are much faster to perform than a full backup. To perform a recovery from a differential backup, you just need the full backup and the latest differential backup. So differential backup restores can be quite fast. But the overall differential backup can take up a large amount of storage space, as the changed files are uploaded to the backup repository until a new full backup is done. Hence, they don’t necessarily offer cost savings in the way of storage.

Lastly, differential backups are used so infrequently that they almost don’t merit mention here, but we wanted to include them to present a full picture of the different kinds of backups out there.

TLDR Version:

  • ✅ Good solution for database applications like SQL.
  • ✅ Faster recoveries.
  • ❌ Not cost-effective.
  • ❌ Requires regular full backups as a base.

As you can see, there is a lot to think about when developing your backup strategy. Backblaze is here to help and demystify the process. Learn more about our backup and archive solutions and get started with our free 10GB offer today.

The post What’s the Diff: Full, Incremental, Differential, and Synthetic Full Backups appeared first on Backblaze Blog | Cloud Storage & Cloud Backup.

The SSD Edition: 2021 Drive Stats Review

Post Syndicated from original https://www.backblaze.com/blog/ssd-edition-2021-drive-stats-review/

Welcome to the first SSD edition of the Backblaze Drive Stats report. This edition will focus exclusively on our SSDs as opposed to our quarterly and annual Drive Stats reports which, until last year, focused exclusively on HDDs. Initially we expect to publish the SSD edition twice a year, although that could change depending on its value to our readers. We will continue to publish the HDD Drive Stats reports quarterly.

Background

The SSDs in this report are all boot drives in our storage servers. In our early storage servers, we used HDDs exclusively for boot drives. We began using SSDs in this capacity in Q4 of 2018. Since that time, all new storage servers and any with failed HDD boot drives have had SSDs installed. Boot drives in our environment do much more than boot the storage servers, they also store log files and temporary files produced by the storage server. Each day a boot drive will read, write, and delete files depending on the activity of the storage server itself.

Overview

As of December 31, 2021, we were using 2,200 SSDs. As we share various tables and charts below, some of the numbers, particularly the annualized failure rate (AFR) will be very surprising to informed readers. For example, an AFR of 43.22% might catch your attention. We will explain these outliers as we go along. Most are due to the newness of a drive, but we’ll let you know.

As with the HDD reports, we have published the data we used to develop our SSD report. In fact, we have always published this data as it resides in the same files as the HDD data. Now for the bad news: The data does not currently include a drive type, SDD or HDD, so you’ll have to do your research by model number. Sorry. You’ll find the links to download the data files on our Drive Stats Test Data webpage. If you are just looking for SSD data, start with Q4 2018 and go forward.

If you are new to our Drive Stats reports, you might wonder why we collect and share this information. It starts with the fact that we have lots of data storage available, over two exabytes to date, for customers using the Backblaze B2 Cloud Storage and Backblaze Computer Backup services. In doing that, we need to have a deep understanding of our environment, one aspect of which is how often drives, both HDDs and SSDs, fail. Starting about seven years ago we decided to share what we learned and shed some light on the previously opaque world of hard drive failure rates. It is only natural that we would be as transparent with SSDs. Read on.

Annual SSD Failure Rates for 2019, 2020, and 2021

At the end of 2021, there were 2,200 SSDs in our storage servers, having grown from zero in Q3 2018. We’ll start with looking at the AFR for the last three years, then dig into 2021 failure rates, and finally, take a look at the monthly AFR rates since 2019. We’ll explain each as we go.

The chart below shows the failure rates for 2019, 2020, and 2021.

Observations and Comments

  • The data for each year (2019, 2020, and 2021) is inclusive of the activity which occurred in that year.
  • There is an upward direction in the failure rate for 2021. We saw this when we compared our HDD and SSD boot drives in a previous post. When we get to the quarter-by-quarter chart later in this blog post, this trend, as such, will be much clearer.
  • Two drives have eye-popping failure rates—the Crucial model: CT250MX500SSD1 and the Seagate model: ZA2000CM10002. In both cases, the drive days and drive count (not shown) are very low. For the Crucial, there are only 20 drives which were installed in December 2021. For the Seagate, there were only four drives and one failed in early 2021. In both cases, the AFR is based on very little data, which leads to a very wide confidence interval, which we’ll see in the next section. We include these drives for completeness.
  • A drive day denotes one drive in operation for one day. Therefore, one drive in operation for 2021 would have 365 drive days. If a drive fails after 200 days, it will have 200 drive days and be marked as failed. For a given cohort of drives over a specified period of time, we compute the AFR as follows:
     
    AFR = (drive failures / (drive days / 365)) * 100
     
    This provides the annualized failure rate (AFR) over any period of time.

2021 Annual SSD Failure Rates

Let’s dig into 2021 and add a few more details. The table below is an expanded version of the annual 2021 section from the previous chart.

From the table, it should be clear that the Crucial and Seagate drives with the double-digit AFRs require a lot more data before passing any judgment on their reliability in our environment. This is evidenced by the extremely wide confidence interval for each drive. A respectable confidence interval is less than 1.0%, with 0.6% or less being optimal for us. Only the Seagate model: ZA250CM10002 meets the 1.0% percent criteria, although the Seagate model: ZA250CM10003 is very close.

Obviously, it takes time to build up enough data to be confident that the drive in question is performing at the expected level. In our case, we expect a 1% to 2% AFR. Anything less is great and anything more bears watching. One of the ways we “watch” is by tracking quarterly results, which we’ll explore next.

Quarterly SSD Failure Rates Over Time

There are two different ways we can look at the quarterly data: over discrete periods of time, e.g., a quarter or year; or cumulative over a period of time, e.g., all data since 2018. Data scoped to quarter by quarter can be volatile or spikey, but reacts quickly to change. Cumulative data shows longer term trends, but is less reactive to quick changes.

Below are graphs of both the quarter-by-quarter and cumulative-by-quarter data for our SSDs beginning in Q1 2019. First we’ll compare all SSDs, then we’ll dig into a few individual drives of interest.

The cumulative curve flows comfortably below our 2% AFR threshold of concern. If we had just followed the quarterly number, we might have considered the use of SSDs as boot drives to be problematic, as in multiple quarters the AFR was at or near 3%. That said, the more data the better, and as the SSDs age we’ll want to be even more on alert to see how long they last. We have plenty of data on that topic for HDDs, but we are still learning about SDDs.

With that in mind, let’s take a look at three of the older SSDs to see if there is anything interesting at this point.

Observations and Comments

  • For all of 2021, all three drives have had cumulative AFR rates below 1%.
  • This compares to the cumulative AFR for all SSD drives as of Q4 2021 which was 1.07% (from the previous chart).
  • Extending the comparison, the cumulative (lifetime) AFR for our hard drives was 1.40% as noted in our 2021 Drive Stats report. But, as we have noted in our comparison of HDDs and SSDs, the two groups (SSDs and HDDs) are not at the same point in their life cycles. As promised, we’ll continue to examine that dichotomy over the coming months.
  • The model (ZA250CM10002) represented by the red line seems to be following the classic bathtub failure curve, experiencing early failures before settling down to an AFR below 1%. On the other hand, the other two drives showed no signs of early drive failure and have only recently started failing. This type of failure pattern is similar to that demonstrated by our HDDs which no longer fit the bathtub curve model.

Experiments and Test Drives

If you decide to download the data and poke around, you’ll see a few anomalies related to the SSD models. We’d like to shed some light on these outliers before you start poking around. We’ve already covered the Crucial and Seagate drives that had higher than expected AFR numbers, but there are two other SSD models that don’t show up in this report, but do show up in the data. These are the Samsung 850 EVO 1TB and the HP SSD S700 250GB.

Why don’t they show up in this report? As with our drive stats review for our HDDs, we remove those drives we are using for testing purposes. Here are the details:

  • The Samsung SSDs were the first SSDs to be installed as boot drives. There were 10 drives that were installed to test out how SSDs would work as boot drives. Thumbs up! We had prior plans for these 10 drives in other servers and after about two weeks, the Samsung drives were swapped out with other SSDs and deployed for their original purpose. Their pioneering work was captured in the Drive Stats data for posterity.
  • The HP SSDs that were part of the testing of our internal data migration platform, i.e., moving data from smaller drives to larger drives. These drives showed up in the data in Q3 and Q4 of 2021. Any data related to these drives in Q3 or Q4 is not based on using these drives in our production environment.

What’s Next

We acknowledge that 2,200 SSDs is a relatively small number of drives on which to perform our analysis, and while this number does lead to wider than desired confidence intervals, we had to start somewhere. Of course, we will continue to add SSD boot drives to the study group, which will improve the fidelity of the data presented. In addition, we expect our readers will apply their usual skeptical lens to the data presented and help guide us towards making this report increasingly educational and useful.

We do have SSDs in other types of servers in our environment. For example, restore servers, utility servers, API servers, and so on. We are considering instrumenting the drives in some of those servers so that they can report their stats in a similar fashion as our boot drives. There are multiple considerations before we do that:

  1. We don’t impact the performance of the other servers.
  2. We recognize the workload of the drives in each of the other servers is most likely different. This means we could end up with multiple cohorts of SSD drives, each with different workloads, that may or may not be appropriate to group together for our analysis.
  3. We don’t want to impact the performance of our data center techs to do their job by adding additional or conflicting steps to the processes they use when maintaining those other servers.

The SSD Stats Data

The complete data set used to create the information used in this review is available on our Hard Drive Test Data page. As noted earlier, you’ll find SSD and HDD data in the same files and you’ll have to use the model number to distinguish one record from another. You can download and use this data for free for your own purpose. All we ask are three things: 1) you cite Backblaze as the source if you use the data, 2) you accept that you are solely responsible for how you use the data, and 3) you do not sell this data to anyone; it is free.
Good luck and let us know if you find anything interesting.

The post The SSD Edition: 2021 Drive Stats Review appeared first on Backblaze Blog | Cloud Storage & Cloud Backup.

Building a Multiregion Origin Store With Backblaze B2 + Fastly Compute@Edge

Post Syndicated from Pat Patterson original https://www.backblaze.com/blog/building-a-multiregion-origin-store-with-backblaze-b2-fastly-computeedge/

Backblaze B2 Cloud Storage customers have long leveraged our partner Fastly’s Deliver@Edge CDN as an essential component of a modern, scalable web architecture. Complementing Deliver@Edge, Compute@Edge is a serverless computing environment built on the same caching platform to provide a general-purpose compute layer between the cloud and end users. Today, we’re excited to celebrate Fastly’s announcement of its Compute@Edge partner ecosystem.

Serverless computing is quickly gaining popularity among developers for its simplicity, agility, and functionality. In the serverless model, cloud providers allocate resources to applications on demand, managing the compute infrastructure on behalf of their customers. The term, “serverless,” is a little misleading: The servers are actually still there, but customers don’t have to get involved in their provisioning, configuration, maintenance, or scaling.

Fastly’s Compute@Edge represents the next generation of serverless computing—purpose-built for better performance, reduced latency, and enhanced visibility and security. Using Fastly’s tools, a developer can create an edge application, test it locally, then with one command, deploy it to the Compute@Edge platform. When a request for that application reaches any of Fastly’s global network of edge servers, the application is launched and running in microseconds and can instantly scale to tens of thousands of requests per second.

It’s difficult to overstate the power and flexibility this puts in your hands as a developer—your application can be running on every edge server, with access to every attribute of its incoming requests, assembling responses in any way you choose. For an idea of the possibilities, check out the Compute@Edge demos, in particular, the implementation of the video game classic, “Doom.”

We don’t have space in a single blog post to explore an edge application of that magnitude, but read on for a simple example of how you can combine Fastly’s Compute@Edge with Backblaze B2 to improve your website’s user experience, directing requests to the optimal origin store end point based on the user’s location.

The Case for a Multiregion Origin Store

Although the CDN caches resources to improve performance, if a requested resource is not present in the edge server cache, it must be fetched from the origin store. When the edge server is close to the origin store, the increase in latency is minimal. If, on the other hand, the edge server is on a different continent from the origin store, it can take significantly longer to retrieve uncached content. In most cases, this additional delay is hardly noticeable, but for websites with many resources that are frequently updated, it can add up to a sluggish experience for users. A solution is for the origin store to maintain multiple copies of a website’s content, each at an end point in a different region. This approach can dramatically reduce the penalty for cache misses, improving the user experience.

There is a problem here, though: How do we ensure that a given CDN edge server directs requests to the “best” end point? The answer: build an application that uses the edge server’s location to select the end point. I’ll explain how I did just that, creating a Fastly Compute@Edge application to proxy requests to Backblaze B2 buckets.

Creating an Application on Fastly Compute@Edge

The Fastly Compute@Edge developer documentation did a great job of walking me through creating a Compute@Edge application. As part of the process, I had to choose a starter kit—a simple working application targeting a specific use case. The Static Content starter kit was the ideal basis for my application—it demonstrates many useful techniques, such as generating an AWS V4 Signature and manipulating the request’s Host HTTP header to match the origin store.

The core of the application is just a few lines written in the Rust programming language:

#[fastly::main]
 
fn main(mut req: Request) -> Result<Response, Error> {
// 1. Where is the application running?
let pop = get_pop(&req);

// 2. Choose the origin based on the edge server (pop) -
// default to US if there is no match on the pop
let origin = POP_ORIGIN.get(pop.as_str()).unwrap_or(&US_ORIGIN);

// 3. Remove the query string to improve cache hit ratio
req.remove_query();

// 4. Set the `Host` header to the bucket name + host rather than
// our Compute@Edge endpoint
let host = format!("{}.{}", origin.bucket_name, origin.endpoint);
req.set_header(header::HOST, &host);

// 5. Copy the modified client request to form the backend request
let mut bereq = req.clone_without_body();

// 6. Set the AWS V4 authentication headers
set_authentication_headers(&mut bereq, &origin);

// 7. Send the request to the backend and assign its response to `beresp`
let mut beresp = bereq.send(origin.backend_name)?;

// 8. Set a response header indicating the origin that we used
beresp.set_header("X-B2-Host", &host);

// 9. Return the response to the client
return Ok(beresp);
}

In step one, the get_pop function returns the three-letter abbreviation for the edge server, or point of presence (POP). For the purposes of testing, you can specify a POP as a query parameter in your HTTP request. For example, https://three.interesting.words.edgecompute.app/image.png?pop=AMS will simulate the application running on the Amsterdam POP. Next, in step two, the application looks up the POP in a mapping of POPs to Backblaze B2 end points. There are about a hundred Fastly POPs spread around the world; I simply took the list generated by running the Fastly command-line tool with the POPs argument, and assigned POPs to Backblaze B2 end points based on their location:

  • POPs in North America, South America, and Asia/Pacific map to the U.S. end point.
  • POPs in Europe and Africa map to the EU end point.

I won’t step through the rest of the logic in detail here—the comments in the code sample above cover the basics; feel free to examine the code in detail on GitHub if you’d like a closer look.

Serve Your Own Data From Multiple Backblaze B2 Regions

As you can see in the screenshot above, Fastly has implemented a Deploy to Fastly button. You can use this to create your own copy of the Backblaze B2 Compute@Edge demo application in just a couple of minutes. You’ll need to gather a few prerequisites before you start:

  • You must create Backblaze B2 accounts in both the U.S. and EU regions. If you have an existing account and you’re not sure which region it’s in, just take a look at the end point for one of your buckets. For example, this bucket is in the U.S. West region:

    To create your second account, go to the Sign Up page, and click the Region drop-down on the right under the big, red Sign Up button:

    Pick the region in which you don’t already have an account, and enter an email and password. Remember, your new account comes with 10GB of storage, free of charge, so there’s no need to enter your credit card details.

    Note: You’ll need to use a different email address from your existing account. If you don’t have a second email address, you can use the plus trick (officially known as sub-addressing) and reuse an existing email address. For example, if you used [email protected] for your existing B2 Cloud Storage account in the U.S. region, you can use [email protected] for your new EU account. Mail will be routed to the same inbox, and Backblaze B2 will be satisfied that it’s a different email address. This technique isn’t limited to Gmail, by the way, it works with many email providers.

  • Create a private bucket in each account, and use your tool of choice to copy the same data into each of them. Make a note of the end point for each bucket.
  • Create an application key with read access to each bucket.
  • Sign up for a free Fastly account if you don’t already have one. Right now, this includes free credits for Compute@Edge.
  • Sign up for a free GitHub account.
  • Go to the Backblaze B2/Fastly Compute@Edge Demo GitHub repository, click the Deploy to Fastly button, and follow the prompts. The repository will be forked to your GitHub account and then deployed to Fastly.
  • Important: There is one post-deploy step you must complete before your application will work! In your new GitHub repository, navigate to src/config.rs and hit the pencil icon near the top right to edit the file. Change the origin configuration in lines 18-31 to match your buckets and their end points. Alternatively, you can, of course, clone the repository to your local machine, edit it there, and push the changes back to GitHub.

Once you have your accounts and buckets created, it takes just a few minutes to deploy the application. Watch me walk through the process:

What Can You Do With Fastly’s Compute@Edge and Backblaze B2?

My simple demo application only scratches the surfaces of Compute@Edge. How could you combine Fastly’s edge computing platform with Backblaze B2 to create a new capability for your website? Check out Fastly’s collection of over 100 Compute@Edge code samples for inspiration. If you come up with something neat and share it on GitHub, let me know in the comments and I’ll round up a bundle of Backblaze-branded goodies, just for you!

The post Building a Multiregion Origin Store With Backblaze B2 + Fastly Compute@Edge appeared first on Backblaze Blog | Cloud Storage & Cloud Backup.

Explore the Backblaze S3 Compatible API With Our New Postman Collection

Post Syndicated from Pat Patterson original https://www.backblaze.com/blog/explore-the-backblaze-s3-compatible-api-with-our-new-postman-collection/

Postman is a platform for building and using APIs. API providers such as Backblaze can use Postman to build API documentation and provide a live environment for developers to experiment with those APIs. Today, you can interact with Backblaze B2 Cloud Storage via our new Postman Collection for the Backblaze S3 Compatible API.

Using the Backblaze S3 Compatible API

The Backblaze S3 Compatible API implements the most commonly used S3 operations, allowing applications to integrate with Backblaze B2 in exactly the same way they do with Amazon S3. Many of our Alliance Partners have used the S3 Compatible API in integrating their products and services with Backblaze B2. Often, integration is as simple as allowing the user to specify a custom endpoint, for example, https://s3.us-west-001.backblazeb2.com, alongside their API credentials in the S3 settings, and verifying that the application works as expected with Backblaze B2.

The Backblaze B2 Native API, introduced alongside Backblaze B2 back in 2015, provides a low-level interface to B2 Cloud Storage. We generally recommend that developers use the S3 Compatible API when writing new applications and integrations, as it is supported by a wider range of SDKs and libraries, and many developers already have experience with Amazon S3. You can use the Backblaze B2 web console or the B2 Native API to access functionality, such as application key management and lifecycle rules, that is not covered by the S3 Compatible API.
 
Our post on the B2 Native and S3 Compatible APIs provides a more detailed comparison.

Most applications and scripts use one of the AWS SDKs or the S3 commands in the AWS CLI to access Backblaze B2. All of the SDKs, and the CLI, allow you to override the default Amazon S3 endpoint in favor of Backblaze B2. Sometimes, though, you might want to interact directly with Backblaze B2 via the S3 Compatible API, perhaps in debugging an issue, or just to better understand how the service works.

Exploring the Backblaze S3 Compatible API in Postman

Our new Backblaze S3 Compatible API Documentation page is the definitive reference for developers wishing to access Backblaze B2 directly via the S3 Compatible API.

In addition to reading the documentation, you can click the Run in Postman button on the top right of the page, log in to the Postman website or desktop app (creating a Postman account is free), and interact with the API.

Integrate With Backblaze B2

Whether you are backing up, archiving data, or serving content via the web, Backblaze B2 is an easy to use and, at a quarter of the cost of Amazon S3, cost-effective cloud object storage solution. If you’re not already using Backblaze B2, sign up now and try it out—your first 10GB of storage is free!

The post Explore the Backblaze S3 Compatible API With Our New Postman Collection appeared first on Backblaze Blog | Cloud Storage & Cloud Backup.

CrashPlan On-Premises Customers: Come On Over

Post Syndicated from Shveta Shahi original https://www.backblaze.com/blog/crashplan-on-premises-customers-come-on-over/

CrashPlan Deprecation Announcement

With CrashPlan sunsetting its On-Premises backup service as of February 28, 2022, customers have some choices to make about how to handle their backups moving forward. As you think about the options—all of which require IT managers to embrace a change—we’d be remiss if we didn’t say Backblaze is ready to help with our Business Backup service for workstations. It’s quick and easy to switch over to, easy to run automatically ongoing, and cost effective.

If you’re a CrashPlan customer but you need a new backup solution, read on to understand your options. If you’re interested in working with us, you can transition from CrashPlan to Backblaze in six simple steps outlined below to protect all employee workstations from accidental data loss or ransomware, automatically and affordably.

What Options Do CrashPlan Customers Have?

CrashPlan customers have two options: transfer to CrashPlan’s Cloud Backup Service or transfer to another vendor. CrashPlan customers have until March 1, 2022 to make the decision and get started. After March 1, CrashPlan customers will lose support for their backup software. If any issues arise with backing up or restoring data, you won’t receive support to help fix the situation from CrashPlan.

CrashPlan’s Cloud Backup Service starts at $10 per endpoint per month for 0-100 endpoints, and is tiered after that. For customers looking for different pricing options or features, some CrashPlan alternatives include Carbonite and iDrive, both of which are offering promotions to attract CrashPlan customers. Keep in mind that once these promotions expire, you’re stuck paying the full price which may be higher than others. And, of course, Backblaze is an option as well.

Transferring from CrashPlan to Backblaze

So, what makes Backblaze a great fit for CrashPlan customers? We’ll share a few reasons. If you are already convinced, you can get started now by following the getting started guide in the next section of this post. If not, here are some of the benefits you’ll get with Backblaze:

  1. Unlimited and Automatic: Lightweight Mac and PC clients back up all user data by default and are Java-free for stability—no system slow-downs or crashes.
  2. Easy Admin and Restores: Transition in a few simple steps then easily manage and deploy at scale via a centralized admin console by choosing from a number of mass-deployment tools with multiple restore options.
  3. Affordable and Predictable: Protect all employee workstations for just $70/computer, with no surprise charges, plus monthly, yearly, or two-year billing flexibility to suit your needs.
  4. Safe and Secure: Defend your business data from ransomware and other threats with single sign-on, two-factor authentication, encryption at rest, encryption in transit, and ransomware protection.
  5. Live Support: Make your transition easy with support during your transition and deployment via our customer service team and solution engineers.

Backblaze has been in the backup business for 15 years, and businesses ranging from PagerDuty to Charity: Water to Roush Auto Group rely on us for their data protection. Former CrashPlan customers who recently transitioned to Backblaze are getting the value they expected. Recently, Richard Charbonneau of Clicpomme spoke of the ease and simplicity he gained from switching:

“All our clients are managed by MDM or Munki, so it was really easy for us just to push the uninstaller for CrashPlan and package the new installer for Backblaze for every client.”
– Richard Charbonneau, Founder, Clicpomme

We invite you to join them.

Ready to Get Started?

➔ Register Now

How to Transition to Backblaze: Getting Started

You can “version off” of CrashPlan and “version on” to Backblaze Business Backup, making for a seamless transition. Simply create and configure an account with Backblaze to start backing up all employee workstations, and let CrashPlan lapse when they sunset On-Premises support on February 28.

You can retain your CrashPlan backups on premises for however long your retention policies stipulate in case you need to restore (or just deprecate those altogether if you’d rather use your on-premises storage servers for something else—it’s up to you!). Then, with Backblaze set up in parallel, you can start relying on Backblaze moving forward.

Here’s how to get started with Backblaze Business Backup.

  1. Click here to get started on our sign-up page.
  2. Enter an email address and password. Then click Create Account with Groups Enabled.
  3. Business Sign Up

  4. You will receive a verification email. When you do, enter the code provided.
  5. Verify Email Address

  6. Now, create a Group for your users. There are a few reason to create a group or groups for your users, including:
    • To establish separate retention periods.
    • To use different billing methods for different groups.
    • To give different kinds of users customized access.
    • To keep your users organized according to your needs.

    Create group

  7. Choose how many licenses you would like to purchase in the Computers to Backup field, select your retention plan under Version History, then click Add a Billing Method and enter your information. When you are done, click Buy and Next (If you are not ready to proceed with adding a payment method, feel free to click “Skip Payment & Try for Free”, this will allow you to try out the product for 15 days with full functionality.)
  8. Add Payment

  9. Now that your Group is created, you have some options on how to invite users into the group. You can:
  10. Invite and Approve

Deployment Considerations

Backblaze offers a number of different deployment options to give you the most flexibility when deciding how to deploy the Backblaze client to your machines. It can be as simple as sending the invite link via Slack or in a personally crafted email to a handful of users. You can use our Invite Email option to just add email addresses to a canned invite. Or you can deploy via a silent install using RMM tools such as JAMF, SCCM, Munki and others to deploy the software to your end users. Assistance is always available from our solution engineers to help guide you through the deployment process.

Additional Configuration Considerations

With Backblaze Business Backup, you can customize your groups’ administrative access. Specify who has administrator privileges to a group simply by adding an email address to the group settings. As a group administrator, you have the ability to assist your users with restores and be aware of issues when they arise.

You can also integrate with your Single Sign-on provider—either Google or Microsoft—in the settings to improve security, reduce support calls, and free users from having to remember yet another password.

An Invitation to Try Backblaze

If you are a CrashPlan user looking to transition to a new cloud backup service for your workstations, Backblaze makes moving to the cloud easy. Reach out to us at any time for help transitioning and getting started.

➔ Register Now

The post CrashPlan On-Premises Customers: Come On Over appeared first on Backblaze Blog | Cloud Storage & Cloud Backup.

USB Flash Drive Restores Ride Off Into the Sunset

Post Syndicated from original https://www.backblaze.com/blog/usb-flash-drive-restores-ride-off-into-the-sunset/

USB Flash Key Thumb Drive Restore Deprecation
Way back in 2012 we decided it was time to sunset our DVD restore option (Yes, that was a thing.) and replace it with USB flash drive restores to accompany our USB hard drives. Today, the time has come to bid farewell to those little flash keys as well.

Demand for USB flash drives has waned considerably since the halcyon days of 2012, while internet bandwidth has made smaller restores far easier. At the same time, demand for our USB hard drive restores has steadily increased. So while we bid a fond adieu to everyone’s favorite spy movie staple, we remain ready and able to fulfill your physical restore needs with larger-capacity USB hard drives should you need to recover a lot of data all at once.

Yes, as of March 3, we will no longer offer USB flash drive restores, but rest assured that the Backblaze Computer Backup service continues to offer many options to restore your files, including:

  • Download via the web application.
  • Save files to Backblaze B2 Cloud Storage.
  • Order a USB hard drive to keep or redeem through our Restore Return Refund program.
  • And you’ll still be able to recover your Backblaze B2 Snapshots using our Snapshot Drive recovery option.
  • And if you’re administering a Business Group, you can utilize any of the above options depending on your configuration.

In the meantime, fly little USB flash drives…fly!

The post USB Flash Drive Restores Ride Off Into the Sunset appeared first on Backblaze Blog | Cloud Storage & Cloud Backup.

What Is Private Cloud Storage?

Post Syndicated from Molly Clancy original https://www.backblaze.com/blog/what-is-private-cloud-storage/

No matter what business you’re in, you’re in the data business. Your files are the backbone of your entire operation and losing access to them would be a disaster. As such, it’s perfectly understandable if you’re a little protective of these all-important 1s and 0s. As you begin your search for a data storage solution, understanding some cloud basics can help you make the best decision, and one option that may cross your desk is the private cloud.

What Is the Private Cloud?

A private cloud is essentially storage dedicated solely to your organization, but accessible from anywhere. While you can outsource the physical infrastructure of this private cloud to a data center, you do have the option to keep it on-premises. It is a costlier solution than typical public cloud storage, but the trade-off is a higher level of security and control over your data.

Refresher: What Is the Public Cloud?

By contrast, a public cloud storage service would be open to many different organizations or tenants. In a public cloud, tenants share the same physical hardware resources as other tenants, and their individual instances are virtually separated so that one tenant can’t access another’s data. Public clouds typically don’t involve on-premises hardware as everything is managed by the public cloud provider in a data center.

Public and Private Clouds: By the Numbers

In 2020, spending on cloud services grew significantly: Public cloud spending reached $14 billion, and private cloud spending reached $5 billion, according to an IDC study. IDC also found that “on-premises private clouds” make up nearly two-thirds (i.e., 64%) of private cloud spending.

According to the Flexera 2021 State of the Cloud Report, 97% of respondents used a public cloud and 80% of respondents used a private cloud. As you can see, there is plenty of overlap. Using a public cloud versus a private cloud is not an either/or decision—78% of respondents use both public and private clouds in a hybrid cloud solution.

Advantages and Disadvantages of Private Clouds

Both the private cloud and the public cloud have their advantages. Benefits of the public cloud include low cost and a higher adoption rate than the private cloud. Therefore, a public cloud can be cheaper to run and it can be easier to find employees who know how to use the public cloud. The high adoption rate also means it is easier to find third-party consultants and experts to provide help when you need it. On the other hand, a private cloud offers advantages such as faster access to data when using on-premises infrastructure and more control over security.

Private Cloud: Use Cases

To better understand how private cloud services can be beneficial, let’s take a closer look at use cases. There are a few reasons organizations are investing time and resources into private cloud deployments:

  • Regulatory compliance. Some industries face high demand for security. For example, financial services and health care organizations frequently handle highly sensitive data. As a result, these organizations may find that the greater security safeguards available through a private cloud may be a good fit. Further, Gartner points out that the U.S. government is starting to increase its adoption of private cloud services. If your organization operates in a highly regulated industry with significant IT security or privacy protection requirements, using a private cloud may make sense. Finally, government contractors may be expected to use the private cloud to give their government clients extra peace of mind regarding security.
  • Meeting high-performance requirements. In some situations, a private cloud may provide access to faster IT services. For instance, an on-premises private cloud may serve data to local users much faster than a private cloud located thousands of miles away. A large organization that needs to work with large volumes of data like video files and big data analytics may find private cloud services a good fit. If a company sees a competitive opportunity in speed (e.g., high-frequency trading in financial services), then a private cloud could be an attractive option.
  • Specific hardware requirements. In a public cloud environment, the end user generally has limited input regarding specific hardware. By contrast, a company willing to pay for a private cloud service will have more control over specific hardware investments.

Public vs. Private: Why Not Both?

Using both private and public clouds simultaneously is called a hybrid cloud solution, and it may be the best way to balance your security needs against your budget constraints to optimize your storage infrastructure. You can use an on-premises private cloud for sensitive files or larger files that will be accessed on a daily basis, while maintaining public cloud storage space for archives or files that need to be accessed remotely by outside vendors or clients. The reduced cost of public cloud storage gives you greater flexibility in tweaking your private vs. public cloud needs to fit your budget.

Managing a Private Cloud Effectively

Using private cloud data storage services has the potential to offer greater security. If your cloud portfolio includes the private cloud, use the following tips to get the most from those services.

  • Manage the scalability limitations of the private cloud. In contrast to a public cloud service, you may find it more difficult or time-consuming to scale up and scale down private cloud services. This challenge can be mitigated in a few ways. For instance, you could pursue a hybrid cloud approach using the private cloud for smaller amounts of highly sensitive data and put the bulk of your corporate data in a public cloud.
  • Enhance your cost management process. A private cloud service comes with higher up-front costs and maintenance costs. And, in a public cloud, your costs can vary based on the amount of storage you’re using at any given time. With a private cloud, once you’ve made that capital expenditure, whether on-premises or off, the capacity is already paid for. However, it requires very accurate assessments of future needs to predict any further spending on capacity. If you run out of space, you’re facing another capital investment.
  • Managing maintenance risk. Compared to a public cloud deployment, private cloud storage can be relatively complex to manage. If upkeep slips, you may start to suffer increasing security risks and lost performance.
  • Challenge customization requests. The ability to customize a private cloud is a double-edged sword. The flexibility is attractive for departments with unusual requirements. On the other hand, each private cloud customization request may involve additional fees and security complexities. Therefore, it may be wise to challenge requests for cloud customization and see if business users can achieve their goals with minimal customization.

Are You Using a Private Cloud?

We’re all in the data business, but nobody knows your business like you. Ultimately, the decision to balance data security against financial concerns will come down to your individual needs and budgetary realities. But for those files that require an extra layer of security, whether it’s for regulatory or operational reasons, a private cloud solution gives you control over your data that is worth the added expense.

Are you using a public cloud, a private cloud, or both? Let us know in the comments.

The post What Is Private Cloud Storage? appeared first on Backblaze Blog | Cloud Storage & Cloud Backup.

Ransomware Takeaways From Q4 2021

Post Syndicated from Jeremy Milk original https://www.backblaze.com/blog/ransomware-takeaways-from-q4-2021/

Ransomware commanded attention from both the media and governments like never before in 2021. It was an unprecedented year of major breaches, astronomical ransom demands, and attacks on businesses of all sizes. And much of what stood out to us towards the end of the year was the seemingly heightened regulatory response to previous quarters’ developments.

New regulations are hopeful signs that people are taking the ransomware threat more seriously, but they’re not enough to stop ransomware operators just yet. If you’re in charge of managing company data, knowing the latest in ransomware developments can help guide the choices and actions you take to protect company assets. Here are five key takeaways based on what we saw over Q4 2021.

This post is a part of our ongoing series on ransomware. Take a look at our other posts for more information on how businesses can defend themselves against a ransomware attack, and more.

➔ Download The Complete Guide to Ransomware E-book

1. U.S. State Department Sweetened the Deal for Reporting Cybercrime.

In Q4, we learned that the U.S. State Department put $10 million bounties on two specific ransomware groups—DarkSide and Sodinokibi—as well as $5 million bounties on their affiliates. This follows a statement issued earlier in 2021 that offered $10 million bounties for information on any person who engages in cybercrime. The bounties have proven effective in the past, with the department paying out more than $200 million since 1984 to individuals who provided intelligence that helped address threats to U.S. security.

2. Cyber Insurers Are Taking a More Conservative Stance.

The rise in attacks in 2021 led to a rise in companies seeking out cyber insurance coverage if they hadn’t already, and subsequently, a rise in claims against cyber insurance policies. The cyber insurance dynamics are evolving in response, and companies may need to think about coverage differently. Lloyds of London, for example, will no longer cover losses stemming from nation-state-affiliated criminals, cyber warfare, and “retaliatory” cyber activity. Whether or not ransomware gangs will be fully accepted as nation-state attackers is still up for debate, but the truth is that the cybersecurity community understands that some big name groups are definitely operating in league with their particular locale’s government branches.

3. Governments Named Names.

Also in November, the Ukrainian Security Service disclosed the names and positions of five members of a major cybercrime syndicate. The disclosure revealed the members’ links to the Crimean branch of the Russian Federal Security Service (FSB). They furthermore released recorded telephone conversations where the members discussed attacks and griped about their FSB salaries. According to the Ukrainian Security Service, the group has heavily targeted the Ukrainian government in more than 5,000 cyberattacks. Despite these efforts to dox major players, the group has continued their attacks as tensions between Russia and Ukraine continue to escalate.

4. Sanctions Tightened Ransomware’s Vice Grip.

In October, a ransomware group linked to a sanctioned entity—Evil Corp—posted information allegedly stolen from the National Rifle Association (NRA). While the NRA has not confirmed the attack, if true, it would potentially put them between a rock and a hard place. If they pay the attackers, they could face penalties from the U.S. government.

The sanctions are also changing the behavior of ransomware groups. Sanctioned groups are less likely to be successful in getting victims to pay. One way they get around this is by creating subsidiary brands or spinoff entities that, to an unknowing victim, seem to be unaffiliated with the sanctioned entity. When victims are unaware of affiliations between groups, they’re more likely to pay ransoms and less likely to disclose attacks to the authorities. However, pleading innocence may not be enough for victims to avoid consequences should the attacks be discovered by authorities.

5. Players in the Ransomware Economy Came Under Fire.

The ransomware economy is a murky web of actors that includes entities beyond just the ransomware operators themselves. In December, researchers linked 15+ ransomware-related crypto exchanges to a single prestigious skyscraper in Moscow—the tallest in the city, in fact. The findings provide more fuel for security experts to argue that Russian authorities give ransomware gangs a wide berth.

What This Means for You

While Q4 saw increased scrutiny on some ransomware operations, stopping ransomware is like a game of Whac-A-Mole. When one group gets exposed or dissolved, the operators and resources just reemerge as a new brand. Ransomware isn’t going away anytime soon, and the stakes for companies who fall victim are only higher with new sanctions. All this makes investing in ransomware protection all the more necessary.

The post Ransomware Takeaways From Q4 2021 appeared first on Backblaze Blog | Cloud Storage & Cloud Backup.

Free Image Hosting With Cloudflare Transform Rules and Backblaze B2

Post Syndicated from Pat Patterson original https://www.backblaze.com/blog/free-image-hosting-with-cloudflare-transform-rules-and-backblaze-b2/

Before I dive into using Cloudflare Transform Rules to implement image hosting on Backblaze B2 Cloud Storage, I’d like to take a moment to introduce myself. I’m Pat Patterson, recently hired by Backblaze as chief developer evangelist. I’ve been working with technology and technical communities for close to two decades, at companies such as Sun Microsystems and Salesforce. I’ll be creating and delivering technical content for you, our Backblaze B2 community, and advocating on your behalf within Backblaze. Feel free to follow my journey and reach out to me via Twitter or LinkedIn.

Cloudflare Transform Rules

Now, on with the show! Cloudflare Transform Rules give you access to HTTP traffic at the CDN edge server, allowing you to manipulate the URI path, query string, and HTTP headers of incoming requests and outgoing responses. Where Cloudflare Workers allows you to write JavaScript code that executes in the same environment, Transform Rules give you much of the same power without the semi-colons and curly braces.

Let’s look at a specific use case: implementing image hosting on top of a cloud object store. Backblaze power user James Ross wrote an excellent blog post back in August 2019, long before the introduction of Transform Rules, explaining how to do this with Cloudflare Workers and Backblaze B2. We’ll see how much of James’ solution we can recreate with Transform Rules, without writing any code. We’ll also discover how the combination of Cloudflare and Backblaze allows you to create your own, personal 10GB image hosting site for free.

Implementing Image Hosting on a Cloud Object Store

James’ requirements were simple:

  • Serve image files from a custom domain, such as files.example.com, rather than the cloud storage provider’s domain.
  • Remove the bucket name, and any other extraneous information, from the URL.
  • Remove extraneous headers, such as the object ID, from the HTTP response.
  • Improve caching (both browser and edge cache) for images.
  • Add basic CORS headers to allow embedding of images on external sites.

I’ll work through each of these requirements in this blog post, and wrap up by explaining why Backblaze B2 might be a better long term provider for this and many other cloud object storage use cases than other cloud object stores.

It’s worth noting that nothing here is Backblaze B2-specific—the user’s browser is requesting objects from a B2 Cloud Storage public bucket via their URLs, just as it would with any other cloud object store. The techniques are exactly the same on Amazon S3, for example.

Prerequisites

You’ll need accounts with both Cloudflare and Backblaze. You can get started for free with both:

You’ll also need your own DNS domain, which I’ll call example.com in this article, on which you can create subdomains such as files.example.com. If you’ve read this far, you likely already have at least one. Otherwise, you can register a new domain at Cloudflare for a few dollars a year, or your local equivalent.

Create a Bucket for Your Images

If you already have a B2 Cloud Storage bucket you want to use for your image store, you can skip this section. Note: It doesn’t matter whether you created the bucket and its objects via the B2 Native API, the Backblaze S3 Compatible API, or any other mechanism—your objects are accessible to Cloudflare via their friendly URLs.

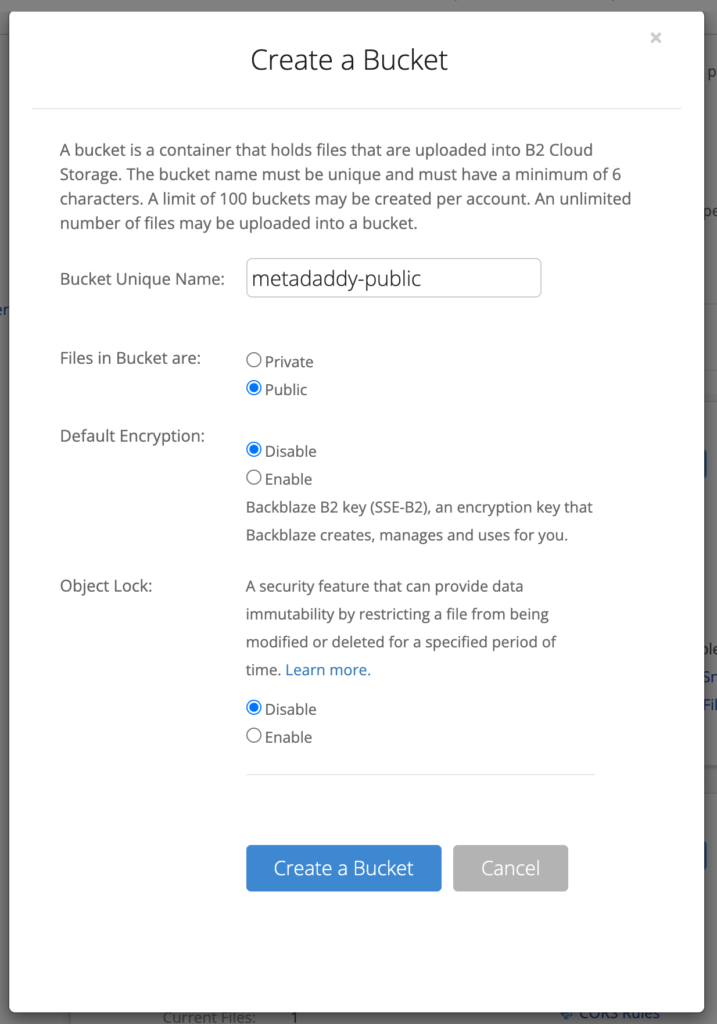
Log in to Backblaze, and click Buckets on the left under B2 Cloud Storage, then Create a Bucket. You will need to give your bucket a unique name, and make it public. Leave the other settings with their default values.

Note that the bucket name must be globally unique within Backblaze B2, so you can’t just call it something like “myfiles.” You’ll hide the bucket name from public view, so you can call it literally anything, as long as there isn’t already a Backblaze B2 bucket with that name.

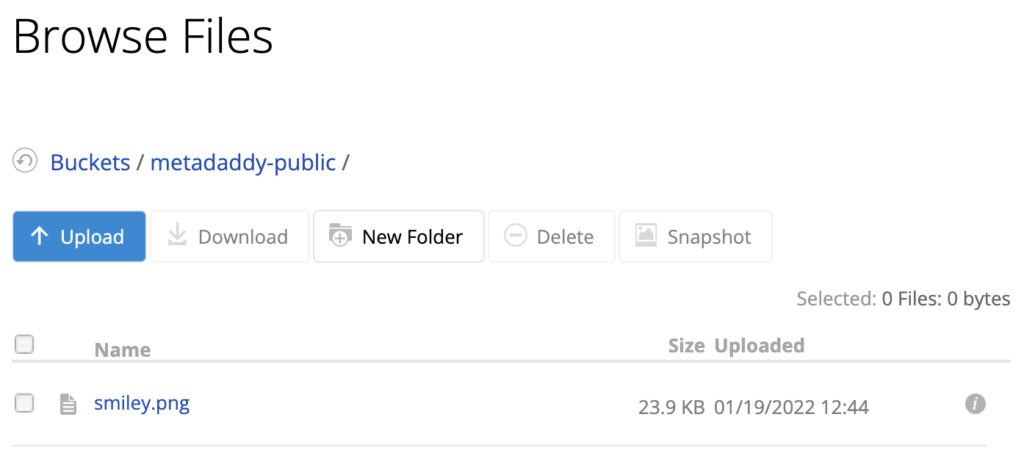
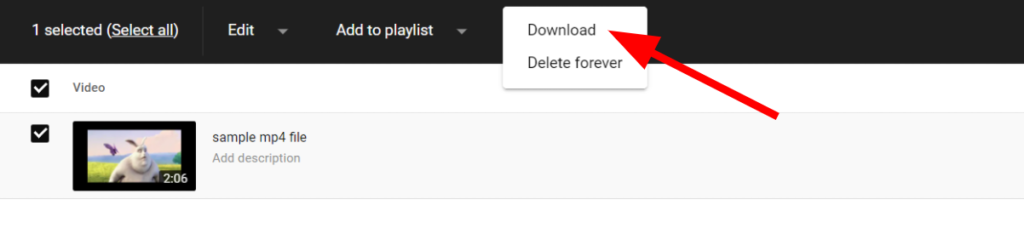
Finally, click Upload/Download and upload a test file to your new bucket.

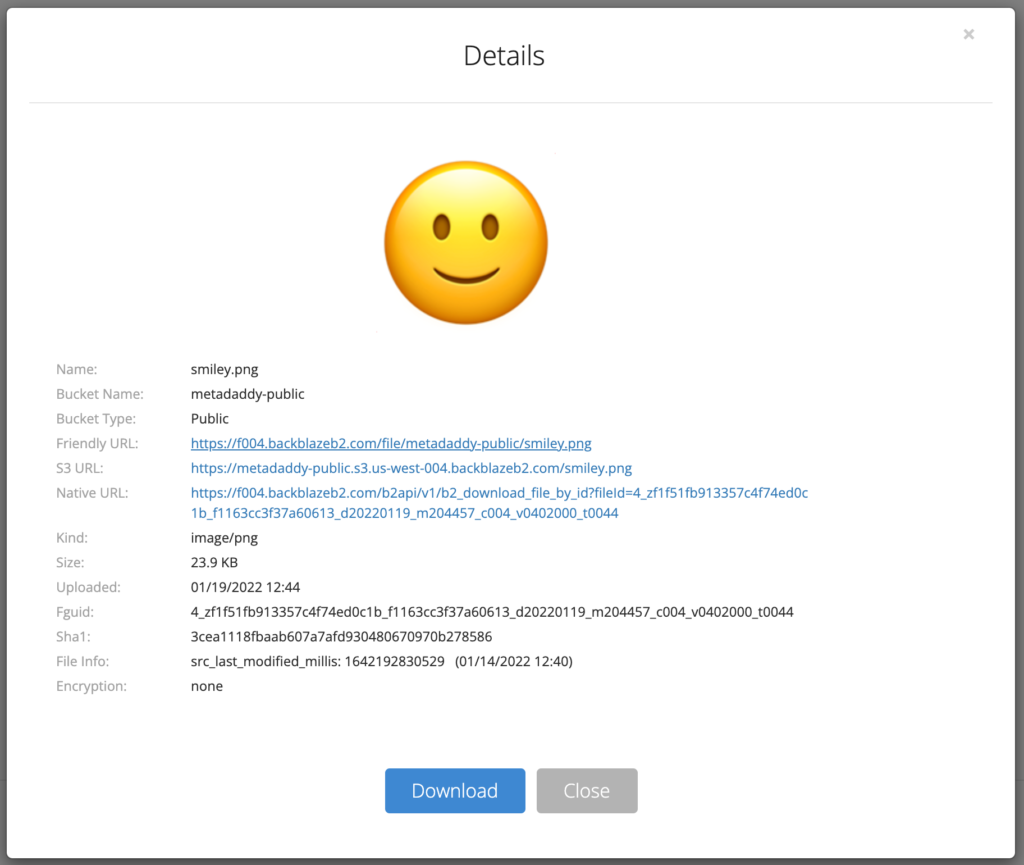
Click the file to see its details, including its various URLs.

In the next step, you’ll rewrite requests that use your custom subdomain, for example, https://files.example.com/smiley.png, to the friendly URL of the form, https://f004.backblazeb2.com/file/metadaddy-public/smiley.png.

Make a note of the hostname in the friendly URL. As you can see in the previous paragraph, mine is f004.backblazeb2.com.

Create a DNS Subdomain for Your Image Host

You will need to activate your domain (example.com, rather than files.example.com) in your Cloudflare account, if you have not already done so.

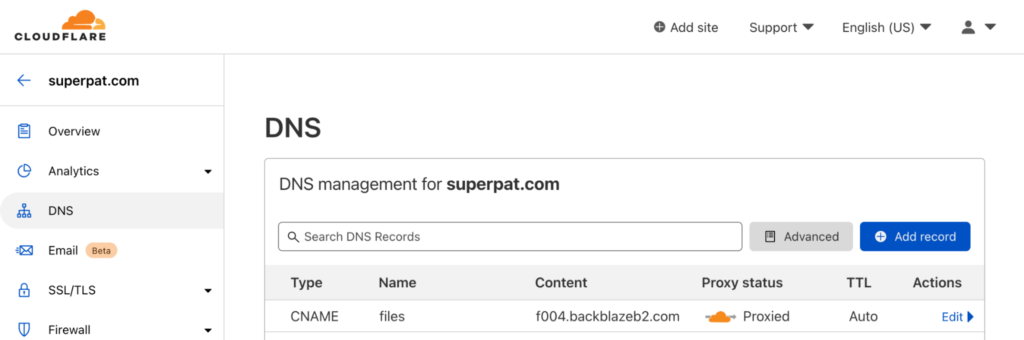
Now, in the Cloudflare dashboard, create your subdomain by adding a DNS CNAME record pointing to the bucket hostname you made a note of earlier.

I created files.superpat.com, which points to my bucket’s hostname, f004.backblazeb2.com.

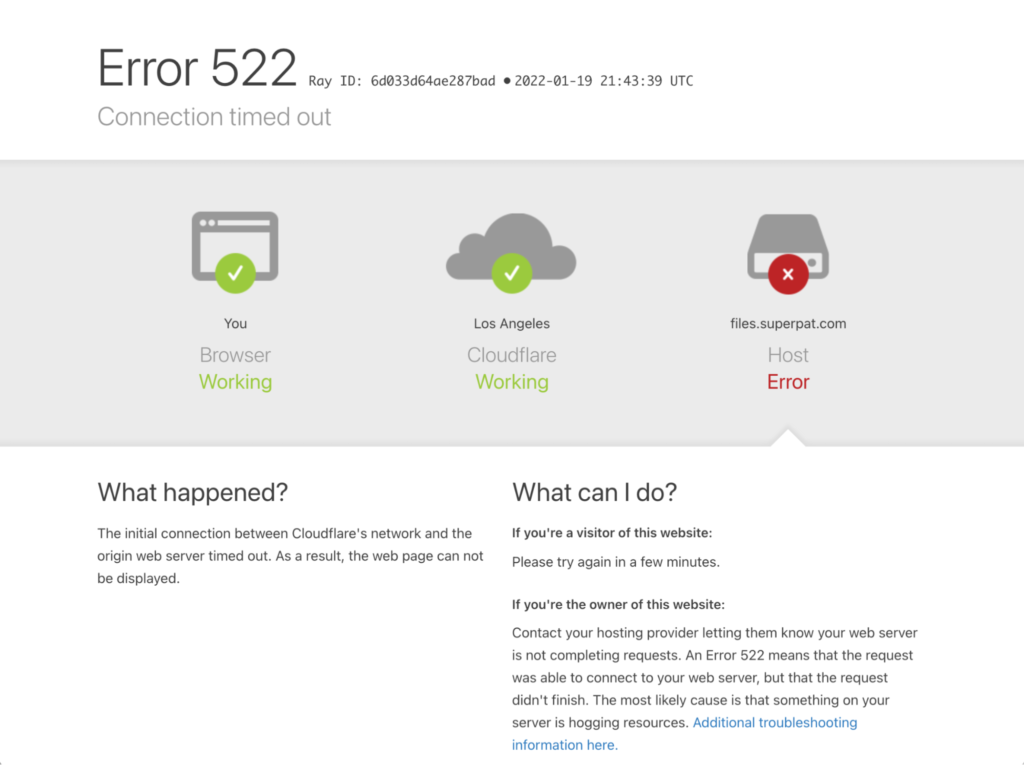
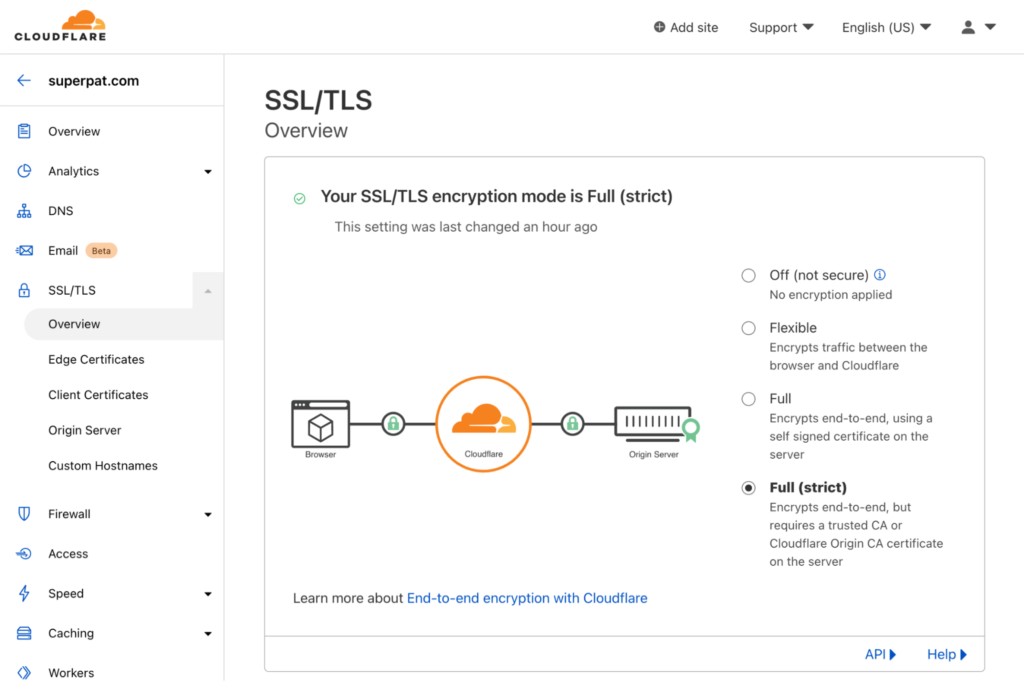
If you test this right now by going to your test file’s URL in your custom subdomain, for example, https://files.example.com/file/my-unique-bucket-name/smiley.png, after a few seconds you will see a 522 “connection timed out” error from Cloudflare:

This is because, by default, Cloudflare accesses the upstream server via plain HTTP, rather than HTTPS. Backblaze only supports secure HTTPS connections, so the HTTP request fails. To remedy this, in the SSL/TLS section of the Cloudflare dashboard, change the encryption mode from “Flexible” to “Full (strict),” so that Cloudflare connects to Backblaze via HTTPS, and requires a CA-issued certificate.

Now you should be able to access your test file in your custom subdomain via a URL of the form https://files.example.com/file/my-unique-bucket-name/smiley.png. The next task is to create the first Transform Rule to remove /file/my-unique-bucket-name from the URL.

Rewrite the URL Path on Incoming Requests

There are three varieties of Cloudflare Transform Rules:

  • URL Rewrite Rules: Rewrite the URL path and query string of an HTTP request.
  • HTTP Request Header Modification Rules: Set the value of an HTTP request header or remove a request header.
  • HTTP Response Header Modification Rules: Set the value of an HTTP response header or remove a response header.

Click Rules on the left of the Cloudflare dashboard, then Transform Rules. You’ll see that the Cloudflare free plan includes 10 Transform Rules—plenty for our purposes. Click Create Transform Rule, then Rewrite URL.

It’s useful to pause for a moment and think about what we need to ask Cloudflare to do. Users will be requesting URLs of the form https://files.example.com/smiley.png, and we want the request to Backblaze B2 to be like https://f004.backblazeb2.com/file/metadaddy-public/smiley.png. We’ve already taken care of the domain part of the URL, so it becomes clear that all we need to do is prefix the outgoing URL with /file/<bucket name>.

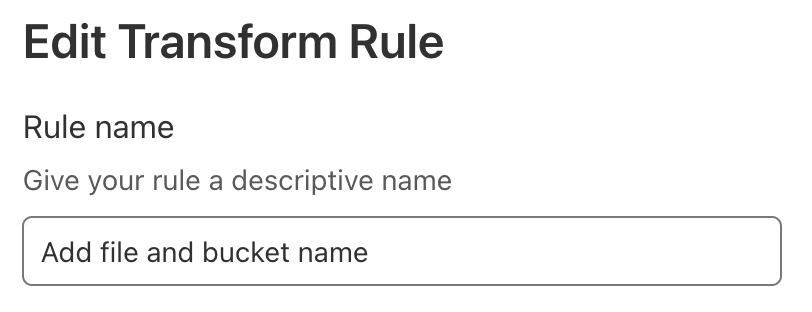
Give your rule a descriptive name such as “Add file and bucket name.”

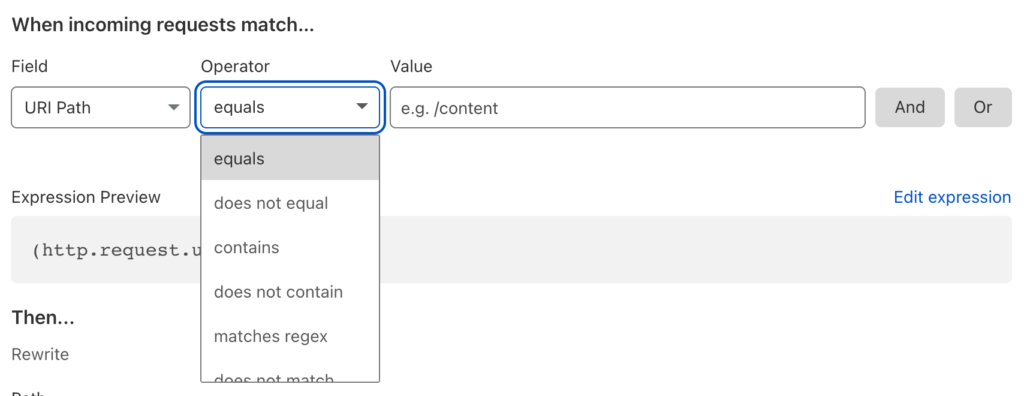
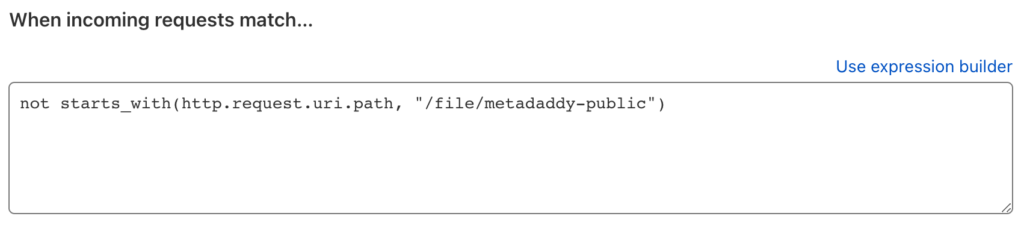
There is an opportunity to set a condition that incoming requests must match to fire the trigger. In James’ article, he tested that the path did not already begin with the /file/<bucket name> prefix, so that you can refer to a file with either the short or long URL.

At first glance, the Cloudflare dashboard doesn’t offer “does not start with” as an operator.

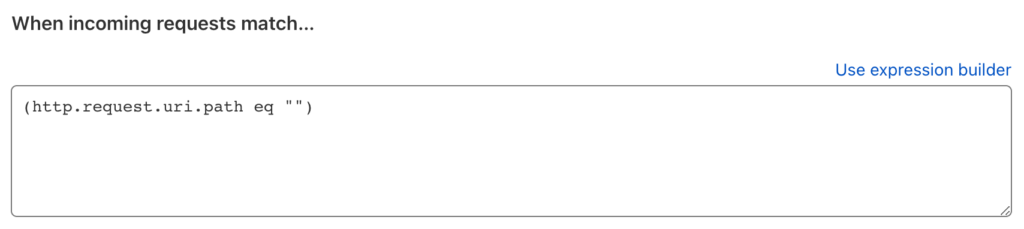
However, clicking Edit expression reveals a more powerful way of specifying the condition:

The Cloudflare Rules language allows us to express our condition precisely:

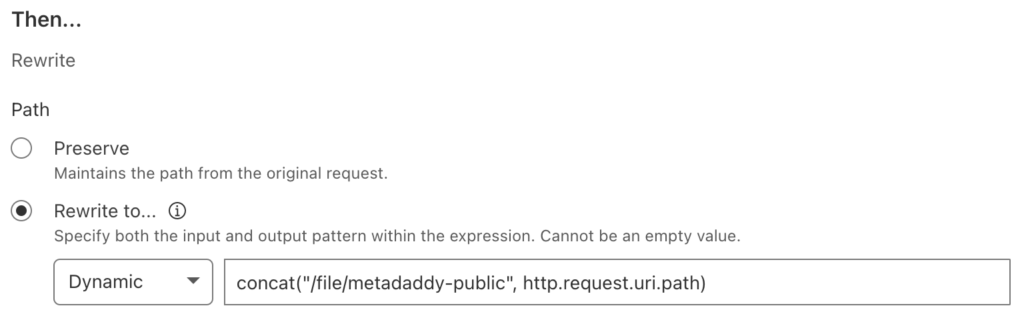
Moving on, Cloudflare offers static and dynamic options for rewriting the path. A static rewrite would apply the same value to the URL path of every request. This use case requires a dynamic rewrite, where, for each request, Cloudflare evaluates the value as an expression which yields the path.

Your expression would prepend the existing path with /file/<bucket name>, like this:

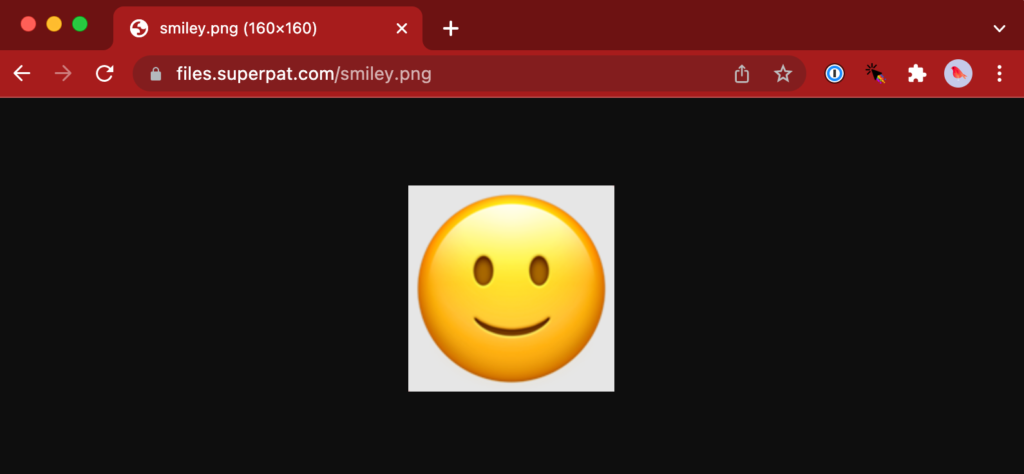
Save the Transform Rule, and try to access your test file again, this time without the /file/<bucket name> prefix in the URL path, for example: https://files.example.com/smiley.png.

You should see your test file, as expected:

Great! Now, let’s take a look at those HTTP headers in the response.

Remove HTTP Headers From the Response

You could use Chrome Developer Tools to view the response headers, but I prefer the curl command line tool. I used the --head argument to show the HTTP headers without the response body, since my terminal would not be happy with binary image data!

Note: I’ve removed some extraneous headers from this and subsequent HTTP responses for clarity and length.

% curl --head https://files.superpat.com/smiley.png
HTTP/2 200
date: Thu, 20 Jan 2022 01:26:10 GMT
content-type: image/png
content-length: 23889
x-bz-file-name: smiley.png
x-bz-file-id: 4_zf1f51fb913357c4f74ed0c1b_f1163cc3f37a60613_d20220119_m204457_c004_v0402000_t0044
x-bz-content-sha1: 3cea1118fbaab607a7afd930480670970b278586
x-bz-upload-timestamp: 1642625097000
x-bz-info-src_last_modified_millis: 1642192830529
cache-control: max-age=14400
cf-cache-status: MISS
last-modified: Thu, 20 Jan 2022 01:26:10 GMT

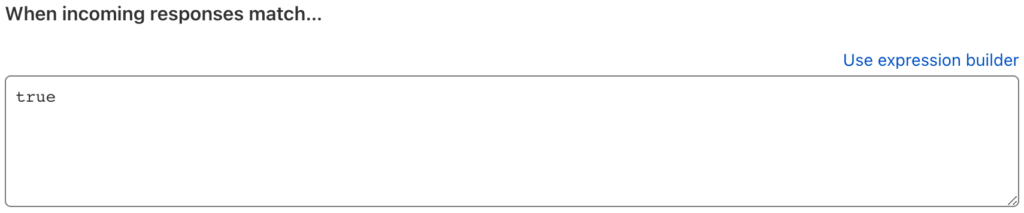
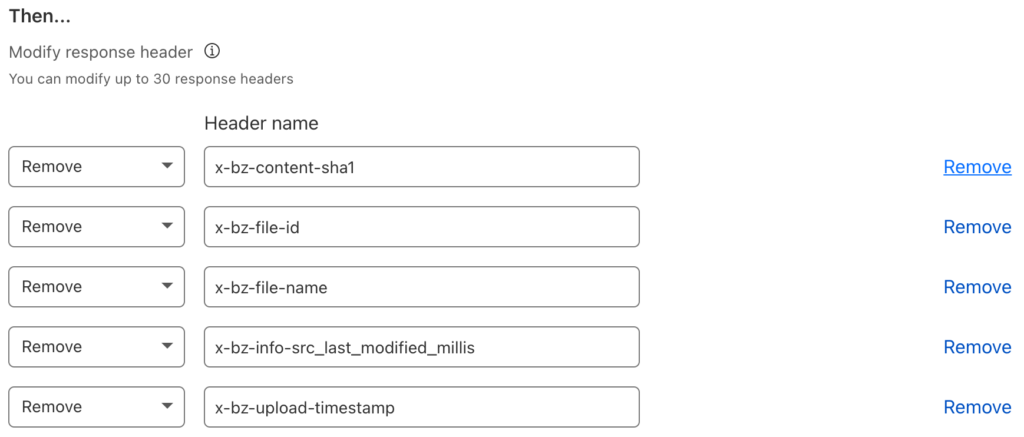
Our goal is to remove all the x-bz headers. Create a Modify Response Header rule and set its name to something like “Remove Backbaze B2 Headers.” We want this rule to apply to all traffic, so the match expression is simple:

Unfortunately there isn’t a way to tell Cloudflare to remove all the headers that are prefixed x-bz, so we just have to list them all:

Save the rule, and request your test file again. You should see fewer headers:

% curl --head https://files.superpat.com/smiley.png
HTTP/2 200
date: Thu, 20 Jan 2022 01:57:01 GMT
content-type: image/png
content-length: 23889
x-bz-info-src_last_modified_millis: 1642192830529
cache-control: max-age=14400
cf-cache-status: HIT
age: 1851
last-modified: Thu, 20 Jan 2022 01:26:10 GMT

Note: As you can see, for some reason Cloudflare does not remove the x-bz-info-src_last_modified_millis header. I’ve reported this to Cloudflare as a bug.

Optimize Cache Efficiency via the ETag and Cache-Control HTTP Headers

We can follow James’ lead in making caching more efficient by leveraging the ETag header. As explained in the MDN Web Docs for ETag:

The ETag (or entity tag) HTTP response header is an identifier for a specific version of a resource. It lets caches be more efficient and save bandwidth, as a web server does not need to resend a full response if the content was not changed.

Essentially, a cache can just request the HTTP headers for a resource and only proceed to fetch the resource body if the ETag has changed.

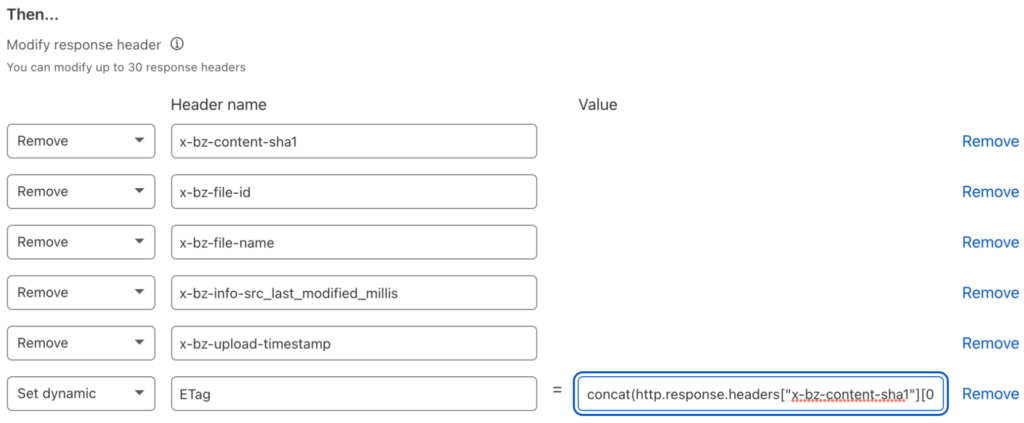
James constructed the ETag by using one of x-bz-content-sha1, x-bz-info-src_last_modified_millis, or x-bz-file-id, in that order. If none of those headers are set, then neither is ETag. It’s not possible to express this level of complexity in a Transform Rule, but we can apply a little lateral thinking to the problem. We can easily concatenate the three headers to create a result that will change when any one or more of them changes:

concat(http.response.headers["x-bz-content-sha1"][0],
http.response.headers["x-bz-info-src_last_modified_millis"][0],
http.response.headers["x-bz-file-id"][0])

Note that it’s possible for there to be multiple values of a given HTTP header, so http.response.headers["<header-name>"] is an array. http.response.headers["<header-name>"][0] yields the first, and in most cases only, element of the array.

Edit the Transform Rule you just created, update its name to something like “Remove Backblaze B2 Headers, set ETag,” and add a header with a dynamic value:

Don’t worry about the ordering; Cloudflare will reorder the operations so that “set” occurs before “remove.” Also, if none of those headers are present in the response, resulting in an empty value for the ETag header, Cloudflare will not set that header at all. Exactly the behavior we need!

Another test shows the result. Note that HTTP headers are not case-sensitive, so etag has just the same meaning as ETag:

% curl --head https://files.superpat.com/smiley.png
HTTP/2 200
date: Thu, 20 Jan 2022 02:01:19 GMT
content-type: image/png
content-length: 23889
x-bz-info-src_last_modified_millis: 1642192830529
cache-control: max-age=14400
cf-cache-status: HIT
age: 2198
last-modified: Thu, 20 Jan 2022 01:24:41 GMT
etag: 3cea1118fbaab607a7afd930480670970b27858616421928305294_zf1f51fb913357c4f74ed0c1b_f1163cc3f37a60613_d20220119_m204457_c004_v0402000_t0044

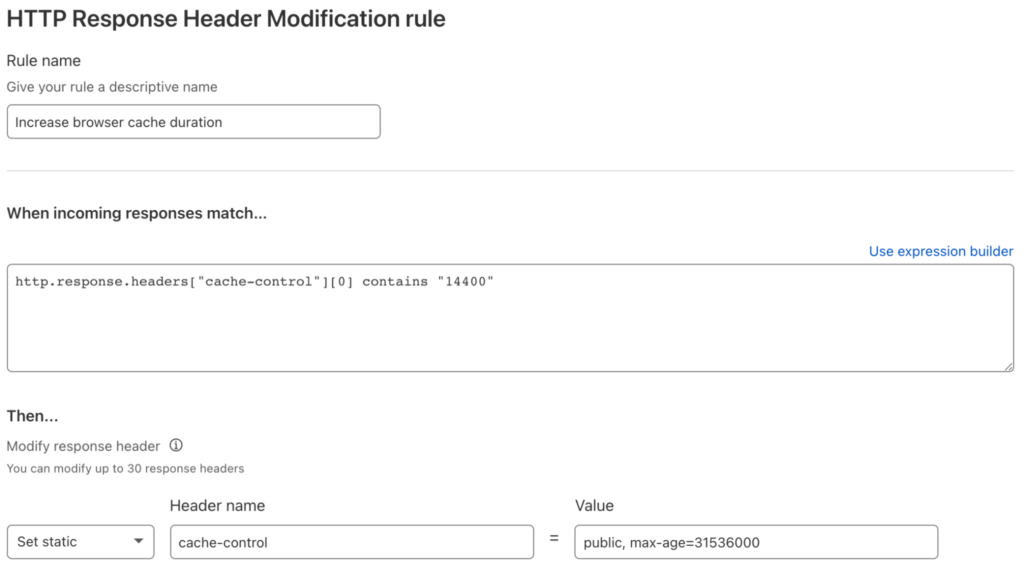
The other cache-related header is Cache-Control, which tells the browser how to cache the resource. As you can see in the above responses, Cloudflare sets Cache-Control to a max-age of 14400 seconds, or four hours.

James’ code, on the other hand, sets Cache-Control according to whether or not the request to B2 Cloud Storage is successful. For an HTTP status code of 200, Cache-Control is set to public, max-age=31536000, instructing the browser to cache the response for 31,536,000 seconds; in other words, a year. For any other HTTP status, Cache-Control is set to public, max-age=300, so the browser only caches the response for five minutes. In both cases, the public directive indicates that the response can be cached in a shared cache, even if the request contained an Authorization header field.

Note: We’re effectively assuming that once created, files on the image host are immutable. This is often true for this use case, but you should think carefully about cache policy when you build your own solutions.

At present, Cloudflare Transform Rules do not give access to the HTTP status code, but, again, we can satisfy the requirement with a little thought and investigation. As mentioned above, for successful operations, Cloudflare sets Cache-Control to max-age=14400, or four hours. For failed operations, for example, requesting a non-existent object, Cloudflare passes back the Cache-Control header from Backblaze B2 of max-age=0, no-cache, no-store. With this information, it’s straightforward to construct a Transform Rule to increase max-age from 14400 to 31536000 for the successful case:

Again, we need to use [0] to select the first matching HTTP header. Notice that this rule uses a static value for the header—it’s the same for every matching response.

We’ll leave the header as it’s set by B2 Cloud Storage for failure cases, though it would be just as easy to override it.

Another test shows the results of our efforts:

% curl --head https://files.superpat.com/smiley.png
HTTP/2 200
date: Thu, 20 Jan 2022 02:31:38 GMT
content-type: image/png
content-length: 23889
x-bz-info-src_last_modified_millis: 1642192830529
cache-control: public, max-age=31536000
cf-cache-status: HIT
age: 4017
last-modified: Thu, 20 Jan 2022 01:24:41 GMT
etag: 3cea1118fbaab607a7afd930480670970b27858616421928305294_zf1f51fb913357c4f74ed0c1b_f1163cc3f37a60613_d20220119_m204457_c004_v0402000_t0044

Checking the failure case—notice that there is no ETag header, since B2 Cloud Storage did not return any x-bz headers:

% curl --head https://files.superpat.com/badname.png
HTTP/2 404
date: Thu, 20 Jan 2022 02:32:35 GMT
content-type: application/json;charset=utf-8
content-length: 94
cache-control: max-age=0, no-cache, no-store
cf-cache-status: BYPASS

Success! Browsers and caches will aggressively cache responses, reducing the burden on Cloudflare and Backblaze B2.

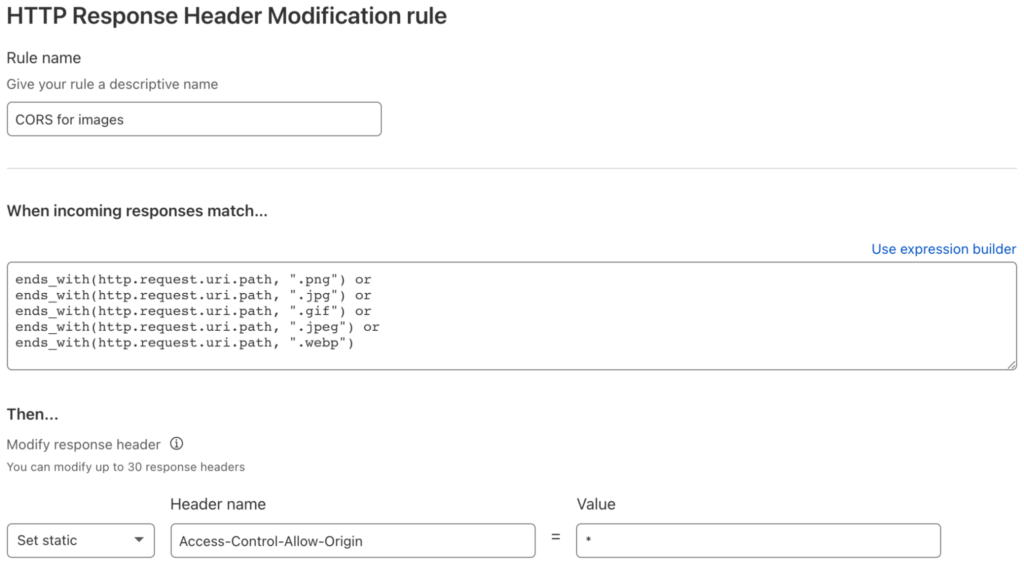
Set a CORS Header for Image Files

We’re almost done! Our final requirement is to set a cross-origin resource sharing (CORS) header for images so that they can be manipulated in web pages from any domain on the web.

The Transform Rule must match a range of file extensions, and set the Access-Control-Allow-Origin HTTP response header to allow any webpage to access resources:

Upload a text file and run a final couple of tests to see the results. First, the image:

% curl --head https://files.superpat.com/smiley.png
HTTP/2 200
date: Thu, 20 Jan 2022 02:50:52 GMT
content-type: image/png
content-length: 23889
x-bz-info-src_last_modified_millis: 1642192830529
cache-control: public, max-age=31536000
cf-cache-status: HIT
age: 4459
last-modified: Thu, 20 Jan 2022 01:36:33 GMT
etag: 3cea1118fbaab607a7afd930480670970b27858616421928305294_zf1f51fb913357c4f74ed0c1b_f1163cc3f37a60613_d20220119_m204457_c004_v0402000_t0044
access-control-allow-origin: *

The Access-Control-Allow-Origin header is present, as expected.

Finally, the text file, without an Access-Control-Allow-Origin header. You can use the --include argument rather than --head to see the file content as well as the headers:

% curl --include https://files.superpat.com/hello.txt
HTTP/2 200
date: Thu, 20 Jan 2022 02:48:51 GMT
content-type: text/plain
content-length: 14
accept-ranges: bytes
x-bz-info-src_last_modified_millis: 1642646740075
cf-cache-status: DYNAMIC
etag: 60fde9c2310b0d4cad4dab8d126b04387efba28916426467400754_zf1f51fb913357c4f74ed0c1b_f1092902424a40504_d20220120_m024635_c004_v0402003_t0000

Hello, World!

Troubleshooting

The most frequent issue I encountered while getting all this working was mixing up request and response when referencing HTTP headers. If things are not working as expected, double check that you don’t have http.response.headers["<header-name>"] where you need http.request.headers["<header-name>"] or vice versa.

Can I Really Do This Free of Charge?

Backblaze B2 pricing is very simple:

Storage
  • The first 10GB of storage is free of charge.
  • Above 10GB, we charge $0.005/GB/month, around a quarter of the cost of other leading cloud object stores (cough, S3, cough).
  • Storage cost is calculated hourly, with no minimum retention requirement, and billed monthly.
Downloaded Data
  • The first 1GB of data downloaded each day is free.
  • Above 1GB, we charge $0.01/GB, but…
  • Downloads through our CDN and compute partners, of which Cloudflare is one, are free.
Transactions
  • Each download operation counts as one class B transaction.
  • The first 2,500 class B transactions each day are free.
  • Beyond 2,500 class B transactions, they are charged at a rate of $0.004 per 10,000.
No Surprise Bills
  • If you already signed up for Backblaze B2, you might have noticed that you didn’t have to provide a credit card number. Your 10GB of free storage never expires, and there is no chance of you unexpectedly incurring any charges.

By serving your images via Cloudflare’s global CDN and optimizing your cache configuration as described above, you will incur no download costs from B2 Cloud Storage, and likely stay well within the 2,500 free download operations per day. Similarly, Cloudflare’s free plan does not require a credit card for activation, and there are no data or transaction limits.

Sign up for Backblaze B2 today, deploy your own personal image host, explore our off-the-shelf integrations, and consider what you can create with an affordable, S3-compatible cloud object storage platform.

The post Free Image Hosting With Cloudflare Transform Rules and Backblaze B2 appeared first on Backblaze Blog | Cloud Storage & Cloud Backup.

Cloud Performance and When It Matters

Post Syndicated from Amrit Singh original https://www.backblaze.com/blog/cloud-performance-and-when-it-matters/

If you run an application that’s bandwidth intensive like media streaming, game hosting, or an e-commerce platform, performance is probably top of mind. You need to be able to deliver content to your users fast and without errors in order to keep them happy. But, what specific performance metrics matter for your use case?

As it turns out, you might think you need a Porsche when what you really need and want to transport your data with is a trusty, reliable (Still speedy!) Volvo.

In this post, we’re taking a closer look at performance metrics and when they matter as well as some strategies that can impact performance, including range requests, prefetching, and others. When you’re assessing a cloud solution for application development, taking these factors into consideration can help you make the best decision for your business.

Performance Metrics: Time to First Byte

Time to first byte (TTFB) is the time between a page request and when the page receives the first byte of information from the server. In other words, TTFB is measured by how long it takes between the start of the request and the start of the response, including DNS lookup and establishing the connection using a TCP handshake and SSL handshake if you’ve made the request over HTTPS.

TTFB identifies pages that load slowly due to server-side calculations that could instead benefit from client-side scripting. It’s often used to assess search rankings by displaying websites that respond to a request faster and appear more usable before other websites.

TTFB is a useful metric, but it doesn’t tell the whole story every time and shouldn’t be the only metric used to make decisions when it comes to choosing a cloud storage solution. For example, when David Liu, Founder and CEO of Musify, a music streaming app, approached his search for a new cloud storage provider, he had a specific TTFB benchmark in mind. He thought he absolutely needed to meet this benchmark in order for his new storage solution to work for his use case, however, upon further testing, he found that his initial benchmark was more aggressive than he actually needed. The performance he got by utilizing Cloudflare in front of his origin store in Backblaze B2 Cloud Storage more than met his needs and served his users well.

Optimizing Cloud Storage Performance

TTFB is the dominant method of measuring performance, but TTFB can be impacted by any number of factors—your location, your connection, the data being sent, etc. As such, there are ways to improve TTFB, including using a content delivery network (CDN) on top of origin storage, range requests, and prefetching.

Performance and Content Delivery Networks

A CDN helps speed content delivery by storing content at the edge, meaning faster load times and reduced latency. For high-bandwidth use cases, a CDN can optimize media delivery.

Companies like Kanopy, a media streaming service; Big Cartel, an e-commerce platform; and CloudSpot, a professional photo gallery platform, use a CDN between their origin storage in Backblaze B2 and their end users to great effect. Kanopy offers a library of 25,000+ titles to 45 million patrons worldwide. Latency and poor performance is not an option. “Video needs to have a quick startup time,” Kanopy’s Lead Video Software Engineer, Pierre-Antoine Tible said. “With Backblaze over [our CDN] Cloudflare, we didn’t have any issues.”

For Big Cartel, hosting one million customer sites likewise demands high-speed performance. Big Cartel’s Technical Director, Lee Jensen, noted, “We had no problems with the content served from Backblaze B2. The time to serve files in our 99th percentile, including fully rendering content, was under one second, and that’s our worst case scenario.” The time to serve files in their 75th percentile was under just 200 to 300 milliseconds, and that’s when content needs to be pulled from origin storage in Backblaze B2 when it’s not already cached in their CDN Fastly’s edge servers.

“We had no problems with the content served from Backblaze B2. The time to serve files in our 99th percentile, including fully rendering content, was under one second, and that’s our worst case scenario.”
—Lee Jensen, Technical Director, Big Cartel

Range Requests and Performance

HTTP range requests allow sending only a portion of an HTTP message from a server to a client. Partial requests are useful for large media or downloading files with pause and resume functions, and they’re common for developers who like to concatenate files and store them as big files. For example, if a user wants to skip to a clip of a full video or a specific frame in a video, using range requests means the application doesn’t have to serve the whole file.

Because the Backblaze B2 vault architecture separates files into shards, you get the same performance whether you call the whole file or just part of the file in a range request. Rather than wasting time learning how to optimize performance on a new platform or adjusting your code to comply with frustrating limitations, developers moving over to Backblaze B2 can utilize existing code they’re already invested in.

Prefetching and Performance

Prefetching is a way to “queue up” data before it’s actually required. This improves latency if that data is subsequently requested. When you’re using a CDN in front of your origin storage, this means the user queues up data/files/content in the CDN before someone asks for it.

Video streaming service, Kanopy, uses prefetching with popular videos they expect will see high demand in certain regions. This would violate some cloud storage providers’ terms of service because they egress out more than they store. Because Kanopy gets free egress between their origin store in Backblaze B2 and their CDN Cloudflare, the initial download cost for prefetching is $0. (Backblaze also has partnerships with other CDN providers like Fastly and bunny.net to offer zero egress.) The partnership means Kanopy doesn’t have to worry about running up egress charges, and they’re empowered to use prefetching to optimize their infrastructure.

Other Metrics to Consider When Assessing Cloud Performance

In addition to TTFB, there are a number of other metrics to consider when it comes to assessing cloud performance, including availability, the provider’s service level agreements (SLAs), and durability.

Availability measures the percentage of time the data is available to be accessed. All data occasionally becomes unavailable due to regular operating procedures like system maintenance. But, obviously data availability is very important when you’re serving content around the globe 24/7. Backblaze B2, for example, commits to a 99.9% uptime with no cold delays. Commitments like uptime are usually outlined in a cloud provider’s SLA—an agreement that lists the performance metrics the cloud provider agrees to provide.

Durability measures how healthy your data is. Object storage providers express data durability as an annual percentage in nines, as in two nines before the decimal point and as many nines as warranted after the decimal point. For example, 11 nines of durability is expressed as 99.999999999%. What this means is that the storage vendor is promising that your data will remain intact while it is under their care without losing any more than 0.000000001% of your data in a year (in the case of 11 nines annual durability).

Ready to Get Started?

Understanding the different performance metrics that might impact your data can help when you’re evaluating cloud storage providers. Ready to get started with Backblaze B2? We offer the first 10GB free.

The post Cloud Performance and When It Matters appeared first on Backblaze Blog | Cloud Storage & Cloud Backup.

How to Build the Right Tech Stack for Your MSP

Post Syndicated from Kari Rivas original https://www.backblaze.com/blog/how-to-build-the-right-tech-stack-for-your-msp/

As a managed service provider (MSP) or IT consultant, your bottom line depends on having the right tools at the right prices to maintain your margins while still providing the resources and functionality your clients need. And you’ve likely seen the resources and functionality your clients need changing over the past few years towards an increased focus on cybersecurity and disaster recovery.

More and more companies are hiring remotely, which means increased security risks, ransomware attacks on small and medium-sized businesses (SMBs) have increased, and severe natural disasters are threatening on-premises office technology. Having the right tech stack for your MSP demonstrates to current and potential clients that they can trust you to safeguard their valuable data and systems against the threats of today and tomorrow.

Level up your value proposition with insights on building a competitive “right-sized” tech stack at our upcoming webinar, “The Essential MSP Tech Stack,” on Tuesday, February 15th at 1 p.m. CST/2 p.m. EST.

➔ Sign Up for the Webinar

Read on to get a preview of what will be covered during the webinar.

The Top Considerations for an Essential MSP Tech Stack

SMBs outsource their IT to MSPs and consultants because they don’t have the time, knowledge, or resources to shop around for the right tech solution for themselves. They may not even know what criteria they should be using to evaluate solutions, and this can lead to them shopping around among MSPs based on price alone.

Sourcing solutions with a lower cost to you means you can price your services more competitively and better attract customers. But pricing is just one of the considerations you should make when purchasing software. Have you also thought about scalability, and whether your tech stack can grow with you as your client base grows? Or what kinds of support options your software provider has available?

Pricing is important, yes, but there are several other factors by which you should judge your tech stack options, including features, automation options, and integrations, which will be covered in more detail during the webinar.

Right-sizing Your MSP Tech Stack

To develop your MSP offering, you’ll also want to think about what MSP services are most in demand in your area and what solutions you can offer the most efficiently and cost-effectively. It’s not “essential” to offer everything. The right tech stack is the one that brings you the most clients at the greatest profitability.

You may even want to do some research on the other MSPs in your geographic area. Is there something you can offer that they do not? Play to your strengths—what technical areas do you know the best?

As you start to develop your offering, consider the following areas of managed IT services and how they might help you attract clients:

Backup and Cloud Storage for MSPs

When it comes to managed backup and cloud storage, Backblaze and our partner, MSP360, have you covered. Backblaze provides easy and affordable server and workstation backup, and our integration with MSP360 provides a seamless experience to back up standalone and multiple servers to Backblaze B2 Cloud Storage.

MSPs and IT organizations with multiple servers can manage all of their machines from one, centralized, web-based admin console. Backblaze B2 backups are “set it and forget it” after the initial setup. Data is kept in hot storage and available immediately when needed. And B2 Cloud Storage is extremely affordable at $5/TB per month without any additional fees or tiered pricing structure.

Our integration with MSP360 includes advanced backup protection features like flexible scheduling, compression, encryption, and ransomware protection. We’ve even made it super easy to get started on your own. Just use our online onboarding tool to create both Backblaze B2 and MSP360 accounts at the same time.

Bundling MSP Services to Streamline the Purchase Decision

Consider bundling your services to make it easier for clients to buy from you and understand how you’ll help protect their business. For instance, the joint solution from MSP360 and Backblaze can be bundled as part of a disaster recovery, backup, and storage package. You could also create tiers of services, like a “bronze” level disaster recovery, backup, and storage package; a “silver” level package that includes all of the above plus monitoring, tech management, and installation services; and a “gold” level package that functions essentially like fully outsourced IT.

Non-IT Tools for the MSP Tech Stack

Finally, as you build your MSP, don’t forget that your tech stack may need to include non-IT tools as well. You’ll need a way to oversee business accounting and your books, a way to manage your client relationships, leads, and sales, plus software to manage employees, payroll, and other aspects of general business management.

Ready to Upgrade Your Tech Stack?

Having the right tech stack isn’t a matter of checking all the boxes on a list of software. It’s a strategic decision about what your potential clients will most value, what you’re best equipped to offer, and how you can make a profit. Instead of trying to meet every possible need, ensure that you have the “right-sized” tech stack to service the types of clients you represent without paying extra for bloated software that may go unused. You can often have a healthier business by specializing in just a few areas and attracting the right types of clients, rather than trying to cater to everyone.

Want to learn more? Join our webinar on Tuesday, February 15th at 1 p.m. CST/2 p.m. EST to learn more about how to build the tech stack for your MSP.

The post How to Build the Right Tech Stack for Your MSP appeared first on Backblaze Blog | Cloud Storage & Cloud Backup.

Backblaze Drive Stats for 2021

Post Syndicated from original https://www.backblaze.com/blog/backblaze-drive-stats-for-2021/

In 2021, Backblaze added 40,460 hard drives and as of December 31, 2021, we had 206,928 drives under management. Of that number, there were 3,760 boot drives and 203,168 data drives. This report will focus on our data drives. We will review the hard drive failure rates for 2021, compare those rates to previous years, and present the lifetime failure statistics for all the hard drive models active in our data center as of the end of 2021. Along the way, we share our observations and insights on the data presented and, as always, we look forward to you doing the same in the comments section at the end of the post.

2021 Hard Drive Failure Rates

At the end of 2021, Backblaze was monitoring 203,168 hard drives used to store data. For our evaluation, we removed 409 drives from consideration which were used for either testing purposes or drive models for which we did not have at least 60 drives. This leaves us with 202,759 hard drives to analyze for this report.

Observations and Notes

The Old Guy Rules: For 2021, the 6TB Seagate (model: ST6000DX000) had the lowest failure rate of any drive model, clocking in with an annualized failure rate (AFR) of 0.11%. This is even more impressive when you consider that this 6TB drive model is the oldest in the fleet with an average age of 80.4 months. The number of drives, 886, and 2021 drive days, 323,390, are on the lower side, but after nearly seven years in operation, these drives are thumbing their nose at the tail end of the bathtub curve.

The Kids Are Alright: Two drive models are new for 2021 and both are performing well. The 16TB WDC drive cohort (model: WUH721816ALE6L0) has an average age of 5.06 months and an AFR of 0.14%. While the 16TB Toshiba drive cohort (model: MG08ACA16TE) has an average age of 3.57 months and an AFR of 0.91%. In both cases, the number of drive days is on the lower side, but these two drive models are off to a good start.

AFR, What Does That Mean?

AFR stands for annualized failure rate. This is different from an annual failure rate in which the number of drives is the same for each model (cohort) throughout the annual period. In our environment, drives are added and leave throughout the year. For example, a new drive installed in Q4 might contribute just 43 days, while a drive that failed in July might contribute 186 days, while drives in continuous operation for the year could contribute 365 days each. We count the number of drive days each drive contributes throughout the period and annualize the total using this formula:

AFR = (drive failures / (drive days / 365)) * 100

The Patient Is Stable: Last quarter, we reported on the state of our 14TB Seagate drives (model: ST14000NM0138) provisioned in Dell storage servers. They were failing at a higher than expected rate and everyone—Backblaze, Seagate, and Dell—wanted to know why. The failed drives were examined by fault analysis specialists and in late Q3 it was decided as a first step to upgrade the firmware for that cohort of drives still in service. The results were that the quarterly failure rate dropped from 6.29% in Q3 to 4.66% in Q4, stabilizing the rapid rise in failures we’d seen in Q2 and Q3. The 19 drives that failed in Q4 were shipped off for further analysis. We’ll continue to follow this process over the coming quarters.

The AFR for 2021 for all drive models was 1.01%, which was slightly higher than the 0.93% we reported for 2020. The next section will compare the data from the last three years.

Comparing Drive Stats for 2019, 2020, and 2021

The chart below compares the AFR for each of the last three years. The data for each year is inclusive of that year only and for the active drive models present at the end of each year.

Digging a little deeper, we can aggregate the different drive models by manufacturer to see how failure rates per manufacturer have fared over the last three years.

Note that for the WDC data, a blank value means we did not have any countable WDC drives in our data center in that quarter.

Trends for 2021

The AFR Stayed Low in 2021: In 2021, the AFR for all drives was 1.01%. This was slightly higher than 2020 at 0.93%, but a good sign that the drop in 2020 from 1.83% in 2019 was not an anomaly. What’s behind the 1.01% for 2021? Large drives, as seen below:

The AFR for larger drives, defined here as 12TB, 14TB, and 16TB drives, are all below the 2021 AFR of 1.01% for all drives. The larger drives make up 69% of the total drive population, but more importantly, they total 66% of the drive days total, while only producing 57% of the drive failures.

The larger drives are also the newer drives, which tend to fail less versus older drives. In fact, the oldest large drive has an average age 33 months, while the youngest “small” (4TB, 6TB, 8TB, and 10TB) drive has an average age of 44.9 months.

In summary, the lower AFR for the larger drives is a major influence in keeping the overall AFR for 2021 low.

Drive Model Diversity Continues: In 2021, we added two new drive models to our farm with no models retired. We now have a total of 24 different drive models in operation. That’s up from a low point of 14 in 2019 and 22 in 2020. The chart below for “Backblaze Quarterly Hard Drive Population Percentage by Manufacturer” examines the changing complexion of our drive farm as we look at the number of models from each manufacturer we used over the past six years.

When we first started, we often mixed and matched drive models, mostly out of financial necessity—we bought what we could afford. As we grew, we bought and deployed drives in larger lots and drive homogeneity settled in. Over the past few years, we have gotten more comfortable with mixing and matching again, enabled by our Backblaze Vault architecture. A Vault is composed of sixty tomes, with each tome being 20 drives. We make each tome the same drive model, but each of the tomes within a vault can have different drive models, and even different drive sizes. This allows us to be less reliant on any particular drive model, so the more drive models the better.

Drive Vendor Diversity Continues, Too: When looking at the chart above for “Backblaze Hard Drive Population by Model Count per Manufacturer Over Time,” you might guess that we have increased the percentage of Seagate drives over the last couple of years. Let’s see if that’s true.

It appears the opposite is true, we have lowered the percentage of Seagate drives in our data centers, even though we have added additional Seagate models.

Why is it important to diversify across multiple manufacturers? Flexibility, just like increasing the number of models. Having relationships with all the primary hard drive vendors gives us the opportunity to get the resources we need in a timely fashion. The fact that we can utilize any one of several different models from these vendors adds to that flexibility.

Lifetime Hard Drive Stats

The chart below shows the lifetime annualized failure rates of all the drive models in production as of December 31, 2021.

Observations and Caveats

The lifetime AFR for all the drives listed above is 1.4% and continues to go down year over year. At the end of 2020, the AFR was 1.54% and at the end of 2019, the AFR stood at 1.62%.

When looking at the chart above, several of the drives have a fairly wide confidence interval (>0.5). In these cases, we do not really have enough information about the drive’s performance to be reasonably confident (>95%) in the AFR listed. This is typically the case with lower drive counts or newer drives.

Looking for SSD Numbers?

We’ll be covering our annual failure rates for our SSD drives in a separate post in the next few weeks. We realized that combining the analysis of our data drives and our boot drives in one post was confusing. Stay tuned.

The Hard Drive Stats Data

The complete data set used to create the information used in this review is available on our Hard Drive Test Data page. You can download and use this data for free for your own purpose. All we ask are three things: 1) you cite Backblaze as the source if you use the data, 2) you accept that you are solely responsible for how you use the data, and 3) you do not sell this data to anyone; it is free.

If you just want the summarized data used to create the tables and charts in this blog post, you can download the ZIP file containing the CSV files for each chart.

Good luck and let us know if you find anything interesting.

The post Backblaze Drive Stats for 2021 appeared first on Backblaze Blog | Cloud Storage & Cloud Backup.

Hybrid Cloud and Modern Workflows for Media Teams

Post Syndicated from Amanda Fesunoff original https://www.backblaze.com/blog/hybrid-cloud-and-modern-workflows-for-media-teams/

By any metric, the demands on media workflows are growing at an unprecedented rate. A Coughlin Associates Report of media and entertainment professionals predicts that overall cloud storage capacity for media and entertainment is expected to grow over 13.8 times between 2020 and 2026 (101.1EB to 140EB). It also predicts that, by the next decade, total video captured for a high-end digital production could be hundreds of petabytes, approaching one exabyte.

Businesses in the media and entertainment industry—from creative teams to production houses to agencies—must manage larger and larger stores of data and streamline production workflows that interact with those stores of data. Optimizing data-heavy workflows provides you with time and cost savings you can reinvest to prioritize the creative work that drives your business.

In today’s post, we’ll examine the trends shaping the media storage landscape, walk through each step of the media workflow, and provide strategies and tactics for reducing friction at each step along the way. Read on to learn how to modernize your media workflow to meet today’s data-heavy demands.

➔ Download Our Media Workflows E-book

Media Technology Trends and Impacts on Media Workflows

Technology is driving changes in media workflows. The media landscape of today looks very different than it did even a few short years ago. If you’re responsible for managing data and workflows for a creative team, understanding the broad trends in the media landscape can help you prepare to optimize your workflows and future-proof your data infrastructure. Here are a few key trends we see driving change across the media storage landscape.

Trend 1: Increased Demand for VR and Higher Resolution 4K and 8K Video Is Driving Workflow Modernization

While VR has been somewhat slow to build steam, demand for VR experiences has grown as the technology evolved. The industry as a whole is growing at a fast pace, with the global VR market size projected to increase from less than $5 billion in 2021 to more than $12 billion by 2024. Today, demands for stereoscopic VR, and VR in general, have increased storage requirements as data sets grow exponentially. Similarly, higher resolution demands more from media workflows, including more storage space, greater standards for compression, and higher performance hardware. All of these files also need to be constantly available and secure. As such, media workflows increasingly value scalable storage, as having to wait for additional storage may cause delays in project momentum/delivery.

Trend 2: Archiving and Content Preservation Needs Are Driving Storage Growth

While the need to digitally convert data from traditional film and tape has slowed, the enormous demand for digital storage for archived content continues to grow. According to the Coughlin Report, more than 174 exabytes of new digital storage will be used for archiving and content conversion and preservation by 2024.

Just as your storage needs for active projects continues to grow as file sizes continue to expand, expect to invest in storage for archival purposes as production continues apace. Furthermore, if you have content conversion or preservation needs, plan for storage needs to house digital copies. The plus side of this surge in archival and preservation demand is that the storage market will continue to be competitive, giving you plenty of choices at competitive rates.

Trend 3: Cloud Adoption Is Playing an Important Role in Enabling Collaboration Across Teams and Geographies

A study by Mesa of nearly 700 decision-makers and managers from media and entertainment companies found that they expect that 50% of their workforce will continue to work remotely. Accessing resources remotely used to be a challenge mired by latency issues, restrictions on file size, and subpar collaboration tools, but cloud adoption has eased these issues and will continue to do so as companies increasingly embrace long-term remote collaboration.

As you think about future-proofing your architecture, one factor to consider is cost, but also designing an architecture that enables your existing workflows to function remotely. A cloud storage provider with predictable pricing can address cost considerations and make cloud adoption even more of a no-brainer. And media workflows can adopt cloud-native solutions or integrate existing on-premises infrastructure with the cloud without additional hardware purchasing and maintenance. The result is that time and money that would have been spent on hardware can be reinvested into adopting new technology, meeting customers’ needs, and differentiating from competitors.

Steps in the Modern Media Workflow

With an understanding of these overarching trends, media and entertainment professionals can evaluate and analyze their workflow to meet future demands. To illustrate that, we’ll walk through an example cloud storage setup within a media workflow, including:

  1. Ingest to Local Storage.
  2. Video Editing Software.
  3. Media Asset Managers.
  4. Archive.
  5. Backup.
  6. Transcoding Software.
  7. Content Delivery.
  8. Cloud Storage.

Ingest to Local Storage

Creatives doing work in progress need high performance, local access storage such as NAS, SANs, etc. These are often backed up to cloud storage to have an off-site version of the current projects. Some examples include Synology and QNAP NAS devices as well as the OWC Jellyfish system. With Synology, you can use their Cloud Sync application to sync your files directly to your cloud bucket. Synology also offers many built-in integrations to various cloud providers. For QNAP, you can use QNAP Hybrid Backup Sync to archive or back up your content to your cloud account. OWC Jellyfish is optimized for video production workflows, and the Jellyfish lineup is embraced by video production teams for on-prem storage.

Video Editing Software

Video editing software is used to edit, modify, generate, or manipulate a video or movie file. Backblaze has a number of tools we support depending on your workflow. Adobe Premiere Pro and Avid Media Composer are two examples of film and video editing software. They are used to create videos, television shows, films, and commercials.

Media Asset Managers

A media asset manager, or MAM, is software used to add metadata, manage content, store media in a hybrid cloud, and share media. Examples of MAMs include iconik, eMAM, EditShare, and Archiware. You can store your media files directly to the cloud from these and other media asset managers, enabling monetization and quicker content delivery of older content.

Archive

An archive often consists of completed projects and infrequently-used assets that are stored away to keep primary production storage capacities under control. Examples of archive tools include LTO tape, external hard drives, servers, and cloud providers.

Backup

A backup is often used with new projects where raw media files are ingested into their systems and then backed up in case of accidental deletion so that they can be easily restored. Examples include LTO tape, external hard drives, servers, and cloud providers.

Transcoding Software

Transcoding software converts encoded digital files into an alternative digital format so that it can be viewed on the widest possible range of devices.

Content Delivery

Content delivery networks (CDNs) enable easy distribution of your content to customers. Examples include Fastly and Cloudflare. CDNs store content on edge servers closer to end users, speeding performance and reducing latency.

Cloud Storage

Cloud storage is integrated with all of the above tools, making it easy to store high resolution, native files for backup, active archives, primary storage, and origin stores. The media workflow tools have easy access to the stored content in the cloud via their user interface. Storing content in the cloud allows teams to easily collaborate, share, reuse, and distribute content. Cloud storage is also emerging as the storage of choice for workflows that use cloud-based MAMs.

illustration of a NAS device and cloud storage

The Benefits of Using a Hybrid Cloud Model for Media Workflows

Because media teams need both fast access and scalable storage, many adopt a hybrid cloud storage strategy. A hybrid cloud strategy combines a private cloud with a public cloud. For most media teams, the private cloud is typically hosted on on-premises infrastructure, but can be hosted by a third party. The key difference between a private and public cloud is that the infrastructure, hardware, and software for a private cloud are maintained on a private network used exclusively by your business or organization.

In a hybrid cloud workflow, media teams have fast, on-premises storage for active projects combined with the scalability of a public cloud to accommodate the large amounts of data media teams generate. Looking specifically at the cloud storage functions above, it is important to keep your local storage lean and mean so that it is fast and operating at peak performance for your creative team. This achieves two things. First, you don’t have to invest more in local storage which can be expensive and time consuming to maintain. And second, you can offload older projects to the cloud while maintaining easy accessibility.

According to a survey of IT decision makers who adopted a hybrid cloud approach: 26% of them said faster innovation was the most important benefit their business gained. 25% said it allowed them to have faster responses to their customers. 22% said it provided their business with better collaboration. Benefits of a hybrid cloud approach for media teams include:

  1. Affordability: Cloud storage can be lower cost versus expanding your own physical infrastructure.
  2. Accessibility: A hybrid cloud provides increased collaboration for a remote workforce.
  3. Scalability: Cloud scalability provides ease and control with scaling up or down.
  4. Innovation: Media teams have an increased ability to quickly test and launch new products or projects, when not bogged down by physical infrastructure.
  5. Data Protection & Security: Media teams benefit from reduced downtime and can bounce back quicker from events, failures, or disasters.
  6. Flexibility: Hybrid solutions allow media teams to maintain control of sensitive or frequently used data on-premises while providing the flexibility to scale in the cloud.

Want to learn more about hybrid clouds? Download our free e-book, “Optimizing Media Workflows in the Cloud,” today.

The post Hybrid Cloud and Modern Workflows for Media Teams appeared first on Backblaze Blog | Cloud Storage & Cloud Backup.

Backup Solutions for Dentist Offices

Post Syndicated from Molly Clancy original https://www.backblaze.com/blog/backup-solutions-for-dentist-offices/

On top of providing excellent care to patients, dental practices today are tasked with the care of ever more complex IT solutions. Complying with regulations like HIPAA, protecting patient health records, and managing stores of data from X-rays to insurance information are among the demands that dental practices have to meet.

Whether you outsource these tasks to a managed service provider (MSP) or you manage your data infrastructure in house with network attached storage (NAS) or other hardware, understanding backup best practices and the different options available to help you manage your practice’s data is important for your continued success.

Keeping your data safe and accessible doesn’t have to be complicated or expensive. In this post, learn more about records retention for dental offices and how you can implement some simple strategies to keep data safe and protected, including 3-2-1 backups, common NAS devices, and insight from an MSP that specializes in IT services specifical for dental practices.

How Long Should a Dental Office Keep Records?

When thinking about backup and data storage solutions for your dental practice, it helps to first have a good understanding of the records retention requirements for dental offices. The best way to understand how long a dental office should keep records is to check with your state board of dentistry. Regulations on records retention vary by state and by patient type.

Retaining records for at least five to seven years is good practice, but some states will require longer retention periods of up to 10 years. Specific types of patients, including minors, may have different retention periods.

Regardless of your state regulations, records must be kept for five years for patients who receive Medicare or Medicaid. If your state regulations are less than five years, plan to retain records longer for these patients.

Finally, it’s good practice to keep all records for patients with whom you’re involved in any kind of legal dispute until the dispute is settled.

What Is the HIPAA Regulation for Storage of Dental Records?

HIPAA does not govern how long medical or dental records must be retained, but it does govern how long HIPAA-related documentation must be retained. Any HIPAA-related documentation, including things like policies, procedures, authorization forms, etc., must be retained for six years according to guidance in HIPAA policy § 164.316(b)(2)(i) on time limits. Some states may have longer or shorter retention periods. If shorter, HIPAA supersedes state regulations.

How Long Does a Dental Office Need to Keep Insurance EOBs?

Explanations of benefits or EOBs are documents from insurance providers that explain the amounts insurance will pay for services. Retention periods for these documents vary by state as well, so check with your state dental board to see how long you should keep them. Additionally, insurance providers may stipulate how long records must be kept. As a general rule of thumb, the longer retention period supersedes others. The best advice—err on the side of caution and keep records for the longest retention period required by either state or federal law. Fortunately, cloud storage provides you with a simple, affordable way to ensure your retention periods meet or exceed requirements.

3-2-1 Backup Strategy

Understanding how long you need to keep records is the first step in structuring your dental practice’s backup plan. The second is understanding what a good backup strategy looks like. The 3-2-1 backup strategy is a tried and true method for protecting data. It means keeping at least three copies of your data on two different media (i.e. devices) with at least one off-site, generally in the cloud. For a dental practice, we can use a simple X-ray file as an example. That file should live on two different devices on-premises, let’s say a machine reserved for storing X-rays which backs up to a NAS device. That’s two copies. If you then back your NAS device up to cloud storage, that’s your third, off-site copy.

The Benefits of Backing Up Your Dental Practice

Why do you need that many copies, you might ask. There are some tried and true benefits that make a strong case for using a 3-2-1 strategy rather than hoping for the best with fewer copies of your data.

  1. Fast access to files. When you accidentally delete a file, you can restore it quickly from either your on-site or cloud backup. And if you need a file while you’re away from your desk, you can simply log in to your cloud backup and access it immediately.
  2. Quick recoveries from computer crashes. Keeping one copy on-site means you can quickly restore files if one of your machines crashes. You can start up another computer and get immediate access, or you can restore all of the files to a replacement computer.
  3. Reliable recoveries from damage and disaster. Floods, fires, and other disasters do happen. With a copy off-site, your data is one less thing you have to worry about in that unfortunate event. You can access your files remotely if needed and restore them completely when you are able.
  4. Safe recoveries from ransomware attacks. After hearing about so many major ransomware attacks in the news this past year, you might be surprised to know that most attacks are carried out on small to medium-sized businesses. Keeping an off-site copy in the cloud, especially if you take advantage of features like Object Lock, can better prepare you to recover from a ransomware attack.
  5. Compliance with regulatory requirements. As mentioned above, dental practices are subject to retention regulations. Using a cloud backup solution that offers AES encryption helps your practice achieve compliance.

Using NAS for Dental Practices

NAS is essentially a computer connected to a network that provides file-based data storage services to other devices on the network. The primary strength of NAS is how simple it is to set up and deploy.

NAS is frequently the next step up for a small business that is using external hard drives or direct attached storage, which can be especially vulnerable to drive failure. Moving up to NAS offers businesses like dental practices a number of benefits, including:

  • The ability to share files locally and remotely.
  • 24/7 file availability.
  • Data redundancy.
  • Integrations with cloud storage that provides a location for necessary automatic data backups.

If you’re interested in upgrading to NAS, check out our Complete NAS Guide for advice on provisioning the right NAS for your needs and getting the most out of it after you buy it.

➔ Download Our Complete NAS Guide

Hybrid Cloud Strategy for Dental Practices: NAS + Cloud Storage

Most NAS devices come with cloud storage integrations that enable businesses to adopt a hybrid cloud strategy for their data. A hybrid cloud strategy uses a private cloud and public cloud in combination. To expand on that a bit, a hybrid cloud refers to a cloud environment made up of a mixture of typically on-premises, private cloud resources combined with third-party public cloud resources that use some kind of orchestration between them. In this case, your NAS device serves as the on-premises private cloud, as it’s dedicated to only you or your organization, and then you connect it to the public cloud.

Some cloud providers are already integrated with NAS systems. (Backblaze B2 Cloud Storage is integrated with NAS systems from Synology and QNAP, for example.) Check if your preferred NAS system is already integrated with a cloud storage provider to ensure setting up cloud backup, storage, and sync is as easy as possible.

Your NAS should come with a built-in backup manager, like Hyper Backup from Synology or Hybrid Backup Sync from QNAP. Once you download and install the appropriate backup manager app, you can configure it to send backups to your preferred cloud provider. You can also fine-tune the behavior of the backup jobs, including what gets backed up and how often.

Now, you can send backups to the cloud as a third, off-site backup and use your cloud instance to access files anywhere in the world with an internet connection.

Using an MSP for Dental Practices

Many dental practices choose to outsource some or all IT services to an MSP. Making the decision of whether or not to hire an MSP will depend on your individual circumstances and comfort level. Either way, coming to the conversation with an understanding of your backup needs and the cloud backup landscape can help.

Nate Smith, Technical Project Manager at DTC, is responsible for backing up 6,000+ endpoints on 500+ servers at more than 450 dental and doctor’s offices in the mid-Atlantic region. He explained that, due to the sheer number of objects most dentists need to restore (e.g., hundreds of thousands of X-rays), the cost of certain cloud providers can be prohibitive. “If you need something and you need it fast, Amazon Glacier will hit you hard,” he said, referring to the service’s warming fees and retrieval costs.

When seeking out an MSP, make sure to ask about the cloud provider they’re using and how they charge for storage and data transfer. And if you’re not using an MSP, compare costs from different cloud providers to make sure you’re getting the most for your investment in backing up your data.

Cloud Storage and Your Dental Practice

Whether you’re managing your data infrastructure in house with NAS or other hardware, or you’re planning to outsource your IT needs to an MSP, cloud storage should be part of your backup strategy. To recap, having a third copy of your data off-site in the cloud gives you a number of benefits, including:

  • Fast access to your files.
  • Quick recoveries from computer crashes.
  • Reliable recoveries from natural disasters and theft.
  • Protection from ransomware.
  • Compliance with regulatory requirements.

Have questions about choosing a cloud storage provider to back up your dental practice? Let us know in the comments. Ready to get started? Click here to get your first 10GB free with Backblaze B2.

The post Backup Solutions for Dentist Offices appeared first on Backblaze Blog | Cloud Storage & Cloud Backup.

How to Download and Back Up YouTube Videos

Post Syndicated from Barry Kaufman original https://www.backblaze.com/blog/how-to-download-and-back-up-youtube-videos/

We like to think of our YouTube videos as being eternal, that somehow once we upload this little clip of our life, it will remain there safe in its URL forever.

The fact is, nothing lasts forever online except for those embarrassing pictures someone posted of you 10 years ago and the 1996 Space Jam website. Content is deleted every day, whether because a website shutters its operations or because the content gets caught up in the vagaries of copyright law. Your YouTube videos are no different.

If you’ve got a bunch of content living on YouTube and nowhere else, it’s time to download and back up your videos so you can control your content’s digital fate. In this post, learn how to download videos from YouTube and make sure they’re backed up safely.

How to Back Up Your Digital Life

Check out our series of guides to help you protect content across many different platforms—including social media, sync services, and more. This list is always a work in progress—please comment below if you’d like to see another platform covered.

Why Back Up Your YouTube Videos?

Aside from the simple fact that having a solid data backup plan can help you avoid the fallout from all manner of tragedies like hardware loss, theft, or damage, keeping your YouTube videos backed up protects you from the ups and downs of an ever-changing YouTube ecosystem. Google’s side project has a bit of a troubled history of deleting videos without the owner’s knowledge or consent. After all, when you have terms of service that border on labyrinthine, enforced by an algorithm to strip spam, fraud, hate speech, copyright infringement, and all manner of ickiness from 30,000 hours of video uploaded every hour, there are bound to be some casualties.

So how can you protect your precious memories from being dissolved in the digital ether? How can you ensure that your skillfully edited masterpiece doesn’t become a casualty of the algorithm? What if, let’s just say for example, you went up in a biplane one time and the camera on which you filmed this adventure has long been lost to the scrap heap of your junk drawer? What if a YouTube video is the only evidence you have of that time you forgot you had a cargo topper on your minivan and almost wrecked at the Mall of America? Hypothetically speaking?

The answer? Just as you upload the video to YouTube, it’s time to back it up both locally and in the cloud. And if you have a whole library of videos on YouTube, it’s time to download them so you can back those up, too.

A Short History of Downloading YouTube Content

There was a time not too long ago when downloading YouTube videos, even your own, meant delving into some of the darker corners of the internet. Often hosted on foreign servers to avoid Digital Millennium Copyright Act enforcement, these sites still exist. But now there’s a far easier native solution for downloading your content.

While they have done their level best to obscure this option, it’s right there for anyone to use. Just follow these simple steps below.

How to Download YouTube Videos

First, open the YouTube Creator Studio. YouTube Creator Studio is a terrific tool the site offers for managing your videos, customizing your channel, viewing analytics, and even monetizing your content. It’s also pretty well hidden, for reasons that aren’t immediately obvious.

To access YouTube Creator Studio on a desktop, click the hamburger menu at the top left of your screen and select “Your Videos.”

In this screenshot, my subscriptions have been blurred so you don’t judge me.

This will bring you to the content page of YouTube, with all of your cinematic achievements laid out before you. Select the video you want, click the kebab menu (the three vertical dots), and then select download. It’s just that easy!

If you’re curious, the video below the one I’m downloading is my dog riding an invisible bicycle.

You can also select multiple videos, click more actions, and download your videos.

Downloading Your Videos on Mobile

To download your videos on mobile, use your phone’s “phone” function to call up someone who has a desktop computer because YouTube Creator on mobile doesn’t let you download videos.

Backing Up Your Videos

Now that you’ve saved all of these videos from being potentially lost forever, how do you make sure they’re stored safely? By saving them locally, you haven’t really addressed the problem that they could be easily lost. Your computer and your external hard drives are, after all, probably more susceptible to data loss than YouTube is.

Which brings us to the 3-2-1 cloud backup strategy. Make sure to have three copies of your data on two different media (read: devices) with one stored off-site (typically in the cloud). Having two backups of your newly downloaded data on-site helps you recover quickly if you ever lose those videos you spent time capturing. And storing a copy in the cloud keeps one copy of your data geographically separated from the others in case of a major disaster like hardware loss, theft, or damage. But how you plan on using these videos will have an impact on which cloud storage method you pick.

If you want to keep copies of your YouTube archive locally, Backblaze Personal Backup is your best bet. It runs silently in the background of your computer. As soon as those YouTube videos hit your hard drive, it will automatically begin backing them up to the cloud, giving you a local copy and a copy on the cloud. If you create a second local copy on an external hard drive, you’re fully backed up and following a good 3-2-1 strategy.

If space is limited locally, and you don’t necessarily need the files on your own computer, Backblaze B2 Cloud Storage gives you plenty of space in the cloud to stash them until they’re needed. Say, when you have to prove to someone that you went up in a biplane that one time. Paired with local copies elsewhere, you could also use this method to achieve a 3-2-1 strategy without taking up a huge amount of space on your machine.

Do you have any techniques on how you download your data from YouTube or other social sites? Share them in the comments section below!

The post How to Download and Back Up YouTube Videos appeared first on Backblaze Blog | Cloud Storage & Cloud Backup.

Building a Diverse and Inclusive Workplace: Our Learnings and Goals

Post Syndicated from Natalie Cook original https://www.backblaze.com/blog/building-a-diverse-and-inclusive-workplace-our-learnings-and-goals/

Backblaze started in a one-bedroom apartment in Palo Alto, California. Today, our products serve customers in more than 175 countries and are available in 11 languages. This would not have been possible without the diversity in culture, perspectives, and experiences within our team. Diversity has helped us understand the needs and expectations of the different markets we’re selling to. As a result of our diversity, we’ve come up with new features, solved interesting problems in an innovative way, and connected with our customers all around the world.

Today, we are sharing some stories of how diversity has helped our business throughout the years as well as our efforts to make our workplace more diverse and inclusive. We know we still have a lot to learn. Our initiatives are always evolving and changing as we strive to foster a diverse environment, and we hope that by sharing these stories we can do our part to promote diversity and inclusion more broadly.

How Diversity Helped Our Business

Building the Storage Pod Was an International Effort

Every true Backblaze fan knows that we built our own Storage Pods. After all, our blog post about how to build cheap cloud storage is one of our most popular posts. What fans may not know is that our staff’s bilingual skills are what helped us make our own Storage Pods. When the founders opened up the disk port multipliers they had just bought, they noticed there was a board inside with the name of the manufacturer: Chyang Fun Industry (CFI Group). This was a Taiwanese company, and they only spoke Mandarin. One of our founders, Billy Ng, spoke to them in Mandarin and explained that we needed 150 boards. These boards were essential pieces to building our Storage Pods.

Not only was Billy able to speak to the manufacturer in their native language, but he also knew the cultural standards so he was aware of what was culturally appropriate. After that initial sale, Backblaze continued to have a great relationship with CFI Group. Over the years, they continued to sell us boards which we used to make our Storage Pods. Brian Wilson, our chief technology officer, said, “Without Billy’s bilingual skills, the company would not have survived because we could not have survived without the Storage Pods.” As a result of Billy’s bilingual skills and bicultural understanding, we were able to build our own Storage Pods and store data from customers all around the world.

Translating the Product Into 11 Languages

Since we are an international company, our products and website are available in 11 languages. When the language features were initially created, our developers internationalized the product/website using Google Translate. However, they quickly realized these translations were not completely accurate. Backblaze then hired an external localization firm, but they were a bit pricey for us at the time—we were still a small, bootstrapped startup. We then looked internally and realized there were employees who were bilingual and even multilingual. These employees began reviewing the translations and fixing any errors. They even roped in friends and family to help with the translations. As a result of our diverse staff, we were able to fix the translations internally rather than spend tens of thousands of dollars on hiring an external localization firm.

Creating a Diverse and Inclusive Workplace

Photo by fauxels from Pexels.

Diversity and inclusion have always been valued at Backblaze. More than half of our founders were born in a country outside the U.S. (Fun fact: some of those countries don’t even exist anymore!) They collectively practice five different religions and speak various languages. Their diverse backgrounds have helped them build the company that Backblaze is today.

In the past year and a half, we’ve made a conscious effort to reinforce and further our commitment to diversity through a number of initiatives. We established a Diversity, Equity, and Inclusion (DEI) Committee made up of staff members from many different teams across the organization who are passionate about creating a safe and diverse workplace for their peers. Of their many initiatives, two we’re highlighting today include our hiring efforts and our inclusivity efforts.

Building Diversity in Hiring

The DEI Committee approached diversity in hiring by building out an internship program, which allowed us to bring on interns at various levels who come from different ethnicities, genders, socioeconomic statuses, etc. As a result of the program, we brought on some of the interns full-time, and we are excited to see them grow their careers at Backblaze!

In addition to the internship program, we’ve also worked with a variety of organizations that help bridge the gap between tech companies and underrepresented talent. These organizations have also provided internal training sessions which contributed to creating a safe and welcoming environment and continuing our positive retention rate.

Fostering a Safe and Inclusive Environment

We realize that it’s not only important to hire diverse employees, but to also create an inclusive and safe environment that supports these team members. The DEI Committee often hosts training sessions such as implicit bias training and gender inclusion training for employees, managers, Human Resources, and executive staff. The DEI Committee also hosts events like virtual panel discussions and movie nights to elevate social justice issues. These events lead to conversations afterward where employees engage in thoughtful discussions about the event, diversity, and social justice.

How Diversity and Inclusion Support a Strong Company Culture

Photo by fauxels from Pexels.

By creating a diverse and inclusive environment, we are enhancing our company culture and reducing employee turnover. According to Gallup, U.S. businesses lose around $3 trillion every year due to employee turnover. As a result of our company culture where we value diversity and employees treat one another with respect, we have a very low attrition rate. Check out our Glassdoor reviews to get a glimpse into our culture!

We’re Always Learning

We understand that as an organization, we still have more to learn. We’re continuously looking for more opportunities to educate our employees and leadership team, whether that be through diversity training sessions or having more open conversations about difficult topics. We’re also listening to our employees and looking into how we can continue to build a workforce that encourages and strengthens our diversity.

We don’t have all the answers yet, but as an organization that encourages learning and development, we are continually refining our approach to diversity and inclusion in the workplace. We look forward to sharing future learnings and using our platform to continue to promote these values to other organizations.

Join Our Team!

We are excited to continue our efforts to make Backblaze a diverse and inclusive environment! If you’d like to join our team, you can check out our careers here. If you don’t see a role you’re looking for, feel free to email jobscontact@backblaze.com. We look forward to hearing from you!

The post Building a Diverse and Inclusive Workplace: Our Learnings and Goals appeared first on Backblaze Blog | Cloud Storage & Cloud Backup.