Post Syndicated from corbet original https://lwn.net/Articles/972473/
The 6.9-rc7 kernel prepatch is out for
testing. “The stats for 6.9 continue to look very normal, and nothing
“
looks particularly alarming.
Post Syndicated from corbet original https://lwn.net/Articles/972473/
The 6.9-rc7 kernel prepatch is out for
testing. “The stats for 6.9 continue to look very normal, and nothing
“
looks particularly alarming.
Post Syndicated from Rohit Kumar original https://www.servethehome.com/xikestor-sks3200m-4gpy2xf-review-managed-4-port-2-5gbe-switch/
In our XikeStor SKS3200M-4GPY2XF review we see how this 2.5GbE and SFP+ 10GbE switch performs and look at its web management interface
The post XikeStor SKS3200M-4GPY2XF Review Managed 4-port 2.5GbE Switch appeared first on ServeTheHome.
Post Syndicated from Deepak Kovvuri original https://aws.amazon.com/blogs/devops/simplify-amazon-eks-deployments-with-github-actions-and-aws-codebuild/
In this blog post, we will explore how to simplify Amazon EKS deployments with GitHub Actions and AWS CodeBuild. In today’s fast-paced digital landscape, organizations are turning to DevOps practices to drive innovation and streamline their software development and infrastructure management processes. One key practice within DevOps is Continuous Integration and Continuous Delivery (CI/CD), which automates deployment activities to reduce the time it takes to release new software updates. AWS offers a suite of native tools to support CI/CD, but also allows for flexibility and customization through integration with third-party tools.
Throughout this post, you will learn how to use GitHub Actions to create a CI/CD workflow with AWS CodeBuild and AWS CodePipeline. You’ll leverage the capabilities of GitHub Actions from a vast selection of pre-written actions in the GitHub Marketplace to build and deploy a Python application to an Amazon Elastic Kubernetes Service (EKS) cluster.
GitHub Actions is a powerful feature on GitHub’s development platform that enables you to automate your software development workflows directly within your repository. With Actions, you can write individual tasks to build, test, package, release, or deploy your code, and then combine them into custom workflows to streamline your development process.
This solution being proposed in this post uses several AWS developer tools to establish a CI/CD pipeline while ensuring a streamlined path from development to deployment:
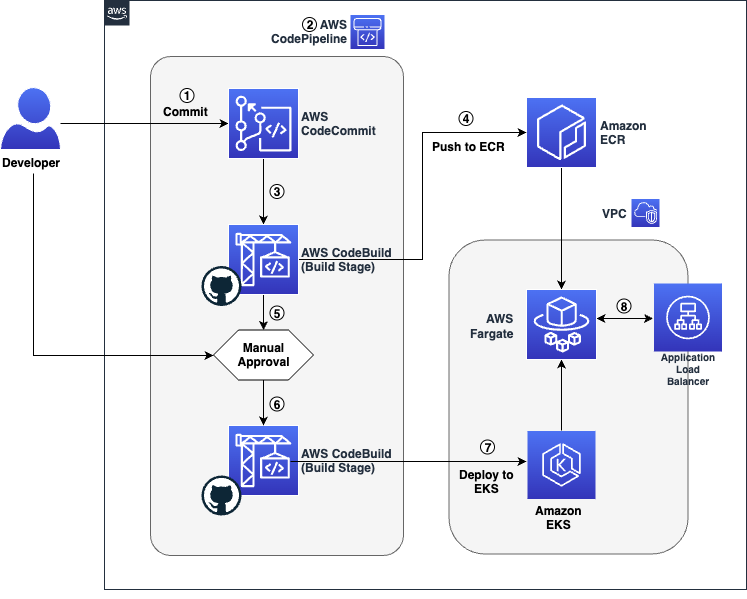
Figure 1 Workflow architecture showing source, build, test, approval and deployment stages
The code’s journey from the developer’s workstation to the final user-facing application is a seamless relay across various AWS services with key build an deploy operations performed via GitHub Actions:
If you choose to replicate the steps in this post, you will need the following items:
Utilities like awscli and eksctl require access to your AWS account. Please make sure you have the AWS CLI configured with credentials. For instructions on setting up the AWS CLI, refer to this documentation.
To get started you will first deploy an AWS CloudFormation stack that pre-creates some foundational developer resources such as a CodeCommit repository, CodeBuild projects, a CodePipeline pipeline that orchestrates the release of the application across multiple stages. If you’re interested to learn more about the resources being deployed, you can download the template and review its contents.
Additionally, to make use of GitHub Actions in AWS CodeBuild, it is required to authenticate your AWS CodeBuild project with GitHub using an access token – authentication with GitHub is required to ensure consistent access and avoid being rate-limited by GitHub.
export CLUSTER_NAME=<cluster-name>
export AWS_REGION=<cluster-region>
export AWS_ACCOUNT_ID=<cluster-account>
export GITHUB_TOKEN=<github-pat>
In the commands above, replace cluster-name with your EKS cluster name, cluster-region with the AWS region of your EKS cluster, cluster-account with your AWS account ID (12-digit number), and github-pat with your GitHub Personal Access Token (PAT).
aws cloudformation create-stack \
  --stack-name github-actions-demo-base \
  --region $AWS_REGION \
  --template-body file://gha.yaml \
  --parameters ParameterKey=ClusterName,ParameterValue=$CLUSTER_NAME \
               ParameterKey=RepositoryToken,ParameterValue=$GITHUB_TOKEN \
  --capabilities CAPABILITY_IAM && \
echo "Waiting for stack to be created..." && \
aws cloudformation wait stack-create-complete \
  --stack-name github-actions-demo-base \
--region $AWS_REGIONaws-auth config-map or using EKS Access Entries (recommended). The CodeBuild service role has been pre-created in the previous step and the role ARN can be retrieved using the command below:
aws cloudformation describe-stacks --stack-name github-actions-demo-base \
--query "Stacks[0].Outputs[?OutputKey=='CodeBuildServiceRole'].OutputValue" \
--region $AWS_REGION --output textNext, you will create a simple python flask application and the associated helm charts required to deploy the application and commit them to source control repository in AWS CodeCommit. Begin by cloning the CodeCommit repository by following the steps below:
export CODECOMMIT_CLONE_URL=$(aws cloudformation describe-stacks \
--stack-name github-actions-demo-base \
--query "Stacks[0].Outputs[?OutputKey=='CodeCommitCloneUrl'].OutputValue" \
--region $AWS_REGION \
--output text)git clone $CODECOMMIT_CLONE_URL github-actions-demo && cd github-actions-demoNow that you’ve set up all the required resources, you can begin building your application and its necessary deployment manifests.
app.py file, which serves as the hello world application using the command below:
cat << EOF >app.py
from flask import Flask
app = Flask(__name__)

@app.route('/')
def demoapp():
  return 'Hello from EKS! This application is built using Github Actions on AWS CodeBuild'

if __name__ == '__main__':
  app.run(port=8080,host='0.0.0.0')
EOFcat << EOF > Dockerfile
FROM public.ecr.aws/docker/library/python:alpine3.18
WORKDIR /app
RUN pip install Flask
RUN apk update && apk upgrade --no-cache
COPY app.py .
CMD [ "python3", "app.py" ]
EOFhelm create demo-app
rm -rf demo-app/templates/*cat <<EOF > demo-app/templates/deployment.yaml
---
apiVersion: apps/v1
kind: Deployment
metadata:
namespace: {{ default "default" .Values.namespace }}
name: {{ .Release.Name }}-deployment
spec:
selector:
matchLabels:
app.kubernetes.io/name: {{ .Release.Name }}
replicas: 2
template:
metadata:
labels:
app.kubernetes.io/name: {{ .Release.Name }}
spec:
containers:
- image: {{ .Values.image.repository }}:{{ default "latest" .Values.image.tag }}
imagePullPolicy: {{ .Values.image.pullPolicy}}
name: demoapp
ports:
- containerPort: 8080
EOFcat <<EOF > demo-app/templates/service.yaml
---
apiVersion: v1
kind: Service
metadata:
namespace: {{ default "default" .Values.namespace }}
name: {{ .Release.Name }}-service
spec:
ports:
- port: {{ .Values.service.port }}
targetPort: 8080
protocol: TCP
type: {{ .Values.service.type }}
selector:
app.kubernetes.io/name: {{ .Release.Name }}
EOFcat <<EOF > demo-app/templates/ingress.yaml
---
apiVersion: networking.k8s.io/v1
kind: Ingress
metadata:
namespace: {{ default "default" .Values.namespace }}
name: {{ .Release.Name }}-ingress
annotations:
alb.ingress.kubernetes.io/scheme: internet-facing
alb.ingress.kubernetes.io/target-type: ip
spec:
ingressClassName: alb
rules:
- http:
paths:
- path: /
pathType: Prefix
backend:
service:
name: {{ .Release.Name }}-service
port:
number: 8080
EOFdefault namespace is configured as the namespace selector for your Fargate profile.
cat <<EOF > demo-app/values.yaml
---
namespace: default
replicaCount: 1
image:
  pullPolicy: IfNotPresent
service:
  type: NodePort
  port: 8080
EOFBelow you’ll learn how to define your buildspec(s) to build and deploy your application onto Amazon EKS by leveraging the AWS managed GitHub action runner on AWS CodeBuild.
Each phase in a buildspec can contain multiple steps and each step can run commands or run a GitHub Action. Each step runs in its own process and has access to the build filesystem. A step references a GitHub action by specifying the uses directive and optionally the with directive is used to pass arguments required by the action. Alternatively, a step can specify a series of commands using the run directive. It’s worth noting that, because steps run in their own process, changes to environment variables are not preserved between steps.
To pass environment variables between different steps of a build phase, you will need to assign the value to an existing or new environment variable and then writing this to the GITHUB_ENV environment file. Additionally, these environment variables can also be passed across multiple stage in CodePipeline by leveraging the exported variables directive.
Here, you will create a file called buildspec-build.yml at the root of the repository – In the following buildspec, we leverage GitHub actions in AWS CodeBuild to build the container image and push the image to ECR. The actions used in this buildspec are:
version: 0.2
env:
  exported-variables:
    - IMAGE_REPO
    - IMAGE_TAG
phases:
  build:
    steps:
      - name: Get CodeBuild Region
        run: |
          echo "AWS_REGION=$AWS_REGION" >> $GITHUB_ENV
      - name: "Configure AWS credentials"
        id: creds
        uses: aws-actions/configure-aws-credentials@v3
        with:
          aws-region: ${{ env.AWS_REGION }}
          output-credentials: true
      - name: "Login to Amazon ECR"
        id: login-ecr
        uses: aws-actions/amazon-ecr-login@v1
      - name: "Build, tag, and push the image to Amazon ECR"
        run: |
          IMAGE_TAG=$(echo $CODEBUILD_RESOLVED_SOURCE_VERSION | cut -c 1-7)
          docker build -t $IMAGE_REPO:latest .
          docker tag $IMAGE_REPO:latest $IMAGE_REPO:$IMAGE_TAG
          echo "$IMAGE_REPO:$IMAGE_TAG"
          echo "IMAGE_REPO=$IMAGE_REPO" >> $GITHUB_ENV
          echo "IMAGE_TAG=$IMAGE_TAG" >> $GITHUB_ENV
          echo "Pushing image to $REPOSITORY_URI"
          docker push $IMAGE_REPO:latest
          docker push $IMAGE_REPO:$IMAGE_TAG
In the buildspec above the variables IMAGE_REPO and IMAGE_TAG are set as exported-variables that will be used in the subsequent deploy stage.
During the deploy stage, you will utilize AWS CodeBuild to deploy the helm manifests to EKS by leveraging the community provided bitovi/deploy-eks-helm action. Furthermore, the alexellis/arkade-get action is employed to install kubectl, which will be used later to describe the ingress controller and retrieve the application URL.
Create a file called buildspec-deploy.yml at the root of the repository as such:
version: 0.2
env:
  exported-variables:
   - APP_URL
phases:
  build:
    steps:
      - name: "Get Build Region"
        run: |
          echo "AWS_REGION=$AWS_REGION" >> $GITHUB_ENV
      - name: "Configure AWS credentials"
        uses: aws-actions/configure-aws-credentials@v3
        with:
          aws-region: ${{ env.AWS_REGION }}
      - name: "Install Kubectl"
        uses: alexellis/arkade-get@23907b6f8cec5667c9a4ef724adea073d677e221
        with:
          kubectl: latest
      - name: "Configure Kubectl"
        run: aws eks update-kubeconfig --name $CLUSTER_NAME
      - name: Deploy Helm
        uses: bitovi/[email protected]
        with:
          aws-region: ${{ env.AWS_REGION }}
          cluster-name: ${{ env.CLUSTER_NAME }}
          config-files: demo-app/values.yaml
          chart-path: demo-app/
          values: image.repository=${{ env.IMAGE_REPO }},image.tag=${{ env.IMAGE_TAG }}
          namespace: default
          name: demo-app
      - name: "Fetch Application URL"
        run: |
          while :;do url=$(kubectl get ingress/demo-app-ingress -o jsonpath='{.status.loadBalancer.ingress[0].hostname}' -n default);[ -z "$url" ]&&{ echo "URL is empty, retrying in 5 seconds...";sleep 5;}||{ export APP_URL="$url";echo "APP_URL set to: $APP_URL";break;};done;echo "APP_URL=$APP_URL">>$GITHUB_ENV
At this point your application structure should have the following structure:
Now check these files in to the remote repository by running the below commands
git add -A && git commit -m "Initial Commit"
git push --set-upstream origin main
Now, let’s verify the deployment of our application using the load balancer URL. Navigate to the CodePipeline console. The pipeline incorporates a manual approval stage and requires a pipeline operator to review and approve the release to deploy the application. Following this, the URL for the deployed application can be conveniently retrieved from the outputs of the pipeline execution.

Figure 2 CodePipeline Console showing the pipeline (release) execution ID

Figure 3 Navigating to the timeline view and reviewing the details for the deploy stage

Figure 4 Copy the APP_URL from the Output Variables for the Deploy action

Figure 5 Preview of the application deployed on Amazon EKS
You can also review the logs for your build and see the GitHub action at work from the AWS CodeBuild console.
To avoid incurring future charges, you should clean up the resources that you created:
helm uninstall demo-appaws cloudformation delete-stack \
--stack-name github-actions-demo-base \
-–region $AWS_REGIONIn this walkthrough, you have learned how to leverage the powerful combination of GitHub Actions and AWS CodeBuild to simplify and automate the deployment of a Python application on Amazon EKS. This approach not only streamlines your deployment process but also ensures that your application is built and deployed securely. You can extend this pipeline by incorporating additional stages such as testing and security scanning, depending on your project’s needs. Additionally, this solution can be used for other programming languages.
Post Syndicated from Talks at Google original https://www.youtube.com/watch?v=h_TvzVO7LVk
Post Syndicated from Explosm.net original https://explosm.net/comics/supr-dee
New Cyanide and Happiness Comic
Post Syndicated from Oglaf! -- Comics. Often dirty. original https://www.oglaf.com/rugburn/


Post Syndicated from Patrick Kennedy original https://www.servethehome.com/sth-weekly-newsletter-you-want-to-subscribe-in-q2-2024/
Subscribe to our weekly newsletter to stay up to date on the latest reviews and coverage from STH delivered each weekend to your inbox
The post STH Weekly Newsletter You Want to Subscribe in Q2 2024 appeared first on ServeTheHome.
Post Syndicated from The History Guy: History Deserves to Be Remembered original https://www.youtube.com/watch?v=cFU9Sa5dXPE
Post Syndicated from The History Guy: History Deserves to Be Remembered original https://www.youtube.com/watch?v=9NeZmAkbb0M
Post Syndicated from The History Guy: History Deserves to Be Remembered original https://www.youtube.com/watch?v=hI2oAIq55U8
Post Syndicated from Matt Granger original https://www.youtube.com/watch?v=pxtMBv9ImhU
Post Syndicated from The History Guy: History Deserves to Be Remembered original https://www.youtube.com/watch?v=h4l8OtJT558
Post Syndicated from Techmoan original https://www.youtube.com/watch?v=aLJNNHWEInw
Post Syndicated from Explosm.net original https://explosm.net/comics/asliceofalan
New Cyanide and Happiness Comic
Post Syndicated from Eric Smith original https://www.servethehome.com/insanely-fast-v-color-ddr5-7200-192gb-ecc-kit-for-amd-ryzen-threadripper-mini-review/
This insanely fast V-Color DDR5-7200 ECC RDIMM kit uses 4x 48GB to hit 192GB of capacity and more bandwidth for the AMD Ryzen Threadripper
The post Insanely Fast V-Color DDR5-7200 192GB ECC Kit for AMD Ryzen Threadripper Mini-Review appeared first on ServeTheHome.
Post Syndicated from The History Guy: History Deserves to Be Remembered original https://www.youtube.com/watch?v=VUXqV9UaCI4
Post Syndicated from BeardedTinker original https://www.youtube.com/watch?v=vdff6g0fcCk
Post Syndicated from Bruce Schneier original https://www.schneier.com/blog/archives/2024/05/friday-squid-blogging-squid-purses.html
Squid-shaped purses for sale.
As usual, you can also use this squid post to talk about the security stories in the news that I haven’t covered.
Read my blog posting guidelines here.
Post Syndicated from Talks at Google original https://www.youtube.com/watch?v=8rUm46mk0Yo
Post Syndicated from Christophe De La Fuente original https://blog.rapid7.com/2024/05/03/metasploit-weekly-wrap-up-05-03-24/
This week, our very own cdelafuente-r7 added a significant improvement to the well-known Windows Secrets Dump module to reduce the footprint when dumping SAM hashes, LSA secrets and cached credentials. The module is now directly reading the Windows Registry remotely without having to dump the full registry keys to disk and parse them, like it was originally. This idea comes from this PR proposed by antuache. The technique takes advantage of the WriteDACL privileges held by local administrators to set temporary read permissions on the SAM and SECURITY registry hives. The module also takes care of restoring the original Security Descriptors after each read. Note that it is still possible to use the original technique by setting the INLINE option to false. Happy dumping!
Author: Dave Yesland with Rhino Security Labs
Type: Exploit
Pull request: #18972 contributed by DaveYesland
Path: linux/http/progress_kemp_loadmaster_unauth_cmd_injection
AttackerKB reference: CVE-2024-1212
Description: This adds a module targeting CVE-2024-1212, an unauthenticated command injection vulnerability in Kemp Progress Loadmaster versions after 7.2.48.1, but patched in 7.2.59.2 (GA), 7.2.54.8 (LTSF) and 7.2.48.10 (LTS).
windows_secrets_dump module to enable accessing the necessary registry data without writing it to disk first.smb_enumusers module to use an updated SMB implementation from RubySMB which fixes an issue where the module could sometimes time out or return an unexpected error when targeting Samba./etc/resolv.conf while initializing.cve_2022_26923_certifried module.rocketmq and activemq modules that would occur when the target is not running the expected service.exploit/multi/http/apache_normalize_path_rce exploit module that affected Metasploit Pro due to how the module was handling datastore options.You can find the latest Metasploit documentation on our docsite at docs.metasploit.com.
As always, you can update to the latest Metasploit Framework with msfupdate and you can get more details on the changes since the last blog post from
GitHub:
If you are a git user, you can clone the Metasploit Framework repo (master branch) for the latest. To install fresh without using git, you can use the open-source-only Nightly Installers or the commercial edition Metasploit Pro.