Post Syndicated from The History Guy: History Deserves to Be Remembered original https://www.youtube.com/watch?v=k4yJu_sg-QI
Yearly Archives: 2024
The Mini ASUS EBP15 PoE Switch is Tiny
Post Syndicated from Rohit Kumar original https://www.servethehome.com/the-mini-asus-ebp15-poe-switch-is-tiny/
The ASUS EBP15 is a tiny PoE+ switch that packs some management capabilities and a 60W PoE budget in something you can mount almost anywhere
The post The Mini ASUS EBP15 PoE Switch is Tiny appeared first on ServeTheHome.
LineageOS 22.1 released
Post Syndicated from corbet original https://lwn.net/Articles/1003862/
Version 22.1 of the
Android-based LineageOS distribution is out.
We’ve been hard at work since Android 15’s release in September,
adapting our unique features to this new version of
Android. Android 15 introduced several complex changes under the
hood, but due to our previous efforts adapting to Google’s
UI-centric adjustments in Android 12 through 14, we were able to
rebase onto Android 15’s code-base faster than anticipated.Additionally, this is far-and-away the easiest bringup cycle from a
device perspective we have seen in years. This means that many more
devices are ready on day one that we’d typically expect to have up
this early in the cycle!Last, but not least, we even had enough time and resources to
introduce not one, but two new exciting apps! The first one,
Twelve, will replace our aging music app, while the other one,
Camelot, will let you view PDF files.
Transform lease agreement workflows with Amazon Bedrock
Post Syndicated from Syed Masudullah Sadullah original https://aws.amazon.com/blogs/architecture/transform-lease-agreement-workflows-with-amazon-bedrock/
Rental and lease agreements can be a complex and time-consuming process for property management companies and landlords. The agreements contain legal language, varied formatting, and diverse terms and conditions based on state and local regulations. Landlord-tenant laws vary significantly across the country, with each state having its own set of regulations. For example, California’s landlord-tenant law spans over 100 pages in the state’s Civil Code. Manually extracting and processing the key details from lease documents is inefficient and error prone. In 2023, there were approximately 45 million rental units managed by over 310,000 property management companies in the US, most of which want to take advantage of AI-powered lease management systems to streamline operations, enhance tenant experience, and optimize costs.
Generative AI, powered by large language models (LLMs), is helping how businesses approach complex document processing tasks, including lease management. Amazon Bedrock, a fully managed service, offers a choice of high-performing foundation models (FMs) from leading AI companies like AI21 Labs, Anthropic, Cohere, Luma (coming soon), Meta, Mistral AI, poolside (coming soon), Stability AI, and Amazon through a single API, along with a broad set of capabilities to build generative AI applications with security, privacy, and responsible AI.
This post explores how Amazon Bedrock can transform property management operations and optimize costs. We examine a practical approach to tackle challenges such as processing high volumes of lease agreements, maintaining compliance with varied regulatory requirements.
Lease management process
Rental property management requires a careful balance of manual and automated processes to provide smooth administration of lease agreements. Although technological solutions have improved efficiency in many areas, the handling of lease documents still relies heavily on manual effort from both property managers and back-office staff.
The following diagram shows a critical part of the lease processing workflow.

In this workflow, when a tenant signs a physical lease document, the property manager scans and uploads it to capture the terms electronically. A back office processor reviews the files, manually extracting key details like rent, duration, and deposit, and uses this to set up billing, payments, and reminders. The processor also manages lease functions, including processing payments, sending reminders, and issuing renewal notices, with some tasks automated but requiring manual review to address non-standard lease terms and special conditions. Alternatively, in the case when a tenant signs the lease digitally, the document is automatically captured in the system and processed further.
Overall, lease management functions involve manual and automated steps.
Solution overview
By using LLMs, you can automate key steps in the lease handling workflow, transitioning from a manual approach to a more streamlined and intelligent system. With prompt engineering, LLMs can interpret the language of lease agreements mandated by state, county, and local laws, and accurately extract terms and conditions for downstream functions such as rent processing and renewal notifications. Optionally, a fine-tuning approach helps LLMs understand industry-specific terminology.
The solution approach in this post uses Amazon Bedrock, which offers a selection of FMs and provides seamless integration with other AWS services. Although we used Anthropic’s Claude 3 Sonnet model on Amazon Bedrock to describe the solution in the post, Amazon Bedrock allows you to experiment with other models using the same approach, enabling you to find the best fit for your specific requirements.
Our event-driven solution is structured in three key steps, as illustrated in the following diagram:
- Constructing a standard lease terms knowledge base – This stage involves building a comprehensive repository of standard lease terms and conditions
- Validating and extracting lease agreement details – Here, we focus on accurately parsing and extracting crucial information from individual lease agreements
- Automating lease-related downstream processes – The final stage implements automation for various lease management tasks and workflows

This solution demonstrates how advanced models can be effectively integrated into real-world business processes, streamlining lease management operations while maintaining accuracy and compliance.
For a practical implementation of this solution, refer to the solution repository, where you can find code for AWS Lambda functions, a sample standard lease template, and an example lease document for you to test in your own AWS environment.
Prerequisites
To implement this solution, you need the following prerequisites:
- An AWS account with AWS Management Console and programmatic administrator access.
- Access to Amazon Bedrock models. To demonstrate this approach, we use Anthropic’s Claude 3 Sonnet.
- Access to AWS Identity and Access Management (IAM) to create roles and policies.
- Proficiency in developing and deploying Lambda functions in your preferred programming language. We use Python pseudocode to describe steps in this post.
- Amazon Simple Queue Service (Amazon SQS) to scale Lambda function invocations.
- Access to an Amazon Simple Storage Service (Amazon S3) bucket to store standard lease templates, lease documents, and other tenant communication templates as required. You should have proficiency in setting up S3 notifications to destinations such as Lambda and Amazon SQS.
- Access to Amazon DynamoDB with an understanding of your data volumes and throughput capacity mode to store lease terms extracted from lease documents.
- Amazon EventBridge Scheduler to configure schedules for recurring lease-related activities.
Build a standard lease terms knowledge base
In the first stage, you build a foundation of the solution by curating a library of standard lease document templates to capture diverse laws and regulations across different states, cities, and counties.
To describe the solution approach in this post, we use the Amazon Bedrock Converse API, which provides a consistent way to invoke models, removing the complexity to adjust for model-specific differences such as inference parameters. It also manages multi-turn conversations by incorporating conversational history into requests.
With the Converse API, you can establish a centralized knowledge base in DynamoDB to streamline validation of mandatory requirements in lease documents. Because the lease templates don’t change often, a DynamoDB based knowledge base provides a cost-effective way to store mandatory terms required by different jurisdictions, removing the need to invoke Amazon Bedrock queries every time a lease is processed. The use of the Converse API with DynamoDB also eliminates an extra layer of complex knowledge base creation that requires additional integration, cost, and maintenance.
Complete the following steps to create your knowledge base:
- Create an S3 bucket called
Lease Templatesand upload the standard lease templates.
Because lease templates don’t change often, this step is done only for new or modified templates.

Next, you configure S3 notifications to trigger a Lambda function to process the template.
- Create a prompt instructing the LLM to analyze lease templates and identify terms and conditions mandated by state, county, and city regulations. The prompt can also include directives on how to parse the template and extract terms, conditions, and clauses as defined in the sample. See the following code:
<instructions>
Please review the provided residential apartment lease agreement template and extract the following information for each state or jurisdiction represented in the document. Extract state, county, city, zipcode and township details of the template in json format such as state as key and Ohio as value, zipcode as key and 43065 as value, etc. State and Zipcode is mandatory.
<laws>
Mandated state or local laws: Identify any specific laws, statutes, or regulations that the lease agreement must include or comply with based on the state or local jurisdiction. This could include things like maximum security deposit amounts, required notice periods for lease termination, or provisions tenant rights, security features on doors or windows or balcony, wall paint related obligations and landlord obligations. Provide output in json format with name and condition as key, value pairs.
</laws>
<terms>
Mandated lease terms and clauses: Extract any specific terms, clauses, or language that the lease agreement must contain due to state or local requirements. This may include items like required disclosures, prohibited provisions, or mandatory sections covering topics such as security deposits, maintenance responsibilities, or move-in/move-out procedures. Provide output in json format with name and condition as key, value pairs.
</terms>
<structure>
Formatting or structure requirements: Note if the lease agreement template must follow a particular format, structure, or organization based on state or local guidelines. This could involve the order of sections, required headings, or formatting of specific provisions. Provide output in json format with name and condition as key, value pairs.
</structure>
For each state or jurisdiction represented in the lease agreement template, please provide the extracted information in json format as described above. Include the state/jurisdiction name, the relevant mandated laws, terms, clauses, and formatting requirements. Where possible, cite the specific legal authority or source for the required provisions. The goal is to create a comprehensive guide in json format that a property manager could use to ensure their residential lease agreements comply with the applicable state and local requirements, based on the provided template document. In addition to above terms and conditions, provide any other relevant terms you find the template that could be important and should be included in lease documents by property manager. Provide only json output and don't include any other text and don't add any super header to the overall json response. Start the json with state key, value pair to put the item into Amazon DynamoDB table.
</instructions>
- Using the Converse API, extract mandatory terms and conditions as JSON output with
stateandzipcodeas unique identifiers:
The following screenshot shows the output of the Amazon Bedrock Converse API call, which will serve as a reference for processing lease documents for that jurisdiction.

- Create a
leaseagreementtemplatetermstable in DynamoDB and store the JSON output, forming the knowledge base:
You can configure on-demand or provisioned throughput capacity for the table based on your workload requirements. This data repository makes sure that the mandatory requirements for each jurisdiction are readily available for validation when new lease agreements are processed. It’s also more cost-effective to retrieve terms from the DynamoDB table than invoking Amazon Bedrock every time a lease needs to be validated against standard terms in the template.

You can repeat the process to capture standard lease terms of all jurisdictions you have operations in and if there are regulatory changes in the standard terms of already processed templates.
Validate and extract lease agreement details
In the second stage of the solution, you validate each lease agreement against standard terms captured during the previous stage to confirm compliance. After the lease is determined to be compliant on all mandatory clauses for the jurisdiction, you extract terms and conditions to run lease management functions. Compared to the volume and frequency of templates processed in first stage, you frequently process a larger number of documents in the lease processing stage, therefore a scalable solution using Amazon SQS is optimal. You can use S3 notifications and an SQS queue-based approach to decouple and scale the document processing as required.
Complete the following steps:
- Create an S3 bucket called
Lease Agreementsto upload lease documents, and configure S3 upload notifications to destination type Amazon SQS.
Next, you configure Amazon SQS to trigger a Lambda function to perform downstream processing of the lease document.
- For this post, to identify the jurisdiction, we mentioned
stateandzipcodeas part of file name. With that information, retrieve mandatory terms corresponding to that jurisdiction from the DynamoDBleaseagreementtemplatetermsknowledge base.
Over a period of time, standard lease templates may change for various reasons. If you have more than one version of the template for each state and zipcode combination, use the latest version of mandatory terms for validation.
- With the extracted mandatory terms and uploaded lease document, create a prompt for the Amazon Bedrock Converse API to validate whether the lease complies with all required clauses and conditions. The following prompt considers various aspects of lease processing, and you can add more details as required for your use case. The prompt also asks the LLM to score the confidence level on the accuracy of the processing, which you can use to determine if further manual review is required.
<instructions>
You are an AI data processor assisting a residential property management company. Your task is to review residential lease agreement document uploaded and validate that it contains the mandatory terms, conditions, and clauses provided in the following context.
<json_mandatory_terms>
+ str(mandatory_lease_terms_json)
</ json_mandatory_terms>
Please review the lease agreement document and check if it includes the mandatory terms, conditions, and clauses as mentioned in terms above. Do not hallucinate or use any public information for validation. Clauses could be just statements. Don't look for specific statements but make sure the meaning is in alignment.
Validate if rent amount, lease start date, security deposit amount, etc, have valid values such as amounts and dates. For example, if security deposit is mandatory in the terms JSON, then the lease document should have the term security deposit with a valid $ amount value. Identify any gaps or missing elements that are in the JSON and provide a summary report.
The report should include: The state and local jurisdiction of the property. A list of all the mandatory terms, conditions, and clauses required for that jurisdiction as per JSON. A list of any missing or incomplete elements in the lease agreement document you just reviewed. If any mandatory terms are missing or not properly mentioned with valid values in the lease document, please provide recommendations on what needs to be amended in the lease document and approximate wording for each recommendation to add in the lease document. Please provide the report in a clear and concise format that the property manager can easily understand and act upon. If all mandatory terms look good, then confirm the same in the report by outputting a response 'status: agreement is validated' along with the report. If a term or condition or clause doesn't fulfill as per mandatory JSON, then output a response 'status: agreement is not fully validated' along with the report.
<confidence_score>
Share a confidence score in percentage on how confident are you that you validation is accurate and the lease document is complete.
</confidence_score>
</instructions>
The Converse API call generates a detailed validation report in JSON format as shown in the following screenshot, outlining any sections or terms that don’t align with the mandatory requirements. It also provides a confidence score on the accuracy of the lease document and recommendations on how to amend those terms and conditions.

- Based on the model’s recommendations, you can amend the lease and make sure the terms and conditions are compliant with mandatory requirements, and then re-validate the lease document.
After the document is successfully validated, the model prepares a final validation report along with a confidence score. In our solution, we’ve considered 95% as the threshold for successful validation. You can decide your threshold and have a manual review step in the workflow as required.

- After the amended lease is validated successfully, prompt the Amazon Bedrock Converse API to extract required terms from the lease document, such as tenancy start date, end date, security deposit, utilities paid by, and so on. Add additional fields to the prompt as required for your business activities and workflows.
<instructions>
You are a Lease document data processor. You will be provided a lease agreement of a real estate rental unit such as apartment, home or condo. Extract the information from the lease document and create a json that can be inserted into Amazon DynamoDB table. Following are the terms and conditions of the lease that you need to extract:
state is state where the lease is processed (Example: Ohio, Pennsylvania, etc.)
zipcode is zipcode where the lease is processed (example 43065, 19019, etc.)
lease_id is Rental agreement title
new_or_amendment is 'new'
agreement_signed_date is date on which this lease is signed (mm/dd/yyyy)
deposit_amount is Deposit amount
deposit_paid_by_date is date when deposit should be paid by mm/dd/yyyy)
fixtures are kitchen appliances, furnitures or any other applicances
owner_name is Landlord's or Owner's name of the rental unit
property_address is address of the rental unit which is on lease
rent_amount is monthly rent amount
rent_paid_by_day_of_month is due date of rental payment
tenancy_end_date is lease end date on which the lease is terminating
tenancy_start_date is lease start date on which the lease is starting
tenant_name is Tenant's name of the rental unit
termination_notice_min_days is minimum notice period in days
utilities_terms_electricity is who will pay the electricity bill
When creating the summary, be sure to understand the legal language in the agreement and create a valid output.
</instructions>
- Create a
Lease Agreementstable in DynamoDB to store the terms and condition of the lease as a lease primary record.
You can use this record to carry out lease management activities throughout the life of the lease, such as rent reminders, renewal notices, and promotional emails. Because the lease is renewed by the same tenant, you can update the primary record and extend the process. If the lease expires and a new lease is signed by different tenant, you can create a new lease primary record again for the rental unit, thereby enabling the continuous lifecycle of property management workflows.
The following screenshot is a sample lease record for each lease agreement processed in the table.

Automate lease-related notifications and reminders
After the lease terms are extracted into the lease agreement table, you can automate downstream processes. The solution in this post uses EventBridge Scheduler and Lambda functions to run different lease management functions. However, you can also use Amazon Bedrock to perform some of those functions, such as generating communications or custom notifications as required. You can determine what works best for your use case based on volumes, flexibility, and cost involved in using Amazon Bedrock and modify the approach.
Complete the following steps:
- Using dates and other lease terms, configure EventBridge Scheduler to trigger periodic notifications and batch processes. For example, you can schedule monthly rent reminders or renewal notices nearing lease end or periodic promotions.
- Using standard templates from Amazon S3, you can automate notices and reminders for an improved customer experience and archive the communications for future audits.
The following screenshot is a sample recurring rent reminder email scheduled through EventBridge.

Conclusion
In this post, we explored a generative AI-based approach to lease processing using the power of Amazon Bedrock. Our approach addresses the complex challenges of manual lease management by establishing a comprehensive lease template library and knowledge base, automating compliance validation against jurisdiction-specific requirements, and centralizing lease term storage for efficient processing of rental management functions. This approach not only streamlines the initial processing of leases, but also significantly reduces administrative overhead in ongoing lease management. By automating lease processing activities, you can optimize administrative costs, improve accuracy, and enhance overall operational efficiency.
For the implementation of this solution, refer to the solution repository, which contains Lambda function code and sample lease files to test in your own AWS environment.
Security updates for Tuesday
Post Syndicated from corbet original https://lwn.net/Articles/1003856/
Security updates have been issued by Debian (debootstrap) and SUSE (assimp-devel, grpc, libQt6Pdf6, and poppler).
The forecast is clear: clouds on e-paper, powered by the cloud
Post Syndicated from Marek Majkowski original https://blog.cloudflare.com/the-forecast-is-clear-clouds-on-e-paper-powered-by-the-cloud/
I’ve noticed that many shops are increasingly using e-paper displays. They’re impressive: high contrast, no backlight, and no visible cables. Unlike most electronics, these displays are seamlessly integrated and feel very natural. This got me wondering: is it possible to use such a display for a pet project? I want to experiment with this technology myself.

(source)
My main goal in this project is to understand the hardware and its capabilities. Here, I’ll be using an e-paper display to show the current weather, but at its core, I’m simply feeding data from a website to the display. While it sounds straightforward, it actually requires three layers of software to pull off. Still, it’s a fun challenge and a great opportunity to work with both embedded hardware and Cloudflare Workers.
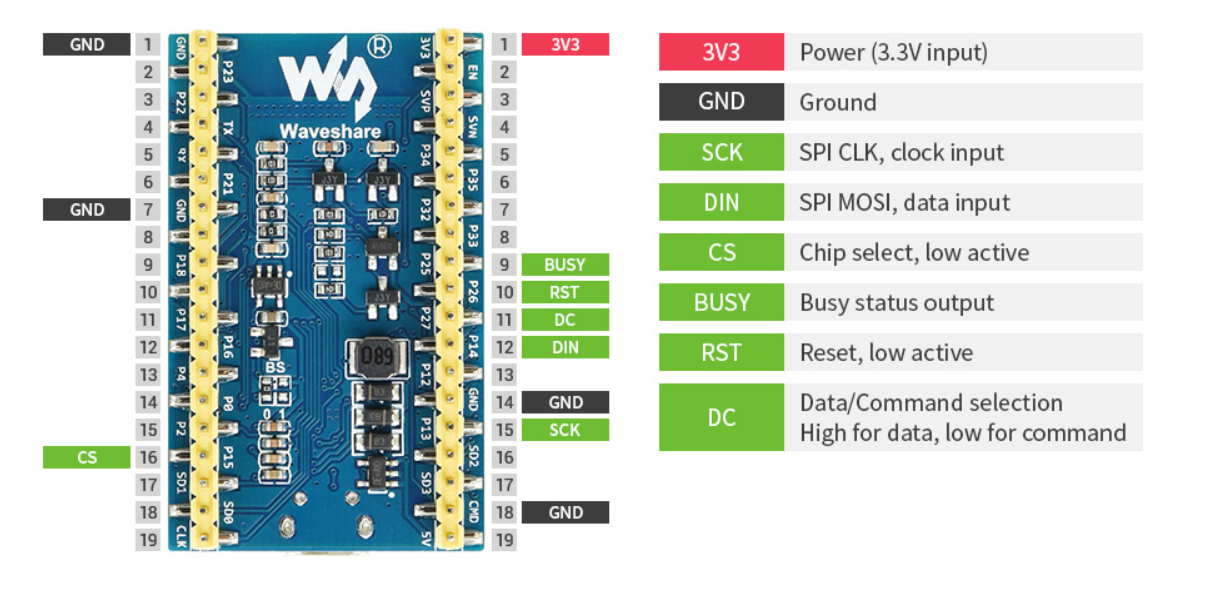
For this project, I’m using components from Waveshare. They offer a variety of e-paper displays, ranging from credit card-sized to A4-sized models. I chose the 7.5-inch, two-color “e-Paper (G)” display. For the controller, I’m using a Waveshare ESP32-based universal board. With just these two components — a display and a controller — I was ready to get started.

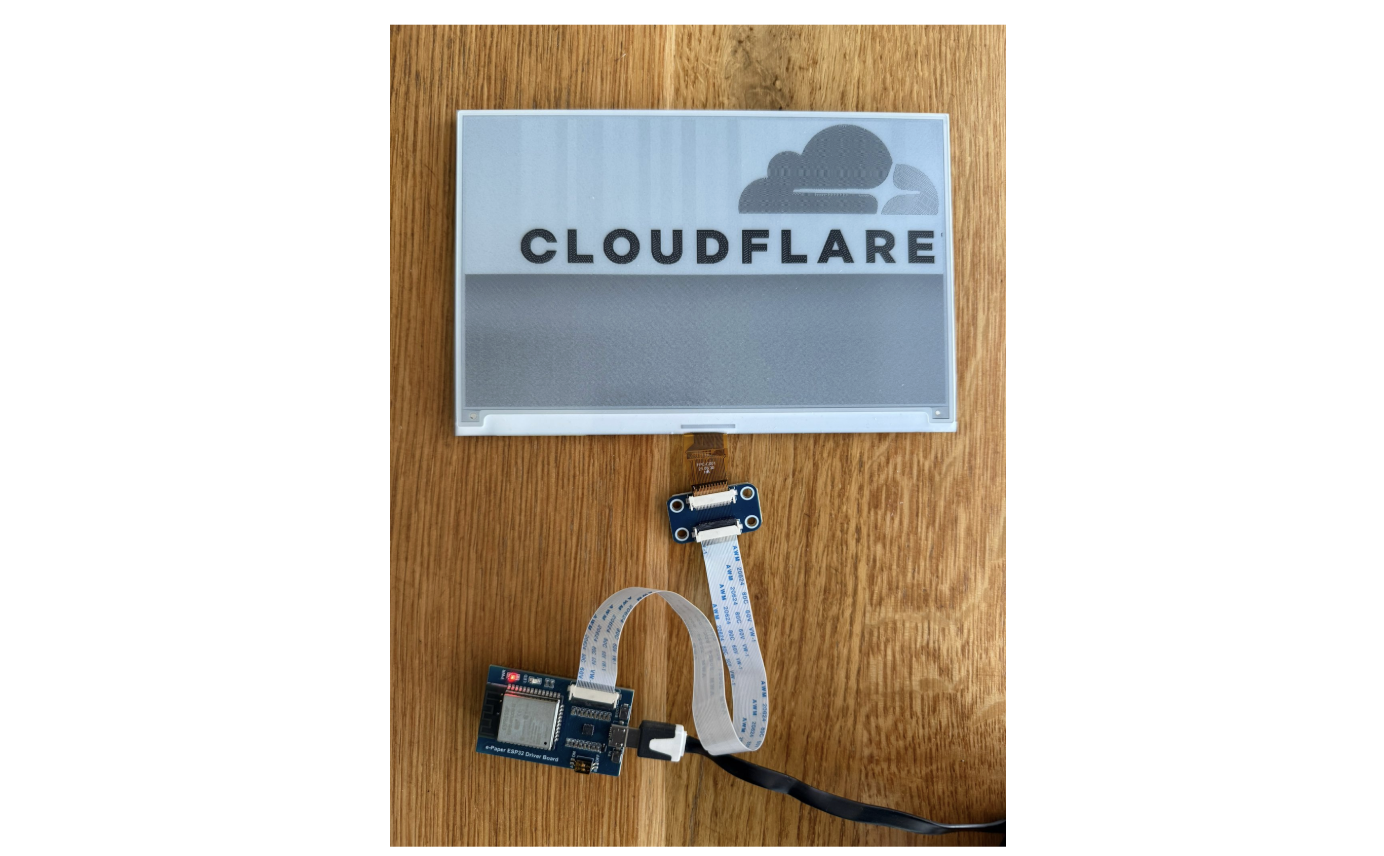
When the components arrived, I carefully connected the display’s ribbon cable to the ESP32 board. Even though this step isn’t documented anywhere, it was simple and almost impossible to get wrong. Best of all, no soldering was needed!
That’s pretty much it for the hardware setup! I’m keeping the device powered with a 5V supply through a micro-USB connection.
(source)
This was my first time working with the ESP32 CPU family, and I’m really impressed. It’s a system-on-chip controller with built-in Bluetooth and Wi-Fi. It’s relatively fast, very power-efficient, and quite popular in DSP (digital signal processing) applications. For example, your audio device might be powered by a CPU like this. Interestingly, the newer models have switched to the RISC-V instruction set.
For our purposes, we’ll only scratch the surface of what the ESP32 is capable of. The chip is straightforward to work with, thanks to the familiar Arduino environment. A great starting point is the demo provided by Waveshare. It sets up a web page where you can easily upload a custom image to the display.
To run the demo you need to:
-
Install the Arduino IDE.
-
Fix permissions of the
/dev/ACM0device. -
Install “Additional Boards Manager URL” as per the instructions, and install the “esp32 by expressif” bundle.
-
Open the “Loader_esp32wf” example downloaded from waveshare.
-
Change the Wi-Fi name, password and IP address in the Arduino IDE
srvr.htab.
Once everything is set up, you should be able to connect to the ESP32’s IP address and use the simple web interface to upload an image to the display.
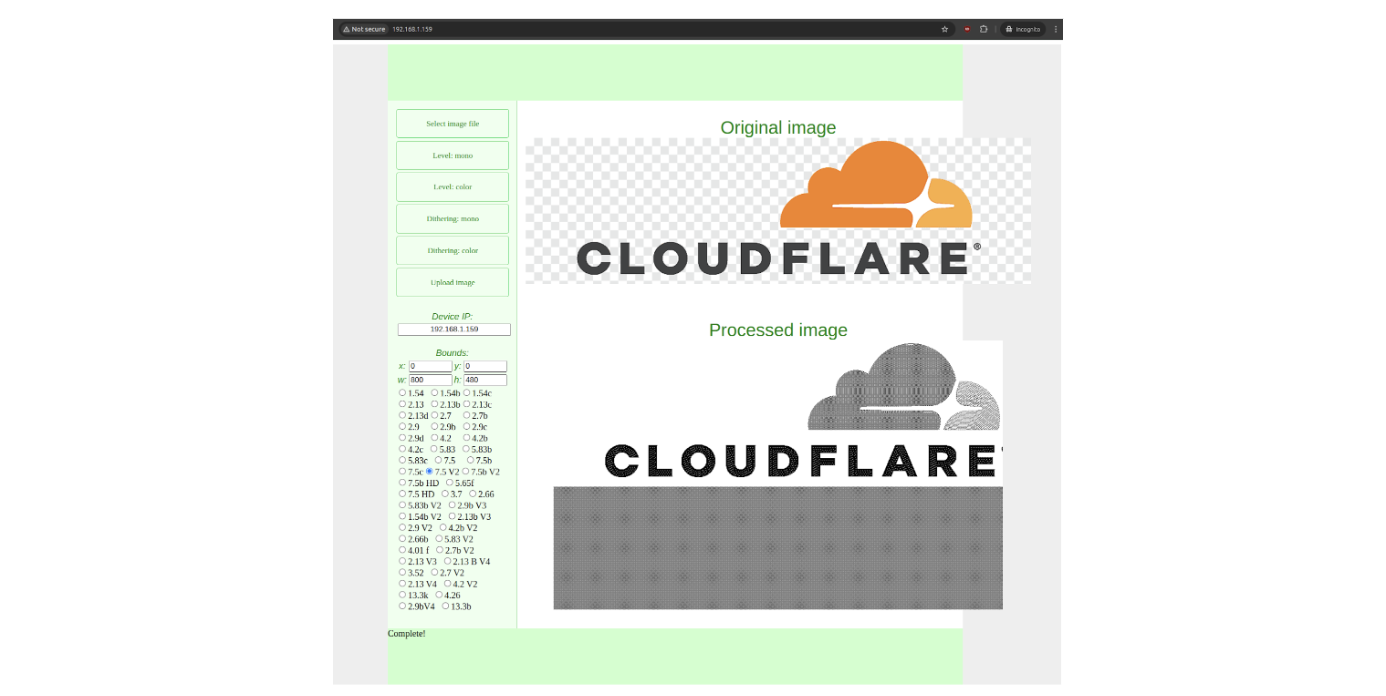
With a simple click of the “Upload Image” button, the magic happens: the e-paper display comes to life, showcasing the uploaded image.
With the demo up and running, we can move on to the next step: figuring out how to render a web page on the e-paper display.
The ESP32 comes with some limitations. It has 520 KiB of RAM, 4 MiB of flash, and a 240 MHz clock speed. While this is fine for tasks like connecting to Wi-Fi or fetching a simple URL, it’s not powerful enough for more demanding tasks, such as parsing JSON or rendering an entire web page.
There are basic Arduino libraries for handling bitmaps, which can draw rectangles and render simple fonts, but manually managing layout doesn’t sound appealing to me. A better approach is to play to the ESP32’s strengths — fetching and displaying bitmaps — and delegate the more complex task of HTML rendering to a more powerful server.
Let’s break the problem into three layers:
-
ESP32 (Display Layer): The ESP32 will periodically, say every minute, fetch a pre-rendered bitmap from the server and display it on the e-paper screen. This keeps the ESP32’s tasks lightweight and manageable.
-
Server A (Rendering Layer): This server will fetch the desired website, render it, and rasterize it into a bitmap format. Its job is to prepare a bitmap that the ESP32 can handle without additional processing.
-
Server B (Content Layer): This server hosts the actual website with the HTML and CSS content. In this case, it will provide the local weather data in a styled format, ready to be fetched and rendered by Server A.

The ESP32 provides some great higher-level libraries to simplify development. For this project, we’ll need three key components:
-
Wi-Fi Arduino Library: To connect the ESP32 to a Wi-Fi network.
-
HTTP Arduino Library: To handle HTTP requests and fetch the rendered bitmap from the server.
-
EPD (e-Paper Display) Driver: To control the e-paper display and render the fetched bitmap.
These libraries make it much easier to implement the required functionality without dealing with low-level details.
Here’s my ESP32 Arduino project code. It’s actually pretty straightforward:
-
First, it connects to Wi-Fi
-
Then, it fetches a rendered bitmap from an HTTP endpoint
-
Then it pushes it to the e-paper display if needed
-
Waits a minute
-
And repeats the whole process forever
E-paper displays typically start to degrade after about one million refresh cycles. To preserve the display’s lifespan, I’m being extra careful to avoid unnecessary refreshes.
Now for the exciting part! We need an online service that can fetch a website, render it, rasterize it to fit our small monochromatic display, and return it as a display-sized binary blob. Initially, I considered using headless Chrome paired with an ImageMagick script, but then I discovered Cloudflare’s Browser Rendering API, which fits our needs perfectly.
This API can be used quite trivially and nicely fits our needs. Here’s the typescript worker code, and there are two particularly interesting parts: handling a remote browser and dithering.
First, see how easy it is to render a website as a PNG using Browser Rendering:
if (!browser) {
browser = await puppeteer.launch(env.MYBROWSER, { keep_alive: 600000 });
launched = true;
}
sessionId = browser.sessionId();

const page = await browser.newPage();
await page.setViewport({
width: 480,
height: 800,
deviceScaleFactor: 1,
})

await page.goto(url);
img = (await page.screenshot()) as Buffer;
I’m genuinely surprised at how practical and effective this approach is. While the remote browser startup isn’t exactly fast — it can take a few seconds to generate the screenshot — it’s not an issue for my use case. The delay is perfectly acceptable, especially considering how much work is offloaded to the cloud.
Dithering
To prepare the bitmap for the ESP32, we need to decode the PNG, reduce the color palette to monochromatic, and apply dithering. Here’s the dithering code:
function ditherTwoBits(px: Buffer,
                       width: number,
                       height: number
                      ): Buffer {
    px = new Float32Array(px);

    for (let y = 0; y < height; y++) {
        for (let x = 0; x < width; x++) {
            const old_pixel = px[y * width + x];
            const new_pixel = old_pixel > 128 ? 0xff : 0x00;

            const quant_error = (old_pixel - new_pixel) / 16.0;
            px[(y + 0) * width + (x + 0)] = new_pixel;
            px[(y + 0) * width + (x + 1)] += quant_error * 7.;
            px[(y + 1) * width + (x - 1)] += quant_error * 3.;
            px[(y + 1) * width + (x + 0)] += quant_error * 5.;
            px[(y + 1) * width + (x + 1)] += quant_error * 1.;
        }
    }

    return Buffer.from(Uint8ClampedArray.from(px));
}
This was my first time experimenting with dithering, and it’s been a lot of fun! I was surprised by how straightforward the process is and that it’s fully deterministic. Now that I understand the details of the algorithm, I can’t help but notice its subtle side effects everywhere — in printed materials, on screens, and even in design choices around me. It’s fascinating how something so simple has such a broad impact!
To deploy this code as a Cloudflare Worker, you only need to install the required dependencies, configure the wrangler.toml file, and publish the code. Here’s a step-by-step guide:
sudo apt install npm
cd worker-render-raster
npm install wrangler
npm install @cloudflare/puppeteer --save-dev
npm install fast-png --save-dev
npx wrangler kv:namespace create KV
npx wrangler kv:namespace create KV --preview
With this out of the way, you can run the code:
2025-01-e-paper/worker-render-raster$ npx wrangler dev --remote

 ⛅️ wrangler 3.99.0
-------------------

Your worker has access to the following bindings:
- KV Namespaces:
  - KV: XXX
- Browser:
  - Name: BROWSER
[wrangler:inf] Ready on http://localhost:46131
⎔ Starting remote preview...
Total Upload: 755.39 KiB / gzip: 149.05 KiB
╭─────────────────────────────────────────────────────────────────────────────────────────────────╮
│  [b] open a browser, [d] open devtools, [l] turn on local mode, [c] clear console, [x] to exit  │
╰─────────────────────────────────────────────────────────────────────────────────────────────────╯
With everything set up, you can now open a browser and see a rendered and rasterized version of a website, processed through your Cloudflare Worker! For example, here’s how the 1.1.1.1 page looks in a 800×480 monochromatic resolution, complete with dithering:
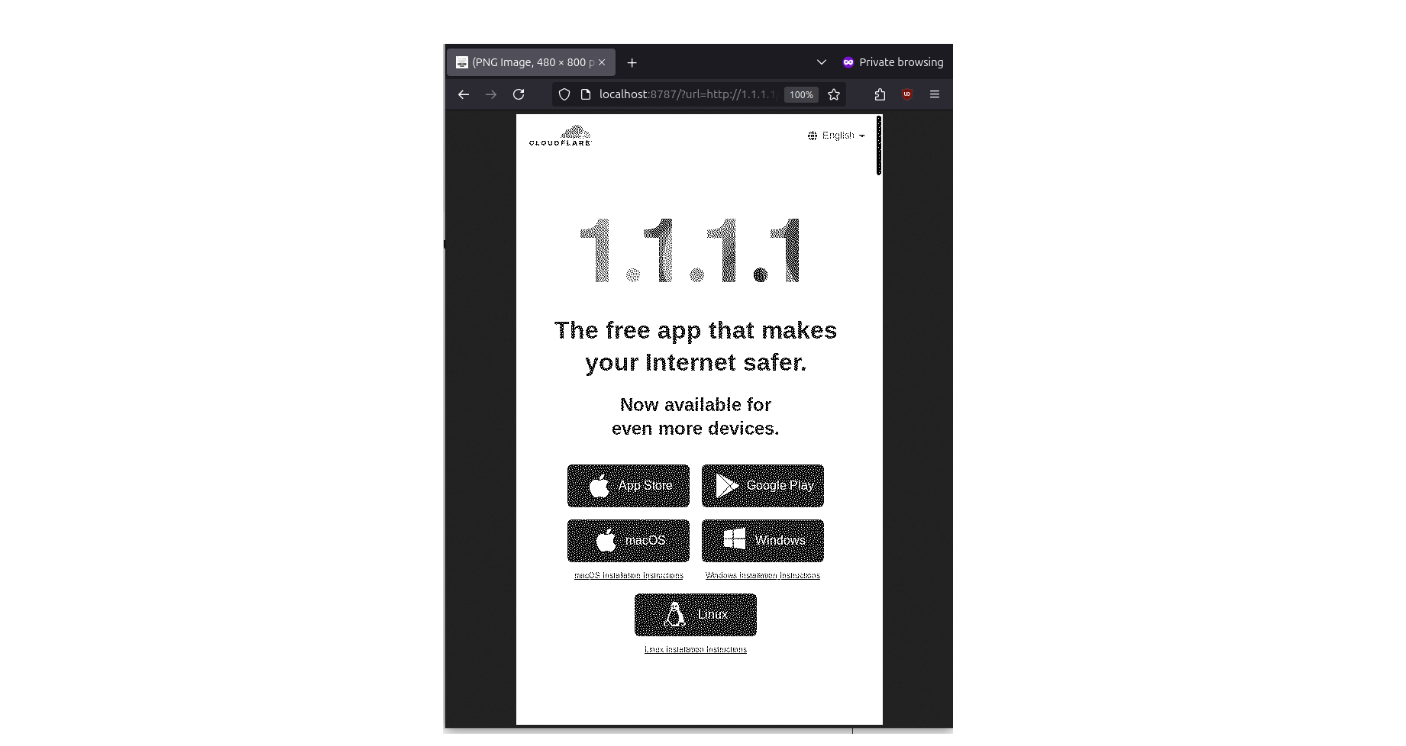
This demonstrates how effectively the Worker can handle rendering, rasterizing, and adapting web content for an e-paper display. It’s quite satisfying to see the pipeline in action.
To create the weather panel, I designed a simple HTML and CSS page and published it as another Cloudflare Worker. This time, I used Python in Cloudflare Workers because it felt more straightforward, especially since the site needs to query an external weather API. The simplicity of the code was surprising and made the process smooth.
async def on_fetch(request, env):
    cached = await env.KV.get("weather")
    if cached:
        cached = json.loads(cached)
    else:
        u = "https://api.open-meteo.com/..."
        a = await fetch(u)
        result = await a.text()
        cached = json.loads(result)
        await env.KV.put("weather", json.dumps(cached))
    return Response.new(render(...), headers=[('content-type', 'text/html')])
Here’s how it appears in a normal browser compared to the rendered and rasterized version by our worker:
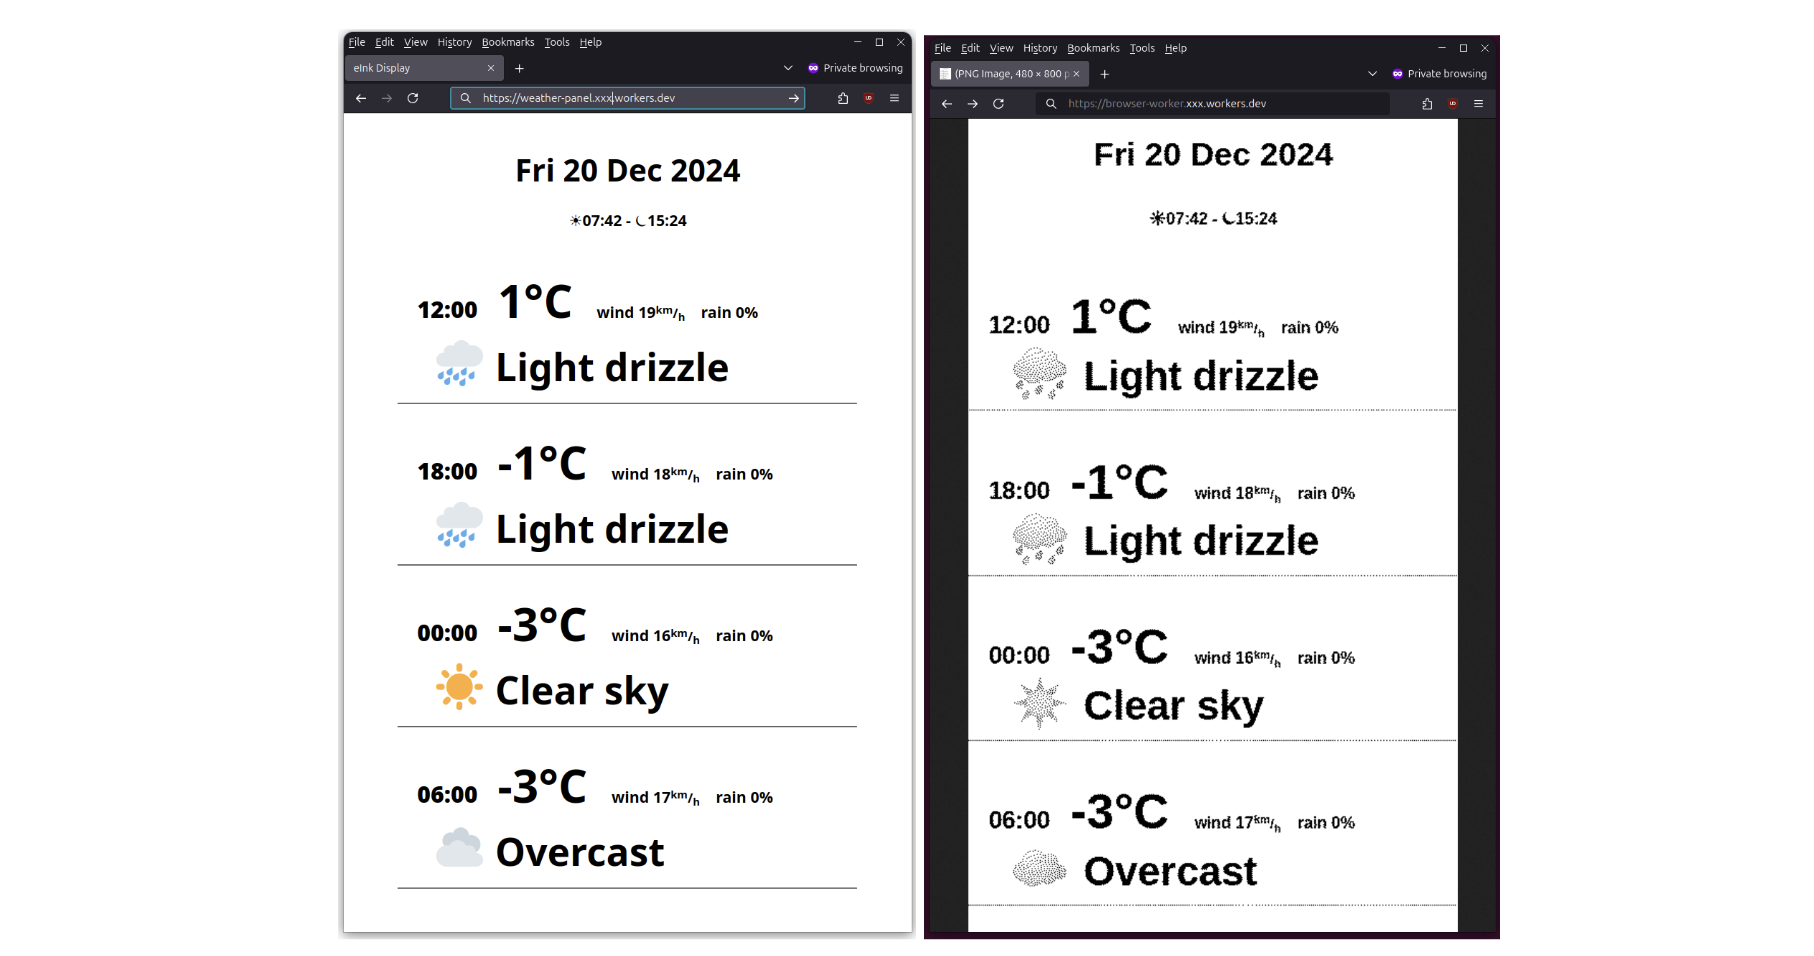
Finally, the display deserves a proper frame. Here’s the finished version:

I started this project wanting to experiment with an e-paper display hardware, but I ended up spending most of my time writing software—and it turned out to be surprisingly enjoyable across all layers:
-
ESP32: The CPU is fantastic. Programming it is straightforward, thanks to powerful built-in libraries that simplify development.
-
Cloudflare Worker Browser Rendering: This is an underrated but incredibly powerful technology. It made implementing features like the Floyd–Steinberg dithering algorithm surprisingly easy.
-
Cloudflare Worker Python: Although still in beta, it worked flawlessly for my needs and was a great fit for handling API requests and serving dynamic content.
It’s remarkable how much you can achieve with relatively inexpensive hardware and free Cloudflare services.
Gift Card Fraud
Post Syndicated from Bruce Schneier original https://www.schneier.com/blog/archives/2024/12/gift-card-fraud.html
It’s becoming an organized crime tactic:
Card draining is when criminals remove gift cards from a store display, open them in a separate location, and either record the card numbers and PINs or replace them with a new barcode. The crooks then repair the packaging, return to a store and place the cards back on a rack. When a customer unwittingly selects and loads money onto a tampered card, the criminal is able to access the card online and steal the balance.
[…]
In card draining, the runners assist with removing, tampering and restocking of gift cards, according to court documents and investigators.
A single runner driving from store to store can swipe or return thousands of tampered cards to racks in a short time. “What they do is they just fly into the city and they get a rental car and they just hit every big-box location that they can find along a corridor off an interstate,” said Parks.
RFK Jr.’s ‘Seeds of Truth’
Post Syndicated from The Atlantic original https://www.youtube.com/watch?v=B4A5u_OSOBo
Governor Assassinated
Post Syndicated from The History Guy: History Deserves to Be Remembered original https://www.youtube.com/watch?v=AdBK38-aZFA
Comic for 2024.12.31 – Position
Post Syndicated from Explosm.net original https://explosm.net/comics/position-2
New Cyanide and Happiness Comic
Horow T38 Smart Toilet
Post Syndicated from digiblur DIY original https://www.youtube.com/watch?v=sUPciEK7ons
Cook: Colliding with the SHA prefix of Linux’s initial Git commit
Post Syndicated from corbet original https://lwn.net/Articles/1003797/
Kees Cook describes
his work resulting in a kernel documentation commit whose ID shares the
same first 12 characters as the initial commit in the kernel’s repository.
This is not yet in the upstream Linux tree, for fear of breaking
countless other tools out in the wild. But it can serve as a test
commit for those that want to get this fixed ahead of any future
collisions (or this commit actually landing).
LWN looked at commit-ID collisions a few
weeks back.
The IMPACT of the GATEWAY ARCH: America’s Modern Monument #sponsored
Post Syndicated from Geographics original https://www.youtube.com/watch?v=hzbYa4RA3M8
Visual Subnet Calculator is a powerful free tool – try it today!
Post Syndicated from Crosstalk Solutions original https://www.youtube.com/watch?v=f8jI6OSrbgc
NVIDIA Completes Run:ai Acquisition
Post Syndicated from Cliff Robinson original https://www.servethehome.com/nvidia-completes-run-ai-acquisition/
NVIDIA completed its Run:ai acquisition bringing the Kubernetes AI management platform into the larger NVIDIA umbrella
The post NVIDIA Completes Run:ai Acquisition appeared first on ServeTheHome.
Doug Melville on rediscovering family legacy, and a quest to honor America’s first Black generals
Post Syndicated from Talks at Google original https://www.youtube.com/watch?v=5xhS6bgluck
[$] The Homa network protocol
Post Syndicated from corbet original https://lwn.net/Articles/1003059/
The origins of the TCP and UDP network protocols can be traced back a full
50 years. Even though networks and their use have changed radically
since those protocols were designed, they can still be found behind most
networking applications. Unsurprisingly, these protocols are not optimal
for all situations, so there is ongoing interest in the development of
alternatives. One such is the Homa
transport protocol, developed by John Ousterhout (of Tcl/Tk and Raft fame, among other accomplishments),
which is aimed at data-center applications. Ousterhout is currently trying
to get a
minimal Homa implementation into the kernel.
Comic for 2024.12.30 – Toy Story
Post Syndicated from Explosm.net original https://explosm.net/comics/toy-story
New Cyanide and Happiness Comic
Security updates for Monday
Post Syndicated from jake original https://lwn.net/Articles/1003768/
Security updates have been issued by Debian (gst-plugins-good1.0 and opensc), Fedora (iwd and libell), and SUSE (chromium, govulncheck-vulndb, and poppler).
Open sourcing h3i: a command line tool and library for low-level HTTP/3 testing and debugging
Post Syndicated from Lucas Pardue original https://blog.cloudflare.com/h3i/
Have you ever built a piece of IKEA furniture, or put together a LEGO set, by following the instructions closely and only at the end realized at some point you didn’t quite follow them correctly? The final result might be close to what was intended, but there’s a nagging thought that maybe, just maybe, it’s not as rock steady or functional as it could have been.
Internet protocol specifications are instructions designed for engineers to build things. Protocol designers take great care to ensure the documents they produce are clear. The standardization process gathers consensus and review from experts in the field, to further ensure document quality. Any reasonably skilled engineer should be able to take a specification and produce a performant, reliable, and secure implementation. The Internet is central to everyone’s lives, and we depend on these implementations. Any deviations from the specification can put us at risk. For example, mishandling of malformed requests can allow attacks such as request smuggling.
h3i is a binary command line tool and Rust library designed for low-level testing and debugging of HTTP/3, which runs over QUIC. h3i is free and open source as part of Cloudflare’s quiche project. In this post we’ll explain the motivation behind developing h3i, how we use it to help develop robust and safe standards-compliant software and production systems, and how you can similarly use it to test your own software or services. If you just want to jump into how to use h3i, go to the h3i command line tool section.
QUIC is a secure-by-default transport protocol that provides performance advantages compared to TCP and TLS via a more efficient handshake, along with stream multiplexing that provides head-of-line blocking avoidance. HTTP/3 is an application protocol that maps HTTP semantics to QUIC, such as defining how HTTP requests and responses are assigned to individual QUIC streams.
Cloudflare has supported QUIC on our global network in some shape or form since 2018. We started while the Internet Engineering Task Force (IETF) was earnestly standardizing the protocol, working through early iterations and using interoperability testing and experience to help provide feedback for the standards process. We launched support for QUIC version 1 and HTTP/3 as soon as RFC 9000 (and its accompanying specifications) were published in 2021.
We work on the Protocols team, who own the ingress proxy into the Cloudflare network. This is essentially Cloudflare’s “front door” — HTTP requests that come to Cloudflare from the Internet pass through us first. The majority of requests are passed onwards to things like rulesets, workers, caches, or a customer origin. However, you might be surprised that many requests don’t ever make it that far because they are, in some way, invalid or malformed. Servers listening on the Internet have to be robust to traffic that is not RFC compliant, whether caused by accident or malicious intent.
The Protocols team actively participates in IETF standardization work and has also helped build and maintain other Cloudflare services that leverage quiche for QUIC and HTTP/3, from the proxies that help iCloud Private Relay via MASQUE proxying, to replacing WARP’s use of Wireguard with MASQUE, and beyond.
Throughout all of these different use cases, it is important for us to extensively test all aspects of the protocols. A deep dive into protocol details is a blog post (or three) in its own right. So let’s take a thin slice across HTTP to help illustrate the concepts.
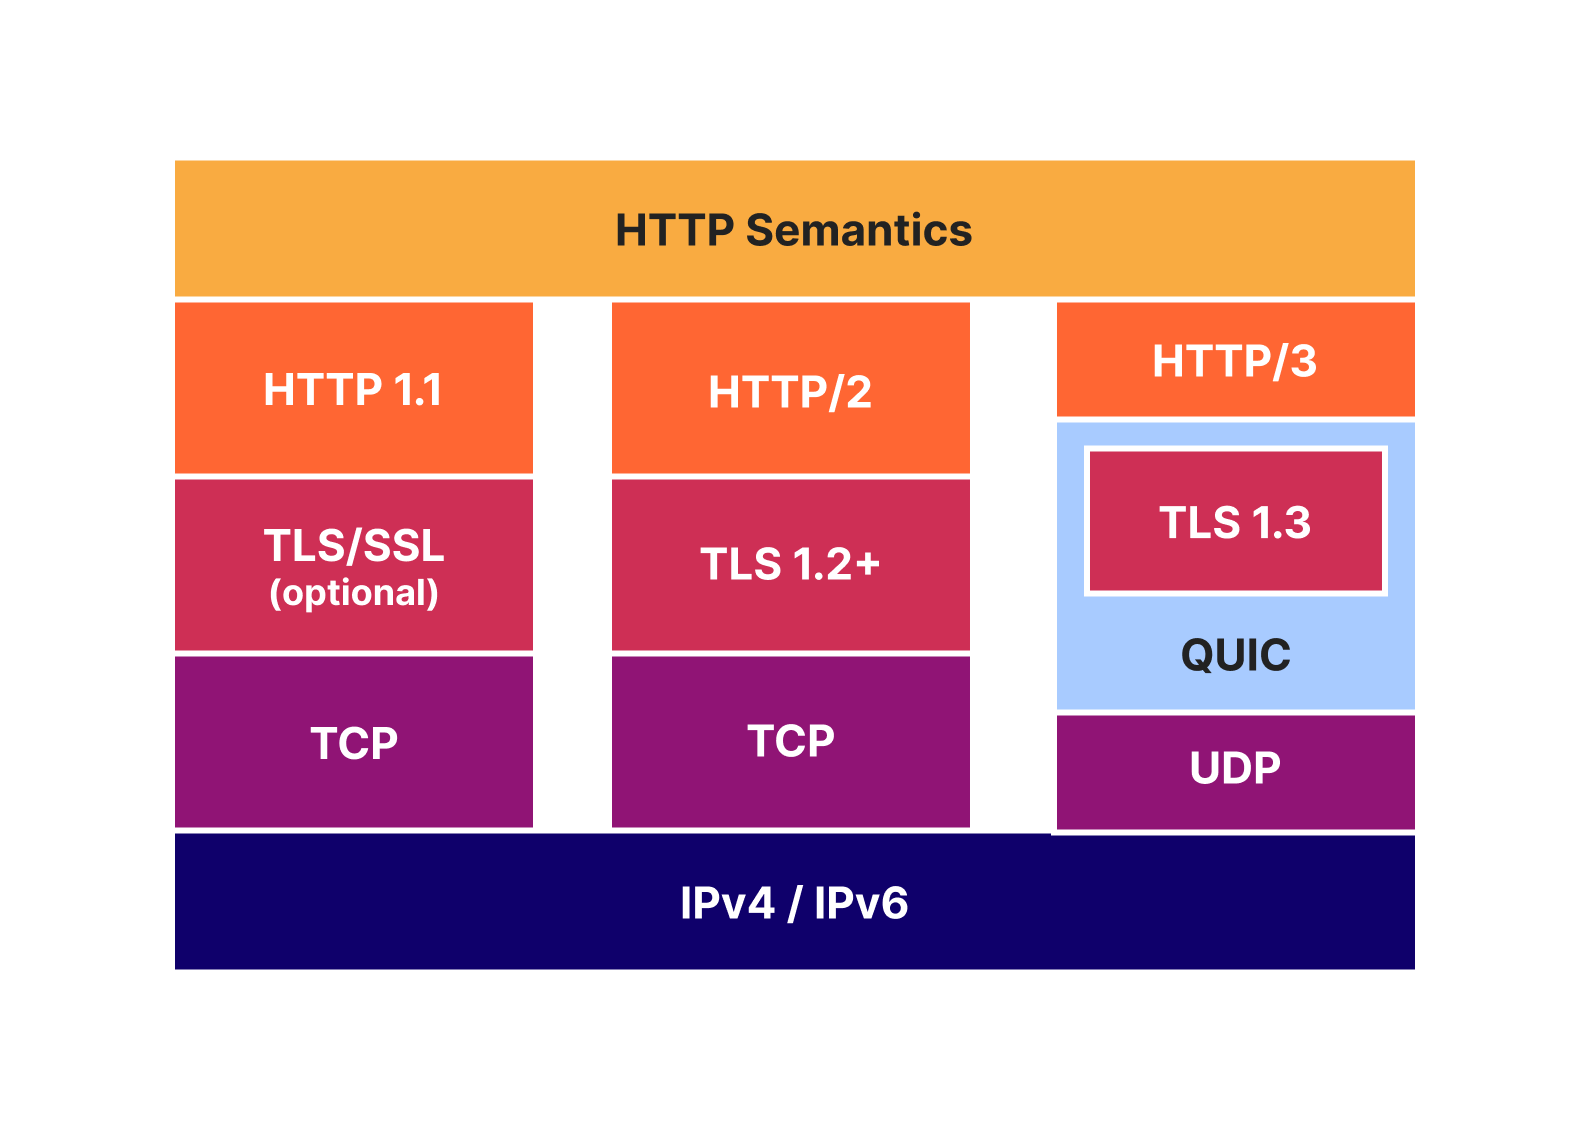
HTTP Semantics are common to all versions of HTTP — the overall architecture, terminology, and protocol aspects such as request and response messages, methods, status codes, header and trailer fields, message content, and much more. Each individual HTTP version defines how semantics are transformed into a “wire format” for exchange over the Internet. You can read more about HTTP/1.1 and HTTP/2 in some of our previous blog posts.
With HTTP/3, HTTP request and response messages are split into a series of binary frames. HEADERS frames carry a representation of HTTP metadata (method, path, status code, field lines). The payload of the frame is the encoded QPACK compression output. DATA frames carry HTTP content (aka “message body”). In order to exchange these frames, HTTP/3 relies on QUIC streams. These provide an ordered and reliable byte stream and each have an identifier (ID) that is unique within the scope of a connection. There are four different stream types, denominated by the two least significant bits of the ID.
As a simple example, assuming a QUIC connection has already been established, a client can make a GET request and receive a 200 OK response with an HTML body using the follow sequence:
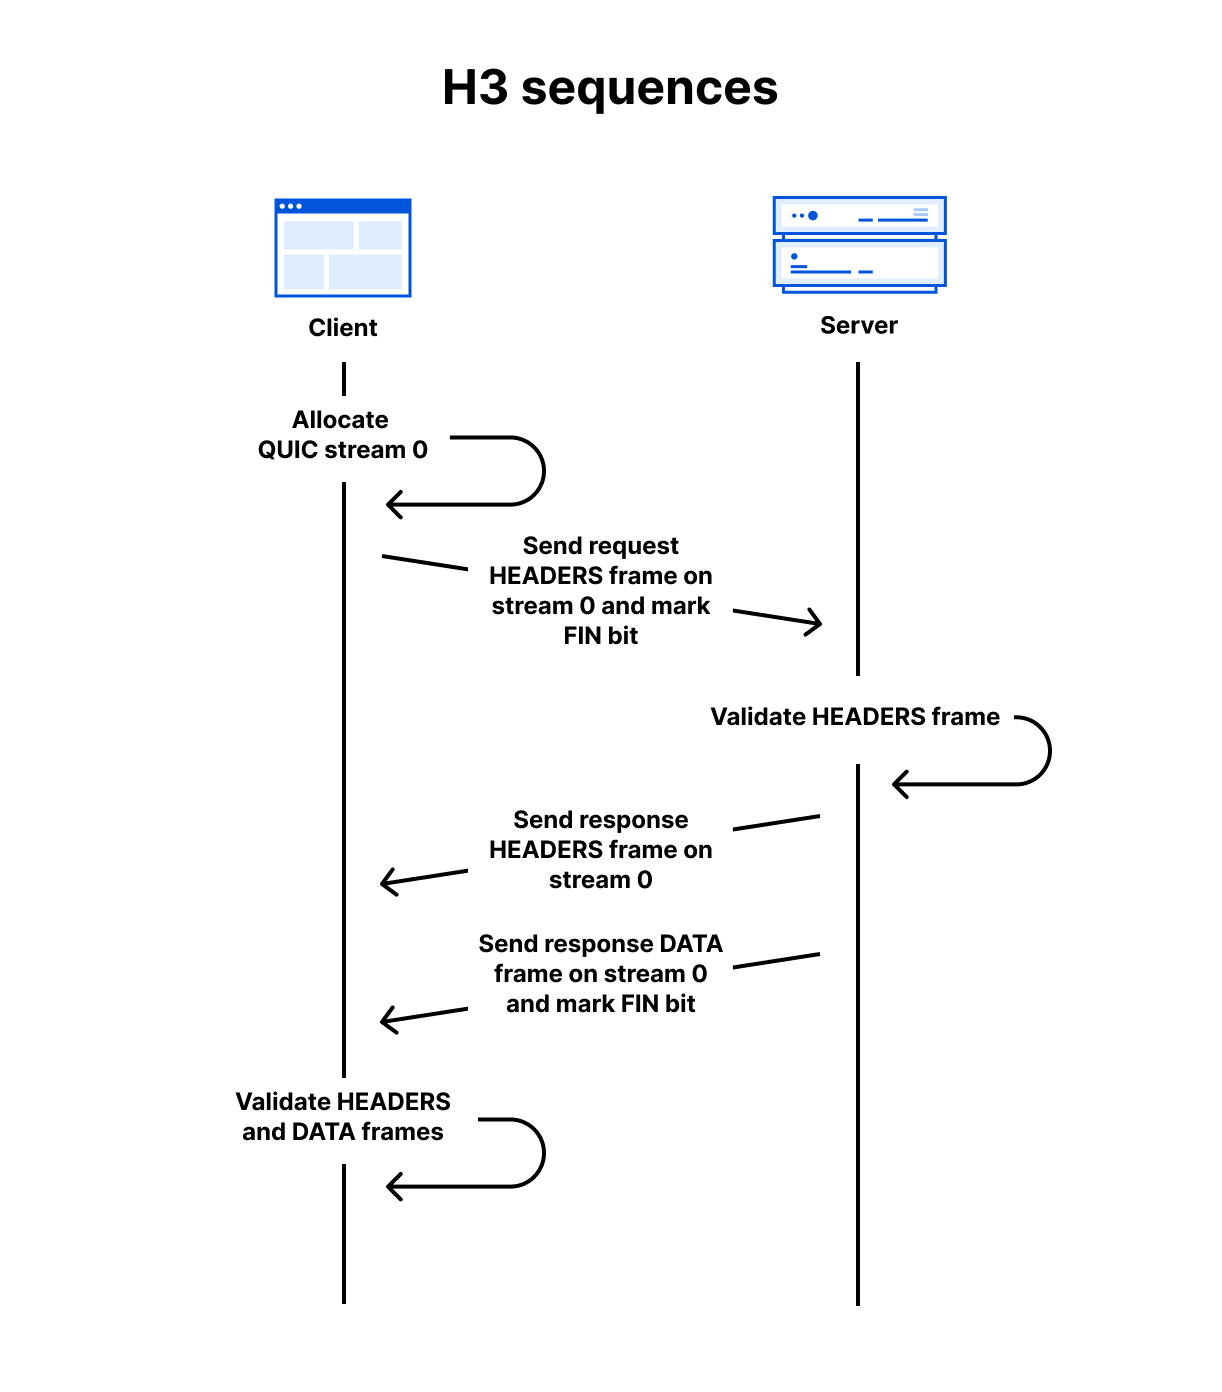
-
Client allocates the first available client-initiated bidirectional QUIC stream. (The IDs start at 0, then 4, 8, 12 and so on)
-
Client sends the request HEADERS frame on the stream and sets the stream’s FIN bit to mark the end of stream.
-
Server receives the request HEADERS frame and validates it against RFC 9114 rules. If accepted, it processes the request and prepares the response.
-
Server sends the response HEADERS frame on the same stream.
-
Server sends the response DATA frame on the same stream and sets the FIN bit.
-
Client receives the response frames and validates them. If accepted, the content is presented to the user.
At the QUIC layer, stream data is split into STREAM frames, which are sent in QUIC packets over UDP. QUIC deals with any loss detection and recovery, helping to ensure stream data is reliable. The layer cake diagram below provides a handy comparison of how HTTP/1.1, HTTP/2 and HTTP/3 use TCP, UDP and IP.
The Protocols team has a diverse set of automated test tools that exercise our ingress proxy software in order to ensure it can stand up to the deluge that the Internet can throw at it. Just like a bouncer at a nightclub front door, we need to prevent as much bad traffic as possible before it gets inside and potentially causes damage.
HTTP/2 and HTTP/3 share several concepts. When we started developing early HTTP/3 support, we’d already learned a lot from production experience with HTTP/2. While HTTP/2 addressed many issues with HTTP/1.1 (especially problems like request smuggling, caused by its ASCII-based message delineation), HTTP/2 also added complexity and new avenues for attack. Security is an ongoing process, and the Protocols team continually hardens our software and systems to threats. For example, mitigating the range of denial-of-service attacks identified by Netflix in 2019, or the HTTP/2 Rapid Reset attacks of 2023.
For testing HTTP/2, we rely on the Python Requests library for testing conventional HTTP exchanges. However, that mostly only exercises HEADERS and DATA frames. There are eight other frame types and a plethora of ways that they can interact (hence the new attack vectors mentioned above). In order to get full testing coverage, we have to break down into the lower layer h2 library, which allows exact frame-by-frame control. However, even that is not always enough. Libraries tend to want to follow the RFC rules and prevent their users from doing “the wrong thing”. This is entirely logical for most purposes. For our needs though, we need to take off the safety guards just like any potential attackers might do. We have a few cases where the best way to exercise certain traffic patterns is to handcraft HTTP/2 frames in a hex editor, store that as binary, and replay it with a tool such as OpenSSL s_client.
We knew we’d need similar testing approaches for HTTP/3. However, when we started in 2018, there weren’t many other suitable client implementations. The rate of iteration on the specifications also meant it was hard to always keep in sync. So we built tests on quiche, using a mix of our quiche-client and http3_test. Over time, the python library aioquic has matured, and we have used it to add a range of lower-layer tests that break or bend HTTP/3 rules, in order to prove our proxies are robust.
Finally, we would be remiss not to mention that all the tests in our ingress proxy are in addition to the suite of over 500 integration tests that run on the quiche project itself.
While we are happy with the coverage of our current tests, the smorgasbord of test tools makes it hard to know what to reach for when adding new tests. For example, we’ve had cases where aioquic’s safety guards prevent us from doing something, and it has needed a patch or workaround. This sort of thing requires a time investment just to debug/develop the tests.
We believe it shouldn’t take a protocol or code expert to develop what are often very simple to describe tests. While it is important to provide guide rails for the majority of conventional use cases, it is also important to provide accessible methods for taking them off.
Let’s consider a simple example. In HTTP/3 there is something called the control stream. It’s used to exchange frames such as SETTINGS, which affect the HTTP/3 connection. RFC 9114 Section 6.2.1 states:
Each side MUST initiate a single control stream at the beginning of the connection and send its SETTINGS frame as the first frame on this stream. If the first frame of the control stream is any other frame type, this MUST be treated as a connection error of type H3_MISSING_SETTINGS. Only one control stream per peer is permitted; receipt of a second stream claiming to be a control stream MUST be treated as a connection error of type H3_STREAM_CREATION_ERROR. The sender MUST NOT close the control stream, and the receiver MUST NOT request that the sender close the control stream. If either control stream is closed at any point, this MUST be treated as a connection error of type H3_CLOSED_CRITICAL_STREAM. Connection errors are described in Section 8.
There are many tests we can conjure up just from that paragraph:
-
Send a non-SETTINGS frame as the first frame on the control stream.
-
Open two control streams.
-
Open a control stream and then close it with a FIN bit.
-
Open a control stream and then reset it with a RESET_STREAM QUIC frame.
-
Wait for the peer to open a control stream and then ask for it to be reset with a STOP_SENDING QUIC frame.
All of the above actions should cause a remote peer that has implemented the RFC properly to close the connection. Therefore, it is not in the interest of the local client or server applications to ever do these actions.
Many QUIC and HTTP/3 implementations are developed as libraries that are integrated into client or server applications. There may be an extensive set of unit or integration tests of the library checking RFC rules. However, it is also important to run the same tests on the integrated assembly of library and application, since it’s all too common that an unhandled/mishandled library error can cascade to cause issues in upper layers. For instance, the HTTP/2 Rapid Reset attacks affected Cloudflare due to their impact on how one service spoke to another.
We’ve developed h3i, a command line tool and library, to make testing more accessible and maintainable for all. We started with a client that can exercise servers, since that’s what our focus has been. Future developments could support the opposite, a server that behaves in unusual ways in order to exercise clients.
Note: h3i is not intended to be a production client! Its flexibility may cause issues that are not observed in other production-oriented clients. It is also not intended to be used for any type of performance testing and measurement.
The primary purpose of the h3i command line tool is quick low-level debugging and exploratory testing. Rather than worrying about writing code or a test script, users can quickly run an ad-hoc client test against a target, guided by interactive prompts.
In the simplest case, you can think of h3i a bit like curl but with access to some extra HTTP/3 parameters. In the example below, we issue a request to https://cloudflare-quic.com/ and receive a response.
Walking through a simple GET with h3i step-by-step:
-
Grab a copy of the h3i binary either by running
cargo install h3ior cloning the quiche source repo at https://github.com/cloudflare/quiche/. Both methods assume you have some familiarity with Rust and Cargo. See the cargo documentation for more information.-
cargo installwill place the binary on your path, so you can then just run it by executingh3i. -
If running from source, navigate to the quiche/h3i directory and then use
cargo run.
-
-
Run the binary and provide the name and port of the target server. If the port is omitted, the default value 443 is assumed. E.g,
cargo run cloudflare-quic.com -
h3i then enters the action prompting phase. A series of one or more HTTP/3 actions can be queued up, such as sending frames, opening or terminating streams, or waiting on data from the server. The full set of options is documented in the readme.
-
The prompting interface adapts to keyboard inputs and supports tab completion.
-
In the example above, the
headersaction is selected, which walks through populating the fields in a HEADERS frame. It includes mandatory fields from RFC 9114 for convenience. If a test requires omitting these, theheaders_no_pseudocan be used instead.
-
-
The
commitprompt choice finalizes the action list and moves to the connection phase. h3i initiates a QUIC connection to the server identified in step 2. Once connected, actions are executed in order. -
By default, h3i reports some limited information about the frames the server sent. To get more detailed information, the
RUST_LOGenvironment can be set with eitherdebugortracelevels.
It can be fun to play around with the h3i command line tool to see how different servers respond to different combinations or sequences of actions. Occasionally, you’ll find a certain set that you want to run over and over again, or share with a friend or colleague. Having to manually enter the prompts repeatedly, or share screenshots of the h3i input can turn tedious. Fortunately, h3i records all the actions in a log file by default — the file path is printed immediately after h3i starts. The format of this file is based on qlog, an in-progress standard in development at the IETF for network protocol logging. It’s a perfect fit for our low-level needs.
Here’s an example h3i qlog file:
{"qlog_version":"0.3","qlog_format":"JSON-SEQ","title":"h3i","description":"h3i","trace":{"vantage_point":{"type":"client"},"title":"h3i","description":"h3i","configuration":{"time_offset":0.0}}}
{
  "time": 0.172783,
  "name": "http:frame_created",
  "data": {
    "stream_id": 0,
    "frame": {
      "frame_type": "headers",
      "headers": [
        {
          "name": ":method",
          "value": "GET"
        },
        {
          "name": ":authority",
          "value": "cloudflare-quic.com"
        },
        {
          "name": ":path",
          "value": "/"
        },
        {
          "name": ":scheme",
          "value": "https"
        },
        {
          "name": "user-agent",
          "value": "h3i"
        }
      ]
    }
  },
  "fin_stream": true
}
h3i logs can be replayed using the --qlog-input option. You can change the target server host and port, and keep all the same actions. However, most servers will validate the :authority pseudo-header or Host header contained in a HEADERS frame. The –replay-host-override option allows changing these fields without needing to modify the file by hand.
And yes, qlog files are human-readable text in the JSON-SEQ format. So you can also just write these by hand in the first place if you like! However, if you’re going to start writing things, maybe Rust is your preferred option…
In our previous example, we just sent a valid request so there wasn’t anything interesting to observe. Where h3i really shines is in generating traffic that isn’t RFC compliant, such as malformed HTTP messages, invalid frame sequences, or other actions on streams. This helps determine if a server is acting robustly and defensively.
Let’s explore this more with an example of HTTP content-length mismatch. RFC 9114 section 4.1.2 specifies:
A request or response that is defined as having content when it contains a Content-Length header field (Section 8.6 of [HTTP]) is malformed if the value of the Content-Length header field does not equal the sum of the DATA frame lengths received. A response that is defined as never having content, even when a Content-Length is present, can have a non-zero Content-Length header field even though no content is included in DATA frames.
Intermediaries that process HTTP requests or responses (i.e., any intermediary not acting as a tunnel) MUST NOT forward a malformed request or response. Malformed requests or responses that are detected MUST be treated as a stream error of type H3_MESSAGE_ERROR.
For malformed requests, a server MAY send an HTTP response indicating the error prior to closing or resetting the stream.
There are good reasons that the RFC is so strict about handling mismatched content lengths. They can be a vector for desynchronization attacks (similar to request smuggling), especially when a proxy is converting inbound HTTP/3 to outbound HTTP/1.1.
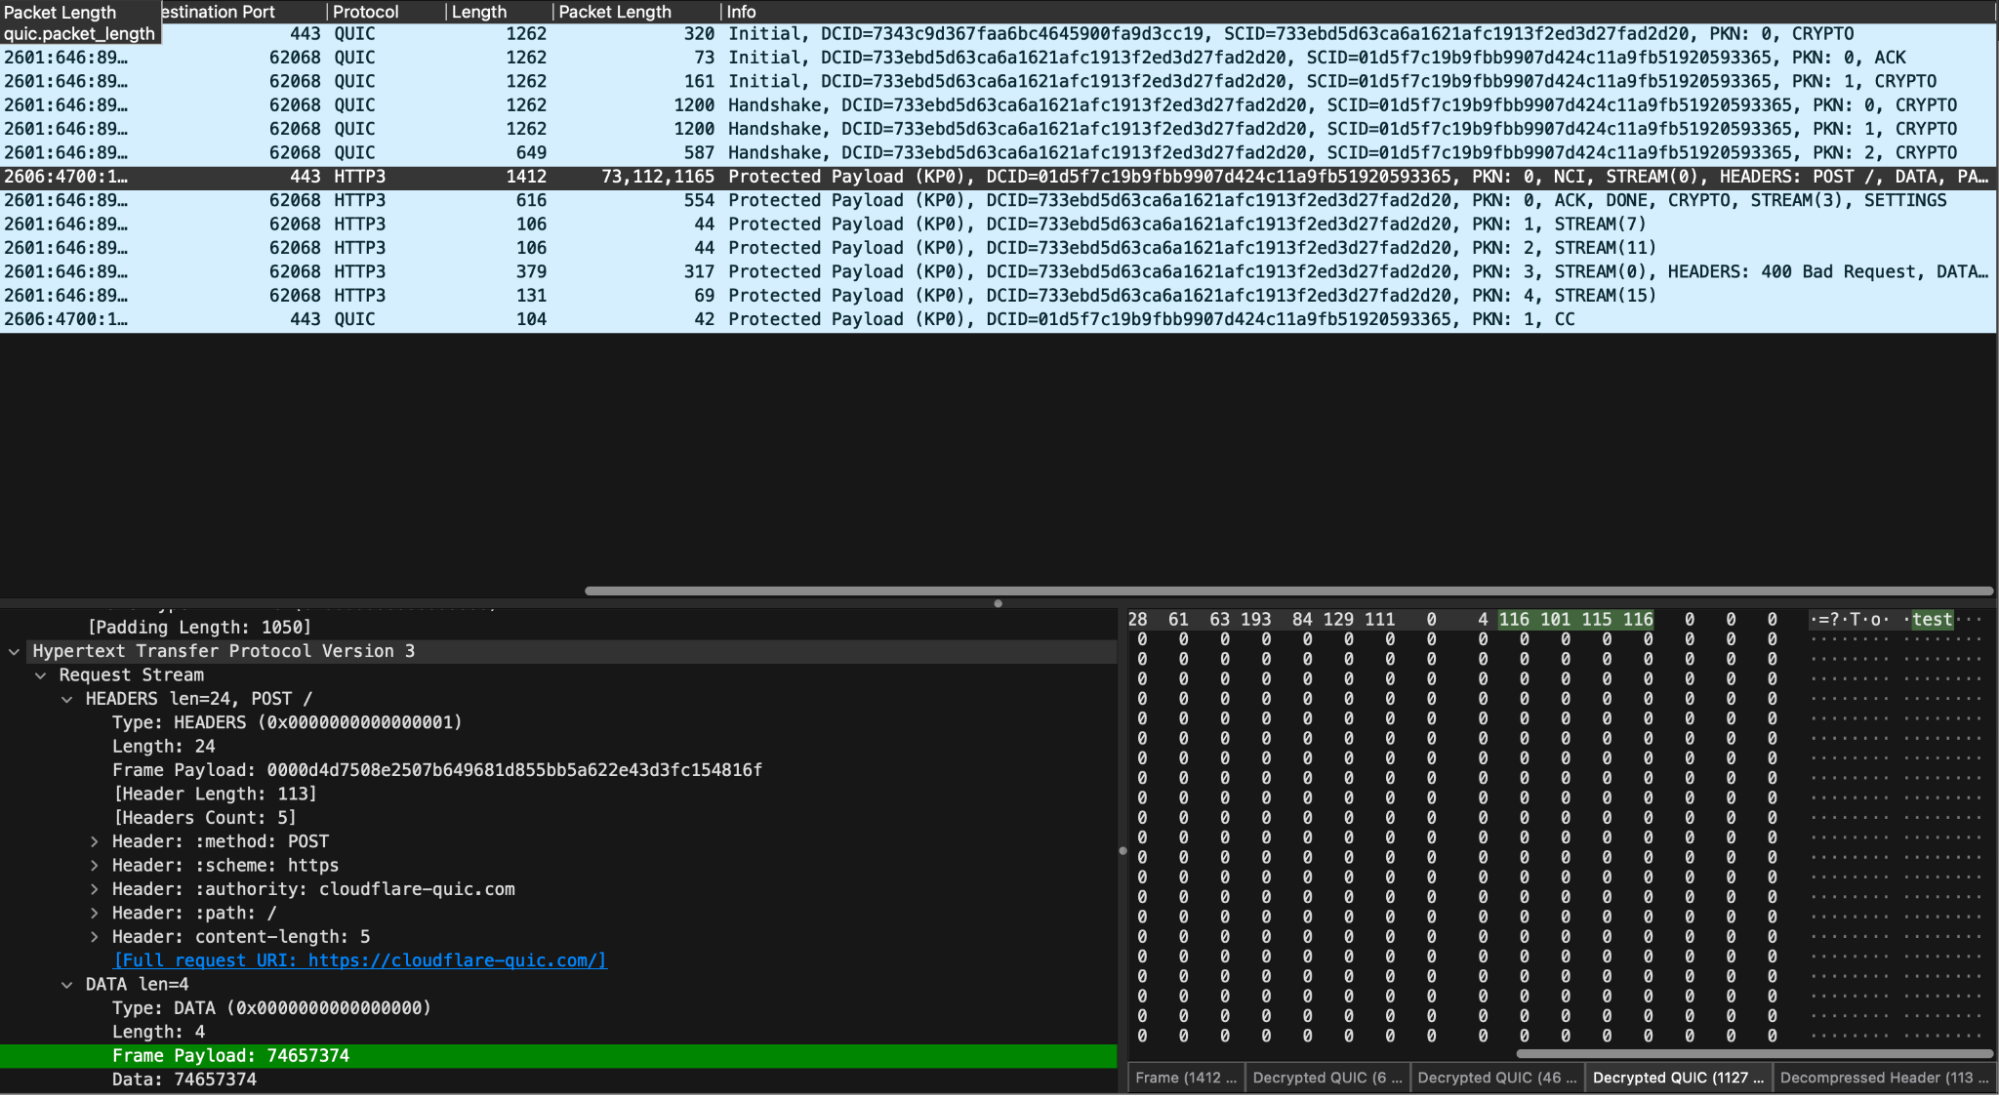
We’ve provided an example of how to use the h3i Rust library to write a tailor-made test client that sends a mismatched content length request. It sends a Content-Length header of 5, but its body payload is “test”, which is only 4 bytes. It then waits for the server to respond, after which it explicitly closes the connection by sending a QUIC CONNECTION_CLOSE frame.
When running low-level tests, it can be interesting to also take a packet capture (pcap) and observe what is happening on the wire. Since QUIC is an encrypted transport, we’ll need to use the SSLKEYLOG environment variable to capture the session keys so that tools like Wireshark can decrypt and dissect.
To follow along at home, clone a copy of the quiche repository, start a packet capture on the appropriate network interface and then run:
cd quiche/h3i
SSLKEYLOGFILE="h3i-example.keys" cargo run --example content_length_mismatch
In our decrypted capture, we see the expected sequence of handshake, request, response, and then closure.
The example is a simple binary app with a main() entry point. Let’s survey the key elements.
First, we set up an h3i configuration to a target server:
let config = Config::new()
        .with_host_port("cloudflare-quic.com".to_string())
        .with_idle_timeout(2000)
        .build()
        .unwrap();
The idle timeout is a QUIC concept which tells each endpoint when it should close the connection if the connection has been idle. This prevents endpoints from spinning idly if the peer hasn’t closed the connection. h3i’s default is 30 seconds, which can be too long for tests, so we set ours to 2 seconds here.
Next, we define a set of request headers and encode them with QPACK compression, ready to put in a HEADERS frame. Note that h3i does provide a send_headers_frame helper method which does this for you, but the example does it manually for clarity:
let headers = vec![
        Header::new(b":method", b"POST"),
        Header::new(b":scheme", b"https"),
        Header::new(b":authority", b"cloudflare-quic.com"),
        Header::new(b":path", b"/"),
        // We say that we're going to send a body with 5 bytes...
        Header::new(b"content-length", b"5"),
    ];

    let header_block = encode_header_block(&headers).unwrap();
Then, we define the set of h3i actions that we want to execute in order: send HEADERS, send a too-short DATA frame, wait for the server’s HEADERS, then close the connection.
let actions = vec![
        Action::SendHeadersFrame {
            stream_id: STREAM_ID,
            fin_stream: false,
            headers,
            frame: Frame::Headers { header_block },
        },
        Action::SendFrame {
            stream_id: STREAM_ID,
            fin_stream: true,
            frame: Frame::Data {
                // ...but, in actuality, we only send 4 bytes. This should yield a
                // 400 Bad Request response from an RFC-compliant
                // server: https://datatracker.ietf.org/doc/html/rfc9114#section-4.1.2-3
                payload: b"test".to_vec(),
            },
        },
        Action::Wait {
            wait_type: WaitType::StreamEvent(StreamEvent {
                stream_id: STREAM_ID,
                event_type: StreamEventType::Headers,
            }),
        },
        Action::ConnectionClose {
            error: quiche::ConnectionError {
                is_app: true,
                error_code: quiche::h3::WireErrorCode::NoError as u64,
                reason: vec![],
            },
        },
    ];
Finally, we’ll set things in motion with connect(), which sets up the QUIC connection, executes the actions list and collects the summary.
let summary =
        sync_client::connect(config, &actions).expect("connection failed");

    println!(
        "=== received connection summary! ===\n\n{}",
        serde_json::to_string_pretty(&summary).unwrap_or_else(|e| e.to_string())
    );
ConnectionSummary provides data about the connection, including the frames h3i received, details about why the connection closed, and connection statistics. The example prints the summary out. However, you can programmatically check it. We do this to write our own internal automation tests.
If you’re running the example, it should print something like the following:
=== received connection summary! ===

{
  "stream_map": {
    "0": [
      {
        "UNKNOWN": {
          "raw_type": 2471591231244749708,
          "payload": ""
        }
      },
      {
        "UNKNOWN": {
          "raw_type": 2031803309763646295,
          "payload": "4752454153452069732074686520776f7264"
        }
      },
      {
        "enriched_headers": {
          "header_block_len": 75,
          "headers": [
            {
              "name": ":status",
              "value": "400"
            },
            {
              "name": "server",
              "value": "cloudflare"
            },
            {
              "name": "date",
              "value": "Sat, 07 Dec 2024 00:34:12 GMT"
            },
            {
              "name": "content-type",
              "value": "text/html"
            },
            {
              "name": "content-length",
              "value": "155"
            },
            {
              "name": "cf-ray",
              "value": "8ee06dbe2923fa17-ORD"
            }
          ]
        }
      },
      {
        "DATA": {
          "payload_len": 104
        }
      },
      {
        "DATA": {
          "payload_len": 51
        }
      }
    ]
  },
  "stats": {
    "recv": 10,
    "sent": 5,
    "lost": 0,
    "retrans": 0,
    "sent_bytes": 1712,
    "recv_bytes": 4178,
    "lost_bytes": 0,
    "stream_retrans_bytes": 0,
    "paths_count": 1,
    "reset_stream_count_local": 0,
    "stopped_stream_count_local": 0,
    "reset_stream_count_remote": 0,
    "stopped_stream_count_remote": 0,
    "path_challenge_rx_count": 0
  },
  "path_stats": [
    {
      "local_addr": "0.0.0.0:64418",
      "peer_addr": "104.18.29.7:443",
      "active": true,
      "recv": 10,
      "sent": 5,
      "lost": 0,
      "retrans": 0,
      "rtt": 0.008140072,
      "min_rtt": 0.004645536,
      "rttvar": 0.004238173,
      "cwnd": 13500,
      "sent_bytes": 1712,
      "recv_bytes": 4178,
      "lost_bytes": 0,
      "stream_retrans_bytes": 0,
      "pmtu": 1350,
      "delivery_rate": 247720
    }
  ],
  "error": {
    "local_error": {
      "is_app": true,
      "error_code": 256,
      "reason": ""
    },
    "timed_out": false
  }
}
Let’s walk through the output. Up first is the StreamMap, which is a record of all frames received on each stream. We can see that we received 5 frames on stream 0: 2 UNKNOWNs, one EnrichedHeaders frame, and two DATA frames.
The UNKNOWN frames are extension frames that are unknown to h3i; the server under test is sending what are known as GREASE frames to help exercise the protocol and ensure clients are not erroring when they receive something unexpected per RFC 9114 requirements.
The EnrichedHeaders frame is essentially an HTTP/3 HEADERS frame, but with some small helpers, like one to get the response status code. The server under test sent a 400 as expected.
The DATA frames carry response body bytes. In this case, the body is the HTML required to render the Cloudflare Bad Request page (you can peek at the HTML yourself in Wireshark). We chose to omit the raw bytes from the ConnectionSummary since they may not be representable safely as text. A future improvement could be to encode the bytes in base64 or hex, in order to support tests that need to check response content.
We believe h3i is a great library for building automated tests on. You can take the above example and modify it to fit within various types of (continuous) integration tests.
We outlined earlier how the Protocols team HTTP/3 testing has organically grown to use three different frameworks. Even within those, we still didn’t have much flexibility and ease of use. Over the last year we’ve been building h3i itself and reimplementing our suite of ingress proxy test cases using the Rust library. This has helped us improve test coverage with a range of new tests not previously possible. It also surprisingly identified some problems with the old tests, particularly for some edge cases where it wasn’t clear how the old test code implementation was running under the hood.
RFC 1025 was published in 1987. Authored by Jon Postel, it discusses bake offs:
In the early days of the development of TCP and IP, when there were very few implementations and the specifications were still evolving, the only way to determine if an implementation was “correct” was to test it against other implementations and argue that the results showed your own implementation to have done the right thing. These tests and discussions could, in those early days, as likely change the specification as change the implementation.
There were a few times when this testing was focused, bringing together all known implementations and running through a set of tests in hopes of demonstrating the N squared connectivity and correct implementation of the various tricky cases. These events were called “Bake Offs”.
While nearly 4 decades old, the concept of exercising Internet protocol implementations and seeing how they compare to the specification still holds true. The QUIC WG made heavy use of interoperability testing through its standardization process. We started off sitting in a room and running tests manually by hand (or with some help from scripts). Then Marten Seemann developed the QUIC Interop Runner, which runs regular automated testing and collects and renders all the results. This has proven to be incredibly useful.

The state of HTTP/3 interoperability testing is not quite as mature. Although there are tools such as Kazu Yamamoto’s excellent h3spec (in Haskell) for testing conformance, there isn’t a similar continuous integration process of collection and rendering of results. While h3i shares similarities with h3spec, we felt it important to focus on the framework capabilities rather than creating a corpus of tests and assertions. Cloudflare is a big fan of Rust and as several teams move to Rust-based proxies, having a consistent ecosystem provides advantages (such as developer velocity).
We certainly feel there is a great opportunity for continued collaboration and cross-pollination between projects in the QUIC and HTTP space. For example, h3i might provide a suitable basis to build another tool (or set of scripts) to run bake offs or interop tests. Perhaps it even makes sense to have a common collection of test cases owned by the community, that can be specialized to the most appropriate or preferred tooling. This topic was recently presented at the HTTP Workshop 2024 by Mohammed Al-Sahaf, and it excites us to see new potential directions of testing improvements.
When using any tools or methods for protocol testing, we encourage responsible handling of security-related matters. If you believe you may have identified a vulnerability in an IETF Internet protocol itself, please follow the IETF’s reporting guidance. If you believe you may have discovered an implementation vulnerability in a product, open source project, or service using QUIC or HTTP, then you should report these directly to the responsible party. Implementers or operators often provide their own publicly-available guidance and contact details to send reports. For example, the Cloudflare quiche security policy is available in the Security tab of the GitHub repository.
Cloudflare takes testing very seriously. While h3i has a limited feature set as a test HTTP/3 client, we believe it provides a strong framework that can be extended to a wider range of different cases and different protocols. For example, we’d like to add support for low-level HTTP/2.
We’ve designed h3i to integrate into a wide range of testing methodologies, from manual ad-hoc testing, to native Rust tests, to conformance testbenches built with scripting languages. We’ve had great success migrating our existing zoo of test tools to a single one that is more accessible and easier to maintain.
Now that you’ve read about h3i’s capabilities, it’s left as an exercise to the reader to go back to the example of HTTP/3 control streams and consider how you could write tests to exercise a server.
We encourage the community to experiment with h3i and provide feedback, and propose ideas or contributions to the GitHub repository as issues or Pull Requests.
