Tag Archives: CodePipeline

Best Practices to help secure your container image build pipeline by using AWS Signer

Post Syndicated from Jorge Castillo original https://aws.amazon.com/blogs/security/best-practices-to-help-secure-your-container-image-build-pipeline-by-using-aws-signer/

AWS Signer is a fully managed code-signing service to help ensure the trust and integrity of your code. It helps you verify that the code comes from a trusted source and that an unauthorized party has not accessed it. AWS Signer manages code signing certificates and public and private keys, which can reduce the overhead of your public key infrastructure (PKI) management. It also provides a set of features to simplify lifecycle management of your keys and certificates so that you can focus on signing and verifying your code.

In June 2023, AWS announced Container Image Signing with AWS Signer and Amazon EKS, a new capability that gives you native AWS support for signing and verifying container images stored in Amazon Elastic Container Registry (Amazon ECR).

Containers and AWS Lambda functions are popular serverless compute solutions for applications built on the cloud. By using AWS Signer, you can verify that the software running in these workloads originates from a trusted source.

In this blog post, you will learn about the benefits of code signing for software security, governance, and compliance needs. Flexible continuous integration and continuous delivery (CI/CD) integration, management of signing identities, and native integration with other AWS services can help you simplify code security through automation.

Background

Code signing is an important part of the software supply chain. It helps ensure that the code is unaltered and comes from an approved source.

To automate software development workflows, organizations often implement a CI/CD pipeline to push, test, and deploy code effectively. You can integrate code signing into the workflow to help prevent untrusted code from being deployed, as shown in Figure 1. Code signing in the pipeline can provide you with different types of information, depending on how you decide to use the functionality. For example, you can integrate code signing into the build stage to attest that the code was scanned for vulnerabilities, had its software bill of materials (SBOM) approved internally, and underwent unit and integration testing. You can also use code signing to verify who has pushed or published the code, such as a developer, team, or organization. You can verify each of these steps separately by including multiple signing stages in the pipeline. For more information on the value provided by container image signing, see Cryptographic Signing for Containers.
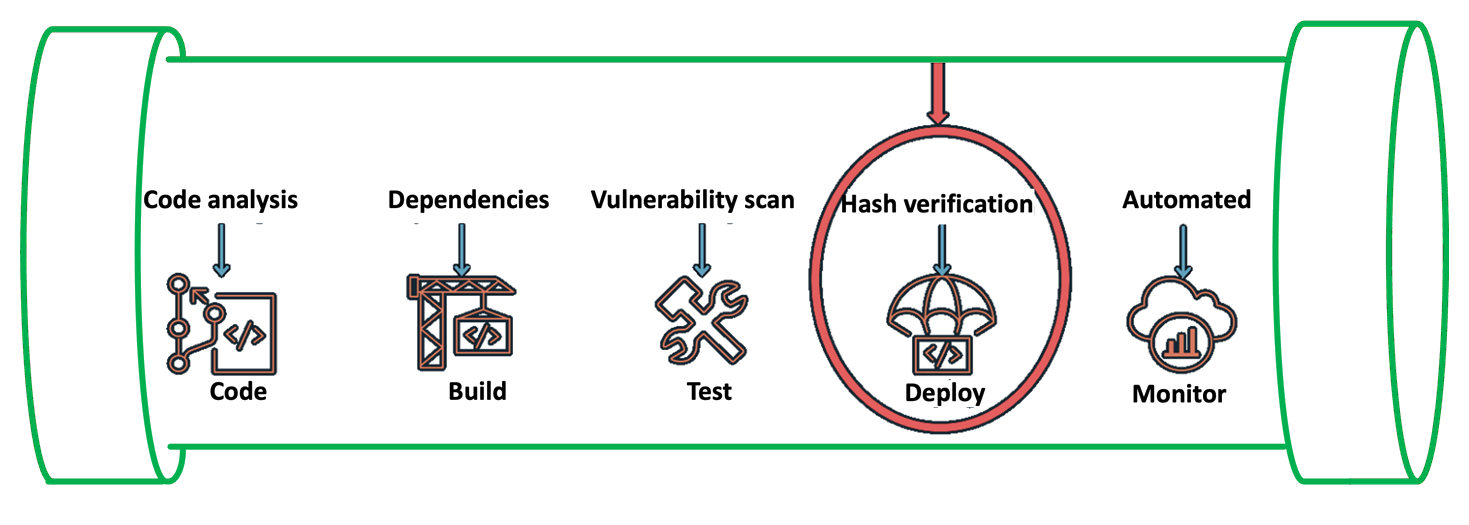
Figure 1: Security IN the pipeline

Figure 1: Security IN the pipeline

In the following section, we will walk you through a simple implementation of image signing and its verification for Amazon Elastic Kubernetes Service (Amazon EKS) deployment. The signature attests that the container image went through the pipeline and came from a trusted source. You can use this process in more complex scenarios by adding multiple AWS CodeBuild code signing stages that make use of various AWS Signer signing profiles.

Services and tools

In this section, we discuss the various AWS services and third-party tools that you need for this solution.

CI/CD services

For the CI/CD pipeline, you will use the following AWS services:

  • AWS CodePipeline — a fully managed continuous delivery service that you can use to automate your release pipelines for fast and reliable application and infrastructure updates.
  • AWS CodeCommit — a fully managed source control service that hosts secure Git-based repositories.
  • AWS Signer — a fully managed code-signing service that you can use to help ensure the trust and integrity of your code.
  • AWS CodeBuild — A fully managed continuous integration service that compiles source code, runs tests, and produces software packages that are ready to deploy.

Container services

You will use the following AWS services for containers for this walkthrough:

  • Amazon EKS — a managed Kubernetes service to run Kubernetes in the AWS Cloud and on-premises data centers.
  • Amazon ECR — a fully managed container registry for high-performance hosting, so that you can reliably deploy application images and artifacts anywhere.

Verification tools

The following are publicly available sign verification tools that we integrated into the pipeline for this post, but you could integrate other tools that meet your specific requirements.

  • Notation — A publicly available Notary project within the Cloud Native Computing Foundation (CNCF). With contributions from AWS and others, Notary is an open standard and client implementation that allows for vendor-specific plugins for key management and other integrations. AWS Signer manages signing keys, key rotation, and PKI management for you, and is integrated with Notation through a curated plugin that provides a simple client-based workflow.
  • Kyverno — A publicly available policy engine that is designed for Kubernetes.

Solution overview
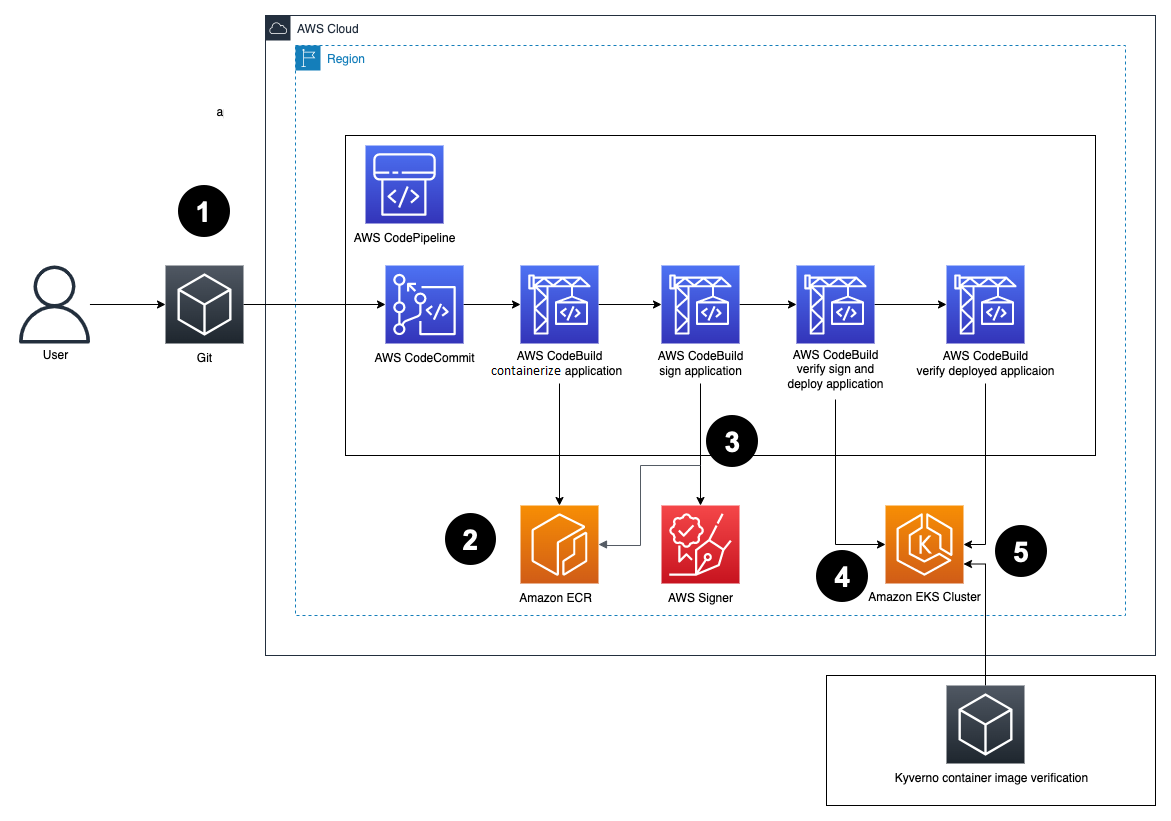
Figure 2: Solution architecture

Figure 2: Solution architecture

Here’s how the solution works, as shown in Figure 2:

  1. Developers push Dockerfiles and application code to CodeCommit. Each push to CodeCommit starts a pipeline hosted on CodePipeline.
  2. CodeBuild packages the build, containerizes the application, and stores the image in the ECR registry.
  3. CodeBuild retrieves a specific version of the image that was previously pushed to Amazon ECR. AWS Signer and Notation sign the image by using the signing profile established previously, as shown in more detail in Figure 3.
    Figure 3: Signing images described

    Figure 3: Signing images described

  4. AWS Signer and Notation verify the signed image version and then deploy it to an Amazon EKS cluster.

    If the image has not previously been signed correctly, the CodeBuild log displays an output similar to the following:

    Error: signature verification failed: no signature is associated with "<AWS_ACCOUNT_ID>.dkr.ecr.<AWS_REGION>.amazonaws.com/hello-server@<DIGEST>" , make sure the artifact was signed successfully

    If there is a signature mismatch, the CodeBuild log displays an output similar to the following:

    Error: signature verification failed for all the signatures associated with <AWS_ACCOUNT_ID>.dkr.ecr.<AWS_REGION>.amazonaws.com/hello-server@<DIGEST>

  5. Kyverno verifies the container image signature for use in the Amazon EKS cluster.

    Figure 4 shows steps 4 and 5 in more detail.

    Figure 4: Verification of image signature for Kubernetes

    Figure 4: Verification of image signature for Kubernetes

Prerequisites

Before getting started, make sure that you have the following prerequisites in place:

  • An Amazon EKS cluster provisioned.
  • An Amazon ECR repository for your container images.
  • A CodeCommit repository with your application code. For more information, see Create an AWS CodeCommit repository.
  • A CodePipeline pipeline deployed with the CodeCommit repository as the code source and four CodeBuild stages: Build, ApplicationSigning, ApplicationDeployment, and VerifyContainerSign. The CI/CD pipeline should look like that in Figure 5.
    Figure 5: CI/CD pipeline with CodePipeline

    Figure 5: CI/CD pipeline with CodePipeline

Walkthrough

You can create a signing profile by using the AWS Command Line Interface (AWS CLI), AWS Management Console or the AWS Signer API. In this section, we’ll walk you through how to sign the image by using the AWS CLI.

To sign the image (AWS CLI)

  1. Create a signing profile for each identity.
    # Create an AWS Signer signing profile with default validity period
    $ aws signer put-signing-profile \
        --profile-name build_signer \
        --platform-id Notation-OCI-SHA384-ECDSA

  2. Sign the image from the CodeBuild build—your buildspec.yaml configuration file should look like the following:
    version: 0.2
    
    phases:
      pre_build:
        commands:
          - aws ecr get-login-password --region $AWS_REGION | docker login --username AWS --password-stdin $AWS_ACCOUNT_ID.dkr.ecr.us-east-1.amazonaws.com
          - REPOSITORY_URI=$AWS_ACCOUNT_ID.dkr.ecr. $AWS_REGION.amazonaws.com/hello-server
          - COMMIT_HASH=$(echo $CODEBUILD_RESOLVED_SOURCE_VERSION | cut -c 1-7)
          - IMAGE_TAG=${COMMIT_HASH:=latest}
          - DIGEST=$(docker manifest inspect $AWS_ACCOUNT_ID.dkr.ecr. $AWS_REGION.amazonaws.com/hello-server:$IMAGE_TAG -v | jq -r '.Descriptor.digest')
          - echo $DIGEST
          
          - wget https://d2hvyiie56hcat.cloudfront.net/linux/amd64/installer/rpm/latest/aws-signer-notation-cli_amd64.rpm
          - sudo rpm -U aws-signer-notation-cli_amd64.rpm
          - notation version
          - notation plugin ls
      build:
        commands:
          - notation sign $REPOSITORY_URI@$DIGEST --plugin com.amazonaws.signer.notation.plugin --id arn:aws:signer: $AWS_REGION:$AWS_ACCOUNT_ID:/signing-profiles/notation_container_signing
          - notation inspect $AWS_ACCOUNT_ID.dkr.ecr. $AWS_REGION.amazonaws.com/hello-server@$DIGEST
          - notation verify $AWS_ACCOUNT_ID.dkr.ecr. $AWS_REGION.amazonaws.com/hello-server@$DIGEST
      post_build:
        commands:
          - printf '[{"name":"hello-server","imageUri":"%s"}]' $REPOSITORY_URI:$IMAGE_TAG > imagedefinitions.json
    artifacts:
        files: imagedefinitions.json

    The commands in the buildspec.yaml configuration file do the following:

    1. Sign you in to Amazon ECR to work with the Docker images.
    2. Reference the specific image that will be signed by using the commit hash (or another versioning strategy that your organization uses). This gets the digest.
    3. Sign the container image by using the notation sign command. This command uses the container image digest, instead of the image tag.
    4. Install the Notation CLI. In this example, you use the installer for Linux. For a list of installers for various operating systems, see the AWS Signer Developer Guide,
    5. Sign the image by using the notation sign command.
    6. Inspect the signed image to make sure that it was signed successfully by using the notation inspect command.
    7. To verify the signed image, use the notation verify command. The output should look similar to the following:
      Successfully verified signature for <AWS_ACCOUNT_ID>.dkr.ecr.<AWS_REGION>.amazonaws.com/hello-server@<DIGEST>

  3. (Optional) For troubleshooting, print the notation policy from the pipeline itself to check that it’s working as expected by running the notation policy show command:
    notation policy show

    For this, include the command in the pre_build phase after the notation version command in the buildspec.yaml configuration file.

    After the notation policy show command runs, CodeBuild logs should display an output similar to the following:

    {
      "version": "1.0",
      "trustPolicies": [
        {
          "name": "aws-signer-tp",
          "registryScopes": [
          "<AWS_ACCOUNT_ID>.dkr.ecr.<AWS_REGION>.amazonaws.com/hello-server"
          ],
          "signatureVerification": {
            "level": "strict"
          },
          "trustStores": [
            "signingAuthority:aws-signer-ts"
          ],
          "trustedIdentities": [
            "arn:aws:signer:<AWS_REGION>:<AWS_ACCOUNT_ID>:/signing-profiles/notation_test"
          ]
        }
      ]
    }

  4. To verify the image in Kubernetes, set up both Kyverno and the Kyverno-notation-AWS Signer in your EKS cluster. To get started with Kyverno and the Kyverno-notation-AWS Signer solution, see the installation instructions.
  5. After you install Kyverno and Kyverno-notation-AWS Signer, verify that the controller is running—the STATUS should show Running:
    $ kubectl get pods -n kyverno-notation-aws -w
    
    NAME                                    READY   STATUS    RESTARTS   AGE
    kyverno-notation-aws-75b7ddbcfc-kxwjh   1/1     Running   0          6h58m

  6. Configure the CodeBuild buildspec.yaml configuration file to verify that the images deployed in the cluster have been previously signed. You can use the following code to configure the buildspec.yaml file.
    version: 0.2
    
    phases:
      pre_build:
        commands:
          - echo Logging in to Amazon ECR...
          - aws --version
          - REPOSITORY_URI=${REPO_ECR}
          - COMMIT_HASH=$(echo $CODEBUILD_RESOLVED_SOURCE_VERSION | cut -c 1-7)
          - IMAGE_TAG=${COMMIT_HASH:=latest}
          - curl -LO "https://dl.k8s.io/release/$(curl -L -s https://dl.k8s.io/release/stable.txt)/bin/linux/amd64/kubectl"
          - curl -LO "https://dl.k8s.io/release/$(curl -L -s https://dl.k8s.io/release/stable.txt)/bin/linux/amd64/kubectl.sha256"
          - echo "$(cat kubectl.sha256)  kubectl" | sha256sum --check
          — chmod +x kubectl
          - mv ./kubectl /usr/local/bin/kubectl
          - kubectl version --client
      build:
        commands:
          - echo Build started on `date`
          - aws eks update-kubeconfig -—name ${EKS_NAME} —-region ${AWS_DEFAULT_REGION}
          - echo Deploying Application
          - sed -i '/image:\ image/image:\ '\"${REPOSITORY_URI}:${IMAGE_TAG}\"'/g' deployment.yaml
          - kubectl apply -f deployment.yaml 
          - KYVERNO_NOTATION_POD=$(kubectl get pods --no-headers -o custom-columns=":metadata.name" -n kyverno-notation-aws)
          - STATUS=$(kubectl logs --tail=1 kyverno-notation-aws-75b7ddbcfc-kxwjh -n kyverno-notation-aws | grep $IMAGE_TAG | grep ERROR)
          - |
            if [[ $STATUS ]]; then
              echo "There is an error"
              exit 1
            else
              echo "No Error"
            fi
      post_build:
        commands:
          - printf '[{"name":"hello-server","imageUri":"%s"}]' $REPOSITORY_URI:$IMAGE_TAG > imagedefinitions.json
    artifacts:
        files: imagedefinitions.json

    The commands in the buildspec.yaml configuration file do the following:

    1. Set up the environment variables, such as the ECR repository URI and the Commit hash, to build the image tag. The kubectl tool will use this later to reference the container image that will be deployed with the Kubernetes objects.
    2. Use kubectl to connect to the EKS cluster and insert the container image reference in the deployment.yaml file.
    3. After the container is deployed, you can observe the kyverno-notation-aws controller and access its logs. You can check if the deployed image is signed. If the logs contain an error, stop the pipeline run with an error code, do a rollback to a previous version, or delete the deployment if you detect that the image isn’t signed.

Decommission the AWS resources

If you no longer need the resources that you provisioned for this post, complete the following steps to delete them.

To clean up the resources

  1. Delete the EKS cluster and delete the ECR image.
  2. Delete the IAM roles and policies that you used for the configuration of IAM roles for service accounts.
  3. Revoke the AWS Signer signing profile that you created and used for the signing process by running the following command in the AWS CLI:
    $ aws signer revoke-signing-profile

  4. Delete signatures from the Amazon ECR repository. Make sure to replace <AWS_ACCOUNT_ID> and <AWS_REGION> with your own information.
    # Use oras CLI, with Amazon ECR Docker Credential Helper, to delete signature
    $ oras manifest delete <AWS_ACCOUNT_ID>.dkr.ecr.<AWS_REGION>.amazonaws.com/pause@sha256:ca78e5f730f9a789ef8c63bb55275ac12dfb9e8099e6a0a64375d8a95ed501c4

Note: Using the ORAS project’s oras client, you can delete signatures and other reference type artifacts. It implements deletion by first removing the reference from an index, and then deleting the manifest.

Conclusion

In this post, you learned how to implement container image signing in a CI/CD pipeline by using AWS services such as CodePipeline, CodeBuild, Amazon ECR, and AWS Signer along with publicly available tools such as Notary and Kyverno. By implementing mandatory image signing in your pipelines, you can confirm that only validated and authorized container images are deployed to production. Automating the signing process and signature verification is vital to help securely deploy containers at scale. You also learned how to verify signed images both during deployment and at runtime in Kubernetes. This post provides valuable insights for anyone looking to add image signing capabilities to their CI/CD pipelines on AWS to provide supply chain security assurances. The combination of AWS managed services and publicly available tools provides a robust implementation.

 
If you have feedback about this post, submit comments in the Comments section below. If you have questions about this post, contact AWS Support.

Want more AWS Security news? Follow us on Twitter.

Jorge Castillo

Jorge Castillo

Jorge is a Solutions Architect at AWS for the public sector based in Santiago, Chile. He focuses on security and compliance and works with many government agencies.

Joseph Rodríguez

Joseph Rodríguez

Joseph is a Solutions Architect at AWS for the public sector based in Chile. Joseph has collaborated with multiple public sector institutions on cloud technology adoption, with a focus on containers. He previously worked as a Software Architect at financial services institutions.

Monika Vu Minh

Monika Vu Minh

Monika is a ProServe Security Consultant at AWS based in London. She works with financial services customers to help them follow security best practices on AWS. In her free time, she likes painting, cooking, and travelling.

Blue/Green deployments using AWS CDK Pipelines and AWS CodeDeploy

Post Syndicated from Luiz Decaro original https://aws.amazon.com/blogs/devops/blue-green-deployments-using-aws-cdk-pipelines-and-aws-codedeploy/

Customers often ask for help with implementing Blue/Green deployments to Amazon Elastic Container Service (Amazon ECS) using AWS CodeDeploy. Their use cases usually involve cross-Region and cross-account deployment scenarios. These requirements are challenging enough on their own, but in addition to those, there are specific design decisions that need to be considered when using CodeDeploy. These include how to configure CodeDeploy, when and how to create CodeDeploy resources (such as Application and Deployment Group), and how to write code that can be used to deploy to any combination of account and Region.

Today, I will discuss those design decisions in detail and how to use CDK Pipelines to implement a self-mutating pipeline that deploys services to Amazon ECS in cross-account and cross-Region scenarios. At the end of this blog post, I also introduce a demo application, available in Java, that follows best practices for developing and deploying cloud infrastructure using AWS Cloud Development Kit (AWS CDK).

The Pipeline

CDK Pipelines is an opinionated construct library used for building pipelines with different deployment engines. It abstracts implementation details that developers or infrastructure engineers need to solve when implementing a cross-Region or cross-account pipeline. For example, in cross-Region scenarios, AWS CloudFormation needs artifacts to be replicated to the target Region. For that reason, AWS Key Management Service (AWS KMS) keys, an Amazon Simple Storage Service (Amazon S3) bucket, and policies need to be created for the secondary Region. This enables artifacts to be moved from one Region to another. In cross-account scenarios, CodeDeploy requires a cross-account role with access to the KMS key used to encrypt configuration files. This is the sort of detail that our customers want to avoid dealing with manually.

AWS CodeDeploy is a deployment service that automates application deployment across different scenarios. It deploys to Amazon EC2 instances, On-Premises instances, serverless Lambda functions, or Amazon ECS services. It integrates with AWS Identity and Access Management (AWS IAM), to implement access control to deploy or re-deploy old versions of an application. In the Blue/Green deployment type, it is possible to automate the rollback of a deployment using Amazon CloudWatch Alarms.

CDK Pipelines was designed to automate AWS CloudFormation deployments. Using AWS CDK, these CloudFormation deployments may include deploying application software to instances or containers. However, some customers prefer using CodeDeploy to deploy application software. In this blog post, CDK Pipelines will deploy using CodeDeploy instead of CloudFormation.

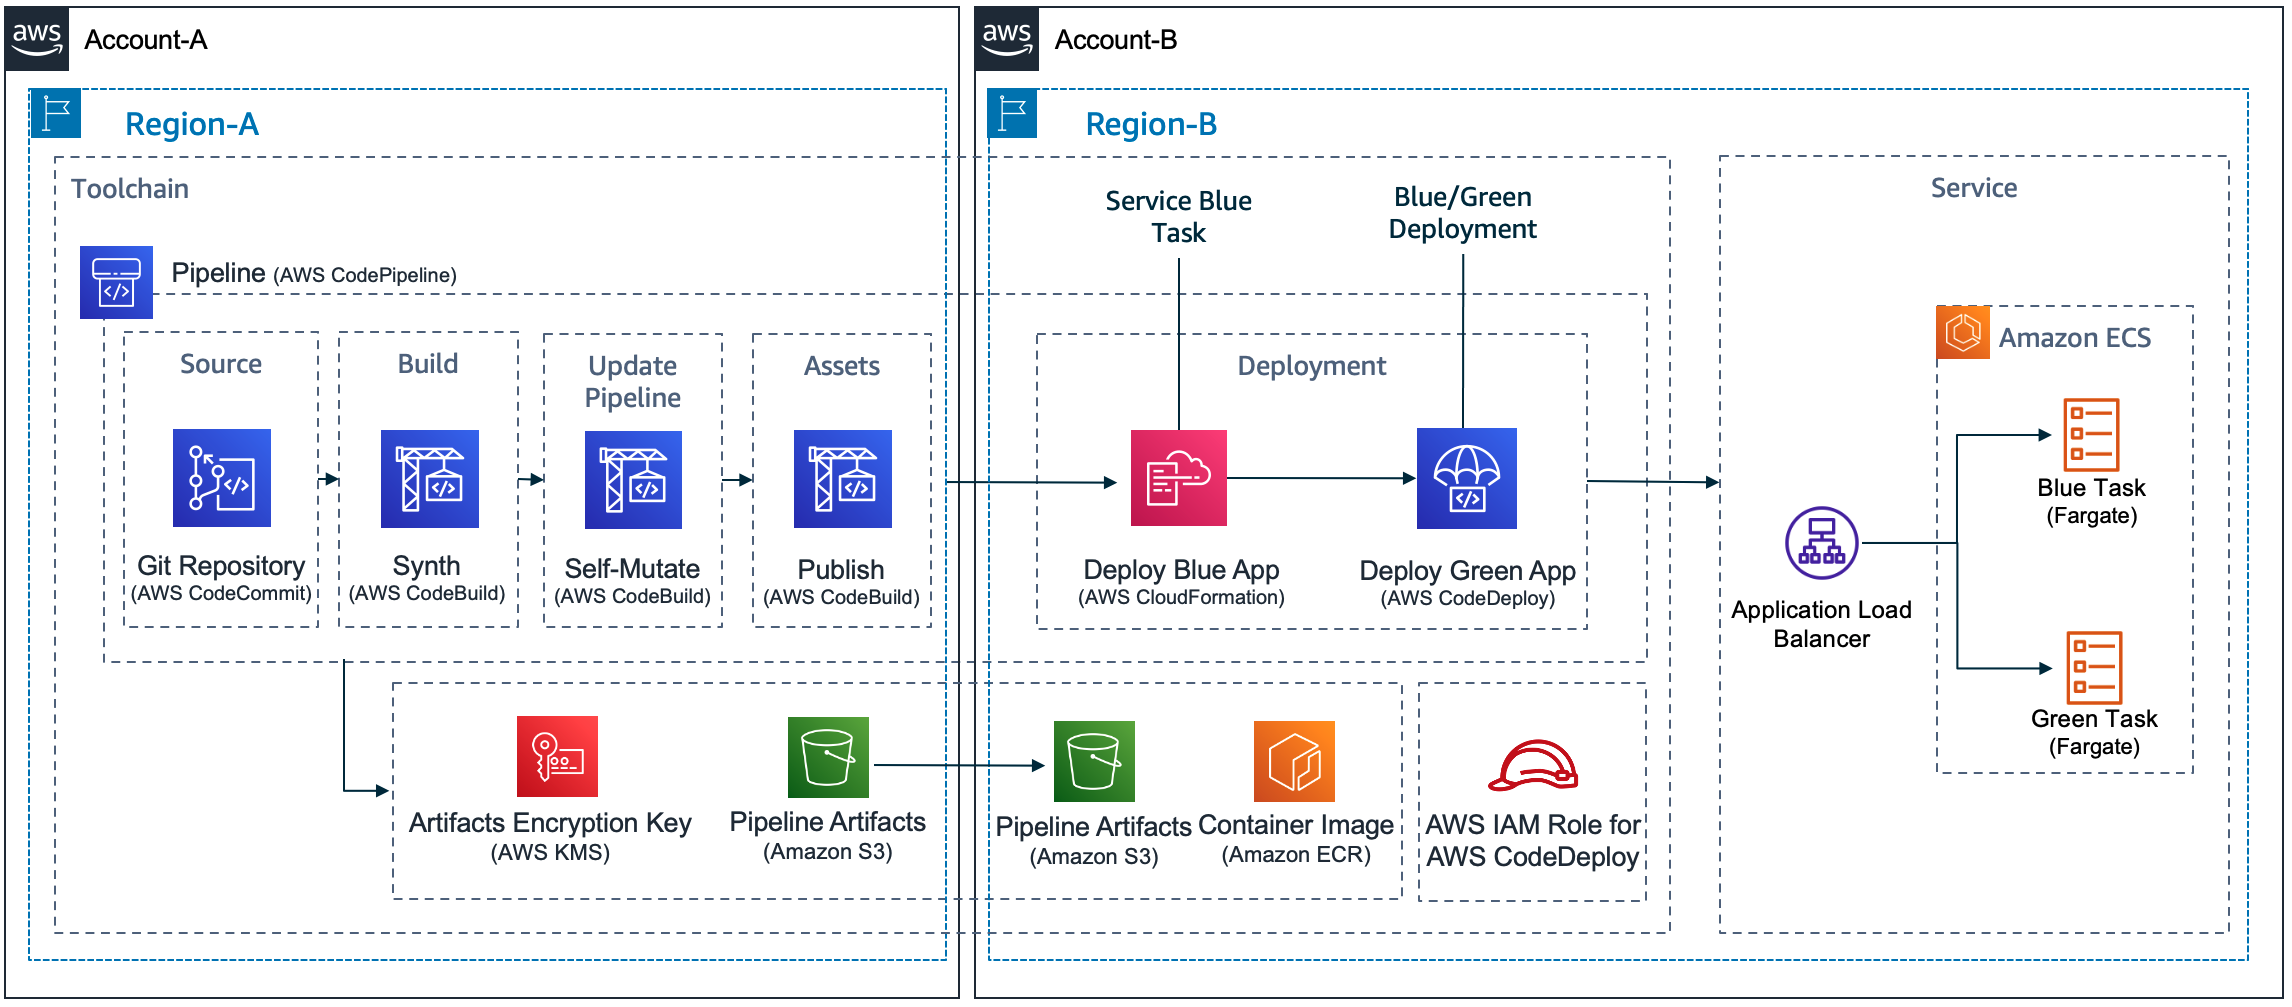
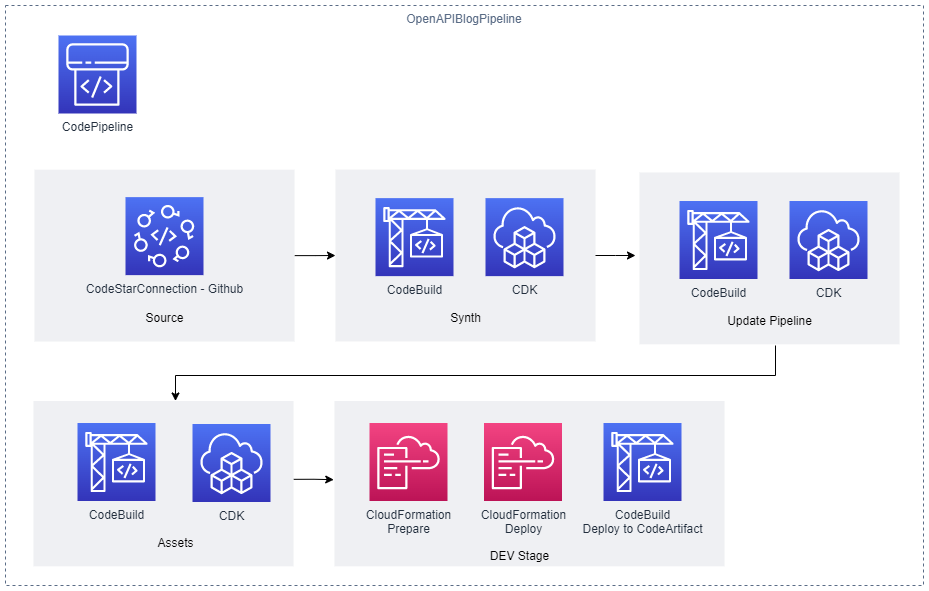
A pipeline build with CDK Pipelines that deploys to Amazon ECS using AWS CodeDeploy. It contains at least 5 stages: Source, Build, UpdatePipeline, Assets and at least one Deployment stage.

Design Considerations

In this post, I’m considering the use of CDK Pipelines to implement different use cases for deploying a service to any combination of accounts (single-account & cross-account) and regions (single-Region & cross-Region) using CodeDeploy. More specifically, there are four problems that need to be solved:

CodeDeploy Configuration

The most popular options for implementing a Blue/Green deployment type using CodeDeploy are using CloudFormation Hooks or using a CodeDeploy construct. I decided to operate CodeDeploy using its configuration files. This is a flexible design that doesn’t rely on using custom resources, which is another technique customers have used to solve this problem. On each run, a pipeline pushes a container to a repository on Amazon Elastic Container Registry (ECR) and creates a tag. CodeDeploy needs that information to deploy the container.

I recommend creating a pipeline action to scan the AWS CDK cloud assembly and retrieve the repository and tag information. The same action can create the CodeDeploy configuration files. Three configuration files are required to configure CodeDeploy: appspec.yaml, taskdef.json and imageDetail.json. This pipeline action should be executed before the CodeDeploy deployment action. I recommend creating template files for appspec.yaml and taskdef.json. The following script can be used to implement the pipeline action:

##
#!/bin/sh
#
# Action Configure AWS CodeDeploy
# It customizes the files template-appspec.yaml and template-taskdef.json to the environment
#
# Account = The target Account Id
# AppName = Name of the application
# StageName = Name of the stage
# Region = Name of the region (us-east-1, us-east-2)
# PipelineId = Id of the pipeline
# ServiceName = Name of the service. It will be used to define the role and the task definition name
#
# Primary output directory is codedeploy/. All the 3 files created (appspec.json, imageDetail.json and 
# taskDef.json) will be located inside the codedeploy/ directory
#
##
Account=$1
Region=$2
AppName=$3
StageName=$4
PipelineId=$5
ServiceName=$6
repo_name=$(cat assembly*$PipelineId-$StageName/*.assets.json | jq -r '.dockerImages[] | .destinations[] | .repositoryName' | head -1) 
tag_name=$(cat assembly*$PipelineId-$StageName/*.assets.json | jq -r '.dockerImages | to_entries[0].key')  
echo ${repo_name} 
echo ${tag_name} 
printf '{"ImageURI":"%s"}' "$Account.dkr.ecr.$Region.amazonaws.com/${repo_name}:${tag_name}" > codedeploy/imageDetail.json                     
sed 's#APPLICATION#'$AppName'#g' codedeploy/template-appspec.yaml > codedeploy/appspec.yaml 
sed 's#APPLICATION#'$AppName'#g' codedeploy/template-taskdef.json | sed 's#TASK_EXEC_ROLE#arn:aws:iam::'$Account':role/'$ServiceName'#g' | sed 's#fargate-task-definition#'$ServiceName'#g' > codedeploy/taskdef.json 
cat codedeploy/appspec.yaml
cat codedeploy/taskdef.json
cat codedeploy/imageDetail.json

Using a Toolchain

A good strategy is to encapsulate the pipeline inside a Toolchain to abstract how to deploy to different accounts and regions. This helps decoupling clients from the details such as how the pipeline is created, how CodeDeploy is configured, and how cross-account and cross-Region deployments are implemented. To create the pipeline, deploy a Toolchain stack. Out-of-the-box, it allows different environments to be added as needed. Depending on the requirements, the pipeline may be customized to reflect the different stages or waves that different components might require. For more information, please refer to our best practices on how to automate safe, hands-off deployments and its reference implementation.

In detail, the Toolchain stack follows the builder pattern used throughout the CDK for Java. This is a convenience that allows complex objects to be created using a single statement:

 Toolchain.Builder.create(app, Constants.APP_NAME+"Toolchain")
        .stackProperties(StackProps.builder()
                .env(Environment.builder()
                        .account(Demo.TOOLCHAIN_ACCOUNT)
                        .region(Demo.TOOLCHAIN_REGION)
                        .build())
                .build())
        .setGitRepo(Demo.CODECOMMIT_REPO)
        .setGitBranch(Demo.CODECOMMIT_BRANCH)
        .addStage(
                "UAT",
                EcsDeploymentConfig.CANARY_10_PERCENT_5_MINUTES,
                Environment.builder()
                        .account(Demo.SERVICE_ACCOUNT)
                        .region(Demo.SERVICE_REGION)
                        .build())                                                                                                             
        .build();

In the statement above, the continuous deployment pipeline is created in the TOOLCHAIN_ACCOUNT and TOOLCHAIN_REGION. It implements a stage that builds the source code and creates the Java archive (JAR) using Apache Maven.  The pipeline then creates a Docker image containing the JAR file.

The UAT stage will deploy the service to the SERVICE_ACCOUNT and SERVICE_REGION using the deployment configuration CANARY_10_PERCENT_5_MINUTES. This means 10 percent of the traffic is shifted in the first increment and the remaining 90 percent is deployed 5 minutes later.
To create additional deployment stages, you need a stage name, a CodeDeploy deployment configuration and an environment where it should deploy the service. As mentioned, the pipeline is, by default, a self-mutating pipeline. For example, to add a Prod stage, update the code that creates the Toolchain object and submit this change to the code repository. The pipeline will run and update itself adding a Prod stage after the UAT stage. Next, I show in detail the statement used to add a new Prod stage. The new stage deploys to the same account and Region as in the UAT environment:

... 
        .addStage(
                "Prod",
                EcsDeploymentConfig.CANARY_10_PERCENT_5_MINUTES,
                Environment.builder()
                        .account(Demo.SERVICE_ACCOUNT)
                        .region(Demo.SERVICE_REGION)
                        .build())                                                                                                                                      
        .build();

In the statement above, the Prod stage will deploy new versions of the service using a CodeDeploy deployment configuration CANARY_10_PERCENT_5_MINUTES. It means that 10 percent of traffic is shifted in the first increment of 5 minutes. Then, it shifts the rest of the traffic to the new version of the application. Please refer to Organizing Your AWS Environment Using Multiple Accounts whitepaper for best-practices on how to isolate and manage your business applications.

Some customers might find this approach interesting and decide to provide this as an abstraction to their application development teams. In this case, I advise creating a construct that builds such a pipeline. Using a construct would allow for further customization. Examples are stages that promote quality assurance or deploy the service in a disaster recovery scenario.

The implementation creates a stack for the toolchain and another stack for each deployment stage. As an example, consider a toolchain created with a single deployment stage named UAT. After running successfully, the DemoToolchain and DemoService-UAT stacks should be created as in the next image:

Two stacks are needed to create a Pipeline that deploys to a single environment. One stack deploys the Toolchain with the Pipeline and another stack deploys the Service compute infrastructure and CodeDeploy Application and DeploymentGroup. In this example, for an application named Demo that deploys to an environment named UAT, the stacks deployed are: DemoToolchain and DemoService-UAT

CodeDeploy Application and Deployment Group

CodeDeploy configuration requires an application and a deployment group. Depending on the use case, you need to create these in the same or in a different account from the toolchain (pipeline). The pipeline includes the CodeDeploy deployment action that performs the blue/green deployment. My recommendation is to create the CodeDeploy application and deployment group as part of the Service stack. This approach allows to align the lifecycle of CodeDeploy application and deployment group with the related Service stack instance.

CodePipeline allows to create a CodeDeploy deployment action that references a non-existing CodeDeploy application and deployment group. This allows us to implement the following approach:

  • Toolchain stack deploys the pipeline with CodeDeploy deployment action referencing a non-existing CodeDeploy application and deployment group
  • When the pipeline executes, it first deploys the Service stack that creates the related CodeDeploy application and deployment group
  • The next pipeline action executes the CodeDeploy deployment action. When the pipeline executes the CodeDeploy deployment action, the related CodeDeploy application and deployment will already exist.

Below is the pipeline code that references the (initially non-existing) CodeDeploy application and deployment group.

private IEcsDeploymentGroup referenceCodeDeployDeploymentGroup(
        final Environment env, 
        final String serviceName, 
        final IEcsDeploymentConfig ecsDeploymentConfig, 
        final String stageName) {

    IEcsApplication codeDeployApp = EcsApplication.fromEcsApplicationArn(
            this,
            Constants.APP_NAME + "EcsCodeDeployApp-"+stageName,
            Arn.format(ArnComponents.builder()
                    .arnFormat(ArnFormat.COLON_RESOURCE_NAME)
                    .partition("aws")
                    .region(env.getRegion())
                    .service("codedeploy")
                    .account(env.getAccount())
                    .resource("application")
                    .resourceName(serviceName)
                    .build()));

    IEcsDeploymentGroup deploymentGroup = EcsDeploymentGroup.fromEcsDeploymentGroupAttributes(
            this,
            Constants.APP_NAME + "-EcsCodeDeployDG-"+stageName,
            EcsDeploymentGroupAttributes.builder()
                    .deploymentGroupName(serviceName)
                    .application(codeDeployApp)
                    .deploymentConfig(ecsDeploymentConfig)
                    .build());

    return deploymentGroup;
}

To make this work, you should use the same application name and deployment group name values when creating the CodeDeploy deployment action in the pipeline and when creating the CodeDeploy application and deployment group in the Service stack (where the Amazon ECS infrastructure is deployed). This approach is necessary to avoid a circular dependency error when trying to create the CodeDeploy application and deployment group inside the Service stack and reference these objects to configure the CodeDeploy deployment action inside the pipeline. Below is the code that uses Service stack construct ID to name the CodeDeploy application and deployment group. I set the Service stack construct ID to the same name I used when creating the CodeDeploy deployment action in the pipeline.

   // configure AWS CodeDeploy Application and DeploymentGroup
   EcsApplication app = EcsApplication.Builder.create(this, "BlueGreenApplication")
           .applicationName(id)
           .build();

   EcsDeploymentGroup.Builder.create(this, "BlueGreenDeploymentGroup")
           .deploymentGroupName(id)
           .application(app)
           .service(albService.getService())
           .role(createCodeDeployExecutionRole(id))
           .blueGreenDeploymentConfig(EcsBlueGreenDeploymentConfig.builder()
                   .blueTargetGroup(albService.getTargetGroup())
                   .greenTargetGroup(tgGreen)
                   .listener(albService.getListener())
                   .testListener(listenerGreen)
                   .terminationWaitTime(Duration.minutes(15))
                   .build())
           .deploymentConfig(deploymentConfig)
           .build();

CDK Pipelines roles and permissions

CDK Pipelines creates roles and permissions the pipeline uses to execute deployments in different scenarios of regions and accounts. When using CodeDeploy in cross-account scenarios, CDK Pipelines deploys a cross-account support stack that creates a pipeline action role for the CodeDeploy action. This cross-account support stack is defined in a JSON file that needs to be published to the AWS CDK assets bucket in the target account. If the pipeline has the self-mutation feature on (default), the UpdatePipeline stage will do a cdk deploy to deploy changes to the pipeline. In cross-account scenarios, this deployment also involves deploying/updating the cross-account support stack. For this, the SelfMutate action in UpdatePipeline stage needs to assume CDK file-publishing and a deploy roles in the remote account.

The IAM role associated with the AWS CodeBuild project that runs the UpdatePipeline stage does not have these permissions by default. CDK Pipelines cannot grant these permissions automatically, because the information about the permissions that the cross-account stack needs is only available after the AWS CDK app finishes synthesizing. At that point, the permissions that the pipeline has are already locked-in­­. Hence, for cross-account scenarios, the toolchain should extend the permissions of the pipeline’s UpdatePipeline stage to include the file-publishing and deploy roles.

In cross-account environments it is possible to manually add these permissions to the UpdatePipeline stage. To accomplish that, the Toolchain stack may be used to hide this sort of implementation detail. In the end, a method like the one below can be used to add these missing permissions. For each different mapping of stage and environment in the pipeline it validates if the target account is different than the account where the pipeline is deployed. When the criteria is met, it should grant permission to the UpdatePipeline stage to assume CDK bootstrap roles (tagged using key aws-cdk:bootstrap-role) in the target account (with the tag value as file-publishing or deploy). The example below shows how to add permissions to the UpdatePipeline stage:

private void grantUpdatePipelineCrossAccoutPermissions(Map<String, Environment> stageNameEnvironment) {

    if (!stageNameEnvironment.isEmpty()) {

        this.pipeline.buildPipeline();
        for (String stage : stageNameEnvironment.keySet()) {

            HashMap<String, String[]> condition = new HashMap<>();
            condition.put(
                    "iam:ResourceTag/aws-cdk:bootstrap-role",
                    new String[] {"file-publishing", "deploy"});
            pipeline.getSelfMutationProject()
                    .getRole()
                    .addToPrincipalPolicy(PolicyStatement.Builder.create()
                            .actions(Arrays.asList("sts:AssumeRole"))
                            .effect(Effect.ALLOW)
                            .resources(Arrays.asList("arn:*:iam::"
                                    + stageNameEnvironment.get(stage).getAccount() + ":role/*"))
                            .conditions(new HashMap<String, Object>() {{
                                    put("ForAnyValue:StringEquals", condition);
                            }})
                            .build());
        }
    }
}

The Deployment Stage

Let’s consider a pipeline that has a single deployment stage, UAT. The UAT stage deploys a DemoService. For that, it requires four actions: DemoService-UAT (Prepare and Deploy), ConfigureBlueGreenDeploy and Deploy.

When using CodeDeploy the deployment stage is expected to have four actions: two actions to create CloudFormation change set and deploy the ECS or compute infrastructure, an action to configure CodeDeploy and the last action that deploys the application using CodeDeploy. In the diagram, these are (in the diagram in the respective order): DemoService-UAT.Prepare and DemoService-UAT.Deploy, ConfigureBlueGreenDeploy and Deploy.

The
DemoService-UAT.Deploy action will create the ECS resources and the CodeDeploy application and deployment group. The
ConfigureBlueGreenDeploy action will read the AWS CDK
cloud assembly. It uses the configuration files to identify the Amazon Elastic Container Registry (Amazon ECR) repository and the container image tag pushed. The pipeline will send this information to the
Deploy action.  The
Deploy action starts the deployment using CodeDeploy.

Solution Overview

As a convenience, I created an application, written in Java, that solves all these challenges and can be used as an example. The application deployment follows the same 5 steps for all deployment scenarios of account and Region, and this includes the scenarios represented in the following design:

A pipeline created by a Toolchain should be able to deploy to any combination of accounts and regions. This includes four scenarios: single-account and single-Region, single-account and cross-Region, cross-account and single-Region and cross-account and cross-Region

Conclusion

In this post, I identified, explained and solved challenges associated with the creation of a pipeline that deploys a service to Amazon ECS using CodeDeploy in different combinations of accounts and regions. I also introduced a demo application that implements these recommendations. The sample code can be extended to implement more elaborate scenarios. These scenarios might include automated testing, automated deployment rollbacks, or disaster recovery. I wish you success in your transformative journey.

Luiz Decaro

Luiz is a Principal Solutions architect at Amazon Web Services (AWS). He focuses on helping customers from the Financial Services Industry succeed in the cloud. Luiz holds a master’s in software engineering and he triggered his first continuous deployment pipeline in 2005.

How to deploy workloads in a multicloud environment with AWS developer tools

Post Syndicated from Brent Van Wynsberge original https://aws.amazon.com/blogs/devops/how-to-deploy-workloads-in-a-multicloud-environment-with-aws-developer-tools/

As organizations embrace cloud computing as part of “cloud first” strategy, and migrate to the cloud, some of the enterprises end up in a multicloud environment.  We see that enterprise customers get the best experience, performance and cost structure when they choose a primary cloud provider. However, for a variety of reasons, some organizations end up operating in a multicloud environment. For example, in case of mergers & acquisitions, an organization may acquire an entity which runs on a different cloud platform, resulting in the organization operating in a multicloud environment. Another example is in the case where an ISV (Independent Software Vendor) provides services to customers operating on different cloud providers. One more example is the scenario where an organization needs to adhere to data residency and data sovereignty requirements, and ends up with workloads deployed to multiple cloud platforms across locations. Thus, the organization ends up running in a multicloud environment.
In the scenarios described above, one of the challenges organizations face operating such a complex environment is managing release process (building, testing, and deploying applications at scale) across multiple cloud platforms. If an organization’s primary cloud provider is AWS, they may want to continue using AWS developer tools to deploy workloads in other cloud platforms. Organizations facing such scenarios can leverage AWS services to develop their end-to-end CI/CD and release process instead of developing a release pipeline for each platform, which is complex, and not sustainable in the long run.

In this post we show how organizations can continue using AWS developer tools in a hybrid and multicloud environment. We walk the audience through a scenario where we deploy an application to VMs running on-premises and Azure, showcasing AWS’ hybrid and multicloud DevOps capabilities.

Solution and scenario overview

In this post we’re demonstrating the following steps:

  • Setup a CI/CD pipeline using AWS CodePipeline, and show how it’s run when application code is updated, and checked into the code repository (GitHub).
  • Check out application code from the code repository, and use an IDE (Visual Studio Code) to make changes, and check-in the code to the code repository.
  • Check in the modified application code to automatically run the release process built using AWS CodePipeline. It makes use of AWS CodeBuild to retrieve the latest version of code from code repository, compile it, build the deployment package, and test the application.
  • Deploy the updated application to VMs across on-premises, and Azure using AWS CodeDeploy.

The high-level solution is shown below. This post does not show all of the possible combinations and integrations available to build the CI/CD pipeline. As an example, you can integrate the pipeline with your existing tools for test and build such as Selenium, Jenkins, SonarQube etc.

This post focuses on deploying application in a multicloud environment, and how AWS Developer Tools can support virtually any scenario or use case specific to your organization. We will be deploying a sample application from this AWS tutorial to an on-premises server, and an Azure Virtual Machine (VM) running Red Hat Enterprise Linux (RHEL). In future posts in this series, we will cover how you can deploy any type of workload using AWS tools, including containers, and serverless applications.

Architecture Diagram

CI/CD pipeline setup

This section describes instructions for setting up a multicloud CI/CD pipeline.

Note: A key point to note is that the CI/CD pipeline setup, and related sub-sections in this post, are a one-time activity, and you’ll not need to perform these steps every time an application is deployed or modified.

Install CodeDeploy agent

The AWS CodeDeploy agent is a software package that is used to execute deployments on an instance. You can install the CodeDeploy agent on an on-premises server and Azure VM by either using the command line, or AWS Systems Manager.
Setup GitHub code repository

Setup GitHub code repository using the following steps:

  1. Create a new GitHub code repository or use a repository that already exists.
  2. Copy the Sample_App_Linux app (zip) from Amazon S3 as described in Step 3 of Upload a sample application to your GitHub repository tutorial.
  3. Commit the files to code repository
    git add .
    git commit -m 'Initial Commit'
    git push

You will use this repository to deploy your code across environments.

Configure AWS CodePipeline

Follow the steps outlined below to setup and configure CodePipeline to orchestrate the CI/CD pipeline of our application.

  1. Navigate to CodePipeline in the AWS console and click on ‘Create pipeline’
  2. Give your pipeline a name (eg: MyWebApp-CICD) and allow CodePipeline to create a service role on your behalf.
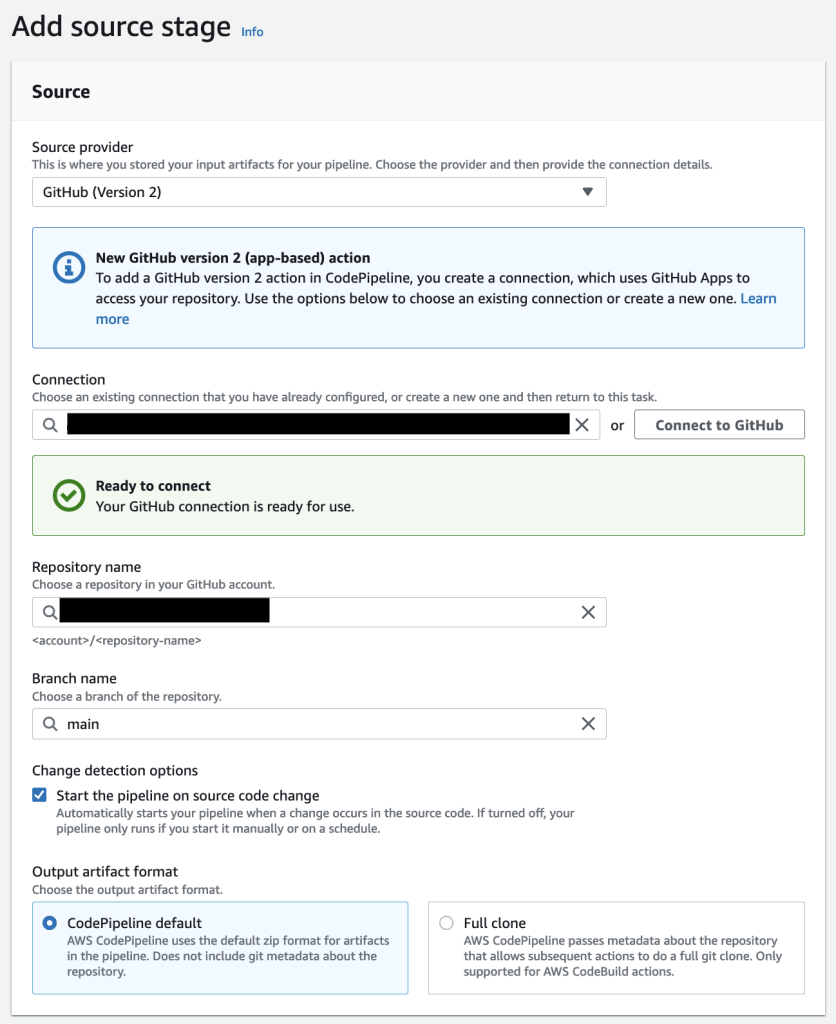
  3. For the source stage, select GitHub (v2) as your source provide and click on the Connect to GitHub button to give CodePipeline access to your git repository.
  4. Create a new GitHub connection and click on the Install a new App button to install the AWS Connector in your GitHub account.
  5. Back in the CodePipeline console select the repository and branch you would like to build and deploy.

Image showing the configured source stage

  1. Now we create the build stage; Select AWS CodeBuild as the build provider.
  2. Click on the ‘Create project’ button to create the project for your build stage, and give your project a name.
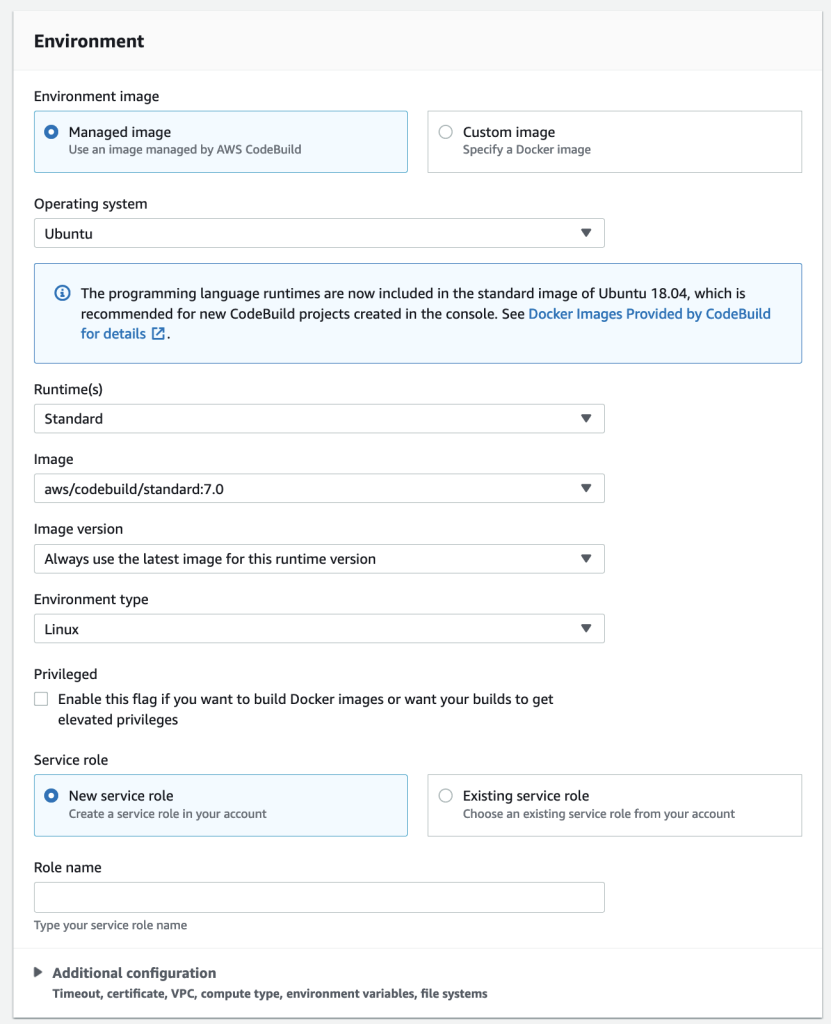
  3. Select Ubuntu as the operating system for your managed image, chose the standard runtime and select the ‘aws/codebuild/standard’ image with the latest version.

Image showing the configured environment

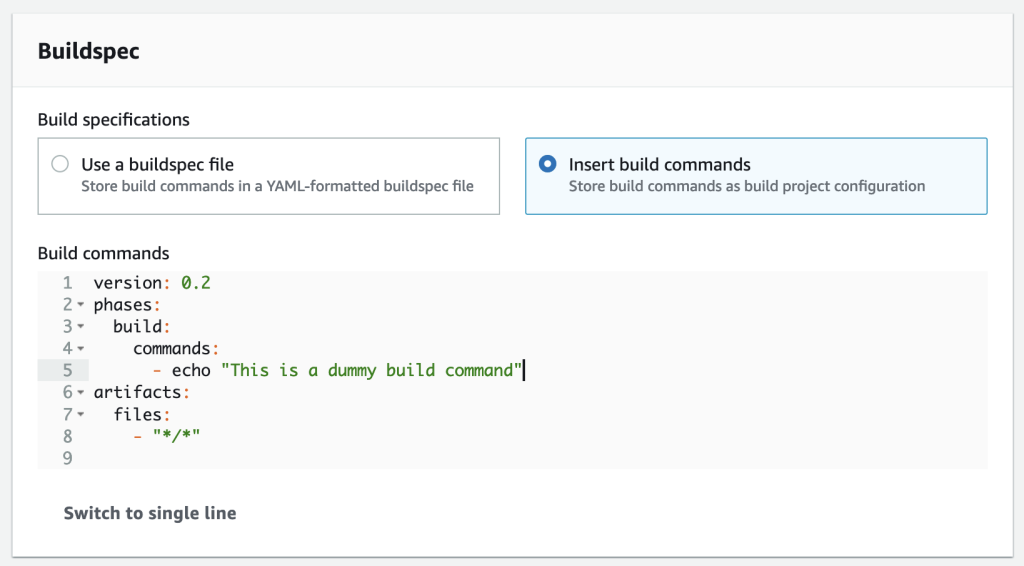
  1. In the Buildspec section select “Insert build commands” and click on switch to editor. Enter the following yaml code as your build commands:
version: 0.2
phases:
    build:
        commands:
            - echo "This is a dummy build command"
artifacts:
    files:
        - "*/*"

Note: you can also integrate build commands to your git repository by using a buildspec yaml file. More information can be found at Build specification reference for CodeBuild.

  1. Leave all other options as default and click on ‘Continue to CodePipeline’

Image showing the configured buildspec

  1. Back in the CodePipeline console your Project name will automatically be filled in. You can now continue to the next step.
  2. Click the “Skip deploy stage” button; We will create this in the next section.
  3. Review your changes and click “Create pipeline”. Your newly created pipeline will now build for the first time!

Image showing the first execution of the CI/CD pipeline

Configure AWS CodeDeploy on Azure and on-premises VMs

Now that we have built our application, we want to deploy it to both the environments – Azure, and on-premises. In the “Install CodeDeploy agent” section we’ve already installed the CodeDeploy agent. As a one-time step we now have to give the CodeDeploy agents access to the AWS environment.  You can leverage AWS Identity and Access Management (IAM) Roles Anywhere in combination with the code-deploy-session-helper to give access to the AWS resources needed.
The IAM Role should at least have the AWSCodeDeployFullAccess AWS managed policy and Read only access to the CodePipeline S3 bucket in your account (called codepipeline-<region>-<account-id>) .

For more information on how to setup IAM Roles Anywhere please refer how to extend AWS IAM roles to workloads outside of AWS with IAM Roles Anywhere. Alternative ways to configure access can be found in the AWS CodeDeploy user guide. Follow the steps below for instances you want to configure.

  1. Configure your CodeDeploy agent as described in the user guide. Ensure the AWS Command Line Interface (CLI) is installed on your VM and execute the following command to register the instance with CodeDeploy.
    aws deploy register-on-premises-instance --instance-name <name_for_your_instance> --iam-role-arn <arn_of_your_iam_role>
  1. Tag the instance as follows
    aws deploy add-tags-to-on-premises-instances --instance-names <name_for_your_instance> --tags Key=Application,Value=MyWebApp
  2. You should now see both instances registered in the “CodeDeploy > On-premises instances” panel. You can now deploy application to your Azure VM and on premises VMs!

Image showing the registered instances

Configure AWS CodeDeploy to deploy WebApp

Follow the steps mentioned below to modify the CI/CD pipeline to deploy the application to Azure, and on-premises environments.

  1. Create an IAM role named CodeDeployServiceRole and select CodeDeploy > CodeDeploy as your use case. IAM will automatically select the right policy for you. CodeDeploy will use this role to manage the deployments of your application.
  2. In the AWS console navigate to CodeDeploy > Applications. Click on “Create application”.
  3. Give your application a name and choose “EC2/On-premises” as the compute platform.
  4. Configure the instances we want to deploy to. In the detail view of your application click on “Create deployment group”.
  5. Give your deployment group a name and select the CodeDeployServiceRole.
  6. In the environment configuration section choose On-premises Instances.
  7. Configure the Application, MyWebApp key value pair.
  8. Disable load balancing and leave all other options default.
  9. Click on create deployment group. You should now see your newly created deployment group.

Image showing the created CodeDeploy Application and Deployment group

  1. We can now edit our pipeline to deploy to the newly created deployment group.
  2. Navigate to your previously created Pipeline in the CodePipeline section and click edit. Add the deploy stage by clicking on Add stage and name it Deploy. Aftewards click Add action.
  3. Name your action and choose CodeDeploy as your action provider.
  4. Select “BuildArtifact” as your input artifact and select your newly created application and deployment group.
  5. Click on Done and on Save in your pipeline to confirm the changes. You have now added the deploy step to your pipeline!

Image showing the updated pipeline

This completes the on-time devops pipeline setup, and you will not need to repeat the process.

Automated DevOps pipeline in action

This section demonstrates how the devops pipeline operates end-to-end, and automatically deploys application to Azure VM, and on-premises server when the application code changes.

  1. Click on Release Change to deploy your application for the first time. The release change button manually triggers CodePipeline to update your code. In the next section we will make changes to the repository which triggers the pipeline automatically.
  2. During the “Source” stage your pipeline fetches the latest version from github.
  3. During the “Build” stage your pipeline uses CodeBuild to build your application and generate the deployment artifacts for your pipeline. It uses the buildspec.yml file to determine the build steps.
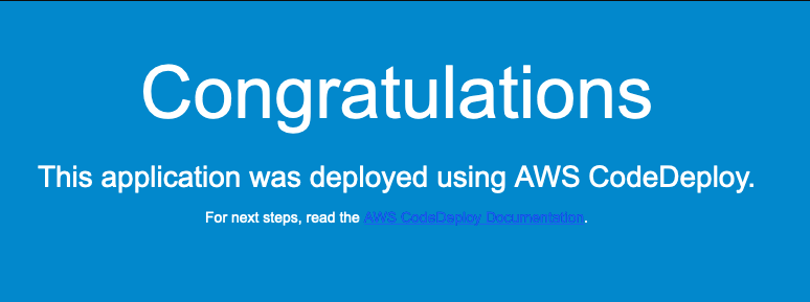
  4. During the “Deploy” stage your pipeline uses CodeDeploy to deploy the build artifacts to the configured Deployment group – Azure VM and on-premises VM. Navigate to the url of your application to see the results of the deployment process.

Image showing the deployed sample application


Update application code in IDE

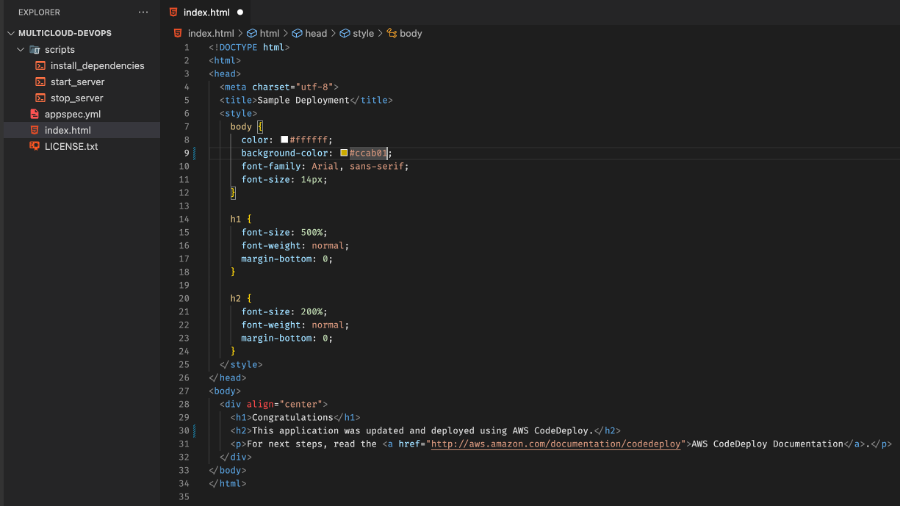
You can modify the application code using your favorite IDE. In this example we will change the background color and a paragraph of the sample application.

Image showing modifications being made to the file

Once you’ve modified the code, save the updated file followed by pushing the code to the code repository.

git add .
git commit -m "I made changes to the index.html file "
git push

DevOps pipeline (CodePipeline) – compile, build, and test

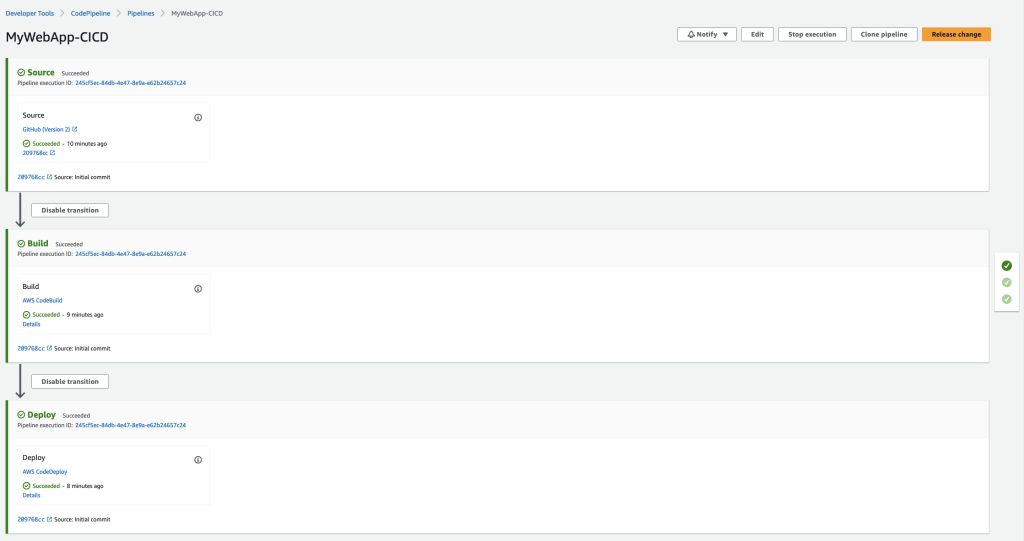
Once the code is updated, and pushed to GitHub, the DevOps pipeline (CodePipeline) automatically compiles, builds and tests the modified application. You can navigate to your pipeline (CodePipeline) in the AWS Console, and should see the pipeline running (or has recently completed). CodePipeline automatically executes the Build and Deploy steps. In this case we’re not adding any complex logic, but based on your organization’s requirements you can add any build step, or integrate with other tools.

Image showing CodePipeline in action

Deployment process using CodeDeploy

In this section, we describe how the modified application is deployed to the Azure, and on-premises VMs.

  1. Open your pipeline in the CodePipeline console, and click on the “AWS CodeDeploy” link in the Deploy step to navigate to your deployment group. Open the “Deployments” tab.

Image showing application deployment history

  1. Click on the first deployment in the Application deployment history section. This will show the details of your latest deployment.

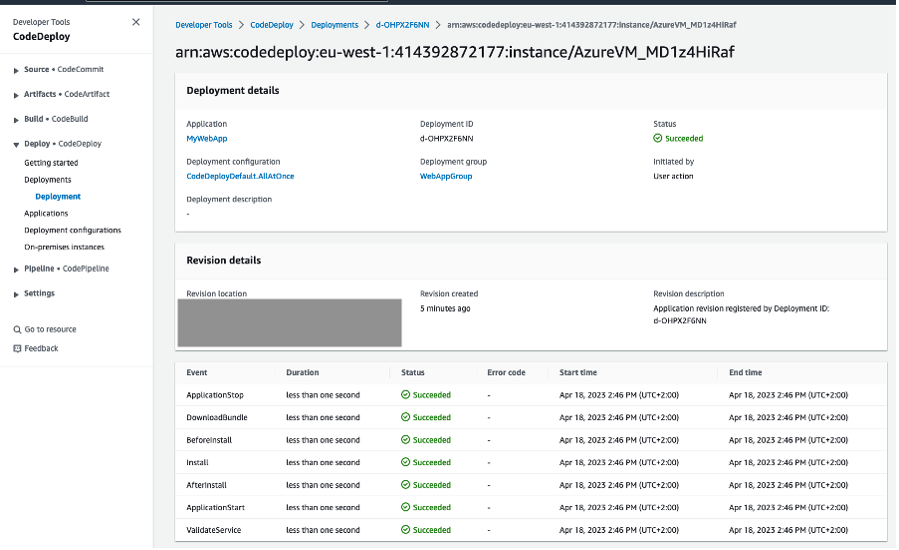
Image showing deployment lifecycle events for the deployment

  1. In the “Deployment lifecycle events” section click on one of the “View events” links. This shows you the lifecycle steps executed by CodeDeploy and will display the error log output if any of the steps have failed.

Image showing deployment events on instance

  1. Navigate back to your application. You should now see your changes in the application. You’ve successfully set up a multicloud DevOps pipeline!

Image showing a new version of the deployed application

Conclusion

In summary, the post demonstrated how AWS DevOps tools and services can help organizations build a single release pipeline to deploy applications and workloads in a hybrid and multicloud environment. The post also showed how to set up CI/CD pipeline to deploy applications to AWS, on-premises, and Azure VMs.

If you have any questions or feedback, leave them in the comments section.

About the Authors

Picture of Amandeep

Amandeep Bajwa

Amandeep Bajwa is a Senior Solutions Architect at AWS supporting Financial Services enterprises. He helps organizations achieve their business outcomes by identifying the appropriate cloud transformation strategy based on industry trends, and organizational priorities. Some of the areas Amandeep consults on are cloud migration, cloud strategy (including hybrid & multicloud), digital transformation, data & analytics, and technology in general.

Picture of Pawan

Pawan Shrivastava

Pawan Shrivastava is a Partner Solution Architect at AWS in the WWPS team. He focusses on working with partners to provide technical guidance on AWS, collaborate with them to understand their technical requirements, and designing solutions to meet their specific needs. Pawan is passionate about DevOps, automation and CI CD pipelines. He enjoys watching mma, playing cricket and working out in the gym.

Picture of Brent

Brent Van Wynsberge

Brent Van Wynsberge is a Solutions Architect at AWS supporting enterprise customers. He guides organizations in their digital transformation and innovation journey and accelerates cloud adoption. Brent is an IoT enthusiast, specifically in the application of IoT in manufacturing, he is also interested in DevOps, data analytics, containers, and innovative technologies in general.

Picture of Mike

Mike Strubbe

Mike is a Cloud Solutions Architect Manager at AWS with a strong focus on cloud strategy, digital transformation, business value, leadership, and governance. He helps Enterprise customers achieve their business goals through cloud expertise, coupled with strong business acumen skills. Mike is passionate about implementing cloud strategies that enable cloud transformations, increase operational efficiency and drive business value.

Setting up a secure CI/CD pipeline in a private Amazon Virtual Private Cloud with no public internet access

Post Syndicated from MJ Kubba original https://aws.amazon.com/blogs/devops/setting-up-a-secure-ci-cd-pipeline-in-a-private-amazon-virtual-private-cloud-with-no-public-internet-access/

With the rise of the cloud and increased security awareness, the use of private Amazon VPCs with no public internet access also expanded rapidly. This setup is recommended to make sure of proper security through isolation. The isolation requirement also applies to code pipelines, in which developers deploy their application modules, software packages, and other dependencies and bundles throughout the development lifecycle. This is done without having to push larger bundles from the developer space to the staging space or the target environment. Furthermore, AWS CodeArtifact is used as an artifact management service that will help organizations of any size to securely store, publish, and share software packages used in their software development process.

We’ll walk through the steps required to build a secure, private continuous integration/continuous development (CI/CD) pipeline with no public internet access while maintaining log retention in Amazon CloudWatch. We’ll utilize AWS CodeCommit for source, CodeArtifact for the Modules and software packages, and Amazon Simple Storage Service (Amazon S3) as artifact storage.

Prerequisites

The prerequisites for following along with this post include:

  • An AWS Account
  • A Virtual Private Cloud (Amazon VPC)
  • A CI/CD pipeline – This can be CodePipeline, Jenkins or any CI/CD tool you want to integrate CodeArtifact with, we will use CodePipeline in our walkthrough here.

Solution walkthrough

The main service we’ll focus on is CodeArtifact, a fully managed artifact repository service that makes it easy for organizations of any size to securely store, publish, and share software packages used in their software development process. CodeArtifact works with commonly used package managers and build tools, such as Maven and Gradle (Java), npm and yarn (JavaScript), pip and twine (Python), or NuGet (.NET).

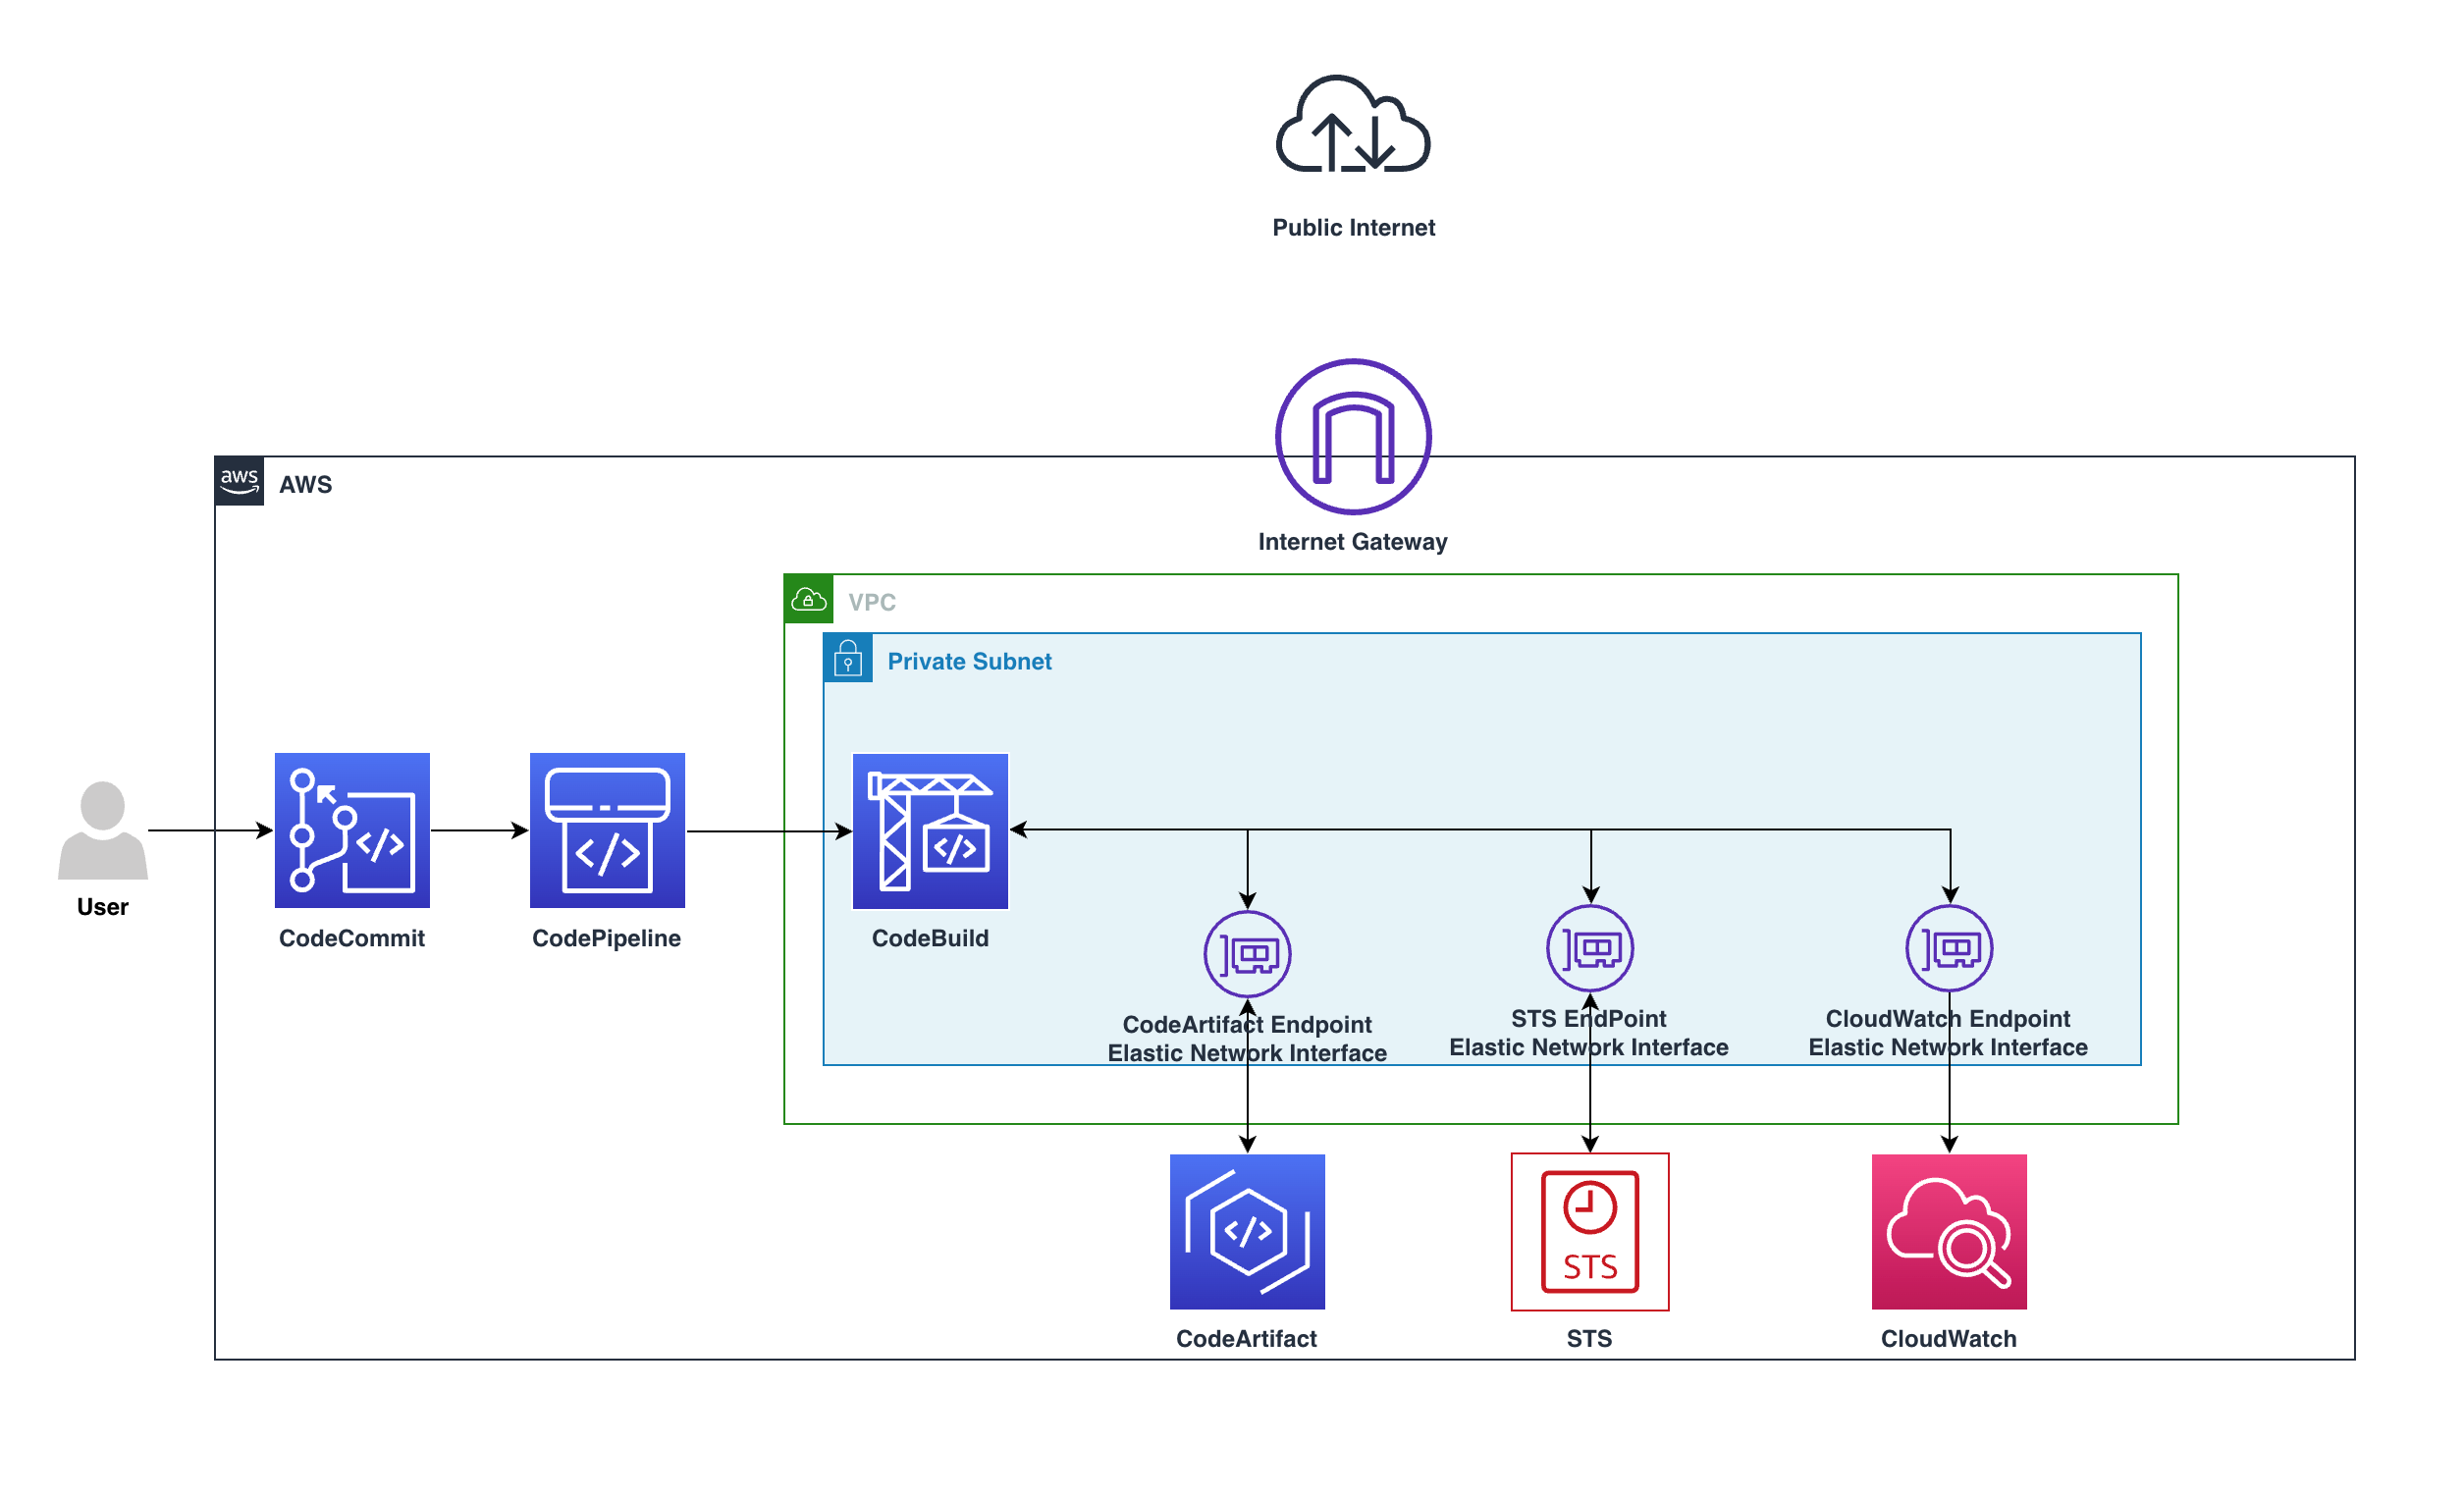
user checkin code to CodeCommit, CodePipeline will detect the change and start the pipeline, in CodeBuild the build stage will utilize the private endpoints and download the software packages needed without the need to go over the internet.

Users push code to CodeCommit, CodePipeline will detect the change and start the pipeline, in CodeBuild the build stage will utilize the private endpoints and download the software packages needed without the need to go over the internet.

The preceding diagram shows how the requests remain private within the VPC and won’t go through the Internet gateway, by going from CodeBuild over the private endpoint to CodeArtifact service, all within the private subnet.

The requests will use the following VPC endpoints to connect to these AWS services:

  • CloudWatch Logs endpoint (for CodeBuild to put logs in CloudWatch)
  • CodeArtifact endpoints
  • AWS Security Token Service (AWS STS) endpoint
  • Amazon Simple Storage Service (Amazon S3) endpoint

Walkthrough

  1. Create a CodeCommit Repository:
    1. Navigate to your CodeCommit Console then click on Create repository
Screenshot: Create repository button

Figure 2. Screenshot: Create repository button.

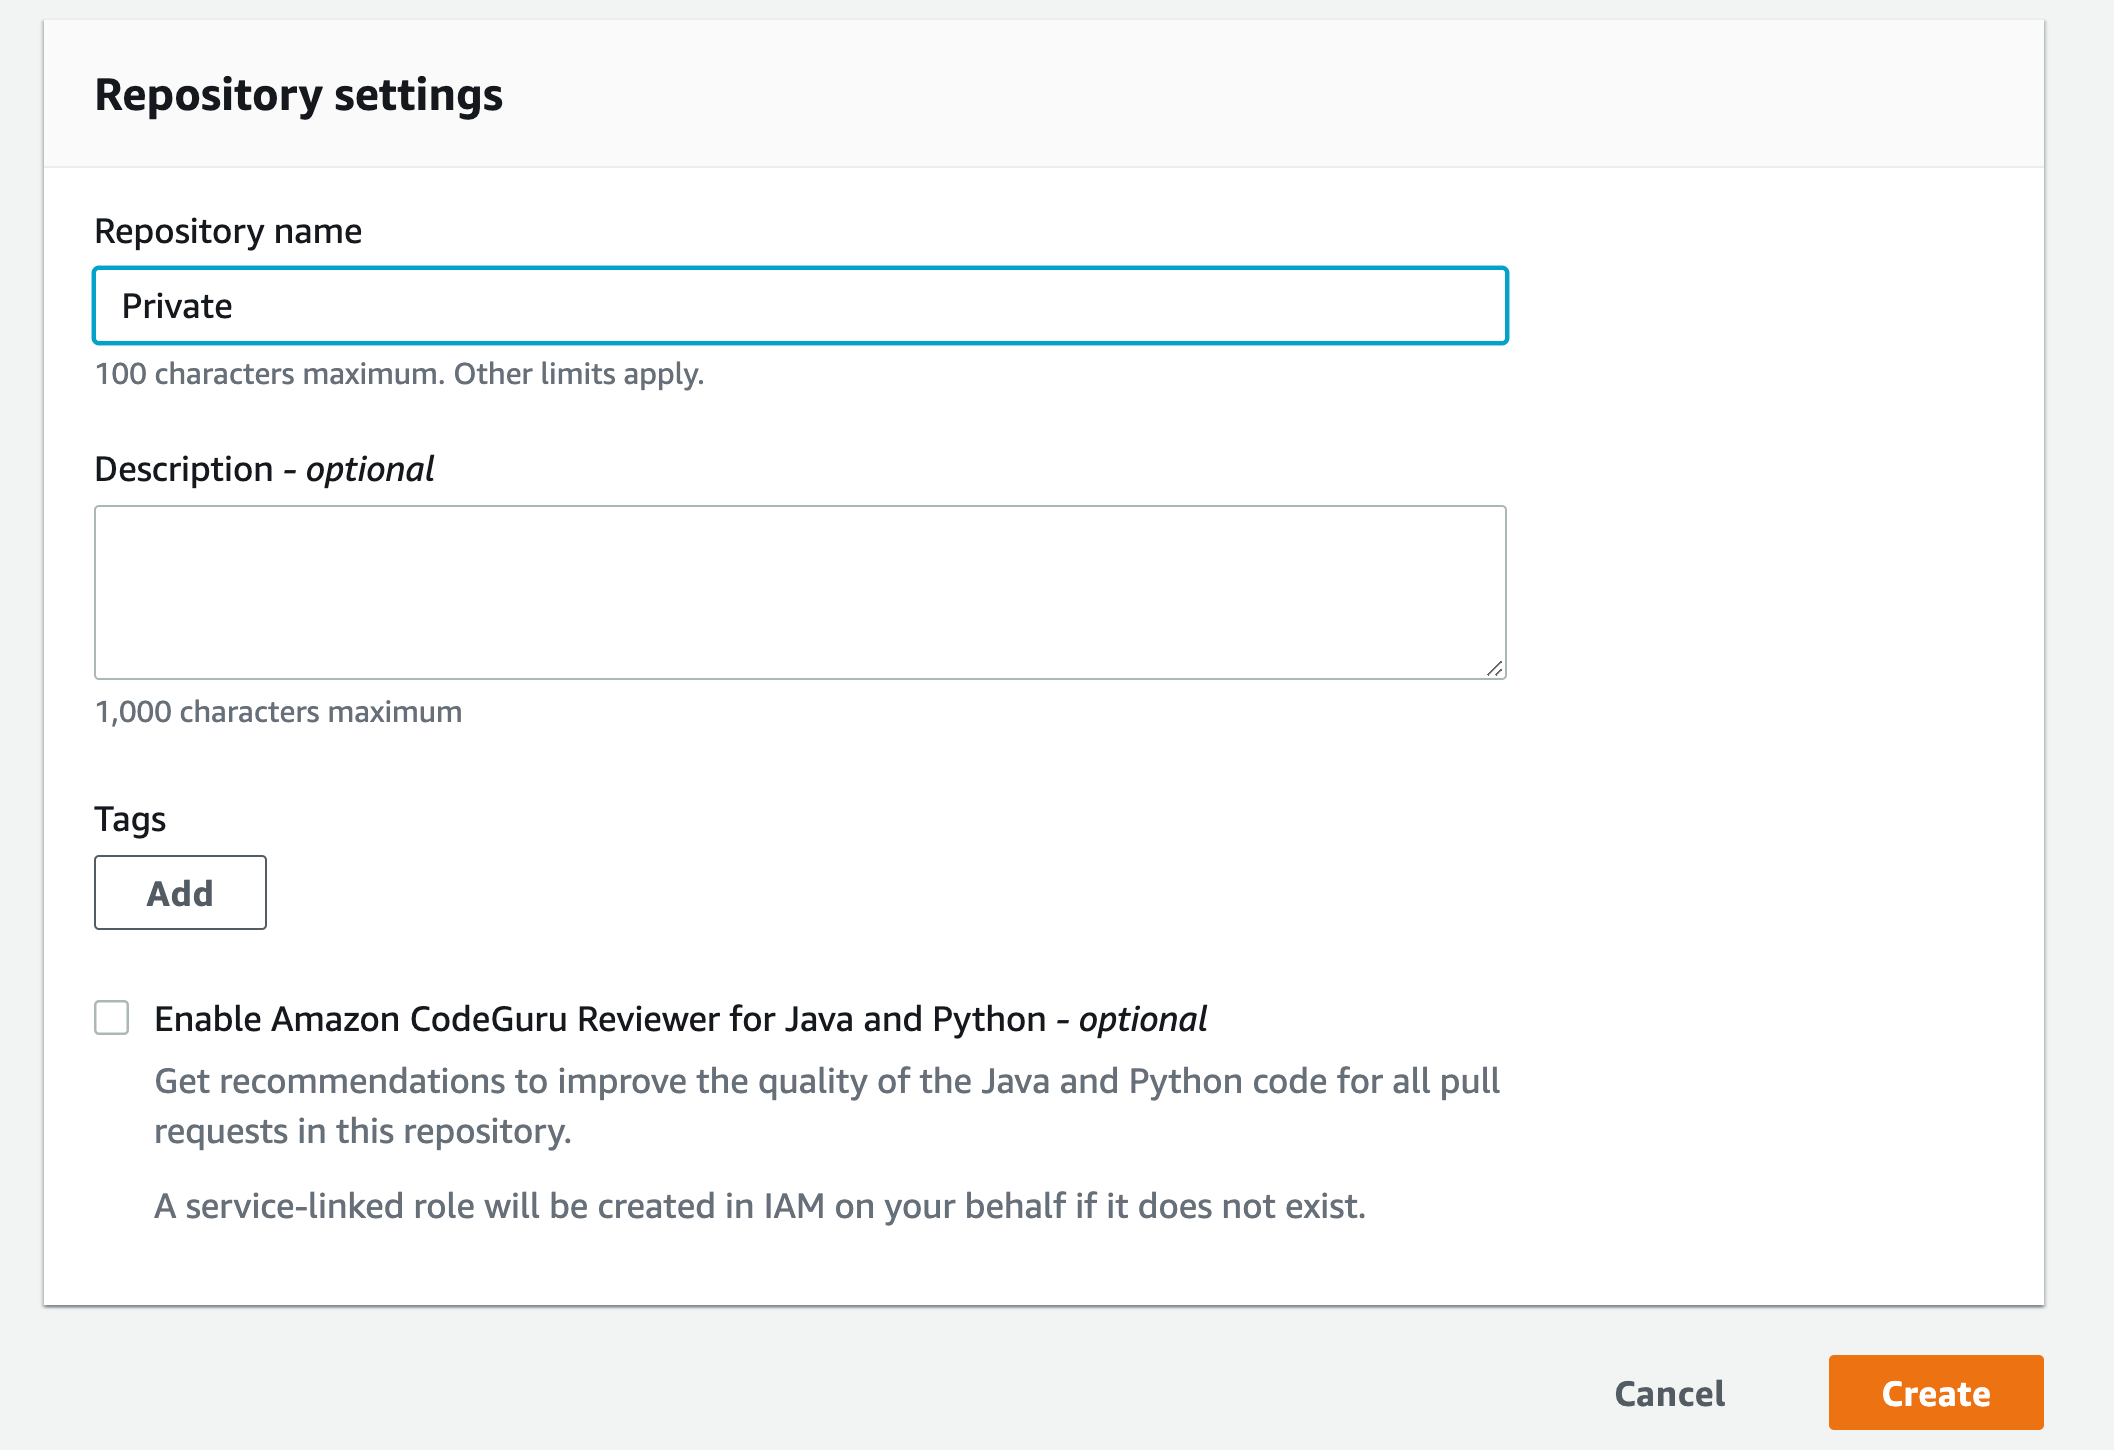
    1. Type in name for the repository then click Create
Screenshot: Repository setting with name shown as "Private" and empty Description

Figure 3. Screenshot: Repository setting with name shown as “Private” and empty Description.

    1. Scroll down and click Create file
Figure 4. Create file button.

Figure 4. Create file button.

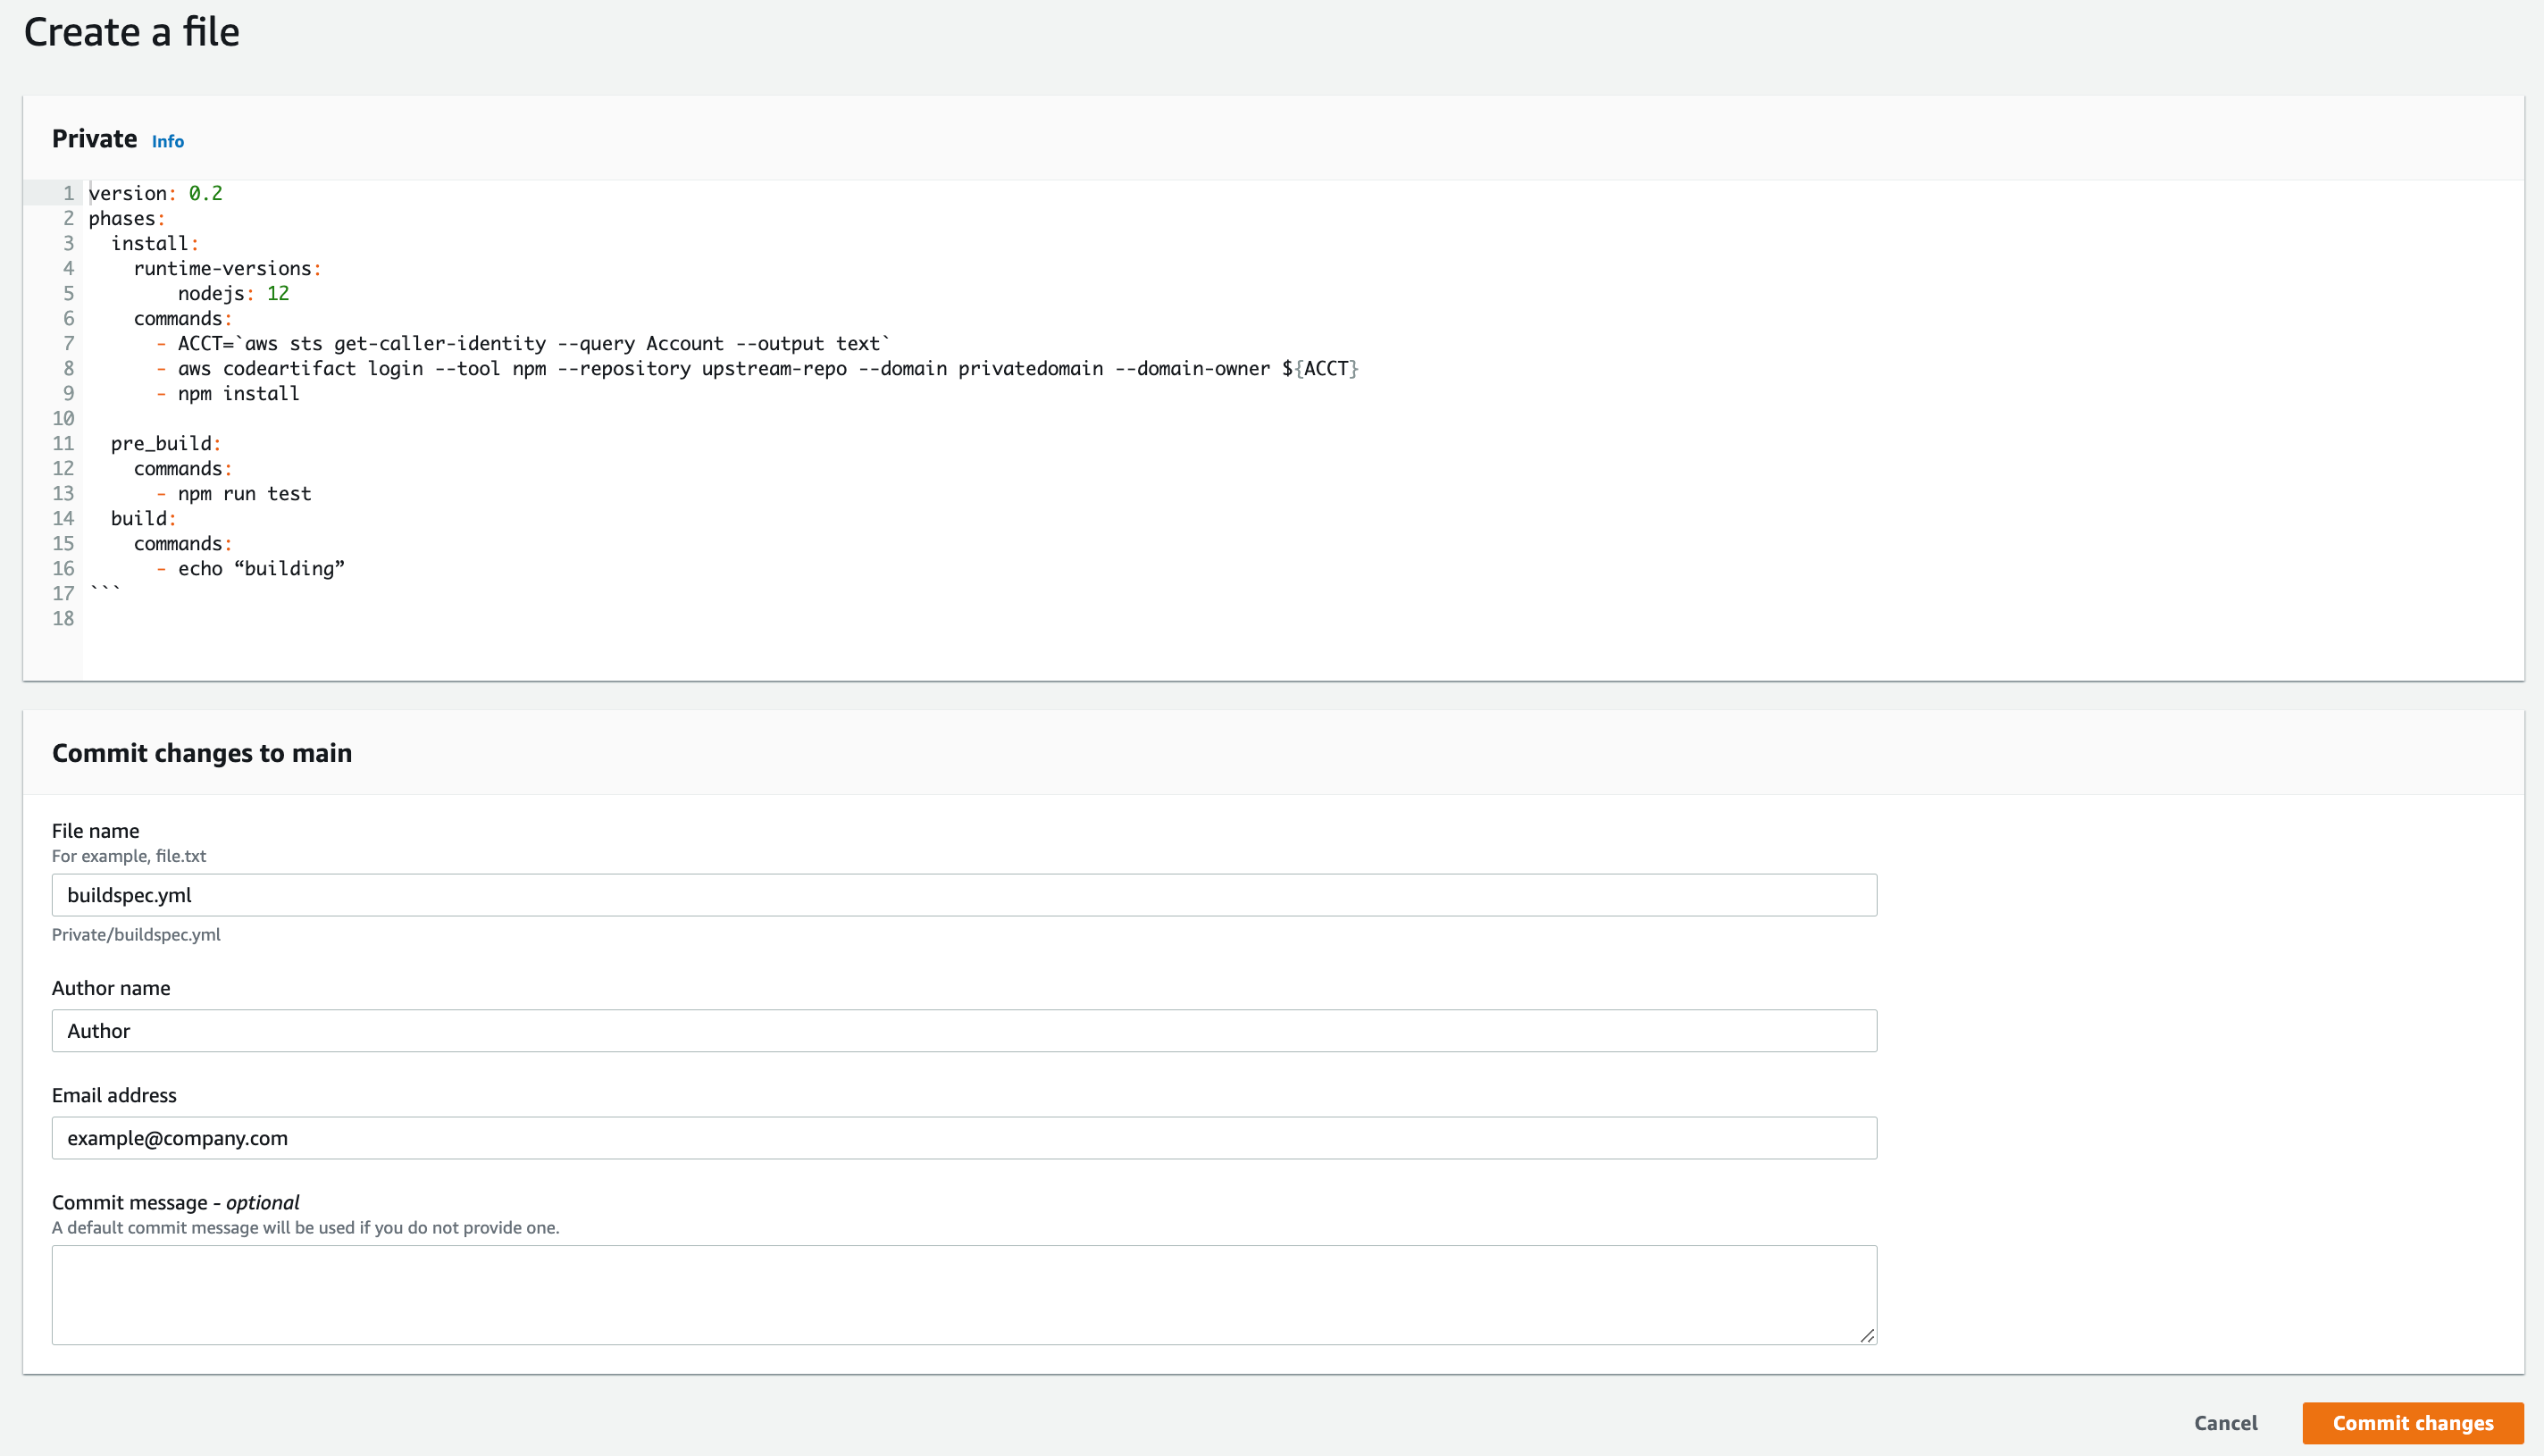
    1. Copy the example buildspec.yml file and paste it to the editor

Example buildspec.yml file:

version: 0.2
phases:
  install:
    runtime-versions:
        nodejs: 16
    
commands:
      - export AWS_STS_REGIONAL_ENDPOINTS=regional
      - ACCT=`aws sts get-caller-identity --region ${AWS_REGION} --query Account --output text`
      - aws codeartifact login --tool npm --repository Private --domain private --domain-owner ${ACCT}
      - npm install
  build:
    commands:
      - node index.js
    1. Name the file buildspec.yml, type in your name and your email address then Commit changes
Figure 5. Screenshot: Create file page.

Figure 5. Screenshot: Create file page.

  1. Create CodeArtifact
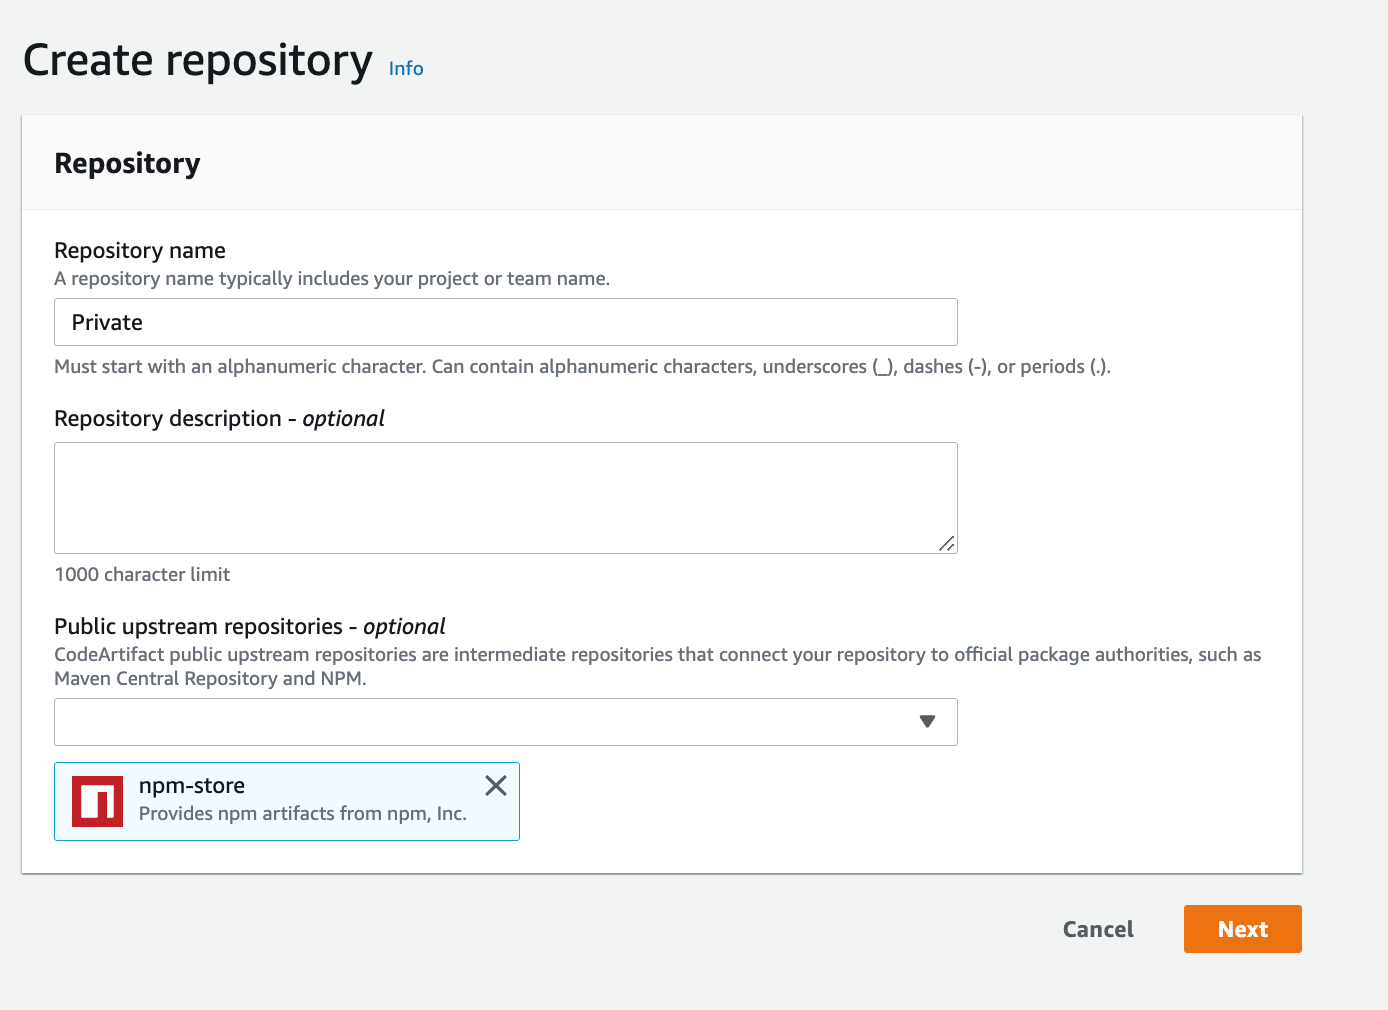
    1. Navigate to your CodeArtifact Console then click on Create repository
    2. Give it a name and select npm-store as public upsteam repository
Figure 6. Screenshot: Create repository page with Repository name "Private".

Figure 6. Screenshot: Create repository page with Repository name “Private”.

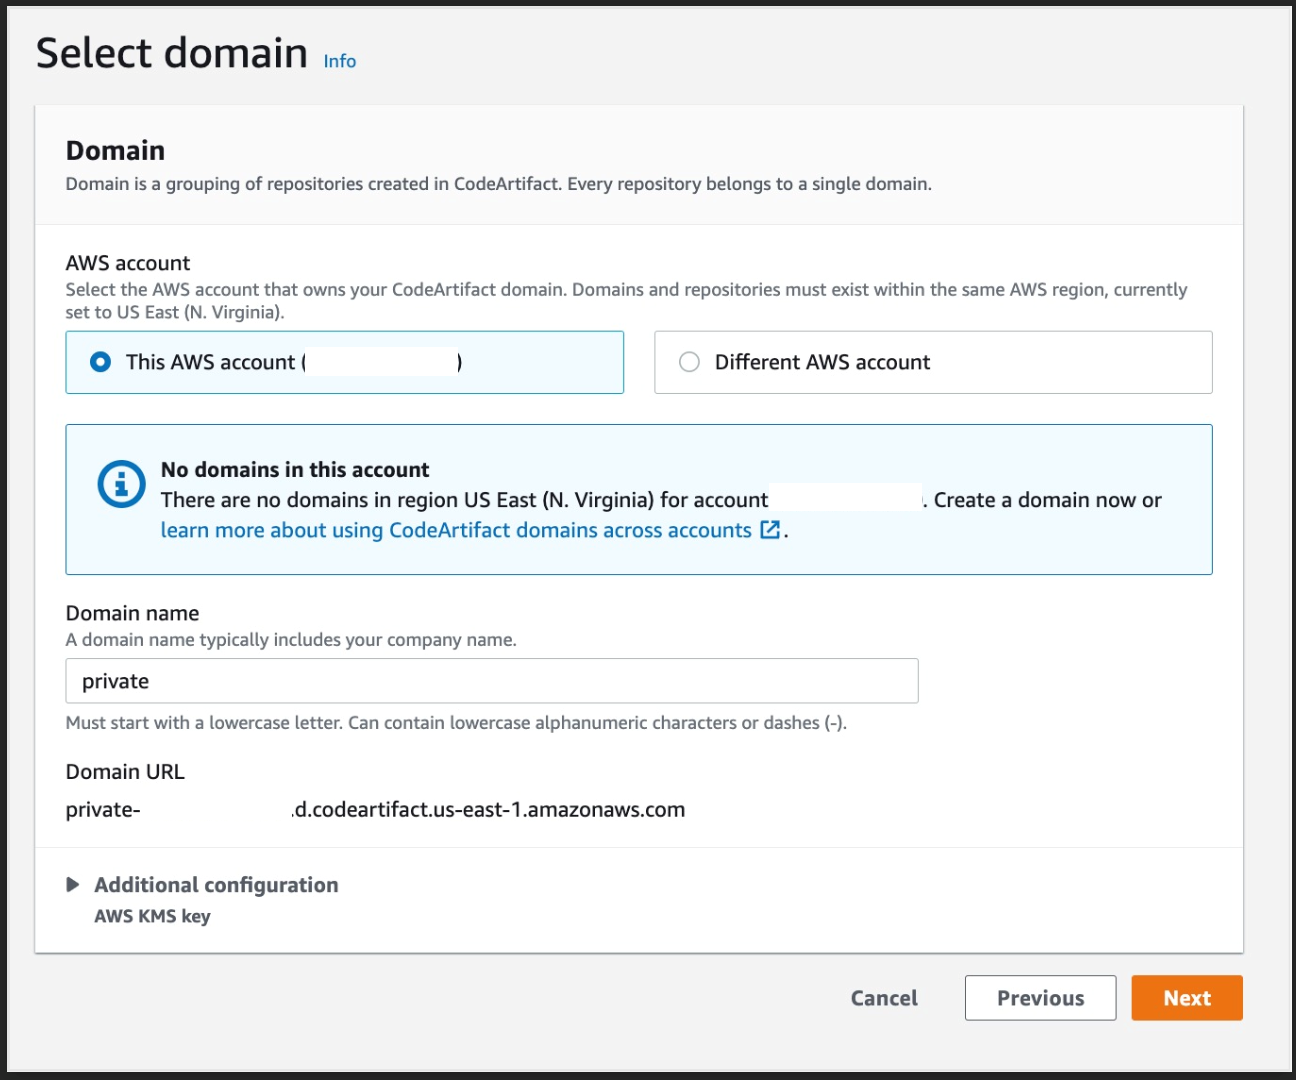
    1. For the Domain Select this AWS account and enter a domain name
Figure 7. Screenshot: Select domain page.

Figure 7. Screenshot: Select domain page.

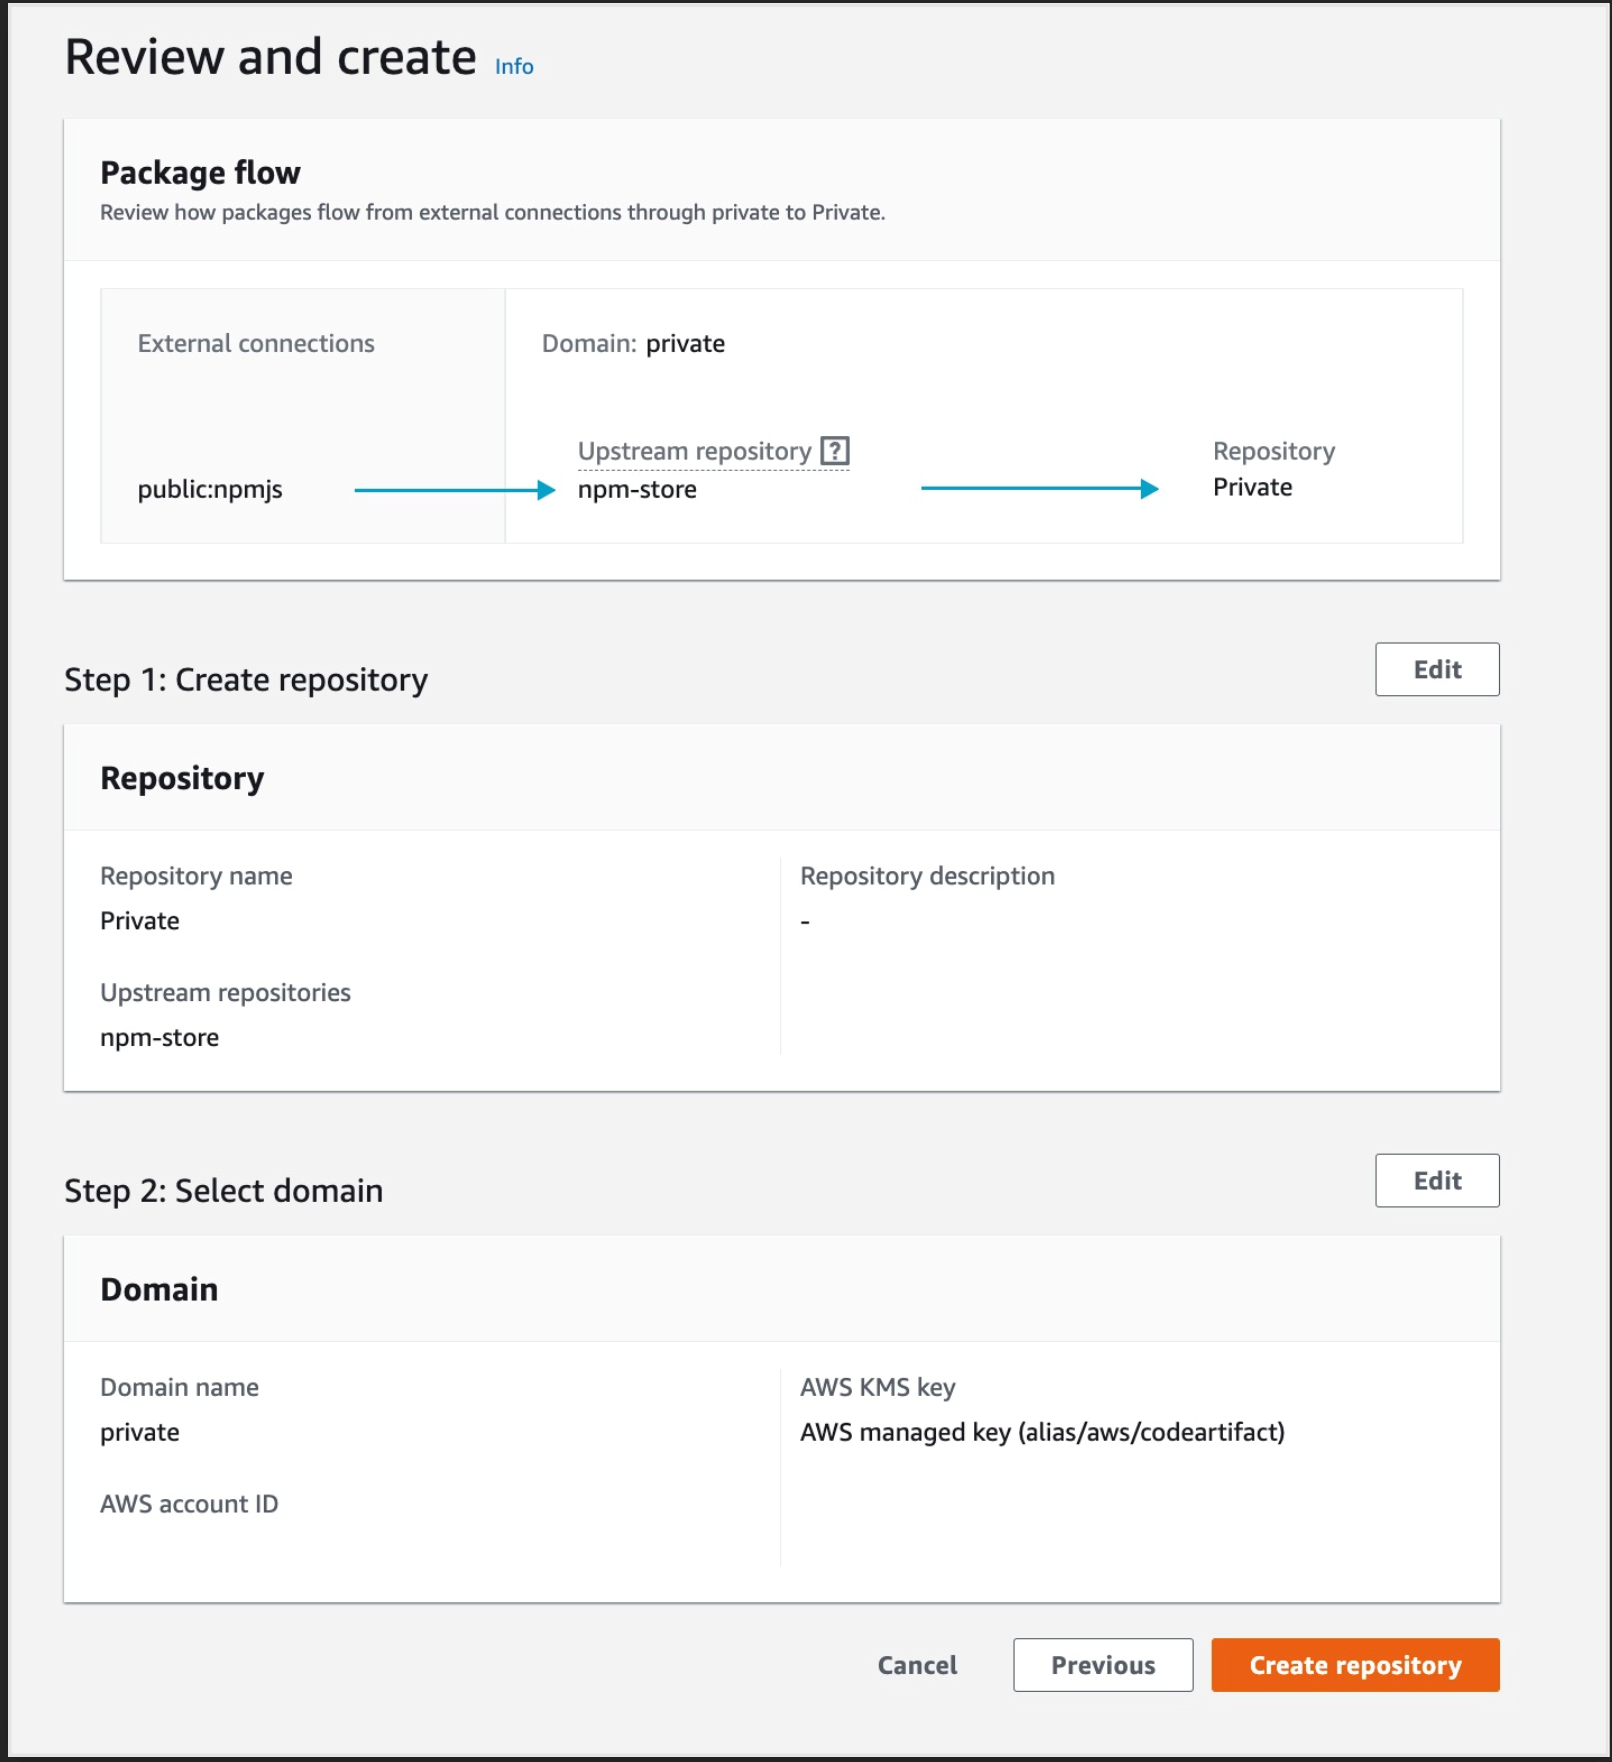
    1. Click Next then Create repository
Figure 8. Screenshot: Create repository review page.

Figure 8. Screenshot: Create repository review page.

  1. Create a CI/CD using CodePipeline
    1. Navigate to your CodePipeline Console then click on Create pipeline
Figure 9. Screenshot: Create pipeline button.

Figure 9. Screenshot: Create pipeline button.

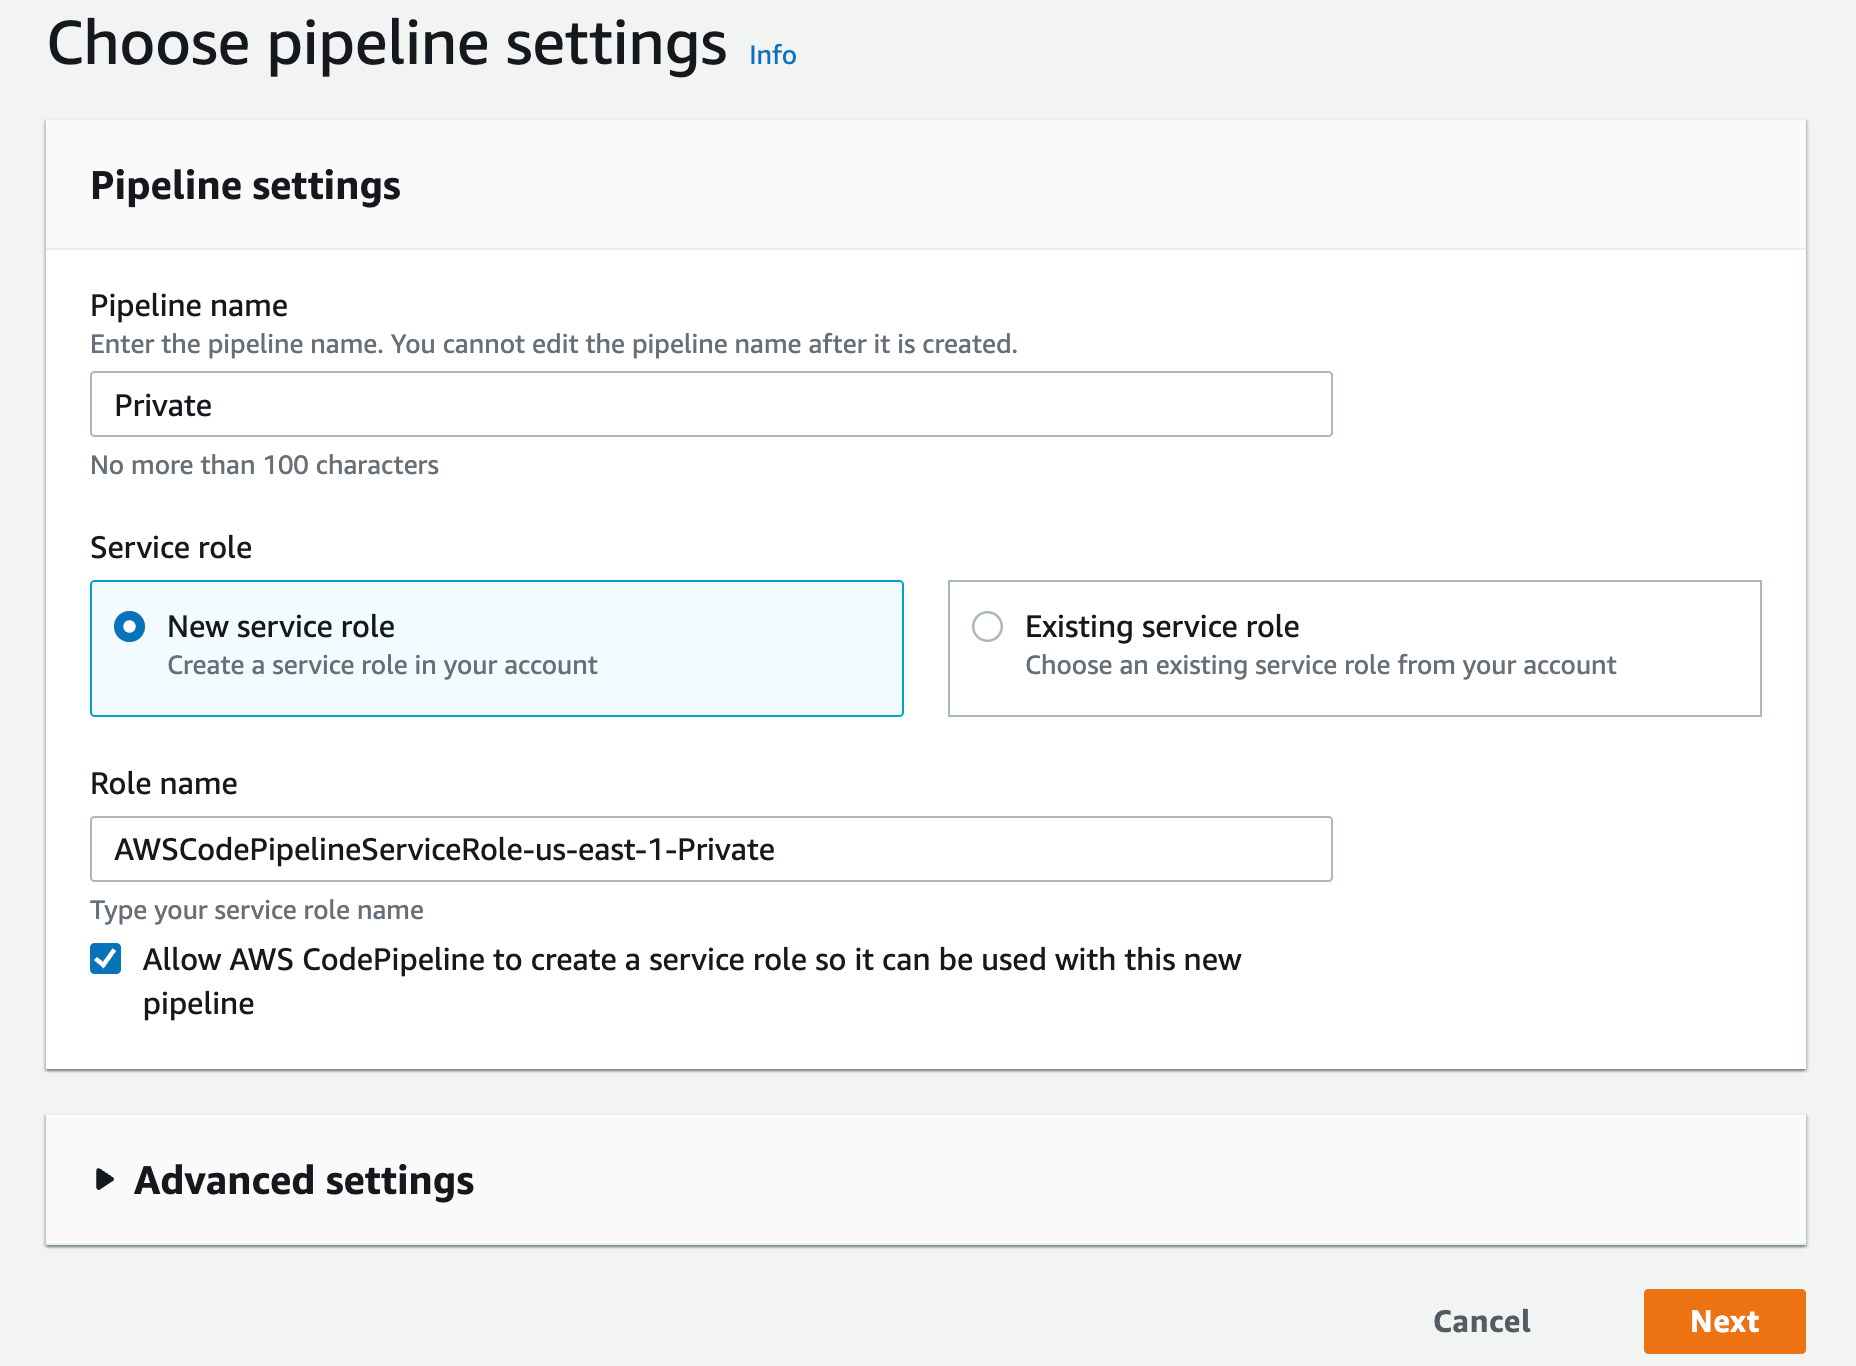
    1. Type a name, leave the Service role as “New service role” and click next
Figure 10. Screenshot: Choose pipeline setting page with pipeline name "Private".

Figure 10. Screenshot: Choose pipeline setting page with pipeline name “Private”.

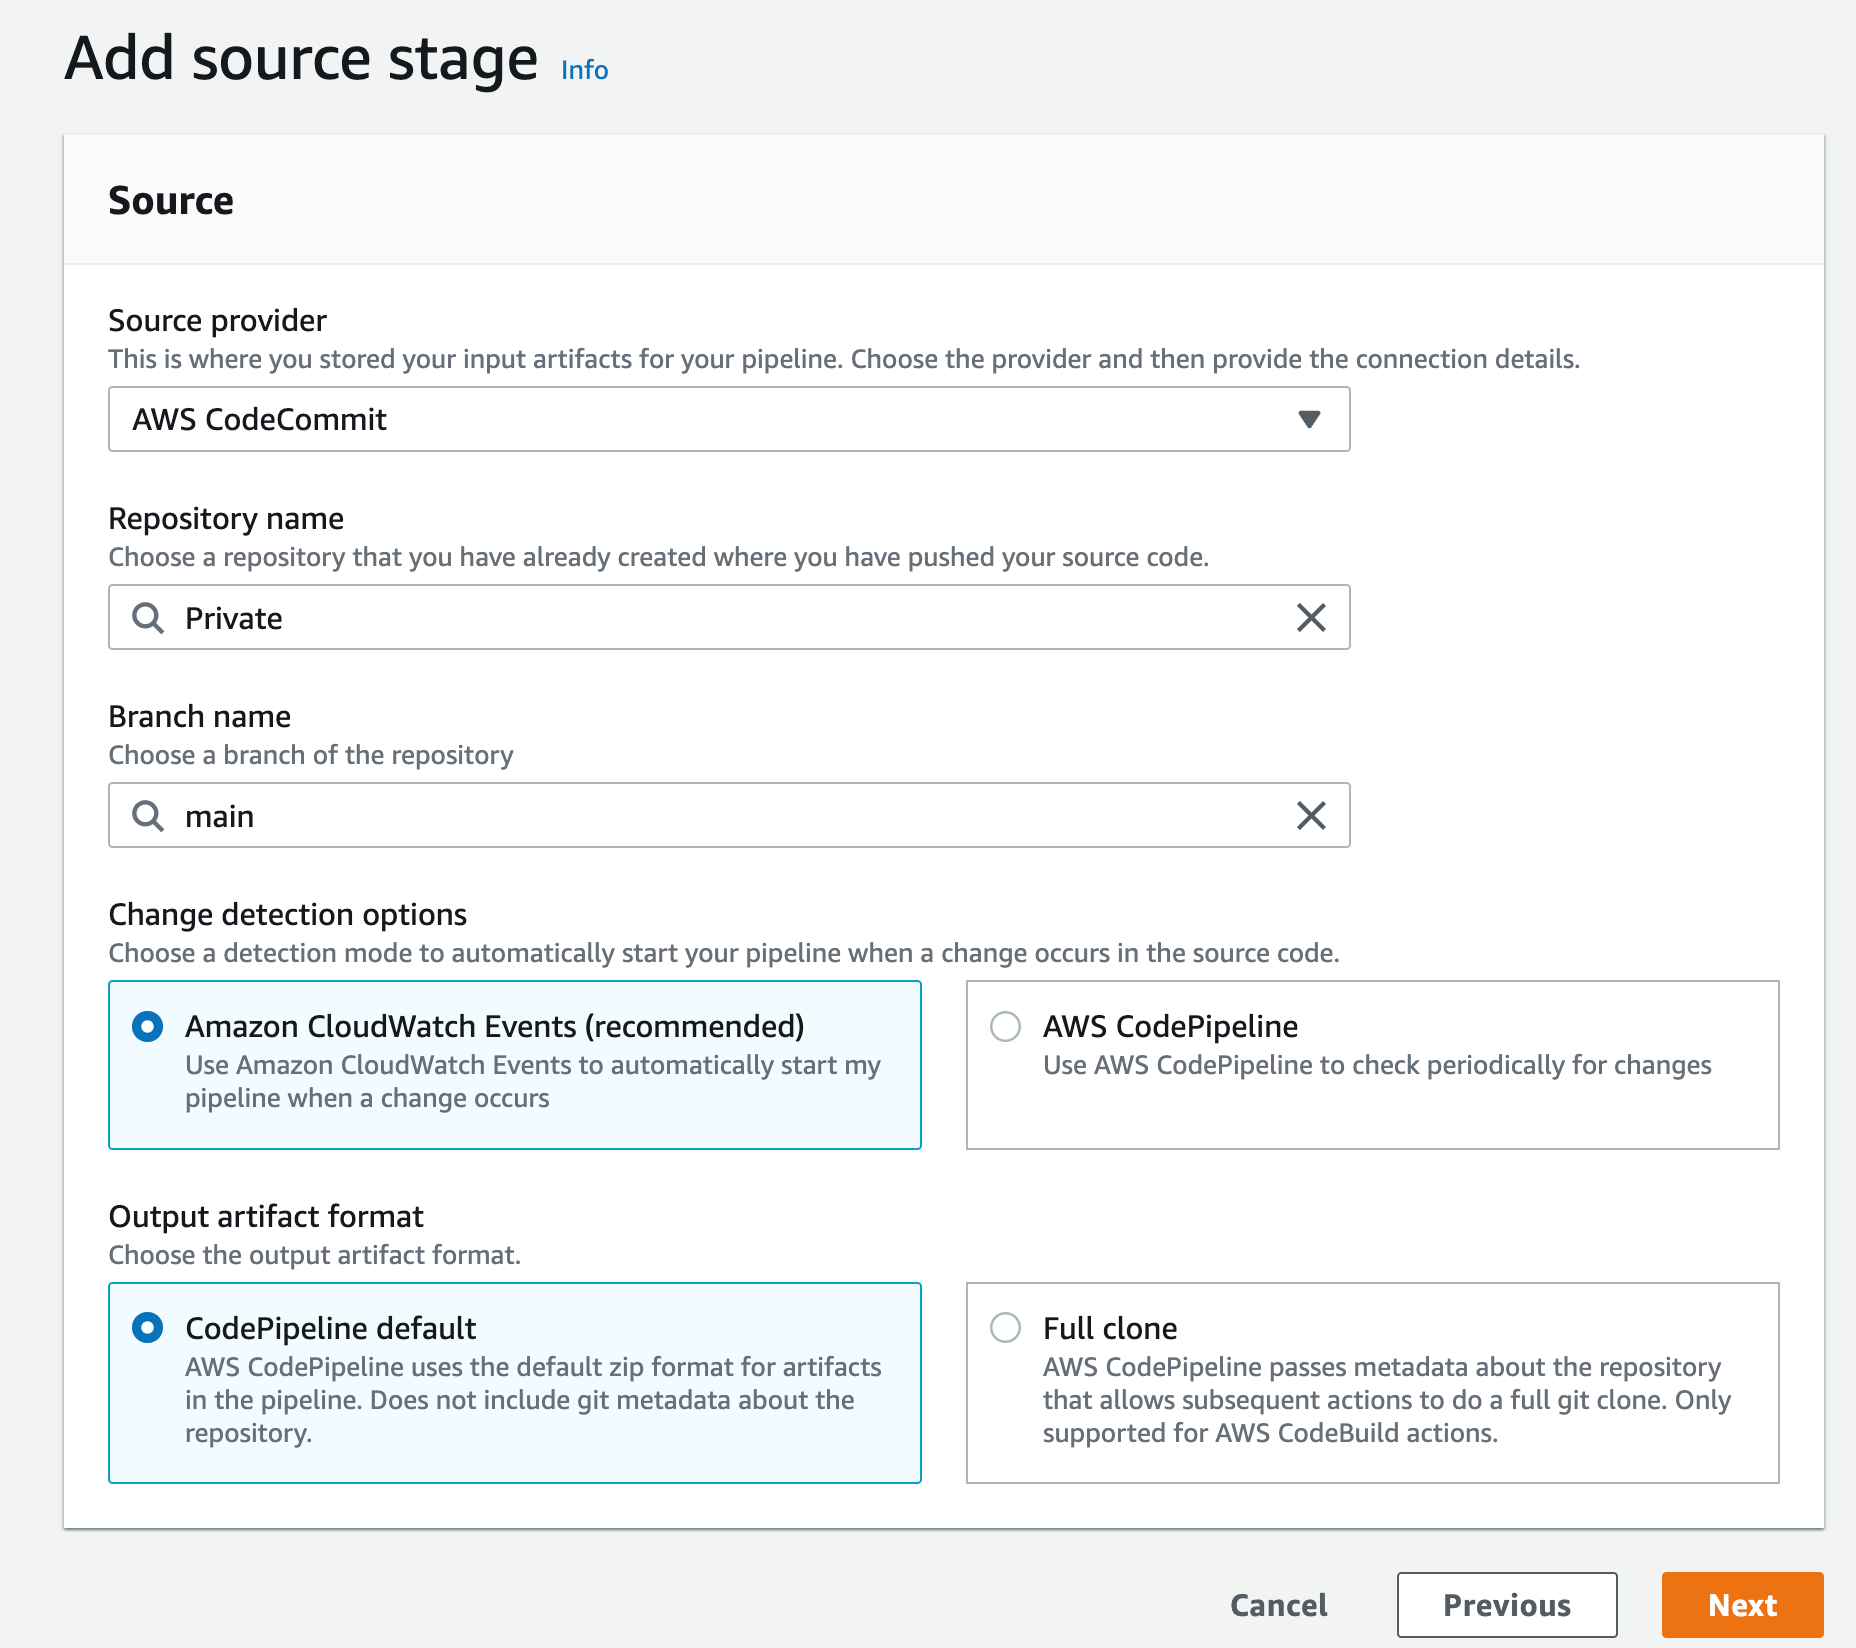
    1. Select AWS CodeCommit as your Source provider
    2. Then choose the CodeCommit repository you created earlier and for branch select main then click Next
Figure 11. Screenshot: Create pipeline add source stage.

Figure 11. Screenshot: Create pipeline add source stage.

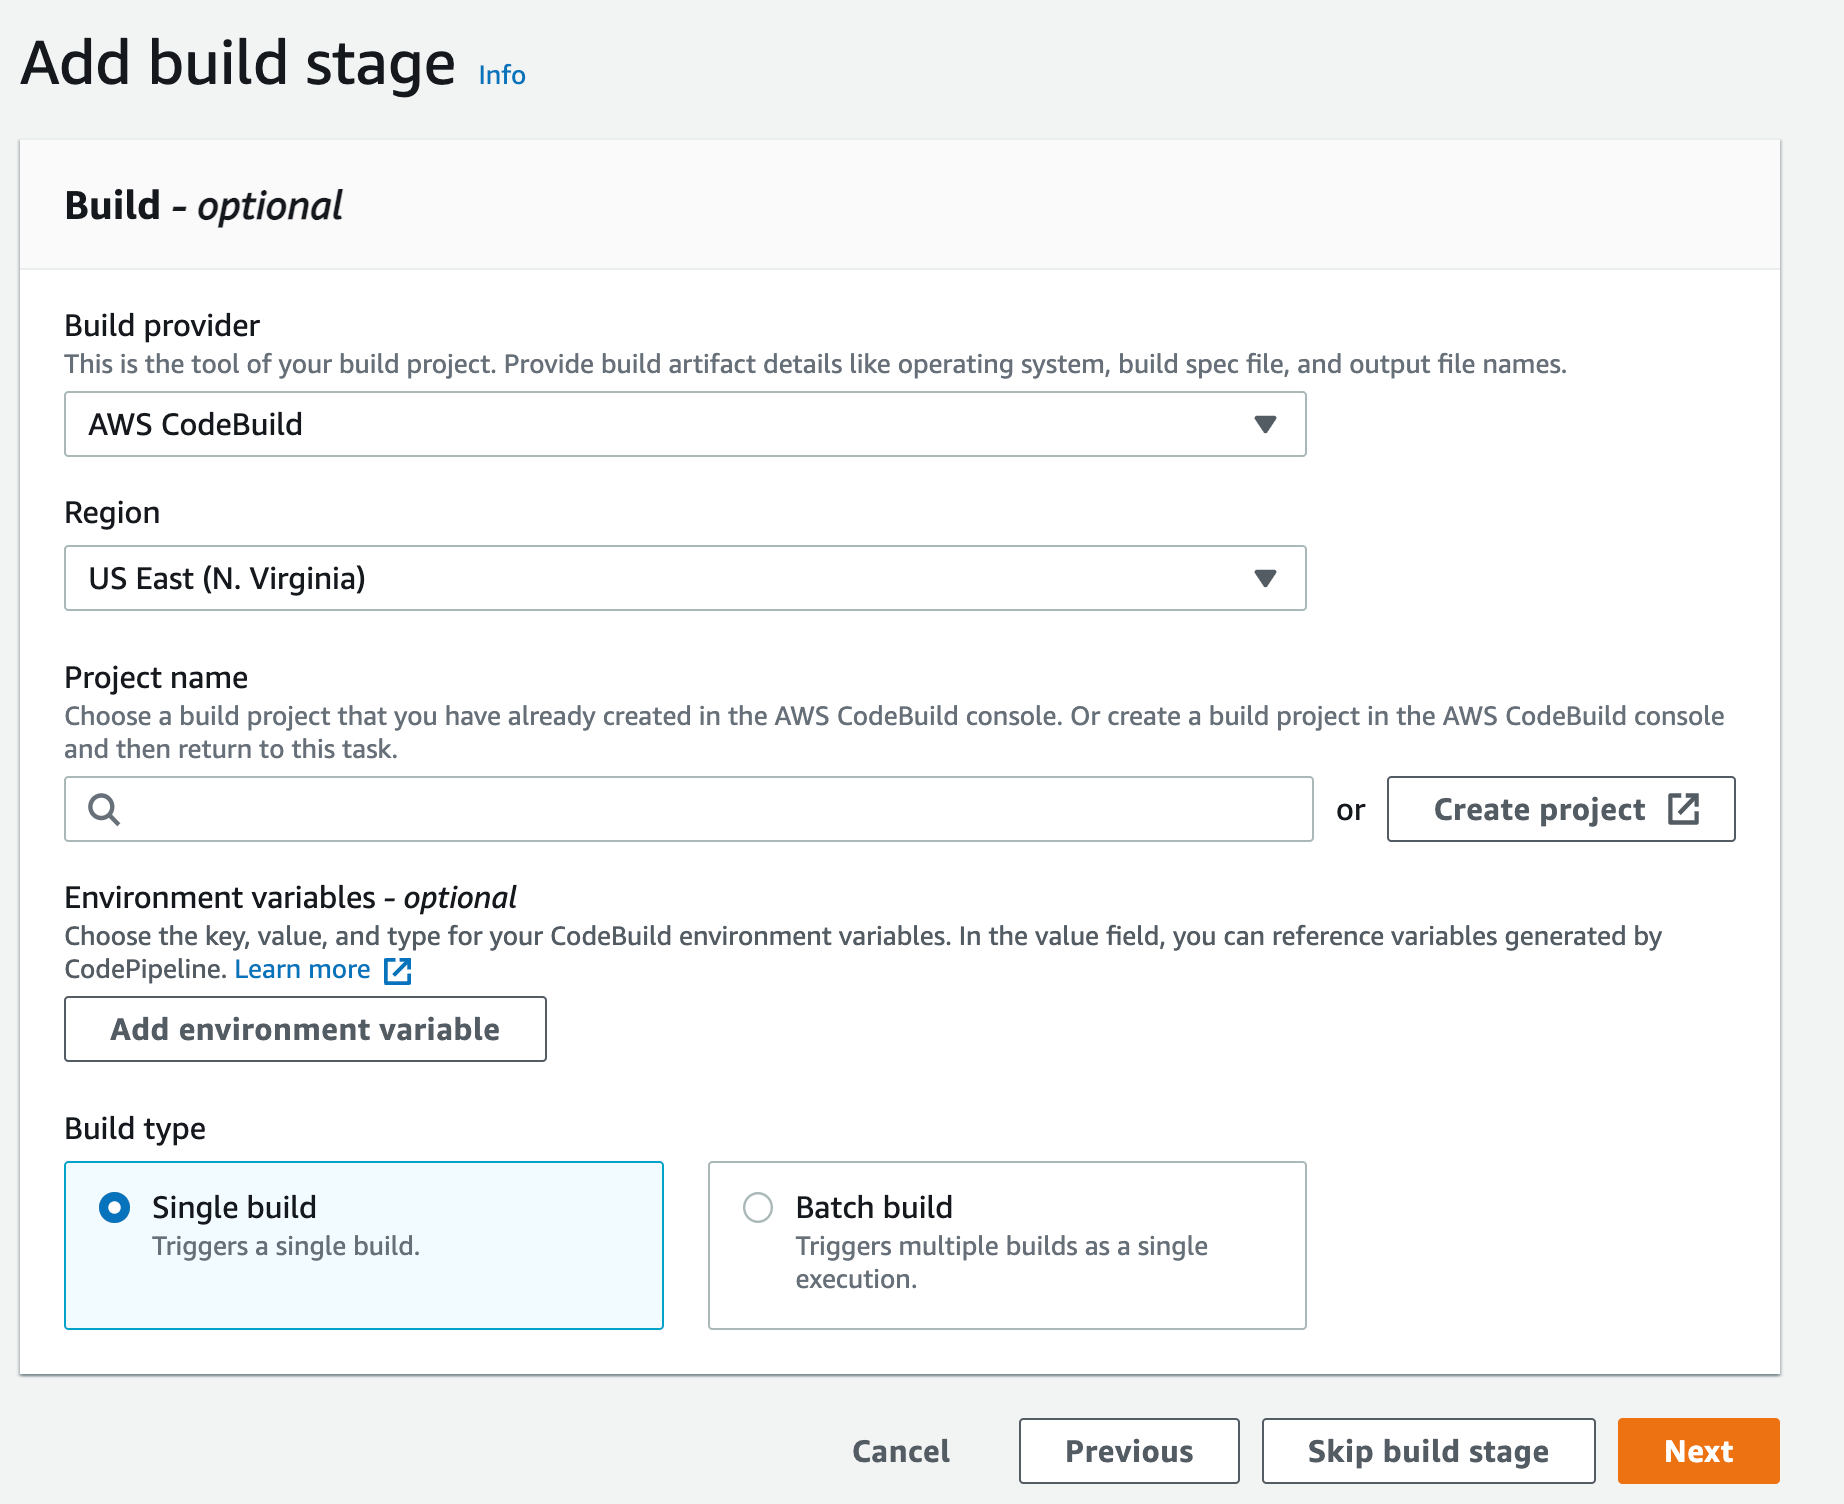
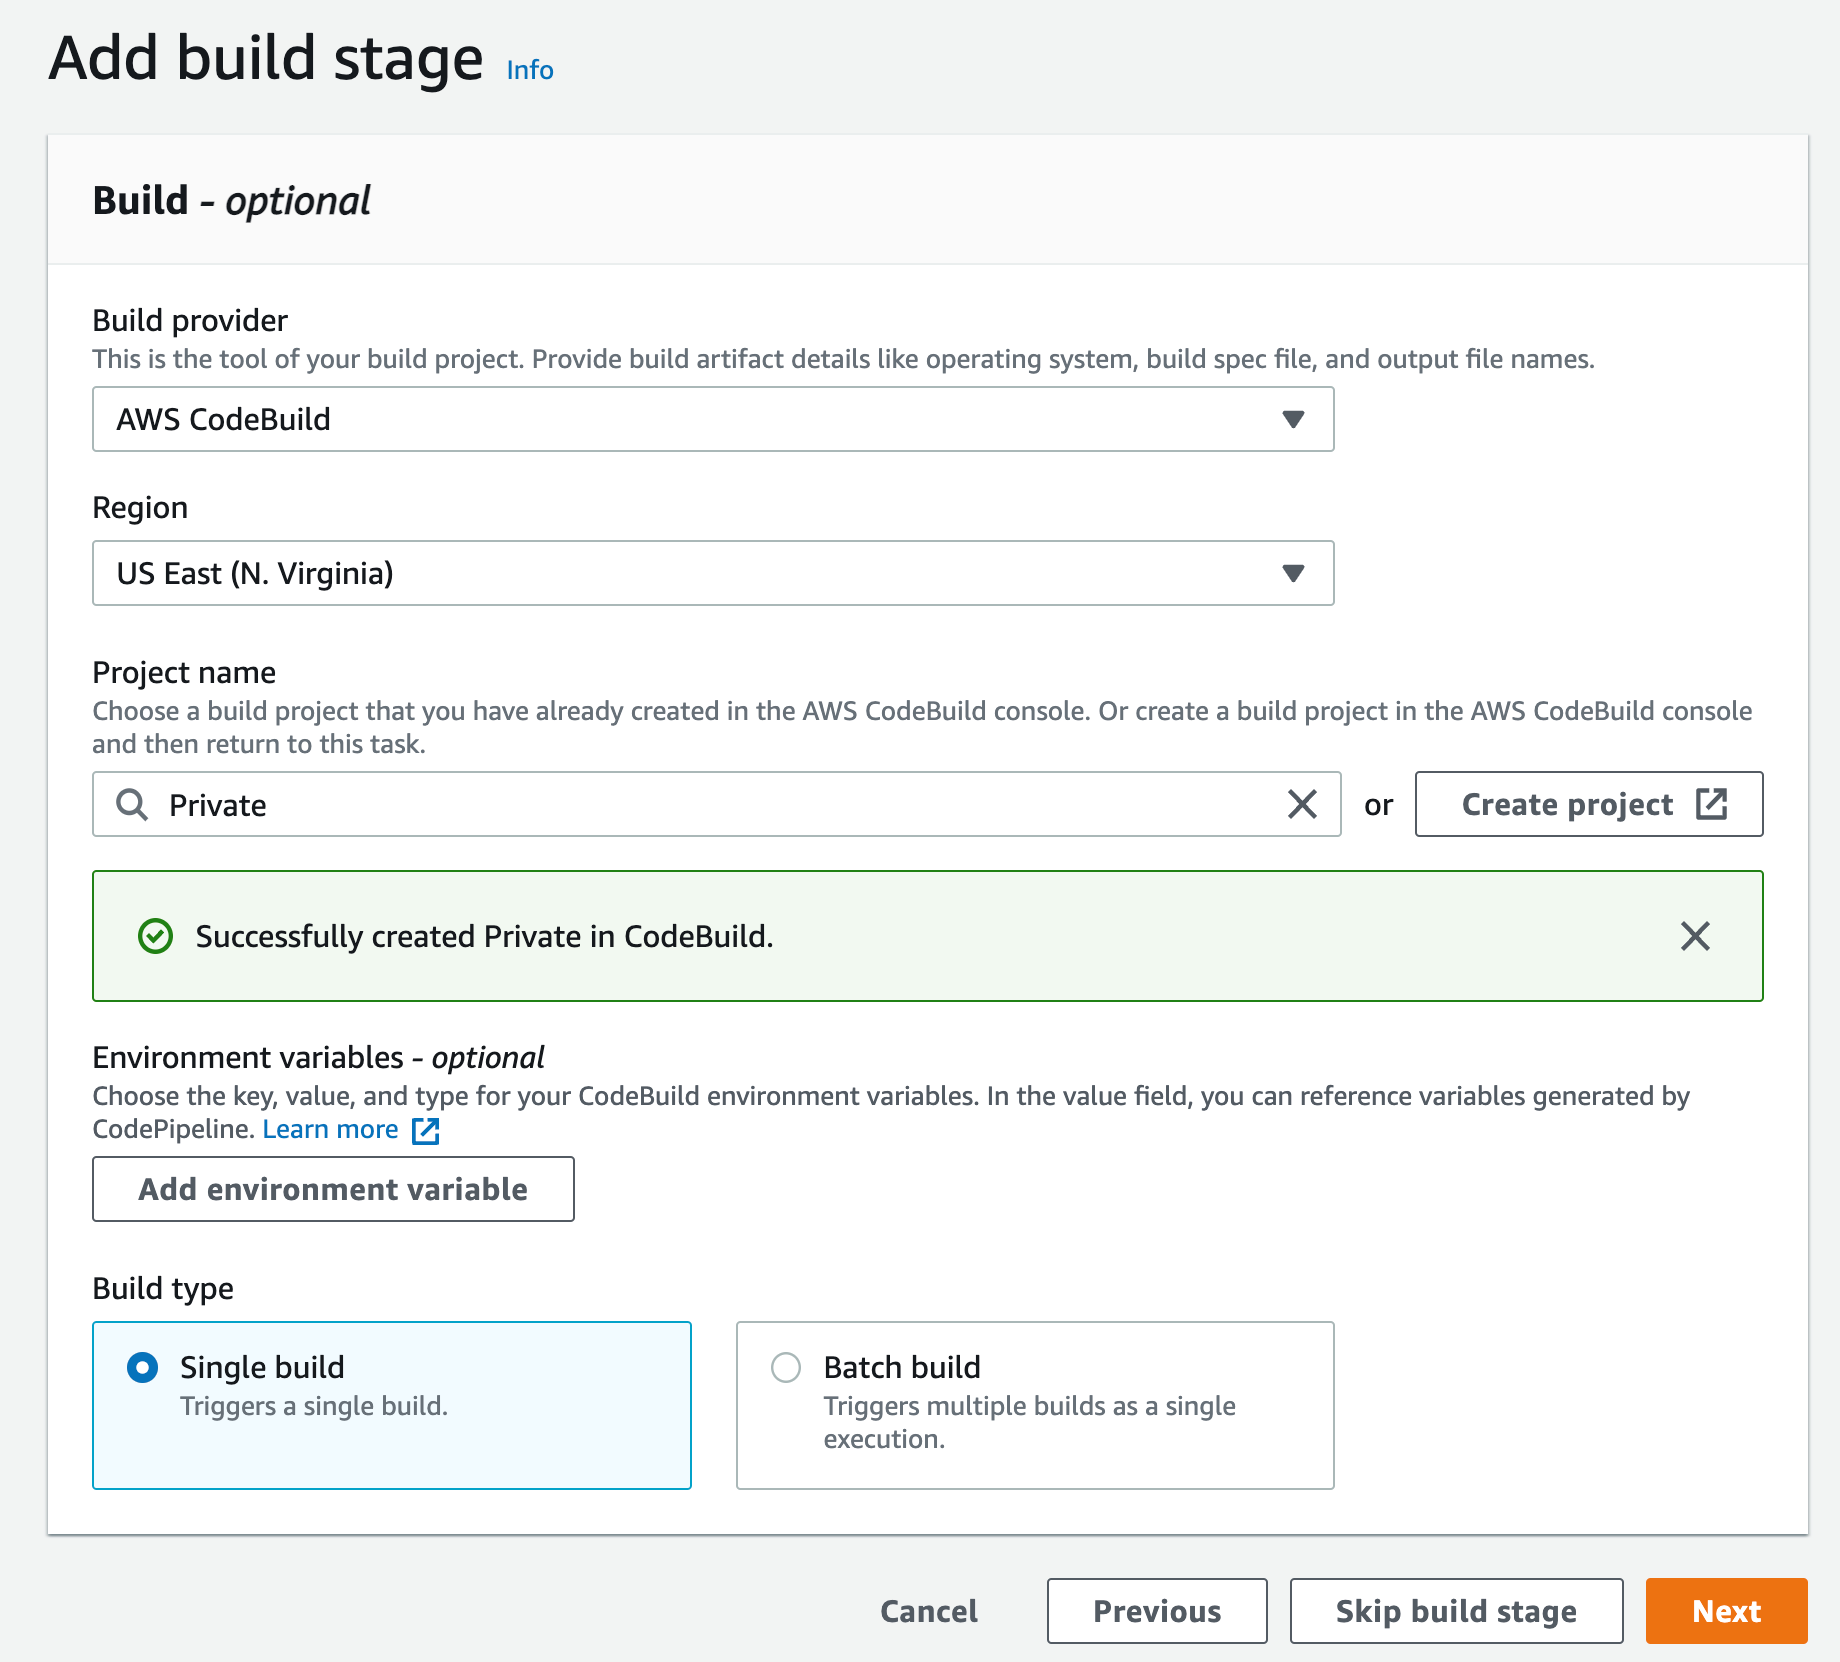
    1. For the Build Stage, Choose AWS CodeBuild as the build provider, then click Create Project
Figure 12. Screenshot: Create pipeline add build stage.

Figure 12. Screenshot: Create pipeline add build stage.

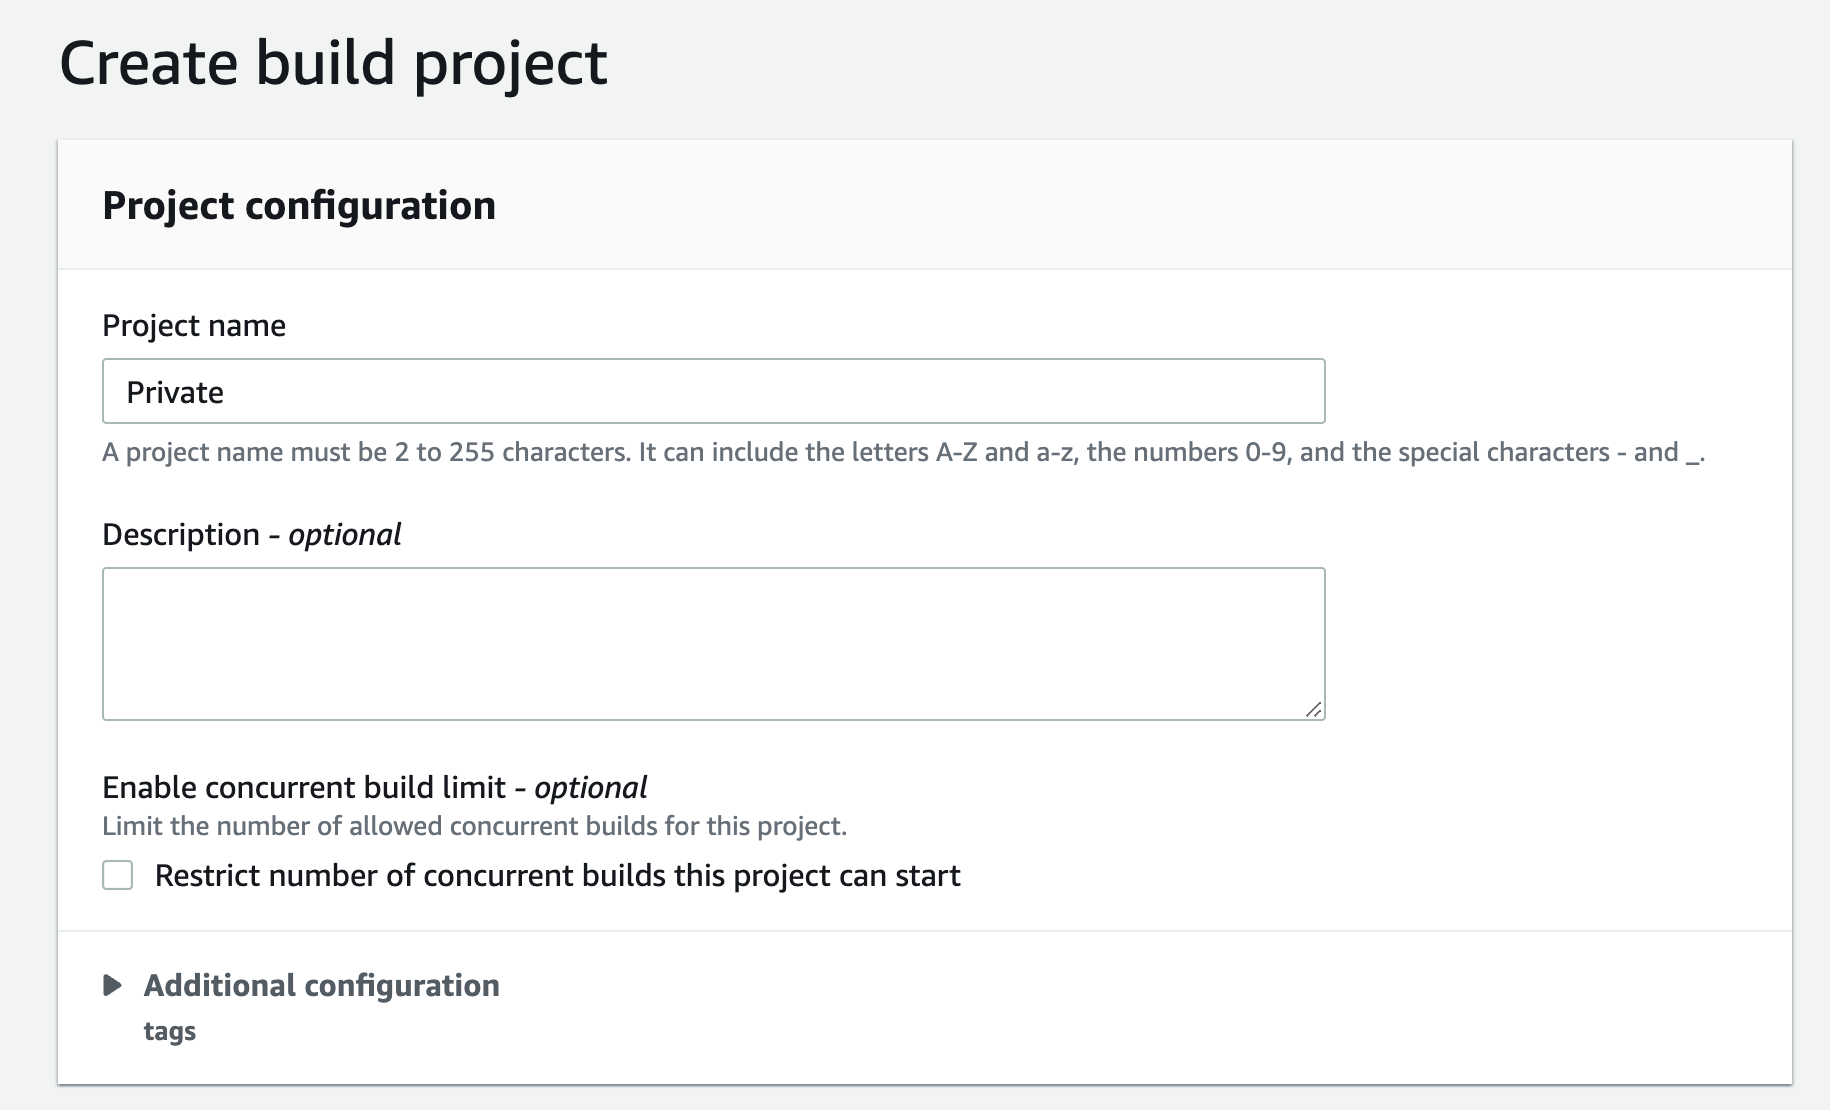
    1. This will open new window to create the new Project, Give this project a name
Figure 13. Screenshot: Create pipeline create build project window.

Figure 13. Screenshot: Create pipeline create build project window.

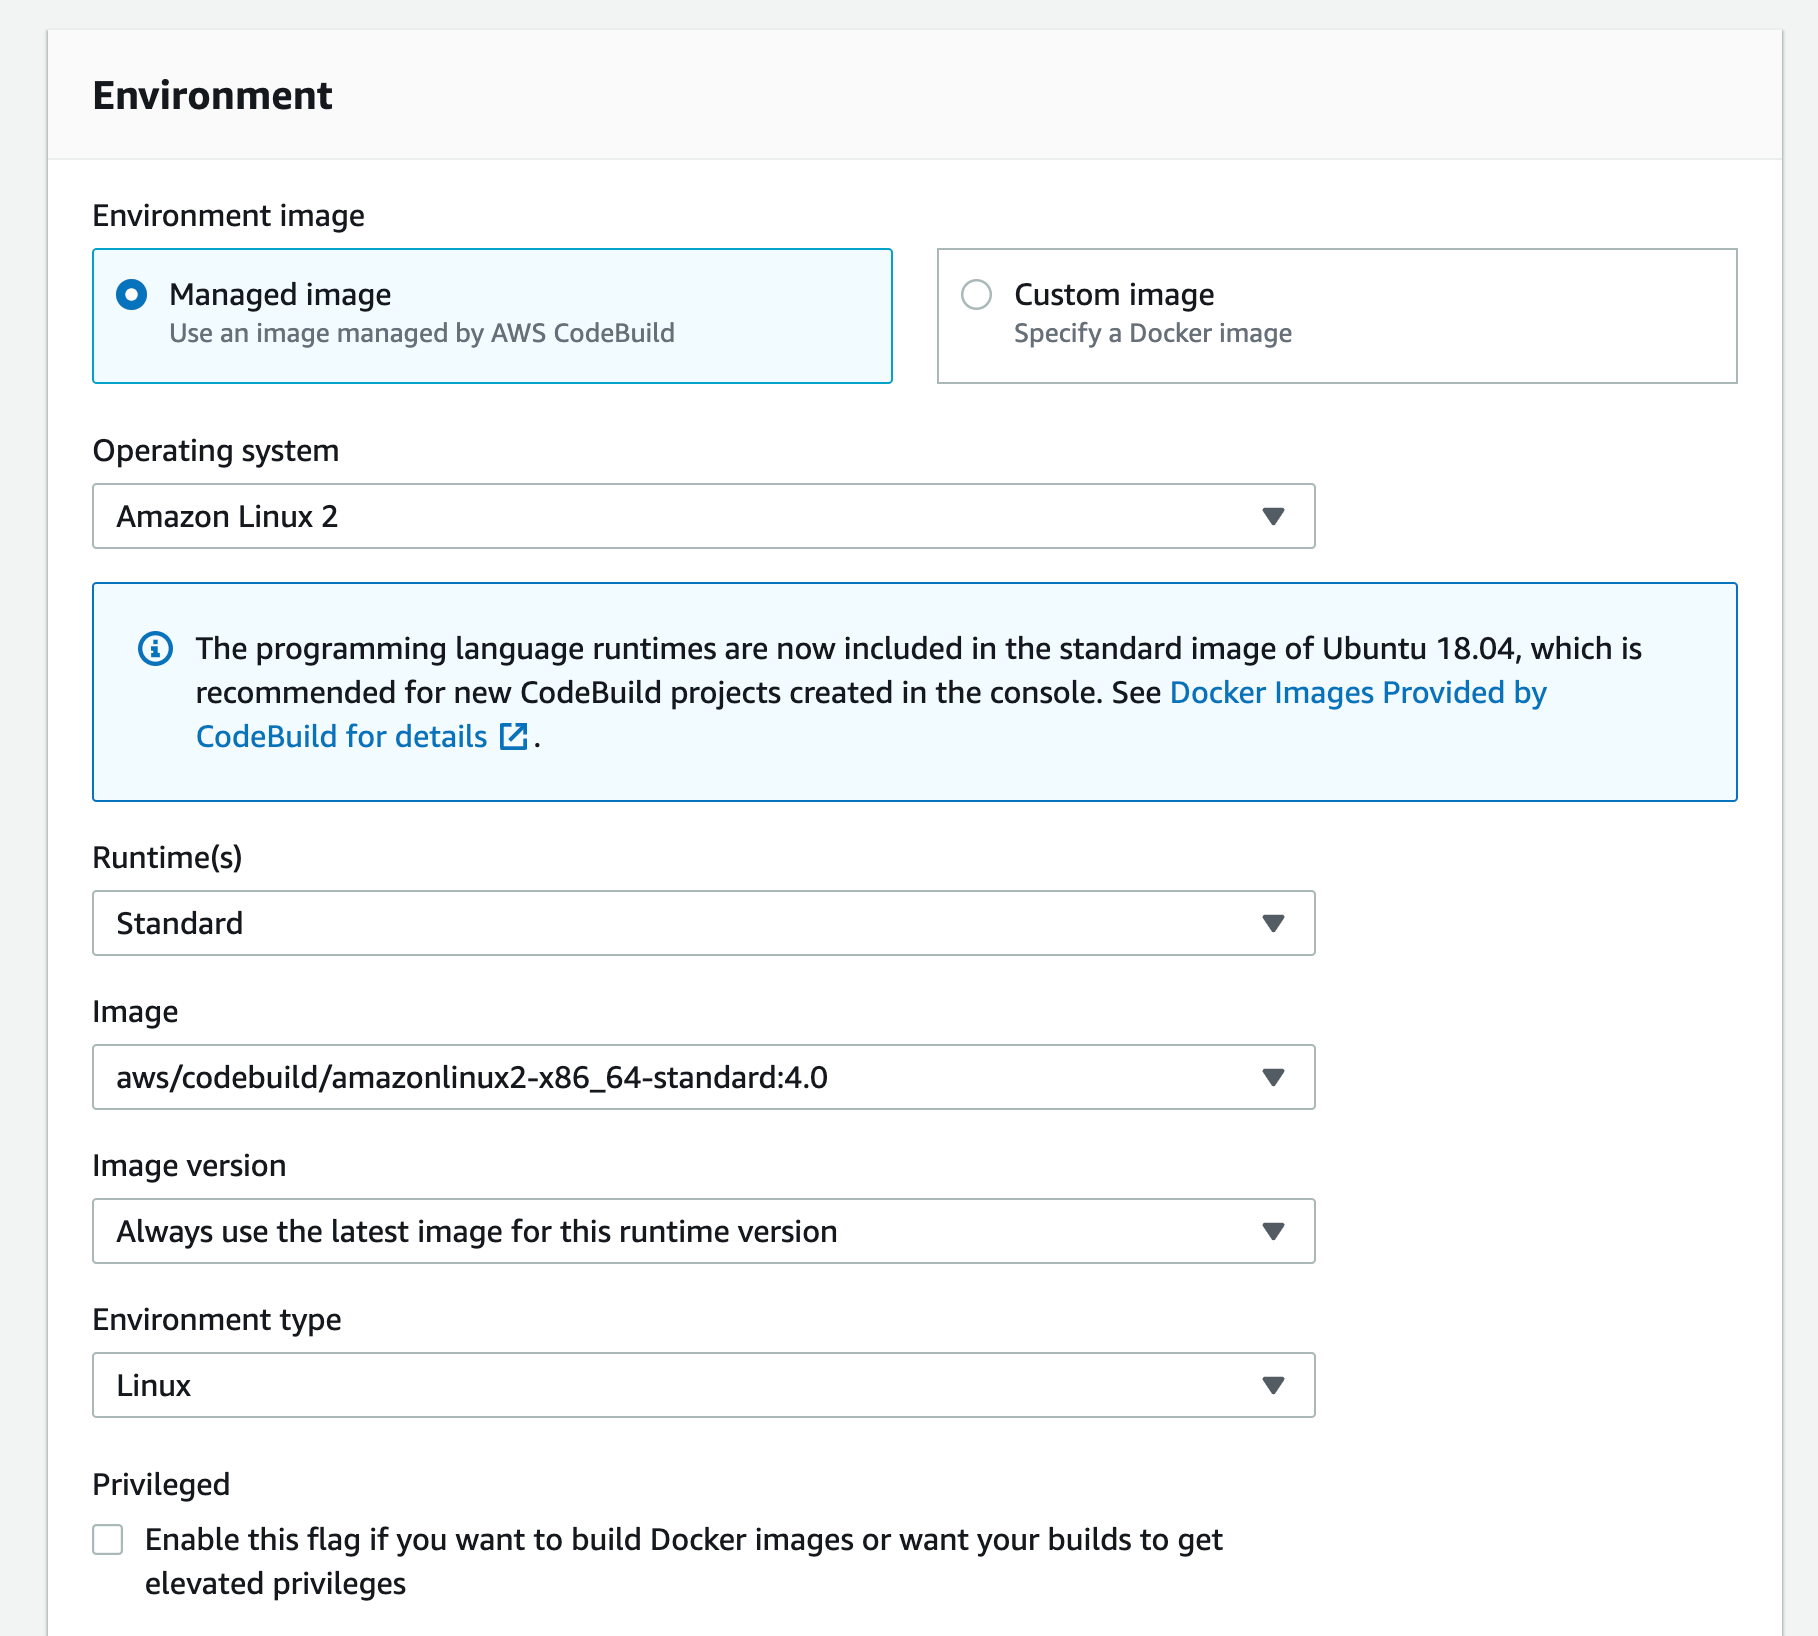
    1.  Scroll down to the Environment section: select pick Managed image,
    2. For Operating system select “Amazon Linux 2”,
    3. Runtime “Standard” and
    4. For Image select the aws/codebuild/amazonlinux2-x86+64-standard:4.0
      For the Image version: Always use the latest image for this runtime version
    5. Select Linux for the Environment type
    6. Leave the Privileged option unchecked and set Service Role to “New service role”
Figure 14. Screenshot: Create pipeline create build project, setting up environment window.

Figure 14. Screenshot: Create pipeline create build project, setting up environment window.

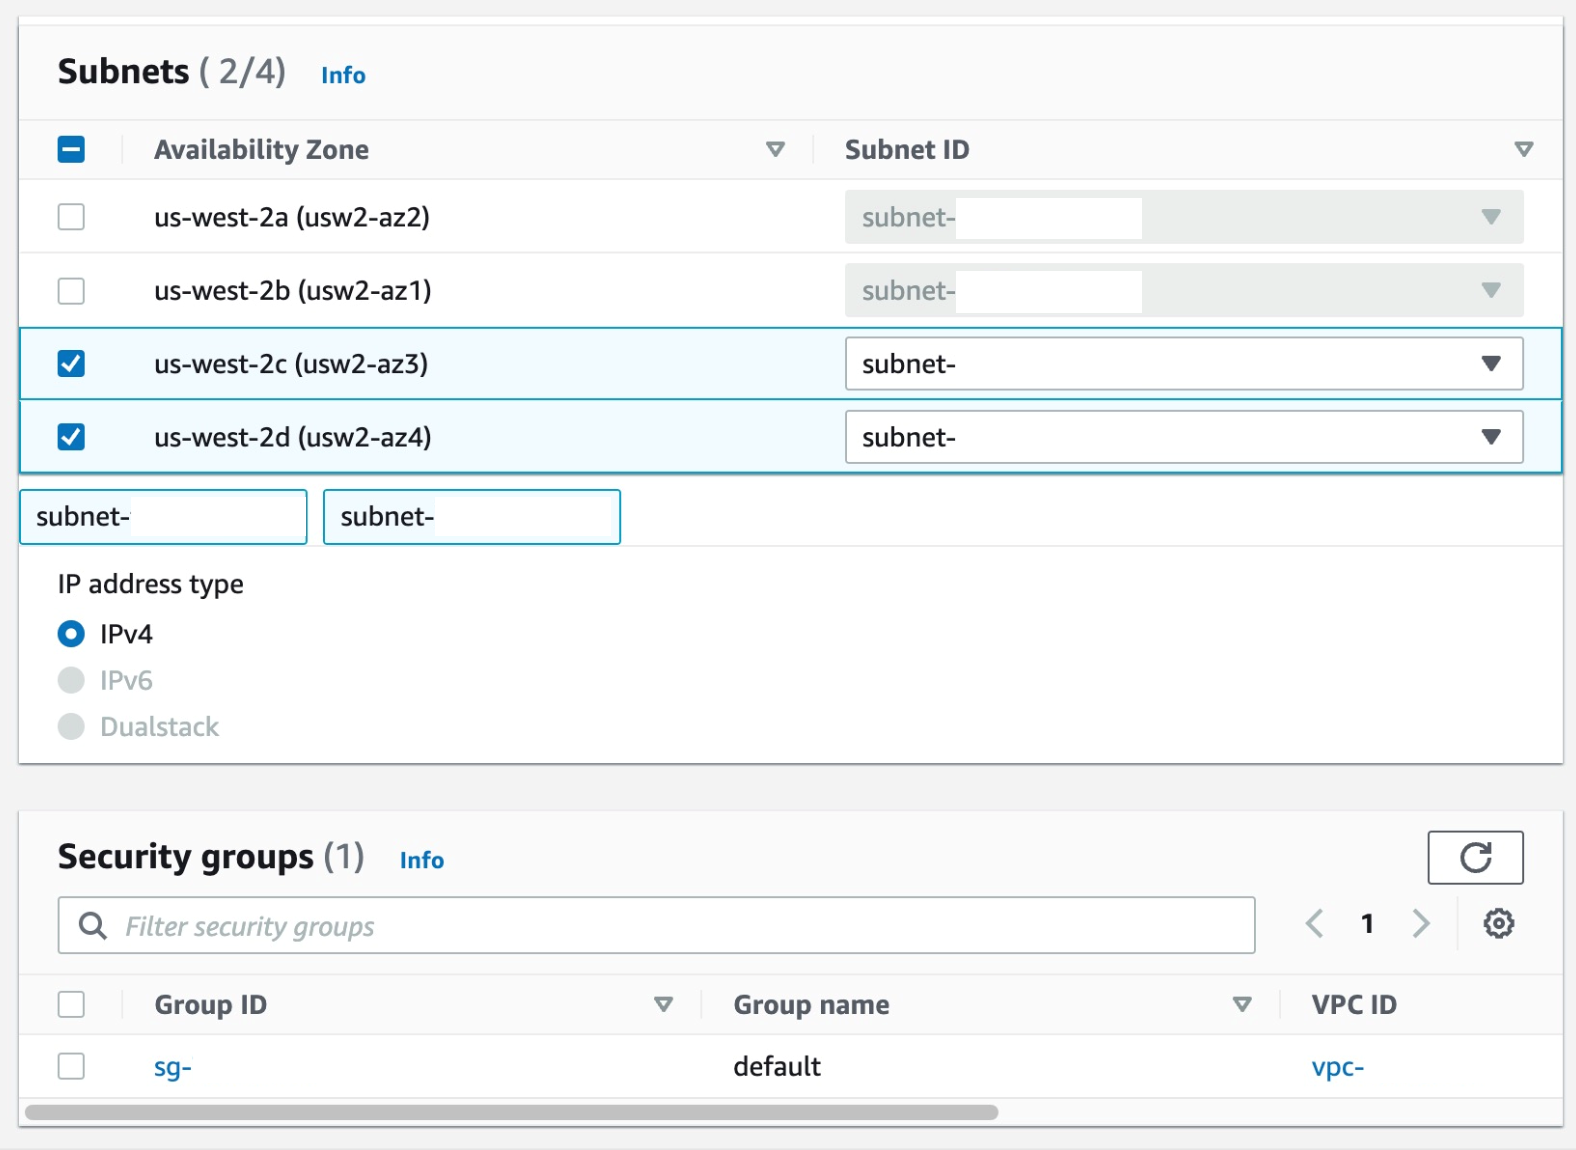
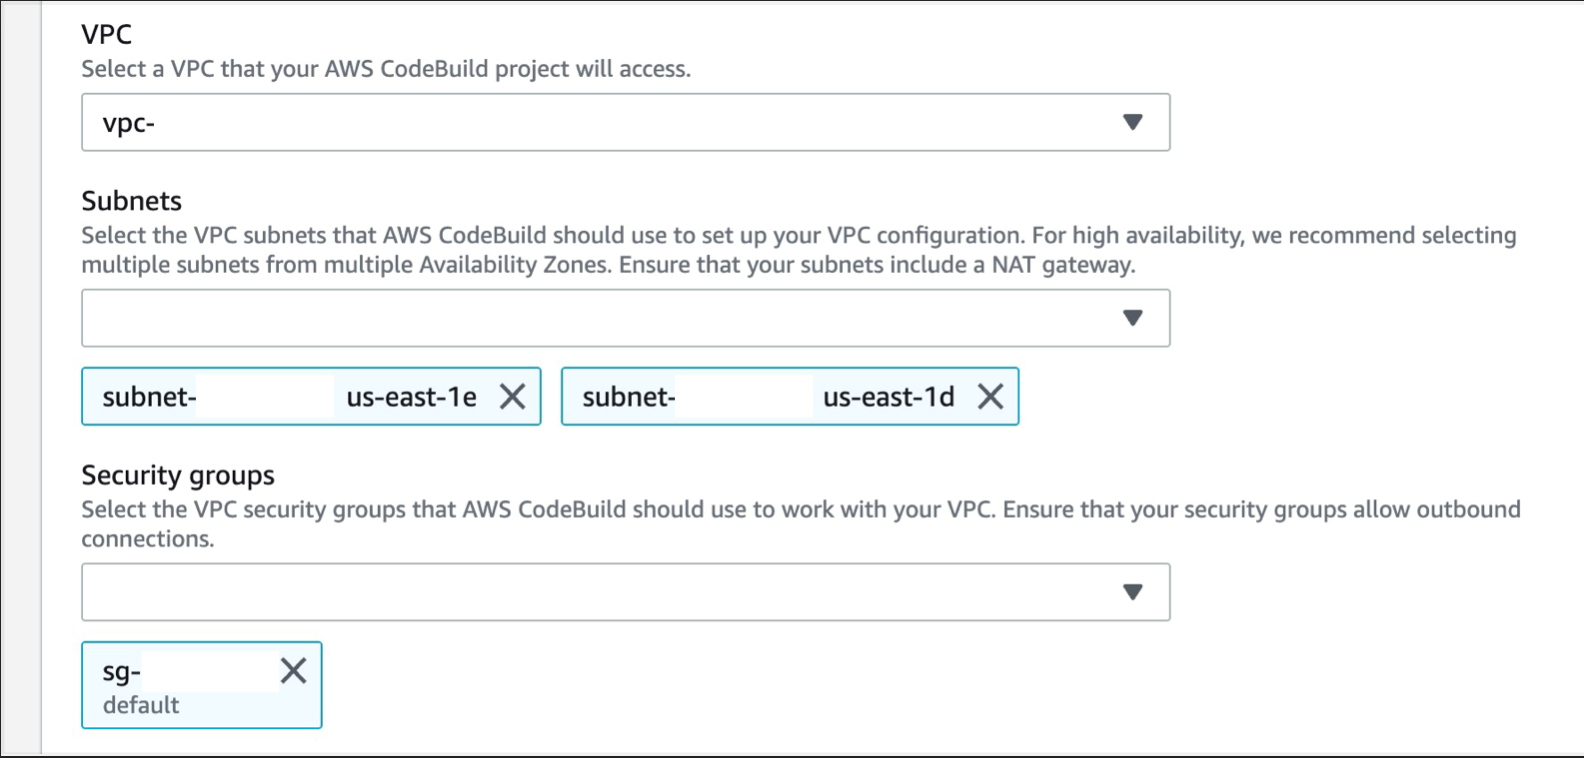
    1. Expand Additional configurations and scroll down to the VPC section, select the desired VPC, your Subnets (we recommend selecting multiple AZs, to ensure high availability), and Security Group (the security group rules must allow resources that will use the VPC endpoint to communicate with the AWS service to communicate with the endpoint network interface, default VPC security group will be used here as an example)
Figure 15. Screenshot: Create pipeline create build project networking window.

Figure 15. Screenshot: Create pipeline create build project networking window.

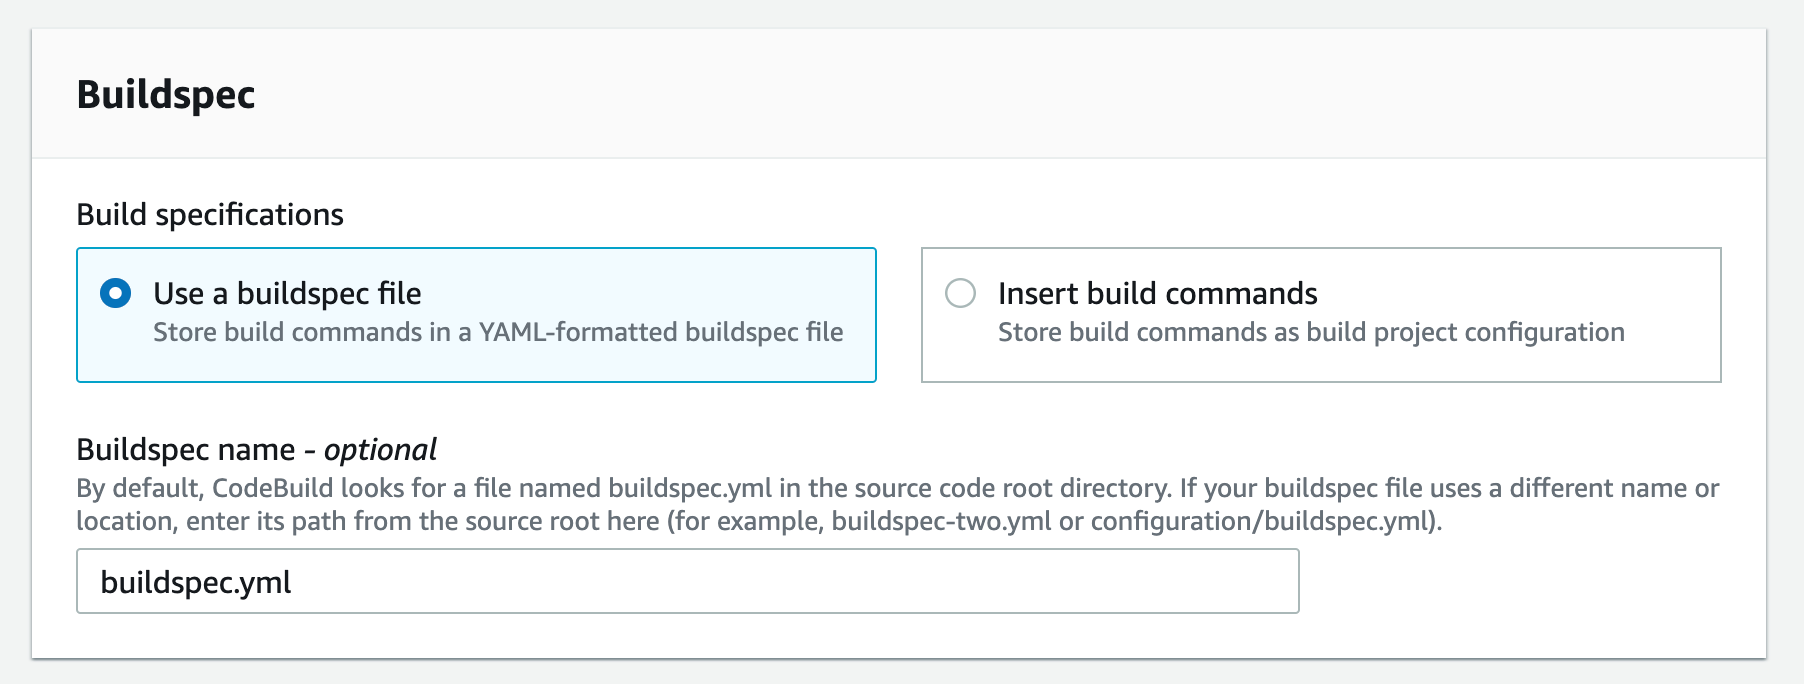
    1. Scroll down to the Buildspec and select “Use a buildspec file” and type “buildspec.yml” for the Buildspec name
Figure 16. Screenshot: Create pipeline create build project buildspec window.

Figure 16. Screenshot: Create pipeline create build project buildspec window.

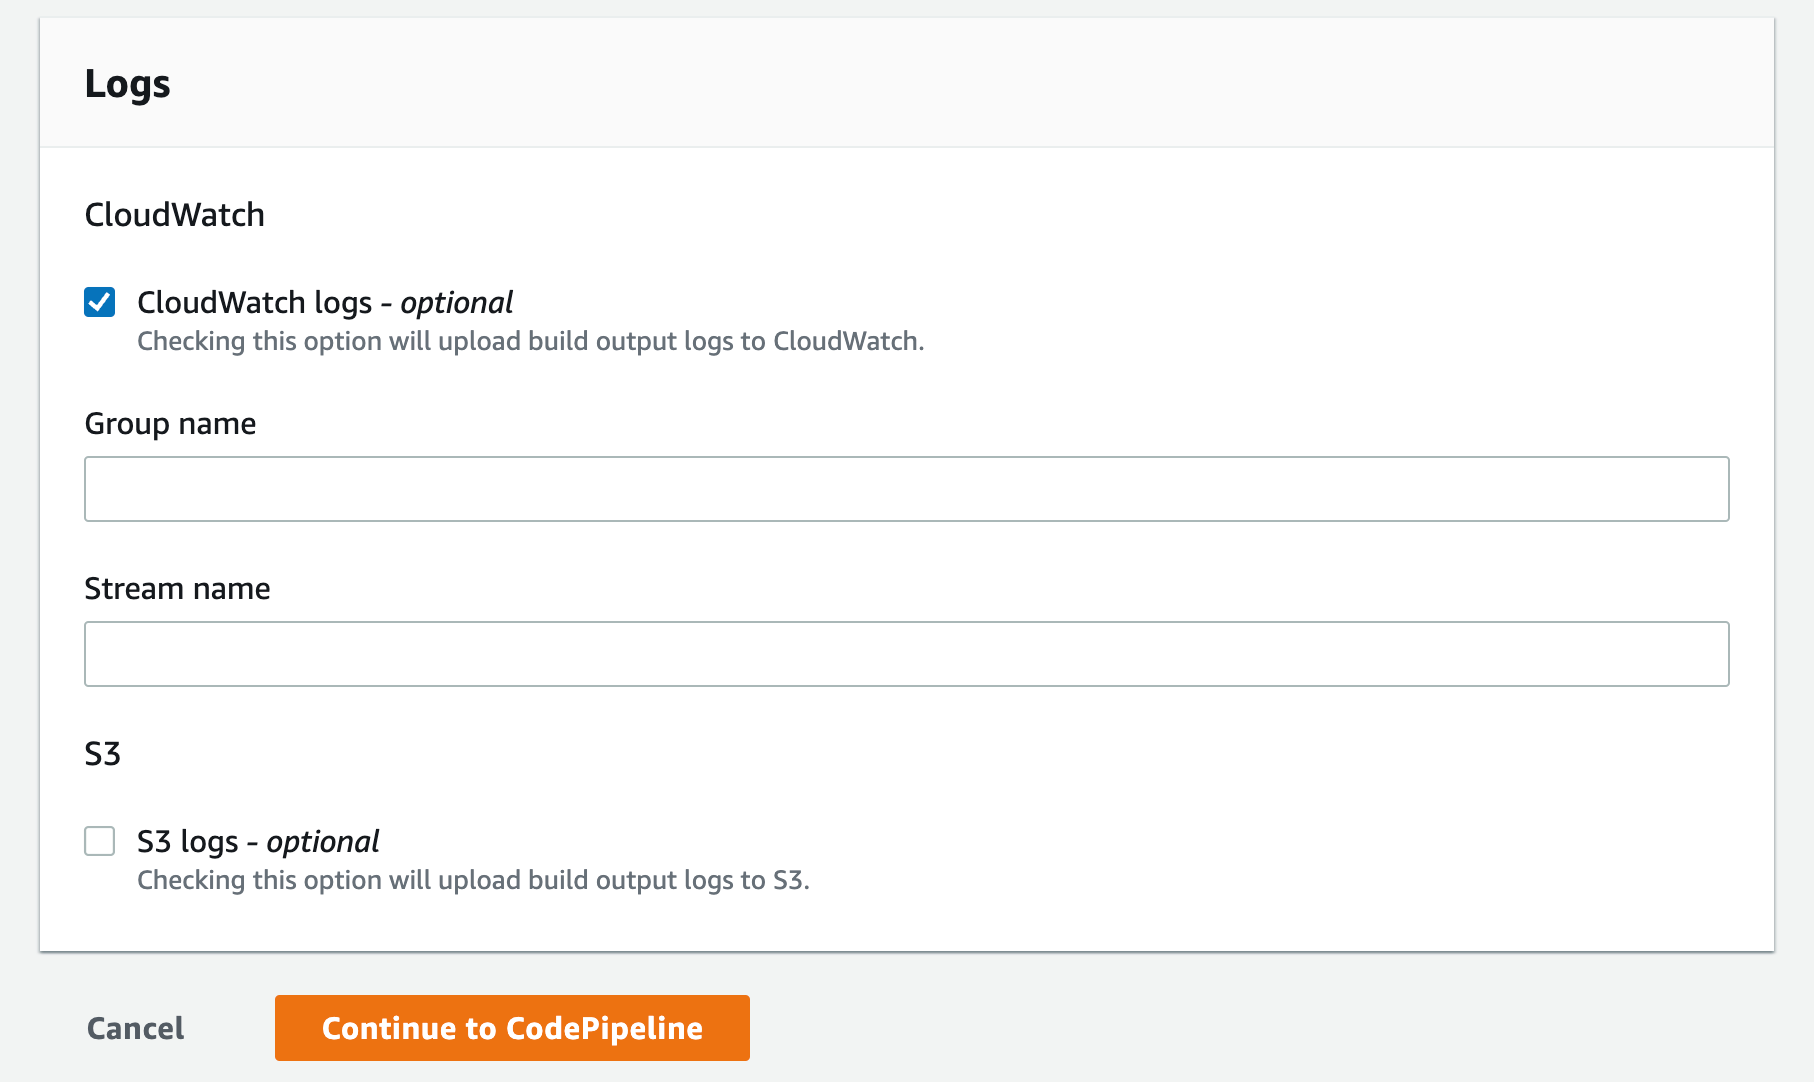
    1. Select the CloudWatch logs option you can leave the group name and stream empty this will let the service use the default values and click Continue to CodePipeline
Figure 17. Screenshot: Create pipeline create build project logs window.

Figure 17. Screenshot: Create pipeline create build project logs window.

    1. This will create the new CodeBuild Project, update the CodePipeline page, now you can click Next
Figure 18. Screenshot: Create pipeline add build stage window.

Figure 18. Screenshot: Create pipeline add build stage window.

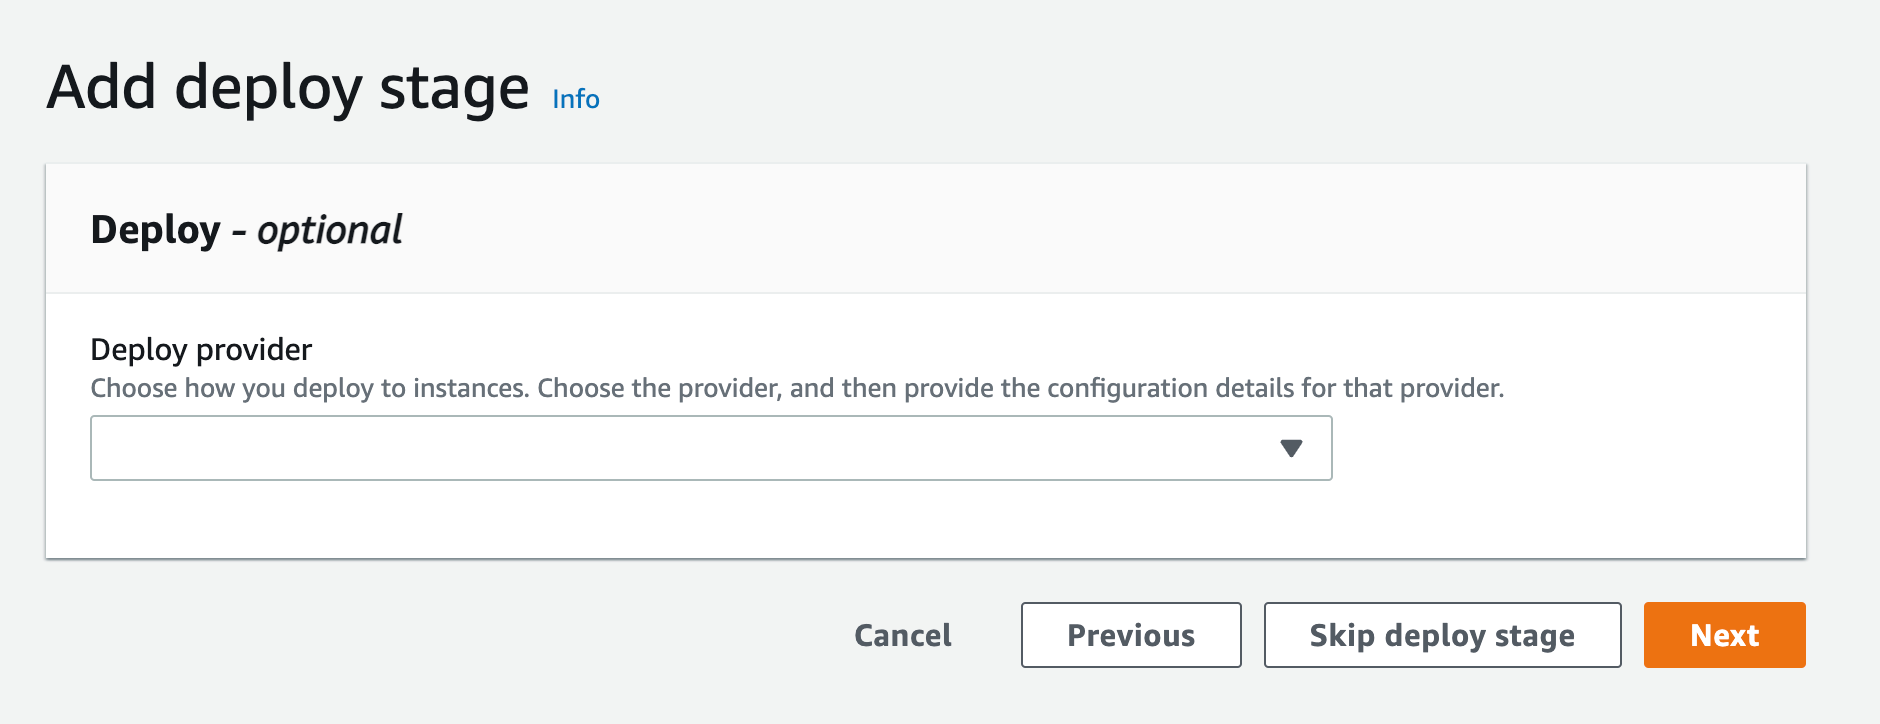
    1.  Since we are not deploying this to any environment, you can skip the deploy stage and click “Skip deploy stage”

Figure 19. Screenshot: Create pipeline add deploy stage.

Figure 20. Screenshot: Create pipeline skip deployment stage confirmation.

Figure 20. Screenshot: Create pipeline skip deployment stage confirmation.

    1. After you get the popup click skip again you’ll see the review page, scroll all the way down and click Create Pipeline
  1. Create a VPC endpoint for Amazon CloudWatch Logs. This will enable CodeBuild to send execution logs to CloudWatch:
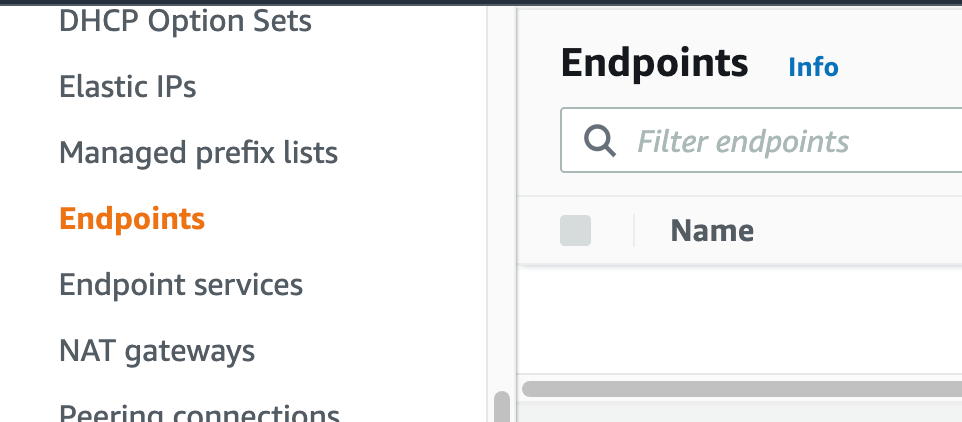
    1. Navigate to your VPC console, and from the navigation menu on the left select “Endpoints”.
Figure 21. Screenshot: VPC endpoint.

Figure 21. Screenshot: VPC endpoint.

    1.  click Create endpoint Button.
Figure 22. Screenshot: Create endpoint.

Figure 22. Screenshot: Create endpoint.

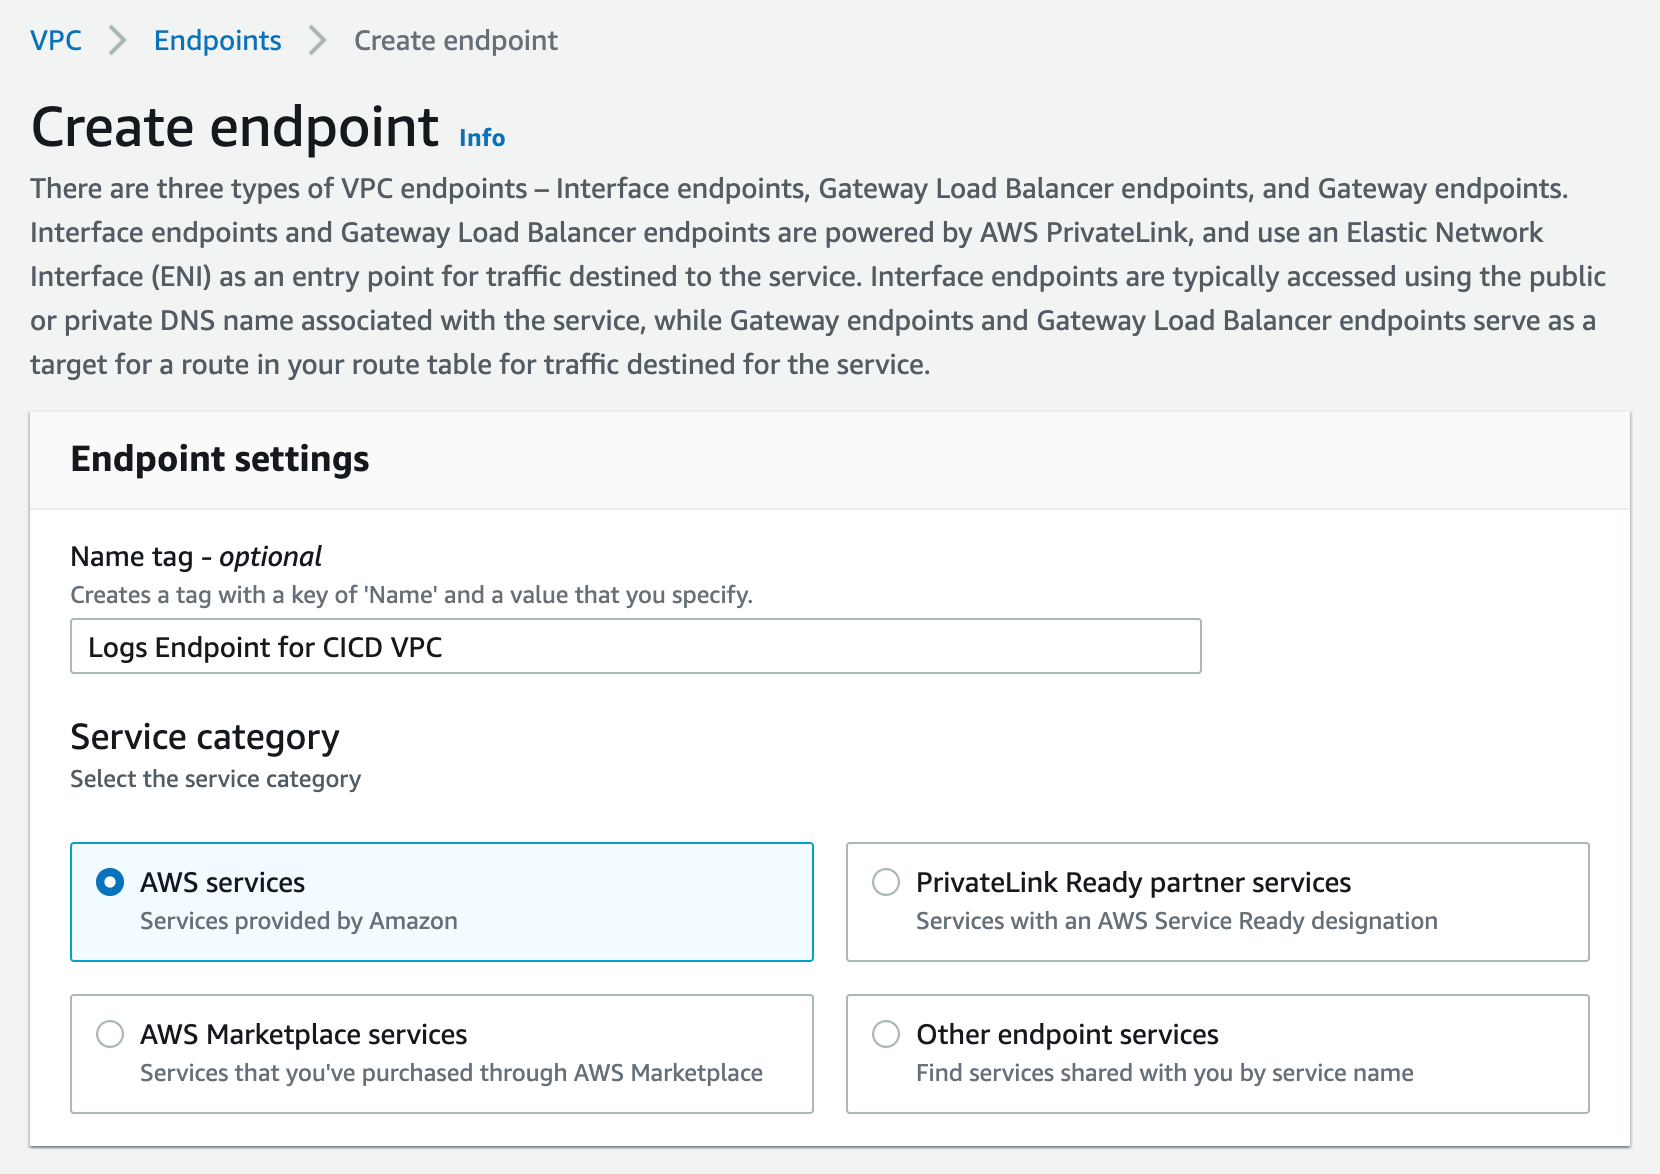
    1. For service Category, select “AWS Services”. You can set a name for the new endpoint, and make sure to use something descriptive.
Figure 23. Screenshot: Create endpoint page.

Figure 23. Screenshot: Create endpoint page.

    1. From the list of services, search for the endpoint by typing logs in the search bar and selecting the one with com.amazonaws.us-west-2.logs.
      This walkthrough can be done in any region that supports the services. I am going to be using us-west-2, please select the appropriate region for your workload.
Figure 24. Screenshot: create endpoint select services with com.amazonaws.us-west-2.logs selected.

Figure 24. Screenshot: create endpoint select services with com.amazonaws.us-west-2.logs selected.

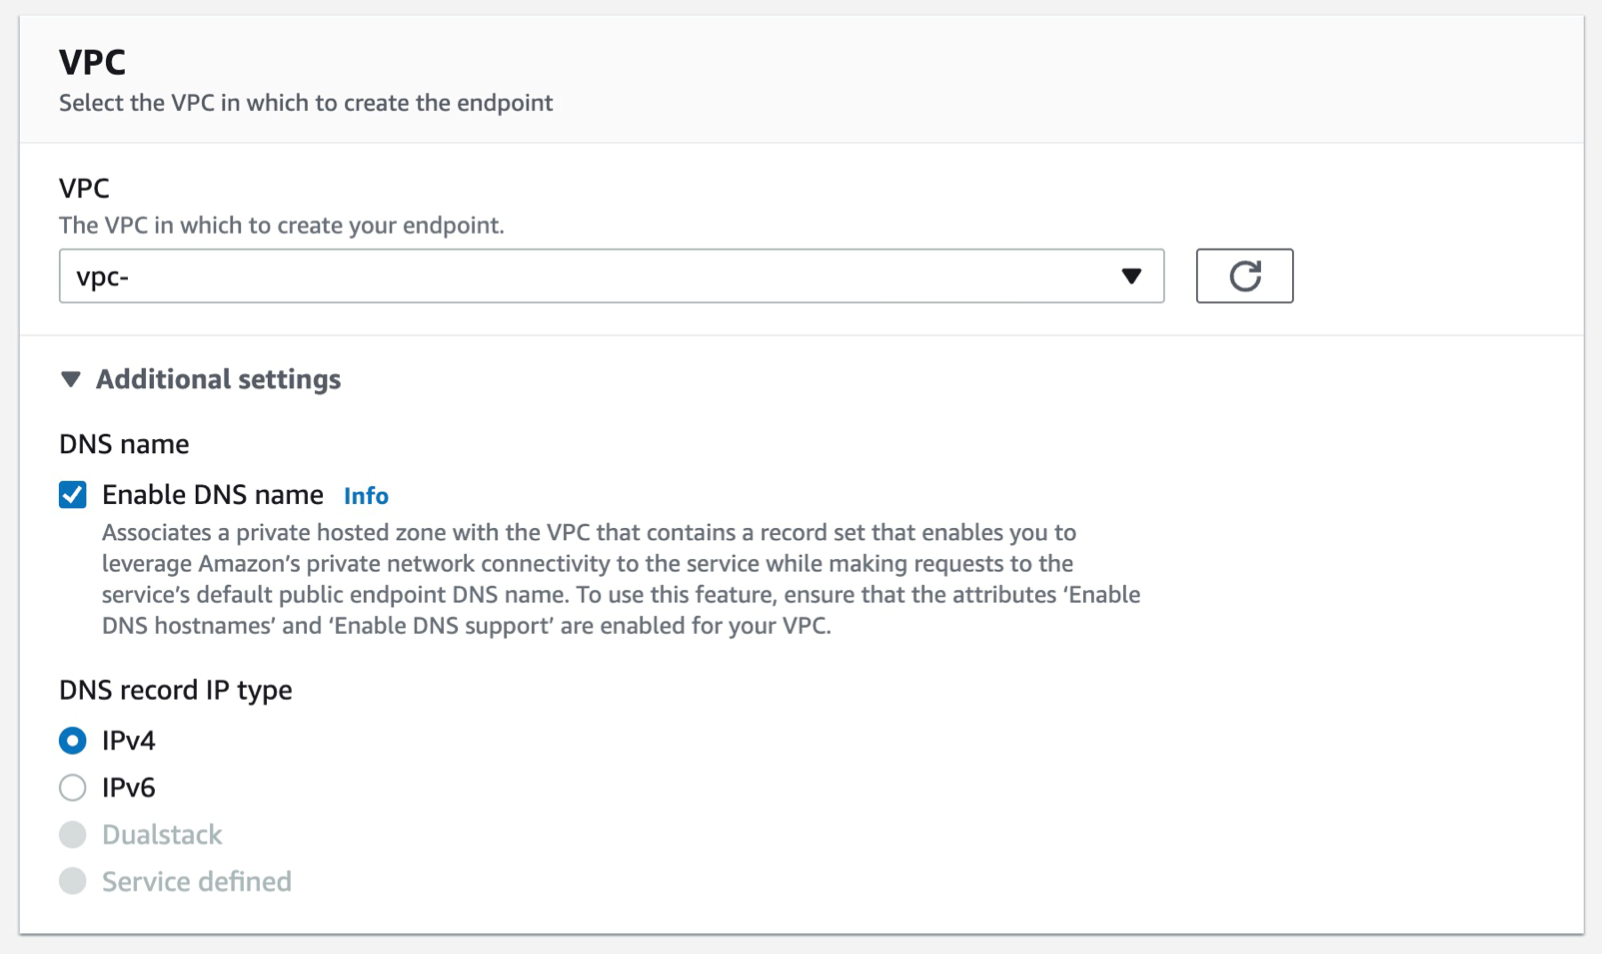
    1. Select the VPC that you want the endpoint to be associated with, and make sure that the Enable DNS name option is checked under additional settings.
Figure 25. Screenshot: create endpoint VPC setting shows VPC selected.

Figure 25. Screenshot: create endpoint VPC setting shows VPC selected.

    1. Select the Subnets where you want the endpoint to be associated, and you can leave the security group as default and the policy as empty.
Figure 26. Screenshot: create endpoint subnet setting shows 2 subnet selected and default security group selected.

Figure 26. Screenshot: create endpoint subnet setting shows 2 subnet selected and default security group selected.

    1. Select Create Endpoint.
Figure 27. Screenshot: create endpoint button.

Figure 27. Screenshot: create endpoint button.

  1. Create a VPC endpoint for CodeArtifact. At the time of writing this article, CodeArifact has two endpoints: one is for API operations like service level operations and authentication, and the other is for using the service such as getting modules for our code. We’ll need both endpoints to automate working with CodeArtifact. Therefore, we’ll create both endpoints with DNS enabled.

In addition, we’ll need AWS Security Token Service (AWS STS) endpoint for get-caller-identity API call:

Follow steps a-c from the steps that were used from the creating the Logs endpoint above.

a. From the list of services, you can search for the endpoint by typing codeartifact in the search bar and selecting the one with com.amazonaws.us-west-2.codeartifact.api.

Figure 28. Screenshot: create endpoint select services with com.amazonaws.us-west-2.codeartifact.api selected.

Figure 28. Screenshot: create endpoint select services with com.amazonaws.us-west-2.codeartifact.api selected.

Follow steps e-g from Part 4.

Then, repeat the same for com.amazon.aws.us-west-2.codeartifact.repositories service.

Figure 29. Screenshot: create endpoint select services with com.amazonaws.us-west-2.codeartifact.api selected.

Figure 29. Screenshot: create endpoint select services with com.amazonaws.us-west-2.codeartifact.api selected.

  1. Enable a VPC endpoint for AWS STS:

Follow steps a-c from Part 4

a. From the list of services you can search for the endpoint by typing sts in the search bar and selecting the one with com.amazonaws.us-west-2.sts.

Figure 30.Screenshot: create endpoint select services with com.amazon.aws.us-west-2.codeartifact.repositories selected.

Figure 30.Screenshot: create endpoint select services with com.amazon.aws.us-west-2.codeartifact.repositories selected.

Then follow steps e-g from Part 4.

  1. Create a VPC endpoint for S3:

Follow steps a-c from Part 4

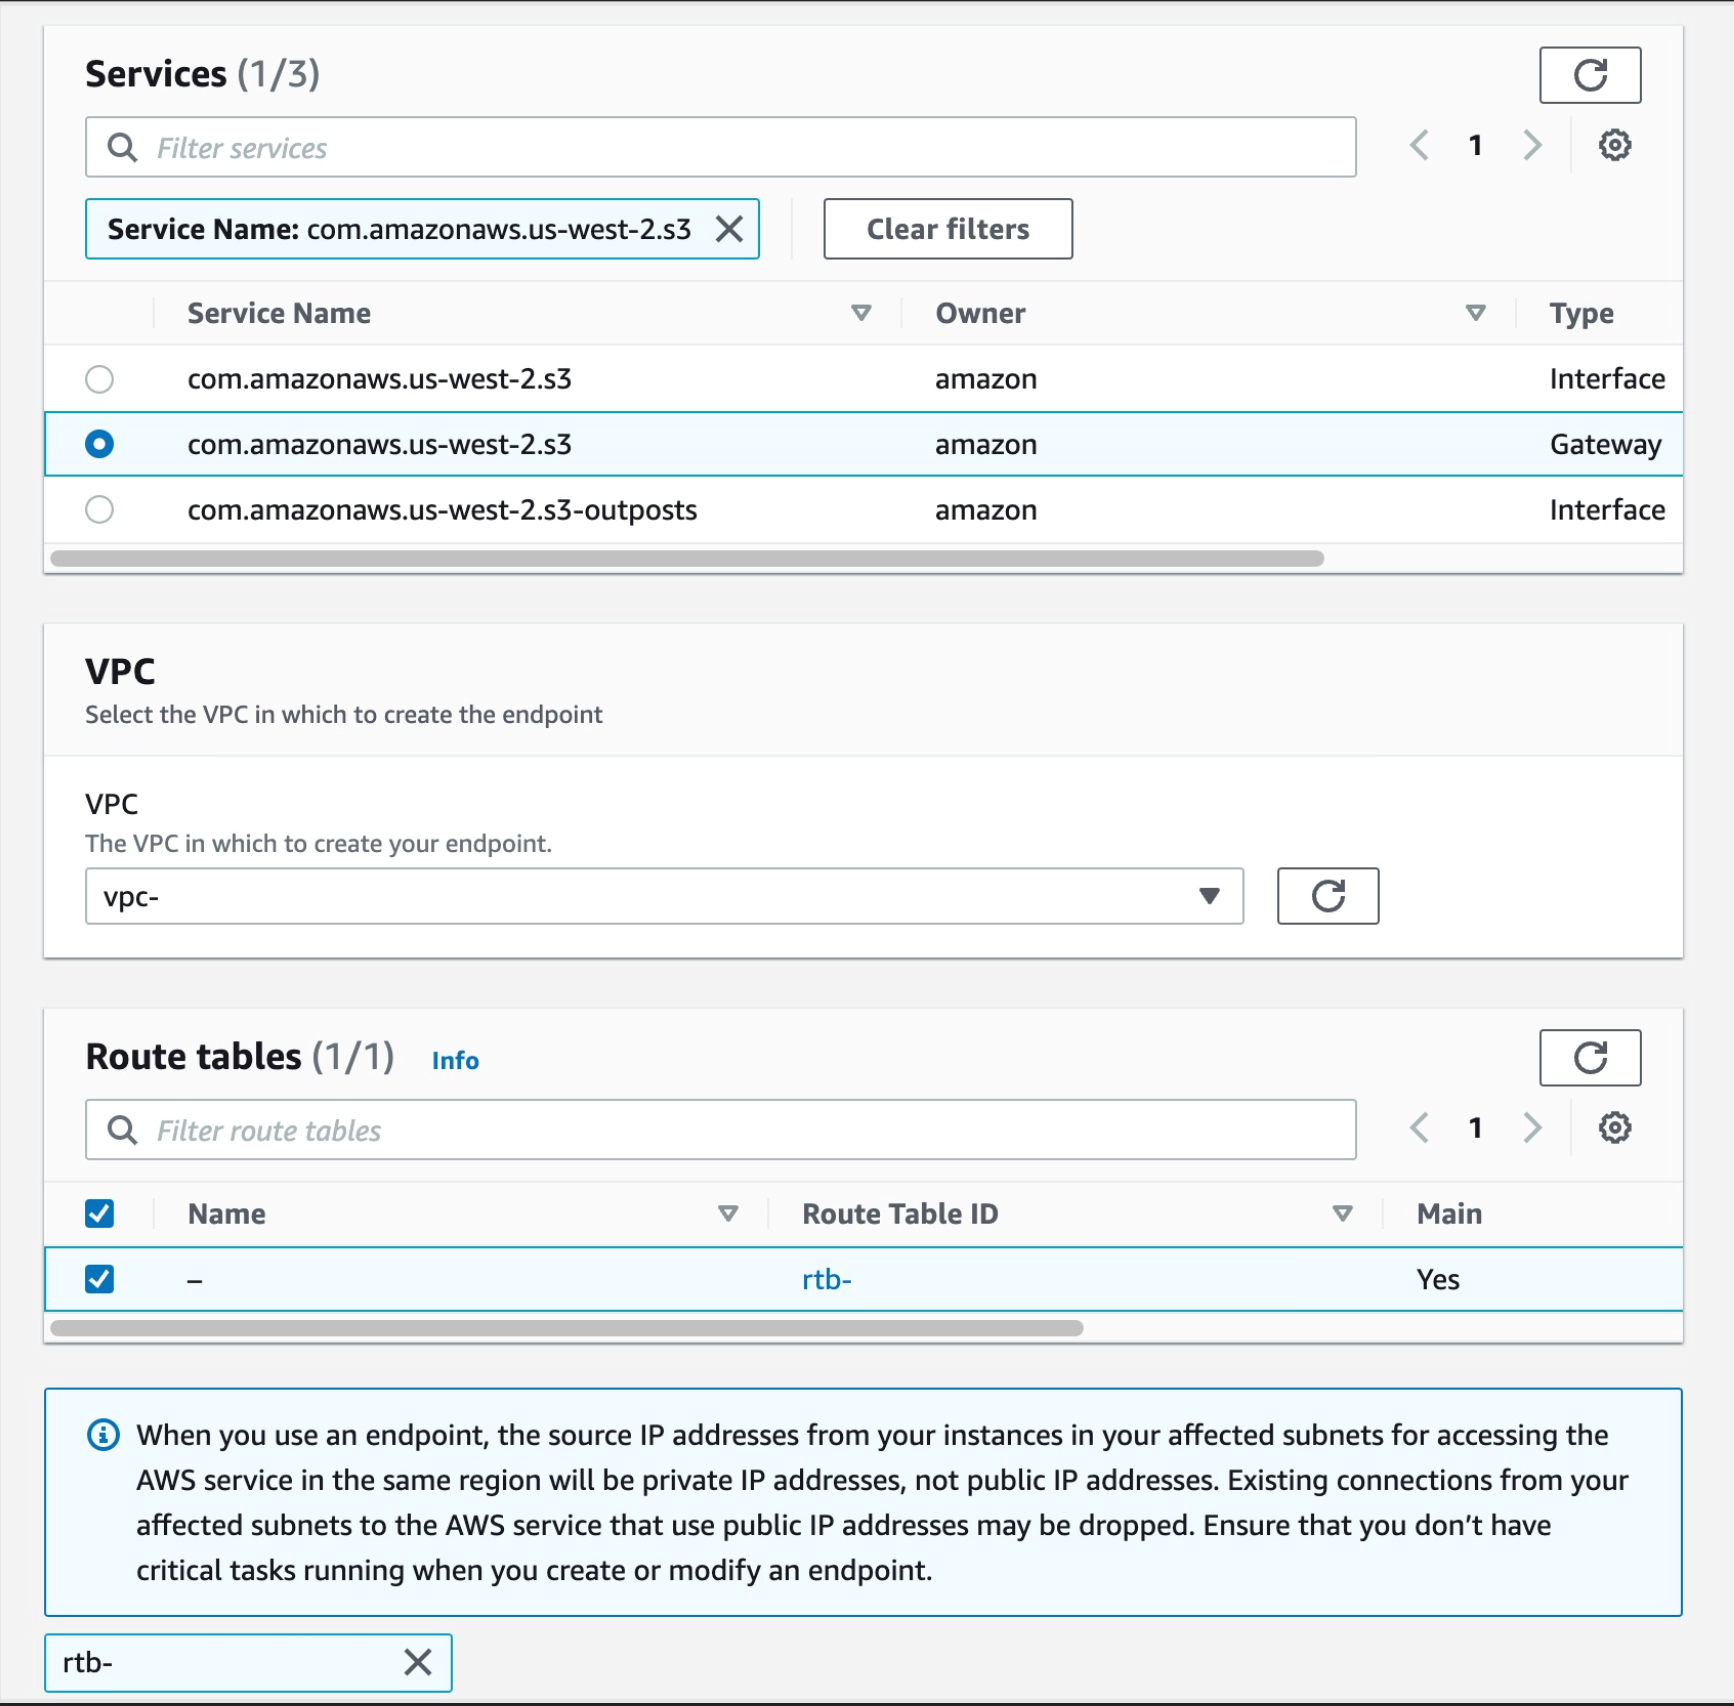
a. From the list of services you can search for the endpoint by typing sts in the search bar and selecting the one with com.amazonaws.us-west-2.s3, select the one with type of Gateway

Then select your VPC, and select the route tables for your subnets, this will auto update the route table with the new S3 endpoint.

Figure 31. Screenshot: create endpoint select services with com.amazonaws.us-west-2.s3 selected.

Figure 31. Screenshot: create endpoint select services with com.amazonaws.us-west-2.s3 selected.

  1. Now we have all of the endpoints set. The last step is to update your pipeline to point at the CodeArtifact repository when pulling your code dependencies. I’ll use CodeBuild buildspec.yml as an example here.

Make sure that your CodeBuild AWS Identity and Access Management (IAM) role has the permissions to perform STS and CodeArtifact actions.

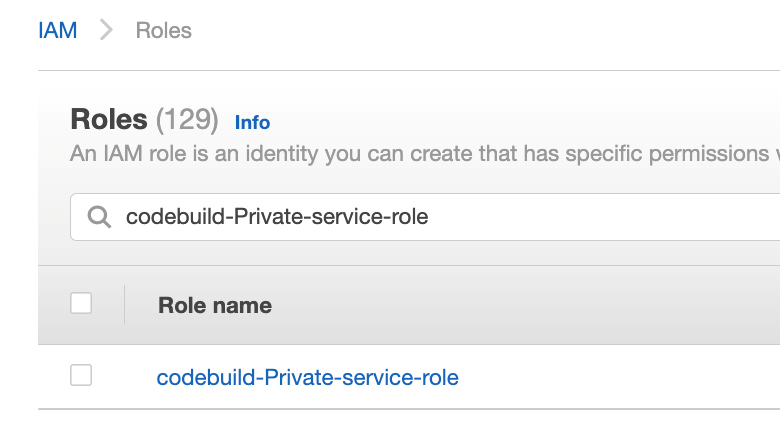
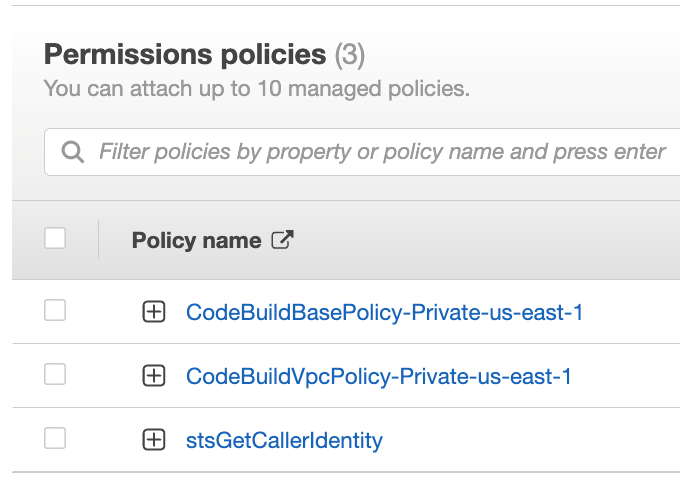
Navigate to IAM console and click Roles from the left navigation menu, then search for your IAM role name, in our case since we selected “New service role” option in step 2.k was created with the name “codebuild-Private-service-role” (codebuild-<BUILD PROJECT NAME>-service-role)

Figure 32. Screenshot: IAM roles with codebuild-Private-service-role role shown in search.

Figure 32. Screenshot: IAM roles with codebuild-Private-service-role role shown in search.

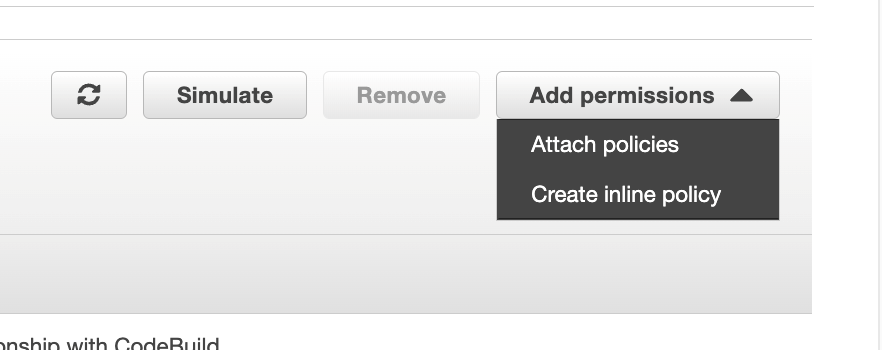
From the Add permissions menu, click on Create inline policy

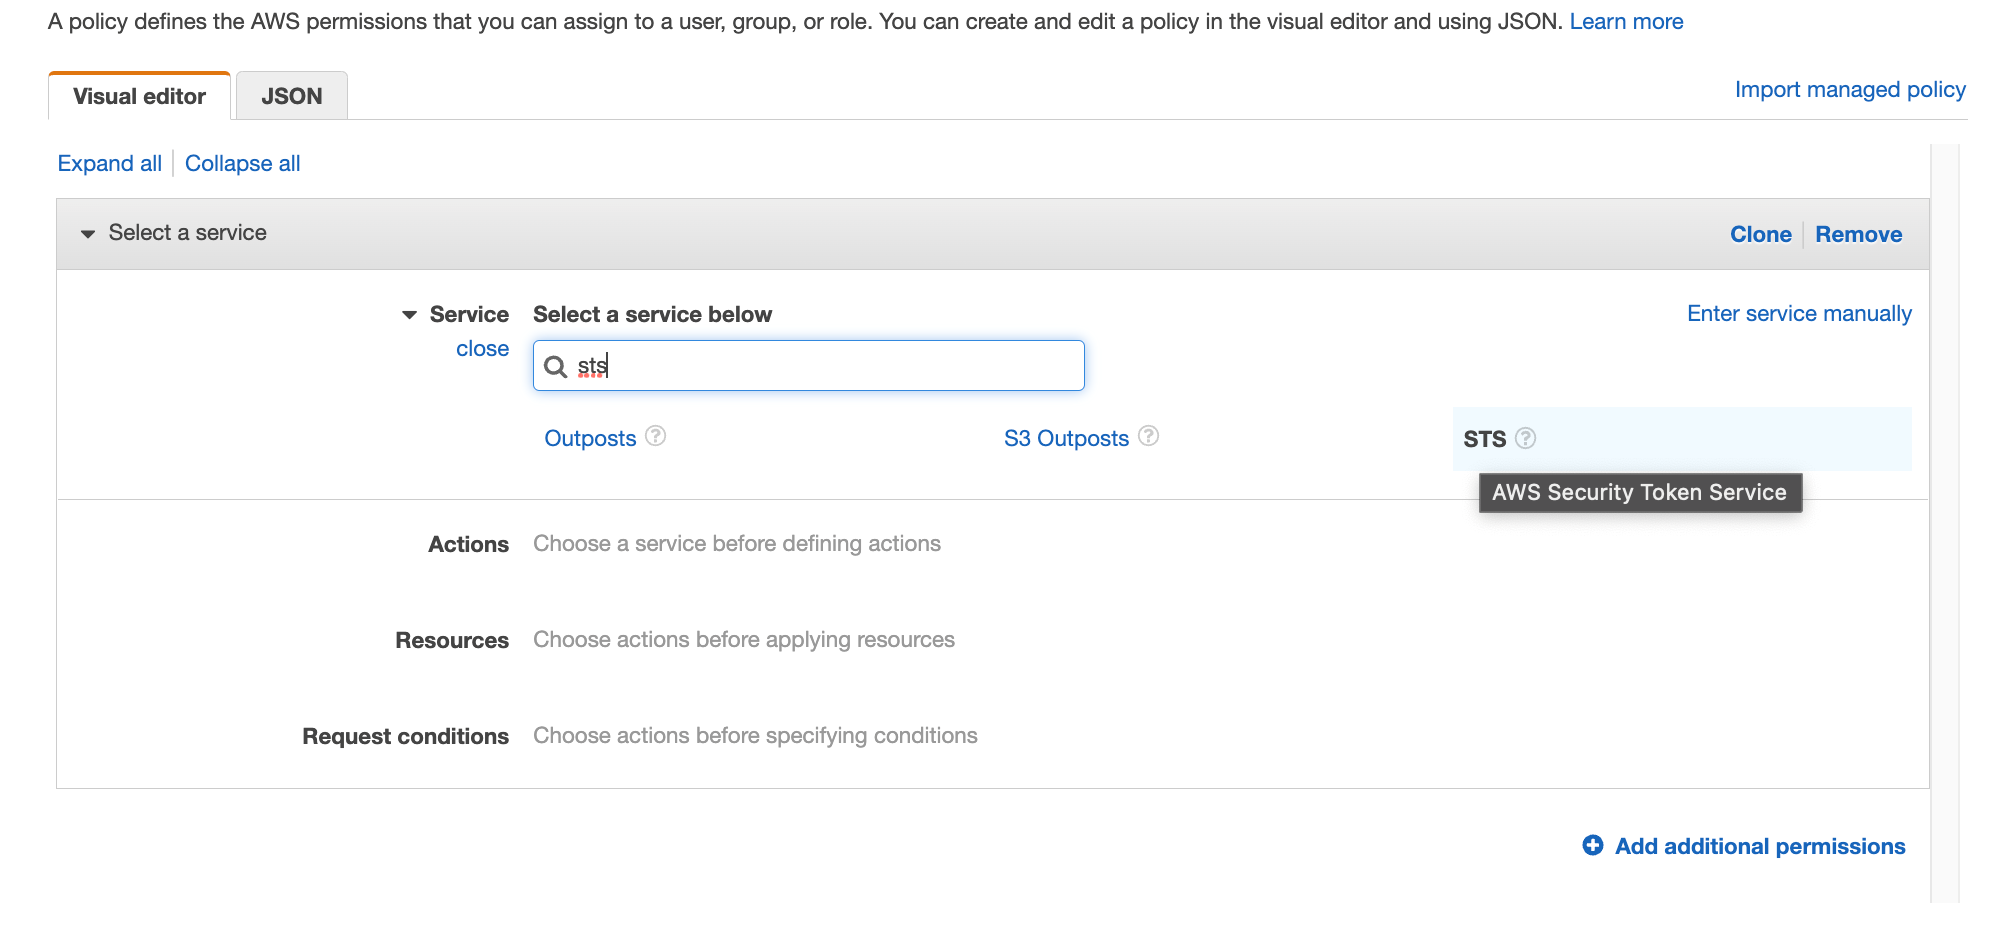
Search for STS in the services then select STS

Figure 34. Screenshot: IAM visual editor with sts shown in search.

Figure 34. Screenshot: IAM visual editor with sts shown in search.

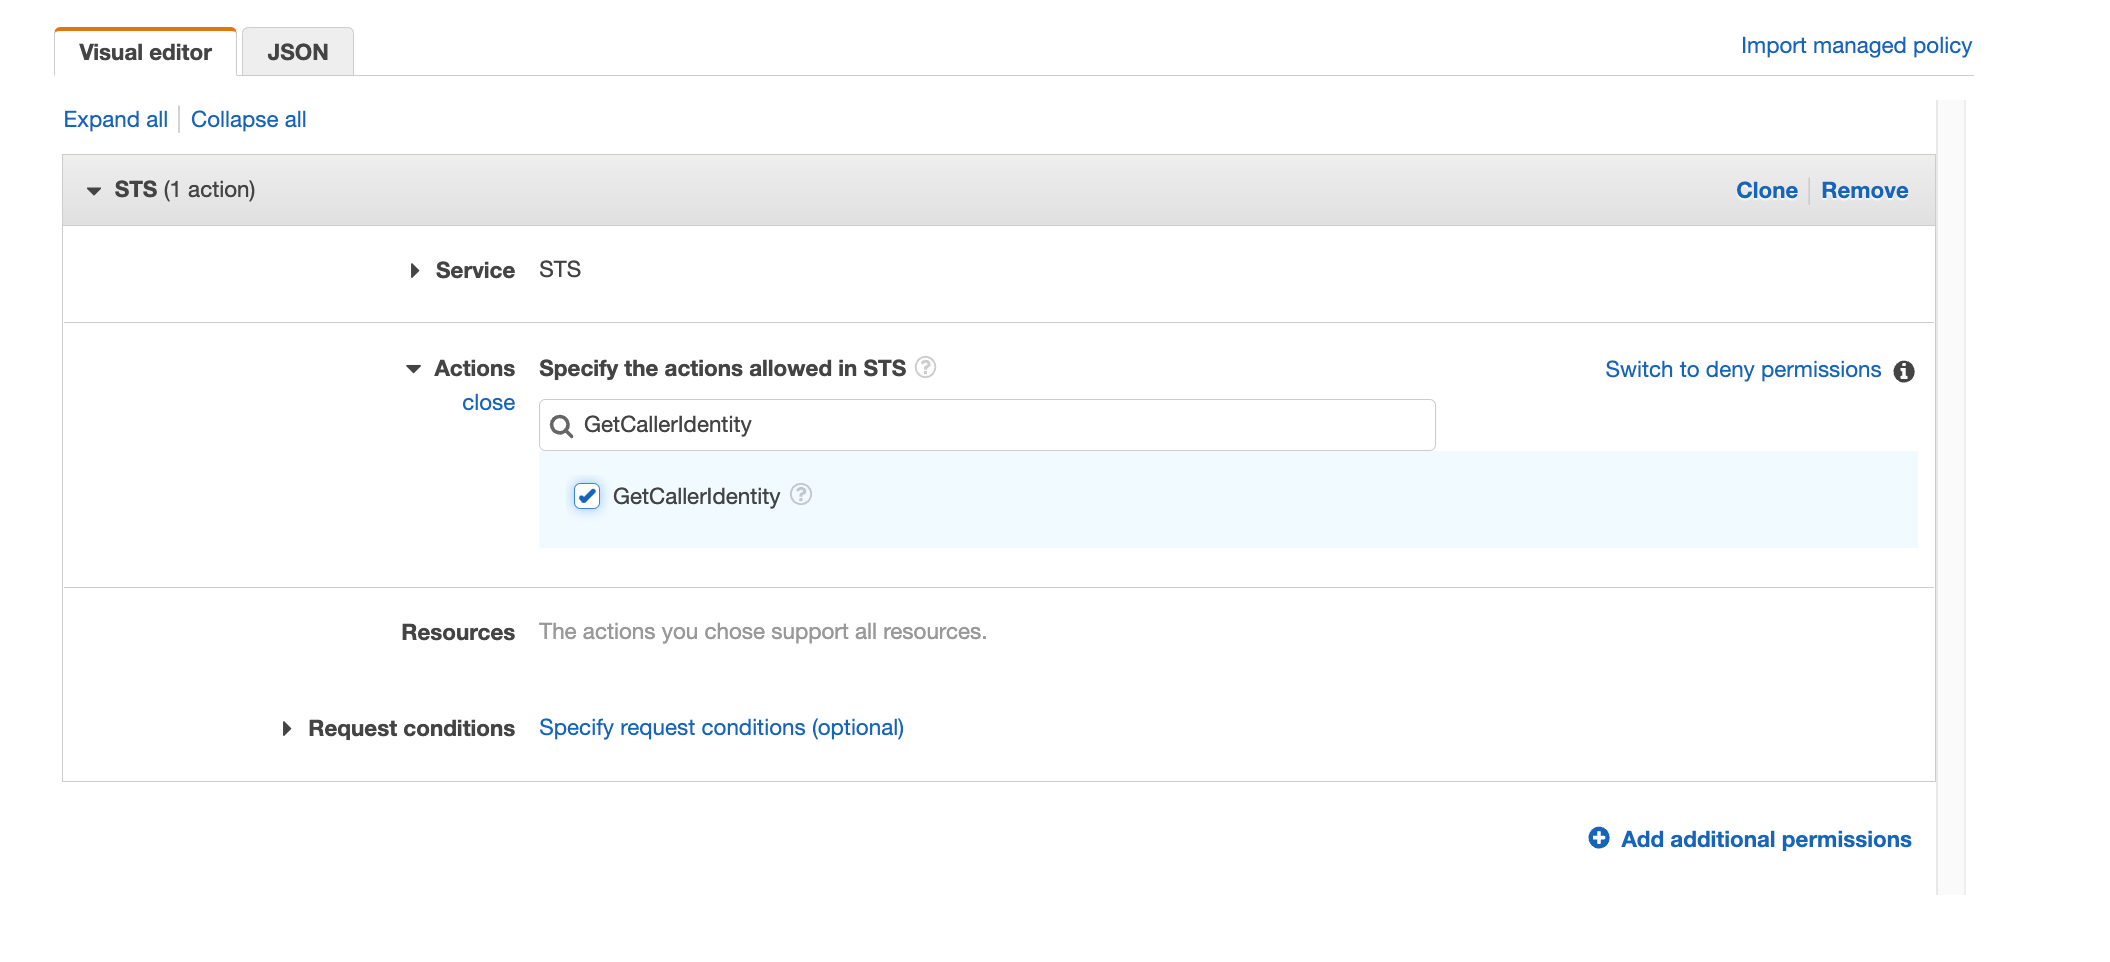
Search for “GetCallerIdentity” and select the action

Figure 35. Screenshot: IAM visual editor with GetCallerIdentity in search and action selected.

Figure 35. Screenshot: IAM visual editor with GetCallerIdentity in search and action selected.

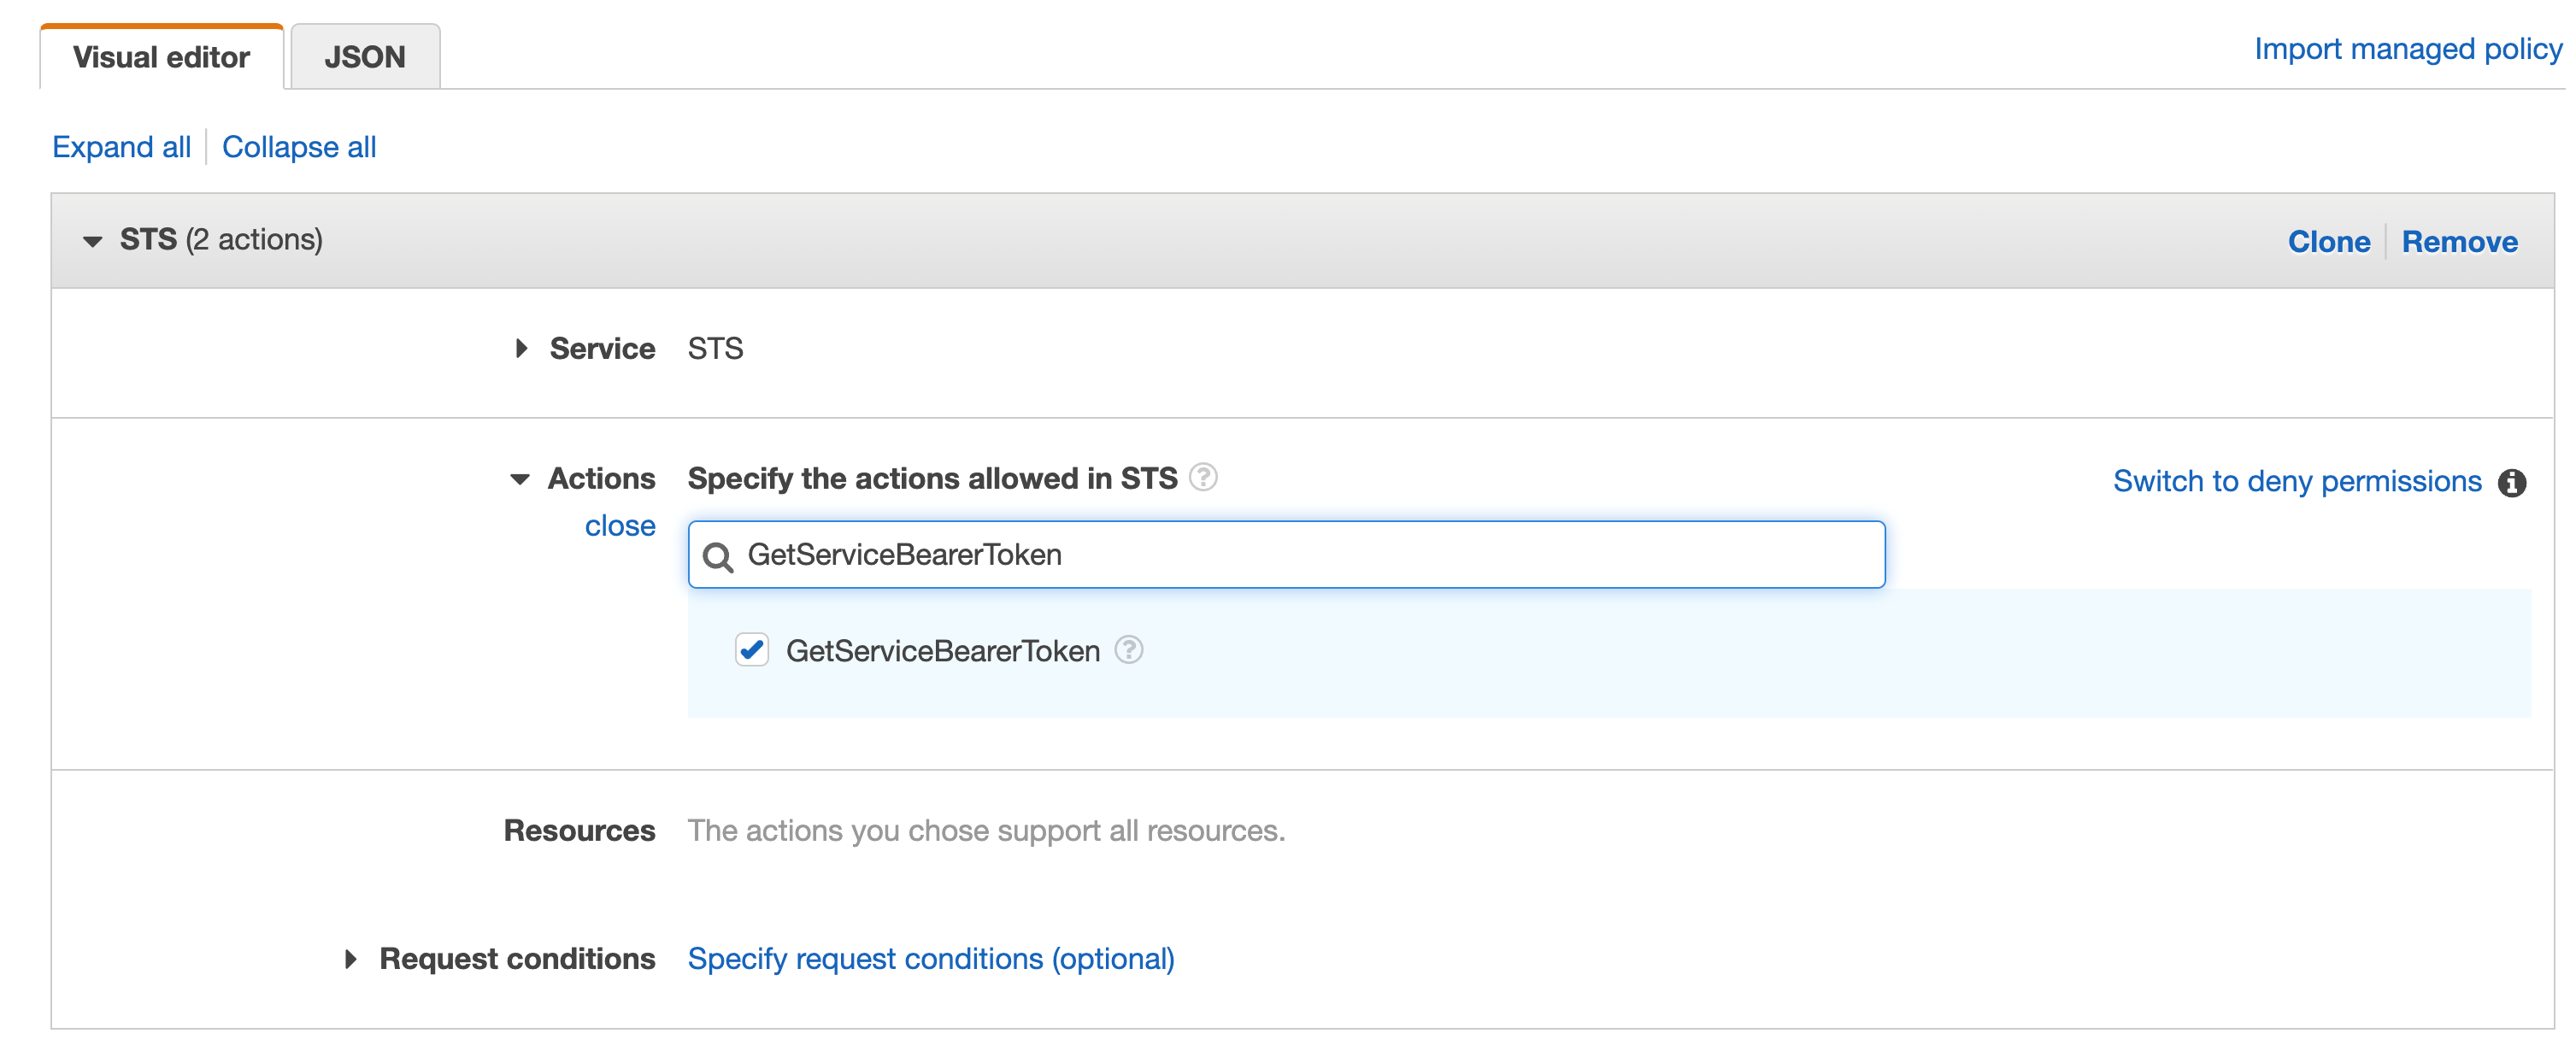
Repeat the same with “GetServiceBearerToken”

Figure 36. Screenshot: IAM visual editor with GetServiceBearerToken in search and action selected.

Figure 36. Screenshot: IAM visual editor with GetServiceBearerToken in search and action selected.

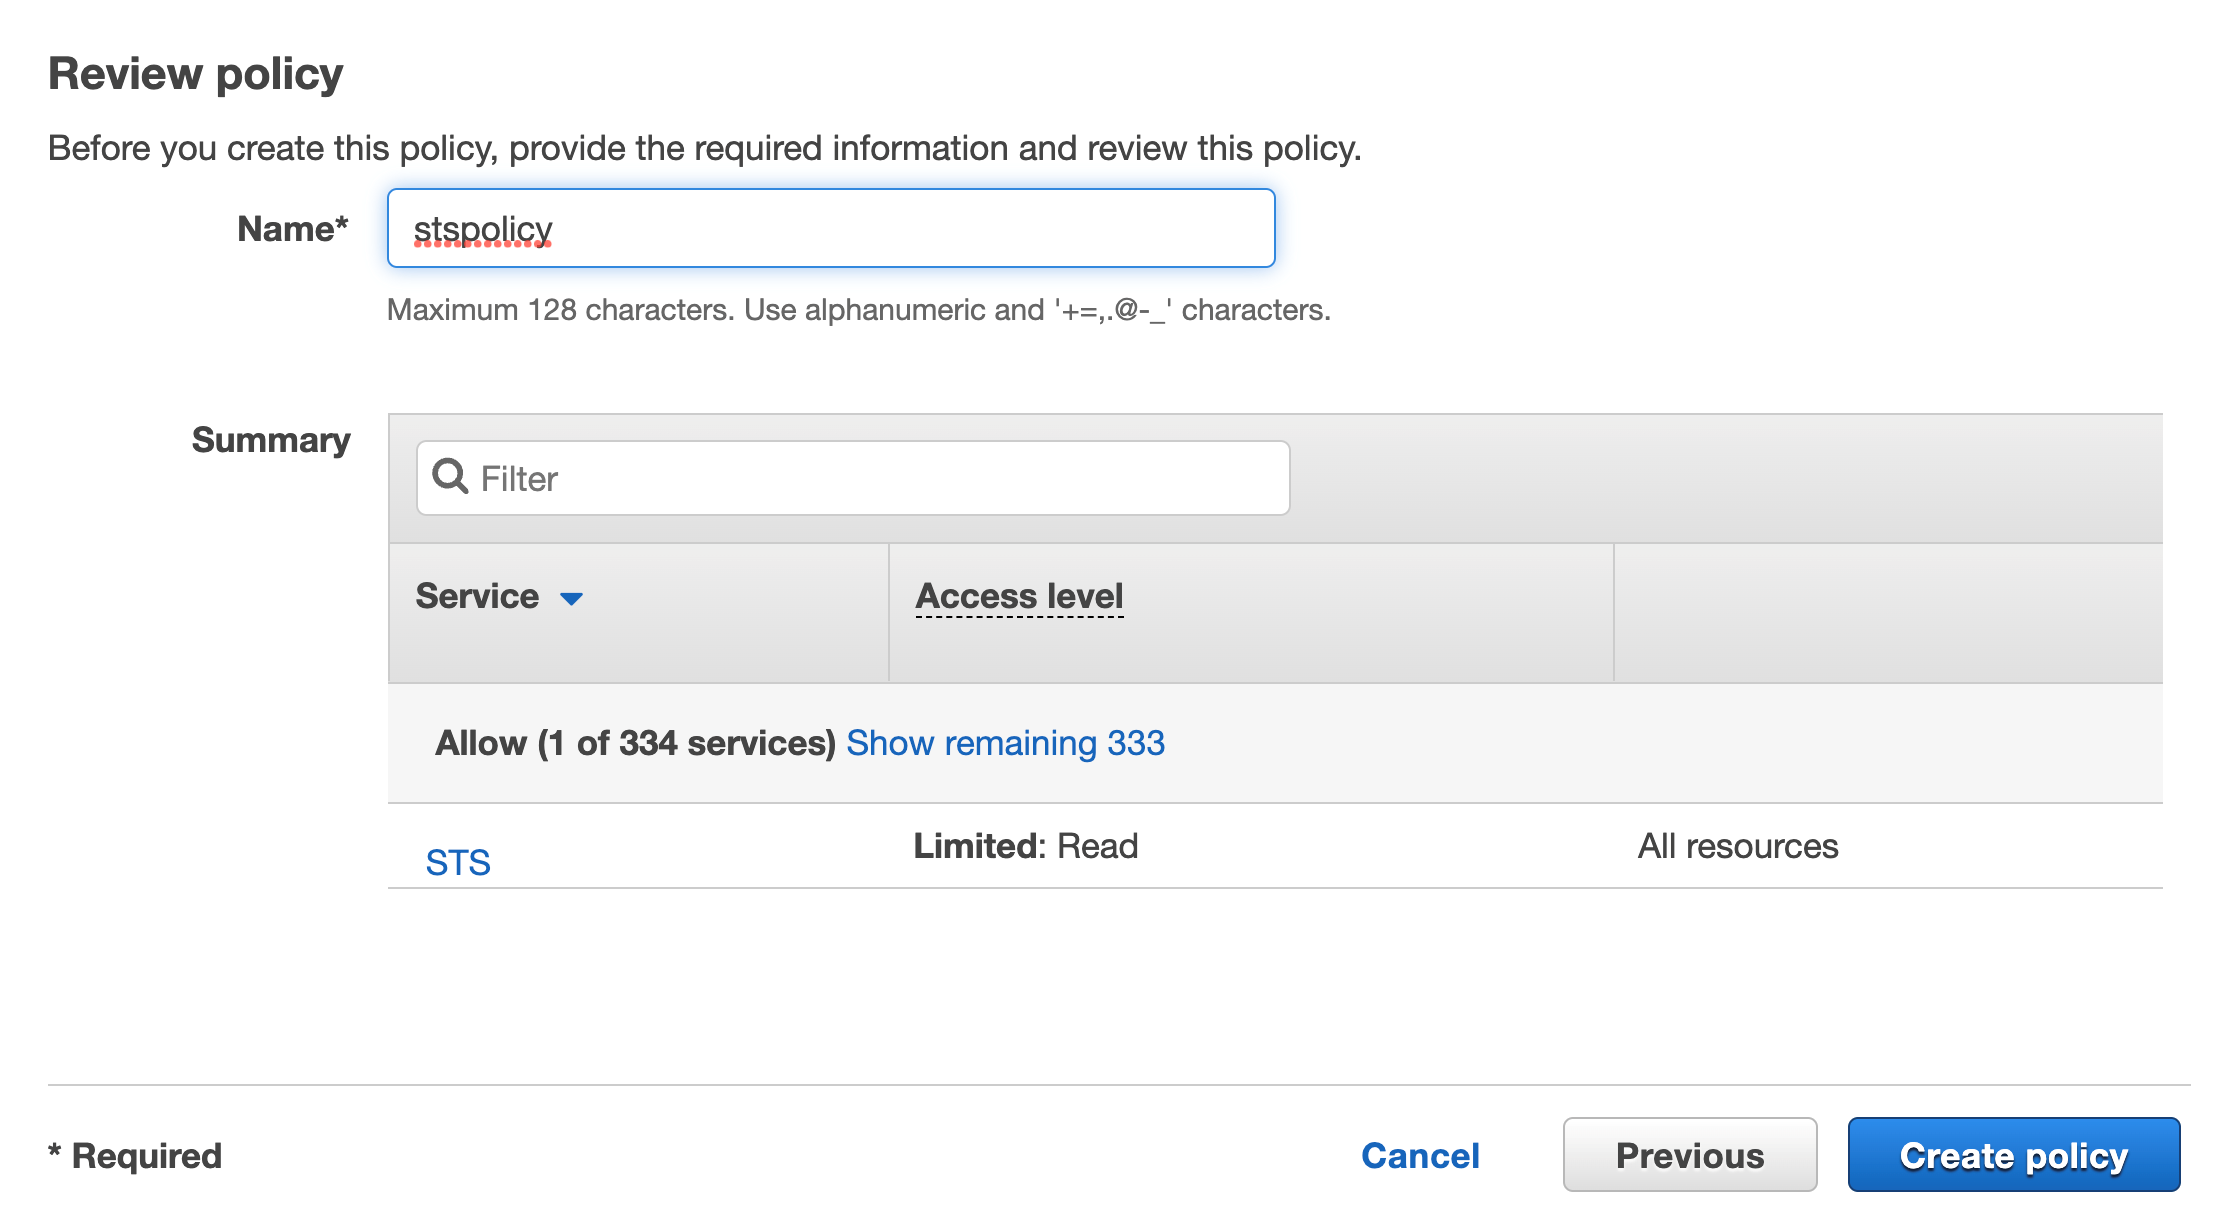
Click on Review, add a name then click on Create policy

Figure 37. Screenshot: Review page and Create policy button.

Figure 37. Screenshot: Review page and Create policy button.

You should see the new inline policy added to the list

Figure 38. Screenshot: shows the new in-line policy in the list.

Figure 38. Screenshot: shows the new in-line policy in the list.

For CodeArtifact actions we will do the same on that role, click on Create inline policy

Figure 39. Screenshot: attach policies.

Figure 39. Screenshot: attach policies.

Search for CodeArtifact in the services then select CodeArtifact

Figure 40. Screenshot: select service with CodeArtifact in search.

Figure 40. Screenshot: select service with CodeArtifact in search.

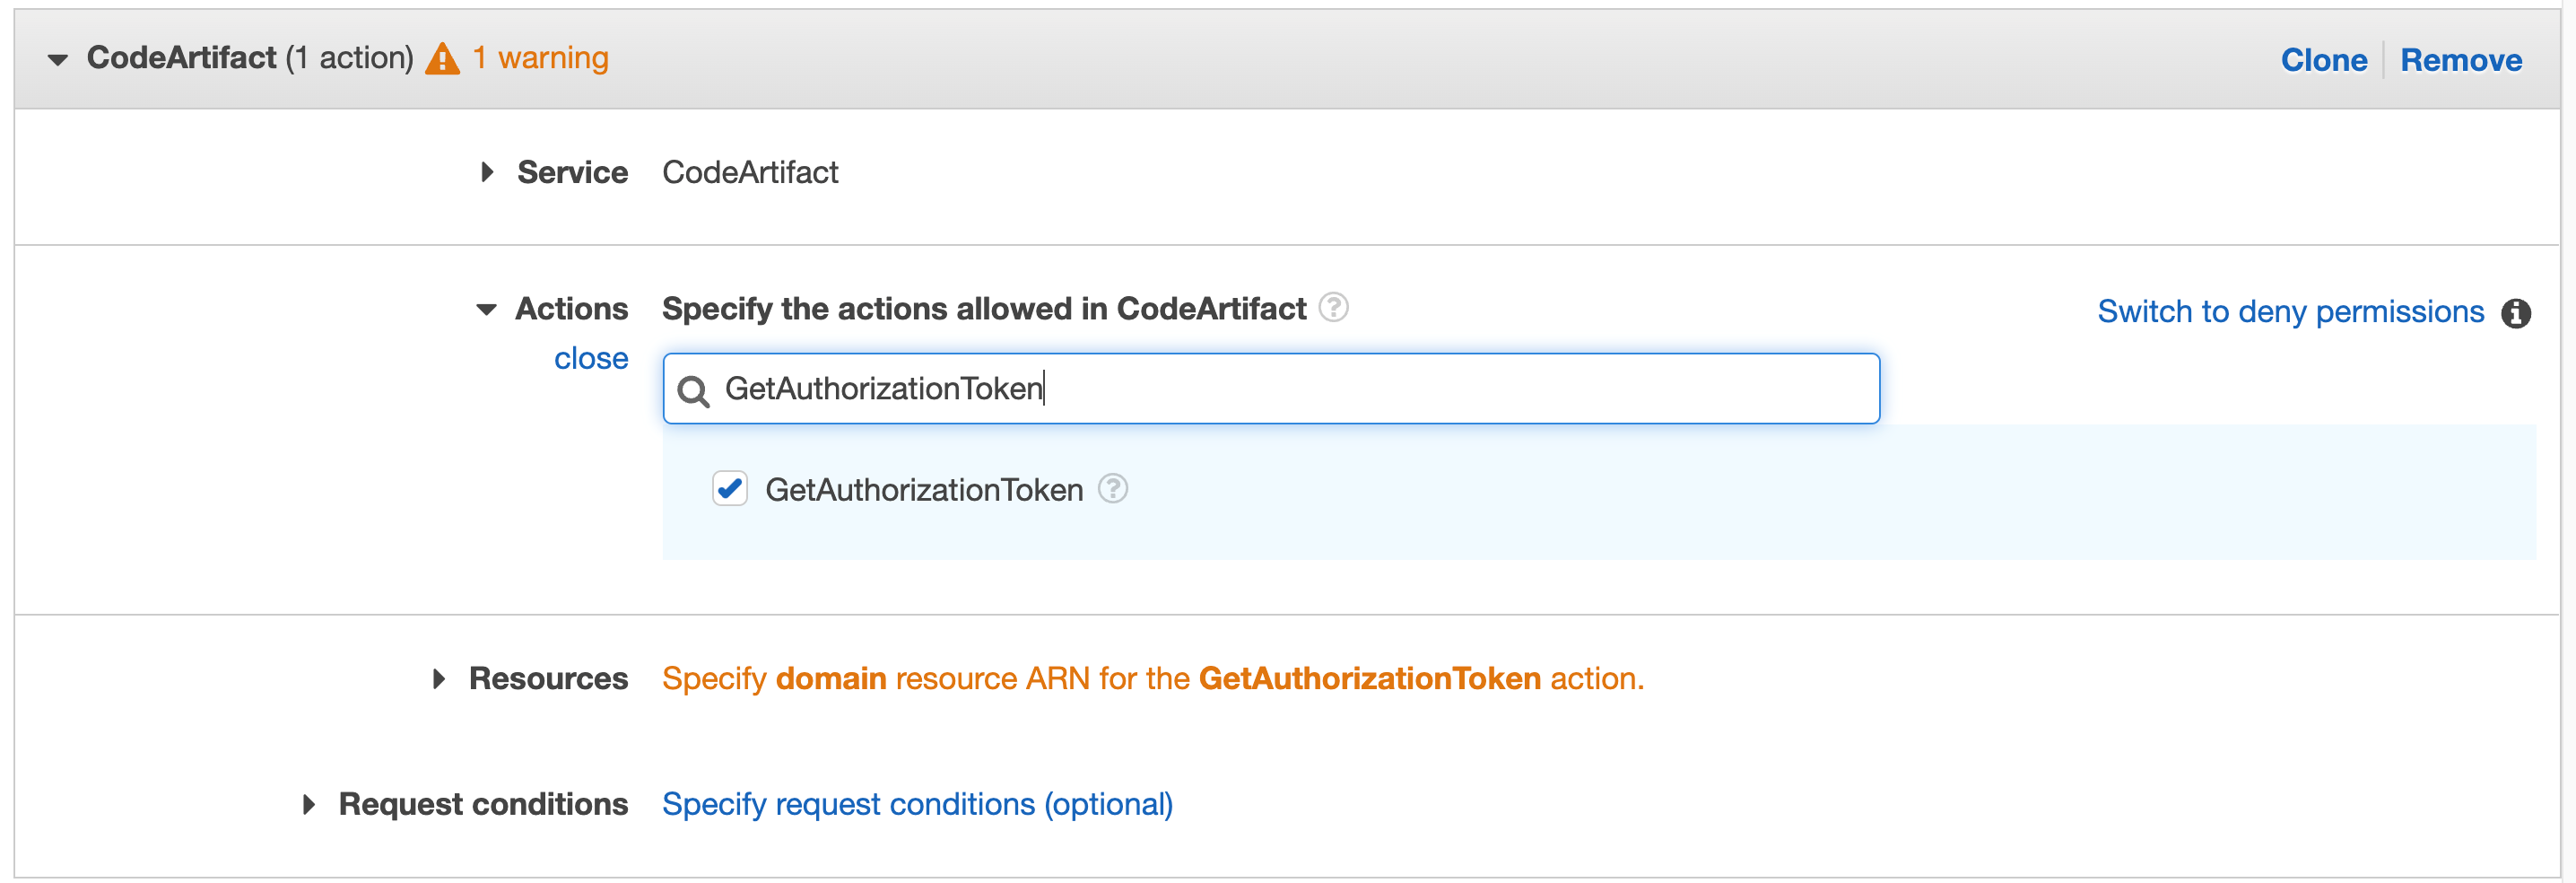
Search for “GetAuthorizationToken” in actions and select that action in the check box

Figure 41. CodeArtifact: with GetAuthorizationToken in search.

Figure 41. CodeArtifact: with GetAuthorizationToken in search.

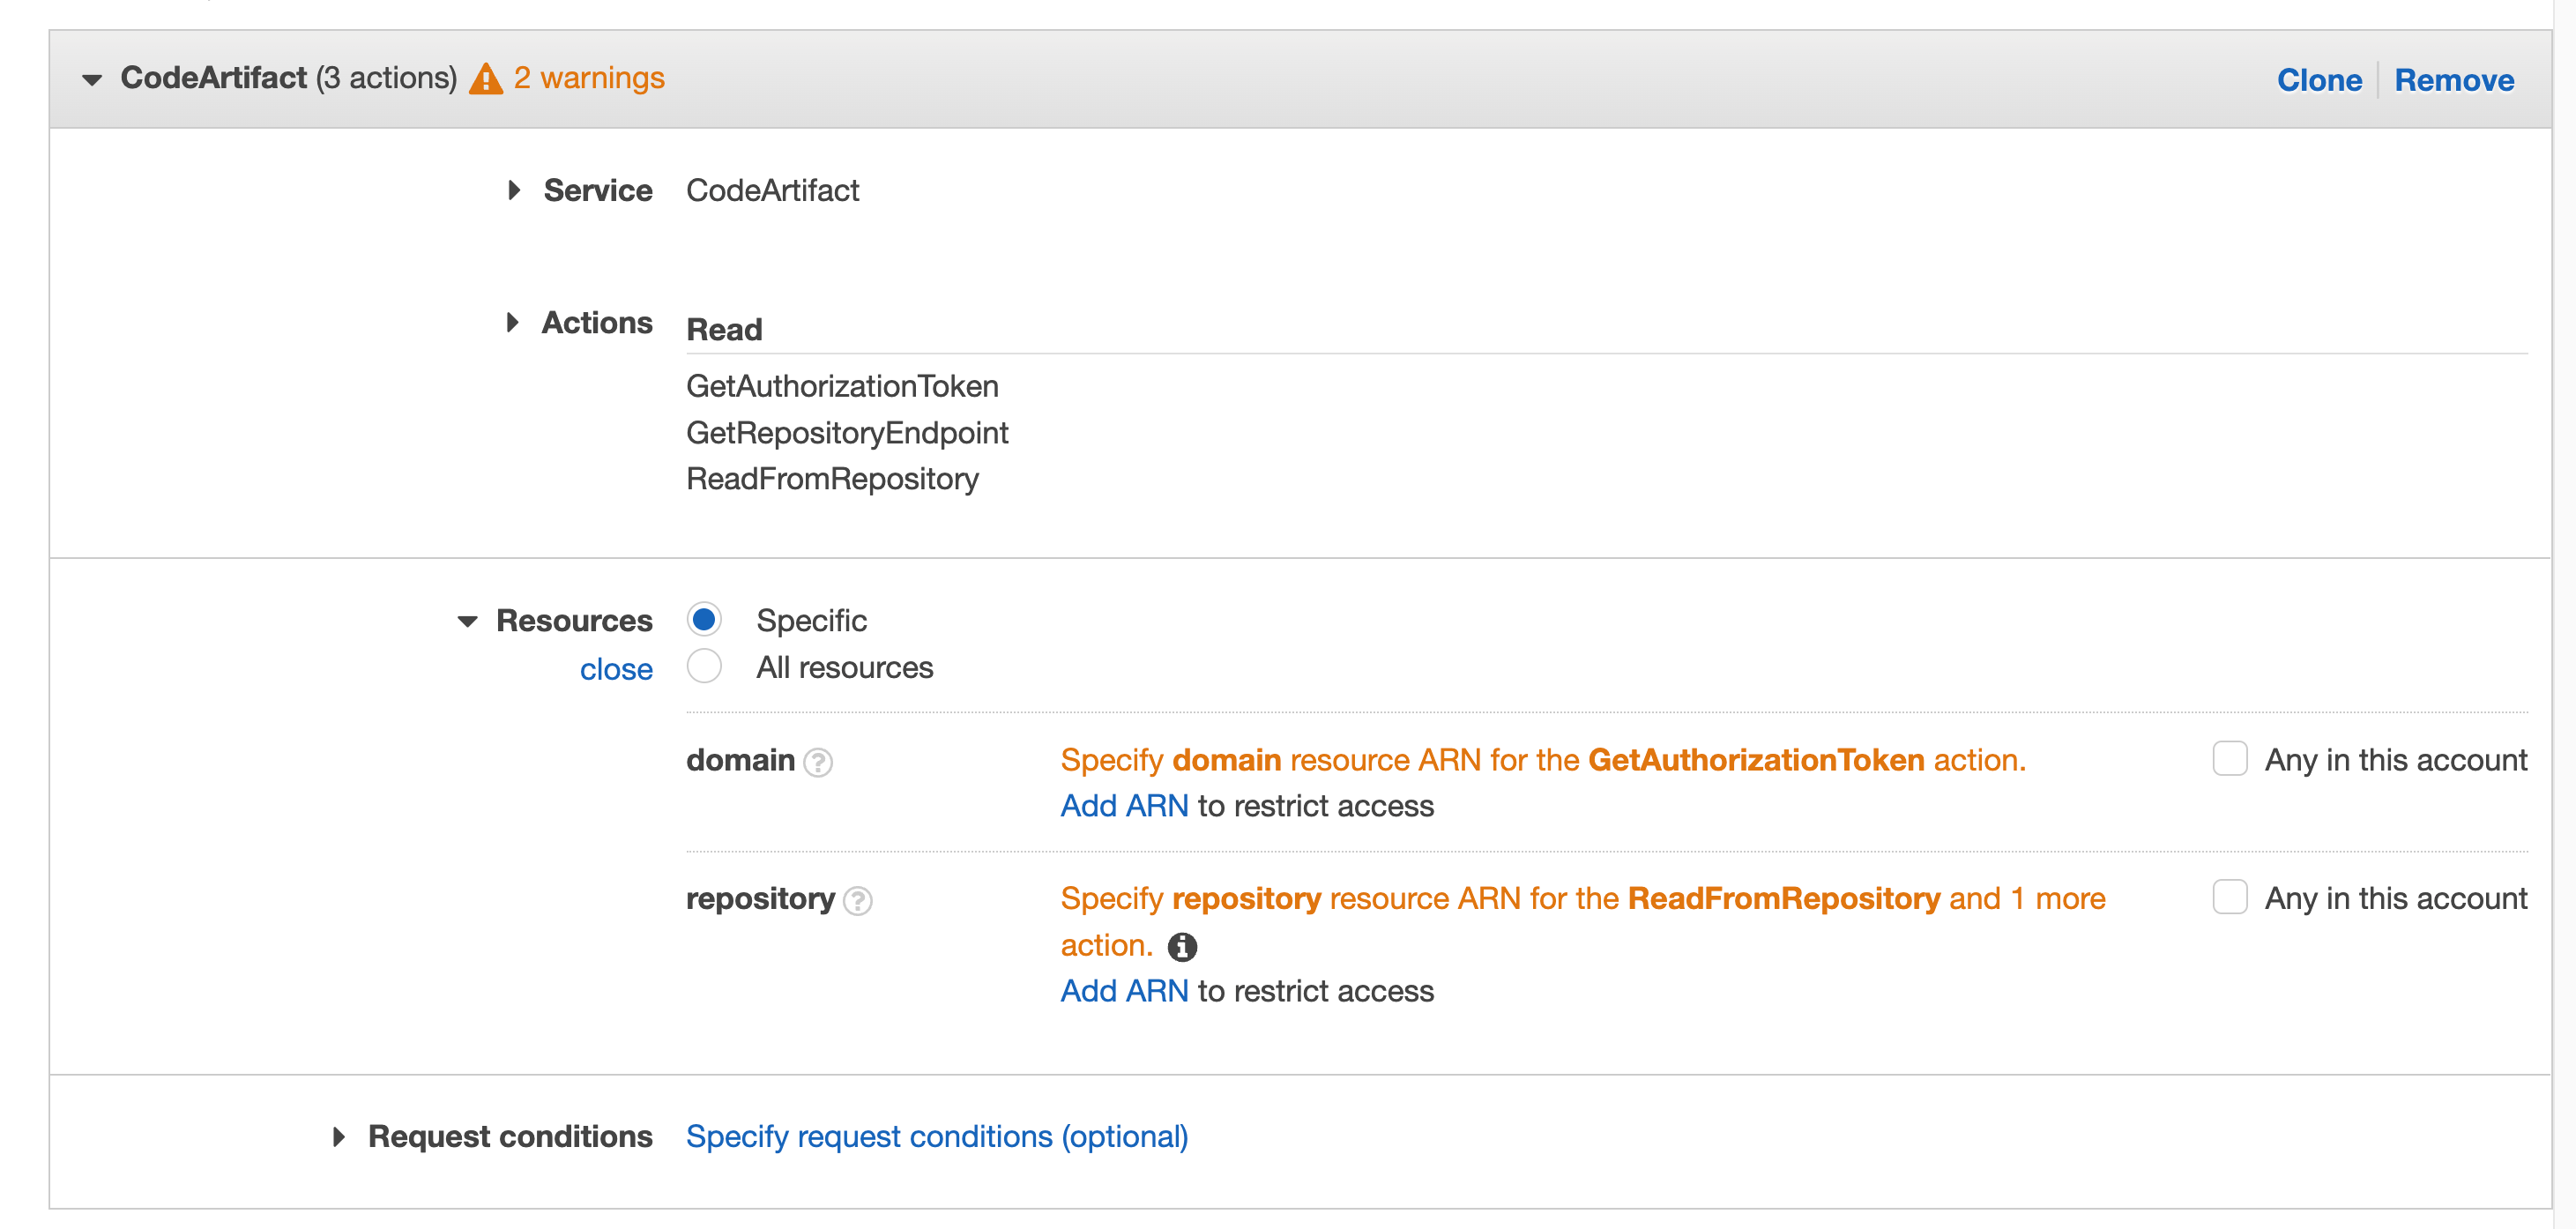
Repeat for “GetRepositoryEndpoint” and “ReadFromRepository”

Click on Resources to fix the 2 warnings, then click on Add ARN on the first one “Specify domain resource ARN for the GetAuthorizationToken action.”

Figure 42. Screenshot: with all selected filed and 2 warnings.

Figure 42. Screenshot: with all selected filed and 2 warnings.

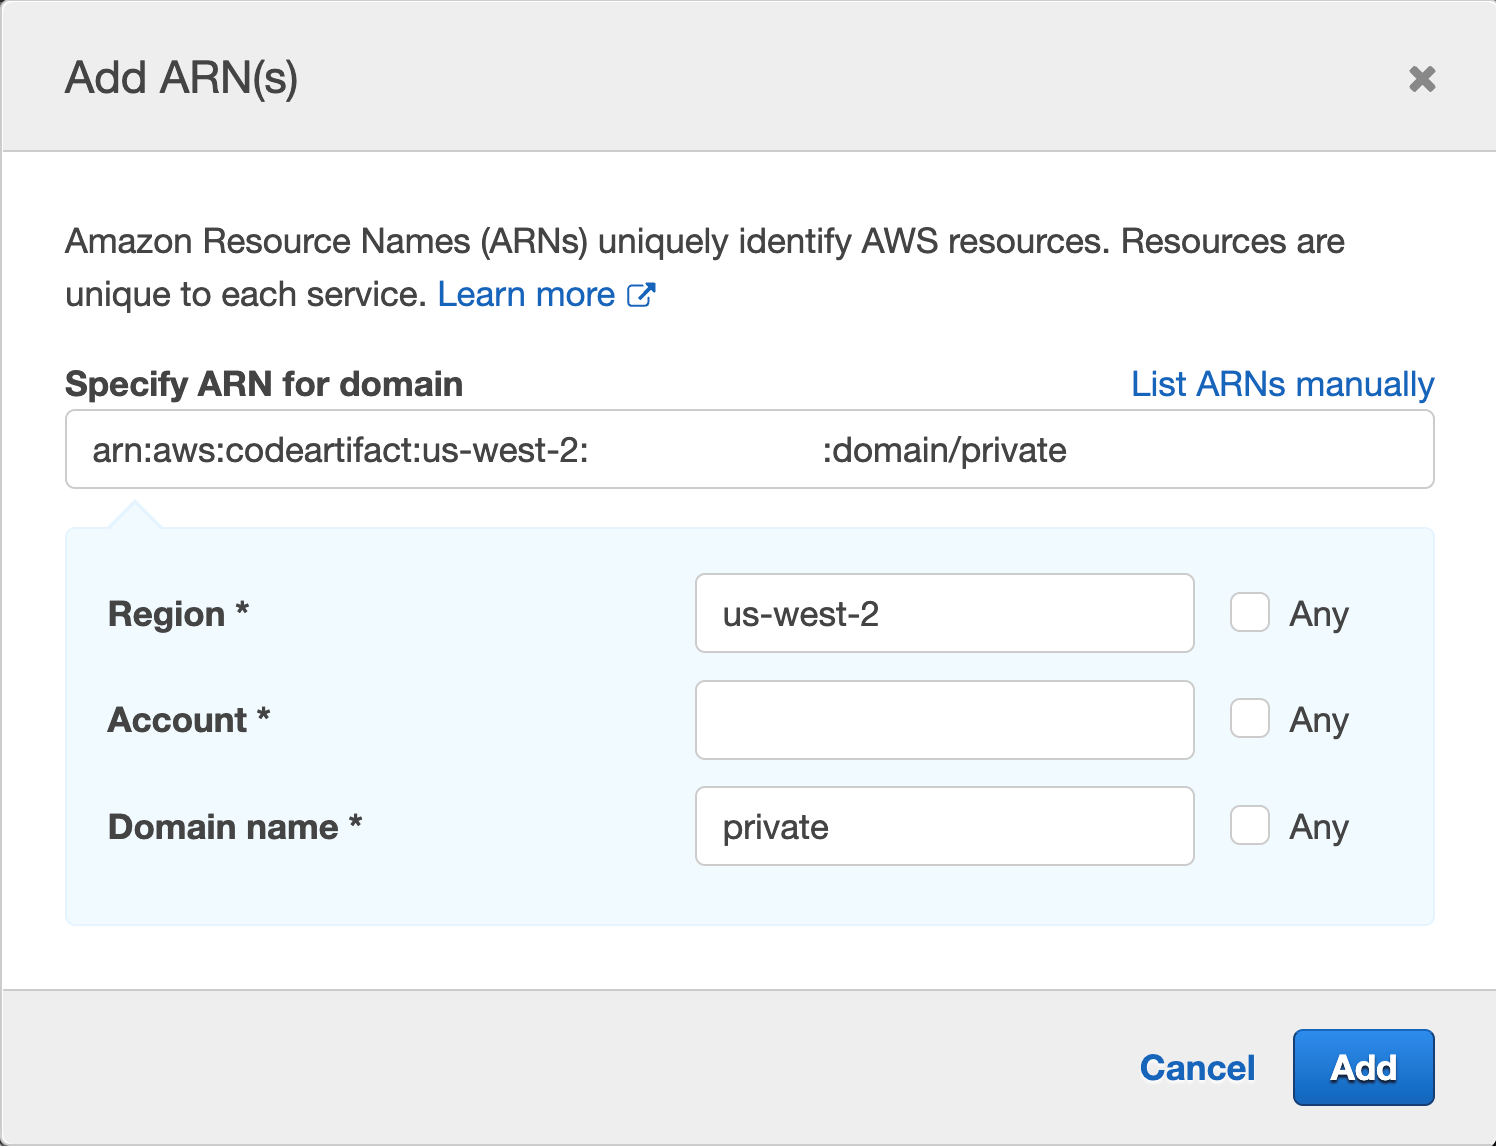
You’ll get a pop up with fields for Region, Account and Domain name, enter your region, your account number, and the domain name, we used “private” when we created our domain earlier.

Figure 43. Screenshot: Add ARN page.

Figure 43. Screenshot: Add ARN page.

Then click Add

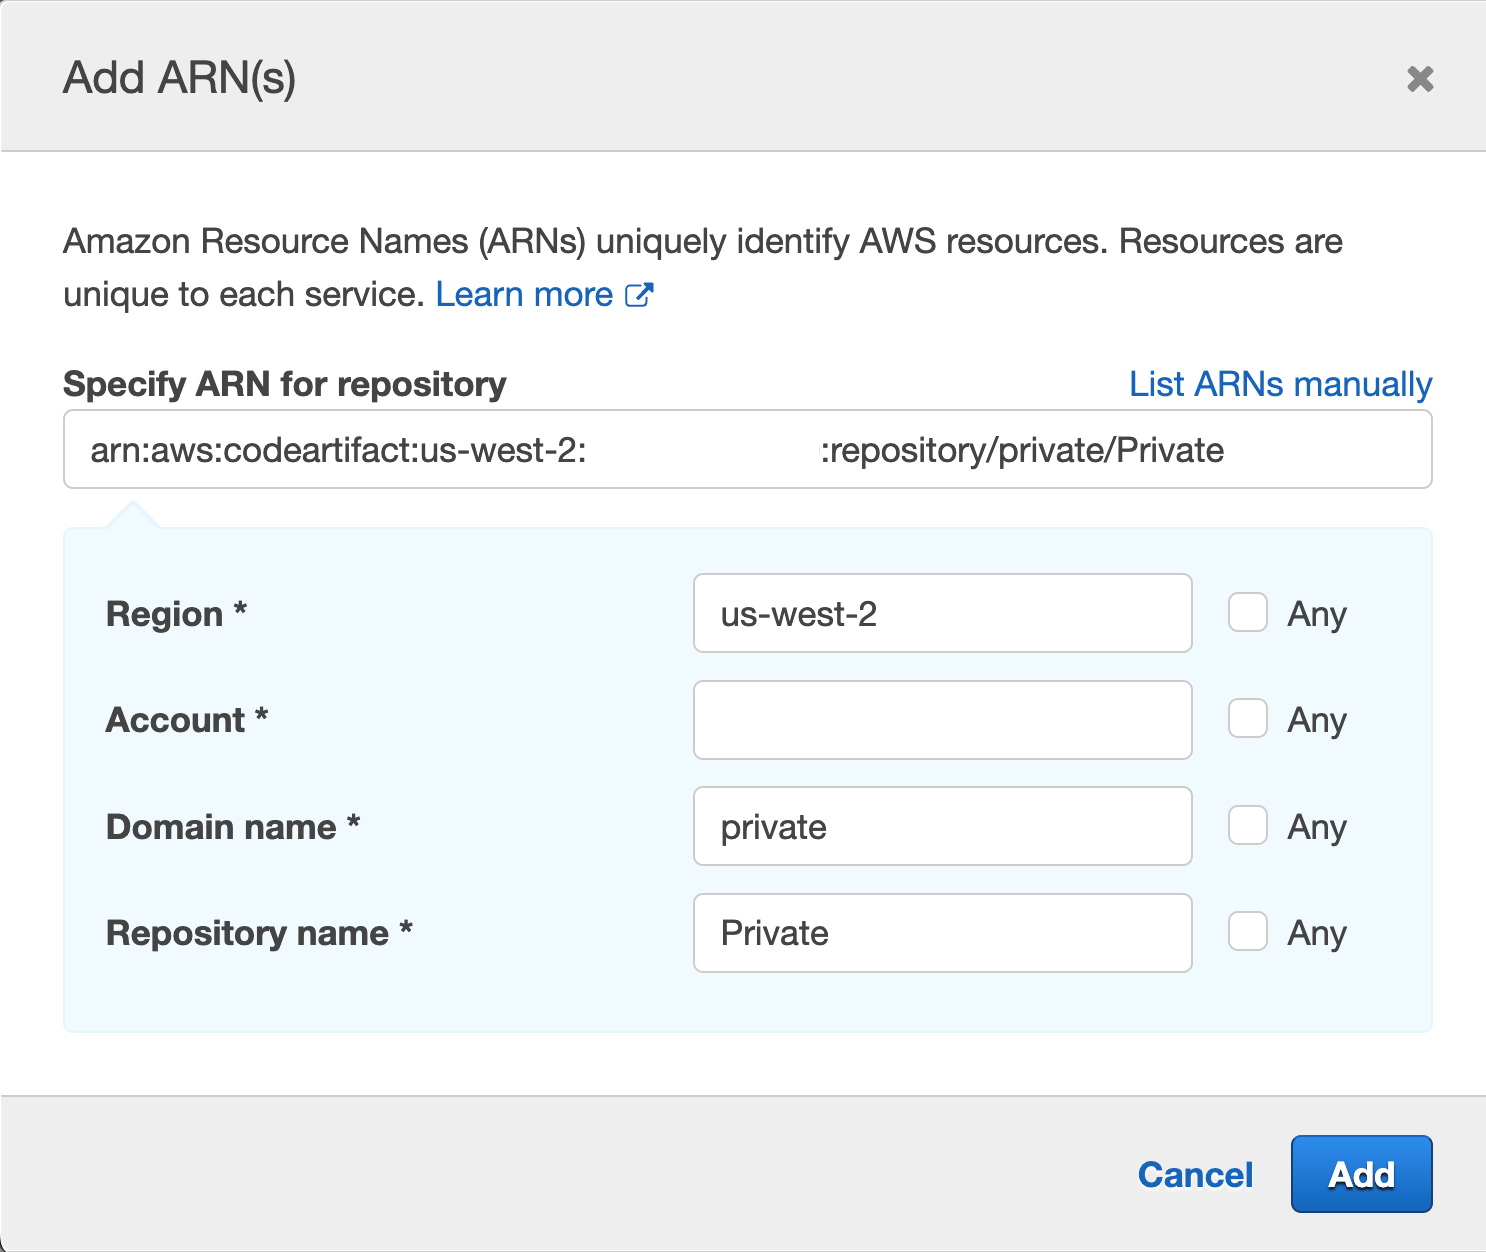
Repeat the same process for “Specify repository resource ARN for the ReadFromRepository and 1 more”, and this time we will provide Region, Account ID, Domain name and Repository name, we used “Private” for the repository we created earlier and “private” for domain

Figure 44. Screenshot: add ARN page.

Figure 44. Screenshot: add ARN page.

Note it is best practice to specify the resource we are targeting, we can use the checkbox for “Any” but we want to narrow the scope of our IAM role best we can.

  1. Navigate to CodeCommit then click on the repo you created earlier in step1
Figure 45. Screenshot: CodeCommit repo.

Figure 45. Screenshot: CodeCommit repo.

Click on Add file dropdown, then Create file button

Paste the following in the editor space:

{
  "dependencies": {
    "mathjs": "^11.2.0"
  }
}

Name the file “package.json”

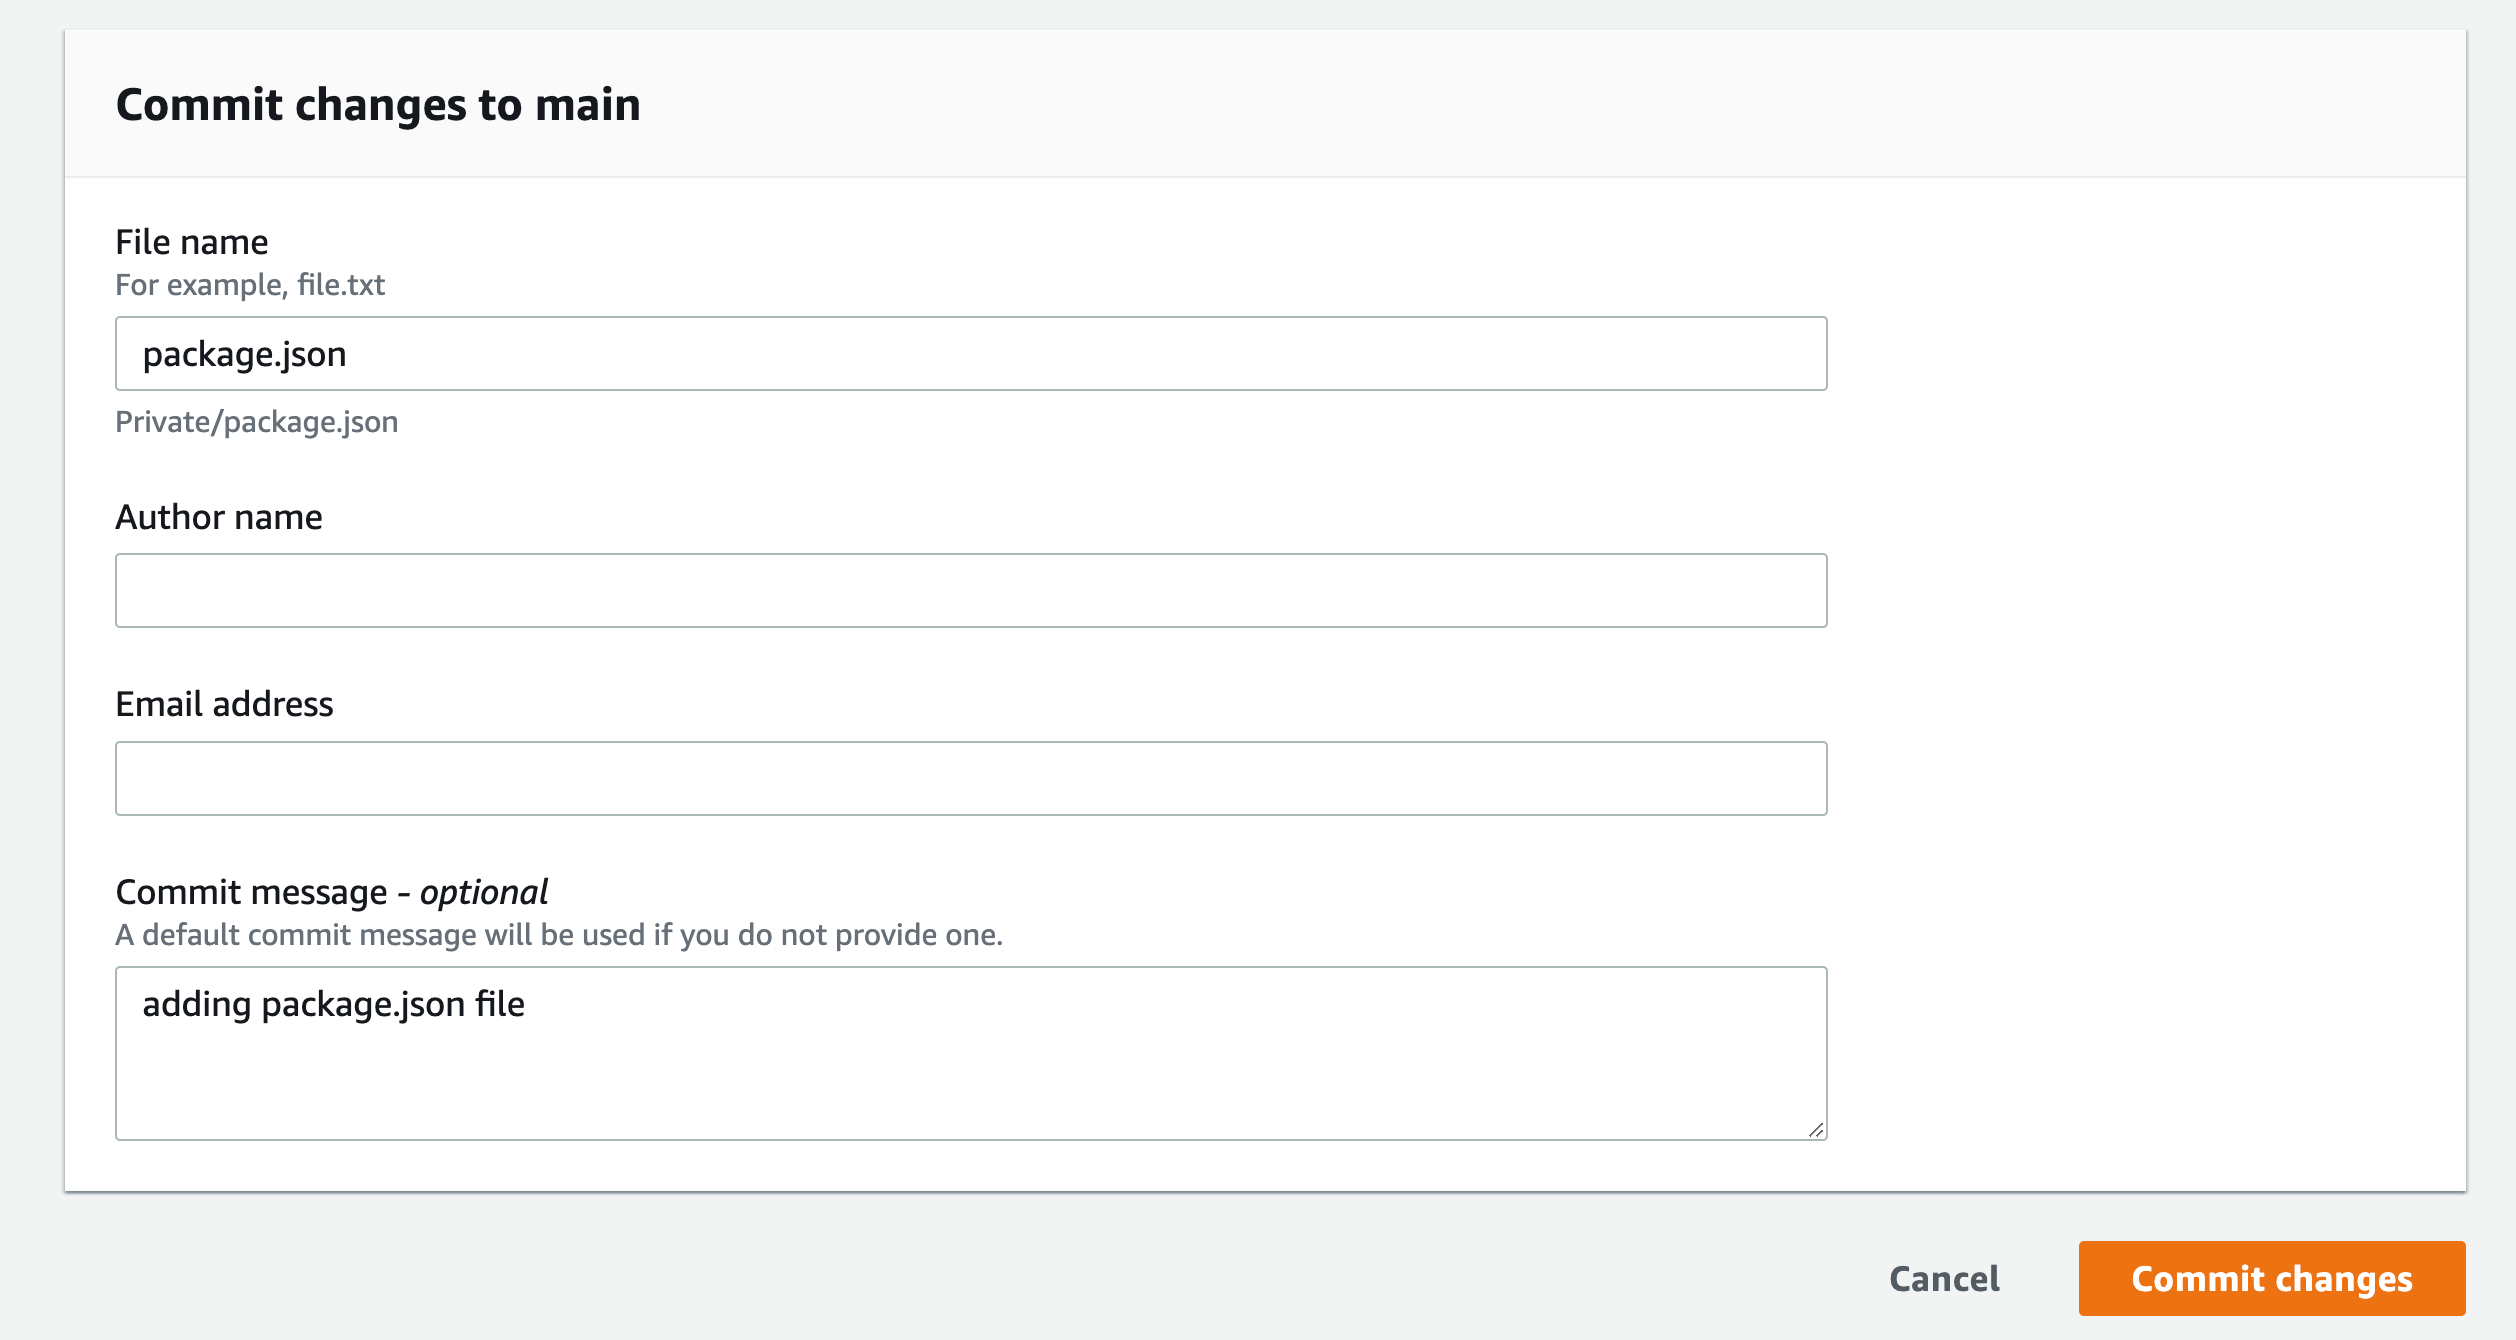
Add your name and email, and optional commit message

Repeat this process for “index.js” and paste the following in the editor space:

const { sqrt } = require('mathjs')
console.log(sqrt(49).toString())

Figure 46. Screenshot: CodeCommit Commit changes button.

Figure 46. Screenshot: CodeCommit Commit changes button.


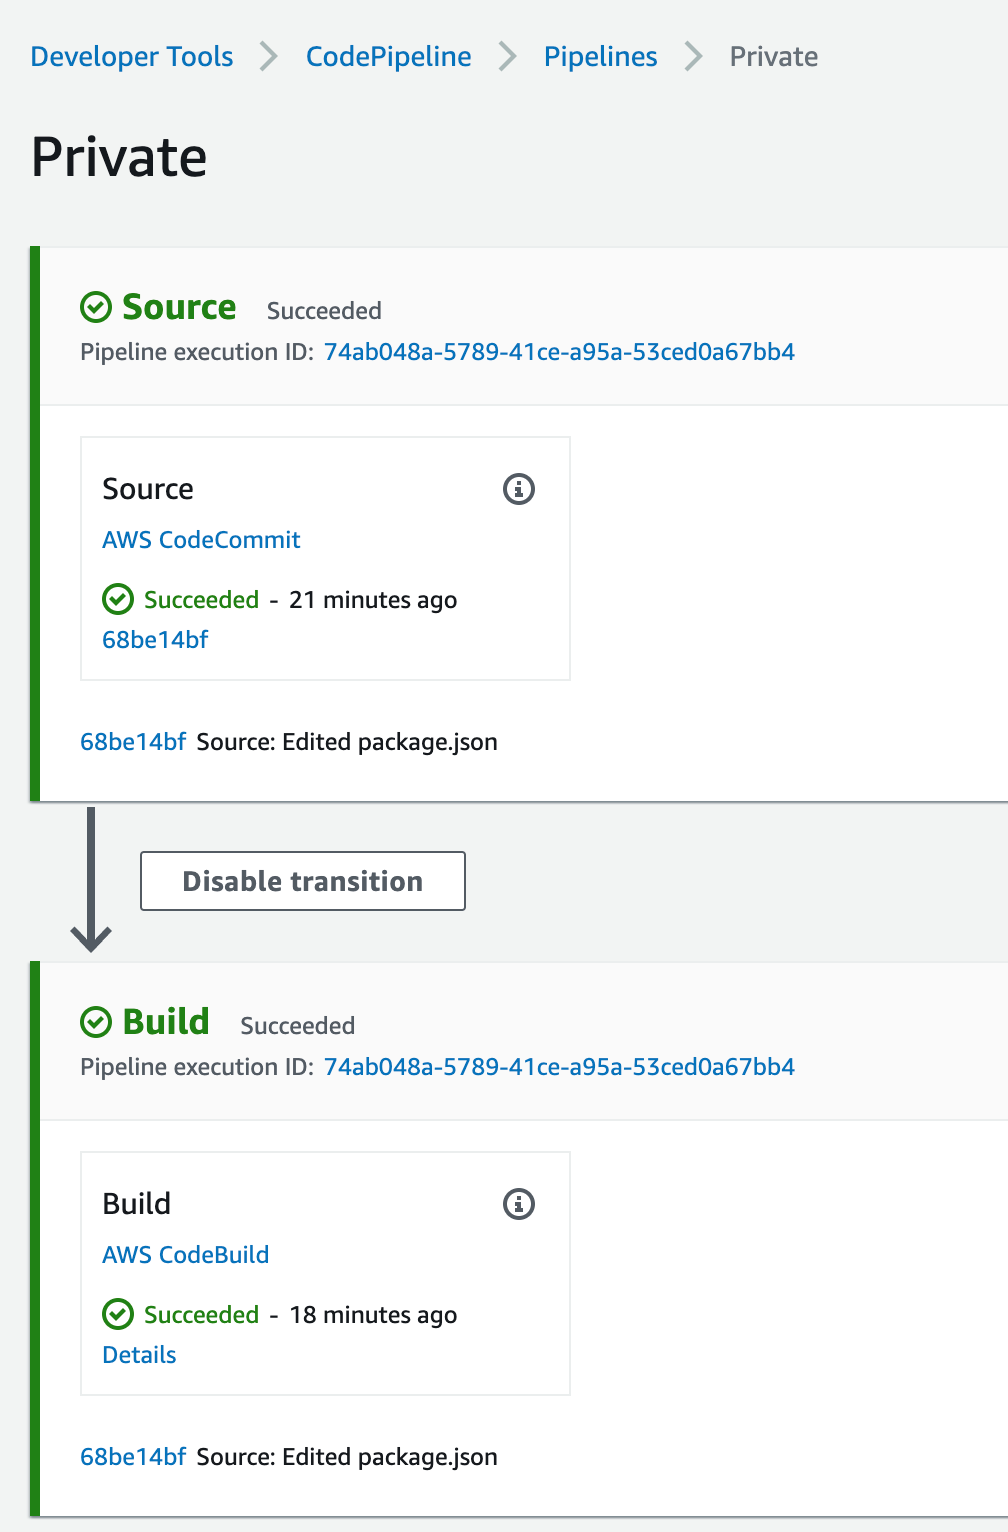
This will force the pipeline to kick off and start building the application

Figure 47. Screenshot: CodePipeline.

Figure 47. Screenshot: CodePipeline.

This is a very simple application that gets the square root of 49 and log it to the screen, if you click on the Details link from the pipeline build stage, you’ll see the output of running the NodeJS application, the logs are stored in CloudWatch and you can navigate there by clicking on the link the View entire log “Showing the last xx lines of the build log. View entire log”

Figure 48. Screenshot: Showing the last 54 lines of the build log. View entire log.

Figure 48. Screenshot: Showing the last 54 lines of the build log. View entire log.

We used npm example in the buildspec.yml above, Similar setup will be used for pip and twine,

For Maven, Gradle, and NuGet, you must set Environment variables and change your settings.xml and build.gradle, as well as install the plugin for your IDE. For more information, see here.

Cleanup

Navigate to VPC endpoint from the AWS console and delete the endpoints that you created.

Navigate to CodePipeline and delete the Pipeline you created.

Navigate to CodeBuild and delete the Build Project created.

Navigate to CodeCommit and delete the Repository you created.

Navigate to CodeArtifact and delete the Repository and the domain you created.

Navigate to IAM and delete the Roles created:

For CodeBuild: codebuild-<Build Project Name>-service-role

For CodePipeline: AWSCodePipelineServiceRole-<Region>-<Project Name>

Conclusion

In this post, we deployed a full CI/CD pipeline with CodePipeline orchestrating CodeBuild to build and test a small NodeJS application, using CodeArtifact to download the application code dependencies. All without going to the public internet and maintaining the logs in CloudWatch.

About the author:

MJ Kubba

MJ Kubba is a Solutions Architect who enjoys working with public sector customers to build solutions that meet their business needs. MJ has over 15 years of experience designing and implementing software solutions. He has a keen passion for DevOps and cultural transformation.

Configuration driven dynamic multi-account CI/CD solution on AWS

Post Syndicated from Anshul Saxena original https://aws.amazon.com/blogs/devops/configuration-driven-dynamic-multi-account-ci-cd-solution-on-aws/

Many organizations require durable automated code delivery for their applications. They leverage multi-account continuous integration/continuous deployment (CI/CD) pipelines to deploy code and run automated tests in multiple environments before deploying to Production. In cases where the testing strategy is release specific, you must update the pipeline before every release. Traditional pipeline stages are predefined and static in nature, and once the pipeline stages are defined it’s hard to update them. In this post, we present a configuration driven dynamic CI/CD solution per repository. The pipeline state is maintained and governed by configurations stored in Amazon DynamoDB. This gives you the advantage of automatically customizing the pipeline for every release based on the testing requirements.

By following this post, you will set up a dynamic multi-account CI/CD solution. Your pipeline will deploy and test a sample pet store API application. Refer to Automating your API testing with AWS CodeBuild, AWS CodePipeline, and Postman for more details on this application. New code deployments will be delivered with custom pipeline stages based on the pipeline configuration that you create. This solution uses services such as AWS Cloud Development Kit (AWS CDK), AWS CloudFormation, Amazon DynamoDB, AWS Lambda, and AWS Step Functions.

Solution overview

The following diagram illustrates the solution architecture:

The image represents the solution workflow, highlighting the integration of the AWS components involved.

Figure 1: Architecture Diagram

  1. Users insert/update/delete entry in the DynamoDB table.
  2. The Step Function Trigger Lambda is invoked on all modifications.
  3. The Step Function Trigger Lambda evaluates the incoming event and does the following:
    1. On insert and update, triggers the Step Function.
    2. On delete, finds the appropriate CloudFormation stack and deletes it.
  4. Steps in the Step Function are as follows:
    1. Collect Information (Pass State) – Filters the relevant information from the event, such as repositoryName and referenceName.
    2. Get Mapping Information (Backed by CodeCommit event filter Lambda) – Retrieves the mapping information from the Pipeline config stored in the DynamoDB.
    3. Deployment Configuration Exist? (Choice State) – If the StatusCode == 200, then the DynamoDB entry is found, and Initiate CloudFormation Stack step is invoked, or else StepFunction exits with Successful.
    4. Initiate CloudFormation Stack (Backed by stack create Lambda) – Constructs the CloudFormation parameters and creates/updates the dynamic pipeline based on the configuration stored in the DynamoDB via CloudFormation.

Code deliverables

The code deliverables include the following:

  1. AWS CDK app – The AWS CDK app contains the code for all the Lambdas, Step Functions, and CloudFormation templates.
  2. sample-application-repo – This directory contains the sample application repository used for deployment.
  3. automated-tests-repo– This directory contains the sample automated tests repository for testing the sample repo.

Deploying the CI/CD solution

  1. Clone this repository to your local machine.
  2. Follow the README to deploy the solution to your main CI/CD account. Upon successful deployment, the following resources should be created in the CI/CD account:
    1. A DynamoDB table
    2. Step Function
    3. Lambda Functions
  3. Navigate to the Amazon Simple Storage Service (Amazon S3) console in your main CI/CD account and search for a bucket with the name: cloudformation-template-bucket-<AWS_ACCOUNT_ID>. You should see two CloudFormation templates (templates/codepipeline.yaml and templates/childaccount.yaml) uploaded to this bucket.
  4. Run the childaccount.yaml in every target CI/CD account (Alpha, Beta, Gamma, and Prod) by going to the CloudFormation Console. Provide the main CI/CD account number as the “CentralAwsAccountId” parameter, and execute.
  5. Upon successful creation of Stack, two roles will be created in the Child Accounts:
    1. ChildAccountFormationRole
    2. ChildAccountDeployerRole

Pipeline configuration

Make an entry into devops-pipeline-table-info for the Repository name and branch combination. A sample entry can be found in sample-entry.json.

The pipeline is highly configurable, and everything can be configured through the DynamoDB entry.

The following are the top-level keys:

RepoName: Name of the repository for which AWS CodePipeline is configured.
RepoTag: Name of the branch used in CodePipeline.
BuildImage: Build image used for application AWS CodeBuild project.
BuildSpecFile: Buildspec file used in the application CodeBuild project.
DeploymentConfigurations: This key holds the deployment configurations for the pipeline. Under this key are the environment specific configurations. In our case, we’ve named our environments Alpha, Beta, Gamma, and Prod. You can configure to any name you like, but make sure that the entries in json are the same as in the codepipeline.yaml CloudFormation template. This is because there is a 1:1 mapping between them. Sub-level keys under DeploymentConfigurations are as follows:

  • EnvironmentName. This is the top-level key for environment specific configuration. In our case, it’s Alpha, Beta, Gamma, and Prod. Sub level keys under this are:
    • <Env>AwsAccountId: AWS account ID of the target environment.
    • Deploy<Env>: A key specifying whether or not the artifact should be deployed to this environment. Based on its value, the CodePipeline will have a deployment stage to this environment.
    • ManualApproval<Env>: Key representing whether or not manual approval is required before deployment. Enter your email or set to false.
    • Tests: Once again, this is a top-level key with sub-level keys. This key holds the test related information to be run on specific environments. Each test based on whether or not it will be run will add an additional step to the CodePipeline. The tests’ related information is also configurable with the ability to specify the test repository, branch name, buildspec file, and build image for testing the CodeBuild project.

Execute

  1. Make an entry into the devops-pipeline-table-info DynamoDB table in the main CI/CD account. A sample entry can be found in sample-entry.json. Make sure to replace the configuration values with appropriate values for your environment. An explanation of the values can be found in the Pipeline Configuration section above.
  2. After the entry is made in the DynamoDB table, you should see a CloudFormation stack being created. This CloudFormation stack will deploy the CodePipeline in the main CI/CD account by reading and using the entry in the DynamoDB table.

Customize the solution for different combinations such as deploying to an environment while skipping for others by updating the pipeline configurations stored in the devops-pipeline-table-info DynamoDB table. The following is the pipeline configured for the sample-application repository’s main branch.

The image represents the dynamic CI/CD pipeline deployed in your account.

The image represents the dynamic CI/CD pipeline deployed in your account.

The image represents the dynamic CI/CD pipeline deployed in your account.

The image represents the dynamic CI/CD pipeline deployed in your account.

Figure 2: Dynamic Multi-Account CI/CD Pipeline

Clean up your dynamic multi-account CI/CD solution and related resources

To avoid ongoing charges for the resources that you created following this post, you should delete the following:

  1. The pipeline configuration stored in the DynamoDB
  2. The CloudFormation stacks deployed in the target CI/CD accounts
  3. The AWS CDK app deployed in the main CI/CD account
  4. Empty and delete the retained S3 buckets.

Conclusion

This configuration-driven CI/CD solution provides the ability to dynamically create and configure your pipelines in DynamoDB. IDEMIA, a global leader in identity technologies, adopted this approach for deploying their microservices based application across environments. This solution created by AWS Professional Services allowed them to dynamically create and configure their pipelines per repository per release. As Kunal Bajaj, Tech Lead of IDEMIA, states, “We worked with AWS pro-serve team to create a dynamic CI/CD solution using lambdas, step functions, SQS, and other native AWS services to conduct cross-account deployments to our different environments while providing us the flexibility to add tests and approvals as needed by the business.”

About the authors:

Anshul Saxena

Anshul is a Cloud Application Architect at AWS Professional Services and works with customers helping them in their cloud adoption journey. His expertise lies in DevOps, serverless architectures, and architecting and implementing cloud native solutions aligning with best practices.

Libin Roy

Libin is a Cloud Infrastructure Architect at AWS Professional Services. He enjoys working with customers to design and build cloud native solutions to accelerate their cloud journey. Outside of work, he enjoys traveling, cooking, playing sports and weight training.

Deploy and manage OpenAPI/Swagger RESTful APIs with the AWS Cloud Development Kit

Post Syndicated from Luke Popplewell original https://aws.amazon.com/blogs/devops/deploy-and-manage-openapi-swagger-restful-apis-with-the-aws-cloud-development-kit/

This post demonstrates how AWS Cloud Development Kit (AWS CDK) Infrastructure as Code (IaC) constructs and AWS serverless technology can be used to build and deploy a RESTful Application Programming Interface (API) defined in the OpenAPI specification. This post uses an example API that describes  Widget resources and demonstrates how to use an AWS CDK Pipeline to:

  • Deploy a RESTful API stage to Amazon API Gateway from an OpenAPI specification.
  • Build and deploy an AWS Lambda function that contains the API functionality.
  • Auto-generate API documentation and publish it to an Amazon Simple Storage Service (Amazon S3)-hosted website served by the Amazon CloudFront content delivery network (CDN) service. This provides technical and non-technical stakeholders with versioned, current, and accessible API documentation.
  • Auto-generate client libraries for invoking the API and deploy them to AWS CodeArtifact, which is a fully-managed artifact repository service. This allows API client development teams to integrate with different versions of the API in different environments.

The diagram shown in the following figure depicts the architecture of the AWS services and resources described in this post.

 The architecture described in this post consists of an AWS CodePipeline pipeline, provisioned using the AWS CDK, that deploys the Widget API to AWS Lambda and API Gateway. The pipeline then auto-generates the API’s documentation as a website served by CloudFront and deployed to S3. Finally, the pipeline auto-generates a client library for the API and deploys this to CodeArtifact.

Figure 1 – Architecture

The code that accompanies this post, written in Java, is available here.

Background

APIs must be understood by all stakeholders and parties within an enterprise including business areas, management, enterprise architecture, and other teams wishing to consume the API. Unfortunately, API definitions are often hidden in code and lack up-to-date documentation. Therefore, they remain inaccessible for the majority of the API’s stakeholders. Furthermore, it’s often challenging to determine what version of an API is present in different environments at any one time.

This post describes some solutions to these issues by demonstrating how to continuously deliver up-to-date and accessible API documentation, API client libraries, and API deployments.

AWS CDK

The AWS CDK is a software development framework for defining cloud IaC and is available in multiple languages including TypeScript, JavaScript, Python, Java, C#/.Net, and Go. The AWS CDK Developer Guide provides best practices for using the CDK.

This post uses the CDK to define IaC in Java which is synthesized to a cloud assembly. The cloud assembly includes one to many templates and assets that are deployed via an AWS CodePipeline pipeline. A unit of deployment in the CDK is called a Stack.

OpenAPI specification (formerly Swagger specification)

OpenAPI specifications describe the capabilities of an API and are both human and machine-readable. They consist of definitions of API components which include resources, endpoints, operation parameters, authentication methods, and contact information.

Project composition

The API project that accompanies this post consists of three directories:

  • app
  • api
  • cdk

app directory

This directory contains the code for the Lambda function which is invoked when the Widget API is invoked via API Gateway. The code has been developed in Java as an Apache Maven project.

The Quarkus framework has been used to define a WidgetResource class (see src/main/java/aws/sample/blog/cdkopenapi/app/WidgetResources.java ) that contains the methods that align with HTTP Methods of the Widget API.
api directory

The api directory contains the OpenAPI specification file ( openapi.yaml ). This file is used as the source for:

  • Defining the REST API using API Gateway’s support for OpenApi.
  • Auto-generating the API documentation.
  • Auto-generating the API client artifact.

The api directory also contains the following files:

  • openapi-generator-config.yaml : This file contains configuration settings for the OpenAPI Generator framework, which is described in the section CI/CD Pipeline.
  • maven-settings.xml: This file is used support the deployment of the generated SDKs or libraries (Apache Maven artifacts) for the API and is described in the CI/CD Pipeline section of this post.

This directory contains a sub directory called docker . The docker directory contains a Dockerfile which defines the commands for building a Docker image:

FROM ruby:2.6.5-alpine
 
RUN apk update \
 && apk upgrade --no-cache \
 && apk add --no-cache --repository http://dl-cdn.alpinelinux.org/alpine/v3.14/main/ nodejs=14.20.0-r0 npm \
 && apk add git \
 && apk add --no-cache build-base
 
# Install Widdershins node packages and ruby gem bundler 
RUN npm install -g widdershins \
 && gem install bundler 
 
# working directory
WORKDIR /openapi
 
# Clone and install the Slate framework
RUN git clone https://github.com/slatedocs/slate
RUN cd slate \
 && bundle install

The Docker image incorporates two open source projects, the NodeJS Widdershins library and the Ruby Slate-framework. These are used together to auto-generate the documentation for the API from the OpenAPI specification.  This Dockerfile is referenced and built by the  ApiStack class, which is described in the CDK Stacks section of this post.

cdk directory

This directory contains an Apache Maven Project developed in Java for provisioning the CDK stacks for the  Widget API.

Under the  src/main/java  folder, the package  aws.sample.blog.cdkopenapi.cdk  contains the files and classes that define the application’s CDK stacks and also the entry point (main method) for invoking the stacks from the CDK Toolkit CLI:

  • CdkApp.java: This file contains the  CdkApp class which provides the main method that is invoked from the AWS CDK Toolkit to build and deploy the  application stacks.
  • ApiStack.java: This file contains the   ApiStack class which defines the  OpenApiBlogAPI   stack and is described in the CDK Stacks section of this post.
  • PipelineStack.java: This file contains the   PipelineStack class which defines the OpenAPIBlogPipeline  stack and is described in the CDK Stacks section of this post.
  • ApiStackStage.java: This file contains the  ApiStackStage class which defines a CDK stage. As detailed in the CI/CD Pipeline section of this post, a DEV stage, containing the  OpenApiBlogAPI stack resources for a DEV environment, is deployed from the  OpenApiBlogPipeline pipeline.

CDK stacks

ApiStack

Note that the CDK bundling functionality is used at multiple points in the  ApiStack  class to produce CDK Assets. The post, Building, bundling, and deploying applications with the AWS CDK, provides more details regarding using CDK bundling mechanisms.

The  ApiStack  class defines multiple resources including:

  • Widget API Lambda function: This is bundled by the CDK in a Docker container using the Java 11 runtime image.
  • Widget  REST API on API Gateway: The REST API is created from an Inline API Definition which is passed as an S3 CDK Asset. This asset includes a reference to the  Widget API OpenAPI specification located under the  api folder (see  api/openapi.yaml ) and builds upon the SpecRestApi construct and API Gateway’s support for OpenApi.
  • API documentation Docker Image Asset: This is the Docker image that contains the open source frameworks (Widdershins and Slate) that are leveraged to generate the API documentation.
  • CDK Asset bundling functionality that leverages the API documentation Docker image to auto-generate documentation for the API.
  • An S3 Bucket for holding the API documentation website.
  • An origin access identity (OAI) which allows CloudFront to securely serve the S3 Bucket API documentation content.
  • A CloudFront distribution which provides CDN functionality for the S3 Bucket website.

Note that the  ApiStack class features the following code which is executed on the  Widget API Lambda construct:

CfnFunction apiCfnFunction = (CfnFunction)apiLambda.getNode().getDefaultChild();
apiCfnFunction.overrideLogicalId("APILambda");

The CDK, by default, auto-assigns an ID for each defined resource but in this case the generated ID is being overridden with “APILambda”. The reason for this is that inside of the  Widget API OpenAPI specification (see  api/openapi.yaml ), there is a reference to the Lambda function by name (“APILambda”) so that the function can be integrated as a proxy for each listed API path and method combination. The OpenAPI specification includes this name as a variable to derive the Amazon Resource Name (ARN) for the Lambda function:

uri:
	Fn::Sub: "arn:aws:apigateway:${AWS::Region}:lambda:path/2015-03-31/functions/${APILambda.Arn}/invocations"

PipelineStack

The  PipelineStack class defines a CDK CodePipline construct which is a higher level construct and pattern. Therefore, the construct doesn’t just map directly to a single CloudFormation resource, but provisions multiple resources to fulfil the requirements of the pattern. The post, CDK Pipelines: Continuous delivery for AWS CDK applications, provides more detail on creating pipelines with the CDK.

final CodePipeline pipeline = CodePipeline.Builder.create(this, "OpenAPIBlogPipeline")
.pipelineName("OpenAPIBlogPipeline")
.selfMutation(true)
      .dockerEnabledForSynth(true)
      .synth(synthStep)
      .build();

CI/CD pipeline

The diagram in the following figure shows the multiple CodePipeline stages and actions created by the CDK CodePipeline construct that is defined in the PipelineStack class.

The CI/CD pipeline’s stages include the Source stage, the Synth stage, the Update pipeline, the Assets stage, and the DEV stage.

Figure 2 – CI/CD Pipeline

The stages defined include the following:

  • Source stage: The pipeline is passed the source code contents from this stage.
  • Synth stage: This stage consists of a Synth Action that synthesizes the CloudFormation templates for the application’s CDK stacks and compiles and builds the project Lambda API function.
  • Update Pipeline stage: This stage checks the OpenAPIBlogPipeline stack and reinitiates the pipeline when changes to its definition have been deployed.
  • Assets stage: The application’s CDK stacks produce multiple file assets (for example, zipped Lambda code) which are published to Amazon S3. Docker image assets are published to a managed CDK framework Amazon Elastic Container Registry (Amazon ECR) repository.
  • DEV stage: The API’s CDK stack ( OpenApiBlogAPI ) is deployed to a hypothetical development environment in this stage. A post stage deployment action is also defined in this stage. Through the use of a CDK ShellStep construct, a Bash script is executed that deploys a generated client Java Archive (JAR) for the Widget API to CodeArtifact. The script employs the OpenAPI Generator project for this purpose:
CodeBuildStep codeArtifactStep = CodeBuildStep.Builder.create("CodeArtifactDeploy")
    .input(pipelineSource)
    .commands(Arrays.asList(
           	"echo $REPOSITORY_DOMAIN",
           	"echo $REPOSITORY_NAME",
           	"export CODEARTIFACT_TOKEN=`aws codeartifact get-authorization-token --domain $REPOSITORY_DOMAIN --query authorizationToken --output text`",
           	"export REPOSITORY_ENDPOINT=$(aws codeartifact get-repository-endpoint --domain $REPOSITORY_DOMAIN --repository $REPOSITORY_NAME --format maven | jq .repositoryEndpoint | sed 's/\\\"//g')",
           	"echo $REPOSITORY_ENDPOINT",
           	"cd api",
           	"wget -q https://repo1.maven.org/maven2/org/openapitools/openapi-generator-cli/5.4.0/openapi-generator-cli-5.4.0.jar -O openapi-generator-cli.jar",
     	          "cp ./maven-settings.xml /root/.m2/settings.xml",
        	          "java -jar openapi-generator-cli.jar batch openapi-generator-config.yaml",
                    "cd client",
                    "mvn --no-transfer-progress deploy -DaltDeploymentRepository=openapi--prod::default::$REPOSITORY_ENDPOINT"
))
      .rolePolicyStatements(Arrays.asList(codeArtifactStatement, codeArtifactStsStatement))
.env(new HashMap<String, String>() {{
      		put("REPOSITORY_DOMAIN", codeArtifactDomainName);
            	put("REPOSITORY_NAME", codeArtifactRepositoryName);
       }})
      .build();

Running the project

To run this project, you must install the AWS CLI v2, the AWS CDK Toolkit CLI, a Java/JDK 11 runtime, Apache Maven, Docker, and a Git client. Furthermore, the AWS CLI must be configured for a user who has administrator access to an AWS Account. This is required to bootstrap the CDK in your AWS account (if not already completed) and provision the required AWS resources.

To build and run the project, perform the following steps:

  1. Fork the OpenAPI blog project in GitHub.
  2. Open the AWS Console and create a connection to GitHub. Note the connection’s ARN.
  3. In the Console, navigate to AWS CodeArtifact and create a domain and repository.  Note the names used.
  4. From the command line, clone your forked project and change into the project’s directory:
git clone https://github.com/<your-repository-path>
cd <your-repository-path>
  1. Edit the CDK JSON file at  cdk/cdk.json  and enter the details:
"RepositoryString": "<your-github-repository-path>",
"RepositoryBranch": "<your-github-repository-branch-name>",
"CodestarConnectionArn": "<connection-arn>",
"CodeArtifactDomain": "<code-artifact-domain-name>",
"CodeArtifactRepository": "<code-artifact-repository-name>"

Please note that for setting configuration values in CDK applications, it is recommend to use environment variables or AWS Systems Manager parameters.

  1. Commit and push your changes back to your GitHub repository:
git push origin main
  1. Change into the  cdk directory and bootstrap the CDK in your AWS account if you haven’t already done so (enter “Y” when prompted):
cd cdk
cdk bootstrap
  1. Deploy the CDK pipeline stack (enter “Y” when prompted):
cdk deploy OpenAPIBlogPipeline

Once the stack deployment completes successfully, the pipeline  OpenAPIBlogPipeline will start running. This will build and deploy the API and its associated resources. If you open the Console and navigate to AWS CodePipeline, then you’ll see a pipeline in progress for the API.

Once the pipeline has completed executing, navigate to AWS CloudFormation to get the output values for the  DEV-OpenAPIBlog  stack deployment:

  1. Select the  DEV-OpenAPIBlog  stack entry and then select the Outputs column. Record the REST_URL value for the key that begins with   OpenAPIBlogRestAPIEndpoint .
  2. Record the CLOUDFRONT_URL value for the key  OpenAPIBlogCloudFrontURL .

The API ping method at https://<REST_URL>/ping can now be invoked using your browser or an API development tool like Postman. Other API other methods, as defined by the OpenApi specification, are also available for invocation (For example, GET https://<REST_URL>/widgets).

To view the generated API documentation, open a browser at https://< CLOUDFRONT_URL>.

The following figure shows the API documentation website that has been auto-generated from the API’s OpenAPI specification. The documentation includes code snippets for using the API from multiple programming languages.

The API’s auto-generated documentation website provides descriptions of the API’s methods and resources as well as code snippets in multiple languages including JavaScript, Python, and Java.

Figure 3 – Auto-generated API documentation

To view the generated API client code artifact, open the Console and navigate to AWS CodeArtifact. The following figure shows the generated API client artifact that has been published to CodeArtifact.

The CodeArtifact service user interface in the Console shows the different versions of the API’s auto-generated client libraries.

Figure 4 – API client artifact in CodeArtifact

Cleaning up

  1. From the command change to the  cdk directory and remove the API stack in the DEV stage (enter “Y” when prompted):
cd cdk
cdk destroy OpenAPIBlogPipeline/DEV/OpenAPIBlogAPI
  1. Once this has completed, delete the pipeline stack:
cdk destroy OpenAPIBlogPipeline
  1. Delete the S3 bucket created to support pipeline operations. Open the Console and navigate to Amazon S3. Delete buckets with the prefix  openapiblogpipeline .

Conclusion

This post demonstrates the use of the AWS CDK to deploy a RESTful API defined by the OpenAPI/Swagger specification. Furthermore, this post describes how to use the AWS CDK to auto-generate API documentation, publish this documentation to a web site hosted on Amazon S3, auto-generate API client libraries or SDKs, and publish these artifacts to an Apache Maven repository hosted on CodeArtifact.

The solution described in this post can be improved by:

  • Building and pushing the API documentation Docker image to Amazon ECR, and then using this image in CodePipeline API pipelines.
  • Creating stages for different environments such as TEST, PREPROD, and PROD.
  • Adding integration testing actions to make sure that the API Deployment is working correctly.
  • Adding Manual approval actions for that are executed before deploying the API to PROD.
  • Using CodeBuild caching of artifacts including Docker images and libraries.

About the author:

Luke Popplewell

Luke Popplewell works primarily with federal entities in the Australian Government. In his role as an architect, Luke uses his knowledge and experience to help organisations reach their goals on the AWS cloud. Luke has a keen interest in serverless technology, modernization, DevOps and event-driven architectures.

Multi-Region Terraform Deployments with AWS CodePipeline using Terraform Built CI/CD

Post Syndicated from Lerna Ekmekcioglu original https://aws.amazon.com/blogs/devops/multi-region-terraform-deployments-with-aws-codepipeline-using-terraform-built-ci-cd/

As of February 2022, the AWS Cloud spans 84 Availability Zones within 26 geographic Regions, with announced plans for more Availability Zones and Regions. Customers can leverage this global infrastructure to expand their presence to their primary target of users, satisfying data residency requirements, and implementing disaster recovery strategy to make sure of business continuity. Although leveraging multi-Region architecture would address these requirements, deploying and configuring consistent infrastructure stacks across multi-Regions could be challenging, as AWS Regions are designed to be autonomous in nature. Multi-region deployments with Terraform and AWS CodePipeline can help customers with these challenges.

In this post, we’ll demonstrate the best practice for multi-Region deployments using HashiCorp Terraform as infrastructure as code (IaC), and AWS CodeBuild , CodePipeline as continuous integration and continuous delivery (CI/CD) for consistency and repeatability of deployments into multiple AWS Regions and AWS Accounts. We’ll dive deep on the IaC deployment pipeline architecture and the best practices for structuring the Terraform project and configuration for multi-Region deployment of multiple AWS target accounts.

You can find the sample code for this solution here

Solutions Overview

Architecture

The following architecture diagram illustrates the main components of the multi-Region Terraform deployment pipeline with all of the resources built using IaC.

DevOps engineer initially works against the infrastructure repo in a short-lived branch. Once changes in the short-lived branch are ready, DevOps engineer gets them reviewed and merged into the main branch. Then, DevOps engineer git tags the repo. For any future changes in the infra repo, DevOps engineer repeats this same process.

Git tags named “dev_us-east-1/research/1.0”, “dev_eu-central-1/research/1.0”, “dev_ap-southeast-1/research/1.0”, “dev_us-east-1/risk/1.0”, “dev_eu-central-1/risk/1.0”, “dev_ap-southeast-1/risk/1.0” corresponding to the version 1.0 of the code to release from the main branch using git tagging. Short-lived branch in between each version of the code, followed by git tags corresponding to each subsequent version of the code such as version 1.1 and version 2.0.”

Fig 1. Tagging to release from the main branch.

  1. The deployment is triggered from DevOps engineer git tagging the repo, which contains the Terraform code to be deployed. This action starts the deployment pipeline execution.
    Tagging with ‘dev_us-east-1/research/1.0’ triggers a pipeline to deploy the research dev account to us-east-1. In our example git tag ‘dev_us-east-1/research/1.0’ contains the target environment (i.e., dev), AWS Region (i.e. us-east-1), team (i.e., research), and a version number (i.e., 1.0) that maps to an annotated tag on a commit ID. The target workload account aliases (i.e., research dev, risk qa) are mapped to AWS account numbers in the environment configuration files of the infra repo in AWS CodeCommit.
The central tooling account contains the CodeCommit Terraform infra repo, where DevOps engineer has git access, along with the pipeline trigger, the CodePipeline dev pipeline consisting of the S3 bucket with Terraform infra repo and git tag, CodeBuild terraform tflint scan, checkov scan, plan and apply. Terraform apply points using the cross account role to VPC containing an Application Load Balancer (ALB) in eu-central-1 in the dev target workload account. A qa pipeline, a staging pipeline, a prod pipeline are included along with a qa target workload account, a staging target workload account, a prod target workload account. EventBridge, Key Management Service, CloudTrail, CloudWatch in us-east-1 Region are in the central tooling account along with Identity Access Management service. In addition, the dev target workload account contains us-east-1 and ap-southeast-1 VPC’s each with an ALB as well as Identity Access Management.

Fig 2. Multi-Region AWS deployment with IaC and CI/CD pipelines.

  1. To capture the exact git tag that starts a pipeline, we use an Amazon EventBridge rule. The rule is triggered when the tag is created with an environment prefix for deploying to a respective environment (i.e., dev). The rule kicks off an AWS CodeBuild project that takes the git tag from the AWS CodeCommit event and stores it with a full clone of the repo into a versioned Amazon Simple Storage Service (Amazon S3) bucket for the corresponding environment.
  2. We have a continuous delivery pipeline defined in AWS CodePipeline. To make sure that the pipelines for each environment run independent of each other, we use a separate pipeline per environment. Each pipeline consists of three stages in addition to the Source stage:
    1. IaC linting stage – A stage for linting Terraform code. For illustration purposes, we’ll use the open source tool tflint.
    2. IaC security scanning stage – A stage for static security scanning of Terraform code. There are many tooling choices when it comes to the security scanning of Terraform code. Checkov, TFSec, and Terrascan are the commonly used tools. For illustration purposes, we’ll use the open source tool Checkov.
    3. IaC build stage – A stage for Terraform build. This includes an action for the Terraform execution plan followed by an action to apply the plan to deploy the stack to a specific Region in the target workload account.
  1. Once the Terraform apply is triggered, it deploys the infrastructure components in the target workload account to the AWS Region based on the git tag. In turn, you have the flexibility to point the deployment to any AWS Region or account configured in the repo.
  2. The sample infrastructure in the target workload account consists of an AWS Identity and Access Management (IAM) role, an external facing Application Load Balancer (ALB), as well as all of the required resources down to the Amazon Virtual Private Cloud (Amazon VPC). Upon successful deployment, browsing to the external facing ALB DNS Name URL displays a very simple message including the location of the Region.

Architectural considerations

Multi-account strategy

Leveraging well-architected multi-account strategy, we have a separate central tooling account for housing the code repository and infrastructure pipeline, and a separate target workload account to house our sample workload infra-architecture. The clean account separation lets us easily control the IAM permission for granular access and have different guardrails and security controls applied. Ultimately, this enforces the separation of concerns as well as minimizes the blast radius.

A dev pipeline, a qa pipeline, a staging pipeline and, a prod pipeline in the central tooling account, each targeting the workload account for the respective environment pointing to the Regional resources containing a VPC and an ALB.

Fig 3. A separate pipeline per environment.

The sample architecture shown above contained a pipeline per environment (DEV, QA, STAGING, PROD) in the tooling account deploying to the target workload account for the respective environment. At scale, you can consider having multiple infrastructure deployment pipelines for multiple business units in the central tooling account, thereby targeting workload accounts per environment and business unit. If your organization has a complex business unit structure and is bound to have different levels of compliance and security controls, then the central tooling account can be further divided into the central tooling accounts per business unit.

Pipeline considerations

The infrastructure deployment pipeline is hosted in a central tooling account and targets workload accounts. The pipeline is the authoritative source managing the full lifecycle of resources. The goal is to decrease the risk of ad hoc changes (e.g., manual changes made directly via the console) that can’t be easily reproduced at a future date. The pipeline and the build step each run as their own IAM role that adheres to the principle of least privilege. The pipeline is configured with a stage to lint the Terraform code, as well as a static security scan of the Terraform resources following the principle of shifting security left in the SDLC.

As a further improvement for resiliency and applying the cell architecture principle to the CI/CD deployment, we can consider having multi-Region deployment of the AWS CodePipeline pipeline and AWS CodeBuild build resources, in addition to a clone of the AWS CodeCommit repository. We can use the approach detailed in this post to sync the repo across multiple regions. This means that both the workload architecture and the deployment infrastructure are multi-Region. However, it’s important to note that the business continuity requirements of the infrastructure deployment pipeline are most likely different than the requirements of the workloads themselves.

A dev pipeline in us-east-1, a dev pipeline in eu-central-1, a dev pipeline in ap-southeast-1, all in the central tooling account, each pointing respectively to the regional resources containing a VPC and an ALB for the respective Region in the dev target workload account.

Fig 4. Multi-Region CI/CD dev pipelines targeting the dev workload account resources in the respective Region.

Deeper dive into Terraform code

Backend configuration and state

As a prerequisite, we created Amazon S3 buckets to store the Terraform state files and Amazon DynamoDB tables for the state file locks. The latter is a best practice to prevent concurrent operations on the same state file. For naming the buckets and tables, our code expects the use of the same prefix (i.e., <tf_backend_config_prefix>-<env> for buckets and <tf_backend_config_prefix>-lock-<env> for tables). The value of this prefix must be passed in as an input param (i.e., “tf_backend_config_prefix”). Then, it’s fed into AWS CodeBuild actions for Terraform as an environment variable. Separation of remote state management resources (Amazon S3 bucket and Amazon DynamoDB table) across environments makes sure that we’re minimizing the blast radius.


-backend-config="bucket=${TF_BACKEND_CONFIG_PREFIX}-${ENV}" 
-backend-config="dynamodb_table=${TF_BACKEND_CONFIG_PREFIX}-lock-${ENV}"
A dev Terraform state files bucket named 

<prefix>-dev, a dev Terraform state locks DynamoDB table named <prefix>-lock-dev, a qa Terraform state files bucket named <prefix>-qa, a qa Terraform state locks DynamoDB table named <prefix>-lock-qa, a staging Terraform state files bucket named <prefix>-staging, a staging Terraform state locks DynamoDB table named <prefix>-lock-staging, a prod Terraform state files bucket named <prefix>-prod, a prod Terraform state locks DynamoDB table named <prefix>-lock-prod, in us-east-1 in the central tooling account” width=”600″ height=”456″>
 <p id=Fig 5. Terraform state file buckets and state lock tables per environment in the central tooling account.

The git tag that kicks off the pipeline is named with the following convention of “<env>_<region>/<team>/<version>” for regional deployments and “<env>_global/<team>/<version>” for global resource deployments. The stage following the source stage in our pipeline, tflint stage, is where we parse the git tag. From the tag, we derive the values of environment, deployment scope (i.e., Region or global), and team to determine the Terraform state Amazon S3 object key uniquely identifying the Terraform state file for the deployment. The values of environment, deployment scope, and team are passed as environment variables to the subsequent AWS CodeBuild Terraform plan and apply actions.

-backend-config="key=${TEAM}/${ENV}-${TARGET_DEPLOYMENT_SCOPE}/terraform.tfstate"

We set the Region to the value of AWS_REGION env variable that is made available by AWS CodeBuild, and it’s the Region in which our build is running.

-backend-config="region=$AWS_REGION"

The following is how the Terraform backend config initialization looks in our AWS CodeBuild buildspec files for Terraform actions, such as tflint, plan, and apply.

terraform init -backend-config="key=${TEAM}/${ENV}-
${TARGET_DEPLOYMENT_SCOPE}/terraform.tfstate" -backend-config="region=$AWS_REGION"
-backend-config="bucket=${TF_BACKEND_CONFIG_PREFIX}-${ENV}" 
-backend-config="dynamodb_table=${TF_BACKEND_CONFIG_PREFIX}-lock-${ENV}"
-backend-config="encrypt=true"

Using this approach, the Terraform states for each combination of account and Region are kept in their own distinct state file. This means that if there is an issue with one Terraform state file, then the rest of the state files aren’t impacted.

In the central tooling account us-east-1 Region, Terraform state files named “research/dev-us-east-1/terraform.tfstate”, “risk/dev-ap-southeast-1/terraform.tfstate”, “research/dev-eu-central-1/terraform.tfstate”, “research/dev-global/terraform.tfstate” are in S3 bucket named 

<prefix>-dev along with DynamoDB table for Terraform state locks named <prefix>-lock-dev. The Terraform state files named “research/qa-us-east-1/terraform.tfstate”, “risk/qa-ap-southeast-1/terraform.tfstate”, “research/qa-eu-central-1/terraform.tfstate” are in S3 bucket named <prefix>-qa along with DynamoDB table for Terraform state locks named <prefix>-lock-qa. Similarly for staging and prod.” width=”600″ height=”677″>
 <p id=Fig 6. Terraform state files per account and Region for each environment in the central tooling account

Following the example, a git tag of the form “dev_us-east-1/research/1.0” that kicks off the dev pipeline works against the research team’s dev account’s state file containing us-east-1 Regional resources (i.e., Amazon S3 object key “research/dev-us-east-1/terraform.tfstate” in the S3 bucket <tf_backend_config_prefix>-dev), and a git tag of the form “dev_ap-southeast-1/risk/1.0” that kicks off the dev pipeline works against the risk team’s dev account’s Terraform state file containing ap-southeast-1 Regional resources (i.e., Amazon S3 object key “risk/dev-ap-southeast-1/terraform.tfstate”). For global resources, we use a git tag of the form “dev_global/research/1.0” that kicks off a dev pipeline and works against the research team’s dev account’s global resources as they are at account level (i.e., “research/dev-global/terraform.tfstate).

Git tag “dev_us-east-1/research/1.0” pointing to the Terraform state file named “research/dev-us-east-1/terraform.tfstate”, git tag “dev_ap-southeast-1/risk/1.0 pointing to “risk/dev-ap-southeast-1/terraform.tfstate”, git tag “dev_eu-central-1/research/1.0” pointing to ”research/dev-eu-central-1/terraform.tfstate”, git tag “dev_global/research/1.0” pointing to “research/dev-global/terraform.tfstate”, in dev Terraform state files S3 bucket named <prefix>-dev along with <prefix>-lock-dev DynamoDB dev Terraform state locks table.” width=”600″ height=”318″>
 <p id=Fig 7. Git tags and the respective Terraform state files.

This backend configuration makes sure that the state file for one account and Region is independent of the state file for the same account but different Region. Adding or expanding the workload to additional Regions would have no impact on the state files of existing Regions.

If we look at the further improvement where we make our deployment infrastructure also multi-Region, then we can consider each Region’s CI/CD deployment to be the authoritative source for its local Region’s deployments and Terraform state files. In this case, tagging against the repo triggers a pipeline within the local CI/CD Region to deploy resources in the Region. The Terraform state files in the local Region are used for keeping track of state for the account’s deployment within the Region. This further decreases cross-regional dependencies.

A dev pipeline in the central tooling account in us-east-1, pointing to the VPC containing ALB in us-east-1 in dev target workload account, along with a dev Terraform state files S3 bucket named <prefix>-use1-dev containing us-east-1 Regional resources “research/dev/terraform.tfstate” and “risk/dev/terraform.tfstate” Terraform state files along with DynamoDB dev Terraform state locks table named <prefix>-use1-lock-dev. A dev pipeline in the central tooling account in eu-central-1, pointing to the VPC containing ALB in eu-central-1 in dev target workload account, along with a dev Terraform state files S3 bucket named <prefix>-euc1-dev containing eu-central-1 Regional resources “research/dev/terraform.tfstate” and “risk/dev/terraform.tfstate” Terraform state files along with DynamoDB dev Terraform state locks table named <prefix>-euc1-lock-dev. A dev pipeline in the central tooling account in ap-southeast-1, pointing to the VPC containing ALB in ap-southeast-1 in dev target workload account, along with a dev Terraform state files S3 bucket named <prefix>-apse1-dev containing ap-southeast-1 Regional resources “research/dev/terraform.tfstate” and “risk/dev/terraform.tfstate” Terraform state files along with DynamoDB dev Terraform state locks table named <prefix>-apse1-lock-dev” width=”700″ height=”603″>
 <p id=Fig 8. Multi-Region CI/CD with Terraform state resources stored in the same Region as the workload account resources for the respective Region

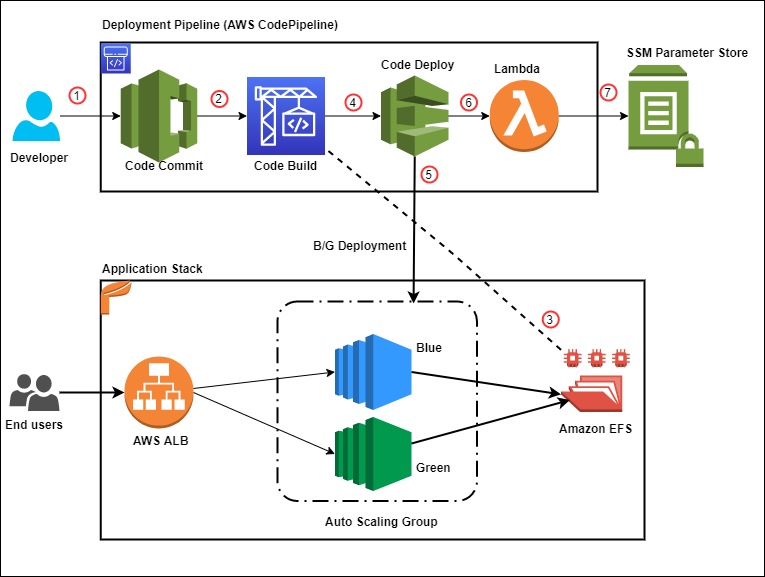
Provider

For deployments, we use the default Terraform AWS provider. The provider is parametrized with the value of the region passed in as an input parameter.

provider "aws" {
  region = var.region
   ...
}

Once the provider knows which Region to target, we can refer to the current AWS Region in the rest of the code.

# The value of the current AWS region is the name of the AWS region configured on the provider
# https://registry.terraform.io/providers/hashicorp/aws/latest/docs/data-sources/region
data "aws_region" "current" {} 

locals {
    region = data.aws_region.current.name # then use local.region where region is needed
}

Provider is configured to assume a cross account IAM role defined in the workload account. The value of the account ID is fed as an input parameter.

provider "aws" {
  region = var.region
  assume_role {
    role_arn     = "arn:aws:iam::${var.account}:role/InfraBuildRole"
    session_name = "INFRA_BUILD"
  }
}

This InfraBuildRole IAM role could be created as part of the account creation process. The AWS Control Tower Terraform Account Factory could be used to automate this.

Code

Minimize cross-regional dependencies

We keep the Regional resources and the global resources (e.g., IAM role or policy) in distinct namespaces following the cell architecture principle. We treat each Region as one cell, with the goal of decreasing cross-regional dependencies. Regional resources are created once in each Region. On the other hand, global resources are created once globally and may have cross-regional dependencies (e.g., DynamoDB global table with a replica table in multiple Regions). There’s no “global” Terraform AWS provider since the AWS provider requires a Region. This means that we pick a specific Region from which to deploy our global resources (i.e., global_resource_deploy_from_region input param). By creating a distinct Terraform namespace for Regional resources (e.g., module.regional) and a distinct namespace for global resources (e.g., module.global), we can target a deployment for each using pipelines scoped to the respective namespace (e.g., module.global or module.regional).

Deploying Regional resources: A dev pipeline in the central tooling account triggered via git tag “dev_eu-central-1/research/1.0” pointing to the eu-central-1 VPC containing ALB in the research dev target workload account corresponding to the module.regional Terraform namespace. Deploying global resources: a dev pipeline in the central tooling account triggered via git tag “dev_global/research/1.0” pointing to the IAM resource corresponding to the module.global Terraform namespace.

Fig 9. Deploying regional and global resources scoped to the Terraform namespace

As global resources have a scope of the whole account regardless of Region while Regional resources are scoped for the respective Region in the account, one point of consideration and a trade-off with having to pick a Region to deploy global resources is that this introduces a dependency on that region for the deployment of the global resources. In addition, in the case of a misconfiguration of a global resource, there may be an impact to each Region in which we deployed our workloads. Let’s consider a scenario where an IAM role has access to an S3 bucket. If the IAM role is misconfigured as a result of one of the deployments, then this may impact access to the S3 bucket in each Region.

There are alternate approaches, such as creating an IAM role per Region (myrole-use1 with access to the S3 bucket in us-east-1, myrole-apse1 with access to the S3 bucket in ap-southeast-1, etc.). This would make sure that if the respective IAM role is misconfigured, then the impact is scoped to the Region. Another approach is versioning our global resources (e.g., myrole-v1, myrole-v2) with the ability to move to a new version and roll back to a previous version if needed. Each of these approaches has different drawbacks, such as the duplication of global resources that may make auditing more cumbersome with the tradeoff of minimizing cross Regional dependencies.

We recommend looking at the pros and cons of each approach and selecting the approach that best suits the requirements for your workloads regarding the flexibility to deploy to multiple Regions.

Consistency

We keep one copy of the infrastructure code and deploy the resources targeted for each Region using this same copy. Our code is built using versioned module composition as the “lego blocks”. This follows the DRY (Don’t Repeat Yourself) principle and decreases the risk of code drift per Region. We may deploy to any Region independently, including any Regions added at a future date with zero code changes and minimal additional configuration for that Region. We can see three advantages with this approach.

  1. The total deployment time per Region remains the same regardless of the addition of Regions. This helps for restrictions, such as tight release windows due to business requirements.
  2. If there’s an issue with one of the regional deployments, then the remaining Regions and their deployment pipelines aren’t affected.
  3. It allows the ability to stagger deployments or the possibility of not deploying to every region in non-critical environments (e.g., dev) to minimize costs and remain in line with the Well Architected Sustainability pillar.

Conclusion

In this post, we demonstrated a multi-account, multi-region deployment approach, along with sample code, with a focus on architecture using IaC tool Terraform and CI/CD services AWS CodeBuild and AWS CodePipeline to help customers in their journey through multi-Region deployments.

Thanks to Welly Siauw, Kenneth Jackson, Andy Taylor, Rodney Bozo, Craig Edwards and Curtis Rissi for their contributions reviewing this post and its artifacts.

Author:

Lerna Ekmekcioglu

Lerna Ekmekcioglu is a Senior Solutions Architect with AWS where she helps Global Financial Services customers build secure, scalable and highly available workloads.
She brings over 17 years of platform engineering experience including authentication systems, distributed caching, and multi region deployments using IaC and CI/CD to name a few.
In her spare time, she enjoys hiking, sight seeing and backyard astronomy.

Jack Iu

Jack is a Global Solutions Architect at AWS Financial Services. Jack is based in New York City, where he works with Financial Services customers to help them design, deploy, and scale applications to achieve their business goals. In his spare time, he enjoys badminton and loves to spend time with his wife and Shiba Inu.

Blue/Green deployment with AWS Developer tools on Amazon EC2 using Amazon EFS to host application source code

Post Syndicated from Rakesh Singh original https://aws.amazon.com/blogs/devops/blue-green-deployment-with-aws-developer-tools-on-amazon-ec2-using-amazon-efs-to-host-application-source-code/

Many organizations building modern applications require a shared and persistent storage layer for hosting and deploying data-intensive enterprise applications, such as content management systems, media and entertainment, distributed applications like machine learning training, etc. These applications demand a centralized file share that scales to petabytes without disrupting running applications and remains concurrently accessible from potentially thousands of Amazon EC2 instances.

Simultaneously, customers want to automate the end-to-end deployment workflow and leverage continuous methodologies utilizing AWS developer tools services for performing a blue/green deployment with zero downtime. A blue/green deployment is a deployment strategy wherein you create two separate, but identical environments. One environment (blue) is running the current application version, and one environment (green) is running the new application version. The blue/green deployment strategy increases application availability by generally isolating the two application environments and ensuring that spinning up a parallel green environment won’t affect the blue environment resources. This isolation reduces deployment risk by simplifying the rollback process if a deployment fails.

Amazon Elastic File System (Amazon EFS) provides a simple, scalable, and fully-managed elastic NFS file system for use with AWS Cloud services and on-premises resources. It scales on demand, thereby eliminating the need to provision and manage capacity in order to accommodate growth. Utilize Amazon EFS to create a shared directory that stores and serves code and content for numerous applications. Your application can treat a mounted Amazon EFS volume like local storage. This means you don’t have to deploy your application code every time the environment scales up to multiple instances to distribute load.

In this blog post, I will guide you through an automated process to deploy a sample web application on Amazon EC2 instances utilizing Amazon EFS mount to host application source code, and utilizing a blue/green deployment with AWS code suite services in order to deploy the application source code with no downtime.

How this solution works

This blog post includes a CloudFormation template to provision all of the resources needed for this solution. The CloudFormation stack deploys a Hello World application on Amazon Linux 2 EC2 Instances running behind an Application Load Balancer and utilizes Amazon EFS mount point to store the application content. The AWS CodePipeline project utilizes AWS CodeCommit as the version control, AWS CodeBuild for installing dependencies and creating artifacts,  and AWS CodeDeploy to conduct deployment on EC2 instances running in an Amazon EC2 Auto Scaling group.

Figure 1 below illustrates our solution architecture.

Sample solution architecture

Figure 1: Sample solution architecture

The event flow in Figure 1 is as follows:

  1. A developer commits code changes from their local repo to the CodeCommit repository. The commit triggers CodePipeline execution.
  2. CodeBuild execution begins to compile source code, install dependencies, run custom commands, and create deployment artifact as per the instructions in the Build specification reference file.
  3. During the build phase, CodeBuild copies the source-code artifact to Amazon EFS file system and maintains two different directories for current (green) and new (blue) deployments.
  4. After successfully completing the build step, CodeDeploy deployment kicks in to conduct a Blue/Green deployment to a new Auto Scaling Group.
  5. During the deployment phase, CodeDeploy mounts the EFS file system on new EC2 instances as per the CodeDeploy AppSpec file reference and conducts other deployment activities.
  6. After successful deployment, a Lambda function triggers in order to store a deployment environment parameter in Systems Manager parameter store. The parameter stores the current EFS mount name that the application utilizes.
  7. The AWS Lambda function updates the parameter value during every successful deployment with the current EFS location.

Prerequisites

For this walkthrough, the following are required:

Deploy the solution

Once you’ve assembled the prerequisites, download or clone the GitHub repo and store the files on your local machine. Utilize the commands below to clone the repo:

mkdir -p ~/blue-green-sample/
cd ~/blue-green-sample/
git clone https://github.com/aws-samples/blue-green-deployment-pipeline-for-efs

Once completed, utilize the following steps to deploy the solution in your AWS account:

  1. Create a private Amazon Simple Storage Service (Amazon S3) bucket by using this documentation
    AWS S3 console view when creating a bucket

    Figure 2: AWS S3 console view when creating a bucket


  2. Upload the cloned or downloaded GitHub repo files to the root of the S3 bucket. the S3 bucket objects structure should look similar to Figure 3:
    AWS S3 bucket object structure after you upload the Github repo content

    Figure 3: AWS S3 bucket object structure


  3. Go to the S3 bucket and select the template name solution-stack-template.yml, and then copy the object URL.
  4. Open the CloudFormation console. Choose the appropriate AWS Region, and then choose Create Stack. Select With new resources.
  5. Select Amazon S3 URL as the template source, paste the object URL that you copied in Step 3, and then choose Next.
  6. On the Specify stack details page, enter a name for the stack and provide the following input parameter. Modify the default values for other parameters in order to customize the solution for your environment. You can leave everything as default for this walkthrough.
  • ArtifactBucket– The name of the S3 bucket that you created in the first step of the solution deployment. This is a mandatory parameter with no default value.
Defining the stack name and input parameters for the CloudFormation stack

Figure 4: Defining the stack name and input parameters for the CloudFormation stack

  1. Choose Next.
  2. On the Options page, keep the default values and then choose Next.
  3. On the Review page, confirm the details, acknowledge that CloudFormation might create IAM resources with custom names, and then choose Create Stack.
  4. Once the stack creation is marked as CREATE_COMPLETE, the following resources are created:
  • A virtual private cloud (VPC) configured with two public and two private subnets.
  • NAT Gateway, an EIP address, and an Internet Gateway.
  • Route tables for private and public subnets.
  • Auto Scaling Group with a single EC2 Instance.
  • Application Load Balancer and a Target Group.
  • Three security groups—one each for ALB, web servers, and EFS file system.
  • Amazon EFS file system with a mount target for each Availability Zone.
  • CodePipeline project with CodeCommit repository, CodeBuild, and CodeDeploy resources.
  • SSM parameter to store the environment current deployment status.
  • Lambda function to update the SSM parameter for every successful pipeline execution.
  • Required IAM Roles and policies.

      Note: It may take anywhere from 10-20 minutes to complete the stack creation.

Test the solution

Now that the solution stack is deployed, follow the steps below to test the solution:

  1. Validate CodePipeline execution status

After successfully creating the CloudFormation stack, a CodePipeline execution automatically triggers to deploy the default application code version from the CodeCommit repository.

  • In the AWS console, choose Services and then CloudFormation. Select your stack name. On the stack Outputs tab, look for the CodePipelineURL key and click on the URL.
  • Validate that all steps have successfully completed. For a successful CodePipeline execution, you should see something like Figure 5. Wait for the execution to complete in case it is still in progress.
CodePipeline console showing execution status of all stages

Figure 5: CodePipeline console showing execution status of all stages


  1. Validate the Website URL

After completing the pipeline execution, hit the website URL on a browser to check if it’s working.

  • On the stack Outputs tab, look for the WebsiteURL key and click on the URL.
  • For a successful deployment, it should open a default page similar to Figure 6.
Sample “Hello World” application (Green deployment)

Figure 6: Sample “Hello World” application (Green deployment)


  1. Validate the EFS share

After the website deployed successfully, we will get into the application server and validate the EFS mount point and the application source code directory.

  • Open the Amazon EC2 console, and then choose Instances in the left navigation pane.
  • Select the instance named bg-sample and choose
  • For Connection method, choose Session Manager, and then choose connect

After the connection is made, run the following bash commands to validate the EFS mount and the deployed content. Figure 7 shows a sample output from running the bash commands.

sudo df –h | grep efs
ls –la /efs/green
ls –la /var/www/
Sample output from the bash command (Green deployment)

Figure 7: Sample output from the bash command (Green deployment)


  1. Deploy a new revision of the application code

After verifying the application status and the deployed code on the EFS share, commit some changes to the CodeCommit repository in order to trigger a new deployment.

  • On the stack Outputs tab, look for the CodeCommitURL key and click on the corresponding URL.
  • Click on the file html.
  • Click on
  • Uncomment line 9 and comment line 10, so that the new lines look like those below after the changes:
background-color: #0188cc; 
#background-color: #90ee90;
  • Add Author name, Email address, and then choose Commit changes.

After you commit the code, the CodePipeline triggers and executes Source, Build, Deploy, and Lambda stages. Once the execution completes, hit the Website URL and you should see a new page like Figure 8.

New Application version (Blue deployment)

Figure 8: New Application version (Blue deployment)


On the EFS side, the application directory on the new EC2 instance now points to /efs/blue as shown in Figure 9.

Sample output from the bash command (Blue deployment)

Figure 9: Sample output from the bash command (Blue deployment)

Solution review

Let’s review the pipeline stages details and what happens during the Blue/Green deployment:

1) Build stage

For this sample application, the CodeBuild project is configured to mount the EFS file system and utilize the buildspec.yml file present in the source code root directory to run the build. Following is the sample build spec utilized in this solution:

version: 0.2
phases:
  install:
    runtime-versions:
      php: latest   
  build:
    commands:
      - current_deployment=$(aws ssm get-parameter --name $SSM_PARAMETER --query "Parameter.Value" --region $REGION --output text)
      - echo $current_deployment
      - echo $SSM_PARAMETER
      - echo $EFS_ID $REGION
      - if [[ "$current_deployment" == "null" ]]; then echo "this is the first GREEN deployment for this project" ; dir='/efs/green' ; fi
      - if [[ "$current_deployment" == "green" ]]; then dir='/efs/blue' ; else dir='/efs/green' ; fi
      - if [ ! -d $dir ]; then  mkdir $dir >/dev/null 2>&1 ; fi
      - echo $dir
      - rsync -ar $CODEBUILD_SRC_DIR/ $dir/
artifacts:
  files:
      - '**/*'

During the build job, the following activities occur:

  • Installs latest php runtime version.
  • Reads the SSM parameter value in order to know the current deployment and decide which directory to utilize. The SSM parameter value flips between green and blue for every successful deployment.
  • Synchronizes the latest source code to the EFS mount point.
  • Creates artifacts to be utilized in subsequent stages.

Note: Utilize the default buildspec.yml as a reference and customize it further as per your requirement. See this link for more examples.

2) Deploy Stage

The solution is utilizing CodeDeploy blue/green deployment type for EC2/On-premises. The deployment environment is configured to provision a new EC2 Auto Scaling group for every new deployment in order to deploy the new application revision. CodeDeploy creates the new Auto Scaling group by copying the current one. See this link for more details on blue/green deployment configuration with CodeDeploy. During each deployment event, CodeDeploy utilizes the appspec.yml file to run the deployment steps as per the defined life cycle hooks. Following is the sample AppSpec file utilized in this solution.

version: 0.0
os: linux
hooks:
  BeforeInstall:
    - location: scripts/install_dependencies
      timeout: 180
      runas: root
  AfterInstall:
    - location: scripts/app_deployment
      timeout: 180
      runas: root
  BeforeAllowTraffic :
     - location: scripts/check_app_status
       timeout: 180
       runas: root  

Note: The scripts mentioned in the AppSpec file are available in the scripts directory of the CodeCommit repository. Utilize these sample scripts as a reference and modify as per your requirement.

For this sample, the following steps are conducted during a deployment:

  • BeforeInstall:
    • Installs required packages on the EC2 instance.
    • Mounts the EFS file system.
    • Creates a symbolic link to point the apache home directory /var/www/html to the appropriate EFS mount point. It also ensures that the new application version deploys to a different EFS directory without affecting the current running application.
  • AfterInstall:
    • Stops apache web server.
    • Fetches current EFS directory name from Systems Manager.
    • Runs some clean up commands.
    • Restarts apache web server.
  • BeforeAllowTraffic:
    • Checks application status if running fine.
    • Exits the deployment with error if the app returns a non 200 HTTP status code. 

3) Lambda Stage

After completing the deploy stage, CodePipeline triggers a Lambda function in order to update the SSM parameter value with the updated EFS directory name. This parameter value alternates between “blue” and “green” to help CodePipeline identify the right EFS file system path during the next deployment.

CodeDeploy Blue/Green deployment

Let’s review the sequence of events flow during the CodeDeploy deployment:

  1. CodeDeploy creates a new Auto Scaling group by copying the original one.
  2. Provisions a replacement EC2 instance in the new Auto Scaling Group.
  3. Conducts the deployment on the new instance as per the instructions in the yml file.
  4. Sets up health checks and redirects traffic to the new instance.
  5. Terminates the original instance along with the Auto Scaling Group.
  6. After completing the deployment, it should appear as shown in Figure 10.
AWS CodeDeploy console view of a Blue/Green CodeDeploy deployment on Ec2

Figure 10: AWS console view of a Blue/Green CodeDeploy deployment on Ec2

Troubleshooting

To troubleshoot any service-related issues, see the following links:

More information

Now that you have tested the solution, here are some additional points worth noting:

  • The sample template and code utilized in this blog can work in any AWS region and are mainly intended for demonstration purposes. Utilize the sample as a reference and modify it further as per your requirement.
  • This solution works with single account, Region, and VPC combination.
  • For this sample, we have utilized AWS CodeCommit as version control, but you can also utilize any other source supported by AWS CodePipeline like Bitbucket, GitHub, or GitHub Enterprise Server

Clean up

Follow these steps to delete the components and avoid any future incurring charges:

  1. Open the AWS CloudFormation console.
  2. On the Stacks page in the CloudFormation console, select the stack that you created for this blog post. The stack must be currently running.
  3. In the stack details pane, choose Delete.
  4. Select Delete stack when prompted.
  5. Empty and delete the S3 bucket created during deployment step 1.

Conclusion

In this blog post, you learned how to set up a complete CI/CD pipeline for conducting a blue/green deployment on EC2 instances utilizing Amazon EFS file share as mount point to host application source code. The EFS share will be the central location hosting your application content, and it will help reduce your overall deployment time by eliminating the need for deploying a new revision on every EC2 instance local storage. It also helps to preserve any dynamically generated content when the life of an EC2 instance ends.

Author bio

Rakesh Singh

Rakesh is a Senior Technical Account Manager at Amazon. He loves automation and enjoys working directly with customers to solve complex technical issues and provide architectural guidance. Outside of work, he enjoys playing soccer, singing karaoke, and watching thriller movies.

Integrate GitHub monorepo with AWS CodePipeline to run project-specific CI/CD pipelines

Post Syndicated from Vivek Kumar original https://aws.amazon.com/blogs/devops/integrate-github-monorepo-with-aws-codepipeline-to-run-project-specific-ci-cd-pipelines/

AWS CodePipeline is a continuous delivery service that enables you to model, visualize, and automate the steps required to release your software. With CodePipeline, you model the full release process for building your code, deploying to pre-production environments, testing your application, and releasing it to production. CodePipeline then builds, tests, and deploys your application according to the defined workflow either in manual mode or automatically every time a code change occurs. A lot of organizations use GitHub as their source code repository. Some organizations choose to embed multiple applications or services in a single GitHub repository separated by folders. This method of organizing your source code in a repository is called a monorepo.

This post demonstrates how to customize GitHub events that invoke a monorepo service-specific pipeline by reading the GitHub event payload using AWS Lambda.


Solution overview

With the default setup in CodePipeline, a release pipeline is invoked whenever a change in the source code repository is detected. When using GitHub as the source for a pipeline, CodePipeline uses a webhook to detect changes in a remote branch and starts the pipeline. When using a monorepo style project with GitHub, it doesn’t matter which folder in the repository you change the code, CodePipeline gets an event at the repository level. If you have a continuous integration and continuous deployment (CI/CD) pipeline for each of the applications and services in a repository, all pipelines detect the change in any of the folders every time. The following diagram illustrates this scenario.


GitHub monorepo folder structure


This post demonstrates how to customize GitHub events that invoke a monorepo service-specific pipeline by reading the GitHub event payload using Lambda. This solution has the following benefits:

  • Add customizations to start pipelines based on external factors – You can use custom code to evaluate whether a pipeline should be triggered. This allows for further customization beyond polling a source repository or relying on a push event. For example, you can create custom logic to automatically reschedule deployments on holidays to the next available workday.
  • Have multiple pipelines with a single source – You can trigger selected pipelines when multiple pipelines are listening to a single GitHub repository. This lets you group small and highly related but independently shipped artifacts such as small microservices without creating thousands of GitHub repos.
  • Avoid reacting to unimportant files – You can avoid triggering a pipeline when changing files that don’t affect the application functionality (such as documentation, readme, PDF, and .gitignore files).

In this post, we’re not debating the advantages or disadvantages of a monorepo versus a single repo, or when to create monorepos or single repos for each application or project.


Sample architecture

This post focuses on controlling running pipelines in CodePipeline. CodePipeline can have multiple stages like test, approval, and deploy. Our sample architecture considers a simple pipeline with two stages: source and build.


Github monorepo - CodePipeline Sample Architecture

This solution is made up of following parts:

  • An Amazon API Gateway endpoint (3) is backed by a Lambda function (5) to receive and authenticate GitHub webhook push events (2)
  • The same function evaluates incoming GitHub push events and starts the pipeline on a match
  • An Amazon Simple Storage Service (Amazon S3) bucket (4) stores the CodePipeline-specific configuration files
  • The pipeline contains a build stage with AWS CodeBuild


Normally, after you create a CI/CD pipeline, it automatically triggers a pipeline to release the latest version of your source code. From then on, every time you make a change in your source code, the pipeline is triggered. You can also manually run the last revision through a pipeline by choosing Release change on the CodePipeline console. This architecture uses the manual mode to run the pipeline. GitHub push events and branch changes are evaluated by the Lambda function to avoid commits that change unimportant files from starting the pipeline.


Creating an API Gateway endpoint

We need a single API Gateway endpoint backed by a Lambda function with the responsibility of authenticating and validating incoming requests from GitHub. You can authenticate requests using HMAC security or GitHub Apps. API Gateway only needs one POST method to consume GitHub push events, as shown in the following screenshot.


Creating an API Gateway endpoint


Creating the Lambda function

This Lambda function is responsible for authenticating and evaluating the GitHub events. As part of the evaluation process, the function can parse through the GitHub events payload, determine which files are changed, added, or deleted, and perform the appropriate action:

  • Start a single pipeline, depending on which folder is changed in GitHub
  • Start multiple pipelines
  • Ignore the changes if non-relevant files are changed

You can store the project configuration details in Amazon S3. Lambda can read this configuration to decide what needs to be done when a particular folder is matched from a GitHub event. The following code is an example configuration:

{

    "GitHubRepo": "SampleRepo",

    "GitHubBranch": "main",

    "ChangeMatchExpressions": "ProjectA/.*",

    "IgnoreFiles": "*.pdf;*.md",

    "CodePipelineName": "ProjectA - CodePipeline"

}

For more complex use cases, you can store the configuration file in Amazon DynamoDB.

The following is the sample Lambda function code in Python 3.7 using Boto3:

def lambda_handler(event, context):

    import json
    modifiedFiles = event["commits"][0]["modified"]
    #full path
    for filePath in modifiedFiles:
        # Extract folder name
        folderName = (filePath[:filePath.find("/")])
        break

    #start the pipeline
    if len(folderName)>0:
        # Codepipeline name is foldername-job. 
        # We can read the configuration from S3 as well. 
        returnCode = start_code_pipeline(folderName + '-job')

    return {
        'statusCode': 200,
        'body': json.dumps('Modified project in repo:' + folderName)
    }
    

def start_code_pipeline(pipelineName):
    client = codepipeline_client()
    response = client.start_pipeline_execution(name=pipelineName)
    return True

cpclient = None
def codepipeline_client():
    import boto3
    global cpclient
    if not cpclient:
        cpclient = boto3.client('codepipeline')
    return cpclient
   

Creating a GitHub webhook

GitHub provides webhooks to allow external services to be notified on certain events. For this use case, we create a webhook for a push event. This generates a POST request to the URL (API Gateway URL) specified for any files committed and pushed to the repository. The following screenshot shows our webhook configuration.

Creating a GitHub webhook2

Conclusion

In our sample architecture, two pipelines monitor the same GitHub source code repository. A Lambda function decides which pipeline to run based on the GitHub events. The same function can have logic to ignore unimportant files, for example any readme or PDF files.

Using API Gateway, Lambda, and Amazon S3 in combination serves as a general example to introduce custom logic to invoke pipelines. You can expand this solution for increasingly complex processing logic.


About the Author

Vivek Kumar

Vivek is a Solutions Architect at AWS based out of New York. He works with customers providing technical assistance and architectural guidance on various AWS services. He brings more than 23 years of experience in software engineering and architecture roles for various large-scale enterprises.


Gaurav-Sharma

Gaurav is a Solutions Architect at AWS. He works with digital native business customers providing architectural guidance on AWS services.


Nitin-Aggarwal

Nitin is a Solutions Architect at AWS. He works with digital native business customers providing architectural guidance on AWS services.


Continuously building and delivering Maven artifacts to AWS CodeArtifact

Post Syndicated from Vinay Selvaraj original https://aws.amazon.com/blogs/devops/continuously-building-and-delivering-maven-artifacts-to-aws-codeartifact/

Artifact repositories are often used to share software packages for use in builds and deployments. Java developers using Apache Maven use artifact repositories to share and reuse Maven packages. For example, one team might own a web service framework that is used by multiple other teams to build their own services. The framework team can publish the framework as a Maven package to an artifact repository, where new versions can be picked up by the service teams as they become available. This post explains how you can set up a continuous integration pipeline with AWS CodePipeline and AWS CodeBuild to deploy Maven artifacts to AWS CodeArtifact. CodeArtifact is a fully managed pay-as-you-go artifact repository service with support for software package managers and build tools like Maven, Gradle, npm, yarn, twine, and pip.

Solution overview

The pipeline we build is triggered each time a code change is pushed to the AWS CodeCommit repository. The code is compiled using the Java compiler, unit tested, and deployed to CodeArtifact. After the artifact is published, it can be consumed by developers working in applications that have a dependency on the artifact or by builds running in other pipelines. The following diagram illustrates this architecture.

Architecture diagram of the solution


All the components in this pipeline are fully managed and you don’t pay for idle capacity or have to manage any servers.


Prerequisites

This post assumes you have the following tools installed and configured:


Creating your resources

To create the CodeArtifact domain, CodeArtifact repository, CodeCommit, CodePipeline, CodeBuild, and associated resources, we use AWS CloudFormation. Save the provided CloudFormation template below as codeartifact-cicd-pipeline.yaml and create a stack:


---
Description: Code Artifact CI/CD Pipeline

Parameters:
  GitRepoBranchName:
    Type: String
    Default: main

Resources:

  ArtifactBucket:
    Type: AWS::S3::Bucket
  
  CodeArtifactDomain:
    Type: AWS::CodeArtifact::Domain
    Properties:
      DomainName: !Sub "${AWS::StackName}-domain"
  
  CodeArtifactRepository:
    Type: AWS::CodeArtifact::Repository
    Properties:
      DomainName: !GetAtt CodeArtifactDomain.Name
      RepositoryName: !Sub "${AWS::StackName}-repo"

  CodeRepository:
    Type: AWS::CodeCommit::Repository
    Properties:
      RepositoryDescription: Maven artifact code repository
      RepositoryName: !Sub "${AWS::StackName}-maven-artifact-repo"
  
  CodeBuildProject:
    Type: AWS::CodeBuild::Project
    Properties:
      Name: !Sub "${AWS::StackName}-CodeBuild"
      Artifacts:
        Type: CODEPIPELINE
      Environment:
        EnvironmentVariables:
          - Name: CODEARTIFACT_DOMAIN
            Type: PLAINTEXT
            Value: !GetAtt CodeArtifactDomain.Name
          - Name: CODEARTIFACT_REPO
            Type: PLAINTEXT
            Value: !GetAtt CodeArtifactRepository.Name
        Type: LINUX_CONTAINER
        ComputeType: BUILD_GENERAL1_SMALL
        Image: aws/codebuild/amazonlinux2-x86_64-standard:3.0
      ServiceRole: !GetAtt CodeBuildServiceRole.Arn
      Source:
        Type: CODEPIPELINE
        BuildSpec: buildspec.yaml
  
  Pipeline:
    Type: AWS::CodePipeline::Pipeline
    Properties:
      ArtifactStore:
        Type: S3
        Location: !Ref ArtifactBucket
      RoleArn: !GetAtt CodePipelineServiceRole.Arn
      Stages:
      - Name: Source
        Actions:
        - Name: SourceAction
          ActionTypeId:
            Category: Source
            Owner: AWS
            Version: '1'
            Provider: CodeCommit
          OutputArtifacts:
          - Name: SourceBundle
          Configuration:
            BranchName: !Ref GitRepoBranchName
            RepositoryName: !GetAtt CodeRepository.Name
          RunOrder: '1'

      - Name: Deliver
        Actions:
        - Name: CodeBuild
          InputArtifacts:
          - Name: SourceBundle
          ActionTypeId:
            Category: Build
            Owner: AWS
            Version: '1'
            Provider: CodeBuild
          Configuration:
            ProjectName: !Ref CodeBuildProject
          RunOrder: '1'

  CodeBuildServiceRole:
    Type: AWS::IAM::Role
    Properties:
      AssumeRolePolicyDocument:
        Version: '2012-10-17'
        Statement:
        - Sid: ''
          Effect: Allow
          Principal:
            Service:
            - codebuild.amazonaws.com
          Action: sts:AssumeRole
      Policies:
      - PolicyName: CodePipelinePolicy
        PolicyDocument:
          Version: '2012-10-17'
          Statement:
          - Sid: CloudWatchLogsPolicy
            Effect: Allow
            Action:
            - logs:CreateLogGroup
            - logs:CreateLogStream
            - logs:PutLogEvents
            Resource:
            - "*"
          - Sid: CodeCommitPolicy
            Effect: Allow
            Action:
            - codecommit:GitPull
            Resource:
            - !GetAtt CodeRepository.Arn
          - Sid: S3GetObjectPolicy
            Effect: Allow
            Action:
            - s3:GetObject
            - s3:GetObjectVersion
            Resource:
            - !Sub "arn:aws:s3:::${ArtifactBucket}/*"
          - Sid: S3PutObjectPolicy
            Effect: Allow
            Action:
            - s3:PutObject
            Resource:
            - !Sub "arn:aws:s3:::${ArtifactBucket}/*"
          - Sid: BearerTokenPolicy
            Effect: Allow
            Action:
            - sts:GetServiceBearerToken
            Resource: "*"
            Condition:
              StringEquals:
                sts:AWSServiceName: codeartifact.amazonaws.com
          - Sid: CodeArtifactPolicy
            Effect: Allow
            Action:
            - codeartifact:GetAuthorizationToken
            Resource:
            - !Sub "arn:aws:codeartifact:${AWS::Region}:${AWS::AccountId}:domain/${CodeArtifactDomain.Name}"
          - Sid: CodeArtifactPackage
            Effect: Allow
            Action:
            - codeartifact:PublishPackageVersion
            - codeartifact:PutPackageMetadata
            - codeartifact:ReadFromRepository
            Resource:
            - !Sub "arn:aws:codeartifact:${AWS::Region}:${AWS::AccountId}:package/${CodeArtifactDomain.Name}/${CodeArtifactRepository.Name}/*"
          - Sid: CodeArtifactRepository
            Effect: Allow
            Action:
            - codeartifact:ReadFromRepository
            - codeartifact:GetRepositoryEndpoint
            Resource:
            - !Sub "arn:aws:codeartifact:${AWS::Region}:${AWS::AccountId}:repository/${CodeArtifactDomain.Name}/${CodeArtifactRepository.Name}"          

  CodePipelineServiceRole:
    Type: AWS::IAM::Role
    Properties:
      AssumeRolePolicyDocument:
        Version: '2012-10-17'
        Statement:
        - Sid: ''
          Effect: Allow
          Principal:
            Service:
            - codepipeline.amazonaws.com
          Action: sts:AssumeRole
      Policies:
      - PolicyName: CodePipelinePolicy
        PolicyDocument:
          Version: '2012-10-17'
          Statement:
          - Action:
            - s3:GetObject
            - s3:GetObjectVersion
            - s3:GetBucketVersioning
            Resource: !Sub "arn:aws:s3:::${ArtifactBucket}/*"
            Effect: Allow
          - Action:
            - s3:PutObject
            Resource:
            - !Sub "arn:aws:s3:::${ArtifactBucket}/*"
            Effect: Allow
          - Action:
            - codecommit:GetBranch
            - codecommit:GetCommit
            - codecommit:UploadArchive
            - codecommit:GetUploadArchiveStatus
            - codecommit:CancelUploadArchive
            Resource:
              - !GetAtt CodeRepository.Arn
            Effect: Allow
          - Action:
            - codebuild:StartBuild
            - codebuild:BatchGetBuilds
            Resource: 
              - !GetAtt CodeBuildProject.Arn
            Effect: Allow
          - Action:
            - iam:PassRole
            Resource: "*"
            Effect: Allow
Outputs:
  CodePipelineArtifactBucket:
    Value: !Ref ArtifactBucket
  CodeRepositoryHttpCloneUrl:
    Value: !GetAtt CodeRepository.CloneUrlHttp
  CodeRepositorySshCloneUrl:
    Value: !GetAtt CodeRepository.CloneUrlSsh

aws cloudformation deploy                         \
  --stack-name codeartifact-pipeline               \
  --template-file codeartifact-cicd-pipeline.yaml  \
  --capabilities CAPABILITY_IAM


If you have a Maven project you want to use, you can use that. Otherwise, create a new one:


mvn archetype:generate        \
  -DgroupId=com.mycompany.app \
  -DartifactId=my-app         \
  -DarchetypeArtifactId=maven-archetype-quickstart \
  -DarchetypeVersion=1.4 -DinteractiveMode=false


Initialize a Git repository for the Maven project and add the CodeCommit repository that was created in the CloudFormation stack as a remote repository:


cd my-app
git init
CODECOMMIT_URL=$(aws cloudformation describe-stacks --stack-name codeartifact-pipeline --query "Stacks[0].Outputs[?OutputKey=='CodeRepositoryHttpCloneUrl'].OutputValue" --output text)
git remote add origin $CODECOMMIT_URL


Updating the POM file

The Maven project’s POM file needs to be updated with the distribution management section. This lets Maven know where to publish artifacts. Add the distributionManagement section inside the project element of the POM. Be sure to update the URL with the correct URL for the CodeArtifact repository you created earlier. You can find the CodeArtifact repository URL with the get-repository-endpoint CLI command:


aws codeartifact get-repository-endpoint --domain codeartifact-pipeline-domain  --repository codeartifact-pipeline-repo --format maven


Add the following to the Maven project’s pom.xml:


<distributionManagement>
  <repository>
    <id>codeartifact</id>
    <name>codeartifact</name>
    <url>Replace with the URL from the get-repository-endpoint command</url>
  </repository>
</distributionManagement>

Creating a settings.xml file

Maven needs credentials to use to authenticate with CodeArtifact when it performs the deployment. CodeArtifact uses temporary authorization tokens. To pass the token to Maven, a settings.xml file is created in the top level of the Maven project. During the deployment stage, Maven is instructed to use the settings.xml in the top level of the project instead of the settings.xml that normally resides in $HOME/.m2. Create a settings.xml in the top level of the Maven project with the following contents:


<settings>
  <servers>
    <server>
      <id>codeartifact</id>
      <username>aws</username>
      <password>${env.CODEARTIFACT_TOKEN}</password>
    </server>
  </servers>
</settings>

Creating the buildspec.yaml file

CodeBuild uses a build specification file with commands and related settings that are used during the build, test, and delivery of the artifact. In the build specification file, we specify the CodeBuild runtime to use pre-build actions (update AWS CLI), and build actions (Maven build, test, and deploy). When Maven is invoked, it is provided the path to the settings.xml created in the previous step, instead of the default in $HOME/.m2/settings.xml. Create the buildspec.yaml as shown in the following code:


version: 0.2

phases:
  install:
    runtime-versions:
      java: corretto11

  pre_build:
    commands:
      - pip3 install awscli --upgrade --user

  build:
    commands:
      - export CODEARTIFACT_TOKEN=`aws codeartifact get-authorization-token --domain ${CODEARTIFACT_DOMAIN} --query authorizationToken --output text`
      - mvn -s settings.xml clean package deploy


Running the pipeline

The final step is to add the files in the Maven project to the Git repository and push the changes to CodeCommit. This triggers the pipeline to run. See the following code:


git checkout -b main
git add settings.xml buildspec.yaml pom.xml src
git commit -a -m "Initial commit"
git push --set-upstream origin main


Checking the pipeline

At this point, the pipeline starts to run. To check its progress, sign in to the AWS Management Console and choose the Region where you created the pipeline. On the CodePipeline console, open the pipeline that the CloudFormation stack created. The pipeline’s name is prefixed with the stack name. If you open the CodePipeline console before the pipeline is complete, you can watch each stage run (see the following screenshot).

CodePipeline Screenshot

If you see that the pipeline failed, you can choose the details in the action that failed for more information.

Checking for new artifacts published in CodeArtifact

When the pipeline is complete, you should be able to see the artifact in the CodeArtifact repository you created earlier. The artifact we published for this post is a Maven snapshot. CodeArtifact handles snapshots differently than release versions. For more information, see Use Maven snapshots. To find the artifact in CodeArtifact, complete the following steps:

  1. On the CodeArtifact console, choose Repositories.
  2. Choose the repository we created earlier named myrepo.
  3. Search for the package named my-app.
  4. Choose the my-app package from the search results.
    CodeArtifact Assets
  5. Choose the Dependencies tab to bring up a list of Maven dependencies that the Maven project depends on.CodeArtifact Dependencies


Cleaning up

To clean up the resources you created in this post, you need to remove them in the following order:


# Empty the CodePipeline S3 artifact bucket
CODEPIPELINE_BUCKET=$(aws cloudformation describe-stacks --stack-name codeartifact-pipeline --query "Stacks[0].Outputs[?OutputKey=='CodePipelineArtifactBucket'].OutputValue" --output text)
aws s3 rm s3://$CODEPIPELINE_BUCKET --recursive

# Delete the CloudFormation stack
aws cloudformation delete-stack --stack-name codeartifact-pipeline

Conclusion

This post covered how to build a continuous integration pipeline to deliver Maven artifacts to AWS CodeArtifact. You can modify this solution for your specific needs. For more information about CodeArtifact or the other services used, see the following:


Complete CI/CD with AWS CodeCommit, AWS CodeBuild, AWS CodeDeploy, and AWS CodePipeline

Post Syndicated from Nitin Verma original https://aws.amazon.com/blogs/devops/complete-ci-cd-with-aws-codecommit-aws-codebuild-aws-codedeploy-and-aws-codepipeline/

Many organizations have been shifting to DevOps practices, which is the combination of cultural philosophies, practices, and tools that increases your organization’s ability to deliver applications and services at high velocity; for example, evolving and improving products at a faster pace than organizations using traditional software development and infrastructure management processes.

DevOps-Feedback-Flow

An integral part of DevOps is adopting the culture of continuous integration and continuous delivery/deployment (CI/CD), where a commit or change to code passes through various automated stage gates, all the way from building and testing to deploying applications, from development to production environments.

This post uses the AWS suite of CI/CD services to compile, build, and install a version-controlled Java application onto a set of Amazon Elastic Compute Cloud (Amazon EC2) Linux instances via a fully automated and secure pipeline. The goal is to promote a code commit or change to pass through various automated stage gates all the way from development to production environments, across AWS accounts.

AWS services

This solution uses the following AWS services:

  • AWS CodeCommit – A fully-managed source control service that hosts secure Git-based repositories. CodeCommit makes it easy for teams to collaborate on code in a secure and highly scalable ecosystem. This solution uses CodeCommit to create a repository to store the application and deployment codes.
  • AWS CodeBuild – A fully managed continuous integration service that compiles source code, runs tests, and produces software packages that are ready to deploy, on a dynamically created build server. This solution uses CodeBuild to build and test the code, which we deploy later.
  • AWS CodeDeploy – A fully managed deployment service that automates software deployments to a variety of compute services such as Amazon EC2, AWS Fargate, AWS Lambda, and your on-premises servers. This solution uses CodeDeploy to deploy the code or application onto a set of EC2 instances running CodeDeploy agents.
  • AWS CodePipeline – A fully managed continuous delivery service that helps you automate your release pipelines for fast and reliable application and infrastructure updates. This solution uses CodePipeline to create an end-to-end pipeline that fetches the application code from CodeCommit, builds and tests using CodeBuild, and finally deploys using CodeDeploy.
  • AWS CloudWatch Events – An AWS CloudWatch Events rule is created to trigger the CodePipeline on a Git commit to the CodeCommit repository.
  • Amazon Simple Storage Service (Amazon S3) – An object storage service that offers industry-leading scalability, data availability, security, and performance. This solution uses an S3 bucket to store the build and deployment artifacts created during the pipeline run.
  • AWS Key Management Service (AWS KMS) – AWS KMS makes it easy for you to create and manage cryptographic keys and control their use across a wide range of AWS services and in your applications. This solution uses AWS KMS to make sure that the build and deployment artifacts stored on the S3 bucket are encrypted at rest.

Overview of solution

This solution uses two separate AWS accounts: a dev account (111111111111) and a prod account (222222222222) in Region us-east-1.

We use the dev account to deploy and set up the CI/CD pipeline, along with the source code repo. It also builds and tests the code locally and performs a test deploy.

The prod account is any other account where the application is required to be deployed from the pipeline in the dev account.

In summary, the solution has the following workflow:

  • A change or commit to the code in the CodeCommit application repository triggers CodePipeline with the help of a CloudWatch event.
  • The pipeline downloads the code from the CodeCommit repository, initiates the Build and Test action using CodeBuild, and securely saves the built artifact on the S3 bucket.
  • If the preceding step is successful, the pipeline triggers the Deploy in Dev action using CodeDeploy and deploys the app in dev account.
  • If successful, the pipeline triggers the Deploy in Prod action using CodeDeploy and deploys the app in the prod account.

The following diagram illustrates the workflow:

cicd-overall-flow


Failsafe deployments

This example of CodeDeploy uses the IN_PLACE type of deployment. However, to minimize the downtime, CodeDeploy inherently supports multiple deployment strategies. This example makes use of following features: rolling deployments and automatic rollback.

CodeDeploy provides the following three predefined deployment configurations, to minimize the impact during application upgrades:

  • CodeDeployDefault.OneAtATime – Deploys the application revision to only one instance at a time
  • CodeDeployDefault.HalfAtATime – Deploys to up to half of the instances at a time (with fractions rounded down)
  • CodeDeployDefault.AllAtOnce – Attempts to deploy an application revision to as many instances as possible at once

For OneAtATime and HalfAtATime, CodeDeploy monitors and evaluates instance health during the deployment and only proceeds to the next instance or next half if the previous deployment is healthy. For more information, see Working with deployment configurations in CodeDeploy.

You can also configure a deployment group or deployment to automatically roll back when a deployment fails or when a monitoring threshold you specify is met. In this case, the last known good version of an application revision is automatically redeployed after a failure with the new application version.

How CodePipeline in the dev account deploys apps in the prod account

In this post, the deployment pipeline using CodePipeline is set up in the dev account, but it has permissions to deploy the application in the prod account. We create a special cross-account role in the prod account, which has the following:

  • Permission to use fetch artifacts (app) rom Amazon S3 and deploy it locally in the account using CodeDeploy
  • Trust with the dev account where the pipeline runs

CodePipeline in the dev account assumes this cross-account role in the prod account to deploy the app.

Do I need multiple accounts?
If you answer “yes” to any of the following questions you should consider creating more AWS accounts:

  • Does your business require administrative isolation between workloads? Administrative isolation by account is the most straightforward way to grant independent administrative groups different levels of administrative control over AWS resources based on workload, development lifecycle, business unit (BU), or data sensitivity.
  • Does your business require limited visibility and discoverability of workloads? Accounts provide a natural boundary for visibility and discoverability. Workloads cannot be accessed or viewed unless an administrator of the account enables access to users managed in another account.
  • Does your business require isolation to minimize blast radius? Separate accounts help define boundaries and provide natural blast-radius isolation to limit the impact of a critical event such as a security breach, an unavailable AWS Region or Availability Zone, account suspensions, and so on.
  • Does your business require a particular workload to operate within AWS service limits without impacting the limits of another workload? You can use AWS account service limits to impose restrictions on a business unit, development team, or project. For example, if you create an AWS account for a project group, you can limit the number of Amazon Elastic Compute Cloud (Amazon EC2) or high performance computing (HPC) instances that can be launched by the account.
  • Does your business require strong isolation of recovery or auditing data? If regulatory requirements require you to control access and visibility to auditing data, you can isolate the data in an account separate from the one where you run your workloads (for example, by writing AWS CloudTrail logs to a different account).

Prerequisites

For this walkthrough, you should complete the following prerequisites:

  1. Have access to at least two AWS accounts. For this post, the dev and prod accounts are in us-east-1. You can search and replace the Region and account IDs in all the steps and sample AWS Identity and Access Management (IAM) policies in this post.
  2. Ensure you have EC2 Linux instances with the CodeDeploy agent installed in all the accounts or VPCs where the sample Java application is to be installed (dev and prod accounts).
    • To manually create EC2 instances with CodeDeploy agent, refer Create an Amazon EC2 instance for CodeDeploy (AWS CLI or Amazon EC2 console). Keep in mind the following:
      • CodeDeploy uses EC2 instance tags to identify instances to use to deploy the application, so it’s important to set tags appropriately. For this post, we use the tag name Application with the value MyWebApp to identify instances where the sample app is installed.
      • Make sure to use an EC2 instance profile (AWS Service Role for EC2 instance) with permissions to read the S3 bucket containing artifacts built by CodeBuild. Refer to the IAM role cicd_ec2_instance_profile in the table Roles-1 below for the set of permissions required. You must update this role later with the actual KMS key and S3 bucket name created as part of the deployment process.
    • To create EC2 Linux instances via AWS Cloudformation, download and launch the AWS CloudFormation template from the GitHub repo: cicd-ec2-instance-with-codedeploy.json
      • This deploys an EC2 instance with AWS CodeDeploy agent.
      • Inputs required:
        • AMI : Enter name of the Linux AMI in your region. (This template has been tested with latest Amazon Linux 2 AMI)
        • Ec2SshKeyPairName: Name of an existing SSH KeyPair
        • Ec2IamInstanceProfile: Name of an existing EC2 instance profile. Note: Use the permissions in the template cicd_ec2_instance_profile_policy.json to create the policy for this EC2 Instance Profile role. You must update this role later with the actual KMS key and S3 bucket name created as part of the deployment process.
        • Update the EC2 instance Tags per your need.
  3. Ensure required IAM permissions. Have an IAM user with an IAM Group or Role that has the following access levels or permissions:

    AWS Service / Components  Access Level Accounts Comments
    AWS CodeCommit Full (admin) Dev Use AWS managed policy AWSCodeCommitFullAccess.
    AWS CodePipeline Full (admin) Dev Use AWS managed policy AWSCodePipelineFullAccess.
    AWS CodeBuild Full (admin) Dev Use AWS managed policy AWSCodeBuildAdminAccess.
    AWS CodeDeploy Full (admin) All

    Use AWS managed policy

    AWSCodeDeployFullAccess.

    Create S3 bucket and bucket policies Full (admin) Dev IAM policies can be restricted to specific bucket.
    Create KMS key and policies Full (admin) Dev IAM policies can be restricted to specific KMS key.
    AWS CloudFormation Full (admin) Dev

    Use AWS managed policy

    AWSCloudFormationFullAccess.

    Create and pass IAM roles Full (admin) All Ability to create IAM roles and policies can be restricted to specific IAM roles or actions. Also, an admin team with IAM privileges could create all the required roles. Refer to the IAM table Roles-1 below.
    AWS Management Console and AWS CLI As per IAM User permissions All To access suite of Code services.


  4. Create Git credentials for CodeCommit in the pipeline account (dev account). AWS allows you to either use Git credentials or associate SSH public keys with your IAM user. For this post, use Git credentials associated with your IAM user (created in the previous step). For instructions on creating a Git user, see Create Git credentials for HTTPS connections to CodeCommit. Download and save the Git credentials to use later for deploying the application.
  5. Create all AWS IAM roles as per the following tables (Roles-1). Make sure to update the following references in all the given IAM roles and policies:
    • Replace the sample dev account (111111111111) and prod account (222222222222) with actual account IDs
    • Replace the S3 bucket mywebapp-codepipeline-bucket-us-east-1-111111111111 with your preferred bucket name.
    • Replace the KMS key ID key/82215457-e360-47fc-87dc-a04681c91ce1 with your KMS key ID.

Table: Roles-1

Service IAM Role Type Account IAM Role Name (used for this post) IAM Role Policy (required for this post) IAM Role Permissions
AWS CodePipeline Service role Dev (111111111111)

cicd_codepipeline_service_role

Select Another AWS Account and use this account as the account ID to create the role.

Later update the trust as follows:
“Principal”: {“Service”: “codepipeline.amazonaws.com”},

Use the permissions in the template cicd_codepipeline_service_policy.json to create the policy for this role. This CodePipeline service role has appropriate permissions to the following services in a local account:

  • Manage CodeCommit repos
  • Initiate build via CodeBuild
  • Create deployments via CodeDeploy
  • Assume cross-account CodeDeploy role in prod account to deploy the application
AWS CodePipeline IAM role Dev (111111111111)

cicd_codepipeline_trigger_cwe_role

Select Another AWS Account and use this account as the account ID to create the role.

Later update the trust as follows:
“Principal”: {“Service”: “events.amazonaws.com”},

Use the permissions in the template cicd_codepipeline_trigger_cwe_policy.json to create the policy for this role. CodePipeline uses this role to set a CloudWatch event to trigger the pipeline when there is a change or commit made to the code repository.
AWS CodePipeline IAM role Prod (222222222222)

cicd_codepipeline_cross_ac_role

Choose Another AWS Account and use the dev account as the trusted account ID to create the role.

Use the permissions in the template cicd_codepipeline_cross_ac_policy.json to create the policy for this role. This role is created in the prod account and has permissions to use CodeDeploy and fetch from Amazon S3. The role is assumed by CodePipeline from the dev account to deploy the app in the prod account. Make sure to set up trust with the dev account for this IAM role on the Trust relationships tab.
AWS CodeBuild Service role Dev (111111111111)

cicd_codebuild_service_role

Choose CodeBuild as the use case to create the role.

Use the permissions in the template cicd_codebuild_service_policy.json to create the policy for this role. This CodeBuild service role has appropriate permissions to:

  • The S3 bucket to store artefacts
  • Stream logs to CloudWatch Logs
  • Pull code from CodeCommit
  • Get the SSM parameter for CodeBuild
  • Miscellaneous Amazon EC2 permissions
AWS CodeDeploy Service role Dev (111111111111) and Prod (222222222222)

cicd_codedeploy_service_role

Choose CodeDeploy as the use case to create the role.

Use the built-in AWS managed policy AWSCodeDeployRole for this role. This CodeDeploy service role has appropriate permissions to:

  • Miscellaneous Amazon EC2 Auto Scaling
  • Miscellaneous Amazon EC2
  • Publish Amazon SNS topic
  • AWS CloudWatch metrics
  • Elastic Load Balancing
EC2 Instance Service role for EC2 instance profile Dev (111111111111) and Prod (222222222222)

cicd_ec2_instance_profile

Choose EC2 as the use case to create the role.

Use the permissions in the template cicd_ec2_instance_profile_policy.json to create the policy for this role.

This is set as the EC2 instance profile for the EC2 instances where the app is deployed. It has appropriate permissions to fetch artefacts from Amazon S3 and decrypt contents using the KMS key.


You must update this role later with the actual KMS key and S3 bucket name created as part of the deployment process.


Setting up the prod account

To set up the prod account, complete the following steps:

  1. Download and launch the AWS CloudFormation template from the GitHub repo: cicd-codedeploy-prod.json
    • This deploys the CodeDeploy app and deployment group.
    • Make sure that you already have a set of EC2 Linux instances with the CodeDeploy agent installed in all the accounts where the sample Java application is to be installed (dev and prod accounts). If not, refer back to the Prerequisites section.
  2. Update the existing EC2 IAM instance profile (cicd_ec2_instance_profile):
    • Replace the S3 bucket name mywebapp-codepipeline-bucket-us-east-1-111111111111 with your S3 bucket name (the one used for the CodePipelineArtifactS3Bucket variable when you launched the CloudFormation template in the dev account).
    • Replace the KMS key ARN arn:aws:kms:us-east-1:111111111111:key/82215457-e360-47fc-87dc-a04681c91ce1 with your KMS key ARN (the one created as part of the CloudFormation template launch in the dev account).

Setting up the dev account

To set up your dev account, complete the following steps:

  1. Download and launch the CloudFormation template from the GitHub repo: cicd-aws-code-suite-dev.json
    The stack deploys the following services in the dev account:

    • CodeCommit repository
    • CodePipeline
    • CodeBuild environment
    • CodeDeploy app and deployment group
    • CloudWatch event rule
    • KMS key (used to encrypt the S3 bucket)
    • S3 bucket and bucket policy
  2. Use following values as inputs to the CloudFormation template. You should have created all the existing resources and roles beforehand as part of the prerequisites.

    Key Example Value Comments
    CodeCommitWebAppRepo MyWebAppRepo Name of the new CodeCommit repository for your web app.
    CodeCommitMainBranchName master Main branch name on your CodeCommit repository. Default is master (which is pushed to the prod environment).
    CodeBuildProjectName MyCBWebAppProject Name of the new CodeBuild environment.
    CodeBuildServiceRole arn:aws:iam::111111111111:role/cicd_codebuild_service_role ARN of an existing IAM service role to be associated with CodeBuild to build web app code.
    CodeDeployApp MyCDWebApp Name of the new CodeDeploy app to be created for your web app. We assume that the CodeDeploy app name is the same in all accounts where deployment needs to occur (in this case, the prod account).
    CodeDeployGroupDev MyCICD-Deployment-Group-Dev Name of the new CodeDeploy deployment group to be created in the dev account.
    CodeDeployGroupProd MyCICD-Deployment-Group-Prod Name of the existing CodeDeploy deployment group in prod account. Created as part of the prod account setup.

    CodeDeployGroupTagKey


    Application Name of the tag key that CodeDeploy uses to identify the existing EC2 fleet for the deployment group to use.

    CodeDeployGroupTagValue


    MyWebApp Value of the tag that CodeDeploy uses to identify the existing EC2 fleet for the deployment group to use.
    CodeDeployConfigName CodeDeployDefault.OneAtATime

    Desired Code Deploy config name. Valid options are:

    CodeDeployDefault.OneAtATime

    CodeDeployDefault.HalfAtATime

    CodeDeployDefault.AllAtOnce

    For more information, see Deployment configurations on an EC2/on-premises compute platform.

    CodeDeployServiceRole arn:aws:iam::111111111111:role/cicd_codedeploy_service_role

    ARN of an existing IAM service role to be associated with CodeDeploy to deploy web app.


    CodePipelineName MyWebAppPipeline Name of the new CodePipeline to be created for your web app.
    CodePipelineArtifactS3Bucket mywebapp-codepipeline-bucket-us-east-1-111111111111 Name of the new S3 bucket to be created where artifacts for the pipeline are stored for this web app.
    CodePipelineServiceRole arn:aws:iam::111111111111:role/cicd_codepipeline_service_role ARN of an existing IAM service role to be associated with CodePipeline to deploy web app.
    CodePipelineCWEventTriggerRole arn:aws:iam::111111111111:role/cicd_codepipeline_trigger_cwe_role ARN of an existing IAM role used to trigger the pipeline you named earlier upon a code push to the CodeCommit repository.
    CodeDeployRoleXAProd arn:aws:iam::222222222222:role/cicd_codepipeline_cross_ac_role ARN of an existing IAM role in the cross-account for CodePipeline to assume to deploy the app.

    It should take 5–10 minutes for the CloudFormation stack to complete. When the stack is complete, you can see that CodePipeline has built the pipeline (MyWebAppPipeline) with the CodeCommit repository and CodeBuild environment, along with actions for CodeDeploy in local (dev) and cross-account (prod). CodePipeline should be in a failed state because your CodeCommit repository is empty initially.

  3. Update the existing Amazon EC2 IAM instance profile (cicd_ec2_instance_profile):
    • Replace the S3 bucket name mywebapp-codepipeline-bucket-us-east-1-111111111111 with your S3 bucket name (the one used for the CodePipelineArtifactS3Bucket parameter when launching the CloudFormation template in the dev account).
    • Replace the KMS key ARN arn:aws:kms:us-east-1:111111111111:key/82215457-e360-47fc-87dc-a04681c91ce1 with your KMS key ARN (the one created as part of the CloudFormation template launch in the dev account).

Deploying the application

You’re now ready to deploy the application via your desktop or PC.

  1. Assuming you have the required HTTPS Git credentials for CodeCommit as part of the prerequisites, clone the CodeCommit repo that was created earlier as part of the dev account setup. Obtain the name of the CodeCommit repo to clone, from the CodeCommit console. Enter the Git user name and password when prompted. For example:
    $ git clone https://git-codecommit.us-east-1.amazonaws.com/v1/repos/MyWebAppRepo my-web-app-repo
    Cloning into 'my-web-app-repo'...
    Username for 'https://git-codecommit.us-east-1.amazonaws.com/v1/repos/MyWebAppRepo': xxxx
    Password for 'https://[email protected]/v1/repos/MyWebAppRepo': xxxx

  2. Download the MyWebAppRepo.zip file containing a sample Java application, CodeBuild configuration to build the app, and CodeDeploy config file to deploy the app.
  3. Copy and unzip the file into the my-web-app-repo Git repository folder created earlier.
  4. Assuming this is the sample app to be deployed, commit these changes to the Git repo. For example:
    $ cd my-web-app-repo 
    $ git add -A 
    $ git commit -m "initial commit" 
    $ git push

For more information, see Tutorial: Create a simple pipeline (CodeCommit repository).

After you commit the code, the CodePipeline will be triggered and all the stages and your application should be built, tested, and deployed all the way to the production environment!

The following screenshot shows the entire pipeline and its latest run:


Troubleshooting

To troubleshoot any service-related issues, see the following:

Cleaning up

To avoid incurring future charges or to remove any unwanted resources, delete the following:

  • EC2 instance used to deploy the application
  • CloudFormation template to remove all AWS resources created through this post
  •  IAM users or roles

Conclusion

Using this solution, you can easily set up and manage an entire CI/CD pipeline in AWS accounts using the native AWS suite of CI/CD services, where a commit or change to code passes through various automated stage gates all the way from building and testing to deploying applications, from development to production environments.

FAQs

In this section, we answer some frequently asked questions:

  1. Can I expand this deployment to more than two accounts?
    • Yes. You can deploy a pipeline in a tooling account and use dev, non-prod, and prod accounts to deploy code on EC2 instances via CodeDeploy. Changes are required to the templates and policies accordingly.
  2. Can I ensure the application isn’t automatically deployed in the prod account via CodePipeline and needs manual approval?
  3. Can I use a CodeDeploy group with an Auto Scaling group?
    • Yes. Minor changes required to the CodeDeploy group creation process. Refer to the following Solution Variations section for more information.
  4. Can I use this pattern for EC2 Windows instances?

Solution variations

In this section, we provide a few variations to our solution:

Author bio

author-pic

 Nitin Verma

Nitin is currently a Sr. Cloud Architect in the AWS Managed Services(AMS). He has many years of experience with DevOps-related tools and technologies. Speak to your AWS Managed Services representative to deploy this solution in AMS!